maximo developing applications (7.5)
TRANSCRIPT

IBM Maximo Asset ManagementVersion 7 Release 5
Developing Applications
���

NoteBefore using this information and the product it supports, read the information in “Notices” on page 113.
This edition applies to version 7, release 5, modification 0 of IBM® Maximo Asset Management and to allsubsequent releases and modifications until otherwise indicated in new editions.
© Copyright IBM Corporation 2008, 2013.US Government Users Restricted Rights – Use, duplication or disclosure restricted by GSA ADP Schedule Contractwith IBM Corp.

Contents
Application development . . . . . . . 1Application framework . . . . . . . . . . . 1Preparing the development environment . . . . . 2
Setting up the environment . . . . . . . . 3Exploring the workspace . . . . . . . . . 3Design guidelines. . . . . . . . . . . . 4Data validation . . . . . . . . . . . . 5
Server-side validation . . . . . . . . . 5Client-side validation . . . . . . . . . 6Best practices for data validation types . . . 8
Property configurations . . . . . . . . . 10Developing applications . . . . . . . . . . 10
Creating and modifying applications . . . . . 11Duplicating applications . . . . . . . . 11Creating applications . . . . . . . . . 11Deleting an application . . . . . . . . 12Creating restrictions . . . . . . . . . 13Defining signature options for an application 15
Arranging the layout of components . . . . . 15Laying out a new tab . . . . . . . . . 15Merging classification attribute values into onecolumn . . . . . . . . . . . . . . 15Controlling the size of fields . . . . . . . 16Adding images . . . . . . . . . . . 17
Defining default values for fields . . . . . . 18Assigning a default label to an attribute . . . 18Saving changes to the database . . . . . . 19Overriding a value in the default label field 19Assigning a default value to an applicationfield . . . . . . . . . . . . . . . 19Setting default filters for a table window . . 20Adding a value list to a text field . . . . . 20
Moving application components . . . . . . 21Moving controls across tabs . . . . . . . 21Moving controls across applications . . . . 21Moving components and applications acrossservers . . . . . . . . . . . . . . 22Exporting multiple applications. . . . . . 22
Adding navigation components. . . . . . . 23Navigation components . . . . . . . . 23Linking to an external URL . . . . . . . 24Linking to an application from a text field . . 24Adding a new button to the applicationtoolbar . . . . . . . . . . . . . . 25Adding an option to the Select Action menu 25Modifying links in a self-service application 26
Providing user information . . . . . . . . 26Adding messages to the messages table . . . 26Linking to user information . . . . . . . 27
Configuring dialog windows for an application 27Modifying an application dialog window . . 27Modifying a system dialog window . . . . 28Creating a dialog window . . . . . . . 28
Transferring data between applications . . . . 29Data transfer options . . . . . . . . . 29
Crossing over domains to share data betweenapplications . . . . . . . . . . . . 33
Configuring conditional user interfacecomponents . . . . . . . . . . . . . 37
Conditional user interface . . . . . . . 37Creating conditions . . . . . . . . . . 39Applying conditional security . . . . . . 42Applying conditional data restrictions . . . 45Adding conditions to the properties of UIfields . . . . . . . . . . . . . . 48
Application developer properties . . . . . . . 49Control properties . . . . . . . . . . . 49
Application bar control . . . . . . . . 49Attachments control . . . . . . . . . 50Blank line control . . . . . . . . . . 51Breadcrumbs control . . . . . . . . . 51Button group control . . . . . . . . . 53Check box control . . . . . . . . . . 54Combo box control . . . . . . . . . . 56Data source control . . . . . . . . . . 58Default value control . . . . . . . . . 60Help grid control . . . . . . . . . . 60Hyperlink control . . . . . . . . . . 61Image control. . . . . . . . . . . . 63Include control . . . . . . . . . . . 65List box control . . . . . . . . . . . 65Menu bar control . . . . . . . . . . 67Multiline text box control . . . . . . . . 68Multipart text box control . . . . . . . 71Parameter value control . . . . . . . . 75Parameter values control . . . . . . . . 75Presentation control . . . . . . . . . 75Push button control . . . . . . . . . 77Radio button control . . . . . . . . . 78Radio button group control . . . . . . . 79Record image control . . . . . . . . . 81Rich text editor control . . . . . . . . 83Rich text viewer control . . . . . . . . 85Section control . . . . . . . . . . . 85Section column control . . . . . . . . 88Section header control . . . . . . . . . 88Section row control . . . . . . . . . . 89Static text control . . . . . . . . . . 89Tab properties . . . . . . . . . . . 90Tab group control . . . . . . . . . . 92Table control . . . . . . . . . . . . 93Table column control . . . . . . . . . 96Text box control . . . . . . . . . . 100Tree control . . . . . . . . . . . . 104Tree attribute control . . . . . . . . . 105Tree node control . . . . . . . . . . 106
User interface system properties . . . . . . 107
Notices . . . . . . . . . . . . . . 113Trademarks . . . . . . . . . . . . . . 114
© Copyright IBM Corp. 2008, 2013 iii

iv Developing Applications

Application development
You can develop new applications and modify existing applications using theApplication Designer application. You can also use the Application Designer toexport XML files which you can then modify using a text editor before importingthem with the Application Designer.
Application frameworkThe application framework includes user interface components for developingapplications and organizational components that provide access to them.
The user interface consists of controls, such as text boxes, buttons, and tabs, andeach control has attributes that determine its behavior. Each application hasapresentation.xml file that contains all of the information required to build theapplication user interface. When you create an application, it is automaticallyadded to the navigation structure for modules and applications.
User interface controls
Controls are predefined components that are used to construct the elements of anapplication window. In Application Designer, you can select individual controls,view and modify the control properties, or drag new controls into the applicationfrom the Control Palette. You cannot change the code of a control, but you canmodify its behavior by specifying appropriate values in the properties window forthe control. For example, you can set a control to be a required field, associate acontrol with a lookup table, or link a control to an event.
Some controls, such as sections, tab groups, or button groups are containercontrols. Most container controls serve no purpose other than to contain othercontrols. Controls that are not containers must be placed within a container control.In Application Designer, you can drag controls from the Control Palette onto theapplication workspace, and then modify the control in the Control Propertieswindow.
The positioning of controls is relative to other controls and is not based on pixelsor a grid and provides for dynamic sizing of the width of a section and itscolumns. For example, if a section contains fields of various widths, the width ofeach field is automatically set to the width of the widest field in that section.
Application XML files
Every application has a presentation.xml file that contains all the informationrequired to build the application user interface. All presentation.xml files arestored in the MAXPRESENTATION table in the database. Controls are predefinedcomponents that are used to construct the elements of an application window. InApplication Designer, you can select individual controls, view and modify thecontrol properties, or drag new controls into the application from the ControlPalette. You cannot change the code of a control, but you can modify its behaviorby specifying appropriate values in the properties window for the control. Forexample, you can set a control to be a required field, associate a control with alookup table, or link a control to an event.
© Copyright IBM Corp. 2008, 2013 1

The presentation.xml file for an application includes a tag for each control used inthe application user interface. Each control has a unique ID and attributes thatdetermine how the control behaves when you view the application. The relativelocation of control tags in the presentation.xml file determine the order andsequence of the user interface elements that you see in an application window.
When a user starts an application, the presentation.xml file is retrieved from thedatabase and is placed in the memory of the application server. The applicationframework retrieves the code for each control and creates a HTML description ofit, based on the attributes specified in the presentation.xml. The rendering processis incremental, and the application server stores HTML descriptions for eachcontrol in memory until all controls in an application window are rendered. Whenall HTML elements are rendered, the application server passes the HTML to theuser's web browser (client). The presentation.xml file is retained in the servercache, ready for the next time a user accesses the application.
When you open an application in the Application Designer, the presentation.xmlfile is loaded into memory. Any changes you make apply only to the storedversion of the file until you save the application. When you save thepresentation.xml, the modified information is committed to the database and youcan then see the changes when you open the application.
Although you can perform most modifications to an application in ApplicationDesigner, you can edit the presentation.xml file if required. Sometimes, modifyingthe presentation.xml file is the most efficient approach to use, for example tochange a specific term using search and replace. In an application with multipletabs and dialog windows, this task requires that you open each individual windowin Application Designer, which is both time-consuming and prone to error. Someapplications use hidden tabs that are not visible in Application Designer. Youcannot modify these tabs in Application Designer and must edit thepresentation.xml file to change them.
Application organization
All applications are contained within modules. Applications are categorized intothree different types although each type uses the same structure and components.When you create an application, you must specify its module and the type ofapplication to create. The available application types are:v A power application is the standard type of application that contains multiple
tabs, a Select Action menu and toolbar buttons.v A self-service application is used to create a record and does not include a List
Table window or a toolbar.v A single-page application is a non-tabbed application but it can include a Select
Action menu and toolbar buttons.
After you create an application, it is added to Go To menu within the module thatyou specify when you create it.
Preparing the development environmentBefore using the Application Designer, set up the development environment andfamiliarize yourself with the workspace and with the design guidelines.
2 Developing Applications

Setting up the environmentPlan and prepare the development environment before you start working withApplication Designer.
Procedure1. Establish separate environments for the following activities to protect your
production environment against configuration changes you make.a. Perform development activities on a dedicated workstation.b. Merge your configurations to a server for testing.c. Migrate the tested configurations to the production environment.
2. Set the screen resolution of your monitor to 1280x768 to optimize the amountof information that you can see without scrolling. With this screen resolution, itis easier to position the Control Palette and Properties windows outside of theapplication workspace where you perform configurations.
Exploring the workspaceWhen you open an application in the Application Designer, the Workspace tabopens, containing the layout of the controls that make up the application. Withinthe workspace, you can select individual controls to modify them and to positionnew controls in the application user interface.
About this task
The workspace opens the main tab of an application but some tabs, windows,controls, and configuration tools are not immediately visible. Before you startdeveloping applications with the Application Designer, use the followingprocedures to familiarize yourself with the workspace.
Procedure1. Open an application that you are familiar with in the Application Designer. The
application opens in the workspace, typically on the application List tab.2. Review the contents of the workspace when it opens, clicking on controls to
select them.3. In the Select Action menu, click Toggle/Show All Controls. You can use this
action repeatedly to show or hide controls that are less frequently modified toconserve space on the workspace.
4. Select any control in the workspace and either right-click and select Propertiesor click the Control Properties icon on the toolbar. The properties window forthe control opens where you can review the properties that are configured forthe control.
5. In the Workspace, select a Section control and click the Control Palette icon onthe toolbar.
6. Drag a control icon from the palette into the selected Section control. If thecontrol cannot be placed within a Section control, it is not added to it. Forexample, you must place a Tab control within a Tab Group control and youmust place a Button control within a Button Group control.
7. Click the Edit Dialogs icon on the toolbar to see a list of the dialog windowsthat are configured for the application.
8. Select a dialog to open it for review or modification in a temporary workspace.
Developing applications 3

9. Click on the Applications tab to close the workspace and do not save thechanges when you are prompted to do so. Changes you make in the workspaceare stored temporarily until you click Save, when the changes are committed tothe database.
Design guidelinesUse the Application Designer and, if necessary, the application XML files, with anappropriate design process to develop applications that are easy and efficient touse.
Review user goals
Before you start developing or modifying an application, review the user goals forthe application. Divide users into groups, based on the tasks that they perform.Instead of creating one large application to serve all users, consider creatingsmaller applications that serve specific needs. Give users only what they need, andnothing more.
Prioritize information
Consider the circumstances when users need access to secondary information andchoose where to locate this information from the following options:v On a separate tab.
If you place secondary information on a separate tab, it does not load until theuser clicks the tab, which makes start up performance faster. The information isavailable with one click when the user needs it.
v Below the screen area (fold line)Users can ignore information at the bottom of the screen and can scroll down tosee it when it is necessary. Including the information on the lower screen canincrease load-time, but vertical scrolling is easier, faster, and less error-pronethan clicking.
When you design an application that requires a lot of data entry, arrange the inputfields to optimize the use of the Tab key to navigate between fields. The tabbingorder of a window goes from top to bottom and from left to right.
If you want to change the location of a number of data input fields in anapplication, consider duplicating the application and then changing the order ofthe input fields. When you are modifying an application, you can delete fields thatare not needed for data entry, or move those fields to another screen.
Use appropriate controls
Controls are predefined components, such as text boxes, buttons, and tabs, that areused to build the application user interface. In the Application Designer, you canselect a control from the Control Palette and drag it to the workspace to add it tothe user interface. You then configure properties for the control, for examplespecifying an image file to use for a button control or setting a text control as arequired field.
The following controls are the main layout controls:v Presentationv Pagev Dialog
4 Developing Applications

The presentation control is the main control for an application, representing thepresentation.xml file that defines all of the user interface components. Eachapplication has just one page control, typically the main tab of the application. Usetab controls or dialog controls to create additional windows. These controls are theoutermost containers for application components. Other container controls include:v Sectionv Tab groupv Tablev Push button group
Within a container control, you can place multiple controls such as placingmultiple text boxes, combo boxes, and list boxes into a section, or placing multiplebuttons into a button group. There are a number of benefits in grouping relatedcontent within the same container control. The grouping provides a logical orderand convenience for the user and, if you move the container to another location, allof the controls that it contains move with it.
Organize navigation
The application framework includes a number of predefined navigation structuresthat you can use to provide quick and easy access to your application andapplication components. Use the following navigation structures:v The Go To menu lists all of the product modules and their applications. When
you create an application, you must specify its module. When you duplicate anapplication, the new application is automatically added to the same module asthe application that you copied.
v You can add buttons and links to the application toolbar to provide quick accessto application features.
v You can create an option in the Select Action menu for a common task. You canalso restrict access to this option based on user group or conditions.
Data validationThe system validates data to ensure that users are working with the correct data.Data can be validated on the server-side or the client-side.Related tasks:“Configuring autofill properties” on page 7To improve performance, fields in forms can be automatically filled with cacheddata. If your network latency is over 100 milliseconds, you can specify the fields tobe automatically filled.Related reference:“User interface system properties” on page 107The web client system properties define the behavior and characteristics of the userinterface. To review or change system properties, filter for the term webclient inthe System Properties application.
Server-side validationWhen you enter information in an application, it is placed in the queue forserver-side validation where the data is validated with data on the server.Server-side validation consists of asynchronous and synchronous validation.Asynchronous validation helps users to work faster because they can move fromfield to field, entering data without waiting for information to be validated.
Developing applications 5

Asynchronous validation is disabled automatically when a screen reader is beingused.
In synchronous processing, values are validated when they are entered;asynchronous values remain in the queue until one of three conditions is met:v When the threshold for the number of asynchronous values in the queue is
reached. The default value is 2.v When there is no action on the user interface, and the default timeout is reached.
The default value is 10 seconds.v When a user completes an action that triggers a synchronous validation.
When one or more of these conditions is met, all values in the queue are then sentto the server to be validated.
Asynchronous validation of user-entered data is enabled at the system level bydefault. You can disable asynchronous validation for the system, you can disable itfor individual controls, and you can change the validation process for the system.
Table 1. Data validation levels
Data validation level Where How
Enable backgroundvalidation at thesystem level
System Propertiesapplication
Disable or enable the mxe.webclient.async systemproperty.
Configure backgroundvalidation forindividual controls
ApplicationDesignerapplication
Configure autofill properties: type-ahead, set values, andfilters.
Modify the validationprocess system-wide
System Propertiesapplication
Change the value for themxe.webclient.asyncrendertimelimit system property.
Change the value for themxe.webclient.asyncerrortooltipwaitbeforeopen systemproperty.
Change the value for themxe.webclient.asyncrequestsbeforerender systemproperty.
Error notification during asynchronous validation
If an error occurs during asynchronous validation, an error indicator appears onthe relevant field. When you click the error icon, a message opens. If there areerrors on more than one tab, an error icon is also set at tab level for each tab thatcontains unresolved messages.
The threshold for the queue ensures that only asynchronous values are sent to theserver for validation when the default value is passed.
Client-side validationTo improve performance, the system validates data on the client browser beforevalidating on the server.
Autofill properties:
The autofill function populates fields based on the data that you enter in otherfields. You can configure autofill properties so that fields are populated withcached data instead of server data to improve performance.
6 Developing Applications

On a high latency network, the use of cached data can be more efficient. A highlatency network is a network with a latency of more than 100 milliseconds.
You can configure autofill for a text box or a multipart text box. When youconfigure autofill properties, a data store is created in the user’s browser. The datastore on a browser is limited in size so configure autofill properties for the mostimportant text boxes and multipart text boxes.
The autofill properties that you can configure are type-ahead, set values, andfilters.
Type-ahead is an incremental search feature. As you type data in a field, one ormore possible matches for the data is listed. You can configure type-ahead so thatthe list of possible matches includes one or more business objects. You must set themxe.webclient.ClientDataValidation property to a value of 1 for type-ahead towork. You must configure type-ahead before you can configure set values andfilters.
You configure set values so that the data that a user enters in one field populatesother fields. For example, if you configure a set value for the Asset field, when auser enters a value in the Asset field, other text boxes, multipart text boxes,combination boxes, or check boxes are populated with data.
You configure filters in a field to limit the type-ahead choices for a user based oninformation in another text box, multipart text box, combination box, or check box.
After you configure autofill properties, the information is validated with the dataon the server. If the autofill configuration data is different from the server data, thefields are updated with the server data.
Configuring autofill properties:
To improve performance, fields in forms can be automatically filled with cacheddata. If your network latency is over 100 milliseconds, you can specify the fields tobe automatically filled.
About this task
You can configure autofill for a text box or a multipart text box.
The autofill properties that you can configure are type-ahead, set values, andfilters. You can configure type-ahead so that the list of possible matches includesone or more business objects. You configure set values so that the data that a userenters in one field populates other fields. You configure filters in a field to limit thetype-ahead choices for a user based on information in another text box, multiparttext box, combination box, or check box.
Procedure
1. In the System Properties application, set the value of themxe.webclient.ClientDataValidation property to 1.
2. In the Application Designer application, select an application, highlight thefield to configure, and open the properties sheet.
3. Click the Advanced tab. In the Autofill Properties section, configure thetype-ahead feature.a. Add the key domain attribute.
Developing applications 7
b. Optional: To provide more information about the key attribute and todistinguish it from other type-ahead choices, add another attribute.
c. Click OK.4. Configure the set values.
a. Specify an attribute that corresponds to the field whose value you want toset.
b. Specify the domain attribute of the field where the set value comes fromand click OK.
5. Configure filters.a. Specify the field to act as a filter for the type-ahead choices.b. Specify the domain attribute of the field with the type-ahead choices.
6. Save the application definition.Related concepts:“Data validation” on page 5The system validates data to ensure that users are working with the correct data.Data can be validated on the server-side or the client-side.Related reference:“User interface system properties” on page 107The web client system properties define the behavior and characteristics of the userinterface. To review or change system properties, filter for the term webclient inthe System Properties application.
Error notification for client-side validation:
The values for data type fields are validated locally in the browser. If an erroroccurs, the user is notified immediately before a server round trip is needed.
For example, when you specify a value in an alphabetic field, the length of thevalue is validated in the browser. The error is added to the queue with theasynchronous values, but the error value is not counted in the threshold for thequeue.
The error values are validated the next time the queue is validated, either whenthe threshold or timeout for asynchronous values is reached or when asynchronous event is triggered.
Error values for smart-fill fields and simple data entry values are also not includedin the queue threshold.
Best practices for data validation typesIn some circumstances, one type of data validation can be more efficient to usethan another. All validation types work on textboxes, multiple-part textboxes, andcheck boxes. Synchronous and asynchronous validation also work on multiple-parttext boxes and check boxes while client-side validation works on the first part ofmultiple-part check boxes.
8 Developing Applications

Table 2. Data validation types and use cases
Validation typeBehaviorsetting
Configurationoptions
Userinteraction Best practice
Interactionwith smart-fill
Synchronous Available iftheasynchronoussetting isturned off.
SystemPropertiesapplication orApplicationDesignerapplication
Users mustcorrect theerrors in thecurrent fieldbefore movingto next field.
Fields that affectthe behavior ofother fields. Forexample, if aparticular entryin field A causesfield B tobecomeread-only, youcan turn offasynchronousvalidation forfield A. Usersthen cannot tabout to field Binadvertentlybefore field Avalidates.
When userstab out of afield, the SelectValue windowopenscontainingfiltered values.Users canspecify thenecessaryvalue.
Asynchronous Defaultbehavior
SystemPropertiesapplication orApplicationDesignerapplication
Errors andwarnings areindicated atthe field level.Users canresolve theerrors andwarnings atany time, inany orderbefore saving.
In applicationswhere usersenter dataquickly.
When userstab out of afield, the SmartFill iconappears in thefield. Users canclick the iconand the SelectValuewindowsopenscontainingfiltered values.
Alternatively,while in fieldusers can pressCtrl+Enter onthe keyboardto invoke theSelect Valuewindowscontainingfiltered values.
Developing applications 9

Table 2. Data validation types and use cases (continued)
Validation typeBehaviorsetting
Configurationoptions
Userinteraction Best practice
Interactionwith smart-fill
Client-side Defaultbehavior fordata typevalidation
Asynchronoussystem settingmust be turnedon.Configurablefor filters andset values inthe ApplicationDesignerapplication.
Errors andwarnings iconsare indicatedat the fieldlevel beforeservervalidation.Users can alsosee values infields. Iftype-ahead isconfigured,users can seetheinformationbefore servervalidation.
In applicationswhere usersexperiencenetwork latencyand for whomserverround-trips forvalidation takestoo long.
You canconfiguretype-ahead toallow users tosee a list ofavailableoptions asdrop-downvalues for afield. Theavailableoptions in thelist reduce aseach successiveletter is typed.
The filteredSelect Valuewindow doesnot appearwhen a choiceis made usingthe type-aheadlist.
Property configurationsThe behavior and characteristics of various user interface components can bedetermined by the values set as system properties or by values set for individualcontrols. Filter for webclient in the System Properties application to view andmodify interface properties. Modify properties for an individual control in theApplication Designer.
Common user interface (webclient) properties include properties that determinebrowser behavior when a connection is lost and properties that identify thelocation of login and log out pages. It can be practical to change these and otherproperty values, depending on the type of application behavior you want todevelop.
If the webclient.smartfill system property is enabled, when a user enters partialdata in a field and an exact match is found in the database, the field updates withthis value. If multiple possible matches are found, the user can select from a list ofpossible matches to update the field. The combined use of smartfill andasynchronous validation on a field can, in some cases, cause confusion. If required,you can disable smartfill for the system or for an individual control.
If you intend to use rich text editing capabilities that use custom fonts, you canadd these fonts to the webclient.richtext.fontlist property. The Rich Text Editorcontrol supports generic fonts by default, such as serif and sans-serif.
Developing applicationsBefore you create or modify applications, review the design guidelines and explorethe workspace in the Application Designer.
10 Developing Applications

Creating and modifying applicationsYou can either create an application or duplicate an existing application to use as atemplate. You can then modify the application to suit your business needs. You canalso delete user-defined applications but you cannot delete predefined applications.
Duplicating applicationsYou can duplicate an existing application to use as a template for a newapplication. You can then extend and modify the functionality of the baseapplication in the Application Designer.
Procedure1. Open the application you want to duplicate in the Application Designer.2. Select the Duplicate Application Definition action to open the Duplicate
Application window.3. In the Application field, specify a unique name for the application. Use a clear
and consistent naming convention, such as using your company name as aprefix. Choose application names that are easy to identify in menus, and easyto recognize in log files and during a system upgrade.
4. In the Description field, specify a text description. This text shows in thenavigation bar of the application.
5. Click OK and then click Save.
Results
The duplicated application is listed in the Go To menu in the same module as theoriginal application. To view the new application, sign out of the system to refreshthe list of applications in the Go To menu. When you sign back into the system,the new application is available in the Go To menu.
What to do next
Open the application in the Application Designer and make the changes needed toadapt the application to your business needs.
Creating applicationsYou can create three types of application in the Application Designer; a powerapplication, a single-page application, or a self-service application. After you createan application, it is automatically added to the Go To menu.
Before you begin
Before you create an application, the main object for the application must exist inthe database. If you intend to associate the application with a new object, definethe object in the Database Configuration application before you create theapplication.
Procedure1. Click New Application Definition in the toolbar of the Application Designer.2. In the Application field, specify a unique name for the application. Use a clear
and consistent naming convention, such as using your company name as aprefix. Choose application names that are easy to identify in menus, and easyto recognize in log files and during a system upgrade.
3. In the Description field, specify a text description. This text shows in thenavigation bar of the application.
Developing applications 11

4. Specify a key attribute for the application.5. Specify the name of the main object for the application.
a. If the object is set at the SYSTEMORGSITE level, you must create a site textbox field and an organization text box field.
6. Specify the name of the module that is to include the application. Everyapplication must be located within a module.
7. Click the button that corresponds to the type of application that you want tocreate. The new application opens in the workspace.
8. Click Save Application Definition.
Results
To view the new application in the Go To menu, sign out and then sign back intothe system.
What to do next
Filter for the new application in the List tab of the Application Designer to startworking on the new application.
The default security setting for new applications is Read. All users who haveaccess to the application in their security profiles can read records but cannot insertor delete information. Select Add/Modify Signature Options in the Select Actionmenu to define additional signature options for the new application.
Deleting an applicationYou can only delete an application that you created or duplicated in theApplication Designer. You must use a database editor (for example, SQL Plus) todelete an application.
Before you begin
You must shut down the application server before you delete an application. If youdelete an application, you do not remove any custom tables, fields, or domainsthat you created to support the application.
Procedure1. Login to a database editor as an administrator.2. Enter the following commands, and replace the variable <APPLICATION
NAME> with the name of the application you want to delete. Enter theapplication name in all uppercase. For example, if the name of the applicationyou want to delete is Test, replace APPLICATION NAME with TEST in all thecommands.a. delete from maxapps where app=’<APPLICATION NAME>’;
b. delete from maxpresentation where app=’<APPLICATION NAME>’;
c. delete from sigoption where app=’<APPLICATION NAME>’;
d. delete from applicationauth where app=’<APPLICATION NAME>’;
e. delete from maxlabels where app=’<APPLICATION NAME>’;
f. delete from maxmenu where app=’<APPLICATION NAME>’ and menutype!=’MODULE’;
g. delete from maxmenu where where elementtype=’APP’ andkeyvalue=’<APPLICATION NAME>’;
12 Developing Applications
h. delete from appdoctype where app=’<APPLICATION NAME>’;
i. delete from sigoptflag where app=’<APPLICATION NAME>’;
3. Logout of the database editor.
Creating restrictionsTo restrict the records that a user can see in an application, you add a query to theapplication. To restrict the data that users see for a control, you add theallowqualifiedrestriction property to the XML for a control in an application
Creating application restrictions:
You add a query to an application to restrict the records that a user can see. Tohide inactive users in the Users application for example, you use the query "status!= ’INACTIVE’". You create restrictions for power applications and single-pageapplications in Application Designer.
Procedure
1. Open the application in Application Designer.2. In the Select Action menu, click Toggle Show All Controls.3. Select the presentation control and click the Control Properties icon.4. In the Presentation Properties window, enter the query in the Application
Restrictions field.5. Save the application definition.
Restricting data:
You add the allowqualifiedrestriction property to the XML for an application torestrict the data that is returned from the database. You can add the restrictionwhen data is shown but not used for calculations. You can add the restriction fordata that is used to route a process through steps. You can also restrict the recordsthat are returned when using lookups.
Restricting the data returned from the database:
You restrict data by adding the allowqualifiedrestriction property. For example,you can restrict the classifications available to users who are classifying a servicerequest.
About this task
You do not apply the restriction to child objects. You manually add theallowqualifiedrestriction property to the XML controls that create a data source.The controls that create a data source have an object, a relationship, or a beanclass. The following controls are supported:v datasrcv sectionv simpleheadertablev tabv tablev tree
Developing applications 13

Some controls inherit data sources from higher-level controls. When you add theproperty to the XML, you also make the data read-only. Editing a restricted dataset can have unexpected results.
Procedure
1. Open the application XML and search for the control where the data source isneeded.
2. Add allowqualifiedrestriction= true to the XML.3. Import the modified XML.
Examples of restrictions on the data that users see:
You control the data that users see by restricting the data that is returned from thedatabase. For example, you can restrict the person groups that users see whenselecting an owner in the Change application.
Example: Restricting the person groups that users see when selecting an ownerin the Change application
In this example, you set the allowqualifiedrestriction property into the XML forthe tab in the window:<dialog id="owner" label="Select Owner">
<tabgroup id="owner_labor">
<tab id="owner_labor_group" label="Person Groups" mboname="persongroup" allowqualifiedrestriction="true”beanclass="psdi.webclient.beans.common.OwnerGroupBean">
Example: Restricting when users see the ’View Work Details’ window in theAssets application
In this example, you set the allowqualifiedrestriction property into the XML forthe tab in the table in the window:
<dialog id="wopms_byasset" label="View Work Details" relationship="VIEWWOPMS"beanclass="psdi.webclient.beans.common.ViewWOPMsBeanAsset" width="975" height="400">
<section id="viewWOandPMs_ViewWOandPMsFieldGridAsset" border="true"><multiparttextbox id="viewWOandPMs_ViewWOandPMsFieldGrid_2" dataattribute="assetnum" inputmode="readonly"
descdataattribute="asset.description" longdescinputmode="readonly" descinputmode="readonly" /><checkbox id="viewWOandPMs_ViewWOandPMsFieldGrid_3a" dataattribute="showchildren" />
<checkbox id="viewWOandPMs_ViewWOandPMsFieldGrid_3b" dataattribute="showparents" />
<buttongroup id="viewWOandPMs_ViewWOandPMsFieldGridAsset99"><pushbutton id="viewWOandPMs_ViewWOandPMsFieldGridAsset98" label="Refresh" default="true" mxevent="doRefresh"
targetid="wopms_byasset"/></buttongroup></section>
<tabgroup id="viewWOandPMs_viewWOandPMsAsset">
<tab id="viewWOandPMs_viewWOandPMsAsset_ViewWO_tab" default="true" label="Work"><table id="viewWOandPMs_viewWOandPMsAsset_ViewWO" label="Work" relationship="VIEWWORK_BYASSET"
allowqualifiedrestriction="true” beanclass="psdi.webclient.beans.common.ViewWOByAssetBean" selectmode="multiple">
<defaultvalue id="viewwoasset_historyflag_default" dataattribute="historyflag" value="N"defaulttype="query" />
<defaultvalue id="viewwoasset_istask_default" dataattribute="istask" value="N" defaulttype="query" />
Example: Restricting the classifications that users see when classifying a servicerequest in the Service Request application
In this example, you set the allowqualifiedrestriction property into the XML forthe table in the tree in the window:<dialog id="associateClassification" label="Classify">
<tree mboname="CLASSSTRUCTURE" allowqualifiedrestriction="true” id="associateClassification_tree"beanclass="psdi.webclient.beans.assetcat.AssociateSpecBean" width="600" height="250" openfirstlevel="false"maxchildren="1000">
14 Developing Applications
Defining signature options for an applicationSignature options specify privileges for using applications, menu options, andtoolbar items. You apply signature options to groups of users to control their accessto data, to applications, and to controls. New applications are automaticallyassigned a READ signature option. You can add more signature options in theApplication Designer.
Procedure1. Open the application in the Application Designer.2. Select the Add Modify Signature Options in the Select Action menu and click
New Row.3. Specify a signature option in the Option field.4. Optional: Add additional signature options in the Option Also Grants field.
Use commas to separate multiple entries if you want to enable more than oneadditional signature option. For example, if the signature option grants accessto the People application, you can add signature options that grant access to arelated application, such as the Users application.
5. Optional: In the Option Also Revokes field, specify any signature options thatare revoked as a result of adding the primary option. For example, you add asignature option that allows read-only access to an application. You want toremove any write access to the application that users with the read-onlysignature option have. To remove the write access, you specify the signatureoption that grants write access to the application in the Option Also Revokesfield.
6. Save the signature options.
Arranging the layout of componentsThe layout of components is relative to the other components in a user interface.Use container controls, like sections and tables, to group associated controls.Arrange controls to make it easy for users to enter information in an orderly andefficient manner.
Laying out a new tabIn standard applications, the information is contained in multiple tabs, includingthe List tab, the application main tab, and additional tabs as required.
Procedure1. Optional: To add a new tab, highlight the Tab Group control in the Application
Designer and drag a Tab control to it from the Control Palette.2. Highlight this new tab control and drag a Section control to it from the Control
Palette. Repeat this step if you want to create multiple sections that createvertical division in the tab. A section control is a container for other controlsand is not visible in the application.
3. Add section column controls to a section if you want to divide a sectionhorizontally.
4. After you create horizontal and vertical sections, you can add data controls,such as text boxes or buttons, within each section or section column.
Merging classification attribute values into one columnMultiple columns are used to display classification attributes and their valueswhich makes the display complex. You can merge the data for the three columns
Developing applications 15

into one column to make more space available in the table for additional columnsto be added. This size reduction ensures that the table is not so large that usershave to scroll to see columns.
Before you begin
The Maximo® business object (MBO) that the Classification Specifications table isbound to must contain ALNVALUE, NUMVALUE, and TABLEVALUE attributes. Ifthe MBO does not contain the attributes, you cannot merge classification attributevalues.
The Classification Specifications table must also contain either a field class or aMBO validation class. The inclusion of either a field class or a MBO validationclass ensures that all the value fields are read-only. The only exception is the valuefield associated with the data type of an attribute. For example, if the datatype isalphanumeric, the alphanumeric MBO attribute is read/write while the numericand table value MBO attributes are read-only.
About this task
You can merge classification attribute values only for the classification specificationattributes.
Procedure1. In the Application Designer application, open the application that you want to
change.2. In the Specifications table on the Specifications tab, click the attribute that you
want to change.3. Delete the alphanumeric value column, the numeric value column, and the
table value column by using the Context menu.4. In the toolbar, click Control Palette and select the Table Column icon.5. Drag the table column onto the Specifications table and close the Controls
window.6. Open the Context menu, click Properties, and specify the label name for the
column. If you do not specify a name, the label from the alphanumeric valueattribute is used.
7. Specify {CLASSSPECVALUE} as the attribute value, and clear the Show Filtercheck box.
8. Ensure that the Sortable check box and the Filterable check box are clear.9. Save the changes.
Controlling the size of fieldsThe size of a field in the user interface is controlled by the settings in thefieldsizegroups.jsp file. This file restricts field sizes so that fields of varyinglengths do not show jagged edges when arranged on top of each other.
About this task
Field sizes are defined in the <root>\applications\maximo\maximouiweb\webmodule\webclient\common\fieldsizegroups.jsp. A unit of measure is not used and size isdetermined based on the character limit set for the field in the database. Changesyou make to field sizes can have unintended consequences because the changesapply to all fields in all applications.
16 Developing Applications

Procedure1. Open the fieldsizegroups.jsp file in a text editor.2. Search for the line fieldtypegroup.put(new Integer("2"), new Integer("2"));
and substitute a different number in place of the number 2 at the end of theline. This size is the smallest and is used for fields with a database size of 1 or2 characters, for example Boolean fields.
3. Search for the line fieldtypegroup.put(new Integer("30"), newInteger("10")); and substitute a different number in place of the number 10 atthe end of the line. This field size is used for fields that have a database size of3 through 30 characters and is used for most standard fields.
4. Search for the line fieldtypegroup.put(new Integer("31"), newInteger("40")); and substitute a different number in place of the number 40 atthe end of the line. This size is used for fields that have a database size of morethan 31 characters and is used for fields such as long descriptions.
What to do next
You must save the file and redeploy the .EAR files on the application server forthese changes to take effect.
Adding imagesThe Application Designer includes controls that you can use to add images such asicons, to an application. The images directory contains existing images that you canreuse or you can add new images to the directory. Images must be in a file formatsupported by a browser.
Adding images to the images directory:
All images used in applications must be stored in the images directory. You canadd new images to this directory.
Before you begin
Images must be in a format that is supported by a browser, such as .gif, .jpg, or.bmp formats.
Procedure
1. Copy an image (in a supported format) into the images directory, at<root>\applications\maximo\maximouiweb\webmodule\webclient\images.
2. If the image is .gif format, no further action is necessary before you use theimage in the Application Designer.
3. If the image is not in .gif format, you must redeploy the .EAR files on theapplication server before you can use it.
Adding a record image to an application:
You can add a record image control to an application to create a placeholder for arecord image, typically an expandable thumbnail image that a user can click toenlarge. When you add the record image to the application, the image displaysautomatically in the placeholders you created with the record image control.
Developing applications 17

Before you begin
The record image file must be located in the images directory before you can addit to an application. If the Add Modify Image option is not included in the SelectAction menu, you must add this menu option before you can add the recordimage to the application.
About this task
You can add only one record image to an application but you can use the sameimage multiple times within the application by inserting multiple record imagecontrols.
Procedure
1. Highlight a container control and drag the Record Image control to it from theControl Palette. You can place a record image control into any container control.
2. Select the Record Image control and click Control Properties to open theRecord Image Properties window.
3. Optional: Deselect Is Thumbnail if you only want to display a full-size versionof the image. The default behavior for record images is to display anexpandable thumbnail image that a user can click to enlarge. If you do notwant to provide a thumbnail version of the image, you must specify a value inthe Label field that overwrites the default label, Click to enlarge.
4. Optional: You can specify a label for the image or you can leave this field blankto use the default label text, Click here to enlarge.
5. Specify appropriate values in the Height and Width fields, based on the size ofthe image you intend to use. The default values generate a thumbnail image of100 x 100 pixels, appropriate for a square image. To avoid distortion of theimage, ensure that the size values are proportionate to the size of the image.
6. Provide a text description of the image in the ALT Text on Image field.Alternative text is used as a substitute for the image when images are notsupported, for example by screen readers.
7. Repeat the preceding steps if you want to add placeholders for the recordimage in other positions in the application, such as on another tab.
8. Select the Add Modify Image option in the Select Action menu to specify therecord image to use for the application. The image can be in .gif or .jpg formatand must be located in the images directory.
Defining default values for fieldsYou can change the labels for fields, specify default values and filters for fields,and you can configure value lists for fields.
Assigning a default label to an attributeYou can specify a default value for an attribute and all text box controls that bindto the attribute inherit this value. The value is saved in the database
Before you begin
This procedure includes updating the database. Backup the database and make anynecessary arrangements before you restart the database and the application server.
18 Developing Applications

Procedure1. Select the attribute in the Database Configuration application or click New Row
to specify a new attribute.2. Specify the value you want to use as the default label for the attribute in the
Title field.3. Click Save.4. Run the configdb command to save the changes to the database. Sign out of
the system and stop the application server.5. In the Application Designer, drag a text box control from the Control Palette
into a section control in the workspace.6. Select the text box control and click Control Properties.7. Specify the attribute that you configured. The window refreshes and the
Default Label field contains the value that you configured.
Saving changes to the databaseAfter you make changes to the database in the Database Configuration application,you must commit the changes to the database. The data on the server is thenreloaded and the user interface (UI) is updated with the changes that you made.For example, new fields are added or field labels are updated.
Procedure1. Select the Apply Configuration Changes option in the Select Action menu in
the Database Configuration application.2. Sign out of the system.3. Stop the application server and wait one minute to ensure that the user session
terminates.4. Open a command prompt, change the directory to install_home\tools\maximo,
and run the configdb command to add the new default value to the database.5. Start the application server and login to the system.
Overriding a value in the default label fieldYou can specify a label for a text box that overrides the default label.
About this task
The label that you specify applies to this specific application and does not replacethe default value that you configured for the attribute.
Procedure1. Select the text box in the workspace and click Control Properties.2. Specify the value that you want to use in the Label field. The label for the text
box updates in the workspace.3. Click Save.
Assigning a default value to an application fieldYou can assign a default value for a field that is specific to an application and doesnot apply to fields in other applications that are associated with the same attribute.
Procedure1. Select the section control that contains the field and click Control Properties.
Developing applications 19
2. Drag the Default Value control to the section from the Control Palette. If youdo not see the Default Value control when the workspace refreshes, clickToggle Show All Controls in the Select Action menu.
3. Select the Default Value control and click Control Properties.4. Specify an attribute and specify its default value in the Label field. When you
associate a text box in the section with the same attribute, the label is set to thisvalue.
Setting default filters for a table windowYou can define a default filter for a table window using the Default Value controlin the Application Designer,
Procedure1. Drag the Default Value control from the Control Palette into the section control
that contains the table to filter. If the Default Value control is not visible afterthe workspace refreshes, click Toggle Show All Controls in the Select Actionmenu.
2. Specify the attribute to filter.3. Specify one or more values to use as filters in the Value field. Use commas to
separate multiple values. You can also use % as a wildcard or = to specify anexact match.
4. Select Query in the Default Type field.5. Click Save.
Adding a value list to a text fieldYou can add a lookup icon to a text box control and configure a list of values thatusers can select from when they click the icon.
Before you begin
You can use an existing lookup value list or you can configure a new one. Tocreate a value list, configure a domain that contains the values and associate thedomain with an attribute. To use an existing lookup value list, export the systemXML and locate the relevant Lookup ID in the lookups.xml file. When you assignlookups for a field that has a table domain, you use a lookup from the applicationthat the field is in. You cannot use the VALUELIST lookup with table domains.
Procedure1. Click Add New Domain > Add New ALN Domain in the Domains
application,2. In the ALN Domain window, specify values in the required fields. You must
use precisely the same values when you configure the associated attribute inthe Database Configuration application. The data type determines whetheroptions in the list are displayed as uppercase, lowercase, or either. The lengthdetermines the width of the list. A length of 10 is adequate for most purposes.
3. Click New Row, specify a value, and click OK. This value becomes an item inthe value list.
4. Repeat Step 3 for each additional value.5. Click Save.6. In the Database Configuration application, open the application to which you
intend to add the value list.7. In the Attributes tab, click New Row and configure the attribute by using the
precise values you specified for the domain.
20 Developing Applications

8. To save the changes to the database:a. Sign out of the system.b. Stop the application server and wait 1 minute.c. Open a command prompt, change the directory to install_home\tools\
maximo, and run the configdb command to add the new default value tothe database.
d. Start the application server and login to the system.9. In the Application Designer, drag a text box control from the Control Palette
to a section in the workspace. An Invalid Binding message is displayed in thetext box. When you associate the control with an attribute, the message nolonger displays.
10. Select the text box control and click Control Properties.11. Specify the same name for the attribute as the name you configured in the
database.12. Specify Valuelist as the value in the Lookup field. A lookup icon is displayed
next to the text box control and the Invalid Binding message is no longerdisplayed.
13. Click Save.
Moving application componentsUse the Application Designer to move controls across tabs or across applications.You can also move components and applications to a different server and exportmultiple applications.
Moving controls across tabsYou can move a control or a group of controls from one tab to another within anapplication.
About this task
When you move a container control, all of the controls it contains move with it.
Procedure1. Select a control or a group of controls, typically a section.2. Right click the mouse, and click Copy or Cut.3. Click the tab where you want to copy or move the control.4. Select the target control (usually a section).5. Click Paste.
Moving controls across applicationsYou must edit the presentation.xml files to move a control or a group of controlsfrom one application to another.
Procedure1. Open the source application in the Application Designer and click Export
Application Definition. The XML definition opens in the browser.2. Save the XML definition to a file.3. Open the target application and perform the same steps to export the XML
definition and save it to a file.4. Open the XML file for the source application in a text editor.
Developing applications 21

5. Locate the control ID or the section control ID that you want to move. You canuse the unique control ID that is listed in the Control Properties window tosearch for the control in the XML file.
6. Select the relevant code and copy it to the clipboard.7. Open the XML file for the target application in a text editor.8. Navigate to where you want to insert the control and Paste the code that is
stored on the clipboard.9. Save both XML files.
10. Open the target application n the Application Designer and click ImportApplication Definition.
11. Specify the target application XML file that you modified, and click OK.
Results
When you copy a multipart text box control to a different application, the controlmust link to an attribute that exists in the main object table for both applications. Ifthe attribute relationship does not exist, the multipart text box control in the targetapplication does not contain any property values.
Moving components and applications across serversYou can move user interface components and applications across servers, forexample to move from a test environment to a production environment. Differentmembers of the organization can configure different applications and then movethem to a centralized test environment.
Procedure1. Create a backup directory for the XML files you are moving. You can use the
backup files to restore application definitions in the future, if necessary.2. Open the application on the source server, and click Export Application
Definition.3. Save the code as an XML file in the backup directory you created.4. Repeat steps 2 and 3 for each application that you want to export.5. Make a copy of the XML file(s) you created.6. Paste the copy of the XML files onto the target server.7. Open the Application Designer on the target server, click Import Application
Definition, and navigate to the XML files. When you import an application,you overwrite the application in the database and not in the directory ofpresentation.xml files.
Exporting multiple applicationsYou can copy multiple applications at the same time to another server by exportingthe presentation XML for each application to a single XML file.
Procedure1. In the Applications tab of the Application Designer, press the Return key. The
screen refreshes with a list of all applications.2. Scroll to the end of the screen and click Select Records check box. The screen
refreshes and includes a selection check box for each record.3. Check each application whose XML presentation you want to export.4. In the Workspace tab, click Export Application Definition from the Select
Action menu.
22 Developing Applications

5. An XML file opens in a browser window that includes the presentation codefor each application you selected for export. You can find the start point for anapplication by searching for the presentation id string.
6. Save the XML file to a directory.
What to do next
To import the XML file into another system, in the Application Designer clickImport Application Definition and navigate to the XML file. The import reads thebeginning and end point for each application embedded in the XML file and loadsthe applications accordingly.
Adding navigation componentsYou can link to applications and to external URLs and you can add menus andbuttons to organize application navigation.
Navigation componentsThere are several ways that you can integrate a new application into the existingnavigation and you can add new navigation components if required.
The Application Designer provides several navigation components that you canmodify to add a link to an application, an application tab, or an application popupwindow.v Go To menuv Application toolbarv Select Action menuv Menu templatesv Application bar menu in self-service applications
Go To menu
The Go To menu lists all of the modules and applications that a user can access.The menu is hierarchical and lists modules at the top level. When the user clicks amodule, a submenu lists the applications in that module. When you create anapplication in the Application Designer, you specify its module and the applicationname is added under this module in the Go To menu. When you duplicate anapplication, the new application is added to the same module as the originalapplication.
The contents of the Go To menu are generated automatically and you cannotcustomize them in the Application Designer.
Application toolbar
The application toolbar contains buttons that are arranged in a horizontal line atthe top of the application window. You can add new buttons to the toolbar andmodify existing ones in the Application Designer. Buttons can be specific to thetoolbar in one application tab, or can be visible in all tabs.
Button images are stored in the images directory and you can add new images orreuse existing images.
Developing applications 23

Select Action menu
The Select Action menu lists application-specific actions. You can add new optionsto the Select Action menu and modify its existing options in the ApplicationDesigner.
Menu templates
You can reuse the code for existing menus as a template for a new menu, Use theApplication Designer to export the menus.xml file, modify the file in a text editor,and then import the updated file back into the Application Designer.
You can use the XML code for any of the menus in the menus.xml file as a templatefor a new menu.
Application bar menu
Self-service applications do not have a Go To menu and provide access toapplications in a menu at the top of the application window. You can export thepresentation.xml file to add a navigation property to the application bar of aself-service application. If you customize the application bar menu, anypreconfigured links are ignored.
Linking to an external URLYou can create a link to an external website from an application using a hyperlinkcontrol.
Procedure1. Open the application in the Application Designer.2. Select either a section control or a table control and drag a hyperlink control to
it from the Control Palette.3. Specify a value in the Label field. This value becomes the text link that a user
clicks to go to the URL.4. Specify a valid URL for the destination site.5. Optional: Specify values in the Image Filename and Image Alignment fields if
you want to associate an image with the hyperlink.6. Optional: Specify a value in the CSS Class Name field if you want to change
the appearance of the hyperlink.
Results
When a user clicks the link within the application, the destination website opens ina new browser window.
Linking to an application from a text fieldYou can configure a pull-down menu associated with a text field to have optionsthat take the user to different applications.
Procedure1. Open the application in the Application Designer.2. Select a text box control and click Control Properties. You can also configure an
application menu for multipart text box control and a table column control.3. Add the name of an application that you want to link to in the GOTO
Application field.
24 Developing Applications

4. Specify a value in the Menu Type field that corresponds to the application youspecified. Click Export System XML in the Select Action menu to export themenus.xml file. You can search this file for the appropriate menu type value.
Adding a new button to the application toolbarYou can add new buttons to an application toolbar in the Application Designer.Toolbar buttons provide quick access to common actions, such as Save and Insert,and can be seen in all application tabs or limited to a specific tab.
Procedure1. Open the application in the Application Designer.2. Select the Add Modify Toolbar Menu option in the Select Action menu. The
Add Modify Toolbar Menu window opens with a list of the buttons that arealready configured for the application toolbar.
3. Click New Row.4. Select an Element Type. The list of key values is updated with options of this
type, for example a list of applications or options.5. Select a Key Value. The key value represents the button action and is visible
when the user moves the mouse over the button.6. Specify an image to use for the button that is located in the images directory
and is in a supported format.7. Enter position values that determine the location of the button relative to the
other buttons in the toolbar. Review the details for other buttons to determinethe appropriate position.
8. Specify where the button is to be visible in the Tabs field.9. Click OK.
Example
To add a Change Password button to the toolbar in the Main tab of the Personapplication:1. Set the Element Type to App (application).2. Select ChgPassword as the Key Value.3. Set Position to 60 and Subposition to 0.4. Specify the nav_icon_changepassword.gif file in the Image field.5. Select the Main tab option.
What to do next
You can add buttons that act as separators if you want to group several buttonstogether in a section.
Adding an option to the Select Action menuYou can add a new option to the Select Action menu in the Application Designer.
Procedure1. Open the application in the Application Designer.2. Select the Add Modify Select Action Menu option in the Select Action menu.
The Add Modify Select Action Menu window opens with a list of the optionsthat are already configured for the menu.
3. Click New Row.
Developing applications 25

4. Select an Element Type. The list of key values is updated with options of thistype, for example a list of applications or options.
5. Select a Key Value. The key value is the label that shows in the menu.6. Enter position values that determine the location of the option in the menu.
Review the details for other menu options to determine the appropriateposition.
7. Specify the Tabs where the option is visible in the Select Action menu.8. Click OK.
Modifying links in a self-service applicationTo change the links in the application bar of a self-service application, you mustconfigure a property in the presentation.xml file for the application. You canconfigure these links for a self-service application that you cloned from an existingapplication or for a new self-service application that you create.
About this task
When you configure the appbarlinks property, any existing links that are found inthe database are ignored, and only the customized links are displayed.
Procedure1. Open the application in the Application Designer.2. Select the Export System XML option in the Select Action menu.3. Save the XML file to a local directory and open it in a text editor.4. Search for the appbar tag in the XML file.5. Add appbarlinks=" " to the appbar tag to add the navigation menu to the
application bar control.6. Insert the links, separated by semicolons.7. For each link, you can specify up to three attributes, separated by commas.
a. ID of the linked applicationb. Text description to display in the application barc. Image to display next to the description
For example:appbarlinks="Application1,Description1,image1.gif:Application2,Description2,image2.gif"
8. Save the changes to the XML file.9. Import the file into the Application Designer to save the new menu
information.
Providing user informationYou can provide information to help users in the windows and tabs in the userinterface. You can create links from windows and tabs, and also from field help, totopics in the product information center. You can also add new error messages toan application.
Adding messages to the messages tableYou can add new messages to an application that help the user to resolve issueswhen the application encounters errors. Messages are displayed to the user and areadded to logs to help with error resolution. When you add a message in theApplication Designer, it becomes available for translation into supportedlanguages.
26 Developing Applications

About this task
Single quotation marks (’) do not appear in the displayed message. To includequotation marks in the displayed message, you must use double quotation marks(") when you write the text of the message.
Procedure1. Open the application in the Application Designer.2. Select the Messages option from the Select Action menu.3. Specify the identifier for the Message Group.4. Specify a Message Key that is unique in this message group.5. Select a Message ID.6. Specify the text of the message in the Value field.7. Complete any other relevant fields and click OK.
Linking to user informationYou can add a link to a topic in the product information center from a help gridcontrol, or from the field help for any other control.
About this task
The URL for an information center topic must have the following format:com.ibm.mbs.doc,application/helpfile.html
Procedure1. To create a link from a help grid control, specify the URL for the topic in the
More information field in the Help Grid Properties window.2. To create a link from the field help for a control, specify the URL for the topic
in the More information field in the control properties window When the userclicks Alt + F1, a More information link is available in the help window.
Results
When the user clicks a more information link, the relevant topic in the informationcenter opens in a new tab. You can add links from multiple controls to one topic,or you can link to multiple topics. You must add links manually to each individualcontrol. If an information center topic is moved or deleted, users can encounterbroken links if you do not update each control.
Configuring dialog windows for an applicationYou can modify dialog windows that are specific to an application in theApplication Designer. To modify dialog windows that are shared with otherapplications, you must modify a system XML file. You can also create a dialog andadd it to an application.
Modifying an application dialog windowYou can modify a dialog window that is specific to an application in theApplication Designer.
About this task
This procedure applies to dialog windows that are specific to the currentapplication. If the dialog window is not available in the Edit Dialogs window, the
Developing applications 27

window is probably a system dialog window that is shared by other applications.
Procedure1. In the Application Designer, click Edit Dialogs and select the dialog window
that you want to modify.2. In the Workspace, perform the modifications in the same manner as you
modify an application.3. Click Save.
Modifying a system dialog windowTo modify a system dialog window, you must export the library.xml file andmodify the XML file in a text editor.
Before you begin
Do not modify the library.xml file while other applications are using it.
About this task
System dialog windows, such as the Change Status window, are shared bymultiple applications and any changes you make apply to all applications that usethe dialog. If you do not want to modify the window for all applications, copy theXML code for the dialog element and use this as a template for a new window thatis specific to an application.
Procedure1. In the Application Designer, click the Export System XML option in the Select
Action menu.2. In the Export System XML window, select the Library option and click the
Export XML icon. The library.xml file opens in a new browser window.3. Save the library.xml file to a local file and open it in a text editor.4. Locate the dialog element that you want to change in the XML file and modify
as required.5. Save the XML file.6. In the Workspace of the Application Designer, click the Import Application
Definition icon on the toolbar.7. Browse to the local copy of the library.xml file that you changed and select it.
The modified XML definition is saved to the database and the changes that youmade are now available to all applications.
Creating a dialog windowYou can add a new dialog window to a specific application or you can make itavailable for use by all applications. You must modify an XML file to create adialog window and import the modified file into the Application Designer. Afterimporting it, you can modify the new dialog window in the Application Designer.
Procedure1. In the Application Designer, export one of the following XML files:
a. In the List tab, click Export System XML in the Select Action menu toexport the library.xml file if you want to add a new dialog for use by allapplications.
28 Developing Applications
b. In the Workspace tab, click the Export Application Definition icon toexport the presentation.xml file if you want to add a new dialog for use bya specific application.
The XML definition opens in a new browser window.2. Save the XML definition to a local file and open it with a text editor.3. Add a code snippet for the dialog at the end of the XML file, just before the
final closing tag, either the </systemlib> tag or the </presentation> tag. Thefollowing code creates a View History dialog window to the end of apresentation.xml file:
<dialog id=”newviewhist” label=”View History”></dialog>
</presentation>
4. Save the changes to the XML file.5. In the Application Designer, click the Import Application Definition icon,
navigate to the modified XML file and import it.6. Click the Edit Dialogs icon and select the dialog window you created.7. In the Workspace tab, modify the dialog window as required.
Transferring data between applicationsLinked objects and crossover domains are different configuration mechanisms thatyou can use to move data from one field in an application to another field in adifferent application.
Data transfer optionsAlthough similar in purpose, there are distinct differences between the twoconfiguration options that you can use to transfer data from a field in oneapplication to a field in another. These data transfer options are based on eitherlinked objects or on crossover domains.
Linked objects can pass data from a source application to a target application usingdatabase relationships. In the destination application, the data value can be read,or read/write, depending on how you configure the input field. If you configurethe destination input field to be read/write, the application frameworkautomatically updates the source application and parent object if you update adisplayed value.
Crossover domains, pass data from one application to a different application usingdomains. A copy of the data value from a source application is passed to adestination application using the crossover domain as a trigger mechanism. Youcannot edit the data value in the destination application and the copied data valueis static.
Database relationships that link objects and crossover domains enable the export ofinformation from a source object to a destination object using WHERE clauses tofilter for list and validation values. You can use a database relationship or acrossover domain to accomplish the following objectives:v Enter an asset number in the Items application, retrieve the serial number of the
asset from the ASSET object, and copy this value into a field.v Enter an asset number for a new work order, retrieve the parent asset number
from the ASSET object, and insert this value into a field.v Enter a user name in an application, retrieve the user’s phone number and
address from the PERSON object, and insert the information into two differentfields.
Developing applications 29

v Enter the user name for a person that is creating a material receipt record,retrieve the name of the user’s supervisor from the PERSON object, and insert itinto a field.
Linking objects to share data between applications:
User interface controls are bound to database attributes that present data from theapplication parent (and child) objects in a browser window. Most applicationspresent data that resides in other objects and you can use relationships, defined inthe Relationships application, to indicate the connection between these objects. Thisscenario describes how to add user comments about an asset to a work order whenyou add the asset to a work order.
Adding a comment attribute to an asset:
You must add an attribute (if one does not already exist) to the asset object as thefirst step in capturing user comment information about an asset.
Procedure
1. In the Database Configuration application, filter for the ASSET object and clickthe Attributes tab.
2. In the Details section, click New Row.3. Specify values in the following required fields or accept default values where
appropriate:
Field label Input value Description
Attribute Assetcomment Attribute name
Description User comments regarding theasset
Text description of attribute
Type ALN The default
Length 100 Field length
Title Comment Alias name to substitute inmessages and window labels
Search Type Wildcard Search on this attribute usingwild card characters like *and %
4. Click Save.5. Perform the usual procedures to run the ConfigDB tool to update the database
to enable these database changes to take effect.
Linking objects in different applications:
To capture comments associated with an asset on a work order, you must create arelationship or link between the ASSET and WORKORDER objects. Linking theseobjects enables the Work Order Tracking application to display and updateinformation stored in the ASSET object.
Procedure
1. In the Database Configuration application, select the Work Order applicationand then open the Relationships tab.
2. Click New Row.3. In the Details window, specify the following values:
30 Developing Applications

Field label Input value Description
Relationship ASSET2WOLINK The name of the databaserelationship
Child Object ASSET The name of the child object.WORKORDER is the parentobject.
Where Clause assetnum=:assetnum andsiteid=:siteid
SQL Where Clause conditionor conditions. The systemdoes not validate your inputin the Where Clause field.Verify that your syntax iscorrect.
Remarks <text> A description of therelationship. For example:This relationship bindsWORKORDER and ASSETobjects when you enter anasset number in a workorder.
The following table describes the logic of the Where Clause conditions for thisexample:
WHERE clause syntax Description
:assetnum Represents asset number value entered inwork order screen
assetnum= Look in Asset object for the asset numberthat matches the value entered in the workorder screen
:siteid The Site value entered in work order screen
siteid= Look in Asset object for the Site value thatmatches the current value in the work orderscreen
The Where Clause above joins the Work Order and Asset objects and locates aunique record.
4. Click Save.
What to do next
To complete the process of capturing asset comment information on work orders,continue to the next procedure that describes how to add a textbox control to WorkOrder Tracking in the Application Designer.
Adding a text box for comments:
Complete this procedure to add text box controls to the Assets application and tothe Work Order Tracking application. The text box in the Assets application letsyou input or edit a comment value for an asset. You can view these comments inthe text box in the Work Order Tracking application.
Before you begin
Before you start, verify that you have added the assetcomment attribute to theAsset object.
Developing applications 31

Procedure
1. In the main tab of the Assets application in the Application Designer, click thesection that holds the Asset field.
2. Click Control Palette and drag a text box control into the Asset section.3. Open the Control Properties window for the text box control.4. Specify the following information to bind the control to the assetcomment
attribute:
Field input Value Description
Default Label Defaults to Comment When you specifyassetcomment in theAttribute field, this fielddefaults to the default labelvalue of the attribute (ifavailable). You can assignyour own label value for thisattribute that is specific tothe application in the Labelfield. For example, youmight enter Asset Comments.
Label Comments The value you enter here, forexample, Comments,overrides the Default Labelsetting within theapplication. The value youenter for Label is specific tothe application and notstored in an object.
Attribute assetcomment The name of the assetcomment attribute in theAsset object.
Input Mode DEFAULT The Default optionconfigures the Input Modefor the Comment field to beRead/Write or Edit mode.
5. Click Save.6. In the Application Designer, open the Work Order Tracking application and
then select the Asset section of the application.7. Drag a text box control from the Control Palette to the workspace and position
it between the Asset and the Parent WO fields.8. Open the Control Properties for the text box and specify the following values:
Field input Value Description
Default Label Defaults to Comment When you specifyassetcomment in theAttribute field, this fielddefaults to the default labelvalue of the attribute (ifavailable). You can assignyour own label value for thisattribute that is specific tothe application in the Labelfield. For example, youmight enter Asset Comments.
32 Developing Applications

Field input Value Description
Label Comments The value you enter here, forexample, Comments,overrides the Default Labelsetting within theapplication. The value youenter for Label is specific tothe application and notstored in an object.
Attribute asset2wolink.assetcomment Type the name of the assetcomment attribute in theAsset object. You mustpreface the assetcommentattribute with the name ofthe database relationship thatbinds the Asset andWorkorder objects and a dot.For example,asset2wolink.assetcomment.
Input Mode DEFAULT or READONLY The Default optionconfigures the Input Modefor the Comment field to beRead/Write or Edit mode.You can also configure theComment field to be ReadOnly
Results
After this configuration, the Comments field is populated in the Work OrderTracking application whenever you add an asset record to a work order.
Crossing over domains to share data between applicationsUsing a crossover domain to display comments about an asset in the Work OrderTracking application is similar to using linked objects except that you use acrossover domain value to establish a link between the Work Order and Assetobjects and not a database relationship. When using a crossover domain to copydata across applications, you cannot edit the asset comment value in thedestination application.
Adding a comment attribute to an asset:
You must add an attribute (if one does not already exist) to the asset object as thefirst step in capturing user comment information about an asset.
Procedure
1. In the Database Configuration application, filter for the ASSET object and clickthe Attributes tab.
2. In the Details section, click New Row.3. Specify values in the following required fields or accept default values where
appropriate:
Field label Input value Description
Attribute Assetcomment Attribute name
Developing applications 33

Field label Input value Description
Description User comments regarding theasset
Text description of attribute
Type ALN The default
Length 100 Field length
Title Comment Alias name to substitute inmessages and window labels
Search Type Wildcard Search on this attribute usingwild card characters like *and %
4. Click Save.5. Perform the usual procedures to run the ConfigDB tool to update the database
to enable these database changes to take effect.
Adding a comment attribute to a work order:
You must add an attribute (if one does not already exist) to the work order object.
Procedure
1. In the Database Configuration application, filter for the WORKORDER objectand click the Attributes tab.
2. In the Details section, click New Row.3. Specify values in the following required fields or accept default values where
appropriate:
Field label Input value Description
Attribute Woassetcomment Attribute name
Description User comments regarding theasset
Text description of attribute
Type ALN The default
Length 100 Field length
Title Comment Alias name to substitute inmessages and window labels
Search Type Wildcard Search on this attribute usingwild card characters like *and %
4. Click Save.5. Perform the usual procedures to run the ConfigDB tool to update the database
to enable these database changes to take effect.
Creating a crossover domain:
You can create a crossover domain in the Domains application.
Procedure
1. In the Domains application, click Add New Domain > Add NewCROSSOVER Domain to open the Crossover Domain window.
2. Specify ASSET2WO as the domain name and Asset to Work Order CrossoverDomain as the full description.
34 Developing Applications

3. Click New Row in the Crossover Domain section to open the detail section.4. Specify Asset in the Object field to define Asset as the source object of the
crossover.5. Enter assetnum=:assetnum and siteid=:siteid in the Validation Where Clause
field.6. Click New Row in the Crossover Fields section to open the detail section.7. Use the lookup to select assetcomment from the Asset object in the Source
field, then type woassetcomment in the Destination field.8. Click OK.
Applying a crossover domain:
You must apply the crossover domain that you created to a field that triggers thecrossover conditions.
Procedure
1. In the Database Configuration application, open the WORKORDER object andclick the Attributes tab.
2. Click Filter, and specify assetnum in the Attribute field.3. Press Enter to open the Assetnum details section, and specify asset2wo in the
Domain field.4. Click Save.
Adding a text box for comments:
Complete this procedure to add text box controls to the Assets application and tothe Work Order Tracking application. The text box in the Assets application letsyou input or edit a comment value for an asset. You can view these comments inthe text box in the Work Order Tracking application.
Before you begin
Before you start, verify that you have added the assetcomment attribute to theAsset object.
Procedure
1. In the main tab of the Assets application in the Application Designer, click thesection that holds the Asset field.
2. Click Control Palette and drag a text box control into the Asset section.3. Open the Control Properties window for the text box control.4. Specify the following information to bind the control to the assetcomment
attribute:
Developing applications 35

Field input Value Description
Default Label Defaults to Comment When you specifyassetcomment in theAttribute field, this fielddefaults to the default labelvalue of the attribute (ifavailable). You can assignyour own label value for thisattribute that is specific tothe application in the Labelfield. For example, youmight enter Asset Comments.
Label Comments The value you enter here, forexample, Comments,overrides the Default Labelsetting within theapplication. The value youenter for Label is specific tothe application and notstored in an object.
Attribute assetcomment The name of the assetcomment attribute in theAsset object.
Input Mode DEFAULT The Default optionconfigures the Input Modefor the Comment field to beRead/Write or Edit mode.
5. Click Save.6. In the Application Designer, open the Work Order Tracking application and
then select the Asset section of the application.7. Drag a text box control from the Control Palette to the workspace and position
it between the Asset and the Parent WO fields.8. Open the Control Properties for the text box and specify the following values:
Field input Value Description
Default Label Defaults to Comment When you specifyassetcomment in theAttribute field, this fielddefaults to the default labelvalue of the attribute (ifavailable). You can assignyour own label value for thisattribute that is specific tothe application in the Labelfield. For example, youmight enter Asset Comments.
Label Comments The value you enter here, forexample, Comments,overrides the Default Labelsetting within theapplication. The value youenter for Label is specific tothe application and notstored in an object.
36 Developing Applications

Field input Value Description
Attribute asset2wolink.assetcomment Type the name of the assetcomment attribute in theAsset object. You mustpreface the assetcommentattribute with the name ofthe database relationship thatbinds the Asset andWorkorder objects and a dot.For example,asset2wolink.assetcomment.
Input Mode DEFAULT or READONLY The Default optionconfigures the Input Modefor the Comment field to beRead/Write or Edit mode.You can also configure theComment field to be ReadOnly
Results
After this configuration, the Comments field is populated in the Work OrderTracking application whenever you add an asset record to a work order.
Configuring conditional user interface componentsBy applying conditions to control application behavior and to the user interface(UI), you can configure the UI to support your business processes. You can achievethe user interface behavior you require by configuring conditional data restrictions,by configuring conditional UI control behavior in Application Designer, or byconfiguring conditional security restrictions. For example, you can apply conditionsto change the color of controls, the content of menus for different user groups, orthe properties of the data shown.Related information:
Technotes about conditional user interface features delivered with yourproduct.
Conditional user interfaceConditions are clauses or classes that evaluate to true or false when they areevaluated against an object. Conditions can be applied to user interface (UI)controls to control how the UI is shown to users and to support your businessprocesses. You can apply conditional data restrictions, signature options toconditionally control access to controls, or conditional control properties toconfigure the UI.
You can bind any UI control to a signature option to grant or revoke access to thecontrol by groups of users. You can also apply conditions to the properties of acontrol so that the control looks or behaves differently for specified groups of usersbased on the evaluation of the applied conditions. For example, you can applyconditions to a control so that the color of the control changes depending on thevalue shown.
You can use the Application Designer to associate a control with a signature optionand conditions. When a control is bound to a signature option or an attribute, youcan take the following actions:
Developing applications 37

v Configure its behavior by setting a data restriction or conditional data restrictionin Security Groups
v Grant the option in the Security Groups applicationv Configure conditional properties in the Application Designer
When you are planning your conditional user interface system, you choosebetween the implementation methods listed. Data restrictions are useful forimplementations where you want the restriction that you create to apply to everyuser interface element or application that uses an object or attribute. Securityrestrictions are useful when you want to restrict access to a control or to data to aspecific group of users.
Example: Showing status options based on the status of the currentrecord
XYZ Corporation requires that the work order status that is available to workorder dispatchers is based on the current work order status. For this company,when a work order status is Waiting on Approval, only the values Approved andCanceled are available to the dispatchers.
To implement this business process, in the Condition Expression Manager, createthe following conditional expression:
WOSTATUSAPPR :status = ‘WAPPR’
Then in the Application Designer application, apply that condition to the domainvalues WOSTATUS|APPR and WOSTATUS|CAN. The status options shown onthe UI reflect the status of the current work order.
Example: Changing historical data to read-only
ABC Inc. requires that all users see completed work orders from previous financialaccounting periods as read-only. To implement this behavior, the applicationdeveloper creates a condition that is true if the date checked is in the past. Thedate condition is evaluated against the date on completed work order records. Thedeveloper applies the condition to work order data in the Security Groupsapplication for the security group that contains all users.
When the condition is evaluated, it returns a value of true if the work order date isfrom a previous financial period. All users see work order records from previousfinancial periods as read-only on the UI.
Hierarchy of restrictions:
The conditional restrictions that you define are applied hierarchically. For example,if you make an attribute read-only by using a data restriction, you cannot use theApplication Designer application to make a field that is bound to the attributeeditable.
The restrictions are applied as follows:1. Database configurations2. Data restrictions3. Application configurations
38 Developing Applications
Database configurations take priority over data restrictions and data restrictionstake priority over application configurations.
If you define an object as read-only in the database, you cannot use datarestrictions or the Application Designer application to make the object editable.
Data restrictions take priority over application configurations made in theApplication Designer application. For example, if an attribute is made read-onlyusing a data restriction, you cannot use the Application Designer application tomake the attribute editable.
Configurations that are made with data restrictions apply everywhere an attributeis used. Application configurations made in Application Designer apply to thatapplication only. For example, if you want to restrict access to a field that is in theheader section of multiple tabs, you can put a data restriction on the field everyinstance of the field has the access restriction. If you configure the restriction inApplication Designer, you must apply the restriction to each instance of the fieldon each tab.
Creating conditionsYou can create conditions in the Conditional Expression Manager. Then, you canapply the conditions to fields, tabs, and other user interface controls in applicationsto control how the UI looks and behaves. You can also apply conditions to securitygroups to control access to applications, controls, and data.
Conditions overview:
A condition is a clause or class that evaluates to true or false when evaluatedagainst an object. You can create and maintain a library of conditions. You canapply the conditions to fields, tabs, and other user interface controls to control thepresentation. You can also apply conditions to security groups to control access todata, applications, and controls.
There are two types of conditions:
Expression-type conditionAn expression-type condition is a clause that evaluates data and returns aresult of true or false. The expression syntax is similar to structured querylanguage (SQL) expressions, but it supports substitution variables. Useexpressions to define simple conditions.
Class-type conditionFor class-type conditions, the condition logic is contained in Java classesthat are stored in a file under the root product folder. You can create theclass files that contain the condition logic. When the class-type condition isevaluated, it returns a true or false result. Use a class-type condition if thelogic to be evaluated is too complex to be accomplished with a simpleexpression.
Conditions are created and managed in the Conditional Expression Manager.Describe each condition that you create to help you identify the conditions toapply to user interface elements or security groups.
You can use the Application Designer to apply conditions to user interfaceelements. You can also apply conditions in the Security Groups application tocontrol access to applications and to actions within applications.
Developing applications 39

You can modify expression-type conditions. When you modify the condition,access to all data and to all user interface controls that use the condition ismodified. You can determine whether a condition is applied to user interfacecontrols, security groups, or data restrictions by checking the reference count field.If the reference count field is zero then the condition is not applied.
Creating conditional expressions and classes:
You can create conditional expression-type and class-type conditions. Then you canapply the conditions to control access to data and to user interface controls.
Procedure
1. In the Conditional Expression Manager, add a row and change theauto-generated Condition identifier to a meaningful identifier. Enter a completedescription of the condition in the Description field. A meaningful identifierand a complete description help you identify a condition later.
2. Select the condition type and enter the condition.a. If you selected expression type, enter an expression, or click Condition
Expression Builder to build an expression in the Condition ExpressionBuilder.
b. If you selected class type, enter the class file name. The file must be in afolder under the root of the product folder, for exampleMaximo_home\maximo\samples
3. Save the condition.Related concepts:“Conditional expression syntax”You enter conditional expressions using a syntax similar to Structured QueryLanguage (SQL) with some additional variables.“Sample conditional class files” on page 42Sample condition class files are stored in a folder under the root directory of theproduct installation. You can use the sample files when you create class-typeconditions.
Conditional expression syntax:
You enter conditional expressions using a syntax similar to Structured QueryLanguage (SQL) with some additional variables.
When you create a conditional expression, use a colon (:) to define a variable. Thecolon is used to avoid ambiguity when you create expressions that relate thecurrent record to a different, specific record.
You can have subselect in an expression,
exists (select 1 from workorder where wonum=:wonum).
The first wonum is the wonum attribute on the work order object. At run time, thesecond wonum is replaced with the value of the wonum attribute for the currentrecord.
40 Developing Applications

Replacement variables
Syntax Description Comments
:yes true Logically true, 1 if stored inthe database
:no false Logically false, 0 if stored inthe database
:&date& Current date
:&datetime& Current date and time
:&user& Logged in user For example, if a user issigned in as Smith,:owner.id=&user& converts to:ownerid=’SMITH’
:&personid& Person ID of logged in user For example, if a user islogged in as Smith,:reportby=&personid&converts to:reportby=’SMITH’
:&appname& Application name For example, in the WorkOrder Tracking application,:&appname& = WOTRACKconverts to WOTRACK =WOTRACK. This variable isuseful for setting differentbehavior for different copiesof an application.
:&mboname& Name of the current businessobject
For example, in the workorder object, object =:&mboname& converts toobject = WORKORDER
:&ownername& Name of the owner businessobject
For example, in the WorkOrder Tracking application,:&ownername&.jobplan.priority>&ownername&.priorityconverts toworkorder.jobplan.priority>workorder.priority
Bind variables
Syntax Description Examples
:<relationshipname>.<attrname>
Value of an attribute of arelated business object of thecurrent business object
:location.description
Developing applications 41

Syntax Description Examples
:&owner&.<attrname> Value of an attribute of theowner business object
When you apply a job planto a work order, the systemcopies the priority of the jobplan to the child work order.The condition can be::&owner&.jobplan.priority>:&owner&.priority. In thisexample, the system copiesthis information if the jobplan has a higher prioritythan the parent work order.
:&owner&.<relationship_name>.<attrname>
Value of an attribute of therelated business object of theowner business object
See the example for:&owner&.<attrname>
:&old_<attrname> The initial value from thedatabase of the attribute
For example, if you changethe value of a field from 1 to2 to 3 to 4, the original valueis 1.
Conditional expressions examples
v :wostatus=’APPR’
v :type=’EM’
v :ownerid=:&user&
v :supervisor!=:&personid&
v :asset.assettype = ’IT’ and :&personid&=:owner
v :reportby=:&personid&
v :assetspec.classstructureid = 122
v :po.poline.receivedqty=0
v :&owner&.jobplan.priority>:&owner&.priority
v :owner&.po.$old_description like ’%Turbin%’
Sample conditional class files:
Sample condition class files are stored in a folder under the root directory of theproduct installation. You can use the sample files when you create class-typeconditions.
To use a sample condition class, enter the file name in the Class field in theConditional Expression Manager application.
Sample condition classes
v Evaluates to true: psdi.common.condition.AlwaysTruev Evaluates to false:psdi.common.condition.AlwaysFalse
Applying conditional securityYou can limit access to data and to elements of the user interface to users that havethe right level of access.
42 Developing Applications

Conditional security:
You can apply these conditions to security groups, to enforce security measures, forexample, you can limit access to certain elements of the user interface to users withthe right level of access.
In the condition library, you can define conditions, either as expressions or ascustom class files. You can control access to applications and to controls inapplications by applying conditions to security groups. The conditions are appliedto signature options (SIGOPTION) that are then granted to the security group.Conditional access is granted in the security groups application. If a user is inmultiple security groups, the highest level of access is granted when the securitygroups are joined.
The following are some examples of the types of conditional access that you canset:v Give read-only access to the information that is shown in a field.v Give read/write access to the information that is shown in a field.v Give a user group read-only access to a specific field in an application.v Give all members of a user group read/write access to an application.v Hide a field or tab in an application from certain users.v Grant access to application options in the Select Action menu for a security
group.v Configure any property in a control for a group, such as making a control
hidden, masked, read-only, or required.v Configure other properties, such as color, label, and application link, to be
different for on the user group that is accessing the UI.v Show or hide a data attribute globally or for a security group.
Defining signature options for an application:
Signature options specify privileges for using applications, menu options, andtoolbar items. You apply signature options to groups of users to control their accessto data, to applications, and to controls. New applications are automaticallyassigned a READ signature option. You can add more signature options in theApplication Designer.
Procedure
1. Open the application in the Application Designer.2. Select the Add Modify Signature Options in the Select Action menu and click
New Row.3. Specify a signature option in the Option field.4. Optional: Add additional signature options in the Option Also Grants field.
Use commas to separate multiple entries if you want to enable more than oneadditional signature option. For example, if the signature option grants accessto the People application, you can add signature options that grant access to arelated application, such as the Users application.
5. Optional: In the Option Also Revokes field, specify any signature options thatare revoked as a result of adding the primary option. For example, you add asignature option that allows read-only access to an application. You want toremove any write access to the application that users with the read-only
Developing applications 43

signature option have. To remove the write access, you specify the signatureoption that grants write access to the application in the Option Also Revokesfield.
6. Save the signature options.
Removing a signature option from a UI control:
To remove a signature option from a user interface (UI) control, you must firstdelete all security groups that are associated with the signature option.
Procedure
1. In the Application Designer workspace, select the control and click ControlProperties.
2. In the Control Properties window, click Configure Conditional Properties.3. Delete all rows in the Security Groups section and click OK.4. Delete the signature option in the Control Properties window.5. Click Save.
Results
The default behavior of the UI control is restored.
Applying signature options to show user interface controls:
You can grant access to a user interface (UI) control by associating it with asignature option. Then, users who belong to the security groups that are associatedwith this signature option are granted access to the control. Security groups thatare not associated with the signature option do not have access to the control.
About this task
Multiple controls can be associated with one signature option. Then, access to thecontrols can be granted or revoked as a group.
Procedure
1. In the Application Designer workspace, select the application that you want toconfigure.
2. Select Add/Modify Signature Options and create a signature option.3. Select the control that you want to configure and click Control Properties.
Select the signature option that you created and close the window.4. Click Save.5. In the Security Groups application, create a group or select an existing group.6. In the Options for Actions section of the Applications tab, select the Grant
Access check box for the access types that you want to provide to theapplication.
7. Select the Grant Access check box for the signature option that you applied tothe control in step 2.
8. Click Save.
Results
The control is visible only to the users in the security groups that this signatureoption is granted to.
44 Developing Applications

Showing controls to some users:
A user can be a member of many security groups. A user can have read-onlyaccess to an application in one group. As a member of another group the sameuser can have conditional access to the application. When the security groupscombine, the user can access the application when the condition is true. When thecondition is false, the user cannot access the application.
Procedure
1. In the Application Designer workspace, select the control and click ControlProperties.
2. Select a signature option and close the window.3. Click Save.4. In the Conditional Expression Manager application, create a condition that
grants access to a control when the condition is true.5. In the Security Groups application, select the security group that contains all
users. For example, MAXEVERYONE.6. Click the Applications tab and filter for the application that you want to
apply the condition to.7. In the signature options row, check Grant Access, and specify the identifier of
the condition you created in Step 4 in the Condition field.8. On the List tab, select another security group. For example,
PROJECTMANAGERS.9. In theApplications tab, check Grant Access in the Read Access to Actions row.
10. Add the same user to both security groups.
Results
You have one group of users, PROJECTMANAGERS that have read-access to theapplication. The security group that contains all users, MAXEVERYONE, hasconditional access to the control. When the two groups are combined, users haveaccess to the control when the condition is true. Users who do not have read-accessto the application in any group do not have access to the control.
Applying conditional data restrictionsTo support your business processes, you can apply conditions to restrict access todata for a user or for a user group. The data can be hidden, read-only, or required.
Conditional data restrictions:
Data restrictions can be conditional or unconditional. You can restrict access to datafor a user or user group. The data can be hidden, read-only, or required.
You can use these methods to restrict a user's access to data:v Database configuration of objects and attributesv Data restrictions on objects and attributesv Application configurations
Data restrictions are configured in the Security Groups application. You can alsoset data restrictions for attributes in objects, either with or without a specifiedapplication. Data restrictions that are applied to an object do not apply to views ofthe object. You must create a separate restriction for the object view.
Developing applications 45

You can apply conditions to objects to hide them, to make them required, or tomake them be read-only. You can apply the condition for every user, or just to aparticular security group. Objects or objects within the context of an applicationcan also be associated with a condition to determine what data is shown in theapplication. Only data that satisfies the condition is returned when the database isqueried.
You can also apply conditions to attributes within objects, either with or withoutan associated application. When you view records in an application, the evaluationof conditions can change the presentation of controls bound to objects or attributeswith conditional restrictions applied.
You associate objects or attributes with conditions in the Security Groupsapplication.
If you apply multiple conditions, the conditions are joined by an OR operatorwhen they are evaluated.
You can apply two or more conditions joined by an AND operator to an object orattribute. You can append the second and subsequent conditions to the first onewith an AND function between them.
As an application developer, you are implementing a data restriction that causesinformation about an asset to be shown on the UI. The asset is shown if thefollowing conditions are met:v The asset is a calibration assetv The asset has asset meter records
You create two conditions in the Condition Expression Manager:v Condition 1 displays calibration-related fields for the asset if it is a calibration
asset:iscalibration=1:
v Condition 2 checks for any asset meter records:exists (select 1 from assetmeter where assetnum = :assetnum and orgid =:orgid)
You append Condition 2 to Condition 1 with an AND operator:iscalibration=1:and exists(select 1 from assetmeter where assetnum = :assetnum and orgid =:orgid)
You apply the appended condition to the required asset object or attribute.Related tasks:“Specifying data restrictions for security groups”To customize your security settings, you can specify restrictions on which records asecurity group can access. You can use a conditional expression or a conditionalclass file to define and apply these restrictions.“Specifying global data restrictions for security groups” on page 47Using global data restrictions, you can use a condition to specify restrictions onwhich records can be accessed by security groups.
Specifying data restrictions for security groups:
To customize your security settings, you can specify restrictions on which records asecurity group can access. You can use a conditional expression or a conditionalclass file to define and apply these restrictions.
46 Developing Applications

Procedure
1. In the Security Groups application, select the group for which you want to setrestrictions.
2. On the Data Restrictions tab, select the type of restriction:v To specify restrictions on objects, click Object Restrictions.v To specify restrictions on attributes, click Attribute Restrictions.
3. Click New Row.4. In the Object field, specify the table or view on which to set the restriction.5. Optional: If you are specifying an attributes restriction, specify the attribute that
you want to restrict.6. Optional: In the Application field, specify the application to which you are
applying the restriction. Leave the field blank to apply the restriction to allapplications that use the object or attribute.
7. Specify the type of restriction.8. Optional: Specify the following options for restrictions:
Option Description
Reevaluate Select this option for the restrictioncondition to be reevaluated when the usertabs to another field. If you do not select thisoption, the restriction conditions areevaluated after the changes to a field aresaved.
Condition Specify a conditional expression.
9. Save your changes.Related concepts:“Conditional data restrictions” on page 45Data restrictions can be conditional or unconditional. You can restrict access to datafor a user or user group. The data can be hidden, read-only, or required.
Specifying global data restrictions for security groups:
Using global data restrictions, you can use a condition to specify restrictions onwhich records can be accessed by security groups.
Procedure
1. Optional: In the Conditional Expression Manager application, create one ormore conditions to be evaluated to control access.
2. From the Select Action menu in the Security Groups application, select GlobalData Restrictions.
3. In the Global Data Restrictions window, select one of the following options:v Specify an object restriction.v Specify an attribute restriction.
4. Click New Row.5. Specify a value for the object or attribute. The object is the table or the view on
which you set the restriction.6. In the Type field, select the type of restriction that you want to set:
v Select the application you want to apply the restriction to.
Developing applications 47

v Leave the Type field blank for the restriction to apply to all applications thatuse the object or attribute.
7. Optional: If you want the restriction condition to be reevaluated when a usernavigates away from a field, select the Reevaluate check box. If you do notselect this check box, restriction conditions are still reevaluated, but only afteryou save the changes that you make to a field.
8. Optional: Specify a condition.9. Click OK.Related concepts:“Conditional data restrictions” on page 45Data restrictions can be conditional or unconditional. You can restrict access to datafor a user or user group. The data can be hidden, read-only, or required.
Adding conditions to the properties of UI fieldsYou can control how the user interface (UI) is shown to users and to support yourbusiness processes. When a control is bound to a signature option or an attribute,you can configure conditional properties in the Application Designer
Adding conditions to determine access to UI controls:
You can conditionally modify the default access to user interface (UI) controls. UIcontrols include text boxes, check boxes, and radio buttons.
Procedure
1. In the Conditional Expression Manager application, create one or moreconditions that grant access to a UI control when the condition is true.
2. In the Security Groups application, create or identify the security groups thatcan access the UI control.
3. In the Application Designer workspace, select Add/Modify Signature Options,and create a signature option.
4. Select the UI control that you want to configure, and select Control Properties.5. Click Configure Conditional Properties and specify the following options:
Option Description
Signature Option Specify the signature option you created forthe control.
Security Groups Specify the groups that you want to providewith access to the control.
Conditions for a Security Group Specify the conditions you created in step 1.The conditions apply only to the securitygroups that you specified.
Property Values for Condition Specify the names and values of theproperties to be controlled by the condition.
6. In the Security Groups application, grant the signature option to the securitygroup.
Results
The users in the security groups that you specified can see the UI control when theconditions you apply are true. Other users cannot see the UI control.
48 Developing Applications

Adding conditions to hide UI controls:
You can create and apply a signature option to a user interface (UI) control to denyaccess based on satisfying a condition. When the condition is true, access isgranted to all of the controls who are associated with the signature option.Conditional access is granted to all users who belong to the security groups thatare associated with the signature option.
Procedure
1. In the Conditional Expression Manager application, create one or moreconditions that denies access to a UI control when the condition is true.
2. In the Security Groups application, create or identify the security groups thatcannot access the UI control.
3. In the Application Designer workspace, select Add/Modify Signature Options,and create a signature option.
4. Select the UI control that you want to configure, and select Control Properties.5. Click Configure Conditional Properties and specify the following options:
Option Description
Signature Option Specify the signature option you created forthe control.
Security Groups Specify the groups that you want to hide theUI control from.
Conditions for a Security Group Specify the conditions you created in step 1.The conditions apply only to the securitygroups that you specified.
Property Values for Condition Specify the names and values of theproperties to be controlled by the condition.
6. In the Security Groups application, grant the signature option to the securitygroup.
Results
The users in the security groups that you specified do not see the UI control whenthe condition you apply is true. Users in other security groups can see the UIcontrol.
Application developer propertiesEach control has its own set of properties that you can set. You can also set userinterface properties to control the behavior of many aspects of user interfacebehavior.
Control propertiesYou can configure the properties for each individual user control in an applicationuser interface.
Application bar controlThe application bar (or appbar) control, is a menu bar that lists all applications in amodule except the currently active application. An application bar is always openat the top of the window in a self-service application.
Developing applications 49

You can place an application bar inside the client area control. You can also placethis control in a section control if you use the correct layout options.
Properties
Attribute name Description
Control ID Each control in a presentation is assigned aunique Control ID that is read-only.
Label Specify a text value in this field if you wantthe application bar to have a label. This labelis specific to the application and is notstored in the MAXATTRIBUTE orAPPFIELDDEFAULTS tables.
Appbarlinks Specify the links to add to the applicationbar.
Signature Option You can specify a signature option that canrestrict access to this control or change theproperties of this control based on acondition that you specify. To create asignature option, click Add/ModifySignature Options in the Select Actionmenu. To specify a condition, click theConfigure Conditional Properties button.
Sig Option Data Source ID An MBO must be used to evaluate whetheror not a user has access to a signatureoption. Specify the value of the data sourcethat performs this evaluation if it is differentto the data source that is configured for thiscontrol.
Attachments controlYou can activate the drop-down menus and windows associated with attachmentsby dropping the control into any section container in an application. However, youcannot access the functions used to build the attachments control through theinterface of the Application Designer.
Properties
Attribute name Description
Control ID Each control in a presentation is assigned aunique Control ID that is read-only.
Label You can specify a text value in this field tooverride the default label for the control,which is Attachment. This label is specific tothe application and is not stored in theMAXATTRIBUTE or APPFIELDDEFAULTS tables.
Signature Option You can specify a signature option that canrestrict access to this control or change theproperties of this control based on acondition that you specify. To create asignature option, click Add/ModifySignature Options in the Select Actionmenu. To specify a condition, click theConfigure Conditional Properties button.
50 Developing Applications

Attribute name Description
Sig Option Data Source ID An MBO must be used to evaluate whetheror not a user has access to a signatureoption. Specify the value of the data sourcethat performs this evaluation if it is differentto the data source that is configured for thiscontrol.
Blank line controlA blank line control inserts vertical white space in a section. Blank lines providespacing between controls to improve readability or to visually separate differenttypes of controls within a section.
A blank line control functions as a graphic element, is transparent in the userinterface, and does not have configurable properties. Place a blank line controlinside a section container control.
Breadcrumbs controlYou can use the breadcrumb control to enhance navigational functionality in anapplication. Breadcrumb navigation tracks the steps you take in an application andhelps you to retrace steps quickly. You can use a breadcrumb control by itself or inconjunction with another control, such as a tree control. You can place this controlinside any container control.
A breadcrumb trail complements a hierarchical tree structure by showing ahorizontal representation of where the user is in a menu structure or a servicecatalog. You can configure a delimiter character to separate items in thebreadcrumb trail, such as the greater than character (>) or or a colon (:). Eachphrase or identifier between delimiters represents one step in a hierarchy.
To synchronize a tree control and a breadcrumb controls, copy the Data Source IDproperty from the tree control to the breadcrumb control. The following tabledescribes how a tree control and breadcrumb control behave in the user interfacewhen they are used in combination.
When you click . . . This happens
The label of any node A new breadcrumb trail replaces anyexisting breadcrumb trail and:
v Highlights the node label in the tree
v Displays the node label in breadcrumb
v All levels in the tree hierarchy above thehighlighted node label appear in thebreadcrumb (in descending order from leftto right)
The plus sign in a tree No effect.
The minus sign in a tree Highlights the right-most breadcrumb,which is the same as the node label next tothe minus sign.
The dot sign in a tree The corresponding node label highlights inthe tree and displays in the breadcrumb. Alllevels in the tree hierarchy above thehighlighted node label appear in thebreadcrumb (in descending order from leftto right).
Developing applications 51

When you click . . . This happens
Any node label in the breadcrumb Equivalent to clicking the node label in thetree. The tree contracts to the level of thenode label and any breadcrumb links to theright of the clicked node label disappear.
A delimiter in the breadcrumb No effect.
You can expect the following user interface behavior when navigating a tree orbreadcrumb:v Any time you highlight a node label in a tree or breadcrumb, the window
displays information related to that label.v Clicking a plus sign in a tree expands the node, but does not affect window
content, label highlighting, or the breadcrumb.v Clicking a minus sign in a tree does not affect window content, but does
highlight the node label associated with the minus sign and the breadcrumbreflects the new hierarchy ending with the highlighted node.
v The highlighted node label in a tree always reflects the right-most element in thebreadcrumb. The breadcrumb elements to the left reflect the intervening levels inthe tree hierarchy.
Properties
Attribute name Description
Control ID Each control in a presentation is assigned aunique Control ID that is read-only.
Label You can specify a text value to use as a labelfor the control. This label is specific to theapplication and is not stored in theMAXATTRIBUTE or APPFIELDDEFAULTS tables.
Bean Class You can specify the name of a data beanclass to use when creating the data sourcefor the control. If not defined and the controlis creating a data source, the defaultpsdi.webclient.system.DataBean class isused. Typically, you use this property tocreate custom event methods or to overridethe manner in which the data source obtainsits MboSet.
Data Source ID You can specify the ID of a data source touse as the parent object for a relationship, orto specify a parent object for a bean class ifnecessary. Then specify the relationship thatuses this parent in the Relationship field. Ifthe field is left blank, the control uses thedata source ID of its parent control as theParent Data Source ID
Business Object Specify the name of a MBO in this field todetermine which MBO the control uses toshow and process information. If a MBO isnot specified, the control uses the datasource of its parent control. When you set aMBO for this control a data source is createdthat can be referenced from other controls.
52 Developing Applications

Attribute name Description
CSS Class Name If you want to change the layout andappearance of the hyperlink, enter the nameof the CSS class to use. For example, the“powerwhite” class name changes the fontcolor of a hyperlink to white. You can searchfor CSS class names in the<root>\applications\maximo\maximouiweb\webmodule\webclient directory.
Separator Specify the delimiter to use betweenbreadcrumb trail entries, for example >.
Relationship If you specified a value in the Parent DataSource ID field, specify a value in this fieldthat identifies the relationship between thiscontrol and the new data source. Arelationship uses a WHERE clause todetermine what to show and process fromthe data source. The control creates adatasource that is by default used by thechild controls. You can search forrelationship values in the DatabaseConfiguration > Relationships tab.
Breadcrumbs The source ID of the breadcrumb control.
Source Method Specify a source method to apply to thesource
Align Specify the alignment options for thebreadcrumbs.
Signature Option You can specify a signature option that canrestrict access to this control or change theproperties of this control based on acondition that you specify. To create asignature option, click Add/ModifySignature Options in the Select Actionmenu. To specify a condition, click theConfigure Conditional Properties button.
Sig Option Data Source ID An MBO must be used to evaluate whetheror not a user has access to a signatureoption. Specify the value of the data sourcethat performs this evaluation if it is differentto the data source that is configured for thiscontrol.
Button group controlA button group is a container control that holds push button controls. The buttongroup defines the layout for the buttons it contains, including alignment within thecontainer and the title for the group. Place this control within a section control or atable control.
Properties
Attribute name Description
Control ID Each control in a presentation is assigned aunique Control ID that is read-only.
Developing applications 53

Attribute name Description
Label You can specify a text value in this field toprovide a label for the button group. Mostbutton groups do not have a label, becausethe control functions primarily as acontainer that holds a layout for its childrenpush button controls.This label is specific tothe application and is not stored in theMAXATTRIBUTE or APPFIELDDEFAULTS tables.
Text Alignment If you specified a label for the control, youcan set the label to align to the Left, Center,or Right. The text label always displays tothe left of any push buttons you add to thegroup.
Button Alignment Reserved for future use.
Show Container If you select this property, a shadedbackground of horizontal lines is visible forthe button group. You cannot showbackground shading for a button groupcontrol in a table container.
Check box controlWith a check box control, a user can indicate a yes or no response to a question orselect one or more items from a list. A check box is a text type control because ithas a text field or a label that is visible to the user. Place this control inside asection control.
General properties
Attribute name Description
Control ID Each control in a presentation is assigned aunique Control ID that is read-only.
Default Label This read-only value is the label associatedwith the database attribute bound to thiscontrol.
The label for a check box control ends witha question mark, for example GL Account?.
Label You can specify a text value in this field tooverride the Default Label for the control.This label is specific to the application and isnot stored in the MAXATTRIBUTE orAPPFIELDDEFAULTS tables.
Attribute You can associate this control with adatabase attribute. Not all attributes have aDefault Label value.
Data Source ID Specify a data source ID if you want thiscontrol to use a different data source thanthe primary data source for this application,the application MAINRECORD.
54 Developing Applications

Attribute name Description
Input Mode Input mode options are:
v Default: The default input mode isread/write. Any information entered inthis field is stored in the database columnspecified in the Attribute field.
v Password: This mode is read/write anddisplays asterisks.
v Password Readonly: This mode isread-only and displays asterisks.
v Password Required: This mode isread/write and displays asterisks. Therecord cannot be saved unless there is avalue in the field.
v Query: This mode is read-only and showsa typed value.
v Readonly: This mode is read-only andshows grayed-out text.
v Required: This mode is read/write andthe record cannot be saved unless the userenters a value in the field.
Advanced properties
Attribute name Description
Data Change Event You can configure a control to perform oneof the following actions in the event of adata change to the control:
v The REFRESHTABLE event refreshes the datasource table for the control.
v The RESETCHILDREN event deletes any childobjects of the data bean of the controlwhich then reacquires its MBOSetRemotereferences.
Always Synchronous If deselected, the control can communicatewith the database without pausing useractivities. If cleared, the user cannot performactivities in other fields until validations forthis field are completed. Synchronousactivity is disabled by default. If there aredependencies between values specified forthis control and other controls in theapplication, you can enable synchronousactivity for the dependent controls.
Notify Portlets If selected, this control can send notificationsto a portlet, if communication with a TivoliIntegration Portlet is configured.
Developing applications 55

Attribute name Description
More information You can specify the values to construct aURL for an information center topic usingthe following format:com.ibm.mbs.doc,application/helpfile.html The server address and otherinformation for the URL are controlled bythe mxe.help properties which you canreview and configure in the SystemProperties application.
If you specify a URL, a More Informationlink is added to the field help (Alt + F1) forthe control. When the user clicks the link,the target topic opens in the informationcenter.
The property is specific to the field ID in thepresentation XML file. If you want toprovide the same link in other controls orother applications, you must manually addthe URL to each individual control.
Signature Option You can specify a signature option that canrestrict access to this control or change theproperties of this control based on acondition that you specify. To create asignature option, click Add/ModifySignature Options in the Select Actionmenu. To specify a condition, click theConfigure Conditional Properties button.
Sig Option Data Source ID An MBO must be used to evaluate whetheror not a user has access to a signatureoption. Specify the value of the data sourcethat performs this evaluation if it is differentto the data source that is configured for thiscontrol.
Combo box controlWith a combo box control, a user can select one or more options from a list dropdown menu. Place this control inside a section control.
General properties
Attribute name Description
Control ID Each control in a presentation is assigned aunique Control ID that is read-only.
Default Label This read-only value is the label associatedwith the database attribute bound to thiscontrol.
Label You can specify a text value in this field tooverride the Default Label for the control.This label is specific to the application and isnot stored in the MAXATTRIBUTE orAPPFIELDDEFAULTS tables.
56 Developing Applications

Attribute name Description
Attribute You can associate this control with adatabase attribute. Not all attributes have aDefault Label value.
Data Source ID Specify a data source ID if you want thiscontrol to use a different data source thanthe primary data source for this application,the application MAINRECORD.
Display Attribute Specify the attributes to show as options inthe drop down menu for the combo boxcontrol. For example, if you create a combobox called Status, you can specify valuessuch as Waiting for Approval and Approved.The values are bound to the data source andthe attribute specified for the control.
Input Mode Input mode options are:
v Default: The default input mode isread/write. Any information entered inthis field is stored in the database columnspecified in the Attribute field.
v Password: This mode is read/write anddisplays asterisks.
v Password Readonly: This mode isread-only and displays asterisks.
v Password Required: This mode isread/write and displays asterisks. Therecord cannot be saved unless there is avalue in the field.
v Query: This mode is read-only and showsa typed value.
v Readonly: This mode is read-only andshows grayed-out text.
v Required: This mode is read/write andthe record cannot be saved unless the userenters a value in the field.
Width The standard width for a combo box controlis 120 pixels. To make the control narroweror wider, enter a numeric value, for example60 (narrower) or 200 (wider).
Advanced properties
Attribute name Description
Select Attribute This value provides a synonym orabbreviation for the Display Attribute in thetext box area of the combo box. For example,for the Status combo box, you can specifyWAPPR and APPR as Select Attributesabbreviations for the Waiting for Approvaland Approved display attributes.
Developing applications 57

Attribute name Description
Data Change Event You can configure a control to perform oneof the following actions in the event of adata change to the control:
v The REFRESHTABLE event refreshes the datasource table for the control.
v The RESETCHILDREN event deletes any childobjects of the data bean of the controlwhich then reacquires its MBOSetRemotereferences.
More information You can construct a URL for an informationcenter topic using the following format:com.ibm.mbs.doc,application/helpfile.html
If you construct a URL, a more informationlink is added to the field help (Alt + F1) forthe control. When the user clicks the link,the target topic opens in the informationcenter.
The property is specific to the field ID in thepresentation XML file. If you want toprovide the same link in other controls orother applications, you must manually addthe URL to each individual control.
Notify Portlets Reserved for future use.
Signature Option You can specify a signature option that canrestrict access to this control or change theproperties of this control based on acondition that you specify. To create asignature option, click Add/ModifySignature Options in the Select Actionmenu. To specify a condition, click theConfigure Conditional Properties button.
Sig Option Data Source ID An MBO must be used to evaluate whetheror not a user has access to a signatureoption. Specify the value of the data sourcethat performs this evaluation if it is differentto the data source that is configured for thiscontrol.
Data source controlUse a data source control to override the default data source, or the current datasource, for an application. This control is used primarily in dialog windows toreference a business object that controls in the window can use as a data source. Adata source control is transparent and does not render any visible element.
You can place a data source control inside the following controls:v Client areav Dialogv Pagev Sectionv Tab
58 Developing Applications

v Table
Properties
Attribute name Description
Control ID Each control in a presentation is assigned aunique Control ID that is read-only.
Bean Class You can specify the name of a data beanclass to use when creating the data sourcefor the control. If not defined and the controlis creating a data source, the defaultpsdi.webclient.system.DataBean class isused. Typically, you use this property tocreate custom event methods or to overridethe manner in which the data source obtainsits MboSet.
Business Object Specify the name of a MBO in this field todetermine which MBO the control uses toshow and process information. If a MBO isnot specified, the control uses the datasource of its parent control. When you set aMBO for this control a data source is createdthat can be referenced from other controls.
Parent Data Source ID You can specify the ID of a data source touse as the parent object for a relationship, orto specify a parent object for a bean class ifnecessary. Then specify the relationship thatuses this parent in the Relationship field. Ifthe field is left blank, the control uses thedata source ID of its parent control as theParent Data Source ID
Relationships If you specified a value in the Parent DataSource ID field, specify a value in this fieldthat identifies the relationship between thiscontrol and the new data source. Arelationship uses a WHERE clause todetermine what to show and process fromthe data source. The control creates adatasource that is by default used by thechild controls. You can search forrelationship values in the DatabaseConfiguration > Relationships tab.
Order By You can specify the order in which a SQLquery fetches data for the data source forthis control.
Where Clause You can specify a WHERE clause that thedata source for this control uses to retrievedata. This WHERE clause is used in additionto any default WHERE clause used by thebusiness object of the data source.
Listeners Enter the ID or IDs of one or more datasources that you want to refresh wheneverthere are changes to this control. Listenercontrols can be located anywhere within theapplication. Separate multiple values with acomma.
Developing applications 59

Default value controlYou can use a default value control to speed up a database insert or query byrestricting the action to a limited set of records. The default value control istransparent and does not render anything visible in the user interface. You canplace the default value control in a section control, a table control, or in thepresentation control.
Properties
Attribute name Description
Control ID Each control in a presentation is assigned aunique Control ID that is read-only.
Attribute Select an attribute from a data source toupdate or query. You can set an update orquery value using one of the followingmethods:
v Specify a static value in the Value field.
v Specify values in the From Data SourceID and the From Attribute fields to reada value from the database.
Value The alphanumeric value in this fieldprovides a static default value for an insertor query action for the specified Attributevalue. In the Person application, forexample, you can specify DEPARTMENT inthe Attribute field and MAINTENANCE inthe Value field, to restrict queries to peopleworking in the maintenance department.
From Data Source ID If you do not configure a static default valuein the Value field, specify the data source IDto use as the data source for the FromAttribute field.
From Attribute If you do not configure a static default valuein the Value field, specify a From Attributethat updates or queries the database with itsvalue.
Default Type Specify the appropriate type of action forthis default query.
Help grid controlA help grid control contains HTML text that you can insert in the user interface,typically to provide brief instructions on how to enter data and perform tasks. Forcomplex information, help grids can include hyperlinks to additional informationin an information center topic. You can place help grid controls within Section,Section Column, Tab, and Dialog controls.
Links to more information
When you set the morehelp attribute on the help grid control, the label Moreinformation is displayed as a link at the end of the text. You can use the followingmethods to add the morehelp attribute:v In the Application Designer application, set the morehelp attribute to
[application/filename] in the mergedprojects directory.
60 Developing Applications

v A developer can hand code the attribute in the presentation XML, for example:helpgrid morehelp="asset/asset.htm"
You can link to a file in the mergedprojects directory, or you can link to a file in asubdirectory of the mergedprojects directory. You cannot link to a file that exists 2or more levels below the mergedprojects directory.
General properties
Attribute name Description
Control ID Each control in a presentation is assigned aunique Control ID that is read-only.
Label You can specify a text value in this field ifyou want to associate a label with thiscontrol. This label is specific to theapplication and is not stored in theMAXATTRIBUTE or APPFIELDDEFAULTS tables.
HTML Content Informational or instructional help textdisplayed in the Help Grid control.
More information You can specify values that construct theURL for an information center topic byusing the following format:com.ibm.mbs.doc,application/helpfile.html
If you specify the values to construct a URL,a more information link is added after theHTML content in the Help Grid. When theuser clicks the link, the target topic opens inthe information center.
The server address and other informationfor the URL are controlled by the mxe.helpproperties which you can review andconfigure in the System Propertiesapplication.
Signature Option You can specify a signature option to restrictaccess to this control or change theproperties of this control based on acondition that you specify. To create asignature option, click Add/ModifySignature Options in the Select Actionmenu. To specify a condition, clickConfigure Conditional Properties.
Sig Option Data Source ID A MBO must be used to evaluate whether auser has access to a signature option. Specifythe value of the data source if it is differentto the data source that is configured for thiscontrol.
Hyperlink controlYou can configure text or a graphic as a hyperlink that opens a menu or window,or a destination inside or outside the application. Place this control inside a sectioncontrol.
Developing applications 61
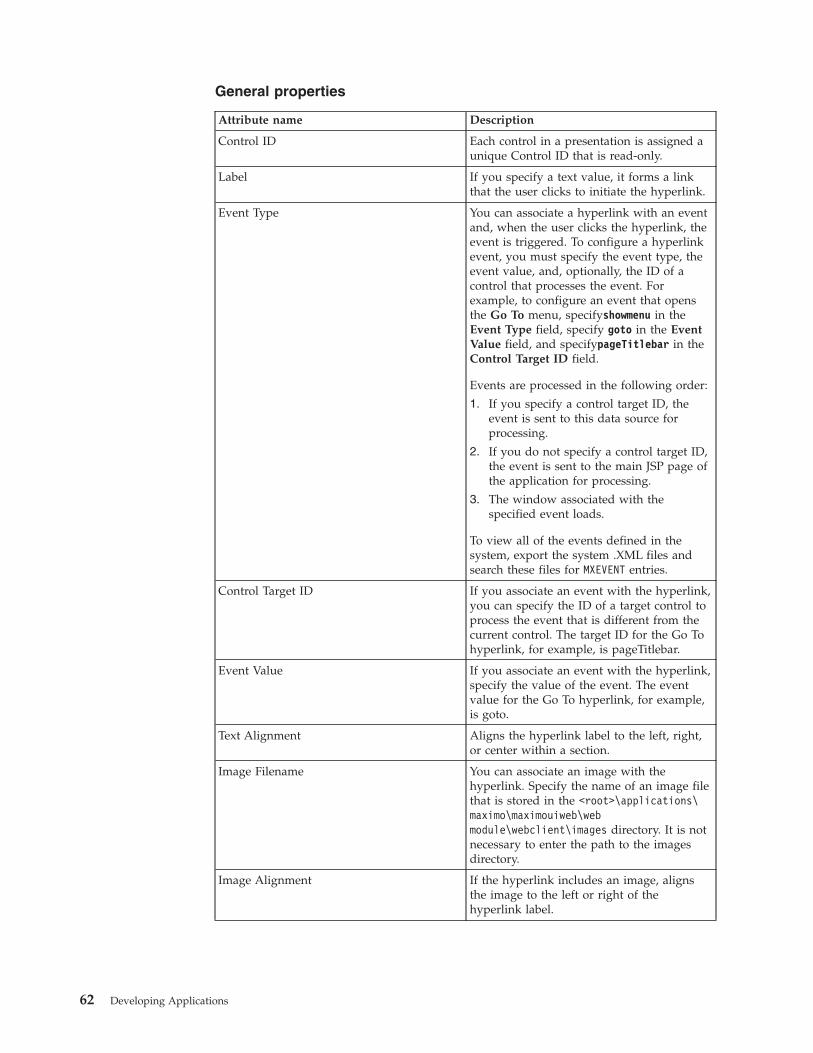
General properties
Attribute name Description
Control ID Each control in a presentation is assigned aunique Control ID that is read-only.
Label If you specify a text value, it forms a linkthat the user clicks to initiate the hyperlink.
Event Type You can associate a hyperlink with an eventand, when the user clicks the hyperlink, theevent is triggered. To configure a hyperlinkevent, you must specify the event type, theevent value, and, optionally, the ID of acontrol that processes the event. Forexample, to configure an event that opensthe Go To menu, specifyshowmenu in theEvent Type field, specify goto in the EventValue field, and specifypageTitlebar in theControl Target ID field.
Events are processed in the following order:
1. If you specify a control target ID, theevent is sent to this data source forprocessing.
2. If you do not specify a control target ID,the event is sent to the main JSP page ofthe application for processing.
3. The window associated with thespecified event loads.
To view all of the events defined in thesystem, export the system .XML files andsearch these files for MXEVENT entries.
Control Target ID If you associate an event with the hyperlink,you can specify the ID of a target control toprocess the event that is different from thecurrent control. The target ID for the Go Tohyperlink, for example, is pageTitlebar.
Event Value If you associate an event with the hyperlink,specify the value of the event. The eventvalue for the Go To hyperlink, for example,is goto.
Text Alignment Aligns the hyperlink label to the left, right,or center within a section.
Image Filename You can associate an image with thehyperlink. Specify the name of an image filethat is stored in the <root>\applications\maximo\maximouiweb\webmodule\webclient\images directory. It is notnecessary to enter the path to the imagesdirectory.
Image Alignment If the hyperlink includes an image, alignsthe image to the left or right of thehyperlink label.
62 Developing Applications

Attribute name Description
CSS Classname If you want to change the layout andappearance of the hyperlink, enter the nameof the CSS class to use. For example, the“powerwhite” class name changes the fontcolor of a hyperlink to white. You can searchfor CSS class names in the<root>\applications\maximo\maximouiweb\webmodule\webclient directory.
Access key Specify a letter that is used in the hyperlinklabel that acts as a keyboard shortcut. Forexample, the access key for the Go Tohyperlink is G and when the user pressesALT + G the Go To menu drops down. Theaccess key is underlined in the userinterface.
Separator Reserved for future use.
Advanced properties
Attribute name Description
Column You can specify a number that positions ahyperlink in a specific column. Each sectioncontrol has 7 columns that are not visible tothe user. If you specify the value 3 in thisfield and set text alignment to center, thehyperlink is centered above or belowcolumn three. If the hyperlink is wider thanits column, the width of the column extendsautomatically to contain the hyperlink.
URL If you want the hyperlink to link to a URL,specify the value here.
Signature Option You can specify a signature option that canrestrict access to this control or change theproperties of this control based on acondition that you specify. To create asignature option, click Add/ModifySignature Options in the Select Actionmenu. To specify a condition, click theConfigure Conditional Properties button.
Sig Option Data Source ID An MBO must be used to evaluate whetheror not a user has access to a signatureoption. Specify the value of the data sourcethat performs this evaluation if it is differentto the data source that is configured for thiscontrol.
Image controlYou can add an image control to create a visual marker to identify an applicationyou can open or an action you can perform. You can configure the height, width,and alignment for the specified image file. You can place an image control with asection control.
Developing applications 63

Properties
The image files provided as application icons are in the <root>\applications\maximo\maximouiweb\webmodule\webclient\images directory. You can access thefiles in this directory using the image control.
Attribute name Description
Control ID Each control in a presentation is assigned aunique Control ID that is read-only.
Filename You can specify the filename of any filestored in the images directory at<root>\applications\maximo\maximouiweb\webmodule\webclient\images. You can reuseany existing images or you can add newimages to the directory.
Images can be in any format supported by abrowser. When you add a .gif file, you canuse it immediately. If you add other fileformats, such as .jpg or .bmp files, you mustredeploy the .EAR file on the applicationserver to add the images to the userinterface.
Height Enter a numeric value in this field that willincrease or decrease the height of the image.If you change the default dimensions, theimage can become distorted.
Width Enter a numeric value in this field that willincrease or decrease the width of the image.If you change the default dimensions, theimage can become distorted.
Align Image Specify where to align the image, to the Left,Center, or Right of the section that containsit.
Column You can use columns to manipulate theposition of an image. A section has fourinvisible columns. You can specify a number(1-4) to position an image in thecorresponding column. You can change theposition of the image by moving the graphicinto one of the columns.
Signature Option You can specify a signature option that canrestrict access to this control or change theproperties of this control based on acondition that you specify. To create asignature option, click Add/ModifySignature Options in the Select Actionmenu. To specify a condition, click theConfigure Conditional Properties button.
Sig Option Data Source ID An MBO must be used to evaluate whetheror not a user has access to a signatureoption. Specify the value of the data sourcethat performs this evaluation if it is differentto the data source that is configured for thiscontrol.
64 Developing Applications

Include controlYou can use include controls to reuse dialog windows, layouts, and data tablesfrom an existing application in the presentation.xml file of a new application. Youcan place an include control within a page, tab, or section control.
The include control is used with the presentation, page, and client area controls tocreate the presentation.xml file for an application. The presentation control containsonly one page control. The page control specifies the main page of an applicationand uses the entire client area of the browser. All other application windows aredialogs that open as popup windows. You can add the definition for a dialogwindow to the presentation.xml file or you can include the definition of an existingdialog from the library.xml file.
Include controls are typically used to obtain common application functions likeheader and footer from the library.xml file. You can also use an include controlwithin the client area to, for example, obtain table definitions for application logfiles from the library.xml file.
Properties
Attribute name Description
Control ID Each control in a presentation is assigned aunique Control ID that is read-only.
Control ID to Clone You can specify any Control ID from thelibrary.xml file. This property enables you toinclude the same library element multipletimes in a presentation.
List box controlA list box control displays a list of items in a box that is always open. Place thiscontrol inside a section control.
General properties
Attribute name Description
Control ID Each control in a presentation is assigned aunique Control ID that is read-only.
Default Label This read-only value is the text value that isassociated with the database attribute boundto this control.
Label You can specify a text value in this field tooverride the Default Label for the control.This label is specific to the application and isnot stored in the MAXATTRIBUTE orAPPFIELDDEFAULTS tables.
Attribute You can associate this control with adatabase attribute. Not all attributes have aDefault Label value.
Developing applications 65

Attribute name Description
Business Object Name Specify the name of a MBO in this field todetermine which MBO the control uses toshow and process information. If a MBO isnot specified, the control uses the datasource of its parent control. When you set aMBO for this control a data source is createdthat can be referenced from other controls.
Parent Data Source ID You can specify the ID of a data source touse as the parent object for a relationship, orto specify a parent object for a bean class ifnecessary. Then specify the relationship thatuses this parent in the Relationship field. Ifthe field is left blank, the control uses thedata source ID of its parent control as theParent Data Source ID
Key Attribute You can specify a different attribute of thebusiness object to use as a key attribute forthe list other than the key attribute specifiedfor the MBO.
Key Value You can specify an option in the list todisplay as the default value.
Input Mode Input mode options are:
v Default: The default input mode isread/write. Any information entered inthis field is stored in the database columnspecified in the Attribute field.
v Password: This mode is read/write anddisplays asterisks.
v Password Readonly: This mode isread-only and displays asterisks.
v Password Required: This mode isread/write and displays asterisks. Therecord cannot be saved unless there is avalue in the field.
v Query: This mode is read-only anddisplays a typed value.
v Readonly : This mode is read-only anddisplays grayed-out text.
v Required: This mode is read/write andthe record cannot be saved unless the userenters a value in the field.
Height To make the control shorter or longer, entera numeric value.
Width To make the control narrower or wider,enter a numeric value.
66 Developing Applications

Advanced properties
Attribute name Description
Bean class You can specify the name of a data beanclass to use when creating the data sourcefor the control. If not defined and the controlis creating a data source, the defaultpsdi.webclient.system.DataBean class isused. Typically, you use this property tocreate custom event methods or to overridethe manner in which the data source obtainsits MboSet.
Where Clause You can specify a WHERE clause that thedata source for this control uses to retrievedata. This WHERE clause is used in additionto any default WHERE clause used by thebusiness object of the data source.
Order By You can specify the order in which a SQLquery fetches data for the data source forthis control.
Auto-Refresh If selected, information in this controlrefreshes automatically when there is achange to the business object.
Always Synchronous If deselected, the control can communicatewith the database without pausing useractivities. If cleared, the user cannot performactivities in other fields until validations forthis field are completed. Synchronousactivity is disabled by default. If there aredependencies between values specified forthis control and other controls in theapplication, you can enable synchronousactivity for the dependent controls.
Signature Option You can specify a signature option that canrestrict access to this control or change theproperties of this control based on acondition that you specify. To create asignature option, click Add/ModifySignature Options in the Select Actionmenu. To specify a condition, click theConfigure Conditional Properties button.
Sig Option Data Source ID An MBO must be used to evaluate whetheror not a user has access to a signatureoption. Specify the value of the data sourcethat performs this evaluation if it is differentto the data source that is configured for thiscontrol.
Menu bar controlThe menu bar control is similar to an application bar control but the menu optionstypically contain drop down menus with additional option choices. The menu barat the top of the List tab in most applications is a typical example, You can place amenu bar control only in a tab control.
Developing applications 67

Properties
Attribute name Description
Control ID Each control in a presentation is assigned aunique Control ID that is read-only.
Label You can specify a label for the menu bar.The label is not visible in the user interface.This label is specific to the application and isnot stored in the MAXATTRIBUTE orAPPFIELDDEFAULTS tables.
Source Method Specify the name of the method used in thecode to call the menu bar, including itssignature options, and layout information.The method that calls the standard searchmenu bar is getAppSearchOptions.
Event Value Specifies the event called when you select anoption on the menu bar. For example, theevent value for the search menu bar issearch.
Multiline text box controlA multiline text box control is a large text box that can display several lines of textor accept this text from user input. Text boxes are often linked to select valuelookups and detailed menus. You can place a multiline text box control within asection control.
General properties
Attribute name Description
Control ID Each control in a presentation is assigned aunique Control ID that is read-only.
Default Label This read-only value is the text value that isassociated with the database attribute boundto this control.
Label If you enter a text value in this field, itoverrides the Default Label for the control.This label is specific to the application and isnot stored in the MAXATTRIBUTE orAPPFIELDDEFAULTS tables.
Hide Label By default, the label is visible in the userinterface. Select this check box to hide thelabel.
Attribute You can associate this control with adatabase attribute. Not all attributes have aDefault Label value.
Rows Enter the number of rows you want in themulti line textbox.
Columns Most multiline text boxes have a defaultwidth of 35. To increase or decrease thewidth of the box, enter a different value.
Data Source ID Specify a data source ID if you want thiscontrol to use a different data source thanthe primary data source for this application,the application MAINRECORD.
68 Developing Applications

Attribute name Description
Lookup You can specify a lookup ID to link thiscontrol to a pre-formatted lookup table thatpulls records from the main table. A usercan select a record from the lookup table touse in this control.
Lookup IDs are stored in the lookups.xmlfile. To view the content of this file, exportthe system XML files.
Input Mode Input mode options are:
v Default: The default input mode isread/write. Any information entered inthis field is stored in the database columnspecified in the Attribute field.
v Password: This mode is read/write anddisplays asterisks.
v Password Readonly: This mode isread-only and displays asterisks.
v Password Required: This mode isread/write and displays asterisks. Therecord cannot be saved unless there is avalue in the field.
v Query: This mode is read-only and showsa typed value.
v Readonly: This mode is read-only andshows grayed-out text.
v Required: This mode is read/write andthe record cannot be saved unless the userenters a value in the field.
Menu Type You can specify the value of a menu ID inthis field to link the control to apreformatted drop-down menu. Menu IDsare stored in the menus.xml file. To view thecontent of this file, export the system XMLfiles.
Advanced properties
Attribute name Description
Data Change Event You can configure a control to perform oneof the following actions if there is any datachange to the control:
v The REFRESHTABLE event refreshes the datasource table for the control.
v The RESETCHILDREN event deletes any childobjects of the data bean of the controlwhich then reacquires its MBOSetRemotereferences.
Developing applications 69

Attribute name Description
Always Synchronous When deselected, the control cancommunicate with the database withoutpausing user activities. If selected, the usercannot perform activities in other fields untilvalidations for this field are completed.Synchronous activity is disabled by default.If there are dependencies between valuesspecified for this control and other controlsin the application, you can enablesynchronous activity for the dependentcontrols.
Notify Portlets If selected, this control can send notificationsto a portlet, if communication with a TivoliIntegration Portlet is configured.
More information You can specify the values to construct aURL for an information center topic usingthe following format:com.ibm.mbs.doc,application/helpfile.html The server address and otherinformation for the URL are controlled bythe mxe.help properties which you canreview and configure in the SystemProperties application.
If you specify a URL, a More Informationlink is added to the field help (Alt + F1) forthe control. When the user clicks the link,the target topic opens in the informationcenter.
The property is specific to the field ID in thepresentation XML file. If you want toprovide the same link in other controls orother applications, you must manually addthe URL to each individual control.
Move to Data Source ID Specify a record stored in a different objectthat the user can move to. You can selectany data source ID from the presentationcontrol.
By default, the system sends the move toevent to the ResultsBean, which contains aset of records displayed in the List tab. Themove to event affects the Move to DataSource ID object.
Signature Option You can specify a signature option that canrestrict access to this control or change theproperties of this control based on acondition that you specify. To create asignature option, click Add/ModifySignature Options in the Select Actionmenu. To specify a condition, click theConfigure Conditional Properties button.
70 Developing Applications

Attribute name Description
Sig Option Data Source ID An MBO must be used to evaluate whetheror not a user has access to a signatureoption. Specify the value of the data sourcethat performs this evaluation if it is differentto the data source that is configured for thiscontrol.
Multipart text box controlA multipart text box contains two text boxes, positioned side-by-side, that cancontain information from different sources. You can input information, populate abox by selecting a value from a list, or show an attribute description from a table.You can place a multipart text box within a section control.
Typically, a multipart text box has a visible label, a pull-down menu in one textbox, and the description of an attribute in the second box. Labels describe the typeof information displayed in the box. Text boxes are often linked to select valuelookups and detailed menus. Most applications typically use the second part of amultipart text box to provide a description for the value contained in the first textbox.
General properties
Attribute name Description
Control ID Each control in a presentation is assigned aunique Control ID that is read-only.
Default Label This read-only value is the text value that isassociated with the database attribute boundto this control.
Label If you enter a text value in this field, itoverrides the Default Label for the control.This label is specific to the application and isnot stored in the MAXATTRIBUTE orAPPFIELDDEFAULTS tables.
Attribute You can associate this control with adatabase attribute. Not all attributes have aDefault Label value.
Attribute for Part 2 You can associate the second part of amultipart text box with a different attributethan the one specified in the Attribute field.Typically, you configure the second part of amultipart control to display the descriptioninformation for the record selected in thefirst part.
Data Source ID Specify a data source ID if you want thiscontrol to use a different data source thanthe primary data source for this application,the application MAINRECORD.
In a multipart text box, the attributes forboth parts must reference the same object.
Developing applications 71

Attribute name Description
Lookup You can specify a lookup ID to link the firstpart of a multipart text box to apre-formatted lookup table that pulls recordsfrom the main table. A user can select arecord from the lookup table to use in thiscontrol.
Lookup IDs are stored in the lookups.xmlfile. To view the content of this file, exportthe system XML files.
Lookup for Part 2 You can specify a lookup ID to link thesecond part of a multipart text box to apre-formatted lookup table that pulls recordsfrom the main table. A user can select arecord from the lookup table to use in thiscontrol.
Lookup IDs are stored in the lookups.xmlfile. To view the content of this file, exportthe system XML files.
Go To Applications You can associate a pull-down menu withthis control and add application names to itthat take the user to different applications.
Input Mode Input mode options are:
v Default: The default input mode isread/write. Any information entered inthis field is stored in the database columnspecified in the Attribute field.
v Password: This mode is read/write anddisplays asterisks.
v Password Readonly: This mode isread-only and displays asterisks.
v Password Required: This mode isread/write and displays asterisks. Therecord cannot be saved unless there is avalue in the field.
v Query: This mode is read-only and showsa typed value.
v Readonly: This mode is read-only andshows grayed-out text.
v Required: This mode is read/write andthe record cannot be saved unless the userenters a value in the field.
Input Mode for Part 2 In most cases, where the second part of amultipart text box contains a fulldescription, the property value will beread-only.
In other cases, standard input mode optionscan apply.
72 Developing Applications

Attribute name Description
Menu Type You can specify the value of a menu ID inthis field to link the control to apreformatted drop-down menu. Menu IDsare stored in the menus.xml file. To view thecontent of this file, export the system XMLfiles.
Advanced properties
Attribute name Description
Change Event You can configure a control to perform oneof the following actions in the event of adata change to the control:
v The REFRESHTABLE event refreshes the datasource table for the control.
v The RESETCHILDREN event deletes any childobjects of the data bean of the controlwhich then reacquires its MBOSetRemotereferences.
Turn Smart Fill Off? Check this option if you want to disablesmart fill which is turned on by default.Smart fill enables a user to enter a partialvalue in a text box which the systemattempts to match to a valid value, orvalues, in the database. When a matchingvalue is found, the value is entered in thetext box. If the system finds more than onematching value, the user can select one froma list of matching values. If you turn smartfill off, user text is not validated duringentry.
Readonly Long Description If the value of Attribute for Part 2 is a longdescription, you can select this box to set thedescription to read only. If you leave thisfield cleared (the default), users can edit thelong description.
Always Synchronous If deselected, the control can communicatewith the database without pausing useractivities. If selected, the user cannotperform activities in other fields untilvalidations for this field are completed.Synchronous activity is disabled by default.If there are dependencies between valuesspecified for this control and other controlsin the application, you can enablesynchronous activity for the dependentcontrols.
Developing applications 73

Attribute name Description
Part 2 Always Synchronous If deselected, the control can communicatewith the database without pausing useractivities. If selected, the user cannotperform activities in other fields untilvalidations for this field are completed.Synchronous activity is disabled by default.If there are dependencies between valuesspecified for this control and other controlsin the application, you can enablesynchronous activity for the dependentcontrols.
Notify Portlets If selected, this control can send notificationsto a portlet, if communication with a TivoliIntegration Portlet is configured.
More information You can specify the values to construct aURL for an information center topic usingthe following format:com.ibm.mbs.doc,application/helpfile.html The server address and otherinformation for the URL are controlled bythe mxe.help properties which you canreview and configure in the SystemProperties application.
If you specify a URL, a More Informationlink is added to the field help (Alt + F1) forthe control. When the user clicks the link,the target topic opens in the informationcenter.
The property is specific to the field ID in thepresentation XML file. If you want toprovide the same link in other controls orother applications, you must manually addthe URL to each individual control.
Move to Data Source ID Specify a record stored in a different objectthat the user can move to. You can selectany Data Source ID from the presentationcontrol.
By default, the system sends the Move Toevent to the ResultsBean, which contains aset of records displayed in the List tab. TheMove To event affects the Move to DataSource ID object.
Signature Option You can specify a signature option that canrestrict access to this control or change theproperties of this control based on acondition that you specify. To create asignature option, click Add/ModifySignature Options in the Select Actionmenu. To specify a condition, click theConfigure Conditional Properties button.
74 Developing Applications

Attribute name Description
Sig Option Data Source ID An MBO must be used to evaluate whetheror not a user has access to a signatureoption. Specify the value of the data sourcethat performs this evaluation if it is differentto the data source that is configured for thiscontrol.
Parameter value controlA parameter value control can display dynamic values in the label of a sectioncontrol or a table control.
Properties
Attribute name Description
Control ID Each control in a presentation is assigned aunique Control ID that is read-only.
Parameter Position This property points to the Parameter ValuesProperty field you want to replace. See theParameter Values Property field for moreinformation.
Attribute You can associate this control with adatabase attribute to display as the Labelproperty in a table or section control.
Data Source ID Specify a data source ID if you want thiscontrol to use a different data source thanthe primary data source for this application,the application MAINRECORD.
Parameter values controlA parameter values control is a container control that can contain a parametervalue to show a dynamic value that represents a replaceable value in the label of aSection Header control.
Properties
Attribute name Description
Control ID Each control in a presentation is assigned aunique Control ID that is read-only.
Property The Property field has a default value ofLabel, which is a variable that displaysdynamic values inherited from theParameter Value control in the Table orSection control.
Presentation controlThe presentation control manages the appearance of the user interface display andall other controls are contained by this control..
Rules
The presentation control is the outermost control for all presentations and cancontain all other controls.
Developing applications 75

General properties
Attribute name Description
Control ID Each control in a presentation is assigned aunique Control ID that is read-only.
Business Object Specify the name of a MBO in this field todetermine which MBO the control uses toshow and process information. If a MBO isnot specified, the control uses the datasource of its parent control. When you set aMBO for this control a data source is createdthat can be referenced from other controls.
App Bean Class You can specify the name of a data beanclass to use when creating the data sourcefor the control. If not defined and the controlis creating a data source, the defaultpsdi.webclient.system.DataBean class isused. Typically, you use this property tocreate custom event methods or to overridethe manner in which the data source obtainsits MboSet.
Order By You can specify the order in which a SQLquery fetches data for the data source forthis control.
Where Clause You can specify a WHERE clause that thedata source for this control uses to retrievedata. This WHERE clause is used in additionto any default WHERE clause used by thebusiness object of the data source.
Application Restrictions You can set restrictions for the application atthe level of the presentation.xml.
Results Table ID You can specify the ID of the results table.
Application help You can specify the URL that takes the userto context-specific help for this applicationin an information center.
Advanced properties
Attribute name Description
Viewport If this application is optimized to be viewedin a viewport other than the standardviewport, specify that viewport in this field.
Is Mobile A Boolean value that indicates whether theapplication is designed for access on amobile device.
Always Synchronous If deselected, the control can communicatewith the database without pausing useractivities. If cleared, the user cannot performactivities in other fields until validations forthis field are completed. Synchronousactivity is disabled by default. If there aredependencies between values specified forthis control and other controls in theapplication, you can enable synchronousactivity for the dependent controls.
76 Developing Applications

Attribute name Description
Debug You can set a debug level for theapplication.
Push button controlA push button control initiates an event such as opening a window with a list ofrecords or opening an empty row where a user can enter a record. Place thiscontrol inside a button group control.
General properties
Attribute name Description
Control ID Each control in a presentation is assigned aunique Control ID that is read-only.
Label You can specify a label that identifies thecontrol to the user. If you do not enter alabel, the button is blank. This label isspecific to the application and is not storedin the MAXATTRIBUTE or APPFIELDDEFAULTStables.
Event You can associate a push button with anevent and, when the user clicks the button,the event is triggered. To configure a pushbutton event, specify the event and,optionally, the ID of a control that processesthe event.
Events are processed in the following order:
1. If you specify a control target ID, theevent is sent to this data source forprocessing.
2. If you do not specify a control target ID,the event is sent to the main JSP page ofthe application for processing.
3. The window associated with thespecified event loads.
To view all of the events defined in thesystem, export the system .XML files andsearch these files for MXEVENT entries.
Target ID If you associate an event with the hyperlink,you can specify the ID of a target control toprocess the event that is different from thecurrent control. The target ID for the Go Tohyperlink, for example, is pageTitlebar.
Value Reserved for future use.
Default Button If selected, this button becomes the defaultbutton in a button group. You can configurethe most frequently used button, forexample, New Row, as the default button.
Developing applications 77

Attribute name Description
Menu Type You can specify the value of a menu ID inthis field to link the control to apreformatted drop-down menu. Menu IDsare stored in the menus.xml file. To view thecontent of this file, export the system XMLfiles.
Advanced properties
Attribute name Description
Image Filename You can associate an image with the pushbutton. Specify the name of an image filethat is stored in the <root>\applications\maximo\maximouiweb\webmodule\webclient\images directory. It is notnecessary to enter the path to the imagesdirectory.
Signature Option You can specify a signature option that canrestrict access to this control or change theproperties of this control based on acondition that you specify. To create asignature option, click Add/ModifySignature Options in the Select Actionmenu. To specify a condition, click theConfigure Conditional Properties button.
Sig Option Data Source ID An MBO must be used to evaluate whetheror not a user has access to a signatureoption. Specify the value of the data sourcethat performs this evaluation if it is differentto the data source that is configured for thiscontrol.
Radio button controlA radio button is a control that allows users to choose one of a predefined set ofoptions. Radio buttons are organized in groups of two or more. Radio buttonstypically appear as little circles that are either empty (for unselected) or contain adot (selected). When you select a radio button, the previously selected button inthe same group is deselected.
Properties
Attribute name Description
Control ID Each control in a presentation is assigned aunique Control ID that is read-only.
Default Label This read-only value is the label defaults tothe database attribute bound to the radiobutton group control.
Label You can specify a label that identifies thecontrol to the user. If you do not enter alabel, the button is blank. This label isspecific to the application and is not storedin the MAXATTRIBUTE or APPFIELDDEFAULTStables.
78 Developing Applications

Attribute name Description
Button Value Specify a data attribute for an individualbutton control. If you do not automaticallypopulate a Radio Button Group with apredefined list of values linked to a dataattribute, then you can enter individualvalues for each button that you manuallyadd to a group.
Signature Option You can specify a signature option that canrestrict access to this control or change theproperties of this control based on acondition that you specify. To create asignature option, click Add/ModifySignature Options in the Select Actionmenu. To specify a condition, click theConfigure Conditional Properties button.
Sig Option Data Source ID An MBO must be used to evaluate whetheror not a user has access to a signatureoption. Specify the value of the data sourcethat performs this evaluation if it is differentto the data source that is configured for thiscontrol.
Radio button group controlA radio button group is a container control that holds radio buttons. The radiobutton group defines the layout for the buttons it contains, including a group title,text alignment for button labels, and whether or not to show a border. You canplace a radio button group control within a section control.
You can bind a radio button group to a database attribute that automaticallypopulates the group with buttons, label values, and so on. Binding to a databaseattribute saves time because you do not have to define the individual radio buttoncontrols for the group. When the user makes a selection in the radio button group,the value automatically updates the attribute in the database. If you link a radiobutton group to a database attribute, you can then edit the group in the DatabaseConfiguration application and in the Domains application.
General properties
Attribute name Description
Control ID Each control in a presentation is assigned aunique Control ID that is read-only.
Default Label This read-only value is the text value that isassociated with the database attribute boundto this control.
Label You can specify a text value in this field tooverride the Default Label for the control.This label is specific to the application and isnot stored in the MAXATTRIBUTE orAPPFIELDDEFAULTS tables.
Hide Label By default, the label value always appears inthe user interface. Select this check box ifyou want the label to be invisible.
Developing applications 79
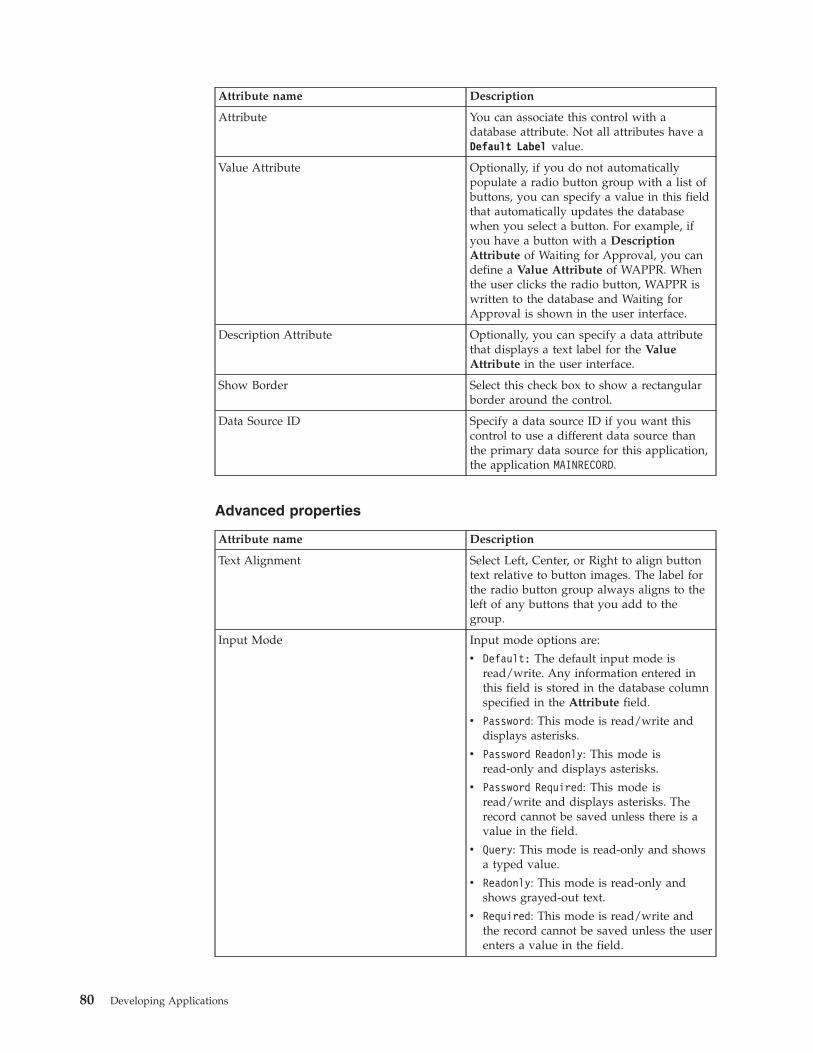
Attribute name Description
Attribute You can associate this control with adatabase attribute. Not all attributes have aDefault Label value.
Value Attribute Optionally, if you do not automaticallypopulate a radio button group with a list ofbuttons, you can specify a value in this fieldthat automatically updates the databasewhen you select a button. For example, ifyou have a button with a DescriptionAttribute of Waiting for Approval, you candefine a Value Attribute of WAPPR. Whenthe user clicks the radio button, WAPPR iswritten to the database and Waiting forApproval is shown in the user interface.
Description Attribute Optionally, you can specify a data attributethat displays a text label for the ValueAttribute in the user interface.
Show Border Select this check box to show a rectangularborder around the control.
Data Source ID Specify a data source ID if you want thiscontrol to use a different data source thanthe primary data source for this application,the application MAINRECORD.
Advanced properties
Attribute name Description
Text Alignment Select Left, Center, or Right to align buttontext relative to button images. The label forthe radio button group always aligns to theleft of any buttons that you add to thegroup.
Input Mode Input mode options are:
v Default: The default input mode isread/write. Any information entered inthis field is stored in the database columnspecified in the Attribute field.
v Password: This mode is read/write anddisplays asterisks.
v Password Readonly: This mode isread-only and displays asterisks.
v Password Required: This mode isread/write and displays asterisks. Therecord cannot be saved unless there is avalue in the field.
v Query: This mode is read-only and showsa typed value.
v Readonly: This mode is read-only andshows grayed-out text.
v Required: This mode is read/write andthe record cannot be saved unless the userenters a value in the field.
80 Developing Applications

Attribute name Description
Change Event You can configure a control to perform oneof the following actions in the event of adata change to the control:
v The REFRESHTABLE event refreshes the datasource table for the control.
v The RESETCHILDREN event deletes any childobjects of the data bean of the controlwhich then reacquires its MBOSetRemotereferences.
Always Synchronous If deselected, the control can communicatewith the database without pausing useractivities. If cleared, the user cannot performactivities in other fields until validations forthis field are completed. Synchronousactivity is disabled by default. If there aredependencies between values specified forthis control and other controls in theapplication, you can enable synchronousactivity for the dependent controls.
Signature Option You can specify a signature option that canrestrict access to this control or change theproperties of this control based on acondition that you specify. To create asignature option, click Add/ModifySignature Options in the Select Actionmenu. To specify a condition, click theConfigure Conditional Properties button.
Sig Option Data Source ID An MBO must be used to evaluate whetheror not a user has access to a signatureoption. Specify the value of the data sourcethat performs this evaluation if it is differentto the data source that is configured for thiscontrol.
Record image controlYou can use the record image control to associate an image with a record,including an expandable thumbnail image. You can then add this image to anapplication from within the application user interface. A user can click on athumbnail image to view its full size and can drag the mouse over the image tosee a text description. You can place a record image control in any containercontrol.
When you add a record image to an application, you are inserting a placeholderbut not the actual image. You can add only one record image to an application butyou can use the same image multiple times within the application. For example,you can show an image in more than one application tab.
After creating a record image control, open the application and click the AddModify Image option from the Select Action menu . If necessary, use an autodbscript to add the Add Modify Image option to the Select Action menu item. Youcan add images that have a .jpg or .gif extension.
You can configure the record image control to view images associated with otherrecords that are not part of the current application. Use View Image in the Details
Developing applications 81

menu to open an image in a popup window. To add View Image to a Detailsmenu, edit the menu.xml file. When you are finished, use Import ApplicationDefinition in the Application Designer to import the menu.xml file.
Properties
Attribute name Description
Control ID Each control in a presentation is assigned aunique Control ID that is read-only.
Label You can specify a text value in this field tooverride the Default Label for the control.This label is specific to the application and isnot stored in the MAXATTRIBUTE orAPPFIELDDEFAULTS tables.
Data Source ID Specify a data source ID if you want thiscontrol to use a different data source thanthe primary data source for this application,the application MAINRECORD.
CSS Class Name You can specify the name of a CSS class touse if you want to change the layout orappearance of the record image. You cansearch for CSS class names in the<root>\applications\maximo\maximouiweb\webmodule\webclient directory.
Height Enter a numeric value in this field that willincrease or decrease the height of the image.If you change the default dimensions, theimage can become distorted.
Width Enter a numeric value in this field that willincrease or decrease the width of the image.If you change the default dimensions, theimage can become distorted.
Is Thumbnail Identifies whether or not the image is anexpandable thumbnail image.
ALT Text on Image You can specify a text description of theimage that is visible when the user drags amouse over the image. An ALT textdescription provides a text substitute for theimage to users with a visual impairmentthat use screen readers.
Signature Option You can specify a signature option that canrestrict access to this control or change theproperties of this control based on acondition that you specify. To create asignature option, click Add/ModifySignature Options in the Select Actionmenu. To specify a condition, click theConfigure Conditional Properties button.
Sig Option Data Source ID An MBO must be used to evaluate whetheror not a user has access to a signatureoption. Specify the value of the data sourcethat performs this evaluation if it is differentto the data source that is configured for thiscontrol.
82 Developing Applications

Rich text editor controlThe rich text editor control provides the ability to add rich text formatting to afield with long description characteristics.
General properties
The rich text editor control can be placed inside standard container controls,including sections, tabs, and tables. A rich text editor control provides users with atoolbar that helps them to apply rich text formats to the text entered in the textarea. Rich text formatting is not appropriate for a field that is the subject of routinesearches or for fields that contain a large quantity of information, because theaddition of HTML tags to the text can exceed the character limit set for the field inthe database.
Attribute name Description
Control ID Each control in a presentation is assigned aunique Control ID that is read-only.
Default Label This read-only value is the text value that isassociated with the database attribute boundto this control.
Label If you enter a text value in this field, itoverrides the Default Label for the control.This label is specific to the application and isnot stored in the MAXATTRIBUTE orAPPFIELDDEFAULTS tables.
Hide Label By default, the label value always appears inthe user interface. Select this check box tomake the label invisible.
Attribute You can associate this control with adatabase attribute. Not all attributes have aDefault Label value.
Data Source ID Specify a data source ID if you want thiscontrol to use a different data source thanthe primary data source for this application,the application MAINRECORD.
Lookup Specify a lookup ID to link this control to apre-formatted lookup table that pulls recordsfrom the main table. A user can select arecord from the lookup table to use in thiscontrol.
Lookup IDs are stored in the lookups.xmlfile. To view the content of this file, exportthe system XML files.
Developing applications 83

Attribute name Description
Input Mode Input mode options are:
v Default: The default input mode isread/write. Any information entered inthis field is stored in the database columnspecified in the Attribute field.
v Password: This mode is read/write anddisplays asterisks.
v Password Readonly: This mode isread-only and displays asterisks.
v Password Required: This mode isread/write and displays asterisks. Therecord cannot be saved unless there is avalue in the field.
v Query: This mode is read-only and showsa typed value.
v Readonly: This mode is read-only andshows grayed-out text.
v Required: This mode is read/write andthe record cannot be saved unless the userenters a value in the field.
Menu Type You can specify the value of a menu ID inthis field to link the control to apreformatted drop-down menu. Menu IDsare stored in the menus.xml file. To view thecontent of this file, export the system XMLfiles.
Width You can enter a numeric value in this fieldto change the width of the editor area.
Height You can enter a numeric value in this fieldto change the height of the editor area.
Advanced properties
Attribute name Description
Plug-ins The plug-ins that you specify determine the items that are displayed in the editortoolbar. The default value for plug-ins in the toolbar is
[’undo’,’redo’,’| ’,’cut’,’copy’,’paste’,’|’,’bold’,’italic’,’underline’,’strikethrough’,’|’,’insertOrderedList’,’insertUnorderedList’,’indent’,’outdent’,’|’,’justifyLeft’,’justifyRight’,’justifyCenter’,’justifyFull’]
You can remove, reorder, or add additional plug-ins. To remove all these itemsfrom the toolbar, set the value to [].
For more information about available plug-ins, go to the Dojo Toolkit website (
http://www.dojotoolkit.org) and search for the reference guide.
Signature Option You can specify a signature option that can restrict access to this control orchange the properties of this control based on a condition that you specify. Tocreate a signature option, click Add/Modify Signature Options in the SelectAction menu. To specify a condition, click the Configure Conditional Propertiesbutton.
84 Developing Applications

Attribute name Description
Sig Option Data Source ID An MBO must be used to evaluate whether or not a user has access to asignature option. Specify the value of the data source that performs thisevaluation if it is different to the data source that is configured for this control.
Rich text viewer controlThe rich text viewer control provides the ability to view rich text formatting in afield with long description characteristics.
General properties
The rich text viewer control can be placed inside standard container controls,including sections, tabs, and tables.
Attribute name Description
Control ID Each control in a presentation is assigned aunique Control ID that is read-only.
Label If you enter a text value in this field, itoverrides the Default Label for the control.This label is specific to the application and isnot stored in the MAXATTRIBUTE orAPPFIELDDEFAULTS tables.
Hide Label By default, the label value always appears inthe user interface. Select this check box tomake the label invisible.
Attribute You can associate this control with adatabase attribute. Not all attributes have aDefault Label value.
Data Source ID Specify a data source ID if you want thiscontrol to use a different data source thanthe primary data source for this application,the application MAINRECORD.
Width You can enter a numeric value in this fieldto change the width of the viewer area.
Height You can enter a numeric value in this fieldto change the height of the viewer area.
Section controlA section control is one of the core container controls that you use to organize thelayout of an application. Container controls occupy space on a page and providestorage for other controls, such as tables, buttons, and text fields.
Rules
Section controls without labels do not have visible borders and are transparent inan application page. A section control with a label includes a visible horizontalblue bar with a minimize icon at the top of the section. You start all newapplication layouts by inserting a section container. Most applications havemultiple pages with many sections and columns.
You can place the following controls in a section:v Attachments
Developing applications 85

v Blank Linev Button Groupv Checkboxv Comboboxv Data Sourcev Default Valuev Hyperlinkv Imagev Includev Listboxv Multiline Textboxv Radio Button Groupv Section Headerv Section Rowv Static Textv Textbox
You can place a section inside the following container controls:v Dialogsv Tabv Tablev Section Columns
General properties
Attribute name Description
Control ID Each control in a presentation is assigned aunique Control ID that is read-only.
Label This value identifies the control to the user.If you do not enter a label, the section doesnot have a title. The label you enter here isspecific to the application and is not storedin the MAXATTRIBUTE or APPFIELDDEFAULTStables.
Show Border Select this option to add a horizontal rule tothe top and bottom of the section. If youdefine a label for the section, the horizontalrules are not added.
Collapsed If you check this box, the section iscollapsed by default in the user interfaceand the user must click to maximize thesection.
Description You can specify text to show under the labelin the title bar of the section.
Data Source ID Specify the ID of an existing data source ifyou want this control to override the parentdata source for this control (at application orcontainer level).
86 Developing Applications

Attribute name Description
Business Object Specify the name of a MBO in this field todetermine which MBO the control uses toshow and process information. If a MBO isnot specified, the control uses the datasource of its parent control. When you set aMBO for this control a data source is createdthat can be referenced from other controls.
Parent Data Source ID You can specify the ID of a data source touse as the parent object for a relationship, orto specify a parent object for a bean class ifnecessary. Then specify the relationship thatuses this parent in the Relationship field. Ifthe field is left blank, the control uses thedata source ID of its parent control as theParent Data Source ID
Input Mode Input mode options are:
v Default: The default input mode isread/write. Any information entered inthis field is stored in the database columnspecified in the Attribute field.
v Password: This mode is read/write anddisplays asterisks.
v Password Readonly: This mode isread-only and displays asterisks.
v Password Required: This mode isread/write and displays asterisks. Therecord cannot be saved unless there is avalue in the field.
v Query: This mode is read-only and showsa typed value.
v Readonly: This mode is read-only andshows grayed-out text.
v Required: This mode is read/write andthe record cannot be saved unless the userenters a value in the field.
Advanced properties
Attribute name Description
Listeners Enter the ID or IDs of one or more datasources that you want to refresh wheneverthere are changes to this control. Listenercontrols can be located anywhere within theapplication. Separate multiple values with acomma.
Signature Option You can specify a signature option that canrestrict access to this control or change theproperties of this control based on acondition that you specify. To create asignature option, click Add/ModifySignature Options in the Select Actionmenu. To specify a condition, click theConfigure Conditional Properties button.
Developing applications 87

Attribute name Description
Sig Option Data Source ID An MBO must be used to evaluate whetheror not a user has access to a signatureoption. Specify the value of the data sourcethat performs this evaluation if it is differentto the data source that is configured for thiscontrol.
Section column controlA section column control is a vertical column that you can use to divide a sectionrow into columns with headings. A section column is a container that can holdchild section controls and is also a child to the parent section control. When youmove a section control, all of its child controls automatically move with it.
You can insert section columns into section rows. When you drag a section columninto a section row, it automatically creates two section columns. A section columndoes not have a label and is transparent in the user interface. A child section canhold, for example, a section header that lets you assign column headings for amulticolumn section. Except for tables, all graphical elements with multiplecolumns have a transparent section column within a section row, all containedwithin a parent section.
A section column control has only one property, the control ID property.
Section header controlUse a section header control to display a text heading for a section or a table. Thetext in the heading can be dynamic, based on variables you configure in parameterand parameter values controls. A section header control is a container control andis transparent in the user interface.
Properties
Attribute name Description
Control ID Each control in a presentation is assigned aunique Control ID that is read-only.
Label The label contains a variable that displaysdynamic values inherited from theparameter value and values controls in thesection control.
Plain Text If selected, the CSS (cascading style sheet)class definition for the label is removed sothat it looks like plain text in the userinterface.
Data Source ID Specify a data source ID if you want thiscontrol to use a different data source thanthe primary data source for this application,the application MAINRECORD.
Signature Option You can specify a signature option that canrestrict access to this control or change theproperties of this control based on acondition that you specify. To create asignature option, click Add/ModifySignature Options in the Select Actionmenu. To specify a condition, click theConfigure Conditional Properties button.
88 Developing Applications
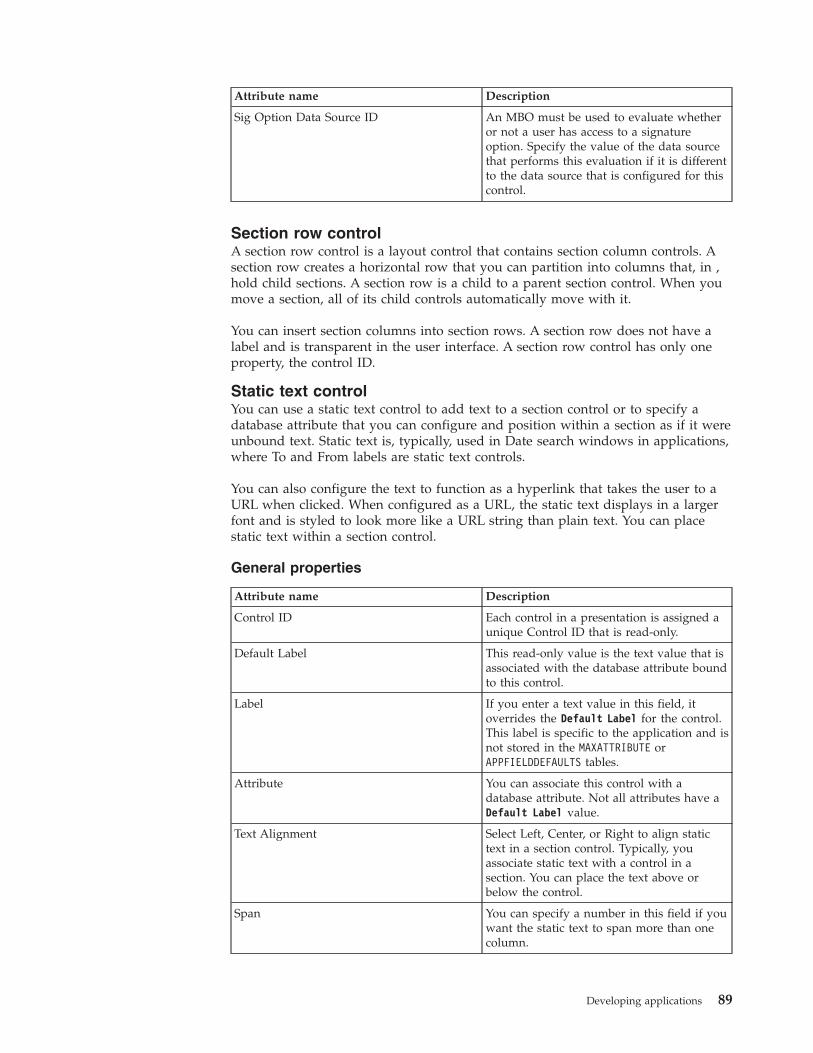
Attribute name Description
Sig Option Data Source ID An MBO must be used to evaluate whetheror not a user has access to a signatureoption. Specify the value of the data sourcethat performs this evaluation if it is differentto the data source that is configured for thiscontrol.
Section row controlA section row control is a layout control that contains section column controls. Asection row creates a horizontal row that you can partition into columns that, in ,hold child sections. A section row is a child to a parent section control. When youmove a section, all of its child controls automatically move with it.
You can insert section columns into section rows. A section row does not have alabel and is transparent in the user interface. A section row control has only oneproperty, the control ID.
Static text controlYou can use a static text control to add text to a section control or to specify adatabase attribute that you can configure and position within a section as if it wereunbound text. Static text is, typically, used in Date search windows in applications,where To and From labels are static text controls.
You can also configure the text to function as a hyperlink that takes the user to aURL when clicked. When configured as a URL, the static text displays in a largerfont and is styled to look more like a URL string than plain text. You can placestatic text within a section control.
General properties
Attribute name Description
Control ID Each control in a presentation is assigned aunique Control ID that is read-only.
Default Label This read-only value is the text value that isassociated with the database attribute boundto this control.
Label If you enter a text value in this field, itoverrides the Default Label for the control.This label is specific to the application and isnot stored in the MAXATTRIBUTE orAPPFIELDDEFAULTS tables.
Attribute You can associate this control with adatabase attribute. Not all attributes have aDefault Label value.
Text Alignment Select Left, Center, or Right to align statictext in a section control. Typically, youassociate static text with a control in asection. You can place the text above orbelow the control.
Span You can specify a number in this field if youwant the static text to span more than onecolumn.
Developing applications 89
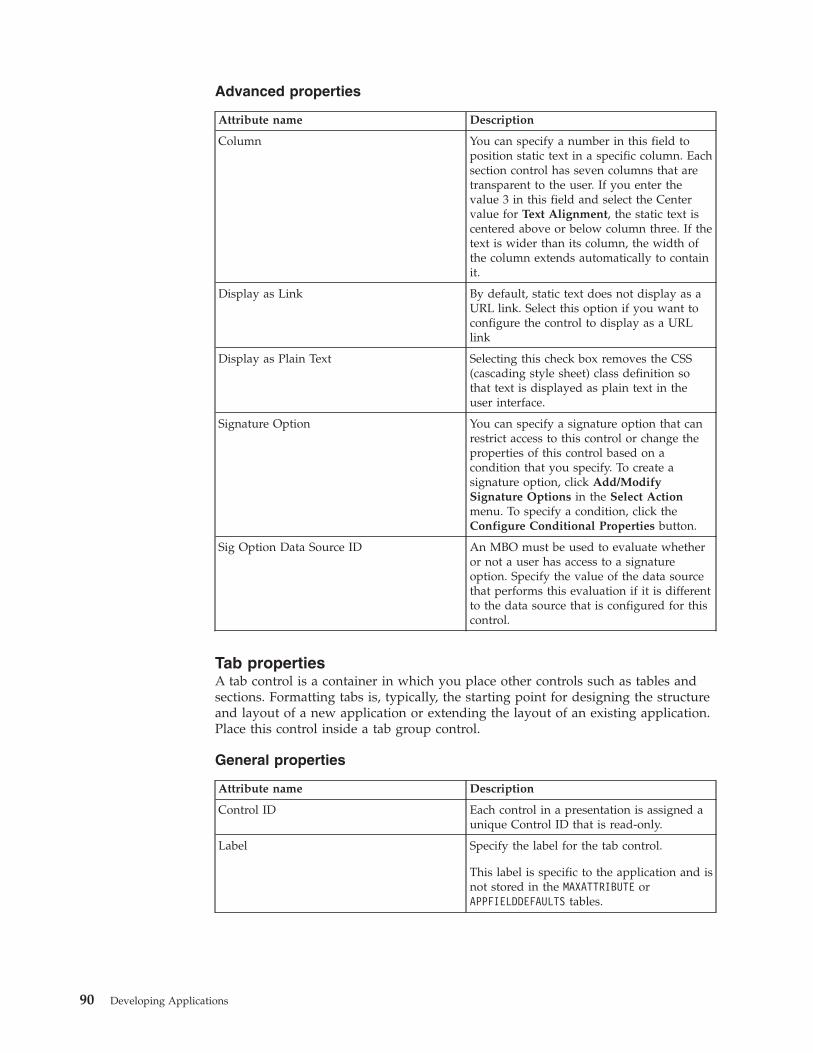
Advanced properties
Attribute name Description
Column You can specify a number in this field toposition static text in a specific column. Eachsection control has seven columns that aretransparent to the user. If you enter thevalue 3 in this field and select the Centervalue for Text Alignment, the static text iscentered above or below column three. If thetext is wider than its column, the width ofthe column extends automatically to containit.
Display as Link By default, static text does not display as aURL link. Select this option if you want toconfigure the control to display as a URLlink
Display as Plain Text Selecting this check box removes the CSS(cascading style sheet) class definition sothat text is displayed as plain text in theuser interface.
Signature Option You can specify a signature option that canrestrict access to this control or change theproperties of this control based on acondition that you specify. To create asignature option, click Add/ModifySignature Options in the Select Actionmenu. To specify a condition, click theConfigure Conditional Properties button.
Sig Option Data Source ID An MBO must be used to evaluate whetheror not a user has access to a signatureoption. Specify the value of the data sourcethat performs this evaluation if it is differentto the data source that is configured for thiscontrol.
Tab propertiesA tab control is a container in which you place other controls such as tables andsections. Formatting tabs is, typically, the starting point for designing the structureand layout of a new application or extending the layout of an existing application.Place this control inside a tab group control.
General properties
Attribute name Description
Control ID Each control in a presentation is assigned aunique Control ID that is read-only.
Label Specify the label for the tab control.
This label is specific to the application and isnot stored in the MAXATTRIBUTE orAPPFIELDDEFAULTS tables.
90 Developing Applications

Attribute name Description
Type Some tabs have a type attribute that youmust set:
v Set the type as "list" if the tab is a List tab.
v Set the type as "insert" if the tab is a Maintab.
v Leave this field blank for all other tabs.
Default Select this option if you want this tab to bethe default tab that opens when a useropens an application. The default tab can bea list tab or an insert tab except in a powerapplication, when the default tab must be alist tab.
Bean Class You can specify the name of a data beanclass to use when creating the data sourcefor the control. If not defined and the controlis creating a data source, the defaultpsdi.webclient.system.DataBean class isused. Typically, you use this property tocreate custom event methods or to overridethe manner in which the data source obtainsits MboSet.
Business Object Specify the name of a MBO in this field todetermine which MBO the control uses toshow and process information. If a MBO isnot specified, the control uses the datasource of its parent control. When you set aMBO for this control a data source is createdthat can be referenced from other controls.
Parent Data Source ID You can specify the ID of a data source touse as the parent object for a relationship, orto specify a parent object for a bean class ifnecessary. Then specify the relationship thatuses this parent in the Relationship field. Ifthe field is left blank, the control uses thedata source ID of its parent control as theParent Data Source ID
Relationship If you specified a value in the Parent DataSource ID field, specify a value in this fieldthat identifies the relationship between thiscontrol and the new data source. Arelationship uses a WHERE clause todetermine what to show and process fromthe data source. The control creates adatasource that is by default used by thechild controls. You can search forrelationship values in the DatabaseConfiguration > Relationships tab.
Developing applications 91

Advanced properties
Attribute name Description
Where Clause You can specify a WHERE clause that thedata source for this control uses to retrievedata. This WHERE clause is used in additionto any default WHERE clause used by thebusiness object of the data source.
Order By You can specify the order in which a SQLquery fetches data for the data source forthis control.
Listeners Enter the ID or IDs of one or more datasources that you want to refresh wheneverthere are changes to this control. Listenercontrols can be located anywhere within theapplication. Separate multiple values with acomma.
Signature Option You can specify a signature option that canrestrict access to this control or change theproperties of this control based on acondition that you specify. To create asignature option, click Add/ModifySignature Options in the Select Actionmenu. To specify a condition, click theConfigure Conditional Properties button.
Sig Option Data Source ID An MBO must be used to evaluate whetheror not a user has access to a signatureoption. Specify the value of the data sourcethat performs this evaluation if it is differentto the data source that is configured for thiscontrol.
Tab group controlA tab group control is a container control that holds tabs. Tab groups are part ofthe template for power applications. When you create a power application, a tabgroup control is provided with the standard List and Workspace tabs.
Properties
Attribute name Description
Control ID Each control in a presentation is assigned aunique Control ID that is read-only.
Format Leave blank (the default) or specify one ofthe following layout options:
v CARDECK
v DEFAULT
v WIZARD
The wizard option replaces the standard tablayout with arrows that point to the tabheadings. The cardeck option appears insingle-page applications that do not use tabs.
92 Developing Applications

Attribute name Description
Style The Style option defaults to FORM, which isa style attribute for the control. The Formstyle defines the appearance of the main tabgroup.
Change Event Reserved for future use.
Table controlThe table control is a container with the basic layout elements of a table window,including a toolbar with filter and search functionality and icons for previous andnext row and page. You can place a table control within a section, tab, or windowcontrol and you can place a table column control or a section control within a tablecontrol.
The table control layout also includes a table column control and a details boxwhere you can enter a section. The table control is similar to the table window inthe List tab of most applications. The tables enable the user to search for anddisplay records from one or more tables in a columnar format. You can use thestandard filter feature to display only records that meet specified criteria.
You can insert a section control into the details section of a table control. Thedetails section is an empty, rectangular box at the bottom of the window.
General properties
Attribute name Description
Control ID Each control in a presentation is assigned aunique Control ID that is read-only.
Label Enter a text value for the label.
This label is specific to the application and isnot stored in the MAXATTRIBUTE orAPPFIELDDEFAULTS tables.
Input Mode Input mode options are:
v Default: The default input mode isread/write. Any information entered inthis field is stored in the database columnspecified in the Attribute field.
v Password: This mode is read/write anddisplays asterisks.
v Password Readonly: This mode isread-only and displays asterisks.
v Password Required: This mode isread/write and displays asterisks. Therecord cannot be saved unless there is avalue in the field.
v Query: This mode is read-only and showsa typed value.
v Readonly: This mode is read-only andshows grayed-out text.
v Required: This mode is read/write andthe record cannot be saved unless the userenters a value in the field.
Developing applications 93

Attribute name Description
Select Mode The select mode controls whether a tableshows a single record or multiple records.
Bean Class You can specify the name of a data beanclass to use when creating the data sourcefor the control. If not defined and the controlis creating a data source, the defaultpsdi.webclient.system.DataBean class isused. Typically, you use this property tocreate custom event methods or to overridethe manner in which the data source obtainsits MboSet.
Order By You can specify the order in which a SQLquery fetches data for the data source forthis control.
Data Source ID Enter a value if you want to use a differentData Source ID than the default ofMAINRECORD.
Each application has a presentation file thatdefines the main MBO for the application,the MAINRECORD. To inherit data from adifferent MBO for this control (or group ofcontrols) specify an alternative Data SourceID in this field.
Business Object Specify the name of a MBO in this field todetermine which MBO the control uses toshow and process information. If a MBO isnot specified, the control uses the datasource of its parent control. When you set aMBO for this control a data source is createdthat can be referenced from other controls.
Parent Data Source ID You can specify the ID of a data source touse as the parent object for a relationship, orto specify a parent object for a bean class ifnecessary. Then specify the relationship thatuses this parent in the Relationship field. Ifthe field is left blank, the control uses thedata source ID of its parent control as theParent Data Source ID
Relationship If you specified a value in the Parent DataSource ID field, specify a value in this fieldthat identifies the relationship between thiscontrol and the new data source. Arelationship uses a WHERE clause todetermine what to show and process fromthe data source. The control creates adatasource that is by default used by thechild controls. You can search forrelationship values in the DatabaseConfiguration > Relationships tab.
Width Specify a number to change the defaultwidth of the table. The default width for atable is 1000. You can decrease the width ofa table to 400, the minimum width requiredto maintain the contents of the toolbar,including the table title and icons.
94 Developing Applications

Attribute name Description
Description Text in this field displays under the label inthe title bar of the table.
Title Attributes Reserved for future use.
Start Empty If you select this option, the table alwaysopens without displaying records. If you donot select the option (the default), the tableautomatically shows records that match thesearch query when opened.
Filterable If you select this option, a filter row isprovided to enable the user to search thetable. The Filterable property is enabled bydefault and the setting automatically appliesto table columns in the table. This optionmust be selected if you want to use theFilter Expanded property.
Collapsed If you select this check box, the section iscollapsed by default in the user interfaceand the user must click to maximize thesection.
Advanced properties
Attribute name Description
Collapsed Empty Label You can specify a value that will overridethe table title (label property) when the tableis collapsed and empty.
Collapsed Label You can specify a value that will overridethe table title (label property) when the tableis collapsed.
Parent Empty Label If this table is a child of a parent table, andthat table is empty, this value overrides thetitle of the parent table.
Row Details Expanded Select this check box if you want a table todisplay the expanded detail sections for eachrecord in the table. The default setting is notto expand the detail sections for a table row.
Application Restrictions Enter a Where Clause that filters informationdisplayed in the table. If you enter arestriction, it modifies the overall WhereClause for the application. You cannotchange the restriction at runtime.
Listeners Enter the ID or IDs of one or more datasources that you want to refresh wheneverthere are changes to this control. Listenercontrols can be located anywhere within theapplication. Separate multiple values with acomma.
Developing applications 95

Attribute name Description
Signature Option You can specify a signature option that canrestrict access to this control or change theproperties of this control based on acondition that you specify. To create asignature option, click Add/ModifySignature Options in the Select Actionmenu. To specify a condition, click theConfigure Conditional Properties button.
Sig Option Data Source ID An MBO must be used to evaluate whetheror not a user has access to a signatureoption. Specify the value of the data sourcethat performs this evaluation if it is differentto the data source that is configured for thiscontrol.
Table column controlThe table column control is a container you can use to add columns and columnheadings to a table. You can place a table column control within a table control.
At runtime, a table column dynamically generates either a text box control or acheck box control to show its data. A check box is used if the data type for thefield is YORN. If the data type for the field is not YORN, a text box is used.
You can add a text box to a table column if you want to bind a field with a YORNdata type to a text box, instead of to a check box. Unless you want to override theuse of a check box for a field with a YORN data type, do not add a control to atable column control.
You can use the standard filter feature to display only records that meet specifiedcriteria.
General properties
Attribute name Description
Control ID Each control in a presentation is assigned aunique Control ID that is read-only.
Default Label This read-only value is the text value that isassociated with the database attribute boundto this control.
Label If you enter a text value in this field, itoverrides the Default Label for the control.This label is specific to the application and isnot stored in the MAXATTRIBUTE orAPPFIELDDEFAULTS tables.
Attribute You can associate this control with adatabase attribute. Not all attributes have aDefault Label value.
96 Developing Applications

Attribute name Description
Type A table column can trigger an event orprovide a link. If you select Link, the value,such as a record number, is underlined.When the user clicks this link, the recordopens.
If you select Event, enter appropriate valuesfor the Event Type, Event Description, andEvent Icon properties. For example, is youspecify the TOGGLEDETAILSTATE event,the user can click a View/Show icon to openor close the details section for a selectedrecord.
Sortable If you select this option, the user can sortrecords in a table by clicking on the label ofa column. The first click sorts the records inascending order. The second click a labelsorts the records in descending order.
Turn Smart Fill Off Select this option to disable smart fill whichis turned on by default. Smart fill enables auser to enter a partial value in a text boxwhich the system attempts to match to avalid value, or values, in the database. Whena matching value is found, the value isentered in the text box. If the system findsmore than one matching value, the user canselect one from a list of matching values. Ifyou turn smart fill off, user text is notvalidated during entry.
Show Filter If you select the Filterable and Show Filterproperties, a filter text box for this column isdisplayed in the filter row of the table.
Filterable If you set the Filterable property for a table,the setting also applies to each column inthe table. You can override the Filterablesetting for a table at the table column level.When you select this option, the user cansearch on the attribute associated with thelabel of the table column.
Event If you select Event as the Type property,specify the event in this field.
There is no directory of events but you cansearch for events and event descriptions inthe system XML files. To export the files, ina main tab in the Application Designer,choose Select Action > Export System XML.This action exports the library.xml,lookups.xml, and menus.xml files to the<root>\resources\presentation\systemdirectory. You can search these files forMXEVENT and mxevent_desc entries. You canalso create your own events.
Target ID Enter a target control ID, if different fromthe current control, where an event (ifdefined) is sent for processing.
Developing applications 97

Attribute name Description
Event Description This property provides a tool tip for anevent (if defined).
Event Icon This property can point to a .gif file of animage that represents an event. The icons inthe user interface are stored in the<root>\applications\maximo\maximouiweb\webmodule\webclient\imagesdirectory. The image control in theApplication Designer provides access to thefiles in the images directory.
Change Event You can configure a control to perform oneof the following actions in the event of adata change to the control:
v The REFRESHTABLE event refreshes the datasource table for the control.
v The RESETCHILDREN event deletes any childobjects of the data bean of the controlwhich then reacquires its MBOSetRemotereferences.
CSS Class Name If you want to change the layout andappearance of the control, enter the CSSclass name to use. You can search for CSSclass names in the applications\maximo\maximouiweb\webmodule\webclient directory.
Lookup You can specify a lookup ID to link thiscontrol to a pre-formatted lookup table thatpulls records from the main table. A usercan select a record from the lookup table touse in this control.
Lookup IDs are stored in the lookups.xmlfile. To view the content of this file, exportthe system XML files.
Go To Applications You can associate a pull-down menu withthis control and add application names to itthat users can click to go to differentapplications.
98 Developing Applications
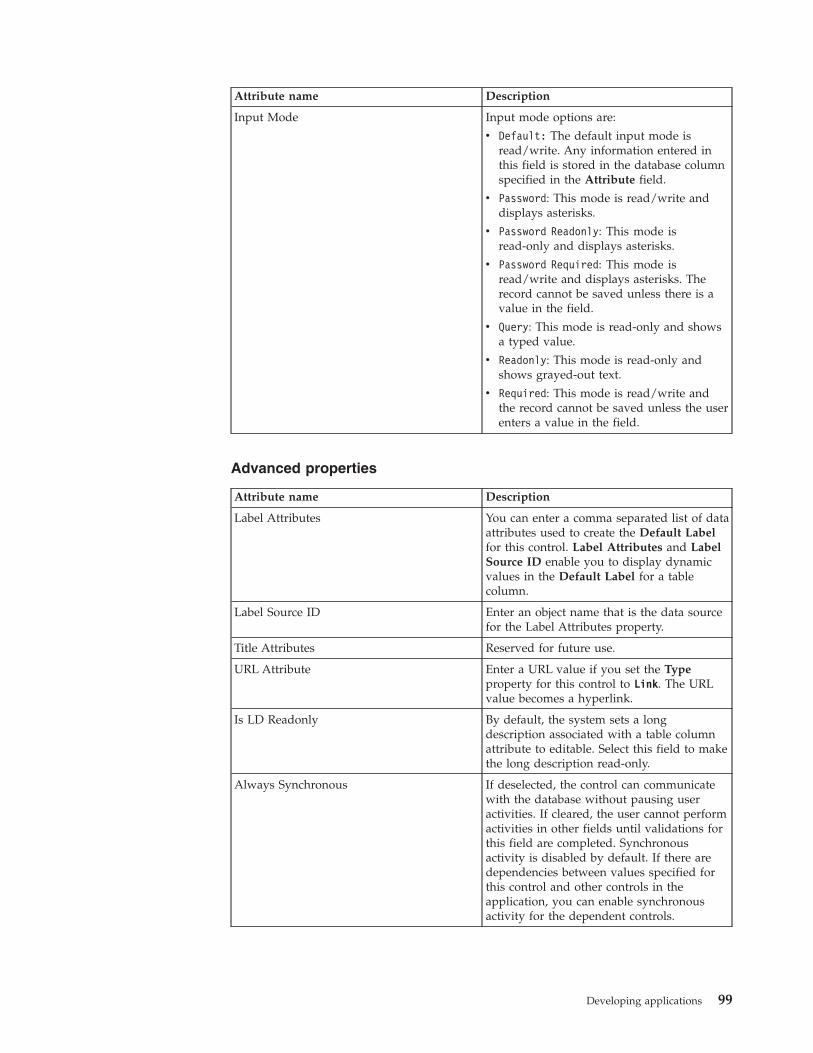
Attribute name Description
Input Mode Input mode options are:
v Default: The default input mode isread/write. Any information entered inthis field is stored in the database columnspecified in the Attribute field.
v Password: This mode is read/write anddisplays asterisks.
v Password Readonly: This mode isread-only and displays asterisks.
v Password Required: This mode isread/write and displays asterisks. Therecord cannot be saved unless there is avalue in the field.
v Query: This mode is read-only and showsa typed value.
v Readonly: This mode is read-only andshows grayed-out text.
v Required: This mode is read/write andthe record cannot be saved unless the userenters a value in the field.
Advanced properties
Attribute name Description
Label Attributes You can enter a comma separated list of dataattributes used to create the Default Labelfor this control. Label Attributes and LabelSource ID enable you to display dynamicvalues in the Default Label for a tablecolumn.
Label Source ID Enter an object name that is the data sourcefor the Label Attributes property.
Title Attributes Reserved for future use.
URL Attribute Enter a URL value if you set the Typeproperty for this control to Link. The URLvalue becomes a hyperlink.
Is LD Readonly By default, the system sets a longdescription associated with a table columnattribute to editable. Select this field to makethe long description read-only.
Always Synchronous If deselected, the control can communicatewith the database without pausing useractivities. If cleared, the user cannot performactivities in other fields until validations forthis field are completed. Synchronousactivity is disabled by default. If there aredependencies between values specified forthis control and other controls in theapplication, you can enable synchronousactivity for the dependent controls.
Developing applications 99

Attribute name Description
Linked Controls ID You can enter a control ID that isautomatically updated whenever there is achange to the attribute value in this column.The control ID must exist somewhere withinthe application.
More information You can specify the values to construct aURL for an information center topic usingthe following format:com.ibm.mbs.doc,application/helpfile.html The server address and otherinformation for the URL are controlled bythe mxe.help properties which you canreview and configure in the SystemProperties application.
If you specify a URL, a More Informationlink is added to the field help (Alt + F1) forthe control. When the user clicks the link,the target topic opens in the informationcenter.
The property is specific to the field ID in thepresentation XML file. If you want toprovide the same link in other controls orother applications, you must manually addthe URL to each individual control.
Signature Option You can specify a signature option that canrestrict access to this control or change theproperties of this control based on acondition that you specify. To create asignature option, click Add/ModifySignature Options in the Select Actionmenu. To specify a condition, click theConfigure Conditional Properties button.
Sig Option Data Source ID An MBO must be used to evaluate whetheror not a user has access to a signatureoption. Specify the value of the data sourcethat performs this evaluation if it is differentto the data source that is configured for thiscontrol.
Text box controlA text box control is a single-line text box that displays information the user eitherenters or selects from a list. Text boxes have labels that are typically visible in theuser interface. Labels are text fields that describe the type of information displayedin the box. You can place a text box within a section control.
Text boxes are often linked to select value lookups and detailed menus. A selectvalue lookup lets you select and then display a single value from a list of records.A text box linked to a detailed menu can contain diverse options, such as a SelectValue window, jumps to other applications, or views of different records. TheMenu Type property you configure for a text box controls the format and contentof the detailed menu.
100 Developing Applications

General properties
Attribute name Description
Control ID Each control in a presentation is assigned aunique Control ID that is read-only.
Default Label This read-only value is the text value that isassociated with the database attribute boundto this control.
Label If you enter a text value in this field, itoverrides the Default Label for the control.This label is specific to the application and isnot stored in the MAXATTRIBUTE orAPPFIELDDEFAULTS tables.
Hide Label By default, the label value always appears inthe user interface. Select this check box tomake the label invisible.
Turn Smart Fill Off Select this option to disable smart fill whichis turned on by default. Smart fill enables auser to enter a partial value in a text boxwhich the system attempts to match to avalid value, or values, in the database. Whena matching value is found, the value isentered in the text box. If the system findsmore than one matching value, the user canselect one from a list of matching values. Ifyou turn smart fill off, user text is notvalidated during entry.
Attribute You can associate this control with adatabase attribute. Not all attributes have aDefault Label value.
Data Source ID Specify a data source ID if you want thiscontrol to use a different data source thanthe primary data source for this application,the application MAINRECORD.
Lookup You can specify a lookup ID to link thiscontrol to a pre-formatted lookup table thatpulls records from the main table. A usercan select a record from the lookup table touse in this control.
Lookup IDs are stored in the lookups.xmlfile. To view the content of this file, exportthe system XML files.
Go To Applications You can associate a pull-down menu withthis control and add application names to itthat users can click to go to differentapplications.
Developing applications 101

Attribute name Description
Input Mode Input mode options are:
v Default: The default input mode isread/write. Any information entered inthis field is stored in the database columnspecified in the Attribute field.
v Password: This mode is read/write anddisplays asterisks.
v Password Readonly: This mode isread-only and displays asterisks.
v Password Required: This mode isread/write and displays asterisks. Therecord cannot be saved unless there is avalue in the field.
v Query: This mode is read-only and showsa typed value.
v Readonly: This mode is read-only andshows grayed-out text.
v Required: This mode is read/write andthe record cannot be saved unless the userenters a value in the field.
Menu Type You can specify the value of a menu ID inthis field to link the control to apreformatted drop-down menu. Menu IDsare stored in the menus.xml file. To view thecontent of this file, export the system XMLfiles.
Advanced properties
Attribute name Description
Detail Image Reserved for future use.
QBE Prepend If you set the Input Mode to Query, you canfilter the search by adding a text prefix thatacts as filter. For example, the More SearchFields window uses QBE Prepend to adddate search filters similar to ">=". You canspecify the value here to save key strokeswhen searching for records that meetspecific date criteria.
Change Event You can configure a control to perform oneof the following actions in the event of adata change to the control:
v The REFRESHTABLE event refreshes the datasource table for the control.
v The RESETCHILDREN event deletes any childobjects of the data bean of the controlwhich then reacquires its MBOSetRemotereferences.
102 Developing Applications

Attribute name Description
Always Synchronous If deselected, the control can communicatewith the database without pausing useractivities. If cleared, the user cannot performactivities in other fields until validations forthis field are completed. Synchronousactivity is disabled by default. If there aredependencies between values specified forthis control and other controls in theapplication, you can enable synchronousactivity for the dependent controls.
Readonly Long Description By default, the system sets a longdescription associated with a table columnattribute to editable. Select this field to makethe long description read-only.
Display Type Reserved for future use.
More information You can specify the values to construct aURL for an information center topic usingthe following format:com.ibm.mbs.doc,application/helpfile.html The server address and otherinformation for the URL are controlled bythe mxe.help properties which you canreview and configure in the SystemProperties application.
If you specify a URL, a More Informationlink is added to the field help (Alt + F1) forthe control. When the user clicks the link,the target topic opens in the informationcenter.
The property is specific to the field ID in thepresentation XML file. If you want toprovide the same link in other controls orother applications, you must manually addthe URL to each individual control.
Move To Data Source ID Specify a record stored in a different objectthat the user can move to. You can selectany Data Source ID from the presentationcontrol.
By default, the system sends the Move Toevent to the ResultsBean, which contains aset of records displayed in the List tab. TheMove To event affects the Move to DataSource ID object.
Signature Option You can specify a signature option that canrestrict access to this control or change theproperties of this control based on acondition that you specify. To create asignature option, click Add/ModifySignature Options in the Select Actionmenu. To specify a condition, click theConfigure Conditional Properties button.
Developing applications 103

Attribute name Description
Sig Option Data Source ID An MBO must be used to evaluate whetheror not a user has access to a signatureoption. Specify the value of the data sourcethat performs this evaluation if it is differentto the data source that is configured for thiscontrol.
Tree controlUse a tree control as a container for tree node and tree attribute controls to builddynamic, hierarchical tree structures with specific business objects that supporthierarchical data. You can place a tree control within a dialog control or a tabcontrol. You can place a tree node control into a tree control.
The Classifications application uses tree controls to construct classificationhierarchies and the Users application uses tree controls to construct the securityprofile hierarchy
When you click What happens
Plus sign Expands the tree node without highlightingthe corresponding node label. The plus signbecomes a minus sign. If you highlighted anode label prior to clicking a plus sign, itremains highlighted.
Minus sign Contracts the tree node and highlights thecorresponding node label.
Dot sign (If node label is not selected) Highlights the node label and removes anyexisting highlights.
Dot sign (If node label is selected) No effect.
Node label (Next to a plus sign) Highlights the node label and removes anyexisting highlights. Highlighted node doesnot expand. window displays hierarchicallevels below the highlighted node.
Node label (Next to a minus sign) Highlights the node label and removes anyexisting highlights. Highlighted node doesnot contract. window displays hierarchicallevels below the highlighted node.
Node label (Next to a dot sign) Highlights the node label and removes anyexisting highlights. Highlighted node doesnot expand or contract. window displaysany items or information related to the nodelabel.
Properties
Attribute name Description
Control ID Each control in a presentation is assigned aunique Control ID that is read-only.
Height Enter a numeric value in this field that willincrease or decrease the height of the image.If you change the default dimensions, theimage can become distorted.
104 Developing Applications

Attribute name Description
Width Enter a numeric value in this field that willincrease or decrease the width of the image.If you change the default dimensions, theimage can become distorted.
Bean Class You can specify the name of a data beanclass to use when creating the data sourcefor the control. If not defined and the controlis creating a data source, the defaultpsdi.webclient.system.DataBean class isused. Typically, you use this property tocreate custom event methods or to overridethe manner in which the data source obtainsits MboSet.
Business Object Specify the name of a MBO in this field todetermine which MBO the control uses toshow and process information. If a MBO isnot specified, the control uses the datasource of its parent control. When you set aMBO for this control a data source is createdthat can be referenced from other controls.
Relationship If you specified a value in the Parent DataSource ID field, specify a value in this fieldthat identifies the relationship between thiscontrol and the new data source. Arelationship uses a WHERE clause todetermine what to show and process fromthe data source. The control creates adatasource that is by default used by thechild controls. You can search forrelationship values in the DatabaseConfiguration > Relationships tab.
Use Data Source Reserved for future use.
Order By You can specify the order in which a SQLquery fetches data for the data source forthis control.
Tree attribute controlThe tree attribute control describes the data that appears in each tree node. Forexample, the tree attributes in the Classifications application display classificationIDs and descriptions in the user interface. You can place a tree attribute controlwithin a tree node control.
Properties
Attribute name Description
Control ID Each control in a presentation is assigned aunique Control ID that is read-only.
Display Select this option to display the Attributevalue in the tree node.
Developing applications 105

Attribute name Description
Attribute You can associate the values that display ina tree node with a database attribute. Tocreate a classification example, you can enter"=classstructure" in the Object field todisplay all the attributes in theCLASSSTRUCTURE table. Select the"CLASSIFICATIONID" attribute to displayClassification ID as one of the Tree Nodeproperties. In the Tree example, you alsodefine another Tree Attribute property called"CLASSIFICATION.DESCRIPTION" todisplay the Classification Description value.
Tree node controlThe Tree Node control is a container type of control that works with the Tree andTree Attribute controls. A Tree Node defines the structure of a hierarchical tree.
Rules
You can place the Tree Attribute control in this container control.
You can place this control inside the Tree container control.
General properties
Attribute name Description
Control ID Each control in a presentation is assigned aunique Control ID that is read-only.
Image You can specify the file name of any filestored in the images directory at<root>\applications\maximo\maximouiweb\webmodule\webclient\images. You can reuseany existing images or you can add newimages to the directory.
Images can be in any format supported by abrowser. You must redeploy the .EAR file onthe application server to add the images tothe user interface.
Display Key Attribute Select this property to display the KeyAttribute as part of the tree node label.
Display Object Name Select this property to display the ObjectName as part of the tree node label.
Key Attribute You can specify a different attribute of thebusiness object to use as a key attribute,other than the key attribute specified for theMBO.
Key Value You can specify an option to display as thedefault value.
Return Attribute Enter an attribute name whose value getsreturned to the browser when you click theicon of a tree node line item.
106 Developing Applications

Attribute name Description
Enable Return Select this property to enable the ReturnAttribute property functionality.
User interface system propertiesThe web client system properties define the behavior and characteristics of the userinterface. To review or change system properties, filter for the term webclient inthe System Properties application.
Property name Description Default value
mxe.webclient.503_retry-after Specifies the number of secondsbefore a retry is attempted when anHTTP connection is not successful.The retry-after value is added to theheader of the HTTP response for a503 response error.
180
mxe.webclient.activitydashboard A Boolean value that enables ordisables activity dashboardmonitoring.
FALSE
mxe.webclient.async Indicates whether asynchronousdata validation is enabled for thesystem. Asynchronous (orbackground) data validation is thedefault behavior but you candisable it if required.
1
mxe.webclient.asyncerrortooltipwaitbeforeopen The number of seconds before anerror tooltip displays when a userdrags the mouse over an error icon.
2
mxe.webclient.asyncrendertimelimit Specifies the maximum number ofseconds between the responses thatare sent to the user interface whenprocessing multiple asynchronousvalidation requests.
15
mxe.webclient.asyncrequestsbeforerender Specifies the maximum number ofconcurrent asynchronous validationrequests that the user interfaceframework processes beforerendering a response.
5
mxe.webclient.ClientDataValidation Enables client side browser datavalidation.
0
mxe.webclient.ClientEventQueue.threshold The maximum number of events inthe client event queue before thequeue is sent to the server.
2
mxe.webclient.ClientEventQueue.timeout The maximum time in millisecondsthe client event queue waits beforethe queue is sent to the server.
10000
mxe.webclient.attachimage Enables or disables the AttachClipboard Image button when youcreate communications.
0
mxe.webclient.deepRequiredCheck When this property is enabled,before saving data, a check iscompleted to verify that valid datawas provided for all fields thatrequire a value.
1
mxe.webclient.disablelongopquery Indicates whether a longop query isdisabled.
0
mxe.webclient.exitcontexttimeout Context timeout on exiting. 0
Developing applications 107

Property name Description Default value
mxe.webclient.listtable.retainstate When enabled, this property retainsthe state of the List tab for the usersession. If disabled, when the userreturns to the List tab after workingin other tabs, the List tab is resetand any filters set are lost.
1
mxe.webclient.logging.CorrelationEnabled A Boolean value to enable ordisable the Correlation ID fortracking.
FALSE
mxe.webclient.lostconnectionrecheckinterval Specifies the interval in seconds towait before rechecking the server tosee if the connection is restoredafter a loss of connection.
2
mxe.webclient.lostconnectionwarninginterval Specifies the interval in seconds towait before checking if theconnection to server is lost.
15
mxe.webclient.lostconnectionwarningonly A Boolean value that enables ordisables display of a serverconnection lost only warning.
FALSE
mxe.webclient.maxuisessions Specifies the maximum number ofconcurrent sessions configured forthe server.
0
mxe.webclient.maxuisessionsend503 If enabled, the server sends a 503error when the server reaches themaximum number of concurrentsessions, or when the user reachesthe maximum number of UIsessions for an HTTP session.
1
mxe.webclient.maxUISessionsPerHttpSession Redirects you to the login errorpage when the user reaches themaximum number of UI sessionsfor an HTTP session. A settingbelow 1 is unlimited.
10
mxe.webclient.outOfOrderReqTimeout The number of seconds a clientrequest waits for earlier sequencedrequests to reach the server.
20
mxe.webclient.simpledomaindownload Allows you to automaticallydownload simple domains.
1
mxe.webclient.skin This value specifies the style usedin the user interface, and the defaultstyle is "tivoli09". You can set thisvalue to "classic" if it is necessary torevert to the style used in earlierreleases, for example to adaptcustom layouts to the default style.
tivoli09
mxe.webclient.staticid When enabled, this propertygenerates static IDs for UIcomponents and is used, primarilyby the Automation Scriptsapplication.
FALSE
mxe.webclient.warningHandling Enables applications to perform acheck for all required fields thatneed a value when saving.
0
webclient.CMSLocation This property specifies the locationof a CMS subsystem. The value isset to local if using the CMS JARfile. This value is set to a validaddress if using a Tivoli®
Integration Platform web service.
local
108 Developing Applications

Property name Description Default value
webclient.ResultSetQueryTimeout Specifies the number of seconds thatelapse before a query timeoutoccurs when it is initiated from aResultsBean.
360
webclient.accessibilitymode A Boolean value that enables ordisables UI accessibility mode.
FALSE
webclient.addhyphentobreak If enabled, adds a hyphen to breakwords.
FALSE
webclient.allowinsubframe Allows the Maximo system to loadwithin a frame (disable framebusting).
FALSE
webclient.canbreakwords If enabled, breaks words for textrendering.
TRUE
webclient.changepwdapp Change password application. changepswd
webclient.debugupgrade Enable additional logging fordebugging the screen upgradeprocess.
FALSE
webclient.designer.group Specifies the default security groupthat can add generic signatureoptions and applicationauthorizations for new applicationsin the Application Designer.
MAXADMIN
webclient.dojo.debug A Boolean value that enables ordisables debugging for the Dojoframework.
0
webclient.downloaddurationastext Allows you to download theduration type as text in MicrosoftExcel.
1
webclient.emptylistonclear If enabled, an empty table displayswhen a filter is cleared, or a Clearbutton is used.
TRUE
webclient.enabledoclinkonload If enabled, the style of anattachments control can change toindicate whether there is adocument attached.
FALSE
webclient.exitcontexttimeout This property specifies the delay inseconds before closing a sessionafter the user exits.
60
webclient.exitwarn A Boolean value that enables ordisables a warning whenever a userexits.
1
webclient.gcfilepath The filepath for garbage collection. C:\\bea\\user_projects\\mydomain\\
webclient.leavecontexttimeout The time that elapses after a userleaves a context, before the contexttimes out.
60
webclient.listwarningthreshold A Boolean value that enables ordisables the display of a warningwhen the number of records to listexceeds the maximum number ofrecords that can be shown on thepage.
1
webclient.loginerrorpage Specifies the location of the loginerror JSP page.
../webclient/login/loginerror.jsp
webclient.loginpage Specifies the location of the loginJSP page.
../webclient/login/login.jsp
webclient.logoutpage Specifies the location of the log outJSP page.
../webclient/login/logout.jsp
Developing applications 109

Property name Description Default value
webclient.longopquerydialogwaitetime If a longop query does not completewithin the time specified (in ms), adialog box opens.
3000
webclient.mask Specifies the characters to showwhen a field is masked.
XXXXXX
webclient.maxdownloadrows Specifies the maximum number ofrecords to download in a table.Setting this value to -1 (minus one)downloads all rows of data.
-1
webclient.maxselectrows Specifies the maximum number ofrows that a user can select from aresults (or list) table.
200
webclient.multibrowsersupport Indicates whether a user can openapplications in multiple tabs in abrowser or in multiple browserwindows.
TRUE
webclient.multisorttables Indicates whether a user can sortmultiple columns.
FALSE
webclient.needssave A Boolean value that enables ordisables save onaddrow,toggledeleterow events.
FALSE
webclient.no_xmlcache Resets the browser cache.
webclient.performancestatistics Generates user interfaceperformance statistics.
disabled
webclient.richtext.fontlist The rich text editor uses defaultweb fonts, such as serif, monospace,and sans-serif. Add acomma-separated list of customfonts, if required.
webclient.savestartcentertemplatelabels If enabled, the labels in the StartCenter are stored in the database fortranslation. If disabled, labels arenot saved for translation.
TRUE
webclient.sessiontimeoutwarningtime Specify the number of minutes thatcan elapse before a session timeoutwarning is shown.
2
webclient.smartfill If enabled, a user can enter partialdata in a field and, if an exactmatch is found in the database, thefield updates with this value. Ifmultiple possible matches arefound, the user can select from a listof possible matches to update thefield.
TRUE
webclient.startapp Specifies the application that loadson startup (if not using a startapplication).
startcntr
webclient.startpage Specifies the page that loads onstartup (if not using a start page).
webclient.systemeventhandler Specifies the system event handler. psdi.webclient.system.controller.SystemEventHandler
webclient.useabbrrenderid If enabled, shorter renderIds areused.
TRUE
webclient.useabsoluteimagepath If enabled, applications must use anabsolute path for images.
FALSE
110 Developing Applications

Property name Description Default value
webclient.wfmapimageformat Specifies the format of theWorkFlow Map image, which mustbe in .png or .gif format.
png
webclient.wraplength Length to wrap 75
webclient.wrapreadonlycolumns Wrap UI Columns TRUE
Related concepts:“Data validation” on page 5The system validates data to ensure that users are working with the correct data.Data can be validated on the server-side or the client-side.Related tasks:“Configuring autofill properties” on page 7To improve performance, fields in forms can be automatically filled with cacheddata. If your network latency is over 100 milliseconds, you can specify the fields tobe automatically filled.
Developing applications 111

112 Developing Applications

Notices
This information was developed for products and services offered in the U.S.A.
IBM may not offer the products, services, or features discussed in this document inother countries. Consult your local IBM representative for information on theproducts and services currently available in your area. Any reference to an IBMproduct, program, or service is not intended to state or imply that only that IBMproduct, program, or service may be used. Any functionally equivalent product,program, or service that does not infringe any IBM intellectual property right maybe used instead. However, it is the user's responsibility to evaluate and verify theoperation of any non-IBM product, program, or service.
IBM may have patents or pending patent applications covering subject matterdescribed in this document. The furnishing of this document does not grant youany license to these patents. You can send license inquiries, in writing, to:
IBM Director of LicensingIBM CorporationNorth Castle DriveArmonk, NY 10504-1785U.S.A.
For license inquiries regarding double-byte (DBCS) information, contact the IBMIntellectual Property Department in your country or send inquiries, in writing, to:
Intellectual Property LicensingLegal and Intellectual Property LawIBM Japan Ltd.1623-14, Shimotsuruma, Yamato-shiKanagawa 242-8502 Japan
The following paragraph does not apply to the United Kingdom or any othercountry where such provisions are inconsistent with local law: INTERNATIONALBUSINESS MACHINES CORPORATION PROVIDES THIS PUBLICATION "AS IS"WITHOUT WARRANTY OF ANY KIND, EITHER EXPRESS OR IMPLIED,INCLUDING, BUT NOT LIMITED TO, THE IMPLIED WARRANTIES OFNON-INFRINGEMENT, MERCHANTABILITY OR FITNESS FOR A PARTICULARPURPOSE. Some states do not allow disclaimer of express or implied warranties incertain transactions, therefore, this statement may not apply to you.
This information could include technical inaccuracies or typographical errors.Changes are periodically made to the information herein; these changes will beincorporated in new editions of the publication. IBM may make improvementsand/or changes in the product(s) and/or the program(s) described in thispublication at any time without notice.
Any references in this information to non-IBM Web sites are provided forconvenience only and do not in any manner serve as an endorsement of thosewebsites. The materials at those websites are not part of the materials for this IBMproduct and use of those websites is at your own risk.
© Copyright IBM Corp. 2008, 2013 113
IBM may use or distribute any of the information you supply in any way itbelieves appropriate without incurring any obligation to you.
Licensees of this program who wish to have information about it for the purposeof enabling: (i) the exchange of information between independently createdprograms and other programs (including this one) and (ii) the mutual use of theinformation which has been exchanged, should contact:
IBM Corporation2Z4A/10111400 Burnet RoadAustin, TX 78758 U.S.A.
Such information may be available, subject to appropriate terms and conditions,including in some cases, payment of a fee.
The licensed program described in this document and all licensed materialavailable for it are provided by IBM under terms of the IBM Customer Agreement,IBM International Program License Agreement or any equivalent agreementbetween us.
Information concerning non-IBM products was obtained from the suppliers ofthose products, their published announcements or other publicly available sources.IBM has not tested those products and cannot confirm the accuracy ofperformance, compatibility or any other claims related to non-IBM products.Questions on the capabilities of non-IBM products should be addressed to thesuppliers of those products.
This information contains examples of data and reports used in daily businessoperations. To illustrate them as completely as possible, the examples include thenames of individuals, companies, brands, and products. All of these names arefictitious and any similarity to the names and addresses used by an actual businessenterprise is entirely coincidental.
COPYRIGHT LICENSE:
This information contains sample application programs in source language, whichillustrate programming techniques on various operating platforms. You may copy,modify, and distribute these sample programs in any form without payment toIBM, for the purposes of developing, using, marketing or distributing applicationprograms conforming to the application programming interface for the operatingplatform for which the sample programs are written. These examples have notbeen thoroughly tested under all conditions. IBM, therefore, cannot guarantee orimply reliability, serviceability, or function of these programs. The sampleprograms are provided "AS IS", without warranty of any kind. IBM shall not beliable for any damages arising out of your use of the sample programs.
TrademarksIBM, the IBM logo, and ibm.com are trademarks or registered trademarks ofInternational Business Machines Corp., registered in many jurisdictions worldwide.Other product and service names might be trademarks of IBM or other companies.A current list of IBM trademarks is available on the Web at “Copyright andtrademark information” at www.ibm.com/legal/copytrade.shtml.
114 Developing Applications

Java and all Java-based trademarks and logos are trademarks or registeredtrademarks of Oracle and/or its affiliates.
Linux is a registered trademark of Linus Torvalds in the United States, othercountries, or both.
Microsoft, Windows, and the Windows logo are trademarks of MicrosoftCorporation in the United States, other countries, or both.
UNIX is a registered trademark of The Open Group in the United States and othercountries.
Notices 115

116 Developing Applications


����
Printed in USA