max operators manual 1990-2014
TRANSCRIPT

MUDD-OX INC.
MAX AND BUFFALO ATV
OPERATOR’S MANUAL
MODEL YEARS 1990 - 2015
DO NOT REMOVE THIS OPERATOR’S MANUAL
FROM THIS VEHICLE
For parts and accessories visit www.Max6x6.com

1
Your ATV can be hazardous to operate.
A collision or rollover can occur quickly, even during routine maneuvers such as turningand driving on hills, over obstacles or while operating in water, if you fail to take properprecautions.
For your safety, understand and follow all the warnings contained in this Operator’sManual and the labels on your vehicle.
Keep this Operator’s Manual with your vehicle at all times.
FAILURE TO FOLLOW THE WARNINGS CONTAINED IN THIS MANUALCAN RESULT IN SERIOUS INJURY OR DEATH.
Particularly important information is distinguished in the manual by the followingnotations:
Mudd-Ox Inc., February 15, 2006
The Safety Alert Symbol meansATTENTION! BE ALERT! YOURSAFETY IS INVOLVED.
WARNING Failure to follow WARNING instructionscould result in severe injury or death to themachine operator, a bystander, or a personinspecting or repairing the machine.
CAUTION A CAUTION indicates special precautionsThat must be taken to avoid damage to themachine.
NOTE: A NOTE provides key information to makeprocedures easier or more clear.

2
Introduction
FOREWORD
Congratulations and thank you from Mudd-ox Inc. for purchasing one of ourMAX or Buffalo All Terrain Vehicles (ATVs)
This Operator’s Manual is furnished to ensure that the operator is aware of safe operatingprocedures. It also includes information about the general care and maintenance of yourATV.
Carefully read the following pages. If you have any questions regarding this ATV,contact an authorized MAX ATV dealer or Mudd-Ox Inc. at (1-800-255-2511) forassistance. Remember, only an authorized Max ATV dealer has the knowledge toprovide you with the best service possible.
Protect Your Sport· Know all local, state/provincial riding laws;· Respect your vehicle;· Respect the environment; and· You will gain the respect of others.
We also advise you to strictly follow the recommended maintenance program as outlined.This preventive maintenance program is designed to ensure that all critical componentson this ATV are thoroughly inspected at various intervals.
All information in this manual is based upon the latest product data and specificationsavailable at the time of printing . Mudd-Ox Inc. reserves the right to make productchanges and improvements which may affect illustrations or explanations without notice.

3
Table of ContentsWARNING Indicates a potential hazard that could result in serious injury
or death
DIVISION I - SAFETY
INTRODUCTION…………………………………………………………………2WARNING LABELS…………………………………………………………...…8LOCATION OF PARTS AND CONTROLS…………………………………..11OPERATION WARNINGS……………………………………………………..12QUICK REFERENCE…………………………………………………..……….27SAFETY SECTION……………………………………………………………...30
Prevention………………………………………………………………...30Clothing and Gear…………………………………………………30Condition of the ATV……………………………………………..31First Aid and Survival……………………………………………..34
Active Driving…………………………………………………………….36Basic Operating Maneuvers……………………………………….36How to Handle the ATV (Active Driving)……………………….. 40Tips………………………………………………………………...44
Sound Judgement………………………………………………………...46The Environment…………………………………………………..47Those Around You………………………………………………...47Equipment………………………………………………………….48Personal Choices…………………………………………………...50
Supervision………………………………………………………………..52Taking Responsibility……………………………………………...52
DIVISION II – OPERATION/MAINTENANCE
PREFACE…………………………………………………………………………53PARTS AND ACCESSORIES…………………………………………………...53SPECIFICATIONS……………………………………………………………….54GENERAL INFORMATION……………………………………………………57OPERATING INSTRUCTIONS………………………………………………...73OPERATING TECHNIQUES…………………………………………………...77GENERAL MAINTENANCE…………………………………………………....83PREPARATION FOR STORAGE……………………………………………..107PREPARATION AFTER STORAGE………………………………………….108LIMITED WARRANTY………………………………………………………...109IDENTIFICATION NUMBERS RECORD……………………………………109

4
An ATV is not a toy and can be hazardous to operate.
An ATV handles differently from other vehicles including motorcycles and cars. Acollision or rollover can occur quickly, even during routine maneuvers such as turningand driving on hills, over obstacles or while operating in water, if you fail to take properprecautions.
SEVERE INJURY OR DEATH can result if you do not follow these instructions:
· Read this manual and all labels carefully and follow the operatingprocedures described. If you did not receive an owner’s manual please callMudd-Ox Inc. at 1-800-255-2511.
· Never allow anyone under 18 years of age to operate your ATV.· Never permit a guest to operate your ATV unless the guest has read this
manual and all product labels.· Never carry more passengers than the vehicle is designed to carry. The
MAX II is a two passenger vehicle and the MAX IV is a four passengervehicle, the Buffalo is a two passenger model. Do not exceed thepassenger total.
· Never carry passengers in the cargo area of the ATV at any time.· Never carry any cargo in the cargo area of the ATV when used in water.· Never exceed loads of 600 pounds on land in the MAX II, including
driver, passengers and any cargo and this capacity is further reduced if anyaccessories and options have been installed (see the specifications sectionin this Operator’s Manual for the weights of accessories and options.)
· Never exceed loads of 800 pounds on land in the MAX IV, includingdriver, passengers and any cargo and this capacity is further reduced if anyaccessories and options have been installed (see the specifications sectionin this owner’s manual for the weights of accessories and options.)
· Never exceed loads of 1000 pounds on land in the Buffalo, includingdriver, passengers and any cargo and this capacity is further reduced if anyaccessories and options have been installed (see the specifications sectionin this Operator’s Manual for the weights of accessories and options).
· Never exceed loads of 500 pounds when taking any ATV into water,including driver, passengers and any cargo and this capacity is furtherreduced if any accessories and options have been installed (see thespecifications section in this Operator’s Manual for the weights ofaccessories and options).
WARNING Indicates a potential hazard that could result in seriousinjury or death.

5
· Never exceed loads of 100 pounds in the cargo area of the MAX II orMAX IV when used on land.
· Never exceed loads of 750 pounds in the cargo area of the Buffalo whenused on land.
· Never raise or lower the Buffalo’s cargo box unless the ATV is stationaryand the parking/auxiliary brake is applied and locked, as described in thismanual.
· Never raise or lower the Buffalo’s cargo box unless the ATV is on levelground.
· Never raise or lower the Buffalo’s cargo box unless you are properlyseated in the ATV, as described in this manual.
· Never place any part of your body in between the Buffalo’s cargo box andany other part of the ATV, when the cargo box is being raised or lowered.
· Never lean into the Buffalo’s engine/transmission area, unless the supportbar is raised and locked.
· Never carry loads above the height of the Buffalo’s load guard.· Make sure loads are securely anchored and evenly distributed.· Never allow the rear wheels to hang over the edge of a loading dock or
ravine, when you are dumping a load from the Buffalo’s cargo box.· Never drive the Buffalo with the cargo box in the raised position.· Always make sure that your drain plugs are properly installed when the
ATV is used in water.· Never tow anything when the ATV is in water.· Never operate an ATV in rough water.· Never operate your ATV in water without the driver and passengers
wearing an approved lifevest.· Always make sure that when ATV is in water that you have a paddle on
board.· Always make sure that when ATV is in water that the driver and
passengers adjust their positions so that the ATV is floating level.· Always enter the water directly, Head–On, and very slowly.· Always make sure that driver and passengers fasten their seat belts if the
vehicle is equipped with rollover protection.· Always make sure that driver and passengers unfasten their seat belts (if
so equipped) when operating this ATV in water deeper than one foot.· Never start the motor on this ATV in forward or neutral gear. This ATV
must be in reverse gear with the parking/auxiliary brake applied and thenlocked as described in this manual, before starting the motor.
· Always apply and lock parking/auxiliary brake when shifting gears.· Avoid shifting gears on a slope. If you must shift gears make sure the
parking/auxiliary brake is applied and locked as described in this manual.· Never apply brakes suddenly when going downhill. If you must apply
brakes when going downhill apply them smoothly and gradually.· Never operate an ATV on any paved surfaces, including sidewalks,
driveways, parking lots and streets.

6
WARNING Indicates a potential hazard that could result in seriousinjury or death.
· Never operate an ATV on public roads.· Never operate an ATV without wearing an approved helmet that fits
properly. You should also wear eye protection, gloves, boots, long-sleevedshirt or jacket, and long pants.
· Never consume alcohol or drugs before or while operating an ATV.· Never operate at excessive speeds. Always travel at a speed which is
proper for the terrain, visibility and operating conditions, and yourexperience.
· Never attempt wheelies, jumps, other stunts.· Always keep both hands and feet inside the ATV during operation.· Always inspect your ATV each time you use it to make sure it is in safe
operating condition. Always follow the inspection and maintenanceprocedures and schedules described in this manual.
· Always go slowly and be extra careful when operating on unfamiliarterrain. Always be alert to changing terrain conditions when operating theATV.
· Never operate on excessively rough, slippery, or loose terrain.· Always follow proper procedures for turning as described in this manual.
Practice turning at slow speeds before attempting to turn at faster speeds.Do not turn at excessive speed.
· Always have the ATV checked by an authorized Max dealer if it has beeninvolved in an accident.
· Never operate the ATV on hills too steep for the ATV or for your abilities.Practice on smaller hills before attempting larger hills.
· Always follow proper procedures for climbing hills as described in thismanual. Check the terrain carefully before you start up any hill.
· Never climb hills with slippery or loose surfaces.· Never open the throttle suddenly.· Never go over the top of any hill at high speed.· Always follow proper procedures for going down hills and for braking on
hills as described in this manual. Check the terrain carefully before youstart down any hill.
· Never go down a hill at high speed.· Avoid going down a hill at an angle which would cause the vehicle to lean
sharply to one side. Go straight down the hill, where possible.· Never apply brakes suddenly.· Always follow proper procedures for crossing the side of a hill as
described in this manual.· Avoid hills with slippery or loose surfaces.· Never attempt to turn the ATV around on any hill until you have mastered
the turning techniques described in this manual on level ground.

7
· Avoid crossing the side of a steep hill if possible.· Always use proper procedures if you stall or roll backward when climbing
a hill. To avoid stalling, maintain a steady speed when climbing a hill andkeep both control levers forward. If you stall or roll backwards, follow thespecial procedure for braking described in this manual. Slowly coastbackward using the control levers and parking/auxiliary brake to controlyour descent.
· Always check for obstacles before operating in a new area.· Never attempt to operate over large obstacles, such as large rocks or fallen
trees.· Always follow proper procedures when operating over obstacles as
described in this manual.· Always be careful of skidding or sliding. On slippery surfaces, such as ice,
go slowly and be very cautious in order to reduce the chance of skiddingor sliding out of control.
· Always be sure there are no obstacles or people behind you when youoperate in reverse. When it is safe to proceed in reverse, go slowly.
· Always use the size and type tires specified in this manual.· Always maintain proper tire pressure as described in this manual.· Never improperly install or improperly use accessories on your ATV.· Never exceed the stated load capacities for an ATV. The stated load
capacity on land is different than in water as described in this manual.· Cargo should be properly distributed and securely attached. Reduce speed
and follow the instructions in this manual for carrying cargo or pulling atrailer and allow greater distance for braking.
· No one under the age of 18 should operate this ATV. Some operators atthe age of 18 may not be able to operate an ATV safely. Parents shouldsupervise the use of the ATV at all times. Parents should permit continueduse only if they determine that the operator has the ability to operate theATV safely.
WARNING Indicates a potential hazard that could result in seriousinjury or death.

8
WARNINGMake sure the following five labels are attached to your ATV. If they aren’t callMudd-Ox Inc. at 1/800-255-2511 for replacement labels.
WARNING LABEL 1SEVERE INJURY OR DEATH CAN RESULT IF YOU DO NOT FOLLOW THESE INSTRUCTIONS:
BEFORE YOU OPERATE THIS ATV, READ THE OPERATOR’S MANUAL
· NEVER CARRY MORE THAN 2 PERSONS TOTAL IN THE MAX II AND BUFFALO AND NEVER MORETHAN 4 PERSONS TOTAL IN THE MAX IV.
· NEVER EXCEED LOADS OF 600 POUNDS ON LAND IN THE MAX II, INCLUDING DRIVER,PASSENGERS AND ANY CARGO AND THIS CAPACITY IS FURTHER REDUCED IF ANY ACCESSORIESAND OPTIONS HAVE BEEN INSTALLED
· NEVER EXCEED LOADS OF 800 POUNDS ON LAND IN THE MAX IV, INCLUDING DRIVER,PASSENGERS AND ANY CARGO AND THIS CAPACITY IS FURTHER REDUCED IF ANY ACCESSORIESAND OPTIONS HAVE BEEN INSTALLED
· NEVER EXCEED LOADS OF 1000 POUNDS ON LAND IN THE BUFFALO, INCLUDING DRIVER,PASSENGERS AND ANY CARGO AND THIS CAPACITY IS FURTHER REDUCED IF ANY ACCESSORIESAND OPTIONS HAVE BEEN INSTALLED
· NEVER EXCEED LOADS OF 500 POUNDS WHEN TAKING ANY ATV INTO WATER, INCLUDINGDRIVER, PASSENGERS AND ANY CARGO AND THIS CAPACITY IS FURTHER REDUCED IF ANYACCESSORIES AND OPTIONS HAVE BEEN INSTALLED
· NO OPERATOR UNDER AGE 18
· ALWAYS WEAR AN APPROVED MOTORCYCLE HELMET AND EYE PROTECTION
· ALWAYS MAKE SURE THAT DRIVER AND PASSENGERS FASTEN THEIR SEATBELTS IF THE VEHICLEIS EQUIPPED WITH ROLLOVER PROTECTION.
· ALWAYS MAKE SURE THAT DRIVER AND PASSENGERS UNFASTEN THEIR SEATBELTS(if so equipped) WHEN OPERATING THIS ATV IN WATER DEEPER THAN ONE FOOT
WARNING LABEL 2SEVERE INJURY OR DEATH CAN RESULT IF YOU DO NOT FOLLOW THESE INSTRUCTIONS:
BEFORE YOU OPERATE THIS ATV, READ THE OPERATOR’S MANUAL
· ALWAYS PROPERLY INSTALL DRAIN PLUGS FOR USE IN WATER.
· NEVER OPERATE IN ROUGH WATER
· ALWAYS MAKE SURE THAT WHEN THE ATV IS IN WATER THAT THE DRIVER AND PASSENGERSWEAR APPROVED LIFEVESTS AND TAKE ALONG A PADDLE
· ALWAYS MAKE SURE THAT WHEN ATV IS IN WATER THAT THE DRIVER AND PASSENGERS ADJUSTTHEIR POSITIONS SO THAT THE ATV IS FLOATING LEVEL.
· NEVER START THE MOTOR ON THIS ATV IN FORWARD OR NEUTRAL GEAR. THIS ATV MUST BE INREVERSE GEAR WITH THE PARKING/AUXILIARY BRAKE APPLIED AND THEN LOCKED BEFORESTARTING MOTOR.
· NEVER APPLY BRAKES SUDDENLY WHEN GOING DOWNHILL.
· AVOID SHIFTING GEARS ON A SLOPE.
· ALWAYS FOLLOW PROPER PROCEDURES FOR OPERATION ON HILLS.
· NEVER OPERATE AT EXCESSIVE SPEEDS.
· ALWAYS FOLLOW PROPER PROCEDURES FOR TURNING.

9
WARNING LABEL 3SEVERE INJURY OR DEATH CAN RESULT IF YOU DO NOT FOLLOW THESE
INSTRUCTIONS:
BEFORE YOU OPERATE THIS ATV, READ THEOPERATOR’S MANUAL
NEVER CARRY PASSENGERS IN THE CARGO AREAAT ANY TIME.
NO CARGO ALLOWED IN THE CARGO AREA WHENUSED IN WATER.
MAXIMUM LOAD IN THE CARGO AREA OF THEMAX II AND MAX IV ON LAND:
100 pounds evenly distributed.
MAXIMUM LOAD IN THE CARGO AREA OF THEBUFFALO ON LAND: 750 pounds evenly distributed.
LABEL 4
WARNINGSEVERE INJURY OR DEATH CAN
RESULT IF YOU DO NOT FOLLOWTHESE INSTRUCTIONS:
BEFORE YOU OPERATETHIS ATV, READ THE
OPERATOR’S MANUAL
NEVER tow anything whenin water.
MAXIMUM TOWINGCAPACITY: 1000 lbs
LABEL 5
WARNING
BEFORE YOU OPERATE THISATV, READ THE OPERATOR’SMANUAL
TO SHIFT GEARS
STOP VEHICLE COMPLETELY
PARKING/AUXILIARY BRAKEMUST BE APPLIED ANDLOCKED.
Reverse UP
Neutral
Forward DOWN

10
WARNING Indicates a potential hazard that could result in serious injuryor death
Make sure the following label (label 6) is attached to the Buffalo’s cargo box. If it isn’tplease call Mudd-Ox Inc. at 1/800-255-2511 for a replacement label.
WARNING LABEL 6SEVERE INJURY OR DEATH CAN RESULT IF YOU DO NOT FOLLOW THESE
INSTRUCTIONS:BEFORE YOU OPERATE THIS ATV, READ THE OPERATOR’S MANUAL
NEVER RAISE OR LOWER THE BUFFALO’S CARGO BOX UNLESS THEATV IS STATIONARY AND THE PARKING/AUXILIARY BRAKE ISAPPLIED AND LOCKED, AS DESCRIBED IN THIS MANUAL
NEVER RAISE OR LOWER THE BUFFALO’S CARGO BOX UNLESS THEATV IS ON LEVEL GROUND
NEVER RAISE OR LOWER THE BUFFALO’S CARGO BOX UNLESS YOUARE PROPERLY SEATED IN THE ATV
NEVER PLACE ANY PART OF YOUR BODY IN BETWEEN THEBUFFALO’S CARGO BOX AND ANY OTHER PART OF THE ATV, WHENTHE CARGO BOX IS BEING RAISED OR LOWERED

11
Location of Parts and Controls
MAX II
MAX IV
BUFFALO

12
OPERATION WARNINGS
WARNING
POTENTIAL HAZARD
Operating this ATV without reading andunderstanding the Operator’s Manual.
WHAT CAN HAPPEN
The risk of accident is greatly increased if theoperator does not know how the operate theATV properly in different situations and on
different types of terrain.
HOW TO AVOID THE HAZARD
Beginning and inexperienced operator’s shouldread and understand the Operator’s Manual.
They should then regularly practice theoperating techniques described in this
Operator’s Manual.
WARNING
POTENTIAL HAZARD
Allowing anyone under age 18 to operate thisATV.
WHAT CAN HAPPEN
Use of ATVs by children can lead to severeinjury or death.
Children under the age of 18 may not have theskills, abilities, or judgment needed to operate
the ATV safely and may be involved in aserious accident.
HOW TO AVOID THE HAZARD
A child under age 18 should never operate thisATV.
WARNING
POTENTIAL HAZARD
Carrying more than 2 persons total in the MAXII and Buffalo or carrying more than 4 persons
total in the MAX IV.
WHAT CAN HAPPEN
Greatly reduces your ability to balance andcontrol this ATV on both land and in the water.
Could cause an accident, including an overturnon both land and in the water, resulting ininjury or death to driver and passengers.
HOW TO AVOID THE HAZARD
Never carry more than 2 persons total in theMAX II and Buffalo or carry more than 4
persons total in the MAX IV.
WARNING
POTENTIAL HAZARD
Carrying passengers in the cargo area of theATV at any time.
WHAT CAN HAPPEN
Greatly reduces your ability to balance andcontrol this ATV on both land and in the water.
Could cause an accident, including an overturnon both land and in the water, resulting ininjury or death to driver and passengers.
HOW TO AVOID THE HAZARD
Never carry passengers in the cargo area of theATV at any time.

13
WARNING
POTENTIAL HAZARD
Carrying cargo in the cargo area of the ATVwhen used in water.
WHAT CAN HAPPEN
Greatly reduces your ability to balance andcontrol this ATV in the water.
Could cause an accident, including capsizingand sinking, resulting in injury or drowning to
driver and passengers.
HOW TO AVOID THE HAZARD
Never carry any cargo in the cargo area whenATV is in water.
WARNING
POTENTIAL HAZARD
Overloading the ATV by exceeding loads of600 pounds on land in the Max II, including
driver, passengers and any cargo. This capacityis further reduced if any accessories and
options have been installed (see thespecifications section in this Operator’s Manual
for the weights of accessories and options.)
WHAT CAN HAPPEN
Could cause changes in vehicle handling,which could lead to an accident, resulting in
injury or death to driver and passengers.
HOW TO AVOID THE HAZARD
Never exceed the stated load capacity for theATV.
WARNING
POTENTIAL HAZARD
Overloading the ATV by exceeding loads of800 pounds on land in the Max IV, including
driver, passengers and any cargo. This capacityis further reduced if any accessories and
options have been installed (see thespecifications section in this Operator’s Manual
for the weights of accessories and options.)
WHAT CAN HAPPEN
Could cause changes in vehicle handling,which could lead to an accident, resulting in
injury or death to driver and passengers.
HOW TO AVOID THE HAZARD
Never exceed the stated load capacity for theATV.
WARNING
POTENTIAL HAZARD
Overloading the ATV by exceeding loads of1000 pounds on land in the Buffalo, includingdriver, passengers and any cargo. This capacity
is further reduced if any accessories andoptions have been installed (see the
specifications section in this Operator’s Manualfor the weights of accessories and options.)
WHAT CAN HAPPEN
Could cause changes in vehicle handling,which could lead to an accident, resulting in
injury or death to driver and passengers.
HOW TO AVOID THE HAZARD
Never exceed the stated load capacity for theATV.

14
WARNING
POTENTIAL HAZARD
Overloading the ATV by exceeding loads of500 pounds when taking any ATV into water,including driver, passengers and any cargo.
This capacity is further reduced if anyaccessories and options have been installed
(see the specifications section in thisOperator’s Manual for the weights of
accessories and options.)
WHAT CAN HAPPEN
Greatly reduces your ability to balance andcontrol this ATV in the water.
Could cause an accident, including capsizingand sinking, which could result in injury or
drowning to driver and passengers.
HOW TO AVOID THE HAZARD
Never exceed the stated load capacity for theATV
WARNING
POTENTIAL HAZARD
Overloading the ATV by exceeding loads of100 pounds in the cargo area of the MAX II or
MAX IV when used on land.
WHAT CAN HAPPEN
Could cause an accident, including an overturn,resulting in injury or death to driver and
passengers.
HOW TO AVOID THE HAZARD
Never exceed the stated load capacity of 100pounds in the cargo area of the MAX II or
MAX IV when used on land.
WARNING
POTENTIAL HAZARD
Overloading the ATV by exceeding loads of750 pounds in the cargo area of the Buffalo
when used on land.
WHAT CAN HAPPEN
Could cause an accident, including an overturn,resulting in injury or death to driver and
passengers.
HOW TO AVOID THE HAZARD
Never exceed the stated load capacity of 750pounds in the cargo area of the Buffalo when
used on land.
WARNING
POTENTIAL HAZARD
Raising or lowering the Buffalo’s cargo boxwhen the ATV is not stationary and the
parking/auxiliary brake is not applied andlocked, as described in this manual.
WHAT CAN HAPPEN
Could cause an accident, including an overturnresulting in injury or death to driver and
passenger.
HOW TO AVOID THE HAZARD
Never raise or lower the Buffalo’s cargo boxunless the ATV is stationary and the
parking/auxiliary brake is applied and locked,as described in this manual.

15
WARNING
POTENTIAL HAZARD
Raising or lowering Buffalo’s cargo box whenthe ATV is not on level ground.
WHAT CAN HAPPEN
Could cause an accident, including an overturnresulting in injury or death to driver and
passenger.
HOW TO AVOID THE HAZARD
Never raise or lower the Buffalo’s cargo boxunless the ATV is on level ground.
WARNING
POTENTIAL HAZARD
Raising or lowering the Buffalo’s cargo boxwhen you are not properly seated.
WHAT CAN HAPPEN
The ATV could overturn resulting in injury ordeath to driver and passenger.
HOW TO AVOID THE HAZARD
Never raise or lower the Buffalo’s cargo boxunless you are properly seated in the ATV, as
described in this manual.
WARNING
POTENTIAL HAZARD
Raising or lowering the Buffalo’s cargo box ifany part of your body is between the Buffalo’s
cargo box and any other part of the ATV.
WHAT CAN HAPPEN
The cargo box could crush you, causing injuryor death.
HOW TO AVOID THE HAZARD
Never place any part of your body in betweenthe Buffalo’s cargo box and any other part of
the ATV, when the cargo box is being raised orlowered.
WARNING
POTENTIAL HAZARD
Leaning into the Buffalo’s engine/transmissionarea, unless the support bar is raised and
locked.
WHAT CAN HAPPEN
The cargo box could fall and crush you,resulting in injury or death.
HOW TO AVOID THE HAZARD
Never lean into the Buffalo’s engine/transmission area, unless the support bar is
raised and locked.
16
WARNING
POTENTIAL HAZARD
Carrying loads above the height of theBuffalo’s load guard.
WHAT CAN HAPPEN
The load could shift forward causing injury ordeath to the driver and passenger.
HOW TO AVOID THE HAZARD
Never carry loads above the height of theBuffalo’s load guard.
WARNING
POTENTIAL HAZARD
Carrying loads that is not securely anchoredand evenly distributed.
WHAT CAN HAPPEN
The load could shift, affecting stability, causingan accident, including an overturn resulting in
injury or death to driver and passenger.
HOW TO AVOID THE HAZARD
Make sure loads are securely anchored andevenly distributed.
WARNING
POTENTIAL HAZARD
Allowing the rear wheels to hang over the edgeof a loading dock or ravine, when you are
dumping a load from the Buffalo’s cargo box.
WHAT CAN HAPPEN
This would place the weight of the load in thecargo box over center and the ATV could tip
over backwards.
HOW TO AVOID THE HAZARD
Never allow the rear wheels to hang over theedge of a loading dock or ravine, when you aredumping a load from the Buffalo’s cargo box.
WARNING
POTENTIAL HAZARD
Driving the Buffalo with the cargo box in theraised position.
WHAT CAN HAPPEN
Could cause an accident, including an overturnresulting in injury or death to driver and
passenger.
HOW TO AVOID THE HAZARD
Never drive the Buffalo with the cargo box inthe raised position.

17
WARNING
POTENTIAL HAZARD
Operating the ATV without the drain plugsproperly installed when the ATV is used in
water.
WHAT CAN HAPPEN
Will cause the vehicle to fill with water andcause it to capsize or sink, which could result
in injury or drowning to driver and passengers.
HOW TO AVOID THE HAZARD
Always make sure the drain plugs are properlyinstalled in the ATV as is described in the
Operator’s Manual.
WARNING
POTENTIAL HAZARD
Towing anything when using the ATV inwater.
WHAT CAN HAPPEN
Greatly reduces your ability to balance andcontrol this ATV in the water.
Could cause an accident, including capsizingand sinking, which could result in injury or
drowning to driver and passengers.
HOW TO AVOID THE HAZARD
Never tow anything when the ATV is used inwater.
WARNING
POTENTIAL HAZARD
Operating the ATV through rough water.
WHAT CAN HAPPEN
Greatly reduces your ability to balance andcontrol this ATV in the water.
Could cause an accident, including capsizingand sinking, which could result in injury or
drowning to driver and passengers.
HOW TO AVOID THE HAZARD
Never operate the ATV in rough water.
WARNING
POTENTIAL HAZARD
Operating or driving the ATV in water withoutthe driver and passengers wearing an approved
lifevest.
WHAT CAN HAPPEN
If you lose control of the ATV in water and itcapsizes and sinks, the driver and passengers
may be injured or drown.
HOW TO AVOID THE HAZARD
Never operate or drive in the ATV without thedriver and passengers wearing an approved
lifevest.

18
WARNING
POTENTIAL HAZARD
Operating the ATV in water without takingalong a paddle.
WHAT CAN HAPPEN
If you run out of gas or have an engine failurethe ATV will not be able to move under its
own power and you may be stranded.
HOW TO AVOID THE HAZARD
Never operate the ATV in water without takingalong a paddle.
WARNING
POTENTIAL HAZARD
Failure to make sure that when ATV is in waterthat the driver and passengers adjust theirpositions so that the ATV is floating level.
WHAT CAN HAPPEN
Water may enter the vehicle and cause it tocapsize or sink, which could result in injury or
drowning to driver and passengers.
HOW TO AVOID THE HAZARD
Always make sure that when ATV is in waterthat the driver and passengers adjust theirpositions so that the ATV is floating level.
WARNING
POTENTIAL HAZARD
Failure to enter the water directly, Head-On,and very slowly.
WHAT CAN HAPPEN
You may cause waves, which will enter theATV and cause it to capsize or sink, which
could result in injury or drowning to driver andpassengers.
HOW TO AVOID THE HAZARD
Always enter the water directly, Head-On andvery slowly.
WARNING
POTENTIAL HAZARD
Failure to fasten seat belts if the ATV isequipped with rollover protection.
WHAT CAN HAPPEN
If the ATV overturns, the driver and passengersmay be thrown from the vehicle and the roll bar
or roll cage could strike them,resulting ininjury or death.
HOW TO AVOID THE HAZARD
Always make sure that the driver andpassengers fasten their seat belts if the ATV is
equipped with rollover protection.

19
WARNING
POTENTIAL HAZARD
Failure to unfasten seat belts (if the ATV is soequipped) when in more than one foot of water.
WHAT CAN HAPPEN
If the ATV capsizes or sinks the driver andpassengers may be unable to unfasten their seat
belts and may drown.
HOW TO AVOID THE HAZARD
Always make sure that the driver andpassengers unfasten their seat belts (if the ATVis so equipped) when in more than one foot of
water.
WARNING
POTENTIAL HAZARD
Starting ATV in forward or neutral gear.
WHAT CAN HAPPEN
Could cause loss of control, which could causean accident.
The ATV could run away from you if theengine speed is too high and it is in forward
gear.
The control levers will not provide any brakingor steering control when the ATV is in neutral.
HOW TO AVOID THE HAZARD
Always start the ATV in reverse gear with theparking/auxiliary brake applied and locked
before starting motor.
WARNING
POTENTIAL HAZARD
Failure to apply and lock the parking/auxiliarybrake when shifting gears.
WHAT CAN HAPPEN
The control levers will not provide any brakingor steering control when the ATV is in neutral.
You could lose control of the ATV on a slope,which could cause an accident including an
overturn resulting in injury or death to driverand passengers.
HOW TO AVOID THE HAZARD
Always make sure that the parking/auxiliarybrake is applied and locked when shifting
gears.
WARNING
POTENTIAL HAZARD
Shifting gears on a slope.
WHAT CAN HAPPEN
The control levers will not provide any brakingor steering control when the ATV is in neutral.
Could cause loss of control of the ATV,causing an accident, including an overturn.
HOW TO AVOID THE HAZARD
Avoid shifting gears on a slope.
If you must shift gears make sure theparking/auxiliary brake is applied and locked.

20
WARNING
POTENTIAL HAZARD
Operating this ATV on paved surfaces.
WHAT CAN HAPPEN
The ATV’s tires are designed for off-road useonly, not for use on pavement. Paved surfacesmay seriously affect handling and control of
the ATV, which could cause an accident,resulting in injury or death to driver and
passengers.
HOW TO AVOID THE HAZARD
Never operate the ATV on any paved surfaces,including sidewalks, driveways, parking lots
and streets.
WARNING
POTENTIAL HAZARD
Applying brakes suddenly when goingdownhill.
WHAT CAN HAPPEN
The ATV may overturn, which could result ininjury or death to driver and passengers.
HOW TO AVOID THE HAZARD
Always make sure that the brakes are appliedsmoothly and gradually when going downhill.
WARNING
POTENTIAL HAZARD
Operating this ATV on public streets, roads, orhighways.
WHAT CAN HAPPEN
You can collide with another vehicle.
HOW TO AVOID THE HAZARD
Never operate this ATV on any public street,road, or highway, even a dirt or gravel one.
In many states it is illegal to operate ATVs onpublic streets, roads, or highways.
WARNING
POTENTIAL HAZARD
Operating or driving as a passenger in thisATV without wearing an approved motorcyclehelmet, eye protection, and protective clothing.
WHAT CAN HAPPEN
Operating or driving without an approvedmotorcycle helmet increases the chance of asevere head injury or death in the event of an
accident.
Operating or driving without eye protection canresult in an accident and increases your chances
of a severe injury in the event of an accident.
HOW TO AVOID THE HAZARD
Always make sure that you and yourpassengers wear an approved motorcycle
helmet that fits properly.
You should also wear:Eye protection(safety glasses or goggles)
GlovesBoots
Long sleeved shirt or jacketLong pants

21
WARNING
POTENTIAL HAZARD
Operating this ATV after or while consumingalcohol or drugs.
WHAT CAN HAPPEN
Could seriously affect your judgement.
Could cause you to react more slowly.
Could affect your balance and perception.
Could result in an accident.
HOW TO AVOID THE HAZARD
Never consume alcohol or drugs before orwhile driving this ATV.
WARNING
POTENTIAL HAZARD
Never operate at excessive speeds.
WHAT CAN HAPPEN
Increases your chances of losing control of theATV, which can result in an accident.
HOW TO AVOID THE HAZARD
Always drive at a speed that is proper for theterrain, visibility, and operating conditions,
and your experience.
WARNING
POTENTIAL HAZARD
Attempting wheelies, jumps, and other stunts.
WHAT CAN HAPPEN
Increases the chance of an accident, includingan overturn.
HOW TO AVOID THE HAZARD
Never attempt stunts, such as wheelies orjumps. Don’t show off.
WARNING
POTENTIAL HAZARD
Removing hands from control levers or feetfrom floorboard during operation.
WHAT CAN HAPPEN
Removing even one hand or foot can reduceyour ability to control the ATV or could cause
you to lose your balance and fall out of theATV.
HOW TO AVOID THE HAZARD
Always keep both hands on the control leversand both feet on the floorboard of your ATV
during operation.

22
WARNING
POTENTIAL HAZARD
Failure to inspect the ATV before operating.
Failure to properly maintain the ATV.
WHAT CAN HAPPEN
Increases the possibility of an accident orequipment damage.
HOW TO AVOID THE HAZARD
Always inspect your ATV each time you use itto make sure the ATV is in safe operating
condition.
Always follow the inspection and maintenanceprocedures and schedules described in this
Operator’s Manual.
WARNING
POTENTIAL HAZARD
Failure to use extra care when operating theATV on unfamiliar terrain.
WHAT CAN HAPPEN
You can come upon hidden rocks, bumps orholes without enough time to react.
Could cause loss of control of the ATV,causing an accident, including overturning.
HOW TO AVOID THE HAZARD
Go slowly and be extra careful when operatingon unfamiliar terrain.
Always be alert to changing terrain conditionswhen operating the ATV.
WARNING
POTENTIAL HAZARD
Failure to use extra care when operating onrough, slippery, or loose terrain.
WHAT CAN HAPPEN
Could cause loss of traction or vehicle control,which could result in an accident, including an
overturn
HOW TO AVOID THE HAZARD
Do not operate on rough, slippery, or looseterrain until you have learned and practiced the
skills necessary to control the ATV on suchterrain.
WARNING
POTENTIAL HAZARD
Turning improperly.
WHAT CAN HAPPEN
ATV could run out of control, causing anaccident including an overturn.
HOW TO AVOID THE HAZARD
Always follow proper procedures for turning asdescribed in this Operator’s Manual.
Practice turning at slow speeds beforeattempting to turn at faster speeds.
Do not turn at excessive speed.

23
WARNING
POTENTIAL HAZARDOperating on steep hills.
WHAT CAN HAPPEN
The ATV can overturn more easily on steephills than on level surfaces or small hills.
HOW TO AVOID THE HAZARD
Never operate the ATV on hills too steep forthe ATV or for your abilities.
Practice on smaller hills before attemptinglarger hills.
WARNING
POTENTIAL HAZARD
Climbing hills improperly.
WHAT CAN HAPPEN
Could cause loss of control, which could leadto an accident including an overturn.
HOW TO AVOID THE HAZARD
Always follow proper procedures for climbinghills as described in this Operator’s Manual.
Always check terrain carefully before you startup any hill.
Never climb hills with slippery or loosesurfaces.
Shift your weight forward.
Never open the throttle suddenly or makesudden movements with the control levers. The
ATV could flip over backwards.
Never go over the top of any hill at high speed.An obstacle, a sharp drop, or another vehicle or
person could be on the other side of the hill.
WARNINGPOTENTIAL HAZARD
Going downhill improperly.
WHAT CAN HAPPEN
Could cause loss of control, which could lead toan accident including an overturn.
HOW TO AVOID THE HAZARD
Always follow proper procedures for going downhills as described in this Operator’s Manual.
Always check the terrain carefully before you startdown any hill.
Shift your weight backward.
Never go down a hill at high speed.
Avoid going down a hill at an angle that wouldcause the vehicle to lean sharply to one side. Go
straight down the hill where possible.
Never pull back suddenly on the control levers.
Never push down suddenly on theparking/auxiliary brake.

24
WARNING
POTENTIAL HAZARD
Improperly crossing hills or turning on hills.
WHAT CAN HAPPEN
Could cause loss of control, which could leadto an accident including an overturn.
HOW TO AVOID THE HAZARD
Never attempt to turn the ATV around on anyhill until you have mastered the turningtechniques described in this Operator’s
Manual. Practice first on level ground. Be verycareful when turning on any hill.
Avoid crossing the side of a steep hill, ifpossible.
When crossing the side of a hill:
Always follow proper procedures as describedin this Operator’s Manual.
Avoid hills with slippery or loose surfaces.
Shift your weight to the uphill side of the ATV.
WARNING
POTENTIAL HAZARD
Stalling, or rolling backwards while climbing ahill.
WHAT CAN HAPPEN
Could cause loss of control, which could leadto an accident including an overturn.
HOW TO AVOID THE HAZARD
Maintain steady speed when climbing a hill.
If you lose all forward speed:
Keep weight uphill.
Pull back on both control levers to apply thebrakes.
Slowly coast backwards down the hill using thecontrol levers or parking/auxiliary brake to
control your descent.
WARNING
POTENTIAL HAZARD
Improperly operating over obstacles.
WHAT CAN HAPPEN
Could cause loss of control, which could lead to an accident including an overturn.
HOW TO AVOID THE HAZARD
Before operating in a new area, check for obstacles.

25
WARNING
POTENTIAL HAZARD
Skidding or sliding.
WHAT CAN HAPPEN
You may lose control of the ATV.
You may also regain traction unexpectedly,which may cause the ATV to overturn.
HOW TO AVOID THE HAZARD
Learn to safely control skidding or sliding bypracticing at slow speeds and on level, smooth
terrain.
On extremely slippery surfaces, such as ice, goslowly and be very cautious in order to reduce
the chance of skidding or sliding out of control.
WARNING
POTENTIAL HAZARD
Improperly operating in reverse.
WHAT CAN HAPPEN
You could hit an obstacle or person behindyou, resulting in serious injury.
HOW TO AVOID THE HAZARD
Before you engage reverse gear, make surethere are no obstacles or people behind you.
When it is safe to proceed, go slowly.
WARNING
POTENTIAL HAZARD
Operating the ATV with improper tires, or withimproper or uneven tire pressure.
WHAT CAN HAPPEN
Use of improper tires on the ATV, or operationof the ATV with improper or uneven tire
pressure, may cause loss of control, increasingyour risk of an accident.
HOW TO AVOID THE HAZARD
Always use the size and type tires specified inthis Operator’s Manual for this ATV.
Always maintain proper tire pressure asdescribed in this Operator’s Manual.
WARNING
POTENTIAL HAZARD
Operating the ATV with impropermodifications.
WHAT CAN HAPPEN
Improper installation of accessories ormodification of the ATV may cause changes inhandling which, in some situations, could lead
to an accident.
HOW TO AVOID THE HAZARD
Never modify the ATV through improperinstallation or improper use of accessories. Allparts and accessories added to this ATV shouldbe genuine Recreatives components designed
for use on the ATV and should be installed andused according to instructions. If you have
questions, consult an authorized Recreativesdealer or contact Mudd-Ox Inc. at
1-800-255-2511.

26
WARNING Indicates a potential hazard that could result in seriousinjury or death.
WARNING
POTENTIAL HAZARD
Overloading the ATV or carrying or towing cargoimproperly.
WHAT CAN HAPPEN
Could cause changes in vehicle handling, whichcould lead to an accident.
HOW TO AVOID THE HAZARD
Never exceed the stated load capacity for the ATV.
Cargo should be properly distributed and securelyattached.
Reduce speed when carrying cargo or pulling atrailer. Allow greater distance for braking.
Always follow the instructions in this Operator’sManual for carrying cargo or pulling a trailer.
27
Quick ReferenceOVERVIEWThis section is intended to give you the basics of ATV safety. More specific informationthat will help you “PASS” the safety test follows in the Safety section of this Operator’sManual. The idea is that if ATV drivers “had only known “ safe driving techniques,things to check, and things to watch for, they could have avoided accidents, injuries, anddeath.
Prevention is:
Wearing proper clothing and gear.1. Helmet2. Eye Protection3. Long Pants4. Long Sleeve Shirt5. Gloves6. Boots / Ankle Protection
Prevention is:
Checking the condition of the ATV every time you drive:1. Brakes Control levers and parking/auxiliary.2. Throttle and Choke Smooth movement, without sticking.3. Tires and Wheels Tire pressure and tire surface (tread and sidewalls).4. Fluids Gas and oil.5. Lights Headlights and taillights.6. Electrical Ignition switch7. Controls Forward, neutral and reverse gears8. Miscellaneous Air filter, battery, tighten nuts and bolts.
Prevention is:
Using T-CLOC to remember parts to check.T- Tires and WheelsC- Controls and CablesL- Lights and Electric SystemO- Oil and FuelC- Chassis
Prevention is:
Keeping first aid and survival supplies on board every time you drive.1. Tools
Bulbs, duct tape, rope, spark plug, drive belt and spare parts.2. Water3. Identification

28
4. Money5. Maps6. Emergency Kit
Flashlight, matches, flares, First Aid Kit.
Active Driving is:
Learning basic ATV operating maneuvers.1. Starting2. Braking3. Steering4. Shifting5. Parking
Active Driving is:
Using BRIC to remember the starting procedure.B- Brakes lockedR- Reverse gear must be engagedI- Ignition Switch to Start PositionC- Choke on
Active Driving is:
1. Driving2. Turns3. Driving Uphill4. Driving Downhill5. Swerving6. Crossing Obstacles
Active Driving is:
Knowing how to use safe riding techniques in special situations.1. Reversing2. Skidding or Sliding3. Parking on a Hill4. Stalling on a Hill5. Operating in Water6. Crossing Roads
Sound Judgement is:Knowing the environment you drive in.1. Weather-Know what the forecast is for your riding time.2. Terrain-Know where you’re riding and the possible hazards.

29
3. Night Riding-Reduced visibility requires extra caution.4. Paved Surfaces-Stay off paved surfaces.5. Trail Riding-Be aware of trail conditions and other trail users.
Sound Judgement is:Being aware of those around you.1. Riding companions-Keep a safe distance from others in your group and don’t carry
more passengers than are allowed.2. Other vehicles-Make yourself visible and watch for others.3. Hikers-Expect people to be in unexpected places.4. Animals and Nature-Respect the environment.
Sound Judgement is:Driving within the ability of your equipment.1. Vehicle Maintenance-Driving only when the ATV is in good mechanical condition.2. Cargo Limitations-Cargo area weight limit, trailer weight limit, weight distribution
and vehicle speed.
Sound Judgement is:Making personal choices that affect your safety.1. Alcohol and Drug Consumption-Do not consume alcohol, medication, or
illegal/mood altering drugs before or during your drive.2. Your Physical Condition-Don’t drive if you’re tired.3. Reckless Driving-Respect ATV limitations.4. Laws and Regulations-Learn local and state/provincial laws and regulations.5. Group Behavior-Avoid risky group situations.6. Underage Drivers-Never let anyone under the age of 18 operate the ATV
Sound Judgement is:Using SIPDE to evaluate yourself, your vehicle, and your environment.S- Scan/SearchI- Identify HazardsP- Predict What Will HappenD- Decide What To DoE- Execute The Decision
Supervision:Taking responsibility for others that use your ATV.1. Inexperienced Drivers/Keep them off your ATV2. Experienced Drivers/Get them familiar with the controls and characteristics of your
ATV.3. Underage Drivers/Do not permit anyone, experienced or not, to drive your vehicle if
they are under the age of 18.

30
PREVENTIONWARNING -Indicates a potential hazard that could result in serious
injury or death.
OVERVIEW
When using an ATV, prevention is the name of the game. “Had you only known”something could go wrong, you would have prevented it. If you don’t notice yourconditions and surroundings before driving your ATV, you give up control over thesituation. Using ATV prevention techniques helps you forecast potential hazards beforethey injure you or damage your machine.
Following the safety instructions and warnings in this manual will help you “P.A.S.S.”the safety test. P.A.S.S. stands for “Prevention,” “Active driving,” “Sound judgement,”and “Supervision.” Remembering P.A.S.S. and what it stands for will help you have asafe, predictable drive every time you go out on your ATV.
Clothing and Gear
Unless you want to scrape your skin or spend months recovering from a serious headinjury, you’ll find it important to dress correctly for ATV driving. It’s easy and couldsave you time in the long run from picking gravel out of your skin. This is the minimumprotection you need to wear during every drive:1. Helmet2. Eye Protection3. Long Pants4. Long sleeve shirt5. Gloves6. Boots / Ankle Protection
Of course, it also makes sense to remember the seasons. Wear a hat under your helmetand a snowmobile suit in the winter, and lighter, protective clothing in the summer.
HelmetThere are several types of helmets on the market, but make sure you wear a helmet thatcomplies with the standards of the U.S. Department of Transportation (DOT), The SnellMemorial Foundation, or the American National Standards Institute (ANSI). Helmets thatcomply with one or more of these agency’s standards have a sticker on the inside oroutside of the helmet.
Helmets should have one of these:1. D.O.T. Label2. SNELL Label3. ANSI Z901 Label

31
If you drop or damage your helmet, get a new one immediately. Your helmet may notprotect your head from injury if it has cracks, fissures, or other damage to its outside orcore padding.And remember, your helmet won’t do you any good if the chin strap isn’t fastened.
Eye protection
Dirt in the eye could mean nailing that rut you planned to avoid or hitting that grass-covered stump that you didn’t see. Wear eye protection, such as safety glasses orgoggles. Sunglasses are not recommended; they may not be shatterproof.
Long Pants and Long Sleeve Shirt
The goal is to protect your body from branches, long grass, airborne objects, or anythingelse that could scrape your skin. The more thick and durable the material, the betterprotection it will provide.
Gloves
Your hands are targets for flying objects and branches. Along with providing skinprotection, gloves will shield your hands from harsh weather. Wear gloves that areweather resistant and have a gripping surface to keep them from sliding off the controllevers.
Boots / Ankle Protection
Wear a boot that covers your ankle and provides good support. Choosing boots with lowheels and a good tread will help prevent your feet from slipping on the floorboard in wetor rugged conditions, or getting hurt if they get hit by rocks, dirt or branches.
Condition of the ATV
The second step in Prevention is checking the condition of your machine. Chances aregood that you’ll be using your ATV in some rough terrain, and there’s no way you wantyour brakes to fail when driving downhill. You need to check the following parts on yourATV before every drive:
1. Brakes 6. Electrical2. Throttle 7. Controls and Cables3. Tires and Wheels 8. Chassis4. Fluids 9. Miscellaneous5. Lights
32
One easy way to remember what parts you need to check is by using the acronym“T-CLOC”. It stands for:
T-Tires and WheelsC-Controls and CablesL-Lights and Electric SystemO-Oil and FuelC-Chassis
Brakes
Check:1. Control Levers2. Parking/Auxiliary Brake3. Locking Mechanism for Parking/Auxiliary Brake
Pull on the control levers. Make sure when you pull back on them that they stop movingbefore they make contact with the seat. Push forward on them and make sure they stopmoving before they make contact with the dashboard. The total travel of the controllevers (measured at the top, where the hand grips are located) should not exceed 10inches from all the way forward to all the way back…..Refer to the Maintenance sectionof this Operator’s Manual for instructions. Don’t use the machine until the brakes areoperating normally.
Test your Parking/Auxiliary Brake and see if it applies the brake into position; thendisengage it to release the brake. Be sure that the locking mechanism will hold theParking/Auxiliary Brake in the ”ON” position. Your brakes could fail during a drive, ifthey’re not maintained.
Throttle
Check:1. Free, smooth range of motion
The throttle should have a free, smooth range of motion, If it seems to “stick” at anypoint, refer to the maintenance section of this Operator’s Manual for instructions. Drivingyour ATV with a sticking throttle can turn your leisurely drive into an unwelcomeaccident. Don’t drive your ATV if the throttle sticks.
Tires and Wheels
Check:1. Tire pressure2. Tire surface (tread and sidewalls)
Correct tire pressure is crucial. Consult the Maintenance section of this Operator’s

33
Manual for tire pressure guidelines.Incorrect tire pressure can cause poor handling, instability and a loss of vehicle control.While checking the tire pressure, inspect the tread and sidewalls of the tires for cracks,cuts, or other damage that could indicate they need to be replaced.
Fluids
Check:1. Gas2. Engine Oil3. Transmission FluidStart with a full tank of gas before every drive and make sure that the engine oil andtransmission fluid are at the proper level.
Lights
Check:1. Headlights2. Taillights
Turn the headlights on and off to make sure they work. At the same time check that thetaillights work. Don’t drive the ATV unless the headlights and taillights are working.
Electrical
Check:1. Ignition Switch in “Off” position2. Ignition Switch in “Lights-Run” position3. Ignition Switch in “Run” position4. Ignition Switch in “Start” position
The ATV won’t go unless the ignition switch works. Check it and make sure all fourpositions operate properly.
Controls
Check:1. Forward 5. Reverse2. Forward Left Turn 6. Reverse Left Turn3. Forward Right Turn 7. Reverse Right Turn4. NeutralWith the ATV on level ground and the engine running, check all shift lever and controllever positions: forward, forward left turn, forward right turn, neutral, reverse, reverse leftturn and reverse right turn.IN NEUTRAL GEAR THERE IS NO STEERING/BRAKING CONTROL—THEPARKING/AUXILIARY BRAKE MUST BE USED FOR STOPPING
34
Chassis
Check:1. Chains2. Belt3. Axles
Grass, leaves and other debris can get caught in your chains, belt or axles. Clear andclean the chains, belt, and axles.
Miscellaneous
Check:1. Air Filter2. Battery3. Tighten parts, nuts and bolts
Inspect your air filter. You’re looking for debris or damage that may indicate you need toreplace it. A clogged filter can stop an engine. Check your battery terminals forcorrosion. Refer to the maintenance section of this Owner’s Manual for cleaninginstructions. Also, be sure to tighten any loose parts, nuts or bolts.
First Aid and Survival
You need to prepare for the unexpected. Emergencies and accidents are traumaticenough, but they’re even worse when you’re not prepared for them. At the minimum,during every ATV drive, you should have the following items on board:ToolsWaterIdentificationFirst Aid Kit
For drives that are longer in duration and distance, the following additional items arerecommended:MoneyMapsEmergency Kit (with flashlight and First Aid Kit)
Tools
Routine maintenance will generally eliminate the need for emergency repairs. But justwhen you think you’re safe, that tree trunk you crossed a few miles back has knockedsome bolts loose and you need to make minor adjustments—where’s that wrench?Especially on long drives, carrying the right tools can prevent inconveniences frombecoming crises.

35
Water
Water is so important that you need to carry it regardless of the duration of your drive.Heat exhaustion and heat stroke creep up suddenly and they take you out of commission;if you become dehydrated, you could find yourself physically unable to safely operateyour vehicle… then what are you going to do?
Identification
If something does happen to you, the emergency personnel will want to know who youare and who to contact. It’s possible you may be in no condition to give them thatinformation. Put your I.D. in your pocket before you drive. Without it, you’reanonymous.
Money
Just try making an urgent phone call without a quarter.
Maps
Maps are unnecessary when you’re familiar with the area. But when you’re driving onunfamiliar trails, it’s good to know where you are, what’s coming up, and how to getback.
Emergency Kit with Flashlight and First Aid Kit
Carry these items:1. Flashlight2. Matches3. Flares4. First Aid Kit
You’ll need several items in your Emergency Kit including a flashlight. The matches willcome in handy if you need to start a fire to stay warm. And flares are appropriate forsignaling help. A first aid kit is essential for medical emergencies.

36
ACTIVE DRIVING
OVERVIEW
“Active driving” is the second part of “P.A.S.S.” It involves an understanding of howbalance, gravity, and physical forces of you and your passengers affect the handling ofthe ATV. For example, when you drive a car quickly into a sharp turn, your body ispulled to the outside of the vehicle; this is centrifugal force. And though your RecreativesATV is relatively stable, enough centrifugal force can cause it to roll over. Making surethat your load is balanced and that you and your passengers remain seated is necessary toavoid rolling or flipping the machine. This is true on both land and in water.
Basic Operating Maneuvers
Active driving and basic maneuvers are the foundation of your ATV drive. Without basicskills, it’s impossible to move to the next level---active driving. These are your basicmaneuvers:
Entering the ATVStartingBraking/StoppingShiftingDriving and SteeringParkingExiting the ATV
Entering the ATV
To get seated:1. Make sure the parking/auxiliary brake is in the locked position and the shift lever is in
the Reverse position.2. Step into the ATV and sit in the center of the seat if you are the only one in the seat.
Sit on the left side of the seat and have your passenger sit on the right side if you aretaking a passenger in that seat. The same applies for the back seat of the Max IV. Thiswill insure that the ATV is balanced.
3. Make sure that the driver and passengers feet are on the floorboard.
Starting
Always start with the ATV on a flat, level surface. Carbon monoxide poisoning can killyou, so keep your ATV outside while it’s running. Then follow these steps to start it up:1. Climb into the ATV2. Pull the choke cable out to its closed position if starting the engine cold (if it’s already
warmed-up, you shouldn’t need to use the choke at all).

37
3. Turn the ignition key to the START position and let it return to the RUN position assoon as the engine starts.
4. Let the engine warm up.
Another way to remember the starting procedure is by using the acronym “BRIC”It stands for:B-----BRAKES LOCKEDR-----REVERSE GEAR ENGAGEDI------IGNITION SWITCH TO “START” POSITIONC-----CHOKE ON
Braking/Stopping
Your ATV actually has two braking systems. One is controlled by the control leverswhich operate the Skid Steer Transmission and the other is controlled by the footoperated Parking/Auxiliary Brake which operates the disc brakes mounted on the frontaxles.Your ATV uses the Skid Steer transmission for braking and for steering. Thistransmission is operated by the left hand and right hand control levers. These controllevers are effective only when the transmission is in the Forward or Reverseposition. IN NEUTRAL GEAR THERE IS NO STEERING/BRAKING CONTROL—THE PARKING/AUXILIARY BRAKE MUST BE USED FOR STOPPING.Coming to a stop should be a slow, easy process. Always allow plenty of room and timeto stop smoothly. Sometimes quick stops are inevitable, so always be prepared. Whetheryou’re stopping slowly or stopping quickly, do this:
In Forward Gear:1. Pull Back gently and evenly on both the right and left hand control levers to apply
both the left and right brakes. Since both control levers are spring loaded forward youwill find that it will take a moderate amount of strength to pull back on the levers.
2. If your wheels lock, release the control levers for a second, then apply them again.
In Reverse Gear:1. Push forward gently and evenly on both the right and left hand control levers to
apply both the left and right brakes. Since the levers are spring loaded forward youwill find it takes very little effort to push forward on them.
2. If your wheels lock, pull the control levers backward slightly for a second, then applythem again.
In Neutral Gear:1. Push down on the Parking/Auxiliary brake to apply both the left and right brakes.2. If your wheels lock, release the Parking/Auxiliary Brake for a second, then apply it
again.

38
IN NEUTRAL GEAR THERE IS NO STEERING/BRAKING CONTROL—THEPARKING/AUXILIARY BRAKE MUST BE USED FOR STOPPING.
Parking/Auxiliary Brake
Here is how to apply the Parking/Auxiliary Brake:
Push down on the foot pedal until moderate resistance is felt. This will apply the discbrakes mounted on the front axles and will slow and then stop the ATV if it is moving orhold it still if it isn’t moving.
In order to lock the Parking/Auxiliary brake you must:1. Apply the Parking/Auxiliary Brake as described above.2. Push down on the locking mechanism and lift your foot off of the foot pedal.3. This will lock the Parking/Auxiliary Brake.
To release the Parking/Auxiliary Brake:Pushing down on the foot pedal will automatically release the brake.
Shifting Gears
The MAX really has two transmissions.
1. The first is the Skid Steer Transmission, which provides braking and steering controlsas well as a gear selector, which must be shifted to engage Forward, Neutral andReverse Gears.
2. The second is the continuously variable drive belt system which automatically selectsa high or low ratio to compensate for the heavy load on the vehicle when climbing ortowing, or the light load when on level ground. This transmission is completelyautomatic and requires no shifting.
You will find it easier to shift gears with the engine running, if the motor is off, you mayhave to rock the vehicle back and forth to get it into gear.
Whenever the ATV is not on level ground, the Parking/Auxiliary brake must be appliedwhen shifting gears. The control levers are effective only when the Skid Steertransmission is in the Forward or Reverse gear.IN NEUTRAL GEAR THERE IS NO STEERING/BRAKING CONTROL—THEPARKING/AUXILIARY BRAKE MUST BE USED FOR STOPPING.
To select Forward, Neutral and Reverse gears follow these steps:1. Stop the ATV completely.2. Apply the Parking/Auxiliary Brake.3. Shifting from neutral to reverse: With one hand pull back both control levers and, at
the same time, with your free hand pull up on the shift lever into the reverse position.

39
4. Shifting from reverse to neutral: With one hand pull back both control levers, andthen, with your free hand push down on the shift lever in to the neutral position.
5. Shifting from neutral to forward: With one hand pull back both control levers and letthem spring forward at the same time you push down on the shift lever with your freehand into the forward position.
6. Shifting from forward to neutral: With one hand pull back both control levers andthen, with your free hand pull up on the shift lever into the neutral position.
Driving and Steering in Forward and Reverse
Your Recreatives ATV is fun and easy to drive. It is extremely responsive to controls.First of all, the control levers are spring loaded forward: to accelerate you merely squeezethe throttle. This feature eliminates the need to move the levers forward and operate thethrottle simultaneously. Allow time to familiarize yourself with the controls.Always avoid jerky or sudden movements of the control levers. This will save wear andtear on the transmission.
Forward movement is achieved by gradually squeezing the throttle lever with the controllevers pushed as far forward as they will go. The more the throttle is squeezed, the fasterthe ATV goes.Reverse movement is achieved by gradually squeezing the throttle lever with the controllevers pulled back as far as they will go. The more the throttle is squeezed, the faster theATV goes.Steering can only be accomplished when the transmission is in Forward or Reverse gear.The control levers are not effective when the transmission is in Neutral.
When in Forward gear: To steer right, ease back on the right hand control lever: to steerleft, ease back on the left hand lever. Pulling back on one lever gradually disengages thethree drive wheels on that side. As the lever is pulled farther back, a neutral position ispassed and a gradual engagement of the brakes occurs. With one lever all the way back,the brakes on that side of the vehicle are fully applied and it will pivot within its ownlength. (NOTE: For smooth turning and longer transmission life, initiate turns after it isrolling, not from a standing position.)
When in Reverse gear: To steer right, ease the right control lever as far forward as itwill go and pull back the left lever. To steer left ease the left lever as far forward as it willgo and pull back the right lever. Releasing the lever forward disengages the clutch andapplies the brake.
Parking
Parking involves following the previous rules for braking, then:1. After the ATV stops, apply the parking/auxiliary brake and move the shift lever to the
reverse position.2. Stop the engine, using the ignition switch.3. Try to park only on level surfaces.
40
4. Apply and lock the parking/auxiliary brake.
Exiting the ATV
After you’ve followed the procedure for parking, it’s time to exit:1. Double check that the parking/auxiliary brake is applied and locked.2. Stand up and with your hand grab hold of the upper body and step out of the ATV.
How to Handle the ATV(Active driving techniques)
Active driving involves using your steering and braking controls as well as understandingthe principles of gravity and balance to maintain control.Your safety depends on using safe driving techniques. You are much more likely to havean accident when you first start driving your ATV than after you have some experience.
Safe driving techniques include:DrivingTurnsDriving UphillDriving DownhillTraversing HillsCrossing Obstacles
Driving
Once the engine’s warm, the ATV is ready to go.1. If your vehicle is equipped with a roll bar or roll cage--- Make sure all occupants put
on their seat belts and pull them tight.2. Shift into Forward gear.3. Pull back both control levers.4. Release the parking/auxiliary brake5. Push both control levers forward.6. Gently squeeze the throttle lever.
Turns in forward gear
ATV accidents can occur during turns. It’s easy for your ATV to get away from you bylosing traction, or tipping. Pay attention to the handling-- if you feel the tires coming offthe ground, reduce your speed and make your turn wider.Use this method for turns:
1. Ease off the throttle as you approach the turn to slow down.2. Ease back gently on the control lever appropriate for the direction you are turning.
(Pull the left control lever to turn left and the right control lever to turn right)

41
3. Maintain a steady throttle pressure. Turns will be smoother if you maintain a steadythrottle pressure (or at slow speeds even increase it slightly) when you pull back onone of the control levers. Throttle pressure enables you to “power” through turns.
4. For sharper turns you will have to pull back on the control lever a little harder.5. For quicker turns you will have to pull back firmly on the control lever and add a
little extra throttle pressure.6. Gradually increase your speed as you come out of the turn and ease the control lever
forward.
Turns from a standing start are possible using the following technique:
Pull back the control lever on the inside of the turn all the way back and push on the leveron the outside of the turn and squeeze the throttle gently.
Turns in reverse gear
The steering and braking controls are reversed in the Reverse Gear position. Keep inmind that in order to stop you must push the control levers forward and to drivebackwards you must pull the control levers back.Use this method for turns in reverse gear:1. Ease off the throttle as you approach the turn to slow down.2. Ease forward gently on the control lever appropriate for the direction you are turning.
(Push the left control lever to turn left and the right control lever to turn right)3. Maintain a steady throttle pressure. Turns will be smoother if you maintain a steady
throttle pressure (or at slow speeds even increase it slightly) when you push forwardon one of the control levers. Throttle pressure enables you to “power” through turns.
4. For sharper turns you will have to push forward on the control lever a little harder.5. For quicker turns you will have to push forward firmly on the control lever and add a
little extra throttle pressure.6. Gradually increase your speed as you come out of the turn and ease the control lever
backward.
Turns from a standing start are possible using the following technique:
Push forward on the control lever on the inside of the turn all the way forward and pullback on the control lever on the outside of the turn and squeeze the throttle gently
Driving uphill in forward gear
Accidents can happen while driving up hill. So, obviously use extreme caution. A directapproach is favored. Angling up a hill may cause a downhill slide or a rollover. Followthis method for driving uphill.
1. Approach the hill at a slow and cautious pace.2. Keep your control levers pushed forward.3. Maintain a steady pace.

42
4. If you lose speed, increase it slightly by squeezing the throttle lever until you are backup to speed.
5. If you have lost all forward motion or if you feel the front of the vehicle get “light”,release the throttle and pull back on both control levers to stop the vehicle. Thenallow the ATV to coast down the hill backwards slowly, keeping in mind that you canstop the ATV by pulling back on the control levers and also by applying theparking/auxiliary brake.
Driving downhill in forward gear
Making a turn while going downhill can be tricky at times. Easing back gradually on onecontrol lever may cause a turn in the opposite direction from the one you would normallyexpect. That’s because the engine is acting as a brake on all wheels, and if one controllever is eased into neutral, the wheels on that side will free-wheel and overrun the brakingforce acting on the wheels on the other side, causing the “wrong way” turn. The answer issimple—pull the control lever back through the neutral position quickly enough to applypositive braking.Engine braking will be provided with the control levers forward and the throttle released.Success in driving downhill depends on how well you know your brakes—take it easy onthem, or you could flip over.Do not apply brakes suddenly while going downhill, it could cause the ATV tooverturn.
1. Approach the hill at a slow and cautious pace.2. Release the throttle and use engine braking to keep the ATV at a slow speed3. If you want to slow down even more, pull back both control levers past the neutral
position until you feel the brakes start to engage and keep a constant steady pressureon them. The harder you pull the greater the stopping power.
4. You can also use the parking/auxiliary brake. The harder you push on the foot leverthe greater the stopping power. Remember there is no steering control with this brake.
5. If you need to change direction remember to pull the control levers past the neutralposition to avoid the “wrong way” turn.
Traversing Hills
Traversing Hills is considered an advanced skill; it’s really tricky and unpredictable. So,whether your skills are advanced or not, try to avoid this kind of driving. If you’re in asituation where you absolutely have to traverse a hill, follow this method:
1. Keep your speed low and consistent.2. Steer as though you’re driving into the hill.3. If the ATV feels like it’s tipping, steer downhill. If that’s not possible because of
terrain or other conditions, or if it just doesn’t work, stop and remove your passengersand then yourself from the ATV. Exit the ATV on the uphill side while maintainingthe balance of the ATV.

43
Crossing obstaclesCrossing obstacles is risky; avoid it if possible. Driving over logs, rocks, and ruts requiresa cautious and direct approach. In certain situations (a heavily rutted ditch, to name one)angling across works better. Experience will be your best teacher in these matters.1. Stop and evaluate the obstacle.2. Move slowly straight ahead until your front tires touch it.3. Increase throttle pressure and keep it steady until you are up and over it.
Operation in water
Remember- Always insert your drain plugs before entering water. You risk achance of drowning if you don’t .
Your Recreatives ATV is amphibious, and you’ll probably want to try it in water soon.Remember that its effective water speed is about four miles per hour. With that in mind,you won’t try to run against a ten mph wind or strong current. You’re not about to towany water skiers, either. But, you will have a lot of fun in sheltered waters, and you’ll beable to fish or use it as a mobile duck blind.
Entering water
When entering water you should take as direct an approach as possible. If the entrance tothe water is steep or rough you could slide or rollover.1. Proceed at a slow cautious pace.2. Continue until you are in the water.
Driving in shallow water (Less than 4 inches deep)
When you’re in shallow water your ATV won’t start floating until the water is about onefoot deep. You won’t be able to see hidden objects under the water so you should driveslowly and be ready to react to a rock or log that might be hiding under the surface.1. Proceed at a slow cautious pace2. Continue at a slow pace.3. If you do make contact with an obstacle, back up and try to find away around it.4. If you must pass over the obstacle you should go forward until your front tires touch
it.5. Then you should increase the throttle pressure slightly until you are over it.
Driving in deep water (more than 1 foot deep)
Your Recreatives ATV will start to float when the water gets about one foot deep. Assoon as it starts to float you will notice whether the ATV is properly balanced. If it is
44
leaning to one side, then you or your passenger(s) should shift their weight slightly awayfrom that side until the ATV is floating level. If the ATV is leaning forward or backwardyou and your passenger(s) should lean their upper bodies in the opposite direction of thelean. If the ATV is still unbalanced after everyone has shifted their weight, then youshould return to land and redistribute the load.When you are in deep water there is always a chance that there is a hidden obstacle underthe water and there is a chance that your tires will start to climb it and tip or capsize theATV.
Use this method for operating in deep water:1. For maximum water speed squeeze the throttle halfway.2. Pull one control lever back when turning and keep the motor revving at half throttle.3. Lean toward the inside of the turn.4. If you feel the ATV start to make contact with an obstacle you should release the
throttle and back up the ATV and try to find a way to avoid the obstacle.5. If you must pass over the obstacle you should go forward until your front tires touch
it.6. Then you should increase the throttle pressure slightly until you are over it.7. If you feel the ATV is going to tip over, you should back up and get off of the
obstacle.
Tips
Here are a few situations that require special attention:ReversingSkidding or slidingParking on a hillStalling on a hillCrossing roads
Reversing
It’s tough to see things behind you. They just seem to jump out while you’re looking theother way.
1. Go slowly. It’s hard to see behind you.2. Pull back both control levers all the way back.3. Remember that to stop you will have to push the control levers forward.
Skidding or sliding
If you lose control after hitting sand, ice, oil or water:1. Turn into the slide.2. Maintain a steady throttle setting.3. Resume your course as soon as the ATV straightens out.

45
If your ATV doesn’t turn and plows straight ahead: Here’s how to handle it:1. Reduce your speed by releasing the throttle slightly.2. Once you regain traction, start to turn the ATV.3. Proceed on course.
Parking on a hill
You should avoid parking on a hill, but if you do:1. Keep the ATV in forward or reverse gear.2. Apply and lock the parking/auxiliary brake.3. Move the shift lever to the reverse position.4. Find something to block the rear tires.
Stalling on a hill
It is unlikely that this will happen but if it does:1. Keep it in forward or reverse gear, do not shift gears.2. Press down on the parking/auxiliary brake.3. Re-start your engine and continue up or down the hill.4. If you can’t continue up the hill or the engine won’t start then coast down the hill
using the control levers and the parking auxiliary brake together to control yourspeed.
Crossing roads
Crossing roads on your ATV is a bad idea, so avoid it. If you can’t:1. Stop completely on the shoulder of the road.2. Check both directions for traffic.3. Crossing near a blind corner or intersection is dangerous; don’t do it.4. Drive straight across to the opposite shoulder.5. Take into account that your ATV could stall while crossing; give yourself enough
time to get off the road.6. You have to assume that oncoming cars don’t see you, and if they do, they won’t be
able to predict your actions.7. It’s illegal to cross public roads in some places. Know your local laws.
Operation with Tracks installed
Your ATV may be equipped with Tracks. These tracks will allow you to go throughconditions that will stop an ATV with only tires installed. You should avoid sharp(aggressive) turns so that you don’t damage the body when the tracks shift as you turn.Follow this method:1. When starting from a standstill squeeze the throttle gently.2. If you start to get stuck relax your grip on the throttle so that you don’t lose traction.3. If you do get stuck, back away and try to find another way around.

46
SOUND JUDGEMENT
OVERVIEW
You are not invincible. And knowing that the first “S” in “P.A.S.S.” stands for “SoundJudgment” means you need to use yours. Sound judgment is what prevents you fromspeeding along a trail in the middle of the night and slamming into a tree.
Do you consider yourself to be pretty conservative or, are you a heavy risk-taker? Beforecontinuing with this section on sound judgment, check your Risk Factor by doing thisshort survey
Do you drive over 60 mph on the highway?1 never 2 sometimes 3 oftenAre you more daring around your friends than you are when alone?1 never 2 sometimes 3 oftenDo you drive your car when the gas gauge is on empty?1 never 2 sometimes 3 oftenDo you feel that no matter what you do, you won’t get hurt?1 never 2 sometimes 3 oftenDo you drink or use drugs before you drive your car?1 never 2 sometimes 3 oftenDo you drive your car even if it has a major problem with the brakes, tires, or engine?1 never 2 sometimes 3 oftenDo you thrive on the adrenaline rush you get from speeding and dangerous situations?1 never 2 sometimes 3 oftenDo you hurt yourself because you do things that are out of your ability range?1 never 2 sometimes 3 oftenDo you tailgate other drivers when you think they’re driving too slow?1 never 2 sometimes 3 oftenDo you disregard weather reports before you do outside activities, like swimming,camping, fishing, or boating?1 never 2 sometimes 3 often
Add the totals from these 10 questions. YOUR RISK FACTOR IS:
10-15: You’re pretty conservative. Chances are good that the consistently safechoices you make will help you avoid hurting yourself and the people around you.16-20: You’re straddling the fence. Depending on your mood or who you’re with,the choices you make may help you or hurt you.21-30: You’re taking your chances. Time to reconsider a lot of the judgments youmake…you leave too much of your personal safety up to luck, whim, and the draw of thecards. You’re destined to put yourself in dangerous situations and potentially hurtyourself and the people around you.

47
The Environment
The environment controls you, not the other way around. And there’s nothing you can doabout it except respect it.
Weather
You need to consider the weather, Think about the last time you ignored thatthunderhead, gusting wind or black sky and “did it anyway”. If you can’t remember thelast time, keep it that way. If the last time was yesterday, you’re a menace to yourself.
Terrain
You’re wrong if you think you can go speeding through terrain you’ve never driventhrough before and come out unhurt all the time. And because you’re on familiar terraindoesn’t mean you don’t have to pay attention. Had you “only known” that little creekwould turn into a raging river, you wouldn’t have tried to cross it. You can’t assume thatthe landscape you’re used to doesn’t change. Weather, climate and development taketheir toll. The thing about terrain is that sometimes you don’t know it’s changed until youget there. Did you know there was a fallen tree around that blind corner before youslammed into it? Whether it’s familiar or not, check out your surroundings before andduring your drive: it’s better than tearing yourself up on that new fence. Because saying“that wasn’t there before” isn’t going to help you get better.
Night Driving
Reduced visibility requires extra caution.
Paved Surfaces
Don’t do it! The ATV isn’t designed for pavement. Its handling becomes more difficulton paved surfaces and your tires won’t last very long.
Trail Driving
Use sound judgment when trail driving; that means driving on a trail that fits your abilitylevel.Make yourself visible by using headlights and taillights, and pull completely off the trailif you need to stop.It also helps to know which trails you can drive and who else might be on those sametrails.
Those Around You
People do all kinds of things that you can’t predict or control.

48
Passengers
Keep in mind that your passengers have minds of their own and may do foolish thingslike standing up or move around while you are driving. Passengers could weigh a lot andcan upset the balance of the vehicle. So make sure you can keep your passengers undercontrol or don’t take them along.
Driving companions
What is that car that’s tailgating you on the freeway going to do if you have to stopsuddenly? He’s going to plow into the back of you before he can react. Leave a lot ofspace between you and other drivers. Especially if you’re kicking up dust, it’ll be difficultto see the drivers in front of you stopping.
Other Vehicles
Depending on where you’re driving, you might encounter other ATV’s, bikes, or motorvehicles on public lands. Respect the presence of cars if you’re crossing roads or drivingin public areas and make yourself be seen. If you can’t see other vehicles coming, thatmeans you’re invisible, too.
Hikers
People can get to some strange places on their feet that you’d never expect them to be.For the sake of the guy who’s innocently collecting firewood or the kid who happens towander onto your private land, keep your eyes open.
Animals and Nature
You love the outdoors…so it wouldn’t be you out there tearing up streambeds, crops, andvegetation with your tire treads. You love to hunt and fish… so charging through lakeand forest habitats is helping to destroy what you love. Tread Lightly and leave it as youfound it.
Equipment
All mechanical equipment has limits. If you are going to a remote place, take along aradio or cellular phone or, best of all, travel with other ATV’s as company.
Vehicle Maintenance
You have to maintain your vehicle. The Maintenance section of this Operator’s Manualtells you about taking care of your ATV. If there’s something you don’t know, give yourRecreatives dealer or Mudd-Ox Inc. a call at 1 800- 255-2511.

49
Passenger and Cargo Limitations
The way you load your vehicle with passengers and cargo makes the difference betweena safe outing and a dangerous one. There are two things that are important:
· Weight· Balance
To determine the maximum weight you can carry you will have to add the weights of thedriver, passenger(s), accessories and cargo. The weights of accessories is shown in thespecifications section of this Operator’s Manual.For example:Max II22” Optional Goodyear Tires-------------------------------- 72 lbsRoll Bar with Seat belts--------------------------------------- 26 lbsWindshield------------------------------------------------------- 15 lbsDriver (Your own weight)------------------------------------ 195 lbs (For example)Passenger------------------------------------------------------- 175 lbs (For example)Cargo (placed in cargo area behind the seat)-------------- 24 lbs (For example)Total weight of driver, passengers,accessories and cargo-------------------------------------- 507 lbs
The specifications section of this Operator’s Manual shows that the maximum weight thisvehicle can carry is 600 lbs on land and 500 lbs in water including driver, passengersaccessories and cargo. In this example the vehicle is not overweight for land but it isoverweight for water use. Another reason you wouldn’t want to take this ATV into thewater is because there is a load in the cargo area.
Driver and Passenger location can throw off the weight and balance of the machine if it’snot balanced properly. For instance when you are in water by yourself you should stayseated in the middle of the seat, so the ATV doesn’t lean to one side. Also, when you aretaking others with you in the water you want to make sure that you don’t have all theweight off to one side because if you do, the ATV will lean to one side and might eventip over. This is true on land as well.
Limit the weight in the cargo area of the Max II & Max IV to 100 lbs. and the Buffalo to750 lbs. when on land and leave them empty when going in the water. Cargo can throwoff the weight and balance of the ATV if it is not distributed evenly front-to-rear andside-to-side.
The maximum weight the Buffalo can carry is 1000 pounds. The maximum weight thatcan be placed in it’s cargo area is 750 pounds. However, you won’t be able to carry 750pounds in the cargo area of the Buffalo if you put more than 250 pounds of additionalweight in the ATV.

50
For example:Lets say you (you’re the driver) weigh 250 pounds and your Buffalo has had the 26” tireoption installed on it. The 26” tire option weighs 132 pounds (as shown in thespecification section of this manual) and you will have to reduce the load in the cargoarea to offset the additional 132 pounds that the tires weigh. That means that you canonly carry 618 pounds in the cargo area if the Buffalo is equipped with 26” tires and evenless if it is equipped with additional accessories or options.
Your ATV is equipped with a trailer hitch and there are limits to the amount of weightyou can put on it. The maximum gross trailer weight is the total weight of the trailer andthe cargo that is loaded on to it. The maximum gross trailer weight is 1000 lbs. Themaximum tongue weight is 100 lbs.
Cargo has such an enormous effect on handling, that you need to pay extra attention toyour speed especially on rough or uneven terrain. Even on very flat surfaces you shouldkeep it under 10 mph if you’ve got a trailer attached. Avoid rough or uneven terrain.Also, consider that your braking distance is going to increase with the more weight youcarry.
Personal choices
You value your freedom…..the freedom to be adventurous, and careless, andreckless…to live life to its fullest and take chances. The other side of the story is thetragedy that sometimes occurs during these adventures…when a victim’s family says,“Had I only known how dangerous these vehicles can be.” Making good personal choicesis your responsibility.
Alcohol and Drug Consumption
You’ve heard the statistics before…alcohol is related to 30% of all hospital admissionsdue to ATV accidents in the U.S. This isn’t an issue of morality. It’s extremely dangerousto drink alcoholic beverages and drive…it’s also very foolish. When the alcohol startskicking in and you’re tearing along on your ATV and those odds do catch you. It’sguaranteed that the emergency room doctors who are trying to piece your skull backtogether again will be thinking one thing… This guy was really foolish.Be aware of prescription and over-the-counter medications. That codeine might sootheyour back, but the drowsiness it causes could knock you right out of your ATV seat. Thesame is true of allergy, cold, flu, and headache medications. Your physical size andweight can’t protect you…just one antihistamine tablet can make some 200 pound guysdrop right into dreamland.
If your sense of adventure persuades you to do illegal drugs when you’re driving yourATV, this is a reality check. Two things to think about—legal consequences that will takeaway all that freedom you love. And the damage you will do to your body if you have aserious accident. Don’t use alcohol or drugs before or during your ATV drive.
51
The Effects of Alcohol*The Number of Drinks that Impair Mental and Physical Abilities
1-2 DRINKS Mental processes such as restraint, awareness, concentration andjudgment affected; reaction time slowed; inability to perform complicated tasks.
3-4 DRINKS Depth perception, glare recovery, eye movement and focusaffected; decreased judgment and control.
5+ DRINKS Coordination deteriorates, loss of critical judgment, impairedmemory and comprehension.
*According to the ATV Safety Institute.
Your Physical Condition
Being physically exhausted is sort of like being drunk. Try to do something that’s detail-oriented when you’re really tired, and you’ll feel totally uncoordinated. What makes youthink that you’re going to be any more successful driving an ATV?
Reckless Driving
Today you’re a regular person, doing regular things—walking into the station to get asoda, opening it, drinking it, thinking about your hunting trip this weekend, and goinghome to wax your car. On your way home you do the regular speeding-on-the-highwaything. When you finally open your eyes in the hospital, your life as a regular person hasended. No more hunting trips, no more driving…you can’t even move your hand to opena can of soda.
You’ve heard this all before, but it’s worth saying again…if you cause an ATV accidentwhen you’re speeding, you have a 25% chance of landing yourself in the hospital. Thefaster you go, the more likely you are to destroy your head and internal organs. And skipthe wheelies, jumps, stunts, and any other showboating.
Laws and Regulations
Any police officer will tell you that ignorance of the law is no defense. Your best defenseis to check out your local, state, or provincial ATV laws before driving. It’ll also makesure that you can continue to drive in your favorite areas. The quickest way to have a landarea closed is by driving over the regulations.
Group BehaviorPeople always do crazier and riskier things in a group than they would consider doing bythemselves. When you’re ATV driving with others and things start to get out of hand,decide whether you’re willing to be injured or see your friends injured.
WARNING -Indicates a potential hazard that could result in seriousinjury or death.

52
SIPDEBy themselves, none of these safe behaviors and sound judgments will go very far. Butwhen you put them all together…when you’re paying attention to how you feel, you’remonitoring the movements of your ATV, and you’re constantly evaluating yourenvironment, then you’re practicing SIPDE. SIPDE is an acronym that stands for:S SCAN/SEARCHI IDENTIFY HAZARDSP PREDICT WHAT WILL HAPPEND DECIDE WHAT TO DOE EXECUTE THE DECISION
SUPERVISIONOVERVIEW
You’re responsible for supervising those who drive your ATV. Your wisdom isvaluable..it’ll bring them all back safely—your friends, your family, your relatives, andyour ATV. It’s crucial that you consider yourself a supervisor for all drivers of yourvehicle. Whether you accept responsibility or not, the truth is that you are responsible forothers driving your ATV.
Taking Responsibility
You’re to the last letter in “P.A.S.S.”.. “Supervision.” You’ve just gone through themanual. And you’ve seen what’s involved. That puts you in a good position to beconfident about what you know. So now it’s time to use your knowledge and superviseothers who drive your ATV.
Inexperienced/Untrained DriversYou can’t let people drive your ATV who don’t know what they’re doing. Unless they’vehad over a year of experience with ATV driving, it’s your responsibility to keep them offyour ATV. There’s no way you’re going to let your 13 year old nephew drive yourcar…so why let him drive your ATV?
Experienced/Trained DriversIf anyone is going to borrow your ATV, you are responsible for their supervision. Beforethey drive, have them read the Operator’s Manual. You train them. It doesn’t matter howyou do it, as long as you do it.
ATV’s are all a little different, from the handling, to the stability, to the controls. Soregardless of how much experience your family members have with ATVs, they don’thave experience with your ATV. Let experienced drivers get familiar with your ATV—show them the basics before they take off. You don’t want it on your conscience thatsomeone got hurt because you didn’t tell them how to use your ATV.
And remember that regardless of experience, you should never let anyone under theage of 18 operate your ATV.

53
PREFACE – DIVISION II(Operation/Maintenance)
This Recreatives ATV Operator’s Manual should be considered a permanent part of theATV and must remain with the ATV at the time of resale. If the ATV changes ownershipmore than once, contact Mudd-Ox Incustries Inc. Service Department, 60 Depot St.Buffalo N.Y. 14206, for proper registration information. Division II of this Operator’sManual was prepared by the Service Department of Mudd-Ox Incustries Inc.
You have chosen a quality Recreatives product designed and manufactured to givedependable service. Be sure, as the owner/operator of a Recreatives ATV, to becomethoroughly familiar with its basic operation, maintenance, and storage procedures. Readand understand the entire Operator’s Manual before operating the ATV to ensure safe andproper use of your new Recreatives ATV. Always operate the ATV within your level ofskill and current terrain conditions.
Division II of this manual covers operator-related maintenance, operating instructions,and storage instructions. If repair or service is ever required, contact a Recreatives dealerif there is one in your area or contact Mudd-Ox Inc. at 1-800-255-2511 to find out whoto take it to.
At the time of publication, all information, photographs, and illustrations were technicallycorrect. Because Mudd-Ox Inc. Inc. constantly refines and improves its products, noretroactive obligation is incurred.
PARTS AND ACCESSORIES
When in need of replacement parts or accessories for your Recreatives ATV, be sure touse only GENUINE RECREATIVES PARTS AND ACCESSORIES. Only genuineRecreatives parts and accessories are engineered to meet the standards and requirementsof your Recreatives ATV. For a complete list of accessories, refer to the currentRecreatives ATV brochure.
54
MAX II – SpecificationsLENGTH……………………………………………………………………...86” (218cm)HEIGHT………………………………………………………………………..37” (94cm)WIDTH……………………………………………………………………… 56” (142cm)WHEELBASE…………………………………………………………….…..50” (127cm)SEATING CAPACITY………………………………………………………2 PERSONSFUEL CAPACITY………………………………………..…5 U.S. GALLONS (19 liters)*SKID STEER TRANSMISSION FLUID TOTAL CAPACITY……………..32 OZ(.961)BATTERY……………………………………………………………..12 VOLT 250CCAHEADLIGHTS/STANDARD……….……………………………………...GE 1156/27WHEADLIGHTS/OPTIONAL HALOGEN…………………………………...GE 894/37WTAILLIGHTS…………………………………………………….…WAGNER 193/4.9WTIRE INFLATION PRESSURE…………………………………………………3.5 P.S.I.FUSE………………………………………………………………..MINI-FUSE 30 AMPAXLES………………………………………………………..1 ¼ “ (32mm) DIAMETERFRAME…………………………………………………5” (12.7 cm) STEEL CHANNELDRY WEIGHT (MAX II-450-T, 21” NANKANG TIRES,NO OPTIONS OR ACCESSORIES)…………………………………………..710 LBSGROSS VEHICLE WEIGHT…………….,,,………….……………….…….1310 LBS(INCLUDES PASSENGERS CARGO, ACCESSORIES AND OPTIONS)GROSS PERMISSABLE WEIGHT IN WATER …..……………………….1210 LBS(INCLUDES PASSENGERS, CARGO, ACCESSORIES AND OPTIONS)GROSS TRAILER WEIGHT……………………………………….………..…1000 LBSCARGO AREA MAXIMUM LOAD……………………………….……………100 LBS
WEIGHT OF ACCESSORIES AND OPTIONS (MAX II)
Option or Accessory Weight Added to ATVBRIGGS AND STRATTON 16HP AND 18HP MOTOR………………………..0 LBSKOHLER COMMAND 23HP MOTOR…………………………………………25 LBS21” GOODYEAR RAWHIDE TIRES (SET OF 6)………………………… 42 LBS22” GOODYEAR RAWHIDE III TIRES (SET OF 6)…………………………..72 LBSO-RING CHAIN (STANDARD ON II-500, 600, 850-T)…. . ..………….………0 LBSWINDSHIELD …………………………………………………………………..15 LBSCONVERTIBLE TOP WITH SIDE CURTAINS ……………………………….12 LBSROLL BAR AND SEAT BELTS (KIT)………………………………………….26 LBSPLOW (INCLUDES WINCH PLATE AND WINCH)...……………………….192 LBSTRACK.. ………… ……………………………………………………………211 LBSWINCH PLATE…………………………………………………………………...9 LBSWINCH…………………………………………………………………………...22 LBSHEAVY DUTY SOLID AXLES (SET OF 6) STD. ON II-500, 600, 850-T….…31 LBSIf the weight of an accessory installed on your ATV is not listed, callMudd-Ox Inc. at 1/800-255-2511 for information
*Use a mixture of 28 oz(.841) Type “F” ATF and 4oz(.120) additive(GM part no. 1052358)

55
MAX IV – SpecificationsLENGTH……………………………………………………………………...96” (244cm)HEIGHT……………………………………………………………………...42” (107cm)WIDTH…………………………………………………………………….. 56” (142cm)WHEELBASE………………………………………………………………..58” (147cm)SEATING CAPACITY………………………………………………………4 PERSONSFUEL CAPACITY……………………………………… ….5 U.S. GALLONS (19 liters)*SKID STEER TRANSMISSION FLUID TOTAL CAPACITY……………..32 OZ(.961)BATTERY……………………………………………………………..12 VOLT 250CCAHEADLIGHTS/STANDARD..……………………………………………..GE 1156/27WHEADLIGHTS/OPTIONAL HALOGEN……………………………………GE 894/37WTAILLIGHTS…………………………………………………….…WAGNER 193/4.9WTIRE INFLATION PRESSURE…………………………………………………3.5 P.S.I.FUSE………………………………………………………………..MINI-FUSE 30 AMPAXLES………………………………………………………..1 ¼ “ (32mm) DIAMETERFRAME…………………………………………………4” (10.2 cm) STEEL CHANNELDRY WEIGHT (MAX IV-500-T, 21” GOODYEAR RAWHIDETIRES, NO OPTIONS OR ACCESSORIES)………………………..…….… 805 LBSGROSS VEHICLE WEIGHT ………………………………………..…….…1605 LBS(INCLUDES PASSENGERS CARGO, ACCESSORIES AND OPTIONS)GROSS PERMISSABLE WEIGHT IN WATER……………………...……1305 LBS(INCLUDES PASSENGERS, CARGO, ACCESSORIES AND OPTIONS)GROSS TRAILER WEIGHT …………………………………………………1000 LBS
WEIGHT OF ACCESSORIES AND OPTIONS (MAX IV)
Option or Accessory Weight Added to ATVBRIGGS AND STRATTON 18HP MOTOR…………………….………………..0 LBSKOHLER COMMAND 23/25 HP MOTOR………………………………………20 LBSKAWASAKI 27HP MOTOR……………………………………………………..64 LBS22” GOODYEAR RAWHIDE III TIRES (SET OF 6)……………………………30 LBS26” GOODYEAR SUPER TERRA-GRIP TIRES (SET OF 6)…….……………114 LBSO-RING CHAIN (STANDARD ON IV-600, 850, 900, 950-T)…..………………..8 LBSWINDSHIELD……………………………………………………………………..20 LBSCONVERTIBLE TOP WITH SIDE CURTAINS…………………………………15 LBSROLL CAGE AND SEAT BELTS (KIT)………………………………………....85 LBSPLOW (INCLUDE WINCH PLATE AND WINCH)……………………………194 LBSTRACK…………….……………………………………………………………..222 LBSWINCH PLATE……………………………………………………………………11 LBSWINCH……………………………………………………………………………..22 LBSFRONT SKID PLATE (STANDARD ON IV-600, 850, 900, 950-T).. …….………7 LBSREAR SKID PLATE (STANDARD ON IV-600, 850, 900, 950-T) .………………6 LBSHEAVY DUTY SOLID AXLES (SET OF 6) (STD. IV-600, 850, 900, 950-T)......29 LBSIf the weight of an accessory installed on your ATV is not listed, callMudd-Ox Inc. at 1/800-255-2511 for information.*Use a mixture of 28 oz(.841) Type “F” ATF and 4oz(.120) additive(GM part no. 1052358)
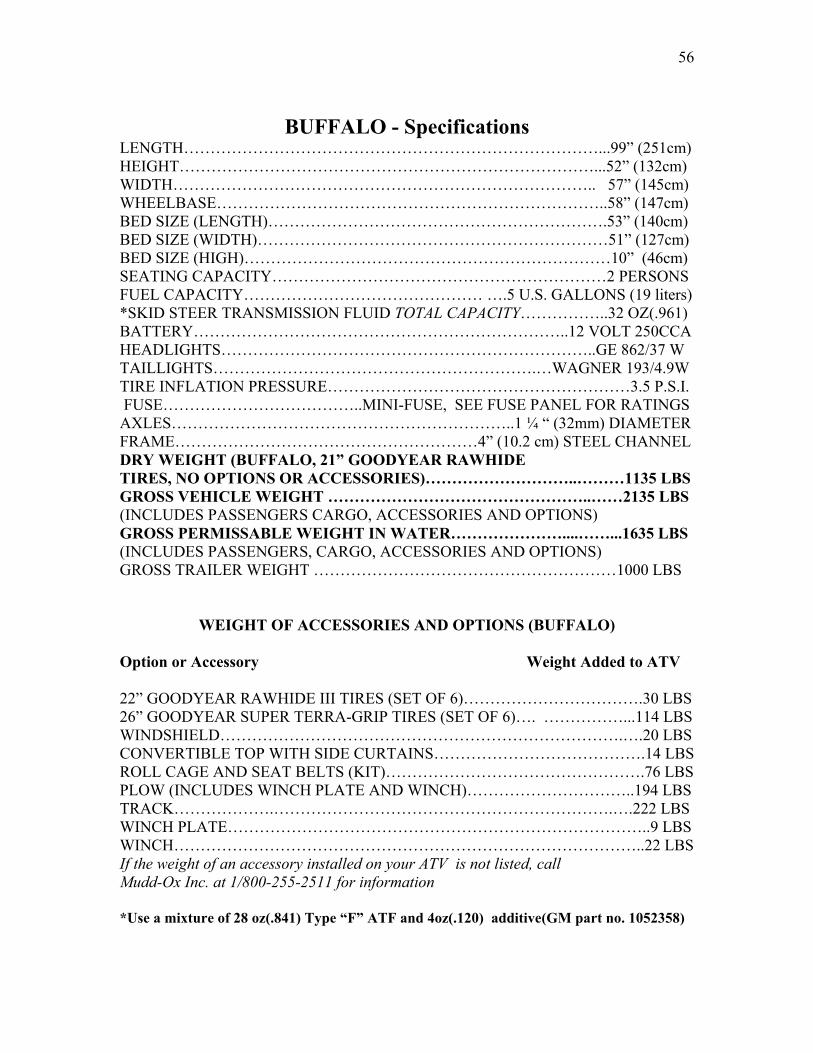
56
BUFFALO - SpecificationsLENGTH……………………………………………………………………...99” (251cm)HEIGHT……………………………………………………………………...52” (132cm)WIDTH…………………………………………………………………….. 57” (145cm)WHEELBASE………………………………………………………………..58” (147cm)BED SIZE (LENGTH)……………………………………………………….53” (140cm)BED SIZE (WIDTH)…………………………………………………………51” (127cm)BED SIZE (HIGH)……………………………………………………………10” (46cm)SEATING CAPACITY………………………………………………………2 PERSONSFUEL CAPACITY……………………………………… ….5 U.S. GALLONS (19 liters)*SKID STEER TRANSMISSION FLUID TOTAL CAPACITY……………..32 OZ(.961)BATTERY……………………………………………………………..12 VOLT 250CCAHEADLIGHTS……………………………………………………………..GE 862/37 WTAILLIGHTS…………………………………………………….…WAGNER 193/4.9WTIRE INFLATION PRESSURE…………………………………………………3.5 P.S.I.FUSE………………………………..MINI-FUSE, SEE FUSE PANEL FOR RATINGS
AXLES………………………………………………………..1 ¼ “ (32mm) DIAMETERFRAME…………………………………………………4” (10.2 cm) STEEL CHANNELDRY WEIGHT (BUFFALO, 21” GOODYEAR RAWHIDETIRES, NO OPTIONS OR ACCESSORIES)………………………..………1135 LBSGROSS VEHICLE WEIGHT …………………………………………..……2135 LBS(INCLUDES PASSENGERS CARGO, ACCESSORIES AND OPTIONS)GROSS PERMISSABLE WEIGHT IN WATER…………………....……...1635 LBS(INCLUDES PASSENGERS, CARGO, ACCESSORIES AND OPTIONS)GROSS TRAILER WEIGHT …………………………………………………1000 LBS
WEIGHT OF ACCESSORIES AND OPTIONS (BUFFALO)
Option or Accessory Weight Added to ATV
22” GOODYEAR RAWHIDE III TIRES (SET OF 6)…………………………….30 LBS26” GOODYEAR SUPER TERRA-GRIP TIRES (SET OF 6)…. ……………...114 LBSWINDSHIELD………………………………………………………………….….20 LBSCONVERTIBLE TOP WITH SIDE CURTAINS………………………………….14 LBSROLL CAGE AND SEAT BELTS (KIT)………………………………………….76 LBSPLOW (INCLUDES WINCH PLATE AND WINCH)…………………………..194 LBSTRACK……………….……………………………………………………….….222 LBSWINCH PLATE……………………………………………………………………..9 LBSWINCH……………………………………………………………………………..22 LBSIf the weight of an accessory installed on your ATV is not listed, callMudd-Ox Inc. at 1/800-255-2511 for information
*Use a mixture of 28 oz(.841) Type “F” ATF and 4oz(.120) additive(GM part no. 1052358)

57
GENERAL INFORMATION
ATV Identification
Recreatives ATV’s have three identification numbers: Vehicle Identification Number,Engine Identification Number and Transmission Identification Number.
These numbers are required by the dealer to complete warranty claims properly. Nowarranty will be allowed by Mudd-Ox Inc. if the Vehicle or Engine or TransmissionIdentification Numbers are removed or mutilated in any way.
Always provide the ATV name, Vehicle Identification Number, Engine IdentificationNumber and Transmission Identification Number when contacting a Recreatives dealer orMudd-Ox Inc. for parts, service, accessories, or warranty.
Ignition Switch Key
Two keys come with this ATV. Keep the spare key in a safe place.
Ignition Switch
The ignition switch has four positions.
OFF position—All electrical circuits are off. The engine will not start. The key can beremoved in this position.
LIGHTS/RUN Position—The ignition circuit is complete and the engine can run and theheadlights and taillights are on. The key cannot be removed in this position.
RUN Position—The ignition circuit is complete and the engine can run. The key cannotbe removed in this position.
START Position—The ignition circuit is complete and the starter is activated. The keycannot be removed in this position.

58
CAUTION !Leaving the ignition switch in the LIGHTS/RUN Position for a long period of timewhen the engine is not running may cause battery damage. Always leave the ignitionswitch in the OFF position when the engine is not running.
Ammeter
The ammeter shows the rate of charge or discharge for the battery. If the battery is fullycharged, the ammeter will be in the center position. If the battery is in a low state ofcharge the ammeter will show a high rate of charge. If the headlights are on the ammeterwill show a lower rate of charge. If there are any other electrical accessories on, such as awinch, the ammeter may show a negative charge.
CAUTIONContinued operation of the ATV with the ammeter showing a negative charge maydamage the electrical system.
Hour/Maintenance Meter
NOTE:Some vehicles may be equipped with a Hour/Maintenance Meter. Please read thefollowing if your vehicle is so equipped.
The hour meter for a Max and Buffalo ATV is programmed with a maintenance function.The hour meter will flash “LUBE” every 10 hours (for 1 hour before and after). Thismeans it is time to perform the 10-hour vehicle maintenance as stated in your OperatorsManual. The hour meter will flash “CNG OIL” every 50 hours (for one hour before andafter). This means it is time to change your engine oil and filter.
The hour meter is key switch operated. If the key switch is not turned to the STOPENGINE position, the hour meter will continue to run even if the engine is not running.Be sure that the key switch is in the STOP ENGINE position when the ATV is not in useto avoid a false hour meter reading.

59
Shift Lever
Max II & Buffalo Max IV
Max II & Buffalo Shift Lever Max IV Shift Lever
This ATV has a shift lever, which must be shifted to engage Forward, Neutral andReverse Gears.
To Shift Gears:
You will find it easier to shift gears with the engine running. If the motor is off, you mayhave to rock the vehicle back and forth to get it in or out of gear.
To select Forward, Neutral and Reverse gears follow these steps:1. Stop the ATV completely.2. Apply the Parking/Auxiliary Brake.3. Shifting from neutral to reverse: With one hand pull back both control levers and,
at the same time, with your free hand pull up on the shift lever into the reverseposition.
4. Shifting from reverse to neutral: With one hand pull back both control levers andthen, with your free hand push down on the shift lever into the neutral position.
5. Shifting from neutral to forward: With one hand pull back both control levers andlet them spring forward at the same time you push down on the shift lever with yourfree hand into the forward position.
6. Shifting from forward to neutral: With one hand pull back both control levers andthen, with your free hand pull up on the shift lever into the neutral position.
WARNINGNever shift the ATV into neutral gear when the ATV is moving or when it is not onlevel ground. The control levers are effective only when the transmission is in theForward or Reverse position. IN NEUTRAL GEAR THERE IS NOSTEERING/BRAKING CONTROL —THE PARKING/AUXILIARY BRAKE MUSTBE USED FOR STOPPING.

60
Control Levers
This ATV has a left and right control lever with forward, neutral and backward position.
The control levers provide braking and steering for your ATV.
The left hand lever controls the left side of the ATV and the right hand lever controls theright hand side.
The control levers are spring loaded in the forward position to make driving in forwardeasier.
When the shift lever is in the Forward position you must pull back on the control leversto stop or slow the ATV. Both control levers must be pulled back to stop the ATV in astraight line. Pulling back only one control lever while the other is forward will cause theATV to steer in the direction of the control lever which is being pulled back.
When the shift lever is in the Reverse position the control levers work exactly theopposite. That is: You must pull back on the control levers to make the ATV go andrelease them to stop or steer the ATV.
WARNINGNever shift the ATV into neutral gear when the ATV is moving or when it is not onlevel ground. The control levers are effective only when the transmission is in theForward or Reverse position. IN NEUTRAL GEAR THERE IS NOSTEERING/BRAKING CONTROL —THE PARKING/AUXILIARY BRAKE MUSTBE USED FOR STOPPING.
Parking/Auxiliary Brake

61
Parking/Auxiliary Brake and Locking Mechanism
Here is how to apply the Parking/Auxiliary Brake.
Push down on the foot pedal until moderate resistance is felt. This will apply the discbrakes mounted on the front axles and will slow and then stop the ATV if it is moving orhold it still if it isn’t moving.
In order to lock the Parking/Auxiliary brake you must:1. Apply the Parking/Auxiliary Brake as shown above.2. Push down on the locking mechanism and lift your foot off of the foot pedal.3. This will lock the Parking/Auxiliary Brake.
To release the Parking/Auxiliary Brake:Pushing down on the foot pedal will automatically release the brake.Choke Knob
The carburetor has a choke system to provide easy starting when the engine is cold. Thechoke is operated by pulling the choke knob out to “engage” and pushing it in to“disengage”. The choke operates best when the throttle is in the closed position. Whenthe engine is warm the choke should not be used for starting.
Throttle Lever
Control engine RPM with the position of the throttle lever. Operate this lever with thethree fingers next to your index finger of your right hand. Pulling it backward, that issqueezing it, increases engine RPM and allowing it to retract decreases engine RPM.
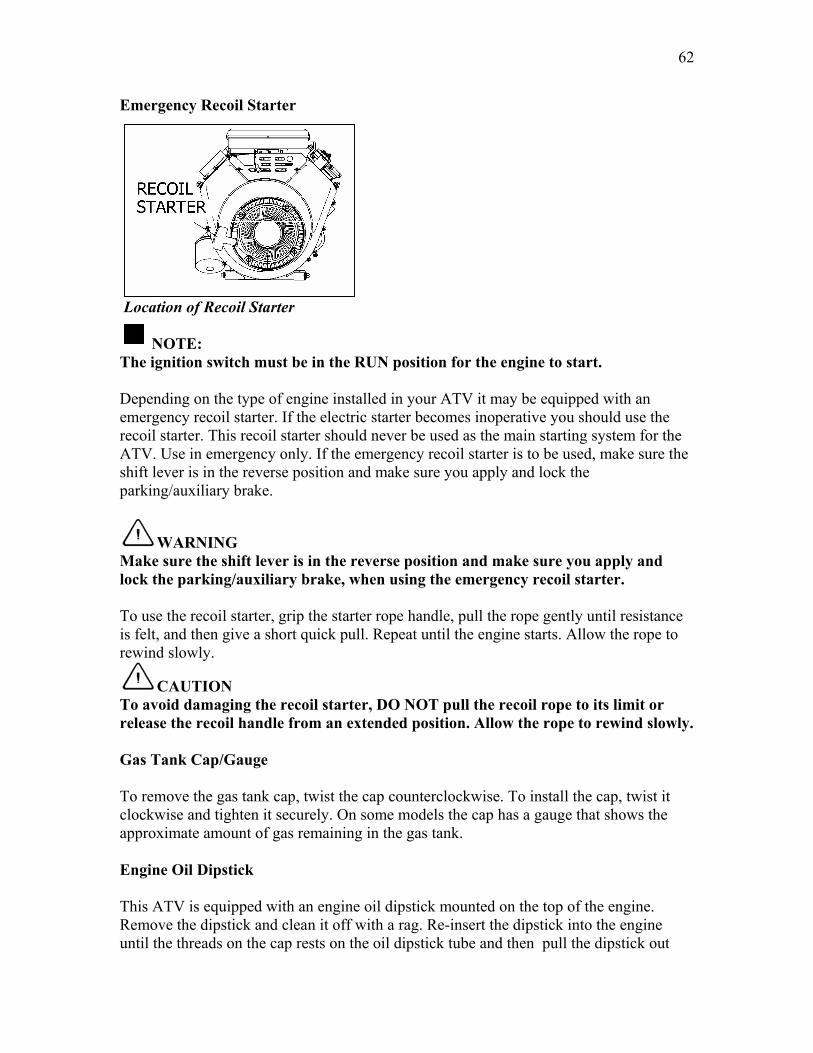
62
Emergency Recoil Starter
Location of Recoil Starter
NOTE:The ignition switch must be in the RUN position for the engine to start.
Depending on the type of engine installed in your ATV it may be equipped with anemergency recoil starter. If the electric starter becomes inoperative you should use therecoil starter. This recoil starter should never be used as the main starting system for theATV. Use in emergency only. If the emergency recoil starter is to be used, make sure theshift lever is in the reverse position and make sure you apply and lock theparking/auxiliary brake.
WARNINGMake sure the shift lever is in the reverse position and make sure you apply andlock the parking/auxiliary brake, when using the emergency recoil starter.
To use the recoil starter, grip the starter rope handle, pull the rope gently until resistanceis felt, and then give a short quick pull. Repeat until the engine starts. Allow the rope torewind slowly.
CAUTIONTo avoid damaging the recoil starter, DO NOT pull the recoil rope to its limit orrelease the recoil handle from an extended position. Allow the rope to rewind slowly.
Gas Tank Cap/Gauge
To remove the gas tank cap, twist the cap counterclockwise. To install the cap, twist itclockwise and tighten it securely. On some models the cap has a gauge that shows theapproximate amount of gas remaining in the gas tank.
Engine Oil Dipstick
This ATV is equipped with an engine oil dipstick mounted on the top of the engine.Remove the dipstick and clean it off with a rag. Re-insert the dipstick into the engineuntil the threads on the cap rests on the oil dipstick tube and then pull the dipstick out

63
again. The amount of oil will be visible on the end of the dipstick. Oil level must bebetween the “F”(full) and “E”(empty) marks on the end of the dipstick.
NOTE:Some engines do not have threaded caps on the dipstick. On these engines you mustinsert the dipstick until it bottoms out, then remove it to check the oil level.
CAUTIONIf the oil level is not between “F” and “E” on the oil dipstick you could causeserious engine damage.
Recommended Engine Oil
The recommended engine oil for your ATV depends on the type of engine installed intoit. Consult the engine Operator’s Manual, which is supplied in addition to this Operator’sManual.
CAUTIONAny oil used in place of the recommended oil could cause serious engine damage.
Transmission Level Plug and Filling Plug
Skid Steer Transmission Level Plug and Filling Plug
The Skid Steer Transmission in your ATV is equipped with a level plug and a fillingplug. The purpose of the level plug is to check for proper fluid level. Fluid should be atthe same level as the bottom of the hole that is exposed when the fluid level plug isremoved. The ATV must be sitting on level ground in order to obtain an accuratereading.
NOTE:To drain fluid, use a suction pump placed into the level plug hole.
NOTE:If fluid must be added, use the hole that is exposed when the fillingPlug is removed.

64
CAUTIONIf the transmission fluid level is incorrect you could cause serious transmissiondamage.
CAUTIONDo not insert the filling plug (there is a vent hole in it) into the level plug hole, if youdo the transmission fluid will leak out causing serious transmission damage.
Recommended Skid Steer Transmission Fluid.The recommended transmission Fluid is a mixture of 28 oz(.841) Type “F” ATF and4oz(.120l) locking differential additive(GM part no. 1052358)Total capacity is 1 Quart.
Recommended GasolineThe Recommended gasoline to use in this ATV is 87 minimum octane regular unleaded.In many areas, oxygenates (either ethanol or MTBE) are added to the gasoline.Oxygenated gasolines containing up to 10% ethanol, 5% methane, or MTBE areacceptable gasolines. When using ethanol blended gasoline, it is not necessary to add agasoline antifreeze since ethanol will prevent the accumulation of moisture in the fuelsystem.
CAUTIONDo not use white gas. Engine damage could occur.Filling Gas Tank
Maximum Fuel Level in Gas Tank
WARNINGAlways fill the gas tank in a well ventilated area. Never add fuel to the ATV gas tanknear any open flames or with the engine running. DO NOT SMOKE while filling thegas tank.
Since gasoline expands as its temperature increases, the gas tank must be filled so thatthere is some expansion room left in the tank. When filling leave about 2 inches belowthe fuel cap empty of fuel. This will leave enough room for gas to expand.

65
Care must be taken not to overfill the tank. If overfilled, gas may leak into the ATVcreating a fire hazard.
WARNINGDo not overflow gasoline when filling the gas tank. A fire hazard could materialize.
Tighten the gas tank cap securely after filling the tank.
WARNINGDo not overfill the gas tank.
Trailering and Towing
Use a trailer and towing equipment that are compatible to this ATV. Use only a No. 1trailer hitch ball 48 mm (1 7/8 in.) in diameter or larger. Never use a trailer hitch bracketthat provides a trailer coupler location lower than the center of the rear wheels.
Make sure cargo weight is evenly distributed between the right and left sides of the trailerand properly secured.
WARNINGMake sure that the load in the trailer is properly secured and will not shift whilemoving. Also, do not overload the trailer.
When loading a trailer properly, two items are critical: Gross Trailer Weight and TrailerTongue Weight.Gross Trailer Weight is the weight of the trailer plus cargo. Gross Trailer Weight shouldnever exceed 1,000 lbs.
Trailer Tongue Weight is the downward force exerted on the hitch by the trailer couplerwhen the trailer is fully loaded and the coupler is at its normal towing height.Approximately 60% of the cargo load must be located in front of the axle of the trailer.Spread the cargo in the trailer so the Trailer Tongue Weight is approximately 10% of theGross Trailer Weight.
Always maintain a slow speed when towing a trailer and avoid sudden accelerations,quick maneuvers, and sudden stops. Braking distance will be affected when towing atrailer. When towing a trailer, always maintain slow speed and allow more stoppingdistance than when not towing a trailer.
WARNING
Driving this ATV without extra caution when towing a trailer will be hazardous.Trailer towing can affect the handling and braking of the ATV. Tow only at lowspeeds (below 10 MPH). Avoid sudden accelerations and stopping of the ATV. Do

66
not make quick maneuvers. Avoid uneven surfaces and do not tow on hills unlessthey are very small. Allow more stopping distance than when not towing a trailer.
Never operate this ATV in water deeper than 4 inches when a trailer is attached. Thetrailer affects the buoyancy of this ATV in water and it is unsafe to operate in waterdeeper than 4 inches.
WARNINGDriving this ATV with a trailer attached, in water deeper than 4 inches ishazardous. Severe personal injury or death may result from operating this ATV inwater deeper than 4 inches when a trailer is attached.
Loading the Cargo Area on the Max II
Cargo Area on the Max IIThe cargo area for the Max II is designed to carry loads up to 100 lb., and is not designedfor use in water deeper than 4 inches.
Loading the Cargo Area on the Max IVCARGO AREA
CARGO AREA

67
Cargo Area on the Max IV
The cargo area for the Max IV is designed to carry loads up to 100 lb., and is notdesigned for use in water deeper than 4 inches.
WARNINGMake sure the loads in the cargo area are evenly distributed, properly secured, andwill not shift while operating the ATV. Do not put any load in the cargo area whenusing the ATV in water deeper than 4 inches.
Loading the Cargo Area on the Buffalo
Cargo Area on the BuffaloThe cargo area for the Buffalo is designed to carry loads up to 750 lb., and is notdesigned for use in water deeper than 4 inches.
WARNING· Never exceed the stated load capacity, which is 750 pounds· Reduce speed when carrying cargo. Allow a greater distance for braking· Reduce load when operating on rough or uneven terrain· Make sure load is securely anchored and evenly distributed· Avoid concentrated loads at the side or rear to prevent vehicle from tipping over· Never carry loads above the height of the load guard· Make sure load is securely anchored and evenly distributed
NOTE: The only way of getting the true weight of the load you are carrying isto use a weigh scale.
Raising and Lowering cargo box
WARNINGNever raise or lower the Buffalo’s cargo box unless the ATV is stationary and theparking/auxiliary brake is applied and locked and make sure it is on level ground

68
WARNINGNever place any part of your body between the Buffalo’s cargo box and any otherpart of the ATV, when it is being raised or lowered.
The Buffalo’s cargo box is raised and lowered using an electric power lift. It can not beraised or lowered manually.
If the battery is dead, the cargo box cannot be raised or lowered. The battery will need tobe recharged in order for the cargo box to be raised or lowered. The battery is locatedunderneath and behind the seat, which is hinged at the front for easy battery access.
To raise the cargo box follow these steps:
1. Insert the key into the ignition switch and turn the ignition switch to the lights/run orrun position.
2. Push upwards on the cargo box switch until the cargo box is fully raised and thenrelease the switch. When it is fully raised, you will hear a clicking noise, whichindicates the power lift is fully extended.
Note: You will also hear a clicking noise if you are trying to raise the cargobox and it is overloaded. If this occurs, empty the cargo box by hand until theload is within proper limits. This noise occurs when the clutch in the power liftcylinder is slipping.
CAUTION: In order to prevent damage to the power lift you shouldrelease the cargo box switch as soon as you hear the clicking noise.
WARNINGNever lean into the engine/transmission area, unless the support bar is raised andlocked.
In order to raise and lock the support bar follow these steps:
1. Insert the key into the ignition switch and turn the ignition switch to the lights/run orrun position.
2. Fully raise the cargo box3. Place support bar into the area shown in the photo
below4. Push downwards on the switch and lower the cargo box
until the support rod just starts to make contact with thecargo box.

69
CAUTION:Make sure you release the cargo box switch as soon as the support bar makescontact with the cargo box. If you don’t you may cause damage to the ATV
In order to unlock and lower the support bar follow these steps:
1. Insert the key into the ignition switch and turn the ignition switch to the lights/run orrun position.
2. Fully raise the cargo box3. Lower the support rod and push it into the support rod holder
To lower the cargo box follow these steps:
1. Insert the key into the ignition switch and turn the ignition switch to the lights/run orrun position.
2. Push downwards on the cargo box switch until the cargo box is fully lowered andthen release the cargo box switch.
Opening and Closing the Tailgate
In order to open the tailgate, disengage the tailgate release latches by pulling themtowards the center of the ATV and pull the tailgate open.
In order to close the tailgate, lift the tailgate up and push it forward until the tailgaterelease latches engage.
Dumping a load from the cargo box
WARNINGNever allow the rear wheels to hang over the edge of a loading dock or ravine, whenyou are dumping a load from the cargo box.
WARNINGNever drive the ATV with the cargo box in the raised position.
In order to dump a load from the cargo box follow these steps:
1. Back the ATV to area where load is desired.2. Apply and lock the auxiliary/parking brake.3. Disengage the tailgate release latches.4. Raise the cargo box.After the load is dumped, lower the cargo box and close the tailgate.
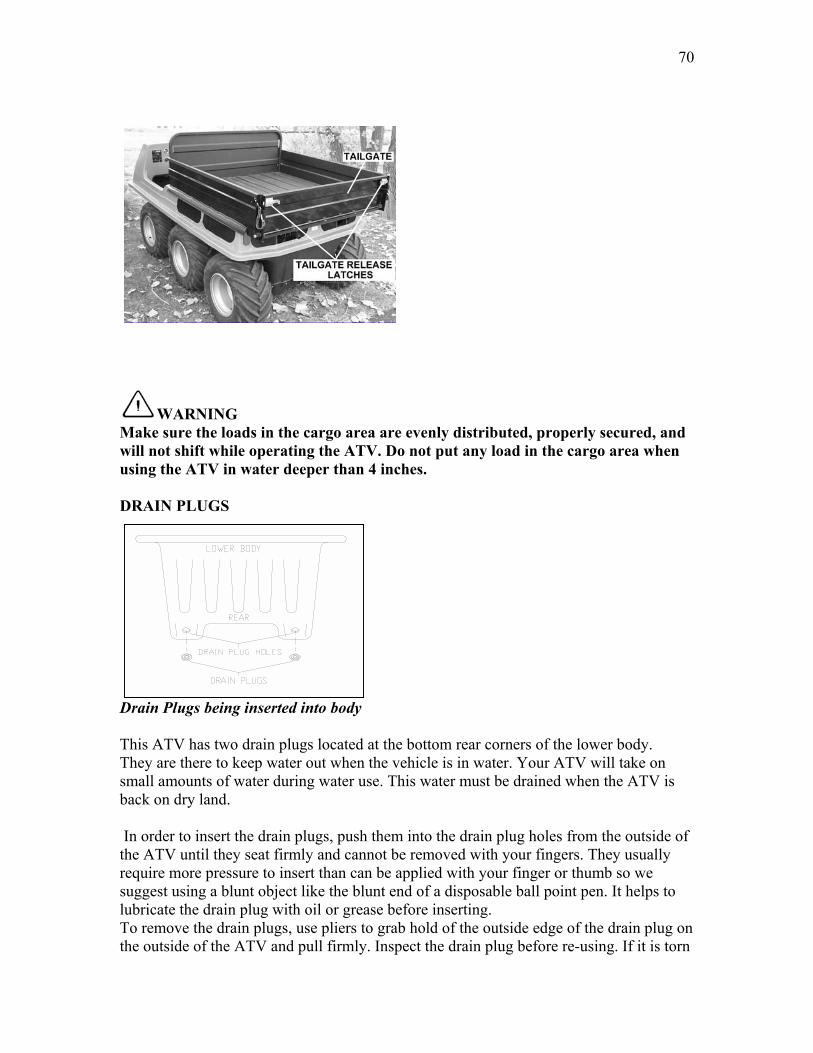
70
WARNINGMake sure the loads in the cargo area are evenly distributed, properly secured, andwill not shift while operating the ATV. Do not put any load in the cargo area whenusing the ATV in water deeper than 4 inches.
DRAIN PLUGS
Drain Plugs being inserted into body
This ATV has two drain plugs located at the bottom rear corners of the lower body.They are there to keep water out when the vehicle is in water. Your ATV will take onsmall amounts of water during water use. This water must be drained when the ATV isback on dry land.
In order to insert the drain plugs, push them into the drain plug holes from the outside ofthe ATV until they seat firmly and cannot be removed with your fingers. They usuallyrequire more pressure to insert than can be applied with your finger or thumb so wesuggest using a blunt object like the blunt end of a disposable ball point pen. It helps tolubricate the drain plug with oil or grease before inserting.To remove the drain plugs, use pliers to grab hold of the outside edge of the drain plug onthe outside of the ATV and pull firmly. Inspect the drain plug before re-using. If it is torn
71
or mutilated in any way do not re-use. Spare drain plugs are available from an authorizedRecreatives dealer or Mudd-Ox Inc. at 1-800-255-2511.
WARNINGMake sure drain plugs are installed properly before using the ATV in water deeperthan 4 inches. If the drain plugs are not installed when the ATV is in water deeperthan 4 inches the ATV will take on water and could sink which could result in thedriver and passengers drowning. Do not re-use drain plugs unless they have beeninspected for defects. If you find a defective drain plug--Do Not Use It. Drowningcould occur.
CAUTIONMake sure the drain plugs are removed after use in water. Failure to drain thewater out of the ATV will cause damage to the chains and sprockets.
TRANSPORTING ATV
When transporting the ATV, Recreatives recommends that the ATV be in its normaloperating position (on all six wheels)
1. Move the shift lever into reverse gear.2. Apply and lock the parking/auxiliary brake.3. Move the fuel shutoff valve, which is located on the fuel line, to the OFF position.4. Secure the ATV with hold-down straps attached to the axles only.5. Use a minimum of 4 hold-down straps total.
NOTE:Suitable hold-down straps are available from a Recreatives dealer or RecreativesInd. Ordinary rope is not recommended because it can stretch under load.
CAUTION !Do not attach any additional hold-down straps anywhere on the ATV, especially thebody or Optional Roll Bar or Roll Cage. If you do, you will damage the body,causing it to sag down. This will reduce the clearance between the tires and body,allowing the tires to rub the body until a hole is worn through it.
NOTE:When transporting the ATV, make sure that it is in Reverse gear and theParking/Auxiliary Brake is applied and locked.

72
BREAK –IN- PROCEDURE
New ATV’s and overhauled ATV engines require a “break-in” period. The first month ismost critical to the life of this ATV. Proper operation during this break-in period willhelp assure maximum life and performance from the ATV.
During the first 10 hours of operation always use less than ½ throttle. Varying the engineRPM during the break-in period allows the components to “load”(aiding the matingprocess) and then “unload” (allowing components to cool). Although it is essential toplace some stress on the engine components during break-in, care should be taken not tooverload the engine too often. Do not pull a trailer during the break-in period.
When the engine starts, allow it to warm up properly. Idle the engine several minutesuntil the engine has reached normal operating temperature. Do not idle the engine forexcessively long periods of time.
During the break-in period, a maximum of ½ throttle is recommended; however, brieffull-throttle accelerations and variations in driving speeds contribute to good enginebreak-in.
The Skid Steer transmission requires no special break in procedures.
During the break-in period the parking/auxiliary brake pads must be burnished. Slowdisc-speed brakes must be properly burnished in order to achieve maximum stoppingpower. Burnish the brakes by repeatedly driving the ATV slowly and pushing down thefoot pedal several times to heat up the brake pads (then allowing them to cool). Thisprocedure burnishes the brake pads, stabilizes the pad material, and extends the life of thebrake pads.
WARNINGDo not attempt sudden stops with the parking auxiliary brake or put yourself into asituation where a sudden stop will be required until the brake pads are properlyburnished.
After completion of the break-in period the engine oil and oil filter should be changed.Other maintenance after break-in should include checking of all prescribed adjustmentsand tightening of all fasteners. At the discretion and expense of the owner/operator, theATV may be taken to a Recreatives dealer for this initial service.
AIR FILTER
The air filter and foam wrap must be kept clean to provide good engine power and gasmileage. If the ATV is used under normal conditions, service the air filter at the intervalsspecified in the engine Operator’s Manual. If dusty, wet, or muddy conditions are

73
encountered, inspect and either clean or replace the air filter and foam wrap much morefrequently.
OPERATING INSTRUCTIONS
PRECAUTIONS
Before driving your ATV, carefully read, understand, and observe all of the informationin Division I of the manual. Being properly prepared means a safer and more enjoyabledrive.
Always use protective clothing and related apparel when operating an ATV.Recommended items include a helmet, eye protection, long-sleeved shirts and long pants,gloves, and boots.
WARNINGIf your ATV is equipped with an optional roll bar or roll cage----Make sure alloccupants put on their seat belts and pull them tight.
WARNINGBeginning and inexperienced operators must read and understand this Operator’sManual.
PRE –START INSPECTION
WARNINGAlways inspect the ATV each time it is used to make sure it is in safe operatingcondition. Perform the following inspection with the engine off.
Control leversCheck smoothness by pulling the left and right control levers fully back and push themforward. Check that there is no binding, restriction, free-play, or looseness in controllevers.
Parking/Auxiliary BrakeCheck the foot pedal to see if has the proper amount of travel (1.5 inches) and there is nobinding and it returns freely when released. It should stop well before contacting theATV’s body when moderate pressure is applied. Visually check the thickness of thebrake pads (the floorboard must be removed in order to do this) and make sure that theyare at least .125 in. thick.
Tire/air pressureCheck each tire for proper air pressure. The proper tire pressure is 3.5 PSI. Also, checkthat each tire has no cracks, rips, or other damage. Check that tread wear is not significant(treads should be at least 1/16” deep for safe usage).
74
GasolineCheck the gasoline level in the tank to ensure a sufficient amount. Check the gasolinedelivery hose for any damage and make sure the tank cap is secured.
LightingCheck that all lights are working properly.
Ignition SwitchCheck that the ignition switch moves freely and smoothly in all positions.
Engine OilCheck the engine oil dipstick for proper oil level in the crankcase. Add if needed.
Transmission FluidCheck the Skid Steer Transmission Fluid level. Add if needed.
ThrottleCheck the throttle lever by compressing three or four times. There should be a slightamount of free-play and it should return to the idle position smoothly and quickly.
Shift LeverCheck the shift lever for smooth operation in all gear positions.
General conditionCheck the general condition of the entire ATV. There should be no loose components andno evidence of damage. All fasteners should be tight and secure.
STARTING THE ENGINETo start the engine, use the following procedure:1. Perform the Pre-Start Inspection.2. Apply and lock the Parking/Auxiliary Brake.3. Test the control levers by pulling back on them and pushing forward on them. They
should feel firm when they reach the limit of their forward and backward travel.
WARNINGDo not start the ATV engine if the brake systems are not functioning properly (if thefoot pedal and control levers do not have proper travel or correct feel), or if theParking/Auxiliary Brake does not lock the wheels or if the control levers will notlock the wheels. Service the brake systems or have them properly repaired prior tooperating the ATV. Serious personal injury or even death may occur if the brakesystems are not operating properly.

75
4. Test the throttle control lever by completely compressing and releasing it severaltimes. The lever MUST return to the idle position quickly and completely.
WARNINGIf the throttle control lever does not function properly, DO NOT ATTEMPT TOSTART THE ENGINE.
5. Shift the transmission into the Reverse position. You may have to rock the ATV toengage reverse.
Starting a Cold EngineIf the ambient temperature is below 40 F (5 C):1. Pull the choke knob out until it stops. Then twist the ignition key to the start position.2. Immediately after the engine starts release the key and it will spring to the run
position. Push the choke knob half way in; then when the engine is sufficientlywarmed up, push the choke knob all the way in.
If the ambient temperature is at or above 40 F (5 C):1. Pull the choke knob half way out. Then twist the ignition key to the start position.2. When the engine is sufficiently warmed up, push the choke knob all the way in.
CAUTIONIt is extremely important that the engine is properly warmed up before subjectingthe engine to high RPM operation or heavy loads. The engine should be allowed toidle at least 3-4 minutes before it is operated at more than ½ throttle. In extremelycold conditions, the warm-up time will be longer. Damage caused by insufficientwarm-up will not be covered by warranty.
Starting a Warm Engine
Operating the choke should not be necessary. Open the throttle slightly and twist theignition key to the start position.
NOTE:Operating the choke should not be necessary to start a warm engine. Operating thechoke could make the engine hard to start due to too rich gas/air mixture.
EMERGENCY STARTING
Some models have an emergency recoil starter to use if the electric starter becomesinoperative. To use the recoil starter, follow this procedure:
WARNINGMake sure the shift lever is in the reverse position and the parking/auxiliary brakeis applied and locked when using the emergency recoil starter.
1. Turn the ignition switch to the RUN position.

76
2. Pull the recoil starter handle slowly until resistance is felt; then give a short, quickpull.
3. Repeat until engine starts.
WARNINGBe sure to follow all starting procedures when using the emergency recoil starter.
CAUTIONTo avoid damaging the recoil starter, DO NOT pull the recoil rope to its limit orrelease the recoil handle from an extended position. Allow the rope to rewind slowly.
STOPPING THE ENGINETo stop the engine, turn the ignition switch key to the OFF position.
SHIFTING AND STARTING OFF
WARNINGNever carry more passengers than the ATV is designed for. See Division I for furtherinformation.
WARNINGNever operate the ATV on any paved surfaces including sidewalks, driveways,parking lots, and streets.
1. After making sure that the engine is warm, push down on the foot pedal of theParking/Auxiliary Brake to automatically release its locking mechanism.
2. Push down on the foot pedal again to engage the Parking/Auxiliary brake but do notengage the locking mechanism. Move the shift lever to the forward position and makesure the control levers are in the forward position. To start moving, release theParking/Auxiliary Brake; then gradually open the throttle until you reach the desiredspeed. Since your ATV has an “automatic type” transmission, there are no higher orlower gears to shift into. When you are on level ground the continuously variabledrive belt system will automatically shift into high gear for maximum speed andwhen a steep hill or a heavy load is encountered it will automatically shift into lowgear.
3. Reduce vehicle speed by releasing the throttle, braking as necessary (using the controllevers). The continuously variable drive belt system will automatically shift into alower gear.
BRAKING
When operating this ATV keep in mind that the main braking system is hand controlledand relies on proper operation of the Skid Steer Transmission and the chains andsprockets. If the Skid Steer Transmission does not have the proper amount and type offluid it may fail causing the main braking system to be inoperable. The same is true if thechains are worn or not adjusted properly. If the main braking system does fail you will

77
lose steering control, however the Parking/Auxiliary Brake system will provide adequatebraking and should be used if the main braking system fails.
WARNINGMake sure the Skid Steer Transmission has the proper amount and type of fluid init. If it doesn’t the main braking system may fail, causing the main braking systemto be inoperable.
WARNINGMake sure the chains are adjusted properly. If they aren’t, the main braking systemmay fail, causing the main braking system to be inoperable.
WARNINGIf the ATV is in a turn or on a hill the brakes should be used with caution so that theATV does not overturn.
WARNINGDo not put yourself into a situation where the Parking/Auxiliary brake will berequired until the Parking/Auxiliary brake pads are properly burnished. See Break-In Procedure for further information.
Never “ride” the Parking/Auxiliary Brake. Even maintaining minimal pressure on thefoot pedal will cause the brake pads to drag on the discs and may cause them to overheat,reducing their effectiveness.
WARNINGExcessive repetitive use of the Parking/Auxiliary Brake for high speed stops willcause overheating and premature brake wear which will result in an unexpected lossof brakes.
To stop the ATV, first release the throttle lever. Next apply the brakes using the controllevers. Remember you must pull back on the control levers to apply the brakes when inForward gear and release them forward and push them to apply the brakes when inReverse gear. Except in the case of an emergency (control lever malfunction) or if youwant less sensitive brakes when descending hills, always use the hand braking system ofthe ATV.
OPERATING TECHNIQUES
The following should be referred to as a “summary” of techniques, which are emphasizedin Division I of this manual. For more detailed information, refer to the Safety Section,Active Driving pages in Division I.
TURNING
To turn the ATV, the driver must use the proper technique. Because this ATV uses a SkidSteer Transmission, the left and right wheels are controlled independently. The left side

78
of wheels is controlled with the left control lever. The right side of wheels is controlledby the right control lever. In order for the ATV to turn, the wheels on the inside of theturn must slow down relative to the wheels on the outside of the turn. In order for this tohappen when in Forward Gear the driver must pull back on the control lever on the sameside as the inside of the turn and keep the other control lever forward. In order for this tohappen when in Reverse Gear the driver must push forward on the control lever on thesame side as the inside of the turn and continue to pull the other control lever backward.Maintain a steady throttle pressure. Turns will be smoother if you maintain a steadythrottle pressure (or at slow speeds even increase it slightly).
WARNINGThe turning procedure when in Reverse Gear is different than when in ForwardGear. The control levers will provide braking when pulled back when in ForwardGear, however when in Reverse Gear the control levers must be pushed forward toprovide braking.
To turn the ATV in Forward Gear use the following technique:1. Ease off the throttle as you approach the turn to slow down.2. Ease back gently on the control lever appropriate for the direction you are
turning.(Pull the left control lever to turn left and the right control lever to turn right)3. Maintain a steady throttle pressure. Turns will be smoother if you maintain a steady
throttle pressure (or at slow speeds even increase it slightly) when you pull back onone of the control levers. Throttle pressure enables you to “power” through turns.
4. For sharper turns you will have to pull back on the control lever a little harder.5. For quicker turns you will have to pull back firmly on the control lever and add a
little extra throttle pressure.6. Gradually increase your speed as you come out of the turn and ease the control lever
forward.7. If the ATV starts to tip or slip while turning, reduce the throttle and make the turn
wider.
Turns from a standing start in forward gear are possible using the followingtechnique:
Pull back the lever on the inside of the turn all the way back and push on the control leveron the outside of the turn and squeeze the throttle gently.
To Turn the ATV in Reverse Gear use the following technique:
1. Ease off the throttle as you approach the turn to slow down.2. Ease forward gently on the control lever appropriate for the direction you are
turning.(Push the left control lever to turn left and the right control lever to turnright)
3. Maintain a steady throttle pressure. Turns will be smoother if you maintain a steadythrottle pressure (or at slow speeds even increase it slightly) when you push forwardon one of the control levers. Throttle pressure enables you to “power” through turns.
4. For sharper turns you will have to push forward on the control lever a little harder.

79
5. For quicker turns you will have to push forward firmly on the control lever and add alittle extra throttle pressure.
6. Gradually increase your speed as you come out of the turn and ease the control leverbackward.
7. If the ATV starts to tip or slip while turning, reduce the throttle and make the turnwider.
Turns from a standing start in reverse gear are possible using the followingtechnique:
Push forward on the control lever on the inside of the turn all the way forward and pullback on the control lever on the outside of the turn and squeeze the throttle gently.
SKIDDINGTo overcome skidding when braking follow this technique:1. Ease off the brakes until you regain control.2. Apply the brakes as soon as you regain control.
SLIDING
To overcome sliding when turning, use the following technique:1. Turn into the slide.2. Maintain a steady throttle setting.3. Resume your course as soon as the ATV straightens out.
OPERATION ON HILLS
WARNINGNever operate the ATV on hills too steep for the ATV or for operator abilities.Practice on smaller hills before trying larger hills.
Climbing a Hill
To climb a hill with the ATV in Forward gear, use the following technique:
1. Approach the hill at a slow and cautious pace.2. Keep the control levers pushed forward.3. Maintain a steady pace.4. Slow down when approaching the top.5. If unable to make it to the top of the hill and if terrain allows, turn around on the hill.6. If the ATV loses forward movement, pull back on the control levers (all the way
back, until they stop) and stop the ATV.7. If the terrain allows turn around or allow the ATV to coast down the hill backwards
slowly, keeping in mind that you can stop the ATV by pulling back on the controllevers and also by applying the parking/auxiliary brake.

80
WARNINGAvoid shifting gears on a slope. If you must shift gears make sure theparking/auxiliary brake is applied.
Descending a Hill
WARNINGWhen using the engine as a brake going down hill the control levers will cause aturn in the opposite direction when they are pulled into their neutral position. Pullthe control levers past the neutral position to the back position to avoid the oppositeor “wrong way” turn.
To descend a hill with the ATV in Forward gear, use the following technique:1. Check the terrain carefully for any obstacles before starting down the hill.2. Point the ATV straight downhill.3. Start down the hill and use engine braking to keep the ATV at a slow speed.4. To slow down even more, pull back on the control levers past the neutral position
until you feel the brakes start to engage and use the control levers to control yourdownhill speed.
5. Avoid going down a hill at an angle that would cause the ATV to lean sharply to oneside. Go straight down a hill whenever possible.
6. If you need to change direction remember to pull the control levers past the neutralposition to avoid the “wrong way” turn.
Traversing a SlopeTo Traverse a slope with the ATV, use the following technique:
1. Keep your speed slow and consistent.2. Steer slightly uphill, if necessary to maintain a straight course.
DRIVING OVER OBSTACLES
If an obstacle cannot be avoided, use the following technique:
1. With the obstacle straight in front, approach at slow speed.2. Move slowly straight ahead until your front tires touch it.3. Increase throttle pressure and keep it steady until you are up and over it.
NOTE:Some obstacles are too high for an ATV or for the operator abilities. If not sureabout safely crossing an obstacle, find another path that you feel is safer.

81
OPERATION IN WATER
WARNINGMake sure drain plugs are inserted when your ATV is in water deeper than 4inches.
WARNINGIf you are going to be in water more than 1 foot deep---Take along a paddle.
WARNINGIf you are going to be in water more than 1 foot deep---Wear an approved lifevest.
NOTE:Even though your ATV is designed for water use, a small amount of water mayenter the ATV and reduce the effectiveness and stopping capability of theparking/auxiliary brake. Test the parking/auxiliary brake after leaving the water. Ifnecessary, apply them several times to let friction dry out the pads.The (Skid Steer Transmission) braking system is not affected by water use, and thecontrol levers will still operate normally, even if there is water inside the ATV.
Entering the water
When entering the water, use the following technique:
1. When entering the water take as direct an approach as possible.2. Proceed at a slow cautious pace.3. Continue until you are in the water.
Driving in shallow water (less than 4 inches deep)
When driving in water less than 4 inches deep, use the following technique:
1. Proceed at a slow cautious pace.2. Continue at a slow pace.3. If you make contact with an obstacle, back up and try to find another way around it.4. If you must pass over the obstacle you should go forward until your front tires touch
it.5. Then you should increase the throttle pressure slightly until you are over it.

82
Driving in deep water (more than 1 foot deep)
WARNINGIf you enter water more than 1 foot deep and your ATV is equipped with seatbelts---Make sure that all occupants unfasten their seatbelts.
When driving in water more than 1 foot deep, use the following technique:
1. For maximum water speed squeeze the throttle halfway.2. Pull one control lever back when turning and keep the motor revving at half throttle.3. Lean toward the inside of the turn.4. If you feel the ATV start to make contact with an obstacle you should release the
throttle and back up the ATV and try to find a way to avoid the obstacle.5. If you must pass over the obstacle you should go forward until your front tires touch
it.6. Then you should increase the throttle pressure slightly until you are over it.7. If you feel the ATV is going to tip over, you should back up and get off of the
obstacle.
OPERATION WITH TRACKS INSTALLED
If your ATV is equipped with optional tracks follow this method.
1. When starting from a standstill squeeze the throttle gently.2. If you start to get stuck relax your grip on the throttle so that you don’t lose traction.3. If you do get stuck, back away and try to find another way around.
NOTE:When tracks are installed the maximum water speed is 1 MPH
DRIVING IN COLD WEATHER
CAUTIONCheck that all controls move freely. Make sure that the control levers and foot pedalare free of ice and snow.
1. Start the engine and make sure the throttle operates normally. If it is frozen it must bethawed out before operating the ATV.
2. As long as the throttle operates normally, try to drive the ATV. If it does not movewith the normal amount of throttle applied the tires may be frozen to the ground orthe parking/auxiliary brake pads may be frozen to the discs.
3. If the tires are frozen to the ground, pour warm water around them to melt the ice.4. If the parking/auxiliary brakes are frozen, take the ATV to a warmer area to thaw
them out.
83
NOTE:After the parking/auxiliary brakes thaw, dry them by applying them several timeswhile driving slowly.
WARNINGGo slowly and be extra careful when driving on snow-covered or ice-coveredterrain. Always be alert to changing terrain conditions when operating the ATV.
1. Practice driving in an open snow-covered or ice-covered area at slow speeds beforedriving on snow-covered or ice-covered trails.
2. Learn how the ATV responds to steering and braking on the type of terrain to beencountered on the drive.
DRIVING IN REVERSE
WARNINGWhen selecting reverse gear, make sure there are no obstacles or people behind,When it is safe, back up slowly.
1. Stop the vehicle and apply and lock the parking/auxiliary brake.2. Put the gearshift into the reverse position.3. Check to make sure there is nothing behind.4. Pull the control levers all the way back and gently squeeze the throttle lever and
unlock the parking/auxiliary brake.
WARNINGWhen driving in reverse, go slowly and turn carefully.
GENERAL MAINTENANCENOTE:
Proper maintenance of the ATV is important for optimum performance. Follow theMaintenance Schedule, Periodic Maintenance Checklist, and all ensuingMaintenance Instructions/Information.
NOTE:A separate Operator’s Manual is supplied with each ATV for the engine. Consultthe engine Operator’s Manual for maintenance schedules and information.
If, at any time, abnormal noises, vibrations, or improper functioning of any component ofthis ATV are detected, DO NOT OPERATE THE ATV. Take the ATV to an authorizedRecreatives dealer for inspection and adjustment or repair. If you do not have anauthorized Recreatives dealer in your area contact Mudd-Ox Inc. at 1-800-255-2511.
If the owner/operator does not feel qualified to perform any of these maintenanceprocedures or checks, return the ATV to an authorized Recreatives dealer for professional

84
service. If you do not have an authorized Recreatives dealer in your area contactMudd-Ox Inc. at 1-800-255-2511.
NOTE:The following instructions and information refer to specific items in themaintenance and care of the ATV.
MAINTENANCE SCHEDULE
Item 0 Every 10 hours Every 50 hours Every 60 hour Every 200 hoursor 1 month or 3 months or 6 months or 2 years
Battery I I - - -Remove floorboards and cleanOut chain troughs I I - - -Visual inspection of allFasteners I I - - -Chains I I - - -Bearings I I - - -Jackshaft Bushings I I - - -Tires/air pressure I I - - -Idle speed I I - - -Engine oil and filter I I R - -Transmission fluid I I - R -Throttle/choke cable I I - - -Air filter/foam wrap I I C - RParking/auxiliary brake I I - - -Control levers I I - - -Drive belt I I - - RFuel filter I I - R -Continuously variable drivePulleys I - - - I
I= Inspect and clean, adjust, lubricate, replace as necessaryT= TightenR=ReplaceC=Clean0=Initial service (after break in)
GETTING INSIDE THE MAX II
ENGINE HATCH COVERIn order to remove the hatch cover, use the following procedure:1. Loosen the ¼ turn fasteners.2. Lift off the engine cover.
NOTE:This gives you access to the oil dip stick, the air filter and the recoil starter.
CAUTIONDo not operate the ATV with the engine hatch cover removed.
SEAT/FLOORBOARDThe seat and floorboard are removed as one unit in order to remove them use thefollowing procedure.1. Place the ATV on level ground.

85
2. Remove the hitch pin on the bottom of the seat/floorboard unit located near the baseof the left hand control lever.
3. Place the gearshift into the reverse position.4. Stand on the left side of the ATV and remove the unit by grasping the seat/floorboard
unit, and lift it over the control levers and gearshift lever.
NOTE:Once the seat/floorboard unit is removed, access to the battery is provided and themain, center, and front drive chains can be inspected, lubricated and adjusted.
WARNINGDo not operate the ATV with the seat/floorboard unit removed.
UPPER BODY
With the seat/floorboard removed use the following technique to raise the upper body:1. Remove all the wing nuts along the edge of the body except three on the front edge.2. If equipped with an optional roll bar, remove the hitch pins, which hold the roll bar
bracket to the vehicle chassis.3. Raise the upper body.4. Swing the upper body support away from the lower body until it is vertical.5. Lower the upper body onto the support.
NOTE:This gives you access to the rear chains and engine.
GETTING INSIDE THE MAX IV
ENGINE COVER IV-500, 600, 850, 900-TTo remove the engine cover; use this procedure:1. Release the four rubber hold-downs2. Remove the engine cover.
NOTE:This gives you access to the oil dip stick, the air filter and the recoil starter, if vehicleis so equipped, as well as the rear chains, inner bearings, oil drain, oil filter and thedrive belt.
WARNINGDo not operate the ATV with the engine cover removed.
ENGINE COVER IV-950-TAccess to the engine area of the Max IV 950T can be obtained two ways:
The top area of the engine cover can be unhooked and lifted towards the front of the

86
vehicle.
To lift the top area of the engine cover, use this procedure:1. Release the two top rear rubber hold-downs.2. Lift the top area of the engine cover and slowly allow it to swing forward.
NOTE: This gives you access to the air cleaner, oil dipstick, throttle andchoke cable hook-up, radiator cap, overflow bottle and the grass screen.
WARNINGDo not operate the ATV with the engine cover open.
To remove the engine cover, use this procedure:Release the four lower rubber hold-downs.Remove the engine cover.
NOTE: This gives you access to the above items as well as the rear chains,inner bearings, oil drain, oil filter and the drive belt.
CAUTIONWhen re-installing the engine cover, make sure the air intake hose passes throughthe hole behind the air deflector in the rear of the engine cover. Failure to do so willresult in very poor engine performance and fuel economy. Extended use may resultin permanent engine damage.
WARNINGDo not operate the ATV with the engine cover removed.FRONT FLOORBOARDTo Remove the front floorboard, use the following procedure:1. Place the ATV on level ground.2. Remove the four screws located on the floorboard.3. Lift out the front floorboard.
NOTE: This gives you access to the parking/auxiliary brake.
WARNINGDo not operate the ATV with the front floorboard removed.
REAR FLOORBOARDTo Remove the rear floorboard use the following procedure:1. Place the ATV on level ground.2. Grasp the back of the rear floorboard and pull up.
NOTE:This gives you access to the front and center chains.
87
CAUTIONWhen re-installing the rear floorboard make sure that it rests on top of the frontfloorboard. This will prevent any foreign material from falling into the drive train.
WARNINGDo not operate the ATV with the rear floorboard removed.
GETTING INSIDE THE BUFFALO
RAISING THE CARGO BOX
WARNINGNever lean into the engine/transmission area, unless the support bar is raised andlockedTo raise the cargo box follow these steps:1. Insert the key into the ignition switch and turn the ignition switch to the lights/run or
run position.2. Push upwards on the cargo box switch (located on the dashboard) until the cargo box
is fully raised and then release the switch. When it is fully raised, you will hear aclicking noise, which indicates the power lift is fully extended.
3. Raise and lock the support bar.
NOTE:This gives you access to engine/transmission area, as well as the main, center andrear chains
WARNINGNever drive the ATV with the cargo box in the raised positionFLOORBOARDTo Remove the floorboard, use the following procedure:1. Place the ATV on level ground.2. Remove the four screws located on the floorboard.3. Lift out the floorboard.
NOTE:This gives you access to the parking/auxiliary brake and front chains.
WARNINGDo not operate the ATV with the floorboard removed.
SEAT BOTTOMTo raise the seat bottom, grasp the rear portion of the seat bottom and pull up.
NOTE:The front of the seat bottom is hinged

88
NOTE:This give you access to the battery and fuse panel
WARNINGDo not operate the ATV with the seat raised
GENERAL LUBRICATION
CablesThe choke cable does not require lubrication; however it is advisable to lubricate the endsof the cable periodically with a good cable lubricant.
The throttle cable should be lubricated at the scheduled intervals. Use a good cablelubricant and a cable lubricating device to ensure that the cable is completely lubricated.To lubricate the throttle cable use the following procedure:1. Disconnect the cable from the engine and the throttle lever.2. Attach the cable lubricating device to the end of the cable that attaches to the engine.3. Insert the nozzle attached to the aerosol can which contains the cable lubricant into
the cable lubricating device and inject about 1 ounce into the cable.4. Disconnect the cable lubricating device from the cable and reattach the cable to the
throttle lever and engine.NOTE:Clean up any excess lubricant after lubricating the throttle cable.
WARNING Make sure that cable moves freely and make sure that the idlespeed and throttle lever free play is correct after you have reattached the throttlecable to the throttle lever and engine. Refer to the section on Engine idle adjustmentEngine Oil and Filter
Change the engine oil and oil filter at the scheduled intervals. The engine should alwaysbe warm when the oil is changed so the oil will drain easily and completely.To change the oil use the following procedure:1. Park the ATV on level ground.2. Remove the oil filler cap.3. Open the oil drain valve with a quick twist and pull.4. Drain the oil into a suitable container5. Using an oil filter wrench, remove the oil filter.6. Apply oil to the gasket and check to make sure it is positioned correctly; then install
the new oil filter. Tighten securely.7. Close the oil drain valve by pushing and twisting, until it is locked.8. Pour the recommended oil and amount in the filler hole.9. Start the engine (while the ATV is outside on level ground) and allow it to idle for a
few minutes.10. Turn the engine off and wait approximately one minute. Recheck the oil level using
the dipstick. The oil should be between the “L” and “F” marks on the dipstick. If oil

89
is not visible or below the “L” mark, add recommended oil until the oil level is at theproper level.
11. Inspect the area around the oil drain valve and oil filter for leaks.
NOTE:Clean up any excess oil after changing the oil and filter.
Transmission Fluid
Transmission Level Plug and Filling Plug
Skid Steer Transmission Level Plug and Filling Plug
Change the transmission fluid at the specified intervals.To change the transmission fluid use the following procedure:1. Park the ATV on level ground2. Apply and lock the parking/auxiliary brake.3. Remove the filler plug.4. Remove the level/drain plug.5. Insert a piece of 3/16” diameter tubing into the level/drain plug hole and position it so
that is rests at the bottom of the transmission.6. Attach a suction pump to the tubing and pump the fluid into a suitable container.7. Using a funnel pour the recommended Automatic Transmission Fluid and additive
into the filler plug hole until the fluid level reaches the bottom of the level/drain hole.8. Install the filler plug and the level/drain plug
. NOTE:Clean up any excess transmission fluid after changing the fluid
CAUTIONInspect the fluid for any signs of metal filings. If found, take the ATV to anauthorized Recreatives dealer or call Mudd-Ox Inc. at 1-800-255-2511 for advice.
CAUTIONThe filler plug has a vent and must be inserted into the upper hole in thetransmission case. If the filler plug is inserted into the lower hole in the transmissioncase, the fluid will leak out and damage the transmission.
Recommended Skid Steer Transmission Fluid.

90
The recommended transmission Fluid is a mixture of 28 oz(.841) Type “F” ATF and4oz(.120l) locking differential additive(GM part no. 1052358)Total capacity is 1 Quart.
AXLE BEARINGS
Lubricate the axle bearings at the scheduled intervals. The ATV should always be onlevel ground to prevent the ATV from rolling.
To lubricate the outer axle bearings, use the following procedure:1. Raise the ATV off of the ground.2. Remove the wheels.3. Attach a grease gun to the fittings on the bearings.4. Pump marine grade wheel bearing grease into the bearings.
NOTE:One or two pumps of grease should be enough to lubricate the bearingproperly.
CAUTIONDo not over lubricate the bearing, if you do, you may damage the seal on the bearing andshorten the life of the bearing.
To lubricate the inner axle bearings, use the following procedure:1. Remove the floorboard or raise the upper body as required.2. Attach a grease gun to the fittings on the bearings.3. Pump marine grade wheel bearing grease into the bearings.
NOTE:Clean up any excess grease after lubricating the bearings.
JACKSHAFT BUSHINGS (MAX II & BUFFALO ONLY)Lubricate the jackshaft bushings for the left and right hand jackshafts at the specifiedintervals.
To lubricate the jackshaft bushings, use the following procedure:1. Place the ATV on level ground.2. Remove the seat/floorboard unit.4. Attach a grease gun to the fittings on the jackshaft .3. Pump marine grade wheel bearing grease into the bushings until the grease starts to
come out of them.
NOTE:Clean up any excess grease after lubricating the bearings.

91
CONTROL LEVERS
WARNINGBe sure to check the control levers for free movement and proper travel before eachuse. If they are binding or sticking or don’t have the proper amount of travel, takethe ATV to a Recreatives Authorized dealer or call Recreatives at 1-800-255-2511for advice.
The control levers must be checked regularly so that the ATV has a fully functionalsteering and braking system.
To check the control levers use the following procedure:1. Make sure the ATV is on level ground.2. Pull the left and right control levers backwards until they come to a stop and then
release them forward. Make sure that they are not binding or sticking.3. Using a tape measure placed horizontally at the tops of the control levers, measure the
total amount of travel from the forward position to the backward position. It shouldbe between 6 and 10 inches.
CAUTION !If the control lever travel is less than 6 inches or more than 10 inches, Take theATV to an authorized Recreatives Dealer or Call Mudd-Ox Inc. at 1-800-255-2511for advice.
Lubricating the control lever shaft:
The control lever shaft should be lubricated at the scheduled intervals to avoid binding orsticking of the control levers.
To lubricate the control lever shaft, put a few drops of engine oil into the holes in the topof the hand grips mounted on the control levers.
NOTE:Clean up any excess oil after lubricating the control lever shaft.
PARKING/AUXILIARY BRAKE
WARNINGBe sure to inspect the parking/auxiliary brake system before each use. Alwaysmaintain brake according to the Maintenance Schedule.

92
Brake Pads
The clearance between the brake pads and brake discs must be adjusted periodically asthe brake pads wear. Replace the brake pads when they show excessive wear. Check thethickness of each of the brake pads as follows:
1. Remove the floorboard, which is above the front axles.2. Measure the thickness of each brake pad.3. If thickness of either brake pad is less than .125 in., take the ATV to an authorized
Mudd-Ox Inc. Dealer to have the brake pads replaced or call Mudd-Ox Inc. at 1-800-255-2511 for advice.
4. Install the floorboard.
The parking/auxiliary brake must be maintained to be fully functional as a parking andauxiliary brake.
To check the parking/auxiliary brake for proper operation, use the following procedure.
1. Press the parking/auxiliary brake and apply the locking mechanism.2. With the engine off, gearshift in neutral position, attempt to push the ATV.3. If the brake has locked the wheels, it is adjusted properly.4. If the brake does not lock the wheels, it must be adjusted.
To adjust the parking/auxiliary brake, use the following procedure:
NOTE:The parking/auxiliary brake must be disengaged for this procedure.
Foot Pedal Free Play
Measure the free play at the top of the foot pedal. It should be 1.5 inches. If the free playis not 1.5 inches use the following procedure.1. Remove the floorboard above the front axle.2. Loosen the locknut on the turnbuckle.

93
3. Separate the male and female ends of the turnbuckle by unthreading the male endfrom the female end.
4. Thread the male end back into the female end and count the number of threads thatare engaging. Make sure that at least 6 threads are engaged.
WARNINGThe parking/auxiliary brake may fail if the male and female ends of theparking/auxiliary brake turnbuckle are not engaged properly. They must have atleast 6 threads engaged.
5. Continue to adjust the turnbuckle so that free play is 1.5 inches.6. Tighten the locknut on the turnbuckle.7. Install the floorboard.
NOTE:Thread the turnbuckle together to reduce foot pedal travel and thread theturnbuckle apart to increase foot pedal travel. If the proper amount of foot pedalfree play cannot be obtained by adjusting the turnbuckle, Take the ATV to anauthorized Mudd-Ox Inc. Dealer or contact Mudd-Ox Inc. for advice.
Turnbuckle Adjustment for Parking/Auxiliary Brake
DRIVE BELT
The Drive belt must be inspected at the scheduled intervals so that the variable speedtransmission functions properly.
To inspect the drive belt, use the following procedure:1. Place the ATV on level ground.2. Remove the engine cover or raise the upper body as required.3. Measure the widest portion of the belt to make sure it is at least 1 1/16 inches wide.
NOTE:If the belt is less than 1 1/16 inches wide it should be replaced with a new belt. It isrecommended to replace the belt every two years.
Check the belt tension by depressing the belt with your index finger and make sure thatthe belt deflects 1 ¾ inches. If it does not it must be adjusted.

94
To adjust the belt tension on the MAX II or Buffalo, use the following procedure:
1. Raise the upper body or cargo box as required.2. Loosen the bolts which hold the engine mount to the chassis.3. Loosen the nuts on the anti-flex mount.4. Slide the engine forward or backward to adjust the belt tension.5. Tighten the bolts on the engine mount.6. Slide the anti flex mount until it makes contact with the engine mount.7. Tighten the nuts on the anti-flex mount.
Engine Mount and Anti-Flex Mount, Max II & Buffalo
To adjust the belt on the MAX IV, use the following procedure:1. Place the ATV on level ground.2. Loosen the nuts that attach the engine to the engine mount.3. Add or remove the shims under the engine to tighten or loosen the belt.4. Tighten the nuts that attach the engine to the engine mount.
Proper Belt Tension
WARNINGWhen adjusting the belt tension on the Max IV, make sure not to move the engine tothe left or right or you will cause a misalignment of the centrifugal clutch and

95
torque converter, which may cause the ATV to start to move when put into forwardgear when it is at idle speed. Be prepared to apply the brakes.
WARNINGIf the belt tension is too tight, the ATV may start to move when put into forwardgear when it is at idle speed. Be prepared to apply the brakes. If this occurs the belttension must be re-adjusted.
CHAIN DRIVE SYSTEMThis ATV is equipped with chains and sprockets that transmit power from the Skid SteerTransmission to all six axles. In order for the drive system to operate properly thesechains must be lubricated at the scheduled intervals and adjusted when they developexcess travel.
MAX II and BUFFALOTwo main drive chains travel from the Skid Steer Transmission to the jackshaft on eachside of the ATV. The center drive chains transmit power from the jackshaft to the centersprockets (located on the center axles). There are two final drive chains on each side ofthe vehicle, they transmit power from the center sprockets to the front and rear sprockets(located on the front and rear axles).
Chain Drive for Max II & Buffalo
MAX IVTwo primary chains travel from the Skid Steer Transmission to the rear sprockets(located on the rear axles) on each side of the ATV. The rear final drive chains transmitpower from the rear sprockets to the center sprockets (located on the center axles). Thefront final drive chains transmit power from the center sprockets to the front sprockets(located on the front axles).

96
Chain Drive for Max IV
CHAIN LUBRICATION
In order to lubricate the chains use the following procedure:1. Remove the floorboard (s) and raise the upper body (Max II) or the cargo box
(Buffalo) to gain access to the chains.2. Wipe the chain with a rag in order to remove any water, dirt or debris.3. Lubricate the chain completely using a good grade of motorcycle chain lubricant.
NOTE:If your ATV is equipped with O-Ring chain, use a chain lubricant specificallydesigned for O-Ring chains.NOTE:Clean up any excess chain lubricant after lubricating the chains.
INSPECTING CHAIN TENSION
Proper chain tension must be maintained so that the chain drive system will be fullyfunctional.
Proper chain tensionNOTE:In order to measure the chain tension properly, the inspection and chainadjustment (if necessary) must be made with the ATV raised off the groundso the tires are not making contact with the ground.
Use the following procedure to inspect the chain tension in the MAX II and Buffalo:1. Park the ATV on level ground.2. Remove the floorboard and raise the upper body (Max II) or raise the cargo box
(Buffalo).3. Raise the ATV so that the tires are not making contact with the ground.4. Check the chain tension on the main and center chains by grasping the chain midway
between the sprockets while rotating the tires slowly by hand.5. Check the chain tension on the final drive chains by grasping the chain midway
between the sprockets on the side opposite the chain adjuster while rotating the tiresslowly by hand.
6. Chain tension should be ½ - ¾ inch of travel at the “tight point”.

97
Use the following procedure to inspect the chain tension in the Max IV:1. Park the ATV on level ground.2. Remove the rear floorboard.3. Raise the ATV so that the tires are not making contact with the ground.4. Check the chain tension on all chains by grasping the chain midway between the
sprockets on the side opposite the idler sprockets while rotating the tires slowly byhand.
5. Chain tension should be ½ - ¾ inch of travel at the “tight point”.
NOTE:Chain tension varies as the sprockets rotate. Rotate the tires slowly (by hand) as youcheck the chain tension to find the point at which the chain has the least amount oftravel (this is the tight point). Always measure the chain tension when it is at itstight point.
CAUTION !Failure to adjust the chains when they have excess travel can damage the chaindrive system.
ADJUSTING CHAIN TENSION
NOTE:In order to measure the chain tension properly, the inspection and chain adjustment(if necessary) must be made with the ATV raised off the ground so the tires are notmaking contact with the ground.
MAX II AND BUFFALO MAIN AND CENTER DRIVE CHAINS
Adjustment for Main & Center Drive Chains, Max II & Buffalo
The main and center drive chains are adjusted by relocating the jackshaft slightly.The clamping bolts hold the jackshaft in place. The adjusting bolts reposition thejackshaft. When your ATV is assembled at the factory the jackshaft is positioned straight

98
and level. When the chain tension is adjusted you can make sure the jackshaft stays asstraight and level as it was when it left the factory by turning the adjusting bolts an equalnumber of turns. Once they are adjusted, the clamping bolts must be tightened securely tohold the jackshaft in place.
Use the following technique to adjust the chain tension on the Max II and Buffalo mainand center drive chains:1. Loosen the four clamping bolts.2. To adjust the main drive chains turn the two adjusting bolts in front of the jackshaft
an equal number of turns until the chain has ½ - ¾ inch travel at the tightest point.3. To adjust the center drive chains turn the two adjusting bolts above the jackshaft an
equal number of turns until the chain has ½ - ¾ inch travel at the tightest point.4. Tighten the clamping bolts securely.
NOTE:Make sure you turn the adjusting bolts an equal number of turns so that thejackshaft remains straight and level.
MAX II FINAL DRIVE CHAINS AND BUFFALO REAR FINAL DRIVE CHAINS
Adjusting Max II Final Drive Chains & Buffalo Rear Final Drive Chains
The final drive chains are adjusted by moving the slide adjusters. These adjusters haveseveral positions and they move easily in one direction. Once they lock into position theycan only be released by firmly grasping the plastic slide portion of the adjuster andpushing it away from the bracket bolted to the frame that it is attached to. The front chainadjuster on the MAX II must be pushed down to tighten the chain. The rear chain adjustermust be pulled up to tighten the chain.
Use the following technique to adjust the final drive chains on the MAX II and Buffalorear final drive chains:
Front chains MAX II only:1. Push down the chain adjuster to tighten the chain until the travel (on the side opposite
the adjuster) is ½ - ¾ inch at the tightest point.2. Pull up slightly on the adjuster to make sure it has locked into position.

99
NOTE:The chain adjuster can be unlocked by grasping the plastic slide portion andpushing it away (towards the center of the ATV) from the bracket that it is attachedto and simultaneously pulling it up (towards the top of the ATV).
Rear chains MAX II and Buffalo:1. Pull up the chain adjuster to tighten the chain until the travel (on the side opposite the
adjuster) is ½ - ¾ inch at the tightest point.2. Push down slightly on the adjuster to make sure it has locked into position.
NOTE:The chain adjuster can be unlocked by grasping the plastic slide portion andpushing it away (towards the center of the ATV) from the bracket that it is attachedto and simultaneously pushing it down (towards the bottom of the ATV).
MAX IV PRIMARY CHAINS
Adjustment for Max IV Primary Chains
NOTE:In order to measure the chain tension properly, the inspection and chainadjustment (if necessary) must be made with the ATV raised off the groundso the tires are not making contact with the ground.
The primary chains are adjusted by turning the adjusting nuts located on the primarychain adjusters. Turning the adjusting nuts clockwise tightens the chain and turning themcounterclockwise loosens it.
To adjust the primary chains use the following technique:1. Loosen the locking nut located on the primary chain adjuster.2. Turn the adjusting nuts until the chain has ½ - ¾ inch travel at the tightest point (on
the side opposite the adjuster).3. Tighten the locking nut.

100
NOTE:Chain tension varies as the sprockets rotate. Rotate the tires slowly (by hand) as youcheck the chain tension to find the point at which the chain has the least amount oftravel (this is the tight point). Always measure the chain tension when it is at itstight point.
MAX IV FINAL DRIVE CHAINS AND BUFFALO FRONT FINAL DRIVECHAINS
Adjusting Max IV Final Drive Chains & Buffalo Front Final Drive Chains
These final drive chains are adjusted by moving the idler sprockets. Pushing the idlersprocket down tightens the chain and pulling it up loosens it.
To adjust these final drive chains use the following technique:1. Loosen the adjuster bolt.2. Move the idler sprocket until the chain has ½ - ¾ inch travel at the tightest point (on
the side opposite the adjuster).3. Tighten the adjuster bolt.
NOTE:In order to measure the chain tension properly, the inspection and chain adjustment(if necessary) must be made with the ATV raised off the ground so the tires are notmaking contact with the ground.
CAUTION !Failure to adjust the chains when they have excess travel can damage the chaindrive system.
BATTERY
The battery is located under the seat on the MAX II and Buffalo, and under the rear seatof the MAX IV.

101
The battery is maintenance free and does not require the fluid level to be checked.
WARNINGBattery acid is harmful if it contacts eyes, skin, or clothing. Care must be takenwhenever handling a battery.
If the battery is discharged, remove the battery from the ATV and charge the battery atthe standard charging rate of 1.4A x 10 hr.
To remove and charge the battery, use the following procedure:1. Remove the negative battery cable; then remove the positive cable.2. Remove the battery hold-down bracket.3. Remove the battery from the ATV.4. Trickle charge the battery at 1.4 amps for 10 hours.5. Place the battery into position in the ATV and secure with the hold-down bracket.6. Connect cables to the proper terminals: positive cable to the positive terminal (+) and
negative cable to the negative (-) terminal..7. Connect the negative cable last.
WARNINGAnytime service is performed on a battery, the following must be observed: Keepsparks, open flame away. Always wear safety glasses. Protect skin and clothingwhen handling batteries. When servicing battery in enclosed space, keep the areawell-ventilated. Make sure battery venting is not obstructed.
WARNINGAvoid spillage and contact with skin, eyes, and clothing.
CAUTIONDo not charge the battery while it is in the ATV with the battery terminalsconnected.
CAUTIONNever exceed the standard charging rate.
CAUTIONConnecting cables in reverse (positive to negative and negative to positive) can causeserious damage to the electrical system.

102
SPARK PLUGS
There are two spark plugs in the engine of your ATV. Make sure that the correct plugsare used. This will be specified in the engine Operator’s Manual supplied with the ATV.A light brown insulator indicates that the plug is correct. A white or dark insulatorindicates that the engine may need to be serviced or the carburetor may need to beadjusted. Consult an authorized Briggs and Stratton or Kohler dealer (depending onwhich engine is installed in your ATV) if the plug insulators are not a light brown color.
To maintain a hot, strong spark, keep the plug free of carbon.
Before removing the spark plugs be sure to clean the area around the spark plug. If youdo not, dirt could enter the engine when removing or installing the spark plugs.
Adjust the gap to the specification provided in the engine Operator’s Manual.
When installing the spark plugs, be sure to tighten it securely. A new spark plug shouldbe tightened ½ turn once the washer contacts the cylinder head. A used spark plug shouldbe tightened 1/8-1/4 turn once the washer contacts the cylinder head.
ENGINE IDLE ADJUSTMENT, BRIGGS & STRATTON OR KOHLER
To properly adjust the idle a tachometer is necessary. If one is not available, take theATV to an Authorized Recreatives, Briggs & Stratton or Kohler.
WARNINGMake sure the ATV is on level ground, the shift lever is in the neutral position andthe parking/auxiliary brake is applied and locked when adjusting idle speed.
To adjust idle RPM:
1. Start the engine and warm it up to normal operating temperature.2. Turn the throttle stop screw on the in or out until the engine idles at 1375-1450 RPM.
WARNINGAdjust the idle to the correct RPM. Make sure the engine is at normal operatingtemperature before adjusting the idle RPM.
THROTTLE LEVER FREE PLAY ADJUSTMENT, BRIGGS & STRATTON ORKOHLER
Check the throttle lever free play. It should be 1/8-3/16 in. (with the engine running) If itis not in this range adjust the throttle lever free play. The maximum RPM must bechecked with a tachometer after adjusting the throttle cable to ensure maximumperformance.
103
CAUTION !The maximum RPM should never exceed 4000 RPM. If it exceeds 4000 RPM seriousengine damage could occur.
WARNINGMake sure the ATV is on level ground, the shift lever is in the neutral position andthe parking/auxiliary brake is applied and locked when adjusting the throttle cable.
To adjust the throttle lever free play use the following technique:1. Shut off the engine.2. Loosen the screw on the swivel assembly on the engine that the inner throttle cable is
attached to.3. Slide the inner cable in or out of the swivel assembly and tighten the screw lightly.4. Start the engine.5. Check the free play, if it is correct; then shut the engine off and tighten the screw
securely. If it is incorrect; then shut off the engine and repeat the procedure, until thefree play is correct.
6. Apply full throttle and observe the tachometer reading. It should be 3900-4000 RPM.7. If the RPM is not within the specified range, a governor adjustment will be required.
NOTE:If a governor adjustment is required, see your engine service manual orcontact an Authorized Recreatives, Briggs & Stratton or Kohler dealer.
WARNINGIf the throttle lever free play or the maximum RPM cannot be adjusted to thecorrect specifications using this method take the ATV to an Authorized Recreatives,Briggs & Stratton or Kohler dealer.
ENGINE IDLE ADJUSTMENT KAWASAKI
To properly adjust the idle a tachometer is necessary. If one is not available, take theATV to an Authorized Recreatives or Kawasaki Dealer.
WARNINGMake sure the ATV is on level ground, the shift lever is in the neutral position andthe parking/auxiliary brake is applied and locked when adjusting idle speed.To adjust idle RPM:
1. Start the engine and warm it up to normal operating temperature.

104
2. Turn the throttle stop screw on the carburetor either in or out until the engine idlesat 1375-1450 RPM.
WARNINGAdjust the idle to the correct RPM. Make sure the engine is at normal operatingtemperature before adjusting the idle RPM.
THROTTLE LEVER CABLE FREE PLAY ADJUSTMENT, KAWASAKI
Check for throttle lever free play. There shouldn’t be any free play at all (with the enginerunning). If there is any free play then you should adjust the throttle cable to eliminateany free play. The maximum RPM must be checked with a tachometer after adjusting thethrottle cable to ensure maximum performance.
CAUTION !The maximum RPM should never exceed 3800 RPM. If it exceeds 3800 RPM seriousengine damage could occur.
WARNINGMake sure the ATV is on level ground, the shift lever is in the neutral position andthe parking/auxiliary brake is applied and locked when adjusting the throttle cable.
To adjust the throttle lever free play use the following technique:1. Shut off the engine.2. Loosen the screw on the swivel assembly on the engine that the inner throttle
cable is attached to.3. Slide the inner cable in or out of the swivel assembly and tighten the screw
lightly.4. Start the engine.5. Check the free play, if it is correct; then shut the engine off and tighten the screw
securely. If it is incorrect; then shut off the engine and repeat the procedure, untilthe free play is correct.
NOTE: If the idle speed increased after the throttle cable adjustment,then the cable was tightened too much and the adjustment procedure will
have to be repeated until all the free play is eliminated without raising the idlespeed.6. Apply full throttle and observe the tachometer reading. It should be 3750-3800
RPM.7. If the RPM is not within the specified range, a governor adjustment will be
requiredNOTE:If a governor adjustment is required, see your engine service manual orcontact an Authorized Recreatives or Kawasaki dealer.

105
WARNINGIf the throttle lever free play or the maximum RPM cannot be adjusted to thecorrect specifications using this method take the ATV to an Authorized Recreatives,or Kawasaki dealer.
AIR FILTER
The two part air filter inside the air filter housing must be kept clean to provide goodengine power and gas mileage. If the ATV is used under normal conditions, service thefilter at the intervals specified. If operated in dusty, wet, or muddy conditions, inspect andservice the filter more frequently. See the engine Operator’s Manual for specificinstructions for servicing the air filter.
NOTE: In order gain access to the air filter the hatch cover must beremoved on the MAX II, the engine cover must be removed on the MAX IV and thecargo box must be raised on the Buffalo.
TIRES
This ATV is equipped with low-pressure tubeless tires of the size and type listed below.Do not, under any circumstances, substitute tires of a different type or size.
MODEL SIZESMAX II 21 X 11.00 X 8 or 22 X 11.00 X 8MAX IV 21 X 11.00 X 8 or 22 X 11.00 X 8 or 26 X 12.00 X 12BUFFALO 21 X 11.00 X 8 or 22 X 11.00 X 8 or 26 X 12.00 X 12
SIZE APPROVED TIRES21 X 11.00 X 8 Nankang Chevron or Goodyear Rawhide22 X 11.00 X 8 Goodyear Rawhide III26 X 12.00 X 12 Goodyear Super Terra-Grip
WARNINGAlways use the size and type of tires listed above.This ATV has low-pressure tubeless tires. Air is sealed by the contact surfaces of theinner wheel rim and the tire bead. If either the inner wheel rim or tire bead isdamaged, air may leak. Be extremely careful not to damage these areas whenreplacing tires.
It is very important to use the proper tools when repairing or replacing tires to preventdamage to the tire bead or wheel rims. If proper tools and related items are not available,have this maintenance performed by an authorized Recreatives dealer or contactMudd-Ox Inc. at 1-800-255-2511 for advice.

106
Tire Inflation Pressure
Use a low pressure gauge to measure the air pressure in the tires. Check the air pressurein all tires before each use of the vehicle.
Tire pressure should be 3.5 psi for all tire types and sizes.
CAUTIONWhen breaking the tire bead loose from the wheel, be extremely careful not todamage the inner wheel surface or the tire bead.
Tubeless Tire Repair
Should a leak or flat tire occur due to a puncture, the tire may be repaired using a plug-type patch. If the damage is from a cut or if the puncture cannot be repaired using a plug,the tire must be replaced. When operating the ATV in areas where transportation orservice facilities are not readily available, it is strongly recommended to carry a plug-typerepair kit and a tire pump along.
WHEEL REMOVAL & REPLACEMENT
1. Park the ATV on level ground and apply and lock the parking/auxiliary brake.2. Loosen the lug nuts on the wheel to be removed.3. Elevate the ATV by placing a jack under the lower body.
NOTE: Use a piece of wood or similar object to prevent the jack fromscratching the lower body.
4. Remove the lug nuts.5. Remove the wheel.6. Install the wheel and install the lug nuts.7. Tighten the lug nuts in a criscross pattern to 40 ft-lb.8. Remove the jack.
SPARK ARRESTER
Your ATV may be equipped with an optional Spark Arrester, which must be periodicallycleaned at the intervals shown in the Maintenance Schedule.To clean the spark arrester using the following procedure:1. Remove the spark arrester retaining screw.2. Pull out the spark arrester.3. Use a wire brush to clean the carbon off the spark arrester.4. Install the spark arrester.5. Tighten the spark arrester retaining screw.
LIGHT BULB REPLACEMENT
The wattage rating of each bulb is shown below. When replacing a burned bulb, alwaysuse the same wattage rating.

107
MODEL HEADLIGHT TAILLIGHTMAX II GE 1156/27W/*GE894/37W WAGNER 193/4.9WMAX IV GE 1156/27W/*GE894/37W WAGNER 193/4.9WBUFFALO GE 862/37W WAGNER 193/4.9W* optional halogen bulb
CAUTIONUse only specified bulbs indicated above as replacement bulbs.HEADLIGHT MAX II, MAX IV & BUFFALO
To replace the headlight bulbs use the following procedure:1. Remove the wire terminals from the bulb holder.2. Rotate the bulb holder ¼ turn counter clockwise and remove it from the headlight.3. Remove the bulb from the bulb holder and replace it with a new one. (be careful not
to touch the glass portion of a halogen bulb, as it will cause damage to it)4. Install the bulb holder on the headlight and install the wire terminals to it.
NOTE:Either wire can be attached to either terminal, polarity is unimportant.
TAILLIGHT-ALL MODELS
To replace the taillight on all models use the following procedure:1. Remove the lens cover2. Pull the bulb out.3. Push the new bulb in.4. Install the lens cover.
FUSES (MAX II and MAX IV) FUSES (BUFFALO)The main fuse on the Max II & IV is There are several fuses on the fuse panel,located under the left side of the dash- which is located under the seat. The fusesboard. It must be replaced with a 30 must be replaced with the proper type (Mini-amp Mini Fuse. Fuse) and rating
NOTE: The ratings are shown onthe fuse panel.
To remove a fuse, pull on it firmly and lift it out.
To install a fuse, push on it firmly until it is well seated.
CAUTIONAlways replace a blown fuse with a fuse of the same type and rating.
PREPARATION FOR STORAGE

108
CAUTIONPrior to storing the ATV, it must be properly serviced to prevent rusting andcomponent deterioration.
Recreatives recommends the following procedure to prepare the ATV for storage:
1. Clean the seat cushion with a damp cloth and allow it to dry.2. Clean the inside and outside of the ATV by thoroughly hosing dirt, oil, grass, and
other foreign matter from the entire ATV. Allow the ATV to dry thoroughly. DONOT get water into any part of the engine.
3. Move the fuel shutoff valve, which is located on the fuel line, to the OFF position.4. Start & run the engine until it stops. This will empty the carburetor of fuel and will
help prevent the carburetor problems sometimes associated with long term storage.5. Either drain the gas tank or add a fuel stabilizer to the gas.6. Remove the spark plugs. Add one tablespoon of engine oil into each spark plug hole.
Install the plugs, but do not connect the plug leads. Crank the engine two or threerevolutions.
7. Plug the hole in the exhaust system with a clean cloth.8. Spray a half ounce of light oil into the holes in the hand grips to lubricate the control
lever shaft.9. Tighten all nuts, bolts and screws.10. Lubricate the chains.11. Grease the axle bearings.12. Store the ATV indoors in a level position.13. Disconnect the battery cables: then clean the battery posts and cables. Remove the
battery and store in a clean, dry area.
CAUTIONAvoid storing outside in direct sunlight and avoid using a plastic cover, as moisturewill collect on the ATV causing rusting.
PREPARATION AFTER STORAGE
Recreatives recommends the following procedure to prepare the ATV after storage:1. Clean the ATV thoroughly.2. Clean the engine. Remove the cloth from the exhaust system.3. Check all cables and wires for signs of wear and fraying. Replace if necessary.4. Change the engine oil and filter.5. Change the transmission fluid.6. Charge the battery: then install, connect the battery cables.7. Check the entire braking and steering systems( brake pads, control lever travel etc.),
all controls, headlight and taillight; replace or adjust as necessary.8. Tighten all nuts, bolts and screws.9. Check the spark plugs. Clean or replace as necessary.10. Move the fuel shutoff valve, which is located on the fuel line, to the ON position.

109
WARRANTYIdentification Numbers Record.
1. Vehicle I.D. Number_________________________2. Engine Serial Number________________________3. Transmission Serial Number___________________
Record your Vehicle Identification Number, Engine Serial Number and TransmissionSerial Number in the spaces provided to assist you in ordering spare parts or for referencein case the ATV is stolen.
Mudd-Ox IncUSTRIES LIMITED CUSTOMER WARRANTY POLICY
Limited Warranty. Mudd-Ox IncUSTRIES INC. (“RI”) WARRANTS THATTHE PRODUCTS MANUFACTURED BY IT ARE FREE FROM DEFECTS INMATERIAL AND WORKMANSHIP UNDER NORMAL USE AND SERVICE FOR APERIOD OF ONE (1)YEAR FROM THE DATE OF PURCHASE BY THE ORIGINALPURCHASER, WHICH IS NOT TRANSFERABLE.
Engines sold with each new All-Terrain Vehicle are warranted by the enginemanufacturer to be free from defects in material and workmanship under normal use andservice for a period of two years from the date of purchase by the original purchaser. Seethe engine manufacturer’s warranty for specific details.
If during the warranty period the Product becomes defective under normal use andservice, RI will, without charge, as its sole obligation and owners exclusive remedy,repair or, at its option, replace with a new or reconditioned part, any part found defective.
This warranty does not cover defects, damage, or deterioration due to normal use, wearand tear, or exposure; normal maintenance services; replacement of service items;deterioration of upholstery, trim or appearance items; damage or defect due to misuse,alteration, negligence, or accident; or any Product modified or operated contrary to theinstructions in this Operator’s Manual. Rental machines are not covered by warranty.
RI shall not be liable for any loss or damage by reason of its failure to discover, repair,report, or modify latent defects inherent in the design of any Product.
THIS WARRANTY IS THE ONLY EXPRESS WARRANTY MADE BY RIAPPLICABLE TO NEW PRODUCTS MANUFACTURED BY IT. NO PERSON ISAUTHORIZED TO CREATE ANY OTHER OBLIGATION OR LIABILITY INCONNECTION WITH THE PRODUCT. THIS WARRANTY IS IN LIEU OF, AND RIEXPRESSLY DISCLAIMS, ALL OTHER WARRANTIES, EXPRESS OR IMPLIED,ARISING BY OPERATION OF LAW OR OTHERWISE INCLUDING, WITHOUTLIMITATION, ANY IMPLIED WARRANTY OF MERCHANTABILITY ORFITNESS FOR A PARTICULAR PURPOSE.
Warranty continued on next page.

110
WARRANTY
Limitation of Liability. THE SOLE AND EXCLUSIVE REMEDIES OF THEOWNER SHALL BE THOSE SPECIFICALLY SET FORTH IN THE WARRANTIESSECTION HEREOF. THE MAXIMUM LIABILITY OF RI FOR ANY AND ALLCLAIMS ARISING DIRECTLY OR INDIRECTLY, WHETHER OR NOTOCCASIONED BY ITS NEGLIGENCE, SHALL NOT IN THE AGGREGATEEXCEED THE PURCHASE PRICE OF THE PRODUCT. RI SHALL NOT BE LIABLEFOR LOSS OF USE OF PRODUCTS, LOSS OF TIME, INCONVENIENCE, TOWING,RENTAL OR SUBSTITUTE TRANSPORTATION, COMMERCIAL DAMAGES,LOSS OF BUSINESS OR PROFIT OR ANY OTHER INCIDENTAL, SPECIAL,INDIRECT, OR CONSEQUENTIAL DAMAGES. THE FOREGOING CONSTITUTESTHE SOLE LIABILITY OR RI AND THE EXCLUSIVE REMEDY OF CUSTOMERWHETHER OR NOT BASED UPON NEGLIGENCE, BREACH OF CONTRACT,BREACH OF WARRANTY, STRICT LIABILITY, TORT, OR ANY OTHER COURSEOF ACTION.
Indemnification. RI does not warrant that the Products comply with any or all federal,state, municipal, or other governmental statutes, laws, or regulations, and the ownerassumes all risk and liability whatsoever resulting from the use of the Products. RI has nocontrol over, and is not responsible for, the manner in which the Products will be used bythe Owner. The Owner assumes all responsibility for any and all sums which RI and/orthe owner may be obligated to pay including, without limitation, for bodily injury orproperty damage, caused by or resulting directly or indirectly from the use of theProducts and indemnifies and holds RI harmless from and against any and all actions,claims, and demands arising out of or in any way connected with the use of the Products.
Governing Law and Jurisdiction. “By using the Product, Owner hereby understandsand agrees that any dispute which arises between the parties shall be governed by andconstrued under the laws of the State of New York without reference to provisions ofconflict of laws. The federal and state courts of the County of Erie, State of New York,shall have exclusive jurisdiction to adjudicate any dispute between the parties. Theparties hereto each consent to: (I) the personal jurisdiction of the courts in the County ofErie, State of New York, and (II) service of process being effected upon it by registeredmail sent to the following address:”
Mudd-Ox Inc. Inc60 Depot St.Buffalo NY 14206