mastering aws development - sample chapter
TRANSCRIPT

Free Sample

In this package, you will find: • The author biography • A preview chapter from the book, Chapter 13 'Building Applications and AWS
Best Practices' • A synopsis of the book’s content • More information on Mastering AWS Development

About the Author
Uchit Vyas i s an IT industry veteran, a Cloud technologist at heart, and a hands-on Cloud automation lead at Opex Software, for Cloud automation and DevOps. He is responsible for the delivery of solutions, services, and product development. He explores new open source technologies and defi nes architecture, roadmaps, and best practices for enterprises. He has consulted and provided training on various tools and technologies, including Cloud computing, Big Data, Hadoop, ESB, infrastructure automation (Chef/Puppet/Ansible), Java-based portals, and CMS technologies to corporations around the world.
He has completed his engineering in computer science from Gujarat University. He worked as a senior associate at Infosys Limited in the Education and Research Team, during which time he worked on Big Data analytics, Cloud security, and virtualization.
He has also published books on Mule ESB, AWS Development Essentials, and AWS DynamoDB and continues to write books on open source technologies.
He hosts a blog named Cloud Magic World, where he posts tips and events about open source technologies mostly related to Cloud on cloudbyuchit.blogspot.com. His Twitter handle is @uchit_vyas.

PrefaceMastering AWS Development is a single place in which you can fi nd solutions for all of your issues with Amazon Web Services. This book will explain how to begin and manage different services using the AWS SDKs and APIs as well as the AWS Management Console, a browser-based graphical user interface to interact with the services. It will include a signifi cant number of examples and use cases that can be used by anyone, from an intermediate to an expert. Using the examples in this book, users can perform advanced-level programming and gain the advantages of AWS services in their SDLC at signifi cantly lower costs on AWS.
What this book coversChapter 1, Architecting in the Cloud, covers the AWS development platform and its access and how to manage the identity for applications. Later, users will be able to state elasticity, scalability, and bootstrapping functionality using code.
Chapter 2, Elastic and Fault-tolerant Infrastructure, discusses how to create scalable infrastructure using EC2, EBS, and an Elastic Load Balancer and, as per the requirement from web traffi c, how to scale it effi ciently. Users will also learn what Auto Scaling is and launch the confi guration with EC2 instances and load balancers.
Chapter 3, Storage Lifecycle Management, discusses how to manage the entire life cycle of storage of AWS using different services such as RDS, S3, and Redshift programmatically.
Chapter 4, Web Application and Batch Processing Architecture, covers how to design and develop web applications and their required infrastructure. Users will also learn an alarm mechanism and how to create an environment for a batch processing system on AWS.
Preface
Chapter 5, High Availability, Disaster Recovery, and Amazon VPC, discusses how to create highly available infrastructure for applications and what the vital steps and logic are that should be implemented as a disaster recovery plan. Later, users will also discover how to create Virtual Private Cloud on the AWS Management Console and CLI.
Chapter 6, Tools for AWS and Setup Guidelines, covers how to set up and use the AWS code library. Users will also get practical setup instructions for SDKs and IDE toolkits, which can be used during programming with AWS services.
Chapter 7, Interacting with AWS Using API, provides hands-on knowledge about APIs and how to connect AWS services through REST-based APIs. Also, users will learn how to authenticate and serve a request of/from API calls.
Chapter 8, Amazon Beanstalk, CloudTrail, and Data Warehouse Services, discusses how to migrate and host an existing/new app on AWS and how to identify appropriate services for the app. You will fi nd out how to use the Elastic Beanstalk container service, AWS trail, CloudFormation, and how to do Auto Scaling based upon the requirements from end user traffi c.
Chapter 9, Bootstrapping and Auto-confi guration, covers how to bootstrap AWS EC2 instances with pre-confi guration commands for the environment setup and how to use Chef for automation and deployment using code. Users will also learn how the AWS CloudFormation service can work seamlessly with an application and how the SWF and OpsWorks service can be used with the AWS infrastructure.
Chapter 10, AWS Billing and Amazon CDN Service, discusses how to do programming for AWS billing, which can be accessed from an application and how to do cost allocation reporting. Users will also learn cost control architecture designs to cut down the cost.
Chapter 11, Analyzing Big Data with AWS, provides brief practical knowledge about big data and Apache Hadoop on AWS Cloud. Users will also learn how to use the EMR and Kinesis services with Big Data analytics and for Hadoop solutions.
Chapter 12, Miscellaneous Features, AWS Security and Troubleshooting, discusses advanced services administration and programming with CloudSearch and Mechanical Turk. Also, users will discover what kind of security AWS provides and how to use those security features at the infrastructure and application level. At the end of this chapter, users will learn some best troubleshooting practices.

Preface
Chapter 13, Building Applications and AWS Best Practices, covers the tools/apps that are available to use with AWS for smooth development/migration and deployment. Later in this chapter, users will also learn integration techniques.
Chapter 14, Third-party Apps and Tools Integration with AWS, is an online chapter which can be found at https://www.packtpub.com/sites/default/files/downloads/Chapter14.pdf.
[ 359 ]
Building Applications and AWS Best Practices
We discussed most of the interesting and benefi cial AWS offerings in the previous chapters. Now, it is time to integrate all of those services in a single application as a use case and the best practices. Here, we will create a web app that will be a mixture of AWS services. In this chapter, we will focus on the following topics:
• Overview of the application• Software and tools requirement elicitation• Implementation and management of application• AWS best practices and design solutions
Application impressionWe will call the application that we will develop and maintain using AWS as EduCloud. The app will grant AWS EC2 instances to its registered consumers. We will use Java Server Faces (JSF) to create the web app. So, the user registering page, login page, dashboard, and every web page will be coded using JSF. In this app, a user will catalogue himself to the EduCloud with his cell phone number and e-mail address. During the registration, an SNS topic will be created with his/her username as the topic name. Both the cell phone number and e-mail address will be subscribed to this topic. Once the admin will approve the request of a new requester, the user can request for an EC2 instance (or our custom AMIs).
Building Applications and AWS Best Practices
[ 360 ]
Even if the user requests the instances in VPC, we will provision the same. As a database, MySQL (RDS) will be used to store this information. Once the instance request has been approved by the administrator, an SMS and e-mail will be sent to the respective endpoints about the connection details to the instance via SES and SNS. As the number of users and instance requests exceeds, there is a possibility that some SNS messages are lost, so we will add those to the SQS queues. We will store the instance key pairs in S3 once the user downloads it; we will delete the same from S3. Lastly, we will see how this application can be deployed on the Elastic Beanstalk container service.
Tool mixtureWe don’t need any precise software tools to build our app. We will practice on the following freeware (an open source software) tools:
• Eclipse IDE (as the development environment) with the AWS plugin setup• JDK 7 and Tomcat 7.0 (to run the web application locally)• MySQL connector (to connect to our RDS instance)• Puttygen (to create the .ppk file from the .pem file)• Putty (to connect to the EC2 instances)
All the preceding software is open source and available over the Internet. Since we have already discussed most of this software in the previous chapters, we will move to the core part, which is obviously the “development”.
Development phaseIt’s time to get our hands dirty by creating the fi rst AWS app, which will hold many AWS services. It will be a JSF app, so rather than talking about the adornment of the JSF page and how to mark the connection with the MySQL database, we will have to concentrate only on the code where we will perform the AWS operations. And, of course, yes, this app can be downloaded from the offi cial Packt website.

Chapter 13
[ 361 ]
ConventionsFor the appropriate working of the app, the subsequent conventions must be made. We can even call the following points as prerequisites. Even if one of the following points is missing, the whole app will fail:
• We should have an S3 bucket with the name my-keypair to save the EC2 keys.
• An RDS instance must have an education_cloud database with admin privileges.
• The AWS credentials file must be configured with the admin’s root AWS account.
• The method publishInstanceCreation of the SNSoperations class should have an accurate subscriber. In the app, it will be hardcoded as 016883241246. This must be replaced with a proper value. AWS SNS will notify the users and admin if an event occurs.
HandlersThis app has two kinds (roles) of handlers, namely the admin and end consumer (normal user). The admin operator can achieve instance requests. His/her dashboard is shown as follows. It consists of two segments. The fi rst segment is the Request section in which he/she can approve, reject, or waitlist a group of instance requests. This unit consists of three links, each to navigate to the Approved requests, Pending requests, and Rejected requests pages. The second sector is the Links section, which has links to add new instances to be made available for the consumer. Other links are used to test whether the app is running, by requesting the instance and approving it; thereby checking the unabridged workfl ow.

Building Applications and AWS Best Practices
[ 362 ]
Our app has another role, which is no-admin (can be apprentice or educator). We will call this handler customer. A non-admin user’s homepage will have links to request a new instance and view and edit the present requests.
An instance is a collection of instance type, AMI ID, and kernel ID. These possessions are appealing much perilous, as choosing improper mishmash will result in an exception. In our app, it will be the concern of the admin to adopt instance confi guration combinations because it requires profi ciency. This is a crucial operation of our app. Without adding an instance, the consumer cannot request for any instance. The following screenshot will give you the hint for the Add Instance page. The fi rst parameter will be the instance type, which starts from the lower end (of course, with free tier eligibility) t2 micro up to i2 8xlarge. If we want to add information such as RAM disk size, we can specify it in portrayal. Then, we can click on the Add Instance button, which will augment this info to the MySQL database.
Starting with EduCloudOn the login page, there will be a link to sign up. The sign up page will ask for subsequent information:
1. Enter the essential personal information (fi rst fi ve fi elds). The other two fi elds are used to create login credentials:

Chapter 13
[ 363 ]
2. Once we click on the Create Account button, a user's personal details will be added to the Customer table and login details will be added to the Login table.
3. In chorus, an SNS topic will be created by our app with the username as the topic name. In the preceding screenshot, we registered a user with the name uchit86. So, an SNS topic will be created as topic name so that the user will be notifi ed about his request update.
4. The code for topic creation is shown as follows:public void createInstanceTopic(String topicName, String mailId, String mobileNumber) { CreateTopicRequest topic = new CreateTopicRequest(); topic.setName(topicName); topic.setRequestCredentials(credential); String topicArn = client.createTopic (topic).getTopicArn(); createInstanceSubscription(topicArn, mailId, mobileNumber); }

Building Applications and AWS Best Practices
[ 364 ]
EduCloud uses four tables in total. The Customer table stores the personal information quantified for the duration of the signup process. The Login table stores the EduCloud login information. The Instance table stores information about instance parameters such as AMI ID, kernel ID, instance type, and so on. The fourth table, Request, has information about the instance requested by the user and its status.
The function createInstanceTopic takes three parameters. The first parameter is topicName, which is the same as that of the username, and the rest is mailId and mobileNumber, which is obtained from the personal information entered during the signup process. The preceding code generates a topic, and topicArn along with mailId and mobileNumber are passed to the createInstanceSubscription method (whose implementation is shown as follows):private void createInstanceSubscription(String topicArn, String mailId, String mobileNumber) { SubscribeRequest subscribeRequest = new SubscribeRequest(); subscribeRequest.setTopicArn(topicArn); subscribeRequest.setEndpoint(mailId); subscribeRequest.setProtocol(“email”); client.subscribe(subscribeRequest); if (mobileNumber.contains(“+1”)) { SubscribeRequest request = new SubscribeRequest(); request.setTopicArn(topicArn); request.setEndpoint(mobileNumber); request.setProtocol(“SMS”); client.subscribe(request); }}
The preceding code subscribes the registered e-mail ID and phone number to the topic. SNS supports all the e-mail IDs, but SMS notification is currently supported only for the US.
5. As soon as we click on the Create Account button, the user will get a subscription mail for the topic.

Chapter 13
[ 365 ]
6. Once the user clicks on the Confi rm subscription link, the mail ID will be subscribed. The same is the case with the mobile number. If the mobile number has +1 (US), then a text message to confi rm the subscription will be sent via an SMS.
7. We can validate the subscription by accessing the management console. Until now, there were two users in our app (admin and uchit86). The last two topics will serve as the determination for instance notifi cations.
Handling instance entreatyAs of now, we confi gured parameters for an instance and registered a customer to our app; the user then has to subscribe to the notifi cation.
1. Once the user is done with the subscription, they can request for the available instances. The user can select one of the instances added by the admin using the Instance Id dropdown.
2. Once the user selects the instance ID, AMI id, Kernel id, Instance Type, and Description will be populated automatically.

Building Applications and AWS Best Practices
[ 366 ]
3. In addition to this, the user can specify the private key pair Key Name to be created and the Duration value for which the instance is needed for practice.
4. Once we are done, we can click on Send Request. This will not produce any EC2 instance. The instance will be created and the connection details will be mailed (and the SMS will be sent) once the request is approved by the admin.
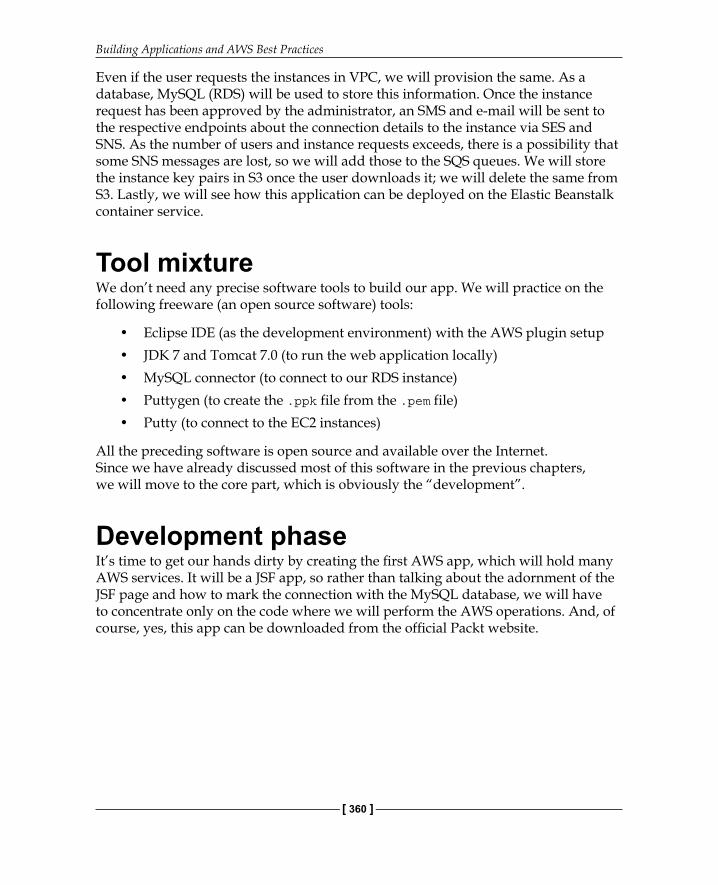
5. The same information will be available in the View Request page (shown in the next screenshot). Since the request is not yet approved, the Status column (of the following table) will show a yellow picture and the checkbox next to this fi eld will be enabled.
Chapter 13
[ 367 ]
This will be enabled only if the request is in the pending state. Since the instance is not yet created, instance ID and public DNS will be empty as long as it is not approved by the admin.
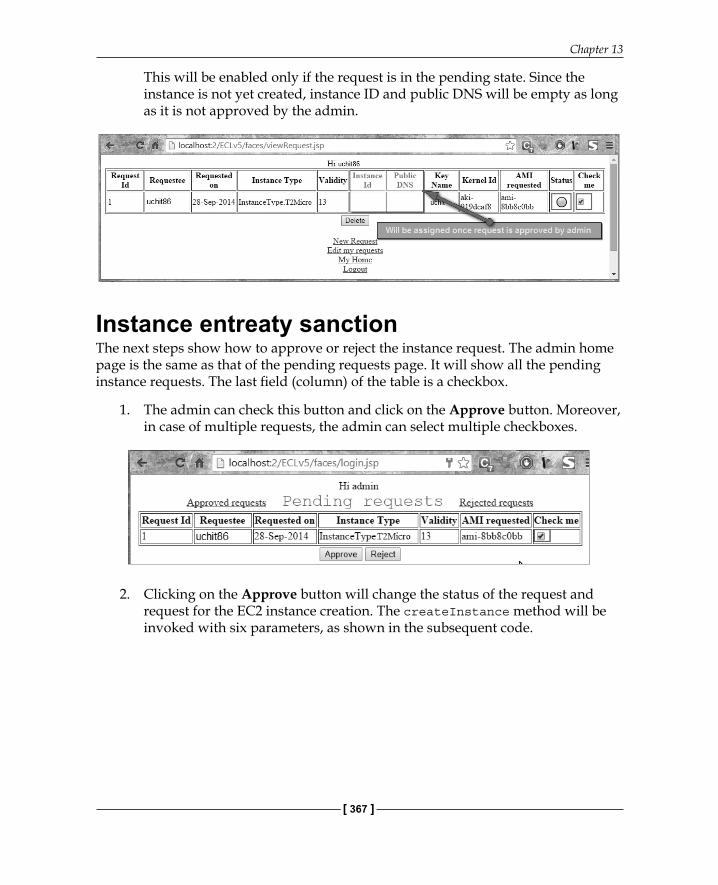
Instance entreaty sanctionThe next steps show how to approve or reject the instance request. The admin home page is the same as that of the pending requests page. It will show all the pending instance requests. The last fi eld (column) of the table is a checkbox.
1. The admin can check this button and click on the Approve button. Moreover, in case of multiple requests, the admin can select multiple checkboxes.
2. Clicking on the Approve button will change the status of the request and request for the EC2 instance creation. The createInstance method will be invoked with six parameters, as shown in the subsequent code.

Building Applications and AWS Best Practices
[ 368 ]
The subsequent code invokes three local functions createKeyPair(), getInstancePublicDndName(), and getInstanceState(). Another two functions updateRequest() and publishInstanceCreation() will be invoked to change the status of the request and send a notification to the registered e-mail address and phone number. In a nutshell, the code does the following functions.
Create a key pair and store it in Amazon S3. Submit the EC2 instance request. Track whether the instance got created. Email the connection details along with the key pair location by
e-mail and SMS. Update the same details in the database, and in case the user missed
the notification, he can get it from his dashboard.
The code is as follows:public void createInstance(Integer requestId, String instanceType, String imageId, String kernelId, String keyName, String topicName) throws Exception { String keyPairName = createKeyPair(keyName); String keyPairLoc = “https://s3.amazonaws.com/my- keypair/” + keyPairName + “.pem”; RunInstancesRequest request = new RunInstancesRequest(); request.setInstanceType(InstanceType.T1Micro); request.setImageId(imageId); request.setMinCount(1); request.setMaxCount(1); request.setKernelId(kernelId); request.setKeyName(keyPairName); RunInstancesResult rs = client.runInstances(request); List<Instance> instances = rs.getReservation(). getInstances(); for (Instance instance : instances) { String awsInstanceId = instance.getInstanceId(); String publicDNS = getInstancePublicDnsName (awsInstanceId); String State = getInstanceState(awsInstanceId); if (State.equalsIgnoreCase(“running”)) { String emailMsg = “Hi “ + topicName + “,\nYour instance’s public DNS is “ + publicDNS

Chapter 13
[ 369 ]
+ “.\nKey pair can be downloaded from “ + keyPairLoc; RequestEntity e = new RequestEntity(); e.setRequestId(requestId); e.setAwsInstanceId(awsInstanceId); e.setKeyName(keyPairName); e.setDns(publicDNS); new RequestService().updateRequest(e); new SNSoperations().publishInstanceCreation( topicName, emailMsg);} } }
The following code is used to produce a key pair with the name stated by the user. It will also add this key pair to the instance request. In order to store this file at an S3 location, the saveKeyPair method of the S3Operations class will be invoked with the keyName and keypair content as a byte array:public String createKeyPair(String keyName) { keyName += System.currentTimeMillis(); CreateKeyPairRequest request = new CreateKeyPairRequest(); request.setKeyName(keyName); CreateKeyPairResult keyPair = client. createKeyPair(request); String key = keyPair.getKeyPair().getKeyMaterial(); return new S3Operations().saveKeyPair(keyName, new ByteArrayInputStream(key.getBytes()));}
The saveKeyPair method of the S3Operations class is shown as follows. In order to make this file available for public download, we set the ACL rule as shown here. The following code adds the key pair to the my-keypair S3 bucket:
public String saveKeyPair(String keyName, InputStream key) { AccessControlList acl = new AccessControlList(); acl.grantPermission(GroupGrantee.AllUsers, Permission.Read); PutObjectRequest request = new PutObjectRequest(“my- keypair”, keyName + “.pem”, key, null). withAccessControlList(acl); client.putObject(request); return keyName;}

Building Applications and AWS Best Practices
[ 370 ]
3. The following code iterates over all the instances in our account and returns the instance state of the passed instanceId. The following method will be invoked until the state becomes running:public String getInstanceState(String instanceId) { DescribeInstancesResult dir = client.describeInstances(); List<Reservation> reservations = dir.getReservations(); for (Reservation reservation : reservations) { for (Instance instance : reservation.getInstances()) { if (instance.getInstanceId().equals(instanceId)) { InstanceState instanceState = instance.getState(); return instanceState.getName(); } } }return null; }
4. Once the instance state becomes running, the following method will be invoked. The following code is used to get the public DNS of the instance, without which the user cannot connect to the EC2 instance. The following code will describe all the EC2 instances for the account. Inside the for-each loop, we will check whether the passed instanceId is the same as that of the current instance. If that is the case, the public DNS will be returned.public String getInstancePublicDnsName(String instanceId) { DescribeInstancesResult dir = client.describeInstances(); List<Reservation> reservations = dir.getReservations(); for (Reservation reservation : reservations) { for (Instance instance : reservation.getInstances()) { if (instance.getInstanceId().equals(instanceId)) { InstanceState instanceState = instance.getState(); return instance.getPublicDnsName(); } } }return null; }
5. Once the key pair is created, stored, and the instance becomes available, the DNS and key pair location will be published as e-mail and SMS to the registered endpoints of the topic, as shown in the following code:public void publishInstanceCreation(String topicName, String emailMsg) { PublishRequest publishRequest = new PublishRequest(); publishRequest.setSubject(“Education cloud- details”); publishRequest.setMessage(emailMsg); publishRequest.setTopicArn(“arn:aws:sns:us-east- 1:016883241246:”+ topicName); publishRequest.setRequestCredentials(credential); client.publish(publishRequest);}

Chapter 13
[ 371 ]
6. The mail for the user request is shown in the following screenshot. It will have information about public DNS and the S3 location, where key pairs corresponding to this instance is stored.
7. We can validate the identical details in the management console, as shown in the following screenshot. The three most important parameters (Instance ID, Public DNS, and Key pair name) are highlighted in the following screenshot:
8. If the user logs into the app, the same information is shown in the dashboard.9. Earlier, the status icon was in yellow; now, it has transformed to green
(since the request is approved and the instance is provisioned). The checkbox to delete the request is disabled. This will be enabled only if the status is pending; otherwise (approved or rejected), it will be disabled.

Building Applications and AWS Best Practices
[ 372 ]
Rejecting an instance entreatyIn the admin dashboard, if the admin has to reject the request and terminate the instance, we can check the corresponding checkbox and click on the Reject button. This will terminate the instance.
1. The code to terminate the instance request is shown as follows. It can accept a list of instanceId. Each instanceId will be iterated and the instances are terminated one by one. The implementation will stay with the while loop until it is terminated.public void terminateInstance(List<String> instanceIds) { TerminateInstancesRequest tir = new TerminateInstancesRequest(); tir.setRequestCredentials(credentials); tir.setInstanceIds(instanceIds); TerminateInstancesResult result = client. terminateInstances(tir); List<InstanceStateChange> resultList = result. getTerminatingInstances(); for (InstanceStateChange instanceStateChange : resultList) { while (!getInstanceState(instanceStateChange. getInstanceId()) .toString().equalsIgnoreCase(“terminated”)); }}
2. If we access the management console, we can infer the same information about the requested instance. We can check the status as shutting-down:

Chapter 13
[ 373 ]
3. The equivalent information will be made available in the user dashboard. Since the EC2 instance is terminated, instance ID and public DNS is also cleared:
4. Now, this request will be available in the admin’s rejected request page. We can check this request and click on Approve to provision the instance once more to the user.
5. Even though the instance (for the same request) is rejected and approved again, public DNS, key pair, and instance ID will be different. The following fi gure shows the mail:
6. In the user dashboard, instance ID, public DNS, and status will be updated.

Building Applications and AWS Best Practices
[ 374 ]
Using RDS and Elastic BeanstalkSince the app we created is the JSF app, we can see a fi le named persistence.xml in the src/META-INF folder. Copy the subsequent content to the XML and fi ll up RDS-endpoint IP, port-number, RDS-instance-username, and RDS-instance-password with the RDS instance details and save the fi le. Before using the app, make sure that a database with the name education_cloud is available in the RDS instance.
<persistence version=”1.0”...><persistence-unit name=”ECL”> <class>education.cloud.entity.InstanceEntity</class> <class>education.cloud.entity.RequestEntity</class> <class>education.cloud.entity.LoginEntity</class> <class>education.cloud.entity.CustomerEntity</class><properties> <property name=”toplink.jdbc.url” value=”jdbc:mysql://<RDS- endpoint IP>:<port-number>/education_cloud” /> <property name=”toplink.jdbc.user” value=”<RDS-instance- username>” /> <property name=”toplink.jdbc.driver” value=”com.mysql.jdbc.Driver”/> <property name=”toplink.jdbc.password” value=”<RDS-instance- password>” /><!-- Some more properties removed --></properties></persistence-unit></persistence>
Deploying this app on Elastic Beanstalk will be done in dozens of clicks if we use the Eclipse IDE. We can right-click on the JSF application and go to Run as | Run on Server, which opens a window asking us to choose the proper server. To run the app in our local system, we use Tomcat7. In order to deploy it in Elastic Beanstalk, we need to choose AWS Elastic Beanstalk for the Tomcat 7 server. A few more windows will pop up, in which we need not do anything (except click on the Next button). If the AWS plugin is properly confi gured, then this application will be deployed on AWS Elastic Beanstalk.

Chapter 13
[ 375 ]
The application of superlative AWS exercisesThere are a few security and performance apprehensions, which we might have come across in the EduCloud app. Let’s review these one by one.
• We save the instance key pair in S3 and the file has read permission for everyone, so this is a major security breach. This should not be the case. We must store this somewhere secured; at least the read permission should be allowed only for the instance requester.
• Irrespective of whether the instance request is rejected or waitlisted, the EC2 instance gets terminated. So, we can make the application more efficient by stopping the instance (when waitlisting the request) and starting it again (when approving the request).
• There should be a provision for a non-admin user to start/stop an instance, which will reduce the billing amount.
• We cannot sell this app to a third party since it is against the AWS agreement.
Best practices with AWSIn this section, we will discuss complex application development and deployment problems, and how to develop AWS centric applications based on the underlying AWS infrastructure. We will go through some of the generic problem statements and try to solve them using AWS services as best possible solutions.
Problem 1: The scaling problem of the infrastructure for the in-house project or in the data center.
Solution: In this scenario, you have to scale up your infrastructure based on the load and demand. So, the following can be the best approach using Auto Scaling:
1. Set up EC2 instances under the ELB.2. Create Base AMI for instances.3. Defi ne the policies (metrics) to trigger events such as add or
remove instances.4. Use CloudWatch to monitor these metrics.5. Set up Auto Scaling, which will increase or decrease the number
of instances based on policies.

Building Applications and AWS Best Practices
[ 376 ]
One should consider the following points as well:
• All of the data is removed in the instances.• The data that the user wants to store or remain should be uploaded into
S3 or inserted into DynamoDB.• The application deployment method should be carefully considered because
the following architecture depends on AMI.
You can refer to the following sample architecture as a design solution—how to implement these services together that we have seen throughout the book:
CloudWatch
(Alarm)
CloudWatch Monitor
Auto Scaling
Auto Scale
Web/APWeb/APWeb/AP
ELB
EC2 EC2 EC2
direct traffic
AWS
AMI
Rules-Based
Alarms
1
2
Notify Auto Scaling3
4 Launch Server

Chapter 13
[ 377 ]
So, this can be the best suitable solution for scale out problem. Also, this can be a solution for high availability requirements. Similarly, for the multi datacenter pattern, you can create the following:
EC2EC2
ELB
AWS
Availability Zone - BAvailability Zone - A
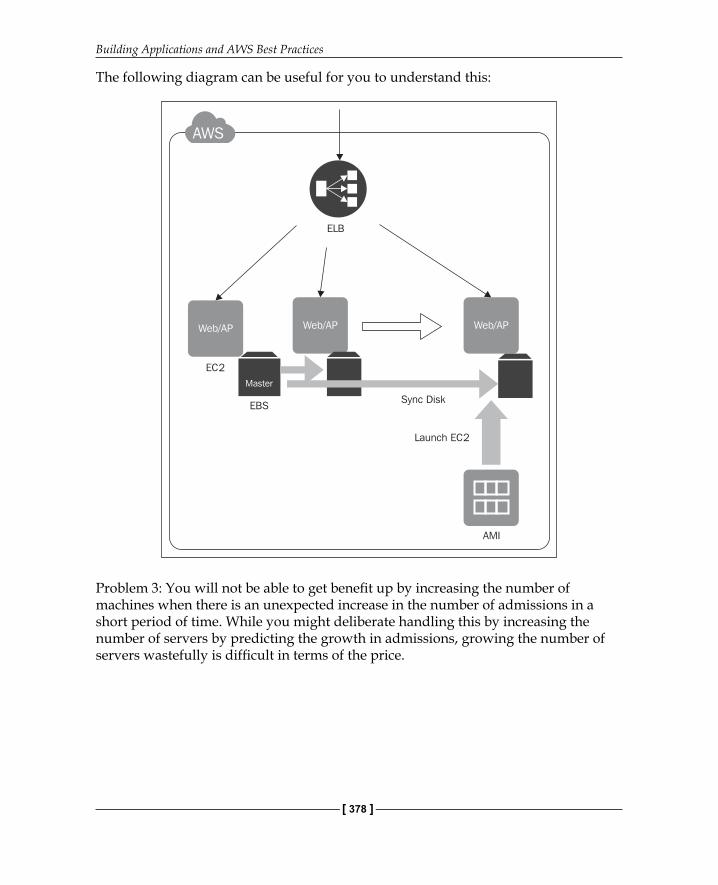
Problem 2: A scale-out construction is a communal method, but in systems that start less frequently, the construction is not one where it is likely to deliver multiserver services using numerous servers at all. In such a case, establishing procedures to handle the increased load may be time-consuming.
Solution: In this case, as a solution, you can create a combination of services, such as EC2, ELB, EBS, and AMI. The following are the steps to proceed further in such a case:
1. Set up your instances under ELB.2. Create instances from running instances, or, let’s say, clone them.3. Use rsync or scheduled EBS volumes, which means rotationally, EBS
volumes will attach and detach to instances and serve you the data.
Building Applications and AWS Best Practices
[ 378 ]
The following diagram can be useful for you to understand this:
ELB
EBSSync Disk
EC2
Launch EC2
AMI
Web/AP Web/AP Web/AP
Master
AWS
Problem 3: You will not be able to get benefi t up by increasing the number of machines when there is an unexpected increase in the number of admissions in a short period of time. While you might deliberate handling this by increasing the number of servers by predicting the growth in admissions, growing the number of servers wastefully is diffi cult in terms of the price.

Chapter 13
[ 379 ]
Solution: In this case, you can use Amazon S3 along with EC2 instances to store static content or even static websites. The following diagram can be helpful to understand more about the combination of AWS EC2 and AWS S3:
video jpg
S3
Upload
html css js
/**/ { }
AWS
Web
EC2
If you have a combination of static and dynamic content, you can follow this diagram:
zip
video html
Users
Offload
S3 EC2
AWS
Web
Problem 4: If you are carrying out successive processing, where processes running on numerous systems accompany each other, there will be a propensity for performance blockages resulting from having systems strongly linked to one another. This tight association also thwarts the retrieval operations when there is a catastrophe.

Building Applications and AWS Best Practices
[ 380 ]
Solution: You can accomplish this loose coupling of systems among systems using queues and then exchanging messages that transfer jobs. You can use the Amazon SQS service to transfer a process from an EC2 instance for one process to the EC2 instance for the next process.
To start with this, you can create the SQS fl ow with EC2 as follows:
1. Receive a message.2. Trigger a job.3. Transmit the message.4. Repeat steps 1 to 3.
Just go through the following diagram as per the preceding steps to understand the message fl ow between SQS and EC2:
SQS SQS
EC2 EC2 EC2
Get Message
Put message
Process job
(e.g. Image processing)
Get MessagePut message
Message (job) remains
in the queue
12
3
5
4
Problem 5: In the stamp pattern, you can get the machine image after all the setup has been accomplished, with the middleware and apps up and running. Whereas this lets you start up the VM tremendously fast, if you want to upgrade one of the middleware things, or you want to alter a locale in an app, you will have to rebuild the AMI.

Chapter 13
[ 381 ]
Solution: While creating an AMI, you can specifi cally place the numerous parameter fi les required to initialize the EC2 instance in Amazon S3, and then, at the time of starting up an EC2 instance, have the EC2 instances read out the parameter fi les to shape themselves. You can store the parameter fi les in a repository such as Git or SVN. The following steps describe how to do this:
1. Place the required data for bootstrapping into S3 or some repository called Git or SVN.
2. Spin up an EC2 instance from a specifi c AMI, which includes the bootstrap.3. At the time of startup, the instance will get the bootstrap data and confi gure
itself accordingly.
Take a look at the following diagram to understand the fl ow and fundamentals of this:
Install, configure
Necessary data
AMI
S3
Launch EC2
EC2 Git and other
services
1
2
So, based on the requirements, your architecture will be different with different AWS services. You can also check out the sample design patterns at http://en.clouddesignpattern.org/index.php/Main_Page, and the best possible solutions given by AWS for commonly required architecture are available at http://aws.amazon.com/architecture.

Building Applications and AWS Best Practices
[ 382 ]
SummaryWe started our journey by discussing the overview of the EduCloud app. Then, we saw the homepage and roles of the admin user and non-admin user. After this, we logged in as the admin and confi gured an instance so that it could be requested by the consumer. Then, the user signed up and requested for the instance. Then, we saw how a mail will be sent with connection particulars and key pair, when the request is approved by the administrator. In conclusion, we terminated the instance by rejecting the instance.
This chapter doesn’t stop there; we also conferred about how to integrate RDS and AWS Elastic Beanstalk to this app. In the end, we deliberated four points, which will improve the app both recital wise and trade wise. The learning doesn’t stop here. Since the app is downloadable, we can accomplish the earlier modifi cations and call ourselves AWS developers.
Finally, we saw generic problem statements of various real-time applications types and best solutions based on AWS services to fulfi ll the requirements.

Where to buy this book You can buy Mastering AWS Development from the Packt Publishing website. Alternatively, you can buy the book from Amazon, BN.com, Computer Manuals and most internet book retailers.
Click here for ordering and shipping details.
www.PacktPub.com
Stay Connected:
Get more information Mastering AWS Development