mastered models 1 - wolftools.com · porosity at the thin areas. ... ever carving tools match the...
TRANSCRIPT
At the Bench
60
MJS
A/J
ourn
al
Mastered Models 1Revising milled CAD/CAM models for manufacturing
BY KATE WOLF Author’s Note: I havegreat respect for the capabilities of CAD/CAM technology, and I’ve seen some ab-solutely amazing pieces generated by it. I’vealso seen some pieces that miss the mark; theyneed some simple revisions to make them eas-ier to produce and aesthetically pleasing. Iasked Marc Williams of MarcCo Jewelers inLuzerne, Pennsylvania, for an assortment ofCAD castoffs—pieces with “issues” that Icould use to demonstrate how to resolve pro-duction and design problems. I’ll evaluateand revise the first of these pieces here, andothers will follow in subsequent issues.
The process involves examining, evaluat-ing, revising, and repeating until the piece isdone. If you have time, you can make theseadjustments on the computer and mill a newmodel. But sometimes it’s quicker to makethe changes by hand—and it’s really helpfulto know how. Finessing the models by handhelps you to see, feel, and understand formand construction—leading to a greaterunderstanding of the design process.
While examining the piece, ask the twomagic questions: Where is my eye beingpulled? and Why? Ask these two questionscontinuously when designing on the computeror on paper, and keep asking the same ques-tions while you are working on the milled,grown, hand-carved, or fabricated pieces.When something is out of whack, dispropor-tionate, or incongruous, it creates a visualtension that is compelling. Adjust, repair,and rework the area that causes the visualtension, then keep looking around the piece,asking the questions repeatedly, and modify-ing. When all the visual tensions are resolved,you (and your customer) will look at thepiece and be pleased.
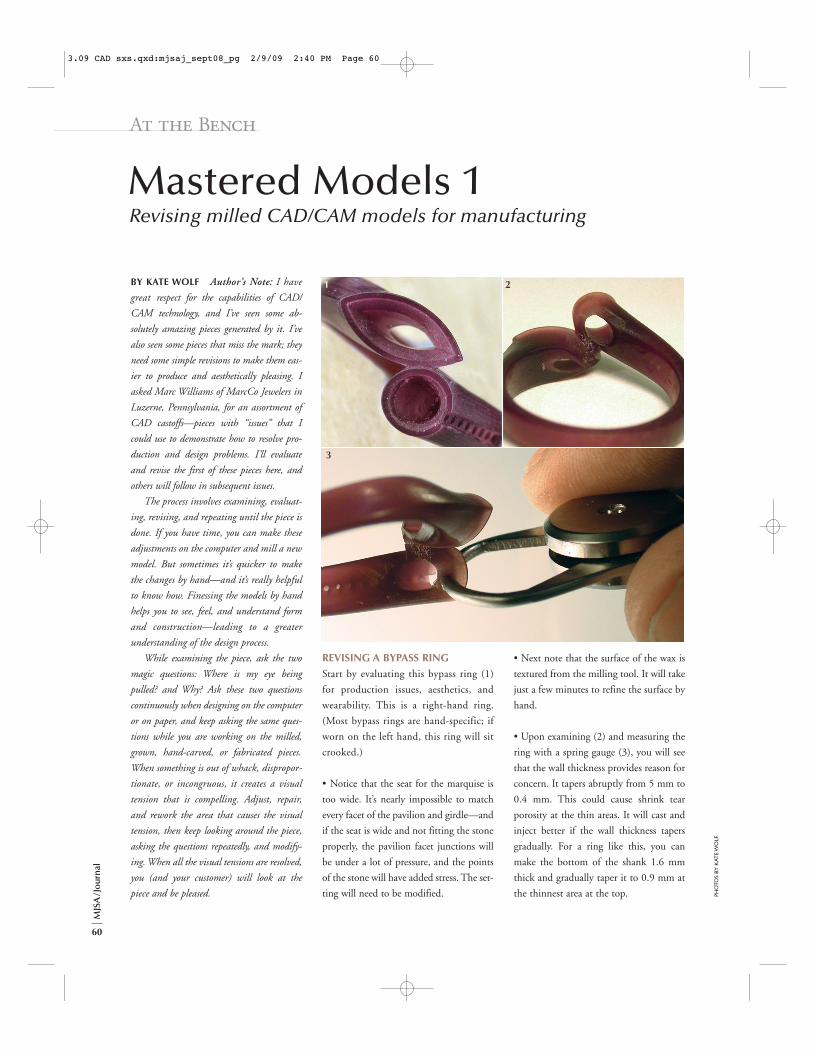
REVISING A BYPASS RINGStart by evaluating this bypass ring (1)for production issues, aesthetics, andwearability. This is a right-hand ring.(Most bypass rings are hand-specific; ifworn on the left hand, this ring will sitcrooked.)
• Notice that the seat for the marquise istoo wide. It’s nearly impossible to matchevery facet of the pavilion and girdle—andif the seat is wide and not fitting the stoneproperly, the pavilion facet junctions willbe under a lot of pressure, and the pointsof the stone will have added stress. The set-ting will need to be modified.
• Next note that the surface of the wax istextured from the milling tool. It will takejust a few minutes to refine the surface byhand.
• Upon examining (2) and measuring thering with a spring gauge (3), you will seethat the wall thickness provides reason forconcern. It tapers abruptly from 5 mm to0.4 mm. This could cause shrink tearporosity at the thin areas. It will cast andinject better if the wall thickness tapersgradually. For a ring like this, you canmake the bottom of the shank 1.6 mmthick and gradually taper it to 0.9 mm atthe thinnest area at the top. PH
OTO
S BY
KAT
E W
OLF
.
1 2
3
3.09 CAD sxs.qxd:mjsaj_sept08_pg 2/9/09 2:40 PM Page 60
At the Bench
61
Mar
ch20
09
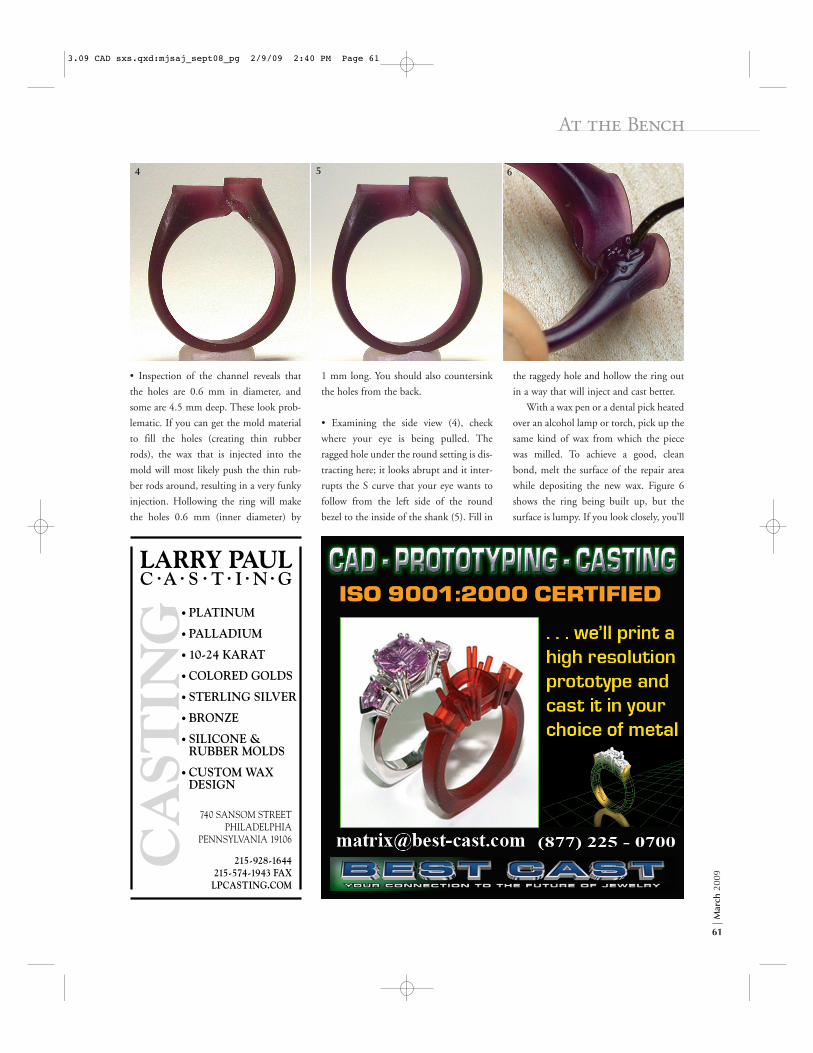
• Inspection of the channel reveals thatthe holes are 0.6 mm in diameter, andsome are 4.5 mm deep. These look prob-lematic. If you can get the mold materialto fill the holes (creating thin rubberrods), the wax that is injected into themold will most likely push the thin rub-ber rods around, resulting in a very funkyinjection. Hollowing the ring will makethe holes 0.6 mm (inner diameter) by
1 mm long. You should also countersinkthe holes from the back.
• Examining the side view (4), checkwhere your eye is being pulled. Theragged hole under the round setting is dis-tracting here; it looks abrupt and it inter-rupts the S curve that your eye wants tofollow from the left side of the roundbezel to the inside of the shank (5). Fill in
the raggedy hole and hollow the ring outin a way that will inject and cast better.
With a wax pen or a dental pick heatedover an alcohol lamp or torch, pick up thesame kind of wax from which the piecewas milled. To achieve a good, cleanbond, melt the surface of the repair areawhile depositing the new wax. Figure 6shows the ring being built up, but thesurface is lumpy. If you look closely, you’ll
• PLATINUM
• PALLADIUM
• 10-24 KARAT
• COLORED GOLDS
• STERLING SILVER
• BRONZE
• SILICONE & RUBBER MOLDS
• CUSTOM WAX DESIGN
740 SANSOM STREETPHILADELPHIA
PENNSYLVANIA 19106
215-928-1644215-574-1943 FAX
LPCASTING.COM
LARRY PAULC •A • S • T • I • N • G
CA
STIN
G4 5 6
3.09 CAD sxs.qxd:mjsaj_sept08_pg 2/9/09 2:40 PM Page 61

At the Bench
62
MJS
A/J
ourn
al
notice strings of wax coming off themodel and air bubbles trapped below thesurface. That’s because the wax pen is nothot enough. The proper temperature isbetween smoke and string. If the moltenwax is smoking, it’s too hot and gettingclose to the flash point. If the wax isstringy and mixed with air bubbles, thewax pen is too cool. Find the right tem-perature and build up the wax until youhave enough.
File the built-up area a bit if necessaryor skip to the next step—scraping withthe back edge of the carving knife (7).Blend in the repaired area until it looksvisually pleasing.
Use a wax bur to hollow the back ofthe shank (8). To continue hollowing andrefining the inside of the ring, use what-ever carving tools match the desired sur-face (9). Check the wall thickness with aspring gauge.
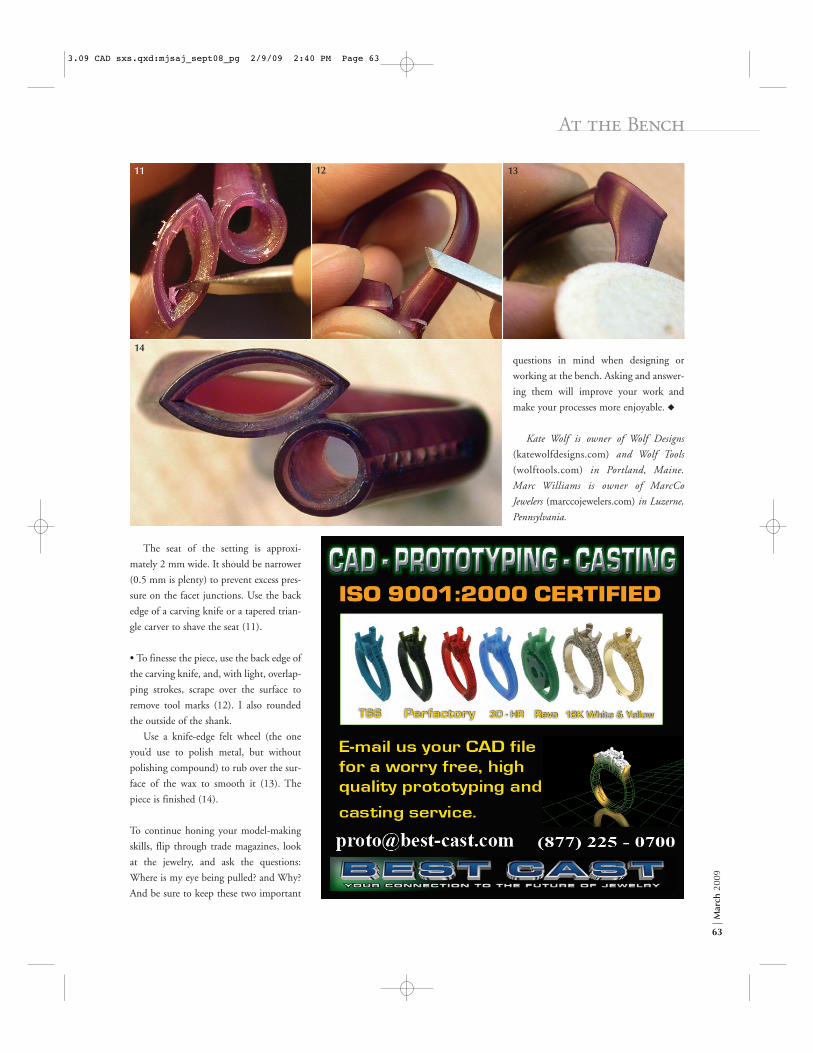
• Now you’re ready to adjust the setting.The most fragile parts of a marquise are itspoints. Blaine Lewis of New ApproachSchool for Jewelers in Virginia Beach,Virginia, has a method for modifying set-tings that reduces breakage significantly.In the wax, use a diamond point carver toremove material from where the girdle ofthe stone touches the corner, down pastthe edge of the seat (10). Now the stone isnot supported at the points.
7 8 9
10
3.09 CAD sxs.qxd:mjsaj_sept08_pg 2/9/09 2:40 PM Page 62
At the Bench
63
Mar
ch20
09
The seat of the setting is approxi-mately 2 mm wide. It should be narrower(0.5 mm is plenty) to prevent excess pres-sure on the facet junctions. Use the backedge of a carving knife or a tapered trian-gle carver to shave the seat (11).
• To finesse the piece, use the back edge ofthe carving knife, and, with light, overlap-ping strokes, scrape over the surface toremove tool marks (12). I also roundedthe outside of the shank.
Use a knife-edge felt wheel (the oneyou’d use to polish metal, but withoutpolishing compound) to rub over the sur-face of the wax to smooth it (13). Thepiece is finished (14).
To continue honing your model-makingskills, flip through trade magazines, lookat the jewelry, and ask the questions:Where is my eye being pulled? and Why?And be sure to keep these two important
questions in mind when designing orworking at the bench. Asking and answer-ing them will improve your work andmake your processes more enjoyable. !
Kate Wolf is owner of Wolf Designs (katewolfdesigns.com) and Wolf Tools(wolftools.com) in Portland, Maine. Marc Williams is owner of MarcCo Jewelers (marccojewelers.com) in Luzerne,Pennsylvania.
11 12 13
14
3.09 CAD sxs.qxd:mjsaj_sept08_pg 2/9/09 2:40 PM Page 63