masshunter quantitative analysis audit trail map program · masshunter quantitative analysis audit...
TRANSCRIPT

MassHunter Quantitative Analysis Audit Trail Map Program
Quick Start GuideGetting Started Roadmap 2
Installation 3
Normal Operation 7
Using Roles to Restrict Actions 17
Where to find more information 24
This guide contains information to install and use the Audit Trail Map (ATM).
What is the MassHunter Quantitative Analysis Audit Trail Map (ATM) Program?
21 CFR Part 11 is a result of the efforts of the US Food and Drug Administration (FDA) and members of the pharmaceutical industry to establish a uniform and enforceable standard by which the FDA will consider electronic records equivalent to paper records and electronic signatures equivalent to traditional handwritten signatures. For more information, see http://www.fda.gov/ICECI/EnforcementActions/default.htm.
The ATM program includes the following features which support 21 CFR Part 11 compliance:
• Security (tamper detection) of data, batches, and results
• Quant Audit Trail
• Roles that restrict actions to certain users
See the online help for more information on these features.
Agilent Technologies
Getting Started RoadmapWhat is the MassHunter Quantitative Analysis Audit Trail Map (ATM) Program?
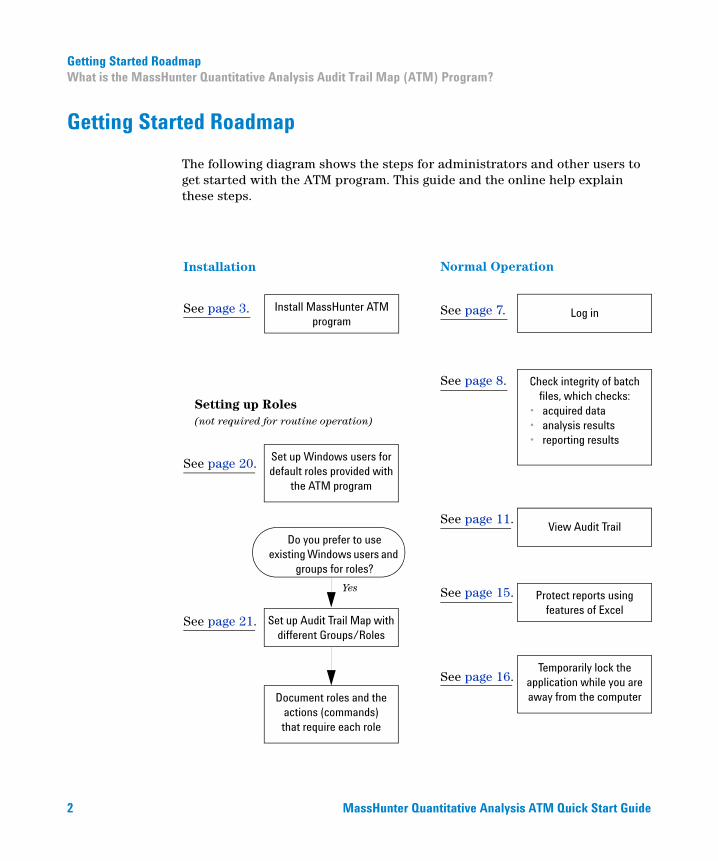
Getting Started Roadmap
The following diagram shows the steps for administrators and other users to get started with the ATM program. This guide and the online help explain these steps.
Check integrity of batch files, which checks:
• acquired data• analysis results• reporting results
Temporarily lock the application while you are away from the computer
View Audit Trail
Protect reports using features of Excel
Log in
See page 16.
See page 15.
See page 11.
See page 7.
See page 8.
See page 3.
See page 21.
See page 20.
Install MassHunter ATM program
Document roles and the actions (commands) that require each role
Normal Operation
Do you prefer to use existing Windows users and
groups for roles?
Set up Windows users for default roles provided with
the ATM program
Set up Audit Trail Map with different Groups/Roles
Yes
Setting up Roles(not required for routine operation)
Installation
2 MassHunter Quantitative Analysis ATM Quick Start Guide

InstallationWhat is the MassHunter Quantitative Analysis Audit Trail Map (ATM) Program?
Installation
Use the following procedure to install the Quantitative Analysis ATM program.
To install the ATM program for version B.07.01:
1 Verify that no other program is running on your system, even Windows Update.
2 From the Quantitative Analysis Disk 1/2 installation DVD, right-click Setup_Quant.exe and then select Run as administrator.
3 Review the License Agreement and accept the terms.
4 Install the program to the default location or click Change to choose a different location.
5 Create a data folder in the default location or, click Change to choose a different location.
6 Click Next to continue.
7 Select the features to install.
8 Choose the User Management and Audit Trail compliance type.
9 Click Desktop Icons.
10 Select which shortcut icons you wish to appear on your desktop. Click OK to continue.
11 Use Back to review your settings, or click Install to continue. Installation may take a few minutes.
12 Click Finish.
13 If the Service Packs folder exists on the installation DVD:
a Open the Service Packs folder. If the folder contains another folder, such as SP1, open that folder.
b Double-click the installation file, ending with SPx.msi.
c Follow the instructions to install the service pack.
MassHunter Quantitative Analysis ATM Quick Start Guide 3

InstallationWhat is the MassHunter Quantitative Analysis Audit Trail Map (ATM) Program?
To install the ATM program for version B.07.00:
When you install version B.07.00 of the MassHunter Quantative Analysis software, the ATM program is automatically installed if you choose the Complete installation procedure. You can determine if the program was installed by checking your Windows Control Panel Program list.
If the ATM program was not installed follow this procedure.
1 Verify that no other program is running on your system. Installation will fail if Windows Update is running, even in the background.
2 From the MassHunter Quantitative Analysis Disk 1/2 installation DVD, right-click Setup_Quant, and then select Run as administrator.
3 In the Welcome to the InstallShield Wizard window, click Next to continue with the installation.
4 In the Program Maintenance page, choose Modify and click Next.
5 In the Custom Setup page, Compliance list, choose This feature, and all subfeatures, will be installed on local hard drive.
Figure 1 This feature is installed on local hard drive
4 MassHunter Quantitative Analysis ATM Quick Start Guide
InstallationWhat is the MassHunter Quantitative Analysis Audit Trail Map (ATM) Program?
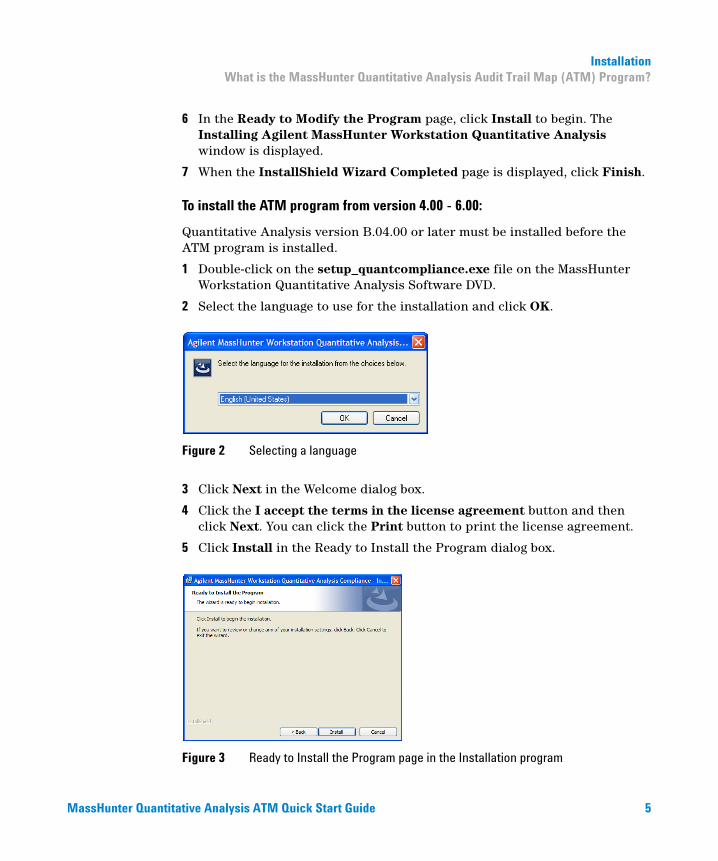
6 In the Ready to Modify the Program page, click Install to begin. The Installing Agilent MassHunter Workstation Quantitative Analysis window is displayed.
7 When the InstallShield Wizard Completed page is displayed, click Finish.
To install the ATM program from version 4.00 - 6.00:
Quantitative Analysis version B.04.00 or later must be installed before the ATM program is installed.
1 Double-click on the setup_quantcompliance.exe file on the MassHunter Workstation Quantitative Analysis Software DVD.
2 Select the language to use for the installation and click OK.
3 Click Next in the Welcome dialog box.
4 Click the I accept the terms in the license agreement button and then click Next. You can click the Print button to print the license agreement.
5 Click Install in the Ready to Install the Program dialog box.
Figure 2 Selecting a language
Figure 3 Ready to Install the Program page in the Installation program
MassHunter Quantitative Analysis ATM Quick Start Guide 5

InstallationWhat is the MassHunter Quantitative Analysis Audit Trail Map (ATM) Program?
Successful install If installation for all components present on the computer is successful, you are shown this message: “The InstallShield Wizard has successfully installed Agilent MassHunter Workstation Quantitative Analysis Compliance.”
Failed install If installation for any component present on the computer is unsuccessful, you are shown this message: “Compliance Installation Failed”.
NOTE You can remove the ATM program for Quantitative Analysis program by using Add/Remove programs.
6 MassHunter Quantitative Analysis ATM Quick Start Guide
Normal OperationLog on to the Quantitative Analysis program
Normal Operation
This section describes using the ATM controlled Quantitative Analysis program.
Log on to the Quantitative Analysis program
1 Double-click the Quantitative Analysis program icon on your desktop or select All Programs > Agilent > MassHunter Workstation > Quantitative Analysis from the Windows Start menu.
2 Depending on how the ATM is configured, you may be prompted for your user name and password. If your account is in a domain, enter your user name and domain into the User field in the format user@DNS_domain_name. To configure the login option, see “Change global settings” on page 22.
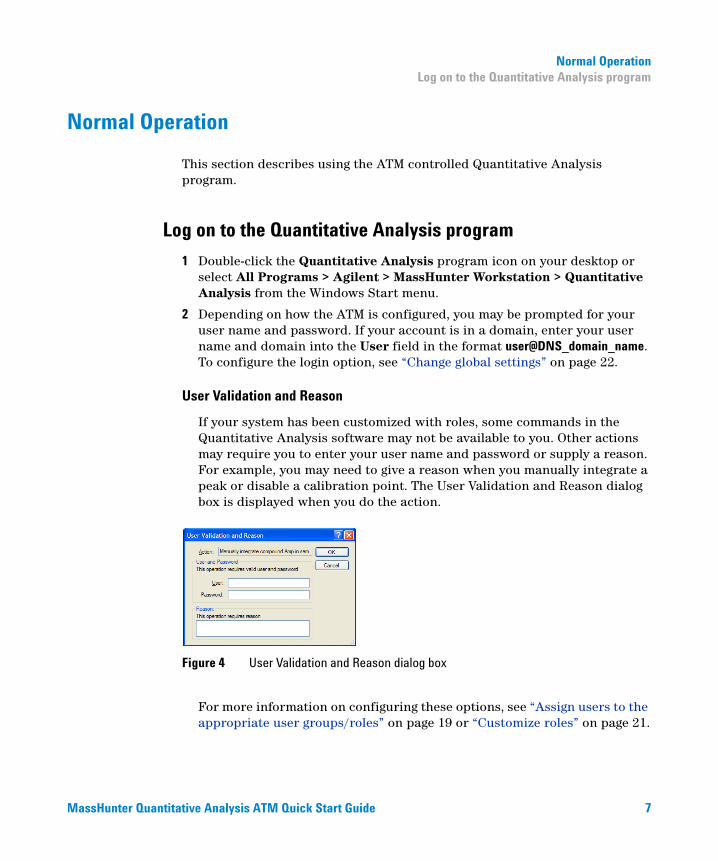
User Validation and Reason
If your system has been customized with roles, some commands in the Quantitative Analysis software may not be available to you. Other actions may require you to enter your user name and password or supply a reason. For example, you may need to give a reason when you manually integrate a peak or disable a calibration point. The User Validation and Reason dialog box is displayed when you do the action.
For more information on configuring these options, see “Assign users to the appropriate user groups/roles” on page 19 or “Customize roles” on page 21.
Figure 4 User Validation and Reason dialog box
MassHunter Quantitative Analysis ATM Quick Start Guide 7

Normal OperationCheck integrity of batch files
Check integrity of batch files
Do this step to check whether any files in a batch have been tampered with. This tool checks all files that are in a selected folder, such as batches (*.batch.bin files), acquired data files (*.d files), and report results (*.report.results.xml files). Checksum values (Hash codes) are checked for all file types. In addition, Audit Trail values are checked for batch and results files.
1 Select All Programs > Agilent > MassHunter Workstation > Quant Tools > Check Batch Files from the Windows Start menu.
2 Click Select Folders from the File menu in the Check Batch Files program.
3 Click the Add button in the Check Batch Files dialog box.
4 Select the folder of interest in the Browse For Folder dialog box. Often, you will select the MassHunter/Data folder or a folder in that folder.
5 Click OK on the Browse For Folder dialog box, then click the OK button in the Check Batch Files dialog box.
6 Click the Run button in the toolbar or click Start Check Batch from the CheckBatch menu to start checking files in the selected folder.
7 Review the results displayed in a table in the Check Batch File window. Files that have a security problem are indicated with a marked check box in the Error column of the table. If a problem was detected with either the Hash Code (Checksum) or the linked Audit Trail for that file, an exclamation mark (!) in a red circle appears in those columns as shown in Figure 6.
Figure 5 Browse For Folder dialog box
8 MassHunter Quantitative Analysis ATM Quick Start Guide

Normal OperationCheck integrity of batch files
In this example, the checksum file is missing from several data files. If a data file is acquired when the Data Acquisition ATM program is disabled, the checksum file is not created.
8 (optional) Click Show Error Records Only from the View menu to display only the rows (files) that have error conditions. Click the command again to return to the full display of data.
9 (optional) Copy the entire table to another application.
a Click Edit > Select All.
b Click Edit > Copy.
The data can then be pasted into a word processing or spreadsheet application.
To cancel the selection for the entire table, select other cells, rows, or columns with the mouse.
10 (optional) Copy selected data to another application.
a Drag the mouse to select the cells, rows, or columns of interest.
b Click Edit > Copy.
c The data can then be pasted into a word processing or spreadsheet application.
Figure 6 Errors after running the Check Batch Files tool
Error indicators
MassHunter Quantitative Analysis ATM Quick Start Guide 9
Normal OperationCheck integrity of batch files
11 (optional) Save the results in a file.
a Click File > Export.
b Select a location for the export file.
c Enter a name for the export file.
d Select the format for the export file: .CSV, Tab-delimited (.TXT), or .XML.
e Click the Save button.
12 When you have finished checking files, click File > Exit to close the Check Batch Files window.
10 MassHunter Quantitative Analysis ATM Quick Start Guide
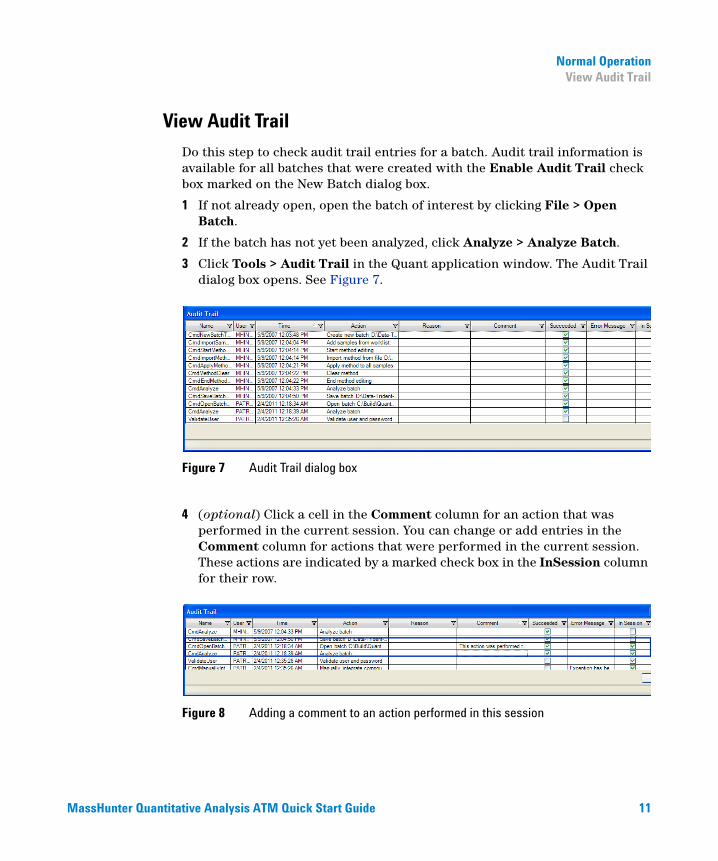
Normal OperationView Audit Trail
View Audit Trail
Do this step to check audit trail entries for a batch. Audit trail information is available for all batches that were created with the Enable Audit Trail check box marked on the New Batch dialog box.
1 If not already open, open the batch of interest by clicking File > Open Batch.
2 If the batch has not yet been analyzed, click Analyze > Analyze Batch.
3 Click Tools > Audit Trail in the Quant application window. The Audit Trail dialog box opens. See Figure 7.
4 (optional) Click a cell in the Comment column for an action that was performed in the current session. You can change or add entries in the Comment column for actions that were performed in the current session. These actions are indicated by a marked check box in the InSession column for their row.
Figure 7 Audit Trail dialog box
Figure 8 Adding a comment to an action performed in this session
MassHunter Quantitative Analysis ATM Quick Start Guide 11
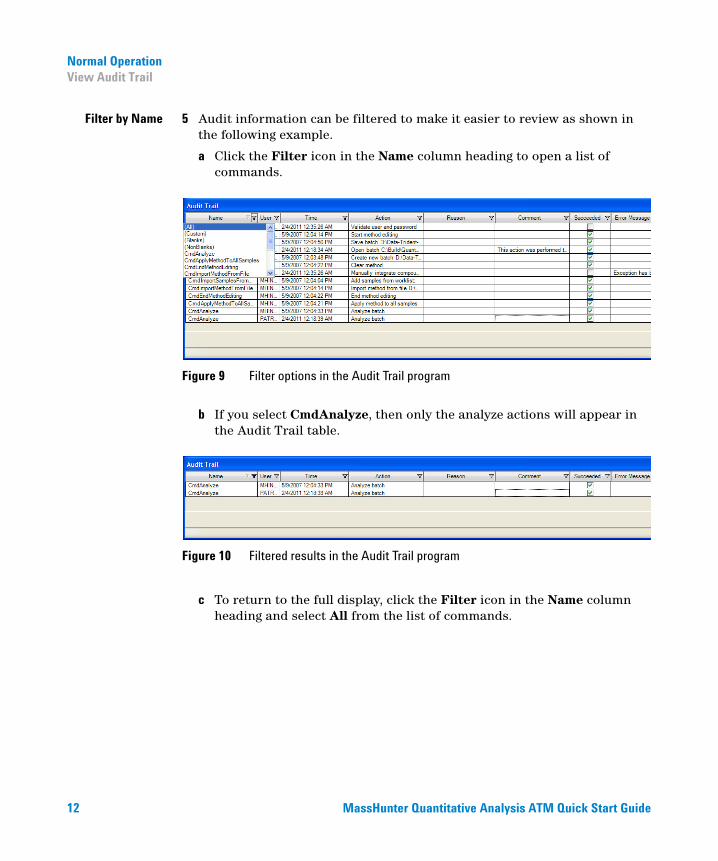
Normal OperationView Audit Trail
Filter by Name 5 Audit information can be filtered to make it easier to review as shown in the following example.
a Click the Filter icon in the Name column heading to open a list of commands.
b If you select CmdAnalyze, then only the analyze actions will appear in the Audit Trail table.
c To return to the full display, click the Filter icon in the Name column heading and select All from the list of commands.
Figure 9 Filter options in the Audit Trail program
Figure 10 Filtered results in the Audit Trail program
12 MassHunter Quantitative Analysis ATM Quick Start Guide
Normal OperationView Audit Trail
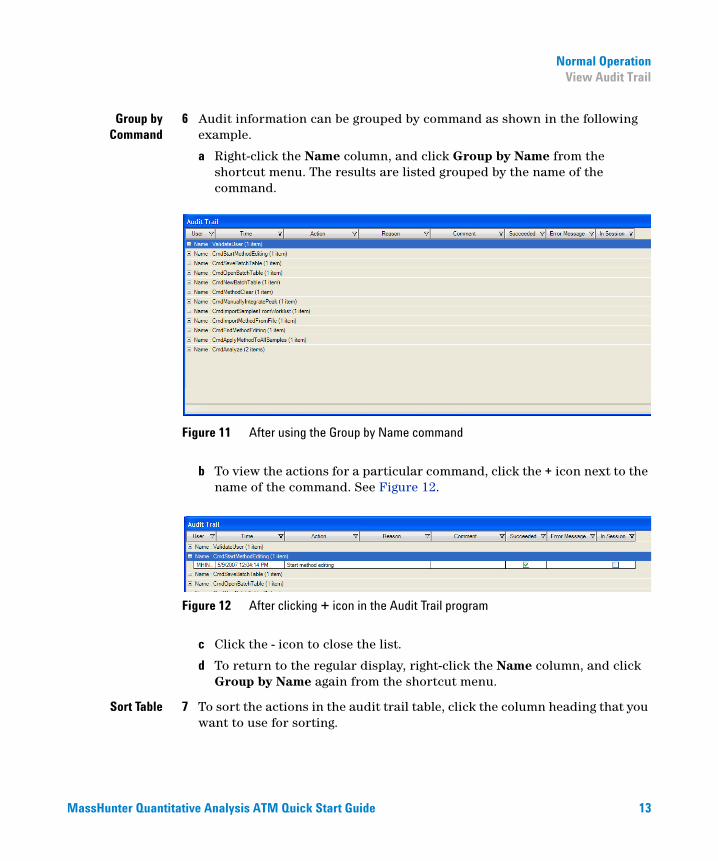
Group byCommand
6 Audit information can be grouped by command as shown in the following example.
a Right-click the Name column, and click Group by Name from the shortcut menu. The results are listed grouped by the name of the command.
b To view the actions for a particular command, click the + icon next to the name of the command. See Figure 12.
.
c Click the - icon to close the list.
d To return to the regular display, right-click the Name column, and click Group by Name again from the shortcut menu.
Sort Table 7 To sort the actions in the audit trail table, click the column heading that you want to use for sorting.
Figure 11 After using the Group by Name command
Figure 12 After clicking + icon in the Audit Trail program
MassHunter Quantitative Analysis ATM Quick Start Guide 13
Normal OperationView Audit Trail
Export Table 8 Right-click the table and click Export from the shortcut menu.
a On the Export dialog box, select the folder and enter a File name for the export file.
b Select the Type for the export file (Excel .xlsx, CSV .csv, Tab Delimited .txt, or XML .xml).
c Click the Save button.
Print orPreview Table
9 Right-click the table and click Print or Print Preview from the shortcut menu.
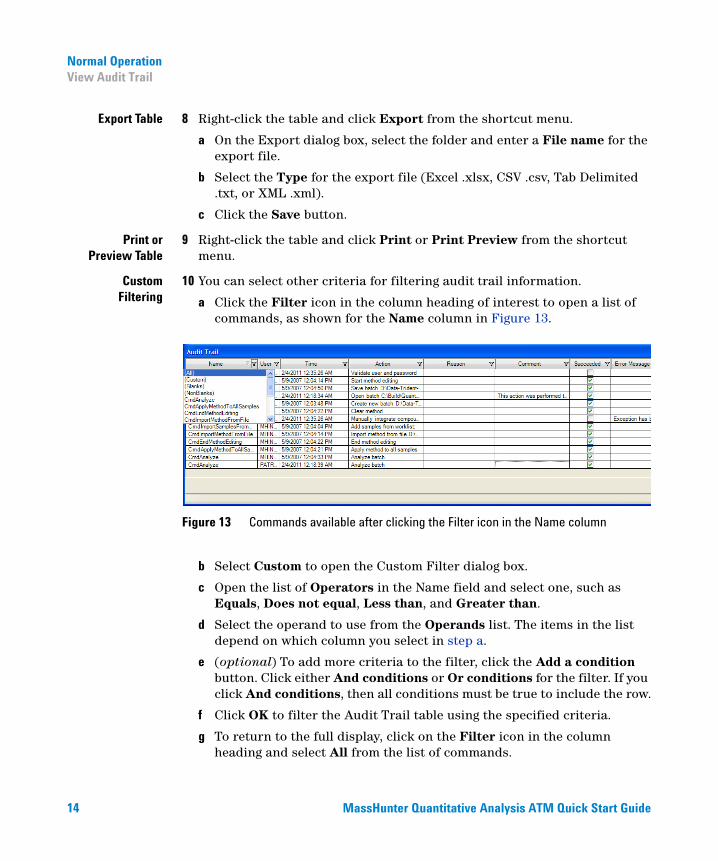
CustomFiltering
10 You can select other criteria for filtering audit trail information.
a Click the Filter icon in the column heading of interest to open a list of commands, as shown for the Name column in Figure 13.
b Select Custom to open the Custom Filter dialog box.
c Open the list of Operators in the Name field and select one, such as Equals, Does not equal, Less than, and Greater than.
d Select the operand to use from the Operands list. The items in the list depend on which column you select in step a.
e (optional) To add more criteria to the filter, click the Add a condition button. Click either And conditions or Or conditions for the filter. If you click And conditions, then all conditions must be true to include the row.
f Click OK to filter the Audit Trail table using the specified criteria.
g To return to the full display, click on the Filter icon in the column heading and select All from the list of commands.
Figure 13 Commands available after clicking the Filter icon in the Name column
14 MassHunter Quantitative Analysis ATM Quick Start Guide
Normal OperationProtect reports
Protect reports
Reports generated by MassHunter Workstation Quantitative Analysis software as Excel worksheets (.xlsx files) are not intended to be edited. The following features help ensure that these report files are not tampered with after they are generated.
1 The templates used to generate the reports can be customized to use password protection. This causes an error message to be displayed when a user tries to edit any cell in the worksheet. This option can be set in the Options section of the template.
2 The reports can be reviewed with the Excel Viewer, which does not allow files to be edited. The Excel Viewer loads more quickly than the full Excel product.
3 You can visually compare Excel reports to detect changes.
a Open both reports in Excel and select the Calibration tab in each report.
b Click the View Side by Side button on the View menu.
c Click Synchronous Scrolling on the View menu if it isn’t selected.
4 You can use a third-party tool to compare two Excel documents, such as the one available from Formula Software, Inc. This tool allows you to compare all sheets that have the same names in two workbooks and is most useful for Quant reports that have been generated with the same template. You can specify that deleted, added, and changed data be reported on separate worksheets, and that the compared sheets be replicated into a new report workbook for easy review.
5 You can generate PDF files of your reports.
a Install Adobe Acrobat and specify a folder to store the generated PDF files.
b Analyze your batch with MassHunter Workstation Quantitative Analysis software.
c Save the batch. Click either File > Save or File > Save As.
d Click Report > Generate to open the Report dialog box.
e If Adobe PDF is not the default printer, then click Advanced. Click Next until the Reports page in the Report wizard is displayed. Select a
MassHunter Quantitative Analysis ATM Quick Start Guide 15
Normal OperationLock your computer screen when unattended
template and a printer. Click the Next button until the final page of the wizard. Then, click the Finish button.
f If Adobe PDF is the default printer, then select a Template file and click the OK button.
g Open the Queue Viewer program from the Report menu to monitor the progress of report generation.
h The PDF report files (.pdf) that are generated can have signatures, approval workflows, comments, and password-protection features enabled.
Lock your computer screen when unattended
When you are going to be away from your computer for awhile, do this step to lock your computer so that it can’t be accessed by others.
1 Press Ctrl and Alt and Delete.
2 Click the Lock Computer button.
To unlock your computer on your return, press Ctrl and Alt and Delete, type in your password and click OK.
16 MassHunter Quantitative Analysis ATM Quick Start Guide
Using Roles to Restrict ActionsWhat are roles?
Using Roles to Restrict Actions
What are roles?
Roles are groups that users can be assigned to that establish the actions (or commands) that users can perform in ATM. The software defaults to five roles: QuantAdministrators, QuantBatchAnalyzer, QuantBatchReviewer, QuantMethodDeveloper, and QuantReportGenerator. These roles must be manually created using the exact names shown here. If desired, roles can be set up using your own Windows group names as described in “Set up roles using existing Windows groups”, and roles can be customized as described in “Customize roles” later in this section.
Set up Windows user groups for Quantitation roles
Do this step to create user groups for the above five roles on the computer where you are running ATM.
1 Open Computer Management.
a Click System Security >Administrative Tools from the Control Panel.
b Click Computer Management.
2 In the Computer Management window, click System Tools > Local Users and Groups > Groups from the navigation pane on the left side of the window.
NOTE Skip this section if you prefer to set up roles using your own Windows groups instead.
MassHunter Quantitative Analysis ATM Quick Start Guide 17

Using Roles to Restrict ActionsSet up Windows user groups for Quantitation roles
3 (optional) If the following groups are not available, create them.
a Click New Group from the Action menu to open the New Group dialog box.
b Type in a name for the new group (i.e. QuantAdministrators, QuantBatchAnalyzer, QuantBatchReviewer, QuantMethodDeveloper, or QuantReportGenerator).
c (optional) Type in a description of the group.
d (optional) Click the Add button to add users to the group at this time. This can also be done later as described in “Assign users to the appropriate user groups/roles” on page 19.
e Click the Create button.
f Repeat step b to step e for the other four groups. Then, click Close.
Figure 14 The Computer Management program
Figure 15 Adding the group QuantBatchAnalyzer
18 MassHunter Quantitative Analysis ATM Quick Start Guide
Using Roles to Restrict ActionsAssign users to the appropriate user groups/roles
Assign users to the appropriate user groups/roles
Do this step to add users to the appropriate user groups, keeping in mind the privileges and restrictions of each role in ATM described in “What are roles?” on page 17.
If you are using the Study Manager program and submitting a Bioanalysis study, make sure that the person using the Study Manager program has the correct permissions for the Quantitative Analysis program. See the Study Manager Quick Start Guide for a list of the permissions that a person submitting a Bioanalysis study needs.
1 Open the Computer Management program.
a Select Administrative Tools from the Control Panel.
b Select Computer Management.
2 In the Computer Management window, select System Tools > Local Users and Groups > Groups from the navigation pane on the left side of the window.
3 Right-click the group of interest (i.e. QuantBatchAnalyzer, QuantBatchReviewer, QuantMethodDeveloper, or QuantReportGenerator) and select Properties from the shortcut menu.
4 Click the Add button on the Group Properties dialog.
5 On the Select Users dialog box, type in the user names in the text box that you want to add to the group, then click the Check Names button. The complete computer name and user name will be filled in for each user.
6 Click OK to complete the process.
Alternate method If you are adding a single user to a group, it may be easier to access User Accounts using the following steps.
1 Click User Accounts from the Control Panel.
2 Select the user you want to add to the group on the Users tab in the User Accounts window, then click the Properties button to assign that member to one of the Quantitation groups.
3 If the user you want to add to the group does not already exist on the local machine, click the Add button to add them to the local machine and to the desired Quantitation group.
MassHunter Quantitative Analysis ATM Quick Start Guide 19
Using Roles to Restrict ActionsSet up roles using existing Windows groups
Set up roles using existing Windows groups
Instead of using the roles provided with ATM, you can use existing Windows groups or create new ones as follows. The QuantAdministrators can do every command, so you do not need to assign roles to that group.
1 Set up Windows user groups, using your own names.
2 “Assign users to the appropriate user groups/roles” on page 19.
3 Open the Audit Trail Map (ATM) Configuration window. Click Programs > Agilent > MassHunter Workstation > Quant Tools > ATM Configuration from the Windows Start button.
4 Log in using the appropriate account name and password.
5 Delete the existing roles (i.e. QuantBatchAnalyzer, QuantBatchReviewer, QuantMethodDeveloper, or QuantReportGenerator).
a Click the Batch Analysis Command Group to open the Required User Role Window.
b Right-click the role in the Required User Role pane and click Remove User Role from the shortcut menu. Click Yes to confirm the deletion.
c Repeat step a for all the roles you want to remove.
6 Create new roles using the Windows user groups you created in step 1.
a Right-click a role in the Required User Role pane and select Add User Role from the shortcut menu.
b Repeat step a for all the roles you want to add.
7 Customize roles as described in “Customize roles” on page 21.
NOTE You must be a member of a group called QuantAdministrators in order to open the ATM Configuration window. If this group does not already exist, you must create it and add a user account to it before you proceed.
20 MassHunter Quantitative Analysis ATM Quick Start Guide

Using Roles to Restrict ActionsCustomize roles
Customize roles
Do this step to assign the roles that are required for various actions or commands in the MassHunter Quantitative Analysis Software. Assigning a role to an action or command means that a user must be a member of that role in order to run that action or command.
1 If the Audit Trail Map (ATM) Configuration window is not already displayed, click Programs > Agilent > MassHunter Workstation > Quant Tools > ATM Configuration from the Windows Start menu. Log in using the appropriate account name and password.
2 Select a command from one of the four command groups (Batch Analysis, Batch Review, Method Development, or Report) on the left side of the ATM Configuration window.
3 Mark a Required User Role for the command under Required User Role.
4 (optional) Mark the Requires Command Reason check box under User Validation and Reason to optionally require that a user enter a reason when they run the selected command.
5 (optional) Mark the Requires User Validation check box under User Validation and Reason to optionally require that a user enter their user name and password when they try to run the selected command.
6 Repeat step 2 to step 5 for all actions or commands that you want to assign to roles.
7 (optional) Add new command groups by right-clicking on Command Groups and selecting Add Command Group from the shortcut menu. Type in the name of the new group and click OK.
NOTE You must be a member of a group called QuantAdministrators in order to open the ATM Configuration window. If this group does not already exist, you must create it and add a user account to it before you proceed.
NOTE If no Required User Role is selected for an action or command, then that action or command can be run by all users.
MassHunter Quantitative Analysis ATM Quick Start Guide 21
Using Roles to Restrict ActionsChange global settings
8 (optional) You can drag commands to move them from one group to another. A command can only be in one group. Be sure to mark the appropriate Required User Role for commands that you move.
9 When you have finished customizing ATM, click Save from the File menu.
Change global settings
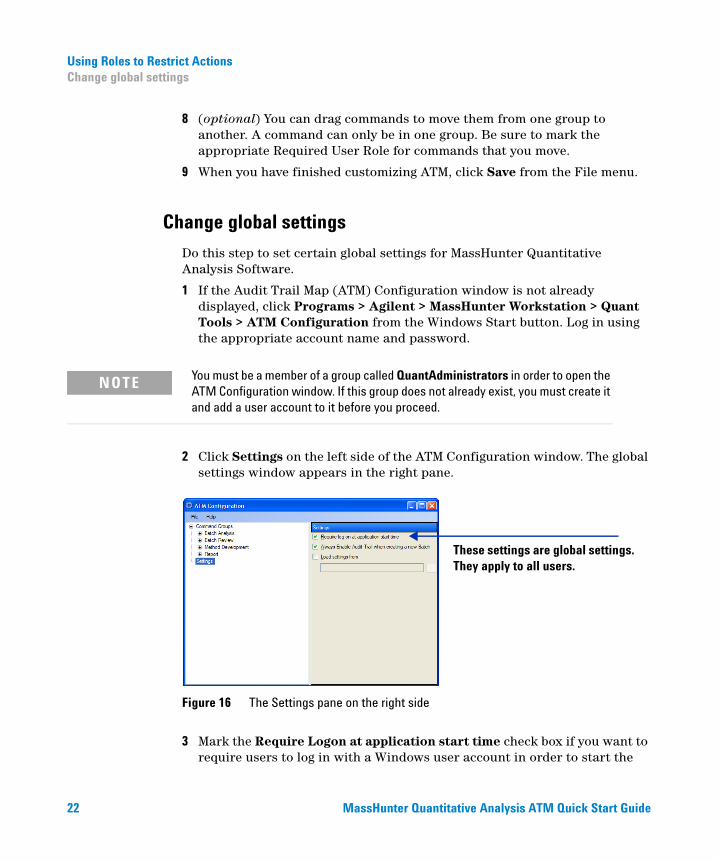
Do this step to set certain global settings for MassHunter Quantitative Analysis Software.
1 If the Audit Trail Map (ATM) Configuration window is not already displayed, click Programs > Agilent > MassHunter Workstation > Quant Tools > ATM Configuration from the Windows Start button. Log in using the appropriate account name and password.
2 Click Settings on the left side of the ATM Configuration window. The global settings window appears in the right pane.
3 Mark the Require Logon at application start time check box if you want to require users to log in with a Windows user account in order to start the
NOTE You must be a member of a group called QuantAdministrators in order to open the ATM Configuration window. If this group does not already exist, you must create it and add a user account to it before you proceed.
Figure 16 The Settings pane on the right side
These settings are global settings. They apply to all users.
22 MassHunter Quantitative Analysis ATM Quick Start Guide
Using Roles to Restrict ActionsChange global settings
MassHunter Quantitative Analysis Software. This user account is used for Audit Trail, User Validation, and Role-based command security. If not marked, then the user session account is used. This option is useful if you are running Quantitative Analysis on the same computer that is used to acquire data from the instrument. In that case, a different user can perform Quantitative Analysis while data is being acquired, and both users will be identified.
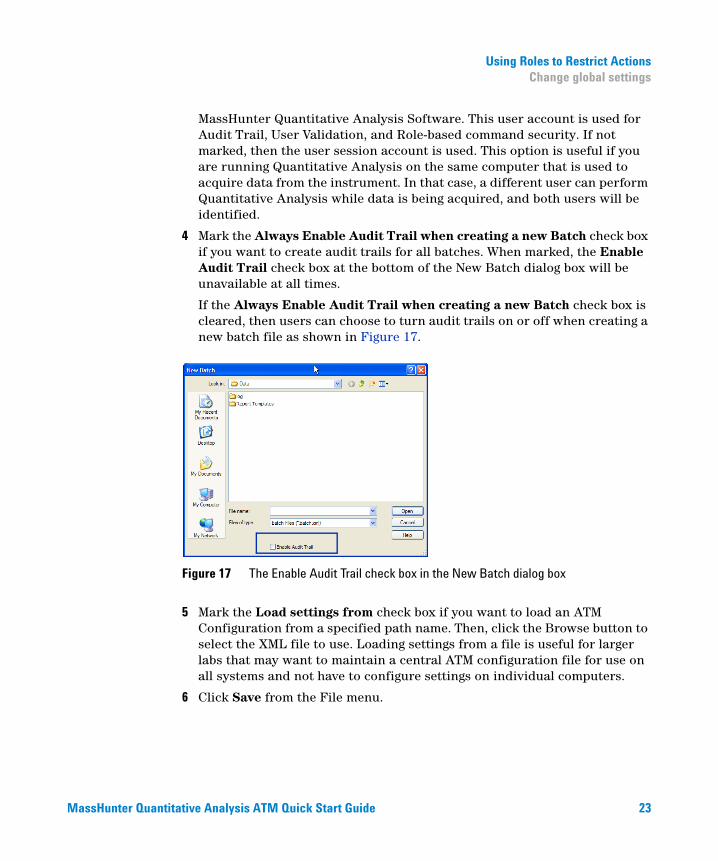
4 Mark the Always Enable Audit Trail when creating a new Batch check box if you want to create audit trails for all batches. When marked, the Enable Audit Trail check box at the bottom of the New Batch dialog box will be unavailable at all times.
If the Always Enable Audit Trail when creating a new Batch check box is cleared, then users can choose to turn audit trails on or off when creating a new batch file as shown in Figure 17.
5 Mark the Load settings from check box if you want to load an ATM Configuration from a specified path name. Then, click the Browse button to select the XML file to use. Loading settings from a file is useful for larger labs that may want to maintain a central ATM configuration file for use on all systems and not have to configure settings on individual computers.
6 Click Save from the File menu.
Figure 17 The Enable Audit Trail check box in the New Batch dialog box
MassHunter Quantitative Analysis ATM Quick Start Guide 23

Where to find more informationAgilent Web Site
Where to find more information
You can access more information about the ATM on the internet and in the online Help.
You can find more information on the MassHunter Data Acquisition ATM program in the online help.
Agilent Web Site
To view support information for the ATM program and other Agilent products, see: http://www.agilent.com/chem and access the Mass Spectrometry products page.
MassHunter Workstation Software Online Help
You can access MassHunter Workstation online help from the Help menu in the software or by pressing F1 in the MassHunter Workstation dialog boxes.
24 MassHunter Quantitative Analysis ATM Quick Start Guide

Where to find more informationMassHunter Workstation Software Online Help
MassHunter Quantitative Analysis ATM Quick Start Guide 25
Agilent Technologies
Agilent Technologies, Inc. 2015
Printed in USA
Second Edition March 2015
*G3335-90196*G3335-90196
www.agilent.com
In This Book
This guide contains information to install and use the ATM.
Microsoft®, Windows®, and Excel® are registered trademarks of Microsoft Corporation in the US and/or other countries.