mask4c(t) / mask6c(t) instruction manual
TRANSCRIPT
MASK4C(T) / MASK6C(T)Instruction manual


Instruction manualMASK4C(T) / MASK6C(T) 3
MASK4C(T) / MASK6C(T) manual

4 Design cabinet loudspeaker
Safety precautions
• Keep this manual for future reference.
• Take care of the speaker wires, they should be free of damage. Damaged speaker wires may result in poor sound quality and can damage amplifiers.
• No mains power shall be connected to the speakers, doing so will damage the speaker.
• This speaker should only be serviced by qualified personnel. If not, warranty might be void.
• Use cables of the right gauge, certainly for long runs.
• Use cables with clear colour indication and maintain polarity throughout the whole system.
• Avoid loud feedback.
• Clean only with dry cloth.
• Do not operate near heaters or place it near other apparatus which produce a lot of heat.
• Only use accessories specified by the manufacturer.
• Make sure the mounting surface can easily support the speaker’s weight.
• Use only industry-accepted mounting tools and methods.
• Exposure to loud audio levels over a long time can cause severe hearing loss.
• Don’t forget to consult the local law directions regarding producing sound in public places.
• Please check the unit’s condition after unpacking. If the outside of the carton box has been damaged, inform your shipper immediately.

Instruction manualMASK4C(T) / MASK6C(T) 5
The enduring success story
The origin of MASK loudspeakers goes back as far as 2006, when the introduction of MASK4 and MASK6 set an industry standard for numerous professional users all over the world. Reliability, sound performance, an unseen design and a unique ease-of-use Intelli-mount bracket resulted in an instant success in every major market worldwide.
So with this essential philosophy of construction quality, reliability, ease-of-installation and sound performance in mind the next generation of MASK was created.
MASK4C - MASK4CT / MASK6C - MASK6CT
A designer evolution with an installer friendly revolution. MASKC series got a subtle facelift resulting in a more mature look and feel. Its underlying engineering evolved to an unprecedented level, exceeding every installer’s expectations.
The patent pending ClickMount bracket is a true revolution for installers and users alike.
Rigid constructed to withstand the most fierce conditions in which a professional loudspeaker can be used. MASK will remain an iconic industry standard for many years to come.

6 Design cabinet loudspeaker
Features
• Timeless design
• Weather resistant (aluminium grille)
• ClickMount: click & connect
• Connectors with passthrough and 0.14 – 4 mm² solid or stranded wire capacity
• Wall and ceiling mountable
• Integrated spirit level
• Unique 3 stage overload protection
• Asymmetric tweeter horn design
• Coated 4.25”LF driver for MASK4C(T) and 6.5” LF driver for MASK6C(T)
• Horn loaded silk dome tweeter
• Paintable in any RAL color
• Rotatable logo
• 70W power handling for MASK4C(T) and 200W for MASK6C(T)
• 70V and 100V compatible (T versions)
• 8 ohm and 16 ohm (T) versions available
• Integrated safety nut for SAFCAB (supplied)
• The installer can mount the ClickMount and connect the speaker cables while the speakers are still safely packed inside the packing carton.
• Glass fibre reinforced bracket included
• Speakers designed to be used in combination with the included ClickMount
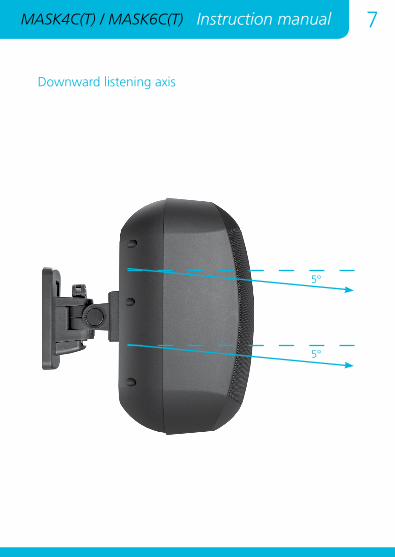
• Incorporated 5° downward listening angle
Instruction manualMASK4C(T) / MASK6C(T) 7
Downward listening axis
5°
5°
8 Design cabinet loudspeaker
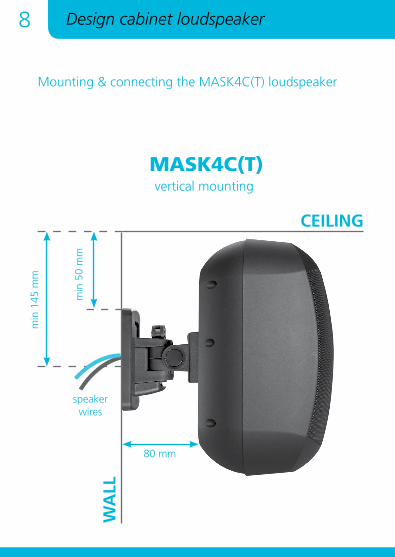
Mounting & connecting the MASK4C(T) loudspeaker
CEILING
WA
LL
min
145
mm
min
50
mm
speaker wires
80 mm
vertical mounting
MASK4C(T)

Instruction manualMASK4C(T) / MASK6C(T) 9
The intelligent ClickMount mounting system helps you to install the MASK4C(T) speaker in a safe and easy way. Please note the minimum distance from the ceiling and wall as shown in the drawings below:
CEILING
WA
LL
min
115
mm m
in
20 m
m
speaker wires
80 mm
horizontal mounting
MASK4C(T)

10 Design cabinet loudspeaker
CEILING
WA
LL
min
200
mm
min
105
mm
speaker wires
80 mm
vertical mounting
MASK6C(T)
Mounting & connecting the MASK6C(T) loudspeaker
Instruction manualMASK4C(T) / MASK6C(T) 11
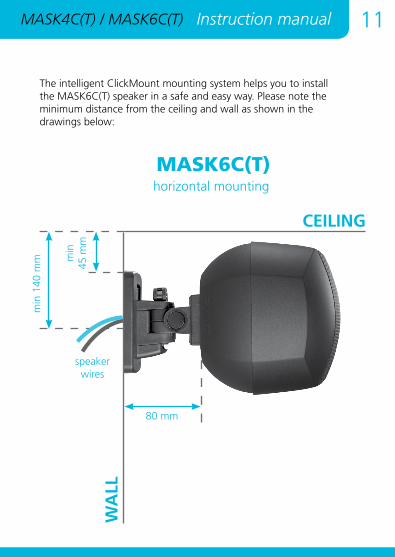
The intelligent ClickMount mounting system helps you to install the MASK6C(T) speaker in a safe and easy way. Please note the minimum distance from the ceiling and wall as shown in the drawings below:
horizontal mounting
MASK6C(T)
CEILING
WA
LL
min
140
mm m
in
45 m
m
speaker wires
80 mm

12 Design cabinet loudspeaker
• Determine the position where the ClickMount will be mounted on the wall. Please allow a minimum distance of 105 mm for MASK6C and 50 mm for MASK4C between the top of the ClickMount and the ceiling is necessary when installing the speaker in the upright position. The cable entry point is 95mm below the top of the bracket. The cable can enter from the rear of the bracket so that it is completely hidden from view. The ClickMount MUST be mounted with the arrows facing upwards!
• Now mark the four mounting holes on the wall. Use the built-in spirit level for correct positioning of the ClickMount unit.
Drill the mounting holes and attach the ClickMount in place using adequate hardware. Use only hardware capable of supporting the speaker’s weight safely. Be careful when you drill the holes in the wall: make sure not to drill into the speaker cables or other objects hidden inside the wall.
Instruction manualMASK4C(T) / MASK6C(T) 13
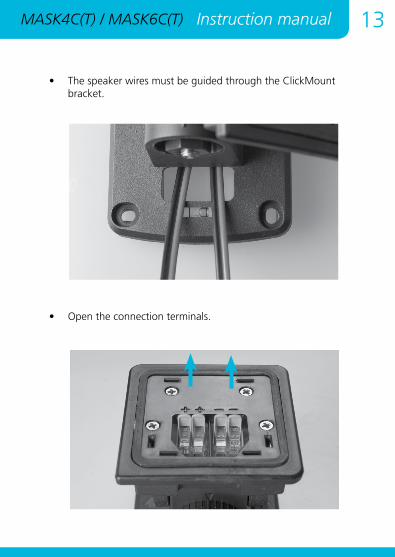
• The speaker wires must be guided through the ClickMount bracket.
• Open the connection terminals.

14 Design cabinet loudspeaker
• Connect the speaker wires taking care of the polarity. Two positive and two negative connectors are supplied to allow speakers to be connected in a daisy chain system.
• Click the cover plate in place.
1
2

Instruction manualMASK4C(T) / MASK6C(T) 15
• Rotate the ClickMount as required by loosening the quick lock lever
• Attach the SAFCAB cable to the rear of the speaker and attach the other end firmly to the wall close to the ClickMount (preferably above the ClickMount). The SAFCAB can handle more than 10 times the speaker’s weight, so mount the cable on the wall using appropriate mounting hardware (not included). Do not use ClickMount to attach the SAFCAB. The SAFCAB must be attached to the wall structure separately.

16 Design cabinet loudspeaker
• MASK(4)(6)CT only: set the power selector in the required position.
• Warning: the 16 ohm setting is not compatible with 70 or 100 volt line amplifiers!
MASK4CT
MASK4CT
MASK6CT
MASK6CT
16 ohm position: for low impedance amplifiers only! This switch position is not compatible with 70 / 100 volt line amplifiers!
Do not use the speaker on 100 volt speaker lines with the power switch in this position! This position is the highest setting
compatible with 70 volt lines only!
Instruction manualMASK4C(T) / MASK6C(T) 17
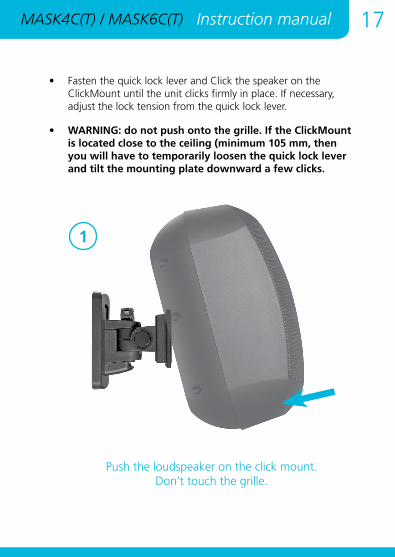
• Fasten the quick lock lever and Click the speaker on the ClickMount until the unit clicks firmly in place. If necessary, adjust the lock tension from the quick lock lever.
• WARNING: do not push onto the grille. If the ClickMount is located close to the ceiling (minimum 105 mm, then you will have to temporarily loosen the quick lock lever and tilt the mounting plate downward a few clicks.
Push the loudspeaker on the click mount. Don’t touch the grille.
1
18 Design cabinet loudspeaker
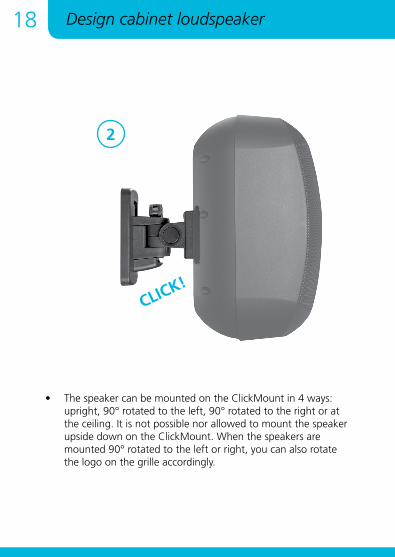
• The speaker can be mounted on the ClickMount in 4 ways: upright, 90° rotated to the left, 90° rotated to the right or at the ceiling. It is not possible nor allowed to mount the speaker upside down on the ClickMount. When the speakers are mounted 90° rotated to the left or right, you can also rotate the logo on the grille accordingly.
CLICK!
2

Instruction manualMASK4C(T) / MASK6C(T) 19
Note: All MASK models have a unique 3 stage overload protection, which is activated when the speakers are overloaded for long periods. When too much power is fed into your MASK, first the red led will blink when the music signal hits peak levels. When you neglect this early warning, the overload protection will disconnect the signal going to the loudspeakers and the red led will remain lit.
Turn down the music level . After about 3 seconds cooling down the signal will be reconnected to the loudspeakers.
REMINDER
Protection systems are not built to be activated all the time, they are to warn you and to give you a safety margin!
20 Design cabinet loudspeaker
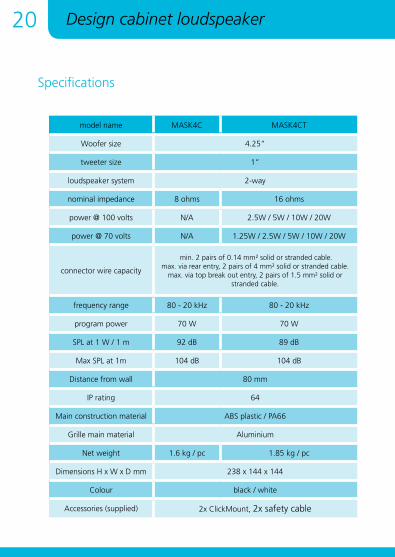
Specifications
model name MASK4C MASK4CT
Woofer size 4.25”
tweeter size 1”
loudspeaker system 2-way
nominal impedance 8 ohms 16 ohms
power @ 100 volts N/A 2.5W / 5W / 10W / 20W
power @ 70 volts N/A 1.25W / 2.5W / 5W / 10W / 20W
connector wire capacity
min. 2 pairs of 0.14 mm² solid or stranded cable. max. via rear entry, 2 pairs of 4 mm² solid or stranded cable.
max. via top break out entry, 2 pairs of 1.5 mm² solid or stranded cable.
frequency range 80 - 20 kHz 80 - 20 kHz
program power 70 W 70 W
SPL at 1 W / 1 m 92 dB 89 dB
Max SPL at 1m 104 dB 104 dB
Distance from wall 80 mm
IP rating 64
Main construction material ABS plastic / PA66
Grille main material Aluminium
Net weight 1.6 kg / pc 1.85 kg / pc
Dimensions H x W x D mm 238 x 144 x 144
Colour black / white
Accessories (supplied) 2x ClickMount, 2x safety cable

Instruction manualMASK4C(T) / MASK6C(T) 21
model name MASK6C MASK6CT
Woofer size 6.5”
tweeter size 1”
loudspeaker system 2-way
nominal impedance 8 ohms 16 ohms
power @ 100 volts N/A 6W / 15W / 30W / 60W
power @ 70 volts N/A 3W / 7.5W / 15W / 30W / 60W
connector wire capacity
min. 2 pairs of 0.14 mm² solid or stranded cable. max. via rear entry, 2 pairs of 4 mm² solid or stranded cable.
max. via top break out entry, 2 pairs of 1.5 mm² solid or stranded cable.
frequency range 65 - 20 kHz 60 - 20 kHz
program power 200 W 200 W
SPL at 1 W / 1 m 90 dB 90 dB
Max SPL at 1m 110 dB 111 dB
Distance from wall 80 mm
IP rating 64
Main construction material ABS plastic / PA66
Grille main material Aluminium
Net weight 3.35 kg / pc 3.9 kg / pc
Dimensions H x W x D mm 328 x 198 x 190
Colour black / white
Accessories (supplied) 2x ClickMount, 2x safety cable

22 Design cabinet loudspeaker
Warranty info
Warranty claims and claims for hidden defects can be considered only if the defects appear within the warranty period of 24 months and are notified within 8 days following their appearance per registered letter. The warranty is not valid in case of an incident, wear, for moving parts, power surges, inadequate packing or shipping, improper use or storage and the disregard of recommendations of Apart Audio. The warranty only concerns the spare parts and not the involved labor, transportation or any other costs. The product must be returned in the original packaging with the proof of purchase by an Apart-Audio authorized reseller.
The general terms and conditions can be found here:
http://www.apart-audio.com/conditions/General_Terms_and_Conditions_Apart_Audio.pdf

developed by
Apart Audio nv Industriepark Brechtsebaan 8 bus 1
2900 Schoten - Belgium
Company names, product names and trademarks are property of their respective owners.
Apart Audio specifications are subject to change without notice.