pastem.wikispaces.com+mars_jamesweb... · web viewplanets have some similarities and many...
TRANSCRIPT

PA – 3 Region Mathematics and Science Partnership
UNIT #1 TITLE: __Mars / James Webb___________________
For use with grades: __4th and 5th __________________
Developed by: Peter Altland John Wagner Amy Summa ______________________________________________ ______________________________________________

PA3 – MSP CalenderEVENT NOTES DATE
September 18Tue night mtg.
NA 9/18/12
Fall Visit 1
October 16Tue night mtg.
LESSON #1 DUE TONIGHT 10/16/12
Fall Visit 2
November 27Tue night mtg.
LESSON #2 DUE TONIGHT 11/27/12
H O L I D A Y B R E A K
January 15Tue night mtg.
UNIT #1 DUE TONIGHT 1/15/13
Winter/Spring Visit 1
February 19Tue night mtg.
NA 2/19/13
March 19Tue night mtg.
LESSON #1 DUE TONIGHT 3/19/13
Winter/Spring Visit 2

April 16Tue night mtg.
POTENTIAL SPEAKERLESSON #2 DUE TONIGHT
4/16/13
May 21(possibly May 15- East only)Tue night mtg.
UNIT #2 DUE TONIGHTPOST-TESTING
5/21/13
Or May 15 (East)
ROLES AND RESPONSIBILITIES
TEAM NAME: Deep Space
Team Member Role Responsibilities
Peter Altland
Organizer
Complete 2 lessons and construct unit.
John Wagner
Organizer
Complete 2 lessons and construct unit.
Amy Suma Organizer
Complete 2 lessons and construct unit.

PA – 3 Region Mathematics and Science Partnership
Participant Portfolio2012 - 2013
GRADE (S) INSTRUCTING: ______4 th and 5th______
SUBJECT AREA(S): Math and Science

CONTACT’S SCHOOL:__KHS, East Fallowfield, Caln____
REGION COORDINATOR: Stan T._
TEAM CONTACT PHONE: __484 678 6212___
TEAM CONTACT EMAIL: [email protected]__
TEAM CONTACT’s SCHOOL MAILING ADDRESS: ________________________________________________________________________________________________________________________________________________________________________________________________________________
Unit #1 Outline
Top of Form
GRADE LEVEL(S):
4th and 5th PA CONTENT STANDARDS:
Math (PA common Core)CC.2.1.4.B.1- Apply place value concepts to show an understanding of multi-digit whole numbers.Science (National Standards)M.D.3.AScience (National Standards)H.D.3.AH.E.2.AH.E.2.BH.E.2.CH.E.2.DH.E.2.E
ASSESSMENT ANCHORS:

S4.D.3 Composition and Structure of the Universe S4.D.3.1 Describe Earth’s relationship to the Sun and the Moon. Reference: 3.4.4.
ESSENTIAL QUESTION:(DEVELOP A GLOBAL QUESTION THE UNIT IS DESIGNED TO ADDRESS)
How big is Earth and where are we in the galaxy?
UNIT OBJECTIVES:
1. The solar system has eight planets, an asteroid belt, several dwarf planets, and numerous small bodies such as comets in orbit around the Sun.
2. The four inner terrestrial planets are small compared to the four outer giant planets.
3. Planets have some similarities and many differences.
4. The distance between planetary orbits is large compared to their sizes.
5. Models can help us comprehend large-scale spatial relationships.
6. Students will determine how big Earth is in relationship to other planets and other “things on Earth.”7.Students will put the size of the planets in order from least to greatest.8. Students will take a virtual tour of the galaxy and understand how far away Earth
is to other “things” in the universe.
GENERAL MATERIALS NEEDED FOR UNIT: (include technology, NASA resources, etc…)
- Smartboard- Video projector- Computer- Venn diagram- Note cards- Pictures of planets- markers

MODELING AND GUIDED INSTRUCTION: (the whole class will be involved in the following learning experience)
- Understanding the order, relative size, and relationship of the planets to earth and the moon.
- Understand the parts, purpose, and importance of the James Webb telescope.
COLLABORATION/GROUP WORK: (problem-based/inquiry learning)
- Creating model of the solar system-
INDEPENDENT PRACTICE: (student exploration and elaboration)
- venn diagrams- planet models- mirror reflection- fruit planet models- percentage activity
ASSESMENT/EVALUATION: (authentic student products and how assessed)Formative:
- observation- exit tickets- student journal
Summative:
- lesson quizzes- unit test

Lesson Plan #1 – Unit #1Top of Form
Author: John Wagner
Grade Level: 4th/5th Topic/Title: How big is Earth and where are we in the galaxy?
Standards: Math - PA Common Core; Science - National StandardsMath (PA common Core)CC.2.1.4.B.1- Apply place value concepts to show an understanding of multi-digit whole numbers.Science (National Standards)M.D.3.AObjectives:
1. Students will determine how big Earth is in relationship to other planets and other “things on Earth.”
2. Students will put the size of the planets in order from least to greatest.3. Students will take a virtual tour of the galaxy and understand how far away
Earth is to other “things” in the universe.Materials:
1. Computer2. Notecards (10 per student)3. String4. Pictures of planets

5. Smartboard6. Markers
Anticipatory Set:Show http://apod.nasa.gov/apod/ap120312.html to the students on the smartboard. This website starts as a human on Earth. You can scroll backwards and it will take you past other objects on Earth, showing their size in meters and in scientific notation. As you scroll out it takes you into space and gives the size of other objects in space such as asteroids, planets, and galaxies. These pictures help put in perspective the size of objects on Earth and in the universe.Activities: (modeling, guided practice, independent practice & group work)
1. Show the website above and list the size of all of the planets on pictures of the planets.
2. Pass the pictures of the planets to students and have them place the sizes of the planets in order from least to greatest. Have them hang them on a piece of string in order.
3. Take the students to the library to get on the thinkpads. Have them get on http://apod.nasa.gov/apod/ap120312.html.
4. Let the students scroll on the website looking at the size of objects.5. Have the students write the size of any 10 objects on notecards.6. Then have them work in groups to put their 10 objects in order from least to
greatest in regards to size.Wrap-up:
1. Show http://www.youtube.com/watch?v=0fKBhvDjuy0&feature=player_embedded
2. This video called “Powers of Ten” takes us on an adventure in magnitudes. Starting at a picnic by the lakeside in Chicago, this film transports us to the outer edges of the universe. Every ten seconds we view the starting point from ten times farther out until our own galaxy is visible only a s a speck of light among many others. Returning to Earth with breathtaking speed, we move inward- into the hand of the sleeping picnicker- with ten times more magnification every ten seconds. Our journey ends inside a proton of a carbon atom within a DNA molecule in a white blood cell.
Evaluation / Assessment:1. Give the students 5 items from the universe. 2. Have them write in their journals the size of these objects in order from least
to greatest as their exit ticket in their science journals.3. Have the students write 2 sentences in their science journals about
something they learned about the size of objects on Earth compared to objects in the universe.

Lesson Plan #2 – Unit #1Top of Form
Author: John Wagner
Grade Level: 4th/5th Topic/Title:Introduction to the James Webb Telescope….How is the James Webb different from the Hubble.
Standards: Math - PA Common Core; Science - National StandardsScience (National Standards)H.D.3.AH.E.2.AH.E.2.BH.E.2.CH.E.2.DH.E.2.EObjectives:
4. Students will understand the characteristics of the James Webb Telescope.
5. Students will understand what the James Webb Telescope does.6. Students will compare the differences between the James Webb and the
Hubble.Materials:
7. Computer8. Smartboard9. Lenovo Thinkpads10.Venn diagram

Anticipatory Set:Show http://hubblesite.org/hubble_discoveries/hubble_deep_field/. Then show the students www.hubblesite.org and show some pictures that the hubble captured. Then, show http://www.youtube.com/user/NASAWebbTelescopeto the students on the smartboard. This website shows James Webb and compares James Webb to the Hubble.Activities: (modeling, guided practice, independent practice & group work)
7. Explain that the hubble has been used to look into the galaxy.8. Explain that the James Webb telescope will be taking the place of the
Hubble in viewing our galaxy.9. Explain that The James Webb Space Telescope is NASA's next orbiting
observatory and the successor to the Hubble Space Telescope. A tennis court-sized telescope orbiting far beyond Earth's moon, Webb will detect infrared radiation and be capable of seeing in that wavelength as well as Hubble sees in visible light. Infrared vision is vital to our understanding of the universe. The furthest objects we can detect are seen in infrared light, cooler objects that would otherwise be invisible emit infrared, and infrared light pierces clouds of dust, allowing us to see into their depths. Webb will unleash a torrent of new discoveries, opening the door to a part of the universe that has just begun to take shape under humanity's observations.Right now, scientists and engineers are piecing Webb together, creating through cutting-edge technology an innovative observatory that not only withstands intense cold, but uses it to its advantage; an observatory that folds up inside a rocket for launch and unfurls like a butterfly opening its wings upon nearing its orbit. Later this decade, the Webb telescope will launch into space, sailing to the distant, isolated orbit where it will begin its quest. Supernovae and black holes, baby galaxies and planets' potential for supporting life — Webb will help reveal the answers to some of the biggest mysteries of astronomy.
10. Take the students to the library to get on the thinkpads. Have them get on http://www.nasa.gov/externalflash/webb_hubble/.
11. Pass out a venn diagram to each student.12. Have the students work in groups to fill out the venn diagram comparing
and contrasting the similarities and differences of the Hubble to the James Webb Telescope.
Wrap-up:3. Have students share out what they found as the differences between the
James Webb and Hubble.4. Explain that the James Webb Telescope is really going to help us
understand and see what is going on in deep space so that we can move on in our knowledge beyond the solar system.
Evaluation / Assessment:4. Venn diagram. 5. Have the students write down one thing that thought was most interesting
as a difference between the Hubble and James Webb as their exit ticket in their science journals.

6. Have the students write a paragraph as to why they think the creation of James Webb will advance astronomy.
Lesson Plan #1 – Unit #1Top of Form
Author: Amy Summa
Grade Level: 4th/5th Topic/Title: Modeling and Understanding the Solar System
Standards: Math - PA Common Core; Science - National StandardsScience (National Standards)H.D.3.AH.E.2.AH.E.2.BH.E.2.CH.E.2.DH.E.2.EObjectives:
7. The solar system has eight planets, an asteroid belt, several dwarf planets, and numerous small bodies such as comets in orbit around the Sun.
8. The four inner terrestrial planets are small compared to the four outer giant planets.
9. Planets have some similarities and many differences.
10. The distance between planetary orbits is large compared to their sizes.
11. Models can help us comprehend large-scale spatial relationships.Materials:For each group of 20 to 30 children:
One of each of the following fruits and other foods* (listed from largest to smallest):

o (55"–wide) giant pumpkin
OR
o (55"–wide) model pumpkin, made from
• 1 Halloween orange pumpkin garbage bag, which is available from retailers such as Amazon.com• Packing peanuts or pillows to fill the bag
o (5 1/2"–wide) large mango or potatoo (4 1/2"–wide) large orange or cantaloupe or coconut
o (2”–wide) plum
o (2"–wide) kiwi or lime
o (1/2"–wide) small grape
o (1/2"–wide) large blueberry
o (1/4"–wide) pea or navy bean
o (1/5"–long) uncooked orzo pasta
o (3/32"–wide) grain of uncooked rice
o (1/16"–wide) grain of uncooked rice
o (1/64"–wide) poppy seed
Measuring tape (to measure a distance of 190 feet)
Coloring supplies, including markers and colored pencils
Optional: 1 set of Our Solar System lithographs (NASA educational product number LS–2001–08–002–HQ), preferably double–sided and in color
1 (22" x 32" or larger) neighborhood map, extending to 6 miles from your geographic location, prepared as described under "Preparation" using either a photocopier and a detailed local map or mapping software and a printer
11 (20") strings
Ruler
Tape
11 coffee stirrers
Planet Labels (Image Credits)
Optional: Access to the online song “11 Planets” by Lisa Loeb
A large area where the children can model the orbit of Mercury around the Sun (perhaps outdoors for this portion of the activity), investigate the fruit, and gather around the map to

plot their team’s planet
A large wall, table, or floor space for posting or laying the map down
For each child:
"Solar System in My Neighborhood" page 1 pencil or pen
For the facilitator:
Background information: Secrets of the Solar System Family
The Other Distant Giants Are Kindred Planets with Individual Quirks
Inner, Rocky Neighbors Are Siblings to Earth
Countless Small Objects Are Part of Our Solar System's Extended Family
Shopping list
Solar System in My Neighborhood: Planet Sizes and Distances Anticipatory Set:
Review the complete background information.
Use the Solar System in My Neighborhood: Planet Sizes and Distances to select appropriate fruits and other foods* to represent the planets, where they are listed in order from smallest to largest to allow more room for substitution/creativity. For example, you may choose to use a small grape for the Earth and a large blueberry for Venus, or vice versa, but "Earth" should be slightly larger than "Venus."
If you are using a large pumpkin to represent the Sun, have an adult carry it during the activity. If you are using a Halloween orange pumpkin garbage bag, fill it with light–weight materials such as packing peanuts or pillows.
Provide a large indoor or outdoor space (measuring at least 190 feet wide) where the children can model the orbit of Mercury around the Sun. Provide an indoor space where the children may work in teams and draw on a common map.
Cut out the Planet Labels and tape them to one end of each coffee stirrer. These flags will be taped to the neighborhood map.
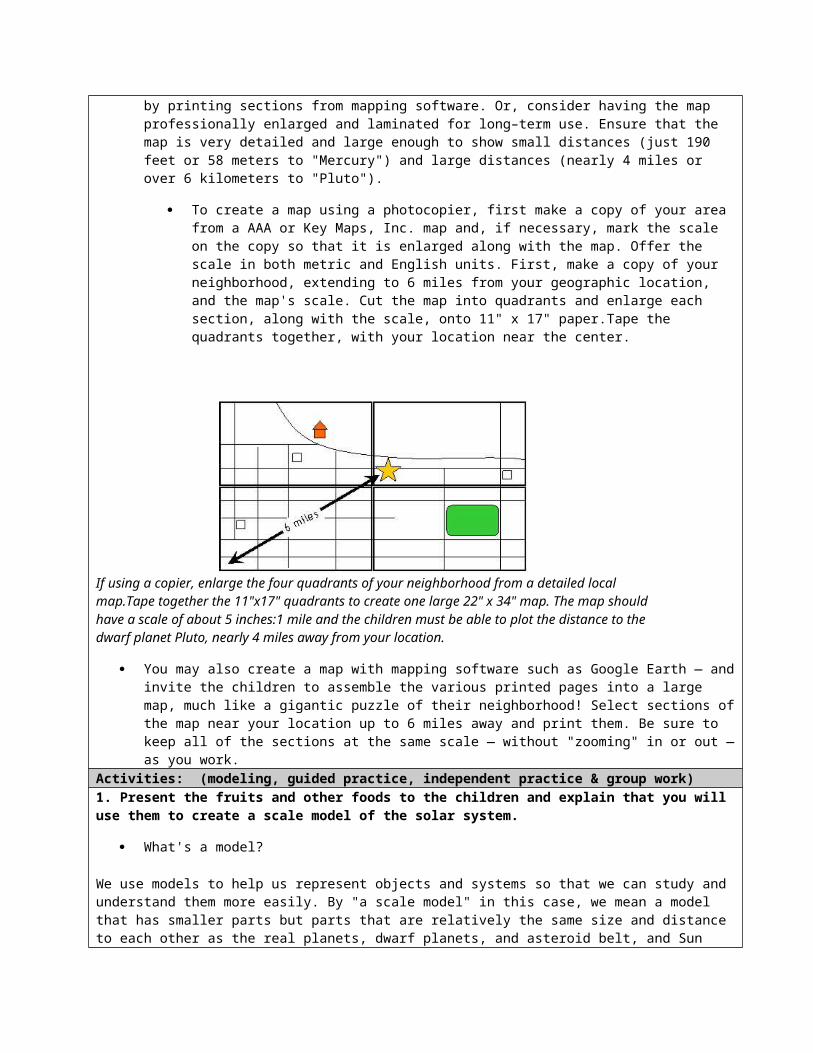
Prepare a large neighborhood map either by photocopying a printed map or by printing sections from mapping software. Or, consider having the map professionally enlarged and laminated for long–term use. Ensure that the map is very detailed and large enough to show small distances (just 190 feet or 58 meters to "Mercury") and large distances (nearly 4 miles or over 6 kilometers to "Pluto").
To create a map using a photocopier, first make a copy of your area from a AAA or Key Maps, Inc. map and, if necessary, mark the scale on the copy so that it is enlarged along with the map. Offer the scale in both metric and English units. First, make a copy of your neighborhood, extending to 6 miles from your geographic location, and the map's scale. Cut the map into quadrants and enlarge each section, along with the scale, onto 11" x 17"

paper.Tape the quadrants together, with your location near the center.
If using a copier, enlarge the four quadrants of your neighborhood from a detailed local map.Tape together the 11"x17" quadrants to create one large 22" x 34" map. The map should have a scale of about 5 inches:1 mile and the children must be able to plot the distance to the dwarf planet Pluto, nearly 4 miles away from your location.
You may also create a map with mapping software such as Google Earth — and invite the children to assemble the various printed pages into a large map, much like a gigantic puzzle of their neighborhood! Select sections of the map near your location up to 6 miles away and print them. Be sure to keep all of the sections at the same scale — without "zooming" in or out — as you work.
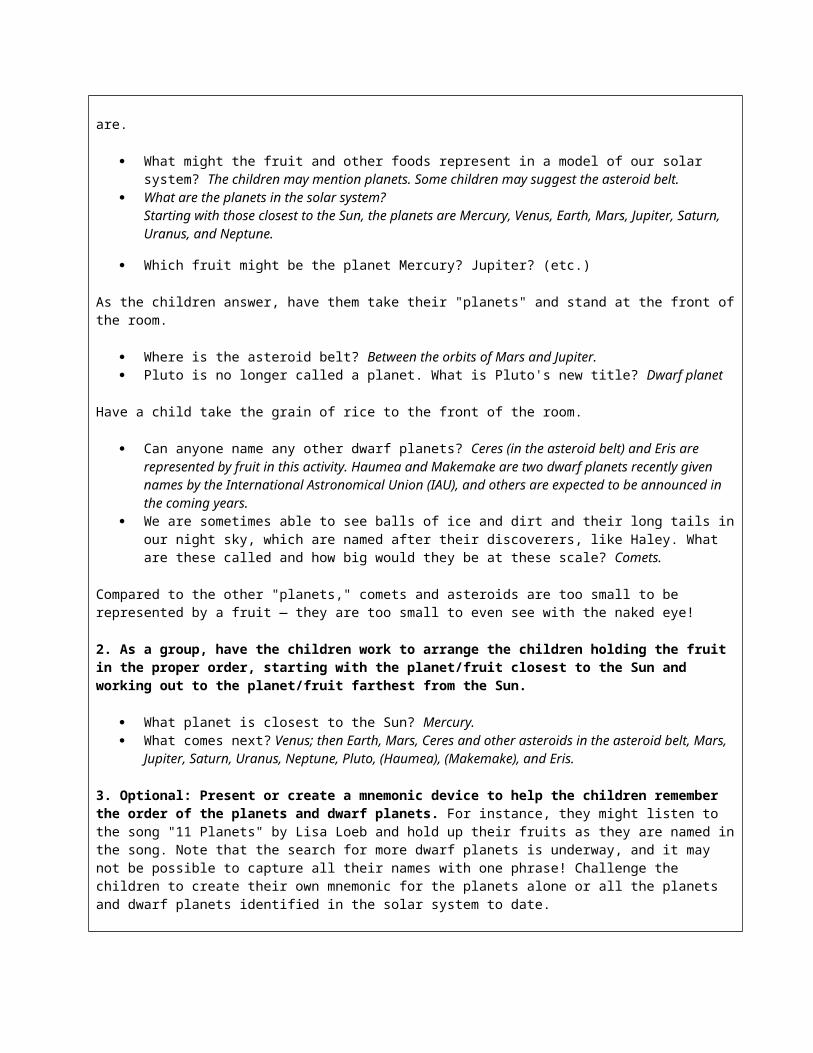
Activities: (modeling, guided practice, independent practice & group work)1. Present the fruits and other foods to the children and explain that you will use them to create a scale model of the solar system.
What's a model?
We use models to help us represent objects and systems so that we can study and understand them more easily. By "a scale model" in this case, we mean a model that has smaller parts but parts that are relatively the same size and distance to each other as the real planets, dwarf planets, and asteroid belt, and Sun are.
What might the fruit and other foods represent in a model of our solar system? The children may mention planets. Some children may suggest the asteroid belt.
What are the planets in the solar system? Starting with those closest to the Sun, the planets are Mercury, Venus, Earth, Mars, Jupiter, Saturn, Uranus, and Neptune.
Which fruit might be the planet Mercury? Jupiter? (etc.)
As the children answer, have them take their "planets" and stand at the front of the room.
Where is the asteroid belt? Between the orbits of Mars and Jupiter. Pluto is no longer called a planet. What is Pluto's new title? Dwarf planet
Have a child take the grain of rice to the front of the room.
Can anyone name any other dwarf planets? Ceres (in the asteroid belt) and Eris are represented by fruit in this activity. Haumea and Makemake are two dwarf planets recently given names by the International Astronomical Union (IAU), and others are expected to be announced in the coming years.
We are sometimes able to see balls of ice and dirt and their long tails in our night sky, which are
named after their discoverers, like Haley. What are these called and how big would they be at these scale? Comets.
Compared to the other "planets," comets and asteroids are too small to be represented by a fruit — they are too small to even see with the naked eye!
2. As a group, have the children work to arrange the children holding the fruit in the proper order, starting with the planet/fruit closest to the Sun and working out to the planet/fruit farthest from the Sun.
What planet is closest to the Sun? Mercury. What comes next? Venus; then Earth, Mars, Ceres and other asteroids in the asteroid belt, Mars,
Jupiter, Saturn, Uranus, Neptune, Pluto, (Haumea), (Makemake), and Eris.
3. Optional: Present or create a mnemonic device to help the children remember the order of the planets and dwarf planets. For instance, they might listen to the song "11 Planets" by Lisa Loeb and hold up their fruits as they are named in the song. Note that the search for more dwarf planets is underway, and it may not be possible to capture all their names with one phrase! Challenge the children to create their own mnemonic for the planets alone or all the planets and dwarf planets identified in the solar system to date.
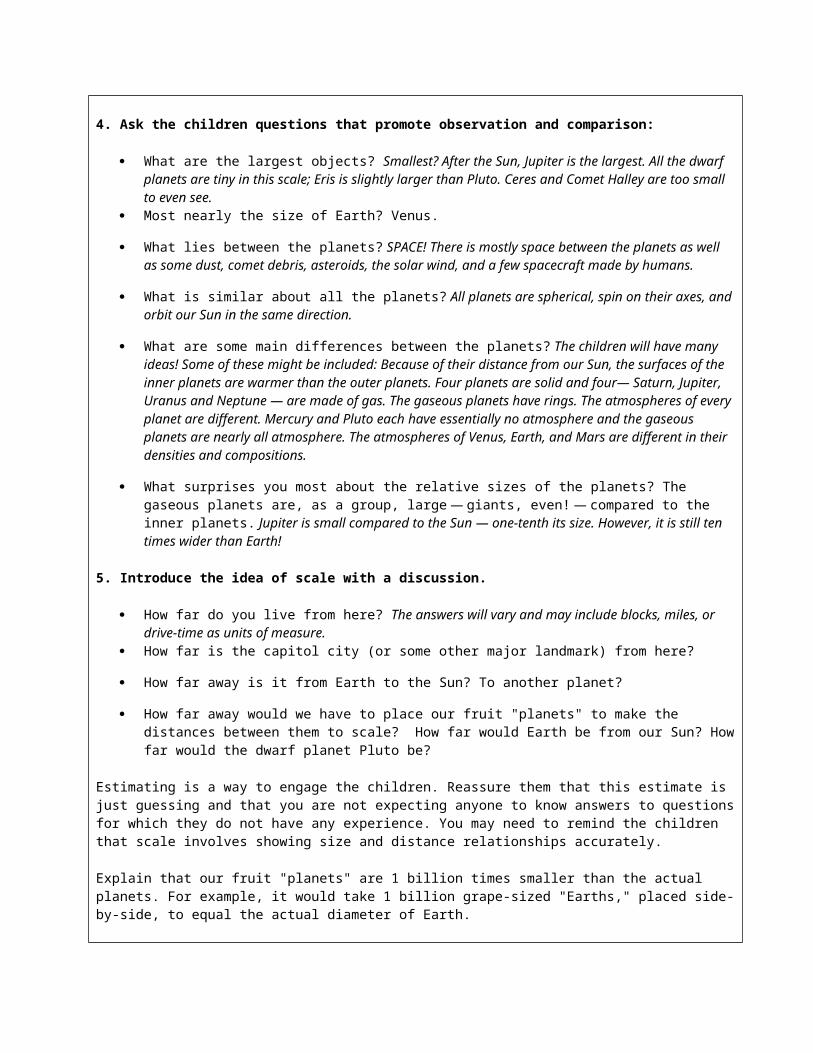
4. Ask the children questions that promote observation and comparison:
What are the largest objects? Smallest? After the Sun, Jupiter is the largest. All the dwarf planets are tiny in this scale; Eris is slightly larger than Pluto. Ceres and Comet Halley are too small to even see.
Most nearly the size of Earth? Venus.
What lies between the planets? SPACE! There is mostly space between the planets as well as some dust, comet debris, asteroids, the solar wind, and a few spacecraft made by humans.
What is similar about all the planets? All planets are spherical, spin on their axes, and orbit our Sun in the same direction.
What are some main differences between the planets? The children will have many ideas! Some of these might be included: Because of their distance from our Sun, the surfaces of the inner planets are warmer than the outer planets. Four planets are solid and four— Saturn, Jupiter, Uranus and Neptune — are made of gas. The gaseous planets have rings. The atmospheres of every planet are different. Mercury and Pluto each have essentially no atmosphere and the gaseous planets are nearly all atmosphere. The atmospheres of Venus, Earth, and Mars are different in their densities and compositions.
What surprises you most about the relative sizes of the planets? The gaseous planets are, as a group, large — giants, even! — compared to the inner planets. Jupiter is small compared to the Sun — one-tenth its size. However, it is still ten times wider than Earth!
5. Introduce the idea of scale with a discussion.
How far do you live from here? The answers will vary and may include blocks, miles, or drive-time as units of measure.
How far is the capitol city (or some other major landmark) from here?
How far away is it from Earth to the Sun? To another planet?
How far away would we have to place our fruit "planets" to make the distances between them to

scale? How far would Earth be from our Sun? How far would the dwarf planet Pluto be?
Estimating is a way to engage the children. Reassure them that this estimate is just guessing and that you are not expecting anyone to know answers to questions for which they do not have any experience. You may need to remind the children that scale involves showing size and distance relationships accurately.
Explain that our fruit "planets" are 1 billion times smaller than the actual planets. For example, it would take 1 billion grape-sized "Earths," placed side-by-side, to equal the actual diameter of Earth.
6. If necessary, temporarily move to a larger space to model the orbit of Mercury around the Sun. Invite a child to hold the pumpkin "Sun'' at one location and use the measuring tape to place another child, holding the orzo pasta "Mercury," 190 feet (58 meters) away. Ask the child to walk in a counterclockwise circle around the pumpkin.
Where would the next planet (Venus) be placed? How many orbits would fit in the space?
Explain that the solar system model would take up your entire neighborhood!
7. Explain that they will create a scale model of the solar system by drawing the orbits on a map of the neighborhood. Hang the neighborhood map in a central location — on a wall, table, or the floor —where it is accessible to all. Tape the Sun label to your location. Together, draw the orbit of Mercury on the map as an example of how to proceed with the other solar system objects. Use the map's scale to mark off units of measure on a piece of string. Ask the children to identify Mercury's scaled distance from the Sun by looking at their journals. Grasp one end of the string, and using the distance markings, measure Mercury's distance of 190 feet (58 meters). Tie a pencil to the string at that length and use it as a drawing compass to create Mercury's orbit around the Sun label on the map.
8. Together, place the planets in the context of your neighborhood! If possible, divide the children into ten teams of two to three and provide each with one of the Planet Labels and a string. Invite the teams to determine how far away their planet's fruit representative is from your location on the map using their strings. Taking turns at the map, use the strings to draw circular paths for each planet, with your location as the center (i.e., the Sun). Comet Haley's orbit can be drawn as an oval shape using the closest and furthest distances. Identify a landmark along that orbit (e.g. a school, grocery store, or child's house). Ask the children to record the name of the landmark, along with the type of food representing it, on the planet label and tape the label at that location.
Wrap-up:
Invite the children to draw a map of their neighborhood and place the planets at their landmarks in their journals.
Evaluation / Assessment:
Help the children visualize the vast scale of our solar system by comparing it to the fruit and its placement on your neighborhood map.
In our scale model of the solar system, how far away are the planets? What landmark did you identify for each one? At this scale, Mercury is an uncooked orzo pasta as far away as the end of the

block; Venus is a large blueberry at Susan's house; etc. Would you walk there or would you ride in a car or bus? Mercury is less than a block away; and
even Venus, Earth, and Mars are within walking distance of the Sun at your location. Jupiter is about a 1/2 mile away, and Saturn nearly one mile away. Uranus, Neptune, and Pluto are all much further away. Comet Halley's orbit takes it almost to the orbit of Pluto.
What do you notice about the distances from the Sun to the inner planets versus the distance to the outer planets? The inner terrestrial planets — Earth, Mercury, Mars, and Venus — are much closer together. The giant planets get farther and farther apart.
The inner planets are clustered near the Sun, and the outer planets are really far away. All the planets are tiny compared to the space between them!
How long do you think it would it take a spacecraft to get to these other planets? Accept all answers before providing more information.
Part of this answer depends on the type of spacecraft and if it is doing other things like circling other planets. In general, if it was possible for a spacecraft to fly directly to Mercury, it would take it about 5 1/2 months to get there if it was going in a straight shot. The MESSENGER spacecraft, launched in 2004, arrived at Mercury in 2011; MESSENGER had several flybys of other planets to help it slow down so that it was able to go into orbit around Mercury. New Horizons, launched in 2006, is expected to reach the dwarf planet Pluto at the "other end" of our solar system in 2015! Due to a gravitational assist from Jupiter, New Horizon’s trip has been shortened by three years. In 2016, the Juno spacecraft will arrive at Jupiter. Juno will launch in 2011, and like MESSENGER, it will have a flyby that slings it past Earth (in 2013) on its way to the giant planet.
Are the planets in a straight line, like we sometimes see them presented in pictures? No!
Remind the children that the planets are in motion as they orbit the Sun. Only rarely do several planets "line up."
Lesson Plan #2 – Unit #1Top of Form
Author: Amy Summa
Grade Level: 4th/5th Topic/Title:James Webb-Inside a Telescope
Standards: Math - PA Common Core; Science - National StandardsScience (National Standards)H.D.3.AH.E.2.AH.E.2.BH.E.2.CH.E.2.DH.E.2.EObjectives:
Students should be able to explain that:
12. Mediums such as water, glass, and plastic focus, or refract, light.13. Surfaces such as mirrors bounce, or reflect, light. We see most things around us because of the light
reflected off them.
14. Telescopes work by gathering light with either a lens or a mirror and creating a magnified image.Materials:
Materials for the Presenter
magnifying glasses to distribute to each group images to project or draw upon the class board
a source of water to fill each glass
For each student
Telescope Worksheet One set of colored pencils, 4 to 8 pencils per set
pencils or pens to record answers
For each Group
1 clear drinking glass 1 brightly colored straw
1 small mirror
Anticipatory Set:
History of TelescopesThe invention of the telescope is often attributed to Hans Lippershey, an optician who, in 1608, aligned two lenses of different curvatures and focal lengths. It is not known how Galileo Galilei heard of the process, but there is evidence that Galileo quickly bought or ground his own lenses and made a simple telescope that he demonstrated in 1610 to the Senate in Venice. Galileo is credited with discovering four of Jupiter’s moons, crater walls on Earth’s moon, Venus’ phases, sunspots, and Saturn’s rings.
Regardless of type and complexity, all telescopes operate in basically the same way. Telescopes capture
light and provide a detailed image to the viewer. Our eyes are telescopes, as are cameras, satellite dishes and radio telescopes.
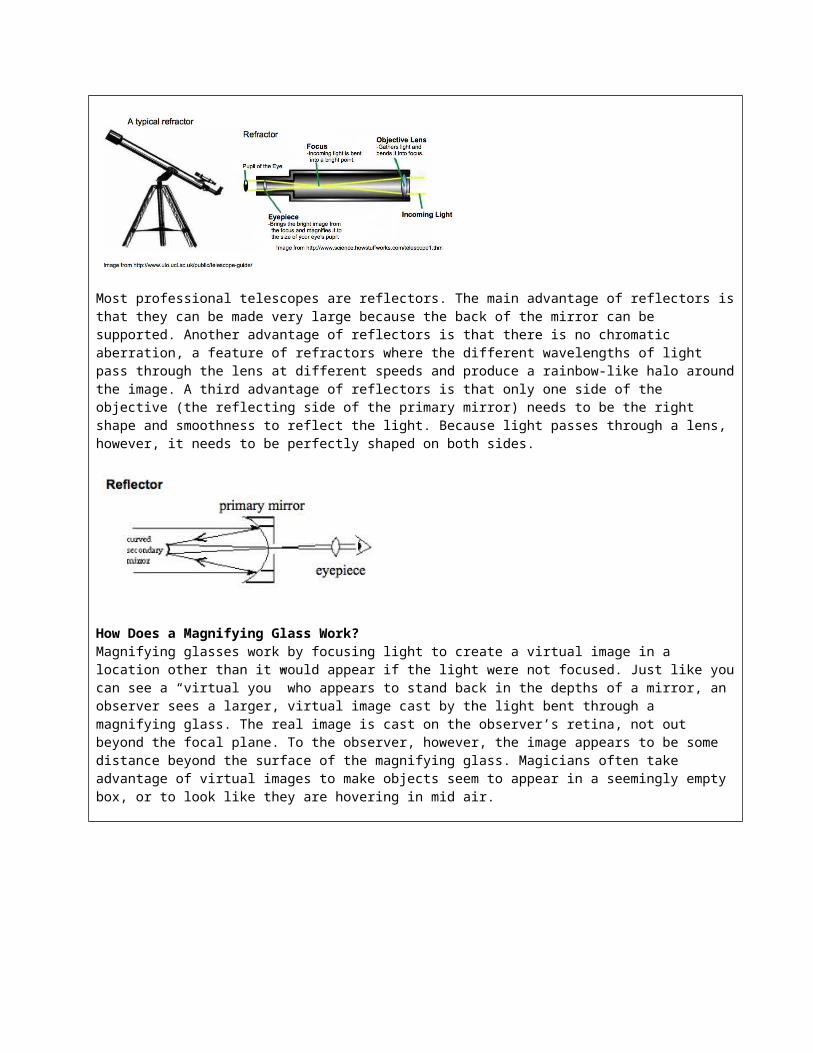
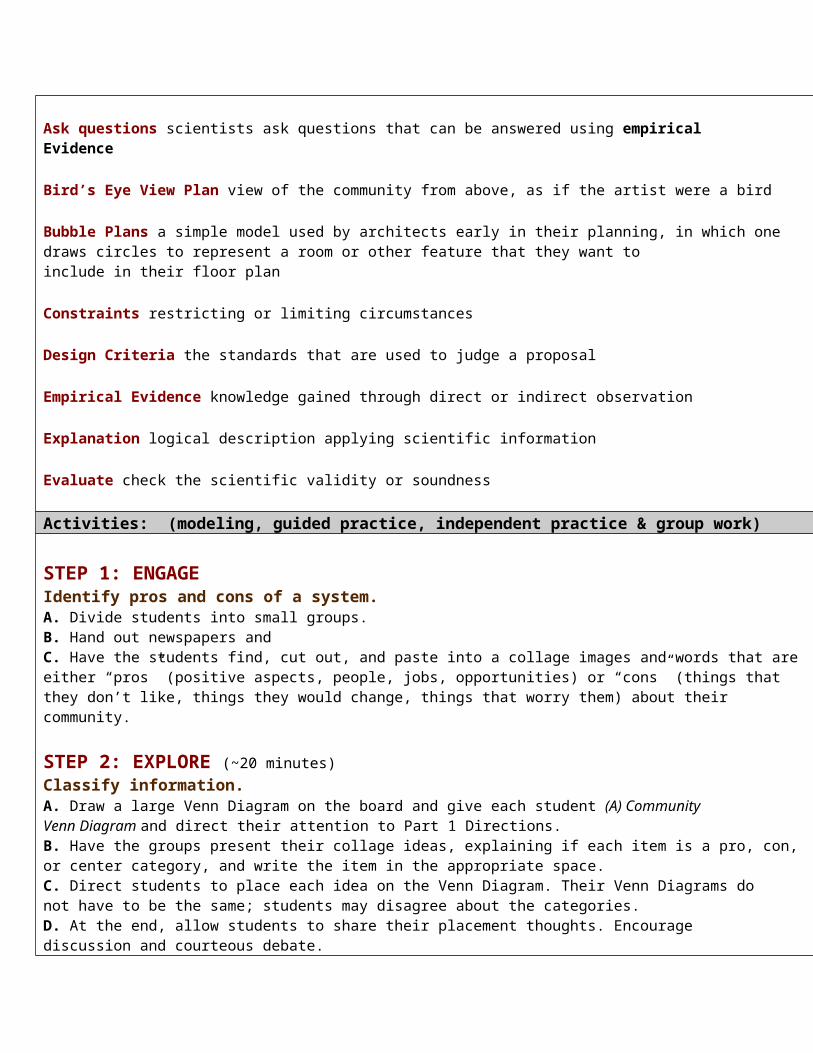
How Do Telescopes Work?Telescopes have two main parts: the first lens and the second lens. The first lens is called the objective lens and the second lens is called the eyepiece. Telescopes that use only lenses are called refracting telescopes, or refractors. Some telescopes use a mirror, called the primary mirror, in place of the first lens. These are called reflecting telescopes, or reflectors. Most professional telescopes are reflectors.
The objective lens (or primary mirror in reflectors) collects light from a distant object and brings it to a point or focus. The image is bent, or focused, on a small surface called the focal plane. The eyepiece is a magnifying glass. It focuses the light from the image at the focal plane so the observer sees a larger, magnified image.
Most professional telescopes are reflectors. The main advantage of reflectors is that they can be made very large because the back of the mirror can be supported. Another advantage of reflectors is that there is no chromatic aberration, a feature of refractors where the different wavelengths of light pass through the lens at different speeds and produce a rainbow-like halo around the image. A third advantage of reflectors is that only one side of the objective (the reflecting side of the primary mirror) needs to be the right shape and smoothness to reflect the light. Because light passes through a lens, however, it needs to be perfectly shaped on both sides.
How Does a Magnifying Glass Work?Magnifying glasses work by focusing light to create a virtual image in a location other than it would appear if the light were not focused. Just like you can see a “virtual you” who appears to stand back in the depths of a mirror, an observer sees a larger, virtual image cast by the light bent through a magnifying glass. The real image is cast on the observer’s retina, not out beyond the focal plane. To the observer, however, the image appears to be some distance beyond the surface of the magnifying glass. Magicians often take advantage of virtual images to make objects seem to appear in a seemingly empty box, or to look like they are hovering in mid air.
Professional Telescopes
Astronomers use telescopes (mostly reflectors) that observe across all wavelengths of light, from low-energy radio and microwave light to high-energy gamma rays and x-rays. The image below is of the complete light spectrum. See the lesson pdf for two images, as well as background information on professional telescopes, the Chandra X-ray observatory and the planned James Webb Space Telescope (JWST). The Chandra X-ray observatory observes x-ray light and the James Webb Space Telescope will observe primarily in infrared light. Students can study both telescopes as a followup to this activity.
More information on telescopes and optics can be found in the content section of the Bringing It Closer module (from www.science-fest.org).
Refracted Light Through Liquid Distorts the Image of the Straw
Activities: (modeling, guided practice, independent practice & group work)
Goal: Students will enact the processes used by a telescope to gather light and create a magnified image.
1. Explain to the students they are going to learn about how telescopes work. Show them an illustration of a reflector telescope and its lenses, using one from this lesson plan, the pdf., or your own drawing on the class board.

2. Identify the objective lens. Explain that it comes first, to “catch and focus light.” Make a catching motion with your hands, then cross your arms to show light focusing. Ask students to repeat what they have heard, copying your motions.
3. Now, identify the eyepiece lens. Explaining that it comes second, and “magnifies the image.” Spread your arms to demonstrate magnification. Ask students to repeat back this back to you.
4. Repeat the motions, names and basic functions of both lens with the class several times, and then throughout the lesson.
5. Distribute the worksheets and colored pencils. Have them complete question #1, tracing the light path for a refractor. After they have done so, project the image of the light path, below (also in the lesson pdf).
6. Explain that there are two types of telescopes: Reflectors and Refractors. Refractors use lenses to catch the light and focus, or refract it. Reflectors use mirrors to catch and bounce, or reflect, it.
7. Hold up the telescope and explain that this is a refractor because it uses a lens.
8. Hold up a picture of James Webb Space Telescope and point to the mirror. Ask if JWST is a reflector or a refractor.

9. Repeat the motions used earlier, this time replacing “objective lens” with “primary mirror” and “focus” with “bounces.” Cross and bounce your arms to show light bouncing off the mirror.
10. Repeat the motions for both reflectors and refractors with the class several times.
ACTIVITY #2 – Bouncing Light
Goal: Students will observe how mirrors reflect light.
Procedure
1. Hold up a mirror at arm’s length and face it, standing sideways to the class so they can see your face and part of the reflection.
2. Ask students to describe what you will see in the mirror. Ask them on which side your right eye will appear when viewed in the mirror.
3. Explain that the light around you is bouncing off your face. Some of the light hits the mirror. Because the mirror is very reflective, most of that light bounces back and goes into your eye, so you see your reflection. Demonstrate how the light is moving by tracing your finger along the light path from your face to the mirror to your eyes.
4. Explain that another word for bouncing is reflecting.
5. Ask a student to explain to you why you can see your reflection in the mirror. Now, have one student to come up and point out where the light is going as it bounces off your face, off the mirror, and into your eye.
6. Have students to complete question #2 on the worksheet, tracing the light path from the mirror.
7. Distribute mirrors to the student groups. Have students describe what they see as they examine the mirrors. Pose the questions: “Which side of the mirror is your right/left eye on?” to help guide their description.
8. Ask a student to explain why her partner can see herself in the mirror, showing the light as it bounces off her face and the mirror. Repeat with several other students.
9. Have students complete question #3 on the worksheet: Draw an oval around the smiley face that the

observer sees using the lens. Draw a rectangle around the smiley face the observer sees using the mirror.
ACTIVITY #3 – Focusing Light
Goal: Students will observe how water and lenses focus light.
Procedure:
1. Distribute the colored straws and glasses to each student group. Have each group prepare a lab report to record their observations; this can be done on the back of the worksheet or a separate piece of paper.
2. Have students examine the straws and describe to one another what they look like. Pose the question, “Are the straws straight or bent?” to help guide their description. Have them record their answer.
3. Direct students to put their straws in their glasses and look at them again. Direct students to describe the straws to the other students in their group, again taking into consideration whether the straw appears straight or bent. Have them record their answer.
4. Pour water into the glasses and ask students to examine the straws once again. Have them record a description of the straws on their labsheet, again identifying whether the straw appears straight or bent.
5. Ask, “What just happened?” Ask whether, the straw is, in fact bent, or if it just appears that way.
6. Explain that water focuses, or refracts, light as it passes through the water. The focusing of the light is what makes it look like the straw is bent. This is also what makes images appear larger through a magnifying glass.
7. Ask students to students to complete question #4 on the worksheet and draw the straw in water on their worksheet.
8. Display the card with a triple sunset on it, from the pdf, page 18, or use another graphic, or items items such as seeds, leaves, and rocks can also be used.
9. Ask students what will happen when they look at these items through a magnifying glass. Expected response: they will look bigger.
10. Explain that magnifying glasses focus light, just like water. This is called refraction. Distribute the magnifying glasses to each group, to hold over the picture or display items and examine the magnified image.
Wrap-up:
Reflect on all three procedures. Students will discuss and share observations.
Evaluation / Assessment:Students will reflect in a journal of their finding for the days activities. Students are to include what they believe they could add to telescopes to improve research from the earth, validating their examples with ideas from the procedures.

Lesson Plan #2 Unit 1Top of Form
Topic: Mars
Peter Altland4th and 5th grade
PA Academic Standards:Science (National Standards)H.D.3.AH.E.2.AH.E.2.BH.E.2.CH.E.2.DH.E.2.E
Objectives:Students Objectives: to construct a simple model according to criteria
-Materials:
Please supply:• White board or chart paper• Multiple recent issues of local/community newspapers• Materials from recycle bin for making 3-D community models• Craft supplies for making models (tape, scissors, markers, etc.)Please Print:From Student Guide:(A) Community Venn Diagram – 1 per student(B) Community Plan Checklist – 1 per pair of students(C) Rules of Brainstorming – 1 per pair of students(D) Community Resources Brainstorm Ticket – 1 per pair of students
Anticipatory Set:Essential Questions: HOW DO ENGINEERS SOLVE PROBLEMS?What Is a Design for? What are the criteria andconstraints of a successful solution?What Is the Process for Developing PotentialDesign Solutions?
WHAT STUDENTS DO: Reflect on the Idea of Community Needs
Human discovery and innovation often depends on our curiosity about how we can improve ourlives. Students identify the positive and negative elements of their home community. Buildingfrom their pros and cons lists, they draft a plan for an ideal community, and build a simple 3-dimensional model of it. Finally, students brainstorm a list of environmental needs a communityhas to sustain life. In this collection, this lesson provides students with an introduction to design,its purpose, and the first stages in its process. It originates from the Imagine Mars Project, cosponsoredby NASA and the National Endowment for the Arts: imaginemars.jpl.nasa.gov
Key Vocabulary:
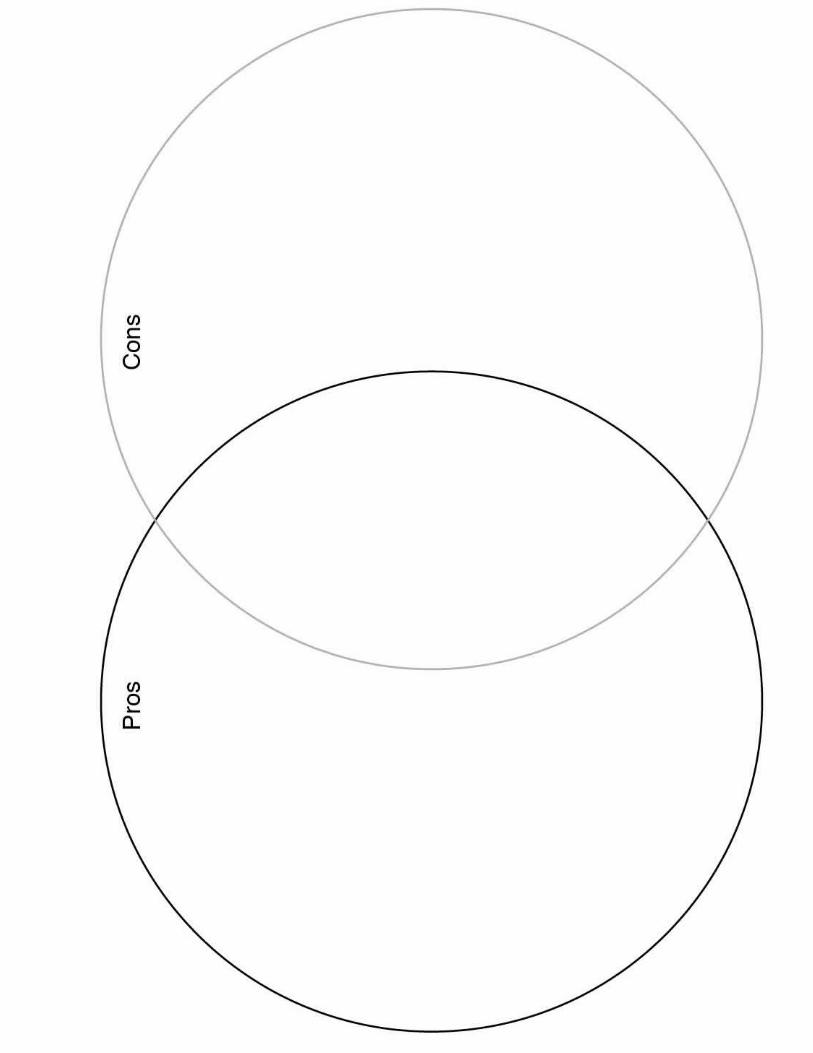
Ask questions scientists ask questions that can be answered using empiricalEvidence
Bird’s Eye View Plan view of the community from above, as if the artist were a bird
Bubble Plans a simple model used by architects early in their planning, in which onedraws circles to represent a room or other feature that they want toinclude in their floor plan
Constraints restricting or limiting circumstances
Design Criteria the standards that are used to judge a proposal
Empirical Evidence knowledge gained through direct or indirect observation
Explanation logical description applying scientific information
Evaluate check the scientific validity or soundness Activities: (modeling, guided practice, independent practice & group work)
STEP 1: ENGAGE Identify pros and cons of a system.A. Divide students into small groups.B. Hand out newspapers andC. Have the students find, cut out, and paste into a collage images and words that areeither “pros” (positive aspects, people, jobs, opportunities) or “cons” (things thatthey don’t like, things they would change, things that worry them) about theircommunity.
STEP 2: EXPLORE (~20 minutes)Classify information.A. Draw a large Venn Diagram on the board and give each student (A) CommunityVenn Diagram and direct their attention to Part 1 Directions.B. Have the groups present their collage ideas, explaining if each item is a pro, con,or center category, and write the item in the appropriate space.C. Direct students to place each idea on the Venn Diagram. Their Venn Diagrams donot have to be the same; students may disagree about the categories.

D. At the end, allow students to share their placement thoughts. Encouragediscussion and courteous debate.E. Engage students in a culminating discussion using topics such as:i. What kinds of careers are needed to help a community function?ii. What would you keep? What would you change?iii. How has your community changed over time? Why?F. Students should keep a copy of the Pros/Cons list so that they can refer to itthroughout the Imagine Mars Unit.
STEP 3: EXPLAIN Create a simple model/design plan.A. Define the purpose of community planning: Community planning is the process ofthinking through neighborhood-based problems and situations systematically.
B. Explain to students that their next goal is to create a model of a new community,including the elements that they identified on the Venn Diagram. Students canchoose a design plan, including bird’s eye view, skyline, bubble plan, or studentchoice.C. Go over the requirements and write them on the board as you explain:a. Use Venn Diagrams to generate ideas for your community.b. The design should represent relative size. If you want a giant field, the graphicshould be large; if you want a small park, the graphic should be small.c. Include at least 5 different elements.d. Include visual clues in your design. For example, a park might have sometrees, grass, picnic benches.D. Give students (B) Community Plan Checklist and review the instructions.E. Once students have a draft, direct them to build a 3-dimensional community out offound objects (items from the recycling bin or available in class).F. Ask each group of students to share the elements they included in their community.G. As they share, write the big ideas on the board. For example, if students have asubway system, write “transportation system” on the board.
Wrap-up:
STEP 4: ELABORATE Identify community resources and needs.A. Explain that students will need to brainstorm with their partners. Give each pair ofstudents (C) The Rules of Brainstorming and review each rule.B. Give each student a (D) Brainstorming Ticket and review directions.C. With elbow partners, students should brainstorm natural and human-maderesources that humans need to survive and that their communities would need tothrive.D. For each resource, students should brainstorm the purpose of those resources.For example, we use wood to build structures. Students should categorize theresources and include a title for each category.

Evaluation / Assessment:
STEP 5: EVALUATE Evaluate suitability of model community.A. Refer students to the (A) Community Venn Diagram, Part 2 Directions and their models.Explain that now is the perfect time to reflect on their 3-D models.B. Once students have finished, ask groups to share what they included, what theyexcluded, and their rationale for the decisions.C. Collect student work to evaluate their proficiency per (E) “Reflect” Rubric
(A) Student Handout. Community Venn DiagramPart 1 Directions: Used at the Beginning of the Project.1. List all pros and cons about the community in the Venn Diagram.2. Place items that can be both pros and cons in the center.Part 2 Directions: Used at the End of the Project. Evaluate your community model.1. Place a star by the items you included in your model.2. Place an X by the items you did not include in your model.3. Circle items you did not include, but would like to add in the future.4. Write in any items you included that were not on the original list.


(B) Student Handout. Community Plan ChecklistCommunity Plan Checklist I spent time to create a comprehensive community.
I considered the ideas of others.
My plan includes at least 5 elements in the community.
Each element is represented by a visual clue.
My graphics represent relative size (for example, a big park has a larger graphic than asmall park).-----------------------------------------------------------------------------------------------------------------Community Plan Checklist I spent time to create a comprehensive community.
I considered the ideas of others.
My plan includes at least 5 elements in the community.
Each element is represented by a visual clue.
My graphics represent relative size (for example, a big park has a larger graphic than asmall park).
(D) Student Handout. Community Resources Brainstorm TicketCommunity Resources Brainstorm TicketDirections: Organize the information listed below in a format that best conveys your learning.1. Include a list of resources that humans depend upon for survival.2. For each resource, describe the use.3. Categorize your resources into like groups and give each category a title.----------------------------------------------------------------------------------------------------------------
Lesson Plan #2 Unit 1Top of Form
Topic: MarsPeter Altland
4th and 5th gradePA Academic Standards:
Science (National Standards)

H.D.3.AH.E.2.AH.E.2.BH.E.2.CH.E.2.D
Objectives:Students Objectives: Understand numbers, ways of representing numbers, relationships among numbers, and number systems:
Work flexibly with fractions, decimals, and percentages to solve problems. Understand and use ratios and proportions to represent quantitative relationships
Materials:- Mars power point- Mars student worksheet- Projector - labtop
Anticipatory Set:
Introduction In the M.A.R.S. mission your classroom will take part in a simulation to find a suitable site to build the first Martian base. In this exploratory mission to survey Mars, students will select sites to visit, calculate the fuel consumption of their planes to reach those sites, and calculate the areas and mineral compositions of sites they choose to visit. This activity provides practice with the math skills used in the M.A.R.S. mission.
Vocabulary
coordinates: an ordered pair of numbers.
formula: a rule showing relationships between quantities.
horizontal axis: the horizontal line of the two lines on which a graph is built.
percent: a ratio comparing a part to a whole using the number 100. The percentage is the number of hundredths that the part is equal to.
quadrilateral: a polygon with four sides.

slope: the measure of the steepness of the line.
vertical axis: the vertical line of the two lines on which a graph is built.
Activities: (modeling, guided practice, independent practice & group work)
1. Decide how you want the students to work on the activity. You may choose to have the students work individually or in groups. Another option would be to assign this activity for homework and review the answers together in class.
2. Discuss all vocabulary in the lesson, including ratio, rate, proportion, and cross-multiplication. Quick review skills have been taught.
3. Preview the activity with the students. Allow time for questions and discussion.
4. Use the M.A.R.S. Math Tasks PowerPoint to guide students through this math activity. I recommend you work through the activity as a class using the M.A.R.S. Math Tasks presentation project from a computer.
5. Make sure your students understand the relevance of this activity to their mission work. During the M.A.R.S. live simulation students will use the formulas in this lesson to calculate the fuel consumption of their surveyor planes, the area of each site their planes visit, and the amount of minerals contained at each site. They will also need to compare the amount of fuel their plane will burn to visit each site to the amount of hematite at the site, using a decision graph.
Wrap-up:
-Students complete an exit ticket, name one thing you liked about the activities and why and name one thing you would change with this activity and why.
Evaluation / Assessment:
- Review student activity sheets- Answer questions and review skills were needed

IMPLEMENTATION PLANUnit #1
A. One videotaped lesson is required per unit,saved on CD-ROM (include in CD ROM sleeves in portfolio).
Anticipated Lesson for Taping _____Spring 2013____________
Planned Taping date(s) __________To Be Decided__________
B. A professional development component is required for each unit. This requirement may be met in any one of the following forms (or another of your choice):
Professional development training to colleagues Local program to share with community Presentation at a conference Video documentary to duplicate and share with others Online resources and video for district website Professional publication Other: _____Grade Level Meeting Sharing / Reviewed with
Parents at Parents’ Night Other: _______________________________________
C. Plan of implementation (Meetings, events, etc.): ________________________________________________________________________________________________________________________________________________________________________________________________________________________________________________________________________________________________________________________
________________________________________________________________________________________________________

UNIT PROGRESSION FORM: Unit #____Group/Coordinator: ________________________________________Date: ___________________________________________________
UNIT ASSESSMENTThe degree to which the lesson(s):
Write a statement to describe how this item was met.
Identified the prior knowledge required by the students.
x Curriculum guides for prior school year were reviewed.
Identify and/or provide an authentic real-world problem relevant to the students for them to solveWas aligned with PA standards.
x Common Core Standards were identified.
Followed problem-based/inquiry learning model.Allowed for student exploration and elaboration.
x Utilized 5e Lesson Planning Method.
Required authentic student products.Integrated technology into the lesson(s).Clearly defined how students would be assessed.Utilized and incorporated NASA resources throughout lesson(s).
GROUP ASSESSMENT (see next page for details)The group showed: Write a statement to describe how this item was met.
Contributions/participation,AttitudeCooperation/Working with othersFocus on task/commitmentTeam role fulfillment
Group Signatures: ___________________________________ Date: ___________
___________________________________ Date: ___________
___________________________________ Date: ___________
Group Work Rubric
Team Participant Names: ______________________________________________________
Skills Basic Sound Thorough Extensive
Contributions/participationAttitude
Seldom cooperative, rarely offers useful ideas. Is disruptive.
Sometimes cooperative, sometimes offered useful ideas. Rarely displays positive attitude.
Cooperative, usually offered useful ideas.Generally displays positive attitude.
Always willing to help and do more, routinely offered useful ideas.Always displays positive attitude.
Working with others/cooperation
Did not do any work – does not contribute, does not work well with others, usually argues with teammates.
Could have done more of the work – has difficulty, requires structure, directions and leadership, sometimes argues.
Did their part of the work – cooperative.Works well with others, rarely argues.
Did more than others – highly productiveWorks extremely well with others, never argues
Focus on task/commitment
Often is not a good team member. Does not focus on the task and what needs to be done. Lets others do the work.
Sometimes not a good team member. Sometimes focuses on the task and what needs to be done. Must be prodded and reminded to keep on task.
Does not cause problems in the group.Focuses on the task and what needs to be done most of the time. Can count on this person.
Tries to keep people working together. Almost always focused on the task and what needs to be done. Is very self-directed.
Team role fulfillment
Participate in few or no group meetings. Provided no leadership. Did little or no work assigned by the group.
Participated in some group meetings. Provided some leadership. Did some of the work assigned by the group.
Participated in most group meetings. Provided leadership when asked. Did most of the work assigned by the group
Participated in all group meetings, assumed leadership role as necessary. Did the work that was assigned by the group.
Communication/listening Information sharing
Rarely listens to, shares with, or supports the efforts of others. Is always talking and never listens to others. Provided no feedback to others. Does not relay any information to teammates
Usually listens to, shares with, and supports the efforts of others. Sometimes talks too much. Provided some effective feedback to others. Relays some basic information – most relates to the topic.
Almost always listens to, shares with, and supports the efforts of others. Seldom talks too much. Provides good feedback to others. Relays solid basic information – usually relates to the topic.
Always listens to, shares with, and supports the efforts of others. Provided effective feedback to other members. Relays a great deal of information – all relates to the topic.
http://www.google.com/#hl=en&q=group+work+rubric&aq=f&oq=&aqi=g4&fp=flbC24gbdiA