marketrak users guide - electric reliability council of texas€¦ · web viewmarketrak users...
TRANSCRIPT

Section 1: Overview
MarkeTrak Users GuideSection 1: General Section
Page 1 of 61MarkeTrak Users Guide – June 4, 2013
Section 1: Overview
Table of Contents
MarkeTrak Users Guide..................................................................................................11.1 MarkeTrak General Overview..................................................................................3
1.1.1 Background.......................................................................................................31.1.2 Digital Certificates............................................................................................31.2.1 User Authentication Process via Market Information System (MIS)...............31.2.2 User Authentication Process directly to MarkeTrak.........................................3
1.2 MarkeTrak Starting Points........................................................................................41.2.1 Launch Page......................................................................................................41.2.2 Using the Submit Pane......................................................................................41.2.3 Home Page........................................................................................................41.2.4 My Favorites Pane.............................................................................................4
1.3 Full MarkeTrak Interface Overview.........................................................................51.3.1 Interface Page....................................................................................................51.3.2 MarkeTrak Toolbar...........................................................................................51.3.4 Screen Layout..................................................................................................12
1.4 MarkeTrak General Issues......................................................................................131.4.1 States and Transitions......................................................................................131.4.2 Issue Visibility.................................................................................................141.4.3 Transition Ability............................................................................................141.4.4 Issue Ownership Model...................................................................................161.4.5 Workflow Principals........................................................................................17
1.5 MarkeTrak Searching and Reporting......................................................................181.5.1 Internet Explorer Configuration Changes.......................................................181.5.2 Searching.........................................................................................................201.5.3 Reporting+.......................................................................................................21
1.6 MarkeTrak Excel Format View..............................................................................361.7 MarkeTrak Rolodex................................................................................................371.8 MarkeTrak Issue Grouping.................................................................................4241
1.8.1 Grouping......................................................................................................42411.9 MarkeTrak Miscellaneous...............................................................................4544
1.9.1 Auto Close Function....................................................................................45441.9.2 Notifications................................................................................................45441.9.3 Duplicate Checking.....................................................................................47461.9.4 ERCOT Registration System Validation.....................................................48471.9.5 Siebel Status and Sub Status.......................................................................51491.9.6 Item Lock....................................................................................................52491.9.7 Auto Logoff.................................................................................................53511.9.8 Issue Archiving............................................................................................5351
1.10 Day to Day (D2D) Issues....................................................................................54511.10.1 What Constitutes a MarkeTrak D2D Issue?................................................54511.10.2 Day to Day Issue Guidelines.......................................................................55521.10.3 Day to Day Issues Required Fields.............................................................5552
MarkeTrak Users Guide – June 4, 2013 Page 2 of 61
Section 1: Overview
1.1 MarkeTrak General Overview
1.1.1 Background
The MarkeTrak tool is a web based database application used to track, manage, and store data utilized by ERCOT and the Market Participants (MPs). This tool is the supported method to track ERCOT Retail market issue management and data discrepancies in the market.
The high level objectives for MarkeTrak: Improve reporting functionality Improve tracking/metrics functionality Create usable issue status Create usable issue types and sub types Create a method to allow users to interface the solution Improve search functionality Improve monitoring and response capabilities Improve the usability Provide all functionality that is deemed required with the legacy tool as part of the enhanced
solution.
1.1.2 Digital Certificates
Digital Certificates identify each user to ERCOT by associating a secured identity with a MarkeTrak user. Digital Certificates are used to secure private information from Market Participants. Digital Certificates provide a “digital signature” that tells the recipient that the information actually came from the sender and has not been forged or tampered with. Without a Digital Certificate, the MarkeTrak system cannot be accessed. Digital Certificates must be renewed each year. Also a Digital Certificate is required for the API process.
1.2.1 User Authentication Process via Market Information System (MIS)
A MarkeTrak user attempting to access MarkeTrak via MIS should use the following steps:
1. Siteminder intercepts the request and asks user for Digital Certificate2. User then selects Digital Certificate3. Siteminder takes Digital Certificate and validates it and verifies the credentials4. If Client certificate is valid individual user is logged into the MarkeTrak
application.
1.2.2 User Authentication Process directly to MarkeTrak
A MarkeTrak user attempting to access MarkeTrak directly should use the following steps:
1. Individual user access MarkeTrak via MarkeTrak URL.2. Siteminder intercepts the request and asks user for Digital Certificate3. User then selects Digital Certificate4. Siteminder takes Digital Certificate and validates it and verifies the credentials5. If Client certificate is valid individual user is logged into the MarkeTrak
application.
Page 3 of 61MarkeTrak Users Guide – June 4, 2013

Section 1: Overview
1.2 MarkeTrak Starting Points
1.2.1 Launch Page
Upon successful login, the user is initially taken to the MarkeTrak Full MarkeTrak Interface (home page). From here, the user can choose to go to the Task Page by selecting the Application Settings link on the toolbar and selecting Launch Page from the Home Page Report list. This view is a split screen of three distinct panes: Submit, Search, and Reports. You can use the Task Page as your starting point upon each login, or you can hide the Task Page and select a specific Home Page Report as your default login profile.
1.2.2 Using the Submit Pane
The Submit pane offers links to commonly used areas of MarkeTrak, such as submitting new MarkeTrak issues, browsing and submitting to Projects, and finding Projects to submit into. To return to the Task Page after visiting one of these areas click the Home link on the tool bar located on the top right of the screen..The following links are available in the Submit pane based on user privileges: Submit a new MarkeTrak Issue - Click this link to open a list of subtypes you can submit based
on user privileges and MP type. Browse and Submit to a Project - Click this link to open a list of Preferred Projects that the
user authored. Preferred Projects allow the user to limit the list that appears in the Project list. This enables the user to quickly submit into, search, and create reports against Projects that are most frequently used.
Find a Project to Submit into - Click this link to search for a specific Project authored by the user.
Find Report - Click this link to open the Reports form that enables you to find existing reports by selecting the “search” button.
Create Report - Click this link to open the Reports form that enables you to create new reports by selecting the “next” button.
Hide This Launch Page - Click this link to hide the Launch Page and open full MarkeTrak interface. You can re-enable the Launch Page by clicking the Launch Page link located in the upper right corner of your browser window.
1.2.3 Home Page
If the MarkeTrak Launch Page is not defaulted as the initial starting point for a user, or if the Hide this Launch Page link is selected, the user will be directed to the Full MarkeTrak Page. The primary pane will display the report selected by the user as the default Home Page Report via the Application Settings link. Any report the user has access to (both built-in and custom) based on login credentials and privileges will be available on a drop down list to be selected as the home page.
1.2.4 My Favorites Pane
The My Favorites pane allows the user to view and access your customized folders and links. Favorites enable the user to add links to frequently used features, forms, items, and reports to folders that you create or that are provided by the system. Favorites provide a personal view of items in the system; other users cannot view your favorites, and vice versa.To view a favorite link from the list, expand the desired folder and choose an item. The favorite item opens in the main browser window. To return to your designated initial starting point in MarkeTrak, select the Home link.
MarkeTrak Users Guide – June 4, 2013 Page 4 of 61

Section 1: Overview
1.3 Full MarkeTrak Interface Overview
1.3.1 Interface Page
The full interface offers complete functionality and navigation to MarkeTrak based on login criteria and privileges. To open the full interface, open the user profile located in the top left of the screen and select the Display tab. Uncheck the Show Launch Page box and select Save Profile.
1.3.2 MarkeTrak Toolbar
1.3.3.1 SBM User Workspace Toolbar
1. SBM User Workspace Toolbar - The Home, Application Settings, MIS, MarkeTrak Documentation, Legal Disclaimer, Administrator, Help, and Exit links are available across the top of each window view in the MarkeTrak application. (Fig 1.3.2.1a)
Fig 1.3.2.1a
2. Home - This button returns to the Home Page report. Depending on settings, this may be a custom Home Page report, a report that the MP administrator has assigned, or the Task page. Below is a sample Multi View Home Page report a user may wish to use. Details for creating and saving reports to the Home Page are located in Sections 1.5 of this guide. (Fig 1.3.2.1b)
Fig 1.3.2.1b
3. Application Settings - Click this button to open the Application Settings form which enables the user to select a Home Page report (Fig 1.3.2.1c) and preferred projects for the application. To select a home page report the user selects it from a drop down of all available reports and Saves as indicated below. This will now be the result set(s) displayed
MarkeTrak Users Guide – June 4, 2013 Page 5 of 61
Section 1: Overview
in the main browser interface each time this user logs into the application or selects the Home button from the SBM User Workface Toolbar.
Fig 1.3.2.1c
4. MIS – This link will take you directly to the main page of the Market Information System website. From there, you can select the Reports and Extracts Index link which will take you to your reports and extracts. The reports and extracts that will appear will be associated with the digital certificate being used.
5. MarkeTrak Documentation - This link will take you to the MarkeTrak Information page on ERCOT.com where you can open the MarkeTrak User Guide under Key Documents. The User Guide gives details of how to interact with the MarkeTrak toolset as well as associated business practices. This page also contains Tips and Tricks as well as the Administrator and Training documentation.
6. Legal Disclaimer – A quick link to the legal disclaimer relevant to the MarkeTrak application entitled:
MarkeTrak Users Guide – June 4, 2013 Page 6 of 61

Section 1: Overview
ANTITRUST GUIDELINES FOR MEMBERS OF ERCOT COMMITTEES, SUBCOMMITTEES AND WORKING GROUPS
7. Help - The help feature is an indexed and searchable resource with a thorough explanation of ‘out-of-the-box’ tool functionality. The purpose of this guide and appendix is to bridge the gap between the application and the ERCOT configuration and concepts.
8. Exit - This is the method to log out of the MarkeTrak tool. This will present the opportunity to re-login to the application.
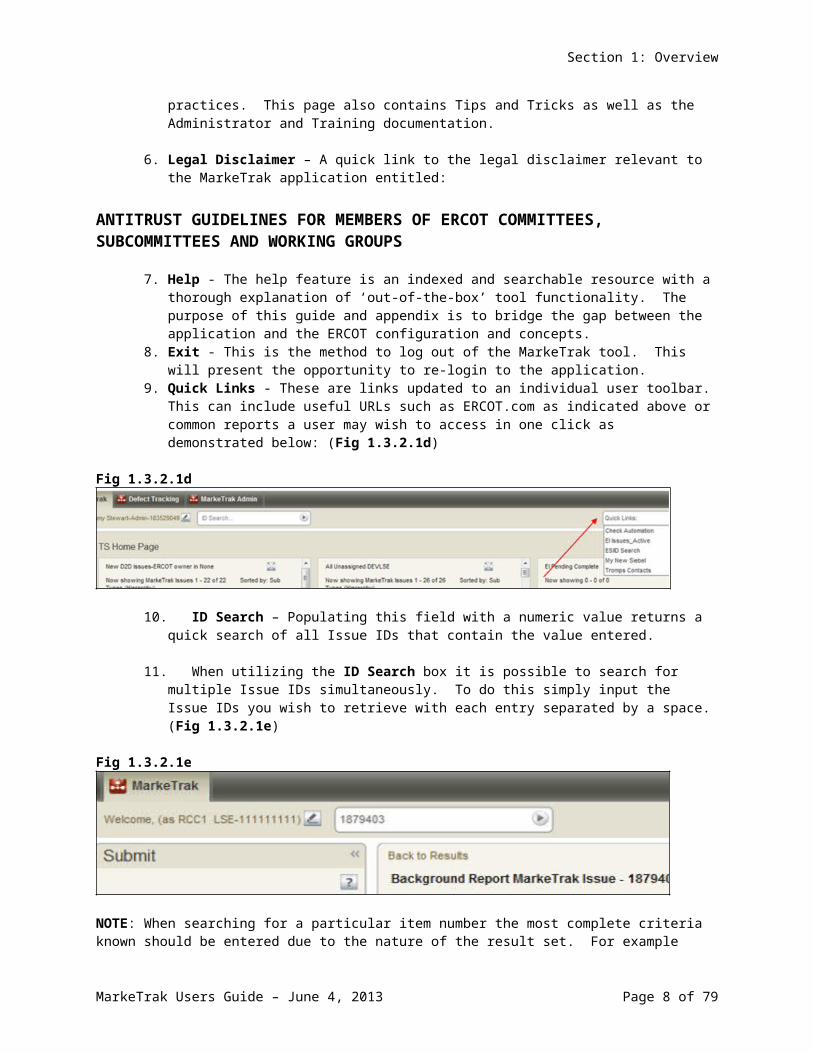
9. Quick Links - These are links updated to an individual user toolbar. This can include useful URLs such as ERCOT.com as indicated above or common reports a user may wish to access in one click as demonstrated below: (Fig 1.3.2.1d)
Fig 1.3.2.1d
10. ID Search – Populating this field with a numeric value returns a quick search of all Issue IDs that contain the value entered.
11. When utilizing the ID Search box it is possible to search for multiple Issue IDs simultaneously. To do this simply input the Issue IDs you wish to retrieve with each entry separated by a space. (Fig 1.3.2.1e)
Fig 1.3.2.1e
NOTE: When searching for a particular item number the most complete criteria known should be entered due to the nature of the result set. For example entering the criteria ‘7’ in the ID Search could produce a result set including Issues 7, 17, 70, 71, etc
12. Add Link in your Favorites - Click this link to add any list, item, or form displayed in the main browser window to your favorites.
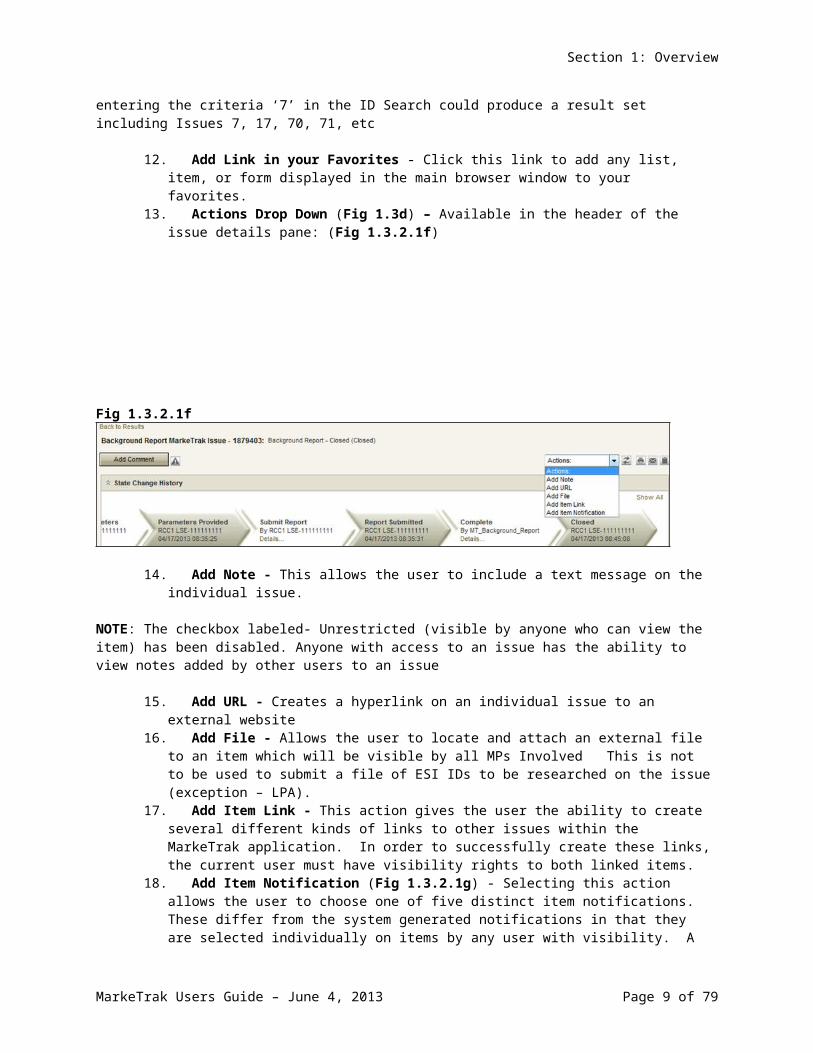
13. Actions Drop Down (Fig 1.3d) – Available in the header of the issue details pane: (Fig 1.3.2.1f)
Fig 1.3.2.1f
MarkeTrak Users Guide – June 4, 2013 Page 7 of 61

Section 1: Overview
14. Add Note - This allows the user to include a text message on the individual issue.
NOTE: The checkbox labeled- Unrestricted (visible by anyone who can view the item) has been disabled. Anyone with access to an issue has the ability to view notes added by other users to an issue
15. Add URL - Creates a hyperlink on an individual issue to an external website16. Add File - Allows the user to locate and attach an external file to an item which will be
visible by all MPs Involved This is not to be used to submit a file of ESI IDs to be researched on the issue (exception – LPA).
17. Add Item Link - This action gives the user the ability to create several different kinds of links to other issues within the MarkeTrak application. In order to successfully create these links, the current user must have visibility rights to both linked items.
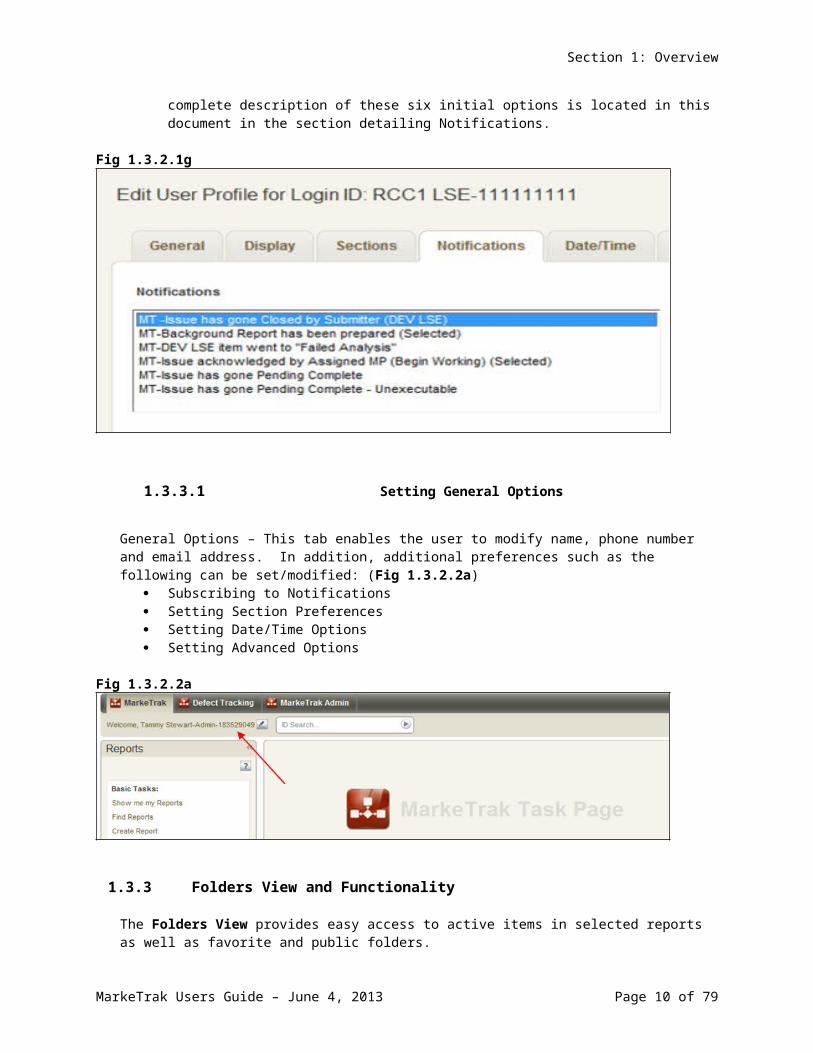
18. Add Item Notification (Fig 1.3.2.1g) - Selecting this action allows the user to choose one of five distinct item notifications. These differ from the system generated notifications in that they are selected individually on items by any user with visibility. A complete description of these six initial options is located in this document in the section detailing Notifications.
Fig 1.3.2.1g
1.3.3.1 Setting General Options
General Options – This tab enables the user to modify name, phone number and email address. In addition, additional preferences such as the following can be set/modified: (Fig 1.3.2.2a)
Subscribing to Notifications Setting Section Preferences Setting Date/Time Options Setting Advanced Options
MarkeTrak Users Guide – June 4, 2013 Page 8 of 61
Section 1: Overview
Fig 1.3.2.2a
1.3.3 Folders View and Functionality
The Folders View provides easy access to active items in selected reports as well as favorite and public folders.
1.3.3.1 Full MarkeTrak Interface Functionality
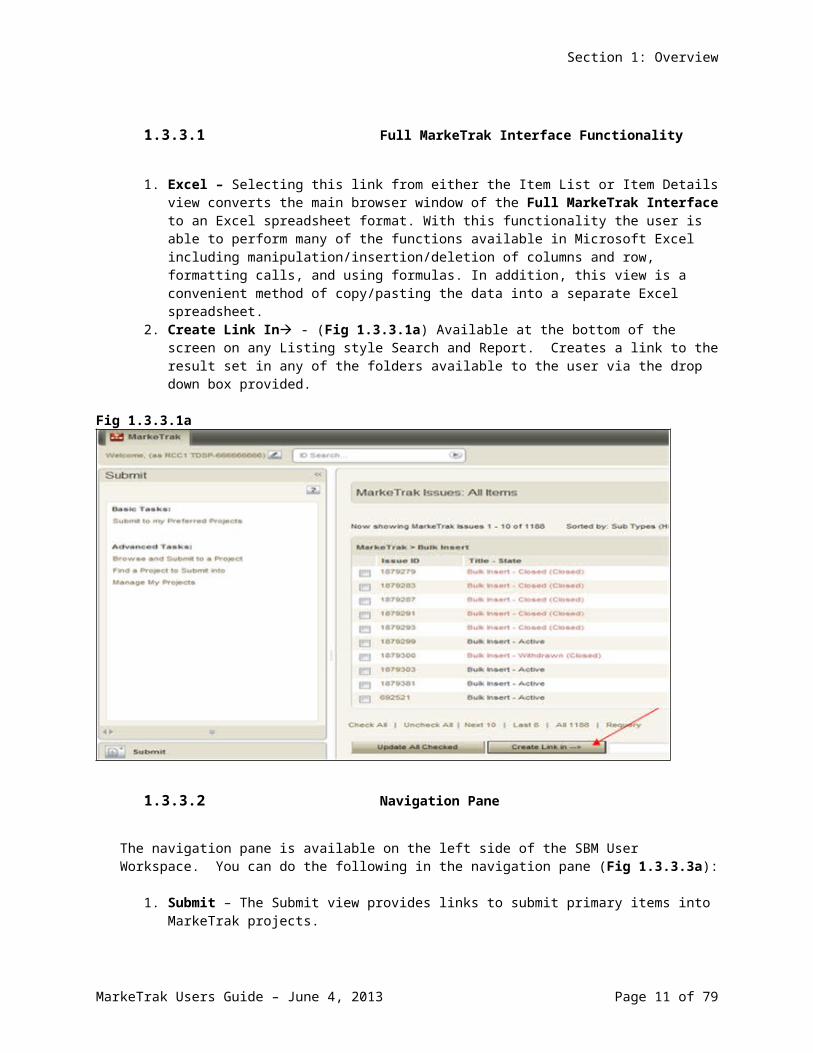
1. Excel – Selecting this link from either the Item List or Item Details view converts the main browser window of the Full MarkeTrak Interface to an Excel spreadsheet format. With this functionality the user is able to perform many of the functions available in Microsoft Excel including manipulation/insertion/deletion of columns and row, formatting calls, and using formulas. In addition, this view is a convenient method of copy/pasting the data into a separate Excel spreadsheet.
2. Create Link In - (Fig 1.3.3.1a) Available at the bottom of the screen on any Listing style Search and Report. Creates a link to the result set in any of the folders available to the user via the drop down box provided.
Fig 1.3.3.1a
MarkeTrak Users Guide – June 4, 2013 Page 9 of 61
Section 1: Overview
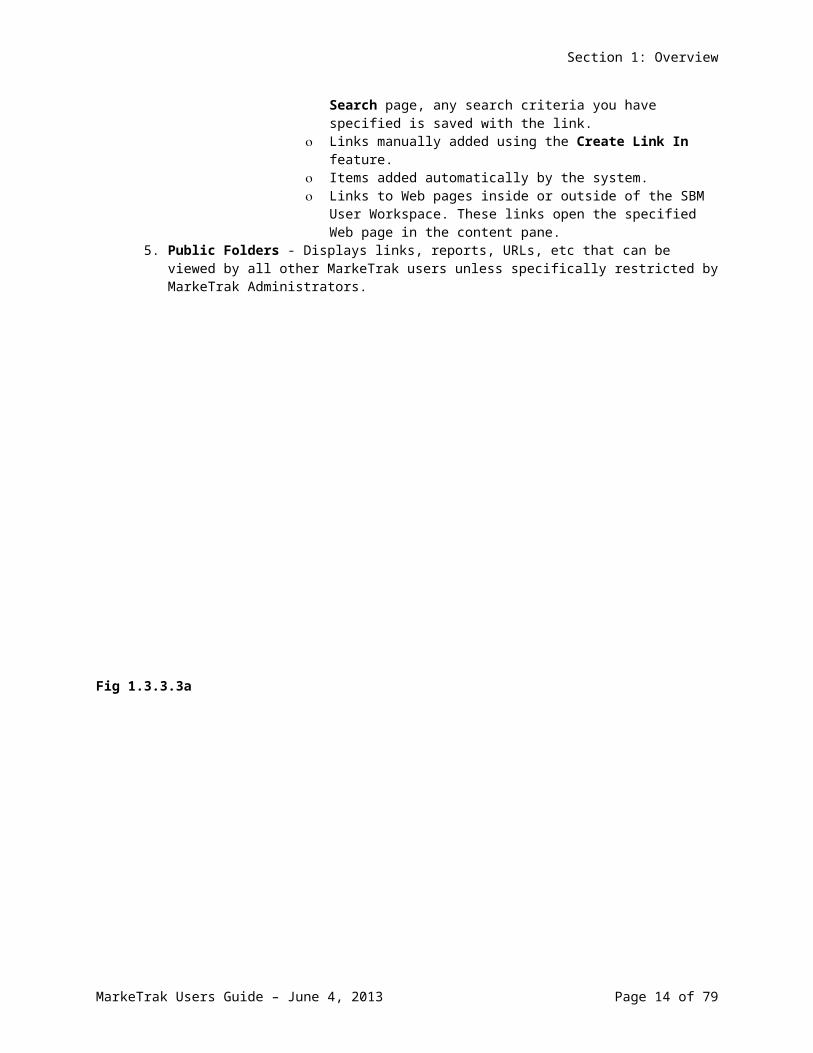
1.3.3.2 Navigation Pane
The navigation pane is available on the left side of the SBM User Workspace. You can do the following in the navigation pane (Fig 1.3.3.3a):
1. Submit – The Submit view provides links to submit primary items into MarkeTrak projects. Submit to my Preferred Projects: Enables users to Submit a subtype(s)
into one of your preferred projects for MarkeTrak. If you do not have any preferred projects defined, you can navigate to a subtype in the Submit Tree.
Browse and Submit to a Project: Enables users to navigate the Submit Tree all subtypes for which you have submit privileges.
Find a Project to Submit into: Performs a keyword search for a project in the application for which you have submit privileges. Users can search on the first word of the project, or on a word contained anywhere in the project name.
2. Search – Provides links to the following search features in the SBM User Workspace:
Search by Keyword(s): Searches for primary items by keyword.
Search by Submitter: Searches for primary items by submitter.
Advanced Search: Searches for primary and auxiliary items, archived primary items, or notes and attachments in primary and auxiliary tables, depending on your privileges. Your administrator determines which fields can be searched on the Advanced Search page.
Global Search: Searches for items in multiple primary and auxiliary tables at once. If you have appropriate privileges, you can save your search specifications as a Multi-Table report.
Use Advanced Lookup Tool: Searches for primary items using a three-pane view.
Knowledge Base: Searches for problems and resolutions in the Knowledge Base.
Manage Data: Also referred to as the Rolodex within this document. Allows the user to perform a quick search to locate contact information from any Market Participant parsed by Contact Type. This is the list owned by each MP Administrator which determines the destination of Notification Emails.
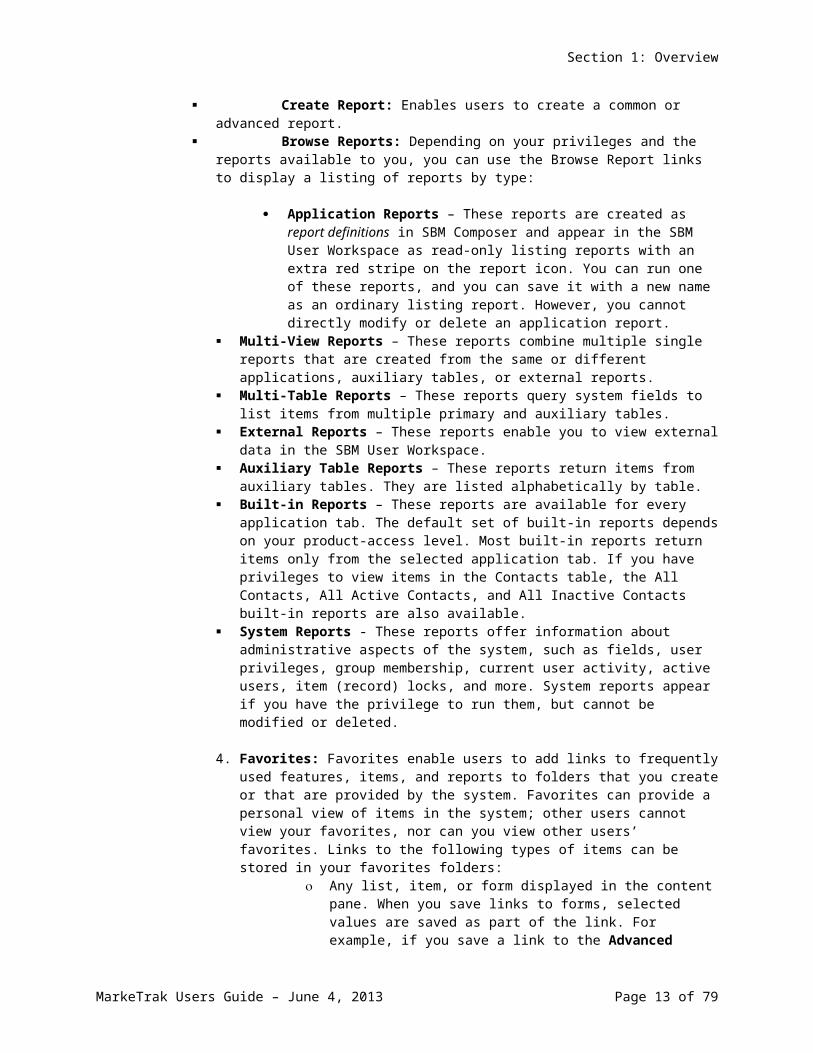
3. Reports - Provides links to the reports that you have privileges to run, modify, or delete. Show me my Reports: Displays all reports that you have created, as well
as reports that you have created for auxiliary tables. Find Reports: Searches for an existing report by title, author, or project. Create Report: Enables users to create a common or advanced report. Browse Reports: Depending on your privileges and the reports available
to you, you can use the Browse Report links to display a listing of reports by type:
Application Reports – These reports are created as report definitions in SBM Composer and appear in the SBM User Workspace as read-only listing reports with an extra red stripe on the report icon. You can run one of these reports, and you can save it with a new name as an ordinary listing report. However, you cannot directly modify or delete an application report.
Multi-View Reports – These reports combine multiple single reports that are created from the same or different applications, auxiliary tables, or external reports.
MarkeTrak Users Guide – June 4, 2013 Page 10 of 61
Section 1: Overview
Multi-Table Reports – These reports query system fields to list items from multiple primary and auxiliary tables.
External Reports – These reports enable you to view external data in the SBM User Workspace.
Auxiliary Table Reports – These reports return items from auxiliary tables. They are listed alphabetically by table.
Built-in Reports – These reports are available for every application tab. The default set of built-in reports depends on your product-access level. Most built-in reports return items only from the selected application tab. If you have privileges to view items in the Contacts table, the All Contacts, All Active Contacts, and All Inactive Contacts built-in reports are also available.
System Reports - These reports offer information about administrative aspects of the system, such as fields, user privileges, group membership, current user activity, active users, item (record) locks, and more. System reports appear if you have the privilege to run them, but cannot be modified or deleted.
4. Favorites: Favorites enable users to add links to frequently used features, items, and reports to folders that you create or that are provided by the system. Favorites can provide a personal view of items in the system; other users cannot view your favorites, nor can you view other users’ favorites. Links to the following types of items can be stored in your favorites folders:
o Any list, item, or form displayed in the content pane. When you save links to forms, selected values are saved as part of the link. For example, if you save a link to the Advanced Search page, any search criteria you have specified is saved with the link.
o Links manually added using the Create Link In feature. o Items added automatically by the system. o Links to Web pages inside or outside of the SBM User
Workspace. These links open the specified Web page in the content pane.
5. Public Folders - Displays links, reports, URLs, etc that can be viewed by all other MarkeTrak users unless specifically restricted by MarkeTrak Administrators.
Fig 1.3.3.3a
MarkeTrak Users Guide – June 4, 2013 Page 11 of 61
Section 1: Overview
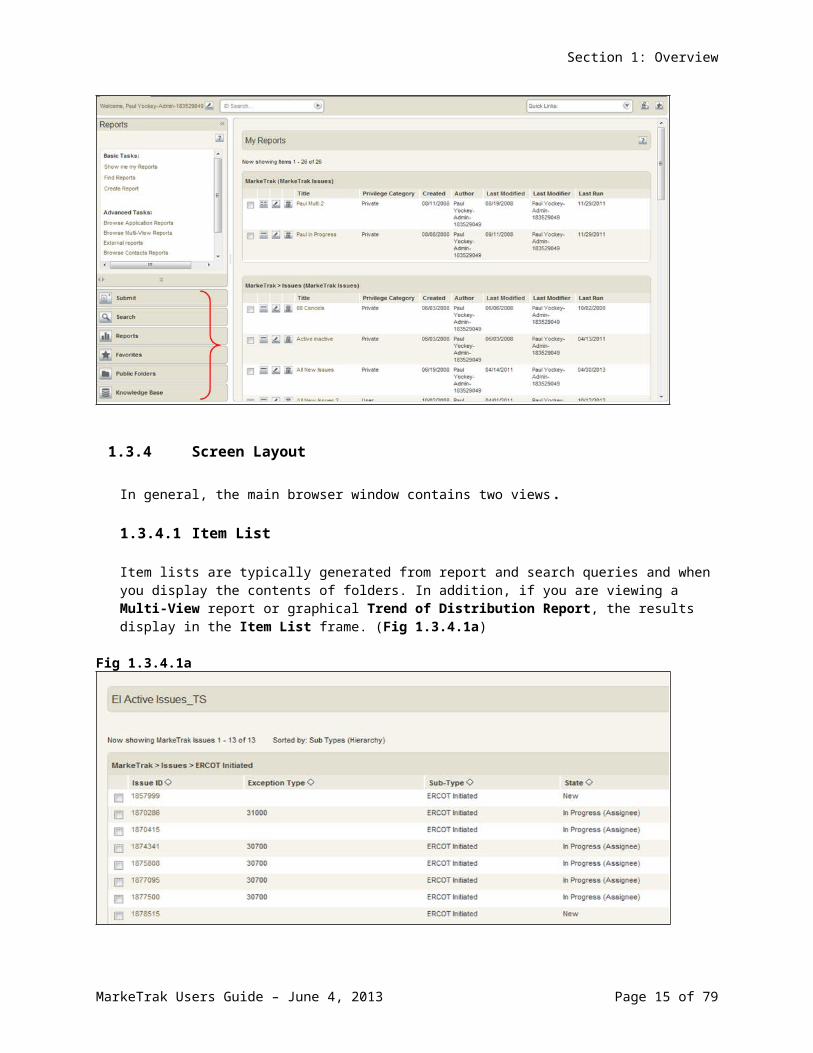
1.3.4 Screen Layout
In general, the main browser window contains two views.
1.3.4.1 Item List
Item lists are typically generated from report and search queries and when you display the contents of folders. In addition, if you are viewing a Multi-View report or graphical Trend of Distribution Report, the results display in the Item List frame. (Fig 1.3.4.1a)
Fig 1.3.4.1a
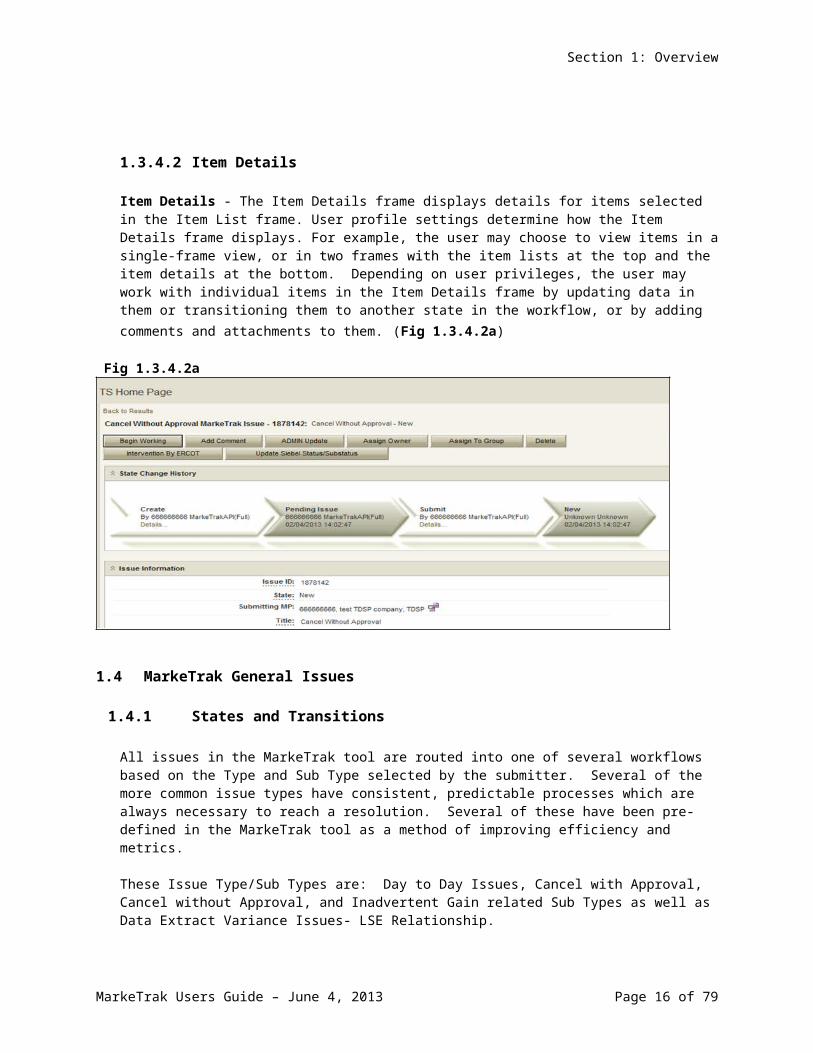
1.3.4.2 Item Details
MarkeTrak Users Guide – June 4, 2013 Page 12 of 61
Section 1: Overview
Item Details - The Item Details frame displays details for items selected in the Item List frame. User profile settings determine how the Item Details frame displays. For example, the user may choose to view items in a single-frame view, or in two frames with the item lists at the top and the item details at the bottom. Depending on user privileges, the user may work with individual items in the Item Details frame by updating data in them or transitioning them to another state in the workflow, or by adding comments and attachments to them. (Fig 1.3.4.2a)
Fig 1.3.4.2a
1.4 MarkeTrak General Issues
1.4.1 States and Transitions
All issues in the MarkeTrak tool are routed into one of several workflows based on the Type and Sub Type selected by the submitter. Several of the more common issue types have consistent, predictable processes which are always necessary to reach a resolution. Several of these have been pre-defined in the MarkeTrak tool as a method of improving efficiency and metrics.
These Issue Type/Sub Types are: Day to Day Issues, Cancel with Approval, Cancel without Approval, and Inadvertent Gain related Sub Types as well as Data Extract Variance Issues- LSE Relationship.
All other issue Type and Sub Types combinations will be funneled into an ‘open-ended’ workflow which will allow much more flexibility as the issue moves towards a resolution.
The fundamental architecture of the MarkeTrak tool is based on States and Transitions.
A state is the position of an issue in the workflow process; this is often similar to the concept of an issue status combined with the issue’s current ‘owner’. Examples of this include: New (ERCOT), In Progress(Assignee), or Cancelled (Pending Complete).
Transitions are the movement of an issue from one state to another. Available transitions are associated on the GUI with buttons. Selection of different buttons from the same state will typically result in the issue appearing in different states when the transition successfully completes. One example is a Day to Day Issue - Cancel with Approval currently in state In Progress with TDSP. If TDSP user selects transition button ERCOT Cancel, the item will move to state Auto Complete. Alternately if the TDSP user is unable to approve the cancel and selects transition button Unable to
MarkeTrak Users Guide – June 4, 2013 Page 13 of 61
Section 1: Overview
Cancel, the issue would appear in the submitting CR’s queue in state Unable to Cancel – (PC). Some transitions, such as Unable to Cancel, require additional steps to complete; in this case completion of a required field: Comments.
1.4.2 Issue Visibility
Visibility to an issue is determined by several factors. These factors determine a user’s ability to find the item by directly searching for the Issue ID as well as having the issue return as part of a result set in searches and reports. The submitter of an issue is always able to view the item regardless of the state in the workflow. ERCOT is able to view all items in the MarkeTrak tool at any time. All other MPs must be selected as the assignee in order to have visibility. This occurs in several ways:
By the submitter (often but not always during submission). Current assignee (as shown on the GUI in field: Responsible MP) at designated times
based on workflow association. By ERCOT, particularly when the Market Participants may not know who the ‘other’
parties involved should be (i.e. IAG).
As soon as an MP is selected as a party to an issue (field name MPs Involved) that participant is able to view the item from that point forward.
NOTE: It is NOT possible for an MP to remove an assignee from the MPs Involved list once they have been added. If a mistake is made and the wrong assignee is selected (and confirmed) an ERCOT analyst should be notified immediately. It is necessary for ERCOT to close the issue and remove ALL proprietary information. The issue will be updated by the MarkeTrak system with data that does not contain sensitive information. The issue must then be resubmitted with appropriate assignee(s) selected.
1.4.3 Transition Ability
Transition ability and selection is based on the particular workflow to which an Issue Sub Type is associated. Any user at an MP that is on the MPs Involved list is able to: add comments to the issue, assign an issue to a group, or assign an individual within the same MP to an issue at any time. Other transition options are determined by the state in which the issue currently resides. Refer to the appendix (Appendix A – MarkeTrak States and Transitions) for a complete list of transitions.
1.4.3.1 Mass Transitioning of Issues
It is possible to commit multiple like transitions simultaneously should the following conditions exist:1) Mass Transition privilege must be assigned to the user by their MP Administrator.2) User’s MP must have transition ability available on all selected issues.3) Desired transition is available on all issues selected.4) List of available issues must be returned utilizing one of the methods detailed in the list
below.
The following list defines locations in the MarkeTrak tool where this functionality is available:
Basic Search results Advanced Search results Listing report preview lists Listing report results Built-in reports ID search results
Mass updates may be performed from the following item lists: Global search results
MarkeTrak Users Guide – June 4, 2013 Page 14 of 61
Section 1: Overview
Manage Data search results Folder lists
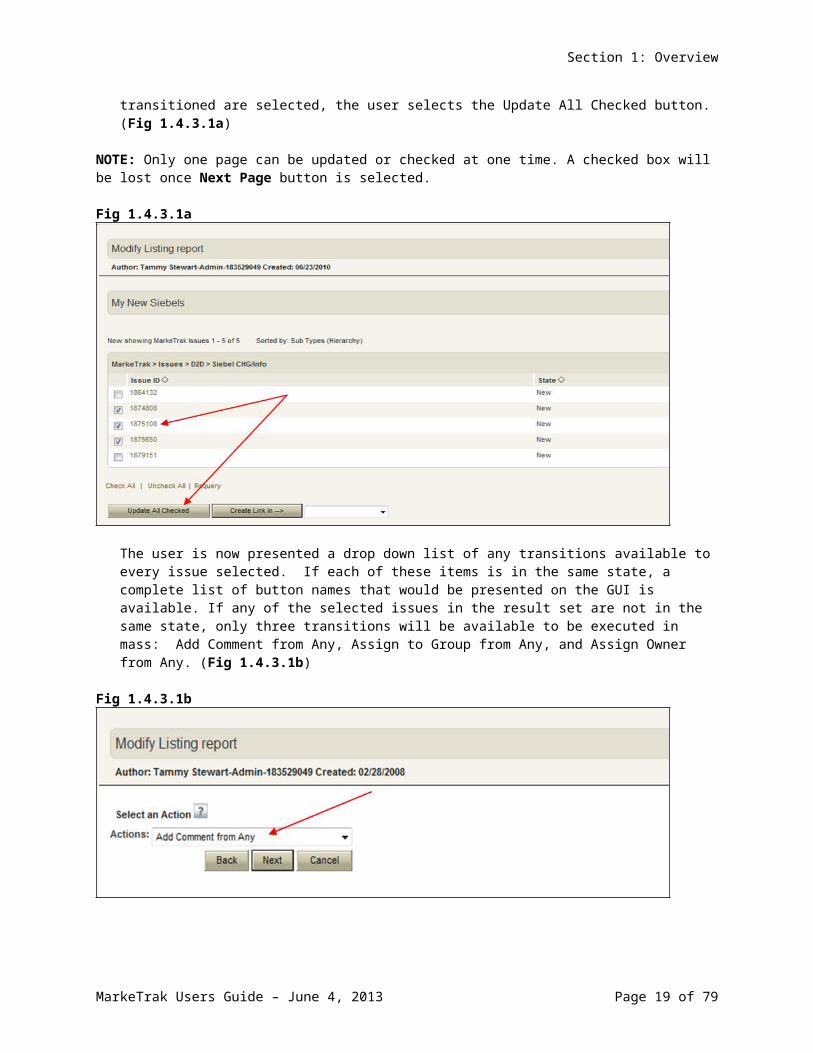
From any result set that allows mass transition, a check box is located next to each issue. Items can be individually selected or deselected; or the user can select the Check All link. When all items that wish to be transitioned are selected, the user selects the Update All Checked button. (Fig 1.4.3.1a)
NOTE: Only one page can be updated or checked at one time. A checked box will be lost once Next Page button is selected.
Fig 1.4.3.1a
The user is now presented a drop down list of any transitions available to every issue selected. If each of these items is in the same state, a complete list of button names that would be presented on the GUI is available. If any of the selected issues in the result set are not in the same state, only three transitions will be available to be executed in mass: Add Comment from Any, Assign to Group from Any, and Assign Owner from Any. (Fig 1.4.3.1b)
Fig 1.4.3.1b
1.4.4 Issue Ownership Model
MarkeTrak Users Guide – June 4, 2013 Page 15 of 61
Section 1: Overview
1.4.4.1 Variety of Ownership
There are several varieties of ownership in the MarkeTrak application: Submitter, Responsible MP, MP’s Involved, and Assigned Owner.
1. The Submitter of the item is indicated near the top of each primary data pane on the issue details window. Submitter Duns number is also incorporated into the title of each issue and listed in the MPs Involved field discussed below.
2. Responsible MP is the single Duns number contained in the MPs Involved list that is considered to be the next participant responsible for transitioning the item towards a resolution. Examples include: the TDSP when an issue is waiting for approval to cancel a service order, ERCOT when the approval has been granted, and the CR when the cancel is complete and the issue is waiting for acceptance of the resolution.
3. MP’s Involved is defined in MarkeTrak as a Secondary Owner. It is a list of all MP duns numbers which are party to an issue. As additional assignments are made to an item the MPs Involved field will be updated with the selected DUNs numbers, reflecting an increase in market participants with the ability to view the item. As ERCOT can always view any issue in the system, this will always be reflected in the MPs Involved list.
4. Assigned Owner is null when an issue is initially assigned to a Market Participant. Assigned owners are individual users. These are assigned by the Responsible MP automatically as issue is acknowledged by way of transition, Begin Working. Taking this action will populate the associated individual’s user id as the Assigned Owner. It will also transition the issue from the state of New into an In Progress state as detailed in the workflow sections of this document. Taking primary ownership has no effect on market rules or responsibilities (i.e. notifications and market-wide metrics); it is used exclusively for contact information, ease of searching and workload management internally to a market participant.
1.4.4.2 Assigning Individual Owners to Issues
Each entity with a unique association to an issue in MarkeTrak has the ability to assign individual ownership to that issue. Individual user assignments have no bearing on the functionality of either visibility or transition capability; the purpose of this is to facilitate workload management and provide contact information. Individuals can run a report with their username as part of the criteria which will return all in progress issues that they have been assigned. Assignment to issues can be created or overwritten at anytime the user has visibility to a given user.
There are three ways that an individual can gain ownership of an issue:
1. Begin Working:When an MP is designated as the Responsible MP on an issue they are given the option to change the state from New to In Progress via a Begin Working button. The user who executes this transition will automatically be populated as the Owner of the item for the appropriate association type.
2. Assign Owner:Anytime a user has visibility to an item (per details in 1.4.2 Issue Visibility) an Assign Owner transition is available. Executing this will present the user with a search list of individual users. The user can assign any individual in their MP to the item in this manner, overriding any previous associations.
3. Mass Transition:
MarkeTrak Users Guide – June 4, 2013 Page 16 of 61
Section 1: Overview
Assignment of individual ownership can also be handled en masse via the mass transition feature as detailed in 4.3.1 Mass Transition of Issues.
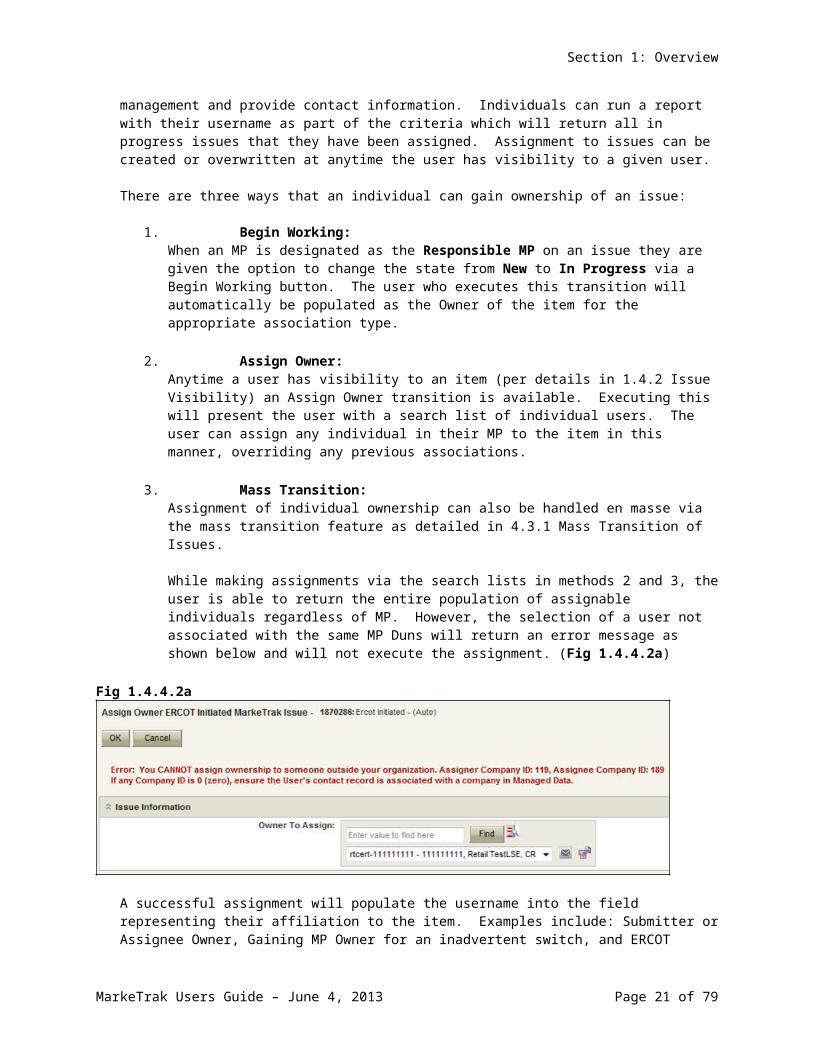
While making assignments via the search lists in methods 2 and 3, the user is able to return the entire population of assignable individuals regardless of MP. However, the selection of a user not associated with the same MP Duns will return an error message as shown below and will not execute the assignment. (Fig 1.4.4.2a)
Fig 1.4.4.2a
A successful assignment will populate the username into the field representing their affiliation to the item. Examples include: Submitter or Assignee Owner, Gaining MP Owner for an inadvertent switch, and ERCOT Owner. Located beside each individual’s naming convention used in MarkeTrak (user name, MP Duns, MP name, MP type) is a link to a pop up window containing contact information. This contact information is created and administered by one member of each Market Participant as detailed later in 1.7 Rolodex.
NOTE: Please See Appendix C about Mass Update Attention Message
1.4.5 Workflow Principals
1.4.5.1 Common Workflow Principals
1. Issue Type and Sub Type combinations that are not available to the submitter based on login credentials will not appear in the Submit Tree.
2. Only the Submitter entity can Withdraw an issue.3. The Withdraw can only be performed before the issue has been acknowledged by another
entity.4. Only the Submitter can be allowed to close an issue. This occurs only from a Pending
Complete state either by accepting the resolution via a transition or failing to transition the issue within the prescribed Auto Close time limit (14 days). There are two exceptions to this rule: The Failed Analysis transition for issue types DEV-LSE as detailed later in this
document. If proprietary information is entered on an issue and the ‘wrong’ Market Participant is
inadvertently associated with the item, ERCOT has the ability to transition by using Wrong MP involved which will replace the proprietary information to an X or O. The issue will update to Intervention Complete to an Inactive state. This unilateral closing of an issue by ERCOT should not be used for any circumstances besides those described above or determined at a later date.
Close Button functionality- allows the submitter to close the D2D issues at any time after the Withdraw function is not available. Also the submitter can close DEV issues as long as they are the responsible party and Withdraw is no longer available.
5. The initial state of New has no individual owner but is owned by a market participant group.
MarkeTrak Users Guide – June 4, 2013 Page 17 of 61

Section 1: Overview
6. The assigned MP must select Begin Working to move the issue into an In Progress state before transitioning it to a new assignee.
7. The state of In Progress has both an individual owner and the same participant group owner as the “New” state.
8. Each of the workflows contains two Pending Complete states owned by the submitter (Cancelled, Unexecutable, etc).
9. Visibility to an issue is determined by user access to the MP assigned only. Individuals for this entity not designated primary owner still have access to the same views.
10. Transition capabilities function in the same manner as visibility but can be further restricted by the Managed Administrator for each Market Participant by Sub-Type. Admin – all functionality plus ability to add/edit/delete users within their own MP. Manager – all User functionality. User – all regular viewing and transition capability but may be further restricted
based on group associated by sub-type restriction needs. Read-Only – read only, user will not be able to change or work issues.
11. Comments can be added to an issue by any entity with visibility while it is in an active state. 12. Any entity with visibility to an issue can assign it to an individual user within the same
organization or to a group designation from any state.13. Transitions which indicate an inability to complete the request (i.e. No Agreement Reached,
Unable to Complete) or which request Wrong MP Involved require Comments to complete.
1.5 MarkeTrak Searching and Reporting
This section is designed as a bridge between the TeamTrack product’s built-in Help functionality and the customized design of the MarkeTrak application.
1.5.1 Internet Explorer Configuration Changes
The following Internet Explorer configuration change must be performed to allow MarkeTrak report/search data to be opened or saved to Excel format.
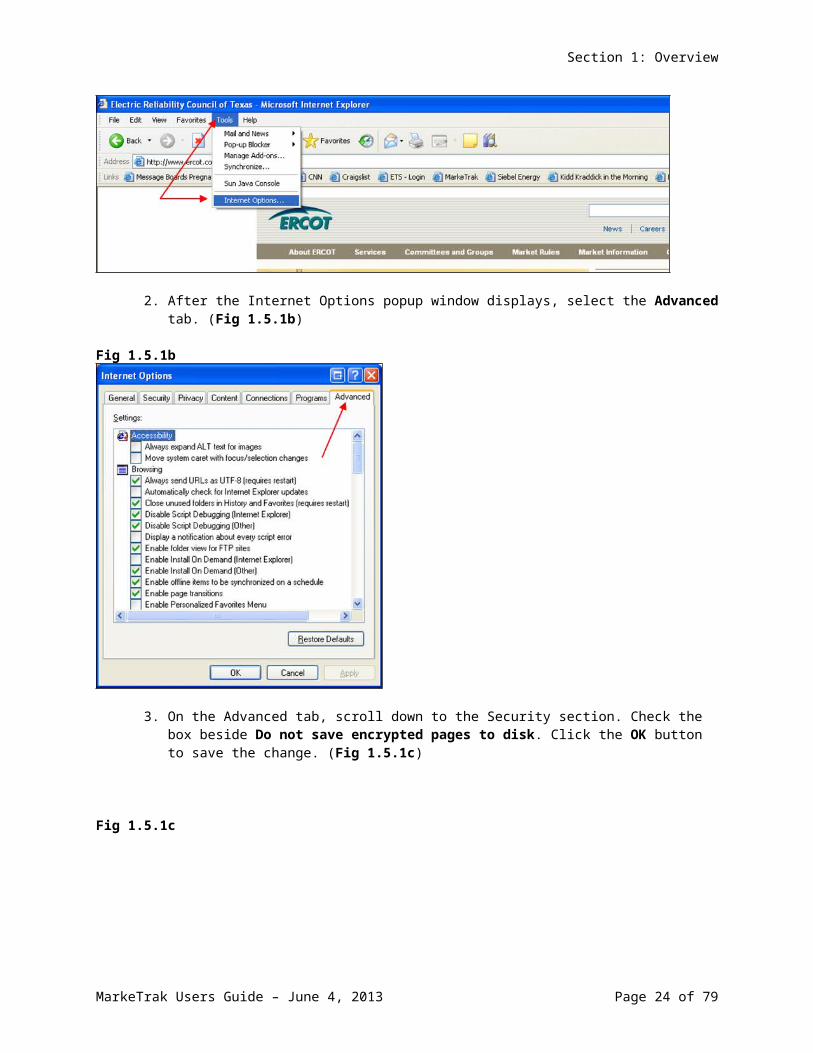
1. Open the Internet Explorer browser. Select the Tools tab in the upper selection bar. Select the Internet Options selection from the drop down list. (Fig 1.5.1a)
Fig 1.5.1a
2. After the Internet Options popup window displays, select the Advanced tab. (Fig 1.5.1b)
Fig 1.5.1b
MarkeTrak Users Guide – June 4, 2013 Page 18 of 61
Section 1: Overview
3. On the Advanced tab, scroll down to the Security section. Check the box beside Do not save encrypted pages to disk. Click the OK button to save the change. (Fig 1.5.1c)
Fig 1.5.1c
4. You will now be able to open or save MarkeTrak report and search data to Excel format.
1.5.2 Searching
MarkeTrak Users Guide – June 4, 2013 Page 19 of 61
Section 1: Overview
Searching in the MarkeTrak application is largely based on the visibility model described in section 1.4.2 Issue Visibility. When searching, those issues available to the user based on login credentials will be returned in any result set.
In comparison with Reports, searches are a quicker and more efficient way to reach a result set if multiple distinct criteria are not necessary.
Available fields that can be utilized are: Issue ID: entering a number in this field will return all issues that are visible to the user
and contain the value entered. Entering multiple ID parameters separated by a space will return all appropriate results.
Keyword(s): compares text strings populated by the user with any text fields associated with an issue. This will allow the user to search the following fields:o Commentso Descriptiono ESI IDo Original Tran ID
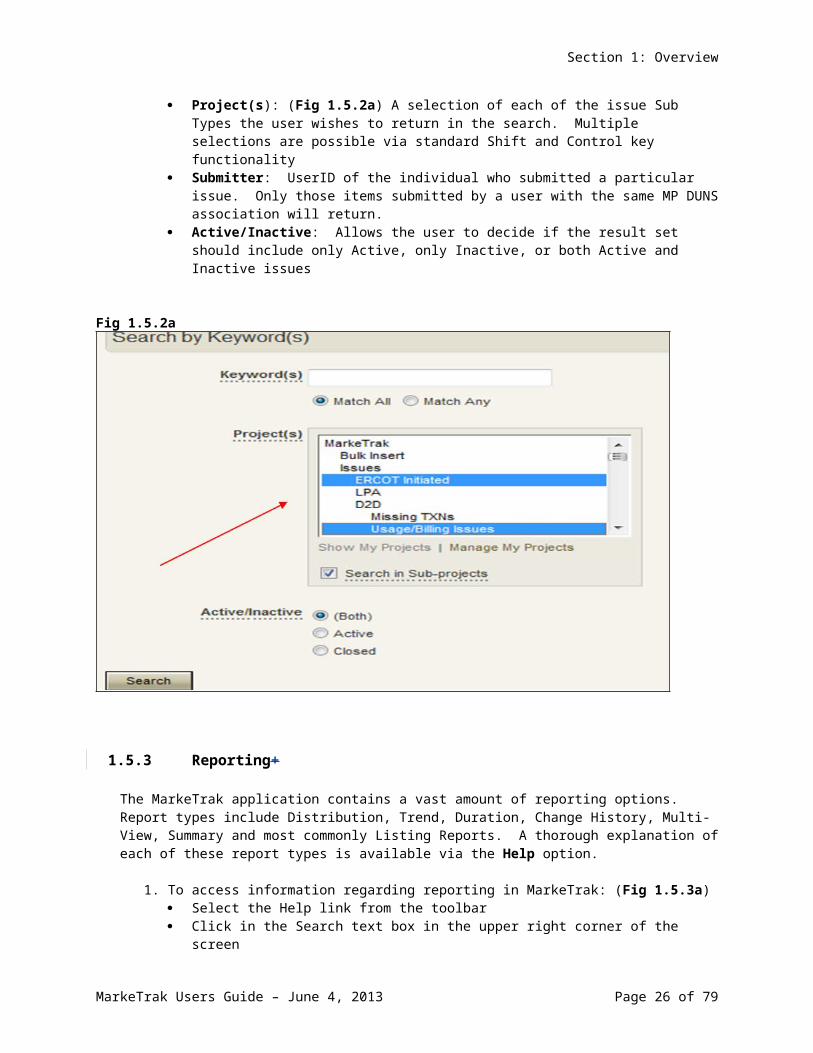
Project(s): (Fig 1.5.2a) A selection of each of the issue Sub Types the user wishes to return in the search. Multiple selections are possible via standard Shift and Control key functionality
Submitter: UserID of the individual who submitted a particular issue. Only those items submitted by a user with the same MP DUNS association will return.
Active/Inactive: Allows the user to decide if the result set should include only Active, only Inactive, or both Active and Inactive issues
Fig 1.5.2a
1.5.3 Reporting+
MarkeTrak Users Guide – June 4, 2013 Page 20 of 61
Section 1: Overview
The MarkeTrak application contains a vast amount of reporting options. Report types include Distribution, Trend, Duration, Change History, Multi-View, Summary and most commonly Listing Reports. A thorough explanation of each of these report types is available via the Help option.
1. To access information regarding reporting in MarkeTrak: (Fig 1.5.3a) Select the Help link from the toolbar Click in the Search text box in the upper right corner of the screen In the text box type Creating Report Select the Title hyperlink for the report you want to create
Fig 1.5.3a
2. This will provide an overview of each of the report types available in MarkeTrak as well as a link to the details of individual report types.
For example: Selecting details for Change History Reports returns the definition, steps to produce and related topics such as Specifying Content Options and Additional Options for Change History Reports. (Fig 1.5.3b)
MarkeTrak Users Guide – June 4, 2013 Page 21 of 61
Section 1: Overview
Fig 1.5.3b
3. Many of the reports that a user will find useful have already been created and saved into the application. These can be accessed in the Reports view in the Navigation Pane on the left hand side of the screen (Fig 1.5.3c) by selecting Find Reports. This method of searching for an existing report involves entering all or part of the report’s title or the report’s author.
1.5.3.1 Create a Report
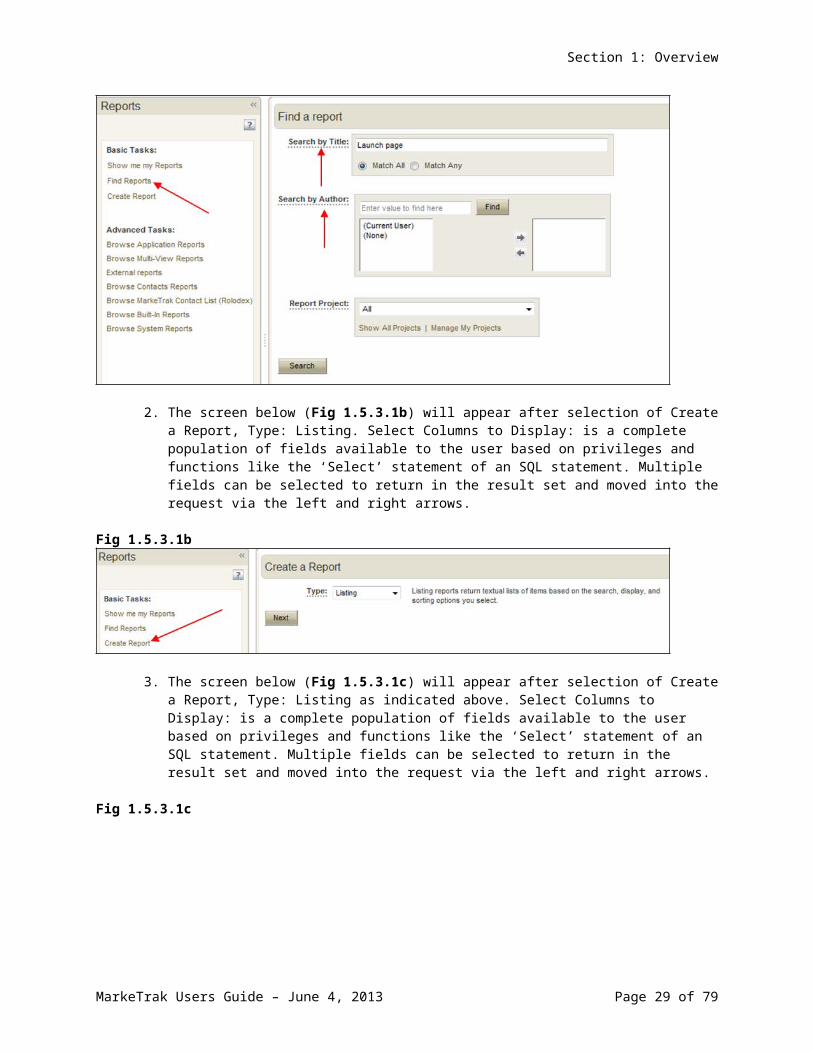
1. The user can also create and save ad hoc reports through the Create a Report (Fig 1.5.3.1a) option accessed via the Reports tab.
Fig 1.5.3.1a
MarkeTrak Users Guide – June 4, 2013 Page 22 of 61
Section 1: Overview
2. The screen below (Fig 1.5.3.1b) will appear after selection of Create a Report, Type: Listing. Select Columns to Display: is a complete population of fields available to the user based on privileges and functions like the ‘Select’ statement of an SQL statement. Multiple fields can be selected to return in the result set and moved into the request via the left and right arrows.
Fig 1.5.3.1b
3. The screen below (Fig 1.5.3.1c) will appear after selection of Create a Report, Type: Listing as indicated above. Select Columns to Display: is a complete population of fields available to the user based on privileges and functions like the ‘Select’ statement of an SQL statement. Multiple fields can be selected to return in the result set and moved into the request via the left and right arrows.
Fig 1.5.3.1c
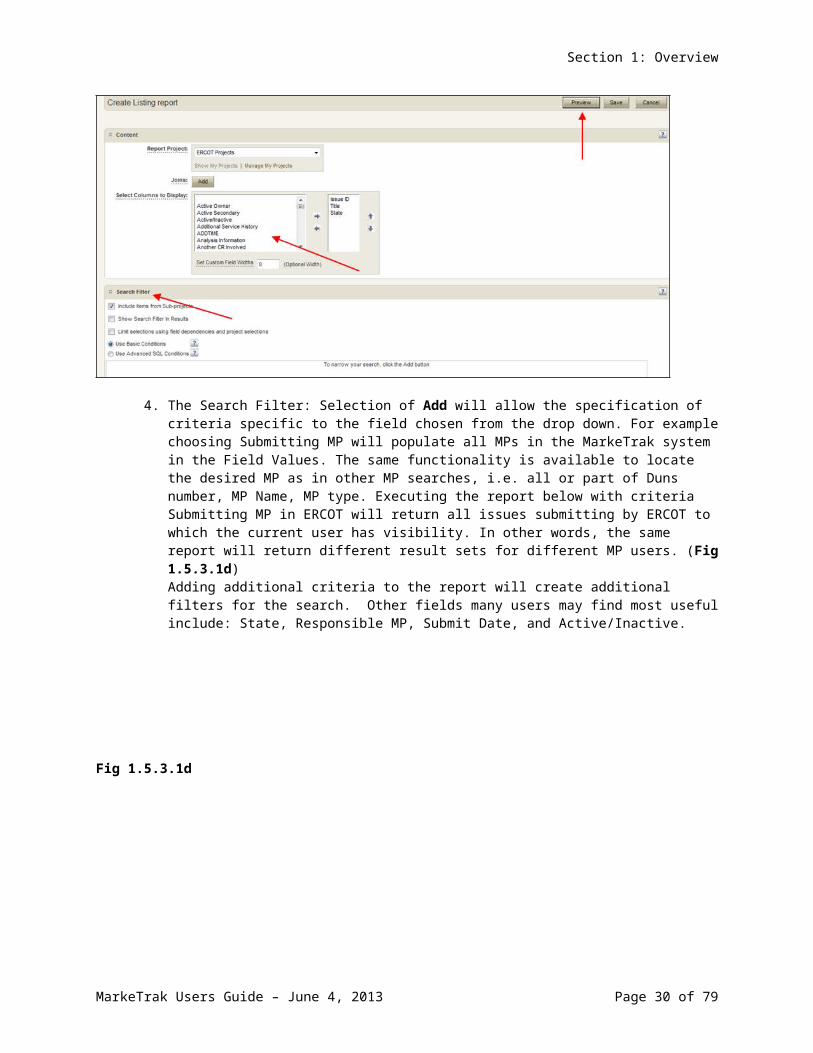
4. The Search Filter: Selection of Add will allow the specification of criteria specific to the field chosen from the drop down. For example choosing Submitting MP will populate all MPs in the MarkeTrak system in the Field Values. The same functionality is available to locate the desired MP as in other MP searches, i.e. all or part of Duns number, MP Name, MP type. Executing the report below with criteria Submitting MP in ERCOT will return all issues submitting by ERCOT to which the current user has visibility. In other words, the same report will return different result sets for different MP users. (Fig 1.5.3.1d)Adding additional criteria to the report will create additional filters for the search. Other fields many users may find most useful include: State, Responsible MP, Submit Date, and Active/Inactive.
MarkeTrak Users Guide – June 4, 2013 Page 23 of 61
Section 1: Overview
Fig 1.5.3.1d
1.5.3.2 Query at Run Time
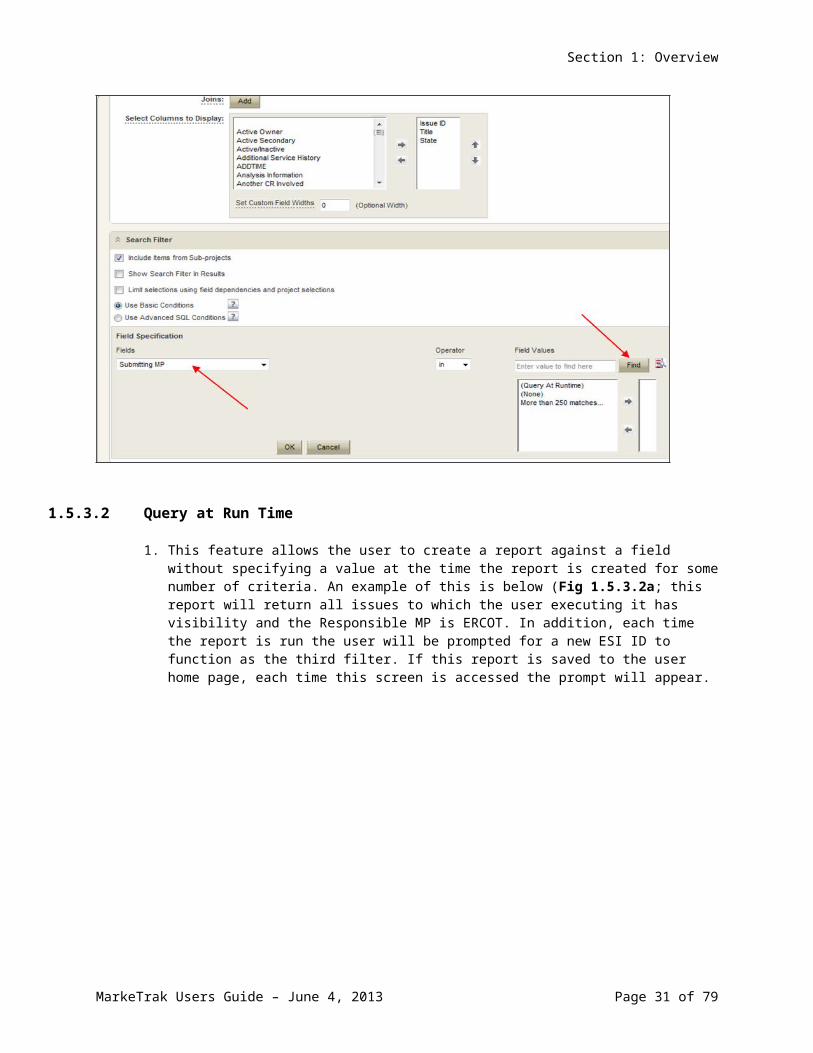
1. This feature allows the user to create a report against a field without specifying a value at the time the report is created for some number of criteria. An example of this is below (Fig 1.5.3.2a; this report will return all issues to which the user executing it has visibility and the Responsible MP is ERCOT. In addition, each time the report is run the user will be prompted for a new ESI ID to function as the third filter. If this report is saved to the user home page, each time this screen is accessed the prompt will appear.
Fig 1.5.3.2a
MarkeTrak Users Guide – June 4, 2013 Page 24 of 61
Section 1: Overview
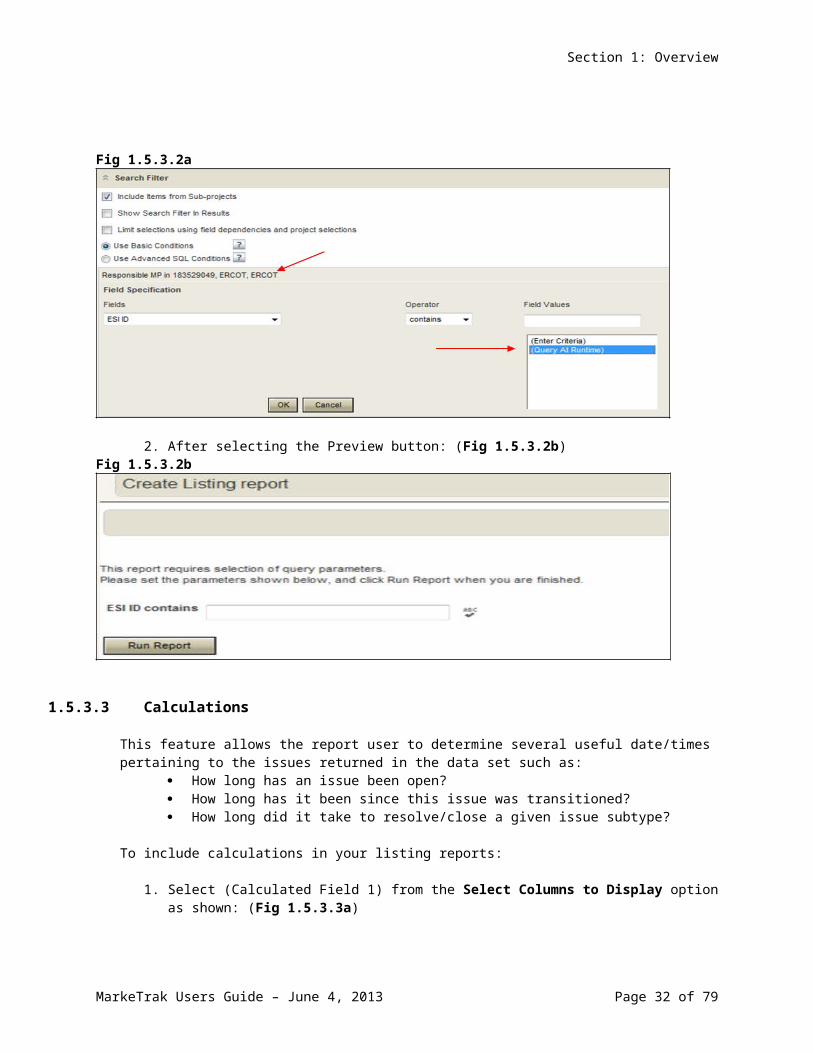
2. After selecting the Preview button: (Fig 1.5.3.2b)Fig 1.5.3.2b
1.5.3.3 Calculations
This feature allows the report user to determine several useful date/times pertaining to the issues returned in the data set such as:
How long has an issue been open? How long has it been since this issue was transitioned? How long did it take to resolve/close a given issue subtype?
To include calculations in your listing reports:
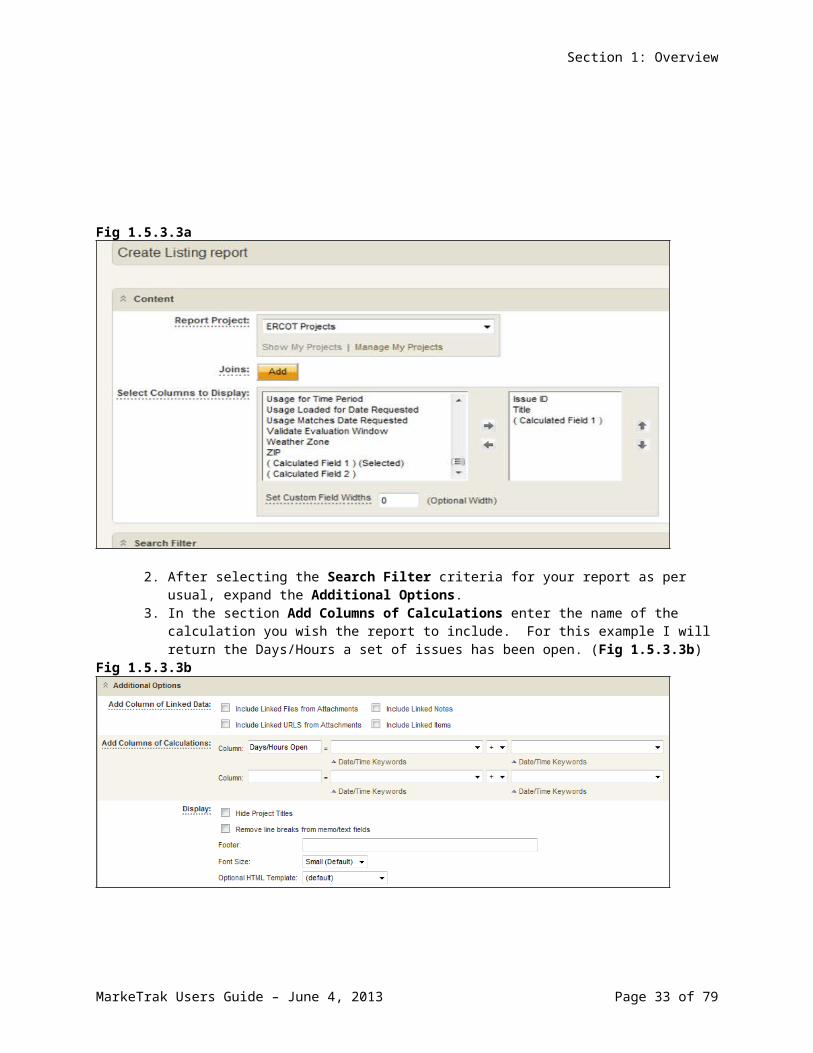
1. Select (Calculated Field 1) from the Select Columns to Display option as shown: (Fig 1.5.3.3a)
Fig 1.5.3.3a
MarkeTrak Users Guide – June 4, 2013 Page 25 of 61

Section 1: Overview
2. After selecting the Search Filter criteria for your report as per usual, expand the Additional Options.
3. In the section Add Columns of Calculations enter the name of the calculation you wish the report to include. For this example I will return the Days/Hours a set of issues has been open. (Fig 1.5.3.3b)
Fig 1.5.3.3b
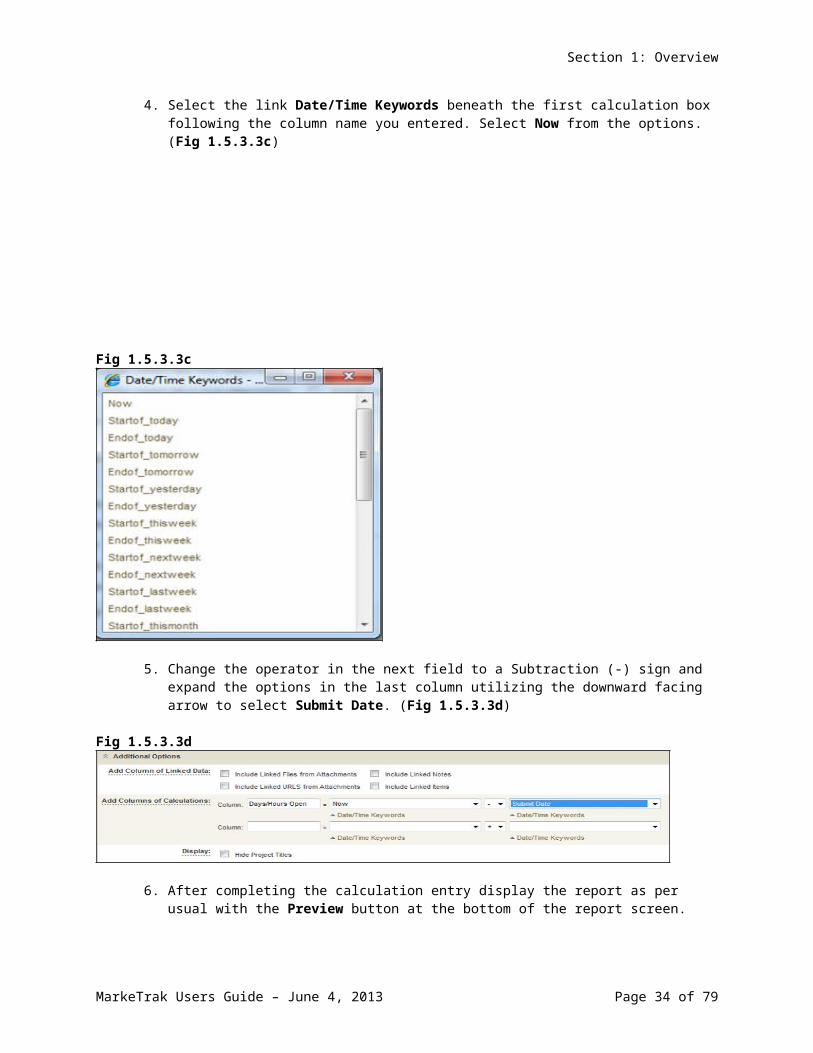
4. Select the link Date/Time Keywords beneath the first calculation box following the column name you entered. Select Now from the options. (Fig 1.5.3.3c)
Fig 1.5.3.3c
MarkeTrak Users Guide – June 4, 2013 Page 26 of 61
Section 1: Overview
5. Change the operator in the next field to a Subtraction (-) sign and expand the options in the last column utilizing the downward facing arrow to select Submit Date. (Fig 1.5.3.3d)
Fig 1.5.3.3d
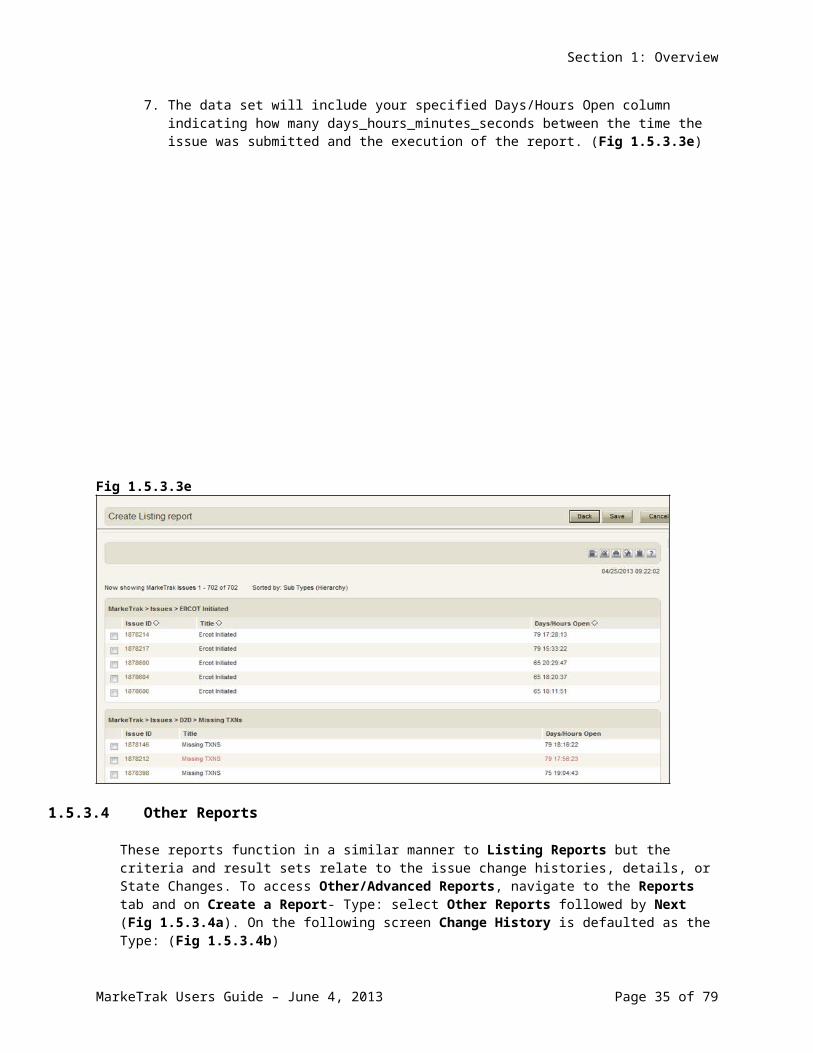
6. After completing the calculation entry display the report as per usual with the Preview button at the bottom of the report screen.
7. The data set will include your specified Days/Hours Open column indicating how many days_hours_minutes_seconds between the time the issue was submitted and the execution of the report. (Fig 1.5.3.3e)
Fig 1.5.3.3e
MarkeTrak Users Guide – June 4, 2013 Page 27 of 61

Section 1: Overview
1.5.3.4 Other Reports
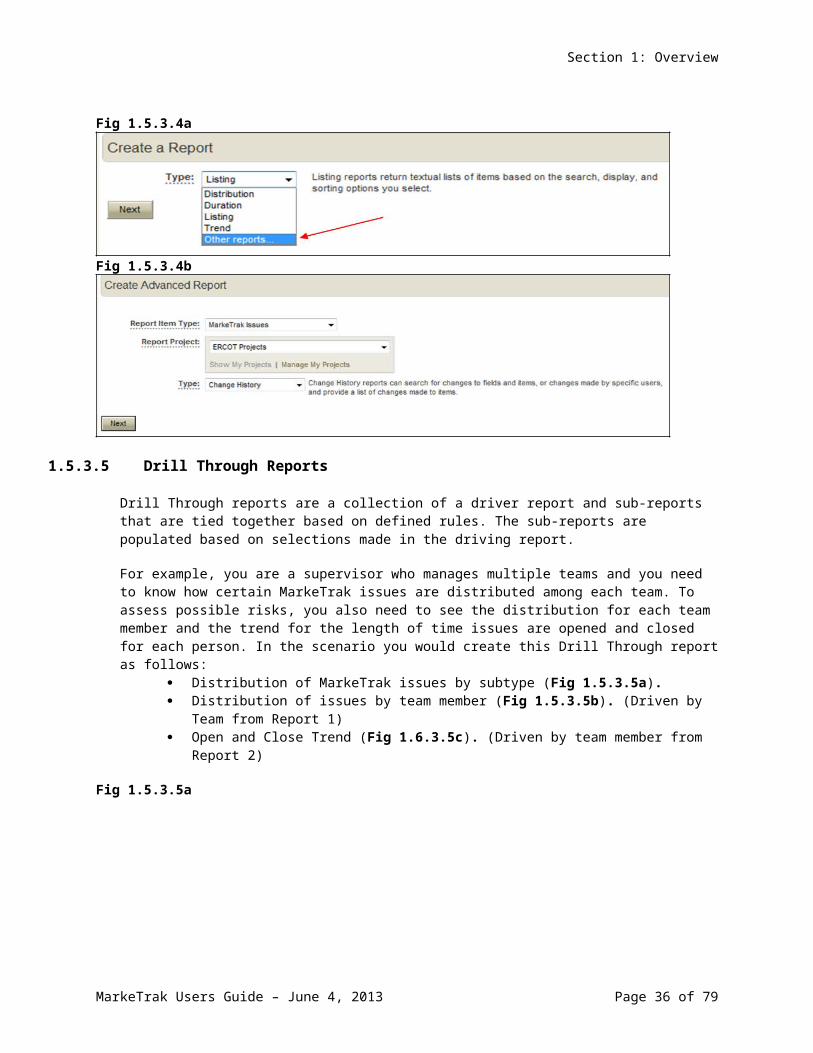
These reports function in a similar manner to Listing Reports but the criteria and result sets relate to the issue change histories, details, or State Changes. To access Other/Advanced Reports, navigate to the Reports tab and on Create a Report- Type: select Other Reports followed by Next (Fig 1.5.3.4a). On the following screen Change History is defaulted as the Type: (Fig 1.5.3.4b)
Fig 1.5.3.4a
Fig 1.5.3.4b
1.5.3.5 Drill Through Reports
Drill Through reports are a collection of a driver report and sub-reports that are tied together based on defined rules. The sub-reports are populated based on selections made in the driving report.
For example, you are a supervisor who manages multiple teams and you need to know how certain MarkeTrak issues are distributed among each team. To assess possible risks, you also need to see
MarkeTrak Users Guide – June 4, 2013 Page 28 of 61

Section 1: Overview
the distribution for each team member and the trend for the length of time issues are opened and closed for each person. In the scenario you would create this Drill Through report as follows:
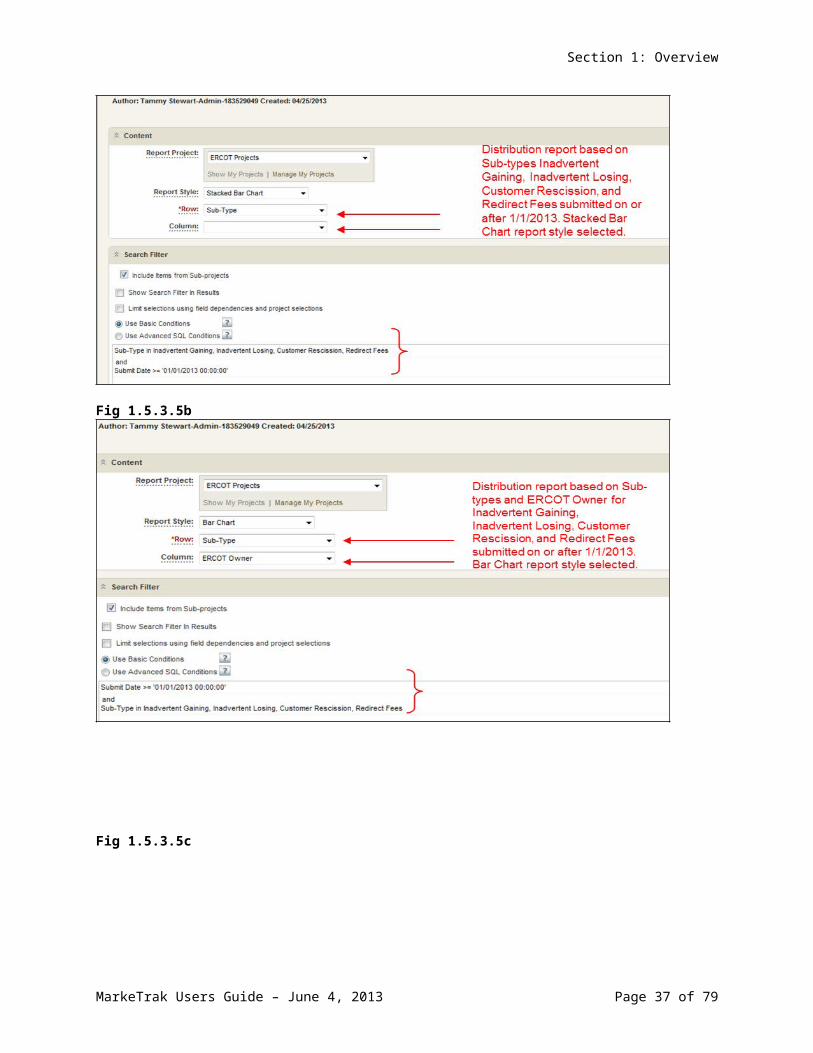
Distribution of MarkeTrak issues by subtype (Fig 1.5.3.5a). Distribution of issues by team member (Fig 1.5.3.5b). (Driven by Team from Report 1) Open and Close Trend (Fig 1.6.3.5c). (Driven by team member from Report 2)
Fig 1.5.3.5a
Fig 1.5.3.5b
Fig 1.5.3.5c
MarkeTrak Users Guide – June 4, 2013 Page 29 of 61
Section 1: Overview
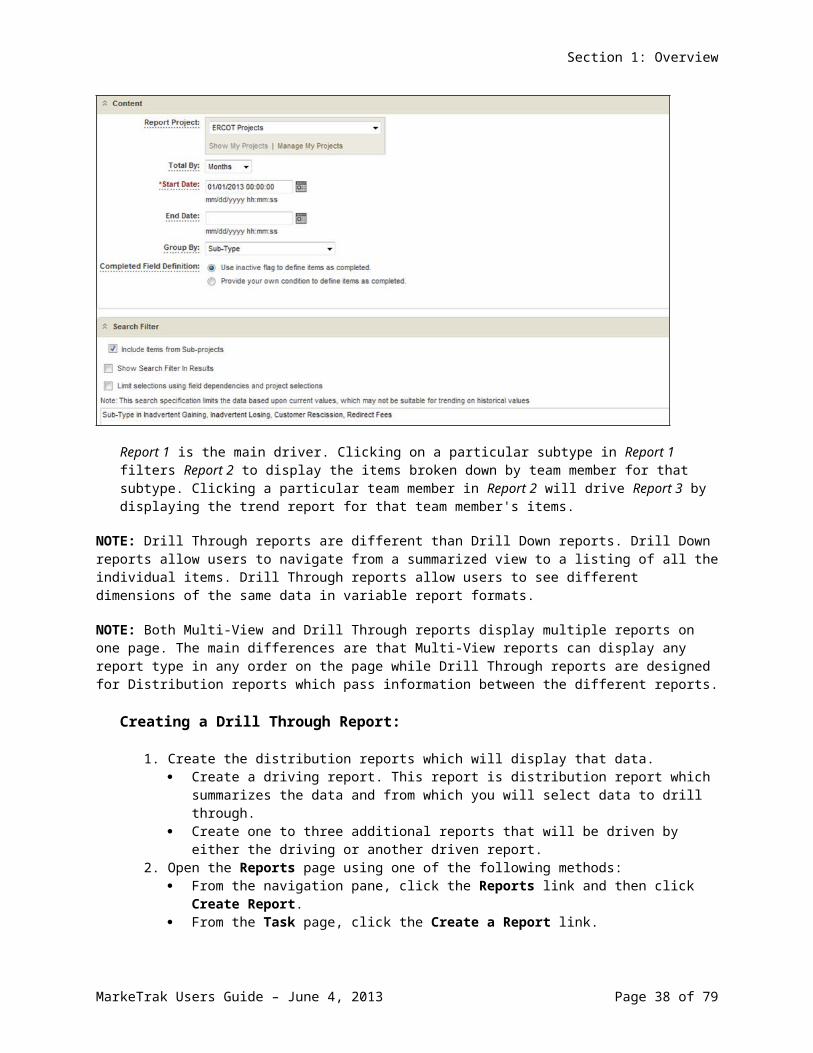
Report 1 is the main driver. Clicking on a particular subtype in Report 1 filters Report 2 to display the items broken down by team member for that subtype. Clicking a particular team member in Report 2 will drive Report 3 by displaying the trend report for that team member's items.
NOTE: Drill Through reports are different than Drill Down reports. Drill Down reports allow users to navigate from a summarized view to a listing of all the individual items. Drill Through reports allow users to see different dimensions of the same data in variable report formats.
NOTE: Both Multi-View and Drill Through reports display multiple reports on one page. The main differences are that Multi-View reports can display any report type in any order on the page while Drill Through reports are designed for Distribution reports which pass information between the different reports.
Creating a Drill Through Report:
1. Create the distribution reports which will display that data. Create a driving report. This report is distribution report which summarizes the data and
from which you will select data to drill through. Create one to three additional reports that will be driven by either the driving or another
driven report. 2. Open the Reports page using one of the following methods:
From the navigation pane, click the Reports link and then click Create Report. From the Task page, click the Create a Report link.
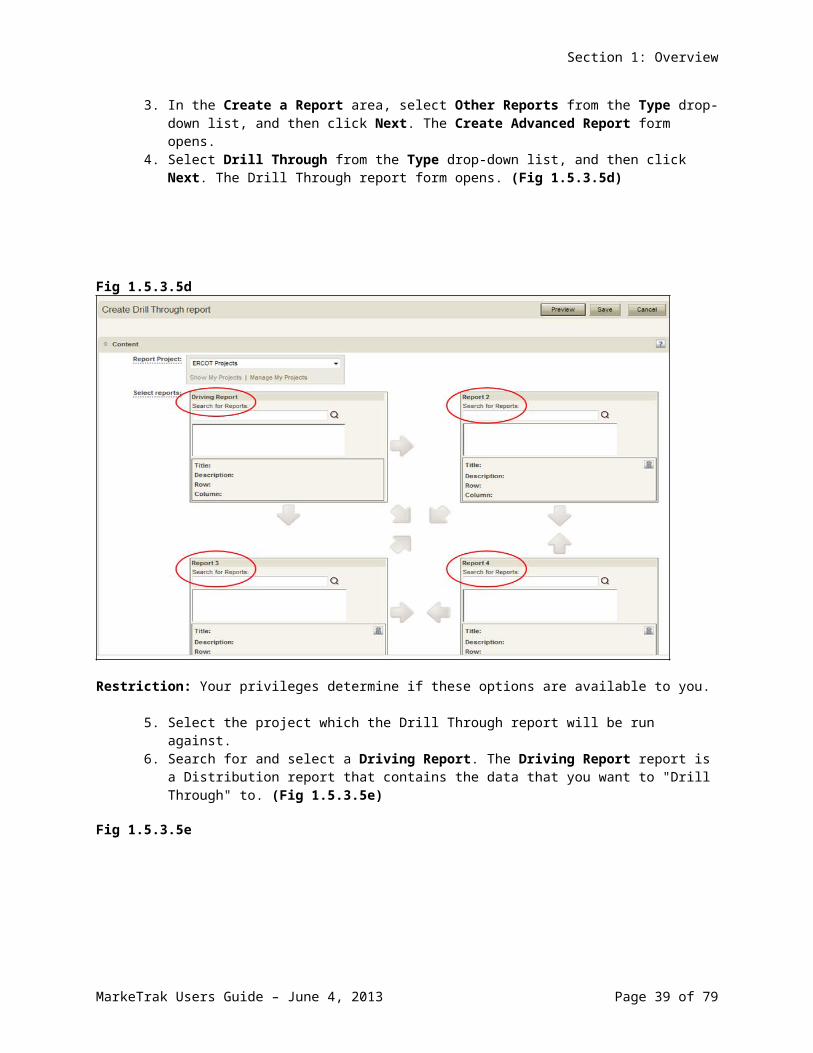
3. In the Create a Report area, select Other Reports from the Type drop-down list, and then click Next. The Create Advanced Report form opens.
4. Select Drill Through from the Type drop-down list, and then click Next. The Drill Through report form opens. (Fig 1.5.3.5d)
Fig 1.5.3.5d
MarkeTrak Users Guide – June 4, 2013 Page 30 of 61
Section 1: Overview
Restriction: Your privileges determine if these options are available to you.
5. Select the project which the Drill Through report will be run against. 6. Search for and select a Driving Report. The Driving Report report is a Distribution report
that contains the data that you want to "Drill Through" to. (Fig 1.5.3.5e)
Fig 1.5.3.5e
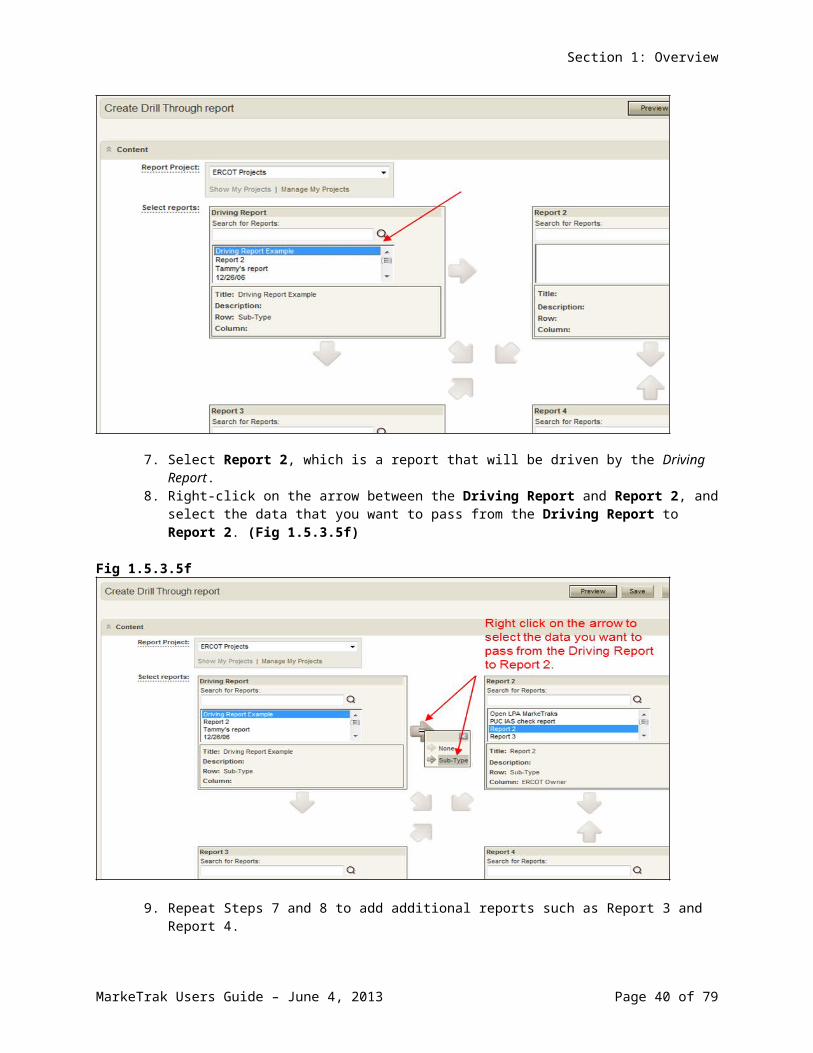
7. Select Report 2, which is a report that will be driven by the Driving Report.
MarkeTrak Users Guide – June 4, 2013 Page 31 of 61
Section 1: Overview
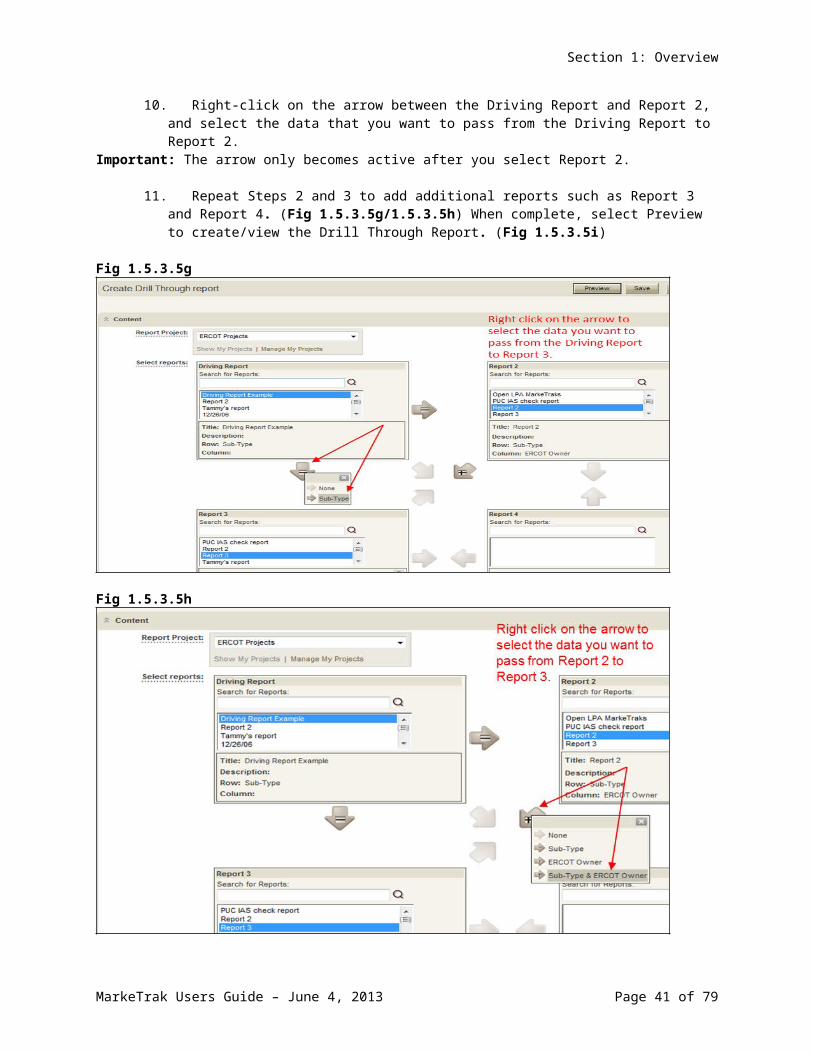
8. Right-click on the arrow between the Driving Report and Report 2, and select the data that you want to pass from the Driving Report to Report 2. (Fig 1.5.3.5f)
Fig 1.5.3.5f
9. Repeat Steps 7 and 8 to add additional reports such as Report 3 and Report 4.10. Right-click on the arrow between the Driving Report and Report 2, and select the data that
you want to pass from the Driving Report to Report 2.Important: The arrow only becomes active after you select Report 2.
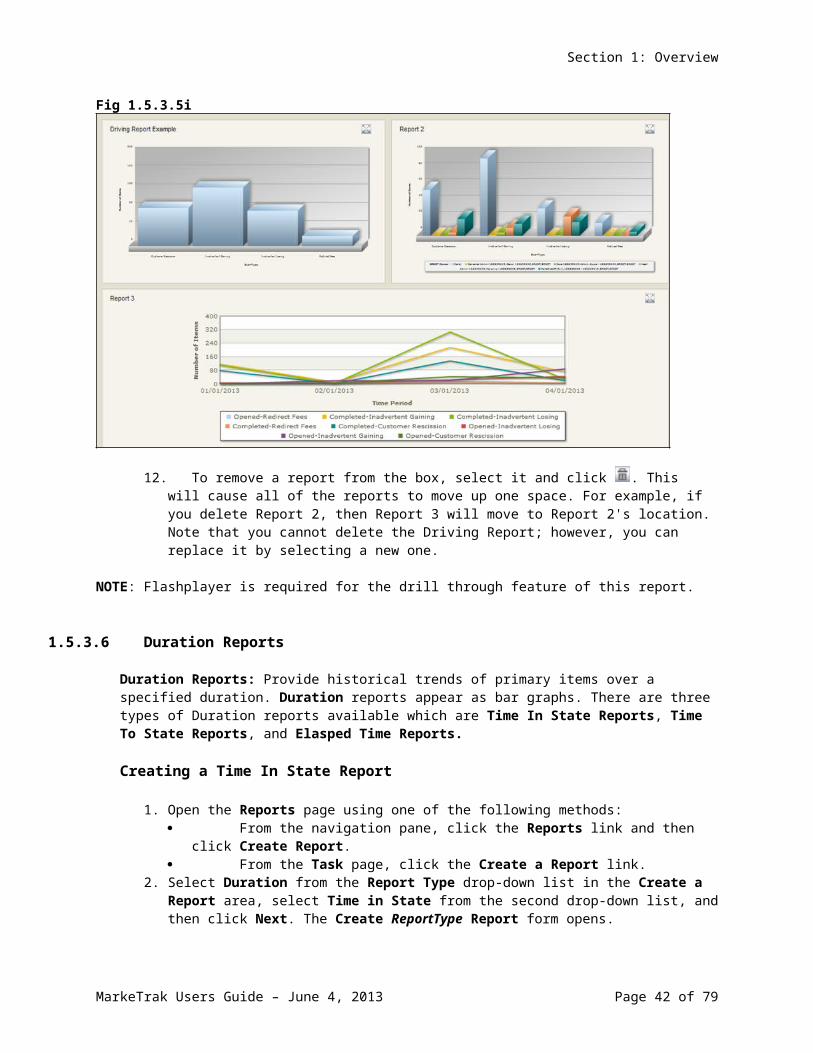
11. Repeat Steps 2 and 3 to add additional reports such as Report 3 and Report 4. (Fig 1.5.3.5g/1.5.3.5h) When complete, select Preview to create/view the Drill Through Report. (Fig 1.5.3.5i)
Fig 1.5.3.5g
Fig 1.5.3.5h
MarkeTrak Users Guide – June 4, 2013 Page 32 of 61
Section 1: Overview
Fig 1.5.3.5i
12. To remove a report from the box, select it and click . This will cause all of the reports to move up one space. For example, if you delete Report 2, then Report 3 will move to Report 2's location. Note that you cannot delete the Driving Report; however, you can replace it by selecting a new one.
NOTE: Flashplayer is required for the drill through feature of this report.
1.5.3.6 Duration Reports
MarkeTrak Users Guide – June 4, 2013 Page 33 of 61
Section 1: Overview
Duration Reports: Provide historical trends of primary items over a specified duration. Duration reports appear as bar graphs. There are three types of Duration reports available which are Time In State Reports, Time To State Reports, and Elasped Time Reports.
Creating a Time In State Report
1. Open the Reports page using one of the following methods: From the navigation pane, click the Reports link and then click Create Report. From the Task page, click the Create a Report link.
2. Select Duration from the Report Type drop-down list in the Create a Report area, select Time in State from the second drop-down list, and then click Next. The Create ReportType Report form opens. Restriction: Your privileges determine whether these options are available to you.
Complete the following sections on the Create ReportType Report form:
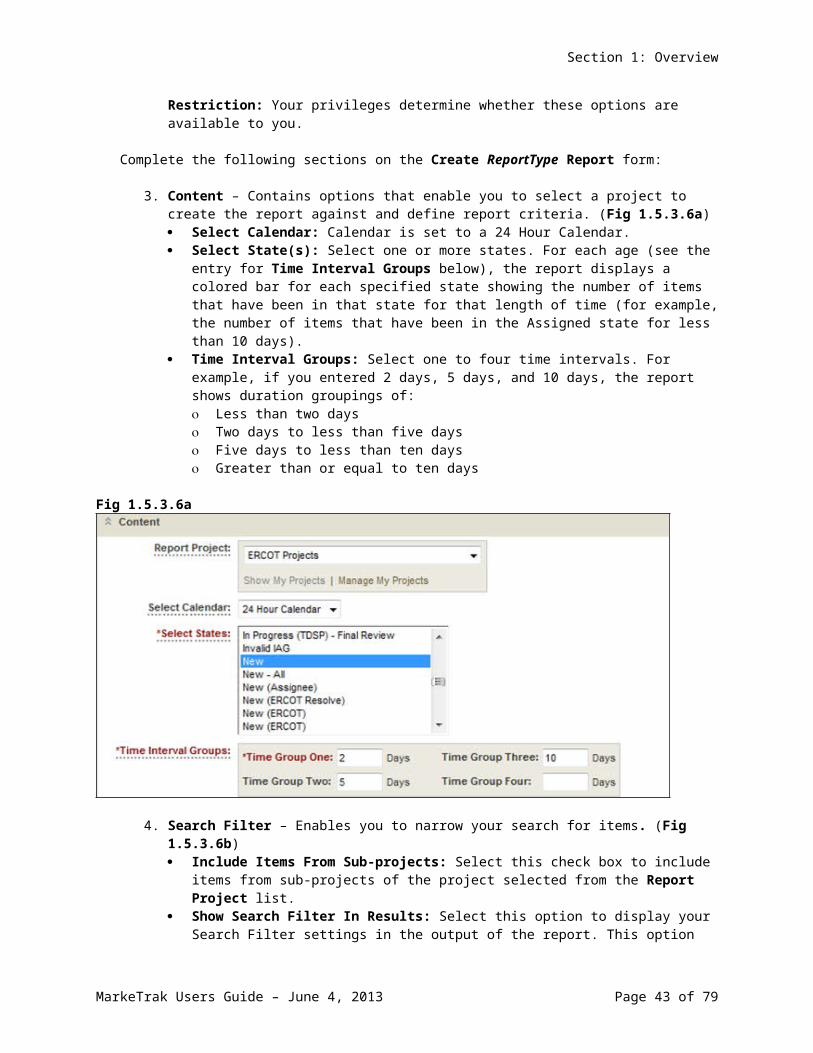
3. Content – Contains options that enable you to select a project to create the report against and define report criteria. (Fig 1.5.3.6a) Select Calendar: Calendar is set to a 24 Hour Calendar. Select State(s): Select one or more states. For each age (see the entry for Time
Interval Groups below), the report displays a colored bar for each specified state showing the number of items that have been in that state for that length of time (for example, the number of items that have been in the Assigned state for less than 10 days).
Time Interval Groups: Select one to four time intervals. For example, if you entered 2 days, 5 days, and 10 days, the report shows duration groupings of: o Less than two days o Two days to less than five days o Five days to less than ten days o Greater than or equal to ten days
Fig 1.5.3.6a
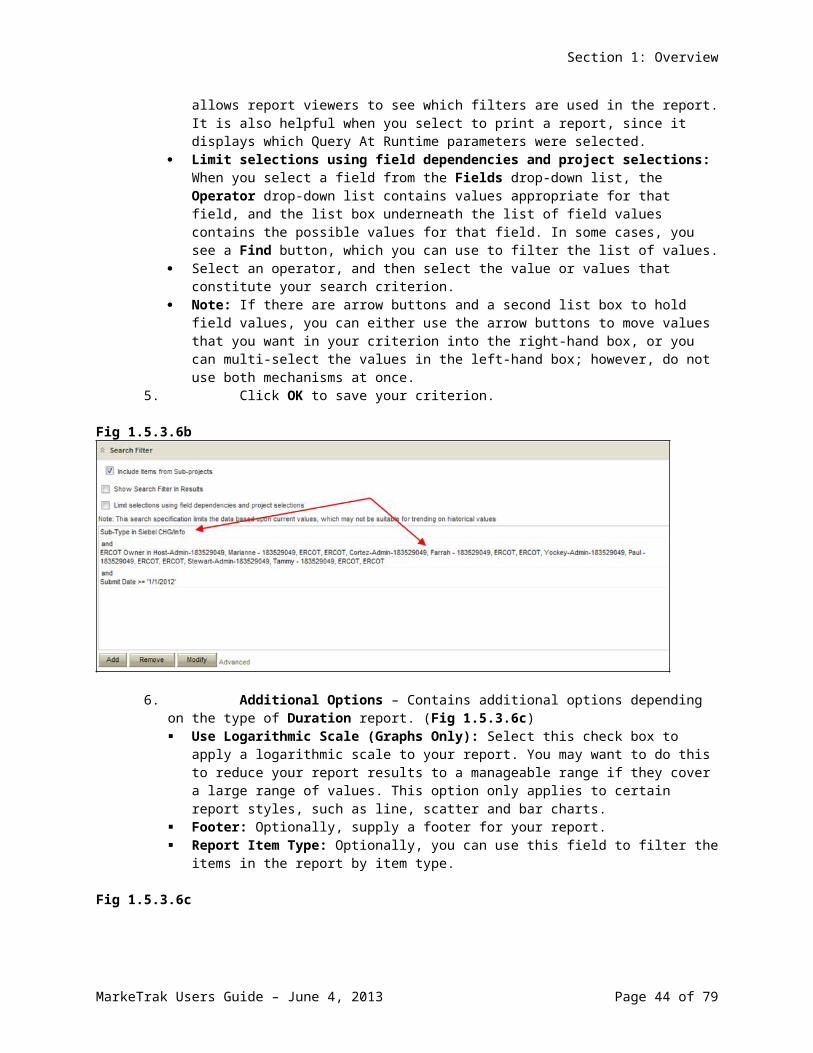
4. Search Filter – Enables you to narrow your search for items. (Fig 1.5.3.6b) Include Items From Sub-projects: Select this check box to include items from sub-
projects of the project selected from the Report Project list.
MarkeTrak Users Guide – June 4, 2013 Page 34 of 61
Section 1: Overview
Show Search Filter In Results: Select this option to display your Search Filter settings in the output of the report. This option allows report viewers to see which filters are used in the report. It is also helpful when you select to print a report, since it displays which Query At Runtime parameters were selected.
Limit selections using field dependencies and project selections: When you select a field from the Fields drop-down list, the Operator drop-down list contains values appropriate for that field, and the list box underneath the list of field values contains the possible values for that field. In some cases, you see a Find button, which you can use to filter the list of values.
Select an operator, and then select the value or values that constitute your search criterion.
Note: If there are arrow buttons and a second list box to hold field values, you can either use the arrow buttons to move values that you want in your criterion into the right-hand box, or you can multi-select the values in the left-hand box; however, do not use both mechanisms at once.
5. Click OK to save your criterion.
Fig 1.5.3.6b
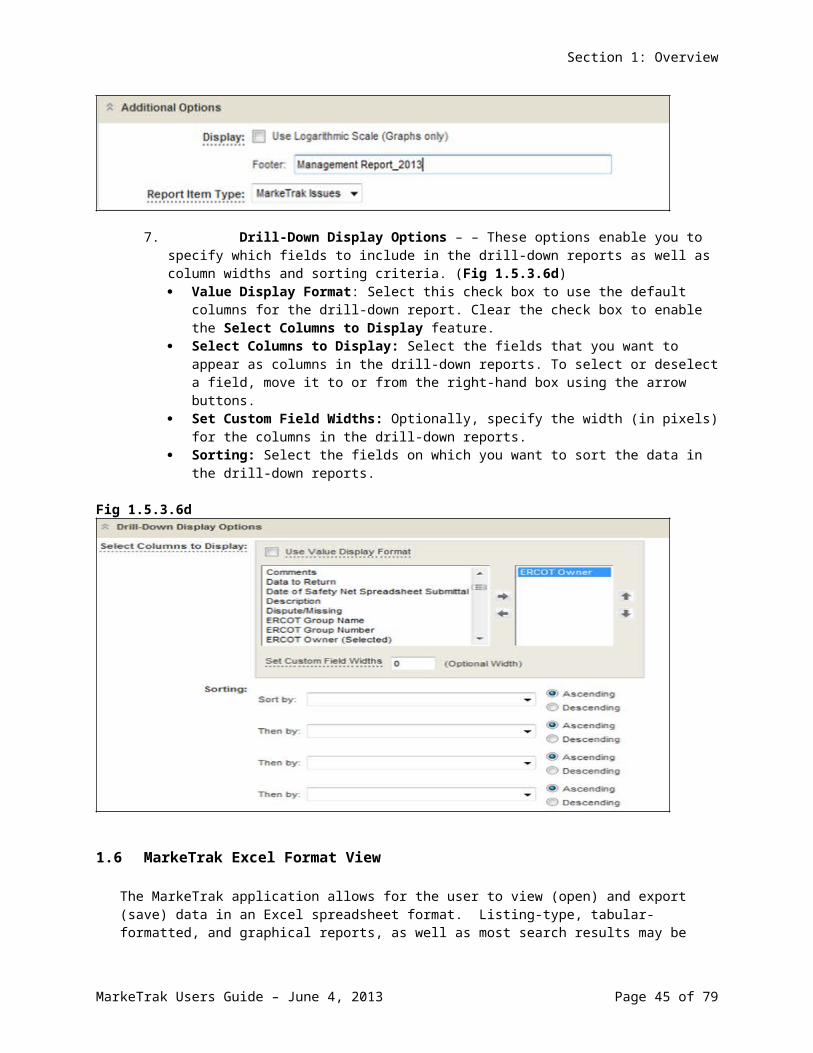
6. Additional Options – Contains additional options depending on the type of Duration report. (Fig 1.5.3.6c) Use Logarithmic Scale (Graphs Only): Select this check box to apply a logarithmic
scale to your report. You may want to do this to reduce your report results to a manageable range if they cover a large range of values. This option only applies to certain report styles, such as line, scatter and bar charts.
Footer: Optionally, supply a footer for your report. Report Item Type: Optionally, you can use this field to filter the items in the report by
item type.
Fig 1.5.3.6c
MarkeTrak Users Guide – June 4, 2013 Page 35 of 61
Section 1: Overview
7. Drill-Down Display Options – – These options enable you to specify which fields to include in the drill-down reports as well as column widths and sorting criteria. (Fig 1.5.3.6d) Value Display Format: Select this check box to use the default columns for the drill-
down report. Clear the check box to enable the Select Columns to Display feature. Select Columns to Display: Select the fields that you want to appear as columns in the
drill-down reports. To select or deselect a field, move it to or from the right-hand box using the arrow buttons.
Set Custom Field Widths: Optionally, specify the width (in pixels) for the columns in the drill-down reports.
Sorting: Select the fields on which you want to sort the data in the drill-down reports.
Fig 1.5.3.6d
1.6 MarkeTrak Excel Format View
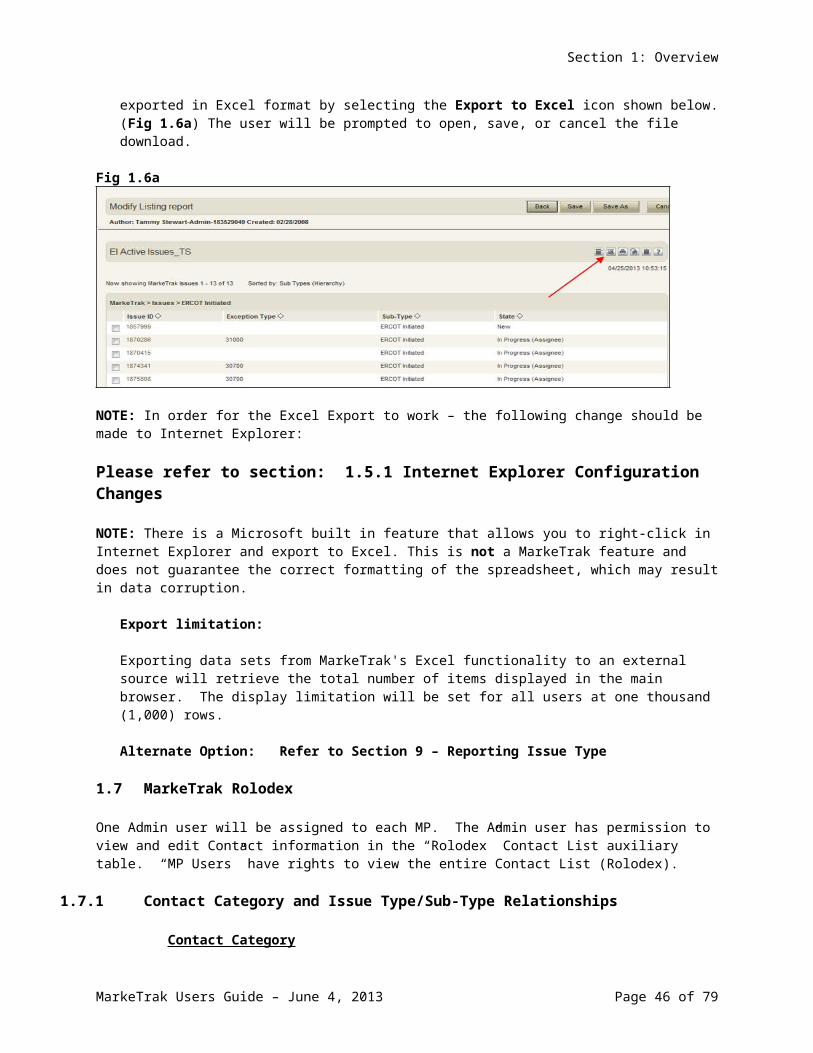
The MarkeTrak application allows for the user to view (open) and export (save) data in an Excel spreadsheet format. Listing-type, tabular-formatted, and graphical reports, as well as most search results may be exported in Excel format by selecting the Export to Excel icon shown below. (Fig 1.6a) The user will be prompted to open, save, or cancel the file download.
Fig 1.6a
MarkeTrak Users Guide – June 4, 2013 Page 36 of 61
Section 1: Overview
NOTE: In order for the Excel Export to work – the following change should be made to Internet Explorer:
Please refer to section: 1.5.1 Internet Explorer Configuration Changes
NOTE: There is a Microsoft built in feature that allows you to right-click in Internet Explorer and export to Excel. This is not a MarkeTrak feature and does not guarantee the correct formatting of the spreadsheet, which may result in data corruption.
Export limitation:
Exporting data sets from MarkeTrak's Excel functionality to an external source will retrieve the total number of items displayed in the main browser. The display limitation will be set for all users at one thousand (1,000) rows.
Alternate Option: Refer to Section 9 – Reporting Issue Type
1.7 MarkeTrak Rolodex
One Admin user will be assigned to each MP. The Admin user has permission to view and edit Contact information in the “Rolodex” Contact List auxiliary table. “MP Users” have rights to view the entire Contact List (Rolodex).
1.7.1 Contact Category and Issue Type/Sub-Type Relationships
Contact CategoryD2D – 997 IssuesD2D – Cancel with ApprovalD2D – Cancel without ApprovalD2D – Customer RescissionD2D – Inadvertent D2D – Market RuleD2D – Missing Enrollment TXNsD2D – OtherD2D – Premise TypeD2D – ProjectsD2D – Redirect FeesD2D – Reject TXNsD2D – Rep of RecordD2D – Safety NetD2D – Service AddressD2D – Service Order – 650D2D – Siebel CHG/InfoD2D – Usage/Billing DisputeD2D – Usage/Billing Dispute LSE Interval DataD2D – Usage/Billing MissingD2D – Usage/Billing Missing LSE Interval DataDEV – IDR & non IDRDEV – LSE DEV – Other All besides LSE, IDR Usage, Non-IDR UsageLPA – Other Load Profile
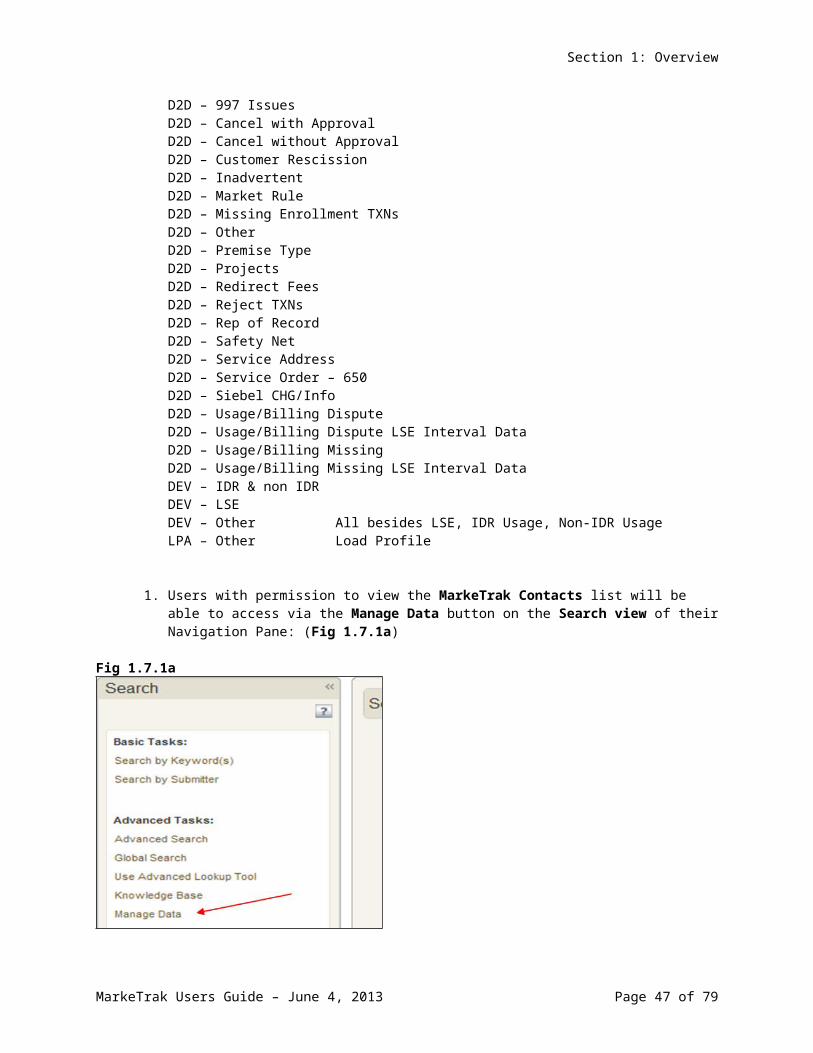
1. Users with permission to view the MarkeTrak Contacts list will be able to access via the Manage Data button on the Search view of their Navigation Pane: (Fig 1.7.1a)
MarkeTrak Users Guide – June 4, 2013 Page 37 of 61
Section 1: Overview
Fig 1.7.1a
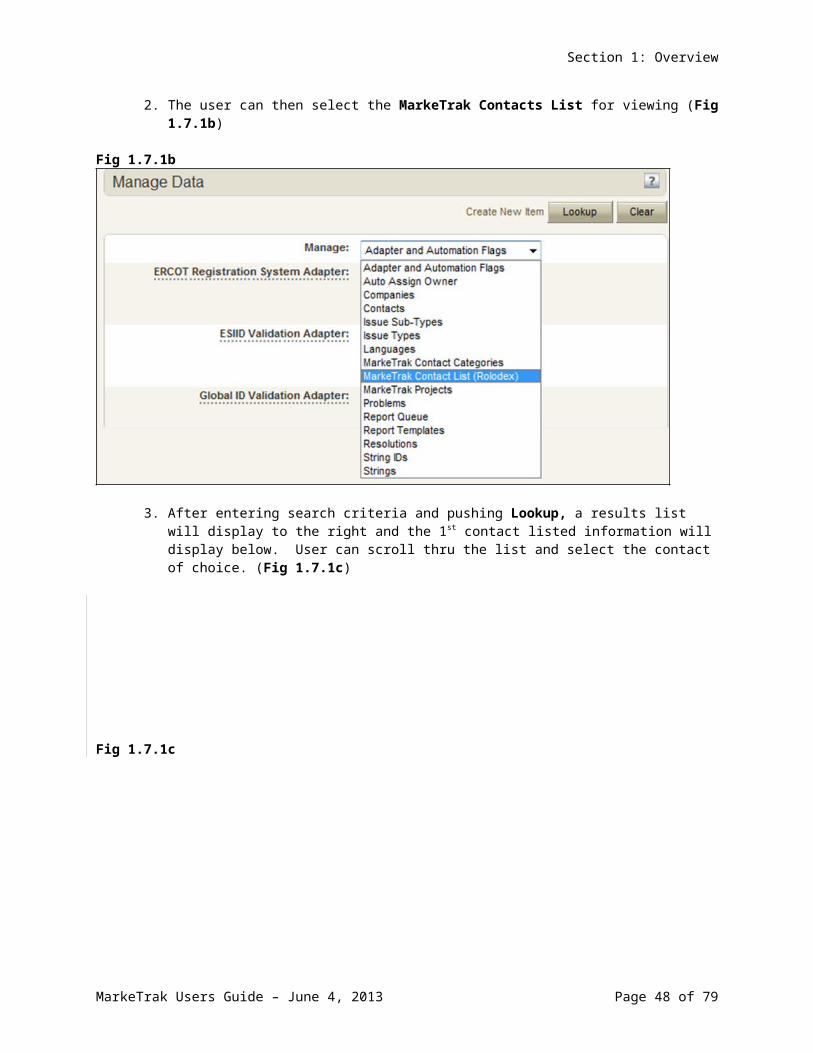
2. The user can then select the MarkeTrak Contacts List for viewing (Fig 1.7.1b)
Fig 1.7.1b
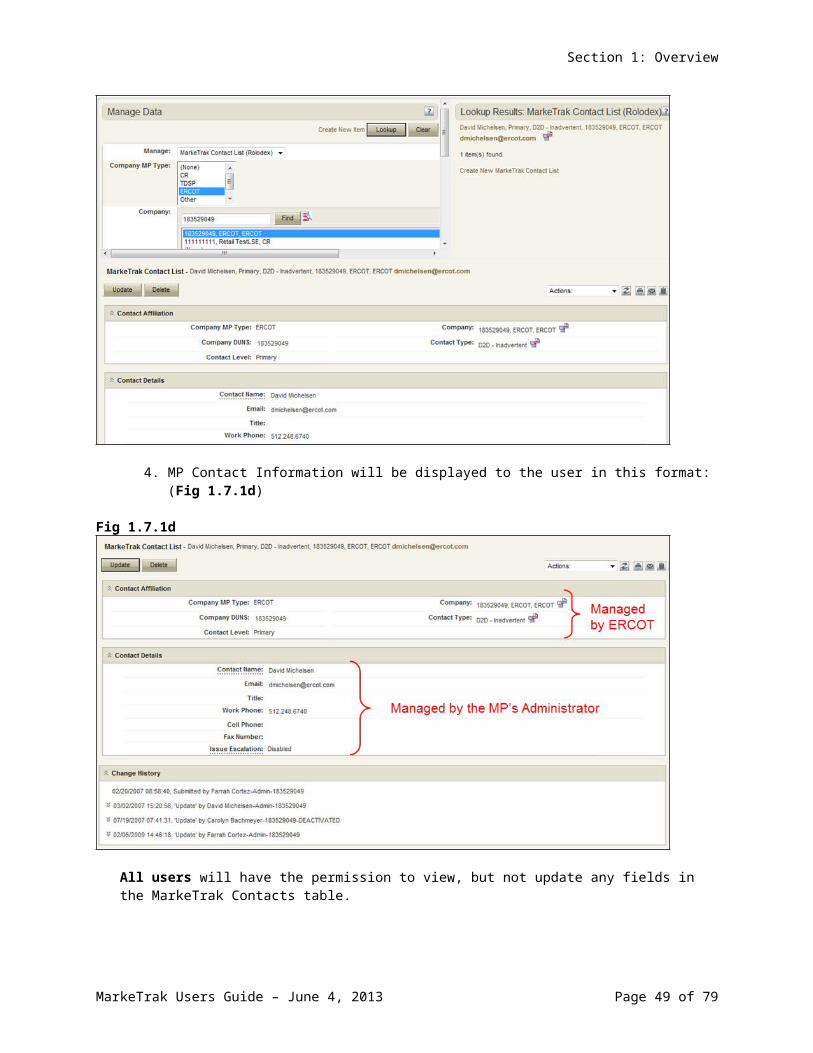
3. After entering search criteria and pushing Lookup, a results list will display to the right and the 1st contact listed information will display below. User can scroll thru the list and select the contact of choice. (Fig 1.7.1c)
MarkeTrak Users Guide – June 4, 2013 Page 38 of 61
Section 1: Overview
Fig 1.7.1c
4. MP Contact Information will be displayed to the user in this format: (Fig 1.7.1d)
Fig 1.7.1d
All users will have the permission to view, but not update any fields in the MarkeTrak Contacts table.
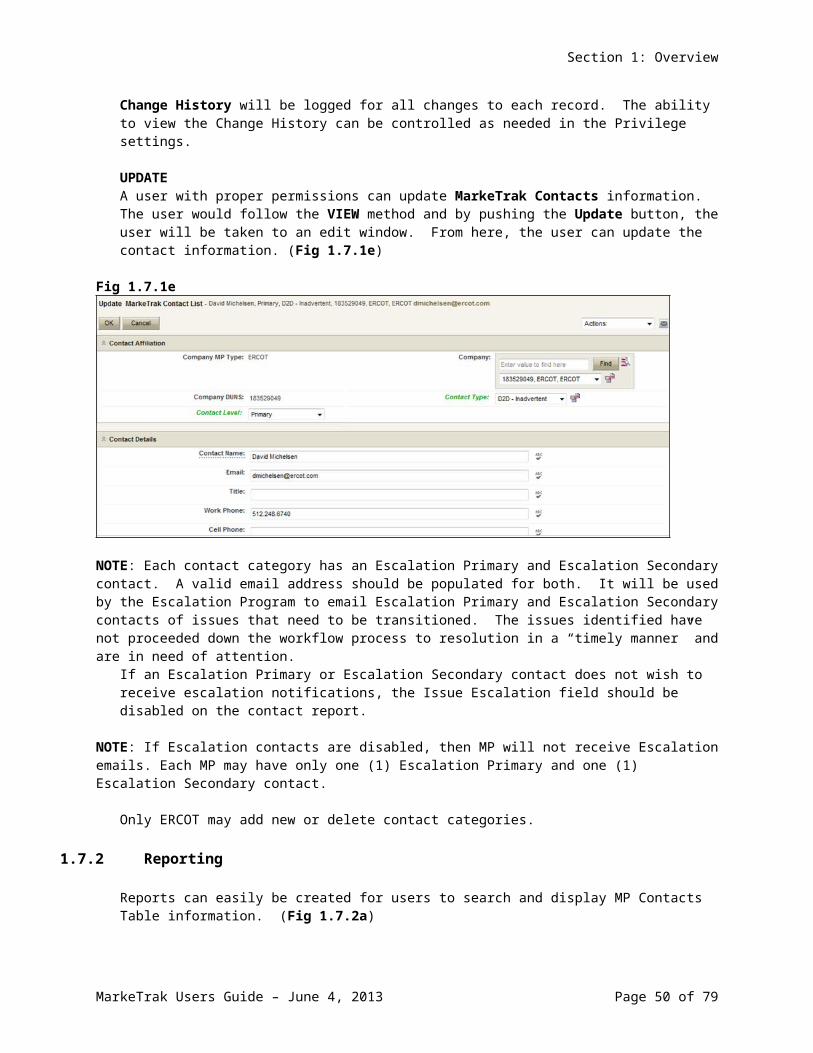
Change History will be logged for all changes to each record. The ability to view the Change History can be controlled as needed in the Privilege settings.
UPDATE
MarkeTrak Users Guide – June 4, 2013 Page 39 of 61
Section 1: Overview
A user with proper permissions can update MarkeTrak Contacts information. The user would follow the VIEW method and by pushing the Update button, the user will be taken to an edit window. From here, the user can update the contact information. (Fig 1.7.1e)
Fig 1.7.1e
NOTE: Each contact category has an Escalation Primary and Escalation Secondary contact. A valid email address should be populated for both. It will be used by the Escalation Program to email Escalation Primary and Escalation Secondary contacts of issues that need to be transitioned. The issues identified have not proceeded down the workflow process to resolution in a “timely manner” and are in need of attention.
If an Escalation Primary or Escalation Secondary contact does not wish to receive escalation notifications, the Issue Escalation field should be disabled on the contact report.
NOTE: If Escalation contacts are disabled, then MP will not receive Escalation emails. Each MP may have only one (1) Escalation Primary and one (1) Escalation Secondary contact.
Only ERCOT may add new or delete contact categories.
1.7.2 Reporting
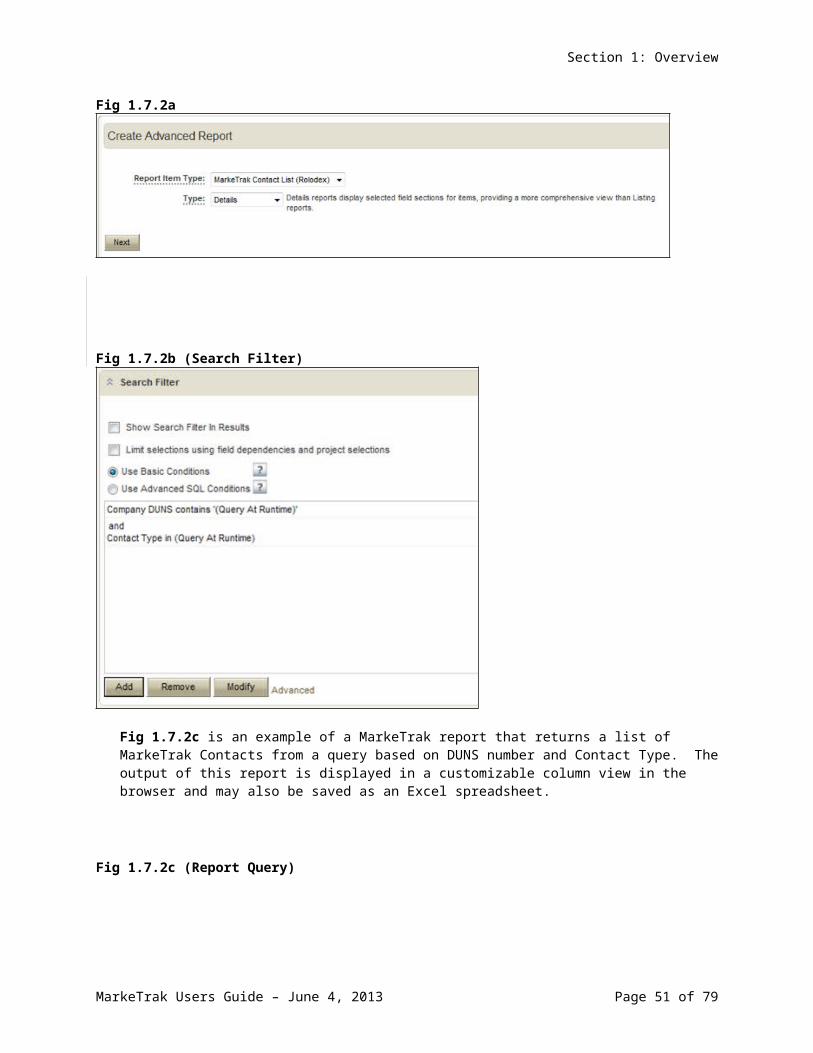
Reports can easily be created for users to search and display MP Contacts Table information. (Fig 1.7.2a)
Fig 1.7.2a
MarkeTrak Users Guide – June 4, 2013 Page 40 of 61
Section 1: Overview
Fig 1.7.2b (Search Filter)
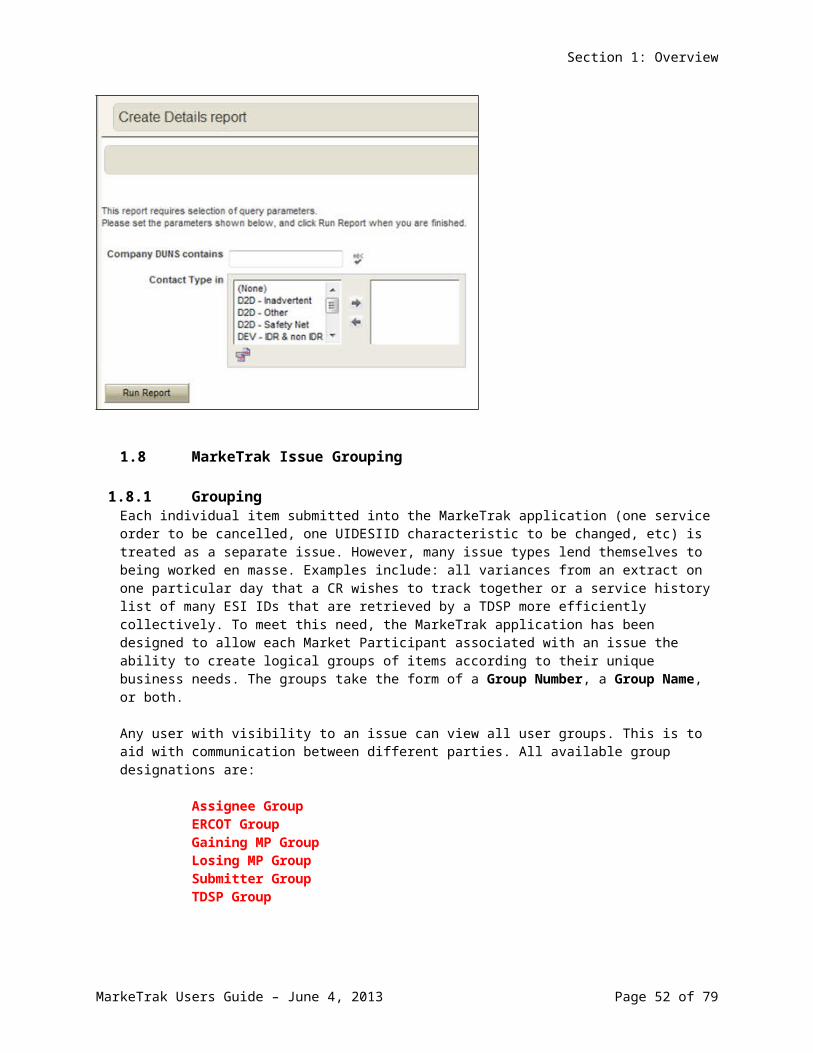
Fig 1.7.2c is an example of a MarkeTrak report that returns a list of MarkeTrak Contacts from a query based on DUNS number and Contact Type. The output of this report is displayed in a customizable column view in the browser and may also be saved as an Excel spreadsheet.
Fig 1.7.2c (Report Query)
MarkeTrak Users Guide – June 4, 2013 Page 41 of 61
Section 1: Overview
1.8 MarkeTrak Issue Grouping
1.8.1 GroupingEach individual item submitted into the MarkeTrak application (one service order to be cancelled, one UIDESIID characteristic to be changed, etc) is treated as a separate issue. However, many issue types lend themselves to being worked en masse. Examples include: all variances from an extract on one particular day that a CR wishes to track together or a service history list of many ESI IDs that are retrieved by a TDSP more efficiently collectively. To meet this need, the MarkeTrak application has been designed to allow each Market Participant associated with an issue the ability to create logical groups of items according to their unique business needs. The groups take the form of a Group Number, a Group Name, or both.
Any user with visibility to an issue can view all user groups. This is to aid with communication between different parties. All available group designations are:
Assignee Group ERCOT Group Gaining MP Group Losing MP Group Submitter Group TDSP Group
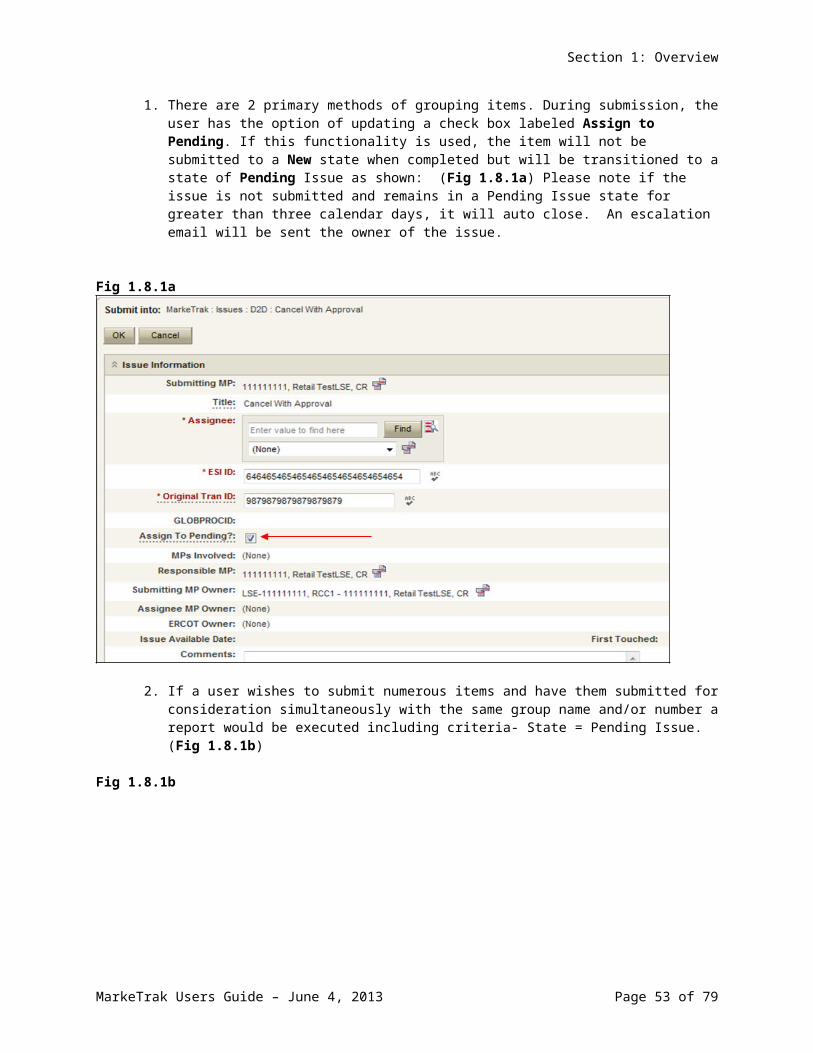
1. There are 2 primary methods of grouping items. During submission, the user has the option of updating a check box labeled Assign to Pending. If this functionality is used, the item will not be submitted to a New state when completed but will be transitioned to a state of Pending Issue as shown: (Fig 1.8.1a) Please note if the issue is not submitted and remains in a Pending Issue state for greater than three calendar days, it will auto close. An escalation email will be sent the owner of the issue.
Fig 1.8.1a
MarkeTrak Users Guide – June 4, 2013 Page 42 of 61
Section 1: Overview
2. If a user wishes to submit numerous items and have them submitted for consideration simultaneously with the same group name and/or number a report would be executed including criteria- State = Pending Issue. (Fig 1.8.1b)
Fig 1.8.1b
3. At this point the items can all be grouped together and submitted via a Mass Transition as detailed in that section. Items that are not in the same state can also be grouped together using this method due to the fact that the Assign to Group transition is available on any issue the user has visibility to. Indicate the issues individually from the result set or select the Check All option. Select the Update All Checked button. From the drop down choose Assign to Group from Any. You will be presented a screen similar to one below: (Fig 1.8.1c) In this case you will have a choice of selecting Replace or Append; you will either choose to replace the group or append or add to the existing group. Append means to add as a supplement or appendix.
MarkeTrak Users Guide – June 4, 2013 Page 43 of 61
Section 1: Overview
Fig 1.8.1c
4. The Group Number is defaulted as an incremented value by MarkeTrak. It can be changed to a new value. Note that if a group currently exists with this number already assigned this will cause an addition to that group.
5. Grouping issues submitted via Bulk Insert functions in a similar manner. After successful
submission of the issues the user wishes to group, create the report in Figure 1.8.1b substituting the criteria shown with the field Created by Bulk Insert Issue.
6. Provide the Bulk Insert Issue number in the criteria field. When the result set returns select the Check All option. Select the Update All Checked button. From the drop down choose Assign to Group from Any and populate the desired Group information
7. The second method of grouping involves placing a single item into a logical group via the Assign to Group transition on each visible issue: (Fig 1.8.1d)
Fig 1.8.1d
MarkeTrak Users Guide – June 4, 2013 Page 44 of 61
Section 1: Overview
8. This will present the option of choosing a Group Number and Group Name in a manner similar to that of the mass transition functionality. However, when assigning issues into groups individually, an incremented Group Number is not generated. This method is designed primarily to allow users to assign issues into preexisting logical groups.
1.9 MarkeTrak Miscellaneous
1.9.1 Auto Close FunctionEach of the workflows in the MarkeTrak application has two states that are designated as Pending Complete (PC). Generally one of these states equates to a successful resolution of the request and one indicates the item is Unexecutable. The issue submitter in both of these is the Responsible MP; they alone have the ability to transition the item to another assignee. If necessary the submitter may also request ERCOT Intervention if they do not agree that the issue is complete as indicated.In the event that the submitter does not transition the item to another owner within a defined period of time (initially 14 calendar days) the issue will auto-transition to state Auto Closed. If the submitter does not agree to the resolution after this transition, a new issue will have to be submitted. Issues cannot be reopened in the MarkeTrak Application.
1.9.2 Notifications
1.9.2.1 Automated Email Notifications
The notification system is comprised of emails sent to MP Administrator assigned contacts. The instruction for designating contacts is detailed in section 1.7 MarkeTrak Rolodex. If triggered, MarkeTrak will generate one email per day per contact type. Contacts are parsed in the tool based on sub type combined with escalation primary or escalation secondary designations in the Rolodex function explained in section 1.7. Included in each notification is an attachment (.csv format) containing issue specific information such as IssueID, Date Submitted, and Date of Last Update. Receipt of these emails is indication that the issue has surpassed the time allotted to complete a transition based on issue sub type. Any issue(s) indicated in the attachment not acted upon (transitioned to a different Responsible MP) before the end of the day will be included in a similar email the follow day.
MarkeTrak Users Guide – June 4, 2013 Page 45 of 61
Section 1: Overview
States are not used exclusively to determine how long a particular MP has owned an issue. This is due to the fact that a Market Participant will typically have each item in a New state followed by an In Progress state. Therefore, MarkeTrak calculates the time an item has had the same Responsible MP. For example, a Cancel with Approval issue is submitted to a state of New with assignee designated as TDSP A. During the time the issue is both New and In Progress, it is pending TDSP approval. After 7 days, in an aggregate of these two states details of this issue would be included in an email to the primary and secondary Day to Day: Other contact for TDSP A. This contact information is available to be edited by MP Admins and viewed by all users in the Rolodex feature. For issues that remain in states of New for more than three calendar days an escalation email will be generated to the primary and secondary responsible contact.
Day to Day Issues:Cancellation:
Escalation after 7 days without transition TDSP Escalation: Siebel Status/Sub-status of the service order should be
Cancelled within 24 hoursInadvertent Switch:
Responsible MP Escalation: after 7 calendar days without transition ERCOT Escalation: 48 hours to update/transition the issue from the “New
(ERCOT)” or “In Progress (ERCOT)” states Losing MP Escalation: The Regaining Transaction Status should be “Scheduled”
or “Complete” within 72 hours of the “Regaining Transaction Submitted”
NOTE: All other D2D Sub Types: Escalation after 28 days
DEV LSE Issues:LSE Variances:
14 calendar days for initial validation and analysis by ERCOT 21 calendar days for analysis and response by TDSP or CR 40 calendar days for ERCOT & CR to take corrective action.
DEV NIDR and IDR Usage Variances: 45 calendar days for TDSP validation and analysis to be completed 30 calendar days for TDSP to send transactions (if necessary) or for CR to manually
update their system (if needed) DEV ESI ID Characteristics:
45 calendar days for TDSP validation and analysis to be completed 30 calendar days for TDSP to send transactions (if necessary) or for CR to manually
update their system (if needed) DEV ESI ID Existence:
calendar days for initial validation and analysis by ERCOT 65 calendar days for TDSP to send transactions (if necessary)
Load Profile Assignment (LPA) Issues:LPA Profile Type:
Escalation after 30 daysLPA Premise Type:
Escalation after 30 daysLPA Zip Code:
Escalation after 45 daysLPA Meter Type:
Escalation after 30 daysLPA Weather Sensitivity:
Escalation after 60 daysLPA Weather Zone:
Escalation after 90 daysLPA Sub-Station:
MarkeTrak Users Guide – June 4, 2013 Page 46 of 61
Section 1: Overview
Escalation after 45 days1.9.2.2 Individual Email Notifications
Each user with access to an item has the ability to manually select a notification related specifically to that individual issue. There are currently six such notifications created. The email address entered in MarkeTrak for the user who selects this option from the Actions: drop down list will be the destination for this email notification. (Fig 1.9.2.2a)
Fig 1.9.2.2a
The available options are:
MT- Issue has gone Pending Complete Email notification will be sent to the user if the issue enters the appropriate Pending Complete state for the workflow to which it is associated.
MT – Issue has gone Pending Complete –UnexecutableEmail notification will be sent to the user if the issue enters the appropriate Unexecutable- Pending Complete state for the workflow to which it is associated.
MT – Issue acknowledged by Assigned MP (Begin Working) Email notification will be sent to the user anytime an MP selects the transition Begin Working which identifies the issue owner.
MT – DEVLSE item went to “Failed Analysis”Email notification will be sent to the user if the DEVLSE issue enters the state Failed Analysis as detailed in the DEVLSE section of this document.
MT – Issue has gone Closed by Submitter (DEV LSE)
NOTE: Email notification will be sent to the user if the Close button was selected on a DEV LSE issue sub-type.
MT – Background Report has been preparedEmail notification will be sent to the user when the background report is complete.
1.9.2.3 Manual Emails
There are three methods of manually sending emails from within a MarkeTrak issue. To send an email to an MP owner on the issue, the user can click on the email icon next to the name and duns number of the intended recipient. This method allows the user to send an email directly to the email address listed on the contact record for that user. The email subject line will include the name and duns number of the sender and the MarkeTrak issue id. (Fig 1.9.2.3a/b)
MarkeTrak Users Guide – June 4, 2013 Page 47 of 61
Section 1: Overview
Fig 1.9.2.3a
Fig 1.9.2.3b
MarkeTrak Users Guide – June 4, 2013 Page 48 of 61
Section 1: Overview
Another method of emailing from within an issue is to select the email icon on the toolbar located on the upper right side of the MarkeTrak issue. This allows the user to find and select a specific contact associated with the issue. The email subject line will include the name and duns number of the sender and the MarkeTrak issue id. (Fig 1.9.2.3c/d)
Fig 1.9.2.3c
Fig 1.9.2.3d
The third method of emailing from within a MarkeTrak issue is to select the exclamation icon also located on the toolbar on the upper right side of the MarkeTrak issue. This allows the user to send an email to the owner of the issue as well as the designated
MarkeTrak Users Guide – June 4, 2013 Page 49 of 61
Section 1: Overview
escalation contacts for the subtype of the issue. The email subject line will include the name and duns number of the sender, the MarkeTrak issue id, and the ESIID on the issue. (Fig 1.9.2.3e/f)
Fig 1.9.2.3e
Fig 1.9.2.3f
MarkeTrak Users Guide – June 4, 2013 Page 50 of 61
Section 1: Overview
1.9.3 Duplicate CheckingThere are two types of duplicate checking in the MarkeTrak system: ESI ID and GLOBPROCID. These checks are designed to help avoid MPs submitting an issue if the same request is already ‘in flight’. A common example of this is an Inadvertent Switch which can be submitted by two CRs and DEVLSE issues which can be submitted by multiple CRs and the TDSP involved. As with the ESI ID Validation described above, the submitter can elect to press OK to continue with submission or Cancel if it is realized that the same request has already been submitted.
1. After the ESI ID validation described in1.9.4, another check occurs exclusively in the MarkeTrak application. If this ESI ID has been submitted on an issue that the current submitting MP has visibility to, a warning message will appear indicating the Issue ID and issue sub type of those issues with a hyperlink to the issue that exist in the live database. Once selected, the issue will open in a new IE window. (Fig 1.9.3a) As detailed in the relevant section of this document, visibility is determined by the current user’s MP Duns being populated in the MPs Involved field of the potential duplicate issue.
2. GLOBALPROCID (or Global_ID) functions in exactly the same manner as ESI ID above with the exception that it only occurs when both an ESI ID and Original Tran ID are included in the submission info. This will most likely occur on Day to Day (D2D) Issues. A duplicate GLOBPROCID message indicates that the exact originating transaction the submitter is requesting has already been submitted against. (Fig 1.9.3b)
Fig 1.9.3a
Fig 1.9.3b
MarkeTrak Users Guide – June 4, 2013 Page 51 of 61
Section 1: Overview
1.9.4 ERCOT Registration System ValidationEach time an ESI ID is submitted on an issue in MarkeTrak, a validation is performed against the ERCOT Registration System. On the first screen after the initial data is entered, a warning message could populate near the top of the Main Browser window indicating that the ESI ID does not exists at ERCOT. This is merely a warning; if the user deems the issue is nonetheless valid the screen can be bypassed by clicking on the OK button. If the user determines the ESI ID entered was entered in error, a corrected ESI ID could be populated and re-validated or Cancel could be selected to discontinue the submit process. A validation is also performed on the original tran ID and the tran ID field. An error will generate if the user attempts to enter invalid data in either of these fields. These fields Tran id field cannot contain special characters.
Below is a demonstration of the message received when the ESI ID submitted does not exist in ERCOT’s Registration System.
Below is an example of the message received when a date is entered into the tran id field.
MarkeTrak Users Guide – June 4, 2013 Page 52 of 61
Section 1: Overview
CR Validation – On Siebel Change/Info issues, if neither the Submitter nor Assignee is the Submitting LSE of the Global ID in ERCOT’S Registration System, an error message will return the following message “The ESIID / Tran ID combination provided is not associated with this CR according to the ERCOT Registration System. Correct and click OK again to continue or Cancel to Abort.”
TDSP Validation – During the Issue Submit if the TDSP returned from ERCOT’s Registration System for the ESIID involved does not match the TDSP on the issue being submitted, it will return the following error message “The ESIID provided is not associated with this TDSP according to the ERCOT Registration System. Please enter a valid ESIID to continue or Cancel to Abort”. This validation will occur on all issue types/subtypes except for Inadvertent Gains – Gaining, Inadvertent Gains – Losing, and 997.
MarkeTrak Users Guide – June 4, 2013 Page 53 of 61
Section 1: Overview
Evaluation Window Validation
1. MarkeTrak has added a validation to verify that the “Cancel With Approval” issue is being submitted within the Evaluation Window for the scheduled transaction.
If transaction type = 814_01(Switch) the Evaluation Window is 1 Business Day prior to the SMRD
If transaction type = 814_16 (Move In) the Evaluation Window is 1 Business Day prior to the SMRD
If transaction type = 814_24 (Move Out) the Evaluation Window is 1 Business Day prior to the SMRD
MarkeTrak will automatically populate the applicable Tran Type to the issue.
o Warning Message: “Issue is being submitted outside of the Evaluation Window and transaction should be canceled using an 814_08.”
1.9.5 Siebel Status and Sub StatusCertain Day to Day (D2D) Issue Sub Types either require or allow the entry of both an ESI ID and Original Tran ID. In these instances a GLOBPROCID (Global_ID) will be created by the MarkeTrak application.
In these instances a Siebel Status and Siebel Sub status will be populated. (Fig 1.9.5a) This will aid both the Submitter and Assignee(s) in determining the proper resolution to the request. Additionally, the Last Siebel Status Retrieval Date is populated. Each of these three fields can be updated at any time via a transition labeled Update Siebel Status/Sub status which is available on all appropriate issues to any of the MPs Involved. The example above demonstrates a use for this data; a Cancel with Approval request has been submitted by a CR. By the time the TDSP received the issue for consideration of approval, the transaction had already cancelled due to an ERCOT Operating Rule. The TDSP could therefore select transition Already Cancelled which would place the request into a Pending Complete state. Should the Siebel Status indicate a pending status for the transaction in question, the TDSP could update the Siebel Status/Substatus via the button indicated above. This would ensure the request is still valid before the user begins work outside of the MarkeTrak application.
MarkeTrak Users Guide – June 4, 2013 Page 54 of 61
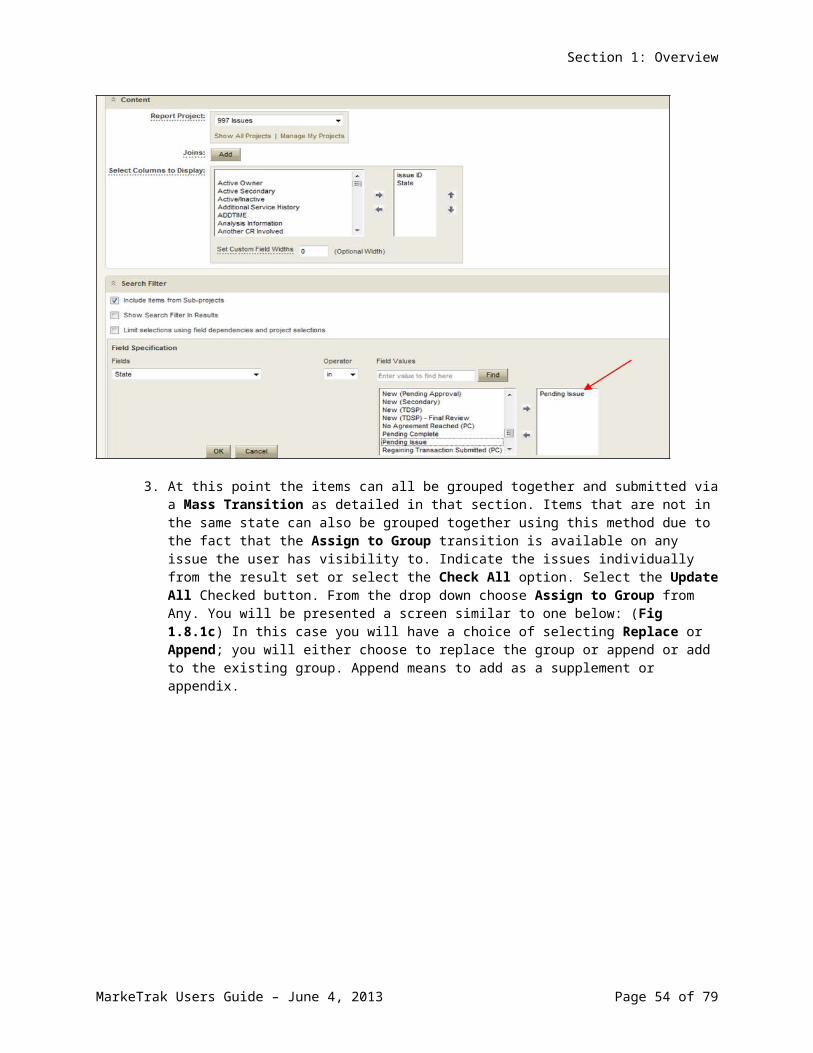
Section 1: Overview
Fig 1.9.5a
1.9.6 Item LockAn item becomes locked in the MarkeTrak application when a transition is initiated and not completed. This typically results from two scenarios. The first one involves a transition that is initiated by a user with necessary rights, but who navigates to another location in the application before completion. A second scenario which would result in an issue being locked begins with the initiation of an invalid transition. There are circumstances in certain workflows in which a Market Participant may have visibility to a transition button but not the right to execute it. This is a result of the visibility and ownership model necessary to meet all business needs of each MP types simultaneously. This will display an error message with the reason for the failed transition. At this point if the user navigates to another location in the application without selecting the Cancel button the item will become locked. An example is provided below: (Fig 1.9.6a)
MarkeTrak Users Guide – June 4, 2013 Page 55 of 61
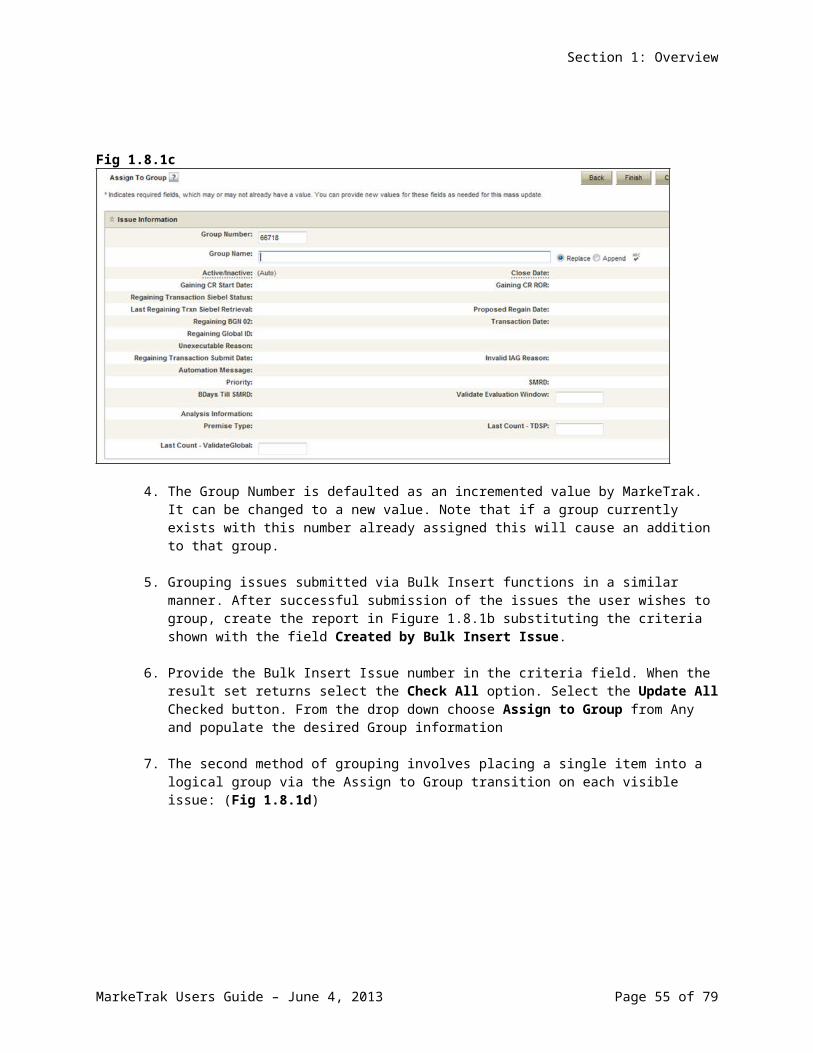
Section 1: Overview
Fig 1.9.6a
Any time an error message such as this is received indicating that the current user is not able to execute a transition, the Cancel button must be selected to avoid locking the item.
If an item has been locked and another user attempts to transition the item, a screen similar to the one below will be displayed. This will indicate that the transition cannot be completed as well as the username of the person who created the lock: (Fig 1.9.6b)
Fig 1.9.6b
If the user who created the item lock does not Cancel the failed transition, the item will unlock itself in one of two ways. Logging out of the application will clear any locks the user has created. In addition, if the user closes the browser the MarkeTrak application is on the item will automatically unlock itself after a predetermined amount of time.
1.9.7 Auto Logoff
For any user that is inactive (not selecting any buttons in the application) for 2.5 consecutive hours the system will automatically log you off.
1.9.8 Issue Archiving
MarkeTrak Users Guide – June 4, 2013 Page 56 of 61
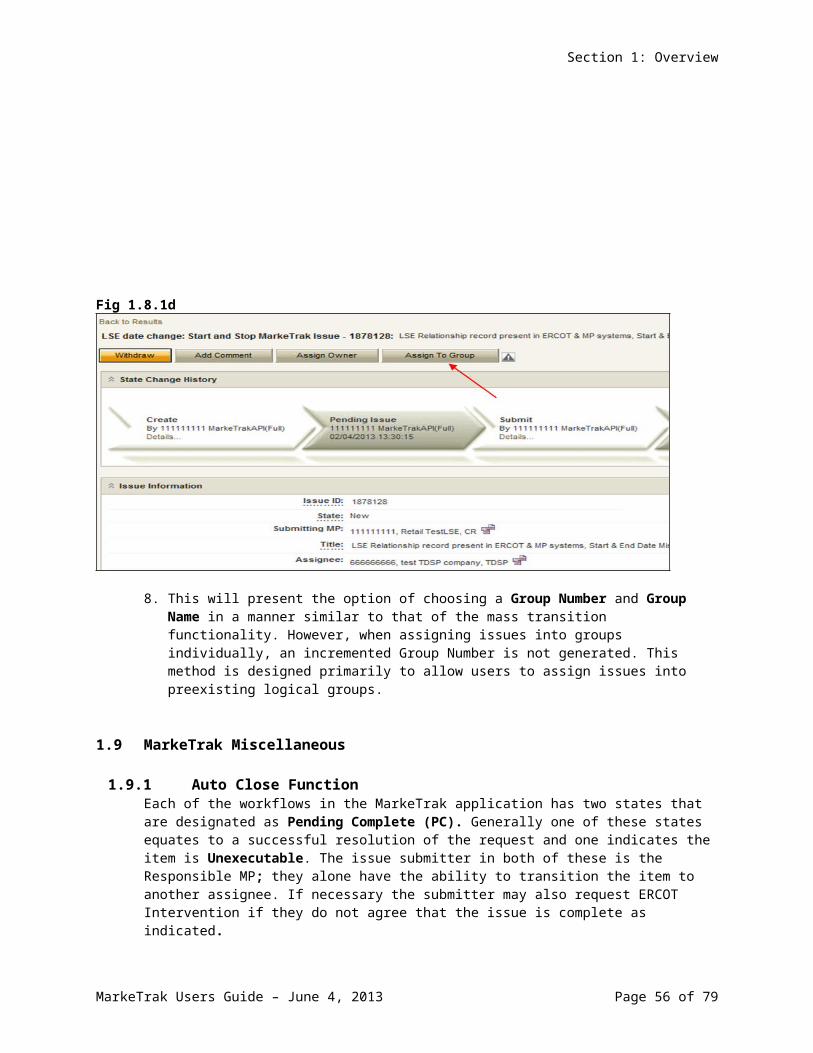
Section 1: Overview
The MarkeTrak Application will archive any issue that has been closed for 7 months. Archived issues will not be returned in normal reports and searches executed thru the MarkeTrak GUI or API.
To access data about archived MarkeTrak issues, users should utilize the Background Reporting feature and in the Data to Return: radial parameter, select either Archived or Both. Selecting Archived will return only those issues which fit the parameters selected in the report that are archived. Selecting Both will return all un-archived (or Live) data as well as archived issues which fit the rest of the parameters provided in the Background Report.
NOTE: Issues which have been Closed by ERCOT will not return potentially proprietary issue details whether accessed from the Archive or Live production data.
1.10 Day to Day (D2D) Issues
1.10.1 What Constitutes a MarkeTrak D2D Issue?
There are many possible scenarios that may require the logging of a MarkeTrak. The following list provides only a small sampling of some of these scenarios.
1. CRs Questions pertaining to why an ESIID is not in ERCOT system Questions pertaining to Inadvertent Gains Questions pertaining to Siebel Reports Questions pertaining to Rejected transactions Questions pertaining to request for filenames Questions pertaining to 997 reports Questions pertaining to transaction status updates Questions pertaining to CSAs Questions pertaining to Reject Reasons (i.e. why a CR received a “Not First In” response
to transaction they submitted Questions pertaining to missing usage transactions Questions pertaining to whether or not ERCOT received a specific transaction Questions pertaining to a premise type Questions pertaining to a particular service address
2. CR or TDSP Requests for cancellation of transactions Questions pertaining to why a transaction was cancelled Questions pertaining to missing information on non-required EDI fields Request for processing of transactions Questions pertaining to Texas SET Questions pertaining to who ERCOT shows as the Rep of Record in ERCOT system Questions pertaining to the processing time of transactions (Protocols) Questions pertaining to MIS Questions pertaining to point-to-point transactions (such as 810s) with TDSPs, excluding
the 867 Contingency Plan Questions pertaining to service order – 650 transactions
3. TDSP Questions pertaining to Siebel not reflecting the correct status based on that the TDSP
has submitted Requesting a CR to follow up with a backdated MVI pertaining to a safety net
order request Requesting a CR to follow up with a MVO due to a meter removal
MarkeTrak Users Guide – June 4, 2013 Page 57 of 61
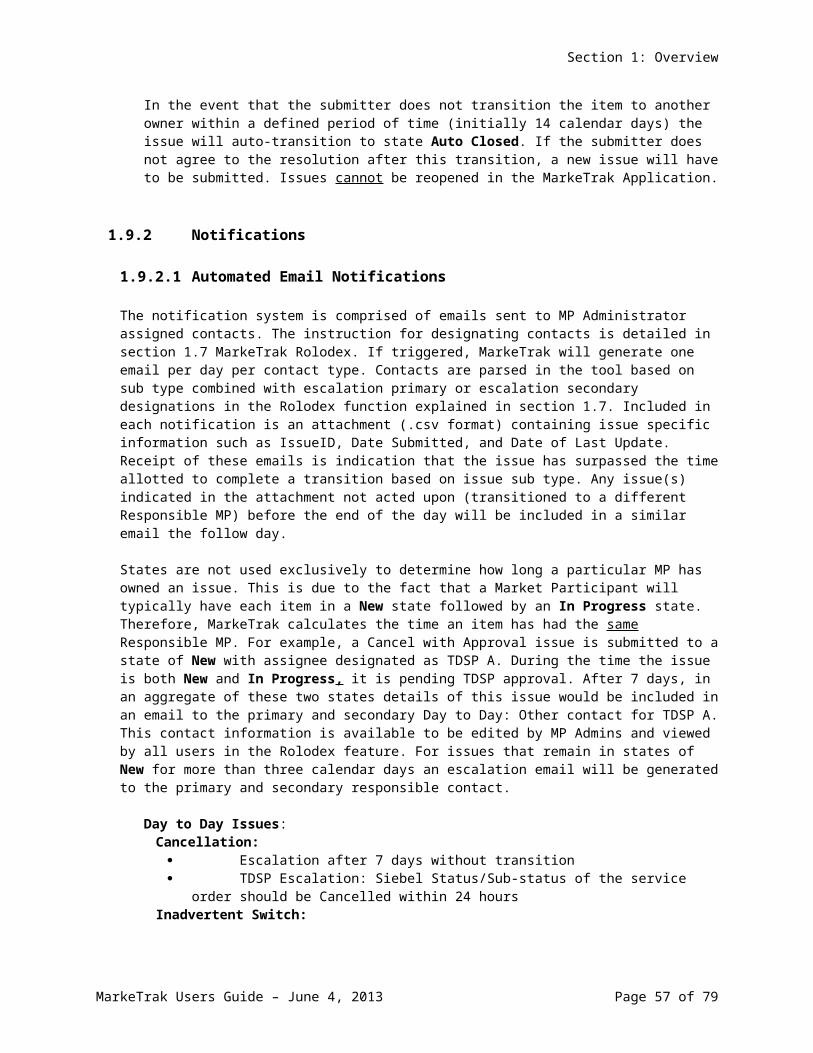
Section 1: Overview
1.10.2 Day to Day Issue Guidelines
1.10.2.1 Validating Issues
Before Submitting a D2D issue, MPs must validate the issue against the market reports and market resource:
Service order Full Extract Reporto Located on the Market Information System website (MIS)
ERCOT MIS ESIID Look-Up/Transaction Look-Up ERCOT Market Participant (MP) Transaction Report
o Located in the FTP Reports Mailbox for each Market Participant
1.10.2.2 Submitting Issues
A MarkeTrak issue shall be opened one ESI ID per issue. An issue with multiple ESIID’S noted in the comments or provided in an attachment shall only be resolved for the ESI ID noted in the ESI ID field of the issue. A note shall be added to the comments to state that the remaining ESI ID’S must be submitted individually.
NOTE: To submit multiple issues at one time, refer to the Bulk Insert Process Section 8.
1.10.2.3 Working Issues
ERCOT D2D issues received by noon will be worked in the queue (from New to In Progress or further along in the workflow) by 5:00 p.m. the same business day. ERCOT D2D issues received after noon will be worked in the queue by noon the next business day.
Within seven (7) business days after a MarkeTrak issue is created, the issue shall be reviewed, analyzed and resolved by the responsible MP (or ERCOT) to whom the issue is assigned. If the MP (or ERCOT) cannot resolve the issue within seven (7) business days, the MP (or ERCOT) shall provide a weekly update by adding a comment, not transitioning until the issue is resolved.
ERCOT utilizes automated processes to populate data and execute transitions on certain high volume issue types. When this automation is disabled, these issues enter ERCOT’s queue and are worked manually. ERCOT will send a Market Notice to the GUI and API listserves advising that the automation has been disabled.
1.10.3 Day to Day Issues Required Fields
1.10.3.1 Day to Day Required Fields
Refer to Section 10_Appendix – MarkeTrak “Bulk Insert” Method Appendix A – D2D Issues
MarkeTrak Users Guide – June 4, 2013 Page 58 of 61

Section 1: Overview
1.10.3.2 Field Descriptions
Field Max Length/Field DescriptionActive/Inactive Active, Inactive
Assign To Pending?Leaves the issue in a Pending State with the Submitter
Assignee MP DUNs, Name, TypeAssignee Company Duns Text - max of 4000 charactersAssignee Group Name Text - max of 80 charactersAssignee Group Number Any integerAssignee MP Owner MarkeTrak Contact
Bday till SMRDBusiness days till the Scheduled Meter Read Date
Category ERCOT Initiated Issue Close Date Example: 05/02/2006 16:26:45 (19 characters)Comments Text - max of 4000 charactersCR Association Validation Bulk Insert/API - ErrorDescription Text - max of 4000 charactersDispute/Missing? Dispute or MissingERCOT Group Name Text - max of 80 charactersERCOT Group Number Any integerERCOT Owner MarkeTrak ContactESI ID Text - max of 36 charactersException Code Text - max of 5 charactersESIID Duplication Check Bulk Insert/API: 0=false or 1=trueESIID Validation Bulk Insert/API: 0=false or 1=trueEvaluation Window Validation Bulk Insert/API: 0=false or 1=trueFirst Touched Date Example: 05/02/2006 16:26:45 (19 characters)First Touched by TDSP Example: 05/02/2006 16:26:45 (19 characters)Gaining CR ROR Yes or No Gaining CR Start Date Example: 05/02/2006 00:00:00 (19 characters)Gaining MP MP DUNs, Name, TypeGaining MP Group Name Any IntegerGaining MP Group Number Text - max of 80 charactersGaining MP Owner MarkeTrak ContactGLOBPROCID Text - max of 128 charactersGroup Name Text - max of 80 charactersGroup Number Any integerGS Number Text - max of 9 charactersIDR/Non-IDR IDR/Non-IDRISA Field Text – max of 9 charactersIssue ID Text - max of 16 characters
IssueStatusNew, Working, Withdrawn, Pending Complete, Closed
IssueAvailableDate Example: 05/02/2006 16:26:45 (19 characters)Issue Type List of Issue TypesInvalid IAG Reason List of IAG ReasonsLast Count – ESI ID Any integerLast Count – Global ID Any integer
MarkeTrak Users Guide – June 4, 2013 Page 59 of 61
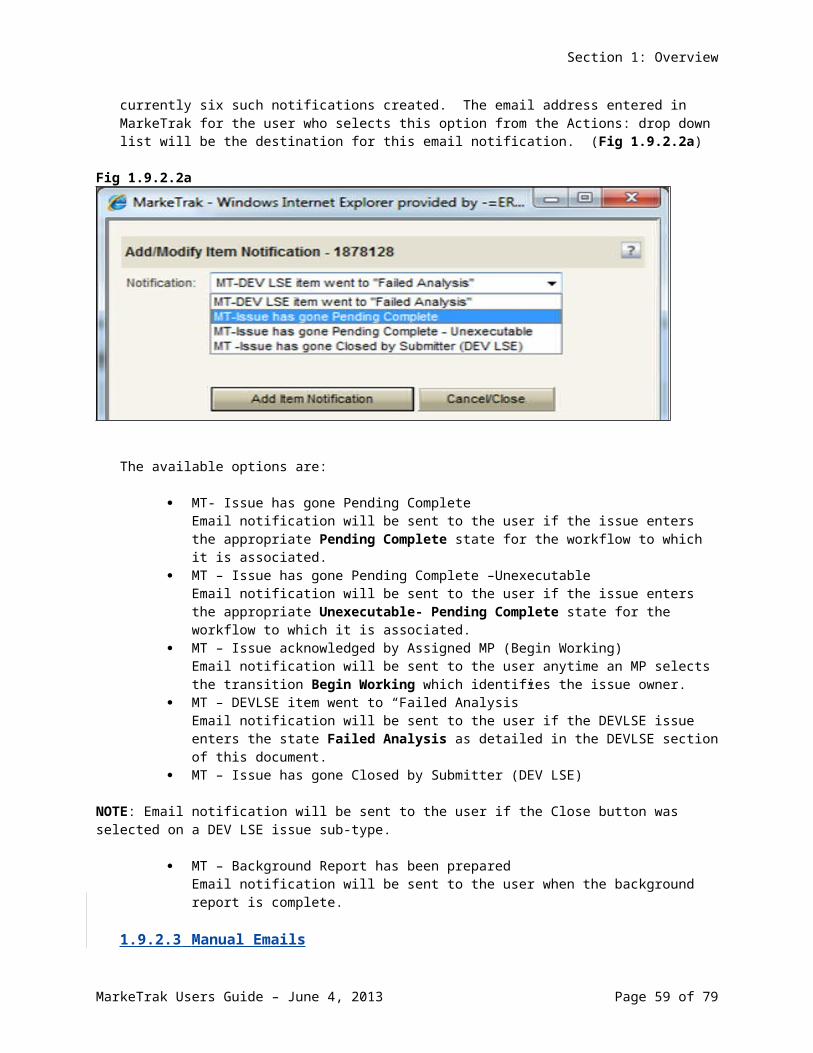
Section 1: Overview
Last Modified Date Example: 05/02/2006 16:26:45 (19 characters)Last Modifier MarkeTrak ContactLast New Date/Time Example: 05/02/2006 16:26:45 (19 characters)Last Regaining Trxn Siebel Retrieval Example: 05/02/2006 16:26:45 (19 characters)Last Siebel Status Retrieval Date Example: 05/02/2006 16:26:45 (19 characters)Last State Change Date Example: 05/02/2006 16:26:45 (19 characters)Last State Change MarkeTrak ContactLosing MP MP DUNs, Name, TypeLosing MP Group Name Text - max of 80 charactersLosing MP Group Number Any integerLosing MP Owner MarkeTrak ContactMeter Removal Date Example: 05/02/2006 16:26:45 (19 characters)MPs Involved Company in MarkeTrakNew Premise Type Text - max of 64 charactersNew Service Address Text - max of 80 charactersNew Service City Text - max of 80 charactersNew Service State Text - max of 2 charactersNew Service Zipcode Text - max of 5 characters New ZIPCODE Text - max of 5 charactersNumber Of Rows TextOrigin Text - max of 64 charactersOriginal Tran ID Text - max of 30 charactersOwner MarkeTrak ContactOwner To Assign Text - max of 64 charactersParent Issue Number Text – max of 16 charactersPremise Energize Date Example: 05/02/2006Premise Type Text - max of 64 charactersPriority Flag SMRD <= 2 then set to “Yes”Proposed Regain Date Example: 05/02/2006 00:00:00 (19 characters)Regaining BGN 02 Min/max length – 1/30 charactersRegaining BGN Requested Date Example: 05/02/2006 00:00:00 (19 characters)Regaining BGN Priority Code Text - max of 5 charactersRegaining Transaction Siebel Status Text - max of 80 characters Regaining Transaction Submit Date Example: 05/02/2006Reject Code List of Reject CodesREP CODE Text - max of 5 charactersRequested Move In Date Example: 05/02/2006Responsible MP MP DUNs, Name, TypeReturn CR DUNS Text - max of 80 charactersReturn TDSP DUNS Text - max of 80 charactersSecondary Owner MarkeTrak ContactService Address Text - max of 80 charactersService City Text - max of 80 charactersService State Text - max of 2 charactersService Zipcode Text - max of 5 characters Siebel Status Text - max of 80 charactersSiebel Substatus Text - max of 80 charactersSMRD Example: 05/02/2006Source GUI, API, Bulk InsertSpreadsheet Submit Date Example: 05/02/2006 16:26:45 (19 characters)
MarkeTrak Users Guide – June 4, 2013 Page 60 of 61
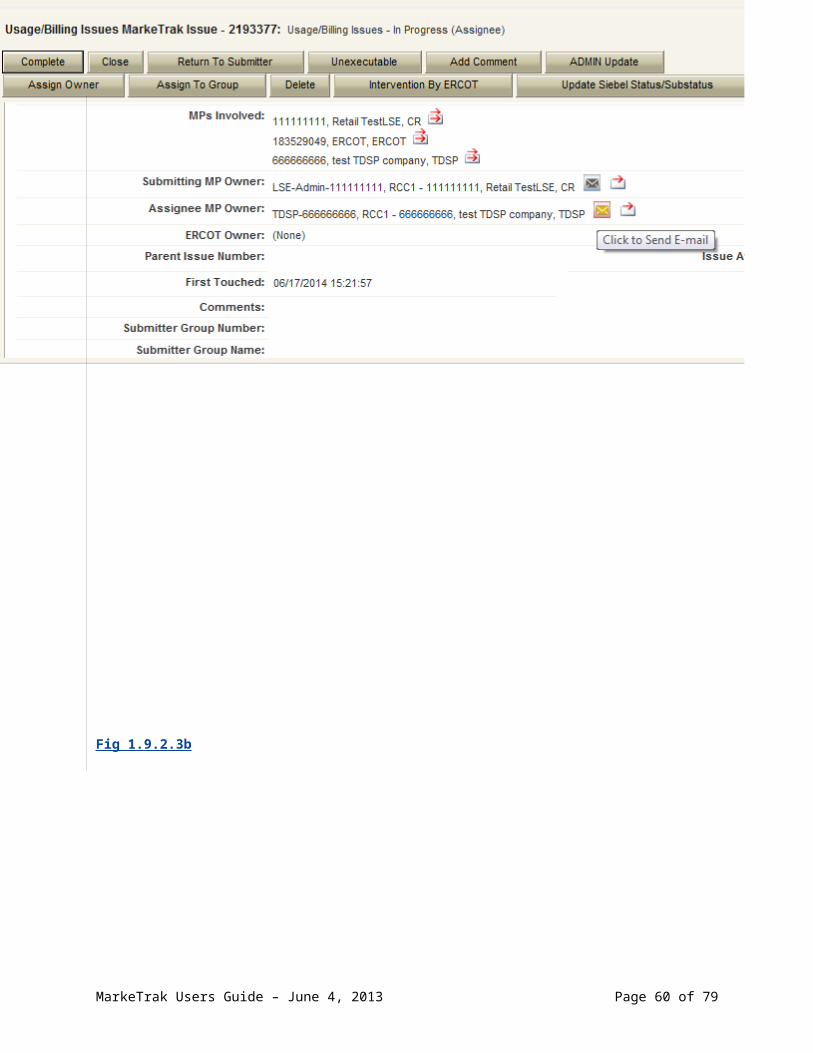
Section 1: Overview
State Text - max of 64 charactersSTATUS Text - max of 64 charactersSubmit Date Example: 05/02/2006 16:26:45 (19 characters)Submitter MarkeTrak ContactSubmitter Group Name Text - max of 80 charactersSubmitter Group Number Any integerSubmitting Company DUNS Text - max of 80 charactersSubmitting MP MP DUNs, Name, TypeSubmitting MP Company Text - max of 80 charactersSubmitting MP Owner MarkeTrak ContactSubmitting MP Type Text - max of 80 charactersSubmitting MP_DUNS Number Text - max of 64 charactersSubstation Percent Numeric – max of 11 charactersSub-Type All MarkeTrak Issue Sub-TypesSub-Types All MarkeTrak Issue Types and Sub-TypesTDSP Group Name Text - max of 80 charactersTDSP Group Number Any integerTDSP Involved DUNSTDSP Involved Owner MarkeTrak ContactTDSP Validation Bulk Insert/API: 0=false or 1=trueTIMESTAMP Example: 05/02/2006 16:26:45 (19 characters)Tran ID Text – max of 30 charactersTransaction Date Example: 05/02/2006 16:26:45 (19 characters)Tran Type List of valuesTXN Date Example: 05/02/2006 (10 characters)Unexecutable Reason List of Unexecutable ReasonsZIP Text - max of 5 characters
MarkeTrak Users Guide – June 4, 2013 Page 61 of 61