manufacturer of electronic weighing instruments...
TRANSCRIPT

Instruction number PTI-16-03/09/06/A
MANUFACTURER OF ELECTRONIC WEIGHING INSTRUMENTS RADWAG 26 – 600 Radom Bracka 28 Street Phone +48 48 38 48 800, phone/fax. +48 48 385 00 10 Selling department +48 48 366 80 06 www.radwag.com

- 2 -
September 2006

- 3 -
Contents 1. APPROPIATION.............................................................................................. 4 2. KEYBOARD..................................................................................................... 5 3. KEYS FUNCTIONS ......................................................................................... 6 4. TURN ON AND SERVICE ............................................................................... 7 5. WEIGHING ...................................................................................................... 8
5.1. MULTI-RANGE BALANCE...................................................................... 8 6. TARE AND SETTING TO ZERO ..................................................................... 9 7. COOPERATION WITH LABELS PRINTER................................................... 10 8. WEIGHING WITH AVERAGE RESULT <AUE> ............................................ 11 9. DEGREE OF FILTER <FIL> .......................................................................... 11 10. SETT-UP SPEED OF TRANSMISSION <bod> ........................................... 12 11. COUNTING PIECES WITH THE SAME MASS ........................................... 13 12. CONTROL +/- ACCORDING TO MASS OF MEASUREMENT STANDARD <StEPS> ............................................................................................................ 16 13. CALIBRATION (option)................................................................................ 17 14. SETT-UP KIND OF WORK RS 232 (manual/ automatic work) <rEPL>....... 19 15. CONSTANCE TRANSMISSION .................................................................. 19 16. ADDITIONAL WEIGHTS <Add> .................................................................. 20 17. DEFINITE SENT DATA AS STABLE/NOT STABLE <StAb>....................... 21 18. AUTOZERO FUNCTION ............................................................................. 22 19. AUTOMATIC TURN BALANCE OFF........................................................... 22 20. MEASUREMENT OF MAXIMUM POWER OF PRESSURE ON PAN [N] („THUMBLOCK”)................................................................................................ 23 21. PROJECTION OF SUPPLY VOLTAGE OF SCALE <SuPP >.................... 24 22. MEASUREMENT IN LB UNITS ................................................................... 24 23. COOPERATION WITH PRINTER................................................................ 24 24. COOPERATION WITH COMPUTER........................................................... 25 25. ORDERS ABOUT ERRORS........................................................................ 25 26. LIST OF ORDERS IN SCALE...................................................................... 26 27. PREPARATION TO WORK ......................................................................... 27 28. TECHNICAL PARAMETERS....................................................................... 27

- 4 -
1. APPROPIATION
Scales are appropriate for fast and precise measurements. Setting to tare in all measure range enables to define net mass of weighed loads.
Softwares of scales enable to make two ranges scales. Additional dot in down part of display signals moving into second range of weighing. Additional functions of the scale:
− Sum functions <Add> − Weighing with average the result of weighing <AUE> − Degree of filter <FIL> − Counting pieces <PIECE> − Control +/- in relation to mass of defined model <StEPS> − Calibration < calibr> (only for not verified scales) − Automatic or manual printout <rePL> − Possibility of printout unstable results <STAB> (Option for not verified
scales) − Weighing loading with ON autozero set - <Auto> (Option for not
verified scales) − Measurement of max power of pressure on a pan [N] or max mass
which lays on the pan [g] or [kg] („thumblock”) <toP> (Option for not verified scales)
− Measurement in ,,lb” − Checking voltage in supplying scale <SuPP> − Cooperation with Eltron label printer − printout results measurements on any printer that cooperates with
computer (RS232) with following possibilities sett-up speed of transmission in range of 300 - 9600 bit/s <bod>
− automatic or manual printout <rEPL> − Possibility of printout unstable results <StAb> (Option for not
verified scales)

2. KEYBOARD
balance in mode working „parts counting",
Set deviation % of weighing product regarding mass master;
Measurement in lb
Measurement of max power of pressure on a pan [N] or max mass which lays on the pan [g] or [kg] („thumblock”)
balance in mode "weighing"
Readout equal exact zero,
stable measurement result,
Tara was used,
balance in second range of weighing,
balance in triple range of weighing,
- 5 -

Weighing result below I threshold
Weighing result between threshold
Weighing result above II threshold
3. KEYS FUNCTIONS
Button Function
Turn on/off display
Set-up functions
Send informations by RS joint
Set-up to zero
Tare scale
Attention: After press F key all functions of each key are changed for time of sett-up functions. Way of how to use them is described in further part of instruction.
- 6 -

4. TURN ON AND SERVICE Unpack balance, put balance on stable flat ground far from sources of heat. Level balance by means of regulation legs and level (in basic under scale) and install scale. To get level indication (bubble of air is central position) turn regulation legs. Put the plug of supplier on to socket, press key ON/OFF and wait until test of scale is finished. Indication of 0 mass appears on display:
1 balance shows precise zero
2 stable result of measurement
3 balance in weighing mode
balance is ready to work
COOPERATION WITH ZR-01 SUPPLIER. Operating conditions are signalized by two LED’s:
green LED red LED Operating procedure blinking shining Battery pack has been charged
shining Switched off charging, connected to the mains
Switched off blinking Norma operation without charging (disconnected from the mains)
Switched off shining Battery pack discharged (connect to the mains)
shining shining Battery fuse blown (inside the indicator) Switched off Switched off Scale switched off
- 7 -

5. WEIGHING
Put load on the scale. Time of stabilization is about 3s.
5.1. MULTI-RANGE BALANCE For the balances made as dual range version all functions and possibilities of setting are accessible the same as for one range balances. Switching between ranges is done automatically without operator’s interference. Marking for weighing in the II measuring range is in the upper part of the display.
Procedure of the multi-range balance If the load is increased on the pan the load is weighed with accuracy for I sub range. If the limit is exceeded switching between accuracies is done automatically – the load is weighed with II sub range accuracy. Return to weighing in I sub range accuracy is possible if there is no load on the pan and the balance show precise zero.
- 8 -

6. TARE AND SETTING TO ZERO
To define net mass put container on scale and after stabilization - press TARE (mass indication returns to zero, sing appears on display). Net mass appears on display after putting load on scale.
Tara can be done many times in all measure range of scale. It’s not allowed to exceed max measure range. After taking load and container off summary of tared mass with minus sign appears on display.
Setting to zero Setting stage of display to zero is possible only in range to ± 2% of max capacity of balance. If this value is higher than ±2% of max capacity display shows order <UAL 4>. Setting to zero is possible only with stable stages on display. Setting to zero is the same as defining new zero point which is precise zero for scale.
- 9 -

7. COOPERATION WITH LABELS PRINTER Connect the balance with KDU keyboard and connect the keyboard to the printer. Press the F button. EL appears on the display of the balance.
Press the PRINT button. Display show state for this function. Press the PRINT button again. The EL function has 1 value. To confirm press the F button.
Select the label from the KDU keyboard to print. This label must have designed one variable (16 signs) with characteristics When Printed (during printout). Put the load on the pan and press the PRINT button on the overlay. On the display of the KDU keyboard order with question how many labels should be printed appears. Introduce the value and press the ENTER button on the KDU.
- 10 -

- 11 -
8. WEIGHING WITH AVERAGE RESULT <AUE>
Result of weighing from few measurements is presented as average. It’s help full when conditions of work are not stable (vibrations, waves). To get result of measurement with assumed precision it’s necessary to use digital filter with higher stage.
Procedure: • press F key repeatedly, till AUE appears on display • press PRINT key or one of following number which is equivalent
chosen amount of average 1 - average I result of digital filter stage 2 - average II result of digital filter stage 3 - average III result of digital filter stage 4 - average IV result of digital filter stage 5 - average V result
• press F key to confirm choice. Balance return to weighing. Notice: Increase stage of average makes times of weighing longer.
9. DEGREE OF FILTER <FIL>
In order to make operation of balance comfortable parameter of setting size of filter is introduced in additionally. This parameter has influence on stability of result depending on conditions in place of usage. Procedure:
• Press F key many times until order FIL appears on display: • By pressing PRINT key choose one of following numbers that refers
to chosen step of average:
1 – I step of filter 2 – II step of filter 3 – III step of filter 4 – IV step of filter
• Press F key to confirm the choice. Balance return to weighing.
Notice: Increase of step of filter causes extension of time

- 12 -
10. SETT-UP SPEED OF TRANSMISSION <bod>
External mechanism connected to socket RS 232 has to be supplied from common net f.eg. with common protection against shock (lack of difference of electric potencial on conductors of balance and attached mechanism).
Parameters of transmission recorded in balance • Speed of transmission - 4800 bit / s • Data bits - 8 • Stop bit - 1 • Control of parity - lack.
Value shown on balance display can be sent to external mechanism by connection in one of three ways:
• Manually – after press PRINT key • Automatically – after stabilization enunciators • For request of external mechanism – see additional functions „List
of orders balance - computer”. Value on display can be sent by connection as: − stable – start sending information after stabilization result of
weighing
− not stable
Way of setting speed of transmission:
− Press F key repeatedly until order bod appears on display − Press PRINT key repeatedly until number of chosen speed of
transmission appears on display
bod 1 - 300 bit / s, bod 2 - 600 bit / s, bod 3 - 1200 bit / s, bod 4 - 2400 bit / s, bod 5 - 4800 bit / s, bod 6 - 9600 bit / s,
− Confirm by pressing F key.

11. COUNTING PIECES WITH THE SAME MASS
Scale in standard made is provided with option of counting small pieces with the same mass. Function of counting pieces doesn’t work with other functions of scale.
To use this function:
• Put package on scale and tare its mass to balance memory - TARE, appears sing NET on display, near description Net. There will be small elements put into the box.
• Put as many elements to scale as many we declare as batch quanta in package
• Press F key until order PIECE appears on display • Press key PRINT to start set up batch quantity
• Press F key - choose value (you can select from 10, 20, 50pcs or free definable)
• If you want to start the counting pieces function, please choose one of the values, eg. 20 pcs and press PRINT key
- 13 -

• After displaying of LoAd information, please put on the pan of the balance as many pieces as have been chosen (20pcs).
• If option Free was chosen, the display will show the number of pieces with flashing of the first digit – you should inscribe as many pieces are in the mass pattern
• set up batch quantity by means of keys TARE – choose digit
PRINT – choose value
- 14 -

• confirm by pressing key F - LOAD appears on display
• after making sure that batch with declared quantity is put on scale confirm by key PRINT once again - balance displays Process, and then amount of elements and PCS.
• after adding or take counted elements off scale their amount appear on display
Return to weighing mode
• press key F many times until - PIECES appears on display
• press TARE key
Balance return to weighing mode and diode with kg or lb mark starts flashing
Attention: 1. If you choose batch quantity remember that precision of counting depends on
metrological parameters of balance and on repeatability of mass singular counted elements.
2. Result of measurement is more precise if batch quantity is bigger 3. If summary mass of batch quantity is less than 5 reading divisions (5d) – balance
shows order about error -LO- and return to weighing automatically.
- 15 -
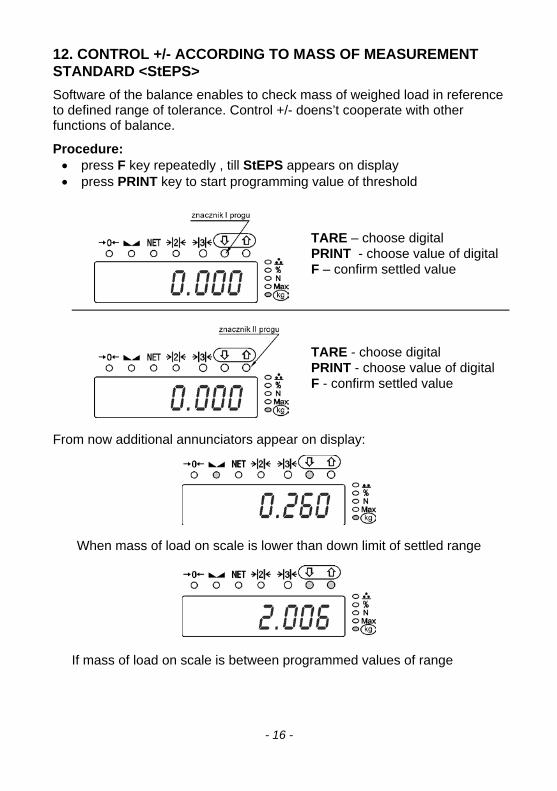
12. CONTROL +/- ACCORDING TO MASS OF MEASUREMENT STANDARD <StEPS>
Software of the balance enables to check mass of weighed load in reference to defined range of tolerance. Control +/- doens’t cooperate with other functions of balance.
Procedure: • press F key repeatedly , till StEPS appears on display • press PRINT key to start programming value of threshold
TARE – choose digital PRINT - choose value of digital F – confirm settled value
TARE - choose digital PRINT - choose value of digital F - confirm settled value
From now additional annunciators appear on display:
When mass of load on scale is lower than down limit of settled range
If mass of load on scale is between programmed values of range
- 16 -

When mass of load on scale is bigger than upper limit of defined range ATTENTION:
If the limits of range are sett-up in wrong way (value of down limit is bigger than value of upper limit of range) balance shows order about error -LH- and returns to weighing mode.
Return to weighing mode: • press F key repeatedly till order StEPS appears on display • press TARE key
13. CALIBRATION (option) To assure very precise weighing introduce correction factor to balance memory – it’s calibration. Scales have system of external calibration. Procedure
− press F key repeatedly, until Calibr appears on display − press PRINT key to activate calibration function
− following order appears on display
- 17 -

− order put calibration weight with defined mass on scale − press PRINT key − following order appears on display
− when calibration is finished display will show
− Take calibration weight off scale Notice:
1. Take the load off the pan before the calibration 2. Calibrate the balance with the mass presented on the
display 3. if user does not follow the instruction in p.2 the balance can
be damaged
- 18 -

- 19 -
14. SETT-UP KIND OF WORK RS 232 (manual/ automatic work) <rEPL>
Procedure: − Press F key many times until order rEPL appears on display − Press PRINT key many times until one of orders appears on
display:
rEPL 0 – manual work (after pressing PRINT key) rEPL 1 – automatic work (after stabilization result of
weighing) − Confirm by pressing F key.
15. CONSTANCE TRANSMISSION
Turn on and turn off the continuous procedure is possible with suitable commands sent to balance from the computer through RS 232 (see the commands balance-computer, point 24).
Procedure for keyboard scale − many times press F, on a display you will see:
Pr_c
− with key PRINT chose one of two possibilities: Pr_c 0 (manual printouts) Pr_c 1 (continuous work)
− approve with F.

16. ADDITIONAL WEIGHTS <Add>
This function is used to add weights made in sequence with possibility of print particular weight and total summary.
PROCEDURE: - Press the F button until the Add appears on the display - Press the PRINT button - Settled value of the parameter „0” appears - Press the PRINT button again the set the value for „1” - Press the F button - The software returns to weighing with using function ADDITION (at
the left side of the display „P” appears)
- Put first load on the pan
- After stabilization press the PRINT button, sum of weights will be
displayed (the „r” at the left side of the display), result of weighing is printed on the connected.
- Take the load off the pan, the balance returns to ZERO and the „P” letter at the left side of the display
- Put following load on the pan
- 20 -

- After stabilization of the result press the PRINT button, balance
shows sum of the first and the second weights and result of the second weight is printed on the connected printer
- To finish addition of weights press the PRINT button at the moment of displaying total, sum of all recorded weights on the printer and the balance return to mode of basic weighing automatically (function Add is set up for the „0”value).
- To use this function again repeat the procedure as described above. Notice: If the range of displaying mass is exceeded the balance shows the F letter at the left side of LED display. In this case set the display to zero and repeat the procedure of addition. Pay attention not to exceed the display range. Return to weighing mode:
- Press the F button repeatedly until command Add appears on the display
- Press PRINT button and set Add 0 - Confirm by pressing F key
17. DEFINITE SENT DATA AS STABLE/NOT STABLE <StAb>
(Option for not verified scales) Procedure:
− Press F key repeatedly until order Stab appears on display. − by means of PRINT key start programming functions − by key F choose one of two values
STAB 0 – sending stable result of weighing
STAB 1 - sending temporary result of weighing
− Confirm by key PRINT
- 21 -

18. AUTOZERO FUNCTION
(Option for not verified scales) To have precise readouts from balance we have function AUTOZERO. This function is to control and correct zero of balance showings – thanks to this measuring always begins from exact zero. There are special cases when this function disturb when measuring. For example when putting very slowly loading on the pan. Correction set of showing zero, can correct also readouts of real mass of loading. In this case there is possibility to block this function. Procedure: − many times press F, on a display you will see:
AUTO − with key PRINT chose one of two possibilities:
AUTO 0 (function AUTOZERO ON) AUTO 1 (function AUTOZERO OFF)
− approve with F.
19. AUTOMATIC TURN BALANCE OFF
This function is necessary to save-up the battery. The scale switches off if no weighing is done during last 5 minutes (function t1 = 0). This function can be switched off if it disturbs in work or if the supply is before.
Procedure:
- press the F button until command t1 appears on the display
- 22 -

- press the PRINT button to select one of two values:
t1 0 - function „Automatic turn off” is active (for battery and accumulator work)
t1 1 - function „Automatic turn off” is not active (recommended for net work)
- to confirm press the F button 20. MEASUREMENT OF MAXIMUM POWER OF PRESSURE ON PAN [N] („THUMBLOCK”) (Option for not verified scales) Procedure: − many times press F, and the display shows :
toP − pressing PRINT, choose setting:
toP 1 balance in work mode measurement maximum power or mass, toP 0 balance in work mode in kg (g)
− approve with F Approving choice with toP 1 is displaying sign Max on the top of the display − if readout is different than zero, two times press TARE, − put on a pan changable power - on a display will be snapped max
value of power − before next measurement pres two times TARE.
Come back to weighing: − many times press F, display shows: toP − pressing PRINT, choose setting: toP 0 − approve with F.
- 23 -

- 24 -
21. PROJECTION OF SUPPLY VOLTAGE OF SCALE <SuPP >
Checking supply voltage on main board of balance. Voltage is shown in Volts.
Procedure: − Press F key repeatedly until order SuPP appears on display − Activate monitoring of supply voltage by PRINT key − To return to weighing press F key
22. MEASUREMENT IN LB UNITS Procedure: − many times press F, display shows:
lb − press PRINT, choose setting:
lb 1 (balance in work mode in [LB]), lb 0 (balance in mode work in kg).
− approve with F. 23. COOPERATION WITH PRINTER
Every press PRINT key makes sending signal to printer. Signal refers to actual state of display with measurement units (if balance has RS 232 joint installed).
Depending on setting parameter StAb it can be printout of stable or temporary value. Depending on setting parameter rEPL printout can be automatic or manual. One of thermal printers KAFKA series can cooperate with every balance:
23.1. KAFKA Printout of result of weighing with measure units is possible.
23.2. KAFKA 1/Z This printer has internal clock of real time. Time and date can be printed after connect printer to supply net.

23.3. KAFKA SQ S There are clock of real time and possibility to make statistics measurement in this sprinter. Statistics contains: Batch quantity, Summary of mass all samples, average value, standard deviation, variation factor, min value, max value, difference in max - min
24. COOPERATION WITH COMPUTER Sending results of weighing to computer can be done:
− manually – after pressing PRINT key − automatically – after stabilization result of weighing (If rEPL 1 and
balance was in autozero zone before put load on the scale) − For demand of computer – see “list of orders in RADWAG scales”
25. ORDERS ABOUT ERRORS
NULL - range of A/D converter performance is over passed from below FULL 1 - range of A/D converter performance is over passed from above FULL-2 - range of weighing is over passed - LH - - start mass is over passed (at the moment of turning balance on) ±
10% of max range of weighing VAL 4 - setting to zero outside range of ± 2% max mass in relation to start
mass -VAL - tare negative value
- 25 -

- 26 -
26. LIST OF ORDERS IN SCALE
Function - TARA (when TARE was pressed) Format - T CR LF Appropriation - setting to zero
Function - ZERO (key →0← was pressed on) Format - Z CR LF Appropriation - setting to zero.
Function - automatic work starts (function rEPl on value 1) Format - S0 CR LF Appropriation - sending this order to balance makes setting function
rEPl on value 1.
Function - automatic work is stopped (function rEPl on value 0) Format - S1 CR LF Appropriation - sending this order sett-up function rEPl on value 0. Function - PRINT ( PRINT was pressed on) Format - S I CR LF Appropriation - sending this order to balance makes return sending
contain of display register. Function - CONTINOUS TRANSMISSION Format - C1 CR LF Destiny - Start continuous transmission. Function - CONTINOUS TRANSMISSION Format - C0 CR LF Destiny - End of continuous transmission If FULL2 is shown on display balance in place of contains sends S + CR LF. If order with error or which is not in register but finished with CR LF balance send return order E S CR LF. Attention! Spaces in formats should be omitted. They are to makes readable better.

27. PREPARATION TO WORK 27.1. One load cell platform scales Take the scale off the package, then put the balance in the place of usage on flat and stable ground far from the sources of heating.
Levelling the scale To do the measurements correctly level the scale. Take the pan off carefully (without rapid pulls and hits) and turn the legs in order to level the balance.
After leveling the scale put the pan on the base of the scale. 28. TECHNICAL PARAMETERS
Type: WTC
15/30/60 C2/K
WTC 30/60/150
C2/K
WTC 15/30/60
C3/K
WTC 30/60/150
C3/K
Maximum capacity 15/30/60 kg 30/60/150 kg 15/30/60 kg 30/60/150 kg
Readability 5/10/20 g 10/20/50 g 5/10/20 g 10/20/50 g
Tare range -60 kg -150 kg -60 kg -150 kg
Pan size 400×500 mm 500×700 mm
Temp. work -10° - +40 °C
Protection IP 65 konstrukcja, IP 66/67 miernik
Power 230V AC, 50Hz
Display LED
Instruction number PTI-16-03/09/06/A
- 27 -

MANUFACTURER OF ELECTRONIC WEIGHING INSTRUMENTS
RADWAG 26 – 600 Radom Bracka 28 Street
POLAND Central phone +48 48 38 48 800, phone/fax. + 48 48 385 00 10
Sales Department + 48 48 366 80 06 www.radwag.com
- 28 -