manufacturer maintenance manual mtosport model 2017
TRANSCRIPT

Manufacturer Maintenance Manual
(Line Maintenance)
MTOsport Model 2017

AircraftMaintenance Manual
AutoGyroMTOsport Model 2017
AMM-M17-A_2018-01 Part A – Introduction and Declarations Page 1 of 12
Aircraft Maintenance Manualfor Gyroplane MTOsport Model 2017

AircraftMaintenance Manual
AutoGyroMTOsport Model 2017
AMM-M17-A_2018-01 Part A – Introduction and Declarations Page 2 of 12
0 – PREFACE
This document contains proprietary information of AutoGyro GmbH, Germany which is provided in confidence and solely for the purpose of supporting aircraft certification and providing applicable information regarding the proper use, maintenance, inspection, repair, servicing and parts application of AutoGyro GmbH products and services, as directed therein. Neither this manual nor any information in it may be disclosed to others, or used for any other purpose, including but not limited to, design, create, develop, reproduce, manufacture or derive any design, part, product, material, process, modification, configuration change or repair, or to obtain airworthiness authorisation’s approval to do so.
With the possession and use of this manual the user accepts and agrees to be bound by the foregoing terms.
If a Government agency or Department intends to disclose any information, written notice should be given to:
AutoGyro GmbH
Dornierstraße 14
31137 Hildesheim
GERMANY
Phone: +49 (0) 51 21 / 8 80 56-00
Fax: +49 (0) 51 21 / 8 80 56-19
E-Mail: [email protected]
All rights reserved. Under the copyright laws, this manual may not be copied, in whole or in part, without the written consent of AutoGyro GmbH. AutoGyro reserves the right to change or improve its products and to make changes in the content of this manual without obligation to notify any person or organisation of such changes or improvements. Notifications to the Civil Aviation Authorities or other organisations based on legal regulations are unaffected.
MTOsport, Calidus, Cavalon, the AutoGyro logo and word picture mark are trademarks or registered trademarks of AutoGyro AG, registered in Germany and other countries.
Other company and product names mentioned herein may be trademarks of their respective companies. Mention of third-party products is for informational purposes only and constitutes neither an endorsement nor a recommendation. AutoGyro assumes no responsibility with regard to the performance or use of these products. All understandings, agreements, or warranties, if any, take place directly between the vendors and the prospective users.
U.S. and foreign patents of AutoGyro AG are used in the Calidus and Cavalon gyroplanes - (US.Pat.No. 8,690,100; US.Pat.No. D699,153)
Every effort has been made to ensure that the information in this manual is accurate. AutoGyro GmbH is not responsible for printing or clerical errors.

AircraftMaintenance Manual
AutoGyroMTOsport Model 2017
AMM-M17-A_2018-01 Part A – Introduction and Declarations Page 3 of 12
1 – INTRODUCTION
This manual provides accepted and recommended maintenance procedures applicable for the MTOsport Model 2017 gyroplane, designed and manufactured by AutoGyro GmbH, Hildesheim, Germany. The generic term “maintenance” comprises checks, inspections, replacement, repair and other tasks, which are defined in “01-11-00 Definitions and Standard Procedures”. The manual also provides a full description of the aircraft and its systems and troubleshooting (fault isolation) procedures. Where applicable, the manual refers to related manuals, such as the engine manufacturer’s documentation or Component Maintenance Manuals, for example battery, avionics, or optional equipment.
All task descriptions follow aerospace, industry and safety standards or special AutoGyro procedures. The procedures, methods, instructions and parameters specified in this manual must be adhered to by all means. It is not permitted to change procedures or to alter parameters provided herein. Proposed deviations from the procedures, methods and instructions contained in this manual should be directed to:
AutoGyro GmbH
Att.: Technical Publications
Dornierstraße 14
31137 Hildesheim
GERMANY
Fax: +49 (0) 51 21 / 8 80 56-19
E-Mail: [email protected]
The manual has been prepared in accordance with ATA Specification No. 100 being a common standard in aviation and for your convenience. The ATA100 numbering system is described under “Organization and Handling of the Manual”.
This manual will be revised as necessary to incorporate changes in design, parts, approved procedures, or parameters. Note that the manual is only valid if available in current version. The use of an out dated manual may render the aircraft in unsafe or even not airworthy condition. The revision service is described below.
Service Information Letters (SIL), Service Bulletins (SB) or Airworthiness Directives (AD) will also be covered by the revision service and incorporated in the maintenance manual.
Revision Service
This manual must always be maintained in current, up-to-date status. The latest version status is available at www.auto-gyro.com. Note that the manual is subdivided into 6 parts which will be revised individually. As an example, the revision index for the aircraft maintenance manual (AMM), MTOsportModel 2017 (M17), Part B could be ‘AMM-M17-B_2018-01’. Note that the date code is ‘yyyy-mm’ so files will sort chronologically.
For the purpose of current status this manual will not be published in paper format. A current personalized copy will be provided by AutoGyro GmbH for all certified and registered service partnerson the basis of a subscription service. Registered users will be informed about new revisions. We recommend not to keep printouts or paper copies for reference.

AircraftMaintenance Manual
AutoGyroMTOsport Model 2017
AMM-M17-A_2018-01 Part A – Introduction and Declarations Page 4 of 12
Record of Revisions
The manufacturer will keep this manual current as an entire document. After each revision of a part the latest revision index (i.e. list of revision indices for each part) will be published on AutoGyro’s web portal and/or by E-Mail to each subscription customer. The document part’s revision index can be found in the footer on the left hand side of each page.

AircraftMaintenance Manual
AutoGyroMTOsport Model 2017
AMM-M17-A_2018-01 Part A – Introduction and Declarations Page 5 of 12
Contents
0 – PREFACE...........................................................................................................................................21 – INTRODUCTION................................................................................................................................3
Revision Service...................................................................................................................................3Record of Revisions .............................................................................................................................4Maintenance Concept and Eligibility ....................................................................................................7Warnings, Caution and Notes ..............................................................................................................7Organization and Handling of the Manual ............................................................................................8ATA100 Numbering System.................................................................................................................8
ATA100 – Chapter Code ..................................................................................................................8Nomenclature and Structure of Maintenance Tasks (Job Cards) ....................................................9Page Block Code..............................................................................................................................9Effectivities......................................................................................................................................10
Abbreviations and Acronyms..............................................................................................................11Service Bulletins (SB) and Airworthiness Directives (AD)..................................................................12

AircraftMaintenance Manual
AutoGyroMTOsport Model 2017
AMM-M17-A_2018-01 Part A – Introduction and Declarations Page 6 of 12
INTENTIONALLY LEFT BLANK

AircraftMaintenance Manual
AutoGyroMTOsport Model 2017
AMM-M17-A_2018-01 Part A – Introduction and Declarations Page 7 of 12
Maintenance Concept and Eligibility
The maintenance concept of the MTOsport gyroplane is structured into 4 qualification levels:
Basic operational (OPR) Maintenance / Pilot Checks and Servicing Line (LNE) Maintenance – Inspection and general maintenance tasks, Inspection of Critical
Parts (CP) included Specialized (SPC) Level Tasks - Major Modification, Repair & Overhaul, Special Topics
The respective maintenance level for each maintenance task is printed in right hand position in the header line on each Job Card as three-letter code for quick reference (see red circle in example below) and repeated under ‘GENERAL, REFERENCES AND REQUIREMENTS’.
Maintenance tasks may be carried out solely by persons or organizations fulfilling the requirements for personal qualification, infrastructure and required equipment, and only in strict compliance with the documentation and manuals listed in below table. Examples are provided for better illustration:
Level Qualification Documentation Example
OPR Licensed Pilot ortrained/briefed person
Pilot’s Operating Handbookand Job Cards marked ‘OPR’
Check and replenish engine oil
LNE AutoGyro maint. course (and organization approval)
Aircraft Maintenance. Manual(AMM) Job Cards ‘LNE’ and ‘HVY’
All maintenance tasks
SPC AutoGyro special courses and org. approval ‘Specialized’
AMM Job Cards ‘SPC’ and manufacturer instructions
Main frame overhaul,major mod., repair
Warnings, Caution and Notes
This manual uses WARNINGs, CAUTIONs and NOTEs in bold italic letters to indicate especially critical and important instructions. The call-outs appear at the top of the Maintenance Job Card if of general nature or applicable for the complete task, or will directly precede the individual Work Step.
The meaning of each call-out is defined below:
WARNING: A warning means that the neglect of the appropriate procedure or condition could result in personal injury or fatal accidents.
CAUTION: A caution means that the neglect of the appropriate procedure or condition could result in damage to or destruction of equipment.
NOTE: A note stresses the attention for a special circumstance, which is essential to emphasize.

AircraftMaintenance Manual
AutoGyroMTOsport Model 2017
AMM-M17-A_2018-01 Part A – Introduction and Declarations Page 8 of 12
Organization and Handling of the Manual
This manual is structured according to ATA100 numbering system. The numbering system will be explained later in more detail.
On document level, the manual is subdivided into 6 parts, named A to F. The designation and content of each part is listed below:
Part Designation / Content
A Introduction and DeclarationsThis section. Explains the basic concept, handling of this manual, its structure according to the ATA100 numbering system, abbreviations and acronyms.
B Master Servicing Manual (ATA Chapters 00 to 20)General description of the aircraft, basic definitions and standard procedures, tools, spares, airworthiness limitations, time limits, inspections and checks.Briefly, part B describes ‘what is to be done, and when’.
C System Description Section (ATA Chapters 21 to 90)Part C describes all aircraft systems, following the ATA100 numbering system.
D Diagrams and ChartsPart D contains diagrams and charts, if necessary in special sizes or as fold-outs.
E Maintenance Job Cards[Maintenance] Job Cards are collected in Part E. Note that the footer of Part E does not spell out to the part’s designation, but just shows part and the job index of the referred maintenance task according to the ATA100 numbering system.Briefly, Part E describes ‘how something has to be done’.
(F) Protocols and FormsProtocols and forms, such as maintenance check lists, are available for download.
ATA100 Numbering System
ATA100 – Chapter Code
The Air Transport Association (ATA) Standard 100 numbering system is a widely accepted standard that provides a 6 digit numbering system to identify aircraft systems, subsystems and individual components in a structured, hierarchical approach.
The first or leftmost pair of digits defines the Chapter, respectively system. The next pair of digits refers to the subsystem. The third pair of digits specifies a unit. Only complex systems use unit numbers. In case of simple systems, all information is contained in the main chapter and there is no subsystem or unit breakdown.
The ATA100 numbering system and the corresponding system designations were adopted where ever possible and rational. In some cases the wording and nomenclature was adapted to match the design specifics of a gyroplane in best possible way. Due to its high degree of system integration, some systems cannot clearly be assigned to a single function. In this case the system or component was categorized by its main function. Example: the pneumatic trim cylinder also acts as brake in itssecondary function.
Chapter 02 has been modified to contain “TOOLS, SPARES AND CONSUMABLE MATERIALS”.

AircraftMaintenance Manual
AutoGyroMTOsport Model 2017
AMM-M17-A_2018-01 Part A – Introduction and Declarations Page 9 of 12
Nomenclature and Structure of Maintenance Tasks (Job Cards)
Part E of this manual describes maintenance tasks to be performed by a qualified person in order to check, inspect, replenish, adjust, replace, repair, clean, or to identify malfunctions. Each Task is outlined in detail in a [Maintenance] Job Card.
Each [Maintenance] Job Card (sometimes referred to as Task Card) consists of
Task Description (header, descriptive text) with task level in most right position a section referring to GENERAL, REFERENCES AND REQUIREMENTS a section listing SPECIAL TOOLS AND CONSUMABLE MATERIALS a section pointing out PRECAUTIONS AND SAFETY MEASURES a section called PROCEDURES, which lists all Work Steps to be performed subsequently a PARTS LIST listing part numbers and associated information, and explanatory GRAPHICS, such as explosion drawings or photographs
For ease of navigation each page in Part E shows a unique job index in the page footer consisting of 3 elements:
Chapter Code(acc. to ATA100, see explanation below)
Page Block Code(distinct index/number per type of maintenance action, see explanation below)
Sub-Index
Page Block Code
The pages within a chapter are structured and numbered according to the page block numbering system as specified below:
Subject Code
Introduction / Description and Operation 0
Fault Isolation / Trouble Shooting 1
Maintenance Procedures 2
Servicing 3
Removal / Installation / Disassembly / Assembly 4
Adjustment / Test 5
Inspection 6
Cleaning / Painting 7
Repair / Replacement / Retrofit / Modification 8
Storage 9

AircraftMaintenance Manual
AutoGyroMTOsport Model 2017
AMM-M17-A_2018-01 Part A – Introduction and Declarations Page 10 of 12
Effectivities
A job card may contain information relating to different versions of the referred aircraft. This may be stipulated by optional equipment installed, by different design states (Serial Number driven), or modification (MI, AD).
The keyword EFFECTIVITY, followed by a term describing its applicability, marks the start of instructions that apply exclusively to a specified version. Examples:
EFFECTIVITY: Variable Pitch Propeller
The following instructions must be performed and are applicable only if a Variable Pitch Propeller is installed
EFFECTIVITY: up to S/N 0123
The following instructions apply to serial numbers 0123 and before
EFFECTIVITY: S/N 0124 to S/N 0248
The following instructions refer only to serial numbers 0124 up to, and including, 0248
EFFECTIVITY: S/N 0124 and subsequent
The following instructions must be performed for serial numbers starting 0124 and subsequent
EFFECTIVITY: before SB 2011-99
Instructions refer to modification state before/without the referenced SB implemented
EFFECTIVITY: SB 2011-99 accomplished
Instructions apply only to those versions where the referenced SB has been accomplished
The end of the range of validity is marked by the term EFFECTIVITY – END
In case the effectivity solely comprises of the subsequent work step, or another effectivity statement is introduced, the term EFFECTIVITY – END will be omitted.
Instructions outside of EFFECTIVITY statements apply to the standard model, respectively to all versions.
Teilelisten-Schlüssel – PC / PIT
Für jedes Teil werden PC (Beschaffungsschlüssel) und PIT (übergeordneter bestellbarer Artikel) genannt (siehe Beispiel). Der Beschaffungsschlüssel kann L0, L1, L2 oder L3 sein.
L0 Bauteil / Baugruppe erhältlich für registrierte Piloten/Betreiber (OPR)
L1 Bauteil / Baugruppe bestellbar für Personen / Organisationen qualifiziert für Inst. “LNE”
L2
L3 Bauteil / Baugruppe bestellbar für Organisationen qualifiziert für “SPC” Tätigkeiten
PIT (übergeordneter bestellbarer Artikel) listet die Bestellnummer des Teils, Pakets, Sets oder der kleinsten Baugruppe auf, in welchem das entsprechende Teil enthalten ist.

AircraftMaintenance Manual
AutoGyroMTOsport Model 2017
AMM-M17-A_2018-01 Part A – Introduction and Declarations Page 11 of 12
Abbreviations and Acronyms
In this manual, a minimum number of abbreviations are used. Where possible the abbreviations and acronyms used correspond with regulations and common standards.
AD Airworthiness Directive
AMM Aircraft Maintenance Manual
ATA Air Transport Association
CHT Cylinder Head Temperature
CP Critical Part
CT (Engine) Coolant Temperature
CRP Carbon Reinforced Plastic
DOM Date of Manufacture
ELT Emergency Locator Transmitter
FOD Foreign Object Damage (Debris)
GRP Glass Reinforced Plastic
hrs hours
i.f.d. in flight direction
JNP Jahresnachprüfung (annual inspection, annual airworthiness review)
LED Light Emitting Diode
LH left hand
LR Limited reusability(Parts or components that can be used only once or a limited number of times, such as self-locking nuts, split pins, …)
LTA Lufttüchtigkeitsanweisung (AD, issued by the Airworthiness Authority)
MAP Manifold Absolute Pressure
MLL Manufacturer Life Limit
N/A not applicable
NPI non procurable item
OAT Outside Air Temperature
PC Procurement Code
PIT procure item through
POH Pilot’s Operating Handbook
Qty. Quantity
rcv receive
rec. recommended
RH right hand
RPM Revolutions Per Minute
SB Service Bulletin
SIL Service Information Letter
SoC Statement of Compliance
sqm square metre(s)
STP Stückprüfung (C of A, i.e. conformity of airworthiness)
TADS Type Approval Data Sheet (dt.: Geräte-Kennblatt)
TBO Time Between Overhaul
VPP Variable Pitch Propeller
VSI Vertical Speed Indicator
xmt transmit
yr year(s)

AircraftMaintenance Manual
AutoGyroMTOsport Model 2017
AMM-M17-A_2018-01 Part A – Introduction and Declarations Page 12 of 12
Service Bulletins (SB) and Airworthiness Directives (AD)
Service Bulletins (SB) (formerly ‘Herstellerinformationen’), published by the manufacturer, or Airworthiness Directives (AD), issued by the Authority, will be incorporated into the Maintenance Manual with the next revision
The following list covers the Service Bulletins applicable to the MTOsport Model 2017. The statement "No Effect" means that the service bulletin has been reviewed to the revision number stated and is considered to have no effect on the text or the illustrations of the manual.
At publishing date, no Service Bulletins have been issued for the MTOsport Model 2017.

AircraftMaintenance Manual
AutoGyroMTOsport Model 2017
AMM-M17-B_2018-01 Part B – Master Servicing Manual (Ch. 00 – 20) Page 1 of 25
Contents
CHAPTER 00 - INTRODUCTION / AIRCRAFT GENERAL .....................................................................3General .................................................................................................................................................3
CHAPTER 01 - GENERAL.......................................................................................................................401-11-00 Definitions, Terms and Standard Procedures ..................................................................401-12-00 Standard Bolt Torques......................................................................................................601-21-00 Standard Commercial Tools .............................................................................................601-91-00 Conversion Tables............................................................................................................7
CHAPTER 02 - TOOLS, SPARES AND CONSUMABLE MATERIALS...................................................902-51-00 Consumable Materials ......................................................................................................9
CHAPTER 03 - MINIMUM EQUIPMENT REQUIREMENT....................................................................10CHAPTER 04 – MANUFACTURER LIFE LIMITATIONS.......................................................................11
1.1 Error! Bookmark not defined.CHAPTER 05 - TIME LIMITS, INSPECTIONS & CHECKS...................................................................13
05-10-00 Time Limits .....................................................................................................................1305-20-00 Scheduled Inspections & Checks ...................................................................................14
Daily / Pre-Flight Check..................................................................................................................14Complementary / Servicing Tasks..................................................................................................1425 hrs Inspection (one-time / non-recurrent) ..................................................................................14100 hrs / Annual Inspection ............................................................................................................14
05-21-00 Temporary Scheduled Inspections & Checks ................................................................1405-30-00 Unscheduled Inspections ...............................................................................................1505-50-00 Conditional Inspections ..................................................................................................1505-51-00 Inspections - Special Operational Conditions.................................................................15
Operation in sand or dust ...............................................................................................................15Winter operation .............................................................................................................................15
05-55-00 Inspections - Special Operational Incident .....................................................................16Suspected hard landing..................................................................................................................16Rotor contact with obstacle ............................................................................................................16Propeller contact with obstacle or external impact .........................................................................16Birdstrike.........................................................................................................................................16Lightning strike ...............................................................................................................................17
05-60-00 Ground Test Run ............................................................................................................1705-70-00 Functional Test Flight .....................................................................................................1705-90-00 Maintenance Records & Aircraft Logs ............................................................................17
CHAPTER 06 - DIMENSIONS & AREAS...............................................................................................18CHAPTER 07 - LIFTING / JACKING / SHORING..................................................................................19CHAPTER 08 - LEVELING & WEIGHING .............................................................................................19CHAPTER 09 - TOWING & TAXIING ....................................................................................................19CHAPTER 10 - PARKING, STORAGE & RETURN TO SERVICE........................................................19CHAPTER 11 - PLACARDS & MARKINGS ...........................................................................................20CHAPTER 12 - SERVICING ..................................................................................................................21
12-10-00 Cleaning..........................................................................................................................2112-20-00 Lubrication ......................................................................................................................21
Lubrication: Teeter hinge................................................................................................................21Lubrication: Pre-rotator drive coupling sleeve ................................................................................21
12-30-10 Servicing: Engine Air Filter .............................................................................................2112-30-20 Servicing: Tire Pressure .................................................................................................2212-30-30 Servicing: Battery............................................................................................................2212-30-40 Servicing: Engine Coolant ..............................................................................................2212-40-00 Replenishing/Replacement of Fluids ..............................................................................22

AircraftMaintenance Manual
AutoGyroMTOsport Model 2017
AMM-M17-B_2018-01 Part B – Master Servicing Manual (Ch. 00 – 20) Page 2 of 25
CHAPTER 13-17 – UNASSIGNED / N/A ...............................................................................................22CHAPTER 18 – VIBRATION & NOISE ANALYSIS ...............................................................................23CHAPTER 19–20 – UNASSIGNED / N/A ..............................................................................................24

AircraftMaintenance Manual
AutoGyroMTOsport Model 2017
AMM-M17-B_2018-01 Part B – Master Servicing Manual (Ch. 00 – 20) Page 3 of 25
CHAPTER 00 - INTRODUCTION / AIRCRAFT GENERAL
General
The MTOsport Model 2017 is a ‘new generation’ gyroplane with 3-bladed push propeller and a 2-bladealuminium main rotor system with swivelling rotor head. It features an open-cockpit fuselage with two seats in tandem configuration. The load carrying frame consists of inert-gas welded stainless steel square tubing. Fuselage and stabilizer with rudder are made from carbon fibre reinforced (CRP) plastic.
The tricycle gear with GRP (glass fibre reinforced plastic) suspension bow features a steerable nose gear.
Rotor flight control consists of conventional linkage using push-rods while the rudder is controlled by cables to allow adjustment of both pairs of pedals and push-pull-cables, routed inside the aft frame extension.

AircraftMaintenance Manual
AutoGyroMTOsport Model 2017
AMM-M17-B_2018-01 Part B – Master Servicing Manual (Ch. 00 – 20) Page 4 of 25
CHAPTER 01 - GENERAL
01-11-00 Definitions, Terms and Standard Procedures
The following definitions, procedures and words with special meanings are used in this manual:
adjust To put in specified position or condition, usually using tools or devicesExample: Adjust the clearance to 1 mm
Check (noun) A set of check items to be performed. Example: pre-flight check
check (verb) To make sure that the item is present and/or a given requirement is fulfilled. No tools are required.Example: Warning Lights…Check NONE
Critical Part (CP) “Critical Parts” are those parts whose failure during ground or flight operation could have a disastrous effect on the gyroplane.
dent Depression in a surface having area and depth with no sharp edges(see also ‘nick’)
discard Put away in order to exclude inadvertent or intentional re-use of the item. Comply with FOD procedures.
dispose of Discard item or substance while employing strict procedures, such as environmental or legal requirements.
hand-tighten Use the bare hand without any tools, gloves or extra efforts
inspect / examine To look carefully at an item and compare with its standard or specification. Tools or devices may be needed. The condition may be explicitly specified (example: no corrosion). Generally, or if not otherwise stated, inspect/examine means:
Make sure that the item - is complete - is correctly attached - has no loose parts - shows no signs of leaks - is not cracked or damaged - is not worn
Make sure that - the surface protection is not damaged - all locking devices are installed correctly
Make sure that items such as pipes, hoses and cables - look serviceable - do not rub against other items
For log books and other technical records: - find pending faults - make sure they are up-to-date and correctly maintained
Inspection Maintenance procedure to be performed as described in this manual.Example: 100 hrs / Annual Inspection
maintenance Any one or combination of overhaul, repair, inspection, replacement, modification or defect rectification of an aircraft or component, with the exception of pre-flight inspection

AircraftMaintenance Manual
AutoGyroMTOsport Model 2017
AMM-M17-B_2018-01 Part B – Master Servicing Manual (Ch. 00 – 20) Page 5 of 25
measure To find out dimensions, capacity or quantity of something. Except for counting of smaller numbers, calibrated measurement devices are needed.
monitor To watch a parameter or item over a certain period of time in order to read an exact value, derive a trend or identify a change caused by an event.Example: monitor rotor speed indication, monitor RPM drop, …
nick A dent with sharp edges (see also ‘dent)
re-torque Refer to procedure ‘torque-tighten’. In contrary to procedure ‘torque check’ attachment hardware may rotate during re-torquing.
Record (noun) Technical name for a documentation that shows the accomplishment of maintenance tasks or other activities, usually stating the responsible person’s name and date of compliance.
record (verb) To make an (official) entry in a maintenance record.
remove securing hardware
Cut open and remove split pins, lock wire, and such. Wear eye protection. Hold securing hardware with other hand to prevent particles from darting around. Collect all splinters and particles of securing hardware and discard.
replace To remove an unserviceable item and install a serviceable in the same location
servicing Simple tasks such as lubrication and cleaning, checking and adjusting of air tire pressure, replenishing of fluids
set To change (or verify) status of equipment to a given parameter, condition or mode.Example: set altimeter sub-scale to 1013 hPa
torque-check Refer to procedure ‘torque-tighten’. Check with the (minimum) torque value supplied. Attachment hardware must NOT turn! If rotation of attachment hardware was noticeable the torque check FAILED. Refer to procedure described in JobCard.
torque-tighten Use a calibrated tool with the correct range and handle properly and carefully. Set tool to minimum torque (if min. and max. torque values are provided). Use stretched fingers at the long end of the tool and counterhold directly at the pivot point.Click-Type: Stop upon the first clicking. If multiple clicking is heard or further rotation is suspected, open/unscrew and repeat. Replace attachment hardware if appropriate. In order to align attachment hardware (for example in case of a split pin) adjust tool to the maximum allowed torque and tighten carefully until hardware aligns. NO clicking must be heard! If clicking was heard, redo the complete procedure while trying different attachment hardware and/or in different installation position.
verify Check that a certain dimension or condition, or set of these, is in-line with given specifications. In order to do so, a special (measurement) procedure will be required and the reference to comply with will be specified.
If not otherwise stated the following standards are based on aeronautical regulations and recommendations (AC43.13-1B), industry and safety standards, and general practices, and shall beapplicable throughout this manual. Examples are:
Torquing Securing (handling of lockwire and other securing hardware) Removal of securing hardware FOD (foreign object damage) protection Discard and disposal procedures Handling of hazardous material Workplace safety
Notes on “nyloc” (and metal locking such as BinX) nuts:

AircraftMaintenance Manual
AutoGyroMTOsport Model 2017
AMM-M17-B_2018-01 Part B – Master Servicing Manual (Ch. 00 – 20) Page 6 of 25
Ideally a nyloc nut should be used once only. It may be re-used if the thread is undamaged and when fitted to its mating fastener it must only turn with a torque greater than the “Prevailing Torque” listed (values factored from AC43.13-1B):
M6 0.8Nm, M8, 0.8Nm, M10 1.0Nm, M12 1.2Nm.
01-12-00 Standard Bolt Torques
Standard torques are M4 2-3 Nm, M5 5-6 Nm, M6 11 +/-1 Nm, M8 25 +/-3Nm, M10 35 +/-4Nm.Always assess the joint to be tightened and use engineering judgement – do not overtighten plastic or unsupported tube joints!
01-21-00 Standard Commercial Tools
Most maintenance tasks on the MTOsport can be conducted using standard, commercially available metric tools. In addition, the following standard commercial tools are required:
Inclinometer (digital) / Digital spirit level with angle gauge Spring balance / Dynamometer Tensiometer (to measure cable tension) 1m aluminium ruler Fuel hose clamp Torque wrench (in required torque ranges) Multimeter 3 m-tape measure Torch light Tyre pressure gauge / tyre filling device

AircraftMaintenance Manual
AutoGyroMTOsport Model 2017
AMM-M17-B_2018-01 Part B – Master Servicing Manual (Ch. 00 – 20) Page 7 of 25
01-91-00 Conversion Tables
LENGTH / DISTANCE
Multiply by to obtain / Multiply by to obtain
m (metre) 3.28 ft (feet) 0.305 m
mm (millimetre) 0.039 in (inch) 25.4 mm
km (kilometre) 0.54 nm (nautical mile) 1.852 km
SPEED
Multiply by to obtain / Multiply by to obtain
m/s (metre per second) 196.85 ft/min (feet per minute) 0.0051 m/s
km/h (kilometre per hour) 0.54 kts (knots) 1.852 km/h
km/h (kilometre per hour) 0.62 mph (miles per hour) 1.61 km/h
PRESSURE
Multiply by to obtain / Multiply by to obtain
hPa (hectopascal) 1.0 mbar (millibar) 0.0001 bar
bar (Bar) 14.50 psi (lb per square inch) 0.0689 bar
bar (Bar) 0.0295 inHg (inch mercury) 33.864 bar
FORCE / WEIGHT
Multiply by to obtain / Multiply by to obtain
N (Newton) 2.205 lbf (pound force) 0.4536 N
N (Newton) 0.1019 (respective force of 1 kg) 9.81 N
MASS (WEIGHT)
Multiply by to obtain / Multiply by to obtain
kg (kilogram) 2.2046 lb (pound) 0.4536 kg
VOLUME
Multiply by to obtain / Multiply by to obtain
l [or ltr] (Litre) 0.2642 US gal (US gallons) 3.7854 l/ltr
l [or ltr] (Litre) 1.057 US qts (US quarts) 0.946 l/ltr
l [or ltr] (Litre) 0.0164 in3 (cubic inch) 0.946 l/ltr
TORQUE
Multiply by to obtain / Multiply by to obtain
Nm (Newton metre) 0.738 lbf.ft. (pound-foot) 1.3558 Nm
Nm (Newton metre) 0.113 lbf.in. (pound-inch) 8.851 Nm
kgmm 0.0098 Nm 101.94 kgmm

AircraftMaintenance Manual
AutoGyroMTOsport Model 2017
AMM-M17-B_2018-01 Part B – Master Servicing Manual (Ch. 00 – 20) Page 8 of 25
Celsius-Fahrenheit Conversion Chart
-150
-100
-50
0
50
100
150
200
250
300
350
400
450
500
-100 -75 -50 -25 0 25 50 75 100 125 150 175 200 225 250
Fahr
enhe
it -°
F
Celsius - °C

AircraftMaintenance Manual
AutoGyroMTOsport Model 2017
AMM-M17-B_2018-01 Part B – Master Servicing Manual (Ch. 00 – 20) Page 9 of 25
CHAPTER 02 - TOOLS, SPARES AND CONSUMABLE MATERIALS
02-51-00 Consumable Materials
The following consumable materials are referenced in the Maintenance Manual:
Material / Description AutoGyro Order Codes
Loctite 221 red 30487
Loctite 243 blue 30483
Loctite 542 red 30488
Loctite 638 green 30485
‘Hohlraumspray’ 34197
WHS 2002 30477
Ballistol Öil Universal 31816, 31846, 31847
Anti-Seize Spray 31590
Würth HHS2000 Oil Spray 30476
Silicone Spray 30490
Talcum powder 34089
Shell Advance VSX4 10W-40 43082, 31629

AircraftMaintenance Manual
AutoGyroMTOsport Model 2017
AMM-M17-B_2018-01 Part B – Master Servicing Manual (Ch. 00 – 20) Page 10 of 25
CHAPTER 03 - MINIMUM EQUIPMENT REQUIREMENT
In accordance with the Pilot’s Operating Handbook (POH) Section 2.11 the following equipment must be operative for flight
Air speed indicatorAltimeterCompassRotor RPM indicatorEngine instruments (oil pressure, oil temperature, RPM, engine coolant temperature/CT)Pre-rotator
Depending on the equipment state or relevant condition a limited or restricted operation may be granted to facilitate maintenance efforts and operability.
Equipment / System Condition Limitation/Restriction
Compass Defective Local flights within the traffic pattern and with ground reference.
Rotor RPM indicator Defective Flight to a maintenance facility.
Pre-rotator Defective / No functionR-RPM indicator working
Flight to a maintenance facility under the following conditions: Experienced pilot as sole
occupant Concrete/asphalt runway with a
minimum of 5 times the normal required take-off roll distance available
Second briefed person ‘handpropping’ the rotor while engine/propeller is off
Steady, laminar headwind
Pre-rotator Malfunction, R-RPM > 120R-RPM indicator working
Flight to a maintenance facility under the following conditions: Experienced pilot Concrete/asphalt runway with a
minimum of 3 times the normal required take-off roll distance available
Steady, laminar headwind

AircraftMaintenance Manual
AutoGyroMTOsport Model 2017
AMM-M17-B_2018-01 Part B – Master Servicing Manual (Ch. 00 – 20) Page 11 of 25
CHAPTER 04 – MANUFACTURER LIFE LIMITATIONS
For the safe operation over the specified lifecycle of the aircraft and liability reasons the following manufacturer limitations shall apply. In case the component has an operating hours and calendric time limit the first limit shall apply.
Note that at expiration of the specified manufacturer life limit (MLL) the component shall be replacedfor your own safety, independent of its condition.
ATA Equipment / System MLL
62-00-00 Rotor System II (RSII) Standard 2500 hrs
Rotor System II (RSII) TOPP 8.4 m 2500 hrs
Rotor System II (RSII) TOPP 8.6 m 2500 hrs
62-31-00 Rotor main bearing 1500 hrs
Note that the Rotor main bearing is only supplied pre-assembled into the teeter tower.
Status and lifetimes of components, liquids and fluids is listed in the Event and Configuration Log (AG-F-ECL) form. The initial Event and Configuration Log is delivered with the gyroplane by AutoGyro. An empty form is provided for download on the AutoGyro web site.
Primary and Secondary structure determination:
A primary structural part is one for which the failure would be catastrophic and would prevent continued safe flight and landing.
All other structure can be considered as Secondary, thus failure of a Secondary structural part would not be immediately catastrophic and with due care continued safe flight and/or a safe precautionary landing could still be made.
Because of the simplicity of the aircraft structure some parts have a dual role – such as the composite body. As an example, the composite body of the aircraft is primary structure, yet it carries attachment point for items not flight critical.The primary structural elements are considered to be:AirframeUpper mastConnection assemblies joining the rotor head to the mast, and mast to airframe.The rotor assembly and rotor headThe tail and rudder assemblyThe rudder and rotor control systemThe main undercarriage and nosegearWhilst other items may have an effect on flight safety, they are considered secondary to the above. The undercarriage is included, as whilst it does not contribute to safe flight, it is difficult to make a safe landing without it – inevitably an aircraft rollover would result, probably destroying the aircraft.
Critical parts.The following parts and assemblies have been denoted critical during the design review process, and special care must be taken with them during storage, handling and installation.
Item & pt No. Reason/commentAssembliesRotor Head Upper Assembly Correct assembly of pitch, roll, main bearing and teeter bolts/nuts
and splits pins is essential for safe operationMast welded fabrication Must be inspected carefully for cracks or other weld problemsAirframe assembly Must be inspected carefully for cracks and integrity of welded-on
brackets, especially mast and keel tube

AircraftMaintenance Manual
AutoGyroMTOsport Model 2017
AMM-M17-B_2018-01 Part B – Master Servicing Manual (Ch. 00 – 20) Page 12 of 25
Rotor assembly RSII 8.4mRotor Assy RSII TOPP 8.4 and 8.6m
Correct assembly of the rotor system is essential for safe operationLife limited and serialised assembly
Rotor Head assembly Comprising combination of Rotor Head upper and lower assemblies
PartsTeeter bolt Must be correctly fitted, with no cracks or damage for safe
operationTeeter tower (assembly) No cracks or damage permitted for safe operation, and free
spinning bearing without any poor feel. Life limited and serialised assembly because it carries the bearing.
Main bearing nut Must be properly tightened and correctly fitted with a split pin.Rotor blade assembly Damage or fracture of the rotor blade is not permitted.Mast box section Must be inspected carefully for cracks or other fracturesGimbal block Must be free of cracks or fractures for safe operation
Main bearing bolt Must be properly tightened and correctly fitted with a split pin.Pitch and roll bolts Must be correctly fitted, with no cracks or damage for safe
operation

AircraftMaintenance Manual
AutoGyroMTOsport Model 2017
AMM-M17-B_2018-01 Part B – Master Servicing Manual (Ch. 00 – 20) Page 13 of 25
CHAPTER 05 - TIME LIMITS, INSPECTIONS & CHECKS
For safe operation and continued airworthiness over the specified lifecycle of the aircraft the following inspection schedule shall apply. Note that specified tolerances must NOT be accumulated!
Task Interval Recurrence Tolerance
Daily / Pre-Flight Check Before flight / daily Each N/A
Complementary / Servicing Tasks 5 hrs (rec.) Each N/A
25 hrs Inspection 25 hrs Once 5 hrs
100 hrs / Annual Inspection 100 hrs / 1 yr Each 10 hrs
The 25 hrs inspection has to be performed once, within the specified tolerance.
The 100 hrs inspection has to be performed every 100 hours, within the specified tolerance, at latest within 12 months, counted from issue of the aircraft’s Statement of Compliance (Stückprüfung) or Annual Inspection (JNP).
Note that tolerances do not accumulate! However, a preponed (earlier) inspection outside the tolerance will reduce the next inspection due cycle accordingly.
(Total time in hours, counted from engine start to engine shut-down, i.e. HOBBS meter)
05-10-00 Time Limits
In addition to time limits for inspection items and checks the following time limits for inspection or overhaul of respective components or replacement of liquids and fluids apply. Please refer also to the engine manufacturer’s manual and time limits specified herein, as well asCHAPTER 04 – Manufacturer Life Limitations!
Components
ATA/Ref. Equipment / System Time Limit
53-00-00 Welded Steel Mainframe on condition
Liquids and Fluids
ATA/Ref. Equipment / System Time Limit
75-00-00 Engine coolant (acc. to coolant manufacturer) at latest 5 years
79-00-00 Engine oil (acc. to engine manufacturer) at latest 100 hrs
Refer to CHAPTER 12 concerning replenishing/replacement procedures and types of liquids and fluids.
Status and lifetimes of components, liquids and fluids is listed in the Event and Configuration Log (AG-F-ECL) form. It is the obligation of the maintenance facility to keep this form current. An empty form is provided for download on the AutoGyro web site.

AircraftMaintenance Manual
AutoGyroMTOsport Model 2017
AMM-M17-B_2018-01 Part B – Master Servicing Manual (Ch. 00 – 20) Page 14 of 25
05-20-00 Scheduled Inspections & Checks
Daily / Pre-Flight Check
All daily or pre-flight check list items consist of visual checks and do not replace professional mechanical inspection and maintenance. The Daily / Pre-Flight Checklist for the standard MTOsportModel 2017 gyroplane is provided in the current Pilot’s Operating Handbook.
Note that there is no ‘post-flight’ inspection mentioned. It is reasonable, however, to perform parts of the pre-flight inspection after the last flight of the day in order to take maintenance action in advance, if necessary.
Complementary / Servicing Tasks
The following tasks have to be performed in-between 100hrs inspections and may be performed on an operational level by the pilot or a trained person.
Task Interval Tolerance
Lubrication: Teeter hinge (see Ch. 12 – Servicing) 5 hrs (rec.) N/A
Lubrication: Pre-rotator drive coupling sleeve as req. N/A
Cleaning/replacement: Engine air filter as req. N/A
25 hrs Inspection (one-time / non-recurrent)
The inspection items of the 25 hrs inspection are covered within the 100 hrs inspection protocol, which is available for download.
100 hrs / Annual Inspection
The maintenance protocol of the 100 hrs / Annual Inspection (AG-F-PCA-MTO2017) is available for download.
05-21-00 Temporary Scheduled Inspections & Checks
Temporary Scheduled Inspections and Checks may be introduced by SBs or AD’s (if any). Notice of, and compliance with ADs is mandatory. If necessary, AutoGyro GmbH will point out the existence of such information and will provide detailed procedures to registered service partners and owners.
Important Note: Temporary scheduled inspections introduced by the engine/powerplant manufacturer will not be covered by process. As a contribution to fleet safety, AutoGyro may point out the existence of such information, if possible.

AircraftMaintenance Manual
AutoGyroMTOsport Model 2017
AMM-M17-B_2018-01 Part B – Master Servicing Manual (Ch. 00 – 20) Page 15 of 25
05-30-00 Unscheduled Inspections
In case of the following events or occurrences, unscheduled inspections have to be performed.
Event / Occurrence / Unusual Condition Action / Reference
Rotor vibration see CHAPTER 18
Propeller vibration see CHAPTER 18
If in doubt contact AutoGyro customer support.
05-50-00 Conditional Inspections
Depending on the conditions the gyroplane is operated in or special operational incident the following conditional inspection may apply:
05-51-00 Inspections - Special Operational Conditions
Condition Action / Reference
Operation in sand or dust see below
AVGAS see Pilot Operating Handbook and engine manufacturer documentation
Winter operation see below
Operation in sand or dust
Refer to engine manufacturer documentation Inspect/change air filter regularly Reduce 100 hrs inspection interval to 50 hrs Apply propeller leading edge protection strip Operation with keel tube fin (recommended)
Winter operation
The cooling system for the cylinder heads of the engine is filled with a mixture of anti-freeze and water, which gives freezing protection down to -20°C. Using a hydrometer, check protection temperature of the coolant and add anti-freeze, if necessary. If temperatures are expected to fall below protection temperature, drain the coolant, and if required for service, refill with pure antifreeze (see 12-30-40 Servicing: Engine Coolant).
CAUTION
Pure antifreeze is not as good an engine coolant as a 50/50 mix with water. Take care that engine coolant limits are not exceeded. As soon as ambient temperatures permit, drain and refill with the normal coolant mix.
Because the oil and coolant system contain a thermostat, operation in winter does not require part-blocking of the radiators to maintain temperatures

AircraftMaintenance Manual
AutoGyroMTOsport Model 2017
AMM-M17-B_2018-01 Part B – Master Servicing Manual (Ch. 00 – 20) Page 16 of 25
05-55-00 Inspections - Special Operational Incident
Event / Occurrence / Unusual Condition Action / Reference
Suspected hard landing see below
Rotor contact with obstacle see below
Propeller contact with obstacle or external impact see below
Birdstrike see below
Lightning strike see below
Suspected hard landing
In case of a suspected hard landing perform the following checks:
Inspect nose gear, attachment, fork, linkage and wheel bearing Inspect main gear axles and attachment Examine possible rotor / propeller strike see ‘Rotor / propeller contact with obstacle’ CRITICAL: Inspect main gear suspension bow (body attachment and both axle attachments
ok, no cracks) CRITICAL: Inspect fuselage, frame and attachment point for possible deformation or cracks.
Perform levelling procedure (see JobCard 08-20-00 2-1) CRITICAL: Inspect engine mounting and propeller to frame clearance approx. 5 cm CRITICAL: Perform a rotor alignment check
Defective components must be replaced. In case one or more of the items marked ‘CRITICAL’ are found defective or out of tolerance, contact AutoGyro customer support.
Rotor contact with obstacle
Rotor contact with an obstacle including any rotor strike of a stationary or turning rotor with an obstacle, including propeller and fuselage structures. In case of rotor contact with obstacle:
Perform a rotor alignment check and adjust, if necessary Examine damage of aluminium rotor profile:
allowed damage: dent with max. depth of 1 mm CRITICAL damage: nick(s)
In case the turning rotor hit the stabilizer/rudder, a detailed inspection of the affected components must be performed.
In case CRITICAL damage is found, the rotor system must be replaced. Contact AutoGyro customer support.It always recommended to replace the main rotor bearing in case of a strike, because the torque reaction of the impact can cause brinelling of the bearing and rough operation.
Propeller contact with obstacle or external impact
Refer to engine manufacturer documentation. If there is no visible damage, then perform tap test on propeller blades to assess for invisible damage. Replace damaged parts.
Birdstrike
Perform detailed inspection of all affected component If rotor blades are affected, proceed according to ‘Rotor contact with obstacle’ If propeller is affected, proceed according to ‘Propeller contact with obstacle or external
impact’

AircraftMaintenance Manual
AutoGyroMTOsport Model 2017
AMM-M17-B_2018-01 Part B – Master Servicing Manual (Ch. 00 – 20) Page 17 of 25
Lightning strike
A lightning strike is likely to cause invisible damage to many components, especially the main rotor bearing. The aircraft must not be flown until satisfactory inspection has been undertaken and any rectification has been completed.
05-60-00 Ground Test Run
The maintenance protocol of the Ground Test Run (AG-F-PGR-Generic) is available for download.
05-70-00 Functional Test Flight
The maintenance protocol of the Functional Test Flight (AG-F-PTF-MTO2017) is available for download.
05-90-00 Maintenance Records & Aircraft Logs
An illustrated ‘Parts List’ (AutoGyro Parts List) will be compiled individually and delivered with each gyroplane.
Forms are available for download.
An ‘Event and Configuration Log’ (ECL) is delivered with the aircraft by AutoGyro and shall be kept current by the maintenance facility. An empty form (AG-F-ECL) is provided for download.

AircraftMaintenance Manual
AutoGyroMTOsport Model 2017
AMM-M17-B_2018-01 Part B – Master Servicing Manual (Ch. 00 – 20) Page 18 of 25
CHAPTER 06 - DIMENSIONS & AREAS
Length 5.10 m
Width 1.88 m
Height 2.71 m
Rotor diameter 8.4 m (or 8.6m)
Rotor disc area 55.4 sqm (or 58.1sqm)
Propeller diameter 1.72 m

AircraftMaintenance Manual
AutoGyroMTOsport Model 2017
AMM-M17-B_2018-01 Part B – Master Servicing Manual (Ch. 00 – 20) Page 19 of 25
CHAPTER 07 - LIFTING / JACKING / SHORING
See Job Card 07-00-00 2-1 in Part E of this manual.
CHAPTER 08 - LEVELING & WEIGHING
Weighing shall be performed in a draft-free hangar on level ground, with the aircraft defueled to minimum useable fuel.
Make sure each wheel of the gyroplane is located centred on the scales.
The weighing report AG-F-WRP-M17 is available for download.
CHAPTER 09 - TOWING & TAXIING
Experience shows that aircraft may be exposed to much higher loads when operated on ground, than when in flight. Such loads caused by rumbling on rough terrain, or bouncing the aircraft over the hangar threshold may easily exceed the design load in peak.
Use caution when handling the gyroplane on ground. Care must be taken when pushing at the rudder or at the outer stabilizers. Avoid excessive swing of the rotor blades as repeated bending ultimately leads to fatigue or damage.
CHAPTER 10 - PARKING, STORAGE & RETURN TO SERVICE
Parking up to 6 months
No special measures need to be taken.
NOTE Don´t let E10 remain in the fuel system for unnecessary long time or for long-term storage!
Parking more than 6 months
Refer to engine manufacturer documentation Maintain battery charged
CAUTION No overwinter survival mode (snowflake) with Ctek charger MXS3.8 for Super B batteries.
Unload wheel gear Cover aircraft with a light plastic tarpaulin or cloth
Long-term Storage
Contact AutoGyro
Return to Service
Perform a 100 hrs Inspection.

AircraftMaintenance Manual
AutoGyroMTOsport Model 2017
AMM-M17-B_2018-01 Part B – Master Servicing Manual (Ch. 00 – 20) Page 20 of 25
CHAPTER 11 - PLACARDS & MARKINGS
To avoid duplication and error, placards are shown in the pilot operating handbook (POH).

AircraftMaintenance Manual
AutoGyroMTOsport Model 2017
AMM-M17-B_2018-01 Part B – Master Servicing Manual (Ch. 00 – 20) Page 21 of 25
CHAPTER 12 - SERVICING
12-10-00 Cleaning
Care and regular cleaning of engine, propeller, rotor system and fuselage is the basic foundation for airworthiness and reliability. Therefore, the gyroplane should be cleaned after every last flight of the day or more often, if environmental conditions dictate.
In order to protect the gyroplane against dirt, dust, bird soil, and sunlight, the aircraft should be covered with a light plastic tarpaulin or cloth. Openings of the engine and airspeed indicator should be closed after the flight (insects, birds etc.).
Contamination can be cleaned with clean water, possibly with mild cleaning additives. To clean the rotor it is best to soak contamination with a cloth or towel, wipe with soft or micro-fibre cloth, and rinse thoroughly with water.
12-20-00 Lubrication
Component Application Reference
Lubrication: Teeter hinge 5 hrs (recomm.) see below
Lubrication: Pre-rotator drive coupling sleeve as required see below
See CHAPTER 05 for respective time limits.
Lubrication: Teeter hinge
The teeter hinge consists of a steel bolt running in special Teflon coated bushings. In order to provide proper bearing action and to avoid wear and bearing play, which will cause rotor vibration in consequence, regular lubrication is essential. In order to do so, the best practise is to perform work steps 5 to 7 from Job Card 62-11-00 6-1 INSPECTION: ROTOR – TEETERING PARTS. Make sure to apply grease also on the outer (secondary) bearings inside the teeter tower.
Lubrication: Pre-rotator drive coupling sleeve
Apply a thin layer of lubricant Liquid Moly LM 47 MoS2- grease (45506) on coupling sleeve when in extended position in regular intervals, at latest when the sliding surface feels dry or after flight through rain.
12-30-10 Servicing: Engine Air Filter
The air intake filters need to be replaced or cleaned according to the manufacturer‘s recommendation. Depending on environmental conditions, such as dust, sand, or pollution the recommended rate of maintenance should be increased as required.

AircraftMaintenance Manual
AutoGyroMTOsport Model 2017
AMM-M17-B_2018-01 Part B – Master Servicing Manual (Ch. 00 – 20) Page 22 of 25
12-30-20 Servicing: Tire Pressure
Main wheels 1.8 – 2.3 bar
Nose wheel 2.0 – 2.4 bar
NOTE: Green valve caps are used when the tire is filled with nitrogen.
12-30-30 Servicing: Battery
The aircraft is fitted with a maintenance-free electrolyte battery. Maintenance is therefore limited to outside soundness, correct attachment, and cleaning. Check integrity of the battery as leaking fluid contains corrosive sulphuric acid which would lead to extensive damage when contacting the framework and attachments.
Charge the battery only with a charging device which is suitable for gel electrolyte batteries.
CAUTION: The battery must never be deep discharged, as it will be damaged. If so, it might need to be replaced.
CAUTION: No overwinter survival mode (snowflake) with Ctek charger MXS3.8 for Super B batteries.
12-30-40 Servicing: Engine Coolant
The cooling system for the cylinder heads of the engine is filled with a mixture of anti-freeze and water, which gives freezing protection down to -20°C. Check protection temperature of the coolant and add anti-freeze, if necessary.
Verify coolant level in the aluminium expansion tank, replenish as required. Minimum cooling fluid level can be read from a sight glass with a cold engine.
In case no cooling fluid is visible through the sight glass a technical defect is most probable. Have engine inspected before the next flight.
If temperatures are expected to fall below protection temperature, refer to 05-51-00 Winter operation.
12-40-00 Replenishing/Replacement of Fluids
Liquid / Fluid Max. Filling Qty. Type / Code
Engine coolant (50/50 water and EthyleneGlycol antifreeze suitable for aluminium engines)
3.4 ltr as documented
Engine Oil 3.4 ltr as documented
See CHAPTER 05 for respective time limits.
CHAPTER 13-17 – UNASSIGNED / N/A

AircraftMaintenance Manual
AutoGyroMTOsport Model 2017
AMM-M17-B_2018-01 Part B – Master Servicing Manual (Ch. 00 – 20) Page 23 of 25
CHAPTER 18 – VIBRATION & NOISE ANALYSIS
Vibration may be induced by the rotor system, the propeller or even the engine. Finding out the cause for vibration and its proper cure requires experience and special equipment. This is why vibration analysis and related maintenance can only be performed by specialized service partners (maintenance level ‘S’), or AutoGyro GmbH, Germany directly.
The following tests or fault isolation procedures should be performed in order to exclude systematic errors in case of rotor vibration:
rotor system cleanliness check/verify correct installation position of the shim washers relative to teeter block and teeter
tower (one or two dot markings on block, shim washer and teeter tower must align) check for possible play in teeter bearing in axial or radial direction check rotor system alignment (see Job Card 62-11-00 5-1) check for possible play in rotor bearing adjust (increase) rotor control friction (see Job Card 62-32-00 5-1)
In case of unusual vibration, contact AutoGyro or an AutoGyro specialized service partner. If possible, try to describe the type of vibration as precise as possible as this will help to save time to reproduce and troubleshoot, or even allow a first remote assessment. The following table provides a basic classification.
Vibration appearance / sensation / parameter
Lateral (left-right / back-forth) vibration with approximately 6 per second amplitude
Vertical (up-down) vibration with approximately 12 per second amplitude
Free-stick movement – carefully release control stick (if possible/safe) and describe path and displacement of control stick head
Flight condition (weight, speed) with highest vibration level
Rotor RPM
Higher frequency vibration (around 50 Hz, like an electric razor), changing with RPM
Higher frequency vibration, frequency and amplitude significantly changing with power setting, possibly irregular or erratic
RPM or power setting with highest vibration levels

AircraftMaintenance Manual
AutoGyroMTOsport Model 2017
AMM-M17-B_2018-01 Part B – Master Servicing Manual (Ch. 00 – 20) Page 24 of 25
Noise is mainly created by the propeller. Engine and muffler play a secondary role in noise emission, as long as intact. Any deficiencies could be easily identified by a visual inspection or tap test. A defective muffler can be refilled with insulating material. Repair as necessary.
Propeller noise is emitted by the fast turning blade tips and usually increases exponentially with RPM and speed due to interaction of air disturbances with the blade tips.
As noise is a subjective perception, only measurement will provide reliable data. However, the following table provides elements and countermeasure to troubleshoot and cure in case of unusual noise emission.
Possible causes for noise / countermeasures
Check propeller condition (cleanliness, erosion, damaged or splintered blade tips). Clean or repair propeller.
Check propeller RPM during take-off (full throttle) or cruise. Adjust/reduce if required.
Check/adjust propeller pitch. Check pitch setting of individual blades and adjust so that they are the same.
Check leading edge of propeller and leading edge protection strip (if installed). A damaged leading edge protection strip (loose or sticking out end) may change noise signature significantly. Replace as necessary.
Check airfilter condition and installation condition.
Check exhaust system for soundness and correct orientation of the aftermuffler exit.
CHAPTER 19–20 – UNASSIGNED / N/A

AircraftMaintenance Manual
AutoGyroMTOsport Model 2017
AMM-M17-B_2018-01 Part B – Master Servicing Manual (Ch. 00 – 20) Page 25 of 25
INTENTIONALLY LEFT BLANK

AircraftMaintenance Manual
AutoGyroMTOsport Model 2017
AMM-M17-C_2018-01 Part C – System Description Section (Ch. 21 – 90) Page 1 of 32
Contents
CHAPTER 21-22 - UNASSIGNED / N/A ..................................................................................................3CHAPTER 23 - COMMUNICATIONS ......................................................................................................3
23-10-00 Speech Communication / Radio .......................................................................................323-40-00 Interphone / Intercom .......................................................................................................3
CHAPTER 24 - ELECTRICAL POWER ...................................................................................................324-30-00 DC Generation and Battery ..............................................................................................424-60-00 DC Electrical Load Distribution.........................................................................................4
CHAPTER 25 - EQUIPMENT / FURNISHINGS.......................................................................................625-10-00 Flight Compartment ..........................................................................................................6
CHAPTER 26 - N/A ..................................................................................................................................6CHAPTER 27 - FLIGHT CONTROLS ......................................................................................................6
27-00-00 Flight Controls...................................................................................................................627-20-00 Flight Controls - Rudder ...................................................................................................6
CHAPTER 28 - FUEL ...............................................................................................................................728-10-00 Storage .............................................................................................................................728-20-00 Distribution........................................................................................................................728-40-00 Indicating ..........................................................................................................................8
CHAPTER 29-30 - N/A .............................................................................................................................8CHAPTER 31 – INDICATING SYSTEM...................................................................................................8
31-10-00 Instruments & Control Panels...........................................................................................831-60-00 Integrated Display Systems............................................................................................18
CHAPTER 32 - LANDING GEAR...........................................................................................................2132-10-00 Main Gear .......................................................................................................................2132-10-00 Nose Gear ......................................................................................................................2132-40-00 Wheels and Brakes ........................................................................................................21
CHAPTER 33 - LIGHTS .........................................................................................................................2133-40-00 Exterior ...........................................................................................................................21
CHAPTER 34 - NAVIGATION................................................................................................................2234-10-00 Flight Environment Data .................................................................................................2234-20-00 Attitude and Direction .....................................................................................................2234-70-00 ATC Transponder ...........................................................................................................22
CHAPTER 35 - N/A ................................................................................................................................22CHAPTER 36 - PNEUMATIC.................................................................................................................22
36-11-00 Generation / Compressor ...............................................................................................2236-21-00 Distribution......................................................................................................................22
CHAPTER 37-50 - UNASSIGNED / N/A ................................................................................................23CHAPTER 51 - STANDARD PRACTICES - STRUCTURES.................................................................23
51-00-00 Standard Practices - Structures......................................................................................23CHAPTER 52 - DOORS, COVERS AND COWLINGS ..........................................................................23
52-10-00 Passenger / Crew ...........................................................................................................2352-40-00 Service Covers and Cowlings.........................................................................................23
CHAPTER 53 – FUSELAGE / MAIN FRAME ........................................................................................23CHAPTER 54 - N/A ................................................................................................................................23CHAPTER 55 - STABILIZERS ...............................................................................................................24
55-40-00 Rudder ............................................................................................................................24CHAPTER 56 - WINDOWS....................................................................................................................24
56-10-00 Flight Compartment / Windshields ......................................................................................24CHAPTER 57-60 - UNASSIGNED / N/A ................................................................................................24CHAPTER 61 - PROPELLER ................................................................................................................25
61-10-00 Propeller assembly .........................................................................................................25

AircraftMaintenance Manual
AutoGyroMTOsport Model 2017
AMM-M17-C_2018-01 Part C – System Description Section (Ch. 21 – 90) Page 2 of 32
61-20-00 Controlling.......................................................................................................................25CHAPTER 62 - ROTOR .........................................................................................................................25
62-11-00 Rotor – Teetering Parts ..................................................................................................2562-31-00 Rotor Head Bridge, Bearing and Teeter Tower..............................................................2662-32-00 Rotor Gimbal Head.........................................................................................................2662-41-00 Rotor RPM Monitoring ....................................................................................................26
CHAPTER 63 - ROTOR DRIVE .............................................................................................................2663-11-00 Pre-rotator.......................................................................................................................2663-11-10 Pre-rotator Lower Engagement ......................................................................................2763-11-20 Pre-rotator Drive .............................................................................................................2763-11-30 Pre-rotator Upper Engagement ......................................................................................2763-51-00 Rotor Brake System .......................................................................................................27
CHAPTER 64-66 - N/A ...........................................................................................................................27CHAPTER 67 - ROTOR FLIGHT CONTROL.........................................................................................27
67-05-00 Pitch Trim System / Rotor Brake ....................................................................................2767-06-00 Roll Trim System ............................................................................................................28
CHAPTER 68-70 - UNASSIGNED / N/A ................................................................................................28CHAPTER 71 - POWER PLANT............................................................................................................28
71-20-00 Engine Mounts................................................................................................................2871-50-00 Engine Electrical Harness ..............................................................................................2871-60-00 Engine Air Intakes...........................................................................................................2871-70-00 Engine Drains .................................................................................................................28
CHAPTER 72 TO 74 - ENGINE RELATED............................................................................................29CHAPTER 75 - AIR / ENGINE COOLING..............................................................................................29CHAPTER 76 - ENGINE CONTROLS ...................................................................................................30
76-10-00 Power Control / Choke ...................................................................................................3076-20-00 Engine Shutdown / Emergency ......................................................................................30
CHAPTER 77 - ENGINE INDICATING ..................................................................................................3177-10-00 Power..............................................................................................................................3177-20-00 Temperature ...................................................................................................................3177-40-00 Integrated Engine Instrument Systems ..........................................................................31
CHAPTER 78 - EXHAUST .....................................................................................................................3178-00-00 Exhaust...........................................................................................................................31
CHAPTER 79 - OIL SYSTEM.................................................................................................................3179-11-00 Storage / Oil tank ............................................................................................................3179-20-00 Distribution and Cooling .................................................................................................3179-21-00 Oil Hoses and Lines .......................................................................................................3179-22-00 Oil Cooler........................................................................................................................3279-30-00 Indicating ........................................................................................................................32

AircraftMaintenance Manual
AutoGyroMTOsport Model 2017
AMM-M17-C_2018-01 Part C – System Description Section (Ch. 21 – 90) Page 3 of 32
CHAPTER 21-22 - UNASSIGNED / N/A
CHAPTER 23 - COMMUNICATIONS
23-10-00 Speech Communication / Radio
The optional communication system consists of an integrated VHF radio system installed in the instrument panel. Different versions may be possible. Please refer to the manufacturer’s specifications and manuals for reference. Wiring diagrams are provided in Part D of this document. Different possible cockpit layouts are described in 31-10-00 Instruments & Control Panels.
At the time of writing, the radio approved by AutoGyro is the Funk ATR833.
23-40-00 Interphone / Intercom
The intercom system features sockets with PJ coupling installed in a panel to the left of the seat to connect a helmet or headset. The intercom amplifier and VOX control is integrated in the respective radio. See manufacturer’s manual for additional information.
As the intercom function is an integral part of the radio system, please refer to 23-10-00 Speech Comm. / Radio.
CHAPTER 24 - ELECTRICAL POWER
The 12V DC electrical system consists of an engine driven electrical generator, a battery, master switch, indicators, switches, electrical consumers, and cabling. With the ROTAX 914 UL engine an electrical power supply is vital for continued engine operation as this engine variant solely relies on electrically driven fuel pumps (depending on configuration).
Turning the master switch to the ON position closes the battery contact and energizes the gyroplane’s electrical system. The red LOW VOLT warning light will illuminate. A steady indication warns the pilot that the voltage of the system has dropped below a safe value. In this case a safety circuit (load shedding relay) will automatically disconnect nonessential consumers, such as the 12V power receptacle and supply for the heated clothing regulator. It is normal for this lamp to be on when the engine is not running.
A red GEN warning light is installed to indicate that the battery is not being charged.

AircraftMaintenance Manual
AutoGyroMTOsport Model 2017
AMM-M17-C_2018-01 Part C – System Description Section (Ch. 21 – 90) Page 4 of 32
24-30-00 DC Generation and Battery
Direct current is provided by an engine-integrated AC generator with external rectifier-regulator (12V 20 A DC). The battery is mounted in a bracket at the rear of the lower mast frame.
24-60-00 DC Electrical Load Distribution
The DC electrical load distribution system includes cockpit switches, control electronics (relays and logic components), fuses, electrical harnesses and cabling, and electrical consumers.
Electrical schematics are provided in Part D - Diagrams and Charts of this manual.
The power demand for various consumers is provided in the following table:
ATA Reference Equipment / System Power load
24-3 Generator (-) 240 W
23-1 Radio ATR833 (if inst.) 7 W (receive) / 39 W (transmit)
25-1 Seat heating (if inst.) 100 W
28-2 Electrical fuel pump (ea) 41 W
33-4 NAV/Pos lights (LED) 8 W
33-4 Strobe lights 46 W
33-4 Landing light (LED) 36 W
34-1 Digital ALT and ASI 6 W / (20 W when charging backup batt.)
34-7 ATC Transp.TRT800H (if inst.) max. 10 W
36-1 Pneumatic compressor 103 W / (280 W peak)
61-2 IVO propeller (if inst.) 30 W / (140 W peak)
85-23 Heated gloves (if conn.) 30 W
85-23 Heated pants (if conn.) 50 W
85-23 Heated jacket (if conn.) 88 W
85-23 Heated soles (if conn.) 17 W
85-34 Aspen (if inst.) 70 W
85-34 Garmin 695 / 795 (if inst.) 40 W
85-34 Garmin area 500 (if inst.) 5 W (charging)
85-34 Garmin G3X (if inst.) 30 W
85-34 Dynon 10 (if inst.) 48 W
85-34 FlyMap L (if inst.) 35 W
85-34 FlyMap XL (if inst.) 46 W

AircraftMaintenance Manual
AutoGyroMTOsport Model 2017
AMM-M17-C_2018-01 Part C – System Description Section (Ch. 21 – 90) Page 5 of 32
Fuses together with their values and application are listed below:
Fuse / Name Value ApplicationGen. 1 5 A Generator / AlternatorGen. 2 5 A Generator 2 (if installed)Compressor 15 A Electric CompressorPump 2 5 A Secondary Fuel Pump (if inst.)TCU 10 A Engine Turbo Control Unit (if inst.)Cockpit 5 AAvionic 10 AACL 10 A StrobesStart 5 A Engine Starter RelayTaxi light 10 ALanding light 10 AProp. 15 A Propeller Adjustment (if inst.)Trim. 3 A Trim and Rotor Brake ControlSensor 3 AHeater pilot 15 A Seat Heating Front Seat (if inst.)Heater copilot 15 A Seat Heating Rear Seat (if inst.)12 V plug 5 A 12 V Power OutletRear cockpit 10 AAt the batteryRegulator 30 ACockpit 50 AAux. generator 50 AStarter 125 A

AircraftMaintenance Manual
AutoGyroMTOsport Model 2017
AMM-M17-C_2018-01 Part C – System Description Section (Ch. 21 – 90) Page 6 of 32
CHAPTER 25 - EQUIPMENT / FURNISHINGS
25-10-00 Flight Compartment
Forward and aft seat are adjustable to suit different pilots and consist of a GRP bowl which is fastened to the frame structure. Basic upholstering consists of seat and backrest cushions with foam core and a fabric covering.
As an option, an easily cleanable, water-repellent ’sports design’ cover is available. The cushions are attached with hook-and-loop tape and press studs.
For each seat an adjustable four point harness is available.
IMPORTANT NOTE: Seat belts have a manufacturer recommended life of 10 years. Continued service is at the discretion of the Servicing Engineer.
CHAPTER 26 - N/A
CHAPTER 27 - FLIGHT CONTROLS
27-00-00 Flight Controls
See CHAPTER 67 – Rotors Flight Control.
Note: Stabilizers are described in CHAPTER 55.
27-20-00 Flight Controls - Rudder
The rudder is connected to the adjustable foot pedals with two push-pull control cables with are routed through the horizontal frame, steel cables and two bell crank levers. Nose wheel steering is directly linked to pedal/rudder control input by the two bell crank levers and control rods. The pair of aft pedals is interconnected in parallel with the nose wheel control path.
Both pairs of pedals are individually adjustable to suit pilot’s comfort. A shorter adjustment is achieved by pulling the handle which moves the pedals closer. Pulling the handle while pushing with both feet gently against the pedals allows longer adjustment.
The rudder fin is described in 55-40-00 Rudder.
Pedals with adjustment
1 – Pedals
2 – Adjustment handle
3 – Nose wheel and rudder control

AircraftMaintenance Manual
AutoGyroMTOsport Model 2017
AMM-M17-C_2018-01 Part C – System Description Section (Ch. 21 – 90) Page 7 of 32
CHAPTER 28 - FUEL
28-10-00 Storage
Two fuel tanks are located under the rear seat and have a total capacity of 94 litres. Tanks are made from PE plastic and feature a ventilation line that is routed under the aircraft body. A drain valve is available in the bottom aft area of each tank that accepts a standard drain tool with pin to open the valve.
A large crossover port connects both tanks to ensure quick equalization.
28-20-00 Distribution
The fuel distribution system comprises fuel hoses, made of fabric-reinforced rubber, filters and pumps.
Possible fuel system versions differ with engine model, see schematics below. In case of ROTAX 912 engine variant, a secondary electrical pump (P2) with filter can be configured as an option.
Fuel system ROTAX 912:
Fuel system ROTAX 914:
Drain Valve(s)

AircraftMaintenance Manual
AutoGyroMTOsport Model 2017
AMM-M17-C_2018-01 Part C – System Description Section (Ch. 21 – 90) Page 8 of 32
28-40-00 Indicating
An electronic fuel level gauge with integrated and independent low fuel sensor is provided in the cockpit. The LOW FUEL warning light is triggered as soon as 7.5 litres or less of usable fuel remain in the tanks. On ground, fuel quantity can be determined by a transparent line positioned at the rear end of the tanks.
Additionally, and optionally, a low fuel pressure warning LED (FUEL P.) may be fitted to the panel. This lamp indicates when the fuel pressure downstream of the fuel pumps is less than 0.15bar. The pressure sensor is located in the fuel supply hose between the pump filters and the fuel pressure regulators on 914UL engines.
CHAPTER 29-30 - N/A
CHAPTER 31 – INDICATING SYSTEM
Note: The hour meter / HOBBS meter is described in CHAPTER 77 - ENGINE INDICATING.
31-10-00 Instruments & Control Panels
Different instrument panel layouts are available. The basic instrumentation arrangements include:
GPS Layout EFIS Layout Night VFR
The panel layout “GPS” includes all relevant instruments arranged in a way to accept most off-the-shelf moving map navigation devices in the respective format. Alternatively, the area in the centre of the panel may be used to install a map holder or attach checklists and/or maps.
Some hand held GPS units and antennas emit magnetic fields that vary with respect to time and/or levels of battery charge. These may change your compass deviations, so always cross check between the compass headings with your GPS installed and placard accordingly if required.
All EFIS layouts are tailored to the integrated flight and navigation suite of the respective manufacturer. In addition to navigational and moving map functions, the system provides primary flight data and engine/vehicle monitoring. It is of utmost importance to read and understand the operators’ manual and to become familiar with the system before operation. In case of a system failure, altimeter and air speed indicator are provided as back-up.
Depending on the chosen instrumentation and optional equipment, the depicted panels on the following pages may vary.

AircraftMaintenance Manual
AutoGyroMTOsport Model 2017
AMM-M17-C_2018-01 Part C – System Description Section (Ch. 21 – 90) Page 9 of 32
Panel Layout – GPS Panel
1 – Magnetic compass 16 – Altimeter 2 – Warning lights 17 – Cut-out 57mm / 2 ¼” for optional inst. 3 – Lateral/roll trim indicator 18 – Cut-out 57mm / 2 ¼” for optional inst. 4 – Rotor RPM 19 – Trim/brake pressure gauge 5 – Engine RPM 20 – Installation provisions 6 – Fuel level indicator 21 – Radio (if installed) 7 – Air speed indicator 22 – ATC Transponder (if inst.) 8 – Variable pitch propeller / VPP (if inst.) 23 – Boost guarded switch– only R914 9 – 12V power receptacle (if installed) 24 – MAG switches10 – Pneumatic mode selector 25 – Master/starter switch11 – Pre-rotator overdrive 26 – Switches (Avionics, P2, Lights, Opt.)12 – Manifold pressure gauge (if inst.) 27 – Outside air temperature / OAT13 – Oil pressure 28 – Hour meter14 – Oil temperature 29 – ELT control (if inst.)15 – Engine Coolant Temperature / CT 30 – Fuses

AircraftMaintenance Manual
AutoGyroMTOsport Model 2017
AMM-M17-C_2018-01 Part C – System Description Section (Ch. 21 – 90) Page 10 of 32
Panel Layout – GPS Rack for Garmin 695
1 – Magnetic compass 16 – Altimeter 2 – Warning lights 17 – Cut-out 57mm / 2 ¼” for optional inst. 3 – Lateral/roll trim indicator 18 – Cut-out 57mm / 2 ¼” for optional inst. 4 – Rotor RPM 19 – Trim/brake pressure gauge 5 – Engine RPM 20 – Option GPS Rack for Garmin 695 6 – Fuel level indicator 21 – Radio (if installed) 7 – Air speed indicator 22 – ATC Transponder (if inst.) 8 – Variable pitch propeller / VPP (if inst.) 23 – Boost guarded switch– only R914 9 – 12V power receptacle (if installed) 24 – MAG switches10 – Pneumatic mode selector 25 – Master/starter switch11 – Pre-rotator overdrive 26 – Switches (Avionics, P2, Lights, Opt.)12 – Manifold pressure gauge (if inst.) 27 – Outside air temperature / OAT13 – Oil pressure 28 – Hour meter14 – Oil temperature 29 – ELT control (if inst.)15 – Engine Coolant Temperature / CT 30 – Fuses

AircraftMaintenance Manual
AutoGyroMTOsport Model 2017
AMM-M17-C_2018-01 Part C – System Description Section (Ch. 21 – 90) Page 11 of 32
Panel Layout – GPS Rack for Garmin 795
1 – Magnetic compass 16 – Altimeter 2 – Warning lights 17 – Cut-out 57mm / 2 ¼” for optional inst. 3 – Lateral/roll trim indicator 18 – Cut-out 57mm / 2 ¼” for optional inst. 4 – Rotor RPM 19 – Trim/brake pressure gauge 5 – Engine RPM 20 – Option GPS Rack for Garmin 795 6 – Fuel level indicator 21 – Radio (if installed) 7 – Air speed indicator 22 – ATC Transponder (if inst.) 8 – Variable pitch propeller / VPP (if inst.) 23 – Boost guarded switch– only R914 9 – 12V power receptacle (if installed) 24 – MAG switches10 – Pneumatic mode selector 25 – Master/starter switch11 – Pre-rotator overdrive 26 – Switches (Avionics, P2, Lights, Opt.)12 – Manifold pressure gauge (if inst.) 27 – Outside air temperature / OAT13 – Oil pressure 28 – Hour meter14 – Oil temperature 29 – ELT control (if inst.)15 – Engine Coolant Temperature / CT 30 – Fuses

AircraftMaintenance Manual
AutoGyroMTOsport Model 2017
AMM-M17-C_2018-01 Part C – System Description Section (Ch. 21 – 90) Page 12 of 32
Panel Layout – GPS Rack for I Pad mini 1,2,3
1 – Magnetic compass 16 – Altimeter 2 – Warning lights 17 – Cut-out 57mm / 2 ¼” for optional inst. 3 – Lateral/roll trim indicator 18 – Cut-out 57mm / 2 ¼” for optional inst. 4 – Rotor RPM 19 – Trim/brake pressure gauge 5 – Engine RPM 20 – Option GPS Rack for I Pad mini 1,2,3 6 – Fuel level indicator 21 – Radio (if installed) 7 – Air speed indicator 22 – ATC Transponder (if inst.) 8 – Variable pitch propeller / VPP (if inst.) 23 – Boost guarded switch– only R914 9 – 12V power receptacle (if installed) 24 – MAG switches10 – Pneumatic mode selector 25 – Master/starter switch11 – Pre-rotator overdrive 26 – Switches (Avionics, P2, Lights, Opt.)12 – Manifold pressure gauge (if inst.) 27 – Outside air temperature / OAT13 – Oil pressure 28 – Hour meter14 – Oil temperature 29 – ELT control (if inst.)15 – Engine Coolant Temperature / CT 30 – Fuses

AircraftMaintenance Manual
AutoGyroMTOsport Model 2017
AMM-M17-C_2018-01 Part C – System Description Section (Ch. 21 – 90) Page 13 of 32
Panel Layout – GPS Rack for I Pad mini 4
1 – Magnetic compass 16 – Altimeter 2 – Warning lights 17 – Cut-out 57mm / 2 ¼” for optional inst. 3 – Lateral/roll trim indicator 18 – Cut-out 57mm / 2 ¼” for optional inst. 4 – Rotor RPM 19 – Trim/brake pressure gauge 5 – Engine RPM 20 – Option GPS Rack for I Pad mini 4 6 – Fuel level indicator 21 – Radio (if installed) 7 – Air speed indicator 22 – ATC Transponder (if inst.) 8 – Variable pitch propeller / VPP (if inst.) 23 – Boost guarded switch– only R914 9 – 12V power receptacle (if installed) 24 – MAG switches10 – Pneumatic mode selector 25 – Master/starter switch11 – Pre-rotator overdrive 26 – Switches (Avionics, P2, Lights, Opt.)12 – Manifold pressure gauge (if inst.) 27 – Outside air temperature / OAT13 – Oil pressure 28 – Hour meter14 – Oil temperature 29 – ELT control (if inst.)15 – Engine Coolant Temperature / CT 30 – Fuses

AircraftMaintenance Manual
AutoGyroMTOsport Model 2017
AMM-M17-C_2018-01 Part C – System Description Section (Ch. 21 – 90) Page 14 of 32
Panel Layout – GPS Insert for Aspen
1 – Magnetic compass 16 – Altimeter 2 – Warning lights 17 – Cut-out 57mm / 2 ¼” for optional inst. 3 – Lateral/roll trim indicator 18 – Cut-out 57mm / 2 ¼” for optional inst. 4 – Rotor RPM 19 – Trim/brake pressure gauge 5 – Engine RPM 20 – Option GPS Insert for Aspen 6 – Fuel level indicator 21 – Radio (if installed) 7 – Air speed indicator 22 – ATC Transponder (if inst.) 8 – Variable pitch propeller / VPP (if inst.) 23 – Boost guarded switch– only R914 9 – 12V power receptacle (if installed) 24 – MAG switches10 – Pneumatic mode selector 25 – Master/starter switch11 – Pre-rotator overdrive 26 – Switches (Avionics, P2, Lights, Opt.)12 – Manifold pressure gauge (if inst.) 27 – Outside air temperature / OAT13 – Oil pressure 28 – Hour meter14 – Oil temperature 29 – ELT control (if inst.)15 – Engine Coolant Temperature / CT 30 – Fuses

AircraftMaintenance Manual
AutoGyroMTOsport Model 2017
AMM-M17-C_2018-01 Part C – System Description Section (Ch. 21 – 90) Page 15 of 32
Panel Layout – GPS Insert for Area 500
1 – Magnetic compass 16 – Altimeter 2 – Warning lights 17 – Cut-out 57mm / 2 ¼” for optional inst. 3 – Lateral/roll trim indicator 18 – Cut-out 57mm / 2 ¼” for optional inst. 4 – Rotor RPM 19 – Trim/brake pressure gauge 5 – Engine RPM 20 – Option GPS Insert for Area 500 6 – Fuel level indicator 21 – Radio (if installed) 7 – Air speed indicator 22 – ATC Transponder (if inst.) 8 – Variable pitch propeller / VPP (if inst.) 23 – Boost guarded switch– only R914 9 – 12V power receptacle (if installed) 24 – MAG switches10 – Pneumatic mode selector 25 – Master/starter switch11 – Pre-rotator overdrive 26 – Switches (Avionics, P2, Lights, Opt.)12 – Manifold pressure gauge (if inst.) 27 – Outside air temperature / OAT13 – Oil pressure 28 – Hour meter14 – Oil temperature 29 – ELT control (if inst.)15 – Engine Coolant Temperature / CT 30 – Fuses
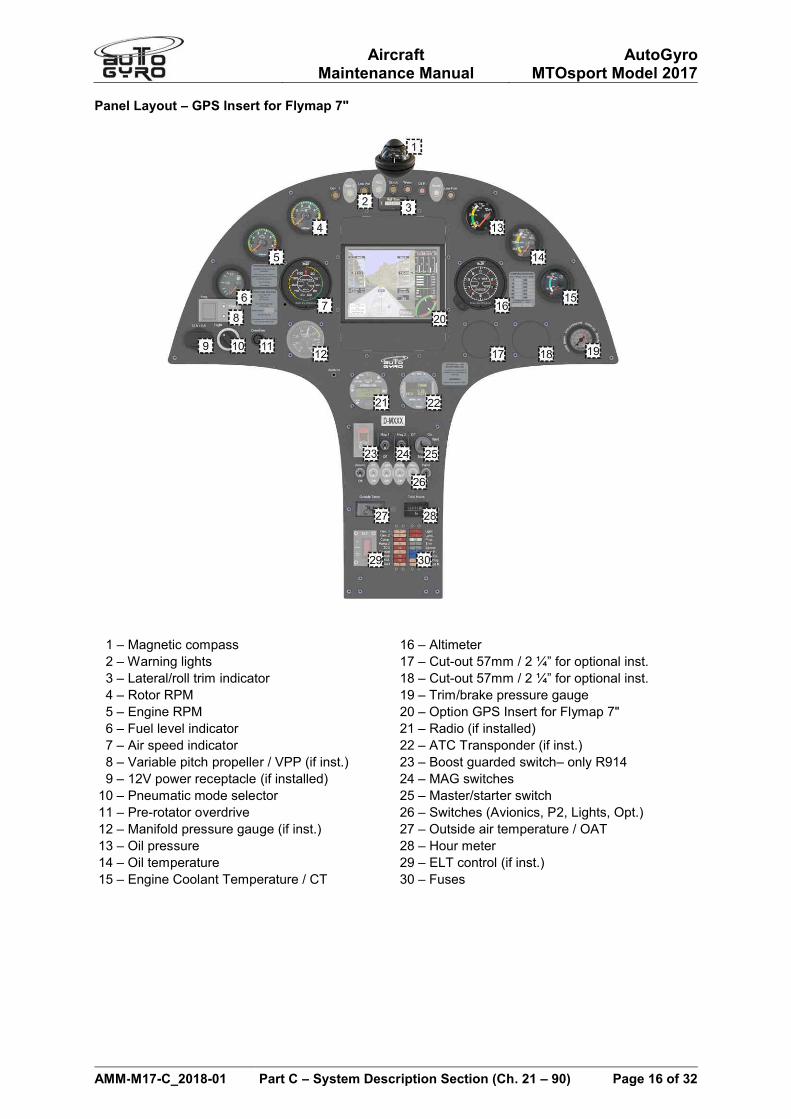
AircraftMaintenance Manual
AutoGyroMTOsport Model 2017
AMM-M17-C_2018-01 Part C – System Description Section (Ch. 21 – 90) Page 16 of 32
Panel Layout – GPS Insert for Flymap 7"
1 – Magnetic compass 16 – Altimeter 2 – Warning lights 17 – Cut-out 57mm / 2 ¼” for optional inst. 3 – Lateral/roll trim indicator 18 – Cut-out 57mm / 2 ¼” for optional inst. 4 – Rotor RPM 19 – Trim/brake pressure gauge 5 – Engine RPM 20 – Option GPS Insert for Flymap 7" 6 – Fuel level indicator 21 – Radio (if installed) 7 – Air speed indicator 22 – ATC Transponder (if inst.) 8 – Variable pitch propeller / VPP (if inst.) 23 – Boost guarded switch– only R914 9 – 12V power receptacle (if installed) 24 – MAG switches10 – Pneumatic mode selector 25 – Master/starter switch11 – Pre-rotator overdrive 26 – Switches (Avionics, P2, Lights, Opt.)12 – Manifold pressure gauge (if inst.) 27 – Outside air temperature / OAT13 – Oil pressure 28 – Hour meter14 – Oil temperature 29 – ELT control (if inst.)15 – Engine Coolant Temperature / CT 30 – Fuses

AircraftMaintenance Manual
AutoGyroMTOsport Model 2017
AMM-M17-C_2018-01 Part C – System Description Section (Ch. 21 – 90) Page 17 of 32
Panel Layout – GPS Insert basic T
1 – Magnetic compass 16 – Altimeter 2 – Warning lights 17 – Cut-out 57mm / 2 ¼” for optional inst. 3 – Lateral/roll trim indicator 18 – Cut-out 57mm / 2 ¼” for optional inst. 4 – Rotor RPM 19 – Trim/brake pressure gauge 5 – Engine RPM 20 – 2 x Cut-out 80mm for opt. installation 6 – Fuel level indicator 21 – Radio (if installed) 7 – Air speed indicator 22 – ATC Transponder (if inst.) 8 – Variable pitch propeller / VPP (if inst.) 23 – Boost guarded switch– only R914 9 – 12V power receptacle (if installed) 24 – MAG switches10 – Pneumatic mode selector 25 – Master/starter switch11 – Pre-rotator overdrive 26 – Switches (Avionics, P2, Lights, Opt.)12 – Manifold pressure gauge (if inst.) 27 – Outside air temperature / OAT13 – Oil pressure 28 – Hour meter14 – Oil temperature 29 – ELT control (if inst.)15 – Engine Coolant Temperature / CT 30 – Fuses

AircraftMaintenance Manual
AutoGyroMTOsport Model 2017
AMM-M17-C_2018-01 Part C – System Description Section (Ch. 21 – 90) Page 18 of 32
31-60-00 Integrated Display Systems
Different Integrated Display Systems are available as an option, and described in the following. In addition to navigational and moving map functions, the systems provide primary flight data and engine/vehicle monitoring. It is of utmost importance to read and understand the operators manual and to become familiar with the system before operation. In case of a system failure, a 2 ¼” (47mm) altimeter, air speed indicator and rotor speed indicator are provided as backup instrumentation.
Panel Layout – EFIS Insert Garmin G3X 10"
1 – Magnetic compass 13 – Trim/brake pressure gauge 2 – Warning lights 14 – Radio (if installed) 3 – Lateral/roll trim indicator 15 – ATC Transponder (if inst.) 4 – Rotor RPM 16 – Boost guarded switch– only R914 5 – Variable pitch propeller / VPP (if inst.) 17 – MAG switches 6 – Air speed indicator 18 – Master/starter switch 7 – 12V power receptacle (if installed) 19 – Switches (Avionics, P2, Lights, Opt.) 8 – Pneumatic mode selector 20 – Outside air temperature / OAT 9 – Pre-rotator overdrive 21 – Hour meter10 – Option EFIS Insert Garmin G3X 10" 22 – ELT control (if inst.)11 – Manifold pressure gauge (if inst.) 23 – Fuses12 – Altimeter

AircraftMaintenance Manual
AutoGyroMTOsport Model 2017
AMM-M17-C_2018-01 Part C – System Description Section (Ch. 21 – 90) Page 19 of 32
Panel Layout – EFIS Insert Skyview 10"
1 – Magnetic compass 13 – Trim/brake pressure gauge 2 – Warning lights 14 – Radio (if installed) 3 – Lateral/roll trim indicator 15 – ATC Transponder (if inst.) 4 – Rotor RPM 16 – Boost guarded switch– only R914 5 – Variable pitch propeller / VPP (if inst.) 17 – MAG switches 6 – Air speed indicator 18 – Master/starter switch 7 – 12V power receptacle (if installed) 19 – Switches (Avionics, P2, Lights, Opt.) 8 – Pneumatic mode selector 20 – Outside air temperature / OAT 9 – Pre-rotator overdrive 21 – Hour meter10 – Option EFIS Insert Skyview 10" 22 – ELT control (if inst.)11 – Manifold pressure gauge (if inst.) 23 – Fuses12 – Altimeter

AircraftMaintenance Manual
AutoGyroMTOsport Model 2017
AMM-M17-C_2018-01 Part C – System Description Section (Ch. 21 – 90) Page 20 of 32
Panel Layout – EFIS Insert Flymap 10"
1 – Magnetic compass 13 – Trim/brake pressure gauge 2 – Warning lights 14 – Radio (if installed) 3 – Lateral/roll trim indicator 15 – ATC Transponder (if inst.) 4 – Rotor RPM 16 – Boost guarded switch– only R914 5 – Variable pitch propeller / VPP (if inst.) 17 – MAG switches 6 – Air speed indicator 18 – Master/starter switch 7 – 12V power receptacle (if installed) 19 – Switches (Avionics, P2, Lights, Opt.) 8 – Pneumatic mode selector 20 – Outside air temperature / OAT 9 – Pre-rotator overdrive 21 – Hour meter10 – Option EFIS Insert Flymap 10" 22 – ELT control (if inst.)11 – Manifold pressure gauge (if inst.) 23 – Fuses12 – Altimeter

AircraftMaintenance Manual
AutoGyroMTOsport Model 2017
AMM-M17-C_2018-01 Part C – System Description Section (Ch. 21 – 90) Page 21 of 32
CHAPTER 32 - LANDING GEAR
The MTOsport Model 2017 has a conventional tricycle gear with GRP (glass fibre reinforced plastic) suspension bow and a steerable nose gear.
32-10-00 Main Gear
The main gear consists of a GRP suspension bow which is bolted to a support frame at the bottom of the mast and main frame. The spar is designed to absorb even higher than normal landing loads in case of a hard landing or crash.
32-10-00 Nose Gear
The nose gear consists of a steerable nose wheel in a fork made of stainless steel tubing. Nose wheel steering is realized by cables and a linkage to pedal/rudder control input.
32-40-00 Wheels and Brakes
Both main wheels feature hydraulic disc brakes. The hydraulic wheel brake is actuated by pulling the brake lever (2). A locking pawl mechanism allows setting for use as parking brake. In order to release the parking brake pull the brake lever a little further to let the spring-loaded locking pawl disengage, and then release wheel brake.
Do not try to disengage the locking pawl by pressing the small release lever without pulling the brake lever at the same time. Releasing the pawl using the small release lever only will lead to premature deterioration of the teeth. If the teeth are worn the function of the parking brake will be compromised!
The throttle and brake quadrant also supports the brake fluid reservoir (4) with screw cap and fluid level minimum and maximum markings, as well as the primary brake cylinder (5).
For correct tire pressure see 12-30-20 Servicing: Tire Pressure.
CHAPTER 33 - LIGHTS
33-40-00 Exterior
The basic aircraft is approved for day VFR operation only. As an option the following lights can be configured on the MTOsport Model 2017:
Landing Light Position Lights with integrated Strobe Lights on both outer vertical stabilizers (Either AutoGyro or
Aveo Ultra Galactica (certified) devices) Belly landing light Dimmable instrument panel lighting for front and rear seats
Electrical schematics / wiring diagrams are provided in Part D - Diagrams and Charts of this manual.
Power consumption figures are listed in 24-60-00 DC Electrical Load Distribution.
Throttle and Brake Quadrant
1 – Throttle lever
2 – Brake lever with locking pawl
3 – Choke control
4 – Brake fluid reservoir
5 – Primary brake cylinder
6 – Seat adjustment control push button
7 – Headset / helmet connectors
8 – Seat heating control (if installed)

AircraftMaintenance Manual
AutoGyroMTOsport Model 2017
AMM-M17-C_2018-01 Part C – System Description Section (Ch. 21 – 90) Page 22 of 32
CHAPTER 34 - NAVIGATION
34-10-00 Flight Environment Data
Total pressure is picked up by a pitot tube located in the nose section of the fuselage. The tube is connected to the integrated cockpit instruments by a plastic line. Static pressure is measured behind the cockpit panel.
Outside air temperature (OAT) is measured by a thermocouple located at the fuselage belly above the nose wheel.
34-20-00 Attitude and Direction
As part of minimum equipment, a magnetic compass is installed on top of the instrument panel, under the windshield.
34-70-00 ATC Transponder
An ATC Transponder may be installed as an option. Possible installation positions in the instrument panel are described in CHAPTER 31. Please refer to the manufacturer’s documentation for reference.
CHAPTER 35 - N/A
CHAPTER 36 - PNEUMATIC
Aircraft trim, rotor brake and activation of the pre-rotator is controlled by a pneumatic system, consisting of an electrically driven air compressor with filter/dryer, a pressure gauge in the cockpit, a pressure compensation vessel, solenoid valves, air lines, pneumatic actuators, and the respective cockpit controls.
The pneumatic system controls the following function:
rotor brake ON, effects i.e. rotor disc flat / flight control stick forward position (brake mode) adjustable longitudinal trim, effects i.e. rotor disc/stick pulled aft (flight mode) engagement of the pre-rotator, i.e. activation of the clutch and upper engagement
(only in flight mode or in brake mode with overdrive/override button)
The aforementioned functions are described in more detail in the dedicated chapters.
A schematic drawing of the pneumatic system is provided in Part D - Diagrams and Charts of this manual.
36-11-00 Generation / Compressor
The electrically driven compressor and filter/dryer is located behind the instrument panel. The wiring diagram is provided in Part D - Diagrams and Charts of this manual.
36-21-00 Distribution
Air distribution comprises of hoses, valves (solenoids), (cockpit) controls and switches, (pressure) sensors and a pressure compensation vessel. The main pneumatic switching logic is combined in the pneumatic control which is installed behind the instrument panel. See Part D - Diagrams and Chartsfor schematics.
Note that the pneumatics actuators (cylinders) are not described in this ATA Chapter, but assigned to their mechanical main function.
Example: the brake/trim cylinder is described in 67-05-00 Pitch Trim System / Rotor Brake.

AircraftMaintenance Manual
AutoGyroMTOsport Model 2017
AMM-M17-C_2018-01 Part C – System Description Section (Ch. 21 – 90) Page 23 of 32
CHAPTER 37-50 - UNASSIGNED / N/A
CHAPTER 51 - STANDARD PRACTICES - STRUCTURES
51-00-00 Standard Practices - Structures
Structural repair of composite structures or the welded steel frame is limited to AutoGyro GmbH or its specialized service partners (job cards labelled ‘SPC’).
CHAPTER 52 - DOORS, COVERS AND COWLINGS
52-10-00 Passenger / Crew
This gyroplane is designed as an open cockpit aircraft and features no doors. Two windshields from break-proof polycarbonate protect the crew against the air stream, insects, and direct rain. Access and exit is provided over the sillboard on the right hand side.
Note that windshields are described in 56-10-00 Flight Compartment / Windshields.
52-40-00 Service Covers and Cowlings
The pneumatic control box is installed behind the cover of the centre panel. Note that some of the pneumatic pump and air dryer can be accessed through the cover of the storage compartment in the nose section.
Access for maintenance and inspection is described in a dedicated job card 52-40-00 2-1 in Part D of this manual.
CHAPTER 53 – FUSELAGE / MAIN FRAME
The load carrying structure of the gyroplane consists of an inert-gas welded stainless steel square tube framework and includes mast, forward extension, and aft extension. The main frame carries all loads induced by the crew stations, engine, rotor, undercarriage, stabilizer, and serves as installation platform for additional equipment. Attachment points for the engine installation are provided by a steel tube ring mount at the rear of the mast, which also supports the rotor at its top end.
The fuselage enclosure including its two crew stations is made of glass fibre reinforced plastic. It is mounted to the forward extension of the main frame and is not designed as a load carrying structure.
CHAPTER 54 - N/A

AircraftMaintenance Manual
AutoGyroMTOsport Model 2017
AMM-M17-C_2018-01 Part C – System Description Section (Ch. 21 – 90) Page 24 of 32
CHAPTER 55 - STABILIZERS
The stabilizer structure with rudder is made of carbon reinforced plastic (CRP) and is bolted to the keel tube (aft extension) of the main frame. Presence and function of the stabilizer plays a vital part in flight stability and safety. Inspect carefully all attachment points and the integrity of the composite component.
In order to assess the integrity of the stabilizer, carefully pull the fin tips in lateral direction (left/right) with a maximum of 150 N. A ‘linear’ resistance must be felt. In case mechanical noises are heard/felt, contact AutoGyro.
55-40-00 Rudder
The rudder is made of CRP and is hinged to the central fin of stabilizer. An aluminium trim tab is provided to eliminate constant pedal input during cruise flight and to provide a pre-defined rudder setting in case of a control failure. The trim tab should be adjusted to allow pedal-off cruise flight. Adjust according to the following table:
Pedal input(for straight and level flight, slip indic./ball centred)
Corrective action(seen from behind, i.e. in flight direction)
Constant right pedal required Bend trim tab to the left
Constant left pedal required Bend trim tab to the right
Avoid unnecessary bending as the tab may break at its perforation. A misadjusted or broken tab may change flight characteristics significantly and in case of a rudder control failure, the gyroplane may render difficult to control. Replace trim tab if it feels soft or if fissures at the perforated part are visible.
CHAPTER 56 - WINDOWS
56-10-00 Flight Compartment / Windshields
Environmental protection for pilot and occupant against the air stream, insects, and direct rain is provided by large windshields in each station. The windshields are made of break-proof polycarbonate (Makrolon) and bolted to the gyroplane enclosure.
CHAPTER 57-60 - UNASSIGNED / N/A

AircraftMaintenance Manual
AutoGyroMTOsport Model 2017
AMM-M17-C_2018-01 Part C – System Description Section (Ch. 21 – 90) Page 25 of 32
CHAPTER 61 - PROPELLER
In standard configuration a 3-bladed, fixed pitch ‘HTC’ propeller with GRP propeller blades is installed.Depending on customer configuration a spinner may be installed. As an option, a variable pitch propeller may be available, either the Woodcomp KW31 or the Ivoprop DL3-68. The Woodcomp KW 31 is an EASA certified propeller and should (‘MUST’ in the case of a certified version of the aircraft) be maintained in accordance with the Woodcomp issued MM.
Ivoprop do not issue an MM for their propeller, so the propeller is maintained iaw with RotorSport Ivoprop maintenance manual RSUK0325, and AutoGyro Service Bulletin AG-SB-2017-05-B-EN IVO-prop gearbox overhaul.
Adjustment of the fixed pitch propeller is described in a dedicated Job Card in Part E of this manual. The mechanical end stops of the variable pitch propeller are pre-adjusted by AutoGyro. In case, re-adjustment should be necessary on the variable pitch propeller, please refer to the manufacturer’s documentation or contact AutoGyro. It is essential that the propeller pitch adjustment does not prevent the aircraft from achieving a minimum climb rate in full coarse of 250fpm at MaxTOW, or allow over-revving in the climb at full fine. Nominal engine rpm at full fine in the climb is 5500, max 5700.
In certain cases, damaged propeller blades can be repaired (specialized / SPC maintenance task). Concerning repair limits and allowable damage contact AutoGyro GmbH. Provide a precise description of the damage, dimensions and preferably photos of the affected area.
61-10-00 Propeller assembly
The propeller assembly comprises propeller blades, hub and related attachment hardware.
61-20-00 Controlling
In case of a variable pitch propeller (VPP) refer to the manufacturer’s (IVO DL3-68 or Woodcomp KW31) documentation and respective wiring diagrams in Part D of this manual.
CHAPTER 62 - ROTOR
The two-bladed, semi-rigid, teetering rotor system comprises high-strength aluminium extruded rotor blades, a hub bar, and a common teeter hinge assembly.
Due to their working principle, every two-bladed teetering rotor system induces a certain amount of vibration, depending on flight condition (speed) and disc loading. AutoGyro optimizes each rotor system at a medium disc loading and speed before delivery. However, if the rotor system shall be tuned to a different flight condition or reveals undue vibration, contact AutoGyro or a specialized service partners (maintenance level ‘S’).
IMPORTANT NOTE: Rotor Systems are Manufacturer Life Limited (MLL)!
Some guidelines to Vibration and Noise Analysis and classification schemes are provided in CHAPTER 18 (Part B) of this manual.
62-11-00 Rotor – Teetering Parts
The teetering parts of the rotor system consist of teeter bolt, teeter block, rotor hub (bar), and rotor blades.
IMPORTANT NOTE: Only rotor system 8.4m standard or TOPP, or 8.6m TOPP is released for use with the Sport 2017.
The rotor blades feature an aerodynamic profile especially suitable for rotorcraft which, in combination with its relative centre of gravity, provides aerodynamic stability by eliminating negative blade pitching moments and flutter tendency. The hollow blade profile is sealed at both ends by plastic blade caps.

AircraftMaintenance Manual
AutoGyroMTOsport Model 2017
AMM-M17-C_2018-01 Part C – System Description Section (Ch. 21 – 90) Page 26 of 32
The aluminium rotor hub bar is pre-coned to the natural coning angle of the blades and connects the blades firmly to each side with fitting bolts and a clamping profile. In order to compensate for asymmetric air flow in forward flight the blades are free to teeter. The hinge assembly consists of teeter tower, teeter bolt and teeter block.
The teeter bolt runs in a long Teflon coated bushing in the teeter block (main bearing action), as well as two shorter bushings in the teeter tower (emergency bearing action). The main bearing action is supported by special grease which is applied through a grease nipple on top of the teeter block. Servicing is described in CHAPTER 05 (Part B) of this manual.
62-31-00 Rotor Head Bridge, Bearing and Teeter Tower
The rotor head bridge is made of welded stainless steel. Rotor bearing (Manufacturer Life Limited!) and teeter tower represent one integrated component.
62-32-00 Rotor Gimbal Head
Tilting action or flight control of the rotor is facilitated by the rotor gimbal head. The gimbal head is sometimes also referred to as ‘hang point’ and represents a cardan hinge.
62-41-00 Rotor RPM Monitoring
Rotor RPM monitoring is realized by an inductive pick-up which is installed with a gap of 2-3mm at the sprocket wheel. The sensor counts the (10) holes in the sprocket disc. Rotor RPM is indicated in the cockpit in an analogue-type instrument which also houses the control electronic. The system requires power supply.
CHAPTER 63 - ROTOR DRIVE
63-11-00 Pre-rotator
The pre-rotator is used to quickly bring the rotor up to safe RPM for take-off run by the press of a button. Pre-rotation is activated by a push-button on the flight control stick. Because of a safety circuit, activation of the pre-rotator is only possible with the pneumatic mode selector in FLIGHT position and the control stick in forward position. This prevents inadvertent activation of the pre-rotator during flight or in BRAKE mode.
The pre-rotator is activated as long as the respective push-button on the control stick head is depressed, provided the following pre-conditions are met:
bar (if installed) down and locked pneumatic mode selector set to FLIGHT control stick in forward position (controlled by a micro switch) trim pressure less than 3 bar
In this case, the pneumatic clutch is pressurized. Engine torque is then transmitted through the pre-rotator drive, a 90° gearbox and upper drive to the pinion which is engaged by another small pneumatic actuator into the geared ring of the rotor head. The drive pinion is sliding on a helical gear to provide automatic lock-out in case of rotor RPM overrun. In order to allow necessary changes in length both pre-rotator drive shafts feature a sliding sleeve coupling.
The pre-rotator can be activated in BRAKE position to park the rotor blades fore-aft for taxi. To do so, the pre-rotator push-button and the overdrive/override switch in the cockpit panel have to be pressed simultaneously. Prolonged activation of the pre-rotator with rotor brake engaged should be avoided.

AircraftMaintenance Manual
AutoGyroMTOsport Model 2017
AMM-M17-C_2018-01 Part C – System Description Section (Ch. 21 – 90) Page 27 of 32
63-11-10 Pre-rotator Lower Engagement
Pre-rotator lower engagement consists of the pneumatically activated clutch.
For pneumatic control of the clutch refer to CHAPTER 36 - PNEUMATIC.
63-11-20 Pre-rotator Drive
Power flow is realized through a 90-degree gearbox and drive shafts. The 90-degree gearbox is mounted directly to the disc clutch. The pre-rotator drive shaft features a cardan joint right after the 90-degree gearbox and a sliding shaft coupling in the upper area to allow changes in length due to the tilt of the rotor head.
63-11-30 Pre-rotator Upper Engagement
The pre-rotator upper engagement comprises a drive pinion with bearing, which is engaged by a small pneumatic actuator into the geared ring / sprocket wheel of the rotor head. The drive pinion is sliding on a helical gear to provide automatic lock-out in case of rotor RPM overrun.
63-51-00 Rotor Brake System
The rotor brake system consists of a brake pad mounted to a bracket which is hinged to the rotor head bridge. A second brake pad is mounted in forward position which will contact the sprocket wheel only when in full flat / level (stick fully forward) position. With the pneumatic mode selector in BRAKE position the operation of the pneumatic trim actuator is reversed so that increased pressure causes the actuator to push the rotor head up (or level) and presses the brake pads against the rotor head disc. In order to increase brake pressure, move the 4-way trim switch to aft. Note that this action will also push the control stick forward which will push the sprocket wheel against the forward brake pad. At full brake pressure the control stick will be maintained in its full forward position while aft and forward brake pads provide braking action.
Due to its main function the pneumatic brake/trim actuator/cylinder itself is allocated to 67-05-00 Pitch Trim.
CHAPTER 64-66 - N/A
CHAPTER 67 - ROTOR FLIGHT CONTROL
Rotor flight control comprises of control stick, a base control unit / tube, flight control base link and control rods (push rods) which are connected to the rotor head bridge.
Pitch and roll of the gyroplane is controlled by tilting the complete rotor head by means of the control stick. Control input is transferred via a base control unit / tube running horizontally along the forward extension of the main frame (below the seats) to the base link and from there to the rotor head via control rods (push rods). The control rods with ball joints at both ends are supported by a bell crank about half way up the mast.
The control stick head is ergonomically shaped to fit the pilot’s right hand and features control buttons for radio transmission (1), a four-way trim function (2), and activation of the pre-rotator (3).
67-05-00 Pitch Trim System / Rotor Brake
The Pitch Trim System comprises of a 4-way beep trim switch (2) / “Chinese Hat” at the flight control stick and the pitch trim / brake pneumatic actuator. Pneumatic control is allocated to and described in CHAPTER 36.Components related to the rotor brake are allocated to 63-51-00 Rotor Brake System.
Control Stick Head
1 – Radio transmission
2 – Trim switch
3 – Pre-rotator

AircraftMaintenance Manual
AutoGyroMTOsport Model 2017
AMM-M17-C_2018-01 Part C – System Description Section (Ch. 21 – 90) Page 28 of 32
Trimming is effected by varying trim pressure in the pneumatic trim actuator which is installed in parallel with the rotor head tilt for pitch control. Aft or nose-up trimming activates the electrical compressor and increases trim pressure, causing the actuator to contract, and tilting the rotor disc aft. Forward trimming opens the pressure relief valve to reduce trim pressure and allows the rotor disc to flatten, due to the spindle head offset and the gyroplane’s weight. The actual trim condition is indicated on the trim/brake pressure gauge in the centre panel of the cockpit.
67-06-00 Roll Trim System
Lateral/roll trim works accordingly, using a lateral pneumatic trim cylinder. Lateral trim condition is indicated by a self-dimming LED bar on the instrument panel.
CHAPTER 68-70 - UNASSIGNED / N/A
CHAPTER 71 - POWER PLANT
Power plant comprises aircraft provisions, installations and systems related to the core engine. The engine itself is allocated to CHAPTER 72 – 74.
71-20-00 Engine Mounts
Attachment points for the engine installation are provided by a steel tube ring mount at the rear of the mast. To provide vibration isolation, the engine is connected to the ring frame by 4 rubber mountingbushings. The engine mounting bushings have to be inspected regularly and have to be replaced, if torn or porous. Defective rubber bushing can also cause undue engine/propeller vibration.
IMPORTANT NOTE: Engine mounting bushings are recommended to be changed at a minimum of every 5years.
71-50-00 Engine Electrical Harness
The engine electrical harness includes wiring, cables and cockpit switches for starting, energizing and grounding of the dual breakerless capacitor discharge ignition circuits (including instructor magswitches, if installed), and engine indication. A wiring diagram is provided in Part D of this manual. Also refer to the engine manufacturer’s documentation.
71-60-00 Engine Air Intakes
The engine aspirates through air filters mounted on each of the carburettors, or in the case of the 914UL engine, via a filter located on the turbocharger.
71-70-00 Engine Drains
Oil tank breathing is provided by a rubber hose which is routed down into the mast.

AircraftMaintenance Manual
AutoGyroMTOsport Model 2017
AMM-M17-C_2018-01 Part C – System Description Section (Ch. 21 – 90) Page 29 of 32
CHAPTER 72 TO 74 - ENGINE RELATED
For the (core) engine refer to the engine manufacturer’s documentation in its latest revision.
Concerning fuel system (Filter, Pumps, Shut-off valve) see CHAPTER 28.
Engine cowlings are described in CHAPTER 52. For removal and installation see the dedicated Job Card in Part E of this manual.
CHAPTER 75 - AIR / ENGINE COOLING
Engine cooling is provided by air cooled cylinders and liquid cooled cylinder heads. The sensors are mounted in the cylinder heads, into the coolant. Therefore, coolant temperature (CT) indication in the cockpit corresponds to actual coolant temperature. The water cooling system comprises of engine driven pump, one radiator, an aluminium expansion tank with radiator cap and sight glass, thermostat and hoses.
The radiator is mounted on rubber isolators and brackets just in front of the propeller. Hoses from/to the radiator go to the engine water pump and return. Hot water to the carburettor heat jackets is provided via T-pieces.
For the relevant checking and replenishing procedures, refer to engine manufacturer’s manual.
Oil cooling is described in CHAPTER 79.

AircraftMaintenance Manual
AutoGyroMTOsport Model 2017
AMM-M17-C_2018-01 Part C – System Description Section (Ch. 21 – 90) Page 30 of 32
CHAPTER 76 - ENGINE CONTROLS
Engine control consists of engine power lever / throttle with choke and related cockpit switches for engine shut-down and test.
76-10-00 Power Control / Choke
Engine power / throttle is controlled by a control column located on the left side of the pilot station. The unit combines a choke control (3) as well as a lever for activation of the wheel brake.
Throttle control (1) is conventional with IDLE in aft (or pulled) and full throttle in most forward position. With the ROTAX 914 UL engine the boost range is entered by overcoming a small resistance to the front. The throttle lever is linked with cable controls to the carburettors. A mechanical spring applies tension to the control cables and brings the carburettors to full throttle in case of a cable break. The throttle lever has a pre-set friction brake which holds the throttle in the selected position.
Choke (3) is used start a cold engine. In order to do so, pull the choke lever fully to the rear or ON position and be sure to have the throttle in idle position. After starting the engine and a short warm-up, the choke can be slowly disengaged by moving the lever into its forward or OFF position.
76-20-00 Engine Shutdown / Emergency
For normal and emergency shutdown, a pair of magneto switches (MAG 1 + MAG 2) is installed in the cockpit centre panel. The magneto switches are also used for testing the individual ignition circuits.
Throttle and Brake Quadrant
1 – Throttle lever
2 – Brake lever with locking pawl
3 – Choke control
4 – Brake fluid reservoir
5 – Primary brake cylinder
6 – Seat adjustment control push button
7 – Headset / helmet connectors
8 – Seat heating control (if installed)

AircraftMaintenance Manual
AutoGyroMTOsport Model 2017
AMM-M17-C_2018-01 Part C – System Description Section (Ch. 21 – 90) Page 31 of 32
CHAPTER 77 - ENGINE INDICATING
All relevant engine parameters are displayed in the cockpit, using analogue-type instruments in standard version. In case of integrated cockpit systems (option), engine data may be displayed in the integrated instrumentation system (glass cockpit). An hour meter (Hobbs Meter) is installed in the cockpit to count engine operating time with an accuracy of two decimals (1/100 hrs). Although the ‘engine operating time’ is also used for total aircraft hours counting, the hour meter is allocated to this chapter as the main function.
77-10-00 Power
With a piston engine with fixed pitch propeller, engine power indication solely consists of an engine RPM indicator. In case a variable pitch propeller is installed, a manifold absolute pressure (MAP) indicator is provided in addition. See CHAPTER 31 for different cockpit layouts.
77-20-00 Temperature
For temperature indication, an engine coolant temperature (CT) gauge is provided. Due to the engine cooling principle (air cooled cylinders with water cooled cylinder heads) the CT represents cylinder head coolant temperature.
Oil temperature indication is described in CHAPTER 79 – OIL SYSTEM.
77-40-00 Integrated Engine Instrument Systems
Integrated display systems (glass cockpit) are described in 31-60-00 Integrated Display Systems.
CHAPTER 78 - EXHAUST
78-00-00 Exhaust
The basic exhaust system including manifold and turbo charger with waste gate (only ROTAX 914) is part of the core engine. Refer to the engine manufacturer’s documentation. The exhaust system is supplemented by a silencer/muffler supplied by AutoGyro, venting to the right side of the aircraft and pointing at 45° backwards and up towards the propeller where required for noise reduction. This configuration meets the noise test requirements of Germany.
CHAPTER 79 - OIL SYSTEM
The dry sump forced lubrication comprises oil pump, separate oil tank with dip stick, oil cooler, hoses, as well as oil temperature and oil pressure indication.
79-11-00 Storage / Oil tank
The oil reservoir with dipstick is behind the aft seat and can be easily reached through an access door on the right hand side of the fuselage. The oil tank is made of stainless steel with oil filler cap. The cap can be unscrewed / tightened by a quarter rotation in order to check the oil level using a dip stick or for replenishing of engine oil.
The type of lubrication system requires a special procedure for accurate oil level checking and to prevent overfilling. Refer to the engine manufacturer documentation for detail and procedures.
79-20-00 Distribution and Cooling
Oil distribution and cooling is provided by a separate oil cooler, which is connected to the oil circuit by oil hoses and a thermostat assembly.
79-21-00 Oil Hoses and Lines
Oil hoses are made of PTFE hoses, protected by braided stainless steel.

AircraftMaintenance Manual
AutoGyroMTOsport Model 2017
AMM-M17-C_2018-01 Part C – System Description Section (Ch. 21 – 90) Page 32 of 32
79-22-00 Oil Cooler
An oil cooler is fitted to the lower aft end of the fuselage / enclosure, below the central section of the main gear suspension bow. Oil flow through the cooler is regulated by a thermostat assembly which opens the cooler circuit at approximately 90 °C.
Do not attempt to block the oil cooler to increase the oil temperature, as this could cause overheating on a hot day. The oil reaches at least 90 °C before the oil can transit through the cooler.
79-30-00 Indicating
Oil temperature is measured in the oil feed line at the thermostat, between the oil cooler and the engine. The oil in this pipe is drawn from the oil sump, where the hot oil from the engine is delivered and mixes. When the gauge indicates 50 °C then the engine oil leaving the engine will exceed that value.
When the oil temperature reaches 90 °C the thermostat will open, allowing the oil to pass through the oil cooler matrix. Having been cooled, the oil then passes the same sensor, which will now indicate a lower temperature than 90 °C – subject to the incoming oil temp and OAT.
Indicators of Oil Pressure (Oil-P) and Oil Temperature (Oil-T) are provided in the cockpit as analogue-type instruments in standard version. See CHAPTER 31 for different cockpit layouts.

AircraftMaintenance Manual
AutoGyroMTOsport Model 2017
AMM-M17-D_2018-01 Part D – Diagrams and Charts Page 1 of 18
Contents
Legend......................................................................................................................................................3Wiring Diagram – Main Wiring..................................................................................................................4Wiring Diagram – Sticks, Reed switch .....................................................................................................5Wiring Diagram – Landing light ................................................................................................................6Wiring Diagram – NAV / Strobe................................................................................................................7Wiring Diagram – Cockpit rear seat .........................................................................................................8Wiring Diagram – Main fuse attachment kit..............................................................................................9Wiring Diagram - Cockpit........................................................................................................................10Wiring Diagram – Pneumatic box standard............................................................................................11Wiring Diagram – Fuel tank sensor ........................................................................................................12Wiring Diagram – Engine bay wiring ......................................................................................................13Wiring Diagram – TCU wiring .................................................................................................................14Wiring Diagram – Seat heater ................................................................................................................15Wiring Diagram – Wiring harness intercom ATR833 .............................................................................16Pneumatic Scheme ................................................................................................................................17

AircraftMaintenance Manual
AutoGyroMTOsport Model 2017
AMM-M17-D_2018-01 Part D – Diagrams and Charts Page 2 of 18
BLANK PAGE

AircraftMaintenance Manual
AutoGyroMTOsport Model 2017
AMM-M17-D_2018-01 Part D – Diagrams and Charts Page 3 of 18
Legend

AircraftMaintenance Manual
AutoGyroMTOsport Model 2017
AMM-M17-D_2018-01 Part D – Diagrams and Charts Page 4 of 18
Wiring Diagram – Main Wiring

AircraftMaintenance Manual
AutoGyroMTOsport Model 2017
AMM-M17-D_2018-01 Part D – Diagrams and Charts Page 5 of 18
Wiring Diagram – Sticks, Reed switch

AircraftMaintenance Manual
AutoGyroMTOsport Model 2017
AMM-M17-D_2018-01 Part D – Diagrams and Charts Page 6 of 18
Wiring Diagram – Landing light

AircraftMaintenance Manual
AutoGyroMTOsport Model 2017
AMM-M17-D_2018-01 Part D – Diagrams and Charts Page 7 of 18
Wiring Diagram – NAV / Strobe

AircraftMaintenance Manual
AutoGyroMTOsport Model 2017
AMM-M17-D_2018-01 Part D – Diagrams and Charts Page 8 of 18
Wiring Diagram – Cockpit rear seat

AircraftMaintenance Manual
AutoGyroMTOsport Model 2017
AMM-M17-D_2018-01 Part D – Diagrams and Charts Page 9 of 18
Wiring Diagram – Main fuse attachment kit

AircraftMaintenance Manual
AutoGyroMTOsport Model 2017
AMM-M17-D_2018-01 Part D – Diagrams and Charts Page 10 of 18
Wiring Diagram - Cockpit

AircraftMaintenance Manual
AutoGyroMTOsport Model 2017
AMM-M17-D_2018-01 Part D – Diagrams and Charts Page 11 of 18
Wiring Diagram – Pneumatic box standard

AircraftMaintenance Manual
AutoGyroMTOsport Model 2017
AMM-M17-D_2018-01 Part D – Diagrams and Charts Page 12 of 18
Wiring Diagram – Fuel tank sensor

AircraftMaintenance Manual
AutoGyroMTOsport Model 2017
AMM-M17-D_2018-01 Part D – Diagrams and Charts Page 13 of 18
Wiring Diagram – Engine bay wiring

AircraftMaintenance Manual
AutoGyroMTOsport Model 2017
AMM-M17-D_2018-01 Part D – Diagrams and Charts Page 14 of 18
Wiring Diagram – TCU wiring

AircraftMaintenance Manual
AutoGyroMTOsport Model 2017
AMM-M17-D_2018-01 Part D – Diagrams and Charts Page 15 of 18
Wiring Diagram – Seat heater

AircraftMaintenance Manual
AutoGyroMTOsport Model 2017
AMM-M17-D_2018-01 Part D – Diagrams and Charts Page 16 of 18
Wiring Diagram – Wiring harness intercom ATR833

AircraftMaintenance Manual
AutoGyroMTOsport Model 2017
AMM-M17-D_2018-01 Part D – Diagrams and Charts Page 17 of 18
Pneumatic Scheme – comfort package

AircraftMaintenance Manual
AutoGyroMTOsport Model 2017
AMM-M17-D_2018-01 Part D – Diagrams and Charts Page 18 of 18
Pneumatic Scheme – Standard package

AircraftMaintenance Manual
AutoGyroMTOsport Model 2017
AMM-M17-E_2018-01 Part E - Content Page 1 of 2
Contents
07-00-00 2-1 LIFTING OF THE GYROPLANE
07-00-00 2-2 JACKING OF THE GYROPLANE
07-00-00 2-3 SHORING OF THE GYROPLANE
08-10-00 2-1 WEIGHING OF THE GYROPLANE
08-20-00 2-1 LEVELLING OF THE GYROPLANE
24-30-00 4-1 REMOVAL-INSTALLATION: BATTERY
27-20-00 0-1 DESCRIPTION: FLIGHT CONTROL - RUDDER
27-20-00 5-1 CHECK-ADJUSTMENT: RUDDER CONTROL ANGLES
28-20-00 6-1 INSPECTION: FUEL FILTER
28-20-00 8-1 REPLACEMENT: FUEL FILTER
28-20-00 8-2 REPLACEMENT: ELECTRICAL FUEL PUMPS
32-40-00 4-1 REMOVAL-INSTALLATION: WHEELS
32-40-00 8-1 REPLACEMENT: BRAKE LOCKING MECHANISM (see 76-10-00 8-1)
32-40-00 8-2 REPLACEMENT: MAIN WHEEL BRAKE PADS
32-40-00 8-3 REPLACEMENT: WHEEL BEARING
34-10-00 7-1 CLEANING: PITOT STATIC SYSTEM
36-21-00 8-1 REPLACEMENT: FILTER/DRYER
52-00-00 4-1 REMOVAL-INSTALLATION: COWLINGS AND FAIRINGS
52-40-00 2-1 PREP. WORK: SERVICE COVERS / MAINTENANCE ACCESS
61-10-00 4-1 REMOVAL-INSTALLATION: PROPELLER - HTC
61-10-00 4-2 DISASSEMBLY-ASSEMBLY: PROPELLER - HTC
61-10-00 5-1 ADJUSTMENT: PROPELLER PITCH - HTC
61-20-00 1-1 TROUBLE-SHOOTING: IVO-VARIABLE PITCH PROPELLER
62-11-00 4-1 REMOVAL: ROTOR - TEETERING PARTS
62-11-00 4-2 DISASSEMBLY: ROTOR - TEETERING PARTS
62-11-00 4-3 ASSEMBLY: ROTOR - TEETERING PARTS
62-11-00 4-4 INSTALLATION: ROTOR - TEETERING PARTS
62-11-00 5-1 CHECK-ADJUSTMENT: ROTOR SYSTEM ALIGNMENT
62-11-00 6-1 INSPECTION: ROTOR - TEETERING PARTS
62-11-00 6-2 INSPECTION: ROTOR BLADES
62-11-00 6-3 INSPECTION: ROTOR HUB BOLTS
62-11-00 8-1 REPLACEMENT: TEETER BUSHINGS
62-20-00 8-1 REPLACEMENT: DRIVE GEAR
62-31-00 6-1 INSPECTION: ROTOR HEAD BRIDGE, BEARING AND TEETER TOWER
62-32-00 5-1 CHECK-ADJUSTMENT: ROTOR CONTROL FRICTION
62-32-00 6-1 INSPECTION: ROTOR GIMBAL HEAD
63-11-10 4-1 REMOVAL-INSTALLATION: PRE-ROTATOR CLUTCH
63-11-10 6-1 INSPECTION: PRE-ROTATOR CLUTCH
63-11-10 8-1 REPLACEMENT: PRE-ROTATOR CLUTCH LINING
63-11-10 8-2 REPLACEMENT: PRE-ROTATOR CLUTCH DOG GEAR
63-11-30 6-1 INSPECTION: PRE-ROTATOR UPPER ENGAGEMENT
63-11-30 8-2 REPAIR: PRE-ROTATOR UPPER ENGAGEMENT
63-51-00 8-1 REPLACEMENT: ROTOR BRAKE PADS

AircraftMaintenance Manual
AutoGyroMTOsport Model 2017
AMM-M17-E_2018-01 Part E - Content Page 2 of 2
67-00-00 0-1 DESCRIPTION: ROTOR FLIGHT CONTROL
67-00-00 5-1 CHECK-ADJUSTMENT: ROTOR CONTROL ANGLES (see 62-32-00 6-1)
67-00-00 6-1 INSPECTION: ROTOR FLIGHT CONTROL
67-00-00 6-2 INSPECTION: FLIGHT CONTROL BASE LINK
67-05-00 8-1 REPLACEMENT: PITCH TRIM/BRAKE PNEUMATIC SEAL
71-20-00 8-1 REPLACEMENT: ENGINE MOUNTING BUSHINGS
76-10-00 8-1 REPLACEMENT: THROTTLE CONTROL WITH BRAKE
78-20-00 3-1 SERVICING: LUBRICATION OF EXHAUST SYSTEM JOINTS
78-20-00 8-1 REPLACEMENT: WOOL OF MUFFLER TUBE

AircraftMaintenance Manual
AutoGyroMTOsport Model 2017
AMM-M17-E_2018-01 Part E - 07-00-00 2-1 Page 1 of 1
07-00-00 2-1 LIFTING OF THE GYROPLANE LNE
GENERAL, REFERENCES AND REQUIREMENTS
Task may only be performed by an organization or individual trained and entitled to carry out 'Line Maintenance'!
Secure gyroplane against unauthorized or unintended operation!
Rotor system must be removed, see 62-11-00 4-1!
SPECIAL TOOLS AND CONSUMABLE MATERIALS
None
PRECAUTIONS AND SAFETY MEASURES
WARNING: Object is heavy! Inadequate handling could cause injury. Use proper lifting techniques or assistance!
WARNING: When working with cranes or other lifting equipment the general safety regulations have to be respected at all times!
CAUTION: Never attempt to lift gyroplane with rotor system attached!
PROCEDURES/DESCRIPTION
1 Re-install teeter bolt, hand-tighten castellated nut and secure castellated nut adequately.
2 Loop a lifting belt around the teeter bolt and carefully lift the gyroplane.
ILLUSTRATIONS
Fig. 1 - Lifting belt looped around teeter bolt

AircraftMaintenance Manual
AutoGyroMTOsport Model 2017
AMM-M17-E_2018-01 Part E - 07-00-00 2-2 Page 1 of 1
07-00-00 2-2 JACKING OF THE GYROPLANE LNE
GENERAL, REFERENCES AND REQUIREMENTS
Task may only be performed by an organization or individual trained and entitled to carry out 'Line Maintenance'!
Secure gyroplane against unauthorized or unintended operation!
Gyroplane must be placed on level ground and restrained (blocks, chocks)
SPECIAL TOOLS AND CONSUMABLE MATERIALS
None
PROCEDURES/DESCRIPTION
Unload nose gear
1 In order to unload the nose gear, load or lash-down keel tube in most aft position until gyroplane rests safely on both main wheels and keel tube.
Unload main gear
2 In order to unload one of the main wheels carefully jack the gyroplane at the keel tube.
3 Let the gyroplane tip to the desired side and continue to jack slowly until the gyroplane rests stable on nose wheel, one main wheel and jack.
NOTE: Sand bags or load may be used to add additional weight on the desired side.
4 Secure gyroplane adequately before commencing work and do not leave unattended in jacked position.
WARNING: Do not work under the aircraft unless the aircraft is properly and safely supported.

AircraftMaintenance Manual
AutoGyroMTOsport Model 2017
AMM-M17-E_2018-01 Part E - 07-00-00 2-3 Page 1 of 2
07-00-00 2-3 SHORING OF THE GYROPLANE OPR
GENERAL, REFERENCES AND REQUIREMENTS
Basic operational task, which can be performed by a licensed pilot or instructed personnel!
Rotor system must be removed, see 62-11-00 4-1!
PRECAUTIONS AND SAFETY MEASURES
CAUTION: Never use tie-down equipment or lashing straps in a way that would excert unsupported stress or high momentum on the structure of the gyroplane!
CAUTION: The suspension bow is not designed to take up high longitudinal forces!
PROCEDURES/DESCRIPTION
Shoring, road transport or container transport
WARNING: The rotor system must be removed, disassembled and carefully packed for road transport.
CAUTION: When wrapping the gyroplane make sure that foil or stretch does not cover the painted surface directly. Put a soft layer in between for damage protection and let plastic components breathe. Do not expose wrapped gyroplane or parts to sun radiation or heat in order to avoid paint damage.
1 Restrain main wheels (blocks/chocks). For container transport replace main wheels with wooden blocks to provide safe stand.
2 Put a wooden block below the lowest point of the keel tube and lash keel tube against wooden block. The block should be dimensioned so that the main wheels (if installed) are half way unloaded.
3 Lash-down both main wheels through the lashing lugs (use rims/axles alternatively) and/or the mast tie-down kit (option).
4 Lash-down nose wheel through its axle.
5 For container transport or shipping, use the mast tie-down kit (option) and consider folding the mast.

AircraftMaintenance Manual
AutoGyroMTOsport Model 2017
AMM-M17-E_2018-01 Part E - 07-00-00 2-3 Page 2 of 2
ILLUSTRATIONS
Fig. 1 - Lash-down methods of gyroplane

AircraftMaintenance Manual
AutoGyroMTOsport Model 2017
AMM-M17-E_2018-01 Part E - 08-10-00 2-1 Page 1 of 1
08-10-00 2-1 WEIGHING OF THE GYROPLANE LNE
GENERAL, REFERENCES AND REQUIREMENTS
Task may only be performed by an organization or individual trained and entitled to carry out 'Line Maintenance'!
PROCEDURES/DESCRIPTION
NOTE:Weighing is performed by measuring the weight below each wheel with level datum (keeltube between front and rear seat) 5° down. Horizontal datum is main wheel axis vertical plane.Contact AutoGyro support for current form.

AircraftMaintenance Manual
AutoGyroMTOsport Model 2017
AMM-M17-E_2018-01 Part E - 08-20-00 2-1 Page 1 of 3
08-20-00 2-1 LEVELLING OF THE GYROPLANE LNE
GENERAL, REFERENCES AND REQUIREMENTS
Task may only be performed by an organization or individual trained and entitled to carry out 'Line Maintenance'!
Secure gyroplane against unauthorized or unintended operation!
Gyroplane must be placed on level ground and restrained (blocks, chocks)
Mast fairing must be removed, see 52-00-00 4-1
SPECIAL TOOLS AND CONSUMABLE MATERIALS
None
PROCEDURES/DESCRIPTION
Measurement of Dimension D1
1 Use a tape measure and measure distance between mast reference point and fuselage reference point. See Fig. 1 for reference.
NOTE:Where no visible reference mark provided, mast reference point is defined as the inner edge of the upper mast end.Fuselage reference point is defined as the outer top edge of the ball joint.
2 Contact AutoGyro for reference values.
Measurement of Stabilizer Alignment
NOTE:The stabilizer is mounted with a slight left (or CCW) rotation relative to longitudinal axis to compensation for propeller swirl. The correct alignment is measured as described below.
3 Mark two reference points with 600 mm offset from the inner edge of the central fin (see Fig. 2).
4 Measure left and right distance (DL and DR) from offset reference points to the central reference point at belly seam at the underside of the fuselage (see Fig. 2).
5 Verify that DL is 10 +/- 2 mm longer than DR.
Measurement of relative angles
NOTE:The datum plane for the aircraft is the keel tube between the front and rear seat (see Fig. 3)
6 Use an inclinometer / digital spirit level and measure thrust line angle (see Fig. 4) relative to datum plane (Fig. 3).
7 Use an inclinometer / digital spirit level and measure stabilizer incident angle (see Fig. 5) relative to datum plane (Fig. 3). Perform measurement in the straight area about 30 cm above the upper surface of the horizontal stabilizer.

AircraftMaintenance Manual
AutoGyroMTOsport Model 2017
AMM-M17-E_2018-01 Part E - 08-20-00 2-1 Page 2 of 3
ILLUSTRATIONS
Fig. 1 - Measurement of Dimension D1
Fig. 2 - Measurement of Stabilizer Alignment

AircraftMaintenance Manual
AutoGyroMTOsport Model 2017
AMM-M17-E_2018-01 Part E - 08-20-00 2-1 Page 3 of 3
Fig. 3 - Measurement of reference zero
Fig. 4 - Measurement of thrust line angle Fig. 5 - Measurement of stabilizer incident

AircraftMaintenance Manual
AutoGyroMTOsport Model 2017
AMM-M17-E_2018-01 Part E - 24-30-00 4-1 Page 1 of 2
24-30-00 4-1 REMOVAL-INSTALLATION: BATTERY LNE
GENERAL, REFERENCES AND REQUIREMENTS
Task may only be performed by an organization or individual trained and entitled to carry out 'Line Maintenance'!
Secure gyroplane against unauthorized or unintended operation!
SPECIAL TOOLS AND CONSUMABLE MATERIALS
None
PRECAUTIONS AND SAFETY MEASURES
WARNING: Electrical shorting of the battery will produce high current with the risk of personal injury and damage to equipment!
PROCEDURES/DESCRIPTION
Removal
WARNING: Be careful to avoid electrical short cuts at all means.
1 Remove ground (L-) connection at the frame and isolate metallic cable shoe.
2 Remove hot (L+) cable at the battery.
3 Untighten battery retainer and remove battery.
Installation
4 Install battery in reverse order (work steps 3 to 1).

AircraftMaintenance Manual
AutoGyroMTOsport Model 2017
AMM-M17-E_2018-01 Part E - 24-30-00 4-1 Page 2 of 2
ILLUSTRATIONS
Fig. 1 - Installation Position Battery
Fig. 2 - Battery with fuse box

AircraftMaintenance Manual
AutoGyroMTOsport Model 2017
AMM-M17-E_2018-01 Part E - 27-20-00 0-1 Page 1 of 2
27-20-00 0-1 DESCRIPTION: FLIGHT CONTROL - RUDDER OPR
PROCEDURES/DESCRIPTION
The rudder is connected to the adjustable foot pedals with two push-pull control cables with are routed through the horizontal frame, steel cables and two bell crank levers. Nose wheel steering is directly linked to pedal/rudder control input by the two bell crank levers and control rods. The pair of aft pedals is interconnected in parallel with the nose wheel control path.
Both pairs of pedals are individually adjustable to suit pilot’s comfort. A shorter adjustment is achieved by pulling the handle which moves the pedals closer. Pulling the handle while pushing with both feet gently against the pedals allows longer adjustment.
The rudder is fitted with a trim tab. This is normally biased to the left, and may be adjusted by the operator to trim the aircraft for straight flight at a desired speed, feet off the pedals.
The rudder is additionally centred by return springs mounted under the tail. These align the rudder in the straight ahead position, such that should a cable fail – or the occupants be unable to control the rudder –then the aircraft will continue to fly reasonably straight.
ILLUSTRATIONS
Fig. 1 - Flight control - Rudder (fwd area)

AircraftMaintenance Manual
AutoGyroMTOsport Model 2017
AMM-M17-E_2018-01 Part E - 27-20-00 0-1 Page 2 of 2
Fig. 2 - Flight control - Rudder (aft area)
Fig. 3 - Flight control - Rudder control horn (note that the horn is offset so that the cables are equal length with the rudder
offset 7.5° to the right)

AircraftMaintenance Manual
AutoGyroMTOsport Model 2017
AMM-M17-E_2018-01 Part E - 27-20-00 5-1 Page 1 of 2
27-20-00 5-1 CHECK-ADJUSTMENT: RUDDER CONTROL ANGLES LNE
GENERAL, REFERENCES AND REQUIREMENTS
Task may only be performed by an organization or individual trained and entitled to carry out 'Line Maintenance'!
Secure gyroplane against unauthorized or unintended operation!
SPECIAL TOOLS AND CONSUMABLE MATERIALS
S.WZ3002 Inclinometer / Digital Spirit Level
PROCEDURES/DESCRIPTION
PROCEDURE: Check/adjust neutral setting
1 Adjust forward pair of pedals neutral/parallel with nose wheel unloaded. In order to simplify measurement and to avoid errors, unload nose wheel until reference plane becomes horizontal.
2 Verify angle A1 is 35 +/-3° when measured against a plane perpendicular to the reference plane (see Fig. 1).
3 Verify angle A2 is 53 +/-3° when measured against a plane perpendicular to the reference plane (see Fig. 1).
4 Verify left and right distance DL and DR of the control links are 80 +/- 2 mm (see Fig. 1) .
NOTE:Do NOT measure rudder deflection against the stabilizer or the central fin as both are slightly twisted by design.Refer to 08-20-00 2-1 for further information and levelling procedure.
5 With pedals neutral, verify rudder deflection AN is 7° to the right when measured against aircraft longitudinal axis.
PROCEDURE: Check left and right control stop and corresponding rudder deflection
6 Press RH control pedal until control stop is reached (see Fig. 1). With cantilever in the mechanical end stop make sure that no other mechanical stop within the complete control path is reached.
7 Verify full RH rudder deflection AR is 32 +4/-2°.
8 Repeat step 6 with pedal in the LH control stop.
9 Verify full LH rudder deflection AL is 27 +4/-2°.
ADJUSTMENT POSSIBILITIES
IMPORTANT NOTE:All components of the rudder control system are manufactured with minimum possible tolerances and pre-adjusted to suit. In case of misalignment or out-of-tolerance values, contact AutoGyro support.

AircraftMaintenance Manual
AutoGyroMTOsport Model 2017
AMM-M17-E_2018-01 Part E - 27-20-00 5-1 Page 2 of 2
ILLUSTRATIONS
Fig. 1 - Rudder control - Pedals angle setting
Fig. 2 - Rudder control - Rudder angle setting

AircraftMaintenance Manual
AutoGyroMTOsport Model 2017
AMM-M17-E_2018-01 Part E - 28-20-00 6-1 Page 1 of 2
28-20-00 6-1 INSPECTION: FUEL FILTER LNE
GENERAL, REFERENCES AND REQUIREMENTS
Task may only be performed by an organization or individual trained and entitled to carry out 'Line Maintenance'!
Battery must be removed, see 24-30-00 4-1
SPECIAL TOOLS AND CONSUMABLE MATERIALS
SP IMPORTANT NOTE: Procedure involves spare parts. Check parts list below for ordering details of affected components!
PRECAUTIONS AND SAFETY MEASURES
WARNING: Fuel and fuel vapors are HAZARDOUS MATERIAL, must be treated and handled accordingly, and constitute a danger to health and hardware!
IMPORTANT NOTE: Depending on engine variant and optional equipment, number and type of installed fuel filters may differ!
PROCEDURES/DESCRIPTION
EFFECTIVITY: Engine variant ROTAX 912 (without second fuel pump P2)
1 Inspect nylon filter (use a flashlight if appropriate).
2 If contamination is found, nylon fuel filter must be replaced, see 28-20-00 8-1.
EFFECTIVITY - END
EFFECTIVITY: Engine variant ROTAX 912 with second fuel pump P2
NOTE: Fuel system consists of one nylon filter upstream of the mechanical fuel pump, a (secondary) electrical fuel pump with built-in strainer and another filter (F5273) downstream.
3 Inspect nylon filter (use a flashlight if appropriate).
4 If contamination is found or in case of scheduled replacement, nylon fuel filter AND filter F 5273 must be replaced, see 28-20-00 8-1 and strainer in electrical fuel pump must be inspected.
5 In order to do so, clamp both fuel lines to prevent fuel from spilling and disconnect incoming (lower) fuel line.
6 Carefully remove strainer from electrical fuel pump and inspect.
7 Clean strainer if necessary. Use brake cleaner and compressed air applied from the outside.
8 In case of residual contamination or damage, strainer has to be replaced, see 28-20-00 8-1.
EFFECTIVITY - END
EFFECTIVITY: Engine variant ROTAX 914
NOTE: Fuel system consists of two electrical fuel pumps with built-in strainer. Each pump has a preceding nylon filter and another filter (F 5273) downstream.
9 Inspect strainer for both electrical fuel pumps. In order to do so, refer to 28-20-00 8-1.
10 In case of residual contamination or damage, strainer has to be replaced, see 28-20-00 8-1.
11 In any case, both KL145 filters must be replaced, see 28-20-00 8-1.
EFFECTIVITY - END
ILLUSTRATIONS

AircraftMaintenance Manual
AutoGyroMTOsport Model 2017
AMM-M17-E_2018-01 Part E - 28-20-00 6-1 Page 2 of 2
Fig. 1 - Effectivity ROTAX 912 with optional second fuel pump (P2) installed
Fig. 2 - Effectivity ROTAX 914

AircraftMaintenance Manual
AutoGyroMTOsport Model 2017
AMM-M17-E_2018-01 Part E - 28-20-00 8-1 Page 1 of 2
28-20-00 8-1 REPLACEMENT: FUEL FILTER LNE
GENERAL, REFERENCES AND REQUIREMENTS
Task may only be performed by an organization or individual trained and entitled to carry out 'Line Maintenance'!
Secure gyroplane against unauthorized or unintended operation!
Battery must be removed, see 24-30-00 4-1
SPECIAL TOOLS AND CONSUMABLE MATERIALS
SP IMPORTANT NOTE: Procedure involves spare parts. Check parts list below for ordering details of affected components!
PRECAUTIONS AND SAFETY MEASURES
WARNING: Fuel and fuel vapors are HAZARDOUS MATERIAL, must be treated and handled accordingly, and constitute a danger to health and hardware!
PROCEDURES/DESCRIPTION
NOTE: Depending on engine variant and optional equipment, number/type of installed fuel filters may differ
1 CAUTION: Before disconnecting any fuel lines, clamp respective hoses to prevent fuel spillage.
Applicable to Nylon Filter and F 5273
2 Disconnect filter and replace with new filter.
3 Re-connect hoses to filter and make sure tight fit (no leaks, dry).
4 Remove clamps from fuel hoses.

AircraftMaintenance Manual
AutoGyroMTOsport Model 2017
AMM-M17-E_2018-01 Part E - 28-20-00 8-1 Page 2 of 2
ILLUSTRATIONS
Fig. 1 - Effectivity ROTAX 912 with optional second fuel pump (P2) installed
Fig. 2 - Effectivity ROTAX 914

AircraftMaintenance Manual
AutoGyroMTOsport Model 2017
AMM-M17-E_2018-01 Part E - 28-20-00 8-2 Page 1 of 2
28-20-00 8-2 REPLACEMENT: ELECTRICAL FUEL PUMPS LNE
GENERAL, REFERENCES AND REQUIREMENTS
Task may only be performed by an organization or individual trained and entitled to carry out 'Line Maintenance'!
Secure gyroplane against unauthorized or unintended operation!
Battery must be removed, see 24-30-00 4-1
SPECIAL TOOLS AND CONSUMABLE MATERIALS
SP IMPORTANT NOTE: Procedure involves spare parts. Check parts list below for ordering details of affected components!
PRECAUTIONS AND SAFETY MEASURES
WARNING: Fuel and fuel vapors are HAZARDOUS MATERIAL, must be treated and handled accordingly, and constitute a danger to health and hardware!
PROCEDURES/DESCRIPTION
WARNING: Make sure the electrical system is switched off and protected against unintended activation
1 Clamp respective hoses to prevent fuel spillage.
2 Unscrew both terminal nuts and disconnect both ring-eye cable connectors. Isolate blank connectors to prevent electrical short-cut.
3 Disconnect fuel lines from pump.
4 Untighten clamp and replace fuel pump.
5 Install new fuel pump and tighten clamp.
IMPORTANT NOTE: The electrical terminals of the pump and the ring-eye cable connectors have different diameters to ensure correct polarization
6 Re-connect electrical cable connectors and tighten terminal nuts. Secure terminal nuts with securing paint.
7 Re-connect hoses to pump and make sure tight fit. Use securing paint on nuts and threads.
8 Remove clamps from fuel hoses.
9 Activate respective fuel pump an check function and proper fuel line connection (no leaks, dry).

AircraftMaintenance Manual
AutoGyroMTOsport Model 2017
AMM-M17-E_2018-01 Part E - 28-20-00 8-2 Page 2 of 2
ILLUSTRATIONS
Fig. 1 - Effectivity ROTAX 912 with optional second fuel pump (P2) installed
Fig. 2 - Effectivity ROTAX 914
Fig. 5 - El. fuel pump terminal

AircraftMaintenance Manual
AutoGyroMTOsport Model 2017
AMM-M17-E_2018-01 Part E - 32-40-00 4-1 Page 1 of 2
32-40-00 4-1 REMOVAL-INSTALLATION: WHEELS LNE
GENERAL, REFERENCES AND REQUIREMENTS
Task may only be performed by an organization or individual trained and entitled to carry out 'Line Maintenance'!
Gyroplane must be jacked, see 07-00-00 2-2
SPECIAL TOOLS AND CONSUMABLE MATERIALS
LR IMPORTANT NOTE: Procedure involves parts with limited reusability. Check parts list below before starting job!
PROCEDURES/DESCRIPTION
Nose wheel - Removal
1 Unscrew and remove nut (Fig. 1, 8) and washer (Fig. 1, 9). Discard nut.
2 Pull out and remove bolt (Fig. 1, 11) with washer (Fig. 1, 10) and remove wheel.
Nose wheel - Installation
3 Install wheel with items (Fig. 1, 12) and (Fig. 1, 13) in place, bolt (Fig. 1, 11) with washer (Fig. 1, 10) and washer (Fig. 1, 9) in reverse order.
4 Install new self-locking nut (Fig. 1, 12) and torque-tighten with 40 Nm.
Main wheel - Removal
5 Remove wheel spat (if installed).
6 Remove split pin, unscrew and remove nut (Fig. 2, 13). Discard pin.
7 Unscrew and remove 4 x bolt (Fig. 2, 1) with serrated washer (Fig. 2, 2). Mind limited reusability of serrated washer!
8 Remove wheel from axle assembly (Fig. 2, 6).
Main wheel - Installation
9 Insert main wheel on axle assembly (Fig. 2, 6).
10 Insert 4 x bolt (Fig. 2, 1) with serrated washer (Fig. 2, 2) and attach brake disc to main wheel.
11 Torque-tighten bolts (Fig. 2, 1) with 10 Nm in crosswise sequence.
12 Install nut (Fig. 2, 13) and torque-tighten with 50 Nm. Install split pin and form pin ends.
13 Check free rotation of wheel, radial run-out and braking action.
14 Install wheel spat, if required.

AircraftMaintenance Manual
AutoGyroMTOsport Model 2017
AMM-M17-E_2018-01 Part E - 32-40-00 4-1 Page 2 of 2
ILLUSTRATIONS
Fig. 1 - Nose gear with wheel
Fig. 2 - Main gear, wheel and brake

AircraftMaintenance Manual
AutoGyroMTOsport Model 2017
AMM-M17-E_2018-01 Part E - 32-40-00 8-2 Page 1 of 2
32-40-00 8-2 REPLACEMENT: MAIN WHEEL BRAKE PADS LNE
GENERAL, REFERENCES AND REQUIREMENTS
Task may only be performed by an organization or individual trained and entitled to carry out 'Line Maintenance'!
Gyroplane must be jacked, see 07-00-00 2-2
Affected wheel must be removed, see 32-40-00 4-1
SPECIAL TOOLS AND CONSUMABLE MATERIALS
AG-LUB-04 Silicone Spray
LR IMPORTANT NOTE: Procedure involves parts with limited reusability. Check parts list below before starting job!
SP IMPORTANT NOTE: Procedure involves spare parts. Check parts list below for ordering details of affected components!
PRECAUTIONS AND SAFETY MEASURES
IMPORTANT NOTE: Procedure involves handling and disposal of special materials. For your health and environmental aspects respect all applicable regulations!
PROCEDURES/DESCRIPTION
1 Pull out brake disc (8) between brake pads.
2 Remove 4 x shaft bolt (11) with serrated washer (10).
3 Remove brake pad (7) and (9). Dispose of properly!
4 Clean 4 x guide sleeves of axle assembly (5) and inspect for damage, scores or run-in grooves.
5 Apply a thin layer of silicone spray on guide sleeves of axle assembly.
6 Fit new brake pad (7) onto lower guide sleeves.
7 Fit new brake pad (9) onto upper guide sleeves.
8 Insert 4 x shaft bolt (11) with serrated washers (10) and torque-tighten with 10 Nm. Make sure that brake caliper and pad moves easily about the guide sleeve.
9 Insert brake disc between brake pads.
10 In order to re-install wheel continue with 32-40-00 4-1.

AircraftMaintenance Manual
AutoGyroMTOsport Model 2017
AMM-M17-E_2018-01 Part E - 32-40-00 8-2 Page 2 of 2
ILLUSTRATIONS
Fig. 1 - Main wheel with brake

AircraftMaintenance Manual
AutoGyroMTOsport Model 2017
AMM-M17-E_2018-01 Part E - 32-40-00 8-3 Page 1 of 2
32-40-00 8-3 REPLACEMENT: WHEEL BEARING LNE
GENERAL, REFERENCES AND REQUIREMENTS
Task may only be performed by an organization trained and entitled to carry out 'Heavy Maintenance'!
Gyroplane must be jacked, see 07-00-00 2-2
Affected wheel must be removed, see 32-40-00 4-1
SPECIAL TOOLS AND CONSUMABLE MATERIALS
AG-BAS-04 Loctite 638 green
ContactAG For special tools or assistance contact AutoGyro customer support
PROCEDURES/DESCRIPTION
1 Remove old bearings.
2 Degrease new bearing and dry-off with paper towel.
3 Apply AG-BAS-04 on outer surface of first bearing and press in bearing.
4 Install spacer. Use of a tool may be appropriate.
5 Apply AG-BAS-04 on outer surface of second bearing and press in bearing.
6 Spacer must be held by both inner bearing rings. Re-position and press as necessary.
7 Check easy run of bearings.

AircraftMaintenance Manual
AutoGyroMTOsport Model 2017
AMM-M17-E_2018-01 Part E - 32-40-00 8-3 Page 2 of 2
ILLUSTRATIONS
Fig. 1 - Main wheel and bearing

AircraftMaintenance Manual
AutoGyroMTOsport Model 2017
AMM-M17-E_2018-01 Part E - 34-10-00 7-1 Page 1 of 2
34-10-00 7-1 CLEANING: PITOT STATIC SYSTEM LNE
GENERAL, REFERENCES AND REQUIREMENTS
Task may only be performed by an organization or individual trained and entitled to carry out 'Line Maintenance'!
Secure gyroplane against unauthorized or unintended operation!
PRECAUTIONS AND SAFETY MEASURES
CAUTION: Make sure all pitot and static lines are disconnected from any instruments before blowing through the lines!
CAUTION: Do not blow with the mouth directly into pitot or static ports. This will introduce moisture and may damage instruments!
PROCEDURES/DESCRIPTION
1 Disconnect all instruments from pitot line. These are airspeed, and optionally integrated display systems, if installed. The static line is vented via a filter behind the instrument panel and should never need cleaning.
NOTE: In most cases it is not necessary to remove the instrument panel.
2 With the help of compressed air clean all pitot and static lines by blowing from the inside (cockpit panel side) to the outside.
3 Make sure to clean/check each branch of a line by closing the other open ends.
4 Re-connect all instruments.

AircraftMaintenance Manual
AutoGyroMTOsport Model 2017
AMM-M17-E_2018-01 Part E - 34-10-00 7-1 Page 2 of 2
ILLUSTRATIONS
Fig. 1 - Static pickup and pitot tube
Fig. 2 - Pitot Static Instruments Connecting Diagram

AircraftMaintenance Manual
AutoGyroMTOsport Model 2017
AMM-M17-E_2018-01 Part E - 36-21-00 8-1 Page 1 of 2
36-21-00 8-1 REPLACEMENT: FILTER/DRYER LNE
GENERAL, REFERENCES AND REQUIREMENTS
Task may only be performed by an organization or individual trained and entitled to carry out 'Line Maintenance'!
Secure gyroplane against unauthorized or unintended operation!
Preparation work: Service covers / maintenance access accomplished, see 52-40-00 2-1
PROCEDURES/DESCRIPTION
1 Perform "PREP. WORK: SERVICE COVERS / MAINTENANCE ACCESS", see 52-40-00 2-1.
2 Unscrew inlet and outlet connection and discard old seal ring (compressor side only).
3 Replace filter/dryer with new one and make sure cartridge is tightened safely to airframe. Install new seal ring.
4 Re-connect and tighten inlet and outlet connection with moderate torque.

AircraftMaintenance Manual
AutoGyroMTOsport Model 2017
AMM-M17-E_2018-01 Part E - 36-21-00 8-1 Page 2 of 2
ILLUSTRATIONS
Fig. 1 - Access to dryer / nose compartment closed Fig. 1 - Access to dryer / nose compartment opened

AircraftMaintenance Manual
AutoGyroMTOsport Model 2017
AMM-M17-E_2018-01 Part E - 52-00-00 4-1 Page 1 of 5
52-00-00 4-1 REMOVAL-INSTALLATION: COWLINGS AND FAIRINGS OPR
GENERAL, REFERENCES AND REQUIREMENTS
Basic operational task, which can be performed by a licensed pilot or instructed personnel!
Secure gyroplane against unauthorized or unintended operation!
PROCEDURES/DESCRIPTION
Mast fairing (1/2) - Removal
1 Remove and maintain linse head bolts with poly washers of forward mast fairing (Fig. 1, marked with a circle) and remove forward mast fairing.
2 Remove and maintain linse head bolts with poly washers of aft mast fairing (Fig. 1, marked with a triangle) and remove forward aft fairing.
Fuselage fairing (3) - Removal
4 Mast fairing must be removed (see previous procedure and Fig. 3).
5 Remove the bolt from the rear of the right side bar and strengthening strut, if fitted (Fig. 4).
6 Remove the bolts from the front and rear of the left side bar, if fitted (Fig. 4 & 5).
7 Loosen the upper clamp of the tank connecting hose and disconnect the hose (Fig. 6).
8 Remove the lower bolts of the left and right upper push/pull rods and disconnect from the bell-cranks (Fig. 7).
9 Loosen the 2 bolts attaching the upper fairings to the forward mast - do not remove (Fig. 8).
10 Remove the 2 screws securing the upper fairings to the rear of the mast (Fig. 9).
11 Remove the 3 screws securing the cowlings to each other along the upper rear joint over the engine (Fig. 10).
12 Remove the 4 fastening bolts securing the lower fairings to the mast root (Fig. 11 & 12).
13 Remove all bolts from the lower centre joint of the left and right fairings, and left and right fairings to forward fairing attachments (Fig. 13, 14 & 15).
14 Remove the 2 previously loosened bolts from the upper fairings to the forward mast attachment one at a time and remove the appropriate fairing, ensuring that it does not foul on the tank drain (Fig. 8 & 16).
Fuselage fairing (3) - Installation
15 The fairings are assembled in the reverse order of disassembly described above.
Mast fairing (1/2) - Installation
16 Install mast fairing in reverse order (work steps 2 - 1).
17 Fasten all bolts with 3 Nm.

AircraftMaintenance Manual
AutoGyroMTOsport Model 2017
AMM-M17-E_2018-01 Part E - 52-00-00 4-1 Page 2 of 5
ILLUSTRATIONS
Fig. 1 - Mast fairing and fuselage fairing

AircraftMaintenance Manual
AutoGyroMTOsport Model 2017
AMM-M17-E_2018-01 Part E - 52-00-00 4-1 Page 3 of 5
Fig. 2 - Mast fairing
Fig. 3 -
Fig. 4 -
Fig. 5 - Fig. 6 -

AircraftMaintenance Manual
AutoGyroMTOsport Model 2017
AMM-M17-E_2018-01 Part E - 52-00-00 4-1 Page 4 of 5
Fig. 7 - Fig. 8 -
Fig. 9 - Fig. 10 -
Fig. 11 - Fig. 12 -

AircraftMaintenance Manual
AutoGyroMTOsport Model 2017
AMM-M17-E_2018-01 Part E - 52-00-00 4-1 Page 5 of 5
Fig. 13 -
Fig. 14 -
Fig. 15 - Fig. 16 -

AircraftMaintenance Manual
AutoGyroMTOsport Model 2017
AMM-M17-E_2018-01 Part E - 52-40-00 2-1 Page 1 of 2
52-40-00 2-1 PREP. WORK: SERVICE COVERS / MAINTENANCE ACCESS
LNE
GENERAL, REFERENCES AND REQUIREMENTS
Task may only be performed by an organization or individual trained and entitled to carry out 'Line Maintenance'!
PROCEDURES/DESCRIPTION
Access to fuses and cabling (Fig. 1 / 2)
1 Fuses are accessible without removing any covers; they are mounted onto the instrument panel and labelled accordingly.
Instrument panel - Removal (Fig. 3)
2 Remove rotor system or secure.
3 Release brake pressure and bring stick in most aft position.
4 Unscrew and remove panel bolts (13 x).
IMPORTANT NOTE:Protect panel and instruments using a soft layer of cloth
5 Remove panel and lean against flight control stick. Use caution and do not damage tubing, cables and connectors. Disconnect as required.
Instrument panel - Installation
6 Bring panel into position so that bores and threaded inserts align. If needed let a second person support the nose. Reconnect any disconnected cables.
NOTE:In order to do so, support nose / lower belly using a jack with a soft cover.
7 Tighten bolts. Use engineering judgement and do not overtorque.If any system has been disconnected, then test that system for proper function (eg pitot disconnection means apply suitable pressure to the pitot tube to prove it is connected properly by noting the airspeed indication on the ASI

AircraftMaintenance Manual
AutoGyroMTOsport Model 2017
AMM-M17-E_2018-01 Part E - 52-40-00 2-1 Page 2 of 2
ILLUSTRATIONS
Fig. 1 - Instrument Panel with attachment bolts
Fig. 2 - Access to fuses and cabling

AircraftMaintenance Manual
AutoGyroMTOsport Model 2017
AMM-M17-E_2018-01 Part E - 61-10-00 4-1 Page 1 of 2
61-10-00 4-1 REMOVAL-INSTALLATION: PROPELLER - HTC LNE
GENERAL, REFERENCES AND REQUIREMENTS
Task may only be performed by an organization or individual trained and entitled to carry out 'Line Maintenance'!
Secure gyroplane against unauthorized or unintended operation!
Battery must be removed, see 24-30-00 4-1
SPECIAL TOOLS AND CONSUMABLE MATERIALS
AG-BAS-02 Loctite 243 blue
PRECAUTIONS AND SAFETY MEASURES
CAUTION: When removing or disassembling make sure to mark all parts so that each and every part of the component is re-assembled and installed in exactly the same location and orientation!
PROCEDURES/DESCRIPTION
Note that the propeller blades may be purchased separately, or as a complete propeller with preset blade pitch to suit the engine variant required. The blades and hub (front and rear as a pair) carry serial identification.
Removal
1 Before removing the spinner (optional equipment) check marking (filed notch) is available on spinner (1) and spinner base plate (8). If not, the installation position has to be marked accordingly.
2 Unscrew and remove bolts (9) with poly washers (10) and remove spinner.
3 Mark installation position of propeller hub, engine flange and spinner base plate (if installed) relative to each other.
4 Release torque on each bolt (4) by turning bolt half a revolution in counter-clockwise direction. Do not untighten or unscrew bolts (4)!
5 Unscrew and remove bolts (2) and washers (3).
Installation
6 Install propeller hub, bolts (2) with washers (3) in its original installation position.
7 Torque-tighten bolts (2) with 15 Nm in crosswise sequence.
8 Torque-tighten bolts (4) with 10 Nm in crosswise sequence.
9 Install spinner (1), spinner bolts (9) with poly washers (10). Make sure spinner is in correct installation position relative to spinner base plate. Check marking.
10 Secure spinner bolts (9) with AG-BAS-02 and torque-tighten with 3 Nm in crosswise sequence.

AircraftMaintenance Manual
AutoGyroMTOsport Model 2017
AMM-M17-E_2018-01 Part E - 61-10-00 4-1 Page 2 of 2
ILLUSTRATIONS
Fig. 1 - Propeller HTC

AircraftMaintenance Manual
AutoGyroMTOsport Model 2017
AMM-M17-E_2018-01 Part E - 61-10-00 4-2 Page 1 of 2
61-10-00 4-2 DISASSEMBLY-ASSEMBLY: PROPELLER - HTC LNE
GENERAL, REFERENCES AND REQUIREMENTS
Task may only be performed by an organization or individual trained and entitled to carry out 'Line Maintenance'!
Propeller must be removed, see 61-10-00 4-1
PROCEDURES/DESCRIPTION
Disassembly
1 Mark inner and outer propeller hub to indicate relative installation position.
2 Place propeller assembly on a horizontal and clean surface and support propeller hub so that assembly does not lie on propeller blades.
3 Unscrew and remove bolts (4).
4 Remove outer propeller hub and remove individual blades.
Assembly
5 Place inner propeller hub on horizontal and clean surface and support propeller hub.
6 Insert individual blades in correct position.
7 Attach outer propeller hub, insert bolts (4) and hand-tighten.
8 Torque-tighten bolts (4) with 10 Nm in crosswise sequence.

AircraftMaintenance Manual
AutoGyroMTOsport Model 2017
AMM-M17-E_2018-01 Part E - 61-10-00 4-2 Page 2 of 2
ILLUSTRATIONS
Fig. 1 - Propeller HTC

AircraftMaintenance Manual
AutoGyroMTOsport Model 2017
AMM-M17-E_2018-01 Part E - 61-10-00 5-1 Page 1 of 3
61-10-00 5-1 ADJUSTMENT: PROPELLER PITCH - HTC LNE
GENERAL, REFERENCES AND REQUIREMENTS
Task may only be performed by an organization or individual trained and entitled to carry out 'Line Maintenance'!
Spinner (if installed) must be removed, see 61-10-00 4-1
Battery must be removed, see 24-30-00 4-1
SPECIAL TOOLS AND CONSUMABLE MATERIALS
M.WZ26 Propeller Pitch Adjustment Tool (MT)
PROCEDURES/DESCRIPTION
1 Untighten bolts (Fig. 1, 4) so that bolt heads does not contact outer propeller hub.
2 Unscrew bolts (Fig. 1, 2) about 2 revolutions.
3 Position propeller pitch adjustment tool with the inner side on outer propeller hub and profiled section on the propeller blade.
4 Carefully adjust blade pitch by tapping with a 200 g rubber hammer in the area of the blade's nose section so that blade pitch increases or decreases. Never use hammer on trailing edge as the blade may be damaged that way.
5 In order to read the correct setting it is advisable to let the blade's trailing edge rest in (touch) the tool while allowing a small light gap between blade's back and the tool's profiled section.
6 Repeat work steps 3 to 5 for the remaining blades.
7 Hand-tighten bolts (Fig. 1, 2) and (Fig. 1, 4) and check blade pitch setting for all blades. If necessary, untighten bolts and re-do from step 1.
8 Torque-tighten bolts (Fig. 1, 2) with 15 Nm in crosswise sequence.
9 Torque-tighten bolts (Fig. 1, 4) with 10 Nm in crosswise sequence.
10 Perform torque-check after first flight or ground run. Flight test should indicate 5400 engine rpm in 60 mph (100 km/h) climb.
NOTE: In the absence of a gauge, the propeller is set with an inclinometer measuring the angle of the blade chord to the thrust line at ¾ blade radius, with the blade set horizontally.

AircraftMaintenance Manual
AutoGyroMTOsport Model 2017
AMM-M17-E_2018-01 Part E - 61-10-00 5-1 Page 2 of 3
ILLUSTRATIONS
Fig. 1 - Propeller HTC
Fig. 2 - Propeller pitch adjustment and tool

AircraftMaintenance Manual
AutoGyroMTOsport Model 2017
AMM-M17-E_2018-01 Part E - 61-10-00 5-1 Page 3 of 3
Fig. 3 - Detail hub
Fig. 4 - Detail blade

AircraftMaintenance Manual
AutoGyroMTOsport Model 2017
AMM-M17-E_2018-01 Part E - 62-11-00 4-1 Page 1 of 2
62-11-00 4-1 REMOVAL: ROTOR - TEETERING PARTS OPR
GENERAL, REFERENCES AND REQUIREMENTS
Basic operational task, which can be performed by a licensed pilot or instructed personnel!
SPECIAL TOOLS AND CONSUMABLE MATERIALS
AG-BAS-01 Loctite 221 red
LR IMPORTANT NOTE: Procedure involves parts with limited reusability. Check parts list below before starting job!
PRECAUTIONS AND SAFETY MEASURES
WARNING: Wear eye protection and mind FOD when removing attachment hardware!
WARNING: Object is heavy! Inadequate handling could cause injury. Use proper lifting techniques or assistance!
WARNING: Never place the rotor system on a dirty or grainy surface and avoid bending moments at the blade attachments!
WARNING: When handled incorrectly the rotor system can be damaged irreparably. If undetected this may have catastrophic consequences!
CAUTION: When removing or disassembling make sure to mark all parts so that each and every part of the component is re-assembled and installed in exactly the same location and orientation!
IMPORTANT NOTE: Some rotor blades have loose washers in them which are required as balance weights. Do not remove or restrain if present!
PROCEDURES/DESCRIPTION
1 Secure the gyroplane on level ground by engaging the parking brake, adjust the rotor system lengthwise and pump up the rotor brake to its maximum.
2 Remove and discard split pin and unscrew the castellated nut (4). The rotor system has to be tilted onto the black rotor teeter stop.
3 The teeter bolt (1) has to be extracted by using only the hand, not a hammer. If needed tilt the rotor blades carefully onto the teeter stop, in order to prevent the bolt from jamming. Make sure that the rotor stays level in the teeter axis, if not the teeter bolt will damage the Teflon coated bushes, while being pushed out.
4 A supervised second person has to hold the rotor system in flying direction.
5 Lift the rotor system carefully out of the teeter tower and be aware of the position of the shim washers (2). Their thicknesses may differ and it is essential that they are reinstalled on the correct side! They are marked with dots to identify the correct side.
6 Remove the rotor system to one side by letting it rest on your shoulder and take care not to collide with stabilizer or propeller.
7 The shim washers and the teeter block in the hub are marked on each side with one or two engraved dots. Directly after the disassembly the shim washers need to be fixed on their respective side with cable ties.
8 If possible, handle with two persons while holding approximately in the middle of each blade. When supporting the system use two stands each positioned in about 2 metres distance from the hub.
9 The rotor system must not be placed on a dirty or grainy surface, as the blades can scratch and damage easily. The best way is to place the rotor blades centrally onto two stands, supporting the rotor at approximately 2 m distance from the hub.
ILLUSTRATIONS

AircraftMaintenance Manual
AutoGyroMTOsport Model 2017
AMM-M17-E_2018-01 Part E - 62-11-00 4-1 Page 2 of 2
Fig. 1 - Removal rotor - teetering parts

AircraftMaintenance Manual
AutoGyroMTOsport Model 2017
AMM-M17-E_2018-01 Part E - 62-11-00 4-2 Page 1 of 2
62-11-00 4-2 DISASSEMBLY: ROTOR - TEETERING PARTS OPR
GENERAL, REFERENCES AND REQUIREMENTS
Basic operational task, which can be performed by a licensed pilot or instructed personnel!
Rotor system must be removed, see 62-11-00 4-1!
SPECIAL TOOLS AND CONSUMABLE MATERIALS
LR IMPORTANT NOTE: Procedure involves parts with limited reusability. Check parts list below before starting job!
PRECAUTIONS AND SAFETY MEASURES
WARNING: When handled incorrectly the rotor system can be damaged irreparably. If undetected this may have catastrophic consequences!
CAUTION: The rotor hub must never be disassembled!
CAUTION: When removing or disassembling make sure to mark all parts so that each and every part of the component is re-assembled and installed in exactly the same location and orientation!
PROCEDURES/DESCRIPTION
1 To disassemble the rotor system, place it upside down onto a clean surface or stands to support the rotor at approximately 2 m from the hub.
2 Untighten and discard self-locking nuts (9) on the first blade by counter-holding the corresponding bolt head to prevent it from turning.
3 Push out all shoulder bolts (1 - 5) without any force, but use no more than a gentle tapping if necessary. Tilt the rotor blade up and down to support easy removal of the bolt.
4 Carefully pull the rotor blade out of the hub (7) in radial direction and take off the clamping profile (10).
5 Repeat step 2 to 4 on second rotor blade.
IMPORTANT NOTE: Do not disassemble the rotor hub!
6 Place rotor blades, clamping profile and rotor hub in a suitable way to prevent bending or surface damage.
IMPORTANT NOTE: Do not lift or support the rotor system at its blade tips as the bending moment due to the weight of the hub assembly may overstress the blade roots. If possible, handle with two persons while holding approximately in the middle of each blade. When supporting the system use two stands each positioned in about 2 metres distance from the hub.
ILLUSTRATIONS

AircraftMaintenance Manual
AutoGyroMTOsport Model 2017
AMM-M17-E_2018-01 Part E - 62-11-00 4-2 Page 2 of 2
Fig. 1 - Disassembly rotor - teetering parts

AircraftMaintenance Manual
AutoGyroMTOsport Model 2017
AMM-M17-E_2018-01 Part E - 62-11-00 4-3 Page 1 of 2
62-11-00 4-3 ASSEMBLY: ROTOR - TEETERING PARTS OPR
GENERAL, REFERENCES AND REQUIREMENTS
Basic operational task, which can be performed by a licensed pilot or instructed personnel!
SPECIAL TOOLS AND CONSUMABLE MATERIALS
LR IMPORTANT NOTE: Procedure involves parts with limited reusability. Check parts list below before starting job!
PRECAUTIONS AND SAFETY MEASURES
WARNING: When handled incorrectly the rotor system can be damaged irreparably. If undetected this may have catastrophic consequences!
CAUTION: When removing or disassembling make sure to mark all parts so that each and every part of the component is re-assembled and installed in exactly the same location and orientation!
PROCEDURES/DESCRIPTION
1 The rotor blades (11), clamping profile (10) and rotor hub (7) are each labelled with an engraved serial number.
2 Insert the first rotor blade carefully into the clamping profile. Make sure that all serial numbers match.
IMPORTANT NOTE: Grease shaft with AG-LUB-03, but do not allow AG-LUB-03 to come into contact with threads at any time!
3 Fit the rotor hub side with the according serial number to clamping profile (7) and blade (11). Insert 6 x shoulder bolts (1-5) and corresponding washers (6) without using force so that the bolt end is on top when the rotor system is installed. For re-identification and correct installation position the shaft length is provided in the figure above. Example: 40/12 means shaft length 40mm.
4 Position the washers (8) and the self-locking nuts (9) and hand-tighten.
5 Torque-tighten nuts (9) with 20 +/- 5 Nm from the inside to the outside. When doing so, counter-hold bolts (5) to prevent any damage to the hub and blade holes.
6 Repeat work steps 2 to 5 for the second rotor blade.
7 Check rotor system alignment according to 62-11-00 5-1 and adjust, if necessary.

AircraftMaintenance Manual
AutoGyroMTOsport Model 2017
AMM-M17-E_2018-01 Part E - 62-11-00 4-3 Page 2 of 2
ILLUSTRATIONS
Fig. 1 - Assembly rotor - teetering parts

AircraftMaintenance Manual
AutoGyroMTOsport Model 2017
AMM-M17-E_2018-01 Part E - 62-11-00 4-4 Page 1 of 2
62-11-00 4-4 INSTALLATION: ROTOR - TEETERING PARTS OPR
GENERAL, REFERENCES AND REQUIREMENTS
Basic operational task, which can be performed by a licensed pilot or instructed personnel!
Secure gyroplane against unauthorized or unintended operation!
SPECIAL TOOLS AND CONSUMABLE MATERIALS
AG-GRS-01 Lagermeister WHS 2002 Grease
LR IMPORTANT NOTE: Procedure involves parts with limited reusability. Check parts list below before starting job!
PRECAUTIONS AND SAFETY MEASURES
WARNING: Object is heavy! Inadequate handling could cause injury. Use proper lifting techniques or assistance!
WARNING: When handled incorrectly the rotor system can be damaged irreparably. If undetected this may have catastrophic consequences!
PROCEDURES/DESCRIPTION
1 Secure the gyroplane on level ground by engaging parking brake, adjust the rotor head or teeter tower corresponding to fore-aft and pressurize the rotor brake up to maximum.
2 Check correct matching of parts: The rotor hub and the teeter tower are marked with two dots according to the orientation for installation.
3 Lift the rotor blade with a second briefed person (one person standing aft, one person standing directly in front of the hub).
4 Approach with the rotor system from the side to the gyroplane and make sure not to collide with propeller or stabilizer. Insert the rotor system into the hub from above while standing on a ladder or the rear seat.
5 The second person can let go, as soon as it is resting centrally in the teeter tower on the teeter stops.
6 Apply a thin layer of AG-GRS-01 on teeter bolt (using a lint-free cloth).
7 Insert teeter bolt by hand in the same orientation as it was before (bolt head should be at that side of the teeter block which is marked with one dot) while matching the shim washers with the corresponding installation positions. Insert teeter bolt by hand in the same orientation as it was before (bolt head should be at that side of the teeter block which is marked with one dot) while matching the shim washers with the corresponding installation positions.
8 Check direction of assembly and shim washers: rotor hub, teeter tower and shim washers are marked on each side either with one or two engraved dots.
9 If the teeter bolt cannot be inserted, tilt the rotor blade along the teeter axis with the free hand.
10 Install washer and castellated nut. Hand-tighten only and secure with a new split pin. Use split pins only once. Make sure that the teeter bolt can be turned easily by hand.
11 Grease nipple in teeter block.
ILLUSTRATIONS

AircraftMaintenance Manual
AutoGyroMTOsport Model 2017
AMM-M17-E_2018-01 Part E - 62-11-00 4-4 Page 2 of 2
Fig. 1 - Installation rotor - teetering parts

AircraftMaintenance Manual
AutoGyroMTOsport Model 2017
AMM-M17-E_2018-01 Part E - 62-11-00 5-1 Page 1 of 2
62-11-00 5-1 CHECK-ADJUSTMENT: ROTOR SYSTEM ALIGNMENT LNE
GENERAL, REFERENCES AND REQUIREMENTS
Task may only be performed by an organization or individual trained and entitled to carry out 'Line Maintenance'!
Rotor system must be removed, see 62-11-00 4-1!
Rotor system must be placed on suitable supports to avoid scratching of the blades or bending moments at the blade attachment
SPECIAL TOOLS AND CONSUMABLE MATERIALS
None
PRECAUTIONS AND SAFETY MEASURES
WARNING: Object is heavy! Inadequate handling could cause injury. Use proper lifting techniques or assistance!
WARNING: Do not lift or support the rotor system at its blade tips as the bending moment due to the weight of the hub assembly may overstress the blade roots!
WARNING: Never place the rotor system on a dirty or grainy surface and avoid bending moments at the blade attachments!
WARNING: When handled incorrectly the rotor system can be damaged irreparably. If undetected this may have catastrophic consequences!
PROCEDURES/DESCRIPTION
1 Place rotor system on suitable stands on level ground. Make sure stand surface is level and stand is oriented exactly 90 degrees to rotor blade (see Fig. 1).
2 String measuring cord between both outer blade tips. Position at rivet as depicted in Fig. 2 'Positioning of measuring cord'.
3 Adjust distance of stand carefully so that measuring cord is strung slightly above the central grease nipple. Verify centre position of grease nipple (Fig. 3).
4 In case the measuring cord deviates by more than 2 mm from centre position (i.e. grease nipple inner bore), adjust rotor system linearity. To do so perform the following work steps:
5 Untighten the self-locking nuts of the blade attachment bolts, except for the most inner bolt(s). Counter-hold bolt head to prevent it from turning.
6 Adjust linearity/alignment of rotor system and tighten nuts. Perform alignment check. If necessary, repeat procedure from step 5 on.
7 Torque-tighten nuts with 20 +/- 5 Nm from the inside to the outside. When doing so, counter-hold bolts to prevent any damage to the hub and blade holes.
8 Perform final linearity/alignment check. If necessary, repeat procedure from step 5 on.
IMPORTANT NOTE: In case of any adjustment, a functional test flight must be performed!

AircraftMaintenance Manual
AutoGyroMTOsport Model 2017
AMM-M17-E_2018-01 Part E - 62-11-00 5-1 Page 2 of 2
ILLUSTRATIONS
Fig. 1 - Rotor system placed on stands
Fig. 2 - Positioning of measuring cord Fig. 3 - Reference point at grease nipple

AircraftMaintenance Manual
AutoGyroMTOsport Model 2017
AMM-M17-E_2018-01 Part E - 62-11-00 6-1 Page 1 of 2
62-11-00 6-1 INSPECTION: ROTOR - TEETERING PARTS LNE
GENERAL, REFERENCES AND REQUIREMENTS
Task may only be performed by an organization or individual trained and entitled to carry out 'Line Maintenance'!
Rotor system must be removed, see 62-11-00 4-1!
SPECIAL TOOLS AND CONSUMABLE MATERIALS
AG-GRS-01 Lagermeister WHS 2002 Grease
PRECAUTIONS AND SAFETY MEASURES
WARNING: Never place the rotor system on a dirty or grainy surface and avoid bending moments at the blade attachments!
WARNING: When handled incorrectly the rotor system can be damaged irreparably. If undetected this may have catastrophic consequences!
PROCEDURES/DESCRIPTION
1 Check inner and outer blade caps for tight fit and general condition. Visible insets or score marks may indicate contact with obstacles with possible damage to the rotor system.
2 Perform visual inspection of clamping profile.
3 Perform visual inspection of rotor hub.
4 Perform visual inspection of grease nipple and check tight fit
5 Check rotor system alignment 62-11-00 5-1, i.e. work steps 1 to 3 for trend monitoring purposes.
6 Inspect teeter bolt. In order to do so, clean with lint-free cloth and inspect for wear marks and corrosion. If corrosion or wear marks are evident (fingernail test), the teeter bolt must be discarded and replaced.
7 Apply a thin layer of AG-GRS-01 on teeter bolt (using a lint-free cloth).
8 Inspect bushings in teeter block and teeter tower for correct seating (see Fig. 1 for positions of slits) and secure installation (must not be possible to turn by hand). Otherwise, bushings must be replaced, see 62-11-00 8-1.
9 Insert teeter bolt in teeter block and inspect for play. If any bearing play is evident, try with new teeter bolt. If play is still evident, replace teeter block bushing, see 62-11-00 8-1.
10 Insert teeter bolt in teeter tower and inspect for play. If any bearing play is evident, try with new teeter bolt. If play is still evident, replace teeter tower bushings, see 62-11-00 8-1.

AircraftMaintenance Manual
AutoGyroMTOsport Model 2017
AMM-M17-E_2018-01 Part E - 62-11-00 6-1 Page 2 of 2
ILLUSTRATIONS
Fig. 1 - Teeter bushings, block and tower

AircraftMaintenance Manual
AutoGyroMTOsport Model 2017
AMM-M17-E_2018-01 Part E - 62-11-00 6-2 Page 1 of 2
62-11-00 6-2 INSPECTION: ROTOR BLADES OPR
GENERAL, REFERENCES AND REQUIREMENTS
Basic operational task, which can be performed by a licensed pilot or instructed personnel!
Rotor system must be disassembled, see 62-11-00 4-2
SPECIAL TOOLS AND CONSUMABLE MATERIALS
S.WZ9001 Aluminium ruler 1000mm
PRECAUTIONS AND SAFETY MEASURES
WARNING: Do not use permanent marker on anodized (eloxated) parts!
CAUTION: Do not use sticky labels on aluminium or composite parts as they may be difficult to remove!
PROCEDURES/DESCRIPTION
1 Inspect for cracks in the blade root area, especially in the area of the inner attachment bore (see Fig. 1 "Critical Area"). In case of any cracks the complete rotor system must be replaced.
2 Check each rotor blade in its root section for linearity. In order to do place each rotor blade with the nose section facing down on the support stands and measure gap with an aluminium ruler in 1 m distance from the inner end (see Fig. 2). Maximum allowed gap (dimension A) is 0.5 mm (LTA DULV-2010-004).
IMPORTANT NOTE: In order to avoid measuring errors draw a straight and parallel line 200 mm from the trailing edge. Use a lead pencil. Do not use permanent marker on anodized (eloxated) parts!

AircraftMaintenance Manual
AutoGyroMTOsport Model 2017
AMM-M17-E_2018-01 Part E - 62-11-00 6-2 Page 2 of 2
ILLUSTRATIONS
Fig. 1 - Critical blade area
Fig. 2 - Measurement of blade root linearity

AircraftMaintenance Manual
AutoGyroMTOsport Model 2017
AMM-M17-E_2018-01 Part E - 62-11-00 6-3 Page 1 of 2
62-11-00 6-3 INSPECTION: ROTOR HUB BOLTS LNE
GENERAL, REFERENCES AND REQUIREMENTS
Task may only be performed by an organization or individual trained and entitled to carry out 'Line Maintenance'!
Rotor system must be removed, see 62-11-00 4-1!
Rotor system must be placed on suitable supports to avoid scratching of the blades or bending moments at the blade attachment
SPECIAL TOOLS AND CONSUMABLE MATERIALS
AG-GRS-01 Lagermeister WHS 2002 Grease
LR IMPORTANT NOTE: Procedure involves parts with limited reusability. Check parts list below before starting job!
PRECAUTIONS AND SAFETY MEASURES
CAUTION: Remove and re-install only one bolt at a time. Never remove more than one bolt of the installation!
PROCEDURES/DESCRIPTION
1 Remove first Rotor Hub Bolt and discard self-locking nut. If necessary use a mandrel and a hammer and tap carefully. Use caution not to damage the threads or the surface of the bore.
2 Inspect Rotor Hub Bolt for corrosion. In case of any signs of corrosion the bolt must be replaced.
3 Apply a thin layer of AG-GRS-01 on shaft, but NOT on the thread.
4 Re-install bolt with a slow turning motion and moderate pressure.
5 Install new self-locking nut and pre-torque to approximately 10 Nm.
6 Repeat work steps 1 to 5 for the remaining bolts.
7 Torque-tighten all Rotor Hub Bolts to the final torque of 25 Nm in opposing/crosswise sequence.

AircraftMaintenance Manual
AutoGyroMTOsport Model 2017
AMM-M17-E_2018-01 Part E - 62-11-00 6-3 Page 2 of 2
ILLUSTRATIONS
Fig. 1 - Rotor hub

AircraftMaintenance Manual
AutoGyroMTOsport Model 2017
AMM-M17-E_2018-01 Part E - 62-11-00 8-1 Page 1 of 3
62-11-00 8-1 REPLACEMENT: TEETER BUSHINGS LNE
GENERAL, REFERENCES AND REQUIREMENTS
Task may only be performed by an organization or individual trained and entitled to carry out 'Line Maintenance'!
Rotor system must be removed, see 62-11-00 4-1!
SPECIAL TOOLS AND CONSUMABLE MATERIALS
AG-BAS-04 Loctite 638 green
S.WZ6010 Puller bushing teeterblock
PRECAUTIONS AND SAFETY MEASURES
CAUTION: When removing or disassembling make sure to mark all parts so that each and every part of the component is re-assembled and installed in exactly the same location and orientation!
PROCEDURES/DESCRIPTION
Removal
CAUTION: It is advisable to heat up the teeter block in an oven. When removing the teeter block marks all parts or use cable ties so that each and every part of the component is re-assembled and installed in exactly the same location and orientation! This is especially important for the shim plates between teeter block and hub bar.
WARNING: Affected aluminium parts must not become warmer than 160 °C.
1 Remove bushings from teeter block. In order to do so warm up teeter block to 120 °C, preferably in an oven.
2 Use appropriate tools to drive out bushings. Be careful not to damage the surface of bore.
3 Remove bushings from pre-heated teeter tower.
4 Use appropriate tools to drive out bushings. Be careful not to damage the surface of bore.
Installation
5 Clean bushing seatings / bores from bonding residues and de-grease.
6 Teeter block: Apply a thin layer of AG-BAS-04 to bore.
7 Press in first bushing (1) with joint/slit facing up. Use a bench vise and press carefully until bushing flange is flush.
8 Clean off excessive Loctite, if necessary.
9 Repeat step 6 to 8 for second bushing.
10 Teeter tower: Apply a thin layer of AG-BAS-04 to bore.
11 Press in first bushing (2) with joint/slit facing down. Pull in bushing until flange is flush. Use thick washers on both sides to protect teeter tower and bushing flange from damage.
12 Clean off excessive Loctite, if necessary.
13 Repeat step 10 to 12 for second bushing.
14 If necessary rework inner diameter of bushings in teeter tower with a reamer 13H7.

AircraftMaintenance Manual
AutoGyroMTOsport Model 2017
AMM-M17-E_2018-01 Part E - 62-11-00 8-1 Page 2 of 3
ILLUSTRATIONS
Fig. 1 - Teeter bushings, block and tower - cross section view

AircraftMaintenance Manual
AutoGyroMTOsport Model 2017
AMM-M17-E_2018-01 Part E - 62-11-00 8-1 Page 3 of 3
Fig. 2 - Teeter bushings, block and tower - exploded view

AircraftMaintenance Manual
AutoGyroMTOsport Model 2017
AMM-M17-E_2018-01 Part E - 62-20-00 8-1 Page 1 of 2
62-20-00 8-1 REPLACEMENT: DRIVE GEAR LNE
GENERAL, REFERENCES AND REQUIREMENTS
Task may only be performed by an organization or individual trained and entitled to carry out 'Line Maintenance'!
Secure gyroplane against unauthorized or unintended operation!
Gyroplane must be placed on level ground and restrained (blocks, chocks)
Rotor system must be removed, see 62-11-00 4-1!
SPECIAL TOOLS AND CONSUMABLE MATERIALS
AG-BAS-02 Loctite 243 blue
LR IMPORTANT NOTE: Procedure involves parts with limited reusability. Check parts list below before starting job!
PRECAUTIONS AND SAFETY MEASURES
CAUTION: When removing or disassembling make sure to mark all parts so that each and every part of the component is re-assembled and installed in exactly the same location and orientation!
PROCEDURES/DESCRIPTION
1 Switch pneumatic mode selector to BRAKE and build-up brake pressure.
2 Remove and dispose the split pin (1) (Fig.1).
WARNING: Wear eye protection when removing attachment hardware!
3 Undo the castle nut (2) (Fig. 1).
4 Switch pneumatic mode selector to FLIGHT.
5 Remove the castle nut (2) (Fig.1).
6 Remove the teeter tower with the drive gear. Fix the teeter tower in a bench vise carefully.
7 Remove and dispose the 6 screws and 6 washers of the drive gear. Remove the drive gear.
8 Put new drive gear on teeter tower.
9 Apply Loctite 243 to the ten screws of the drive gear. Tighten the screws with a torque of 25 Nm.
10 Rotate rotor head so that rotor blades (removed!) would point exactly in flight direction.
11 Put teeter tower with new drive gear on the rotor head.
12 Align the hole or magnet to the 7 o´clock position in flight direction (Fig.2 & 3).
13 Torque-tighten castle nut (2) with final torque of 120 Nm and re-check position. Apply further torque until the split pin can be inserted.
14 Inspect backlash of pre-rotator upper engagement. Backlash should be as tight as possible, but also wide enough to allow easy engagement of the pinion into the sprocket wheel in any position.
15 Insert and secure new split pin (1). Make sure that ends do not contact rotating parts (Fig.2).
16 Install the rotor system, according to 62-11-00 4-4.
17 Perform jobcard 63-11-30 6-1 "INSPECTION: PRE-ROTATOR UPPER ENGAGEMENT".

AircraftMaintenance Manual
AutoGyroMTOsport Model 2017
AMM-M17-E_2018-01 Part E - 62-20-00 8-1 Page 2 of 2
ILLUSTRATIONS
Fig. 1 - Split pin and castle nut
Fig. 2 - Hole or magnet in the 7 o´clock position in flight direction
Fig. 3 - Hole or magnet in the 7 o´clock position in flight direction

AircraftMaintenance Manual
AutoGyroMTOsport Model 2017
AMM-M17-E_2018-01 Part E - 62-31-00 6-1 Page 1 of 2
62-31-00 6-1 INSPECTION: ROTOR HEAD BRIDGE, BEARING AND TEETER TOWER
LNE
GENERAL, REFERENCES AND REQUIREMENTS
Task may only be performed by an organization or individual trained and entitled to carry out 'Line Maintenance'!
SPECIAL TOOLS AND CONSUMABLE MATERIALS
LR IMPORTANT NOTE: Procedure involves parts with limited reusability. Check parts list below before starting job!
PRECAUTIONS AND SAFETY MEASURES
WARNING: Wear eye protection and mind FOD when removing attachment hardware!
PROCEDURES/DESCRIPTION
1 Inspect rotor head bridge (5) function and condition, i.e. no misalignment, dents, nicks, corrosion, or cracks. In case of any of the aforementioned is evident or suspected contact AutoGyro customer support.
2 Inspect, whether the upper bearing shield bendix shaft is welded on inner bottom side to the rotor head side plates; if not contact AutoGyro customer support.
3 Inspect teeter stops (4) for correct attachment and condition.
4 Inspect teeter tower (3) for correct attachment and condition, i.e. no cracks. In case of cracks or unusual condition or appearance contact AutoGyro customer support.
5 Perform torque-check on main bolt nut (2). In order to do so, remove and discard split pin (1) and torque-check castle nut with 120 Nm.
6 If torque-check fails mark component / gyroplane unserviceable and contact AutoGyro customer support.
7 Insert new split pin (1) and secure. Make sure that ends do not contact rotating parts.
WARNING: Do not fly gyroplane in case torque-check failed. Clearly mark as unserviceable and prevent from use until resolved.

AircraftMaintenance Manual
AutoGyroMTOsport Model 2017
AMM-M17-E_2018-01 Part E - 62-31-00 6-1 Page 2 of 2
ILLUSTRATIONS
Fig. 1 - Rotor head bridge, bearing and teeter tower

AircraftMaintenance Manual
AutoGyroMTOsport Model 2017
AMM-M17-E_2018-01 Part E - 62-32-00 5-1 Page 1 of 3
62-32-00 5-1 CHECK-ADJUSTMENT: ROTOR CONTROL FRICTION LNE
GENERAL, REFERENCES AND REQUIREMENTS
Task may only be performed by an organization or individual trained and entitled to carry out 'Line Maintenance'!
Rotor head bridge / gimbal head configuration state must conform to version II
Rotor system must be removed, see 62-11-00 4-1!
SPECIAL TOOLS AND CONSUMABLE MATERIALS
S.WZ6008 Spring balance / Dynamometer
PROCEDURES/DESCRIPTION
1 Switch pneumatic mode selector to FLIGHT and release trim pressure completely. If necessary, switch repeatedly!
2 Attach spring balance / dynamometer as shown in Fig. 1 and pull carefully until control stick starts to move. Note maximum value (breakout force).
WARNING: Job includes work at critical flight controls. Duplicate inspection must be performed after completion!
3 Breakout force can be adjusted by tightening the gimbal head pitch bolt. If the bore pin drill of the gimbal head pitch bolt is covered by the castle nut, place shim washers between the washers (Pos. 3 & 6). Note: 0.1 mm shim washer equates approximately 20° nut rotating angle.
4 Rotor vibration levels will decrease with higher control friction, but handling qualities will suffer, if control friction is too high. Friction should not exceed 10 N, with an absolute maximum of 15 N!
5 After completion, switch pneumatic mode selector to BRAKE, apply brake pressure and secure rotor system.

AircraftMaintenance Manual
AutoGyroMTOsport Model 2017
AMM-M17-E_2018-01 Part E - 62-32-00 5-1 Page 2 of 3
ILLUSTRATIONS
Fig. 1 - Measurement of rotor control friction
Fig. 2 - Gimbal head assembly, Rotor System III (with spring washers)

AircraftMaintenance Manual
AutoGyroMTOsport Model 2017
AMM-M17-E_2018-01 Part E - 62-32-00 5-1 Page 3 of 3
Fig. 3 - Arrangement of spring and shim washers on gimbal head - Version III

AircraftMaintenance Manual
AutoGyroMTOsport Model 2017
AMM-M17-E_2018-01 Part E - 62-32-00 6-1 Page 1 of 2
62-32-00 6-1 INSPECTION: ROTOR GIMBAL HEAD LNE
GENERAL, REFERENCES AND REQUIREMENTS
Task may only be performed by an organization or individual trained and entitled to carry out 'Line Maintenance'!
Rotor system must be removed, see 62-11-00 4-1!
SPECIAL TOOLS AND CONSUMABLE MATERIALS
AG-GRS-01 Lagermeister WHS 2002 Grease
S.WZ3002 Inclinometer / Digital Spirit Level
PROCEDURES/DESCRIPTION
1 Inspect gimbal head (4) for correct function and condition, i.e. check split pin (7) and (11) is installed and no play at the hinge points is evident.
2 Verify angles of gimbal head mechanical end stops. In order to do so perform the following work steps:
3 Place gyroplane on level ground with zero roll attitude and lower mast section vertical.
4 Rotate rotor head so that rotor blades (removed!) would point exactly fore-aft. Place inclinometer on top of teeter tower and measure RH and LH end stop angle. Make sure that mechanical stops are reached. Record values.
5 Rotate rotor head so that rotor blades (removed!) would point exactly left-right. Place inclinometer on top of teeter tower and measure FORE and AFT end stop angle. Make sure that mechanical stops are reached. Record values.
6 Verify measured angles comply with the values specified in the corresponding type certificate data sheet. If any of the values differs by more than 1° from the specified value mark component unserviceable and contact AutoGyro customer support.

AircraftMaintenance Manual
AutoGyroMTOsport Model 2017
AMM-M17-E_2018-01 Part E - 62-32-00 6-1 Page 2 of 2
ILLUSTRATIONS
Fig. 1 - Gimbal head assembly

AircraftMaintenance Manual
AutoGyroMTOsport Model 2017
AMM-M17-E_2018-01 Part E - 63-11-10 4-1 Page 1 of 1
63-11-10 4-1 REMOVAL-INSTALLATION: PRE-ROTATOR CLUTCH LNE
GENERAL, REFERENCES AND REQUIREMENTS
Task may only be performed by an organization or individual trained and entitled to carry out 'Line Maintenance'!
Secure gyroplane against unauthorized or unintended operation!
Fuselage fairing must be removed, see 52-00-00 4-1!
SPECIAL TOOLS AND CONSUMABLE MATERIALS
AG-BAS-02 Loctite 243 blue
LR IMPORTANT NOTE: Procedure involves parts with limited reusability. Check parts list below before starting job!
PROCEDURES/DESCRIPTION
Removal (Assumes aircraft side panels are already removed)
1 Remove hoses from oil reservoir and seal open ends against contamination.
2 Remove oil reservoir.
3 Loop a lifting belt around the propeller/gearbox shaft and take the load off the engine mounts using appropriate lifting equipment.
NOTE: Both engine mounts in the LH side remain in place.
4 Unscrew and remove 2 x attachment hardware of engine mounts on RH side. Discard self-locking nuts.
5 With the engine weight unloaded, tilt engine around remaining LH engine mounts as far as necessary (do not overstretch rubber bushings) in order to get access to the pneumatic clutch.
6 Disconnect pneumatic hose at quick connect coupling.
7 Cut open and discard affected cable ties.
8 Unscrew and remove 4 x M6 bolts and remove pneumatic clutch with attach ring.
NOTE:Do not separate attach ring from clutch and let adapter frame remain on engine.
9 Remove pneumatic clutch by pulling apart sliding shaft coupling.
Installation
10 Insert sliding shaft coupling and position pneumatic clutch with attach ring on adapter frame.
11 Apply AG-BAS-02 on threads and torque-tighten 4 x M6 bolts with 10 Nm.
12 Check that vertical pre-rotator drive can be easily turned by hand.
13 Re-connect pneumatic hose at quick connect coupling. Make sure flow control valve is in place and installed in correct flow direction (blue line to clutch, white line to pneumatic box).
14 Perform functional check (engine off) and monitor clutch actuation.
15 Re-install engine mounts. Use new self-locking nuts and torque-tighten.
16 Remove lifting belt.
17 Install oil reservoir.
18 Remove seals and re-connect oil hoses to reservoir.

AircraftMaintenance Manual
AutoGyroMTOsport Model 2017
AMM-M17-E_2018-01 Part E - 63-11-10 6-1 Page 1 of 2
63-11-10 6-1 INSPECTION: PRE-ROTATOR CLUTCH LNE
GENERAL, REFERENCES AND REQUIREMENTS
Task may only be performed by an organization or individual trained and entitled to carry out 'Line Maintenance'!
Secure gyroplane against unauthorized or unintended operation!
SPECIAL TOOLS AND CONSUMABLE MATERIALS
None
PROCEDURES/DESCRIPTION
1 Inspect pre-rotator bracket for cracks, especially in the marked area (Fig. 1).
2 Inspect alignment of upper and lower pulley. Use a ruler at the flanges (Fig. 2).
3 Inspect sufficient slackness of belt. Belt must click when slapped with the palm of your hand against lower pulley from below. Replace belt if necessary.
NOTE: Improper pre-rotation (too high clutch speed, extensive slip) induces heat which may cause the belt to shrink in diameter. As a result the clutch is permanently exposed to friction which causes excessive wear, heat and further shrinking.
4 Check that pneumatic piston is not at its mechanical stop during clutch activation (belt is short enough). In order to do so, activate pre-rotation (engine off) until clutch is fully engaged. Check that pneumatic cylinder is not in its mechanical end stop by manually compressing the cylinder further (Fig. 3).
5 Check that upper pulley / actuation arm can easily return into its neutral position (i.e. sufficient braking action). If actuation arm hesitates to return into neutral position and braking action is low, perform the following work steps 6 to 11.
6 Disconnect ball joint from actuation arm.
7 Check that bearing of actuation arm has no excessive friction. In order to do so, move actuation arm by hand. Adjust if necessary.
8 Move actuator piston by hand and check alignment of ball joint and actuation arm bore. If necessary, adjust (carefully bend) attachment bracket of actuator.
9 Move actuator piston by hand and assess ease of movement. In case of excessive friction, the actuator piston must be replaced.
10 Rotate brake rubber, if necessary (run-in groves).
11 Re-connect ball joint to actuation arm.

AircraftMaintenance Manual
AutoGyroMTOsport Model 2017
AMM-M17-E_2018-01 Part E - 63-11-10 6-1 Page 2 of 2
ILLUSTRATIONS
Fig. 1 -Pneumatic clutch with attach ring

AircraftMaintenance Manual
AutoGyroMTOsport Model 2017
AMM-M17-E_2018-01 Part E - 63-11-10 8-1 Page 1 of 2
63-11-10 8-1 REPLACEMENT: PRE-ROTATOR CLUTCH LINING LNE
GENERAL, REFERENCES AND REQUIREMENTS
Task may only be performed by an organization trained and entitled to carry out 'Heavy Maintenance'!
Secure gyroplane against unauthorized or unintended operation!
Engine cowlings must be removed, see 52-00-00 4-1!
SPECIAL TOOLS AND CONSUMABLE MATERIALS
S.VB3008 Loctite 7063 Super Clean
S.VB6055 Loctite 648
V.WZ3024 Installation Aid Dog Gear
PROCEDURES/DESCRIPTION
1 Disconnect battery according to 24-30-00 4-1, work steps 1 - 2.
2 Remove M8x20 screw plug (Fig. 2) with seal ring from the crankcase. Turn the crankshaft by propeller into top dead centre (TDC) position of cylinder 1 and 2. TDC can be checked with the aid of a lamp through the opening of the removed screw. When the crankshaft is in correct position screw V.WZ3028 (Fig. 3) so that the crankshaft is blocked.
3 Remove pre-rotator clutch according to 63-11-10 4-1, work steps 1 - 9
IMPORTANT NOTE: New clutch liners feature an with improved design additional brake pad. Stock items having old design shall be returned to AutoGyro or discarded.
4 Replace clutch linerIn order to do so, untighten central screw. Should it not be possible untighten central screw bore out bolt head and remove remaining screw thread with pliers. Pull friction plate off the drive shaft axially. Place spare part and fix it with new central screw.
5 Remove clutch dog gear with ‘Installation Aid Dog Gear’
6 Thoroughly clean the crankshaft and the driver stud with Loctite 7063
CAUTION: For the following work step, use Loctite 648 only! The use of other brands or alternative products will prevent correct functioning.
7 Apply Loctite 648 on inner and outer thread in sufficient quantity (Fig.4)
CAUTION: For the following work step, the clutch dog gear must be easily screwable (floating) up to the stop!
8 Screw dog clutch gear onto the thread and remove excess Loctite
9 Tighten dog clutch gear using ‘Installation Aid Dog Gear’ with a torque of 140 Nm (Fig. 5). Clean driver free of Loctite residues.
10 Check with feeler gauge 0.05 mm whether dog clutch gear is contacted with the flywheel. Feeler gauge 0.05 mm must not be able to stick in between dog clutch gear and flywheel (Fig. 6).
11 Remove thread pin M8x50 V.WZ3028. Mount M8x20 screw plug with new copper seal ring and tighten with a torque of 15 Nm. For checking, carefully turn propeller by hand.
12 Re-connect battery according to 24-30-00 4-1, work steps 2 - 1.
13 Re-install pre-rotator clutch according to 63-11-10 4-1, work steps 10 - 19
ILLUSTRATIONS

AircraftMaintenance Manual
AutoGyroMTOsport Model 2017
AMM-M17-E_2018-01 Part E - 63-11-10 8-1 Page 2 of 2
Fig. 1 - Pneumatic Clutch III Fig. 2 - M8x20 screw plug
Fig. 3 - Thread Pin M8x50 Fig. 4 - Loctite 648 on inner and outer thread
Fig. 5 - Torque dog gear with 140 Nm
Fig. 6 - Correct mounting position

AircraftMaintenance Manual
AutoGyroMTOsport Model 2017
AMM-M17-E_2018-01 Part E - 63-11-10 8-2 Page 1 of 2
63-11-10 8-2 REPLACEMENT: PRE-ROTATOR CLUTCH DOG GEAR LNE
GENERAL, REFERENCES AND REQUIREMENTS
Task may only be performed by an organization trained and entitled to carry out 'Heavy Maintenance'!
Secure gyroplane against unauthorized or unintended operation!
Engine cowlings must be removed, see 52-00-00 4-1!
SPECIAL TOOLS AND CONSUMABLE MATERIALS
S.VB3008 Loctite 7063 Super Clean
S.VB6055 Loctite 648
V.WZ3024 Installation Aid Dog Gear
PROCEDURES/DESCRIPTION
1 Disconnect battery according to 24-30-00 4-1, work steps 1 - 2.
2 Remove M8x20 screw plug (Fig. 1) with seal ring from the crankcase. Turn the crankshaft by propeller into top dead centre (TDC) position of cylinder 1 and 2. TDC can be checked with the aid of a lamp through the opening of the removed screw. When the crankshaft is in correct position screw in V.WZ3028 (Fig. 2) so that the crankshaft is blocked (for further information see Rotax Maintenance Manual 12-20-00).
3 Remove pre-rotator clutch according to 63-11-10 4-1, work steps 1 - 9
4 Remove clutch dog gear with ‘Installation Aid Dog Gear’
5 Thoroughly clean the crankshaft and the driver stud with Loctite 7063.
CAUTION: For the following work step, use Loctite 648 only! The use of other brands or alternative products will prevent correct functioning.
6 Apply Loctite 648 on inner and outer thread in sufficient quantity (Fig.4)
CAUTION: For the following work step, the clutch dog gear must be easily screwable (floating) up to the stop!
7 Screw dog clutch gear onto the thread and remove excess Loctite
8 Tighten dog clutch gear using ‘Installation Aid Dog Gear’ with a torque of 140 Nm (Fig. 5). Clean driver free of Loctite residues.
9 Check with feeler gauge 0.05 mm whether dog clutch gear is contacted with the flywheel. Feeler gauge 0.05 mm must not be able to stick in between dog clutch gear and flywheel (Fig. 6).
10 Remove thread pin M8x50 V.WZ3028. Install M8x20 screw plug with new copper seal ring and tighten with a torque of 15 Nm. For checking, carefully turn propeller by hand.
11 Re-connect battery according to 24-30-00 4-1, work steps 2 - 1
12 Re-install pre-rotator clutch according to 63-11-10 4-1, work steps 10 - 19.

AircraftMaintenance Manual
AutoGyroMTOsport Model 2017
AMM-M17-E_2018-01 Part E - 63-11-10 8-2 Page 2 of 2
ILLUSTRATIONS
Fig. 1 - M8x20 screw plug Fig. 2 - Thread Pin M8x50
Fig. 3 - Loctite 648 on inner and outer thread Fig. 4 - Correct mounting position

AircraftMaintenance Manual
AutoGyroMTOsport Model 2017
AMM-M17-E_2018-01 Part E - 63-11-30 6-1 Page 1 of 1
63-11-30 6-1 INSPECTION: PRE-ROTATOR UPPER ENGAGEMENT LNE
GENERAL, REFERENCES AND REQUIREMENTS
Task may only be performed by an organization or individual trained and entitled to carry out 'Line Maintenance'!
Secure gyroplane against unauthorized or unintended operation!
Gyroplane must be placed on level ground and restrained (blocks, chocks)
SPECIAL TOOLS AND CONSUMABLE MATERIALS
AG-GRS-01 Lagermeister WHS 2002 Grease
PROCEDURES/DESCRIPTION
1 Inspect wear pattern and gear mesh of pre-rotator upper engagement. If in doubt, contact AutoGyro customer support.
2 If the wear pattern is uneven (see Fig. 1), e.g. due to dynamic skew, the pre-rotoator upper engagement / Bendix shaft must be repaired acc. to 63-11-30 8-2.IMPORTANT NOTE: adjustment job is classified as heavy maintenance (HVY)!
3 Inspect backlash of pre-rotator upper engagement. Backlash should be as tight as possible, but also wide enough to allow easy engagement of the pinion into the sprocket in any position.
4 If necessary, adjust backlash.
5 Grease with AG-GRS-01.
ILLUSTRATIONS
Fig. 1 - Wear Pattern (uneven)

AircraftMaintenance Manual
AutoGyroMTOsport Model 2017
AMM-M17-E_2018-01 Part E - 63-51-00 8-1 Page 1 of 2
63-51-00 8-1 REPLACEMENT: ROTOR BRAKE PADS LNE
GENERAL, REFERENCES AND REQUIREMENTS
Task may only be performed by an organization or individual trained and entitled to carry out 'Line Maintenance'!
Secure gyroplane against unauthorized or unintended operation!
Gyroplane must be placed on level ground and restrained (blocks, chocks)
Rotor system must be removed, see 62-11-00 4-1!
SPECIAL TOOLS AND CONSUMABLE MATERIALS
AG-BAS-02 Loctite 243 blue
SP IMPORTANT NOTE: Procedure involves spare parts. Check parts list below for ordering details of affected components!
PRECAUTIONS AND SAFETY MEASURES
IMPORTANT NOTE: Procedure involves handling and disposal of special materials. For your health and environmental aspects respect all applicable regulations!
PROCEDURES/DESCRIPTION
1 Unscrew and remove hexagon socket screws (1) with washers (2) of affected brake pad.
2 Replace integrated rotor brake pad assembly (3/4) with new component.
3 Apply Loctite 243 (blue) on screws, re-install hexagon socket screws (1) with washers (2) and torque-tighten.
4 After replacing the front pad, check that the head stops onto the pad before the stick reaches the forward limit stop. Adjust limit stop as required.

AircraftMaintenance Manual
AutoGyroMTOsport Model 2017
AMM-M17-E_2018-01 Part E - 63-51-00 8-1 Page 2 of 2
ILLUSTRATIONS
Fig. 1 - Rotor bridge with brake pads

AircraftMaintenance Manual
AutoGyroMTOsport Model 2017
AMM-M17-E_2018-01 Part E - 67-00-00 0-1 Page 1 of 1
67-00-00 0-1 DESCRIPTION: ROTOR FLIGHT CONTROL OPR
PROCEDURES/DESCRIPTION
Rotor flight control comprises of control stick, a base control unit / tube, flight control base link and control rods (push rods) which are connected to the rotor head bridge.
Pitch and roll of the gyroplane is controlled by tilting the complete rotor head by means of the control stick. Control input is transferred via a base control unit / tube running horizontally along the forward extension of the main frame (below the seats) to the base link and from there to the rotor head via control rods (push rods). The control rods with ball joints at both ends are supported by a bell crank about half way up the mast.
ILLUSTRATIONS
Fig. 1 - Rotor flight control

AircraftMaintenance Manual
AutoGyroMTOsport Model 2017
AMM-M17-E_2018-01 Part E - 67-00-00 6-1 Page 1 of 1
67-00-00 6-1 INSPECTION: ROTOR FLIGHT CONTROL LNE
GENERAL, REFERENCES AND REQUIREMENTS
Task may only be performed by an organization or individual trained and entitled to carry out 'Line Maintenance'!
Secure gyroplane against unauthorized or unintended operation!
Work should be performed with the aid of a second briefed person!
SPECIAL TOOLS AND CONSUMABLE MATERIALS
None
PROCEDURES/DESCRIPTION
1 Pump up the rotor brake to its maximum.
2 Carefully move forward flight control stick forward and aft to determine free play. Touch each joint and assess relative motion of joint elements using tactile sense, if necessary with help of a second person.
3 A 5 mm free play, measured at the top end of the control stick, is considered within limits as long as the free play is only a result of equal play in the ball joints.
CAUTION: Control base link and ball bearing must be free of play!
4 If a ball joint exhibits above average play the respective ball joint must be replaced.
5 If control base link or ball bearings exhibit play, or the total play from the ball joints results in play more than 10 mm, measured at the control stick, affected components must be replaced.
6 Move forward and aft flight control stick relative to each other (push one forward while pulling the other one back, and vice versa). No play must be evident. If play ist evident, investigate and replace component(s).

AircraftMaintenance Manual
AutoGyroMTOsport Model 2017
AMM-M17-E_2018-01 Part E - 67-00-00 6-2 Page 1 of 2
67-00-00 6-2 INSPECTION: FLIGHT CONTROL BASE LINK LNE
GENERAL, REFERENCES AND REQUIREMENTS
Task may only be performed by an organization or individual trained and entitled to carry out 'Line Maintenance'!
Rotor system must be removed, see 62-11-00 4-1!
SPECIAL TOOLS AND CONSUMABLE MATERIALS
None
PRECAUTIONS AND SAFETY MEASURES
WARNING: Job includes work at critical flight controls. Duplicate inspection must be performed after completion!
PROCEDURES/DESCRIPTION
NOTE: The procedure ensures necessary clearance of the flight control base link when flight control stick is in full aft position.
1 Switch pneumatic mode selector to FLIGHT and allow control stick to move to most aft position.
2 Make sure that gimbal head rests in its aft mechanical stops.
3 Disconnect upper ball joint of lower RH flight control rod from bell crank (see picture). Let gimbal head rest in aft mechanical stops while flight control stick is in full aft position, laterally centred.
NOTE: The bar of the flight control base link now contacts the ball joint of base control unit.
4 The resulting offset must be between 6.5 mm (outer diameter of spacer aligns with bore centre of bell crank) and 9.5 mm (spacer barely visible through bore in bell crank). Adjust and secure control rod, if necessary. Torque-tighten with 25Nm.
5 Re-connect ball joint to bell crank and secure.
6 Perform duplicate inspection and functional check.
7 After completion, switch pneumatic mode selector to BRAKE and apply brake pressure.

AircraftMaintenance Manual
AutoGyroMTOsport Model 2017
AMM-M17-E_2018-01 Part E - 67-00-00 6-2 Page 2 of 2
ILLUSTRATIONS
Fig. 1 - Clearance in flight control base link
Fig. 2 - Connection of upper ball joint of lower RH flight control rod with bell crank(step3/5)
Fig. 3 - Offset measurement

AircraftMaintenance Manual
AutoGyroMTOsport Model 2017
AMM-M17-E_2018-01 Part E - 67-05-00 8-1 Page 1 of 2
67-05-00 8-1 REPLACEMENT: PITCH TRIM/BRAKE PNEUMATIC SEAL LNE
GENERAL, REFERENCES AND REQUIREMENTS
Task may only be performed by an organization or individual trained and entitled to carry out 'Line Maintenance'!
Secure gyroplane against unauthorized or unintended operation!
SPECIAL TOOLS AND CONSUMABLE MATERIALS
AG-BAS-02 Loctite 243 blue
SP IMPORTANT NOTE: Procedure involves spare parts. Check parts list below for ordering details of affected components!
PROCEDURES/DESCRIPTION
NOTE: Following photos show the operation on the sport 2010. The process is the same.
1 Disconnect upper cardan joint.
2 Install rotor lash bag to support rotor system.
3 Switch pneumatic mode selector to FLIGHT and release trim pressure completely. If necessary, switch repeatedly!
4 Disconnect rod end from ball joint (Fig. 1).
5 Retract cylinder (pneumatic mode selector to FLIGHT and trim aft).
6 Remove circlip / snap ring with appropriate tool (Fig. 2).
7 Tilt pneumatic cylinder to the side and move out piston completely. In order to do so, switch pneumatic mode selector to BRAKE and apply brake pressure.
NOTE: The servo-valve requires a certain system pressure to switch-over to BRAKE mode. If brake pressure is not built-up during compressor activation, switch to FLIGHT, run the compressor (trim AFT) for some seconds and switch-over to BRAKE mode with the compressor engaged.
8 Remove old seal ring and discard. Install new seal ring using the special grease provided in the package (Fig. 3).
9 Re-install piston and re-assemble pneumatic cylinder. Re-install circlip / snap ring.
10 Apply AG-BAS-02 on threads, install ball head and tighten.
11 Re-connect upper cardan joint. Use AG-BAS-02 on threads to secure nut (Fig. 4).

AircraftMaintenance Manual
AutoGyroMTOsport Model 2017
AMM-M17-E_2018-01 Part E - 67-05-00 8-1 Page 2 of 2
ILLUSTRATIONS
Fig. 1 - Disconnect rod end from ball joint (step 4) Fig. 2 - Remove circlip / snap rind (step 6)
Fig. 3 - New seal rind installed with special grease (step 8) Fig. 4 - Re-connect ball joint and upper cardan hinge

AircraftMaintenance Manual
AutoGyroMTOsport Model 2017
AMM-M17-E_2018-01 Part E - 71-20-00 8-1 Page 1 of 1
71-20-00 8-1 REPLACEMENT: ENGINE MOUNTING BUSHINGS LNE
GENERAL, REFERENCES AND REQUIREMENTS
Task may only be performed by an organization or individual trained and entitled to carry out 'Line Maintenance'!
Secure gyroplane against unauthorized or unintended operation!
Battery must be removed, see 24-30-00 4-1
Fuselage fairing must be removed, see 52-00-00 4-1!
SPECIAL TOOLS AND CONSUMABLE MATERIALS
None
PROCEDURES/DESCRIPTION
1 Loop a lifting belt around the intake manifold of the engine and unload weight of the engine with a crane or appropriate lifting device.
2 Start with lower mounting bushings and replace engine mounting bushings one-by-one.
3 Check correct seating of mounting bushing prior to torquing.

AircraftMaintenance Manual
AutoGyroMTOsport Model 2017
AMM-M17-E_2018-01 Part E - 76-10-00 8-1 Page 1 of 1
76-10-00 8-1 REPLACEMENT: THROTTLE CONTROL WITH BRAKE LNE
GENERAL, REFERENCES AND REQUIREMENTS
Task may only be performed by an organization or individual trained and entitled to carry out 'Line Maintenance'!
Secure gyroplane against unauthorized or unintended operation!
SPECIAL TOOLS AND CONSUMABLE MATERIALS
None
PROCEDURES/DESCRIPTION
ILLUSTRATIONS
Fig. 1 - Throttle control and brake lever

AircraftMaintenance Manual
AutoGyroMTOsport Model 2017
AMM-M17-E_2018-01 Part E - 78-20-00 3-1 Page 1 of 2
78-20-00 3-1 SERVICING: LUBRICATION OF EXHAUST SYSTEM JOINTS OPR
GENERAL, REFERENCES AND REQUIREMENTS
Basic operational task, which can be performed by a licensed pilot or instructed personnel!
SPECIAL TOOLS AND CONSUMABLE MATERIALS
AG-LUB-02 Anti-Seize 31590
PROCEDURES/DESCRIPTION
1 Apply Aluminium Anti-Seize 31590 to all exhaust system joints. See Fig. 1/2 for reference. Use a small brush, if appropriate.

AircraftMaintenance Manual
AutoGyroMTOsport Model 2017
AMM-M17-E_2018-01 Part E - 78-20-00 3-1 Page 2 of 2
ILLUSTRATIONS
Fig. 1 - Effectivity ROTAX 912 Fig. 2 - Effectivity ROTAX 914

AircraftMaintenance Manual
AutoGyroMTOsport Model 2017
AMM-M17-E_2018-01 Part E - 78-20-00 8-1 Page 1 of 6
78-20-00 8-1 REPLACEMENT: WOOL OF MUFFLER TUBE LNE
GENERAL, REFERENCES AND REQUIREMENTS
Task may only be performed by an organization or individual trained and entitled to carry out 'Line Maintenance'!
Secure gyroplane against unauthorized or unintended operation!
Execute procedure only in cold engine condition!
SPECIAL TOOLS AND CONSUMABLE MATERIALS
LR IMPORTANT NOTE: Procedure involves parts with limited reusability. Check parts list below before starting job!
SP IMPORTANT NOTE: Procedure involves spare parts. Check parts list below for ordering details of affected components!
PRECAUTIONS AND SAFETY MEASURES
WARNING: Risk of severe burns and scalds! Hot engine parts! Always allow engine to cool down to ambient temperature before start any work!
WARNING: Wear eye protection and mind FOD when removing attachment hardware!
CAUTION: When removing or disassembling make sure to mark all parts so that each and every part of the component is re-assembled and installed in exactly the same location and orientation!
PROCEDURES/DESCRIPTION
1 Remove and dispose the locking wire of the hose clamps.
2 Loosen the hinge pin clamp (Fig.1).
3 Before replacing the muffler tube, mark the position so that the muffler tube can be exactly installed in the same location and orientation.
4 Remove the hose clamps and keep them for the installation procedure (Fig.2). Inspect the hose clamps for possible damage.
5 Remove and clamp muffler tube in bench vise carefully.
6 Use appropriate tools to drive out the riveting mandrels.
7 Drill out the rivet pin (Fig.3). Then, use appropriate tool to tap out the pin of the rivet.
8 Remove outer shell.
9 Remove the rivet mandrel and rivet heads from the wool if it is left in place. Make sure any metal swarf is removed.
10 Check the wool. If it is visibly burnt, remove it completely.
11 Install the whole new wool with tension tightly around the pipe (Fig.4).
Installation
Important: Rivet the outer shell to the hot end of the muffler tube (Fig.1)!
Effectivity: When the outer shell is riveted to the cold end (Fig.5)!
12 When the outer shell is riveted to the cold end, reposition the outer shell so that the outer shell can be riveted to the hot end (Fig.1).
13 Install the outer shell and mark the position of the four rivet holes.
14 Remove the outer shell and drill four holes. Make sure any metal swarf is removed.
Effectivity: End
15 Install the outer shell. Make sure that the rivets holes of muffler tube and the steel tube are perfectly lined up

AircraftMaintenance Manual
AutoGyroMTOsport Model 2017
AMM-M17-E_2018-01 Part E - 78-20-00 8-1 Page 2 of 6
(Fig.6).
16 Insert the four rivets into the hole and install them with a rivet gun (Fig.6).
17 Set and tighten the muffler tube into the correct position with hose clamps and hinge pin clamp (Fig.7).
18 Secure the screws of hose clamps with locking wire (Fig.8).

AircraftMaintenance Manual
AutoGyroMTOsport Model 2017
AMM-M17-E_2018-01 Part E - 78-20-00 8-1 Page 3 of 6
ILLUSTRATIONS
Fig. 1 - Rivets at the hot end and hinge pin clamp
Fig. 2 - Hose clamps
Fig. 3 - Drill out the rivet pin

AircraftMaintenance Manual
AutoGyroMTOsport Model 2017
AMM-M17-E_2018-01 Part E - 78-20-00 8-1 Page 4 of 6
Fig. 4 - Installation of wool
Fig. 5 - Rivets at the cold end of muffler tube
Fig. 6 - Riveting of the outer shell

AircraftMaintenance Manual
AutoGyroMTOsport Model 2017
AMM-M17-E_2018-01 Part E - 78-20-00 8-1 Page 5 of 6
Fig. 7 - Installation of hose clamps and hinge pin clamp
Fig. 8 - Installation of locking wire

AircraftMaintenance Manual
AutoGyroMTOsport Model 2017
AMM-M17-E_2018-01 Part E - 78-20-00 8-1 Page 6 of 6

Tragschrauber Flug- und Betriebshandbuch
AutoGyro GmbH Dornierstrasse 14 31137 HildesheimGermany
Phone +49 (0) 5121 / 880 56– [email protected]