manuale operativo operating manual - galileo pianosgalileopianos.com/owners...
TRANSCRIPT

0DHVWUR�²�*UDQGH���6LQIRQLD�
Manuale operativo Operating manual

WARNING: READ THIS FIRST! ∗∗∗ AVIS IMPORTANT!WARNING
AVIS
RISK OF ELECTRIC SHOCKDO NOT OPEN
RISQUE DE CHOC ÉLECTRIQUENE PAS OUVRIR
This symbol is intended to alert the user to thepresence of uninsulated “dangerous voltage”within the product’s enclosure that may be ofsufficient magnitude to constitute a risk of electricshock to persons.
This symbol is intended to alert the user to thepresence of important operating and maintenance(servicing) instructions in the literatureaccompanying the appliance.
CAUTIONTO REDUCE THE DANGER OF ELECTRIC SHOCK
DO NOT REMOVE COVER (OR BACK)NO USER-SERVICEABLE PARTS INSIDE
REFER SERVICING TO QUALIFIED SERVICE PERSONNEL
ATTENTIONAFIN D’EVITER LES RISQUES DE CHOC ÉLECTRIQUE:
NE PAS OUVRIR LE COUVERCLE (OU PANNEAU ARRIERE)L’UTILISATEUR NE PEUT EFFECTUER AUCUNE REPARATION
PUOR TOUTE REPARATION EVENTUELLE, FAIRE APPEL AUN PERSONNEL QUALIFIE
Ce simbole sert pour avertir l’utilisateurqu’à l’interieur de ce produit sontprésents éléments non isolés soumis à“tensions dangereuses” suffisants à créerun risque d’électrocution.Ce simbole sert pour avertir l’utilisateurqu’à l’interieur de la documentation del’appareil sont présentes importantesinstructions pour l’utilisation correcte et lamanutention de l’appareil.
“INSTRUCTIONS PERTAINING TO A RISK OF FIRE,ELECTRIC SHOCK, OR INJURY TO PERSONS”
IMPORTANT SAFETY INSTRUCTIONSWARNING:1) Read these instructions.2) Keep these instructions.3) Heed all warnings.4) Follow all instructions.5) Do not use this apparatus near water.6) Clean only with dry cloth.7) Do not block any ventilation openings. Install in accordance with the manufacturer’s instructions.8) Do not install near any heat sources such as radiators, heat registers, stoves,
or other apparatus (including amplifiers) that produce heat.9) Do not defeat the safety purpose of the polarized or grounding-type plug. A polarized plug has two blades with one
wider than the other. A grounding type plug has two blades and a third grounding prong. The wider blade or the thirdprong are provided for your safety. If the provided plug does not fit in to your outlet, consult an electrician for replacementof the obsolete outlet.
10) Protect the power cord from being walked on on pinhead, particularly at plugs, convenience receptacles,and the point where they exit form the apparatus.
11) Only use attachments/accessories specified by the manufacturer.12) Use only with the cart, stand, tripod, bracket, or table specified by
the manufacturer, or sold, with the apparatus.When a cart is used, use caution when moving the cart/apparatuscombination to avoid injury from tip-over.
13) Unplug this apparatus during lightning storms or when unused for long periods of time.14) Refer all servicing to qualified service personnel. Servicing is required when the apparatus has been damaged
in any way, such ad power-supply cord or plug is damaged, liquid has been spilled or objects have fallen intothe apparatus, the apparatus has been exposed to rain or moisture, does not operate normally, or has been dropped.
SAVE THESE INSTRUCTIONS INSTRUCTIONS A CONSERVER∗∗∗

Viscount Maestro – Grande – Sinfonia
35
TABLE OF CONTENTS
TABLE OF CONTENTS............................................................................................................................35
TECHNICAL DRAWINGS .......................................................................................................................36
ASSEMBLY SCHEME OF MAESTRO..................................................................................................36 ASSEMBLY SCHEME OF GRANDE ......................................................................................................3
1.GETTING TO KNOW VISCOUNT MAESTRO, GRANDE AND SINFONIA ................................38
1.1. MAIN FEATURES ...........................................................................................................................38 1.2. LET'S TAKE A LOOK AT THE INSTRUMENT............................................................................40 1.3. CONNECTIONS...............................................................................................................................41 1.4. THE USER INTERFACE: HOW TO INTERACT WITH THE INSTRUMENT ............................42 1.5. HOW TO MODIFY THE INSTRUMENT PARAMETERS ............................................................43
2. THE TIMBRE SECTION ......................................................................................................................44
2.1. DESCRIPTION .................................................................................................................................44 2.2. HOW TO SELECT AND SET THE TIMBRES ...............................................................................44 2.3. A LIST AND A DESCRIPTION OF VISCOUNT IS2 TIMBRES....................................................45
3. THE KEYBOARD MODES...................................................................................................................47
3.1. DESCRIPTION .................................................................................................................................47 3.2. PROGRAMMING THE KEYBOARD MODES ..............................................................................47 3.3. HOW TO RECOGNIZE THE PROGRAMMED MODE.................................................................48
4. THE AUTOMATIC ACCOMPANIMENT SECTION .......................................................................49
4.1. DESCRIPTION .................................................................................................................................49 4.2. THE ACCOMPANIMENT STYLES................................................................................................49 4.3. THE METRONOME.........................................................................................................................50 4.4. THE CHORDS RECOGNITION......................................................................................................50 4.5. LIST OF THE AUTOMATIC ACCOMPANIMENT STYLES .......................................................51
5. THE VOLUMES SECTION ..................................................................................................................53
5.1. DESCRIPTION .................................................................................................................................53 5.2. HOW DOES THE VOLUMES SECTION WORK ..........................................................................53
6. THE EFFECTS SECTION.....................................................................................................................55
6.1. DESCRIPTION .................................................................................................................................55 6.2. USER EFFECTS FOR 1ST AND 2ND PARTS ...............................................................................56 6.3. USER AMBIENCE CHOICES FOR THE REVERBERATION GLOBAL EFFECT .....................57
7. THE RECORDER...................................................................................................................................58
7.1. DESCRIPTION .................................................................................................................................58 7.2. HOW TO USE THE RECORDER....................................................................................................58 7.3. THE "METRONOME" OPTION......................................................................................................59 7.4. THE "MIXER" OPTION...................................................................................................................59 7.4. THE "CONTINUOUS CONTROLLER" OPTION ..........................................................................59 7.5. HOW TO USE THE FLOPPY DISK................................................................................................60
8. HOW TO STORE THE INSTRUMENT SETTINGS .........................................................................62
8.1. INTRODUCTION.............................................................................................................................62 8.2. WHAT'S INSIDE A PERFORMANCE ............................................................................................62 8.3. THE PERFORMANCE SETTINGS .................................................................................................63 8.4. GLOBAL SETTINGS .......................................................................................................................65 8.5. MIDI SETTINGS ..............................................................................................................................66 8.5. FACTORY SETTINGS RECALL ....................................................................................................67

Viscount Maestro – Grande - Sinfonia
36
TECHNICAL DRAWINGS
ASSEMBLY SCHEME OF MAESTRO

Viscount Maestro – Grande – Sinfonia
37
ASSEMBLY SCHEME OF GRANDE

Viscount Maestro – Grande - Sinfonia
38
1.GETTING TO KNOW VISCOUNT MAESTRO, GRANDE AND SINFONIA
1.1. MAIN FEATURES VISCOUNT MAESTRO, GRANDE and SINFONIA are powerful and versatile
instruments, which has the best qualitative features you can find in their range of products. Among them, it's worth underlining the following:
9�WEIGHTED KEYBOARD. With a 88-keys extension and state-of-the-art mechanics,
it reproduces accurately the touch of a real piano keyboard; you can also adjust the keyboard dynamic response choosing among 8 different settings.
9�VISCOUNT IS2 (Interpolative Spectral Segmentation) SYNTHESIS. This
synthesis technology, offered only by VISCOUNT trademark, is among the world's most appreciated thanks to the incredibly faithful reproduction of timbres, especially those of the acoustic and electric piano; you can choose among 25 VISCOUNT IS2 timbres.
9�YAMAHA XG ® SYNTHESIS. It adds to the instrument the wide range of XG sounds
(480 timbres and 11 drum sets), making possible the sound reproduction of virtually every musical instrument in the world.
9�AUTOMATIC ACCOMPANIMENT. If you just press a button, VISCOUNT
MAESTRO, GRANDE e SINFONIA can turn into a real orchestra; you can choose among 48 accompaniment styles, each one complete of variations, and divided into 12 families covering a complete spectrum of musical genres, both classical and modern. A complex chord recognition technique allows the style to follow the harmonic evolution of the song played on the keyboard.
9�DIGITAL EFFECTS (DSP). They enrich the sound with faithful ambience
simulations, and with effects commonly used by musicians, as chorus, tremolo, etc.; you can set out an effect for each part (1ST and 2ND), and an overall effect for the instrument, with the faculty of intervention on the main parameters, as well as on the level.
9�RECORDER. The floppy disk driver allows to have access to the huge archive of
pre-recorded MIDI bases; in this way you can play the latest hit, while the instrument produces a complete accompaniment, reading it on the floppy. Furthermore, you can record the performances played on the keyboard, if you want to create your own MIDI tracks.
9�KARAOKE. The text information enclosed in a MIDI track, when this is read from the
floppy, is displayed on the screen in a clear and legible way, pointing out the current syllable; thus the instrument allows you to enrich your performance by singing, just following the MIDI track development.

Viscount Maestro – Grande – Sinfonia
39
9�GRAPHIC USER INTERFACE. The dot matrix (240*64) graphic LCD screen,
together with a rotative encoder to insert data, and cursor and function buttons, make the instrument very simple to use; the complex front panel, divided into sections, allows to reach the most sophisticated programming functions by just pressing a key.
9�CARE IN THE DESIGN. The elegant and refined wood chassis makes VISCOUNT
MAESTRO, GRANDE and SINFONIA enjoyable from an aesthetic point of view: this aspect, too, contributes to the realistic emulation of the acoustic piano.

Viscount Maestro – Grande - Sinfonia
40
1.2. LET'S TAKE A LOOK AT THE INSTRUMENT Here below you can find the front panel of the instrument, split in two parts for
sake of clarity. On the panel you can recognize different zones associated to the instrument functions; the explanations refer to the chapters of the guide, illustrating all the functions associated to each zone.
1. Volumes Section (Chapter 5) 2. PROG. SPLIT button: keyboard mode selection (Chapter 3) 3. Automatic accompaniment (Chapter 4) 4. Function buttons (Paragraph 1.4) 5. Graphic LCD screen (Paragraph 1.4) 6. Cursor buttons (Paragraph 1.4) 7. ENTER/EXIT buttons (Paragraph 1.4)
8. Rotational encoder (Paragraph 1.4) 9. Beat LEDs (Paragraph 7.3) 10. Timbre selection (Chapter 4) 11. Performance buttons (Chapter 8) 12. Effects Section (Chapter 5) 13. Global and performance settings (Chapter 8) 14. Floppy commands (Paragraph 7.4) 15. Recorder (Chapter 7)

Viscount Maestro – Grande – Sinfonia
41
1.3. CONNECTIONS The figure below shows the connection box placed under the keyboard, in front
of the player, on the left side. The following list explains the functions of each connector.
1. MIDI THRU connector: 5-pin DIN socket that repeats the MIDI messages
sent to the instrument. 2. MIDI OUT connector: 5-pin DIN socket for transmitting MIDI messages. Plug
here the output MIDI cable, when needed. 3. MIDI IN connector: 5-pin DIN socket for receiving MIDI messages coming
from an external source. Plug here the input MIDI cable, when needed. 4. INPUT connectors L(MONO)/R: TS Jack sockets for connecting audio
sources to the internal amplification. Use the L(MONO) connector for a monophonic source.
5. OUTPUT connectors L(MONO)/R: TS Jack sockets carrying the instrument audio output, with the standard LINE OUT level. Use the L(MONO) connector to get a monophonic output.
The figure below is a detail of the instrument bottom, showing the right front
corner, with respect to the player. Here you can find the two headphone connectors (PHONES). When plugging a headphone, the internal amplification is automatically disabled.
Viscount Maestro – Grande - Sinfonia
42
1.4. THE USER INTERFACE: HOW TO INTERACT WITH THE INSTRUMENT VISCOUNT MAESTRO, GRANDE and SINFONIA have a great number of user-
defined features, concerning all aspects of their functionment. Therefore, the interaction between the user and the instrument has been made as simple as possible, dividing to the front panel into sections separated in their functions. Moreover, there is a graphic screen where you can check out and change the parameters.
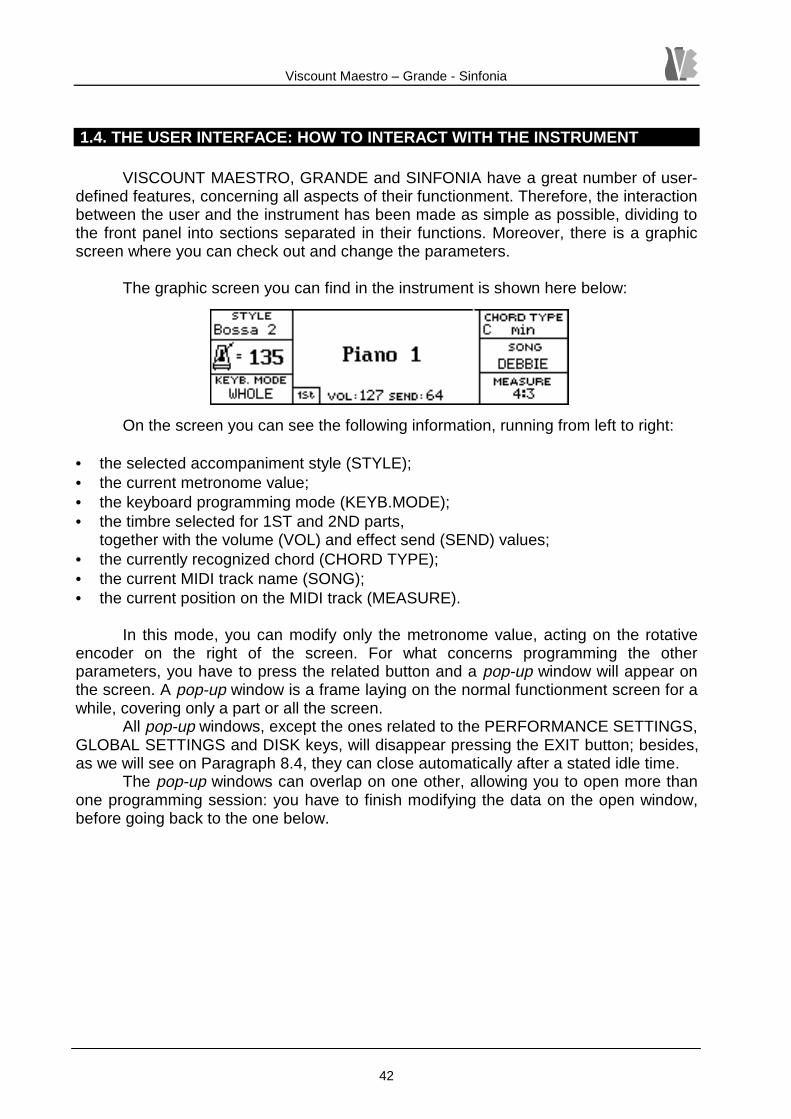
The graphic screen you can find in the instrument is shown here below:
On the screen you can see the following information, running from left to right:
• the selected accompaniment style (STYLE); • the current metronome value; • the keyboard programming mode (KEYB.MODE); • the timbre selected for 1ST and 2ND parts,
together with the volume (VOL) and effect send (SEND) values; • the currently recognized chord (CHORD TYPE); • the current MIDI track name (SONG); • the current position on the MIDI track (MEASURE).
In this mode, you can modify only the metronome value, acting on the rotative
encoder on the right of the screen. For what concerns programming the other parameters, you have to press the related button and a pop-up window will appear on the screen. A pop-up window is a frame laying on the normal functionment screen for a while, covering only a part or all the screen.
All pop-up windows, except the ones related to the PERFORMANCE SETTINGS, GLOBAL SETTINGS and DISK keys, will disappear pressing the EXIT button; besides, as we will see on Paragraph 8.4, they can close automatically after a stated idle time.
The pop-up windows can overlap on one other, allowing you to open more than one programming session: you have to finish modifying the data on the open window, before going back to the one below.
Viscount Maestro – Grande – Sinfonia
43
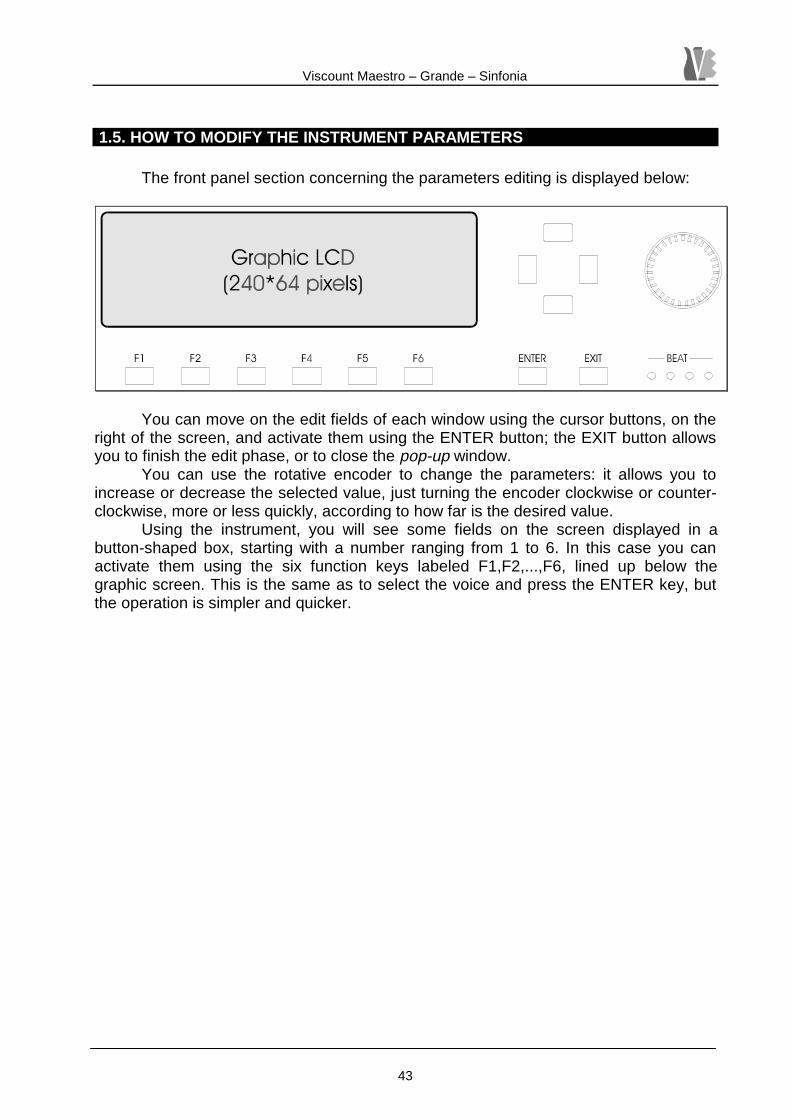
1.5. HOW TO MODIFY THE INSTRUMENT PARAMETERS The front panel section concerning the parameters editing is displayed below:
You can move on the edit fields of each window using the cursor buttons, on the
right of the screen, and activate them using the ENTER button; the EXIT button allows you to finish the edit phase, or to close the pop-up window.
You can use the rotative encoder to change the parameters: it allows you to increase or decrease the selected value, just turning the encoder clockwise or counter-clockwise, more or less quickly, according to how far is the desired value.
Using the instrument, you will see some fields on the screen displayed in a button-shaped box, starting with a number ranging from 1 to 6. In this case you can activate them using the six function keys labeled F1,F2,...,F6, lined up below the graphic screen. This is the same as to select the voice and press the ENTER key, but the operation is simpler and quicker.

Viscount Maestro – Grande - Sinfonia
44
2. THE TIMBRE SECTION
2.1. DESCRIPTION The instrument allows you to play up to three different parts, named 1ST, 2ND
and MANUAL BASS; they can be associated to the keyboard extension in several ways, as shown in Chapter 3. Each part has a related timbre, that means the sound of a given instrument.
If we consider timbres, the instrument is two machines in one. First of all, you can choose among a set of 25 VISCOUNT timbres, 22 for 1ST and 2ND parts, and 3 for MANUAL BASS. VISCOUNT timbres have been created with the IS2 proprietary technology, well known and appreciated all over the world market of musical instruments; to VISCOUNT timbres we add the very wide timbre set (nearly 500) provided by YAMAHA XG© synthesis board, which is hosted inside the instrument and represents a qualitative standard in the field of WaveTable synthesis.
2.2. HOW TO SELECT AND SET THE TIMBRES The timbre selection for 1ST and 2ND parts is performed using the buttons on
the front panel zone called TONE PRESETS, displayed in the figure below.
As already said, the 1ST and 2ND parts are able to play one of the 22 timbres,
each one associated to a button, or a YAMAHA XG timbre, which you can activate with XG1 or XG2 buttons. The button LED will light up showing which is the selected timbre. The 2ND button allows to toggle between the 1ST and 2ND part selection; in the second case, the button LED will be on.
You have to press and hold one of the two related keys (XG1 or XG2) to select an XG timbre, among the 480 available in the instrument; as a consequence, you can see a pop-up window selection screen, with the available timbres divided into families, according to the classification found in Appendix A of this book. When you have selected the family on the left list, you can activate the desired timbre by looking over the list on the right.
The XG timbres selection has been doubled in order to have always two different timbres on line, thus having the possibility of passing from one to another just pressing the related button, XG1 or XG2.
When a timbre is selected for one of the parts, you can disable the part pressing the associated key again: if the keyboard is in the split mode and no timbre is selected, the keyboard zone associated to that part won't make any sound; in the same way, if

Viscount Maestro – Grande – Sinfonia
45
the keyboard is in the layer mode, one of the two voices overlaid on each key will disappear. Please refer to Chapter 3 for explanations on the keyboard modes.
Pressing and holding the buttons associated to the VISCOUNT timbres, you will
have access to a pop-up window, allowing to set the output level (Level) and the effect send level (Send). The values of these two parameters, ranging from 0 to 127, are stored separately from timbre to timbre, allowing you to set up a level equalization of your own; the level that you set here, obviously, is completely independent from the volume section settings (see Chapter 5). Moreover, these values are stored in the performances (see chapter 8), and so it is possible to recall in a very fast way different volume settings for the same timbre. For XG timbres, the level and effects send settings are found in the timbre pop-up selection window.
For the MANUAL BASS part you can choose among 3 VISCOUNT timbres and
an XG timbre. You can follow the same procedure shown for the 1ST and 2ND parts to select these timbres. The selection buttons are grouped under the name MANUAL BASS, immediately on the left of the TONE PRESETS section. In this situation, too, you can set the output and effects send level of each timbre, in the same way as the 1ST and 2ND parts case.
2.3. A LIST AND A DESCRIPTION OF VISCOUNT IS 2 TIMBRES
• Piano1. Classic piano timbre, coming from the sampling of a concert grand piano. • Piano2. Classic piano timbre, rich in medium tones, which make it softer. • Piano3. A piano timbre with enhanced high frequencies, suitable to play Rock and
Pop songs. • El.Piano 1. Typical electro-acoustic piano timbre. • El.Piano 2. Typical synthesized electric piano timbre. • El.Piano 3. Variation of El.Piano 2 timbre. • El.Piano 4. Electric piano timbre. • Harpsichord. A classic harpsichord timbre. • Vibes. A warm vibraphone sound, suitable for jazz music. • Marimba. A timbre simulating the typical exotic percussive instrument. • Nylon Guitar. A Nylon strings classic guitar timbre. • Jazz Guitar. Electric guitar sound, jazz style. • Strings 1 . A pad of bowed instruments, with a natural attack.

Viscount Maestro – Grande - Sinfonia
46
• Strings 2. Same as before, but with a faster attack. • Choir. Human choir simulation. • Brass. A typical brass timbre. • Synth Horn. Typical synthesized sound of brass instruments. • Jazz Organ 1. Drawbar organ, with standard settings. • Jazz Organ 2. Variation of Jazz Organ 1 timbre. • Jazz Organ 3. Variation of Jazz Organ 1 timbre. • Pipe Organ. Church organ, set to the TUTTI register. • Synth Pad. A pad of synthesized bowed instruments.
Viscount Maestro – Grande – Sinfonia
47
3. THE KEYBOARD MODES
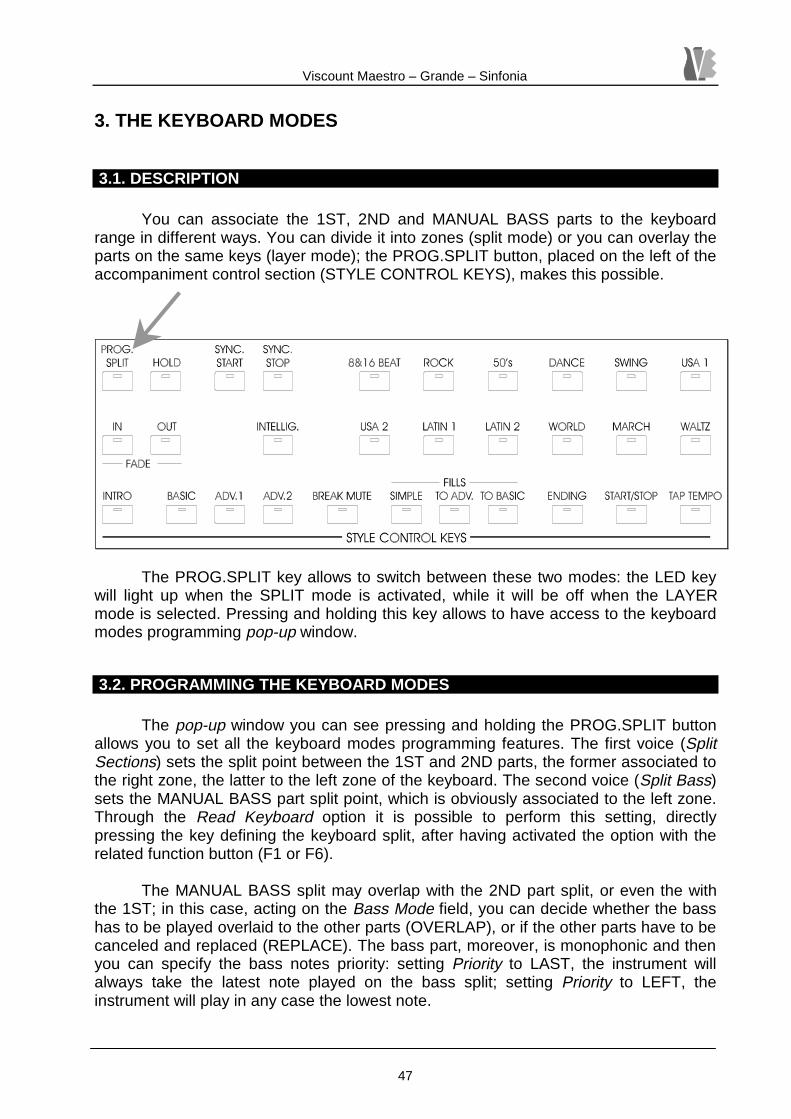
3.1. DESCRIPTION You can associate the 1ST, 2ND and MANUAL BASS parts to the keyboard
range in different ways. You can divide it into zones (split mode) or you can overlay the parts on the same keys (layer mode); the PROG.SPLIT button, placed on the left of the accompaniment control section (STYLE CONTROL KEYS), makes this possible.
The PROG.SPLIT key allows to switch between these two modes: the LED key
will light up when the SPLIT mode is activated, while it will be off when the LAYER mode is selected. Pressing and holding this key allows to have access to the keyboard modes programming pop-up window.
3.2. PROGRAMMING THE KEYBOARD MODES The pop-up window you can see pressing and holding the PROG.SPLIT button
allows you to set all the keyboard modes programming features. The first voice (Split Sections) sets the split point between the 1ST and 2ND parts, the former associated to the right zone, the latter to the left zone of the keyboard. The second voice (Split Bass) sets the MANUAL BASS part split point, which is obviously associated to the left zone. Through the Read Keyboard option it is possible to perform this setting, directly pressing the key defining the keyboard split, after having activated the option with the related function button (F1 or F6).
The MANUAL BASS split may overlap with the 2ND part split, or even the with
the 1ST; in this case, acting on the Bass Mode field, you can decide whether the bass has to be played overlaid to the other parts (OVERLAP), or if the other parts have to be canceled and replaced (REPLACE). The bass part, moreover, is monophonic and then you can specify the bass notes priority: setting Priority to LAST, the instrument will always take the latest note played on the bass split; setting Priority to LEFT, the instrument will play in any case the lowest note.

Viscount Maestro – Grande - Sinfonia
48
For instance, if you set Bass Mode to OVERLAP and Priority to LEFT, making some chords with your left hand, these will be played by the 1ST and/or 2ND parts, whereas the MANUAL BASS will play the lowest note of the chord.
The 1st and 2nd Play Mode field, finally, allows to set the two parts in layer mode
only on a zone of the keyboard: when the Split Mode is selected (PROG.SPLIT button lighted up), setting 1st and 2nd Play Mode to LAYER, the 1ST and 2ND parts will play overlaid in the highest part of the keyboard, down to the point defined by the Split Sections voice; on the contrary, if you set the 1st and 2nd Play Mode to Split, the 1ST and 2ND part will be normally associated to the two splits. This setting, obviously, has no effect if the keyboard is in LAYER Mode: in this case, the two parts will play overlaid even below the split point.
As the keyboard mode is stored in the performances, it is possible to recall a
setting, even a complex one, by just pressing a button. For further information on that, please refer to Chapter 8.
3.3. HOW TO RECOGNIZE THE PROGRAMMED MODE The current keyboard programming mode is displayed in the box KEYB.MODE,
on the lower left side of the graphic screen. In the table below you can see the different writings associated to the programming modes.
WRITING
(KEYB.MODE) RELATED KEYBOARD MODE
WHOLE layer mode (PROG.SPLIT button LED off)
SPLIT ### split mode: 1ST/2ND split set to ###; 1ST and 2ND Play Mode set to SPLIT MODE
LAYER ### split mode: 1ST/2ND split set to ###; 1ST and 2ND Play Mode set to LAYER MODE

Viscount Maestro – Grande – Sinfonia
49
4. THE AUTOMATIC ACCOMPANIMENT SECTION
4.1. DESCRIPTION VISCOUNT MAESTRO, GRANDE and SINFONIA are able to generate in real
time, while you are playing, a complete and enjoyable accompaniment, featuring high quality arrangements, made of five sections: drums / percussions, bass and up to three instruments, changing after the accompaniment style you have chosen. The accompaniment is able to follow the harmonic progression you are playing, through a complex technique of chords recognition. This may work even on all the keyboard, or, if the keyboard is in the split mode, it can be forced to recognize only the notes below the split point.
The level of the five accompaniment parts can be regulated separately (see
Chapter 5), or you can even cut them off one by one, pressing the button underneath the related volume slider.
You can set and control the accompaniment using the buttons group called
STYLE CONTROL KEYS, displayed below.
4.2. THE ACCOMPANIMENT STYLES The instrument has 48 different accompaniment styles, divided into 12 families;
you can find a table at the end of this chapter, with the complete list of the styles. You can select the style pressing the button of the desired family, and then using the cursor buttons to highlight the style: pressing the ENTER key you will finish the procedure. Otherwise, you can use the F1 to F4 function buttons.
Each style has three playing variations: BASIC, ADVANCED 1 and ADVANCED
2, and you can switch from one to another with a fill measure, using the TO BASIC and TO ADVANCED fills; the SIMPLE fill performs a fill measure, and then goes back to the current selected variation. The BREAK MUTE button mutes the accompaniment up to the end of the current musical measure.

Viscount Maestro – Grande - Sinfonia
50
The START / STOP button runs and stops the accompaniment; alternatively, the SYNC START and SYNC STOP buttons allow to run or stop the accompaniment, respectively when you press and release the notes played on the keyboard; this can be useful, for instance, to start the accompaniment simultaneously with the first chord of a song.
The song beginning and ending can be enriched by some introduction and conclusion measures, activating the INTRO and ENDING options respectively, by pressing the related button; if you prefer, you can choose the IN and OUT fading modes to begin and end up the accompaniment with a volume progression.
4.3. THE METRONOME The central frame on the left part of the screen, reproducing a traditional
mechanical metronome, displays the current metronome value, ranging from 30 to 240 beats per minute; this value affects the execution of the automatic accompaniment, as well as the play back of the MIDI tracks read from the floppy disk.
The metronome setting, in terms of beats per minute (BPM), can be done by using the rotative encoder to change the value shown on the screen, or by pressing four consecutive times, with the desired speed, the TAP TEMPO button; the button LED will light up showing you the acquisition phase, then it will turn off when the instrument has computed and displayed the new value for the metronome.
Each accompaniment style has a related metronome speed, which is set automatically when selecting the style; however, if the automatic accompaniment is enabled and you are switching from one style to another, the current metronome speed is maintained. Finally, when playing a song with the recorder (see Chapter 7), the metronome will follow the settings read from the MIDI track.
4.4. THE CHORDS RECOGNITION The chords recognition may work on all the keyboard, or only on the 2ND split,
depending on the current PROG.SPLIT status; the recognition technique used is a complete one, as it is able to recognize every chord of three or four notes, in any turn-up. The recognized chord is shown on the upper right corner of the screen (CHORD TYPE), using the standard abbreviations of the musical notation. The automatic accompaniment is able to follow the recognized harmony, even after having released the chord: the HOLD button activates this function (button LED on).
Instead of using the automatic recognition, you may set the harmony by an
alternative technique commonly used by musicians, especially in the USA. This is possible using the ONE FINGER key, through which the chords recognition works in the following way: the lowest note in the recognition zone is chosen as the fundamental tone, and the chord type depends on the number of pressed keys, as shown below.

Viscount Maestro – Grande – Sinfonia
51
AUTOMATIC ACCOMPANIMENT – ONE FINGER MODE
NUMER OF PRESSED KEYS CHORD 1 Major (Maj) 2 Minor (Min ) 3 Seventh (7) 4 Diminished (dim )
5 or more 4th Sustain (sus4 )
4.5. LIST OF THE AUTOMATIC ACCOMPANIMENT STYLES In the current and next page you will find the complete list of the automatic
accompaniment styles, divided into families.
FAMILY No. STYLE FULL NAME 1 16 Beat 2 8 Beat1 3 8 Beat2
8&16 BEAT
4 Pop Bld Pop Ballad 1 SoftRock 2 ShflRock Shuffle Rock 3 HardRock
ROCK
4 Funk 1 Rock'n R Rock and Roll 2 Shuffle 3 Twist
50's
4 SlowRock 1 Dance 2 Disco 70 3 Techno
DANCE
4 Rap 1 Swing 1 2 Swing 2 3 Big Band
SWING
4 SwngRock Swing Rock 1 Fox Trot 2 Dixie Dixieland 3 QuickStp Quick Step
USA 1
4 Charlest Charleston
(continued®)

Viscount Maestro – Grande - Sinfonia
52
(ªcontinued from previous page)
FAMILY No. STYLE FULL NAME 1 Blues 2 Gospel 3 Bluegr. BlueGrass
USA 2
4 CntrWltz Country Waltz 1 Samba 2 Bossa 1 Bossa Nova 1 3 Bossa 2 Bossa Nova 2
LATIN 1
4 Beguine 1 Cha-Cha 2 Mambo 3 Salsa
LATIN 2
4 Merengue 1 Tango 2 Hawaiian 3 Reggae
WORLD
4 Caribean Caribbean 1 6/8March 2 Tarantel Tarantella 3 Polka 1
MARCH
4 Polka 2 1 Waltz 2 Musette 3 W.Waltz Wiener Waltz
WALTZ
4 JazzWltz Jazz Waltz
Viscount Maestro – Grande – Sinfonia
53
5. THE VOLUMES SECTION
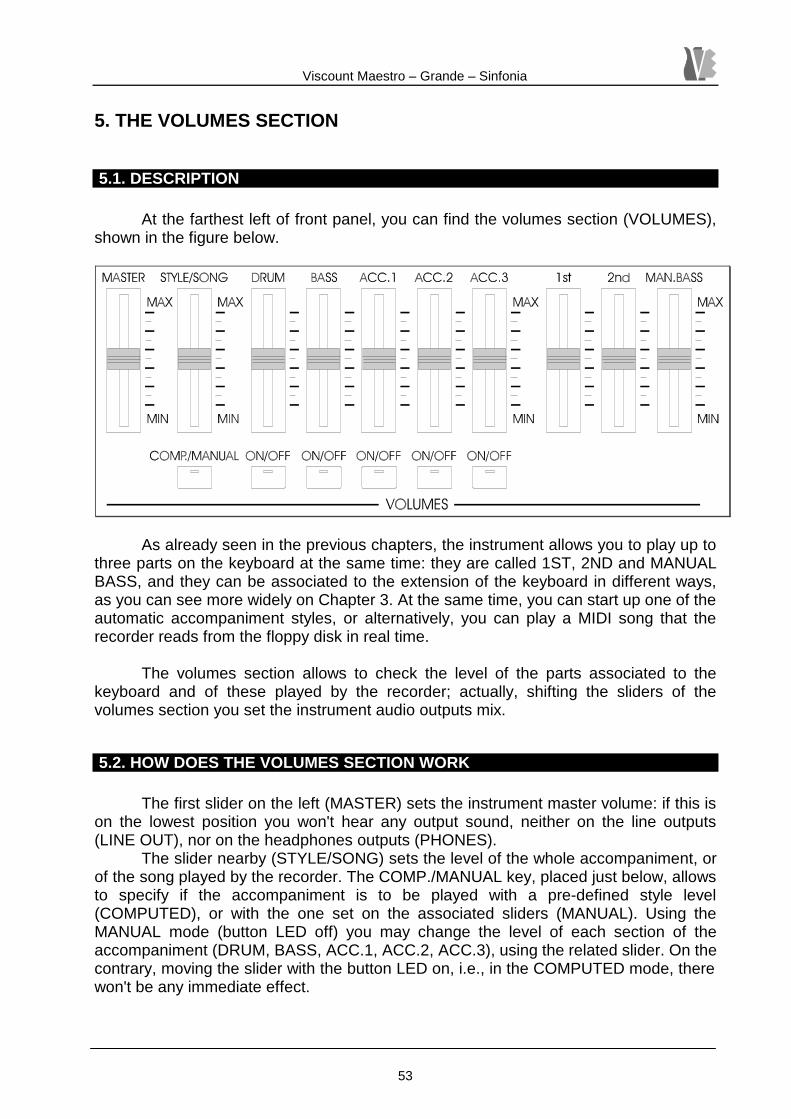
5.1. DESCRIPTION At the farthest left of front panel, you can find the volumes section (VOLUMES),
shown in the figure below.
As already seen in the previous chapters, the instrument allows you to play up to
three parts on the keyboard at the same time: they are called 1ST, 2ND and MANUAL BASS, and they can be associated to the extension of the keyboard in different ways, as you can see more widely on Chapter 3. At the same time, you can start up one of the automatic accompaniment styles, or alternatively, you can play a MIDI song that the recorder reads from the floppy disk in real time.
The volumes section allows to check the level of the parts associated to the
keyboard and of these played by the recorder; actually, shifting the sliders of the volumes section you set the instrument audio outputs mix.
5.2. HOW DOES THE VOLUMES SECTION WORK The first slider on the left (MASTER) sets the instrument master volume: if this is
on the lowest position you won't hear any output sound, neither on the line outputs (LINE OUT), nor on the headphones outputs (PHONES).
The slider nearby (STYLE/SONG) sets the level of the whole accompaniment, or of the song played by the recorder. The COMP./MANUAL key, placed just below, allows to specify if the accompaniment is to be played with a pre-defined style level (COMPUTED), or with the one set on the associated sliders (MANUAL). Using the MANUAL mode (button LED off) you may change the level of each section of the accompaniment (DRUM, BASS, ACC.1, ACC.2, ACC.3), using the related slider. On the contrary, moving the slider with the button LED on, i.e., in the COMPUTED mode, there won't be any immediate effect.
Viscount Maestro – Grande - Sinfonia
54
Pressing the ON/OFF key below the accompaniment sliders, you can disable the related section, and it will disappear immediately. The LED on the button will turn off when the section is disabled; if you press again the same key, the section will be on again immediately. For instance, if you use the automatic accompaniment leaving only the DRUM voice enabled, the accompaniment will be limited only to the drum/percussions rhythmic section.
The last three sliders on the right, called 1st, 2nd and MAN.BASS, concern the
parts played on the keyboard: each of these parts has an associated volume slider, allowing to mix them as you like, both among them and with the other voices generated by the instrument. For instance, playing the 1ST and 2ND parts in layer mode (see Chapter 3) you may bring a piano sound to the foreground, setting the volume of its part to the highest level, and place a violins "pad" on the background.
Viscount Maestro – Grande – Sinfonia
55
6. THE EFFECTS SECTION
6.1. DESCRIPTION The parts played by the user can be enriched and made more realistic and
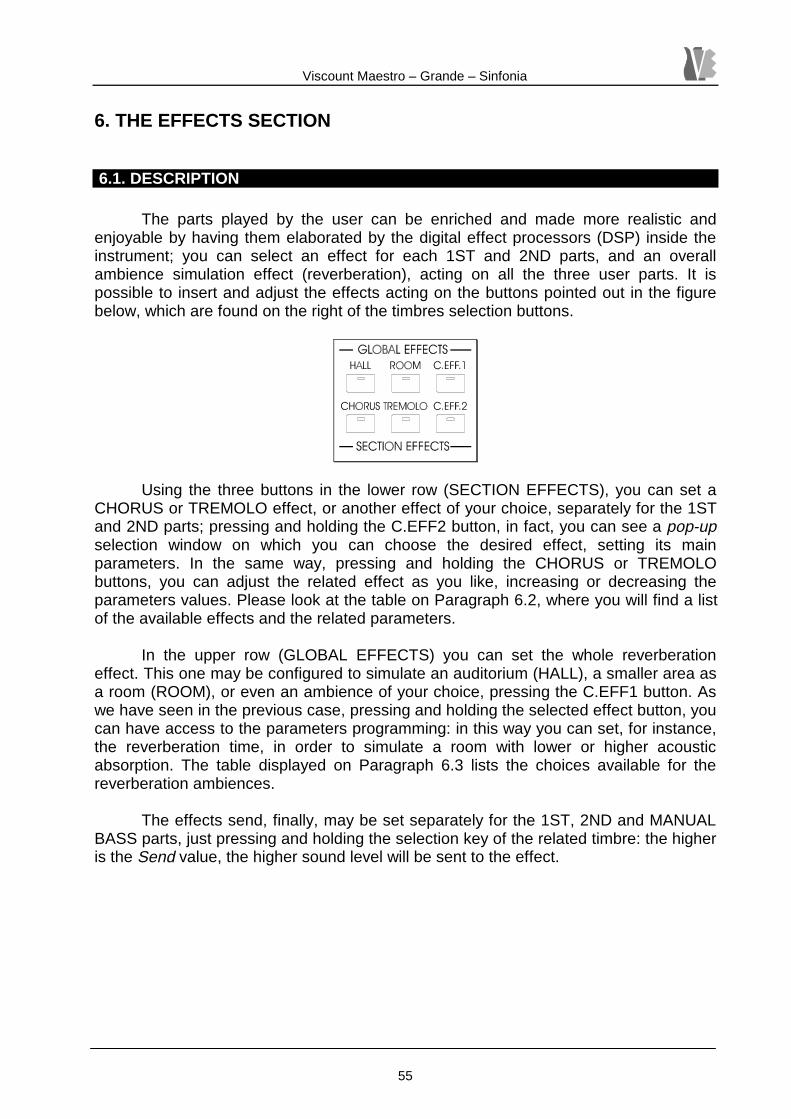
enjoyable by having them elaborated by the digital effect processors (DSP) inside the instrument; you can select an effect for each 1ST and 2ND parts, and an overall ambience simulation effect (reverberation), acting on all the three user parts. It is possible to insert and adjust the effects acting on the buttons pointed out in the figure below, which are found on the right of the timbres selection buttons.
Using the three buttons in the lower row (SECTION EFFECTS), you can set a
CHORUS or TREMOLO effect, or another effect of your choice, separately for the 1ST and 2ND parts; pressing and holding the C.EFF2 button, in fact, you can see a pop-up selection window on which you can choose the desired effect, setting its main parameters. In the same way, pressing and holding the CHORUS or TREMOLO buttons, you can adjust the related effect as you like, increasing or decreasing the parameters values. Please look at the table on Paragraph 6.2, where you will find a list of the available effects and the related parameters.
In the upper row (GLOBAL EFFECTS) you can set the whole reverberation
effect. This one may be configured to simulate an auditorium (HALL), a smaller area as a room (ROOM), or even an ambience of your choice, pressing the C.EFF1 button. As we have seen in the previous case, pressing and holding the selected effect button, you can have access to the parameters programming: in this way you can set, for instance, the reverberation time, in order to simulate a room with lower or higher acoustic absorption. The table displayed on Paragraph 6.3 lists the choices available for the reverberation ambiences.
The effects send, finally, may be set separately for the 1ST, 2ND and MANUAL
BASS parts, just pressing and holding the selection key of the related timbre: the higher is the Send value, the higher sound level will be sent to the effect.

Viscount Maestro – Grande - Sinfonia
56
6.2. USER EFFECTS FOR 1ST AND 2ND PARTS In the following table you will find a list of the effects that you can set separately
on the 1ST and 2ND parts, using the C.EFF.2 button.
No.
EFFECTS DESCRIPTION PARAM.1 PARAM.2
1 Mono Phaser cyclically changes the signal phase, modulating the sound
Rate Emphasis
2 Stereo Phaser same as above, with stereo input Rate Emphasis 3 Chorus (*) typical modulation
that conveys a natural spatiality Rate Depth
4 Flanger chorus with an added resonance that modulate the timbre
Rate Resonance
5 Tremolo (**) cyclic level modulation Speed Depth 6 Vibrato cyclic phase modulation
that shifts the sound pitch Speed Depth
7 Vibrato Scanner vibrato effect typical in drawbar organs
Mix Depth
8 AutoPanPot cyclically moves the sound image in the stereo field (L-R-L-R-L-...)
Speed Depth
9 Cross Panner like AutoPanPot, with stereo input, so that L and R channels cyclically swap
Speed Depth
10
Rotary Speaker rotating loudspeaker simulation, mostly used with drawbar organs
Hi Speed Lo Speed
(*) same effect as the one related to the CHORUS button on the panel
(**) same effect as the one related to the TREMOLO button on the panel NOTA BENE: you can have a section effect for the 2ND part only, when playing
XG timbres: this means that the selected section effect for 1ST part will be enabled only if a Viscount timbre plays on that part. Moreover, the ‘Rotary Speaker’ effect is available only on 1ST part, whatever timbre is selected.

Viscount Maestro – Grande – Sinfonia
57
6.3. USER AMBIENCE CHOICES FOR THE REVERBERATION GLOBAL EFFECT In the following table you can find all the choices of ambience you may wish to
set for the reverberation global effect, selecting the C.EFF.1 key.
No. NAME DESCRIPTION 1 Small Room <see name> 2 Large Room 1 <see name> 3 Large Room 2 (*) <see name> 4 Medium Hall 1 <see name> 5 Medium Hall 2 <see name> 6 Large Hall 1 (**) <see name> 7 Large Hall 2 <see name> 8 Chamber 1 <see name> 9 Chamber 2 <see name>
10 Plate plate reverb simulation 11 Spring spring reverb simulation
(*) same ambience as the one related to the ROOM button on the panel (**) same ambience as the one related to the HALL button on the panel

Viscount Maestro – Grande - Sinfonia
58
7. THE RECORDER
7.1. DESCRIPTION VISCOUNT MAESTRO, GRANDE and SINFONIA feature a recorder, i.e., a
device that is able to record and play back the musical events performed on the keyboard. The recorder is controlled from the panel through the RECORDER section buttons, and it has the usual controls found in playback and recording devices: Play, Fast Forward, Rewind, Pause and Record, as shown in the figure below:
The recorder uses the MIDI standard code for musical events, and the floppy disk
driver for storing data permanently. This allows you to exchange the musical tracks recorded on VISCOUNT piano with any other instrument having a floppy disk driver. In this way the huge data bank of pre-recorded MIDI bases you can find on the market is available to you. Moreover, you can also use the karaoke function to display the song text on the screen during playback (see Paragraph 8.4).
7.2. HOW TO USE THE RECORDER If you want to use a pre-recorded track, you have first of all to select the desired
song, using the SONG+ and SONG- buttons; when you see the desired song name on the SONG NAME box, press the PLAY button and you can listen to the song. When the song is playing, you can see the progress indication in the lower right corner of the screen. The progression indication is given in the M:B format, where M indicates the current measure, and B the current beat.
If you want to stop playing back the song, you have to press again the PLAY key, or you can use the PAUSE key, which allows you to restart the MIDI sequence from the same point. The FF and REW keys allow, even while the MIDI sequence is playing, to jump forward or back for an arbitrary number of beats. You just have to press and hold the key, releasing it when you have reached the number of beats to skip.
When you want to record a sequence played on the keyboard, you have to press
the REC key once to start recording: the LED on the key will light up, and at the same time the instrument will start storing the notes pressed on the keyboard, together with the accompaniment, if it is enabled. At the end of the song performance you just have to press again the REC key; as a consequence, the recording will stop, and you will see a

Viscount Maestro – Grande – Sinfonia
59
pop-up window on the screen asking for the file name to be associated to the sequence on the floppy disk. The recorded sequence will become the active one, and its name will be displayed on the SONG NAME box on the screen: now you can listen to it, using the PLAY, FF, REW and PAUSE buttons as shown before. Other information on the floppy disk file management is found in Paragraph 7.4.
7.3. THE “METRONOME” OPTION The METRONOME option, when used, generates a "beep" pattern that you can
set in musical terms, specifying its speed, expressed in Beats Per Minute (BPM) and the musical measure divisions as shown later. You can activate the BPM using the rotative encoder, or pressing the TAP TEMPO button four consecutive times with the desired speed, as already shown in Paragraph 4.3. The current value is clearly displayed on the screen.
The measure is to be set pressing and holding the METRONOME button; you can set some typical measures as 4/4, 3/4, 6/8, but also less common ones as 5/4, 7/8: you can specify both the number of beats and the temporal length of each one, ranging from 1/2 to 1/16. As a consequence of this setting, when the metronome is enabled (LED of the metronome button on) the BEAT LEDs on the panel, placed below the encoder, will light up following the desired time pattern. The STANDALONE option, that can be activated through the pop-up screen window where you program the measure, allows you to listen to the metronome even out of the recording phase.
7.4. THE “MIXER” OPTION Pressing and holding the PLAY button, the LCD screen will display a set of 16
sliders, split in two rows; by way of the cursor buttons and of the encoder, you can set up the levels for each of the 16 MIDI channels. As you can read on the screen, the first three MIDI channels are reserved for the user parts (1ST, 2ND and MANUAL BASS, respectively); this means that you can control the user parts levels and the song instruments levels at the same time.
7.5. THE “CONTINUOUS PLAYBACK” FEATURE
With this feature you can continuously play back the songs from your floppy disks, starting from the one you have selected, and ending up with the last song found on the media, i.e., the song found at the bottom of the directory shown in the Disk pop-up window.
This option can be enabled/disabled acting on the 'All Songs Play ' option in the Global Settings / 3 - Song Settings pop-up window, and comes disabled as the default factory setting.
When the 'continuous playback' option is enabled, you cannot use the fast-forward/reverse controls to move along the song, while it is still possible to skip songs forward and backward using the SONG+/SONG- keys.

Viscount Maestro – Grande - Sinfonia
60
7.6. HOW TO USE THE FLOPPY DISK The disk option, activated with the DISK key above the RECORDER section of
the panel, allows to have access to the functions of the floppy disk. Above all, the floppy disk is considered as a permanent memory unit for MIDI tracks, but you can use it also to save and recall the instrument presets, called performances. You can refer to Chapter 8 for a complete explanation concerning the performances.
The floppy disk file management system allows to store on a single magnetic storage medium up to 512 files, or anyway a number of files limited only by its capacity, which is 720 KBytes, if you have a DS/DD floppy disk, or 1440 KBytes if you have a DS/HD floppy. The format is MS/DOS system compatible, the same used on PC systems, and on virtually every musical instrument having a floppy disk driver. Each file has a name made of up to 8 characters, defined by the user, and a 3-characters extension which reminds the file contents, as shown in the following table.
EXTENSION MEANING NOTES MID MIDI file world-wide standard file format
for storing music events (songs) PRF Single Preset File Viscount proprietary file format
for storing a single preset PRB Preset Bulk Viscount proprietary file format
for storing all the machine presets SET Global Settings Viscount proprietary file format
for storing global settings (see Paragraph 8.4)
For what concerns the songs management, pressing the DISK button a number
of commands displayed on the screen will be available to you. You can find here below the description of each command.
1-Del: delete a file. The selected file is canceled, and its contents are lost
forever. You have to confirm this operation through a related pop-up window, as you can't undo this command.
2-Ren: rename a file. This command allows you to give to the selected file a
name different from the current one, provided that the new name isn't the same of another file. If you select the 2-Ren option, a pop-up window will appear, where you can insert the new name: you just have to point out the New File Name field and press the ENTER button. Now you can change the eight characters of the name using the cursor buttons and the encoder. Pressing the F6 button you confirm the rename operation, while F1 allows you to abort the command.
3-Copy: duplicate a file. The 3-Copy command allows you to duplicate an
existing file, changing its name, if the copy is done on the same floppy disk. Otherwise you can copy the file on another magnetic storage medium (using the Disk-Disk option). You can rename the file pointing out the New Name field and then following the procedure shown for the 2-Ren command. The F6 button starts the copy operation, whereas the F1 button cancels it; when the Disk-Disk option is activated, you can see a

Viscount Maestro – Grande – Sinfonia
61
sequence of pop-up windows where you are asked to insert or remove, each time, either the source disk or the destination disk. NOTA BENE: you cannot copy a file between two disk having different capacity (DS/DD – DS/HD)
4-Ld Perf: load a memory. This command allows you to recall the settings saved
before in the instrument memory; the machine will recognize the selected file type, going on loading only the PRF, PRB and SET files (see the previous table).
5-Quantiz: quantize a MIDI track. This command allows you to create a new
MIDI track, starting from the selected one, where all the notes played are placed on a time grid having a resolution of your choice. In this way the MIDI sequence will have a sharper time setting. The new MIDI track can be named using the New Name field, following the procedure already seen for the 2-Ren and 3-Copy commands; the quantization value is indicated in beat fractions, ranging from 1/4 to 1/64, or with the ternary fractions 1/8t, whose value is a third of a beat, and 1/64t, whose value is a twenty-fourth of a beat. You can activate this command using the F6 button, and cancel it using the F1 button.
6-More...: transition to the second command screen. This control allows you to
pass to the second group of commands related to the floppy disk, listed here below. 1-SvP Sgl: save the current performance. This command stores the current
performance (see Paragraph 8.1) on a floppy, in a PRF-type file, named by the user. You have to use the F6 button to start the operation, or the F1 button to cancel it.
2-SvP Blk: save all the performances. All the performances, that means the 32
locations of the four memory banks (see Paragraph 8.1), in addition to the current performance, are stored on the floppy disk. They are saved in a PRB-type file, named by the user. This operation is started with the F6 button, while the F1 button is used to cancel it.
3-Sv Set: save all the global settings. The global settings of the instrument, listed
in Paragraph 8.5, are saved on the floppy disk, in a SET-type file, named by the user. You have to use the F6 button to start the operation, or the F1 button to cancel it.
4-Format: format the magnetic storage medium. This command is able to
prepare a blank floppy disk for its use with the instrument. You have to use this command only for new supports, but you may execute it again even on used floppy disks. In this case all the information on the disk will be lost; therefore, a pop-up window will ask you to confirm the operation before going on. The applied format depends on the type of magnetic storage medium used: DS/DD floppy disks are automatically formatted to 720 KBytes, while DS/HD floppy disks are automatically formatted to 1.44 MBytes.
6-Back: transition to the first command screen. If you use this option you will go
back to the first group of commands related to the floppy disk.
Viscount Maestro – Grande - Sinfonia
62
8. HOW TO STORE THE INSTRUMENT SETTINGS
8.1. INTRODUCTION The user is able to change all the parameters concerning VISCOUNT
MAESTRO, GRANDE and SINFONIA functionment; the instrument has a buffer memory, so the values set are stored up to the next machine power-on, even if it is switched off and disconnected from mains.
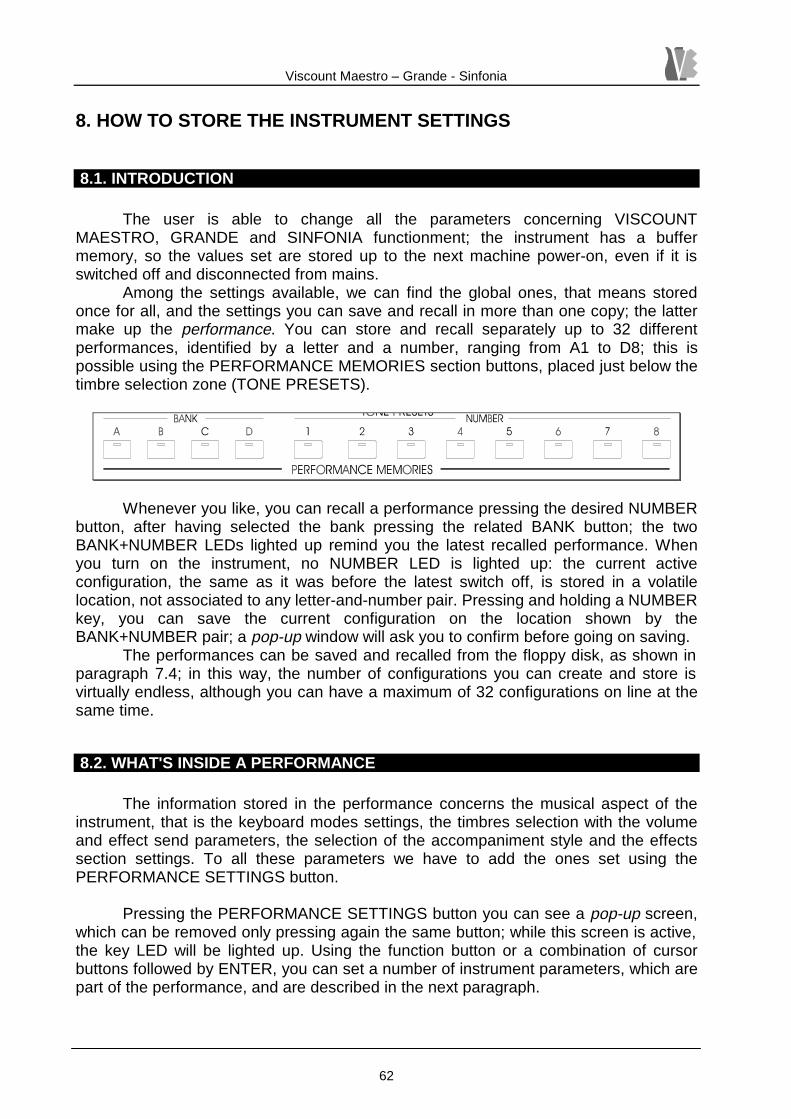
Among the settings available, we can find the global ones, that means stored once for all, and the settings you can save and recall in more than one copy; the latter make up the performance. You can store and recall separately up to 32 different performances, identified by a letter and a number, ranging from A1 to D8; this is possible using the PERFORMANCE MEMORIES section buttons, placed just below the timbre selection zone (TONE PRESETS).
Whenever you like, you can recall a performance pressing the desired NUMBER
button, after having selected the bank pressing the related BANK button; the two BANK+NUMBER LEDs lighted up remind you the latest recalled performance. When you turn on the instrument, no NUMBER LED is lighted up: the current active configuration, the same as it was before the latest switch off, is stored in a volatile location, not associated to any letter-and-number pair. Pressing and holding a NUMBER key, you can save the current configuration on the location shown by the BANK+NUMBER pair; a pop-up window will ask you to confirm before going on saving.
The performances can be saved and recalled from the floppy disk, as shown in paragraph 7.4; in this way, the number of configurations you can create and store is virtually endless, although you can have a maximum of 32 configurations on line at the same time.
8.2. WHAT'S INSIDE A PERFORMANCE The information stored in the performance concerns the musical aspect of the
instrument, that is the keyboard modes settings, the timbres selection with the volume and effect send parameters, the selection of the accompaniment style and the effects section settings. To all these parameters we have to add the ones set using the PERFORMANCE SETTINGS button.
Pressing the PERFORMANCE SETTINGS button you can see a pop-up screen,
which can be removed only pressing again the same button; while this screen is active, the key LED will be lighted up. Using the function button or a combination of cursor buttons followed by ENTER, you can set a number of instrument parameters, which are part of the performance, and are described in the next paragraph.

Viscount Maestro – Grande – Sinfonia
63
8.3. THE PERFORMANCE SETTINGS 1-TranSect: keyboard transposition. You can set, separately for the 1ST and
2ND parts, a pitch transposition value for the notes, both in semitones (coarse) and in semitone fractions (fine). The transposition ranges from -12 to +12 semitones, corresponding to an octave below and above; for the semitones fractions you can set a value ranging from -128 to +127, corresponding to the range of a semitone below and above.
You can add a global transposition (ALL sections) to the part-specific transposition (Section:), setting it in the same way; in the bottom line the instrument displays the overall value sent to the synthesis module for the selected part (Sent value). The global transposition, as the name suggests, acts on the MANUAL BASS part and on the automatic accompaniment, too.
2-TranSong: transposition of the song played by the recorder. To fit a musical
base to the preferred tone, you can transpose the MIDI sequences while playing them, up to an octave, both below and above; you do so setting a value ranging from -12 to +12 semitones in the Transpose field. The transposition doesn't affect the MIDI channel commonly related to dums/percussions, that is channel number 10; anyway, you can choose the channel to exclude by using the Exclude Chan field: the values allowed are OFF,1,2,...16.
3-Dynam crv: dynamic curve for the keyboard. You can choose among 8
different dynamic curves, which determine the relationship between the pressing speed of the keys, as measured by the instrument, and the corresponding transmitted MIDI value.
4-Tone Eqlz: tones equalization. Only for the VISCOUNT IS2 timbres, you can
set up a two-band tone control, separately for 1ST and 2ND parts: the parameters to be changed are named 1st bass, 1st trbl, 2nd bass and 2nd trbl, and their value is displayed graphically on the screen. If you enter values from 63 to 0, the related band will be attenuated; the values ranging from 65 to 127 give a progressive enhancement, while the neutral position corresponds to the value 64. For instance, if you are playing in an ambience where the Harpsichord timbre, associated to the 1ST part, sounds poorly bright and sharp, try to enhance the high frequencies giving a value higher than 64 to the 1st trbl parameter.

Viscount Maestro – Grande - Sinfonia
64
5-Pdl Func: pedal functions. The VISCOUNT MAESTRO, GRANDE and
SINFONIA pedal board, working as that of a real tail piano, is fully configurable: you can associate a different function to each of the three pedals, which allows the pedal to work on both 1ST and 2ND parts, or only on one part. In addition, the pedal can control the automatic accompaniment or the metronome speed. The table below displays all the settings available.
LEFT PEDAL
CENTER PEDAL
RIGHT PEDAL
DESCRIPTION
All Soft All Sost All Damper default pedal functions: left pedal=soft center pedal=sostenuto right pedal=damper
1st Soft 1st Sost 1st Damper same as above, only for 1ST part 2nd Soft 2nd Sost 2nd Damper same as above, only for 2ND part
Start/Stop doubles the START/STOP button in the STYLE CONTROL KEYS section
Simple doubles the SIMPLE button in the STYLE CONTROL KEYS section
To Adv. doubles the TO ADV. button in the STYLE CONTROL KEYS section
To Basic doubles the TO BASIC button in the STYLE CONTROL KEYS section
Break doubles the BREAK MUTE button in the STYLE CONTROL KEYS section
Basic doubles the BASIC button in the STYLE CONTROL KEYS section
Adv.1 doubles the ADV.1 button in the STYLE CONTROL KEYS section
Adv.2 doubles the ADV.2 button in the STYLE CONTROL KEYS section
Ending doubles the ENDING button in the STYLE CONTROL KEYS section
Tap Tempo doubles the TAP TEMPO button in the STYLE CONTROL KEYS section
Rotary Spd toggles the speed in the rotary effect
None no function for that pedal

Viscount Maestro – Grande – Sinfonia
65
6-Tmperamnt: keyboard temperament. You can set the temperament type to be
associated to the keyboard, choosing among the options shown in the table; this affects the tuning of the twelve tones of the chromatic scale.
TEMPERAMENT DESCRIPTION Equal uniform temperament:
every interval is a whole multiple of the 2nd minor interval (1 semitone, frequency ratio=1.059)
Pythagorean pythagorean temperament: the 5th interval is related to a frequency ratio of 1.5
Vallotti for a full description, please refer to a music technique book
Mean Tone <see above> Werkmeister <see above> Kirnberger <see above>
8.4. GLOBAL SETTINGS Some settings of the instrument have an overall meaning; you don't need to
change them very often, or to recall different parameters configurations; so the instrument is only able to keep these settings stored from the latest power-off. Anyway, you can change these parameters whenever you like, using the GLOBAL SETTINGS button, placed to the farthest right on the front panel. You can also save and recall the global settings using the floppy disk, as shown in Paragraph 7.4.
When you press the GLOBAL SETTINGS button, the related LED will light up and a three-fields pop-up screen will appear; by selecting each of these fields, you will set the parameters listed here below.
1-MIDI: MIDI interface settings. For a full explanation, please contact Viscount. 2-Display: setting of the LCD screen contrast. If you select this option, a pop-up
window will appear, where it is possible to set the LCD screen contrast, turning the encoder when the cursor is on the Contrast field.
The Hold Windows field allows to specify if the pop-up windows, used to set the instrument parameters, are to stay open on the screen until you activate the EXIT button (Hold Windows enabled), or if these windows have to disappear after an idle time of about 15 seconds (Hold Windows disabled).
3-Karaoke: karaoke settings. As already seen Chapter 1, if you play back a MIDI
track with lyrics, you can see them on the graphic screen. The 3-Karaoke field allows to enable or disable this option (Karaoke enable), and to select the font size of the text displayed on the graphic screen, using the Big Fonts field.

Viscount Maestro – Grande - Sinfonia
66
8.5. MIDI SETTINGS Enabling the GLOBAL SETTINGS option, then pressing the F1 button, or the
ENTER button if the 1-MIDI field is selected, you have access to the MIDI settings screen. The following options are available:
1-IN MIDI input configuration; 2-OUT MIDI output configuration; 3-TEMPLATE recall of presets for the overall MIDI configuration The Loc.KeyBrd , Loc.Style and Loc.Songs fields, which can be edited by
toggling the check mark in the related boxes, enable or disable the internal synthesis (Viscount and XG), allowing the instrument to act as a mere MIDI event generator. When the Loc.KeyBrd box is unchecked, the notes played on the keyboard will only be sent to the MIDI output, while the internal synthesis will stay idle, whatever timbre or mode is selected. The same applies for Loc.Style and Loc.Songs fields, relating to the automatic accompaniment and to the recorder, respectively.
By pressing the F1 button you enter the MIDI input settings screen. Here you find
the following fields: R.Time , enabling System Realtime input commands for the automatic accompaniment, EX, enabling System Exclusive input messages; Style EX , enabling style-related System Exclusive input messages; Clk ext , enabling synchronization with an input MIDI Realtime Clock.
Finally, pressing the F6 button, the user can access the pair of screens showing the channel options. Each MIDI input channel has a selectable internal destination (Sez1, Sez2, Bass, one of the 16 XG channels, OFF), the possibility of filtering Program Change and Control Change messages, and a programmable pitch transposition of up to +/-32 halftones.
The MIDI output settings screen is entered by pressing the F2 button. It shows
the following fields: Out KeyB , enabling the transmission of MIDI messages coming from the keyboard; Out Sty. , enabling the transmission of MIDI messages coming from the recorder; R.Time , enabling System Realtime output commands from the automatic accompaniment, EX and Style EX , enabling System Exclusive output, generic and style-related, respectively.
Pressing the F1 button enables the MIDI DUMP options: it is possible to dump any number of performance memories (see Paragraph 8.2), by selecting the first and the last one to be dumped, and then pressing the F1 button to perform the dump; moreover, all the MIDI settings can be dumped via MIDI using the F6 key.
Finally, pressing the F6 button, the user can access the pair of screens showing the channel options. Each MIDI output channel has a selectable internal source (Sez1, Sez2, Bass, one of the 16 XG channels, OFF), the possibility of filtering Program Change and Control Change messages, and a programmable pitch transposition of up to +/-32 halftones.

Viscount Maestro – Grande – Sinfonia
67
Since the whole MIDI settings are quite many, and programming all of them it's a rather lengthy task, you can always recall a MIDI configuration template, suitable for a given operating environment: this can be done by pressing the F3 button, which enables the 3-TEMPLATE option. The built-in templates are the following:
TEMPLATE DESCRIPTION 1st.2nd.M.Bass the typical configuration (default) 1.2.Bass&Style same as above, plus automatic accompaniment 1.2.Bass&Style Control same as above, with external control 1.2.Bass&Style Remote user parts play a remote instrument Playback mode1 the MIDI input controls the VISCOUNT piano Playback mode2 another choice of previous configuration XG remote1 XG internal synthesis with external control XG remote2 another choice of previous configuration THE 'PANIC' OPTION: During normal operation, the MIDI chain downstream the
instrument may cease to work properly, due to a transmission failure or whatever else; in this case, the user can gain back control, sending the usual 'All notes off' and 'Reset all controllers' messages. This is made possible by pressing and holding the EXIT key (just below the rotative encoder); a self-explicative pop-up screen will appear, to confirm that the requested MIDI 'panic-solving' messages were sent.
8.5. FACTORY SETTINGS RECALL The VISCOUNT MAESTRO, GRANDE and SINFONIA buffer memory is
originally set in the factory for a standard functionment of the instrument, both for the performances and for the global settings. If you want to bring back all the programmable values to the factory preset, you have to follow this procedure:
1. switch off the instrument and wait for some seconds; 2. press the three keys on the farther left of the panel, that is COMP./MANUAL, DRUM
ON/OFF, BASS ON/OFF; 3. switch on the instrument again, holding the three keys pressed.
If the operation is successful you will see a different startup screen, where you
can read "FACTORY SETTINGS OK!"; soon afterwards, the instrument goes back to the usual working conditions.


Viscount Maestro – Grande - Sinfonia APPENDIX A: Sound List
69
Piano Name CC32 CC0 PC
GrandPno 0 0 1 GrndPnoK 1 0 1 MelloGrP 18 0 1 PianoStr 40 0 1 Dream 41 0 1 BritePno 0 0 2 BritPnoK 1 0 2 E.Grand 0 0 3 ElGrPnoK 1 0 3 Det.CP80 32 0 3 ElGrPno1 40 0 3 ElGrPno2 41 0 3 HnkyTonk 0 0 4 HnkyTnkK 1 0 4 E.Piano1 0 0 5 El.Pno1K 1 0 5 MelloEP1 18 0 5 Chor.EP1 32 0 5 HardEl.P 40 0 5 VX El.P1 45 0 5 60s El.P 64 0 5 E.Piano2 0 0 6 El.Pno2K 1 0 6 Chor.EP2 32 0 6 DX Hard 33 0 6 DXLegend 34 0 6 DX Phase 40 0 6 DX+Analg 41 0 6 DXKotoEP 42 0 6 VX El.P2 45 0 6 Harpsi. 0 0 7 Harpsi.K 1 0 7 Harpsi.2 25 0 7 Harpsi.3 35 0 7 Clavi. 0 0 8 Clavi.K 1 0 8 ClaviWah 27 0 8 PulseClv 64 0 8 PierceCl 65 0 8 Chromatic Percussion
Name CC32 CC0 PC Celesta 0 0 9 Glocken 0 0 10 MusicBox 0 0 11 Orgel 64 0 11 Vibes 0 0 12 VibesK 1 0 12 HardVibe 45 0 12 Marimba 0 0 13 MarimbaK 1 0 13 SineMrmb 64 0 13 Balafon2 97 0 13 LogDrum 98 0 13 Xylophon 0 0 14 TubulBel 0 0 15 ChrchBel 96 0 15 Carillon 97 0 15
Dulcimer 0 0 16 Dulcimr2 35 0 16 Cimbalom 96 0 16 Santur 97 0 16 Organ
Name CC32 CC0 PC DrawOrgn 0 0 17 DetDrwOr 32 0 17 60sDrOr1 33 0 17 60sDrOr2 34 0 17 70sDrOr1 35 0 17 DrawOrg2 36 0 17 60sDrOr3 37 0 17 EvenBar 38 0 17 16+2\ 2 40 0 17 Organ Ba 64 0 17 70sDrOr2 65 0 17 CheezOrg 66 0 17 DrawOrg3 67 0 17 PercOrgn 0 0 18 70sPcOr1 24 0 18 DetPrcOr 32 0 18 LiteOrg 33 0 18 PercOrg2 37 0 18 RockOrgn 0 0 19 RotaryOr 64 0 19 SloRotar 65 0 19 FstRotar 66 0 19 ChrchOrg 0 0 20 ChurOrg3 32 0 20 ChurOrg2 35 0 20 NotreDam 40 0 20 OrgFlute 64 0 20 TrmOrgFl 65 0 20 ReedOrgn 0 0 21 Puff Org 40 0 21 Acordion 0 0 22 Accordlt 32 0 22 Harmnica 0 0 23 Harmo 2 32 0 23 TangoAcd 0 0 24 TngoAcd2 64 0 24 Guitar
Name CC32 CC0 PC NylonGtr 0 0 25 NylonGt2 16 0 25 NylonGt3 25 0 25 VelGtHrm 43 0 25 Ukulele 96 0 25 SteelGtr 0 0 26 SteelGt2 16 0 26 12StrGtr 35 0 26 Nyln&Stl 40 0 26 Stl&Body 41 0 26 Mandolin 96 0 26 Jazz Gtr 0 0 27 MelloGtr 18 0 27 Jazz Amp 32 0 27 CleanGtr 0 0 28
ChorusGt 32 0 28 Mute Gtr 0 0 29 FunkGtr1 40 0 29 MuteStlG 41 0 29 FunkGtr2 43 0 29 Jazz Man 45 0 29 Ovrdrive 0 0 30 Gt.Pinch 43 0 30 Dist.Gtr 0 0 31 FeedbkGt 40 0 31 FeedbGt2 41 0 31 GtrHarmo 0 0 32 GtFeedbk 65 0 32 GtrHrmo2 66 0 32 Bass
Name CC32 CC0 PC Aco.Bass 0 0 33 JazzRhtm 40 0 33 VXUprght 45 0 33 FngrBass 0 0 34 FingrDrk 18 0 34 FlangeBa 27 0 34 Ba&DstEG 40 0 34 FngrSlap 43 0 34 FngBass2 45 0 34 Mod Alem 65 0 34 PickBass 0 0 35 MutePkBa 28 0 35 Fretless 0 0 36 Fretles2 32 0 36 Fretles3 33 0 36 Fretles4 34 0 36 SynFretl 96 0 36 Smooth 97 0 36 SlapBas1 0 0 37 ResoSlap 27 0 37 PunchThm 32 0 37 SlapBas2 0 0 38 VeloSlap 43 0 38 SynBass1 0 0 39 SynBa1Dk 18 0 39 FastResB 20 0 39 AcidBass 24 0 39 Clv Bass 35 0 39 Tekno Ba 40 0 39 Oscar 64 0 39 Sqr Bass 65 0 39 RubberBa 66 0 39 Hammer 96 0 39 SynBass2 0 0 40 MelloSB1 6 0 40 Seq Bass 12 0 40 ClkSynBa 18 0 40 SynBa2Dk 19 0 40 SmthBa 2 32 0 40 ModulrBa 40 0 40 DX Bass 41 0 40 X WireBa 64 0 40

Viscount Maestro – Grande - Sinfonia APPENDIX A: Sound List
70
Strings Name CC32 CC0 PC
Violin 0 0 41 SlowVln 8 0 41 Viola 0 0 42 Cello 0 0 43 Contrabs 0 0 44 Trem.Str 0 0 45 SlowTrSt 8 0 45 Susp Str 40 0 45 Pizz.Str 0 0 46 Harp 0 0 47 YangChin 40 0 47 Timpani 0 0 48 Ensemble
Name CC32 CC0 PC Strings1 0 0 49 S.Strngs 3 0 49 Slow Str 8 0 49 Arco Str 24 0 49 60sStrng 35 0 49 Orchestr 40 0 49 Orchstr2 41 0 49 TremOrch 42 0 49 Velo Str 45 0 49 Strings2 0 0 50 S.SlwStr 3 0 50 LegatoSt 8 0 50 Warm Str 40 0 50 Kingdom 41 0 50 70s Str 64 0 50 Str Ens3 65 0 50 Syn.Str1 0 0 51 ResoStr1 27 0 51 Syn.Str4 64 0 51 SS Str 65 0 51 Syn.Str2 0 0 52 ChoirAah 0 0 53 S. Choir 3 0 53 Ch.AAhs2 16 0 53 MelChoir 32 0 53 ChoirStr 40 0 53 VoiceOoh 0 0 54 SynVoice 0 0 55 Syn Vox2 40 0 55 Choral 41 0 55 AnaVoice 64 0 55 Orch.Hit 0 0 56 OrchHit2 35 0 56 Impact 64 0 56 Brass
Name CC32 CC0 PC Trumpet 0 0 57 Trumpet2 16 0 57 BriteTrp 17 0 57 Warm Trp 32 0 57 Trombone 0 0 58 Trmbone2 18 0 58 Tuba 0 0 59
Tuba2 16 0 59 Mute.Trp 0 0 60 Fr.Horn 0 0 61 FrHrSolo 6 0 61 FrHorn2 32 0 61 HornOrch 37 0 61 BrasSect 0 0 62 Tp&TbSec 35 0 62 BrssSec2 40 0 62 HiBrass 41 0 62 MelloBrs 42 0 62 SynBras1 0 0 63 QuackBr 12 0 63 RezSynBr 20 0 63 PolyBrss 24 0 63 SynBras3 27 0 63 JumpBras 32 0 63 AnaVelBr 45 0 63 AnaBrss1 64 0 63 SynBras2 0 0 64 Soft Brs 18 0 64 SynBras4 40 0 64 ChorBrss 41 0 64 VelBras2 45 0 64 AnaBras2 64 0 64 Reed Name CC32 CC0 PC SprnoSax 0 0 65 Alto Sax 0 0 66 Sax Sect 40 0 66 HyprAlto 43 0 66 TenorSax 0 0 67 BrthTnSx 40 0 67 SoftTenr 41 0 67 TnrSax 2 64 0 67 Bari.Sax 0 0 68 Oboe 0 0 69 Eng.Horn 0 0 70 Bassoon 0 0 71 Clarinet 0 0 72 Pipe
Name CC32 CC0 PC Piccolo 0 0 73 Flute 0 0 74 Recorder 0 0 75 PanFlute 0 0 76 Bottle 0 0 77 Shakhchi 0 0 78 Whistle 0 0 79 Ocarina 0 0 80 Synth Lead
Name CC32 CC0 PC SquareLd 0 0 81 LMSquare 8 0 81 Hollow 18 0 81 Shmoog 19 0 81 Mellow 64 0 81 SoloSine 65 0 81 SineLead 66 0 81
Saw.Lead 0 0 82 Saw 2 6 0 82 ThickSaw 8 0 82 DynaSaw 18 0 82 DigiSaw 19 0 82 Big Lead 20 0 82 HeavySyn 24 0 82 WaspySyn 25 0 82 PulseSaw 40 0 82 Dr. Lead 41 0 82 VeloLead 45 0 82 Seq Ana 96 0 82 CaliopLd 0 0 83 Pure Pad 65 0 83 Chiff Ld 0 0 84 Rubby 64 0 84 CharanLd 0 0 85 DistLead 64 0 85 WireLead 65 0 85 Voice Ld 0 0 86 SynthAah 24 0 86 Vox Lead 64 0 86 Fifth Ld 0 0 87 Big Five 35 0 87 Bass&Ld 0 0 88 Big&Low 16 0 88 Fat&Prky 64 0 88 SoftWurl 65 0 88 Synth Pad
Name CC32 CC0 PC NewAgePd 0 0 89 Fantasy2 64 0 89 Warm Pad 0 0 90 ThinkPad 16 0 90 Soft Pad 17 0 90 Sine Pad 18 0 90 Horn Pad 64 0 90 RotarStr 65 0 90 PolySyPd 0 0 91 PolyPd80 64 0 91 ClickPad 65 0 91 Ana Pad 66 0 91 SquarPad 67 0 91 ChoirPad 0 0 92 Heaven 2 64 0 92 Itopia 66 0 92 CC Pad 67 0 92 BowedPad 0 0 93 Glacier 64 0 93 GlassPad 65 0 93 MetalPad 0 0 94 Tine Pad 64 0 94 Pan Pad 65 0 94 Halo Pad 0 0 95 SweepPad 0 0 96 Shwimmer 20 0 96 Converge 27 0 96 PolarPad 64 0 96 Celstial 66 0 96
Viscount Maestro – Grande - Sinfonia APPENDIX A: Sound List
71
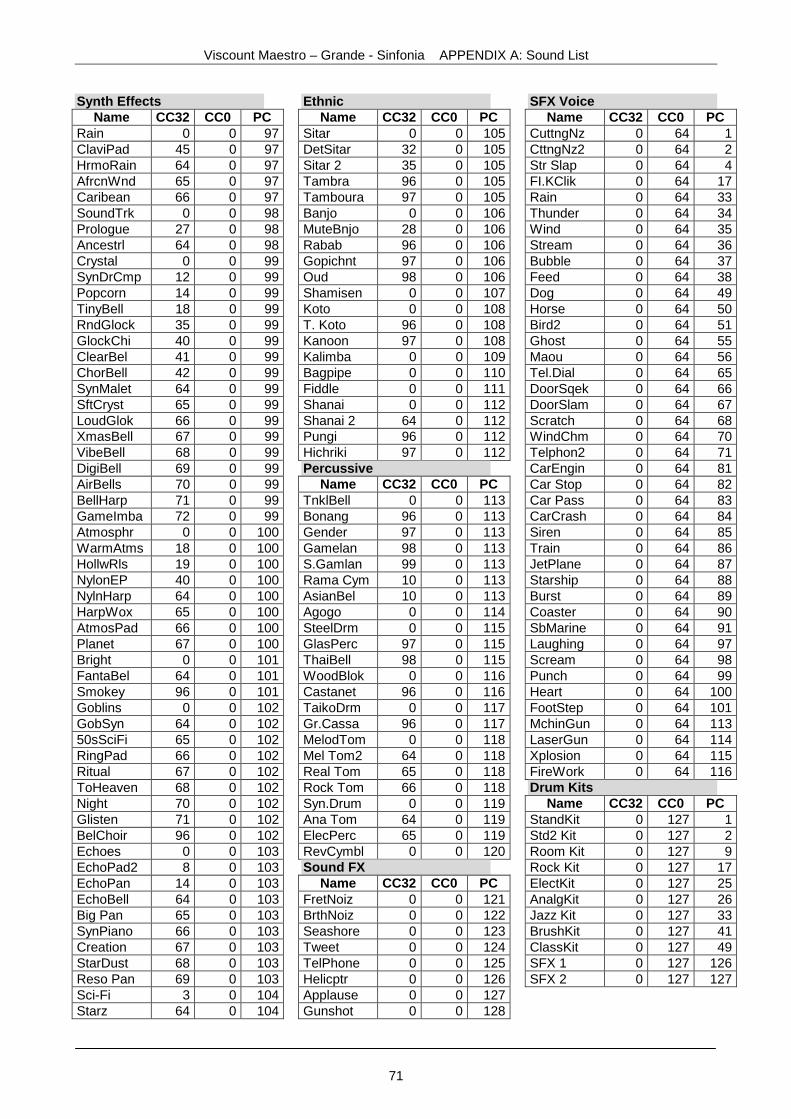
Synth Effects Name CC32 CC0 PC
Rain 0 0 97 ClaviPad 45 0 97 HrmoRain 64 0 97 AfrcnWnd 65 0 97 Caribean 66 0 97 SoundTrk 0 0 98 Prologue 27 0 98 Ancestrl 64 0 98 Crystal 0 0 99 SynDrCmp 12 0 99 Popcorn 14 0 99 TinyBell 18 0 99 RndGlock 35 0 99 GlockChi 40 0 99 ClearBel 41 0 99 ChorBell 42 0 99 SynMalet 64 0 99 SftCryst 65 0 99 LoudGlok 66 0 99 XmasBell 67 0 99 VibeBell 68 0 99 DigiBell 69 0 99 AirBells 70 0 99 BellHarp 71 0 99 GameImba 72 0 99 Atmosphr 0 0 100 WarmAtms 18 0 100 HollwRls 19 0 100 NylonEP 40 0 100 NylnHarp 64 0 100 HarpWox 65 0 100 AtmosPad 66 0 100 Planet 67 0 100 Bright 0 0 101 FantaBel 64 0 101 Smokey 96 0 101 Goblins 0 0 102 GobSyn 64 0 102 50sSciFi 65 0 102 RingPad 66 0 102 Ritual 67 0 102 ToHeaven 68 0 102 Night 70 0 102 Glisten 71 0 102 BelChoir 96 0 102 Echoes 0 0 103 EchoPad2 8 0 103 EchoPan 14 0 103 EchoBell 64 0 103 Big Pan 65 0 103 SynPiano 66 0 103 Creation 67 0 103 StarDust 68 0 103 Reso Pan 69 0 103 Sci-Fi 3 0 104 Starz 64 0 104
Ethnic Name CC32 CC0 PC
Sitar 0 0 105 DetSitar 32 0 105 Sitar 2 35 0 105 Tambra 96 0 105 Tamboura 97 0 105 Banjo 0 0 106 MuteBnjo 28 0 106 Rabab 96 0 106 Gopichnt 97 0 106 Oud 98 0 106 Shamisen 0 0 107 Koto 0 0 108 T. Koto 96 0 108 Kanoon 97 0 108 Kalimba 0 0 109 Bagpipe 0 0 110 Fiddle 0 0 111 Shanai 0 0 112 Shanai 2 64 0 112 Pungi 96 0 112 Hichriki 97 0 112 Percussive
Name CC32 CC0 PC TnklBell 0 0 113 Bonang 96 0 113 Gender 97 0 113 Gamelan 98 0 113 S.Gamlan 99 0 113 Rama Cym 10 0 113 AsianBel 10 0 113 Agogo 0 0 114 SteelDrm 0 0 115 GlasPerc 97 0 115 ThaiBell 98 0 115 WoodBlok 0 0 116 Castanet 96 0 116 TaikoDrm 0 0 117 Gr.Cassa 96 0 117 MelodTom 0 0 118 Mel Tom2 64 0 118 Real Tom 65 0 118 Rock Tom 66 0 118 Syn.Drum 0 0 119 Ana Tom 64 0 119 ElecPerc 65 0 119 RevCymbl 0 0 120 Sound FX
Name CC32 CC0 PC FretNoiz 0 0 121 BrthNoiz 0 0 122 Seashore 0 0 123 Tweet 0 0 124 TelPhone 0 0 125 Helicptr 0 0 126 Applause 0 0 127 Gunshot 0 0 128
SFX Voice Name CC32 CC0 PC
CuttngNz 0 64 1 CttngNz2 0 64 2 Str Slap 0 64 4 FI.KClik 0 64 17 Rain 0 64 33 Thunder 0 64 34 Wind 0 64 35 Stream 0 64 36 Bubble 0 64 37 Feed 0 64 38 Dog 0 64 49 Horse 0 64 50 Bird2 0 64 51 Ghost 0 64 55 Maou 0 64 56 Tel.Dial 0 64 65 DoorSqek 0 64 66 DoorSlam 0 64 67 Scratch 0 64 68 WindChm 0 64 70 Telphon2 0 64 71 CarEngin 0 64 81 Car Stop 0 64 82 Car Pass 0 64 83 CarCrash 0 64 84 Siren 0 64 85 Train 0 64 86 JetPlane 0 64 87 Starship 0 64 88 Burst 0 64 89 Coaster 0 64 90 SbMarine 0 64 91 Laughing 0 64 97 Scream 0 64 98 Punch 0 64 99 Heart 0 64 100 FootStep 0 64 101 MchinGun 0 64 113 LaserGun 0 64 114 Xplosion 0 64 115 FireWork 0 64 116 Drum Kits
Name CC32 CC0 PC StandKit 0 127 1 Std2 Kit 0 127 2 Room Kit 0 127 9 Rock Kit 0 127 17 ElectKit 0 127 25 AnalgKit 0 127 26 Jazz Kit 0 127 33 BrushKit 0 127 41 ClassKit 0 127 49 SFX 1 0 127 126 SFX 2 0 127 127

Viscount Maestro – Grande – Sinfonia APPENDIX B: MIDI Implementation Chart
72
MIDI IMPLEMENTATION CHART
Viscount MAESTRO – GRANDE – SINFONIA Date: 11/06/2001 Digital Pianos with Styles Ver.: 1.666
FUNCTION TRANSMITTED RECOGNIZED REMARKS BASIC CHANNEL
Default Changed
1-16 1-16
1-16 1-16
see manual for internal mapping
MODE Default Messages Altered
Mode 3 X *********
Mode 3 X
NOTE NUMBER
True Voice
0-127 21-108
0-127 21-108
some timbre limits to narrower range
VELOCITY Note ON Note OFF
O X
O X
AFTER TOUCH
Key's Ch's
X X
X O
only XG module
PITCH BENDER X O CONTROL CHANGE
7 11 64 66 67 91 93
120 123
O O O O O O O O O
O O O O O O O O O
Main Volume Expression Contr. Damper Pedal Sustain Pedal Soft Pedal Reverb Chorus All Sound Off All Note Off (*1) (*2)
PROGRAM CHANGE
True #
0-127 0-127
0-127 0-127
(*1)
SYSTEM EXCLUSIVE O O SYSTEM COMMON
Song Pos Song Sel Tune
X X X
X X X
SYSTEM REAL TIME
Clock Commands
O O
O O
AUX MESSAGES
Local On-Off All Note Off Active Sense Reset
X O O X
X O O X
NOTES: *1 Message can be filtered *2 The internal XG module can handle any CC ranging from 0 to 127
Mode 1: Omni On, Poly Mode 2: Omni On, Mono O = YES Mode 3: Omni Off, Poly Mode 4: Omni Off, Mono X = NO
CAUTION! This product contains a lithium battery. There is danger of explosion if battery isincorretly replaced. Replace only with a Maxell CR2032.Replace only with the correct polarity. Discard used battery according to manufacter’sinstruction’s.ADVARSEL! Lithiumbatteri – Eksplosjonsfare. Vade utksifting benyttes kun batteri som anbefaltav apparatfabrikanten. Brukt batteri returneres apparatleverandøren.ADVARSEL! Lithiumbatteri - Eksplosjonsfare ved fejlagtig håndtering. Udskiftning må kun skemed batteri av samme fabrikat og type. Levér det brugte batteri tilbage til leverandøren.VAROITUS! Paristo voi räfähtää, jos se on virheellisesti asennettu. Vaihda paristo ainoastaanlaitevalmistajan suosittelemaan tyyppin. Hävitä käytetty paristovalmistajan ohjeiden mukaisesti.WARNING! Explosionsfar vid felaktigt batteribyte. Anväd samma batterityp eller en ekvivalenttyp som rekommendars av apparatillverkaren. Kassera använt batteri enlight fabrikantensistructions.
The information contained in this manual is subject to change at any time without notification.Some information contained in this manual may also be inaccurate due to undocumentedchanges in the product or operating system since this version of the manual was completed.The information contained in this version of the owner’s manual supercedes all previous version.
NOTE: This equipment has been tested and found to comply with the limits for a Class Bdigital Device, persuant to Part 15 if the FCC Rules. These limits are designed to providereasonable protection against harmful interference in a residential installation. This equipmentgenerates, uses and can radiate radio frequency energy and, if not installed and used inaccordance with the instruction, may cause harmful interference to radio comunications.However, there is no guarantee that the interference will not occur in a particular installation. Ifthis equipment does cause harmful interference to radio or television reception, which can bedeterminated by turning the equipment off and on, the user is encuraged to try to correct theinterference by one or more of the following measures:
- Reorient or relocate the receiving antenna.- Increase the separation between the equipment and receiver.- Connect the equipment into an outlet on a circuit different from that to which the receiver
is connected.- Consult the dealer or an experienced Radio/Tv technician for help.
The user is cautioned that any changes or modification not expressly approved by the partyresponsable for compliance could void the user’s authority opearate the equipment.

Sales Division: Via Belvedere Fogliense 8, I-47836 Mondaino (RN) Italy tel.+39-0541-981700 - fax +39-0541-869605 -
e-mail: [email protected] - Internet: www.viscount-organs.com - www.viscount.it
Distribution for Italy: TITAN MUSIC S.A. Strada Genghe di Atto, 80 - 47031 Acquaviva – Repubblica di San Marino
tel.0549-999164 - fax 0549-999490 e-mail: [email protected] - Internet: www.viscount-organs.com - www.viscount.it