manual hunter xc
TRANSCRIPT

7/31/2019 Manual Hunter XC
http://slidepdf.com/reader/full/manual-hunter-xc 1/20
SEASONALADJUSTMENT WATERDAYS
ALLMANUAL-ALL STATIONS START TIMES
SYSTEM OFF CURRENT TIME/DAY
1MANUAL-ONESTATION RUNTIMES
ACTIVE
SENSOR BYPASS
RUN
PRG
Battery Operated Controllers
Owner’s Manual and
Programming Instructions

7/31/2019 Manual Hunter XC
http://slidepdf.com/reader/full/manual-hunter-xc 2/20

7/31/2019 Manual Hunter XC
http://slidepdf.com/reader/full/manual-hunter-xc 3/20
ENG
Introduction� � � � � � � � � � � � � � � � � � � � � � � � � � �� � � � � � � � � � � � � � � � � � � � � � � � � � � �� � � � � � � � � � � � � � � � � � 1
XC Hybrid Components� � � � � � � � � � � � � � � � � � � � � � � � � � � �� � � � � � � � � � � � � � � � � � � � � � � � � 1
Mounting the Controller to the Wall � � �� � � � � � � � � � � � � � � � � � � � � � � � � � � �� � � � � � � � � 3
Connecting Valves� � � � � � � � � � � � � � � � � � � � � � � � � � � �� � � � � � � � � � � � � � � � � � � � � � � � � � � � �� � � � � � � 3
Installing Batteries� � � � � � � � � � � � � � � � � � � � � � � � � � �� � � � � � � � � � � � � � � � � � � � � � � � � � � � �� � � � � � � 4
Connecting a Master Valve � � � � � � � �� � � � � � � � � � � � � � � � � � � � � � � � � � � � � � �� � � � � � � � � � � � � 4
Connecting a Weather Sensor � � � � � � � � � � � � � � �� � � � � � � � � � � � � � � � � � � � � � � � � � � �� � � � � 5
Testing the Weather Sensor� � � � � � � � � � � � � � � � � � � � � � � � � � � � �� � � � � � � � � � � � � � � � � � 5
Manually Bypassing the Weather Sensor ������� �������� ������� �������� 5
Power Failures� � � � � � � � � � � � � � � � � � � � � � � � � � � �� � � � � � � � � � � � � � � � � � � � � � � � � � � �� � � � � � � � � � � � � 6
Installing the Transformer (optional) �������� ������� �������� ������� �������� � 6
Watering Schedule � � � �� � � � � � � � � � � � � � � � � � � � � � � � � � � �� � � � � � � � � � � � � � � � � � � � � � � � � � � � �� � 7
Programming the Controller�������� ������� �������� ������� �������� ������� ������ 8
Setting the Date and Time � � � � � � � � � � � � � � � � � � � � � � � � � � � � �� � � � � � � � � � � � � � � � � � � 8
Setting the Program Start Time(s) � � � � � � � � � �� � � � � � � � � � � � � � � � � � � � � � � � � � � 8
Eliminating a Program Start Time � �� � � � � � � � � � � � � � � � � � � � � � � � � � � � �� � � � � � � � 9
Setting Station Run Times � � � � � � � � � � � � � � � � � � � � � � � � � � � � �� � � � � � � � � � � � � � � � � � � 9
Setting Days To Water � � � � � � � � � � � � � � � � � � � � � � � � �� � � � � � � � � � � � � � � � � � � � � � � � � � � �� 9
Selecting Specific Days of the Week to Water � � � � � � � � � � � � � � � � �� � � � � � 9
Selecting Interval Watering � � � � � � � � � � � � � � � � � � � � � � � � � � � �� � � � � � � � � � � � � � � � � � 1 0
Setting Event Day(s) Off ������� �������� ������� �������� �������� ������� ������ 10
Automatic Watering� � � � � � � � � � � � � � � � � � � � � � � � � � � �� � � � � � � � � � � � � � � � � � � � � � � � � � � �� 1 0
System Off � � � � � � � � � � � � � � � � � � � � � � � � � � � � � � � � � � � � � � � � � � � � � � � � � � � � � � � � � � � � � � � � � � � � 1 0
Programmable Rain Off� � � � � � � � � � � � � � � � � � � � � � � � � � �� � � � � � � � � � � � � � � � � � � � � � � � � 1 0
Seasonal Adjustment � � � � � � � � � � � � � � � � � � � � � � � � � � � � �� � � � � � � � � � � � � � � � � � � � � � � � � 1 1
Manually Run a Single Station ������� �������� ������� �������� ������� �����1 1
Manually Run All Stations � � � � � � � � � � � � � � � � � � � � � � � � � � � � � � � � � � � � � � � � � � � � � � � � 1 1
One Touch Manual Start and Advance �������� ������� �������� �������� ��11
Advanced Features� � � � � � � � � � � � � � � � � � � � � � � � � � �� � � � � � � � � � � � � � � � � � � � � � � � � � � �� � � � � � � 1 2
Programmable Sensor Override������� �������� ������� �������� �������� ���12
Test Program of All Stations � � � � � � � � � � � � � � � � � � � � � � � � � � � � � � � � � � � � � � � � � � � � � 1 2
Easy Retrieve™ Program Memory � � � � � � � � � � � � � � � � � � � � � � � � �� � � � � � � � � � � � � 1 3
Programmable Delay Between Stations������� �������� ������� �������� �13
Clearing the Controller's Memory/Resetting the Controller �����13
Troubleshooting Guide� � � � � � � � � � � � � � � � � � � � � � � � � � � �� � � � � � � � � � � � � � � � � � � � � � � � � 1 4
Specifications� � � � � � � � � � � � � � � � � � � � � � � � � � � � �� � � � � � � � � � � � � � � � � � � � � � � � � � � � � �� � � � � � � � � � 1 5
Operating Specifications � � � � � � � � � � � � � � � � � � � � � � � � � � � � � � � � � � � � � � � � � � � � � � � � � � 1 5
Electrical Specifications� � � � � � � � � � � � � � � � � � � � � � � � �� � � � � � � � � � � � � � � � � � � � � � � � � � � � �� 1 5
Explanation of Symbols� � � � � � � � � � � � � � � � � � � � � � � � � � � � � � � � � � � � � � � � � � � � � � � � � � � � 1 5
Certificate of Conformity to European Directives �������� ������� ������� 16
Table of ConTenTs
7/31/2019 Manual Hunter XC
http://slidepdf.com/reader/full/manual-hunter-xc 4/20
1
ENG
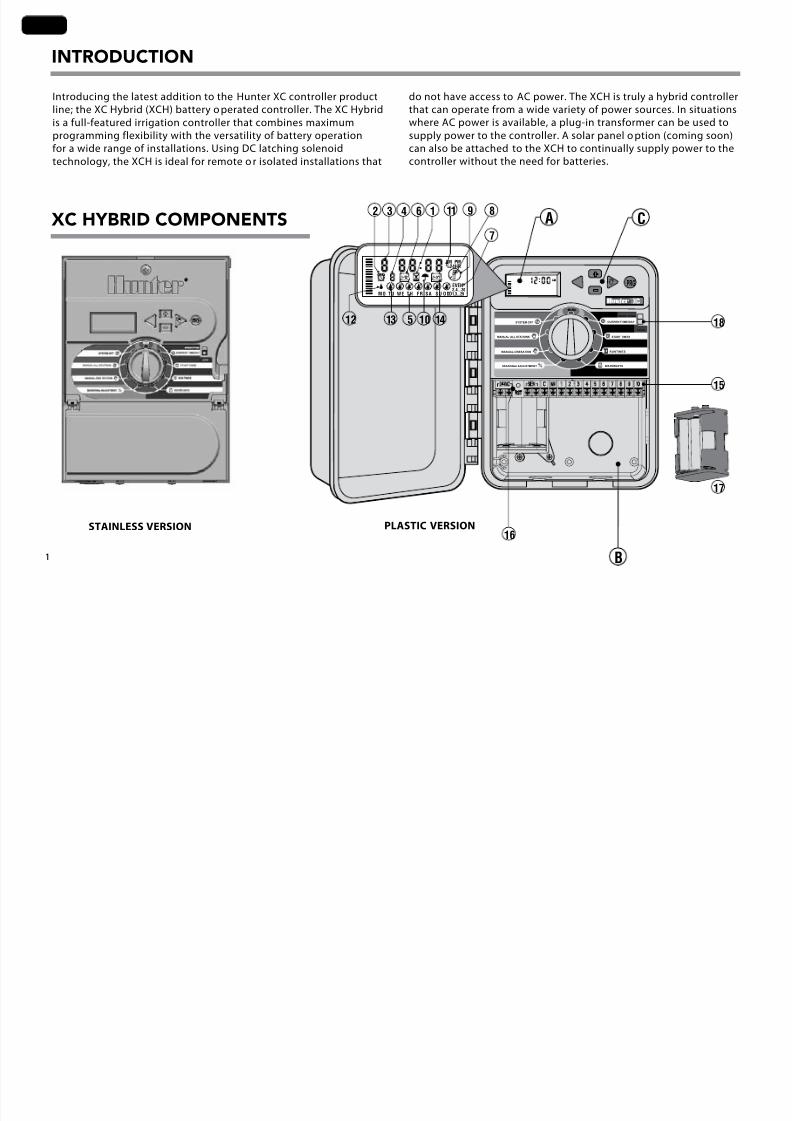
InTroduCTIon
XC HybrId ComponenTs
Introducing the latest addition to the Hunter XC controller product
line; the XC Hybrid (XCH) battery o perated controller. The XC Hybrid
is a full-featured irrigation controller that combines maximum
programming flexibility with the versatility of battery operationfor a wide range of installations. Using DC latching solenoid
technology, the XCH is ideal for remote o r isolated installations that
do not have access to AC power. The XCH is truly a hybrid controller
that can operate from a wide variety of power sources. In situations
where AC power is available, a plug-in transformer can be used to
supply power to the controller. A solar panel o ption (coming soon)can also be attached to the XCH to continually supply power to the
controller without the need for batteries.
16
PRG
15
18
17
B
A C
SEASONALADJUSTMENT WATERDAYS
ALLMANUAL-ALL STATIONS START TIMES
SYSTEM OFF CURRENT TIME/DAY
1MANUAL-ONESATION RUNTIMES
ACTIVE
SENSOR BYPASS
RUN
MO TU WE TH FR SA SU ODD
EVEN
AM PM%24HR
2,4...301,3...29
13
2 3 9114 6
10512
1
7
8
14
PLASTIC VERSIONSTAINLESS VERSION

7/31/2019 Manual Hunter XC
http://slidepdf.com/reader/full/manual-hunter-xc 5/20
ENG
2
A – LCD Display
1. RunTimes – Allows user to set each valve station run time
from 1 minute to 4 hours.
2. StartTimes – Allows 1 to 4 start times to be set in each
program.
3. StationNumber – Indicates currently selected station number. 4. ProgramDesignator – Identifies program (A, B, or C) in use.
5. DayoftheWeek – Identifies day of the week.
6. Interva lWatering – Identifies month when programming
current date.
7. Odd/EvenWatering – Identifies if Odd or Even watering has
been selected.
8. FlashingSprinkler – Indicates that watering is taking place.
9. SystemOff – Allows user to discontinue all programs and
watering. Also allows the user to set the programmable "rain off"
which stops watering for a period from 1 to 7 days.
10. Umbrella – Indicates that the rain sensor is active.
11. SeasonalAdjustment – Allows the user to make run time
changes according to the seasons without reprogramming the
controller. Bars on the left allow quick visual reference to the
seasonal adjustment percentage.
12. RainDrop – Indicates watering will occur on the selected day.
13. CrossedRainDrop – Indicates the watering will NOT o ccur
on the selected day.
14. Calendar – Indicates interval watering schedule has been
programmed. Icon also appears when programming the current
day.
B – Wiring Compartment
15. TerminalStrip – Use to attach transformer, sensor, and valve
wires from their source to the controller.
16. ResetButton – Use to reset the controller.
17. BatteryHolder – Holds six AA alkaline batteries.
C – Control Buttons
Button – Increases the sele cted item flashing in the d isplay.
Button – Decreases the sele cted item flashing in the d isplay.
Button – Returns selected flashing display to previous item.
Button – Advances the selected flashing display to the next item.
Button – Selects program A, B or C for different watering zone
requirements.
18. SensorBypassSwitch.
D – Dial Settings
Run– Normal dial position for all controller automatic and manual
operation.
CurrentTime/Day – Allows current day and clock time to be set.
StartTimes – Allows 1 to 4 start times to be set in each program.
RunTimes – Allows user to set each valve station run time from 1
minute to 4 hours.
WaterDays – Allows the user to select interval days to water.
SeasonalAdjustment – Allows user to make run time changes
according to the seasons without reprogramm ing the controller.
Bars on the left allow quick visual reference to the seasonal
adjustment percentage.
1 Manual-OneStation – Allows user to activate a one-time
watering of a single valve.
ALL Manual-AllStations – Allows user to activate a one-time
watering of all valve stations or a few selected stations.
SystemOff – Allows user to discontinue all programs and
watering. Also allows the user to set the programmable rain off
which stops watering for a period from 1 to 7 days.
E – External Transformer (Optional)
A plug in transformer can be used to supply AC power to the controller.

7/31/2019 Manual Hunter XC
http://slidepdf.com/reader/full/manual-hunter-xc 6/20
3
ENG
mounTIng THe ConTroller To THe Wall
1. Secure one screw into the wall. Install screw anchors if attaching
to drywall or masonry wall.
2. Slide the keyhole on top of the controller over the screw.
3. Secure the controller in place by installing screws in the holes
below the terminal strip.
ConneCTIng ValVes
NOTE: The XCH operates DC latching solenoids only (order Hunter
P/N: 458200). 24 VAC solenoids will NOT operate with the XCH.
DC solenoids can be easily identified by red and black leads. The
red lead is attached to the station output, while the black lead is
attached to the common wire.
1. Route valve wires between the control valve location and
controller.2. At valves, attach a common wire to the black solenoid wire on
all valves. Attach a separate control wire to the remaining red
wire of each valve. All wire connections should be done using
waterproof connectors.
3. Route the valve wires through the conduit. Attach the conduit
through the bottom right side o f the controller.
4. Secure the valve common wire to the C (Common) screw on the
terminal strip. Attach each of the individual valve control wires
to the appropriate station terminals and tighten their screws.
WIRE SIZE DISTANCE FROM VALVE
TO CONTROLLER
18 AWG 550 feet
16 AWG 870 feet
14 AWG 1380 feet
12 AWG 2200 feet
Valve Common Wire
(Black Leads)
Valve 1
Valve 2
Valve 3
Valve 4
Station Wires(Red Leads)
7/31/2019 Manual Hunter XC
http://slidepdf.com/reader/full/manual-hunter-xc 7/20
ENG
4
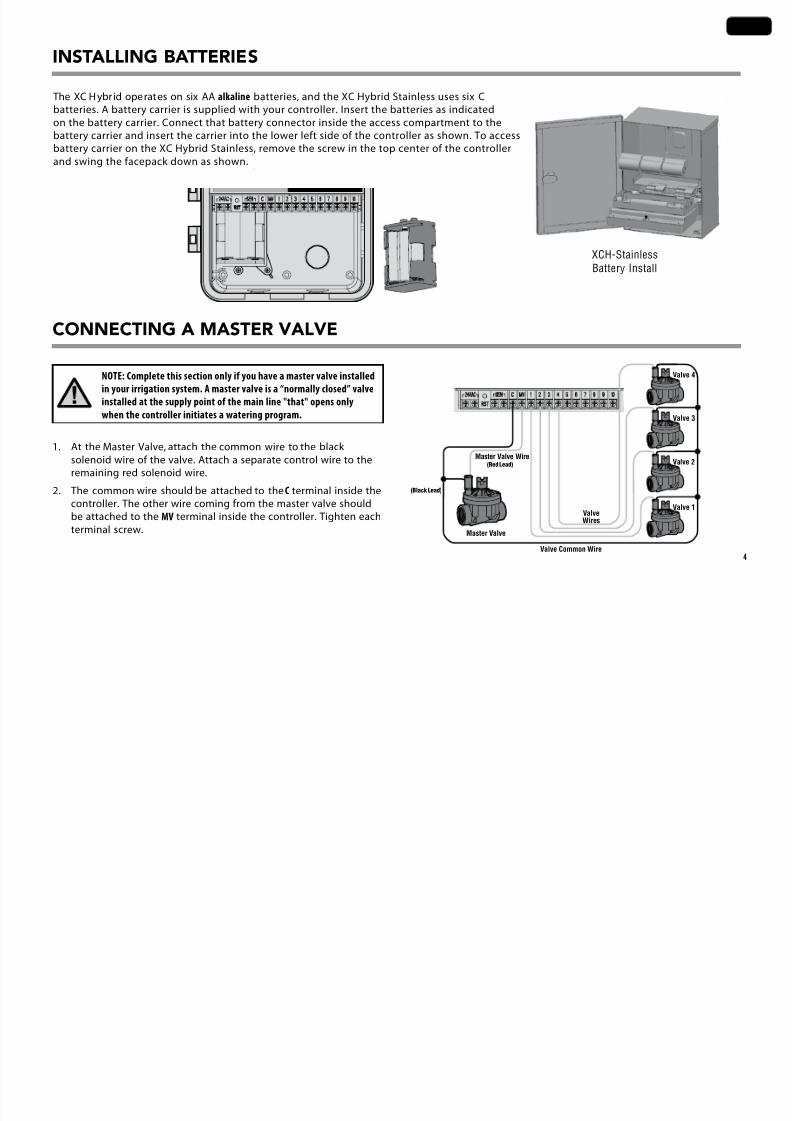
InsTallIng baTTerIes
LL
1
I
XCH-Stainless
Battery Install
The XC H ybrid operates on six AA alkaline batteries, and the XC Hybrid Stainless uses six C
batteries. A battery carrier is supplied with your controller. Insert the batteries as indicated
on the battery carrier. Connect that battery connector inside the access compartment to the
battery carrier and insert the carrier into the lower left side of the controller as shown. To accessbattery carrier on the XC Hybrid Stainless, remove the screw in the top center of the controller
and swing the facepack down as shown.
ConneCTIng a masTer ValVe
NOTE: Complete this section only if you have a master valve installed
in your irrigation system. A master valve is a “normally closed” valve
installed at the supply point of the main line "that" opens only
when the controller initiates a watering program.
1. At the Master Valve, attach the common wire to the black
solenoid wire of the valve. Attach a separate control wire to the
remaining red solenoid wire.
2. The common wire should be attached to the C terminal inside the
controller. The other wire coming from the master valve should
be attached to the MV terminal inside the controller. Tighten each
terminal screw.
Valve Common Wire
Valve 1
Valve 2
Valve 3
Valve 4
ValveWires
Master Valve
Master Valve Wire
(Black Lead)
(Red Lead)
7/31/2019 Manual Hunter XC
http://slidepdf.com/reader/full/manual-hunter-xc 8/20
5
ENG
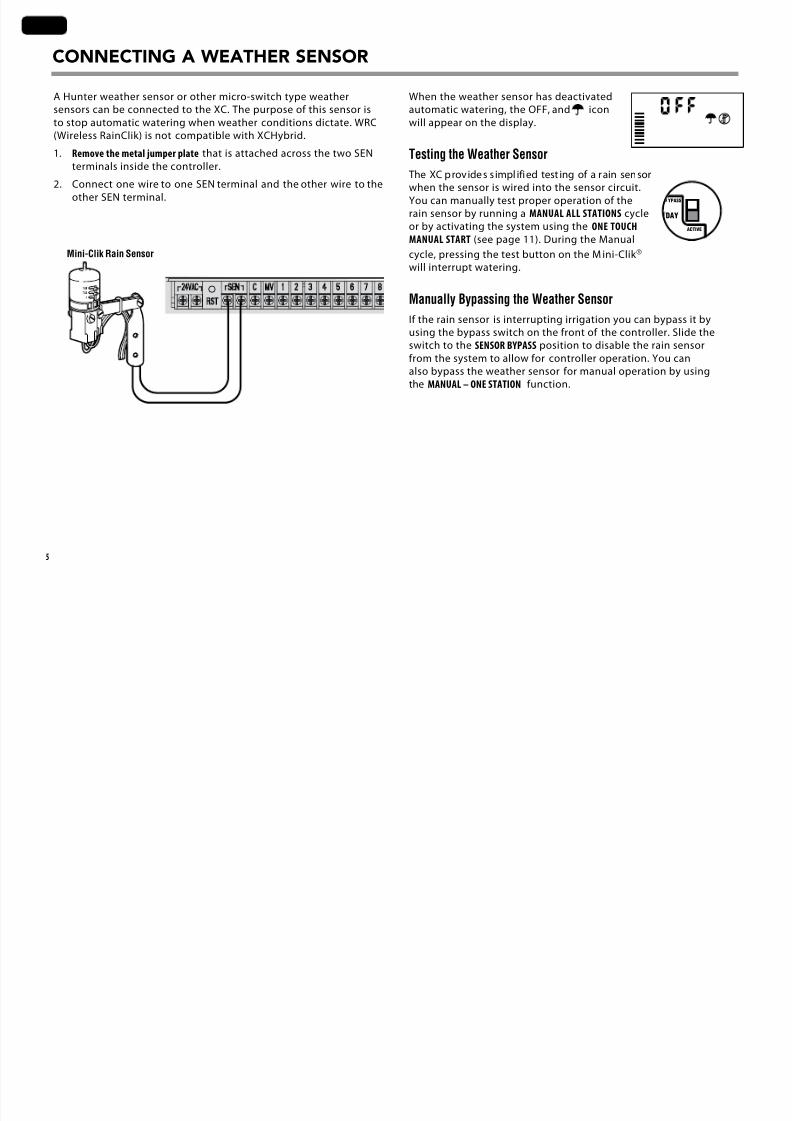
ConneCTIng a WeaTHer sensor
A Hunter weather sensor or other micro-switch type weather
sensors can be connected to the XC. The purpose of this sensor is
to stop automatic watering when weather conditions dictate. WRC
(Wireless RainClik) is not compatible with XCHybrid.1. Remove the metal jumper plate that is attached across the two SEN
terminals inside the controller.
2. Connect one wire to one SEN terminal and the other wire to the
other SEN terminal.
When the weather sensor has deactivated
automatic watering, the OFF, and icon
will appear on the display.
Testing the Weather Sensor
The XC provides s impl ified test ing of a rain sensor
when the sensor is wired into the sensor circuit.
You can manually test proper operation of the
rain sensor by running a MANA A TATON cycle
or by activating the system using the ONE TOCH
MANA TART (see page 11). During the Manual
cycle, pressing the test button on the M ini-Clik ®
will interrupt watering.
Manually Bypassing the Weather Sensor
If the rain sensor is interrupting irrigation you can bypass it by
using the bypass switch on the front of the controller. Slide the
switch to the ENOR BYPA position to disable the rain sensor
from the system to allow for controller operation. You can
also bypass the weather sensor for manual operation by using
the MANA – ONE TATON function.
Mini-Clik Rain Sensor
DAY
ACTIVE
YPASS

7/31/2019 Manual Hunter XC
http://slidepdf.com/reader/full/manual-hunter-xc 9/20
ENG
6
InsTallIng THe Transformer (opTIonal)
poWer faIlures
The XC Hybrid is d esigned to operate on batteries or 2 4 VAC power.
If AC power is available, a 24 VAC output plug in transformer can be
attached to the two 24 VAC terminals inside the lower access area.
The cont rol ler has non-volati le mem ory. Programm ed informa tion
will never be lost due to a power outage (when using AC power) or
if the AAA batteries go dead.IN / OUT VERSION
CATALOG
NUMBER
120/24 VAC US 526500
230/24 VAC European 545700
240/24 VAC Australian 545500
7/31/2019 Manual Hunter XC
http://slidepdf.com/reader/full/manual-hunter-xc 10/20
7
ENG
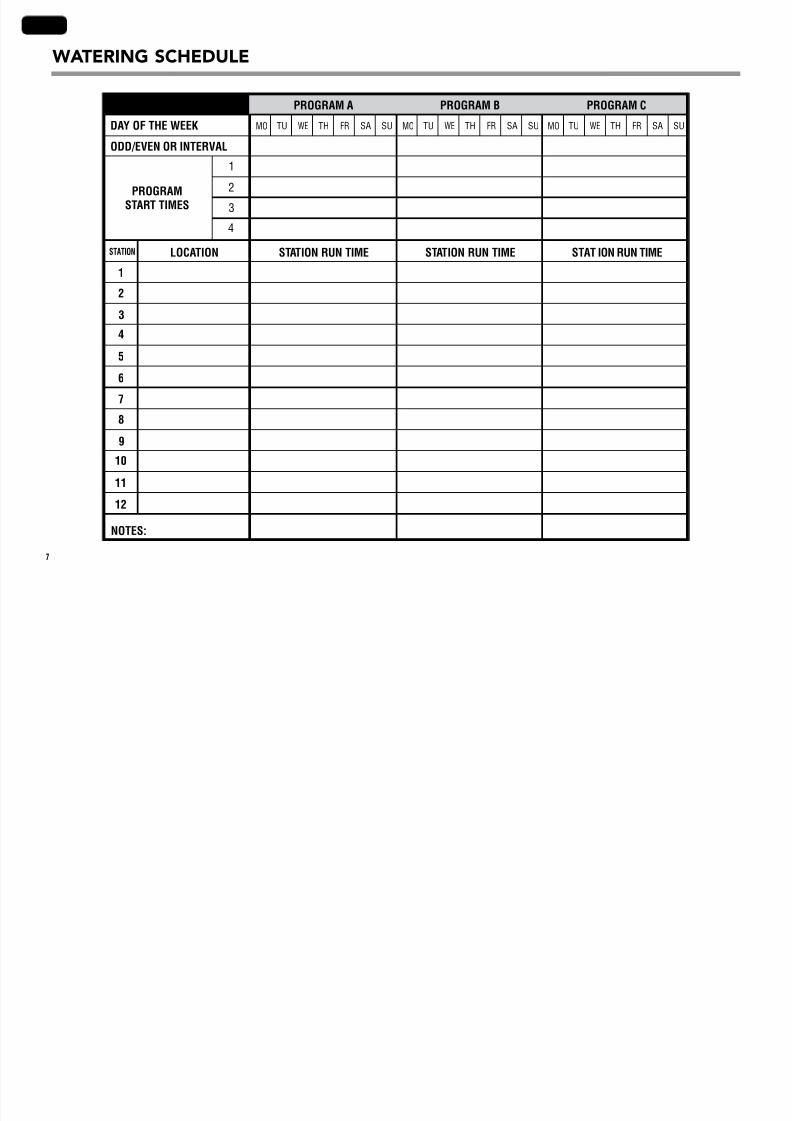
PROGRAM A PROGRAM B PROGRAM C
LOCATION
12
3
4
5
6
7
8
9
10
11
12
STA TION STAT ION RUN TIME STAT ION RUN TIME STAT ION RUN TIME
1
2
3
4
PROGRAM
START TIMES
HUNTER XC Hybrid
NOTES:
DAY OF THE WEEK
ODD/EVEN OR INTERVAL
MO TU WE TH FR SUSA MO TU WE TH FR SUSA MO TU WE TH FR SUSA
WaTerIng sCHedule
7/31/2019 Manual Hunter XC
http://slidepdf.com/reader/full/manual-hunter-xc 11/20
ENG
8
programmIng THe ConTroller
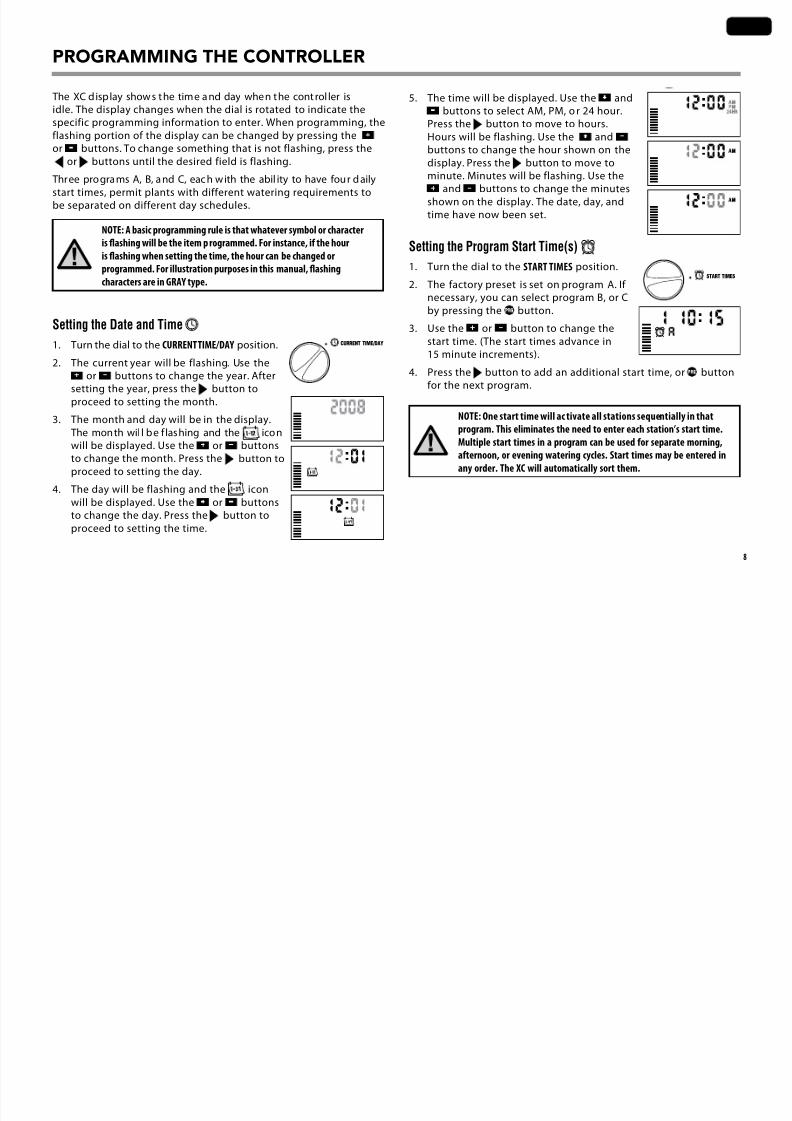
5. The time will be displayed. Use the and
buttons to select AM, PM, o r 24 hour.
Press the button to move to hours.
Hours will be flashing. Use the andbuttons to change the hour shown on the
display. Press the button to move to
minute. Minutes will be flashing. Use the
and buttons to change the minutes
shown on the display. The date, day, and
time have now been set.
Setting the Program Start Time(s)
1. Turn the dial to the TART TME position.
2. The factory preset is set on program A. If
necessary, you can select program B, or C
by pressing the button.
3. Use the or button to change the
start time. (The start times advance in
15 minute increments).
4. Press the button to add an additional start time, or button
for the next program.
NOTE: One start time will ac tivate all stations sequentially in thatprogram. This eliminates the need to enter each station’s start time.
Multiple start times in a program can be used for separate morning,
afternoon, or evening watering cycles. tart times may be entered in
any order. The XC will automatically sort them.
The XC display show s the time a nd day when the cont rol ler is
idle. The display changes when the dial is rotated to indicate the
specific programming information to enter. When programming, the
flashing portion of the display can be changed by pressing the
or buttons. To change something that is not flashing, press the
or buttons until the desired field is flashing.
Three programs A, B, a nd C, eac h with the abil ity to have four d aily
start times, permit plants with different watering requirements to
be separated on different day schedules.
NOTE: A basic programming rule is that whatever symbol or character
is ashing will be the item p rogrammed. For instance, if the hour
is ashing when setting the time, the hour can be changed or
programmed. For illustration purposes in this manual, ashing
characters are in GRAY type.
Setting the Date and Time
1. Turn the dial to the CRRENT TME/DAY position.
2. The current year will be flashing. Use the
or buttons to change the year. After
setting the year, press the button to
proceed to setting the month.
3. The month and day will be in the display. The month wil l be f lashing and the icon
will be displayed. Use the or buttons
to change the month. Press the button to
proceed to setting the day.
4. The day will be flashing and the icon
will be displayed. Use the or buttons
to change the day. Press the button to
proceed to setting the time.
CURRENT TIME/DAY
START TIMES

7/31/2019 Manual Hunter XC
http://slidepdf.com/reader/full/manual-hunter-xc 12/20
9
ENG
Selecting Specic Days of the Week to Water
1. With the cursor on a specific day
(the cursor will always start with MO),
press the button to activate a
particular day of the week to water. Press
the button to cancel watering for that day. After pressing a
button the cursor automatically advances to the next day.
2. Repeat step 1 until all desired days have been selected. The
selected days will show a to indicate their status is ON. The
last is the last day of watering for that program.
Selecting Odd or Even Days to Water
This feature uses nu mbered day(s) of the mon th f or wate ringinstead of specific days of the week (odd days: 1st, 3rd, 5th, etc.;
even days: 2nd, 4th, 6th, etc.).
1. With the cursor on Su press the
button once. The icon and odd will be
displayed.
2. If odd day watering is desired, turn the
dial back to the run position.
3. If even day watering is desired, press the
button once. The icon and EVEN willbe displayed. You can move back and forth
from ODD to EVEN by pressing the and
buttons.
NOTE: The 31st of any month and February 29th are always “off” days
if Odd watering is selected.
Eliminating a Program Start Time
With the dial set to TART TME position,
push the or button until you reach
12:00 AM (Midnight). From here push the
button once to reach the OFF position.
Setting Station Run Times
1. Turn the dial to Run Times position.
2. The display will show the last program
selected (A, B, or C), the station number
selected, icon, and the station will
be flashing. You can switch to another
program by pressing the button.
3. Use the or button to change the
station run time on the display. You can
set the run times from 0 to 4 hours.
4. Press the button to advance to the next station.
Setting Days To Water
1. Turn the dial to the WATER DAY position.
2. The display will show the last programselected (A, B, or C). You can switch to
another program by pressing the button.
3. The controller will display the seven days of the week (MO,
TU, WE, TH , FR, SA, SU). Each day wil l ha ve a icon or a icon
above the day. The icon would represent an “On” water day,
while a icon would represent an “Off” watering day.
START TIMES
RUN TIMES
WATER DAYS
Even2, 4,...30
Odd Day Watering
Even Day Watering
SuSuMoMo TuTu WeWe ThT h F rF r S aSa

7/31/2019 Manual Hunter XC
http://slidepdf.com/reader/full/manual-hunter-xc 13/20
ENG
10
Automatic Watering
After programming the XC, set the dial to the RN
position to enable automatic execution of all selected
watering programs and start times.
System Off
Valves currently watering will be shut off af ter the
dial is turned to the YTEM OFF position for two
seconds. All active programs are discontinued and
watering is stopped. To return the controller to
normal automatic operation, simply return the dial to
the RN position.
Programmable Rain Off
This feature permits the user to s top all
programmed waterings for a designated period
from 1 to 7 days. At the end of the programmed rain
off period, the controller will resume normal
automatic operation.
1. Turn the dial to the YTEM OFF position.
Wait for OFF to be displayed.
2. Press the button as many times asneeded to set the number of days off (up to 7 days).
3. Turn the dial back to the RN position at which OFF ,
a number, the and icons wil l be displayed.
The days off remaining will dec rease at
midnight each day. When it goes to zero, the
display will show normal time of day and
normal irrigation will resume at the next
scheduled start time.
Selecting Interval Watering
With this option you can select interval
watering from 1 to 31 days.
1. With the cursor on EVEN, press the button once and the icon will appear and a 1 flashing in the
display. Interval watering schedule appears on the display.
2. Press the or button to select the number of days between
watering days (from 1 to 31 days). This is called the interval.
The cont rol ler will water t he select ed program at the nex t star t t ime
and will then water at the interval programmed.
Setting Event Day(s) Off
The XC allows you to program a No Water Day(s). This feature is
useful to inhibit watering on specific day(s). For e xample, if you
always mow the lawn on Saturdays, you would designate Saturday
as a No Water Day so that you are not mowing wet grass.
1. Turn the dial to the WATER DAY position.
2. Enter an interval watering schedule as described on page 10.
3. Press the button to scroll to the NO WATER DAY at the bottom
of the d isplay. MO will be flashing.
4. Use the button until the cursor is at the day of the week youwish to set as a No Water Day.
5. Press the button to set this day as a no water day. The will
illuminate over this day.
6. Repeat steps 4 and 5 until all desired event day(s) are off.
NOTE: You also have the option in the interval watering schedule to
program Odd or Even days off.
SYSTEM OFF
RUN
RUN
SYSTEM OFF
7/31/2019 Manual Hunter XC
http://slidepdf.com/reader/full/manual-hunter-xc 14/20
11
ENG
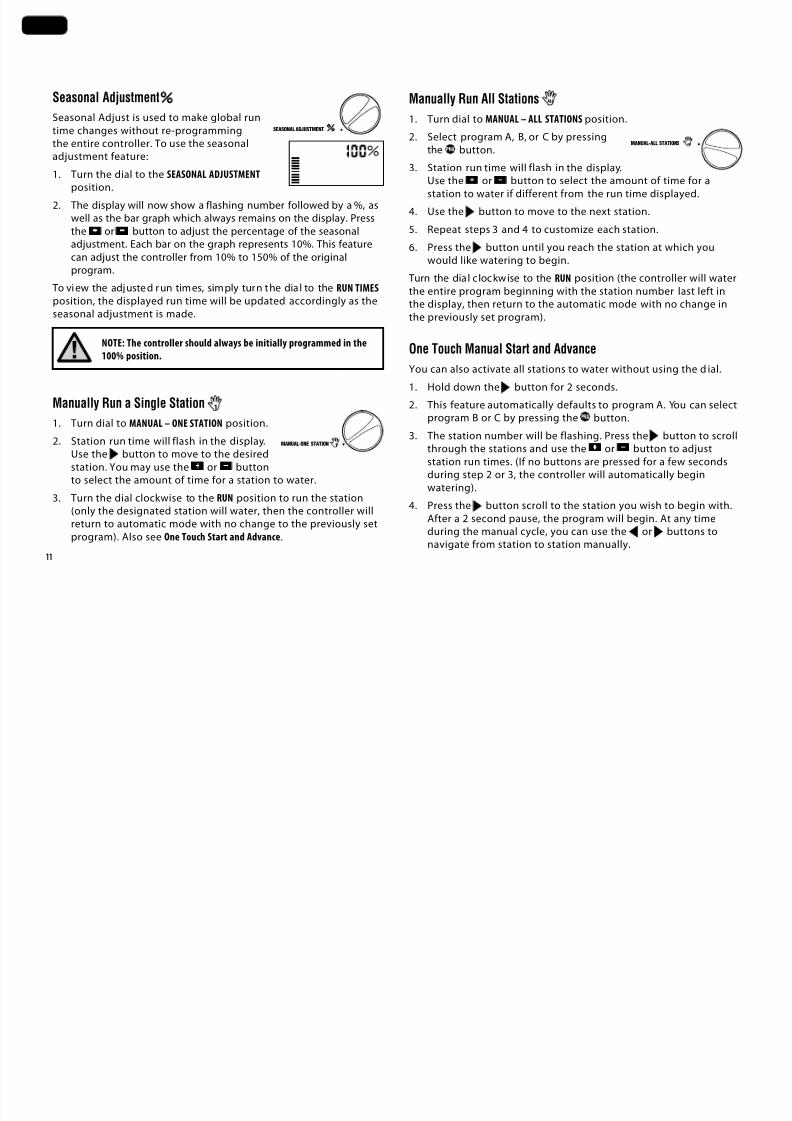
Manually Run All Stations ALL
1. Turn dial to MANA – A TATON position.
2. Select program A, B, or C by pressingthe button.
3. Station run time will flash in the display.
Use the or button to select the amount of time for a
station to water if different from the run time displayed.
4. Use the button to move to the next station.
5. Repeat steps 3 and 4 to customize each station.
6. Press the button until you reach the station at which you
would like watering to begin.
Turn the dial c lockwise to the RN position (the controller will waterthe entire program beginning with the station number last left in
the display, then return to the automatic mode with no change in
the previously set program).
One Touch Manual Start and Advance
You can also activate all stations to water without using the d ial.
1. Hold down the button for 2 seconds.
2. This feature automatically defaults to program A. You can select
program B or C by pressing the button.
3. The station number will be flashing. Press the button to scroll
through the stations and use the or button to adjust
station run times. (If no buttons are pressed for a few seconds
during step 2 or 3, the controller will automatically begin
watering).
4. Press the button scroll to the station you wish to begin with.
After a 2 second pause, the program will begin. At any time
during the manual cycle, you can use the or buttons to
navigate from station to station manually.
Seasonal Adjustment
Seasonal Adjust is used to make global run
time changes without re-programming
the entire controller. To use the seasonaladjustment feature:
1. Turn the dial to the EAONA ADJTMENT
position.
2. The display will now show a flashing number followed by a %, as
well as the bar graph which always remains on the display. Press
the or button to adjust the percentage of the seasonal
adjustment. Each bar on the graph represents 10%. This feature
can adjust the controller from 10% to 150% of the original
program.
To vi ew the adjusted run times, simply turn the dial to the RN TME
position, the displayed run time will be updated accordingly as the
seasonal adjustment is made.
NOTE: The controller should always be initially programmed in the
100% position.
Manually Run a Single Station 1
1. Turn dial to MANA – ONE TATON position.
2. Station run time will flash in the display.
Use the button to move to the desired
station. You may use the or button
to select the amount of time for a station to water.
3. Turn the dial clockwise to the RN position to run the station
(only the designated station will water, then the controller will
return to automatic mode with no change to the previously set
program). Also see One Touch tart and Advance.
MANUAL-ONE STATION 1
MANUAL-ALL STATIONS ALL
SEASONAL ADJUSTMENT

7/31/2019 Manual Hunter XC
http://slidepdf.com/reader/full/manual-hunter-xc 15/20
ENG
12
adVanCed feaTures
Test Program of All Stations
The XC a llow s the user a simplif ied met hod for running a test
program. This feature will operate each station in numerical
sequence, from the lowest to the highest.
1. With the dial in the RN position, press and hold the button.
The stat ion number wil l be d ispl ayed and the time will be
flashing.
2. Use the or buttons to set the run time from 1 to 15
minutes. The run time needs to be entered only once.
3. After a 2 second pause, the test program will start.
Programmable Sensor Override
The XC allows the user to program the controller so t hat the sensor
disables watering on only desired stations. For example, patio
gardens that have pots under overhangs and roofs may not receivewater when it rains and will continue to need to be watered during
periods of rain. To program sensor override:
1. Turn the dial to the RN position.
2. Press and hold the button down while turning the
dial to TART TME position.
3. Release the button. At this point, the display will
show the station number, ON, and the icon,
will be flashing.
4. Press the or button to enable or disablethe sensor for the station shown.
ON = Sensor enabled (will suspend irrigation)
OFF = Sensor disabled (will allow watering)
5. Use the or buttons to scroll to the next
station that you would like to program the
sensor override.
NOTE: The controller default is for the sensor to disable watering on
all zones when rain occurs.
When the XC receives an input from the sensor
to disable watering, the display will indicate
those stations that have been programmed to
override the sensor. A station that is running in
the sensor override mode will flash the and
icons alternately.
Sensor Enable
Sensor Disabled
RUN
7/31/2019 Manual Hunter XC
http://slidepdf.com/reader/full/manual-hunter-xc 16/20
13
ENG
Easy Retrieve™ Program Memory
The XC is capable of sav ing the preferred water ing program into
memory for retrieval at a later time. This feature allows for a quick
way of resetting the controller to the original programmed wateringschedule.
To save the program into the memory
1. With the dial in the RN position, press and hold the and
buttons for 5 seconds. The display will scroll three segments
from left to right across the display indicating the program is
being saved into memory.
2. Release the and buttons.
To retrieve a program that was previously saved into memory.
1. With the dial in the RN position, press and hold the and
buttons for 5 seconds. The display will scroll three segments
from right to left across the display indicating the program is
being saved into memory.
2. Release the and buttons.
Programmable Delay Between Stations
This feature allows the user to insert a d elay be tween stations
between when one station turns off and the next one turns on.
1. Start with the dial in the RN position.
2. Press and hold the button down while turning the dial to the
RN TME position.
3. Release the button. At this point the display will show a
delay time for all stations in seconds, which will be flashing.
4. Press the or buttons to increase or decrease the delay
time between 20 seconds and 4 hours.
5. Return the dial to the RN position.
Clearing the Controller's Memory/Resetting the Controller
If you feel you have misprogrammed the controller, there is a
process that will reset the memory to the factory defaults and erase
all programs and data that have been entered into the controller.
1. Press and hold down the button.
2. Press and release the reset button in the lower
wiring compartment.
3. Wait 2 seconds and release the button. The display should
now show 12:00 AM. All the memory has been cleared and thecontroller may now be reprogrammed.

7/31/2019 Manual Hunter XC
http://slidepdf.com/reader/full/manual-hunter-xc 17/20
ENG
14
TroublesHooTIng guIde
PROBLEM CAUSES SOLUTIONS
The cont rol ler is cont inuo usly watering Too m any start times have been
programmed
Only one start time is necessary to activate a program.
(refer to "Setting the Program Start Time(s)" on page 8) There i s no d isplay Check batteri es or AC power Correc t any errors
Display reads “Off, ” The rain sensor is interru ptin g
irrigation or the sensor jumper has
been removed
Slide the rain sensor bypass switch to the BYPA
position to bypass the rain sensor circuit, or reinstall the
jumper
Rain sensor will not shut off the system Defective rain sensor
Jumper was not removed when sensor
was installed
Stations have been programmed to
override the sensor
Verify operation of rain sensor and proper wiring
Remove jumper from the sensor terminals
Reprogram the sensor override to enable the sensor
(refer to "Programmable Sensor Override" on page 12)
Frozen display, or showing incorrect
information
Power surge Reset the controller (refer to "Clearing the Controller's
Memory/Resetting the Controller" on page 13)
Display shows a station is running but
the and icons are flashing
The sensor is interru ptin g i rri gati on,
however the station has been
programmed to override the sensor
Check the Programmable Sensor Override status
(refer to "Programmable Sensor Override" on page 12)
Automatic irrigation does not start at
the start time and controller is not in
the System Off mode
AM/PM of time of day not set correctly
AM/PM of start time not set correctly
Start Time is disabled (set for Off)Batteries are dead
Controller is not receiving AC power
(if using a transformer)
Correct AM/PM of time of day
Correct AM/PM of start time
Refer to "Setting the Program Start Time(s)" on page 8Replace batteries
Check AC power connections
7/31/2019 Manual Hunter XC
http://slidepdf.com/reader/full/manual-hunter-xc 18/20
15
ENG
speCIfICaTIons
Electrical Specications
• Electronic short circuit protection
• Six AA (1.5 V) alkaline batteries required
• Non-volatile memory for program data
• Model XCH-x00 has an IP2X Rating
• Clean only with a cloth dampened with
mild soap and water
Explanation of Symbols
= AC
= Consult Documentation
= Ground
Operating Specications
• Station Run Times: 0 to 4 hours in
1-minute increments
• 3 Independent Watering Programs
• Start Times: 4 per day per program for
up to 12 daily starts
• Watering Schedule: 365-day calendar,
interval watering, odd/even watering
• AM/PM, 24-hour clock
• Simple manual operation
• Sensor override by station
• Programmable rain delay (1 to 7 days)
• Seasonal adjustment (10% to 150%)
• Sensor bypass switch
• XCH-x00 and XCHM-x00 for outdoor use
• Sea level to 2000 m at 0-50°C

7/31/2019 Manual Hunter XC
http://slidepdf.com/reader/full/manual-hunter-xc 19/20
ENG
16
CerTIfICaTe of ConformITy To european dIreCTIVes
This product should not be used for anything othe r than what i s desc ribed in t his document. T his produc t should only be ser viced by t rained
and authorized personnel.
FCC part 15:
This equip ment has been te sted and found to comply with the limits for a C lass B digital dev ice, purs uant to par t 15 of the FCC Rules. Th ese
limits are designed to provide reasonable protection against harmful interference in a residential installation. This equipment generates,
uses and can radiate radio frequency energy and, if not installed and used in accordance with the instructions, may cause harmful interfer-
ence to radio communications. However, there is no guarantee that interference will not occur in a particular installation. If this equipment
does cause harmful interference to radio or television reception, which can be determined by turning the equipment off and on, the user is
encouraged to try to correct the interference by one or more of the following measures:
• Reorient or relocate the receiving antenna.
• Increase the separation between the equipment and receiver.
• Connect the equipment into an outlet on a circuit different from that to which the receiver is connected.
• Consult the dealer or an experienced radio/TV technician for help.
Hunter Industries declares that the ir rigation controller Model XCH complies with the standards of the European Directives of “electromag-
netic compatibility” 87/336/EEC a nd “low voltage” 73/23/EEC.
__________________________________
Project Engineer

7/31/2019 Manual Hunter XC
http://slidepdf.com/reader/full/manual-hunter-xc 20/20
Hunter Industries Incorporated • The Irrigation Innovators © 2009 Hunter Industries Incorporated
1940 Diamond Street • San Marcos, California 92078
www.hunterindustries.com LIT-467 A 10/09