manual - herzlich willkommen bei u-turn · - doppelsitziges fliegen ... these rescue systems are...
TRANSCRIPT

Manual
English Rev. 1.0 Effective: October 2011Please read this manual
before you use your securerescue parachute.

Contents
Introduction - Welcome to U-TurnSECURE 3UsageTechnical DataLicensing timeNecessary PapersEmployment - Controlling - Damage - Maintenance and care - StorageMaterialPacking directions - Main Preparations - Panel Adjustment - Reassembling - Bundle of the lines - Closing the parachute-opening-device - Packing and checking bookBuild-in of the Secure - Build-in of the SECURE into a harness with integrated rescue container - Build-in of the SECURE into an external rescue container - Build-in of the SECURE with original container - Special features for the paraglider towing - Doppelsitziges Fliegen - Pre-flight checkNature and environment friendly behaviourFinal WordsCertification SECURE 3 XS/SCertification SECURE 3 M/LCertification SECURE 3 XL/UL
Seite 1Seite 1Seite 1Seite 1Seite 2Seite 2Seite 2Seite 2Seite 3Seite 3Seite 3Seite 3Seite 4Seite 4Seite 5Seite 5Seite 6Seite 7Seite 8Seite 8Seite 9Seite 9Seite 9Seite 10Seite 10Seite 10Seite 10Seite 11Seite 11Seite 11Seite 12Seite 13Seite 14
Introduction
Welcome to U-Turn!
Welcome to the U-Turn team and Thank you for the purchase of your new rescuesystem.The U-Turn rescue-sytems family “SECURE 3“, utilizing new technology materials, in careful combi-nation with sound aerodynamic principles, represents a new state of the art in rescue-systems design. The U-Turn SECURE 3 will provide outstanding performance if you really have to use it.
SECURE 3
The SECURE III of U-Turn stands for security in its latest fashion: basing on the PROTECT III and there for equipped with innovative features like Rapid Inflation System (RIS) is the SECURE III a real high-end product.The latest generation of Paratex-RS cloth is used combining excellent strength and light weight. Naturally the choice of sewing materials is first quality too. The SECURE III is produced in a brand spanking new Production in Asia. Equipped with latest technology and certified to highest produc-tion precision.“In the end the rescue system SECURE III is a product on highest level regarding the technical features as well as the manufacturing quality” promises U-Turn joint founder Thomas Vosseler. The SECURE III comes together with a 4-blade container ensuring a perfect opening.
Usage
These Rescue Systems are for manual use by Paragliding- and Hanggliding pilots who are getting in an emergency situation during a paraglider or hangglider flight. Any other use has not been tested and certified and is therefore not allowed. Especially this Rescue System is not dedicated for skydi-ving.
attEntiOn: This rescue system must not be used as flying parachute.
Emergency systems are not required to be registered by the Department ofAviation in Germany (Luftfahrtbundesamtes LBA)Any injuries or damage occurring in connection with this emergency systemcannot be held the responsibility of the manufacturer.
The SECURE complies with certification norms according to DHV at the time of delivery. Any unauthorized alteration is followed by the expiration of the operating licence! The operation is at your own risk and the pilot needs to make sure that the aircraft is checked for its airworthiness before every flight.
Seite 1

Technical Data
Licensing time
Your SECURE 3 lifetime is 10 years i fit is treaded and cared properly. Every two years a check and inspection by the manufacturer or a licensed service agent is mandatory. After ten years, it can be used another two years but requires a yearly inspection then.
Necessary Papers
The documentation of the periodic check-over and a list of all packing is obligatory. Base for that is the in the service record included with the delivery. That needs to be with the rescue when it is sent to an authorised pack service.
Employment
Grap the rescue release handle with one hand. Pull the release handle and let the Secure fall into the free space diagonally behind you through a sideways movement. Mind that you need to let go of the handle! Only then the rescue system will open!A regularly packed rescue parachute will open immediately after the lines are stretched. Badly maintained rescue systems can open with delay or not at all. If this happens strong and sudden pulls on the connection line to the rescue system is necessary to try and reach an opening.
TIP: A quick grasp to the rescue release-handle at every flight automatizes the move-ment and position for a case of emergency. If possible we also recommend dry-throw-ing training to train the release under stress-free circumstances.
Seite 2
XS/S M/L XL/ULWeightEigengewicht 1,6 kg 2,4 kg 2,6 kg
AreaFläche 25 m2 38 m2 42 m2
Maximal charge DHV Release test positiveMaximal Zuladung DHVAbwurftest positiv 120 kg 140 kg 160 kg
Take off weight; rate of descentAbfl ug Gewicht; Sinkgeschwindigkeit
100 kg > ca. 6,0m/s80 kg > ca. 5,3m/s
120 kg > ca. 5,2m/s100 kg > ca. 4,7m/s80 kg > ca. 4,2m/s
140 kg > ca. 5,0m/s120 kg > ca. 4,7m/s100 kg > ca. 4,3m/s
Recommended additional loadEmpfohlene Zuladung 70 kg-100 kg 80 kg-120 kg 100 kg-140 kg
Fabric Tuch RSTX 40 RSTX 40 RSTX 40
Middle lineMittelleine 1 1 1
Reserve containerHilfsschirm
YesJa
YesJa
YesJa
Certifi kationZulassung DHV GS-02-0161-11 DHV GS-02-0162-11 DHV GS-02-0163-11
secure

Controlling
Before packing the SECURE 3, it has to be checked by authorized service people.In the case of throwing, the rescue has to be checked from the manufactureror the authorized person. If the parachute has to be packed, the pulling power hasto be checked. This has to be between 7 and 9 kg.
Additionally the connection line, between rescue release handle and rescue container is not ad-justed too long and not too short. The rescue relese handle should be able to be released without major resistance and needs to be tested through the compatability verification.
attEntiOn: The trial release needs to be performed after every repacking. The opening force has to be between 4 and 8 daN.
Damage
If there are some damages while checking the parachute, the parachute has to besent to the manufacturer ort he authorized person.
attEntiOn: Repairs only occur at the manufacturer or at an authorized U-Turn competence center.
Maintenance and Care
To clean the canopy use warm water and a soft sponge.If you use a detergent for hard stains, make sure that you rinse intensively a& erwards.Never apply any chemicals for cleaning, they weaken the material and damage the coating.Store your parachute at a dry and dark location away from any chemicals. After 6 Month or oneflighthour, whichever occurs first, your SECURE 3 has to be inspected by the manufacturer, incase of extreme use we are glad to do that earlier. Only you know about the condition of yourparachute. Should there be a need for any repairs they are to be done by the manufacturer.
Storage
The rescue system should be stored at a dry and cool place. Oils, paints, solvent, acid and other harmful substances should not be stored in close distance of the rescue systemIn case you do not use the SECURE for a longer period of time it is recommended to unpack it and store it loosely rolled up in an air-permable bag. Before re-packing it should be aerated again.
Seite 3

Materialien
The Product is a tear-resistant Nylon fabric: with a weight of 40g per square meter it meets the re-quirement of tearing and tear strength while at the same time maintaining optimal porosity. “We’ve been testing and re-testing for about 18 months, until we discovered the right fabric consistency”, says Ernst Strobl, chief developer at U-Turn. It took over 40 DHV testings and even more droptests in order to develop a material that is able to withstand all demands in all imaginable conditions. I turned out that a certain relation between warp and weft produces the best results, although simple and double incorporated were used for the Paratex RS. The double polyamide threads are weaved into the fabric. The outcome is a material that greatly satisfies the demands of rescue equipment.
Due to the RIS you are guaranteed a very small opening time; the glider uses special bands which cause the canopy and the “basis” not to lie on top of one another but constitute exactly calculated input tension of the air duct. This positively affects the ampleness particularly in the first millise-conds.
For the SECURE 3 XS/S the RIS turned out to be obsolete as tests have shown that the system only generates advantages in opening times as of a certain canopy size. The SECURE Nano only weighs 1.6 kg, the flat surface is only 25 square meters. However the maximum pay load in accordance with DHV testing is still 6,8 m/s 128,2 kg. At a take off weight of 80 kg the sinking rate is 5,3 m/s. The SECURE 3 RIS in size XL with a flat surface of 42 square meters brings whole 2,4 kg to the scale and in the DHV testing it holds 140 kg. Even at a pay load of 140 kg, the sinking rate is still only 6,1 m/s and by 120 kg is the sinking rate 5,2 m/s.
Seite 4

Packing directions
Main Preparations
The packing should be done mostly on a table. The minimum requirement is a clean surface. The parachute has to be stretched on his overall length.
Afterwards one line will be pulled through the packing loops and fixed at the top of the table (see picture 1). On the lower end of the table the raiser will be fixed and the parachute tightened. The lines will be checked on straight and parallel course. Take line one and the last of the lines and check there course U-Turn to the raiser. If there are twisted lines remove them.
(Picture 1) (Picture 2)
Seite 5

Panel Adjustment
In this example we are assuming parachute type SECURE 3 RIS UL which has 20 panels. The adjust-ment other parachutes differs only in the number of panels, but is done always in the same way. Take panel 1 and count to the half of the panels (for example SECURE 3RIS XL/UL – count to 10) and put the divided lines to the left and to the right (see picture 3). Now the panels 1-10 are on the right side and on the left side you have panels 11-20. To lay out the panels start with number 10. This is done with following procedure: Take panel 10 and pull the panels towards you. Place panel by panel, beginning by 10 counting to 1 in that way that the lines are be placed between your thumb and your forefinger of your right hand. Be sure that lines 10-1, while retaking, are between your forefinger and middle finger of your right hand. After that, panel 20-11 will be placed between thumb and forefin-ger.
(Picture 3) (Picture 4)
ATTENTION: Be sure to remove the line which was pulled through the packing loops.
In case of not removing this, the parachute will NOT open!
If you are using a special packing device, looking like a comb, this device will now be put on top of the lines. The canopy now will be divided in that way that the stamped panel (in this case No.20) lays on the top left. Align the top of the chute which is presently held with the packing loops.
(Picture 5) (Picture 6)
Seite 6

Take care that all lines are in the centre (see picture 7). Now try attaching the canopy with some weight. (Books, etc)
(Picture 7)
Reassembling
The canopy will be folded in a `S`shape. Loosen the raisers from table. Go behind the top part of the parachute, and place the canopy to the back part of the parachute-opening-device (see picture 8). The S-shaped folded package with the base is then pushed into the inner container at the bottom (Fig. 10).
(Picture 8) (Picture 9)
(Picture 10)
Seite 7
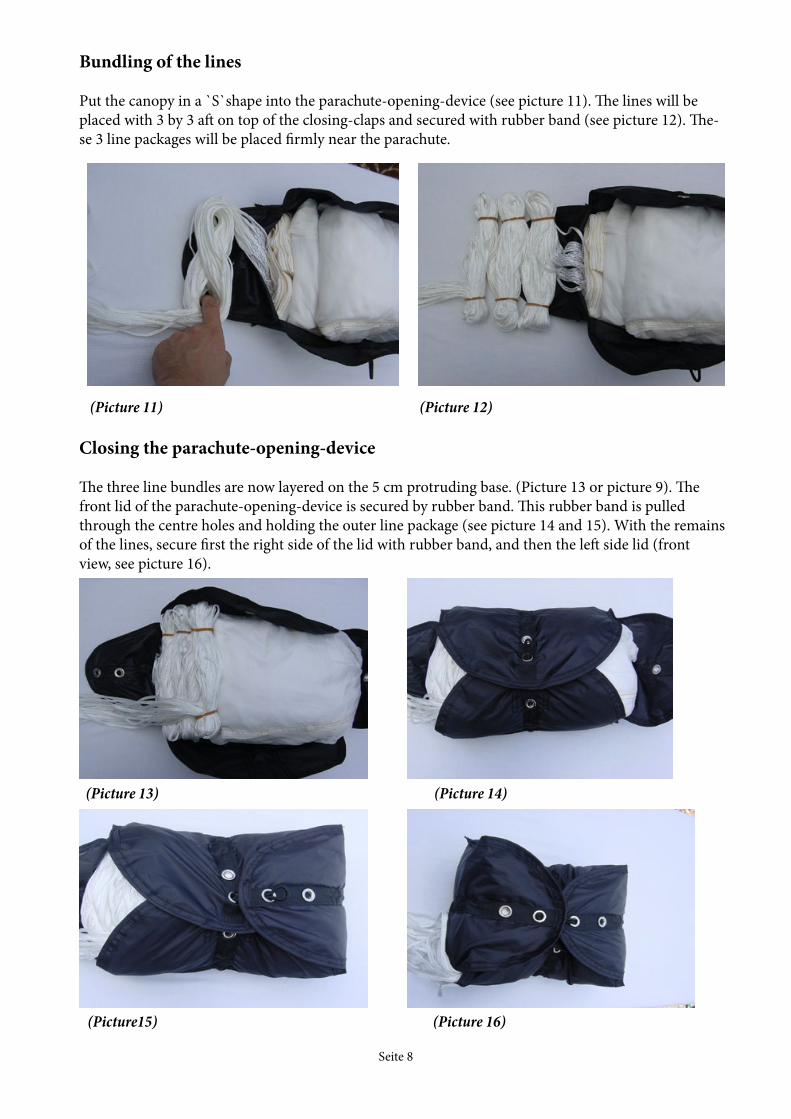
Bundling of the lines
Put the canopy in a `S`shape into the parachute-opening-device (see picture 11). The lines will be placed with 3 by 3 aft on top of the closing-claps and secured with rubber band (see picture 12). The-se 3 line packages will be placed firmly near the parachute.
(Picture 11) (Picture 12)
Closing the parachute-opening-device
The three line bundles are now layered on the 5 cm protruding base. (Picture 13 or picture 9). The front lid of the parachute-opening-device is secured by rubber band. This rubber band is pulled through the centre holes and holding the outer line package (see picture 14 and 15). With the remains of the lines, secure first the right side of the lid with rubber band, and then the left side lid (front view, see picture 16).
(Picture 13) (Picture 14)
(Picture15) (Picture 16)
Seite 8
Seite 9
Packing and checking book
At least, be sure to enter the date, name of the person who packed the para-chute, what was done. The same person packing has to sign the book.
Build-in of the Secure
Build-in of the SECURE into a harness with integrated rescue container
In case your harness has an integrated container, that should be used. The packed rescue parachute is taken out of the original container and built into the integrated container of the harness. Please follow the manu-al of your harness on that.
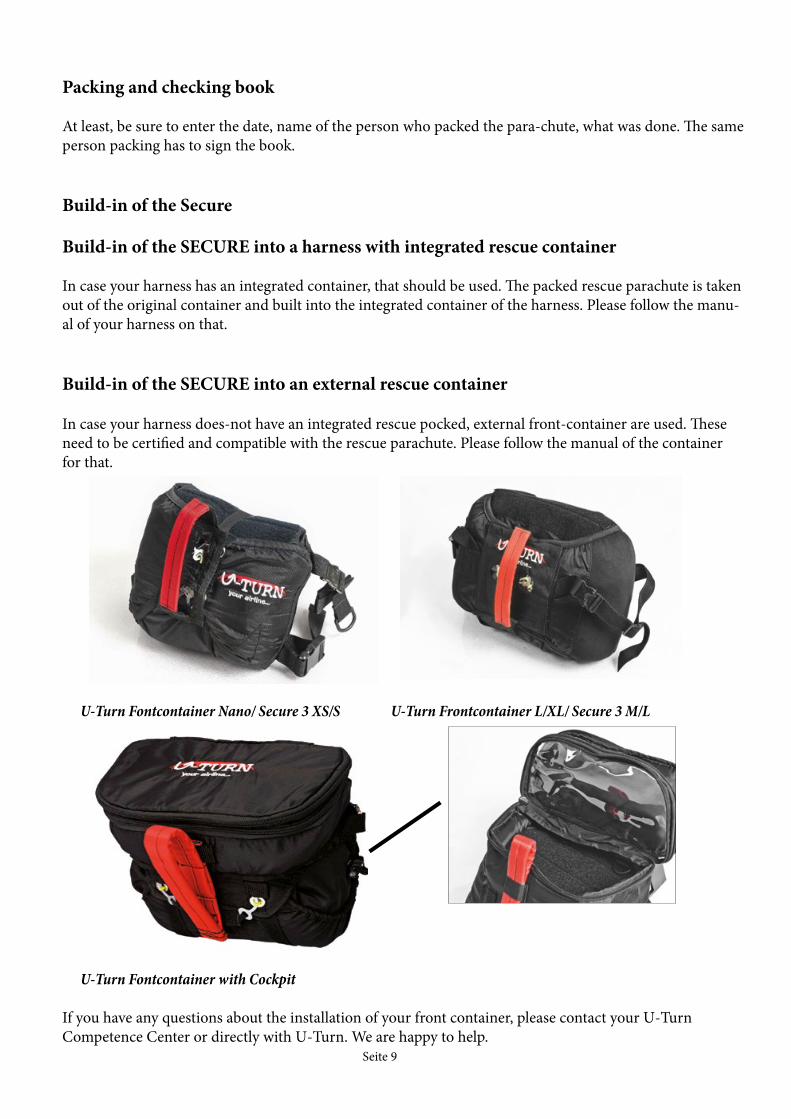
Build-in of the SECURE into an external rescue container
In case your harness does-not have an integrated rescue pocked, external front-container are used. These need to be certified and compatible with the rescue parachute. Please follow the manual of the container for that.
U-Turn Fontcontainer Nano/ Secure 3 XS/S U-Turn Frontcontainer L/XL/ Secure 3 M/L
U-Turn Fontcontainer with Cockpit
If you have any questions about the installation of your front container, please contact your U-Turn Competence Center or directly with U-Turn. We are happy to help.

Build-in of the SECURE with original container
The SECURE is delivered with its own container. In case the rescue pocket of your harness does not come with its own container, the SECURE container can be used.There are two different mounting loops to fix the release handle to the inner container. Please follow the manual of your harness for the build-in of the rescue parachute. The connection bet-ween release handle and inside container must never be under tension after built in, otherwise there’s the risk that the opening of the rescue pocked is impaired or even inhibited.
Special features for the paraglider towing
For the towing, the regulations of the harness, paraglider and jack manufacturer must be ob-served! When using a front container, it must be ensured that the release of the rescue device is ensured at all times.
Doppelsitziges Fliegen
Nur der SECURE Tandem ist für das doppelsitzige Gleitschirmfliegen zugelassen. Dieses Ge-rät besitzt eine sehr kurze Verbindungsleine um darin eine gurtzeugspezifische V-Leine zum Verbinden. Die V-Leine sollte nur mit Karabiener eingebaut werden, nicht durch einschlaufen! Die Länge der V-Leine sollte nach dem Grundsatz: „so kurz wie möglich und so lang wie nötig“ gewählt werden. In der Regel liefert der Gurtzeughersteller die entsprechend richtige Länger der V-Leine automatisch mit. Diese V-Leine ist vom Rettungsgerät direkt links und rechts in die Tandemspreize einzuhängen (vgl. Betriebsanleitung Gurtzeug).Die Festigkeit der V-Leine muss geprüft sein und mindestens 2400 daN betragen. Dies ist spezi-ell bei der Verwendung von V-Leinen aus dem Zubehörbereich zu beachten!Besonders beim doppelsitzigen Fliegen sei nochmals ausdrücklich darauf hingewiesen, dass vor dem Gebrauch unbedingt die Kompatibilität des Rettungsgerätes zum Gurtzeug und Tan-demspreize überprüft und gewährleistet ist.
Seite 10
Pre-flight check
Make sure to also check the following points before every start:- is the rescue release handle mounted correctly on the harness.- is the rescue container closed correctly and secured.
Nature and environment friendly behaviour
We ask you to perform our sport in a manner, that impacts nature and environment with mini-mum intensity. Please do not walk beside marked paths, don`t leave any waste, please be notnoisy and respect the sensitive biological equilibrium in the mountains. Especially at startingareas maximum care for nature is necessary.
Disposal
After expiration of the designated life of the rescue system a environmentally appropriate disposal is to be secured. The synthetic materials that are used in a rescue system demand appropriate dis-posal. Please return worn-out equipment to U-Turn GmbH - there they will be disassembled and disposed of appropriately. Even if the rescue system was never activated, we recommend to replace it after ten years of purchase date.
Final Words
The U-Turn SECURE 3 is at the pole in Rescue Systems research and develop-ment. We wish you that you will never have to use your U-Turn SECURE 3. Remember to treat your canopy properly and always fly with respect for conditions and your capabilities. Remember that all flying is poten-tially dangerous and that you must take responsibility for your own safety. Fly conservatively with respect to conditions and use ample altitude for manoeuvring. We also strongly recommend that you use a certified harness with a back protection, a certified glider, a certified Rescue System and a helmet.
We remind you that The operation is at your own risk and the pilot needs to make sure that the aircraft is checked for its airworthiness before every flight. Safety warnings at the U-Turn website are to be considered.
We wish you many enjoyable flights and great moments in the air, without having to use your SECURE.
Seite 11
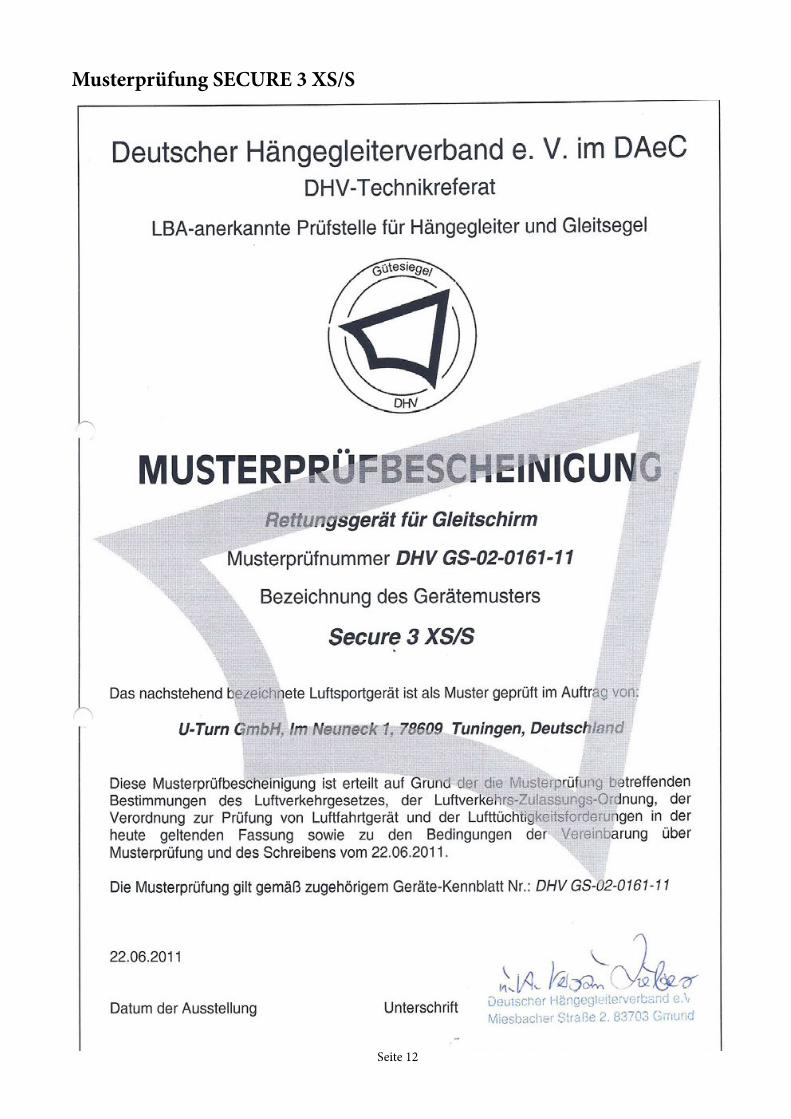
Musterprüfung SECURE 3 XS/S
Seite 12

Musterprüfung SECURE 3 M/L
Seite 13
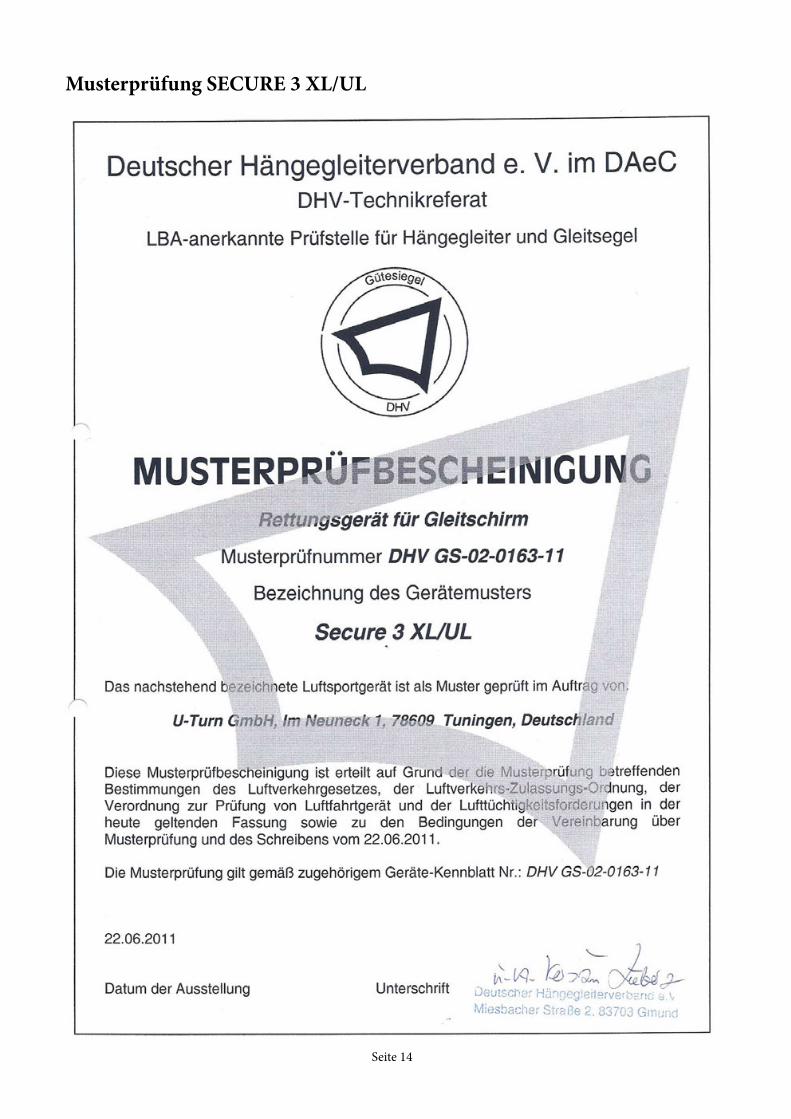
Musterprüfung SECURE 3 XL/UL
Seite 14


U-turn GmbHIm Neuneck 178609 TuningenFon: +49 (0)7464 98 91 28-0Fax: +49 (0)7464 98 91 [email protected]
For furhter information visit: www.u-turn.de
Copyright ©2016 by U-Turn GmbH, alle Rechte vorbehalten. Kein Teil dieser Publikation darf ohne schriftliche Genehmi-gung der U-Turn GmbH reproduziert oder in irgend einer Form weiter verarbeitet werden.Alle technischen Angaben in diesem Handbuch wurden sorgfältig von U-Turn überprüft. Wir weisen jedoch darauf hin, dass für evtl. fehlerhaft angegebene technische Angaben keine Haftung über-nommen wird. Dies gilt für die juristische Verantwortung sowie die Haftung für Folgen, die auf fehlerhaften Angaben beruhen. Laufende Änderungen zu diesem Handbuch, soweit sie dem technischen Fortschritt dienen, behalten wir uns vor.