manual for scanfile retrieval version 9 - spielberg · manual for scanfile retrieval version 9...
TRANSCRIPT
ScanFile User Guide Disclaimer
Welcome to ScanFile Page 1
Manual for
Scanfile Retrieval
Version 9
Introduction & Configuration
ScanFile User Guide Disclaimer
Page 2 Welcome to ScanFile
Disclaimer
Spielberg Solutions GmbH makes no representation or warranties with respect to the contents or use of this help file and specifically disclaims any express or implied warranties of merchantability or fitness for any particular purpose. Further, Spielberg Solutions GmbH reserves the right to revise this help file and to make changes to its content, at any time, without obligation to notify any person or entity of such revisions or changes.
Further, Spielberg Solutions GmbH makes no representations or warranties with respect to any ScanFile software, and specifically disclaims any express or implied warranties of merchantability or fitness for any particular purpose. Further, Spielberg Solutions GmbH reserves the right to make changes to any or all parts of ScanFile software, at any time, without obligation to notify any person or entity of such changes.
Copyright
© 1999 - 2015 Spielberg Solutions GmbH, All Rights Reserved
No part of this document may be reproduced, transmitted or stored in any form or by any means, electronic or mechanical, for any purpose, without the express written permission of Spielberg Solutions GmbH.
ScanFile User Guide Welcome to ScanFile
Welcome to ScanFile Page 3
Contents
WELCOME TO SCANFILE ................................................................................ 5
INTRODUCTION .................................................................................................. 6 Recommended Requirements ..................................................................... 6
WHAT IS SCANFILE? .......................................................................................... 6 SCANFILE FEATURES......................................................................................... 6
SCANFILE OPTIONS ........................................................................................... 7 Global Index ................................................................................................ 7 Barcode ....................................................................................................... 7
Keywords .................................................................................................... 7 Export .......................................................................................................... 7 OCR ............................................................................................................ 8 Forms Recognition ...................................................................................... 8 TIFFWriter ................................................................................................... 8
COLD .......................................................................................................... 8
Auditing ....................................................................................................... 8 Document Routing ...................................................................................... 8
LuraDocument ............................................................................................. 9 Virtual Printing (VNP) .................................................................................. 9 ISIS ............................................................................................................. 9
FIRST STEPS .................................................................................................. 10
OVERVIEW ...................................................................................................... 11 STARTING SCANFILE ....................................................................................... 11 SCANFILE MAIN SCREEN ................................................................................. 11
SEARCH DRIVES ............................................................................................. 11 OPEN FOLDER ................................................................................................ 12
SEARCHING AND VIEWING DOCUMENTS ................................................... 13
OVERVIEW ...................................................................................................... 14 SEARCH ......................................................................................................... 14 FULL TEXT SEARCH ......................................................................................... 15
HITLIST ........................................................................................................... 16 HITLIST MENU ................................................................................................. 17
Send to… .................................................................................................. 18
IMAGE DISPLAY ............................................................................................... 18 IMAGE DISPLAY MENU ..................................................................................... 19 ELECTRONIC DOCUMENTS ............................................................................... 20
Electronic Document Display Menu .......................................................... 20
VIEWING MULTIPLE DOCUMENTS ...................................................................... 20 FASTPICS ....................................................................................................... 21
FastPics Menu .......................................................................................... 22
PRINTING, EMAIL AND EXPORT ................................................................... 23
OVERVIEW ...................................................................................................... 24
ScanFile User Guide Contents
Page 4 Welcome to ScanFile
PRINTING ........................................................................................................ 24
EMAIL ............................................................................................................. 25 EXPORT.......................................................................................................... 25
GENERAL SETTINGS ..................................................................................... 27
OVERVIEW ...................................................................................................... 28 DISPLAY MODE ............................................................................................... 28
PRINTING ........................................................................................................ 29 KEYWORD SEARCH MODE ................................................................................ 30 SEND TO EMAIL ............................................................................................... 31 HITLIST ........................................................................................................... 32 OTHER SETTINGS ............................................................................................ 33
Choose Background .................................................................................. 33
Colour........................................................................................................ 33
Image ........................................................................................................ 33
ADDITIONAL SETTINGS ................................................................................ 34
OVERVIEW ...................................................................................................... 35 CHOOSE LANGUAGE ........................................................................................ 35
GENERAL INFORMATION .............................................................................. 36
OVERVIEW ...................................................................................................... 37
SCANFILE VERSION ......................................................................................... 37 IMAGE INFORMATION........................................................................................ 37
ScanFile User Guide Welcome to ScanFile
Welcome to ScanFile Page 5
Welcome to ScanFile
ScanFile User Guide Introduction
Page 6 Welcome to ScanFile
Introduction
ScanFile Retrieval software allows you to search for and view documents that have been stored to ScanFile Folders and subsequently written to CD or DVD. ScanFile Retrieval is a licence free application that can be installed on as many workstations as required.
ScanFile Retrieval will only open Folders that were written to CD or DVD with the option of putting ScanFile Retrieval software on the CD/DVD also. Folders that have not been written to CD/DVD in this manner cannot be opened.
Recommended Requirements
The minimum recommended specification for a workstation is as follows:
Personal computer using a 400Mhz Pentium II Processor
128MB RAM
17” Display
CD-ROM Drive
MS Windows 2000 Professional
What is ScanFile?
ScanFile is the core application and is a full 32bit application that is optimised to run on Microsoft Windows 2000/XP/Vista/7/8/8.1 based workstations. ScanFile can also be installed on Novell Netware and Microsoft Windows 2000/2003/2008/2012/2012 R2 servers.
ScanFile Features
ScanFile is a very straightforward and easy document management system to use and manage, but has all the features required for serious document management applications.
Intuitive user interface
Black & white and colour scanner support
Import any electronic format document such as MS Word/Excel files
Integration with Microsoft Office 97/2000/XP/2003 and 2007
Comprehensive document referencing and retrieval features with user-defined index fields, keywords and full text search.
ScanFile User Guide ScanFile Options
Welcome to ScanFile Page 7
Full document display features including zoom, rotate and enhance. View multiple documents
Inbuilt document viewer that supports over 200 document types including MS Office and PDF documents
Automatic barcode indexing*
COLD data import*
TIFFWriter*
Zone and Full text OCR*
Forms Recognition*
Document Routing*
Audit Trail*
Full network and jukebox support * Features marked with an asterix are additional purchases to the ScanFile core application
ScanFile Options
The basic ScanFile system comes complete with everything you need to create folders and scan and import documents into them. The following options can be purchased to enhance the functionality of your ScanFile document management solution.
Global Index
This adds support for Libraries into ScanFile.
Barcode
This allows ScanFile to automatically read and index bar-coded documents
Keywords
This allows keyword lists to be applied to ScanFile folders and libraries
Export
The Export option allows you to export complete folders/libraries to a selected drive and directory. All documents will be exported and a data file will be created with the index information associated with the documents
ScanFile User Guide ScanFile Options
Page 8 Welcome to ScanFile
OCR
The OCR module has two functions. Zone OCR can automatically index scanned documents from data contained within the page of a document. Full Text OCR creates a searchable word list from scanned documents, allowing you to search the contents of documents
Forms Recognition
This option enhances the Zone OCR and allows different forms to be scanned into the same folder, and by configuring Forms templates, different index zones can be applied for each form.
Please note: The OCR option is also required if Forms Recognition capability is required.
TIFFWriter
TIFFWriter is a printer driver that allows you to 'print' from any Windows application into a ScanFile folder. The 'print' will be converted to TIFF format
COLD
This module adds support for importing computer generated spool data, which might otherwise be output to Microfiche, or held in printed form
Auditing
With the optional Audit feature, every event performed by all users can be logged to a central database and then reviewed and printed. The events to be viewed can be selected by folder or library, user and within a given date range
Document Routing
Documents can be assigned to pre-defined routes that will send documents to specific users and/or folders for viewing/commenting and approval. Each route can have multiple steps and documents can be sent from route to route
ScanFile User Guide ScanFile Options
Welcome to ScanFile Page 9
LuraDocument
The LuraDocument file format compresses image files to a higher degree than TIFF or JPEG, whilst preserving the quality of the document
Virtual Printing (VNP)
With ScanFile VNP, you can create virtual printers which allow to you ‘print’ documents, which are converted to TIFF format and saved to specified directories, and can then be automatically imported into ScanFile folders
ISIS
Scanners can also be connected via ISIS driver. The scanner settings are configured in the appearing ISIS driver window.

ScanFile Retrieval First Steps
First Steps Page 10
First Steps
ScanFile Retrieval Overview
First Steps Page 11
Overview
This section describes the first steps after the installation of ScanFile. It leads your through the first start-up of ScanFile, the licensing process and informs you about important general settings.
Starting ScanFile
When ScanFile Retrieval is installed, a Windows program group is created, with the program icons contained within it. Click on the Start button and select Programs -> ScanFile -> ScanFile Retrieval.
ScanFile Main Screen
After starting ScanFile Retrieval the main window will be displayed. This will have a standard Windows Menu bar and a Toolbar for quick access to the applications functions.
Before being able to open any folders the drive and/or UNC paths to be used must be set. This can be done by selecting the Choose search drives from the File menu.
Search Drives
Before folders and libraries can be created, search drives for ScanFile to work on have to be defined. Selecting Choose search drives from the File menu allows you to specify the locations which can be anywhere on the workstation, mapped drives or UNC paths. Within the Search Drives window, a list of drives and paths that have been added will be displayed. When ScanFile is first started, the Search Drives selection screen will be automatically displayed, and will list the available drives on the workstation.
The list of search drives is stored centrally and shared with all workstations. If a user does not have rights to access certain paths defined, then those paths will appear empty.
To add a storage location to the list, press the + button on the top right of the display. A window will then be displayed where you can select the drive or UNC path that you want to add. To remove a storage location, highlight it on the list and press the – button on the top left of the display.

ScanFile Retrieval Open Folder
Page 12 First Steps
Open Folder
To open a ScanFile folder, select the Open Folder option from the File menu, and the Open Folder screen will be displayed, showing the list of folders on the currently selected storage location. A different location can be selected by choosing one of the Search drives previously specificed from the Folder Drives drop down list.
To open the required folder, highlight the folder name and then click on OK. If a password has been assigned to the Folder, this will have to be entered before the folder will open.

ScanFile Retrieval Searching and Viewing documents
Searching and Viewing documents Page 13
Searching and Viewing
documents
ScanFile Retrieval Overview
Page 14 Searching and Viewing documents
Overview
Searching for documents within ScanFile is a straightforward and easy task. The standard document search tools in ScanFile are comprehensive, allowing you to perform range searches with AND/OR properties on more information than just the user-defined index fields created within a folder.
Search
The primary search screen is available from the Folder toolbox Search option, where the fields within the folder are presented, as well as the keywords if used. Just enter your search criteria, and pressing the Search button will produce a list of all the documents that matched the search criteria. At the same time, the first document in the matching list will be displayed.
Wildcard Description
* Denotes a string of any length (even 0)
? Denotes any single character
[x,y,z] Denotes one character , x or y or z ( [list of characters] )
[1-5] Denotes a single character of 1,2,3,4 or 5 (first character must be smaller than the second)
With wildcards, there is no distinction between uppercase and lowercase.
Examples:
Wildcard Description
* Puts all records into the Hitlist
????? Shows all records with 5 characters in the field selected
1* Shows all records beginning with 1, for example: 1, 11-19, 100-199 s.o.
M??le Shows records with Mable, Mowle etc
M*le Shows records with Mable , Mayle, Mole, Mowle, Mule, Module etc.
ScanFile Retrieval Full Text Search
Searching and Viewing documents Page 15
Use of wildcards combined with other keyword fields reduces the Hitlist to a minimum and targets desired records as closely as possible. Several search criteria can be combined to narrow down the results. The search entries are logical AND combined, apart from keywords, which can be set to produce and AND or an OR search.
Once the search has been performed it will return a Hitlist of the results of your search. Both the Hitlist and the Image Display windows can be sized as required. The size of the display on the PC will obviously affect how these windows can be shown. The fields within the Folder Toolbox will display the indexing information and the assigned keywords for the selected record from the Hitlist. The information shown in the Folder Toolbox will change to reflect the record selected.
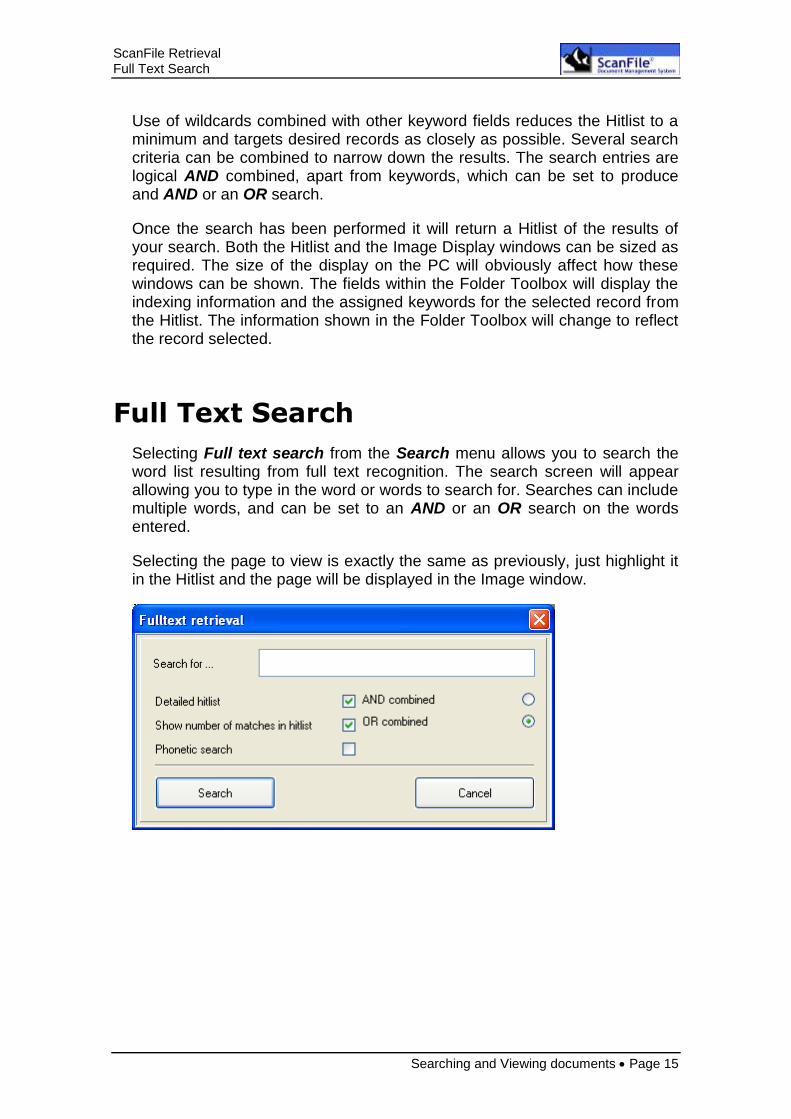
Full Text Search
Selecting Full text search from the Search menu allows you to search the word list resulting from full text recognition. The search screen will appear allowing you to type in the word or words to search for. Searches can include multiple words, and can be set to an AND or an OR search on the words entered.
Selecting the page to view is exactly the same as previously, just highlight it in the Hitlist and the page will be displayed in the Image window.
ScanFile Retrieval Hitlist
Page 16 Searching and Viewing documents
Option Description
Detailed Hitlist This option, when selected, will show a Hitlist record for each page that contains the word or words searched for. When not selected, the Hitlist record will correspond to the file the words were found in.
Please note that a Detailed Hitlist can take a longer period of time to be generated due to each page having to be identified.
Show number of matches
With this selected, the number of times the word or words occur on the page or in the file will be displayed in the Hitlist.
Phonetic Search With the Phonetic Search option words with a similar pronunciation to the searched word will be included in the search result.
When you select a record on the Hitlist, by single clicking on it with the mouse, the document being displayed will automatically change to show the selected file.
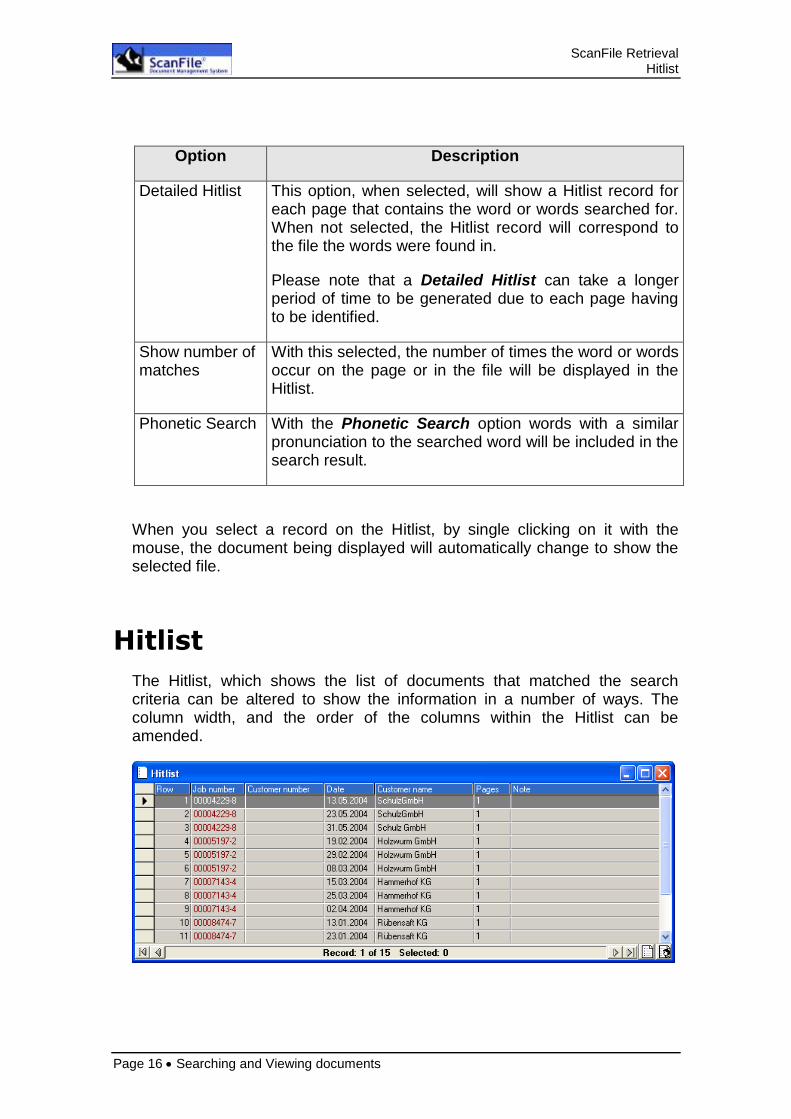
Hitlist
The Hitlist, which shows the list of documents that matched the search criteria can be altered to show the information in a number of ways. The column width, and the order of the columns within the Hitlist can be amended.
ScanFile Retrieval Hitlist menu
Searching and Viewing documents Page 17
To alter the column width, move the mouse pointer to the right edge of the column, within the column heading, and then hold the left mouse button down and drag the column edge to the required width.
To move a column, hold down the left mouse button anywhere within the column heading and then drag the column to the required position.
You can also select whether the Row Number and/or the Notes columns are displayed. This is done from the General Settings Options screen. If from this screen you select to save Column Settings, the changes you make will be saved, and each time you open a Hitlist, those settings will be used. They can be changed at any time, with the new settings then being saved. It is also possible to set Alternating Row Colours which will display the rows in alternate grey and blue lines instead of just grey.
Hitlist menu
From the Hitlist menu, several options are available that allow you to alter the display of the Hitlist information, and to also print, export copy and send documents. The Hitlist menu is available by pressing the right mouse button anywhere within the Hitlist window. The available options are:
Option Description
Sort Ascending / Descending
Will sort the Hitlist by the data in the column over which the right mouse button was clicked.
Print Hitlist Prints the Hitlist record information to the default printer
Export to file Exports the Hitlist record information to a named file
Copy to Clipboard Copies the Hitlist record information to the Windows Clipboard
Font Select the font and font size the Hitlist will use.
Send to… Send selected Hitlist documents to folders, users, e-mail, route, wallet and export. See below
Summarise column For Numeric Values: Calculates the total of the selected column
Select Tool to select documents
Close Close the Hitlist menu
ScanFile Retrieval Image Display
Page 18 Searching and Viewing documents
Send to…
The Send to option from the Hitlist menu allows you to send a document or selected documents to a variety of destinations, which are explained below.
Option Description
ScanFile Folder Sends selected document(s) to another ScanFile Folder.
Export to file Exports selected document(s)
E-Mail Attaches selected document(s) to a new email message
When selecting the File or Email option, the images can be saved as PDF format documents. This is enabled within General Settings -> Send to email.
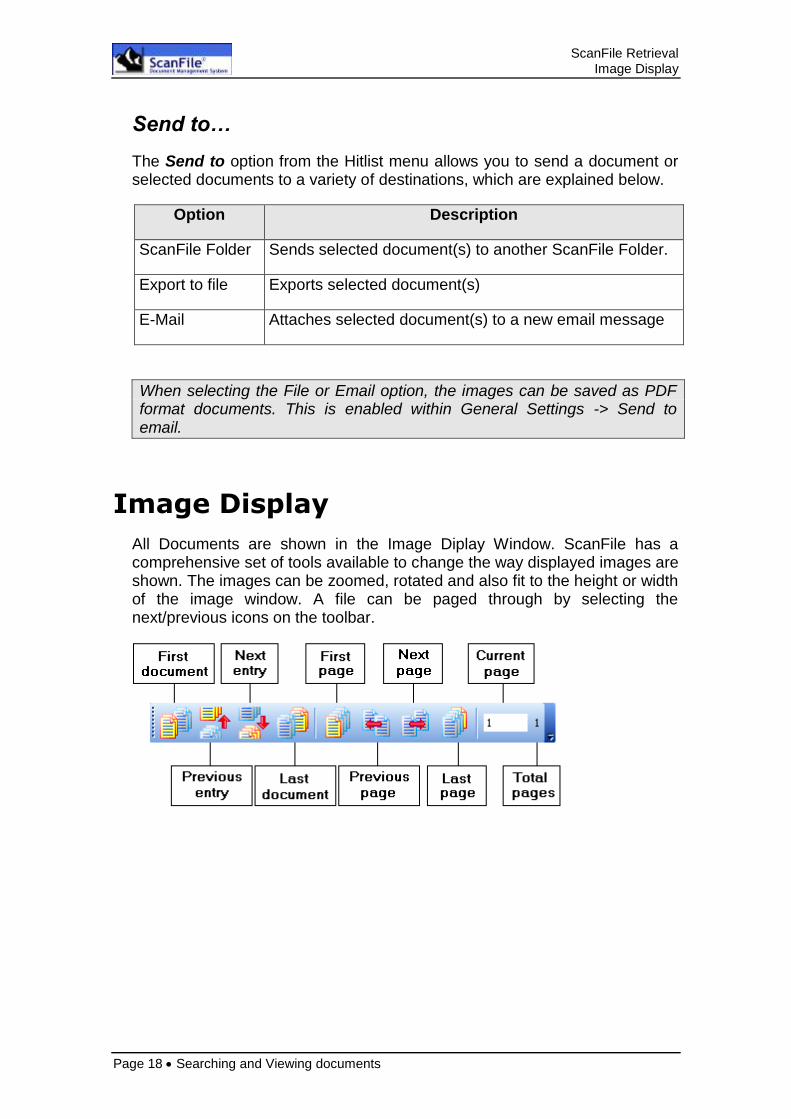
Image Display
All Documents are shown in the Image Diplay Window. ScanFile has a comprehensive set of tools available to change the way displayed images are shown. The images can be zoomed, rotated and also fit to the height or width of the image window. A file can be paged through by selecting the next/previous icons on the toolbar.
ScanFile Retrieval Image Display Menu
Searching and Viewing documents Page 19
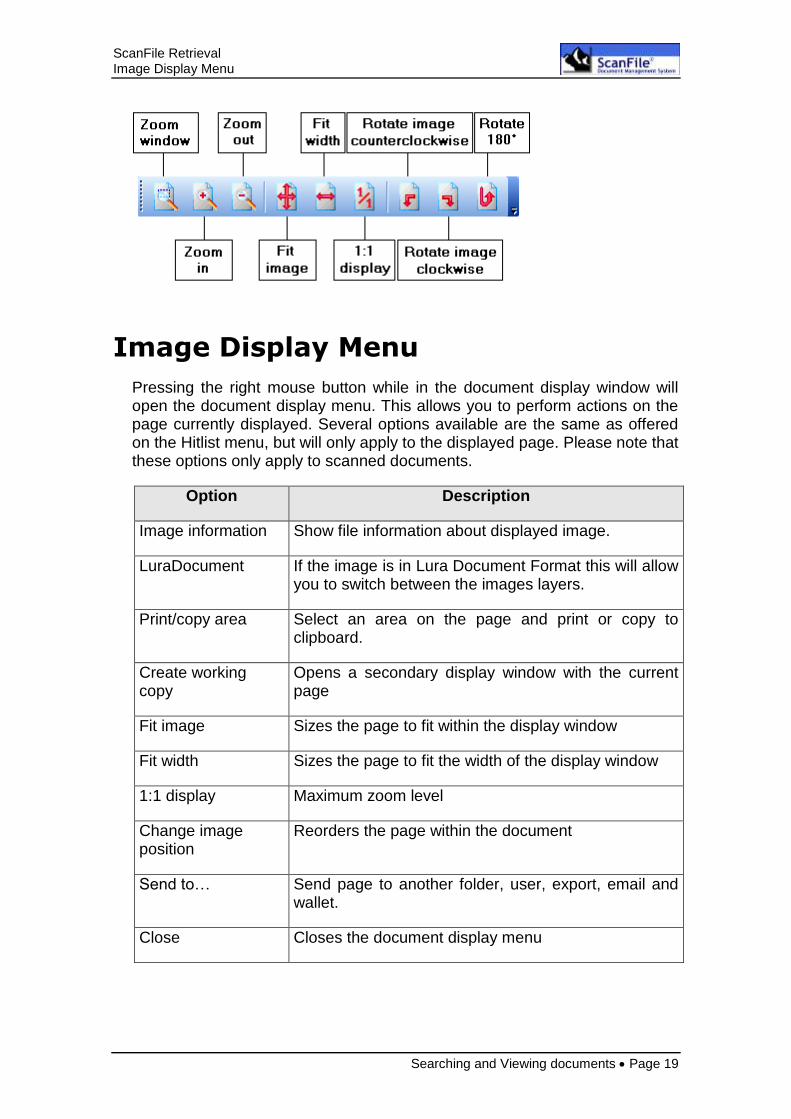
Image Display Menu
Pressing the right mouse button while in the document display window will open the document display menu. This allows you to perform actions on the page currently displayed. Several options available are the same as offered on the Hitlist menu, but will only apply to the displayed page. Please note that these options only apply to scanned documents.
Option Description
Image information Show file information about displayed image.
LuraDocument If the image is in Lura Document Format this will allow you to switch between the images layers.
Print/copy area Select an area on the page and print or copy to clipboard.
Create working copy
Opens a secondary display window with the current page
Fit image Sizes the page to fit within the display window
Fit width Sizes the page to fit the width of the display window
1:1 display Maximum zoom level
Change image position
Reorders the page within the document
Send to… Send page to another folder, user, export, email and wallet.
Close Closes the document display menu
ScanFile Retrieval Electronic Documents
Page 20 Searching and Viewing documents
Electronic Documents
ScanFile supports the display of over 200 different electronic document file formats, such as Microsoft Office documents, Adobe PDF documents, HTML pages and graphic format files, such as AutoCAD and CorelDraw.
When viewing multi-page documents such as PDF files and PowerPoint presentations, the tools to move from page to page, or worksheet to worksheet will be displayed at the bottom of the viewing window. For documents such as Word files and text files, these can be scrolled through using the scroll bar on the right of the viewing window.
Electronic Document Display Menu
The options displayed when you right-click on an electronic document will be different to those available when viewing a black & white or colour image.
Optionen Description
To the clipboard Copies the selection to the Windows clipboard
Print Prints the currently displayed document
Display Selects to display the document in Draft. Normal or Preview mode
Options Settings that affect the copying, display and printing of documents
Launch application Launches the documents associated application (if available)
Viewing Multiple Documents
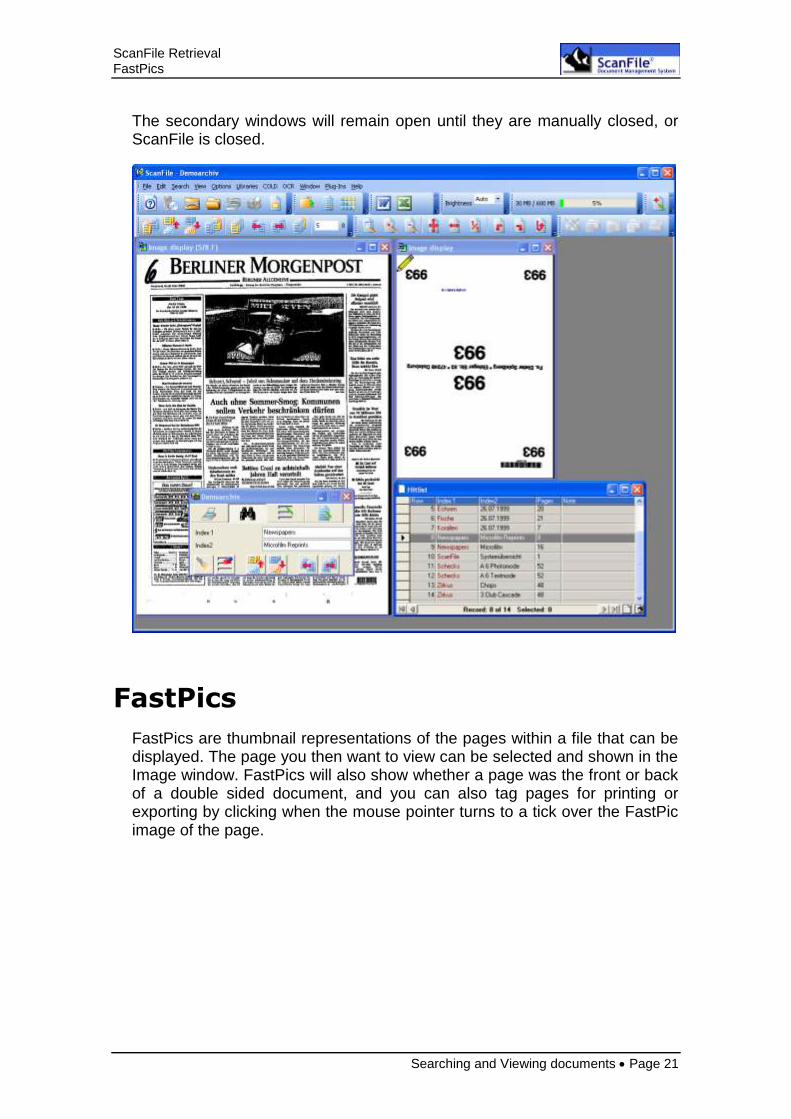
Up to three secondary image display windows can be opened in addition to the standard image display window. To open a secondary display window, right click on the image in the standard display window and choose Create Working Copy. This will open a secondary display window showing the image currently displayed in the standard display window.
The secondary display windows are totally independent of the standard display window, and of the folder, and do not relate to a particular file. It is not possible to page through a document from a secondary window.
ScanFile Retrieval FastPics
Searching and Viewing documents Page 21
The secondary windows will remain open until they are manually closed, or ScanFile is closed.
FastPics
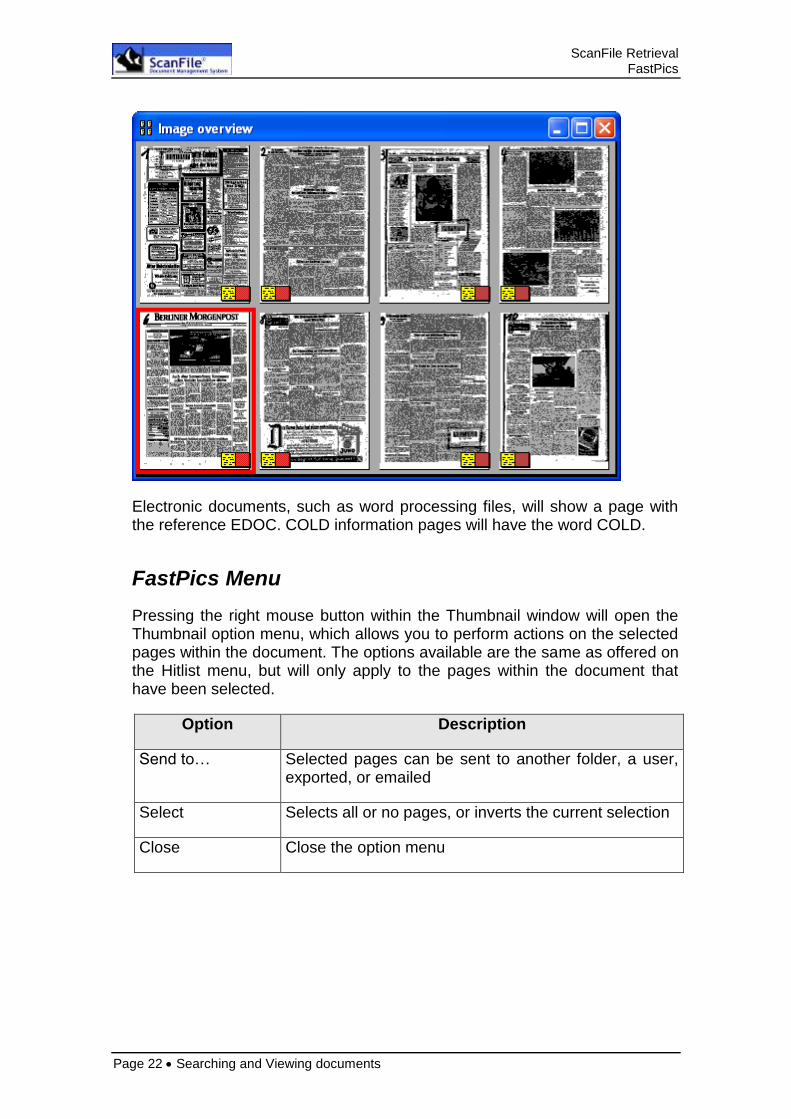
FastPics are thumbnail representations of the pages within a file that can be displayed. The page you then want to view can be selected and shown in the Image window. FastPics will also show whether a page was the front or back of a double sided document, and you can also tag pages for printing or exporting by clicking when the mouse pointer turns to a tick over the FastPic image of the page.
ScanFile Retrieval FastPics
Page 22 Searching and Viewing documents
Electronic documents, such as word processing files, will show a page with the reference EDOC. COLD information pages will have the word COLD.
FastPics Menu
Pressing the right mouse button within the Thumbnail window will open the Thumbnail option menu, which allows you to perform actions on the selected pages within the document. The options available are the same as offered on the Hitlist menu, but will only apply to the pages within the document that have been selected.
Option Description
Send to… Selected pages can be sent to another folder, a user, exported, or emailed
Select Selects all or no pages, or inverts the current selection
Close Close the option menu

ScanFile Retrieval Printing, Email and Export
Printing, Email and Export Page 23
Printing, Email and Export
ScanFile Retrieval Overview
Page 24 Printing, Email and Export
Overview
ScanFile has comprehensive facilities for the printing of scanned documents as well as for exporting both indexes and documents for use outside of ScanFile.
Printing
With ScanFile, you can choose from several options for printing:
Currently displayed page of a document
All pages in the selected document
Range of pages from the selected document
Selected pages from the selected document
Selected documents
Hitlist
Audit Trail Events
Selecting the Print Image option from the File menu allows you to print the currently selected file, or a range of pages from the currently selected file. It also gives you the opportunity to choose the printer you wish to print to.
The Print button in the toolbar has different functions depending on which window is active at the time it is pressed.
Window Action
Image Window Displayed image is printed
Hitlist Window The selected hitlist documents are printed
Fastpic Window The selected images from the current document are printed
Selecting Print Hitlist from the File menu will print the Hitlist.
When printing scanned images, various options are available. These can be selected from the General Settings dialogue. The options and their explanations are listed in the chapter General Settings.
ScanFile Retrieval Email
Printing, Email and Export Page 25
Use the pop-up menu of the hitlist to create an email with the selected document attached. Therefore right-click on a document in ScanFile, choose Send To -> E-mail option and ScanFile opens a new message window in the PC's default e-mail software, and attaches the selected document(s).
Scanned, multi-page documents can be converted to single page Tiff, multi-page Tiff’s or PDF file, depending upon the option selected in General Settings. Electronic documents will be copied in their native format.
Export
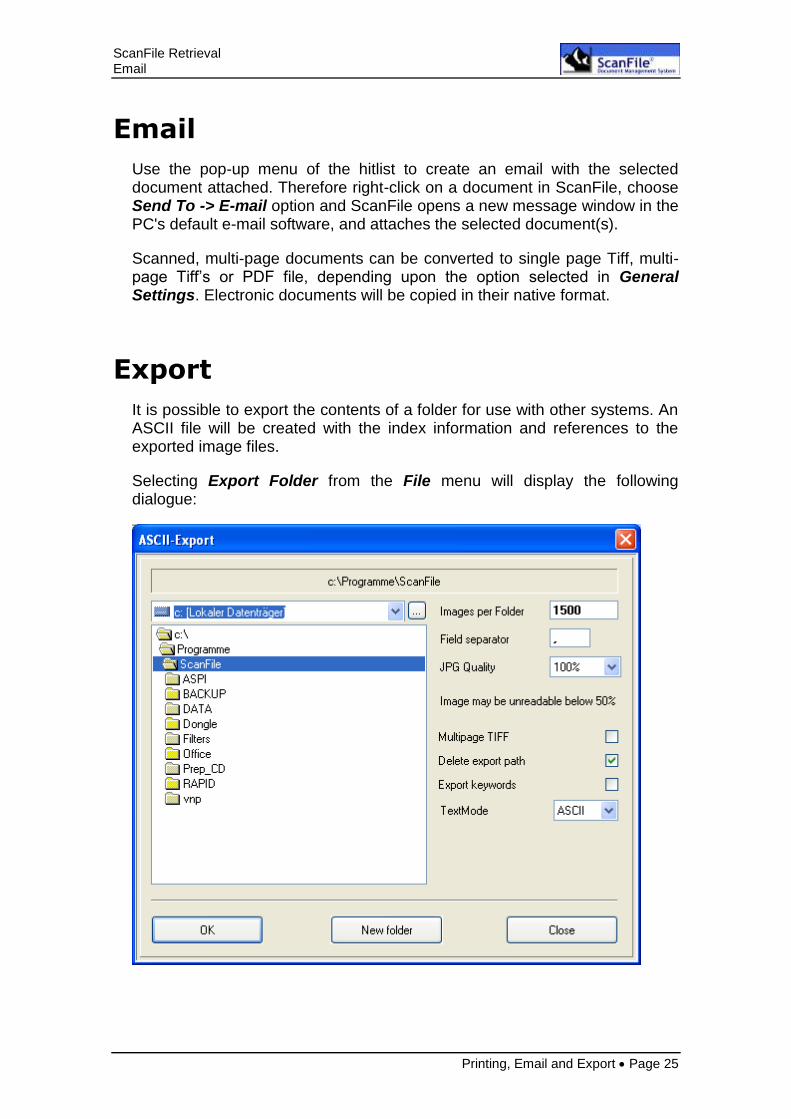
It is possible to export the contents of a folder for use with other systems. An ASCII file will be created with the index information and references to the exported image files.
Selecting Export Folder from the File menu will display the following dialogue:
ScanFile Retrieval Export
Page 26 Printing, Email and Export
Before starting the export, the directory the information will be exported to must be selected. The number of TIFF images to be written to each directory can also be set, as well as the field delimiter for the data file. The delimiter is the character within a record line used to separate the index records. A comma is normally used for this purpose. Multi-page documents can be exported as either a multi-page TIFF file, or separate TIFF files for each page of a document.
If Export keywords is selected, ScanFile will export keywords as additional document index. If a document is not connected to a keyword, the index will be left empty (““). If more than one keyword is assigned to a document, the document will be exported as many times as it has keywords assigned to, every time with a different one as additional index.
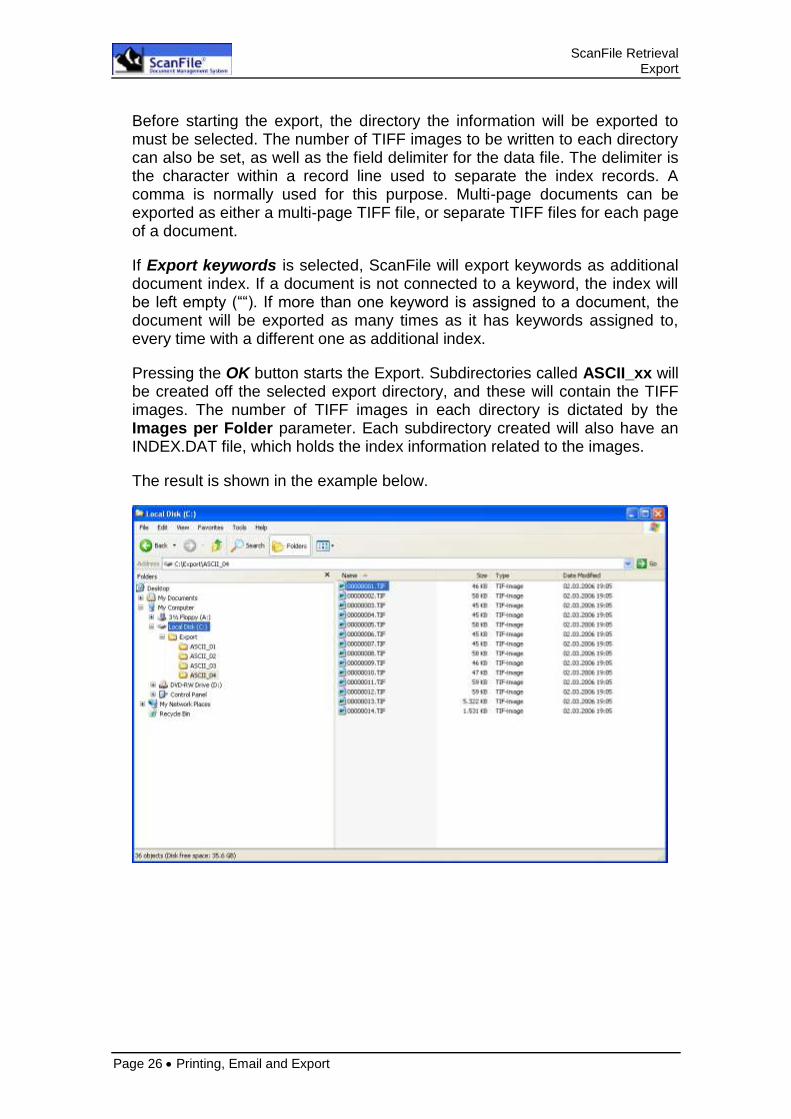
Pressing the OK button starts the Export. Subdirectories called ASCII_xx will be created off the selected export directory, and these will contain the TIFF images. The number of TIFF images in each directory is dictated by the Images per Folder parameter. Each subdirectory created will also have an INDEX.DAT file, which holds the index information related to the images.
The result is shown in the example below.

ScanFile Retrieval General Settings
General Settings Page 27
General Settings
ScanFile Retrieval Overview
Page 28 General Settings
Overview
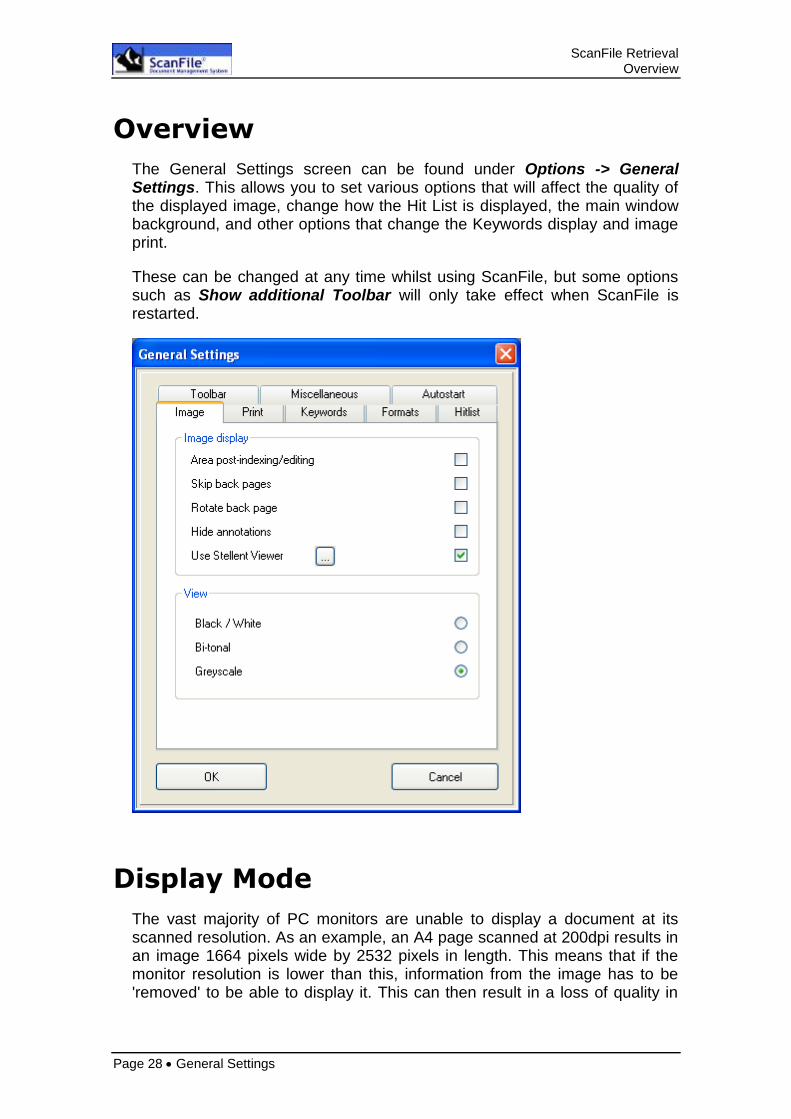
The General Settings screen can be found under Options -> General Settings. This allows you to set various options that will affect the quality of the displayed image, change how the Hit List is displayed, the main window background, and other options that change the Keywords display and image print.
These can be changed at any time whilst using ScanFile, but some options such as Show additional Toolbar will only take effect when ScanFile is restarted.
Display Mode
The vast majority of PC monitors are unable to display a document at its scanned resolution. As an example, an A4 page scanned at 200dpi results in an image 1664 pixels wide by 2532 pixels in length. This means that if the monitor resolution is lower than this, information from the image has to be 'removed' to be able to display it. This can then result in a loss of quality in

ScanFile Retrieval Printing
General Settings Page 29
the displayed image. ScanFile has three image display modes which can be applied so that optimum display quality can be achieved:
Option Description
Greyscale Applies 4 levels of greyscale to enhance the displayed image
Bitonal Applies one level of grey to enhance the image
Black / White Displays the image with no enhancement
When the scanned image is displayed at 1:1 level (one screen pixel for each scanned pixel), the Greyscale and Bitonal enhancements are not applied.
There are more settings to influence the image display in ScanFile. Following table lists the options and gives a brief description:
Option Description
Skip back pages When enabled, it will stop the reverse side of a double-sided scanned document from being displayed when browsing through a file.
Rotate Back Page If a double-sided page has been scanned, and the reverse side of the document is 'upside down' in relation to the front side, the option will display the reverse side of all files in the correct orientation.
Use Stellent Viewer Allows you to switch off the display of electronic documents with the Stellent Viewer, which can take some time if the documents are large. If this viewer is not used, the electronic documents will appear as an iconic symbol on the image window. With a double click on the icon the documents can be displayed in their corresponding applications, as long as they are installed.
Printing
Following settings change the print settings of ScanFile:
ScanFile Retrieval Keyword Search Mode
Page 30 General Settings
Option Description
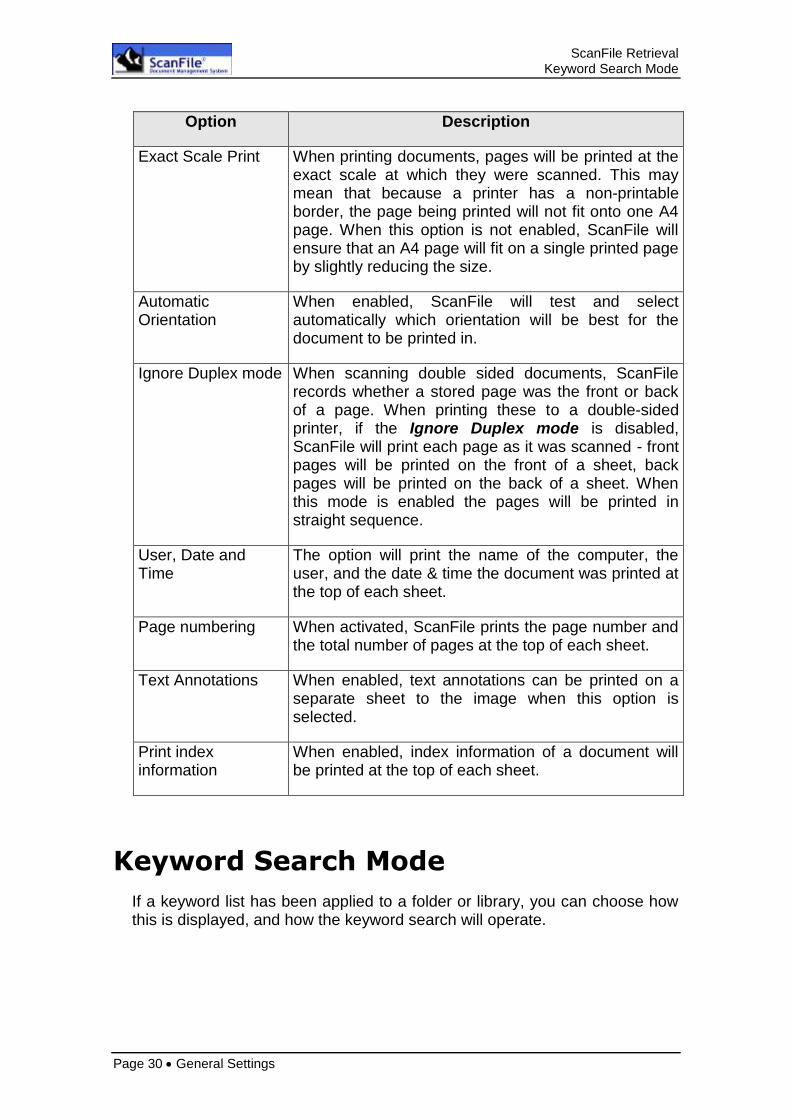
Exact Scale Print When printing documents, pages will be printed at the exact scale at which they were scanned. This may mean that because a printer has a non-printable border, the page being printed will not fit onto one A4 page. When this option is not enabled, ScanFile will ensure that an A4 page will fit on a single printed page by slightly reducing the size.
Automatic Orientation
When enabled, ScanFile will test and select automatically which orientation will be best for the document to be printed in.
Ignore Duplex mode When scanning double sided documents, ScanFile records whether a stored page was the front or back of a page. When printing these to a double-sided printer, if the Ignore Duplex mode is disabled, ScanFile will print each page as it was scanned - front pages will be printed on the front of a sheet, back pages will be printed on the back of a sheet. When this mode is enabled the pages will be printed in straight sequence.
User, Date and Time
The option will print the name of the computer, the user, and the date & time the document was printed at the top of each sheet.
Page numbering When activated, ScanFile prints the page number and the total number of pages at the top of each sheet.
Text Annotations When enabled, text annotations can be printed on a separate sheet to the image when this option is selected.
Print index information
When enabled, index information of a document will be printed at the top of each sheet.
Keyword Search Mode
If a keyword list has been applied to a folder or library, you can choose how this is displayed, and how the keyword search will operate.

ScanFile Retrieval Send to Email
General Settings Page 31
Option Description
Clear Selected Keywords
If the option is enabled, when the Clear fields button is pressed in a folder or library, the currently highlighted keywords will be de-selected. If this option is disabled, the keywords will remain selected.
Hide Keyword List When a folder or library is open, this option, when selected, will not show the keyword list next to the folder or library fields.
Display Keywords as Text
Enabled, the keyword list will be shown in list format. Otherwise the text will be shown in the cell box. One of the features of the Canofile is index cells, which work in the same way as keywords. These cells can have graphic images scanned into them and can be displayed using cells.
AND / OR When using keywords to search for documents, multiple keywords can be selected. By choosing either the AND or the OR option, the search will find documents that have had ALL the selected keywords applied to them, or will find documents that have had ANY of the keywords applied to them.
Send to Email
This option allows you to select how images are sent to an e-mail message. If a document has multiple pages, the images can be put into the new message as either single page TIFF files, a multi-page TIFF file or as a PDF File. If a document is of mixed format – it also contains colour documents or Word/Excel files – these will be separate to the file(s). This setting also affects the Save to File option
Option Description
Normal Mode In this case all files that are sent and automatically appended to an Email, remain in there original format.
ScanFile Retrieval Hitlist
Page 32 General Settings
Multipage TIFF In this mode the system stores single TIFF files in a multipage TIFF files. In case a document contains only TIFF files, one multipage TIFF file is appended to the Email.
In case a document contains a mixture of file formats, it will still collect consecutive TIFF pages and COLD pages in one file, all other formats remain in their original format.
Group to PDF In this mode pages in TIFF, JPEG and COLD format will be converted into a PDF file containing these pages as graphics.
Electronic documents are appended in their original format.
Hitlist
The Hitlist is used to display the results of a document search. Four options are available, to alter its appearance and functionality.
Option Description
Display Hitlist Numbers
The records in the Hitlist will be numbered in ascending order. This will be in the first column of the Hitlist.
Show Notes Column
Adds a column to the end of the Hitlist. The Notes column will show whether records have memos applied to them, or that the records are hidden. Records with a memo attached will show a 'M' in the Notes column. Records hidden for users of the group View will have an 'X'.
Save Column settings
If selected, it allows each user, for each folder they have access to, to customize how the Hitlist is displayed. The order of the columns in the Hitlist can be changed, as well as the column widths. These settings will be saved with the folder or library being accessed.
Alternating Row Colours
The setting changes the view of the hitlist from plain grey lines to alternating blue and grey lines, this can help when viewing similar index information.
ScanFile Retrieval Other Settings
General Settings Page 33
Other Settings
Choose Background
The default display for the main ScanFile window is a grey background. Each user can change this by selecting the Choose Background button in the General Settings. You can then select whether you wish to choose a colour for the background, or to apply an image to the main screen background.
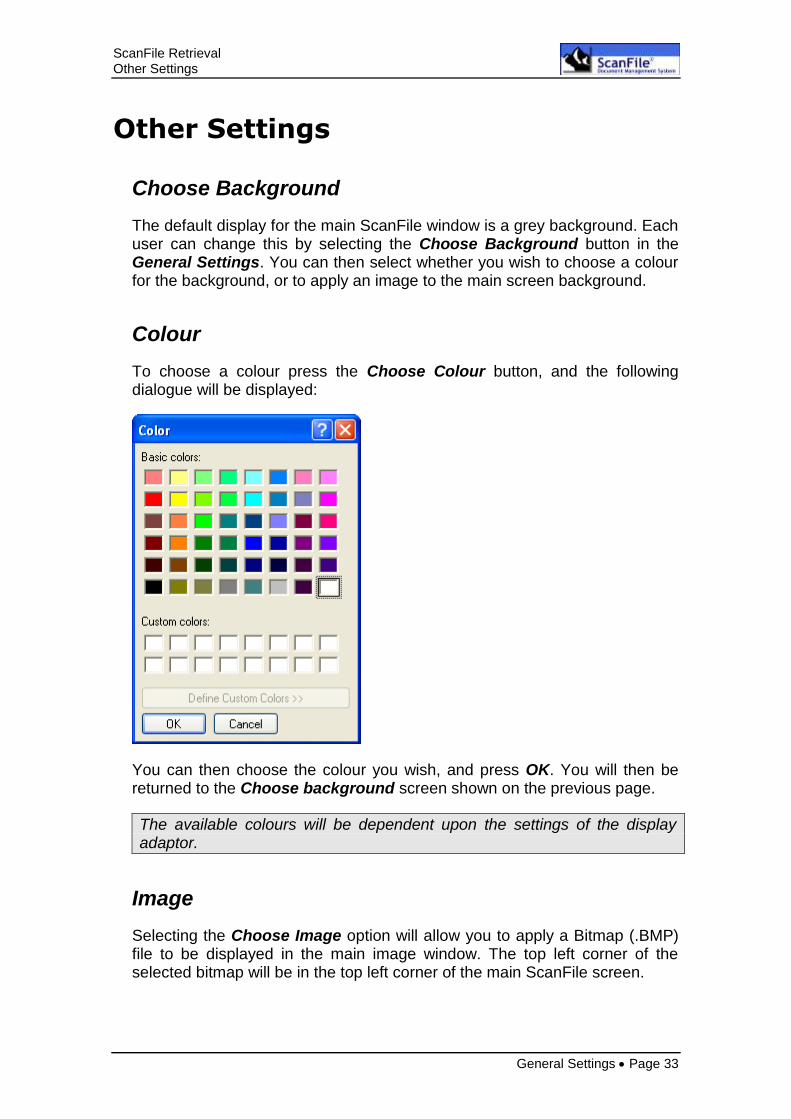
Colour
To choose a colour press the Choose Colour button, and the following dialogue will be displayed:
You can then choose the colour you wish, and press OK. You will then be returned to the Choose background screen shown on the previous page.
The available colours will be dependent upon the settings of the display adaptor.
Image
Selecting the Choose Image option will allow you to apply a Bitmap (.BMP) file to be displayed in the main image window. The top left corner of the selected bitmap will be in the top left corner of the main ScanFile screen.
ScanFile Retrieval Additional Settings
Additional Settings Page 34
Additional Settings
ScanFile Retrieval Guide Overview
Additional Settings Page 35
Overview
Further settings are available within ScanFile that allow you to select the language ScanFile uses, which barcode to read, and other scanning related functions. These are described below.
Choose language
When installing ScanFile, you will be asked to select the language required, but this can be changed at any time by selecting Choose Language from the Options menu. Available languages are:
Before the new language will take effect, ScanFile must be closed down and restarted.
The Far East languages Japanese, Korean and Chinese are available in special setups.

ScanFile Retrieval General Information
General Information Page 36
General Information
ScanFile Retrieval Overview
General Information Page 37
Overview
This chapter describes several options which provide information about the installed ScanFile version, image information, and information concerning the activity that has taken place within folders.
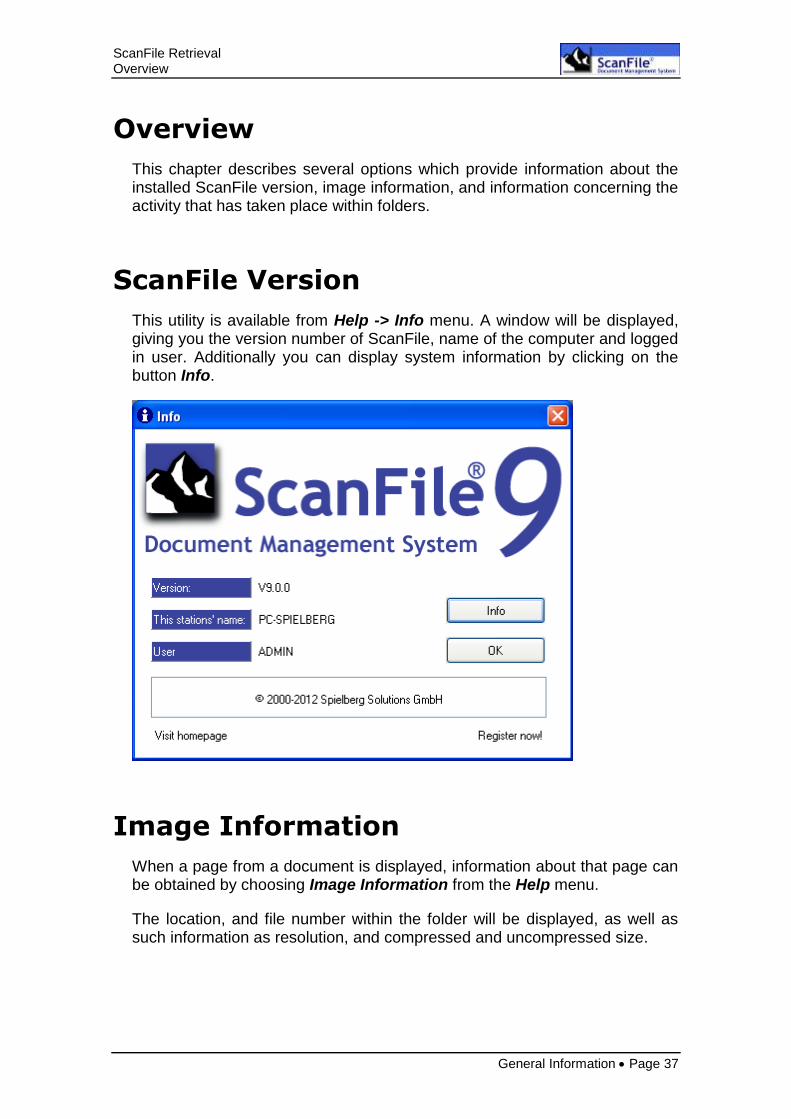
ScanFile Version
This utility is available from Help -> Info menu. A window will be displayed, giving you the version number of ScanFile, name of the computer and logged in user. Additionally you can display system information by clicking on the button Info.
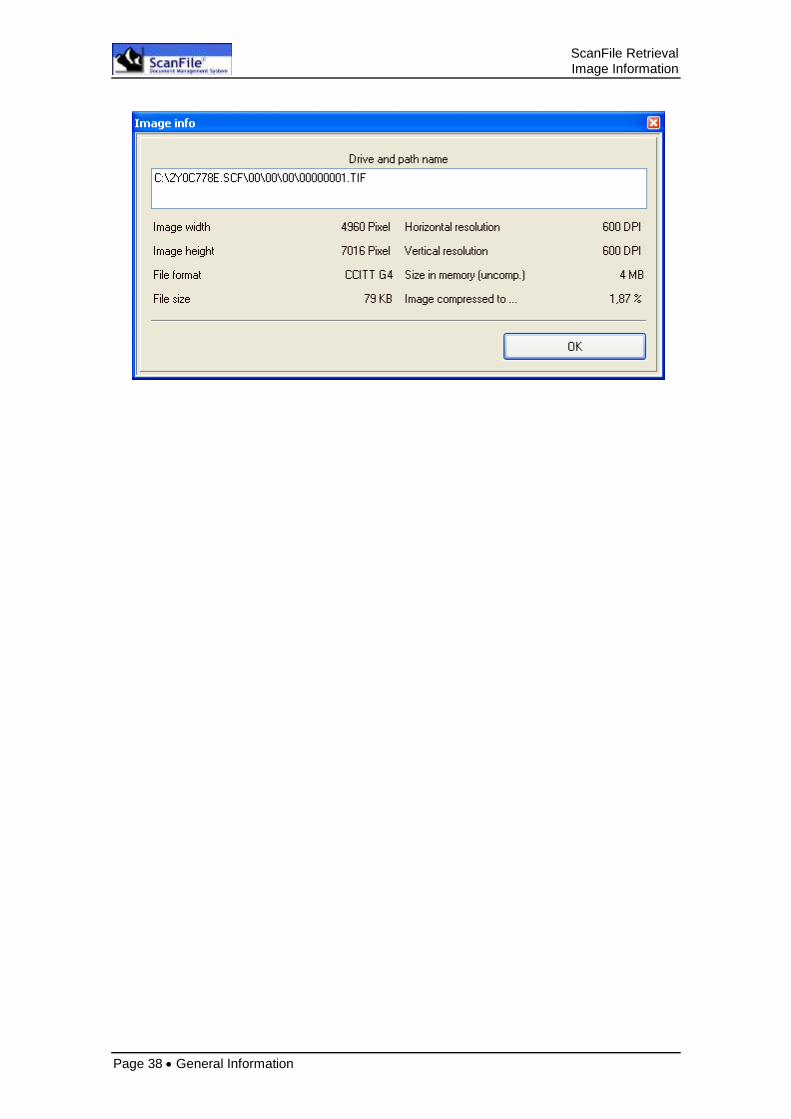
Image Information
When a page from a document is displayed, information about that page can be obtained by choosing Image Information from the Help menu.
The location, and file number within the folder will be displayed, as well as such information as resolution, and compressed and uncompressed size.
ScanFile Retrieval Image Information
Page 38 General Information