manual exarqe robust quality estimator - yokogawa...
TRANSCRIPT

IM 36J06D20-01E 9th Edition
IM 36J06D20-01E
Instruction Manual
IM 36J06D20-01E
Exarqe Robust Quality Estimator Installation Manual
9th Edition

IM 36J06D20-01E 9th Edition
Blank Page

i
IM 36J06D20-01E 9th Edition
Preface This document covers the installation aspects of Exarqe, an online robust quality estimator software integrated with the user’s DCS. The instructions are meant only for Exarqe online software used for the Advanced Process Control. It is assumed that the user’s required hardware as defined during project is in place.
Intended Readership This manual is intended for use to engineers who are actually responsible to implement Exarqe an online robust quality estimator. A good knowledge of Windows NT based system and DCS is required.
Safety Precautions Safety, Protection, and Modification of the Product
• In order to protect the system controlled by the product and the product itself and ensure safety operation, observe this instruction manual. We assume no liability for safety if users fail to observe these instructions, when operating the product. • If any protection or safety circuit is required for the system controlled by the product or for the product itself, please prepare it separately. • Be sure to use the spare parts approved by Yokogawa Electric Corporation (hereafter simply referred to as YOKOGAWA) when replacing parts or consumables. • Modification of the product is strictly prohibited.
Notes on Handling Manuals • Please hand over the instruction manuals to your end users so that they can keep the manuals on hand for convenient reference. • Please read the information thoroughly before using the product. • The purpose of these manuals is not to warrant that the product is well suited to any particular purpose but rather to describe the functional details of the product. • No part of the manuals may be transferred or reproduced without prior written consent from YOKOGAWA. • YOKOGAWA reserves the right to make improvements in the manuals and product at any time, without notice or obligation. • For any questions, mistakes or omissions detected in the manuals, contact our sales representative or your local distributor.
Warning and Disclaimer The product is provided on an "as is" basis. YOKOGAWA shall have neither liability nor responsibility to any person or entity with respect to any direct or indirect loss or damage arising from using the product or any defect of the product that YOKOGAWA can not predict in advance.
Notes on Software

ii
IM 36J06D20-01E 9th Edition
• YOKOGAWA makes no warranties, either expressed or implied, with respect to the software's merchantability or suitability for any particular purpose, except as specified in the terms of warranty. • This product may be used on one machine only. If you need to use the product on another machine, you must purchase another product. • It is strictly prohibited to reproduce the product except for the purpose of backup. • Store the DVD-ROM (the original medium) in a safe place. • It is strictly prohibited to perform any reverse-engineering operation, such as reverse compilation or reverse assembling on the product. • No part of the product may be transferred, converted or sublet for use by any third party, without prior written consent from YOKOGAWA.
Copyright and Trademark Notices All Rights Reserved
The copyrights of the programs contained in the DVD-ROM are reserved. Copying this manual is not allowed also no part of the manual be transferred, sold, distributed or registered or recorded.
Trademark Acknowledgments • Exasmoc and Exarqe are trademark of Yokogawa Electric Corporation • Exaopc, Exapilot, Exaplog and Exaquantum are trademark of Yokogawa Electric Corporation. • SMOC, RQE, AIDA and COAST are trademarks of Shell Global Solutions. • CENTUM is a registered trademark of YOKOGAWA. • Microsoft, Windows, ‘Windows 2000’, ‘Windows Server 2003’, ‘Windows Server 2008’, ‘Windows XP’, ‘Windows Vista’ and ‘Windows 7’ are product names, trade marks or registered trademarks of Microsoft Corporation. • Ethernet is a registered trademark of XEROX Corporation. • All other company and product names mentioned in this manual are trademarks or registered trademarks of their respective companies. • We do not use TM or ® mark to indicate those trademarks or registered trademarks in this manual.
iii
IM 36J06D20-01E 9th Edition
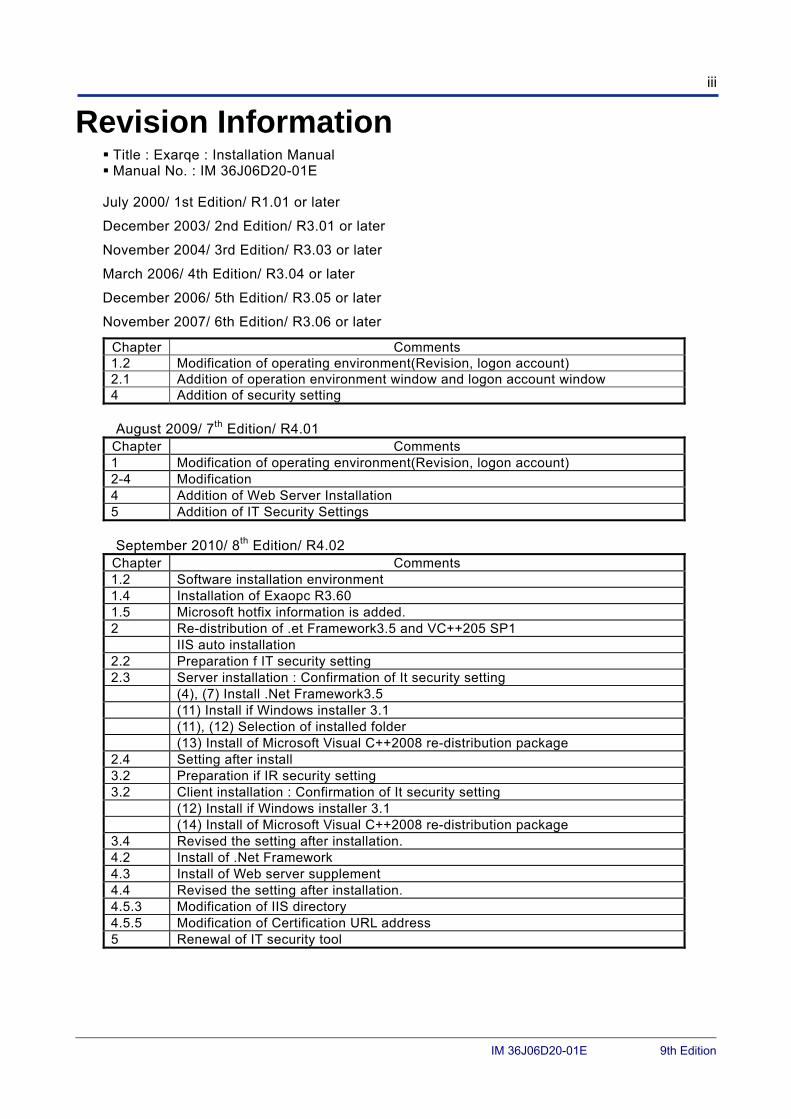
Revision Information Title : Exarqe : Installation Manual Manual No. : IM 36J06D20-01E
July 2000/ 1st Edition/ R1.01 or later
December 2003/ 2nd Edition/ R3.01 or later
November 2004/ 3rd Edition/ R3.03 or later
March 2006/ 4th Edition/ R3.04 or later
December 2006/ 5th Edition/ R3.05 or later
November 2007/ 6th Edition/ R3.06 or later
Chapter Comments 1.2 Modification of operating environment(Revision, logon account) 2.1 Addition of operation environment window and logon account window 4 Addition of security setting August 2009/ 7th Edition/ R4.01
Chapter Comments 1 Modification of operating environment(Revision, logon account) 2-4 Modification 4 Addition of Web Server Installation 5 Addition of IT Security Settings September 2010/ 8th Edition/ R4.02
Chapter Comments 1.2 Software installation environment 1.4 Installation of Exaopc R3.60 1.5 Microsoft hotfix information is added. 2 Re-distribution of .et Framework3.5 and VC++205 SP1 IIS auto installation 2.2 Preparation f IT security setting 2.3 Server installation : Confirmation of It security setting (4), (7) Install .Net Framework3.5 (11) Install if Windows installer 3.1 (11), (12) Selection of installed folder (13) Install of Microsoft Visual C++2008 re-distribution package 2.4 Setting after install 3.2 Preparation if IR security setting 3.2 Client installation : Confirmation of It security setting (12) Install if Windows installer 3.1 (14) Install of Microsoft Visual C++2008 re-distribution package 3.4 Revised the setting after installation. 4.2 Install of .Net Framework 4.3 Install of Web server supplement 4.4 Revised the setting after installation. 4.5.3 Modification of IIS directory 4.5.5 Modification of Certification URL address 5 Renewal of IT security tool
iv
IM 36J06D20-01E 9th Edition
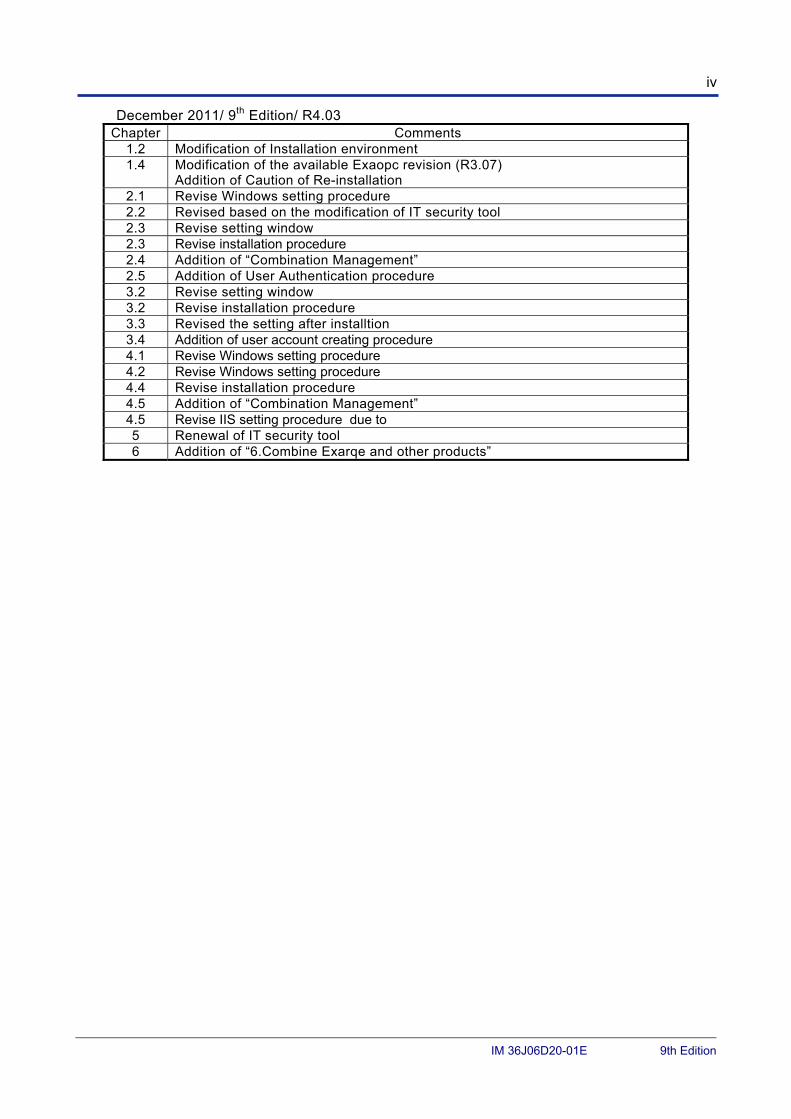
December 2011/ 9th Edition/ R4.03 Chapter Comments
1.2 Modification of Installation environment 1.4 Modification of the available Exaopc revision (R3.07)
Addition of Caution of Re-installation 2.1 Revise Windows setting procedure 2.2 Revised based on the modification of IT security tool 2.3 Revise setting window 2.3 Revise installation procedure2.4 Addition of “Combination Management” 2.5 Addition of User Authentication procedure 3.2 Revise setting window 3.2 Revise installation procedure 3.3 Revised the setting after installtion 3.4 Addition of user account creating procedure 4.1 Revise Windows setting procedure4.2 Revise Windows setting procedure4.4 Revise installation procedure 4.5 Addition of “Combination Management” 4.5 Revise IIS setting procedure due to 5 Renewal of IT security tool 6 Addition of “6.Combine Exarqe and other products”
v
IM 36J06D20-01E 9th Edition
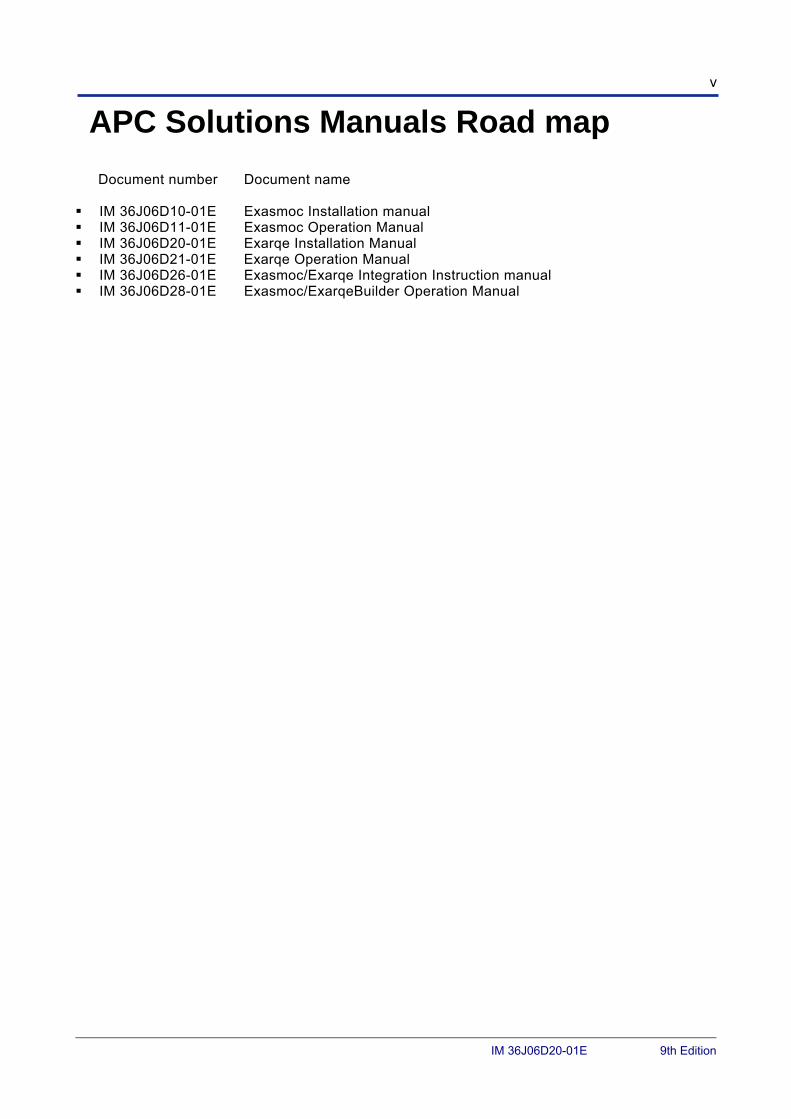
APC Solutions Manuals Road map
Document number Document name IM 36J06D10-01E Exasmoc Installation manual IM 36J06D11-01E Exasmoc Operation Manual IM 36J06D20-01E Exarqe Installation Manual IM 36J06D21-01E Exarqe Operation Manual IM 36J06D26-01E Exasmoc/Exarqe Integration Instruction manual IM 36J06D28-01E Exasmoc/ExarqeBuilder Operation Manual
i
IM 36J06D20-01E 9th Edition
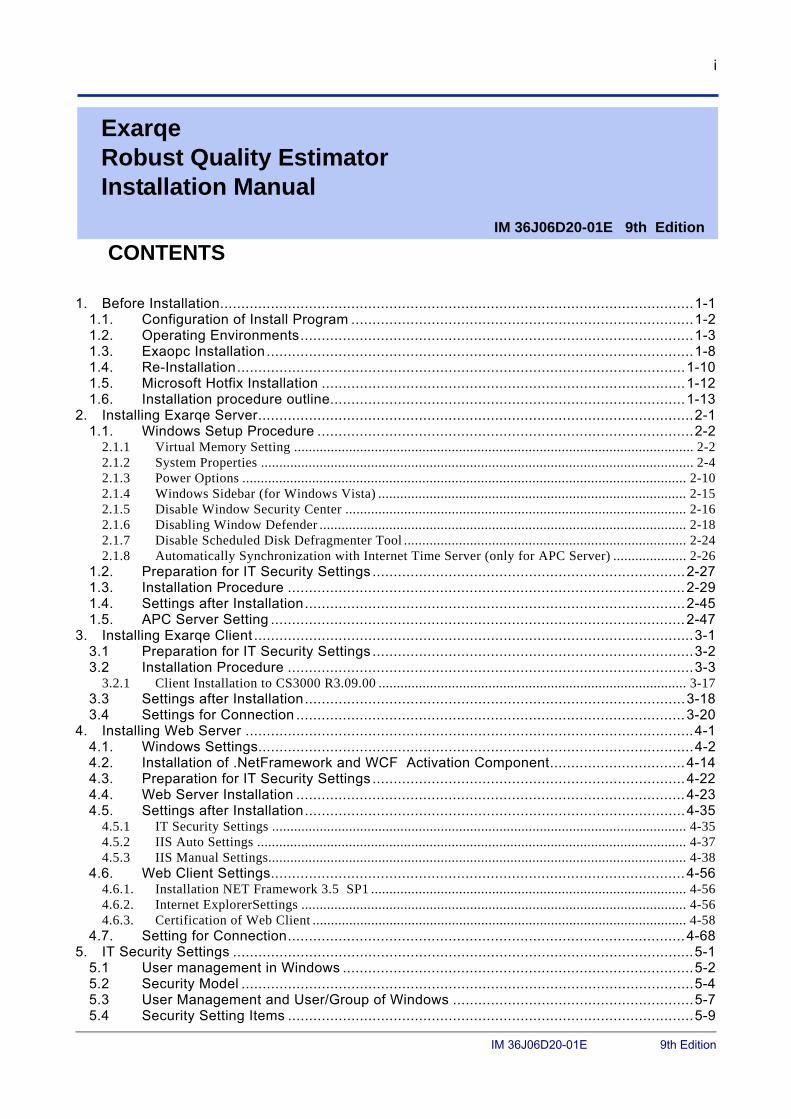
CONTENTS
1. Before Installation ................................................................................................................ 1-1 1.1. Configuration of Install Program ................................................................................. 1-2 1.2. Operating Environments ............................................................................................. 1-3 1.3. Exaopc Installation ..................................................................................................... 1-8 1.4. Re-Installation .......................................................................................................... 1-10 1.5. Microsoft Hotfix Installation ...................................................................................... 1-12 1.6. Installation procedure outline.................................................................................... 1-13
2. Installing Exarqe Server ....................................................................................................... 2-1 1.1. Windows Setup Procedure ......................................................................................... 2-2
2.1.1 Virtual Memory Setting ............................................................................................................. 2-2 2.1.2 System Properties ...................................................................................................................... 2-4 2.1.3 Power Options ......................................................................................................................... 2-10 2.1.4 Windows Sidebar (for Windows Vista) .................................................................................... 2-15 2.1.5 Disable Window Security Center ............................................................................................. 2-16 2.1.6 Disabling Window Defender .................................................................................................... 2-18 2.1.7 Disable Scheduled Disk Defragmenter Tool ............................................................................. 2-24 2.1.8 Automatically Synchronization with Internet Time Server (only for APC Server) .................... 2-26
1.2. Preparation for IT Security Settings .......................................................................... 2-27 1.3. Installation Procedure .............................................................................................. 2-29 1.4. Settings after Installation .......................................................................................... 2-45 1.5. APC Server Setting .................................................................................................. 2-47
3. Installing Exarqe Client ........................................................................................................ 3-1 3.1 Preparation for IT Security Settings ............................................................................ 3-2 3.2 Installation Procedure ................................................................................................ 3-3
3.2.1 Client Installation to CS3000 R3.09.00 .................................................................................... 3-17 3.3 Settings after Installation .......................................................................................... 3-18 3.4 Settings for Connection ............................................................................................ 3-20
4. Installing Web Server .......................................................................................................... 4-1 4.1. Windows Settings....................................................................................................... 4-2 4.2. Installation of .NetFramework and WCF Activation Component ................................ 4-14 4.3. Preparation for IT Security Settings .......................................................................... 4-22 4.4. Web Server Installation ............................................................................................ 4-23 4.5. Settings after Installation .......................................................................................... 4-35
4.5.1 IT Security Settings ................................................................................................................. 4-35 4.5.2 IIS Auto Settings ..................................................................................................................... 4-37 4.5.3 IIS Manual Settings.................................................................................................................. 4-38
4.6. Web Client Settings .................................................................................................. 4-56 4.6.1. Installation NET Framework 3.5 SP1 ...................................................................................... 4-56 4.6.2. Internet ExplorerSettings ......................................................................................................... 4-56 4.6.3. Certification of Web Client ...................................................................................................... 4-58
4.7. Setting for Connection .............................................................................................. 4-68 5. IT Security Settings ............................................................................................................. 5-1
5.1 User management in Windows ................................................................................... 5-2 5.2 Security Model ........................................................................................................... 5-4 5.3 User Management and User/Group of Windows ......................................................... 5-7 5.4 Security Setting Items ................................................................................................ 5-9
Exarqe Robust Quality Estimator Installation Manual
IM 36J06D20-01E 9th Edition
ii
IM 36J06D20-01E 9th Edition
5.5 IT Security Tool Operating Procedure ....................................................................... 5-11 5.6 Security model change or new setting ...................................................................... 5-17 5.7 IT Security Tool and Other Functions ....................................................................... 5-19
6. Combine Exarqe and other products .................................................................................... 6-1 7. Notice: Installation on HIS ................................................................................................... 7-1
7.1 Installation Procedure ................................................................................................ 7-2 7.2 Settings after Installation in case of HIS type SSO ..................................................... 7-3
1 Before Installation 1-1
IM 36J06D20-01E 9th Edition
1. Before Installation This chapter describes the outline of the install program and explains preparations for Exarqe online installation.
Please be sure to refer to this before the installation.
In this document, ‘Windows Server 2008’, ‘Windows Vista’ and ‘Windows 7’ are referred as ‘Windows’.
1 Before Installation 1-2
IM 36J06D20-01E 9th Edition
1.1. Configuration of Install Program Installation programs consist of the following parts. You will prepare Exarqe DVD-ROM(NTPKM72) and the license number. Confirm the latest revision number.
Install Exarqe server function
All the Exarqe functions are installed; control function, HMI function, scheduler, database management and so on. In addition, additional installation of Exarqe server function is available.
Install Exarqe client function
HMI function is installed on the client PC. It is possible to install the client function to multiple PCs, even though the performance will be down according to the number of PCs and the resource of the server PC. In addition, additional installation of Exarqe client function is available.
Install Exasmoc/Exarqe Web Server function
The Web server function to access Exasmoc and Exarqe data are installed on the Web server PC.
IT security setting
IT security settings are necessary after installing Exasmoc/Exarqe Server, Exasmoc/Exarqe Client, and Exasmoc/Exarqe WebServer.
Logon as the administrative user account that used for installation. if this is the first time that Exarqe server function has been installed and PC has been restarted.
When the Exarqe client function is installed in the PC where CENTUM CS3000 or VP operation and monitoring functions are running, logon as administrator for the first time.
1 Before Installation 1-3
IM 36J06D20-01E 9th Edition
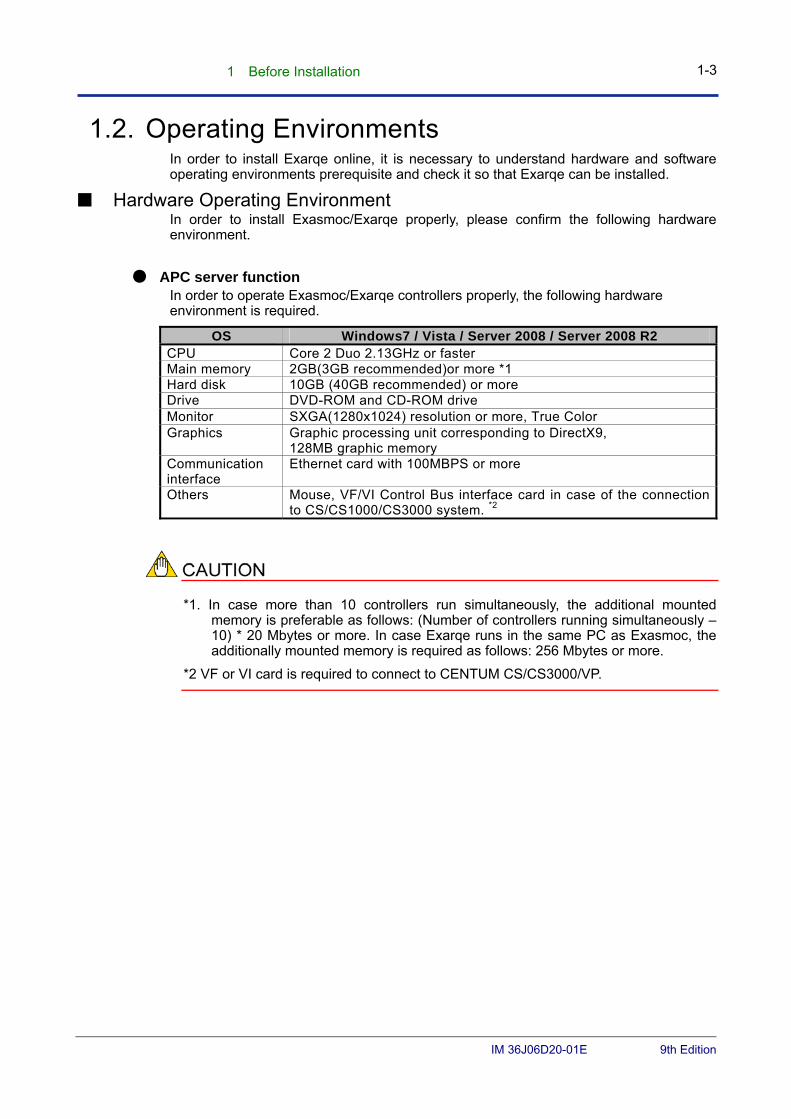
1.2. Operating Environments In order to install Exarqe online, it is necessary to understand hardware and software operating environments prerequisite and check it so that Exarqe can be installed.
■ Hardware Operating Environment In order to install Exasmoc/Exarqe properly, please confirm the following hardware environment.
● APC server function In order to operate Exasmoc/Exarqe controllers properly, the following hardware environment is required.
OS Windows7 / Vista / Server 2008 / Server 2008 R2 CPU Core 2 Duo 2.13GHz or faster Main memory 2GB(3GB recommended)or more *1 Hard disk 10GB (40GB recommended) or more Drive DVD-ROM and CD-ROM drive Monitor SXGA(1280x1024) resolution or more, True Color Graphics Graphic processing unit corresponding to DirectX9,
128MB graphic memory Communication interface
Ethernet card with 100MBPS or more
Others Mouse, VF/VI Control Bus interface card in case of the connection to CS/CS1000/CS3000 system. *2
*1. In case more than 10 controllers run simultaneously, the additional mounted memory is preferable as follows: (Number of controllers running simultaneously – 10) * 20 Mbytes or more. In case Exarqe runs in the same PC as Exasmoc, the additionally mounted memory is required as follows: 256 Mbytes or more.
*2 VF or VI card is required to connect to CENTUM CS/CS3000/VP.
1 Before Installation 1-4
IM 36J06D20-01E 9th Edition
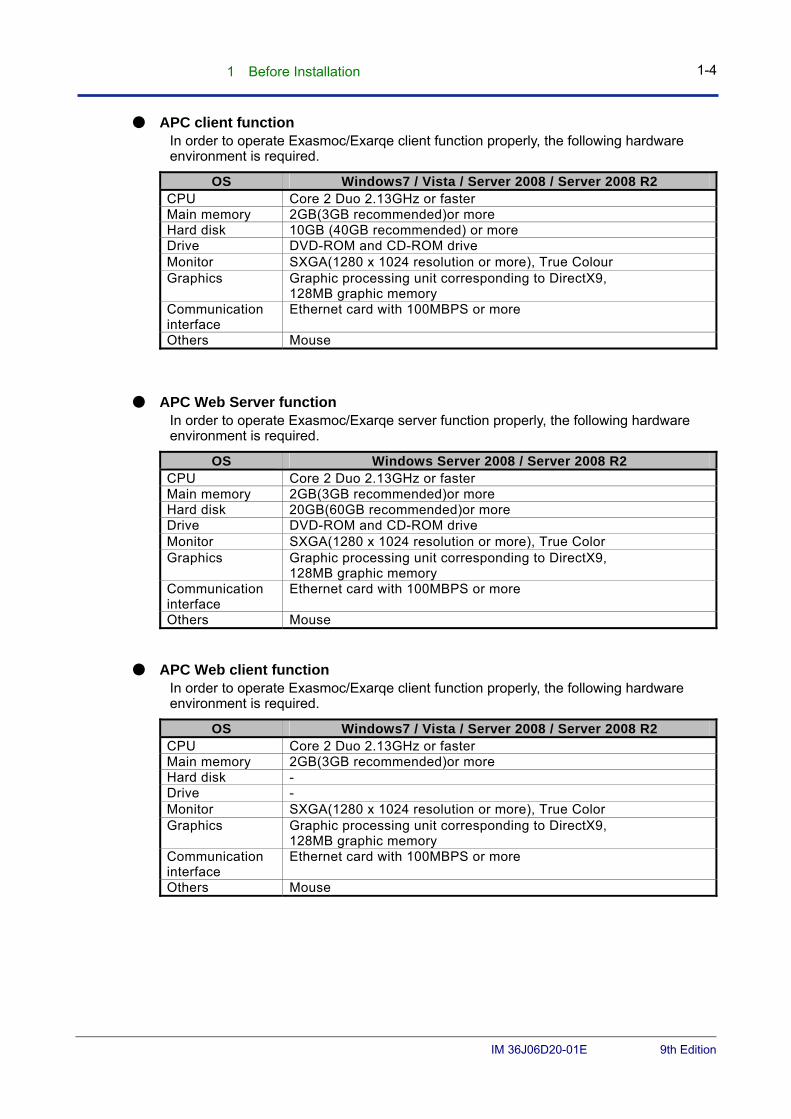
● APC client function In order to operate Exasmoc/Exarqe client function properly, the following hardware environment is required.
OS Windows7 / Vista / Server 2008 / Server 2008 R2 CPU Core 2 Duo 2.13GHz or faster Main memory 2GB(3GB recommended)or more Hard disk 10GB (40GB recommended) or more Drive DVD-ROM and CD-ROM drive Monitor SXGA(1280 x 1024 resolution or more), True Colour Graphics Graphic processing unit corresponding to DirectX9,
128MB graphic memory Communication interface
Ethernet card with 100MBPS or more
Others Mouse
● APC Web Server function In order to operate Exasmoc/Exarqe server function properly, the following hardware environment is required.
OS Windows Server 2008 / Server 2008 R2 CPU Core 2 Duo 2.13GHz or faster Main memory 2GB(3GB recommended)or more Hard disk 20GB(60GB recommended)or more Drive DVD-ROM and CD-ROM drive Monitor SXGA(1280 x 1024 resolution or more), True Color Graphics Graphic processing unit corresponding to DirectX9,
128MB graphic memory Communication interface
Ethernet card with 100MBPS or more
Others Mouse
● APC Web client function In order to operate Exasmoc/Exarqe client function properly, the following hardware environment is required.
OS Windows7 / Vista / Server 2008 / Server 2008 R2 CPU Core 2 Duo 2.13GHz or faster Main memory 2GB(3GB recommended)or more Hard disk - Drive - Monitor SXGA(1280 x 1024 resolution or more), True Color Graphics Graphic processing unit corresponding to DirectX9,
128MB graphic memory Communication interface
Ethernet card with 100MBPS or more
Others Mouse
1 Before Installation 1-5
IM 36J06D20-01E 9th Edition
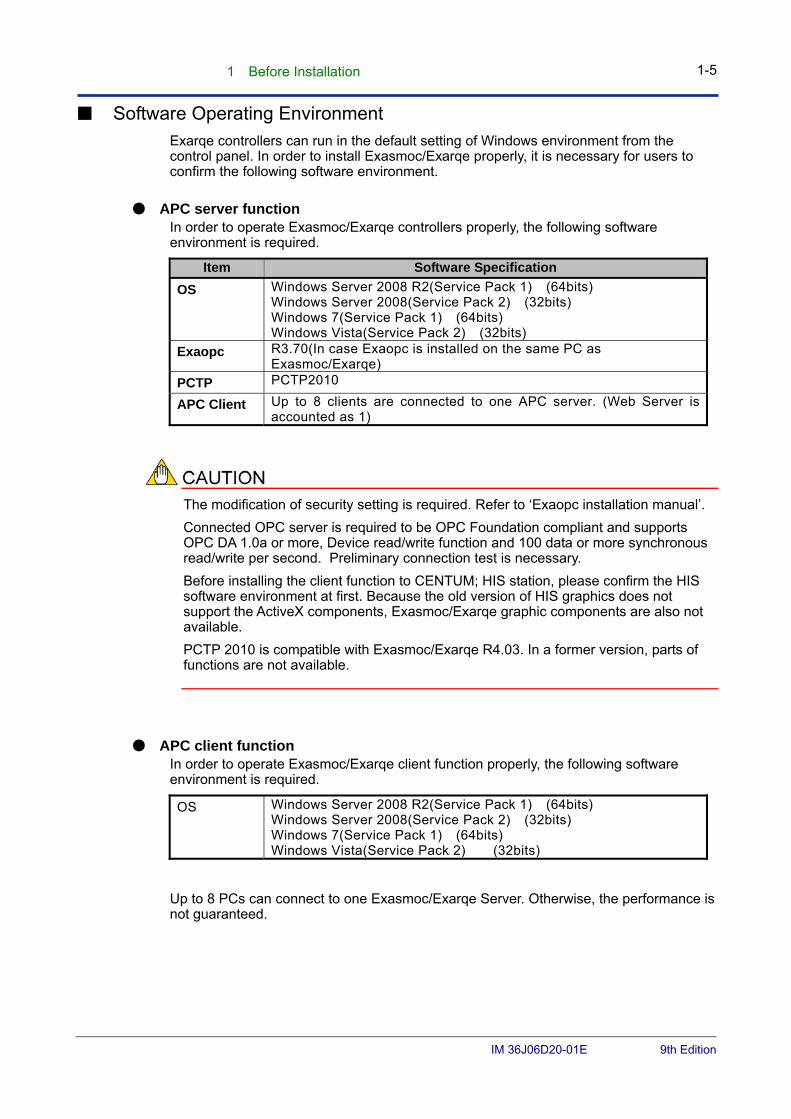
■ Software Operating Environment Exarqe controllers can run in the default setting of Windows environment from the control panel. In order to install Exasmoc/Exarqe properly, it is necessary for users to confirm the following software environment.
● APC server function In order to operate Exasmoc/Exarqe controllers properly, the following software environment is required.
Item Software Specification
OS Windows Server 2008 R2(Service Pack 1) (64bits) Windows Server 2008(Service Pack 2) (32bits) Windows 7(Service Pack 1) (64bits) Windows Vista(Service Pack 2) (32bits)
Exaopc R3.70(In case Exaopc is installed on the same PC as Exasmoc/Exarqe)
PCTP PCTP2010
APC Client Up to 8 clients are connected to one APC server. (Web Server is accounted as 1)
The modification of security setting is required. Refer to ‘Exaopc installation manual’.
Connected OPC server is required to be OPC Foundation compliant and supports OPC DA 1.0a or more, Device read/write function and 100 data or more synchronous read/write per second. Preliminary connection test is necessary.
Before installing the client function to CENTUM; HIS station, please confirm the HIS software environment at first. Because the old version of HIS graphics does not support the ActiveX components, Exasmoc/Exarqe graphic components are also not available.
PCTP 2010 is compatible with Exasmoc/Exarqe R4.03. In a former version, parts of functions are not available.
● APC client function In order to operate Exasmoc/Exarqe client function properly, the following software environment is required.
OS Windows Server 2008 R2(Service Pack 1) (64bits) Windows Server 2008(Service Pack 2) (32bits) Windows 7(Service Pack 1) (64bits) Windows Vista(Service Pack 2) (32bits)
Up to 8 PCs can connect to one Exasmoc/Exarqe Server. Otherwise, the performance is not guaranteed.
1 Before Installation 1-6
IM 36J06D20-01E 9th Edition
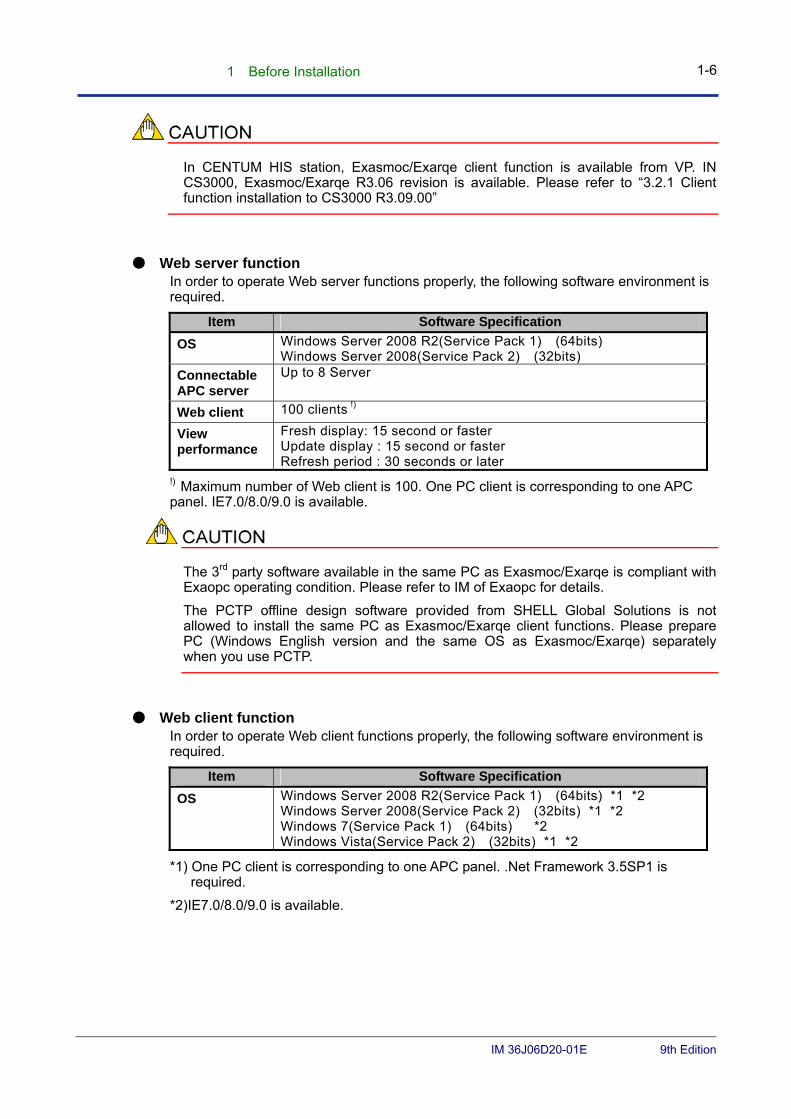
In CENTUM HIS station, Exasmoc/Exarqe client function is available from VP. IN CS3000, Exasmoc/Exarqe R3.06 revision is available. Please refer to “3.2.1 Client function installation to CS3000 R3.09.00”
● Web server function In order to operate Web server functions properly, the following software environment is required.
Item Software Specification
OS Windows Server 2008 R2(Service Pack 1) (64bits) Windows Server 2008(Service Pack 2) (32bits)
Connectable APC server
Up to 8 Server
Web client 100 clients !)
View performance
Fresh display: 15 second or faster Update display : 15 second or faster Refresh period : 30 seconds or later
!) Maximum number of Web client is 100. One PC client is corresponding to one APC panel. IE7.0/8.0/9.0 is available.
The 3rd party software available in the same PC as Exasmoc/Exarqe is compliant with Exaopc operating condition. Please refer to IM of Exaopc for details.
The PCTP offline design software provided from SHELL Global Solutions is not allowed to install the same PC as Exasmoc/Exarqe client functions. Please prepare PC (Windows English version and the same OS as Exasmoc/Exarqe) separately when you use PCTP.
● Web client function In order to operate Web client functions properly, the following software environment is required.
Item Software Specification
OS Windows Server 2008 R2(Service Pack 1) (64bits) *1 *2 Windows Server 2008(Service Pack 2) (32bits) *1 *2 Windows 7(Service Pack 1) (64bits) *2 Windows Vista(Service Pack 2) (32bits) *1 *2
*1) One PC client is corresponding to one APC panel. .Net Framework 3.5SP1 is required.
*2)IE7.0/8.0/9.0 is available.
1 Before Installation 1-7
IM 36J06D20-01E 9th Edition
● Network setting Exarqe is designed to run at the Windows initial setting condition.
It is necessary to perform the driver installation, local area network name change and IP address setting.
Active desktop is not recommended to use at the screen property setting.
● Auto generated account When Exasmoc/Exarqe is installed, user ser accounts such as APC_PROCESS, and ISS_PROCESS are created as Windows logon users. These accounts are used in the execution of Windows service functions, DCOM registrations and so on. Please do not delete these user counts or do not change the password.
● Coexistent software The following software is allowed to install on the same PC with Exarqe.
Mcafee VirusScan 8.7i Symantec EndPoint 11.0 Adobe Acrobat Reader 10.1 Latest version of each Exasmoc/Exarqe/Exapilot/Exaplog/Exaquantum client
software. As to detail, please refer to each instruction manual.
1 Before Installation 1-8
IM 36J06D20-01E 9th Edition
1.3. Exaopc Installation Exaopc installation is required to connect to FCS stations of CENTUM system.
● Installation procedure
Exarqe can send and receive data from/to FCS and other controllers by connecting via Exaopc OPC server. So It is necessary to install Exaopc before Exarqe is installed for that. According to the application system, Exarqe and Exaopc are installed on the same PC or separately.
As to the detail of Exaopc installation, please refer to ‘NTPF100 Exaopc OPC Interface Install Manual’(IM36J02A12-01).
● Connection to other vendor’s OPC server
In order to connect to other vendor’s OPC server, the client setup of the connected OPC server is required. Other vendors’ OPC server is not allowed in the same PC as Exasmoc/Exarqe server function. Please refer to each instruction manual proved by each vendor.
Item Specification
Server OPC Data Access Revision OPC DA 1.0a or later, in case of single OPC server
OPC DA 2.05a or later, in case of multiple OPC server OPC Method Synchronous data read/write, in case of single OPC server)
Asynchronous read/write, in case of multiple OPC server Performance 100 data read/write per second or more *1
*1) More performance will be required according to the increase of the number of Exasmoc/Exarqe controllers.
Exarqe is an OPC client software, compliant to OPC standards of OPC Foundation.
In order to connect to other vendor’s OPC server, any pre-test is required to guarantee the behavior and support the connection.
1 Before Installation 1-9
IM 36J06D20-01E 9th Edition
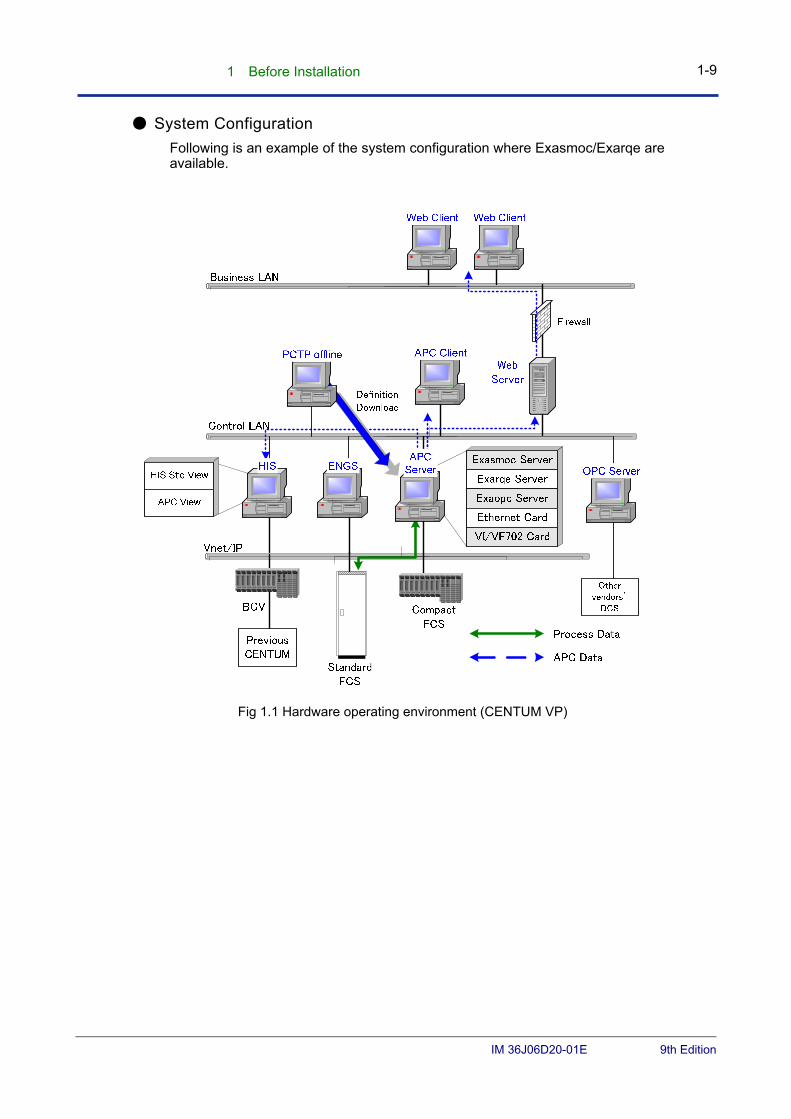
● System Configuration
Following is an example of the system configuration where Exasmoc/Exarqe are available.
Fig 1.1 Hardware operating environment (CENTUM VP)
1 Before Installation 1-10
IM 36J06D20-01E 9th Edition
1.4. Re-Installation Exasmoc and Exarqe are overridden on the current installed programs. Please confirm the revision of CD-ROM/DVD-ROM and the current version to avoid the incorrect installation.
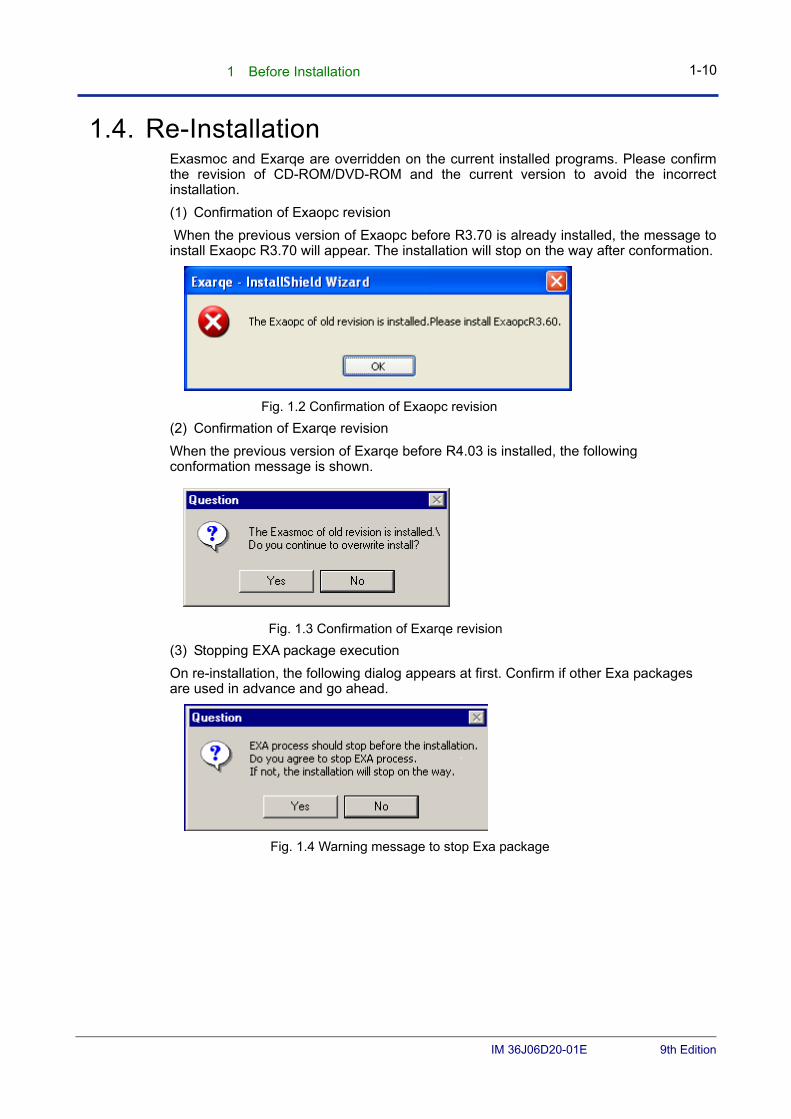
(1) Confirmation of Exaopc revision
When the previous version of Exaopc before R3.70 is already installed, the message to install Exaopc R3.70 will appear. The installation will stop on the way after conformation.
Fig. 1.2 Confirmation of Exaopc revision
(2) Confirmation of Exarqe revision
When the previous version of Exarqe before R4.03 is installed, the following conformation message is shown.
Fig. 1.3 Confirmation of Exarqe revision
(3) Stopping EXA package execution
On re-installation, the following dialog appears at first. Confirm if other Exa packages are used in advance and go ahead.
Fig. 1.4 Warning message to stop Exa package
1 Before Installation 1-11
IM 36J06D20-01E 9th Edition
The following shows the precautions when changing the version of Exarqe from R4.03 or earlier to R4.03 or later.
■Precautions for Installing In the case of revision up, restart PC with keeping DVD-ROM on the drive.
After confirming the start of APC Builder from the start menu with success, remove DVD-ROM on the drive
■Settings after Installation
●Precautions For Exarqe Server PC
The OPC user authentication, which is introduced on and after Exaopc R3.70, is required, if necessary. For detail of the setting procedure refer to 2.5 APC Server Settings (the OPC User authentication).
●Precautions For Exarqe Client PC
Though it does not matter which login account is used on server PC and client PC in the previous version, the adequate account is required on and after R4.03, if the server and the client are configured as “workgroup” of network environment. For detail of account setting procedure refer to “User Account Creation” in 3.4 Settings for Connection.
●Precautions For Exarqe Web Client PC
Please execute "4.6.3 Certification of Web Client" When you renew the Web server
Removal of ‘Exasmoc/Exarqe’ is NOT recommended from the ‘Add/Remove Programs’ window of the Windows control panel, as it will affect other EXA packages installed in the same PC.
Client installation is done from DVD-ROM, instead of the network.
1 Before Installation 1-12
IM 36J06D20-01E 9th Edition
1.5. Microsoft Hotfix Installation In Exarqe R4.03, the following Microsoft hotfix is installed. However, as some of the operating systems do not support the hotfix, it is not automatically installed. In that case, after applying Service Pack2 at first, install the hotfix manually
Exarqe Server/ Client/ Web Server In Exarqe R4.03, the following Microsoft hotfix is automatically installed.
[Microsoft hotfix] KB981107 -WPF based application experiences different memory leaks with .NET 3.5 As to detail, please refer to the following web site. <http://support.microsoft.com/kb/981107>
[Not supported operating system] Windows Vista Service Pack1, Windows 2008 Service pack 1.
Web Client It is recommended to install Microsoft hotfix.
[Microsoft hotfix] KB981107 -WPF based application experiences different memory leaks with .NET 3.5 As to detail, please refer to the following web site. <http://support.microsoft.com/kb/981107>
[Not supported operating system] Windows Vista Service Pack1, Windows 2008 Service pack 1
1 Before Installation 1-13
IM 36J06D20-01E 9th Edition
1.6. Installation procedure outline The outline of the installation procedure is shown below.
Please refer to each chapter for details.
1) Confirmation of system Environments (Chapter 1)
2) Installation of server function (Chapter 2)
3) Installation of client function (Chapter 3)
4) Installation of Web server function (Chapter 4)
5) Execution of IT security utility (Chapter 5)
6) Combine Exarqe and other products (Chapter 6)
IT Security settings are done on the installation of each function. As to the detail of IT Security settings, please refer to Chapter 5.
2 Installing Exarqe Server 2-1
IM 36J06D20-01E 9th Edition
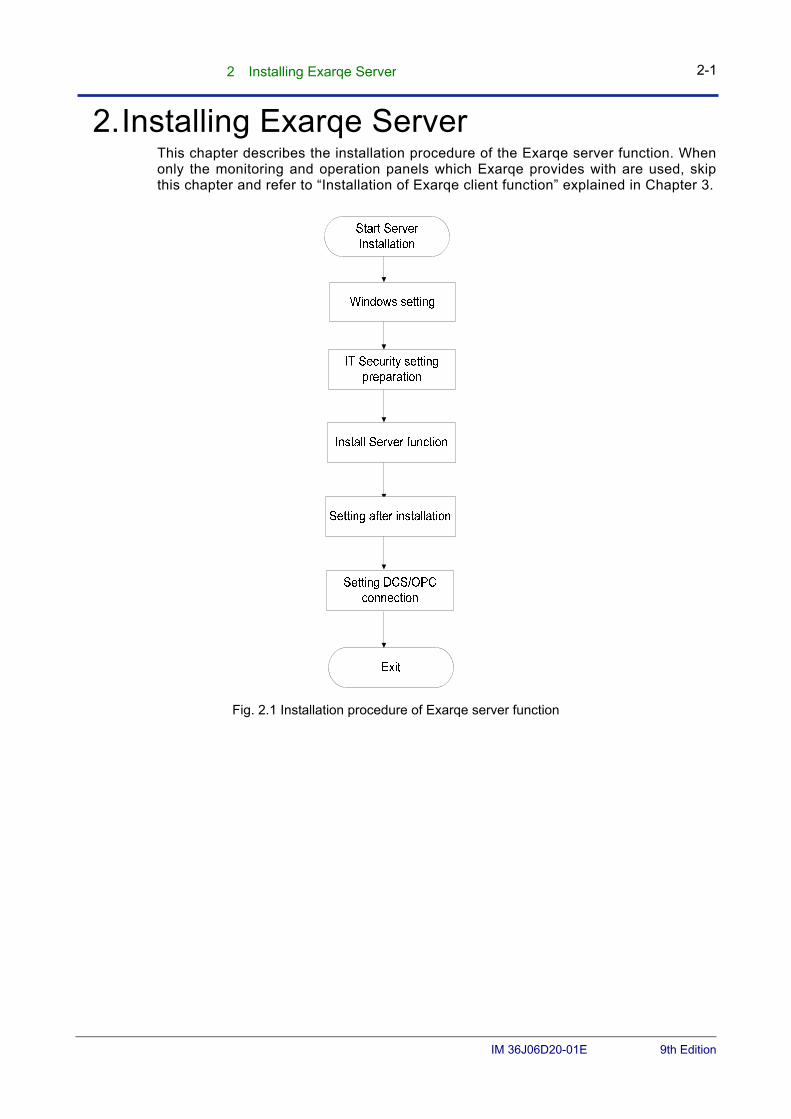
2. Installing Exarqe Server This chapter describes the installation procedure of the Exarqe server function. When only the monitoring and operation panels which Exarqe provides with are used, skip this chapter and refer to “Installation of Exarqe client function” explained in Chapter 3.
Fig. 2.1 Installation procedure of Exarqe server function
2 Installing Exarqe Server 2-2
IM 36J06D20-01E 9th Edition
2.1. Windows Setup Procedure Confirm the installed Windows settings before you install Exarqe.
When Exaopc is installed in advance, this procedure is unnecessary because Exaopc installs the same content as is written in the Exarqe Installation manual.
This setting should be done as an administrative user.
■ About File System The file system of the disk partitions should be NTFS. If the partition of operating system is already formatted to FAT, it is necessary to convert it into NTFS and then reinstall the operating system.
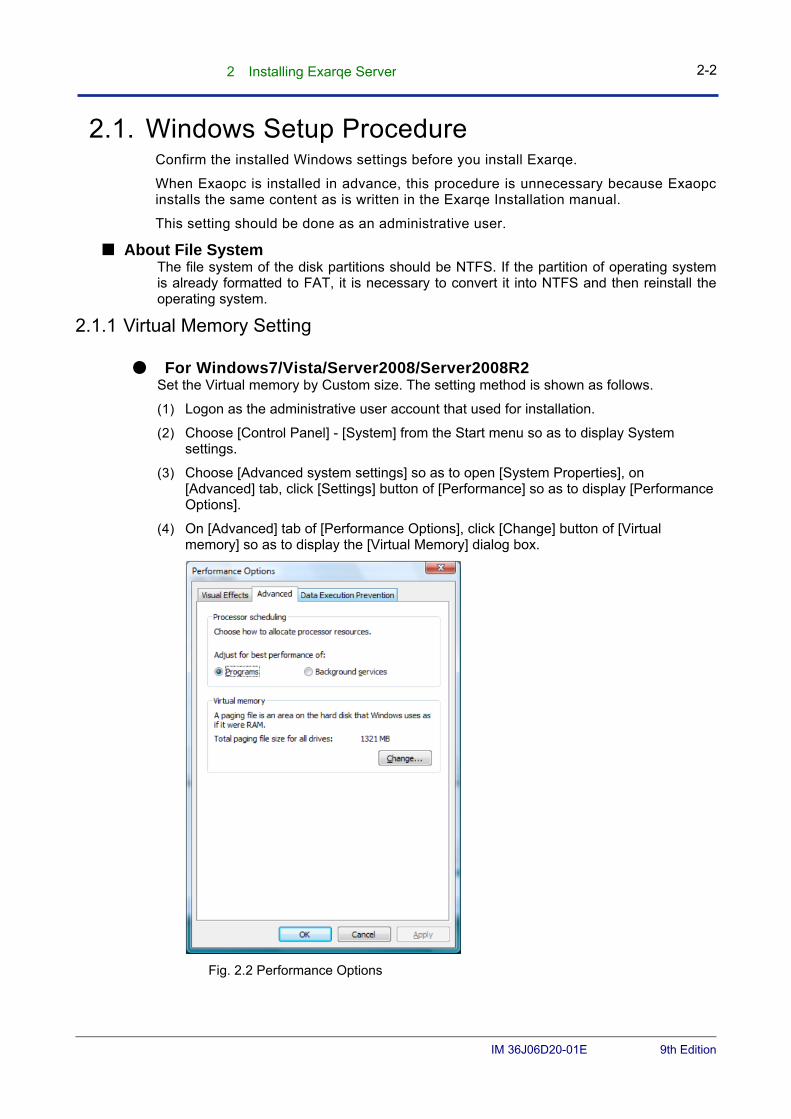
2.1.1 Virtual Memory Setting
● For Windows7/Vista/Server2008/Server2008R2 Set the Virtual memory by Custom size. The setting method is shown as follows.
(1) Logon as the administrative user account that used for installation.
(2) Choose [Control Panel] - [System] from the Start menu so as to display System settings.
(3) Choose [Advanced system settings] so as to open [System Properties], on [Advanced] tab, click [Settings] button of [Performance] so as to display [Performance Options].
(4) On [Advanced] tab of [Performance Options], click [Change] button of [Virtual memory] so as to display the [Virtual Memory] dialog box.
Fig. 2.2 Performance Options

2 Installing Exarqe Server 2-3
IM 36J06D20-01E 9th Edition
(5) The paging file size of the selected drive can be defined as follows.
Fig. 2.3 Virtual Memory Dialog
(6) Choose [Custom size] and then enter the sizes for [Initial size] and [Maximum size]. A size that is three times of main memory size is recommended for the initial size. However, 4096MB is the upper limit. For an example, if the main memory size is 1GB, the initial size can be defined with 3072MB. However, if the main memory size is 2GB or 4GB, 4096MB should be used.
(7) After confirmation, click [OK] button.
(8) When you are prompted to restart, click Yes.
2 Installing Exarqe Server 2-4
IM 36J06D20-01E 9th Edition
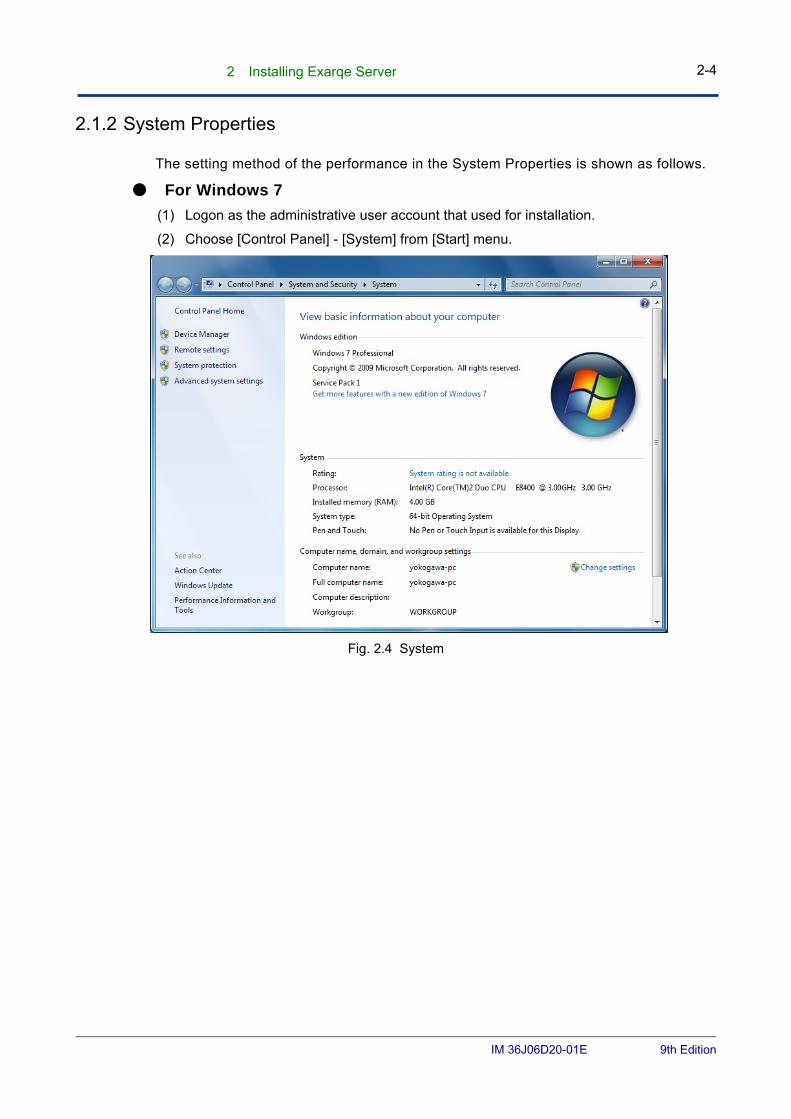
2.1.2 System Properties
The setting method of the performance in the System Properties is shown as follows.
● For Windows 7
(1) Logon as the administrative user account that used for installation.
(2) Choose [Control Panel] - [System] from [Start] menu.
Fig. 2.4 System
2 Installing Exarqe Server 2-5
IM 36J06D20-01E 9th Edition
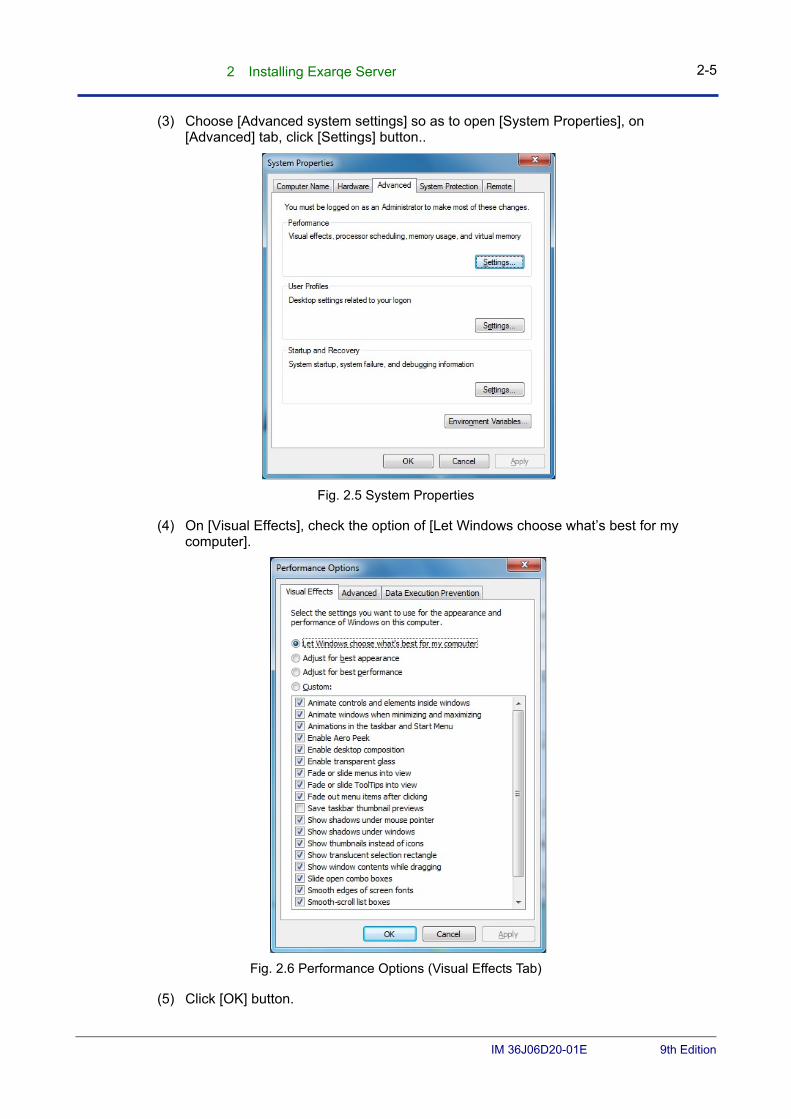
(3) Choose [Advanced system settings] so as to open [System Properties], on [Advanced] tab, click [Settings] button..
Fig. 2.5 System Properties
(4) On [Visual Effects], check the option of [Let Windows choose what’s best for my computer].
Fig. 2.6 Performance Options (Visual Effects Tab)
(5) Click [OK] button.
2 Installing Exarqe Server 2-6
IM 36J06D20-01E 9th Edition
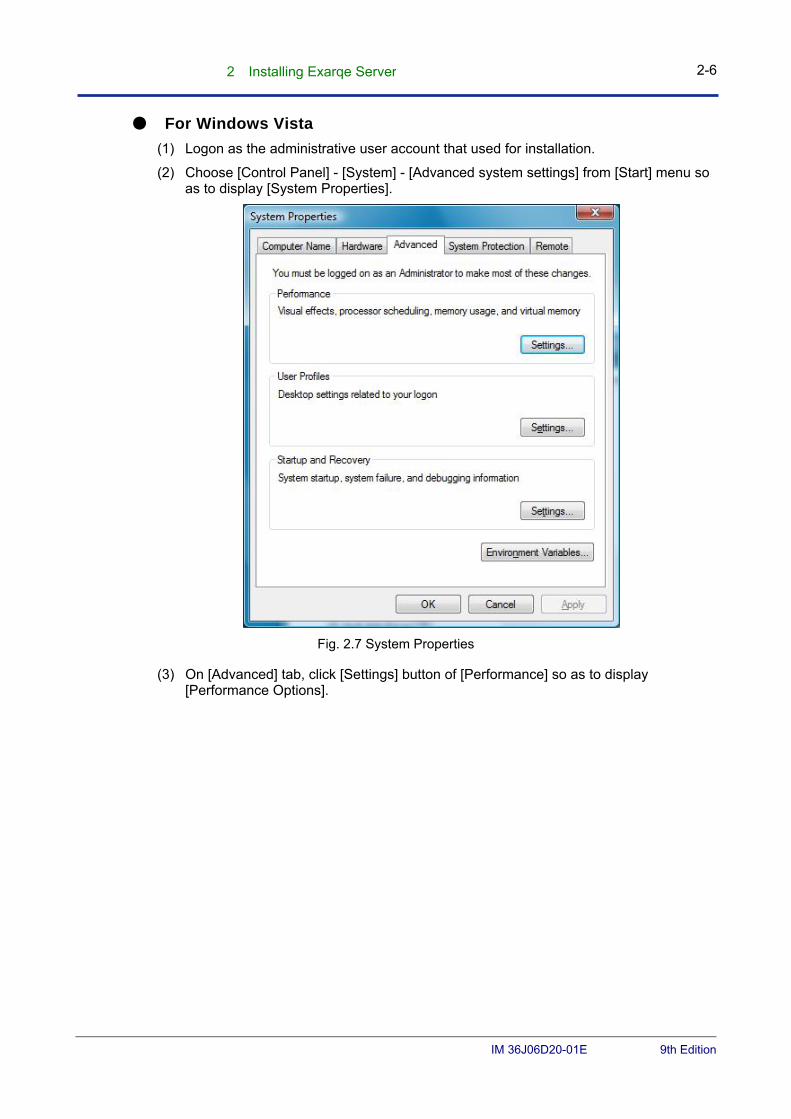
● For Windows Vista
(1) Logon as the administrative user account that used for installation.
(2) Choose [Control Panel] - [System] - [Advanced system settings] from [Start] menu so as to display [System Properties].
Fig. 2.7 System Properties
(3) On [Advanced] tab, click [Settings] button of [Performance] so as to display [Performance Options].
2 Installing Exarqe Server 2-7
IM 36J06D20-01E 9th Edition
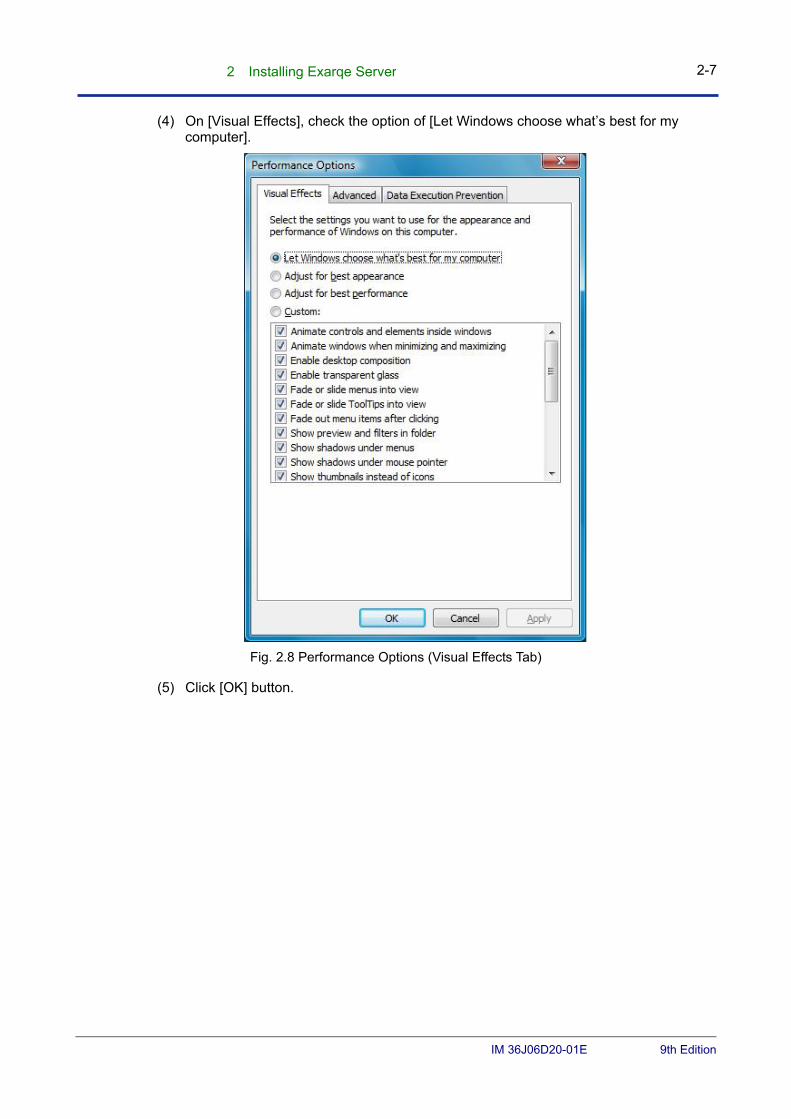
(4) On [Visual Effects], check the option of [Let Windows choose what’s best for my computer].
Fig. 2.8 Performance Options (Visual Effects Tab)
(5) Click [OK] button.
2 Installing Exarqe Server 2-8
IM 36J06D20-01E 9th Edition
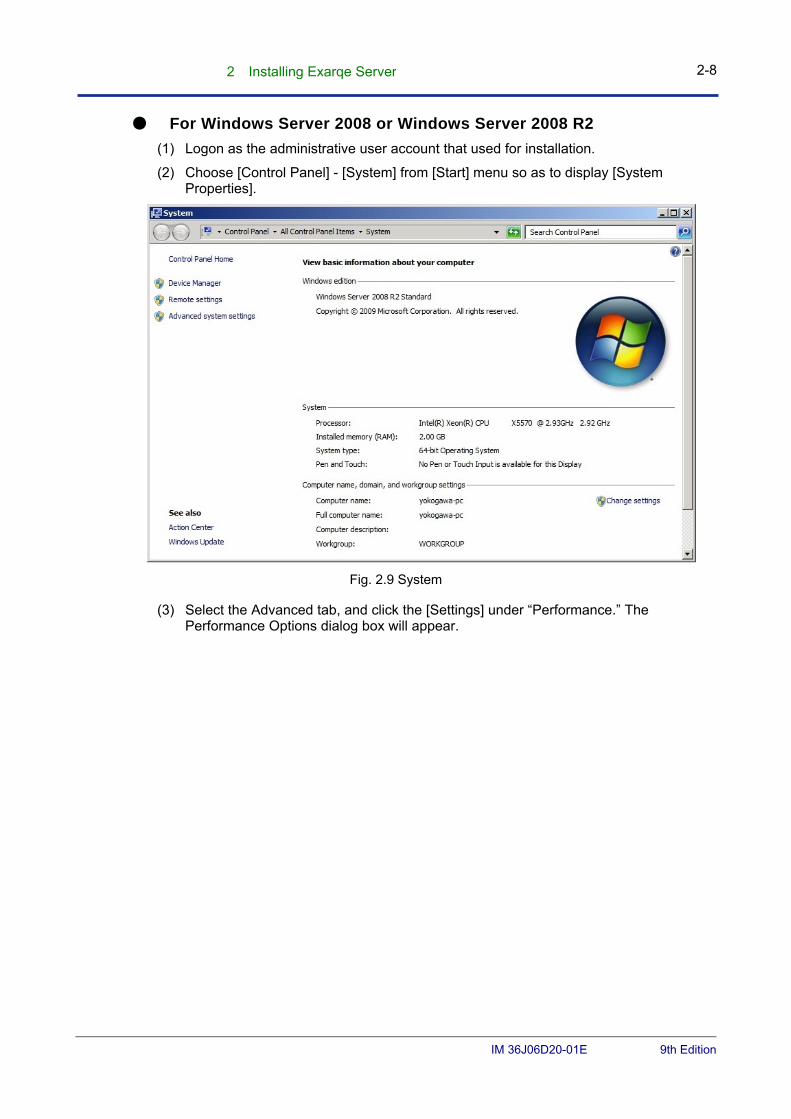
● For Windows Server 2008 or Windows Server 2008 R2
(1) Logon as the administrative user account that used for installation.
(2) Choose [Control Panel] - [System] from [Start] menu so as to display [System Properties].
Fig. 2.9 System
(3) Select the Advanced tab, and click the [Settings] under “Performance.” The Performance Options dialog box will appear.
2 Installing Exarqe Server 2-9
IM 36J06D20-01E 9th Edition
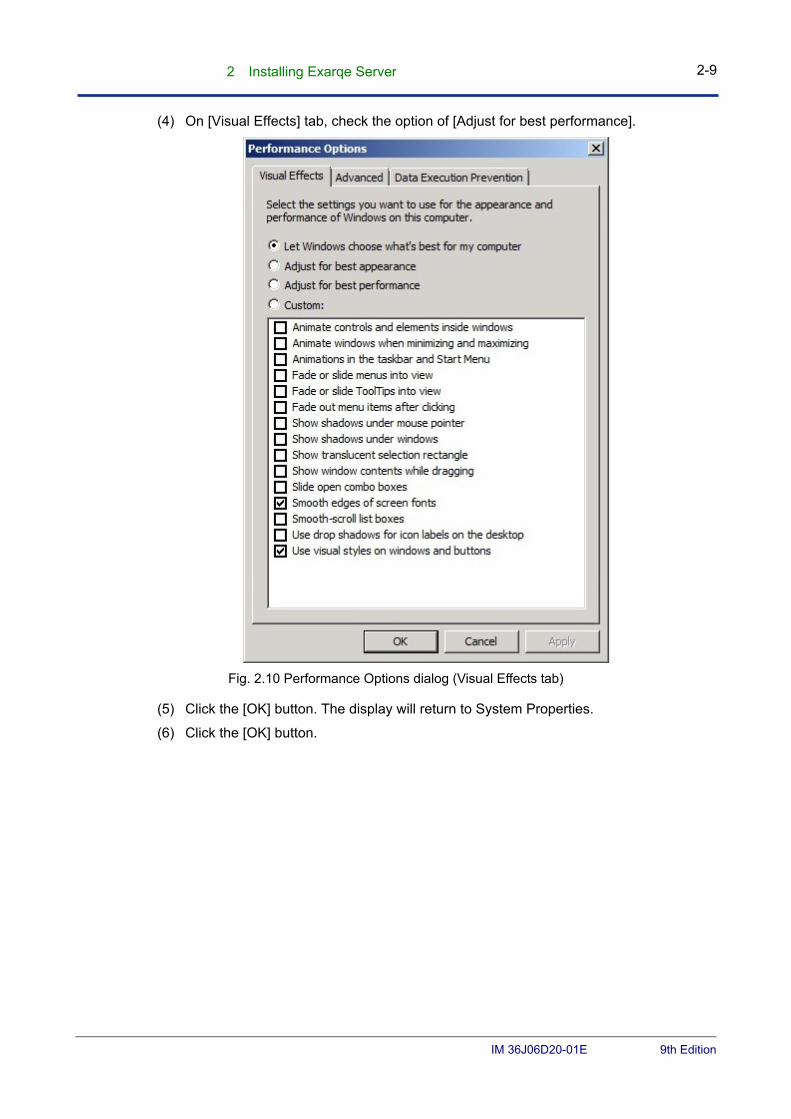
(4) On [Visual Effects] tab, check the option of [Adjust for best performance].
Fig. 2.10 Performance Options dialog (Visual Effects tab)
(5) Click the [OK] button. The display will return to System Properties.
(6) Click the [OK] button.
2 Installing Exarqe Server 2-10
IM 36J06D20-01E 9th Edition
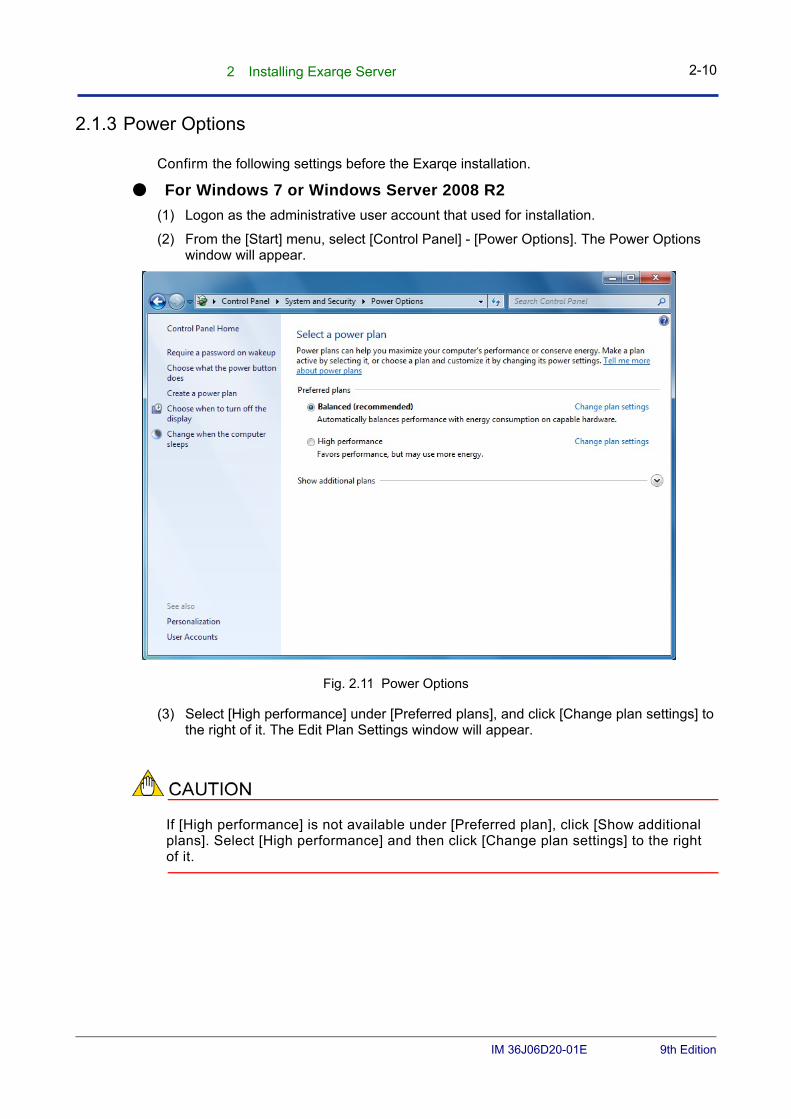
2.1.3 Power Options
Confirm the following settings before the Exarqe installation.
● For Windows 7 or Windows Server 2008 R2
(1) Logon as the administrative user account that used for installation.
(2) From the [Start] menu, select [Control Panel] - [Power Options]. The Power Options window will appear.
Fig. 2.11 Power Options
(3) Select [High performance] under [Preferred plans], and click [Change plan settings] to the right of it. The Edit Plan Settings window will appear.
If [High performance] is not available under [Preferred plan], click [Show additional plans]. Select [High performance] and then click [Change plan settings] to the right of it.
2. Installing Server Function 2-11
IM 36J06D20-01E 9th Edition
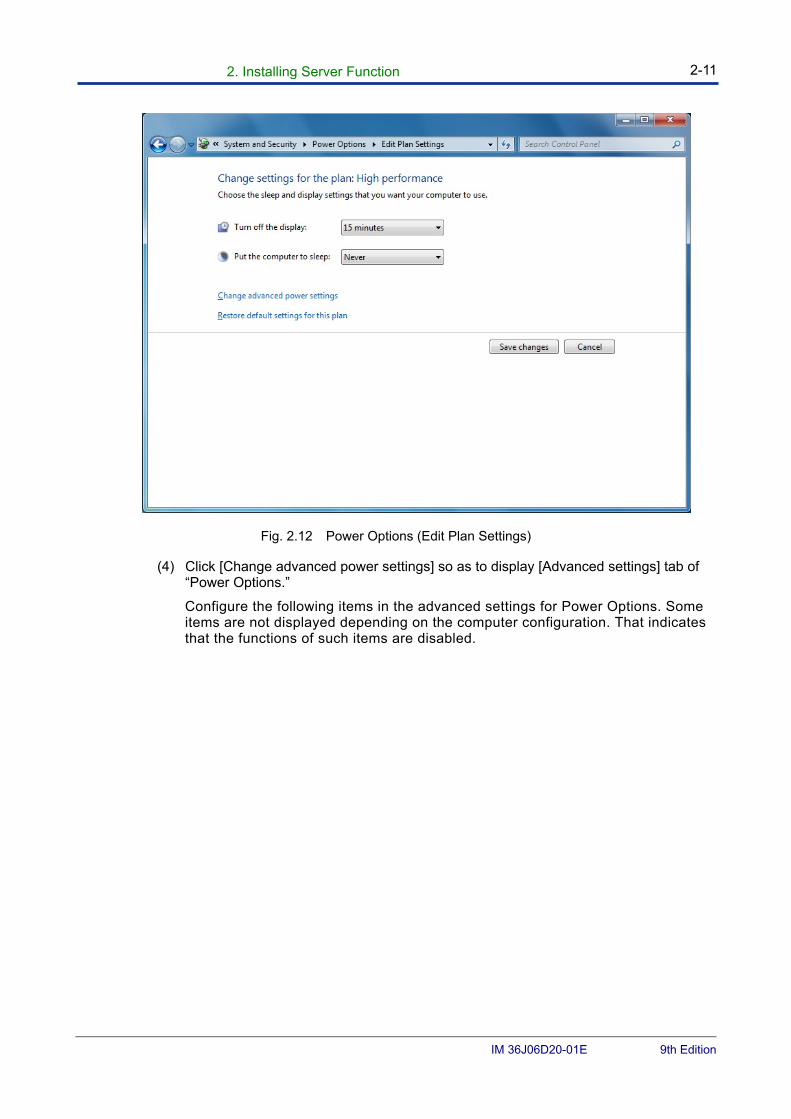
Fig. 2.12 Power Options (Edit Plan Settings)
(4) Click [Change advanced power settings] so as to display [Advanced settings] tab of “Power Options.”
Configure the following items in the advanced settings for Power Options. Some items are not displayed depending on the computer configuration. That indicates that the functions of such items are disabled.
2. Installing Server Function 2-12
IM 36J06D20-01E 9th Edition
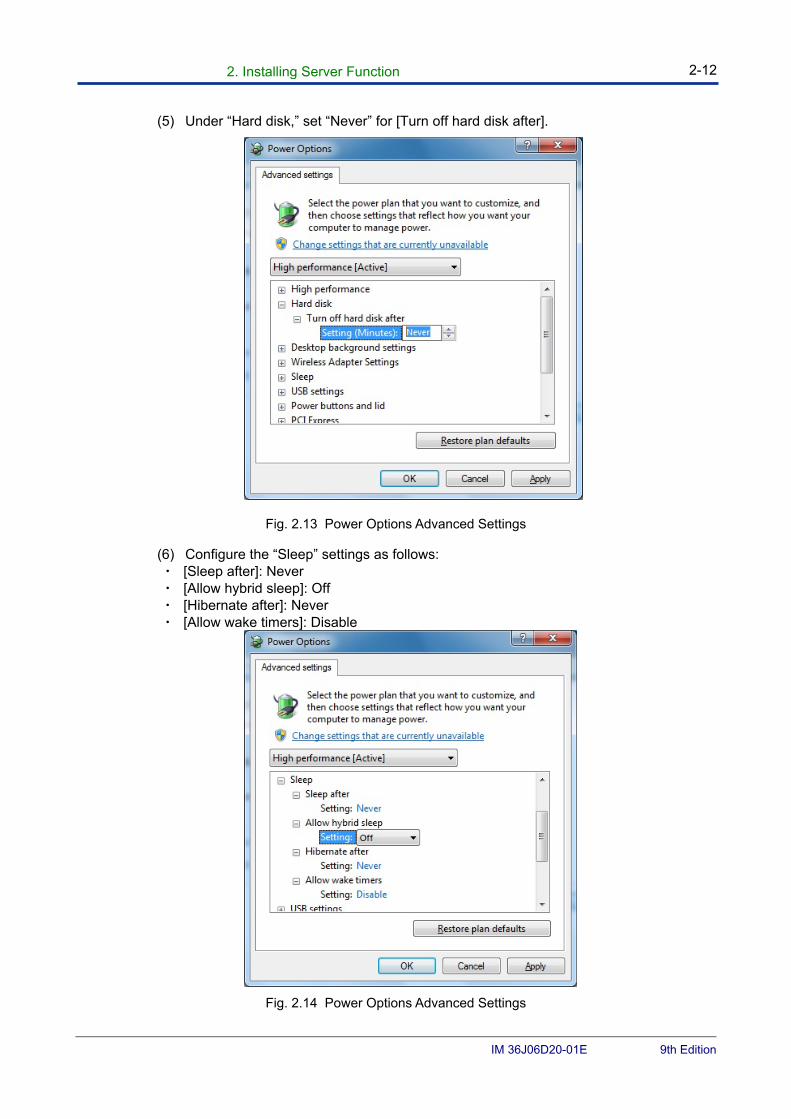
(5) Under “Hard disk,” set “Never” for [Turn off hard disk after].
Fig. 2.13 Power Options Advanced Settings
(6) Configure the “Sleep” settings as follows: ・ [Sleep after]: Never ・ [Allow hybrid sleep]: Off ・ [Hibernate after]: Never ・ [Allow wake timers]: Disable
Fig. 2.14 Power Options Advanced Settings
2. Installing Server Function 2-13
IM 36J06D20-01E 9th Edition
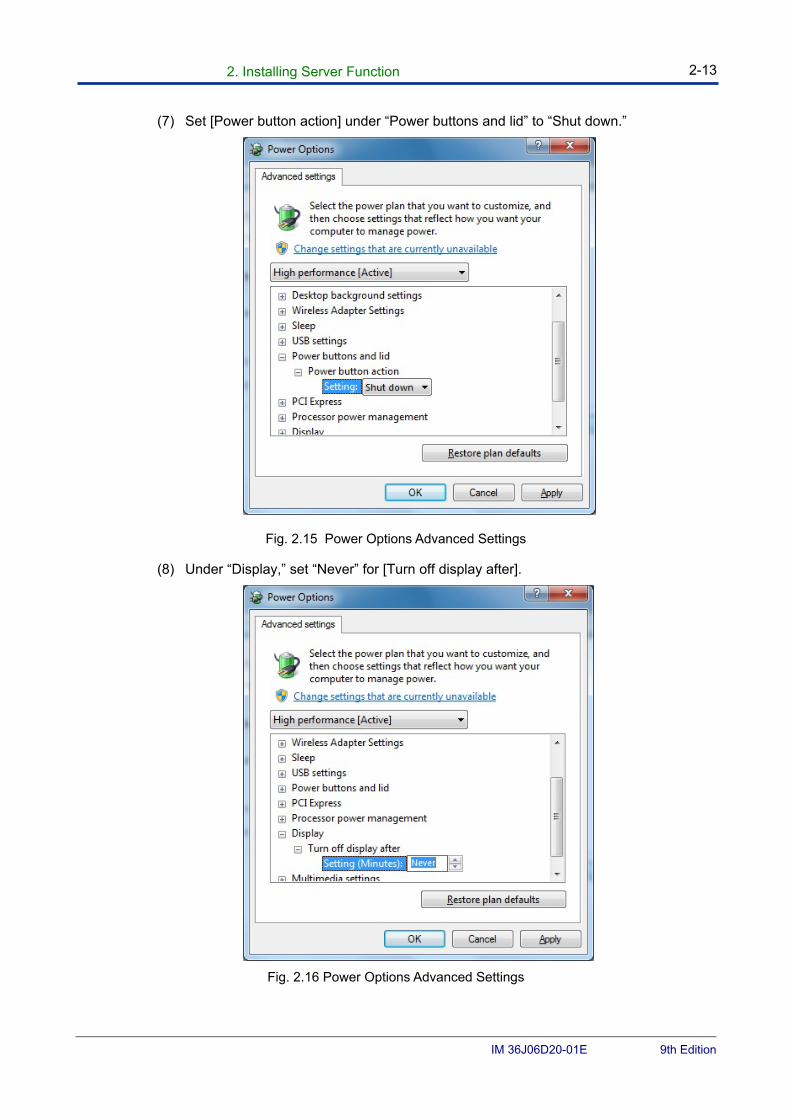
(7) Set [Power button action] under “Power buttons and lid” to “Shut down.”
Fig. 2.15 Power Options Advanced Settings
(8) Under “Display,” set “Never” for [Turn off display after].
Fig. 2.16 Power Options Advanced Settings
2. Installing Server Function 2-14
IM 36J06D20-01E 9th Edition
● For Windows Vista / Server 2008 Setting procedure is as follows.
(1) Logon as the administrative user account that used for installation.
(2) From the [Start] menu, Choose [Control Panel] - [Power Options] from [Start] menu so as to display [Power Options].
(3) Choose [High performance] from [Preferred plans]. Click [Change plan settings] at the lower part so as to display [Edit Plan Settings].
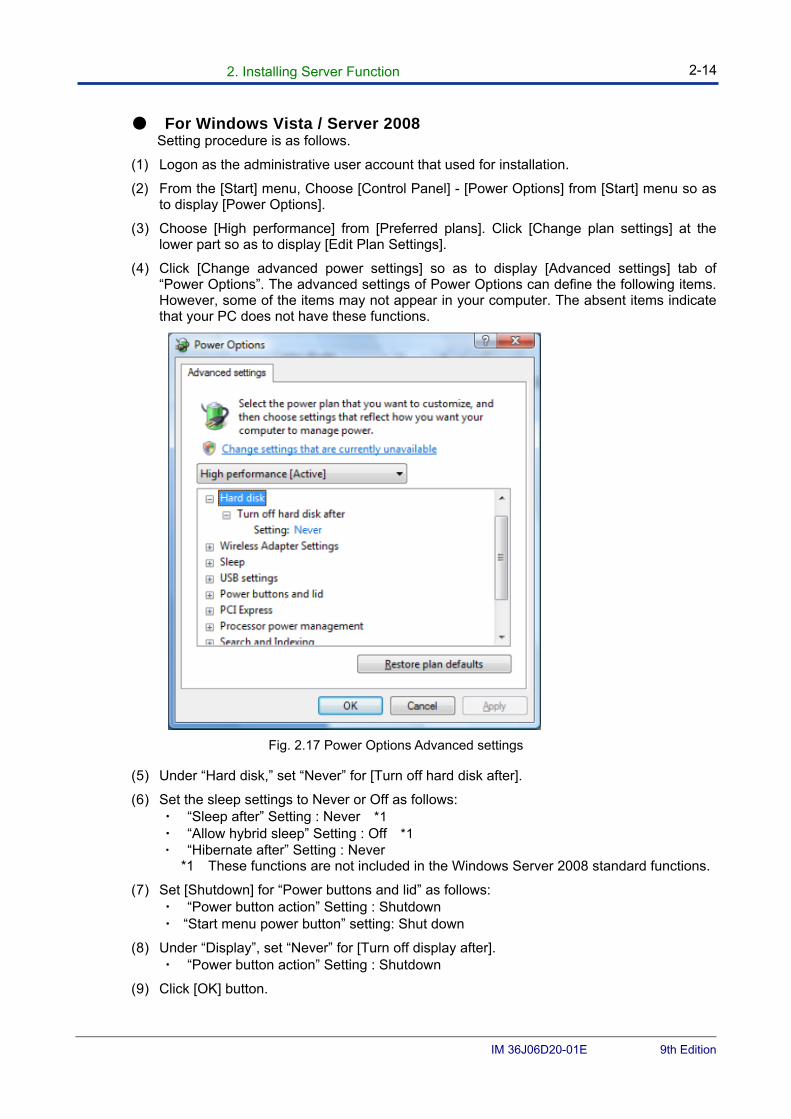
(4) Click [Change advanced power settings] so as to display [Advanced settings] tab of “Power Options”. The advanced settings of Power Options can define the following items. However, some of the items may not appear in your computer. The absent items indicate that your PC does not have these functions.
Fig. 2.17 Power Options Advanced settings
(5) Under “Hard disk,” set “Never” for [Turn off hard disk after].
(6) Set the sleep settings to Never or Off as follows: ・ “Sleep after” Setting : Never *1 ・ “Allow hybrid sleep” Setting : Off *1 ・ “Hibernate after” Setting : Never
*1 These functions are not included in the Windows Server 2008 standard functions.
(7) Set [Shutdown] for “Power buttons and lid” as follows: ・ “Power button action” Setting : Shutdown ・ “Start menu power button” setting: Shut down
(8) Under “Display”, set “Never” for [Turn off display after]. ・ “Power button action” Setting : Shutdown
(9) Click [OK] button.
2. Installing Server Function 2-15
IM 36J06D20-01E 9th Edition
2.1.4 Windows Sidebar (for Windows Vista)
The procedure to disable the Windows sidebar is shown as follows, and this setting should be performed for all the users since it is only valid for the environment of each user.
(1) Logon Windows using a user account that the user environment to be changed.
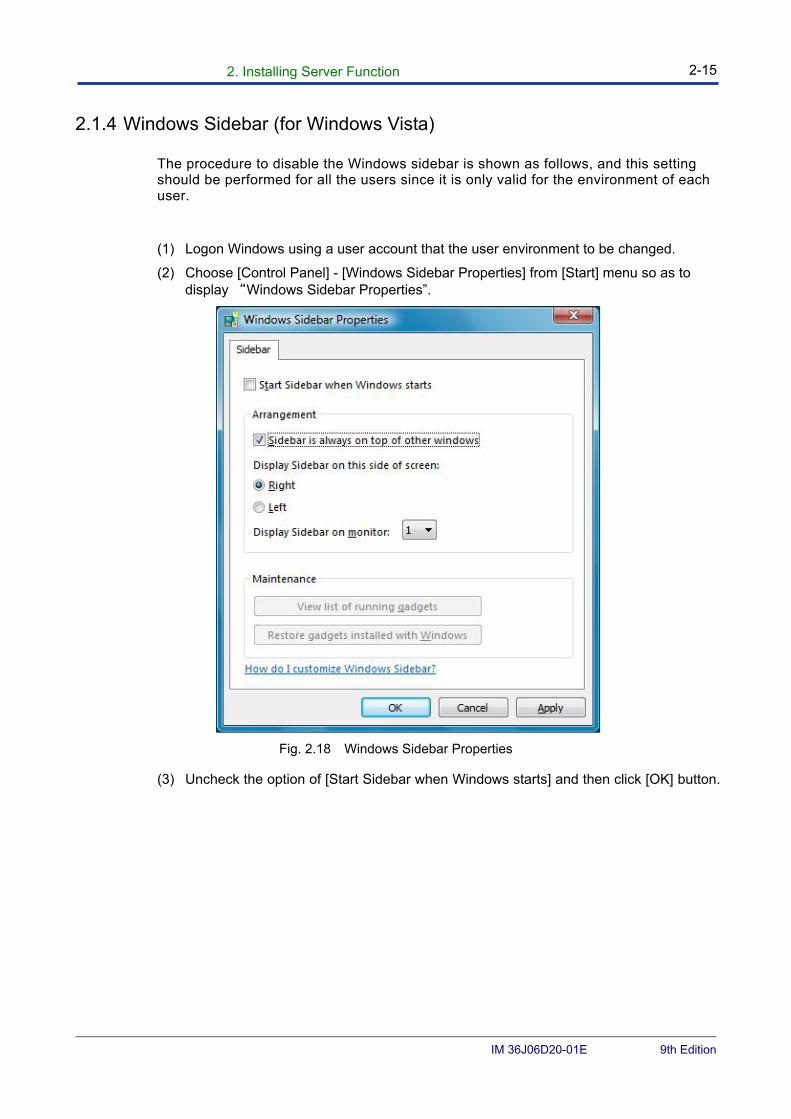
(2) Choose [Control Panel] - [Windows Sidebar Properties] from [Start] menu so as to display “Windows Sidebar Properties”.
Fig. 2.18 Windows Sidebar Properties
(3) Uncheck the option of [Start Sidebar when Windows starts] and then click [OK] button.
2. Installing Server Function 2-16
IM 36J06D20-01E 9th Edition
2.1.5 Disable Window Security Center
Windows securities are comprehensively managed in Windows Security Center for protecting the computer from the security risks. However, for Exarqe, it is recommended to disable Windows security automatic updating and disable the Windows security alerts sent from the Windows Security Center. For Windows Vista, this change is valid only for one user’s environment.
● For Windows 7 or Windows Server 2008 R2
(1) Logon as the account of the user for whom the alerts by Windows Security Center and Action Center be disabled.
(2) From the [Start] menu, select [Control Panel].
(3) Set the display style of control panel to Icons.
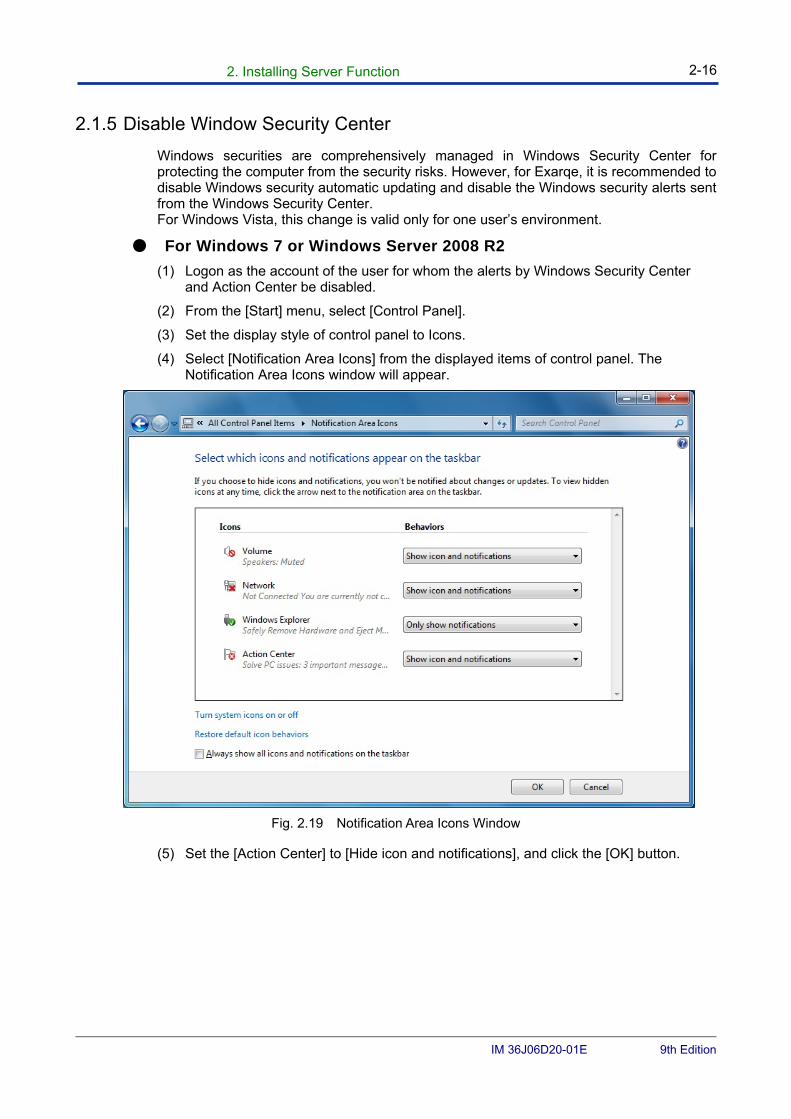
(4) Select [Notification Area Icons] from the displayed items of control panel. The Notification Area Icons window will appear.
Fig. 2.19 Notification Area Icons Window
(5) Set the [Action Center] to [Hide icon and notifications], and click the [OK] button.
2. Installing Server Function 2-17
IM 36J06D20-01E 9th Edition
● For Windows Vista
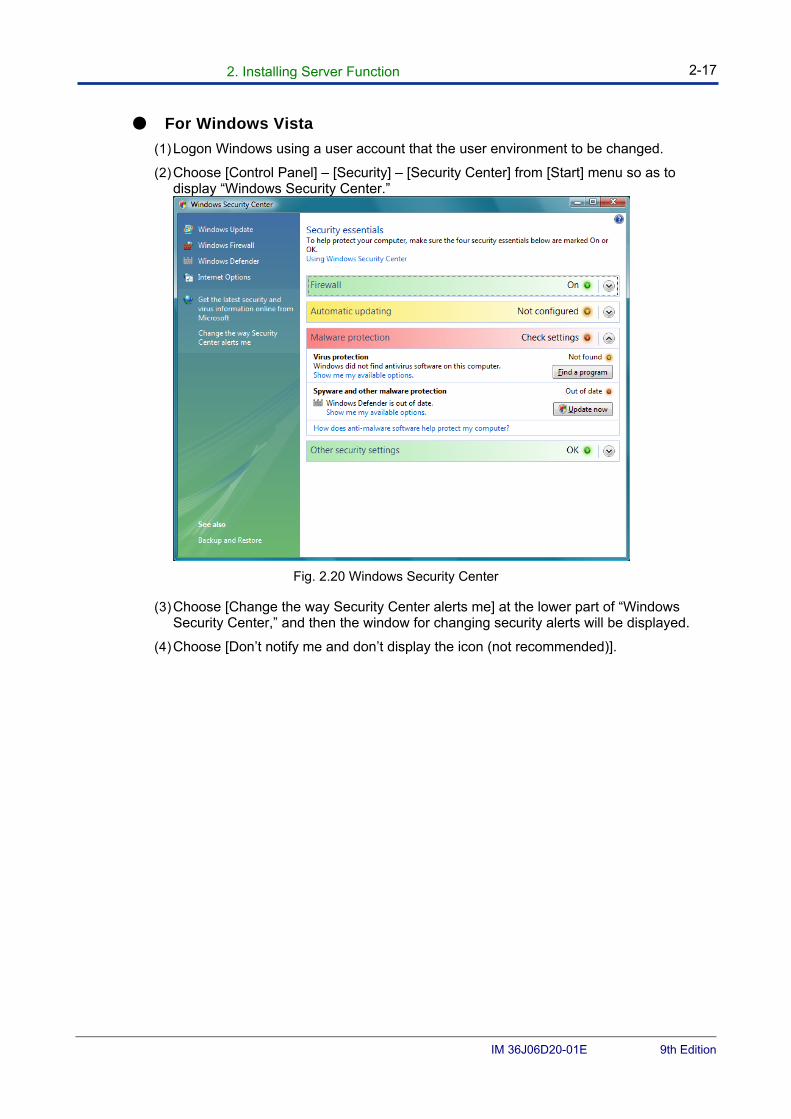
(1) Logon Windows using a user account that the user environment to be changed.
(2) Choose [Control Panel] – [Security] – [Security Center] from [Start] menu so as to display “Windows Security Center.”
Fig. 2.20 Windows Security Center
(3) Choose [Change the way Security Center alerts me] at the lower part of “Windows Security Center,” and then the window for changing security alerts will be displayed.
(4) Choose [Don’t notify me and don’t display the icon (not recommended)].
2. Installing Server Function 2-18
IM 36J06D20-01E 9th Edition
2.1.6 Disabling Window Defender
Windows Defender is a software program capable of detecting and eliminating malware (malicious software such as spyware). We recommend you disable it because it is not used.
To disable Windows Defender, follow the steps below.
● For Windows 7
(1) Logon as the administrative user account that used for installation.
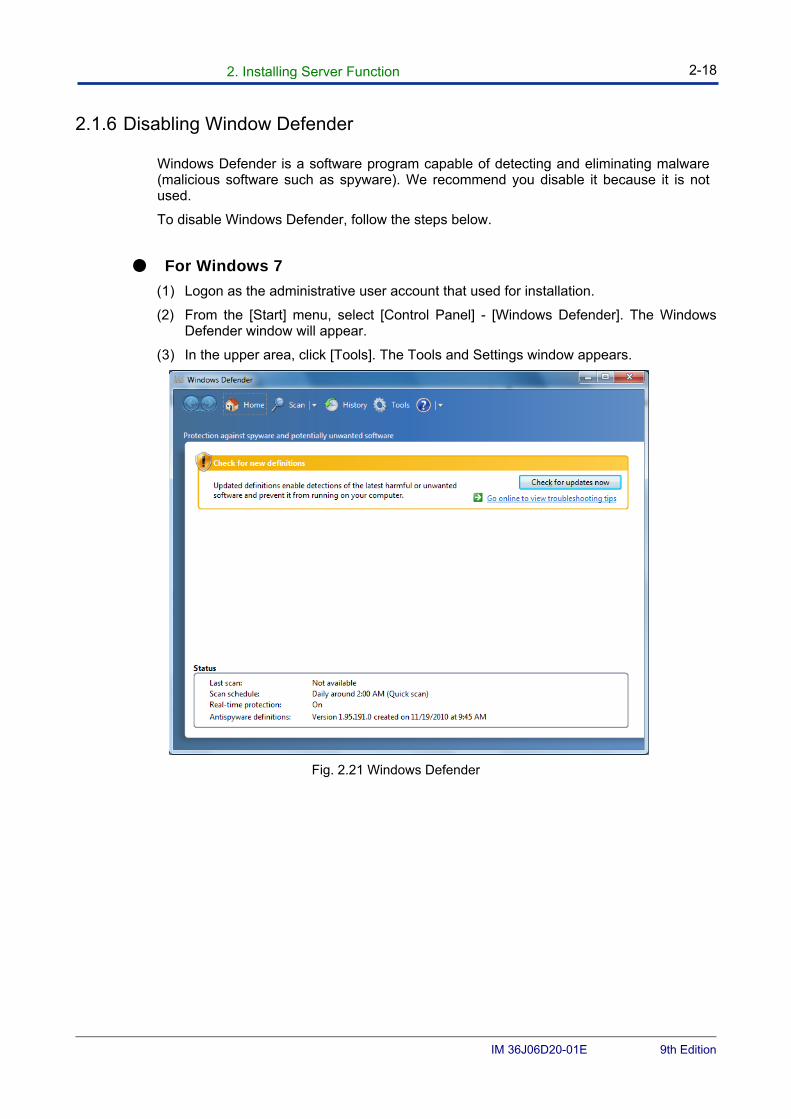
(2) From the [Start] menu, select [Control Panel] - [Windows Defender]. The Windows Defender window will appear.
(3) In the upper area, click [Tools]. The Tools and Settings window appears.
Fig. 2.21 Windows Defender
2. Installing Server Function 2-19
IM 36J06D20-01E 9th Edition
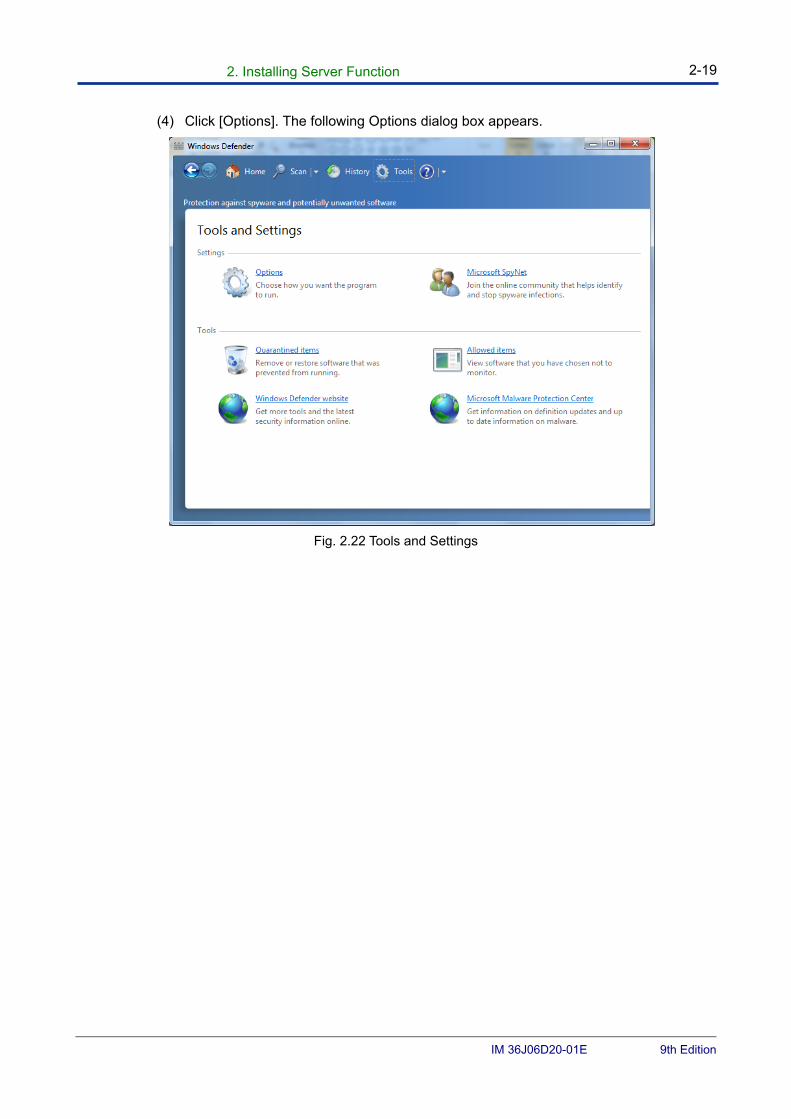
(4) Click [Options]. The following Options dialog box appears.
Fig. 2.22 Tools and Settings
2. Installing Server Function 2-20
IM 36J06D20-01E 9th Edition
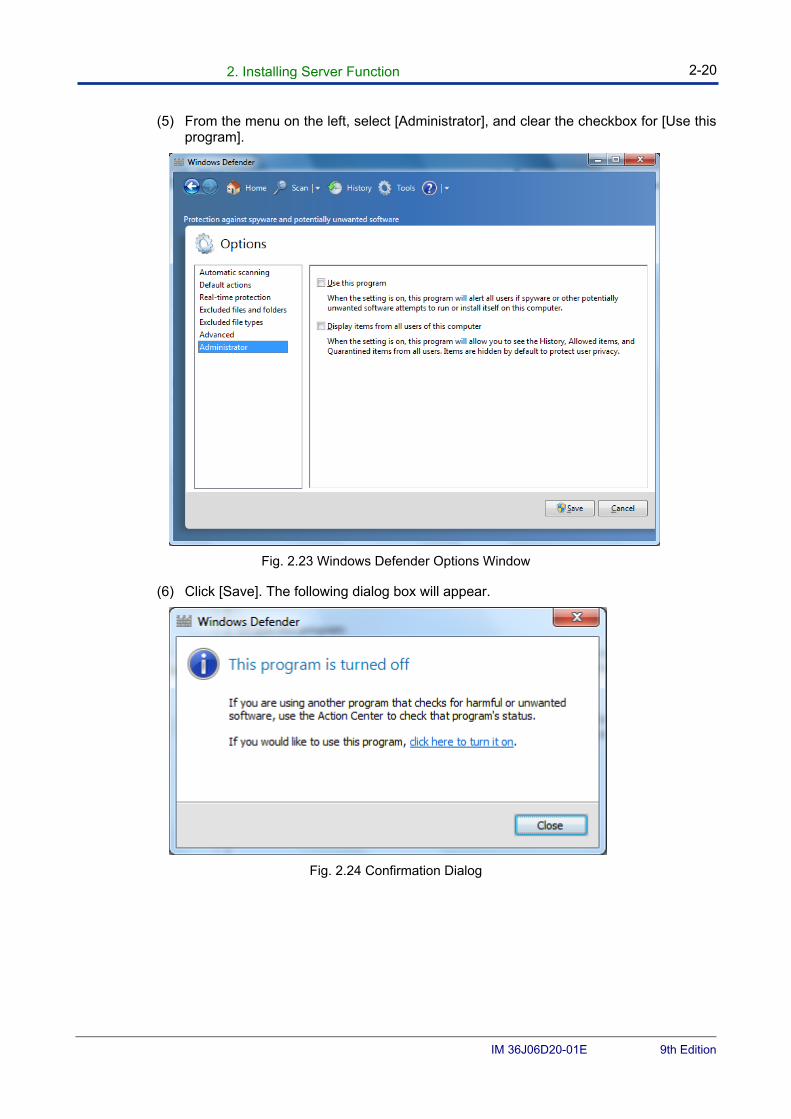
(5) From the menu on the left, select [Administrator], and clear the checkbox for [Use this program].
Fig. 2.23 Windows Defender Options Window
(6) Click [Save]. The following dialog box will appear.
Fig. 2.24 Confirmation Dialog

2. Installing Server Function 2-21
IM 36J06D20-01E 9th Edition
● For Windows Vista
(1) Logon as the administrative user account that used for installation.
(2) From the [Start] menu, select [Control Panel] - [Windows Defender]. The Windows Defender window will appear.
(3) In the upper area, click [Tools]. The Tools and Settings window appears.
(4) Click [Options]. The following Options dialog box appears.
Fig. 2.25 Windows Defender
(5) Clear the check box [Use Windows Defender], and click [Save]. The following dialog box appears.
Fig. 2.26 Confirmation Dialog
(6) Click [Close].
2. Installing Server Function 2-22
IM 36J06D20-01E 9th Edition
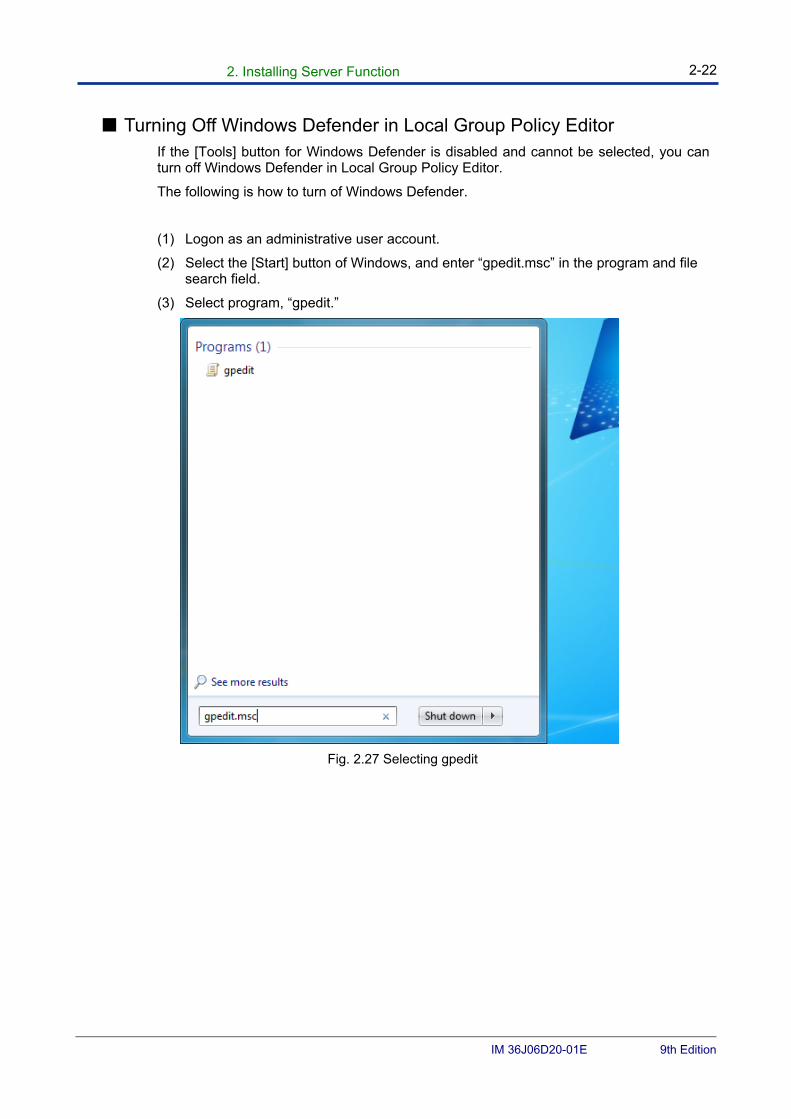
■ Turning Off Windows Defender in Local Group Policy Editor If the [Tools] button for Windows Defender is disabled and cannot be selected, you can turn off Windows Defender in Local Group Policy Editor.
The following is how to turn of Windows Defender.
(1) Logon as an administrative user account.
(2) Select the [Start] button of Windows, and enter “gpedit.msc” in the program and file search field.
(3) Select program, “gpedit.”
Fig. 2.27 Selecting gpedit
2. Installing Server Function 2-23
IM 36J06D20-01E 9th Edition
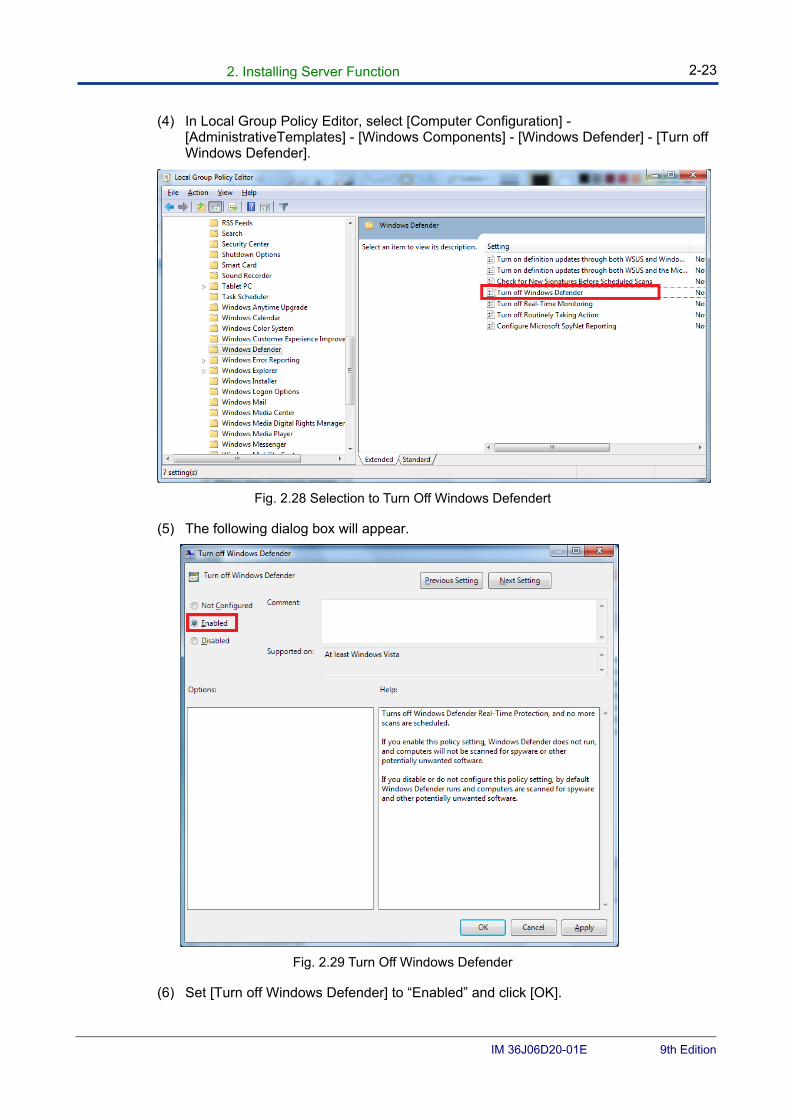
(4) In Local Group Policy Editor, select [Computer Configuration] - [AdministrativeTemplates] - [Windows Components] - [Windows Defender] - [Turn off Windows Defender].
Fig. 2.28 Selection to Turn Off Windows Defendert
(5) The following dialog box will appear.
Fig. 2.29 Turn Off Windows Defender
(6) Set [Turn off Windows Defender] to “Enabled” and click [OK].
2. Installing Server Function 2-24
IM 36J06D20-01E 9th Edition
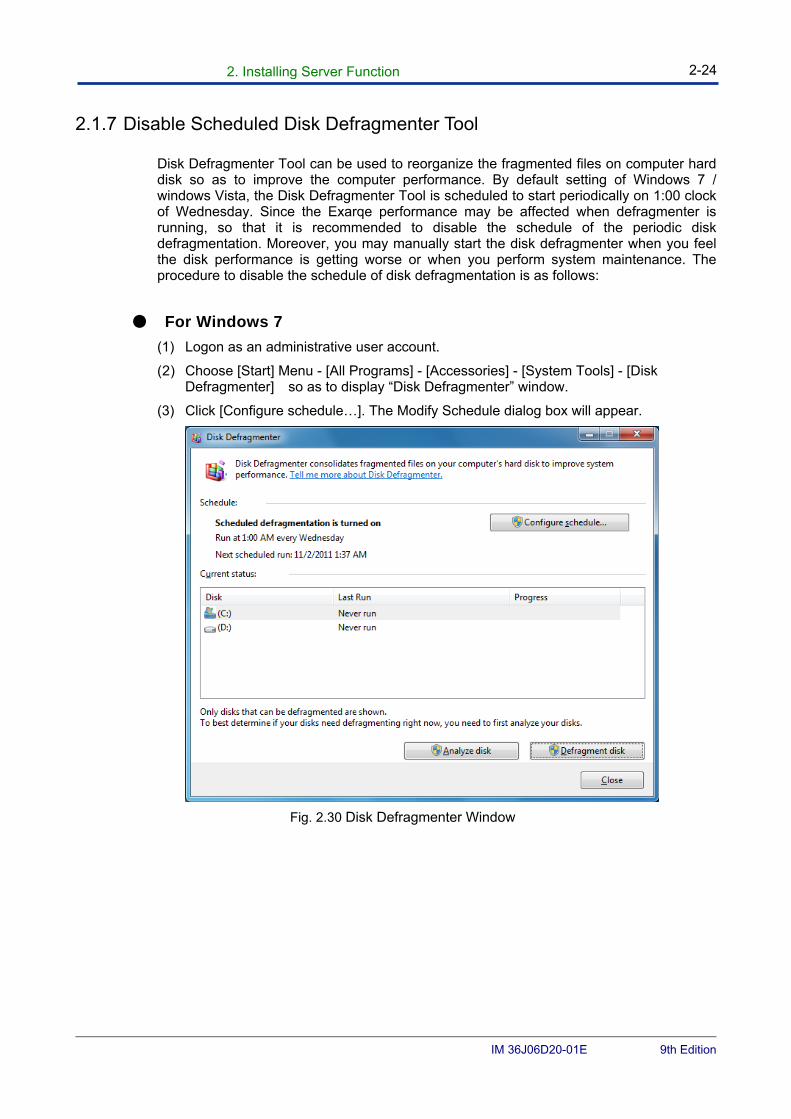
2.1.7 Disable Scheduled Disk Defragmenter Tool
Disk Defragmenter Tool can be used to reorganize the fragmented files on computer hard disk so as to improve the computer performance. By default setting of Windows 7 / windows Vista, the Disk Defragmenter Tool is scheduled to start periodically on 1:00 clock of Wednesday. Since the Exarqe performance may be affected when defragmenter is running, so that it is recommended to disable the schedule of the periodic disk defragmentation. Moreover, you may manually start the disk defragmenter when you feel the disk performance is getting worse or when you perform system maintenance. The procedure to disable the schedule of disk defragmentation is as follows:
● For Windows 7
(1) Logon as an administrative user account.
(2) Choose [Start] Menu - [All Programs] - [Accessories] - [System Tools] - [Disk Defragmenter] so as to display “Disk Defragmenter” window.
(3) Click [Configure schedule…]. The Modify Schedule dialog box will appear.
Fig. 2.30 Disk Defragmenter Window
2. Installing Server Function 2-25
IM 36J06D20-01E 9th Edition
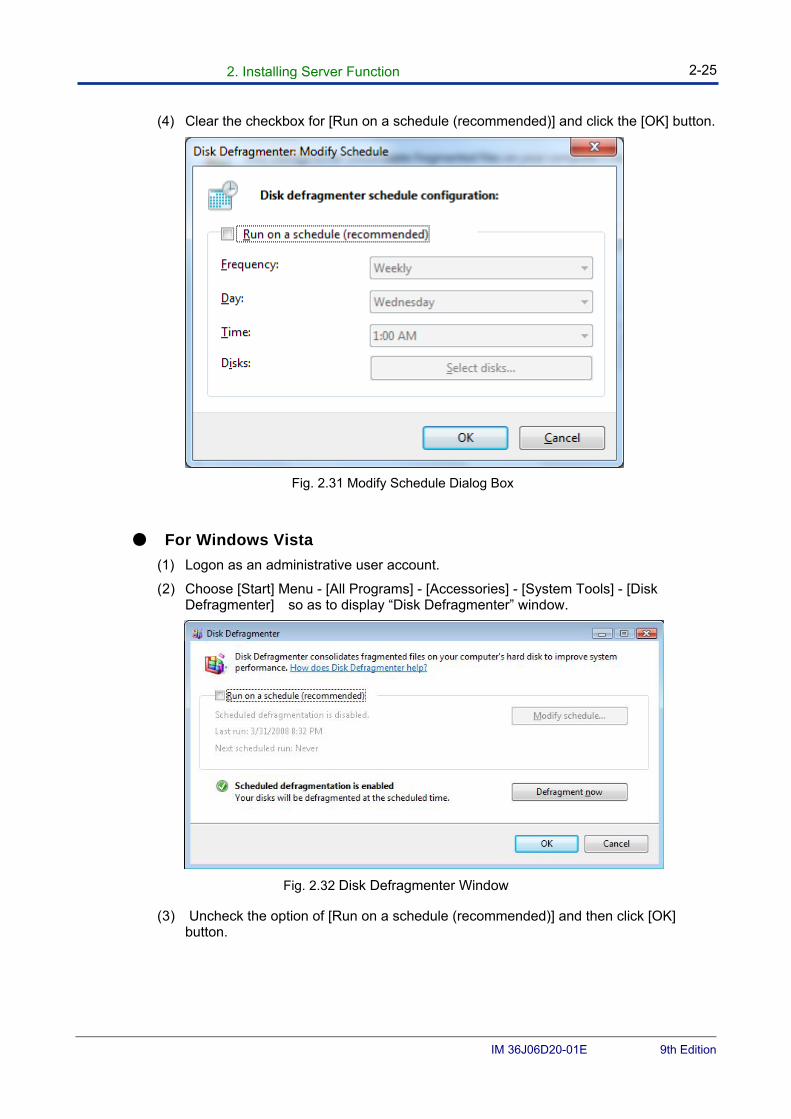
(4) Clear the checkbox for [Run on a schedule (recommended)] and click the [OK] button.
Fig. 2.31 Modify Schedule Dialog Box
● For Windows Vista
(1) Logon as an administrative user account.
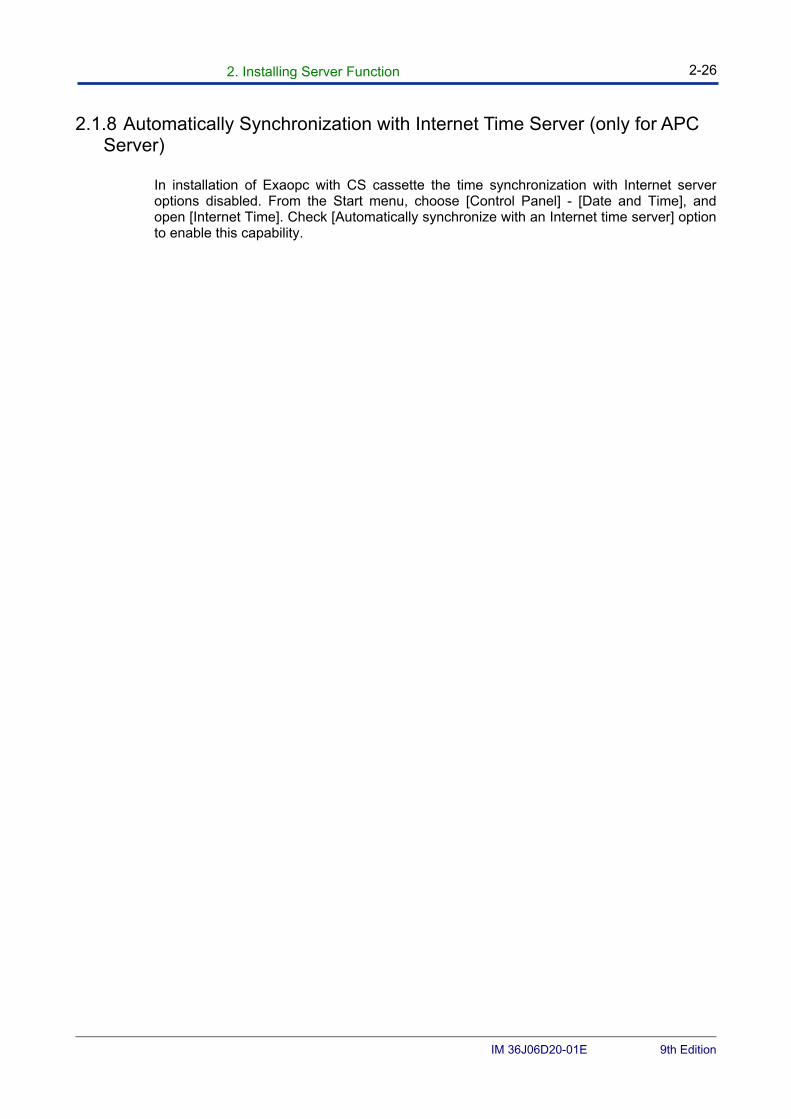
(2) Choose [Start] Menu - [All Programs] - [Accessories] - [System Tools] - [Disk Defragmenter] so as to display “Disk Defragmenter” window.
Fig. 2.32 Disk Defragmenter Window
(3) Uncheck the option of [Run on a schedule (recommended)] and then click [OK] button.
2. Installing Server Function 2-26
IM 36J06D20-01E 9th Edition
2.1.8 Automatically Synchronization with Internet Time Server (only for APC Server)
In installation of Exaopc with CS cassette the time synchronization with Internet server options disabled. From the Start menu, choose [Control Panel] - [Date and Time], and open [Internet Time]. Check [Automatically synchronize with an Internet time server] option to enable this capability.
2. Installing Server Function 2-27
IM 36J06D20-01E 9th Edition
2.2. Preparation for IT Security Settings In Exarqe system, each user should set its own account to use Exarqe.
It is also necessary to register the account to the Exarqe groups. This chapter explains how to create user account and register them to user groups.
The procedures of account creation and registration to groups in each security setting are shown below:
■ Legacy Model
Preparation is unnecessary.
■ Standard (Standalone) Model
Preparation is unnecessary.
■ Standard (Domain) Model
For the security setting on the domain environment, prepare the settings both on the domain management PC and PCs where Exarqe is installed.
When the user account for installation work is different from the domain manager, please ask the domain manager to do this preparation on the domain management PC.
Domain management PC
(1) Create a domain user account where Exarqe software is installed.
(2) Register the domain user account to “Domain Adnmins” domain user group.
When the user account is not allowed to “Domain Admins” domain user group due to the domain management restriction , follow the next procedure.
Create the following user group on the domain.
APC_OPERATOR APC_ENGINEER APC_MAINTENANCE EXA_MAINTENANCE APC_OPC
Register the domain user account to “EXA_MAINTENACE” domain user group.
PC for Exarqe installation
(1) Logon as the administrative user account that used for installation.
(2) After register on the PC domain, restart the PC.
(3) When the created domain account is not yet registered to “Domain Admins”, register the user accounts created on the domain PC for Exarqe installation to Administrators group on Exarqe PC. Restart PC.
(4) Confirm to logon as the user account for Exarqe installation.
(5) Log off.

2. Installing Server Function 2-28
IM 36J06D20-01E 9th Edition
■ Standard (Combination) Model
The same setup as “Standard (Domain) Model”

2. Installing Server Function 2-29
IM 36J06D20-01E 9th Edition
2.3. Installation Procedure
Step 1 Logon In the Exarqe Station, logon as “Administrator”.
In case of Standard (Domain) Model, logon as “Administrator of Domain”.
Step 2 Load Load Exarqe DVD-ROM (Model NTPKM72) in DVD-ROM Drive of Exarqe station.
Step 3 Setup Double-click the "Setup.exe" in the folder < \EXA > in DVD-ROM.
"Setup.exe" that exists in the folder < \EXA > in DVD-ROM is double-clicked.
1) ICON of Setup.exe:
In case of Vista/Server2008 On the execution of “Setup.exe”, the following icon displays are done. Right-click and execute it as administrator.
Fig. 2.33 Setup.exe Icon□
In case of 7/Server2008 R2 On the execution of “Setup.exe”, the following icon displays are done. Right-click and execute it as administrator.
Fig. 2.34 Setup.exe Icon□
2. Installing Server Function 2-30
IM 36J06D20-01E 9th Edition
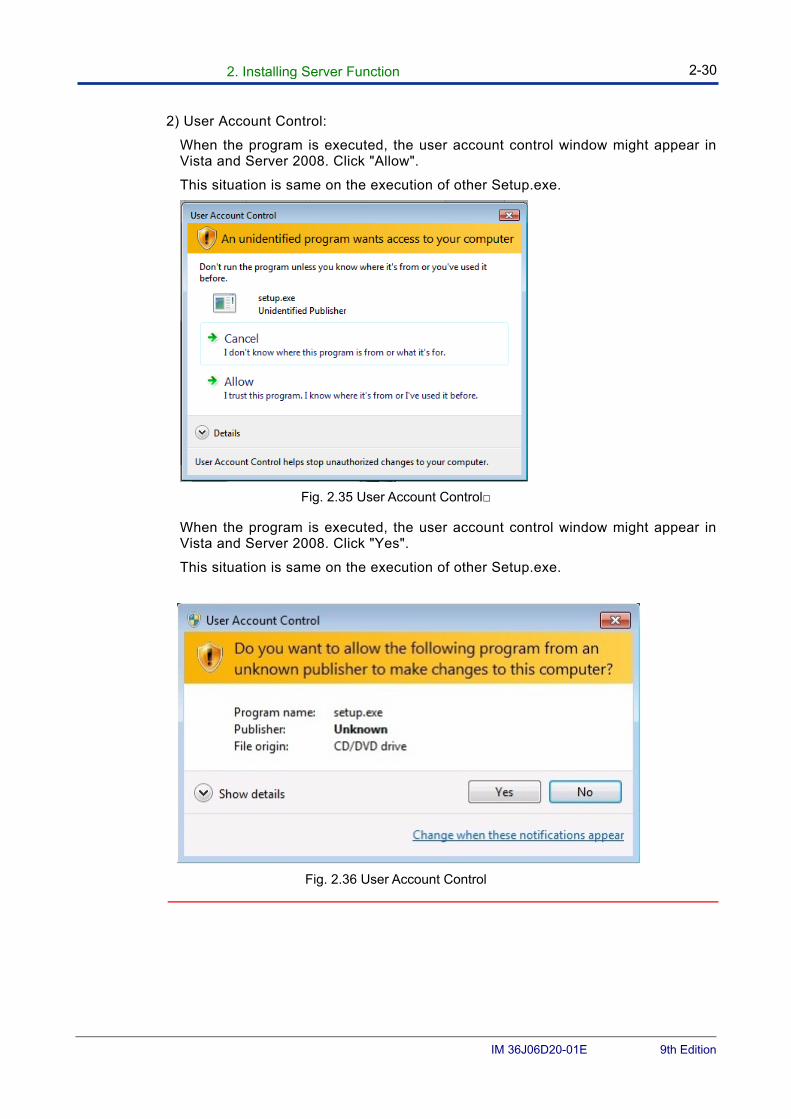
2) User Account Control:
When the program is executed, the user account control window might appear in Vista and Server 2008. Click "Allow".
This situation is same on the execution of other Setup.exe.
Fig. 2.35 User Account Control□
When the program is executed, the user account control window might appear in Vista and Server 2008. Click "Yes".
This situation is same on the execution of other Setup.exe.
Fig. 2.36 User Account Control
2. Installing Server Function 2-31
IM 36J06D20-01E 9th Edition
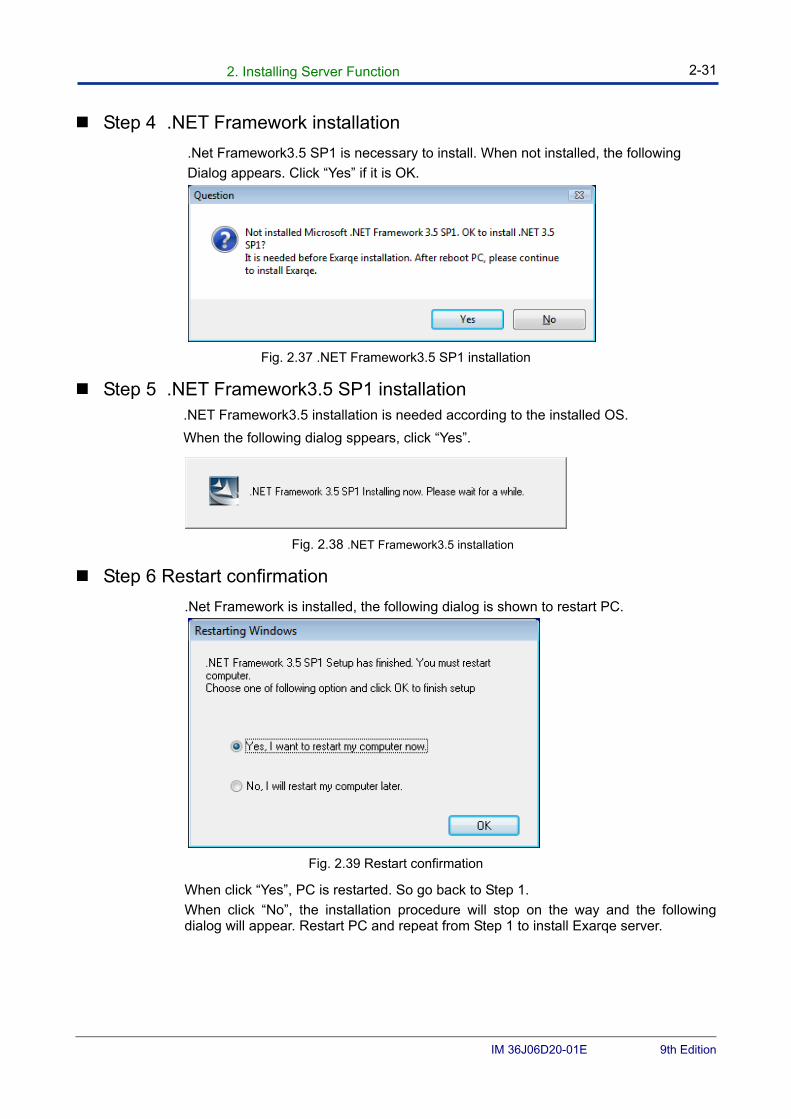
Step 4 .NET Framework installation
.Net Framework3.5 SP1 is necessary to install. When not installed, the following
Dialog appears. Click “Yes” if it is OK.
Fig. 2.37 .NET Framework3.5 SP1 installation
Step 5 .NET Framework3.5 SP1 installation .NET Framework3.5 installation is needed according to the installed OS.
When the following dialog sppears, click “Yes”.
Fig. 2.38 .NET Framework3.5 installation
Step 6 Restart confirmation
.Net Framework is installed, the following dialog is shown to restart PC.
Fig. 2.39 Restart confirmation
When click “Yes”, PC is restarted. So go back to Step 1.
When click “No”, the installation procedure will stop on the way and the following dialog will appear. Restart PC and repeat from Step 1 to install Exarqe server.
2. Installing Server Function 2-32
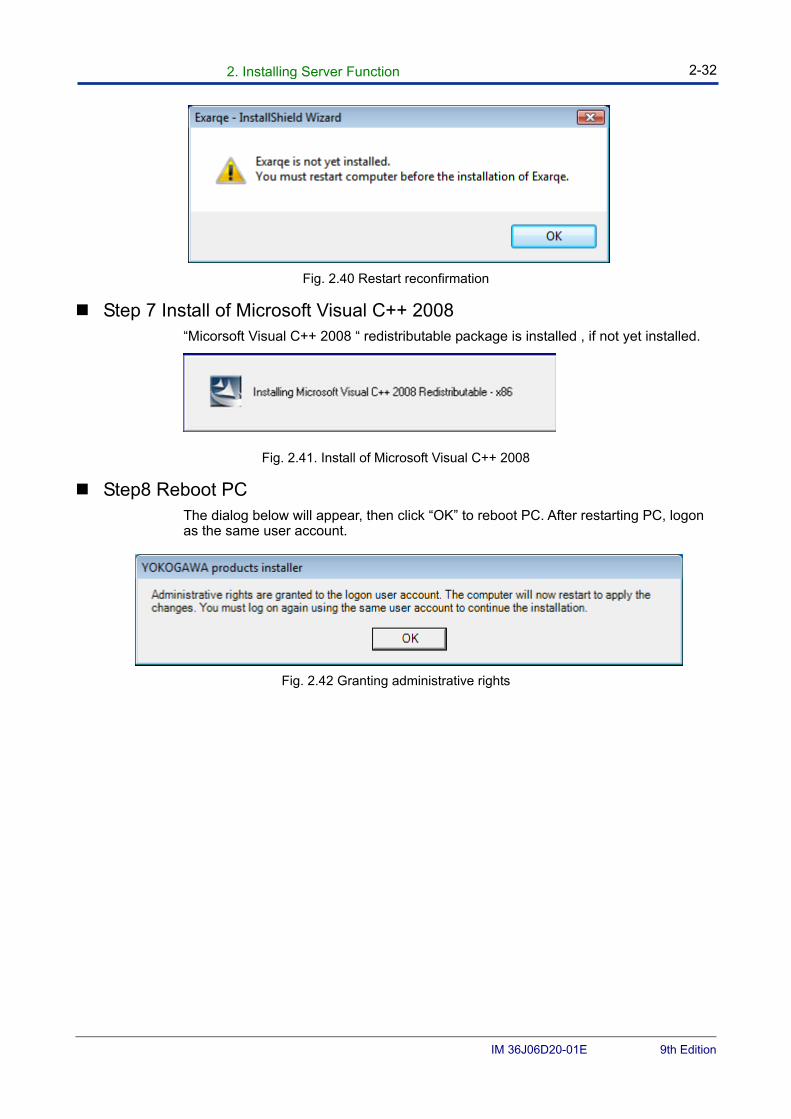
IM 36J06D20-01E 9th Edition
Fig. 2.40 Restart reconfirmation
Step 7 Install of Microsoft Visual C++ 2008 “Micorsoft Visual C++ 2008 “ redistributable package is installed , if not yet installed.
Fig. 2.41. Install of Microsoft Visual C++ 2008
Step8 Reboot PC The dialog below will appear, then click “OK” to reboot PC. After restarting PC, logon as the same user account.
Fig. 2.42 Granting administrative rights
2. Installing Server Function 2-33
IM 36J06D20-01E 9th Edition
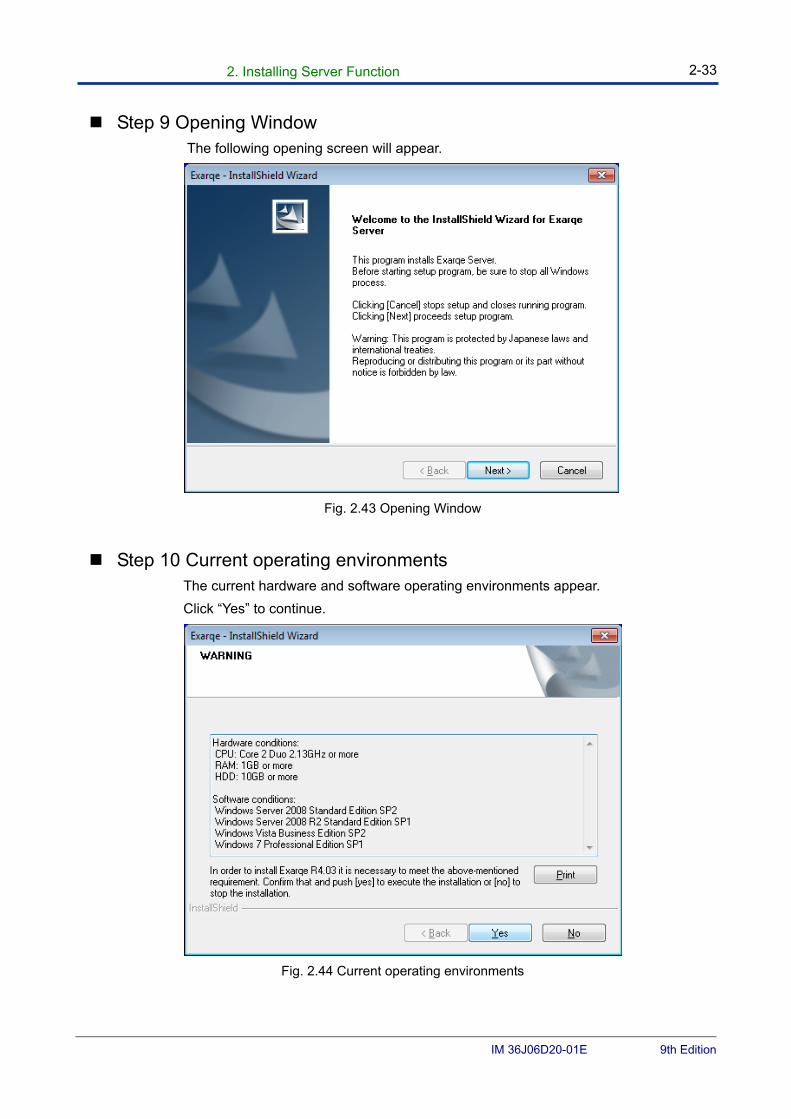
Step 9 Opening Window The following opening screen will appear.
Fig. 2.43 Opening Window
Step 10 Current operating environments The current hardware and software operating environments appear.
Click “Yes” to continue.
Fig. 2.44 Current operating environments
2. Installing Server Function 2-34
IM 36J06D20-01E 9th Edition
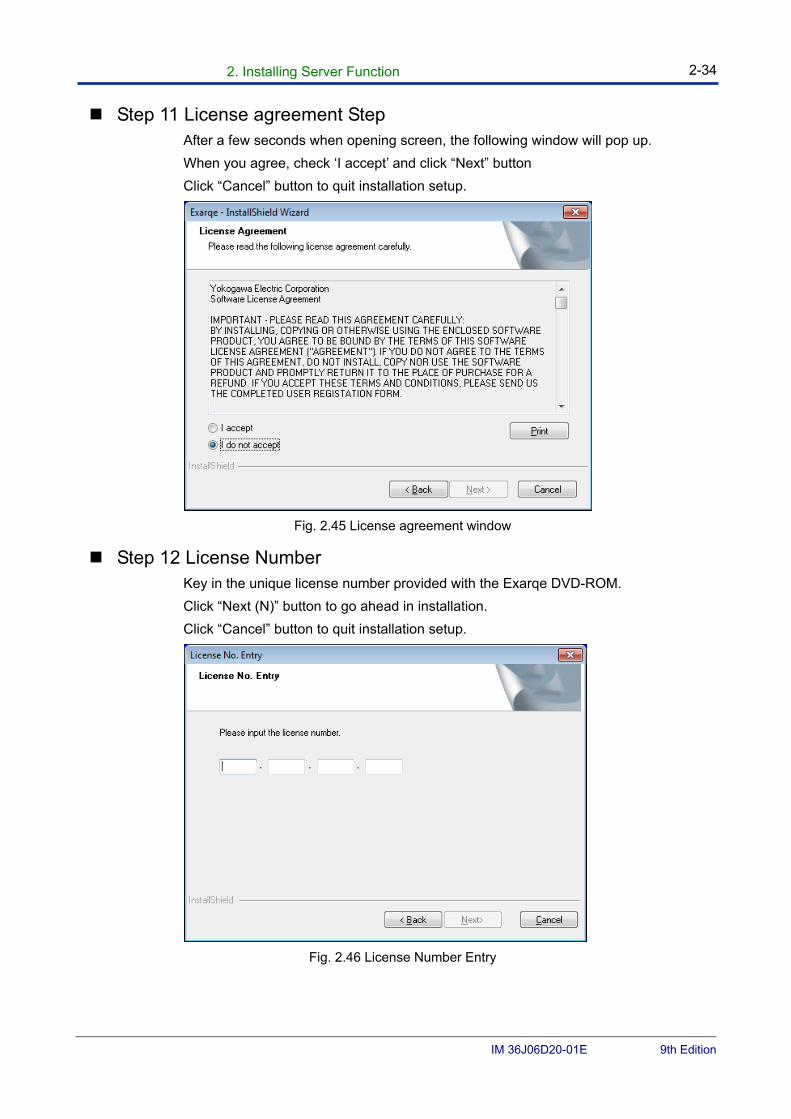
Step 11 License agreement Step After a few seconds when opening screen, the following window will pop up.
When you agree, check ‘I accept’ and click “Next” button
Click “Cancel” button to quit installation setup.
Fig. 2.45 License agreement window
Step 12 License Number Key in the unique license number provided with the Exarqe DVD-ROM.
Click “Next (N)” button to go ahead in installation.
Click “Cancel” button to quit installation setup.
Fig. 2.46 License Number Entry
2. Installing Server Function 2-35
IM 36J06D20-01E 9th Edition
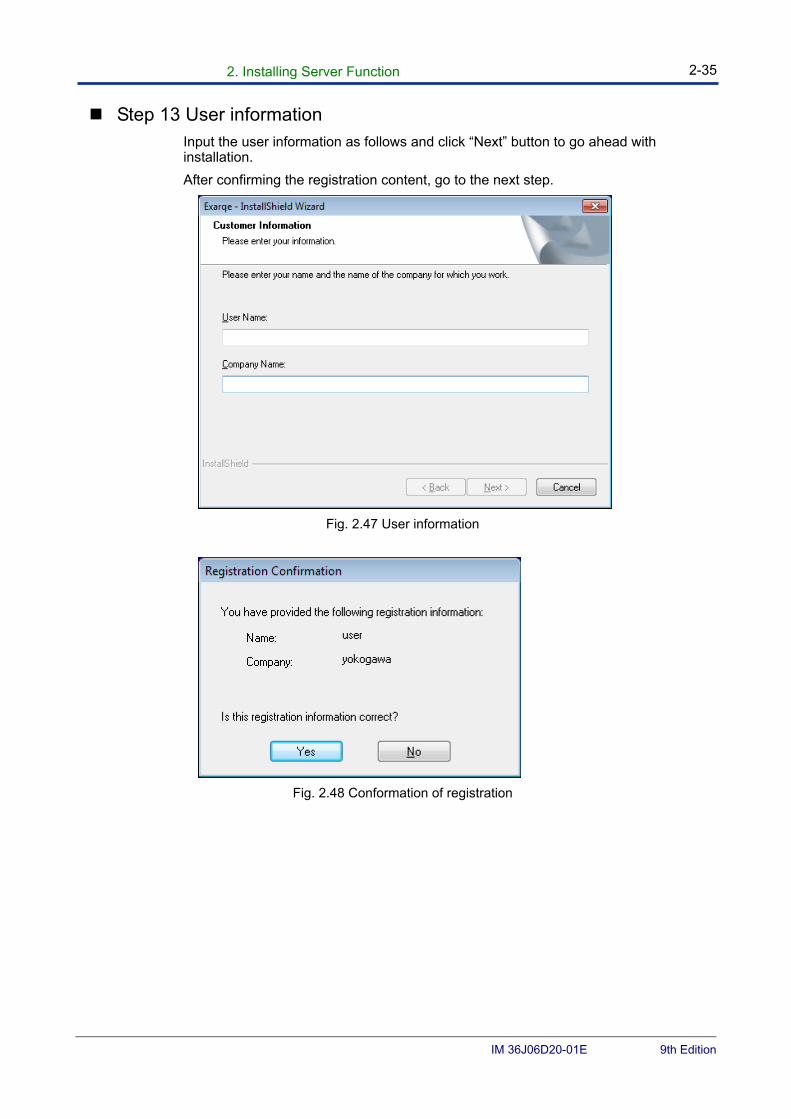
Step 13 User information Input the user information as follows and click “Next” button to go ahead with installation.
After confirming the registration content, go to the next step.
Fig. 2.47 User information
Fig. 2.48 Conformation of registration
2. Installing Server Function 2-36
IM 36J06D20-01E 9th Edition
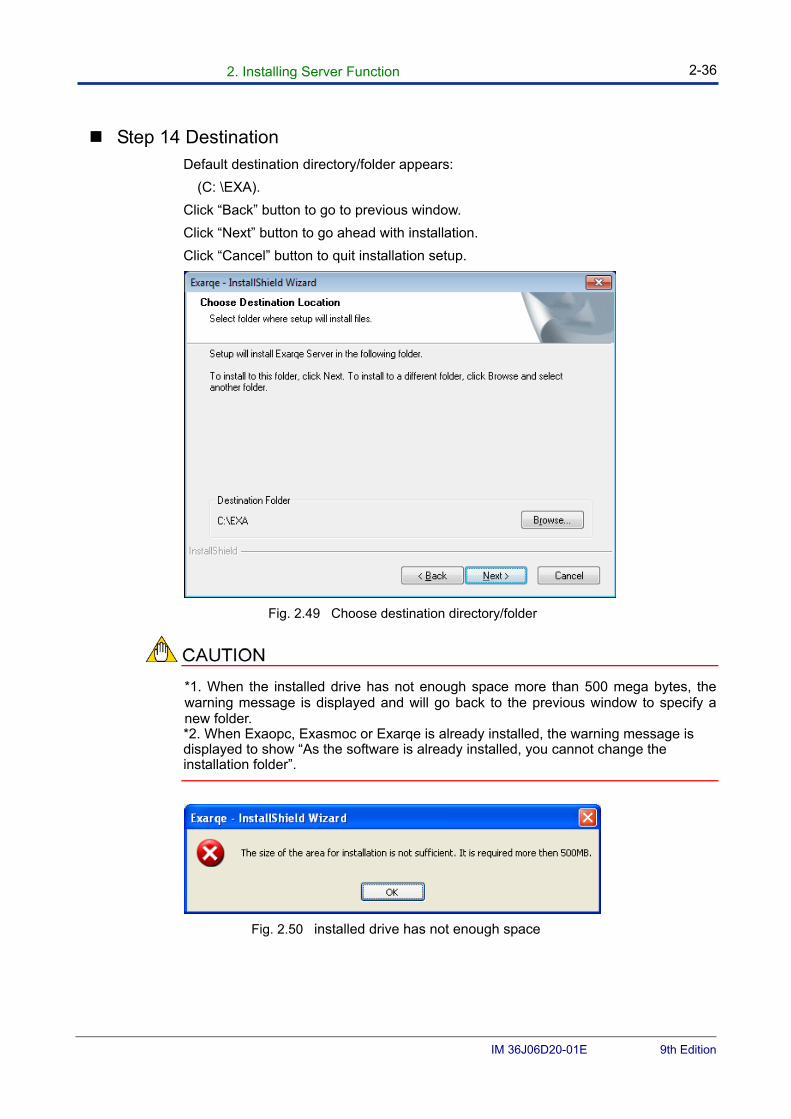
Step 14 Destination Default destination directory/folder appears:
(C: \EXA).
Click “Back” button to go to previous window.
Click “Next” button to go ahead with installation.
Click “Cancel” button to quit installation setup.
Fig. 2.49 Choose destination directory/folder
*1. When the installed drive has not enough space more than 500 mega bytes, the warning message is displayed and will go back to the previous window to specify a new folder. *2. When Exaopc, Exasmoc or Exarqe is already installed, the warning message is displayed to show “As the software is already installed, you cannot change the installation folder”.
Fig. 2.50 installed drive has not enough space
2. Installing Server Function 2-37
IM 36J06D20-01E 9th Edition
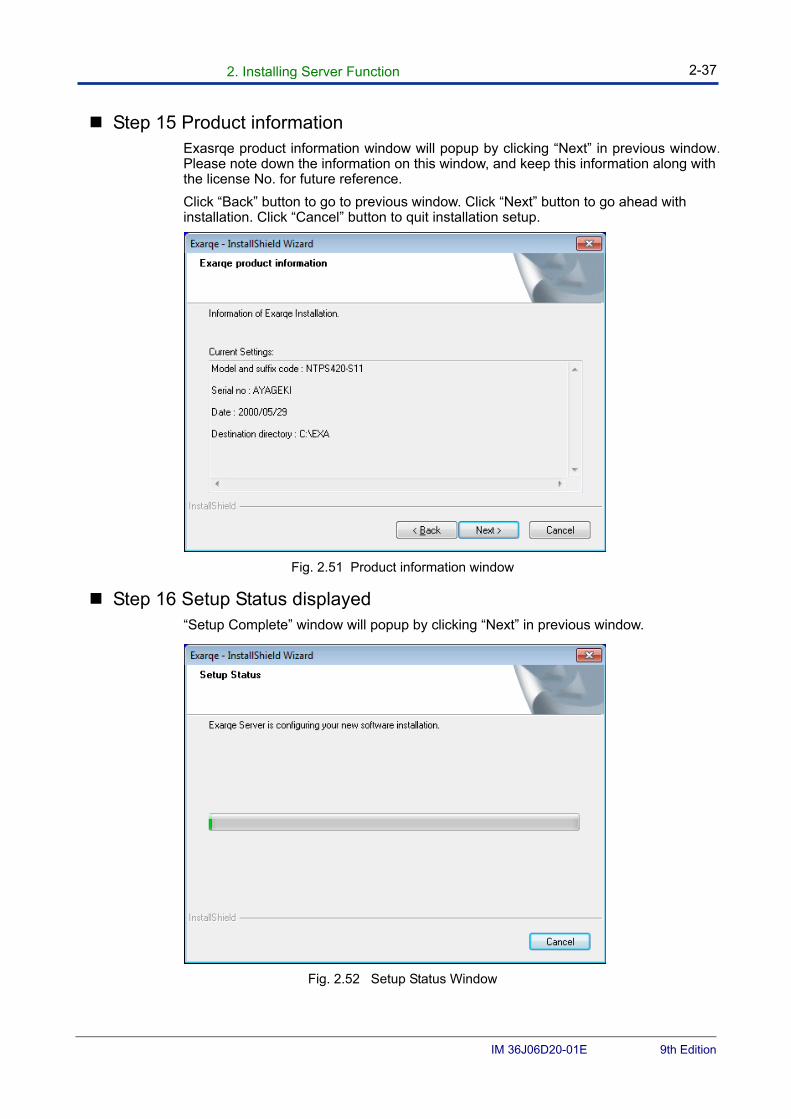
Step 15 Product information Exasrqe product information window will popup by clicking “Next” in previous window.Please note down the information on this window, and keep this information along with the license No. for future reference.
Click “Back” button to go to previous window. Click “Next” button to go ahead with installation. Click “Cancel” button to quit installation setup.
Fig. 2.51 Product information window
Step 16 Setup Status displayed “Setup Complete” window will popup by clicking “Next” in previous window.
Fig. 2.52 Setup Status Window
2. Installing Server Function 2-38
IM 36J06D20-01E 9th Edition
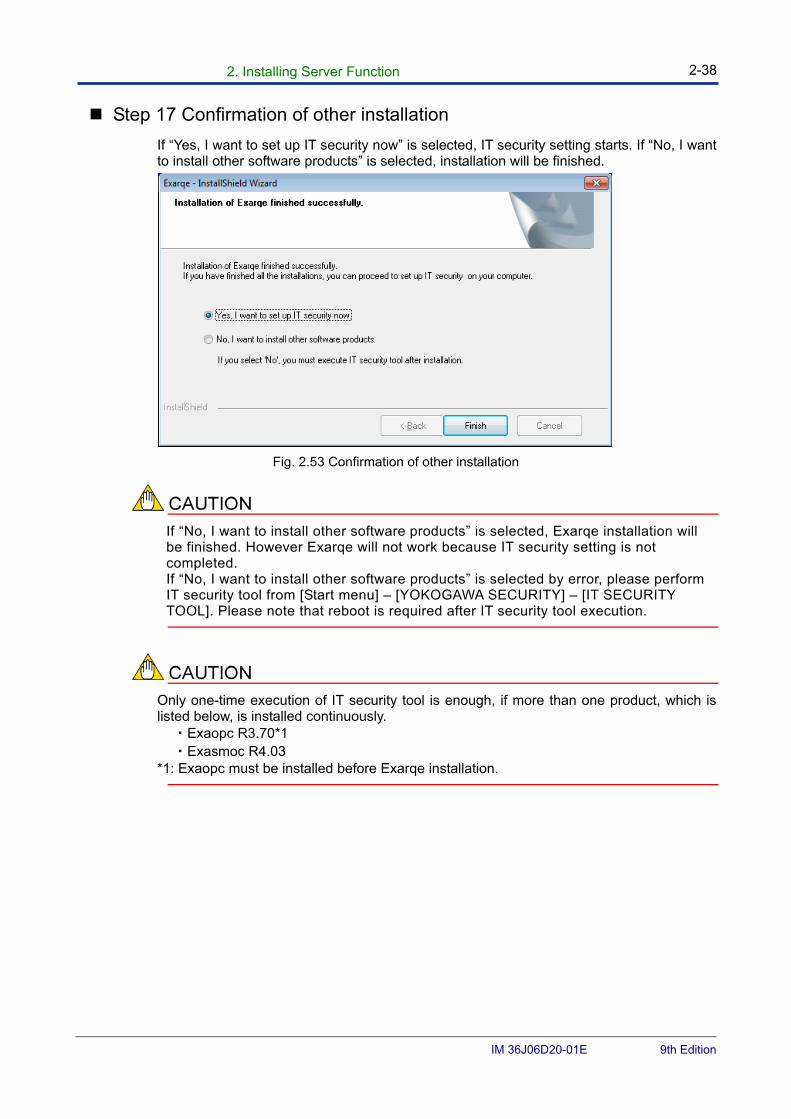
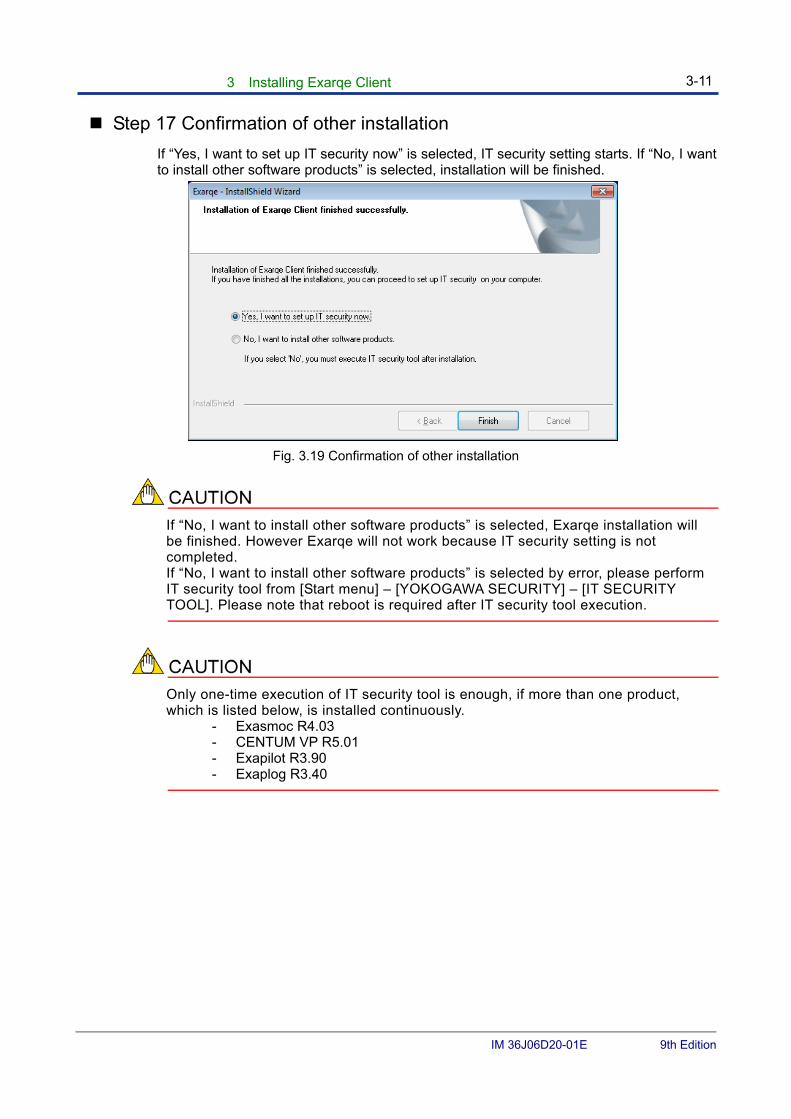
Step 17 Confirmation of other installation
If “Yes, I want to set up IT security now” is selected, IT security setting starts. If “No, I want to install other software products” is selected, installation will be finished.
Fig. 2.53 Confirmation of other installation
If “No, I want to install other software products” is selected, Exarqe installation will be finished. However Exarqe will not work because IT security setting is not completed. If “No, I want to install other software products” is selected by error, please perform IT security tool from [Start menu] – [YOKOGAWA SECURITY] – [IT SECURITY TOOL]. Please note that reboot is required after IT security tool execution.
Only one-time execution of IT security tool is enough, if more than one product, which is listed below, is installed continuously.
・Exaopc R3.70*1 ・Exasmoc R4.03
*1: Exaopc must be installed before Exarqe installation.
2. Installing Server Function 2-39
IM 36J06D20-01E 9th Edition
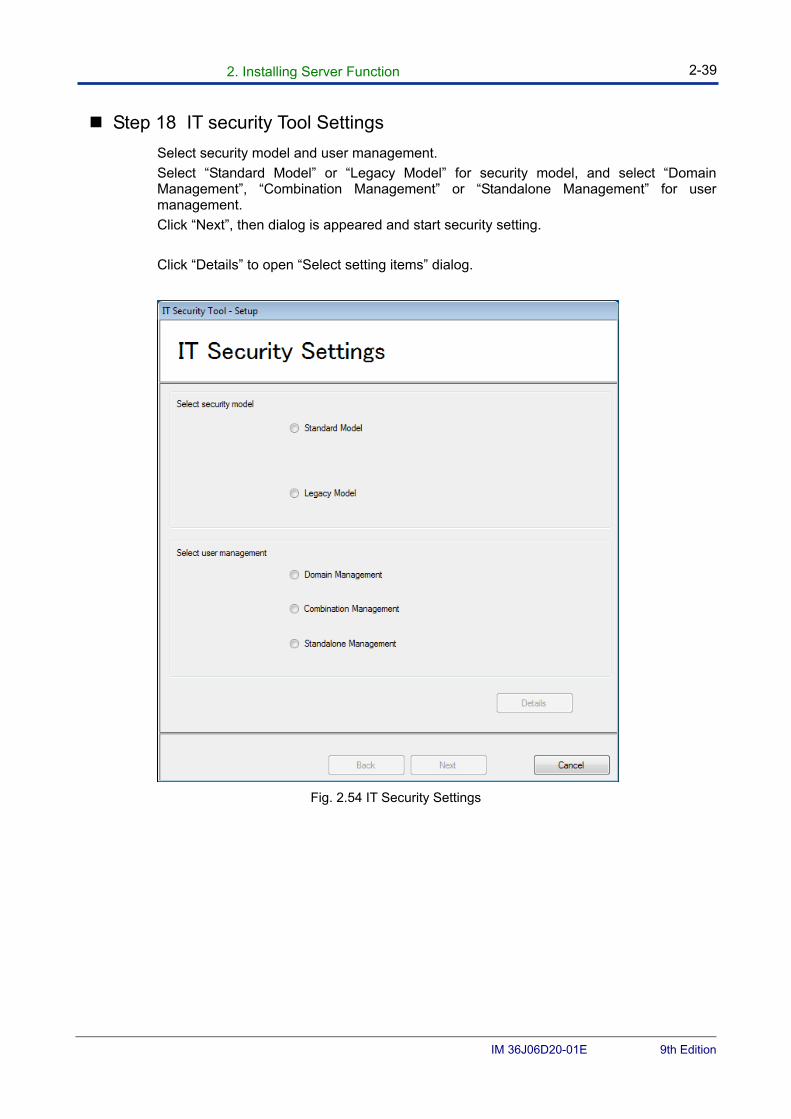
Step 18 IT security Tool Settings
Select security model and user management.
Select “Standard Model” or “Legacy Model” for security model, and select “Domain Management”, “Combination Management” or “Standalone Management” for user management.
Click “Next”, then dialog is appeared and start security setting.
Click “Details” to open “Select setting items” dialog.
Fig. 2.54 IT Security Settings
2. Installing Server Function 2-40
IM 36J06D20-01E 9th Edition
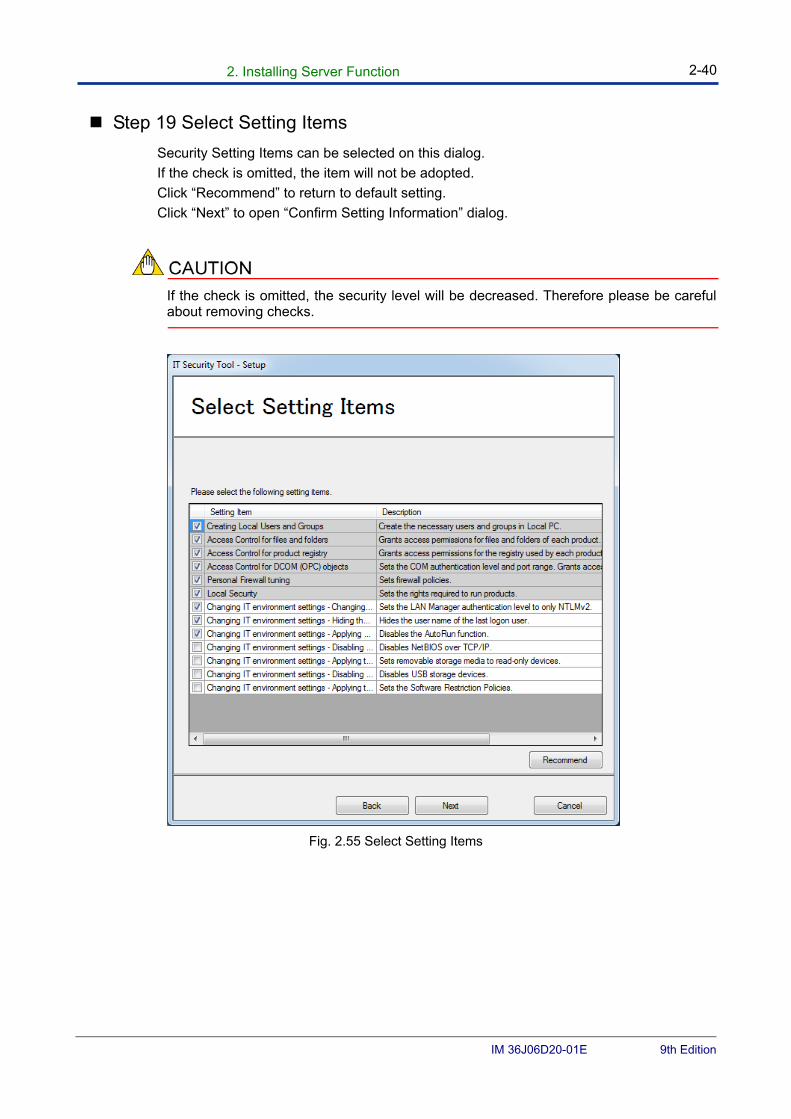
Step 19 Select Setting Items
Security Setting Items can be selected on this dialog.
If the check is omitted, the item will not be adopted.
Click “Recommend” to return to default setting.
Click “Next” to open “Confirm Setting Information” dialog.
If the check is omitted, the security level will be decreased. Therefore please be careful about removing checks.
Fig. 2.55 Select Setting Items
2. Installing Server Function 2-41
IM 36J06D20-01E 9th Edition
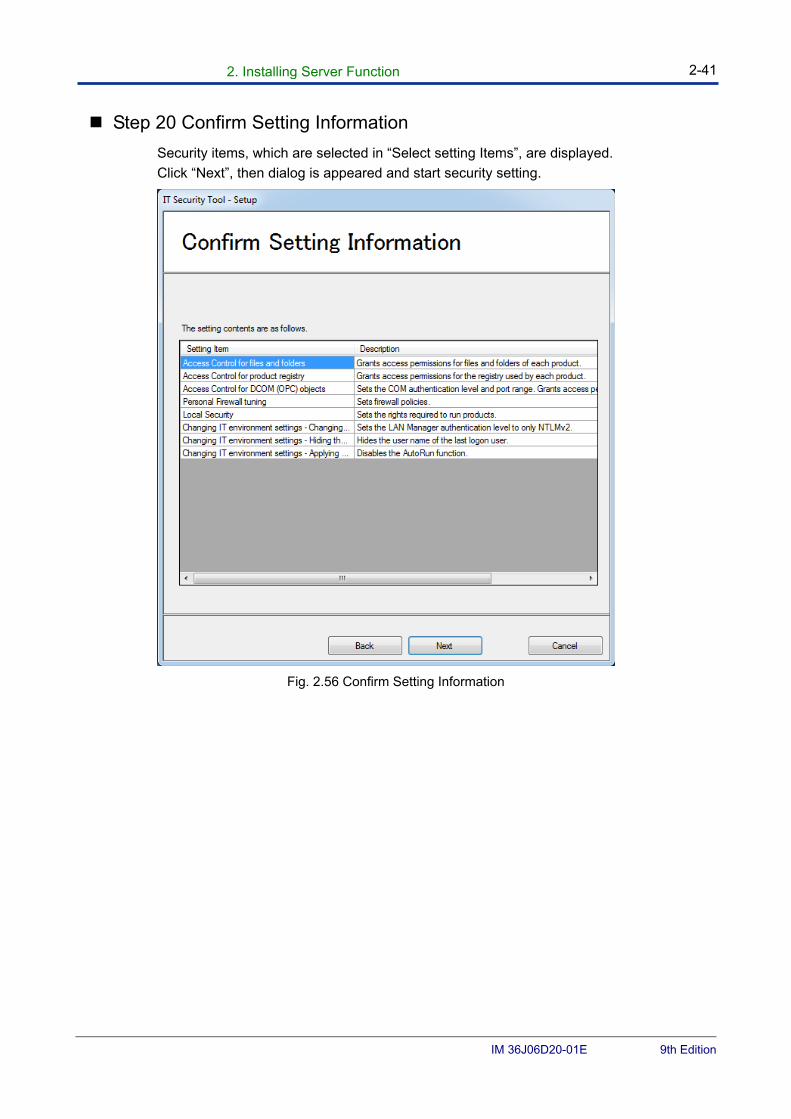
Step 20 Confirm Setting Information
Security items, which are selected in “Select setting Items”, are displayed.
Click “Next”, then dialog is appeared and start security setting.
Fig. 2.56 Confirm Setting Information
2. Installing Server Function 2-42
IM 36J06D20-01E 9th Edition
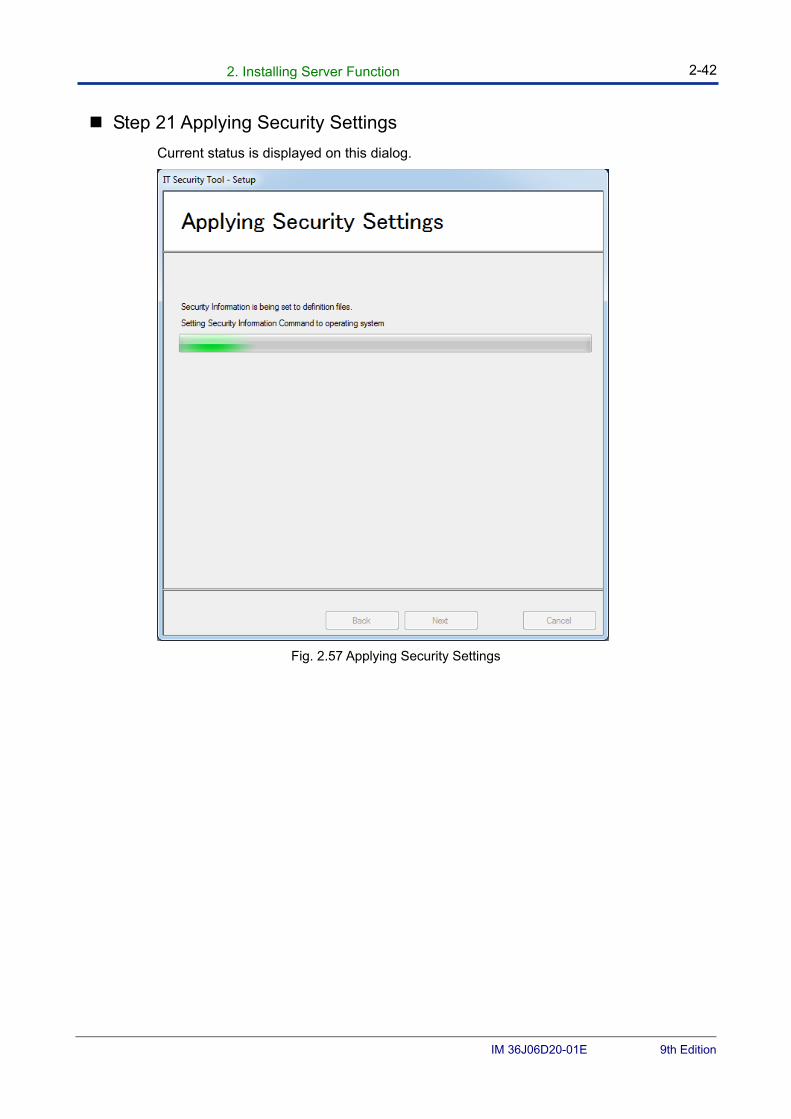
Step 21 Applying Security Settings
Current status is displayed on this dialog.
Fig. 2.57 Applying Security Settings
2. Installing Server Function 2-43
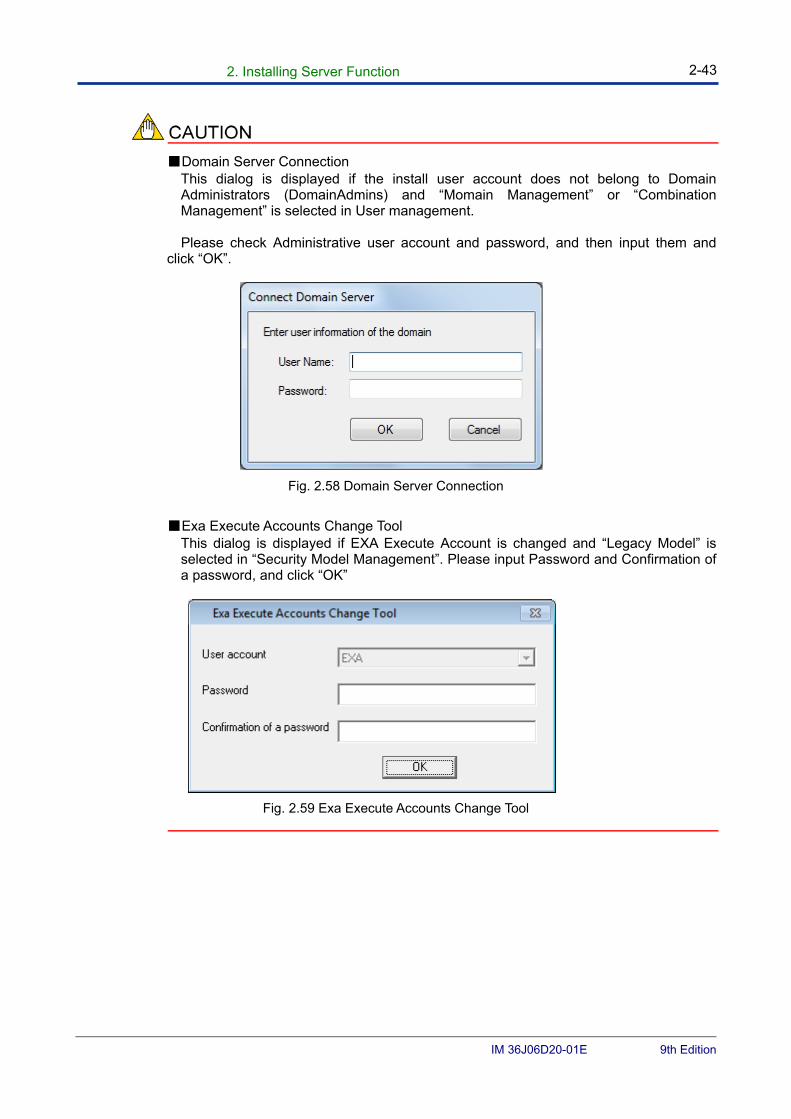
IM 36J06D20-01E 9th Edition
■Domain Server Connection This dialog is displayed if the install user account does not belong to Domain Administrators (DomainAdmins) and “Momain Management” or “Combination Management” is selected in User management.
Please check Administrative user account and password, and then input them and
click “OK”.
Fig. 2.58 Domain Server Connection
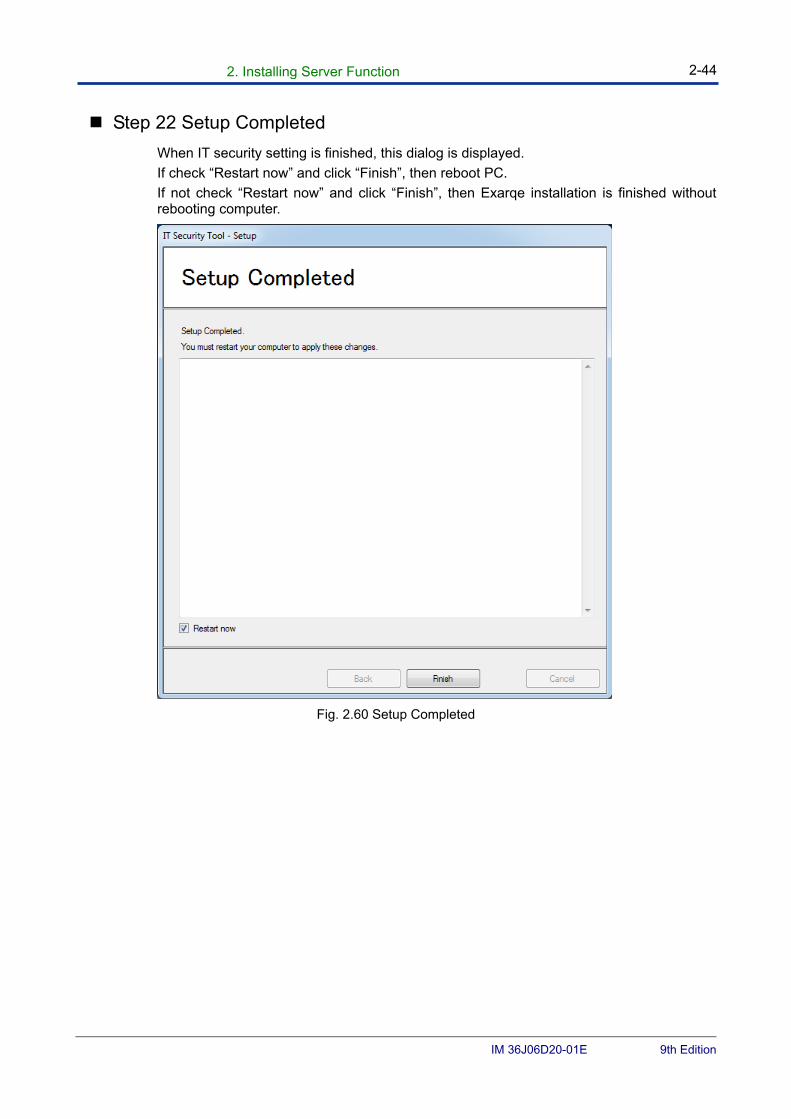
■Exa Execute Accounts Change Tool
This dialog is displayed if EXA Execute Account is changed and “Legacy Model” is selected in “Security Model Management”. Please input Password and Confirmation of a password, and click “OK”
Fig. 2.59 Exa Execute Accounts Change Tool
2. Installing Server Function 2-44
IM 36J06D20-01E 9th Edition
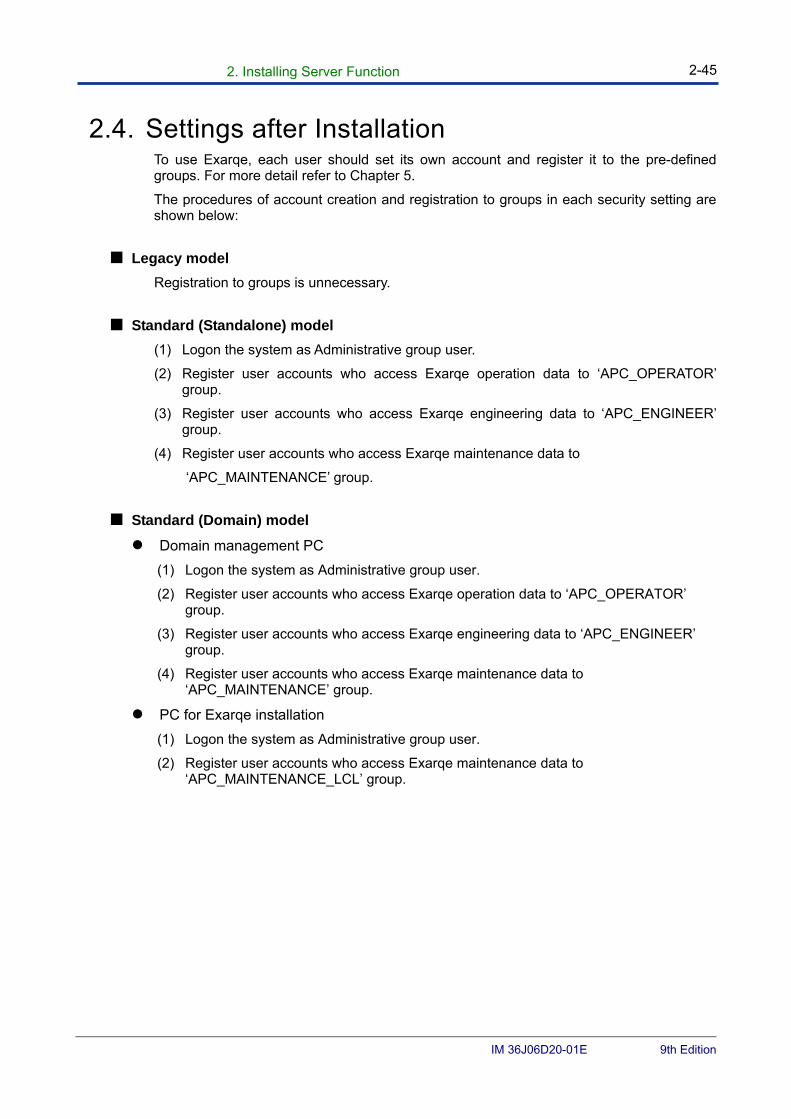
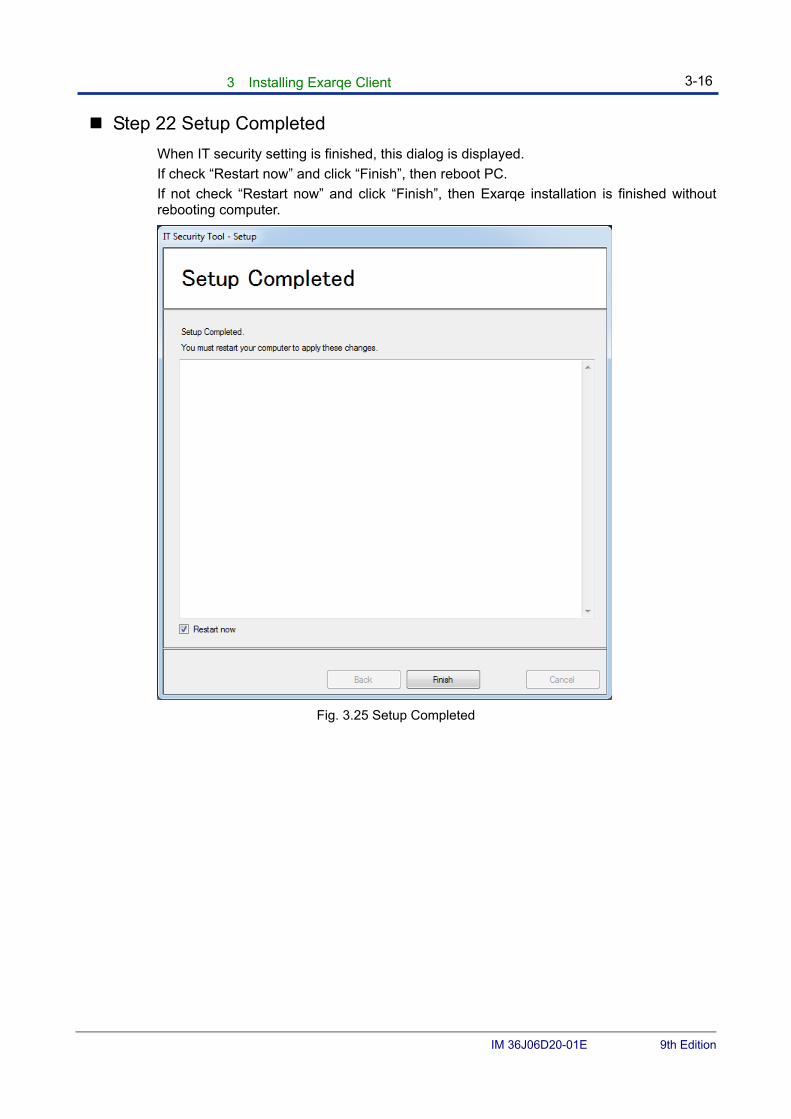
Step 22 Setup Completed
When IT security setting is finished, this dialog is displayed.
If check “Restart now” and click “Finish”, then reboot PC.
If not check “Restart now” and click “Finish”, then Exarqe installation is finished without rebooting computer.
Fig. 2.60 Setup Completed
2. Installing Server Function 2-45
IM 36J06D20-01E 9th Edition
2.4. Settings after Installation To use Exarqe, each user should set its own account and register it to the pre-defined groups. For more detail refer to Chapter 5.
The procedures of account creation and registration to groups in each security setting are shown below:
■ Legacy model
Registration to groups is unnecessary.
■ Standard (Standalone) model
(1) Logon the system as Administrative group user.
(2) Register user accounts who access Exarqe operation data to ‘APC_OPERATOR’ group.
(3) Register user accounts who access Exarqe engineering data to ‘APC_ENGINEER’ group.
(4) Register user accounts who access Exarqe maintenance data to
‘APC_MAINTENANCE’ group.
■ Standard (Domain) model
Domain management PC
(1) Logon the system as Administrative group user.
(2) Register user accounts who access Exarqe operation data to ‘APC_OPERATOR’ group.
(3) Register user accounts who access Exarqe engineering data to ‘APC_ENGINEER’ group.
(4) Register user accounts who access Exarqe maintenance data to ‘APC_MAINTENANCE’ group.
PC for Exarqe installation
(1) Logon the system as Administrative group user.
(2) Register user accounts who access Exarqe maintenance data to ‘APC_MAINTENANCE_LCL’ group.
2. Installing Server Function 2-46
IM 36J06D20-01E 9th Edition
■ Standard (Combination) model
Domain management PC
(1) The same setup as “Standard(Domain)Model”
PC for Exarqe installation
(1) Logon the system as Administrative group user.
(2) Register user accounts who access Exarqe operation data to ‘APC_OPERATOR_LCL’ group.
(3) Register user accounts who access Exarqe engineering data to ‘APC_ENGINEER_LCL’ group.
(4) Register user accounts who access Exarqe maintenance data to ‘APC_MAINTENANCE_LCL’ group.
When the APC Builder function such as OPC Server setting or APC controller registration described on the Builder Instruction manual, is started before IT security is set, the program might not be installed on the expected folder.
2. Installing Server Function 2-47
IM 36J06D20-01E 9th Edition
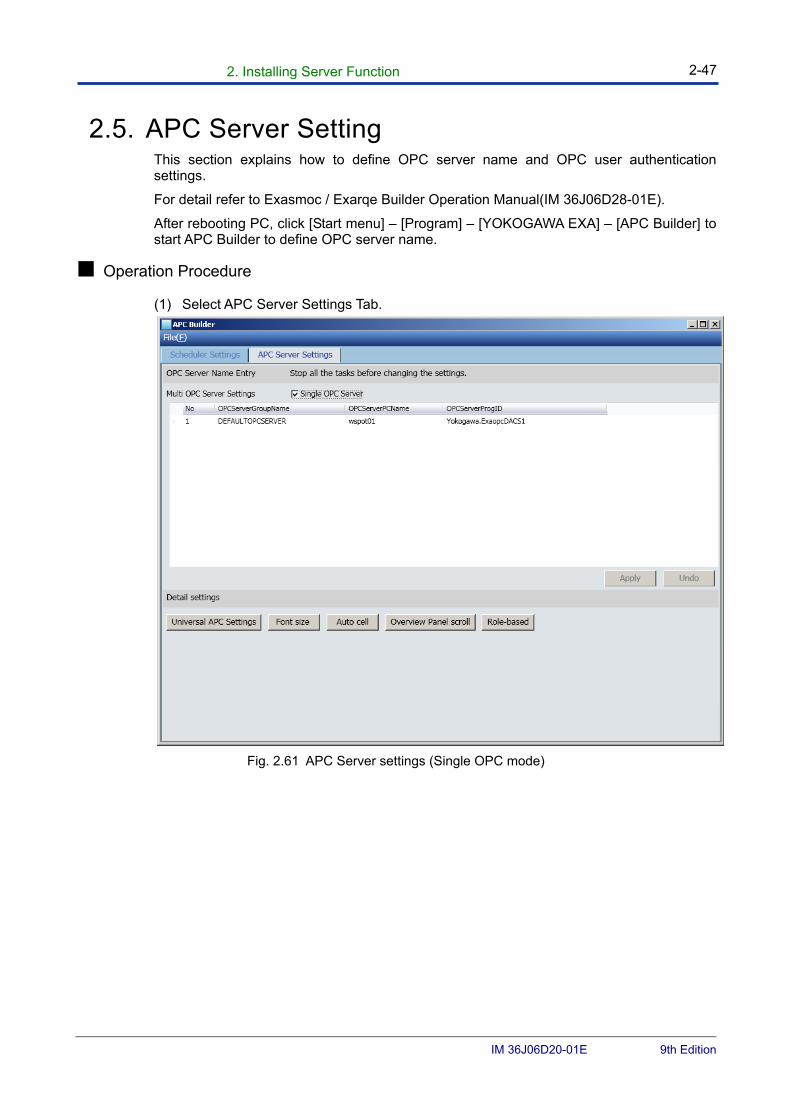
2.5. APC Server Setting This section explains how to define OPC server name and OPC user authentication settings.
For detail refer to Exasmoc / Exarqe Builder Operation Manual(IM 36J06D28-01E).
After rebooting PC, click [Start menu] – [Program] – [YOKOGAWA EXA] – [APC Builder] to start APC Builder to define OPC server name.
■ Operation Procedure
(1) Select APC Server Settings Tab.
Fig. 2.61 APC Server settings (Single OPC mode)
2. Installing Server Function 2-48
IM 36J06D20-01E 9th Edition
● OPC Server Name
(1) To connect one OPC server, confirm the check of ‘Single OPC Server’ box is ON.
(2) Specify a PC name where OPC server exists and the ProgramID of the OPC server on the table. Do not change the OPC server group name but DEFAULTOPCSERVER.
(3) To connect multiple OPC servers, remove the check of Single OPC server box. Reboot PC is necessary when you change the setting.
(4) When two or more OPC servers are used, OPC group name, PC name, ProgramID of the OPC server and Certification of logon are specified. By clicking ‘Set’ button, the registered user name is shown. Up to 16 OPC servers are available.
(5) After all data are input, push the Apply button and click OK in the confirmation dialog. The registered information is saved.
(6) Apply button becomes inactive in two minutes.
● OPC User Certificate
(1) Check ‘Regist OPC Authentication Users’ box to define OPC User Certificate settings.
(2) For each OPC server check box in ‘Authentication’ field, and then click ‘Set’ button. For estimators in ‘Multi OPC Server Setting’ frame, for integration tool in ‘Set Authentication users for integration tool’.
(3) When clicking the ‘Set’ button, OPC User Certificate dialog is shown. Specify the user name for certificate and password.
(4) When clicking the ‘Test’ button, the input user name and password are confirmed.
(5) When clicking ‘OK’ button, the input user name is sent to APC server to access the registered OPC server. The connected result is shown as dialog.
3 Installing Exarqe Client 3-1
IM 36J06D20-01E 9th Edition
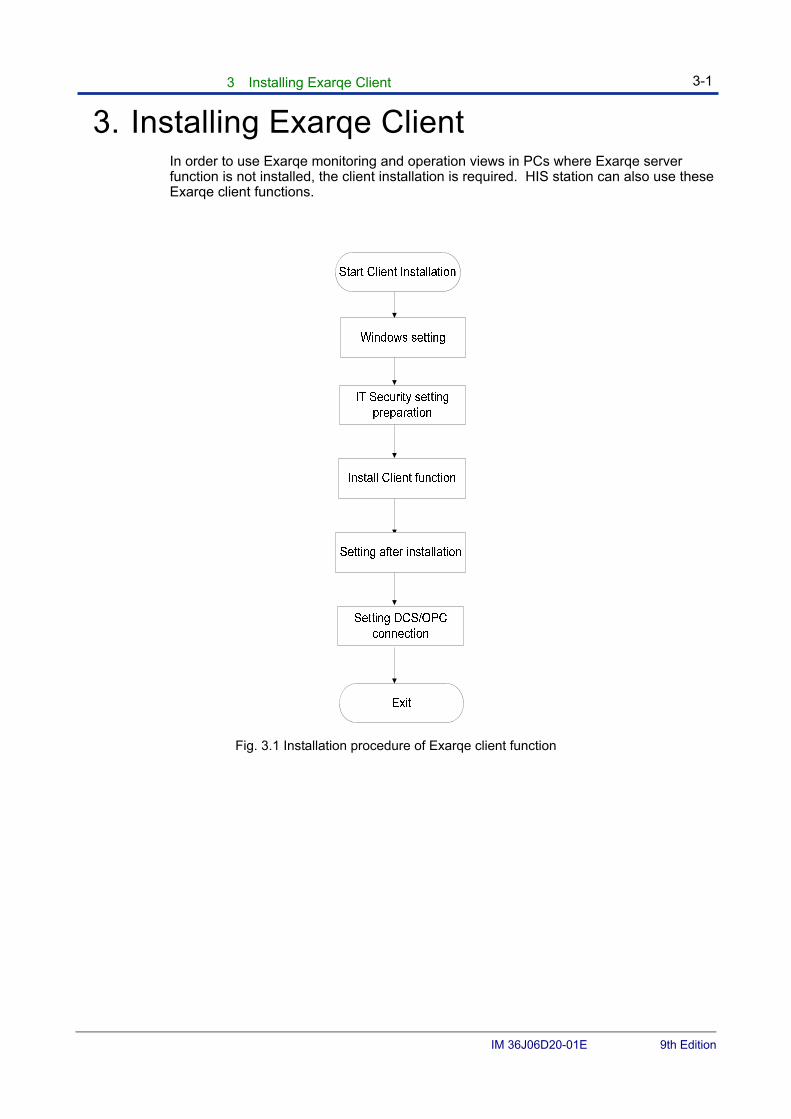
3. Installing Exarqe Client In order to use Exarqe monitoring and operation views in PCs where Exarqe server function is not installed, the client installation is required. HIS station can also use these Exarqe client functions.
Fig. 3.1 Installation procedure of Exarqe client function
3 Installing Exarqe Client 3-2
IM 36J06D20-01E 9th Edition
3.1 Preparation for IT Security Settings Prepare for IT security settings, as is same as 2.2 section.
Legacy Model
Standard Standalone model
Standard Domain model
Domain management PC
PC for Exarqe installation
Standard Combination model
Domain management PC
PC for Exarqe installation
3 Installing Exarqe Client 3-3
IM 36J06D20-01E 9th Edition
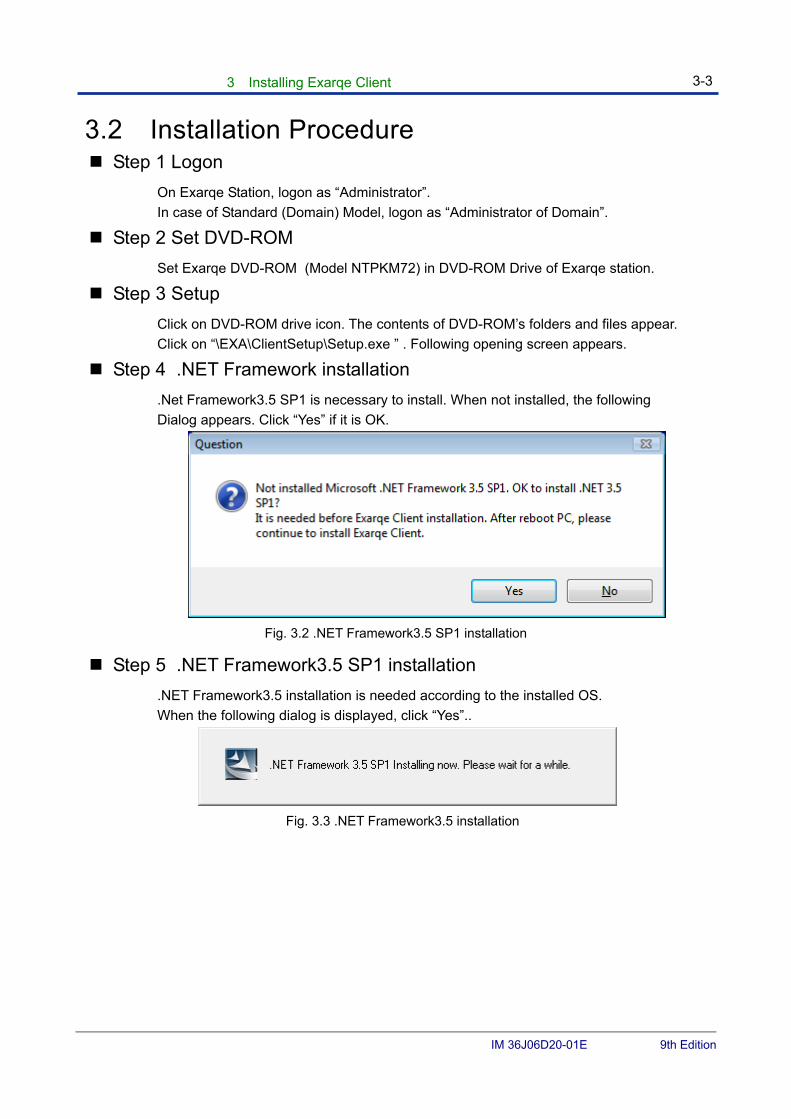
3.2 Installation Procedure Step 1 Logon
On Exarqe Station, logon as “Administrator”.
In case of Standard (Domain) Model, logon as “Administrator of Domain”.
Step 2 Set DVD-ROM
Set Exarqe DVD-ROM (Model NTPKM72) in DVD-ROM Drive of Exarqe station.
Step 3 Setup
Click on DVD-ROM drive icon. The contents of DVD-ROM’s folders and files appear.
Click on “\EXA\ClientSetup\Setup.exe ” . Following opening screen appears.
Step 4 .NET Framework installation
.Net Framework3.5 SP1 is necessary to install. When not installed, the following
Dialog appears. Click “Yes” if it is OK.
Fig. 3.2 .NET Framework3.5 SP1 installation
Step 5 .NET Framework3.5 SP1 installation
.NET Framework3.5 installation is needed according to the installed OS.
When the following dialog is displayed, click “Yes”..
Fig. 3.3 .NET Framework3.5 installation
3 Installing Exarqe Client 3-4
IM 36J06D20-01E 9th Edition
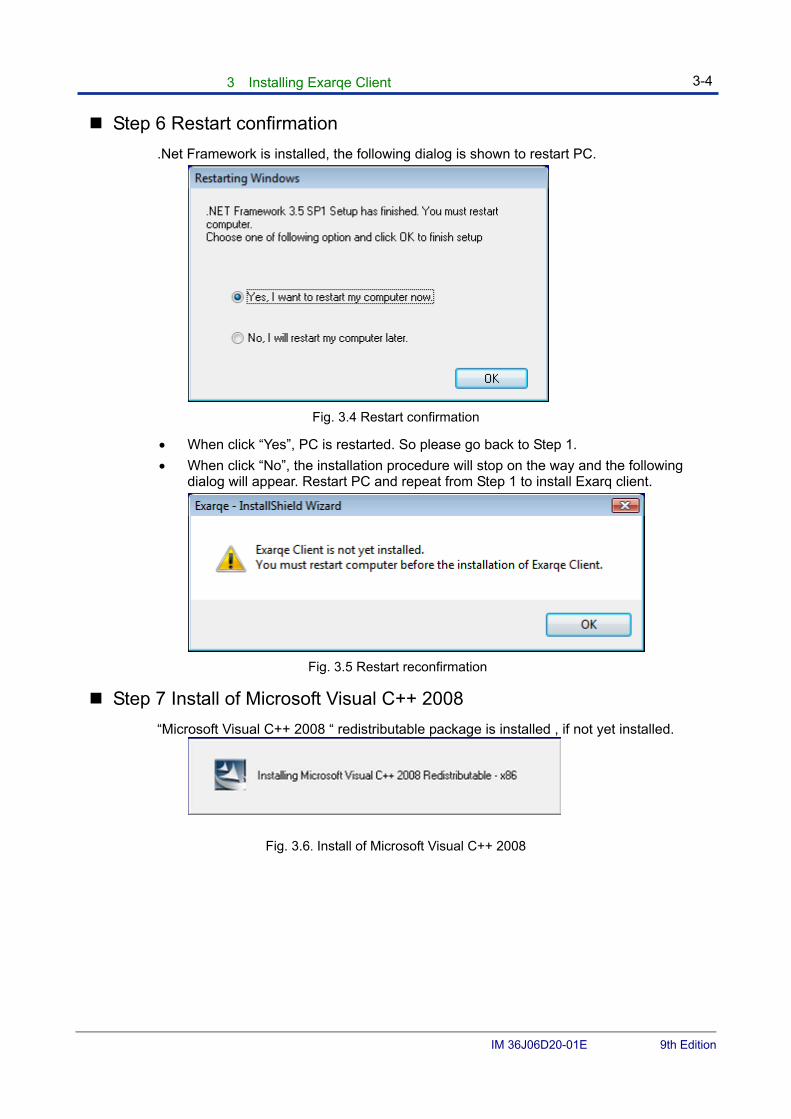
Step 6 Restart confirmation
.Net Framework is installed, the following dialog is shown to restart PC.
Fig. 3.4 Restart confirmation
When click “Yes”, PC is restarted. So please go back to Step 1.
When click “No”, the installation procedure will stop on the way and the following dialog will appear. Restart PC and repeat from Step 1 to install Exarq client.
Fig. 3.5 Restart reconfirmation
Step 7 Install of Microsoft Visual C++ 2008
“Microsoft Visual C++ 2008 “ redistributable package is installed , if not yet installed.
Fig. 3.6. Install of Microsoft Visual C++ 2008
3 Installing Exarqe Client 3-5
IM 36J06D20-01E 9th Edition
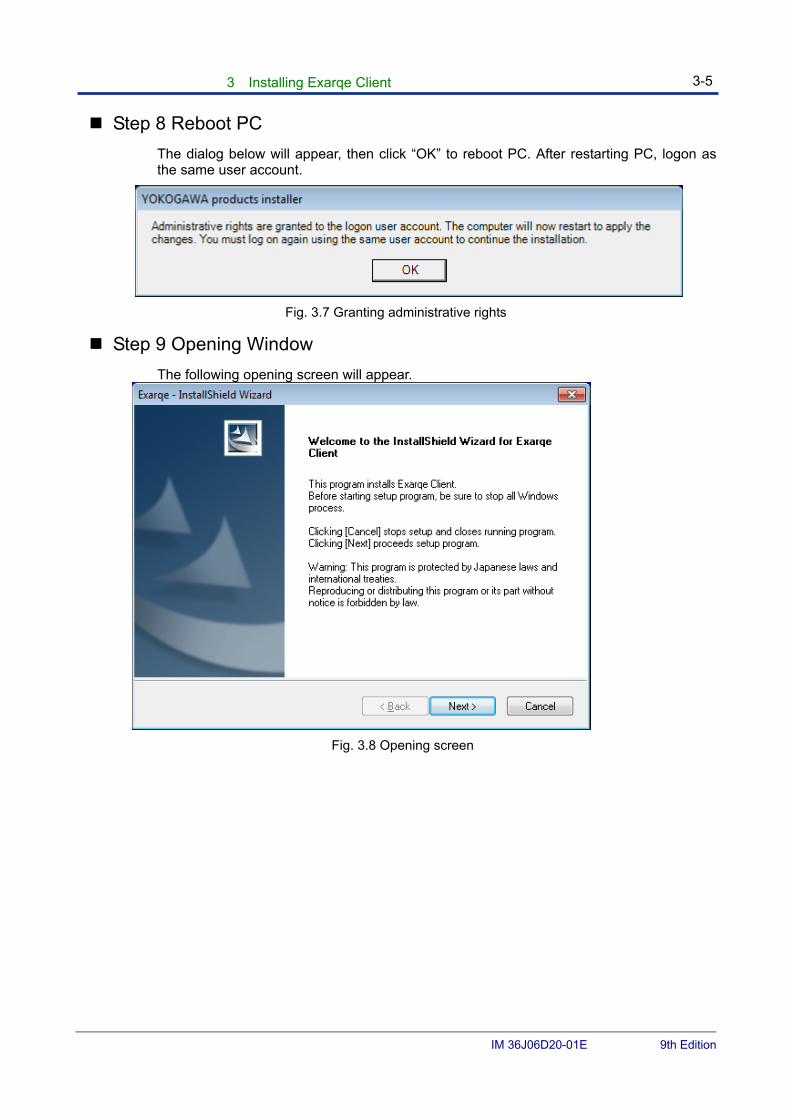
Step 8 Reboot PC
The dialog below will appear, then click “OK” to reboot PC. After restarting PC, logon as the same user account.
Fig. 3.7 Granting administrative rights
Step 9 Opening Window
The following opening screen will appear.
Fig. 3.8 Opening screen
3 Installing Exarqe Client 3-6
IM 36J06D20-01E 9th Edition
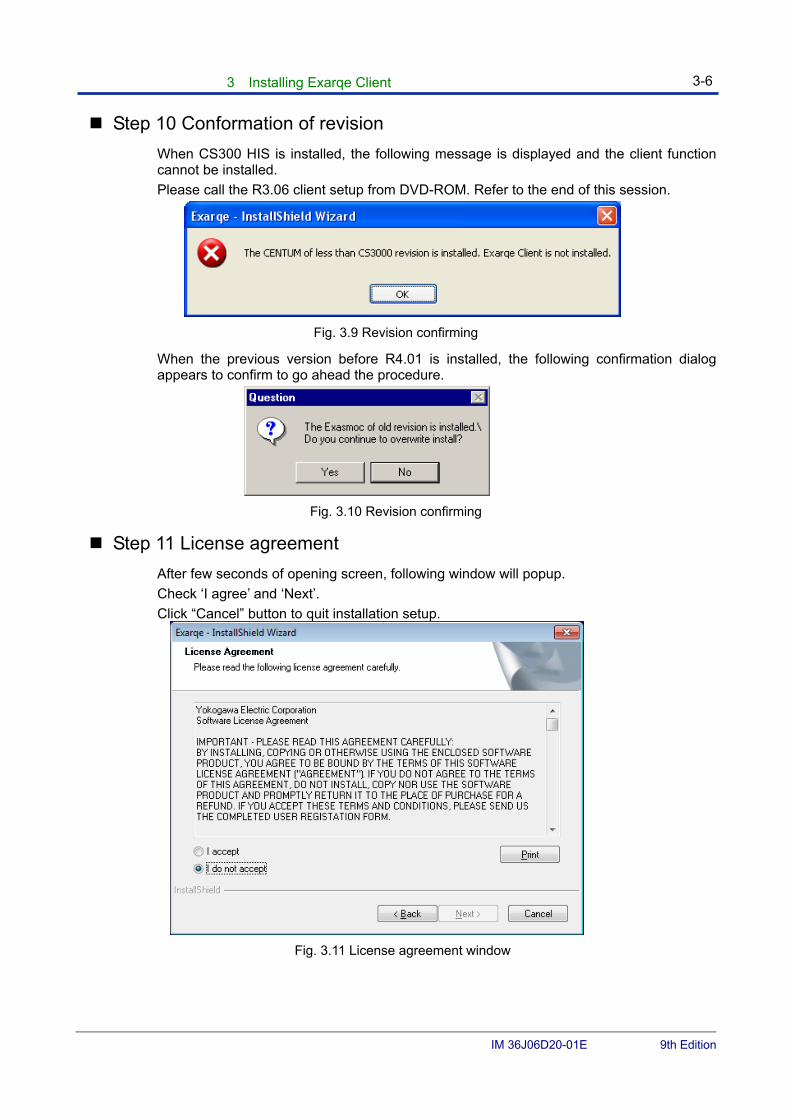
Step 10 Conformation of revision
When CS300 HIS is installed, the following message is displayed and the client function cannot be installed.
Please call the R3.06 client setup from DVD-ROM. Refer to the end of this session.
Fig. 3.9 Revision confirming
When the previous version before R4.01 is installed, the following confirmation dialog appears to confirm to go ahead the procedure.
Fig. 3.10 Revision confirming
Step 11 License agreement
After few seconds of opening screen, following window will popup.
Check ‘I agree’ and ‘Next’.
Click “Cancel” button to quit installation setup.
Fig. 3.11 License agreement window
3 Installing Exarqe Client 3-7
IM 36J06D20-01E 9th Edition
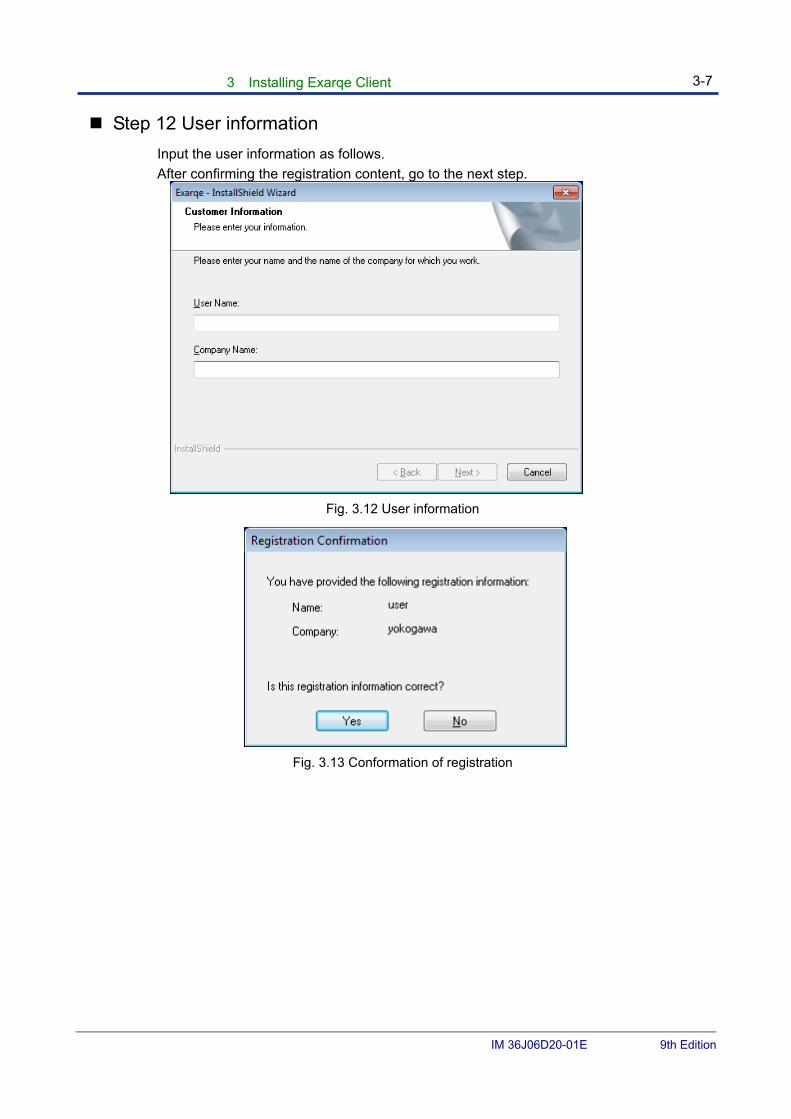
Step 12 User information
Input the user information as follows.
After confirming the registration content, go to the next step.
Fig. 3.12 User information
Fig. 3.13 Conformation of registration
3 Installing Exarqe Client 3-8
IM 36J06D20-01E 9th Edition
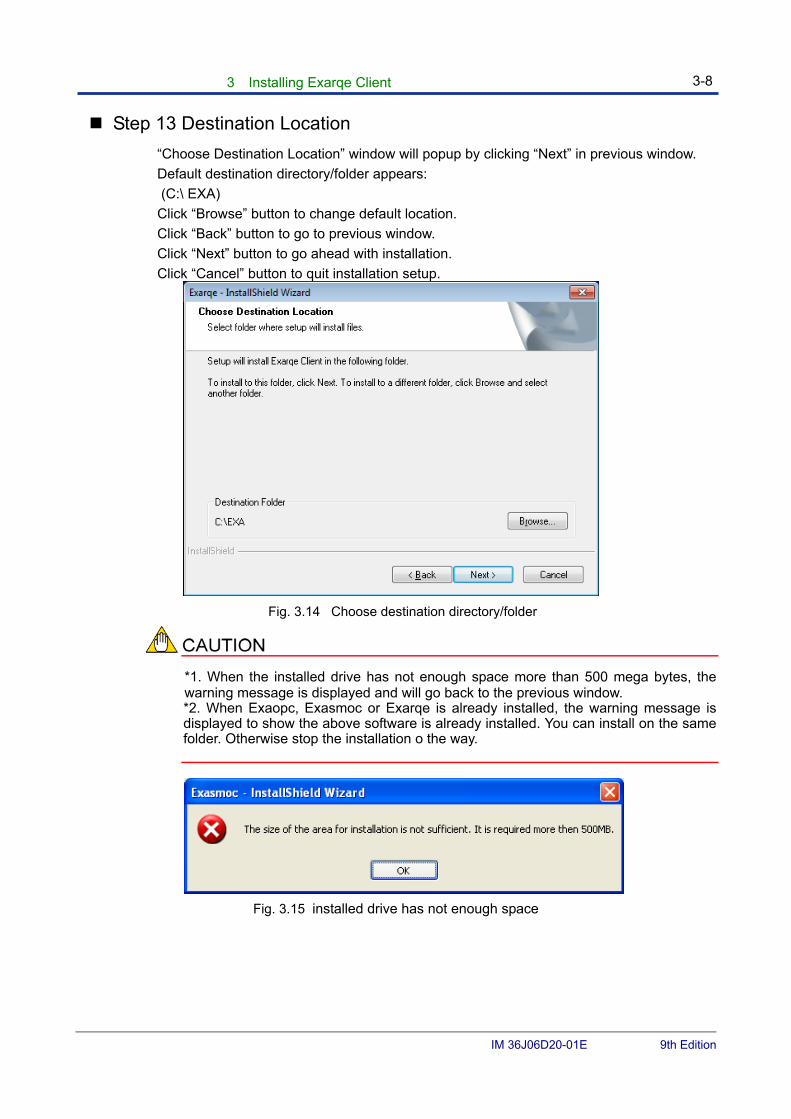
Step 13 Destination Location
“Choose Destination Location” window will popup by clicking “Next” in previous window.
Default destination directory/folder appears:
(C:\ EXA)
Click “Browse” button to change default location.
Click “Back” button to go to previous window.
Click “Next” button to go ahead with installation.
Click “Cancel” button to quit installation setup.
Fig. 3.14 Choose destination directory/folder
*1. When the installed drive has not enough space more than 500 mega bytes, the warning message is displayed and will go back to the previous window. *2. When Exaopc, Exasmoc or Exarqe is already installed, the warning message is displayed to show the above software is already installed. You can install on the same folder. Otherwise stop the installation o the way.
Fig. 3.15 installed drive has not enough space
3 Installing Exarqe Client 3-9
IM 36J06D20-01E 9th Edition
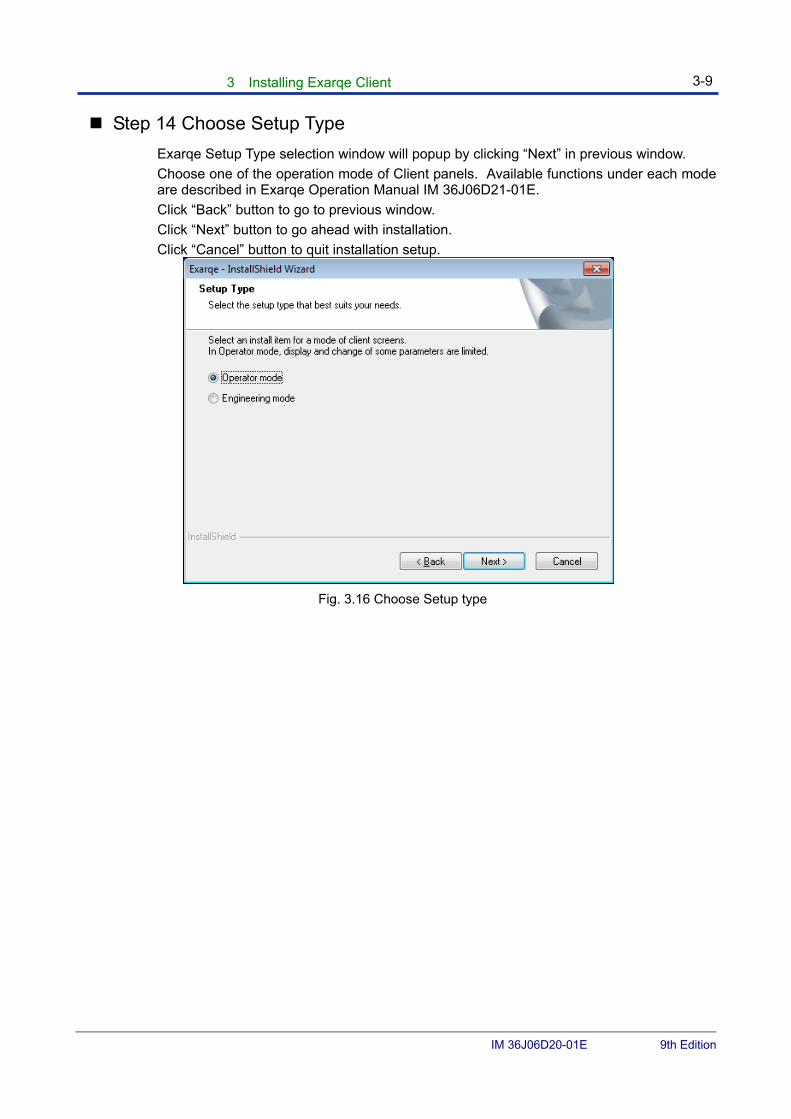
Step 14 Choose Setup Type
Exarqe Setup Type selection window will popup by clicking “Next” in previous window.
Choose one of the operation mode of Client panels. Available functions under each mode are described in Exarqe Operation Manual IM 36J06D21-01E.
Click “Back” button to go to previous window.
Click “Next” button to go ahead with installation.
Click “Cancel” button to quit installation setup.
Fig. 3.16 Choose Setup type
3 Installing Exarqe Client 3-10
IM 36J06D20-01E 9th Edition
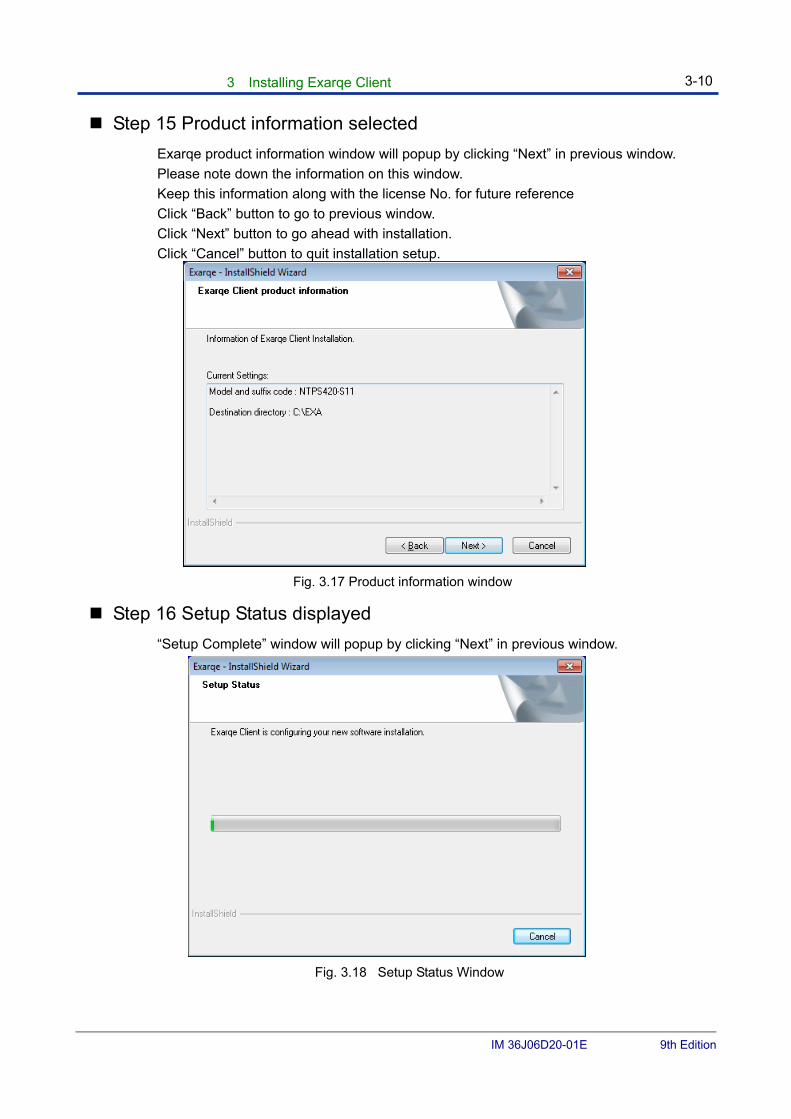
Step 15 Product information selected
Exarqe product information window will popup by clicking “Next” in previous window.
Please note down the information on this window.
Keep this information along with the license No. for future reference
Click “Back” button to go to previous window.
Click “Next” button to go ahead with installation.
Click “Cancel” button to quit installation setup.
Fig. 3.17 Product information window
Step 16 Setup Status displayed
“Setup Complete” window will popup by clicking “Next” in previous window.
Fig. 3.18 Setup Status Window
3 Installing Exarqe Client 3-11
IM 36J06D20-01E 9th Edition
Step 17 Confirmation of other installation
If “Yes, I want to set up IT security now” is selected, IT security setting starts. If “No, I want to install other software products” is selected, installation will be finished.
Fig. 3.19 Confirmation of other installation
If “No, I want to install other software products” is selected, Exarqe installation will be finished. However Exarqe will not work because IT security setting is not completed. If “No, I want to install other software products” is selected by error, please perform IT security tool from [Start menu] – [YOKOGAWA SECURITY] – [IT SECURITY TOOL]. Please note that reboot is required after IT security tool execution.
Only one-time execution of IT security tool is enough, if more than one product, which is listed below, is installed continuously.
- Exasmoc R4.03 - CENTUM VP R5.01 - Exapilot R3.90 - Exaplog R3.40
3 Installing Exarqe Client 3-12
IM 36J06D20-01E 9th Edition
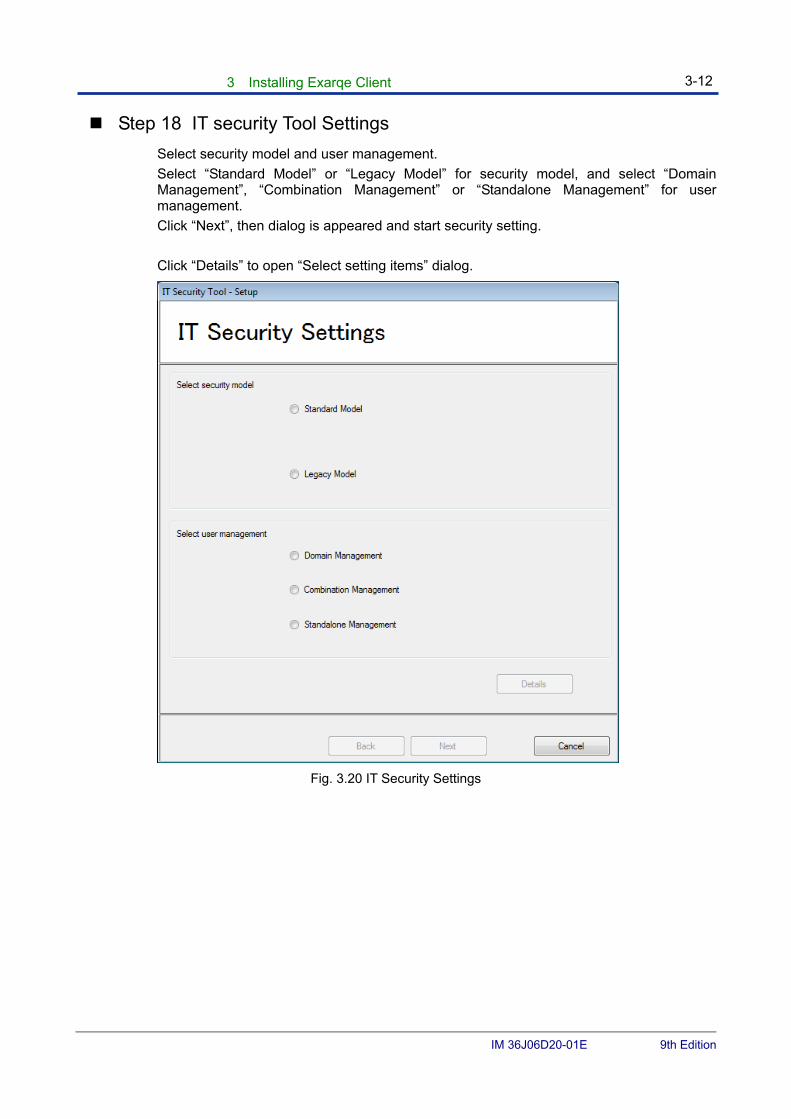
Step 18 IT security Tool Settings
Select security model and user management.
Select “Standard Model” or “Legacy Model” for security model, and select “Domain Management”, “Combination Management” or “Standalone Management” for user management.
Click “Next”, then dialog is appeared and start security setting.
Click “Details” to open “Select setting items” dialog.
Fig. 3.20 IT Security Settings
3 Installing Exarqe Client 3-13
IM 36J06D20-01E 9th Edition
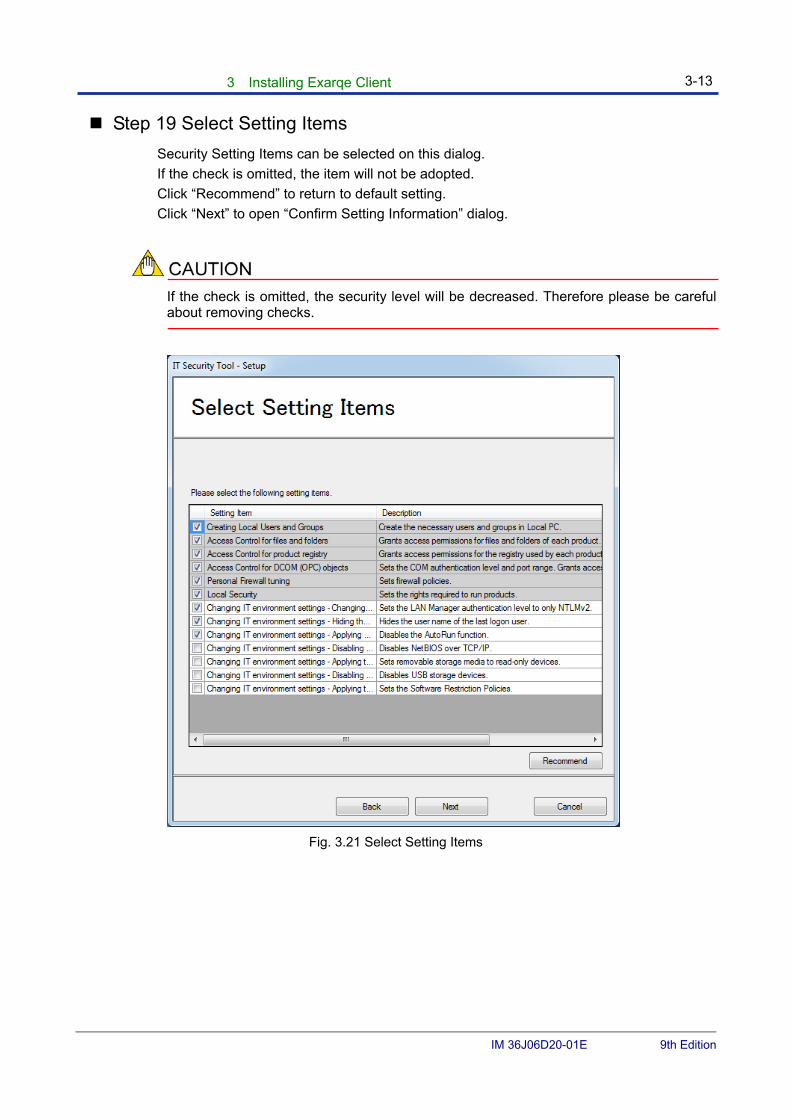
Step 19 Select Setting Items
Security Setting Items can be selected on this dialog.
If the check is omitted, the item will not be adopted.
Click “Recommend” to return to default setting.
Click “Next” to open “Confirm Setting Information” dialog.
If the check is omitted, the security level will be decreased. Therefore please be careful about removing checks.
Fig. 3.21 Select Setting Items

3 Installing Exarqe Client 3-14
IM 36J06D20-01E 9th Edition
Step 20 Confirm Setting Information
Security items, which are selected in “Select setting Items”, are displayed.
Click “Next”, then dialog is appeared and start security setting.
Fig. 3.22 Confirm Setting Information
3 Installing Exarqe Client 3-15
IM 36J06D20-01E 9th Edition
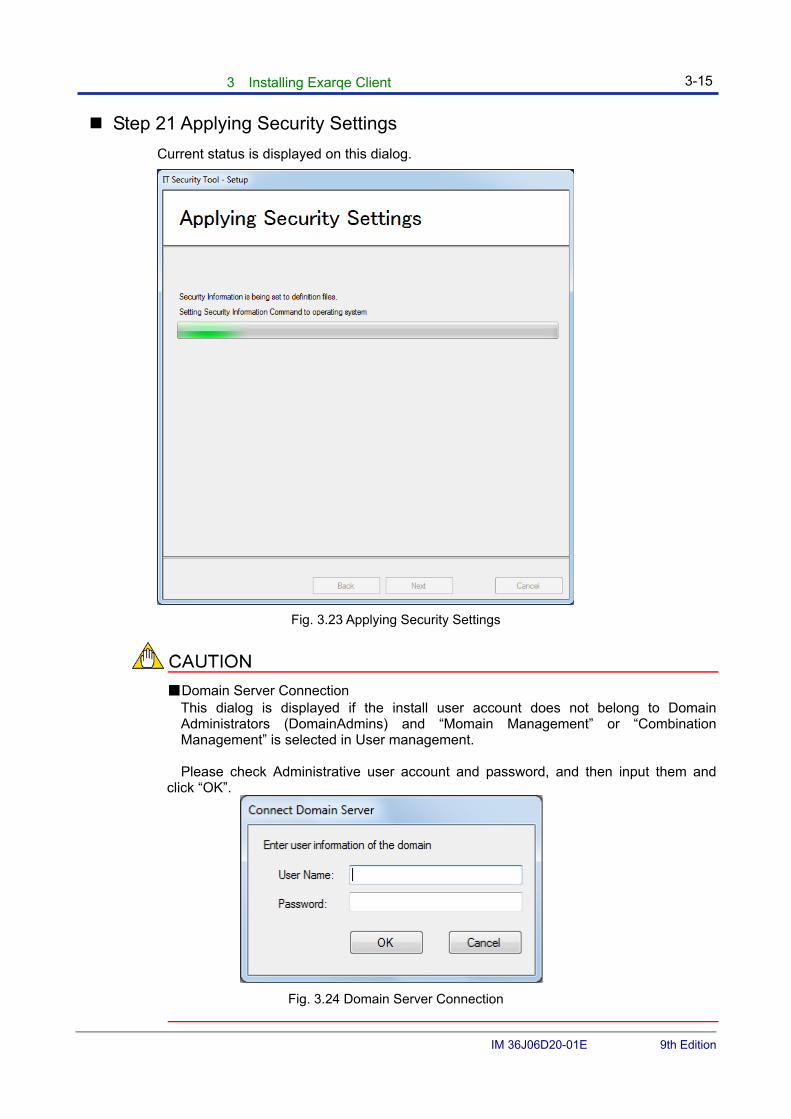
Step 21 Applying Security Settings
Current status is displayed on this dialog.
Fig. 3.23 Applying Security Settings
■Domain Server Connection This dialog is displayed if the install user account does not belong to Domain Administrators (DomainAdmins) and “Momain Management” or “Combination Management” is selected in User management.
Please check Administrative user account and password, and then input them and
click “OK”.
Fig. 3.24 Domain Server Connection
3 Installing Exarqe Client 3-16
IM 36J06D20-01E 9th Edition
Step 22 Setup Completed
When IT security setting is finished, this dialog is displayed.
If check “Restart now” and click “Finish”, then reboot PC.
If not check “Restart now” and click “Finish”, then Exarqe installation is finished without rebooting computer.
Fig. 3.25 Setup Completed
3 Installing Exarqe Client 3-17
IM 36J06D20-01E 9th Edition
3.2.1 Client Installation to CS3000 R3.09.00
The client installer of Exarqe R3.06 to CS3000 R3.09.00 is prepared.
Execute the client installation according to the following procedures. As a result, the R3.06 style client screen can be displayed. The installer is included in the DVD-ROM of R4.02.
Procedure
(1) Logon as the administrative user account that used for installation.
(2) Execure “\EXA\ClientSetup\legacyhmi\ClientSetup” in DVD-ROM.
(3) After restarting the Windows, double click “\EXA\ClientSetup\legacyhmi \remote.reg” in DVD-ROM.

3 Installing Exarqe Client 3-18
IM 36J06D20-01E 9th Edition
3.3 Settings after Installation To use Exarqe, each user should set its own account and register it to the pre-defined groups. These works should be done before executing the IT security Setting utility described in Chapter 5.
The procedures of account creation and registration to groups in each security setting are shown below:
■ Legacy model
Registration to groups are unnecessary..
■ Standard (Standalone) model
(1) Logon the system as Administrative group user.
(2) Register user accounts who access Exarqe operation data to ‘APC_OPERATOR’ group.
(3) Register user accounts who access Exarqe engineering data to ‘APC_ENGINEER’ group.
(4) Register user accounts who access Exarqe maintenance data to ‘APC_MAINTENANCE’ group.
■ Standard (Domain) model
Domain management PC
(1) Logon the system as Administrative group user.
(2) Register user accounts who access Exarqe operation data to ‘APC_OPERATOR’ group.
(3) Register user accounts who access Exarqe engineering data to ‘APC_ENGINEER’ group.
(4) Register user accounts who access Exarqe maintenance data to ‘APC_MAINTENANCE’ group.
PC for Exarqe installation
(1) Logon the system as Administrative group user.
(2) Register user accounts who access Exarqe maintenance data to ‘APC_MAINTENANCE_LCL’ group.
3 Installing Exarqe Client 3-19
IM 36J06D20-01E 9th Edition
■ Standard (Combination) model
Domain management PC
(1) The same setup as “Standard(Domain)Model”
PC for Exarqe installation
(1) Logon the system as Administrative group user.
(2) Register user accounts who access Exarqe operation data to ‘APC_OPERATOR_LCL’ group.
(3) Register user accounts who access Exarqe engineering data to ‘APC_ENGINEER_LCL’ group.
(4) Register user accounts who access Exarqe maintenance data to ‘APC_MAINTENANCE_LCL’ group.
When the APC Builder function such as OPC Server setting or APC controller registration described on the Builder Instruction manual, is started before IT security is set, the program might not be installed on the expected folder.
3 Installing Exarqe Client 3-20
IM 36J06D20-01E 9th Edition
3.4 Settings for Connection
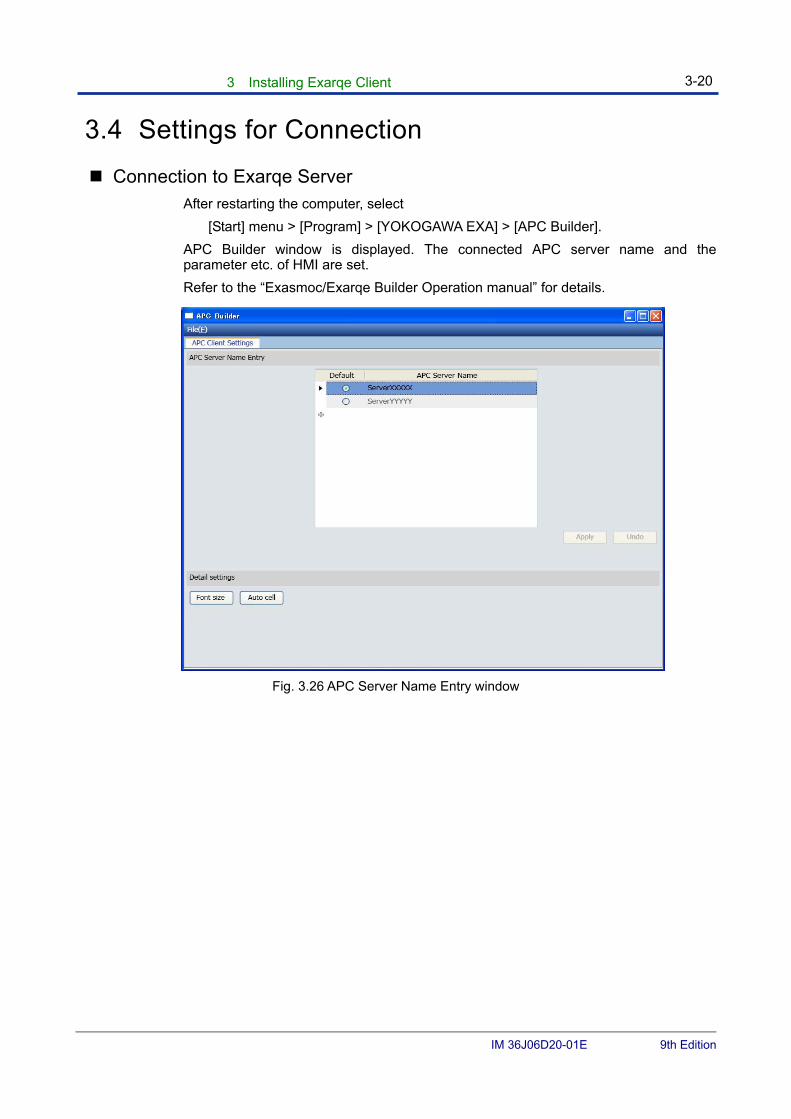
Connection to Exarqe Server After restarting the computer, select
[Start] menu > [Program] > [YOKOGAWA EXA] > [APC Builder].
APC Builder window is displayed. The connected APC server name and the parameter etc. of HMI are set.
Refer to the “Exasmoc/Exarqe Builder Operation manual” for details.
Fig. 3.26 APC Server Name Entry window
3 Installing Exarqe Client 3-21
IM 36J06D20-01E 9th Edition
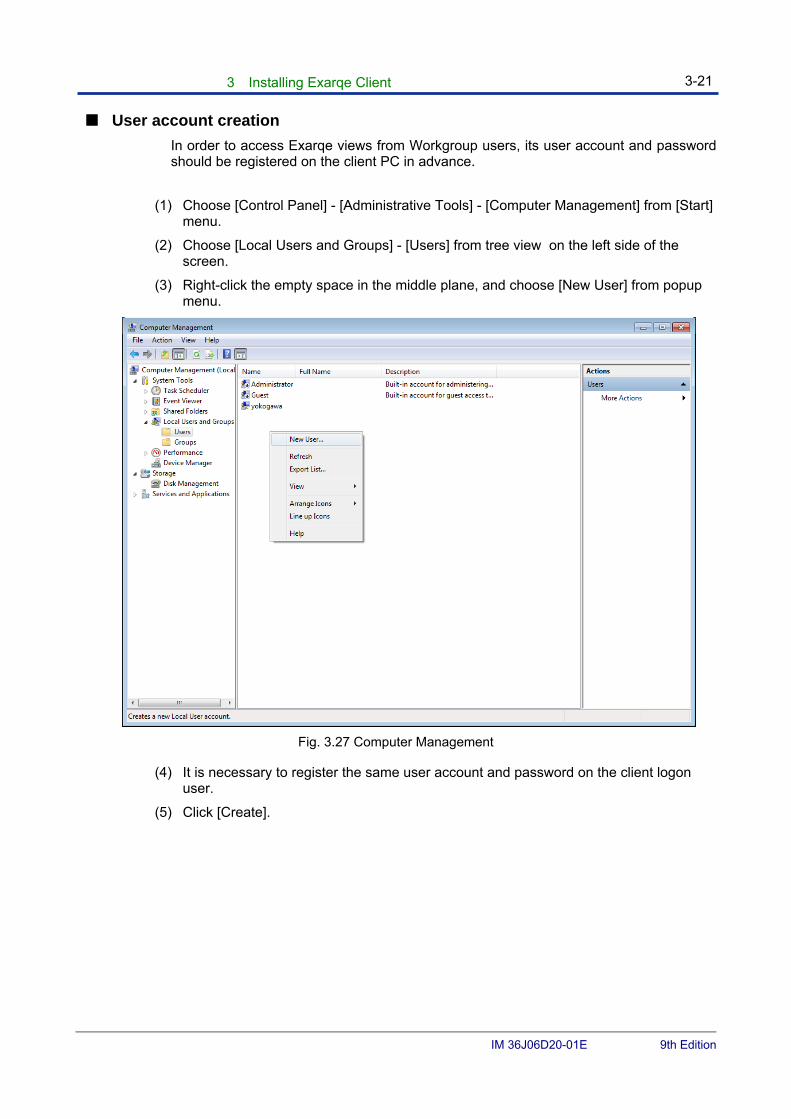
■ User account creation
In order to access Exarqe views from Workgroup users, its user account and password should be registered on the client PC in advance.
(1) Choose [Control Panel] - [Administrative Tools] - [Computer Management] from [Start] menu.
(2) Choose [Local Users and Groups] - [Users] from tree view on the left side of the screen.
(3) Right-click the empty space in the middle plane, and choose [New User] from popup menu.
Fig. 3.27 Computer Management
(4) It is necessary to register the same user account and password on the client logon user.
(5) Click [Create].
4. Installing Web Server 4-1
IM 36J06D20-01E 9th Edition
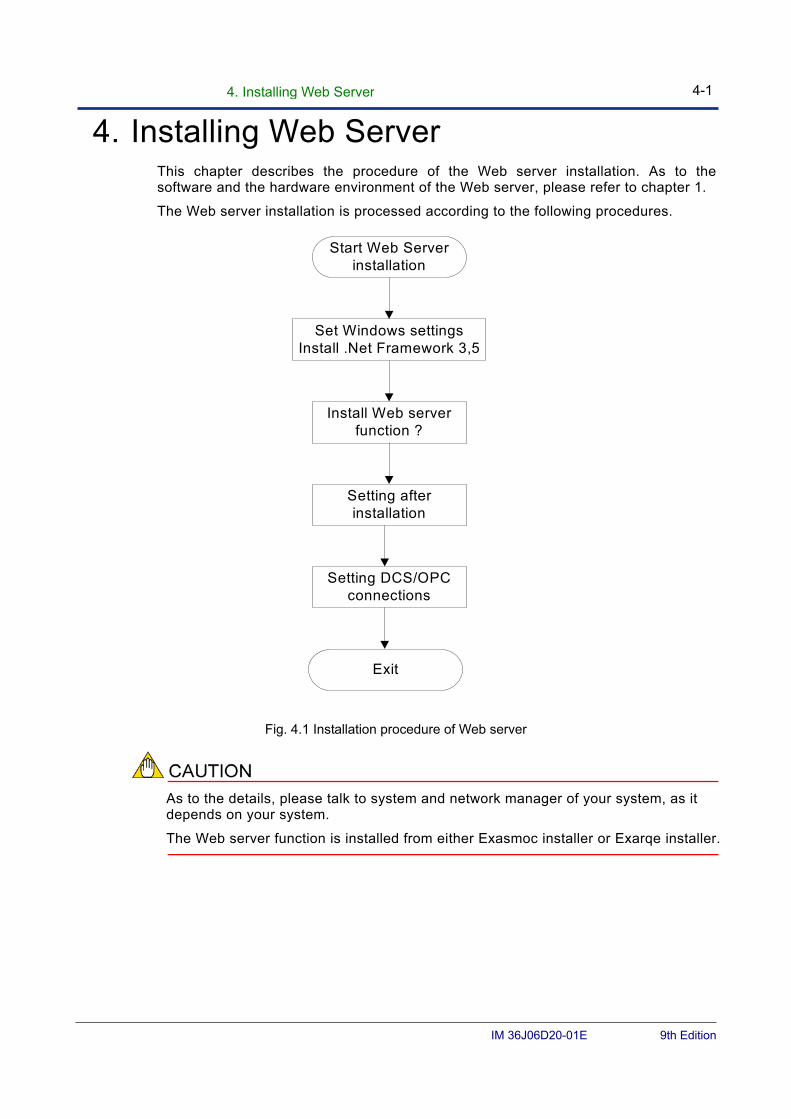
4. Installing Web Server This chapter describes the procedure of the Web server installation. As to the software and the hardware environment of the Web server, please refer to chapter 1.
The Web server installation is processed according to the following procedures.
Start Web Serverinstallation
Set Windows settingsInstall .Net Framework 3,5
Install Web serverfunction ?
Exit
Setting afterinstallation
Setting DCS/OPCconnections
Fig. 4.1 Installation procedure of Web server
As to the details, please talk to system and network manager of your system, as it depends on your system.
The Web server function is installed from either Exasmoc installer or Exarqe installer.
4. Installing Web Server 4-2
IM 36J06D20-01E 9th Edition
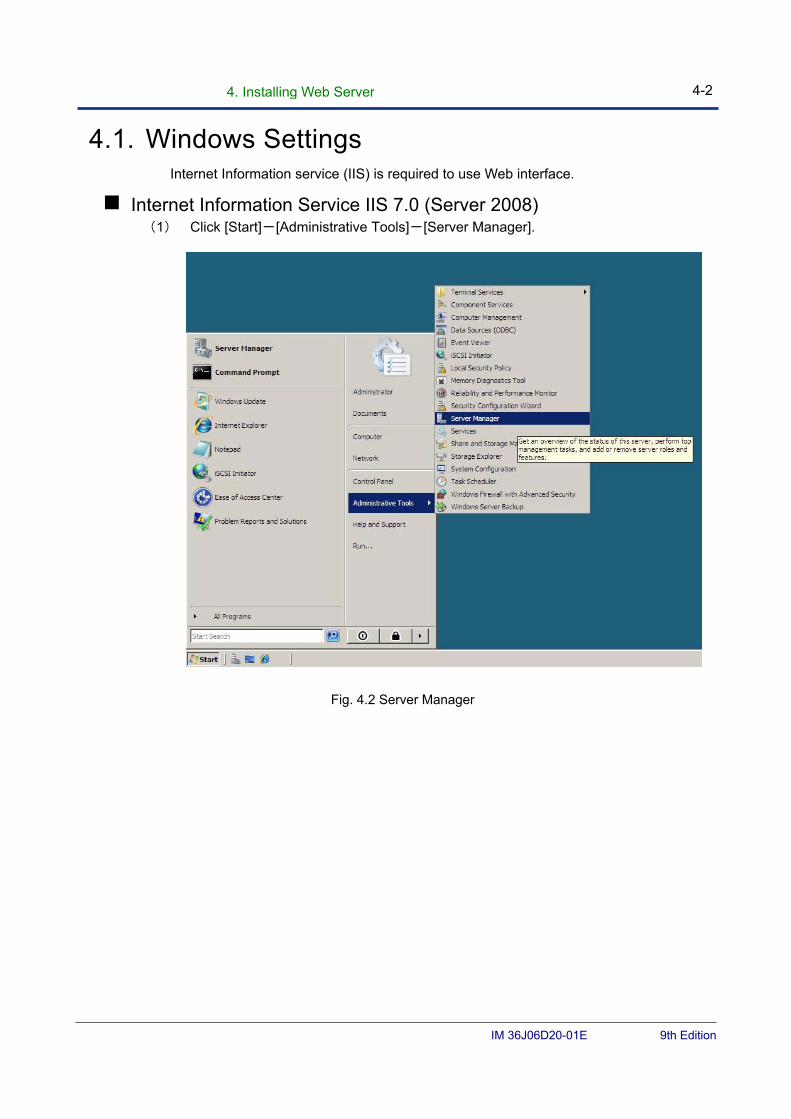
4.1. Windows Settings Internet Information service (IIS) is required to use Web interface.
Internet Information Service IIS 7.0 (Server 2008) (1) Click [Start]-[Administrative Tools]-[Server Manager].
Fig. 4.2 Server Manager
4. Installing Web Server 4-3
IM 36J06D20-01E 9th Edition
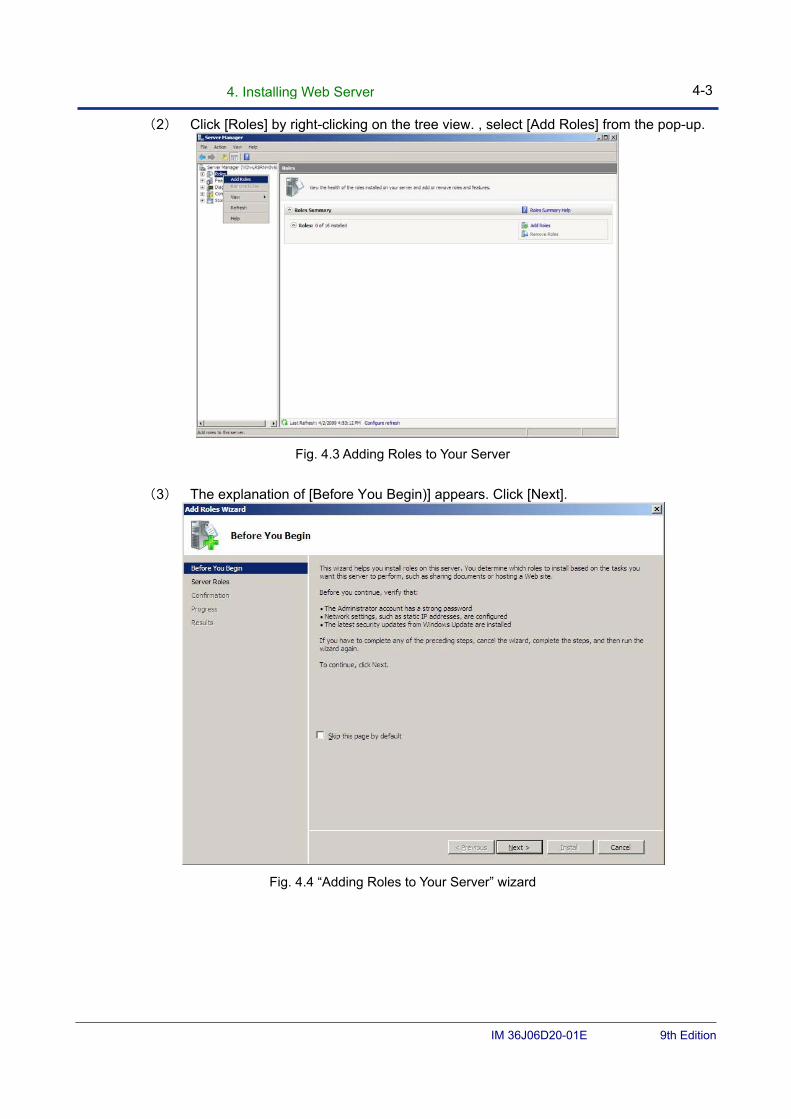
(2) Click [Roles] by right-clicking on the tree view. , select [Add Roles] from the pop-up.
Fig. 4.3 Adding Roles to Your Server
(3) The explanation of [Before You Begin)] appears. Click [Next].
Fig. 4.4 “Adding Roles to Your Server” wizard
4. Installing Web Server 4-4
IM 36J06D20-01E 9th Edition
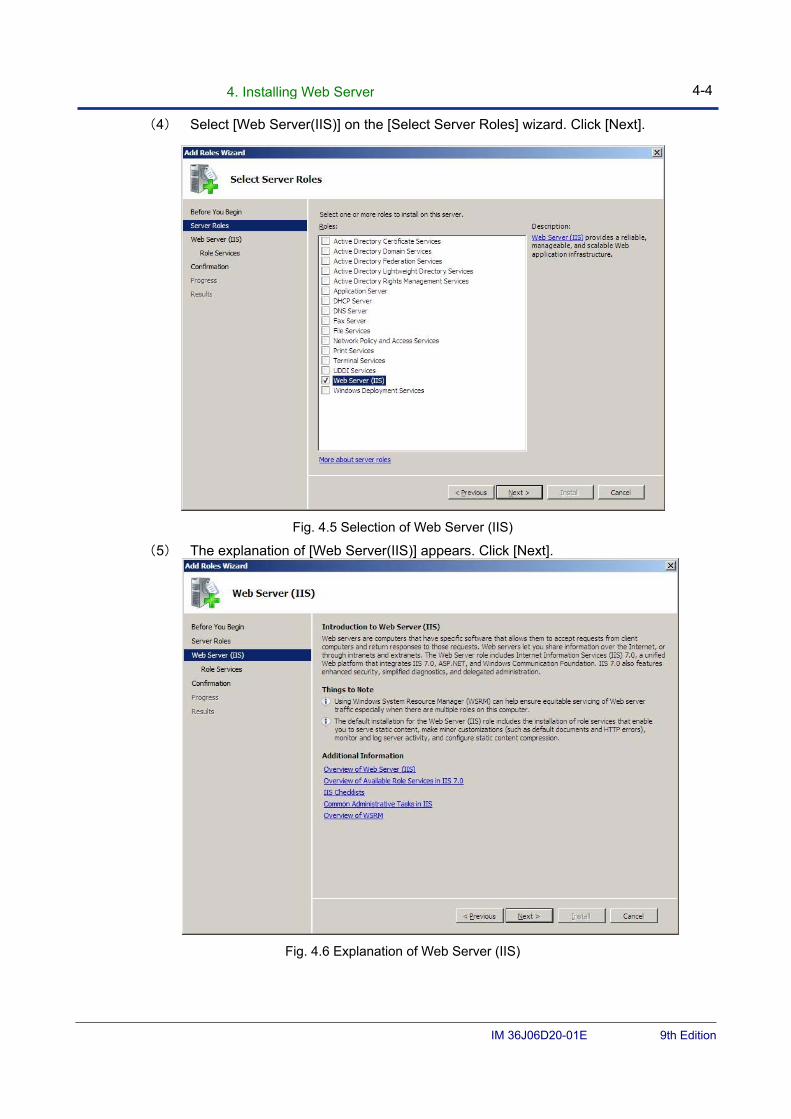
(4) Select [Web Server(IIS)] on the [Select Server Roles] wizard. Click [Next].
Fig. 4.5 Selection of Web Server (IIS)
(5) The explanation of [Web Server(IIS)] appears. Click [Next].
Fig. 4.6 Explanation of Web Server (IIS)
4. Installing Web Server 4-5
IM 36J06D20-01E 9th Edition
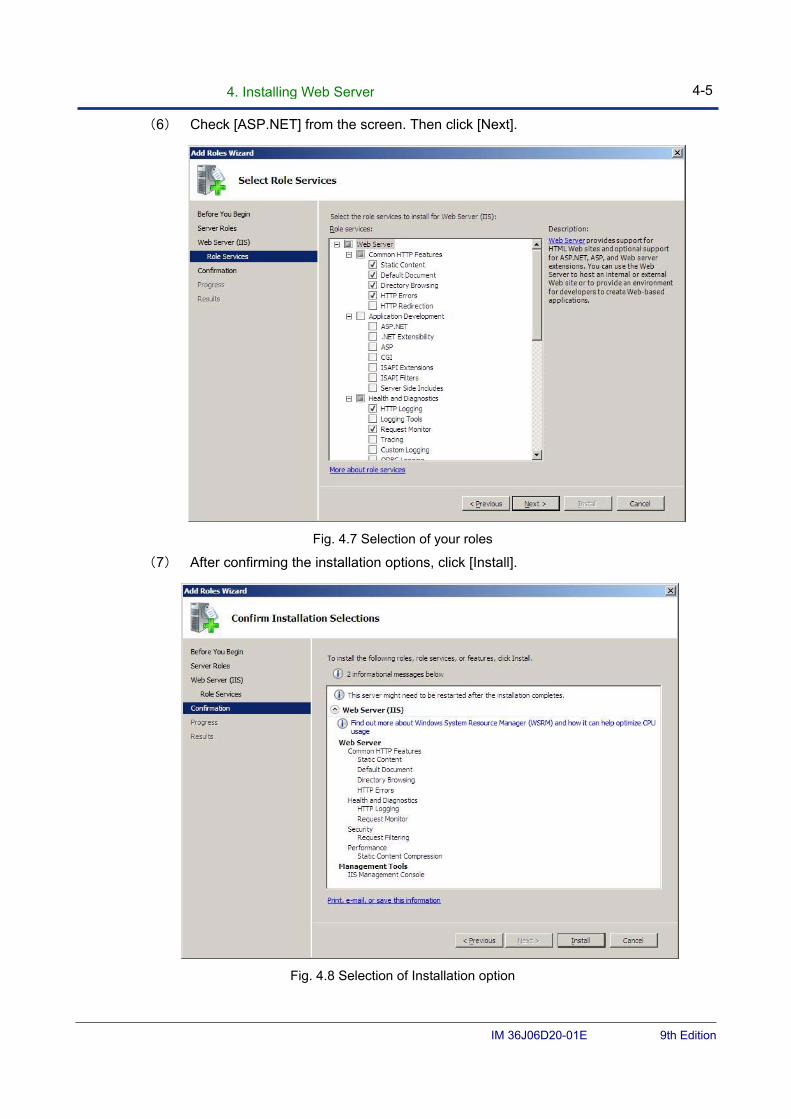
(6) Check [ASP.NET] from the screen. Then click [Next].
Fig. 4.7 Selection of your roles
(7) After confirming the installation options, click [Install].
Fig. 4.8 Selection of Installation option
4. Installing Web Server 4-6
IM 36J06D20-01E 9th Edition
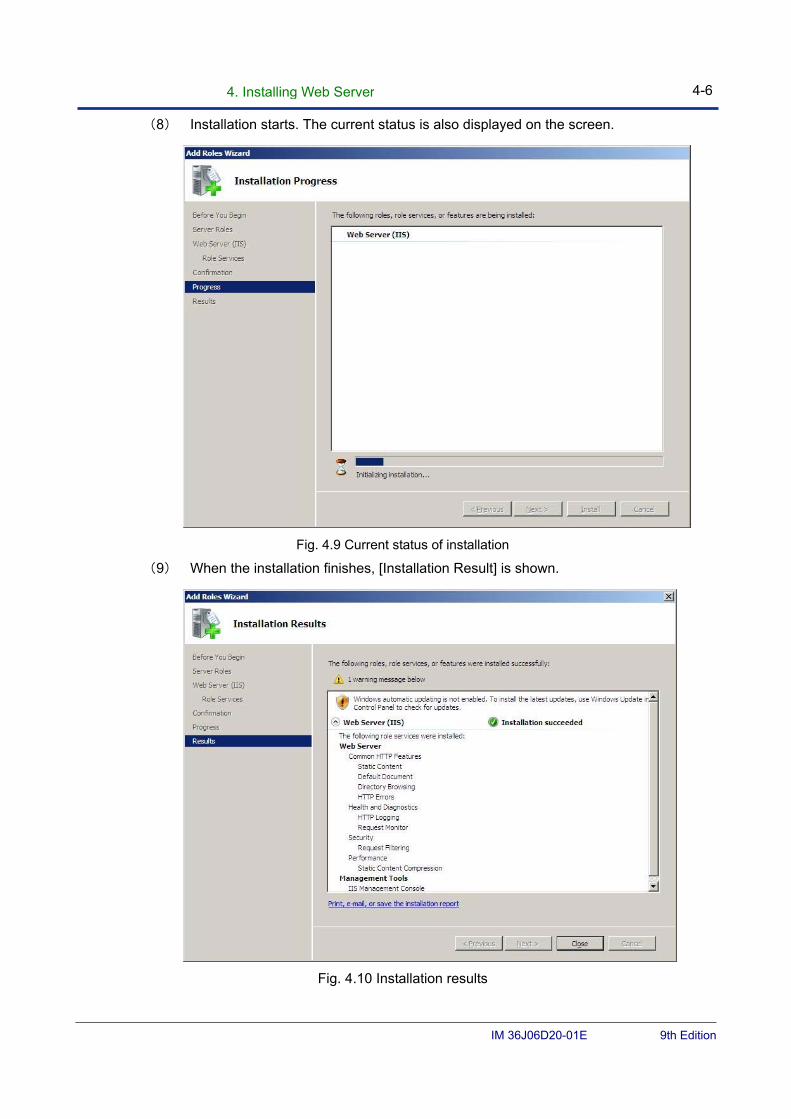
(8) Installation starts. The current status is also displayed on the screen.
Fig. 4.9 Current status of installation
(9) When the installation finishes, [Installation Result] is shown.
Fig. 4.10 Installation results
4. Installing Web Server 4-7
IM 36J06D20-01E 9th Edition
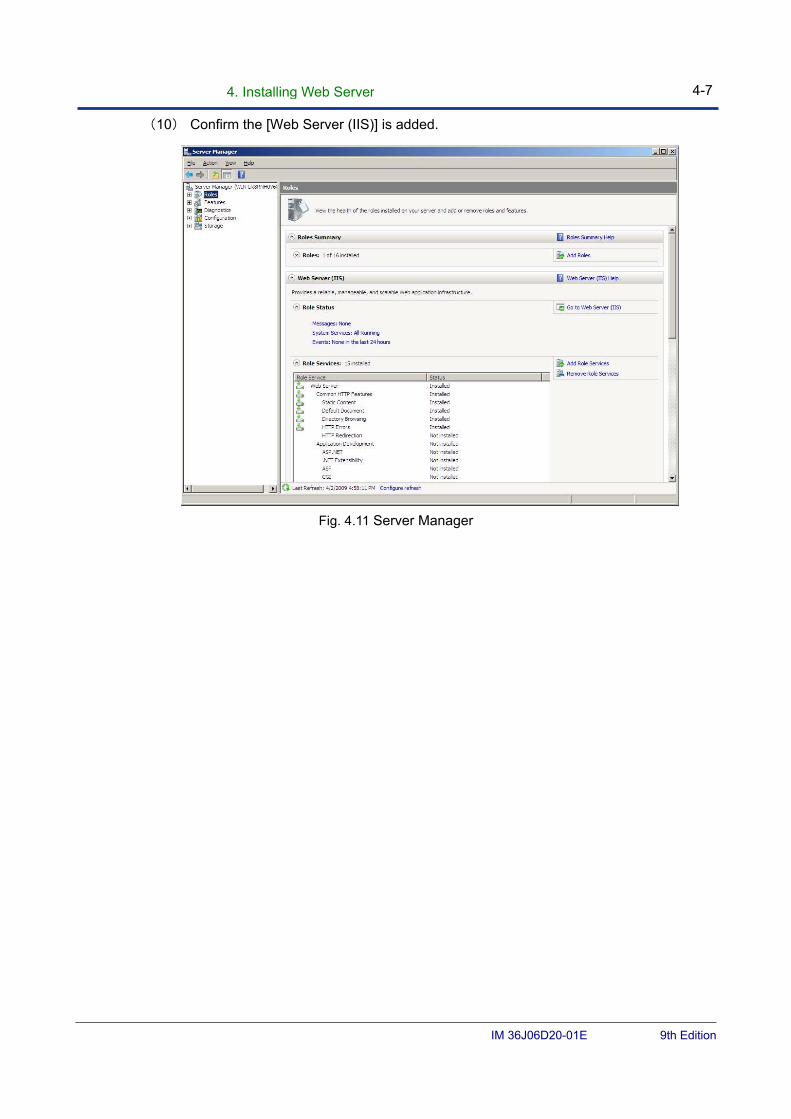
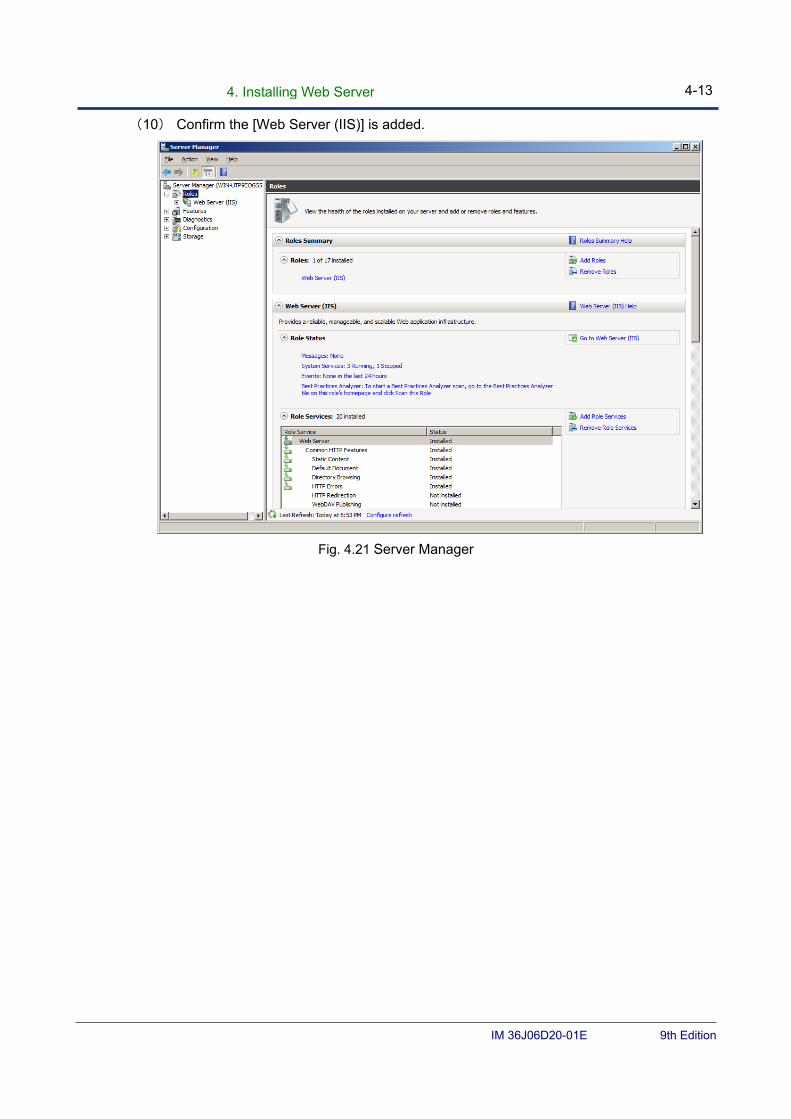
(10) Confirm the [Web Server (IIS)] is added.
Fig. 4.11 Server Manager
4. Installing Web Server 4-8
IM 36J06D20-01E 9th Edition
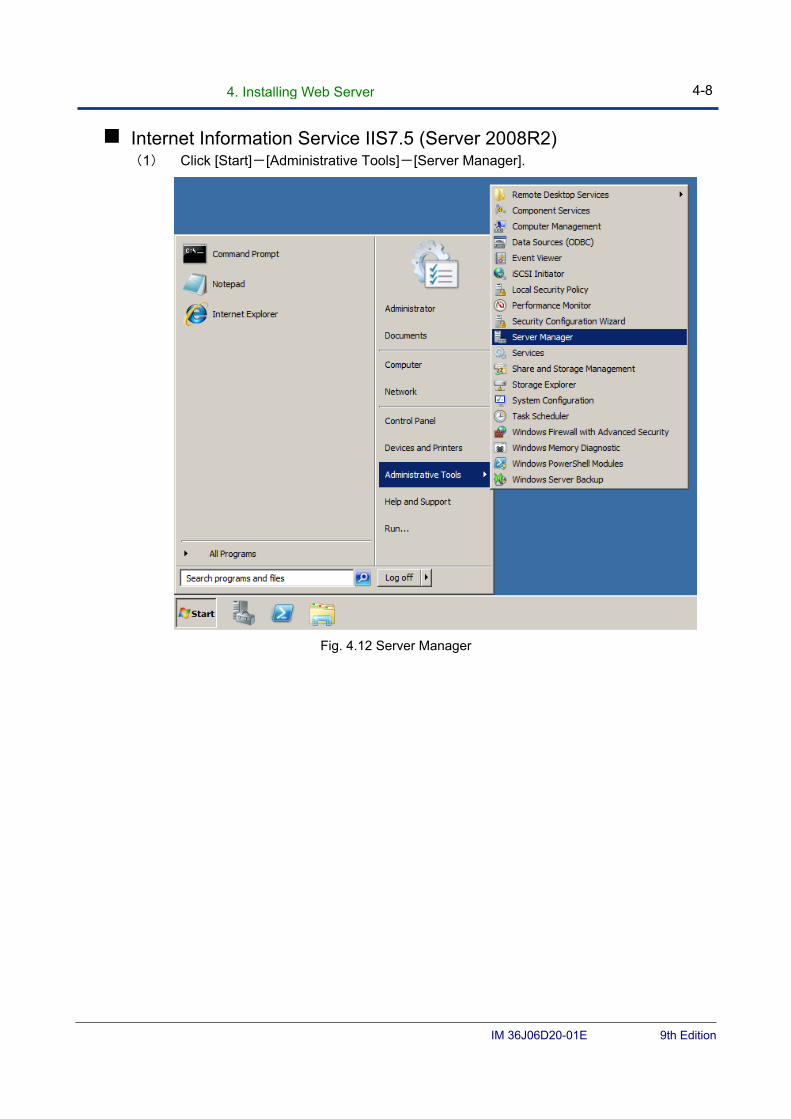
Internet Information Service IIS7.5 (Server 2008R2) (1) Click [Start]-[Administrative Tools]-[Server Manager].
Fig. 4.12 Server Manager
4. Installing Web Server 4-9
IM 36J06D20-01E 9th Edition
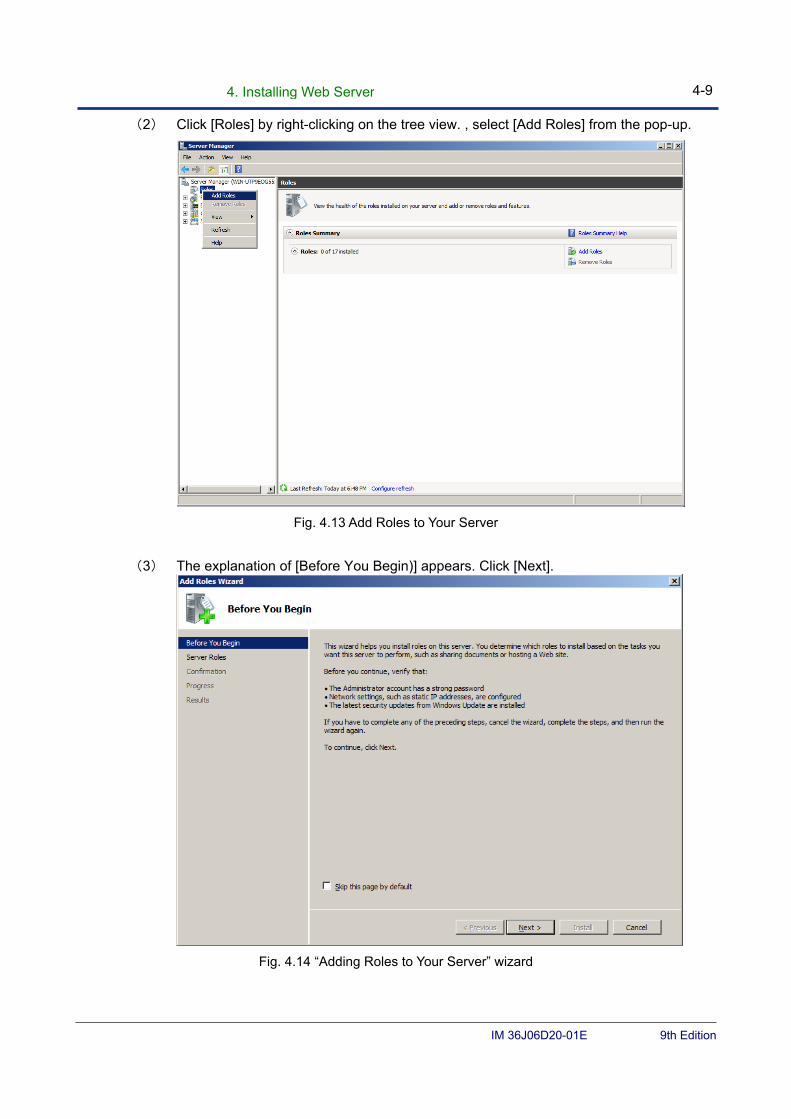
(2) Click [Roles] by right-clicking on the tree view. , select [Add Roles] from the pop-up.
Fig. 4.13 Add Roles to Your Server
(3) The explanation of [Before You Begin)] appears. Click [Next].
Fig. 4.14 “Adding Roles to Your Server” wizard
4. Installing Web Server 4-10
IM 36J06D20-01E 9th Edition
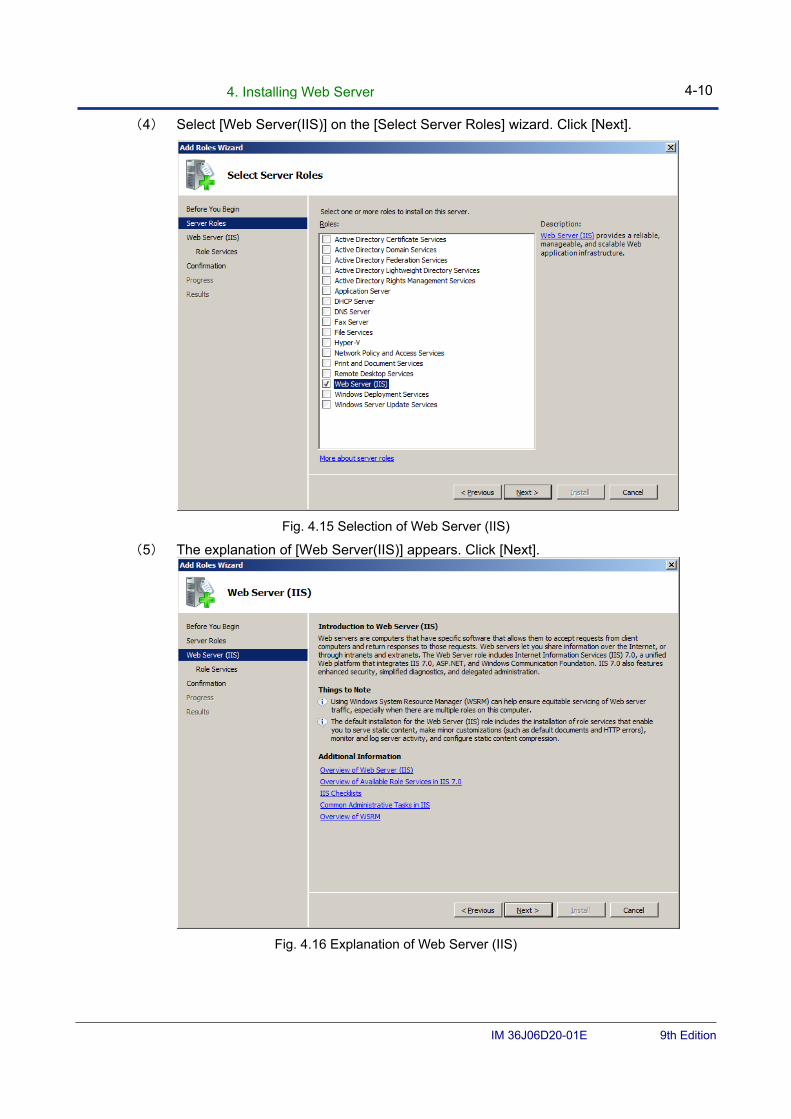
(4) Select [Web Server(IIS)] on the [Select Server Roles] wizard. Click [Next].
Fig. 4.15 Selection of Web Server (IIS)
(5) The explanation of [Web Server(IIS)] appears. Click [Next].
Fig. 4.16 Explanation of Web Server (IIS)
4. Installing Web Server 4-11
IM 36J06D20-01E 9th Edition
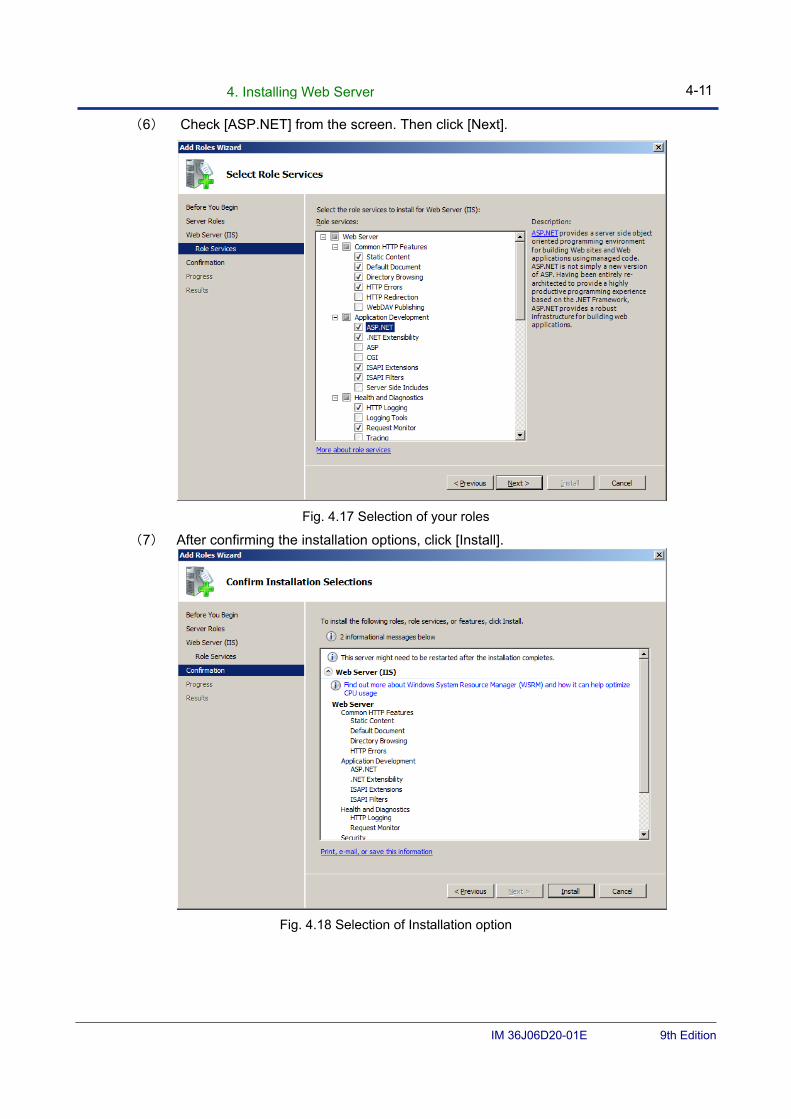
(6) Check [ASP.NET] from the screen. Then click [Next].
Fig. 4.17 Selection of your roles
(7) After confirming the installation options, click [Install].
Fig. 4.18 Selection of Installation option

4. Installing Web Server 4-12
IM 36J06D20-01E 9th Edition
(8) Installation starts. The current status is also displayed on the screen.
Fig. 4.19 Current status of installation
(9) When the installation finishes, [Installation Result] is shown.
Fig. 4.20 Installation results
4. Installing Web Server 4-13
IM 36J06D20-01E 9th Edition
(10) Confirm the [Web Server (IIS)] is added.
Fig. 4.21 Server Manager
4. Installing Web Server 4-14
IM 36J06D20-01E 9th Edition
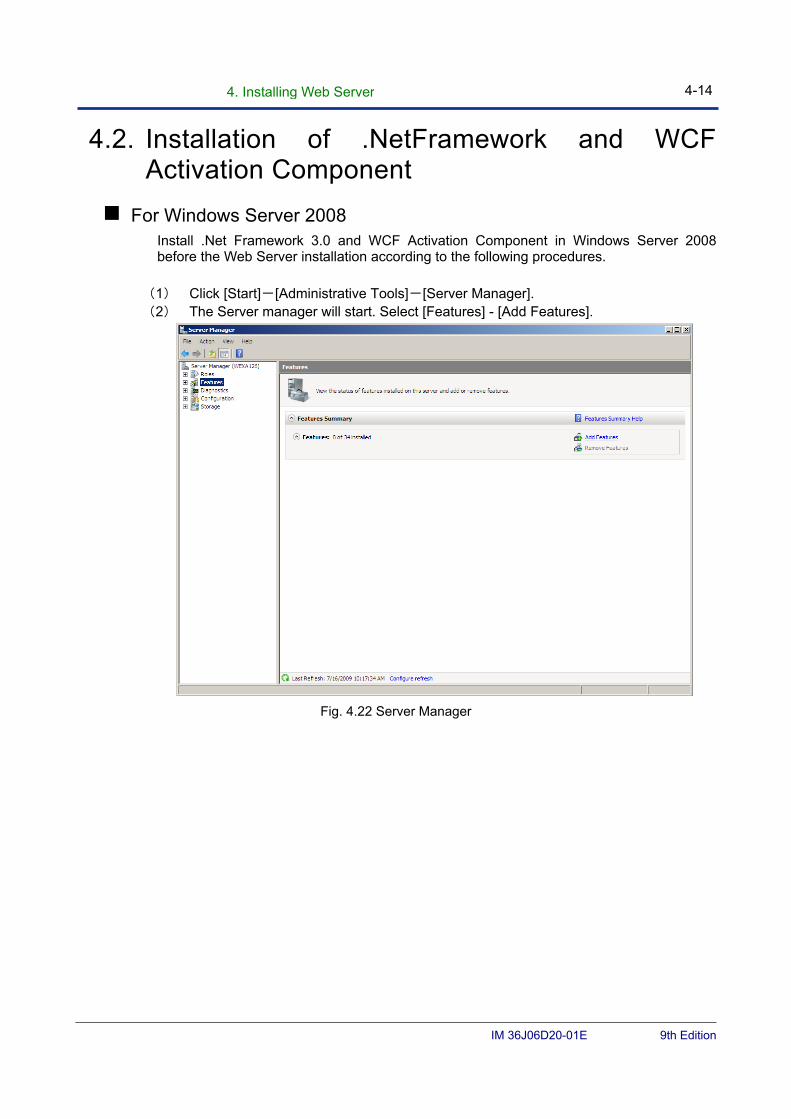
4.2. Installation of .NetFramework and WCF Activation Component
For Windows Server 2008 Install .Net Framework 3.0 and WCF Activation Component in Windows Server 2008 before the Web Server installation according to the following procedures.
(1) Click [Start]-[Administrative Tools]-[Server Manager]. (2) The Server manager will start. Select [Features] - [Add Features].
Fig. 4.22 Server Manager
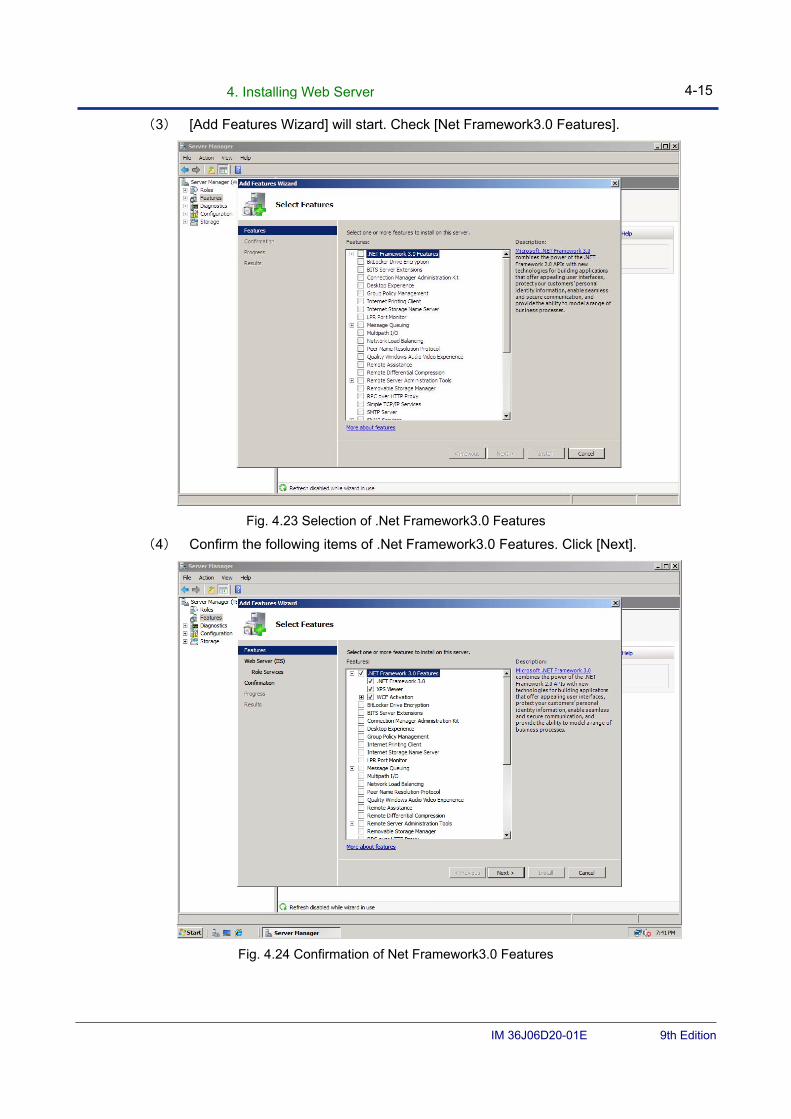
4. Installing Web Server 4-15
IM 36J06D20-01E 9th Edition
(3) [Add Features Wizard] will start. Check [Net Framework3.0 Features].
Fig. 4.23 Selection of .Net Framework3.0 Features
(4) Confirm the following items of .Net Framework3.0 Features. Click [Next].
Fig. 4.24 Confirmation of Net Framework3.0 Features
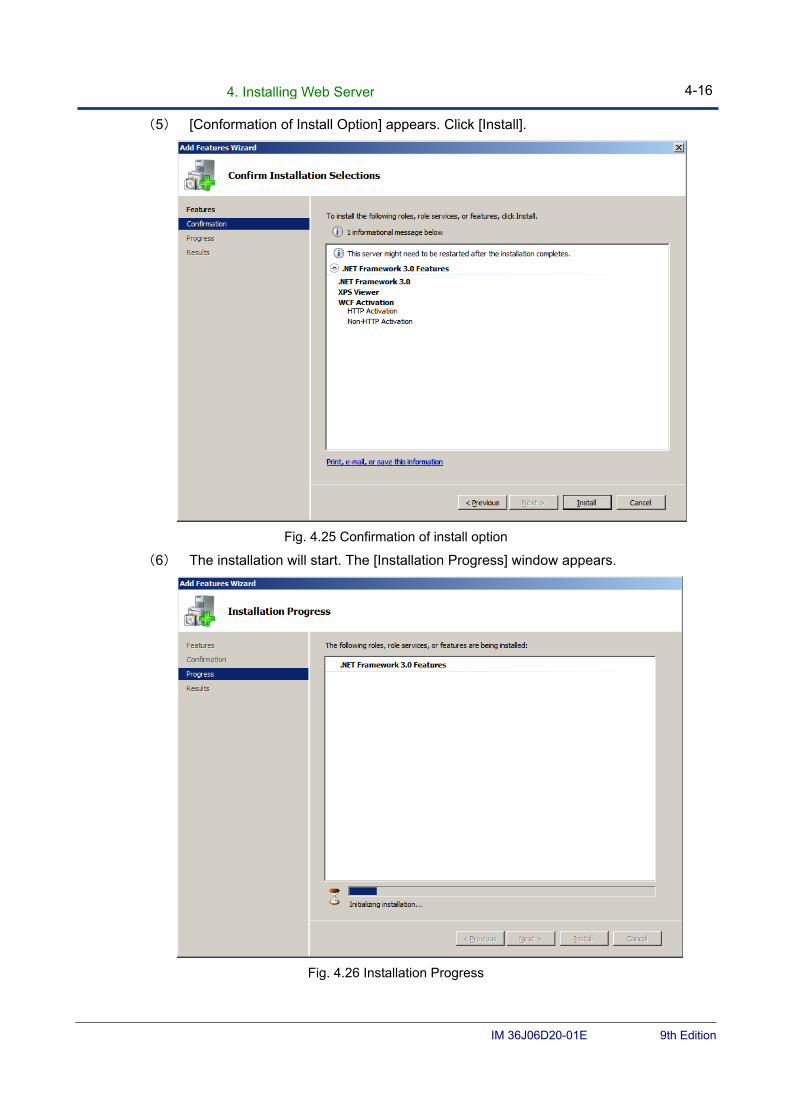
4. Installing Web Server 4-16
IM 36J06D20-01E 9th Edition
(5) [Conformation of Install Option] appears. Click [Install].
Fig. 4.25 Confirmation of install option
(6) The installation will start. The [Installation Progress] window appears.
Fig. 4.26 Installation Progress
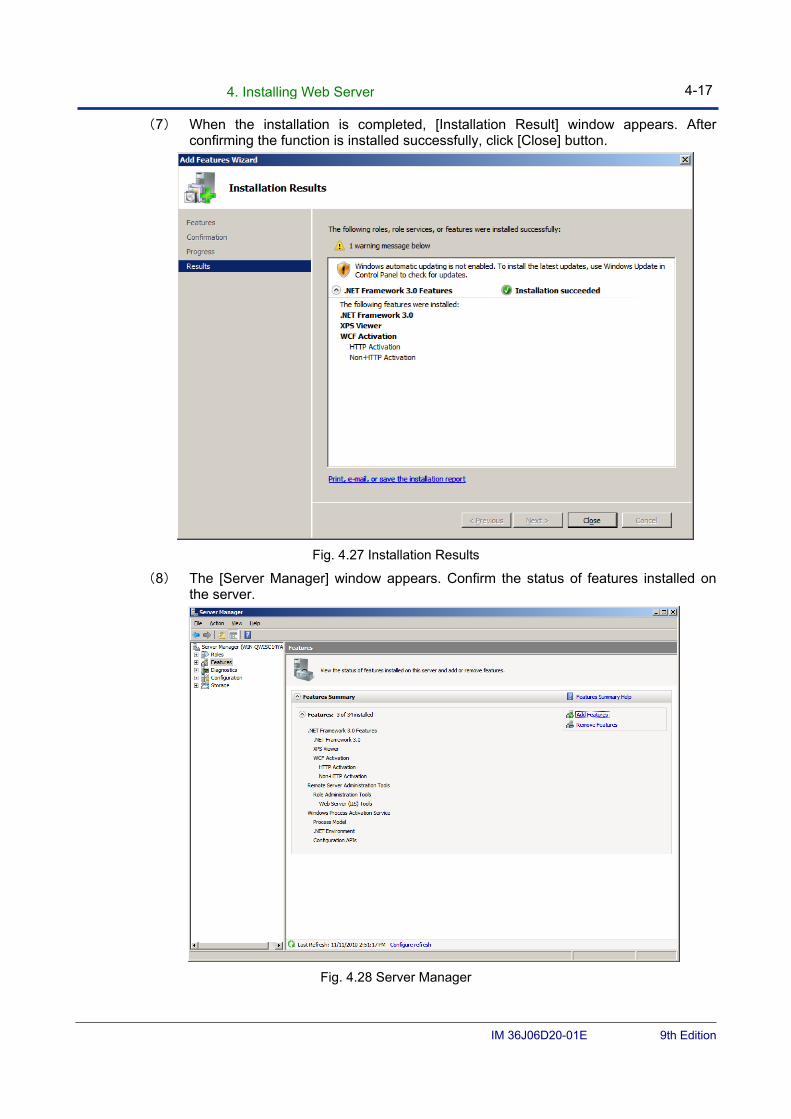
4. Installing Web Server 4-17
IM 36J06D20-01E 9th Edition
(7) When the installation is completed, [Installation Result] window appears. After confirming the function is installed successfully, click [Close] button.
Fig. 4.27 Installation Results
(8) The [Server Manager] window appears. Confirm the status of features installed on the server.
Fig. 4.28 Server Manager
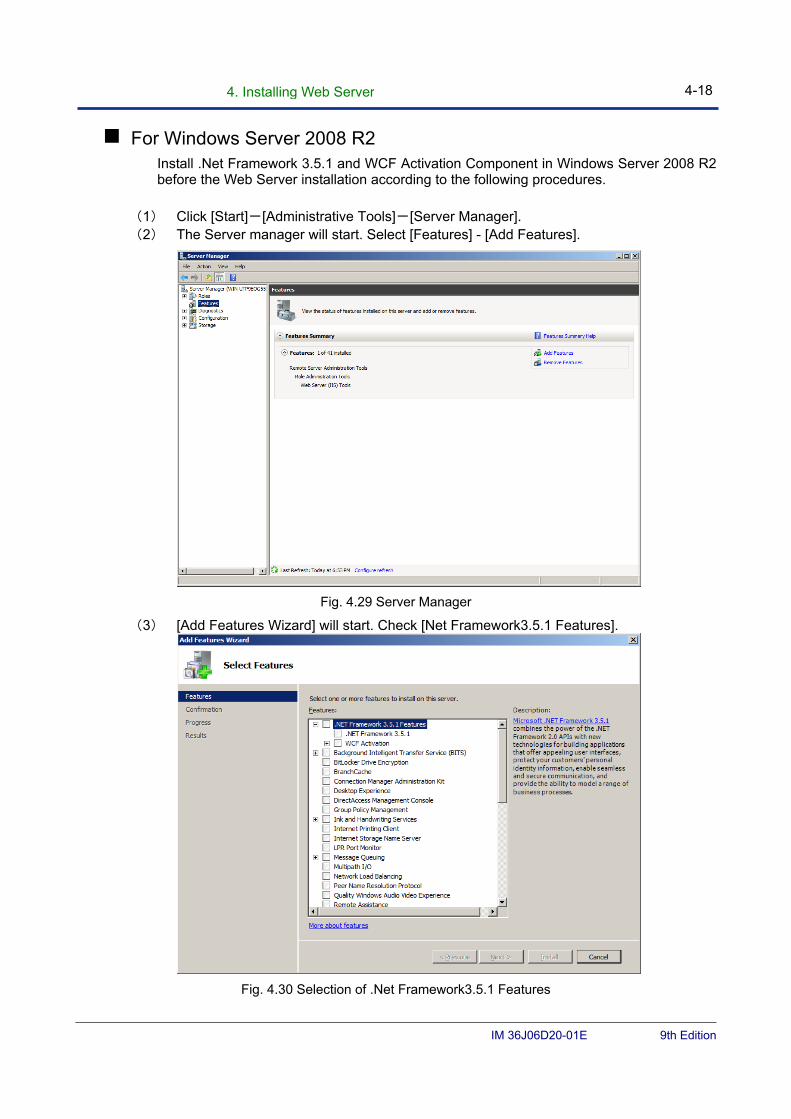
4. Installing Web Server 4-18
IM 36J06D20-01E 9th Edition
For Windows Server 2008 R2 Install .Net Framework 3.5.1 and WCF Activation Component in Windows Server 2008 R2 before the Web Server installation according to the following procedures.
(1) Click [Start]-[Administrative Tools]-[Server Manager]. (2) The Server manager will start. Select [Features] - [Add Features].
Fig. 4.29 Server Manager
(3) [Add Features Wizard] will start. Check [Net Framework3.5.1 Features].
Fig. 4.30 Selection of .Net Framework3.5.1 Features
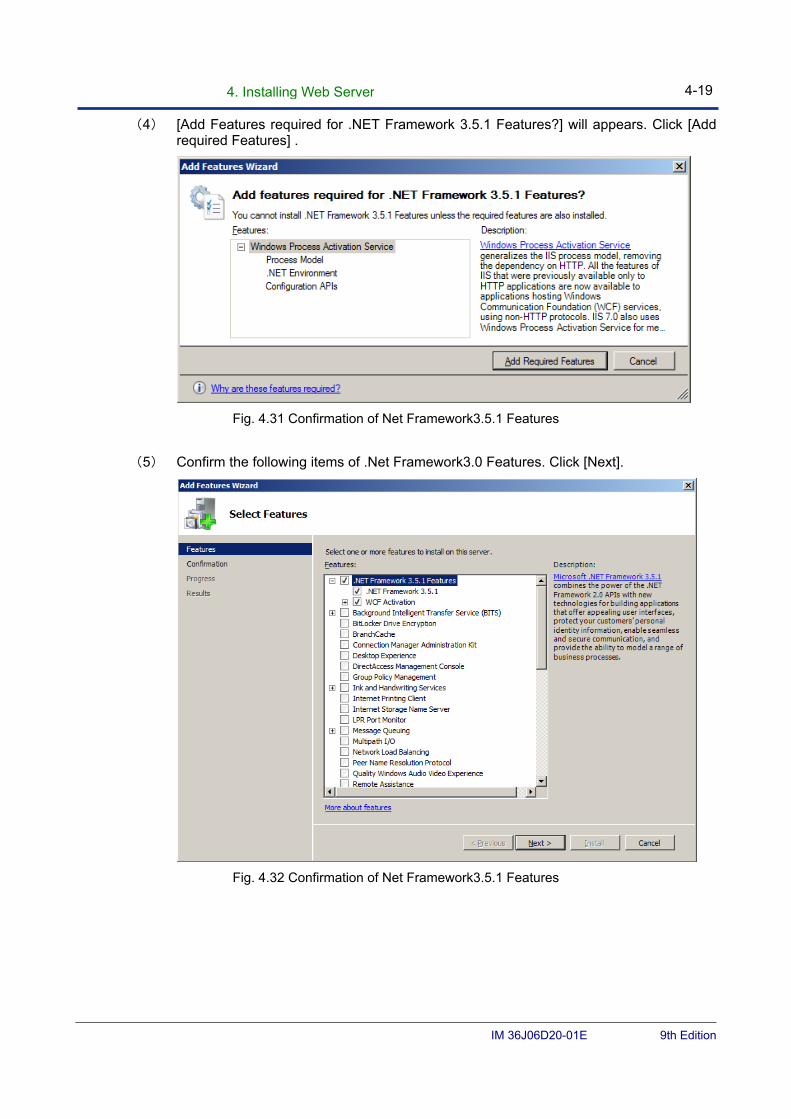
4. Installing Web Server 4-19
IM 36J06D20-01E 9th Edition
(4) [Add Features required for .NET Framework 3.5.1 Features?] will appears. Click [Add required Features] .
Fig. 4.31 Confirmation of Net Framework3.5.1 Features
(5) Confirm the following items of .Net Framework3.0 Features. Click [Next].
Fig. 4.32 Confirmation of Net Framework3.5.1 Features
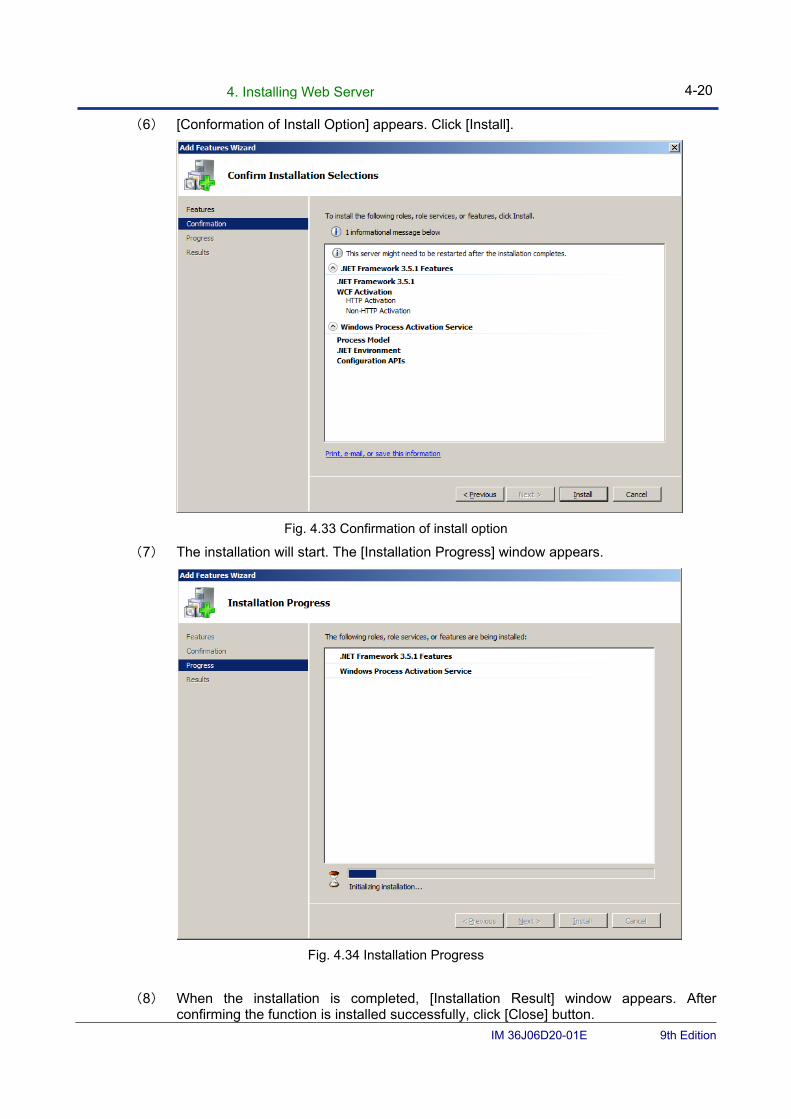
4. Installing Web Server 4-20
IM 36J06D20-01E 9th Edition
(6) [Conformation of Install Option] appears. Click [Install].
Fig. 4.33 Confirmation of install option
(7) The installation will start. The [Installation Progress] window appears.
Fig. 4.34 Installation Progress
(8) When the installation is completed, [Installation Result] window appears. After
confirming the function is installed successfully, click [Close] button.
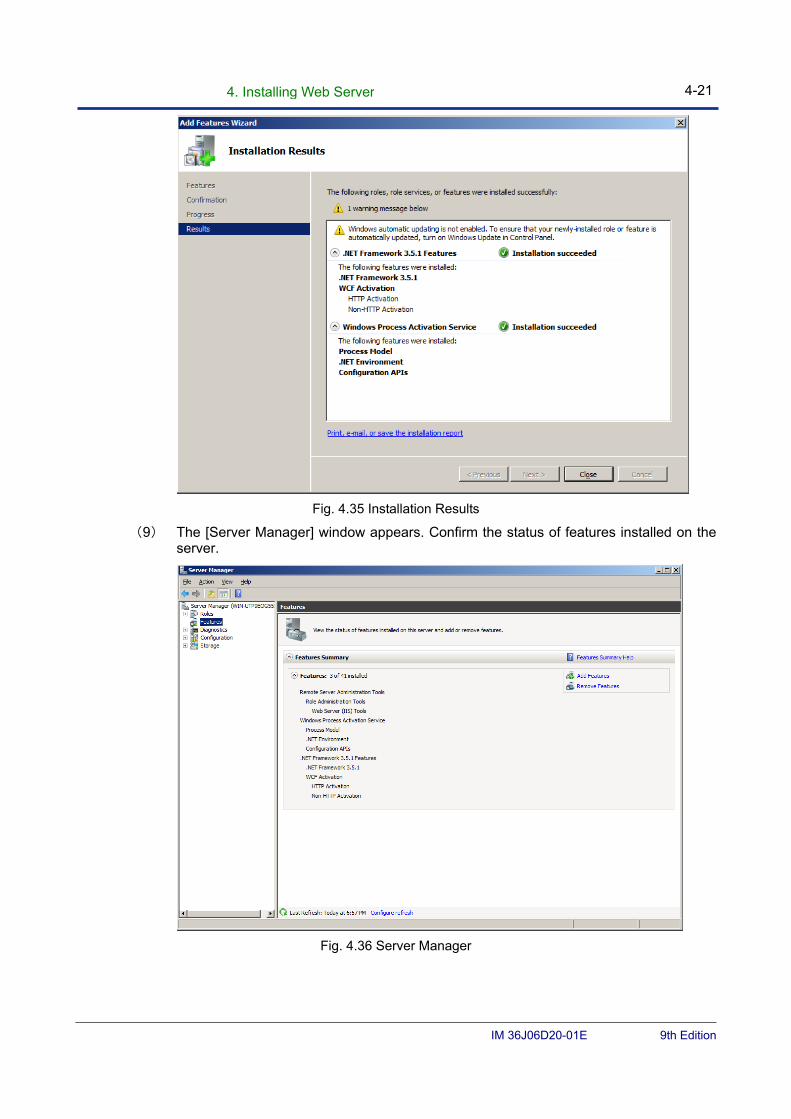
4. Installing Web Server 4-21
IM 36J06D20-01E 9th Edition
Fig. 4.35 Installation Results
(9) The [Server Manager] window appears. Confirm the status of features installed on the server.
Fig. 4.36 Server Manager
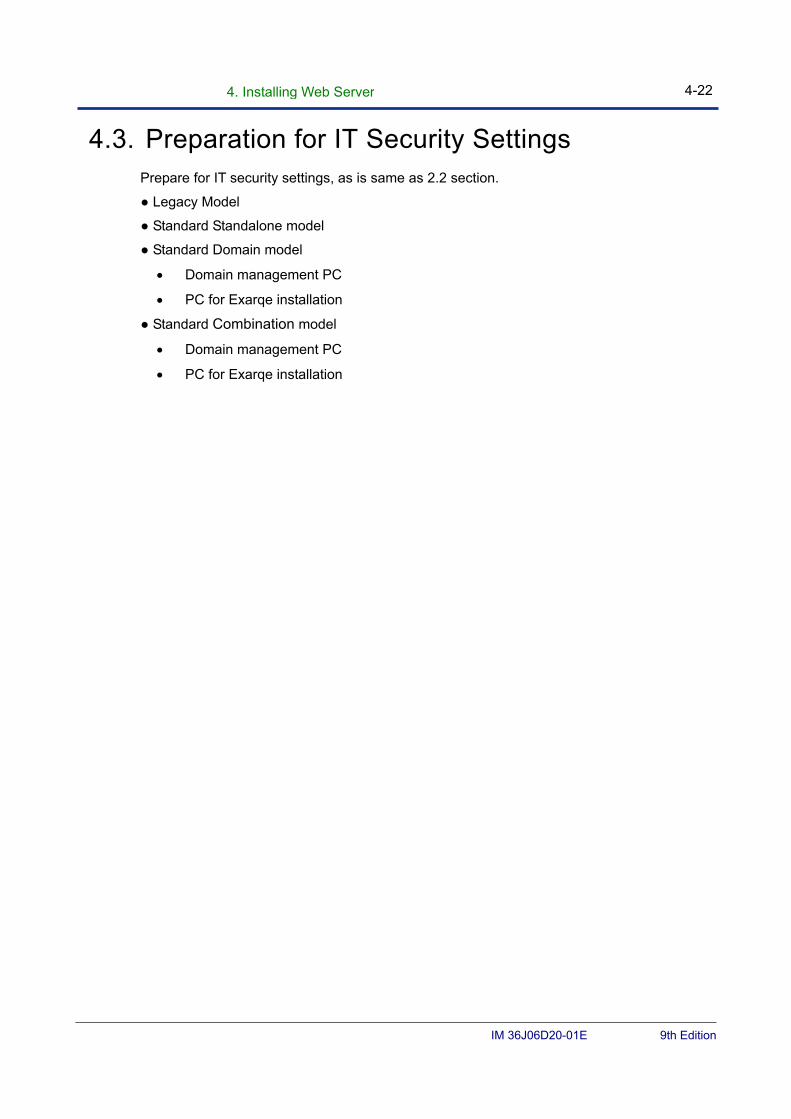
4. Installing Web Server 4-22
IM 36J06D20-01E 9th Edition
4.3. Preparation for IT Security Settings Prepare for IT security settings, as is same as 2.2 section.
● Legacy Model
● Standard Standalone model
● Standard Domain model
Domain management PC
PC for Exarqe installation
● Standard Combination model
Domain management PC
PC for Exarqe installation
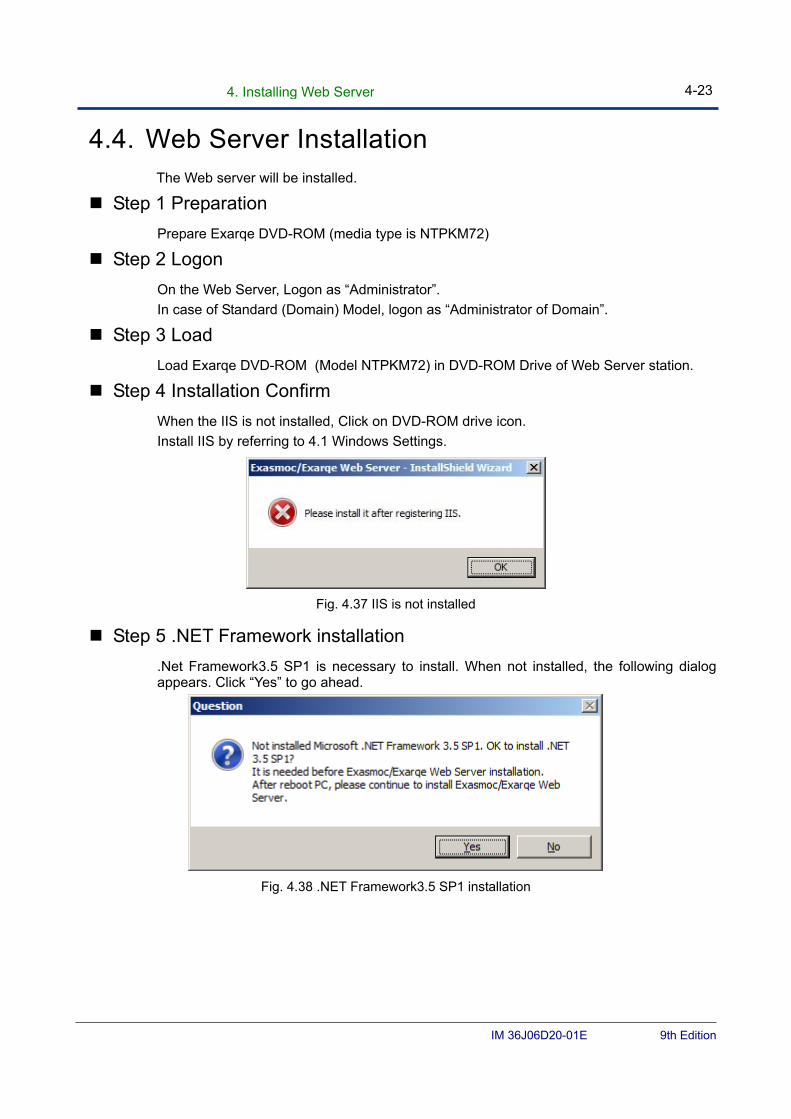
4. Installing Web Server 4-23
IM 36J06D20-01E 9th Edition
4.4. Web Server Installation The Web server will be installed.
Step 1 Preparation
Prepare Exarqe DVD-ROM (media type is NTPKM72)
Step 2 Logon
On the Web Server, Logon as “Administrator”.
In case of Standard (Domain) Model, logon as “Administrator of Domain”.
Step 3 Load
Load Exarqe DVD-ROM (Model NTPKM72) in DVD-ROM Drive of Web Server station.
Step 4 Installation Confirm
When the IIS is not installed, Click on DVD-ROM drive icon.
Install IIS by referring to 4.1 Windows Settings.
Fig. 4.37 IIS is not installed
Step 5 .NET Framework installation
.Net Framework3.5 SP1 is necessary to install. When not installed, the following dialog appears. Click “Yes” to go ahead.
Fig. 4.38 .NET Framework3.5 SP1 installation
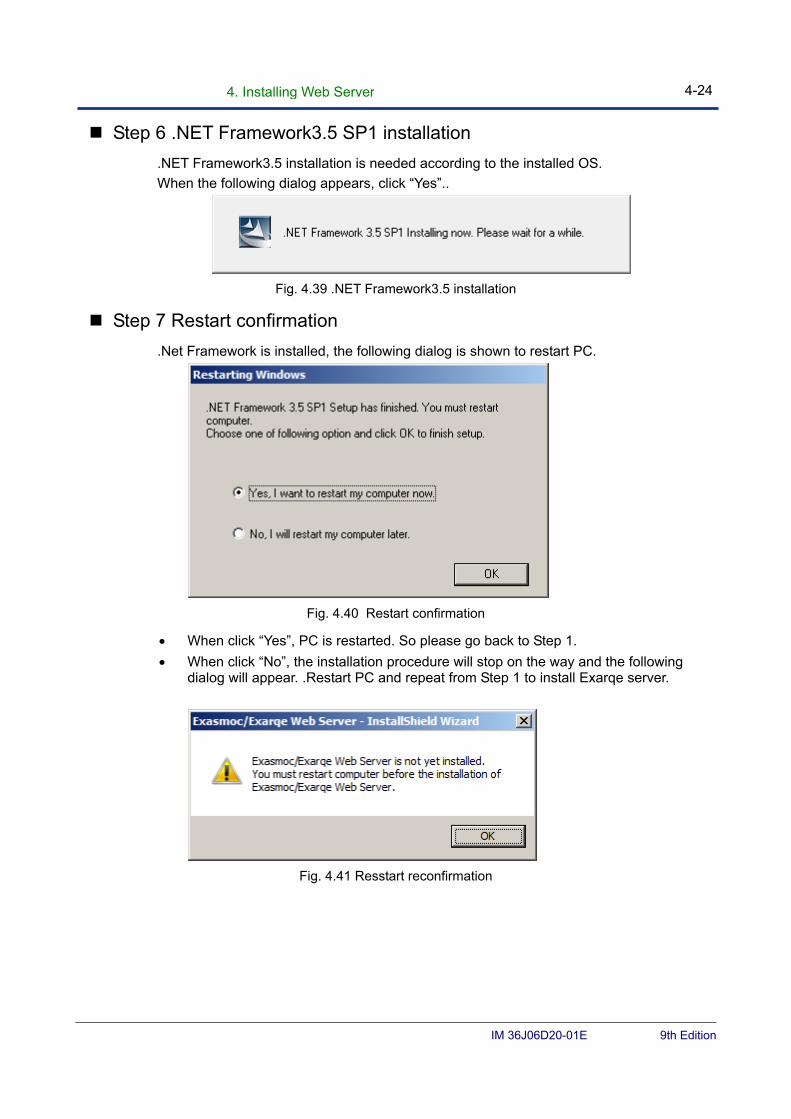
4. Installing Web Server 4-24
IM 36J06D20-01E 9th Edition
Step 6 .NET Framework3.5 SP1 installation
.NET Framework3.5 installation is needed according to the installed OS.
When the following dialog appears, click “Yes”..
Fig. 4.39 .NET Framework3.5 installation
Step 7 Restart confirmation
.Net Framework is installed, the following dialog is shown to restart PC.
Fig. 4.40 Restart confirmation
When click “Yes”, PC is restarted. So please go back to Step 1.
When click “No”, the installation procedure will stop on the way and the following dialog will appear. .Restart PC and repeat from Step 1 to install Exarqe server.
Fig. 4.41 Resstart reconfirmation
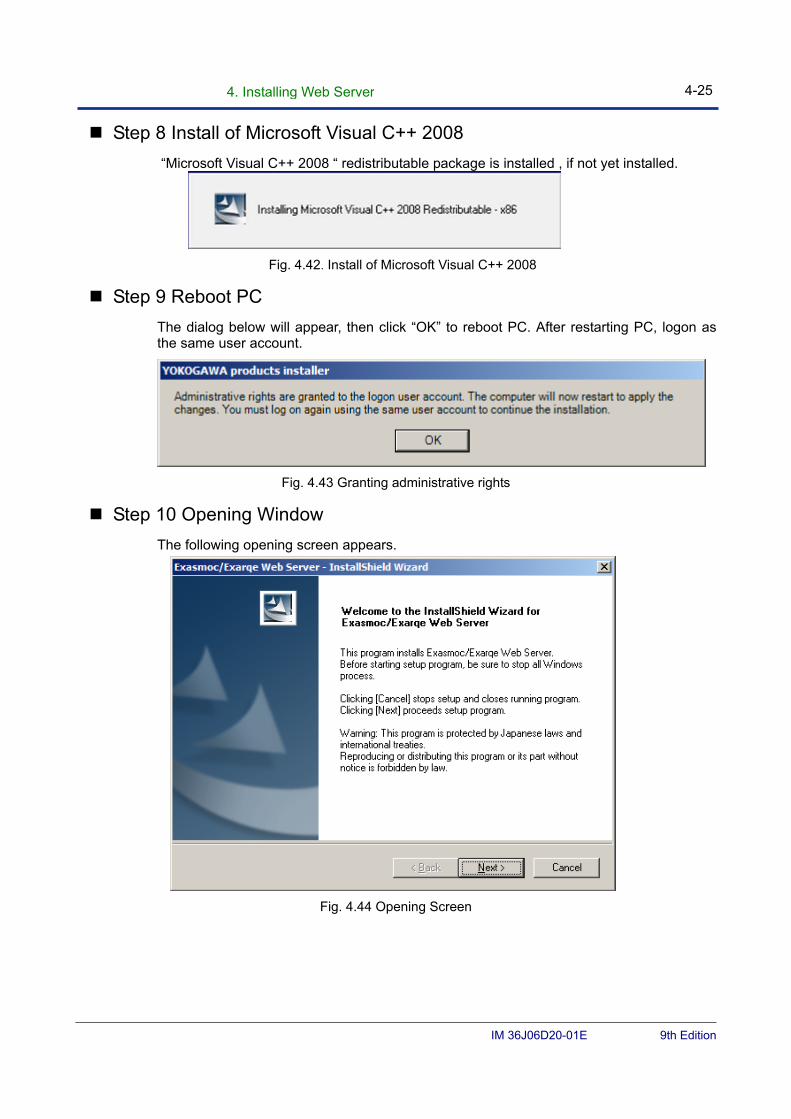
4. Installing Web Server 4-25
IM 36J06D20-01E 9th Edition
Step 8 Install of Microsoft Visual C++ 2008
“Microsoft Visual C++ 2008 “ redistributable package is installed , if not yet installed.
Fig. 4.42. Install of Microsoft Visual C++ 2008
Step 9 Reboot PC
The dialog below will appear, then click “OK” to reboot PC. After restarting PC, logon as the same user account.
Fig. 4.43 Granting administrative rights
Step 10 Opening Window
The following opening screen appears.
Fig. 4.44 Opening Screen
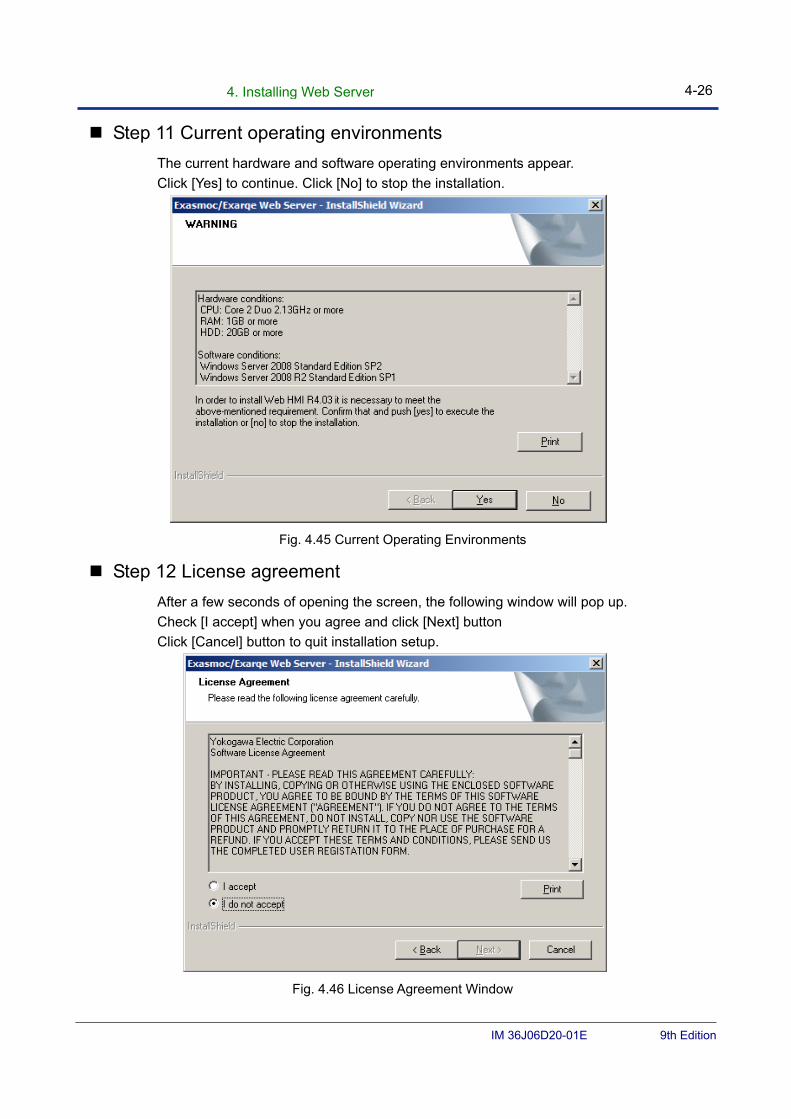
4. Installing Web Server 4-26
IM 36J06D20-01E 9th Edition
Step 11 Current operating environments
The current hardware and software operating environments appear.
Click [Yes] to continue. Click [No] to stop the installation.
Fig. 4.45 Current Operating Environments
Step 12 License agreement
After a few seconds of opening the screen, the following window will pop up.
Check [I accept] when you agree and click [Next] button
Click [Cancel] button to quit installation setup.
Fig. 4.46 License Agreement Window
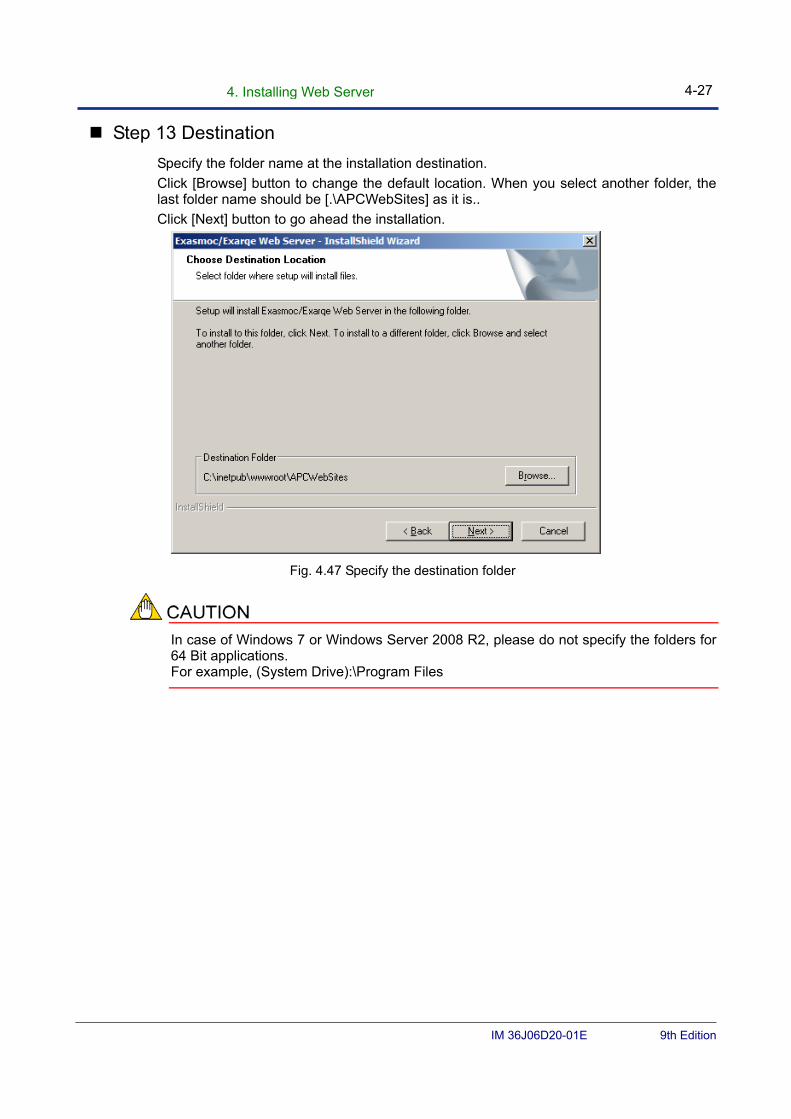
4. Installing Web Server 4-27
IM 36J06D20-01E 9th Edition
Step 13 Destination
Specify the folder name at the installation destination.
Click [Browse] button to change the default location. When you select another folder, the last folder name should be [.\APCWebSites] as it is..
Click [Next] button to go ahead the installation.
Fig. 4.47 Specify the destination folder
In case of Windows 7 or Windows Server 2008 R2, please do not specify the folders for 64 Bit applications. For example, (System Drive):\Program Files
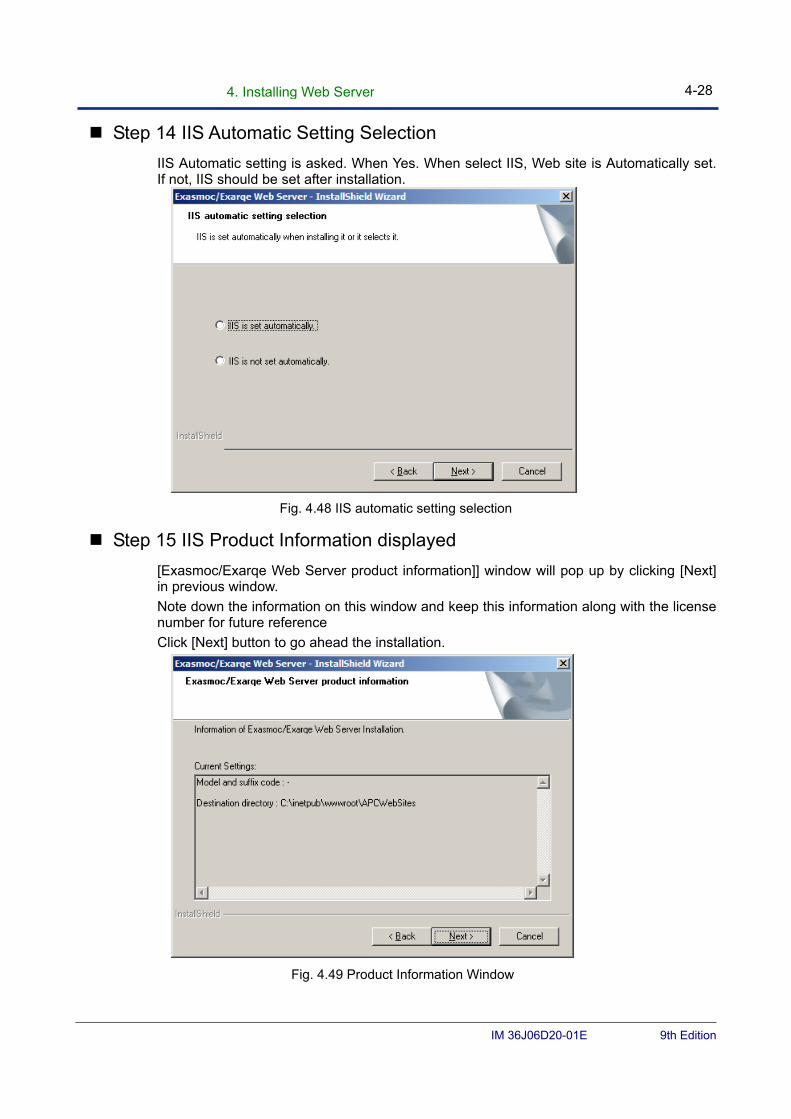
4. Installing Web Server 4-28
IM 36J06D20-01E 9th Edition
Step 14 IIS Automatic Setting Selection
IIS Automatic setting is asked. When Yes. When select IIS, Web site is Automatically set. If not, IIS should be set after installation.
Fig. 4.48 IIS automatic setting selection
Step 15 IIS Product Information displayed
[Exasmoc/Exarqe Web Server product information]] window will pop up by clicking [Next] in previous window.
Note down the information on this window and keep this information along with the license number for future reference
Click [Next] button to go ahead the installation.
Fig. 4.49 Product Information Window
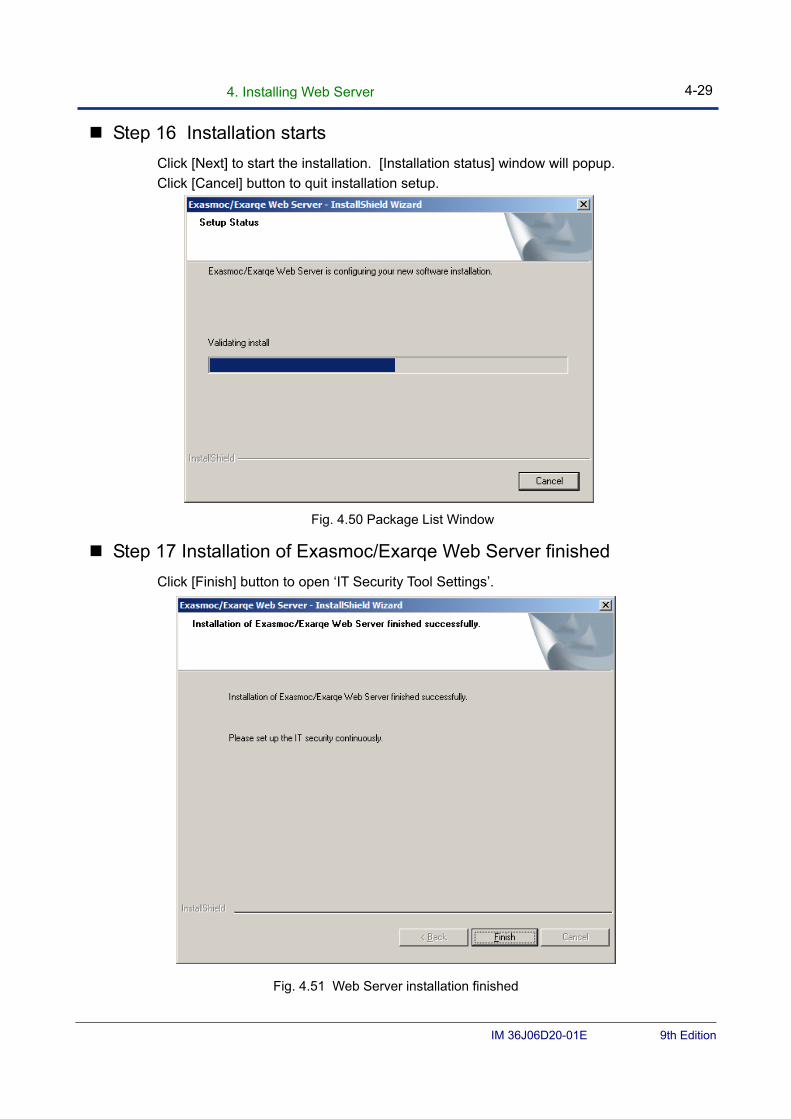
4. Installing Web Server 4-29
IM 36J06D20-01E 9th Edition
Step 16 Installation starts
Click [Next] to start the installation. [Installation status] window will popup.
Click [Cancel] button to quit installation setup.
Fig. 4.50 Package List Window
Step 17 Installation of Exasmoc/Exarqe Web Server finished
Click [Finish] button to open ‘IT Security Tool Settings’.
Fig. 4.51 Web Server installation finished
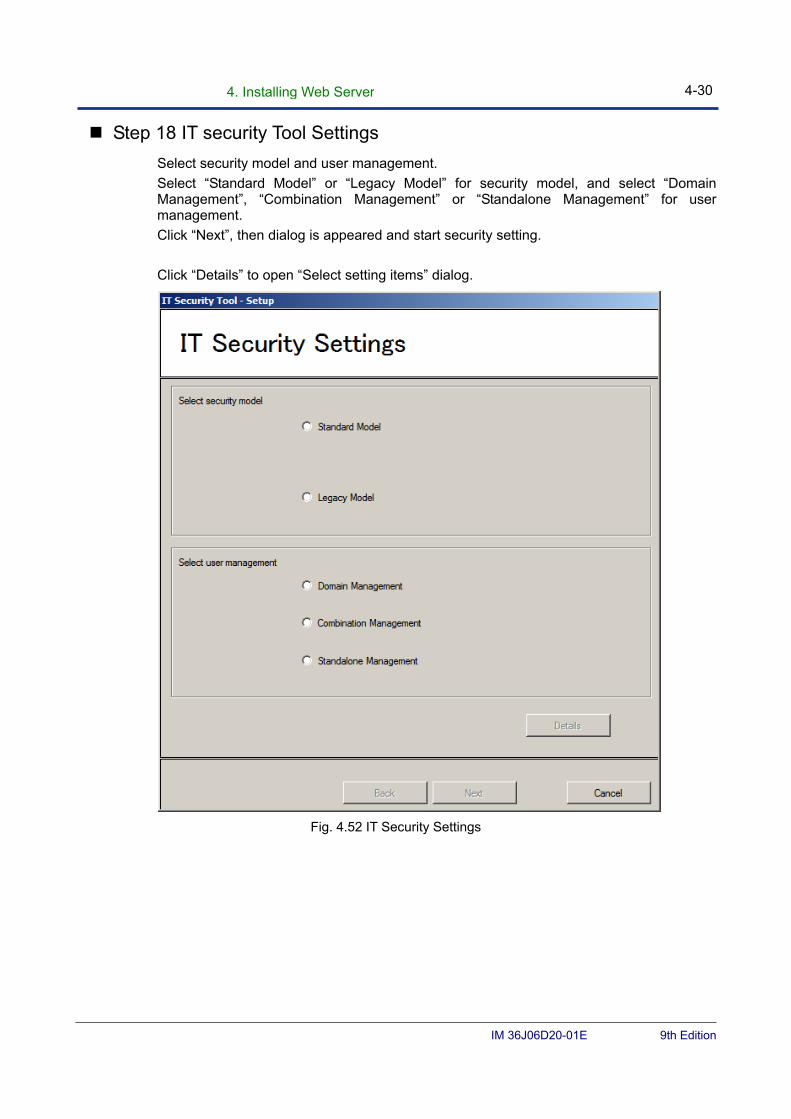
4. Installing Web Server 4-30
IM 36J06D20-01E 9th Edition
Step 18 IT security Tool Settings
Select security model and user management.
Select “Standard Model” or “Legacy Model” for security model, and select “Domain Management”, “Combination Management” or “Standalone Management” for user management.
Click “Next”, then dialog is appeared and start security setting.
Click “Details” to open “Select setting items” dialog.
Fig. 4.52 IT Security Settings
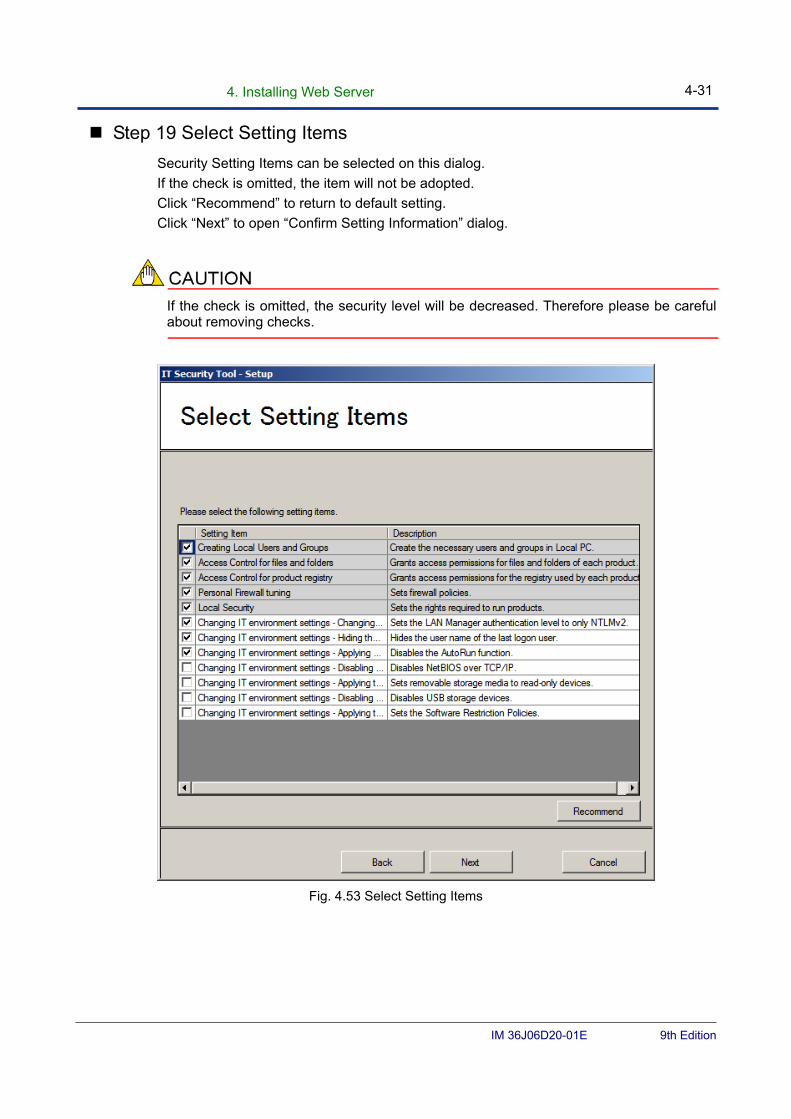
4. Installing Web Server 4-31
IM 36J06D20-01E 9th Edition
Step 19 Select Setting Items
Security Setting Items can be selected on this dialog.
If the check is omitted, the item will not be adopted.
Click “Recommend” to return to default setting.
Click “Next” to open “Confirm Setting Information” dialog.
If the check is omitted, the security level will be decreased. Therefore please be careful about removing checks.
Fig. 4.53 Select Setting Items
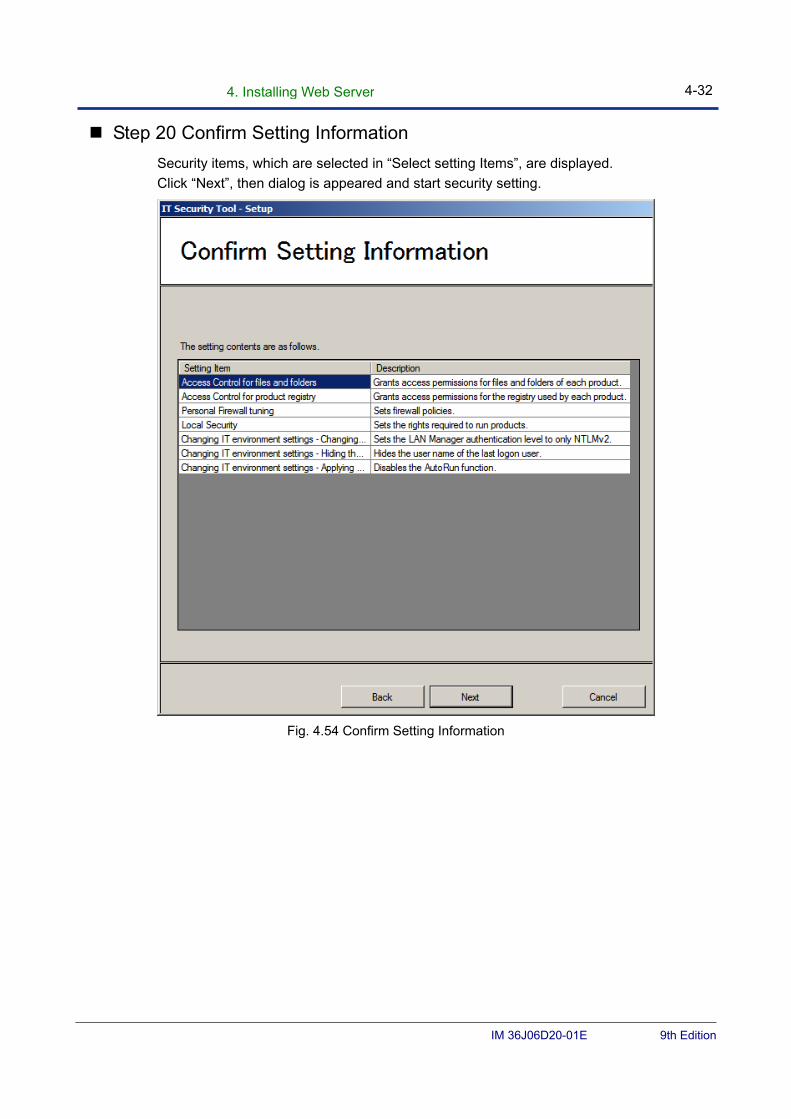
4. Installing Web Server 4-32
IM 36J06D20-01E 9th Edition
Step 20 Confirm Setting Information
Security items, which are selected in “Select setting Items”, are displayed.
Click “Next”, then dialog is appeared and start security setting.
Fig. 4.54 Confirm Setting Information
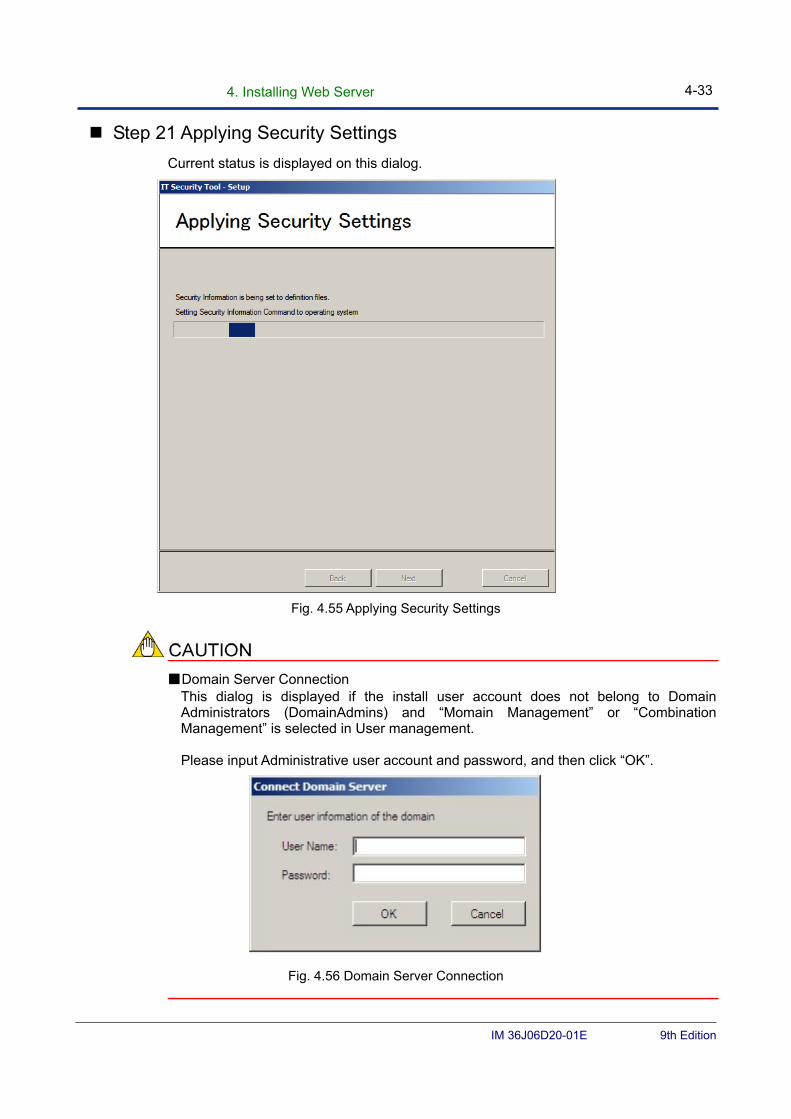
4. Installing Web Server 4-33
IM 36J06D20-01E 9th Edition
Step 21 Applying Security Settings
Current status is displayed on this dialog.
Fig. 4.55 Applying Security Settings
■Domain Server Connection This dialog is displayed if the install user account does not belong to Domain Administrators (DomainAdmins) and “Momain Management” or “Combination Management” is selected in User management.
Please input Administrative user account and password, and then click “OK”.
Fig. 4.56 Domain Server Connection
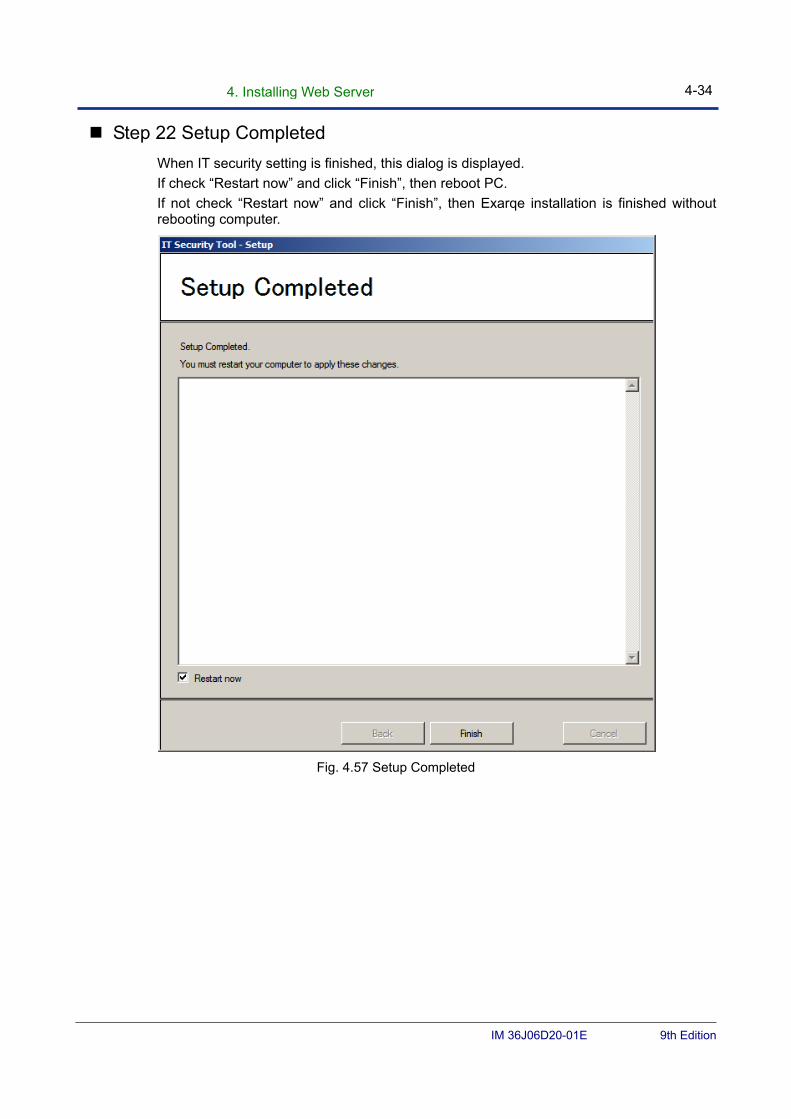
4. Installing Web Server 4-34
IM 36J06D20-01E 9th Edition
Step 22 Setup Completed
When IT security setting is finished, this dialog is displayed.
If check “Restart now” and click “Finish”, then reboot PC.
If not check “Restart now” and click “Finish”, then Exarqe installation is finished without rebooting computer.
Fig. 4.57 Setup Completed
4. Installing Web Server 4-35
IM 36J06D20-01E 9th Edition
4.5. Settings after Installation
4.5.1 IT Security Settings
To use Exarqe, each user should set its own account and register it to the pre-defined groups. For more detail refer to Chapter 5.
The procedures of account creation and registration to groups in each security setting are shown below:
■ Legacy model
Registration to groups is unnecessary.
■ Standard Standalone model
(1) Logon the system as Administrative group user.
(2) Register user accounts who access Exarqe operation data to ‘APC_OPERATOR’ group.
(3) Register user accounts who access Exarqe engineering data to ‘APC_ENGINEER’ group.
(4) Register user accounts who access Exarqe maintenance data to ‘APC_MAINTENANCE’ group.
■ Standard Domain model
Domain management PC
(1) Logon the system as Administrative group user.
(2) Register user accounts who access Exarqe operation data to ‘APC_OPERATOR’ group.
(3) Register user accounts who access Exarqe engineering data to ‘APC_ENGINEER’ group.
(4) Register user accounts who access Exarqe maintenance data to ‘APC_MAINTENANCE’ group.
PC for Exarqe installation
(1) Logon the system as Administrative group user.
(2) Register user accounts who access Exarqe maintenance data to ‘APC_MAINTENANCE_LCL’ group.
4. Installing Web Server 4-36
IM 36J06D20-01E 9th Edition
■ Standard (Combination) model
Domain management PC
(1) The same setup as “Standard(Domain)Model”
PC for Exarqe installation
(1) Logon the system as Administrative group user.
(2) Register user accounts who access Exarqe operation data to ‘APC_OPERATOR_LCL’ group.
(3) Register user accounts who access Exarqe engineering data to ‘APC_ENGINEER_LCL’ group.
(4) Register user accounts who access Exarqe maintenance data to ‘APC_MAINTENANCE_LCL’ group.
When the APC Builder function such as OPC Server setting or APC controller registration described on the Builder Instruction manual, is started before IT security is set, the program might not be installed on the expected folder.
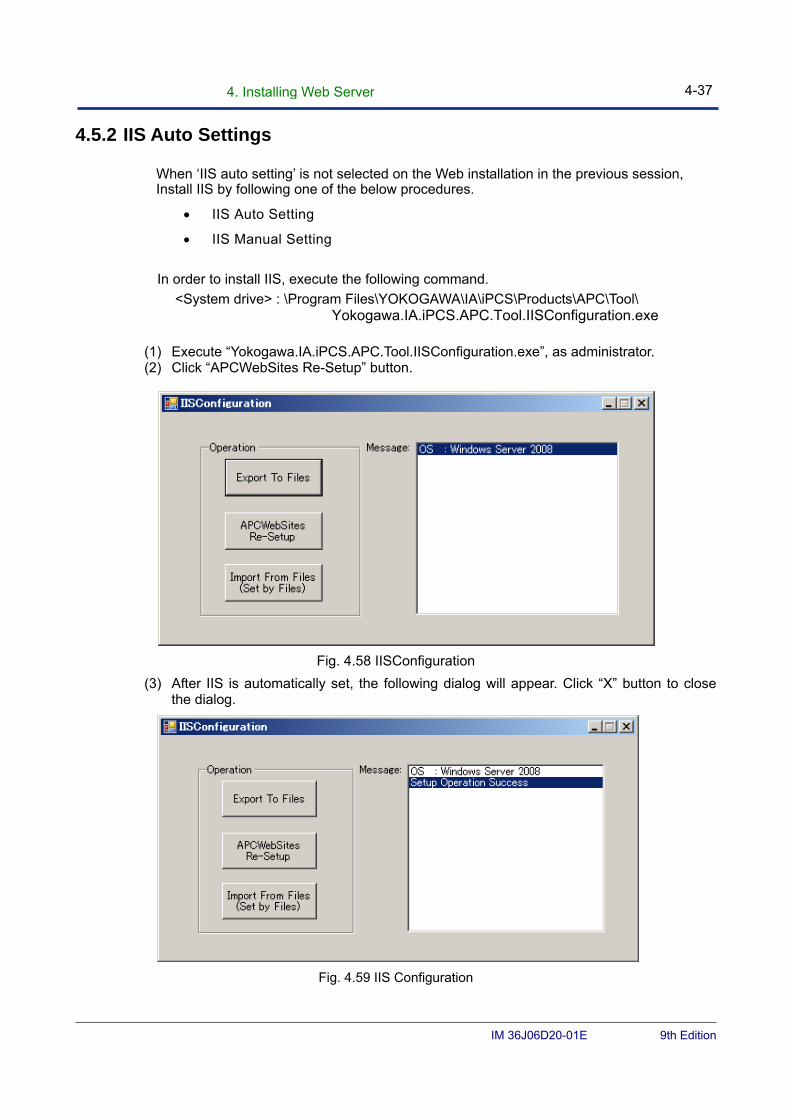
4. Installing Web Server 4-37
IM 36J06D20-01E 9th Edition
4.5.2 IIS Auto Settings
When ‘IIS auto setting’ is not selected on the Web installation in the previous session, Install IIS by following one of the below procedures.
IIS Auto Setting
IIS Manual Setting
In order to install IIS, execute the following command.
<System drive> : \Program Files\YOKOGAWA\IA\iPCS\Products\APC\Tool\ Yokogawa.IA.iPCS.APC.Tool.IISConfiguration.exe
(1) Execute “Yokogawa.IA.iPCS.APC.Tool.IISConfiguration.exe”, as administrator. (2) Click “APCWebSites Re-Setup” button.
Fig. 4.58 IISConfiguration
(3) After IIS is automatically set, the following dialog will appear. Click “X” button to close the dialog.
Fig. 4.59 IIS Configuration
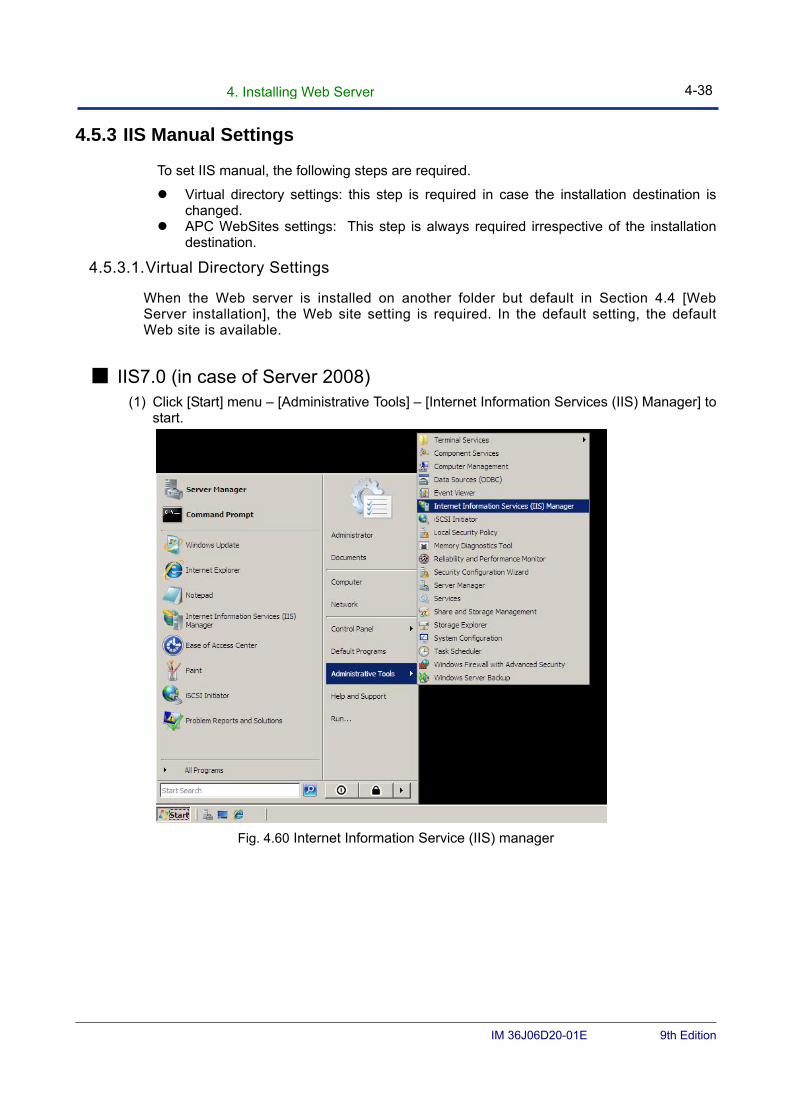
4. Installing Web Server 4-38
IM 36J06D20-01E 9th Edition
4.5.3 IIS Manual Settings
To set IIS manual, the following steps are required.
Virtual directory settings: this step is required in case the installation destination is changed.
APC WebSites settings: This step is always required irrespective of the installation destination.
4.5.3.1. Virtual Directory Settings
When the Web server is installed on another folder but default in Section 4.4 [Web Server installation], the Web site setting is required. In the default setting, the default Web site is available.
■ IIS7.0 (in case of Server 2008) (1) Click [Start] menu – [Administrative Tools] – [Internet Information Services (IIS) Manager] to
start.
Fig. 4.60 Internet Information Service (IIS) manager
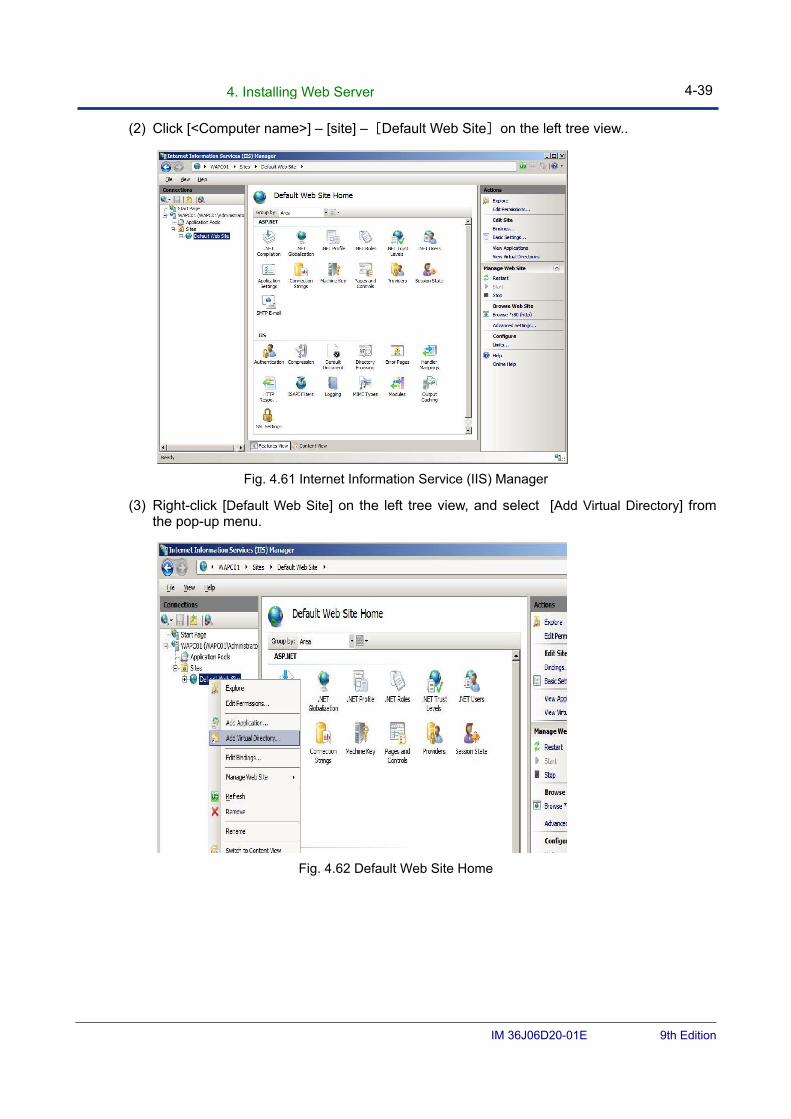
4. Installing Web Server 4-39
IM 36J06D20-01E 9th Edition
(2) Click [<Computer name>] – [site] –[Default Web Site]on the left tree view..
Fig. 4.61 Internet Information Service (IIS) Manager
(3) Right-click [Default Web Site] on the left tree view, and select [Add Virtual Directory] from the pop-up menu.
Fig. 4.62 Default Web Site Home
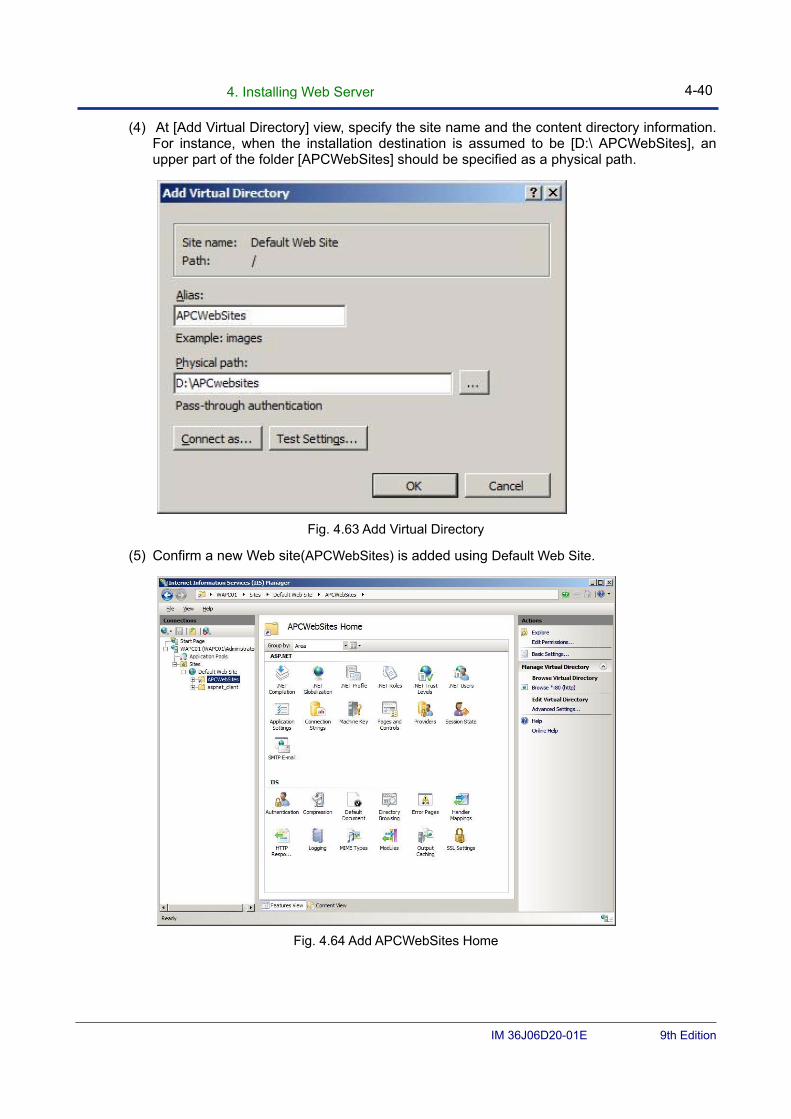
4. Installing Web Server 4-40
IM 36J06D20-01E 9th Edition
(4) At [Add Virtual Directory] view, specify the site name and the content directory information. For instance, when the installation destination is assumed to be [D:\ APCWebSites], an upper part of the folder [APCWebSites] should be specified as a physical path.
Fig. 4.63 Add Virtual Directory
(5) Confirm a new Web site(APCWebSites) is added using Default Web Site.
Fig. 4.64 Add APCWebSites Home

4. Installing Web Server 4-41
IM 36J06D20-01E 9th Edition
■ IIS7.5 (in case of Server 2008 R2) (1) Click [Start] menu – [Administrative Tools] – [Internet Information Services (IIS) Manager]
to start.
Fig. 4.65 Internet Information Service (IIS) manager
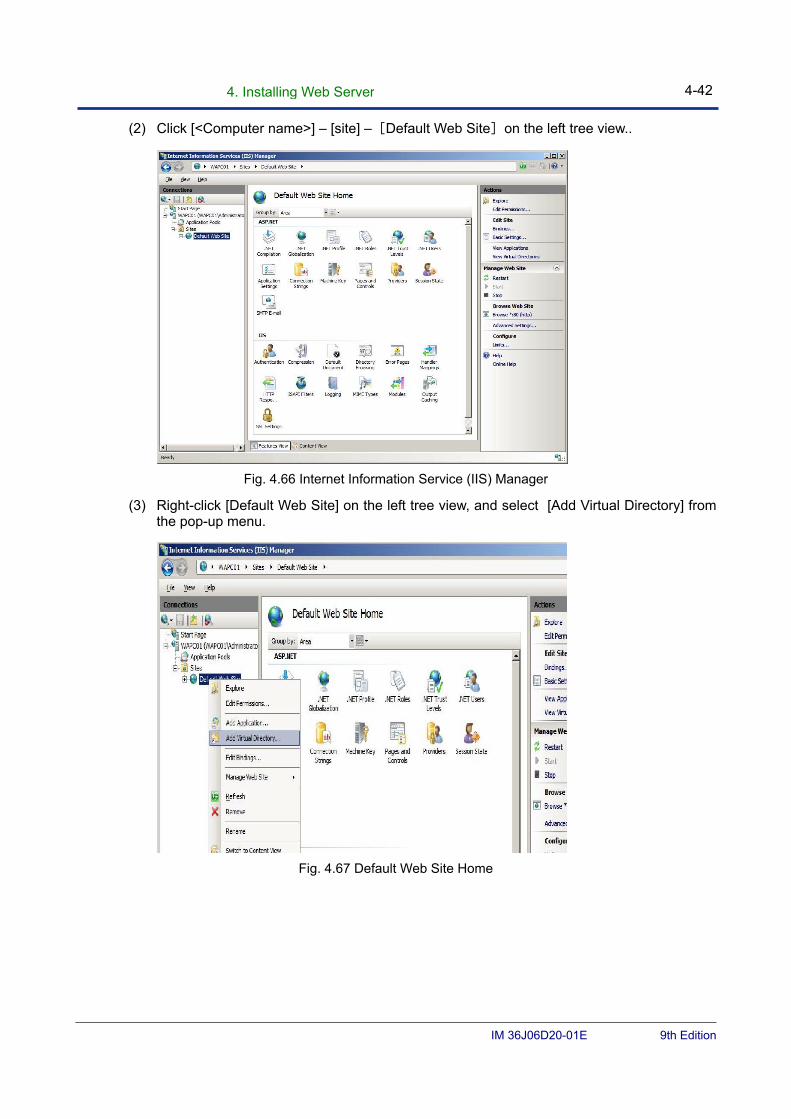
4. Installing Web Server 4-42
IM 36J06D20-01E 9th Edition
(2) Click [<Computer name>] – [site] –[Default Web Site]on the left tree view..
Fig. 4.66 Internet Information Service (IIS) Manager
(3) Right-click [Default Web Site] on the left tree view, and select [Add Virtual Directory] from the pop-up menu.
Fig. 4.67 Default Web Site Home
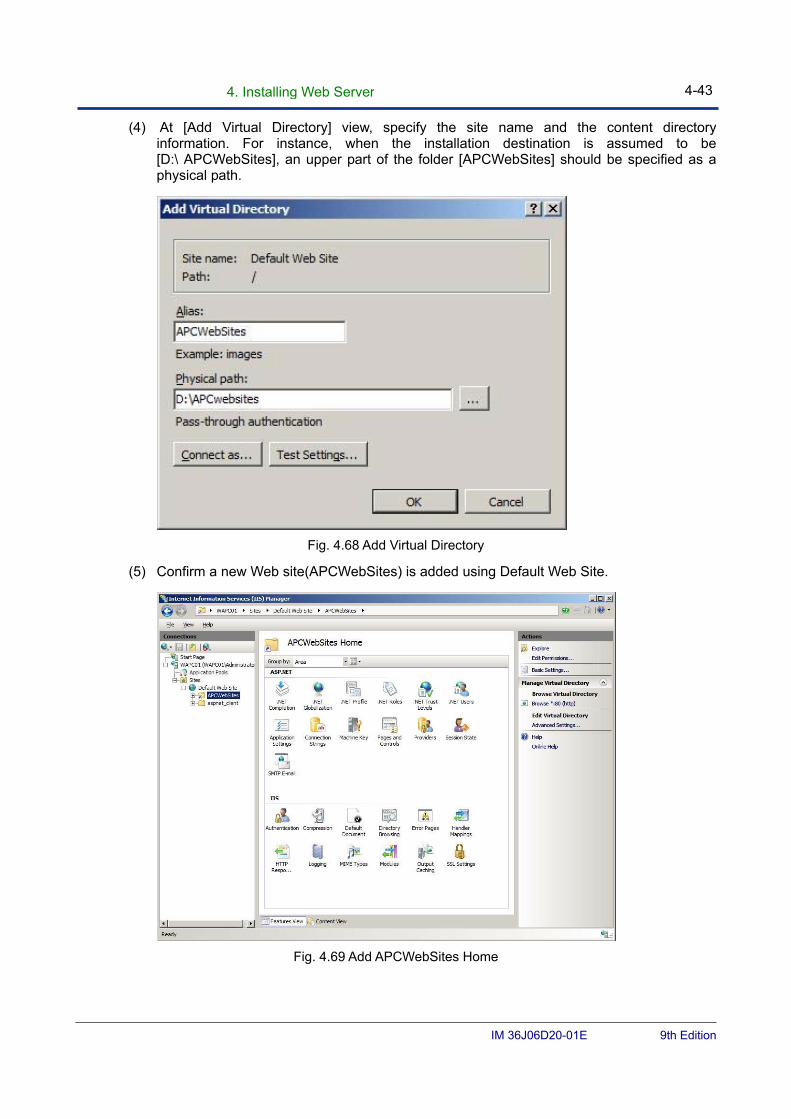
4. Installing Web Server 4-43
IM 36J06D20-01E 9th Edition
(4) At [Add Virtual Directory] view, specify the site name and the content directory information. For instance, when the installation destination is assumed to be [D:\ APCWebSites], an upper part of the folder [APCWebSites] should be specified as a physical path.
Fig. 4.68 Add Virtual Directory
(5) Confirm a new Web site(APCWebSites) is added using Default Web Site.
Fig. 4.69 Add APCWebSites Home
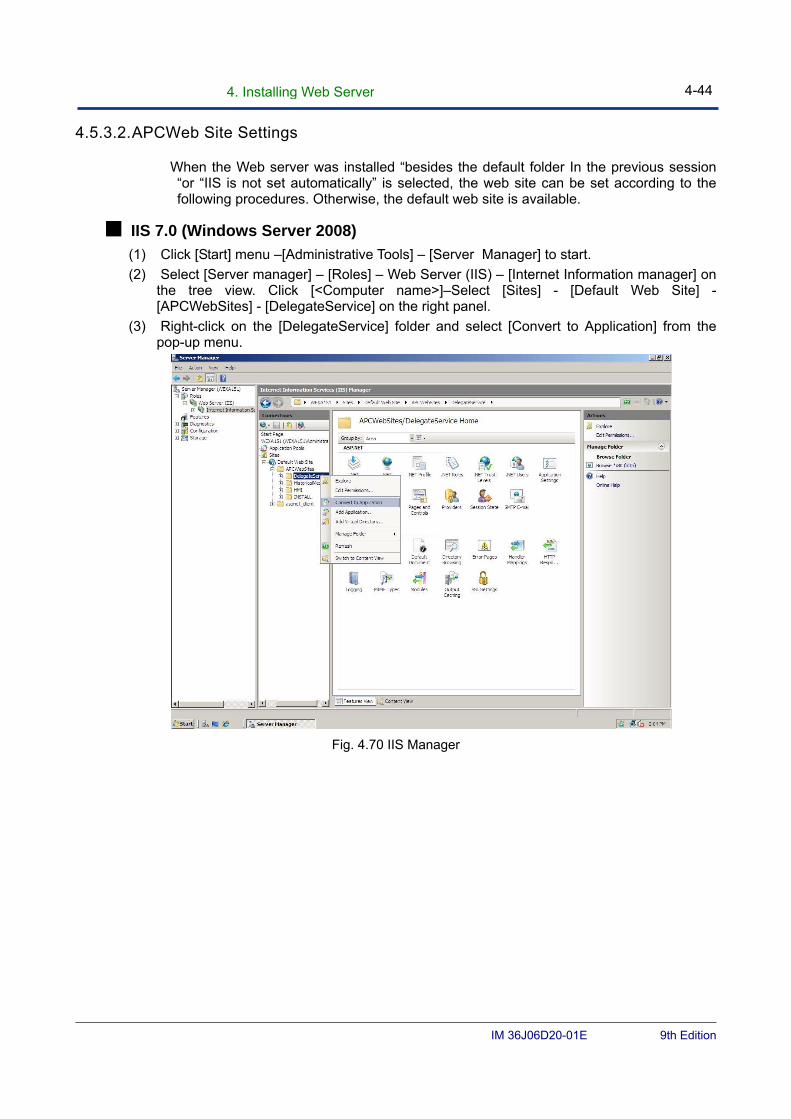
4. Installing Web Server 4-44
IM 36J06D20-01E 9th Edition
4.5.3.2. APCWeb Site Settings
When the Web server was installed “besides the default folder In the previous session “or “IIS is not set automatically” is selected, the web site can be set according to the following procedures. Otherwise, the default web site is available.
■ IIS 7.0 (Windows Server 2008)
(1) Click [Start] menu –[Administrative Tools] – [Server Manager] to start.
(2) Select [Server manager] – [Roles] – Web Server (IIS) – [Internet Information manager] on the tree view. Click [<Computer name>]–Select [Sites] - [Default Web Site] - [APCWebSites] - [DelegateService] on the right panel.
(3) Right-click on the [DelegateService] folder and select [Convert to Application] from the pop-up menu.
Fig. 4.70 IIS Manager
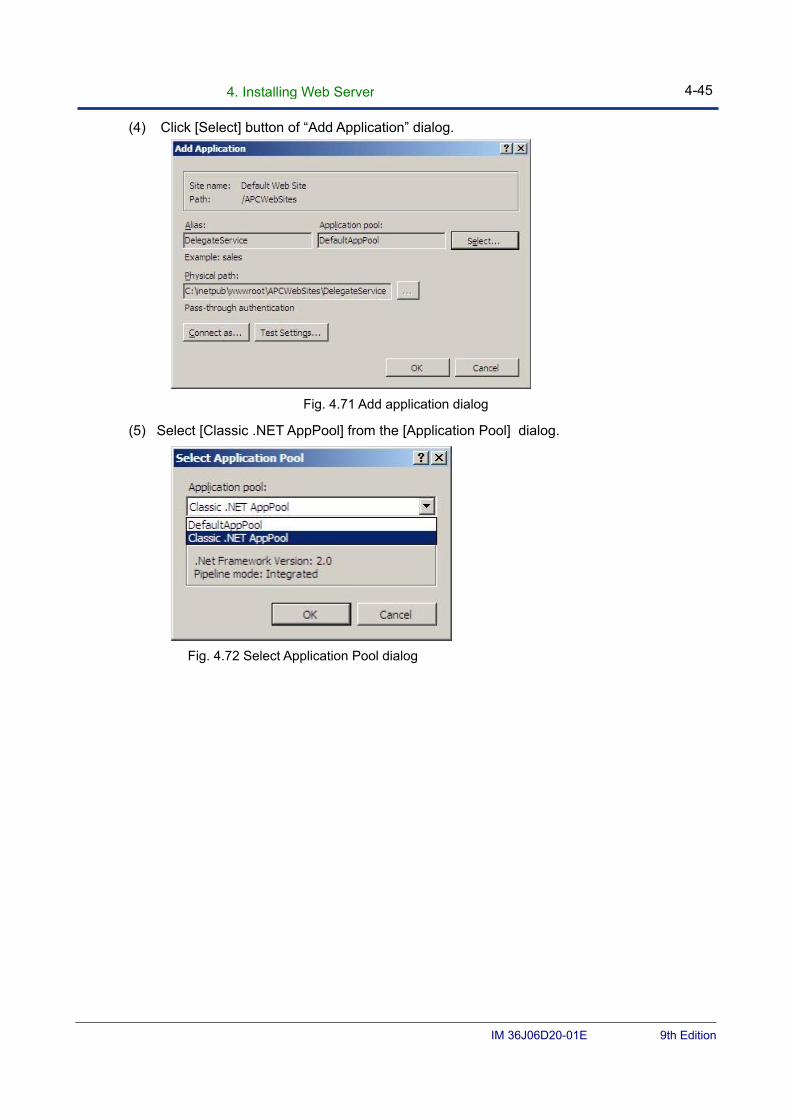
4. Installing Web Server 4-45
IM 36J06D20-01E 9th Edition
(4) Click [Select] button of “Add Application” dialog.
Fig. 4.71 Add application dialog
(5) Select [Classic .NET AppPool] from the [Application Pool] dialog.
Fig. 4.72 Select Application Pool dialog
4. Installing Web Server 4-46
IM 36J06D20-01E 9th Edition
(6) In the same way as (2) – (5), Select [Convert to Application]. The[Application Pool] of the [HistoricalMessage]l is [DefaultAppPool”]
Fig. 4.73 Select Application Pool dialog
IIS has a function that Web application (Web service) is regularly recycled during the fixed time interval. When this recycling occurs on the Web server, all the APC Web client HMIs connecting with the Web server become error.
The following is a procedure to stop the recycling. Please use this setting according your requirements.
4. Installing Web Server 4-47
IM 36J06D20-01E 9th Edition
(7) Select [Application Pool] – [Classic .NET AppPool] from the left tree view and specify [Advanced Settings] on the right side.
Fig. 4.74 Select Application Pool
(8) After opening [Advanced Setting] window, set [Process Model - Idle Time-out (minutes)] and [Recycling - Regular Time Interval (minutes)] to 0 minutes.
Fig. 4.75 Advanced Setting of DefaultAppPool
4. Installing Web Server 4-48
IM 36J06D20-01E 9th Edition
(9) Go back to the IIS Management window. Select [Application Pool] - [DefaultAppPool] from the left tree view and specify [Advanced Settings] on the right side.
Fig. 4.76 Select Application Pool
(10) After opening [Advanced Setting] window, set [Process Model - Idle Time-out (minutes) ] and [Recycling - Regular Time Interval (minutes)] to 0 minutes.
Fig. 4.77 Advanced Setting of DefaultAppPool
(11) Restart PC.
4. Installing Web Server 4-49
IM 36J06D20-01E 9th Edition
■ IIS7.5(Windows Server 2008 R2) (1) Click [Start] menu - [Administrative Tools] – [Server Manager] to start.
(2) Select [Server manager] – [Roles] – [Web Server (IIS)] – [Internet Information manager] on the tree view. Select [Sites] - [Default Web Site] - [APCWebSites] - [DelegateService] on the right panel.
(3) Right-click on the [DelegateService] folder and select [Convert to Application] from the pop-up menu.
Fig. 4.78 Server Manager
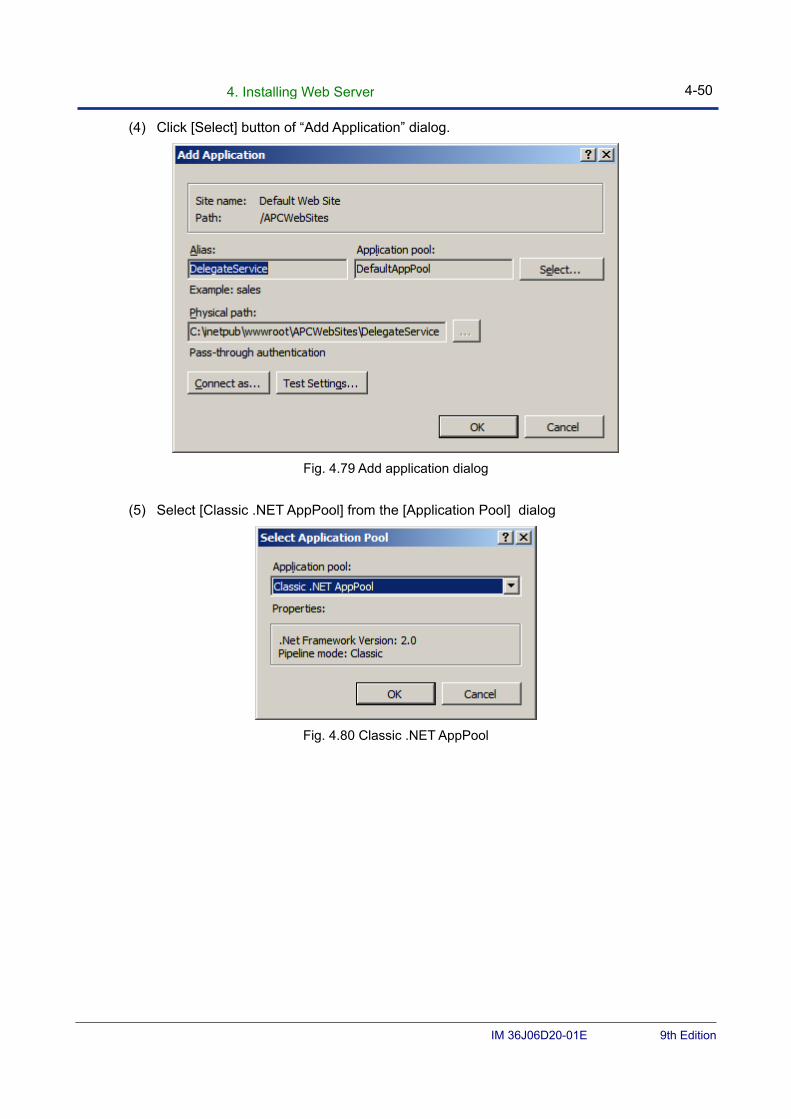
4. Installing Web Server 4-50
IM 36J06D20-01E 9th Edition
(4) Click [Select] button of “Add Application” dialog.
Fig. 4.79 Add application dialog
(5) Select [Classic .NET AppPool] from the [Application Pool] dialog
Fig. 4.80 Classic .NET AppPool
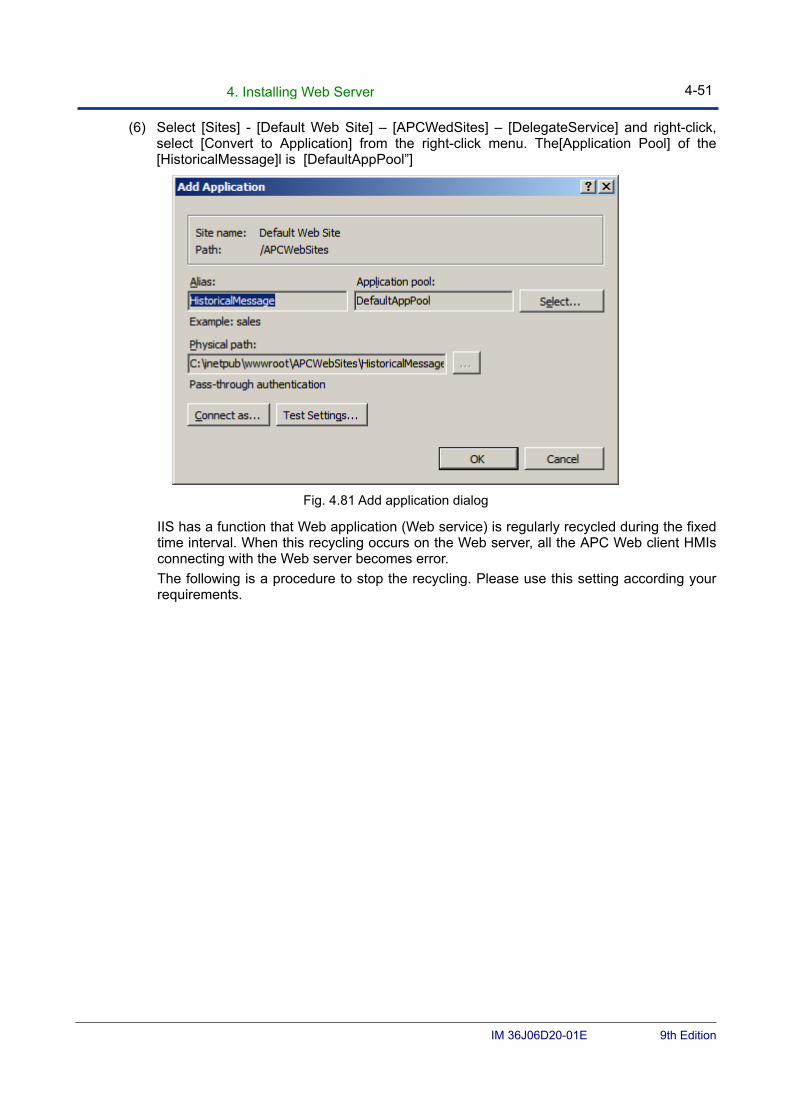
4. Installing Web Server 4-51
IM 36J06D20-01E 9th Edition
(6) Select [Sites] - [Default Web Site] – [APCWedSites] – [DelegateService] and right-click, select [Convert to Application] from the right-click menu. The[Application Pool] of the [HistoricalMessage]l is [DefaultAppPool”]
Fig. 4.81 Add application dialog
IIS has a function that Web application (Web service) is regularly recycled during the fixed time interval. When this recycling occurs on the Web server, all the APC Web client HMIs connecting with the Web server becomes error.
The following is a procedure to stop the recycling. Please use this setting according your requirements.
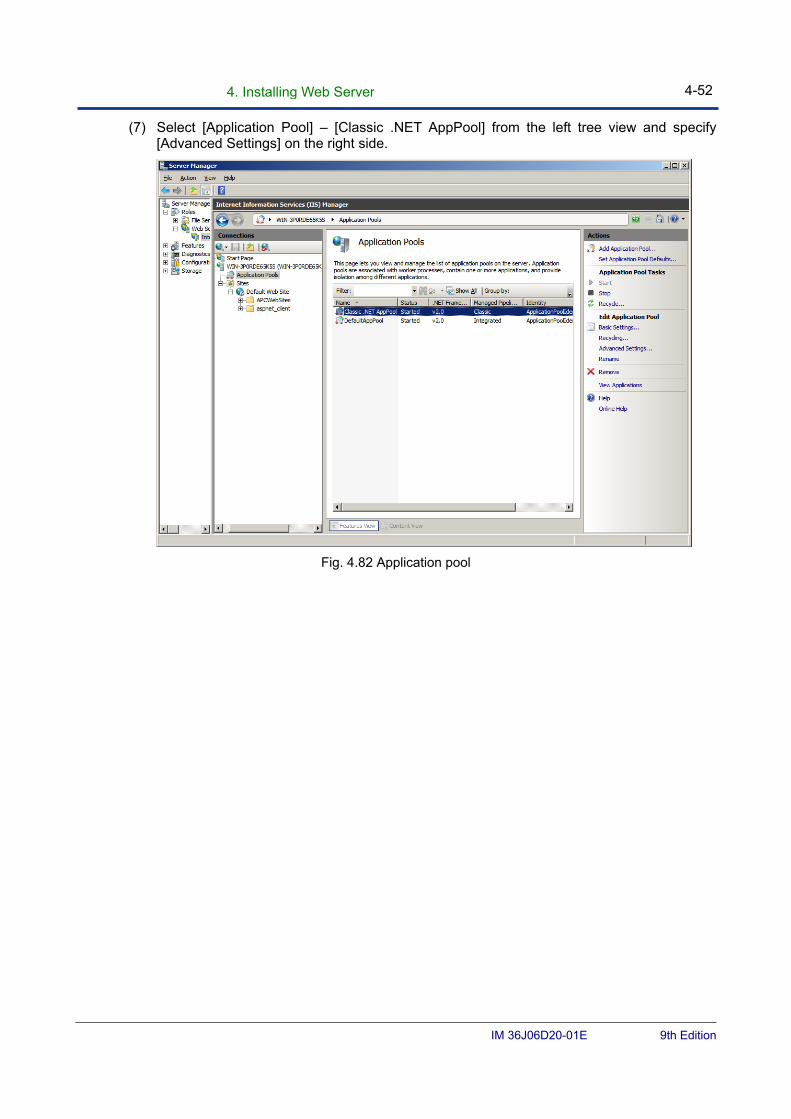
4. Installing Web Server 4-52
IM 36J06D20-01E 9th Edition
(7) Select [Application Pool] – [Classic .NET AppPool] from the left tree view and specify [Advanced Settings] on the right side.
Fig. 4.82 Application pool
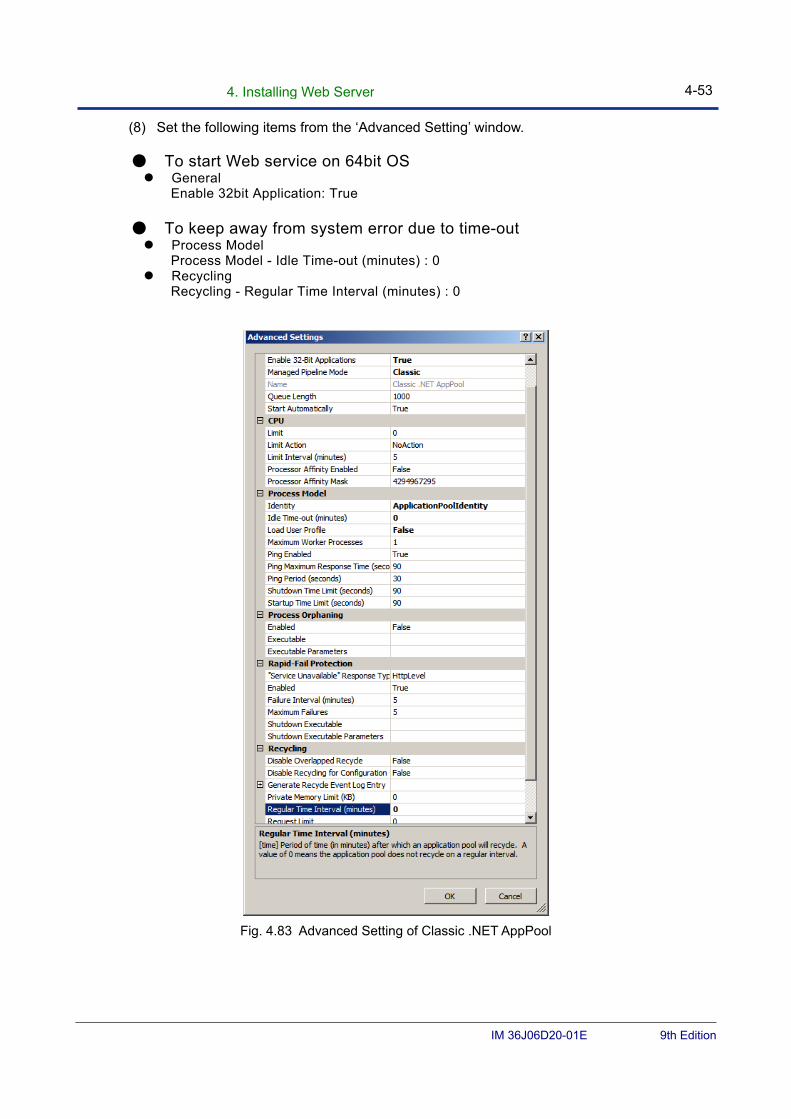
4. Installing Web Server 4-53
IM 36J06D20-01E 9th Edition
(8) Set the following items from the ‘Advanced Setting’ window.
● To start Web service on 64bit OS General
Enable 32bit Application: True ● To keep away from system error due to time-out Process Model
Process Model - Idle Time-out (minutes) : 0 Recycling
Recycling - Regular Time Interval (minutes) : 0
Fig. 4.83 Advanced Setting of Classic .NET AppPool
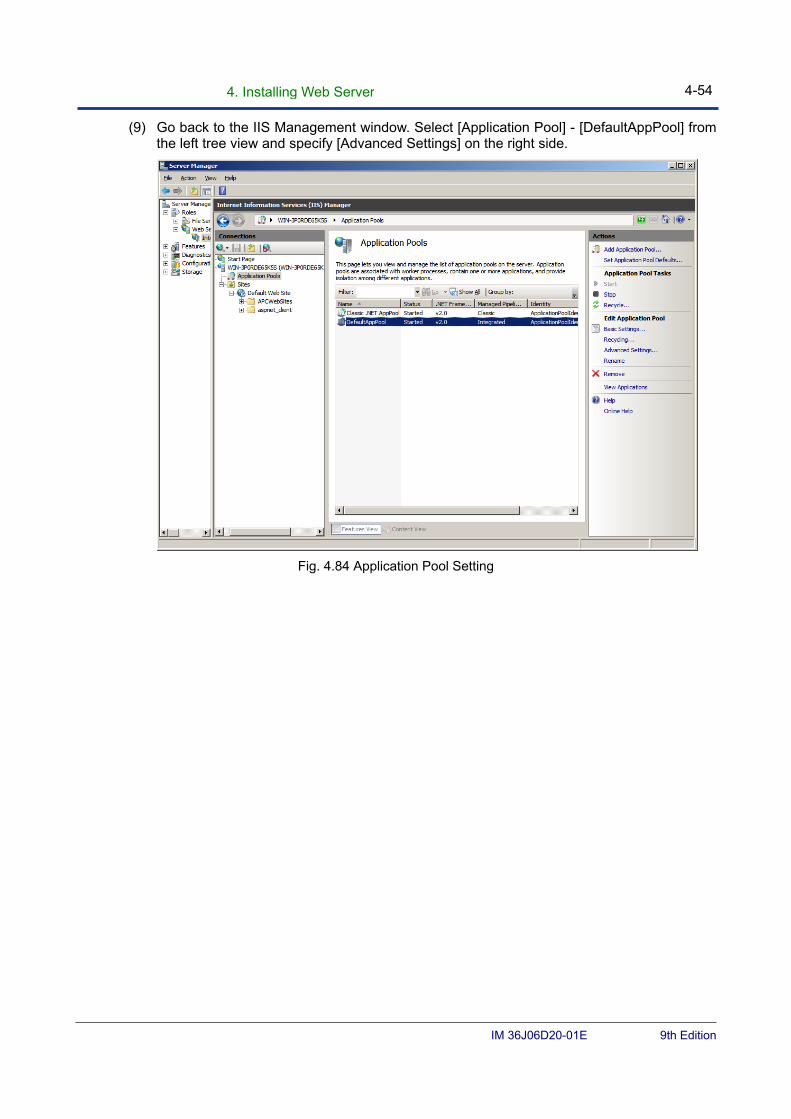
4. Installing Web Server 4-54
IM 36J06D20-01E 9th Edition
(9) Go back to the IIS Management window. Select [Application Pool] - [DefaultAppPool] from the left tree view and specify [Advanced Settings] on the right side.
Fig. 4.84 Application Pool Setting
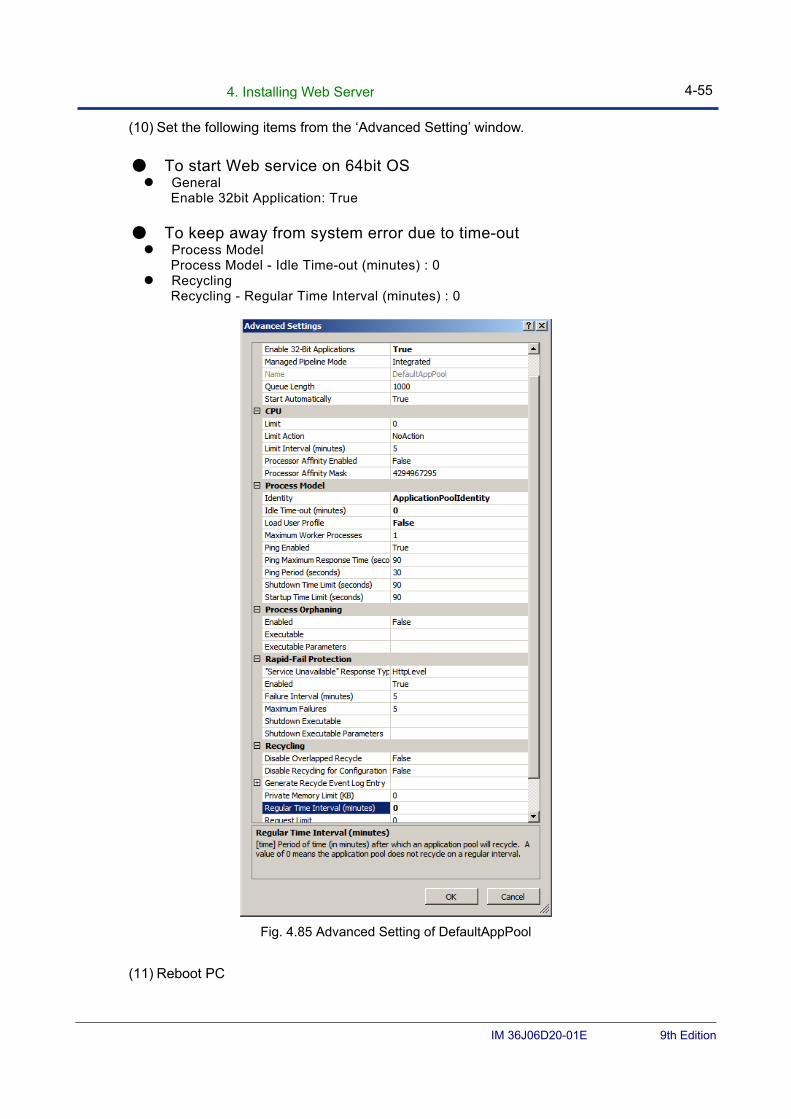
4. Installing Web Server 4-55
IM 36J06D20-01E 9th Edition
(10) Set the following items from the ‘Advanced Setting’ window.
● To start Web service on 64bit OS General
Enable 32bit Application: True ● To keep away from system error due to time-out Process Model
Process Model - Idle Time-out (minutes) : 0 Recycling
Recycling - Regular Time Interval (minutes) : 0
Fig. 4.85 Advanced Setting of DefaultAppPool
(11) Reboot PC
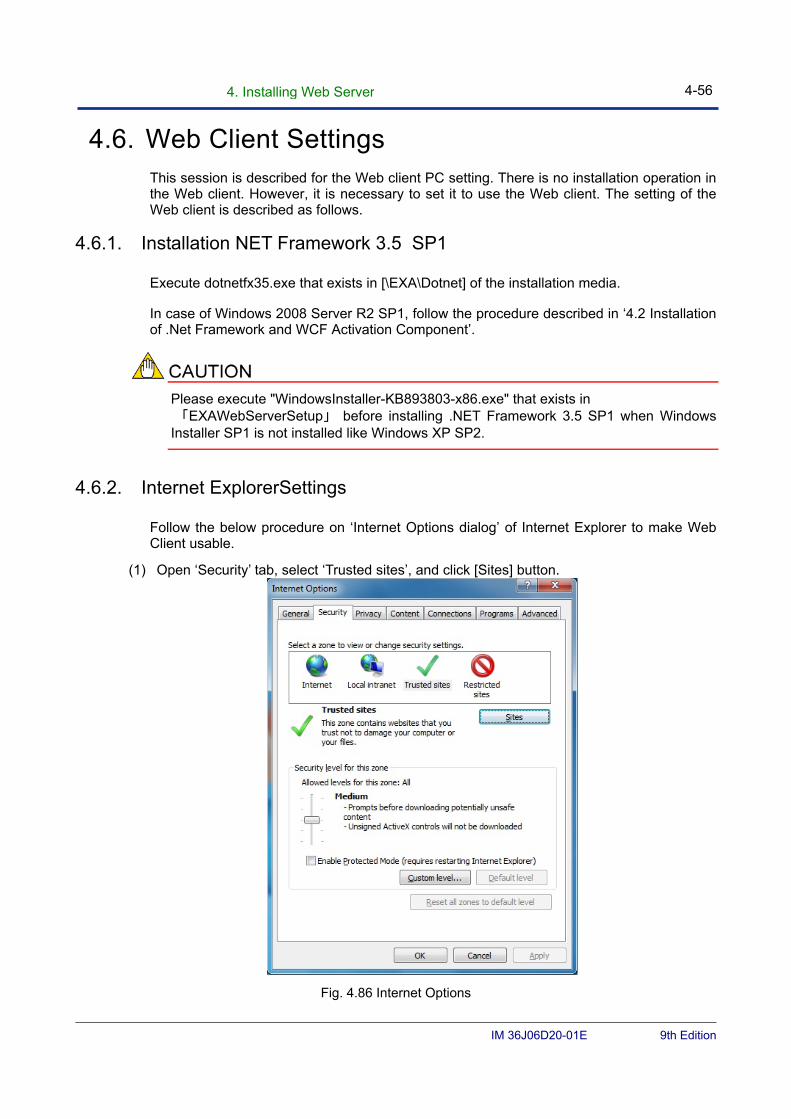
4. Installing Web Server 4-56
IM 36J06D20-01E 9th Edition
4.6. Web Client Settings This session is described for the Web client PC setting. There is no installation operation in the Web client. However, it is necessary to set it to use the Web client. The setting of the Web client is described as follows.
4.6.1. Installation NET Framework 3.5 SP1
Execute dotnetfx35.exe that exists in [\EXA\Dotnet] of the installation media.
In case of Windows 2008 Server R2 SP1, follow the procedure described in ‘4.2 Installation of .Net Framework and WCF Activation Component’.
Please execute "WindowsInstaller-KB893803-x86.exe" that exists in 「EXAWebServerSetup」 before installing .NET Framework 3.5 SP1 when Windows Installer SP1 is not installed like Windows XP SP2.
4.6.2. Internet ExplorerSettings
Follow the below procedure on ‘Internet Options dialog’ of Internet Explorer to make Web Client usable.
(1) Open ‘Security’ tab, select ‘Trusted sites’, and click [Sites] button.
Fig. 4.86 Internet Options
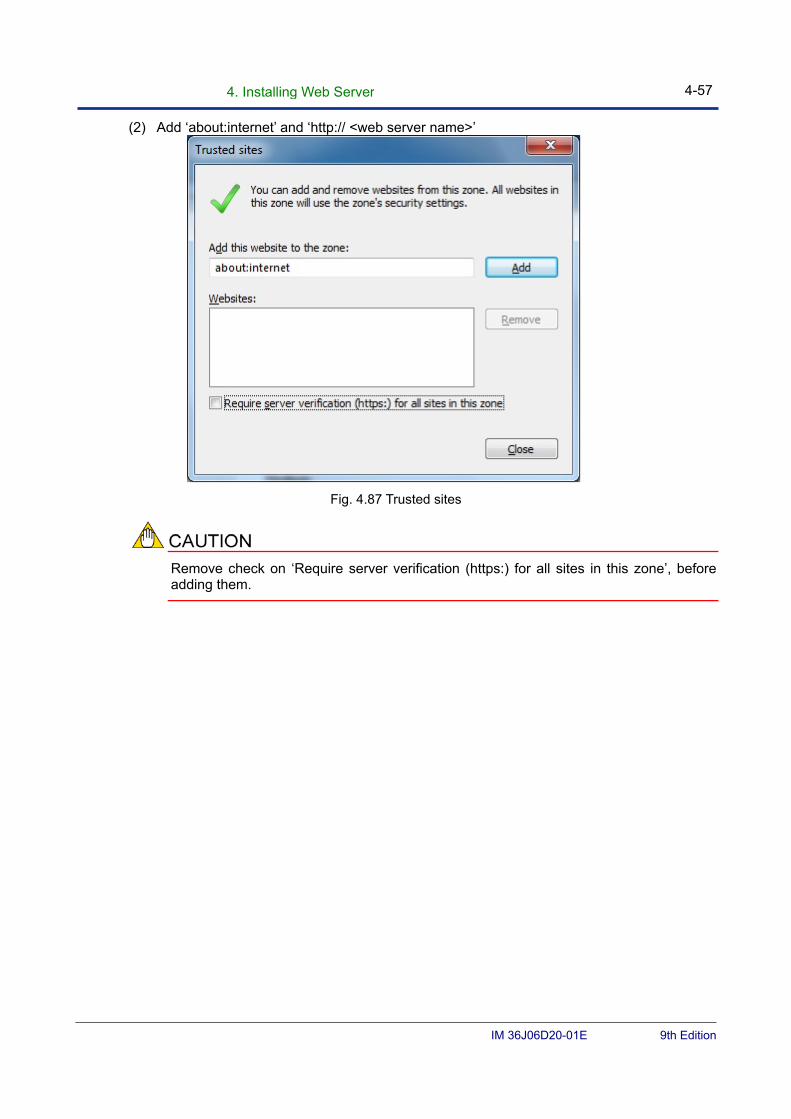
4. Installing Web Server 4-57
IM 36J06D20-01E 9th Edition
(2) Add ‘about:internet’ and ‘http:// <web server name>’
Fig. 4.87 Trusted sites
Remove check on ‘Require server verification (https:) for all sites in this zone’, before adding them.
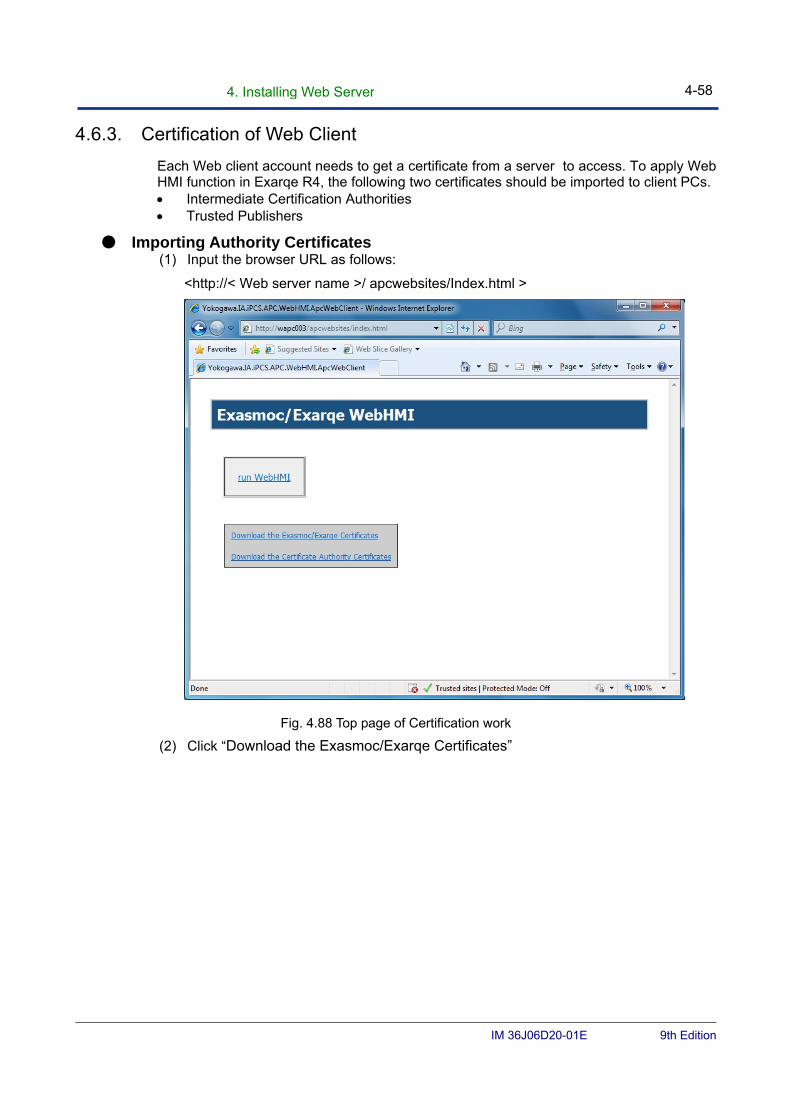
4. Installing Web Server 4-58
IM 36J06D20-01E 9th Edition
4.6.3. Certification of Web Client
Each Web client account needs to get a certificate from a server to access. To apply Web HMI function in Exarqe R4, the following two certificates should be imported to client PCs. Intermediate Certification Authorities Trusted Publishers
● Importing Authority Certificates (1) Input the browser URL as follows:
<http://< Web server name >/ apcwebsites/Index.html >
Fig. 4.88 Top page of Certification work
(2) Click “Download the Exasmoc/Exarqe Certificates”
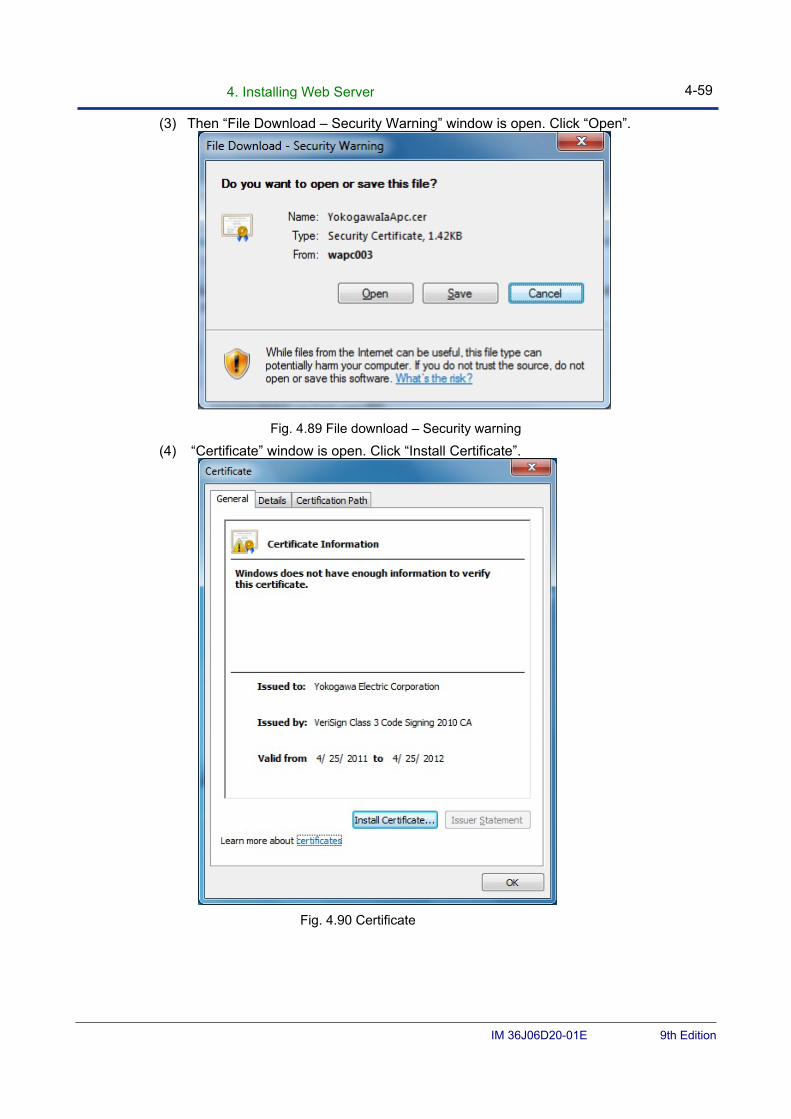
4. Installing Web Server 4-59
IM 36J06D20-01E 9th Edition
(3) Then “File Download – Security Warning” window is open. Click “Open”.
Fig. 4.89 File download – Security warning
(4) “Certificate” window is open. Click “Install Certificate”.
Fig. 4.90 Certificate
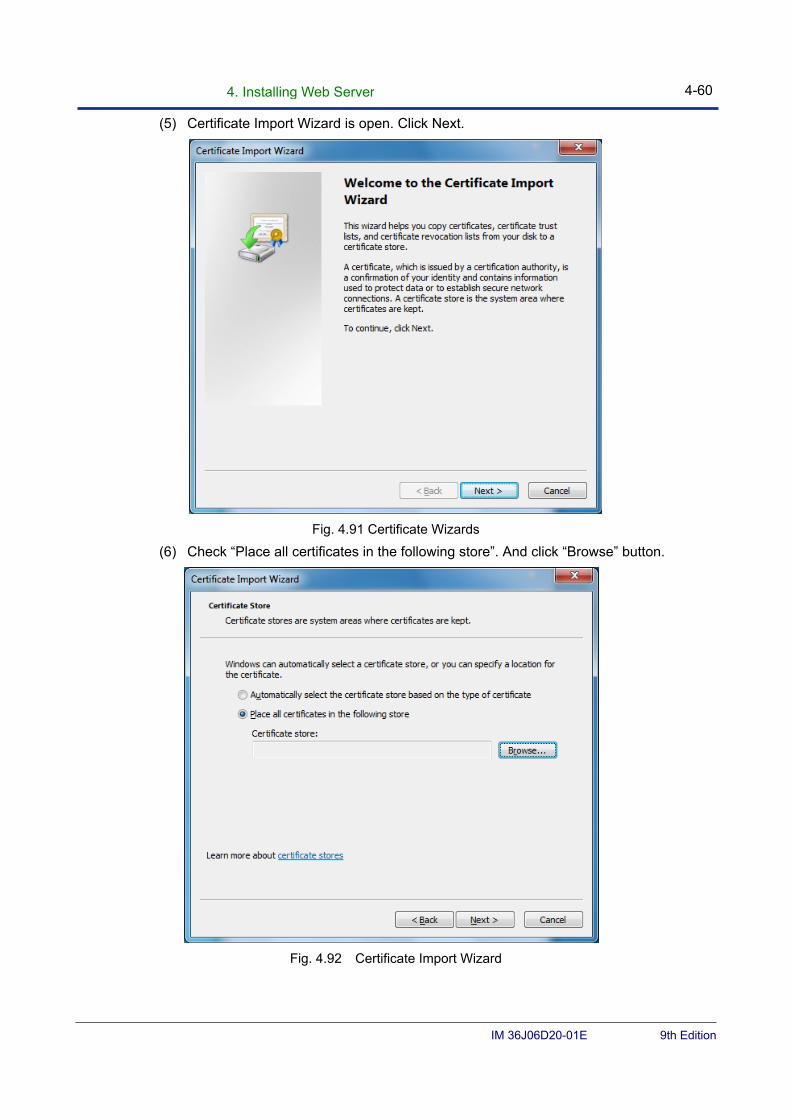
4. Installing Web Server 4-60
IM 36J06D20-01E 9th Edition
(5) Certificate Import Wizard is open. Click Next.
Fig. 4.91 Certificate Wizards
(6) Check “Place all certificates in the following store”. And click “Browse” button.
Fig. 4.92 Certificate Import Wizard

4. Installing Web Server 4-61
IM 36J06D20-01E 9th Edition
(7) Select “Trusted Publishers” from the certificate store, and click “OK”.
Fig. 4.93 Select certificate store
(8) Select “Place all certificates in the following store” and click “Next” button.
Fig. 4.94 Certificate Import Wizard
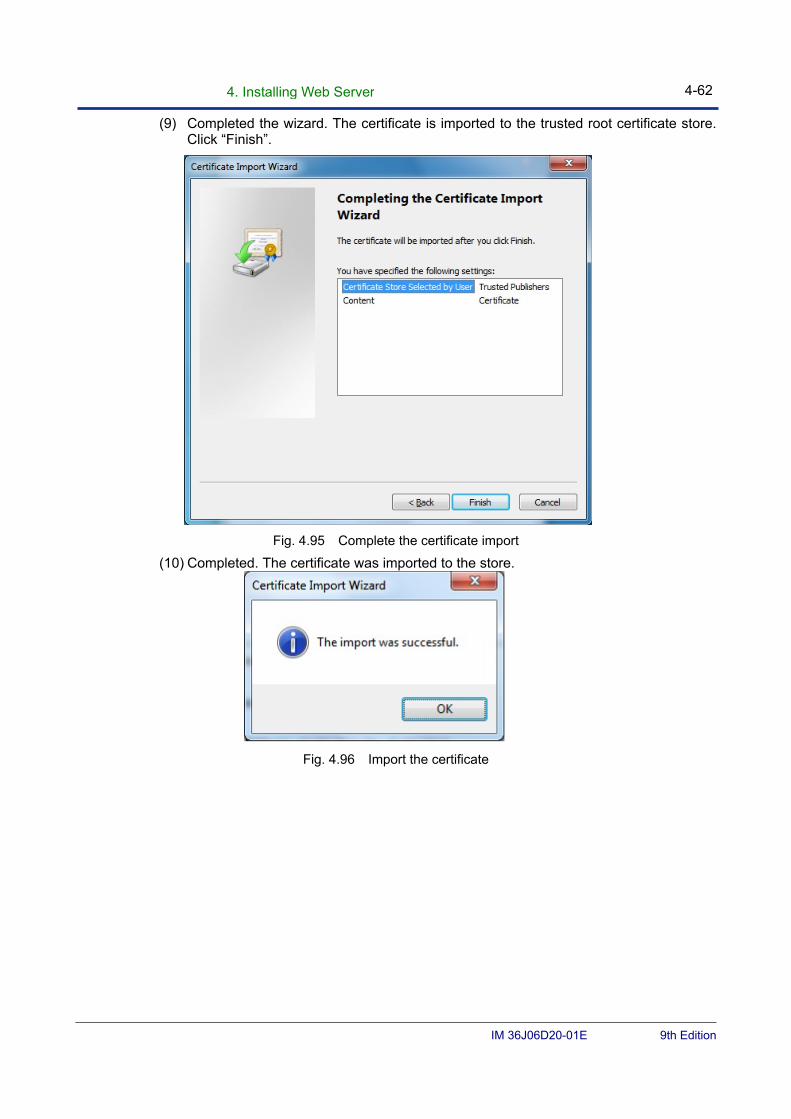
4. Installing Web Server 4-62
IM 36J06D20-01E 9th Edition
(9) Completed the wizard. The certificate is imported to the trusted root certificate store. Click “Finish”.
Fig. 4.95 Complete the certificate import
(10) Completed. The certificate was imported to the store.
Fig. 4.96 Import the certificate
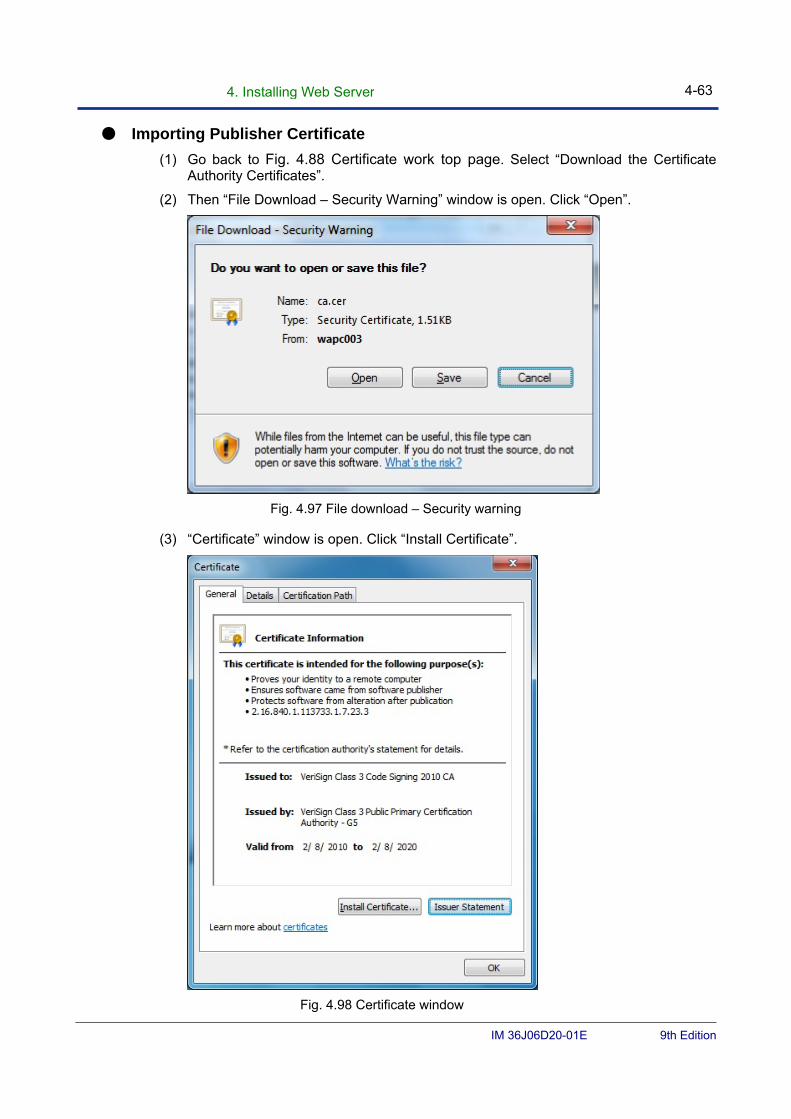
4. Installing Web Server 4-63
IM 36J06D20-01E 9th Edition
● Importing Publisher Certificate
(1) Go back to Fig. 4.88 Certificate work top page. Select “Download the Certificate Authority Certificates”.
(2) Then “File Download – Security Warning” window is open. Click “Open”.
Fig. 4.97 File download – Security warning
(3) “Certificate” window is open. Click “Install Certificate”.
Fig. 4.98 Certificate window

4. Installing Web Server 4-64
IM 36J06D20-01E 9th Edition
(4) Certificate Import Wizard is open. Click Next.
Fig. 4.99 Certificate Wizards
(5) Check “Place all certificates in the following store”. And click “Browse” button.
Fig. 4.100 Certificate Import Wizard
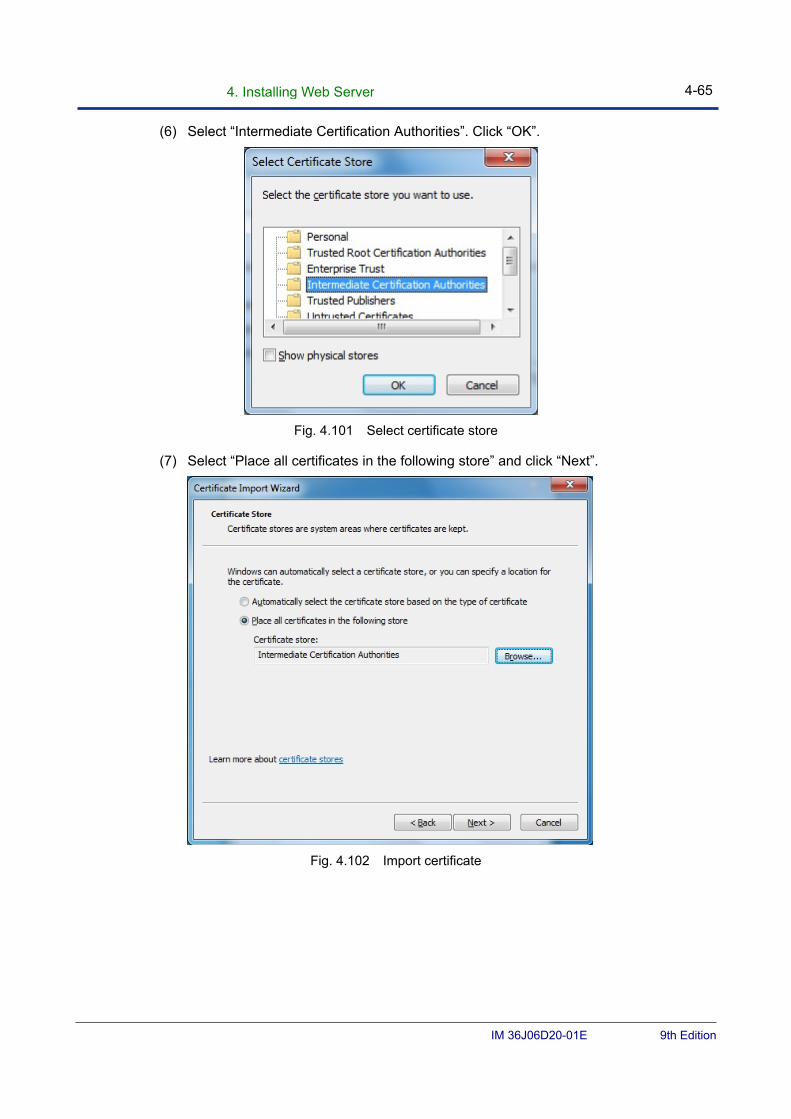
4. Installing Web Server 4-65
IM 36J06D20-01E 9th Edition
(6) Select “Intermediate Certification Authorities”. Click “OK”.
Fig. 4.101 Select certificate store
(7) Select “Place all certificates in the following store” and click “Next”.
Fig. 4.102 Import certificate
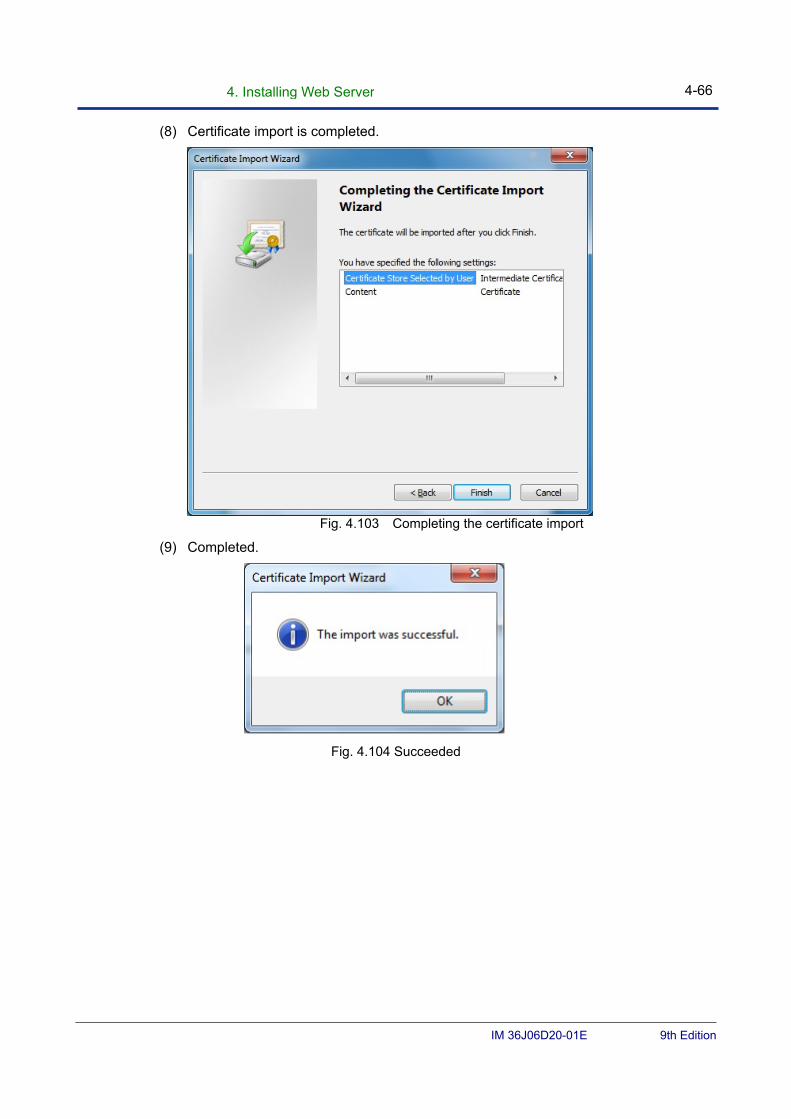
4. Installing Web Server 4-66
IM 36J06D20-01E 9th Edition
(8) Certificate import is completed.
Fig. 4.103 Completing the certificate import
(9) Completed.
Fig. 4.104 Succeeded
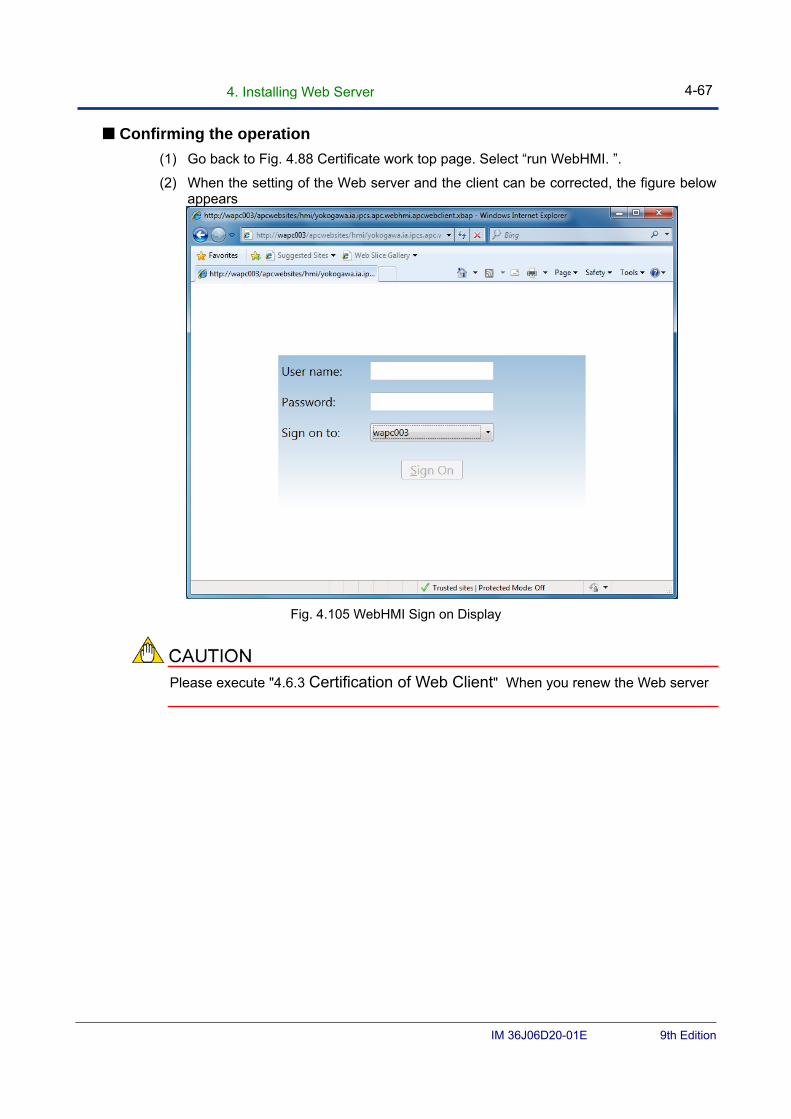
4. Installing Web Server 4-67
IM 36J06D20-01E 9th Edition
■ Confirming the operation
(1) Go back to Fig. 4.88 Certificate work top page. Select “run WebHMI. ”.
(2) When the setting of the Web server and the client can be corrected, the figure below appears
Fig. 4.105 WebHMI Sign on Display
Please execute "4.6.3 Certification of Web Client" When you renew the Web server
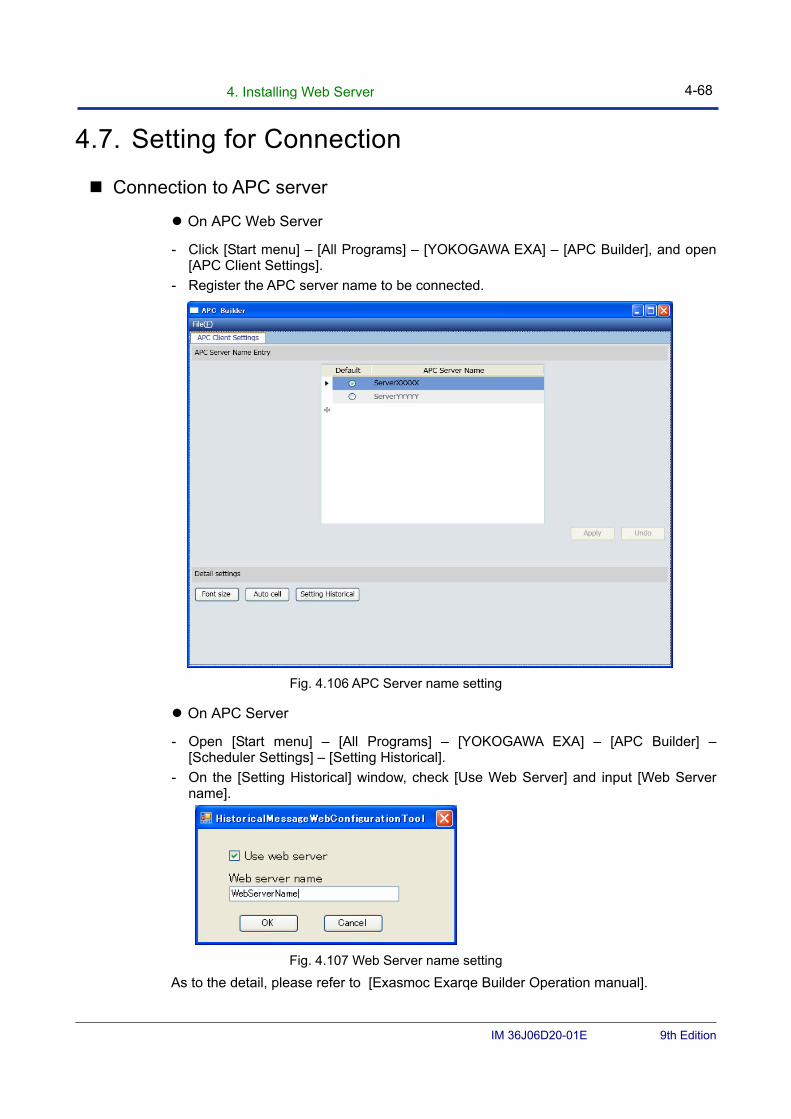
4. Installing Web Server 4-68
IM 36J06D20-01E 9th Edition
4.7. Setting for Connection
Connection to APC server
On APC Web Server
- Click [Start menu] – [All Programs] – [YOKOGAWA EXA] – [APC Builder], and open [APC Client Settings].
- Register the APC server name to be connected.
Fig. 4.106 APC Server name setting
On APC Server
- Open [Start menu] – [All Programs] – [YOKOGAWA EXA] – [APC Builder] – [Scheduler Settings] – [Setting Historical].
- On the [Setting Historical] window, check [Use Web Server] and input [Web Server name].
Fig. 4.107 Web Server name setting
As to the detail, please refer to [Exasmoc Exarqe Builder Operation manual].
4. Installing Web Server 4-69
IM 36J06D20-01E 9th Edition
Set the time deviation between Web server and client clocks within 5 minutes (GMT). Otherwise the Web client sign-on may fail.
5 IT Security Settings 5-1
IM 36J06D20-01E 9th Edition
5. IT Security Settings The Exarqe system is required to perform setup for strengthening IT security of the PC after installing software on it.
This IT security setting is performed with the IT Security Tool which is started at the end of the installation.
For information about EXA products compatible with IT security, contact Yokogawa.
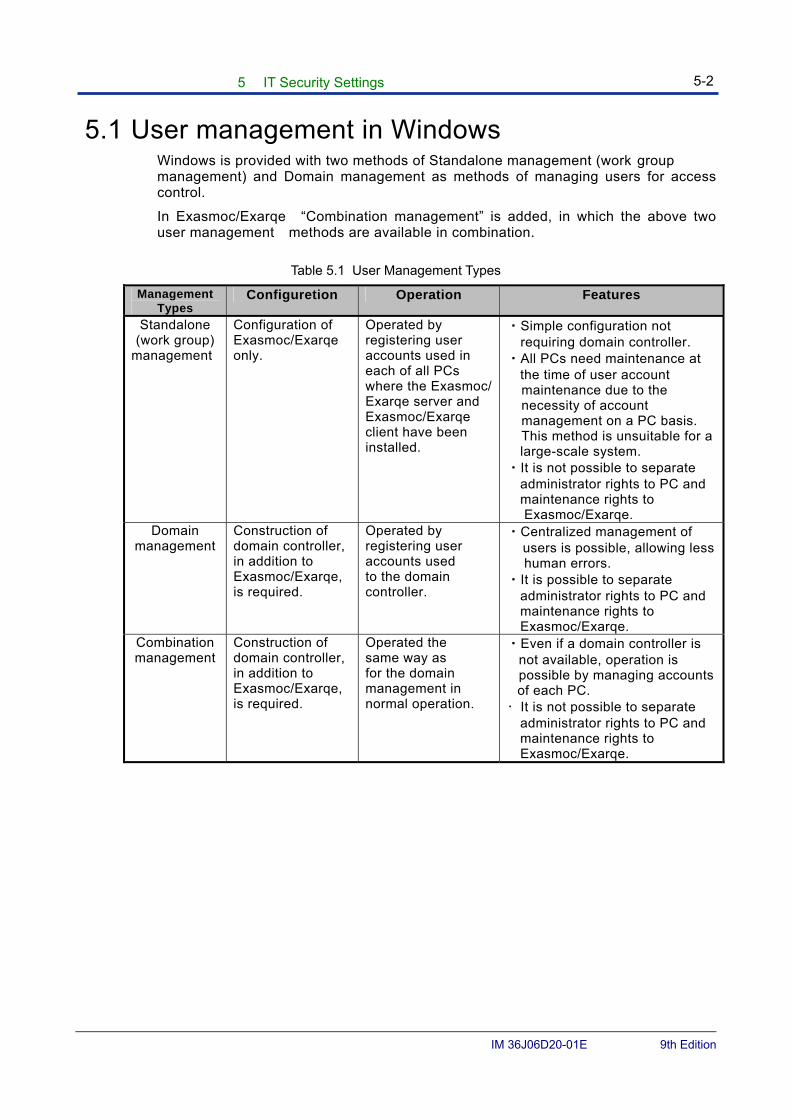
5 IT Security Settings 5-2
IM 36J06D20-01E 9th Edition
5.1 User management in Windows Windows is provided with two methods of Standalone management (work group management) and Domain management as methods of managing users for access control.
In Exasmoc/Exarqe “Combination management” is added, in which the above two user management methods are available in combination.
Table 5.1 User Management Types
Management Types
Configuretion Operation Features
Standalone (work group)
management
Configuration of Exasmoc/Exarqe only.
Operated by registering user accounts used in each of all PCs where the Exasmoc/Exarqe server and Exasmoc/Exarqe client have been installed.
・Simple configuration not requiring domain controller.
・All PCs need maintenance at the time of user account
maintenance due to the necessity of account management on a PC basis. This method is unsuitable for a large-scale system.
・It is not possible to separate administrator rights to PC and maintenance rights to Exasmoc/Exarqe.
Domain management
Construction of domain controller, in addition to Exasmoc/Exarqe, is required.
Operated by registering user accounts used to the domain controller.
・Centralized management of users is possible, allowing less
human errors. ・It is possible to separate
administrator rights to PC and maintenance rights to Exasmoc/Exarqe.
Combination management
Construction of domain controller, in addition to Exasmoc/Exarqe, is required.
Operated the same way as for the domain management in normal operation.
・Even if a domain controller is not available, operation is possible by managing accounts of each PC. • It is not possible to separate
administrator rights to PC and maintenance rights to Exasmoc/Exarqe.

5 IT Security Settings 5-3
IM 36J06D20-01E 9th Edition
In the combination management the main user management is performed through the domain management. This is also used during regular operation if a workgroup management-like operation is supposed.
The following cases can be supposed in practice:
<Supposed case of use 1>
Usually, user creation management is performed in the central administration section using the domain management.
However, this is used if only the specified PCs are expected to be configured so that they can set privileges to optional users under the local responsibility on the work floor.
<Supposed case of use 2>
In regular operation the user management is performed through domain management. However, the user management may be useful as an escape means to continue operation if "the function of using the previous number of times to use cash memory during logon where the domain controller is not available" is set to 0 time.
5 IT Security Settings 5-4
IM 36J06D20-01E 9th Edition
5.2 Security Model Security model is categorized into 3 models depending on the security strength to be set.
The IT Security Setting Tool is allowed to set up “legacy model”, “standard model” and “Strengthened model”.
■ Legacy Model This model is provided with an equivalent security level to that of EXA packages incompatible with IT security (corresponding to “Exarqe R3.06”).
The legacy model is applied in the following cases. ・Exasmoc/Exarqe coexists with Yokogawa products (CENTUM, EXA packages, etc.)
incompatible with IT security. ・Exarqe coexists with Yokogawa products (CENTUM, EXA packages, etc.) of the legacy
model for security.
For detailed information about the legacy model, refer to “5.4 Security Configuration Items”.
With the legacy model applied, Windows Firewall is disabled.
■ Standard Model Standard model is mainly allowed to set the following security items. ・File, folder access control by user authentication ・DCOM access control by user authentication ・Enabling the firewall function
With the legacy model applied, Windows Firewall is disabled.
The standard model is further divided into 3 types depending on the method of user administration.
・Security configuration under standalone management
Select this type when performing IT security setting for each PC without using the Windows domain controller. Although user accounts are generated for each PC in this case, it is necessary to make the management of all related PC groups and users consistent with each other.
5 IT Security Settings 5-5
IM 36J06D20-01E 9th Edition
・Security configuration under Windows domain management
Select this type when the users and groups in the account are managed by the Windows domain controller.
・Security setting of the combination management
Even if the Windows domain controller is not available, select this to perform the account management for each PC.
As shown in the following table, in the standard model, the created groups have limited access privilege. To perform each function, the logged on users have to join the groups which have the proper conditions for each function.
Table 5.2 Created group of Standard Model
Group Description about Group Group name 1. Operator User for operation
APC_OPERATOR APC_OPERATOR_LCL A user group for users who operate using
the operation window etc. 2. Engineer User for engineering
APC_ENGINEER APC_ENGINEER_LCL A user group for users who engineer for
operation using the configuration window. 3. Maintenance Exarqe Maintenance User
APC_MAINTENANCE APC_MAINTENANCE_LCL
A user group for users (SE for system construction and persons who are in charge of maintenance) who maintain Exarqe.
4. Common
Maintenance
EXA Package Common Maintenance User
EXA_MAINTENANCE EXA_MAINTENANCE_LCL
A user group for users who perform such EXA package common maintenance as executing the EXA common tools and performing installation.
There are the following limitations when programs are executed in the standard model.
Table 5.3 Execution control of Exasmoc/Exarqe common programs
Group Window name/function
Operator Engineer Maintenance Common Maintenance
Exaopc Setting ● ● Software Configuration Viewer ● ● ● ● OPC Connection Confirm tool ● ● ● Integration AP Builder ● ● Apc HMI ● ● ● Apc Builder ● ● Client Window Builder ● ● Role Based Builder ● ● IT Security Tool ●
● :Executable
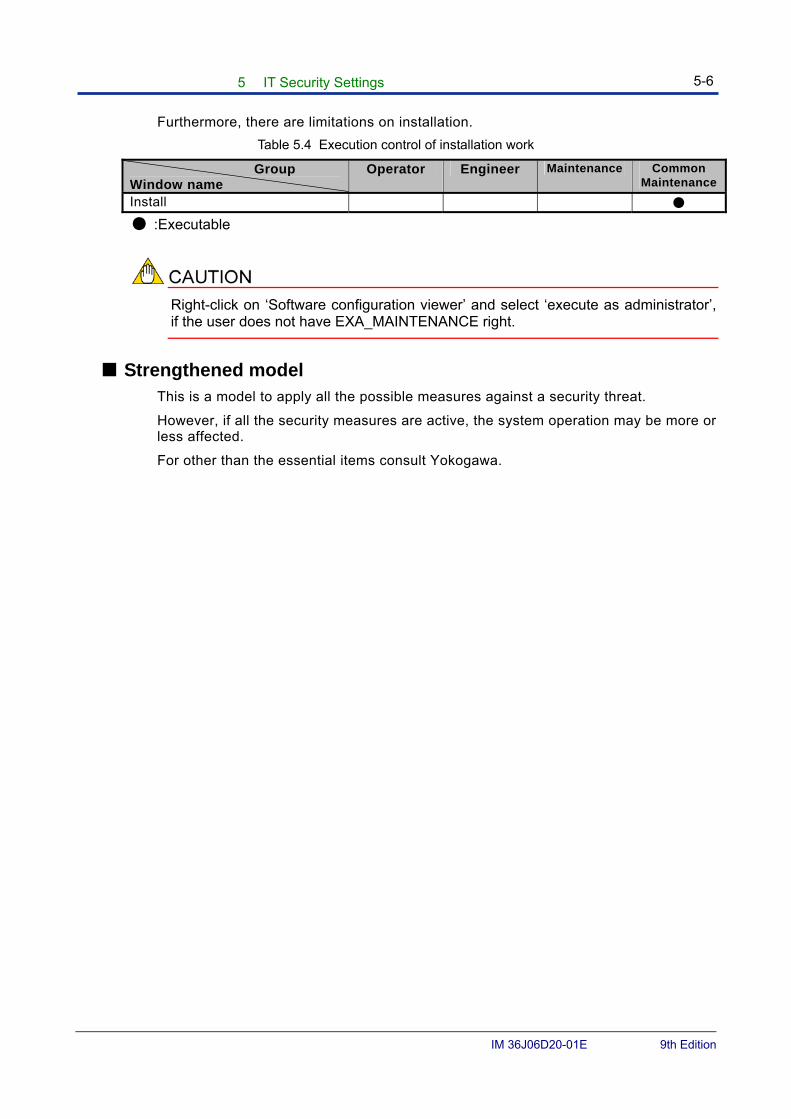
5 IT Security Settings 5-6
IM 36J06D20-01E 9th Edition
Furthermore, there are limitations on installation.
Table 5.4 Execution control of installation work
Group Window name
Operator Engineer Maintenance Common Maintenance
Install ●
● :Executable
Right-click on ‘Software configuration viewer’ and select ‘execute as administrator’, if the user does not have EXA_MAINTENANCE right.
■ Strengthened model This is a model to apply all the possible measures against a security threat.
However, if all the security measures are active, the system operation may be more or less affected.
For other than the essential items consult Yokogawa.
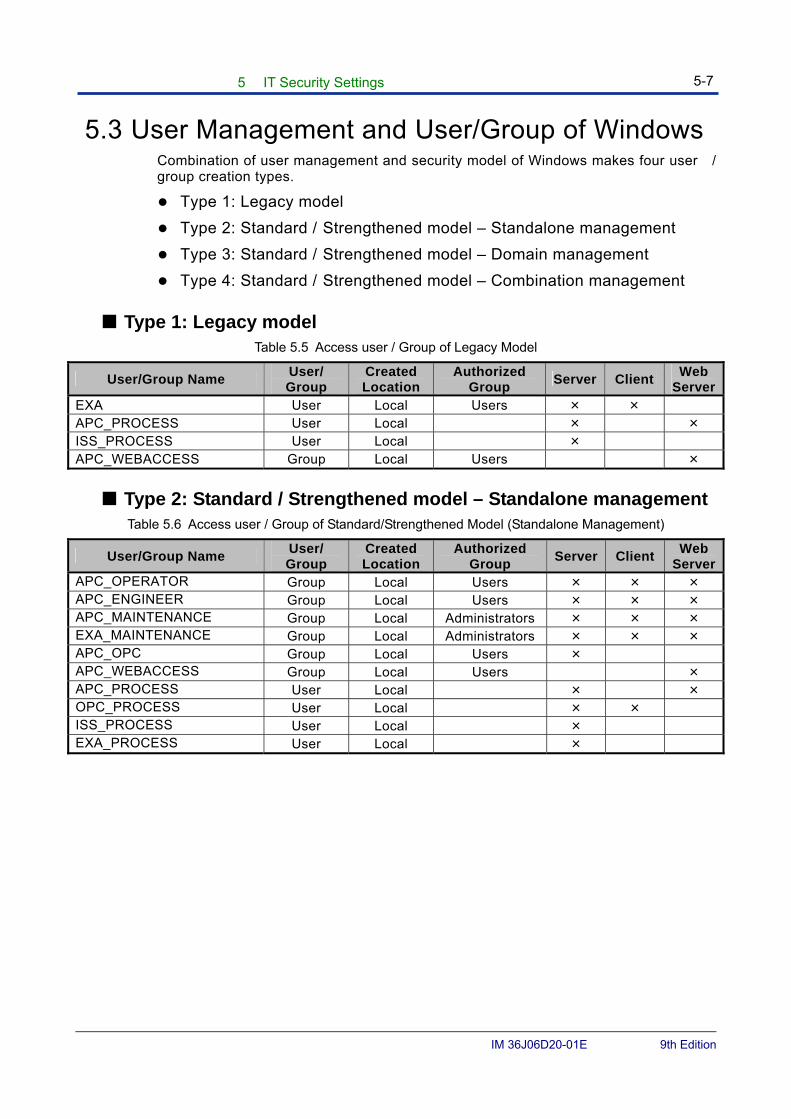
5 IT Security Settings 5-7
IM 36J06D20-01E 9th Edition
5.3 User Management and User/Group of Windows Combination of user management and security model of Windows makes four user / group creation types.
Type 1: Legacy model
Type 2: Standard / Strengthened model – Standalone management
Type 3: Standard / Strengthened model – Domain management
Type 4: Standard / Strengthened model – Combination management
■ Type 1: Legacy model Table 5.5 Access user / Group of Legacy Model
User/Group Name User/ Group
Created Location
Authorized Group
Server ClientWeb
ServerEXA User Local Users × × APC_PROCESS User Local × × ISS_PROCESS User Local × APC_WEBACCESS Group Local Users ×
■ Type 2: Standard / Strengthened model – Standalone management Table 5.6 Access user / Group of Standard/Strengthened Model (Standalone Management)
User/Group Name User/ Group
Created Location
Authorized Group
Server ClientWeb
ServerAPC_OPERATOR Group Local Users × × × APC_ENGINEER Group Local Users × × × APC_MAINTENANCE Group Local Administrators × × × EXA_MAINTENANCE Group Local Administrators × × × APC_OPC Group Local Users × APC_WEBACCESS Group Local Users × APC_PROCESS User Local × × OPC_PROCESS User Local × × ISS_PROCESS User Local × EXA_PROCESS User Local ×

5 IT Security Settings 5-8
IM 36J06D20-01E 9th Edition
■ Type 3: Standard / Strengthened model – Domain management Table 5.7 Access user / Group of Standard/Strengthened Model (Domain Management)
User/Group Name User/ Group
Created Location
Authorized Group
Server ClientWeb
ServerAPC_OPERATOR Group Domain Domain Users × × × APC_ENGINEER Group Domain Domain Users × × × APC_MAINTENANCE Group Domain Domain Admins × × × APC_MAINTENANCE_LCL Group Local Administrators × × × EXA_MAINTENANCE Group Domain Domain Admins × × × EXA_MAINTENANCE_LCL Group Local Administrators × × × APC_OPC Group Domain Domain Users × APC_OPC_LCL Group Local Users × APC_WEBACCESS Group Local Users × APC_PROCESS User Local × × OPC_PROCESS User Local × × ISS_PROCESS User Local × EXA_PROCESS User Local ×
■ Type 4: Standard / Strengthened model – Combination management Table 5.8 Access user / Group of Standard/Strengthened Model (Combination Management)
User/Group Name User/ Group
Created Location
Authorized Group
Server ClientWeb
ServerAPC_OPERATOR Group Domain Domain Users × × × APC_OPERATOR_LCL Group Local Users × × × APC_ENGINEER Group Domain Domain Users × × × APC_ENGINEER_LCL Group Local Users × × × APC_MAINTENANCE Group Domain Domain Admins × × × APC_MAINTENANCE_LCL Group Local Administrators × × × EXA_MAINTENANCE Group Domain Domain Admins × EXA_MAINTENANCE_LCL Group Local Administrators × APC_OPC Group Domain Domain Users × APC_OPC_LCL Group Local Users × APC_WEBACCESS Group Local Users × APC_PROCESS User Local × × OPC_PROCESS User Local × × ISS_PROCESS User Local × EXA_PROCESS User Local ×
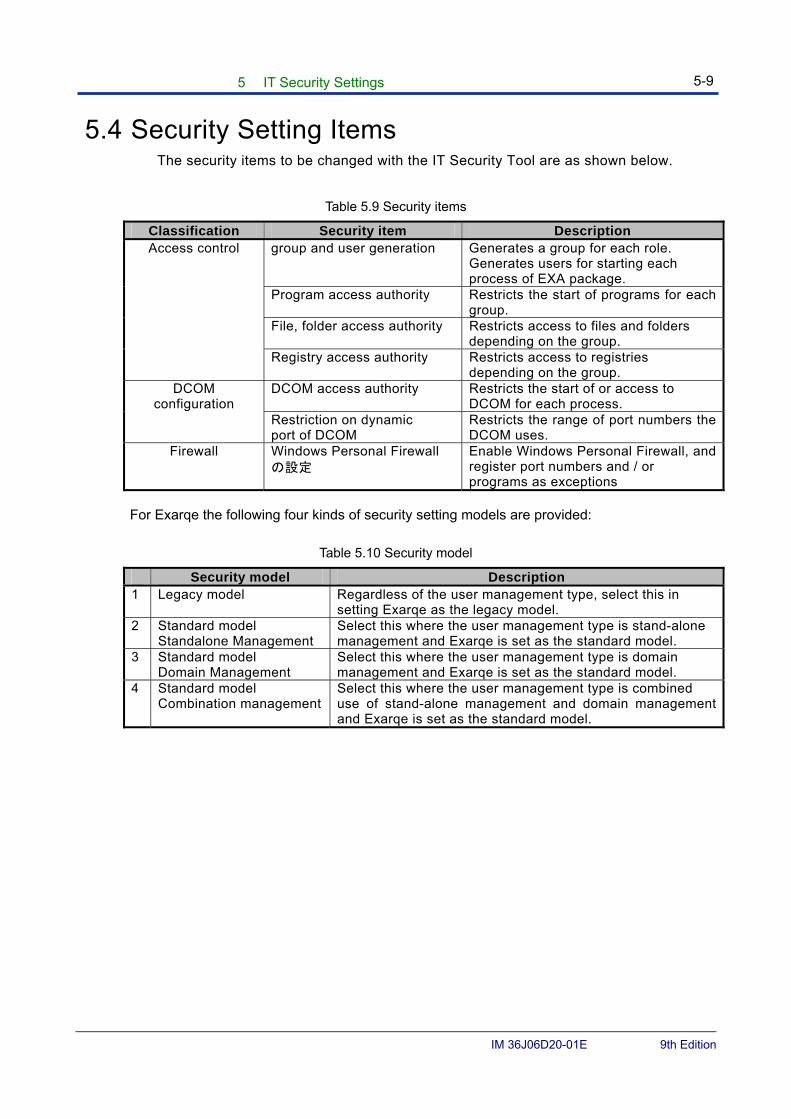
5 IT Security Settings 5-9
IM 36J06D20-01E 9th Edition
5.4 Security Setting Items The security items to be changed with the IT Security Tool are as shown below.
Table 5.9 Security items
Classification Security item Description Access control group and user generation Generates a group for each role.
Generates users for starting each process of EXA package.
Program access authority Restricts the start of programs for each group.
File, folder access authority Restricts access to files and folders depending on the group.
Registry access authority Restricts access to registries depending on the group.
DCOM configuration
DCOM access authority Restricts the start of or access to DCOM for each process.
Restriction on dynamic port of DCOM
Restricts the range of port numbers the DCOM uses.
Firewall Windows Personal Firewall の設定
Enable Windows Personal Firewall, and register port numbers and / or programs as exceptions
For Exarqe the following four kinds of security setting models are provided:
Table 5.10 Security model
Security model Description 1 Legacy model Regardless of the user management type, select this in
setting Exarqe as the legacy model. 2 Standard model
Standalone Management Select this where the user management type is stand-alone management and Exarqe is set as the standard model.
3 Standard model Domain Management
Select this where the user management type is domain management and Exarqe is set as the standard model.
4 Standard model Combination management
Select this where the user management type is combined use of stand-alone management and domain management and Exarqe is set as the standard model.
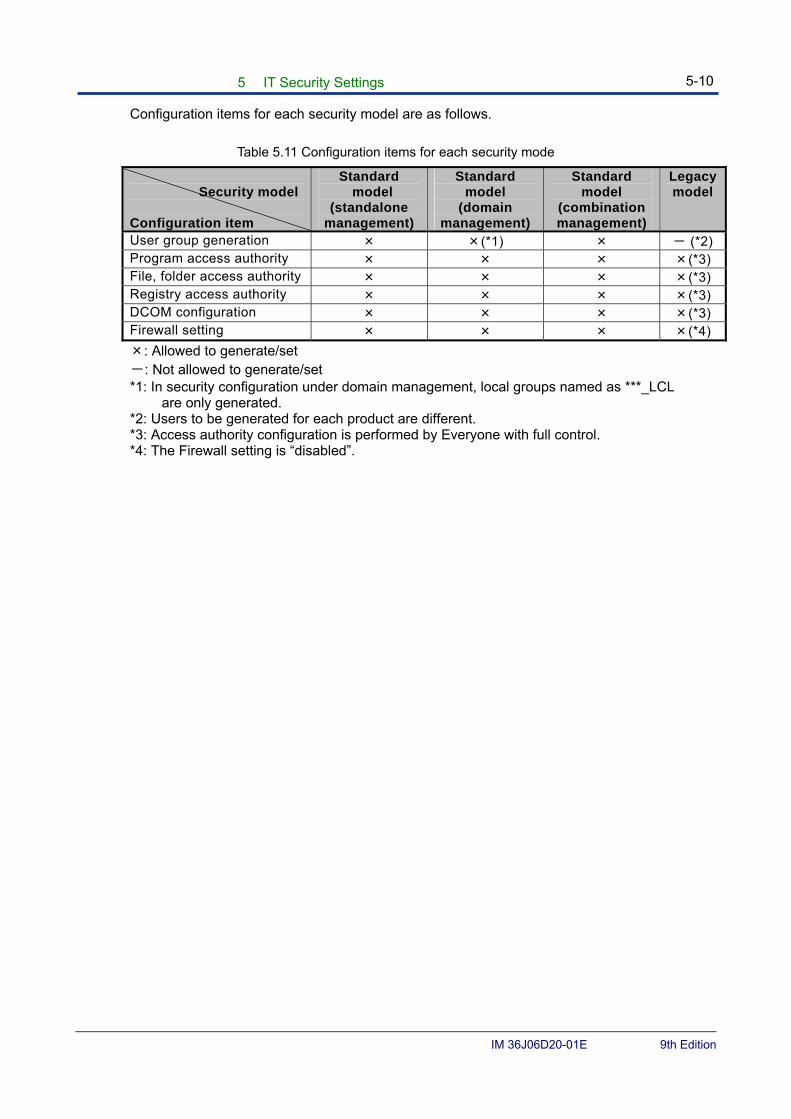
5 IT Security Settings 5-10
IM 36J06D20-01E 9th Edition
Configuration items for each security model are as follows.
Table 5.11 Configuration items for each security mode
Security model Configuration item
Standard model
(standalone management)
Standard model
(domain management)
Standard model
(combination management)
Legacymodel
User group generation × ×(*1) × - (*2)Program access authority × × × ×(*3) File, folder access authority × × × ×(*3) Registry access authority × × × ×(*3) DCOM configuration × × × ×(*3) Firewall setting × × × ×(*4)
×: Allowed to generate/set -: Not allowed to generate/set *1: In security configuration under domain management, local groups named as ***_LCL
are only generated. *2: Users to be generated for each product are different. *3: Access authority configuration is performed by Everyone with full control. *4: The Firewall setting is “disabled”.
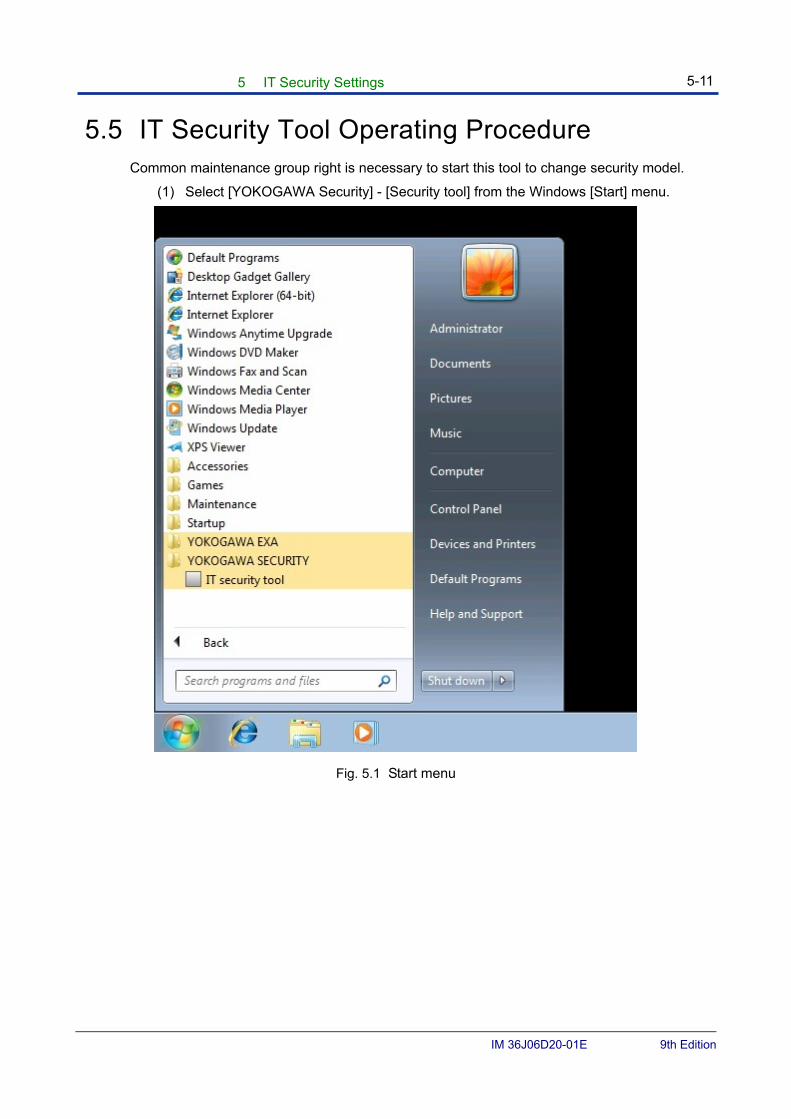
5 IT Security Settings 5-11
IM 36J06D20-01E 9th Edition
5.5 IT Security Tool Operating Procedure
Common maintenance group right is necessary to start this tool to change security model.
(1) Select [YOKOGAWA Security] - [Security tool] from the Windows [Start] menu.
Fig. 5.1 Start menu
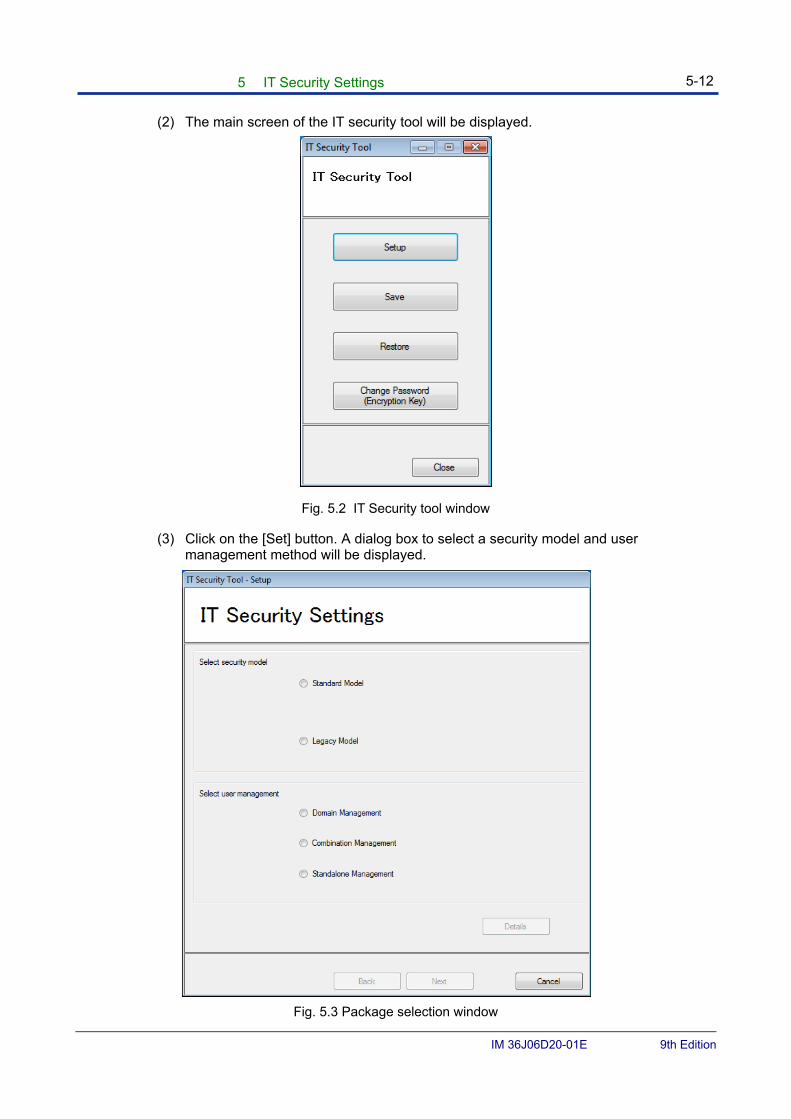
5 IT Security Settings 5-12
IM 36J06D20-01E 9th Edition
(2) The main screen of the IT security tool will be displayed.
Fig. 5.2 IT Security tool window
(3) Click on the [Set] button. A dialog box to select a security model and user management method will be displayed.
Fig. 5.3 Package selection window
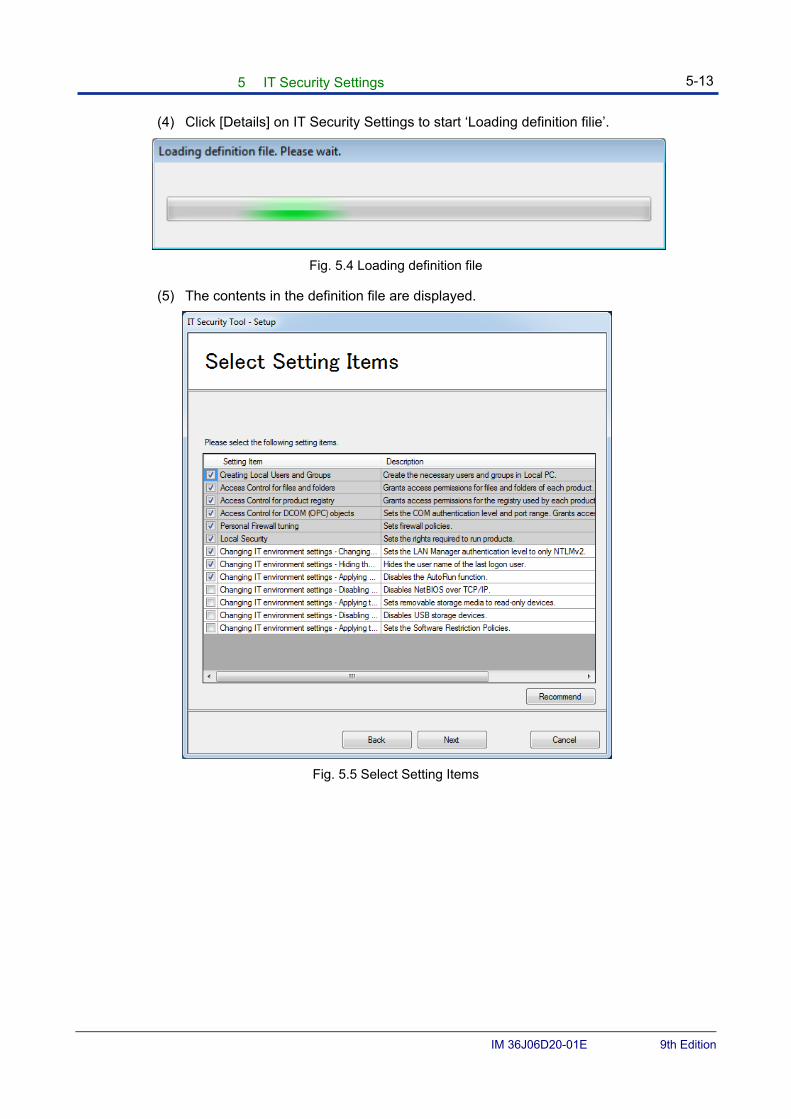
5 IT Security Settings 5-13
IM 36J06D20-01E 9th Edition
(4) Click [Details] on IT Security Settings to start ‘Loading definition filie’.
Fig. 5.4 Loading definition file
(5) The contents in the definition file are displayed.
Fig. 5.5 Select Setting Items

5 IT Security Settings 5-14
IM 36J06D20-01E 9th Edition
(6) Click Next, then ‘Confirm Setting Information’ appears.
Fig. 5.6 Confirm Setting Information
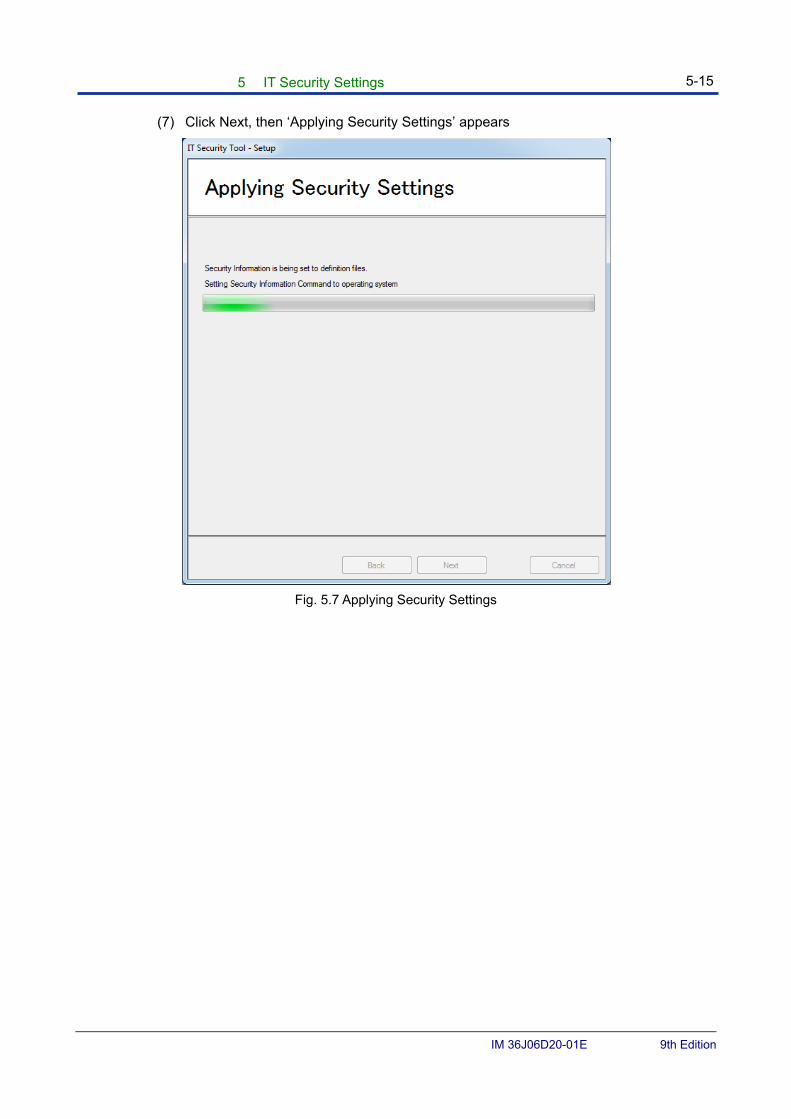
5 IT Security Settings 5-15
IM 36J06D20-01E 9th Edition
(7) Click Next, then ‘Applying Security Settings’ appears
Fig. 5.7 Applying Security Settings
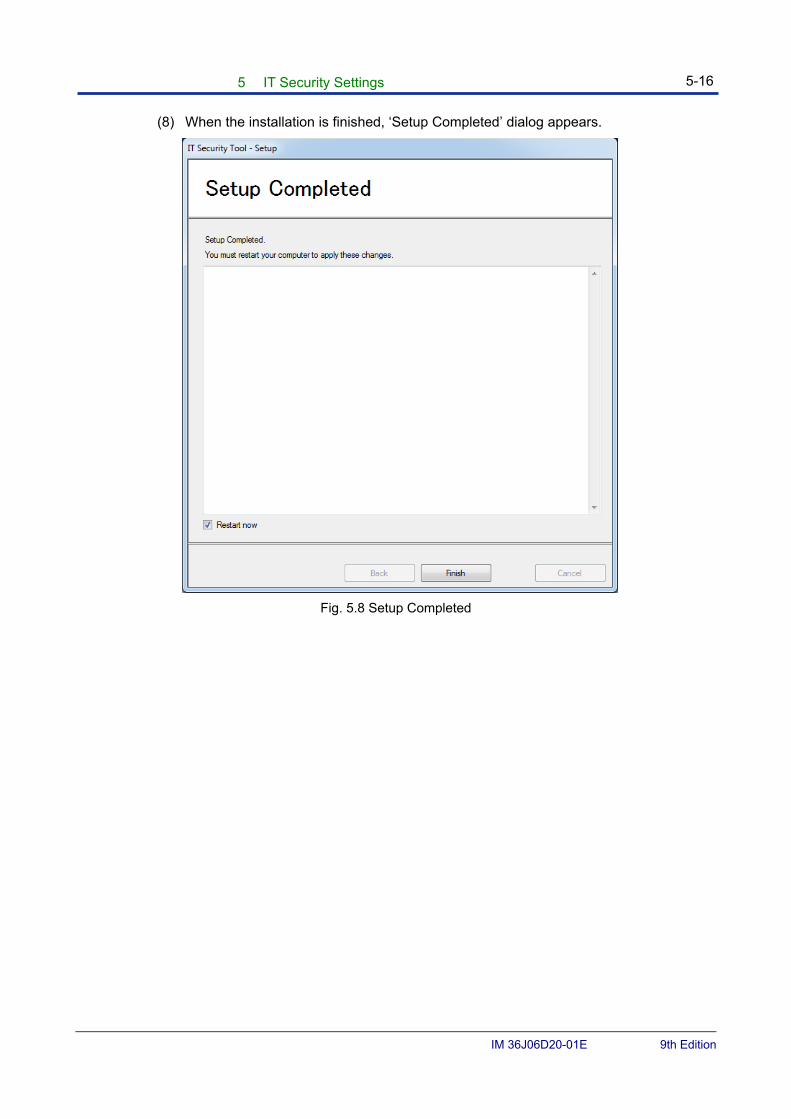
5 IT Security Settings 5-16
IM 36J06D20-01E 9th Edition
(8) When the installation is finished, ‘Setup Completed’ dialog appears.
Fig. 5.8 Setup Completed
5 IT Security Settings 5-17
IM 36J06D20-01E 9th Edition
5.6 Security model change or new setting Start the IT security setup tool to perform change or reconfiguration of the security model.
To do this, use the following procedure.
(1) If the user management is set to “domain management” or “combined management” after change or reconfiguration of the security model, get the PC involved in the domain.
(2) Logon with an appropriate user account among the following.
Table 5.12 user account
Security model Necessary authority Before changing After changing
Legacy Legacy Local user account belonging to the following user groups ・”Administrators” of local PCs (*1) ・”EXA_MAINTENANCE” of local PCs
Standard (Stand-alone)Standard
(Stand-alone) Legacy
Standard (Stand-alone)Legacy Standard (Domain) /
Standard (Combination)Domain user account belonging to the following user groups • “Domain Admins” of the domain or
“Administrators” of local PCs (*1) • “EXA_MAINTENANCE” of local PCs
Standard (Domain) / Standard (Combination)
Standard (Domain) / Standard
(Combination)
Legacy Local user account belonging to the following user groups ・”Administrators” of local PCs (*1) ・”EXA_MAINTENANCE_LCL” of local PCs
Standard (Stand-alone)
Standard (Domain) / Standard (Combination)
Domain user account belonging to the following user groups • “Domain Admins” of the domain or “Administrators” of local PCs (*1) • “EXA_MAINTENANCE” of the domain
*1:If a user account belongs to the local “Administrators”, it is necessary to register the required users and groups in the domain server in advance. For information about users and groups to be registered, refer to “5.3 User Management and User/Group of Windows”.
(3) Start the IT security tool from the following menus.
[Programs] – [YOKOGAWA SECURITY] – [IT Security Tool] in the Windows Start Menu
(4) Select [Settings] from the [Main Menu] screen.
(5) Select either “Standard model” or “Legacy model” in the “Security model option” field.Additionally, select one of “Domain management”, “Combination management”, and “Standalone management” in the “User management option” field. After selecting both options, click on [Next].
(6) When security setup has been completed, an error display area appears on the screen.
(7) Windows will restart.
(8) If the user management is changed from “Domain management” or “Combination management” to “Standalone management”, delete the PC from the domain.
5 IT Security Settings 5-18
IM 36J06D20-01E 9th Edition
This completes change or reconfiguration of the security model.
Please note that when security model of Exarqe is changed, the security model of the other YOKOGAWA products (*1) installed in the same PC will be changed. (*1) Following YOKOGAWA Products ・CENTUM VP R5.01 or later ・Exaopc R3.70 or later ・Exasmoc R4.03 or later ・Exaplog R3.40 or later ・Exapilot R3.90 or later In some cases of coexistences only legacy model is supported. Please refer to ‘6. Combine Exarqe and other products’.
5 IT Security Settings 5-19
IM 36J06D20-01E 9th Edition
5.7 IT Security Tool and Other Functions
The IT security tool has the following functions in addition to the “security model change and reconfiguration” function.
Save
Restoration
Password (encryption key) change
This section describes the above IT security tool functions and operating procedures.
■ Save If any security setting is changed with the Windows tool, the “Save” function is allowed to save the security settings of a local PC.
(1) Start the IT security tool from the following menus.
[Programs] – [YOKOGAWA SECURITY] – [IT Security Tool] in the Windows Start Menu
(2) After the IT security tool has started, click on the [Save] button.
(3) The Saving Destination Selection dialog is displayed. Specify a saving destination and enter necessary information. Click on the [Next] button
(4) The input dialog for a default account password the account is displayed. A password inputted in this dialog is saved as an initial password. After inputting a password, click on the [Next] button.
The default account password will be used when recover the saved accounts. When recover the saved accounts, if an account achieve is not found in the local PC, a new account will be created. All the newly created accounts will be assigned with a same password. When recovering an account, if the password of the account does not meet the equipment of the password policy, an error will occur, and this password will be used as the initial password. You will be prompted to change the password when logon this account next time.
(5) The Password dialog for encrypting saved data is displayed. After inputting an encryption key, click on the [Next] button.
5 IT Security Settings 5-20
IM 36J06D20-01E 9th Edition
・If the password (encryption key) is not met, data encryption will not be made. The users are required to properly manage their password (encryption key).
・A password (encryption key) must be of one character or more. ・ Characters available for a password (encryption key) are upper/lower-case
alphabetic characters, numeric characters, and marks (` ~ ! @ # $ % ^ & * ( ) _ + - = { } | \ : " ; ' < > ? , . /). Double-byte characters are not available.
(6) A dialog indicating that security setting is being saved will appear.
(7) When saving has been completed, the Finish dialog is displayed. If any item failed to be saved, information on fail-to-save data is displayed. Click on the [Finish] button to complete saving.
When saving the security settings, two files with extensions “.hed” and “.csf” are created as a set. To restore the security settings, this set of files are required.
■ Restoration This function is to change the security setting of a local PC to that setting saved using the “Save” function.
(1) Start the IT security tool from the following menus.
[Programs] – [YOKOGAWA SECURITY] – [IT Security Tool] in the Windows Start menu
(2) After the IT security tool has started, click on the [Restore] button.
(3) The Setting File Selection dialog is displayed. Select a setting file used for implementing the “Restore” function.
(4) The Password (Encryption Key) Input dialog is displayed to load a selected file. Input the password (encryption key) that has been set at the time of security setting save.
Click on the [OK] button.
(5) Detailed information is displayed in the Setting File Selection dialog. Click on the“Next” button.
(6) If it takes much time to load the setting file, a dialog indicating that the file is being loaded will appear.
(7) The Setting Content Confirmation dialog is displayed. Click on the “Next” button.
(8) A dialog indicating that the security setting is being performed will appear.
(9) When the setting has been completed, the Finish dialog is displayed. If any item failed to be configured, fail-to-configure data is displayed. Select the check box of [Restart right now], and then click on the [Finish] button.
5 IT Security Settings 5-21
IM 36J06D20-01E 9th Edition
To restore the security settings, set the same security model to the destination as the security model of the source.
■ Password (encryption key) change This function is allowed to change a password (encryption key) to the Security Setting file.
(1) Start the IT security tool from the following menus.
[Programs] – [YOKOGAWA SECURITY] – [IT Security Tool] in the Windows Start Menu
(2) After the IT security tool has started, click on the [Change password (encryption key] button.
(3) The Security Information Backup File Selection dialog is displayed. If a single file is replaced, select [Single File], and then entering the source file name and the path and the name after the change. Click on the “Next” button. If multiple files are replaced as a whole, select [Multiple Files] and then select a source folder to be replaced and a replacing folder. Click on the “Next” button.
・If multiple files to be replaced are selected, the files with the same file names as those in a source folder to be replaced are saved in a replacing folder. Additionally, only save files with the same password (encryption key) in a single folder.
・For two files (extensions “.hed” and “.csf”) created as a set at the time of saving, change each password to the same encryption key. If a folder contains only one set of files (with extensions “.hed” and “.csf” created at the same time) or if the passwords (encryption keys) for existing multiple sets of files are changed to the same one, select [Multiple Files] in the dialog. If the password (encryption key) for only one set of files is changed from among multiple sets in a holder, select [Single File] and then first change the password (encryption key) of a file with extension “.hed” and next change the password (encryption key) of a file with extension “.csf” in the same way.
(4) The Password (Encryption key) Change dialog is displayed. After inputting necessary information, click on the [Next] button.
(5) A dialog indicating that a password (encryption key) is being changed will appear.
(6) When password (encryption key) change has been completed, the Finish dialog is displayed.
(7) Click [Finish] button.
6. Combine Exarqe and other products 6-1
IM 36J06D20-01E 9th Edition
6. Combine Exarqe and other products The items which must be set for connection to or coexistence with a package other than Exasmoc/Exarqe are shown in the following.
For coexistence with other products, the security model must be matched. In case of different security models, one package may not operate depending on the firewall setting (enabled/disabled).
In case of coexistence with a product not compatible with IT security, the Exarqe security model becomes the “Legacy model.”
The following setting items are set when your Exarqe is connected to each package.
Integration Code: When connecting Exarqe with other systems, you must check the Integration code in the documentation of both systems. The Integration code represents the combination of YOKOGAWA system products. Follow the accompanying requirements and procedures of the code with a higher value in the last two digits. ex.) 0103-0201-03-01 (1st P-code)-(2nd P-Code)- (Integration type)- (Revision)
■ Creating the Execution Account If the Exarqe server is set as the standard model, execution account “ISS_PROCESS” needs to be created in the PC where the server is to be connected.
Execution account “ISS_PROCESS” is created using the process execution account creation tool.
The process execution account creation tool is contained in the DVD-ROM supplied with the Exarqe package.
The process execution account creation tool is executed by the user who has the administrative authority.
Set the DVD-ROM of Exarqe in the PC where the account is to be created, and then double-click the left mouse button to execute “CreatePLTProcess.exe” in the “TOOLS” folder contained in the DVD-ROM.
The user needs to perform manual operation for adding the account to the user group.
6. Combine Exarqe and other products 6-2
IM 36J06D20-01E 9th Edition
■ Exasmoc (R4.03) ● Exasmoc Server
Coexistence with Exasmoc server is supported.
● Exasmoc Client Coexistence with Exasmoc client is supported.
6. Combine Exarqe and other products 6-3
IM 36J06D20-01E 9th Edition
■ CENTUM VP (R5.01)
● Connection to CENTUM VP R5.01 Not Applicable
● Coexistence with CENTUM VP R5.01
Exarqe client can coexist with CENTUM VP R5.01 HIS IT Security model of Exarqe and CENTUM VP must be the same. (Exarqe client integration code: 0101-1051-01-02)
For more detail refer to Ch.7.
6. Combine Exarqe and other products 6-4
IM 36J06D20-01E 9th Edition
■ CS3000(R3.09) ● Connection to CENTUM CS3000 R3.09
Not Applicable
● Coexistence with CENTUM CS3000 R3.09 Exarqe R4.03 client can not coexist with CENTUM CS3000 R3.09 HIS.
Exarqe R3.06 client installer is included in Exarqe R4.03 package instead of R4.03 client. For detail refer to ‘3.2.1. Client install to CS3000 R3.09.00’
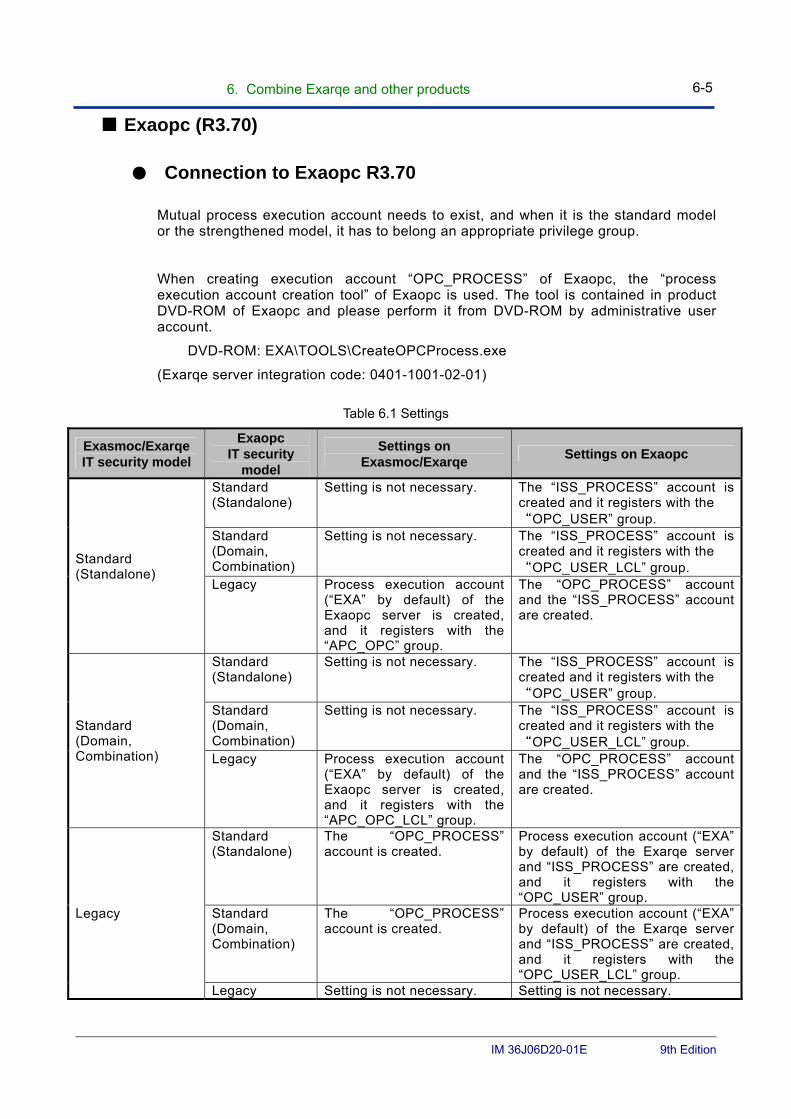
6. Combine Exarqe and other products 6-5
IM 36J06D20-01E 9th Edition
■ Exaopc (R3.70)
● Connection to Exaopc R3.70
Mutual process execution account needs to exist, and when it is the standard model or the strengthened model, it has to belong an appropriate privilege group.
When creating execution account “OPC_PROCESS” of Exaopc, the “process execution account creation tool” of Exaopc is used. The tool is contained in product DVD-ROM of Exaopc and please perform it from DVD-ROM by administrative user account.
DVD-ROM: EXA\TOOLS\CreateOPCProcess.exe
(Exarqe server integration code: 0401-1001-02-01)
Table 6.1 Settings
Exasmoc/Exarqe IT security model
Exaopc IT security
model
Settings on Exasmoc/Exarqe
Settings on Exaopc
Standard (Standalone)
Standard (Standalone)
Setting is not necessary. The “ISS_PROCESS” account is created and it registers with the “OPC_USER” group.
Standard (Domain, Combination)
Setting is not necessary. The “ISS_PROCESS” account is created and it registers with the “OPC_USER_LCL” group.
Legacy Process execution account (“EXA” by default) of the Exaopc server is created, and it registers with the “APC_OPC” group.
The “OPC_PROCESS” account and the “ISS_PROCESS” account are created.
Standard (Domain, Combination)
Standard (Standalone)
Setting is not necessary. The “ISS_PROCESS” account is created and it registers with the “OPC_USER” group.
Standard (Domain, Combination)
Setting is not necessary. The “ISS_PROCESS” account is created and it registers with the “OPC_USER_LCL” group.
Legacy Process execution account (“EXA” by default) of the Exaopc server is created, and it registers with the “APC_OPC_LCL” group.
The “OPC_PROCESS” account and the “ISS_PROCESS” account are created.
Legacy
Standard (Standalone)
The “OPC_PROCESS” account is created.
Process execution account (“EXA” by default) of the Exarqe server and “ISS_PROCESS” are created, and it registers with the “OPC_USER” group.
Standard (Domain, Combination)
The “OPC_PROCESS” account is created.
Process execution account (“EXA” by default) of the Exarqe server and “ISS_PROCESS” are created, and it registers with the “OPC_USER_LCL” group.
Legacy Setting is not necessary. Setting is not necessary.
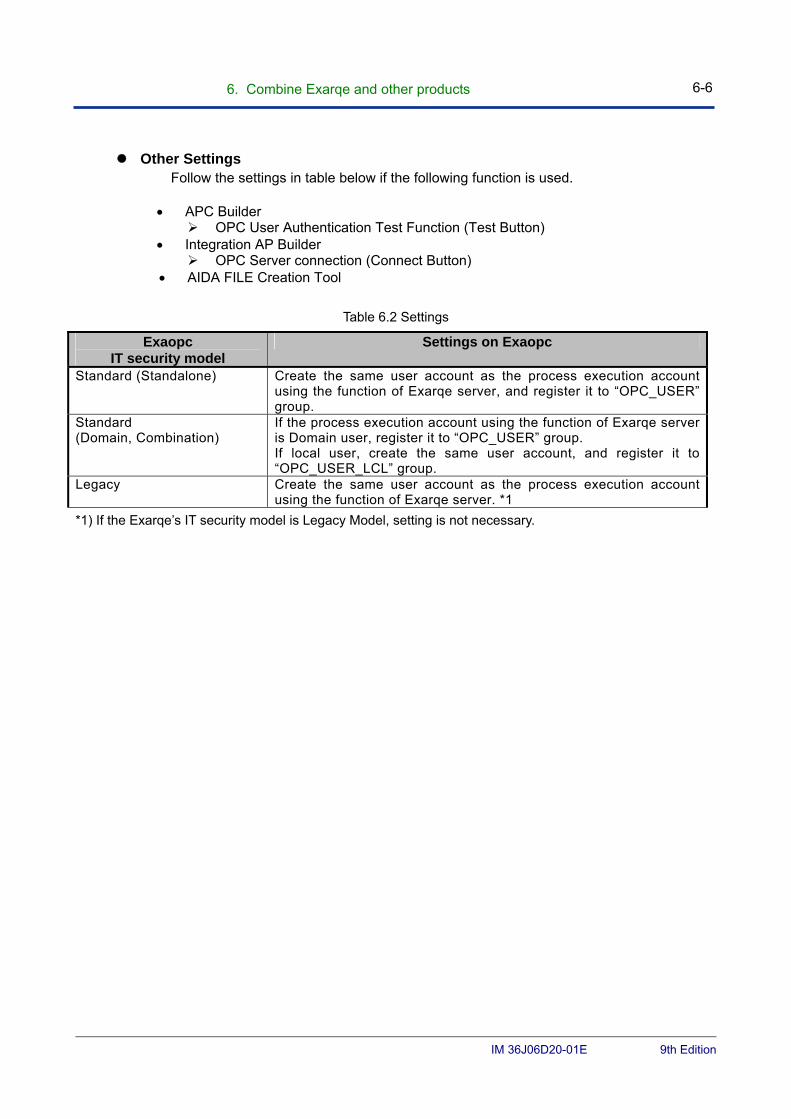
6. Combine Exarqe and other products 6-6
IM 36J06D20-01E 9th Edition
Other Settings Follow the settings in table below if the following function is used.
APC Builder OPC User Authentication Test Function (Test Button)
Integration AP Builder OPC Server connection (Connect Button)
AIDA FILE Creation Tool
Table 6.2 Settings
Exaopc IT security model
Settings on Exaopc
Standard (Standalone) Create the same user account as the process execution account using the function of Exarqe server, and register it to “OPC_USER” group.
Standard (Domain, Combination)
If the process execution account using the function of Exarqe server is Domain user, register it to “OPC_USER” group. If local user, create the same user account, and register it to “OPC_USER_LCL” group.
Legacy Create the same user account as the process execution account using the function of Exarqe server. *1
*1) If the Exarqe’s IT security model is Legacy Model, setting is not necessary.
6. Combine Exarqe and other products 6-7
IM 36J06D20-01E 9th Edition
● Coexistence with Exaopc R3.70 IT Security model of Exarqe server and Exaopc R3.70 must be the same. To use the common tools with Exaopc, register the user account to the group created by Exaopc. (Exarqe server integration code: 0401-1001-03-02)
Other settings The same settings as connection with Exaopc R3.70 are required if the following function is used. .
APC Builder OPC User Authentication Test Function (Test Button)
Integration AP Builder OPC Server connection (Connect Button)
AIDA FILE Creation Tool
6. Combine Exarqe and other products 6-8
IM 36J06D20-01E 9th Edition
■ Exaquantum (R2.60)
● Connection to Exaquantum R2.60 Not applicable.
● Coexistence with Exaquantum R2.60
Exarqe client R4.03 can coexist with Exaquantum client R2.60. Set the security model of Exarqe as the “Legacy model. In case that Exarqe client will coexist with Exaquantum Explore client, install Exarqe client later. (Exarqe client integration code: 0851-1051-01-02)
In case that Exarqe client R4.03 will coexist with Exaquantum R2.60.00 client, revision up of Exaquantum to R2.60.05 is required. Exaquantum R2.60.05 is stored in the following folder in the Exarqe product DVD-ROM: Destination folder: EXA\COMMOM_EXA_EQR26005 Execute installation according to instructions of Installation Guide (“Patch Installation.txt” for English, “Patch InstallationJp.txt” for Japanese) stored in the folder shown above. When revision up of Exaquantum has been executed after installing Exarqe R4.03, perform the security setting of Exarqe again by using the IT security tool for Exarqe.
6. Combine Exarqe and other products 6-9
IM 36J06D20-01E 9th Edition
■ Other SBP’s There are following SBP products;
Exapilot (R3.90) Exaplog (R3.40)
● Connection
Not applicable.
● Coexistence
Exarqe client can coexist with their client. IT Security model of Exarqe and them must be the same.
Exapilot (R3.90) (Exarqe client integration code: 0651-1051-01-02)
Exaplog (R3.40)
(Exarqe client integration code: 0751-1051-01-02)
7. Notice: Installation on HIS 7-1
IM 36J06D20-01E 9th Edition
7. Notice: Installation on HIS
In order to install on CENTUM VP R5.01, the following procedure is diffrent from Chapter 3 Clinet installation.
7. Notice: Installation on HIS 7-2
IM 36J06D20-01E 9th Edition
7.1 Installation Procedure ■ Preparation
When you set [Auto logon setting] including HIS type SSO, follows the procedures below. (1) Reset [Auto logon setting] and restart PC. (2) Logon from the same account which was used at CENTUMVP security setting.
When the account which was used for the security setting was used for HIS reboot, reset the HIS start setting and restart PC.
■ Preparation for IT security setting
● Standard Standalome model: Execute Session 2.2 [preparation for IT Security Settings] from the administrator account
belonging to [CTM_ MAINTENACE] group.
● Standard Domain model: Work for Domain Controller PC: ・ Execute Session 2.2 [preparation for IT Security Settings]. ・ Add the user accounts belonging to [EXA_MAINTENANCE] to [CTM_MAINTENANCE]
domain user account. Work for PCs where Exasmoc/Exarqe is installed:
Execute Session 2.2 [preparation for ITSecurity Settings] from the administrator account belonging to [CTM_ MAINTENACE] group.
■ Exasmoc/ExarqeClient Installation Execute the Web client installation in the same way as Session 3.2 [Exasmoc/Exarqe client install] from the account for IT Security Setting.
■ After Installation Settings
● Setting for Exasmoc/Exarqe Follow the procedure in Session 3.3 [Settings after Installation].
■ Settings for Connection Refer to Section 3.4 [Settings for Connection].
7. Notice: Installation on HIS 7-3
IM 36J06D20-01E 9th Edition
7.2 Settings after Installation in case of HIS type SSO
In case of HIS type SSO, please do not assign OFFUSER the authentication to access from the security point of view.
So you cannot call each APC application from the start menu on the auto logon environment. To call APC applications, the following preparation is necessary. Refer to CENTUM VP Instruction Manual in detail.
Security setting of user account to user in
Setting of Function key preset menu
■ Security Setting of User Account to User In
For user accounts defined in [Settings for Connection] in chapter 2, execute the following setting. Refer to CENTUM VP Instruction manual.
(1) Register the above user accounts to [CENTUM VP] group.
(2) Define to make user in.
■ Setting of Function Key Preset Menu
Assign each APC tool to the function key from [Run] in the preset menu, if necessary,
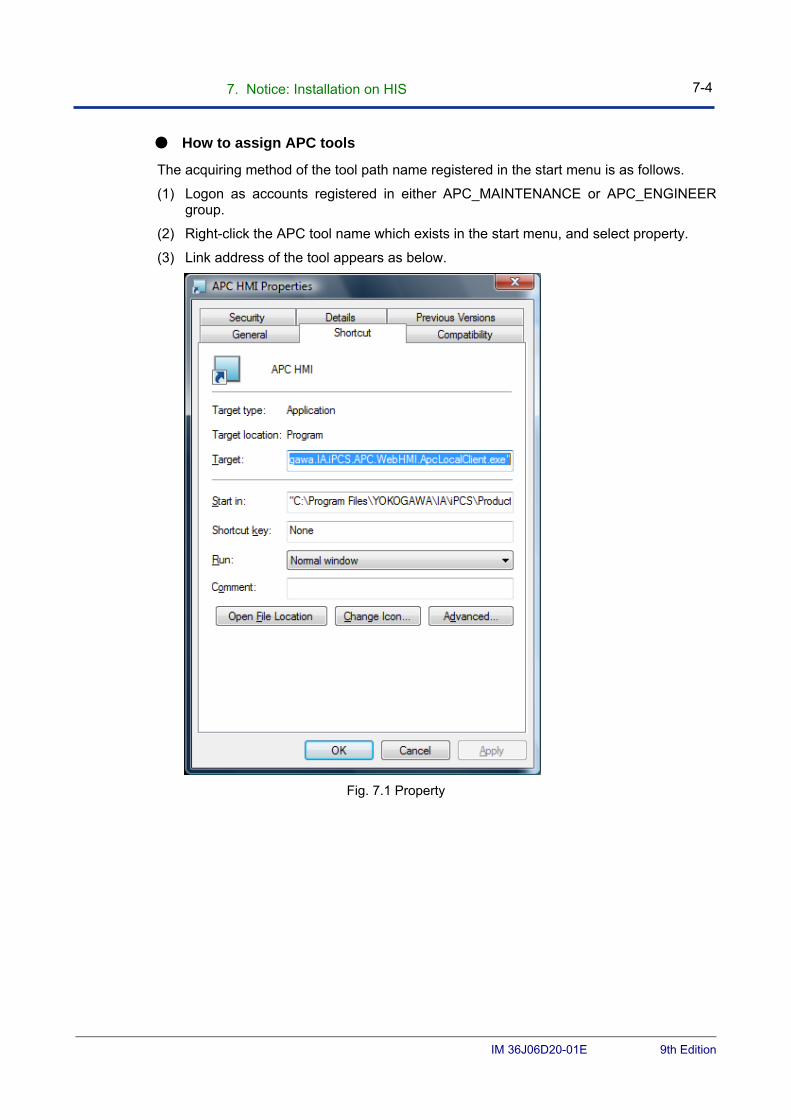
7. Notice: Installation on HIS 7-4
IM 36J06D20-01E 9th Edition
● How to assign APC tools
The acquiring method of the tool path name registered in the start menu is as follows.
(1) Logon as accounts registered in either APC_MAINTENANCE or APC_ENGINEER group.
(2) Right-click the APC tool name which exists in the start menu, and select property.
(3) Link address of the tool appears as below.
Fig. 7.1 Property
7. Notice: Installation on HIS 7-5
IM 36J06D20-01E 9th Edition
The correspondence of APC tools in the start menu and the pass names are as follows.
Table 7.1 APC tool and their pass name in the start menu
Name on Start menu Path APC Builder*1 %ProgramFiles%\Yokogawa\IA\iPCS\Products\APC\Program\
Yokogawa.IA.iPCS.APC.Builder.ScheduleBuilder.exe APC HMI*1 %ProgramFiles%\Yokogawa\IA\iPCS\Products\APC\Program\
Yokogawa.IA.iPCS.APC.WebHMI.ApcLocalClient.exe Client Builder*1 %ProgramFiles%\Yokogawa\IA\iPCS\Products\APC\Program\
Yokogawa.IA.iPCS.APC.Builder.ClientWindowBuilder.exe Role Based Builder*1 %ProgramFiles%\Yokogawa\IA\iPCS\Products\APC\Program\
Yokogawa.IA.iPCS.APC.Builder.RoleBasedBuilder.exe Integration Builder <Exa Top Folder>\Program\ZACItgBuilder.exe Software Configuration Viewer <Exa Top Folder>\Program\PMCSftView.exe
*1: %ProgramFiles% represent the folder below. The following example is based on the assumption that C drive is system drive.
OS: Windows Vista, Windows Server 2008: “C: \Program Files” OS: Windows 7, Windows Server 2008 R2: “C: \Program Files(x86)”
Assign Function key to APC application call From the function key assign of CENTUM builder, select the function, following to the procedure in CENTUM VP Instruction Manual.
Preset Menu Settings From HIS setting window, select [Preset Settings], following to the procedures in CENTUM VP Instruction Manual.

7. Notice: Installation on HIS 7-6
IM 36J06D20-01E 9th Edition
Blank Page