manual de usurario - fedena
DESCRIPTION
El presente documento es un manual de uso del sistema Fedena.TRANSCRIPT
Fedena User Guide version 2.1 www.projectfedena.org
©2011 Foradian Technologies Page 2
Contents
LOGGING IN................................................................................................................................................... 4
SETTINGS ....................................................................................................................................................... 9
HUMAN RESOURCE ..................................................................................................................................... 29
STUDENT ADMISSION ................................................................................................................................. 67
STUDENT DETAILS ....................................................................................................................................... 75
MANAGE NEWS ........................................................................................................................................... 78
MANAGE USER ............................................................................................................................................ 84
EXAMINATION ............................................................................................................................................. 90
TIMETABLE ................................................................................................................................................ 111
ATTENDANCE ............................................................................................................................................ 120
FINANCE .................................................................................................................................................... 125
CALENDAR & EVENTS ................................................................................................................................ 169
LEAVE SYSTEM .......................................................................................................................................... 180
MESSAGING SYSTEM ................................................................................................................................. 189
Fedena User Guide version 2.1 www.projectfedena.org
©2011 Foradian Technologies Page 3
IMPORTANT NOTE (18th August 2011)
Some of the features described in this ebook is outdated in Fedena version 2.1 release. Still you can use
this ebook to get a good knowledge on the workflow and different features of Fedena.

Fedena User Guide version 2.1 www.projectfedena.org
©2011 Foradian Technologies Page 4
LOGGING IN
Fedena User Guide version 2.1 www.projectfedena.org
©2011 Foradian Technologies Page 5
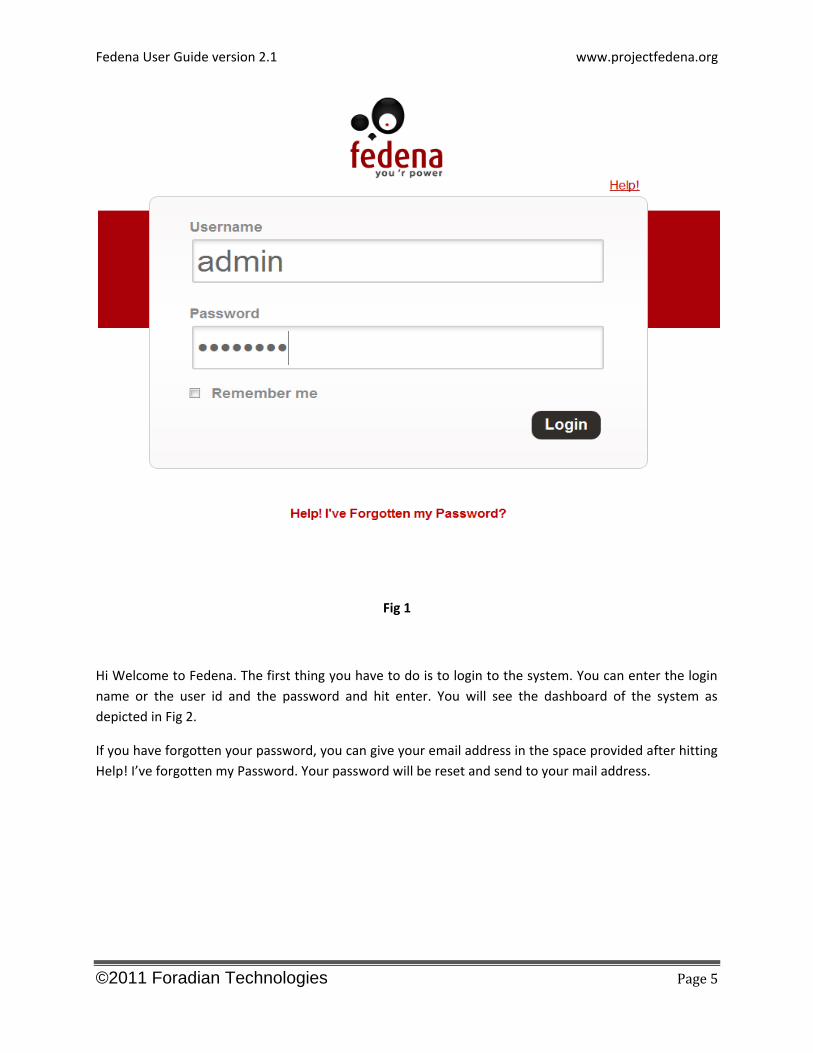
Fig 1
Hi Welcome to Fedena. The first thing you have to do is to login to the system. You can enter the login
name or the user id and the password and hit enter. You will see the dashboard of the system as
depicted in Fig 2.
If you have forgotten your password, you can give your email address in the space provided after hitting
Help! I’ve forgotten my Password. Your password will be reset and send to your mail address.
Fedena User Guide version 2.1 www.projectfedena.org
©2011 Foradian Technologies Page 6
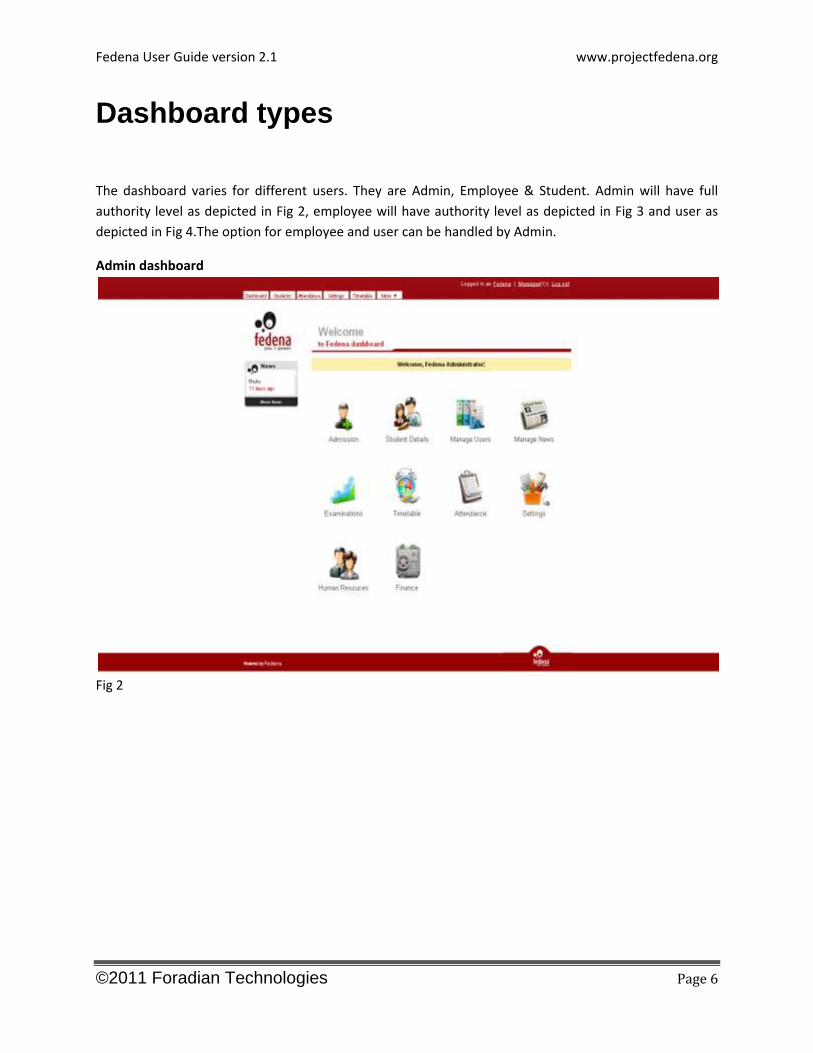
Dashboard types
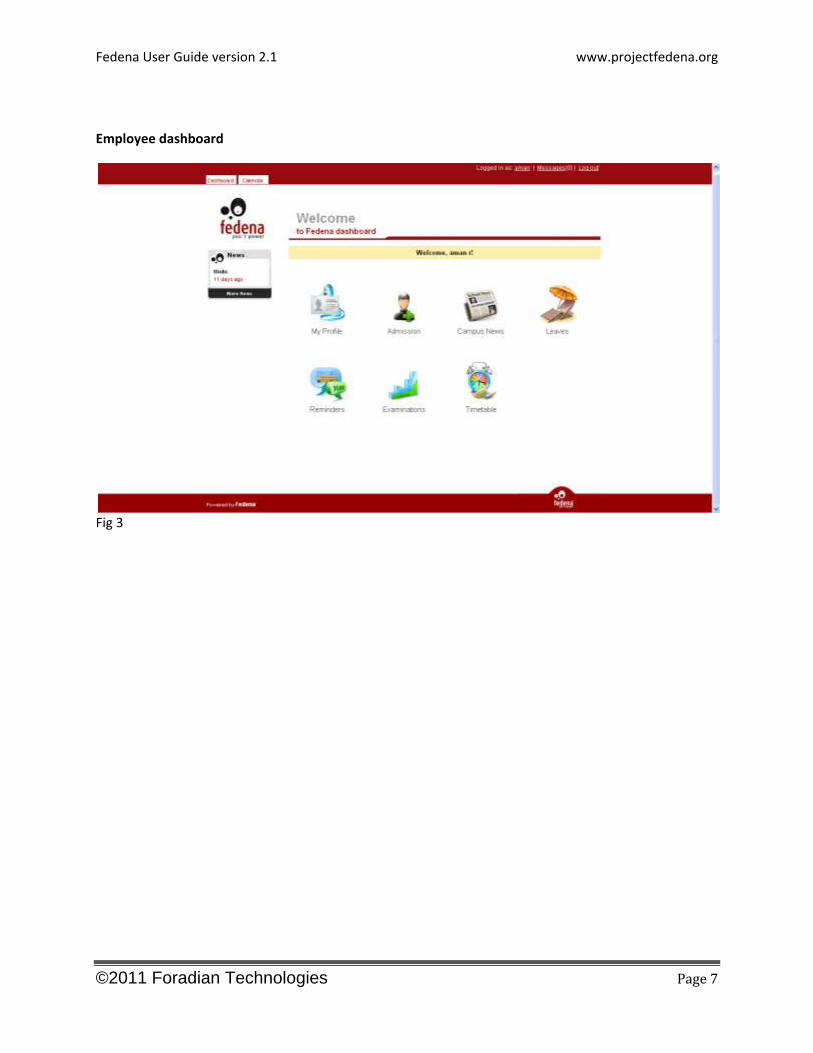
The dashboard varies for different users. They are Admin, Employee & Student. Admin will have full
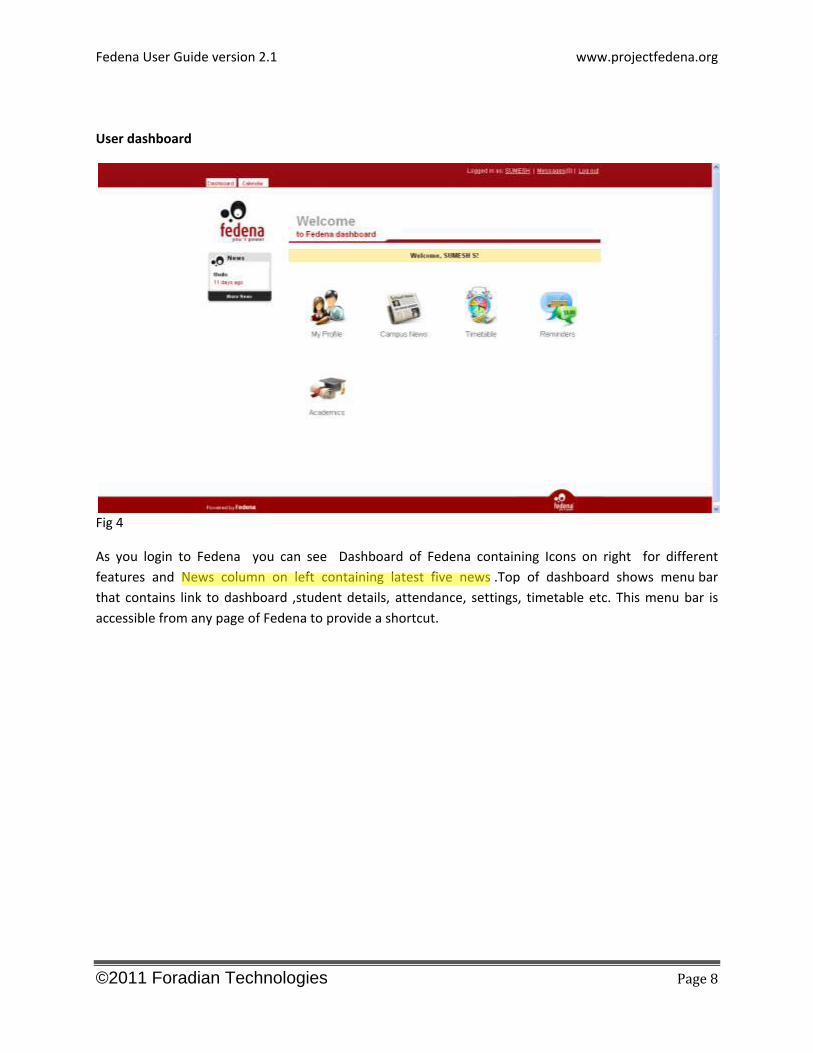
authority level as depicted in Fig 2, employee will have authority level as depicted in Fig 3 and user as
depicted in Fig 4.The option for employee and user can be handled by Admin.
Admin dashboard
Fig 2
Fedena User Guide version 2.1 www.projectfedena.org
©2011 Foradian Technologies Page 7
Employee dashboard
Fig 3
Fedena User Guide version 2.1 www.projectfedena.org
©2011 Foradian Technologies Page 8
User dashboard
Fig 4
As you login to Fedena you can see Dashboard of Fedena containing Icons on right for different
features and News column on left containing latest five news .Top of dashboard shows menu bar
that contains link to dashboard ,student details, attendance, settings, timetable etc. This menu bar is
accessible from any page of Fedena to provide a shortcut.

Fedena User Guide version 2.1 www.projectfedena.org
©2011 Foradian Technologies Page 9
SETTINGS
Fedena User Guide version 2.1 www.projectfedena.org
©2011 Foradian Technologies Page 10
Fig 5
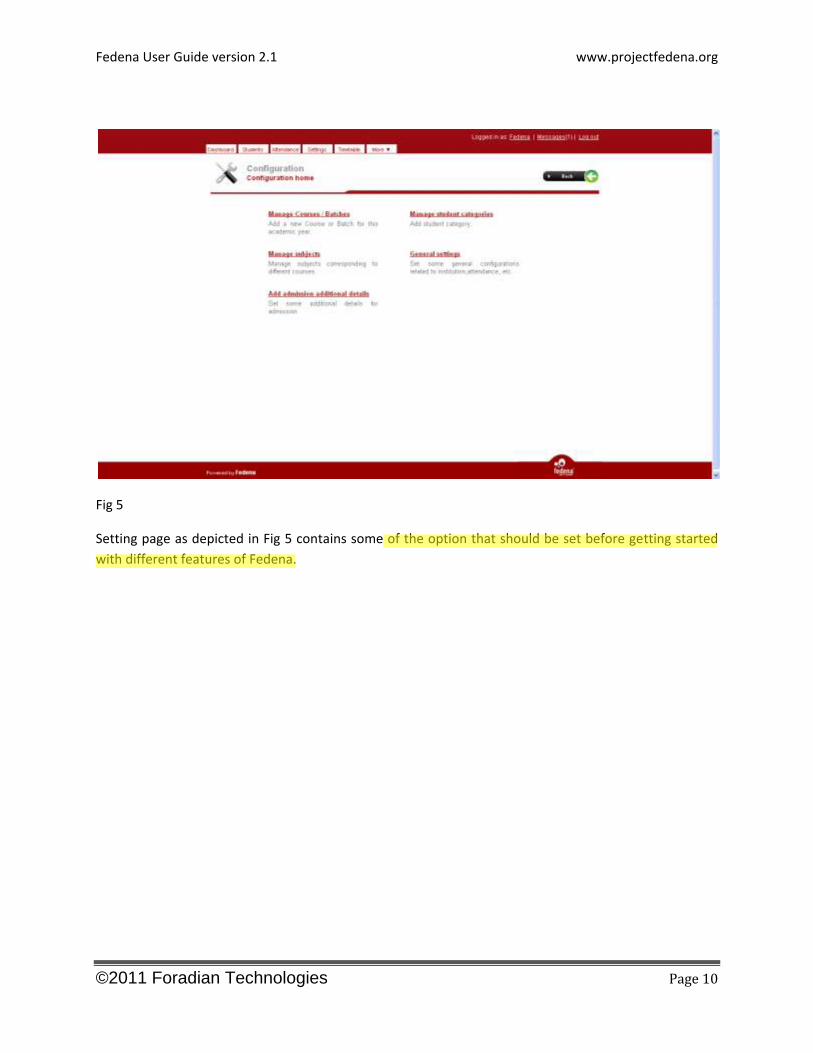
Setting page as depicted in Fig 5 contains some of the option that should be set before getting started
with different features of Fedena.
Fedena User Guide version 2.1 www.projectfedena.org
©2011 Foradian Technologies Page 11
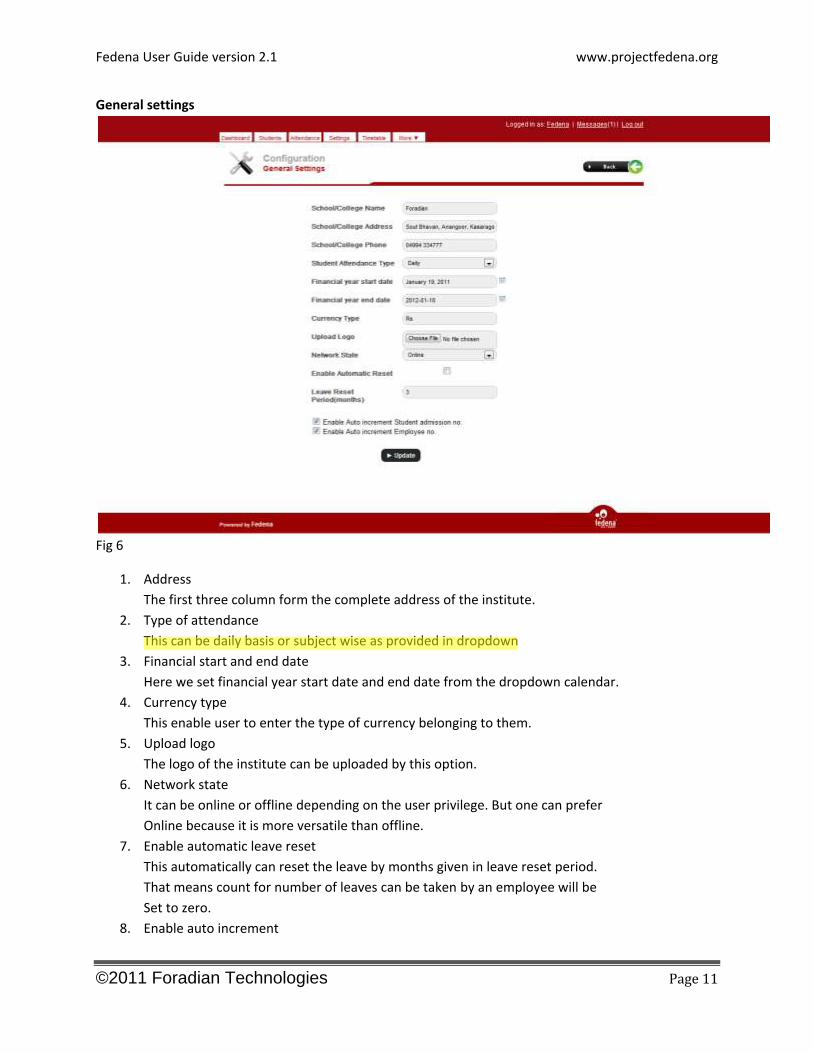
General settings
Fig 6
1. Address
The first three column form the complete address of the institute.
2. Type of attendance
This can be daily basis or subject wise as provided in dropdown
3. Financial start and end date
Here we set financial year start date and end date from the dropdown calendar.
4. Currency type
This enable user to enter the type of currency belonging to them.
5. Upload logo
The logo of the institute can be uploaded by this option.
6. Network state
It can be online or offline depending on the user privilege. But one can prefer
Online because it is more versatile than offline.
7. Enable automatic leave reset
This automatically can reset the leave by months given in leave reset period.
That means count for number of leaves can be taken by an employee will be
Set to zero.
8. Enable auto increment
Fedena User Guide version 2.1 www.projectfedena.org
©2011 Foradian Technologies Page 12
Auto increment of student admission number and employee number can be done
by checking the box.
`
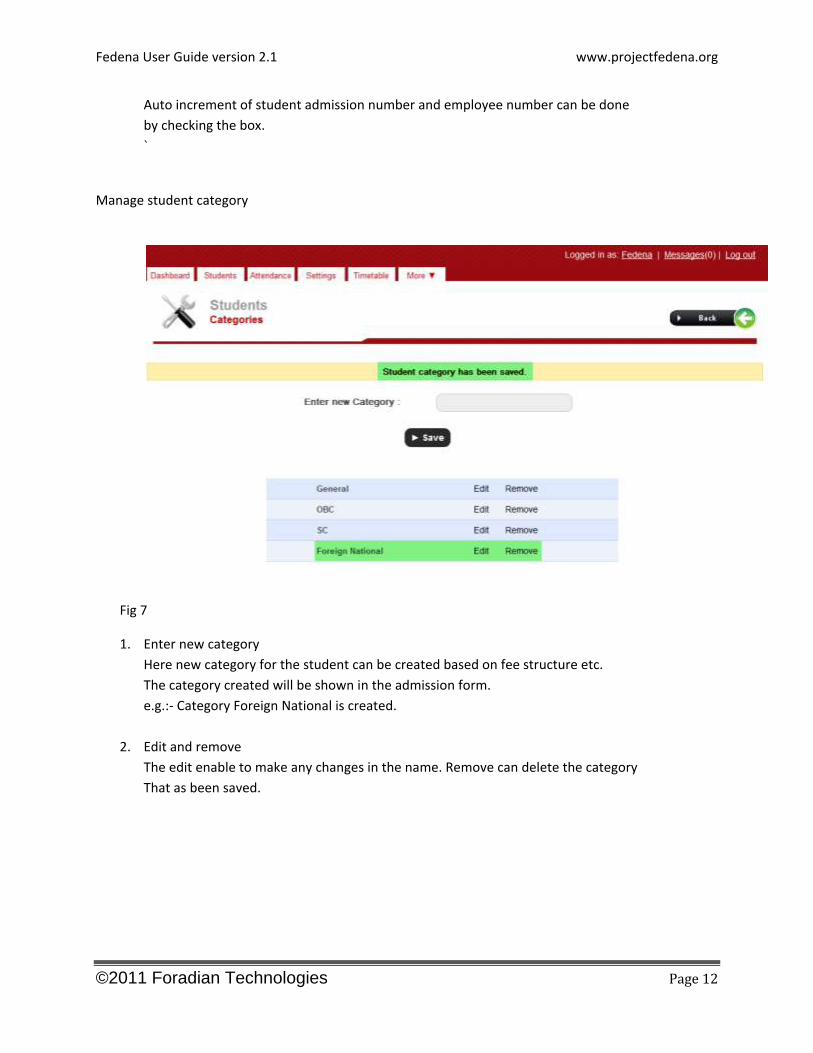
Manage student category
Fig 7
1. Enter new category
Here new category for the student can be created based on fee structure etc.
The category created will be shown in the admission form.
e.g.:- Category Foreign National is created.
2. Edit and remove
The edit enable to make any changes in the name. Remove can delete the category
That as been saved.
Fedena User Guide version 2.1 www.projectfedena.org
©2011 Foradian Technologies Page 13
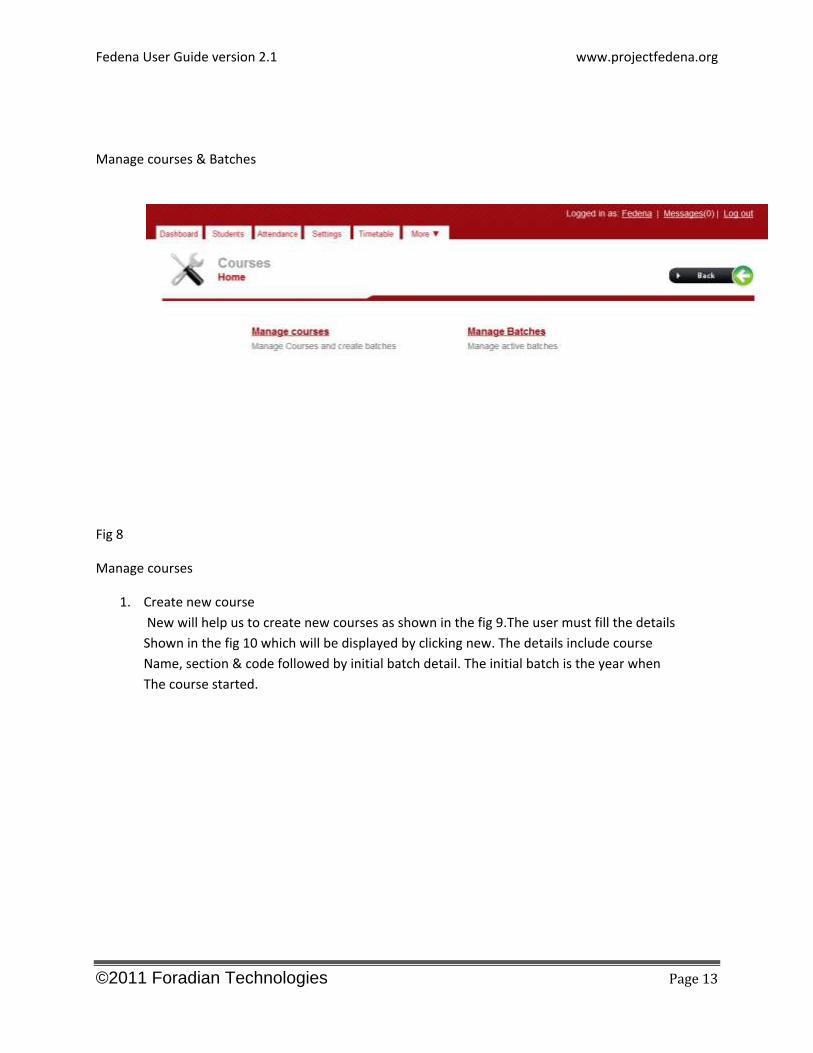
Manage courses & Batches
Fig 8
Manage courses
1. Create new course
New will help us to create new courses as shown in the fig 9.The user must fill the details
Shown in the fig 10 which will be displayed by clicking new. The details include course
Name, section & code followed by initial batch detail. The initial batch is the year when
The course started.

Fedena User Guide version 2.1 www.projectfedena.org
©2011 Foradian Technologies Page 14
Fig 9
Fig 10
Fedena User Guide version 2.1 www.projectfedena.org
©2011 Foradian Technologies Page 15
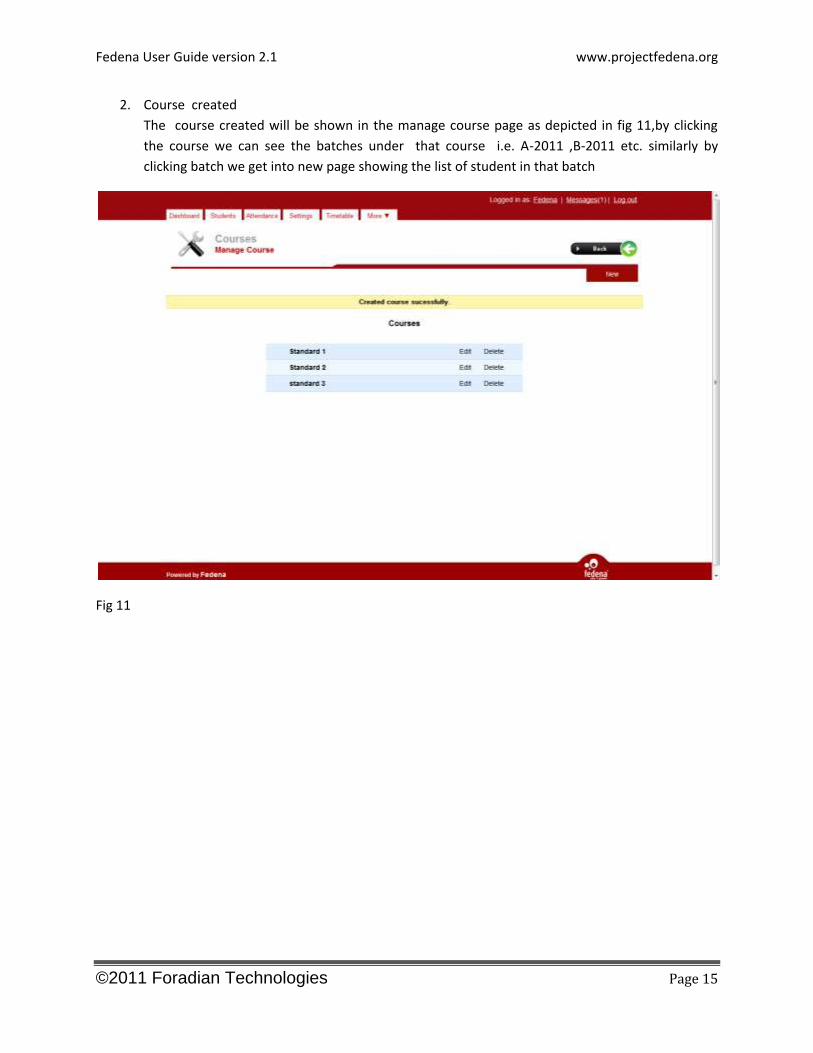
2. Course created
The course created will be shown in the manage course page as depicted in fig 11,by clicking
the course we can see the batches under that course i.e. A-2011 ,B-2011 etc. similarly by
clicking batch we get into new page showing the list of student in that batch
Fig 11
Fedena User Guide version 2.1 www.projectfedena.org
©2011 Foradian Technologies Page 16
Manage batches
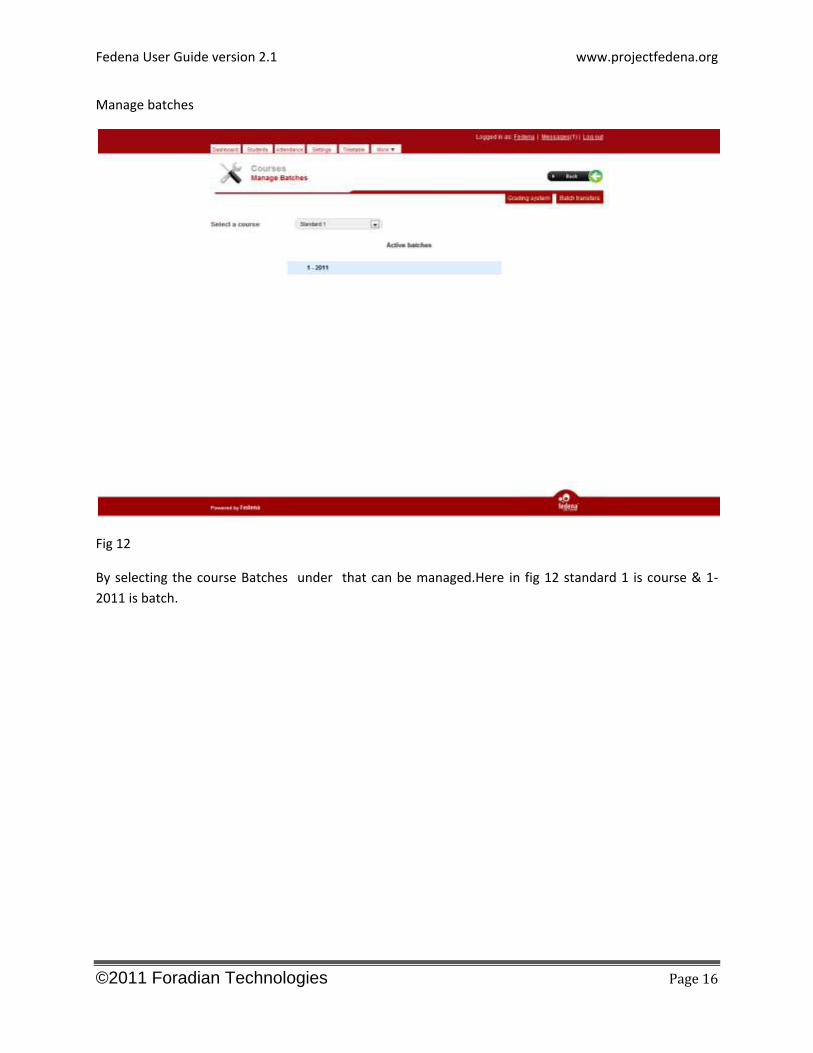
Fig 12
By selecting the course Batches under that can be managed.Here in fig 12 standard 1 is course & 1-
2011 is batch.
Fedena User Guide version 2.1 www.projectfedena.org
©2011 Foradian Technologies Page 17
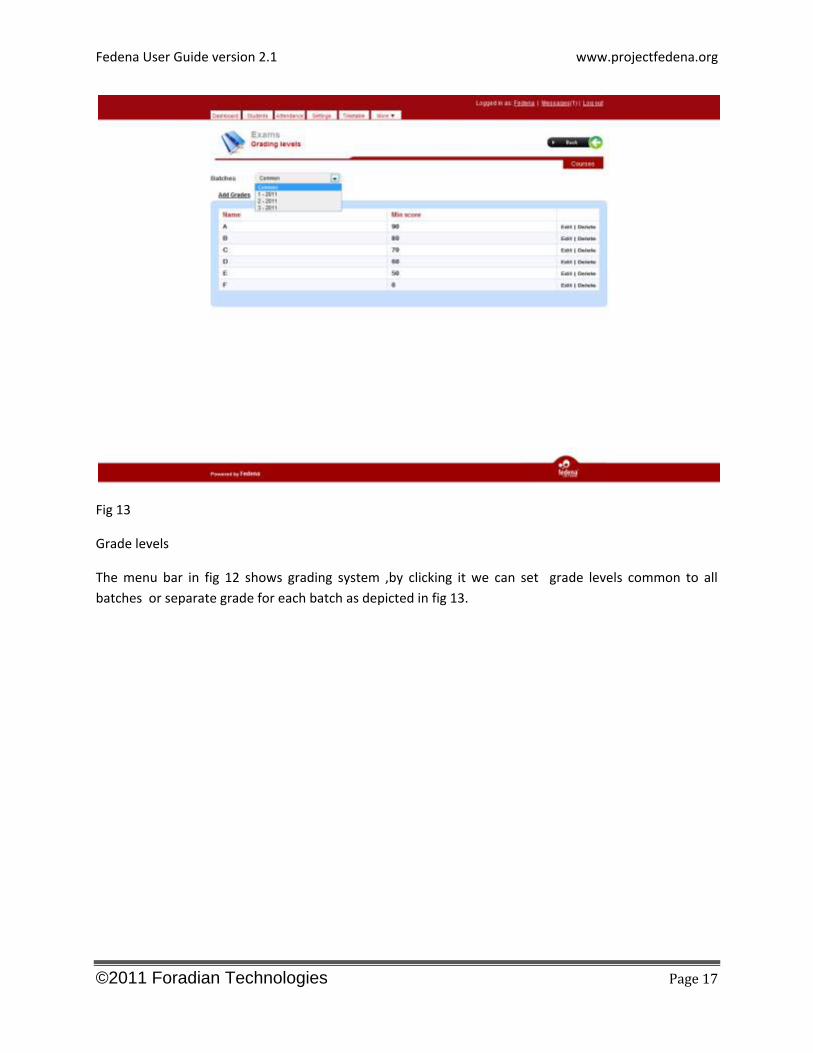
Fig 13
Grade levels
The menu bar in fig 12 shows grading system ,by clicking it we can set grade levels common to all
batches or separate grade for each batch as depicted in fig 13.
Fedena User Guide version 2.1 www.projectfedena.org
©2011 Foradian Technologies Page 18
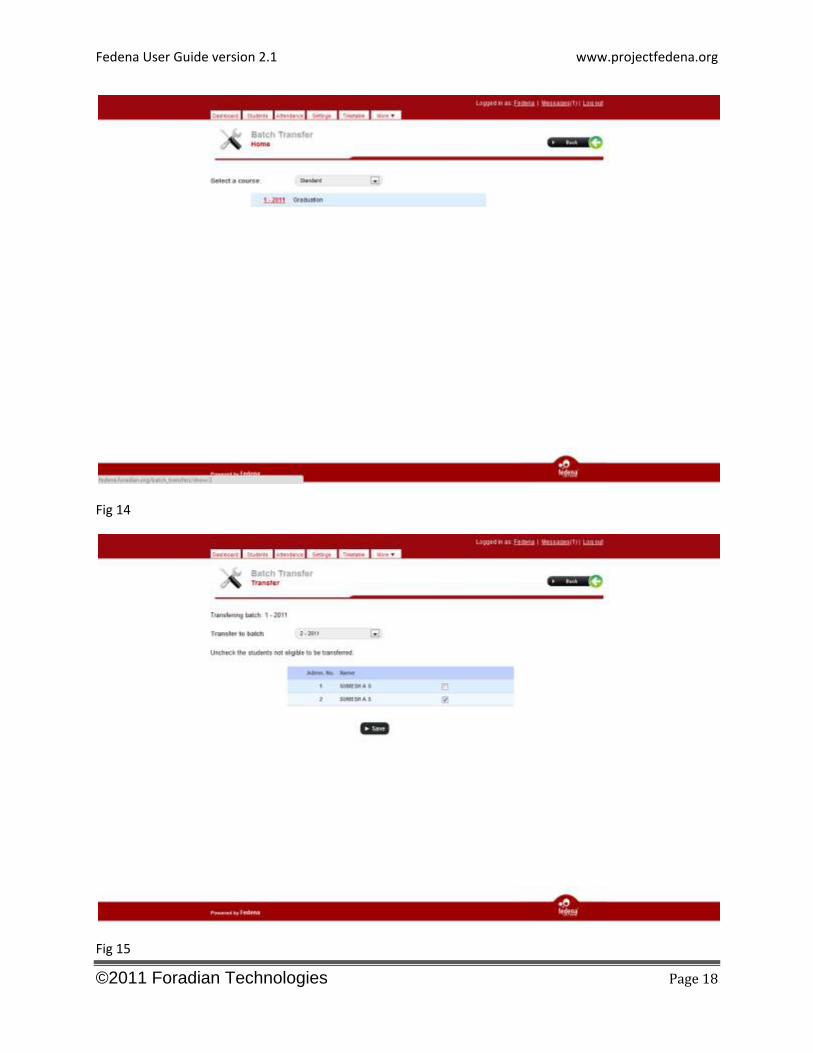
Fig 14
Fig 15
Fedena User Guide version 2.1 www.projectfedena.org
©2011 Foradian Technologies Page 19
Batch transfer
We have seen option for batch transfer in fig 12 this is applicable for the completion of a course.
Here after the completion of course say 1st standard, the students in the batches should be
transferred to new batches under the course say 2nd standard.
Consider the fig 14 & fig 15 here transfer is done by selecting the batch under course to be
transferred & then selecting the batch under another course to where it should be transferred
and uncheck the student who are not eligible and save.
Graduation
The student in the batch is graduated only if he has completed all the courses.ie 1st standard till
10th standard. Graduation option is provided to the right to the batch in batch transfer as
depicted in fig 14.
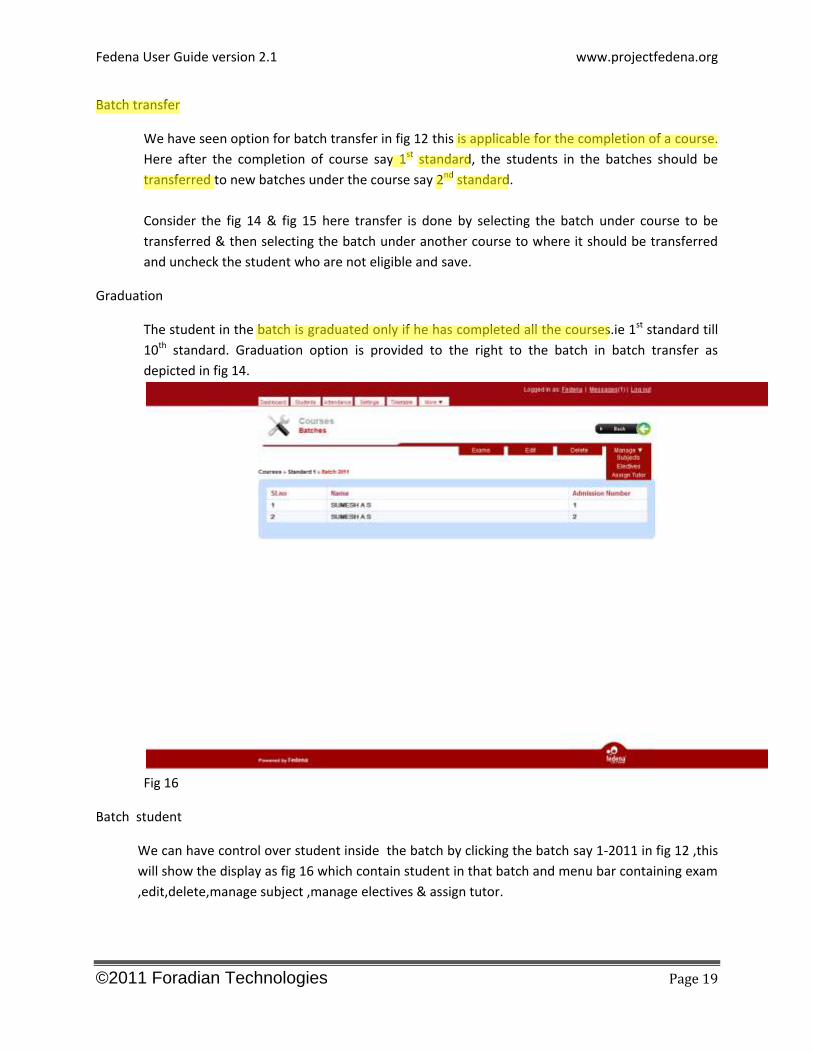
Fig 16
Batch student
We can have control over student inside the batch by clicking the batch say 1-2011 in fig 12 ,this
will show the display as fig 16 which contain student in that batch and menu bar containing exam
,edit,delete,manage subject ,manage electives & assign tutor.
Fedena User Guide version 2.1 www.projectfedena.org
©2011 Foradian Technologies Page 20
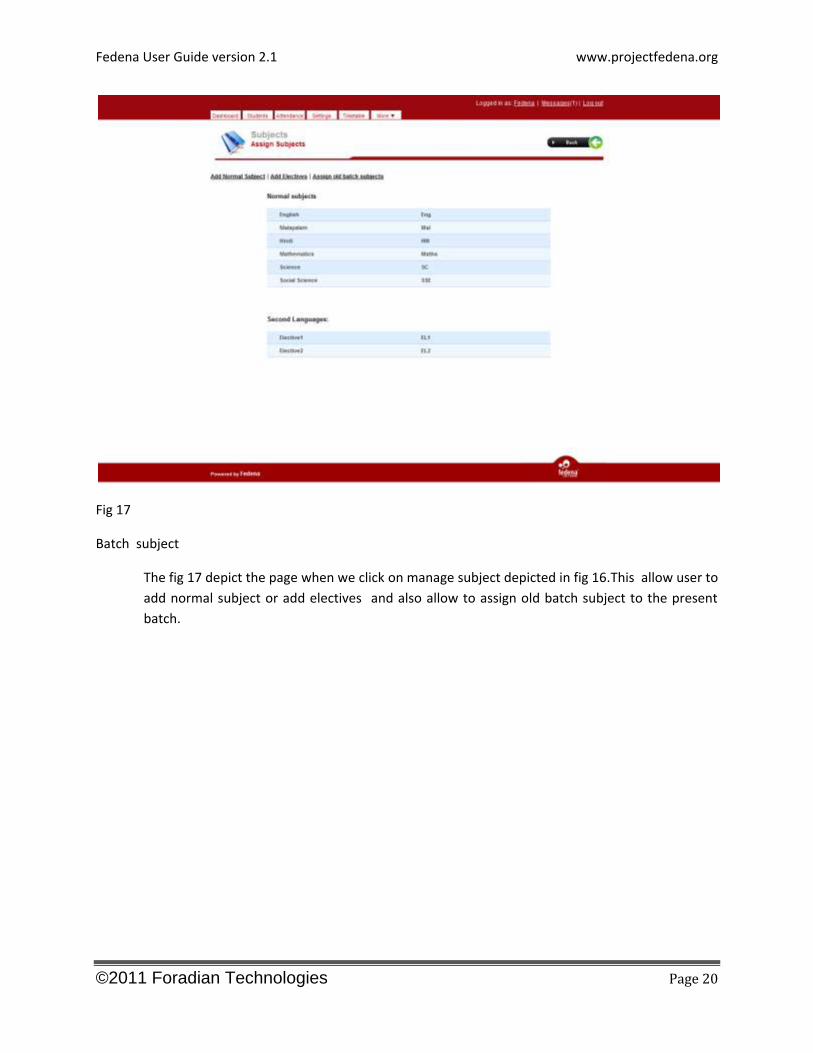
Fig 17
Batch subject
The fig 17 depict the page when we click on manage subject depicted in fig 16.This allow user to
add normal subject or add electives and also allow to assign old batch subject to the present
batch.
Fedena User Guide version 2.1 www.projectfedena.org
©2011 Foradian Technologies Page 21
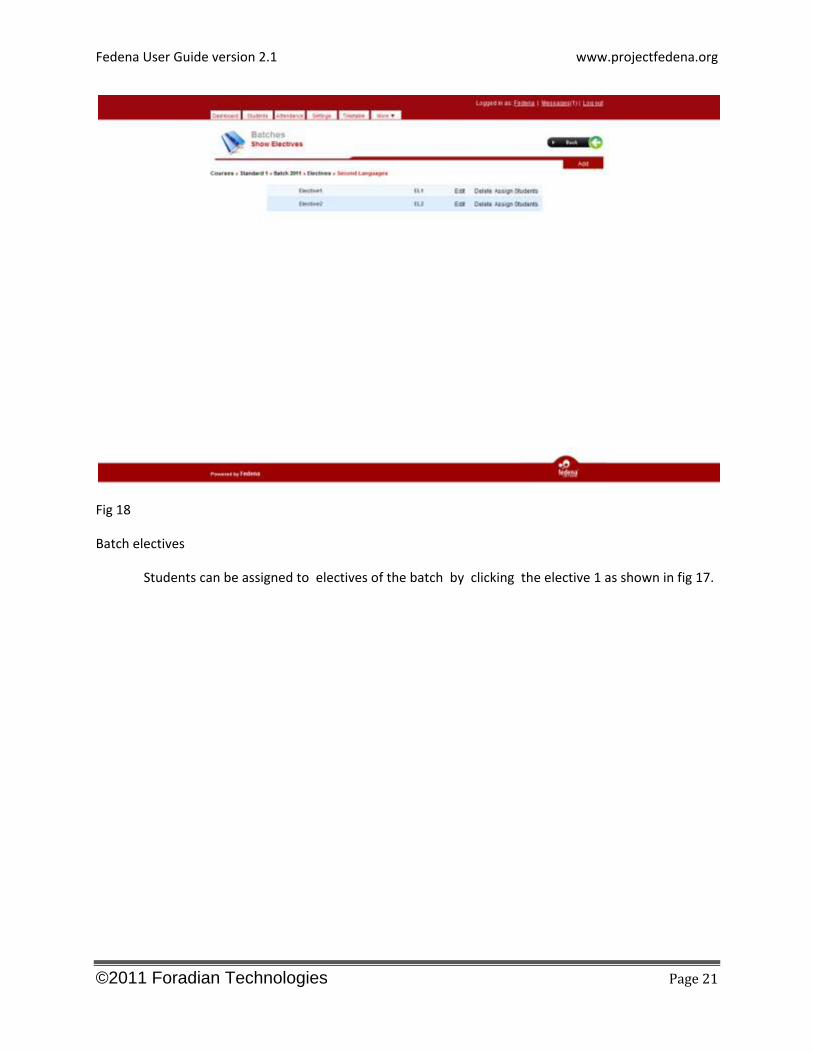
Fig 18
Batch electives
Students can be assigned to electives of the batch by clicking the elective 1 as shown in fig 17.
Fedena User Guide version 2.1 www.projectfedena.org
©2011 Foradian Technologies Page 22
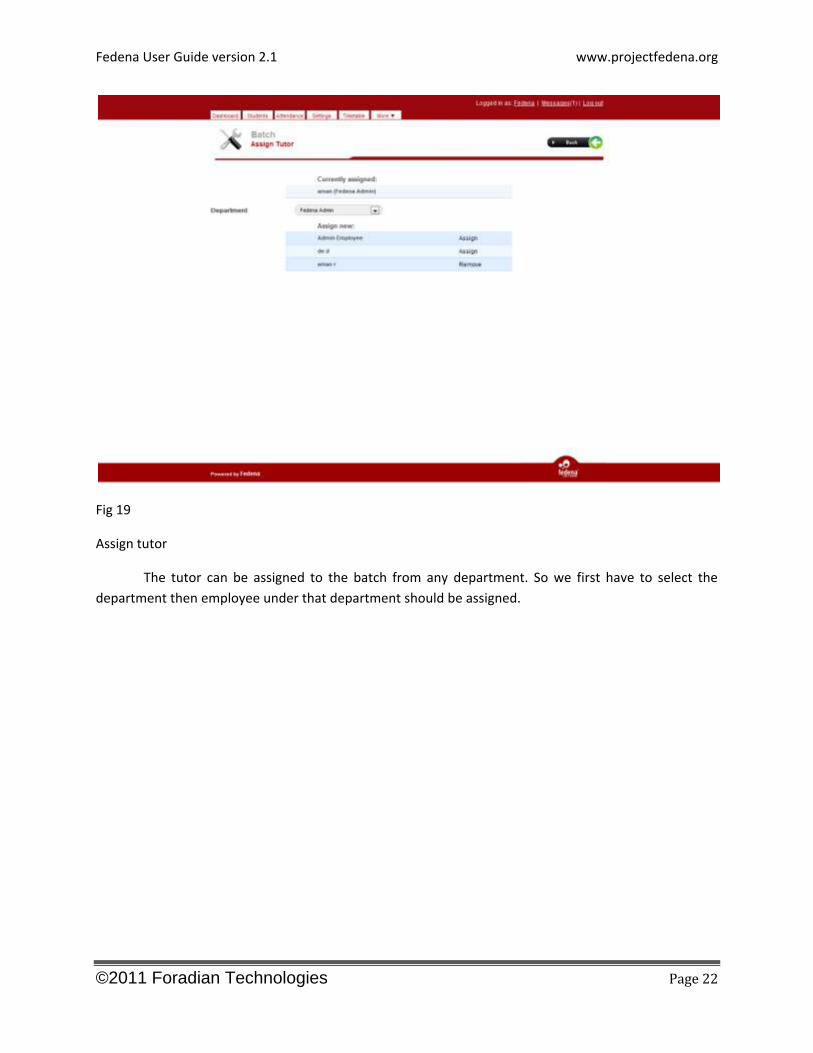
Fig 19
Assign tutor
The tutor can be assigned to the batch from any department. So we first have to select the
department then employee under that department should be assigned.
Fedena User Guide version 2.1 www.projectfedena.org
©2011 Foradian Technologies Page 23
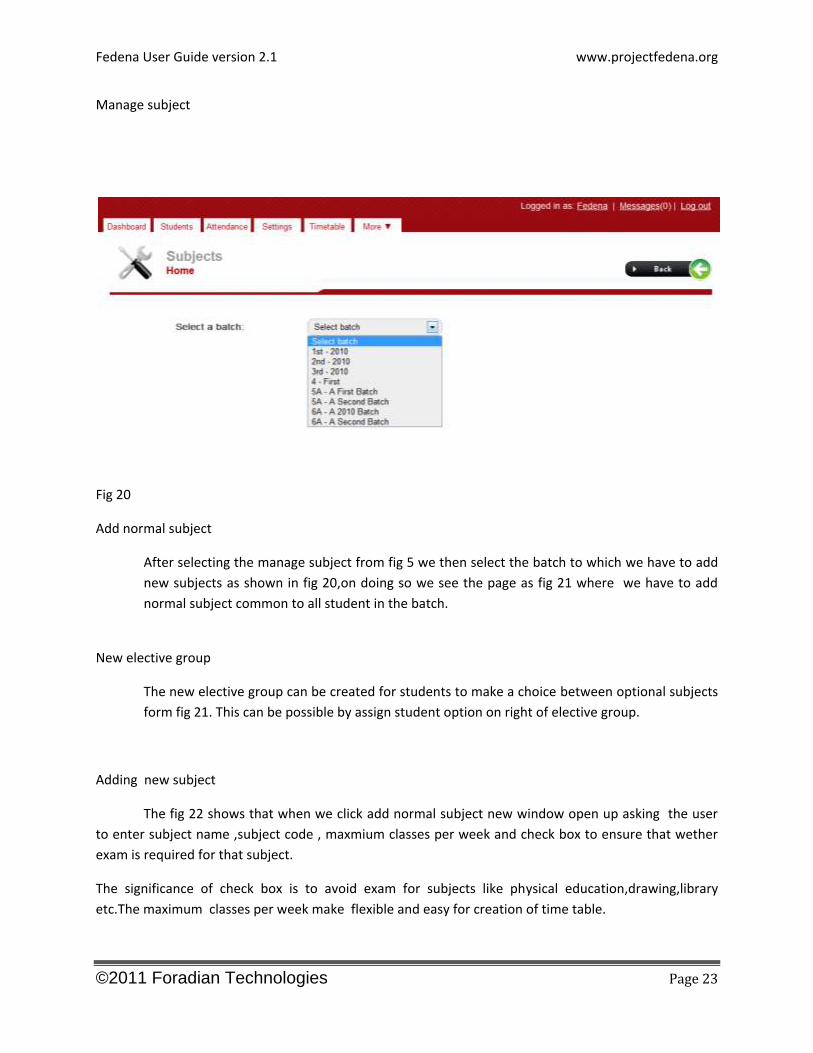
Manage subject
Fig 20
Add normal subject
After selecting the manage subject from fig 5 we then select the batch to which we have to add
new subjects as shown in fig 20,on doing so we see the page as fig 21 where we have to add
normal subject common to all student in the batch.
New elective group
The new elective group can be created for students to make a choice between optional subjects
form fig 21. This can be possible by assign student option on right of elective group.
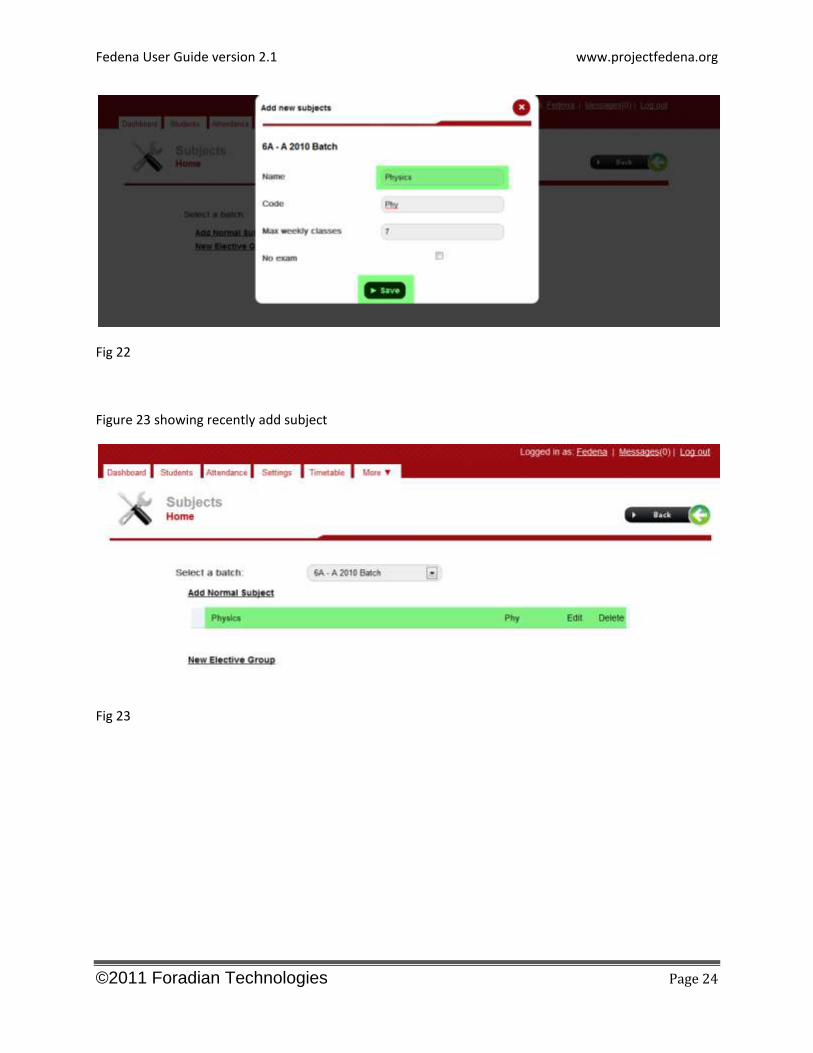
Adding new subject
The fig 22 shows that when we click add normal subject new window open up asking the user
to enter subject name ,subject code , maxmium classes per week and check box to ensure that wether
exam is required for that subject.
The significance of check box is to avoid exam for subjects like physical education,drawing,library
etc.The maximum classes per week make flexible and easy for creation of time table.
Fedena User Guide version 2.1 www.projectfedena.org
©2011 Foradian Technologies Page 24
Fig 22
Figure 23 showing recently add subject
Fig 23

Fedena User Guide version 2.1 www.projectfedena.org
©2011 Foradian Technologies Page 25
New elective group
Fig 24
After adding all normal subject we go for creating new elective group depicted in fig 24.This process is as
follows
Fig 25
Name of the elective group is entered.
Fedena User Guide version 2.1 www.projectfedena.org
©2011 Foradian Technologies Page 26
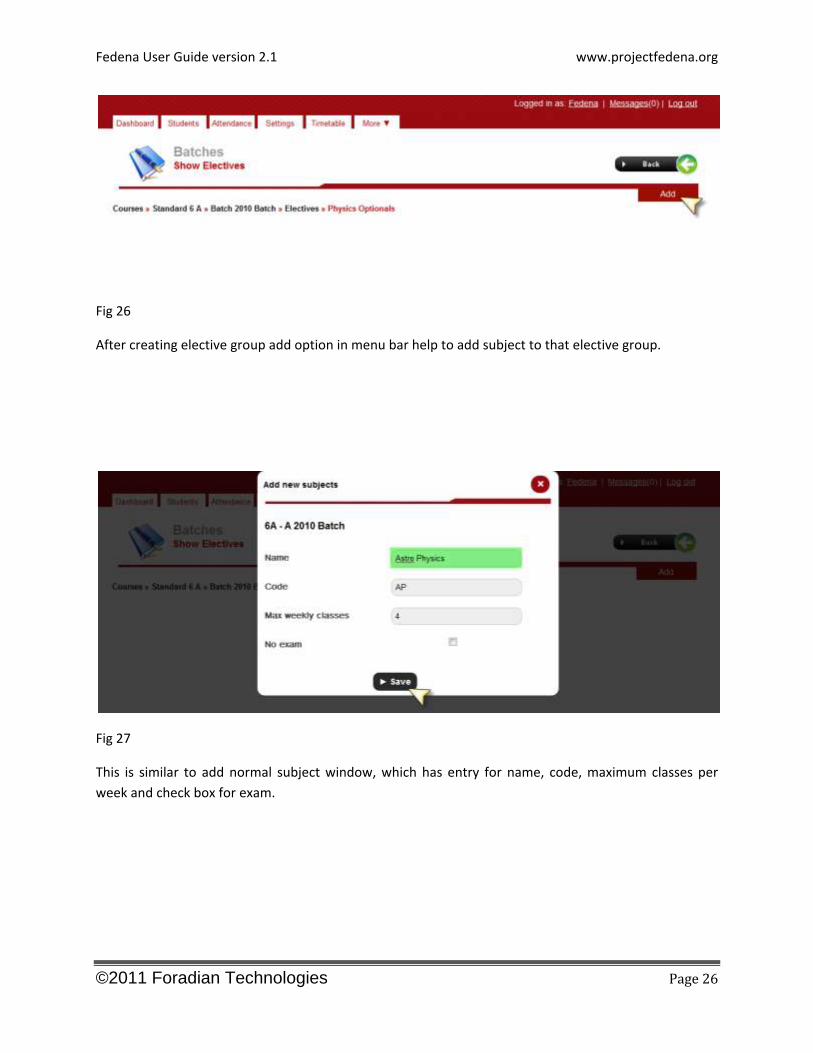
Fig 26
After creating elective group add option in menu bar help to add subject to that elective group.
Fig 27
This is similar to add normal subject window, which has entry for name, code, maximum classes per
week and check box for exam.
Fedena User Guide version 2.1 www.projectfedena.org
©2011 Foradian Technologies Page 27
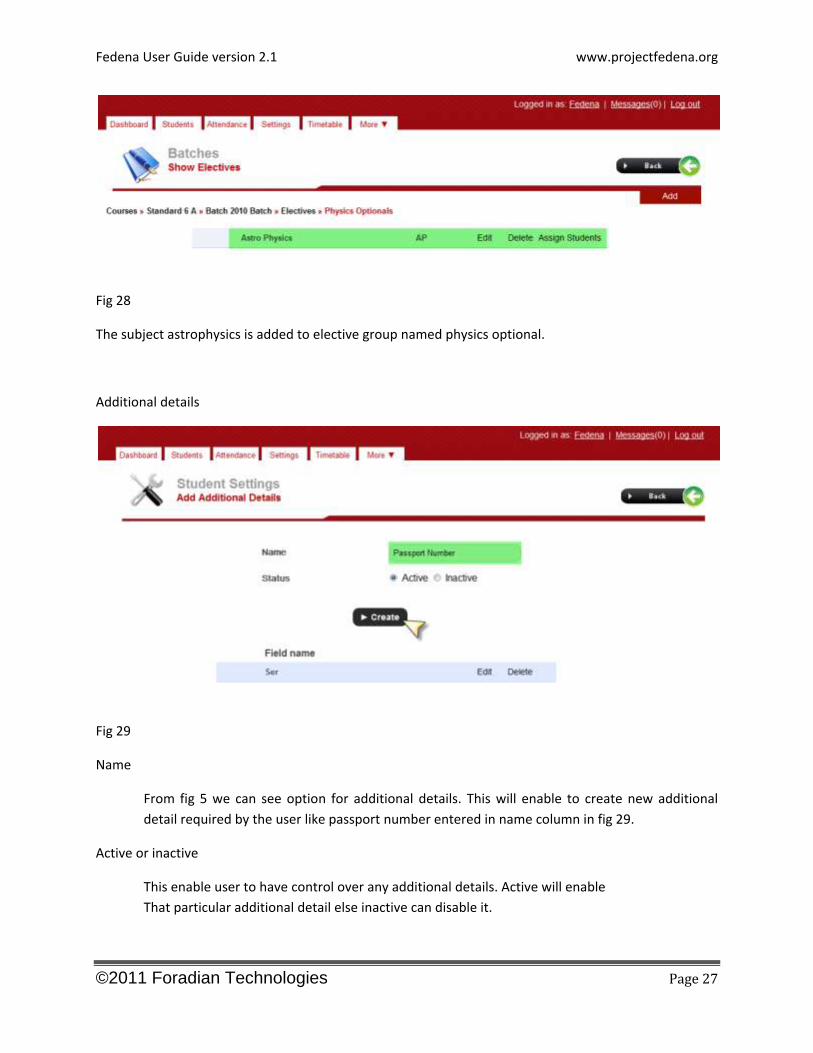
Fig 28
The subject astrophysics is added to elective group named physics optional.
Additional details
Fig 29
Name
From fig 5 we can see option for additional details. This will enable to create new additional
detail required by the user like passport number entered in name column in fig 29.
Active or inactive
This enable user to have control over any additional details. Active will enable
That particular additional detail else inactive can disable it.
Fedena User Guide version 2.1 www.projectfedena.org
©2011 Foradian Technologies Page 28
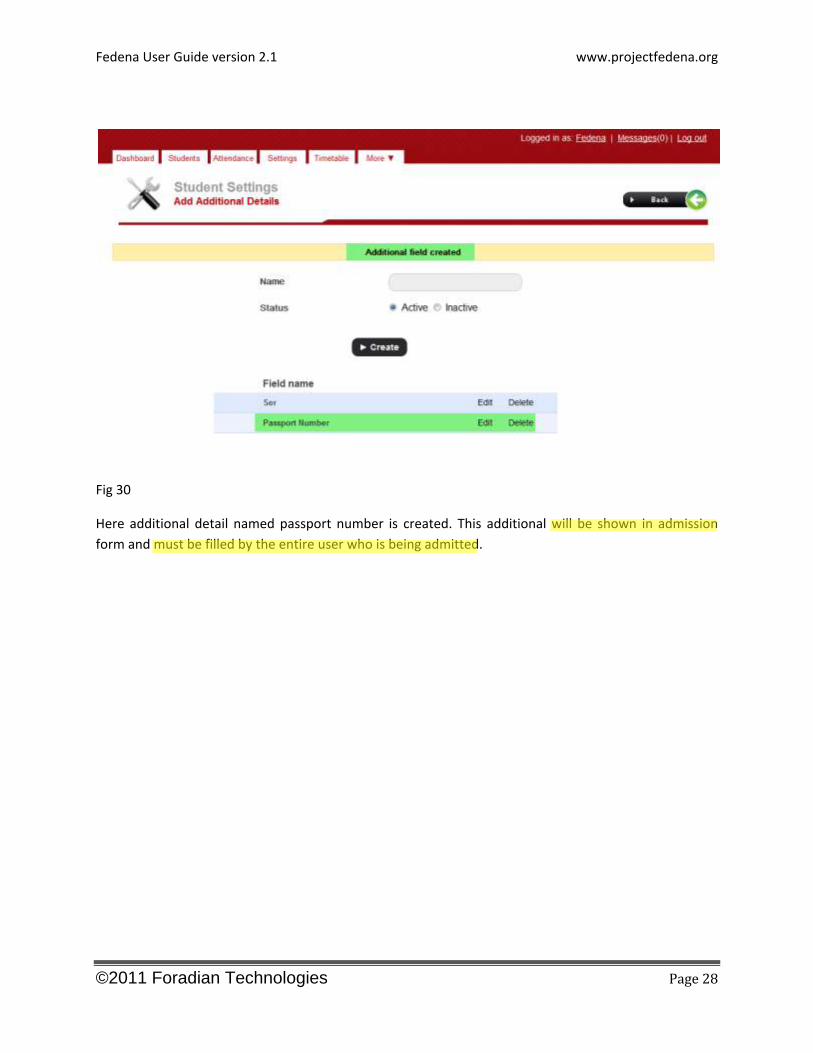
Fig 30
Here additional detail named passport number is created. This additional will be shown in admission
form and must be filled by the entire user who is being admitted.

Fedena User Guide version 2.1 www.projectfedena.org
©2011 Foradian Technologies Page 29
HUMAN
RESOURCE
Fedena User Guide version 2.1 www.projectfedena.org
©2011 Foradian Technologies Page 30
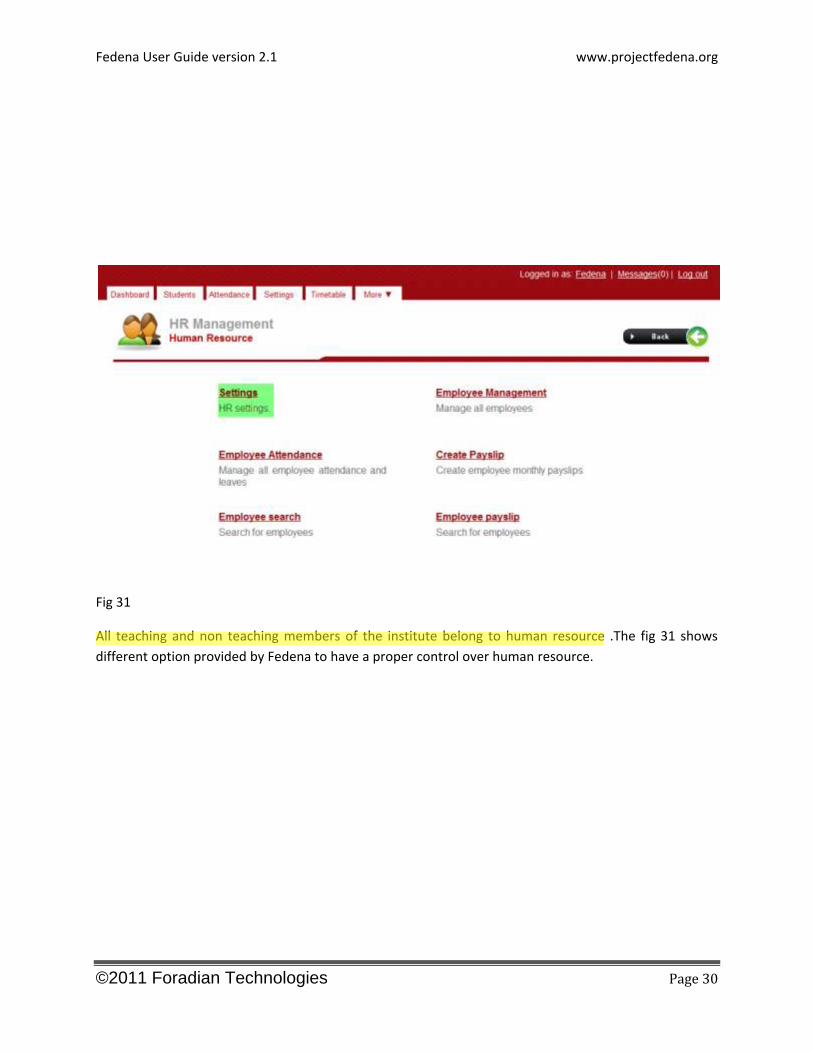
Fig 31
All teaching and non teaching members of the institute belong to human resource .The fig 31 shows
different option provided by Fedena to have a proper control over human resource.
Fedena User Guide version 2.1 www.projectfedena.org
©2011 Foradian Technologies Page 31
Setting
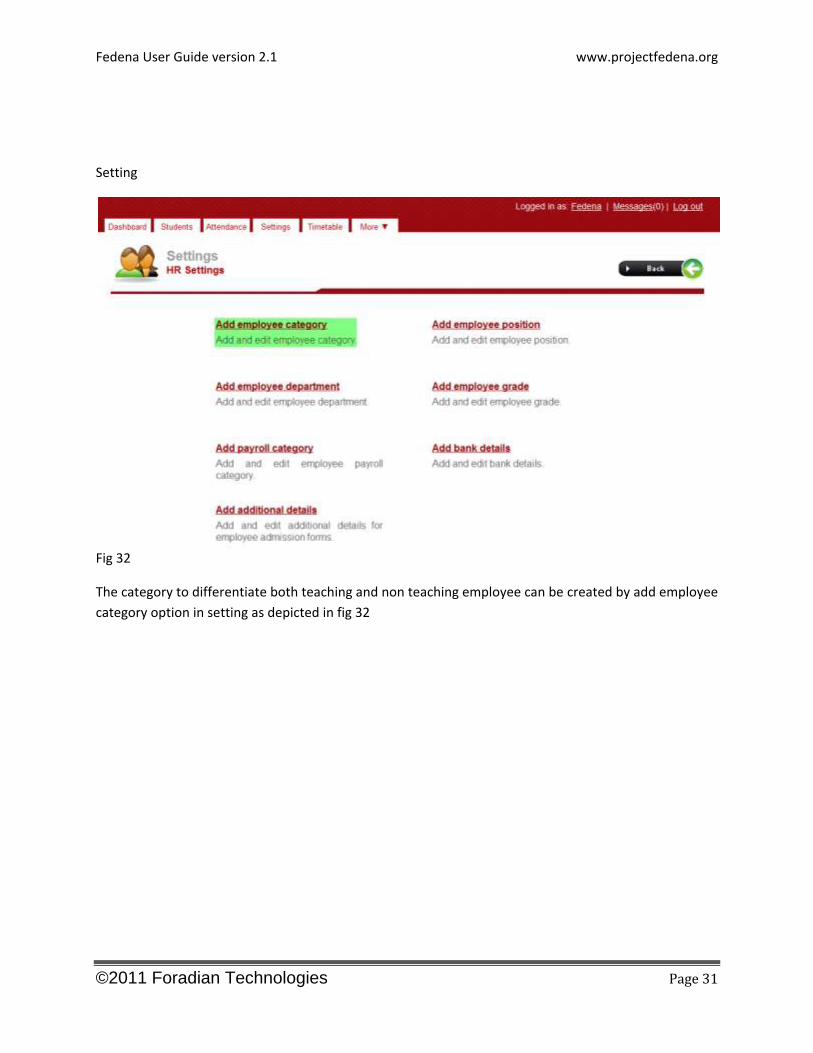
Fig 32
The category to differentiate both teaching and non teaching employee can be created by add employee
category option in setting as depicted in fig 32
Fedena User Guide version 2.1 www.projectfedena.org
©2011 Foradian Technologies Page 32
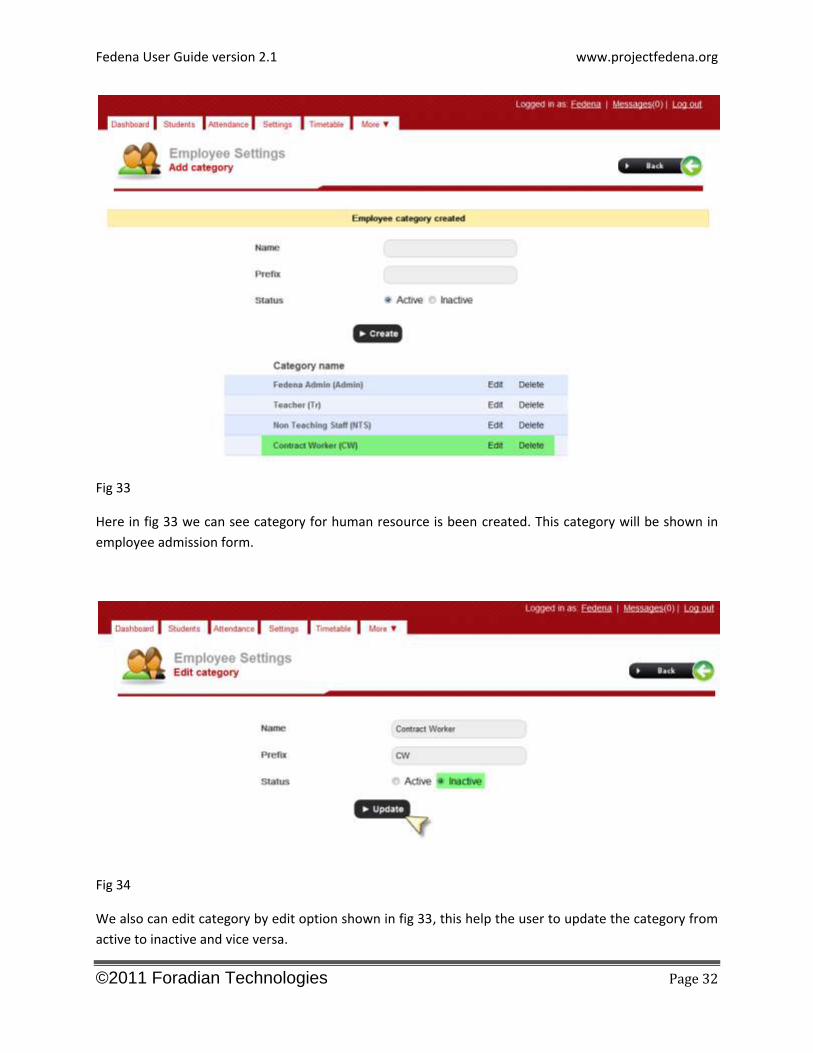
Fig 33
Here in fig 33 we can see category for human resource is been created. This category will be shown in
employee admission form.
Fig 34
We also can edit category by edit option shown in fig 33, this help the user to update the category from
active to inactive and vice versa.
Fedena User Guide version 2.1 www.projectfedena.org
©2011 Foradian Technologies Page 33
Add employee position
Fig 35
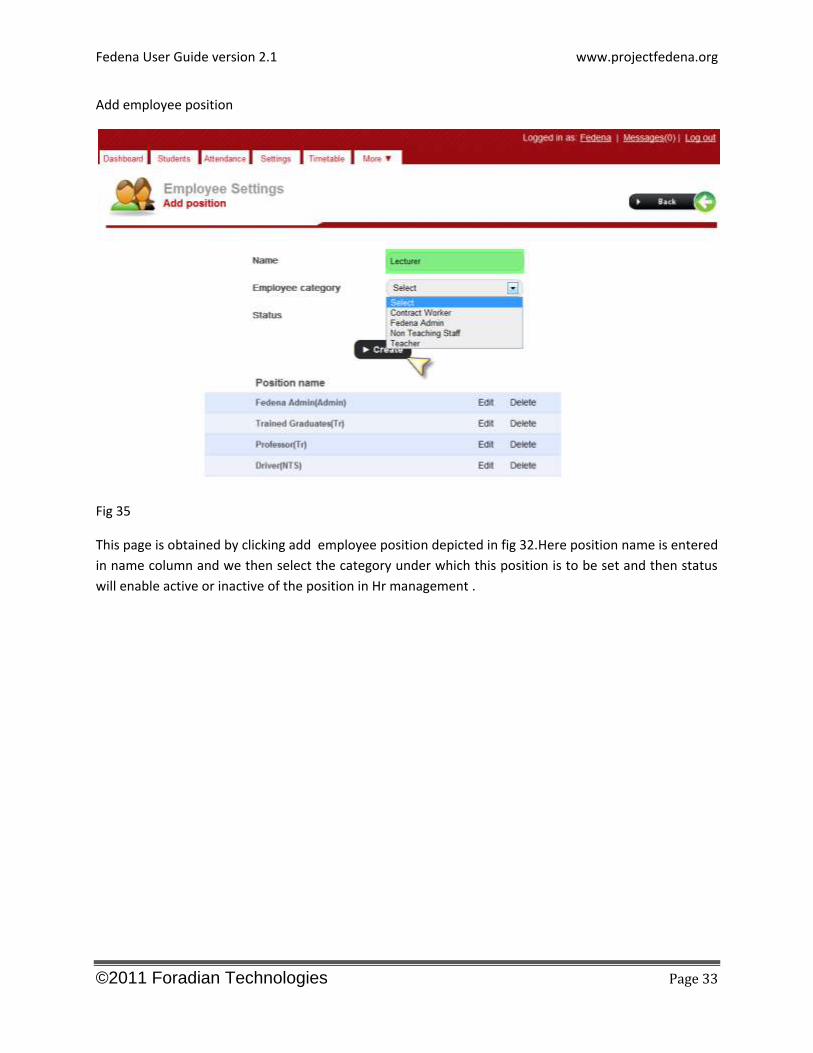
This page is obtained by clicking add employee position depicted in fig 32.Here position name is entered
in name column and we then select the category under which this position is to be set and then status
will enable active or inactive of the position in Hr management .
Fedena User Guide version 2.1 www.projectfedena.org
©2011 Foradian Technologies Page 34
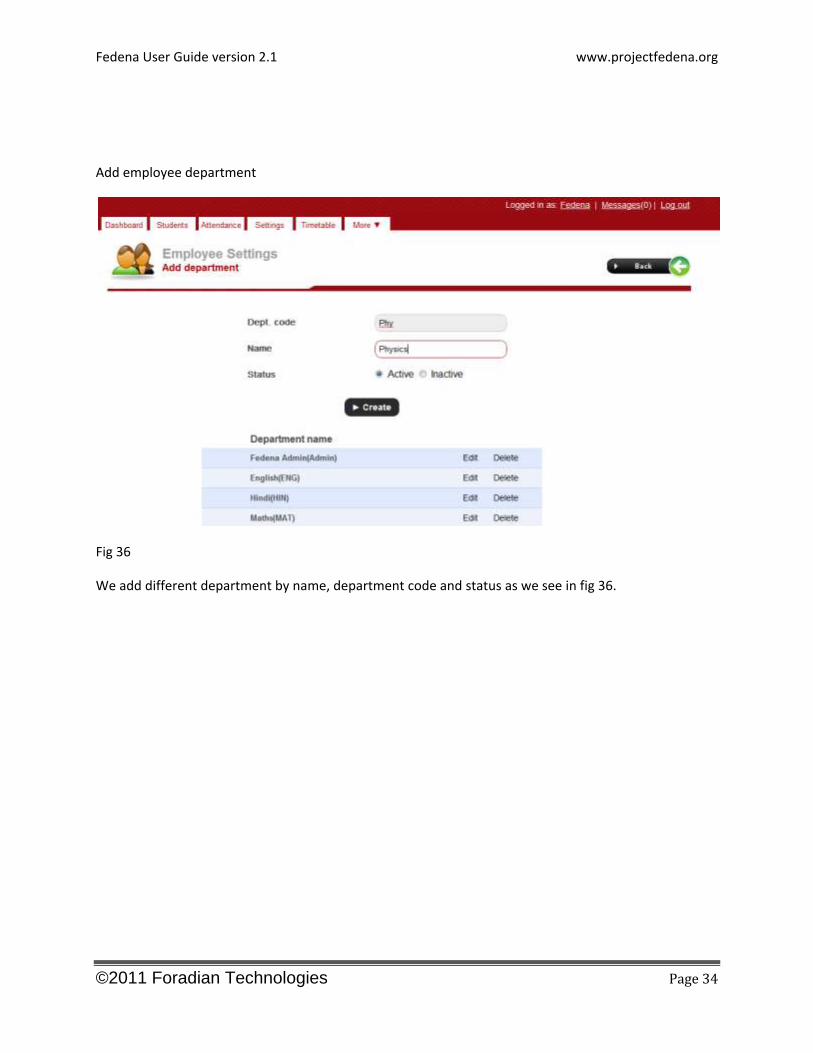
Add employee department
Fig 36
We add different department by name, department code and status as we see in fig 36.
Fedena User Guide version 2.1 www.projectfedena.org
©2011 Foradian Technologies Page 35
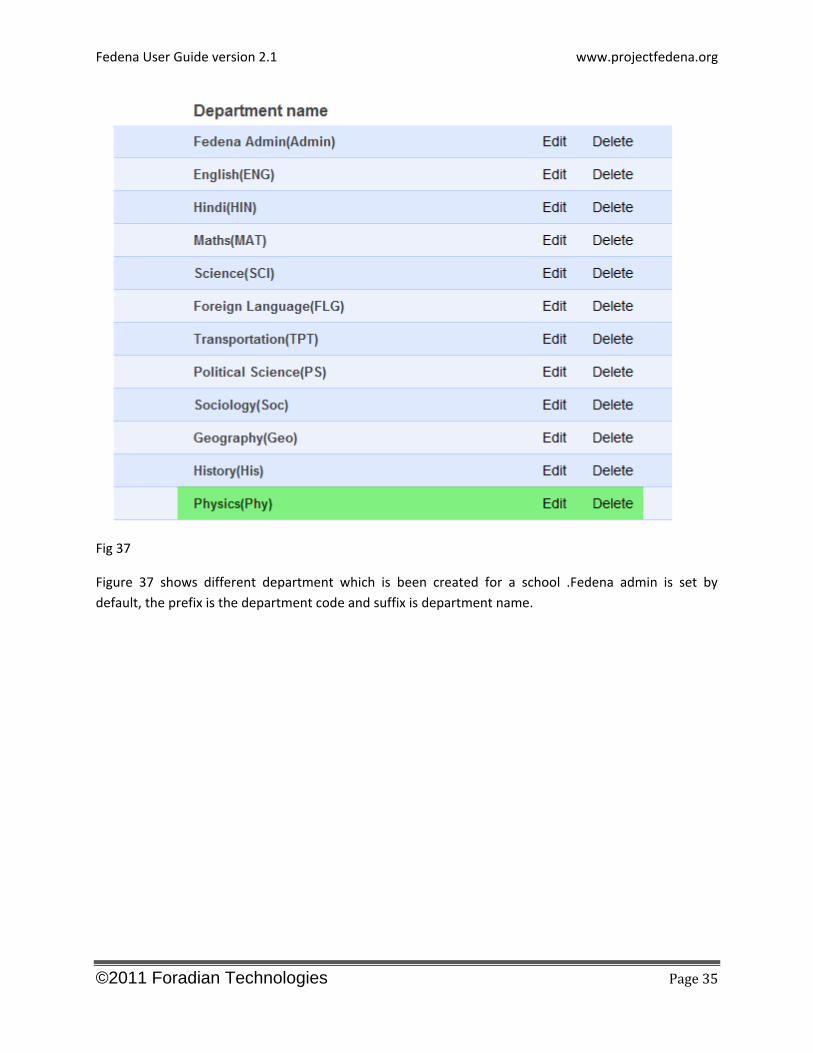
Fig 37
Figure 37 shows different department which is been created for a school .Fedena admin is set by
default, the prefix is the department code and suffix is department name.
Fedena User Guide version 2.1 www.projectfedena.org
©2011 Foradian Technologies Page 36
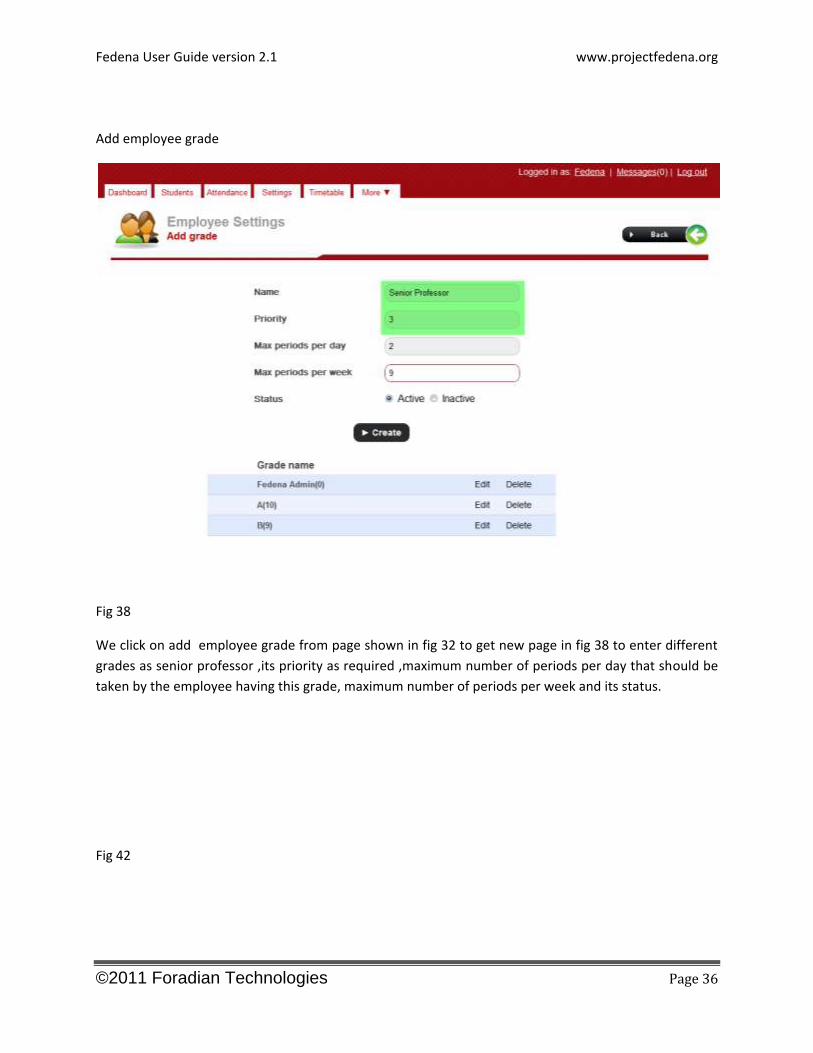
Add employee grade
Fig 38
We click on add employee grade from page shown in fig 32 to get new page in fig 38 to enter different
grades as senior professor ,its priority as required ,maximum number of periods per day that should be
taken by the employee having this grade, maximum number of periods per week and its status.
Fig 42
Fedena User Guide version 2.1 www.projectfedena.org
©2011 Foradian Technologies Page 37
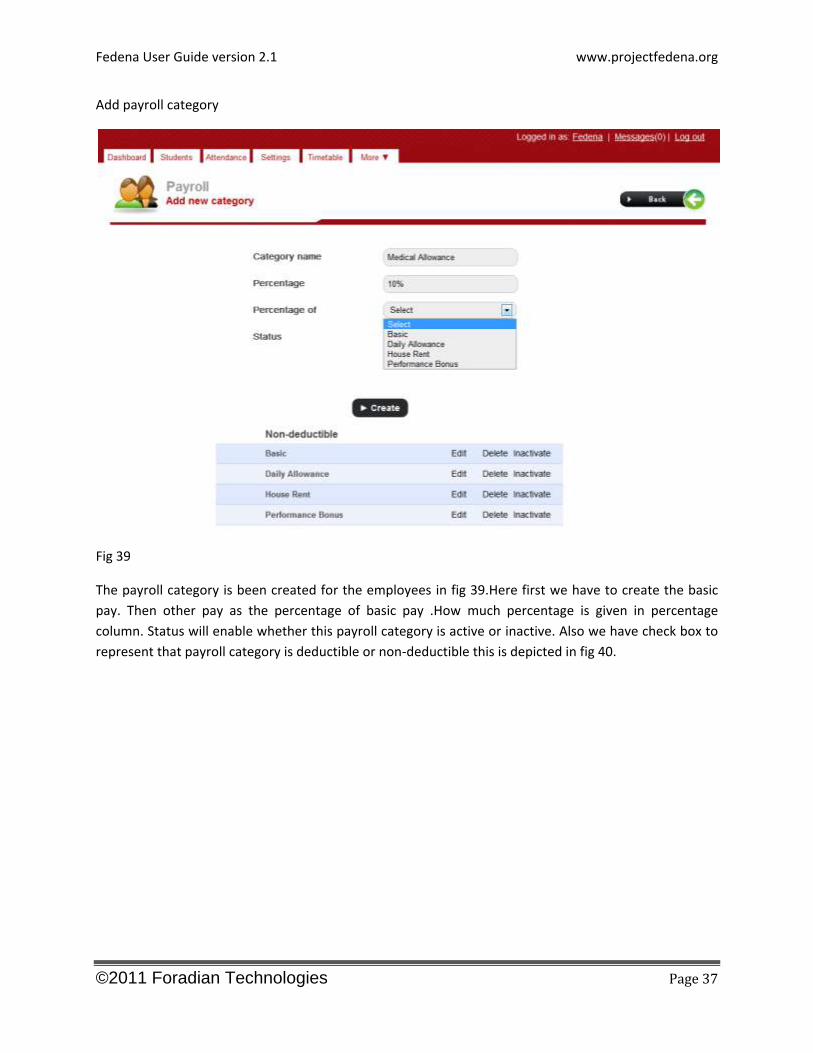
Add payroll category
Fig 39
The payroll category is been created for the employees in fig 39.Here first we have to create the basic
pay. Then other pay as the percentage of basic pay .How much percentage is given in percentage
column. Status will enable whether this payroll category is active or inactive. Also we have check box to
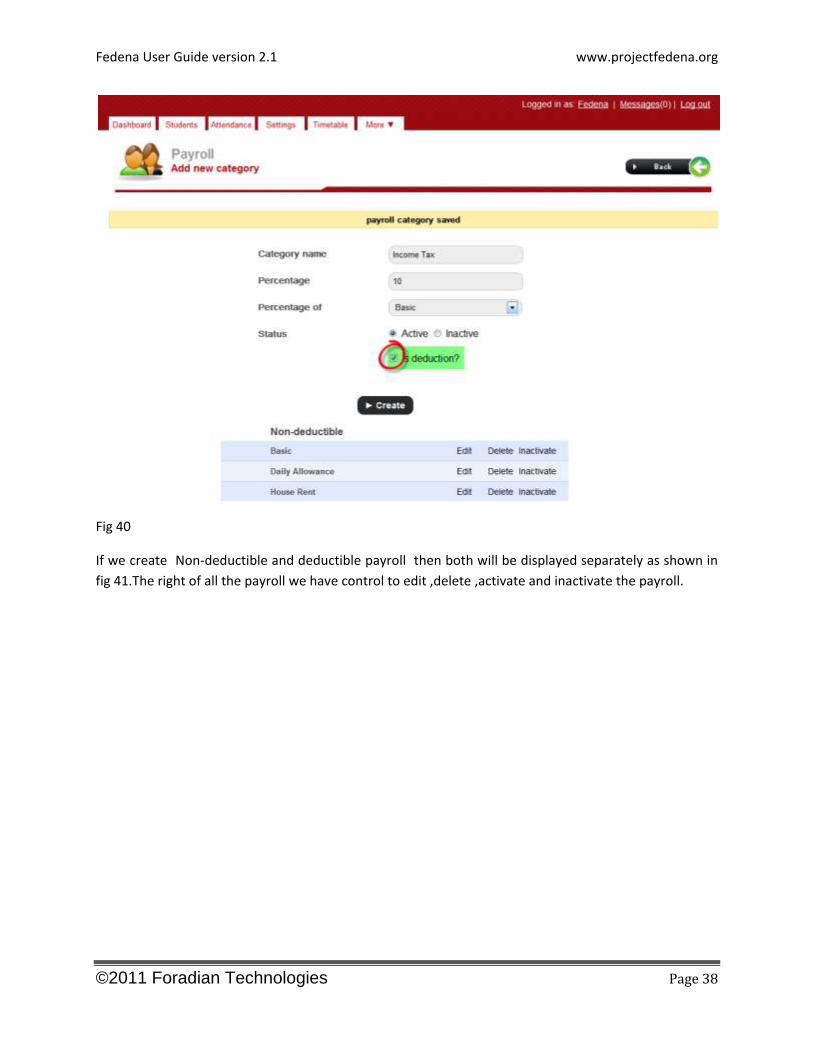
represent that payroll category is deductible or non-deductible this is depicted in fig 40.
Fedena User Guide version 2.1 www.projectfedena.org
©2011 Foradian Technologies Page 38
Fig 40
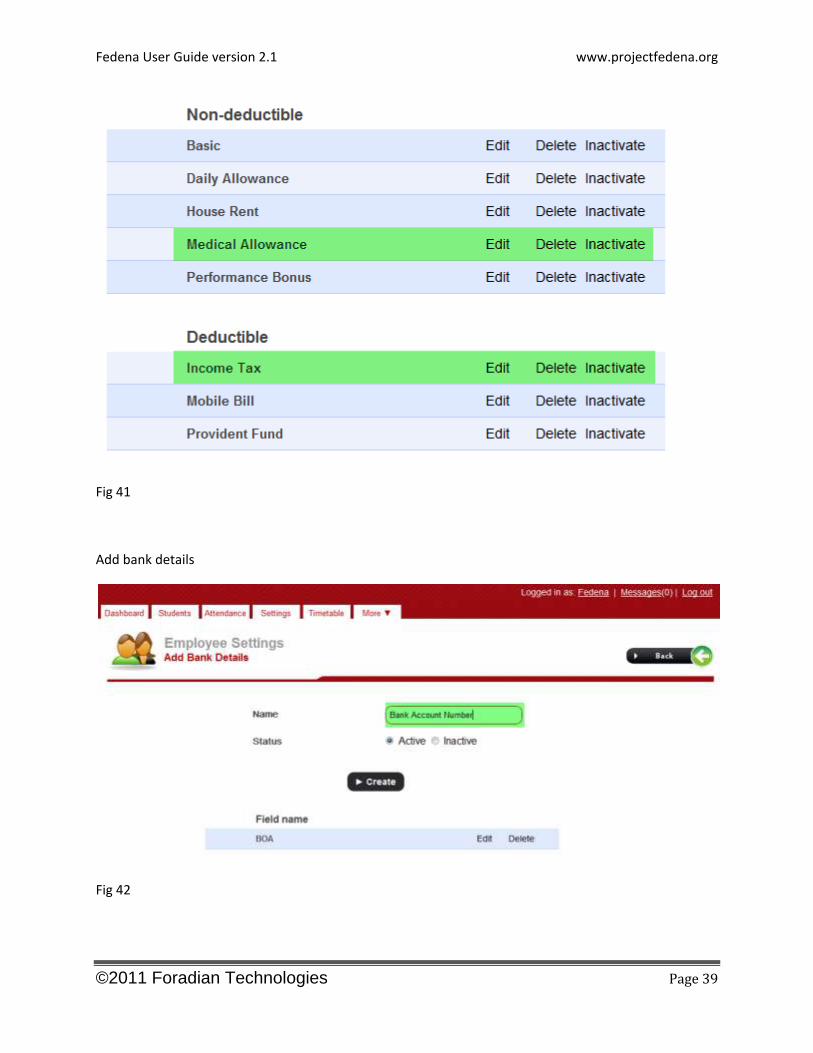
If we create Non-deductible and deductible payroll then both will be displayed separately as shown in
fig 41.The right of all the payroll we have control to edit ,delete ,activate and inactivate the payroll.
Fedena User Guide version 2.1 www.projectfedena.org
©2011 Foradian Technologies Page 39
Fig 41
Add bank details
Fig 42
Fedena User Guide version 2.1 www.projectfedena.org
©2011 Foradian Technologies Page 40
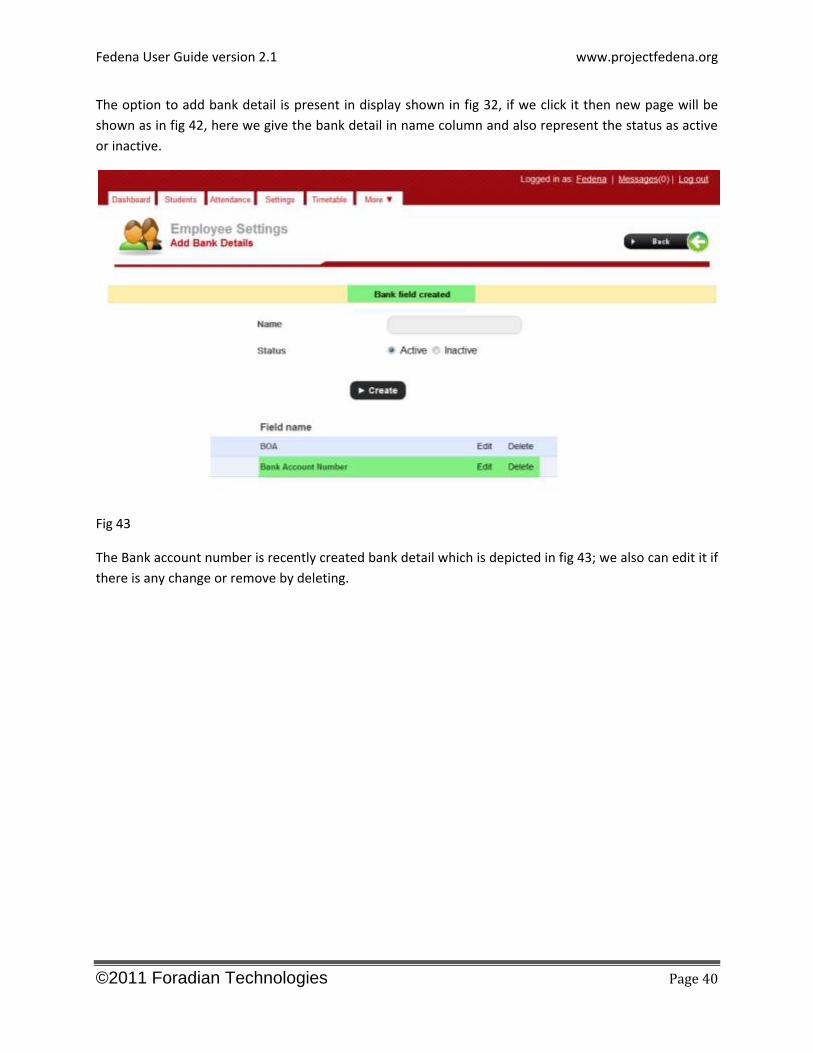
The option to add bank detail is present in display shown in fig 32, if we click it then new page will be
shown as in fig 42, here we give the bank detail in name column and also represent the status as active
or inactive.
Fig 43
The Bank account number is recently created bank detail which is depicted in fig 43; we also can edit it if
there is any change or remove by deleting.
Fedena User Guide version 2.1 www.projectfedena.org
©2011 Foradian Technologies Page 41
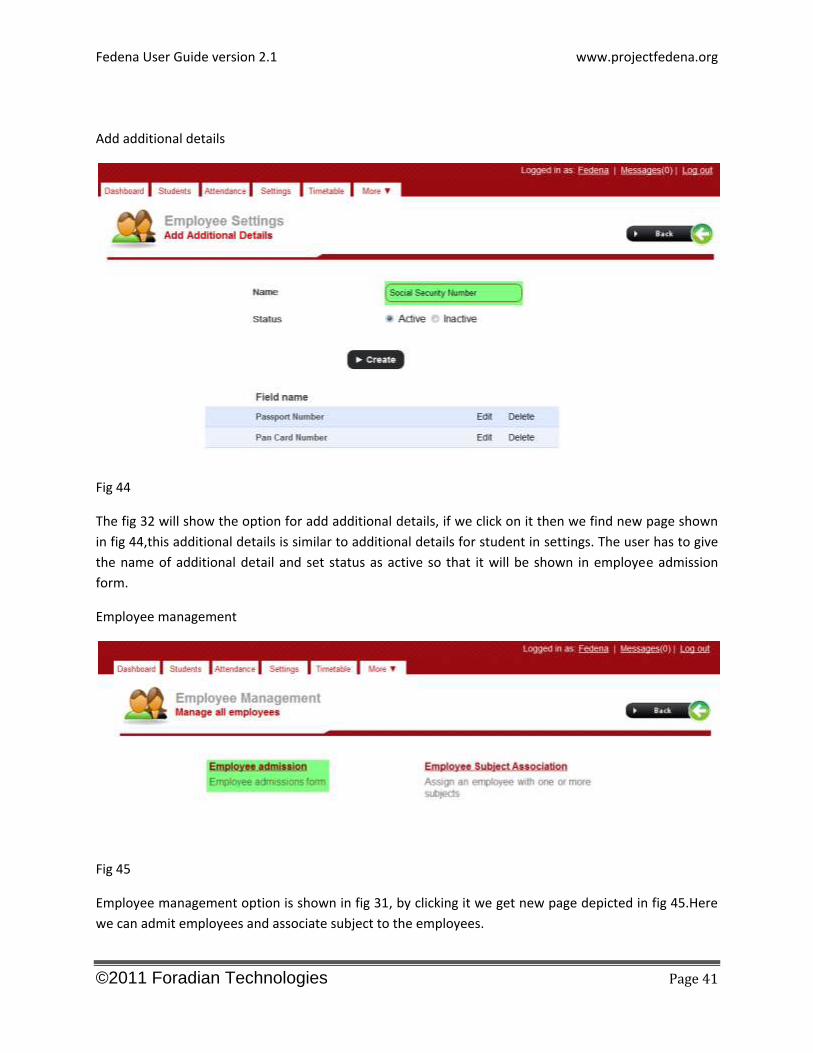
Add additional details
Fig 44
The fig 32 will show the option for add additional details, if we click on it then we find new page shown
in fig 44,this additional details is similar to additional details for student in settings. The user has to give
the name of additional detail and set status as active so that it will be shown in employee admission
form.
Employee management
Fig 45
Employee management option is shown in fig 31, by clicking it we get new page depicted in fig 45.Here
we can admit employees and associate subject to the employees.
Fedena User Guide version 2.1 www.projectfedena.org
©2011 Foradian Technologies Page 42
Employee admission
Fig 46
Fedena User Guide version 2.1 www.projectfedena.org
©2011 Foradian Technologies Page 43
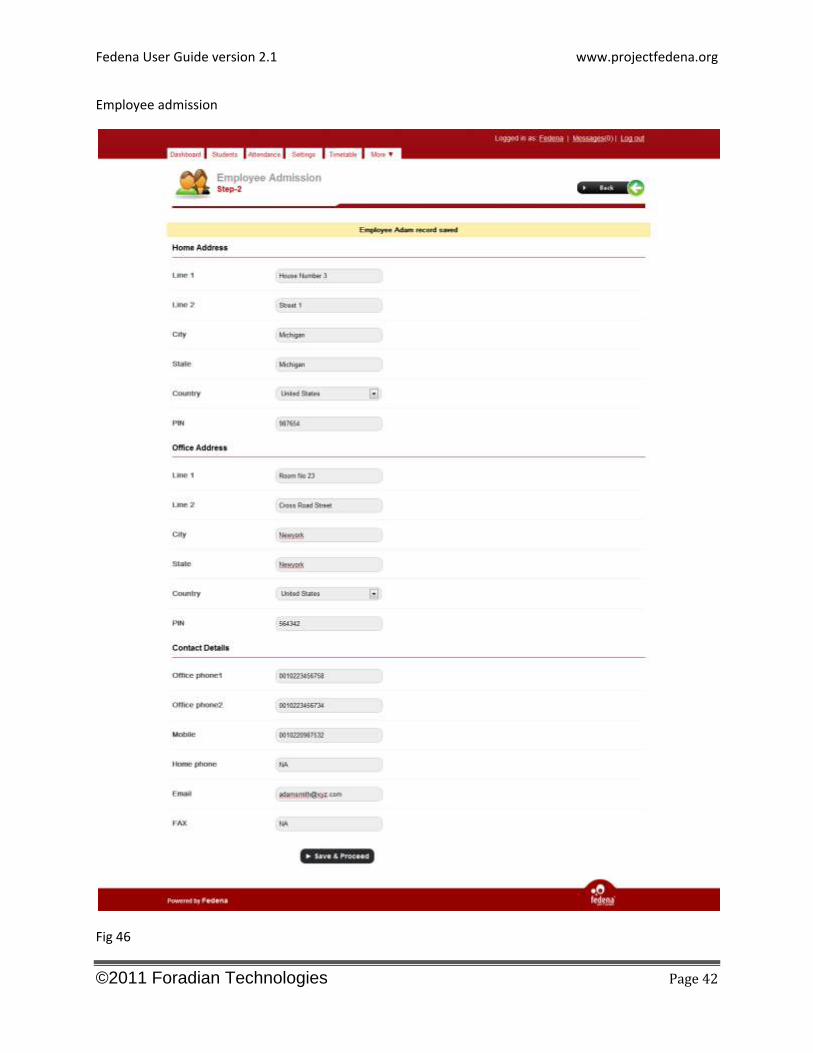
The figure 46 shows admission form of an employee, this can obtained by clicking employee admission
in fig 45, thus only by entering all the details of an employee which is mandatory an employee can be
connected to Fedena having his own profile.
Fig 47
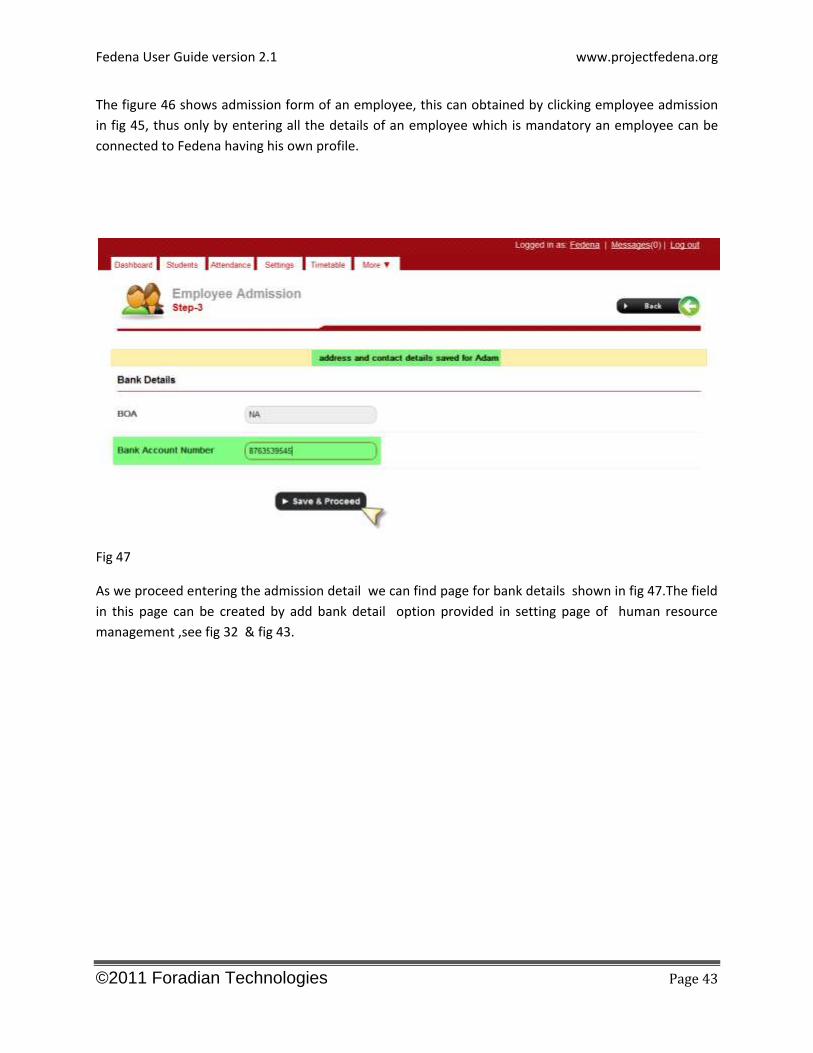
As we proceed entering the admission detail we can find page for bank details shown in fig 47.The field
in this page can be created by add bank detail option provided in setting page of human resource
management ,see fig 32 & fig 43.
Fedena User Guide version 2.1 www.projectfedena.org
©2011 Foradian Technologies Page 44
Fig 48
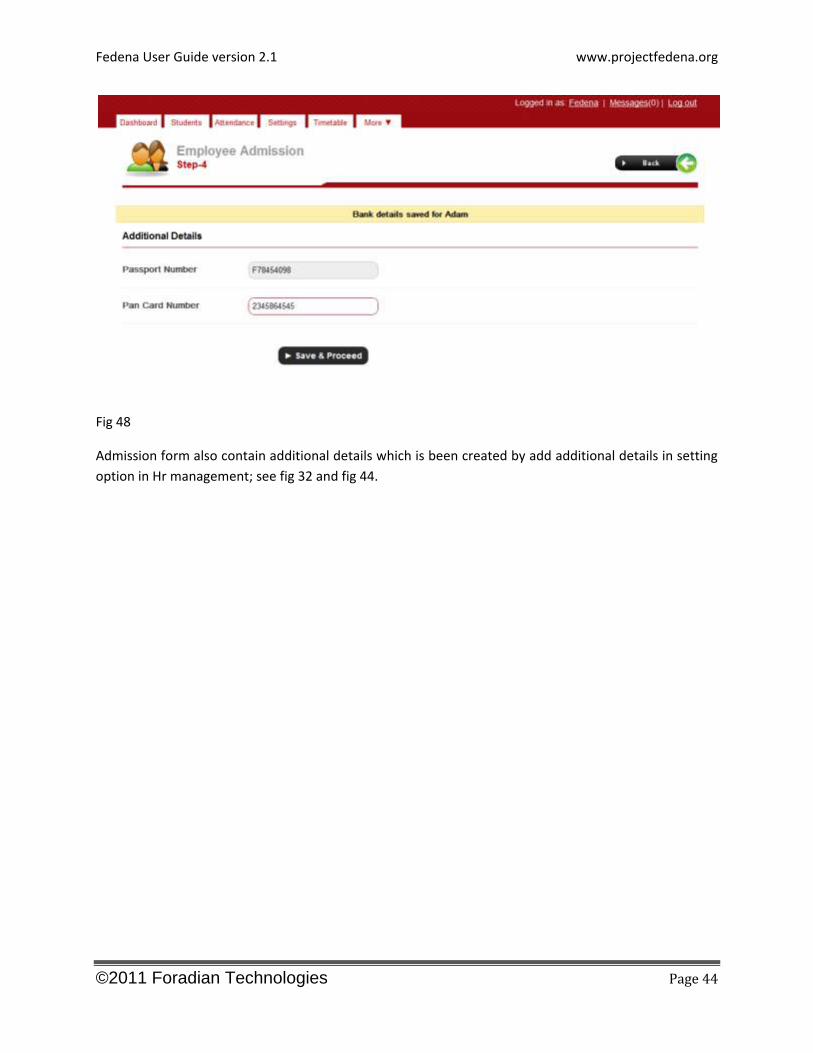
Admission form also contain additional details which is been created by add additional details in setting
option in Hr management; see fig 32 and fig 44.
Fedena User Guide version 2.1 www.projectfedena.org
©2011 Foradian Technologies Page 45
Fig 49
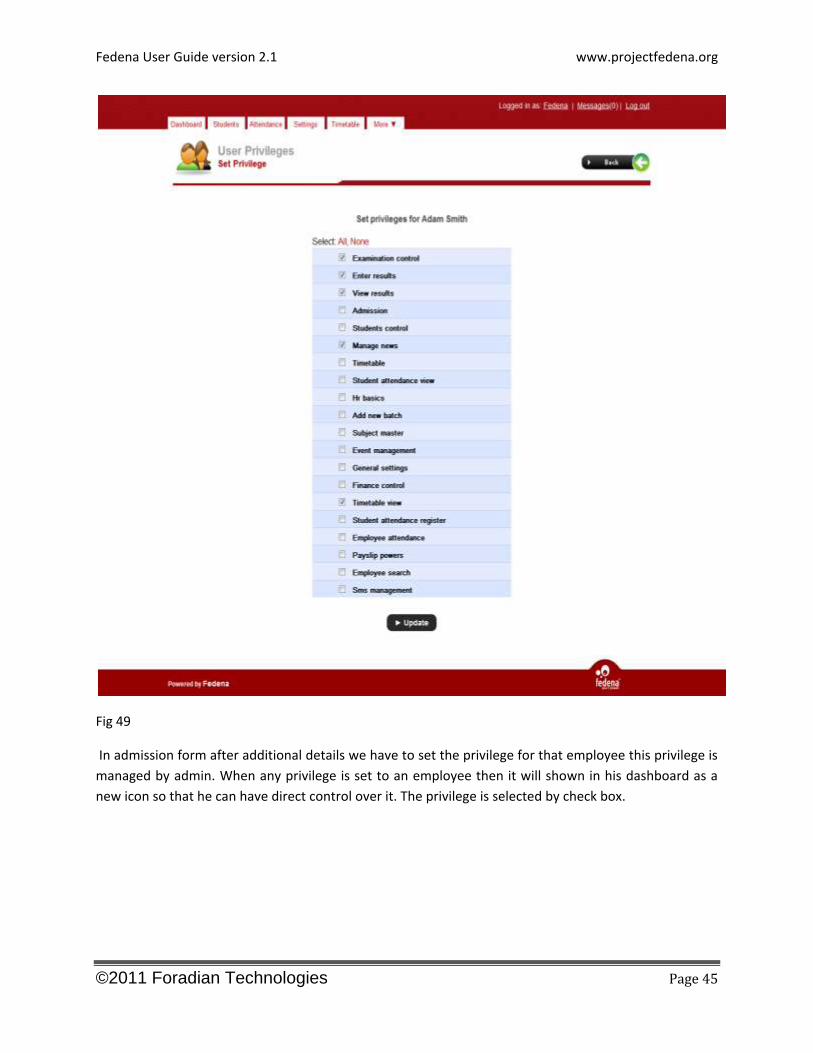
In admission form after additional details we have to set the privilege for that employee this privilege is
managed by admin. When any privilege is set to an employee then it will shown in his dashboard as a
new icon so that he can have direct control over it. The privilege is selected by check box.
Fedena User Guide version 2.1 www.projectfedena.org
©2011 Foradian Technologies Page 46
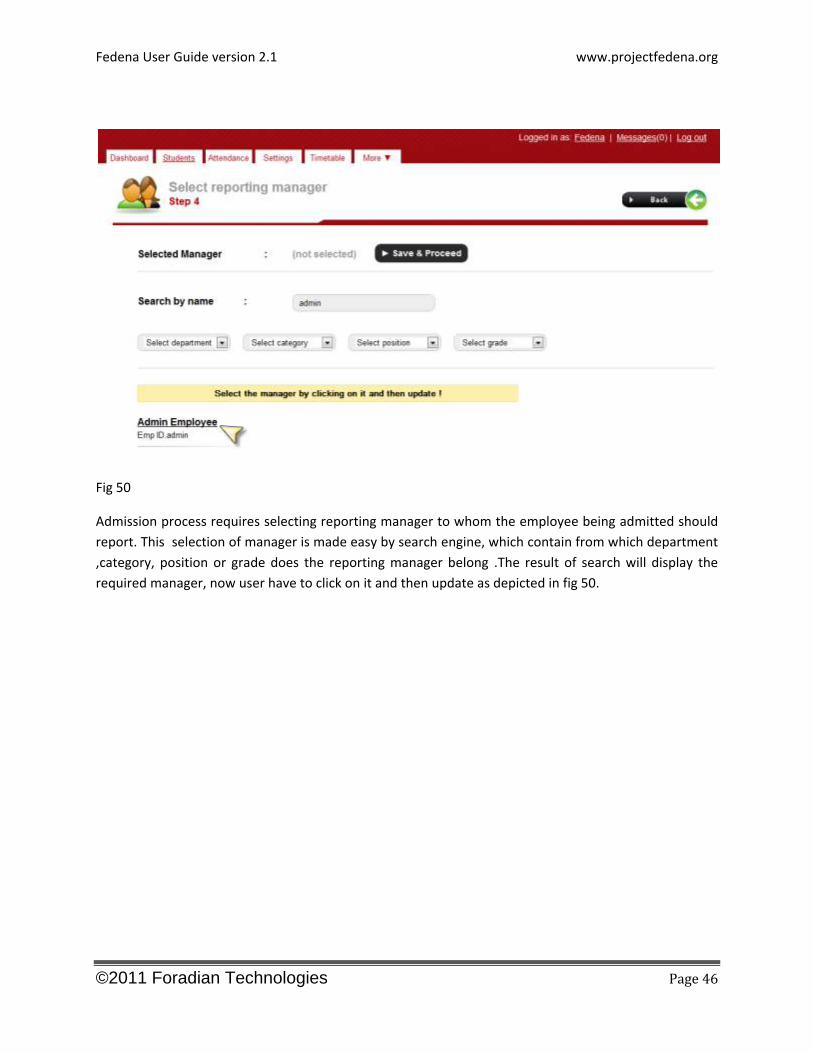
Fig 50
Admission process requires selecting reporting manager to whom the employee being admitted should
report. This selection of manager is made easy by search engine, which contain from which department
,category, position or grade does the reporting manager belong .The result of search will display the
required manager, now user have to click on it and then update as depicted in fig 50.
Fedena User Guide version 2.1 www.projectfedena.org
©2011 Foradian Technologies Page 47
i
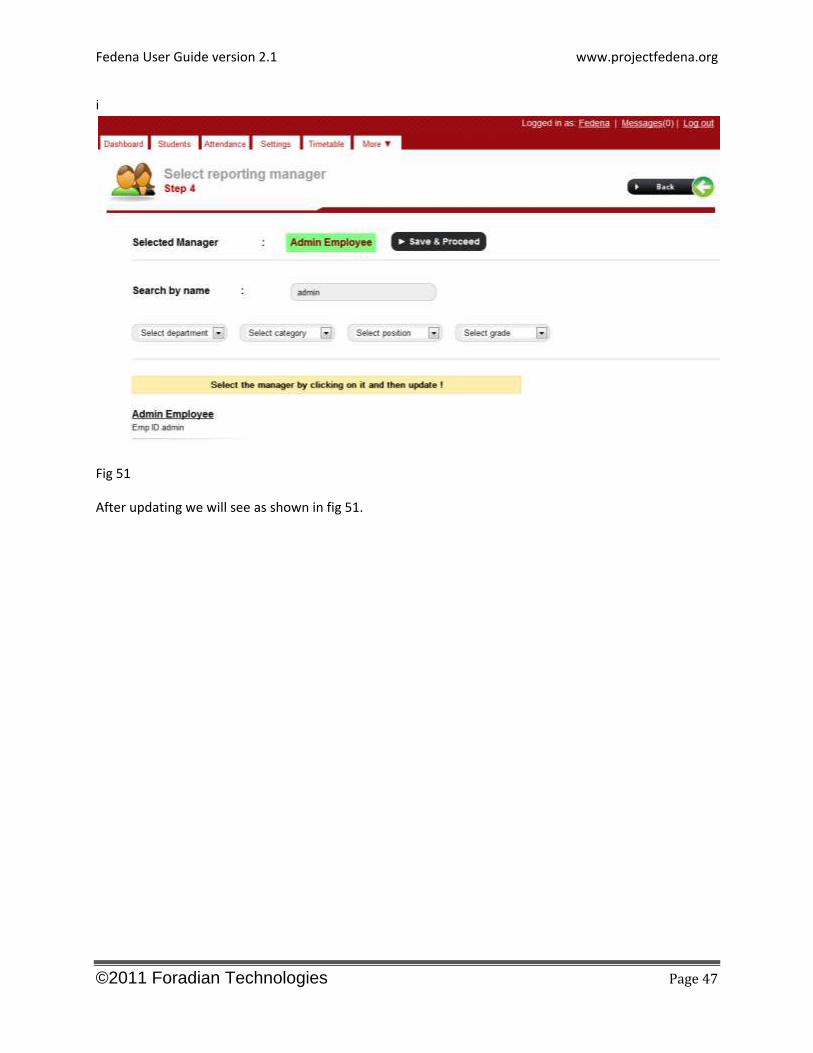
Fig 51
After updating we will see as shown in fig 51.
Fedena User Guide version 2.1 www.projectfedena.org
©2011 Foradian Technologies Page 48
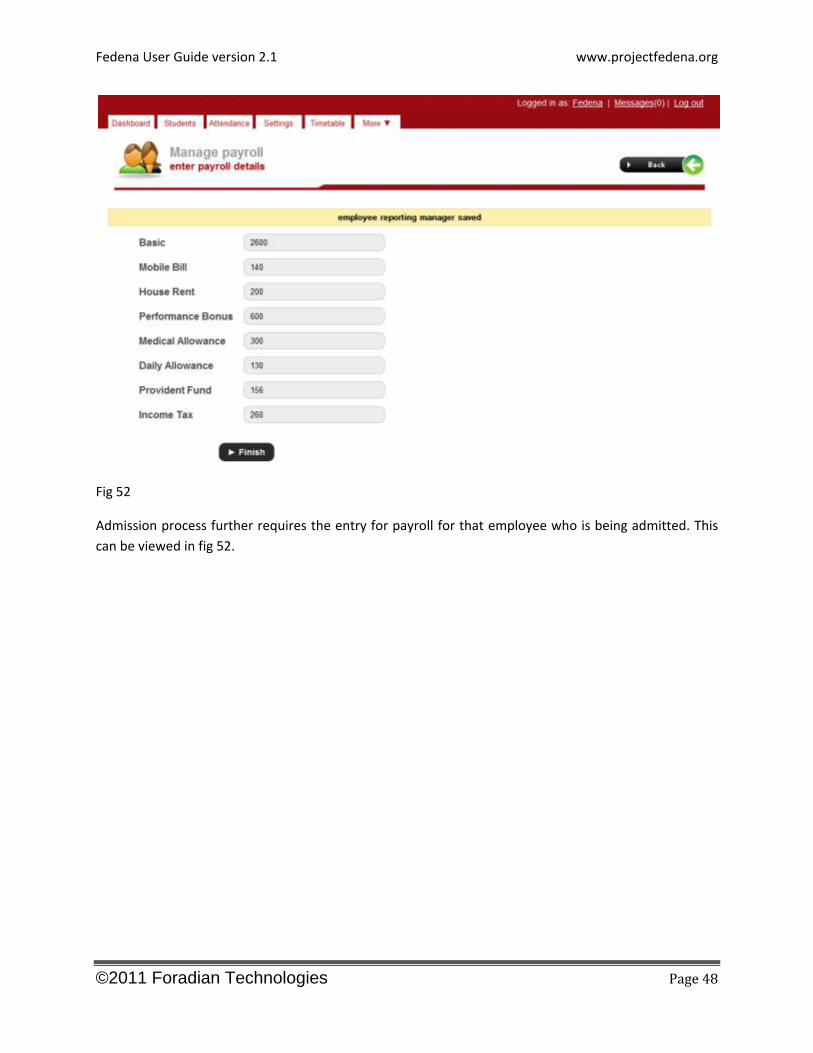
Fig 52
Admission process further requires the entry for payroll for that employee who is being admitted. This
can be viewed in fig 52.
Fedena User Guide version 2.1 www.projectfedena.org
©2011 Foradian Technologies Page 49
Fig 53
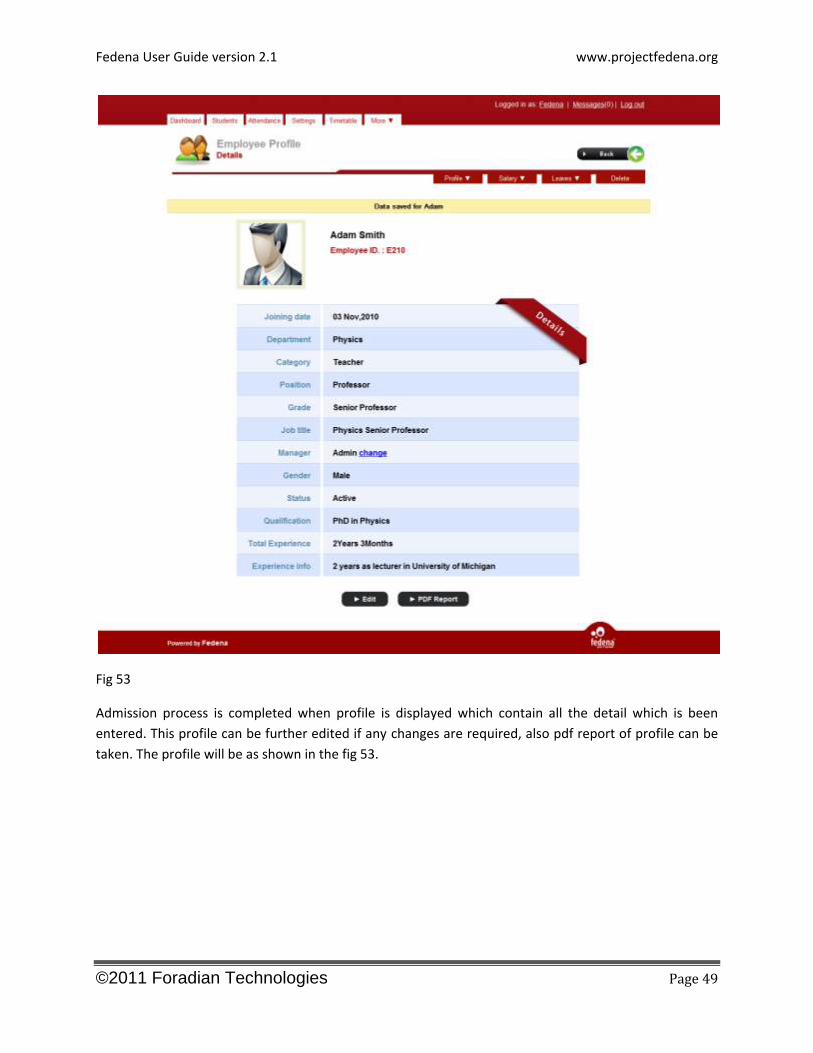
Admission process is completed when profile is displayed which contain all the detail which is been
entered. This profile can be further edited if any changes are required, also pdf report of profile can be
taken. The profile will be as shown in the fig 53.
Fedena User Guide version 2.1 www.projectfedena.org
©2011 Foradian Technologies Page 50
Employee subject association
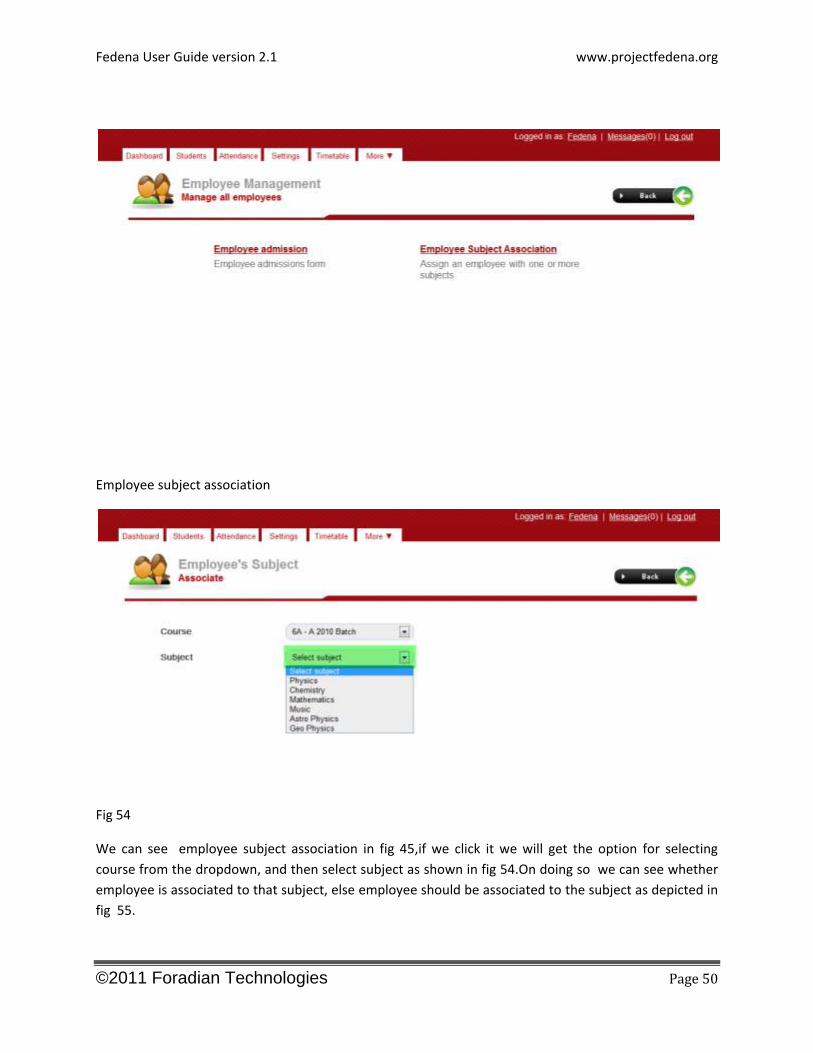
Fig 54
We can see employee subject association in fig 45,if we click it we will get the option for selecting
course from the dropdown, and then select subject as shown in fig 54.On doing so we can see whether
employee is associated to that subject, else employee should be associated to the subject as depicted in
fig 55.
Fedena User Guide version 2.1 www.projectfedena.org
©2011 Foradian Technologies Page 51
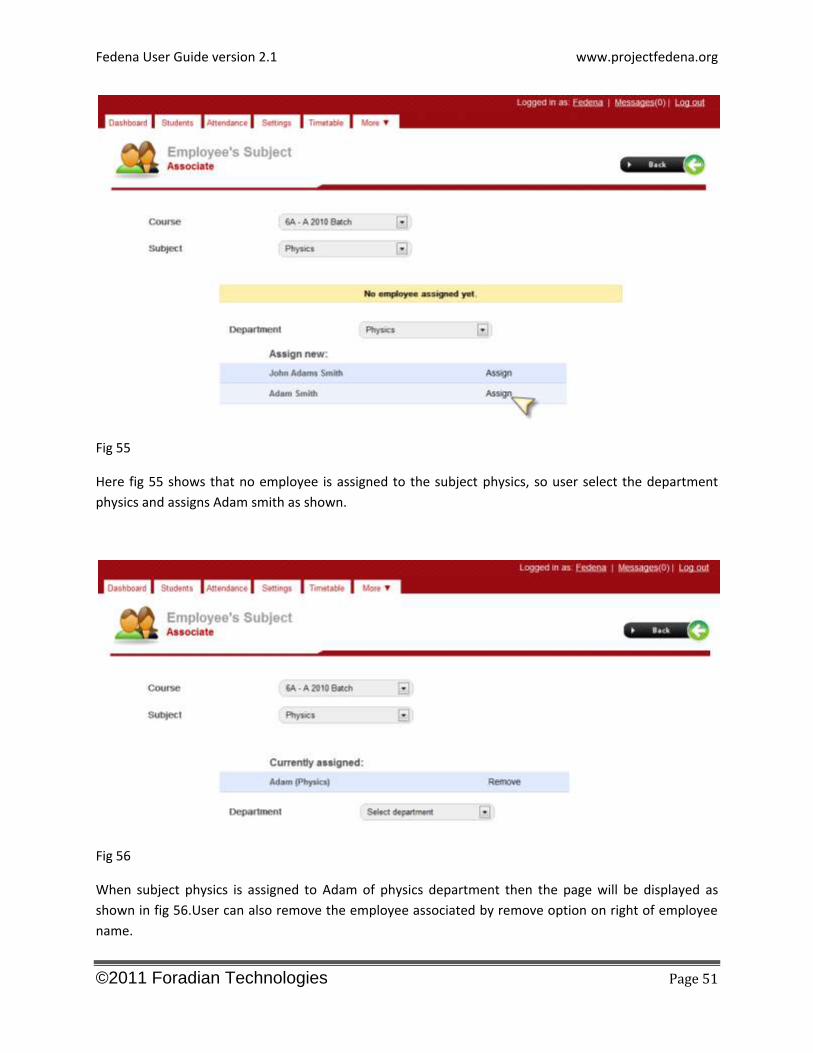
Fig 55
Here fig 55 shows that no employee is assigned to the subject physics, so user select the department
physics and assigns Adam smith as shown.
Fig 56
When subject physics is assigned to Adam of physics department then the page will be displayed as
shown in fig 56.User can also remove the employee associated by remove option on right of employee
name.
Fedena User Guide version 2.1 www.projectfedena.org
©2011 Foradian Technologies Page 52
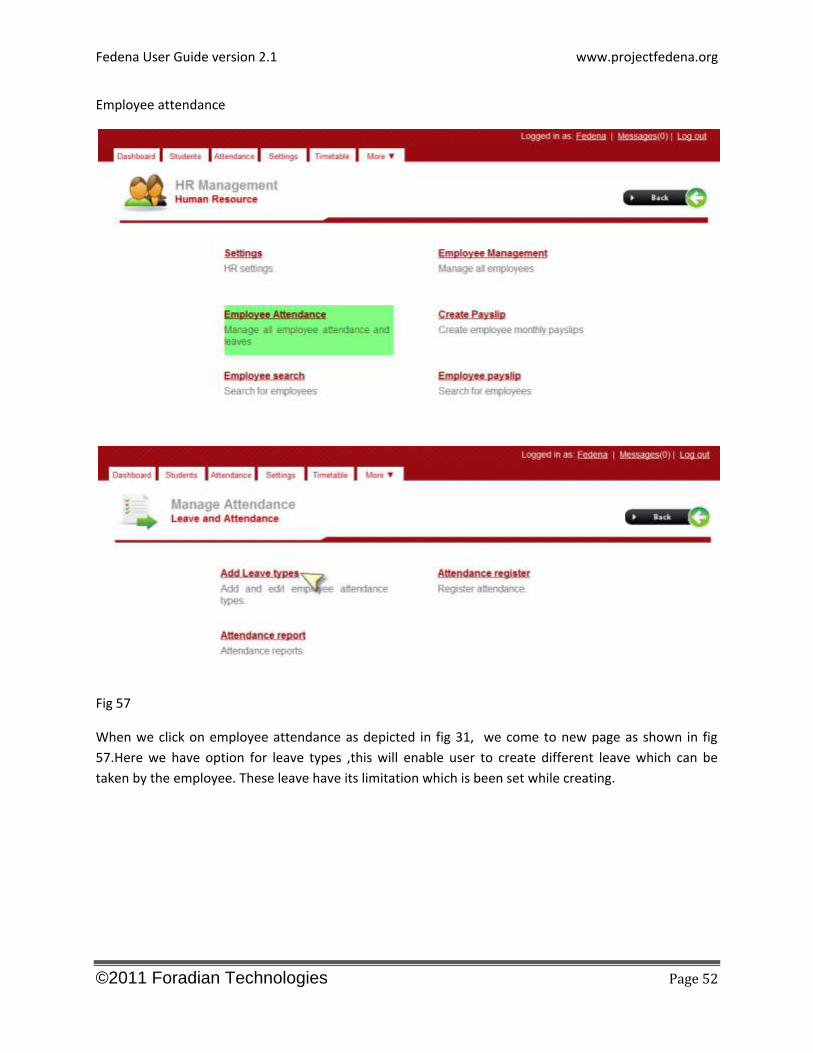
Employee attendance
Fig 57
When we click on employee attendance as depicted in fig 31, we come to new page as shown in fig
57.Here we have option for leave types ,this will enable user to create different leave which can be
taken by the employee. These leave have its limitation which is been set while creating.

Fedena User Guide version 2.1 www.projectfedena.org
©2011 Foradian Technologies Page 53
Fig 58
The type of leave is created by entering leave name, its code, and maximum count and set whether it is
active or inactive. The fig 58 shows how to create medical leave.

Fedena User Guide version 2.1 www.projectfedena.org
©2011 Foradian Technologies Page 54
Fig 59
We have seen entries for medical leave which is been created as shown in fig 58.User can also edit
medical leave after creating, i.e. leave count can be reduced or it can be made inactive etc.
Fedena User Guide version 2.1 www.projectfedena.org
©2011 Foradian Technologies Page 55
Attendance register
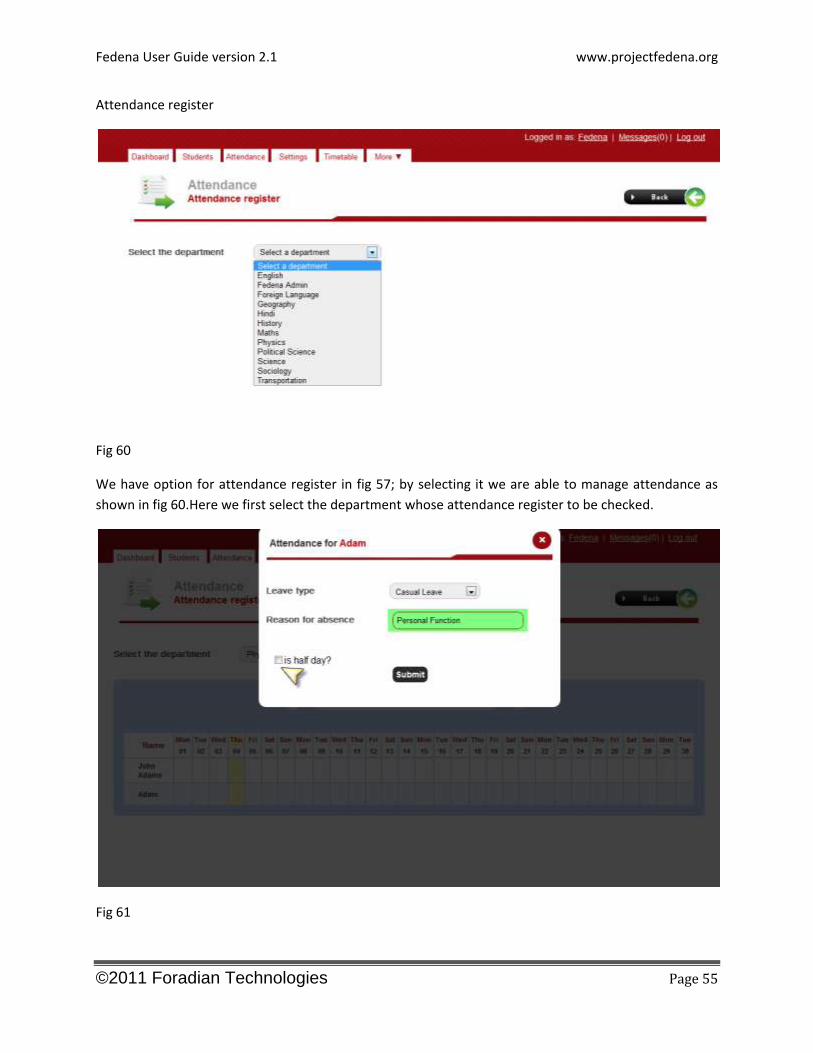
Fig 60
We have option for attendance register in fig 57; by selecting it we are able to manage attendance as
shown in fig 60.Here we first select the department whose attendance register to be checked.
Fig 61

Fedena User Guide version 2.1 www.projectfedena.org
©2011 Foradian Technologies Page 56
When department is selected say physics as shown in fig 61,then employee associated to physics will be
shown like john Adams smith and Adam smith etc and right to them is register for that month. The
leave can be taken by clicking on particular date on right of that employee; this will pop up a new leave
form which should be filled by that employee.
Attendance report
Fig 62
In order to view attendance report we have to follow the path attendance report form fig 57 and then
select department from drop down this will show report of all the employee in that department as
shown in fig 62.The report gives clear picture of number of leave count permitted for each employee
and total number of leave he has taken.
Fedena User Guide version 2.1 www.projectfedena.org
©2011 Foradian Technologies Page 57
Create payslip
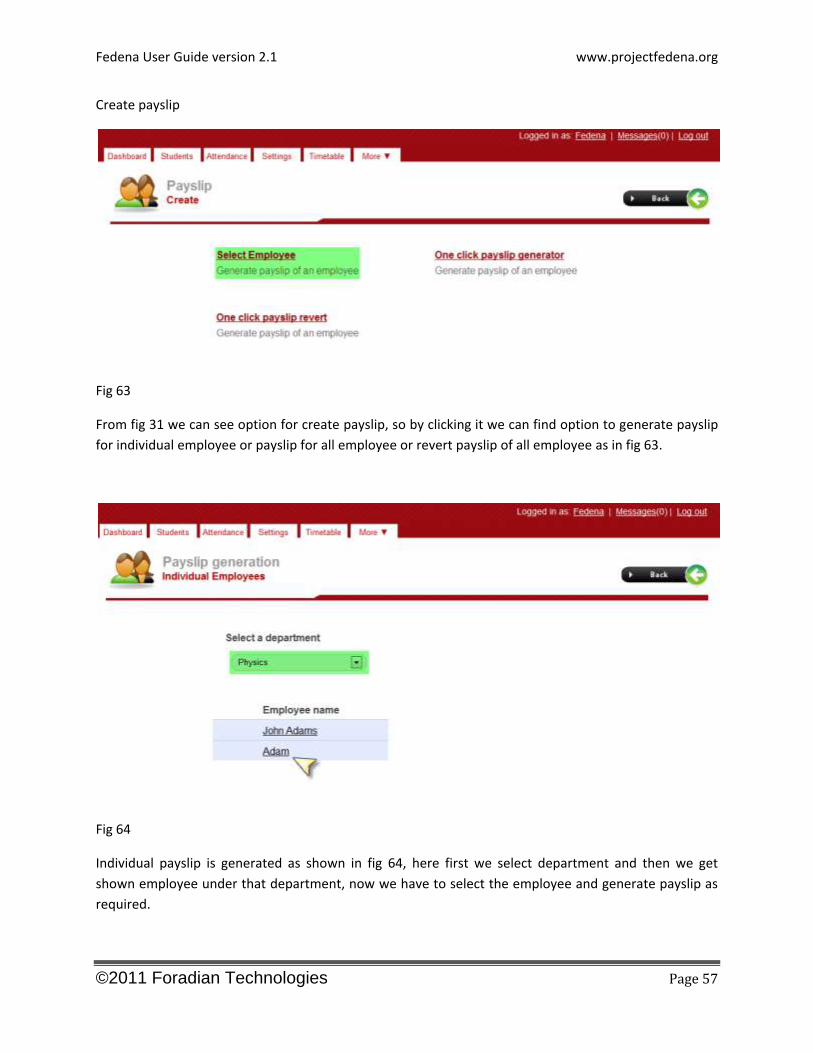
Fig 63
From fig 31 we can see option for create payslip, so by clicking it we can find option to generate payslip
for individual employee or payslip for all employee or revert payslip of all employee as in fig 63.
Fig 64
Individual payslip is generated as shown in fig 64, here first we select department and then we get
shown employee under that department, now we have to select the employee and generate payslip as
required.

Fedena User Guide version 2.1 www.projectfedena.org
©2011 Foradian Technologies Page 58
Fig 65
This fig 65 show entry for payslip for individual and on right there is option to add new category. If new
category is added then it will be shown in payslip and amount for it should be entered.
Fedena User Guide version 2.1 www.projectfedena.org
©2011 Foradian Technologies Page 59
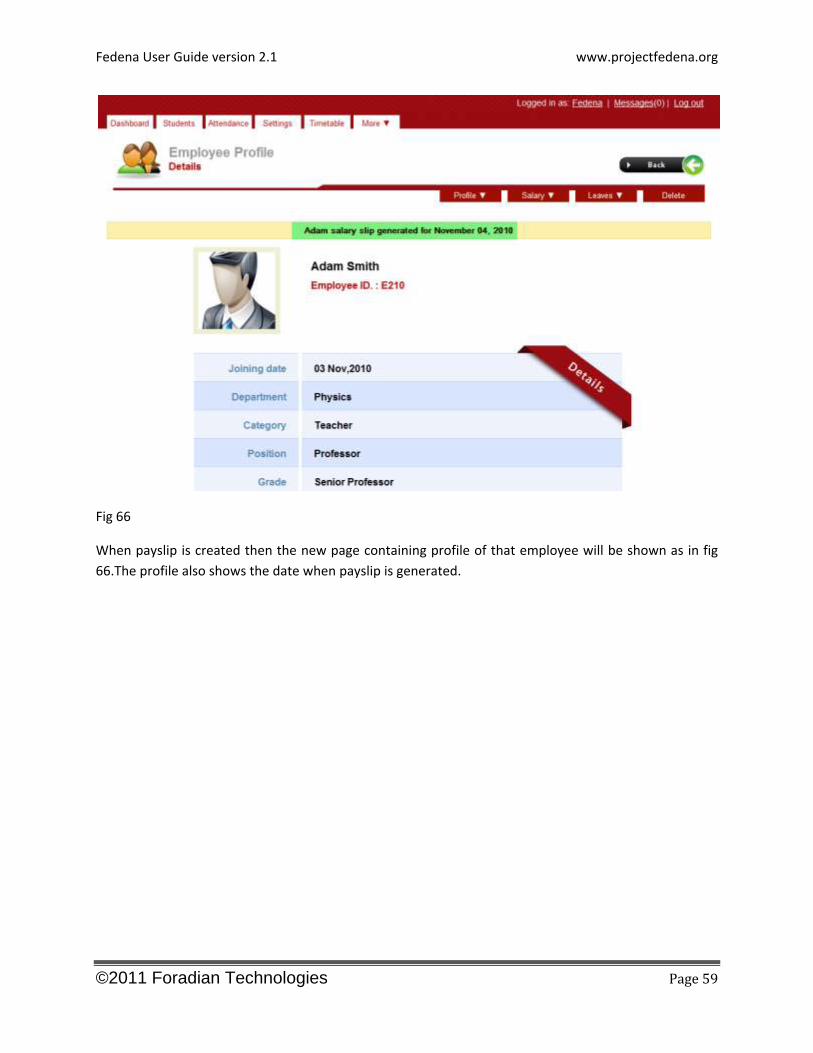
Fig 66
When payslip is created then the new page containing profile of that employee will be shown as in fig
66.The profile also shows the date when payslip is generated.

Fedena User Guide version 2.1 www.projectfedena.org
©2011 Foradian Technologies Page 60
zzzzxsx0078zs
Fig 67
One click payslip generator
Fig 68
Fedena User Guide version 2.1 www.projectfedena.org
©2011 Foradian Technologies Page 61
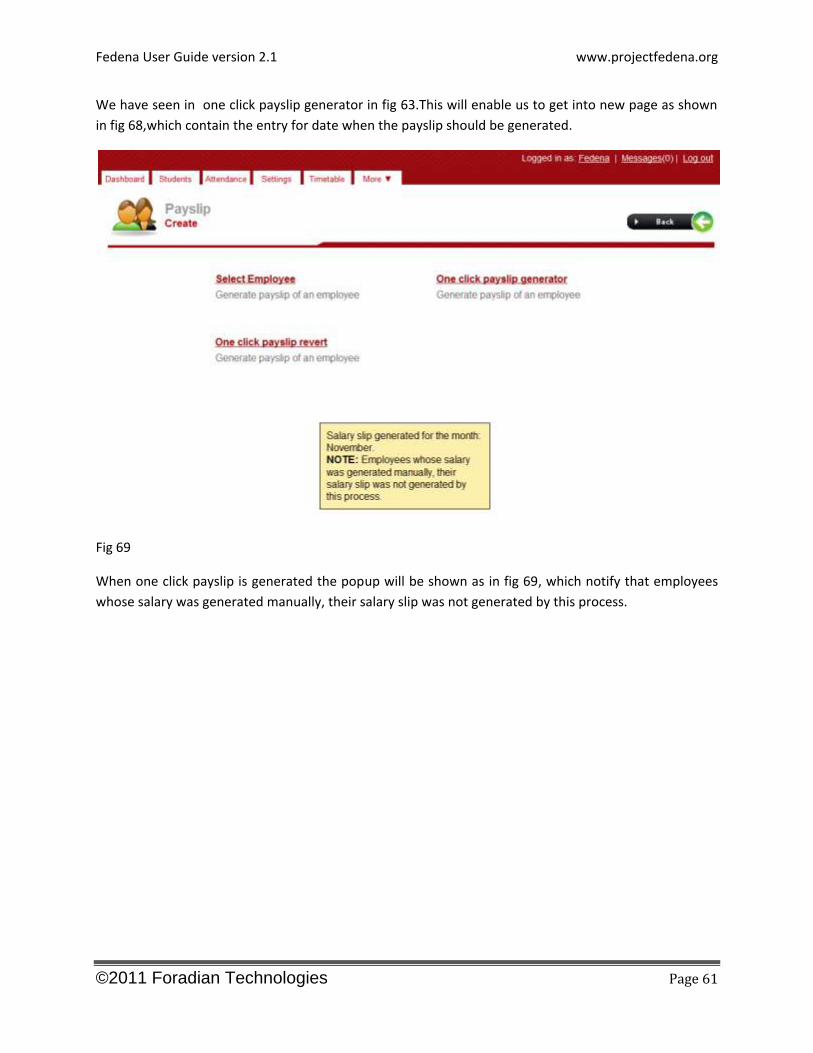
We have seen in one click payslip generator in fig 63.This will enable us to get into new page as shown
in fig 68,which contain the entry for date when the payslip should be generated.
Fig 69
When one click payslip is generated the popup will be shown as in fig 69, which notify that employees
whose salary was generated manually, their salary slip was not generated by this process.
Fedena User Guide version 2.1 www.projectfedena.org
©2011 Foradian Technologies Page 62
Fig 70
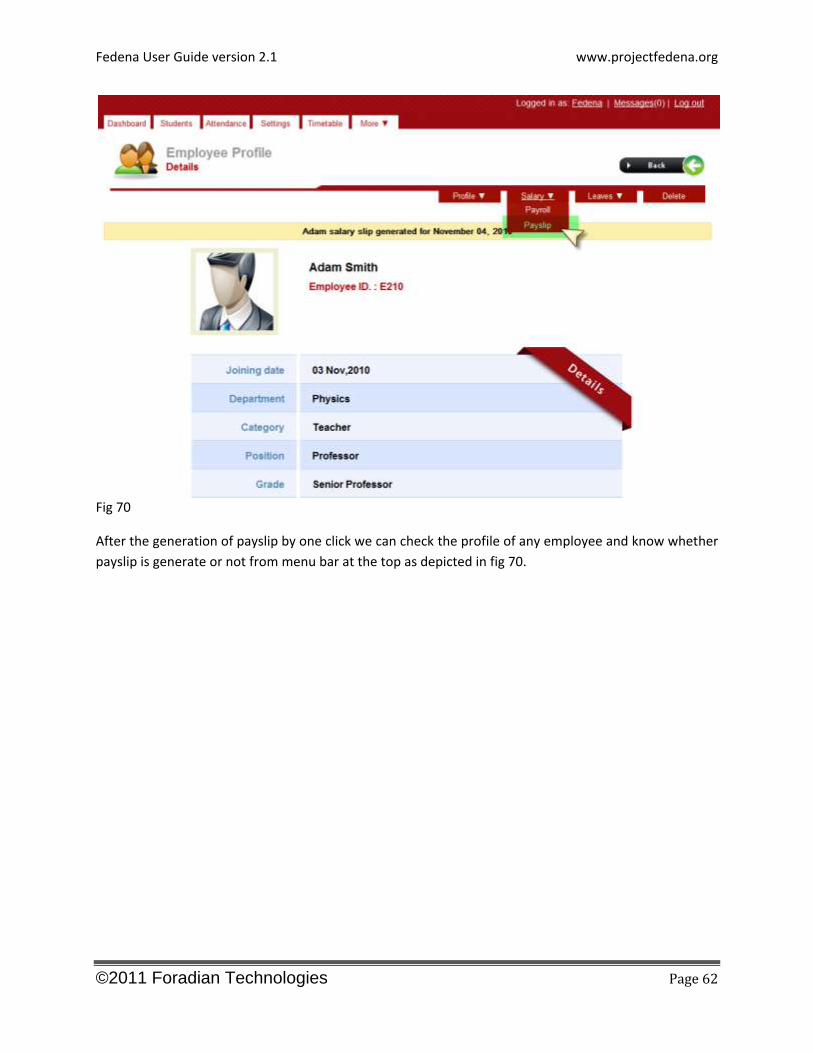
After the generation of payslip by one click we can check the profile of any employee and know whether
payslip is generate or not from menu bar at the top as depicted in fig 70.
Fedena User Guide version 2.1 www.projectfedena.org
©2011 Foradian Technologies Page 63
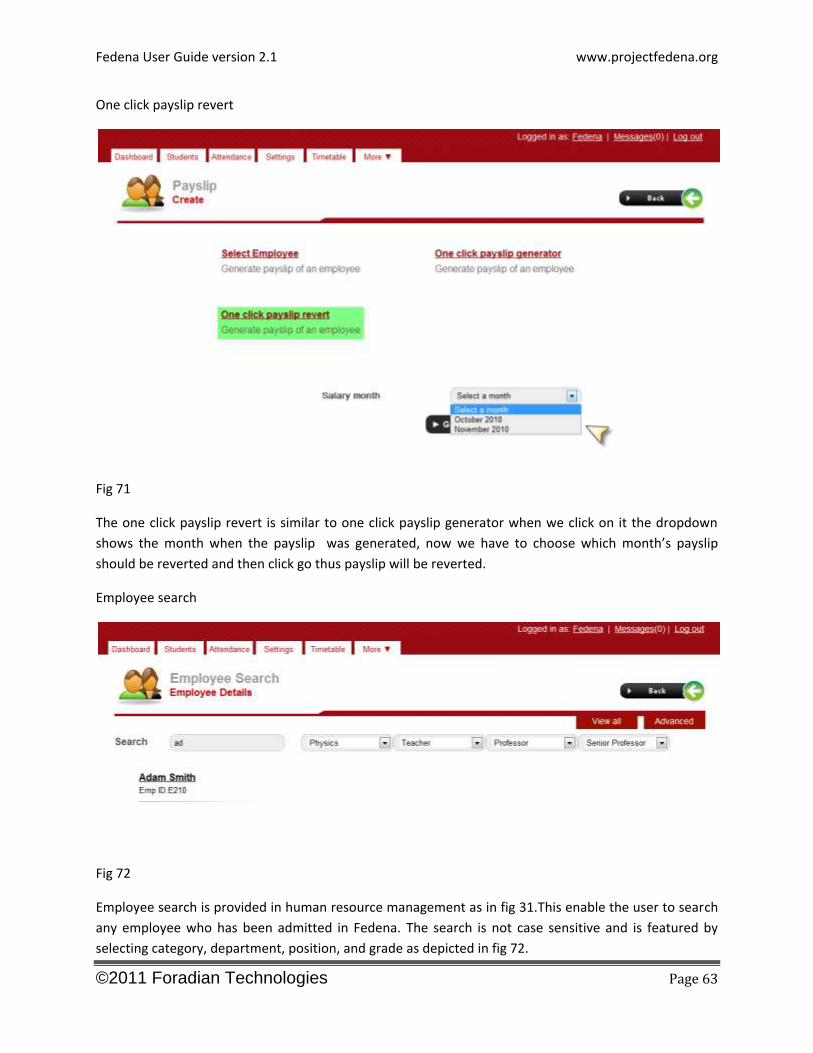
One click payslip revert
Fig 71
The one click payslip revert is similar to one click payslip generator when we click on it the dropdown
shows the month when the payslip was generated, now we have to choose which month’s payslip
should be reverted and then click go thus payslip will be reverted.
Employee search
Fig 72
Employee search is provided in human resource management as in fig 31.This enable the user to search
any employee who has been admitted in Fedena. The search is not case sensitive and is featured by
selecting category, department, position, and grade as depicted in fig 72.

Fedena User Guide version 2.1 www.projectfedena.org
©2011 Foradian Technologies Page 64
View all
Fig 73
When employee is not found because of unavailable of proper information about the employee, then
user can use view all in menu bar as in fig 73.
Fig 74
The view all will open up a new page, where the department should be selected. The same is shown in
fig 74 here physics department is been selected.
Fedena User Guide version 2.1 www.projectfedena.org
©2011 Foradian Technologies Page 65
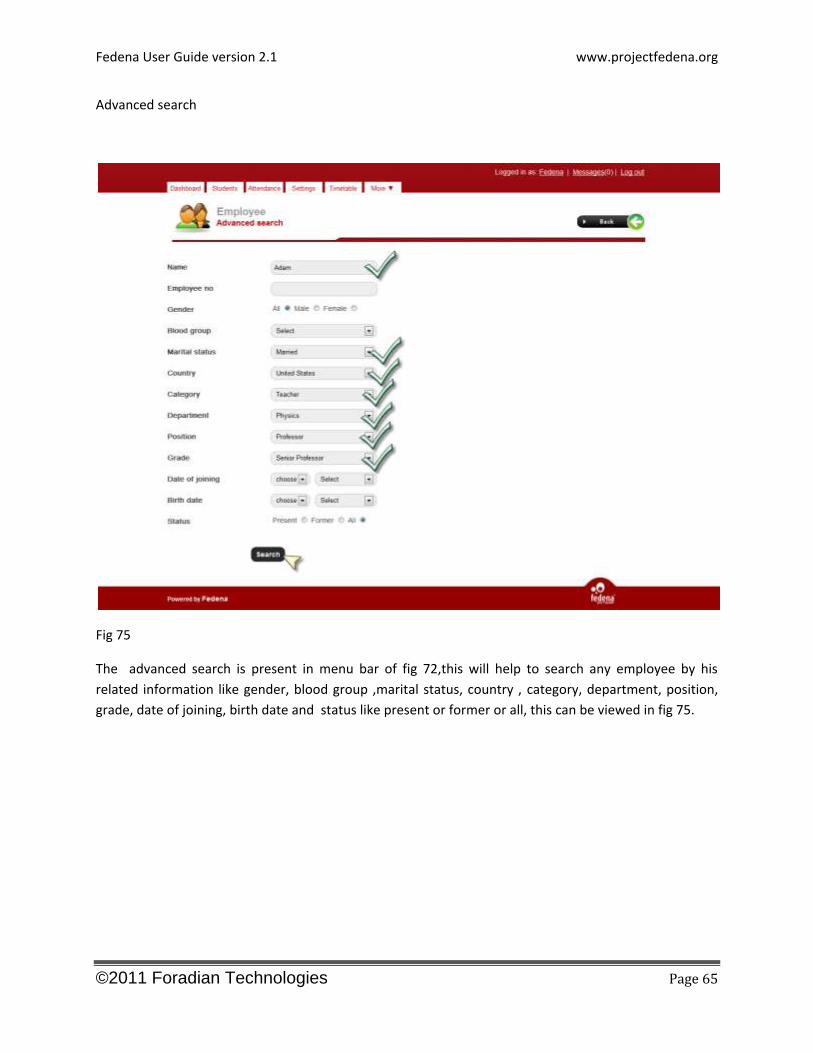
Advanced search
Fig 75
The advanced search is present in menu bar of fig 72,this will help to search any employee by his
related information like gender, blood group ,marital status, country , category, department, position,
grade, date of joining, birth date and status like present or former or all, this can be viewed in fig 75.
Fedena User Guide version 2.1 www.projectfedena.org
©2011 Foradian Technologies Page 66
Fig 76
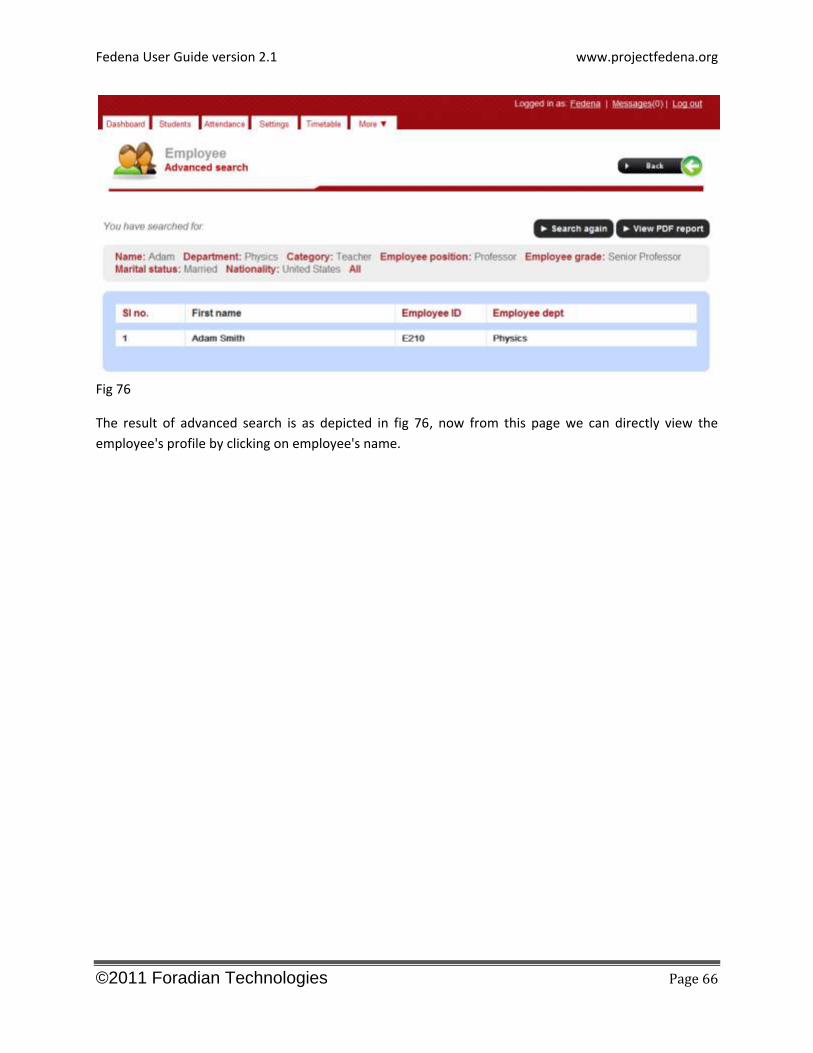
The result of advanced search is as depicted in fig 76, now from this page we can directly view the
employee's profile by clicking on employee's name.

Fedena User Guide version 2.1 www.projectfedena.org
©2011 Foradian Technologies Page 67
STUDENT ADMISSION
Fedena User Guide version 2.1 www.projectfedena.org
©2011 Foradian Technologies Page 68
Fig 174
Fedena User Guide version 2.1 www.projectfedena.org
©2011 Foradian Technologies Page 69
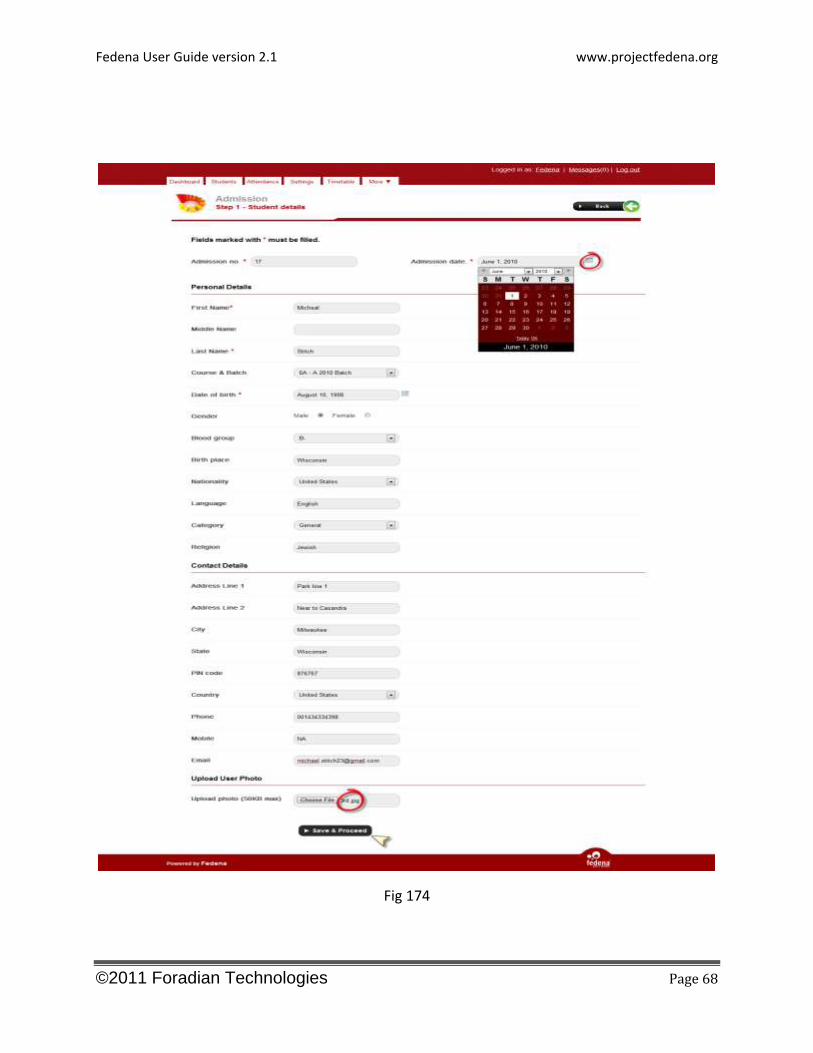
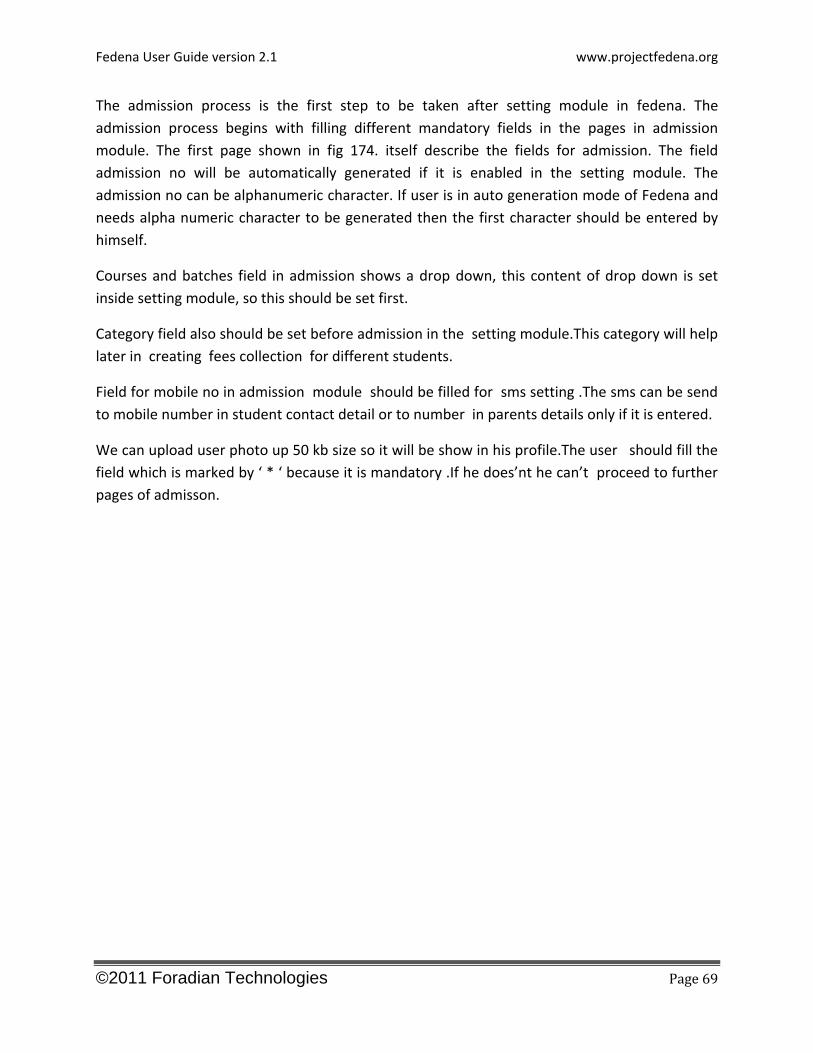
The admission process is the first step to be taken after setting module in fedena. The
admission process begins with filling different mandatory fields in the pages in admission
module. The first page shown in fig 174. itself describe the fields for admission. The field
admission no will be automatically generated if it is enabled in the setting module. The
admission no can be alphanumeric character. If user is in auto generation mode of Fedena and
needs alpha numeric character to be generated then the first character should be entered by
himself.
Courses and batches field in admission shows a drop down, this content of drop down is set
inside setting module, so this should be set first.
Category field also should be set before admission in the setting module.This category will help
later in creating fees collection for different students.
Field for mobile no in admission module should be filled for sms setting .The sms can be send
to mobile number in student contact detail or to number in parents details only if it is entered.
We can upload user photo up 50 kb size so it will be show in his profile.The user should fill the
field which is marked by ‘ * ‘ because it is mandatory .If he does’nt he can’t proceed to further
pages of admisson.
Fedena User Guide version 2.1 www.projectfedena.org
©2011 Foradian Technologies Page 70
Fig 175
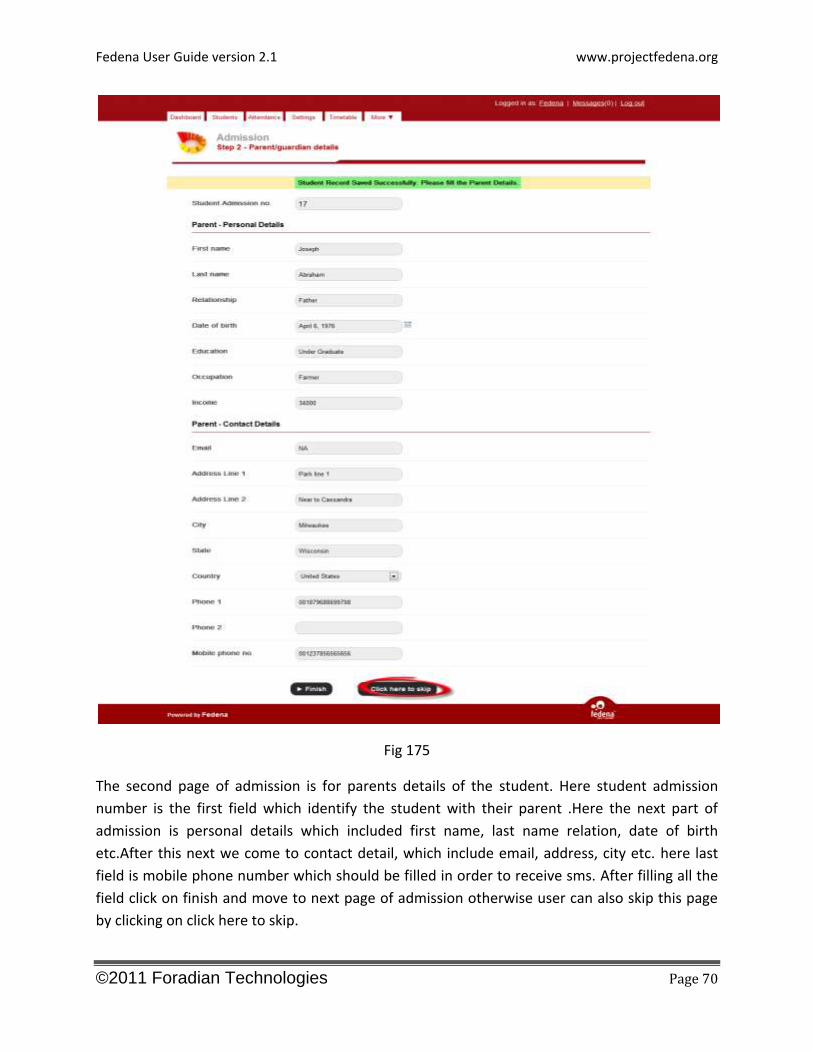
The second page of admission is for parents details of the student. Here student admission
number is the first field which identify the student with their parent .Here the next part of
admission is personal details which included first name, last name relation, date of birth
etc.After this next we come to contact detail, which include email, address, city etc. here last
field is mobile phone number which should be filled in order to receive sms. After filling all the
field click on finish and move to next page of admission otherwise user can also skip this page
by clicking on click here to skip.
Fedena User Guide version 2.1 www.projectfedena.org
©2011 Foradian Technologies Page 71
Fig 176
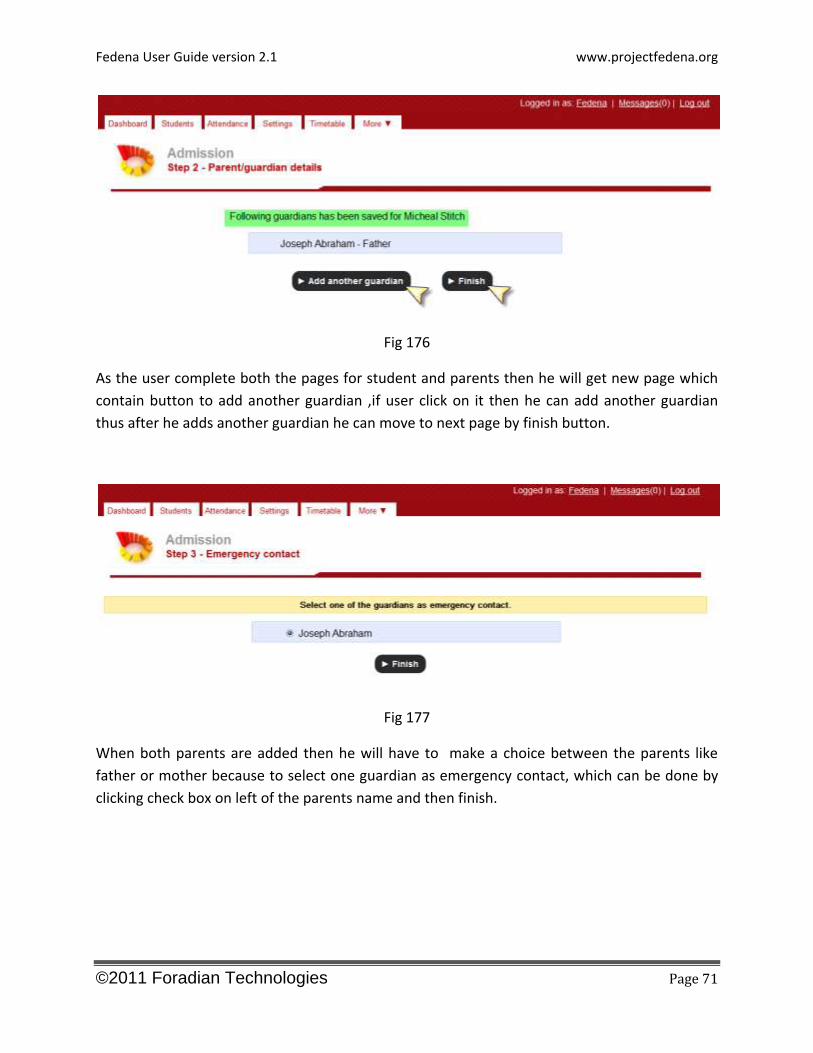
As the user complete both the pages for student and parents then he will get new page which
contain button to add another guardian ,if user click on it then he can add another guardian
thus after he adds another guardian he can move to next page by finish button.
Fig 177
When both parents are added then he will have to make a choice between the parents like
father or mother because to select one guardian as emergency contact, which can be done by
clicking check box on left of the parents name and then finish.
Fedena User Guide version 2.1 www.projectfedena.org
©2011 Foradian Technologies Page 72
Fig 178
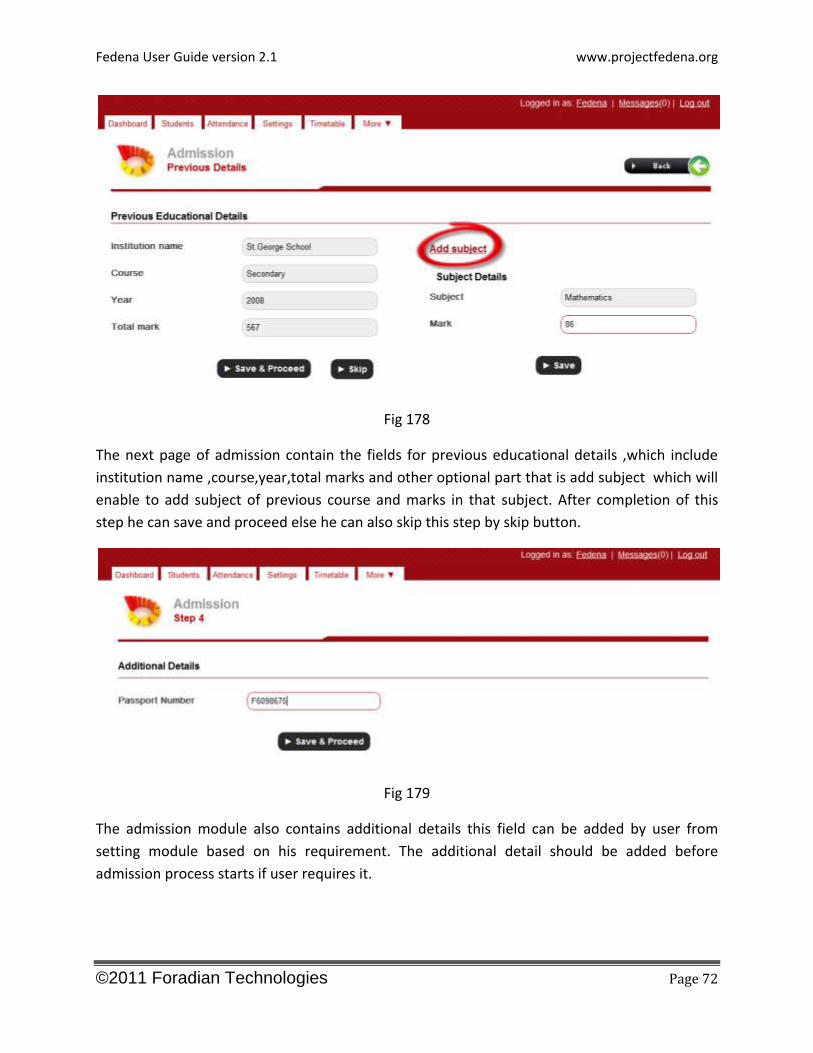
The next page of admission contain the fields for previous educational details ,which include
institution name ,course,year,total marks and other optional part that is add subject which will
enable to add subject of previous course and marks in that subject. After completion of this
step he can save and proceed else he can also skip this step by skip button.
Fig 179
The admission module also contains additional details this field can be added by user from
setting module based on his requirement. The additional detail should be added before
admission process starts if user requires it.

Fedena User Guide version 2.1 www.projectfedena.org
©2011 Foradian Technologies Page 73
Fig 180
Fedena User Guide version 2.1 www.projectfedena.org
©2011 Foradian Technologies Page 74
When user completes the admission process then the page as shown in fig 180 will be created
which contain complete detail for a student to be admitted. This page contain a menu bar on
top which contain option for report that enable user to view the report of any particular
student from his profile.
User need to click on guardian in menu bar from his profile to view guardian detail. The
message can also be send to student or guardian or both. There is also fee option which is
provided for the collection of entire course fee at time for the student. thus if he pays entire fee
then no remainder for payment of fees will be sent to that student.
The last option in menu bar is delete which can remove the student from Fedena by keeping
him as former or removing completely from database .The Fedena also provide user to take the
pdf of any of the student from his profile.

Fedena User Guide version 2.1 www.projectfedena.org
©2011 Foradian Technologies Page 75
STUDENT DETAILS
Fedena User Guide version 2.1 www.projectfedena.org
©2011 Foradian Technologies Page 76
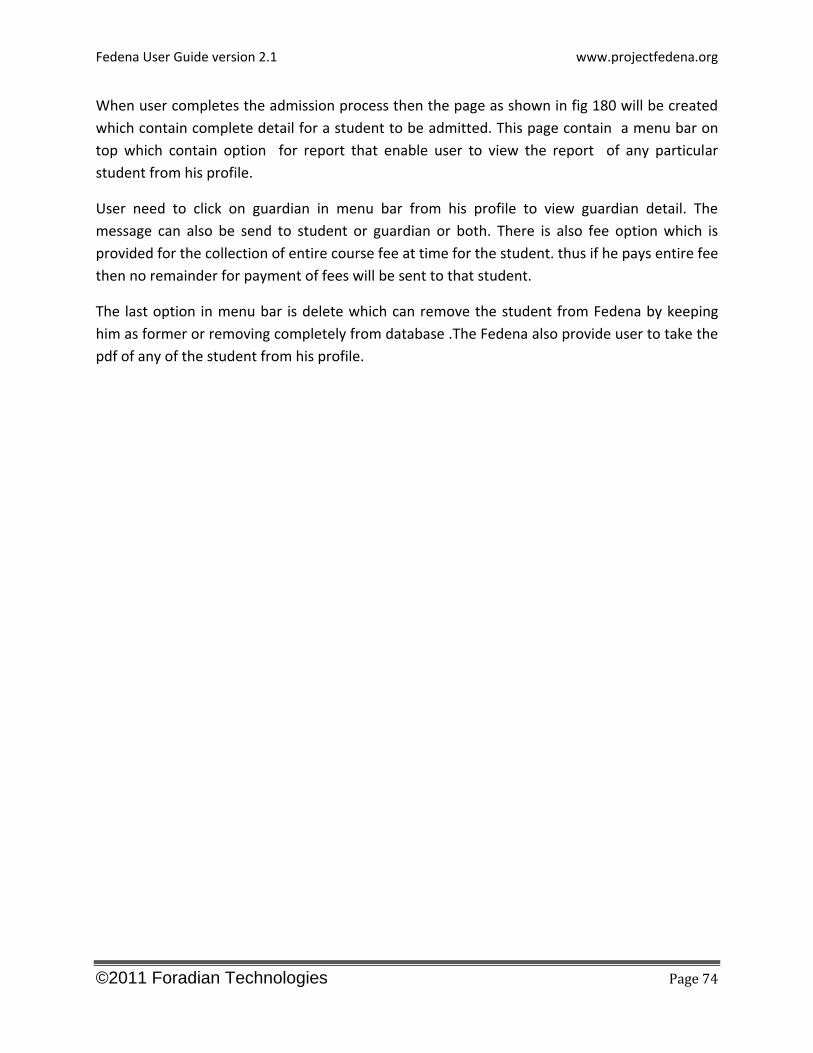
Fig 181
The very flexible module of Fedena is student detail because from here we can find any student
in the Fedena just by typing the name in the search box after selecting present student or
former student from right in student detail.
If in case user is not able to find he can use advanced search which is much more versatile.
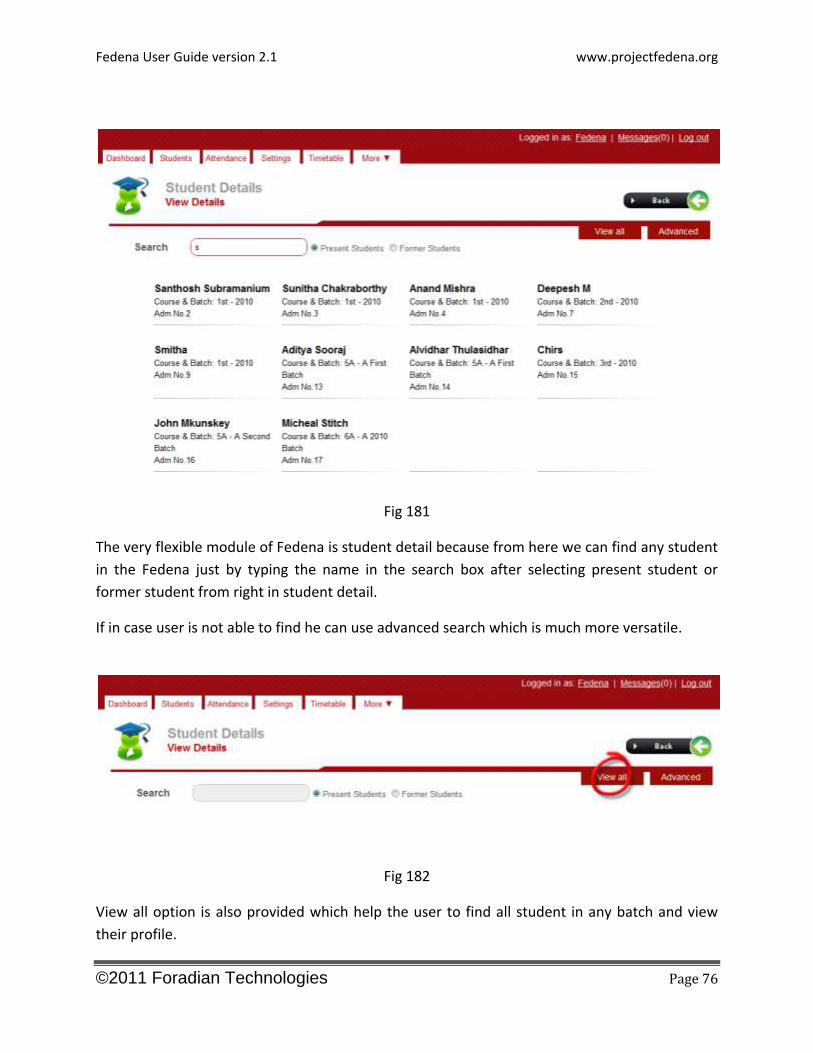
Fig 182
View all option is also provided which help the user to find all student in any batch and view
their profile.
Fedena User Guide version 2.1 www.projectfedena.org
©2011 Foradian Technologies Page 77
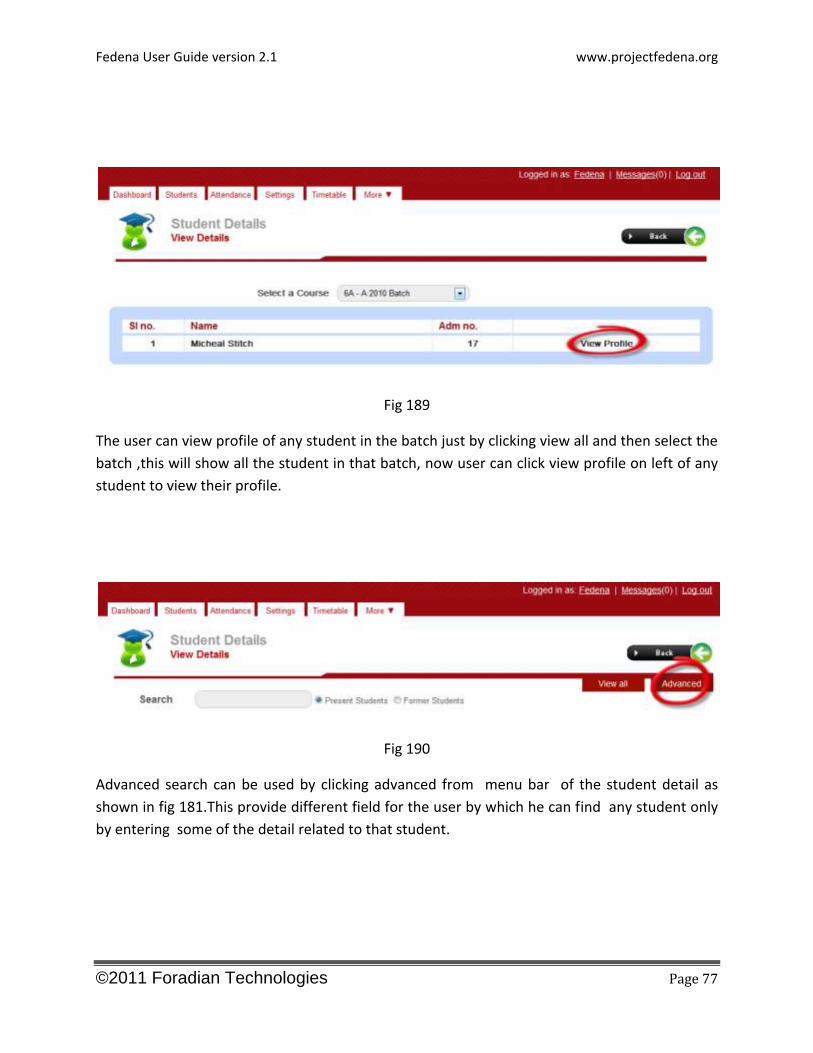
Fig 189
The user can view profile of any student in the batch just by clicking view all and then select the
batch ,this will show all the student in that batch, now user can click view profile on left of any
student to view their profile.
Fig 190
Advanced search can be used by clicking advanced from menu bar of the student detail as
shown in fig 181.This provide different field for the user by which he can find any student only
by entering some of the detail related to that student.

Fedena User Guide version 2.1 www.projectfedena.org
©2011 Foradian Technologies Page 78
MANAGE NEWS
Fedena User Guide version 2.1 www.projectfedena.org
©2011 Foradian Technologies Page 79
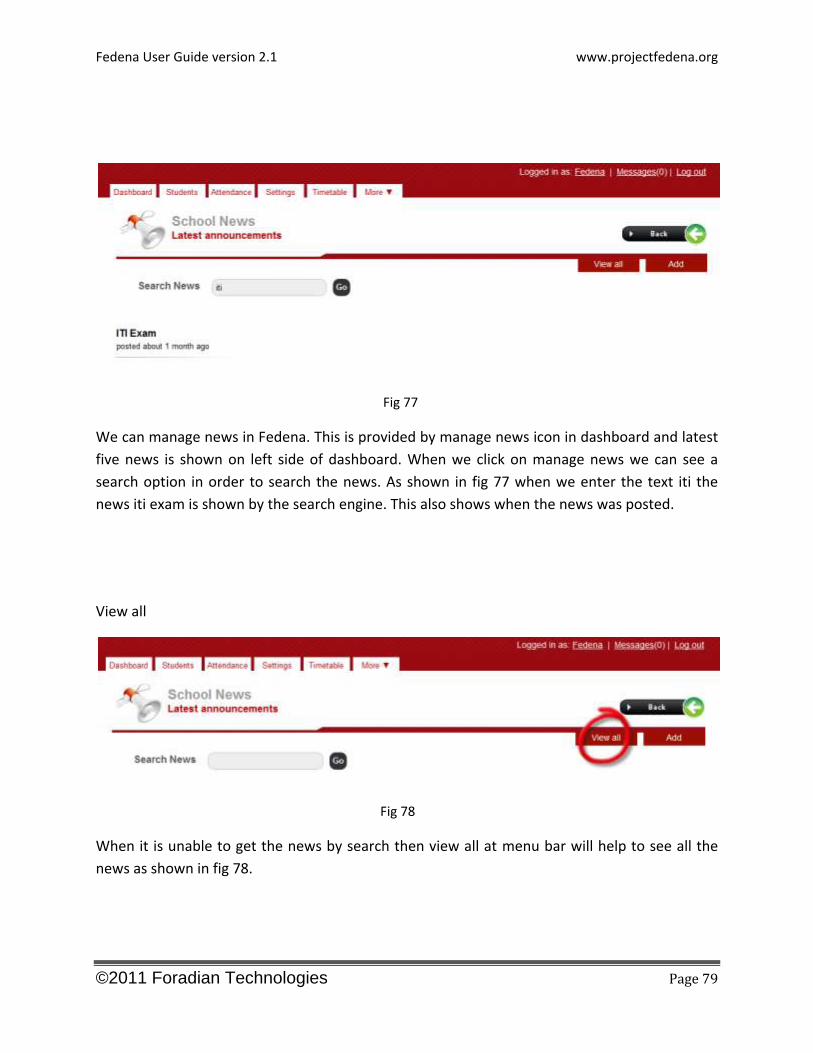
Fig 77
We can manage news in Fedena. This is provided by manage news icon in dashboard and latest
five news is shown on left side of dashboard. When we click on manage news we can see a
search option in order to search the news. As shown in fig 77 when we enter the text iti the
news iti exam is shown by the search engine. This also shows when the news was posted.
View all
Fig 78
When it is unable to get the news by search then view all at menu bar will help to see all the
news as shown in fig 78.
Fedena User Guide version 2.1 www.projectfedena.org
©2011 Foradian Technologies Page 80
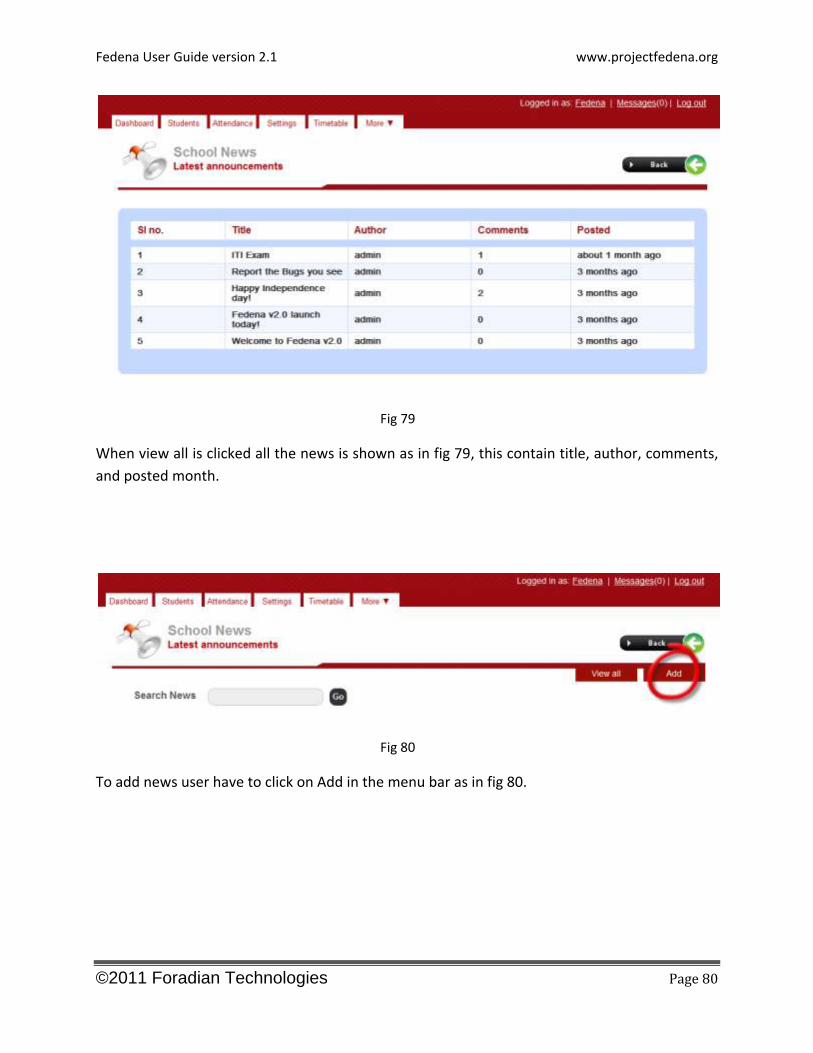
Fig 79
When view all is clicked all the news is shown as in fig 79, this contain title, author, comments,
and posted month.
Fig 80
To add news user have to click on Add in the menu bar as in fig 80.
Fedena User Guide version 2.1 www.projectfedena.org
©2011 Foradian Technologies Page 81
Fig 81
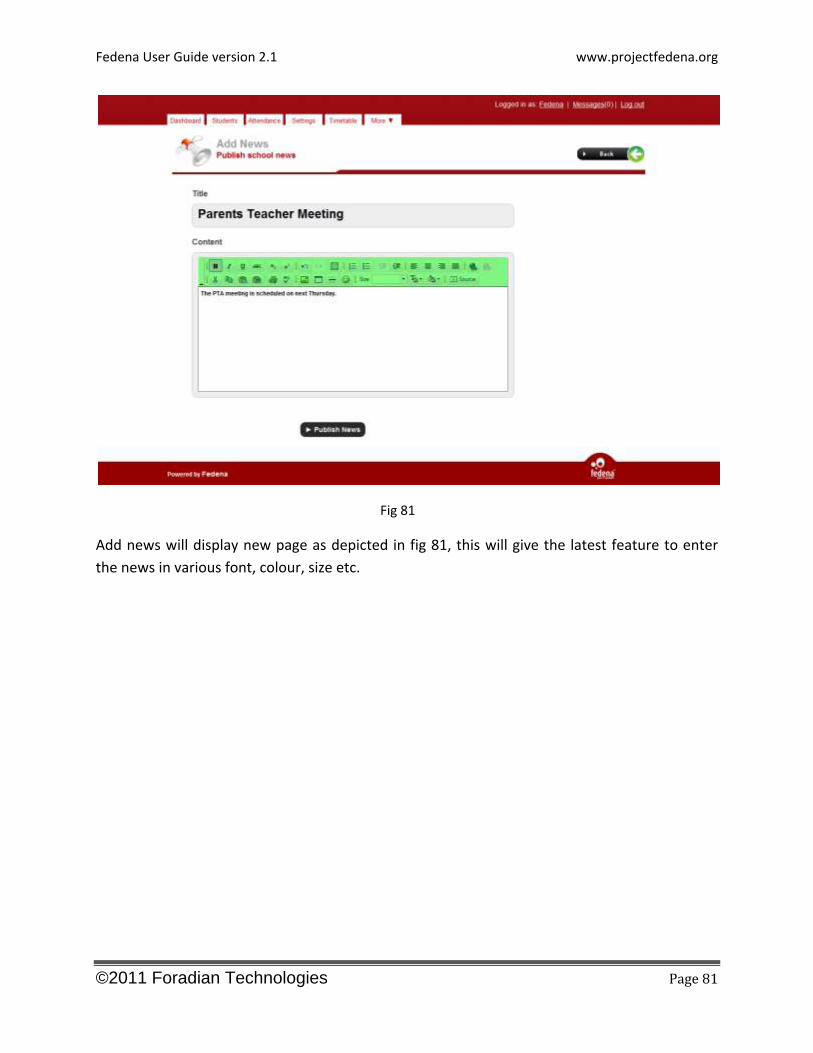
Add news will display new page as depicted in fig 81, this will give the latest feature to enter
the news in various font, colour, size etc.
Fedena User Guide version 2.1 www.projectfedena.org
©2011 Foradian Technologies Page 82
Fig 82
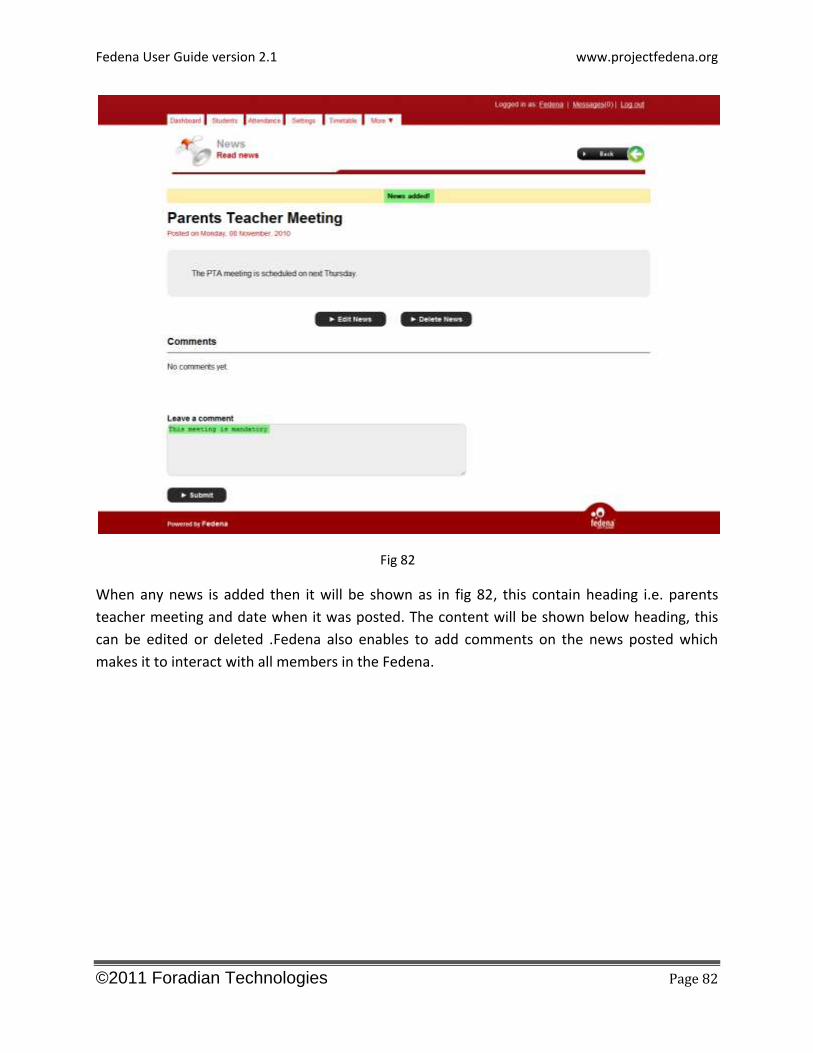
When any news is added then it will be shown as in fig 82, this contain heading i.e. parents
teacher meeting and date when it was posted. The content will be shown below heading, this
can be edited or deleted .Fedena also enables to add comments on the news posted which
makes it to interact with all members in the Fedena.
Fedena User Guide version 2.1 www.projectfedena.org
©2011 Foradian Technologies Page 83
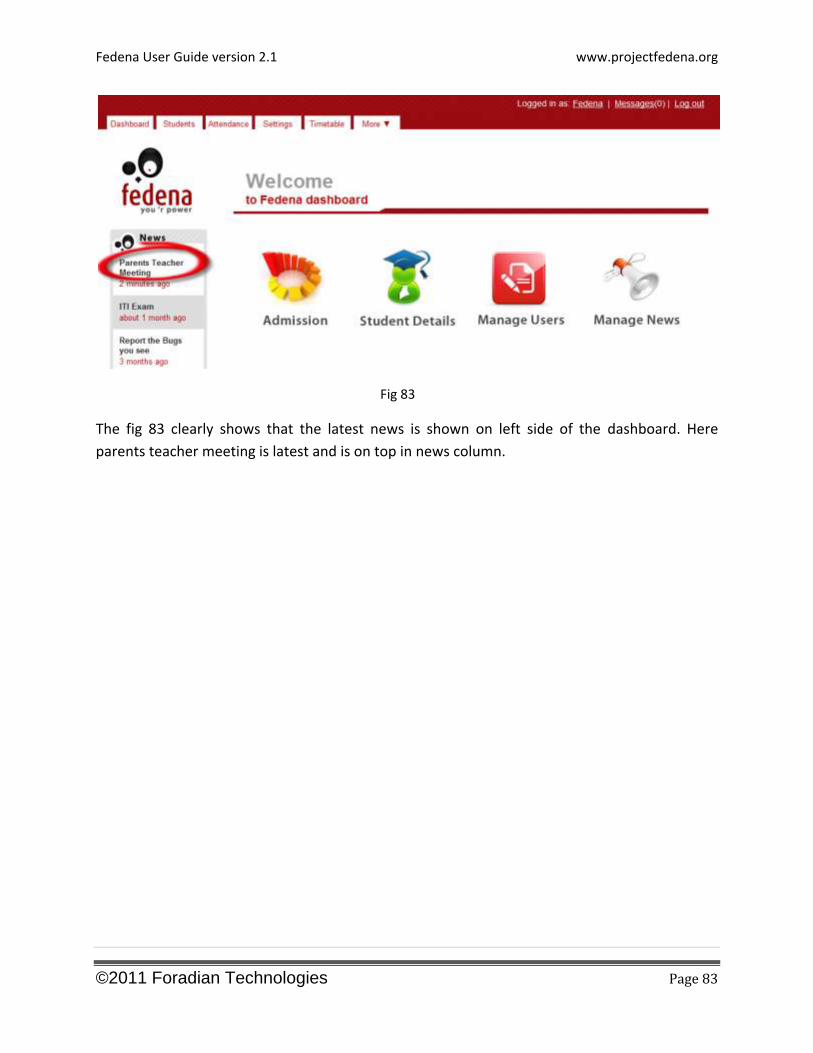
Fig 83
The fig 83 clearly shows that the latest news is shown on left side of the dashboard. Here
parents teacher meeting is latest and is on top in news column.

Fedena User Guide version 2.1 www.projectfedena.org
©2011 Foradian Technologies Page 84
MANAGE USER
Fedena User Guide version 2.1 www.projectfedena.org
©2011 Foradian Technologies Page 85
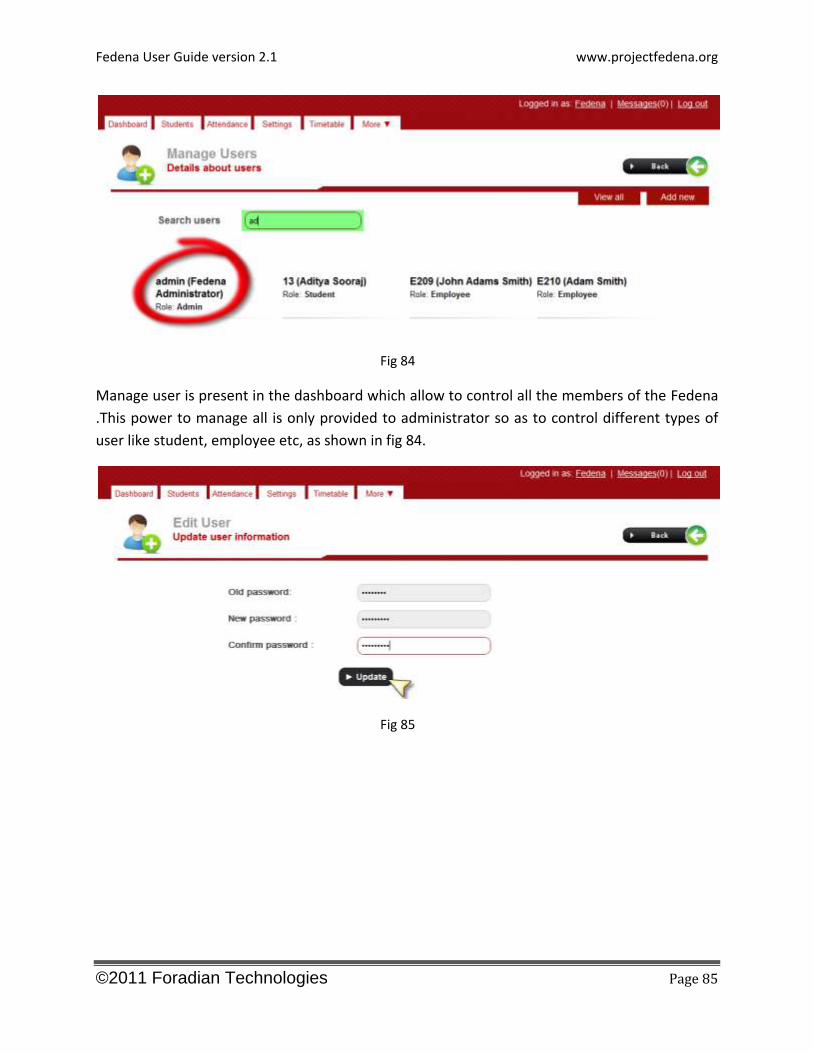
Fig 84
Manage user is present in the dashboard which allow to control all the members of the Fedena
.This power to manage all is only provided to administrator so as to control different types of
user like student, employee etc, as shown in fig 84.
Fig 85
Fedena User Guide version 2.1 www.projectfedena.org
©2011 Foradian Technologies Page 86
Fig 86
Fig 87
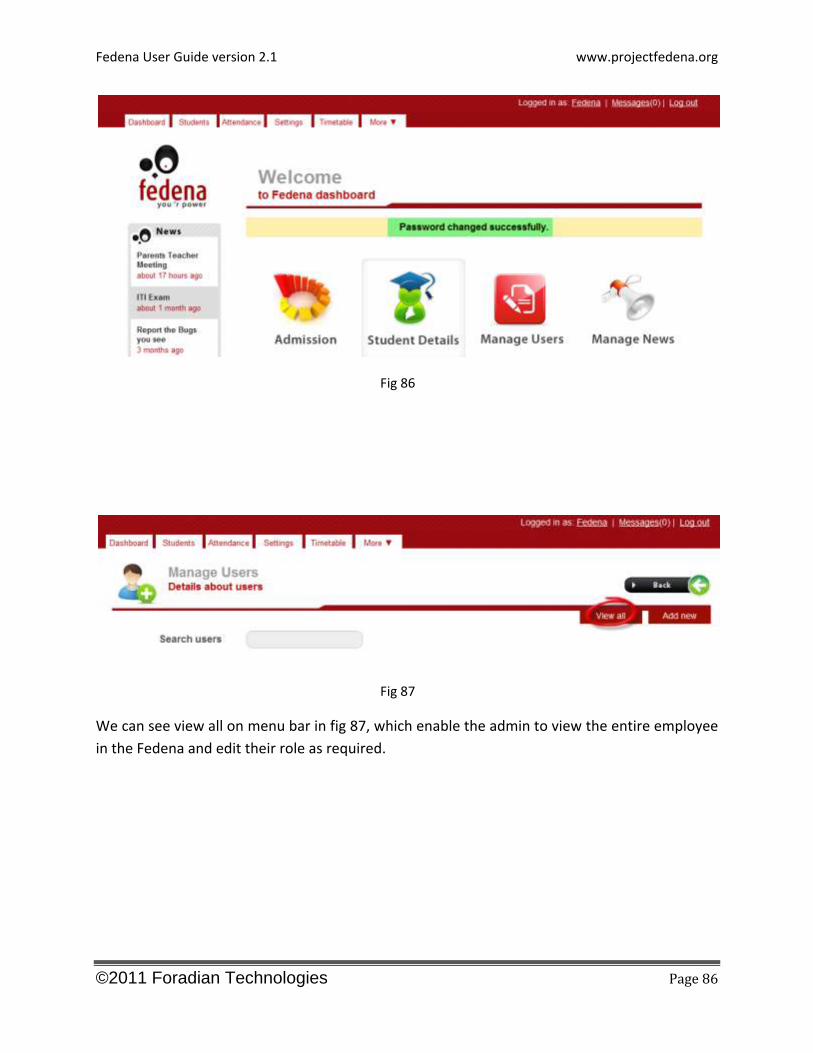
We can see view all on menu bar in fig 87, which enable the admin to view the entire employee
in the Fedena and edit their role as required.
Fedena User Guide version 2.1 www.projectfedena.org
©2011 Foradian Technologies Page 87
Fig 88
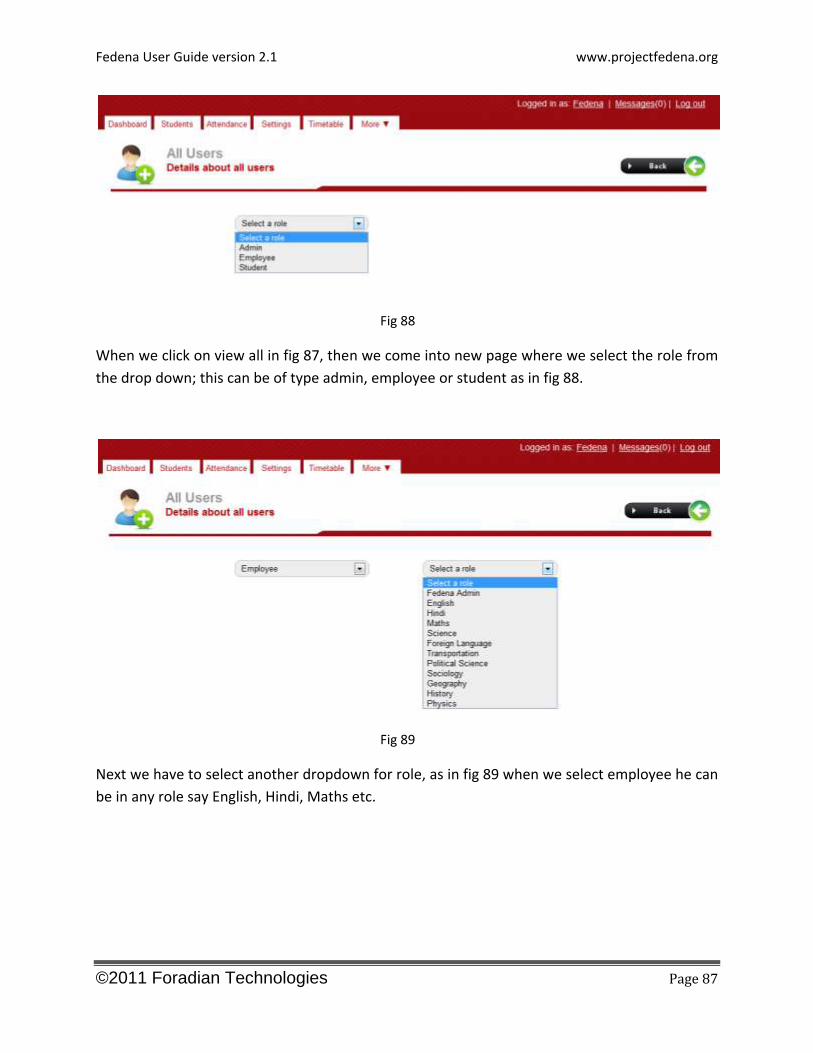
When we click on view all in fig 87, then we come into new page where we select the role from
the drop down; this can be of type admin, employee or student as in fig 88.
Fig 89
Next we have to select another dropdown for role, as in fig 89 when we select employee he can
be in any role say English, Hindi, Maths etc.
Fedena User Guide version 2.1 www.projectfedena.org
©2011 Foradian Technologies Page 88
Fig 90
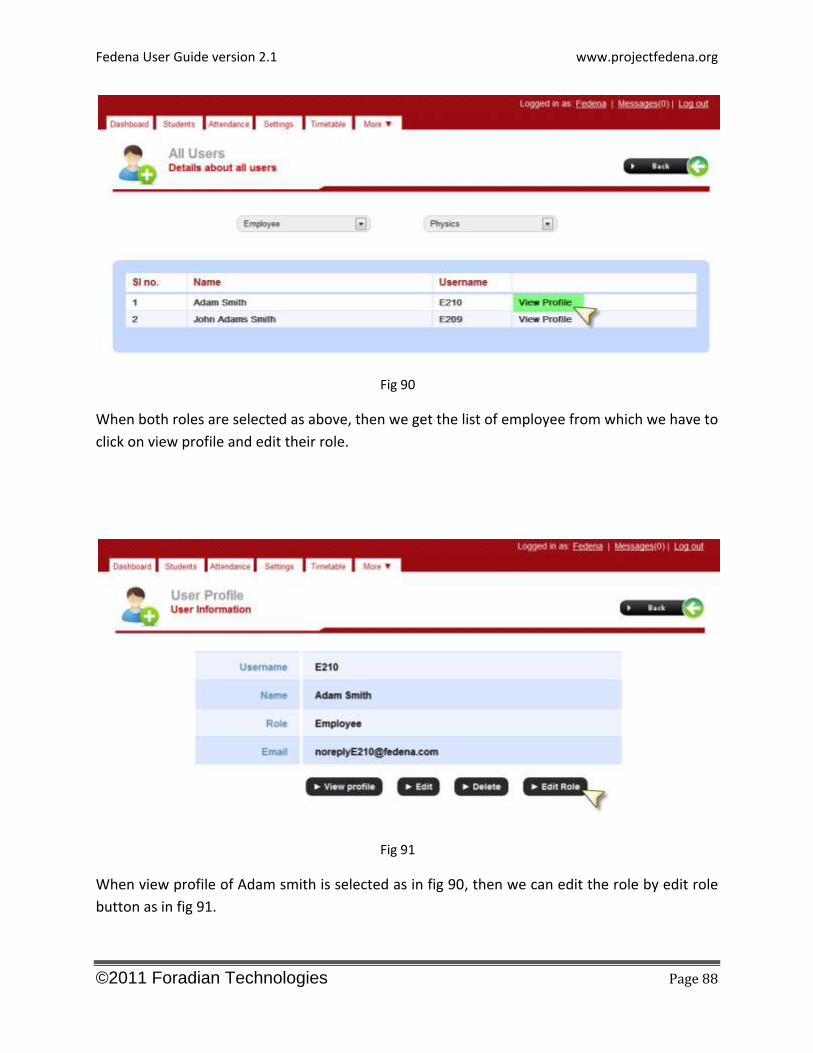
When both roles are selected as above, then we get the list of employee from which we have to
click on view profile and edit their role.
Fig 91
When view profile of Adam smith is selected as in fig 90, then we can edit the role by edit role
button as in fig 91.
Fedena User Guide version 2.1 www.projectfedena.org
©2011 Foradian Technologies Page 89
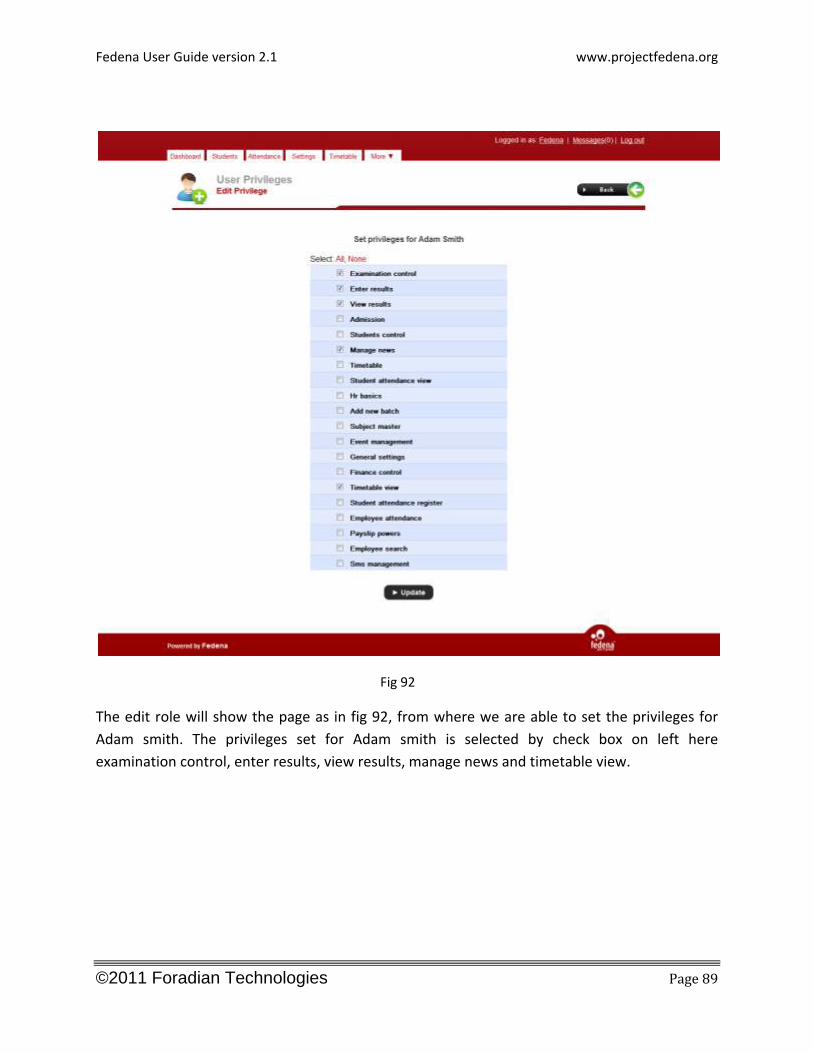
Fig 92
The edit role will show the page as in fig 92, from where we are able to set the privileges for
Adam smith. The privileges set for Adam smith is selected by check box on left here
examination control, enter results, view results, manage news and timetable view.

Fedena User Guide version 2.1 www.projectfedena.org
©2011 Foradian Technologies Page 90
EXAMINATION
Fedena User Guide version 2.1 www.projectfedena.org
©2011 Foradian Technologies Page 91
Fig 93
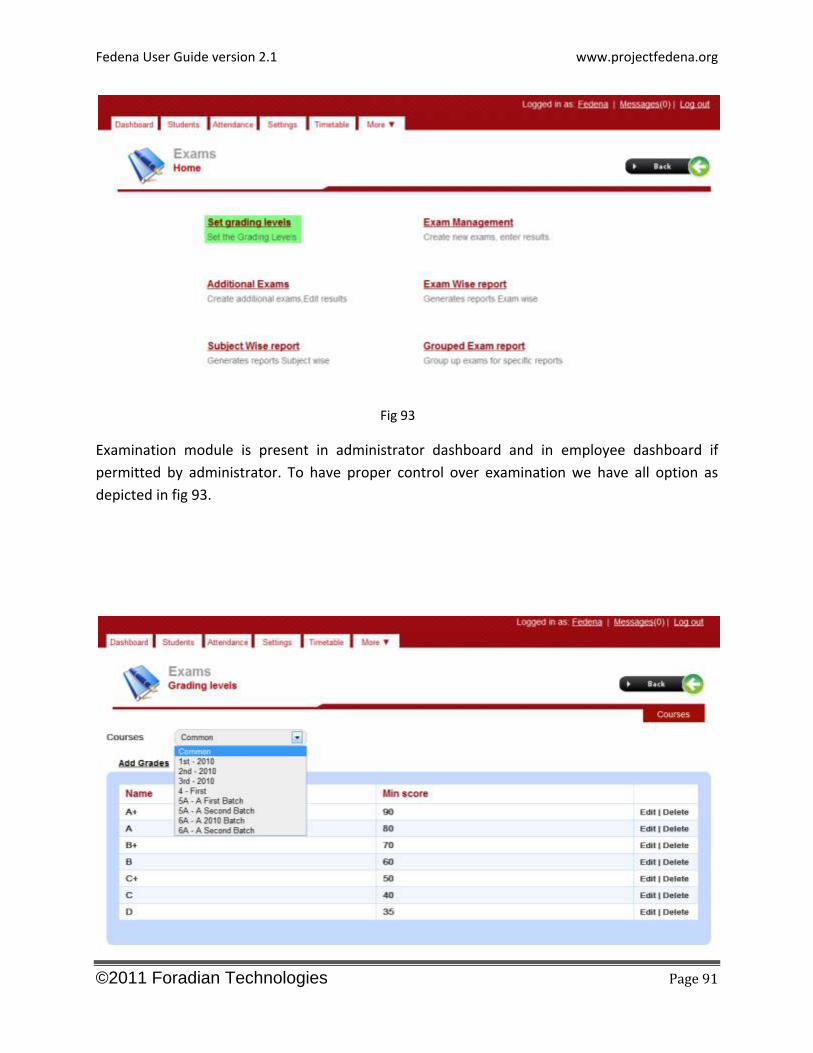
Examination module is present in administrator dashboard and in employee dashboard if
permitted by administrator. To have proper control over examination we have all option as
depicted in fig 93.

Fedena User Guide version 2.1 www.projectfedena.org
©2011 Foradian Technologies Page 92
Fig 94
Since any test requires grades here also in Fedena we have grading levels for examination
which should be set by examination controller. He just need to go for setting grade levels in
examination module and select course if grade is only for that particular course else common if
all grade are same to every course as in fig 94.Each grade is set by its minimum score as shown
and user can also change it when required by edit option and can also delete.
Fig 95
Here in fig 95 we can see how grade is been set just by grade name and minimum score for
grade.
Fedena User Guide version 2.1 www.projectfedena.org
©2011 Foradian Technologies Page 93
,
Fig 96
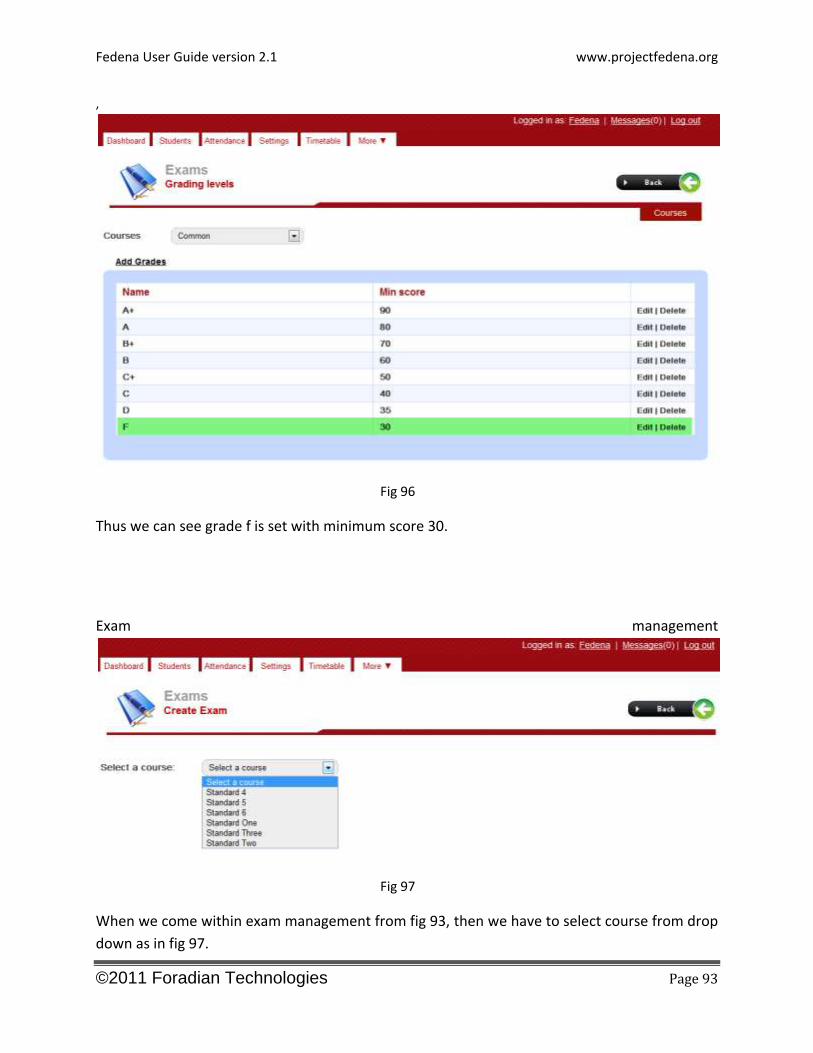
Thus we can see grade f is set with minimum score 30.
Exam management
Fig 97
When we come within exam management from fig 93, then we have to select course from drop
down as in fig 97.
Fedena User Guide version 2.1 www.projectfedena.org
©2011 Foradian Technologies Page 94
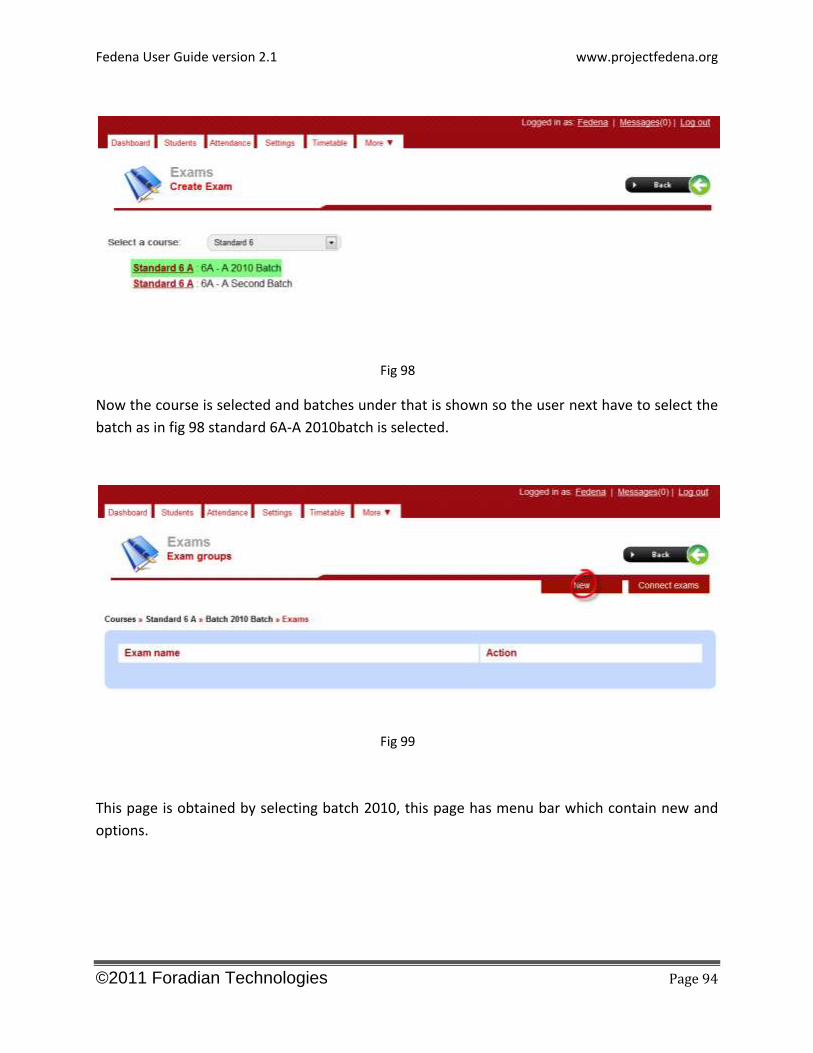
Fig 98
Now the course is selected and batches under that is shown so the user next have to select the
batch as in fig 98 standard 6A-A 2010batch is selected.
Fig 99
This page is obtained by selecting batch 2010, this page has menu bar which contain new and
options.
Fedena User Guide version 2.1 www.projectfedena.org
©2011 Foradian Technologies Page 95
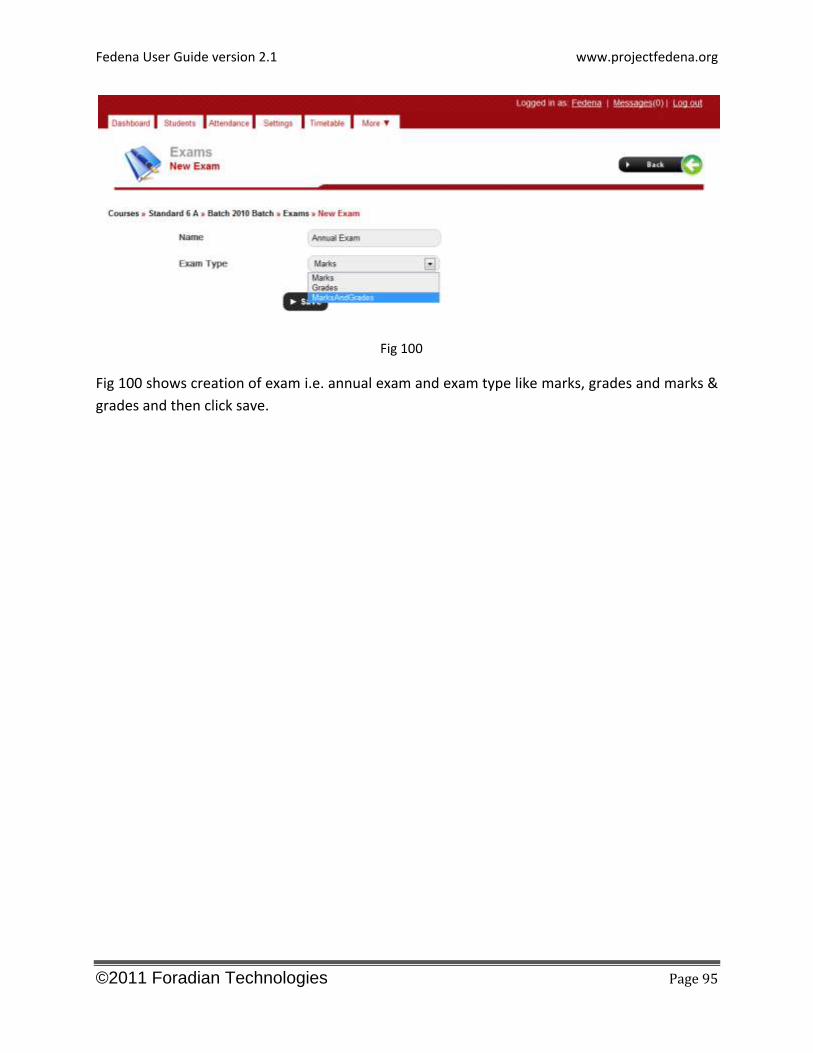
Fig 100
Fig 100 shows creation of exam i.e. annual exam and exam type like marks, grades and marks &
grades and then click save.
Fedena User Guide version 2.1 www.projectfedena.org
©2011 Foradian Technologies Page 96
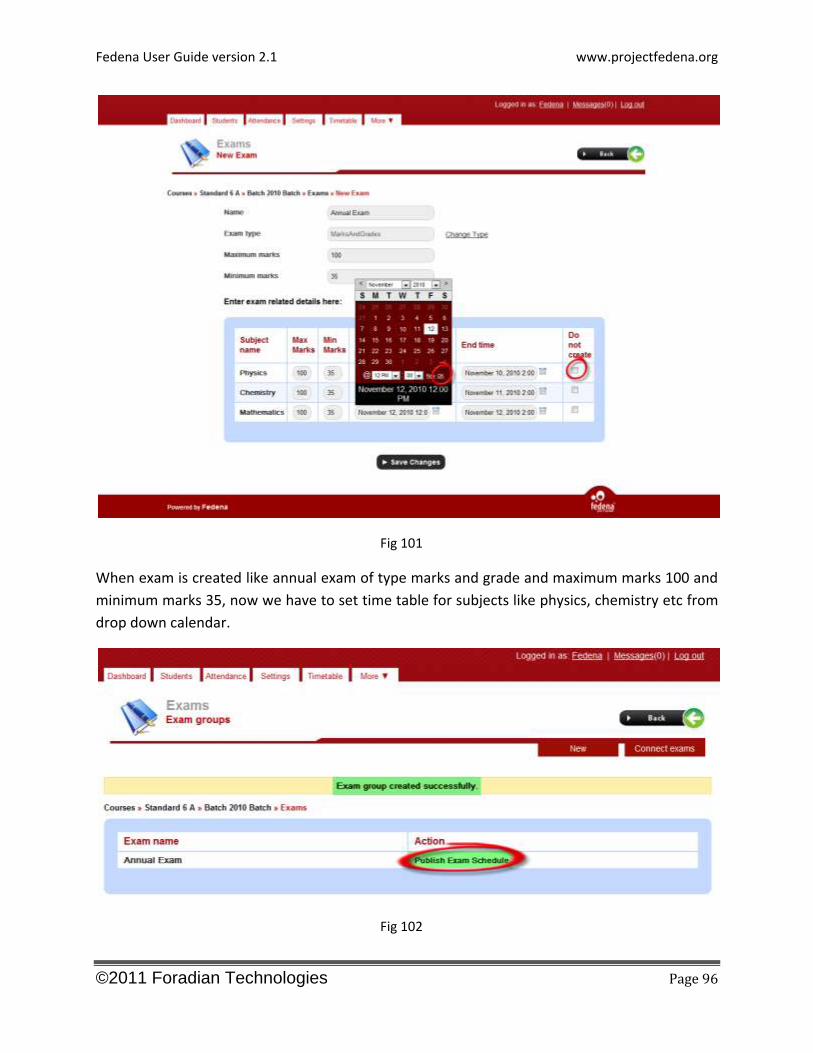
Fig 101
When exam is created like annual exam of type marks and grade and maximum marks 100 and
minimum marks 35, now we have to set time table for subjects like physics, chemistry etc from
drop down calendar.
Fig 102
Fedena User Guide version 2.1 www.projectfedena.org
©2011 Foradian Technologies Page 97
Thus when exam is created it will be shown in list as in fig 102.This list contain exam name and
action like publish exam schedule. Here we have to note that only after selecting publish exam
schedule the exam time table will be set and shown to all student.
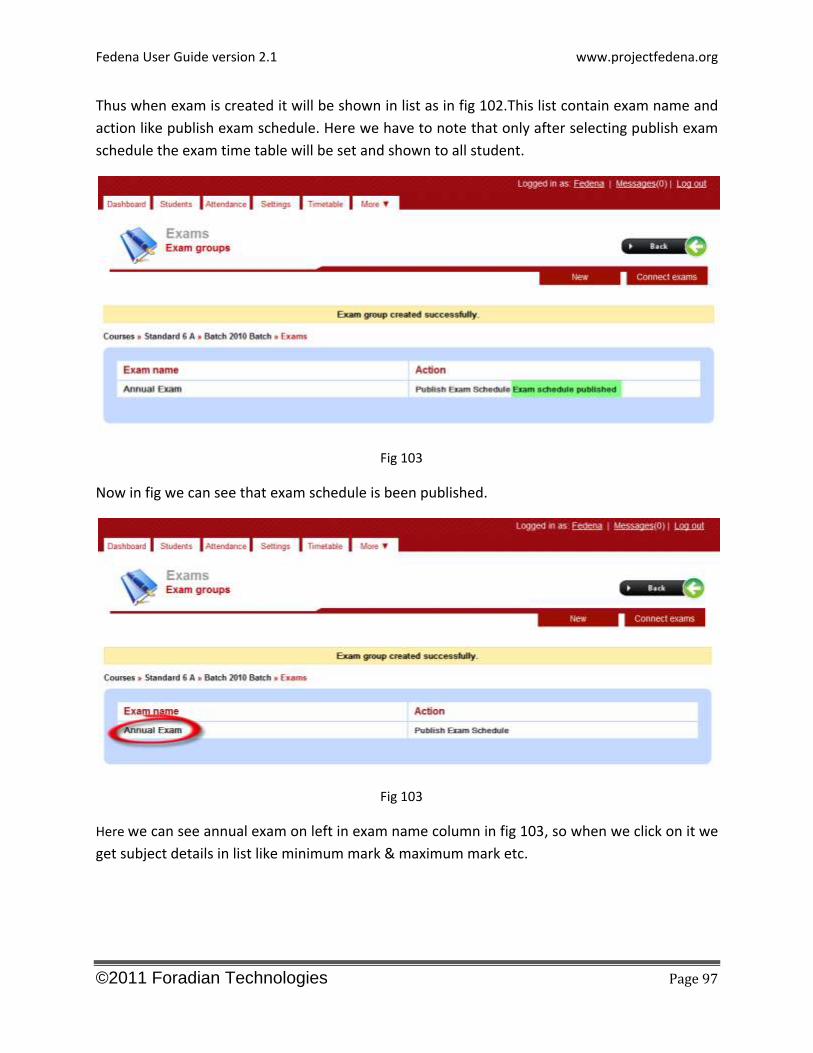
Fig 103
Now in fig we can see that exam schedule is been published.
Fig 103
Here we can see annual exam on left in exam name column in fig 103, so when we click on it we
get subject details in list like minimum mark & maximum mark etc.
Fedena User Guide version 2.1 www.projectfedena.org
©2011 Foradian Technologies Page 98
Fig 104
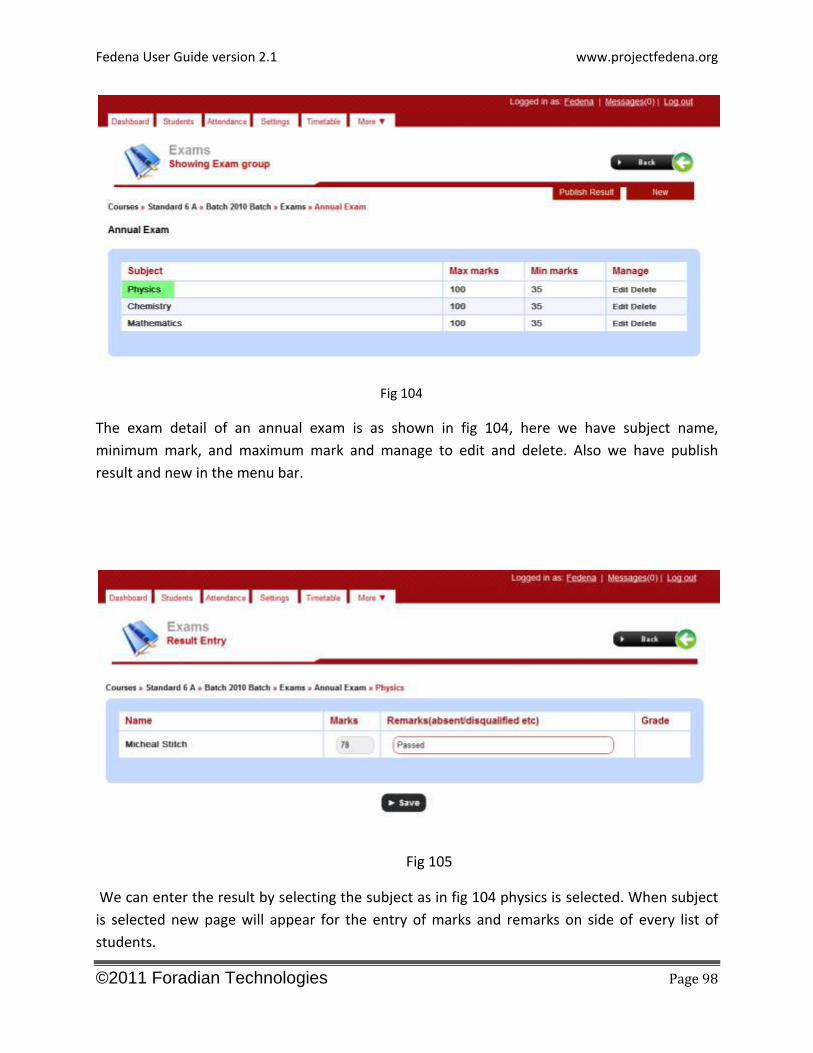
The exam detail of an annual exam is as shown in fig 104, here we have subject name,
minimum mark, and maximum mark and manage to edit and delete. Also we have publish
result and new in the menu bar.
Fig 105
We can enter the result by selecting the subject as in fig 104 physics is selected. When subject
is selected new page will appear for the entry of marks and remarks on side of every list of
students.
Fedena User Guide version 2.1 www.projectfedena.org
©2011 Foradian Technologies Page 99
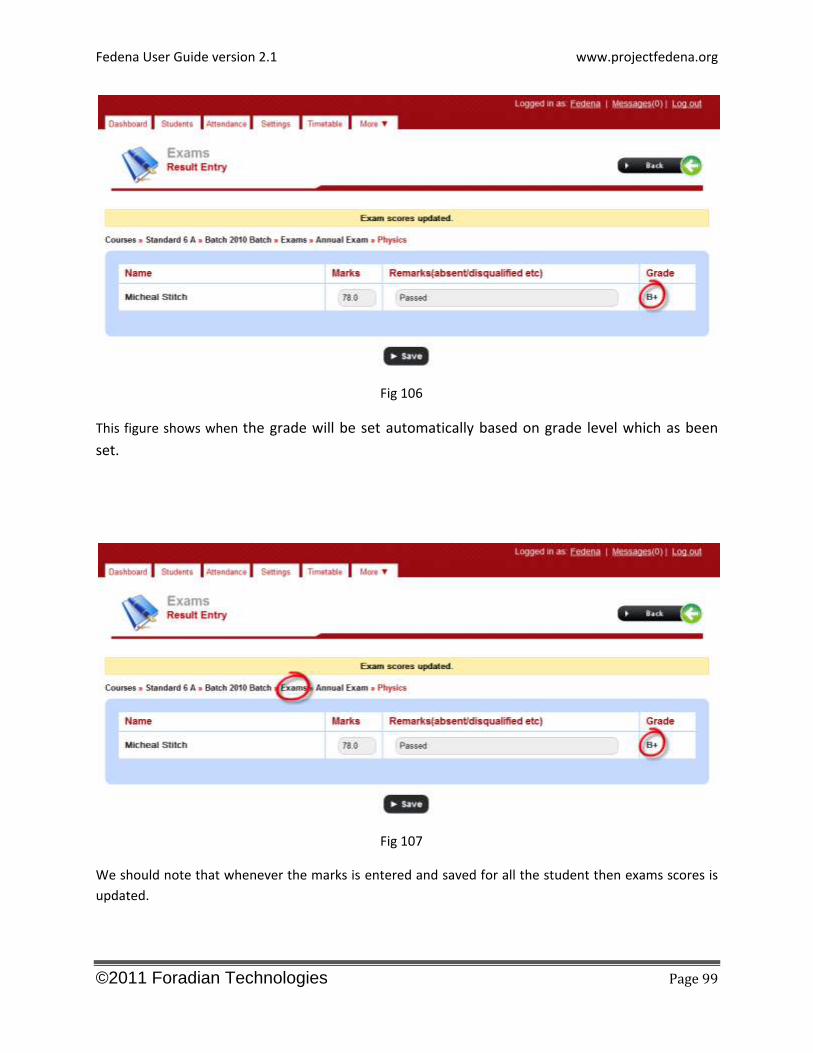
Fig 106
This figure shows when the grade will be set automatically based on grade level which as been
set.
Fig 107
We should note that whenever the marks is entered and saved for all the student then exams scores is
updated.
Fedena User Guide version 2.1 www.projectfedena.org
©2011 Foradian Technologies Page 100
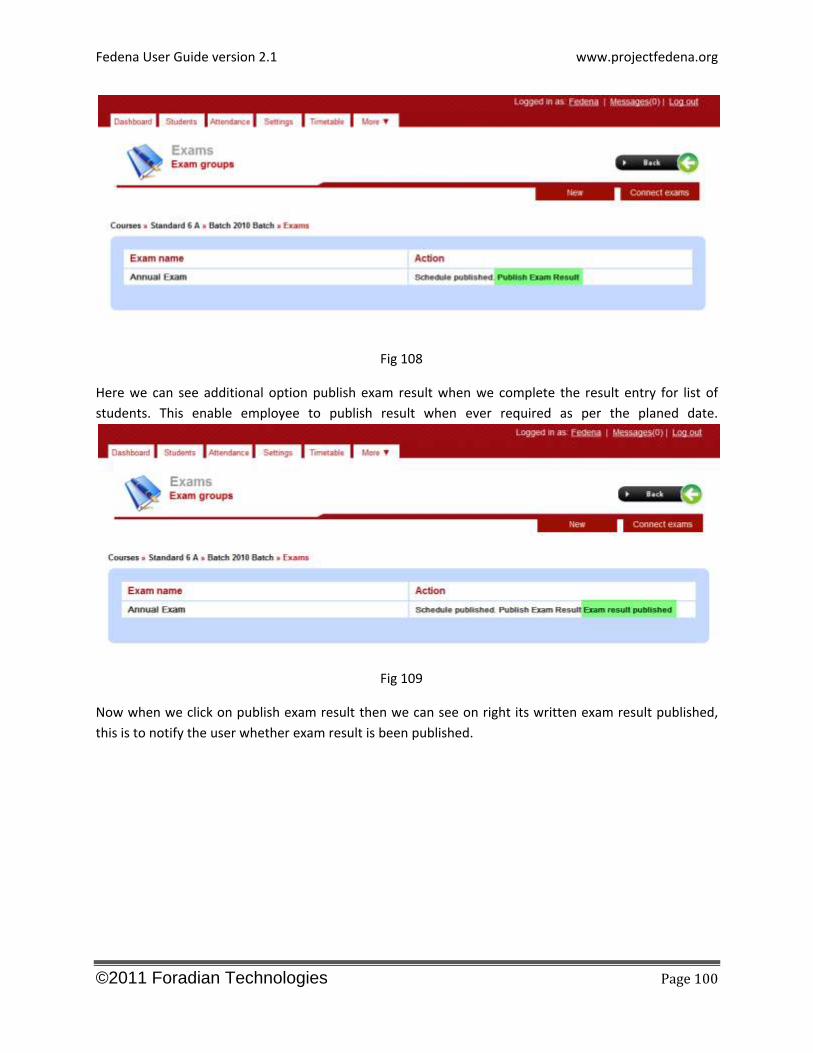
Fig 108
Here we can see additional option publish exam result when we complete the result entry for list of
students. This enable employee to publish result when ever required as per the planed date.
Fig 109
Now when we click on publish exam result then we can see on right its written exam result published,
this is to notify the user whether exam result is been published.
Fedena User Guide version 2.1 www.projectfedena.org
©2011 Foradian Technologies Page 101
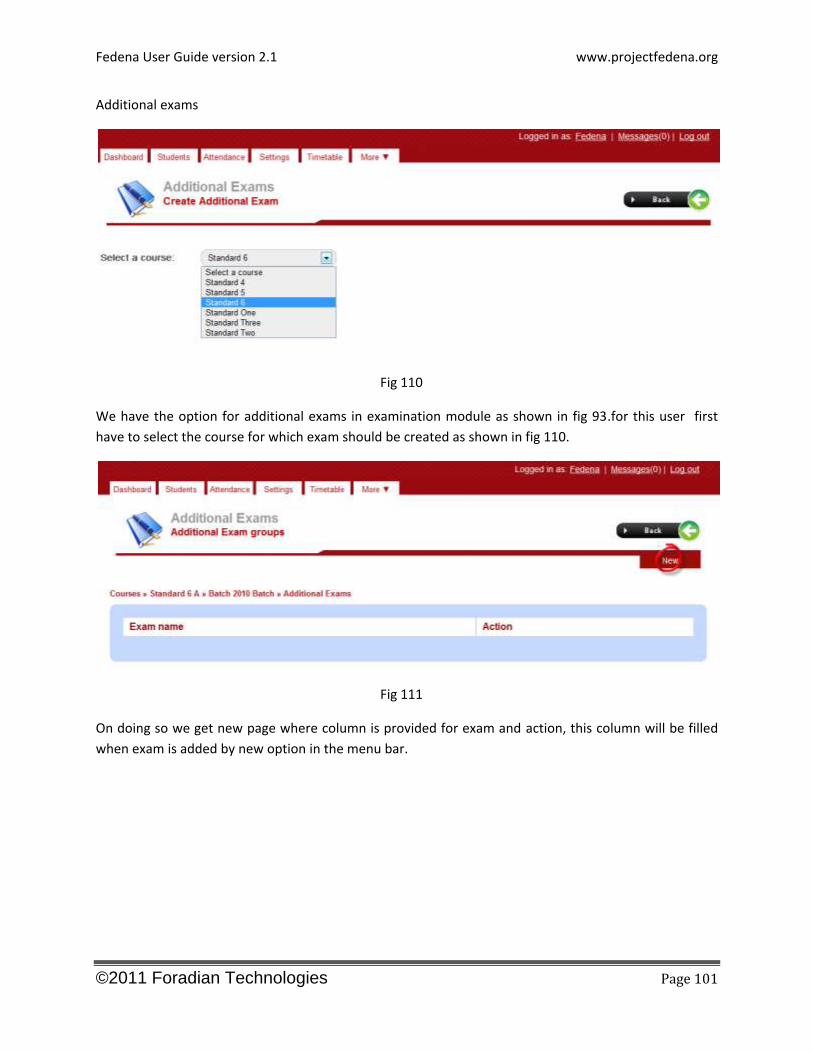
Additional exams
Fig 110
We have the option for additional exams in examination module as shown in fig 93.for this user first
have to select the course for which exam should be created as shown in fig 110.
Fig 111
On doing so we get new page where column is provided for exam and action, this column will be filled
when exam is added by new option in the menu bar.
Fedena User Guide version 2.1 www.projectfedena.org
©2011 Foradian Technologies Page 102
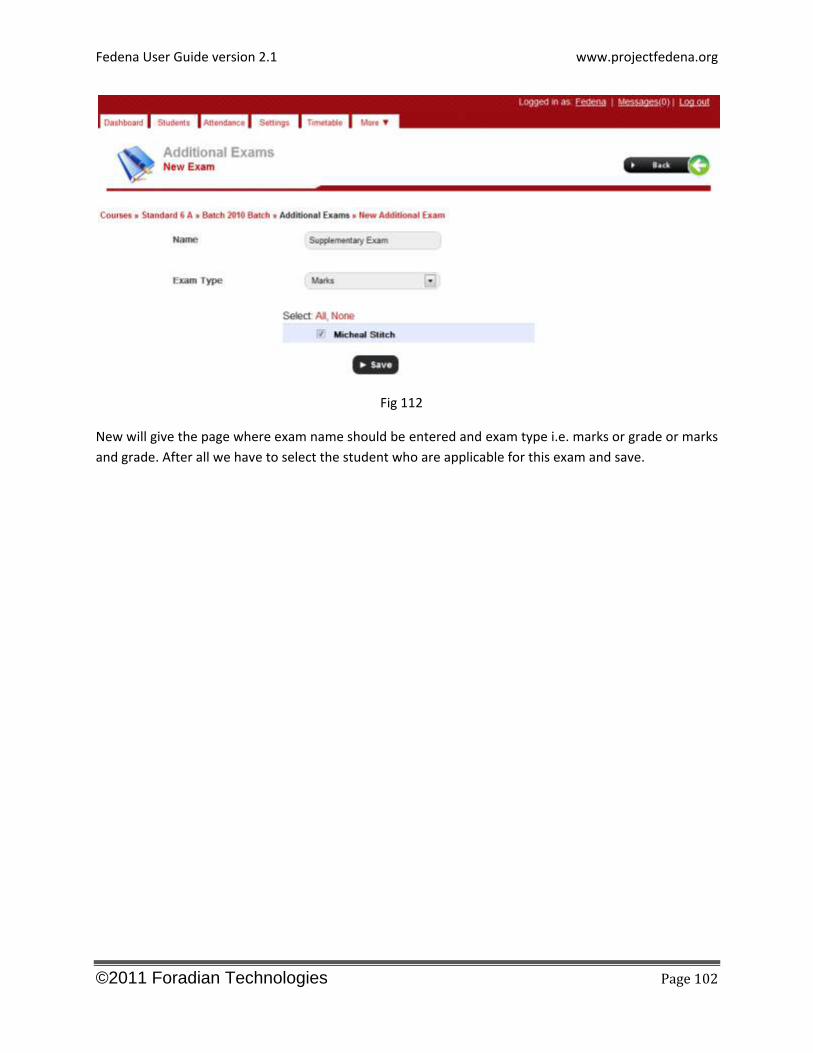
Fig 112
New will give the page where exam name should be entered and exam type i.e. marks or grade or marks
and grade. After all we have to select the student who are applicable for this exam and save.
Fedena User Guide version 2.1 www.projectfedena.org
©2011 Foradian Technologies Page 103
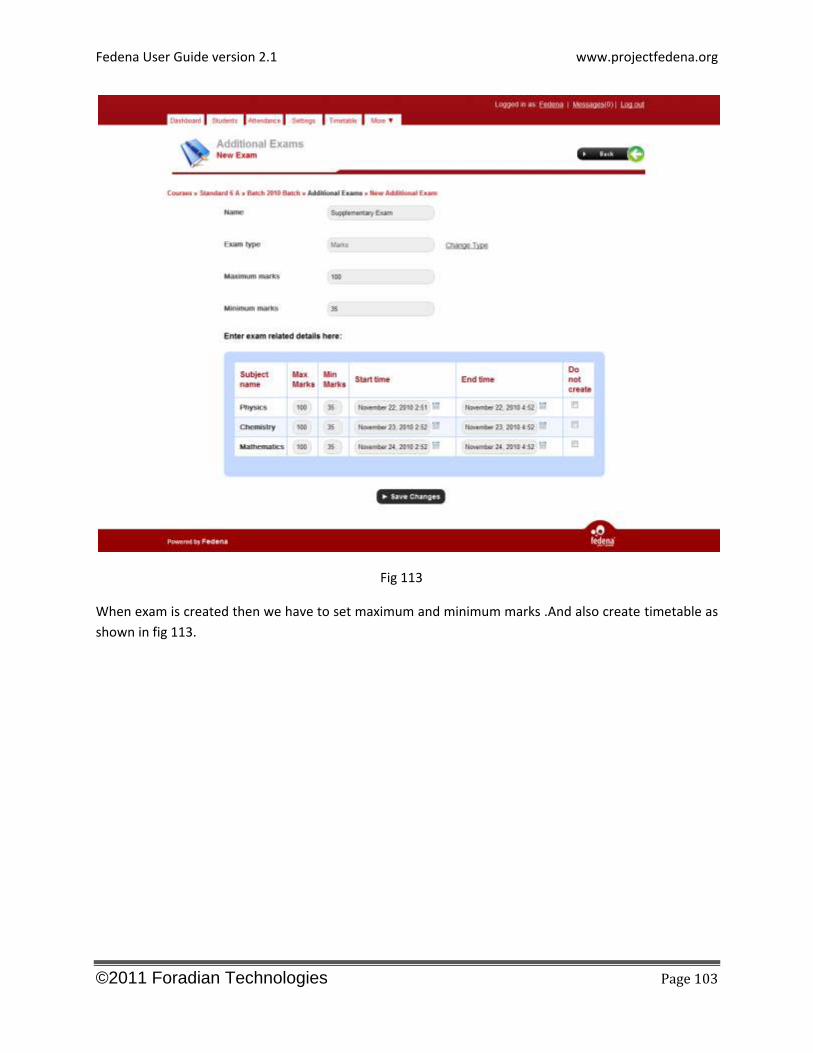
Fig 113
When exam is created then we have to set maximum and minimum marks .And also create timetable as
shown in fig 113.
Fedena User Guide version 2.1 www.projectfedena.org
©2011 Foradian Technologies Page 104
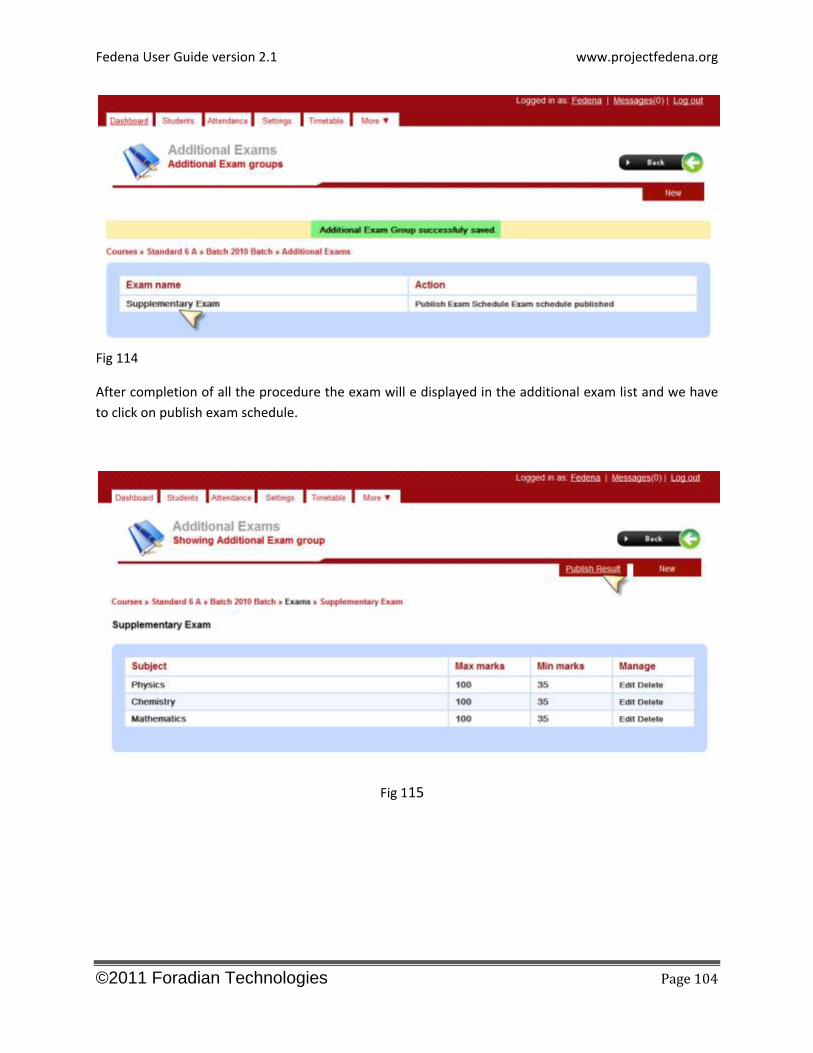
Fig 114
After completion of all the procedure the exam will e displayed in the additional exam list and we have
to click on publish exam schedule.
Fig 115
Fedena User Guide version 2.1 www.projectfedena.org
©2011 Foradian Technologies Page 105
Exam wise reports
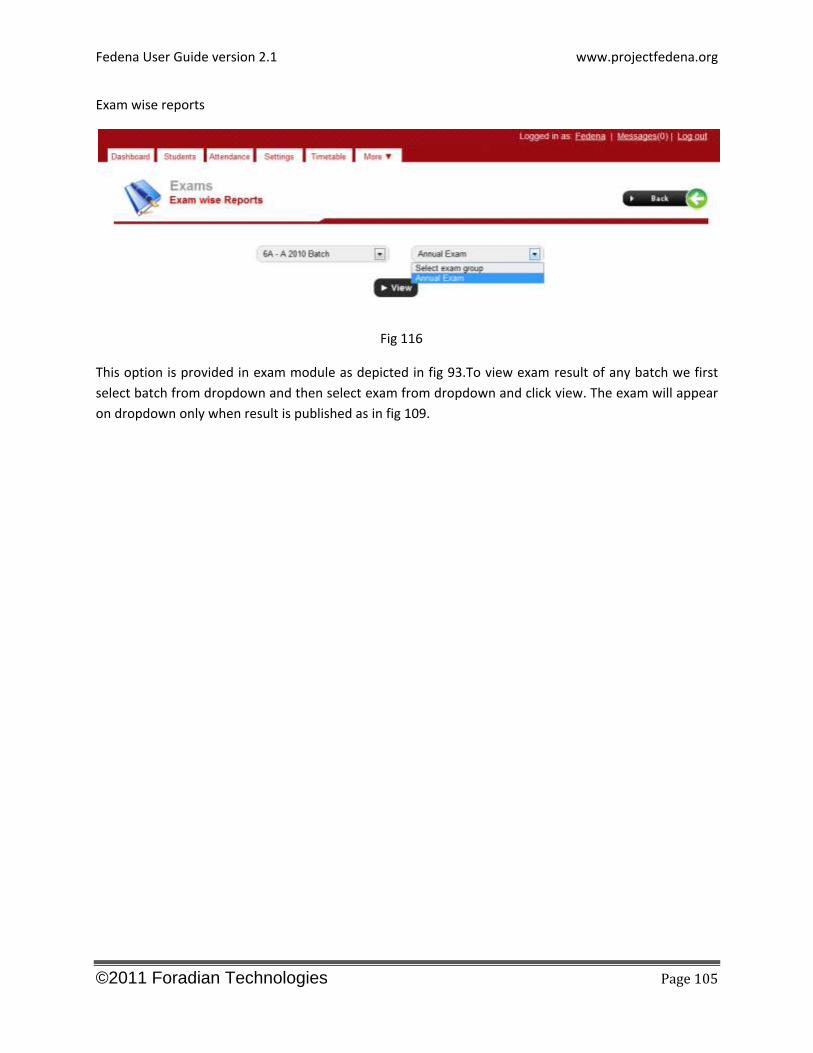
Fig 116
This option is provided in exam module as depicted in fig 93.To view exam result of any batch we first
select batch from dropdown and then select exam from dropdown and click view. The exam will appear
on dropdown only when result is published as in fig 109.
Fedena User Guide version 2.1 www.projectfedena.org
©2011 Foradian Technologies Page 106
compared
Fig 117
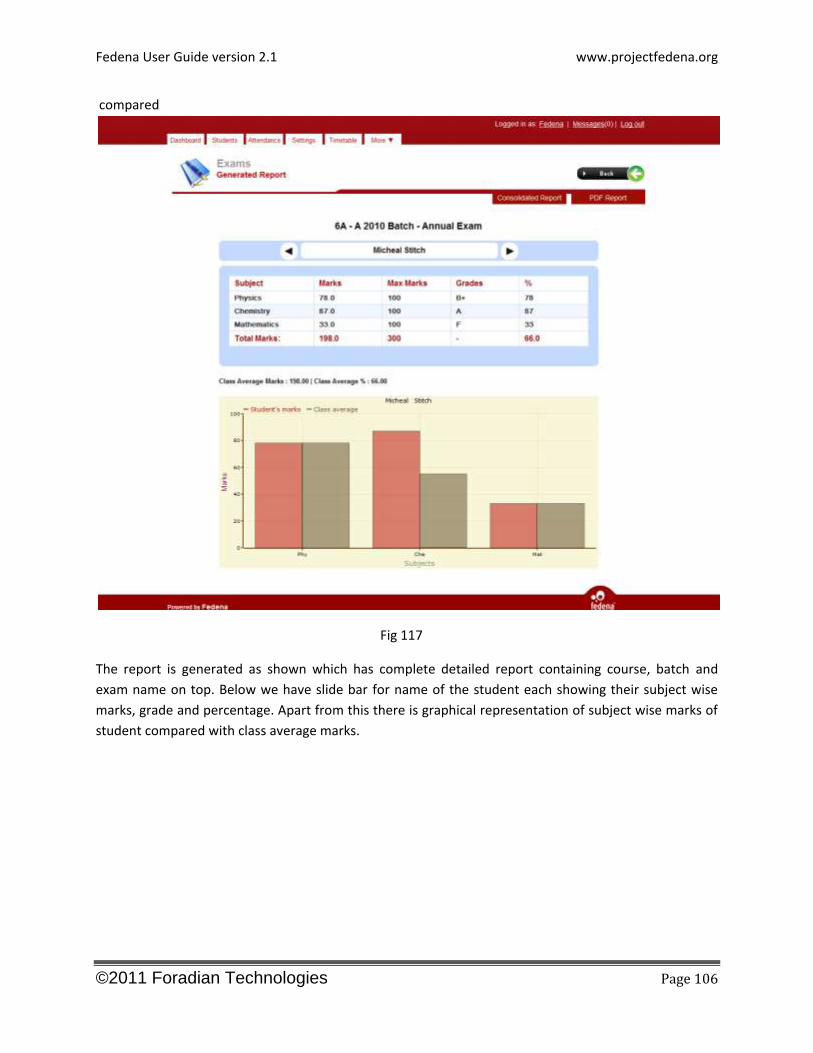
The report is generated as shown which has complete detailed report containing course, batch and
exam name on top. Below we have slide bar for name of the student each showing their subject wise
marks, grade and percentage. Apart from this there is graphical representation of subject wise marks of
student compared with class average marks.
Fedena User Guide version 2.1 www.projectfedena.org
©2011 Foradian Technologies Page 107
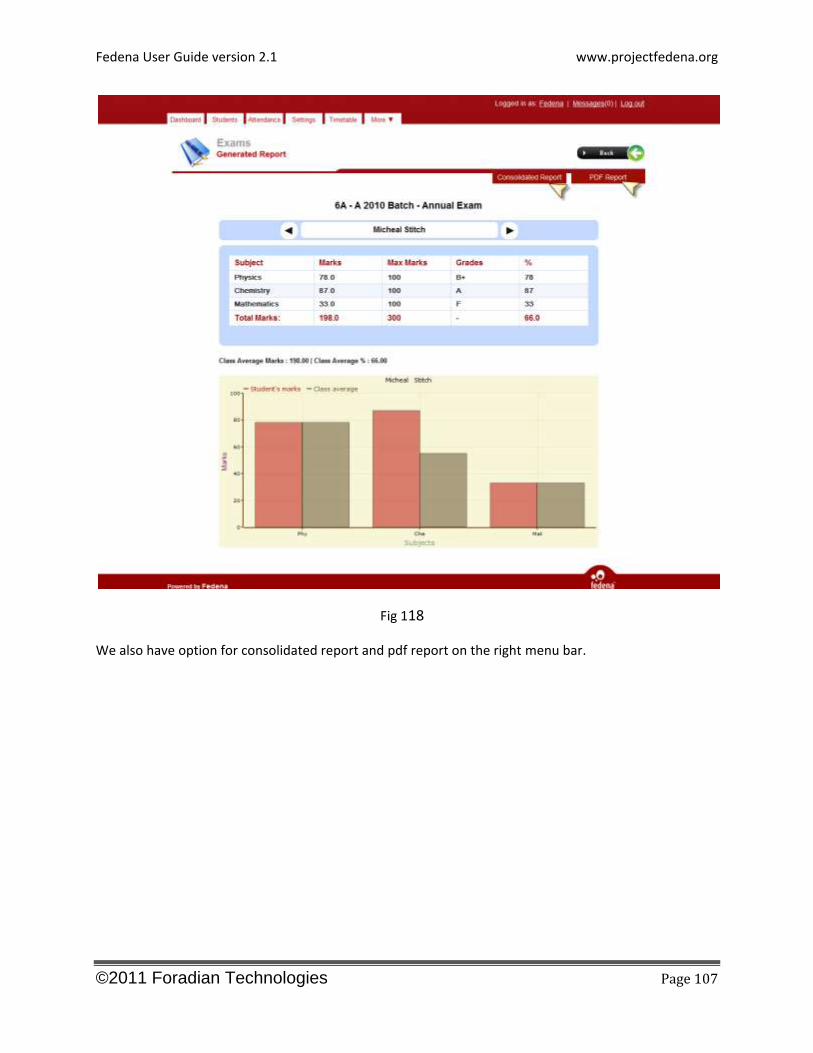
Fig 118
We also have option for consolidated report and pdf report on the right menu bar.
Fedena User Guide version 2.1 www.projectfedena.org
©2011 Foradian Technologies Page 108
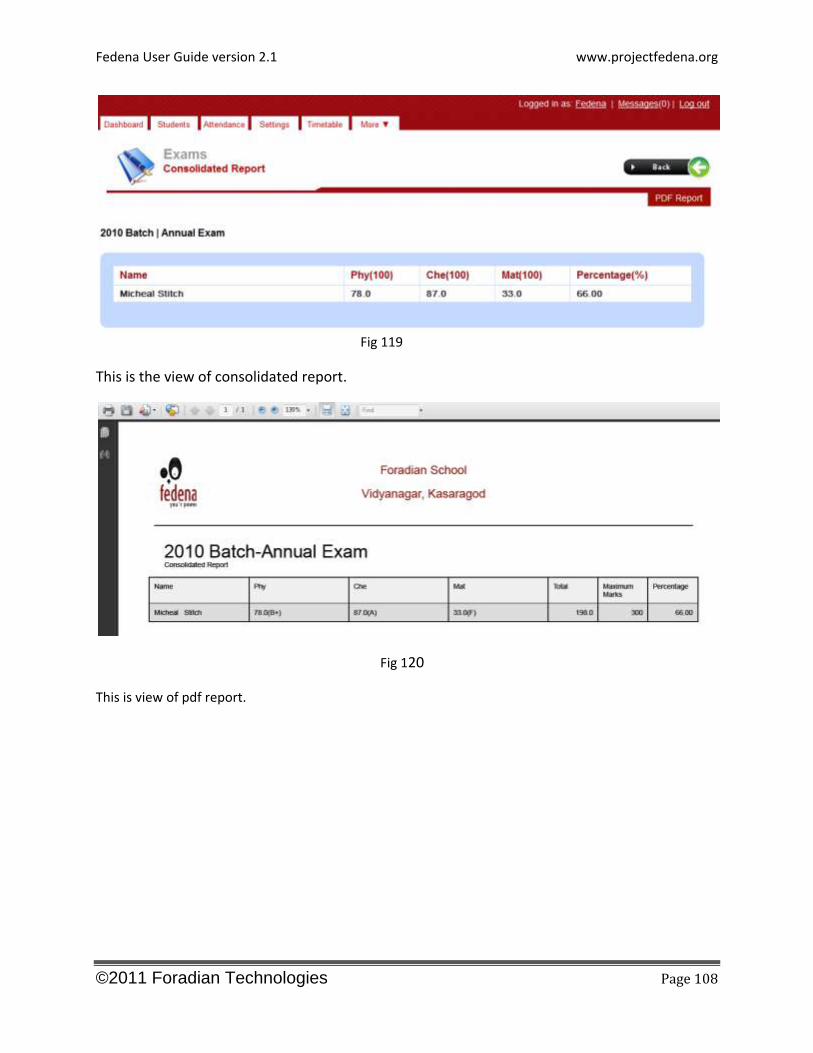
Fig 119
This is the view of consolidated report.
Fig 120
This is view of pdf report.
Fedena User Guide version 2.1 www.projectfedena.org
©2011 Foradian Technologies Page 109
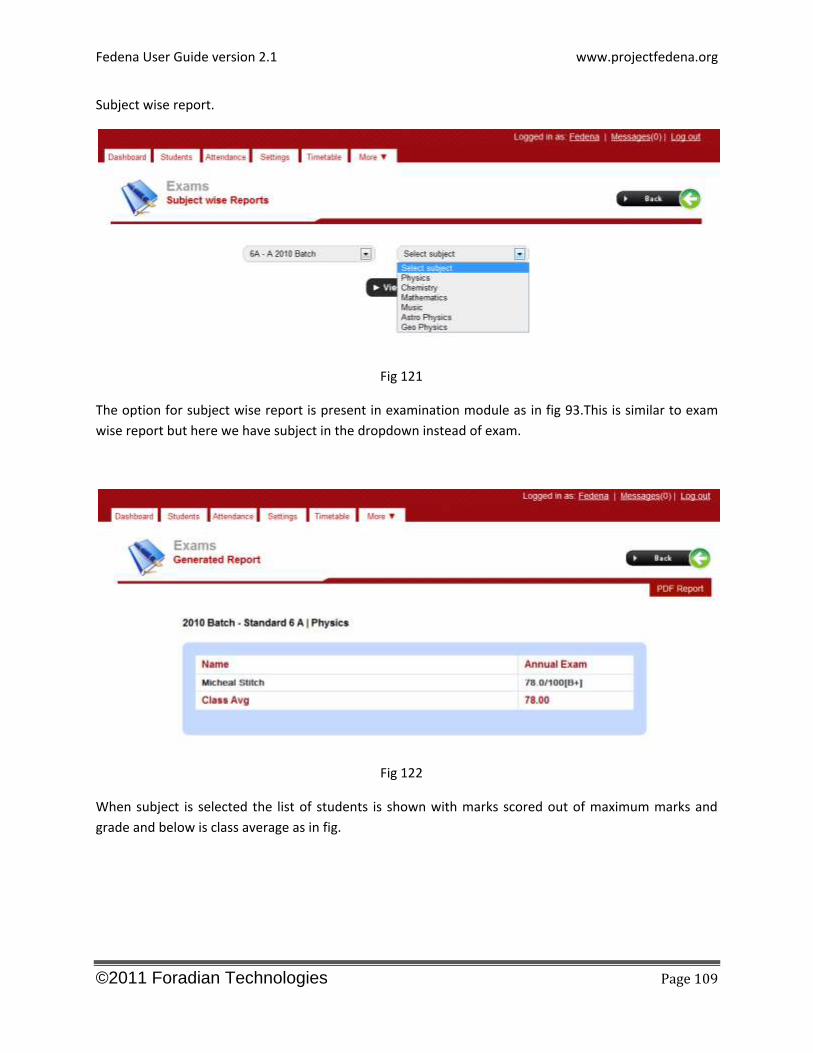
Subject wise report.
Fig 121
The option for subject wise report is present in examination module as in fig 93.This is similar to exam
wise report but here we have subject in the dropdown instead of exam.
Fig 122
When subject is selected the list of students is shown with marks scored out of maximum marks and
grade and below is class average as in fig.
Fedena User Guide version 2.1 www.projectfedena.org
©2011 Foradian Technologies Page 110
Grouped exam report
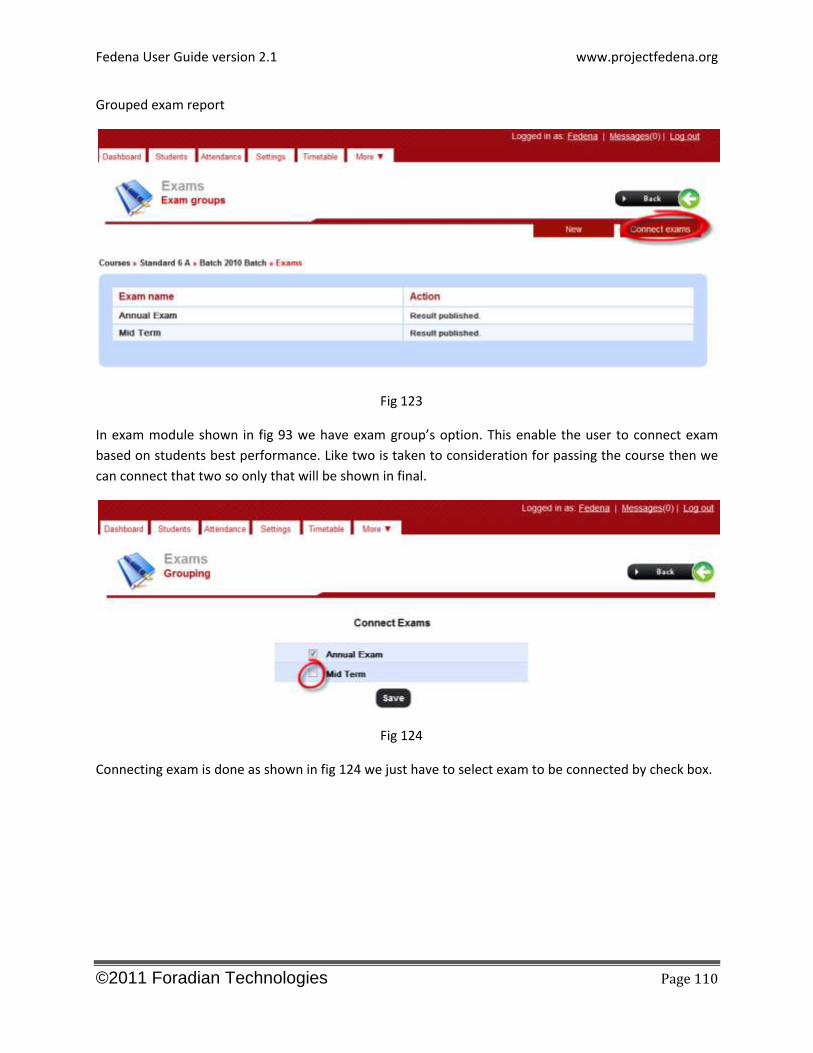
Fig 123
In exam module shown in fig 93 we have exam group’s option. This enable the user to connect exam
based on students best performance. Like two is taken to consideration for passing the course then we
can connect that two so only that will be shown in final.
Fig 124
Connecting exam is done as shown in fig 124 we just have to select exam to be connected by check box.

Fedena User Guide version 2.1 www.projectfedena.org
©2011 Foradian Technologies Page 111
TIMETABLE
Fedena User Guide version 2.1 www.projectfedena.org
©2011 Foradian Technologies Page 112
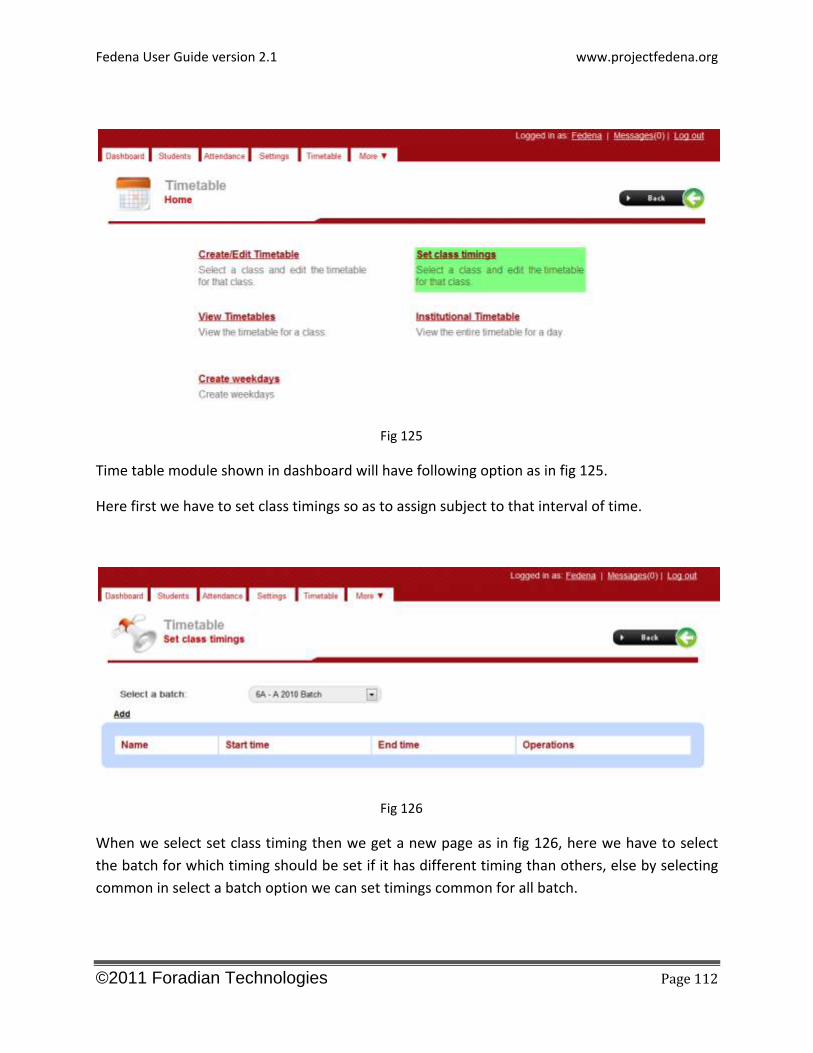
Fig 125
Time table module shown in dashboard will have following option as in fig 125.
Here first we have to set class timings so as to assign subject to that interval of time.
Fig 126
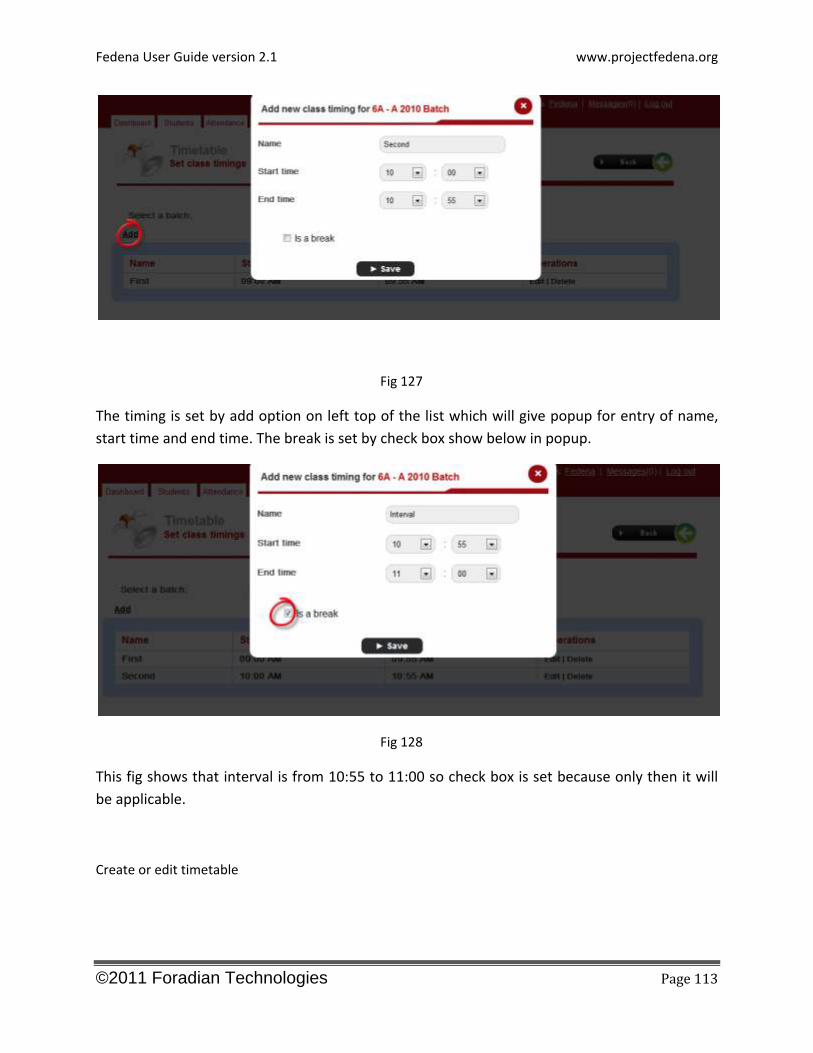
When we select set class timing then we get a new page as in fig 126, here we have to select
the batch for which timing should be set if it has different timing than others, else by selecting
common in select a batch option we can set timings common for all batch.
Fedena User Guide version 2.1 www.projectfedena.org
©2011 Foradian Technologies Page 113
Fig 127
The timing is set by add option on left top of the list which will give popup for entry of name,
start time and end time. The break is set by check box show below in popup.
Fig 128
This fig shows that interval is from 10:55 to 11:00 so check box is set because only then it will
be applicable.
Create or edit timetable
Fedena User Guide version 2.1 www.projectfedena.org
©2011 Foradian Technologies Page 114
Fig 129
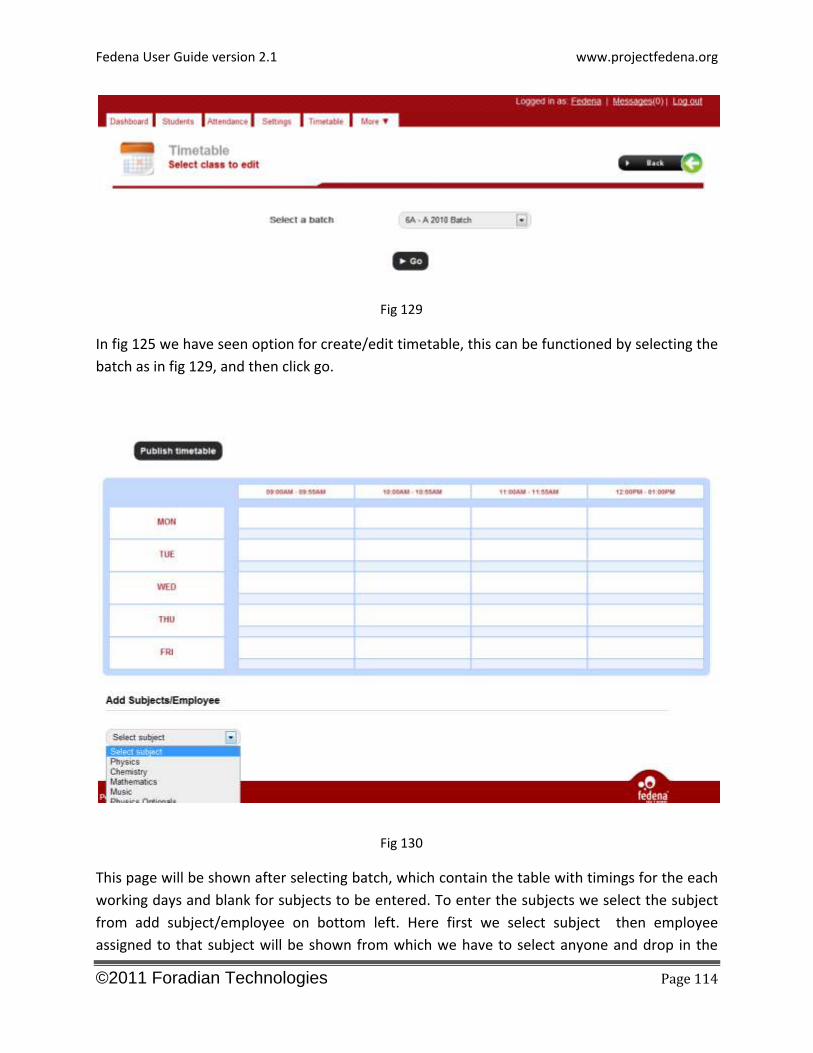
In fig 125 we have seen option for create/edit timetable, this can be functioned by selecting the
batch as in fig 129, and then click go.
Fig 130
This page will be shown after selecting batch, which contain the table with timings for the each
working days and blank for subjects to be entered. To enter the subjects we select the subject
from add subject/employee on bottom left. Here first we select subject then employee
assigned to that subject will be shown from which we have to select anyone and drop in the
Fedena User Guide version 2.1 www.projectfedena.org
©2011 Foradian Technologies Page 115
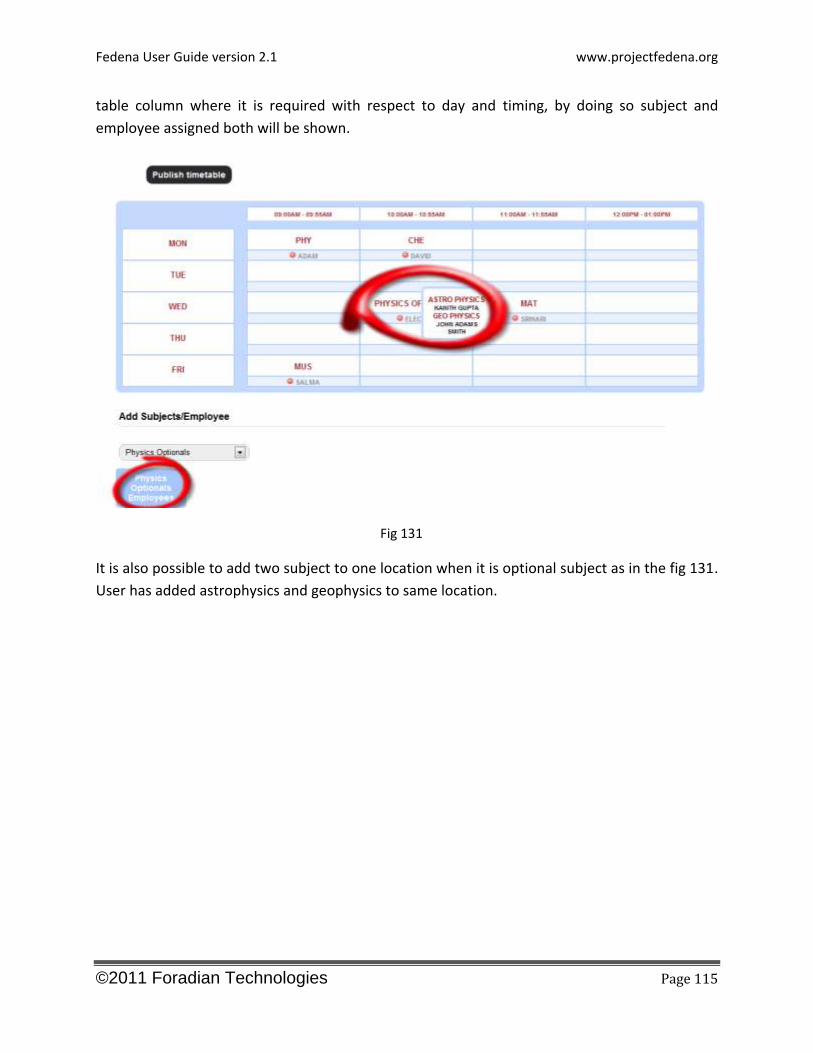
table column where it is required with respect to day and timing, by doing so subject and
employee assigned both will be shown.
Fig 131
It is also possible to add two subject to one location when it is optional subject as in the fig 131.
User has added astrophysics and geophysics to same location.
Fedena User Guide version 2.1 www.projectfedena.org
©2011 Foradian Technologies Page 116
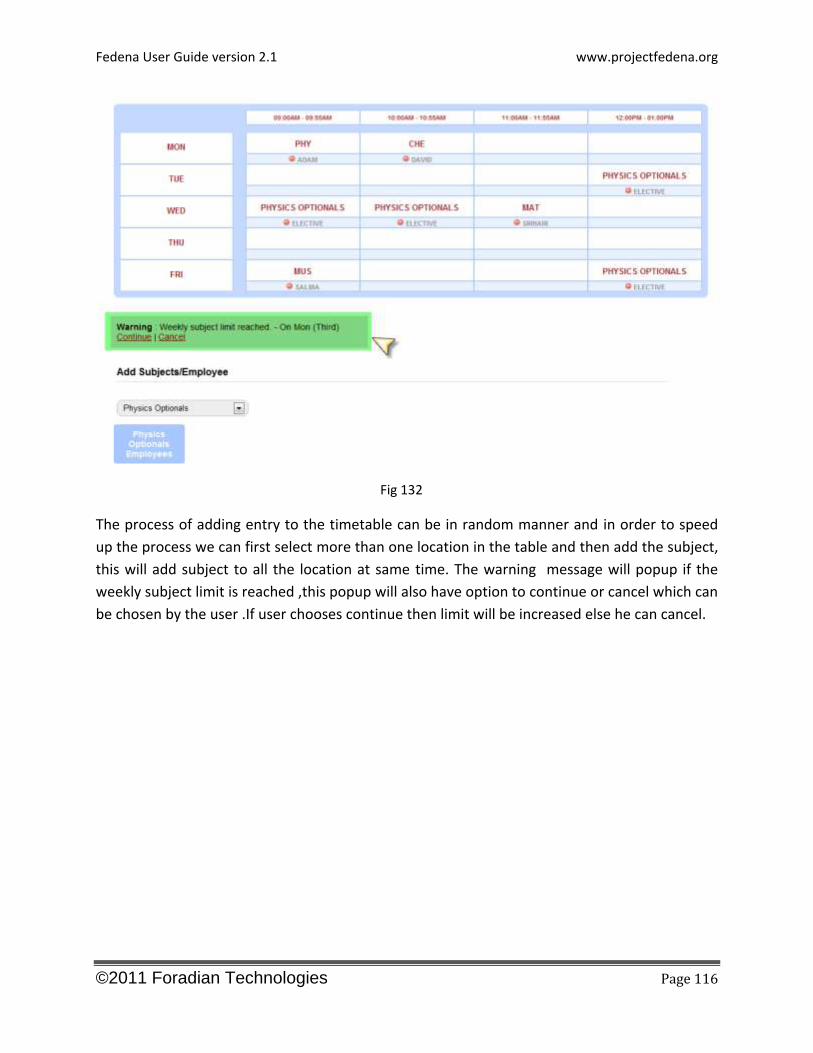
Fig 132
The process of adding entry to the timetable can be in random manner and in order to speed
up the process we can first select more than one location in the table and then add the subject,
this will add subject to all the location at same time. The warning message will popup if the
weekly subject limit is reached ,this popup will also have option to continue or cancel which can
be chosen by the user .If user chooses continue then limit will be increased else he can cancel.
Fedena User Guide version 2.1 www.projectfedena.org
©2011 Foradian Technologies Page 117
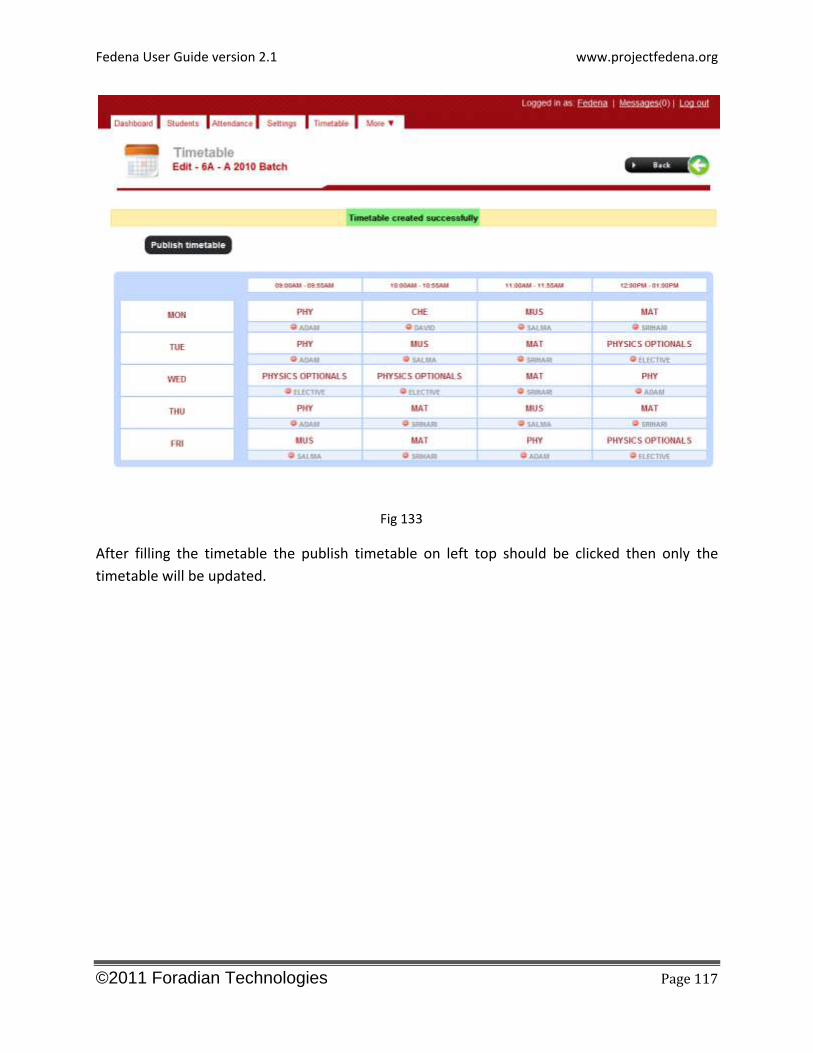
Fig 133
After filling the timetable the publish timetable on left top should be clicked then only the
timetable will be updated.

Fedena User Guide version 2.1 www.projectfedena.org
©2011 Foradian Technologies Page 118
Create weekdays
Fig 134
We have create weekdays in timetable module as in fig 125, this is simple we just need to select
common if weekdays are common to all batches else select the batch and check the box on
right of the days
Fedena User Guide version 2.1 www.projectfedena.org
©2011 Foradian Technologies Page 119
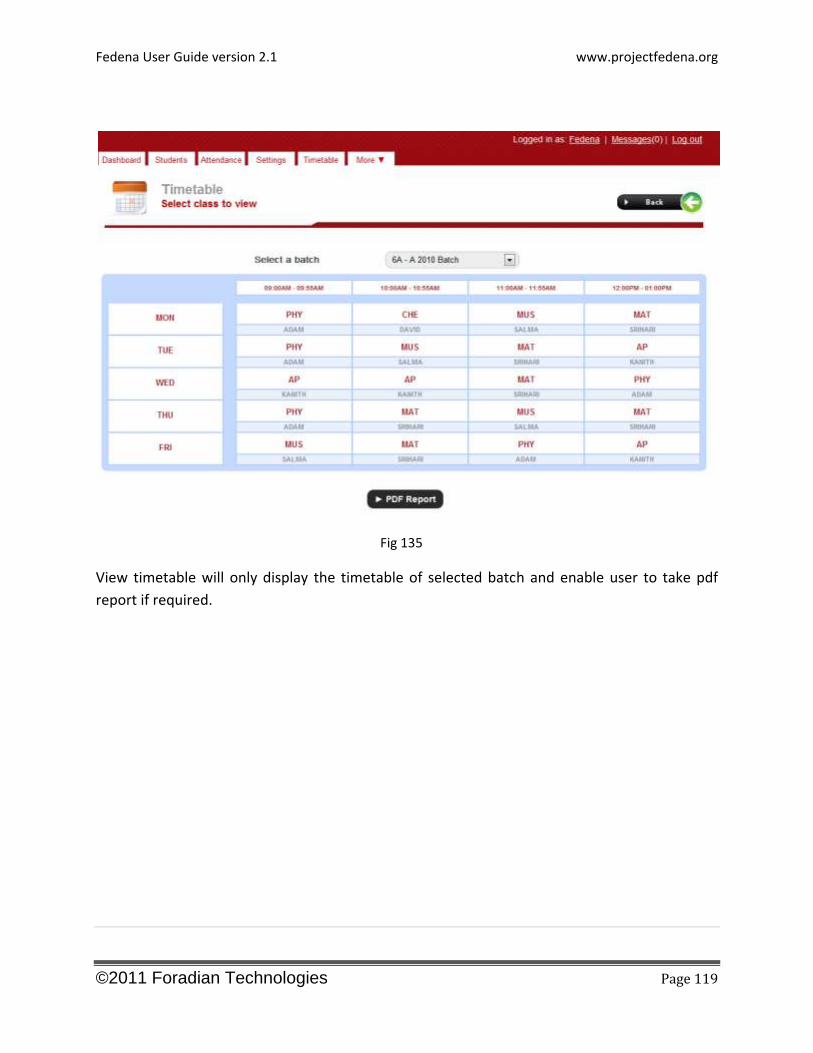
Fig 135
View timetable will only display the timetable of selected batch and enable user to take pdf
report if required.

Fedena User Guide version 2.1 www.projectfedena.org
©2011 Foradian Technologies Page 120
ATTENDANCE
Fedena User Guide version 2.1 www.projectfedena.org
©2011 Foradian Technologies Page 121
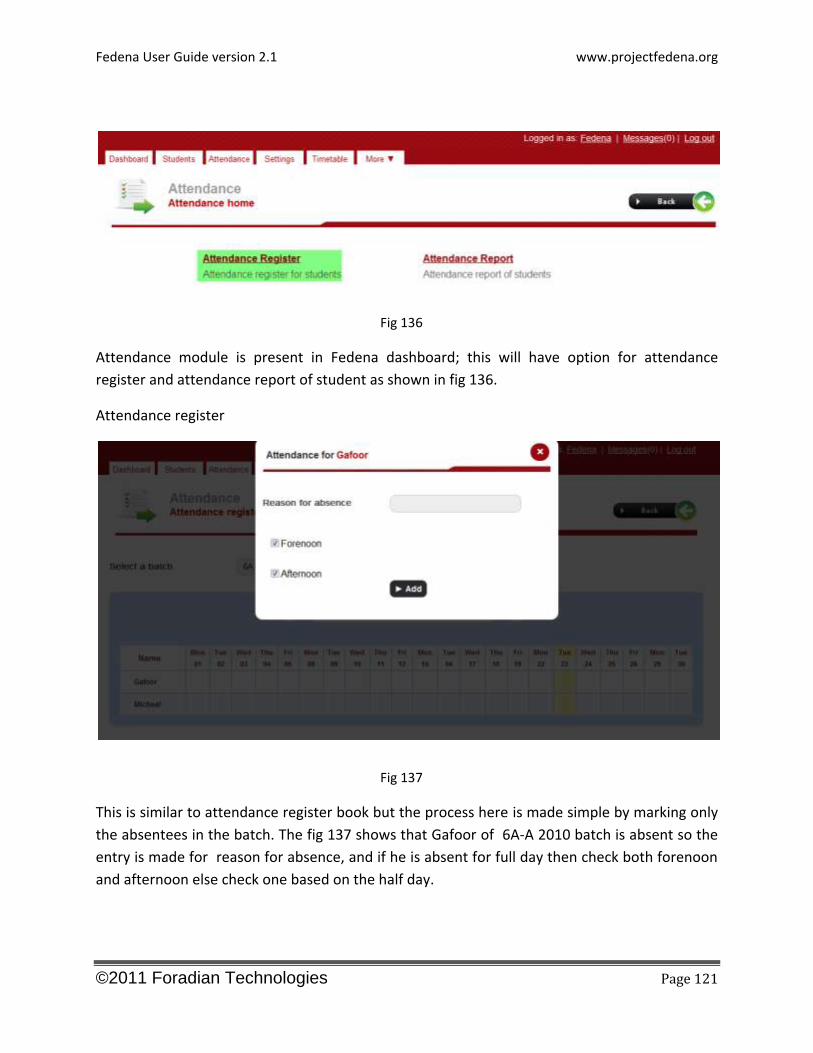
Fig 136
Attendance module is present in Fedena dashboard; this will have option for attendance
register and attendance report of student as shown in fig 136.
Attendance register
Fig 137
This is similar to attendance register book but the process here is made simple by marking only
the absentees in the batch. The fig 137 shows that Gafoor of 6A-A 2010 batch is absent so the
entry is made for reason for absence, and if he is absent for full day then check both forenoon
and afternoon else check one based on the half day.
Fedena User Guide version 2.1 www.projectfedena.org
©2011 Foradian Technologies Page 122
Fig 138
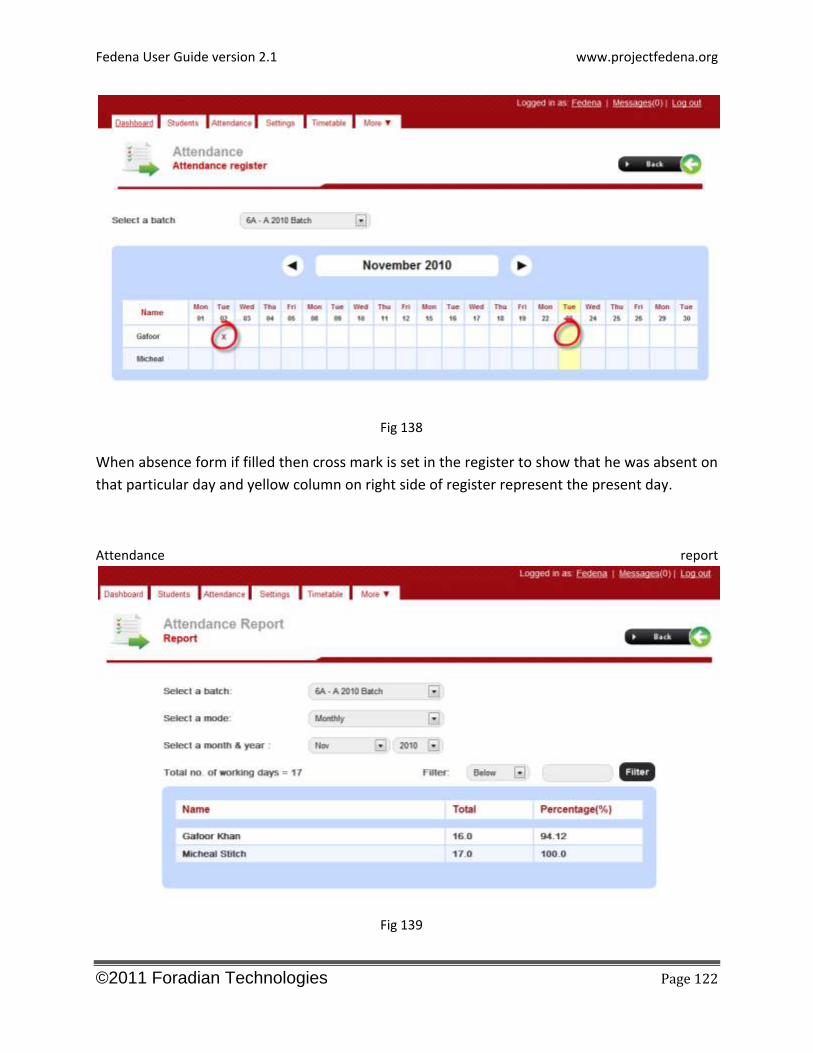
When absence form if filled then cross mark is set in the register to show that he was absent on
that particular day and yellow column on right side of register represent the present day.
Attendance report
Fig 139
Fedena User Guide version 2.1 www.projectfedena.org
©2011 Foradian Technologies Page 123
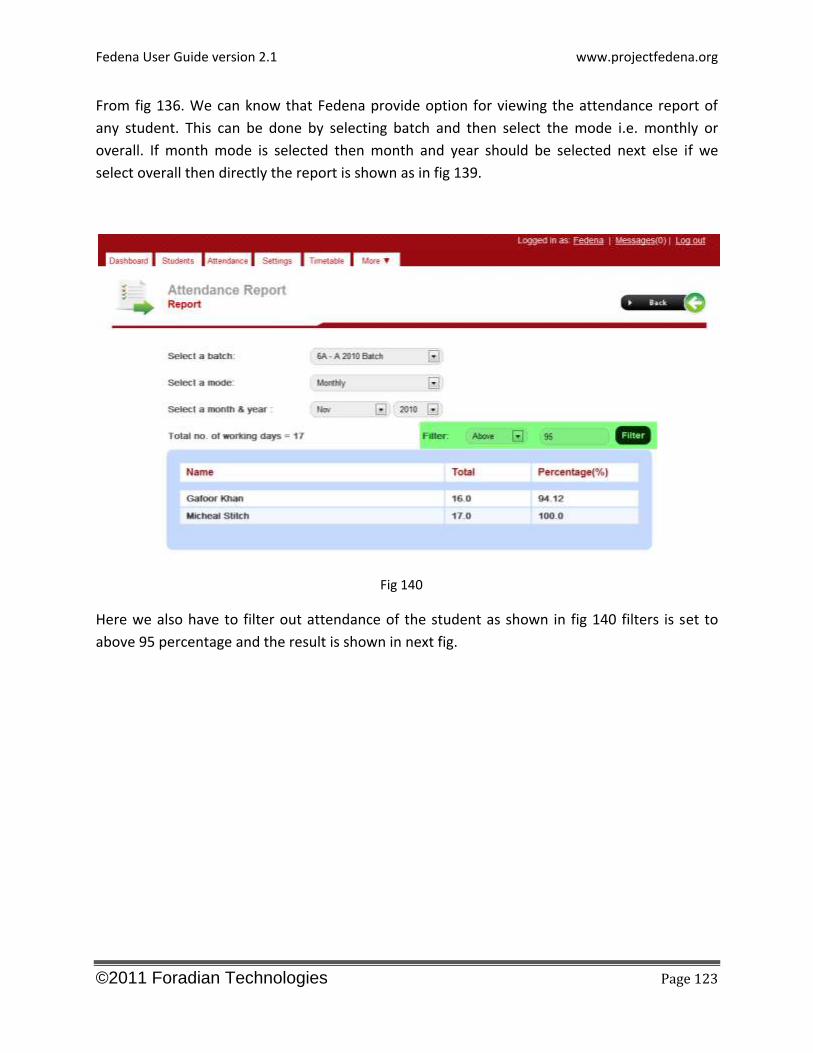
From fig 136. We can know that Fedena provide option for viewing the attendance report of
any student. This can be done by selecting batch and then select the mode i.e. monthly or
overall. If month mode is selected then month and year should be selected next else if we
select overall then directly the report is shown as in fig 139.
Fig 140
Here we also have to filter out attendance of the student as shown in fig 140 filters is set to
above 95 percentage and the result is shown in next fig.
Fedena User Guide version 2.1 www.projectfedena.org
©2011 Foradian Technologies Page 124
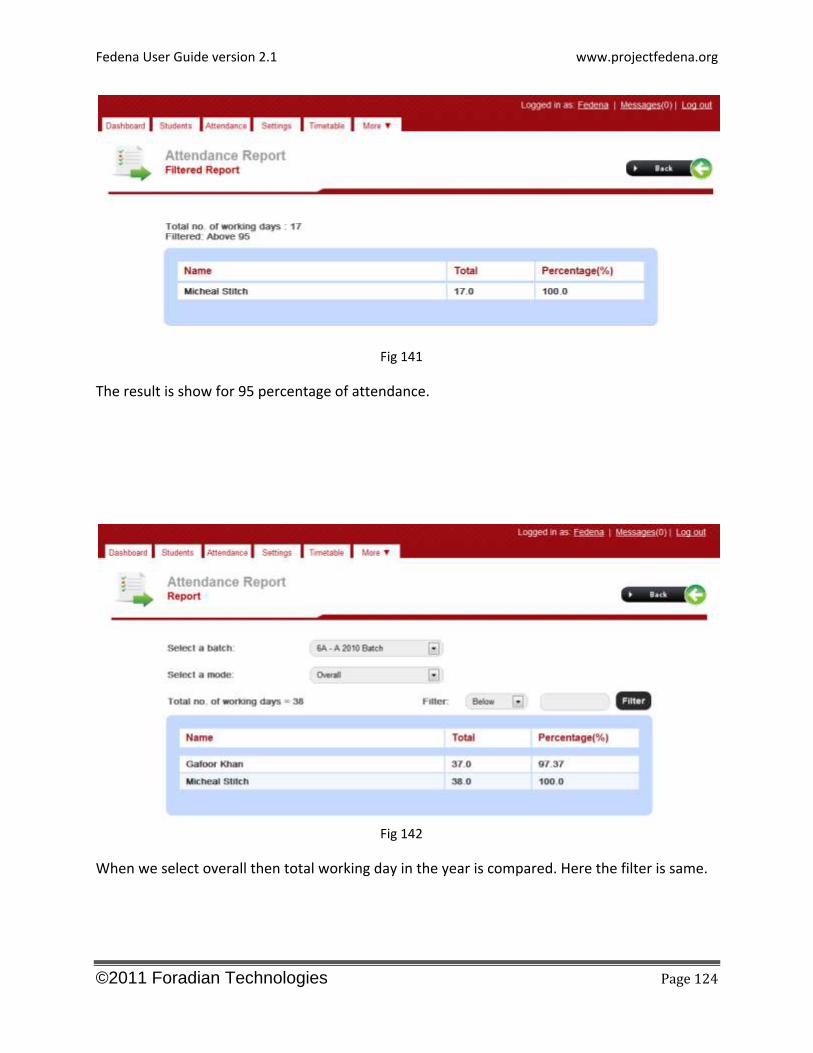
Fig 141
The result is show for 95 percentage of attendance.
Fig 142
When we select overall then total working day in the year is compared. Here the filter is same.

Fedena User Guide version 2.1 www.projectfedena.org
©2011 Foradian Technologies Page 125
FINANCE
Fedena User Guide version 2.1 www.projectfedena.org
©2011 Foradian Technologies Page 126
Fig 191
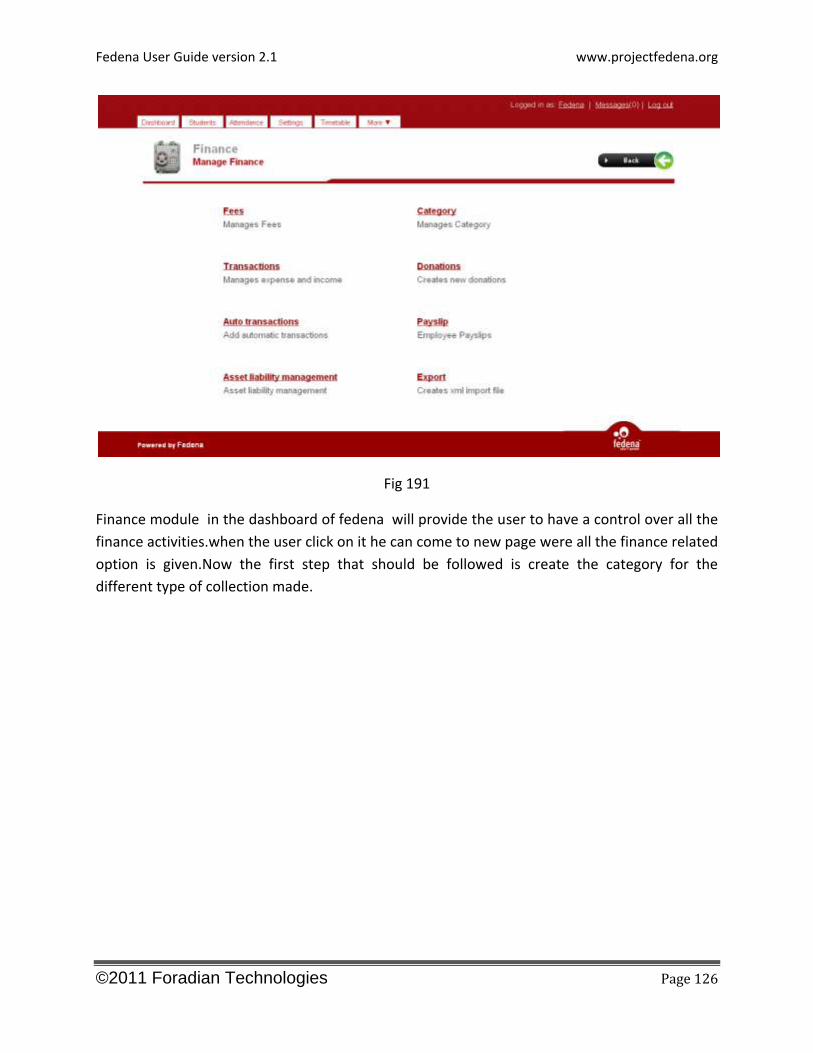
Finance module in the dashboard of fedena will provide the user to have a control over all the
finance activities.when the user click on it he can come to new page were all the finance related
option is given.Now the first step that should be followed is create the category for the
different type of collection made.
Fedena User Guide version 2.1 www.projectfedena.org
©2011 Foradian Technologies Page 127
Fig 192
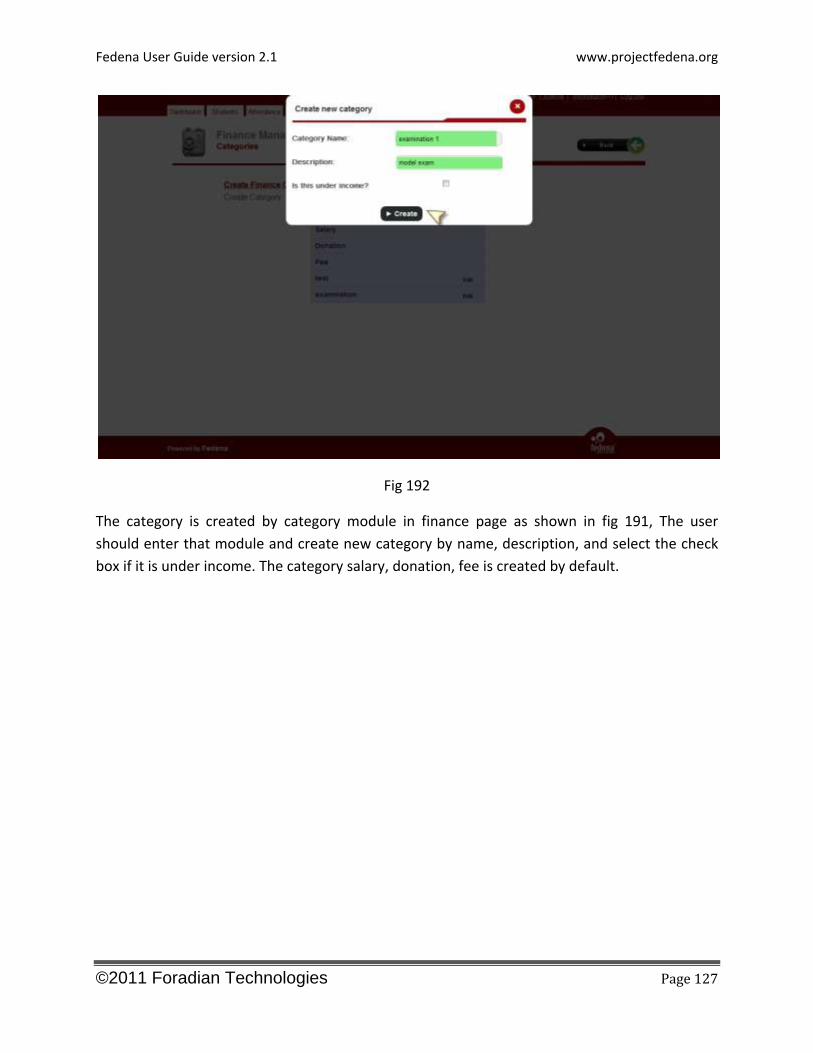
The category is created by category module in finance page as shown in fig 191, The user
should enter that module and create new category by name, description, and select the check
box if it is under income. The category salary, donation, fee is created by default.
Fedena User Guide version 2.1 www.projectfedena.org
©2011 Foradian Technologies Page 128
Fig 193
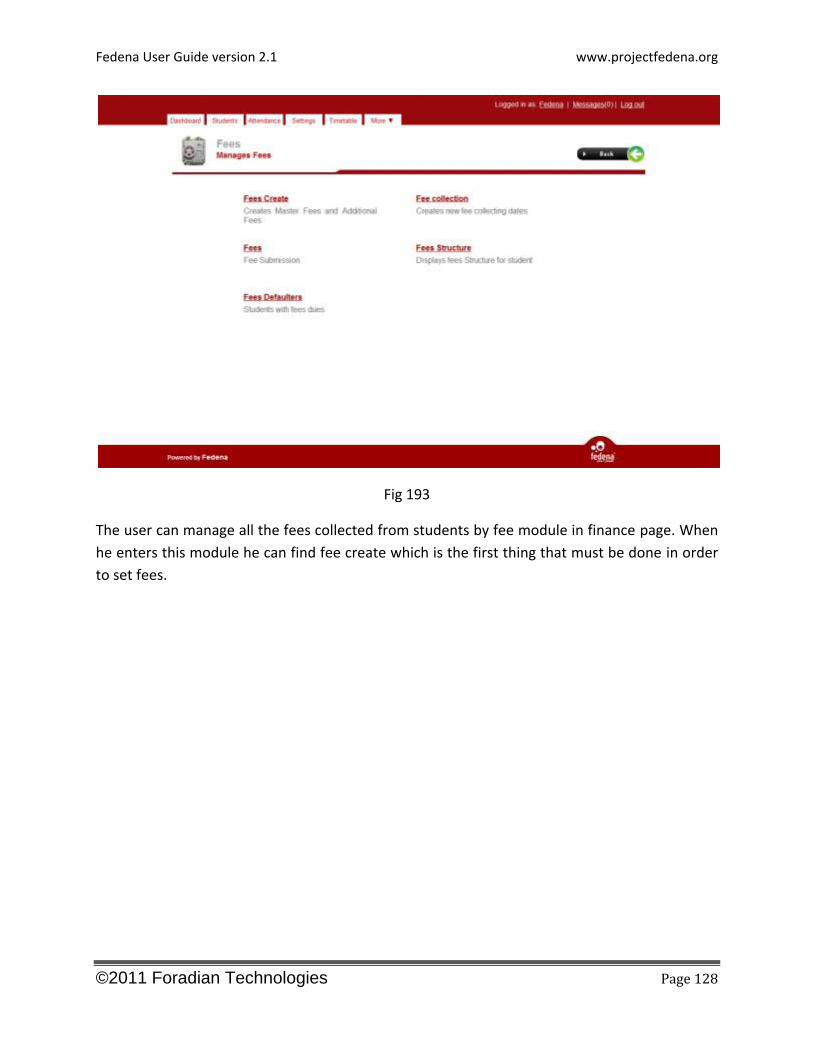
The user can manage all the fees collected from students by fee module in finance page. When
he enters this module he can find fee create which is the first thing that must be done in order
to set fees.
Fedena User Guide version 2.1 www.projectfedena.org
©2011 Foradian Technologies Page 129
fig 194
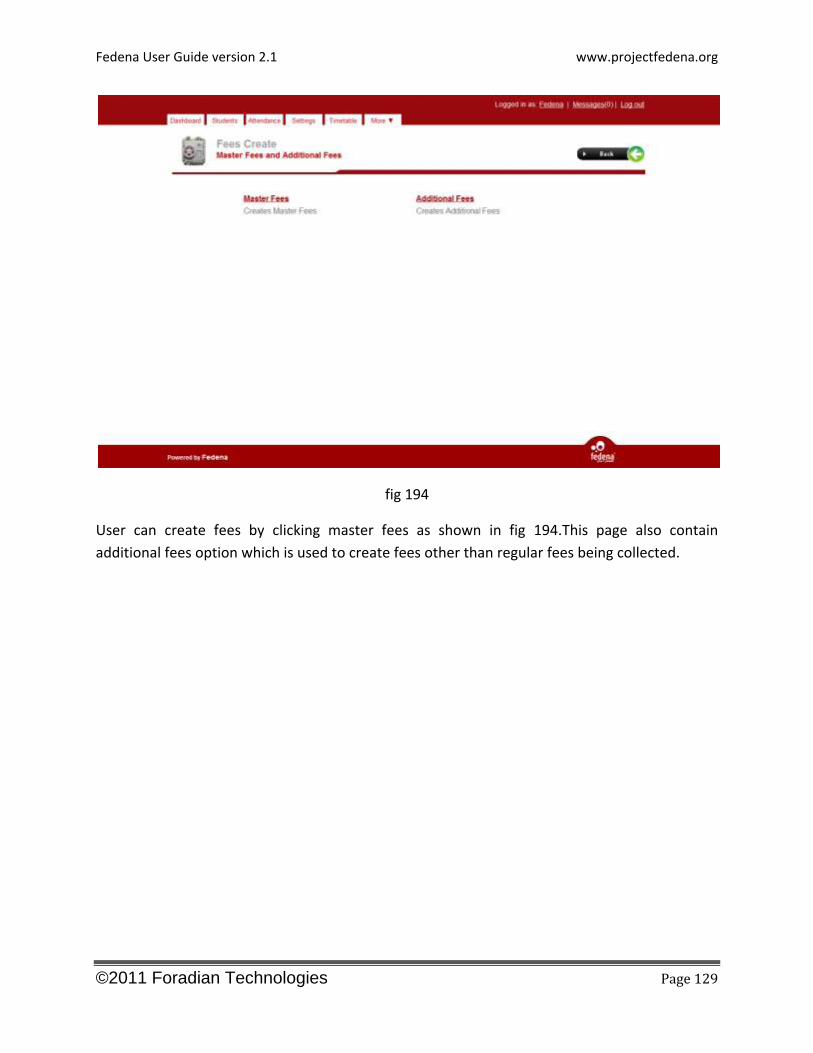
User can create fees by clicking master fees as shown in fig 194.This page also contain
additional fees option which is used to create fees other than regular fees being collected.
Fedena User Guide version 2.1 www.projectfedena.org
©2011 Foradian Technologies Page 130
fig 195
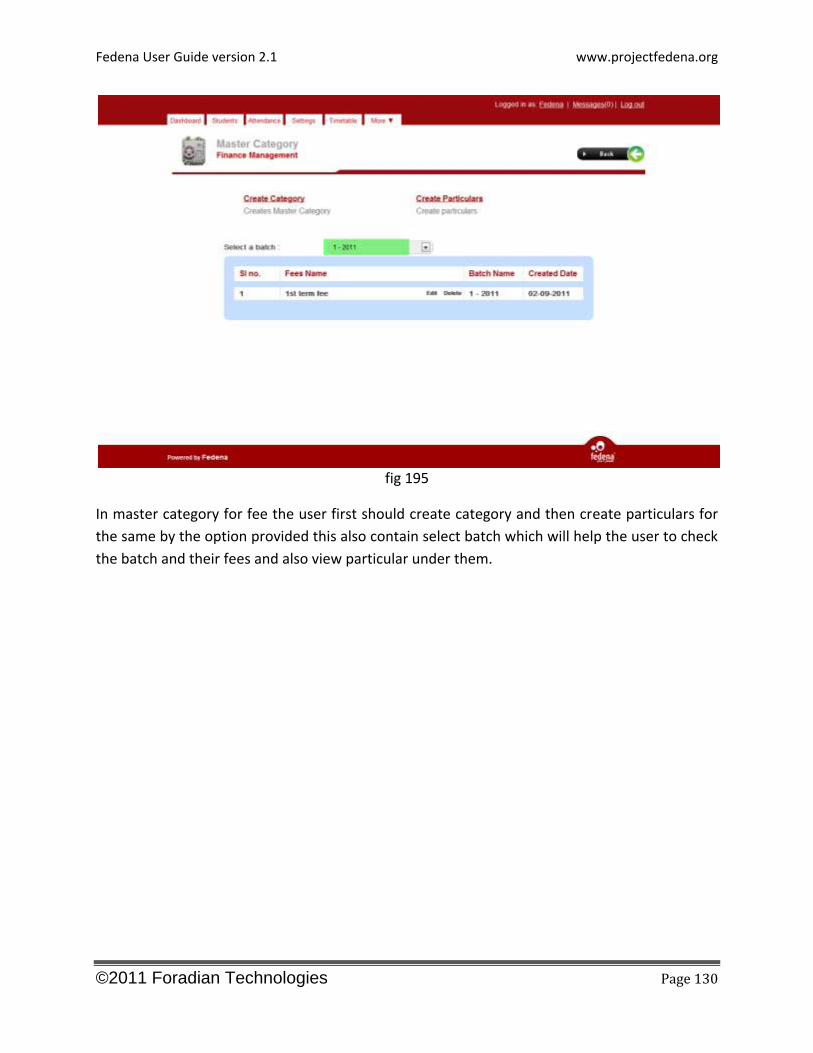
In master category for fee the user first should create category and then create particulars for
the same by the option provided this also contain select batch which will help the user to check
the batch and their fees and also view particular under them.
Fedena User Guide version 2.1 www.projectfedena.org
©2011 Foradian Technologies Page 131
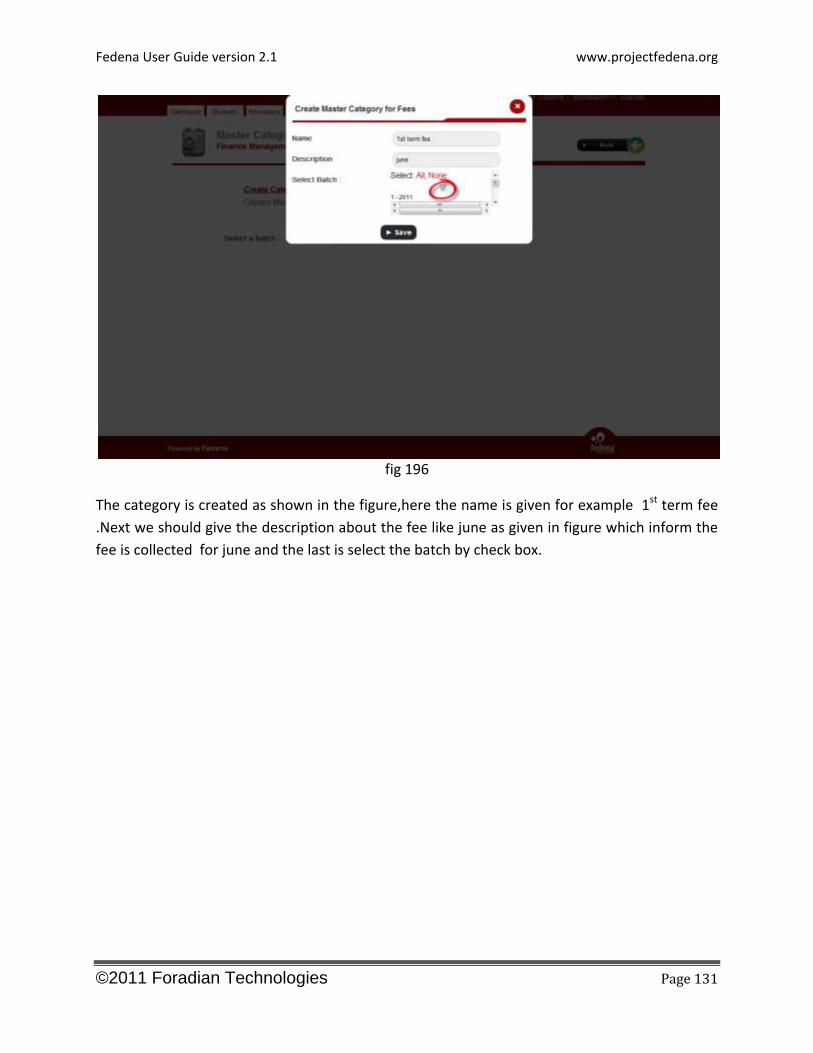
fig 196
The category is created as shown in the figure,here the name is given for example 1st term fee
.Next we should give the description about the fee like june as given in figure which inform the
fee is collected for june and the last is select the batch by check box.
Fedena User Guide version 2.1 www.projectfedena.org
©2011 Foradian Technologies Page 132
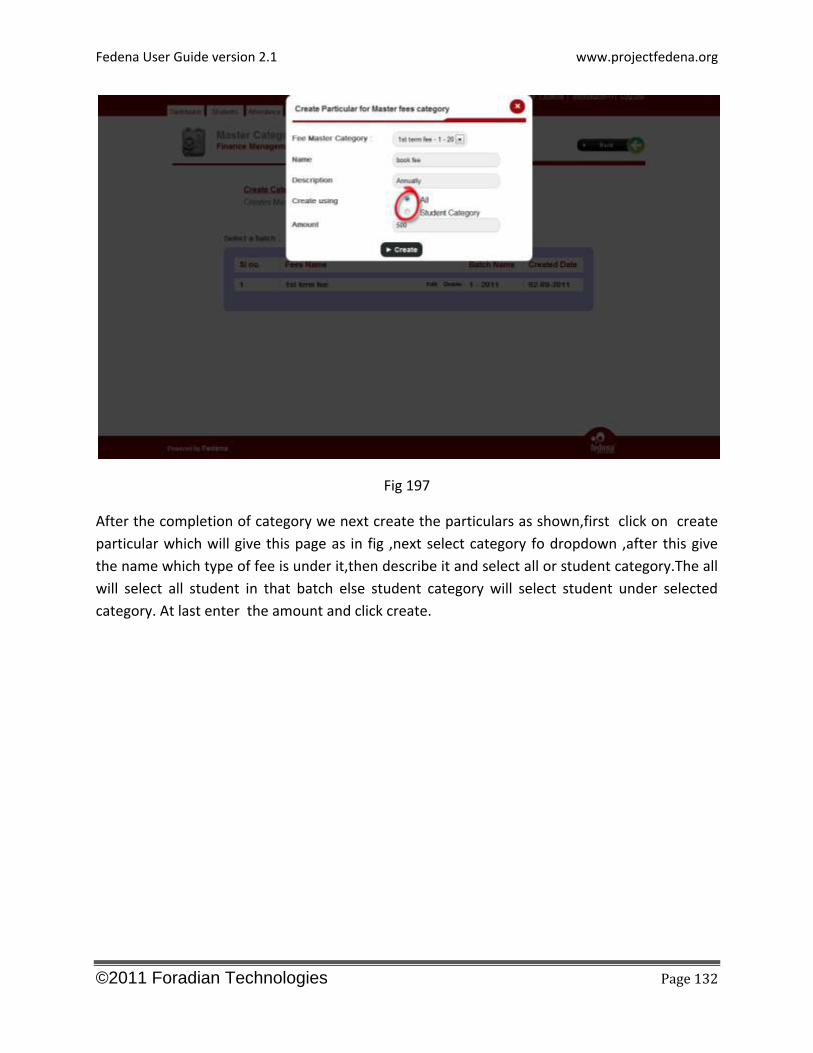
Fig 197
After the completion of category we next create the particulars as shown,first click on create
particular which will give this page as in fig ,next select category fo dropdown ,after this give
the name which type of fee is under it,then describe it and select all or student category.The all
will select all student in that batch else student category will select student under selected
category. At last enter the amount and click create.
Fedena User Guide version 2.1 www.projectfedena.org
©2011 Foradian Technologies Page 133
fig 198
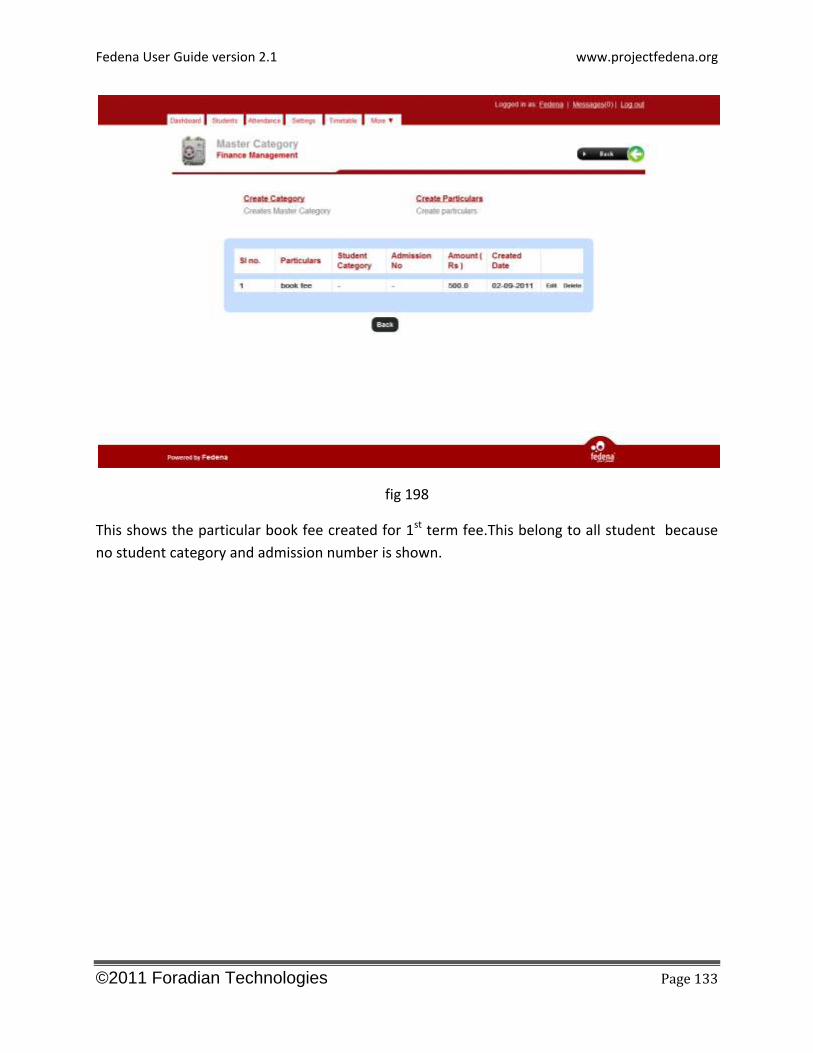
This shows the particular book fee created for 1st term fee.This belong to all student because
no student category and admission number is shown.
Fedena User Guide version 2.1 www.projectfedena.org
©2011 Foradian Technologies Page 134
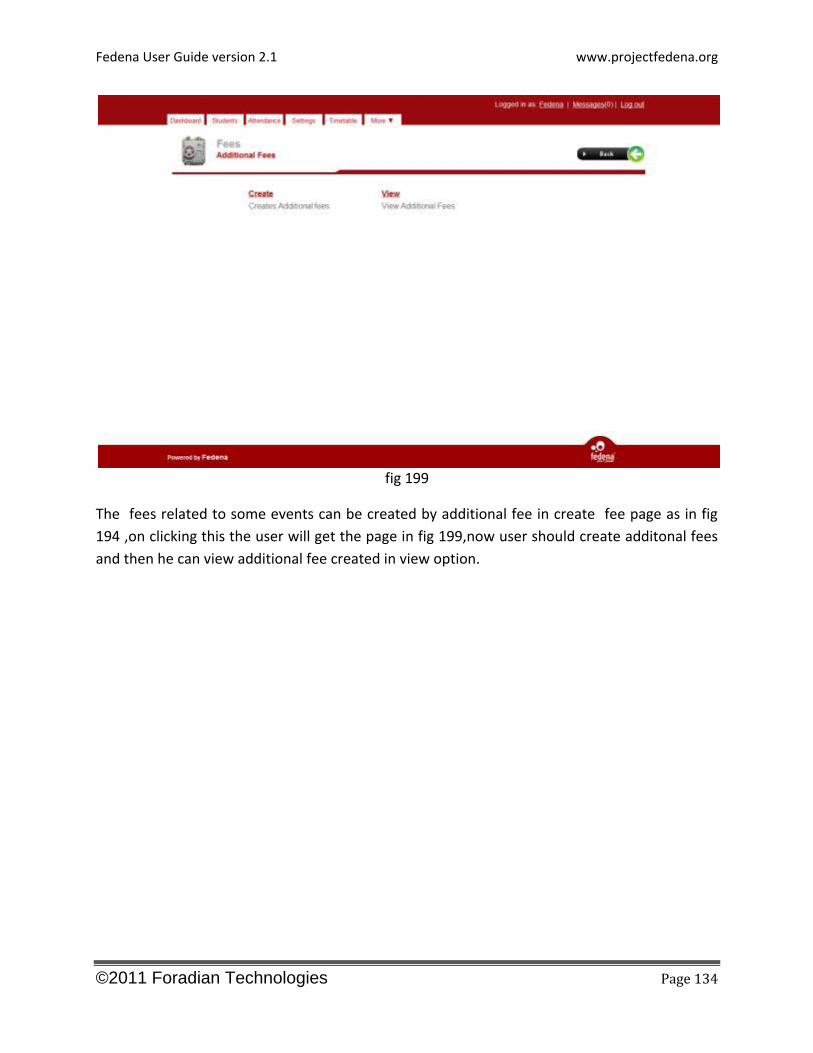
fig 199
The fees related to some events can be created by additional fee in create fee page as in fig
194 ,on clicking this the user will get the page in fig 199,now user should create additonal fees
and then he can view additional fee created in view option.
Fedena User Guide version 2.1 www.projectfedena.org
©2011 Foradian Technologies Page 135
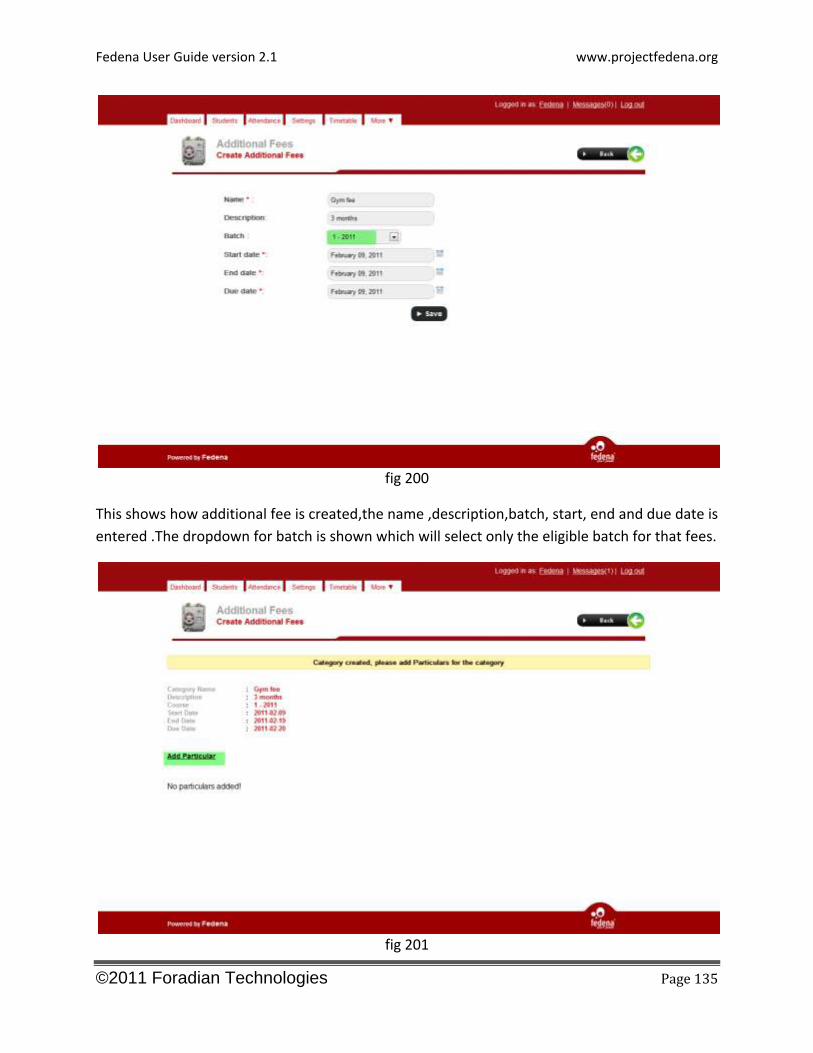
fig 200
This shows how additional fee is created,the name ,description,batch, start, end and due date is
entered .The dropdown for batch is shown which will select only the eligible batch for that fees.
fig 201
Fedena User Guide version 2.1 www.projectfedena.org
©2011 Foradian Technologies Page 136
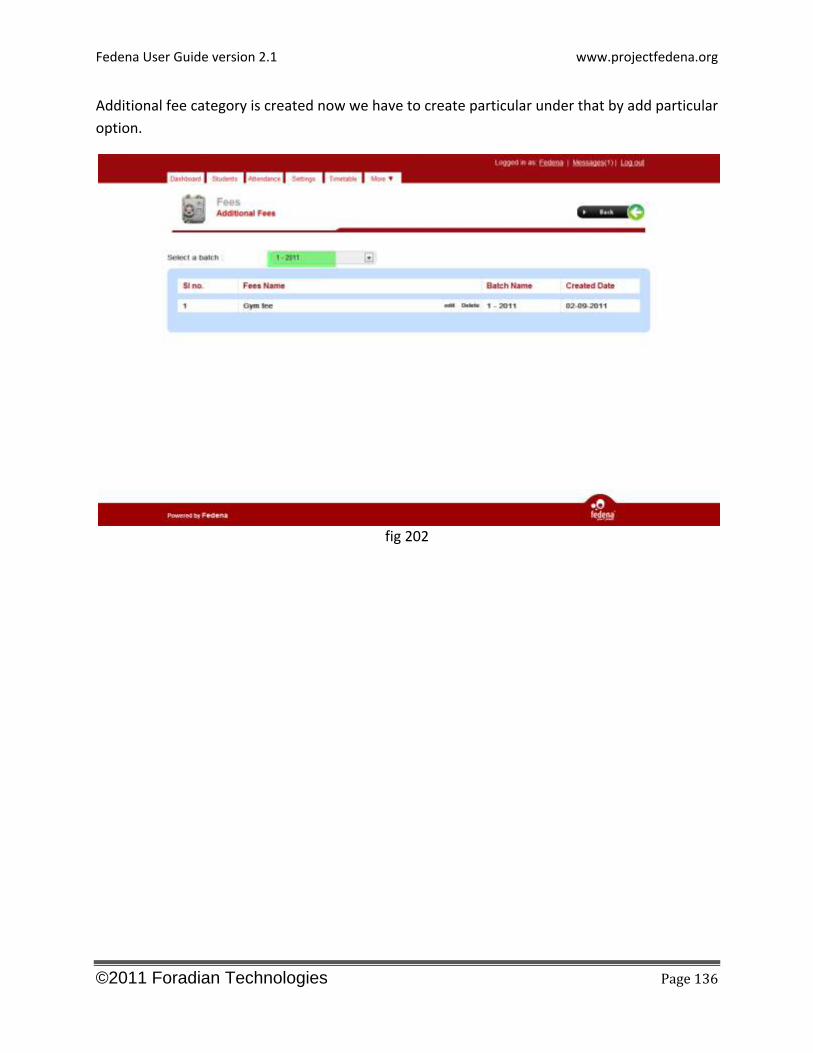
Additional fee category is created now we have to create particular under that by add particular
option.
fig 202
Fedena User Guide version 2.1 www.projectfedena.org
©2011 Foradian Technologies Page 137
The figure shows the view additional fees created like gym fee by additonal fee option
fig 203
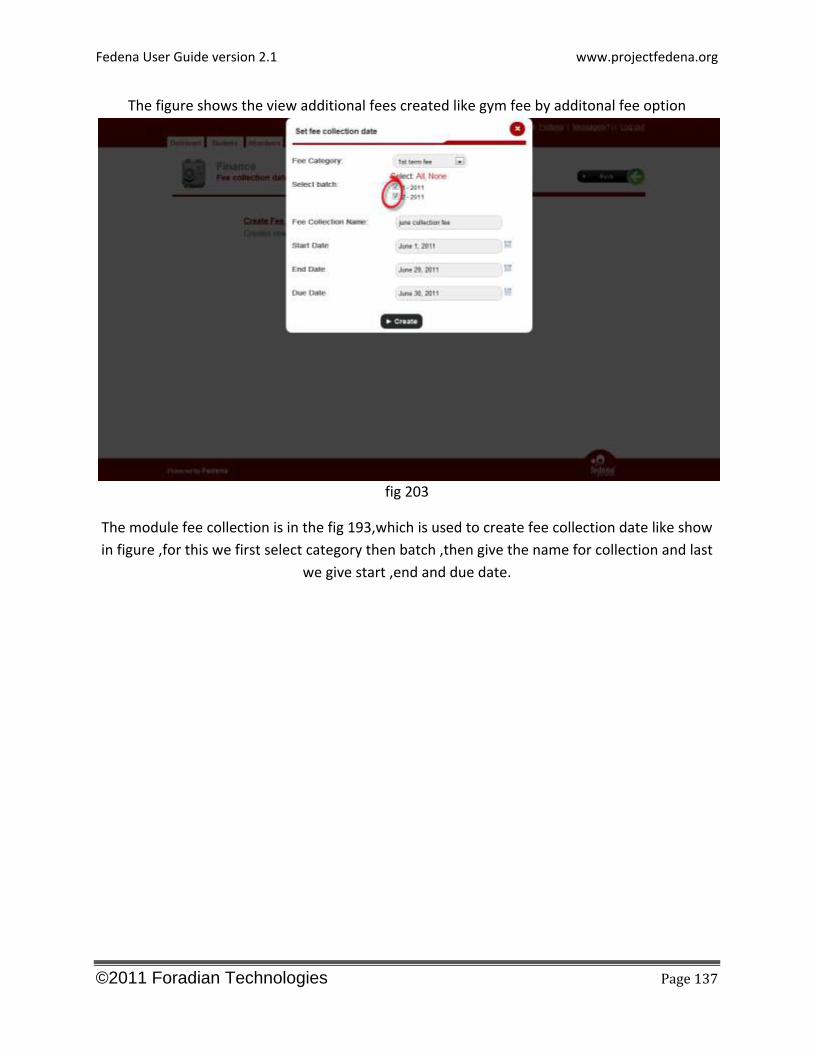
The module fee collection is in the fig 193,which is used to create fee collection date like show
in figure ,for this we first select category then batch ,then give the name for collection and last
we give start ,end and due date.
Fedena User Guide version 2.1 www.projectfedena.org
©2011 Foradian Technologies Page 138
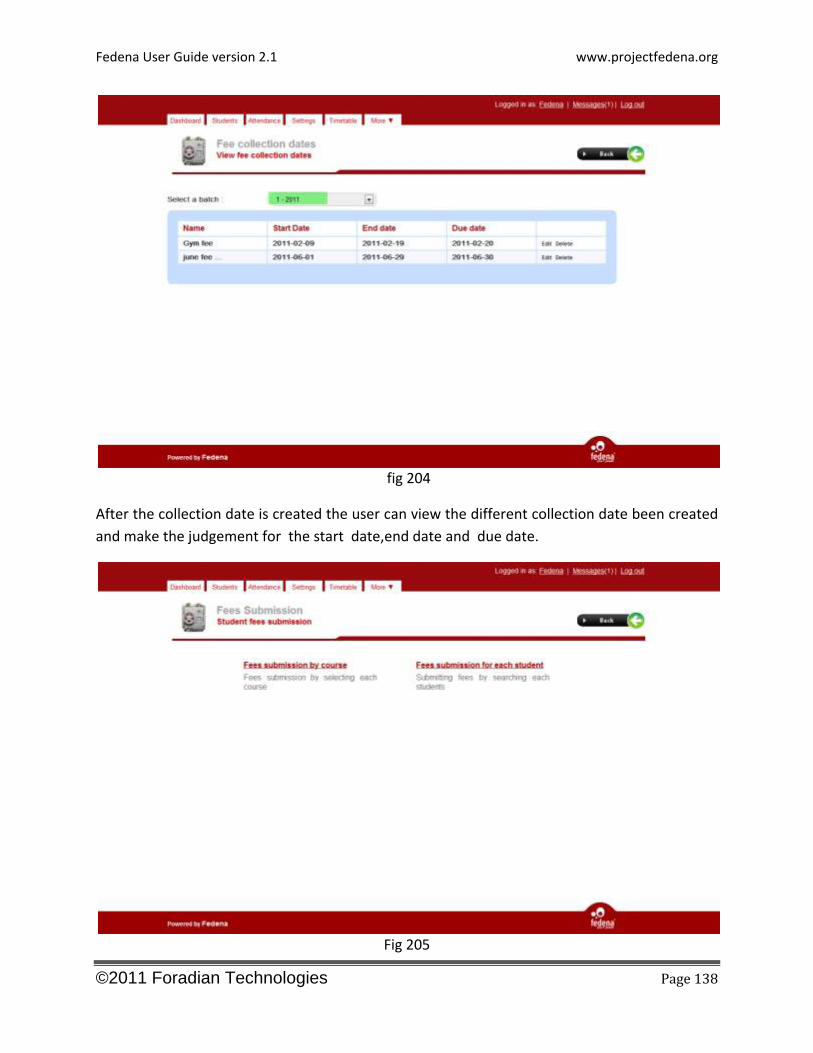
fig 204
After the collection date is created the user can view the different collection date been created
and make the judgement for the start date,end date and due date.
Fig 205
Fedena User Guide version 2.1 www.projectfedena.org
©2011 Foradian Technologies Page 139
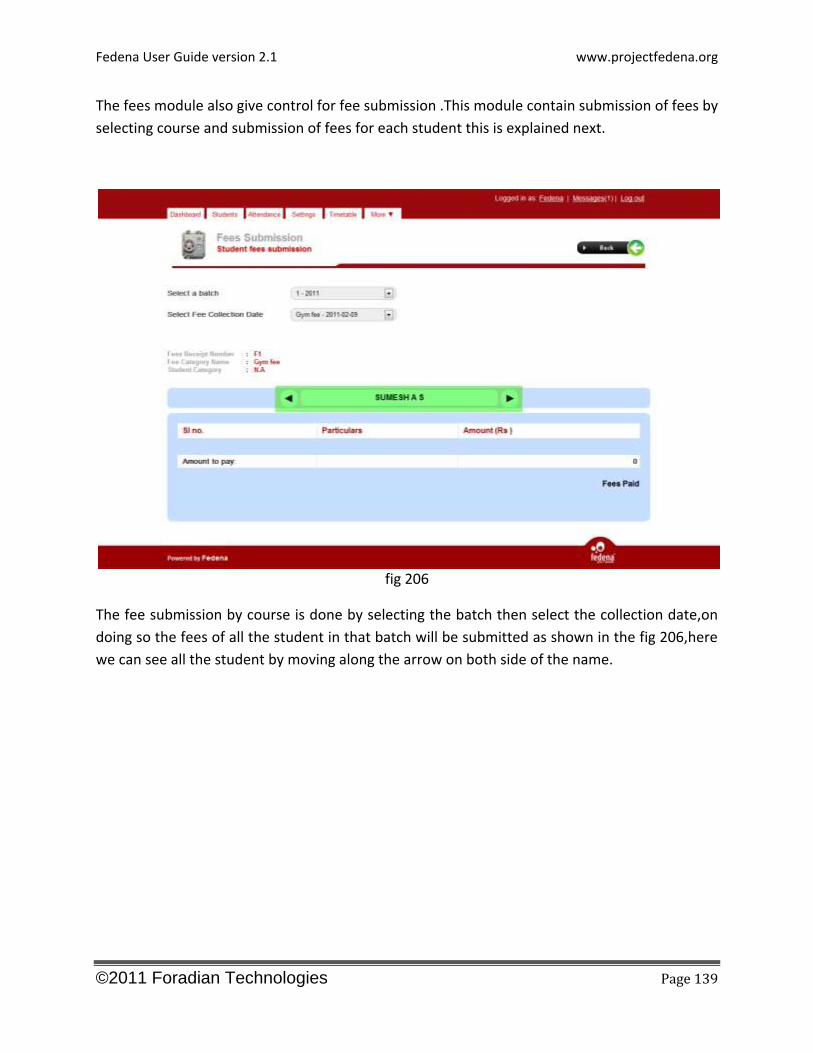
The fees module also give control for fee submission .This module contain submission of fees by
selecting course and submission of fees for each student this is explained next.
fig 206
The fee submission by course is done by selecting the batch then select the collection date,on
doing so the fees of all the student in that batch will be submitted as shown in the fig 206,here
we can see all the student by moving along the arrow on both side of the name.

Fedena User Guide version 2.1 www.projectfedena.org
©2011 Foradian Technologies Page 140
fig 207
We also have another option for fee submision that is by selecting each student,in this we have
to type the name in the search which will show the match below.Then we select the name from
the match for submission.
Fedena User Guide version 2.1 www.projectfedena.org
©2011 Foradian Technologies Page 141
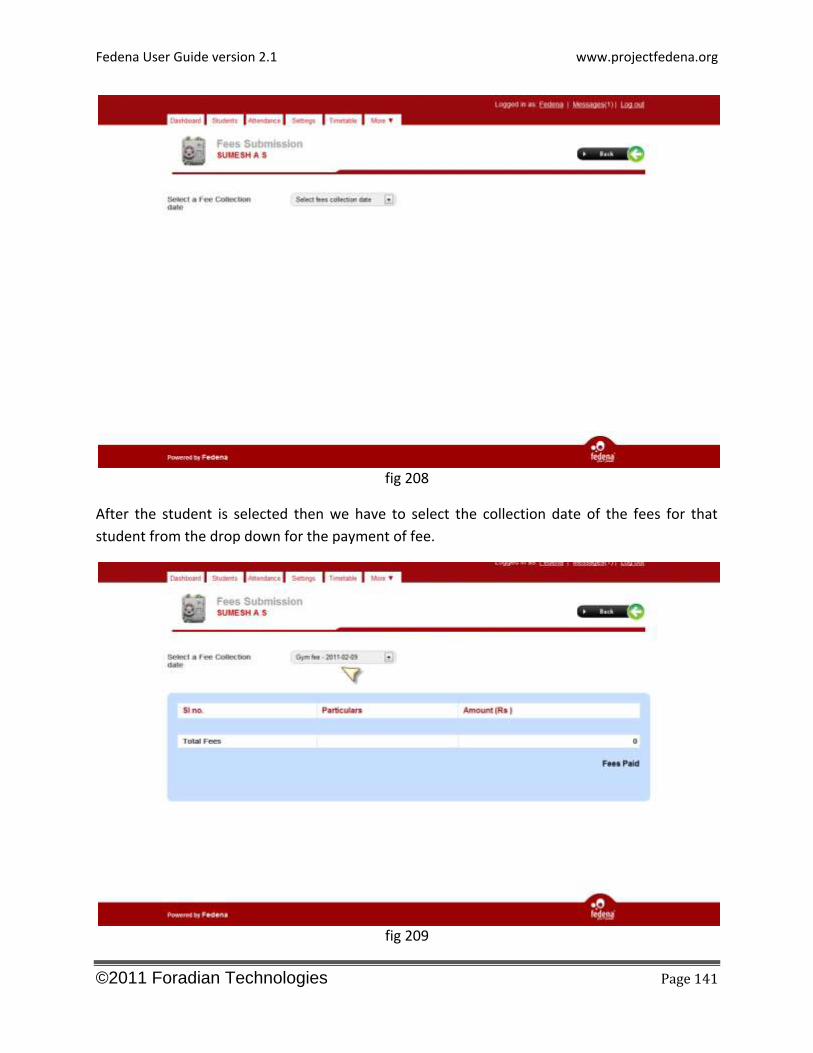
fig 208
After the student is selected then we have to select the collection date of the fees for that
student from the drop down for the payment of fee.
fig 209
Fedena User Guide version 2.1 www.projectfedena.org
©2011 Foradian Technologies Page 142
From the figure 209 we can see that by selecting the fee collection date for Sumesh a.s we
submitted his fees.
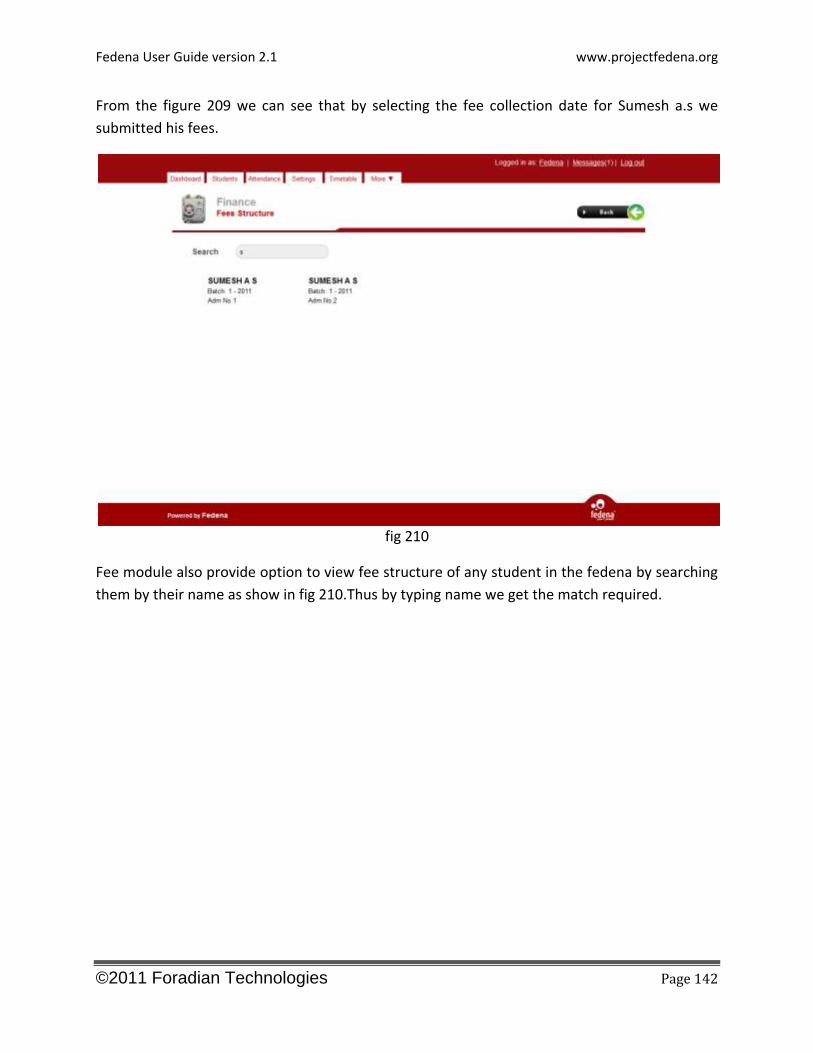
fig 210
Fee module also provide option to view fee structure of any student in the fedena by searching
them by their name as show in fig 210.Thus by typing name we get the match required.
Fedena User Guide version 2.1 www.projectfedena.org
©2011 Foradian Technologies Page 143
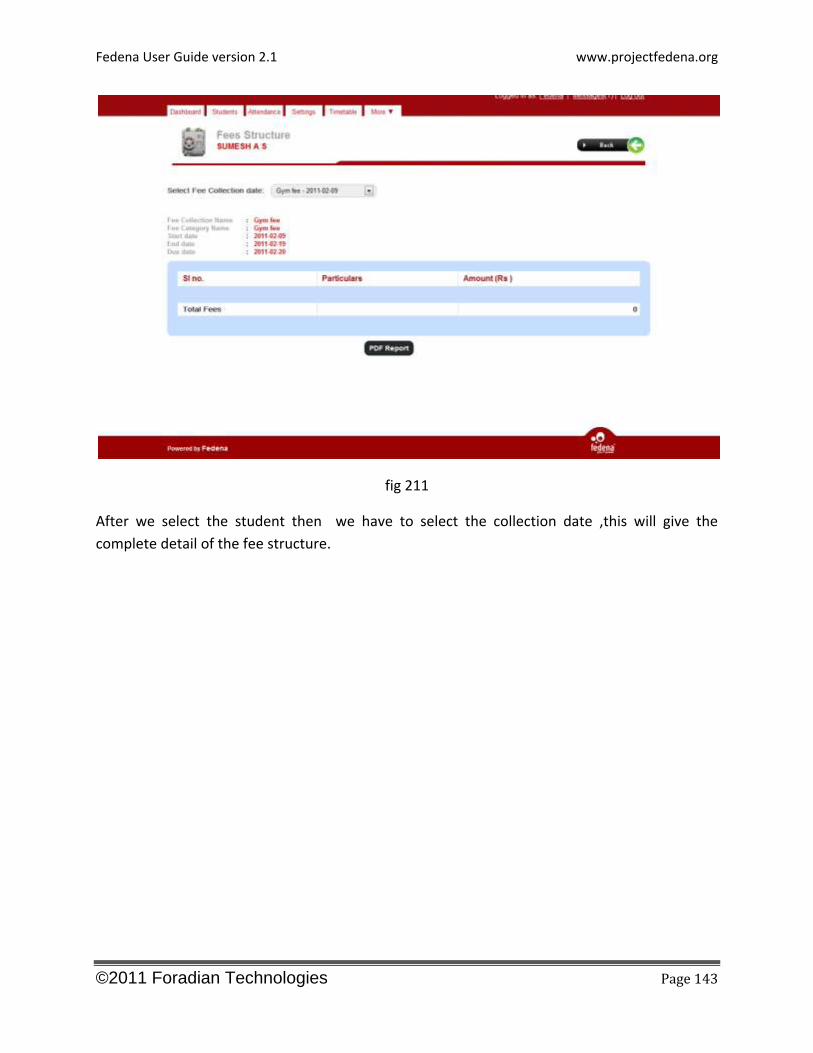
fig 211
After we select the student then we have to select the collection date ,this will give the
complete detail of the fee structure.
Fedena User Guide version 2.1 www.projectfedena.org
©2011 Foradian Technologies Page 144
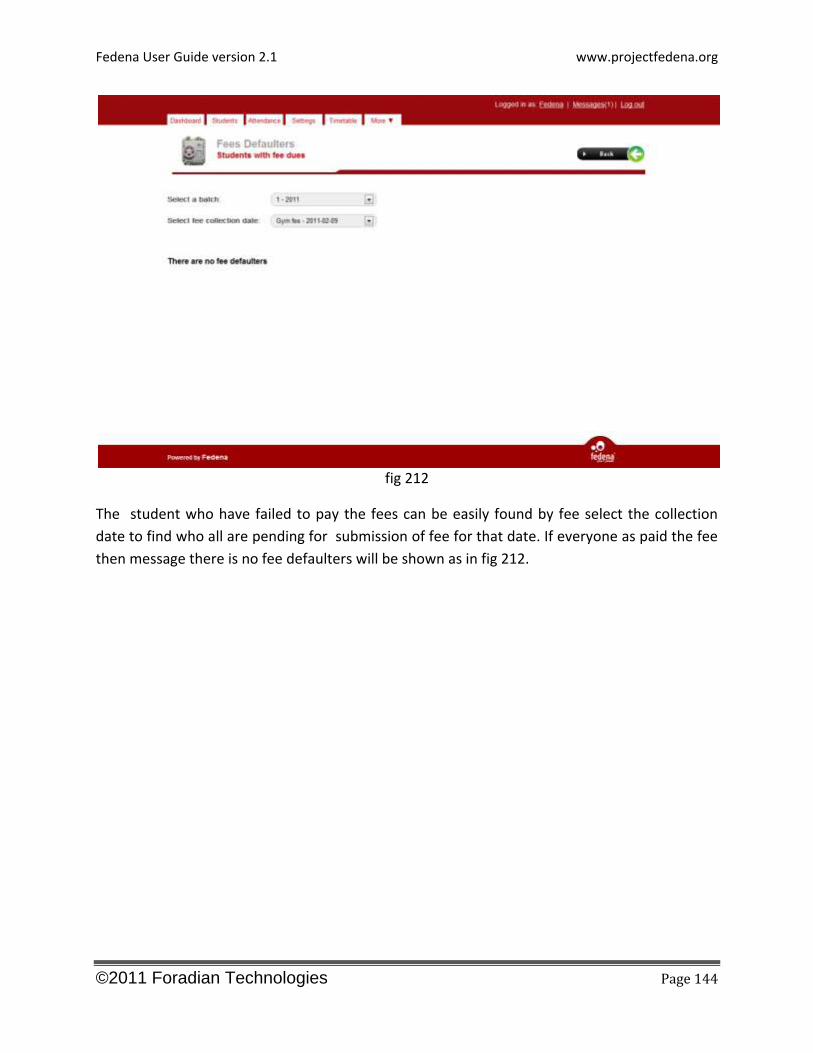
fig 212
The student who have failed to pay the fees can be easily found by fee select the collection
date to find who all are pending for submission of fee for that date. If everyone as paid the fee
then message there is no fee defaulters will be shown as in fig 212.
Fedena User Guide version 2.1 www.projectfedena.org
©2011 Foradian Technologies Page 145
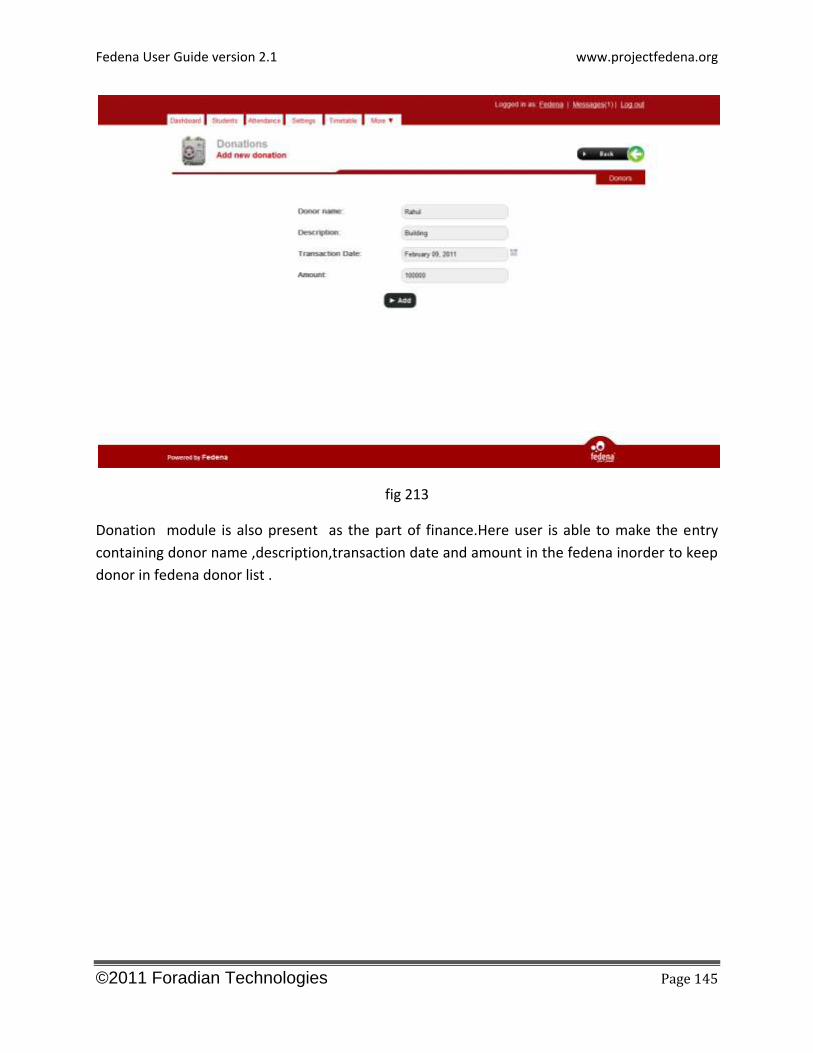
fig 213
Donation module is also present as the part of finance.Here user is able to make the entry
containing donor name ,description,transaction date and amount in the fedena inorder to keep
donor in fedena donor list .
Fedena User Guide version 2.1 www.projectfedena.org
©2011 Foradian Technologies Page 146
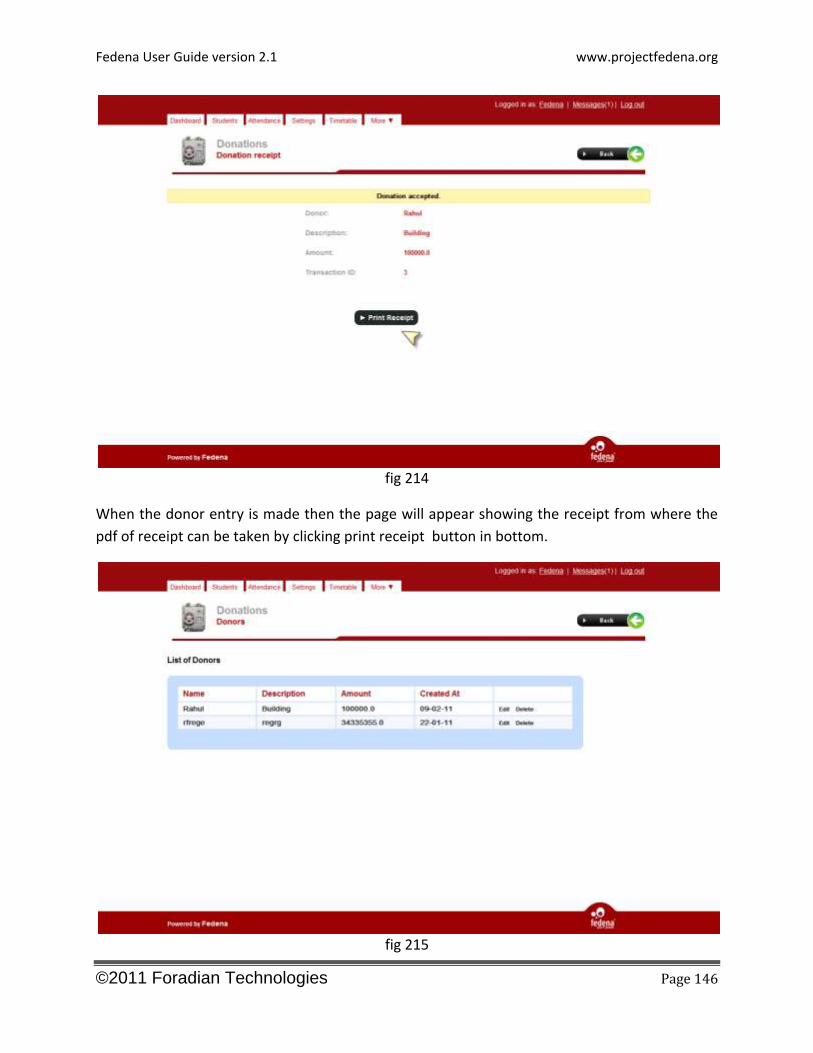
fig 214
When the donor entry is made then the page will appear showing the receipt from where the
pdf of receipt can be taken by clicking print receipt button in bottom.
fig 215
Fedena User Guide version 2.1 www.projectfedena.org
©2011 Foradian Technologies Page 147
The list of donors can be seen by donor option provided in menubar of donation page as in fig
213.Here name, description ,amount and created at date is shown for each donor.
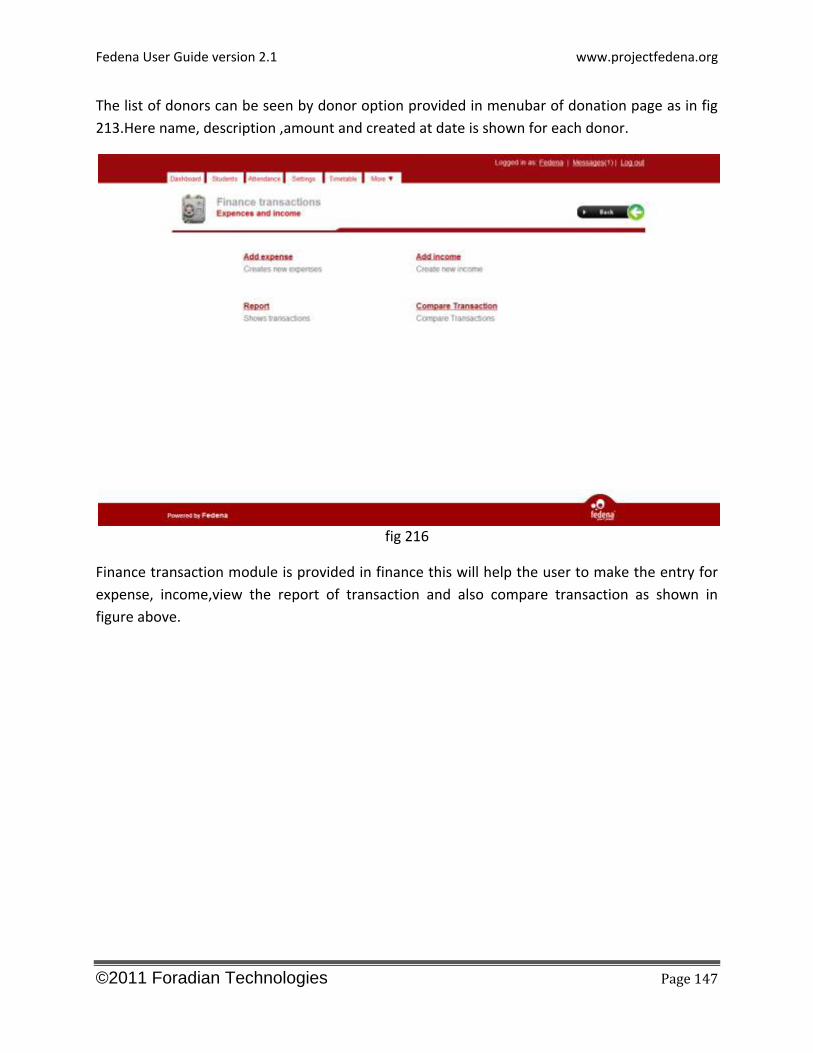
fig 216
Finance transaction module is provided in finance this will help the user to make the entry for
expense, income,view the report of transaction and also compare transaction as shown in
figure above.
Fedena User Guide version 2.1 www.projectfedena.org
©2011 Foradian Technologies Page 148
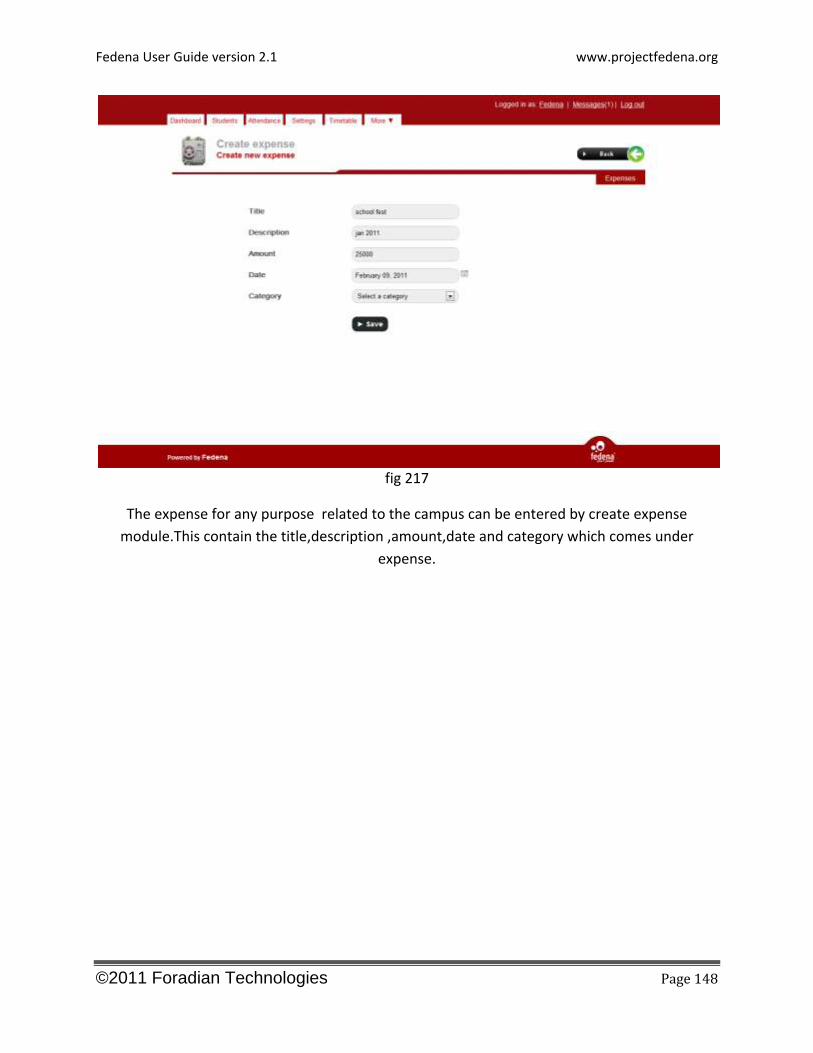
fig 217
The expense for any purpose related to the campus can be entered by create expense
module.This contain the title,description ,amount,date and category which comes under
expense.
Fedena User Guide version 2.1 www.projectfedena.org
©2011 Foradian Technologies Page 149
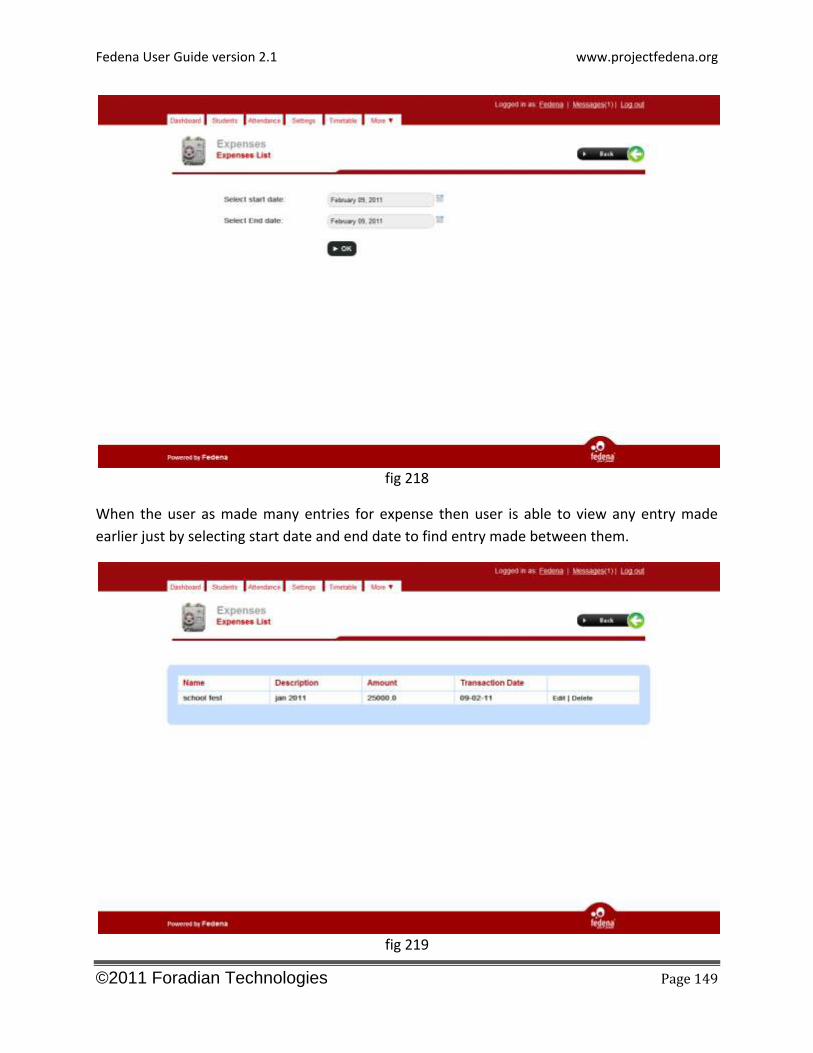
fig 218
When the user as made many entries for expense then user is able to view any entry made
earlier just by selecting start date and end date to find entry made between them.
fig 219
Fedena User Guide version 2.1 www.projectfedena.org
©2011 Foradian Technologies Page 150
The user will find the page as in figure which give entry for expense made between or on that
date with name ,description ,amount and transaction date.
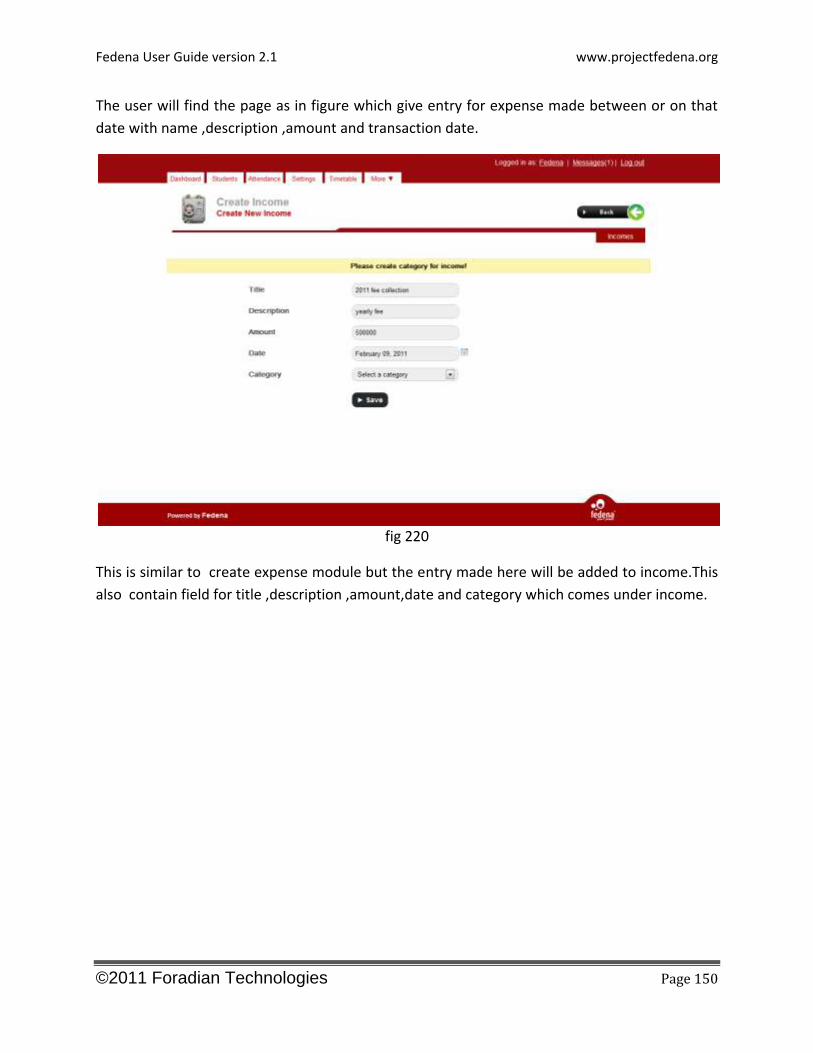
fig 220
This is similar to create expense module but the entry made here will be added to income.This
also contain field for title ,description ,amount,date and category which comes under income.
Fedena User Guide version 2.1 www.projectfedena.org
©2011 Foradian Technologies Page 151
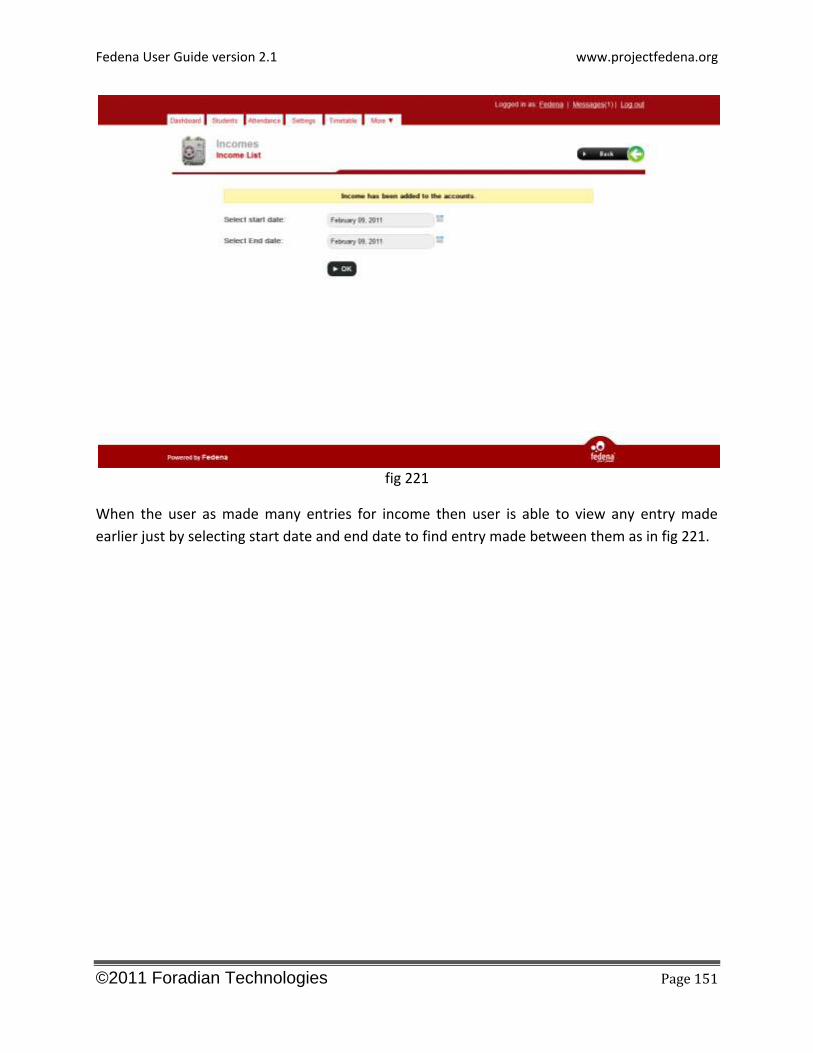
fig 221
When the user as made many entries for income then user is able to view any entry made
earlier just by selecting start date and end date to find entry made between them as in fig 221.
Fedena User Guide version 2.1 www.projectfedena.org
©2011 Foradian Technologies Page 152
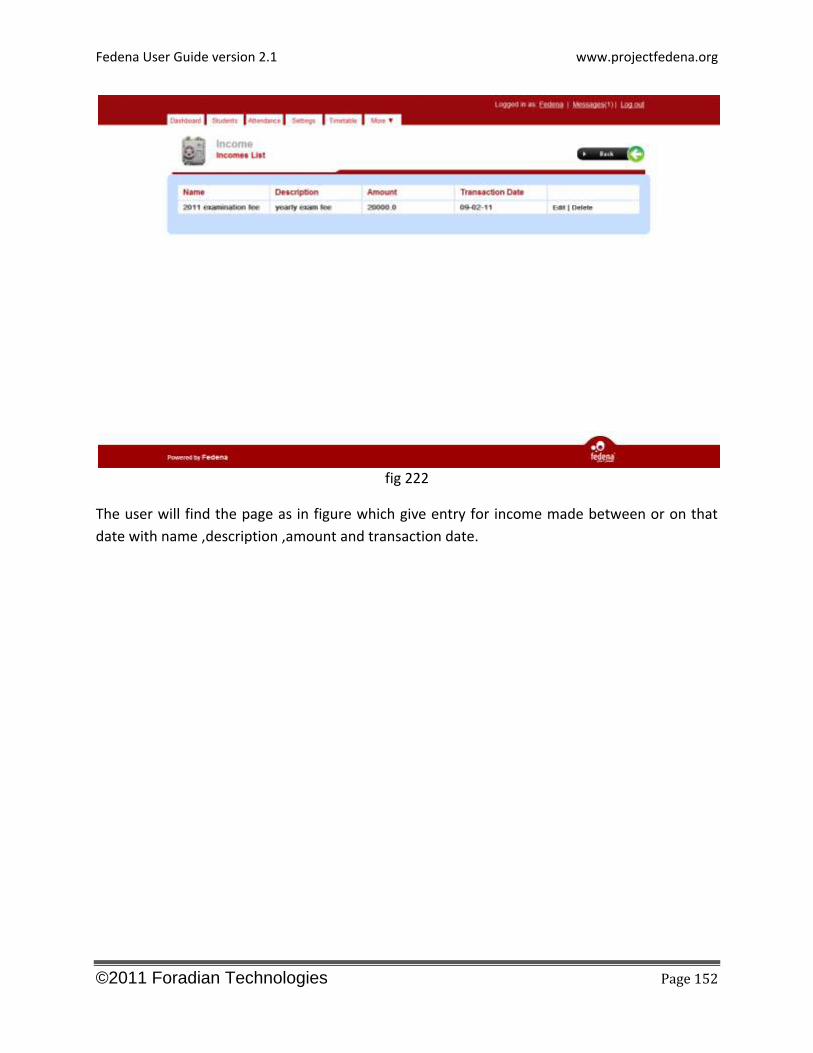
fig 222
The user will find the page as in figure which give entry for income made between or on that
date with name ,description ,amount and transaction date.
Fedena User Guide version 2.1 www.projectfedena.org
©2011 Foradian Technologies Page 153
fig 223
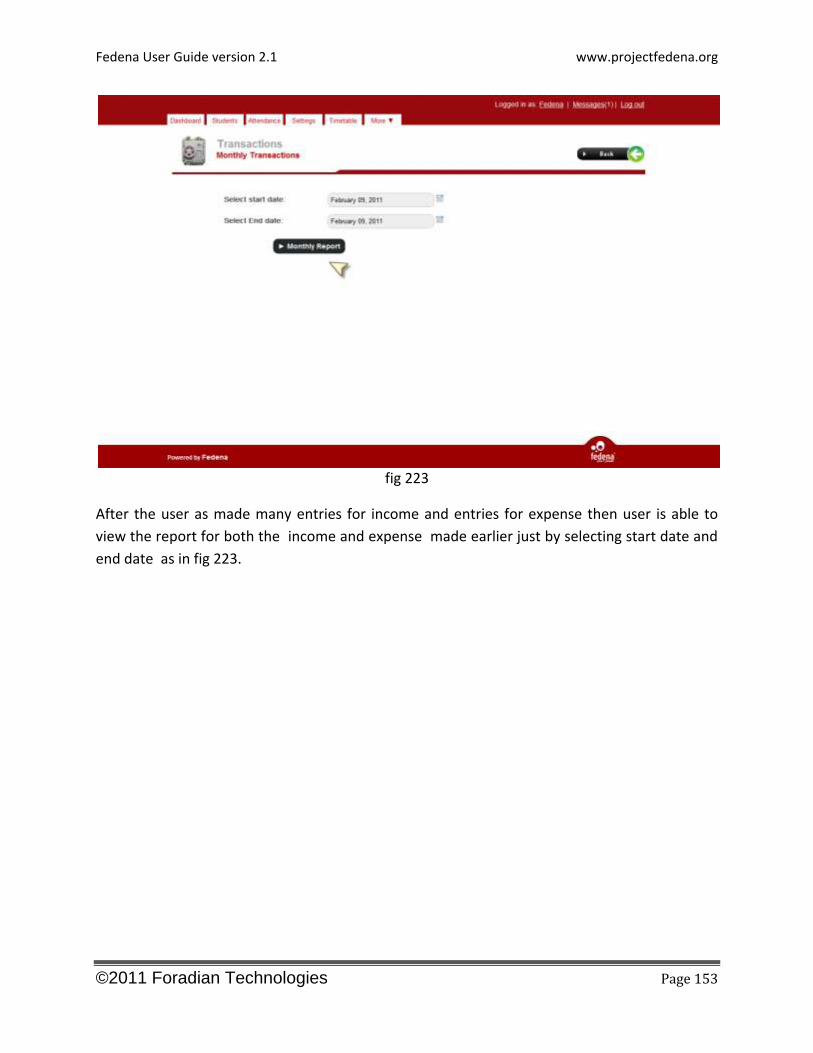
After the user as made many entries for income and entries for expense then user is able to
view the report for both the income and expense made earlier just by selecting start date and
end date as in fig 223.
Fedena User Guide version 2.1 www.projectfedena.org
©2011 Foradian Technologies Page 154
fig 224
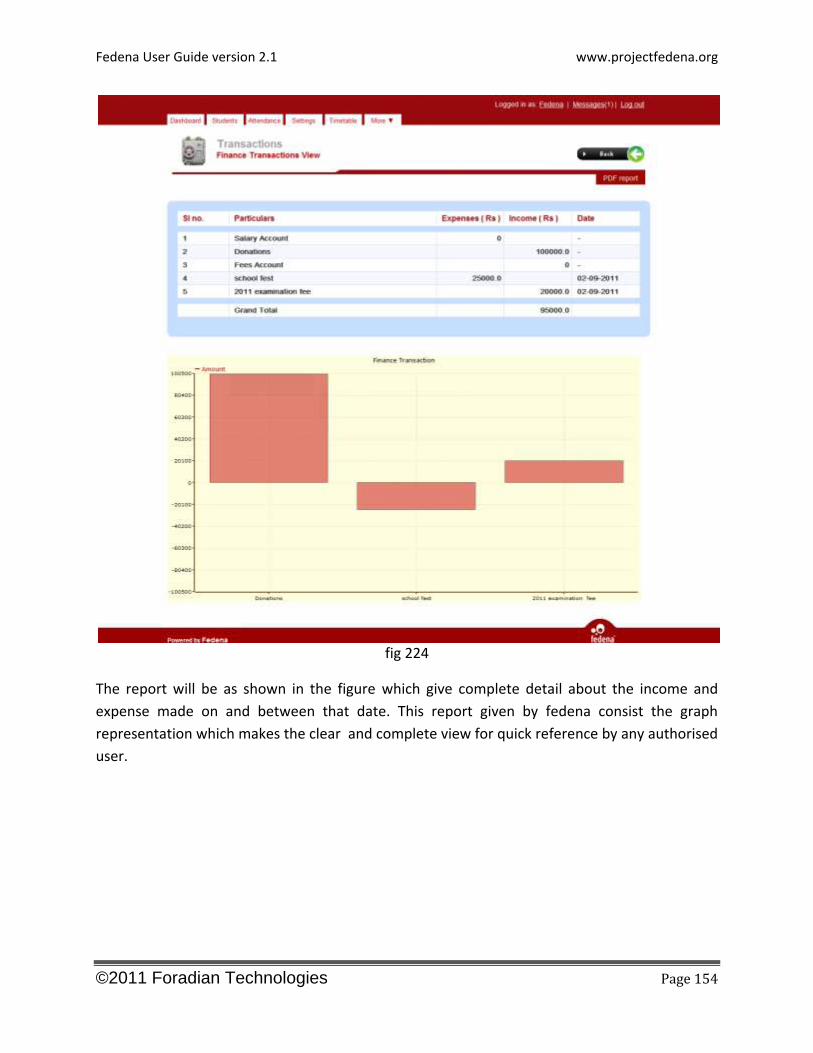
The report will be as shown in the figure which give complete detail about the income and
expense made on and between that date. This report given by fedena consist the graph
representation which makes the clear and complete view for quick reference by any authorised
user.
Fedena User Guide version 2.1 www.projectfedena.org
©2011 Foradian Technologies Page 155
fig 225
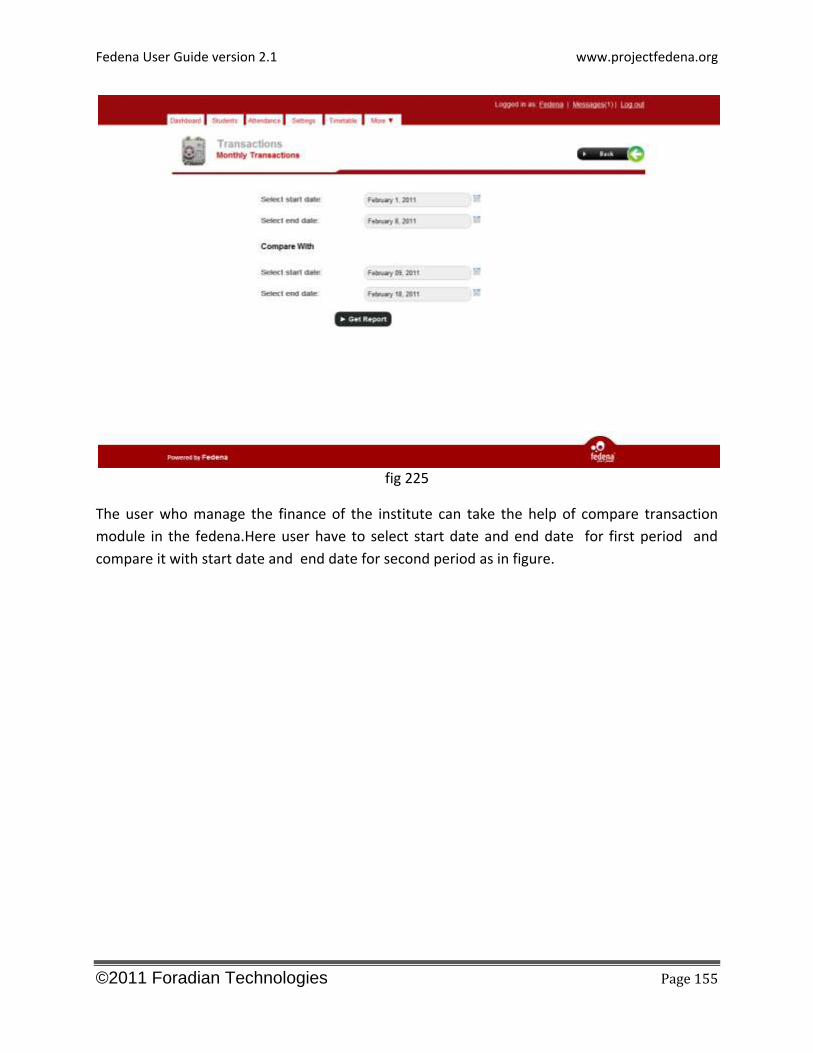
The user who manage the finance of the institute can take the help of compare transaction
module in the fedena.Here user have to select start date and end date for first period and
compare it with start date and end date for second period as in figure.
Fedena User Guide version 2.1 www.projectfedena.org
©2011 Foradian Technologies Page 156
fig 226

Fedena User Guide version 2.1 www.projectfedena.org
©2011 Foradian Technologies Page 157
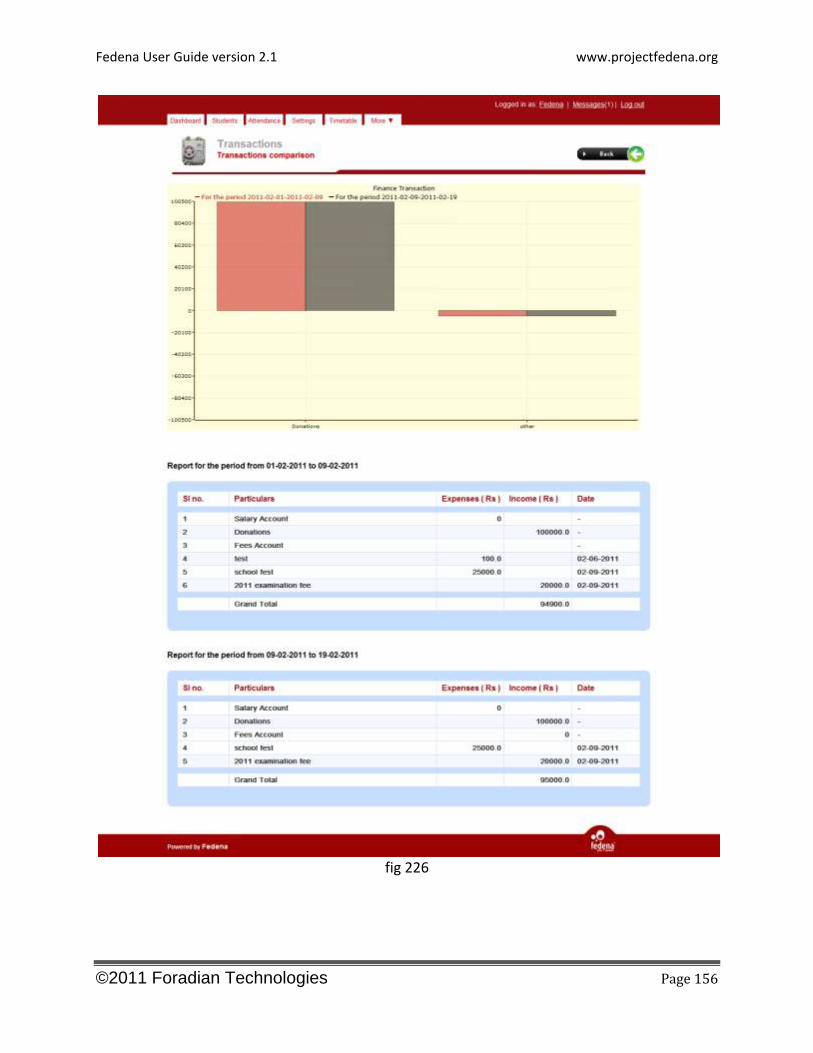
When the compare is made the comparison report will be shown as in the figure with both
income and expense of both the periods and also graph representation for income and expense
of both the periods
Fig 227
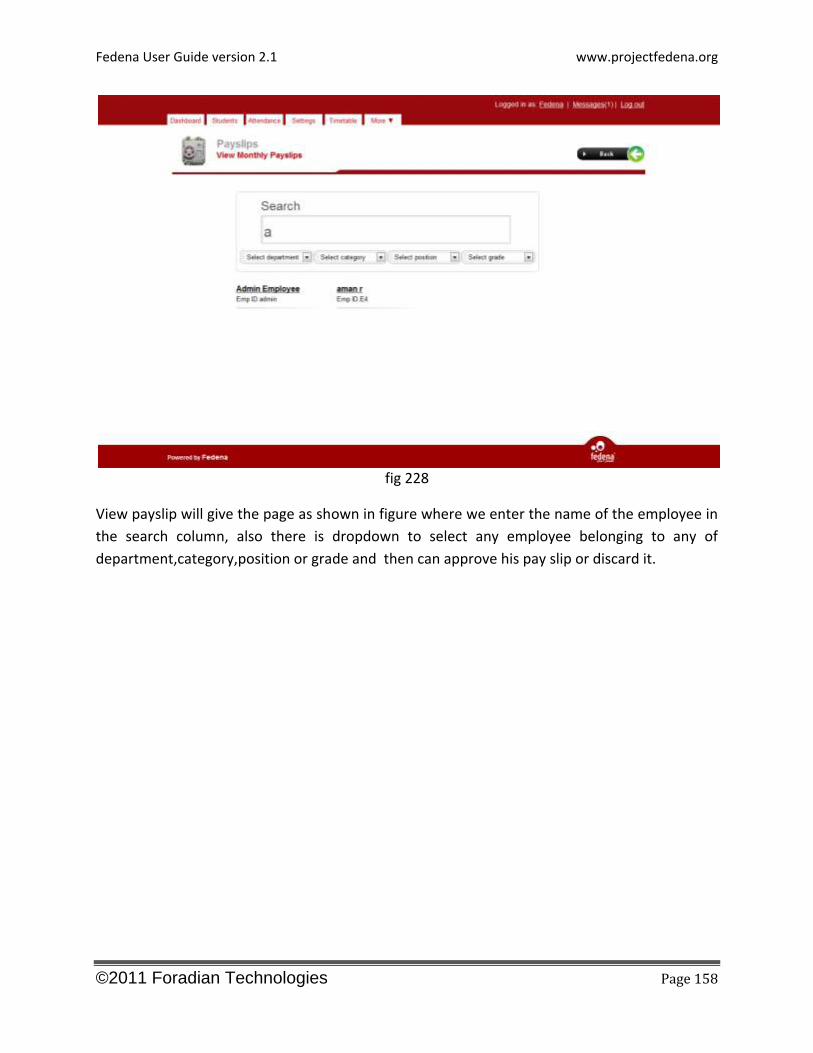
The user is able to view the payslip of any employee in fedena.This can be used by finance
manager in order to check the payslip and make any variation if required.Also we have one
click to approve payslip which enable fast payment than paying one by one.
Fedena User Guide version 2.1 www.projectfedena.org
©2011 Foradian Technologies Page 158
fig 228
View payslip will give the page as shown in figure where we enter the name of the employee in
the search column, also there is dropdown to select any employee belonging to any of
department,category,position or grade and then can approve his pay slip or discard it.
Fedena User Guide version 2.1 www.projectfedena.org
©2011 Foradian Technologies Page 159
fig 229
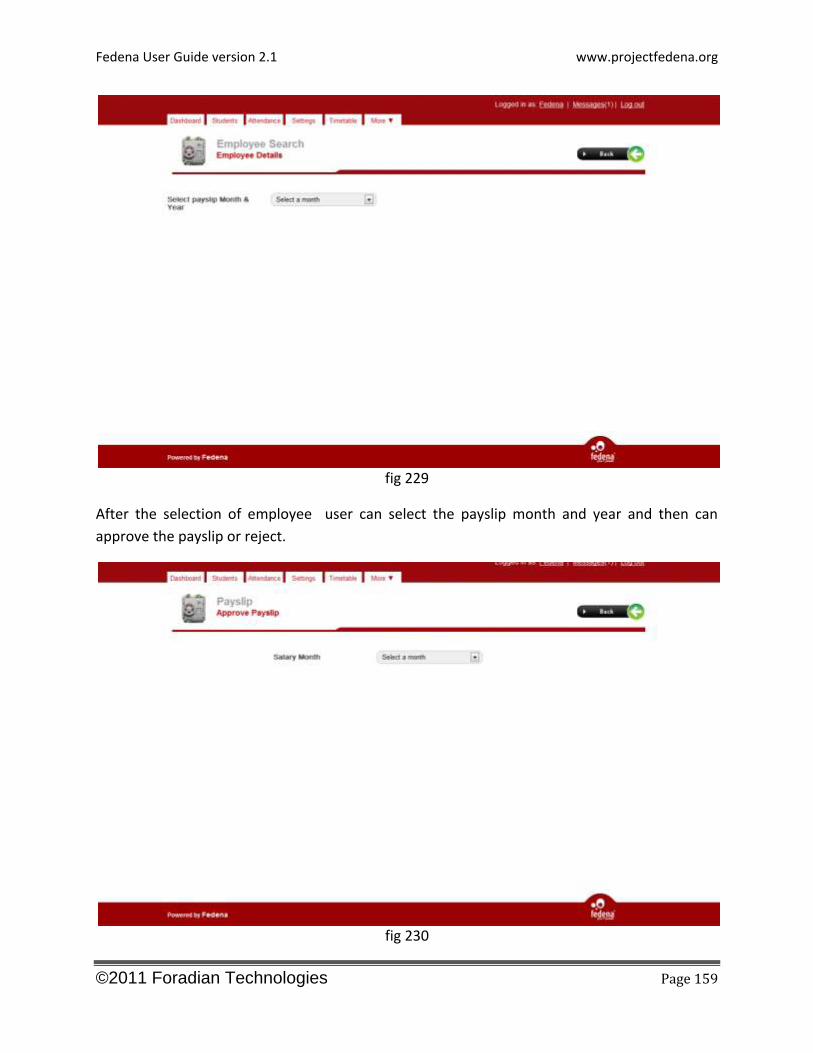
After the selection of employee user can select the payslip month and year and then can
approve the payslip or reject.
fig 230
Fedena User Guide version 2.1 www.projectfedena.org
©2011 Foradian Technologies Page 160
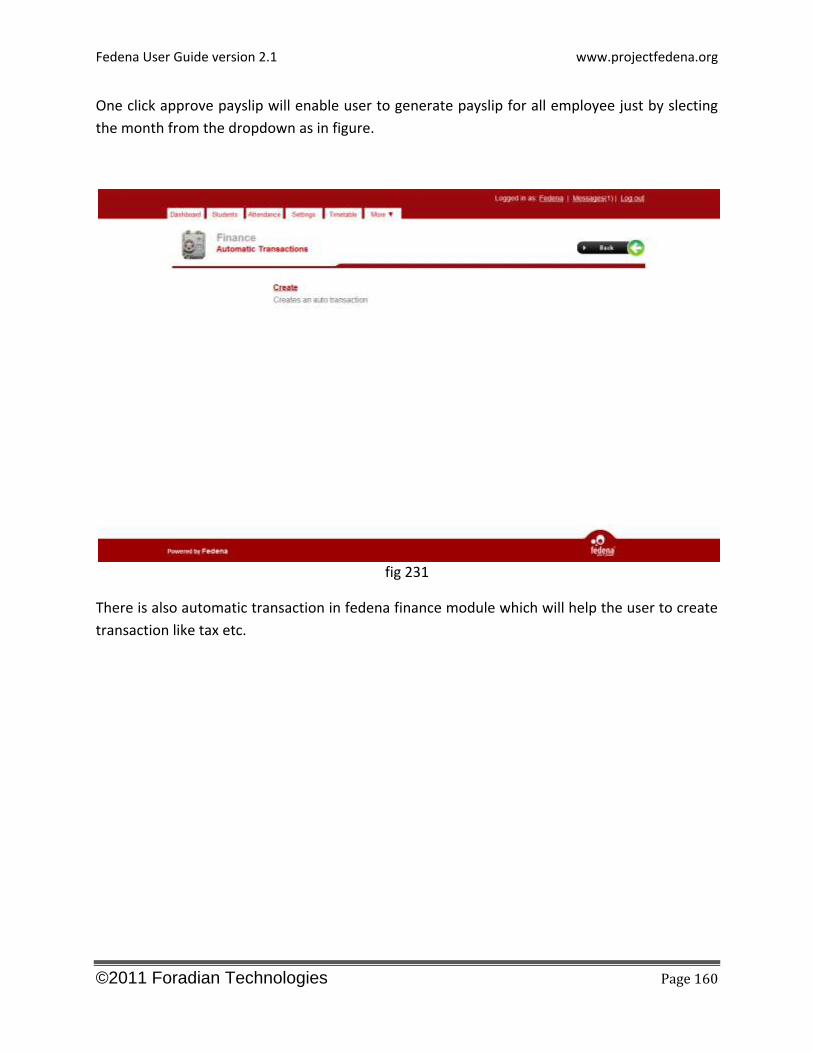
One click approve payslip will enable user to generate payslip for all employee just by slecting
the month from the dropdown as in figure.
fig 231
There is also automatic transaction in fedena finance module which will help the user to create
transaction like tax etc.
Fedena User Guide version 2.1 www.projectfedena.org
©2011 Foradian Technologies Page 161
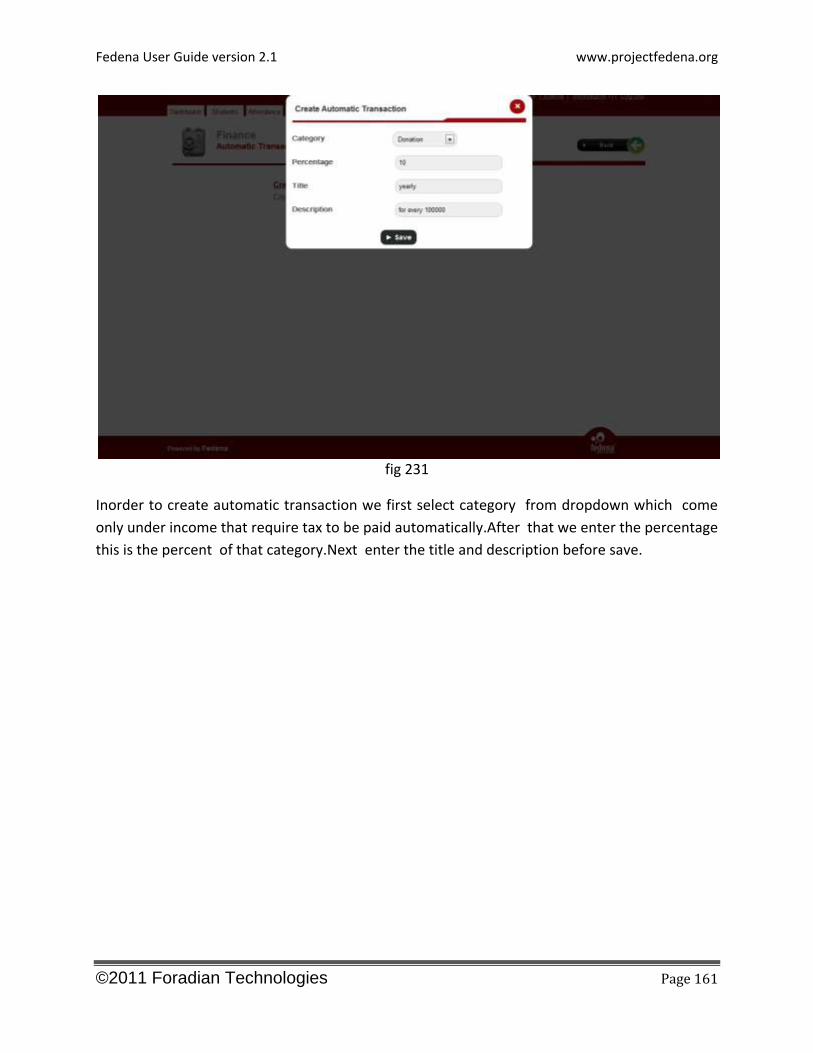
fig 231
Inorder to create automatic transaction we first select category from dropdown which come
only under income that require tax to be paid automatically.After that we enter the percentage
this is the percent of that category.Next enter the title and description before save.
Fedena User Guide version 2.1 www.projectfedena.org
©2011 Foradian Technologies Page 162
fig 232
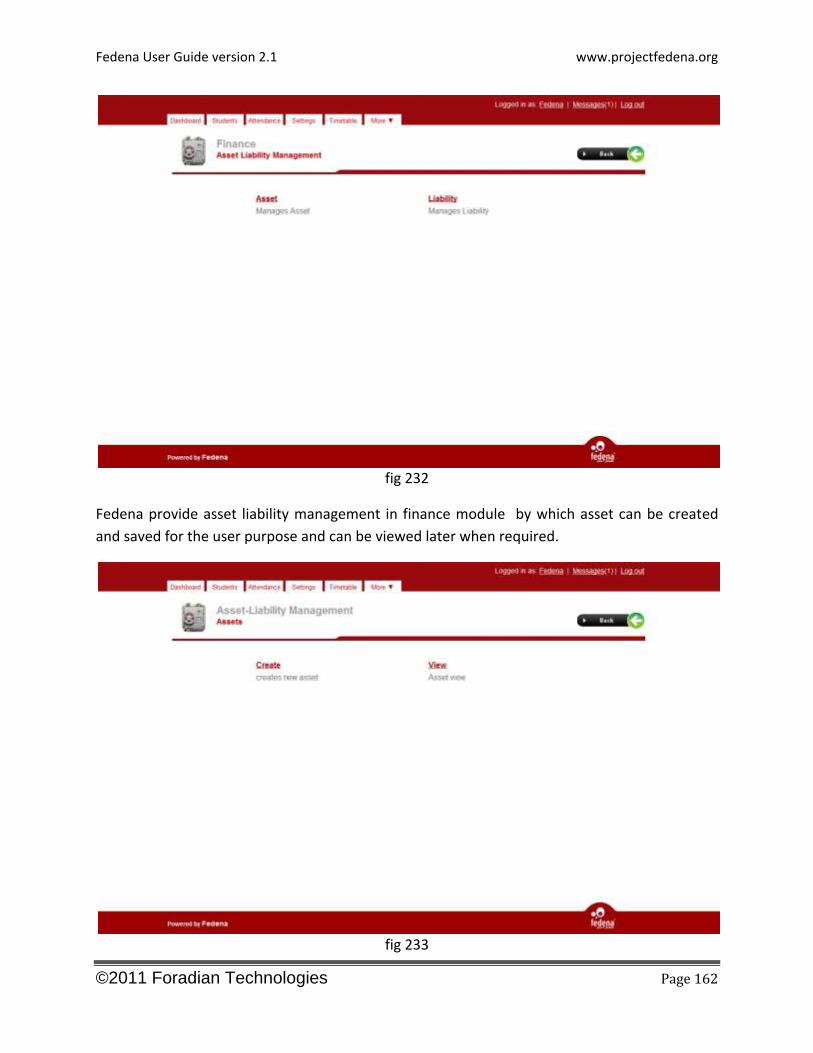
Fedena provide asset liability management in finance module by which asset can be created
and saved for the user purpose and can be viewed later when required.
fig 233
Fedena User Guide version 2.1 www.projectfedena.org
©2011 Foradian Technologies Page 163
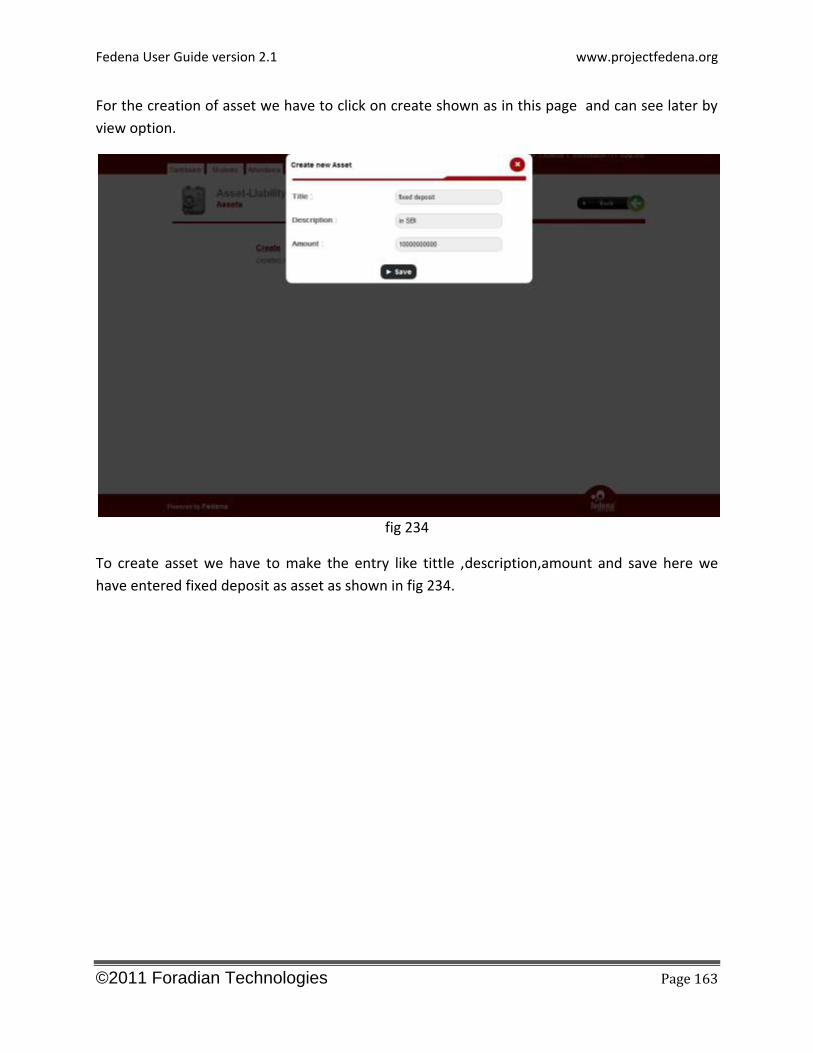
For the creation of asset we have to click on create shown as in this page and can see later by
view option.
fig 234
To create asset we have to make the entry like tittle ,description,amount and save here we
have entered fixed deposit as asset as shown in fig 234.
Fedena User Guide version 2.1 www.projectfedena.org
©2011 Foradian Technologies Page 164
fig 235
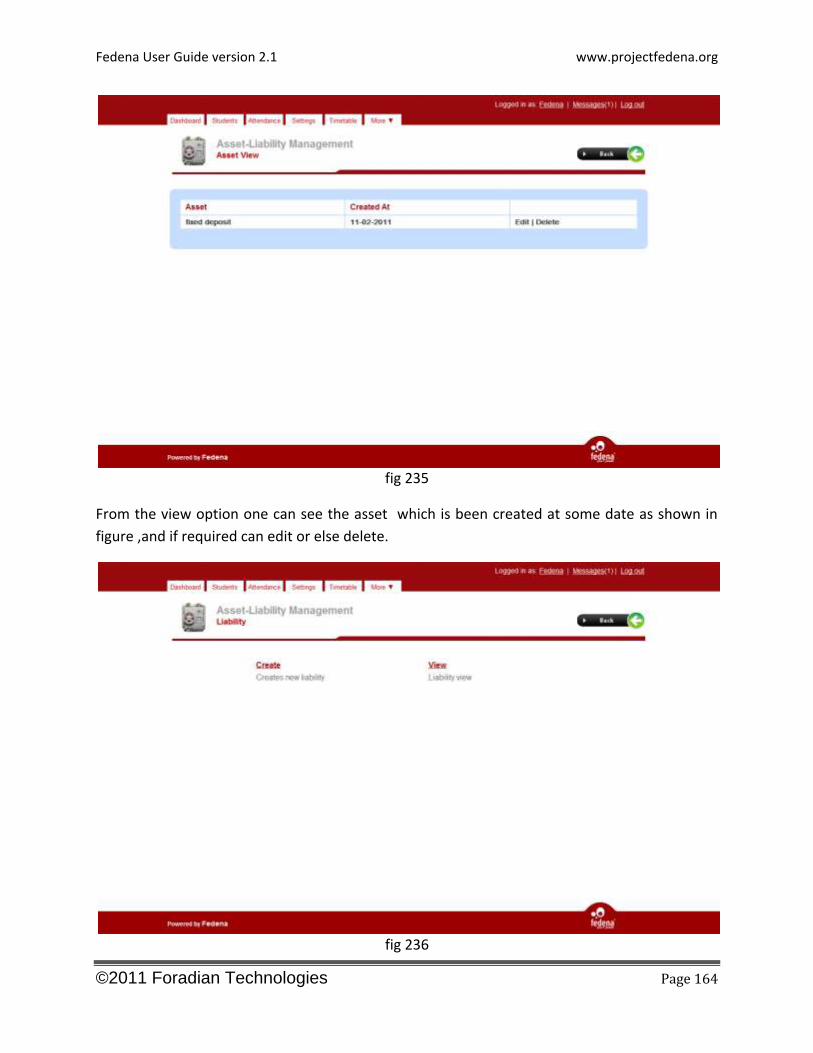
From the view option one can see the asset which is been created at some date as shown in
figure ,and if required can edit or else delete.
fig 236
Fedena User Guide version 2.1 www.projectfedena.org
©2011 Foradian Technologies Page 165
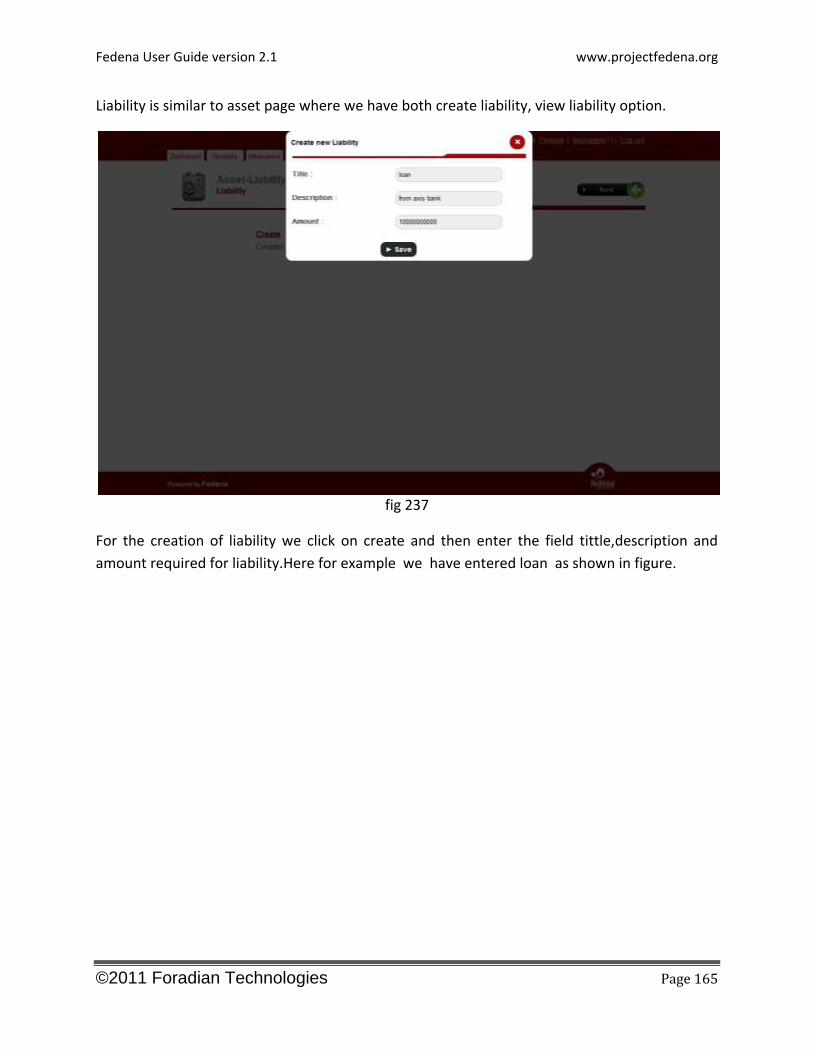
Liability is similar to asset page where we have both create liability, view liability option.
fig 237
For the creation of liability we click on create and then enter the field tittle,description and
amount required for liability.Here for example we have entered loan as shown in figure.
Fedena User Guide version 2.1 www.projectfedena.org
©2011 Foradian Technologies Page 166
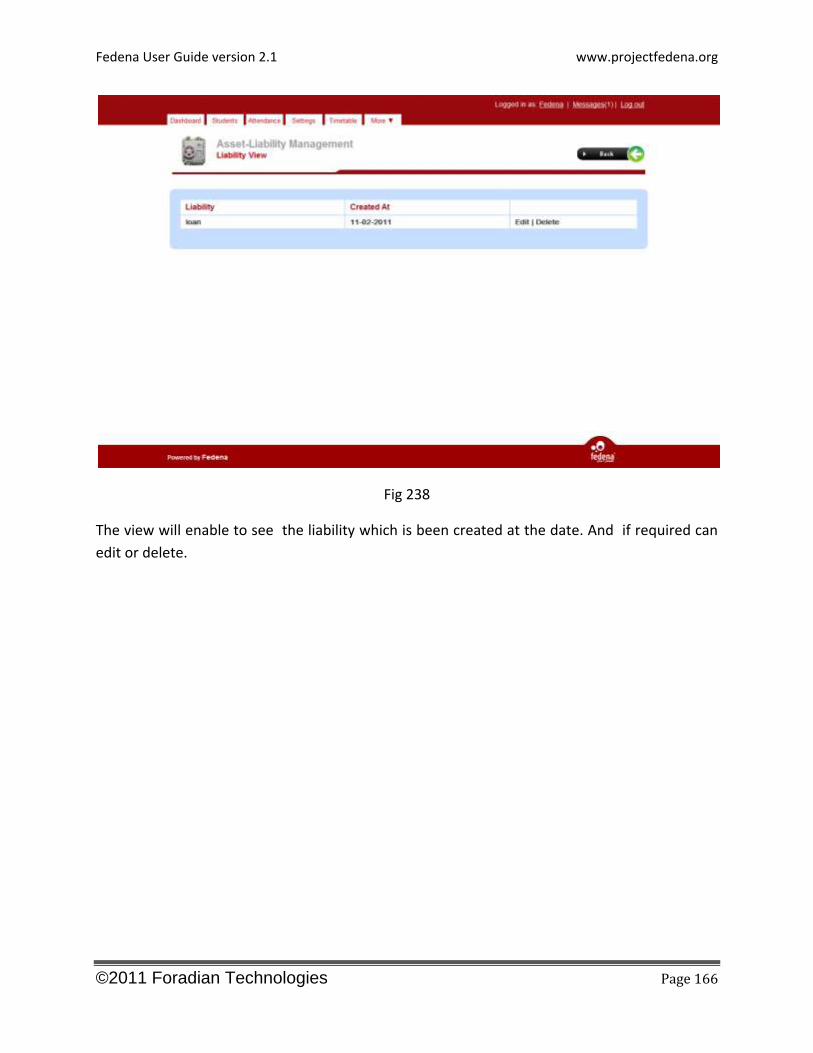
Fig 238
The view will enable to see the liability which is been created at the date. And if required can
edit or delete.
Fedena User Guide version 2.1 www.projectfedena.org
©2011 Foradian Technologies Page 167
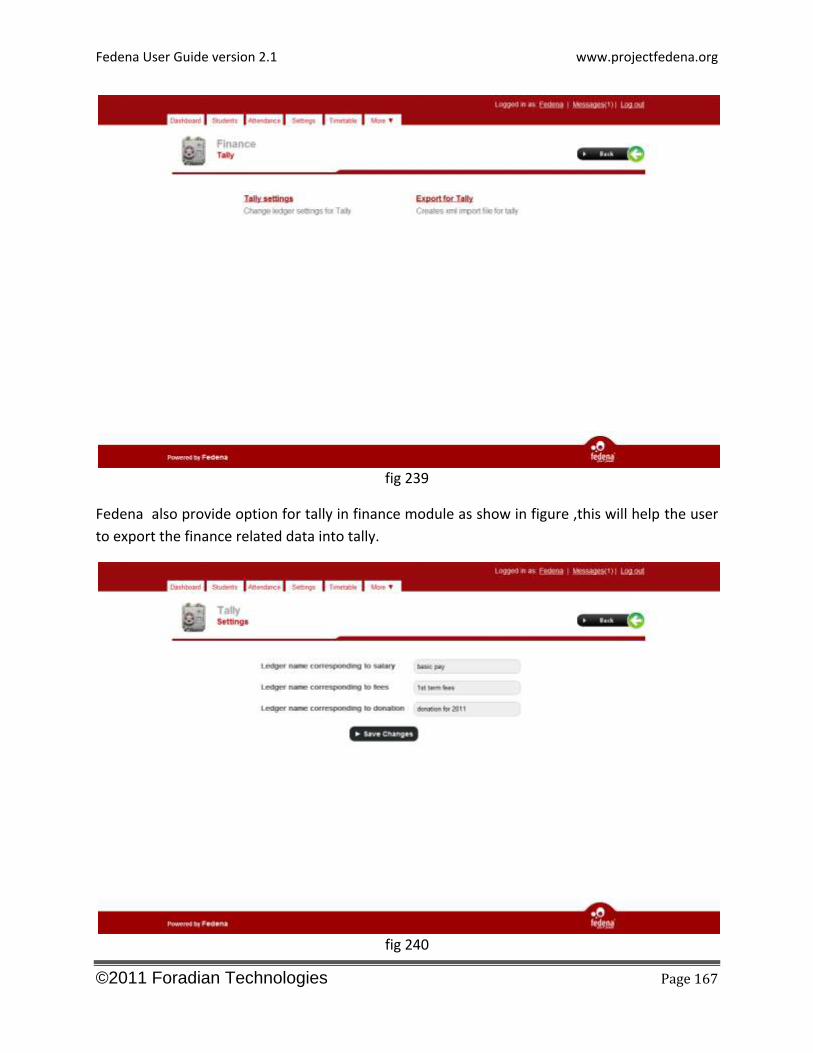
fig 239
Fedena also provide option for tally in finance module as show in figure ,this will help the user
to export the finance related data into tally.
fig 240
Fedena User Guide version 2.1 www.projectfedena.org
©2011 Foradian Technologies Page 168
In order to export the file into tally we first have to do the setting. Here we set the ledger name
corresponding to Salary, Fees, and Donation and save it in order to identify it in tally. The ledger
name should be as in the tally.
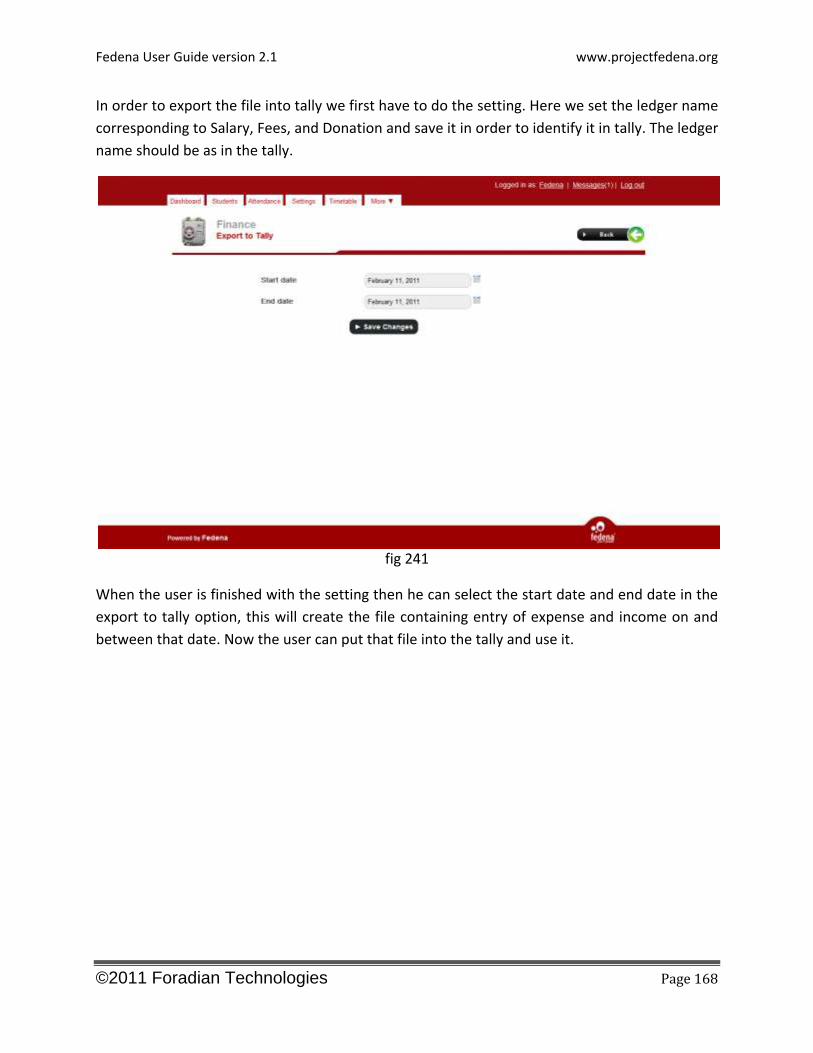
fig 241
When the user is finished with the setting then he can select the start date and end date in the
export to tally option, this will create the file containing entry of expense and income on and
between that date. Now the user can put that file into the tally and use it.

Fedena User Guide version 2.1 www.projectfedena.org
©2011 Foradian Technologies Page 169
CALENDAR & EVENTS
Fedena User Guide version 2.1 www.projectfedena.org
©2011 Foradian Technologies Page 170
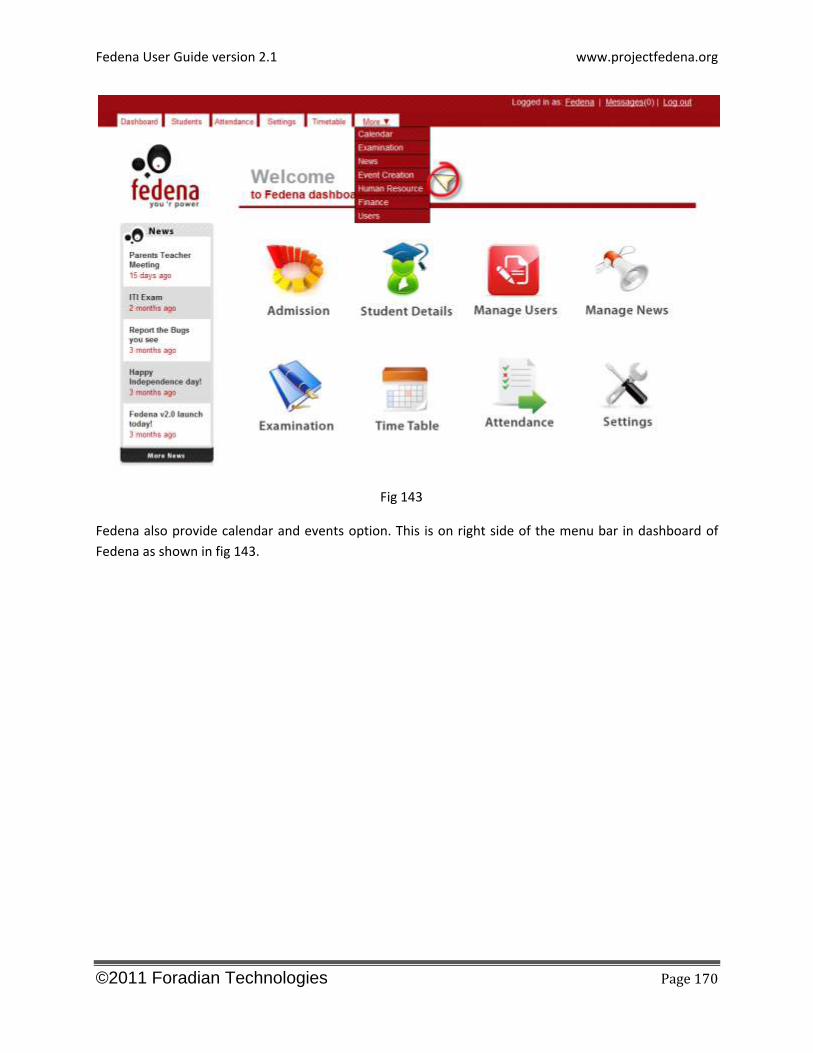
Fig 143
Fedena also provide calendar and events option. This is on right side of the menu bar in dashboard of
Fedena as shown in fig 143.

Fedena User Guide version 2.1 www.projectfedena.org
©2011 Foradian Technologies Page 171
Fig 144
The user have to click on event creation as in fig 143 ,to get the page to enter the start and end date of
the event .User should also give the title and description as given in figure. There is check box to
represent whether it is holiday or not and another check box for events that is common to all.
Fedena User Guide version 2.1 www.projectfedena.org
©2011 Foradian Technologies Page 172
Fig 145
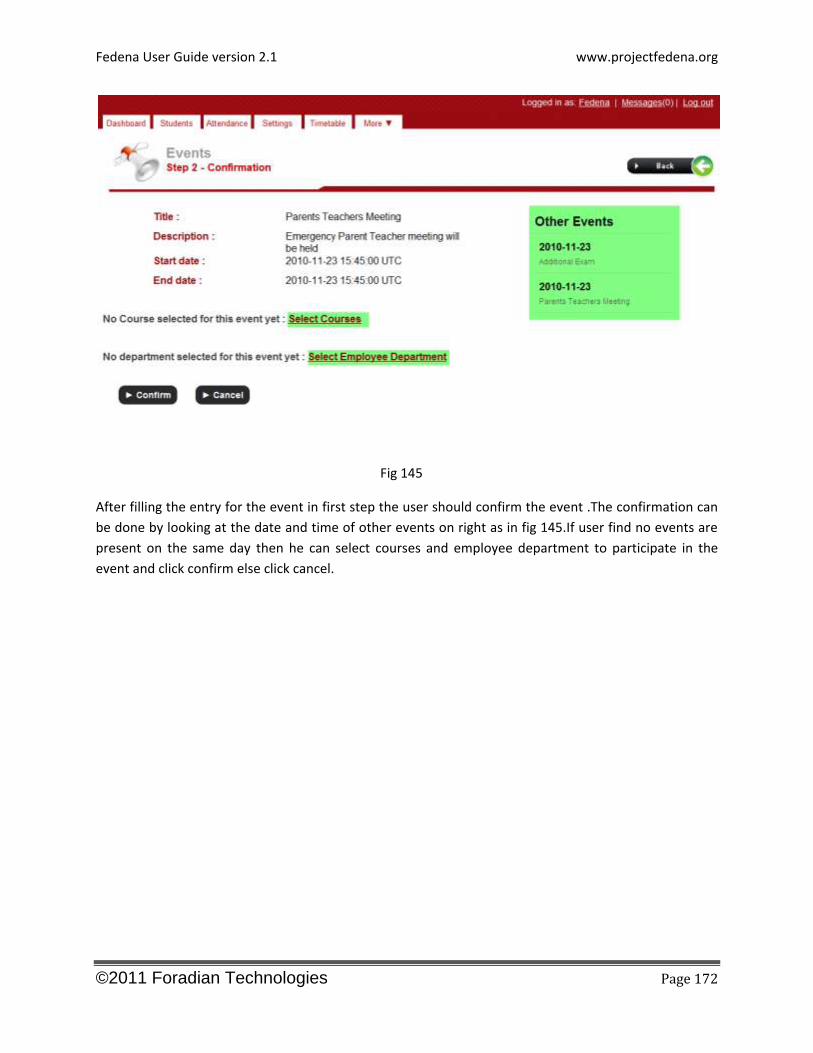
After filling the entry for the event in first step the user should confirm the event .The confirmation can
be done by looking at the date and time of other events on right as in fig 145.If user find no events are
present on the same day then he can select courses and employee department to participate in the
event and click confirm else click cancel.
Fedena User Guide version 2.1 www.projectfedena.org
©2011 Foradian Technologies Page 173
Fig 146
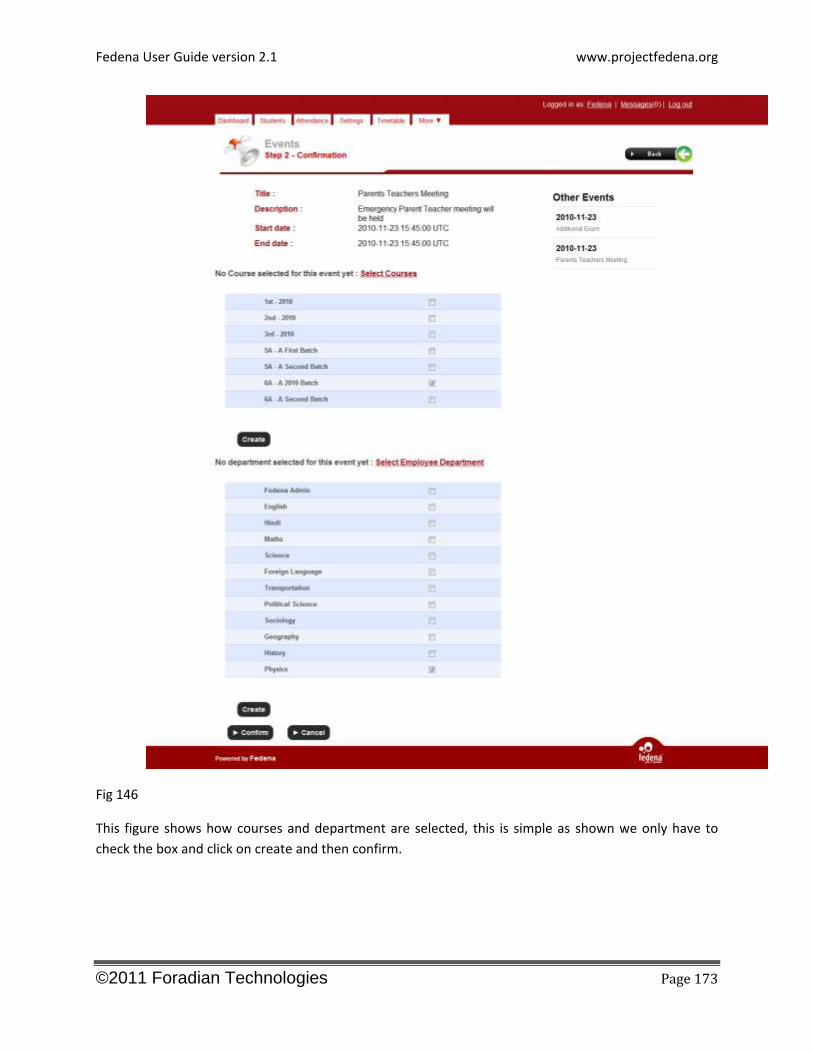
This figure shows how courses and department are selected, this is simple as shown we only have to
check the box and click on create and then confirm.
Fedena User Guide version 2.1 www.projectfedena.org
©2011 Foradian Technologies Page 174
Fig 147
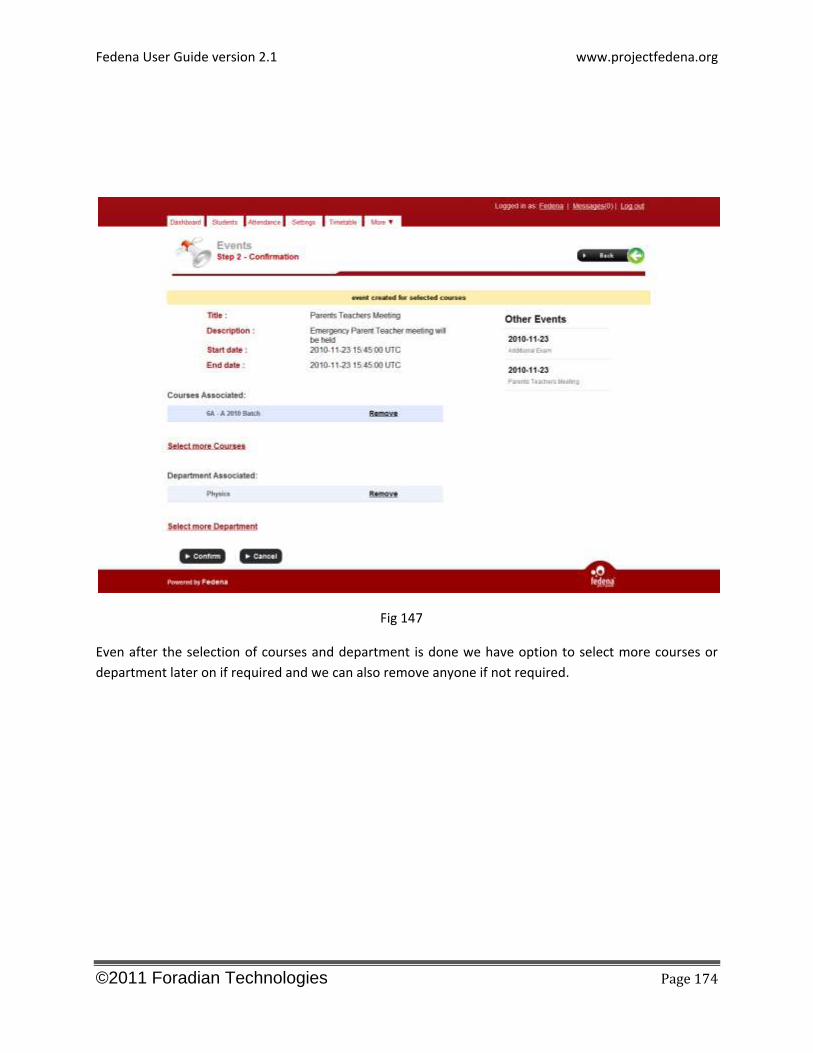
Even after the selection of courses and department is done we have option to select more courses or
department later on if required and we can also remove anyone if not required.
Fedena User Guide version 2.1 www.projectfedena.org
©2011 Foradian Technologies Page 175
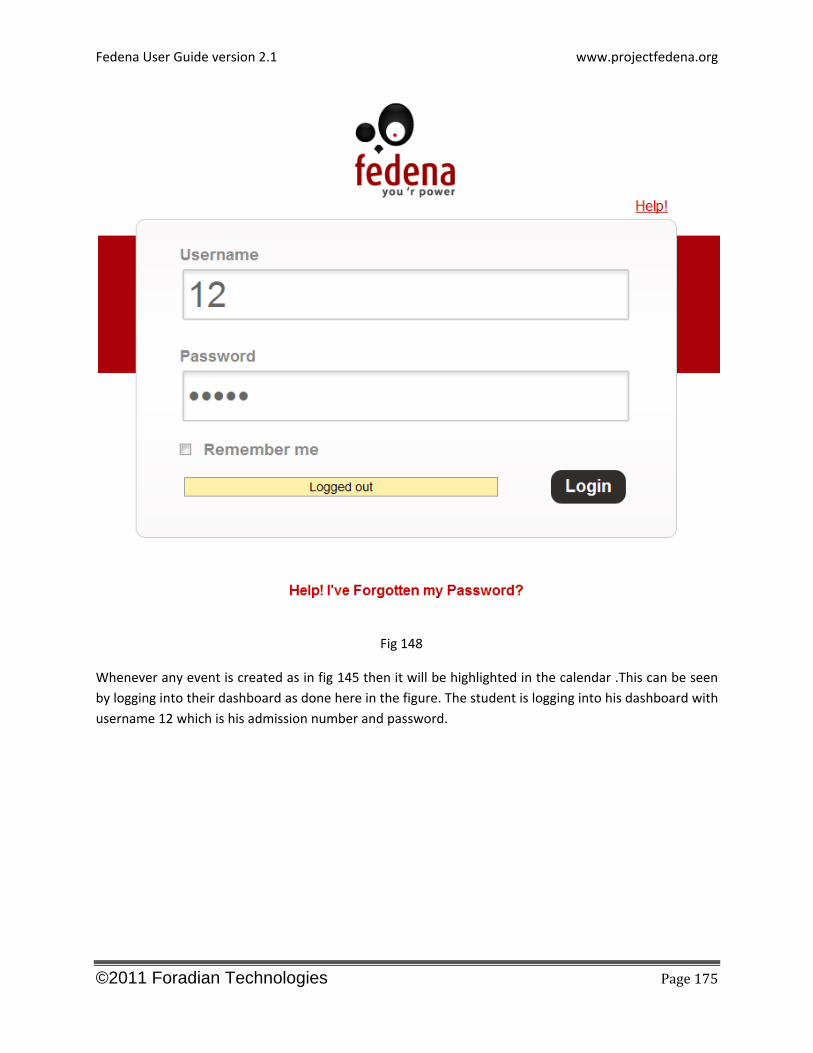
Fig 148
Whenever any event is created as in fig 145 then it will be highlighted in the calendar .This can be seen
by logging into their dashboard as done here in the figure. The student is logging into his dashboard with
username 12 which is his admission number and password.

Fedena User Guide version 2.1 www.projectfedena.org
©2011 Foradian Technologies Page 176
Fig 149
The dashboard of student is shown in fig 149, here in left of top menu bar is calendar which contain the
events been created.
Fedena User Guide version 2.1 www.projectfedena.org
©2011 Foradian Technologies Page 177
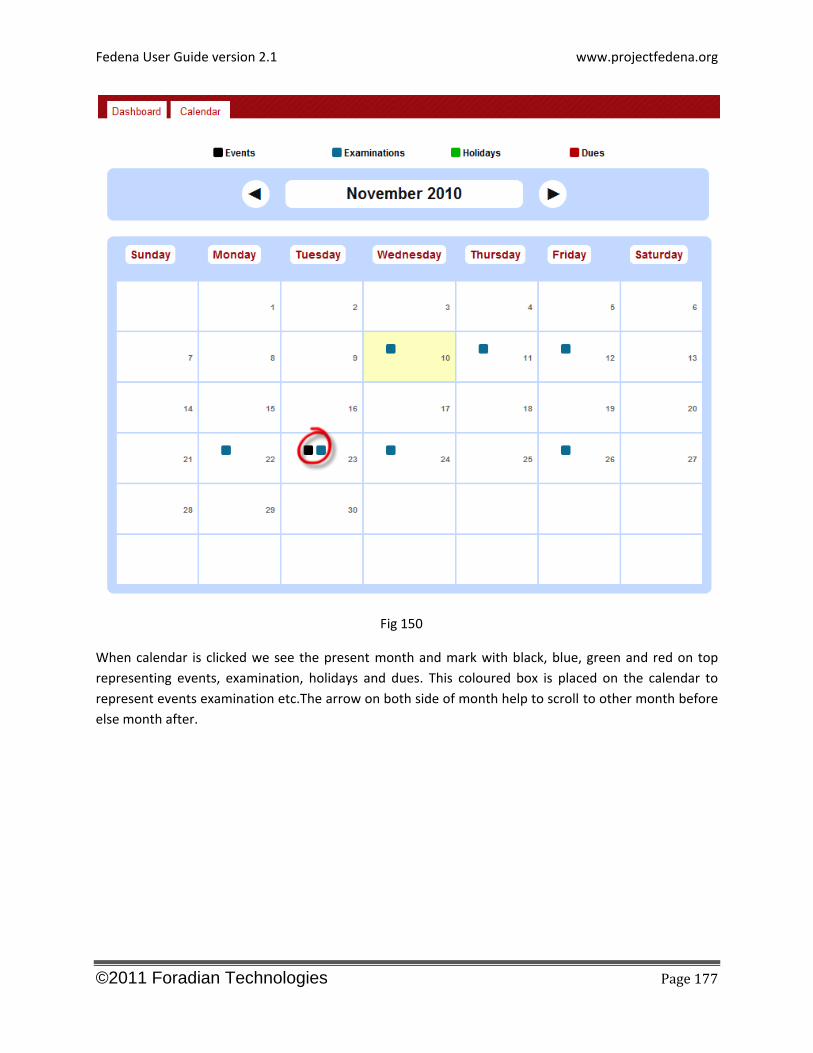
Fig 150
When calendar is clicked we see the present month and mark with black, blue, green and red on top
representing events, examination, holidays and dues. This coloured box is placed on the calendar to
represent events examination etc.The arrow on both side of month help to scroll to other month before
else month after.
Fedena User Guide version 2.1 www.projectfedena.org
©2011 Foradian Technologies Page 178
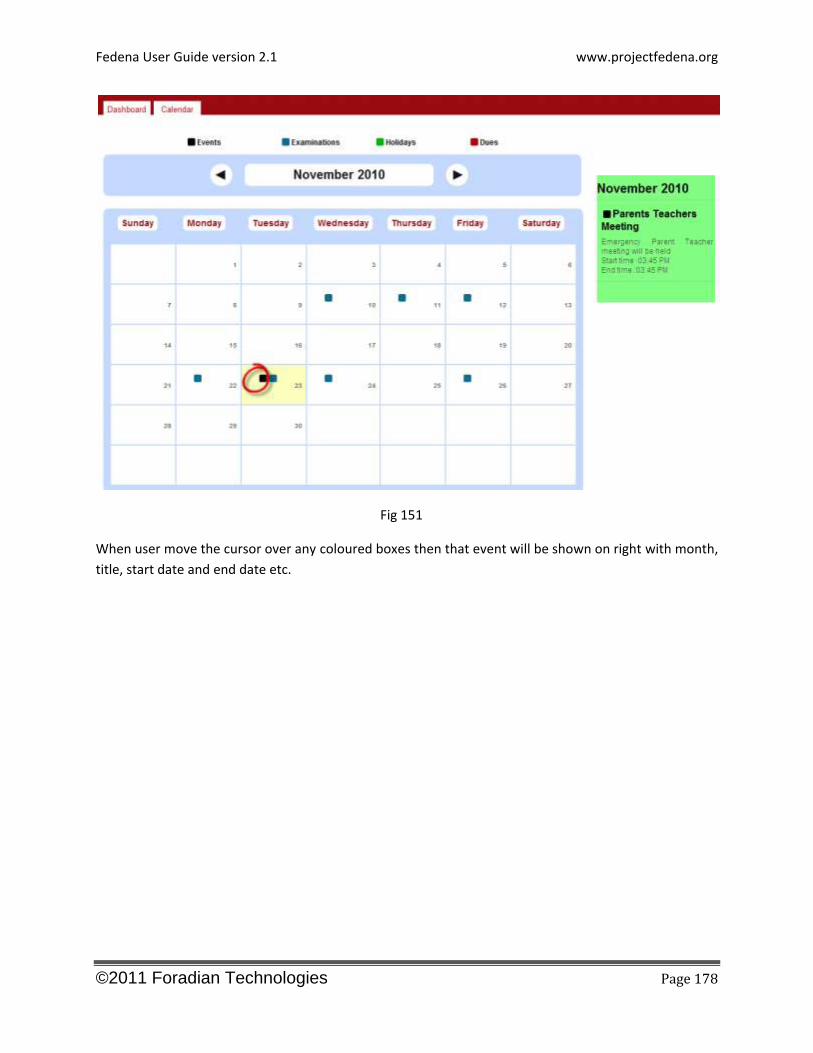
Fig 151
When user move the cursor over any coloured boxes then that event will be shown on right with month,
title, start date and end date etc.
Fedena User Guide version 2.1 www.projectfedena.org
©2011 Foradian Technologies Page 179
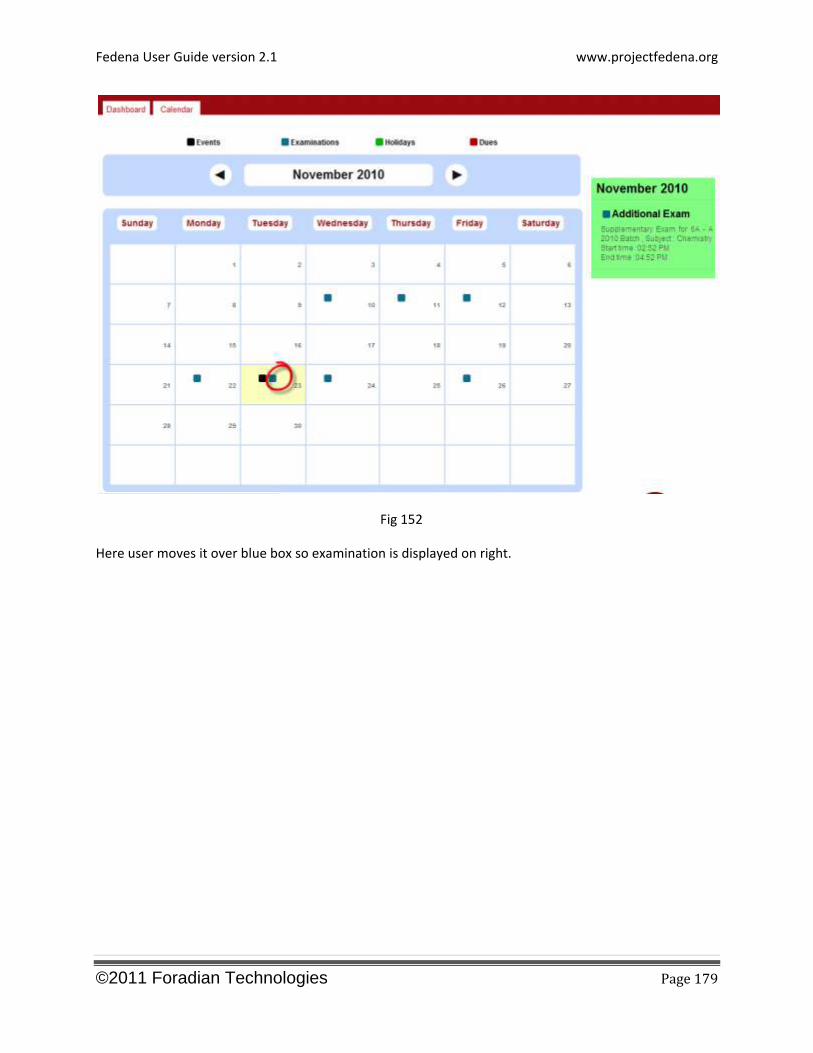
Fig 152
Here user moves it over blue box so examination is displayed on right.

Fedena User Guide version 2.1 www.projectfedena.org
©2011 Foradian Technologies Page 180
LEAVE SYSTEM
Fedena User Guide version 2.1 www.projectfedena.org
©2011 Foradian Technologies Page 181
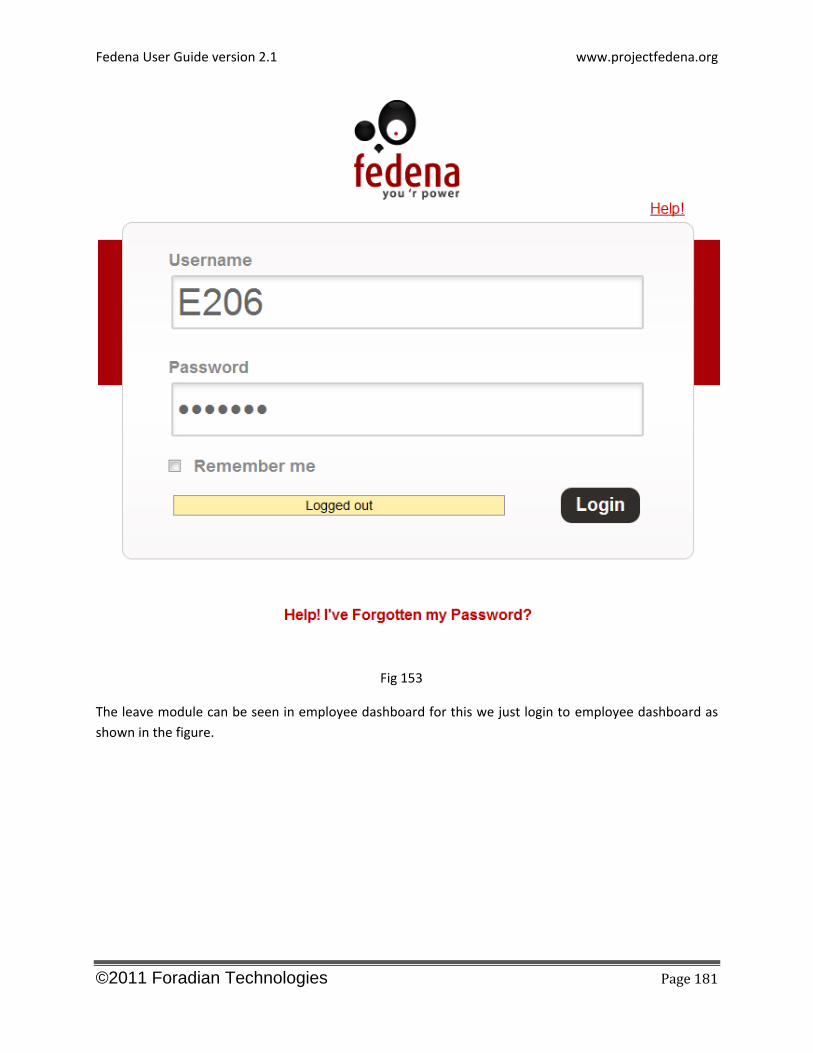
Fig 153
The leave module can be seen in employee dashboard for this we just login to employee dashboard as
shown in the figure.
Fedena User Guide version 2.1 www.projectfedena.org
©2011 Foradian Technologies Page 182
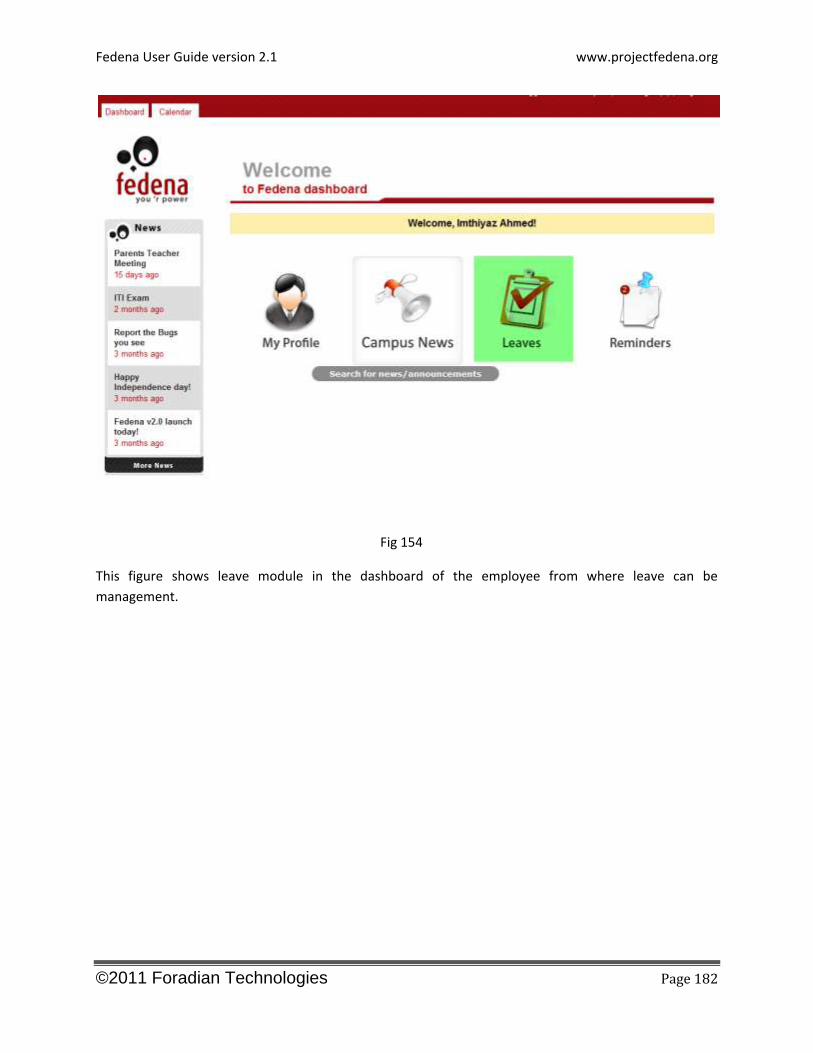
Fig 154
This figure shows leave module in the dashboard of the employee from where leave can be
management.
Fedena User Guide version 2.1 www.projectfedena.org
©2011 Foradian Technologies Page 183
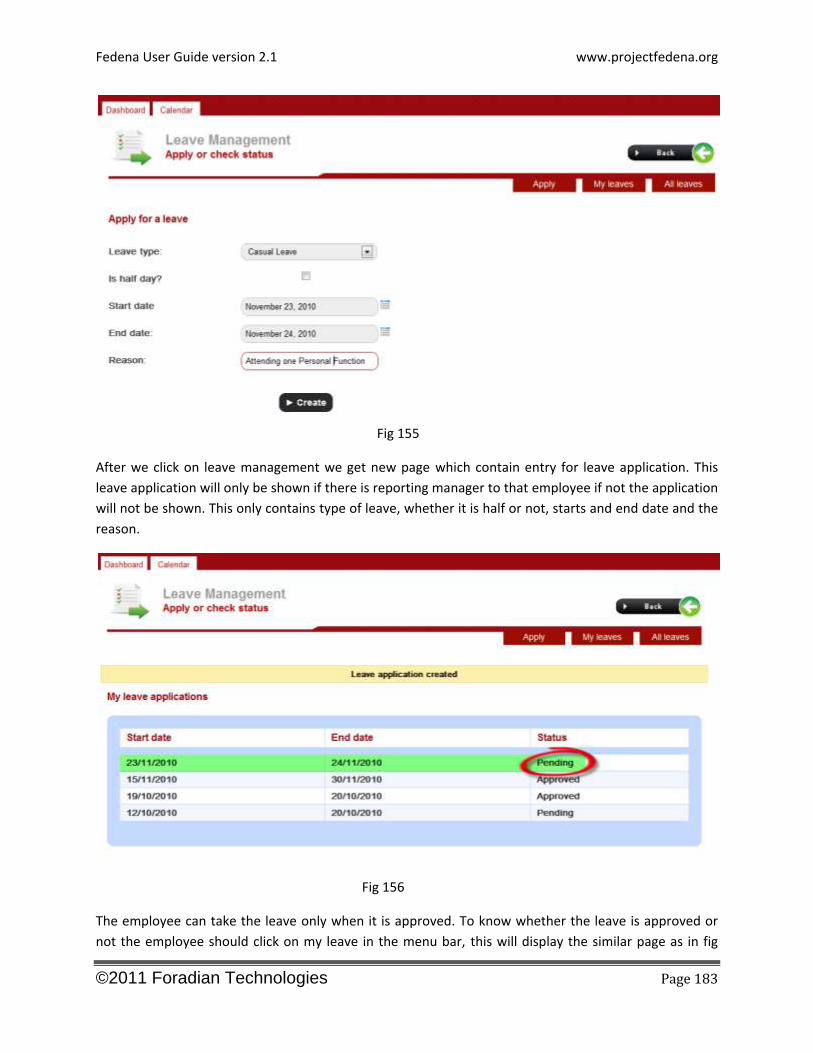
Fig 155
After we click on leave management we get new page which contain entry for leave application. This
leave application will only be shown if there is reporting manager to that employee if not the application
will not be shown. This only contains type of leave, whether it is half or not, starts and end date and the
reason.
Fig 156
The employee can take the leave only when it is approved. To know whether the leave is approved or
not the employee should click on my leave in the menu bar, this will display the similar page as in fig
Fedena User Guide version 2.1 www.projectfedena.org
©2011 Foradian Technologies Page 184
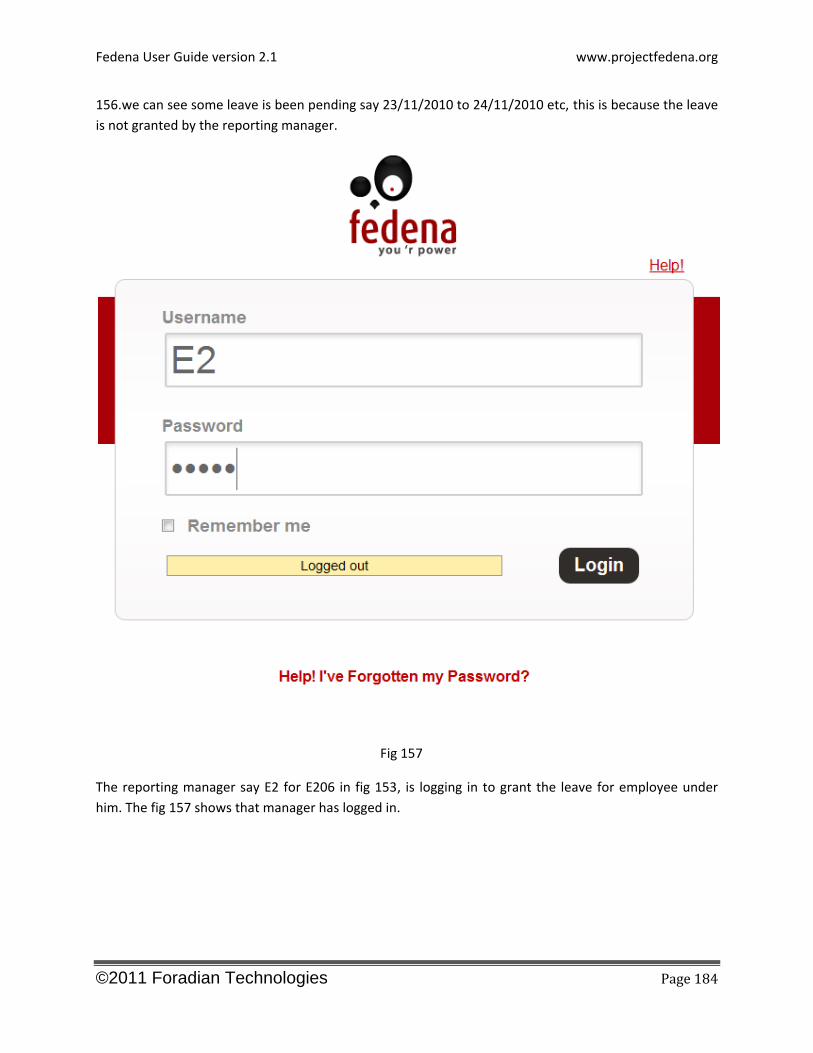
156.we can see some leave is been pending say 23/11/2010 to 24/11/2010 etc, this is because the leave
is not granted by the reporting manager.
Fig 157
The reporting manager say E2 for E206 in fig 153, is logging in to grant the leave for employee under
him. The fig 157 shows that manager has logged in.
Fedena User Guide version 2.1 www.projectfedena.org
©2011 Foradian Technologies Page 185
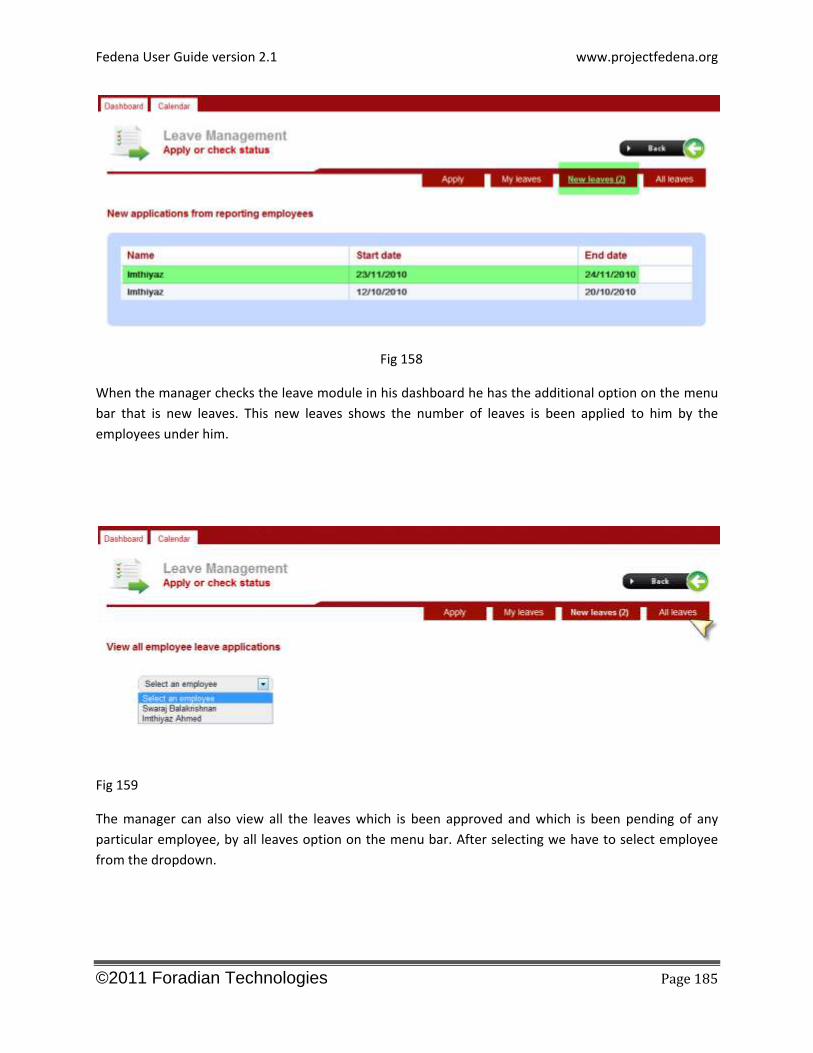
Fig 158
When the manager checks the leave module in his dashboard he has the additional option on the menu
bar that is new leaves. This new leaves shows the number of leaves is been applied to him by the
employees under him.
Fig 159
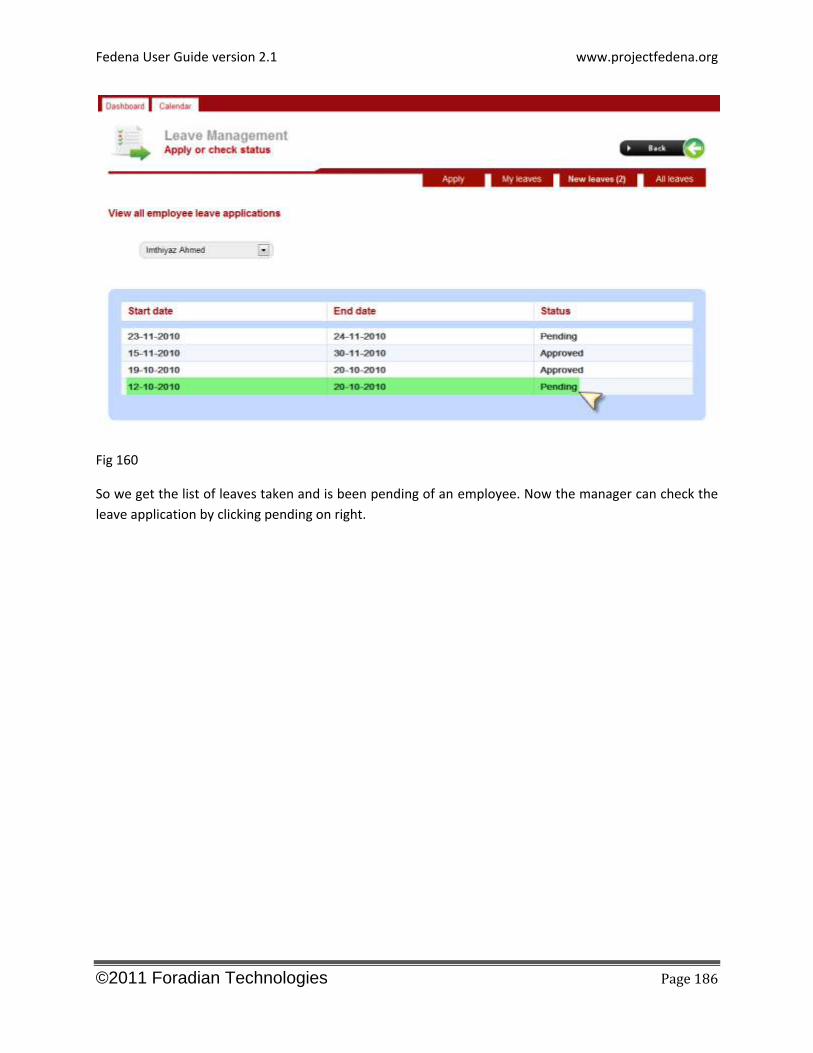
The manager can also view all the leaves which is been approved and which is been pending of any
particular employee, by all leaves option on the menu bar. After selecting we have to select employee
from the dropdown.
Fedena User Guide version 2.1 www.projectfedena.org
©2011 Foradian Technologies Page 186
Fig 160
So we get the list of leaves taken and is been pending of an employee. Now the manager can check the
leave application by clicking pending on right.
Fedena User Guide version 2.1 www.projectfedena.org
©2011 Foradian Technologies Page 187
Fig 161
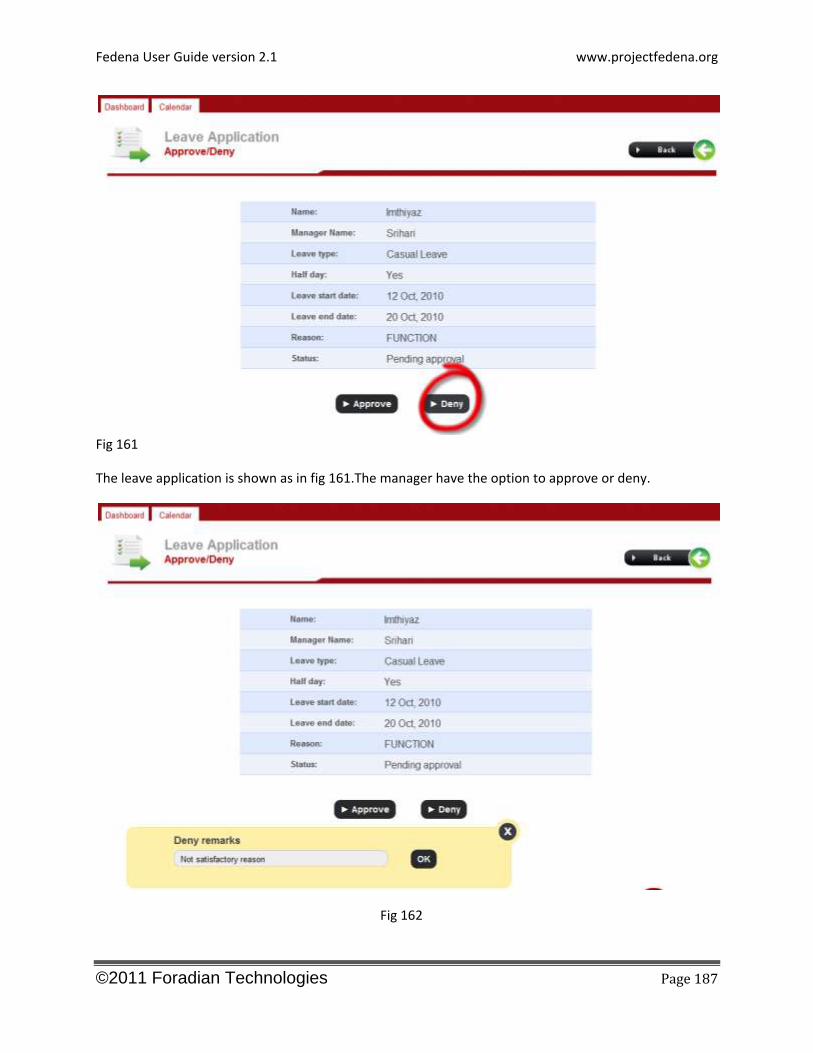
The leave application is shown as in fig 161.The manager have the option to approve or deny.
Fig 162
Fedena User Guide version 2.1 www.projectfedena.org
©2011 Foradian Technologies Page 188
If the leave reason is not up to the satisfactory the manager can deny by the giving the reason in the
column as n fig 162.
Fig 163
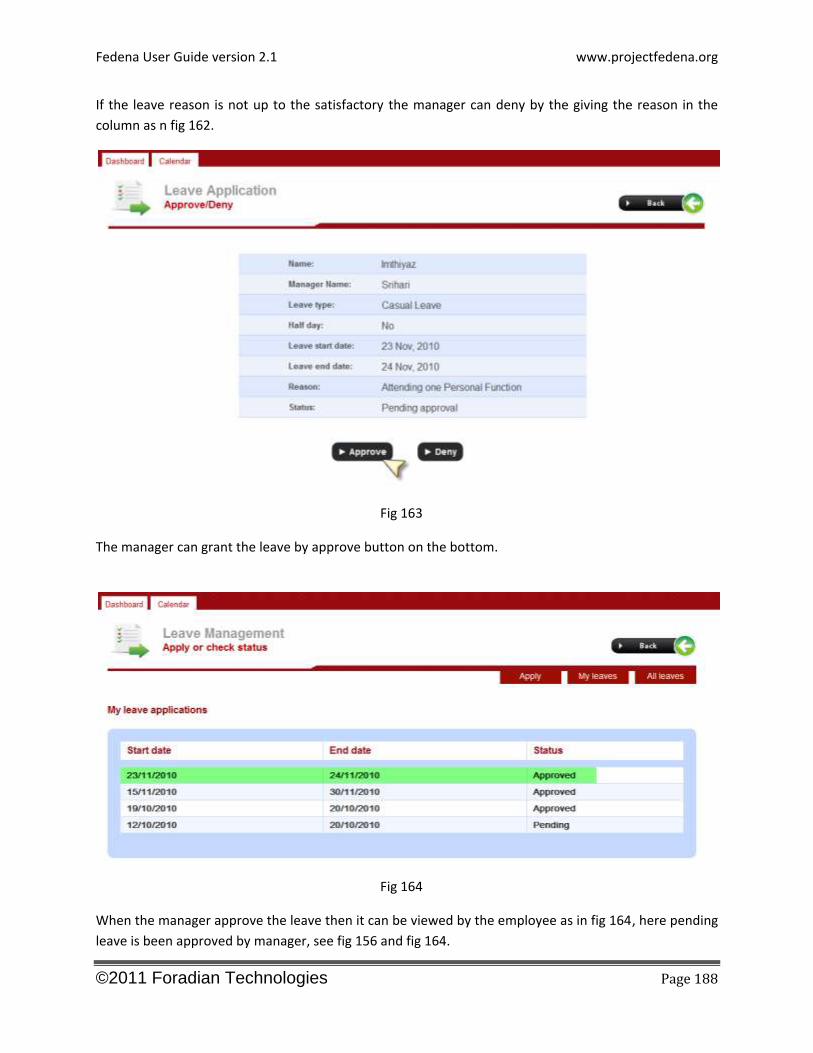
The manager can grant the leave by approve button on the bottom.
Fig 164
When the manager approve the leave then it can be viewed by the employee as in fig 164, here pending
leave is been approved by manager, see fig 156 and fig 164.

Fedena User Guide version 2.1 www.projectfedena.org
©2011 Foradian Technologies Page 189
MESSAGING SYSTEM

Fedena User Guide version 2.1 www.projectfedena.org
©2011 Foradian Technologies Page 190
Fig 165
The message option is provided to all admin, employee and student. When any unread message
is in the inbox then right to message will show how many messages are unread. Thus if any new
message arrived it will be found in the inbox as shown in fig 165 with from, subject and date.
.
Fedena User Guide version 2.1 www.projectfedena.org
©2011 Foradian Technologies Page 191
Fig 166
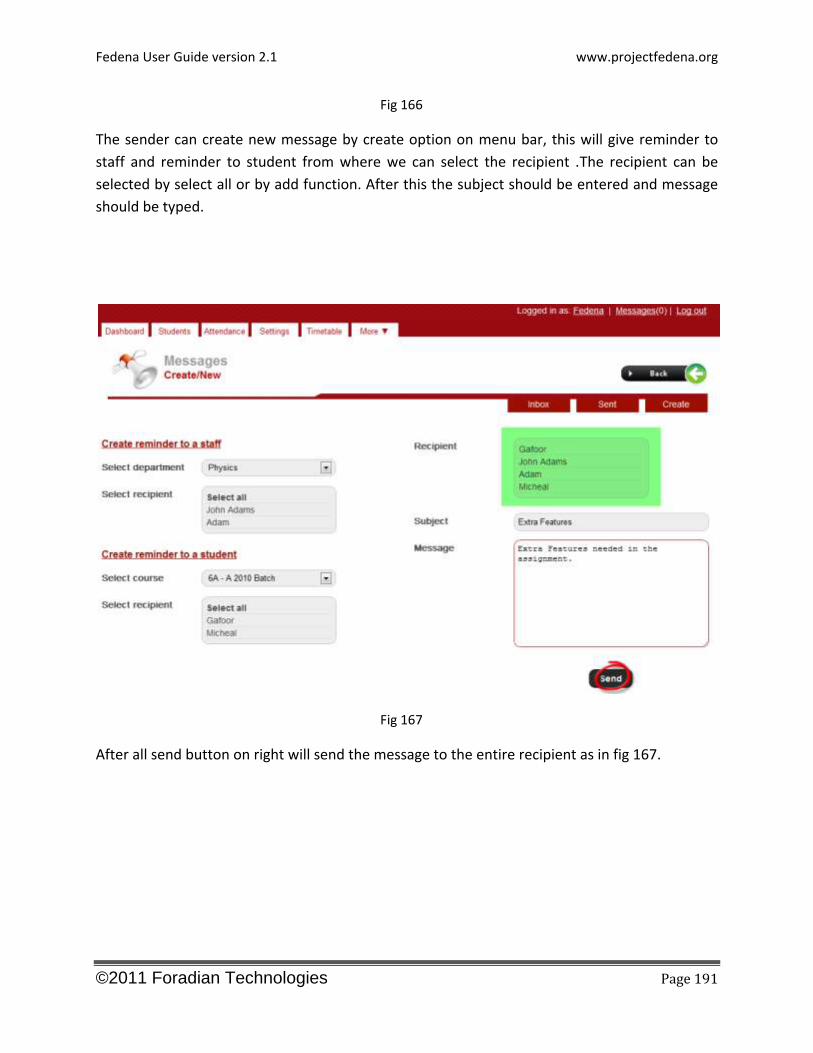
The sender can create new message by create option on menu bar, this will give reminder to
staff and reminder to student from where we can select the recipient .The recipient can be
selected by select all or by add function. After this the subject should be entered and message
should be typed.
Fig 167
After all send button on right will send the message to the entire recipient as in fig 167.
Fedena User Guide version 2.1 www.projectfedena.org
©2011 Foradian Technologies Page 192
Fig 168
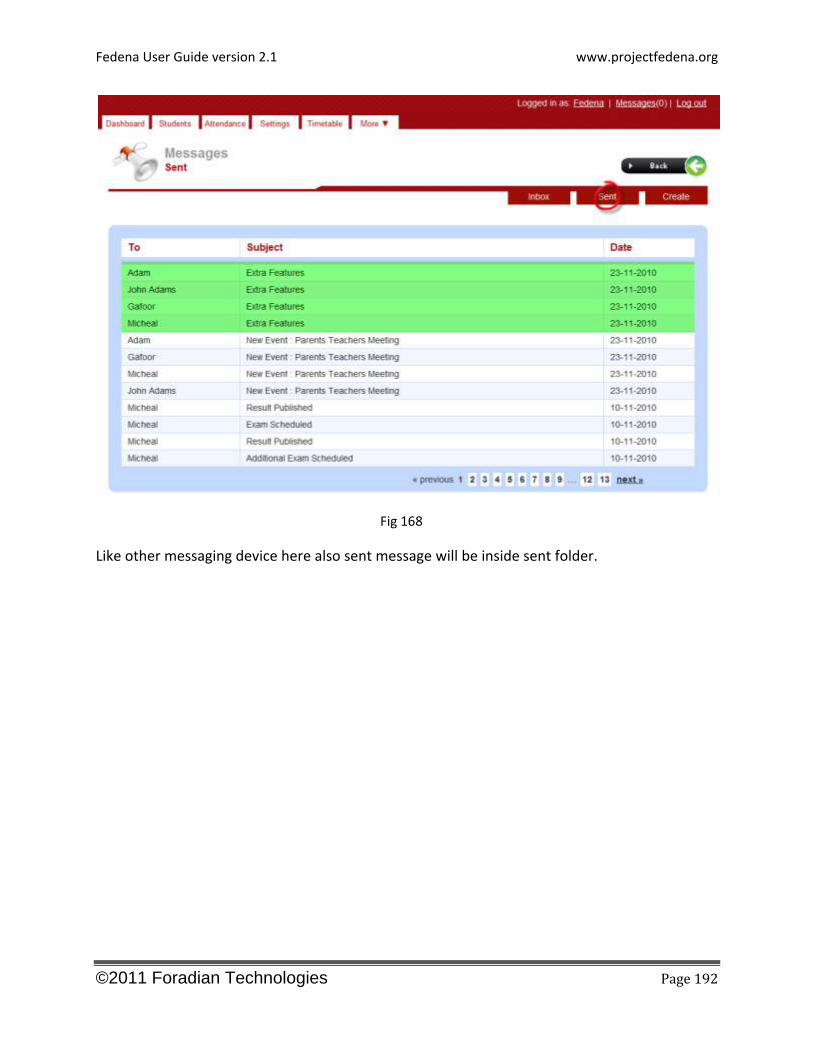
Like other messaging device here also sent message will be inside sent folder.
Fedena User Guide version 2.1 www.projectfedena.org
©2011 Foradian Technologies Page 193
Fig 169
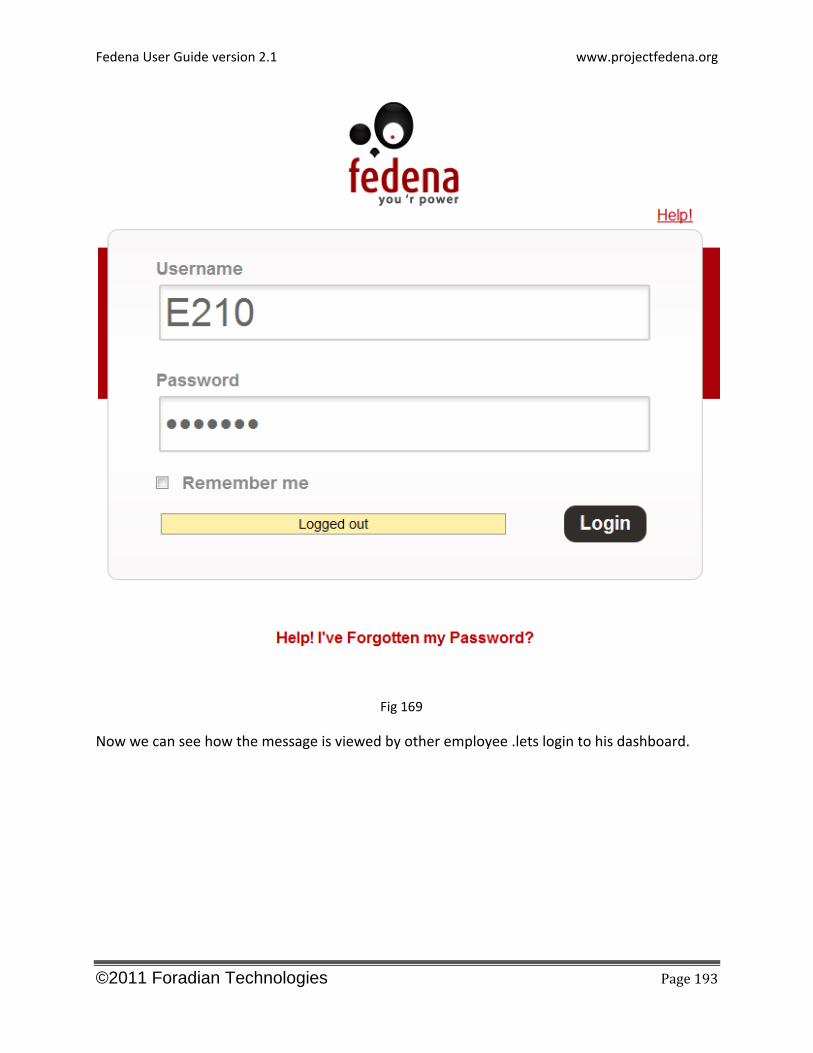
Now we can see how the message is viewed by other employee .lets login to his dashboard.
Fedena User Guide version 2.1 www.projectfedena.org
©2011 Foradian Technologies Page 194
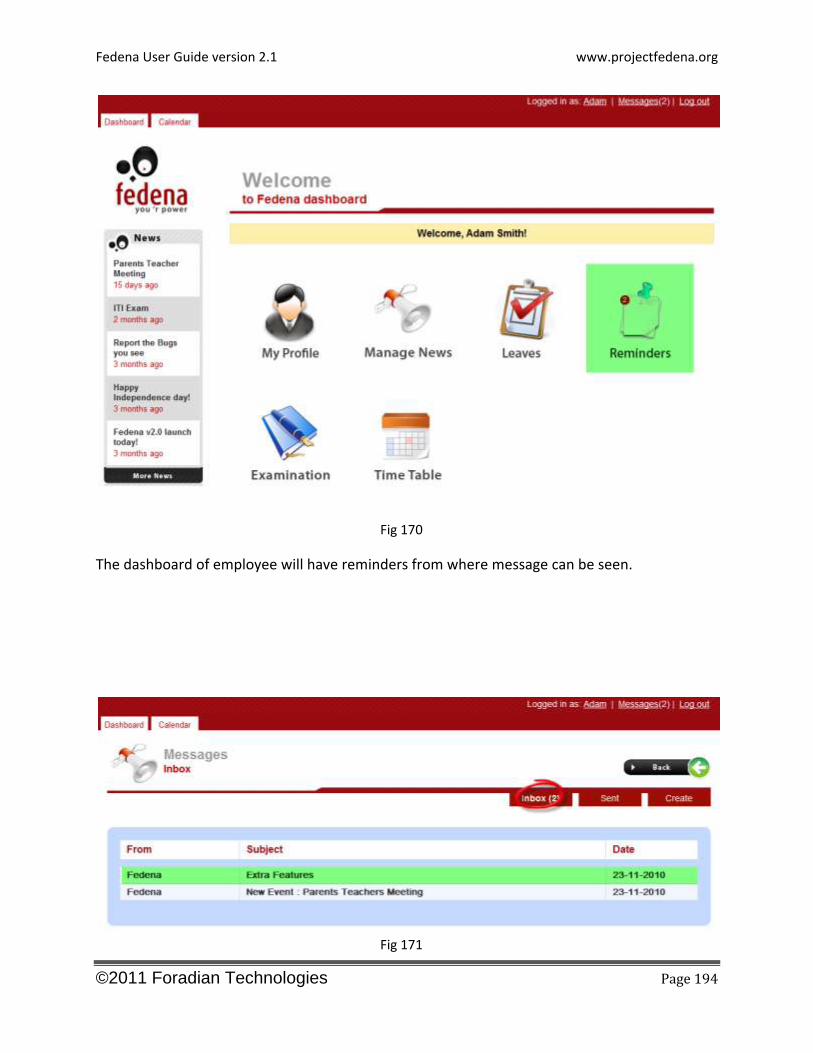
Fig 170
The dashboard of employee will have reminders from where message can be seen.
Fig 171
Fedena User Guide version 2.1 www.projectfedena.org
©2011 Foradian Technologies Page 195
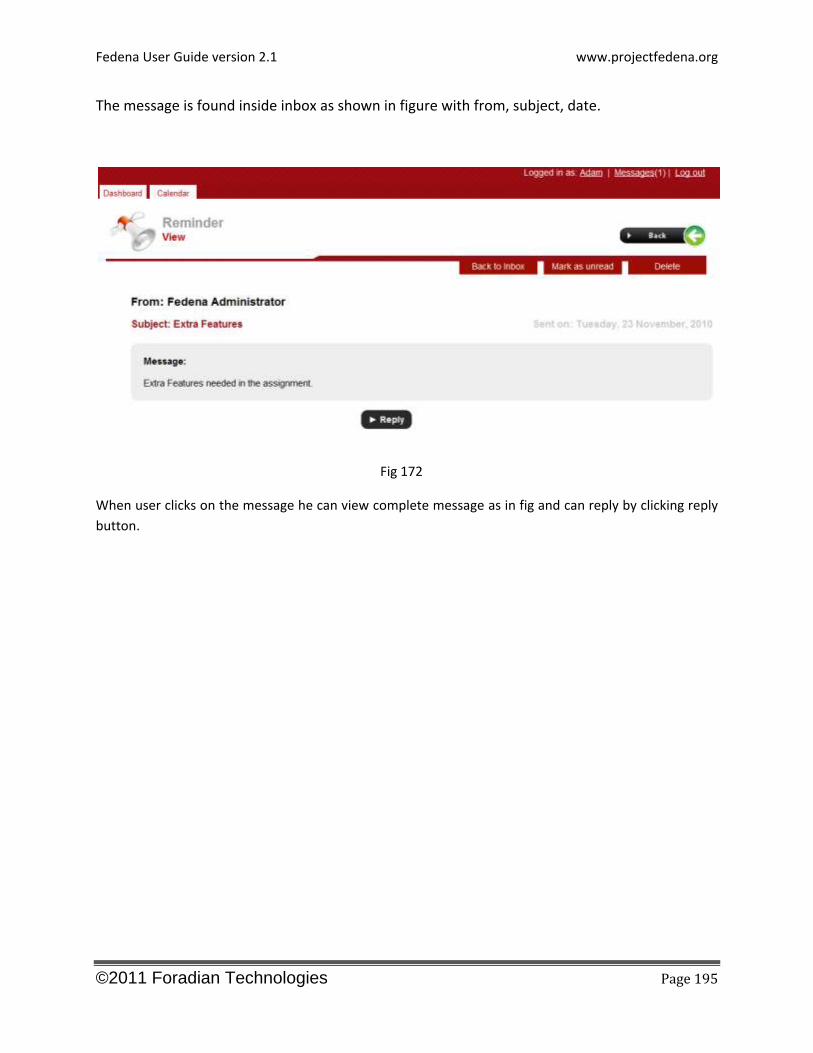
The message is found inside inbox as shown in figure with from, subject, date.
Fig 172
When user clicks on the message he can view complete message as in fig and can reply by clicking reply
button.
Fedena User Guide version 2.1 www.projectfedena.org
©2011 Foradian Technologies Page 196
Fig 173
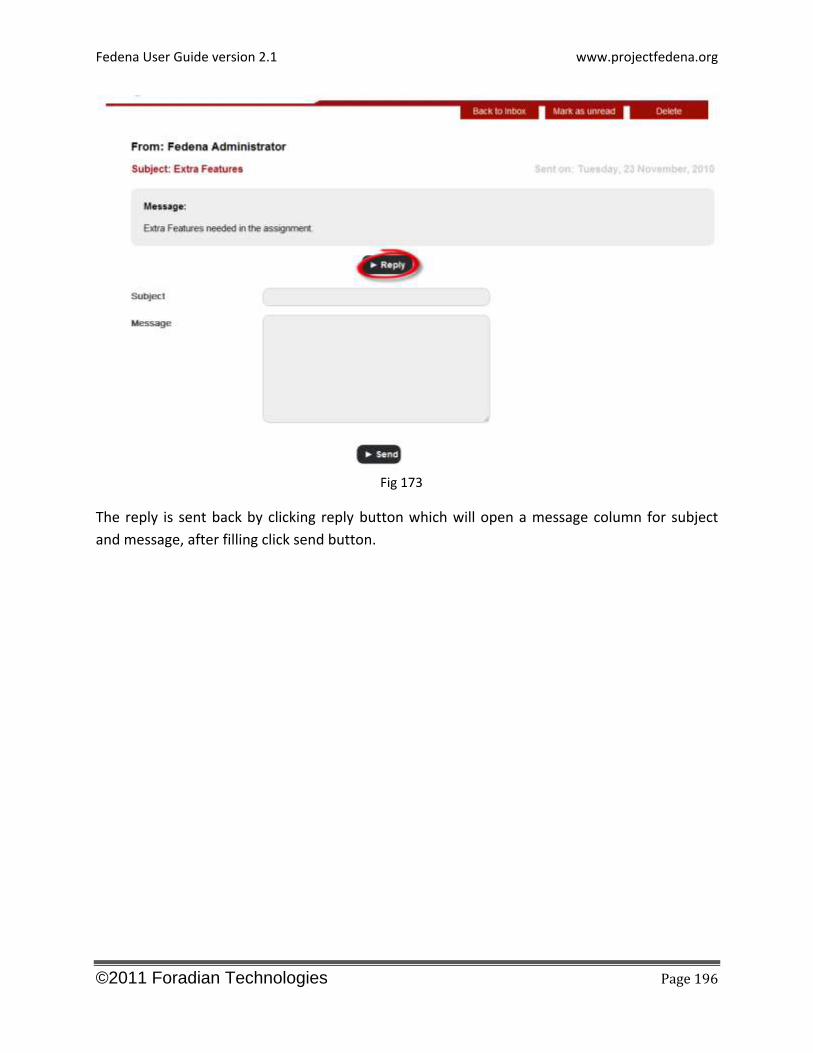
The reply is sent back by clicking reply button which will open a message column for subject
and message, after filling click send button.

Fedena User Guide version 2.1 www.projectfedena.org
©2011 Foradian Technologies Page 197