mandala mk2.9 instructions - synesthesiacorp.com€˜mandala mk2.9 manual’ to your desktop or hard...
TRANSCRIPT

1
Mandala mk2.9 + Virtual Brain v3 Operator’s Manual
Note: Rollover help in the program contains a lot of guidance too!
Synesthesia Corporation ©2011

2
THE BASICS OF YOUR NEW MANDALA mk2.9 AND VIRTUAL BRAIN v3 ARE AS FOLLOWS:
- The best way to get going is to explore the preset menus above each pad. - The Mandala is made up of concentric circular areas labeled: Center, Mid-In, Mid-Out, Edge, Rim and Xstick. - The Virtual Brain graphics show where you strike within the concentric areas from center to edge. You will see full resolution (128 rings). - In the Virtual Brain there are just 2 pages (tabs) for each pad, a Zones tab and an Effects tab. - Each circular area can be assigned a sound from a list of over 600 factory library instruments, or any sample you add to the library. - Each area has its own dashboard with effects, velocity curve and volume envelope settings, and scale capabilities (for tonal instruments), all as shown on the pad’s Zones page. - Also, each overall pad has its own set of effects as shown on its Effects page. - The only other page is the Tools page, where you can create 10 of your own velocity curves and 10 of your own scales to use in any zone of any pad. The Tools page is also where you set LFO settings for each individual pad. - There are many samples in the factory library with z1, z2, z3, etc. labels in their names which means they are position based samples of actual drums from Center (z1) to edge (z4 and beyond). - The Mandala mk2.9 can detect rim shots as well as what we call Xstick hits, which are rim shots while the surface is being pressed.
Have at it… - Vince

3
CONTENTS Introduction…………………………………………………………… 2 Some Possible Setups……………………………………………….… 4 Getting Started [PC] ………………………………………………….. 5 Getting Started [Mac] ………………………………………………… 8 Master Window……………...……………………………………….. 10
Pad Visuals Section…...………….…………….……….……... 11
Tab Navigation Bar………………………………….………… 12 Zones Page…………………………………………………….. 13
Effects Page………………………………………………….... 17
Controller Windows………………………………………………….. 18 Tools Page……………..……………………………………………… 19 Menu Bar Options……………………………………………..…….. 20 Add Custom Sounds ………………………………………….. 20 Selecting and Saving Presets…………………………………………. 21 Tips & Troubleshooting……………………………………………….. 23 Appendix A: Driver Info……………………………………………… 31 Appendix B: MIDI Info…..…………………………………………... 33

4
SOME POSSIBLE SETUPS

5
GETTING STARTED (Windows) INSTALLING THE VIRTUAL BRAIN - Place the Mandala Virtual Brain DVD into your computer's DVD drive. - Choose 'Open folder to view files using Windows Explorer' or go to Start>Computer and double-click the Mandala Drum mk2.9 DVD icon. - Double-click the 'Drag Enclosed Folders to Windows' icon. - Drag the 3 enclosed items: 'Mandala Virtual Brain v3.0', ‘Beauty v2.9’ and ‘Mandala mk2.9 Manual’ to your desktop or hard drive. (*** Warning: Never move or change anything within those folders! You can create a shortcut to the Mandala Virtual Brain program but please leave the original program where it belongs. ***) - Remove the DVD from your computer. CONNECTING YOUR MANDALA - Newer systems will recognize and configure your Mandala automatically when connected. Otherwise, proceed as follows: - Plug in your Mandala and the 'Found New Hardware Wizard' will appear. - Choose 'No, Not this time.' and click 'Next'. - Choose 'Install the software automatically' and click 'Next'. - Click 'Finish'. - Your Mandala should now be present under both ‘Sound, video and game controllers’ and ‘Universal Serial Bus controllers’ in your system’s Device Manager.

6
IF YOU ARE NOT USING AN EXTERNAL AUDIO INTERFACE For best results and lowest latency please download and install the free audio driver called ASIO4ALL: - Go to http://asio4all.com - Choose 'ASIO4ALL 2.10' for download - Click 'Save' in the subsequent File Download window - Choose 'Desktop' for location and then click 'Save' - Choose 'Open Folder' - Double click the ASIO4ALL icon in the Desktop folder
that opens - Click 'Run' - Click 'Next' - Check ' I Accept...' and then click 'Next'. - Click 'Next'. Click 'Install'. Click 'Finish' - Launch the Mandala Virtual Brain application - Go to File>Audio/Pad Driver Window in the Virtual Brain and click the 'Audio Control Panel' button to open up the ASIO4ALL control panel - Click on the Wrench for Advanced Settings - Click the '+' button next to the name of your computer's internal audio interface under WDM Device List
- Toggle the power button a few times next to the proper analog 'Out' listing under your interface. It should go dark and then light up as you click it. Now your computer's audio outputs are connected and available for use by way of ASIO4ALL.
7
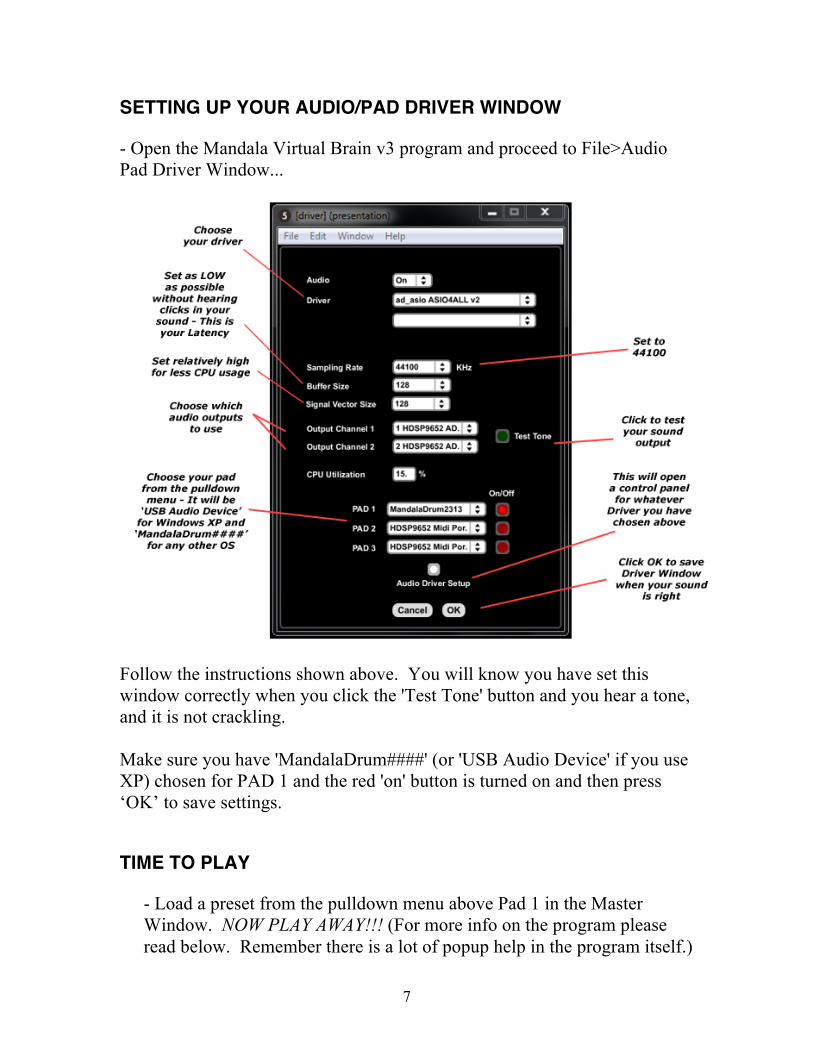
SETTING UP YOUR AUDIO/PAD DRIVER WINDOW - Open the Mandala Virtual Brain v3 program and proceed to File>Audio Pad Driver Window...
Follow the instructions shown above. You will know you have set this window correctly when you click the 'Test Tone' button and you hear a tone, and it is not crackling. Make sure you have 'MandalaDrum####' (or 'USB Audio Device' if you use XP) chosen for PAD 1 and the red 'on' button is turned on and then press ‘OK’ to save settings. TIME TO PLAY
- Load a preset from the pulldown menu above Pad 1 in the Master Window. NOW PLAY AWAY!!! (For more info on the program please read below. Remember there is a lot of popup help in the program itself.)

8
GETTING STARTED (Macintosh) INSTALLING THE VIRTUAL BRAIN - Place the Mandala Virtual Brain DVD into your computer's DVD drive. - Double-click the Mandala Drum mk2.9 DVD icon. - Double-click the 'Drag Enclosed Folders to Macintosh' icon. - Drag the 3 enclosed items: 'Mandala Virtual Brain v3.0', ‘Beauty v2.9’ and ‘Mandala mk2.9 Manual’ to your desktop or hard drive. (*** Warning: Never move or change anything within those folders! You can create a shortcut to the Mandala Virtual Brain program but please leave the original program where it belongs. ***) - Remove the DVD from your computer. CONNECTING YOUR MANDALA - Plug in your Mandala (If you are connecting through a USB hub please make sure it is a powered USB hub.) - Your Mandala should now be present in the MIDI Window of Applications>Utilities>Audio MIDI Setup as ‘MandalaDrum####’.

9
SETTING UP YOUR AUDIO/PAD DRIVER WINDOW - Open the Mandala Virtual Brain v3 program and proceed to File>Audio Pad Driver Window…
Follow the instructions shown above. You will know you have set this window correctly when you click the 'Test Tone' button and you hear a tone. Make sure you have 'MandalaDrum####' chosen for PAD1 and the red 'on' button is turned on and then press 'OK' to save settings. TIME TO PLAY
- Load a preset from the pulldown menu above Pad 1 in the Master Window. NOW PLAY AWAY!!! (For more info on the program please read below. Remember there is a lot of popup help in the program itself.)
10
MASTER WINDOW
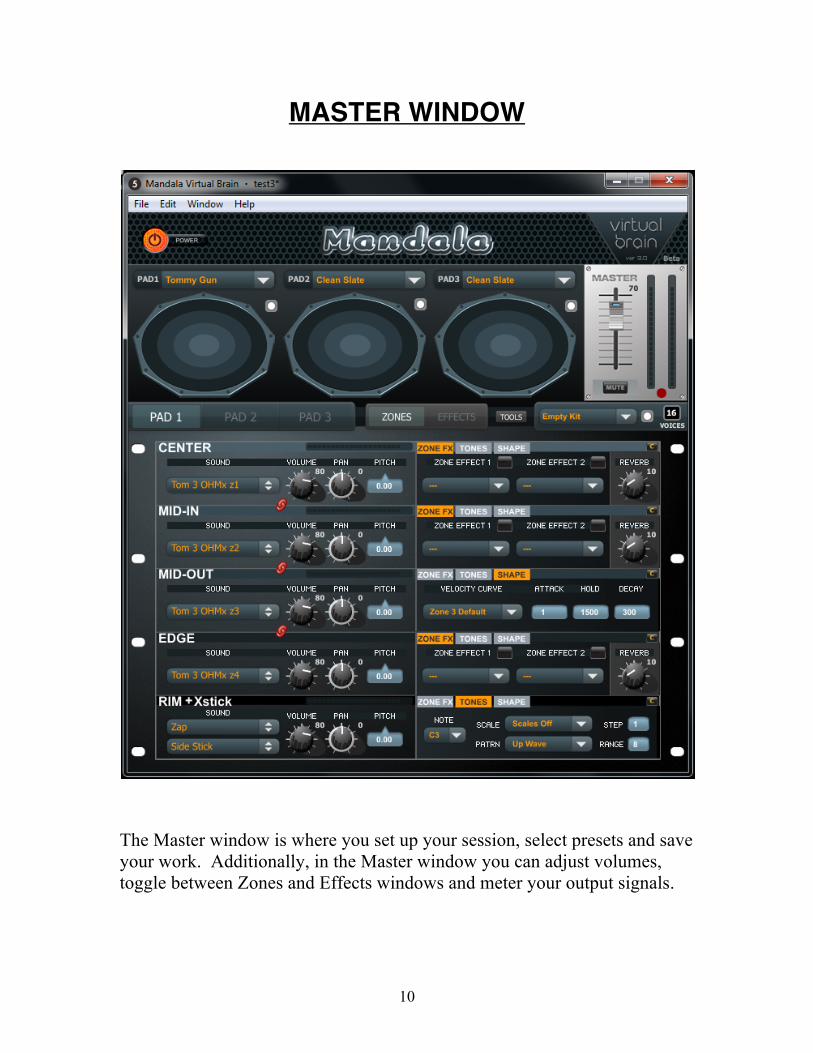
The Master window is where you set up your session, select presets and save your work. Additionally, in the Master window you can adjust volumes, toggle between Zones and Effects windows and meter your output signals.

11
PAD VISUALS SECTION
PAD GRAPHICS Virtual Brain software is ready for trigger signals from up to three separate Mandala Drum pads. When you strike a pad the exact strike ring (0-127 from center to edge) will light up on the correlating pad icon. MASTER FADER The Master volume fader will change the overall volume of all the pads together. Click at the top of the Master volume panel to change the panel to a three fader panel for controlling each individual pad volume. METERS Two analog-style meters help you monitor the Master output volumes of the left and right channels. Click the red button below the meters to activate a sound overload safety feature. PAD PRESETS Above each pad graphic is a pulldown menu full of preset names. Select from this list to load a preset for any pad. At the upper right of each pad graphic there is a small round button. Press this button to open a window for saving a preset you have made on that pad. It will take a snapshot of exactly how that pad is currently configured. Once you save a preset it will instantly be available for loading from all 3 pad preset pulldown menus so that you can play it on any of the three pads. KIT PRESETS The pulldown menu below the master fader is a list of kit presets. Choosing one of these will load a specific preset for each of the 3 pads, thus loading an entire ‘kit’. The small round button to the right of this menu will allow you to save a kit preset by taking a snapshot of all 3 pads. The name you choose will then show up in the Kit Preset menu. It will also be applied to each of the 3 pads, with a .pad1, .pad2 and .pad3 suffix added to the name. Those individual .pad1, .pad2 and .pad3 presets will then be

12
visible, and loadable if you would like, from the three individual pad preset menus. VOICES Sample playback software such as the Virtual Brain can be set to a specific number of voices. Each sample that is triggered constitutes a voice (while the sample is audible) and the voices setting represents the maximum polyphony for the overall program.
TAB NAVIGATION BAR
PAD TAB Click on the pad tab to select PAD 1, PAD 2 or PAD 3 for changing parameters of each specific pad. Whichever pad you select will be represented by all the settings below it which show either Zones or Effects settings depending on what is currently selected on the Zones/Effects tab. ZONES/EFFECTS TAB Click here to toggle between adjusting the chosen pad’s Zone parameters or the chosen pad’s overall Effects. TOOLS BUTTON Click here to open the Tools Page which allows you to set LFO parameters, turn on/off the Velocity Layers feature, and build and save custom Velocity Curves and Tonal Scales. The following sections describe the two main pages of the Virtual Brain: The Zones page and the Effects page. Each pad has its own Zones page and its own Effects page

13
ZONES PAGE
The Mandala Drum Pad is divided into concentric rings called zones, each ready for its own unique settings. Using the Zone Dashboards you will assign sounds, configure note and scale parameters, and set other essentials mentioned below. When using multiple drums, clicking on each pad in the Master window pad tab will show its associated Zone Dashboards below. The Brain software currently supports simultaneous use of up to three Mandala pads. ZONE DASHBOARDS Dashboards are control panels for each zone of your Mandala.

14
Each Dashboard presents the following zone parameters: SOUND Click on this pulldown menu to select from a list of hundreds of top-quality instrument samples. Drag and drop any of your own sounds from your hard drive onto this menu and your sounds will then be available for loading into any zone on any pad. User sounds will appear at the end of the factory list in the Sound pulldown menu. VOLUME, PAN, PITCH These do what you expect them to! REVERB Every pad has its own reverb effect. You can choose how much audio from each zone is sent to the reverb by adjusting this knob. The reverb settings for each pad are accessible on that pad’s Effects page. ZONE FX TAB
Each zone can have up to 2 individual effects assigned to it. Once you choose an effect from a ZONE EFFECT pulldown window under this tab you will see its panel appear to the side of the Master Window. That’s where you will set the parameters of the effect. The effects you choose here will only alter the sound of that particular zone. If you close an effect panel you can reopen it by clicking the word ZONE EFFECT above its pulldown menu. Available Zone Effects include: Distortions [Overdrive, BitCrunch, DownSample], Filters [State-Variable, BiQuad, Comb. AllPass, Hilbert, PhaseShift, Resonant, Teeth], Flange, RingMod, and Delay [*** Please note that Pad Effects are also available as well as these Zone Effects (see below). Pad Effects work on the entire pad (all zones!) at the same time. This means you can layer effects on top of effects by way of Zone Effects and then Pad Effects!]
15
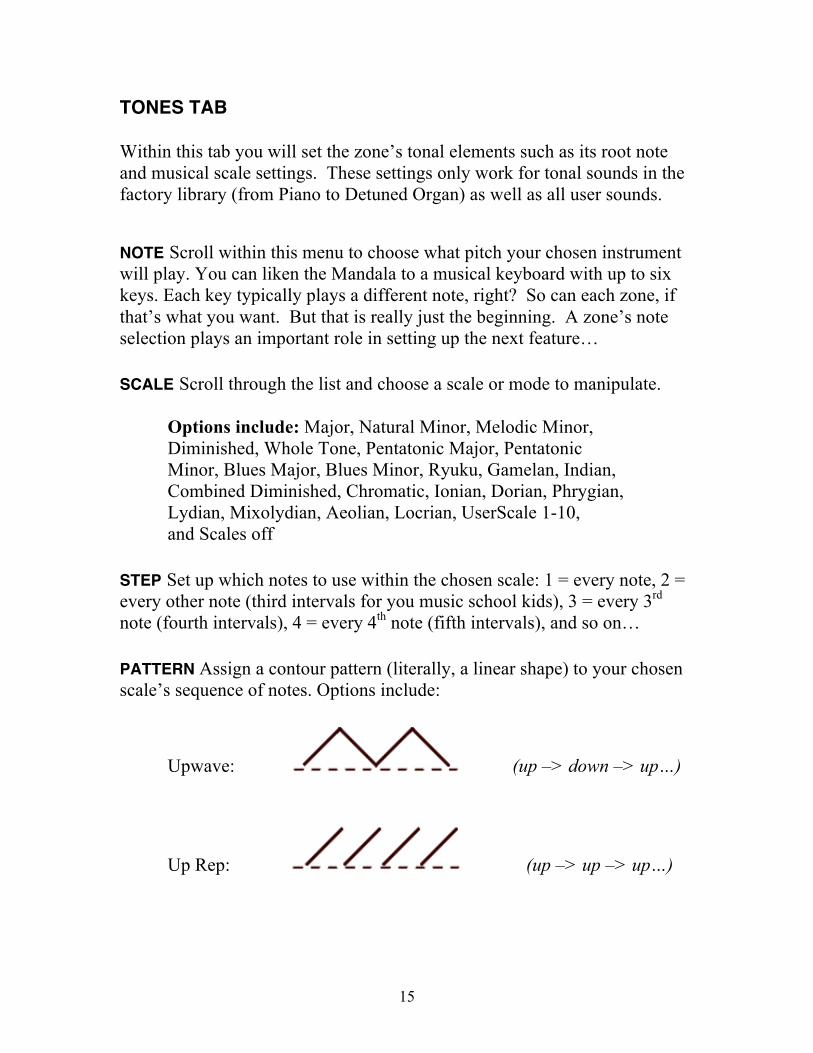
TONES TAB Within this tab you will set the zone’s tonal elements such as its root note and musical scale settings. These settings only work for tonal sounds in the factory library (from Piano to Detuned Organ) as well as all user sounds. NOTE Scroll within this menu to choose what pitch your chosen instrument will play. You can liken the Mandala to a musical keyboard with up to six keys. Each key typically plays a different note, right? So can each zone, if that’s what you want. But that is really just the beginning. A zone’s note selection plays an important role in setting up the next feature… SCALE Scroll through the list and choose a scale or mode to manipulate. Options include: Major, Natural Minor, Melodic Minor, Diminished, Whole Tone, Pentatonic Major, Pentatonic Minor, Blues Major, Blues Minor, Ryuku, Gamelan, Indian, Combined Diminished, Chromatic, Ionian, Dorian, Phrygian, Lydian, Mixolydian, Aeolian, Locrian, UserScale 1-10, and Scales off STEP Set up which notes to use within the chosen scale: 1 = every note, 2 = every other note (third intervals for you music school kids), 3 = every 3rd note (fourth intervals), 4 = every 4th note (fifth intervals), and so on… PATTERN Assign a contour pattern (literally, a linear shape) to your chosen scale’s sequence of notes. Options include:
Upwave: (up –> down –> up…)
Up Rep: (up –> up –> up…)

16
Downwave : (down –> up –> down…)
Down Rep : (down –> down –> down…)
Fullwave Up : (up -> doooown -> uuuup…)
Fullwave Down: (down -> uuuuup -> dooown…)
Velocity Up: the harder you hit, the higher the scale note you trigger
Velocity Down: the harder you hit, the lower the scale note you trigger Random: any strike triggers a random note in the scale
RANGE Program the scale’s tonal range by deciding how many notes you want to fit into the contour

17
SHAPE TAB AHD ENVELOPE The next section on the Dashboard is based on a classic ADSR (Attack, Decay, Sustain, Release). AHD (Attack, Hold, Decay) settings help you define certain characteristics of the sounds you trigger. ATTACK Refers to how quickly the triggered sound reaches full volume. On acoustic instruments attack is almost immediate, but with an electronic instrument like the Mandala you can alter reality. HOLD Refers to the length of time that the sound sustains at full volume. DECAY Refers to how quickly the sound drops from its Hold volume.
EFFECTS PAGE
Pad Effects work on the entire pad and can be accessed through the Effects Tab. These Pad Effects are additional to the Zone Effects (see above).
18
Sometimes you may want to instantly apply an effect to all zones simultaneously, and Pad Effects is how you do that. Each pad can have up to 3 effects as well as a Limiter and Reverb. Available Pad Effects include: Distortions [Overdrive, BitCrunch, DownSample], Filters [State-Variable, BiQuad, Comb. AllPass, Hilbert, PhaseShift, Resonant, Teeth], Flange (mono), Flange (stereo), RingMod (mono), RingMod (stereo), Delay (mono), Delay (stereo), Limiter and Reverb
CONTROLLER WINDOWS
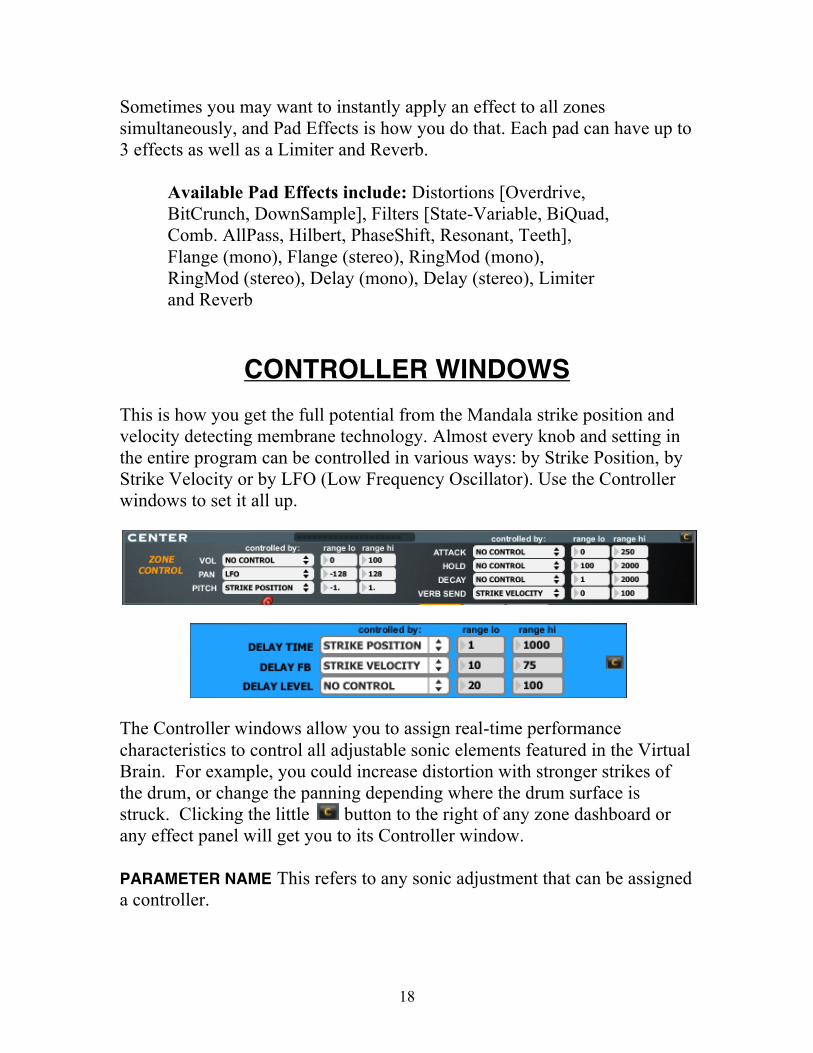
This is how you get the full potential from the Mandala strike position and velocity detecting membrane technology. Almost every knob and setting in the entire program can be controlled in various ways: by Strike Position, by Strike Velocity or by LFO (Low Frequency Oscillator). Use the Controller windows to set it all up.
The Controller windows allow you to assign real-time performance characteristics to control all adjustable sonic elements featured in the Virtual Brain. For example, you could increase distortion with stronger strikes of the drum, or change the panning depending where the drum surface is struck. Clicking the little button to the right of any zone dashboard or any effect panel will get you to its Controller window. PARAMETER NAME This refers to any sonic adjustment that can be assigned a controller.

19
CONTROLLED BY Three separate sources can control the effects parameters. Your real time choices are Strike Position (where on the drum surface a strike occurs) and Strike Velocity (how hard a strike it is. You can also assign an LFO (you can adjust its rate and type in the TOOLS page) to oscillate a parameter automatically. RANGE LO/RANGE HI Scale your controller data differently for every parameter you are controlling. As an example, you might set your PAN to alternately increase and decrease at the rate of the LFO. Reducing the range would decrease how far left and right the PAN would swing.
TOOLS PAGE
LFOʼs Here you will find settings for 3 LFO’s. There is one per pad so you can make intertwining automated effects or zone pitches that pass in opposite directions or…? Velocity Layers You can turn on/off the Velocity Layers feature if you would like. This will eliminate the ‘soft’ and ‘hard’ samples from sounding as you hit your pad with different velocities. The program defaults to 3

20
velocity layers per sound, which means you will hear 3 different samples from soft to medium to hard hits. Velocity Curve Builder If you would like to make a custom Velocity Curve for your zones then draw one here and press the save button to assign it to whatever UserCurve is listed in the pulldown menu. From then on you can load that Curve on any zone of any pad in the Shape section of the Zone Dashboards. User Scale Entry Choose how many notes in your scale and then pick the notes in order from the appropriate note entry boxes that appear. Press save to assign the scale to the name currently listed in the pulldown menu next to the ‘Save’ button. From then on you can load that Scale on any zone of any pad in the Tones section of the Zone Dashboards.
MENU BAR OPTIONS
FILE MENU AUDIO/PAD DRIVER WINDOW… Open this window to set some vital preferences, including which audio driver to utilize. You can save your settings so the Brain defaults to your ideal setup every time you start the program. PREFERENCES… Come here to set the MIDI output parameters (Channel and Controller Number) of your Mandala for when you want to control other programs. There is also a setting here for rim sensitivity. These settings will save to the Mandela’s internal memory so they will be ready when using the Mandala standalone with no Virtual Brain. Finally, you can also recalibrate your drum’s position readout from this window, though you should only do so as a troubleshooting procedure.

21
ADD USER SOUNDS… You guessed it. Scroll here to add sounds from other sources to your Mandala’s sample library. The program accepts WAV, AIFF and SDII files. Remember you can always just drag and drop files over any sound pulldown menu in any zone in order to add your sounds instead of, or as well as, using this menu option. Any sound you add will be instantly available in every zone Sound pulldown menu of every pad from then on. The user sounds will be added at the end of the sound list. To delete a user sound from the Sound menu just load the sound and then click on the word ‘SOUND’ above the menu while holding down the ‘Delete’ key on your keyboard. The sample will not be deleted from your hard drive but it will no longer be available in the Virtual Brain program.
SELECTING AND SAVING PRESETS
This crux of the Mandala’s functionality demands italics. The Preset lists are the part of the Brain that contains your Mandala’s personalities. Every preset you create makes your drum more unique, and the capabilities
22
steadily increase. PRESET LIST In the menus above each pad you’ll find a list of presets. Try them out by clicking and scrolling through the pull down menu. Once you create and save a preset it will be accessible from all three lists. There is also a Kit Preset pulldown menu to the right of the TOOLS button. This will load presets onto all three pads. SAVE PRESET Whenever you alter a preset – or create your own from scratch – you’ll of course want to save your customizations. Clicking the round button to the upper right of a pad will allow you to save that pad’s current settings, effects and all, as a preset. The same goes for an overall kit. Click the round button to the right of the Kit Preset menu to take a ‘snapshot’ of all three pads and give it a name. All Save features are also accessible from the File menu.
-----------------------

23
TIPS & TROUBLESHOOTING The Mandala is as simple as ‘plug-in and set-up’. We recognize that every computer is different and so we provide the following tips to answer any questions you might have: Q. How do I mount my Mandala drums?
The mounting scheme on each Mandala is meant to connect securely to standard 8mm cymbal hardware. You also have the option of using a snare stand to mount your pad.
Q. Can I connect my Mandala to my computer through a USB hub?
Yes you can, as long as the hub is a powered USB hub. Non-powered hubs may not provide enough juice to keep your Mandala running.
Q. How do I connect multiple Mandalay to the same computer?
You can either connect your Mandalas to any available USB ports on your computer or connect them through a powered USB hub which is connected to a USB port on your computer.
Q. Can I connect more than 3 Mandalas to the same computer?
Absolutely. Theoretically you can connect 128 USB devices to your computer, so, yes you can connect as many Mandalas to your computer through powered USB hubs as you would like. The Virtual Brain software handles up to 3 Mandalas but you can configure as many as you would like to control 3rd-party audio programs like Battery 3, LIVE, Reason, Logic, Protools, GarageBand, BFD, Reaktor, etc. Put together a kit of 16 of them!

24
Q. I don’t see my Mandala in the pull down menu in the Audio/Pad Driver window.
If you do not see ‘Mandala####’ (#### is your individual pad’s onboard serial number) or ‘USB Audio Device’ (XP users only) in the Pad pull down menu in the Driver window then here are some things to know… Because your Mandala pad circuitry is MIDI compliant its driver is a component of your computer's operating system. For this reason it is NOT necessary to reinstall your Mandala software if your Mandala pad is not showing up in your driver window. Make sure if you are connecting the Mandala to your computer through a USB hub that the hub is powered. Non-powered hubs may not provide enough juice to keep your Mandala running. Please do the following: Make sure neither the Virtual Brain nor The Beauty application is running. Disconnect the USB cable from your Mandala pad. Mac users: Open Audio MIDI Setup located in the Utilities folder in your Applications folder and open its MIDI Window. Plug the USB cable back into your Mandala pad and verify that it shows up in the MIDI Window. If not, disconnect and reconnect the pad again. Please refrain from pushing the cable into the pad with excessive force. PC Users: Open Device Manager (get there by right clicking on My Computer and choosing Properties then clicking the Hardware tab). Plug the USB cable back into your Mandala pad and verify that 'USB Audio Device' shows up under 'Video Game and Sound Controllers' in the Device Manager. If not,

25
disconnect and reconnect the pad again. Please refrain from pushing the cable into the pad with excessive force. *** If your pad is unplugged while one of the Mandala applications is running you will need to quit the application and reconnect the pad before continuing.
Q. Do I need to add an Audio Interface to my computer in order to play my Mandala?
This is an option every musician needs to consider, but it should not be necessary. Your computer is unique in its ability to output sound from a piece of software. While many computers do not need any help out-of-the-box in producing quality sound others may struggle when certain parameters and features of the Virtual Brain software are activated. Audio interfaces can connect internally to computers as well as externally by way of a USB or firewire cable. Many interfaces are available ranging from very affordable to quite expensive and their use can only help any professional audio software you intend to use.
Q. What’s the deal with this Audio/Pad Driver Window thing? Tell me about the settings.
See ‘Getting Started’ above or the ‘Audio Driver Info’ section below.
Q. My Mandala isn’t reacting when I hit it. What did I miss?
Very simple…a proper pipeline to and from your pad has not been established. You should try the following, exactly step-by-step: - Disconnect your Mandala and quit the Virtual Brain
26
- Connect your Mandala - Open the Virtual Brain program - Go into the Audio/Pad Driver Window and make sure PAD 1 is set to 'MandalaDrum####' (or 'USB Audio Device' if you are running Windows XP) - Load a preset in the Master Window and begin playing.
Q. How can I achieve near-zero latency with my computer?
As a drum controller Mandala technology is the fastest in the world. Strike information is getting from your pad into your computer faster than any person could ever detect. The lag arises within your computer when the Virtual Brain tries pushing sound out of your computer's audio jack. It's like a river is flowing but then it has to go through a straw to get out. The way to reduce latency is… Mac users: Reduce the size of I/O Vector Size in the Virtual Brain Audio/Pad Driver Window. Set it as low as possible before you hears pops and crackles in your audio output. PC users: Use a better audio driver, such as ASIO4ALL. It opens up the pipeline. Some people buy an audio interface to improve their PC's audio capabilities as well, but ASIO4ALL does a great job without one. You can lower the Buffer Size in the ASIO4ALL control panel to increase speed even more. (See ‘If You Are Not Using an External Audio Interface’ in the ‘Getting Started (PC)’ section above for ASIO4ALL install instructions.)
Q. How many zones can I hit at the same time?
With the slightest flam you can trigger two 'simultaneous' strikes. It can even be 1 millisecond between hits but just not exactly at the same time. This is because the membrane switch under the drum surface is analog, like a record album, and the needle can touch down at just one place at any instant but as
27
many places as necessary as long as there is a linear approach, like flamming, which is unnoticeable in the audio because the Virtual Brain has up to 64 voices and can therefore overlap 64 samples playing at the same time.
Q. Do I ever have to calibrate my Mandala?
Mandalas are factory calibrated. We have included a calibration option in the Preferences menu as a safeguard against the rare occurrence of power fluctuation in your computer setup. Such a power fluctuation could alter the resolution of your drum surface. With the calibration option you can simply reset your Mandala surface. In the rare occurrence that there is a dead spot in the center of your pad, simply recalibrate.
Q. When I hit my pad I see zones light up in more than one drum in the Master window.
Proceed to the Audio/Pad Driver window and make sure you only have one pad activated by way of the red On/Off buttons.
Q. My SoundBlaster isn’t putting out clean sound when I play my Mandala.
There is a very handy (and free!) 3rd-party Universal ASIO Driver which has been known to work miracles compared to the drivers that SoundBlasters usually use. It’s called ASIO4ALL and it’s downloadable at http://asio4all.com.
Q. How do I get my custom sounds to play?
See ‘Add Custom Sounds’ earlier in this manual. Make sure your sounds are WAV, AIFF or SDII.

28
Q. What can I do to make the Virtual Brain program faster?
Not all (older) computers can handle the requirements of the VB when it is running full tilt with many of its features activated. You always have the option to reduce the number of voices in the Master window and also turn off effects in the signal chain in order to reduce CPU load.
Q. How do I use Mandala pads with other MIDI programs?
Your Mandala pad is a USB MIDI controller just like a musical keyboard. It will show up as an input device in the MIDI Device input window of other applications. (Please see Appendix B for MIDI output configuration information.)
Q. How do I send Virtual Brain audio to other programs?
If you would like to route the audio out from the Virtual Brain program into another audio application on the same computer for the purpose of recording or sound manipulation you have several options. You can use your Audio Interface’s Loopback Mode (if available) or… Mac users: http://cycling74.com/downloads/soundflower PC users: VAC http://software.muzychenko.net/eng/vac.html Rewire is also an option for both platforms. Once you have installed Soundflower or Virtual Audio Cable (VAC) they will be available as an option in your VB Audio/Pad Driver window. Just choose Soundflower(2ch) or Virtual Audio Cable in the VB Driver window and then in programs like LIVE you will choose Soundflower(2ch) or VAC as an input source for the tracks or channels you would like to feed. Here is a step-by-step for GarageBand:
- Once you have installed Soundflower it will be available as

29
an option in your VB driver pull down menu. - Choose Soundflower(2ch) in the VB driver window. - Now in GarageBand go to GarageBand>Preference>Audio/MIDI and choose Soundflower(2ch) as 'Audio Input' - Now create and highlight a Real Instrument track in GarageBand and on the lower right of the GarageBand screen set 'Input Source' to 'Stereo 1/2 (Sound Flower(2Ch))' - Turn 'Monitor' on in lower right corner of GarageBand.
- When you play the Mandala the sound will go right into Garageband and be audible and recordable in there. To send VB audio into Logic using SoundFlower there are a few extra steps…
You must install Soundflower on your system and then create an Aggregate Device in the Audio MIDI Setup app on your Mac. This combines Built-in Output with the Soundflower buss. You do this by checking the Use box by Built-in Output and then checking the Use box next to Soundflower(2ch). Now you have created an Aggregate Device with 2 inputs and 4 outputs. Do this without the VB or Logic running. Now open the VB and choose Soundflower(2ch) as your audio driver in the Audio/Pad Driver Window. Then open Logic and go to Preferences-Audio and choose Aggregate Device for Device. Now create a stereo track and set its inputs to 1 and 2 and record enable the track and you will get the sound straight off the Soundflower buss from the VB. You will hear it in Logic because your Out should be set to 1 and 2. You can record it too. Remember the Master fader in VB can still alter the level of the signal that is sent out of the VB to Logic. If you are using a sound card and happened to choose it along with Soundflower to make an Aggregate Device in Audio MIDI Setup instead of

30
Built-in then you will have to choose the appropriate Inputs to the track in Logic so it corresponds with the proper channels. It may not be 1 and 2 anymore, but some higher numbers depending on your sound card.
------------------------
31
APPENDIX A:
AUDIO DRIVER INFO
Available drivers depend on your computer, the sound card you are using, if any, and your computer platform. Choose the fastest driver protocol supported by your soundcard, which will likely be ASIO with Windows, or Core Audio for Mac. For Windows you can also use DirectSound and Multimedia (MME), but expect a delay between the time you play and the time you hear it. Core Audio - This is the default audio driver for the VB on Macintosh. It interfaces with the system’s built-in Core Audio system and can be used with the built-in audio of the computer, or, with the proper software support, a third-party hardware interface, such as ASIO. DirectSound (Windows only) – Developed by Microsoft and can work well depending on your sound card, but not recommended by us. If you adjust the interface for an acceptable amount of latency, you may hear glitches and clicks in the audio that can only be fixed by increasing latency. MME (Windows Only) – This is the standard Windows audio driver. Most sound cards support this interface. However, MME is even less suitable than DirectSound due to its comparatively high latency. ASIO (Windows only) - If you have a third-party audio interface which supports ASIO (a cross-platform audio hardware standard developed by Steinberg), and it is installed correctly, it will be found by the Virtual Brain application. You may have as many ASIO devices as you wish; they will all be found by the driver and will appear in the Driver pull-down menu in the Audio/Pad Driver Window preceded by the word ASIO. ASIO is highly recommended for its low latency and high performance. ASIO4ALL is a free driver which we highly recommend no matter what sound card you are using. I/O Vector Size (I/O stands for input/output) controls the number of samples that are transferred to and from the audio interface at one time. The I/O Vector Size may have an effect on latency and overall performance. A smaller vector size may reduce the inherent delay between hitting the pad and audio output, but may introduce crackling when the limit of your interface is reached. Signal Vector Size is how many audio samples the VB calculates at a time. This can be

32
less than or equal to the I/O Vector Size, but not more. Changing the signal vector size won’t have any effect on latency, but the larger you set it, the more performance [less crackling] you can expect. The lower you set it the more CPU you will utilize. Optimizing performance when you are close to the limit of your CPU’s capability is a trial-and-error process. That’s why the VB provides you with a choice of vector sizes, as well as Overdrive and Interrupt choices.
------------------------
33
APPENDIX B:
MIDI INFO The Mandala mk2.9 is a class compliant standard USB MIDI controller. This means it will work with any 3rd party MIDI controllable application and no special drivers are needed. Every strike of the Mandala mk2.9 outputs a MIDI note with velocity, and a MIDI ‘Position’ controller which ranges from 0 at the center to 127 at the edge. In the Preferences window of the Virtual Brain 3.0 you can choose which MIDI channel your pad operates on and which MIDI controller number is assigned to position. These settings are saved in your pad’s internal memory. These settings are irrelevant to any functionality within the Virtual brain itself. They are only relevant when using the Mandala as an external MIDI controller with other programs. MIDI Channel (1-16): Determined by user in Virtual Brain preferences and saved to pad memory. MIDI Controller Number (0-127): Determined by user in Virtual Brain preferences and saved to pad memory. This controller outputs a number which represents exact strike position from 0 (center) to 127 (edge) every time the pad is triggered. MIDI Note Output (permanently set): Center: C3 (note 60) Mid-In: C#3 (note 61) Mid-Out: D3 (note 62) Edge: D#3 (note 63) Rim: E3 (note 64) [if activated] Xstick F3 (note 65) [if activated]
------------------------

34