managing windows-based dell wyse thin clients using system
TRANSCRIPT

Managing Windows-based Dell Wyse ThinClients using System Center ConfigurationManagerAdministrator’s Guide
October 2020Rev. A06

Notes, cautions, and warnings
NOTE: A NOTE indicates important information that helps you make better use of your product.
CAUTION: A CAUTION indicates either potential damage to hardware or loss of data and tells you how to avoid
the problem.
WARNING: A WARNING indicates a potential for property damage, personal injury, or death.
© 2018 - 2020 Dell Inc. or its subsidiaries. All rights reserved. Dell, EMC, and other trademarks are trademarks of Dell Inc. or its subsidiaries.Other trademarks may be trademarks of their respective owners.

Chapter 1: Introduction................................................................................................................. 4About this guide................................................................................................................................................................... 4SCCM system requirements............................................................................................................................................. 4SCCM features.....................................................................................................................................................................4SCCM prerequisites............................................................................................................................................................ 4
Chapter 2: Imaging Dell Wyse thin clients with System Center Configuration Manager (SCCM)....6Creating driver packages for imaging.............................................................................................................................6Preparing the operating system image for capturing................................................................................................14Creating capture media task sequence........................................................................................................................ 15Capturing Windows image from reference system....................................................................................................18
Chapter 3: Deploying operating system image by using Operating Systems Deployment (OSD)... 21Associating target thin clients with Configuration Manager server...................................................................... 21Importing a captured Windows reference image into Configuration Manager.................................................. 26Creating task sequence to deploy Windows reference image............................................................................... 28Deploying Windows reference image............................................................................................................................47
Chapter 4: Prerequisites to deploy software applications............................................................ 53
Chapter 5: Prerequisites to capture and deploy an operating system...........................................54
Appendix A: Creating software package for unattended installation........................................... 55
Contents
Contents 3

IntroductionSystem Center Configuration Manager (SCCM) is a system management software by Microsoft to manage large groups ofWindows-based computers. Dell Wyse supports SCCM 2012 R2, SCCM 2016, and SCCM 2019 to manage thin clients that runthe following operating systems:
● Windows 10 IoT Enterprise● Windows Embedded 8 Standard● Windows Embedded Standard 7 Enterprise● Windows Embedded Standard 7P
Topics:
• About this guide• SCCM system requirements• SCCM features• SCCM prerequisites
About this guideThis guide is intended for administrators and system engineers who work on SCCM.
This guide contains the following information:
● Features that are supported on the Dell Wyse Enhanced Windows Embedded builds● Managing software on Dell Wyse thin clients● Imaging and deploying operating systems on Dell Wyse thin clients
For more information about SCCM and Windows Embedded operating system, see System Center Developer DocumentationLibrary at https://msdn.microsoft.com.
SCCM system requirementsAdditional storage space for the installation of Microsoft quick fix engineering (QFEs) on the thin client is the minimum systemrequirement.
SCCM featuresThe main features of SCCM are the following:
● Asset discovery● Asset inventory● Image capture● Image deployment● Software package advertisement with write filter management
SCCM prerequisitesBefore working on SCCM, you must configure the following:
● Active Directory (AD)—You must create an AD to add a set of thin clients.● Dynamic Host Configuration Protocol (DHCP)—You need to configure DHCP that hosts the IP that you have created.● Domain Name System (DNS)—DNS helps in creating a unique IP which is the domain IP.
1
4 Introduction

● Windows Deployment Services (WDS)—If enabled, WDS helps to deploy any Windows-related updates.● Windows Server Update Services (WSUS)—WSUS is also used to enable the Windows-related updates.● Windows Assessment and Deployment Kit (Windows ADK 10)—This is a development kit and you must install this kit on the
SCCM server.● System Center Configuration Manager (version)—This is the console to access SCCM.
For more configuration settings, see Introduction to Application Management in Configuration Manager at https://technet.microsoft.com.
NOTE: For reference, SCCM 2016 and Windows 10 IoT Enterprise screenshots are used in this guide. However this guide
can also be used for SCCM 2012 R2 or SCCM 2019.
Introduction 5

Imaging Dell Wyse thin clients with SystemCenter Configuration Manager (SCCM)
Topics:
• Creating driver packages for imaging• Preparing the operating system image for capturing• Creating capture media task sequence• Capturing Windows image from reference system
Creating driver packages for imagingPerform the following steps to create a driver package for imaging the thin client:
1. Click Start > All Programs > Microsoft System Center > Configuration Manager Console.The System Center Configuration Manger window is displayed.
2. Click Software Library.
3. Expand Overview > Operating Systems > Drivers, and right-click Import Driver.
Figure 1. Import driver
The Import New Driver Wizard window is displayed.
4. On the Locate Driver page, do one of the following:● If you want to import all the drivers from a network path, click Import all drivers in the following path (UNC), browse
to the folder, and then click Select Folder.● If you want to import a specific driver from a network path, click the Import a specific driver by specifying the
network path (UNC) to its .inf or txtsetup.oem file radio button, browse to the specific driver, and click Open.
2
6 Imaging Dell Wyse thin clients with System Center Configuration Manager (SCCM)

Figure 2. Locate driver
NOTE: The driver must be available in the local share path of SCCM.
5. Select the option for duplicate drivers from the Specify the option for duplicate drivers drop-down list.
6. Click Next.
7. On the Driver Details page, select the drivers you want to import.
Imaging Dell Wyse thin clients with System Center Configuration Manager (SCCM) 7

Figure 3. Driver details
8. If you want to install the selected drivers on your system, select Enable these drivers and allow computers to installthem check box.
9. Click Next.
10. On the Add Driver to Packages page, select New Package.The Create Driver Package window is displayed.
11. In the Create Driver Package window, enter the package name, and browse to the network UNC path where you want theConfiguration Manager to store the drivers added to the package. Click Ok.
8 Imaging Dell Wyse thin clients with System Center Configuration Manager (SCCM)

Figure 4. Create driver package
12. Select the packages to which you want to add the driver and click Next.
Imaging Dell Wyse thin clients with System Center Configuration Manager (SCCM) 9

Figure 5. Select the packages
13. On the Add Driver to Boot Images page retain the default options and click Next.
14. On the Summary page, verify the details, and click Next.
15. After the configuration is complete, click Close.
16. Click Software Library.
17. Expand Overview > Operating System > Driver Packages.
18. Right-click the imported driver package, and select Distribute Content. The Distribute Content wizard window isdisplayed.
10 Imaging Dell Wyse thin clients with System Center Configuration Manager (SCCM)

Figure 6. Distribute content
19. On the General page, click Next.
Figure 7. Review selected content
20. On the Content Destination page, click Add, and then select Distribution Point from the drop-down list.
Imaging Dell Wyse thin clients with System Center Configuration Manager (SCCM) 11

Figure 8. Content destination
The Add Distribution Points window is displayed.
21. Select the available distribution points, and click Ok. On the Content Destination page, click Next.
12 Imaging Dell Wyse thin clients with System Center Configuration Manager (SCCM)

Figure 9. Add distribution points
NOTE: SCCM uses distribution points to store files needed for packages to run on client computers. These distribution
points function as distribution centers for the files used by the package and enable you to download and run files,
programs, and scripts when a package is advertised.
22. On the Summary page, verify the details, and click Next.
23. After the configuration is complete, click Close.
24. Refresh the Driver Packages screen, and ensure that the Success message is displayed on the Content Status page.
Figure 10. Content status
25. Click Software Library.
26. Expand Overview > Operating System > Boot Images.
27. Right-click the appropriate boot image, and select Properties.
Imaging Dell Wyse thin clients with System Center Configuration Manager (SCCM) 13

Figure 11. Properties
28. In the Properties window, select Drivers, and add the relevant client driver.
29. Click Apply, and then click Yes.
30. Right-click the appropriate boot image, and select Update Distribution Points.
31. In the Update Distribution Points page, click Next and then click Close.
32. Refresh the Boot Images window, and ensure that the Success message is displayed on the Content Status page.
Preparing the operating system image for capturingThis section describes how to prepare an operating system image to capture, import, and deploy to the supported Wyse thinclients running Windows 10 IoT Enterprise operating system in a Configuration Manager environment. The reference image mustbe captured as a Windows Imaging (WIM) format file.
NOTE: To prepare a reference Windows 10 IoT Enterprise image, Dell Technologies recommends that you start with a newly
imaged thin client. Customize the build as required, and prepare the build for the Configuration Manager image capture.
1. Click Start > Log off, and hold the Shift key until the login window is displayed.
2. Log in as an administrator.
NOTE: For Windows 10 IoT Enterprise image, the default user name is Admin, and the default password is DellCCCvdi.
NOTE: For Windows Embedded Standard 7P and Windows Embedded Standard 7 image, the default user name is
Administrator, and the default password is DellCCCvdi.
3. Double-click the green icon on the desktop to disable the write filter.The system restarts after the write filter is disabled.
4. Customize the drivers, application, wallpapers and so on.
5. Navigate to the C:\windows\setup folder, and run the Build_Master.cmd file.
NOTE: For legacy scripts, run the WIE10_ConfigMgr_Capture.ps1 file as an administrator and for Powershell
ported scripts, run Build_Master.cmd.
6. Select Configmgr Sysprep and press Enter.
14 Imaging Dell Wyse thin clients with System Center Configuration Manager (SCCM)

7. To run the complete script, restart the thin client.
8. To open the Services window, press Windows+R, and type services.msc in the Open field.
9. Press Enter.
10. Ensure that the SMS Agent Host service is running. If the service is not active, right-click the service, and click Start.The image in the thin client is ready for capturing.
NOTE: If you restart the thin client during capturing, all the Configuration Manager related customizations are reverted.
Creating capture media task sequenceCapture media in the Configuration Manager allows you to capture an operating system image from a reference computer. Tocreate a capture media task sequence, do the following:
1. Click Start > All Programs > Microsoft System Center > Configuration Manager Console
Figure 12. Software library
The System Center Configuration Manger window is displayed.
2. Click Software Library
3. Expand Overview > Operating Systems > Task Sequences, and right-click Task Sequences.
4. Select Create Task Sequence Media.The Create Task Sequence Media Wizard window is displayed.
5. Select the Capture Media radio button, and click Next.
Imaging Dell Wyse thin clients with System Center Configuration Manager (SCCM) 15

Figure 13. Media type
6. On the Media Type page, select the media type which you want to use for capturing media.● To use a removable USB drive for the image deployment, select the Removable USB drive radio button, and from the
drop-down list, select the drive.● To use a CD/DVD set for the image deployment, select the CD/DVD set radio button, and browse to the media file.
16 Imaging Dell Wyse thin clients with System Center Configuration Manager (SCCM)

Figure 14. Create task sequence media wizard
7. Click Next.
8. On the Boot Image page, browse to the appropriate boot image and distribution point.
Imaging Dell Wyse thin clients with System Center Configuration Manager (SCCM) 17

Figure 15. Boot image
NOTE: You must include Ethernet/ SFP driver in the boot image. You can contact the Dell Wyse support team for the
respective driver.
9. Click Next.
10. On the Summary page, verify the details, and click Next.The captured media or ISO is created.
11. After the installation is complete, click Close.
12. Extract and copy the ISO to a removable USB drive.
Capturing Windows image from reference systemTo capture the Windows image from a reference system, do the following:
1. Plug in the prepared USB flash drive or CD/DVD to the reference thin client.
2. Open the USB pen drive or CD/DVD drive, and go to D:\SMS\Bin\i386.
3. Run the D:\SMS\Bin\i386\TSMBAutoRun.exe file.The Image Capture Wizard is displayed.
4. On the Welcome to the Image Capture Wizard page, click Next.
18 Imaging Dell Wyse thin clients with System Center Configuration Manager (SCCM)

Figure 16. Image capture wizard
5. On the Image Destination page, browse to any of the following:● A shared location on the remote network—recommended● A local USB drive path along with the .wim file name extension
Figure 17. Image destination
6. Click Next.
7. On the Image Information page, click Next.
8. On the Summary page, click Finish.
The installer takes 5–10 minutes to start the capture process. During the capture process, the machine completes theSysprep and boots into the Windows Preinstallation Environment. In the Windows Preinstallation Environment session, the
Imaging Dell Wyse thin clients with System Center Configuration Manager (SCCM) 19

image is captured. After the image capture, the .wim file is generated and stored to the location specified in the CaptureWizard page.
NOTE:
After the image is captured, the reference thin client will not be in the same state as it was before the capture. To bring
the reference thin client back to its original state, see msdn.microsoft.com/library/.
For a media creation standalone deployment, go to C:\Program Files (x86)\Microsoft ConfigurationManager\AdminConsole\bin\i386, and open the command prompt. Run the command. For example:
CreateMedia.exe /K:full /p:"SCCM2016.cloud.com" /D:"SCCM2016.cloud.com" /S:"IND" /L:"FullMediaLabel" /A:"IND0004A" /K:"False" /T:"CD" /M:"44482" /F:"C:\deployment.iso" /X:"OSDComputerName=" /X:"OSTType=Enterprise"
20 Imaging Dell Wyse thin clients with System Center Configuration Manager (SCCM)

Deploying operating system image by usingOperating Systems Deployment (OSD)
Configuration Manager provides two default boot images. Capture an image of the operating system that you want to deploy byusing a task sequence. Distribute the boot image, operating system image, and any related content to a distribution point.
Topics:
• Associating target thin clients with Configuration Manager server• Importing a captured Windows reference image into Configuration Manager• Creating task sequence to deploy Windows reference image• Deploying Windows reference image
Associating target thin clients with ConfigurationManager serverTo associate a target thin client with the Configuration Manager server, do the following:
1. Add the thin client to the domain.
2. Go to Control Panel > Configuration Manager > Site > Configuration Settings.
3. In the Configuration Manager service location section, enter the site code.
4. In the Actions tab, select either Machine Policy Retrieval and Evaluation Cycle or Policy Retrieval and EvaluationCycle, and click Run Now.
3
Deploying operating system image by using Operating Systems Deployment (OSD) 21

Figure 18. Configuration Manager Properties
The thin client is added to the Configuration Manager server.
5. On the Configuration Manager server side, go to Asset and Compliance > Device Collections.
6. Right-click Device Collection and select Create Device Collection.
22 Deploying operating system image by using Operating Systems Deployment (OSD)

Figure 19. Create Device Collection
7. In the General page, enter the name of the collection, and from the Limiting collection drop-down list, select AllSystems.
Figure 20. General
8. Click Next.
NOTE: Add a rule when multiple clients are available. For more information about rules, see how to create collections in
configuration manager in https://technet.microsoft.com.
Deploying operating system image by using Operating Systems Deployment (OSD) 23

Figure 21. Membership Rules
9. On the Summary page, click Next. The selected settings are applied.
24 Deploying operating system image by using Operating Systems Deployment (OSD)

Figure 22. Summary page
10. Click Close.
11. In the Devices list, right-click a device, and click Add Selected Items > Add Selected Items to Existing Devicecollection.
Figure 23. Devices
12. In the Device Collections window, select the device to add to the collection, and click OK.
Deploying operating system image by using Operating Systems Deployment (OSD) 25

Figure 24. Select device collections
Figure 25. Device collections
In the Asset and Compliance section, click Device Collections and verify whether the device is added. The Membercount is displayed as 1.
Importing a captured Windows reference image intoConfiguration ManagerTo import a captured Windows reference image into Configuration Manager, do the following:
1. Expand Software Library > Overview > Operating Systems.
2. Right-click Operating System Images, and click Add Operating System Image.
26 Deploying operating system image by using Operating Systems Deployment (OSD)

Figure 26. Add operating system image
3. Enter the network path (UNC), and click Next.
Figure 27. Data source
4. Enter the necessary information, and click Next.
5. Verify the information that you have provided and click Next.The settings are applied.
6. Click Close.
7. Expand Software Library > Overview > Operating Systems, and select an operating system image.
Deploying operating system image by using Operating Systems Deployment (OSD) 27

8. Right-click Distribute Content, and click Next.
9. In the Content Destination section, add a Distribution Point.
10. Select your destination point, and click Next.
11. When the wizard installation is complete, click Close.
12. Refresh the Operating System screen. Ensure that the content status displays Success before proceeding to the nexttask.
Creating task sequence to deploy Windows referenceimageTo create a task sequence, do the following:
1. Expand Software Library > Overview > Operating Systems.
2. Right-click Task Sequence, and click Create Task Sequence.
Figure 28. Create task sequence
3. In the New Task Sequence wizard, select Install an existing image package, and click Next.
4. Enter the Task sequence name, select the appropriate boot image, and then click Next.
28 Deploying operating system image by using Operating Systems Deployment (OSD)

Figure 29. Task sequence information
5. Enter the package name and image index and click Next. The Index number may vary depending on the configuration of yourthin client.
Deploying operating system image by using Operating Systems Deployment (OSD) 29

Figure 30. Install Windows
6. On the Configure the network page, specify your preferred configuration, and click Next.
30 Deploying operating system image by using Operating Systems Deployment (OSD)

Figure 31. Configure network
7. On the Install the Configuration Manager Client page, click Browse, and select Configuration Manager ClientPackage and then click Next.
Deploying operating system image by using Operating Systems Deployment (OSD) 31

Figure 32. Install configuration manager
8. Clear the following check boxes and click Next:
● Capture user settings and files● Capture network settings● Capture Microsoft Windows settings
32 Deploying operating system image by using Operating Systems Deployment (OSD)

Figure 33. State migration
9. On the Include Software Updates page, select Do not install any software updates check box, and click Next.
10. On the Install applications page click Next.
Deploying operating system image by using Operating Systems Deployment (OSD) 33

Figure 34. Install applications
11. On the Summary page, verify the information that you have provided, and click Next.
34 Deploying operating system image by using Operating Systems Deployment (OSD)

Figure 35. Summary page
The selected settings are applied.
12. Click Close.
Deploying operating system image by using Operating Systems Deployment (OSD) 35

13. Right-click the deployment task sequence, and click Edit.
36 Deploying operating system image by using Operating Systems Deployment (OSD)

Figure 36. Task sequence
14. In the Task Sequence Editor window, click Capture Files and Settings.
15. In the Options tab, select the Disable this Step check box and click Apply.
16. Click Install Operating System, and do the following:
17. Click the Properties tab, and add the following command line for mapping the network drive:
net use \\IPAddress\share\PrepareOS_WIE10 password /user: domainname\User nameNOTE: Copy the PrepareOSPartition.wss file available in the C:\windows\setup folder to the Configuration
Manager server's shared folder. The operating system partition file is used to format the operating system partition
before deployment. For PowerShell ported images, the path is C:\windows\setup\tools.
18. Click Install Operating System, and click Add.
19. In the Properties tab, enter Mapping_DEW in the Name field.
Deploying operating system image by using Operating Systems Deployment (OSD) 37

Figure 37. Mapping DEW
20. Enter the command line to map the network drive of the SCCM Server share where the DEW files are copied.
21. Create cmd scripts execute-DEW-script.cmd and Task-sequence-dew-script.ps1, and copy to the DEW folderin share path. For more information, see Pre-requisites to capture and deploy an operating system.
22. Click Apply and then click OK.
23. Click Install Operating System, and click Add.
24. In the Properties tab, enter DEW_Directory in the Name field.
38 Deploying operating system image by using Operating Systems Deployment (OSD)

Figure 38. DEW_Directory
25. Enter cmd.exe /c md C:\DEW\Temp in the Command line field.
26. Click Apply and then click OK.
27. Click Install Operating System, and click Add.
28. In the Properties tab, enter CopyFiles_DEW in the Name field.
Deploying operating system image by using Operating Systems Deployment (OSD) 39

Figure 39. Copyfiles_DEW
29. Enter xcopy L:\ C:\DEW_Temp /c /d /e /h /i /k /q /r /s /x /y in the Command line field.
30. Click Apply and then click OK.
31. Click Install Operating System, and click Add.
32. In the Properties tab, enter Invoke_DEW_Script in the Name field.
40 Deploying operating system image by using Operating Systems Deployment (OSD)

Figure 40. Invoke_DEW_Script
33. Enter cmd.exe /c "C:\DEW_Temp\execute-DEW-script.cmd" in the Command line field.
34. Type C:\DEW_Temp in the Start in field.
35. Select the Run this step as the following account option and set the account to the domain administrator.
36. Click Apply and then click OK.
37. Click Install Operating System, and click Add.
38. In the Properties tab, enter Restart in Windows PE in the Name field.
Deploying operating system image by using Operating Systems Deployment (OSD) 41

Figure 41. Restart in Windows PE
39. Click Apply and then click OK.
40. Click Install Operating System, and click Add.
41. In the Properties tab, enter Mapping in the Name field.
42 Deploying operating system image by using Operating Systems Deployment (OSD)

Figure 42. Mapping
42. Enter the command line to map the network drive of the SCCM Server share where the DEW files are copied.
43. Click Apply and then click OK.
44. Click Install Operating System, and click Add.
45. In the Properties tab, enter Format in the Name field.
Deploying operating system image by using Operating Systems Deployment (OSD) 43

Figure 43. Format
46. Enter Diskpart.exe /s PrepareOSPartition.wss in the Command line field.
47. Enter K:\ in the Start in field.
48. Click Apply and then click OK.
49. Click Install Operating System, and click Add.
50. Click the Properties tab, and do the following:
a. Click the Apply an operating system from a captured image radio button.
44 Deploying operating system image by using Operating Systems Deployment (OSD)

Figure 44. Apply Operating System
b. Browse to the location where you have placed the image package.c. From the Image index drop-down list, select a value of the image. Ensure that the value is the highest of 1-1, 2-2, 3-3.
NOTE: If only a single image exists, then by default the value is displayed as 1-1.
d. Select the Use an Unattended or Sysprep answer file for a custom installation check box.e. Browse to the location where you have placed the unattended installation software package created in step b.f. In the File name field, enter the file name of the unattended installation software package.g. From the Destination folder drop-down menu, select Specific disk and partition for destination.h. From the Disk drop-down menu, select 0.i. From the Partition drop-down menu, select 5.j. Click Apply and then click OK.
51. Click Install Operating System, and click Add.
52. In the Properties tab, enter Apply Network Settings in the Name field.
Deploying operating system image by using Operating Systems Deployment (OSD) 45

Figure 45. Apply Network Settings
53. Select the Join a workgroup radio button and specify the workgroup name.
54. Click Apply and then click OK.
55. Click Setup Operating System, and click Add.
56. In the Properties tab, enter Setup Windows and Configuration Manager in the Name field.
46 Deploying operating system image by using Operating Systems Deployment (OSD)

Figure 46. Setup Windows and Configuration Manager
57. In the Client Package field, browse and select Configuration Manager Client Package.
58. Click Apply and then click OK.
Deploying Windows reference imageTo deploy the Windows reference image, do the following:
1. Right-click the created task sequence, and click Deploy.
2. Specify the collection to which you want to deploy the task sequence, and click Next.
Deploying operating system image by using Operating Systems Deployment (OSD) 47

Figure 47. Deploy software wizard
3. On the Specify settings to control how this software is deployed page, select Required from the Purpose drop-downlist.
4. To make this task sequence available for software deployment, select Configuration Manager Clients, media and PXEfrom the drop-down list and click Next.
48 Deploying operating system image by using Operating Systems Deployment (OSD)

Figure 48. Deployment settings
5. On the Specify the schedule for this deployment page, click New.
Deploying operating system image by using Operating Systems Deployment (OSD) 49

Figure 49. Assignment schedule
The Assignment Schedule window is displayed.
6. On the Assignment Schedule window, do one of the following:● Select the specific time to start the deployment.● Select the As soon as possible option to deploy the software after you complete the configuration.
7. In Assignment Schedule click OK.
8. On the User Experience page, retain the default options and click Next.
9. On the Alert page, retain the default options and click Next.
50 Deploying operating system image by using Operating Systems Deployment (OSD)

Figure 50. User experience
10. On the Distribution Points page, select the Download content locally when needed by running task sequencedeployment option, and then select the When no local distribution point is available, use a remote distribution pointoption and then click Next.
11. On the Summary page, verify the details, and click Next, and then click Close.
After the task sequence is complete, the thin client restarts in the Windows pre-installation environment.NOTE: Time for the advertisement to appear at the client side depends on the thin client and the user policy refresh
interval time. It also depends on the server and network parameters such as server capacity to handle the clients and
network traffic. If you do not receive an advertisement, go to Control Panel > Configuration Manager > Actions >
Machine Policy Retrieval & Evaluation Cycle, and click Run Now.
Deploying operating system image by using Operating Systems Deployment (OSD) 51
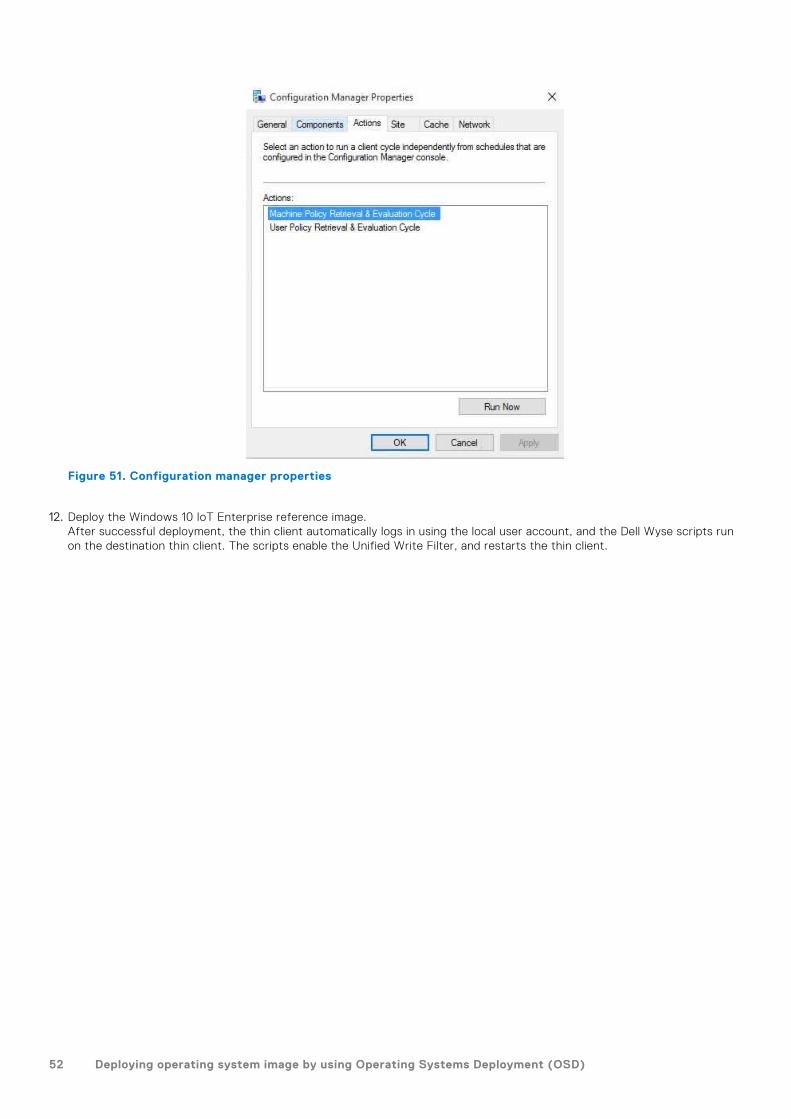
Figure 51. Configuration manager properties
12. Deploy the Windows 10 IoT Enterprise reference image.After successful deployment, the thin client automatically logs in using the local user account, and the Dell Wyse scripts runon the destination thin client. The scripts enable the Unified Write Filter, and restarts the thin client.
52 Deploying operating system image by using Operating Systems Deployment (OSD)

Prerequisites to deploy software applicationsThe following are the prerequisites to deploy the third party software applications:
● The device should be discovered in the Configuration Manager server.
● Disable the write filter.
● Obtain the latest application, and copy it to the local drive on the Configmgr site server's shared locationC:\ConfigMgr_packages\apps\.
● The device should be a member of a collection that has a configured maintenance window. This configured maintenancewindow allows you to manage the device when the write filter is disabled and enabled, and when the device restarts.
● For more information about the application deployment with System Center Configuration Manager, see Deploy applicationswith System Center Configuration Manager at https://docs.microsoft.com/.
NOTE: When you deploy applications to the devices running Windows 10, that are write-filter-enabled, you can specify
whether to disable the write filter on the device during the deployment. After you disable the write filter, restart the device.
If the write filter is not disabled, the software is deployed to a temporary overlay, and the software is not installed when you
restart the device.
NOTE: In the Deploy Software Wizard, the user experience setting that controls the write filter behavior is a check box
named Commit changes at deadline or during a maintenance window.
For more information on managing Windows Embedded devices that are write-filer enabled, see blogs.technet.microsoft.comand Planning for client deployment to Windows Embedded devices in System Center Configuration Manager at https://docs.microsoft.com/.
4
Prerequisites to deploy software applications 53

Prerequisites to capture and deploy anoperating system
● When capturing an operating system image by using capture media task sequence, ensure that the FODPacks folder is notpresent in the C drive. If there is any FODPacks folder, delete the folder.
● When you deploy an operating system image to the client by using a task sequence, the size of the wim file that is capturedusing the capture media and the size of the used space of drive C in the reference device put together must be less than thecapacity of drive C.
For example, if the size of the wim file that is captured from reference device is 8 GB, the size of the used space in the driveC is 17 GB. You can then deploy the wim file only if the capacity of operating system drive is greater than 25 GB.
You must create cmd scripts execute-DEW-script.cmd and Task-sequence-dew-script.ps1 before you create a tasksequence to deploy Windows reference image.1. Create a text file with name execute-DEW-script and copy the following content to the file:
%Windir%\System32\WindowsPowerShell\v1.0\powershell.exe -command Set-ExecutionPolicy Unrestricted
%Windir%\System32\WindowsPowerShell\v1.0\powershell.exe "C:\DEW_Temp\Task-sequence-dew-script.ps1"
2. Save the text file in the SCCM Share DEW folder with name execute-DEW-script.cmd.
3. Create a text file with name Task-sequence-dew-script and copy the following content to the file:
#C:\Windows\System32\WindowsPowerShell\v1.0\powershell.exe Set-ExecutionPolicy -ExecutionPolicy Unrestricted#Get GUID $id = Get-WmiObject -Class Win32_Volume |Where-Object {$_.Name -like "C:\DEW\"} | Select-Object -property "DeviceID"#Set-Volume -UniqueId $test.DeviceID -NewFileSystemLabel DEW_VOLUME`
#formatting DEW volume Format-Volume -Path $id.DeviceID -FileSystem NTFS -Force -Full$service = "DEWSERVICE" Set-Service -Name $service -StartupType DisabledNew-Item -path 'C:\DEW\DEW_VOLUME' -ItemType DirectoryNew-Item C:\DEW\DEW_VOLUME\DEW.txtSet-Content C:\DEW\DEW_VOLUME\DEW.txt 'DEW_PARTITION'
4. Save the text file in the SCCM Share DEW folder with name Task-sequence-dew-script.ps1.
NOTE: For better performance during imaging, Dell Technologies recommends that the total size of the wim file and the
used space is 1 GB less than the size of drive C.
5
54 Prerequisites to capture and deploy an operating system

Creating software package for unattendedinstallation
You must create a software package for unattended installation. Unattended installation is an automated installation technologythat you can use to install or upgrade an operating system with minimal user intervention.
NOTE: Copy the C:\windows\setup\sysprep.xml file (for legacy scripts) and C:\windows\setup\tools\sysprep.xml file (for PowerShell ported scripts) with supported images to the \SCCMserver\share-folderlocation on the Configuration Manager server. The .xml file must be accessible by the Configuration Manager server.
1. Expand Software Library > Overview > Application management > Packages.
Figure 52. Packages
2. Right-click Packages and click Create Package.
3. Enter the package name, description, manufacturer name, language, and version.
A
Creating software package for unattended installation 55

Figure 53. Information about package
4. Browse to the source folder where you have copied the sysprep files.
5. Click Next.
6. Select Program for device radio button, and then click Next.
NOTE: Based on your requirement, you can select any one of the options available on the Program type page.
56 Creating software package for unattended installation
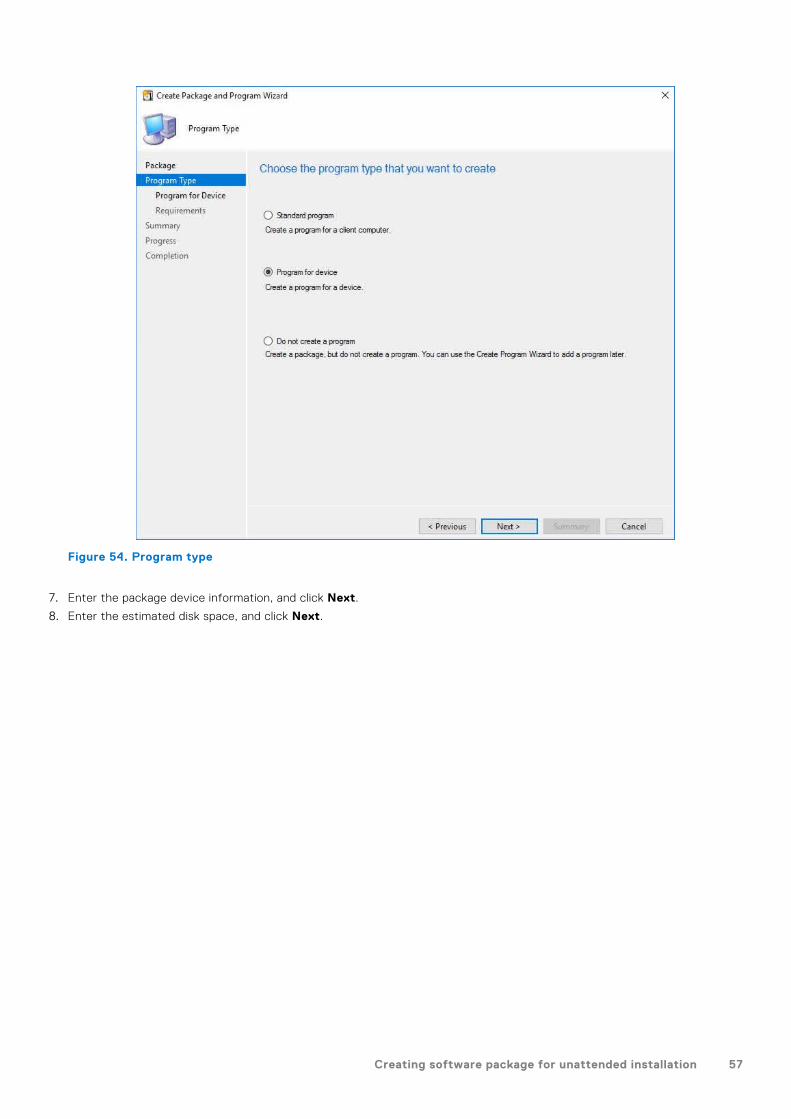
Figure 54. Program type
7. Enter the package device information, and click Next.
8. Enter the estimated disk space, and click Next.
Creating software package for unattended installation 57

Figure 55. Estimated disk space
9. Verify the information that you have provided and click Next.
58 Creating software package for unattended installation

Figure 56. Summary page
The settings are applied.
10. Click Close.
11. In the Distribute Content wizard, right-click the software package which you have created, and click Distribute content.
Creating software package for unattended installation 59

Figure 57. Content destination
12. From the Add drop-down list, select Distribution Point.
60 Creating software package for unattended installation

Figure 58. Add distribution points
13. In Available distribution points, select the check boxes applicable to the distribution points that host your content, andclick OK.
14. Click Next.
Figure 59. Content status
The content status is displayed in green. It may take a few minutes to complete the distribution process.
Creating software package for unattended installation 61