mama's egr milk money
TRANSCRIPT
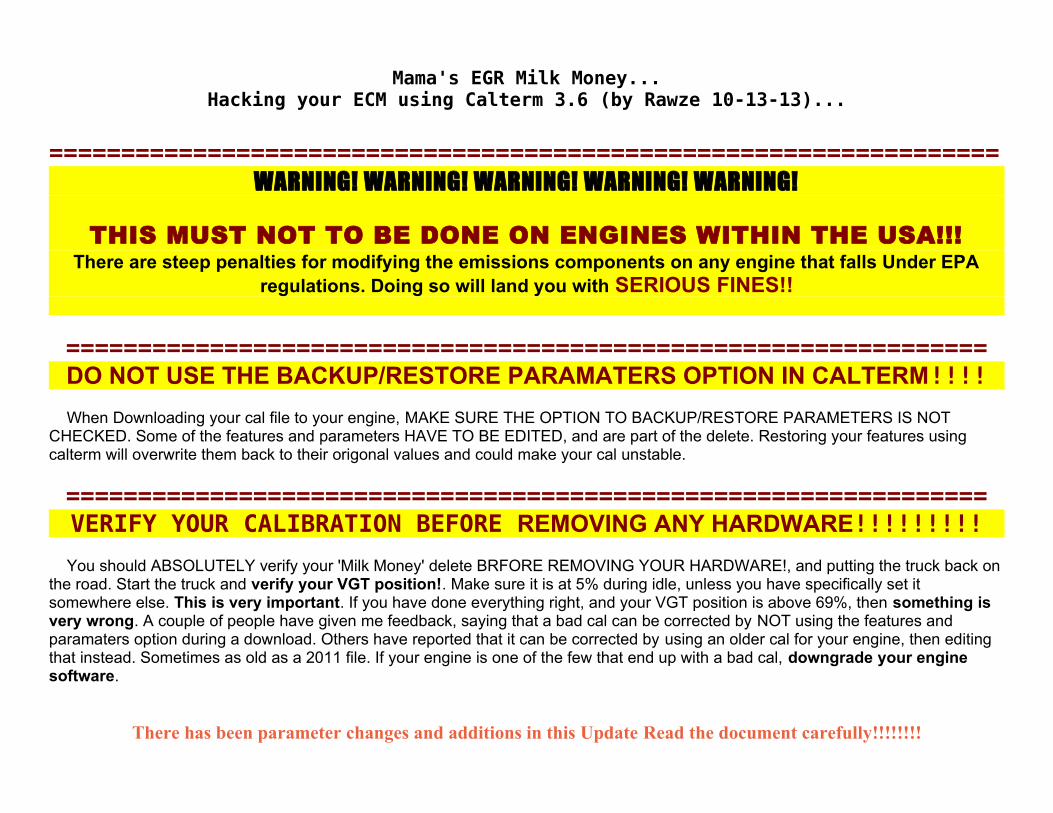
Mama's EGR Milk Money...Hacking your ECM using Calterm 3.6 (by Rawze 10-13-13)...
==================================================================WARNING! WARNING! WARNING! WARNING! WARNING!
THIS MUST NOT TO BE DONE ON ENGINES WITHIN THE USA!!!There are steep penalties for modifying the emissions components on any engine that falls Under EPA
regulations. Doing so will land you with SERIOUS FINES!!
================================================================DO NOT USE THE BACKUP/RESTORE PARAMATERS OPTION IN CALTERM!!!!
When Downloading your cal file to your engine, MAKE SURE THE OPTION TO BACKUP/RESTORE PARAMETERS IS NOT CHECKED. Some of the features and parameters HAVE TO BE EDITED, and are part of the delete. Restoring your features using calterm will overwrite them back to their origonal values and could make your cal unstable.
================================================================VERIFY YOUR CALIBRATION BEFORE REMOVING ANY HARDWARE!!!!!!!!!
You should ABSOLUTELY verify your 'Milk Money' delete BRFORE REMOVING YOUR HARDWARE!, and putting the truck back on the road. Start the truck and verify your VGT position!. Make sure it is at 5% during idle, unless you have specifically set it somewhere else. This is very important. If you have done everything right, and your VGT position is above 69%, then something is very wrong. A couple of people have given me feedback, saying that a bad cal can be corrected by NOT using the features and paramaters option during a download. Others have reported that it can be corrected by using an older cal for your engine, then editing that instead. Sometimes as old as a 2011 file. If your engine is one of the few that end up with a bad cal, downgrade your engine software.
There has been parameter changes and additions in this Update Read the document carefully!!!!!!!!
This document is an ongoing process, Check regularly for updates!
Mama's EGR Milk Money...
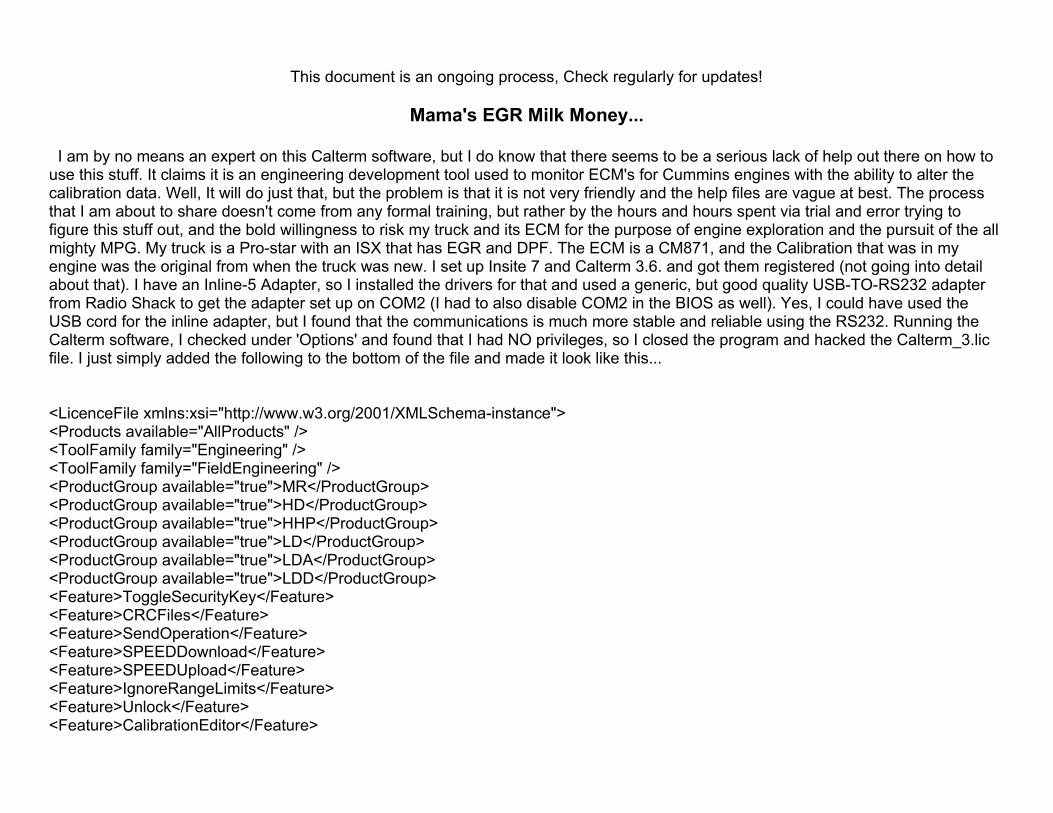
I am by no means an expert on this Calterm software, but I do know that there seems to be a serious lack of help out there on how to use this stuff. It claims it is an engineering development tool used to monitor ECM's for Cummins engines with the ability to alter the calibration data. Well, It will do just that, but the problem is that it is not very friendly and the help files are vague at best. The process that I am about to share doesn't come from any formal training, but rather by the hours and hours spent via trial and error trying to figure this stuff out, and the bold willingness to risk my truck and its ECM for the purpose of engine exploration and the pursuit of the all mighty MPG. My truck is a Pro-star with an ISX that has EGR and DPF. The ECM is a CM871, and the Calibration that was in my engine was the original from when the truck was new. I set up Insite 7 and Calterm 3.6. and got them registered (not going into detail about that). I have an Inline-5 Adapter, so I installed the drivers for that and used a generic, but good quality USB-TO-RS232 adapter from Radio Shack to get the adapter set up on COM2 (I had to also disable COM2 in the BIOS as well). Yes, I could have used the USB cord for the inline adapter, but I found that the communications is much more stable and reliable using the RS232. Running the Calterm software, I checked under 'Options' and found that I had NO privileges, so I closed the program and hacked the Calterm_3.lic file. I just simply added the following to the bottom of the file and made it look like this...
<LicenceFile xmlns:xsi="http://www.w3.org/2001/XMLSchema-instance"> <Products available="AllProducts" /> <ToolFamily family="Engineering" /> <ToolFamily family="FieldEngineering" /> <ProductGroup available="true">MR</ProductGroup> <ProductGroup available="true">HD</ProductGroup> <ProductGroup available="true">HHP</ProductGroup> <ProductGroup available="true">LD</ProductGroup> <ProductGroup available="true">LDA</ProductGroup> <ProductGroup available="true">LDD</ProductGroup> <Feature>ToggleSecurityKey</Feature> <Feature>CRCFiles</Feature> <Feature>SendOperation</Feature> <Feature>SPEEDDownload</Feature> <Feature>SPEEDUpload</Feature> <Feature>IgnoreRangeLimits</Feature> <Feature>Unlock</Feature> <Feature>CalibrationEditor</Feature>
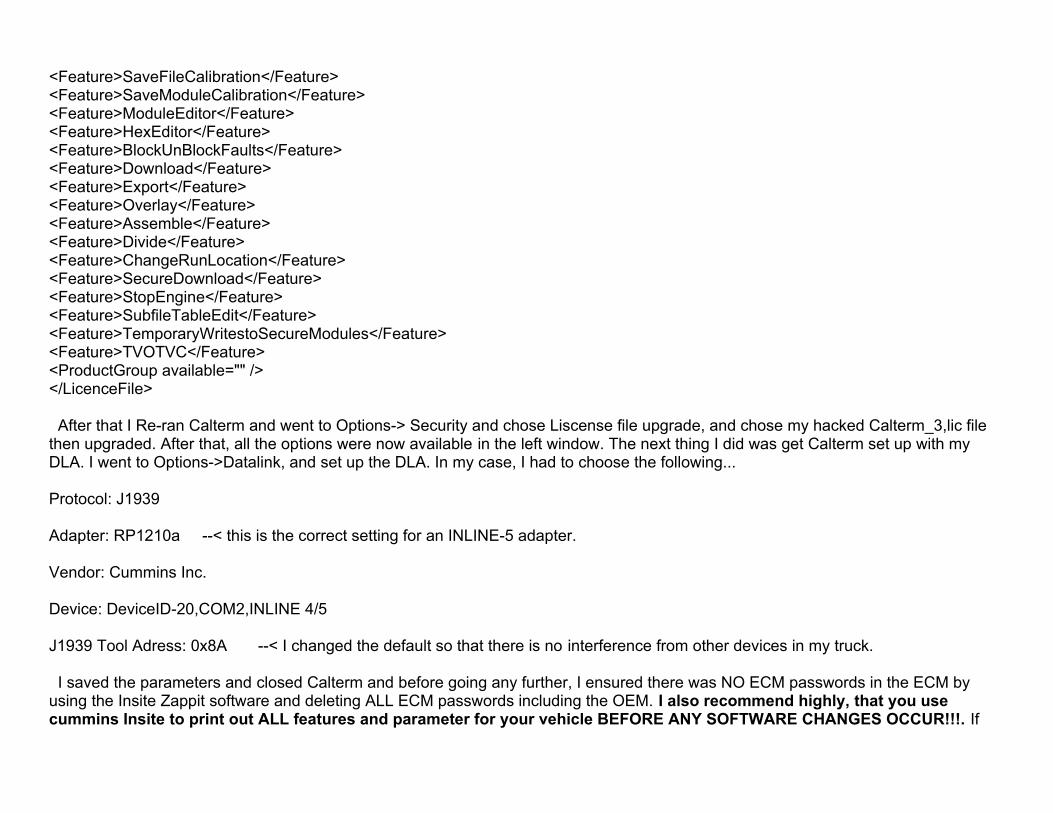
<Feature>SaveFileCalibration</Feature> <Feature>SaveModuleCalibration</Feature> <Feature>ModuleEditor</Feature> <Feature>HexEditor</Feature> <Feature>BlockUnBlockFaults</Feature> <Feature>Download</Feature> <Feature>Export</Feature> <Feature>Overlay</Feature> <Feature>Assemble</Feature> <Feature>Divide</Feature> <Feature>ChangeRunLocation</Feature> <Feature>SecureDownload</Feature> <Feature>StopEngine</Feature> <Feature>SubfileTableEdit</Feature> <Feature>TemporaryWritestoSecureModules</Feature> <Feature>TVOTVC</Feature> <ProductGroup available="" /> </LicenceFile>
After that I Re-ran Calterm and went to Options-> Security and chose Liscense file upgrade, and chose my hacked Calterm_3,lic file then upgraded. After that, all the options were now available in the left window. The next thing I did was get Calterm set up with my DLA. I went to Options->Datalink, and set up the DLA. In my case, I had to choose the following...
Protocol: J1939
Adapter: RP1210a --< this is the correct setting for an INLINE-5 adapter.
Vendor: Cummins Inc.
Device: DeviceID-20,COM2,INLINE 4/5
J1939 Tool Adress: 0x8A --< I changed the default so that there is no interference from other devices in my truck.
I saved the parameters and closed Calterm and before going any further, I ensured there was NO ECM passwords in the ECM by using the Insite Zappit software and deleting ALL ECM passwords including the OEM. I also recommend highly, that you use cummins Insite to print out ALL features and parameter for your vehicle BEFORE ANY SOFTWARE CHANGES OCCUR!!!. If
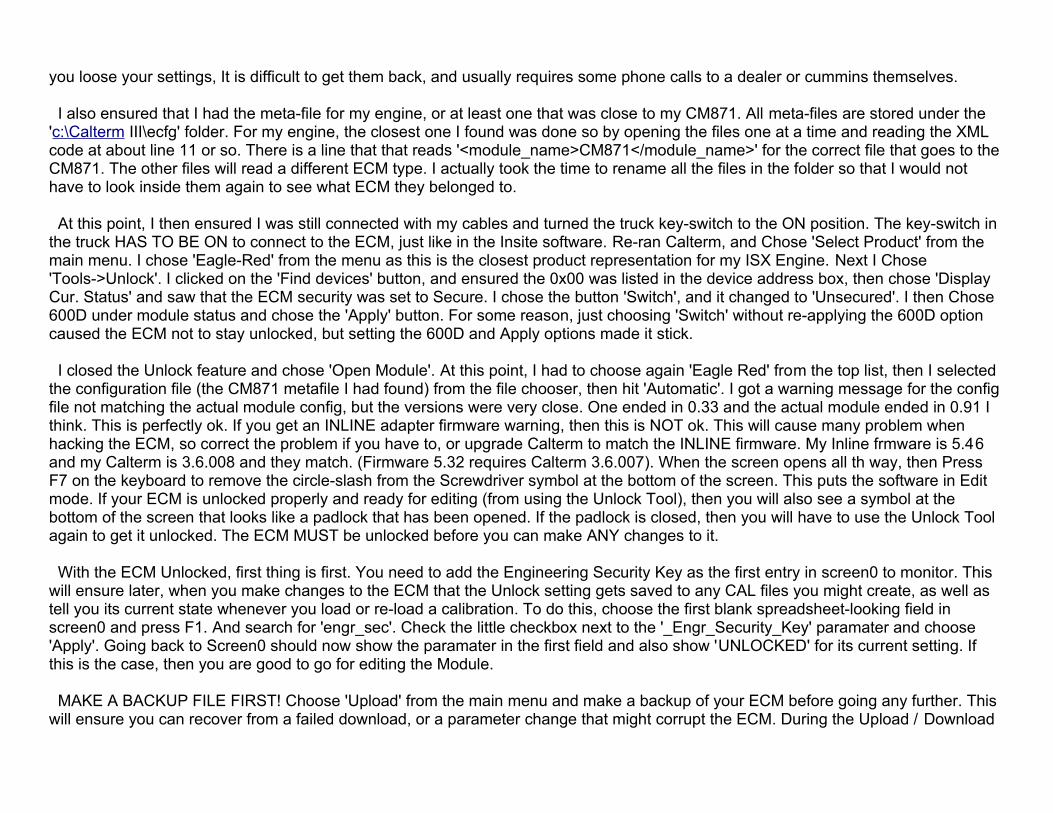
you loose your settings, It is difficult to get them back, and usually requires some phone calls to a dealer or cummins themselves.
I also ensured that I had the meta-file for my engine, or at least one that was close to my CM871. All meta-files are stored under the 'c:\Calterm III\ecfg' folder. For my engine, the closest one I found was done so by opening the files one at a time and reading the XML code at about line 11 or so. There is a line that that reads '<module_name>CM871</module_name>' for the correct file that goes to the CM871. The other files will read a different ECM type. I actually took the time to rename all the files in the folder so that I would not have to look inside them again to see what ECM they belonged to.
At this point, I then ensured I was still connected with my cables and turned the truck key-switch to the ON position. The key-switch in the truck HAS TO BE ON to connect to the ECM, just like in the Insite software. Re-ran Calterm, and Chose 'Select Product' from the main menu. I chose 'Eagle-Red' from the menu as this is the closest product representation for my ISX Engine. Next I Chose 'Tools->Unlock'. I clicked on the 'Find devices' button, and ensured the 0x00 was listed in the device address box, then chose 'Display Cur. Status' and saw that the ECM security was set to Secure. I chose the button 'Switch', and it changed to 'Unsecured'. I then Chose 600D under module status and chose the 'Apply' button. For some reason, just choosing 'Switch' without re-applying the 600D option caused the ECM not to stay unlocked, but setting the 600D and Apply options made it stick.
I closed the Unlock feature and chose 'Open Module'. At this point, I had to choose again 'Eagle Red' from the top list, then I selected the configuration file (the CM871 metafile I had found) from the file chooser, then hit 'Automatic'. I got a warning message for the config file not matching the actual module config, but the versions were very close. One ended in 0.33 and the actual module ended in 0.91 I think. This is perfectly ok. If you get an INLINE adapter firmware warning, then this is NOT ok. This will cause many problem when hacking the ECM, so correct the problem if you have to, or upgrade Calterm to match the INLINE firmware. My Inline frmware is 5.46 and my Calterm is 3.6.008 and they match. (Firmware 5.32 requires Calterm 3.6.007). When the screen opens all th way, then Press F7 on the keyboard to remove the circle-slash from the Screwdriver symbol at the bottom of the screen. This puts the software in Edit mode. If your ECM is unlocked properly and ready for editing (from using the Unlock Tool), then you will also see a symbol at the bottom of the screen that looks like a padlock that has been opened. If the padlock is closed, then you will have to use the Unlock Tool again to get it unlocked. The ECM MUST be unlocked before you can make ANY changes to it.
With the ECM Unlocked, first thing is first. You need to add the Engineering Security Key as the first entry in screen0 to monitor. This will ensure later, when you make changes to the ECM that the Unlock setting gets saved to any CAL files you might create, as well as tell you its current state whenever you load or re-load a calibration. To do this, choose the first blank spreadsheet-looking field in screen0 and press F1. And search for 'engr_sec'. Check the little checkbox next to the '_Engr_Security_Key' paramater and choose 'Apply'. Going back to Screen0 should now show the paramater in the first field and also show 'UNLOCKED' for its current setting. If this is the case, then you are good to go for editing the Module.
MAKE A BACKUP FILE FIRST! Choose 'Upload' from the main menu and make a backup of your ECM before going any further. This will ensure you can recover from a failed download, or a parameter change that might corrupt the ECM. During the Upload / Download
process, it is not unusual to get some alarms on the dash of the truck. This is because the ECM is put in boot-loader mode and taken out of Application mode during the upload.
After the upload is done, add parameters to Screen0 that you want to change. Note that not all parameters are editable. Many parameters are hard-coded, but this really doesn't limit you much because somewhere else in the thousands of parameters is the bypass, or actual editable setting to replace it. One thing that helped me in finding editable parameters is the descriptions. Just about any description that has the words 'Tells the Tool', or 'informs the Tool' are NOT editable. These are output parameters only that actually are just Outputs of other settings and results. Many of the variable names include prefixes to indicate their functions, For example, C_ indicates a user-adjustable control, and T_ indicates a control toggle. EMO_ indicates a function related to emissions management. There are many other prefixes, and learning what they mean by studying the comments is very helpful. Many parameters are Copies of others with a different name, so be thoughtful and investigate thoroughly before choosing something to change or monitor. Anyways, When you have some parameters selected and you Edit their value, If the ECM will let you change them, then the Value field will turn Yellow indicating there was a change. Make your changes to all fields desired, then use the 'Save' button at the top to actually commit them into temporary ram-space in the ECM. These changes will stay until the power is cycled on the ECM (the keyswitch in the dash of the truck turned off, then on a again). This makes it easy to change something and then test it without screwing up your ECM.
To permanently change something, you need to get a little creative. First, Set all the changes you want to make, Then use the 'Save' button to send them to the ECM, then Choose the 'Upload' function from the main menu. Upload the file and save it as a CAL file. After that, You will need to choose 'Download' to Download it BACK to the ECM. The ECM will then have the edited file as its main Calibration file and the changes will then be permanent. You can compare the module, or the new cal file to your original backup to see what changes you have made if you get lost along the way using the compare tool.
If you decide for some reason to hack a .ecfg or .cal file directly then there is a tool to Re-certify the file's CRC. Just choose 'CRC Files' from the main menu and select the hacked .ecfg or .cal file and then add them to the list and choose ok. They will be updated with the new CRC info permanently. I hacked my .ecfg to make it match my exact engine calibration software version to eliminate the warning messages whenever I opened the Module Editor this way.
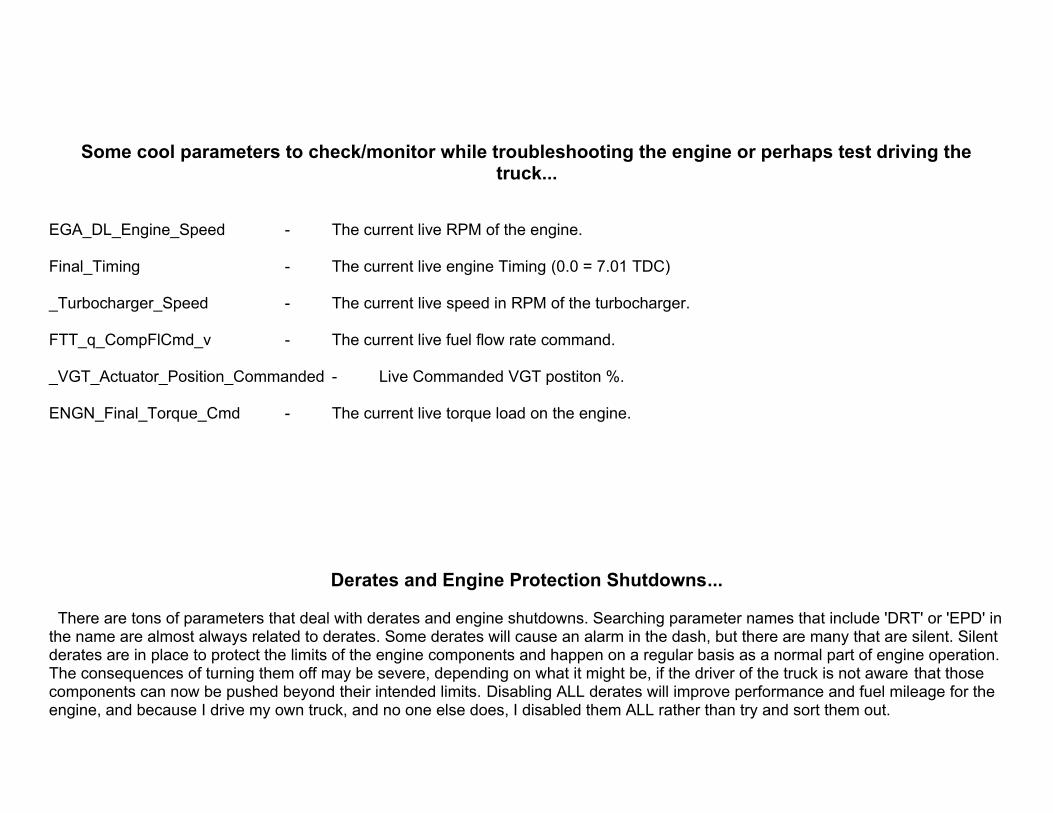
Some cool parameters to check/monitor while troubleshooting the engine or perhaps test driving the truck...
EGA_DL_Engine_Speed - The current live RPM of the engine.
Final_Timing - The current live engine Timing (0.0 = 7.01 TDC)
_Turbocharger_Speed - The current live speed in RPM of the turbocharger.
FTT_q_CompFlCmd_v - The current live fuel flow rate command.
_VGT_Actuator_Position_Commanded - Live Commanded VGT postiton %.
ENGN_Final_Torque_Cmd - The current live torque load on the engine.
Derates and Engine Protection Shutdowns...
There are tons of parameters that deal with derates and engine shutdowns. Searching parameter names that include 'DRT' or 'EPD' in the name are almost always related to derates. Some derates will cause an alarm in the dash, but there are many that are silent. Silent derates are in place to protect the limits of the engine components and happen on a regular basis as a normal part of engine operation. The consequences of turning them off may be severe, depending on what it might be, if the driver of the truck is not aware that those components can now be pushed beyond their intended limits. Disabling ALL derates will improve performance and fuel mileage for the engine, and because I drive my own truck, and no one else does, I disabled them ALL rather than try and sort them out.
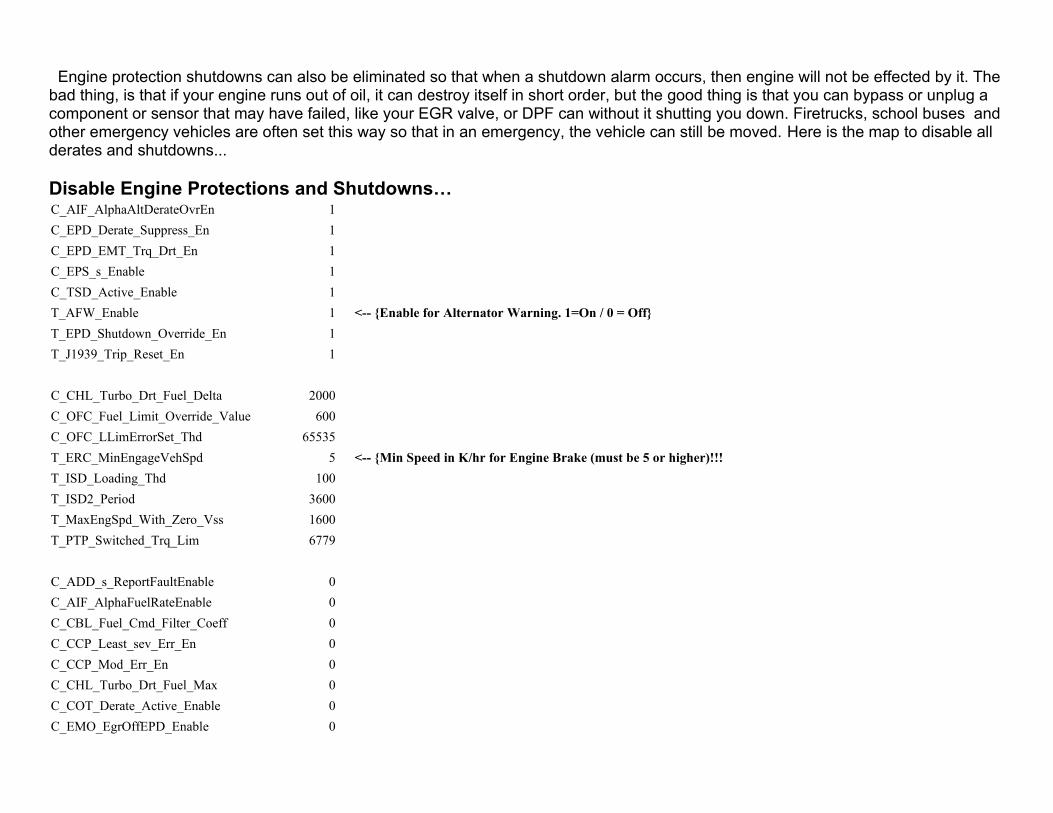
Engine protection shutdowns can also be eliminated so that when a shutdown alarm occurs, then engine will not be effected by it. The bad thing, is that if your engine runs out of oil, it can destroy itself in short order, but the good thing is that you can bypass or unplug a component or sensor that may have failed, like your EGR valve, or DPF can without it shutting you down. Firetrucks, school buses and other emergency vehicles are often set this way so that in an emergency, the vehicle can still be moved. Here is the map to disable all derates and shutdowns...
Disable Engine Protections and Shutdowns…C_AIF_AlphaAltDerateOvrEn 1
C_EPD_Derate_Suppress_En 1
C_EPD_EMT_Trq_Drt_En 1
C_EPS_s_Enable 1
C_TSD_Active_Enable 1
T_AFW_Enable 1 <-- {Enable for Alternator Warning. 1=On / 0 = Off}
T_EPD_Shutdown_Override_En 1
T_J1939_Trip_Reset_En 1
C_CHL_Turbo_Drt_Fuel_Delta 2000
C_OFC_Fuel_Limit_Override_Value 600
C_OFC_LLimErrorSet_Thd 65535
T_ERC_MinEngageVehSpd 5 <-- {Min Speed in K/hr for Engine Brake (must be 5 or higher)!!!
T_ISD_Loading_Thd 100
T_ISD2_Period 3600
T_MaxEngSpd_With_Zero_Vss 1600
T_PTP_Switched_Trq_Lim 6779
C_ADD_s_ReportFaultEnable 0
C_AIF_AlphaFuelRateEnable 0
C_CBL_Fuel_Cmd_Filter_Coeff 0
C_CCP_Least_sev_Err_En 0
C_CCP_Mod_Err_En 0
C_CHL_Turbo_Drt_Fuel_Max 0
C_COT_Derate_Active_Enable 0
C_EMO_EgrOffEPD_Enable 0
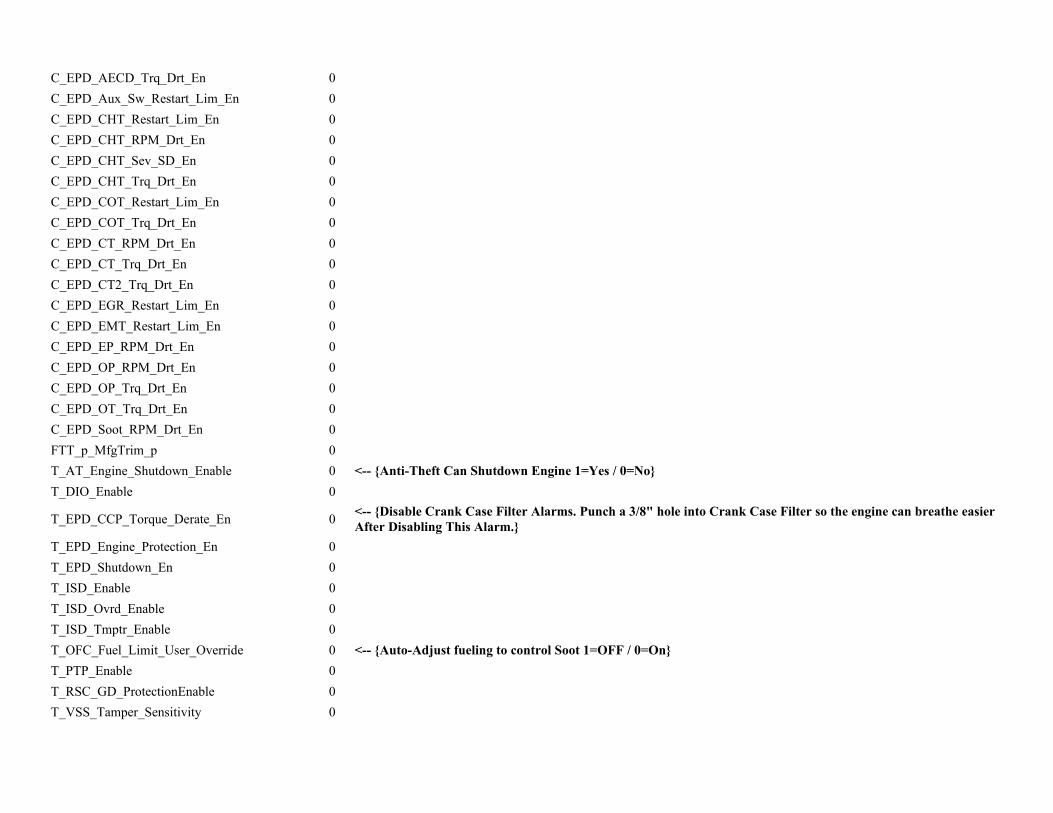
C_EPD_AECD_Trq_Drt_En 0
C_EPD_Aux_Sw_Restart_Lim_En 0
C_EPD_CHT_Restart_Lim_En 0
C_EPD_CHT_RPM_Drt_En 0
C_EPD_CHT_Sev_SD_En 0
C_EPD_CHT_Trq_Drt_En 0
C_EPD_COT_Restart_Lim_En 0
C_EPD_COT_Trq_Drt_En 0
C_EPD_CT_RPM_Drt_En 0
C_EPD_CT_Trq_Drt_En 0
C_EPD_CT2_Trq_Drt_En 0
C_EPD_EGR_Restart_Lim_En 0
C_EPD_EMT_Restart_Lim_En 0
C_EPD_EP_RPM_Drt_En 0
C_EPD_OP_RPM_Drt_En 0
C_EPD_OP_Trq_Drt_En 0
C_EPD_OT_Trq_Drt_En 0
C_EPD_Soot_RPM_Drt_En 0
FTT_p_MfgTrim_p 0
T_AT_Engine_Shutdown_Enable 0 <-- {Anti-Theft Can Shutdown Engine 1=Yes / 0=No}
T_DIO_Enable 0
T_EPD_CCP_Torque_Derate_En 0<-- {Disable Crank Case Filter Alarms. Punch a 3/8" hole into Crank Case Filter so the engine can breathe easier After Disabling This Alarm.}
T_EPD_Engine_Protection_En 0
T_EPD_Shutdown_En 0
T_ISD_Enable 0
T_ISD_Ovrd_Enable 0
T_ISD_Tmptr_Enable 0
T_OFC_Fuel_Limit_User_Override 0 <-- {Auto-Adjust fueling to control Soot 1=OFF / 0=On}
T_PTP_Enable 0
T_RSC_GD_ProtectionEnable 0
T_VSS_Tamper_Sensitivity 0

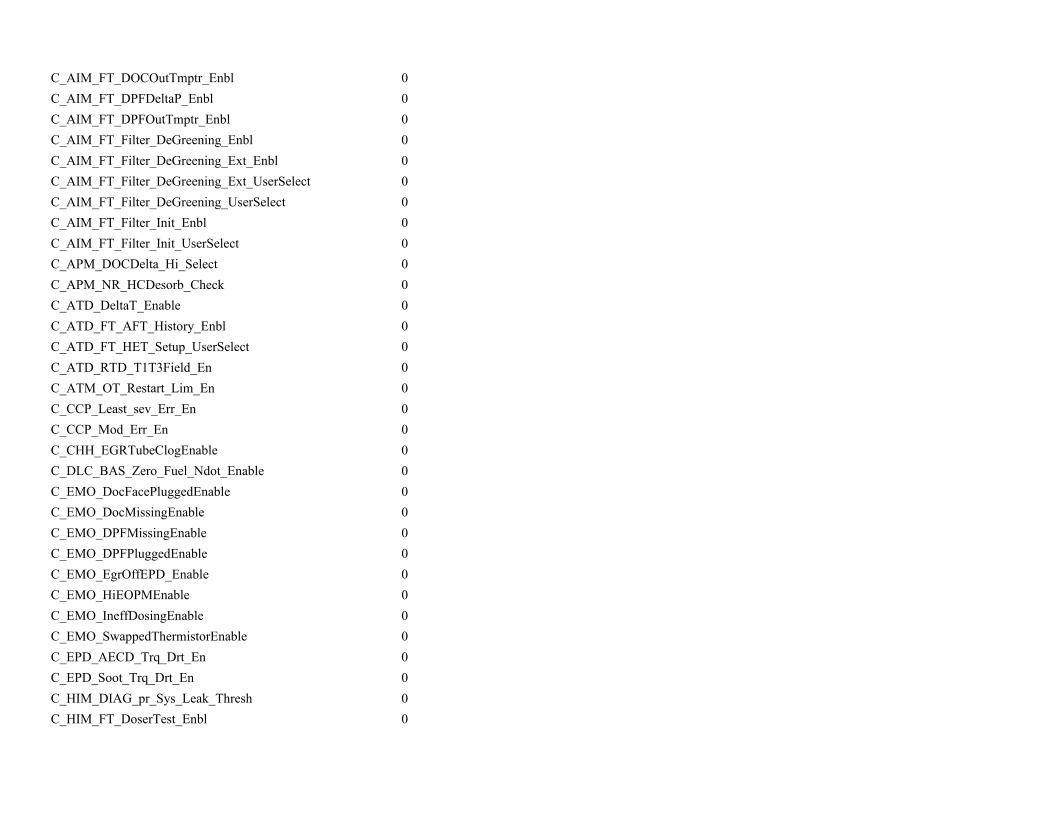
Deleting the After-treatment systemon the ISX Engine (CM871).
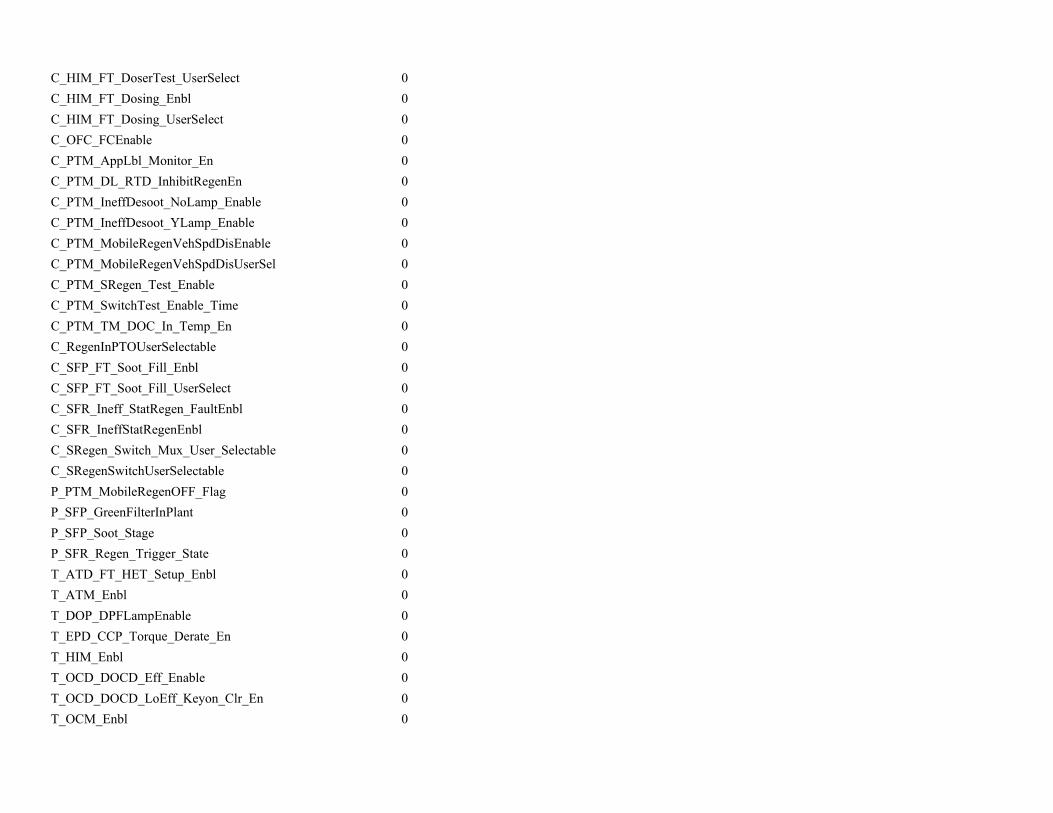
These parameter changes completely remove the logic for the DPF and After-treatment (Dosing) injector. It took many hours of research and comparison of CAL files to get the proper changes. These changes should work on ALL CM871 engines that have a DPF and no DEF system. The Information has been verified and tested as well. After making these adjustments, Remove the DPF and DOC and hollow them out with a hammer and chisel, or replace them with a muffler. The main Wiring harness going to the DPF then needs to be unplugged and wrapped to prevent corrosion. Please take note that these changes do NOT affect the EGR system itself, only the After-treatment system. If the vehicle has more that 200k+ miles on it, then the IMAP (Intake Manifold Air Pressure Sensor) should also be removed from the intake and replaced or cleaned thoroughly with a dry toothbrush to ensure accurate charge pressure feedback to the ECM. This will ensure maximum horsepower and fuel efficiency as the ECM will now rely heavily on this sensor for its torque curves because of the lack of extra sensors that were arranged at the DPF. Here are the changes that need to take place...
Disable DPF…C_EPD_Derate_Suppress_En 1
C_PTM_ATM_Input_Override_En 1
T_EMD_Low_Eff_ErrReset_Enbl 1
T_HIM_DIAG_Test_Enbl 1
T_OCL_FacePlug_Disable 1
T_OCL_FacePlug_Disable 1
T_OCR_TransComp_Enbl 1
C_APM_NR_OverTemp_SysIO 01D90E3F
C_APM_NR_OverTemp_SysPerf 006EC103
C_APM_tm_DPFOut_HiTmptr 10
C_EPD_Soot_Spd_Derate 1900
P_OCD_fn_DOC_NmlEff 1
C_AIM_FT_DOCInTmptr_Enbl 0
C_AIM_FT_DOCOutTmptr_Enbl 0
C_AIM_FT_DPFDeltaP_Enbl 0
C_AIM_FT_DPFOutTmptr_Enbl 0
C_AIM_FT_Filter_DeGreening_Enbl 0
C_AIM_FT_Filter_DeGreening_Ext_Enbl 0
C_AIM_FT_Filter_DeGreening_Ext_UserSelect 0
C_AIM_FT_Filter_DeGreening_UserSelect 0
C_AIM_FT_Filter_Init_Enbl 0
C_AIM_FT_Filter_Init_UserSelect 0
C_APM_DOCDelta_Hi_Select 0
C_APM_NR_HCDesorb_Check 0
C_ATD_DeltaT_Enable 0
C_ATD_FT_AFT_History_Enbl 0
C_ATD_FT_HET_Setup_UserSelect 0
C_ATD_RTD_T1T3Field_En 0
C_ATM_OT_Restart_Lim_En 0
C_CCP_Least_sev_Err_En 0
C_CCP_Mod_Err_En 0
C_CHH_EGRTubeClogEnable 0
C_DLC_BAS_Zero_Fuel_Ndot_Enable 0
C_EMO_DocFacePluggedEnable 0
C_EMO_DocMissingEnable 0
C_EMO_DPFMissingEnable 0
C_EMO_DPFPluggedEnable 0
C_EMO_EgrOffEPD_Enable 0
C_EMO_HiEOPMEnable 0
C_EMO_IneffDosingEnable 0
C_EMO_SwappedThermistorEnable 0
C_EPD_AECD_Trq_Drt_En 0
C_EPD_Soot_Trq_Drt_En 0
C_HIM_DIAG_pr_Sys_Leak_Thresh 0
C_HIM_FT_DoserTest_Enbl 0
C_HIM_FT_DoserTest_UserSelect 0
C_HIM_FT_Dosing_Enbl 0
C_HIM_FT_Dosing_UserSelect 0
C_OFC_FCEnable 0
C_PTM_AppLbl_Monitor_En 0
C_PTM_DL_RTD_InhibitRegenEn 0
C_PTM_IneffDesoot_NoLamp_Enable 0
C_PTM_IneffDesoot_YLamp_Enable 0
C_PTM_MobileRegenVehSpdDisEnable 0
C_PTM_MobileRegenVehSpdDisUserSel 0
C_PTM_SRegen_Test_Enable 0
C_PTM_SwitchTest_Enable_Time 0
C_PTM_TM_DOC_In_Temp_En 0
C_RegenInPTOUserSelectable 0
C_SFP_FT_Soot_Fill_Enbl 0
C_SFP_FT_Soot_Fill_UserSelect 0
C_SFR_Ineff_StatRegen_FaultEnbl 0
C_SFR_IneffStatRegenEnbl 0
C_SRegen_Switch_Mux_User_Selectable 0
C_SRegenSwitchUserSelectable 0
P_PTM_MobileRegenOFF_Flag 0
P_SFP_GreenFilterInPlant 0
P_SFP_Soot_Stage 0
P_SFR_Regen_Trigger_State 0
T_ATD_FT_HET_Setup_Enbl 0
T_ATM_Enbl 0
T_DOP_DPFLampEnable 0
T_EPD_CCP_Torque_Derate_En 0
T_HIM_Enbl 0
T_OCD_DOCD_Eff_Enable 0
T_OCD_DOCD_LoEff_Keyon_Clr_En 0
T_OCM_Enbl 0
T_PIP_Enbl 0
T_PTM_AutoDesorb_Enable 0
T_PTM_PTORegenEnable 0
T_SFD_HiDeltaP_Diag_Enable 0
T_SFD_HiSootLoad_Diag_Enable 0
T_SFM_Enbl 0
T_SFR_ApplicationLabel_Ov_Enbl 0
T_SRegen_Switch_Mux_Enable 0
T_SRegenSwitchEnable 0
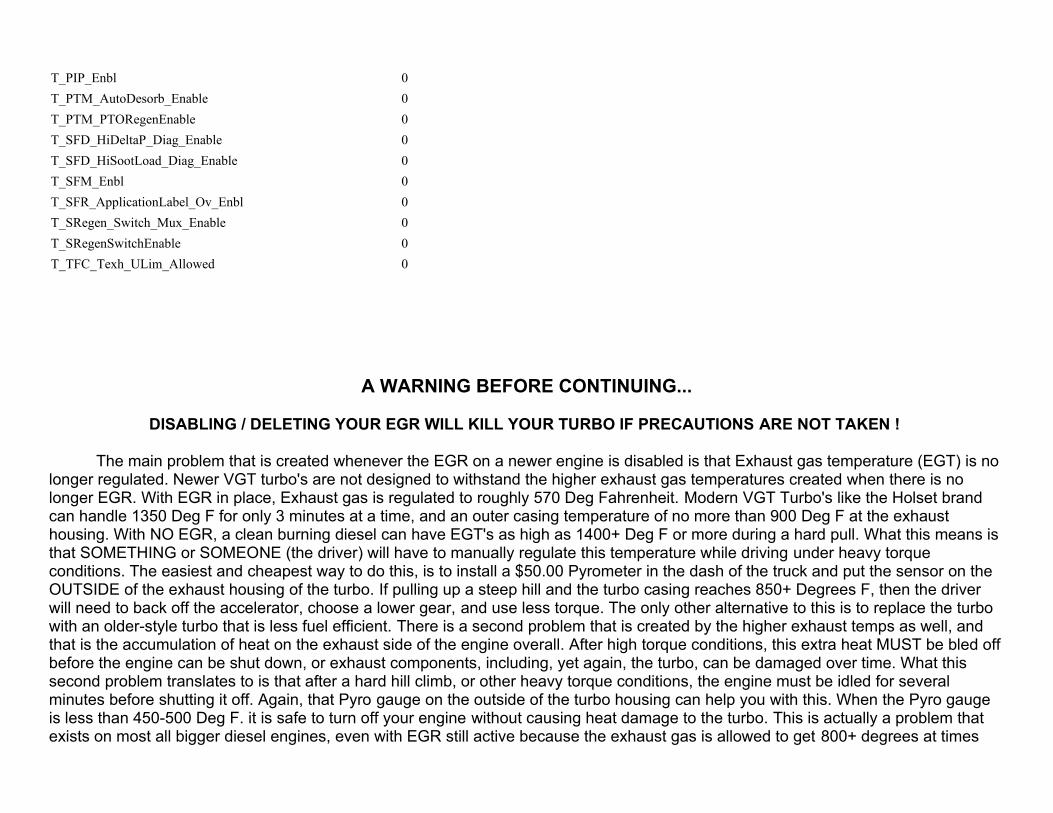
T_TFC_Texh_ULim_Allowed 0
A WARNING BEFORE CONTINUING...
DISABLING / DELETING YOUR EGR WILL KILL YOUR TURBO IF PRECAUTIONS ARE NOT TAKEN !
The main problem that is created whenever the EGR on a newer engine is disabled is that Exhaust gas temperature (EGT) is no longer regulated. Newer VGT turbo's are not designed to withstand the higher exhaust gas temperatures created when there is no longer EGR. With EGR in place, Exhaust gas is regulated to roughly 570 Deg Fahrenheit. Modern VGT Turbo's like the Holset brand can handle 1350 Deg F for only 3 minutes at a time, and an outer casing temperature of no more than 900 Deg F at the exhaust housing. With NO EGR, a clean burning diesel can have EGT's as high as 1400+ Deg F or more during a hard pull. What this means is that SOMETHING or SOMEONE (the driver) will have to manually regulate this temperature while driving under heavy torque conditions. The easiest and cheapest way to do this, is to install a $50.00 Pyrometer in the dash of the truck and put the sensor on the OUTSIDE of the exhaust housing of the turbo. If pulling up a steep hill and the turbo casing reaches 850+ Degrees F, then the driver will need to back off the accelerator, choose a lower gear, and use less torque. The only other alternative to this is to replace the turbo with an older-style turbo that is less fuel efficient. There is a second problem that is created by the higher exhaust temps as well, and that is the accumulation of heat on the exhaust side of the engine overall. After high torque conditions, this extra heat MUST be bled off before the engine can be shut down, or exhaust components, including, yet again, the turbo, can be damaged over time. What this second problem translates to is that after a hard hill climb, or other heavy torque conditions, the engine must be idled for several minutes before shutting it off. Again, that Pyro gauge on the outside of the turbo housing can help you with this. When the Pyro gauge is less than 450-500 Deg F. it is safe to turn off your engine without causing heat damage to the turbo. This is actually a problem that exists on most all bigger diesel engines, even with EGR still active because the exhaust gas is allowed to get 800+ degrees at times

during Regen cycles, or at high altitude conditions.
This warning is from experience and from researching and performing failure analysis on several dozen failed turbo's after an EGR delete was performed, so don't say I DIDN'T KNOW ANY BETTER when your looking at a popped turbo, a runaway engine, and $3,000 plus just to get a new turbo.
Switching OFF EGR...
The EGR logic on the ISX CM871 engines is deeply embedded. After all, The Entire ECM and all of its programming was re-designed for just that purpose. To completely remove the EGR from the engine, including its hardware, some pretty tricky things have to be done. There are a few places out there that have figured out some of the changes needed, like PDI and others, but NONE OF THESE BUTCHER SHOPS HAVE ACCOMPLISHED IT CORRECTLY SO FAR!!!
What you end up with, After spending several thousands of dollars to these over-priced crooks, is an engine that cannot control the turbocharger correctly. Their solution to try and cover these facts up, is for you to buy some Over priced After-Market Mechanical Turbo for several thousand more dollars. The end result is an engine that has no more engine brake, or a very crappy after-market exhaust brake, as well as little or no control by the ECM to maintain decent combustion efficiency. Secondary effects include excess head and exhaust pressures, poor cylinder compensation, poor timing control, and if you decide to keep your existing VGT, destroyed turbocharger(s) and possibly a cracked head or gaskets.
I was challenged with these same problems when researching this subject, and know full well that THE ECM CAN IN FACT OPERATE THE ENGINE VERY WELL with its existing VGT and EGR switched OFF. The 'Combustion Manager' has the final say, as to weather or not the EGR should be on or off, and making it WANT the egr off is the problem. It cannot be satisfied by disabling the EGR logic or any components. The only thing that will make it happy so that it runs the engine as efficiently as possible while the EGR is actually off, is if it is being told to do so by the 'Emissions Manager'. The Emissions Manager is the only thing in the ECM has this ability because the EGR can actually cause the engine to stall and shut down when it is being operated in extreme high altitudes (like the top of veil pas at 12,000 ft), or while the engine is below 140 degrees for the same reason. It can also request an 'off condition' if there is a fault in one of the EGR components. THE PROPER WAY is to leave the EGR logic ON, and Instead, convince the Emissions Manager that there are conditions present where there is no need for it to be on. BOTH must be happy for the engine to run as efficiently as possible.
Knowing all that would make it Easy right?... NOT!!!. Someones first assumption would be to make the engine think its at high Attitude all the time, but the problem with that, is that the Combustion Mgr needs the correct Altitude for the engine to keep combustion
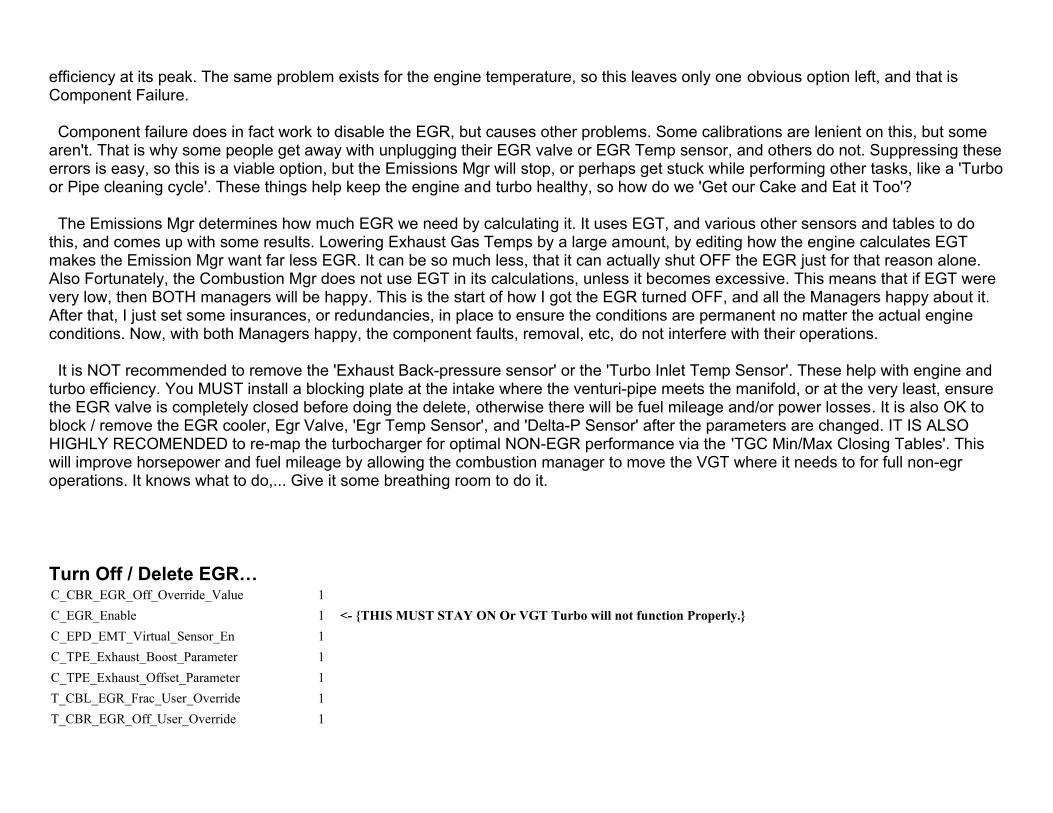
efficiency at its peak. The same problem exists for the engine temperature, so this leaves only one obvious option left, and that is Component Failure.
Component failure does in fact work to disable the EGR, but causes other problems. Some calibrations are lenient on this, but some aren't. That is why some people get away with unplugging their EGR valve or EGR Temp sensor, and others do not. Suppressing these errors is easy, so this is a viable option, but the Emissions Mgr will stop, or perhaps get stuck while performing other tasks, like a 'Turbo or Pipe cleaning cycle'. These things help keep the engine and turbo healthy, so how do we 'Get our Cake and Eat it Too'?
The Emissions Mgr determines how much EGR we need by calculating it. It uses EGT, and various other sensors and tables to do this, and comes up with some results. Lowering Exhaust Gas Temps by a large amount, by editing how the engine calculates EGT makes the Emission Mgr want far less EGR. It can be so much less, that it can actually shut OFF the EGR just for that reason alone. Also Fortunately, the Combustion Mgr does not use EGT in its calculations, unless it becomes excessive. This means that if EGT were very low, then BOTH managers will be happy. This is the start of how I got the EGR turned OFF, and all the Managers happy about it. After that, I just set some insurances, or redundancies, in place to ensure the conditions are permanent no matter the actual engine conditions. Now, with both Managers happy, the component faults, removal, etc, do not interfere with their operations.
It is NOT recommended to remove the 'Exhaust Back-pressure sensor' or the 'Turbo Inlet Temp Sensor'. These help with engine and turbo efficiency. You MUST install a blocking plate at the intake where the venturi-pipe meets the manifold, or at the very least, ensure the EGR valve is completely closed before doing the delete, otherwise there will be fuel mileage and/or power losses. It is also OK to block / remove the EGR cooler, Egr Valve, 'Egr Temp Sensor', and 'Delta-P Sensor' after the parameters are changed. IT IS ALSO HIGHLY RECOMENDED to re-map the turbocharger for optimal NON-EGR performance via the 'TGC Min/Max Closing Tables'. This will improve horsepower and fuel mileage by allowing the combustion manager to move the VGT where it needs to for full non-egr operations. It knows what to do,... Give it some breathing room to do it.
Turn Off / Delete EGR…C_CBR_EGR_Off_Override_Value 1
C_EGR_Enable 1 <- {THIS MUST STAY ON Or VGT Turbo will not function Properly.}
C_EPD_EMT_Virtual_Sensor_En 1
C_TPE_Exhaust_Boost_Parameter 1
C_TPE_Exhaust_Offset_Parameter 1
T_CBL_EGR_Frac_User_Override 1
T_CBR_EGR_Off_User_Override 1
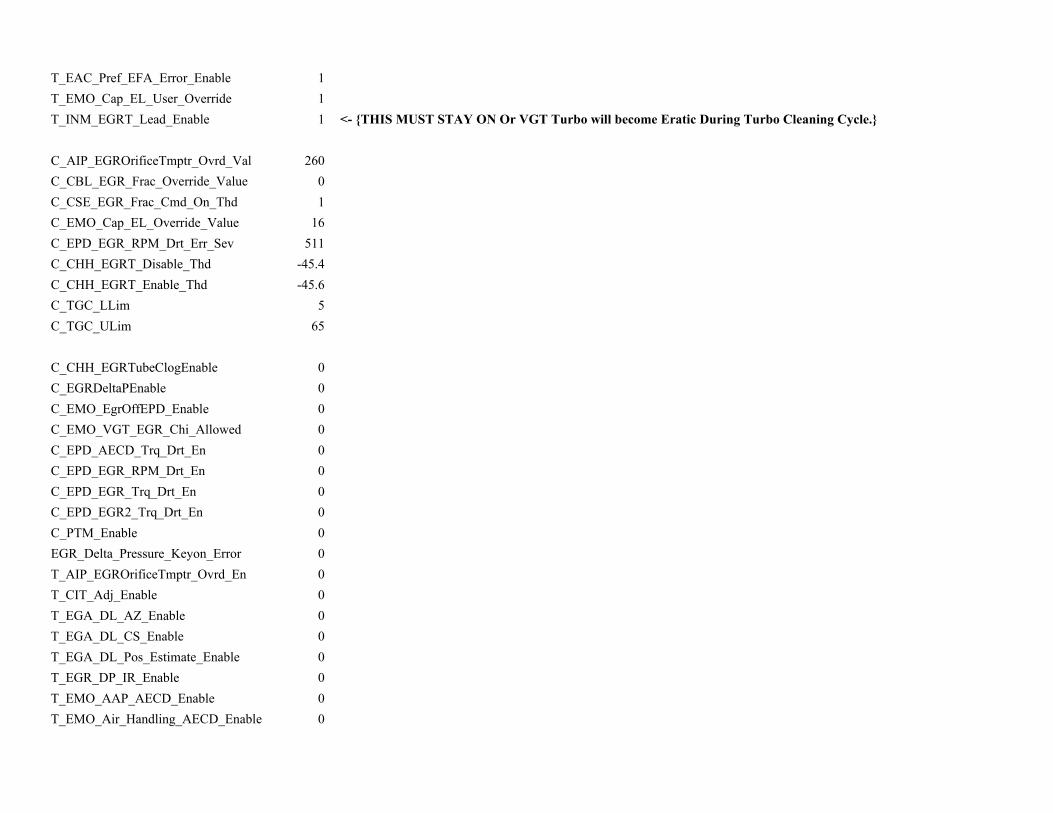
T_EAC_Pref_EFA_Error_Enable 1
T_EMO_Cap_EL_User_Override 1
T_INM_EGRT_Lead_Enable 1 <- {THIS MUST STAY ON Or VGT Turbo will become Eratic During Turbo Cleaning Cycle.}
C_AIP_EGROrificeTmptr_Ovrd_Val 260
C_CBL_EGR_Frac_Override_Value 0
C_CSE_EGR_Frac_Cmd_On_Thd 1
C_EMO_Cap_EL_Override_Value 16
C_EPD_EGR_RPM_Drt_Err_Sev 511
C_CHH_EGRT_Disable_Thd -45.4
C_CHH_EGRT_Enable_Thd -45.6
C_TGC_LLim 5
C_TGC_ULim 65
C_CHH_EGRTubeClogEnable 0
C_EGRDeltaPEnable 0
C_EMO_EgrOffEPD_Enable 0
C_EMO_VGT_EGR_Chi_Allowed 0
C_EPD_AECD_Trq_Drt_En 0
C_EPD_EGR_RPM_Drt_En 0
C_EPD_EGR_Trq_Drt_En 0
C_EPD_EGR2_Trq_Drt_En 0
C_PTM_Enable 0
EGR_Delta_Pressure_Keyon_Error 0
T_AIP_EGROrificeTmptr_Ovrd_En 0
T_CIT_Adj_Enable 0
T_EGA_DL_AZ_Enable 0
T_EGA_DL_CS_Enable 0
T_EGA_DL_Pos_Estimate_Enable 0
T_EGR_DP_IR_Enable 0
T_EMO_AAP_AECD_Enable 0
T_EMO_Air_Handling_AECD_Enable 0
T_TIB_Fuel_Adjustment_Enable 0
Dealing with Error Codes after a Delete...
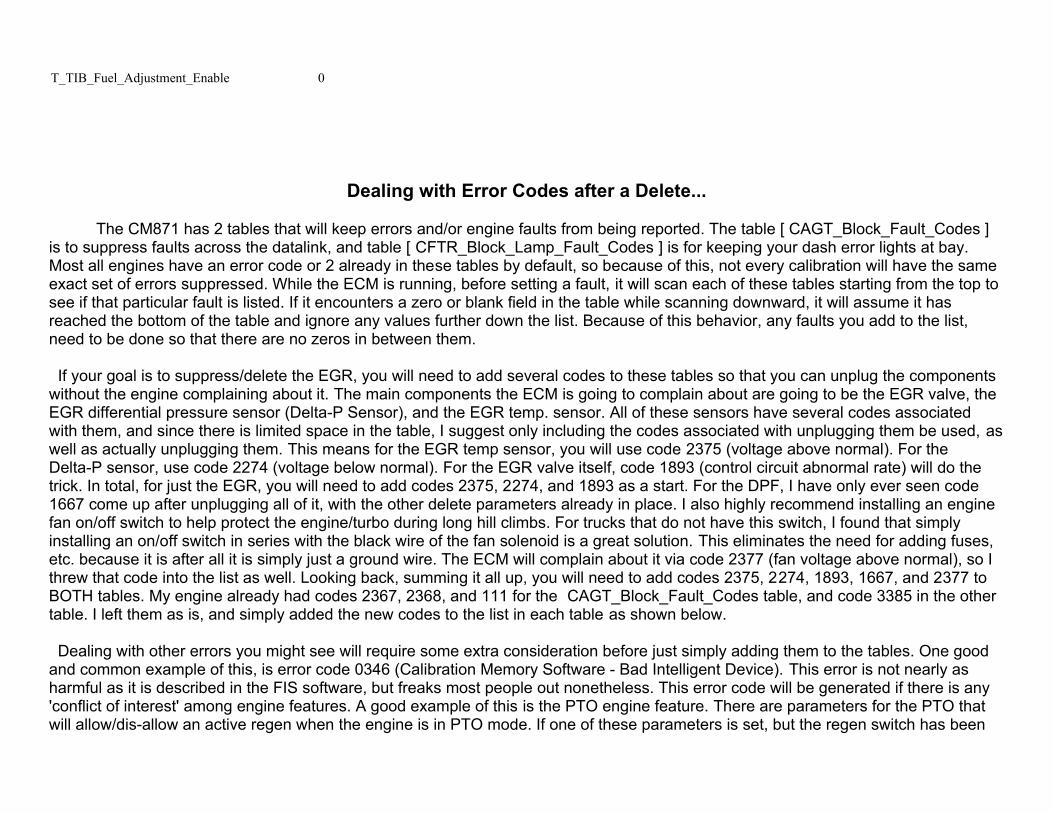
The CM871 has 2 tables that will keep errors and/or engine faults from being reported. The table [ CAGT_Block_Fault_Codes ] is to suppress faults across the datalink, and table [ CFTR_Block_Lamp_Fault_Codes ] is for keeping your dash error lights at bay. Most all engines have an error code or 2 already in these tables by default, so because of this, not every calibration will have the same exact set of errors suppressed. While the ECM is running, before setting a fault, it will scan each of these tables starting from the top to see if that particular fault is listed. If it encounters a zero or blank field in the table while scanning downward, it will assume it has reached the bottom of the table and ignore any values further down the list. Because of this behavior, any faults you add to the list, need to be done so that there are no zeros in between them.
If your goal is to suppress/delete the EGR, you will need to add several codes to these tables so that you can unplug the components without the engine complaining about it. The main components the ECM is going to complain about are going to be the EGR valve, the EGR differential pressure sensor (Delta-P Sensor), and the EGR temp. sensor. All of these sensors have several codes associated with them, and since there is limited space in the table, I suggest only including the codes associated with unplugging them be used, as well as actually unplugging them. This means for the EGR temp sensor, you will use code 2375 (voltage above normal). For the Delta-P sensor, use code 2274 (voltage below normal). For the EGR valve itself, code 1893 (control circuit abnormal rate) will do the trick. In total, for just the EGR, you will need to add codes 2375, 2274, and 1893 as a start. For the DPF, I have only ever seen code 1667 come up after unplugging all of it, with the other delete parameters already in place. I also highly recommend installing an engine fan on/off switch to help protect the engine/turbo during long hill climbs. For trucks that do not have this switch, I found that simply installing an on/off switch in series with the black wire of the fan solenoid is a great solution. This eliminates the need for adding fuses, etc. because it is after all it is simply just a ground wire. The ECM will complain about it via code 2377 (fan voltage above normal), so I threw that code into the list as well. Looking back, summing it all up, you will need to add codes 2375, 2274, 1893, 1667, and 2377 to BOTH tables. My engine already had codes 2367, 2368, and 111 for the CAGT_Block_Fault_Codes table, and code 3385 in the other table. I left them as is, and simply added the new codes to the list in each table as shown below.
Dealing with other errors you might see will require some extra consideration before just simply adding them to the tables. One good and common example of this, is error code 0346 (Calibration Memory Software - Bad Intelligent Device). This error is not nearly as harmful as it is described in the FIS software, but freaks most people out nonetheless. This error code will be generated if there is any 'conflict of interest' among engine features. A good example of this is the PTO engine feature. There are parameters for the PTO that will allow/dis-allow an active regen when the engine is in PTO mode. If one of these parameters is set, but the regen switch has been
rendered useless via the DPF delete, then this creates a conflict. A PTO manual regen cannot take place if the switch has been disabled, so the ECM throws code 0346 as a result. Resolving error code 0346 is simply a matter of figuring out what needs to be turned off in the engine features to accommodate the EGR delete, and nothing more. Yes, you can simply add it to the blocked fault tables, but it is better to first try and resolve what might be in conflict, so that engine features, such as PTO will continue to work correctly. I have also seen where the parameter [ T_Mux_SRegen_Switch_Source_Address ] set incorrect;ly can cause this, or where [ T_SRegenSwitchEnable ] is not set to 0 after a delete.
Another common error that comes up when dealing with an engine that has had the 'Other-Guys' deletes in them previously, is error 2636 (VGT Actuator Driver Circuit). This code is an actual fault, and not a ghost of the delete. The problem that is created, if the delete has been done correctly, is that the VGT and its Actuator are now run in a much wider band of operation, where previously, they were not. JBLL,PDI, BD, and all the other brain butchers out there suppress this error for reasons beyond me, and I suppose you could too, but personally, I think correcting the actual problem is the correct solution to this one. What typically causes this error is either too much backlash in the gear for the Actuator because it is worn out, The VG ring itself is not traveling its full range of motion, or the actuator is out of calibration. If you are getting this error, then I recommend you remove the actuator from the turbo and check everything. There is a hole in the control arm (the arm with the gear teeth) of the turbo itself that will align with a hole under it, in the turbo housing, when the arm is almost all the way to the right. This is called the 'PIN Position'. It is this position that the control arm MUST BE IN when the per-calibrated actuator is placed down onto the turbo. Use the dull end of a drill-bit that fits snug into this hole to align the actuator arm precisely to the hole under it. Then use insite software to per-calibrate the actuator BEFORE placing it down onto the turbo, taking care not to move the control arm in the process. Before doing all of this, you should check the range of motion of the control arm by moving it all the way to the right, where it will align slightly past with the hole under it, and all the way to the left, where HALF of that same hole will be visible out from underneath the edge of the control arm. If you cannot move the control arm this full travel length without it binding or dragging, then there is something wrong with the turbo. Any more then ¼-1/2 tooth free-play in the actuator gear itself on the actuator, and it has too much backlash as well. I have had more than one tech argue this with me, but have had several people report that the error goes away after re-calibrating the Actuator carefully, using this method.
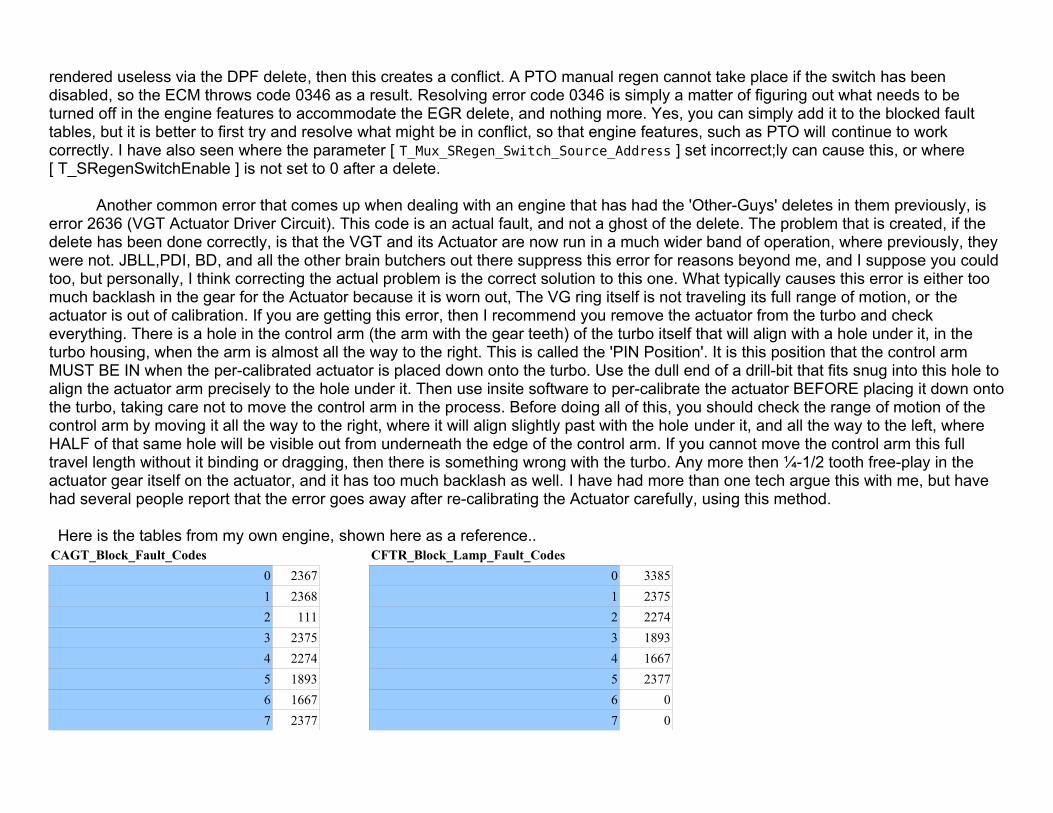
Here is the tables from my own engine, shown here as a reference..CAGT_Block_Fault_Codes CFTR_Block_Lamp_Fault_Codes
0 2367 0 3385
1 2368 1 2375
2 111 2 2274
3 2375 3 1893
4 2274 4 1667
5 1893 5 2377
6 1667 6 0
7 2377 7 0
8 0 8 0
9 0 9 0
10 0 10 0
11 0 11 0
12 0 12 0
13 0 13 0
14 0 14 0
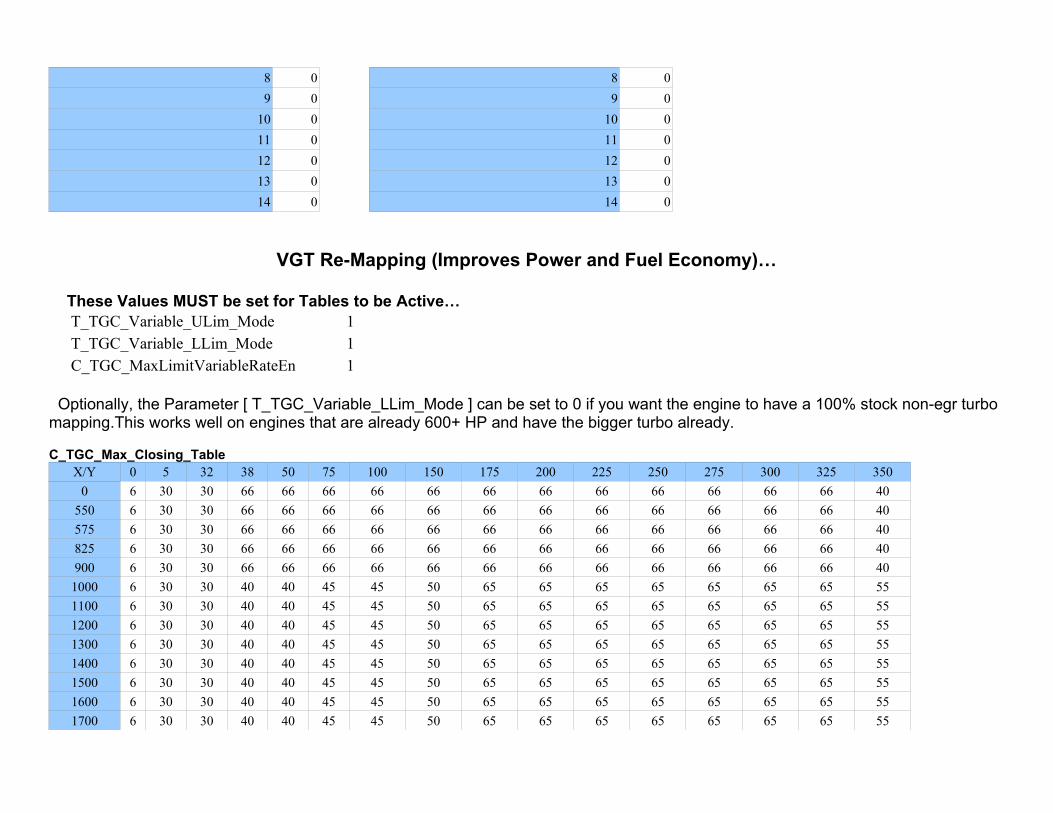
VGT Re-Mapping (Improves Power and Fuel Economy)…
These Values MUST be set for Tables to be Active…T_TGC_Variable_ULim_Mode 1T_TGC_Variable_LLim_Mode 1C_TGC_MaxLimitVariableRateEn 1
Optionally, the Parameter [ T_TGC_Variable_LLim_Mode ] can be set to 0 if you want the engine to have a 100% stock non-egr turbo mapping.This works well on engines that are already 600+ HP and have the bigger turbo already.
C_TGC_Max_Closing_TableX/Y 0 5 32 38 50 75 100 150 175 200 225 250 275 300 325 350
0 6 30 30 66 66 66 66 66 66 66 66 66 66 66 66 40
550 6 30 30 66 66 66 66 66 66 66 66 66 66 66 66 40
575 6 30 30 66 66 66 66 66 66 66 66 66 66 66 66 40
825 6 30 30 66 66 66 66 66 66 66 66 66 66 66 66 40
900 6 30 30 66 66 66 66 66 66 66 66 66 66 66 66 40
1000 6 30 30 40 40 45 45 50 65 65 65 65 65 65 65 55
1100 6 30 30 40 40 45 45 50 65 65 65 65 65 65 65 55
1200 6 30 30 40 40 45 45 50 65 65 65 65 65 65 65 55
1300 6 30 30 40 40 45 45 50 65 65 65 65 65 65 65 55
1400 6 30 30 40 40 45 45 50 65 65 65 65 65 65 65 55
1500 6 30 30 40 40 45 45 50 65 65 65 65 65 65 65 55
1600 6 30 30 40 40 45 45 50 65 65 65 65 65 65 65 55
1700 6 30 30 40 40 45 45 50 65 65 65 65 65 65 65 55
1800 6 30 30 40 40 45 45 50 65 65 65 65 65 65 65 55
1900 6 30 30 40 40 45 45 50 65 65 65 65 65 65 65 55
2000 6 6 6 6 6 6 6 6 6 6 6 6 6 6 6 6
2100 6 6 6 6 6 6 6 6 6 6 6 6 6 6 6 6
2200 6 6 6 6 6 6 6 6 6 6 6 6 6 6 6 6
2300 6 6 6 6 6 6 6 6 6 6 6 6 6 6 6 6
C_TGC_Min_Closing_TableX/Y 0 5 32 38 50 75 100 150 175 200 225 250 275 300 325 350
0 5 5 5 10 18 20 20 30 40 60 60 60 60 60 60 68
550 5 5 5 10 18 20 20 30 30 30 30 30 30 30 30 30
575 5 5 5 10 18 20 20 30 30 30 30 30 30 30 30 40
825 5 5 5 10 18 20 20 30 40 40 40 40 40 40 40 50
900 5 5 5 10 18 20 20 30 40 45 45 45 45 45 45 45
1000 5 5 5 10 18 20 20 30 40 45 45 45 64 60 60 54
1100 5 5 5 10 12 13 15 25 32 45 45 55 60 60 60 54
1200 5 5 5 10 12 13 14 25 32 45 45 55 60 60 60 54
1300 5 5 5 10 12 13 14 25 32 45 45 55 60 60 60 54
1400 5 5 5 10 12 15 18 28 35 45 45 55 60 60 60 54
1500 5 5 5 18 25 25 28 35 45 45 45 55 60 60 60 54
1600 5 5 5 18 25 25 28 35 45 45 45 55 60 60 60 54
1700 5 5 5 18 25 25 28 35 45 45 45 55 60 60 60 54
1800 5 5 5 18 25 25 28 35 45 45 45 55 60 60 60 54
1900 5 5 5 18 25 25 28 35 45 45 45 55 60 60 60 54
2000 5 5 5 5 5 5 5 5 5 5 5 5 5 5 5 5
2100 5 5 5 5 5 5 5 5 5 5 5 5 5 5 5 5
2200 5 5 5 5 5 5 5 5 5 5 5 5 5 5 5 5
2300 5 5 5 5 5 5 5 5 5 5 5 5 5 5 5 5
Soot / Black Smoke Control (over-fueling)...
There is a manager in place that limits fueling during sudden changes of the accelerator pedal. Its purpose is to limit fuel while the turbo is spooling up so that the amount of black smoke/soot is reduced when someone stomps the fuel pedal. This helps to keep the DPF from clogging up in city traffic and/or because of an abusive driver. Without the DPF, This manager now becomes optional. The benefit of leaving this manager active is less black smoke and reduced soot, as well as improved fuel economy in city traffic. The downside is that the engine feels like it hesitates a bit during hard acceleration. If your looking for faster power response, and don't care about that proverbial 'puff of black smoke', then setting parameter [ T_OFC_Fuel_Limit_User_Override ] to a 1 will DISABLE the manager. If your looking for maximum fuel economy, ensue it is set to 0.
Tweaking the Engine Brake...
The ISX uses charge pressure to increase the strength of the engine brakes. The condition is known a VGT OC or Over-Closed condition. In an Over-closed condition, the VGT is used to produce back-pressure to place resistance on the engine. This also results in increased charge pressure at the intake manifold, making it harder for the engine to compress the cylinders as well. This double-action of resistance makes the engine brake for the ISX one of the strongest in its class of engines. For this to happen properly, the ECM must have control of the VGT, and it also needs the ability to force the turbo past its normal 'Boost-Providing' range of operation. The VGT has a travel range from 0 to 100%. From about 5-70%, it will provide boost for combustion, but above 70%, although it will provide boost, it will provide the excess back-pressure needed to force exhaust gases into the EGR system, so that it can 'Overcome' that boost at the intake manifold. It is this same excess in exhaust back-pressure that is needed for the engine brake, so between 70% and 100%, there is little increase in boost gain, but much back-pressure gain. When this is happening, the turbo's actuating ring is extended past the main housing and relies on a keyed retainer ring in the most rear housing to keep it in place. This retainer ring suffers heat expansion on a constant basis and has been known to vibrate at high frequency as it gets worn. The sound is almost Identical in nature to the sound produced if the turbine were to touch the housing. This annoying 'squeal' is actually not nearly as harmful as it would seem, but can easily confuse a driver or mechanic into thinking the turbo is bad. If this vibration becomes severe to the point of fluctuating the engine during over-closed conditions, then it is time to replace the turbocharger. Usually, by the time it gets this worn, the rest of the turbo will show signs of failure as well. Here are the tables that control the Over-Closing limits during engine braking events with modified values to provide maximum braking ability. Values above 90% closing can be difficult for the VGT Actuator to achieve or maintain as the outer retaining ring gets worn. A second concern that needs to be considered heavily, when altering the engine brake settings is excess back-pressure. Lots of back-pressure is used to make the engine brake work, but if it is excessive, It can cause exhaust valves not to close properly. This results in the valve being struck by the piston hard, then driven up into the head, witch results on cracking and destroying it. The condition is known among mechanics as 'Dropping A Valve'. The higher the RPM of the engine, the higher the risk. To prevent this, I recommend the higher RPM ranges be set a bit lower as a protection.
Engine Brakes…T_ERC_ServiceBrkActivateEn 1 <-- 1 = Engine Brake Activates when Brake Pedal is pressed (and Jakes are turned on in the
dash).T_FCC_Engine_Brake_En 1 <-- 1 = Engine Fan is used to help engine brakesC_FCC_Engine_Brake_Time 15000 <-- 15000 = Make fan come on after 15 seconds.C_FCC_Engine_OverSpd_Thd 2500 <-- Max RPM Engine Fan can spin before it Explodes!
Use VGT to make Engine Brakes Stronger…
C_TGC_E_Brake_OC_ULim_Table C_TGC_Exh_E_Brake_OC_ULim_Table
RPM % RPM %500 87 500 87
600 87 600 87700 87 700 87
800 87 800 87900 87 900 87
1000 87 1000 871100 87 1100 87
1200 87 1200 871300 85 1300 85
1400 85 1400 851500 80 1500 80
1600 75 1600 751700 75 1700 75
1800 75 1800 751900 75 1900 75
2000 72 2000 722100 70 2100 70
2200 70 2200 702300 70 2300 70
Engine Timing...
The Engine Timing can be monitored via Parameter [ Final_Timing ]. When watching this parameter, you will quickly notice that it will swing both Positive AND Negative. It is not the absolute timing of the engine, but rather an Offset to the mechanical timing set when the engine is built. The actual timing is 7.01 Degrees forward of this parameter. Thia means that when the timing is zero, the mechanical Timing is at 7.01 Degrees, and when this parameter reads 1.0, the mechanical timing is actually 8.01 TDC. The ECM has the ability to alter the engine timing greatly, and is mapped via several timing and fuel tables. The engine is mapped correctly, and is set for very good fuel efficiency vs power already, so if you are not planning on doing something radical with the engine, these tables are best left alone. There is however the issue of EGR, or lack thereof, once it has been deleted. The Timing is generally retarded a bit by default due to EGR. This means that without EGR, there is a slight power increase due to timing, but also an increase in actual EGT's. Without EGR, the timing can be advanced easily via a 'Timing Shift' to further improve engine fuel efficiency, Lowering EGT's as well, wich help protect the turbo and improve fuel mileage at the same time. Studying the mechanical process heavily, I also noticed that when it comes to timing, there is little or no live 'lead compensation' for mechanical lash in the engine concerning timing. Having lead compensation in the engine timing on the fly will allow the engine to run slightly smoother, as well as make the fueling rate more stable, witch saves fuel. Studying how the injectors are actually primmed during a fueling/timing cycle actually revealed that the timing actuators actually finish their cycle very close to when the overhead cam starts to compress the injector for combustion. Because of this, a slight shift forward in Hydraulic delay during the timing actuator process, would result in the cam actually ending the timing cycle mechanically just ahead of the solenoid. Too much shift and the timing cycle becomes erratic, and too little causes the timing to become very unstable. The default hydraulic delay set in [ CTS_ti_TmActDelay_c ] of 1.3 ensures the timing cycle ends before the mechanics takes over. Shifting this delay forward a bit will cause interference from the cam (and also increases timing slightly). The lash in the cam itself will alter the timing, and the result is a mechanically compensated timing offset, witch now includes the engine lash. A value of 2.4 seems to work quite well for this on engines that do not have other timing or actuator problems.
Shifting the timing forward to improve fuel economy works well, but the further the shift, the higher risk of cylinder flashing. With less forward compression and a lower angle on the piston arm, there is less resistance for engine cam to be pushed forward, resulting in a faster, hotter burn. Since the burn is faster, less residual heat is produced, but much higher combustion temps will occur. This can result in burning the tops of the pistons and / or scoring them, the injector, or the valves if it is not kept in check. Most documents on this subject for diesel engines agree that the problem will not likely occur under heavy engine load until the timing shifted forward more
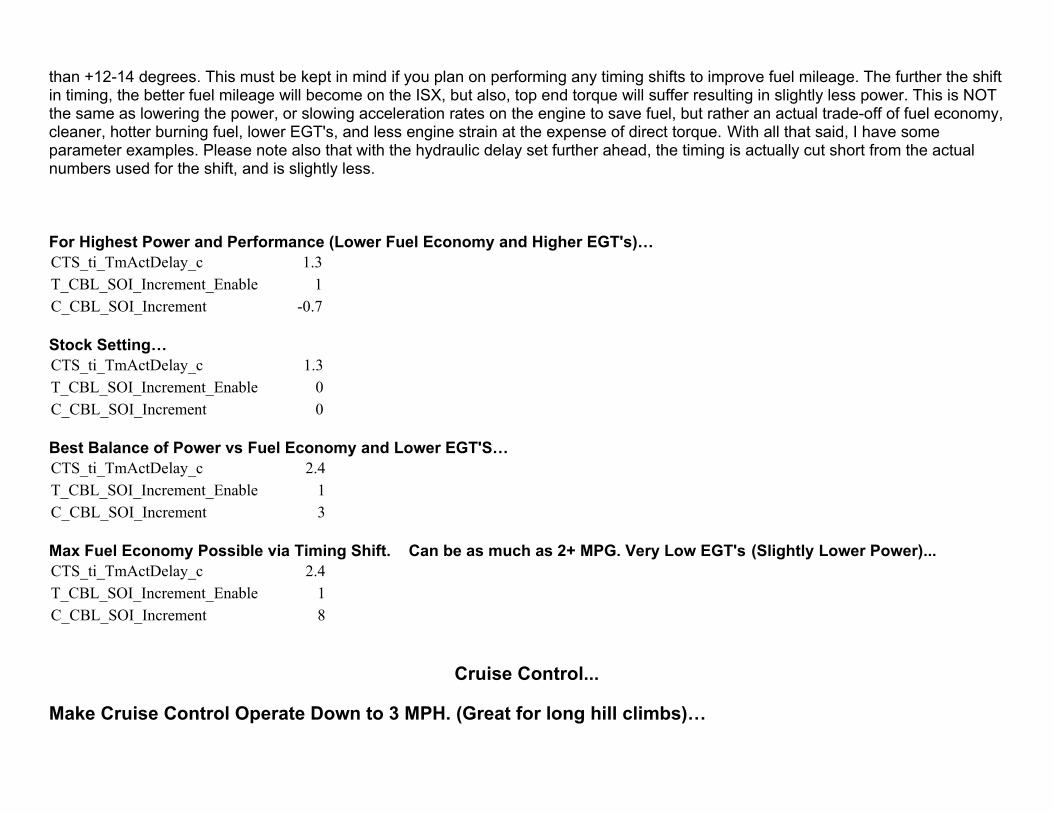
than +12-14 degrees. This must be kept in mind if you plan on performing any timing shifts to improve fuel mileage. The further the shift in timing, the better fuel mileage will become on the ISX, but also, top end torque will suffer resulting in slightly less power. This is NOT the same as lowering the power, or slowing acceleration rates on the engine to save fuel, but rather an actual trade-off of fuel economy, cleaner, hotter burning fuel, lower EGT's, and less engine strain at the expense of direct torque. With all that said, I have some parameter examples. Please note also that with the hydraulic delay set further ahead, the timing is actually cut short from the actual numbers used for the shift, and is slightly less.
For Highest Power and Performance (Lower Fuel Economy and Higher EGT's)…CTS_ti_TmActDelay_c 1.3T_CBL_SOI_Increment_Enable 1C_CBL_SOI_Increment -0.7
Stock Setting…CTS_ti_TmActDelay_c 1.3T_CBL_SOI_Increment_Enable 0C_CBL_SOI_Increment 0
Best Balance of Power vs Fuel Economy and Lower EGT'S…CTS_ti_TmActDelay_c 2.4T_CBL_SOI_Increment_Enable 1C_CBL_SOI_Increment 3
Max Fuel Economy Possible via Timing Shift. Can be as much as 2+ MPG. Very Low EGT's (Slightly Lower Power)...CTS_ti_TmActDelay_c 2.4T_CBL_SOI_Increment_Enable 1C_CBL_SOI_Increment 8
Cruise Control...
Make Cruise Control Operate Down to 3 MPH. (Great for long hill climbs)…
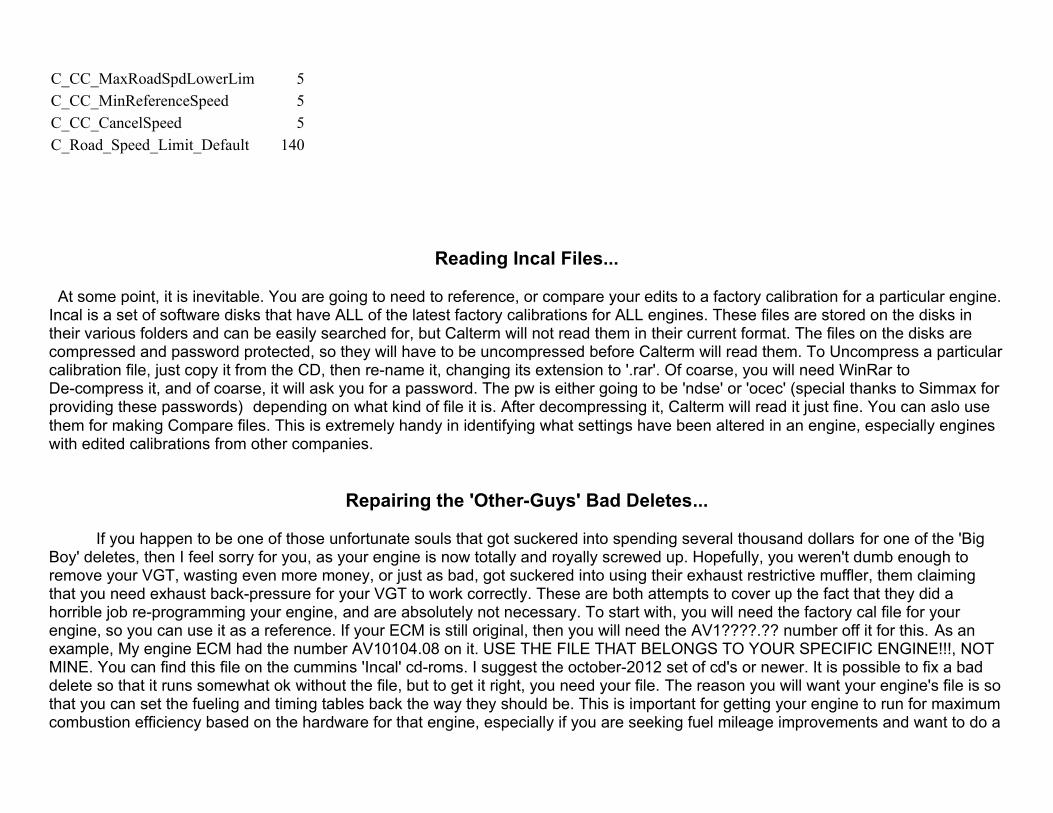
C_CC_MaxRoadSpdLowerLim 5C_CC_MinReferenceSpeed 5C_CC_CancelSpeed 5C_Road_Speed_Limit_Default 140
Reading Incal Files...
At some point, it is inevitable. You are going to need to reference, or compare your edits to a factory calibration for a particular engine. Incal is a set of software disks that have ALL of the latest factory calibrations for ALL engines. These files are stored on the disks in their various folders and can be easily searched for, but Calterm will not read them in their current format. The files on the disks are compressed and password protected, so they will have to be uncompressed before Calterm will read them. To Uncompress a particular calibration file, just copy it from the CD, then re-name it, changing its extension to '.rar'. Of coarse, you will need WinRar to De-compress it, and of coarse, it will ask you for a password. The pw is either going to be 'ndse' or 'ocec' (special thanks to Simmax for providing these passwords) depending on what kind of file it is. After decompressing it, Calterm will read it just fine. You can aslo use them for making Compare files. This is extremely handy in identifying what settings have been altered in an engine, especially engines with edited calibrations from other companies.
Repairing the 'Other-Guys' Bad Deletes...
If you happen to be one of those unfortunate souls that got suckered into spending several thousand dollars for one of the 'Big Boy' deletes, then I feel sorry for you, as your engine is now totally and royally screwed up. Hopefully, you weren't dumb enough to remove your VGT, wasting even more money, or just as bad, got suckered into using their exhaust restrictive muffler, them claiming that you need exhaust back-pressure for your VGT to work correctly. These are both attempts to cover up the fact that they did a horrible job re-programming your engine, and are absolutely not necessary. To start with, you will need the factory cal file for your engine, so you can use it as a reference. If your ECM is still original, then you will need the AV1????.?? number off it for this. As an example, My engine ECM had the number AV10104.08 on it. USE THE FILE THAT BELONGS TO YOUR SPECIFIC ENGINE!!!, NOT MINE. You can find this file on the cummins 'Incal' cd-roms. I suggest the october-2012 set of cd's or newer. It is possible to fix a bad delete so that it runs somewhat ok without the file, but to get it right, you need your file. The reason you will want your engine's file is so that you can set the fueling and timing tables back the way they should be. This is important for getting your engine to run for maximum combustion efficiency based on the hardware for that engine, especially if you are seeking fuel mileage improvements and want to do a
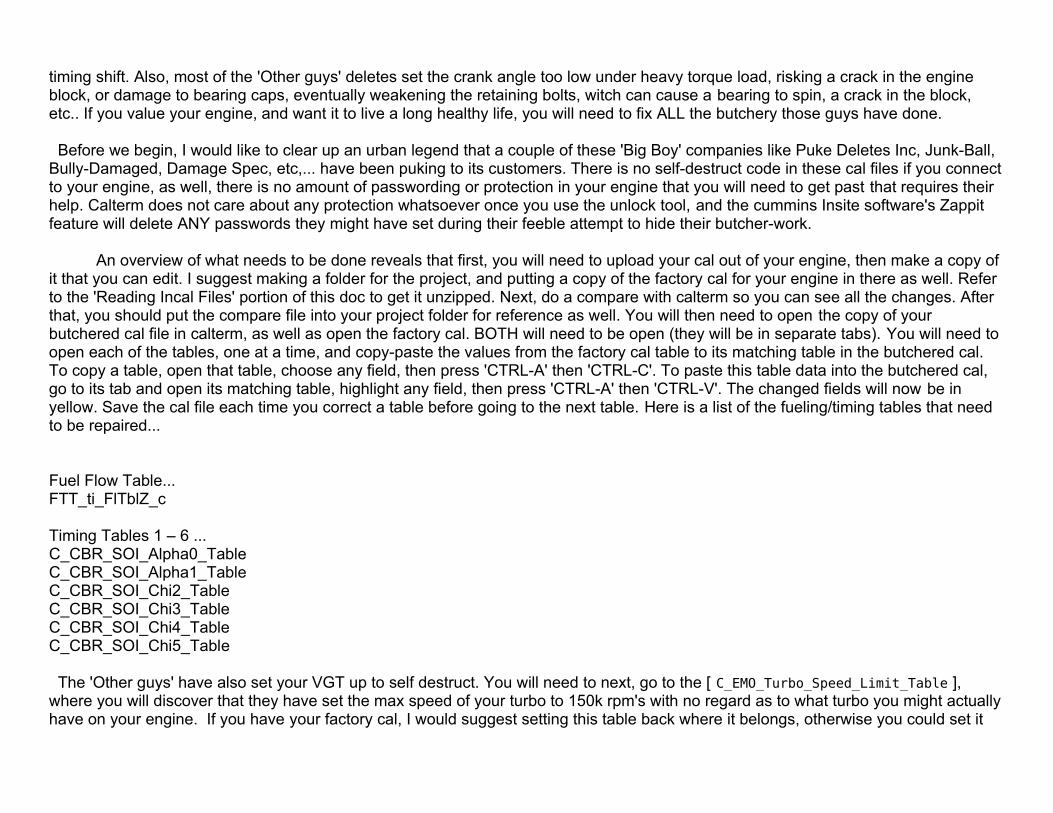
timing shift. Also, most of the 'Other guys' deletes set the crank angle too low under heavy torque load, risking a crack in the engine block, or damage to bearing caps, eventually weakening the retaining bolts, witch can cause a bearing to spin, a crack in the block, etc.. If you value your engine, and want it to live a long healthy life, you will need to fix ALL the butchery those guys have done.
Before we begin, I would like to clear up an urban legend that a couple of these 'Big Boy' companies like Puke Deletes Inc, Junk-Ball, Bully-Damaged, Damage Spec, etc,... have been puking to its customers. There is no self-destruct code in these cal files if you connect to your engine, as well, there is no amount of passwording or protection in your engine that you will need to get past that requires their help. Calterm does not care about any protection whatsoever once you use the unlock tool, and the cummins Insite software's Zappit feature will delete ANY passwords they might have set during their feeble attempt to hide their butcher-work.
An overview of what needs to be done reveals that first, you will need to upload your cal out of your engine, then make a copy of it that you can edit. I suggest making a folder for the project, and putting a copy of the factory cal for your engine in there as well. Refer to the 'Reading Incal Files' portion of this doc to get it unzipped. Next, do a compare with calterm so you can see all the changes. After that, you should put the compare file into your project folder for reference as well. You will then need to open the copy of your butchered cal file in calterm, as well as open the factory cal. BOTH will need to be open (they will be in separate tabs). You will need to open each of the tables, one at a time, and copy-paste the values from the factory cal table to its matching table in the butchered cal. To copy a table, open that table, choose any field, then press 'CTRL-A' then 'CTRL-C'. To paste this table data into the butchered cal, go to its tab and open its matching table, highlight any field, then press 'CTRL-A' then 'CTRL-V'. The changed fields will now be in yellow. Save the cal file each time you correct a table before going to the next table. Here is a list of the fueling/timing tables that need to be repaired...
Fuel Flow Table...FTT_ti_FlTblZ_c
Timing Tables 1 – 6 ...C_CBR_SOI_Alpha0_TableC_CBR_SOI_Alpha1_TableC_CBR_SOI_Chi2_TableC_CBR_SOI_Chi3_TableC_CBR_SOI_Chi4_TableC_CBR_SOI_Chi5_Table
The 'Other guys' have also set your VGT up to self destruct. You will need to next, go to the [ C_EMO_Turbo_Speed_Limit_Table ], where you will discover that they have set the max speed of your turbo to 150k rpm's with no regard as to what turbo you might actually have on your engine. If you have your factory cal, I would suggest setting this table back where it belongs, otherwise you could set it
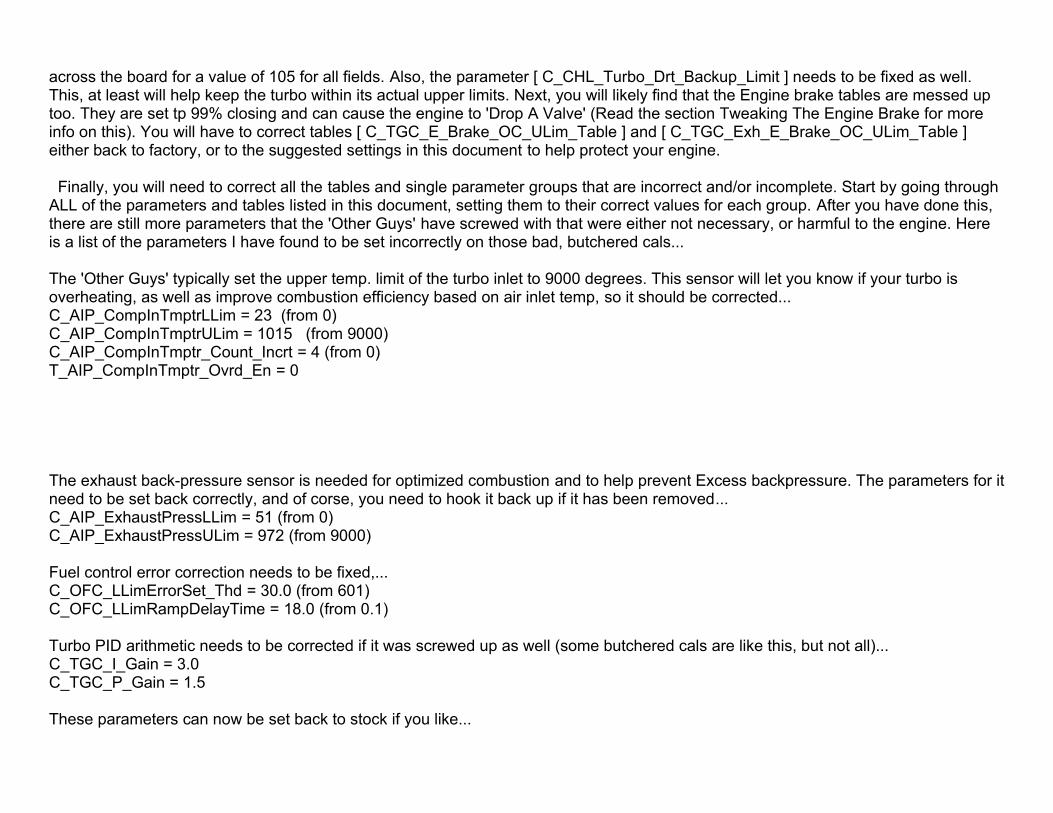
across the board for a value of 105 for all fields. Also, the parameter [ C_CHL_Turbo_Drt_Backup_Limit ] needs to be fixed as well. This, at least will help keep the turbo within its actual upper limits. Next, you will likely find that the Engine brake tables are messed up too. They are set tp 99% closing and can cause the engine to 'Drop A Valve' (Read the section Tweaking The Engine Brake for more info on this). You will have to correct tables [ C_TGC_E_Brake_OC_ULim_Table ] and [ C_TGC_Exh_E_Brake_OC_ULim_Table ] either back to factory, or to the suggested settings in this document to help protect your engine.
Finally, you will need to correct all the tables and single parameter groups that are incorrect and/or incomplete. Start by going through ALL of the parameters and tables listed in this document, setting them to their correct values for each group. After you have done this, there are still more parameters that the 'Other Guys' have screwed with that were either not necessary, or harmful to the engine. Here is a list of the parameters I have found to be set incorrectly on those bad, butchered cals...
The 'Other Guys' typically set the upper temp. limit of the turbo inlet to 9000 degrees. This sensor will let you know if your turbo is overheating, as well as improve combustion efficiency based on air inlet temp, so it should be corrected...C_AIP_CompInTmptrLLim = 23 (from 0)C_AIP_CompInTmptrULim = 1015 (from 9000)C_AIP_CompInTmptr_Count_Incrt = 4 (from 0)T_AIP_CompInTmptr_Ovrd_En = 0
The exhaust back-pressure sensor is needed for optimized combustion and to help prevent Excess backpressure. The parameters for it need to be set back correctly, and of corse, you need to hook it back up if it has been removed...C_AIP_ExhaustPressLLim = 51 (from 0)C_AIP_ExhaustPressULim = 972 (from 9000)
Fuel control error correction needs to be fixed,...C_OFC_LLimErrorSet_Thd = 30.0 (from 601)C_OFC_LLimRampDelayTime = 18.0 (from 0.1)
Turbo PID arithmetic needs to be corrected if it was screwed up as well (some butchered cals are like this, but not all)...C_TGC_I_Gain = 3.0C_TGC_P_Gain = 1.5
These parameters can now be set back to stock if you like...
C_EPD_EGR_RPM_Drt_Err_SevC_EPD_EGR_Trq_Drt_Err_Sev
These paramaters should be set to a 1...C_AIF_AlphaAltDerateOvrEn
These paramaters should be set to a 0...C_AIF_AlphaFuelRateEnable
Once you have made all these changes to you new cal file, I suggest doing a compare once again. Compare your new file with the butchered one you uploaded and double check that everything is right. Don't forget about setting the turbo min/max closing tables and other settings from this document. When happy with it, Download it into your engine and try it out. If you have trouble then check again to see if something got missed and try to work through it. Do not be dumb as a rock with this. Double and tripple check your settings. You need to be somewhat computer savvy. If your getting EGR/DPF alarms. Obviously you did something wrong and/or forgot to unplug something. This works very, very well. Use some common sense.
Rougher Idle, and the Downside of Efficient Combustion...
A bad calibration typically have some severe control issues for the VGT Actuator. The result is that the VGT position, when monitored during idle, will be upwards of 72 – 80+%, and sometimes 95%. This creates some unstable idle conditions for the engine, especially if it exceeds 72% closing. It is a tell-tale sign of a bad delete for sure. That is why they recommend you bump up your idle to above 700 RPM's, because this hides this fact by loading the engine with even more excess back-pressure, smoothing out the idle a bit more. A good delete does not require high idle RPM's. Ironically, the default turbo mapping for EGR operation sets the turbo actuator at 70% (and not higher) during idle. This is to create some excess back-pressure to the engine, putting it under a slight load. The benefit of this is to improve the 'Clean Air Idle' emissions by forcing excess air through the cylinders, and to increase the oxygen content of the exhaust for the purpose of Regens. It also contributed to a smoother idle, and a more rapid buildup of heat to make the engine ready for operation sooner, especially when the engine is cold. When the Actuator sits above this 70% so-called 'sweet-spot', it creates problems for the engine.
If you choose to do an EGR/DPF delete via this document, and map the turbo tables like they should be for full non-egr operation, then your engine is going to idle differently, especially in cold weather when it is cold. There is a drawback of creating excess head pressures and loading the engine unnecessarily during idle. The problem is that it consumes more fuel. Personally, I would rather the engine idle using the least amount of fuel possible, so this is why I set the TGC Min/Max Closing tables above, to not have the default 70% for the 500-800 RPM ranges below the FF-50 mark. You can certianly edit this back in if you like, it's your engine, but instead of 70%, I recommend 67-68%. The reason is that it minimizes the effects of having excess pressures. The tables would look
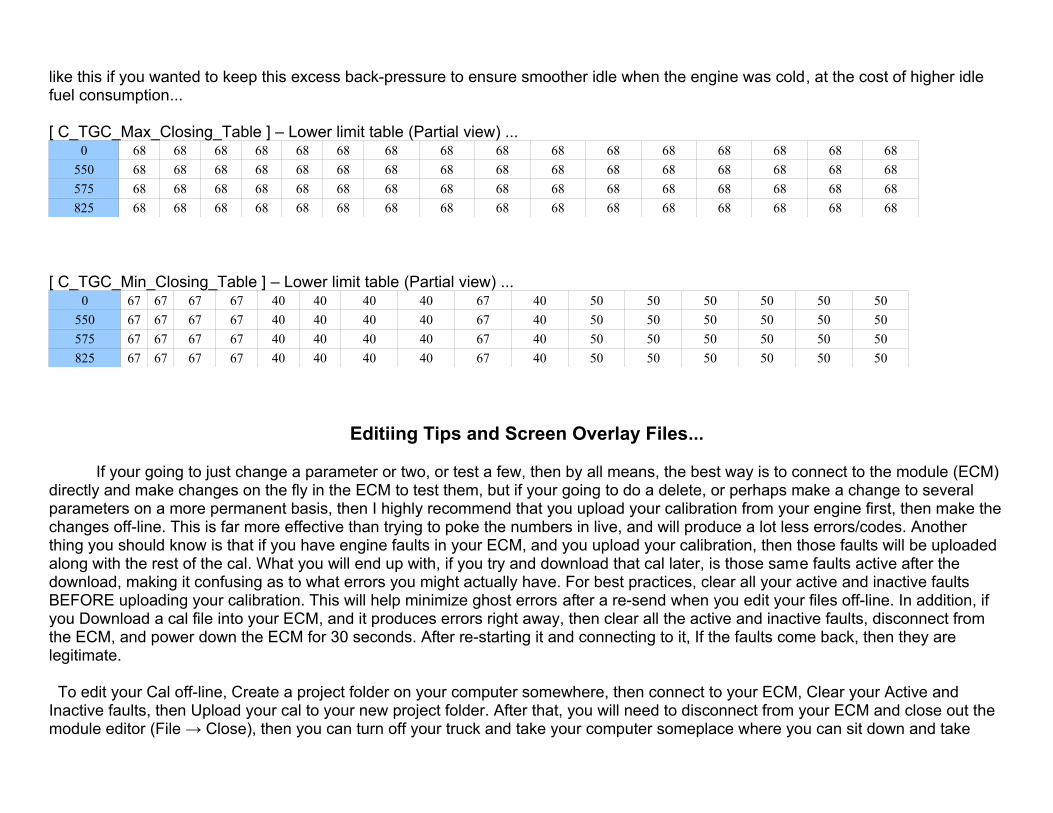
like this if you wanted to keep this excess back-pressure to ensure smoother idle when the engine was cold, at the cost of higher idle fuel consumption...
[ C_TGC_Max_Closing_Table ] – Lower limit table (Partial view) ...0 68 68 68 68 68 68 68 68 68 68 68 68 68 68 68 68
550 68 68 68 68 68 68 68 68 68 68 68 68 68 68 68 68
575 68 68 68 68 68 68 68 68 68 68 68 68 68 68 68 68
825 68 68 68 68 68 68 68 68 68 68 68 68 68 68 68 68
[ C_TGC_Min_Closing_Table ] – Lower limit table (Partial view) ...0 67 67 67 67 40 40 40 40 67 40 50 50 50 50 50 50
550 67 67 67 67 40 40 40 40 67 40 50 50 50 50 50 50
575 67 67 67 67 40 40 40 40 67 40 50 50 50 50 50 50
825 67 67 67 67 40 40 40 40 67 40 50 50 50 50 50 50
Editiing Tips and Screen Overlay Files...
If your going to just change a parameter or two, or test a few, then by all means, the best way is to connect to the module (ECM) directly and make changes on the fly in the ECM to test them, but if your going to do a delete, or perhaps make a change to several parameters on a more permanent basis, then I highly recommend that you upload your calibration from your engine first, then make the changes off-line. This is far more effective than trying to poke the numbers in live, and will produce a lot less errors/codes. Another thing you should know is that if you have engine faults in your ECM, and you upload your calibration, then those faults will be uploaded along with the rest of the cal. What you will end up with, if you try and download that cal later, is those same faults active after the download, making it confusing as to what errors you might actually have. For best practices, clear all your active and inactive faults BEFORE uploading your calibration. This will help minimize ghost errors after a re-send when you edit your files off-line. In addition, if you Download a cal file into your ECM, and it produces errors right away, then clear all the active and inactive faults, disconnect from the ECM, and power down the ECM for 30 seconds. After re-starting it and connecting to it, If the faults come back, then they are legitimate.
To edit your Cal off-line, Create a project folder on your computer somewhere, then connect to your ECM, Clear your Active and Inactive faults, then Upload your cal to your new project folder. After that, you will need to disconnect from your ECM and close out the module editor (File → Close), then you can turn off your truck and take your computer someplace where you can sit down and take
your time with the edit. To start, MAKE A COPY OF YOUR CAL FILE so that you can always fall back to it as a reference, or use it to get your truck going again if you make a mistake. You do not need any kind of connection active to edit cal files, so go ahead and open your copied cal file in calterm via File → Open Calibration. Choose the right ECFG file, and then choose a screen file if you like via 'Editor > Open Screen File'. Make all your changes carefully and then save your edited cal file via File → Save or File → Save As. Once you are done, then choose Compare from the tools menu and do a compare from your uploaded cal file to your edited cal file. I always use the HTML setting in the compare tool, then go through it carefully, checking the edit for errors. If all looks good, then close out your cal files in calterm, and re-connect to your ECM with the module editor. Finally, you will want to Download the edited cal file to the ECM with the Download tool and wait for it to finish. Do not use the features and paramaters backup option during a download. Use Cummins Insite to backup/restore your paramaters if you need to. After confirming that it has finished, its a good idea to just let the calterm program sit for about 30 - 45 seconds. It will reset the ECM and close/re-open the monitoring screen on its own usually. When it has settled out again, its a good idea to then clear all active and inactive faults, then close the module session and shut off the ECM for about 30 seconds. After that, you should make sure the truck starts and runs with your new cal, as well as checking for fults in Insite and/or the dash of the truck.
Well, instead of torturing you, making you build your own screen file from this document one parameter at a time, I thought I would save you some time and headache. To use this screen file, simply un-rar it, put it with your project, and load it up after you have opened your calibration. I do NOT recommend using this screen file when connected live to your ECM unless you have to for some reason (troubleshooting/verifying a cal perhaps), because the hundreds of parameters will be trying to update constantly, slowing down your connection to the ECM. Its best used for editing Calibration files off-line. While your calibration file is open, you can choose from the main menu 'Editor > Open Screen File'. There are several tabs at the top, separating the different parts of the ECM.
Here is the download link to the screen file I use. It contains ALL the parameters from this document, some of the parameters I typically check when looking at bad cals, and some various whatnots. Use it at your own risk...Download Link: http://mastergeeks.opendrive.com/files/OV8xNjgxNDI3Nl9CVzJzcF8zOTVm/Screen_998.rar
VERIFY YOUR CALIBRATION BEFORE REMOVING ANY HARDWARE!!!!!!!!!
VERIFY YOUR CALIBRATION BEFORE REMOVING ANY HARDWARE!!!!!!!!!VERIFY YOUR CALIBRATION BEFORE REMOVING ANY HARDWARE!!!!!!!!!VERIFY YOUR CALIBRATION BEFORE REMOVING ANY HARDWARE!!!!!!!!!
Using Alternate Factory Cal Files...
Just Don't do it. Use the one you uploaded from your engine. If you want more HP or fueling, then copy the fueling/timing tsbles from the higher HP cal files only. This helps prevent some bad results for your engine. This also helps keep your features and parameters from getting messed up.
Optional Reading... Harness your VGT! (Customizing it to your needs)...
Re-mapping your VGT and customizing it to how your truck is driven can be a big benefit. Not only can you improve horsepower/torque with it, but fine tune it for maximum fuel savings. When researching this, I read an article or 2 that stated without a bunch of emulation software, that it is humanly impossible to re-map an ECM to get the correct torque curves, boost pressure, fueling rates, timing angles, vgt positions, hydraulic delays, yada, yada the list goes on... Well I got offended by this and took it as a personal challenge. There has to be an easy way to sort of 'Get what you want' without having to re-write every table in the ECM. Most of the calibration is not that far off of what needs to happen to keep things in tune, so with that in mind, I set out to find a way to more or less guide the ECM towards what I wanted when it came to fuel mileage and/or torque rather then re-write the entire calibration.
The turbocharger plays a big role in the delicate balancing game of tug-of-war that must take place to get both performance and decent fuel economy. When it comes to this delicate balance, the VGT, or perhaps specifically, the VGT Actuator, should be looked at as the sort of 'Focusing Nozzle' to the fire inside your engine the same way that a focusing nozzle is used on a blowtorch. When looking for raw power, this 'Focus' needs to be fairly precise to give us that fine point that lets us 'Cut through steel' per say, and too much 'Focus' in one direction or the other, and there will be losses. On the other hand, when looking for low heat (fuel savings), this 'Focus' needs to be backed off from so that overall temps and exhaust back-pressure can be lowered. Excess heat and pressure, when not needed, will definitely cost you fuel unnecessarily, so how do we get both? And how do we tell the ECM this is what you want? Before answering these questions, perhaps a clear and precise description of what you want your engine to do, and when to do it should be in order.
Every driver is different, and operates their truck differently. Every truck is slightly different, and not all trucks have the same gear ratios, load capacity, trailers, operations, etc. If anything is 'Software-icly Impossible' (an insult to those who say software is superior to human intellect), it is the assumption that every situation and scenario across all trucks can be dealt with by a single calibration, or perhaps even a few different variations of such for that matter.
I am not even going to begin trying to guess what others want or need, so instead, I will just simply stick to what I did, and maybe that will give others an idea toward what they might want. I drive across all kinds of terrain, flat and mountainous alike. In my particular operation, profit margins are low, so saving fuel is what makes me the most money above all else. Because of this, I am usually only
driving 55-60 mph. This means that most of the time, my engine is turning 1200-1300 RPM's according to how it is geared. Also at this speed, most of the time, my foot is not very far down on the throttle. It is usually less than 30%.
After several days of monitoring my VGT actuator position vs fueling rate, I noticed that much of the time, my actuator would sit at 5%, and only go up when I started climbing a hill. I got curious as to where it should be for max fuel economy, so I spent the next couple of days using the override command for the VGT, manually setting it while watching my fueling rate. I Found that most of the time, I actually got better fuel economy with the actuator at 12-15% rather than at 5% where the ECM wanted it. The only exception to this was when I needed almost no throttle (very slight downgrades) where 5% was better, and of course, when I needed some power to climb a hill. The fueling rate on my truck has a range from 0-350, so zero is no fuel, and 350 is the pedal to the floor.
With all this in mind, it was clear what I wanted. I wanted the VGT to be at 5% when the fueling rate was below 50, the VGT at 12-15% at a fueling rate of 50-150, and for the VGT to go from 15% to 60% between 150 and 275 (this gave me max boost and torque during hill climbing). And to back off the VGT to 54% from 300-350 to prevent over-RPM of the turbo when the throttle was all the way to the floor. To complicate the matter even more, I only wanted this to happen between 1200-1300 RPM. Thats a pretty tall and complicated task but that is what I wanted, so how do I get the ECM to do this?
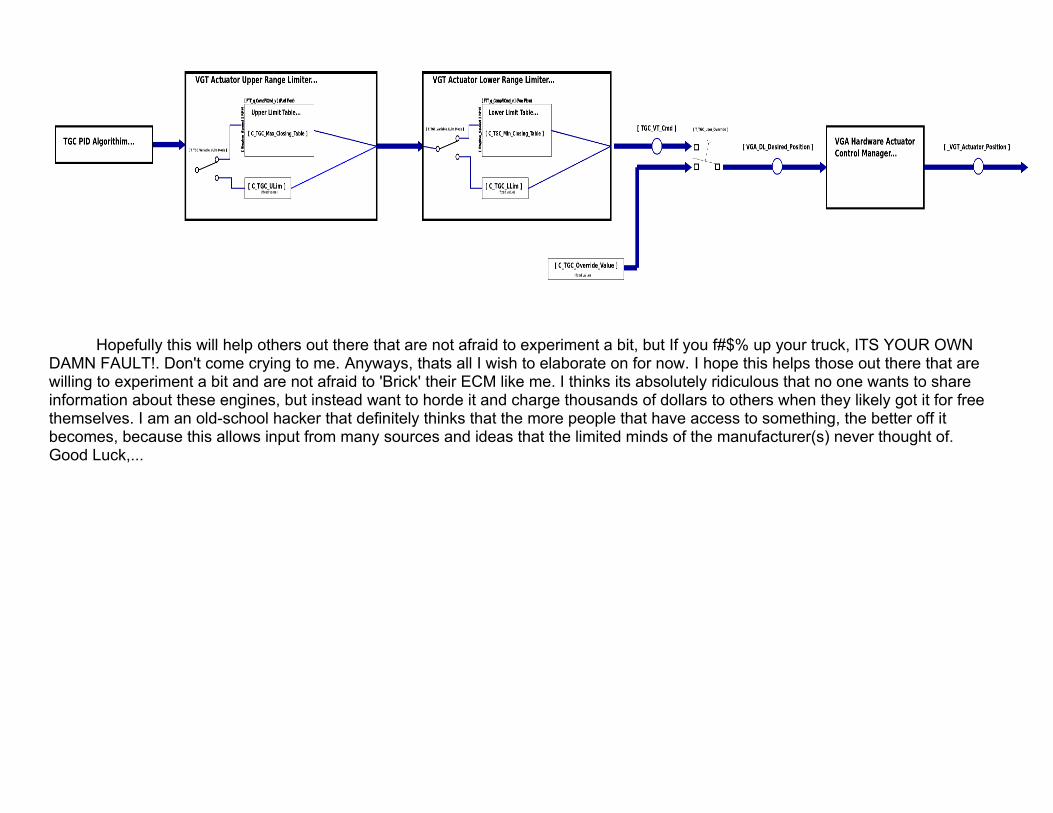
There is probably several different ways to get the ECM to do what I ask, but I didn't want to interfere with all of its complicated programming to achieve this. I just wanted to place a sort-of last minute, back-end, guiding hand to what the ECM was already trying to make the VGT actuator do. After many hours of poking around, I found a place where this can actually be achieved. It turns out that there are 2 tables that are able to limit the final VGT position the ECM is requesting, before the signal is sent out to the turbo. BOTH of these tables are based on the fueling rate vs RPM, so this was perfect for me, but these tables do NOT normally directly control the VGT position. The purpose for these tables is just simply limit the range of how low or high the VGT position can be at any given RPM / Fueling Rate. For example, If the lower limit table is set to 5% at 1200-RPM/FR-50 (the row/column where 1200rpm aligns with a fueling rate of 50) and the upper limit table is set for 72% at the same 1200-RPM/FR-50, then the ECM is free to set the VGT position anywhere it wants to between 5 and 72%. Since I want a minimum of 12% at 1200-RPM/FR-50, I just set the lower limit table for this row/column to 12, and now the VT cannot go below 12% at this rpm/fr. Looking back to what I want to achieve, I just set the entire 1200-rpm row all the way across to the positions I want for each of the fueling rates. Now, when the engine is at 1200rpm, the VGT is forced to a minimum of these positions. I entered the same values for the 1300rpm row as well.
Now that I have this in place, does this get me what I want? Well, not exactly. The ECM is still free to make the VGT go above these positions, limited only by the upper limit table. so I needed to determine what was ok, and not ok for an upper limit. After some experimenting going up some steep hills, it became very clear that anything past about 65% on the actuator with my foot to the floor just caused more boost but no more power gain. At 65%, my boost was already higher than I had ever seen it, and horsepower was way above anything I had ever experienced from this engine. With that in mind, I first replaced ALL the table values to 65% that were higher than this. Then, I just set a few of the values around 12-1300 rpm with low fueling a bit less.

[ C_TGC_Min_Closing_Table ] – Lower limit table (Partial view) ...1100 5 5 5 10 12 13 15 25 32 45 45 55 60 64 64 54
1200 5 5 5 10 12 13 14 25 32 45 45 55 60 64 64 54
1300 5 5 5 10 12 13 14 25 32 45 45 55 60 64 64 54
[ C_TGC_Max_Closing_Table ] – Lower limit table (Partial view) ...1100 6 30 30 68 68 65 65 65 65 65 65 65 65 65 65 65
1200 6 30 30 30 30 65 65 65 65 65 65 65 65 65 65 65
1300 6 30 30 40 40 65 65 65 65 65 65 65 65 65 65 65
Well, this gave me what I wanted, but now, the rest of the table(s) values are out of place compared to what I entered. This means I had to correct the rest of the 2 tables and blend the values the best I could. Now, I had to ensure these tables were active in he ECM, so I found the parameters to activate them. They are set as follows...
[ T_TGC_Variable_LLim_Mode ] = 1[ T_TGC_Variable_ULim_Mode ] = 1
This activates the tables and forces the VGT to behave the way I wanted it to. Test driving the truck resulted in some decent power gains and better fuel mileage to boot. I didn't know my engine was capable of such power. I would imagine that if this power were abused heavily, then some engine component damage would probably result, I don't know. I like it much better now, but I have to remind myself not to get my foot too carried away when going up a hill. Instead, I enjoy much better fuel mileage.
For those who are curious, the VGT can be manually controlled via 2 parameters. They are set as follows...
[ T_VGA_DL_Cmd_User_Override ] = 1 ← This enables the override to all other VGT position logic.
[ C_VGA_DL_Cmd_Override_Value ] = {POSITION 0-100%} ← The value you want it to be positioned at.
Hopefully this will help others out there that are not afraid to experiment a bit, but If you f#$% up your truck, ITS YOUR OWN DAMN FAULT!. Don't come crying to me. Anyways, thats all I wish to elaborate on for now. I hope this helps those out there that are willing to experiment a bit and are not afraid to 'Brick' their ECM like me. I thinks its absolutely ridiculous that no one wants to share information about these engines, but instead want to horde it and charge thousands of dollars to others when they likely got it for free themselves. I am an old-school hacker that definitely thinks that the more people that have access to something, the better off it becomes, because this allows input from many sources and ideas that the limited minds of the manufacturer(s) never thought of. Good Luck,...