malwarebytes administrator guide · 2017-07-20 · malwarebytes administrator guide version 1.0 ......
TRANSCRIPT
Malwarebytes Administrator Guide Version 1.0 28 June 2017
Notices Malwarebytes products and related documentation are provided under a license agreement containing restrictions on use and disclosure and are protected by intellectual property laws. Except as expressly permitted in your license agreement or allowed by law, you may not use, copy, reproduce, translate, broadcast, modify, license, transmit, distribute, exhibit, perform, publish, or display any part, in any form, or by any means. You may copy and use this document for your internal reference purposes only.
This document is provided “as-is.” The information contained in this document is subject to change without notice and is not warranted to be error-free. If you find any errors, we would appreciate your comments; please report them to us in writing.
The Malwarebytes logo is a trademark of Malwarebytes. Windows is a registered trademark of Microsoft Corporation. All other trademarks or registered trademarks listed belong to their respective owners.
Copyright © 2017 Malwarebytes. All rights reserved.
Third Party Project Usage Malwarebytes software is made possible thanks in part to many open source and third party projects. A requirement of many of these projects is that credit is given where credit is due. Information about each third party/open source project used in Malwarebytes software – as well as licenses for each – are available on the following page.
https://www.malwarebytes.com/support/thirdpartynotices/
Sample Code in Documentation Sample code which may be described herein is provided on an "as is" basis, without warranty of any kind, to the fullest extent permitted by law. Malwarebytes does not warrant or guarantee the individual success developers may have in implementing the sample code on their development platforms. You are solely responsible for testing and maintaining all scripts.
Malwarebytes does not warrant, guarantee or make any representations regarding the use, results of use, accuracy, timeliness or completeness of any data or information relating to the sample code. Malwarebytes disclaims all warranties, express or implied, and in particular, disclaims all warranties of merchantability, fitness for a particular purpose, and warranties related to the code, or any service or software related there to.
The Malwarebytes Protection Strategy Malwarebytes’ products incorporate several prevention features which utilize a layered defense strategy to protect you against malware threats which you face daily. Each layer is designed to disrupt the attack chain at a different stage. While all Malwarebytes products are highly effective in dealing with attacks that are becoming all too commonplace, our protection capabilities are most effective when you take advantage of the full product suite, allowing each prevention layer to do the job they are best suited for.
It’s your data. Protect it wisely!
CWB30-1000a
Table of Contents
Laying the Groundwork ................................................................................................... 1
Introduction ............................................................................................................................................... 1
Before You Begin ...................................................................................................................................... 1 External Access Requirements .......................................................................................................................................... 2
Basic Environment–Console .............................................................................................................................................. 2
Basic Environment–Endpoints .......................................................................................................................................... 2
Getting Started .......................................................................................................................................... 2
Screen Layout ............................................................................................................................................ 3
My Account ................................................................................................................................................ 3
Adding a New User .................................................................................................................................. 4
Discovery and Deployment Tool .................................................................................. 5 Program Modes ........................................................................................................................................ 5
Login ............................................................................................................................................................. 5
Discovery ..................................................................................................................................................... 5 Who To Discover................................................................................................................................................................... 5
How We Discover ................................................................................................................................................................. 6
Scan .............................................................................................................................................................. 6
Endpoints .................................................................................................................................................... 7
Preparing for Deployment ..................................................................................................................... 8
Deployment with Malwarebytes Methods ....................................................................................... 8
Deployment with Windows Methods (WMI) ................................................................................... 9
Tasks ............................................................................................................................................................. 9
Assembling the Pieces ................................................................................................... 11 Understanding Malwarebytes Agents............................................................................................... 11
Endpoints .................................................................................................................................................. 11 Add ........................................................................................................................................................................................... 11
Delete ...................................................................................................................................................................................... 12
Move ....................................................................................................................................................................................... 12
Actions .................................................................................................................................................................................... 13
Search ..................................................................................................................................................................................... 13
Policies ....................................................................................................................................................... 13
Groups ....................................................................................................................................................... 13
Adding Endpoints to Group ................................................................................................................ 13
Exclusions .................................................................................................................................................. 13
What’s Next? ............................................................................................................................................ 14
Malwarebytes Incident Response ............................................................................... 15
Policies ....................................................................................................................................................... 15 Scan Options ........................................................................................................................................................................ 15

Table of Contents (continued)
Reboot Options ................................................................................................................................................................... 15
Asset Management ............................................................................................................................................................ 16
Schedules .................................................................................................................................................. 16 Scan Type .............................................................................................................................................................................. 16
Scan Targets ......................................................................................................................................................................... 17
Scan Schedule ...................................................................................................................................................................... 17
Malwarebytes Endpoint Protection ........................................................................... 18 Policies ....................................................................................................................................................... 18
Real-Time Protection ......................................................................................................................................................... 18
Scan Options ........................................................................................................................................................................ 23
Reboot Options ................................................................................................................................................................... 23
Windows Action Center .................................................................................................................................................... 23
Schedules ................................................................................................................................................. 23 Scan Type .............................................................................................................................................................................. 23
Scan Targets .........................................................................................................................................................................24
Scan Schedule ......................................................................................................................................................................24
System Status .................................................................................................................. 25 Dashboard ............................................................................................................................................... 25
Threats ...................................................................................................................................................... 26
Quarantine ............................................................................................................................................... 26
Real-Time Protection............................................................................................................................ 26
Events ........................................................................................................................................................ 27
Tasks .......................................................................................................................................................... 27
Discovery and Deployment Command Line Reference ........................................ 28
Malwarebytes Administrator Guide 1
Laying the Groundwork The Malwarebytes platform is comprised of several components that enhance the security of your network, your endpoints, and your users. The purpose of this guide is to help you use the Malwarebytes platform. Please note that this guide is specifically for a Malwarebytes managed solution. Standalone product users should consult administrator guides for those products.
Introduction The Malwarebytes platform consists of the following solutions which provide threat response against modern computing threats:
Malwarebytes console – This web-based centralized management tool is responsible for discovery, deployment, management and administration of Malwarebytes agents on your company’s endpoints. This console eliminates the need to dedicate web servers and database servers for management of your endpoint data integrity, and provides scalability for organizations of all sizes.
Endpoint Agent – This intermediary software component is in charge of direct communication between the Malwarebytes console and installed Malwarebytes products, and also in charge of installation of the endpoint product itself. It may also be called on to install third-party products.
Endpoint Protection/Remediation products – These products are designed to protect and/or remediate malware and adware from Windows/Mac endpoints. They may be easily deployed by the Malwarebytes platform, Malwarebytes Discovery and Deployment Tool, Active Directory Group Policies, Microsoft SCCM, or a comparable tool of your choice.
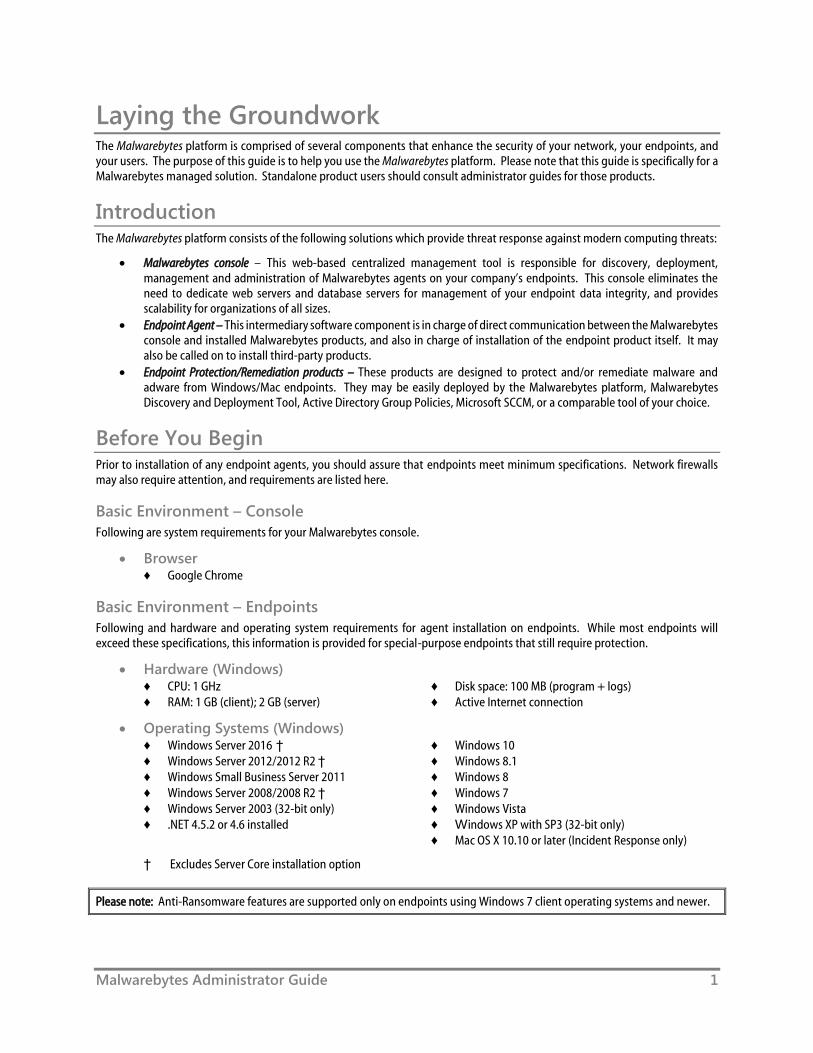
Before You Begin Prior to installation of any endpoint agents, you should assure that endpoints meet minimum specifications. Network firewalls may also require attention, and requirements are listed here.
Basic Environment – Console
Following are system requirements for your Malwarebytes console.
Browser ♦ Google Chrome
Basic Environment – Endpoints
Following and hardware and operating system requirements for agent installation on endpoints. While most endpoints will exceed these specifications, this information is provided for special-purpose endpoints that still require protection.
Hardware (Windows) ♦ CPU: 1 GHz ♦ Disk space: 100 MB (program + logs) ♦ RAM: 1 GB (client); 2 GB (server) ♦ Active Internet connection
Operating Systems (Windows) ♦ Windows Server 2016 † ♦ Windows 10 ♦ Windows Server 2012/2012 R2 † ♦ Windows 8.1 ♦ Windows Small Business Server 2011 ♦ Windows 8 ♦ Windows Server 2008/2008 R2 † ♦ Windows 7 ♦ Windows Server 2003 (32-bit only) ♦ Windows Vista ♦ .NET 4.5.2 or 4.6 installed ♦ Windows XP with SP3 (32-bit only) ♦ Mac OS X 10.10 or later (Incident Response only)
† Excludes Server Core installation option
Please note: Anti-Ransomware features are supported only on endpoints using Windows 7 client operating systems and newer.

Malwarebytes Administrator Guide 2
External Access Requirements
If your company’s Internet access is controlled by a firewall or other access-limiting device, you must grant access for endpoint agents to reach Malwarebytes services. These are:
https://cloud.malwarebytes.com Port 443 outbound https://telemetry.malwarebytes.com Port 443 outbound https://data-cdn.mbamupdates.com Port 443 outbound https://data-cdn-static.mbamupdates.com Port 443 outbound https://keystone.mwbsys.com Port 443 outbound https://data.service.malwarebytes.com Port 443 outbound https://meps.mwbsys.com Port 443 outbound https://keystone-akamai.mwbsys.com Port 443 outbound https://socket.malwarebytes.com Port 443 outbound https://sirius.mwbsys.com Port 443 outbound https://hubble.mb-cosmos.com Port 443 outbound https://blitz.mb-cosmos.com Port 443 outbound https://cdn.mwbsys.com Port 443 outbound https://ark.mwbsys.com Port 443 outbound
Antivirus and Firewall Exclusions
Interactions between Malwarebytes protection products and other security software are possible. Some antivirus and firewall applications require that you define file and folder exclusions to prevent conflicts with the program, and we recommend that you exclude the following Malwarebytes folders and registry keys.
Endpoint Agent Folders
%ProgramFiles%\Malwarebytes Endpoint Agent (Windows)
%ProgramData%\Malwarebytes Endpoint Agent (Windows)
/Library/Application Support/Malwarebytes/NebulaAgent/ (Mac)
/Library/LaunchDaemons/com.malwarebytes.NebulaAgent.plist (Mac)
Incident Response/Endpoint Protection Folders
%ProgramData%\Malwarebytes\MBAMService
%ProgramFiles%\Malwarebytes Endpoint Agent\Plugins\Incident Response\Logs
Getting Started
Access to the Malwarebytes platform comes to the administrator in the form of an “invitation” email sent by Malwarebytes following purchase. Accepting that invitation created your account, using your email address as the login name. Enter your name, and create a password for your account. Your login name is your email address, and was registered to you when you accepted the invitation sent to you in email.
Confirm your password, accept the terms of the End User License Agreement (EULA) and click Submit to get started.
You may now login to the Malwarebytes platform (https://cloud.malwarebytes.com). You may wish to create a bookmark for this URL to simplify access.
Malwarebytes Administrator Guide 3
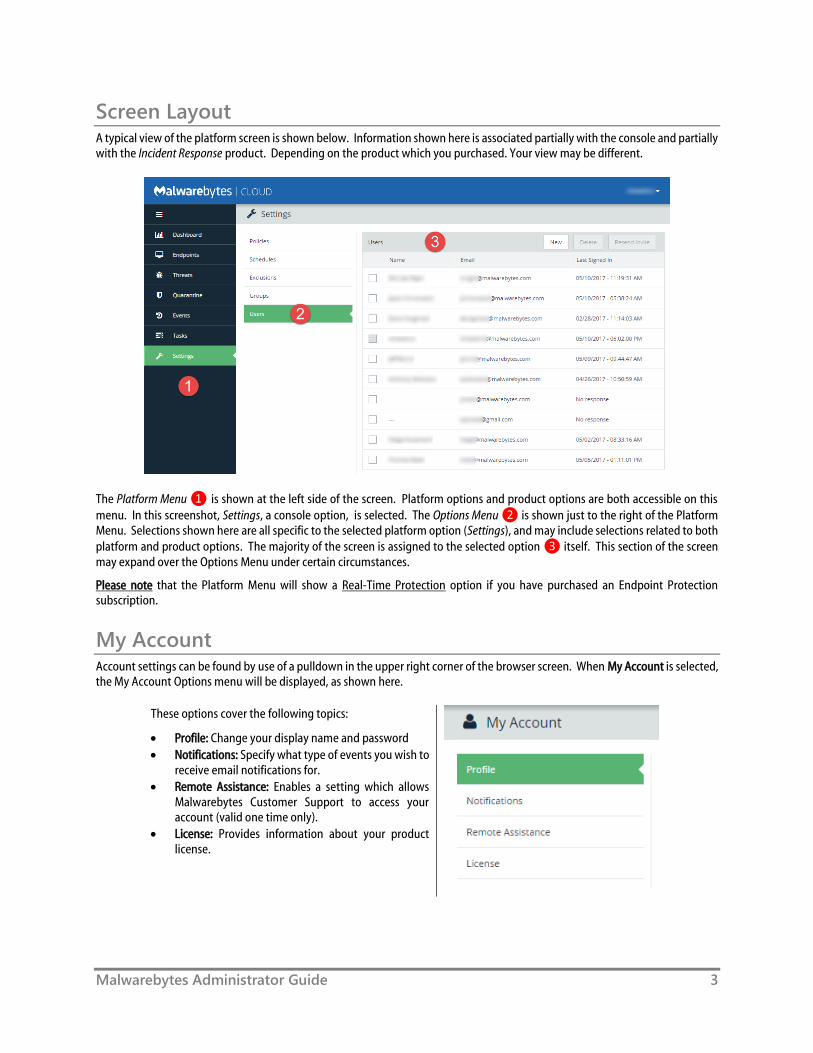
Screen Layout A typical view of the platform screen is shown below. Information shown here is associated partially with the console and partially with the Incident Response product. Depending on the product which you purchased. Your view may be different.
The Platform Menu ❶ is shown at the left side of the screen. Platform options and product options are both accessible on this menu. In this screenshot, Settings, a console option, is selected. The Options Menu ❷ is shown just to the right of the Platform Menu. Selections shown here are all specific to the selected platform option (Settings), and may include selections related to both platform and product options. The majority of the screen is assigned to the selected option ❸ itself. This section of the screen may expand over the Options Menu under certain circumstances.
Please note that the Platform Menu will show a Real-Time Protection option if you have purchased an Endpoint Protection subscription.
My Account Account settings can be found by use of a pulldown in the upper right corner of the browser screen. When My Account is selected, the My Account Options menu will be displayed, as shown here.
These options cover the following topics:
Profile: Change your display name and password
Notifications: Specify what type of events you wish to receive email notifications for.
Remote Assistance: Enables a setting which allows Malwarebytes Customer Support to access your account (valid one time only).
License: Provides information about your product license.
Malwarebytes Administrator Guide 4
Once the administrator can access the Malwarebytes platform, he may extend invitations to others via email. That invitation is valid only for fourteen (14) days, but may be renewed. The process of accepting the invitation and creating an account are identical.
Adding a New User Once the administrator has access to the Malwarebytes platform, he may extend invitations to others via email. That invitation is valid only for fourteen (14) days, but may be renewed. The process of accepting the invitation and creating an account are identical.
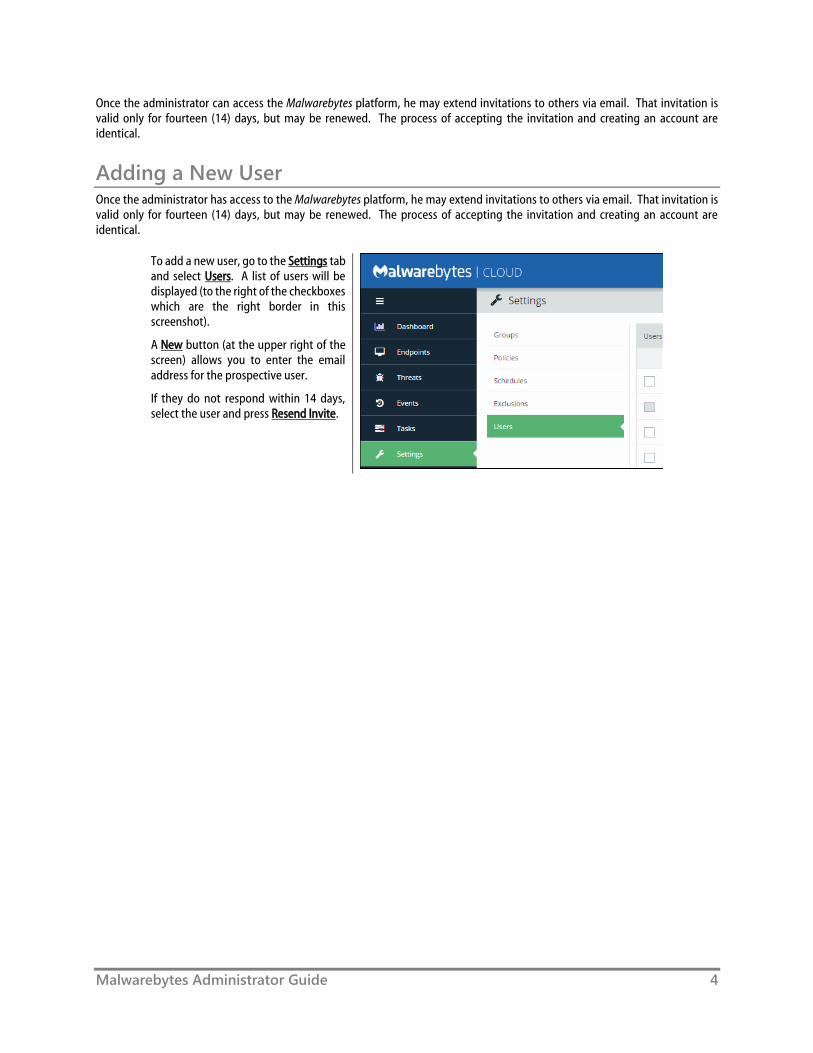
To add a new user, go to the Settings tab and select Users. A list of users will be displayed (to the right of the checkboxes which are the right border in this screenshot).
A New button (at the upper right of the screen) allows you to enter the email address for the prospective user.
If they do not respond within 14 days, select the user and press Resend Invite.
Malwarebytes Administrator Guide 5
Discovery and Deployment Tool Malwarebytes has developed a utility program to assist you with the task of adding endpoints. The Discovery and Deployment Tool scans your network based on criteria which you specify, and identifies networked devices which may be suitable for agent deployment. It also identifies endpoints where Malwarebytes agents have already been installed. A wide range of criteria may be used to identify endpoints, and an equally wide range of analysis methods provide an accurate snapshot of information relevant to deployment. Once target endpoints have been identified, you may select them and begin the agent deployment process. The tool will access Malwarebytes servers to obtain the newest MSI installer package and then perform the deployment. Let’s go inside!
Program Modes The Discovery and Deployment Tool can perform its tasks in both GUI mode and command line mode. Please refer to the end of this guide for command line operation.
Login
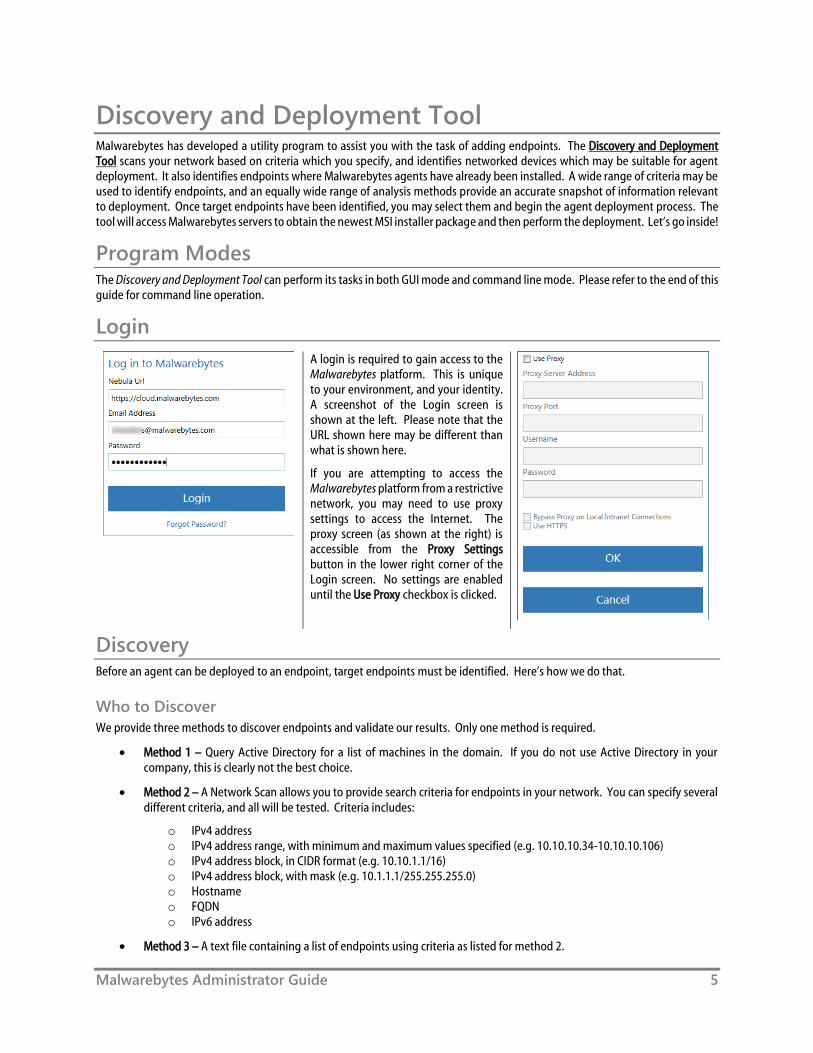
A login is required to gain access to the Malwarebytes platform. This is unique to your environment, and your identity. A screenshot of the Login screen is shown at the left. Please note that the URL shown here may be different than what is shown here.
If you are attempting to access the Malwarebytes platform from a restrictive network, you may need to use proxy settings to access the Internet. The proxy screen (as shown at the right) is accessible from the Proxy Settings button in the lower right corner of the Login screen. No settings are enabled until the Use Proxy checkbox is clicked.
Discovery Before an agent can be deployed to an endpoint, target endpoints must be identified. Here’s how we do that.
Who to Discover
We provide three methods to discover endpoints and validate our results. Only one method is required.
Method 1 – Query Active Directory for a list of machines in the domain. If you do not use Active Directory in your company, this is clearly not the best choice.
Method 2 – A Network Scan allows you to provide search criteria for endpoints in your network. You can specify several different criteria, and all will be tested. Criteria includes:
o IPv4 address o IPv4 address range, with minimum and maximum values specified (e.g. 10.10.10.34-10.10.10.106) o IPv4 address block, in CIDR format (e.g. 10.10.1.1/16) o IPv4 address block, with mask (e.g. 10.1.1.1/255.255.255.0) o Hostname o FQDN o IPv6 address
Method 3 – A text file containing a list of endpoints using criteria as listed for method 2.
Malwarebytes Administrator Guide 6
How We Discover
For each endpoint we have identified as part of our target group, we determine if they are available for agent installation. Please note that the majority of the tests listed here require ports to be accessible through the firewall. Here’s how we do it.
Ping – This is a simple ICMP command which requests the target endpoint to respond. Endpoint configuration or network topology may block pings, so alternative means would be needed to reach those endpoints.
DNS – The IP address or hostname specified in discovery criteria will be searched in the A record of the DNS server used by the host. The Time to Live (TTL) indicates an endpoint which is online or has been online recently.
UDP Datagram – The program uses UDP to send a small datagram to the endpoint, and receive a response.
TCP/IP Probe – Using the endpoint’s IP address, attempts to communicate with several ports associated with critical services (NETBIOS, HTTP, SSH, Telnet, DNS, etc.). While some ports may not respond, it is likely that a machine which is online will respond to some degree. A response to any attempt is considered a success.
Nmap – A powerful multi-purpose open source tool used for network discovery and security auditing. Much information about an endpoint can be found using this tool.
These final tests are used to determine whether an agent has been deployed to the endpoint, checking from the perspective of the endpoint as well as the Malwarebytes server.
Remote Registry Detector – Determines whether this service is available to the program, this enabling agent installation.
WMI Detector – Determines whether Windows Management Instrumentation (WMI) is accessible for agent installation.
Service Controller Detector – This allows the program to get a list of services running on the endpoint.
Agent Status Check – Using endpoint identity information, the program will query the Malwarebytes server with that identity information, looking for evidence of a previous agent deployment
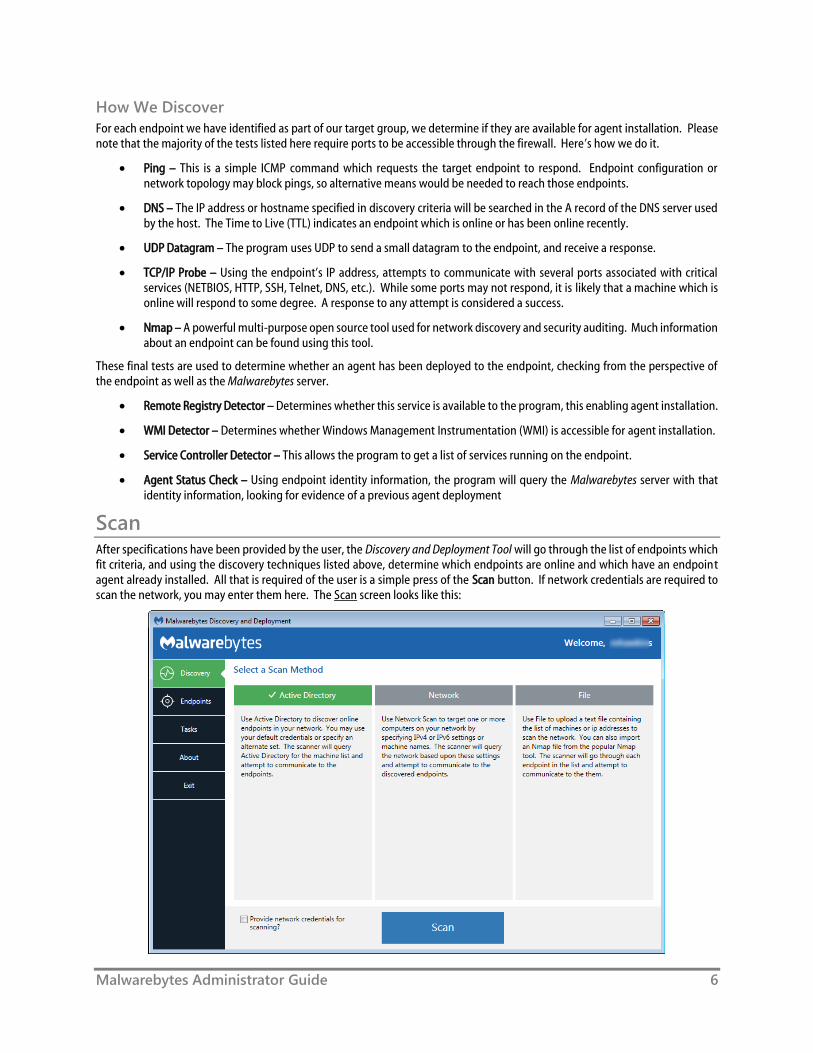
Scan After specifications have been provided by the user, the Discovery and Deployment Tool will go through the list of endpoints which fit criteria, and using the discovery techniques listed above, determine which endpoints are online and which have an endpoint agent already installed. All that is required of the user is a simple press of the Scan button. If network credentials are required to scan the network, you may enter them here. The Scan screen looks like this:
Malwarebytes Administrator Guide 7
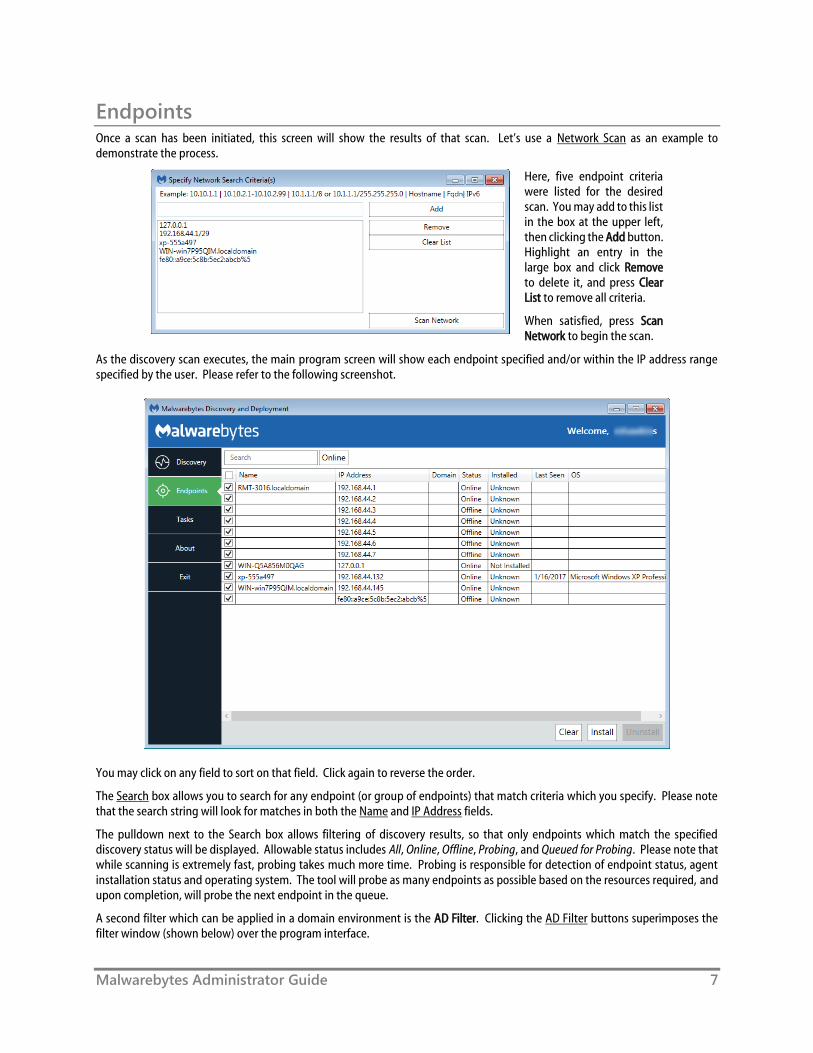
Endpoints Once a scan has been initiated, this screen will show the results of that scan. Let’s use a Network Scan as an example to demonstrate the process.
Here, five endpoint criteria were listed for the desired scan. You may add to this list in the box at the upper left, then clicking the Add button. Highlight an entry in the large box and click Remove to delete it, and press Clear List to remove all criteria.
When satisfied, press Scan Network to begin the scan.
As the discovery scan executes, the main program screen will show each endpoint specified and/or within the IP address range specified by the user. Please refer to the following screenshot.
You may click on any field to sort on that field. Click again to reverse the order.
The Search box allows you to search for any endpoint (or group of endpoints) that match criteria which you specify. Please note that the search string will look for matches in both the Name and IP Address fields.
The pulldown next to the Search box allows filtering of discovery results, so that only endpoints which match the specified discovery status will be displayed. Allowable status includes All, Online, Offline, Probing, and Queued for Probing. Please note that while scanning is extremely fast, probing takes much more time. Probing is responsible for detection of endpoint status, agent installation status and operating system. The tool will probe as many endpoints as possible based on the resources required, and upon completion, will probe the next endpoint in the queue.
A second filter which can be applied in a domain environment is the AD Filter. Clicking the AD Filter buttons superimposes the filter window (shown below) over the program interface.
Malwarebytes Administrator Guide 8
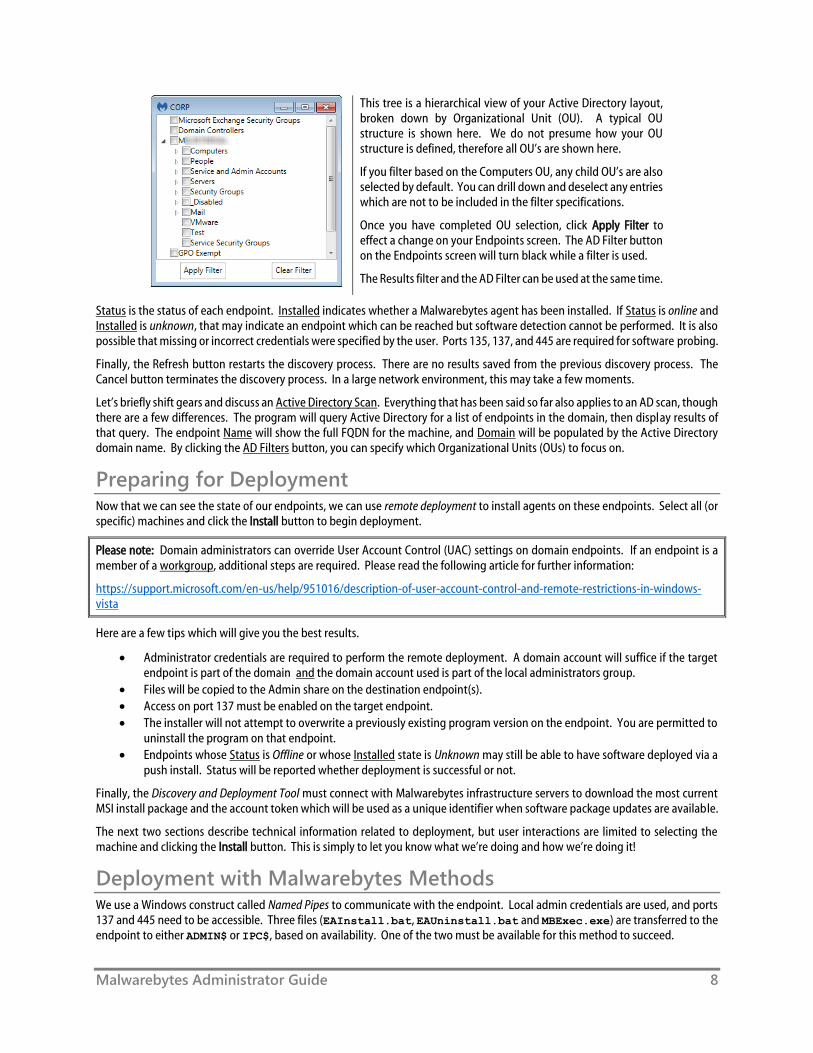
This tree is a hierarchical view of your Active Directory layout, broken down by Organizational Unit (OU). A typical OU structure is shown here. We do not presume how your OU structure is defined, therefore all OU’s are shown here.
If you filter based on the Computers OU, any child OU’s are also selected by default. You can drill down and deselect any entries which are not to be included in the filter specifications.
Once you have completed OU selection, click Apply Filter to effect a change on your Endpoints screen. The AD Filter button on the Endpoints screen will turn black while a filter is used.
The Results filter and the AD Filter can be used at the same time.
Status is the status of each endpoint. Installed indicates whether a Malwarebytes agent has been installed. If Status is online and Installed is unknown, that may indicate an endpoint which can be reached but software detection cannot be performed. It is also possible that missing or incorrect credentials were specified by the user. Ports 135, 137, and 445 are required for software probing.
Finally, the Refresh button restarts the discovery process. There are no results saved from the previous discovery process. The Cancel button terminates the discovery process. In a large network environment, this may take a few moments.
Let’s briefly shift gears and discuss an Active Directory Scan. Everything that has been said so far also applies to an AD scan, though there are a few differences. The program will query Active Directory for a list of endpoints in the domain, then display results of that query. The endpoint Name will show the full FQDN for the machine, and Domain will be populated by the Active Directory domain name. By clicking the AD Filters button, you can specify which Organizational Units (OUs) to focus on.
Preparing for Deployment Now that we can see the state of our endpoints, we can use remote deployment to install agents on these endpoints. Select all (or specific) machines and click the Install button to begin deployment.
Please note: Domain administrators can override User Account Control (UAC) settings on domain endpoints. If an endpoint is a member of a workgroup, additional steps are required. Please read the following article for further information:
https://support.microsoft.com/en-us/help/951016/description-of-user-account-control-and-remote-restrictions-in-windows-vista
Here are a few tips which will give you the best results.
Administrator credentials are required to perform the remote deployment. A domain account will suffice if the target endpoint is part of the domain and the domain account used is part of the local administrators group.
Files will be copied to the Admin share on the destination endpoint(s).
Access on port 137 must be enabled on the target endpoint.
The installer will not attempt to overwrite a previously existing program version on the endpoint. You are permitted to uninstall the program on that endpoint.
Endpoints whose Status is Offline or whose Installed state is Unknown may still be able to have software deployed via a push install. Status will be reported whether deployment is successful or not.
Finally, the Discovery and Deployment Tool must connect with Malwarebytes infrastructure servers to download the most current MSI install package and the account token which will be used as a unique identifier when software package updates are available.
The next two sections describe technical information related to deployment, but user interactions are limited to selecting the machine and clicking the Install button. This is simply to let you know what we’re doing and how we’re doing it!
Deployment with Malwarebytes Methods We use a Windows construct called Named Pipes to communicate with the endpoint. Local admin credentials are used, and ports 137 and 445 need to be accessible. Three files (EAInstall.bat, EAUninstall.bat and MBExec.exe) are transferred to the endpoint to either ADMIN$ or IPC$, based on availability. One of the two must be available for this method to succeed.
Malwarebytes Administrator Guide 9
Deployment with Windows Methods (WMI) Windows Management Instrumentation (WMI) is another method we use. It is typically used when our primary method is unsuccessful. WMI Deployment uses the ADMIN$ share. This share is used as a temporary home for files that we retrieve for updating and installing on the endpoint. You may need to enable Remote Management of the endpoint to successfully access the ADMIN$ share. Endpoint port 135 must be available through the firewall. Local admin credentials are required.
Please note: You should not use the Discovery and Deployment Tool to deploy agents to endpoints outside of your local network. This includes those which connect to the network using a VPN connection. The ports which are opened for the deployment process would remain open after deployment is complete, creating a security risk on that endpoint.
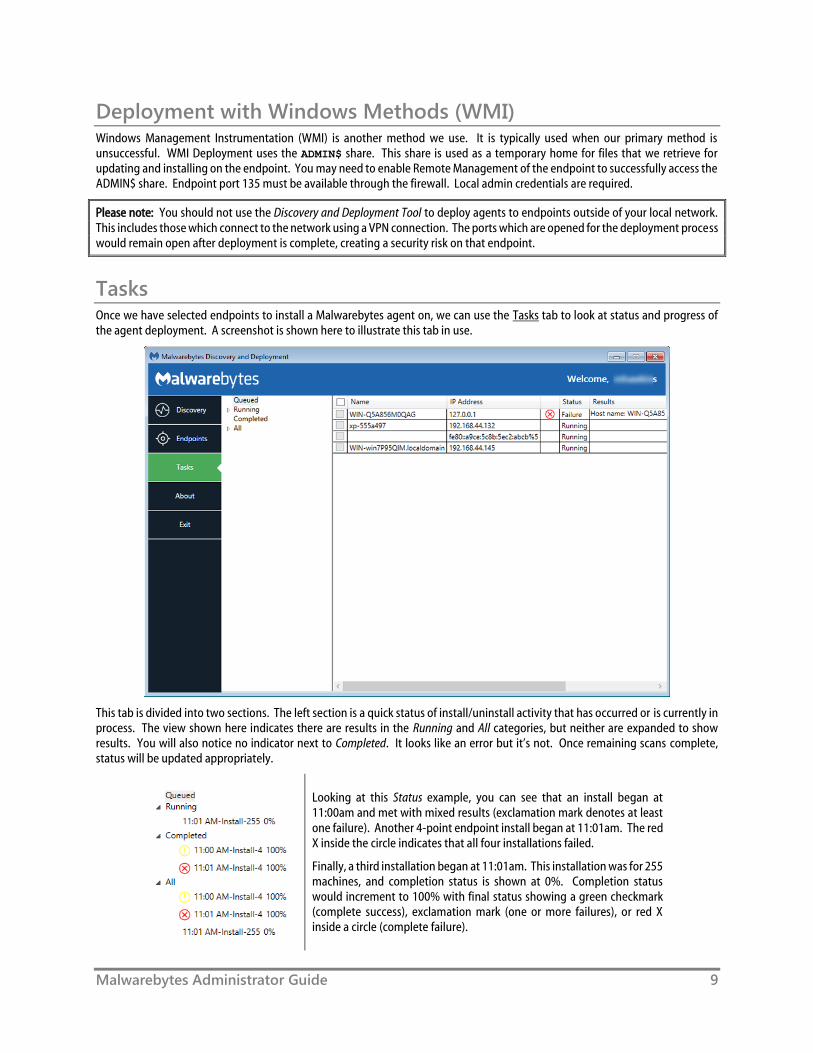
Tasks Once we have selected endpoints to install a Malwarebytes agent on, we can use the Tasks tab to look at status and progress of the agent deployment. A screenshot is shown here to illustrate this tab in use.
This tab is divided into two sections. The left section is a quick status of install/uninstall activity that has occurred or is currently in process. The view shown here indicates there are results in the Running and All categories, but neither are expanded to show results. You will also notice no indicator next to Completed. It looks like an error but it’s not. Once remaining scans complete, status will be updated appropriately.
Looking at this Status example, you can see that an install began at 11:00am and met with mixed results (exclamation mark denotes at least one failure). Another 4-point endpoint install began at 11:01am. The red X inside the circle indicates that all four installations failed.
Finally, a third installation began at 11:01am. This installation was for 255 machines, and completion status is shown at 0%. Completion status would increment to 100% with final status showing a green checkmark (complete success), exclamation mark (one or more failures), or red X inside a circle (complete failure).

Malwarebytes Administrator Guide 10
The screenshot below shows installation results for these same four endpoints. Status is shown with both words and symbols, and Results shows relevant information as well as a link to view logs. Only an excerpt of the screen is shown here because the screen required expansion to show Results detail, and that action would have caused display of the full screen to become illegible here.
Please note that when several endpoints are selected for installation, you may also see Status shown as Queued. Resources are required for each installation, and when requirements exceed availability, installation will be Queued until resources are available.
Malwarebytes Administrator Guide 11
Assembling the Pieces So far, we have created users and added endpoints. We may wish to add more endpoints at a later time. We also need to configure the environment to so that a stable protection platform is in place. Let’s begin!
Understanding Malwarebytes Agents Malwarebytes protection is delivered to you as an installable agent. Each agent serves a different purpose, and must be configured to provide proper functionality. Available agents include:
Incident Response provides scheduled scanning of your endpoint based on specifications which you provide, as well as on-demand scanning of areas where a majority of malware is hidden. If a threat is detected, it is quarantined for later remediation. Asset management is also included in this product.
Endpoint Protection provides all of the functionality that Incident Response offers, and couples that with real-time protection against several types of threats (malware, exploits, ransomware, and malicious web controls). Malwarebytes Endpoint Protection is an effective anti-virus replacement, and you may also choose whether it appears in Windows Action Center (Vista and later).
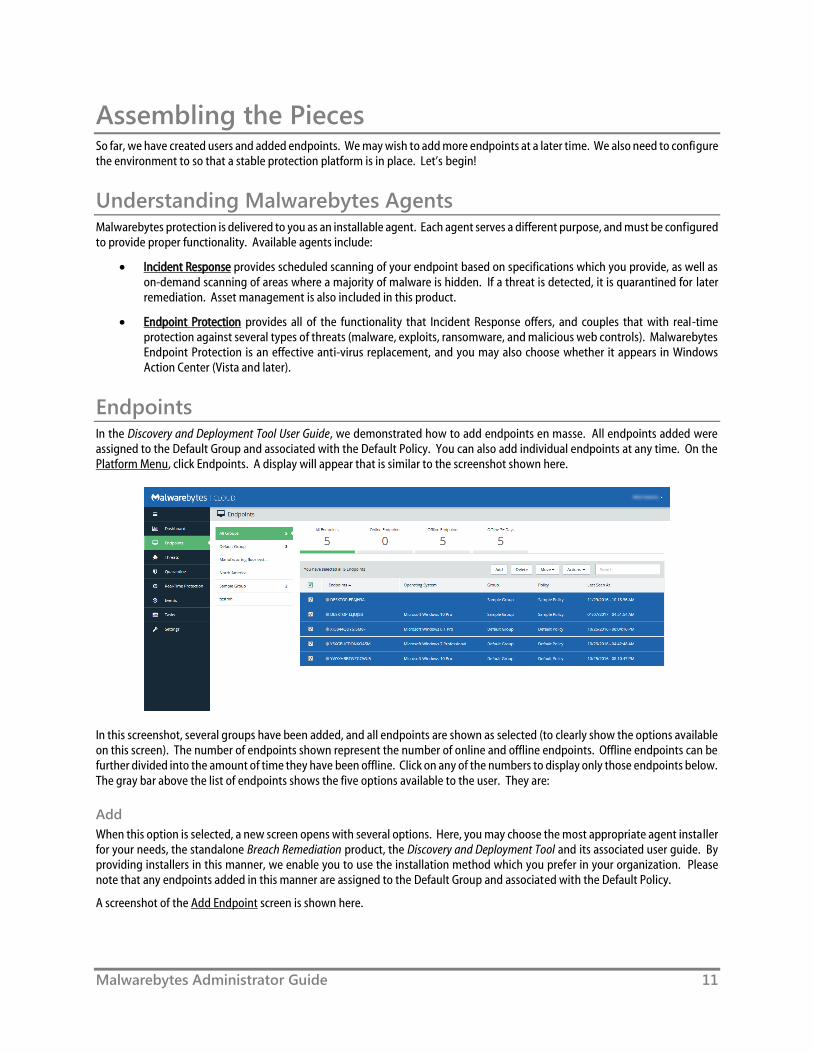
Endpoints In the Discovery and Deployment Tool User Guide, we demonstrated how to add endpoints en masse. All endpoints added were assigned to the Default Group and associated with the Default Policy. You can also add individual endpoints at any time. On the Platform Menu, click Endpoints. A display will appear that is similar to the screenshot shown here.
In this screenshot, several groups have been added, and all endpoints are shown as selected (to clearly show the options available on this screen). The number of endpoints shown represent the number of online and offline endpoints. Offline endpoints can be further divided into the amount of time they have been offline. Click on any of the numbers to display only those endpoints below. The gray bar above the list of endpoints shows the five options available to the user. They are:
Add
When this option is selected, a new screen opens with several options. Here, you may choose the most appropriate agent installer for your needs, the standalone Breach Remediation product, the Discovery and Deployment Tool and its associated user guide. By providing installers in this manner, we enable you to use the installation method which you prefer in your organization. Please note that any endpoints added in this manner are assigned to the Default Group and associated with the Default Policy.
A screenshot of the Add Endpoint screen is shown here.

Malwarebytes Administrator Guide 12
You will notice a reference in this screenshot to Malwarebytes Breach Remediation, our highly-effective remediation program for Windows and Mac endpoints. There may be instances when its usage is more appropriate for your needs. You can also download this application here. Documentation is included in the ZIP file.
Delete
This option will delete Malwarebytes software from endpoints. This includes applications (Incident Response and Endpoint Protection) as well as the agent which controls communications between the console and applications. To delete software on one or more endpoints, select those endpoints and click Delete. All deletions in a single group should be performed at the same time before acting on a different group, unless you are performing deletions from the All Groups list. When deleting software from offline endpoints which have been offline for less than 90 days, deletion will occur as requested. Endpoints which have been offline 90 days or longer will not be processed…they will remain under console management. Finally, groups whose entire endpoint population have been removed from console management will remain intact.
Move
By selecting one or more endpoints, you can move them from one group to another. The value of this will become apparent after we discuss the relationship between endpoints, policies and groups.
Malwarebytes Administrator Guide 13
Actions
After selecting endpoints, you may run one of the following on-demand scans:
Scan + Report – Run a threat scan and report the results. This scan method does not remove any threats which were detected during the scan.
Scan + Quarantine – Run a threat scan, quarantine any threats which were detected, and report scan results.
Refresh Assets – Update hardware/software assets for the endpoint. Unless the administrator has created scheduled scans for this purpose, this may be the only method by which assets are checked.
These actions are available for all Malwarebytes users, regardless of the specific product subscribed to.
Search
It may be easier for you to search for a computer than to scroll through a list. Start typing the hostname of the endpoint, and the list of endpoints will be continually updated until you locate the endpoint you were searching for.
Policies A policy defines the behavior which a Malwarebytes product uses when running a scheduled scan. Each policy is used by a specific product, Incident Response or Endpoint Protection. It cannot serve both. A policy can be paired with multiple groups, providing flexibility for the administrator, although it is important to note that the policy can only have only one set of specifications.
Initially there is a single policy, called the Default Policy. It may not be deleted. If a policy is not associated with a group, it may be deleted, or it may be renamed by selecting it and overwriting its existing Policy Name. Scheduled scans and Real-Time Protection both draw heavily on policy specifications, so policies will be discussed in detail in product sections (later in this guide). You may create several policies which are similar in nature. It is your best interest to use an easily discernable naming convention.
You can find this in Settings ►Policies.
Groups A group is defined as a collection of endpoints. Initially there is a single group, called the Default Group. It may not be deleted. You may add a new group at any time. You can rename a group by first selecting the group, then overwriting its existing Group Name. You may also delete a group if it is not associated with a scheduled scan. Here, you will associate a group with a policy. This defines protection characteristics for endpoints that are members of that group. You may create several groups which are similar in nature. It is your best interest to use an easily discernable naming convention.
You can find this in Settings ►Groups.
Adding Endpoints to Groups The last piece of the puzzle is to specify members of the newly-added group. The group has been tied to a policy, and the endpoint will now be tied to the same policy for as long as it is a member of that group. Referring back to the screenshot in Endpoints (page 11), select one or more endpoints and click the Move button, which appears directly above the list of endpoints. A pulldown menu will appear which displays the names of available groups. Select the desired group to make the endpoint a member of that group.
Until you have performed the above action, newly added endpoints are associated with the Default Group.
Exclusions You may find that exclusions are needed to provide satisfactory performance in your environment. They are often unnecessary. They may be needed if antivirus and anti-malware products interfere with each other’s performance. They may also be needed if an application or data file which you trust is being flagged as a false positive–being seen as a threat when you know that it is not. Creating exclusions for these items helps to provide the best performance.
You may exclude files, folders, file extensions and registry keys. Wildcards (as used in Microsoft Windows) are accepted, anywhere in the text string that defines the exclusion.
You can find this in Settings ►Exclusions.

Malwarebytes Administrator Guide 14
What’s Next All prerequisites have been defined, and the stage is now set for us to dig in to your new Malwarebytes product. Along with a full description of console usage, this guide contains information for both Incident Response and Endpoint Protection. Let’s begin with Incident Response.
Malwarebytes Administrator Guide 15
Malwarebytes Incident Response Malwarebytes Incident Response is available to all paid users of the Malwarebytes platform. It has four primary functions. These are:
To execute on-demand scans of endpoints in your environment
To execute scheduled scans of endpoints in your environment
To remediate threats discovered during execution of the scan
Provide scan and remediation results to the platform Dashboard.
We will focus here on scanning and remediation, and leave results for the Status and Results section, later in this guide. Let’s begin.
Policies As mentioned previously, protection behavior is determined by the policy which is applied to the group of endpoints that are to be scanned. Go to Settings ►Policies, and select the Default Policy, unless you have already created a policy. The Option Menu will show settings for Incident Response, Endpoint Protection and Asset Management. Select Incident Response to view settings for this policy. Please note that Windows and Mac endpoints are handled separately due to differences between the two systems. The first setting enables you to turn Incident Response on or off. There is no harm in turning Incident Response off. You simply cannot use the product in the policy until it is turned on.
If you are an Endpoint Protection subscriber, you must remember the following:
Turning on Endpoint Protection will automatically turn Incident Response off.
Turning off Endpoint Protection followed by turning Incident Response on may require a reboot of affected endpoints.
Scan Options
There are a number of settings here which may be defined. These are a function of the scan method selected, as well as the endpoint family being scanned. They are as follows:
Scan Rootkits: This setting applies only to Threat scans. This is always on for Macs, and may be turned on or off for Windows endpoints. The default setting is off.
Scan within Archives: This also applies only to Threat scans. It may be turned on or off on Windows endpoints (the default is on), and is not currently supported for Macs.
Potentially Unwanted Programs (PUPs): This applies to Threat and Hyper Scans, and specifies whether PUPs will be treated as malware, or ignored.
Potentially Unwanted Modifications (PUMs): This applies to Threat and Hyper Scans, and specifies whether PUMs will be treated as malware, or ignored. This is not applicable to Mac endpoints,
Reboot Options
Detection of a threat does not end with quarantine of the visible threat. Malware may leave behind remnants of itself which may later be activated, as well as copies of itself in the endpoint’s memory. For this reason, certain types of malware required a reboot to complete the removal task.
Restart computer: Choose if the endpoint should be restarted when needed to remove a threat. Not restarting the endpoint may leave the user in jeopardy. The default is off.
Reboot Warning Delay: Specify a time between thirty seconds and five minutes which will count down before a reboot occurs. This is not supported currently for Macs.
Reboot Warning Message: Notification to provide to the user if a reboot will occur to fully remediate a threat. This is not supported currently for Macs.
Malwarebytes Administrator Guide 16
Asset Management
In addition to malware scans, you may also execute an asset management scan. This evaluates basic environmental settings of the endpoint being scanned, and reports changes which have occurred on any of the six available specifications. While there are options for both Windows and Mac endpoints, they contain identical settings, allowing you to track different assets for different platforms.
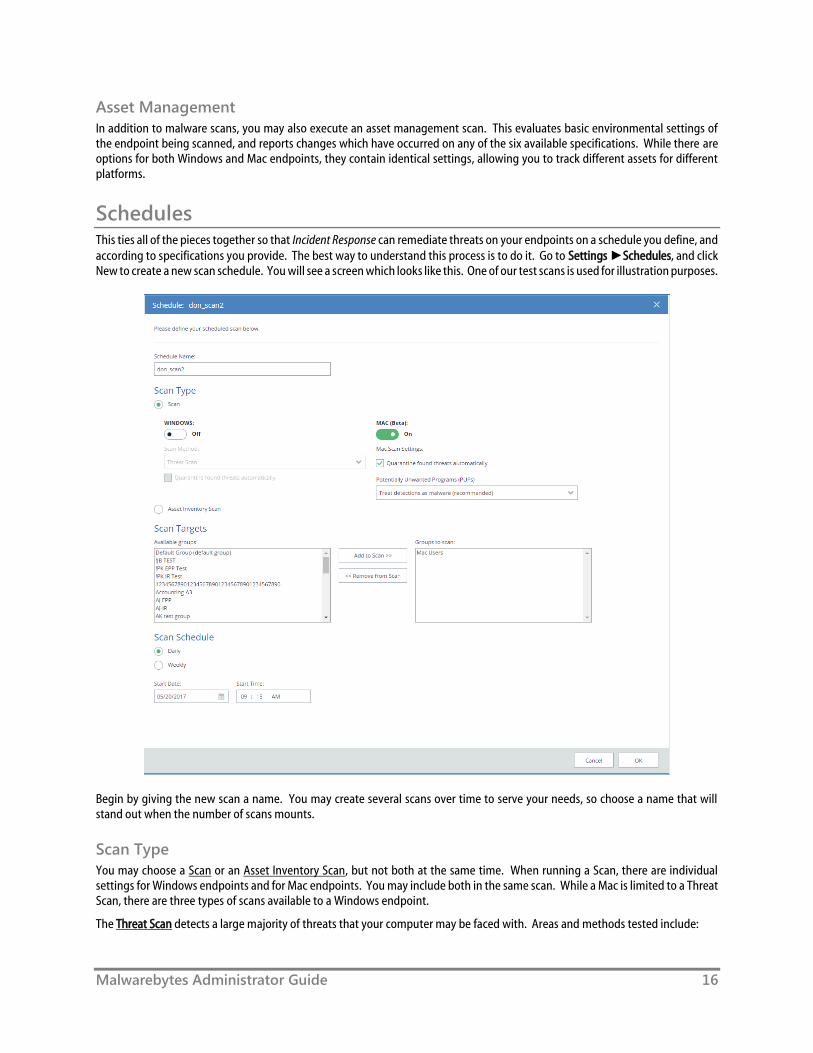
Schedules This ties all of the pieces together so that Incident Response can remediate threats on your endpoints on a schedule you define, and according to specifications you provide. The best way to understand this process is to do it. Go to Settings ►Schedules, and click New to create a new scan schedule. You will see a screen which looks like this. One of our test scans is used for illustration purposes.
Begin by giving the new scan a name. You may create several scans over time to serve your needs, so choose a name that will stand out when the number of scans mounts.
Scan Type
You may choose a Scan or an Asset Inventory Scan, but not both at the same time. When running a Scan, there are individual settings for Windows endpoints and for Mac endpoints. You may include both in the same scan. While a Mac is limited to a Threat Scan, there are three types of scans available to a Windows endpoint.
The Threat Scan detects a large majority of threats that your computer may be faced with. Areas and methods tested include:
Malwarebytes Administrator Guide 17
Memory Objects: Memory which has been allocated by operating system processes, drivers, and other applications.
Startup Objects: Executable files and/or modifications which will be initiated at computer startup.
Registry Objects: Configuration changes which may have been made to the Windows registry.
File System Objects: Files stored on your computer's local disk drives which may contain malicious programs or code snippets.
Heuristic Analysis: Analysis methods which we employ in the previously-mentioned objects – as well as in other areas – which are instrumental in detection of and protection against threats, as well as the ability to assure that the threats cannot reassemble themselves.
The Threat Scan is the scan method which we recommend for daily scans. While it will not scan every file on your computer, it will scan the locations which most commonly are the launch point for a malware attack.
The Hyper Scan is limited to detection of immediate threats. Areas and methods tested include:
Memory Objects: Memory which has been allocated by operating system processes, drivers, and other applications.
Startup Objects: Executable files and/or modifications which will be initiated at computer startup.
While a Hyper Scan will clean any threats which have been detected, we strongly recommend that a Threat Scan be performed if a Hyper Scan has detected threats.
You may also choose to run a Custom Scan. This allows you to scan according to specifications which you define at the time of the scan. These settings will override scan settings defined elsewhere. When performing a Custom Scan, the following settings are available to you.
Quarantine found threats automatically: This setting allows you to quarantine immediately on detection, or be prompted for each presumed threat detected during a scan.
Scan memory objects: Memory which has been allocated by operating system processes, drivers, and other applications. It is important to note that threats detected during scans are still considered threats if they have an active component in memory. As an extra measure of safety, memory objects should be scanned.
Scan startup and registry settings: Executable files and/or modifications which are initiated at computer startup, as well as registry-based configuration changes that can alter startup behavior.
Scan within archives: If checked, archive files (ZIP, 7Z, RAR, CAB and MSI) will be scanned up to four levels deep. Encrypted (password-protected) archives cannot be tested. If left unchecked, archive files will be ignored.
Rootkits: These are files stored on your computer's local disk drives which are invisible to the operating system. These files may also influence system behavior.
You can also choose whether Potentially Unwanted Programs (PUPs) and Potentially Unwanted Modifications (PUMs) will be considered as malware or simply ignored. You can choose each separately. Finally, you can specify a Scan Path, which defines the top level of a folder tree to be scanned.
Scan Targets
This is where you choose the group of endpoints that will be scanned. Earlier, we created the policy that defines the behavior of the group, then we added endpoints as members of the group. Here is where it all comes together. Add or Remove groups from the list of groups to be scanned, and finally set the Scan Schedule.
Scan Schedule
The last piece of the puzzle is to schedule the scan. You may not select a day that is in the past, and if you select today as a starting day for the schedule, you may not schedule it at a time that has already passed.
That’s all there is to it! Later in this guide, we will look at System Status as a function of Incident Response activities.
Malwarebytes Administrator Guide 18
Malwarebytes Endpoint Protection This product offers Real-Time Protection, providing full proactive and reactive protection for your Windows endpoints. It is not currently available for Mac endpoints. These features include:
Malicious web sites
Exploits of application vulnerabilities
Drive-by attacks
Ransomware
We will focus here on all aspects of Endpoint Protection but results, leaving that for the Status and Results section (coming up next).
Policies As mentioned previously, protection behavior is determined by the policy which is applied to the group of endpoints that are to be scanned. Go to Settings ►Policies, and select the Default Policy, unless you have already created a policy. The Option Menu will show settings for Incident Response, Endpoint Protection and Asset Management. Select Endpoint Protection to view settings for this policy. At the present time, this product is available only for Windows endpoints.
The first setting enables you to turn Endpoint Protection on or off. Please note that turning this feature set off leaves you unprotected with regard to real-time threats. You should also be aware of the following:
Turning on Endpoint Protection automatically turns Incident Response off.
Turning off Endpoint Protection followed by turning Incident Response on may require a reboot of affected endpoints.
Real-Time Protection
The following is a description of the types of real-time protection offered by Malwarebytes Endpoint Protection.
Web Protection protects users by blocking access to/from Internet addresses which are known or suspected of engaging in malicious activity. This feature does not treat different protocols differently. It does not distinguish between your favorite game being served on one port and a potential malware source being served on another. Should you choose to disable this feature, you could inadvertently compromise your computer's safety.
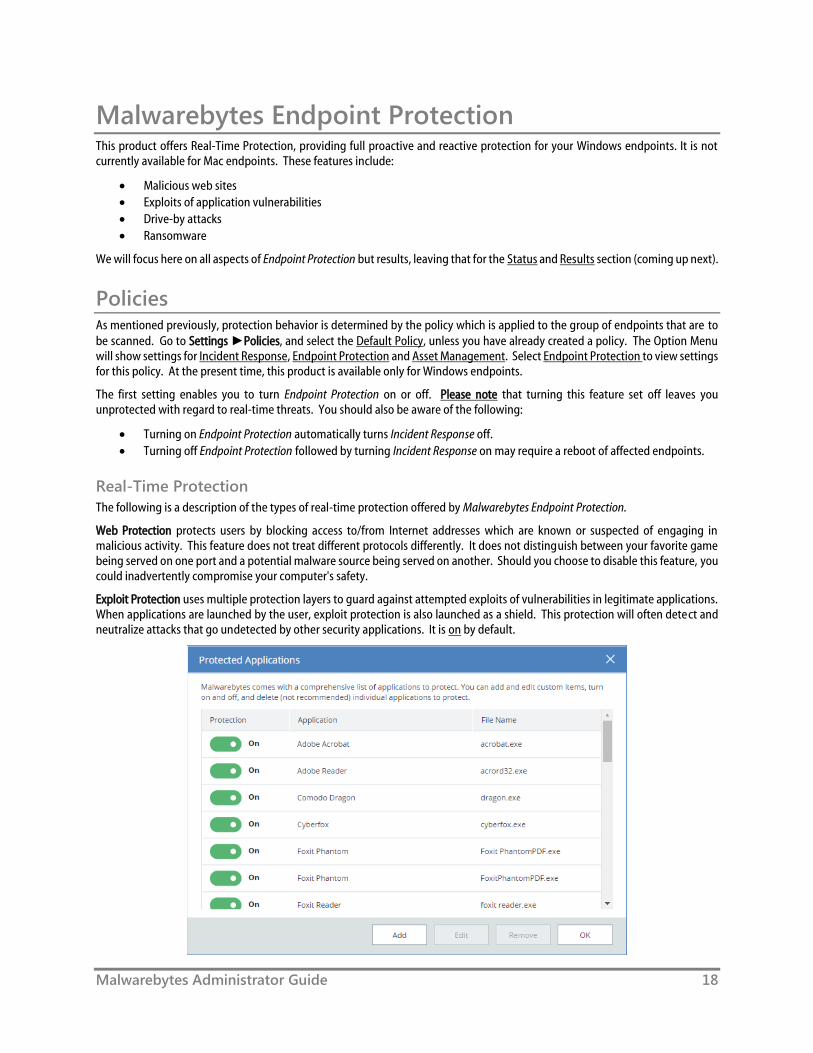
Exploit Protection uses multiple protection layers to guard against attempted exploits of vulnerabilities in legitimate applications. When applications are launched by the user, exploit protection is also launched as a shield. This protection will often detect and neutralize attacks that go undetected by other security applications. It is on by default.
Malwarebytes Administrator Guide 19
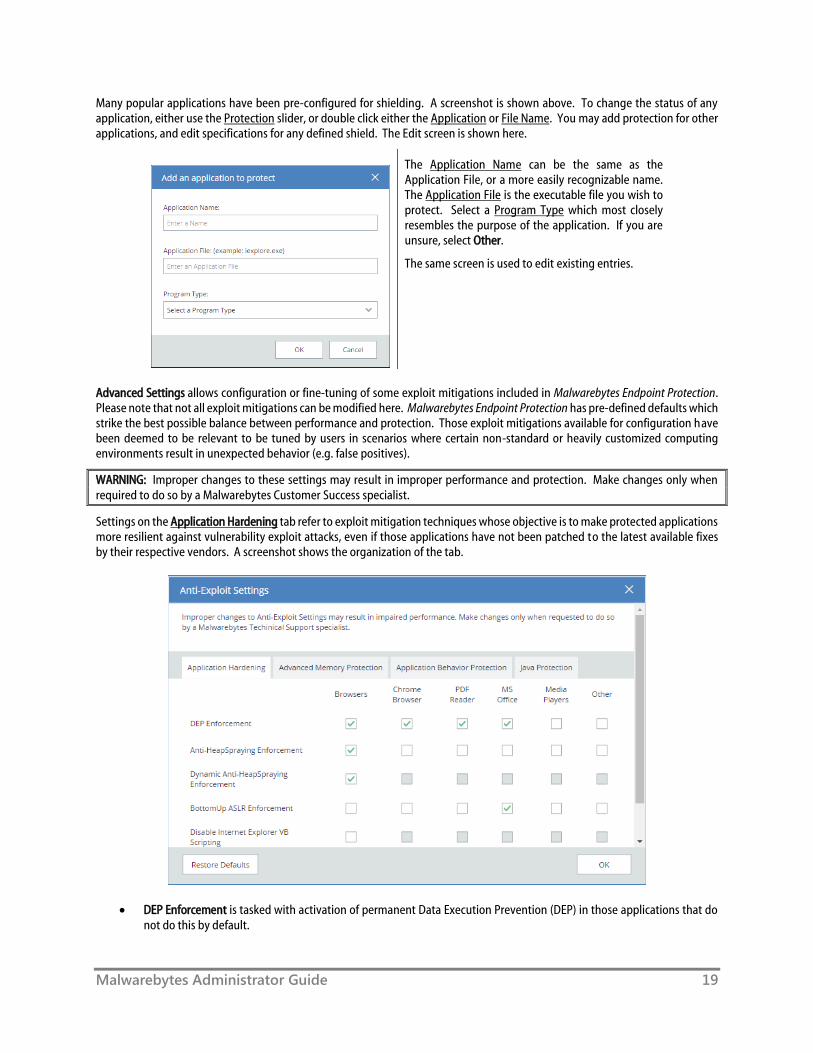
Many popular applications have been pre-configured for shielding. A screenshot is shown above. To change the status of any application, either use the Protection slider, or double click either the Application or File Name. You may add protection for other applications, and edit specifications for any defined shield. The Edit screen is shown here.
The Application Name can be the same as the Application File, or a more easily recognizable name. The Application File is the executable file you wish to protect. Select a Program Type which most closely resembles the purpose of the application. If you are unsure, select Other.
The same screen is used to edit existing entries.
Advanced Settings allows configuration or fine-tuning of some exploit mitigations included in Malwarebytes Endpoint Protection. Please note that not all exploit mitigations can be modified here. Malwarebytes Endpoint Protection has pre-defined defaults which strike the best possible balance between performance and protection. Those exploit mitigations available for configuration have been deemed to be relevant to be tuned by users in scenarios where certain non-standard or heavily customized computing environments result in unexpected behavior (e.g. false positives).
WARNING: Improper changes to these settings may result in improper performance and protection. Make changes only when required to do so by a Malwarebytes Customer Success specialist.
Settings on the Application Hardening tab refer to exploit mitigation techniques whose objective is to make protected applications more resilient against vulnerability exploit attacks, even if those applications have not been patched to the latest available fixes by their respective vendors. A screenshot shows the organization of the tab.
DEP Enforcement is tasked with activation of permanent Data Execution Prevention (DEP) in those applications that do not do this by default.
Malwarebytes Administrator Guide 20
Anti-HeapSpraying Enforcement is designed to reserve certain memory ranges, to prevent them from being abused by Heap-Spraying attack techniques.
Dynamic Anti-HeapSpraying Enforcement analyzes the memory heap of a protected process in order to find evidence of malicious shellcode on the heap using heap spraying techniques.
Bottom-Up ASLR Enforcement is tasked with addition of randomization to the memory heap when the process starts.
Disable Internet Explorer VB Scripting is tasked with preventing the deprecated Visual Basic scripting engine from loading. The scripting engine is frequently abused by exploits. This setting applies only to the browser family.
Detection of Anti-Exploit fingerprinting attempts is a technique which detects attempts by popular exploit kits (e.g. Angler) of fingerprinting the victim machine to determine if it should be attacked by its exploit arsenal.
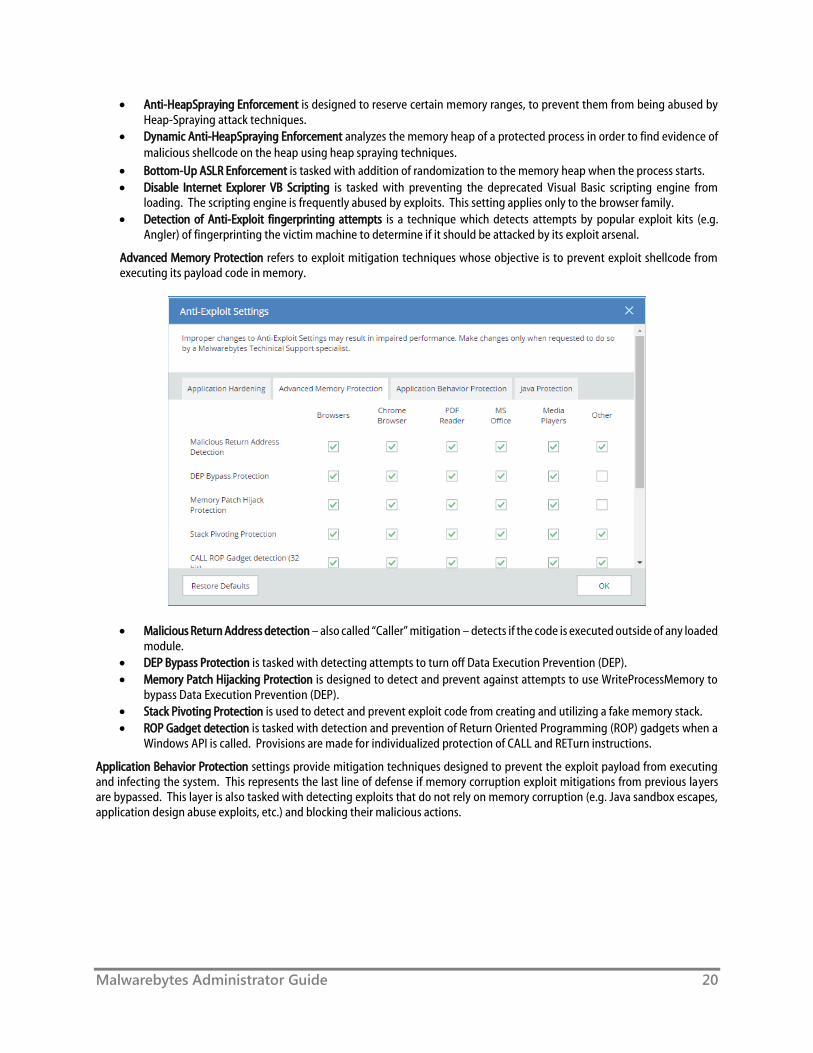
Advanced Memory Protection refers to exploit mitigation techniques whose objective is to prevent exploit shellcode from executing its payload code in memory.
Malicious Return Address detection – also called “Caller” mitigation – detects if the code is executed outside of any loaded module.
DEP Bypass Protection is tasked with detecting attempts to turn off Data Execution Prevention (DEP).
Memory Patch Hijacking Protection is designed to detect and prevent against attempts to use WriteProcessMemory to bypass Data Execution Prevention (DEP).
Stack Pivoting Protection is used to detect and prevent exploit code from creating and utilizing a fake memory stack.
ROP Gadget detection is tasked with detection and prevention of Return Oriented Programming (ROP) gadgets when a Windows API is called. Provisions are made for individualized protection of CALL and RETurn instructions.
Application Behavior Protection settings provide mitigation techniques designed to prevent the exploit payload from executing and infecting the system. This represents the last line of defense if memory corruption exploit mitigations from previous layers are bypassed. This layer is also tasked with detecting exploits that do not rely on memory corruption (e.g. Java sandbox escapes, application design abuse exploits, etc.) and blocking their malicious actions.

Malwarebytes Administrator Guide 21
Malicious LoadLibrary protection prevents delivery of a payload library from a UNC network path.
Protection for Internet Explorer VB scripting is designed to detect and prevent exploits related to an application design vulnerability known as CVE-2014-6332. For further information on this exploit, please refer to https://web.nvd.nist.gov/view/vuln/detail?vulnId=CVE-2014-6332.
Protection for MessageBox payload prevents exploits from delivering a messagebox as its payload. It is turned off by default as these payloads are normally only used in proof of concepts and do not cause any harm.
Protection for Office WMI abuse protects against macro exploits in Microsoft Office using Windows Management Instrumentation (WMI).
Protection for Office VBA7 abuse protects against macro exploits in Microsoft Office using Visual Basic for Applications.
Java Protection refers to mitigation techniques which are unique to exploits commonly used in Java programs.

Malwarebytes Administrator Guide 22
Prevent Web-Based Java Command Line protects against web-based Java programs issuing system commands.
Java malicious inbound shell protection guards against remote shell exploits whose payloads rely on inbound sockets.
Java malicious outbound shell protection guards against remote shell exploits whose payloads rely on outbound sockets.
Java Metasploit/Meterpreter generic protection is designed to generically detect and prevent attempts to use the Metasploit Java/Meterpreter payload.
Java Metasploit/Meterpreter command execution protection is tasked with detecting and blocking commands in an established Java/Meterpreter session.
Allow Insecure Java Operations in Internal IP Ranges is primarily used to allow insecure internal tools and applications used within a corporate network without compromising on protection from external Java threats.
Malware Protection may be turned on or off as needed. It is on by default. This feature protects against infected code/files that try to execute on your computer. These files may have been downloaded, imported from a USB drive, or received as an email attachment. While we do not recommend disabling this protection mechanism, there may be times when it needs to be done to troubleshoot compatibility issues that arise with anti-virus updates or computer startup problems. If either situation does occur, start your computer in Safe Mode, disable Malware Protection, isolate and correct the issue, then turn Malware Protection back on.
Ransomware Protection provides protection against ransomware. This protection is not available for users of Windows XP or Windows Vista. While all other protection features may provide some degree of protection against ransomware, well-crafted ransomware may go undetected until it attempts to initiate its attack. As many computer users have found, there is little or no remedy available after the fact. We strongly recommend that ransomware protection be turned on at all times. It is on by default.
Scan Options
There are a number of settings here which may be defined. These are a function of the scan method selected, as well as the endpoint family being scanned. They are as follows:
Scan Rootkits: This setting applies only to Threat scans. It may be turned on or off. The default setting is off.
Scan within Archives: This also applies only to Threat scans. It may be turned on or off . The default setting is on.
Potentially Unwanted Programs (PUPs): This applies to Threat and Hyper Scans, and specifies whether PUPs will be treated as malware, or ignored.
Potentially Unwanted Modifications (PUMs): This applies to Threat and Hyper Scans, and specifies whether PUMs will be treated as malware, or ignored. This is not applicable to Mac endpoints,
Reboot Options
Threat remediation does not end with quarantine of the visible threat. Malware may leave behind remnants which may later be activated, as well as copies of itself in the endpoint’s memory. For this reason, certain types of malware require a reboot to complete the removal task.
Restart computer: Choose if the endpoint should be restarted when needed to remove a threat. Not restarting the endpoint may leave the user in jeopardy. The default is off.
Reboot Warning Delay: Specify a time between thirty seconds and five minutes which passes before a reboot occurs.
Reboot Warning Message: Notification to provide to the user if a reboot will occur to fully remediate a threat.
Windows Action Center
You may have noticed an icon in your system tray with a red X superimposed over an white flag. That is a status indicator for the Windows Action Center, which tells you when your computer has a security issue that needs your attention. Malwarebytes Endpoint Protection can now be registered as the security solution on your computer. There are three settings available, which will be abbreviated here for easier reading. Brief descriptions for the meaning of each setting are also provided.
Let Malwarebytes choose whether to register: Malwarebytes will determine whether it should be registered in Action Center. The program will not register when Microsoft Security Essentials is in use on a Windows 7 or older operating system. It will also not register when Windows Defender is used on a Windows 8 or newer OS.
Always register Malwarebytes: Malwarebytes program status will always appear in Action Center.
Never register Malwarebytes: Malwarebytes program status will never appear in Action Center.
Malwarebytes Administrator Guide 23
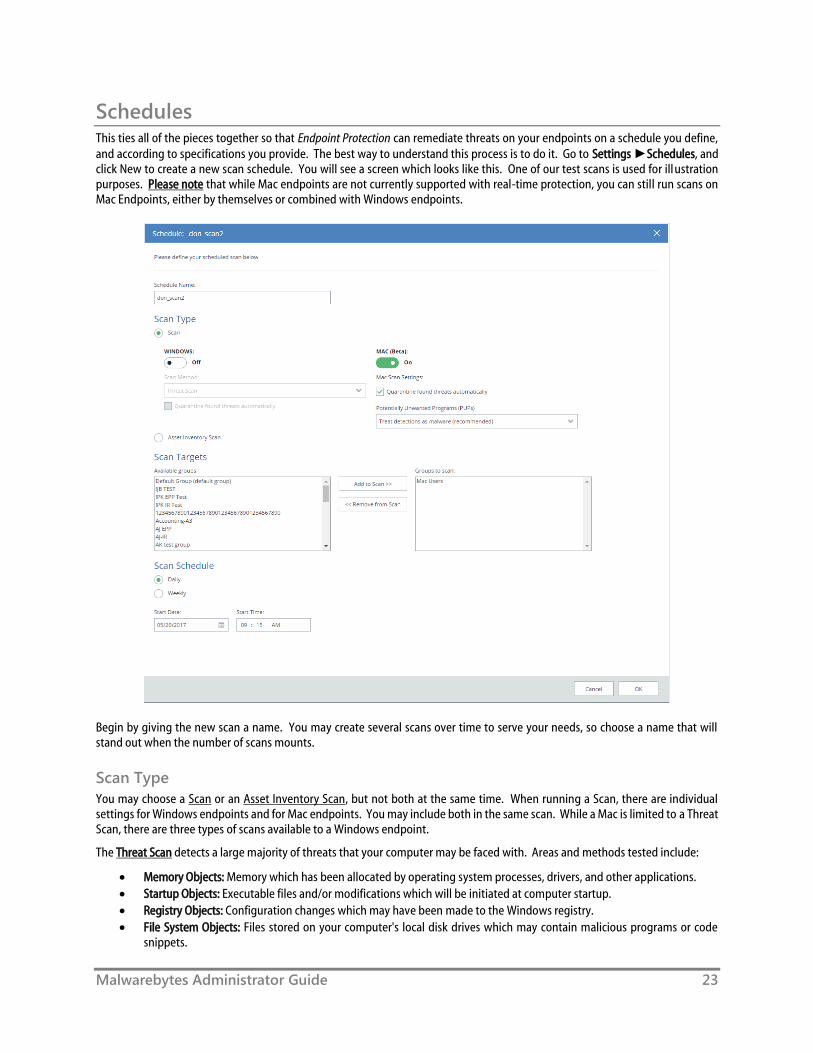
Schedules This ties all of the pieces together so that Endpoint Protection can remediate threats on your endpoints on a schedule you define, and according to specifications you provide. The best way to understand this process is to do it. Go to Settings ►Schedules, and click New to create a new scan schedule. You will see a screen which looks like this. One of our test scans is used for illustration purposes. Please note that while Mac endpoints are not currently supported with real-time protection, you can still run scans on Mac Endpoints, either by themselves or combined with Windows endpoints.
Begin by giving the new scan a name. You may create several scans over time to serve your needs, so choose a name that will stand out when the number of scans mounts.
Scan Type
You may choose a Scan or an Asset Inventory Scan, but not both at the same time. When running a Scan, there are individual settings for Windows endpoints and for Mac endpoints. You may include both in the same scan. While a Mac is limited to a Threat Scan, there are three types of scans available to a Windows endpoint.
The Threat Scan detects a large majority of threats that your computer may be faced with. Areas and methods tested include:
Memory Objects: Memory which has been allocated by operating system processes, drivers, and other applications.
Startup Objects: Executable files and/or modifications which will be initiated at computer startup.
Registry Objects: Configuration changes which may have been made to the Windows registry.
File System Objects: Files stored on your computer's local disk drives which may contain malicious programs or code snippets.
Malwarebytes Administrator Guide 24
Heuristic Analysis: Analysis methods which we employ in the previously-mentioned objects – as well as in other areas – which are instrumental in detection of and protection against threats, as well as the ability to assure that the threats cannot reassemble themselves.
The Threat Scan is the scan method which we recommend for daily scans. While it will not scan every file on your computer, it will scan the locations which most commonly are the launch point for a malware attack.
The Hyper Scan is limited to detection of immediate threats. Areas and methods tested include:
Memory Objects: Memory which has been allocated by operating system processes, drivers, and other applications.
Startup Objects: Executable files and/or modifications which will be initiated at computer startup.
While a Hyper Scan will clean any threats which have been detected, we strongly recommend that a Threat Scan be performed if a Hyper Scan has detected threats.
You may also choose to run a Custom Scan. This allows you to scan according to specifications which you define at the time of the scan. These settings will override scan settings defined elsewhere. When performing a Custom Scan, the following settings are available to you.
Quarantine found threats automatically: This setting allows you to quarantine immediately on detection, or be prompted for each presumed threat detected during a scan.
Scan memory objects: Memory which has been allocated by operating system processes, drivers, and other applications. It is important to note that threats detected during scans are still considered threats if they have an active component in memory. As an extra measure of safety, memory objects should be scanned.
Scan startup and registry settings: Executable files and/or modifications which are initiated at computer startup, as well as registry-based configuration changes that can alter startup behavior.
Scan within archives: If checked, archive files (ZIP, 7Z, RAR, CAB and MSI) will be scanned up to four levels deep. Encrypted (password-protected) archives cannot be tested. If left unchecked, archive files will be ignored.
Rootkits: These are files stored on your computer's local disk drives which are invisible to the operating system. These files may also influence system behavior.
You can also choose whether Potentially Unwanted Programs (PUPs) and Potentially Unwanted Modifications (PUMs) will be considered as malware or simply ignored. You can choose each separately. Finally, you can specify a Scan Path, which defines the top level of a folder tree to be scanned.
Scan Targets
This is where you choose the group of endpoints that will be scanned. Earlier, we created the policy that defines the behavior of the group, then we added endpoints as members of the group. Here is where it all comes together. Add or Remove groups from the list of groups to be scanned, and finally set the Scan Schedule.
Scan Schedule
The last piece of the puzzle is to schedule the scan. You may not select a day that is in the past, and if you select today as a starting day for the schedule, you may not schedule it at a time that has already passed.
That’s all there is to it! Now it’s time to look at System Status.

Malwarebytes Administrator Guide 25
System Status Malwarebytes products are now ready to protect your endpoints. You have set up scan schedules. You have configured protection layers of Real-Time Protection. It is time to discuss how Malwarebytes keeps you informed with regard to malware-related activities on your endpoints. Tabs and topics to be discussed here include:
● Dashboard ● Real-Time Protection ● Threats ● Events ● Quarantine ● Tasks
Dashboard When you first open the Malwarebytes console, the first screen that you will see is the Dashboard. It is designed to provide a high-level view of malware-related activities on your network. Data shown is a cross-section of information which is displayed in detail on the other Malwarebytes console status pages. The Dashboard view includes:
Number of endpoints online, offline, and infected (both online and offline) over the most recent 72 hours
Threats cleaned during the past 72 hours, broken down by Malware, PUP and PUM
Tasks issued by the Malwarebytes console over the past 24 hours, broken down by status (success, failure or pending)
Threats detected during the past 90 days, broken down by Malware, PUP and PUM
A bar graph showing Malware, PUPs and PUMs by day, over the past 30 days.
List of 10 most highly-infected endpoints over the past 90 days
List of 10 most prevalent malware infections detected over the past 90 days
List of 10 most prevalent PUPs over the past 90 days
List of 10 most prevalent PUMs over the past 90 days
The Dashboard does not automatically update. It will be updated each time that the tab is accessed after visiting another tab. A screenshot of the Dashboard is shown below.
Malwarebytes Administrator Guide 26
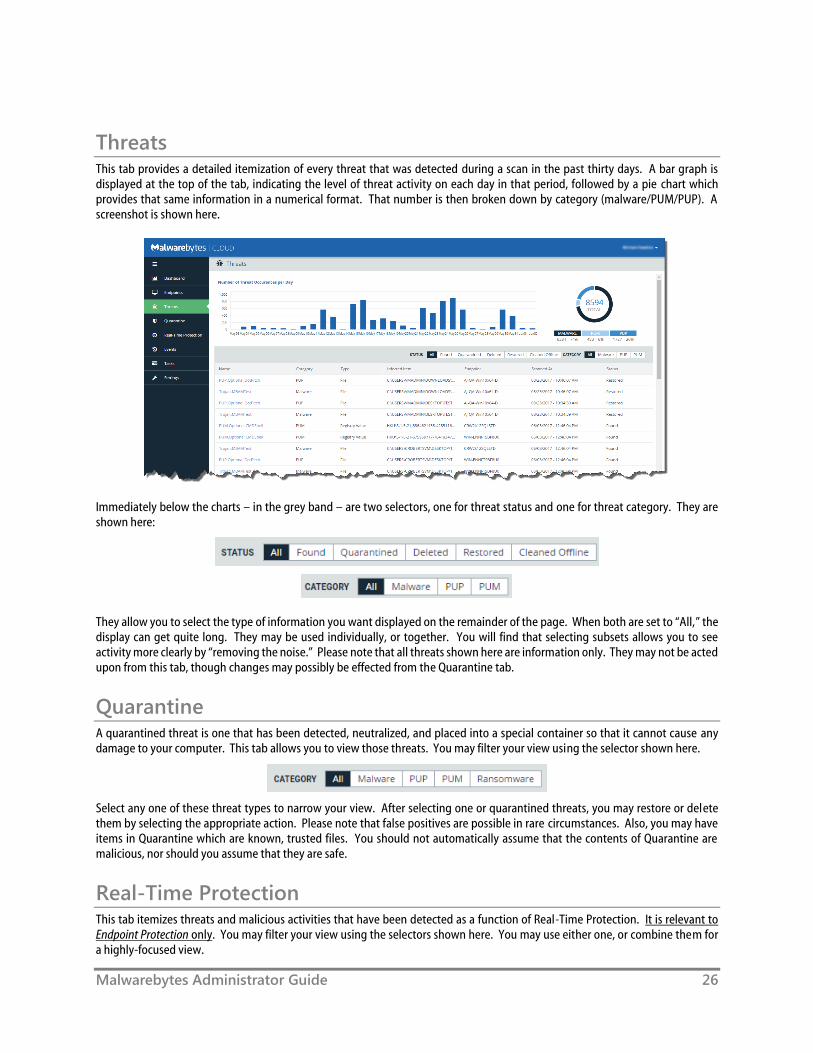
Threats This tab provides a detailed itemization of every threat that was detected during a scan in the past thirty days. A bar graph is displayed at the top of the tab, indicating the level of threat activity on each day in that period, followed by a pie chart which provides that same information in a numerical format. That number is then broken down by category (malware/PUM/PUP). A screenshot is shown here.
Immediately below the charts – in the grey band – are two selectors, one for threat status and one for threat category. They are shown here:
They allow you to select the type of information you want displayed on the remainder of the page. When both are set to “All,” the display can get quite long. They may be used individually, or together. You will find that selecting subsets allows you to see activity more clearly by “removing the noise.” Please note that all threats shown here are information only. They may not be acted upon from this tab, though changes may possibly be effected from the Quarantine tab.
Quarantine A quarantined threat is one that has been detected, neutralized, and placed into a special container so that it cannot cause any damage to your computer. This tab allows you to view those threats. You may filter your view using the selector shown here.
Select any one of these threat types to narrow your view. After selecting one or quarantined threats, you may restore or delete them by selecting the appropriate action. Please note that false positives are possible in rare circumstances. Also, you may have items in Quarantine which are known, trusted files. You should not automatically assume that the contents of Quarantine are malicious, nor should you assume that they are safe.
Real-Time Protection This tab itemizes threats and malicious activities that have been detected as a function of Real-Time Protection. It is relevant to Endpoint Protection only. You may filter your view using the selectors shown here. You may use either one, or combine them for a highly-focused view.
Malwarebytes Administrator Guide 27
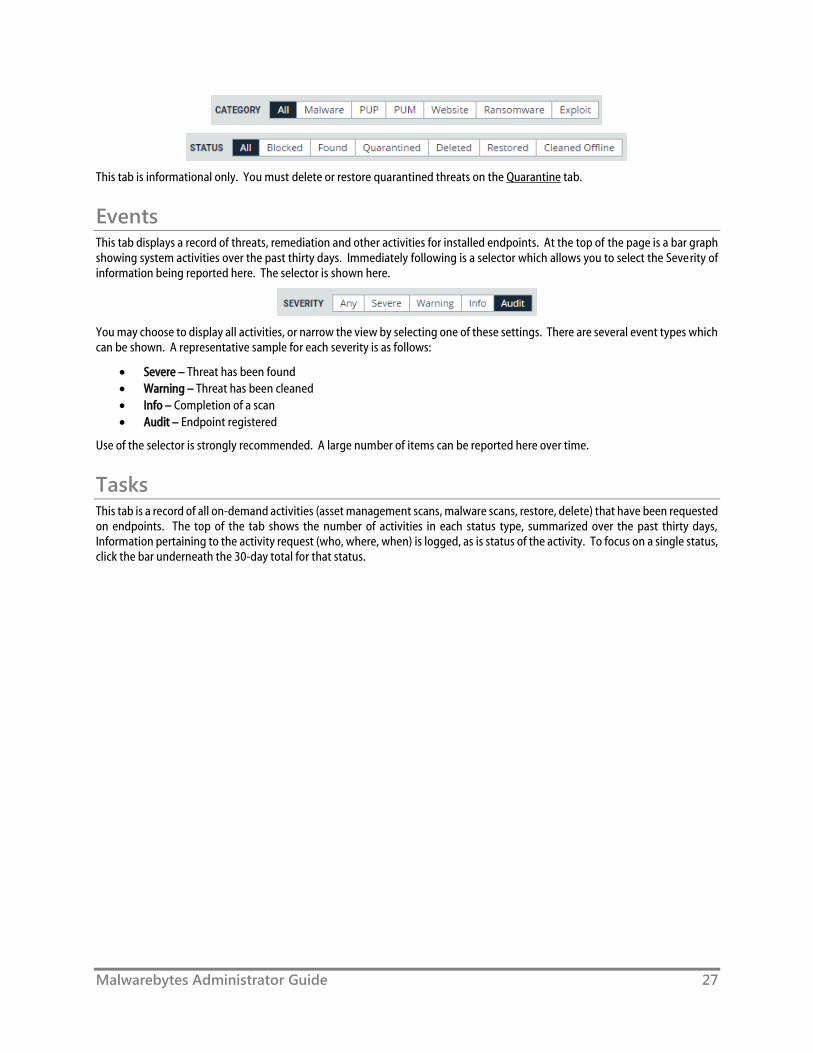
This tab is informational only. You must delete or restore quarantined threats on the Quarantine tab.
Events This tab displays a record of threats, remediation and other activities for installed endpoints. At the top of the page is a bar graph showing system activities over the past thirty days. Immediately following is a selector which allows you to select the Severity of information being reported here. The selector is shown here.
You may choose to display all activities, or narrow the view by selecting one of these settings. There are several event types which can be shown. A representative sample for each severity is as follows:
Severe – Threat has been found
Warning – Threat has been cleaned
Info – Completion of a scan
Audit – Endpoint registered
Use of the selector is strongly recommended. A large number of items can be reported here over time.
Tasks This tab is a record of all on-demand activities (asset management scans, malware scans, restore, delete) that have been requested on endpoints. The top of the tab shows the number of activities in each status type, summarized over the past thirty days, Information pertaining to the activity request (who, where, when) is logged, as is status of the activity. To focus on a single status, click the bar underneath the 30-day total for that status.
Malwarebytes Administrator Guide 28
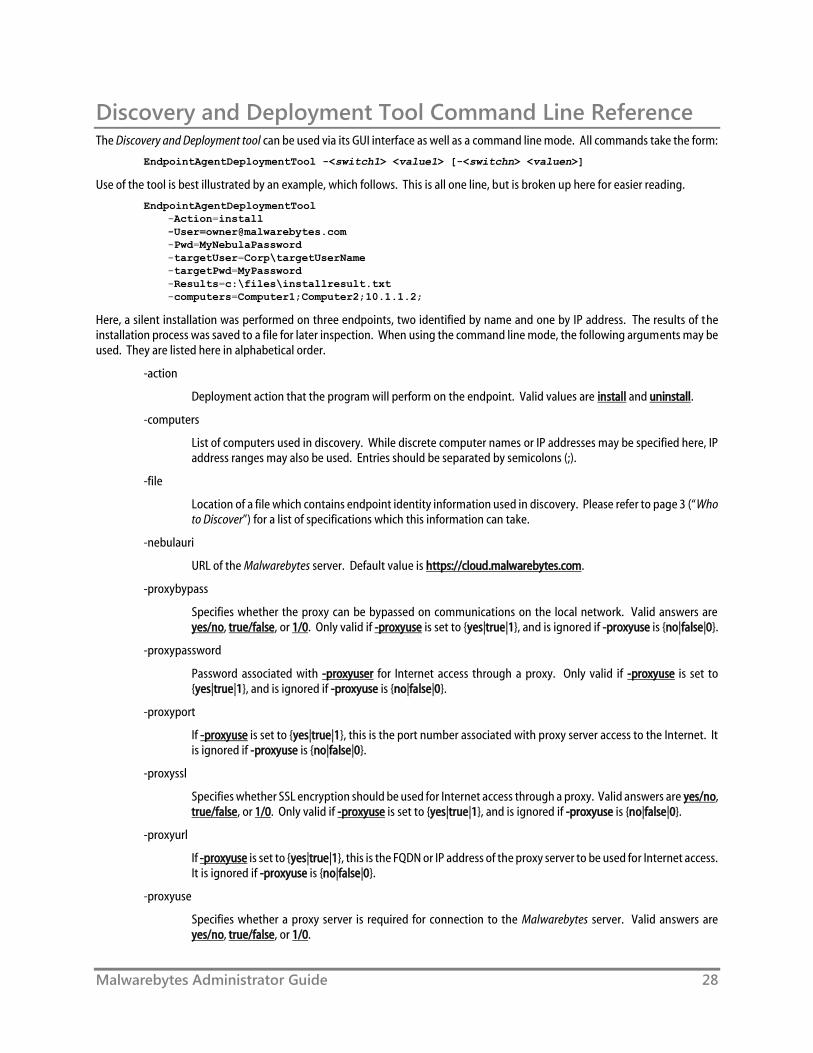
Discovery and Deployment Tool Command Line Reference The Discovery and Deployment tool can be used via its GUI interface as well as a command line mode. All commands take the form:
EndpointAgentDeploymentTool -<switch1> <value1> [-<switchn> <valuen>]
Use of the tool is best illustrated by an example, which follows. This is all one line, but is broken up here for easier reading.
EndpointAgentDeploymentTool
-Action=install
-Pwd=MyNebulaPassword
-targetUser=Corp\targetUserName
-targetPwd=MyPassword
-Results=c:\files\installresult.txt
-computers=Computer1;Computer2;10.1.1.2;
Here, a silent installation was performed on three endpoints, two identified by name and one by IP address. The results of the installation process was saved to a file for later inspection. When using the command line mode, the following arguments may be used. They are listed here in alphabetical order.
-action
Deployment action that the program will perform on the endpoint. Valid values are install and uninstall.
-computers
List of computers used in discovery. While discrete computer names or IP addresses may be specified here, IP address ranges may also be used. Entries should be separated by semicolons (;).
-file
Location of a file which contains endpoint identity information used in discovery. Please refer to page 3 (“Who to Discover”) for a list of specifications which this information can take.
-nebulauri
URL of the Malwarebytes server. Default value is https://cloud.malwarebytes.com.
-proxybypass
Specifies whether the proxy can be bypassed on communications on the local network. Valid answers are yes/no, true/false, or 1/0. Only valid if -proxyuse is set to {yes|true|1}, and is ignored if -proxyuse is {no|false|0}.
-proxypassword
Password associated with -proxyuser for Internet access through a proxy. Only valid if -proxyuse is set to {yes|true|1}, and is ignored if -proxyuse is {no|false|0}.
-proxyport
If -proxyuse is set to {yes|true|1}, this is the port number associated with proxy server access to the Internet. It is ignored if -proxyuse is {no|false|0}.
-proxyssl
Specifies whether SSL encryption should be used for Internet access through a proxy. Valid answers are yes/no, true/false, or 1/0. Only valid if -proxyuse is set to {yes|true|1}, and is ignored if -proxyuse is {no|false|0}.
-proxyurl
If -proxyuse is set to {yes|true|1}, this is the FQDN or IP address of the proxy server to be used for Internet access. It is ignored if -proxyuse is {no|false|0}.
-proxyuse
Specifies whether a proxy server is required for connection to the Malwarebytes server. Valid answers are yes/no, true/false, or 1/0.
Malwarebytes Administrator Guide 29
-proxyuser
Username to be used for Internet access through a proxy. Only valid if -proxyuse is set to {yes|true|1}, and is ignored if -proxyuse is {no|false|0}.
-pwd
Password associated with <user>.
-results
A valid file path/name where results of the specified action should be stored. This allows install/uninstall activities to be performed in a silent manner.
-targetpwd
Password associated with <targetuser>.
-targetuser
Username that will be used for agent deployment on endpoints.
-user
User name for login to the Malwarebytes server.
-wmionly
If present, only WMI methods will be used for endpoint discovery.