making radio - webs
TRANSCRIPT

The City of Portsmouth Girls� School guide to�
Making Radio

1
Welcome! What is special about radio? Radio is a fantastic medium. Unlike television, it requires your audience to use their imaginations, and that offers a challenge to you. As a presenter you have to �paint pictures� in words, because you have to rely on your audience only using their sense of hearing. Radio is intimate, your audience forms a special relationship with you over time, and that gives radio another advantage over television. It is usually live too, whereas television seldom is. Therefore as it�s instant and in the moment, it is very exciting, creative and a great challenge. What�s in it for you? Whether or not you want to have a future career in the media, taking part in this radio training will benefit you. You are likely to become �
• More confident • A better communicator • Able to deal with difficult and new situations • Learn technical skills • Develop a more enquiring mind • Become more knowledgeable • Improve your timekeeping skills • Become more creative • Face challenges • Learn to work as part of a team
All of these things will help you both in your day-to-day school life, and your future professional life and will be a bonus on your record of achievement

2
About this guide This is a guide to the most important parts of how to make radio. It is broken down into two parts; the first providing the essential insight into using the CPGS studio equipment, the second looking towards your first show gives some presentation and production tips. It should equip you with the knowledge and confidence to make a great start. From there more advanced work may require a look at websites (listed later), asking questions, and � most importantly � using your ears and your imagination! → TIP: Throughout this guide, boxes like this contain useful hints and advice for simplifying life inside the studio. Radio is dynamic and limited only by your ability to �paint pictures in words�, don�t be afraid to experiment until you find your own magic! Contents Technical skills for radio � the essentials Section One: The Mixer 3Section Two: Microphones 7Section Three: CD players 8Section Four: DAD general 9Section Five: DAD playback 11Section Six: DAD recording and editing 13Section Seven: Importing Interviews into DAD 17 Presenting skills for radio � your first show
22
Section Eight: Getting Ready 23Section Nine: On The Air 25Section Ten: Music 26Section Eleven: Interview Techniques 27Section Twelve: Location Interviews 28 Appendix One: Useful websites

3
Technical skills for radio � the essentials
SECTION ONE: The Mixer
Overview of the Mixer
The heart of any radio studio, the mixer or �desk� shapes and creates your programme by mixing together different sounds into one single output! Although they may look different all mixers follow the same basic operational techniques. Faders
The fader is king! If you push it up and the thing attached to it is making a noise (Mic, CD player etc), then that noise becomes part of your programme or recording. Most faders spend most of their lives fully down (off or closed), and some time fully up (on or open). Not many spend any time halfway up � you either want to hear your voice or you don�t! An exception is when you talk over a song or a jingle � then you want to ease the music fader down � but even then, probably only around a fifth of the way down. → TIP: The best way to use faders is to open them swiftly a few seconds before you want that sound�. then start making the sound (start a song or start talking)�. then close them shortly after you stop wanting that sound. Keep a neat mixer with as few faders open as possible! → Important: At the far right of the mixer is a pair of smaller faders labelled �Left� and �Right�. These are the master faders and should always be fully up otherwise no sound will be heard!

4
Each fader is linked to a switch at the top of the panel (shown right) that allows you to select more than one input (Stereo Line A / B and Mic) source for that channel. Ensure it�s set to the one you want. The sources are labelled beneath the faders (shown below).
Channel Strips with labels and Right, the source select switches
Levels The meters with the needles (shown below) � called �Peak Programme Meters� or PPMs � are the best guides to how loud sounds are. To make it comfortable to listen, aim for regular music peaks at around 5 on the meter. No listener wants to have to adjust the radio volume all the time � getting the levels constant is your job!
Left the PPM meters and Right, the GAIN control at the top of each mixer channel
Various sounds, such as your voice or different CDs, will be at different levels. The GAIN control is used to match-up the level before it reaches the fader. This is the very top knob above the fader (shown above), and effectively adjusts the volume of the CD, Mic etc. →Tip: Pre-produced music often sounds more �punchy� than a normal Mic, so you may want to let studio Mics peak between 5 and 6 on the PPM meters (a little louder than the music). You will often want to listen to a sound before you fade it up and share it with the audience. To do that, use the button marked CUE. This lets you check you have the right track (or that the microphone�s working), and also sends that sound to the LED meters so you can GAIN the level. Here you should aim for lighting the first two �amber� LED�s but no more. A common mistake is to use CUE and also put-up the fader � beware!!

5
Monitoring You can listen to one of three things: ! DESK: is the output of the mixer. This is what you
spend most time listening to while making a recording.
! STATION OUTPUT: this button is linked to a
radio allowing you to hear exactly what the studio is sending out to the stream. This is what you should listen to most of the time, as a �final quality control�.
! CUE will interrupt your monitoring of either of the
above; use it to pre-check sounds but release the CUE button as soon as you can, so you can maintain a watch on the output. There�s a button marked FOLLOW PHONES that needs to be on to make this work (it normally is). Note: PFL will only interrupt your monitoring within the Studio; it will not affect the actual Output.
There are separate volume controls for the DJ (marked PRES for Presenter), the guest (GUEST) and the speakers (SPKRS). Don�t listen at high volume through speakers or headphones for more than a few seconds; it�s tiring and will damage your ears. →Tip: If you can�t hear anything check the volume controls first!! Even the very best can forget the obvious from time to time. Other channel controls
ON switches the channel on or off, over-riding the fader. Rarely used � should be left on. EQ - Equalisation controls. These are treble, mid and bass controls designed to match-up sounds from different sources. Because heavily produced music often has boosted bass (LOW frequency) and/or treble (HIGH), many DJs aim to match-up their voice with that sound by turning-up the bass and treble a little on the Mic channels. Don�t overdo it! Rarely used on music channels such as CD or DAD. AUX this routes the channel to the AUX mix. Rarely used � should be left set to 0.
Right side of the Mixer showing LED meters and volume controls
Channel Strip, showingthe EQ, ON and AUXcontrols

6
Telephone controls (next to the PPM�s at the top of the desk)
Telephone Controls, located at the top of the Desk
ON LINE CONNECT switches the telephone line onto the Phone channel. Disengage after use, or it blocks the line! TO CALLER is not used and the TUNING knobs should not be adjusted. Telephone callers can be very important ingredients to radio programmes, from competition entries to �phone-ins� where the callers make the programme! When receiving a telephone call, the phone won�t ring, instead a light will flash indicating the incoming call. Answer the phone in a polite manner �Good Morning...� etc. Inform the caller that you are going to transfer them to the studio, and press the �ON LINE CONNECT� button on the desk, now hang up the phone. The call has now been transferred to the desk and can now be treated as a mic channel, setting the GAIN as normal, and opening the FADER to add the call to the output.
[END of SECTION ONE]

7
SECTION TWO: Microphones In an ideal world, you want to get talkers as close to the mic as possible without causing �popping� (the unpleasant effect from saying explosive �p� sounds too close and overloading the mic). So�position the mic so that it�s close to the talker�s mouth (say 10cm away) BUT the rush of breath from the mouth goes away at an angle. Typically this means putting the DJ mic a bit high � maybe level with the nose. The guest mic, should be pointing diagonally at the guest�s mouth. Experiment so you get the best, warmest sound without popping. → TIP: In order to maintain a constant mic level, suggest to your guest or easily excitable co-presenter to rest their elbows on the desk in front of their mic. This ensures a near perfect distance and angle to the mic, and prevents the guest from moving / fidgeting while speaking. → TIP: In an interview, you often want two or more mics open at once. But the effect can be to make the whole interview a bit echoey, like it�s in a bathroom! A good trick is to nudge the fader of the person who�s not talking down about a fifth of the way. Keep your hand on it so you don�t forget to nudge it back up again. This also works well with phone calls, to avoid the phone line making the DJ voice sound odd.
[END of SECTION TWO]
DJ mic

8
SECTION THREE: CD players The twin CD decks have advanced features for mixing, and also function very well as two �normal� CD players. There are lots of additional features to these decks which are not covered in this guide, please refer to the manufacturer�s manual for full features and details. Insert the CD and start the track you want to hear. To select a track turn the small white control to the right of the display marked �Track Select�. To confirm that this is the right one press and hold the �CUE� button (it�s white, and then glows redish) � the track will start playing (use CUE on the desk to listen). When you�ve confirmed it�s the right one, release the CD �CUE� and the track will return to the start point automatically. The track is now �cued-up� and ready to start when you want it.
CD Deck with �CUE� button glowing Redish
→ TIP: On these CD decks there is NO �Stop� button. These �DJ� machines feature �PLAY / PAUSE� and �CUE�. PLAY / PAUSE: push once to start playback, push once again to pause, and push once more to resume playback! CUE: pushing the cue button during play will stop and return the track to the position at which play was first started. A word of warning here, if you hit PAUSE at any point during playback and then PLAY again, this now becomes your new CUE point! → TIP: While playing the CD you can press the TIME button (right hand grey button above the �jog wheel�) to see how long it has left to run. → TIP: You can set the CD players to �loop� a whole track or part of a track, press either �A1� or �A2� at the start of the intended loop and then �B� to mark the end of the loop. The CD will now seamlessly loop until you press the �Exit / Re-loop� button. This is useful if you want to loop the intro of a track to talk over, or you want to use an instrumental as a �bed.� Pressing �CUE� at any point will stop and return the track to the start or previously set CUE point.
[END of SECTION THREE]

9
SECTION FOUR: DAD GENERAL The DAD system has two audio outputs. Each has its own fader, where DAD is the INPUT A. → TIP: The �normal� look for the screen (right) is with a Playback machine on the left and Mini-Array 1 on the right. You change what�s showing by using the small crosses at the top of each window. Click that and you can see icons (see below) offering the Record Machine, the Playback Machine and the two Mini-Arrays. Click the one you want to display.
�normal look to DAD screen�
DAD screen with no windows open
The big buttons along the bottom have special functions: NEXT FADER 1. Will start the next item in a playlist in DAD Playback Machine 1, and send it to DAD fader one. NEXT FADER 2. Will start the next item in a playlist in DAD Playback Machine 1, and send it to DAD fader two.
Rec
Play
Mini

10
The big buttons along the top have special functions.
Buttons along the top of the DAD screen
REC OFF is left OFF LIBRARY (Lib2000) allows you to browse our library, listen to tracks (on fader 2) and edit tracks. To leave the Library, click EXIT
Library Screen used for searching the DAD cut library
ARRAY puts-up a big button wall we don�t normally use. To leave it, click EXIT SETUP puts-up a screen most users don�t need. To leave it, click ACCEPT AND RUN. Do not click EXIT DAD!!! → IMPORTANT TIP: You will occasionally see a VIRTUAL KEYBOARD pop-up across the screen. Don�t panic! You can get rid of it simply by clicking ESC on it.
[END of SECTION FOUR]

11
SECTION FIVE: DAD PLAYBACK Mini Arrays
These play on Fader 2. Each mini-array has ten �pages� of buttons. Use the arrows to move between them. Click a button to play the jingle/item. Click it again if you want to stop the item. You can play multiple items at once. To assign an item (a �cut�) to a button, Right-click with the mouse, select Assign and click Search. Ensure this pop-up window shows �Ignore Case Sensitive / Use All Groups / Use Exact Match� (If not, click the yellow bars to change them). Now you click in the white bar, type a track name, artist name or cut number, and click Quick Search. From the results, highlight the track you want and click ASSIGN.
Playback Machine These play on Fader 1 To select a Playlist, click the Playlist bar (about 4cm from the top of the machine). Highlight the list you want by clicking it, and then click LOAD. Start the first track with PLAY Most playlists will run forever if you toggle the third button (MAN or AUTO) to the AUTO position. In the MAN position they play one track at a time, then park the next track in the machine�s top window until you press PLAY again. (The playlist bar in manual mode will change from green to red as the song plays out) While a track is playing, the NEXT button will force a mix to the next track. If the machine isn�t playing, the NEXT button will nudge the next track in the list up to the play window. → TIP: While a track is playing you can preview the next track by using PFL on fader 2 (with the fader down!) and pressing AUD (Audition)
DAD Mini Array loaded withJingles, Sweepers, Stabs, Bedsand Features
Playback machine showing �now playing� cut at the top

12
Making / modifying a playlist To create or modify a playlist, click the Playlist bar and either select NEW or highlight an existing list and select MODIFY.
�Playlist modify screen�
The left side of the Playlist Modify screen allows you to display a group of tracks, or just search for a single track. To add tracks to your playlist, use the mouse to drag and drop them into the right-hand window. Alternatively double click on the desired track. You can highlight a track in the list and DELETE it, or MOVE it (the MOVE button changes to a PUT button). When you come to SAVE the playlist, you must give it a �formal� name of up to 8 characters, but can give it a longer Description as well. → TIP: When you save a list the system may ask you if you want to �refresh� the list already in a Playback machine. The normal answer is yes � but it could be what�s playing on air, so consider your reply!
[END of SECTION FIVE]
→ TIP: The grey highlighted item within the list indicates the next to play cut. To select a different cut to play, first select the cut � it is then highlighted grey; now press the CHG button to accept the change. Pressing the RET button will revert back to the previous selected cut.
Playback bar area of the Playback machineshowing the RET and CHG buttons (right)

13
SECTION SIX: DAD RECORDING AND EDITING Record Machine To make a recording:
Click the NEXT RECORDING bar
Type the cut number you want to use in the CUT window.
Click in the TITLE window and type your title.
Click the GROUP box, choose a group (we mostly use SONGS, PROMOS, JINGLES and NEWS, if in doubt just choose ALL) and click SELECT.
Now click ACCEPT. If you�re re-using an existing cut number you�ll have to confirm you really want to copy over the old cut.
Next click REC, and then click PLAY shortly before you start the recording. You�ll see the Record Machine counter start to count-up.
When the recording�s over, leave a couple of seconds� silence and press STOP. Click EDIT (this launches the track Editor)
The next page will describe how to put the important markers on the newly recorded cut.
Record Machine; click �Next Recording to begin

14
Editor You can access the Editor by:
- clicking EDIT from the Record Machine - going to the Library, finding/highlighting a track and clicking EDIT - right-clicking a cut in the mini-array and selecting EDITOR.
The Editor will let you move the various markers such as Head, Tail and Segue.
EDITOR showing the recorded waveform
The Track Editor (shown above) shows the recorded waveform, with blue head (H) and tail (T) markers at the start and end. Drag the Head (using the mouse) to the very start of the recording. Confirm it�s a nice tight start by pressing PLAY.
EDITOR �zoomed� showing the start of the recording and the Blue Head marker

15
Go to the end of the recording and drag the Tail to the very end of the item (i.e when the sound you want is completely over, but before any unwanted noises). → TIP: You can jump to the start and end of the recording using the Home and End keys on the keyboard. → TIP: You can confirm the exact position of a marker by right clicking on it and choosing �Play Across / Play To / Play From�.
Now, click the blue HEAD/TAIL button and from the drop-down menu select SEGUES. A segue is a transition from one track to the next. What you do next will tell DAD when to start the next song/item after playing this one.
EDITOR showing SEGUE H and T markers at the end of the track
Go to the end of the recording and click the left side of the screen to make the green H segue marker appear. Drag it across and position it at the point when the next item should start. This will typically be on the final fade with a few seconds left, or as the resonance dies-away if the song ends. It�s normally a little way before the blue Tail marker. Now click SAVE/EXIT and confirm SAVE.
EDITOR with the blue HEAD/TAIL buttonpressed showing the drop-down list

16
→ VERY IMPORTANT TIP: When you find yourself back at the Record Machine window, by all means try-out the cut by pressing PLAY but never press REC again, unless you want to wipe the whole recording and start again! Because of this risk, never leave your recording in the window when you finish � click UNLOAD to clear it off the screen. The Editor Screen can also be used to chop bits out of the recording. For this click the HEAD/TAIL button and from the drop-down menu select CUT/PASTE. Drag the H marker from the left to the start of the bit you want to remove. Drag the T marker to the end of that bit. Now press CUT. → TIP: To listen to an edit, click SCREEN PLAY to hear only the part of the cut that�s visible. → TIP: You can control what you see on screen by dragging the small grey marker along the line near the top of the Editor window, by dragging the yellow box beneath that grey line, and by using ZOOM IN / ZOOM OUT. When your edit is finished, click SAVE/EXIT. Next, we suggest you copy the neatly edited cut over the raw recording, by clicking REWRITE AUDIO, selecting HEAD TO TAIL and confirming REWRITE AUDIO. This window also lets you give the edit a different cut number, thus preserving the raw version.
[END of SECTION SIX]

17
SECTION SEVEN: IMPORTING INTERVIEWS INTO DAD On location recording can play a large part in any radio programme, as you may wish to capture the atmosphere of an event, or your guest is unable to make it into the studio and so you will travel to them. This section will guide you through the basics of transferring your interview from the Olympus recorder into the DAD system. First plug the Olympus recorder into the USB port on the �production pc�, located to the left of the mixer. The Olympus recorder creates Windows Media files (wma) and this need to be converted to Wave (wav) to be used with DAD. This is done using a program called SWITCH. Double click on the SWITCH icon on the desktop to load. Now you need to load the appropriate file into SWITCH. The Olympus recorder will be drive �E�, click on the green + (Add Files) and locate the desired interview from the recorder. This normally means opening the Olympus Folder A (DSS_FLDA) and choosing a numbered track. Now that you have loaded the correct file into SWITCH check that the �Output Folder� (displayed towards the bottom of the window) is set to Converted voice � you shouldn�t need to change this. Click on the file, to select and then click the convert button located at the top right of the window. SWITCH will now save your interview as a wav file into the correct Converted voice folder. The next step is to open Audacity, an audio editor that will allow you to edit your interview (as required) before you import it into DAD.
SWITCH with file highlighted and Convert pressed

18
Audacity is a straightforward audio editor. Similarly to the DAD editor it can be used to edit audio files such as pre-recorded interviews or features. It can also be used to record. Note: Audacity will recognise most file formats, such as WAV or MP3 however it won�t recognise the WMA files created by the Olympus recorders. Material recorded using these will need to be converted before it can be edited (see previous). Double click on the Audacity icon on the desktop (blue headphones) to load.
Audacity � to open your converted interview, select file open and then converted voice
Your readily converted interview can be found in the Converted voice folder (see above). Audacity will display the waveform of your selected file, you can now select and manipulate this to produce your final edit.
Audacity main screen with Zoom enabled
Zoom Clicking on the magnifying glass shaped icon at the top of the screen will allow you to zoom in and out (left and right click respectively) to more accurately edit the waveform.
19
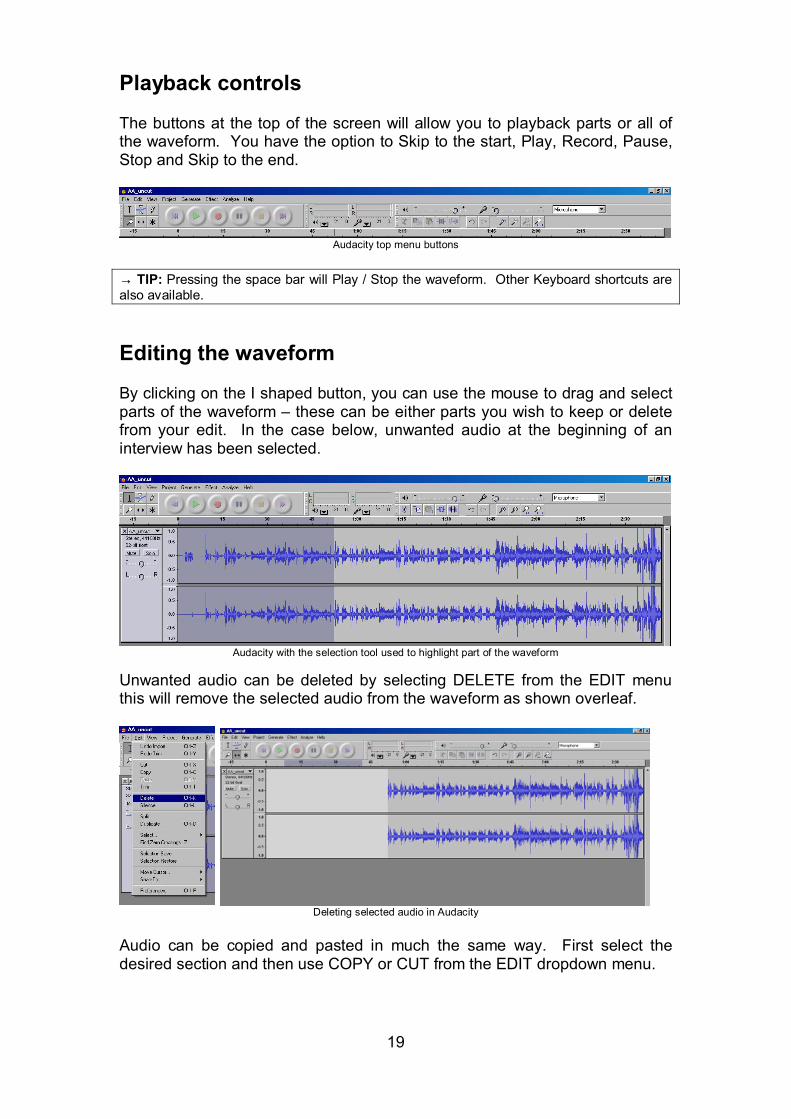
Playback controls The buttons at the top of the screen will allow you to playback parts or all of the waveform. You have the option to Skip to the start, Play, Record, Pause, Stop and Skip to the end.
Audacity top menu buttons
→ TIP: Pressing the space bar will Play / Stop the waveform. Other Keyboard shortcuts are also available. Editing the waveform By clicking on the I shaped button, you can use the mouse to drag and select parts of the waveform � these can be either parts you wish to keep or delete from your edit. In the case below, unwanted audio at the beginning of an interview has been selected.
Audacity with the selection tool used to highlight part of the waveform
Unwanted audio can be deleted by selecting DELETE from the EDIT menu this will remove the selected audio from the waveform as shown overleaf.
Deleting selected audio in Audacity
Audio can be copied and pasted in much the same way. First select the desired section and then use COPY or CUT from the EDIT dropdown menu.
20
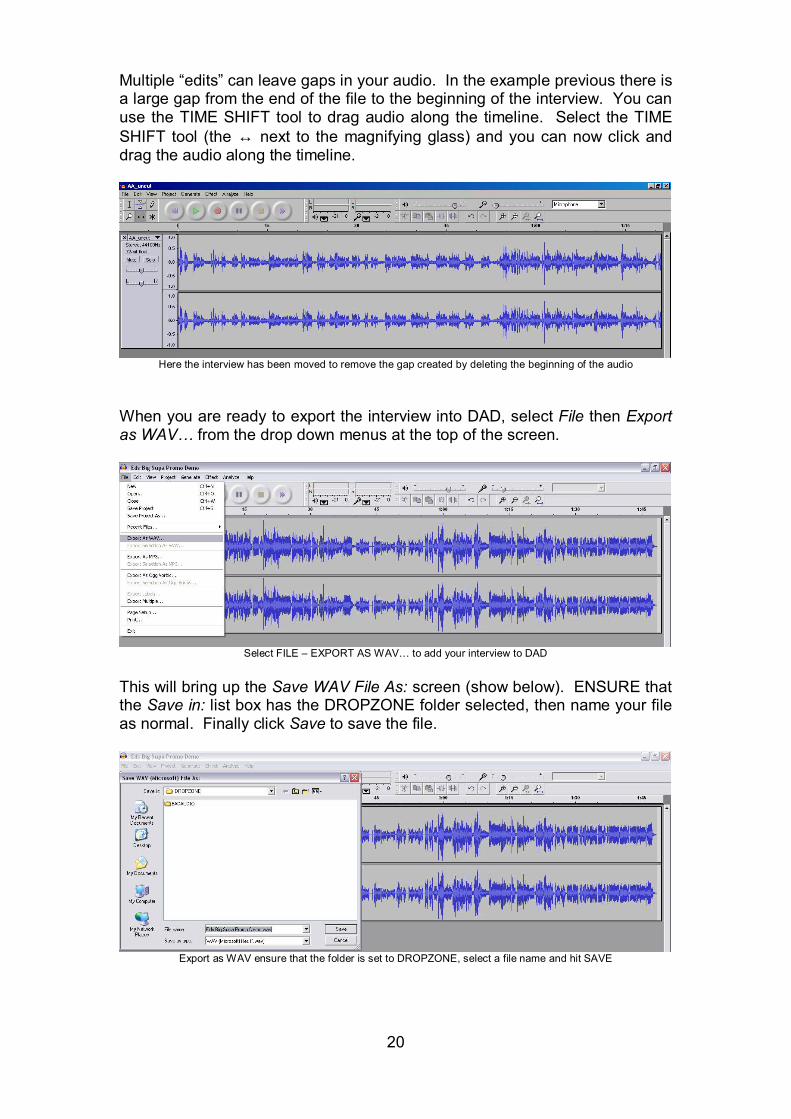
Multiple �edits� can leave gaps in your audio. In the example previous there is a large gap from the end of the file to the beginning of the interview. You can use the TIME SHIFT tool to drag audio along the timeline. Select the TIME SHIFT tool (the ↔ next to the magnifying glass) and you can now click and drag the audio along the timeline.
Here the interview has been moved to remove the gap created by deleting the beginning of the audio
When you are ready to export the interview into DAD, select File then Export as WAV� from the drop down menus at the top of the screen.
Select FILE � EXPORT AS WAV� to add your interview to DAD
This will bring up the Save WAV File As: screen (show below). ENSURE that the Save in: list box has the DROPZONE folder selected, then name your file as normal. Finally click Save to save the file.
Export as WAV ensure that the folder is set to DROPZONE, select a file name and hit SAVE

21
At this point the rest of the process is automatic. Audacity saves your interview into the Dropzone folder that DAD continually monitors. As soon as it detects a new file DAD will add the file to the library.
Dropbox - left monitoring the Dropzone folder and right adding a new file to the library
You are now able to access the interview within the DAD library and add the important �Head�, �Tail� and �Segue� markers as normal (See Section 6).
[END of SECTION SEVEN]

22
Presenting skills for radio � your first show
The heart of a radio studio may be the mixing desk, but the presenter breathes its life and soul. Each spoken word over the airwaves allows your audience to let their imaginations run riot. Herein lies the challenge, as it is your voice and only your voice that separates radio from a jukebox or mp3 player!! This guide looks at the basics required to produce and present a straightforward radio show. As your confidence builds don�t be afraid to experiment and find your own style, but always remember your listeners and be prepared to heed advice from others. What programmes make up a station? There are many different types of programmes, for example �
• Pure music programmes. • Request shows. • Current affairs. • Special interest programmes • Panel debates. • Phone-in debate • Outside broadcasts. • Pure news.
You need to be clear what type of programme you want to be producing or involved in because they all require different design and content. Studio etiquette
• Treat all the equipment with respect. • Do not take food or drinks into the studio • Always leave the studio tidy when you leave

23
SECTION EIGHT: GETTING READY Starting at the very beginning, switch on the radio and listen to your favourite station for a while. Many different types of programmes make up a station, and it�s easiest to start with what you like. You need a clear understanding on your programming type as they all require different design and content, these could be anything from pure music to special interest / current affairs. Once you�ve decided on your programme style it�s time for the real work to begin� → TIP: An hour�s programming might contain around 12 songs; the average length of these is about 3 minutes 30. This leaves 18 minutes an hour to fill with content; like interviews and DJ chat. It is always best to �over fill� your programme, as it is far easier to leave stuff out than to generate content under pressure. Fail to prepare � prepare to fail! Preparation is the key to a good performance, know your subject, do as much research as you can. Create a show plan and structure, this can be as detailed or as brief as you feel necessary ranging from a complete script, through to short notes acting as reminders to the next links. Try not to read from a complete script, however if you do, make sure that it doesn�t sound as if you are reading it. Your speech needs to sound natural and not stiff or forced. Experiment to see what works best for you, however as a bare minimum plan where and when vocal links take place and what music you are going to play. → TIP: Start with either Song→Link→Song or Song→Song→Link, as you get more confident you can experiment with a combination between the two. Try not to drag topics across to many links, listeners have short attention spans and will lose interest very quickly. Listeners can tune-in at any time; never assume they know what you were talking about earlier. Actual content will vary depending on your chosen programme type and your presenting style, from information about the music you�re playing; release date, album, record label, chart position, etc to pre-produced full features. Start by keeping it simple, as this will relieve the pressure while �on air�. If you have a guest, see what you can find out about them � their interests, experiences. Put yourself in their shoes and try to anticipate what sort of person they might be. Be clear what to get out of the interview but try not to lead your guest, try to avoid asking closed questions and allow the guest to develop their answers. Imagine yourself as your own audience; is what you are saying interesting? Would you listen to yourself? Hopefully the answer is yes to both questions; now try to anticipate what your real audience will be interested in and how they will react to you.

24
Warm up your voice, it will help you to feel more confident, take deep breaths, as these will help you to relax. Finally make sure you get to the studio in plenty of time� What about promoting your programme? Pre-recorded trailers (often called �promos�) are a vital tool in radio as they inform your audience and can tempt them to keep listening to your station. Promos need to be kept fresh and current so make them regularly. Ideally keep promos short, maybe around 30 seconds.
[END of SECTION EIGHT]

25
SECTION NINE: ON THE AIR Make sure you are comfortable before you begin; if you are making a recording hit record and then wait a few seconds before you begin - take your time. A positive confident, upbeat start to your programme gets you off to a good start. Have a warm and friendly approach. Don�t dive straight into any stories or features, as you will confuse your listeners. ! Keep the listeners informed as to who you are and what they are
listening to. ! Don�t speak too softly, too quickly or mumble. ! Don�t talk too much or keep repeating yourself. ! Tell the listeners what you have in store for them; tease them with the
prospect of upcoming music or guests. This helps listeners �buy in� to you and keep listening.
! People love stories, imagery and metaphors, but use a mixture of facts and figures when appropriate.
! Keep your language clean!! ! Do not give reason to offend, antagonise, irritate or create fear,
however this doesn�t mean you have to be prim and proper. → TIP: Imagine the microphone as a friend, try to forget about the studio and speak to the mic as you would your friend. If you have guests or other people in the studio don�t forget about your friend (the mic) this should prevent you ignoring your listeners. In this way listeners feel you are talking directly to them individually, generating a special intimate relationship between you and your audience. → TIP: People have fairly short concentration spans when they are just listening, so it�s best to deal in short chunks of speech (5 minutes max) → TIP: Don�t start speaking without first having an idea how you are going to end. Is it going to be a statement, a question, or just a natural finish? Awkward pauses while you work out what to say next are not good. → TIP: If you make a mistake, try not to sound embarrassed. Sometimes you can just ignore a mistake and not point it out. Or if you do, it is best if you can laugh at yourself then that helps your audience to laugh with you rather than feel awkward at your embarrassment. → TIP: to �er� is to be human, don�t worry about it too much; use �er�s� and strategic pauses as thinking time (a couple of pauses throughout a sentence is much better than one long one at the end.)
[END of SECTION NINE]

26
SECTION TEN: MUSIC Selecting music can cause healthy disagreements, as everyone has their own opinion! But there are a few points that no good music programmer will ignore. ! Never just pick the music that you like! Think about your audience, as
without them there is very little point to your programme. ! Make sure you have the right amount of music for your programme.
! Keep the music varied, not too many upbeat or slow tracks. Even
within a specialist music programme it is possible to keep the listeners �on their toes�
! Ignore so-called �commercial� music, or �sell-outs� at your peril. It�s
commercial because it�s popular and therefore familiar to your audience. It is all too easy to get lost in the abyss of �underground� or �alternative� music. Therefore lead your listeners to your hot tracks don�t throw them in at the deep end.
! If you are going to segue tracks (link two tracks together) make sure
they sound good together! ! Don�t forget to announce the tracks, either introduce or back-announce
them. ! Promote ahead. It�s like sign posting, and it helps to keep your
listeners �tuned in� looking forward to what�s coming next.
→ TIP: Don�t forget to �duck� your music when you want to speak � drop the appropriate fader about a 1/5th just as you begin speaking. → TIP: If you are going to talk over the instrumentals either at the beginning or during a track, make sure you don�t crash into the vocals.
[END of SECTION TEN]

27
SECTION ELEVEN: INTERVIEW TECHNIQUES ! Promote your guest before the interview happens - trail ahead.
! Get your guest sitting comfortably during a record so that they are
feeling settled and not rushed. ! Take a voice level check. Ask them to keep near to the microphone
and not use their hands or move around too much. ! Tell them what you are proposing to ask them about. Ask them if they
have any concerns or any questions they want you to cover, or things they want to mention during the course of the interview.
! Make good eye contact with them and smile at them. If you are calm
and confident you will put your guest at ease. ! Ask one question at a time then focus and listen to the answer. Whilst
you might have a list of questions you want to ask, an unexpected answer might require you to ask questions you had not considered.
Thank your guest at the end of the interview and remind your audience who they are. If your guest has asked you to mention their contact details or any relevant information about them or the subject they have been talking about, do it now, and perhaps repeat it after the next track.
[END of SECTION ELEVEN]

28
SECTION TWELVE: LOCATION INTERVIEWS 1. Choose the right location. Echo-ey rooms that sound like you�re in the toilet are bad! Rooms with lots of soft furnishing and curtains will sound a lot better. The outdoors (if it�s not too loud or windy) is great. Inside a car is surprisingly good. Think; do you want silence in the background or would the sound of a busy factory/office/funfair etc actually help to �paint the picture�? If so, go for it (but make sure the microphone is the right distance from the talker to balance the voice and the background sound). 2. Hold and point the microphone. The classic mic position is around 30cm/12� from the mouth, but pointing diagonally at the mouth, often from below.
You want the mic to be close enough to get a full, rich recording, but not in the direct line of bursts of breath that come with saying �Peter Piper picked a peck of pickled peppers�. Those bursts cause �popping� on the mic and ruin the recording. To record both sides of the conversation, you�ll have to move the mic between you and the interviewee as the interview goes on. The trick is to minimise that movement, so you don�t end-up with the sound of �mic rattle�. Best way to do this is for you both to stand upright and quite close together, so you can leave the mic in place and just gently tilt it back and forth. If that�s not possible, trying arranging the chairs so you sit almost alongside each other but facing opposite ways; again that should allow a simple mic tilt.

29
3. Record a little more than you need. Why not use the recorder to note-down the interviewee�s name, job title and anything else you�d otherwise put in a notebook? If the interviewee�s nervous, you can ask a couple of �warm-up questions� that you don�t intend to transmit. We suggest you don�t interrupt the interviewee in a recording. If they�re waffling you can always edit later, and editing�s much easier with one voice at a time on the recording! For the same reason use body language (nodding, smiling) to encourage your interviewee, not audible words and grunts! Try to start recording a few seconds before anyone talks, and keep recording in silence a few seconds after you finish (before you even say thanks). It lets you fade background noise in and out at either end of the final transmission. If you grind to a halt (a loud bus goes past, you get interrupted or either of you �dry up�) and you want to start again, it�s a good idea to re-take from the start of your question. That makes it easier to edit. 4. Using the Olympus recorders. Soon all stations will use solid-state recorders. They�re lightweight, hard to break and run for ages. Right now we�re unusual, so interviewees may ask where the clicke machine is. Feel free to boast about how modern we are!
• Switch ON using the slide control on the back. The HOLD button must be in the off (down) position or nothing else will work!
• Plug the microphone fully into its socket on top.
• Using headphones lets you check quality while you record. Unfold
them fully, plug in and set volume with the lower �rocker� on the side.
• To record a new track, simply push the REC button on the side. Check that you are hearing the right thing in the headphones, and the timer is counting up � and start recording!
• When you�ve finished, simply press STOP
• If you need this recording, NEVER let the interviewee go until you�ve
tried to play back this track and checked it�s there! Select the track using the upper �rocker� on the side, then press PLAY. (When playing, the rocker also lets you skip forward and back within a track).
• Please switch off the recorder after use. Back at base, copy all tracks
you want to save or edit off the recorder. Then erase its entire contents, by holding ERASE for a couple of seconds until everything flashes, then releasing the button and pressing it again.
Please leave the kit complete and neatly stowed for the next user.
[END of SECTION TWELVE]

30
APPENDIX ONE: Useful web addresses BBC training has a useful set of free guides to things like handling microphones and news writing style. Go to http://www.bbctraining.com/onlineCourses.asp Enco Systems have a support area that includes frequently asked questions and user manuals for the DAD system. It�s at http://www.enco.com/new/support.htm Portsmouth City Council�s website has a useful events diary (handy for interview ideas) plus a media section with access to press releases on current topics. Go to http://www.portsmouth.gov.uk/ Ananova has a fun section of �quirky� news stories that can be great for sparking ideas for DJ chat. It�s at http://www.ananova.com/news/lp.html?keywords=Quirkies