main screen - maven
TRANSCRIPT

Main Screen
Connect the remote controller of your DJI™ Drone to your iPhone/iPad! Then tap the picture of the drone to start!
Icons in the Main Screen:
Flight Log:
•View the last known drone position and export all flight log.
User Guide:
• Brings you to this user guide.
App Information:
•Provides you with information on the app version and other useful information.
Waypoint Mission:
•Shortcut to the Waypoint Mission Manager. (see Waypoint User Manual)
Virtual Polygonal Geofence:
•Shortcut to the VPG Manager. (see VPG User Manual)
WIFI channel
tap to change the channel (WIFI drones only)

Piloting Screen
Fullscreen Mode
VR Mode
Waypoint Mission Manager (see Waypoint User Manual)
Virtual Geofence (see VPG User Manual)
Virtual Copilot (see Virtual Copilot User Manual)
App Settings

Open Map View (see Drone Position / choose POI)
Controller Signal Level
Vision System State (On/Off)
Current Flight Mode
Take off / Landing Button
Return To Home Button
Back To Main Screen
Status of the anti-collision system, forward, backward and sideways (depends on the available sensors of the connected drone)
Right Info Panel
Drone GPS state + sat Number, Drone/Remote/Device Battery
level
Left Info Panel
Drone Speed
Drone Altitude from Take off point
Drone Distance from Piloting Device
Radar
Will show how the drone and the remote are oriented one respect the other.
It appear on screen only when the drone distance is >20m (>65ft)
The orientation of the remote controller is based on the compass of your iPhone/iPad and the GPS position of your iPhone/iPad.GPS and compass errors can effect the accuracy of the Radar especially if the distance from the drone is low.
Focus
Use Tap on screen to choose the object to focus (not available on MAVIC™ air and mini)
if your remote controller have “C1 button” press it to focus on center of the screen. “C1 Button” also work to center focus while in VR mode.
Automatic Focus is enabled by default.
Flight Modes
Currently you can fly in Atti/GPS Mode , Sport Mode, Tripod Mode (base on drone specification)
Mavic Mini don’t have flight mode switch on the remote: you can press and hold the video recording button for 2 sec to change flight mode
Gimbal Modes
You can select the gimbal mode: "Follow" which is the normal mode stabilized on 3 axes or "FPV" in which the gimbal is no longer stabilized on the “Roll” axis, you can change it in the app settings or simply press and hold the 5D button (FN button on the Mavic Air, Shutter button on the Mavic Mini) for 2 seconds to switch from one mode to another (press once FN on the Air2 )
note:Head Tracking (in VR mode) and gimbal mode FPV cannot be used together

VR Mode
In this Mode you will have an immersive flight experience!! Enjoy the First Person View with any VR headset (goggles)
On screen you have all the information that you need! like distance,altitude,speed,video recording state and all batteries level.
1 Batteries Level
2 Distance
3 Altitude
4 Video Recoding State
5 Speed
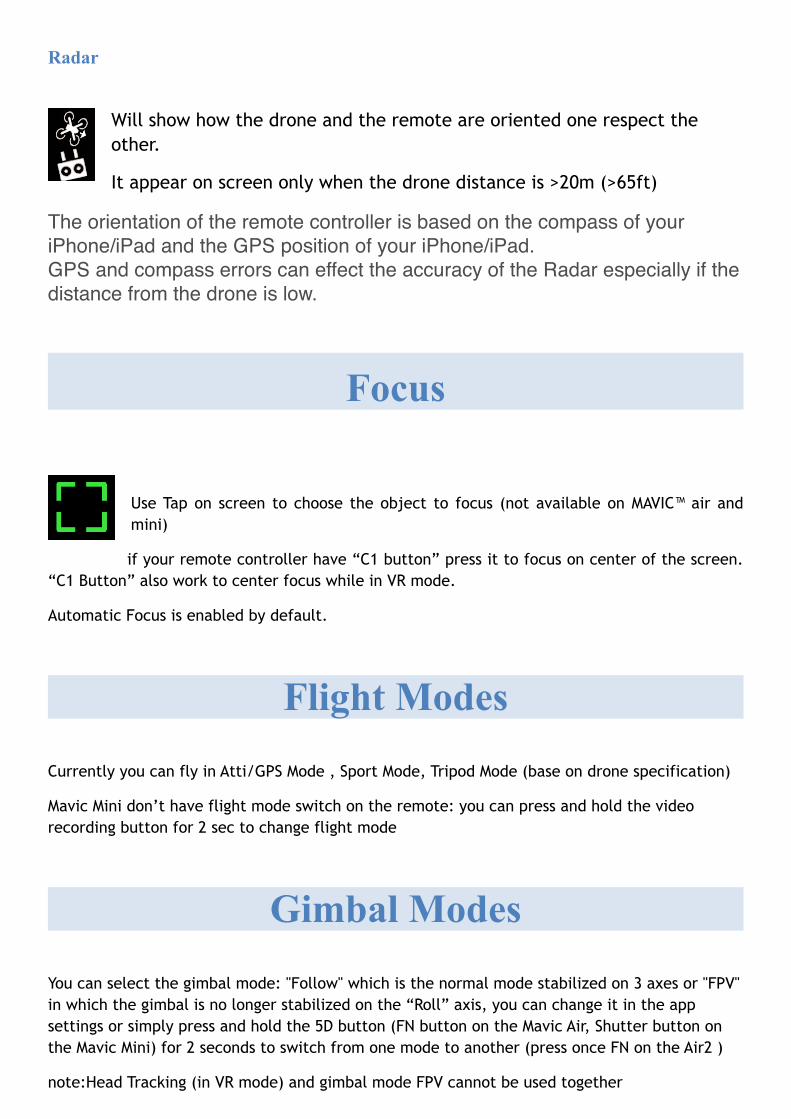
If you need to look around you while you are wearing the Headset you can press the “C2 button” on the remote to switch from the Drone point of view to Your point of view using the camera of your iPhone!
Drones without "C2 button" (Mavic Mini) can simultaneously press the video and photo buttons to change the view
Mavic Air 2 will use a double click on FN button for this
(View from the iPhone Camera)
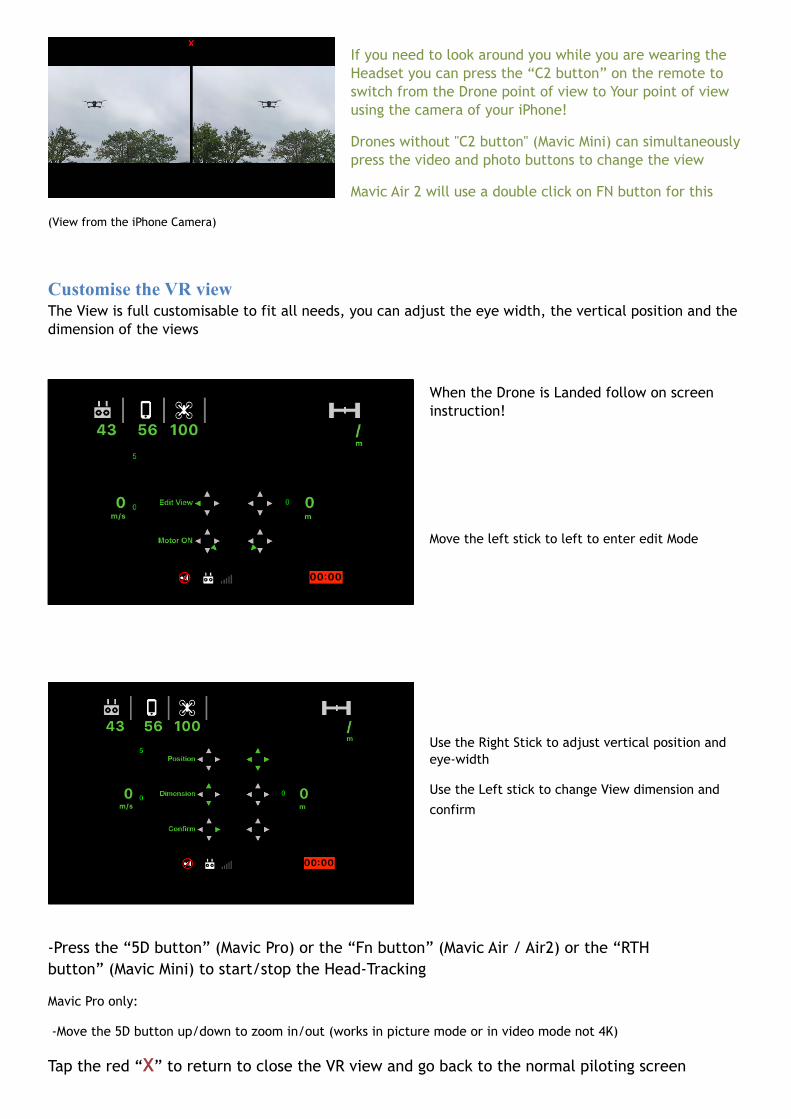
Customise the VR view The View is full customisable to fit all needs, you can adjust the eye width, the vertical position and the dimension of the views
When the Drone is Landed follow on screen instruction!
Move the left stick to left to enter edit Mode
Use the Right Stick to adjust vertical position and eye-width
Use the Left stick to change View dimension and
confirm
-Press the “5D button” (Mavic Pro) or the “Fn button” (Mavic Air / Air2) or the “RTH button” (Mavic Mini) to start/stop the Head-Tracking
Mavic Pro only:
-Move the 5D button up/down to zoom in/out (works in picture mode or in video mode not 4K)
Tap the red “X” to return to close the VR view and go back to the normal piloting screen

AR Localizer
You have three Augmented Reality Localizer that will help you orient yourself on the Drone video feed.
The green locator will always show the Home position, the red one will show you the Position and Distance of a Point of Interest that you can choose on Map. The blue one show the GPS position of the piloting device
GPS Error, compass error or barometer sensor error could affect the accuracy of the localizer but will always be a great help to find your destination.
Localizers are available in normal mode, full screen and “VR” Mode
You can switch localizers on/off in the settings.
To choose the POI, tap on set POI.
Just Tap on the map to set your POI.
To adjust the Altitude of the POI use the altitude picker on the left of the screen (altitude is relative to take off point)

Settings
General Settings Here you can calibrate the Drone and choose some basic settings such as measurement units (imperial / metric)
VR settings Head-tracking settings for VR view
RTH settings Here you change the Altitude of the RTH also you can set the FailSafe Behaviour
Flight Limit settings Here you can set the Max altitude and distance for your flight
Hardware Decoding OptionIn setting you can choose hardware decoding ON/OFF, it’s recommended to keep it ON on all device with “A8” chip or newer (iPhone 6/iPad Mini 4/iPad Air 2 or newer devices) this will reduce video latency also will reduce the over heating/battery consumption of the device. (not available with the mavic mini)

Home Point
The behaviour of RTH - and Smart-RTH is the same as using the DJI GO 4 or DJI FLY apps.
The home point is automatically saved when the drone gets a good GPS position and automatically updates every time it takes off.
In this app you can also update the home point "on the fly" whenever you want:
quickly press the RTH button + Shutter button together on the remote to update the Home Point to the current Drone Position
quickly press the RTH button + Record button together on the remote to update the Home Point to your current Position (iPhone GPS position)
Note: the altitude of the home point will remain the same as the last take-off and cannot be updated on the fly
Mavic Air 2 don’t have separated Record or Shutter Button, so at this stage can’t change home point on the fly, new solution will come in future app update

USB Connection
If you need to use the bottom USB port of the Controller, remember to disconnect the side connector before, in order to activate the bottom port
DJI™,MAVIC™ are trademarks of DJIiPhone®,iPad® are trademarks of Apple Inc.