mac os x basics part one - laguardia community college os x basics part one handout objectives . 1....
TRANSCRIPT
Mac OS X Basics Part one Handout Objectives
1. Desktop
a. Desktop elements
b. Customizing the Desktop
2. The Dock
a. The Dock elements
b. Customizing the Dock
c. Adding/Removing items from the Dock
3. Finder
a. Setting Finder Preferences
b. Modifying the Finder Window
4. Menu Bar
a. Investigating Menus
b. Using the Menu Bar
c. Understanding standard Mac OS X menus
5. Spotlight
a. What Spotlight can do for you
b. Using Spotlight
c. Setting Spotlight preferences
Overview: This lesson will show quick overview of the basics Mac OS X
1. Desktop
Everything starts on the desktop at the bottom of your screen is The Dock, where
you have quick access to applications and files. To open something just click on it.
2
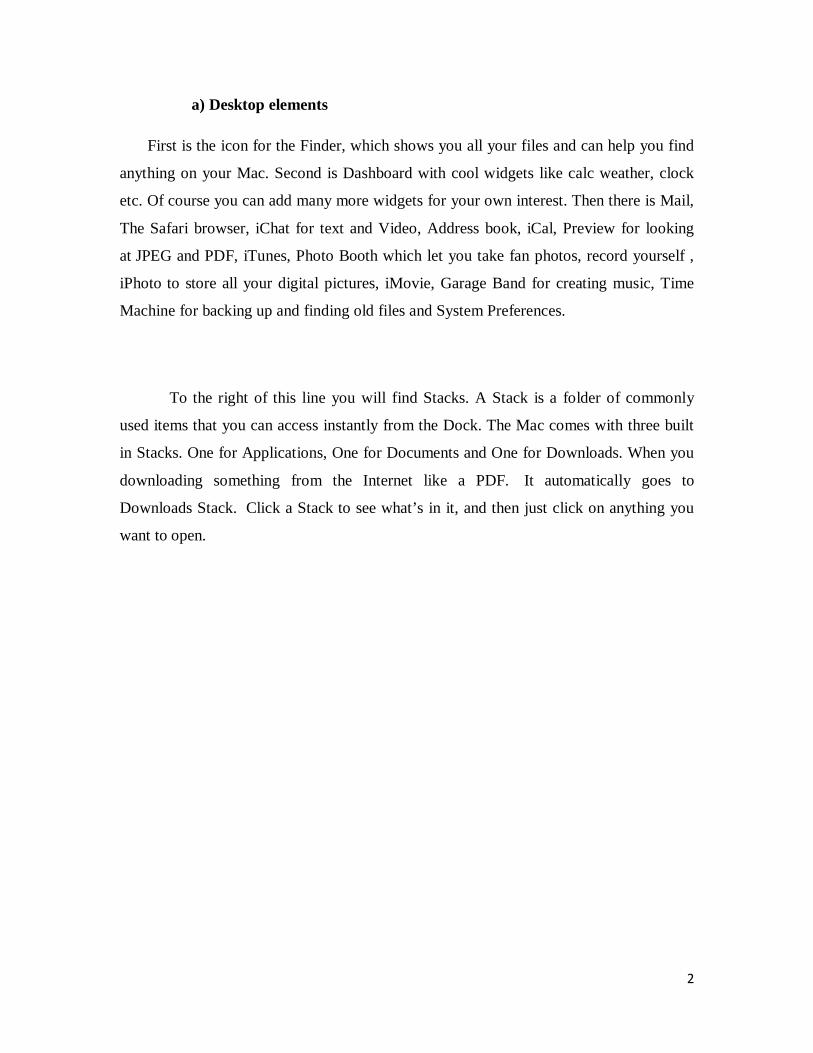
a) Desktop elements
First is the icon for the Finder, which shows you all your files and can help you find
anything on your Mac. Second is Dashboard with cool widgets like calc weather, clock
etc. Of course you can add many more widgets for your own interest. Then there is Mail,
The Safari browser, iChat for text and Video, Address book, iCal, Preview for looking
at JPEG and PDF, iTunes, Photo Booth which let you take fan photos, record yourself ,
iPhoto to store all your digital pictures, iMovie, Garage Band for creating music, Time
Machine for backing up and finding old files and System Preferences.
To the right of this line you will find Stacks. A Stack is a folder of commonly
used items that you can access instantly from the Dock. The Mac comes with three built
in Stacks. One for Applications, One for Documents and One for Downloads. When you
downloading something from the Internet like a PDF. It automatically goes to
Downloads Stack. Click a Stack to see what’s in it, and then just click on anything you
want to open.
3
b) Customizing the Desktop
The Desktop as you know is the large expanse of the color that compromises the
background of your Mac OS environment. You can cover the desktop with a solid color
or a picture by choosing an image as follows:
1.Click The System Preferences icon on the Dock (or select Apple – System
Preferences.
2.In System Preferences, click the Desktop & Screen Saver button or choose
View – Desktop & Screen Server.

4
2. The Dock By Default, the Dock is located on the bottom of your display and is quite
large. In addition to changing the location and size the Dock has a few additional
tricks, available in the Dock preference pane.
a) The Dock contains Application and Interface components. On the right of the Dock
we have: (1). Applications (Finder, Mail, Safari etc.) (4) To the right of this line you will
find Stacks (Downloads, Applications, Documents and Trash). (2) Bright dot - Indicates
open (running) applications. (3) Dock size adjuster

5
b) Customizing the Dock
To change the Dock size, magnification, hiding position, and visual effect go to
the Dock pane in System Preferences.
c) Adding/Removing items from the Dock
Add any item to the Dock by simply dragging it to the Dock. This creates a Dock
based alias of the item. Applications must be placed on the same side of the separator line
as the Finder; documents, folders and disks must be placed on the other side of the line.
To remove an item from the Dock is extremely simple. Drag the item out of the Dock, let
go, and it disappears in a puff of smoke.
3. Finder
Lets take a closer look at the Finder. It is how you access everything you
want to do on the Mac.

6
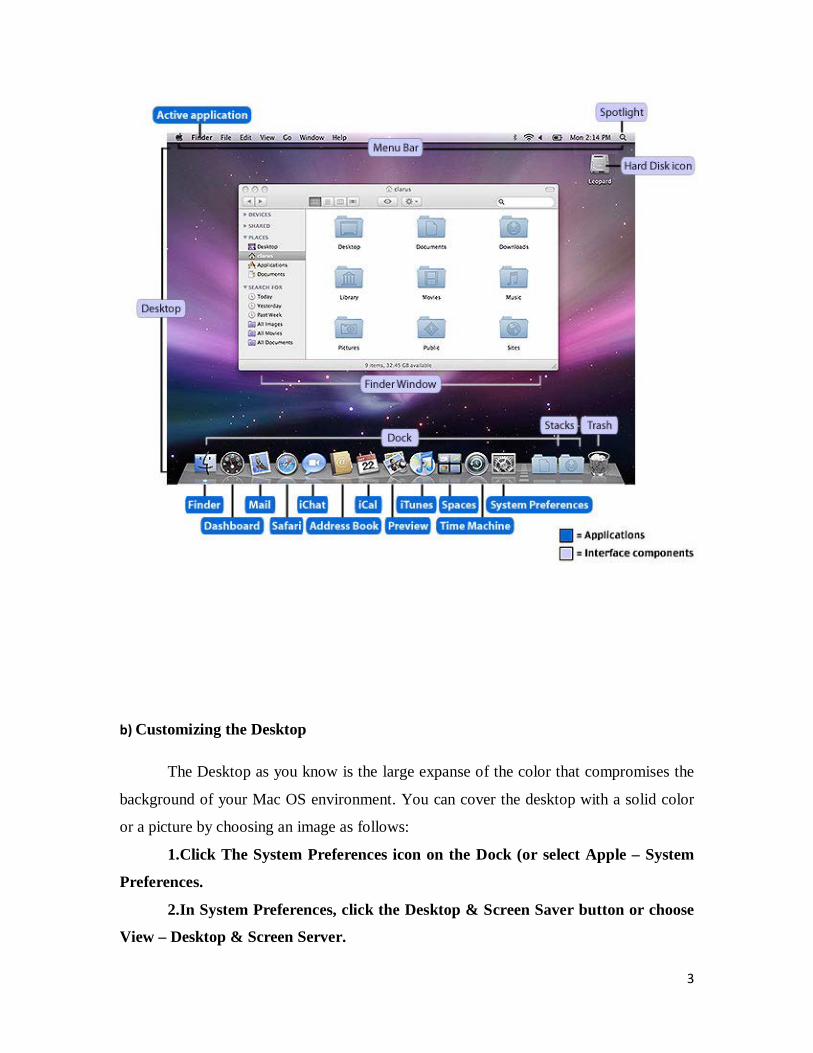
a) Setting Finder Preferences
The Finder has a number of preference settings that affect the appearance of icons
on the desktop, the behavior of Finder windows, Label colors, emptying Trash, and
showing extensions on the names of files and more. You can change these
preference settings by choosing Finder – Preferences. The Finder Preferences
window appears. There are four available subpanels to the Finder to the Finder
Preferences window.
7
b) Modifying the Finder Window
The Sidebar in the Finder window help you navigate. Just click on the icon to see
files and folders inside. You can choose how you view Finder items by Icon view,
List view, Column View or Cover Flow. To get a closer look at a file use click look.
Just tap the space bar and quick look will show instantly the content of the file
without even an opening an application. In the Finder you can easily create a New
Folders, rename Folders and keep all your folders organized exactly how you want
them.

8
4. Menu Bar
Along the top is a Menu Bar. It changes to match any application you using
it. Click on any item and you see a list of commands. You also find a Status
Menu on the right of the Menu Bar for things like sound, date and time, WI-FI
connection and yours on line chat status.
a) Investigating Menus
The Mac OS uses menus to present lists of commands and attributes. You
can issue a command or put an attribute into effect simply by choosing it from a
menu using the mouse. The menu bar menus will change as you switch
applications.
b) Using the Menu Bar
The menus in the menu bar at the top of the screen contain commands that
are relevant to the application you are using at the time. To use the menu bar, you
position over a menu title and click or press the mouse button. The menu opens
beneath title so that you can see the items in it and choose one, if you like.

9
c) Understanding standard Mac OS X menus
In most Mac OS X application, the left side of the menu bar includes several of the
following standard menus:
• Apple: at the left end of the menu bar.
• Application menu: This menu is next to Apple menu and is very unique.
• File: Next to the Application menu and contains commands that effect whole
document (or file) , such as New, Open , Close, Save, and Print.
• Edit: To the right of the File menu and contains commands that you can use
change a document’s contents.
• Window: This menu item enables you to zoom (max or min) the active
window.
• Help: This menu gives you access to onscreen help.

10
5. Spotlight
Mac OS X includes powerful tool to help you search for information. Spotlight is a
revolutionary new technology that helps you to find files and folder and many more stuff
on your Mac. Spotlight also does math equations, without opening the calculator.
a) What Spotlight can do for you?
Spotlight can find anything on your Mac for you almost instantly. Spotlight can
search through your e-mail, your calendars, yours contacts even movie, image and music
files.
11
b) Using Spotlight
A Spotlight search can be run in two main ways:
• From the menu bar
• From a Finder window
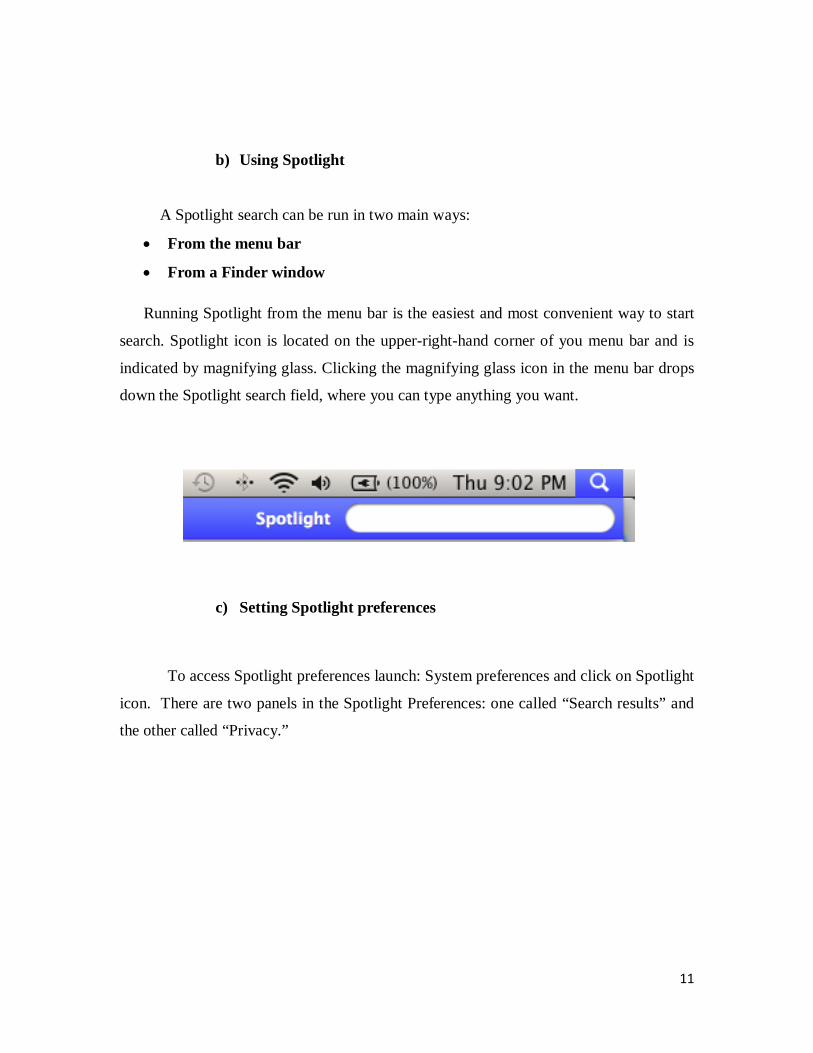
Running Spotlight from the menu bar is the easiest and most convenient way to start
search. Spotlight icon is located on the upper-right-hand corner of you menu bar and is
indicated by magnifying glass. Clicking the magnifying glass icon in the menu bar drops
down the Spotlight search field, where you can type anything you want.
c) Setting Spotlight preferences
To access Spotlight preferences launch: System preferences and click on Spotlight
icon. There are two panels in the Spotlight Preferences: one called “Search results” and
the other called “Privacy.”

12

13