mac end-user guide - access - home
TRANSCRIPT

Symantec Endpoint Protection End-User Guide
For MacOS X
Symantec Endpoint Protection (SEP) is the evolutionary successor to Symantec Anti-Virus (SAV). SEP
provides the anti-virus protection of SAV and will be Symantec’s focus for future endpoint protection
development on the MacOS X platform. New with version 12.1.4013.4013 is Network Threat Protection
(NTP). NTP will block the network activity of over 2600 exploits (as of 7 Mar 2014).
This document will guide the user through the installation process and introduce the most basic
components of the SEP interface and provide insight as to what to expect from SEP’s behavior.
LLNL is providing SEP for home use as a no-cost benefit for its’ employees, collaborators, and summer
students. The SEP software is provided as-is and this document as the exclusive means of support. DO
NOT CONTACT 4-HELP or any other support organizations at LLNL for support of this software. The
ONLY exception will be the case where the user is having difficulty downloading the SEP installation files
from access.llnl.gov . You may report download problems to 4-HELP.
Installation
The installation package of SEP from access.llnl.gov is compressed in a zip file.
Double clicking on the Symantec Endpoint Protection Installer package will start the installation and
bring up a user license acceptance window. A foreground window will notify you that a system reboot
will be required.
Double click on the downloaded zip
file to extract it into the native
MacOS X installation package.
Acknowledge reboot notification by
selecting the “Continue” button

After the Reboot and Upon Logon
Select the “Agree & Install” button.
Note that about 200MB of disk
space is required.
The installation will proceed with a
progress indicator.
Upon completion of installation, you
will be prompted for a reboot. Select
the “Close & Restart” button.

You will want to update your SEP product with the latest virus definitions and client updates. You can
accomplish by going to the Apple Menu Bar and locating the Symantec icon (see below).
Select the Open LiveUpdate from the fly-out menu. A LiveUpdate window will display. Select the
“Update Now” button.
A download and installation progress indicator
will appear. Several minutes may be required
for the download and installation even with a
fast internet connection.
All Symantec Endpoint components that
were updated will be displayed. Click “Ok”.

Scheduling LiveUpdate
In order to maximize SEP’s effectiveness, it is critically important to keep the product and its’ antivirus
definitions up-to-date. The following guide will illustrate the process to schedule regular and periodic
updates.
To schedule product updates, launch the SEP client by navigating the Apple Menu Bar
The SEP status windows will launch
Select the “Settings”
button.

In the settings pane, select the “LiveUpdate” tab to review the scheduling options.
A 4 hour reoccurring schedule is the
default. You can change this up to
23 hours. Or if prefer a specific time
of occurrence, you can choose
settings for daily or weekly.
Choosing either of these options will
bring-up settings for the time and
day of the week as appropriate.
It’s highly recommended that you set
a schedule that occurs either daily at
a convenient time or reoccurring.
Keeping your virus definitions up-to-
date is critically important.

Scheduling File Scans
While SEP’s AutoProtect feature can scan new files as they are accessed by the user or
operating system, it’s still a good idea of perform periodic scans of the entire hard drive or at
least user data (home directory). By default SEP will not schedule a full or partial drive scan;
you’ll need to schedule one if you want the additional protection. We recommend a monthly
drive scan.
To schedule a scan, launch the SEP client and from the “Status” pane, select the “Settings”
button
Click on the “Virus and Spyware
Protection” tab to reveal all the
feature options.
Under the “Schedule Scans” header,
click on the “Configure…” link
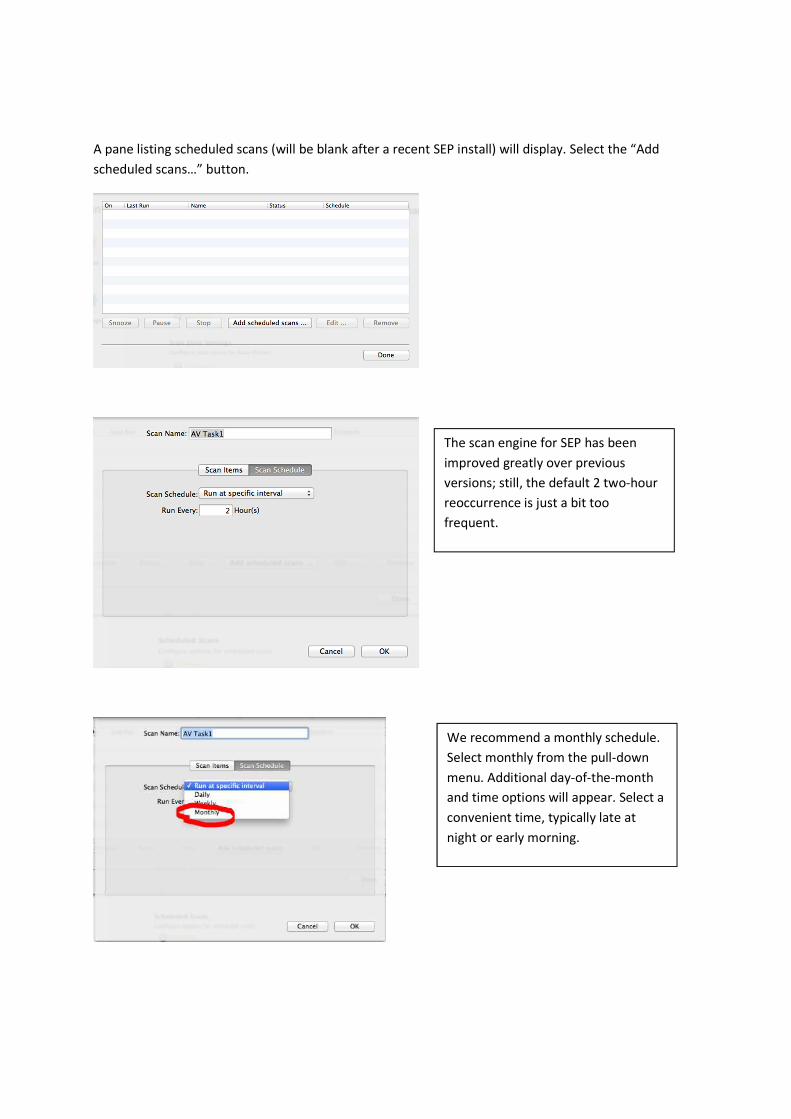
A pane listing scheduled scans (will be blank after a recent SEP install) will display. Select the “Add
scheduled scans…” button.
The scan engine for SEP has been
improved greatly over previous
versions; still, the default 2 two-hour
reoccurrence is just a bit too
frequent.
We recommend a monthly schedule.
Select monthly from the pull-down
menu. Additional day-of-the-month
and time options will appear. Select a
convenient time, typically late at
night or early morning.

After you’ve choosen when to scan, next you want to select what to scan. Selet the “Scan Items” button
and review the options.
It’s HIGHLY RECOMMENDED that you
select at least the defaults as shown.
Pay particular attention to the “Auto
Repair” and “Auto Quarantine” checks.
Both must be checked if you want viruses
and malware to be moved to quarantine
or a repair attempt made. Checking “Auto
Quarantine” only will NOT move virus and
malware to the quarantine.
Click “Ok” when satisfied with options.
Your scheduled scan should now be
displayed in the scan listing pane.
Select the “Done” button to
complete.

Responding to SEP Virus Detection:
SEP will typically discover viruses on your system automatically as they are introduced. SEP’s
notifications and prompts are straightforward to understand. The following will document the process
of virus detection.
SEP has discovered a virus on the desktop
named “eicar.com” that was copied from a
network location. The file was deleted because
it could not be automatically repaired.
To access SEP’s quarantine, go to the Apple
Menu Bar, click on the Symantec icon, choose
Symantec EndPoint Protection, and then Open
Symantec Endpoint Protection.
From the SEP menu, select Tools and
Quarantine.
Infected files are listed in the quarantine.
Highlight the files by selecting them and then
choose the “Delete” button to empty the
quarantine.
Note: You may need to click on the admin
“lock” and provide admin credentials to access
the “Delete” button

SEP’s File Scan Detects Virus
While rare, at times, SEP won’t discover a virus until a file scan is performed. The notification and
remediation process is similar to the process described earlier.
Select the “Delete” button in the confirmation
display.
SEP has discovered two infected files,
a compressed file and its’ contents.
Select the “Delete” button to remove
the file. You can attempt to “Repair”
the file. A “Repair” often removes the
file or places it on the quarantine.
Since the file is embedded in an
archived file, SEP is asking whether it
should repair the archive. In this case,
you should select “Repair Archives”.
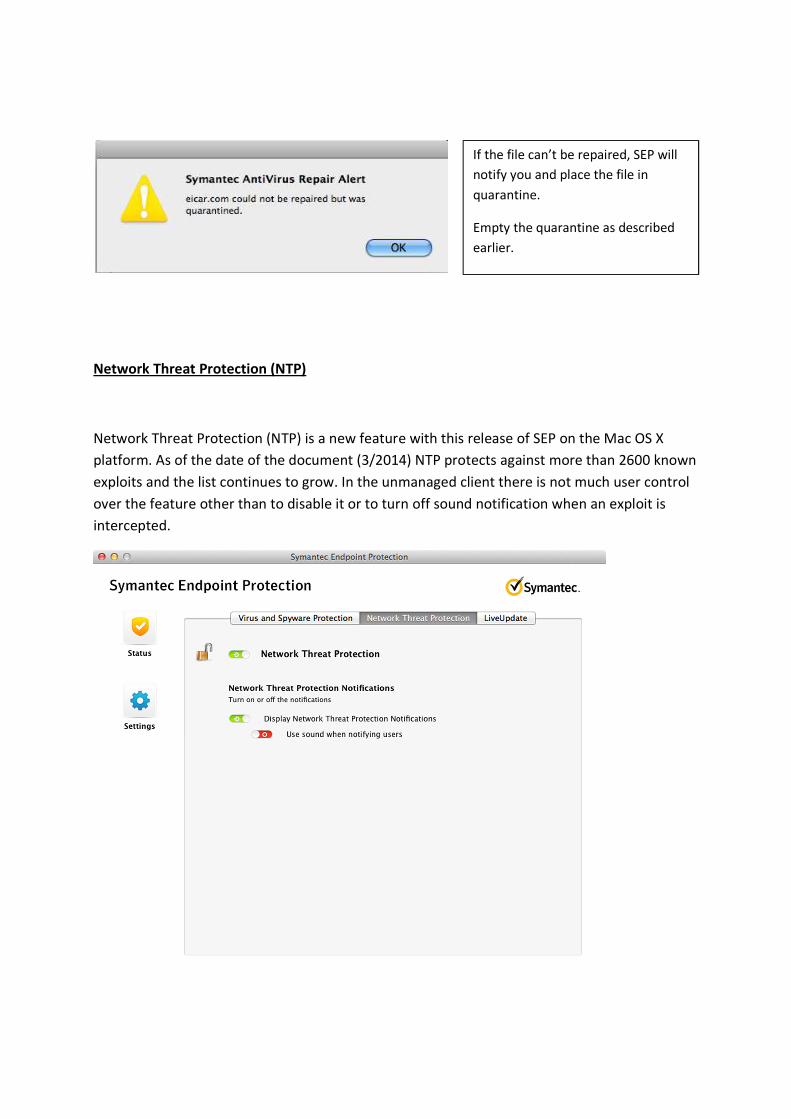
Network Threat Protection (NTP)
Network Threat Protection (NTP) is a new feature with this release of SEP on the Mac OS X
platform. As of the date of the document (3/2014) NTP protects against more than 2600 known
exploits and the list continues to grow. In the unmanaged client there is not much user control
over the feature other than to disable it or to turn off sound notification when an exploit is
intercepted.
If the file can’t be repaired, SEP will
notify you and place the file in
quarantine.
Empty the quarantine as described
earlier.
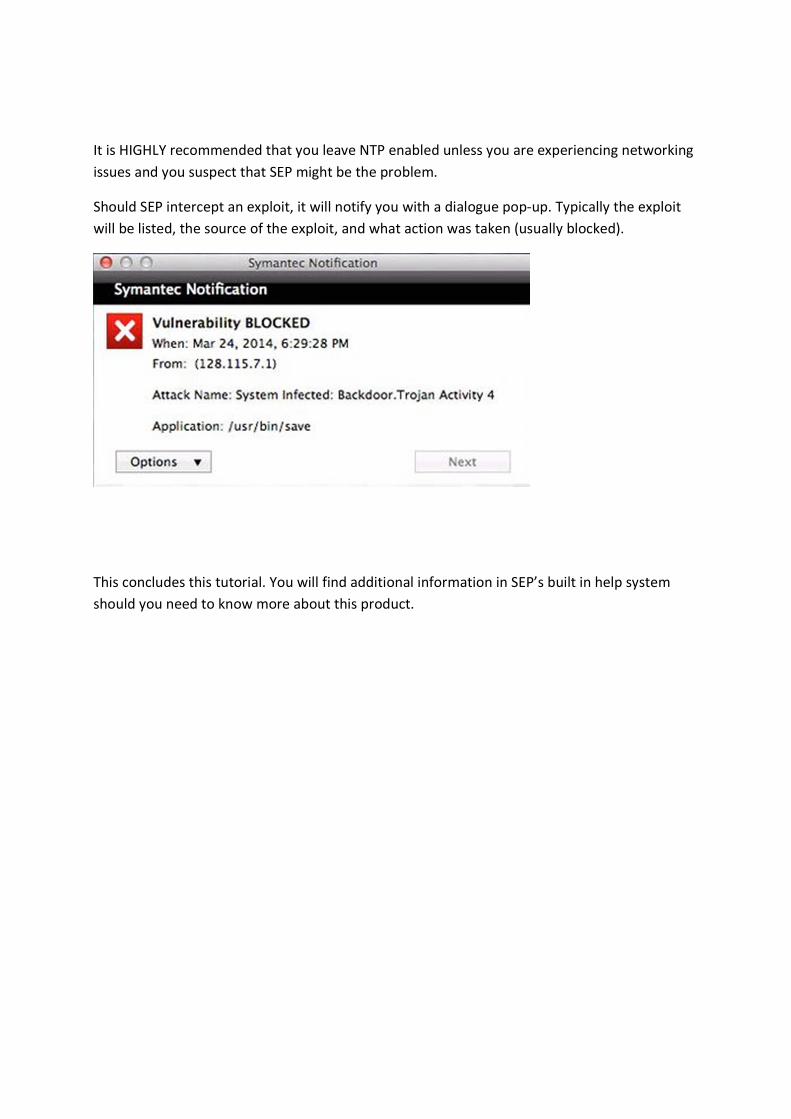
It is HIGHLY recommended that you leave NTP enabled unless you are experiencing networking
issues and you suspect that SEP might be the problem.
Should SEP intercept an exploit, it will notify you with a dialogue pop-up. Typically the exploit
will be listed, the source of the exploit, and what action was taken (usually blocked).
This concludes this tutorial. You will find additional information in SEP’s built in help system
should you need to know more about this product.