m202/m212 ethernet print server - microplex systems ltd. · 1997-02-26 · m202/m212 ethernet print...
TRANSCRIPT
M202/M212ETHERNET
PRINT SERVERInstallation and Configuration Manual
Manual Version 5.5Firmware Version 5.5
Microplex Systems Ltd.8525 Commerce CourtBurnaby, BC V5A 4N3
P/N 79-202-300

Copyright 1991, 1992, 1993, 1994, 1995 Wyndham Technologies Inc.All rights reserved.
No part of this manual shall be reproduced, photocopied, recorded, stored in a retrieval system, translated toanother language, or transmitted by any means electronic, mechanical, or otherwise, without writtenpermission from Wyndham Technologies Inc.
No patent liability is assumed with respect to the use of the information contained herein. While everyprecaution has been taken in the preparation of this manual, Microplex Systems Ltd. assumes no liability forerrors contained herein or for incidental or consequential damages in connection with the performance or useof this material.
PostScript and TranScript are trademarks of Adobe Systems, Inc. DEC and Ultrix are trademarks of DigitalEquipment Corporation. Hewlett-Packard, HP/UX, LaserJet, and DeskJet are registered trademarks ofHewlett-Packard Company. IBM is a registered trademark of International Business Machines. SCO and theSCO logo are registered trademarks of The Santa Cruz Operation, Inc. Sun Microsystems, and SunWorkstation are registered trademarks, and OpenWindows, NeWSprint, NFS, Sun-2, Sun-3, Sun-4, Sun386i,and SPARCstation, are trademarks of Sun Microsystems, Inc. Novell and NetWare are trademarks of Novell,Inc., AppleTalk is a registered trademark of Apple, Inc., NetBIOS is a trademark of International BusinessSystems Corp., Windows NT, Windows for Workgroups, and Windows 95 are registered trademark ofMicrosoft Corporation.
This manual was written, illustrated, and produced using FrameMaker workstation publishing software.
Manual Version: 5.5Firmware Version: 5.5
Rev: 09/95
Printed in Canada

TABLE OF CONTENTS
TABLE OF CONTENTS ................................................................ i
LIST OF FIGURES ...................................................................... iv
LIST OF TABLES ......................................................................... v
PREFACE ..................................................................................... 1Who Should Use This Manual.................................................................. 1Organization of This Manual.................................................................... 1General Conventions ................................................................................ 2Computer Entry and Display Conventions ............................................... 3
GETTING TO KNOW THE M202/M212 ....................................... 5Overview................................................................................................... 5M202/M212 Features................................................................................ 5Overview of Print Server Architecture ..................................................... 8Overview of Print Server Installation ..................................................... 10
INSTALLING THE M202/M212 ON THE NETWORK ................ 15Overview................................................................................................. 15Preparing for Installation ........................................................................ 15Installing ................................................................................................. 16Connecting Peripherals........................................................................... 18
CONFIGURING THE M202/M212 FOR TCP/IP ......................... 21Overview................................................................................................. 21Host Software ......................................................................................... 21M202/M212 Configuration..................................................................... 25Host Configuration ................................................................................. 32
CONFIGURING THE M202/M212 FOR NOVELL ...................... 53Overview................................................................................................. 53Host Software ......................................................................................... 53M202/M212 Configuration..................................................................... 54Host Configuration ................................................................................. 55
CONFIGURING THE M202/M212 FOR APPLETALK ............... 65Overview................................................................................................. 65M202/M212 Configuration..................................................................... 65
TABLE OF CONTENTS i

Host Configuration ................................................................................. 65Additional Configuration Options .......................................................... 66
CONFIGURING THE M202/M212 FOR WINDOWS .................. 69Overview................................................................................................. 69TCP/IP Setup .......................................................................................... 70M202/M212 Configuration..................................................................... 73Host Configuration ................................................................................. 74
M202/M212 INTERNAL ARCHITECTURE ................................ 79Overview................................................................................................. 79Destinations ............................................................................................ 79Models .................................................................................................... 80Variables ................................................................................................. 81Logpaths ................................................................................................. 82I/O Ports.................................................................................................. 82
USING THE M202/M212’S COMMAND SET ............................. 83Overview................................................................................................. 83npsh Overview........................................................................................ 83npsh Prompt ............................................................................................ 84User Accounts and Permissions.............................................................. 84Redirecting Output from Commands...................................................... 84npsh Basic Commands............................................................................ 85npsh Command Set ................................................................................ 85
USING NPWIN .......................................................................... 115Overview............................................................................................... 115System Requirements ........................................................................... 115Installation ............................................................................................ 115Print Server Configuration.................................................................... 116Starting a NPWin Session With An Unconfigured Unit ...................... 116
USING THE M202/M212’S ADDITIONAL OPTIONS ............... 119Overview............................................................................................... 119General Options .................................................................................... 119TCP/IP Options..................................................................................... 124Novell Options...................................................................................... 128Managing With SNMP ......................................................................... 129FTP Daemon......................................................................................... 134
ii TABLE OF CONTENTS

Serial Line IP ........................................................................................ 141IP Routing............................................................................................. 145
TROUBLESHOOTING THE M202/M212 ................................. 147Overview............................................................................................... 147Common Problems ............................................................................... 147TCP/IP Problems .................................................................................. 147Novell Problems ................................................................................... 151AppleTalk Problems ............................................................................. 155Windows Problems............................................................................... 155
GETTING HELP WITH THE M202/M212 ................................. 159Overview............................................................................................... 159Help Methods Available ....................................................................... 159Technical Support................................................................................. 160Upgrade Procedure ............................................................................... 161Warranty ............................................................................................... 162
M202/M212 SPECIFICATIONS ................................................ 165Variable Definitions.............................................................................. 165Hardware Specifications....................................................................... 167Software Specifications ........................................................................ 180
GLOSSARY .............................................................................. 183
APPENDIX A ............................................................................ 189Planning Your Print Setup .................................................................... 189
INDEX ....................................................................................... 193
TABLE OF CONTENTS iii
iv LIST OF FIGURES
LIST OF FIGURES
Figure 1: Print Server Operating Logic .............................................9
Figure 2: M202/M212 Diagram ......................................................17
Figure 3: npd Overview....................................................................44
Figure 4: M202/M212 Jumper Settings ........................................125
Figure 5: Sample Commercial Invoice ..........................................164
Figure 6: Parallel Port Timing .......................................................169
LIST OF TABLES
Table 1: npconfig/ezsetup Main Menu ..........................................23
Table 2: npconfig Detailed Configuration Options Sub-Menu ......23
Table 3: Model Types ....................................................................80
Table 4: UTP (RJ45) Connector Pinout .......................................167
Table 5: THICK (Transceiver) Connector Pinout ........................168
Table 6: Parallel Port Timing .......................................................170
Table 7: PRN1/PRN2 Pinout .......................................................171
Table 8: 9-Pin COM1/COM2 Pinout ...........................................172
Table 9: 25-Pin Serial Device Pinout ...........................................173
Table 10: LED Patterns ..................................................................176
Table 11: Run and Auto-Reset Mode Description .........................177
Table 12: TCP/IP Port Numbers ....................................................180
Table 13: Configuration Considerations ........................................189
LIST OF TABLES v

vi LIST OF TABLES
ual.
:
nd
ps
vari-
ent.
PREFACE
Who Should Use This Manual
A system administrator or someone with a good understanding of the protocolinvolved should perform the installation and configuration procedures in this man
Organization of This Manual
This manual covers each aspect of the M202/M212 and contains these chapters
PREFACE on page 1Contents, organization, and conventions used in this manual.
GETTING TO KNOW THE M202/M212 on page 5Description of the M202/M212’s features and an introduction to its architecture ainstallation.
INSTALLING THE M202/M212 ON THE NETWORK on page 15Description of the M202/M212’s network connectors and I/O ports, along with steto connect the Print Server to the network.
CONFIGURING THE M202/M212 FOR TCP/IP on page 21Overview of TCP/IP host software and details on M202/M212 configuration and ous TCP/IP host setups.
CONFIGURING THE M202/M212 FOR NOVELL on page 53Full introduction to Novell host software and to the various print configurationsavailable with all versions of NetWare.
CONFIGURING THE M202/M212 FOR APPLETALK on page 65Description of a full AppleTalk setup.
CONFIGURING THE M202/M212 FOR WINDOWS on page 69Explanation of a print setups in a Windows NT, Windows 95, and WfW environm
M202/M212 INTERNAL ARCHITECTURE on page 79Explanation of the M202/M212’s internal operating architecture and logic.
unit
host
PREFACE: Who Should Use This Manual 1
up-
age
ading.
are in
etimes
USING THE M202/M212’S COMMAND SET on page 83Full reference section based on the M202/M212’s command set.
USING NPWIN on page 115Explanation of using the NPWin to configure and manage the M202/M212.
USING THE M202/M212’S ADDITIONAL OPTIONS on page 113Introduction to some of the print enhancements provided by the M202/M212.
TROUBLESHOOTING THE M202/M212 on page 147Helpful hints and steps to consider when you run into problems in any setup.
GETTING HELP WITH THE M202/M212 on page 159Information on Microplex’s service and support procedures including Technical Sport, upgrading, and warranty.
M202/M212 SPECIFICATIONS on page 161Full details about the M202/M212’s hardware and software specifications.
GLOSSARY on page 183Definitions of words, abbreviations, and acronyms used in this manual.
APPENDIX A on page 189Useful information on setting up your printing environment.
General Conventions
These are some of the conventions followed in this manual:
• At the bottom of each page is the name of the chapter, the section, and the pnumber.
• The header contains an icon to represent which chapter you are currently re
• Names of other publications and references to other sections in this manual italics.
Caution
Cautions are indicated to warn of any undesirable effects an action may cause.
Notes are added to make you aware of certain steps or considerations, and somto provide tips or suggestions.
Note
?
BA C
2 PREFACE: General Conventions
.
Computer Entry and Display Conventions
Command syntax and examples are formatted as follows:
• The Courier font inboldface indicates command entries.
$ ping ftp.microplex.com
• Regular Courier font indicates displayed results.
ftp.microplex.com is alive
• Arguments separated by theor symbol ( | ) mean that a choice must be made.
list default com1|com2
• Square brackets [ ] around something indicates that it is optional.
set sysinfo name [ namestring ]
• Command names, entries, and example references arebold along with directoriesand file names.Boldface is also used if emphasis is needed.
Enternpwrite when you see...
sends data to the M202/M212 namedspike...
• Variable values are shown initalics both in command syntax, output, and in text
ping ipname
ipname is alive
Please enter theipname at the prompt.
• Italics are also used for emphasis.
PREFACE: Computer Entry and Display Conventions 3

4 PREFACE: Computer Entry and Display Conventions
tainsitec- envi-
trixngsup-
for
of
GETTING TO KNOW THE M202/M212
Overview
The purpose of this chapter is to get you acquainted with the M202/M212. It conan overview of the Print Server’s features, an overview of the Print Server’s archture, and an overview of basic Print Server installations in each of the supportedronments.
M202/M212 Features
With the Microplex M202/M212 Print Server, you can locate laser printers, dot maprinters, plotters, and other peripherals anywhere on the LAN rather than attachithem directly to a host system. Installation is also quick and simple in any of the ported environments.
Common Features:
• simultaneous supportfor all network protocols:TCP/IP, SPX/IPX, EtherTalk,and NetBIOS over TCP/IP,
• NPWin for Windows-based configuration and management,
• two high-speed, IEEE 1284-I compliantparallel ports withfour-speeds speedsto support any peripheral, slow or fast,
• two serial ports,
• multi-level configuration security through passwords and permission levels,
• SNMP support through MIB II, custom MIBs, and custom traps to aid innetwork management,
• multiple printer destinations for printing flexibility,
• load-balancing so a job can be redirected to an idle printer instead of waitinga particular one to free up,
• the choice todisable selected Print Serverservices,
• extra printing functionality such as carriage return insertion to remove somethe processing burden from the host,
GETTING TO KNOW THE M202/M212: Overview 5

-job
• banner/trailer page generation,
• autosensing of job/file format forASCII to PostScript conversion or forautomatic switching of the printer’s emulation mode,
• header and trailer strings to instruct printers in tray selection, font, pitch,simplex/duplex, and other options,
• logging to keep track ofjob, user, page count, checksum,and printer errorinformation,
• TCP/IPsyslog and SMTP (email) support for additional logging functionality,
• backchanneling for printers to send various PostScript messages about: printstatus, paper out, paper jam, busy, toner out, etc. back through a serial port,
• queuing of all print jobs on LANs or WANs, while supporting up tofour printerssimultaneously,
TCP/IP Features:
• further configuration security through TCP access lists,
• scrambled print job data to protect the job as it passes over the network,
• ability to telnet andping to another host on the network from the M202/M212allowing for terminal server capabilities,
• up to256 simultaneousTCP connections,
• GOSIP RFC-1042 support,
• IP Routing support for communications over separate networks,
• FTP daemon support for printing, unit monitoring, and configuration,
• SLIP support for serial port network communications,
• IP packetfragmentation support,
Novell Features
• support for all versions of NetWare, including NetWare 4,
• simultaneous support of multiple Novell frame types,
• encrypted password support,
• queueing on up to32 queues over16 file servers,
6 GETTING TO KNOW THE M202/M212: M202/M212 Features
ort
• ability to add apreferred Novell file server list,
• automatic frame type sensing of all Novell frame types,
AppleTalk Features:
• quick printer setup through the Chooser,
• ability to disable certain print destinations on the M202/M212 so they don’t allappear in the Chooser,
• configurable AppleTalk zones,
Windows Features:
• NetBIOS over TCP/IP support for Windows NT, Windows for Workgroups(WfW), and Windows 95,
• simple printer setup,
Printer SupportThe M202/M212 Print Server is compatible with PC’s, UNIX systems, Macintoshcomputers, minis, and mainframes as long asat least one of the following is present:
TCP/IP
• an LPR client to interact with our Line Printer Daemon on the unit,
• an RSH client (i.e. rsh, remsh, rcmd) to interact with our RSH Daemon,
• the ability to print directly to a TCP port number on our unit; we have a TCP pnumber mapped to each I/O port on the unit by default (i.e. com1 is 4000),
Other
• NetWare support,
• AppleTalk over EtherTalk support,
• NetBIOS over TCP/IP support,
For a listing of the printing standards supported, please seeStandards Supported onpage 176.
GETTING TO KNOW THE M202/M212: M202/M212 Features 7

er-
be
evenIP).
an
yr I/O etc. Ifmean-
eocess-s
delsl.
ll the
Overview of Print Server Architecture
This section will provide an overview of how the M202/M212 works. To better undstand how the Print Server works, it is important to understandI/O ports, destinationsandmodels.
I/O Ports
The M202/M212 has four I/O ports: two parallel and two serial ports. Printers canattached to any or all of the four I/O ports. Each I/O port has an internal queuingmechanism that automatically queues print jobs on a first-come, first-serve basisif the print jobs come from different network environments (e.g. Novell and TCP/
Destinations
When you send a print job to the Print Server, the print job doesn’t go directly to I/O port but first goes to adestination. A destination can be thought of aslogical placeon the Print Server to send print jobs. Each destination has anI/O port and amodel(see below) associated with it. The purpose of ourdestinations is to allow you theability to configure a number of different print setups on the Print Server.
There are eight pre-defined destinations on the Print Server and each of them, bdefault, is associated to one of the four I/O ports on the unit (two destinations peport). By default, the destinations have names such as d1prn1, d2prn2, d3com1,you like, any of these destination names can be changed to be something more ingful.
Models
Each destination on the unit also has amodelassociated with it. The eight models (onper destination) can be thought of as a series of mini-filter that can do special pring to the print job data. For example, a model can be set up to do such things aASCII to PostScript conversion (a2ps) or carriage return insertion (onlcr).
By default, all eight models on the Print Server are initially set up to beraw. Whenraw, they simply pass data through to the I/O port untouched. By default, the moare namedm1 through tom8 but can be changed to be something more meaningfu
Models only need to be reconfigured when you want to do special processing to aprint jobs that are sent to a particular destination.
8 GETTING TO KNOW THE M202/M212: Overview of Print Server Architecture
ch on a
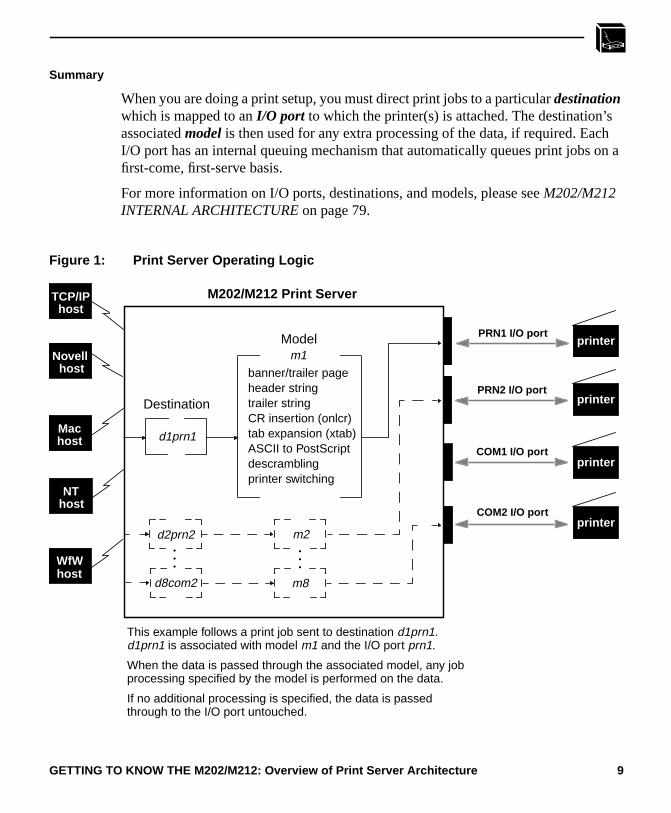
Summary
When you are doing a print setup, you must direct print jobs to a particulardestinationwhich is mapped to anI/O port to which the printer(s) is attached. The destination’sassociatedmodel is then used for any extra processing of the data, if required. EaI/O port has an internal queuing mechanism that automatically queues print jobsfirst-come, first-serve basis.
For more information on I/O ports, destinations, and models, please seeM202/M212INTERNAL ARCHITECTURE on page 79.
Figure 1: Print Server Operating Logic
Destination
PRN1 I/O port
COM1 I/O port
COM2 I/O port
Model
M202/M212 Print Server
PRN2 I/O port
banner/trailer pageheader stringtrailer stringCR insertion (onlcr)tab expansion (xtab)ASCII to PostScriptdescrambling
TCP/IPhost
Novellhost
Machost
printer
printer
printer
printer
NThost
WfWhost
d1prn1
printer switching
This example follows a print job sent to destination d1prn1.d1prn1 is associated with model m1 and the I/O port prn1.
When the data is passed through the associated model, any jobprocessing specified by the model is performed on the data.
If no additional processing is specified, the data is passedthrough to the I/O port untouched.
d2prn2
d8com2 m8
m2
m1
......
GETTING TO KNOW THE M202/M212: Overview of Print Server Architecture 9
ion
212.
sev-
Overview of Print Server Installation
This section will provide an overview of the basic steps required to install theM202/M212 in the various supported environments: Unix, Novell (PSERVER andRPRINTER), NetBIOS over TCP/IP, and AppleTalk.
Before installing the Print Server, it may be useful to look at Appendix A,PlanningYour Print Setup on page 189 for advantages/disadvantages of various configuratoptions.
Basic Unix Configuration
The following outlines the basic steps required to add a M202/M212 to a Unixnetwork.
Once the unit is physically attached to the network, you need to:
1 Assign an IP address, netmask, and possibly a default router to the M202/MThis can be done in several ways:
• automatically withezsetup or npconfig (option 1 from the Main Menu).Please see page 26.
• manually through the network usingARP. Please see page 27.
• manually through the network usingRARP. Please see page 28.
• manually through the network usingBOOTP. Please see page 29.
• manually through theCOM port . Please see page 30.
2 Configure the print setup on the host to print to this unit. This can be done ineral ways depending on your host system.
• automatically withezsetup or npconfig (Option 2 from the Main Menu)Please see page 26.
• manually for a BSD Unix environment. Please see page 37.
• manually for a System V Unix environment. Please see page 41.
• manually for a AIX Unix environment. Please see page 49.
Note
10 GETTING TO KNOW THE M202/M212: Overview of Print Server Installation

net-212
tup.
s on
erver.
net-212
.
me
Basic Novell Configuration
PSERVER Setup
The following outlines the basic steps required to add a M202/M212 to a Novell work using a PSERVER setup and applies to any Netware version. The M202/Mreplaces a dedicated workstation running PSERVER.EXE or PSERVER.NLM sothese are no longer needed.
Once the unit is physically attached to the network, you need to:
1 Enter into a PCONSOLE session. PCONSOLE is used for the entire print se
2 Create a new queue.
3 Create a new print server. The name will be is M_xxxxxx wherexxxxxx is the lastsix digits of the Ethernet address as found on the bottom of the unit.
4 Add a new printer and type in the name of one of the eight default destinationthe unit. (e.g. d1prn1, d2prn2, etc.) At the prompt for thetype field, selectDEFINED ELSEWHERE. If this is not available, choose PARALLEL.
5 Associate this printer with the queue defined in Step 2.
6 Reboot the Print Server and wait about a minute for it to connect to the file s
RPRINTER Setup
The following outlines the basic steps required to add a M202/M212 to a Novell work using a RPRINTER setup and applies to any Netware version. The M202/Minteracts with an existing PSERVER running PSERVER.EXE or PSERVER.NLM
Once the unit is physically attached to the network, you need to:
1 Enter into a PCONSOLE session.
2 Create a new queue.
3 Select an existing PSERVER and define a new remote printer. The printer nacan be anything but the type must be REMOTE OTHER/UNKNOWN.
4 Associate this printer with the queue created in step 2.
5 Exit PCONSOLE.
6 Restart PSERVER. (e.g. PSERVER.NLM)
7 Go to SYS:\LOGIN and create a directory named M_xxxxxx wherexxxxxx is the
GETTING TO KNOW THE M202/M212: Overview of Print Server Installation 11

erver.
ee
s
. In
con-
last six digits of the Ethernet address as found on the bottom of the unit.
8 Inside this directory, create a file called CONFIG.
9 Enter the line:set rprinter add pservername printernumber dest-name wherepservername is the existing PSERVER’s name,printernumber is thedefined number for this printer in that PSERVER, anddestname is a M202/M212destination (e.g. d1prn1, d4com2, etc.).
10 Reboot the Print Server and wait about a minute for it to connect to the file s
For more information on Novell PSERVER or RPRINTER configuration, please sCONFIGURING THE M202/M212 FOR NOVELL on page 53.
Basic Windows Configuration
The following outlines the basic steps required to add a M202/M212 to a WindowNT Version 3.5 network using the LPR print method.
Once the unit is physically attached to the network, you need to:
1 Ensure that the appropriate network software is installed on your host systemtheNetwork Settings dialogue box, make sure you see these in theInstalled Net-work Software scroll box:
• MS TCP/IP Printing
• TCP/IP Protocol
• Simple TCP/IP Service
2 Make sure your workstation has an IP address and netmask.
3 Assign an IP address and netmask to the M202/M212. Use a PC or terminalnected to the Print Server’s serial port to do this. Please seeManual ConfigurationThrough the COM Port on page 30 for information on completing this step.
4 On your NT workstation, select thePrint Manager.
5 SelectCreate a Printer from thePrinter menu.
6 Define the printer name and driver. In thePrint to field, selectOther...
7 ChooseLPR port from the displayed list and select Ok.
8 Enter the name or IP address of the Print Server.
9 Fill in the destination on the Print Server and selectOK . The destination will be
12 GETTING TO KNOW THE M202/M212: Overview of Print Server Installation

prn2,
Talk
on
the name of one of the eight default destinations on the unit. (e.g. d1prn1, d2etc.)
For more information on NetBIOS over TCP/IP configurations, please seeCONFIG-URING THE M202/M212 FOR WINDOWS on page 69.
Basic AppleTalk Configuration
The following outlines the basic steps required to add a M202/M212 to an Applenetwork.
An AppleTalk setup does not require any Print Server configuration; the networkparameters are automatically configured for you once the M202/M212 is bootedthe network.
Once the unit is physically attached to the network, you need to:
1 SelectChooser from the Apple Menu.
2 Select theLaserwriter icon.
A list of available printers will appear. By default, the format of each name isM202/M212name_papname whereM202/M212name is the name of theM202/M212 andpapname is an M202/M212 I/O port. Both names are config-urable.
M_000BF5_prn1
is the printer associated with the M202/M212 namedM_000BF5 using the firstparallel port.
3 From the list of printers, select one to print to.
For more information on AppleTalk configurations, please seeCONFIGURING THEM202/M212 FOR APPLETALK on page 65.
Note
Example
GETTING TO KNOW THE M202/M212: Overview of Print Server Installation 13

14 GETTING TO KNOW THE M202/M212: Overview of Print Server Installation

tells
ioningtust
INSTALLING THE M202/M212 ON THENETWORK
Overview
The first step of your M202/M212 setup is to attach it to the network. This sectionyou how to do that and also covers the Print Server’s network interfaces.
Preparing for Installation
Before unpacking and installing the hardware, read theFCC Warning.
CE Mark Conformity Declaration
The Microplex M202/M212 Print Server fulfils the requirements for radiated emissaccording to limit B of EN55022/1987 and the requirements for immunity accordto EN50082-1/1992 residential, commercial, and light industry. Compliance is novalid for unshielded network and printer cables. Also, the included plastic caps mbe place over any unused I/O port.
FCC Warning
This equipment generates, uses and can radiate radio frequency energy.If it is not installed and used as directed in this manual, interference toradio communications may result. The equipment has been tested andfound to comply with the limits for a Class A computing devicepursuant to Subpart B of Part 15 of FCC rules, which are designed toprovide reasonable protection against such interference when operatedin a commercial environment. Operation of this equipment in aresidential area is likely to cause interference. In such a case the userwill be required to correct the interference at the expense of the user.
INSTALLING THE M202/M212 ON THE NETWORK: Overview 15
usheckcom-
pack-is in
ed
1 or
or
-rtlet.
Unpacking the M202/M212
Before unpacking the M202/M212 Print Server, check the package for any obviodamage resulting from mishandling. If the outside box is damaged, open it and cfor any damage to the contents. Immediately report any damage to the shipping pany.
Unpack the M202/M212 and check the contents and serial numbers against the ing slip. Immediately report any errors or shortages to your vendor. If everything acceptable order, fill out theWarranty Registration/Customer Survey card and mailit in.
Site Requirements
Environment:
Prepare to install the M202/M212 in a clean, well-ventilated environment protectfrom extremes of temperature, humidity, mechanical shock, or vibration. Provideenough space at the front and back of the unit for cable connections.
Location:
Prepare to install the M202/M212:
• within four meters (13 feet) of a grounded 115 or 230 VAC outlet,
• within five meters (15 feet) of any device connected to the parallel ports (PRNPRN2),
• within 15 meters (50 feet) of any device connected to the serial ports (COM1COM2).
Grounding, Power, and Connection:
Ensure that the electrical outlet is properly grounded.
Power is supplied to the M202/M212 from an external transformer through a twometer (six-foot) output cord to a 2-conductor barrel jack. The external transformeconnects through a two-meter (six-foot) line cord to a 3-prong 115 or 230 VAC ou
16 INSTALLING THE M202/M212 ON THE NETWORK: CE Mark Conformity Declaration
2tomat-s notor
NC
o the
ack
and
Installing
The M202 and M212 are identical except for their network connections. The M20provides both 10Base-T and 10Base2 connectors and is intelligent enough to auically sense the type of connection used. First, it checks for 10Base-T and if this iused, it will then proceed with 10Base2. The M212 provides a 10Base5 connectonly.
10Base2 (Thin Ethernet)
The Print Server is equipped with a male BNC connector for connection to THINEthernet. Splice the T connector into your network cable and then connect the Bconnector onto the THIN connector on the back of the M202.
10Base-T (UTP)
The M202 is equipped with an RJ45 UTP connector. Plug the RJ45 connector intUTP socket on the back of the M202.
10Base5 (AUI)
The M212 has a THICK connector. Plug the transceiver into this AUI port on the bof the M212.
Connecting the M202/M212
To attach the M202/M212 to the network:
1 Connect peripherals to the appropriate I/O ports. Please see Connecting Peripher-als on page 19 for details on each of the M202/M212’s I/O ports.
Unpack and plug in the power supply. The connector plugs into the back of theM202/M212. Watch the lights on the from panel of the Print Server as they cyclethrough the power-on self test. When the test is complete, the POWER light is onSTAT is flashing.
INSTALLING THE M202/M212 ON THE NETWORK: Installing 17

Figure 2: M202/M212 Diagram
M202/M212 Front View
M202 Rear View
M212 Rear View
18 INSTALLING THE M202/M212 ON THE NETWORK: Installing
two
o-rtsese
d
edrame-
Connecting Peripherals
A maximum of four devices can be attached to an M202/M212 at the same time;on the parallel ports and two on the serial ports.
Parallel Port Connections (PRN1, PRN2)
Two 25-pin female DB-25S connectors with an IBM PC compatible pinout are prvided on the rear panel for connection to a printer using a parallel port. These pocan be configured with various parameters depending on the attached printer. Thparameters include:
• ackmode for printers (usually non-laser printers) that use theACK signal for thetrigger of next data transfer rather than the BUSY signal,
• autofeed for printers (usually non-laser printers) that require theAUTOFD line tobe asserted,
• bbmode for simulating an attached printer,
• fastmode for high performance parallel interfaces that can handle an increasetransfer rate,
• slowmode for slower parallel interfaces which require slower transfer rates.
For more information, please seelist prn1|prn2 on page 89,set prn1|prn2 on page101, andPRN1/PRN2 Pinout on page 167.
Serial Port Connections (COM1, COM2)
Two 9-pin male DE-9P connectors with IBM PC AT compatible pinouts are providfor connection to printers using serial ports. Each of these ports have various paters which control such things as:
• parity selection, generation, and detection,
• hardware flow control,
• software flow control,
• character description.
For more information, please seelist com1|com2 on page 87,set com1|com2 on page94, andCOM1/COM2 Pinout on page 169.
INSTALLING THE M202/M212 ON THE NETWORK: Connecting Peripherals 19
tol pre-
rkpter
For best performance, connect RXD lines (Pin 2) to ground on cables connectedequipment that do not drive the transmit data signal (i.e. some printers). This wilvent induced noise from being processed as data.
You have now completed the basic installation of the Print Server onto the netwoand now it must be configured for use. Please continue with the appropriate chafor your printing environment to learn how to print to the M202/M212:
• CONFIGURING THE M202/M212 FOR TCP/IP on page 21,
• CONFIGURING THE M202/M212 FOR NOVELL on page 53,
• CONFIGURING THE M202/M212 FOR APPLETALK on page 65,
• CONFIGURING THE M202/M212 FOR WINDOWS on page 69.
Note
20 INSTALLING THE M202/M212 ON THE NETWORK: Connecting Peripherals
yound net-, theent.
ce
ing.
extra
ther-
y
CONFIGURING THE M202/M212 FOR TCP/IP
Overview
If you are setting the Print Server in a TCP/IP environment, this chapter will helpwith all aspects of the setup process. The provided host software is introduced athen steps are given for configuring the M202/M212 for communications over thework and for printing. Since TCP/IP encompasses a wide variety of system typescommon ones are covered in detail to help you get printing in a TCP/IP environm
Host Software
The TCP/IP software provided includes two setup programs, source code, interfafiles, and various printing-related programs such as:
• a2ps for ASCII to PostScript conversion,
• onlcr for carriage return insertion,
• banner for banner page generation,
• chr for echoing ASCII characters and strings to standard output,
• npscramble for print job scrambling,
• npd for bi-directional communications when printing,
• npwrite for direct socket printing.
chr is the only mandatory binary when using one of the interface scripts for printThe extra processing binaries (a2ps, onlcr, banner) can be configured for the host toperform or they can each be set on the M202/M212 alleviating the host of these tasks.
To be utilized on a host, they must be used in conjunction with an interface file. Owise, please seeUSING THE M202/M212’S COMMAND SET on page 83 for infor-mation on the commands necessary to set these features on the M202/M212. Bsetting these features on the Print Server, the compilation ofchr may be the only onerequired.
Note
CONFIGURING THE M202/M212 FOR TCP/IP: Overview 21
yourh
ub-
tain-
o suc-
rver- allow-
run
Compiling Host Software
Some compilation may be needed before adding print setups to your host unlesshave SunOS 4.1.x, Solaris 2.x, orSCO Unix. Pre-compiled binaries are provided fothese.npconfig can be used to do the compilation or you can try and compile eacprogram independently. For thenpconfig method, please:
1 SelectDetailed Configuration Options . . . from thenpconfig Main Menu.
2 SelectManage Host Software . . . from the Options Sub-Menu.
3 SelectCompile Host Software and answer the prompts until compiled.
For more information on all of this provided host software, please see the next ssections.
ezsetup and npconfig
ezsetupand npconfig are the two installation programs provided; one is for a veryquick, simple setup and the latter is for a more detailed configuration or for maining and troubleshooting the Print Server. Both programs help you configure yourM202/M212 and direct print jobs to it.
ezsetupprovides two choices only; these are thesame as the first two choices ofnpconfig’s Main Menu. Within minutes, you will have configured the M202/M212 sit can be recognized on the network and your host will be able to send print jobscessfully to it.
If you want to spend more time manipulating the extra capabilities of the Print Seand your host’s configuration, usenpconfig. It can be used to configure a print destination on your host and it can also be used as a Print Server management utilitying you to monitor, change, and troubleshoot the unit.
Both setup scripts create individual log files,/tmp/ezsetup.logand /tmp/npcon-fig.log, which simultaneously log a copy of all of the commands executed as youthrough each of these scripts.
Please refer toTable 1: npconfig/ezsetup Main Menu, andTable 2: npconfig DetailedConfiguration Options Sub-Menu for an explanation of the menus.
22 CONFIGURING THE M202/M212 FOR TCP/IP: Host Software
-
d I/O
d
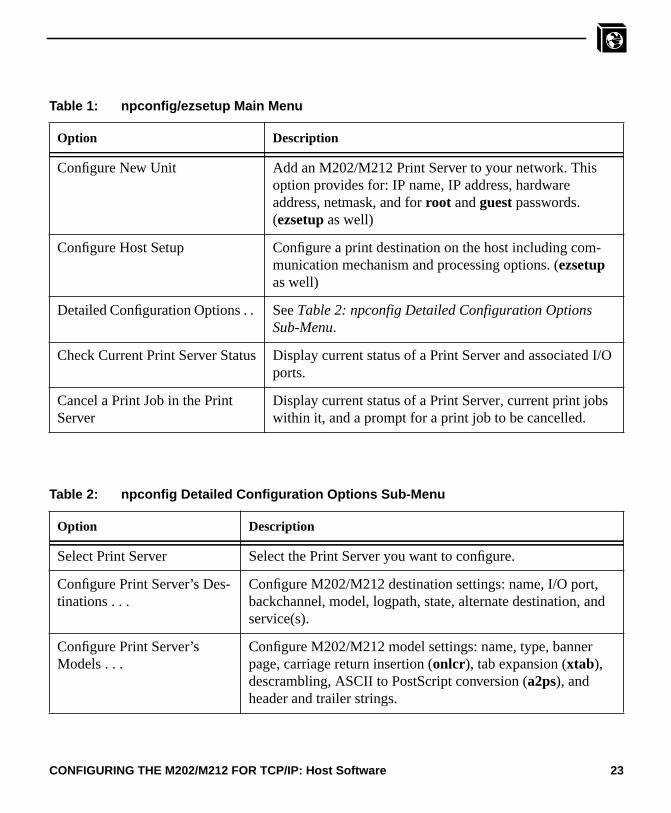
Table 1: npconfig/ezsetup Main Menu
Option Description
Configure New Unit Add an M202/M212 Print Server to your network. Thisoption provides for: IP name, IP address, hardwareaddress, netmask, and forroot andguest passwords.(ezsetup as well)
Configure Host Setup Configure a print destination on the host including communication mechanism and processing options. (ezsetupas well)
Detailed Configuration Options . . SeeTable 2: npconfig Detailed Configuration OptionsSub-Menu.
Check Current Print Server Status Display current status of a Print Server and associateports.
Cancel a Print Job in the PrintServer
Display current status of a Print Server, current print jobswithin it, and a prompt for a print job to be cancelled.
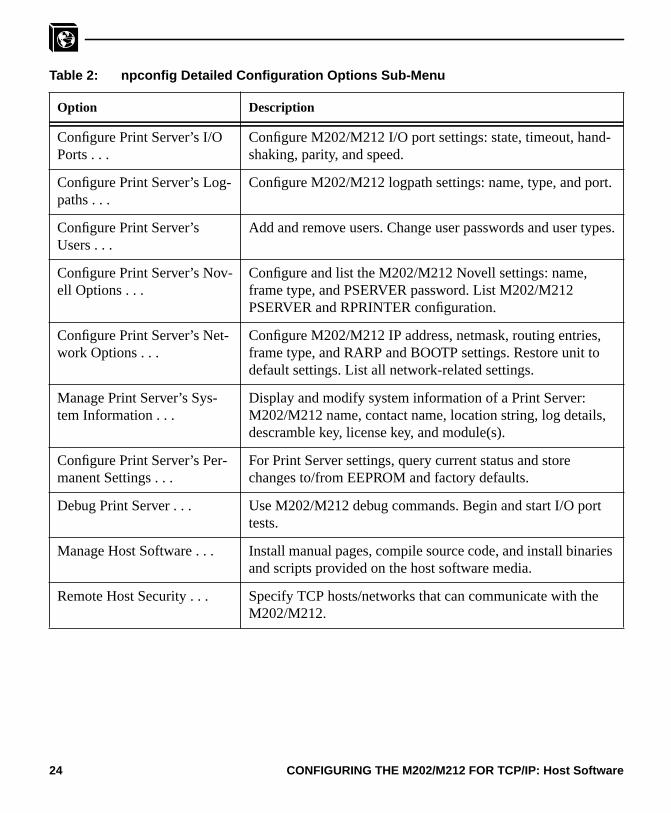
Table 2: npconfig Detailed Configuration Options Sub-Menu
Option Description
Select Print Server Select the Print Server you want to configure.
Configure Print Server’s Des-tinations . . .
Configure M202/M212 destination settings: name, I/O port,backchannel, model, logpath, state, alternate destination, anservice(s).
Configure Print Server’sModels . . .
Configure M202/M212 model settings: name, type, bannerpage, carriage return insertion (onlcr), tab expansion (xtab),descrambling, ASCII to PostScript conversion (a2ps), andheader and trailer strings.
CONFIGURING THE M202/M212 FOR TCP/IP: Host Software 23
-
t.
pes.
rt
aries
e
Configure Print Server’s I/OPorts . . .
Configure M202/M212 I/O port settings: state, timeout, handshaking, parity, and speed.
Configure Print Server’s Log-paths . . .
Configure M202/M212 logpath settings: name, type, and por
Configure Print Server’sUsers . . .
Add and remove users. Change user passwords and user ty
Configure Print Server’s Nov-ell Options . . .
Configure and list the M202/M212 Novell settings: name,frame type, and PSERVER password. List M202/M212PSERVER and RPRINTER configuration.
Configure Print Server’s Net-work Options . . .
Configure M202/M212 IP address, netmask, routing entries,frame type, and RARP and BOOTP settings. Restore unit todefault settings. List all network-related settings.
Manage Print Server’s Sys-tem Information . . .
Display and modify system information of a Print Server:M202/M212 name, contact name, location string, log details,descramble key, license key, and module(s).
Configure Print Server’s Per-manent Settings . . .
For Print Server settings, query current status and storechanges to/from EEPROM and factory defaults.
Debug Print Server . . . Use M202/M212 debug commands. Begin and start I/O potests.
Manage Host Software . . . Install manual pages, compile source code, and install binand scripts provided on the host software media.
Remote Host Security . . . Specify TCP hosts/networks that can communicate with thM202/M212.
Table 2: npconfig Detailed Configuration Options Sub-Menu
Option Description
24 CONFIGURING THE M202/M212 FOR TCP/IP: Host Software
om-ion,
gh
EDgniz-
on-p
indi-
M202/M212 Configuration
When the M202/M212 is first installed on a TCP/IP network, you are unable to cmunicate with it since its network parameters are not initialized. During configuratthe following parameters are initialized and saved in EEPROM:
• IP address (mandatory),
• netmask or sub-netmask(mandatory),
• root user password (recommended for security),
• guest user password (recommended for security).
Initializing these parameters permits configuration of all remaining settings throuany of these five ways:
1 computer-aided configuration withezsetupor npconfig,
2 manual configuration with a terminal connected to COM1,
3 manual configuration through the network with RARP,
4 manual configuration through the network with BOOTP,
5 manual configuration through the network with ARP.
Once you have completed any one of these methods, you will notice the STAT Lflashing on once per second. This means the M202/M212 is configured and recoable on the network. At this point, you can then configure a host for printing by ctinuing withHost Configuration on page 32. This will complete your entire print setuunless you want to enhance it.
If you want to continue with any of the following procedures, please find them as cated in other sections of this manual:
• Add to or change configuration of your M202/M212. Please seeUSING THEM202/M212’S COMMAND SET on page 83.
• Utilize more advanced features of the Print Server. Please seeUSING THEM202/M212’S ADDITIONAL OPTIONS on page 113.
CONFIGURING THE M202/M212 FOR TCP/IP: M202/M212 Configuration 25
tact
he
Computer-aided Configuration with ezsetup or npconfig
If you choose computer-aided configuration, you must log on to your system asrootor superuser and use the host software diskette or tape supplied with yourM202/M212. If the software is not provided, or you need a different medium, conyour vendor.
To configure the M202/M212 with the aid of a script, you must:
1 Insert the host software medium into the drive.
2 Login asroot user.
3 cd to a directory with at least three megabytes of free space.
4 Transfer the compressed tar file from the media onto the host:
tar xvf /dev/ devicename
devicenameis usuallyfd0 for a diskette.
5 Uncompress this file. Enter:
uncompress npdist.tar.1.Z
6 Untar this file. Enter:
tar xvf npdist.tar.1
A list of files displays and scrolls up on the screen astar executes and several filesand sub-directories are created.
7 Assign an IP address and IP name to the M202/M212 in your host table(/etc/hosts, hosts nis map, or DNS name tables).
8 Runezsetup or npconfig. Enter:
./ezsetup or ./npconfig
If running the host software on an HP/UX system, you need to explicitly set tKorne shell by adding “ksh ” before “./ezsetup ” or “ ./npconfig ”.
9 Enter the number forConfigure New Unit from the Main Menu.
10 Follow the prompts.
For more information, please seeezsetup and npconfig on page 22.
Note
Note
26 CONFIGURING THE M202/M212 FOR TCP/IP: M202/M212 Configuration
nd
st be
s
fol-
can
Manual Configuration Through the Network with ARP
To manually configure the M202/M212 using the network, go to a host terminal ado the following:
1 Log on to your system asroot user.
2 Assign an IP address and IP name to the M202/M212 in your host table(/etc/hosts, hosts nis map, or DNS name tables).
3 Find the Ethernet address for the M202/M212 on the bottom of the unit. It muentered as part of this procedure.
4 Use thearp command to add an entry in the host'sarp able. This is the most com-mon syntax for this command:
arp -s ipname ethernetaddress
whereipname is the M202/M212’s IP name or IP address andethernetaddress isthat of the M202/M212.
If this syntax doesn’t apply, look in your host’s reference manual to find theproper syntax for thearp command.
5 telnet to the M202/M212. This will bring up a login screen.
telnet ipname
6 Log into the Print Server asroot.
7 At the password prompt, press<Enter>. No password is required at this point athe M202/M212 is still unconfigured.
This WARNING message is normal at this point so you can ignore it:
STORED AND CURRENT VALUES DIFFER
You should now see a prompt displayed that has the M202/M212 IP addresslowed by a colon, thenroot.
ipaddress :root>
8 Store the new IP address and netmask in EEPROM so that the M202/M212 remember its configuration after reboots. Enter:
store tcpip ifnum addr ipaddress
store tcpip ifnum mask netmask
Syntax
Note
Note
CONFIGURING THE M202/M212 FOR TCP/IP: M202/M212 Configuration 27
he
When
otnfig-
ifnum is the index to a particular Network Interface.ifnum will always be1 forthe M202/M212 since there is only one network interface, Ethernet.
9 [Optional, but recommended] Configureroot andguest user passwords with thefollowing commands.
set user passwd root newrootpasswd
set user passwd guest newguestpasswd
10 Save these configurations to EEPROM. Enter:
save
11 Verify the IP address and netmask. Enter:
list stored tcpip
These are now stored in EEPROM.
12 Logout of the Telnet session withquit . Then reboot the M202/M212 by poweringthe unit off, then on.
13 Test the equipment and configuration after installation is complete. Enter at tshell prompt on your UNIX machine:
ping ipname
Manual Configuration Through the Network with RARP
The RARP daemon provides a mechanism for dynamic IP address assignment. a RARP-configured TCP/IP host boots, it broadcasts a RARP request for an IPaddress. Your network must have this daemon running on some host. If you do nknow whether your network has one, please ask your system administrator or coure the M202/M212 with one of the other methods in this section.
To configure the M202/M212 with RARP, you need to:
1 Make an entry in the/etc/ethers file for the new M202/M212.
00:80:72:00:AB:CD spike
entry for the M202/M212 namedspike which has this Ethernet address.
2 Start the RARP daemon if it isn’t running. Send a HUP signal to it with thekillcommand:
kill -HUP pid
Note
Example
28 CONFIGURING THE M202/M212 FOR TCP/IP: M202/M212 Configuration
en
e see
boot
rver isvideom2 is
ol-
3 Reboot the M202/M212. After the STAT LED flashes regularly, wait another tseconds to allow the RARP process to complete.
4 Test the new IP address by trying aping with the new IP name:
ping ipname
5 [Optional, but recommended] At this point, set up the user passwords. Pleasset user on page 106.
If no response is given by the M202/M212, the RARP process probably failed. Rethe unit and try one of the other methods mentioned in this section.
Manual Configuration Through the Network with BOOTP
BOOTP is a protocol for configuring the M202/M212 as it boots. During the bootsequence, the Print Server can broadcast a BOOTP request and if a BOOTP serunning on the network configured to respond to the requesting device, it will prothe M202/M212 with its IP address, netmask, default router, and a time server frwhich to query the current time (GMT) and the timezone in which the M202/M21located.
By default, the Print Server will broadcast a BOOTP request when it boots. The flowing command can be used to control this request:
store tcpip ifnum opts [[-]rarp] [[-]bootp]
On the BOOTP server, there must be an entry in /etc/bootptab similar to this:
M202:\:sm= netmask :\:hd=/usr/boot:\:bf=null:\:gw= default router :\:ht=ethernet:\:ha= network address :\ (e.g. 0080720000DC):ip= ipaddress :\:ts= time server :\:to= timezone : (in seconds from GMT)
CONFIGURING THE M202/M212 FOR TCP/IP: M202/M212 Configuration 29

s for a PC
less
d
ettings
rs
as
can
Manual Configuration Through the COM Port
A terminal, PC, or laptop can be connected to one of the M202/M212’s COM portconfiguration purposes. A straight-through serial cable is normally needed unlessis attached; in this case, a null modem cable can be used. Please seeSerial CableSchematic on page 168 for more details.
To configure the M202/M212 through the serial ports, you need to:
1 Configure your terminal settings according to the following specifications, unthe COM port’s parameters have been modified on the Print Server:
Baud rate: 9600 Data bits: 8Stop bits: 1 Parity : NONEReceive handshake: XON/XOFF Transmit handshake: XON/XOFF
2 Turn on the M202/M212 power. Wait until the STAT LED flashes regularly anthen press the <Break> key on your terminal once.
If you see garbage characters on the screen, check the baud rate and parity sof the terminal. If you aren’t getting anything, it may be your cable.
3 Press<Enter> for the local host (i.e. the M202/M212) when the prompt appeaasking for an Internet address to login to.
4 Login asroot when asked for a login name.
5 Press<Enter> at the password prompt. No password is required at this point,the M202/M212 is still unconfigured.
6 Store the new IP address and netmask in EEPROM so that the M202/M212 remember its configuration after reboot. Enter:
store tcpip ifnum addr ipaddress
store tcpip ifnum mask netmask
ifnum is the index to a particular Network Interface.ifnum will always be1 forthe M202/M212 since there is only one network interface, Ethernet.
7 [Optional, but recommended] Configureroot andguest user passwords with thefollowing commands:
set user passwd root newrootpasswd
set user passwd guest newguestpasswd
Note
Note
30 CONFIGURING THE M202/M212 FOR TCP/IP: M202/M212 Configuration
he
8 Save these configurations to EEPROM. Enter:
save
9 Verify the IP address and netmask. Enter:
list stored tcpip
These are now stored in EEPROM.
10 After configuration, turn the M202/M212 off, then on. This reboots the PrintServer and automatically logs you out of the terminal session.
11 Test the equipment and configuration after installation is complete. Enter at tshell prompt on your UNIX machine:
ping ipname
Restoring to Factory Defaults
If at any time you’d like to restore the Print Server’snetwork settings to their originalstate, you can do so with annpsh command or by utilizing jumpers within theM202/M212 itself. Please seeRestoring To Factory Defaults on page 118 for moredetails on this process.
CONFIGURING THE M202/M212 FOR TCP/IP: M202/M212 Configuration 31

a
ourry
oler
ing
rint
re
. The.
ed
Host Configuration
When setting up a print destination on a Unix host, you have the option to utilizecomputer-aided script such asezsetup ornpconfig or to do all of the appropriate stepsmanually.
If you decide to go with one of the provided installation scripts, selectConfigureHost Setup from the Main Menu of either program to configure a print setup on yhost. It will step you through some questions and then perform all of the necessasetup commands for you. Please seeezsetup and npconfig on page 22 for more infor-mation on these scripts.
The rest of this section introduces you to different printing methods, with the spoand without, and discusses each of themanual steps for these environments:
• BSD
• System V
• Sun NeWSprint and Adobe TranScript
• AIX
• PC.
Direct Printing Without the Spooler
Before configuring the spooling system, test that basic communications are workwith the M202/M212 and attached printers. Perform tests by sending print jobsdirectly to the M202/M212 and bypassing the spooler altogether. You can send pjobs directly to the M202/M212 with either npwrite or rsh/rcmd/remsh.
Thersh/rcmd/remsh program provides the same functions as thenpwrite programexcept that thersh/rcmd/remsh program exits with an error code when the networkconnection is down.npwrite continually tries until the job is completed. Remembethis behavior when you are manually modifying your interface script because somspooler systems simply send a message about the error but the job gets flushednpr.if interface script gives you examples of how this behavior should be handled
npwrite
The data transfer program npwrite is provided with the host software shipped with thM202/M212. It sends data to the Print Server over a TCP connection. Data is rea
32 CONFIGURING THE M202/M212 FOR TCP/IP: Host Configuration
not
ta
thesve
e
from a file or, if no file is specified, from standard input. The format of the data isaltered by this program so make sure it is in printer-ready format.
The syntax fornpwrite is:
npwrite ipname portname [ filenames ]
where:
ipname M202/M212 IP name or IP address.
portname I/O port on the M202/M212 (i.e.prn1, prn2, com1, com2).
filenames [optional]. Filename(s) to be printed. If no filename is specified, dais read from standard input.
npwrite 192.75.11.32 prn1 testfile.txt
npwrite spike com2 testfile.txt
cat testfile.txt | npwrite 192.75.11.32 prn1
wherespike and192.75.11.32 are the M202/M212’s IP name and IP address.
For more information onnpwrite , please refer to the online manual pages. If thenpwrite binary is not available for your UNIX machine, usersh/rcmd/remsh instead.
rsh/rcmd/remsh
Thersh/rcmd/remsh programs are remote command execution clients that talk torshd server in the M202/M212.rsh, rcmd, andremsh are actually the same programbut have different names on different UNIX systems; some systems may even haanother name for remote command. Enterman rshd to display the online manualpages for information on the remote shell server for your version of UNIX.
The Print Server provideslp, lpstat, andcancel programs for print services throughthershd server. Thelp command reads data from standard input and sends it to thspecified port as follows:
• on SCO UNIX, either of the following:
rcmd spike lp -d d1prn1 < testfile.txt
cat testfile.txt | rcmd spike lp -d d1prn1
Syntax
Example
Example
CONFIGURING THE M202/M212 FOR TCP/IP: Host Configuration 33

llyd
the
a
youro-re
off
ess- print-
• on Sun UNIX, either of the following:
rsh spike lp -d d1prn1 < testfile.txt
cat testfile.txt | rsh spike lp -d d1prn1
wherespike is the M202/M212’s IP name andd1prn1 is the destination.
Printing Via the Spooler
Once you know your communications are correct and you can successfully printdirectly to the Print Server, you can integrate the spooler.
Interface scripts play important roles in BSD spooling environments and especiawith System V print spoolers. BSD systems also provide a remote printing methothat utilizes the spooler but needsno script or host software at all.
The following sections elaborate on different spooling environments and providemanual steps for full host configuration in various environments.ezsetup ornpconfig,in most cases, can be used instead to simplify the setup process. Please seeezsetupand npconfig on page 22 for further details.
npr.if Interface Script
Thenpr.if interface script provided works in most environments, but it can bereplaced by a custom interface script if you have other requirements. It is usuallyUNIX script which reads parameters from the command line, processes the jobaccording to the parameters, and sends it to the destination.
Two interface scripts,nprbsd.if andnprsysv.if, are shipped inraw state. These inter-face scripts can be named anything you would like. Load the appropriate one forsystem spooler type and use it in this state if the M202/M212 can do sufficient prcessing. The M202/M212 itself contains enough processing options, when they aturned on, to handle most processing needswithout the need for host software. Someof these options include ASCII to PostScript conversion (a2ps) and carriage returninsertion (onlcr). Therefore, host software may be unnecessary and you can turnall processing options on the host. Please seeHost Software on page 21 to find outmore about these options.
If you require high-speed printing, use one of the interface scripts with host procing turned on. This removes processing load from the Print Server and increases
Example
Note
34 CONFIGURING THE M202/M212 FOR TCP/IP: Host Configuration
ur
e-ust
incehis
, add
file
ing throughput.
Both ezsetupand npconfig utilize the appropriate interface script by renaming it tonprprintername.if, whereprintername is the name of the printer on the host. Toinstall one of these scripts manually, please refer to the section that applies to yohost: theBSD UNIX section starting on page 37 or theSystem V UNIX section startingon page 41.
Custom Interface Scripts
If an interface script is to be used for your print setup, you have three choices:
1 Usenpr.if provided in the host software.
2 Use a pre-defined script for your particular printer.
3 Use a script you have created yourself.
Thenpr.if method is explained throughout this section. However, if you have a prdefined printer script or a script of your own, there are certain modifications you mmake in order for it to work with the M202/M212.
The important part of an interface script is where it sends the print job. With theM202/M212, the data must be captured and sent over the network for printing, syour printer is no longer locally attached. There are two possible ways to make thappen with your current script:
1 Encapsulate your script’s code with brackets ( ) and after the closing bracketa command to send the data to the M202/M212 for printing.
2 Usenpd as the print method.
Both of these methods are explained on the next page.
Modifying Your Script
If you choose to simply edit the script, you need to understand how an interface works. The structure of any standard interface file should be as follows:
process options(generate printer setup charactersgenerate banner page data for each file
CONFIGURING THE M202/M212 FOR TCP/IP: Host Configuration 35

des-
t
d toase
ter
translate data to printer format) | communication program
wherecommunication program is the command executingrsh/rcmd/remsh ornpwrite so the print job is redirected over the network to the M202/M212.
(FILE=$6#the spool file is found in the sixth parameter on System Vcat $FILE | onlcr#filter the job) | rcmd spike lp -d d3com1
wherespike is the name of the M202/M212 and the print jobs are being sent to itstinationd3com1by remotely executing the print server’slp print command.
Please seenpwrite on page 32,rsh/rcmd/remsh on page 33, andlp on page 91 formore details on each command’s syntax.
Even if you have a very simplistic script, it’s important that you enclose your scripwith brackets and then add in acommunication program at the end.
Using npd and Your Own Script
If npd is the print method you would like to use with your interface script, you neestart thenpd daemon on your host and then incorporate it into your print setup. Pleseenpd Pseudo-device Interface on page 44 to find out more aboutnpd and how toget it started.
Once you have this daemon running, you can go ahead and work it into your princonfiguration. For BSD systems, this requires anlp= field in your printcap entry alongwith the standardif= field for the name of your interface script. The lp= field is filledin with the name of thenpd devicefile used innpd’s startup command. If you have aSystem V setup, the-v option in thelpadmin command will equal thenpd devicefile.
Example
Note
36 CONFIGURING THE M202/M212 FOR TCP/IP: Host Configuration
lly
acess-
Thethe
NIX
crip-
BSD UNIX
BSD systems allow you to print remotely or to print with an interface file for a locaattached printer. This is configured within the/etc/printcap database.
lpd Remote Printing
The lpd daemon spools files locally, then sends them to an M202/M212 acting asremote printer. As interface scripts cannot be used with this spooling method, proing must be done by the Print Server.
This method should be used in the following conditions:
• your UNIX host supports BSD 4.3 LPD protocol,
• no bi-directional communication is required between the printer and printingapplication,
• you want to avoid using special host software.
In BSD printing, two files are sent to the print server, a data file and a control file.control file contains information about originating user and host. However, since control file may not arrive before the data file in the current LPD standards, fullydetailed banner pages cannot be guaranteed.
Setting up lpd Remote
To manually add an M202/M212 printer as a remote printer entry on your BSD Uhost, you need to add an entry to the /etc/printcap file and then create its associatedfiles and directories.
Here is an example of what the printcap entry should look like followed by a destion of the commands necessary to create these entries:
ps|PostScript printer on spike’s com2 port:\:lp=:\:rp=d4com2:\:rm=spike:\:sd=/usr/spool/lpd/spike/ps:\:lf=/usr/spool/lpd/spike/ps/log:\:af=/usr/spool/lpd/spike/ps/acct:
whereps is the printer name sending jobs to the destinationd4com2 on theM202/M212 namedspike.
Example
CONFIGURING THE M202/M212 FOR TCP/IP: Host Configuration 37

e
crip-
To create the necessary entries for this example, these commands are needed:
cd /usr/spool/lpdmkdir spikemkdir spike/pstouch spike/ps/log spike/ps/acctchown -R daemon.daemon spikechmod -R g+rwX,o+rX spike
Once this is done, you can then start this printer.
lpc start ps
To send a print job, use this syntax:
lpr -P printername filename
BSD Interface Script Printing
If you decide not to go with a remote printer setup, you can use an interface fileinstead. This interface script is specified in /etc/printcap with the if= entry instead oftherm= andrp= entries. The script is called by the lpd daemon with the followingsyntax:
nprbsd.if -w width -l length -i indent -n login -h host acct_file
where:
nprbsd.if Name of the interface script.
width Width of page in characters.
length Length of page in lines.
indent Number of characters of indent from left margin.
login Login name of person originating the print request.
host Name of host where the print job originates.
acct_file File where accounting data is stored.
Setting up an Interface Script
To manually set up your host with an interface file, you need to add an entry to th/etc/printcap file and then create and edit its associated files and directories.
Here is an example of what the printcap entry should look like followed by a des
Syntax
Syntax
38 CONFIGURING THE M202/M212 FOR TCP/IP: Host Configuration

y.
nte
vari-
see
tion of the commands necessary to create these entries:
hp:\:sh:pw#80:mx#0\:lp=/dev/spike.com2:\:sd=/usr/spool/lpd/spike/com2:\:lf=/usr/spool/lpd/spike/com2/log:\:af=/usr/spool/lpd/spike/com2/acct:\:if=/usr/spool/lpd/spike/com2/npr.if:
wherehp is the printer name sending jobs to the M202/M212 namedspike throughthe interface file npr.if .
To create these entries, please do the following:
1 Create the printer’s spooling directory and associated files.
cd /usr/spool/lpdmkdir spikemkdir spike/com2touch spike/com2/log spike/com2/acctchown -R daemon.daemon spikechmod -R g+rwX,o+rX spike
2 Copy thenprbsd.if file from the host software medium to the spooling directorCopy the file asnpr.if or name it something more meaningful.
cp nprbsd.if /usr/spool/lpd/spike/com2/npr.ifcd /usr/spool/lpd/spike/com2chown daemon.daemon npr.ifchmod g+rwX,o+rX npr.if
3 Edit thenpr.if variables to suit your system environment. Look for the commesection beginning with “EDIT THESE VARIABLES” and at the end of this largcomment block, you will find these:
When defining these variables, remember that each iscase sensitive. Please definethem as seen in these descriptions. In addition, a further description of theseables is included in the large comment block before them.
NPDIR_PATH (mandatory) Define the directory location ofchr, banner,onlcr, a2ps, and npscramblebinaries. Usually/usr/local/bin.
These binaries must be copied over from the host software medium. Please
Example
Note
Note
CONFIGURING THE M202/M212 FOR TCP/IP: Host Configuration 39

ted, 1,er in
t
Host Software on page 21 for more details.
COMM_PROG (mandatory) Specify a communication program to transferdata to the M202/M212 (i.e.npwrite, rsh). If the program isnpwrite , define theUNIT_PORT variable. Otherwise,define theLP_DEST variable.
PRINTER_TYPE (mandatory) Specify printer type (i.e.raw, ascii, ps, hp, pcl-ps, gen7170).
UNIT_NAME (mandatory) Define the M202/M212 IP name.
UNIT_PORT (conditional) Specify the M202/M212 port name (i.e.prn1,prn2, com1, com2). Use only whenCOMM_PROG isdefined asnpwrite .
LP_DEST (conditional) Specify M202/M212 destination name. Useonly whenCOMM_PROG is defined asrsh.
#END_MARK_1NPDIR_PATH=/usr/local/binCOMM_PROG=rshUNIT_NAME=spikeLP_DEST=d4com2PRINTER_TYPE=hpBANNERPAGE=1#START_MARK_1
Additional variables can also be defined within this variable section as indicaby BANNERPAGE=1. Some other options are ASCII to PostScript conversioncarriage return insertion, and scrambling. By setting a particular variable to athis option is then turned on and a 0 turns it off. These too are described furththe beginning ofnpr.if .
4 Create thelp= device that is used as a locking mechanism for contending prinjobs.
touch /dev/spike.com2chmod go+rw /dev/spike.com2
5 Start the print spooler.
lpc start hp
Example
Note
40 CONFIGURING THE M202/M212 FOR TCP/IP: Host Configuration

e.
gram the
rface
st.
6 Try printing with the following syntax:
lpr -P printername filename
System V UNIX
Printing in a System V environmentrequires the use of an interface file. It also con-sists of:
• the lp printer interface program,
• the lpsched printing scheduler,
• a set of programs that act as interfaces between scheduler and printing devic
The scheduler copies the file into a spooling directory and calls the interface prowhen the job is ready to go to the M202/M212. It processes the job according toscript’s settings and then sends it over to the Print Server for printing.
The interface script is usually kept in /usr/spool/lp/admins/lp/interfaces and carriesthe same name as the associated printer. It is copied there from the original intefile in /usr/spool/lp/model when thelpadmin command is executed.
The interface script is called with the following syntax:
ps203 reqid username title copies options file1 ...
where:
ps203 Name of the interface script which is also the printer name on the ho
reqid Print job identification.
username ID of the user requesting the job.
title Title of the print job if desired.
copies Number of copies of each file to be printed.
options Additional switches for extra job processing options.
file1 Spool file.
... Indicates additional spool files.
Syntax
Syntax
CONFIGURING THE M202/M212 FOR TCP/IP: Host Configuration 41
ed
-is
vari-
see
Setting up an Interface Script
The following steps are the manual instructions for setting up your host withnpr.if :
The example commands provided represent a print setup involving a printer namhp, an M202/M212 namedspike, and a printer attached to the Print Server’scom2port.
1 Copy thenprsysv.if file from the host software medium to the model directory.Copy the file asnpr.if or name it something more meaningful.
cp nprsysv.if /usr/spool/lp/model/npr.if
2 Edit thenpr.if variables to match your system requirements. Look for the comment section beginning with “EDIT THESE VARIABLES” and at the end of thlarge comment block, you will find these:
When defining these variables, remember that each iscase sensitive. Please definethem as seen in these descriptions. In addition, a further description of theseables is included in the large comment block before them.
NPDIR_PATH (mandatory) Define the directory location ofchr, banner,onlcr, a2ps, andnpscramble binaries. Usually/usr/local/bin.
These binaries must be copied over from the host software medium. Please Host Software on page 21 for more details.
COMM_PROG (mandatory) Specify a communication program to transferdata to the M202/M212 (i.e.npwrite, rsh, rcmd, remsh). Ifthe program isnpwrite , define theUNIT_PORT variable.Otherwise define theLP_DEST variable.
PRINTER_TYPE (mandatory) Specify printer type (i.e.raw, ascii, ps, hp, pcl-ps, gen7170).
UNIT_NAME (mandatory) Define the M202/M212 IP name.
UNIT_PORT (conditional) Specify the M202/M212 port name (i.e.prn1,prn2, com1, com2). Use only whenCOMM_PROG isdefined asnpwrite .
LP_DEST (conditional) Specify M202/M212 destination name.Use only whenCOMM_PROG is defined asrsh, rcmd, orremsh.
Note
Note
Note
42 CONFIGURING THE M202/M212 FOR TCP/IP: Host Configuration
ted, 1,er in
con-
my
#END_MARK_1NPDIR_PATH=/usr/local/binCOMM_PROG=rcmdUNIT_NAME=spikeLP_DEST=d4com2PRINTER_TYPE=hpBANNERPAGE=1#START_MARK_1
Additional variables can also be defined within this variable section as indicaby BANNERPAGE=1. Some other options are ASCII to PostScript conversioncarriage return insertion, and scrambling. By setting a particular variable to athis option is then turned on and a 0 turns it off. These too are described furththe beginning ofnpr.if .
3 Create the dummy output device file used as a locking mechanism between tending print jobs.
touch /dev/spike.com2chmod go+rw /dev/spike.com2
4 Install a new printer specifying printer name, interface script name, and dumdevice created in Step 3.
/usr/lib/lpadmin -php -mnpr.if -v/dev/spike.com2
5 Start the scheduler.
lpsched
6 Enable the printer and allow it to accept requests.
enable hpaccept hp
7 Try printing a file with the following syntax:
lp -d printername filename
Example
Note
Syntax
CONFIGURING THE M202/M212 FOR TCP/IP: Host Configuration 43

redter-
i-essagesP
npd Pseudo-device Interface
Thenpd pseudo-tty daemon is used when bi-directional communications is requibetween the printer and printing application, and when changes to the printer’s inface script are undesirable.
Some applications like Sun NeWSprint and Adobe TranScript work best with a bdirectional communications channel to the printer because they can provide mordetails on the printer status. For example, PostScript printers can send error meback to the application as they occur.npd is used in this case making use of the TCprotocol and pseudo-tty device drivers.
Please see below for a graphical understanding of hownpd works.
Figure 3: npd Overview
TCP/IP Host
M202/M212
/dev/m202.prn1 npd watches over this deviceand sends any print jobs overto the M202/M212.
The spoolerprocesses the job
and passes it to theprinter device. printer
44 CONFIGURING THE M202/M212 FOR TCP/IP: Host Configuration

the
a
irecto-
ice.
ut
sec-
Starting npd
Starting thenpd daemon is all that is needed to utilizenpd. Integrating any specialapplications can then be done anytime thereafter.
Use the following syntax to startnpd:
npd devicefile ipname portname
where:
devicefile Name for a pseudo-tty pair’s slave device acquired bynpd.
ipname M202/M212 IP name or IP address.
portname M202/M212 I/O port name (i.e.prn1, prn2, com1, com2).
Thedevicefile cannot exist prior to startingnpd and this particularnpd daemon can-not be running already. It is possible to have more than one daemon running on same host, however, as long as they are not using the samedevicefile.
npd /dev/spike.com2 spike com2
starts annpd daemon utilizing/dev/spike.com2 to send print jobs to the printerattached tocom2 on the M202/M212 namedspike.
By default, npd looks in the /dev directory to find a free pseudo-tty pair(/dev/pty?? and /dev/tty?? files). However, if your UNIX system has these files indifferent directory, you can specify the directory pathname with a-p option.
npd -p /dev/pty /dev/spike.com2 spike com2
where /dev/pty is the directory to be searched for a free pseudo-tty pair.
Some systems such as HPUX place the master and slave devices in separate dries (e.g./dev/ptym and/dev/pty). Specify where each of the pairs reside with the-pm and-ps options.
npd -pm /dev/ptym -ps /dev/pty /dev/spike.com2 spike com2
where/dev/ptym is the directory searched to find a free pseudo-tty pair’s masterdevice and/dev/pty is the directory used for locating the pseudo-tty pair slave dev
npd locks
As npd acquires an exclusive lock on the M202/M212 port, it is possible to lock oother daemons that may reside on other UNIX hosts. Therefore,npd is designed totimeout and release the lock if the pseudo-tty pair is idle for a specified time (30
Syntax
Note
Example
Example
Example
CONFIGURING THE M202/M212 FOR TCP/IP: Host Configuration 45
it
onds is the default). You can modify this value with the -t option.
npd -t 60 /dev/spike.com2 spike com2
for the timeout to occur in60 seconds.
Testing npd
Oncenpd has been started, it’s a good idea to test and see ifnpd is working beforetrying to print through the spooler. This is one test method.
cat test.txt > /dev/spike.com2
redirects thecat output oftest.txt to thenpd device/dev/spike.com2 which is thensent to the M202/M212 namedspike.
Modifying a Host to Use npd
If you want thenpd daemon to start every time you reboot your UNIX machine, edyour .rc file to include the appropriatenpd startup command line (from the previoussection). Afternpd starts, integrate the print spooler into this pseudo-tty setup.
In BSD print spooler systems, modify thelp= field in the appropriate printer entry inthe /etc/printcap file. Setlp= to thedevicefile argument of the npd program.
On System V systems, the-v option in thelpadmin command will equal thedevice-file.
Stopping npd
Whenever annpd daemon starts, it makes a log entry in the/usr/adm/npdlog file.The contents of this file have the following naming information:
pid ipname port masterfile slavefile devicefile
where:
pid Process ID ofnpd daemon.
ipname M202/M212 IP address or IP name serviced bynpd.
port M202/M212 I/O port used bynpd (i.e.prn1, prn2, com1, com2).
masterfile Master device used bynpd.
slavefile Slave device used bynpd.
Example
Example
46 CONFIGURING THE M202/M212 FOR TCP/IP: Host Configuration
n
backm
for a
devicefile Name linked to theslavefile by npd.
153 spike com2 /dev/ptyq1 /dev/ttyq1 /dev/spike.com2
is the log entry for thenpd daemon using process ID153.
You can acquire the process ID of thenpd daemon that needs to be stopped and theexecute the followingkill command for that process:
kill -TERM pid
Applications Using npd
Sun NeWSprint
Sun NeWSprint page accounting works with PostScript printers. It utilizes the bi-directionality of the M202/M212’s serial ports to get this status back to the host.
If the printer is attached to one of the parallel ports, no page information comes from the printer. This causes Sun NeWSprint to assume a communication probleand disable the queue. To avoid this, remove the af= field in the/etc/printcap entryand set theHANDLER_INTERFACE variable toPARALLEL in the.param filelocated in the printer’s spooling directory.
Add a new Sun NeWSprint printer entry with theadd_np_printer program. Thepseudo-tty device is a serial interface. Therefore, when this program prompts youdevice interface, selectSerial and device suffixa for any port on the unit.
After NeWSprint creates the necessary spooling directory and entry in the/etc/print-cap file, set the lp= field in the new entry to thedevicefile argument of thenpd pro-gram.
The modified/etc/printcap entry looks like this for a PostScript printer namedpsattached tocom2 on the M202/M212 namedspike:
# entry for a PostScript printer on a serial portps|PostScript|PostScript on spike’s com2 port:\:lp=/dev/spike.com2:\:sd=/b/newsprint/lpd/spike/com2:\:lf=/b/newsprint/lpd/spike/com2/log:\:af=/b/newsprint/lpd/spike/com2/acct:\:if=/b/newsprint/lpd/if:\:gf=/b/newsprint/lpd/gf:\:nf=/b/newsprint/lpd/nf:\
Example
Syntax
Example
CONFIGURING THE M202/M212 FOR TCP/IP: Host Configuration 47
i-
back
s-
w,
:tf=/b/newsprint/lpd/tf:\:rf=/b/newsprint/lpd/rf:\:vf=/b/newsprint/lpd/vf:\:cf=/b/newsprint/lpd/cf:\:df=/b/newsprint/lpd/df:\:of=/b/newsprint/lpd/of:\:mx#0:\:sf:\:sb:\:br#19200:\:xc#0177777:\:ms=-parity,ixon,-opost,-ixany:
If you are using a PostScript printer, remember to include:sh:\ in this entry to sup-press the standard LPD header.
Adobe TranScript
Adobe TranScript page accounting works with PostScript printers. It utilizes the bdirectionality of the unit’s serial ports to get this status back to the host.
If the printer is attached to one of the parallel ports, no page information comes from the printer. This causes Adobe TranScript’spscomm to assume a communica-tion problem and disable the queue. To avoid this, replace thepscomm program withMicroplex’s equivalentnpcomm.sh program in the.options file which redirects thedata to the M202/M212.npcomm.sh is found in the host software.
Create and edit this.options file in the printer’s spooling directory with globalreadpermissions. This setup usesrsh/rcmd/remsh or npwrite to talk to the unit.
Add the following variable definitions in this.options file:
NPDIR_PATH Define the directory location ofnpcomm.sh program. Usually/usr/local/bin.
PSCOMM Redefine the communication program used bypsint.sh to usenpcomm.sh instead ofpscomm.
RCMD Specify the name of the remote shell command to use for tranferring data to the M202/M212 (i.e.rsh).
UNIT_NAME Define the M202/M212 IP name or IP address.
LP_DEST Specify the M202/M212 destination name.
Use themkprinter.sh program to add a new Adobe TranScript printer entry. For no
Note
48 CONFIGURING THE M202/M212 FOR TCP/IP: Host Configuration
ro-
rint-
use/dev/ttypa as the device interface for any port on the M202/M212. When the pgram creates the spooling directory and entry in/etc/printcap file, set thelp= field tothedevicefile argument fromnpd.
For a PostScript printer namedps attached tocom1 on the M202/M212 namedspike:
ps|PostScript|PostScript on spike’s com1 port:\:lp=/dev/spike.com1:\:sd=/usr/spool/lpd/spike/com1:\:lf=/usr/adm/printers/ps-log:\:af=/usr/adm/printers/ps-acct:\:br#19200:rw:fc#0000374:fs#0000003:\:xc#0:xs#0040040:mx#0:sf:sb:\:if=/usr/local/lib/ts/psif:\:of=/usr/local/lib/ts/psof:\:gf=/usr/local/lib/ts/psgf:\:nf=/usr/local/lib/ts/psnf:\:tf=/usr/local/lib/ts/pstf:\:rf=/usr/local/lib/ts/psrf:\:vf=/usr/local/lib/ts/psvf:\:cf=/usr/local/lib/ts/pscf:\:df=/usr/local/lib/ts/psdf:
Using:sh:\ in this entry will suppress headers and also prevent TranScript from ping out banner pages if they are set in the.options file.
AIX
IBM has a unique print spooler system that uses theqdaemon program. Use the fol-lowing steps to interface with the M202/M212 usingrsh:
These steps and associated examples refer to a setup with a queue namedqueue2, aqueue device namedlp0, printing to the destinationd1prn1 on the M202/M212namedspike.
1 Create a device. Enter:
smit pdp
2 SelectPrinter/Plotter and thenAdd a Printer/Plotter . Follow the prompts untilSMIT executes the “mkdev” command to create this device.
Select “parallel” as the interface even if you have a printer attached to theM202/M212’s serial port.
Example
Note
Note
Note
CONFIGURING THE M202/M212 FOR TCP/IP: Host Configuration 49
a
thes.
ecify
tter
5.
er:
Selectp as theport number.
Selectppa0 as the adapter.
Select a printer type that best matches what you are using.
Select a devicelp0. If this device is not available, go back and select “RemovePrinter/Plotter” and removelp0 making it available for your next run through.AIX has a limit of four physical devices. If you run out, IBM suggests deleting device after completing a print setup thus making it available for future setup
3 Create a new queue. Enter:
mkque -q queue2
4 Create a queue device to do the one-to-one mapping with the printer and spthe backend program for theqdaemon to send print jobs to. Enter:
mkquedev -d lp0 -q queue2 -a ‘backend = /usr/lib/lpd/piobe’
Sometimes /usr/lpd/piobe is the location of this backend program.
5 Create a virtual printer. This associates the queue, queue device, printer/ploname, data type, and printer/plotter type. Enter:
mkvirprt -q queue2 -d lp0 -n lp0 -s pcl -t hplj3
-s is usuallypcl but can also beps (Postscript)or asc (ASCII). This does notseem to affect the output on the printer so it may be best to usepcl.
6 Change thepio-file for your queue. This will be located in/usr/lib/lpd/pio/cus-tom and will be called queue2:lp0 after the queue and queue device names.Change the line beginning with307 mo::. Enter:
307 mo::rsh spike lp -d d1prn1
This file is only created after themkvirprt command has been executed in StepThis step redirects the print job over the network to the M202/M212.
For destinations other thand1prn1, please seeDestinations on page 79.
7 Runchvirprt since the print setup has been altered and needs updating. Ent
chvirprt -q queue2 -d lp0
If you need to delete an entire print setup, use thermvirprt command.
Note
Note
Note
Note
50 CONFIGURING THE M202/M212 FOR TCP/IP: Host Configuration
u-
r.
fter
This is the/etc/qconfig entry created for this particular setup:
queue2: queue stanzadevice = lp0 by mkquedev (queue device)up = TRUE printer’s ready to go
lp0: queue device stanzabackend = /usr/lib/lpd/piobe for local printing
For further information on these commands, please see your AIX system docmentation.
Other TCP/IP Print Methods
NCSA
NCSA is a freeware package available on the Internet atzaphod.ncsa.uiuc.eduin the directory /PC/Telnet/msdos/contributions.The file istel23bin.zip. It contains anlpr client for DOS that is compatible with the Print Serve
You can send jobs to the M202/M212 with the following command syntax:
lpr -S ipname -P destname
whereipname is the M202/M212 IP name or IP address anddestname is the name ofa M202/M212 destination.
lpr -Sspike -Pd4com2
sends a print job tod4com2 on the M202/M212 namedspike.
FTP’s PC/TCP
FTP Software markets a package calledPC/TCP which provides anlpr client forDOS that is compatible with the M202/M212.
Jobs can be sent to the M202/M212 directly with the following command syntax aan entry has been made for the Print Server in the host table:
lpr -S ipname -P destname
whereipname is the M202/M212’s IP name or IP address anddestname is the nameof an M202/M212 destination.
lpr -Sspike -Pd4com2
sends a print job tod4com2 on the M202/M212 namedspike.
Example
Syntax
Example
Syntax
Example
CONFIGURING THE M202/M212 FOR TCP/IP: Host Configuration 51
ith more
-edsed
are
ns
for
FTP’s package also provides Windows printing along with several other softwarepackages on the market. These are just two possible applications that will work wthe M202/M212. Please see the user manuals of the appropriate applications forinformation.
Direct Socket Printing
The Print Server provides a socket interface for custom printing applications. Programs can open a TCP connection to a TCP port on the Print Server. The specifiport number corresponds to a destination on the Print Server, and data is procesaccording to the model associated with this destination. Please seelist pserver on page89, list dest on page 88, andlist model on page 89 for more details.
npwrite is a sample program that performs this way. It is included in the host softwshipped with your M202/M212. For examples, please refer toDirect Printing Withoutthe Spooler on page 32.
FTP Daemon
The FTP Daemon provides an additional method to submit print jobs to theM202/M212. For a complete discussion of printing and other M202/M212 functiousing the FTP Daemon, please seeFTP Daemon on page 128.
Now that your TCP/IP host is configured for printing, please look to the followingfurther configuration options:
• Add to or change configuration of your M202/M212. Please seeUSING THEM202/M212’S COMMAND SET on page 83 orUSING NPWIN on page 115.
• Utilize more advanced features of the Print Server. Please seeUSING THEM202/M212’S ADDITIONAL OPTIONS on page 113.
Note
52 CONFIGURING THE M202/M212 FOR TCP/IP: Host Configuration

e12
s, addER or isf
to
mpt
g-
-
.
CONFIGURING THE M202/M212 FOR NOVELL
Overview
This chapter introduces the M202/M212’s configuration possibilities along with thvarious methods of printing available within a Novell environment. The M202/M2works with different NetWare versions, including version 4, and we provide setupsteps for each.
Host Software
NetWare’s PCONSOLE is generally used to change passwords, add print serverremote printers, and add queues to be serviced. It can be used for both a PSERVRPRINTER setup. To install a M202/M212 in a Novell environment, PCONSOLEused for the entire installation. The following pages give step-by-step examples oinstalling the M202/M212 in various Novell environments.
Even though the entire print set-up is done through PCONSOLE, you may want communicate directly with the print server in order to modify settings, monitor theunit, etc. To communicate with the print server, the optional host software,npsh.exe isincluded.npsh.exe is a DOS executable program that can be run from a DOS proon a NetWare workstation.
You can also use the NPWin software to configure the unit.
npsh.exe, does these things:
npsh nvplist Lists all of the M202/M212’s on the network; eachname is in the formatM_xxxxxx (wherexxxxxxequals the last six digits of the unit’s Ethernetaddress) by default regardless of whether it is confiured as a PSERVER or an RPRINTER.
npsh unitname Starts a Telnet-like session with the named PrintServer allowing you to configure, monitor, and troubleshoot the unit with its built-in command set.
npsh unitname command Initiates a singlecommand with guest access only tothe unit instead of entering into a complete session
Note
CONFIGURING THE M202/M212 FOR NOVELL: Overview 53
ass-
.
ting
and in and
me
To communicate with the unit usingnpsh.exe, you need to:
1 From a DOS prompt on a Novell workstation, begin annpsh session with the unit.
npsh unitname
Starts a Telnet-like session with the named print server withguest access only.
2 To obtainroot access to the unit, type:
supervisor
A standard login screen is displayed prompting you for the login name and pword.
3 Login to the unit as aroot user.
root
Root users require the use of a password as configured in the unit’s user list
4 Enter the password. If this password is not yet set, pressenter at the passwordprompt. Otherwise, enter the password that is already stored on the unit.
password
You are now logged in to the unit as a root user and can access anynpsh command onthe unit.
Becausenpsh.exe makes use of broadcasts, you may have problems communicaacross a router.
Please seeUser Accounts and Permissions on page 84,USING THE M202/M212’SCOMMAND SET on page 83, andUSING NPWIN on page 115 for further details.
M202/M212 Configuration
The Print Server configuration in a Novell environment is much simpler than thatrequired in a TCP/IP one. No addresses, masks, or router entries are necessarymost cases, the M202/M212 can simply be connected to the network, turned on,then configured for printing from a Novell station through PCONSOLE. The onlyparameters that you may want to set is a PSERVER password or possibly the fratype. Please seestore pserver on page 109. This type of configuration is done usingnpsh.exe as detailed in the previous section.
Note
Note
54 CONFIGURING THE M202/M212 FOR NOVELL: M202/M212 Configuration
nvi- fileNTER
e is aefault)
firstlled
as
VER
:
Host Configuration
The M202/M212 can act as either a PSERVER or as a RPRINTER in a Novell eronment. It supports encrypted passwords and it is capable of servicing up to 16servers and 32 queues as a PSERVER. One M202/M212 can handle eight RPRIsetups.
PSERVER Bootup
When booting as a PSERVER, the M202/M212 gets a server list from the first filserver it contacts. The unit then contacts those servers on that list to see if therequeue that needs servicing. The queues are then be polled every 5 seconds (by dby the Print Server to see if there are any jobs queued.
RPRINTER Bootup
When booting as a RPRINTER, the M202/M212 again gets a server list from thefile server it contacts. For each server found on that list, it then looks for a file caSYS:\LOGIN\M_xxxxxx\CONFIG wherexxxxxx is the last six hexadecimal digitsin the Ethernet address found on the bottom of the unit. This file contains onesetrprinter command for each RPRINTER serviced by the M202/M212 since theRPRINTER settings do not hold their effect through a power cycle.
If the M202/M212 loses a connection to a file server (as a PSERVER) or to aPSERVER (as a RPRINTER), it will automatically reconnect when that serverbecomes available again.
Following is the configuration steps for a PSERVER setup, a RPRINTER setup, well as the options available for NetWare 4 environments.
PSERVER Setup (Pre-NetWare 4)
This procedure configures the Novell file server to use an M202/M212 as a PSERin a non-NetWare 4 environment. Please seeNetWare 4 Options on page 61 for moreon a NetWare 4 setup.
The M202/M212replaces a dedicated workstation running PSERVER.EXE orPSERVER.NLM on the file server, so these are no longer needed.
To set up the unit as a PSERVER in a non-NetWare 4 environment, you need to
Note
Note
CONFIGURING THE M202/M212 FOR NOVELL: Host Configuration 55

Step Action Result of Action
1 Log in to Novell assupervisor. Gives you supervisor rights.
2 EnterPCONSOLE. PCONSOLE’s Main Menu displays.
3 Select PRINT QUEUE INFORMA-TION.
List of currently-defined queues comes up.
4 Press<Insert> to add a queue. Asks for new queue’s name.
5 Type in this new name in any formatyou like and press<Enter>.
New queue is added to list.
6 Press<Escape>. Returns to PCONSOLE’s Main Menu.
7 Select PRINT SERVER INFORMA-TION.
A list of existing print servers displays.
8 Press<Insert> to add a server. Prompts for the server’s name.
9 Type the name of the M202/M212. Bydefault, it isM_xxxxxx wherexxxxxxequals the last six digits of the unit’sEthernet address. (e.g. M_000BF5)
This new server is added to the list.
10 Select it and press<Enter>. PRINT SERVER INFORMATION menucomes up.
11 Select PRINT SERVER CONFIGU-RATION.
This menu displays.
12 Select PRINTER CONFIGURA-TION.
A list of configured printers is displayed.
13 Select the first item listed as NOTINSTALLED and press<Enter>.
The PRINTERN CONFIGURATION win-dow comes up whereN equals the selectedprinter.
56 CONFIGURING THE M202/M212 FOR NOVELL: Host Configuration
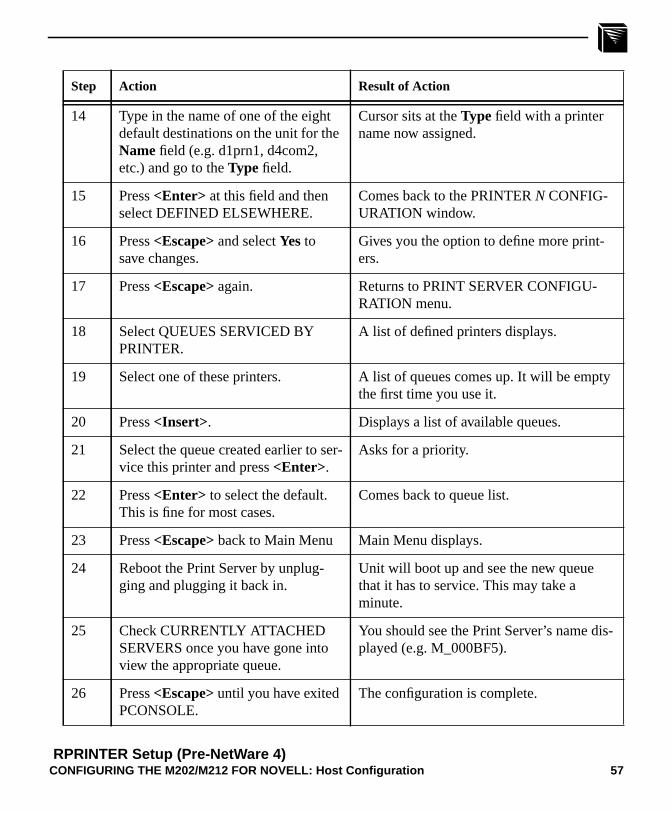
ty
-
14 Type in the name of one of the eightdefault destinations on the unit for theName field (e.g. d1prn1, d4com2,etc.) and go to theType field.
Cursor sits at theType field with a printername now assigned.
15 Press<Enter> at this field and thenselect DEFINED ELSEWHERE.
Comes back to the PRINTERN CONFIG-URATION window.
16 Press<Escape> and selectYes tosave changes.
Gives you the option to define more print-ers.
17 Press<Escape> again. Returns to PRINT SERVER CONFIGU-RATION menu.
18 Select QUEUES SERVICED BYPRINTER.
A list of defined printers displays.
19 Select one of these printers. A list of queues comes up. It will be empthe first time you use it.
20 Press<Insert>. Displays a list of available queues.
21 Select the queue created earlier to ser-vice this printer and press<Enter>.
Asks for a priority.
22 Press<Enter> to select the default.This is fine for most cases.
Comes back to queue list.
23 Press<Escape> back to Main Menu Main Menu displays.
24 Reboot the Print Server by unplug-ging and plugging it back in.
Unit will boot up and see the new queuethat it has to service. This may take aminute.
25 Check CURRENTLY ATTACHEDSERVERS once you have gone intoview the appropriate queue.
You should see the Print Server’s name displayed (e.g. M_000BF5).
26 Press<Escape> until you have exitedPCONSOLE.
The configuration is complete.
Step Action Result of Action
CONFIGURING THE M202/M212 FOR NOVELL: Host Configuration 57 RPRINTER Setup (Pre-NetWare 4)
ng asy tomotee
tello notcon-
, it
file,
:
This procedure associates an existing PSERVER with a remote M202/M212 actia RPRINTER in a pre-NetWare 4 environment. It is the PSERVER’s responsibilitget jobs from the queue and to pass them off to the M202/M212 acting as the reprinter. Unlike a PSERVER set-up, the M202/M212 does not deal directly with thqueues.
As a RPRINTER, the Print Server does not use a login ID. In addition, a non-M202/M212 PSERVER (e.g. PSERVER.NLM) must be running for RPRINTER tooperate.
A RPRINTER set up requires the use of a configuration file. This file is required tothe Print Server to act as a RPRINTER upon boot up since RPRINTER settings dhold their effect through a power cycle. Once the unit boots up, the Print Server tacts file servers it knows about and on each one, looks for the fileSYS:\LOGIN\M_xxxxxx\CONFIG wherexxxxxx is the last six digits (in hexadeci-mal) of the Ethernet address as found on the bottom of the unit. If it finds this filereads in each entry as if it were annpsh command entered right on the unit.
To ensure that the M202/M212 contacts the file server that contains the CONFIGset up the appropriate file server as a preferred file server. Please seeSetting PreferredFile Servers on page 123 for more information.
CautionIf you are using a configuration file and you have changed the name of theM202/M212, you must change the name of the directory containing this file.
To set up the unit as a RPRINTER in a pre-Netware 4 environment, you need to
Step Action Result of Action
1 Log in to Novell assupervisor. Gives you supervisor rights.
2 EnterPCONSOLE. PCONSOLE’s Main Menu displays.
3 Select PRINT QUEUE INFORMA-TION.
List of currently-defined queues comes up.
4 Press<Insert> to add a queue. Asks for new queue’s name.
Note
Note
58 CONFIGURING THE M202/M212 FOR NOVELL: Host Configuration
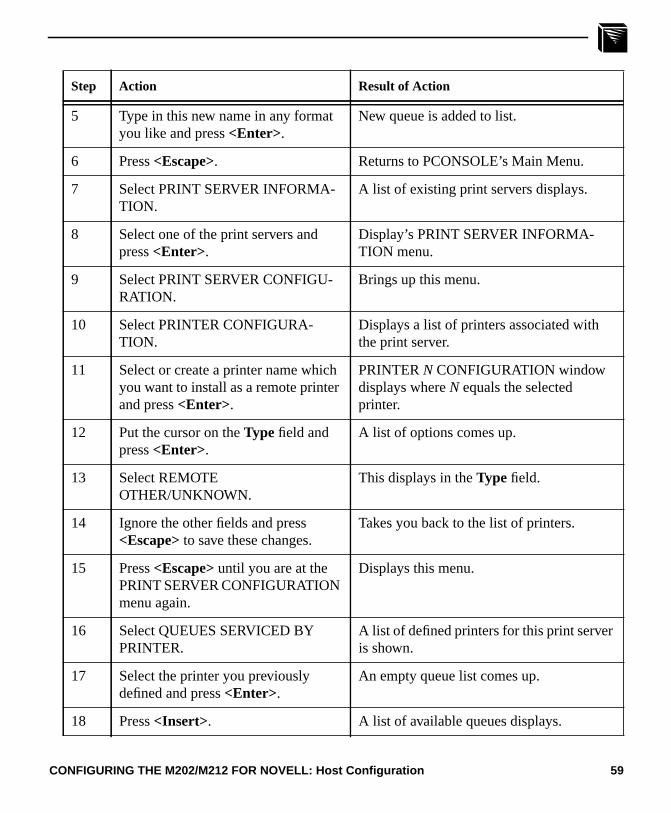
5 Type in this new name in any formatyou like and press<Enter>.
New queue is added to list.
6 Press<Escape>. Returns to PCONSOLE’s Main Menu.
7 Select PRINT SERVER INFORMA-TION.
A list of existing print servers displays.
8 Select one of the print servers andpress<Enter>.
Display’s PRINT SERVER INFORMA-TION menu.
9 Select PRINT SERVER CONFIGU-RATION.
Brings up this menu.
10 Select PRINTER CONFIGURA-TION.
Displays a list of printers associated withthe print server.
11 Select or create a printer name whichyou want to install as a remote printerand press<Enter>.
PRINTERN CONFIGURATION windowdisplays whereN equals the selectedprinter.
12 Put the cursor on theType field andpress<Enter>.
A list of options comes up.
13 Select REMOTEOTHER/UNKNOWN.
This displays in theType field.
14 Ignore the other fields and press<Escape> to save these changes.
Takes you back to the list of printers.
15 Press<Escape> until you are at thePRINT SERVER CONFIGURATIONmenu again.
Displays this menu.
16 Select QUEUES SERVICED BYPRINTER.
A list of defined printers for this print serveris shown.
17 Select the printer you previouslydefined and press<Enter>.
An empty queue list comes up.
18 Press<Insert>. A list of available queues displays.
Step Action Result of Action
CONFIGURING THE M202/M212 FOR NOVELL: Host Configuration 59

19 Select the queue you want this printerto service and press<Enter>.
Prompts you for a priority.
20 Press<Enter> to use the default.Usually this is fine.
Returns you to the queue list.
21 Press<Escape> until you have exitedPCONSOLE.
You’re now at the command prompt.
22 StartPSERVER. Starts the PSERVER so the M202/M212can service it as an RPRINTER.
23 InSYS VOLUME on the file server,change to the\LOGIN directory.
You will be at this prompt.
24 Create a directory named after theM202/M212. By default, this will beM_xxxxxx wherexxxxxx is the lastsix digits of the unit’s Ethernetaddress. (e.g. M_000BF5)
This directory is created.
25 Within this directory, create a filecalledCONFIG and open it for edit-ing.
A blank file displays.
26 Enter the line:set rprinter addpservername printernumberdestname wherepservernameequals the existing PSERVER’s name,printernumber equals the definednumber for this printer in thatPSERVER, anddestname equals anM202/M212 destination (e.g. d1prn1,d4com2, etc.).
One entry is written in the file. One entry isrequired for each RPRINTER serviced bythe M202/M212.
27 Reboot the M202/M212 to enablethese changes.
The M202/M212 will boot up and read thisentry from theCONFIG file and set itselfto act as an RPRINTER.
Step Action Result of Action
60 CONFIGURING THE M202/M212 FOR NOVELL: Host Configuration

used
ning
R.
haveded
.
NetWare 4 Options
NetWare 4 introduces NDS and some new frame types. The M202/M212 can bein a NetWare 4 environment with either of these options:
• Set the M202/M212 up as a PSERVER replacing a dedicated workstation runPSERVER.EXE or PSERVER.NLM on the file server. The M202/M212replacesthese loadable PSERVER’s so they are no longer needed.
• Set the M202/M212 up as a RPRINTER interacting with an existing PSERVE
If following a PSERVER setup,bindery emulation is required.
Included in this sub-section are the steps for a PSERVER setup since the steps changed now that bindery emulation is required. A RPRINTER setup is not inclusince the only changes from a pre-NetWare 4 RPRINTER setup are some namechanges in PCONSOLE.
To configure the unit as a PSERVER in a NetWare 4 environment, you need to:
Step Action Result of Action
1 Log in to Novell assupervisor. Gives you supervisor rights.
2 EnterPCONSOLE. PCONSOLE’s Main Menu displays.
3 Press F4. Puts you into bindery emulation mode anddisplays Main Menu.
4 Select PRINT QUEUES. List of currently-defined queues comes up
5 Press<Insert> to add a queue. Asks for new queue’s name.
6 Type in this new name and press<Enter>.
New queue is added to list.
7 Press<Escape>. Returns to PCONSOLE’s Main Menu.
8 Select PRINT SERVERS. A list of existing print servers displays.
9 Press<Insert> to add a new printserver.
Prompts you for the name of the printserver.
Note
CONFIGURING THE M202/M212 FOR NOVELL: Host Configuration 61
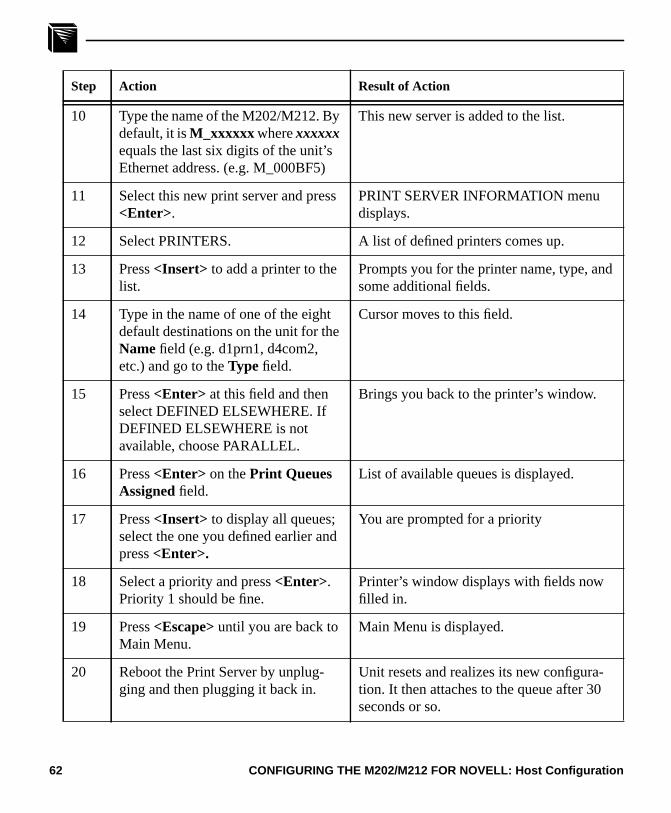
10 Type the name of the M202/M212. Bydefault, it isM_xxxxxx wherexxxxxxequals the last six digits of the unit’sEthernet address. (e.g. M_000BF5)
This new server is added to the list.
11 Select this new print server and press<Enter>.
PRINT SERVER INFORMATION menudisplays.
12 Select PRINTERS. A list of defined printers comes up.
13 Press<Insert> to add a printer to thelist.
Prompts you for the printer name, type, andsome additional fields.
14 Type in the name of one of the eightdefault destinations on the unit for theName field (e.g. d1prn1, d4com2,etc.) and go to theType field.
Cursor moves to this field.
15 Press<Enter> at this field and thenselect DEFINED ELSEWHERE. IfDEFINED ELSEWHERE is notavailable, choose PARALLEL.
Brings you back to the printer’s window.
16 Press<Enter> on thePrint QueuesAssigned field.
List of available queues is displayed.
17 Press<Insert> to display all queues;select the one you defined earlier andpress<Enter>.
You are prompted for a priority
18 Select a priority and press<Enter>.Priority 1 should be fine.
Printer’s window displays with fields nowfilled in.
19 Press<Escape> until you are back toMain Menu.
Main Menu is displayed.
20 Reboot the Print Server by unplug-ging and then plugging it back in.
Unit resets and realizes its new configura-tion. It then attaches to the queue after 30seconds or so.
Step Action Result of Action
62 CONFIGURING THE M202/M212 FOR NOVELL: Host Configuration

indi-
-
If you want to continue with any of the following procedures, please find them as cated in other sections of this manual:
• Add to or change configuration of your M202/M212. Please seeUSING THEM202/M212’S COMMAND SET on page 83 andUSING NPWIN on page 115.
• Utilize more advanced features of the Print Server. Please seeUSING THEM202/M212’S ADDITIONAL OPTIONS on page 113.
• Troubleshoot Novell installation and printing problems. Please seeNovellProblems on page 151.
21 Check the CURRENTLYATTACHED SERVERS once youhave gone into view the appropriatequeue.
You should see the Print Server’s name displayed (e.g. M_000BF5).
22 Press<Escape> until you are out ofPCONSOLE.
You will be back at the command line andthe M202/M212 is now configured.
Step Action Result of Action
CONFIGURING THE M202/M212 FOR NOVELL: Host Configuration 63

64 CONFIGURING THE M202/M212 FOR NOVELL: Host Configuration

on
the
net
212.
CONFIGURING THE M202/M212 FORAPPLETALK
Overview
This chapter will cover the few steps required to get your print jobs printing to anM202/M212 in an AppleTalk over EtherTalk environment.
The M202/M212 does not support LocalTalk.
M202/M212 Configuration
An AppleTalk setup does not require any Print Server configuration; the networkparameters are automatically configured for you once the M202/M212 is bootedthe network. If you wish to modify some of the M202/M212’s default settings, youcan use the built-in command set. Please seeUSING THE M202/M212’S COMMANDSET on page 83 for more on the available commands.
There is no host software provided for the Macintosh. To do any configuration onunit, you must rely on:
• npsh commands available through atelnet session. These commands could beissued from a Macintosh workstation if you a running program like NCSA Teland MacTCP is installed on your system.
• a Novell workstation running the host softwarenpsh.exe.
• a Windows workstation running the NPWin software utility,
• a terminal, PC, or laptop connected to one of the serial ports on the M202/M
Host Configuration
Once you have physically attached the M202/M212 to the network, the followingsteps will get your Apple host printing to the Print Server:
1 SelectChooser from the Apple Menu.
2 Select the appropriate print driver icon (e.g.Laserwriter icon).
Note
Note
CONFIGURING THE M202/M212 FOR APPLETALK: Overview 65

gure
he
ears in
A list of available printers will appear. By default, the format of each name isM20xname_papname whereM20xname is the name of the M202/M212 andpap-name is an M202/M212 I/O port. Both names are configurable.
M_000BF5_prn1
is the printer associated with the M202/M212 namedM_000BF5 using the firstparallel port.
The Print Server’s default name isM_xxxxxx wherexxxxxx equals the last sixdigits of the unit’s Ethernet address found on the bottom of the unit.
3 From the list of printers, select one to print to.
You have now configured your AppleTalk system to print to the M202/M212.
Additional Configuration Options
AppleTalk Zones
If the M202/M212 does not come up in the correct AppleTalk zone, you can confia particular zone name on the unit. To do this, start annpsh session with the unit andenter the following command:
store pserver apple zone [ zonename]
reset
wherezonename is the zone where you want the M202/M212 to appear.
To clear the AppleTalk zone, type the command without entering azonename andpress<Enter>.
Changing Print Server Name
By default, the Print Server’s name isM20xname_papname whereM20xname is thename of the M202/M212 andpapname is an M202/M212 I/O port. Thenpsh com-mand,list pserver, will give you a listing showing both the Print Server name and tpapname.
The following example details the steps necessary to change the name that appthe Chooser fromM_000BF5_prn1 to Sales_laser.
1 Start annpsh session with the unit.
Example
Note
66 CONFIGURING THE M202/M212 FOR APPLETALK: Additional Configuration Options
. This
his
e
dis-is,
pple-
on in
each
2 Enter the name that you would like to appear for the Print Server (e.g. Sales)will make up the first part of the name in the Chooser.
store pserver name Sales
This new name will also affect Unix, Novell and NetBIOS setups.
3 Enter the name that you would like to appear for the papname (e.g. laser). Twill make up the second part of the name in the Chooser.
store pserver applepap prn1 name laser
4 Reset the unit so the changes take effect.
reset
Removing Excess Printers from the Chooser
When you first install an M202/M212 in an AppleTalk environment, you will noticthat four printers show up in your Chooser; one printer for eachdestination on thePrint Server that has AppleTalk services enabled.
If you want to limit the number of printers showing up in the Chooser, you need toable the AppleTalk service from the related destination’s list of services. To do thstart annpsh session with the unit and follow the steps below:
1 Display a listing of the Print Server’s characteristics across all protocols.
list pserver
2 Look at the Apple Pap section of the listing to learn thedestination name thatcorresponds with the unnecessary printer’spapname.
3 For each printer that you do not want to appear in the Chooser, disable the ATalk service from the correspondingdestination’s list of services. Type the fol-lowing command:
set dest destname service -appletalk
You can also turn off any other services that are not required by this destinatithe same way.
4 Repeat the previous step until you have removed the AppleTalk service from of destinations that correspond to the papname of the unnecessary printers.
5 Save the changes to EEPROM.
save
Note
Note
CONFIGURING THE M202/M212 FOR APPLETALK: Additional Configuration Options 67
mk
oser.
not
indi-
Disabling the AppleTalk Module
If you have several Microplex Print Servers in your network and only some of theare servicing AppleTalk networks, it is a good idea to turn off the entire AppleTalmodule from the particular Print Server. This will not only save on Print Serverresources but will ensure that only appropriate Print Servers show up in the Cho
To disable the AppleTalk module, start annpsh session with the unit and follow thesteps below:
1 Remove AppleTalk from the available protocols.
set sysinfo module -appletalk
In the same way, you can also turn off the Novell protocol if the Print Server isservicing any Novell networks. The TCP/IP module cannot be turned off.
2 Save the changes to EEPROM.
save
If you want to continue with any of the following procedures, please find them as cated in other sections of this manual:
• Add to or change configuration of your M202/M212. Please seeUSING THEM202/M212’S COMMAND SET on page 83 orUSING NPWIN on page 115.
• Utilize more advanced features of the Print Server. Please seeUSING THEM202/M212’S ADDITIONAL OPTIONS on page 113.
Note
68 CONFIGURING THE M202/M212 FOR APPLETALK: Additional Configuration Options
pro-5.
.nsou
hoston forheytherthe
ns
rint-
-
the
CONFIGURING THE M202/M212 FORWINDOWS
Overview
This chapter discusses the M202/M212’s support for Windows. The M202/M212vides support for Windows NT, Windows for Workgroups (WfW), and Windows 9Examples are provided for each of these environments.
In a Windows environment, TCP/IP is the data transfer protocol used for printingThis means that IP addresses and netmasks are required in your Windows statioalong with the appropriate TCP/IP software. This chapter will also discuss how yset this up in your environment.
Print Methods Overview
A Central Host
The recommended print method for a Windows environment is to have a central act as a spooler for jobs before they are sent to the Print Server/printer. The reasthis is that the central workstation has the ability to store the spooled jobs while tare waiting to go to the Print Server/printer. The Windows Print Manager would rasee the data get spooled centrally rather than having to hold on to the data until Print Server/printer can accept it.
An example of this setup would be an Windows NT host which allows WfW statioto spool to it. The NT host would have the only print setup going to the PrintServer/printer directly and it would beshared across the network. In this way, theWfW station could send jobs to thisshared printer on the NT host. All WfW jobswould first spool to the NT host before being sent to the Print Server/printer for ping.
Print Setup Possibilities
There are two print methods available with the M202/M212 in a Windows environment:
LPR - Berkeley’s Line Printer Protocol which uses TCP/IP to transfer data toPrint Server’s built-in Line Printer Daemon.
CONFIGURING THE M202/M212 FOR WINDOWS: Overview 69
artic-
ay.
from
ows
).
ry
NetBIOS -NetBIOS over TCP/IP used to transfer data to the Print Server.
NetBIOS is further broken down into these two setup procedures:
“net use” - Microsoft’s shared resource feature.
Print Manager - Microsoft’s management tool for printing.
Choosing one of these methods depends entirely on what’s available with your pular Windows software. The following is a list of what is supported in each:
Windows NT and NT/AS - LPR and NetBIOS (“net use” and Print Manager)
Windows for Workgroups - NetBIOS (“net use” and Print Manager)
Windows 95 - NetBIOS (Print Manager)
Regardless of which method you choose, TCP/IP will always be used in some w
Basic Setup Steps
In each of these environments, the basic setup steps required to get you printingone of these hosts are to:
1 Ensure that you have the appropriate network software installed on your Windhost.
2 Configure the Windows host with an IP address and netmask.
3 Configure the M202/M212 with an IP address and netmask.
4 Create a printer and select a method of printing to the Print Server (e.g. LPR
TCP/IP Setup
Setting Up TCP/IP Services on Your Windows Stations
The following section gives step-by-step directions on how to install the necessanetwork software in the supported environments.
Windows NT LPR Network Software Installation
1 Go to theMain program group.
2 Double click onControl Panel.
Note
70 CONFIGURING THE M202/M212 FOR WINDOWS: TCP/IP Setup

.
e
e
3 Double click onNetwork.
4 A dialogue box will appear showing your current network settings. UnderInstalled Network Software, check to see ifMS TCP/IP Printing shows. If itdoesn’t, you’ll need to perform the following steps.
5 SelectAdd New Software.
6 SelectTCP/IP Protocol and Components.
7 Click onContinue.
8 SelectTCP/IP Printing Support from the TCP/IP components list that displaysYou may also want to selectConnectivity Utilities.
9 Click onContinue.
Windows NT NetBIOS Network Software Installation
1 Go to theMain program group.
2 Double click onControl Panel.
3 Double click onNetwork.
4 A dialogue box will appear showing your current network setting. UnderInstalled Network Software, check to see ifNetBIOS TCPIP->Streams Envi-ronment appears. If not, you’ll need to add this new software by clicking on thAdd New Software Button.
Windows For Workgroups NetBIOS Network Software Installation
1 Make sure that you have theMicrosoft TCP/IP-32 group in yourProgram Man-ager. If you do not have the file,wfwt32.exe, you can download it from:
• Compuserve in “MS Software Library”
• Microsoft’s FTP site, ftp.microsoft.com, under “Softlib/MSLFILES”
• Microplex’s FTP site, ftp.microplex.com, under “support/misc”
2 Once this is placed in a directory on you WfW station, you will need to doublclick on theNetwork Setup icon in theNetwork Group.
3 Click onDrivers.
4 Since the TCP/IP services will not yet be listed here, click onAdd Protocols.
5 Select Unlisted.
CONFIGURING THE M202/M212 FOR WINDOWS: TCP/IP Setup 71

-his
ust be
ent
6 Specify the directory where the file exists. A newTCP/IP-32 program group willthen be created which will include FTP, Telnet, etc.
At this point, you will be prompted with a dialogue box asking for the TCP/IP network settings (i.e. IP address and netmask) for this WfW station. Fill these in at ttime.
Windows 95 NetBIOS Network Software Installation
1 Make sure thatFile and Printer Sharing for Microsoft Networks is installed inyourNetwork setup. If not, you’ll need to perform the following steps.
2 Open Settings:Control Panel folder.
3 Double click on theNetwork icon.
4 SelectAdd.
5 SelectService.
6 SelectFile and Printer Sharing for Microsoft Networks from the list.
7 Click OK .
8 Click OK again since this service will now show in the list to the left.
Configuring TCP/IP On Your Windows Workstations
Since TCP/IP is used as the data transfer protocol, IP addresses and netmasks massigned to your Windows workstation(s) if you haven’t already done so.
If you are not familiar with IP addresses and are sure that this networkwill not goonto the Internet, the following are some sample settings to use:
IP Address Netmask
Host 1 192.1.1.1 255.255.255.0
M202/M212 192.1.1.2 255.255.255.0
Host 2 192.1.1.3 255.255.255.0
and so on...
The following sections will detail how you configure TCP/IP settings on the differWindows platforms.
Note
72 CONFIGURING THE M202/M212 FOR WINDOWS: TCP/IP Setup
s
oce-
s
IP
y to of theIP
Windows NT IP Address and Netmask Configuration
1 Go to theMain program group.
2 Double click onControl Panel.
3 Double click onNetwork.
4 SelectTCP/IP Protocol from Installed Network Software list.
5 Click on theConfigure button.
6 A dialogue box will come up asking for network settings. Fill in the IP addresand netmask for this workstation and then clickOK .
Windows for Workgroups IP Address and Netmask Configuration
Configuring an IP address and netmask for the WfW workstation is part of the prdure involved in installing NetBIOS Network Software. Please see Windows ForWorkgroups NetBIOS Network Software Installation on page 71 for more details.
Windows 95 IP Address and Netmask Configuration
1 Open theSettings:Control Panel folder.
2 Double click on theNetwork icon.
3 Under theInstalled Network Software list, select the entry dealing with theTCP/IP Protocol.
4 Click on Configure.
5 A dialogue box will come up asking for network settings. Fill in the IP addresand netmask for this workstation and then clickOK .
M202/M212 Configuration
Since TCP/IP is being utilized, the M202/M212’s configuration involves storing anaddress and a netmask. This is normally handled with thearp command but in thecase of Windows NT and WfW, this does not work reliably. Therefore, the best wastore an IP address and a netmask is to connect a terminal, PC, or laptop to oneM202/M212’s serial ports. This will log you into the unit where you can store the address and netmask.
To configure a M202/M212 with its network settings, please seeManual Configura-
CONFIGURING THE M202/M212 FOR WINDOWS: M202/M212 Configuration 73
eet-
sks,dingting
is
tion Through the COM Port on page 30 for detailed instructions.
Once you have configured the unit, you will notice the STAT LED flashing on oncper second. This means the M202/M212 is configured and recognizable on the nwork. At this point, you can now configure your host.
Host Configuration
Now that your workstation(s) and the M202/M212 have IP addresses and netmayou can now configure a print setup. There are several methods available depenon what Windows package you are using. If you experience Windows-related prinproblems after completing these setups, please seeTROUBLESHOOTING THEM202/M212 on page 147 for more information.
Windows NT Version 3.5x
LPR Method
1 Create a print path and printer; selectMain .
2 SelectControl Panel.
3 SelectPrinters which loads up thePrint Manager.
4 SelectCreate a Printer from thePrinter menu.
5 Define the printer name and driver; in thePrint to field, selectOther....
6 ChooseLPR port from the list that comes up and selectOK .
7 Fill in the host name or IP address of the M202/M212.
8 Fill in thedestination or queue on the M202/M212 (e.g. d1prn1) and selectOK .
where:
destination Is a pre-defined destination or queue on the M202/M212 that automatically mapped by default to an I/O port. For example,destinationd1prn1 is automatically mapped to the PRN1 port.Please seeDestinations on page 79 for a more detailed descrip-tion. Please note that destinations arecase sensitive and arelow-ercase by default.
74 CONFIGURING THE M202/M212 FOR WINDOWS: Host Configuration

softart-
ows
rk-
This printer is now available for printing and will interact with the M202/M212’sbuilt-in Line Printer Daemon using TCP/IP.
NetBIOS Using Print Manager Method
In order to use this method, you must first configure the M202/M212 with a MicroNetworks Workgroup name. This can be done by telneting to the M202/M212, sting annpsh session with the unit, and issuing the following command:
store pserver smb workgrp workgroupname
whereworkgroupname is the name of the Microsoft Networks Workgroup that youwant the M202/M212 to be included in (e.g. Engineering).
You must reset the M202/M212 for this command to take affect.
1 Ensure that the network connection is functioning properly between the WindNT workstation and the M202/M212. Try to ping or telnet to the unit.
2 OpenPrint Manager.
3 SelectConnect Network Printer from thePrinter menu or click on the appro-priate toolbar item.
4 A list of network services will appear. Double click on theMicrosoft WindowsNetwork.
5 A list of known workgroups will appear. Double click on the workgroup namethat you previously configured the M202/M212 under (e.g. Engineering).
6 Double click on the M202/M212 once the list of registered devices in this wogroup appears.
7 A list of destinations (e.g. d1prn1) with NetBIOS service enabled will appear.These are read directly from the M202/M212. Select one of them.
8 Print Manager will then ask to install a local printer driver. Click onOK .
9 A dialogue box appears providing a list of possible printer drivers. Once youselect one, click onOK .
This printer is now available for printing using NetBIOS over TCP/IP.
Note
Note
CONFIGURING THE M202/M212 FOR WINDOWS: Host Configuration 75
softart-
ows
rk-
1
soft
Windows for Workgroups (WfW)
NetBIOS Using Print Manager Method
In order to use this method, you must first configure the M202/M212 with a MicroNetworks Workgroup name. This can be done by telneting to the M202/M212, sting annpsh session with the unit, and issuing the following command:
store pserver smb workgrp workgroupname
whereworkgroupname is the name of the Microsoft Networks Workgroup that youwant the M202/M212 to be included in (e.g.Engineering).
You must reset the M202/M212 for this command to take affect.
1 Ensure that the network connection is functioning properly between the Windworkstation and the M202/M212. Try to ping or telnet to the unit.
2 OpenPrint Manager.
3 SelectConnect Network Printer from thePrinter menu or click on the appro-priate toolbar item.
4 A list of known workgroups will appear. Double click on the workgroup namethat you previously configured the M202/M212 under (e.g. Engineering).
5 Double click on the M202/M212 once the list of registered devices in this wogroup appears.
6 A list of destinations (e.g. d1prn1) with NetBIOS service enabled will appear.These are read directly from the M202/M212. Select one of them.
7 Click OK .
This printer is now available for printing using NetBIOS over TCP/IP.
Windows 95
NetBIOS Using Print Manager Method
This setup assumes that you have already created a local printer using theAdd a NewPrinter icon in theSettings:Printer folder. You can use any port here such as LPTor LPT2 when creating this printer.
In order to use this method, you must first configure the M202/M212 with a Micro
Note
Note
Note
Note
76 CONFIGURING THE M202/M212 FOR WINDOWS: Host Configuration

art-
ows
rk-
.
indi-
Networks Workgroup name. This can be done by telneting to the M202/M212, sting annpsh session with the unit, and issuing the following command:
store pserver smb workgrp workgroupname
whereworkgroupname is the name of the Microsoft Networks Workgroup that youwant the M202/M212 to be included in (e.g.Engineering).
You must reset the M202/M212 for this command to take affect.
1 Ensure that the network connection is functioning properly between the Windworkstation and the M202/M212. Try to ping or telnet to the unit.
2 Open theSettings:Printer folder.
3 Double click on the target printer that you created earlier.
4 SelectProperties from thePrinter menu.
5 Select theDetails tab and click on theAdd Port... button.
6 Select theBrowse button.
7 A list of network services will appear. Double click on theEntire Network .
8 A list of known workgroups will appear. Double click on the workgroup namethat you previously configured the M202/M212 under (e.g. Engineering).
9 Double click on the M202/M212 once the list of registered devices in this wogroup appears.
10 A list of destinations (e.g. d1prn1) with NetBIOS service enabled will appearThese are read directly from the M202/M212. Select one of them.
11 Click onOK to exit theBrowse for Printer dialogue box.
12 Click on OK to exit theProperties dialogue box.
This printer is now available for printing using NetBIOS over TCP/IP.
If you want to continue with any of the following procedures, please find them as cated in other sections of this manual:
• For problems related to Windows printing, please seeTROUBLESHOOTINGTHE M202/M212 on page 147.
• Add to or change configuration of your M202/M212. Please seeUSING THEM202/M212’S COMMAND SET on page 83 andUSING NPWIN on page 115.
Note
CONFIGURING THE M202/M212 FOR WINDOWS: Host Configuration 77

• Utilize more advanced features of the M202/M212. Please seeUSING THEM202/M212’S ADDITIONAL OPTIONS on page 113.
78 CONFIGURING THE M202/M212 FOR WINDOWS: Host Configuration

unit
host
hi-nd
desti-eirint
y
ch lim-
ore
r
,
M202/M212 INTERNAL ARCHITECTURE
Overview
This chapter will provide a more detailed description of the internal operating arctecture of the M202/M212 including: destinations, models, variables, logpaths, aI/O ports.
Destinations
The M202/M212 provides eight printer destinations that are used by all hosts. A nation can be thought of aslogical place on the Print Server to which hosts send thprint jobs. Destinations allow you the ability to configure a number of different prsetups on the Print Server.
Destinations map a name, with a nine-character maximum, to the I/O ports and bdefault, each I/O port comes with two destinations mapped to it. Thedefaultdestination names are:
d1prn1 d2prn2 d3com1 d4com2d5prn1 d6prn2 d7com1 d8com2
Any of the eight destinations can be matched to any of the four I/O ports, and eadestination uses one of the defined models for processing. The destination list isited to a maximum of eight entries, and is configured through thenpsh interface onthe Print Server. Default destination names can also be changed to something mmeaningful.
An alternate destination can also be configured so that a print job goes to anotheprinter if the defined printer is busy, in error, or off-line.
Destination definitions include: name, I/O port, backchannel, model used, logpathstate, service(s) supported, and alternate destination.
See also:list dest on page 88, set dest on page 96,Making An Alternate Print Destina-tion on page 116,Manipulating the M202/M212’s Services on page 115, andUSINGNPWIN on page 115.
unit
host
M202/M212 INTERNAL ARCHITECTURE: Overview 79

unit
host
do
ti-oodel
e-
-
Models
Each destination on the M202/M212 also has amodelassociated with it. The eightmodels (one per destination) can be thought of as a series of mini-filter that can special processing to the print job data. These processing options include:
• banner page generation,
• header string insertion,
• trailer string insertion,
• tab expansion (xtab),
• carriage return insertion (onlcr),
• ASCII to PostScript conversion (a2ps),
• print job descrambling.
The default model names arem1to m8 and each comes mapped to a particular desnation. By default, the model settings areraw, that is, they simply pass data through tthe I/O port untouched. This provides a clean slate to begin your configuration. Mnames can be changed to be something more meaningful.
The models arenot capable of multiple copies and throughput may decrease ifonlcror a2ps is enabled.
Eachmodel definition includes: name, type, and some of these processing paramters, if any.
See also:list model on page 89, set model on page 99, Setting Up Special Job Processing on page 115, andUSING NPWIN on page 115.
Table 3: Model Types
Setting Inclusions
raw No content sensing. Jobs are assumed to match the printertype, or else the printer does the autosensing and switching.
Note
80 M202/M212 INTERNAL ARCHITECTURE: Models
unit
host
terodes
trailere one
p toents
-
Variables
Variables are actually utilized within the M202/M212’smodels and are useful fordefining lengthy header or trailer strings. This might be necessary for certain prinswitch strings, for example. Each variable consists of a combination of escape cand text for this printer control.
Variables are used to make efficient use of the limited space in these header andstrings. Only nine elements can be included in these strings. Each element can bof the following:
letter a
code 0x40
variable $FF
Therefore, you could make up a series of variables and specify each of these (unine) in the header or trailer string. Each variable could then contain up to 14 elemof its own.
Please seeVariable Definitions on page 161 for a description of all pre-defined variables. You can also create your own variables to add to this list.
See also:list var on page 91,set var on page 106,list model on page 89, andset modelon page 99, andUSING NPWIN on page 115.
pcl-ps For printers thatcannot autosense the print job format andswitch modes by themselves. Precedes each job with a stringto switch from PostScript to PCL, or vice versa, dependingon job content. These strings must be specified in the setupcommand.
a2ps Convert ASCII jobs to PostScript or pass PostScript jobsdirectly to PostScript printers.
Table 3: Model Types
Setting Inclusions
M202/M212 INTERNAL ARCHITECTURE: Variables 81
unit
host
e, andta
ed tosired.
path
rtsnd
param-
Logpaths
The termlogpath comes from the UNIXsyslog logging system. With theM202/M212, each destination can report statistics on: user, page count, job namprinter errors. In addition, a checksum calculation can be obtained to confirm daintegrity when a job is sent to the printer.
Logging occurs either through a printer or terminal connected to an I/O port, orthrough a Telnet session to a particular TCP port. A logpath can also be configurreport statistics via email to a particular user. This can then be saved to a file if deIn addition, messages can be l ogged to SYSLOGD on a particular TCP/IP host.
Each logpath is associated with a particular destination and the eight default lognames range froml1 to l8. Logpath names can be changed to be something moremeaningful.
Logpath definitions include: name, log port, and log type.
See also:list logpath on page 89,set logpath on page 97,Capturing Printer Feedbackon page 116, andUSING NPWIN on page 115.
I/O Ports
The M202/M212 comes with four I/O ports: two IEEE 1284-I compliant parallel poand two serial ports. These ports have several parameters such as flow control abaud rate, that can be manipulated to best suit your attached peripherals. Theseeters are configured using theset commands whilelist commands display each port’ssettings. Please refer to the following commands for the indicated information:
• To look at current I/O port settings, please see:
list com1|com2 on page 87 andlist prn1|prn2 on page 89.
• To change I/O port settings, please see:
set com1|com2 on page 94 andset prn1|prn2 on page 101.
82 M202/M212 INTERNAL ARCHITECTURE: Logpaths
g-pur-rint
d
imul-
n and
USING THE M202/M212’S COMMAND SET
Overview
At this point in the manual, you should have your M202/M212 installed and confiured on the network and at least one host configured to print to it. This section’s pose is to give you the basic tools to add to your print setup by introducing the PServer’s command set.
npsh Overview
On the Print Server itself, is an entire command set,npsh, allowing for M202/M212parameter configuration, display, and execution. These commands can be utilizethrough one of these methods:
• a Telnet session,
• a remote command (i.e.rsh/rcmd/remsh),
• npconfig (please seenpconfig Detailed Configuration Options Sub-Menu on page23),
• DOS host software (please seeHost Software on page 53),
• a terminal on the COM1 port (please seeManual Configuration Through theCOM Port on page 30).
The M202/M212 can support up to 256 simultaneous TCP connections and 10 staneous Telnet sessions. Allnpsh commands exceptlp are available to all of the abovemethods. Thelp command is available only torsh/rcmd/remsh clients. Please referto lp on page 91.
The M202/M212 can be configured, managed, and monitored using the includedGraphical User Interface software. Please seeUSING NPWIN on page 115 for moredetails.
The M202/M212’s parameters can also be manipulated through the FTP daemothrough SNMP. Please seeFTP Daemon on page 128 andManaging With SNMP onpage 123 for more details.
Note
Note
USING THE M202/M212’S COMMAND SET: Overview 83
dis- The
amed
s on
rence,
npsh Prompt
Whennpsh is accessed through a Telnet or COM1 terminal session, a prompt is played after login to indicate that it is ready to accept a command from the user.Telnet prompt is formatted ipaddress :userid > whereipaddress is the IP addressof the M202/M212, anduserid is the user ID of the currently logged-in user.
192.75.11.32:root>
where192.75.11.32 is the M202/M212’s IP address and the user isroot.
The COM1 I/O port’s login prompt is formatteduserid> .
root>
where the user logged into the COM1 port isroot.
User Accounts and Permissions
When you log into the M202/M212, you either log in as aguest or asroot user. Thecommands you will be able to utilize on the Print Server depend on which login nyou use. By default, there is oneroot user and oneguest user; users can then be addeto this with either permission level.
Users withroot permission can execute all commands; users withguest permissioncannot do any configuration and can only execute commands that display settingthe M202/M212. However, they can useping andtelnet as well.
Please uselist user on page 91 to look at current settings. Asroot user, please refer toset user on page 106 to change these settings. For a complete command set refeplease seenpsh Command Set on page 85.
Redirecting Output from Commands
You can redirect output from anynpsh command to any I/O port with the redirectioncharacter>. The syntax is:
command > ioportname
wherecommandis a validnpsh command andioportname can beprn1, prn2, com1,or com2.
Example
Example
Syntax
84 USING THE M202/M212’S COMMAND SET: npsh Prompt
tand
gs.m-l onlyot).
-
Allain
nce is
list tcpip > prn1
sends current network settings to the first parallel port.
chr $FF > prn1
sends aformfeed to PRN1.
npsh Basic Commands
Before reading on about the M202/M212’s command set, it is important to underssome of the basic commands involved.
Set commands affect only current settings, not stored settings in EEPROM. Thesavecommand is used afterset to save the new settings to EEPROM.
Store commands only affect stored settings in EEPROM but not the current settinThis means the M202/M212 must bereset to make any changes take effect. For exaple, if you change the current settings of the IP address and the netmask, this wiltake effect after a reset (warm boot) from EEPROM, or after a power-on (cold bo
npsh Command Set
Command Syntax
The commands in this section are listed alphabetically by title and include all commands available on the M202/M212.
The command syntax follows the command name, where:
• Arguments enclosed by brackets [ ] are optional.
• Arguments inbold italics are user-defined strings.
• Arguments separated by theor symbol ( | ) mean that a choice must be made.
An explanation of what the command does and how to use it follows the syntax. examples for a particular command are provided at the end of that command’s msection and when another command or other information may be useful, a referegiven.
Examples
USING THE M202/M212’S COMMAND SET: npsh Basic Commands 85
-
ut
e the
cancel
cancel jobid
Delete a job from the M202/M212’s internal queue.
See also:lpstat on page 92.
chr
chr arguments
Used with redirection, thechr command sends output control codes to theprinter. Separatearguments with spaces.Arguments can be a combination ofwords, any printable character, or the common set of$BS, $TAB, $ESC,$DEL, $EOF, $NULL, $FF, $LF, or 0xhh (hexadecimal code for any character).
chr $LF
causes an extralinefeed before the next prompt.
See also:Redirecting Output from Commands on page 84.
Debug Commands
Thedebug set of commands displays detailed debugging information abomemory, the network interface, and protocols.
debug
debug ip|lpq|mem|netbios|nif|novell|tcp
Display debugging information for a particular module.
disable
disable ioportname | destname
Disable the specified I/O port so jobs are queued but not printed or disablspecified destination so any new jobs are rejected.ioportnameis one of thefour I/O ports and destname is the name of one of the unit’s destinations.
See also:enable on page 87,list dest on page 88,list com1|com2 on page 87,andlist prn1|prn2 on page 89.
Example
86 USING THE M202/M212’S COMMAND SET: npsh Command Set

eci-
enable
enable ioportname | destname
Enable the specified I/O port so jobs queued are printed or enable the spfied destination so new jobs are processed.ioportnameis one of the four I/Oports and destname is the name of one of the M202/M212 destinations.
See also:disable on page 86,list dest on page 88,list com1|com2 on page 87,andlist prn1|prn2 on page 89.
keycode
keycode escapecharacter
List the hexadecimal value ofescapecharacter.
See also:telnet on page 114.
List Commands
The list command provides these three possibilities:
list choice List current settings.
list default choice List default settings.
list stored choice List stored settings in EEPROM.
choice can refer to a number of parameters. All possible options are listednext.
list arp
list arp
List the contents of the M202/M212’sarp table.
list com1|com2
list com1|com2
List the current settings of the serial I/O port.
See also:set com1|com2 on page 94.
USING THE M202/M212’S COMMAND SET: npsh Command Set 87

-esti-
list date
list date
List the current date.
See also:set date on page 96.
list dest
list dest
List current M202/M212 destination definitions and their properties including: name, I/O port, backchannel, model used, logpath, state, alternate dnation, and service(s).
list dest destname
List the specified M202/M212 destination’s complete current settings.dest-name is the desired destination.
See also:Destinations on page 79 andset dest on page 96.
list diff
list diff
List the differences between current settings and EEPROM settings.
list ifc
list ifc
Display all of the NIT modules’ physical properties such as their interfacenumber and Ethernet address.
See also:store ifc on page 109 andManipulating the M202/M212’s UTPInterface on page 114.
list key
list key
List the license details and license key number.
88 USING THE M202/M212’S COMMAND SET: npsh Command Set
list logins
list logins
List users currently logged into the Print Server.
See also:User Accounts and Permissions on page 84 andlist user on page 91.
list logpath
list logpath
List the current settings of all logpaths.
See also:Logpaths on page 82 andset logpath on page 97.
list model
list model
List the current processing options for all models.
list model modelname
List the specified M202/M212 model’s complete current settings.modelnameis the desired model.
See also:Models on page 80 andset model on page 99.
list prn1|prn2
list prn1|prn2
List current settings of the parallel I/O port.
See also:set prn1|prn2 on page 101.
list pserver
list pserver
List common print server characteristics across all protocols.
See also:store pserver on page 109.
USING THE M202/M212’S COMMAND SET: npsh Command Set 89
list rprinter
list rprinter
List information about the Novell RPRINTER configuration. Entry willappear if the M202/M212 has made a connection to the file server.
See also:Host Configuration on page 55,set rprinter on page 103, anddebugon page 86.
list sysinfo
list sysinfo
List the current M202/M212 system information.
This output will not include the descramble key even if you have set one.
See also:set sysinfo on page 103,set logpath on page 97,ping on page 92,andtelnet on page 114.
list tcpip
list tcpip
List all properties of the TCP stack.
See also:Getting Ready for Complex Networks on page 119 andstore tcpip onpage 111.
list test
list test
List the status of output I/O port tests.
See also:start on page 107 andstop on page 108.
list time
list time
List the current time.
See also:set time on page 105.
Note
90 USING THE M202/M212’S COMMAND SET: npsh Command Set

s.rts,
n
e
ow
list user
list user [ userid |all]
List current settings of a particular user indicated byuserid, or all users. Cur-rent settings include user ID and permissions.
See also:User Accounts and Permissions on page 84,list logins on page 89,andset user on page 106.
list var
list var
List current settings of all variables.
See also:Variable Definitions on page 161,set var on page 106, andVari-ables on page 81.
load
load
Load the settings stored in EEPROM and use them as the current settingThese settings include: destinations, models, logpaths, user, TCP, I/O povariables, system information, and portmaps. This doesnot affectnetworkparameters. Use this after a power failure to restore settings saved inEEPROM.
load default
Load the factory settings and use them as the current settings. Use this icombination withstore net from default when reinstalling the Print Server.
See also:save on page 93 andstore tcpip on page 111.
lp
lp options -d destname
Print to the M202/M212 using standard TCP/IP rsh/rcmd/remsh. destnameis the name of the M202/M212 destination. This command in default modwill show any parallel port printer errors to the user. Theoptions are:
-v Show incremental byte counts as the job is printing and shthe job’s position in the queue as it moves to the top.
USING THE M202/M212’S COMMAND SET: npsh Command Set 91
ge.
e.
he
-V Show number of bytes printed.
-onlcr Insert a CR character before LF characters.
-ttabwidth Number of spaces for the tab in the range of 1 to 16.
-off Generate a FF character at the end of the job.
-oeof Generate an EOF character at the end of the job.
-uusername The name of the user that will be printed on the banner pa
-ffilename The name of the file that will be printed on the banner pag
lp can only be used with a remote command (i.e.rsh/rcmd/remsh).
rsh spike lp -d d1prn1 -off < test.txt
prints the filetest.txt, followed by aformfeed to the M202/M212 destinationd1prn1 on the Print Server namedspike.
lpstat
lpstat
Display active and queued jobs on the Print Server and I/O port status.
See also:cancel on page 86.
ping
ping ipname
Ping another TCP/IP host on the network indicated byipname.
ping [-s] ipname [ packetsize [ count ]]
Continually ping another TCP/IP host on the network specified byipname.This can be an IP address or an IP name. packetsize is the datagram packetsize which defaults to 64 bytes if no size is included in the syntax.count is thenumber of requests to be sent.
To utilize the IP name, the DNS server’s IP address must be set first so t
Note
Example
Note
92 USING THE M202/M212’S COMMAND SET: npsh Command Set
ot ore.
-
e-e2
M202/M212 can resolve the IP name. Please seeset sysinfo on page 103 formore information.
reset
reset
Restore current settings to those stored in EEPROM. Performs a warm bohardware reset, simulating a power-on reset. Use this after a power failur
save
save
Save the current settings to EEPROM. These parameters include: systeminformation, destinations, models, logpaths, variables, I/O ports, and portmaps. Resetting the unit isnot required.
save default
Caution
This command overwriteseverything and saves factory settings of all paramters to EEPROM, except the factory-programmed Ethernet addresses. Thchanges donot affect the current operating parameters until the M202/M21is reset.
See also:load on page 91,reset on page 93, andSet Commands on page 93.
Set Commands
Change the current parameters. The three command possibilities are:
set choice parameters Set some parameters.
set choice from default Set default parameters.
set choice from stored Set stored parameters from EEPROM.
choice andparameters can be any of the following options described next.
Once you haveset any parameters, you need to issue asave command to storethese new values to EEPROM.
Note
USING THE M202/M212’S COMMAND SET: npsh Command Set 93
-
.
rs
s.
set com1|com2
set com1|com2 arguments
Configure serial I/O port parameters. arguments generally have the same syntax and meaning as UNIXsttycommand options. Use the optional“- ” whereindicated to reverse the command. The possiblearguments are:
[-]parenb Enable [disable] parity generation and detection.
[-]parodd Select odd [even] parity.
[-]rtsflow Set RTS low when the M202/M212 is not ready to acceptdata. With“-” , RTS output is constantly high, and theM202/M212 does not use the RTS line to control input flow
[-]ctsflow Observe [ignore] CTS input and don’t transmit data if it islow.
cs5|cs6|cs7|cs8Select character size (five to eight bits).
50|110|134|300|600|1200|2400|4800|9600|19200|38400Set terminal baud rate to the selected value.
[-]cstopb Use two [one] stop bits per character.
[-]istrip Strip input characters to seven bits. With“- ”, do not strip.
[-]ixon Enable [disable] START/STOP output flow control.
[-]ixoff Ask the system to send [not send] START/STOP charactewhen the input queue is nearly empty/full.
[-]ixany Allow any character to restart output. With “- ”, only restartwith a START character.
[-]parity Enableparenb, disableparodd, and setcs7 (seven-bit char-acter size). With “- ”, disableparenb, and setcs8 (eight-bitcharacter size).
[-]ignbrk Enable [disable] break detection to prevent error message
94 USING THE M202/M212’S COMMAND SET: npsh Command Set
o
ion.
d
s.
outt to
terdata
[-]igndcd Disable this feature if you are using a modem connected tthe COM port to establish terminal sessions.
[-]onlcr Enable [disable] carriage return insertion.
[-]opost Allow output processing such asonlcr, xtab, and descram-bling. With “-”, do not allow any of this processing.
[-]slip Sets the specified serial port as a dedicated SLIP connect
This command will fail if the serial port is already configureas a print destination. Users must reconfigure theM202/M212’s destinations so that none of the destinationsare mapped to the serial port that you want to use as adedicated SLIP connection.
flush Flush the data in the serial I/O port input and output buffer
unlock Release the access lock on the serial I/O port.
Caution
When an I/O port is active,unlock can cause output from two jobs to mix.
set com1|com2 timeout < INT >
Terminate the print job sent to the I/O port if it is not printed after the timeperiod (INT is time in minutes in the range of 0 to 255). If the timeout is sezero (0), the timeout feature is disabled.
Printer errors will cause the M202/M212 to postpone printing until the prinis fixed regardless of this timeout feature being set or not. Therefore, no will be lost.
set com1|com2 xtab < INT >|none
Sets the tabstop width.INT is an integer within the range 1 to 16.
Note
Note
USING THE M202/M212’S COMMAND SET: npsh Command Set 95
-
on
are
set com1 4800 cs7 cstopb parodd
setsCOM1 to 4800 bps (bits per second),7 data bits,2 stop bits, andoddparity .
See also:list com1|com2 on page 87.
set date
set date year month day
Set the current date.year is four digits,month is from 1 to 12, andday is thenumber in the month.
See also:list date on page 88.
set dest
set dest destname alternate alternatedestname
Set up an alternate destination for the print job if that particulardestname’sprinter is busy, in error mode, or off-line.alternatedestname is the alternatedestination to send to.
See also:Making An Alternate Print Destination on page 116.
set dest destname backchannel [com1|com2]
Establish a return path for printer feedback when printing to a non-bidirectional parallel port.backchannel can be a serial I/O port.
set dest destname ioport prn1|prn2|com1|com2
Associate a destination with an I/O port so that jobs sent to that destinatiappear on the specified port.
set dest destname logpath logpathname
Associate a logpath with a destination. Please seeset logpath on page 97 toconfigure thislogpathname.
set dest destname model modelname
Associate a model with a destination. Jobs sent to the named destination
Example
96 USING THE M202/M212’S COMMAND SET: npsh Command Set
ee
In
ost to
s are
processed according to the options defined in the named model. Please ssetmodel on page 99 to configure thismodelname.
set dest destname name newname
Change the current name of a destination to a new name.destname is the cur-rent name andnewname is the new name you wish to give the destination.Thisnewname must be nine characters or less or else it will be truncated.addition, all names arecase sensitive.
Caution
When you change a destination name, you may have to reconfigure the hreflect the change.
set dest destname service [[-]socket] [[-]lpd] [[-]lpsched] [[-]rprinter] [[-]pserver] [[-]appletalk][[-]netbios] [[-]ftpd]
Set the destination to handle only certain print server services.
See also:Manipulating the M202/M212’s Services on page 115.
set dest d1prn1 alternate d2prn2
where print jobs going tod1prn1 are redirected tod2prn2’s printer if theoriginal printer is currently busy.
set dest d1prn1 ioport prn1
set dest d1prn1 backchannel com1
associatesd1prn1 with PRN1 andCOM1 to receive printer feedback.
See also:Destinations on page 79 andlist dest on page 88.
set logpath
set logpath logpathname name newname
Rename a set of printer logging options.logpathname is the current name andnewname is the new name you wish to give the logpath. Thisnewname mustbe nine characters or less or else it will be truncated. In addition, all name
Examples
USING THE M202/M212’S COMMAND SET: npsh Command Set 97
of-
.
cing
a-
on
the
case sensitive.
set logpath logpathname port tcpport |prn1|prn2|com1|com2|email|syslog
Send the printer logging information either to a TCP port number, to one the M202/M212’s I/O ports, to a particular user’s email address, or to SYSLOGD on a TCP/IP host.tcpport is a TCP port in the range 1,024 to 65,000
If theemail or syslogoption is selected, please seeset sysinfo on page 103 forsetting up IP addresses to send to.
Do not use an I/O port forboth printing jobs and printing logs.
set logpath logpathname type [job] [user] [pgcnt][cksum] [printer] [ioport]
Establish the type of printer logging. These types can be combined by plaa space between each entry:
job Contents of job log.
user Username of print job.
pgcnt Number of pages each job uses. Needs bi-directionalcommunication. Not completely secure from user manipultion.
cksum 16-bit checksum value to confirm integrity of data printed.
printer Printer errors are logged. The type of errors is dependant the particular printer’s reporting abilities. Needs bi-direc-tional communication.
ioport Monitors printer error and out-of-paper messages through parallel port pins.
See also:Logpaths on page 82,list dest on page 88,list logpath on page 89,andCapturing Printer Feedback on page 116.
Note
98 USING THE M202/M212’S COMMAND SET: npsh Command Set

-.
be
-
key
that
.
set model
set model modelname banner [ps|text|auto] [after]
Indicate if destinations usingmodelname are to send a banner page. If a banner page is to be sent, indicate the type according to the printer attachedSpecifyingafter will print a trailing banner at the end of the job.
The banner type and the printer type must match.
set model modelname stty [[-]onlcr] [[-]descramble] [xtab<1-16>|none]
Control extra job processing done by the model specified bymodelname:
onlcr Indicate whether or not isolated linefeed characters shouldconverted to CR LF (carriage return - linefeed) pairs. Turnthis on when linesstair-step down the page, starting a newline without returning to the original line beginning.
onlcr may slow throughput performance on the unit.
descramble Set the model to automatically descramble any print jobspassing through. These jobs must pass through the scrambling filter,npscramble, on a TCP/IP host first. If they donot, the jobs will pass through as is.
To set this feature on, you must configure the descramble first. Please seeset sysinfo on page 103 for more on thisrequirement and for further details, please seeHost Softwareon page 21 andScrambling/Descrambling on page 121.
xtab Sets the tabstop width within the range of1 to 16.
set model modelname header headerstring
Set the header string for a named model. The header precedes every jobgoes to a destination using the named model. headerstring is a string with amaximum of nine elements; each element may include a letter, code (e.g0x04), or variable (e.g. $FF).
Note
Note
Note
USING THE M202/M212’S COMMAND SET: npsh Command Set 99
isdi-
endel.ay
ter.
, ifb,
butld
e
set model modelname name newname
Change the name of a model to a new name. modelname is the current nameof the model andnewname is the new name you wish to give the model. Thnewname must be nine characters or less or else it will be truncated. In adtion, all names arecase sensitive.
set model modelname trailer trailerstring
Set the trailer contents for a named model. The trailer is appended to theof every job that goes to any destination associated with the named modtrailerstring is a string with a maximum of nine elements; each element minclude a letter, code (e.g. 0x04), or variable (e.g. $FF).
set model modelname type a2ps [ pageorient [ page-size [ rows | width ]]] [cont]
Convert text jobs from ASCII to PostScript before sending them to the prinPostScript jobs are not processed, but passed on without conversion. Thea2psdefault settings are portrait, letter, 60 rows, and 80 columns.
pageorient Direction of page: portrait | landscape.
pagesize Size of page: letter | legal | exec | a4.
rows Number of rows in page.
width Number of characters per line.
cont Continuously senses print job for data format. For examplethere is a PostScript banner page in front of a PCL print jothe M202/M212 will sense both parts of the job separatelyand do the conversion. Enabling this feature will decreaseoutput performance.
set model modelname type pcl-ps [ pclswvar psswvar ]
Switch printer modes if the printer is not capable of doing this on its own is capable of printing both PCL and PostScript jobs. To do this, the modeappends a header and trailer string to each job switching the printer to anfrom the appropriate mode. The switch strings must be provided to tell th
100 USING THE M202/M212’S COMMAND SET: npsh Command Set

for
or
ere isthe
t
an
s
printer how to change between PCL and PostScript modes.
If no parameters are specified, the model defaults to the switching stringsan HP LJIIIsi printer.pclswvar is the switching string to change modes toPCL andpsswvar is the switching string to change modes to PostScript.
Seeset var on page 106 to set a new variable with a particular switch stringVariable Definitions on page 161 for the pre-defined switching variables.
set model modelname type raw
Set the model specified to no sensing and no conversion. In this mode, thno ASCII to PostScript processing and no switching strings appended to jobs.
set model m4 header $ESC \&k2
sets the header string of the modelm4 with five elements. Invokes CR inser-tion.
When inputting a “$” or a “&” and you’re using RSHD to execute this com-mand, you must place a “\ ” beforehand so the local shell interpretor doesn’parse it out.
set model m3 type pcl-ps $HP3-SWPCL $HP3-SWPS
sets the modelm3 to switch printer modes between PCL and PostScript forHPLJIIIsi-compatible printer. The two variables defined represent a PCLswitch string and a PostScript one.
See also:Models on page 80 andlist model on page 89.
set prn1|prn2
set prn1|prn2 arguments
Configure parallel I/O port parameters. Thearguments can be the followingand if used with a“- ”, thearguments will be reversed:
[-]ackmode Use theACK signal for the trigger of next data transfer. Thican generally be used with older printers. With “- ”, theBUSY signal is used as the trigger.
[-]autofd AssertAUTOFD line for CR insertion. This only affectsprinters that support this function.
Examples
Note
USING THE M202/M212’S COMMAND SET: npsh Command Set 101
ding
o
e
terdata
[-]bbmode Simulate an attached printer even if a printer isn’t reallythere.
[-]fastmode Increase transfer rate.The parallel interface of the attacheprinter must be able to support this increased rate and if usthis mode, use only with short (less than two meter) low-capacitance cabling.
[-]onlcr Enable [disable] carriage return insertion.
[-]opost Allow output processing such asonlcr, xtab, and descram-bling. With “-”, do not allow any of this processing
[-]slowmode Slow the transfer rate to match that of a PC’s parallel port.Might be necessary with older, slower laser printers.
[-]vslowmode Slow the transfer rate even more to accommodate certainprinters.
flush Flush the data in the parallel I/O port’s output buffer.
unlock Release the access lock on the parallel I/O port.
Caution
Using theunlock option when an I/O port is active can cause output from twjobs to intermix.
set prn1|prn2 timeout < INT >
Terminate a print job sent to the parallel I/O port if it is not printed after thtimeout period (INT is time in minutes). If the timeout is set to zero (0), thetimeout feature is also disabled.
Printer errors will cause the M202/M212 to postpone printing until the prinis fixed regardless of this timeout feature being set or not. Therefore, no will be lost.
Note
102 USING THE M202/M212’S COMMAND SET: npsh Command Set

t as
.
dny
set prn1|prn2 xtab < INT >|none
Sets the tabstop width.INT is an integer within the range 1 to 16
set prn1 fastmode -ackmode
setsPRN1 to high performance mode and tonot use theACK handshake sig-nal.
See also:list prn1|prn2 on page 89.
set rprinter
set rprinter add pservername printernumber destname
Initiate a connection to a Novell PSERVER so that the M202/M212 can aca remote printer. A non-M202/M212 PSERVER must be pre-configured torecognize a remote printer.
pservername Name of the PSERVER to connect to.
printernumber Number of the printer as defined in the PSERVER display
destname Destination name on the M202/M212.
set rprinter del pservername printernumber
Disable a remote printer connection.
See also:Host Configuration on page 55 andlist rprinter on page 90.
set sysinfo
set sysinfo contact [ contactstring ]
Set a person to contact in case of system trouble. Ifcontactstring is notincluded in the syntax, the field is emptied.
set sysinfo descramblekey key
Set thekey value used for descrambling print jobs from TCP/IP hosts. Thiskey is a four digit hexadecimal value obtained from the host software,npscramble. Within thenpscramble.c source code, there is a variable calleSR_KEY which contains the default key value. This can be changed to a
Example
USING THE M202/M212’S COMMAND SET: npsh Command Set 103

sed
onn
four digit hex value you’d like.
If you change the key value innpscramble.c, you must recompile the sourcecode and then use thiskey in theset sysinfo command.
set sysinfo dns ipaddress
Set the DNS server’s IP address so the M202/M212 can resolve names uwith ping andtelnet. Please seeping on page 92 ortelnet on page 114.
set sysinfo email emailname@ipaddress
Set the user’s email address to receive printer logging information.email-name is the IP name of the user to send mail to.ipaddress is the IP addresswhere the mail is stored. See alsoset logpath on page 97 to set printer loggingto email.
set sysinfo location [ locationstring ]
Set the physical location of the M202/M212. If thelocationstring is notincluded in the syntax, the field is emptied.
set sysinfo loginfo [[-]sys] [[-]tcp] [[-]ipx] [[-]spx]
Select the M202/M212 debugging information type. Usually this informatiincludes unexpected errors or exceptions from the unit and can be brokedown into:
sys General system messages.
tcp TCP stack messages.
ipx IPX stack messages.
spx SPX stack messages.
This debugging information is from the M202/M212 only, not from theprinter. Please seeset logpath on page 97 andCapturing Printer Feedback onpage 116 for details on acquiring printer logging.
Note
Note
104 USING THE M202/M212’S COMMAND SET: npsh Command Set
go
e
om
t to
set sysinfo logport prn1|prn2|com1|com2|syslog
Set the I/O port to receive M202/M212 debugging information or set it to back to SYSLOGD on a TCP/IP host. If thesyslog option is selected, youmust set the IP address of the host it will send the details back to.
set sysinfo module [[-]novell] [[-]appletalk]
Set the Print Server to handle particular protocol modules.
See also:Manipulating the M202/M212’s Services on page 115.
set sysinfo name [ namestring ]
Set the name of the M202/M212. This is just a string and is not used in thoperation of the unit. Ifnamestring is not included in the syntax, the field isemptied.
set sysinfo syslog ipaddress
Set the IP address of the host which will receive debugging information frthe unit and printer logging through SYSLOGD. Please see the earlierset sys-info commands andset logpath on page 97 for furthersyslog configuration.
set sysinfo descramblekey ABCD
sets the descramble key to match the value found innpscramble.c.
set sysinfo email [email protected]
setsfred as the user to receive printer logging as long as the logport is seemail. This printer logging just includes job information.
See also:list sysinfo on page 90.
set time
set time hour minute [ second ]
Set the current time.hour is based on the 24 hour system,minute andsecondare from 0 to 59.
See also:list time on page 90.
Examples
USING THE M202/M212’S COMMAND SET: npsh Command Set 105

leternit
-
on-
set user
set user add|delete userid
Define a new user or delete a current one.userid is the user’s login ID.
Caution
Any user can be deleted so be careful using this command. You might deall theroot user types. If this happens, configuration capability is no longeavailable through any of the normal methods. Instead, you must set the uback to defaults with the jumper settings. Please seeRestoring To FactoryDefaults on page 118.
set user passwd userid [ password ]
Set a password for a specific user. userid is the user’s login ID.password isthe desired password for this user.password must be less than eleven characters and if it is not included in the syntax, the user’s password is cleared.
If you forget the root password, you can use a TCP/IP host and RSHD assuperuser to set the users back to factory defaults (set user from default) oryou can use the jumper method mentioned inRestoring To Factory Defaultson page 118.
set user type userid root|guest
Set a user withguest or root permissions.userid is the user’s login ID.
See also:list user on page 91,list logins on page 89, andUser Accounts andPermissions on page 84.
set var
set var varname string
Create a named variable with a specific string.string is a space-separated listof words, hex numbers (e.g. 0x04), and references to other variables or cstants.
Note
106 USING THE M202/M212’S COMMAND SET: npsh Command Set

t
n-
y
ed,
dif-
the
set var NEW_VAR $ESC E
sets a variable namedNEW_VAR with an HP PCL defined printer reset.
When inputting a “$” or a “&” and you’re using RSHD to execute this com-mand, you must place a “\ ” beforehand so the local shell interpretor doesn’parse it out.
See also:Variables on page 81,Variable Definitions on page 161, andlist varon page 91.
slip
slip
Configures the serial port as a SLIP connection from a terminal or PC conected to the particular serial port. This command cancelsnpsh on the serialport and starts SLIP. Once the connection is broken, SLIP is automaticallstopped and the serial port returns tonpsh mode.
start
start fox|tts|loopb [prn1|prn2|com1|com2]
Start an ASCII output test on the specified I/O port. If no I/O port is specifithe command affects all of them.
These tests are for confirming that the serial and parallel I/O ports on theM202/M212 are communicating properly with connected devices. Three ferent types of tests can be done:
1 fox message test.A continuous stream of text is sent to the output I/O port as follows: 1 The quick brown fox jumps over the slow lazy dog’s back 1234567890 :!@#$&().
2 The quick brown fox jumps over the slow lazy dog’s back 1234567890 :!@#$&().
3 The quick brown fox jumps over the slow lazy dog’s back 1234567890 :!@#$&().
4 The quick brown fox jumps over the slow lazy dog’s back 1234567890 :!@#$&().
...
When the line counter reaches 99, it is reset to 0.
2 tts message test.A continuous stream of Gandalf 400C TTS compatible text is sent to output I/O port as follows:THE QUICK BROWN FOX JUMPS OVER THE LAZY DOG 1234567890 DE
Example
Note
USING THE M202/M212’S COMMAND SET: npsh Command Set 107
re
gs.
till
t )
THE QUICK BROWN FOX JUMPS OVER THE LAZY DOG 1234567890 DE
THE QUICK BROWN FOX JUMPS OVER THE LAZY DOG 1234567890 DE
THE QUICK BROWN FOX JUMPS OVER THE LAZY DOG 1234567890 DE
...
3 loopback test.Any input characters from the device attached to the output I/O port aechoed back as output characters.
See also:stop on page 108 andlist test on page 90.
stop
stop all|prn1|prn2|com1|com2
Stop an output test on the specified I/O port(s).
See also:start on page 107 andlist test on page 90.
Store Commands
Change critical parameters such as network, I/O port, and protocol settinThe three command possibilities are:
store choice parameters Store some values.
store choice from default Store default settings.
store choice from current Store current settings.
choice andparameters can be any of the options listed next.
Once youstore any parameters, you need to issue areset command or do acold reboot of the M202/M212 to apply the changes. Otherwise, you will sbe using the current settings.
For thestore commands, these new words are important to know:
ifnum Interface number. An index to a Network Interface Tap(NIT ). ifnum will always be1 for the since there is only onenetwork interface, Ethernet.
NIT Network Interface Tap. A module that serves as a genericinterface between the data link protocol layer (i.e. Etherne
Note
108 USING THE M202/M212’S COMMAND SET: npsh Command Set
y
orlf ofd tourn
e,
and higher network protocol layers. Each NIT is indexed ban interface number (ifnum ).
papname Printer Access Protocol (PAP) name. An AppleTalk name feach printer defined on the host. Makes up the second hathe name listed in the Chooser and is transparently mappean M202/M212 destination. There can be a maximum of foprinters which can point to any one of eight destinations othe M202/M212.
store ifc
store ifc ifnum utp [[-]li] [[-]rx]
Modify the NIT module’s physical UTP interface properties whereli enableslink integrity andrx enables the increased receive threshold.
A “ -” before either disables this feature.
ifnum will always be 1 for the M202/M212 since there is only one networkinterface, Ethernet.
See also:list ifc on page 88.
store pserver
store pserver name newservername
Store a new name for the M202/M212 indicated bynewservername. Thisname will affect Novell, AppleTalk, and NetBIOS setups.
store pserver apple zone [ zonename]
Store a particular AppleTalk zone on the unit. To clear the AppleTalk zontypestore pserver apple zone and press enter.
store pserver applepap papname dest destname
Alter the AppleTalk printer specified bypapname to print to the destinationindicated bydestname. This name does not appear in the Chooser.
Note
USING THE M202/M212’S COMMAND SET: npsh Command Set 109
rs.
.
is
nly
ed
store pserver applepap papname driver chooser_driver
Change the AppleTalk printer specified bypapname to use the printer drivername specified bychooser_driver. This driver is selected in the Choosermenu.
store pserver applepap papname name newpapname
Change the AppleTalk printer name that appears in the Chooser.papnamemakes up the second half of the name and is transparently mapped to anM202/M212 destination.
store pserver applepap prn1 name hp4si
changes the AppleTalk printer namedprn1 to hp4si.
See also:list pserver on page 89.
store pserver opts [[-]jobsecurity]
Allows users to cancel print jobs on the unit without having to be root useDisabling jobsecurity allows all users to issue thecancel command.
store pserver novell frametype [ethernet2 | 802.3 | 802.2| 802.2snap | autosense]
Store a particular frame type for the M202/M212 to adhere to in a Novellenvironment.
The M202/M212 provides simultaneous support for all Novell frame types
store pserver novell fserver add fservername
Adds a specified Novell file server as a preferred file server. This feature useful in a large Novell network so that the M202/M212 does not ignoreimportant file servers. If this feature is not enabled, the M202/M212 will oacknowledge the first 16 file servers it senses.
store pserver novell fserver del fservername
Deletes a particular Novell file server from the M202/M212’s list of preferrfile servers.
Example
Note
110 USING THE M202/M212’S COMMAND SET: npsh Command Set
the
rely.
-sata
P
store pserver novell opts [[-]spxkeepalive]
Allows users to disable the keepalive packets sent by the M202/M212 to host in order to maintain an SPX connection. The [-] disablesspxkeepalive.
store pserver novell passwd [ password ]
Store thepassword for the Print Server to use when logging in to the fileserver. This password must match the password set in PCONSOLE.
store pserver novell polltime [ time ]
Store thetime (in seconds) between polling by the unit to see if print jobs ain the queue on the file server. This is applicable to a PSERVER setup on
The M202/M212’s NET LED will flash according to thispolltime.
store pserver smb workgrp workgroupname
Store the Print Server’s workgroup name for Microsoft Networks (i.e. Windows for Workgroups, Windows NT, and Windows 95). Microsoft Networkuse these names to organize groups of computers into workgroups so thwhen browsing certain functions, users see only computers belonging to particular workgroup rather than all the computers on the network.
If no workgroupname has been specified, the default name is WORKGROU(note all capitals). This is a standard Windows default.
store tcpip
store tcpip ifnum addr ipaddress
Store theipaddress for the NIT module specified byifnum.
ifnum will always be1 for the M202/M212 since there is only one networkinterface, Ethernet.
store tcpip ifnum frametype [[-]ethernet2] [[-]802.2snap]
Control the frame type(s) used by the NIT module specified byifnum.
Note
Note
Note
USING THE M202/M212’S COMMAND SET: npsh Command Set 111

on
at are
he
store tcpip ifnum mask netmask
Store the netmask for the NIT module specified byifnum.
store tcpip ifnum opts [[-]rarp] [[-]bootp]
Enable or disable the RARP and BOOTP for the NIT module specified byifnum.
store tcpip opts [-]ipforward
Enables the IP forwarding or routing functions of the M202/M212. Bydefault, the gateway is disabled. This command must be used in conjuctiwith thestore tcpip proxy command below.
store tcpip proxy add [host|net] targetipaddress [ /tar-getnetmask ]
Enables the M202/M212 to respond to ARP requests for IP addresses thdifferent than the interface configuration of the M202/M212.
store tcpip proxy del targetipaddress
Removes this entry from the proxy ARP table.
store tcpip route add|del default routeripaddress ifnum
Add or delete a default router entry in the M202/M212’s routing table for tNIT module specified byifnum.
store tcpip route add [host|net] targetipaddress [/ target-netmask ] routeripaddress ifnum|com1|com2 [ metric ]
Add a specific route to the Print Server’s routing table.
store tcpip route add 192.75.30.11 192.75.30.3 1
stores a host with IP address192.75.30.11 into the unit’s routing table for thefirst NIT module. The router’s IP address is192.75.30.3.
Example
112 USING THE M202/M212’S COMMAND SET: npsh Command Set

by
pty
r.
store tcpip route add|del default routeripaddress ifnum
Add or delete a default router entry in the M202/M212’s routing table.
store tcpip route del [host|net] targetipaddress ifnum
Delete a specific route from the routing table of the NIT module specifiedifnum.
store tcpip tcp access [root] add|del ipaddress [/ net-mask]
Add or delete a host or network in the TCP connection access list. An emlist allows any host to have TCP sessions with the M202/M212.
store tcpip tcp access add root 192.75.30.11
Provides the host with IP address192.75.30.11 root access to the Print Serve
store tcpip tcp opts [-]keepalive
Enable or disable the keepalive packet usage in the TCP stack.
store tcpip tcp rxwin packetsize
Modify the receive window size property for TCP connections.packetsize isthe number of full size packets and must be in the range1 to 8. The higher thenumber, the less simultaneous TCP connections.
See also:list tcpip on page 90.
supervisor
supervisor
Gives youroot permissions when utilizing the Novell host software,npsh.exe, to start a full session with the M202/M212.
See also:Host Software on page 53 andUser Accounts and Permissions onpage 84.
Example
USING THE M202/M212’S COMMAND SET: npsh Command Set 113

ts aost.
and
nit-
telnet
telnet ipname [ escapecharacter [ portnumber ]]
Telnet from the M202/M212 to another host on the network specified by iipname. ipname can be either an IP address or an IP name. By specifyingTCPportnumber, you can also connect to a specific socket on the target h
If escapecharacter is used, it resets the key sequence to exit you to commmode indicated by thetelnet> prompt. In this mode, you can execute:
quit Exit the Telnet session.
? Print the help information.
By default,Ctrl-] is theescapecharacter. To reset this value, please seekey-code on page 87. This will give you the hexadecimal representation of theescapecharacter you want to use which can be substituted into this telnetcommand.
To utilize IP name, the DNS server’s IP address must be set first so the ucan resolve the IP name. Please seeset sysinfo on page 103 for more information.
Note
114 USING THE M202/M212’S COMMAND SET: npsh Command Set
gu-
in help
rt-
he
y
USING NPWIN
Overview
NPWin is an SNMP-based software utility that allows you to perform all unit confiration and management in apoint-and-click, Windows environment. NPWin providesall the same configuration and management functionality available with the built-npsh command set. NPWin also includes an extensive, context-sensitive, on-linesystem to explain the features and how they work.
System Requirements
NPWin requires a workstation capable of running Windows 3.11, Windows NT, oWindows 95. The workstation must also be configured with an IP address and nemask, have TCP/IP services available, and be on the same local IP network as tM202/M212.
A Windows workstation on a Novell IPX network willnot be able to communicatewith the M202/M212.
Please read the SETUP.TXT file for a list of compatible TCP/IP stacks.
Installation
Please follow the steps below to install the NPWin software on to your Windowsworkstation:
1 Start File Manager.
2 Insert disk labelledNPWin into drive A.
3 Double-click on the SETUP.EXE icon and answer the dialogue boxes as theappear.
The installation scripts take the following actions:
• asks for a directory name, the default is c:\npwin• installs several files into this directory
Note
Note
USING NPWIN: Overview 115

to
vi-t way
it, andtem
ne fol-
in.
w:
net-
4 Change to the specified directory, and double click on the NPWIN.EXE icon launch the software.
Print Server Configuration
NPWin allows you to configure the M202/M212 in a point-and-click, graphical enronment. NPWin has been designed to be very intuitive and easy-to-use; the besto learn about its features and potential is to start it up, open a session with a unbrowse around. Also, NPWin has an extensive context-sensitive, on-line help sysavailable to assist you with your configuration options.
To run the software, simply double-click the NPWIN.EXE icon and start a sessiowith the unit. If the unit has not yet been added to the list of available units, pleaslow the steps outlined inStarting a NPWin Session With An Unconfigured Unit onpage 116.
NPWin communicates with the M202/M212 over the TCP/IP protocol. You mustensure that you have TCP/IP services available on the workstation running NPW
Starting a NPWin Session With An Unconfigured Unit
To start a session with an unconfigured M202/M212, please follow the steps belo
These steps relate to establishing a stored IP address in the M202/M212. If yourwork uses a dynamically assigned IP address, please seeManual ConfigurationThrough the Network with RARP on page 28 andManual Configuration Through theNetwork with BOOTP on page 29 for more information.
Step Action Result of Action
1 Double click theNPWIN.EXE iconto start the software.
A dialogue box appears prompting for thetype of network.
2 SelectIP from the dialogue box. (Thisis the default setting).
NPWin is started and theOpen PrintServer Session dialogue box appears.
Note
Note
116 USING NPWIN: Print Server Configuration

, thecte,
The IP address entered in step 4 will be saved to the M202/M212’s EEPROM.
If the unit already has an IP address or if the IP address is assigned dynamicallyunit should show up in the list of already configured Print Servers when you seleOpen Print Server Session. If it doesn’t, try clicking on the Scan button. Otherwisyou may have to manually enter the IP address of the unit.
3 SelectAdd from the dialogue box. A new unit IP configuration windowappears.
4 Enter the IP address, serial number,netmask, and IP name (optional) ofthe M202/M212.Note: The serialnumber is the six digit number foundon the bottom of the unit.
5 SelectOK . Returns to window showing previouslyconfigured Microplex Print Servers.
6 Select the M202/M212 that you havejust added.
A dialogue box appears asking if you wantto eitherView or View and Change theconfiguration.
7 SelectView and Change. Window appears asking for SNMP pass-word. Type the word “default” in this field.Note: this can be changed once you haveentered a session with the unit.
8 SelectOK . Window appears with graphical view ofM202/M212 Print Server.
9 Configure unit as desired.
Step Action Result of Action
Note
USING NPWIN: Starting a NPWin Session With An Unconfigured Unit 117

118 USING NPWIN: Starting a NPWin Session With An Unconfigured Unit
tocrib-wn
nipu-
file
ing
rver
USING THE M202/M212’S ADDITIONALOPTIONS
Overview
As of now, you will have configured your M202/M212 and you’re probably printingit successfully. The purpose of this chapter is to enhance your print setup by desing some of the additional features that the Print Server provides. It is broken dointo the following sections:
1 General Optionson page 113: network security, changing the Print Server’sname, manipulating the UTP interface, setting up special job processing, malating the unit’s services, configuring an alternate print destination, capturingprinter feedback, and controlling frame types.
2 TCP/IP Options on page 118: restoring to factory defaults, getting ready forcomplex networks, remotely managing the unit, TCP/IP network security, andusing the terminal sever capabilities.
3 Novell Optionson page 122: setting password security and setting preferred servers.
4 Managing with SNMP on page 123: custom MIBs and traps, SNMP security,and SNMP procedures.
5 FTP Daemon on page 128: FTP file system, printing using FTP, monitoring usFTP, and configuring parameters using FTP.
6 Serial Line IP (SLIP) on page 135: configuring a serial port for SLIP.
7 IP Routing on page 139: the unit’s IP routing features.
General Options
Network Security
The M202/M212 provides various built-in security methods to protect the Print Seand its configuration. These include passwords and permission levels.
USING THE M202/M212’S ADDITIONAL OPTIONS: Overview 113
s.
ibilitynipu-wo
vell, for
sethe
its
n
thistions
e see
In addition, TCP/IP and Novell environments each have further security measurePlease seeMaintaining Network Security on page 120 andSetting Password Securityon page 122 for more information.
Setting passwords and assigning a permission level to users eliminates the possof any unwanted users from getting into the M202/M212’s command set and malating the current settings. To configure passwords and to learn more about the tdifferent permission levels provided for users, please seeset user on page 106 andUser Accounts and Permissions on page 84. To view the current user settings, seelistuser on page 91.
Using Different Naming Schemes
By default, the M202/M212 is namedM_xxxxxx wherexxxxxx is the last six digits ofthe Ethernet address as found on the bottom of the unit. This name affects a NoAppleTalk, and NetBIOS setup. To change this name to something more suitableyour printing environment, please seestore pserver on page 109.
CautionIf you decide to reconfigure the default name and you are using a CONFIG file toM202/M212 parameters with your Novell setup, you must remember to rename tdirectory containing this file.
Manipulating the M202/M212’s UTP Interface
If using UTP on your network, you have some control over the UTP interface andproperties on the M202/M212.
By default, link integrity is turned on but this can be turned off. In addition, you caincrease the sensitivity of the 10Base-T receiver for implementations where linelengths exceed the recommended 10Base-T maximum of 100 meters. However,increases the receiver’s vulnerability to noise and should only be used in installawith 2-pair cable. Factory default for this setting isoff.
To see the current UTP interface settings for a particular network interface, pleaslist ifc on page 88. To manipulate the UTP interface, please seestore ifc on page 109.
114 USING THE M202/M212’S ADDITIONAL OPTIONS: General Options
ur-help-
ay set
ned
opriateted
s,s.
is-ee
. Not the
Setting Up Special Job Processing
Printing with the M202/M212 adds a lot of extra job processing options to your crent print setup. No matter the environment, you now have the choice of several ful features including:
• ASCII to PostScript conversion (a2ps),
• carriage return insertion (onlcr),
• tab expansion (xtab),
• banner page generation,
• load-balancing (sending to another printer if the current one is busy),
• printer mode switching and general printer manipulation.
These are just some of the many features provided and with each of these, you mthem on the host within an interface file,nprbsd.if or nprsysv.if, or on the PrintServer itself. The choice is completely up to you.
You are given the choice between eight differentdestinations on the M202/M212allowing for eight different possible print setups; each of these print setups is defiby the extra processing specified by it’s associatedmodel. It is the model that definesmost of these extra processing options.
To make use of these special job processing features, please read over the apprhost configuration section or the full list of extra job processing options documenin set model on page 99.
Manipulating the M202/M212’s Services
The M202/M212 has a lot of functionality and along with the benefits this providethere’s one main drawback: the more features it has, the more memory it requireTherefore, you have been given the ability to control this somewhat.
If you are not utilizing all of the protocols provided on the M202/M212, you can dable the unused ones providing more memory for the protocol(s) in use. Please ssetsysinfo module [[-]novell] [[-]appletalk] on page 105 for the command details.
In addition to disabling certain modules, you can also disable destination servicesevery destination on the M202/M212 needs to have the same functionality and in
USING THE M202/M212’S ADDITIONAL OPTIONS: General Options 115
in
e out thes’ittingtion
-line
so
interthat’ss a
able
tion.
tion
case of an AppleTalk setup, you probably don’t want every destination appearingthe Chooser. Please seeset dest on page 96 andRemoving Excess Printers from theChooser on page 67 for further details.
Making An Alternate Print Destination
If more than one printer is attached to the M202/M212, you can make the best usof each one with load-balancing. Normally, you would print to one destination onunit and your print jobs would go to that printer only. This can be a waste of usertime if more than one printer is attached; one of the attached printers could be sidle while another is being overloaded with print jobs. Setting an alternate destinaovercomes this by keeping all printers busy. Also, if the specified printer goes offor into error mode, the job will be printed by the alternate printer.
Please seeset dest on page 96 for details on how to set up an alternate destinationyour print jobs can get re-routed to an alternate printer.
Capturing Printer Feedback
One of the key aspects of maintaining a computing environment is monitoring prstatus and logging this information to useful places. The M202/M212 allows just through logpaths or through a backchannel method. In addition, the Print Server lpcommand provides parallel port printer status and job information as a user sendjob.
Logpath Method
The easiest and most reliable method is to utilize the many logpath options availon the Print Server. These include logging printer feedback to:
• a particular user’s email address through SMTP,
• SYSLOGD on a particular TCP/IP host,
• a TCP port number in the range of 1,024 to 65,000 to which you cantelnet to,
• another I/O port where a printer or terminal is attached to display the informa
To configure any of these logpath options, please seeset logpath on page 97.
I/O ports and SYSLOGD can be used to capture M202/M212 debugging informaas well as printer logging. Please seeset sysinfo on page 103 for more details.
Note
116 USING THE M202/M212’S ADDITIONAL OPTIONS: General Options

of aeed here,
WS-
-sec-
on
-alsow the
ed in
sup-roto-
Backchannel Method
In addition, printer feedback can be directed to a serial I/O port through the use backchannel method. For example, if you like the speed of the parallel port but nthe printer status, you could set up a backchannel to one of the serial ports. Fromyou have two choices:
1 Utilize host software to obtain this data such as Adobe TranScript or Sun Neprint with npd (seenpd Pseudo-device Interface on page 44).
2 Make use of the I/O port’s associated destination (seelist pserver on page 89) andmanipulate its logpath to use one of the choices mentioned earlier in this subtion.
To make use of a backchannel method, the printer must be able to support inputone port and be able to output status on another.
Please seeset dest on page 96 to configure a backchannel.
Lp Method
The M202/M212 provides its own version of thelp print command. This is used inconjunction withrsh/rcmd/remsh within an interface script or directly from the command line on the host. By default, it provides parallel port printer status and can be configured to report incremental byte counts as the job prints. It can also shojob position in the M202/M212’s queue as it moves to the top.
Using lp will provide printer error messages as well as job status.
If lp is used from the command line, any printer status will come right back to thescreen. If used within an interface script, the messages will go to the log file locatthe spooling directory.
Sincelp must be used withrsh/rcmd/remsh only, this feature is only offered with aprint setup utilizing an interface script or with arsh/rcmd/remsh command from thecommand line on the host.
Please seelp on page 91 andrsh/rcmd/remsh on page 33 for further details.
Controlling the Frame Types Used by the M202/M212
Various frame types can be used by the Print Server at any given time but each ported protocol’s frame type configuration is completely separate from another pcol’s. This frame type support is configurable.
Note
Note
Note
USING THE M202/M212’S ADDITIONAL OPTIONS: General Options 117
e
hang-ork
ble.
Novell and TCP/IP are the only protocols that offer this configuration. TheM202/M212 provides simultaneous support of multiple Novell frame types. Pleasseestore pserver on page 109 andstore tcpip on page 111 to find out which frametypes are offered in each environment.
TCP/IP Options
Restoring To Factory Defaults
Once and a while, it is necessary to set the M202/M212’snetwork parameters back tofactory defaults whether it is because you are moving the Print Server, you are cing your addressing schemes, or you just want to start from scratch. These netwparameters include: IP address, netmask, and routing table entries.
Two methods are available for doing this:
1 physically moving jumpers inside the Print Server,
2 issuing a command on the M202/M212 and rebooting.
Either way will produce an M202/M212 that has all of thenetwork settings it camewith originally. Each method is described next.
Through Jumpers
For normal operation, the unit has its S2 strap on pins 1 and 2 for EEPROM EnaMoving the strap from this position to pins 3 and 4, or DEFAULT IP, will overrideyournetwork settings and put the unit to factory defaults. Please seeM202/M212Jumper Settings on page 119 for the jumper locations.
CautionThe inside of the M202/M212 is sensitive to static electricity so be sure to groundyourself to the chassis before touching any internal components.
To manually set the unit to defaults:
1 Open the cover.
2 Move the jumper strap from pins 1 and 2 to 3 and 4.
118 USING THE M202/M212’S ADDITIONAL OPTIONS: TCP/IP Options
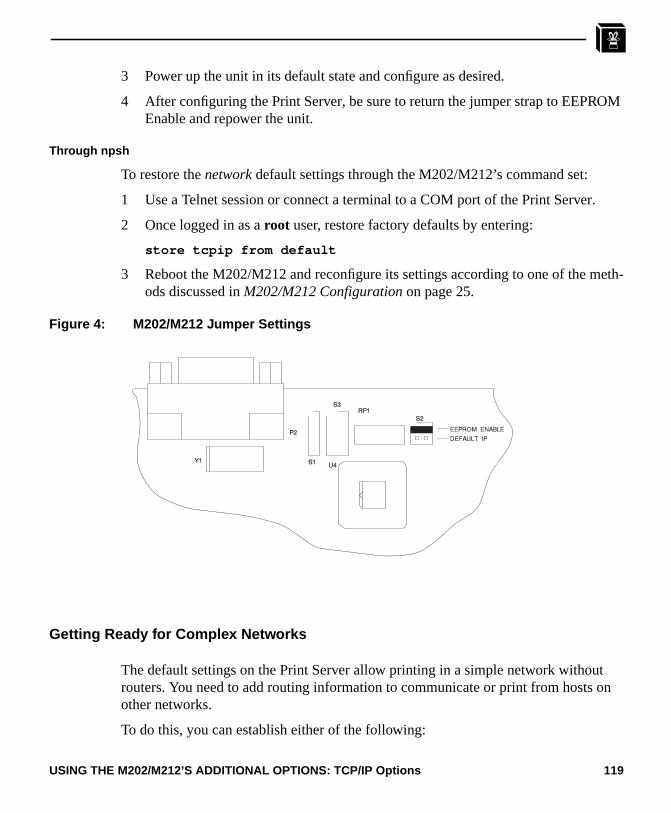
OM
.
eth-
ton
3 Power up the unit in its default state and configure as desired.
4 After configuring the Print Server, be sure to return the jumper strap to EEPREnable and repower the unit.
Through npsh
To restore thenetwork default settings through the M202/M212’s command set:
1 Use a Telnet session or connect a terminal to a COM port of the Print Server
2 Once logged in as aroot user, restore factory defaults by entering:
store tcpip from default
3 Reboot the M202/M212 and reconfigure its settings according to one of the mods discussed inM202/M212 Configuration on page 25.
Figure 4: M202/M212 Jumper Settings
Getting Ready for Complex Networks
The default settings on the Print Server allow printing in a simple network withourouters. You need to add routing information to communicate or print from hosts other networks.
To do this, you can establish either of the following:
USING THE M202/M212’S ADDITIONAL OPTIONS: TCP/IP Options 119
k.
the
-et-
func-to spec- 10,abled.
• default routes for generic or unknown network addresses to use,
• static routes to known network addresses such as a particular host or networ
To set a default router or a static route, please seestore tcpip on page 111 and to lookat the current routing entries, please seelist tcpip on page 90.
Remotely Managing the M202/M212
In a TCP/IP environment, various methods are available for remotely monitoringPrint Server. These include:
• through a Telnet session,
• usingrsh/rcmd/remsh and a command from the unit’s command set,
• usingnpconfig’s Detailed Configuration Options Sub-Menu,
• using the FTP Daemon,
• through an SNMP manager.
Maintaining Network Security
Besides the general security measures mentioned inNetwork Security on page 113,the M202/M212 provides two more for TCP/IP environments. These include:
• a TCP access list,
• scrambling/descrambling of print jobs.
Access List
The TCP access list protects the Print Server and its configuration while the scrambling protects your print data from being viewed by others as it passes over the nwork to the M202/M212.
The M202/M212 has the ability to control host access to printer destinations andremote command execution services. This is done using an access list, similar intion to the UNIX.rhosts file. If the access list is empty, any host can have access the M202/M212’s services. If there are entries in the access list, only those hostsified have access to these services. Although the maximum number of entries iseach entry can refer to a network or a host so more than 10 machines can be en
120 USING THE M202/M212’S ADDITIONAL OPTIONS: TCP/IP Options
.
t
twork
for
rs.k.
e
et
Only users that haveroot permission can configure the remote host access entriesUsers withguest permission can only display these entries.
To set up the access list, please seestore tcpip on page 111 and to look at the currensettings, seelist tcpip on page 90.
Scrambling/Descrambling
A second method of security is provided through datascrambling/descrambling.This TCP/IP security method protects users’ print data as it is sent across the neto the M202/M212 for printing. A binary is provided on the host,npscramble, whichscrambles the print job. Then the job reaches the Print Server, it is descrambledprinting.
This scrambling method will protect against casual viewing with network analyzeHowever, it isnot encrypted andcannot be considered safe from cryptographic attac
To utilize this feature, you need to:
1 Look into thenpscramble.c source code for a variable calledSR_KEY. This con-tains a four digit hexadecimal value to be used as the descrambling key on thM202/M212.
2 Log into the Print Server asroot user and set this value as the key. Enter:
set sysinfo descramblekey key
3 Set descrambling on in the model you are utilizing. Enter:
set model modelname stty descramble
4 Save these new settings. Enter:
save
5 Incorporatenpscramble into your print setup on your host. Scrambling can be swithin npr.if or added to the command line when printing.
cat test.txt | npscramble | rsh spike lp -d d1prn1
wheretest.txt is piped throughnpscramble for scrambling and then sent forprinting on the M202/M212spike’s destinationd1prn1.
Please seeHost Software on page 21,Printing Via the Spooler on page 34, andsetmodel on page 99.
Note
Note
Example
USING THE M202/M212’S ADDITIONAL OPTIONS: TCP/IP Options 121
pabil-rk or
e net-
at
ork
s to
Using the Terminal Server Capabilities
The M02/M212’s built-in command set includestelnet which allows the unit to act asa terminal server as well as a print server. The Print Server’s terminal serving caities can be used in a number of ways including connecting a terminal to a netwousing a terminal as an output device.
To use the Print Server’s terminal serving capabilities to connect a terminal to thwork, you need to:
1 Physically attach the terminal to one of the serial ports on the Print Server.
2 Press the<Break> key and at the prompt, type in the IP address of the host thyou want to connect to.
3 Login to the host.
In addition,ping is provided for testing TCP/IP configuration parameters and netwconnections with target hosts. Please seeping on page 92 andtelnet on page 114 forcommand details.
Novell Options
Setting Password Security
Besides the general security measures mentioned inNetwork Security on page 113, aNovell setup provides further password security. A password can be set on theM202/M212 and within your PCONSOLE setup so that when the M202/M212 trielogin to the file server, the passwords are compared.
To configure a PSERVER setup with password protection:
1 Establish a password on the M202/M212.
Please usestore pserver on page 109.
2 Reset or reboot the Print Server to make the password take affect.
3 EnterPCONSOLE assupervisoron your Novell host.
4 Select PRINT SERVER INFORMATION from the Main Menu.
5 Select the appropriate print server and press<Enter>.
122 USING THE M202/M212’S ADDITIONAL OPTIONS: Novell Options
nvi-oes
ill
re-
2.
n-
rull
avail- man-
6 Select CHANGE PASSWORD.
7 At the prompts, type and retype the new password used on this M202/M212PSERVER. Press<Enter> when you are finished.
These steps may vary for NetWare 4 environments.
Setting Preferred File Servers
The M202/M212 allows you to specify a list of preferred file servers in a Novell eronment. This feature is useful in a large Novell network so that the M202/M212 dnot ignore important file servers. If this feature is not enabled, the M202/M212 wonly acknowledge the first 16 file servers it senses.
To add a preferred file server to the M202/M212:
1 Login to the M202/M212 through annpsh session as aroot user.
2 At thenpsh prompt, enter:
store pserver novell fserver add fservername
wherefservername is the name of the Novell file server you want to add as a pferred file server.
This adds the specified file server as a preferred file server on the M202/M21
3 Repeat steps 1 and 2 to add additional preferred file servers.
For more information, please seestore pserver novell fserver add fservername onpage 110.
Managing With SNMP
SNMP (Simple Network Management Protocol) is a protocol for internetwork maagement services. This protocol provides a means for computers (oragents) to bemanaged remotely bymanagers. The level of management depends on the manageand agent and can go from providing information such as statistics to providing fmanagement capabilities of the agent.
MIB (Management Information Base) files are a description of managed objects able in an agent. MIB files provide the data for the manager so they can remotely
Note
USING THE M202/M212’S ADDITIONAL OPTIONS: Managing With SNMP 123
be
ol,
-
load-
inP
ter-hese
rapeaved
ng
age the agent. A MIB file is simply a formal description of the way an agent can accessed using SNMP and what functions can be managed.
The M202/M212 is a fully manageable SNMP agent that supports MIB-II, customMIB’s and traps.
MIB II Support
The M202/M212 is MIB II compliant allowing SNMP managers to monitor protocnetwork, and routing statistics.
Custom MIBs and Traps
The M202/M212 provides a custom MIB definition file which consists of 150 variables and three traps. This MIB file allows you to monitor and configure the PrintServer directly. In fact, the MIB file represents all of the possible configurationoptions such as destination settings, network configurations, print queue status, ing of defaults, etc.
The M202/M212’s custom MIB definition file is included on the host software diska file calledm202mib.txt. This file can also be downloaded from the Microplex FTsite (ftp.microplex.com: support/m202/misc/m202mib.txt) or can be accessed viathe Microplex Web site (http://microplex.com/microplex/support.html/ ).
Custom MIB Variables
The variables found within the custom MIB definition file describe every type of innal information that can be accessed on the M202/M212 by an SNMP manager. Tvariables can be divided into two groups:
System Variables
The first grouping of variables contains general information about the Print Servesuch as firmware version, serial number, etc. In addition to these, it includes a trtable which defines what SNMP managers will receive the traps generated by thM202/M212. The trap table can have up to ten entries, but only the first entry is sto EEPROM.
Product Variables
The second grouping of variables contains information defining all of the remainifunctionality of the Print Server. The product variables are divided into:
config group All configuration components such as models,
124 USING THE M202/M212’S ADDITIONAL OPTIONS: Managing With SNMP
s
nager.
d
.
can
can
l
destinations, logpaths, and users.
status group All dynamic monitoring components such asprint queues, user logins, and RPRINTER con-figurations.
command group This includes the commands save, load, andreset.
These variables can have read, write, or read-write permissions. Along with these permissionthere are other elements that can limit the writeaccess to these variables. Please seeSNMP Secu-rity on page 125 andUser Accounts and Permis-sions on page 84 for more information.
Custom MIB Traps
A trap is an event generated by an agent to indicate a significant event to the maThe M202/M212 continuously generates three traps:
coldstart A generic trap generated every time theM202/M212 is powered on or reset
authenticationFailure A generic trap generated whenever a disalloweaccess is attempted
lpqIOStatusChanged The only custom trap. This trap is generatedwhenever an I/O port’s status changes.
No trap is generated on a CTS change on theserial ports. Only DCD changes will trigger this
SNMP Security
SNMP does not include any formal type of security definition. However, security be accomplished usingcommunities. A community is a string that is sent with everySNMP request and is used to define a certain view of the MIB. By doing this, youcontrol what parts of the MIB are accessed by SNMP managers.
To access the M202/M212’s custom MIB, thepublic community string can be used toread any variable that haveread access. To restrictwrite access, there is an additionasecurity step implemented. This involves defining a user namedsnmp on theM202/M212 withroot privileges. The password defined for thissnmp user will then
Note
Note
USING THE M202/M212’S ADDITIONAL OPTIONS: Managing With SNMP 125

le
ish
be used as thecommunity string which allowswrite access.
If no snmp user is defined withroot privileges, nowrite requests will be accepted bythe M202/M212.
Adding an SNMP User
To add a user namedsnmp with root privileges, please follow the steps below:
1 Login to the M202/M212 as aroot user.
2 Add a user namedsnmp.
set user add snmp
3 Set the user type toroot.
set user type snmp root
4 Set the password for thesnmp user.
set user passwd snmp snmppassword
5 Save the changes.
save
The usersnmp is now created andsnmppassword is the only community string whichwill allow write access.
SNMP Procedures
Compiling the Custom MIB
Monitoring the Custom MIB
For read-only SNMP functionality, please follow the steps below:
1 Copy the M202/M212 MIB definition file from the host software disk in a ficalledm202mib.txt. This file can also be downloaded from the MicroplexFTP site (ftp.microplex.com: support/m202/misc/m202mib.txt) or can beaccessed via the Microplex Web site(http://microplex.com/microplex/support.html/ ).
2 Compile this MIB description file to work with your SNMP manager.
3 Using your SNMP manager, view the particular MIB variables that you wto monitor.
Note
126 USING THE M202/M212’S ADDITIONAL OPTIONS: Managing With SNMP
herties
-
ord
d in,nd
-
heger
e
Writing to the Custom MIB
The following example explains how to use the custom MIB variables to set tM202/M212’s parameters. For example, to set the M202/M212’s com2 propeto 19200, cs8, ixon, please follow the steps below:
This example assumes that the snmp password has been defined ascustommib,that the M202/M212’s ipname isspike,and that the SNMP manager is the Tricklets package.
1 Set up ansnmp user withroot privileges on the M202/M212. Please seeAdd-ing an SNMP User on page 126 for details.
2 Issue the following configuration commands using the snmp user’s passwas the community string.
echo “m202IfComSpeed[1.4]=19200” | snmp-set spikecustommib
echo “m202IfComCharS[1.4]=8” | snmp-set spike custommib
echo “m202IfComIxon[1.4]=2” | snmp-set spike custommib
Setting the M202/M212 to Send Traps to an SNMP Manager
The M202/M212 continuously generates traps but unless the trap table is filleno SNMP manager will receive this information. To set the M202/M212 to setraps to a particular SNMP manager, please follow the steps below:
This example assumes that the snmp password has been defined ascustommib,that the M202/M212’s ipname isspike,and that the SNMP manager is the Tricklets package.
1 Set up asnmp user withroot privileges on the M202/M212. Please seeAdd-ing an SNMP User on page 126 for details.
2 Set the following M202/M212 trap variables using your SNMP manager. Tactual syntax of the commands will depend on the particular SNMP manayou are using.
echo “trapCommunity[1]=\”building-A\”” | snmp-set spikecustmmibwherebuilding-A is the string that you want the M202/M212 to send with thtrap information. This community string has a 14 character maximum.
echo “trapDest[1]=192.75.11.11” | snmp-set spike
Note
Note
USING THE M202/M212’S ADDITIONAL OPTIONS: Managing With SNMP 127

stom
n
g therint
212 totem:
rd.rding
e com-
achiew
custommibwhere192.75.11.11is the IP address of your SNMP manager.
To disable the entry in the trap table, set the IP address to 0.0.0.0
The M202/M212 will now send trap information with the community stringbuilding-A to the SNMP manager with the IP address192.75.11.11. For moreinformation on these trap variables, please see their description in the cuMIB definition file.
The trap table can hold up to ten entries but only the first entry is stored iEEPROM. If you turn the unit off, you will lose the additional entries.
FTP Daemon
The FTP Daemon provides an additional method to access the M202/M212. UsinFTP Daemon, users are able to submit print jobs, cancel print jobs, monitor the pqueue, and upload/download M202/M212 configuration files. Users FTP to theM202/M212 as if it were any other computer on the network.
For the purposes of FTP, a pseudo file system has been defined on the M202/Mallow access to the unit’s functions. Three types of users can access this file sysroot, guest, andanonymous. Root andguest correspond to the entries in theM202/M212’s user list;anonymous is a special type that does not require a passwoFor each directory or file within this file system, there are access restrictions accoto the type of user logged in.
M202/M212 FTP File System
The M202/M212 FTP file system is where you execute allftp commands on the unit.Please see the examples on the following pages for a complete description of thmands and how they are executed.
The following is the structure of the file system you will see when youftp to the unit:
/queue
Contains four files with information pertaining to the print queue associated with eof the M202/M212’s ports (i.e. prn1/prn2, com1/com2). These files allow you to vthe current status of each queue.
/dest
Note
Note
128 USING THE M202/M212’S ADDITIONAL OPTIONS: FTP Daemon

nd
d
.
12f
user
ry if
Contains eight subdirectories, one for each of the eight print destination on theM202/M212. Please seeDestinations on page 79 to better understand destinations aprinting. These directories are where files areput in order to print.
/jobs
Contains files representing all the print jobs currently queued. The only commanavailable for these files isdel, which cancels the job.
/config
Contains three subdirectories:current , stored, anddefault. Each of the files in thesesubdirectory represents one data structure of the M202/M212. The files in thecurrentdirectory reflect the current configuration, files in thestored directory reflect thestored configuration, and files in thedefault directory reflect the default configurationThese files are in binary format.
/exec
This directory is used as a command interpreter directory. Any file with M202/M2configuration commands that isput to this directory will be interpreted as a series onpsh commands.
Printing A File Using FTP
The following example shows how to print a file using FTP:
1 Change to the local directory where the file to print resides.
2 Login to the M202/M212 usingftp .
ftp ipname
3 Login asguest, root, or anonymous.
Guest androot users require the use of passwords as configured in the unit’s list. Anonymous is a special login that does not require a password.
4 Change to the/dest directory that you want to print to.
cd dest/ destinationnam e
5 Change the mode to correspond to the type of file to be printed. Choose binamode if the file to be printed contains both text and graphics and ASCII modethe file is text only. The default mode is always ASCII.
bin
Note
USING THE M202/M212’S ADDITIONAL OPTIONS: FTP Daemon 129

6 Copy the file you want to print to this directory.
put filename
The file is spooled and printed.
7 Logout of the FTP session.
quit
Removing a Print Job Using FTP
The following example shows how to remove a print job using FTP:
1 Login to the M202/M212 usingftp .
ftp ipname
2 Login asguest, root or anonymous.
3 Change to the/jobs directory
cd jobs
4 Display a list of current print jobs.
ls
Displays listing of all queued print jobs by their ID number.
5 Remove desired print job from the list.
del jobname
6 Logout of the FTP session.
quit
Monitoring a Print Queue Using FTP
The following example shows how to monitor a print queue using FTP:
1 Login to the M202/M212 usingftp .
ftp ipname
2 Login asguest, root or anonymous.
3 Change to the/queue directory
cd queue
130 USING THE M202/M212’S ADDITIONAL OPTIONS: FTP Daemon
pts
y.
he
gard-of theit to
-n-
4 Turn interactive mode off.
prompt
This enables you to copy a number of files without having to respond to promby the M202/M212.
5 Download all files in the print queue directory.
mget *
Files prn1, prn2, com1, and com2 are downloaded to the users local director
6 Logout of the FTP session.
quit
7 View file with information pertaining to print queue status.
cat prn1 prn2 com1 com2
This command gives you the same information as alpstat in npsh. cat is a UNIXcommand; with DOS, use thetype command.
Configuring M202/M212 Parameters Using FTP
Users have two ways of configuring the M202/M212's parameters using FTPD. Tfirst is by uploading binary files to the /configdirectory and the second is by upload-ing text configuration files to the /exec directory. We discuss each method and giveappropriate examples below.
1. /config directory
The /config directory is divided into three subdirectories;current , stored, anddefault. Each of the files in these sub-directories represent one data structure reing the configuration of the unit. These files can be used to make a backup copy unit's configuration parameters or to copy configuration parameters from one unanother.
The configuration files are in binary form and their format may differ between firmware versions. Users may not be able to upload a configuration file that was dowloaded from a previous version.
Copying a Configuration Using FTP
The following example shows how to copy a configuration file using FTP:
NoteNote
Note
USING THE M202/M212’S ADDITIONAL OPTIONS: FTP Daemon 131
es set-
gura-
st be
1 Login to the M202/M212 usingftp .
ftp ipname
2 Login asroot.
You must be aroot user in order to copy a configuration file.
3 Change to theconfig/storeddirectory.
cd config/stored
4 Set mode to binary.
bin
5 Turn off the interactive mode.
prompt
6 Download all the files in this directory.
mget *
Downloads a copy of all files in theconfig/storeddirectory to the user’s localdirectory on their host.
7 Logout of the FTP session.
quit
Now you have a copy of the M202/M212’s stored configuration parameters. Thesfiles can be saved for archival purposes, used to reconfigure the unit to a previouting, or used to set a number of units to the same configuration.
It is only necessary to save the files from thestored directory. Files from the defaultand current directory are not required in order to restore a unit’s configuration.
Restoring a Configuration Using FTP
FTP can be used to restore a configuration saved from the unit or restore a confition saved from another unit.
If you are restoring a configuration saved from another unit, the configuration muof the same version as the unit receiving the configuration.
1 Change to the local directory on the host where the saved configuration filesreside.
Note
Note
132 USING THE M202/M212’S ADDITIONAL OPTIONS: FTP Daemon

nfig--elnettion
ere
ds
num-ura-
2 Login to the M202/M212 usingftp .
ftp ipname
3 Login asroot.
You must be aroot user in order to FTP files to the /config directory.
4 Change to theconfig/stored directory.
cd config/stored
5 Set mode to binary. Configuration files are always in binary form.
bin
6 Turn off the interactive mode.
prompt
7 Upload all the files from the user’s local directory.
put *
Copies all files from the local directory to theconfig/stored directory.
8 Logout of the FTP session.
quit
It will be necessary toreset the M202/M212 for the changes to take effect.
2. /exec directory
Using the /exec directory, users can upload a text file that includes a number of couration commands. When this file is placed in the /execdirectory, the commands contained in it are executed as if they were commands entered sequentially from a tsession usingnpsh. This feature enables the user to create a single text configurafile that can be used to quickly and easily configure a number of M202/M212s.
The command syntax for the text configuration file is exactly the same as if you wentering individual commands withnpsh through a telnet session. Please seeUSINGTHE M202/M212’S COMMAND SET on page 83 for details regarding the commanand their syntax.
The configuration file can be seen as simply a user-defined script that includes aber of configuration commands to be executed. Comments describing the configtion can also be included in this file provided they follow the correct syntax.
Note
Note
Note
USING THE M202/M212’S ADDITIONAL OPTIONS: FTP Daemon 133
iontheatible
lt
the
-
gu-
The following is an example of a simple configuration file:
; These are comments for the example config file.; Note that comments have to start at the beginning of a; line and be preceded by an ‘;’;version 5.4; If this command is found and the current version does not; correspond to the command parameter, the file execution; will abort.;redirect prn1load defaultset dest d1prn1 name newdestset dest d2prn2 name anotherset dest newdest ioport com2set model m1 name newmodset prn1 slowmodeset com1 cs8 19200 istripsave
The above example includes a line for theversion number. Because the commandsand/or syntaxmay change from one firmware version to another, an old configuratfile may be incompatible with the current version. By entering a version number, transfer will be aborted and the user notified to check if the commands are compwith the current firmware version if the version numbers do not match.
The above example includes theload default command. This is optional. Includingload default ensures that you always begin a configuration from the factory defausettings.
The above example uses theredirect command. This redirects standard output to aspecified port with an attached monitor or printer. This allows the user to monitorcommands as they are being executed. Without theredirect command, users will seeno output from the commands as they are being executed.
It is important to ensure that the redirect port's parameters are not altered in commands that follow or else the output may be affected.
It is not possible to generate a text configuration file from an existing binary confiration file in the/config directory.
Example
Note
Note
Note
Note
134 USING THE M202/M212’S ADDITIONAL OPTIONS: FTP Daemon
con-
ssary
en
me
e. to
n,cols
Executing a Configuration File Using FTP
The following example shows how to execute a configuration file using FTP:
1 Change to the local directory where the text configuration file resides.
2 Login to the M202/M212 usingftp .
ftp ipname
3 Login asroot.
You must be a root user in order to FTP files to the /execdirectory.
4 Change to the /execdirectory.
cd exec
5 Copy the text configuration file to theexec directory.
put filename
The M202/M212’s parameters are now set according to the commands in thefiguration file.
Depending on the specific commands in the configuration file, it may be neceto reset the M202/M212 for the commands to take effect. Basically, the samerules apply whether you are usingnpsh to issue commands or a configuration filto issue commands. For more information on the rules regarding configuratiocommands and options, please seeUSING THE M202/M212’S COMMAND SETon page 83
6 Logout of the FTP session.
quit
If two FTP clients try to send configuration files to the exec directory at the satime, the second file will fail.
Serial Line IP
Serial Line IP (SLIP) is a protocol used to connect two networks using a serial linThe M202/M212’s serial ports support SLIP allowing the M202/M212 to be usedprovide remote hosts with dial-up access to the local network via a modem.
SLIP is a very simple protocol and does not have any type of packet identificatioerror detection/correction, or address configuration. It relies on upper level proto
Note
Note
Note
USING THE M202/M212’S ADDITIONAL OPTIONS: Serial Line IP 135
o thehek
localg a
on-al-in
ress
l
at
sent
(IP, TCP and UDP) for such tasks. With SLIP, every IP packet that is to be sent tremote network is just sent through the serial line followed by a byte to indicate tend of that packet. SLIP does not allow communications with Novell or AppleTalnetwork.
SLIP is very userful if you want, for example, to allow remote users access to the network or to allow users to send print jobs to a remote office rather than sendinfax.
There are two ways to enable SLIP on the serial ports:
• As a dedicated SLIP connection.
• As a temporary SLIP connection
Configuring a Serial Port as a Dedicated SLIP Connection with an Attached Modem
The following example explains how to set up a serial port as a dedicated SLIP cnection with an attached modem. This procedure will provide one remote host diaccess to the local network via a modem attached to the serial port, com1.
This example assumes that the remote host is already configured with an IP addand has TCP/IP and SLIP available.
1 Login to the M202/M212 and enter the followingnpsh commands to set the seriaport to SLIP and to configure other necessary serial port settings.
set com1 slip ignbrk ctsflow rtsflow -ixon -inoff [baudrate]
save
The baud rate must correspond to the baud rate of the attached modem.
2 Add a route to the M202/M212’s routing table for the remote host.
store tcpip route add host [ remotehost ipaddress ] [r emote-host ipaddress ] [ ioportname ]
store net route add host 192.147.242.3 192.147.242.3 com1
3 Configure the M202/M212 to answer ARP requests for this remote host so thanything destined for this remote host will go to the M202/M212.
store tcpip proxy add host [ remotehost ipaddress ]
store tcpip proxy add host 192.147.242.3
4 Enable the IP gateway option on the M202/M212 so that data packets will be
Note
Note
Example
Example
136 USING THE M202/M212’S ADDITIONAL OPTIONS: Serial Line IP
12’se
e with
ed to
con-
rt
ress
at
from the Local M202/M212 network to the romote host.
store tcpip opts gateway
5 Reset the Print Server to make these settings take effect.
reset
The remote host can now dial-in to the modem and become part of the M202/M2network as if it were a new host on that network. Basically, whatever a host on thlocal network can do, the remote host can do.
A dedicated SLIP connection can be the source of a security hole because anyonthe dial-in modem number can access the local network.
A serial portcannot be configured as both a SLIP connection and a print server desti-nation. Any destinations that are configured to the serial port must be reconfiguranother I/O port.
Configuring a Serial Port as a Temporary SLIP Connection with an Attached Modem
The following example explains how to set up a serial port as a temporary SLIP nection with an attached modem. This procedure will provide remote host dial-inaccess to the local network via a modem but will terminate SLIP on the serial powhen the connection is broken.
This example assumes that the remote host is already configured with an IP addand has TCP/IP and SLIP available.
1 Login to the M202/M212 and enter the followingnpsh commands to configurethe serial port to the nessary settings.
set com1 ignbrk ctsflow rtsflow -ixon -inoff [baud rate]
save
The baud rate must correspond to the baud rate of the attached modem.
2 Add a route to the M202/M212’s routing table for the remote host.
store tcpip route add host [ remotehost ipaddress ] [r emote-host ipaddress ] [ ioportname ]
store net route add host 192.147.242.3 192.147.242.3 com1
3 Configure the M202/M212 to answer ARP requests for this remote host so th
Note
Note
Note
Note
Example
USING THE M202/M212’S ADDITIONAL OPTIONS: Serial Line IP 137
sent
withpe
d.
t on host
thedemthatill
ed to
anything destined for this remote host will go to the M202/M212.
store tcpip proxy add host [ remotehost ipaddress ]
store tcpip proxy add host 192.147.242.3
4 Enable the IP gateway option on the M202/M212 so that data packets will befrom the Local M202/M212 network to the romote host.
store tcpip opts gateway
5 Create logins for the users who will be dialing-in from a remote host.
set user add userid
set user passwd userid [ password ]
6 Reset the Print Server to make these settings take effect.
reset
7 The remote host can now dial-in to the modem. Once the connection is madethe M202/M212, they will be given a standard login screen where they will tytheir user id and password and press<Enter>.
8 The standardnpsh message will appear. At the prompt, type:
slip
This configures the serial port to SLIP for as long as the connection is maintaineWhen the connection is dropped, the serial port reverts back to standardnpsh mode.
The remote host is now part of the M202/M212’s network as if it were a new hosthat network. Basically, whatever a host on the local network can do, the remotecan do.
The Print Server detects that the connection was dropped via the DCD signal onserial port pin. When connecting via a modem, this is usually handled by the moitself. If you are connecting to the serial port via a null modem cable, make sure the cable carries the DCD signal from the remote host so that the M202/M212 wrevert back tonpsh mode when the remote computer is turned off.
A serial portcannot be configured as both a SLIP connection and a print server desti-nation. Any destinations that are configured to the serial port must be reconfiguranother I/O port.
For more information on setting up a serial port for SLIP, please see set com1|com2
Example
Note
Note
138 USING THE M202/M212’S ADDITIONAL OPTIONS: Serial Line IP
mu-rver
-
on page 94.
IP Routing
IP routers allow computers connected to two (or more) separate networks to comnicate with each other. The M202/M212 IP routing capabilities allows the Print Seto be Wide Area Network compatible.
For information on configuring the M202/M212’s IP routing features, please seestoretcpip opts [-]ipforward on page 112 and store tcpip route add|del default routeripaddress ifnum on page 112.
USING THE M202/M212’S ADDITIONAL OPTIONS: IP Routing 139

140 USING THE M202/M212’S ADDITIONAL OPTIONS: IP Routing
?
our
p
our
olve
TROUBLESHOOTING THE M202/M212
Overview
This chapter will help you with various problems you may encounter throughout yprint setup or when printing. There are five main sections in this chapter:
1 Common Problems
2 TCP/IP Problems
3 Novell Problems
4 AppleTalk Problems
5 Windows Problems.
Common Problems
The M202/M212 doesn’t power up with the correct LED sequence
Please refer toLED Patterns on page 171. This table describes different LED startupatterns that are possible on the M202/M212.
If at any time after the bootup process the ERR LED comes on, please contact ylocal vendor.
TCP/IP Problems
Communication Related
You cannot ping the M202/M212
There are a number of possible reasons for this:
• Have you rebooted the Print Server? Sometimes something this simple will svarious communication problems.
• Is the network connector fastened on tightly to the Print Server?
Note
?
?
?
TROUBLESHOOTING THE M202/M212: Overview 147

?w
and
er oro get
so,
the
, a
inal get
tions
• Have you checked your network connection to the M202/M212? Try it at a nelocation on your network if possible or swap in another device.
• Have you made an entry in your host table (/etc/hosts, host nis map, or DNSname table) for the M202/M212?
• Have you tried toping with the IP address instead of the IP name? This willeliminate any name-lookup issues and focus more on the communicationsbetween the M202/M212 and your host.
• Is it possible that a duplicate IP address has been assigned?
• Did you use the correct netmask for your particular environment?
• Has the M202/M212 been moved from another network? If so, it needs to bereconfigured to integrate with its new location. This includes a new IP addressnetmask at the minimum. Please seeRestoring To Factory Defaults on page 118andM202/M212 Configuration on page 25 for possible configuration methods.
• Is there a router between the M202/M212 and your host? If so, a default routa static route must be configured on the unit so the Print Server knows how tits response back to the originating host. Please seestore tcpip on page 111 andGetting Ready for Complex Networks on page 119.
• Have you set any hosts or networks in the M202/M212’s TCP access list? If only these entries can access the unit. Please seelist tcpip on page 90 to viewcurrent entries.
• Do you have a RARP or BOOTP server running on your network? By default,M202/M212 comes with the RARP and BOOTP request turnedon so althoughyou may have stored a particular network configuration in the units EEPROMRARP or BOOTP server may supply newnetwork parameters upon bootup. Toturn off RARP and BOOTP on the unit, please seestore tcpip on page 111.
If none of these help, try the following:
• Store the network parameters or view the currently stored settings via a termon COM1 or COM2. This logs you into the unit’s command set where you cana better understanding of what’s going wrong. Please seeManual ConfigurationThrough the COM Port on page 30.
• Reset the unit to default settings. Please seeRestoring To Factory Defaults onpage 118. Once the unit is in the default state, use one of the configuration oplisted inM202/M212 Configuration on page 25 to reconfigure it.
148 TROUBLESHOOTING THE M202/M212: TCP/IP Problems
?
ld
ach
ationow.”
r?ase
able.
thed. If.
b
ugh.sider
You cannot Telnet to the M202/M212
If you are unable toping the Print Server as well, please seeCommunication Relatedon page 147. If it istelnet only that you are having problems with, these points shoube considered:
• Are you able totelnet to another host on your network ortelnet from anotherhost? If not, look into your host’s TELNET configuration.
• Have you tried rebooting the M202/M212?
• Does the fourth octet of the M202/M212’s given IP address equal 0 or 255? Eof the four octets in the IP address should be between 1 and 254.
Printing Related
You’ve completed your print setup but nothing is printing
This can be the most frustrating problem since you’ve gone through the configurprocess and suddenly you don’t know what’s happening - “it’s supposed to work nHere are some things to check over:
• Are you able to communicate with the M202/M212? If you are havingcommunication problems, please seeCommunication Related on page 147.
• Is the printer online and in the correct mode for the file being sent to it?
• Is the printer spooler up and running on the host?
• Have you confirmed communications between the M202/M212 and the printeThis can easily be done with the ASCII output tests provided on the unit. Pleseestart on page 107 for information on these various tests. If you are notsuccessful with these, look at flow control, I/O port settings, or possibly the c
• Is anything happening on the printer when the print job is sent? Sometimes, print job may have gotten to the printer but just may need a manual form-feethis is the case, please seeset model on page 99 for information on trailer strings
• Is the print job data even getting to the M202/M212? Once you’ve sent the jofrom the host, try continuouslpstat commands on the Print Server. You shouldsee the byte count for that particular port incrementing as the job passes throIf you are not seeing this happen, you may need to try a larger job or else consome of the other suggestions in this section.
?
?
TROUBLESHOOTING THE M202/M212: TCP/IP Problems 149
?a
r fileswn
rm.
r
see
as or it
e
ey are
t
e is
• If you’re usingnpr.if to print, are the host binaries installed on your system in general directory such as/usr/local/bin? Please seePrinting Via the Spooler onpage 34 for more on interface file printing.
• Are there any error messages in your email, a log file, or other standard erroon your particular host? These messages can be very helpful in narrowing dothe problem.
• Are all permissions correct on relative directories and files? Usually the errormessage files will indicate permission problems but it’s still something to confi
• Might the destination or I/O port on the M202/M212 be disabled? Please seedisable on page 86 andenable on page 87 for more on this feature.
If you are not able to print successfully yet, try the following:
Avoid the print spooler altogether by printing directly to the M202/M212 from youhost. If you are successful, go over your host’s print setup.
cat test.txt | rsh spike lp -d d1prn1
sendstest.txt to the M202/M212 namedspike to be remotely printed on the printerattached tod1prn1. The print spooler is not used at all.
npwrite can also be used to send print jobs without spooler intervention. Please Direct Printing Without the Spooler on page 32.
Your print job comes out formatted incorrectly
In a TCP/IP environment, this generally happens if no carriage return insertion hbeen incorporated into the printing process. The M202/M212 can handle this taskcan be set on the host system with the use ofonlcr. To set this feature on the PrintServer, please seeset model on page 99. For the host, a variable, ONLCR_YN, in thprovided interface file,nprbsd.if or nprsysv.if, must be set to 1. Please seePrintingVia the Spooler on page 34.
Your data comes out garbled
This tends to happen when PCs are used with a TCP/IP software package and thprinting to a Unix system or directly to the M202/M212 whereonlcr is turned on.DOS jobs have difficulty with this carriage return insertion and will therefore, prinout incorrectly. To solve, make sureonlcr is turned off in the model associated withthe destination that you are printing to and it is not set in the interface script if on
Example
Note
?
?
150 TROUBLESHOOTING THE M202/M212: TCP/IP Problems
?
ER,
ing
faultTER.
ach
n ons
used somewhere in the print path.
Any printing from PCs should have a “raw” setup.
Some other things to consider when garbled data persists are:
• tab expansion (xtab) set on with graphic jobs,
• cable used between the M202/M212 and the printer,
• type of flow control being used on the M202/M212 and a serial printer.
If you cannot eliminate the garbling, you may want to try printingwithout the PrintServer to see if the problem persists.
Novell Problems
Communication Related
No connection is made with the M202/M212 after you have completed theprint setup
Whether you have configured the Print Server as a PSERVER or as an RPRINTthere are several things to confirm:
• Have you tried repowering the M202/M212 Wait about a minute before checkto see if it has logged in and attached to a queue.
• Is the network connector fastened tightly to the unit?
• When going through the setup steps, did you name the M202/M212M_xxxxxxwherexxxxxx equals the last six digits of the Ethernet address? This is the deformat of the unit’s name whether it is acting as a PSERVER or as an RPRIN
ThisM_xxxxxx name must have six digits after the “_” so if necessary, pad out ebyte with a zero (0).
• Has the M202/M212’s name been changed from its default ofM_xxxxxx and ifso, have you incorporated this new name into your setup?
• When setting the M202/M212 up as a PSERVER, did you specify a destinatiothe M202/M212 (e.g. d1prn1) for the printer name and did you remember thiname iscase sensitive?
Note
Note
?
TROUBLESHOOTING THE M202/M212: Novell Problems 151
? are
e? Ifter)
hef the
he
-
are,
haveave
om- fol-
etinger to
M202/M212 destinations are case sensitive so they will not be recognized if theytyped incorrectly. By default, they are all inlowercase. If you are setting up in a Net-Ware 4 environment, the destination must be renamed touppercase to match PCON-SOLE’s entry. Please seeset dest on page 96 for information on changing names.
• In a PSERVER setup, did you ensure that you were in bindery emulation modyou were, then did you do your entire print setup (i.e. queue, print server, prinin this mode? It is important to create all print setup elements in this mode.
• Is there a password set for the Print Server to utilize when it is logging in to tfile server? Make sure the M202/M212’s PSERVER password matches that oPCONSOLE’s PSERVER setup or set both places tono password.
• Is there an entry when alist rprinter is done on the M202/M212? When theM202/M212 is configured as an RPRINTER, this command should produce tappropriate entry. Please seeHost Software on page 53 for details on using theprovided DOS host software,npsh.exe, to communicate with the unit in a Novellonly environment.
• Have you tried using the M202/M212’sdebug novell command to see if it evenrecognizes any file servers on the network? You can use the DOS host softwnpsh.exe, to communicate with the unit.
• If you look in CURRENT QUEUE STATUS within the PRINT QUEUEINFORMATION menu in PCONSOLE, can new servers attach to this queue?
• If you’re configuring the M202/M212 as an RPRINTER, have you setup theCONFIG file accordingly? Is SYS VOLUME correct for your particularenvironment or was it configured differently upon your Novell installation?
• If the M202/M212 has logged in to the file server but has not attached to thequeue, there may be a permission problem. Make sure the appropriate usersrights to this queue (they should be in the group “everyone.”) Also, you may hto assign the queue to “root” so that is available to everyone.
If none of these help your situation, you may want to try the whole setup again. Cpletely delete the setup that is giving you trouble and go through the setup againlowing each step carefully.
Be sure to reboot the M202/M212 before beginning a new setup and after compleither a PSERVER or RPRINTER setup. Wait at least a minute for the Print Servlogin and attach to a queue.
Note
Note
152 TROUBLESHOOTING THE M202/M212: Novell Problems
?
day be
erly,i.e.
m.
the. If.
his
thisr
Printing Related
The job goes to the queue but nothing prints
If nothing is printing, make sure you have a connection to the M202/M212 first.Please seeCommunication Related on page 151 if you are having connection-relateproblems. Otherwise, consider these points to solve any printing problems you mhaving in your Novell environment:
• Does the job leave the queue or is it stuck there indefinitely? If it leaves propthe problem points to the actual printing mechanism on your Novell system (CAPTURE, NPRINT, etc.), to the print job format, or to the printer itself.Otherwise, concentrate on the configuration steps you’ve taken on your syste
• Have you confirmed that you can print from the M202/M212 to the printerignoring the Novell setup altogether? Please seestart on page 107 for a good testyou can try.
• Is anything happening on the printer when the print job is sent? Sometimes, print job may have gotten to the printer but just may need a manual formfeedthis is the case, please seeset model on page 99 for information on trailer strings
• Is the printing mechanism you are using (i.e. CAPTURE, NPRINT, etc.)configured to service the appropriate queue?
• Is the M202/M212 configured as the queue’sCurrently Attached Server? If not,make sure you have associated the queue and the printer. Please seeHostConfiguration on page 55.
• Is there a hold on the print job? If you select the job from PCONSOLE’sCURRENT PRINT JOB ENTRIES, change theUser Hold or Operator Hold tono.
• If you look in PCONSOLE’s CURRENT QUEUE STATUS within the PRINTQUEUE INFORMATION menu, is the server configured to service entries in tqueue? It is possible to turn servicingoff here.
These are just a few things to confirm. If you are still having printing problems atpoint, try rebooting the M202/M212 and either go over every step you took in youconfiguration process, or try a new setup paying special attention to each stepexplained inHost Configuration on page 55.
?
TROUBLESHOOTING THE M202/M212: Novell Problems 153
?
t char-wever,
usedr
ithinures
ade
set
terThis
t job
cha-
The job prints but it comes out incorrectly
This category really can be broken down into several sub-categories such as losacters, garbled data, extra banner pages, or blank pages at the end of the job. Hothe reason for these mishaps can generally be traced to the printing mechanismon your Novell system. These points should be considered when configuring youprint method (i.e. CAPTURE, NPRINT, etc.):
• Did you include theNo Tabs option?
• Did you specifyNo Banner with PostScript printers?
• Did you turn off banner pages and formfeeds if this is already taken care of wan application or on the M202/M212? Doubling up of these types of print featis easy to do since these options are provided both on the M202/M212 (in amodel) and within the print command.
• Are you running the latest version of PSERVER (later than 1.22)? If not, upgrthe PSERVER software.
• In a PSERVER setup, did you ensure that the printer name (e.g. d1prn1) wasup as“Defined Elsewhere”?
• Is the timeout option in the CAPTURE command set high enough so the prindoesn’t time out before the print processing has had a chance to complete? can be a problem with graphic jobs.
Some other things to consider when garbled data persists are:
• tab expansion (xtab) set on (in amodel) with graphic jobs,
• the right driver for the printer if printing from within Windows,
• cable used between the M202/M212 and the printer,
• type of flow control being used on the M202/M212 and a serial printer.
With other print methods, the only thing to remember here is to configure the prinfor Byte Stream. This will pass the data to the M202/M212 untouched.
For additional information on these suggestions or on various Novell printing menisms, please refer to your NetWare user manuals.
?
154 TROUBLESHOOTING THE M202/M212: Novell Problems
?
ions?
ne.
lemwait- for
g to
lemee any
ge-theagea).
AppleTalk Problems
The Laserwriter icon in the Chooser Menu doesn’t display any printerdestinations
In this situation, these things should be considered:
• Are you using EtherTalk rather than LocalTalk or TokenTalk?
• Is “EtherTalk” chosen in theControl Panel’s Network icon?
• Have you checked the M202/M212 and the Apple system’s Ethernet connect
• Have you configured the M202/M212 to show up in the correct AppleTalk ZoPlease seeAppleTalk Zones on page 66 for information on doing this.
Windows Problems
Windows NT 3.5x
Queue hangs
Hanging print jobs or queues with Windows NT 3.5x usually means there’s a probat the host end. Most likely the printer and print server are sitting on the network ing for some form of activity but the host is not doing anything. This is very typicalany LPR printing with Windows NT 3.5 and is possible with NT 3.51 as well.
The first thing to check is that the printer is in fact ready to go, meaning it is willinaccept more data. The best way to do this is to the use thelpstat command found onthe print server. In fact, this command’s output will tell you where exactly the probis. Therefore, you’ll want to telnet into the unit when the hanging occurs and issulpstat. Search under the appropriate I/O port you are printing to and see if you semessages like:
• “printing data - blocked”
If you see this message with the seconds to the right of the “blocked” messaincrementing with every lpstat command you issue, then the printer is not allowing the print server to pass data to it. This will hang the print queue because print server cannot take more data in its output buffer until the “blocked” messgoes away (i.e. the printer sends the signal saying it’s okay to send more dat
?
?
TROUBLESHOOTING THE M202/M212: AppleTalk Problems 155

?goes prop-
geensendrver the.
con-asuad
rint
lly
tin-
. somean’tsre tond
Once the printer is cleared of any error situation and the “blocked” message away, the print job should then go through and the queue should move alongerly.
However, if the printer is in fact online and ready to print but you’re still seein“blocked” messages, there may be a problem with the communications betwthe print server’s I/O port and the printer. Possibly the cable is faulty and the signal isn’t getting through to the print server or maybe the printer and print searen’t communicating properly. If this is the case, you need to look closely atsettings on both the printer’s interface and the print server’s I/O port interfaceAnother option is to try another printer to see if it works any better.
• “printing data - waiting”
Anytime you see this message, the print server says it knows about the printnection but it is waiting for the host to send data. Currently the unit’s buffer hsome room in it for more data but the host is not co-operating. Therefore, yoneed to look to the host to see why it is hung up. Look for errors that might leyou in the right direction and definitely make sure the host can still see the pserver on the network using “ping” or “telnet”.
This “waiting” message is very common when using NT’s LPR client with NTversion 3.5. Microsoft has a known bug that hangs up LPR printing periodicabut this is supposed to be fixed with NT v3.51 according to Microsoft’s onlineKnowledge Base.
Various other errors
Printing in a Windows NT environment can produce various errors that do noalways mean too much to the user at first glance. Some common ones are “Wdows cannot write to this file.” or “A network error has occurred.”
In most cases, the errors are all related to the LPR bug with Microsoft NT 3.5That or an error comes up because the print server cannot take more data forreason (i.e. the printer is in an error state). Windows has a real problem if it csend all of the print job data right away so if it’s blocked from sending data, itspool file builds and builds leading to an error like the ones mentioned. Be sucheck thelpstat output on the print server to determine where the problem is aif it’s host related, keep the LPR bug in mind.
?
156 TROUBLESHOOTING THE M202/M212: Windows Problems
?
Thetherthend
b
irerint
say-
e an torintd it
youuse a thatrk
Windows for Workgroups
Printer and Network Errors
Anytime you have several Windows for Workgroups (WfW) stations printingdirectly to a print server, you may run into various printer and network errors. problem occurs when one station is sending a print job to the printer and anostation tries to send a print job to the same printer at the same time. The prinserver tells the second station to hold on to its data until it has finished with tfirst job. However, the Print Manager on this second station doesn’t like this aerrors out. This requires that the user on the second station resubmit their jowhen the printer is clear again.
This problem will occur with any external print server that does not spool entprint jobs (which is the case for every print server on the market today). The PManager likes to send the data it spools immediately and if it can’t do this(because the printer is already busy with another job) it will produce an erroring the network or printer is busy.
The best solution to this problem is to then have a central spooling station (likNT server) which allows each WfW station to spool the print job immediatelythe server’s hard drive. The NT server then can sit with the print job until the pserver/printer can take it. The print server then only deals with one station angoes through each job as it gets queued up.
It is not possible to set up a WfW station as the central spooling device sincecannot share a printer on the network that is already being shared. It is beca“net use” connection is used between this central station and the print servercauses the problem. However, a central NT station can offer a shared netwoprinter to these WfW stations.
Note
?
TROUBLESHOOTING THE M202/M212: Windows Problems 157

?
158 TROUBLESHOOTING THE M202/M212: Windows Problems

ack-war-
ev-
for-ion,
GETTING HELP WITH THE M202/M212
Overview
This is an important chapter to read if you are in need of any assistance with theM202/M212. It covers the procedures for obtaining technical support, upgrade pages, and general product information and software, and it explains Microplex’s ranty policy.
Help Methods Available
Support and information regarding your Microplex product can be obtained via seral methods:
• WWW site:http://www.microplex.com/ ,
• FTP site:ftp.microplex.com ,
• Email: [email protected] or [email protected] ,
• Tel: +1 604 444-4232 or +1 800 665-7798 (in North America),
• Fax: +1 604 444-4239.
These methods are described next.
WWW Site
Microplex’s HTTP site contains information on the company as well as detailed inmation on the M202/M212 including data sheets and technical bulletins. In additthe latest software and manuals are always available.
Using whatever Web browser you have available, you need to get to the URL,http://www.microplex.com/ .
FTP Site
The FTP site contains similar data to the HTTP site.
The site is located atftp.microplex.com and once logged in as an “anonymous”user, change to the directory/support where you’ll find various sub-directories
GETTING HELP WITH THE M202/M212: Overview 159

This
toth
ns.
themes
d up
related to the different products and information available.
If you cannot access this site over the Internet, a 1-900 number is also provided.is a dial-up line that goes directly to this FTP site. You can login “anonymous” and nopassword is required. The number is1-900-468-7727.
A fee is charged for using this number.
Two email addresses are provided if you want to contact Microplex. Please [email protected] if you have any general product questions or problems withe unit. [email protected] if you need technical assistance butbefore doing so, please seeTechnical Support on page 160.
For specific service and support procedures, please see the following sub-sectio
Technical Support
Microplex offers technical support for any problems you may have with yourM202/M212. It is available through any of the methods mentioned inHelp MethodsAvailable on page 159.
If you decide to call Microplex, you may be placed in a call queue depending on current support load. A support technician will get back to you as soon as one coavailable.
Email is usually the quickest option.
Requirements Before Contacting Technical Support
Before contacting Microplex for help, it is important that you:
• go through the troubleshooting suggestions described inTROUBLESHOOTINGTHE M202/M212 on page 147,
• delete your current print setup and try again.
If the printing problem still persists, please have this information on hand to speethe technical support process:
Note
Note
160 GETTING HELP WITH THE M202/M212: Technical Support

.
are,
s doe eas-s
• M202/M212 firmware version (please seelist sysinfo on page 90),
• M202/M212 I/O port settings (please seelist com1|com2 on page 87 orlistprn1|prn2 on page 89),
• host print setup including the host type and print method used,
• any special processing done on the host or on the Print Server,
• description of the problem including the troubleshooting steps you have tried
The more details you have for the support technician and the more prepared youthe better.
Upgrade Procedure
The M202/M212’s upgrade procedure is simple due to its FLASH memory. ROMnot need to be replaced on the Print Server but rather, the ROM code itself can bily downloaded to the unit. The latest code can be obtained from any of the placementioned inHelp Methods Available on page 159.
There are three files that are required for the upgrade process:
1 m202dl.hex.Z is the FLASH upgrader,
2 m202hex.Z is the Print Server binary,
3 download.txt explains the upgrade procedure.
Host software is also available for the various versions of firmware.
WWW Site
To get these from the WWW site, you need to:
1 Click onTechnical Support on the home page.
2 Under the section “M202/M212 Print Server”, click onUpgrading Firmware.
3 Follow the instructions in Step 1 under “Start Here” and downloadm202dl.hexandm202.hex.
To obtain the upgrade instructions, just print out theUpgrading Flash Firmwarepage. In addition, to get the latest host software, click onHost Software under the
Note
Note
Note
GETTING HELP WITH THE M202/M212: Upgrade Procedure 161
n
.
shipasea
em.
r- (3)iablese-nt
lexfixed
section “M202 Print Server” on theTechnical Support page.
FTP Site
If using the FTP site, you need to change to the directory/support/m202/rom where these upgrade files exist. Enter intobinary mode andthenget each file.
Change to/support/m202/host/current to get the latest host software. Once ibinary mode,get the filem202npdist.tar.1.Z.
To be notified of any new releases, make sure you send in yourWarranty Registra-tion/Customer Survey card. This will keep you current on any new advancements
Warranty
Microplex Systems Ltd. warrants this product to be free from defects in workmanand material for the duration of three (3) years from the time of the original purchdate. During this period, Microplex will repair or replace a defective product with new or rebuilt product at no extra charge except as stipulated below.
At no time shall Microplex’s liability exceed the replacement cost of the subject it
All express and implied warranties for this product including all warranties of Mechantability, Suitability, and Fitness for a particular application are limited to threeyears from the time of the original purchase date. In no event shall Microplex be lfor Loss of Use, Loss of Profits or Revenues, or other Indirect, Incidental, or Conquential Damages. This warranty does not imply the right to loaner or replacemeunits during the time required to perform repairs.
To obtain service under this warranty, the defective product must be returned toMicroplex in packaging that will prevent damage from occurring while in transit. AReturn Merchandise Authorization (RMA) number must be obtained from Micropprior to shipping the product. This number should be clearly marked on a label afto the outside of the package.
This warranty does not cover any losses or damage caused by:
• shipping,
• improper installation, use, or maintenance,
• unauthorized repair, modification, alteration, or replacement of components,
Note
162 GETTING HELP WITH THE M202/M212: Warranty
:
he
.
age
plex
cial
quire-
• excessive environmental conditions including electrical power surges,temperature, humidity, or any other irregularities,
• negligence or abuse.
Warranty Claim Procedure
Please use the following guidelines when shipping goods back for warranty claim
• Get an RMA number and shipping instructions from Microplex using one of tmethods mentioned inHelp Methods Available on page 159.
• Indicate the RMA number clearly on the address label of the shipping carton
• Include a copy of the invoice/receipt.
• Package the product securely, in original packaging if possible, to prevent damduring shipping.
• ShipONLY BY FEDERAL EXPRESS, insured and collect.
Using any other shipping company may result in charges to your company. Microwill pre-pay the return shipping charges with Federal Express.
• If you ship from a country other than Canada, type (on any paper) a commerinvoice containing the following information:
• your address,
• Microplex’s address (asconsignee),
• country of origin of the product (i.e. Canada),
• number of packages in the shipment,
• description of the product,
• quantity,
• total value of shipment (your total purchase price),
• reason for return (e.g. warranty repair),
• a declaration.
This invoice must accompany the returned product to meet Canadian customs rements. Please seeSample Commercial Invoice on page 164.
Note
GETTING HELP WITH THE M202/M212: Warranty 163

Figure 5: Sample Commercial Invoice
COMMERCIAL INVOICE fromLeslie SmithABC Corporation1234 Western ParkwayAnycity, NCUSA, 27511
DATE OF EXPORT: 02/12/93 AIR WAYBILL NO. : 123-12341234
CONSIGNEE: IMPORTER (IF OTHER THAN CONSIGNEE)Microplex Systems Ltd.8525 Commerce Court same as consigneeBurnaby, B.C.V5A 4N3, CANADA
COUNTRY OF ORIGIN: Canada
# OFPKGS COMPLETE DESCRIPTION OF GOODS QTY TOTAL VALUE
1 Print Server 1 600.00
REASON FOR RETURN: warranty repair
I declare all information contained in this invoice to be true and correct.
Leslie Smith 02/12/93
SIGNATURE NAME AND TITLE DATE
164 GETTING HELP WITH THE M202/M212: Warranty

M202/M212 SPECIFICATIONS
Variable Definitions
list default var
Name Hexadecimal Description
BS 08 backspace
FF 0C formfeed
CR 0D carriage return
SP 20 space
LF 0A linefeed
TAB 09 tab
ESC 1B escape
DEL 7F delete
EOT 04 end of transmission
NUL 00 NULL character
PCL-POP 1B 26 6C 30 4F portrait page orientation
PCL-POL 1B 26 6C 31 4F landscape page orientation
PCL-PORP 1B 26 6C 32 4F reverse portrait page orientation
PCL-PORL 1B 26 6C 33 4F reverse landscape page orientation
PCL-PSZ1 1B 26 6C 31 41 executive page size
PCL-PSZ2 1B 26 6C 32 41 letter page size
PCL-PSZ3 1B 26 6C 33 41 legal page size
PCL-PSZ4 1B 26 6C 32 36 41 A4 page size
PCL-PSRC0 1B 26 6C 30 48 eject page paper source
PCL-PSRC1 1B 26 6C 31 48 upper tray paper source
PCL-PSRC2 1B 26 6C 32 48 manual feed paper source
M202/M212 SPECIFICATIONS: Variable Definitions 161

PCL-PSRC3 1B 26 6C 33 48 manual envelope feed paper source
PCL-PSRC4 1B 26 6C 34 48 lower tray paper source
PCL-PSRC6 1B 26 6C 36 48 envelope feeder paper source
PCL-PDST1 1B 26 6C 31 47 upper output bin paper destination
PCL-PDST2 1B 26 6C 32 47 reader output bin paper destination
PCL-RST 1B 45 printer reset
PCL-JSEP 1B 26 6C 31 54 job separation
HP3-SWPCL 1B 25 2D 31 32 33 34 3558 40 50 4A 4C 20 45 4E54 45 52 20 4C 41 4E 4755 41 47 45 20 3D 20 5043 4C 0A
PCL-5 PJL command to switch printer into PCLLaguage mode
HP3-SWPS 1B 25 2D 31 32 33 34 3558 40 50 4A 4C 20 45 4E54 45 52 20 4C 41 4E 4755 41 47 45 20 3D 20 506F 73 74 53 63 72 69 7074 0A
PCL-5 PJL command to switch printer into Post-Script Language mode
PAC-SWPCL 1B 26 6C 31 30 35 37 2E33 32 32 35 39 4A
PacificPage PE cartridge command to switchprinter into PCL Language mode
PAC-SWPS 1B 26 6C 35 30 35 37 2E31 30 35 38 4A
PacificPage PE cartridge command to switchprinter into PostScript Language mode
Name Hexadecimal Description
162 M202/M212 SPECIFICATIONS: Variable Definitions
or
Hardware Specifications
Network Interfaces
Provides compatibility with TCP/ICMP/IP and 802.3 Ethernetprotocols.
IEEE 802.3 10Base2 Thin-wire Ethernet female BNC connect(M202 only).
IEEE 802.3 10Base-T UTP Ethernet female RJ45 connector(M202 only).
IEEE 802.3 10BASE5 Thick-wire Ethernet female DA15 AUIconnector through Transceiver/Tap (M212 only).
Table 4: UTP (RJ45) Connector Pinout
Pin Signal Source Pin Signal Source
1 Transmit+ M202/M212 5 none none
2 Transmit- M202/M212 6 Receive- Network
3 Receive+ Network 7 none none
4 none none 8 none none
THIN Ethernet
UTP
THICK Ethernet
M202/M212 SPECIFICATIONS: Hardware Specifications 163
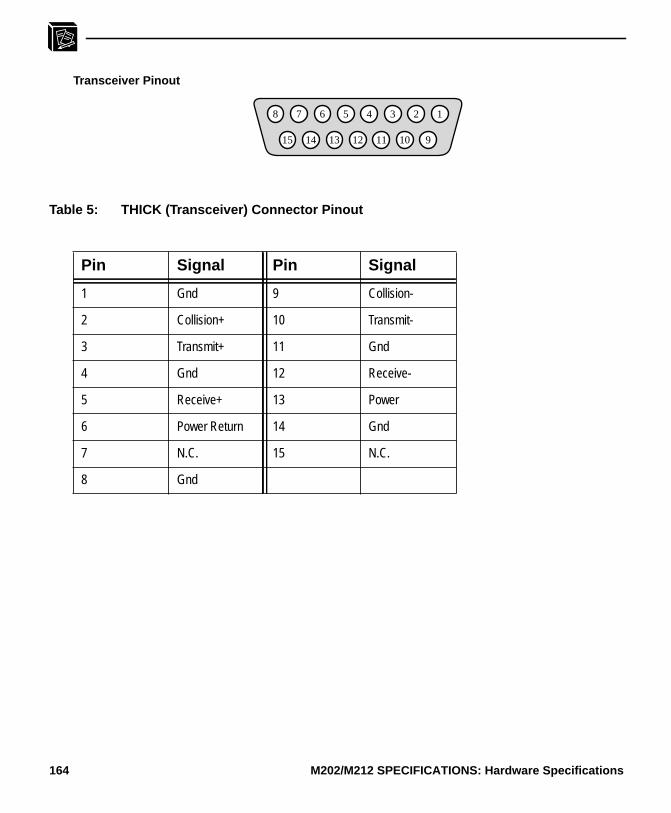
Table 5: THICK (Transceiver) Connector Pinout
Pin Signal Pin Signal
1 Gnd 9 Collision-
2 Collision+ 10 Transmit-
3 Transmit+ 11 Gnd
4 Gnd 12 Receive-
5 Receive+ 13 Power
6 Power Return 14 Gnd
7 N.C. 15 N.C.
8 Gnd
Transceiver Pinout
12345
9101112
678
131415
164 M202/M212 SPECIFICATIONS: Hardware Specifications
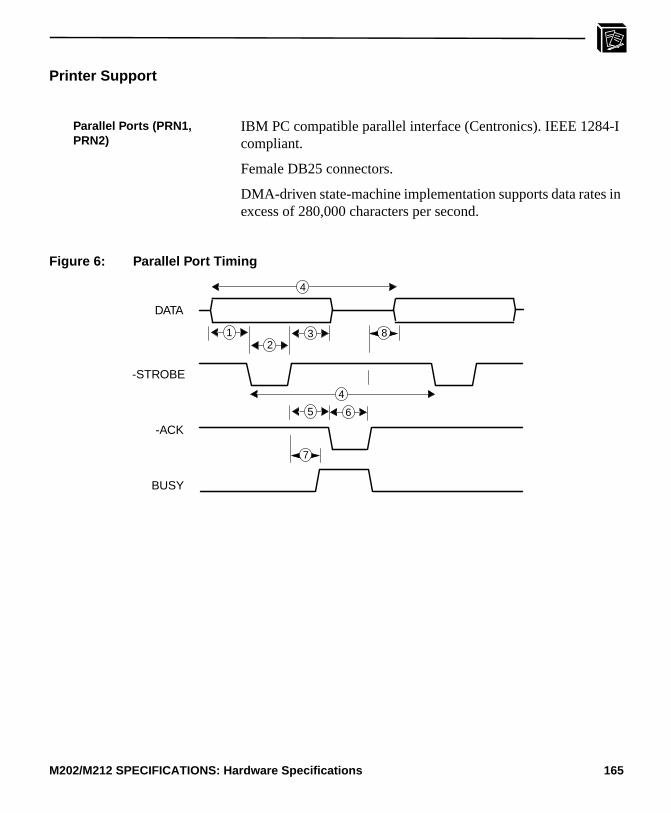
-I
in
Printer Support
IBM PC compatible parallel interface (Centronics). IEEE 1284compliant.
Female DB25 connectors.
DMA-driven state-machine implementation supports data ratesexcess of 280,000 characters per second.
Figure 6: Parallel Port Timing
Parallel Ports (PRN1,PRN2)
DATA
-STROBE
-ACK
BUSY
2
4
1 3
4
5 6
8
7
M202/M212 SPECIFICATIONS: Hardware Specifications 165
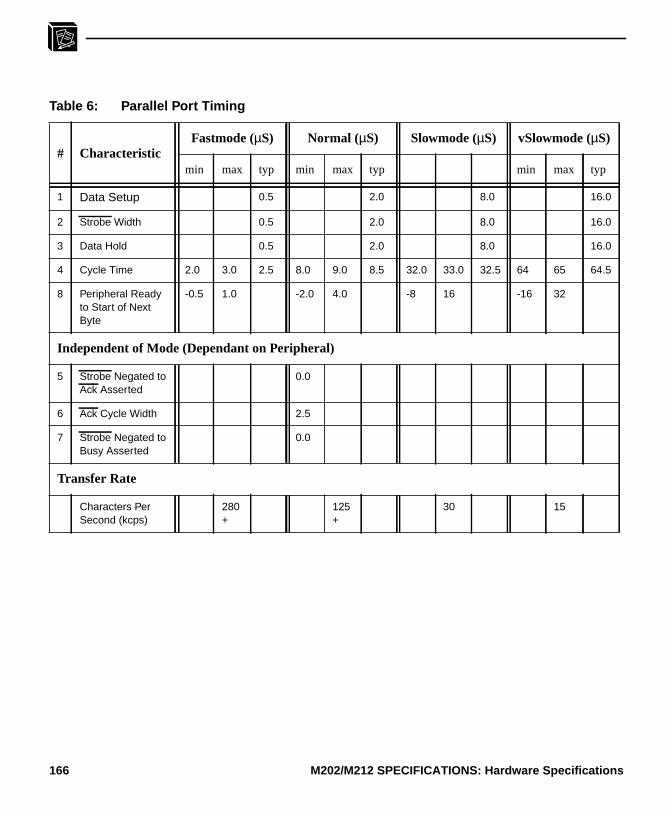
Table 6: Parallel Port Timing
# CharacteristicFastmode (µS) Normal (µS) Slowmode (µS) vSlowmode (µS)
min max typ min max typ min max typ
1 Data Setup 0.5 2.0 8.0 16.0
2 Strobe Width 0.5 2.0 8.0 16.0
3 Data Hold 0.5 2.0 8.0 16.0
4 Cycle Time 2.0 3.0 2.5 8.0 9.0 8.5 32.0 33.0 32.5 64 65 64.5
8 Peripheral Readyto Start of NextByte
-0.5 1.0 -2.0 4.0 -8 16 -16 32
Independent of Mode (Dependant on Peripheral)
5 Strobe Negated toAck Asserted
0.0
6 Ack Cycle Width 2.5
7 Strobe Negated toBusy Asserted
0.0
Transfer Rate
Characters PerSecond (kcps)
280+
125+
30 15
166 M202/M212 SPECIFICATIONS: Hardware Specifications

Parallel Port P inout
Table 7: PRN1/PRN2 Pinout
Pin Signal Source Pin Signal Source
1 -STROBE M202/M212 10 -ACK PRINTER
2 DATA 1 M202/M212 11 BUSY PRINTER
3 DATA 2 M202/M212 12 PE PRINTER
4 DATA 3 M202/M212 13 SLCT PRINTER
5 DATA 4 M202/M212 14 -AUTOFD M202/M212
6 DATA 5 M202/M212 15 -ERROR PRINTER
7 DATA 6 M202/M212 16 -INIT M202/M212
8 DATA 7 M202/M212 17 -SLCTIN M202/M212
9 DATA 8 M202/M212 18-25 GROUND -
12345
14151617
678
181920
910111213
2122232425
M202/M212 SPECIFICATIONS: Hardware Specifications 167
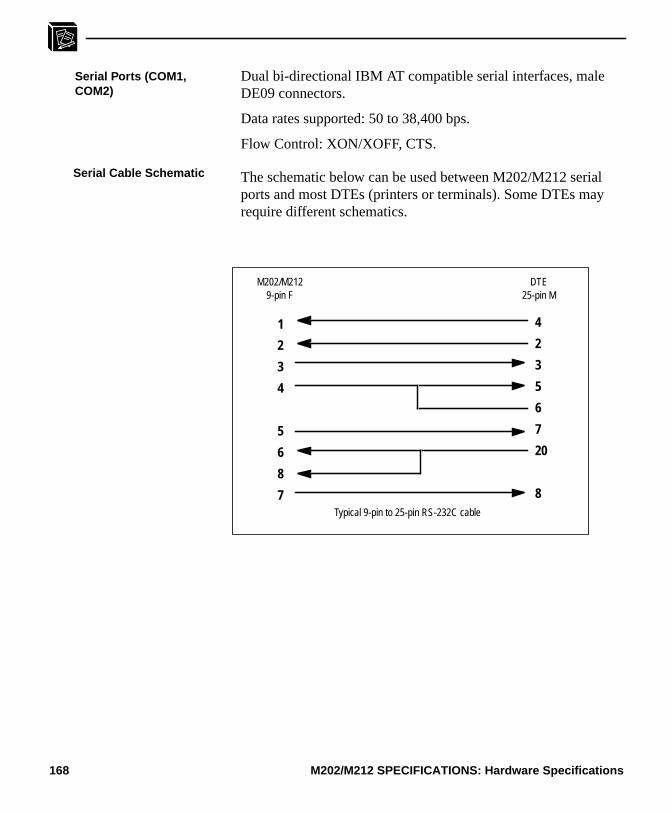
l
Dual bi-directional IBM AT compatible serial interfaces, maleDE09 connectors.
Data rates supported: 50 to 38,400 bps.
Flow Control: XON/XOFF, CTS.
The schematic below can be used between M202/M212 seriaports and most DTEs (printers or terminals). Some DTEs mayrequire different schematics.
Serial Ports (COM1,COM2)
Serial Cable Schematic
M202/M2129-pin F
DTE25-pin M
1
2
3
4
5
6
8
7
4
2
3
5
6
7
20
8Typical 9-pin to 25-pin RS-232C cable
168 M202/M212 SPECIFICATIONS: Hardware Specifications

Table 8: COM1/COM2 Pinout
Pin Abbr. Name Source EIA CCITT
1 DCD Data Carrier Detect DCE CF 109
2 RXD Receive Data DCE BB 104
3 TXD Transmit Data DTE BA 103
4 DTR Data Terminal Ready DTE CD 108.2
5 GND Signal Ground - AB 102
6 DSR Data Set Ready DCE CC 107
7 RTS Request To Send DTE CA 105
8 CTS Clear To Send DCE CB 106
9 RI Ring Indicator DCE CE 125
Serial Port Pinout
54321
9876
M202/M212 SPECIFICATIONS: Hardware Specifications 169
VA
Electrical Details
Typical 115VAC +/- 10% 0.3 A, 60Hz220VAC +/- 10% 0.15 A, 50/60Hz
(M212 w/load 115VAC +/- 10% 0.6 A, 60Hzon AUI) 220VAC +/-10% 0.3 A, 50/60Hz
Maximum 115VAC +/- 10% 0.4 A, 60Hz220VAC +/- 10% 0.2 A, 50/60Hz.
(M212 w/load 115VAC +/- 10% 0.8 A, 60Hzon AUI) 220VAC +/-10% 0.4 A, 50/60Hz
Typical 16V AC +/- 10%, 600mA (THIN Ethernet)
Maximum
Customer-supplied external transformers must be rated at 20or greater for proper operation.
Typical 16W
Maximum 21W
External transformer available in 120V/60Hz or 220 -240V/50Hz.
External TransformerPower Requirements
Low Voltage AC PowerRequirements
Power Consumption
Power Supply Options
Power SocketAC IN 16V
170 M202/M212 SPECIFICATIONS: Hardware Specifications

M202/M212 LED’s
PWR Power supply.
STAT System status.
ERR System error.
NET Data to network.
Table 9: LED Patterns
STAT ERR NET Mode STAT ERR NET Mode
ON ON ON PIA/CPU Test FLASH OFF - Run Mode
ON OFF ON RAM Test FLASH ON - Auto-Reset Mode
ON OFF OFF ROM Test OFF FLASH ON License Violation
ON ON OFF EEPROM Test FLASH FLASH OFF Firmware Panic
OFF ON OFF COM1/COM2 Test OFF FLASH OFF Watchdog Alarm
OFF ON ON Network Interface Test ON FLASH OFF Spurious Interrupt
OFF OFF ON PRN1/PRN2 Test ON FLASH ON Hardware Exception
LED Indicators
M202/M212 SPECIFICATIONS: Hardware Specifications 171
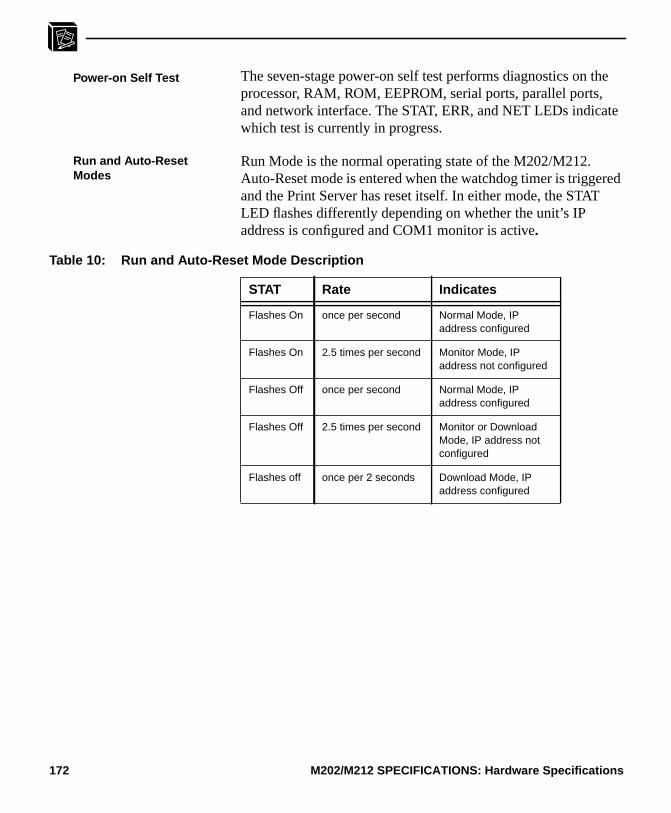
e
te
red
The seven-stage power-on self test performs diagnostics on thprocessor, RAM, ROM, EEPROM, serial ports, parallel ports,and network interface. The STAT, ERR, and NET LEDs indicawhich test is currently in progress.
Run Mode is the normal operating state of the M202/M212.Auto-Reset mode is entered when the watchdog timer is triggeand the Print Server has reset itself. In either mode, the STATLED flashes differently depending on whether the unit’s IPaddress is configured and COM1 monitor is active.
Table 10: Run and Auto-Reset Mode Description
STAT Rate Indicates
Flashes On once per second Normal Mode, IPaddress configured
Flashes On 2.5 times per second Monitor Mode, IPaddress not configured
Flashes Off once per second Normal Mode, IPaddress configured
Flashes Off 2.5 times per second Monitor or DownloadMode, IP address notconfigured
Flashes off once per 2 seconds Download Mode, IPaddress configured
Power-on Self Test
Run and Auto-ResetModes
172 M202/M212 SPECIFICATIONS: Hardware Specifications

t the
rce
m ifogfpt,
-
er-
An invalid license mask and key forces the M202/M212 intolicense-violation mode afterthree minutes of operation. Themask and key settings are printed on the serial number label atime of shipment.
Unrecoverable errors detected by the M202/M212 firmware fothe Print Server into Firmware Panic mode. Manually reset theM202/M212 to resume normal operation.
The watchdog timer is a hardware device that resets the systenot serviced regularly by the CPU. The purpose of the watchdis to prevent the CPU from entering an infinite loop because osome hardware or firmware problem. After a watchdog interrusome diagnostic information is saved for debugging and theM202/M212 resumes operation in Auto-Reset Mode. TheM202/M212 will auto-reset up to 16 times before entering nonoperational Watchdog Halt.
Unsupported interrupts force the M202/M212 into this non-opational mode and typically indicate a hardware problem.
Bus errors, address errors, and illegal instructions force theM202/M212 into this non-operational mode.
License Violation
Firmware Panic
Watchdog Halt
Spurious Interrupt
Hardware Exception
M202/M212 SPECIFICATIONS: Hardware Specifications 173

Physical Details
Metric 20 cm W x 3.3 cm H x 13 cm D
Imperial 7.8” W x 1.3” H x 5.1” D
With external transformer 1.6 kg, 3.5 lbs
Without external transformer 0.8 kg, 1.7 lbs
Environmental Details
Operating 0° C to 50° C
Storage -40° C to 70° C
95% maximum humidity, non-condensing.
Dimensions
Weight
174 M202/M212 SPECIFICATIONS: Hardware Specifications
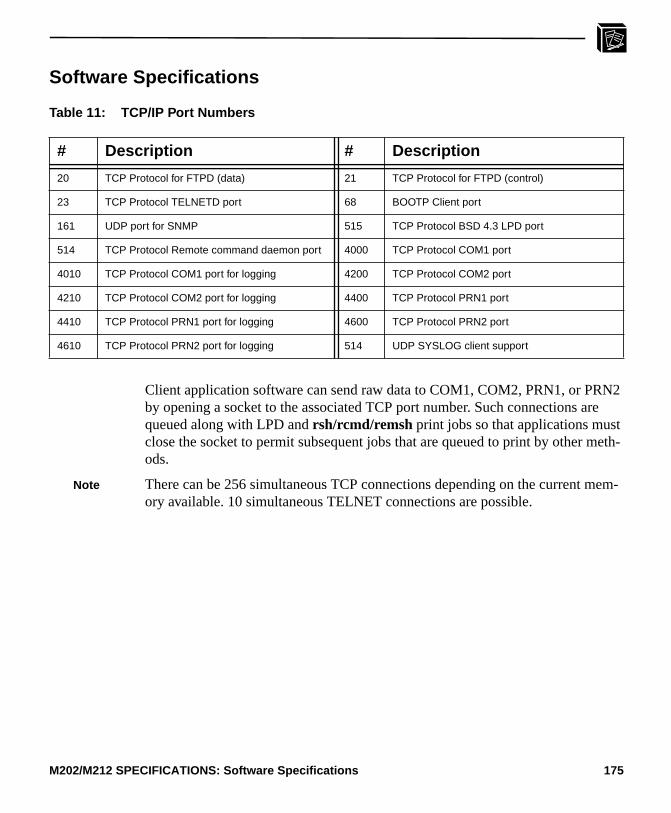
N2re
tmeth-
mem-
Software Specifications
Table 11: TCP/IP Port Numbers
Client application software can send raw data to COM1, COM2, PRN1, or PRby opening a socket to the associated TCP port number. Such connections aqueued along with LPD andrsh/rcmd/remsh print jobs so that applications musclose the socket to permit subsequent jobs that are queued to print by other ods.
There can be 256 simultaneous TCP connections depending on the current ory available. 10 simultaneous TELNET connections are possible.
# Description # Description
20 TCP Protocol for FTPD (data) 21 TCP Protocol for FTPD (control)
23 TCP Protocol TELNETD port 68 BOOTP Client port
161 UDP port for SNMP 515 TCP Protocol BSD 4.3 LPD port
514 TCP Protocol Remote command daemon port 4000 TCP Protocol COM1 port
4010 TCP Protocol COM1 port for logging 4200 TCP Protocol COM2 port
4210 TCP Protocol COM2 port for logging 4400 TCP Protocol PRN1 port
4410 TCP Protocol PRN1 port for logging 4600 TCP Protocol PRN2 port
4610 TCP Protocol PRN2 port for logging 514 UDP SYSLOG client support
Note
M202/M212 SPECIFICATIONS: Software Specifications 175
Standards Supported
ARC (Ethernet Address Control Protocol)
ARP (Address Resolution Protocol)
BOOTP (Bootstrap Protocol)
ICMP (Internet Address Resolu-tion Protocol)
IEEE 802.3 10Base2 Thin-cable Ethernet
IEEE 802.3 10Base-T UTP Ethernet
IEEE 802.3 10Base5 Thick-cable Ethernet
GOSIP RFC-1042 (Government Open Systems Interconnection Profile)
IP (Internet Protocol)
IPX (Internetwork Packet Exchange)
LPD (Line Printer Daemon Protocol)
NetBIOS/SMB (Network Basic Input Output System/Server Message Block)
PAP (Printer Access Protocol)
PSERVER /RPRINTER, NPRINTER
RARP (Reverse Address Resolution Protocol)
RFC-1001 (NetBIOS over TCP/IP)
RSHD (Remote Command Execution Protocol)
SMTP (Simple Mail Transfer Protocol)
SNMP (Simple Network Management Protocol)
TCP (Transmission Control Protocol)
TELNET (Telnet Protocol)
UDP (User Datagram Protocol)
176 M202/M212 SPECIFICATIONS: Software Specifications

M202/M212 SPECIFICATIONS: Software Specifications 177

BA C
andint
ral,
at
ter
s
ron-
ec-
nc-nd
a
GLOSSARY
a2ps ASCII to PostScript translation program.
ARP Address Resolution Protocol.
autosensing printer Printer that automatically switches between PostScript (PS)HP Print Control Language (PCL), depending on the type of prjob.
backchannel Device for reverse-direction communication from the peripheproviding printer status information such as PostScript pagecounting.
banner page A page printed before the print job including details about thjob.
bps Bits per second.
centralized spooling Sending all print jobs to a central host for storage until a prinbecomes available.
checksum 16-bit value to confirm integrity of the data printed.
Chooser Feature within the Macintosh’s operating system that controlsystem devices.
configuration (CONFIG) file File that the M202/M212 reads upon bootup in a Novell enviment. This file containsnpsh commands which the Print Serverexecutes as if they were entered on the unit itself. This file is nessary if the M202/M212 is configured as an RPRINTER butoptional otherwise.
cps Characters per second.
CR Carriage return.
daemon A continuously running process that handles system-wide futions, such as network administration or line printer spooling ais not associated with a user.
DCE Data Communications Equipment.
default router A device on a communications network that assists messagedelivery. On a single network linking many computers through
BA C
GLOSSARY 183
BA C
es-bestkstsem.
a
ta
P
-
nd
es
ov-ls.
d set
.
mesh of possible connections, a router receives transmitted msages and forwards them to their correct destinations over the available route. On an interconnected set of local area networ(LANs) using the same communications protocols, a router acas a link between LANs, so messages can be sent between th
destination Conceptual destination (similar to alogical queue) within theM202/M212 firmware that defines the print job and directs it tospecific I/O port.
On the host, any number of print destinations can be defined.These are not the same as M202/M212 destinations.
DMA Direct Memory Access. A high-speed technique for moving dainto and out of memory.
domain A group of computers administered together.
domain name server (DNS) Host providing responses to queries for a given IP name’s Iaddress.
DTE Data Terminal Equipment.
EEPROM Electrically-Erasable, Programmable Read-Only Memory. Preserves data after power is removed.
ezsetup Quick and easy installation script that runs on a TCP/IP host aconfigures both the M202/M212 and a host for printing.
FCC Federal Communications Commission of the United States ofAmerica.
FF Formfeed.
FLASH memory Allows for upgrade without replacing ROMs inside the PrintServer.
FTP Daemon File Transfer Protocol Daemon for uploading/downloading filin TCP/IP.
GOSIP Government Open Systems Interconnection Profile. A U.S. gernment document allowing new networks to use OSI protoco
header strings Strings that precede print jobs used to control the printer anprinting options.
host A computer attached to a network. Location of print job origin
Note
184 GLOSSARY
BA C
te
-
-
hat
one
r-n
ifnum Interface number. An index to a Network Interface Tap (NIT ).ifnum will always be1 for the M202/M212 since there is onlyone network interface, Ethernet.
interface file Host filter that processes the print job before it is sent to theM202/M212.
IP Router IP routers allow computers connected to two or more separanetworks to communicate with each other. IP routers forwarddata packets that do not belong on the local network.
kbps Kilobytes per second.
LF to CLRF mapping Linefeed to carriage return-linefeed conversion.
load-balancing Balancing print jobs between more than one printer so eachprinter is kept busy.
logpath Logging path. Format and location for printer logging information.
LPD Line printer daemon. A program used for printing on BSD systems.
MIB Management Information Base. A set of variables (database) ta gateway running SNMP maintains.
model Specifies a destination’s characteristics. Each model includesor more settings that act as mini-filters for each job passingthrough the associated destination.
NetBIOS Network Basic Input Output System. Standard interface to PCnetworks.
netmask A binary value used to sub-network IP inter-networks.
netname An IP name.
Sun NeWSprint SunPics (SUN) system for open network printing.
NIT Network Interface Tap. A module that serves as a generic inteface between the data link protocol layer (i.e. Ethernet or TokeRing) and higher network protocol layers. Each NIT is indexedby an interface number (ifnum).
npd NetPrint Daemon. Daemon for handling bi-directional TCP/IPprinting requirements.
GLOSSARY 185
BA C
lity
u-t-
st
-
them ofht
-
t-.
ter-
npconfig NetPrint setup and configuration. An in-depth management utiallowing you to install, monitor, change, and troubleshoot theM202/M212.
npscramble NetPrint scramble. A program that scrambles print job databefore sending it over a TCP/IP network to the M202/M212where it is descrambled and printed.
npsh Command shell on the M202/M212 used for parameter configration and display and for print job monitoring and troubleshooing.
npwrite NetPrint write. A program to send data directly from a UNIX hoto an M202/M212.
onlcr A filtering program that adds carriage returns to all solitary linefeeds.
output processing On the M202/M212, this refers to carriage return insertion(onlcr), tab expansion(xtab) settings, and print job descram-bling. Referred to as “opost” in the model.
papname Printer Access Protocol (PAP) name. An AppleTalk name foreach printer defined on the host. Makes up the second half ofname which appears in the Chooser. There can be a maximufour printers which are transparently mapped to any one of eigdestinations on the M202/M212.
parity The quality ofeven or odd for a quantity. Mechanism for check-ing integrity of a data byte. Usually used in serial communica-tions.
ping Command to test an IP connection.
pio file AIX spooling system configuration file.
pseudo-tty A UNIX facility for accessing network resources through standard UNIXdevice interfaces.
RARP Reverse Address Resolution Protocol. A mechanism for a nework device to discover its address dynamically when it boots
rarpd daemon Server that responds to requests for address discovery.
RFC Request For Comment. A set of documents that specify the In
186 GLOSSARY
BA C
es-
sed
to
m
m.
m-
tot-
ost-
t
net protocols and provide other relevant information about theInternet.
router A device that forwards Internet Protocol (IP) packets to their dtination.
rsh/rcmd/remsh Executes a command on a different host.
SLIP Serial Line IP. A protocol used to connect two internet hostsusing a serial line.
SMIT program AIX device administration program.
SNMP Simple Network Management Protocol. A standard protocol uto monitor IP gateways, hosts, and the networks to which theyattach.
spooling Storing data in memory or in a file until it can be printed.
switchable Capable of printing both PCL and PostScript files. TheM202/M212 attaches a header and trailer string to a print job switch printer modes.
SYSLOGD System Message Logger. Collects messages sent from systeprocesses and routes them to a common destination.
tab expansion Expanding a tab character in the data to its required width inspaces (xtab).
tar Command for archiving data onto a permanent storage mediu
TCP Transmission Control Protocol used for reliable end-to-end comunication over an IP connection.
TCP/IP Name given to the suite of protocols (including but not limitedTCP and IP) that govern the transmission and services of a nework.
TCP port A logical connection point in the software on a TCP/IP host.
TELNET Command and protocol to establish a terminal connection to aremote host over a TCP/IP network.
TranScript Printing system developed by Adobe to facilitate printing of PScript documents. Referred to as Adobe TranScript.
trailer strings Strings that follow print jobs used to control the printer and se
GLOSSARY 187

BA C
printing options.
188 GLOSSARY
s
APPENDIX A
Planning Your Print Setup
In this appendix, you will find information that will help you with your print setupincluding the advantages and disadvantages of your various configuration option
Table 13: Configuration Considerations
Setting Advantages Disadvantages
Port Used:
Parallel ports High speed and IEEE 1284-Icompliant.
Need bi-directional printer if using1284-I capabilities.
Serial ports Bi-directional. Allows connec-tion of alternate device, such asmodem.
Lower throughput than parallel.
TCP/IP Print Methods:
lpd communica-tions
Print without an interface file. Nohost software required and easysetup.
Not available on all UNIX systems.Output processing must be done onthe Print Server, not on the host.
rsh/rcmd/remshcommunications
Available on most UNIX systems.Allows for processing on the hostto improve unit’s performance.
Requires an interface file on a BSDsystem (System V hosts need oneanyways).
npd communica-tions
Allows bi-directional communi-cation. Uses standard UNIXdevice interface.
Requires host software.npd mayhave to be compiled for your system.
Novell Print Methods:
PSERVER Faster print process. Replaces adedicated workstation or frees upfile server resources.
Takes up a NetWare user license.Requires bindery emulation if usingNetWare 4.
APPENDIX A: Planning Your Print Setup 189

RPRINTER Doesn’t take up a NetWare userlicense.
A non-M202/M212 print server(PSERVER) must be running.
Processing Location:
Output process-ing performedon host
Increases M202/M212 through-put.
Increases overhead on host systemand requires host software.
Output process-ing performedon M202/M212
Interface files optional and nohost software required.
Decreases M202/M212 throughput.
Optional Processing:
Backchannel Access to printer status and canbe used with applications that dopage counting.
Requires use of a serial I/O port.Decreases throughput.
Banner page Job identification at printer out-put.
Decreases throughput. Requires anextra page to be printed.
Tab expansion(xtab)
Flexible tab widths. Decreases throughput.
Carriage returninsertion (onlcr)
Adds carriage returns to solitarylinefeeds. Eliminates stair-step-ping on ASCII printers.
Decreases throughput.
ASCII to Post-Script conver-sion (a2ps)
Autosenses print job type andconverts ASCII files for printingon PostScript printers.
Decreases throughput.
Switchableprinter control
Use one printer for both PCL andPostScript jobs.
Requires header and trailer strings tomanually switch printer betweenmodes.
Table 13: Configuration Considerations
Setting Advantages Disadvantages
190 APPENDIX A: Planning Your Print Setup
Load-balancing Print job goes to first availableprinter rather than waiting for abusy one.
May print on a printer that’s not com-patible with the print job format.
Descrambling Some print job security as datatravels over the network.
Requires binary on host system andlowers throughput.
Table 13: Configuration Considerations
Setting Advantages Disadvantages
APPENDIX A: Planning Your Print Setup 191

192 APPENDIX A: Planning Your Print Setup

INDEX
Symbols.options file 48.rc 46.rhosts file 126/etc/bootptab29/etc/ethers28/etc/hosts26, 27, 148/etc/printcap37, 38, 46, 47, 49/etc/qconfig 51/support 159/tmp/ezsetup.log22/tmp/npconfig.log22/usr/adm/npdlog46/usr/spool/lp/admins/lp/interfaces41/usr/spool/lp/model41> (redirection)84
Aa2ps
in host software21list 89set in models100
a2ps, see alsoASCII to PostScriptconversion
ackmode18set on parallel ports101
additional options119address
hardware27Adobe TranScript32, 44
details 48AIX 32
configuration 49alternate destination79, 121
configure with npconfig23details 122list 88set 96
alternate destination, see alsoload-balancing
AppleTalk 7configuration 65disabling module68features7limiting printers 67limitting printers 122naming 66, 120
problems155zones66, 109
architecturediagram 9overview 8
ARP 25, 181command syntax27configuration with27list 87
ASCII to PostScript conversion121advantages/disadvantages190autosensing6configure with npconfig23in interface scripts34, 40in models 8, 80, 81
ASCII to PostScript conversion, seealsoa2ps
AUIdetails 167
autofeed18set on parallel ports101
autosensingjob format 6, 190
autosensing/autoswitchingadvantages/disadvantages190of printer mode6, 121
Bbackchannel6
advantages/disadvantages190and logging122configure with npconfig23in destinations79list in destinations88set in destinations96
banner page generation121advantages/disadvantages190configure with npconfig23extra with Novell 154in host software21in interface scripts39in models 80list 89set in models99trailing banner99
baud ratedefault 30list 87set on serial ports94
bbmode18set on parallel ports102
bi-directional communications189and logging98in host software21
bi-directional communications. seealsonpd
blank pageswith Novell 154
BNCdetails 167
BOOTP 25, 181configuration with29configure with npconfig24list 90port number180store 112store request29
bootupNovell 55
BSD 32and npd46direct/remote printing37host configuration37interface script setup39interface script syntax38port number180print syntax 38spooling 34start the printer38
BSD, see alsoLPD, LPR
Ccancel 33, 86
jobs with npconfig23CAPTURE 153
configuration 154carriage return insertion121
advantages/disadvantages190configure with npconfig23in interface scripts34, 40in lp command92in models 8, 80set in models99with DOS 150
carriage return insertion, see alsoonlcr
checksumand logging6in logpaths82set in logpaths98
Chooser7configuration with65
INDEX 193

problems155chr 86
and redirecting output85in host software21in interface scripts39use 21
COM1port numbers180
COM1|COM2and npsh83and restoring defaults125cable schematic174cabling 16configuration with30details 172list 87login prompt 84pinout 172set 94set in logpaths98terminal on 25, 148
COM1|COM2, see alsoCOM1,COM2, I/O port, serial ports
COM1|COM2, see alsoI/O port,serial ports
command set, seenpshcommand syntax
in manual 3npsh 85
commercial invoiceinclusions 163sample164
config fileand naming schemes120and RPRINTER55configuration with58problems152
configurationadditional options119AppleTalk 65considerations189destinations on host23I/O ports 82manual through COM port30Novell 53parallel ports101planning 189serial ports94TCP/IP 21Windows 69with ARP 27
with BOOTP 29with npconfig 26with RARP 28
connectionlosing a Novell55to network 16
control file 37
Ddebug
commands86default
load 91restoring factory31, 124router 148save 93set with npconfig24terminal settings30
Default IP 124diagram 125
deletingjob from printer queue86
deleting, see alsojobsdescrambling
advantages/disadvantages191and opost95, 102configure with npconfig23in models 80list key value90set in models99set key value103set key value with npconfig24
descrambling, see alsoscrambling/descrambling
destinations5alternate79, 122and backchannels123and PSERVER151configure with npconfig23default 79details 79diagram 9disable and enable86in lp command91in set rprinter103list 88save 93set 96
devicefile 45, 46dimensions179direct socket printing52, 180
and host software21overview 32
disable 86DNS 26, 27, 148
and ping 92and telnet114set 104
driverlist 89store 110
EEEPROM
and npconfig24and npsh commands85at power-on177differences in88load from 91reset to93saving to 93upon installation25
EEPROM Enable124diagram 125
electricaldetails 175
emailand error messages150and logging82, 122for support 159set in logpaths98set in sysinfo104
enable 87encrypted password6
Novell 55environmental
details 179ERR LED 147, 176EtherTalk 155ezsetup34
and interface scripts35configuration with26host configuration with32Main Menu 23overview 22
Ffactory defaults, seedefaultfastmode18
set on parallel ports102FCC Warning15flashing
194 INDEX

STAT LED 25, 177flow control 19
and garbled data151, 154default serial30list parallel 89list serial 87problems149serial options173set on parallel ports101set on serial ports94
frame typeconfigure with npconfig24controlling 123list 89, 90store 110
FTP Daemonand configuration137and printing 135details 134
FTP site 159details 159
FTP Softwaredetails 51
Ggarbled data150, 154GOSIP 6, 181guest
and access list127npsh permissions84set access106with DOS software53
Hhardware address
list 90header string6
configure with npconfig23for switching 100, 190in models 80list 89set in models99with variables81
host configurationAIX 49AppleTalk 65BSD 37Novell 55System V 41TCP/IP 32
host destination
configure with npconfig23host software
and interface scripts34DOS and npsh83for Novell 53, 152for TCP/IP 21installing 26manage with npconfig24
http sitedetails 159
II/O port
and backchannels190and destinations79and logging82, 105, 122configure with npconfig24details 82disable and enable86list in destinations88problems149receiving data96redirect output to84save 93set in destinations96status92status with npconfig23test on 107timeout 95
I/O port, see alsoCOM1|COM2,PRN1|PRN2
ICMP 181IEEE 1284-I 5, 189ifnum 108installation
preparation8, 15site requirements16testing 28
interface scriptadvantages/disadvantages189BSD syntax38choices35modifying 35overview 34System V syntax41
IP addressconfigure with npconfig24duplicate 148dynamic assignment of28format 149instead of IP name148
list 90store 27, 111
IP Routingand configuration112details 145
IPX 181
Jjobs
and logging6cancel 86in logpaths82security 191set in logpaths98status91, 92status with npconfig23
jobsecurityand configuration110
jumper settingsand defaults124diagram 125
Kkeepalive111
list 90keycode 87
and telnet114
LLED
details 176errors 147patterns176
licenselist 88violation 178
link integritydetails 120list ifc 88
listusers89
listingactive and queued jobs92contents of arp table87differences88network settings90system information90users91
load 91load-balancing5, 121
advantages/disadvantages191
INDEX 195

details 122load-balancing, see alsoalternate
destinationlogging 6
email 104methods122set with npconfig24system options104type 98with syslog 6
logging, see alsologpathslogin
list 89with Telnet 27
logpathsand backchannels123configure with npconfig24details 82in destinations79list 89list in destinations88options 98, 122save 93set 97set in destinations96
lp 33, 83, 91, 92and logging122, 123
lpadmin 43, 46LPD 181
avantages/disadvantages189LPD, see alsoBSDLPR
client 7lpsched 41lpstat 33, 92
troubleshooting with149
Mmemory
controlling 121models
and descrambling127and onlcr 150and processing options80, 121configure with npconfig23default 80diagram 9in destinations79list 89list in destinations88save 93
set 99set in destinations96types and inclusions80
modulecontrol 121set 105
movingthe unit 148
Nname
list 89naming schemes120NCSA 51
details 51NET LED 176NetBIOS 7, 181
naming 120netmask28
configure with npconfig23, 24list 90store 27, 112
NetWare 7version 4 options61versions6
NetWare, see alsoNovellnetwork
interface 108NIT 108Novell 151
additional options128communication problems151configuration 54controlling frame type124features6host configuration55, 65host software53naming 120password111password security128preferred file servers129printing mechanisms154printing problems153queueing6, 153settings with npconfig24
Novell, see alsoNetWare, PSERVER,RPRINTER
npcomm.sh48npconfig 32, 34
and interface scripts35and npsh83
and remote management126compiling host software22configuration with26Detailed Options Sub-Menu23host configuration with32Main Menu 23overview 22
npdadvantages/disadvantages189and interface scripts35, 36applications using47command syntax45details 44diagram 45in host software21
npr.if 32, 35and extra job processing121, 150and scrambling127overview 34problems150using 39, 42
nprbsd.if, seenpr.ifNPRINT 153
configuration 154NPRINTER 181nprsysv.if, seenpr.ifnpscramble99
details 103in host software21in interface scripts39npscramble.c103, 127using 127
npshand restoring defaults125basic commands85command syntax85permissions84prompt 84under Novell 53
NPWininstallation 115starting session with unit116using 115
npwriteand Adobe TranScript48and direct socket printing52and interface scripts36, 40command syntax33details 32in host software21
196 INDEX

Oonlcr
data in wrong format150garbled data150in host software21list 89set on parallel ports102set on serial ports95
onlcr, see alsocarriage return inser-tion
opostpossibilities 186set on parallel ports102set on serial ports95
Ppage count
and logging6in logpaths82set in logpaths98
PAP 109, 181, 186papname109
list 89store 109
parallel porttiming 170
parallel portsadvantages/disadvantages189data rate169details 18flush 102list 89pinout 171set 101speeds5timeout 102timing 169unlock 102
parallel ports, see alsoPRN1|PRN2,I/O port
parity 19, 24default 30list 87set on serial ports94
password120configure with npconfig23encrypted6, 55Novell 111, 128, 152prompt 27set 28, 106
PC/TCP
details 51PCMCIA
ifnum 108PCONSOLE54
and setting passwords128troubleshooting with152
peripheralsand parallel ports18and serial ports19
permission levels84, 120ping 6, 92, 104
and terminal server128permissions84problems147testing with 29
planningprint setup189
poll time 55list 89store 111
port numbers180and direct printing52
portmaplist 89save 93
power 16details 175socket diagram175
print setupconsiderations189
printerfeedback91, 98, 122
printing mechanismsNovell 153
PRN1|PRN2cabling 16details 169list 89port numbers180set 101
PRN1|PRN2, see alsoparallel ports,I/O port
processing optionsadvantages/disadvantages190and opost95, 102details 121in interface scripts40list in models89location of 34, 190on host 21set in models99
promptnpsh 84on COM1|COM284password27root 27Telnet 84
PSERVER53, 55, 181advantages/disadvantages189communication problems151configuration 55default name151NetWare 4 setup61password protection128
Qqdaemon49
RRARP 25, 181
configuration with28configure with npconfig24list 90problems148store 112
redirecting output84remote management
TCP/IP methods126reset 85, 93
and store command108RJ45
details 167pinout 167
RMA number 162, 163root
and access list127and restoring defaults125npsh permissions84prompt 27set access106with DOS software113
routingconfigure with npconfig24list 90problems148set 125store 112
RPRINTER 53, 55, 181advantages/disadvantages190communication problems151configuration 58default name151
INDEX 197

delete 103keepalive111list 90set 103
rsh/rcmd/remsh181advantages/disadvantages189and Adobe TranScript48and interface scripts36, 40, 42and lp 91, 123and npsh83and remote management126BSD syntax34details 33port number180System V syntax33
RXDgrounding 19
SS2 124save 85, 93
and set command93default 93
scrambling/descrambling6advantages/disadvantages191and security126in host software21in interface scripts40set 127set key value103
security 5and npconfig24general network119Novell 128TCP/IP 6, 126
serial portsadvantages/disadvantages189and backchannels123, 190and SLIP 107cable schematic174data rate172flush 95parameters94pinout 172set 94timeout 95unlock 95
serial ports, see alsoCOM1|COM2, I/O port
service 5configure with npconfig23
control 121list 88set 97
set 85and I/O ports82
settingDNS 104for complex networks125system information103user information106
SLIPand configuration95, 107details 141
slowmode18set on parallel ports102
SMIT 49SMTP 181SNMP 5, 181
and remote management126custom MIBs 130details 129port number180security 131traps 131
softwarespecifications180standards181
spoolerbypassing32, 150integrating 34problems149
SR_KEY 103, 127stair-stepping
fixing 190stair-stepping, see alsoonlcrstandards
software 181start 107STAT LED 176
flash patterns177stop 108store 85Sun 47Sun NeWSprint32, 44
setup 47supervisor 113support
technical 160syslog 6
and logging122in logpaths82
set 105set in logpaths98
system informationlist 90set 103
System V 32and npd46host configuration41interface script syntax41print syntax 43spooling 34start the printer43
Ttab expansion121
advantages/disadvantages190configure with npconfig23in lp command92in models 80set in models99
tab expansion, see alsoxtabtar
and host software26TCP
access list6, 90, 113, 126, 148connections allowed6, 83direct connections52port for logging 82port numbers7, 180port numbers and logging98, 122
TCP/IPadditional options124and NetBIOS73and remote management126communication problems147configuration 25controlling frame type124debugging86features6host configuration32host software21other print methods51port numbers180printing problems149security 126
technical supportdetails 160
Telnet 181and logging82and npsh83and remote management126
198 INDEX

and restoring defaults125connections allowed83login 27port number180problems149prompt 84
telnet 6, 104, 114and logging122and terminal server128permissions84
terminaland logging82and npsh83and restoring defaults125configuration with30default settings30on COM1|COM225, 148server capabilities128
testequipment and configuration28for npd 46list 90options 107power-on 177printer 149start 107stop 108with npconfig 24
THICK 181details 167
THIN 181details 167power 175
trailer string 6, 190and formfeeds149, 153configure with npconfig23for switching 100, 190in models 80list 89set in models100with variables81
transceiverpinout 168
troubleshooting147
Uuncompress
host software26upgrade procedure161users
accounts84
and logging6configure with npconfig24in logpaths82list 91list logins 89set 106set in logpaths98
UTP 181details 167list 88manipulate120
Vvariables93
default settings165details 81in switch strings101list 91set 106
vslowmodeset on parallel ports102
Wwarnings
at login 27warranty 162
details 162weight 179Windows
host configuration74overview 69problems155TCP/IP settings72TCP/IP software70
Windows 95host configuration76
Windows for Workgroupshost configuration75problems157
Windows NT 7host configuration74problems155
www sitedetails 159
Xxtab
and garbled data151, 154list 89set on parallel ports103set on serial ports95
xtab, see alsotab expansion
INDEX 199

200 INDEX