lytec 2021 upgrade guide
TRANSCRIPT

Title page
Lytec 2021 Upgrade GuideMarch 2021

Lytec 2021ii March 2021
Copyright notice
Copyright noticeCopyright © 2021 eMDs, Inc. All Rights Reserved.
Use of this documentation and related software is governed by a license agreement and this document is incorporated into and is made part of the license agreement. This documentation and related software contain confidential, proprietary, and trade secret information of eMDs, Inc., and is protected under United States and international copyright and other intellectual property laws. Use, disclosure, reproduction, modification, distribution, or storage in a retrieval system in any form or by any means is prohibited without the prior express written permission of eMDs, Inc. This documentation and related software is subject to change without notice.
Publication dateMarch 2021
ProductLytec, 2021
Corporate addresseMDs, Inc.10901 Stonelake Blvd.Austin, Texas 78759512-257-5200

Lytec 2021March 2021 iii
Table of Contents
Table of Contents
Chapter 1 - Lytec Hardware and Software Requirements . . . . . . . . . . . . . . . . . . . . . . . . . . 1Lytec 2021 Single-User Hardware and Software Requirements . . . . . . . . . . . . . . . . . . 1
Hardware - Minimum Required . . . . . . . . . . . . . . . . . . . . . . . . . . . . . . . . . . . . . . . . 1Hardware - Recommended . . . . . . . . . . . . . . . . . . . . . . . . . . . . . . . . . . . . . . . . . . . 1Workstation Operating System - Supported . . . . . . . . . . . . . . . . . . . . . . . . . . . . . . 1Internet - Required . . . . . . . . . . . . . . . . . . . . . . . . . . . . . . . . . . . . . . . . . . . . . . . . . 1Database - Version of SQL . . . . . . . . . . . . . . . . . . . . . . . . . . . . . . . . . . . . . . . . . . . 2
Lytec 2021 Professional or Multi-User Hardware and Software Requirements. . . . . . . 2Server Hardware - Minimum Required . . . . . . . . . . . . . . . . . . . . . . . . . . . . . . . . . . 2Server Hardware - Recommended . . . . . . . . . . . . . . . . . . . . . . . . . . . . . . . . . . . . . 2Server Operating System - Recommended . . . . . . . . . . . . . . . . . . . . . . . . . . . . . . 2Server Operating System - Supported . . . . . . . . . . . . . . . . . . . . . . . . . . . . . . . . . . 2Workstation Hardware - Minimum Required . . . . . . . . . . . . . . . . . . . . . . . . . . . . . . 3Workstation Hardware - Recommended . . . . . . . . . . . . . . . . . . . . . . . . . . . . . . . . . 3Workstation Operating System - Supported . . . . . . . . . . . . . . . . . . . . . . . . . . . . . . 3Lytec 2021 Client/Server Hardware and Software Requirements. . . . . . . . . . . . . . 4Server Hardware - Minimum Required . . . . . . . . . . . . . . . . . . . . . . . . . . . . . . . . . . 4Server Hardware - Recommended . . . . . . . . . . . . . . . . . . . . . . . . . . . . . . . . . . . . . 4Server Operating System - Recommended . . . . . . . . . . . . . . . . . . . . . . . . . . . . . . 4Server Operating System - Supported . . . . . . . . . . . . . . . . . . . . . . . . . . . . . . . . . . 4Workstation Hardware - Minimum Required . . . . . . . . . . . . . . . . . . . . . . . . . . . . . . 5Workstation Hardware - Recommended . . . . . . . . . . . . . . . . . . . . . . . . . . . . . . . . . 5Workstation Operating System - Supported . . . . . . . . . . . . . . . . . . . . . . . . . . . . . . 5
Lytec 2021 Supported Operating Systems . . . . . . . . . . . . . . . . . . . . . . . . . . . . . . . . . . 6Revenue Management . . . . . . . . . . . . . . . . . . . . . . . . . . . . . . . . . . . . . . . . . . . . . . . . . 6MPIC System Requirements . . . . . . . . . . . . . . . . . . . . . . . . . . . . . . . . . . . . . . . . . . . . . 7
Hardware requirements. . . . . . . . . . . . . . . . . . . . . . . . . . . . . . . . . . . . . . . . . . . . . . 7Software requirements . . . . . . . . . . . . . . . . . . . . . . . . . . . . . . . . . . . . . . . . . . . . . . 7
Lytec MD 2021 Supported Operating Systems . . . . . . . . . . . . . . . . . . . . . . . . . . . . . . . 7Lytec MD Best Practices . . . . . . . . . . . . . . . . . . . . . . . . . . . . . . . . . . . . . . . . . . . . . . . . 8
SQL Server 2017 Upgrade . . . . . . . . . . . . . . . . . . . . . . . . . . . . . . . . . . . . . . . . . . 11Lytec Installation Overview . . . . . . . . . . . . . . . . . . . . . . . . . . . . . . . . . . . . . . . . . . . . . 11
Chapter 2 - Lytec Single-User Installation. . . . . . . . . . . . . . . . . . . . . . . . . . . . . . . . . . . . . . 13Before you begin . . . . . . . . . . . . . . . . . . . . . . . . . . . . . . . . . . . . . . . . . . . . . . . . . . . . . 13
Important Installation note. . . . . . . . . . . . . . . . . . . . . . . . . . . . . . . . . . . . . . . . . . . 13Pre-installation Recommendations . . . . . . . . . . . . . . . . . . . . . . . . . . . . . . . . . . . . . . . 13Linking to Other Applications. . . . . . . . . . . . . . . . . . . . . . . . . . . . . . . . . . . . . . . . . . . . 14Installation . . . . . . . . . . . . . . . . . . . . . . . . . . . . . . . . . . . . . . . . . . . . . . . . . . . . . . . . . . 14
Chapter 3 - Lytec Professional or Multi-User Installation . . . . . . . . . . . . . . . . . . . . . . . . . 17Before you begin . . . . . . . . . . . . . . . . . . . . . . . . . . . . . . . . . . . . . . . . . . . . . . . . . . . . . 17
Important Installation note. . . . . . . . . . . . . . . . . . . . . . . . . . . . . . . . . . . . . . . . . . . 17Pre-installation Recommendations . . . . . . . . . . . . . . . . . . . . . . . . . . . . . . . . . . . . . . . 17Linking to Other Applications. . . . . . . . . . . . . . . . . . . . . . . . . . . . . . . . . . . . . . . . . . . . 18Overview . . . . . . . . . . . . . . . . . . . . . . . . . . . . . . . . . . . . . . . . . . . . . . . . . . . . . . . . . . . 18

Lytec 2021iv March 2021
Table of Contents
Server Installation and Setup . . . . . . . . . . . . . . . . . . . . . . . . . . . . . . . . . . . . . . . . . . . 18Installing on the Server . . . . . . . . . . . . . . . . . . . . . . . . . . . . . . . . . . . . . . . . . . . . . 18
Workstation Installation and Setup . . . . . . . . . . . . . . . . . . . . . . . . . . . . . . . . . . . . . . . 20
Chapter 4 - Lytec Client/Server Installation . . . . . . . . . . . . . . . . . . . . . . . . . . . . . . . . . . . . 23Before you begin . . . . . . . . . . . . . . . . . . . . . . . . . . . . . . . . . . . . . . . . . . . . . . . . . . . . . 23
Important Installation note. . . . . . . . . . . . . . . . . . . . . . . . . . . . . . . . . . . . . . . . . . . 23Pre-installation Recommendations . . . . . . . . . . . . . . . . . . . . . . . . . . . . . . . . . . . . . . . 23Linking to Other Applications. . . . . . . . . . . . . . . . . . . . . . . . . . . . . . . . . . . . . . . . . . . . 24Overview . . . . . . . . . . . . . . . . . . . . . . . . . . . . . . . . . . . . . . . . . . . . . . . . . . . . . . . . . . . 24Server Installation and Setup . . . . . . . . . . . . . . . . . . . . . . . . . . . . . . . . . . . . . . . . . . . 24
Installation . . . . . . . . . . . . . . . . . . . . . . . . . . . . . . . . . . . . . . . . . . . . . . . . . . . . . . . 24Workstation Installation and Setup . . . . . . . . . . . . . . . . . . . . . . . . . . . . . . . . . . . . . . . 26
Chapter 5 - Lytec MD Installation . . . . . . . . . . . . . . . . . . . . . . . . . . . . . . . . . . . . . . . . . . . . . 29Important Installation note. . . . . . . . . . . . . . . . . . . . . . . . . . . . . . . . . . . . . . . . . . . 29
Upgrade Paths. . . . . . . . . . . . . . . . . . . . . . . . . . . . . . . . . . . . . . . . . . . . . . . . . . . . . . . 29Upgrading to Web View 11.0. . . . . . . . . . . . . . . . . . . . . . . . . . . . . . . . . . . . . . . . . . . . 30Installing on a Domain Controller . . . . . . . . . . . . . . . . . . . . . . . . . . . . . . . . . . . . . . . . 30Upgrade overview . . . . . . . . . . . . . . . . . . . . . . . . . . . . . . . . . . . . . . . . . . . . . . . . . . . . 30Backup and restore process . . . . . . . . . . . . . . . . . . . . . . . . . . . . . . . . . . . . . . . . . . . . 31Pre-installation tasks . . . . . . . . . . . . . . . . . . . . . . . . . . . . . . . . . . . . . . . . . . . . . . . . . . 31Server Installation and Setup . . . . . . . . . . . . . . . . . . . . . . . . . . . . . . . . . . . . . . . . . . . 42
Post-Application Server installation tasks . . . . . . . . . . . . . . . . . . . . . . . . . . . . . . . 49Workstation Installation and Setup . . . . . . . . . . . . . . . . . . . . . . . . . . . . . . . . . . . . . . . 50Upgrading to eMDs Prescribe . . . . . . . . . . . . . . . . . . . . . . . . . . . . . . . . . . . . . . . . . . . 53eMDs Prescribe migration process . . . . . . . . . . . . . . . . . . . . . . . . . . . . . . . . . . . . . . . 54Transferring data to the new system . . . . . . . . . . . . . . . . . . . . . . . . . . . . . . . . . . . . . . 59
Chapter 6 - Post Installation Setup . . . . . . . . . . . . . . . . . . . . . . . . . . . . . . . . . . . . . . . . . . . 71Specifying the Default SQL Server Credentials. . . . . . . . . . . . . . . . . . . . . . . . . . . . . . 71Converting data from previous versions of Lytec. . . . . . . . . . . . . . . . . . . . . . . . . . . . . 72
Migrating existing databases. . . . . . . . . . . . . . . . . . . . . . . . . . . . . . . . . . . . . . . . . 72Converting practices . . . . . . . . . . . . . . . . . . . . . . . . . . . . . . . . . . . . . . . . . . . . . . . 73
Post installation for users of Lytec MD . . . . . . . . . . . . . . . . . . . . . . . . . . . . . . . . . . . . 74Upgrade the PPMT Utility for Practice Partner 11.0 . . . . . . . . . . . . . . . . . . . . . . . 74Post-installation ICD-10 checklist . . . . . . . . . . . . . . . . . . . . . . . . . . . . . . . . . . . . . 74
Appendix A - Uninstalling SQL Management Studio Express 2005 . . . . . . . . . . . . . . . . . 93
Appendix B - Setting Permissions for the Lytec MD Root Drive and Folders . . . . . . . . . 95
Appendix C - Add-Ons. . . . . . . . . . . . . . . . . . . . . . . . . . . . . . . . . . . . . . . . . . . . . . . . . . . . . . 99Installing Add-Ons . . . . . . . . . . . . . . . . . . . . . . . . . . . . . . . . . . . . . . . . . . . . . . . . . . . . 99
Appendix D - Linking Lytec With Other Applications. . . . . . . . . . . . . . . . . . . . . . . . . . . . 101
Appendix E - Changing the number of licensed users . . . . . . . . . . . . . . . . . . . . . . . . . . 103
Index . . . . . . . . . . . . . . . . . . . . . . . . . . . . . . . . . . . . . . . . . . . . . . . . . . . . . . . . . . . . . . . . . . . 105

Lytec 2021March 2021 1
Chapter 1 - Lytec Hardware and Software Requirements
Lytec 2021 Single-User Hardware and Software Requirements
Hardware - Minimum Required
Hardware - Recommended
*Your database will grow as you add data to your practice, increasing the amount of space needed on the hard drive.
Workstation Operating System - Supported • Windows 10 Pro/Enterprise (Windows 10 S and Home are NOT supported)
Internet - RequiredHigh-speed Cable, DSL, or Satellite Internet service.
CPU Type Intel Pentium IV 4.2GHz or faster
RAM (Memory) 2GB
Storage Space available 4GB*
Optical Drive DVD-ROM (required if installing from a CD)
Network Card (NIC) 100Mbps
Display Monitor 1024x768 (1280x800 for widescreen displays)
CPU Type Pentium D 2.6GHz or faster
RAM (Memory) 8GB
Storage Space available 8GB*
Optical Drive DVD-ROM (required if installing from a CD)
Network Card (NIC) 1Gbps
Display Monitor 1024x768 (1280x800 for widescreen displays)

Lytec 20212 March 2021
Database - Version of SQL Chapter 1 - Lytec Hardware and Software Requirements
Database - Version of SQL
Lytec Single User version uses SQL Server Express. With this application, the size of your database is limited to 10GB. SQL Server 2017 Express will use, at most, 1GB of RAM.
Lytec 2021 Professional or Multi-User Hardware and Software Requirements
Server Hardware - Minimum Required
Server Hardware - Recommended
*Your database will grow as you add data to your practice, increasing the amount of space needed on the hard drive.
Server Operating System - Recommended • Windows Server 2016 Standard
Server Operating System - Supported • Windows Server 2012 (64 Bit)
• Windows Server 2012 R2 (64 Bit)
• Windows Server 2016 Standard (64 Bit), Datacenter, Essentials
• Windows Server 2019 Standard
• Windows 10 Professional/Enterprise (Windows 10 S and Home are NOT supported)
CPU Type Intel Pentium IV 4.3GHz or faster
RAM (Memory) 2GB
Storage Space available 6GB*
Optical Drive DVD-ROM (required if installing from a CD)
Network Card (NIC) 100Mbps
Display Monitor 1024x768 (1280x800 for widescreen displays)
CPU Type Core 2 - 2.4GHz or faster
RAM (Memory) 8GB
Storage Space available 8GB*
Optical Drive DVD-ROM (required if installing from a CD)
Network Card (NIC) 1Gbps
Display Monitor 1024x768 (1280x800 for widescreen displays)

Lytec 2021March 2021 3
Chapter 1 - Lytec Hardware and Software Requirements Network - Recommended
Network - RecommendedConsult with a licensed network vendor for proper wiring for your business computing environment. Wireless networks are not recommended. If a wireless network is the only option, eMDs requires the use of Terminal Services/RDP/ Thin Clients and does not support a direct connected wireless workstation.
Internet - RequiredHigh-speed Cable, DSL, or Satellite Internet service.
Database - Version of SQLUses SQL Server 2017 Express. With this application, the size of your database is limited to 10GB. In addition, SQL Server 2017 Express will use, at most, 1GB of RAM.
Workstation Hardware - Minimum Required
Workstation Hardware - Recommended
*Your database will grow as you add data to your practice, increasing the amount of space needed on the hard drive.
Workstation Operating System - Supported • Windows 10 Professional, Enterprise (Windows 10 S and Home are NOT supported)
CPU Type Intel Pentium IV 2GHz or faster
RAM (Memory) 2GB
Storage Space available 6GB*
Optical Drive DVD-ROM (required if installing from a CD)
Network Card (NIC) 100Mbps
Display Monitor 1024x768 (1280x800 for widescreen displays)
CPU Type Intel Pentium IV 2.6GHz or faster
RAM (Memory) 8GB
Storage Space available 8GB*
Optical Drive DVD-ROM (required if installing from a CD)
Network Card (NIC) 1Gbps
Display Monitor 1024x768 (1280x800 for widescreen displays)

Lytec 20214 March 2021
Lytec 2021 Client/Server Hardware and Software Requirements Chapter 1 - Lytec Hardware and Software Requirements
Lytec 2021 Client/Server Hardware and Software Requirements
Server Hardware - Minimum Required
Server Hardware - Recommended
*Your database will grow as you add data to your practice, increasing the amount of space needed on the hard drive.
Server Operating System - Recommended • Windows Server 2016 Standard
Server Operating System - Supported • Windows Server 2012 (64 Bit)
• Windows Server 2012 R2 (64 Bit)
• Windows Server 2016 Standard (64 Bit), Datacenter, Essentials
• Windows Server 2019 Standard
Network - RecommendedConsult with a licensed network vendor for proper wiring for your business computing environment. Wireless networks are not recommended. If a wireless network is the only option, eMDs requires the use of Terminal Services/RDP/ Thin Clients and does not support a direct connected wireless workstation.
CPU Type Intel Pentium IV 4.3GHz or faster
RAM (Memory) 4GB
Storage Space available 6GB*
Optical Drive DVD-ROM (required if installing from a CD)
Network Card (NIC) 1Gbps
Display Monitor 1024x768 (1280x800 for widescreen displays)
CPU Type Core 2 - 2.4GHz or faster
RAM (Memory) 8GB
Storage Space available 8GB*
Optical Drive DVD-ROM (required if installing from a CD)
Network Card (NIC) 1Gbps
Display Monitor 1024x768 (1280x800 for widescreen displays)

Lytec 2021March 2021 5
Chapter 1 - Lytec Hardware and Software Requirements Internet - Required
Internet - RequiredHigh-speed Cable, DSL, or Satellite Internet service.
Database - Version of SQLUses SQL Server 2017 Standard
Workstation Hardware - Minimum Required
Workstation Hardware - Recommended
*Your database will grow as you add data to your practice, increasing the amount of space needed on the hard drive.
Workstation Operating System - Supported • Windows 10 Professional, Enterprise (Windows 10 S and Home are NOT supported)
CPU Type Intel Pentium IV 2GHz or faster
RAM (Memory) 4GB
Storage Space available 8GB*
Optical Drive DVD-ROM (required if installing from a CD)
Network Card (NIC) 100Mbps
Display Monitor 1024x768 (1280x800 for widescreen displays)
CPU Type Core 2 2.4GHz or faster
RAM (Memory) 8GB
Storage Space available 8GB*
Optical Drive DVD-ROM (required if installing from a CD)
Network Card (NIC) 1Gbps
Display Monitor 1024x768 (1280x800 for widescreen displays)

Lytec 20216 March 2021
Lytec 2021 Supported Operating Systems Chapter 1 - Lytec Hardware and Software Requirements
Lytec 2021 Supported Operating Systems
*Windows 10 S and Home are NOT supported.
Revenue Management
Revenue Management uses Advantage Local Server. Advantage Local Server is limited to a maximum of five concurrent users. If you want to have more than five users accessing Revenue Management at the same time, you will need to upgrade to Advantage Database Server. Contact your Value Added Reseller for more information.
OPERATING SYSTEM
SERVER WORKSTATION
Version of Lytec 2021 Version of Lytec 2021
Client/Server
Single-User, Professional, or
Multi-User Client/Server
Single-User, Professional, or
Multi-User
Windows 10 Professional, Enterprise* N/A N/A Y Y
Windows Server 2012/2012 R2, 2016 Standard, Datacenter, Essentials
Windows Server 2019 Standard Y N/A
Y
Y

Lytec 2021March 2021 7
Chapter 1 - Lytec Hardware and Software Requirements MPIC System Requirements
MPIC System Requirements
Hardware requirements
Software requirements
MPIC must be installed at the same location as your SQL server. It does not need to be installed on any of your workstations. Nor does it have to be dedicated.
You may use a virtual server with MPIC.
With Practice Partner 11.2 • Windows Server 2012 and R2
• Windows Server 2016 Standard, Datacenter, Essentials
• Lytec 2014 SP1 or higher
Lytec MD 2021 Supported Operating Systems
*Lytec MD is NOT supported for Windows 10 Home version for Patient Records and Medical Billing. Windows 10 S is NOT supported.
CPU (Processor) Equivalent of Intel Quad Core Xeon 1.6GHz
RAM (Memory) 8GB
Storage Array Type RAID-1
Optical Drive DVD-ROM
Network Card (NIC) 1Gbps (cannot be a teamed network card)
Hard Drive At least 30GB
OPERATING SYSTEM
SERVER WORKSTATION DATABASE
Version of Lytec 2021 Version of Lytec 2021 Version of SQL
Client/Server Client/Server
SQL Server 2017 Standard
EditionWindows Server 2012 and R2, Windows
Server 2016 Standard, Datacenter, Essentials, Windows Server 2019
Standard Y
Y
Y
Windows 10 Professional, Enterprise* N/A Y N

Lytec 20218 March 2021
Lytec MD Best Practices Chapter 1 - Lytec Hardware and Software Requirements
For a complete list of all system requirements for Lytec MD, see Lytec MD System Requirements in the System Administration and System Requirements section of the Lytec 2021 Documentation page in Salesforce.
NOTE: End of life cycle for Practice Partner (Lytec MD) 11.1 was 12/31/2020. eMDs no longer supports versions of Lytec MD with Practice Partner 11.1 after that date.
Lytec MD Best Practices
eMDs provides both requirements and recommendations for Lytec MD best practices.
Required best practicesThe following table lists the required best practices for using Lytec MD.
Topic Comments
Lytec MD Application Folder The Lytec MD application folder must be on its own logical partition.
The logical drive on your application server must be a drive letter that is not reserved by any workstation (P: is the recommended drive letter).
The drive letter where the application folder resides on the application server must be available to be mapped on every Lytec MD computer.
Backups Backups are required. eMDs recommends a tape rotation with periodic offsite backups.
eMDs Lytec MD does not install, support, or maintain backup solutions. This is the responsibility of the customer.
eMDs Lytec MD cannot be held responsible for data loss incurred due to incomplete or corrupt backups.

Lytec 2021March 2021 9
Chapter 1 - Lytec Hardware and Software Requirements Lytec MD Best Practices
Anti-virus Solutions An anti-virus solution must be installed with the eMDs-recommended configurations.
The application folder and client folder must be excluded from real-time/on-access scanning. eMDs recommends scheduled scans when users are not in the system.
Windows Defender is installed for versions 8.0 and above and is recommended by eMDs. Ensure that exclusions are set. eMDs recommends turning off Windows Defender during installation, otherwise it may interact with files and some files may not get installed.
Trend Micro and CA eTrust are unapproved anti-virus solutions that may cause instability in the Practice Partner application.
Any anti-virus that does not allow for exclusions should not be installed. If asked by Support, you must be able to show the exclusions.
Oracle or SQL Database Platforms Customers using the Oracle or SQL database platforms must have qualified DBA services. This can be a full-time employee of the organization or a contractor. eMDs does offer a variety of DBA service solutions as additional service contract fees.
Teamed Network Interface Cards The use of teamed network interface cards (NICs) is not supported.
Domain/Active Directory Infrastructure Lytec MD requires a domain/Active Directory infrastructure.
New Technology File System (NTFS) NTFS is required due to the necessity to set file permissions.
Microsoft Security The following Microsoft security features and software must be disabled.
• User Account Control (UAC)
• Data Execution Prevention (DEP)
• Windows Firewall
Topic Comments

Lytec 202110 March 2021
Lytec MD Best Practices Chapter 1 - Lytec Hardware and Software Requirements
Recommended best practicesThe following table lists the recommended best practices for using Lytec MD.
Permissions The following items’ permissions must be set
to full control on the ppart drive.
• Network Service
• System
• Domain users
• Domain Admin
Topic Comments
Topic Comments
Windows Pagefile The Windows pagefile should be on its own disk controller and should be two times the amount of RAM in the machine.
Domain Name Servers (DNS) DNS should be on the same subnet as the Lytec MD servers.
Hardware eMDs highly recommends hardware from experienced and trusted vendors such as HP, Dell, and IBM. eMDs strongly discourages White-box servers.
Operating System Partition Provision enough space on your operating system partition for growth. eMDs recommends 32GB+ for your operating system partition.
Firewalls Customers should have a hardware-level firewall protecting their network.

Lytec 2021March 2021 11
Chapter 1 - Lytec Hardware and Software Requirements SQL Server 2017 Upgrade
SQL Server 2017 Upgrade The table below explains the upgrade path for the different versions of Lytec.
Lytec Installation Overview
This document contains instructions for all versions of Lytec, including Lytec MD. Please carefully review the instructions for your version of Lytec and hardware and software requirements (see “Lytec Hardware and Software Requirements” on page 1) before installing the software.
Version Using earlier than SQL 2005 Using SQL 2005, 2008, or 2012
Single User
Multiple User
Professional
Client/Server
Upgrade to Lytec 2010 and then upgrade to Lytec 2021.
You can choose to upgrade SQL Server manually. For Client/Server you will use the SQL 2017 Standard ISO image. For other Lytec versions, you will use the SQL 2017 Express installer.
You can find the SQL installer on the installation ISO or in the directory of extracted files if using the web installer exe.
Lytec MD Not applicable Not applicable
Upgrade to this version of Lytec Use these instructions
Lytec Single-User “Lytec Single-User Installation” on page 13
Lytec Professional or Multi-User “Lytec Professional or Multi-User Installation ” on page 17
Lytec Client/Server “Lytec Client/Server Installation ” on page 23
Lytec MD “Lytec MD Installation” on page 29

Lytec 202112 March 2021
Lytec Installation Overview Chapter 1 - Lytec Hardware and Software Requirements

Lytec 2021March 2021 13
Chapter 2 - Lytec Single-User Installation
Before you begin
Make a backup of your practice data in the prior release before installing Lytec.
Use an administrator account with full privileges when installing the software.
Do not uninstall your previous version of Lytec. Uninstalling previous versions of Lytec is not required for upgrading and in most cases not necessary or recommended. eMDs recommends that you keep older versions of Lytec. If you do uninstall, make a backup of the application and databases first. In addition, you must reinstall Lytec 2021 (if you installed it prior to uninstalling the older version) to restore any shared components that may have been removed when you uninstalled the old version.
Disable MPIC.
In some instances, you may have to restart the Lytec installation after the .NET framework is installed. If this occurs, the installation will close after installing .NET. Restart the installation. This situation can occur with older versions of the .NET framework on the PC.
If you are extracting the ISO or webinstall file to the hard drive prior to installing, extract to a folder that is immediately off the root drive and the folder name must be shorter than 8 characters. For example, c:\Install. Do NOT use a long folder name.
Make sure that Windows PowerShell is installed (if installing via webinstall). To see if it is installed, click Start and then Run. Type Powershell and press ENTER. If Windows PowerShell is not installed, follow the instructions to install. See “Installing Windows PowerShell” on page 77.
Reboot your server and/or workstation.
Important Installation noteeMDs highly recommends that you install SQL Server 2017 using the automatic process in the Lytec installer. However, if you choose to install SQL Server 2017 manually, you MUST install/enable (depending on your operating system) .NET 3.5 FIRST. Failure to do so will cause issues with eligibility verification.
Pre-installation Recommendations
1. If SQL Management Studio Express is installed, uninstall it prior to installing Lytec. For steps to do so, see “Uninstalling SQL Management Studio Express 2005” on page 93.
If you are unsure, follow the steps for uninstalling it. If it does not show up on the list of installed programs, then it is not installed.

Lytec 202114 March 2021
Linking to Other Applications Chapter 2 - Lytec Single-User Installation
2. Make sure your Windows operating system has the latest service pack installed. This will be checked during installation.
Linking to Other Applications
You can link Lytec to certain other applications, such as Practice Partner, using MPIC. Refer to “Linking Lytec With Other Applications” on page 101 for more information on MPIC and how to download it.
Installation
1. Disable UAC (User Account Control) prior to installing on each workstation. Once it is disabled, you will need to reboot the computer for the changes to take effect. In addition, disable any anti-virus applications prior to installation. Be sure to re-enable both UAC and anti-virus applications after installation.
2. Download the ISO for Lytec MD from the Lytec and Lytec MD Download Links page in Support Center.
3. Extract the ISO and launch autorun.exe. The Installation screen appears.
eMDs recommends that you do NOT attempt to install using any of the programs with the extension *.msi, such as Lytec.msi. Always use autorun.exe.
4. Click Install Lytec. The Lytec 2021 Installation – Welcome screen appears.5. Click the Next button. The End User License Agreement screen appears.Review the terms of
the agreement and click I accept the agreement. 6. Click the Next button. The Select Installation Type screen appears. Select the Lytec Single
User – Serial Number Prefix 7500 button.7. Click the Next button. The Select Lytec Server Components screen appears. Select which
components you want to install.
SQL Server: The database engine used by Lytec.
Lytec Client: Use this Lytec software to enter information for your practice.
Crystal Reports: Use this reporting program to print and generate reports. You must select this check box for a complete installation of Lytec.
Predefined Forms: Forms you can use with Lytec.

Lytec 2021March 2021 15
Chapter 2 - Lytec Single-User Installation Installation
Figure 1. Select Lytec Server Components screen
8. Click the Next button. The Select Target Folder screen appears.
NOTE: eMDs recommends that you use the default program folder location.
9. Click the Next button. The Select Data Folder appears. Either leave the default or click the Browse button to find a different folder.
10. Click the Next button. The SQL Server Setup screen appears if you selected SQL Server on the Select Components to Install screen. During the installation, Lytec will install SQL Server Express in the Data Folder and use it to manage your practice database. Use this screen to set up the SQL instance that Lytec will use for its practice database. You will need the information you enter here when you start Lytec and specify the default SQL credentials.
If you use MPIC, you MUST use LytecMD as your instance name.
Figure 2. SQL Server Setup screen
Note the password requirements above. Failure to create a password that meets these requirements WILL cause the installation to fail.
IMPORTANT: For security purposes, eMDs recommends that you change the default shown here to something unique, especially if you have more than one Lytec server on your network.
11. Click the Next button. The Start Installation screen appears. 12. Click the Next button. The Installing screen appears and tracks the progress of the install. 13. Reboot the computer when the installation is complete.14. Start Lytec. 15. Specify the default SQL server credentials. For step by step instructions, go to “Specifying the
Default SQL Server Credentials” on page 71.16. Register the program.17. If you are upgrading from Lytec 2010 or below, you will need to migrate your existing database
to a new location. For instructions, go to “Migrating existing databases” on page 72.18. Convert your practice data. Instructions are found at “Converting practices” on page 73.
SQL Server 2017 password requirements:
• The password does not contain all or part of the account name of the user.
• The password is at least eight characters long.
• The password contains characters from three of the following four categories: •Latin uppercase letters (A through Z) •Latin lowercase letters (a through z) •Base 10 digits (0 through 9) •Non-alphanumeric characters such as:
exclamation point (!), dollar sign ($), number sign (#), or percent (%).
• Passwords can be up to 128 characters long. Use passwords that are as long and complex as possible.

Lytec 202116 March 2021
Installation Chapter 2 - Lytec Single-User Installation

Lytec 2021March 2021 17
Chapter 3 - Lytec Professional or Multi-User Installation
Before you begin
Make a backup of your practice data in the prior release before installing Lytec.
Use an administrator account with full privileges when installing the software.
Do not uninstall your previous version of Lytec. Uninstalling previous versions of Lytec is not required after upgrading and in most cases not necessary or recommended. eMDs recommends that you keep older versions of Lytec. If you do uninstall, make a backup of the application and databases first. In addition, you must reinstall Lytec 2021 (if you installed it prior to uninstalling the older version) to restore any shared components that may have been removed when you uninstalled the old version.
Disable MPIC if it is running.
In some instances, you may have to restart the Lytec installation after the .NET framework is installed. If this occurs, the installation will close after installing .NET. Restart the installation. This situation can occur with older versions of the .NET framework on the PC.
If you are extracting the ISO or webinstall file to the hard drive prior to installing, extract to a folder that is immediately off the root drive and the folder name must be shorter than 8 characters. For example, c:\Install. Do NOT use a long folder name.
Reboot your server and/or workstation.
Important Installation noteeMDs highly recommends that you install SQL Server 2017 using the automatic process in the Lytec installer. However, if you choose to install SQL Server 2017 manually, you MUST install/enable (depending on your operating system) .NET 3.5 FIRST. Failure to do so will cause issues with eligibility verification.
Pre-installation Recommendations
1. If SQL Management Studio Express is installed on your server computer, uninstall it prior to installing Lytec. For steps to do so, see “Uninstalling SQL Management Studio Express 2005” on page 93.
2. Make sure your Windows operating system has the latest service pack installed. This will be checked during installation.

Lytec 202118 March 2021
Linking to Other Applications Chapter 3 - Lytec Professional or Multi-User Installation
Linking to Other Applications
You can link Lytec to certain other applications, such as Practice Partner, using MPIC. Refer to “Linking Lytec With Other Applications” on page 101 for more information on MPIC and how to download it.
If you are currently linked to other applications or want to link to other applications, you must use MPIC going forward. Communications Manager is no longer available.
Overview
There are four major steps for installing Lytec Professional or Multi-User on a network:
1. Install Lytec on the server.2. Migrate the existing database to the new SQL instance if you are upgrading from Lytec 2010 or
earlier.3. Convert your existing practice. 4. Install Lytec on each workstation.
These instructions take you through each step.
Server Installation and Setup
Installing on the Server1. Disable UAC (User Account Control) prior to installing on each workstation. Once it is
disabled, you will need to reboot the computer for the changes to take effect. In addition, disable any anti-virus applications prior to installation. Be sure to re-enable both UAC and anti-virus applications after installation.
2. Download the ISO for Lytec MD from the Lytec and Lytec MD Download Links page in Support Center.
3. Extract the ISO and launch autorun.exe. The Installation screen appears. eMDs recommends that you do NOT attempt to install using any of the programs with the extension *.msi, such as Lytec.msi. Doing so may result in failure of the installation. Always use autorun.exe.
4. On the Lytec Installation screen, click Install Lytec. The Lytec 2021 Installation – Welcome screen appears.
5. Click the Next button. The End User License Agreement screen appears. Review the terms of the agreement and click I accept the agreement.
6. Click the Next button. The Installation Type screen appears. Depending on the product purchased, select either the Lytec Multi User – Serial Number Prefix 7400 button or the Lytec Professional – Serial Number Prefix 7300 button.
7. Click the Next button. The Select Installation Mode screen appears.

Lytec 2021March 2021 19
Chapter 3 - Lytec Professional or Multi-User Installation Installing on the Server
8. Select Server.
Figure 3. Select Installation Mode screen
9. Click the Next button. The Select Lytec Server Components screen appears. Select the components you want to install.
Figure 4. Select Lytec Server Components screen
10. Click the Next button.The Select Target Folder screen appears. 11. Click the Next button. The Select Data Folder screen appears. Specify the folder on the server
where the practice data will be stored.12. Click the Next button. The SQL Server Setup screen opens if you selected the SQL Server
check box on the Select Components to Install screen. Enter the name of the SQL instance and the password for the system administrator. You will need this information when you specify the default SQL instance later, both on the server machine and the client workstations.
If you use MPIC, you MUST use LytecMD as your instance name.
SQL Server 2017 password requirements:
• The password does not contain all or part of the account name of the user.
SQL Server: The database engine used by Lytec.
Lytec Client: Use this Lytec software to enter information for your practice.
Crystal Reports: Use this to print and generate reports. You must select this check box for a complete installation of Lytec.
Predefined Forms: Forms you can use with Lytec.

Lytec 202120 March 2021
Workstation Installation and Setup Chapter 3 - Lytec Professional or Multi-User Installation
• The password is at least eight characters long.
• The password contains characters from three of the following four categories:
• Latin uppercase letters (A through Z)
• Latin lowercase letters (a through z)
• Base 10 digits (0 through 9)
• Non-alphanumeric characters such as: exclamation point (!), dollar sign ($), number sign (#), or percent (%).
• Passwords can be up to 128 characters long. Use passwords that are as long and complex as possible.
Note the password requirements above. Failure to create a password that meets these requirements WILL cause the installation to fail.
IMPORTANT: For security purposes, eMDs recommends that you change the default shown here to something unique, especially if you have more than one Lytec server on your network.
13. Click the Next button. 14. The Start Installation screen appears. This screen will tell you what type of installation you are
actually performing, so what it says may differ from what appears here.15. Click the Next button. The Installing screen appears and tracks the progress of the install. 16. Reboot the computer when the installation is complete.17. Start Lytec and specify the default SQL server credentials. For step by step instructions, go to
“Specifying the Default SQL Server Credentials” on page 71.18. Following that, migrate existing databases to the new SQL instance if you are upgrading from
Lytec 2010 or earlier. See “Migrating existing databases” on page 72.19. Convert existing practices. See “Converting practices” on page 73.20. After you are finished setting up a practice or converting, go to “Workstation Installation and
Setup” on page 20 for information on installing and setting up the program on a workstation.
Workstation Installation and Setup
1. Disable UAC (User Account Control) prior to installing on each workstation. Once it is disabled, you will need to reboot the computer for the changes to take effect. In addition, disable any anti-virus applications prior to installation. Be sure to re-enable both UAC and anti-virus applications after installation.
2. Launch autorun.exe. The Lytec Installation screen appears. eMDs recommends that you do NOT attempt to install using any of the programs with the extension *.msi, such as Lytec.msi. Doing so may result in failure of the installation. Always use autorun.exe.
3. On the Lytec Installation screen, click Install Lytec. The Lytec 2021 Installation – Welcome screen appears.
4. Click the Next button. The End User License Agreement screen appears. Select I accept the agreement.

Lytec 2021March 2021 21
Chapter 3 - Lytec Professional or Multi-User Installation Workstation Installation and Setup
5. Click the Next button. The Installation Type screen appears. Depending on the product purchased, select either the Lytec Multi User – Serial Number Prefix 7400 button or the Lytec Professional – Serial Number Prefix 7300 button.
6. Click the Next button. The Select Installation Mode screen appears. 7. Select Client.
Figure 5. Select Installation Mode screen
8. Click the Next button. The Select Lytec Server Components screen appears. Select the components you want to install.
Figure 6. Select Lytec Client Components screen
Warning: Ensure that you have selected Predefined Forms. If you leave this check box cleared, existed forms will be deleted during install.
9. Click the Next button. The Select Target Folder screen appears.
NOTE: eMDs recommends that you use the default program folder location.
10. Click the Next button. The Start Installation screen appears. 11. Reboot the computer when the installation is complete.
Lytec Client: Use this Lytec software that to enter information for your practice. For the client installation, this option is automatically selected.
Crystal Reports: Use this program to print and generate reports. You must select this check box for a complete installation of Lytec.
Predefined Forms: Forms you can use with Lytec.

Lytec 202122 March 2021
Workstation Installation and Setup Chapter 3 - Lytec Professional or Multi-User Installation
12. Repeat these steps for each workstation on which you want to install Lytec.
Lytec 2021March 2021 23
Chapter 4 - Lytec Client/Server Installation
Before you begin
Make a backup of your practice data in the prior release before installing Lytec.
Use an administrator account with full privileges when installing the software.
Do not uninstall your previous version of Lytec. Uninstalling previous versions of Lytec is not required after upgrading and in most cases not necessary or recommended. eMDs recommends that you keep older versions of Lytec. If you do uninstall, make a backup of the application and databases first. In addition, you must reinstall Lytec 2021 (if you installed it prior to uninstalling the older version) to restore any shared components that may have been removed when you uninstalled the old version.
Disable MPIC.
In some instances, you may have to restart the Lytec installation after the .NET framework is installed. If this occurs, the installation will close after installing .NET. Restart the installation. This situation can occur with older versions of the .NET framework on the PC.
If you are extracting the ISO or webinstall file to the hard drive prior to installing, extract to a folder that is immediately off the root drive and the folder name must be shorter than 8 characters. For example, c:\Install. Do NOT use a long folder name.
Reboot your server and/or workstation.
Important Installation noteeMDs highly recommends that you install SQL Server 2017 using the automatic process in the Lytec installer. However, if you choose to install SQL Server 2017 manually, you MUST install/enable (depending on your operating system) .NET 3.5 FIRST. Failure to do so will cause issues with eligibility verification.
Pre-installation Recommendations
1. If SQL Management Studio Express is installed on your server computer, uninstall it prior to installing Lytec. For steps to do so, see “Uninstalling SQL Management Studio Express 2005” on page 93.
If you are unsure, follow the steps for uninstalling it. If it does not show up on the list of installed programs, then it is not installed.
2. Make sure your Windows operating system has the latest service pack installed. This will be checked during installation.

Lytec 202124 March 2021
Linking to Other Applications Chapter 4 - Lytec Client/Server Installation
Linking to Other Applications
You can link Lytec to certain other applications, such as Practice Partner, using MPIC. Refer to “Linking Lytec With Other Applications” on page 101 for more information on MPIC and how to download it.
If you are currently linked to other applications or want to link to other applications, you must use MPIC going forward. Communications Manager is no longer available.
Overview
There are four major steps for installing Lytec Client/Server:
1. Install and set up Lytec on the server.2. Migrate the existing database to the new SQL instance if you are upgrading from Lytec 2010 or
earlier.3. Convert existing practices.4. Install Lytec on each workstation.
These instructions take you through each step.
Server Installation and Setup
Perform the server installation on a computer with a supported server operating system (Windows Server 2012, Windows Server 2016, or Windows Server 2019) using an administrator account with full privileges. Unless instructed, accept all default choices and follow all the default screen prompts.
Installation1. Disable UAC (User Account Control) prior to installing on each workstation. Once it is
disabled, you will need to reboot the computer for the changes to take effect. In addition, disable any anti-virus applications prior to installation. Be sure to re-enable both UAC and anti-virus applications after installation.
2. Download the ISO for Lytec MD from the Lytec and Lytec MD Download Links page in Support Center.
3. Extract the ISO and launch autorun.exe. The Installation screen appears. eMDs recommends that you do NOT attempt to install using any of the programs with the extension *.msi, such as Lytec.msi. Doing so may result in failure of the installation. Always use autorun.exe.
4. On the Lytec Installation screen, click Install Lytec. The Lytec Installation – Welcome screen appears.
5. Click the Next button. The End User License Agreement screen appears. Review the terms of the agreement and click I accept the agreement.

Lytec 2021March 2021 25
Chapter 4 - Lytec Client/Server Installation Installation
6. Click the Next button. The Installation Type screen appears.Select the Lytec Client Server – Serial Number Prefix 7600 button.
7. Click the Next button. The Installation Mode screen appears. 8. Select the Server button.
Figure 7. Select Installation Mode screen
9. Click the Next button. The Select Lytec Server Components screen appears. Make your selections.
10. Click the Next button.
Figure 8. Select Lytec Server Components screen
11. The Select Target Folder screen appears. 12. Click the Next button. The Select Data Folder screen appears. 13. Click the Next button. The SQL Server Setup screen opens if you selected SQL Server on the
Select Components to Install screen. Enter the name of the SQL instance and the password for the system administrator. You will need this information when you specify the default SQL instance later, for the server database and the client computers.
If you use MPIC, you MUST use LytecMD as your instance name.
SQL Server 2017 password requirements:
SQL Server: The database engine used by Lytec.
Lytec Client: Use this Lytec software to enter information for your practice.
Crystal Reports: Use this reporting program to print and generate reports. You must select this check box for a complete installation of Lytec.
Predefined Forms: Forms you can use with Lytec.

Lytec 202126 March 2021
Workstation Installation and Setup Chapter 4 - Lytec Client/Server Installation
• The password does not contain all or part of the account name of the user.
• The password is at least eight characters long.
• The password contains characters from three of the following four categories:
• Latin uppercase letters (A through Z)
• Latin lowercase letters (a through z)
• Base 10 digits (0 through 9)
• Non-alphanumeric characters such as: exclamation point (!), dollar sign ($), number sign (#), or percent (%).
• Passwords can be up to 128 characters long. Use passwords that are as long and complex as possible.
Note the password requirements above. Failure to create a password that meets these requirements WILL cause the installation to fail.
IMPORTANT: For security purposes, eMDs recommends that you change the default shown here to something unique, especially if you have more than one Lytec server on your network.
14. Click the Next button.
NOTE: If you are installing on a domain controller, a second screen appears at this point.
Enter your domain name and the login and password. By default, the login will appear. To find the domain name for the computer you are installing Lytec on,a. Select Start.b. Right-click (My) Computer and select Properties.c. Select the Computer Name tab and the domain name will be listed to the right of
Domain. The password will be that of the Domain Administrator (usually it is just “administrator”). If you do not know the password, contact the Domain Administrator.
d. Click the Next button.13. Click the Next button. The Start Installation screen appears. 14. Click the Next button. The Installing screen appears and tracks the progress of the install. 15. Reboot the computer when the installation is complete.16. Start Lytec and specify the default SQL server credentials. For step by step instructions, go to
“Specifying the Default SQL Server Credentials” on page 71.17. Following that, you will find steps to creating a new practice or converting existing practices.18. After you are finished setting up a practice or converting, go to “Workstation Installation and
Setup” on page 26 for information on installing and setting up the program on a workstation.
Workstation Installation and Setup
1. Disable UAC (User Account Control) prior to installing on each workstation. Once it is disabled, you will need to reboot the computer for the changes to take effect. In addition, disable any anti-virus applications prior to installation. Be sure to re-enable both UAC and anti-virus applications after installation.

Lytec 2021March 2021 27
Chapter 4 - Lytec Client/Server Installation Workstation Installation and Setup
2. Launch autorun.exe. The Lytec Installation screen appears. eMDs recommends that you do NOT attempt to install using any of the programs with the extension *.msi, such as Lytec.msi. Doing so may result in failure of the installation. Always use autorun.exe.
3. On the Lytec Installation screen, click Install Lytec. The Lytec 2021 Installation – Welcome screen appears.
4. Click the Next button. The End User License Agreement screen appears. Review the terms of the agreement and click I accept the agreement.
5. Click the Next button. The Installation Type screen appears. Select the Lytec Client Server – Serial Number Prefix 7600 button.
6. Click the Next button.The Select Installation Mode screen appears. Select the Client button.
Figure 9. Select Installation Mode screen
7. Click the Next button. The Select Lytec Client Components screen appears. Select your components.
Figure 10. Select Lytec Client Components screen
Warning: Ensure that you have selected Predefined Forms. If you leave this check box cleared, existing forms will be deleted during install.
Lytec Client: Use this Lytec software to enter information for your practice. For the client installation, this option is automatically selected.
Crystal Reports: Use this reporting program to print and generate reports. You must select this check box for a complete installation of Lytec.
Predefined Forms: Forms you can use with Lytec.

Lytec 202128 March 2021
Workstation Installation and Setup Chapter 4 - Lytec Client/Server Installation
8. Click the Next button. The Select Target Folder screen appears.9. Click the Next button. The Start Installation screen appears.
10. Click the Next button. Let the installation complete.11. Reboot the computer when the installation is complete.12. Repeat these steps for each workstation on which you want to install Lytec.
Lytec 2021March 2021 29
Chapter 5 - Lytec MD Installation
This chapter provides information for upgrading Lytec MD.
You can find several guides for using Lytec MD on your LytecMD installation DVD. You can access them from the DVD or insert the DVD and start Autorun.
Do not uninstall your previous version of Lytec MD. Uninstalling previous versions of Lytec MD is not required after upgrading and in most cases not necessary or recommended.
Important Installation noteeMDs highly recommends that you install SQL Server 2017 using the automatic process in the Lytec installer. However, if you choose to install SQL Server 2017 manually, you MUST install/enable (depending on your operating system) .NET 3.5 FIRST. Failure to do so will cause issues with eligibility verification.
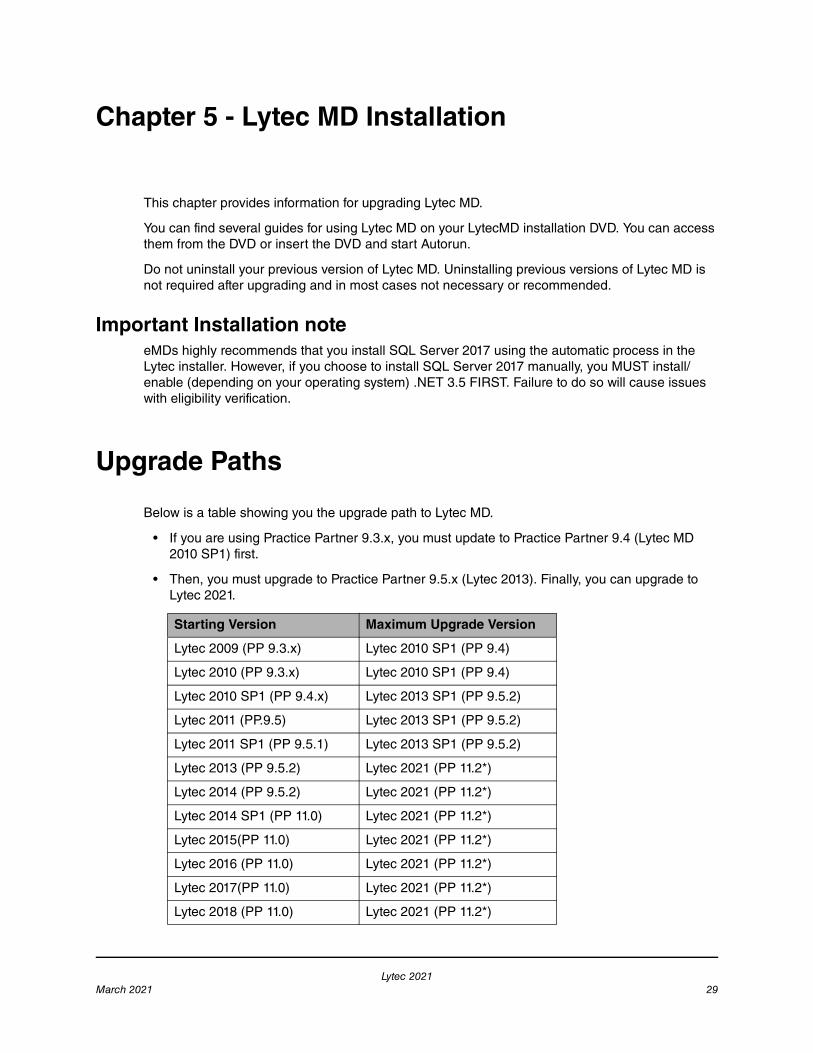
Upgrade Paths
Below is a table showing you the upgrade path to Lytec MD.
• If you are using Practice Partner 9.3.x, you must update to Practice Partner 9.4 (Lytec MD 2010 SP1) first.
• Then, you must upgrade to Practice Partner 9.5.x (Lytec 2013). Finally, you can upgrade to Lytec 2021.
Starting Version Maximum Upgrade Version
Lytec 2009 (PP 9.3.x) Lytec 2010 SP1 (PP 9.4)
Lytec 2010 (PP 9.3.x) Lytec 2010 SP1 (PP 9.4)
Lytec 2010 SP1 (PP 9.4.x) Lytec 2013 SP1 (PP 9.5.2)
Lytec 2011 (PP.9.5) Lytec 2013 SP1 (PP 9.5.2)
Lytec 2011 SP1 (PP 9.5.1) Lytec 2013 SP1 (PP 9.5.2)
Lytec 2013 (PP 9.5.2) Lytec 2021 (PP 11.2*)
Lytec 2014 (PP 9.5.2) Lytec 2021 (PP 11.2*)
Lytec 2014 SP1 (PP 11.0) Lytec 2021 (PP 11.2*)
Lytec 2015(PP 11.0) Lytec 2021 (PP 11.2*)
Lytec 2016 (PP 11.0) Lytec 2021 (PP 11.2*)
Lytec 2017(PP 11.0) Lytec 2021 (PP 11.2*)
Lytec 2018 (PP 11.0) Lytec 2021 (PP 11.2*)

Lytec 202130 March 2021
Upgrading to Web View 11.0 Chapter 5 - Lytec MD Installation
* After installing all patches
Upgrading to Web View 11.0
Email the eMDs Web View Setup team at least one week (or more) prior to upgrading to Lytec MD to inform the team of your upcoming upgrade. After your organization upgrades to Web View 11.0, eMDs must complete the set up needed for Web View to function after the upgrade. Send the email to [email protected] with the subject "WebView v11 Upgrade Request". Include the name of your organization and your Web View URL in the email.
Installing on a Domain Controller
You no longer need to install SQL Server manually prior to installing Lytec. eMDs recommends that you simply start the installer and allow it to install SQL automatically. You will be prompted for a domain account Login and Password at the appropriate time in the procedure.
Upgrade overview
The following steps overview the process for installing Lytec MD.
Do not rename or move the Lytec MD directory after the installation. This directory is used to register files, and the program may fail to work if the directory name is changed.
Lytec 2019 (PP 11.0) Lytec 2021 (PP 11.2*)
Lytec 2020 (PP 11.0) Lytec 2021 (PP 11.2*)
Step Action Page
1 Complete applicable pre-installation tasks for Lytec MD. 31
2 Install Lytec MD Server and Lytec Client on your server. 42
3 Install Lytec MD Client and Lytec Client on your client workstations.
50
4 Complete applicable post-installation tasks. 71

Lytec 2021March 2021 31
Chapter 5 - Lytec MD Installation Backup and restore process
Backup and restore process
Make a full cold backup of your Medisoft Clinical application server. This backup should include everything you need to re-create your production environment. Do not continue the conversion until the backup is complete and verified.
You must have a System Restore backup and not just ppart backup, if there is a need to have a system restore, this would be what you would need for a catastrophic restore.
If you have SQL on another machine, make backups of that SQL database also.
If the patch process fails, contact Technical Support for help resolving the patch failure issue. If the Server Patch completes but there is a failure in the database conversion that cannot be resolved by Technical Support, then a complete system restore will be necessary. After the complete system restore, run the MigrateToEmdsRx.exe utility rollback option so that you can e-prescribe on the old system. You can try the migration again at a later date.
Pre-installation tasks
Before installation, complete the tasks in the following table.
Task Description
Verify that SQL Server Express is NOT installed
Your upgrade will fail if you have SQL Server Express installed instead of the full version of SQL Server. To check your version:
1. Run the following command line in the SSMS(SQL Server Management Studio) query window.
SELECT SERVERPROPERTY('productversion'), SERVERPROPERTY ('productlevel'), SERVERPROPERTY ('edition')
2. The correct response is “Stand Edition x64 bit”. If the response is “Express”, you must uninstall SQL Server Express and install the full SQL server before continuing.
Uninstall SQL Management Studio Express 2005
If SQL Management Studio Express 2005 is installed on your server computer, uninstall it prior to installing Lytec. For steps to do so, see “Uninstalling SQL Management Studio Express 2005” on page 93.
If you are unsure, follow the steps for uninstalling it. If it does not show up on the list of installed programs, then it is not installed.
Patient Records Tasks

Lytec 202132 March 2021
Pre-installation tasks Chapter 5 - Lytec MD Installation
Run the Clinical Quality Measures (CQM) report
Run the CQM report for your 2011 measures (that is, the measures supported in Practice Partner 9.5.2) and retain copies of your existing CQM reports before upgrading. The CQM Report for Practice Partner 11.0 supports the new 2014 CQM measures. After upgrading, you will not be able to generate the report for 2011 measures. For more information, see the Clinical Quality Measures Report User’s Guide.
Sign off on all Lab Review items Sign off on all Lab Review items before upgrading. Due to Lab Review template enhancements, the display order has changed in Lytec MD 2021. Unsigned results that remain in review bins after the upgrade may cause some performance issues (for example, a delay in opening review screens).
Sign off on all Note Review items Sign off on all Note Review items before the upgrade. Unsigned results that remain in review bins after upgrading may cause some performance issues (for example, a delay in opening notes).
Verify that the BulkDataLoad files are present in the ppart file.
Verify that the BulkDataLoad files are present in the ppart file before the upgrade. If the BulkDataLoad files are not present in the ppart file and you run the upgrade, the default BulkDataLoad files will be installed.
Appointment Scheduler Tasks
Optional - Back up your sample Appointment Scheduler Encounter forms
During the upgrade installation the sample Appointment Scheduler encounter forms (that is, AS_Encounter, AS_Label, OE_Custom, OE_Label, and Cancelled_Orders) will be overwritten. If you are using these forms you must copy your encounter forms before the installation to ensure that the forms are saved for future use.
ePrescribing Module Tasks
Respond to refill requests Respond to all refill requests before upgrading. For steps on how to respond to refill requests, see the Lytec MD Add-ons User’s Guide.
Administrative Tasks (complete these tasks outside the application)
Print Lytec Registration Files Save or print the registration files for Lytec Client before you upgrade. To do so
1. On the Help menu in Lytec Client, click Register Program.
2. Step through the registration screens until you click the Done button.
3. You can then print the Software Registration page or save it to disk.
Task Description
Lytec 2021March 2021 33
Chapter 5 - Lytec MD Installation Pre-installation tasks
Download your new license files from the eMDs Practice Support website
Download the product license file from the Customer Support Web site.
To download your license files:1. Go to the eMDs Practice Support website at https://
practicesupport.emds.com.
2. Enter your eMDs Practice Support website username and password.
3. Under Quick Links on the left side of the page, click the Downloads & License Files link.
4. To download the current (11.0) license file, click the drop-down arrow on the Download Current Version button and select Download License File from the menu.
If you are already using 11.x, you do not need to download a new license file.
To download the previous (9.5.2) license file, click the drop-down arrow on the Download Current Version button and select Download Previous License from the menu.
5. The license file will be downloaded immediately to your machine.Click the Request a license file for installation link.
Important: Make sure to review the Patch Release Notes documents for any necessary database changes. The Patch Release Notes documents are available on Salesforce.
Task Description

Lytec 202134 March 2021
Pre-installation tasks Chapter 5 - Lytec MD Installation
Install your license files After you download your license files, you must install them.
1. Create a License folder on the P:\ drive (or whatever drive the ppart folder is on).
a. Open Windows Explorer. Click Start, point to All Programs, point to Accessories, and then click Windows Explorer.
b. Browse to the P:\ drive (or whatever drive the ppart folder is on).
c. Create a new folder by right-clicking a blank area in a folder window or on the desktop, pointing to New, and then clicking Folder.
d. Rename the default folder to License and press Enter.
2. Save the files attached to the e-mail in the License folder (usually P:\license). One of the files should be named pplic.txt. If this file doesn't exist (because some e-mail programs strip this file), please save the other file in the License folder and rename it to pplic.txt.
3. Begin your installation or upgrade of Lytec MD. During the install, you will be prompted to browse to the License folder (usually P:\license) where your license files are located.
If you are changing the number of licensed users, see “Changing the number of licensed users” on page 103.
Make sure all users are logged out of all Lytec MD applications
Make sure all users are logged out of all Lytec MD applications and will not log back in until after the upgrade is complete. For example, if you are running Dragon software for speech recognition, have all users exit Dragon.
Disable User Access Control (UAC) and anti-virus applications
UAC must be disabled. Once it is disabled, reboot the server for the changes to take effect. Below are the steps to disable UAC on Server 2008 Standard.
1. From the desktop, select Start, and then Control Panel.
2. Double-click User Accounts and click the link Turn User Account Control on or off.
3. Clear the Use User Access Control (UAC) to help protect your computer check box.
4. Click the OK button.
Task Description

Lytec 2021March 2021 35
Chapter 5 - Lytec MD Installation Pre-installation tasks
Make a full backup of your SQL databases
Make a full backup of your SQL database. In the event that the conversion fails, you will need your backup to restore your Practice Partner SQL database.
Restart your server before beginning the installation
Lytec MD must be installed directly on the server that houses the database. eMDs recommends that you restart your server before beginning the installation.
Shut Down Watchdog If you have Watchdog installed and running, you must stop it first or it will restart services (such as the PMSI Server) even if you stop them manually. To shut down Watchdog:
1. Check if the green Watchdog icon displays in the System Tray.
2. If so, right click the icon and select Stop.If it does not display in the System Tray, you do not have it installed.
Since Watchdog is no longer supported, eMDs recommends that you leave it disabled.
If your site uses it, uninstall Patient Education.
For steps on how to uninstall Patient Education, see the Lytec MD Add-ons Configuration and Installation Guide.
Shut Down PP Connect 1. On the desktop, click the Exit button on the Connect-DemSch In screen if it is open. To open this screen, double click the Inbound DemSched icon on the desktop.
Figure 11. Connect DemSch In screen
2. On the desktop, click the Exit button on the Connect-BillCode and Sch Out screen if it is open. To open this screen, double click the Outbound BillCode icon on the desktop.
Figure 12. Connect BillCode and Sch Out screen
Task Description

Lytec 202136 March 2021
Pre-installation tasks Chapter 5 - Lytec MD Installation
Disable MPIC On the MPIC Control Panel, click Stop Service.
Be sure to restart this service after the upgrade is complete.
Stop the PMSI Data and Application Servers
Stop the PMSI Data Server and PMSI Application Server before installing on the server computer. If you do not stop the service, you will not be able to upgrade successfully.
1. Click Start and then Control Panel. 2. Click Performance and Maintenance.3. Click Administrative Tools and then Services.
NOTE: depending on your version of the Windows operating system and if you are using the Classic view option, the Performance and Maintenance option does not always appear. In this case, go to the Administrative Tools option.
4. Find PMSI Data Server and right-click.5. Click Stop.6. Find PMSI Application Server and right-click. 7. Click Stop.
Be sure to restart these services after the installation is complete.
If you are already using Practice Partner 11.0 or newer, skip to the step: Check Available Storage Space.
Task Description

Lytec 2021March 2021 37
Chapter 5 - Lytec MD Installation Pre-installation tasks
Download and run the new Pre11ConversionFixes.exe utility.
Download and run the new Pre11ConversionFixes.exe utility. This utility repairs history notes that may cause the upgrade to 11.0 to fail.
NOTE: if you are already using 11.0 or newer, skip this step.
This command line utility creates a log file named Pre11ConversionFixes.log in the PPart folder. This log file indicates how many history notes the utility fixed.
This utility can be run with users in the system, so there is no down time. For most sites that were tested, the utility ran in less than an hour, but depending on the size of your database, database type, and hardware, the run time for this utility can vary from a few minutes to a few days. eMDs recommends that you run this utility during the weekend before your upgrade.
NOTE: The issue that the utility fixes should no longer occur with 9.5.2 SP2 sites that are fully patched.
To run the Pre11ConversionFixes.exe utility: 1. Download the self-extracting executable from https://
download.practicepartner.com/ Pre11ConversionFixes.exe. If you receive a certificate error, opt to download anyway.
2. Click the Run button. The system asks where you want to extract the folder. The default location is C:\McKesson.
3. Navigate to the extract location, open the Pre11ConversionFixes folder, and copy Pre11ConversionFixes.exe to your PPart folder.
4. You may double-click Pre11ConversionFixes.exe to run the utility, but eMDs recommends running the utility at the command prompt in the PPart folder so you see the messages on the screen. For example:
P:\ppart>pre11conversionfixes.exe
Running pre 11.0 conversion fixes
Number of Past Medical History Notes fixed: 0
Number of Social History Notes fixed: 0
Number of Family History Notes fixed: 0
If, like in the example, the utility does not fix any history notes, the Pre11ConversionFixes.log file contains only the start time. For example: Started fixing pre 11 conversion issues on 04/21/2014 at 08:54:22 AM.
Task Description

Lytec 202138 March 2021
Pre-installation tasks Chapter 5 - Lytec MD Installation
Download and run the new Pre11DBConnectionCheck.exe utility
Download and run the new Pre11DBConnectionCheck.exe utility. This utility checks and reports any issues with the connection string details that the v11 installer will use to update your system.
To run the Pre11DBConnectionCheck.exe utility:
1. Download the self-extracting zip file from https:// download.practicepartner.com/ Pre11DBConnectionCheck.exe, which contains the Pre11DBConnectionCheck.exe utility, Pre11DBConnectionCheck.dll, and Microsoft Visual C++ 2010 redistributable.
2. Click the self-extracting zip file. It extracts by default to C:\McKesson\Pre11DBConnectionCheck. Copy the .exe and .dll files to your PPart folder, which usually is p:\ppart.
3. Open C:\McKesson\Pre11DBConnectionCheck and double-click vcredist_x86.exe to install the Microsoft Visual C++ 2010 redistributable, which is required by the utility to run.
4. After the Microsoft Visual C++ 2010 redistributable has finished installing, open your PPart folder and double-click Pre11DBConnectionCheck.exe.
5. Click the Check Database Connection button to check the database connection details that the v11 installer will use. If there are no issues, a message displays stating that the connection check passed. Otherwise, a message displays stating why the connection check failed. To resolve the connection issue, contact Practice Partner Support before upgrading to release 11.0.
Install and run the PPMT utility Install and run the PPMT utility for Practice Partner 9.5.2. Running the index defrag scripts that are part of the PPMT utility can prevent a SQL timeout during conversion.
Check available storage space The SQL server’s drive should have enough storage space for the PP_Small file group. The upgrade can increase the size to two times its original size. To check your storage space usage, you can use SQL Server Management Studio.
Task Description

Lytec 2021March 2021 39
Chapter 5 - Lytec MD Installation Pre-installation tasks
Change the SQL database recovery mode to Simple
Change the SQL database recovery model before upgrading to Simple.
1. From the SQL Enterprise Manager, click the database name in DBName from the Database menu.
2. Right-click on Properties, then click Options.
3. Select Simple from the Recovery: Model drop-down list.
Disable Mirth and stop the Mirth service.
1. If the Mirth Connect Server Manager appears in the System Tray, right-click it and select Close Manager.
1. Click Start and then Control Panel. 2. Click Performance and Maintenance.3. Click Administrative Tools and then Services.
NOTE: depending on your version of the Windows operating system and if you are using the Classic view option, the Performance and Maintenance option does not always appear. In this case, go to the Administrative Tools option.
4. Find Mirth Connect Service and right-click.5. Click Stop.
Disable Windows Firewall 1. Click Start on the Windows Desktop.
2. Click Control Panel. The Control Panel appears.
3. Click System and Security.
4. Click Windows Firewall.
5. Click Turn Windows Firewall on or off. The Customize Settings screen appears.
6. Select the option to turn off Windows Firewall.
7. Click the OK button.
Be sure to enable Windows Firewall when the installation is complete.
Task Description

Lytec 202140 March 2021
Pre-installation tasks Chapter 5 - Lytec MD Installation
Disable DEP (Data Execution Protection)
1. Click Start on the Windows Desktop.
2. Click Control Panel. The Control Panel appears.
3. Click System and Security.
4. Click System.
5. Click Advanced System Settings.
If you are prompted for an administrator password or confirmation, type the password or provide confirmation.
6. Under Performance, click Settings.
7. Click the Data Execution Prevention tab.
8. Select Turn on DEP for essential Windows programs and services only.
9. Click the OK button.
10. Click the OK button.
11. Close Control Panel.
Be sure to enable DEP when the installation is complete.
Sites running the eMDsELIXIR HQI Practice Connector service for FIGmd connectivity only - Stop the service before upgrading
If your site is partnered with FIGmd for reporting and running the eMDsELIXIR HQI Practice Connector service, stop this service before upgrading to 11.2. When the upgrade is complete, you must restart the eMDsELIXIR HQI Practice Connector service.
SQL sites Prior to upgrade, perform a database check (dbcc checkDB) for the database your medical software is named (for example, PROD). PPMT should be installed and working, and check for errors daily.
Add URLs to your trusted sites Ensure that the following URLs are added to your trusted sites:
• https://microservice.emds.com/
• https://erx.emdscloud.com
Execute fixppsq.exe ALL command
Open a command prompt and change the path to your ppart folder, which usually is in the P: drive. Execute the command fixppsq.exe ALL, which is to fix the unique sequence values. If you do not run this step, you may encounter an Unable to add prescription error when prescribing a medication.
Task Description

Lytec 2021March 2021 41
Chapter 5 - Lytec MD Installation Pre-installation tasks
Run the CheckProviderSPIAndNPI.exe utility
Before you run the CheckProviderSPIAndNPI.exe utility, back up the following three files in the ppart folder:
• PMSI.Networking.Services.InteroperabilityService.e xe.config
• ServersTemplate.config
• server.config eMDs recommends
eMDs recommends that a few days before you plan to perform the migration to eMDs Prescribe, that you run the CheckProviderSPIAndNPI.exe utility located in the ppart folder. If the utility is missing from the ppart folder, make sure you have installed all of the latest patches, and if it still is not present in the folder, contact Technical Support.
The CheckProviderSPIandNPI.exe utility performs a check to verify that an SPI associated with a provider is associated with only one practice and that all providers who have an SPI also have an NPI. If either of these checks fails, you will see a list of warning messages indicating the providers you need to fix before you start the migration.
Check the <Client> section of the servers.config.
Check the <Client> section of the servers.config for the following endpoint. Be sure to substitute the name of your server for <NameOfServerHERE>.
<endpoint name=”InteropSvcEpcsProxy”
address=”net.tcp://
<NameOfServerHERE>:50508/ InteroperabilityService/EPCSProxy/net.tcp”
binding="netTcpBinding"
contract="eMDs.EPCS.IEPCSProxy"
bindingConfiguration="TCPWindowsSecurity"
behaviorConfiguration="ClientConfigBehavior"
/>
If this endpoint is missing after backing up the file, add the section.
Task Description

Lytec 202142 March 2021
Server Installation and Setup Chapter 5 - Lytec MD Installation
NOTE: Do not upgrade if you currently are in the process of identity proofing and/or registering with DrFirst for electronic prescribing of non-controlled substances or ECPS. You may upgrade after you have completed the identity proofing and/or DrFirst registration processes.
Server Installation and Setup
You must perform the server installation on a computer with a supported server operating system (Windows Server 2012, Windows Server 2016, or Windows Server 2019) using an administrator account with full privileges.
The installation of Lytec MD Server could take several hours because your data is being upgraded during the installation. Once the installation has started, do not cancel the installation or you will have to start it over.
Installation1. Download the ISO for Lytec MD from the Lytec and Lytec MD Download Links page in Support
Center.
2. Extract the ISO and launch autorun.exe. The Installation screen appears. eMDs recommends that you do NOT attempt to install using any of the programs with the extension *.msi, such as Lytec.msi. Doing so may result in failure of the installation. Always use autorun.exe.
3. Click Install Lytec. The Lytec 2021 Installation – Welcome screen appears.
4. Click the Next button. The End User License Agreement screen appears. Review the terms of the agreement and click I accept the agreement.
5. Click the Next button. The Select Installation Type screen appears. Select the Lytec MD button.
Check the <client> section in the PMSI.interoperability.Service config.
Check the <client> section in the PMSI.interoperability.Service config for the following section:
<endpoint address=”
binding=”basicHttpBinding”
bindingConfiguration=”EPCSServiceBinding”
contract=”eMDs.EPCS.IEPCSService”
name=”CHServer_EPCSService”/>
If this section is missing after backing up the file, add the section.
Task Description

Lytec 2021March 2021 43
Chapter 5 - Lytec MD Installation Installation
6. Click the Next button. The Select Installation Mode screen appears. Select the Server button.
Figure 13. Select Installation Mode screen
7. Click the Next button. The Select Lytec Server Components screen appears. 8. Select which options you want to install.
Figure 14. Select Lytec Server Components screen
9. Use the following table to determine which items to select for the clinical component of Lytec MD.
10. Use the table to determine which items to select or clear:
SQL Server: The database engine used by Lytec
Lytec Client: Use this Lytec software to enter information for your practice.
Crystal Reports: Use this to print and generate reports. You must select this check box for a complete installation of Lytec.
Predefined Forms: Forms you can use with Lytec.
LytecMD Server: This is the software that goes on the server computer to run Lytec MD. It is ONLY installed during the Server installation.
LytecMD Client: This is the Lytec MD program.
If you are upgrading from... Perform this action
Lytec 2014 or earlier Select the Lytec MD Server check box.
Select the Lytec MD Client check box.
Lytec 2014 SP1 Clear the Lytec MD Server check box.
Clear the Lytec MD Client check box.
If you already have the following installed... Perform this action:

Lytec 202144 March 2021
Installation Chapter 5 - Lytec MD Installation
If you have cleared ALL of the check boxes, stop! You do NOT need to perform a server installation.
11. Select the SQL Server check box.
Depending on your selections, the screens you see will change.
12. Click the Next button.The Select Target Folder screen appears. You will see this screen ONLY if you selected Lytec Client on the Lytec Components screen.
13. Click the Next button. The Select Data Folder screen appears. This is the folder where the Lytec practice data files will be stored on the server.
14. Click the Next button. The SQL Server Setup screen opens.
Figure 15. SQL Server Setup screen
The SQL instance will default to the existing instance. If, for some reason, you change the instance, you must use this new instance for all future installs.
You must NOT use the following instance names: LYTEC_SQL or PP_SQL.
In addition, if you change the Instance name, the screen will display another field that will allow you to specify the location of the SQL Server files.
If you use MPIC, you MUST use LytecMD as your instance name.
SQL Server 2017 password requirements:
• The password does not contain all or part of the account name of the user.
• The password is at least eight characters long.
• The password contains characters from three of the following four categories:
Lytec Client Select the Lytec Client check box.
Select the Crystal Reports check box.
Select the Predefined Forms check box.

Lytec 2021March 2021 45
Chapter 5 - Lytec MD Installation Installation
• Latin uppercase letters (A through Z)
• Latin lowercase letters (a through z)
• Base 10 digits (0 through 9)
• Non-alphanumeric characters such as: exclamation point (!), dollar sign ($), number sign (#), or percent (%).
• Passwords can be up to 128 characters long. Use passwords that are as long and complex as possible.
Note the password requirements above. Failure to create a password that meets these requirements WILL cause the installation to fail.
IMPORTANT: For security purposes, eMDs recommends that you change the default shown here to something unique, especially if you have more than one Lytec server on your network.
15. Click the Next button.
NOTE: If you are installing on a domain controller, a second screen appears at this point.
Enter your domain name and the login and password. By default, the login will appear. To find the domain name for the computer you are installing Lytec on,
1.Select Start.2.Right-click on (My) Computer and select Properties.3.Select the Computer Name tab and the domain name will be listed to the right of
Domain. If you do not know the password, contact the Domain Administrator. 4.Click the Next button.
12. Click the Next button. If you changed the name of the Instance, you will see the Data Migration screen.This screen will show you the name of the existing instance and give you the opportunity to decide if you want to migrate the existing Lytec MD database to the new instance. •If you select No, the installer will create a new database and your existing Lytec MD data will
not be used. •If you select Yes, your existing Lytec MD database will be backed up and moved to the new
instance.
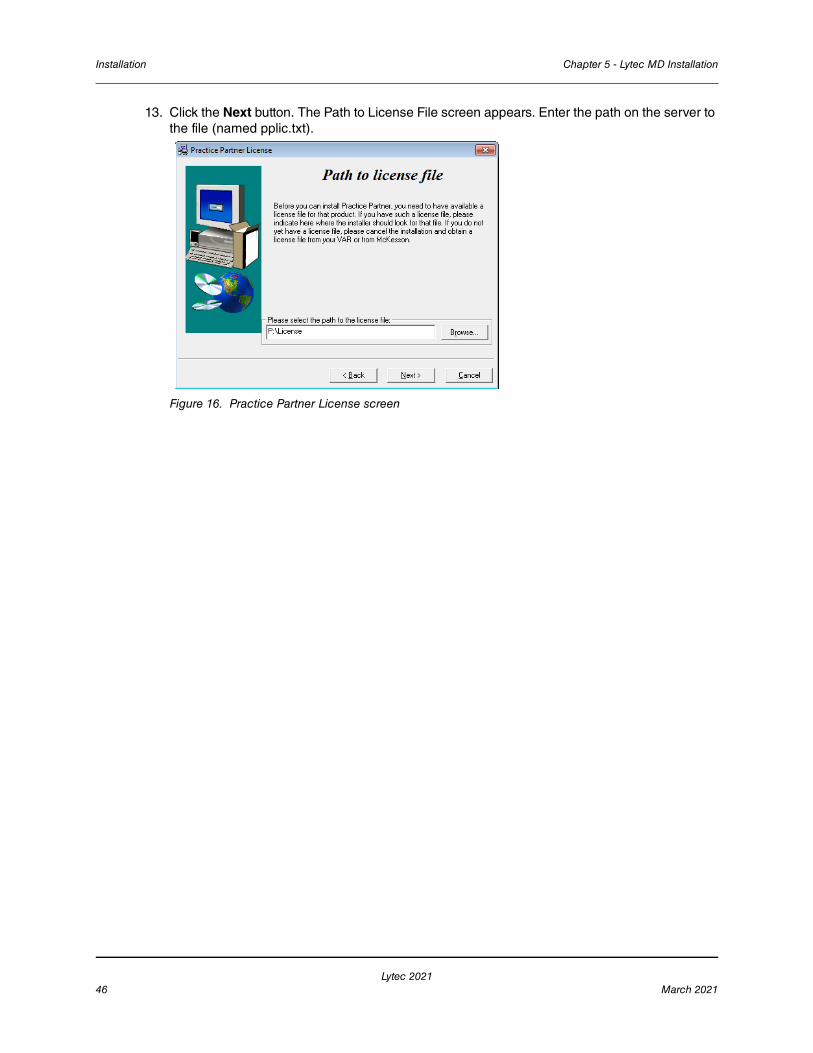
Lytec 202146 March 2021
Installation Chapter 5 - Lytec MD Installation
13. Click the Next button. The Path to License File screen appears. Enter the path on the server to the file (named pplic.txt).
Figure 16. Practice Partner License screen

Lytec 2021March 2021 47
Chapter 5 - Lytec MD Installation Installation
14. Click the Next button. The PP Server Setup screen appears. Specify the location on the computer where you want the Practice Partner Server to be installed. This must be a server drive and be identified by a letter. The folder name or final sub-folder must be named ppart.
Figure 17. Practice Partner Server screen
15. Click the Next button. The PP Initial User screen appears. Write down the name and password of the initial user. You will need this information when you first start and log into Practice Partner.
16. Click the Next button. On the PP Database Setup screen, enter the name of the database and a user name and password for the user. This information gives the database a name, user, and password for the Practice Partner database. If you are unsure, leave the defaults for the first two fields and follow the requirements for the password below, make a note of the information.
17. Click the Next button.
Your password must be
• Between 8 and 16 characters in length and
• Consist of a combination of letters and at least one number and one non-alphanumeric character.
• Cannot be the same as your user name.
The default value shown to the left is the recommended password.
Figure 18. Practice Partner User screen

Lytec 202148 March 2021
Installation Chapter 5 - Lytec MD Installation
WARNING: If you are running Windows 2012 Server or newer, you must change the default password on this screen. PM$1ADMIN will not work. eMDs recommends PM$1Admin.
If the current database user (PHTECH) password does not meet the new requirements, you will see a dialog box that will allow you to change the password.
You will see this screen only if you selected LytecMD Server on the Select Components screen.
18. Click the Next button. If you selected Yes to migrate the instance, you will see the PP Data Migration screen. Enter the SA password for the existing instance and then specify the location where you want a backup of the data to be placed.
19. Click the Next button. The Start Installation screen appears. This screen will tell you what type of installation you are actually performing, so what it says may differ from what appears here.
20. Click the Next button. The Installing screen appears and tracks the progress of the install. 21. Install any Add-Ons to Lytec MD that you want to install. For more information on Add-Ons,
see “Add-Ons” on page 67.22. After you complete your installation of Lytec MD and install/upgrade any Add-Ons, 23. Follow the steps in the next section on “Upgrading Lytec MD/Practice Partner to release 11.2”
on page 48.
Upgrading Lytec MD/Practice Partner to release 11.2If you want to upgrade Lytec MDl/Practice Partner to the latest release (11.2), you must first upgrade to release 11.1 by installing all patches and then upgrading to 11.2. Follow these steps:
Install patches to upgrade to 11.1 1. Install ALL of the 2017 patches in order, starting with the 2/2017 cumulative patch, making
sure to OMIT the 4/5/2017 client/server patches until there are no more patches left.
NOTE: All of the other pre-2017 patches will be on the list. Do not be alarmed; this is normal.
2. When there are only the 4/5/2017 patches left, install both client/server patches, leaving all the pre-2017 patches uninstalled.
Figure 19. Practice Partner Database screen
Passwords cannot contain the user’s account name or parts of the user’s full name that exceed two consecutive characters.
Passwords must be at least six characters in length.
Passwords must contain characters from three of the following four categories:
• English uppercase characters (A through Z).
• English lowercase characters (a through z).
• Base 10 digits (0 through 9).
• Non-alphabetic characters (for example, !, $, #, %).

Lytec 2021March 2021 49
Chapter 5 - Lytec MD Installation Post-Application Server installation tasks
3. Once the Update Manager reboots after installing patches, all of the post-4/5/2017 patches will be available, as you now are pointing to another bucket. You then can install all the remaining patches through current.
NOTE: eMDs recommends that you install the server patches first in order one-by-one post-4/ 5/2017 patch so that you can verify that the database changes are made without error. The error will be noticeable in the command prompt window but also is recorded in the ppart\ligs\MaintenanceEngine.log text file. If you have an error, contact Technical Support.
4. Once the server has updated, you can accept all other patches together by selecting all.
If you use Appointment Scheduler and/or Medical Billing...1. Obtain the new patching utility. This utility, called EnableVersion11_2.exe, has been created
for Appointment Scheduler and/or Medical Billing sites to switch to the new 11.2 patching system.
2. Download the utility from the Support website and save it to your ppart folder.
3. Run the utility from the command prompt to make the switch to the new 11.2 patching system. The utility will indicate in the command prompt window if it completed successfully or failed.
If you use Patient Records...See the instructions for installing eMDs Prescribe: “To upgrade to eMDs Prescribe for Lytec MD :” on page 54.
Post-Application Server installation tasksPrior to performing the tasks in this section, be sure you have installed all patches for 11.1. For steps, see “Upgrading Lytec MD/Practice Partner to release 11.2” on page 48.
After the application server upgrade is complete, perform the following task, if applicable.
Post-Installation Task Description
Lytec 202150 March 2021
Workstation Installation and Setup Chapter 5 - Lytec MD Installation
Perform these steps only if you are upgrading from Lytec 2014 or earlier. Do NOT perform them if you are upgrading from Lytec 2014 SP1.
Workstation Installation and Setup
1. Disable UAC (User Account Control) prior to installing on each workstation. Once it is disabled, you will need to reboot the computer for the changes to take effect. In addition, disable any anti-virus applications prior to installation. Be sure to re-enable both UAC and anti-virus applications after installation.
2. Launch autorun.exe. The Installation screen appears. eMDs recommends that you do NOT attempt to install using any of the programs with the extension *.msi, such as Lytec.msi. Doing so may result in failure of the installation. Always use autorun.exe.
3. On the Lytec Installation screen, click Install Lytec. The Lytec 2021 Installation – Welcome screen appears.
4. Click the Next button. The End User License Agreement screen appears. Review the terms of the agreement and click I accept the agreement.
Run the FixOperatorSwitches utility if the PRUtils setting, User may set PIN was selected before the upgrade
If previous to the upgrade, your organization had the PRUtils setting, User may set PIN on the Electronic Security screen - Access 1 tab selected, you must run the FixOperatorSwitches utility. The User may set PIN setting has been removed in Practice Partner 11.0. Running the utility will ensure that your operators who are also providers can sign prescriptions directly after the upgrade.
Before running the utility you must download the utility and save it in your PPart folder.
To download and run the utility:
1. On your application server open a web browser and go to: http://download.practicepartner.com/FixOperatorSwitches.exe. The File Download - Security Warning screen appears.
2. Click the Save button. The Save As screen appears.
3. Browse to the PPart folder.
4. Click the Save button. The download process begins. After the process is complete, the Download Complete dialog box appears.
5. Click the Close button.
6. Open Windows Explorer, and browse to the PPart folder.
7. Double-click FixOperatorSwitches.exe.

Lytec 2021March 2021 51
Chapter 5 - Lytec MD Installation Workstation Installation and Setup
5. Click the Next button. The Select Installation Type screen appears.
Figure 20. Select Installation Type screen
6. Select the LytecMD button and click the Next button. The Installation Mode screen appears. 7. Select the Client button.
Figure 21. Select Installation Mode screen
8. Click the Next button. The Select Lytec Client Components screen appears. Select your components.

Lytec 202152 March 2021
Workstation Installation and Setup Chapter 5 - Lytec MD Installation
9. Select which options you want to install.
Warning: Ensure that you have selected Predefined Forms. If you leave this check box cleared, existed forms will be deleted during install.
10. Use the following table to determine your selection for Lytec MD Client.
11. Use the table to determine which items to select or clear.
Depending on your selections, the procedure below will change.
12. Click the Next button. The Select Target Folder screen appears. eMDs recommends that you use the default program folder location.
Select Lytec Client Components screen.
Lytec Client: Use this Lytec software to enter information for your practice.
Crystal Reports: Use this reporting program to print and generate reports. You must select this check box for a complete installation of Lytec.
Predefined Forms: Forms you can use with Lytec.
LytecMD Client: This is the LytecMD client software.
Are you upgrading from Lytec 2014 or earlier?
Lytec MD Client check box
No Cleared
Yes Selected
If you already have the following installed... Perform this action:
Lytec Client Select the Lytec Client check box.
Select the Crystal Reports check box.
Select the Predefined Forms check box.

Lytec 2021March 2021 53
Chapter 5 - Lytec MD Installation Upgrading to eMDs Prescribe
13. Click the Next button. The Practice Partner Client screen appears.
Figure 22. Practice Partner Client screen
Use the Browse button to locate the Practice Partner server files (set up during the Server installation procedure). These files will be on the server computer (typically in P:\ppart). In addition, type in the path where the Practice Partner Client is located. These files will be on the client computer.
14. Click the Next button. The Start Installation screen appears. 15. Click the Next button. Let the installation complete. 16. Install any Add-Ons that you want to install. For more information on Add-Ons, see “Installing
Add-Ons” on page 67.17. After you complete the upgrade of Lytec MD and any Add-Ons, start Lytec MD from the Start
menu. It will automatically install any patches for the client workstation. 18. Repeat these steps for each workstation on which you want to use Lytec MD.
Upgrading to eMDs Prescribe
This section lists the steps you must complete to upgrade to eMDs Prescribe for Lytec MD /Practice Partner 11.2.

Lytec 202154 March 2021
eMDs Prescribe migration process Chapter 5 - Lytec MD Installation
eMDs Prescribe migration process
PrerequisiteeMDs recommends that a few days before you plan to perform the migration to eMDs Prescribe, that you run the CheckProviderSPIAndNPI.exe utility located in the ppart folder. If the utility is missing from the ppart folder, make sure you have installed all of the latest patches, and if it still is not present in the folder, contact Technical Support.
The CheckProviderSPIandNPI.exe utility performs a check to verify that an SPI associated with a provider is associated with only one practice, that all providers who have an SPI also have an NPI, and that practices do not have duplicate addresses. The utility generates a report called the Migration Readiness Assessment. If any of the checks fails, you will see a list of warning messages indicating the provider(s) or practice(s) you need to fix before you start the migration.
If the report finds no issues in any of the checks, it will report the prescriber and demographics that will be migrated to eMDs Prescribe. Please check this data for accuracy in order to avoid issues when transferring data to the new system.
Figure 23. Migration Readiness Assessment
NOTE: If a provider requires a new SPI, you can use the Prescriber Management screen to register for a new SPI after you migrate to eMDs Prescribe. For more information, see the Electronic Prescribing Registration Process and Setup Guide and the Prescriber Management screen help topic.
To upgrade to eMDs Prescribe for Lytec MD :Complete the following steps to upgrade to eMDs Prescribe for Lytec MD .

Lytec 2021March 2021 55
Chapter 5 - Lytec MD Installation eMDs Prescribe migration process
1. Log onto the Practice Support website to download the MigrateToEmdsRx.exe utility to your PPart folder.
2. Complete each item on the following checklist:
3. Double-click MigrateToEmdsRx.exe. The Migrate to eMDs Prescribing screen appears.
Figure 24. Migrate to eMDs Prescribing screen
Check off when complete
Task
_________ Approve or deny all refill requests for all providers.
_________ Back up your Lytec MD database and PPart folders.
_________ The process to migrate could take a significant amount of time, depending on the size of your database. Both internal and beta testing have shown that upgrade completion times can exceed 10 hours, during which system access should not be allowed. eMDs recommends that you plan accordingly and allow for ample time for the process to complete.
_________ Understand that once the MigrationtoEmdsRx.exe utility is run successfully, you CANNOT revert to the previous version of prescription functionality, as your Clearinghouse ePrescribing account will be disabled. However, if the MigrationtoEmdsRx.exe utility fails to complete, you will be able to roll back to the previous version of prescription functionality with the assistance of Technical Support.
_________ Ensure that you are up to date on all patches.
_________ Ensure that the following URLs are added to your trusted sites:
https://microservice.emds.com/
https://erx.emdscloud.com

Lytec 202156 March 2021
eMDs Prescribe migration process Chapter 5 - Lytec MD Installation
4. Select the Migrate to eMDs ePrescribing option, select all check boxes at the bottom of the screen, and click the OK button.
Figure 25. Launch the Software Update screen
5. Click the OK button. The Product Update Manager screen appears.
Figure 26. Product Update Manager screen
6. Select all patches and download and install them.
Open a command prompt and change the path to your ppart folder, which usually is in the P: drive. Execute the command fixppsq.exe ALL, which is to fix the unique sequence values. If you do not run this step, you may encounter an Unable to add prescription error when prescribing a medication.
If the utility... Then...
completes successfully the Launch the Software Update screen appears.
fails to complete return to the Migrate to eMDs Rx screen, select the Roll back a failed migration option, and click the OK button so that you can continue to use electronic prescribing.
When you are ready to run the migration again, start at step 2.

Lytec 2021March 2021 57
Chapter 5 - Lytec MD Installation eMDs Prescribe migration process
NOTE: If the patch process fails, contact Technical Support for help resolving the patch failure issue. If the Server Patch completes but there is a failure in the database conversion that cannot be resolved by Technical Support, then a complete system restore will be necessary. After the complete system restore, run the MigrateToEmdsRx.exe utility rollback option so that you can ePrescribe on the old system. You can try the migration again at a later date.
Verify that the migration process started all PMSI services. If it did not, attempt to restart the PMSI services yourself. If you are unable to get all PMSI services started, contact Technical Support.
7. Access Patient Records to activate with eMDs Prescribe.
a. Select Maintenance > Set Up > External Systems. The External Systems screen appears.
Figure 27. External Systems screen

Lytec 202158 March 2021
eMDs Prescribe migration process Chapter 5 - Lytec MD Installation
b. Select the Activation Keys row and click the Edit button. The Activation Configuration screen appears.
Figure 28. Activation Configuration screen
c. Leave all fields in the Schedule area set to their default values and click the Activate button.
d. When activation is complete, information will display in the Activation Log area. If activation did not complete, contact Support.
8. Exit Patient Records.
9. Run the RegisterWithEmdsRX.exe utility from the PPart folder. This utility will download your prescriber demographic data. If there are any mismatches between the data and what is stored in eMDs Prescribe, you must resolve the issues. (If you currently are not using e-Prescribing or are a new customer, you can skip this step since there will be no data to reconcile.)
10. Once the data is reconciled, click the Register button to register the customer and sync the information in the Lytec MD EHR system with the data.
11. When the utility completes successfully, you are ready to start using eMDs Prescribe.

Lytec 2021March 2021 59
Chapter 5 - Lytec MD Installation Transferring data to the new system
Transferring data to the new system
Complete the following steps to transfer your existing data to the new system.
1. In the ppart folder, double-click RegisterWithEmdsRx.exe. The Register Customer screen appears.
Figure 29. Register Customer screen
2. Click the Next button. The Register With eMDs Prescribe screen appears.
Figure 30. Register With eMDs Prescribe screen
eMDs strongly recommends that you match Surescripts practices and providers so that you can reconcile any differences you have between your data and the data contained in Surescripts. If you choose not to do so, skip to step 14.

Lytec 202160 March 2021
Transferring data to the new system Chapter 5 - Lytec MD Installation
To match Surescripts practices and providers:3. Click the Match Surescripts Practices and Prescribers button. The Surescripts Practices
screen appears. This screen displays all Lytec MD practices that have data that differs from the data recorded in Surescripts. If no practices are found that require reconciliation, the Surescripts Practices screen will not appear and you can skip to step 8.
Figure 31. Surescripts Practices screen
4. Highlight a practice and click the Reconcile button. The Practice Reconciliation screen appears.
Figure 32. Practice Reconciliation screen

Lytec 2021March 2021 61
Chapter 5 - Lytec MD Installation Transferring data to the new system
The following table describes the grids/fields on this screen.
5. Select a value in the Surescripts Properties grid and an available field in the Local Properties grid and click the Transfer Property button to copy the Surescripts value to the Local Properties.
NOTE: If the selected Local Properties value is not one of the ‘available local properties’ for the selected Surescripts property, nothing will happen when you click the Transfer Property button.
You also can update the Local Properties fields manually by clicking in the field and typing a value.
6. When you are finished reconciling the practice data, click the Save and Close button to save the updates and return to the Surescripts Practices screen.
7. Repeat steps 4-6 for each practice that needs reconciling.
8. When you are finished reconciling all practice data, click the Save and Close button on the Surescripts Practices screen. The Surescripts Prescribers screen appears. This screen displays all Lytec MD providers whose data differs from the data recorded in Surescripts. If no providers are found who require reconciliation, then this screen will not display and you can
Grid/field Description
Surescripts Properties This grid displays the demographic data associated with the practice in Surescripts.
Local Properties This grid displays the demographic data of the practice in Lytec MD.
Selected Surescripts Property This field displays the value that currently is selected in the Surescripts Properties grid.
Available Local Properties This field displays each Local Properties value that is available to transfer the Surescripts data to replace in Lytec MD.

Lytec 202162 March 2021
Transferring data to the new system Chapter 5 - Lytec MD Installation
skip to step 14.
Figure 33. Surescripts Prescribers screen
9. Highlight a prescriber and click the Reconcile button. The Prescriber Reconciliation screen appears.
Figure 34. Prescriber Reconciliation screen

Lytec 2021March 2021 63
Chapter 5 - Lytec MD Installation Transferring data to the new system
The following table describes the grids/fields on this screen.
10. Highlight a value in the Surescripts Properties grid and an available field in the Local Properties grid and click the Transfer Property button to copy the Surecripts value to the Local Properties.
NOTE: If the selected Local Properties value is not one of the ‘available local properties’ for the selected Surescripts Property, nothing will happen when you click the Transfer Property button.
You also can update the Local Properties fields manually by clicking in the field and typing a value.
11. When you are finished reconciling the prescriber data, click the Save and Close button to save the updates and return to the Surescripts Prescribers screen.
12. Repeat steps 9-11 for each prescriber who needs reconciling.
Grid/field Description
Surescripts Properties This grid displays the demographic data associated with the prescriber in Surescripts.
Local Properties This grid displays the demographic data of the provider in Lytec MD.
Selected Surescripts Property This field displays the value that currently is selected in the Surescripts Properties grid.
Available Local Properties This field displays each Local Properties field that is available to transfer the Surescripts data to replace in Lytec MD.
Lytec 202164 March 2021
Transferring data to the new system Chapter 5 - Lytec MD Installation
13. When you are finished reconciling all prescriber data, click the Save and Close button on the Surescript Prescribers screen. The Register With eMDs Rx screen appears again.
Figure 35. Register With eMDs Rx screen
NOTE: Any issues with the data reconciliation must be resolved before continuing with the next step.
14. Click the Next button. Your customer and practices will be registered with eMDs Prescribe. The Register Organizations for eMDs Prescribe screen appears with the results of the registration process.
Figure 36. Register Organizations for eMDs Rx screen

Lytec 2021March 2021 65
Chapter 5 - Lytec MD Installation Transferring data to the new system
15. Click the Next button. The Prescriber Migration screen appears and displays the total number of providers who you have affiliated with practices at your customer and the number of providers who need to be migrated.
Figure 37. Prescriber Migration screen
16. Click the Migrate Prescribers button to migrate the prescribers. The results of the migration display on the Prescriber Migration screen.
Figure 38. Prescriber Migration screen
If you encounter an error that states ‘Change/Refill service already assigned to spi: ####’, note the SPI number listed in the error message. This error is caused by a conflict of address information in Surescripts for the prescriber. Close and restart the utility and click the Next button to return to the Prescriber Migration screen and finish migrating your prescribers. This prescriber will be registered and will be allowed to prescribe; however, the prescriber still will

Lytec 202166 March 2021
Transferring data to the new system Chapter 5 - Lytec MD Installation
have conflicting address information in Surescripts. Contact Technical Services the day after the migration completes with the SPI number to get the conflicting address data corrected.
Figure 39. ‘One or more prescribers failed to migrate’ error message - with SPI number
If you encounter any other error, review the cause of the error and then close the utility. Log into Lytec MD and resolve the issue. Once the issue is resolved, you can restart the utility and click the Next button to return to the Prescriber Migration screen, where you can finish migrating your prescribers. Contact Technical Services if you need assistance.
Figure 40. ‘One or more prescribers failed to migrate’ error message

Lytec 2021March 2021 67
Chapter 5 - Lytec MD Installation Transferring data to the new system
17. Click the Next button. The Pharmacy Migration screen appears and displays the number of custom pharmacies associated with patients in Lytec MD.
Figure 41. Pharmacy Migration screen
18. Click the Migrate Pharmacies button to migrate the custom pharmacies. The results of the migration display on the Pharmacy Migration screen.
NOTE: This migration process can take several hours to complete, but your normal work activities can continue during this time.
Figure 42. Pharmacy Migration screen

Lytec 202168 March 2021
Transferring data to the new system Chapter 5 - Lytec MD Installation
19. Click the Close button. The Migration Activity Report appears.
Figure 43. Migration Activity Report
20. Click the Close button to close the wizard.
NOTE: If you encounter any issues during the registration process, review the RegisterWithEmdsRx.log file in the ppart folder.
Set the PrescriberManagementAdministrators= setting in the Rx section of the ppart.ini file
The PrescriberManagementAdministrators= setting in the [Rx] section of the ppart.ini file controls which users receive the EPCS Audit report. The default setting is PrescriberManagementAdministrators=UsePrescriberManagement, which will send the EPCS Audit report to all users who have the Prescriber Management access level enabled.

Lytec 2021March 2021 69
Chapter 5 - Lytec MD Installation Transferring data to the new system
To send the report to only certain users, specify those users’ operator names in the setting in the case in which the operator names exist in the system (this setting is case sensitive). For example, PrescriberManagementAdministrators=ACOBB, JSMITH, BBALL. In this case, the EPCS Audit report will be sent only to users ACOBB, JSMITH, and BBALL.
The list of checks that this setting makes is as follows. Steps 3 and 4 are reached only if no operators have the Prescriber Management access level set.
1. List of operators in Override setting
2. Operators with Prescriber Management access level
3. Admin operator in Surescripts_Rcv.ini
4. OPID=1
Remove the PMSI.ePrescriptionConfiguration.exe utilityWith release 11.2, the PMSI.ePrescriptionConfiguration.exe utility no longer is used. eMDs recommends removing this utility to avoid potential confusion.

Lytec 202170 March 2021
Transferring data to the new system Chapter 5 - Lytec MD Installation

Lytec 2021March 2021 71
Chapter 6 - Post Installation Setup
Important: Make sure to review the Patch Release Notes documents for any necessary database changes. The Patch Release Notes documents are available on Salesforce.
Specifying the Default SQL Server Credentials
After you have installed Lytec, you will need to specify the default SQL credentials. Lytec no longer installs or controls the SQL instance. Instead, it uses an existing one by being given the credentials to the instance.
1. Start Lytec. The Specify Default SQL Credentials screen appears.
Figure 44. Specify Default SQL Credentials screen
2. Select the server and instance name that was specified in the SQL Server Setup step during installation. The default Username is sa.
If you use MPIC, you MUST use LytecMD as your instance name.
3. Click the OK button. 4. Go to the next section, “Converting data from previous versions of Lytec” on page 72.

Lytec 202172 March 2021
Converting data from previous versions of Lytec Chapter 6 - Post Installation Setup
Converting data from previous versions of Lytec
Migrating existing databases
NOTE: if you are upgrading from Lytec 2011 or above, you will not have to migrate your database(s). This procedure was performed in an earlier installation.
Lytec has an updated use of SQL in which it no longer controls the SQL instance on the computer, allowing other programs to use the instance as well. Lytec now simply is given the SQL instance credentials and uses them. Because of this, it is necessary to migrate Lytec databases to the new instance as part of the process of installation and conversion.
NOTE: Run this utility only on the server computer.
Once you have Lytec installed, you will be prompted to migrate your databases when you first start Lytec. The program will look for the old LYTEC_SQL instance. If it finds this instance, it will trigger the Database Migration wizard. In addition, there is also an option on the main application menu that you can use to manually start the wizard.
Figure 45. Open Practice screen

Lytec 2021March 2021 73
Chapter 6 - Post Installation Setup Converting practices
When you click this option, Lytec will check for a LEGACY_SQL instance and check if any legacy practices exist. If so, the Database Migration wizard will start. Use the Migrate Legacy Databases screen to select the databases that you want to migrate to the new SQL instance.
Figure 46. Migrate Legacy Databases screen
Once you have made your selections, click the Migrate button. A progress bar will show you the progress of the migration. When the process is complete, click the OK button.
When the databases have been migrated, you can continue with the conversion of your practices.
Converting practicesThis procedure applies to users converting data from earlier versions of Lytec to 2021 on the same operating system; that is, you are installing on the same operating system as the previous version.
1. After you have migrated your databases to the new SQL instance (if needed), click the Lytec button and select Open Practice. The Practice List screen opens.
2. Click Browse. Select the practice you want to convert3. Click Open Practice. The Converting Data Files screen appears.4. Click the Yes button. The Log In screen appears.5. On the User Code and Password fields, enter the information for the practice.6. Click the OK button. The Conversion Backup screen appears.7. Click the OK button. The Backup Type screen appears.8. Select the Backup Database button and click the Next button.9. Click the Backup File button to navigate to a location for storing the backup. Use the Folders
drop down list to further select a location and enter a file name in the Selected File field. 10. Click the OK button. 11. Click the Next button.12. Click the Next button on the Backup Options screen. 13. Click the Next button on the Backup Media screen.14. Click the Finish button on the Backup SQL Preview screen. The backup utility runs and the
Database Interface screen appears.15. Click the OK button. Conversion continues.16. When the conversion is complete, the Error Log screen appears. 17. Click the OK button. The Log In screen appears. Enter the user code and password from the
practice.

Lytec 202174 March 2021
Post installation for users of Lytec MD Chapter 6 - Post Installation Setup
18. Click the OK button. The converted practice opens.
Post installation for users of Lytec MD
NOTE: If you are upgrading from Lytec MD 2014 SP1 or newer, you do NOT need to perform these steps.
Upgrade the PPMT Utility for Practice Partner 11.0A new version of the PPMT Utility is available for Practice Partner 11.0. You must obtain the Practice Partner 11.0 PPMT utility files and upgrade the utility before it can be used for 11.0.
Past Medical History, Family History, and Social History - legacy data and default titlesAfter you upgrade to Lytec MD 2021, you will have untitled data in the Past Medical History, Family History, and Social History sections of the patient chart. Therefore, the data in each of these sections needs a default note title. The default note titles are: Past Medical History, Family History, and Social History.
When you use Dot codes .IPH, .ISH, and .IFH in a template without a title parameter, the Dot code will insert the most recent note with the default note title. See the following table for examples.
Post-installation ICD-10 checklistAfter upgrading to Lytec MD 2021, eMDs recommends updating all areas of Lytec MD which use ICD codes (for example, your existing templates, orders, active patient problems, etc). Use the following checklist to ensure that you update all affected areas.
If you subscribe to Clinical Tools, eMDs-supplied Templates and QuickText will be updated automatically with ICD-10 codes when you install the next Clinical Tools - Clinical Templates update. If you do not subscribe to Clinical Tools or your organization uses custom Templates and/or QuickText, you can update these manually using Template and QuickText Maintenance. If you customized any of the eMDs-supplied Templates and/or QuickText but did not change the name to a unique name, eMDs recommends renaming your Templates and QuickText before running the Clinical Templates update. The install will overwrite eMDs-supplied Templates and QuickText.
Carrier MaintenanceThe Carrier Maintenance is set up to start using ICD-10 by the date of 10/1/14. You may change the default to ICD-9 if the carrier is not ready for ICD-10 by the October 1 date. Select Maintenance
If a chart contains a legacy Past Medical History note and...
Then Dot code .IPH (without a title parameter) will insert the...
an additional note with a different title legacy Past Medical History note.
another note in the Past Medical History chart section titled Cardiology History
legacy Past Medical History note.
a note titled Cardiology History and a more recent note titled Past Medical History
most recent note titled Past Medical History.

Lytec 2021March 2021 75
Chapter 6 - Post Installation Setup Carrier Maintenance
> Tables > Insurance Carriers > select the carrier > Edi t> General Tab 1 Diagnosis Coding. There is a drop-down for ICD-9, ICD-10, or Default (ICD-10 after 10/1/14).
Step System Area Procedural Steps
1 Update Diagnosis Codes To update diagnosis codes:1. Select Maintenance > Tables > Diagnosis Codes.
2. Select the code > Edit.
3. Click the Advance Code Search button (best to search by name).
4. Select the appropriate ICD-10 > OK.
You will see the table now has both ICD 9 and 10, along with SNOMED.
2 Health Maintenance
• Run the Age Health Maintenance Templates utility
To run the Age Health Maintenance Templates utility:Prerequisite: Backup your data before running the utility.
1. Select Maintenance > Utilities > Health Maintenance Utilities > Age Health Maintenance Templates.
2. A message asks you whether your data is backed up.
- To confirm, click the Yes button.
- If you have not yet backed up your data, click the No button to exit.
3. When the utility has finished running, a confirmation message appears. Click the OK button.
3 Forms
• Run the Import New Form Items utility once to update the diagnosis codes and descriptions in all of the individual form items.
With Lytec MD 2021, the diagnosis codes and descriptions in the imported form items will have an increased length to handle the ICD-10 values.
To run the Import New Form Items utility:1. Back up your Medical Billing database.
2. In Medical Billing, select Maintenance > Utilities > Import New Form Items. The Add Form Items screen appears.
3. Click the OK button.
4. Log off and restart Medical Billing.

Lytec 202176 March 2021
Carrier Maintenance Chapter 6 - Post Installation Setup
4 Prescription Templates
• Update prescription templates with indications
(eMDs recommends updating your 50 most commonly used templates)
• In the patients chart all medications will need to be updated prior to refilling by eRx. Edit the medication to populate the NDC or the ePrescription will not send.
To edit Prescription templates:1. In Patient Records, select Maintenance >
Prescription Templates > Prescription Templates. The Prescription Templates screen appears.
2. Select the prescription template that you want to edit.
3. Click the Edit button. The Prescription Template <Edit> screen appears.
4. Click the Indications button. The Indications for Rx Template for Universal Provider screen appears.
5. Delete all existing indications (using the Delete button). Before deleting indications, eMDs recommends keeping a record of the indications. The next step requires adding the deleted indications.
6. Click the New button. The Diagnosis Select screen appears.
7. Search for and select the diagnosis or problem you want to add as an indication.
8. On the Indication for Rx Template screen, indicate the Rx Type and optionally enter a message.
9. Click the OK button.
10. Repeat steps 6 - 9 until you have added all indications for the prescription template.

Lytec 2021March 2021 77
Chapter 6 - Post Installation Setup Carrier Maintenance
5 QuickText and QuickText Pick Lists
1. Identify your most commonly-used diagnosis codes (approximately 25-50 codes)
2. Update disease and new problems (the average list is over 100)
3. Update chronic disease diagnoses
4. Update custom (added by your organization) QuickText and pick lists. Start with the most commonly-used diagnoses; however, eventually you must update all custom QuickText.
If you subscribe to Clinical Tools, eMDs-supplied QuickText for all .MP, DX, and .OP Dot codes will be updated automatically when you install the next Clinical Tools - Clinical Templates update.
To edit QuickText and QuickText pick lists:
1. In Patient Records, select Maintenance > Tables > QuickText. The QuickText Maintenance screen appears.
2. Keep the Regular option button selected.
3. Select the QuickText or QuickText pick list that you want to edit.
4. Click the Edit button. The Edit QuickText screen appears.
5. Delete the existing QuickText in the text box.
6. Click the Lookup button. The Diagnosis Code Select screen appears.
7. Search for and select the diagnosis or problem previously entered for the QuickText. The selected concept will appear in the text box on the Edit QuickText screen.
8. Click the Save button.
9. Repeat steps 3 - 9 until you have updated all QuickText and pick lists.

Lytec 202178 March 2021
Carrier Maintenance Chapter 6 - Post Installation Setup
6 Progress Notes (with diagnosis codes)
1. Update your custom progress note templates
2. Update progress note templates by specialty (the average is between 10 and 50 templates)
To edit note templates: 1. In Patient Records, select Maintenance > Note
Templates. The Provider/Practice Selection screen appears.
2. Select the provider or practice whose templates you want to edit, or leave the Provider ID and Practice ID fields blank to add a universal template.
3. Click the OK button. The Note Template Lookup screen appears.
4. Select the template you want to edit.
5. Click the OK button. The Note Templates screen appears.
6. Click the Edit button.
7. Delete the template’s existing Dot code lines and replace them with the new triad set (ICD-10, ICD-9, and SNOMED codes) using the Diagnosis Code Select screen.
a. Click the Pb/Dx button. The Diagnosis Code Select screen appears.
b. Search for and select the diagnosis or problem you want to include in the template.
c. Click the OK button. The triad code set is inserted into the template.
8. Click the Save button.
9. Click the Close button. The Note Template Lookup screen appears.
10. Repeat steps 4 - 9 until you have updated all note templates.

Lytec 2021March 2021 79
Chapter 6 - Post Installation Setup Carrier Maintenance
7 Conditional Logic
1. Check all progress note templates (starting with the most commonly used first).
2. Update Letter templates (the average is between 10 and 25 templates)
3. Update Past Medical History, Social History, and Family History templates
4. Update your patients’ history (Past Medical, Social, and Family)
To edit note templates:1. In Patient Records, select Maintenance > Note
Templates. The Provider/Practice Selection screen appears.
2. Select the provider or practice whose templates you want to edit, or leave the Provider ID and Practice ID fields blank to add a universal template.
3. Click the OK button. The Note Template Lookup screen appears.
4. Select the template you want to edit.
5. Click the OK button. The Note Templates screen appears.
6. Click the Edit button.
7. Delete the template’s existing Dot code lines and replace them with the new triad set (ICD-10, ICD-9, and SNOMED codes) using the Diagnosis Code Select screen.
a. Click the Pb/Dx button. The Diagnosis Code Select screen appears.
b. Search for and select the diagnosis or problem you want to include in the template.
c. Click the OK button. The triad code set is inserted into the template.
8. Click the Save button.
9. Click the Close button. The Note Template Lookup screen appears.
10. Repeat steps 4 - 9 until you have updated all note templates.
Lytec 202180 March 2021
Carrier Maintenance Chapter 6 - Post Installation Setup
To edit letter templates:1. In Patient Records, Select Maintenance >
Templates > Letter Templates. The Provider/Practice Selection screen appears.
2. Select the provider or practice whose templates you want to edit, or leave the Provider ID and Practice ID fields blank to add a universal template. The Letter Template Lookup screen appears.
3. Select the template that you want to edit.
4. Click the OK button. The Letter Templates screen appears.
5. Click the Edit button.
6. Delete the template’s existing Dot code lines and replace them with the new triad set (ICD-10, ICD-9, and SNOMED codes) using the Diagnosis Code Select screen.
a. Click the Pb/Dx button. The Diagnosis Code Select screen appears.
b. Search for and select the diagnosis or problem you want to include in the template.
c. Click the OK button. The triad code set is inserted into the template.
7. Click the Save button.
8. Click the Close button. The Letter Template Lookup screen appears.
9. Repeat steps 3 - 8 until you have updated all note templates.
To edit Past Medical History, Social History, and Family History templates:
1. In Patient Records, select Maintenance > Templates and then select one of the following options:
- Past Medical History Templates
- Social History Templates
- Family History Templates
The Provider/Practice Selection screen appears.

Lytec 2021March 2021 81
Chapter 6 - Post Installation Setup Carrier Maintenance
2. Select the provider or practice whose templates you want to edit, or leave the Provider ID and Practice ID fields blank to add a universal template. The Lookup screen appears.
3. Select the template that you want to edit.
4. Click the OK button. The Note Templates screen appears.
5. Click the Edit button.
6. Delete the template’s existing Dot code lines and replace them with the new triad set (ICD-10, ICD-9, and SNOMED codes) using the Diagnosis Code Select screen.
a. Click the Pb/Dx button. The Diagnosis Code Select screen appears.
b. Search for and select the diagnosis or problem you want to include in the template.
c. Click the OK button. The triad code set is inserted into the template.
7. Click the Save button.
8. Click the Close button. The Lookup screen appears.
9. Repeat steps 3 - 8 until you have updated all your Past Medical History, Social History, and Family History templates.
To update a patient’s history:1. Open a patient’s chart.
2. Click one of the following tabs:
- Past Medical History
- Social History
- Family History
3. The Past Medical History, Social History, or Family History screen appears.
4. Select the note you want to edit (using the Older and Newer buttons).
5. Click the Edit button.
6. Delete the note’s existing Dot code lines and replace them with the new triad set (ICD-10, ICD-9, and SNOMED codes) using the Diagnosis Code Select screen.

Lytec 202182 March 2021
Carrier Maintenance Chapter 6 - Post Installation Setup
a. Click the Pb/Dx button. The Diagnosis Code Select screen appears.
b. Search for and select the diagnosis or problem you want to replace.
c. Click the OK button. The triad code set is inserted into the template.
7. Click the Save button.
8. Repeat these steps until you have updated all your patients’ Past Medical History, Social History, and Family History notes.
8 Problem List
• Update Major Problem, Other Problem, and Diagnosis lists
For procedural steps, see “Updating existing patient problem lists with ICD-10 and SNOMED codes” on page 87.

Lytec 2021March 2021 83
Chapter 6 - Post Installation Setup Carrier Maintenance
9 Advance Beneficiary Notice (ABN) trigger with ICD code
• Update existing orders associated with ABN / Insurance before 10/01/2014
To update order names:1. Select Maintenance > Templates > Order
Templates > Order Names. The Order Names Select screen appears.
2. Select the order name that you want to edit.
3. Click the Edit button. The Order Name <Edit> screen appears.
4. Click the Insurance button. The Order Insurance screen appears.
5. Click the Codes button. The Carrier-Specific Diagnosis Codes screen appears.
6. Select the Dx Code that you want to update.
7. Click the Edit button. The Carrier-Specific Diagnosis Codes <Edit> screen appears.
8. Click the Carrier-Specific Diagnosis Code down-arrow button. The Diagnosis Code Select screen appears.
9. Search for and select the diagnosis you want to replace.
10. Click the OK button. The ICD-10 appears in the Carrier-Specific Diagnosis Code field.
11. Click the OK button to close the screen.
12. Repeat steps 6 - 11 until you have updated all diagnosis codes.
13. Click the Close button to close the Carrier-Specific Diagnosis Codes screen.
14. Click the Close button to close the Order Insurance screen.
15. Click OK to save your changes and close the Order Name <Edit> screen. The Order Names Select screen appears.
16. Repeat steps 2 - 15 until you have updated all order names associated with ABN/Insurance.

Lytec 202184 March 2021
Carrier Maintenance Chapter 6 - Post Installation Setup
10 Orders
• Update any order that has an ICD code linked to it (the average is between 50 and100 orders)
• Update note templates that include the .OR3 Dot code
To edit order QuickText:1. In Patient Records, select Maintenance > Tables >
QuickText. The QuickText Maintenance screen appears.
2. Keep the Regular option button selected.
3. Enter ORDER in the QuickText Name field.
4. Select the QuickText that you want to edit.
5. Click the Edit button. The Edit QuickText screen appears.
6. Delete the existing QuickText in the text box.
7. Click the Lookup button. The Diagnosis Code Select screen appears.
8. Search for and select the diagnosis or problem previously entered for the QuickText. The selected concept will appear in the text box on the Edit QuickText screen.
9. Click the Save button.
10. Repeat steps 4- 9 until you have updated all order QuickText.
To edit note templates with .OR3 Dot codes:1. In Patient Records, select Maintenance > Note
Templates. The Provider/Practice Selection screen appears.
2. Select the provider or practice whose templates you want to edit, or leave the Provider ID and Practice ID fields blank to add a universal template.
3. Click the OK button. The Note Template Lookup screen appears.
4. Select the template you want to edit.
5. Click the OK button. The Note Templates screen appears.
6. Click the Edit button.
7. Find the .OR3 Dot code line(s) and replace the diagnosis codes with the new triad set (ICD-10, ICD-9, and SNOMED codes) using the Diagnosis Code Select screen.
a. Click the Pb/Dx button. The Diagnosis Code Select screen appears.
b. Search for and select the diagnosis or problem you want to replace in the template.
Lytec 2021March 2021 85
Chapter 6 - Post Installation Setup Carrier Maintenance
c. Click the OK button. The triad code set is inserted into the template.
8. Click the Save button.
9. Click the Close button. The Note Template Lookup screen appears.
10. Repeat steps 4 - 9 until you have updated all note templates.

Lytec 202186 March 2021
Carrier Maintenance Chapter 6 - Post Installation Setup
11 Electronic Encounter Form (EEF) Templates
• Update EEF templates added by name (specialty or practice)
To edit EEF templates:1. In Patient Records, select Maintenance >
Templates > Electronic Encounter Form Templates > Electronic Encounter Templates. The Electronic Encounter Template Select screen appears.
2. Select the template that you want to edit.
3. Click the Edit button. The Electronic Encounter Template <Edit> screen appears.
4. Click the Diagnosis Codes tab.
5. Remove all diagnosis codes in the Diagnosis Codes list. Before removing any diagnosis codes, eMDs recommends keeping a record of the codes. The next step requires adding the deleted codes.
To remove diagnosis codes:
a. Select the diagnosis code that you want to remove in the Diagnosis Codes list.
b. Click the Remove button.
c. Repeat this process until all codes have been removed.
6. Add the diagnosis codes (with the new triad set) to the Diagnosis Codes tab.
To add diagnosis codes:
a. Click the Lookup button. The Diagnosis Code Select screen appears.
b. Search for and select the diagnosis or problem you want to add to the template.
c. Click the OK button. The diagnosis or problem is added to the Diagnosis Codes list.
d. Repeat steps a - c until all diagnosis codes have been added.
7. Click the OK button. The Electronic Encounter Template Select screen appears.
8. Repeat steps 2- 7 until you have updated all your templates.

Lytec 2021March 2021 87
Chapter 6 - Post Installation Setup Carrier Maintenance
Updating existing patient problem lists with ICD-10 and SNOMED codesTo prevent providers from having to manually update and add ICD-10 and SNOMED codes to existing active patient problems one at a time, eMDs provides new functionality that is available from the Diagnosis Code Maintenance <New> and <Edit> screens.
See “List of common ICD-9 codes for Family Practice” on page 90 for a list of common ICD-9 codes (used primarily by Family Practice) and their associated ICD-10 and SNOMED codes. Use this list as a reference to update your site’s patient problem lists that contain these active problems/ICD-9 codes with the new ICD-10 and SNOMED codes. You also may choose to update additional problems/ICD-9 codes that are not on the list, and you must do so using the maintenance table, one at a time.
12 Prenatal
1. Update Pregnancy problems (in the Problems/Procedures screen - Major Problems tab)
2. Update Prenatal templates
Update existing patient pregnancy problems using Diagnosis Code Maintenance. For procedural steps, see “Updating existing patient problem lists with ICD-10 and SNOMED codes” on page 87.
To edit prenatal templates:1. In Patient Records, select Maintenance >
Templates > Health Maintenance Templates. The Provider/Practice Selection screen appears.
2. Select the provider or practice whose templates you want to edit, or leave the Provider ID and Practice ID fields blank to add a universal template. The Health Maintenance Templates screen appears.
3. Select the Pregnancy option button.
4. Select the template you want to edit in the list.
5. Click the Edit button. The Health Maintenance Template <Edit> screen appears.
6. Click the Lookup button. The Diagnosis Code Select screen appears.
7. Search for and select the diagnosis or problem you want to add to the template.
8. Click the OK button. The Health Maintenance Template <Edit> screen appears and the Pregnancy/Problem field is updated with the selected diagnosis or problem.
9. Click the OK button. The Health Maintenance Templates screen appears.
10. Repeat steps 3 - 9 until you have updated all prenatal templates.

Lytec 202188 March 2021
Carrier Maintenance Chapter 6 - Post Installation Setup
To update with ICD-10 and SNOMED codes the active problems/diagnoses on all existing patient problem lists that use the ICD-9 code you are about to edit, complete the steps in the following table.
Did you modify the eMDs-supplied office codes in your previous release of Lytec MD?
Then complete the following steps to...
No update existing records by adding the associated ICD-10 and SNOMED codes.
1. From the Diagnosis Codes maintenance table, select the record that you want to edit.
2. On the Diagnosis Code Maintenance <Edit> screen, click the Advanced Code Search button. The Diagnosis Code Select screen appears.
3. Search for and select the appropriate code combination, ensuring that you select a combination that includes the ICD-9 code you are editing. Click the OK button. The sys-tem updates the Diagnosis Code <Edit> screen with the selected information.
4. Click the OK button. The following new warning message displays:
This change will result in an immediate update of the codes for all patients with this active problem on their problem list(s), in addition to any other areas in the product where this office code is used.
Do you still want to proceed?
5. Click the Yes button to save the changes. The system will not change the existing problem descriptions on the patients’ problem lists, but it will update the description for new problems.
Click the No button to close the screen without saving the changes.
If you access an active problem from the problem list that contains the ICD-9 code you just edited, you will see the newly-added ICD-10 and SNOMED codes.

Lytec 2021March 2021 89
Chapter 6 - Post Installation Setup Carrier Maintenance
Yes map your existing office code to a new, valid office code and add the associated ICD-10 and SNOMED codes.
1. From the Diagnosis Codes maintenance table, select the record that you want to edit.
2. On the Diagnosis Code Maintenance <Edit> screen, select the Diagnosis Code Mapping tab.
NOTE: If you attempt to complete these steps from a tab other than the Diagnosis Code Mapping tab, the following new warning message displays: Unable to write record to data base. Please try a different combination of values.
3. Click the Advanced Code Search button. The Diagnosis Code Select screen appears.
4. Search for and select the appropriate code combination, ensuring that you select a combination that includes the ICD-9 code in the record that you are editing. Click the OK button. The system updates the Diagnosis Code <Edit> screen with the selected information.
5. Click the OK button. The following new warning message displays:
This combination of ICD9, ICD10, and SNOMED codes is already in use. Would you like to update all active problems using <old office code> to use <new office code>?
This will affect all active problems that use the code <old office code>.
This process may take a long time.
Yes (continued) 6. Click the Yes button to save the changes. The system will update the patients’ problem lists with the new codes, but it will not update the problem descriptions. Also note that the Diagnosis Code Maintenance <Edit> screen will not be updated; the previous office code continues to display in the both Office Code fields.
Click the No button to close the screen without saving the changes.
Did you modify the eMDs-supplied office codes in your previous release of Lytec MD?
Then complete the following steps to...

Lytec 202190 March 2021
Carrier Maintenance Chapter 6 - Post Installation Setup
List of common ICD-9 codes for Family PracticeThe following table lists ICD-9 codes that are commonly used by Family Practice. The list includes the associated ICD-10 and SNOMED codes that your site may choose to add to existing records.
ICD-9 Code/Descrip-tion
ICD-10 Code/Description
SNOMED Code/Description
Provider-Friendly Description
465.9/Acute upper respiratory infections of unspecified site
J06.9/Acute upper respiratory infection, unspecified
54398005/Acute upper respiratory infection
Acute upper respira-tory infection
401.9/Unspecified essential hyperten-sion
I10/Essential (pri-mary) hypertension
59621000/Essential hypertension
Essential (primary) hypertension
401.1/Benign essen-tial hypertension
I10/Essential (pri-mary) hypertension
1201005/Benign essential hyperten-sion
Benign essential hypertension
272.4/Other and unspecified hyperlip-idemia
E78.5/Hyperlipid-emia, unspecified
55822004/Hyperlipid-emia
Hyperlipidemia
466.0/Acute bronchi-tis
J20.9/Acute bronchi-tis, unspecified
10509002/Acute bron-chitis
Acute bronchitis
250.00/Diabetes mel-litus without mention of complication, type II or unspecified type, not stated as uncon-trolled
E11.9/Type 2 diabetes mellitus without com-plications
44054006/Diabetes mellitus type 2
Type 2 diabetes
250.01/Diabetes mel-litus without mention of complication, type I (juvenile type), not stated as uncontrolled
E10.9/Type 1 diabetes mellitus without com-plications
46635009/Diabetes mellitus type 1
Type 1 diabetes
250.02/Diabetes mel-litus without mention of complication, type II or unspecified type, uncontrolled
E11.65/Type 2 diabe-tes mellitus with hyperglycemia
443694000/Type II diabetes mellitus uncontrolled
Uncontrolled Type 2 diabetes mellitus
250.03/Diabetes mel-litus without mention of complication, type I (juvenile type), uncon-trolled
E10.65/Type 1 diabe-tes mellitus with hyperglycemia
444073006/Type I diabetes mellitus uncontrolled
Uncontrolled Type 1 diabetes mellitus
461.9/Acute sinusitis, unspecified
J01.90/Acute sinus-itis, unspecified
15805002/Acute sinusitis
Acute sinusitis, unspecified
789.00/Abdominal pain, unspecified site
R10.9/Unspecified abdominal pain
21522001/Abdominal pain
Abdominal pain

Lytec 2021March 2021 91
Chapter 6 - Post Installation Setup Carrier Maintenance
244.9/Unspecified hypothyroidism
E03.9/Hypothyroid-ism, unspecified
40930008/Hypothy-roidism
Hypothyroidism
462/Acute pharyngitis J02.9/Acute pharyngi-tis, unspecified
363746003/Acute pharyngitis
Acute pharyngitis
724.2/Lumbago M54.5/Low back pain 279039007/Low back pain
Low back pain
724.5/Backache, unspecified
M54.9/Dorsalgia, unspecified
161891005/Backache Backache
496/Chronic airway obstruction, not else-where classified
J44.9/Chronic obstructive pulmonary disease, unspecified
13645005/Chronic obstructive lung dis-ease
Chronic obstructive pulmonary disease
786.2/Cough R05/Cough 49727002/Cough Cough
300.0/Anxiety state, unspecified
F41.9/Anxiety disor-der, unspecified
48694002/Anxiety Anxiety
599.0/Urinary tract infection, site not specified
N39.0/Urinary tract infection, site not specified
68566005/Urinary tract infectious dis-ease
Urinary tract infection
278.00/Obesity, unspecified
E66.9/Obesity, unspecified
414916001/Obesity Obesity
272.2/Mixed hyperlip-idemia
E78.2/Mixed hyperlip-idemia
267434003/Mixed hyperlipidemia
Mixed hyperlipidemia
278.01/Morbid obesity E66.01/Morbid (severe) obesity due to excess calories
238136002/Morbid obesity
Morbid obesity due to excess calories
477.9/Allergic rhinitis, cause unspecified
J30.9/Allergic rhinitis, unspecified
61582004/Allergic rhi-nitis
Allergic rhinitis
V58.61/Long term (current) use of anti-coagulants
Z79.01/Long term (current) use of anti-coagulants
266713003/Long-term drug therapy
Long-term use of anti-coagulants
715.90/Osteoarthritis, unspecified whether generalized or local-ized, involving unspecified state
M19.90/Unspecified osteoarthritis, unspecified state
396275006/Osteoar-thritis
Osteoarthritis
V20.2/Routine infant or child health check
Z00.129/Encounter for routine child health examination without abnormal findings
102506008/Well child Well child exam
ICD-9 Code/Descrip-tion
ICD-10 Code/Description
SNOMED Code/Description
Provider-Friendly Description

Lytec 202192 March 2021
Carrier Maintenance Chapter 6 - Post Installation Setup
V70.0/Routine gen-eral medical examina-tion at a health care facility
Z00.00/Encounter for general adult medical examination without abnormal findings
268565007/Adult health examination
Routine medical exam
V04.81/Need for pro-phylactic vaccination and inoculation against influenza
Z23/Encounter for immunization
1411000119106/Influ-enza vaccine needed
Need for prophylactic vaccination and inoc-ulation against influ-enza
V06.1/Need for pro-phylactic vaccination and inoculation against Diphtheria-tet-anus-pertussis, com-bined [DPT] [DTaP]
Z23/Encounter for immunization
399014008/Vaccina-tion for diphtheria, pertussis, and tetanus
DTaP vaccination
530.81/Esophageal reflux
K21.9/Gastro-esopha-geal reflux disease without esophagitis
235595009/Gastro-esophageal reflux dis-ease
Gastroesophageal reflux
780.60/Fever unspec-ified
R50.9/Fever unspeci-fied
386661006/Fever Fever
786.50/Unspecified chest pain
R07.9/Chest pain, unspecified
29857009/Chest pain Chest pain
427.31/Atrial fibrilla-tion
I48.91/Unspecified atrial fibrillation
49436004/Atrial fibril-lation
Atrial fibrillation
414.01/Coronary ath-erosclerosis of native coronary artery
I25.10/Atheroscle-rotic hearth disease of native coronary artery without angina pecto-ris
1641000119107/Coro-nary atherosclerosis in native coronary artery
Coronary atheroscle-rosis of native coro-nary artery
285.9/Anemia, unspecified
D64.9/Anemia, unspecified
271737000/Anemia Anemia
ICD-9 Code/Descrip-tion
ICD-10 Code/Description
SNOMED Code/Description
Provider-Friendly Description

Lytec 2021March 2021 93
Appendix A - Uninstalling SQL Management Studio Express 2005
If you have version 2005 installed, you will need to uninstall it prior to installing Lytec.
To uninstall this program:1. Click Start, and then click Control Panel.2. Double-click Add or Remove Programs.3. In the list of installed programs, click Microsoft SQL Server Management Studio Express,
and then click Remove.4. Click the Yes button on the warning screen. The program is uninstalled.

Lytec 202194 March 2021
Appendix A - Uninstalling SQL Management Studio Express 2005

Lytec 2021March 2021 95
Appendix B - Setting Permissions for the Lytec MD Root Drive and Folders
Workstations and users must have full access to the root drive and folders where the Practice Partner files are stored.
1. On the server drive, double click the My Computer icon or select Start, and then Computer.2. Right-click on the drive set up for Lytec MD Server/Practice Partner (typically P:) and click
Properties.3. Select the Sharing tab and click Advanced Sharing.4. Select the Share this folder check box5. Specify the Share name (typically P).
Figure 47. Advanced Sharing screen on Sharing tab
6. Click the Permissions button. The Permissions screen appears.7. Click the Add button.8. Type in USERS in the Enter the object names to select box. 9. Click the OK button.
10. Repeat this process and create a SYSTEM user and a DOMAIN USER (if you are on a domain; If there is no domain, you might get a message telling you so).

Lytec 202196 March 2021
Appendix B - Setting Permissions for the Lytec MD Root Drive and
Figure 48. Permissions tab
11. On the Permissions screen, select each user from the Group or user names box and then click Allow for Full Control in the Permissions for… box.
Figure 49. Permissions tab Full Allow
12. Click the OK button twice to return to the Properties screen.13. Select the Security tab.14. Highlight Everyone and click Edit.

Lytec 2021March 2021 97
Appendix B - Setting Permissions for the Lytec MD Root Drive and Folders
15. On the Permissions screen, select the Allow check box for Full Control.
Figure 50. Permissions tab Allow for Full Control
16. Highlight SYSTEM, Users, and Domain (if necessary) and select the Allow check box for Full control.
17. Click the OK button.18. Click the Close button on the Properties screen and close My Computer.

Lytec 202198 March 2021
Appendix B - Setting Permissions for the Lytec MD Root Drive and

Lytec 2021March 2021 99
Appendix C - Add-Ons
Your Lytec MD DVD comes with five add-on applications that can enhance the capabilities of Lytec MD. These add-Ons are
Installing Add-Ons
To install an Add-On: 1. Insert the Lytec MD DVD in the drive. The Autorun screen appears. If the Autorun screen does
not appear automatically, click Start and select Run. The Run screen appears. On the Run screen in the Open field, type X:\AUTORUN (where X is your DVD-ROM drive letter) and click the OK button.
2. Click the Lytec MD Add-Ons link. A list of Add-Ons appears.
3. Click the link for the Add-On you want to install. The installer starts.
4. Follow the installation wizard for the Add-On.
Add-On Description
ePrescribing Use ePrescribing to send and receive prescription-related messages to and from pharmacies, to view real-time pharmacy benefits and eligibility data on your patients, to see up-to-date formulary and coverage information for specific drugs during the prescribing process, and to view information about prescriptions your patients have had filled, even from other providers
Templates Use templates to save time by eliminating the need to type up routine tasks. Templates contain often repeated text and the necessary codes for a given problem. When you use a template in a note, you only need to add patient-specific information.
PPConnect Use PPConnect to add and update information from a third-party system into Practice Partner Patient Records and Appointment Scheduler, as well as Practice Partner to a third-party system.
Remote Client Connect Use Remote Client Connect to run interfaces on client workstations.
LabCorp Use LabCorp to receive patient lab results and send orders created in Patient Records to the lab.

Lytec 2021100 March 2021
Installing Add-Ons Appendix C - Add-Ons

Lytec 2021March 2021 101
Appendix D - Linking Lytec With Other Applications
MPIC is an application that is installed and configured independently of Lytec. It will transmit data from Lytec to other applications. You can use MPIC to link Lytec to Practice Partner.
You can download the latest version of MPIC here: https://supportcenter.emds.com/richmond/articles/
Richmond_VAR_KBA/Lytec-and-Lytec-MD-Download-Links
eMDs recommends that you download and open the MPIC User’s Guide prior to installing or configuring MPIC. You can find the User’s Guide on the LYtec Documentation page in Support Center.

Lytec 2021102 March 2021
Appendix D - Linking Lytec With Other Applications

Lytec 2021March 2021 103
Appendix E - Changing the number of licensed users
To change the number of licensed users:You must know the path to your Lytec MD data files directory (typically p:\ppart). All users must exit out of all Lytec MD applications.
NOTE: this will affect only Lytec MDl/Practice Partner. It will NOT affect Lytec Client.
1. Create a License folder on the P:\ drive (or whatever drive the ppart folder is on).
a. Open Windows Explorer. Click Start, point to All Programs, point to Accessories, and then click Windows Explorer.
b. Browse to the P:\ drive (or whatever drive the ppart folder is on).
c. Create a new folder by right-clicking a blank area in a folder window or on the desktop, pointing to New, and then clicking Folder.
d. Rename the default folder to License and press Enter.
2. Save the files attached to the e-mail in the License folder (usually P:\license). One of the files should be named pplic.txt. If this file doesn't exist (because some e-mail programs strip this file), please save the other file in the License folder and rename it to pplic.txt.
a. From the Windows Taskbar, click the Start button and then select Run from the menu.
b. Type the path to your Lytec MD data file directory followed by \SETUSER2. For example, if your data is located in p:\license, you would type:
p:\ppart\setuser2 p:\license
3. Click OK.

Lytec 2021104 March 2021
Appendix E - Changing the number of licensed users
Lytec 2021March 2021 105
Index
Index
AActive Directory infrastructures 9Add-Ons
installing 99list 99, 101
anti-virus solutions 9application folder 8
Bbackups 8best practices 8
Cchanging
number of licensed users 103Client/Server
server installation and setup 24workstation installation and setup 26
client/server hardware and software requirements 4Client/Server installation 23converting
data from earlier versions 72practices 73
Ddatabases
Oracle 9SQL 9
default titlespast medical history, family history, and social
history 74Diagnosis Code New and Edit screen
updating existing patient problem lists with ICD-10 and SNOMED codes 87
disablingFirewall 39User Access Control (UAC) 34
DNS 10domain infrastructures 9domain name servers 10downloading
license file 103license files 33
EElectronic Security screen
Access 1 tab 50EnableUA registry entry 14, 18, 20, 24, 26, 50ePrescrbing
defined 99
FFirewall disable 39firewalls 10
IICD-10
post-installation checklist 74ICD-10 codes
updating existing patient problem lists 87infrastructures
Active Directory 9domain 9
installationClient/Server 23Lytec MD 29Professional or Multi-User 17Single User 13
installation overview 11installing
Add-Ons 99Practice Partner 34Windows PowerShell 101
LLabCorp
defined 99legacy data
past medical history, family history, and social history 74
license filedownloading 103
license filesdownloading 33
licensed userschanging the number of 103
Lytec MDserver installation and setup 42workstation installation and setup 50

Index
Lytec 2021106 March 2021
Lytec MD installation 29
MMicrosoft security features 9migrating
existing databases 72
Nnetwork interface cards
teamed 9New Technology File System 9NICs
teamed 9NTFS 9
OOracle database platforms 9overview
installation 11
Ppast medical history, family history, and social
history - legacy data and default titles 74post-installation ICD-10 checklist 74
Advance Beneficiary Notice (ABN) 83conditional logic 79Electronic Encounter Form (EEF) templates 86forms 75health maintenance 75orders 84prenatal 87prescription templates 76problem list 82QuickText 77QuickText pick lists 77
PP Connectdefined 99
Practice Partnerinstalling 34upgrading 34
Practice Partner Web Viewupgrading to 11.0 30
pre-installation tasks 31problem lists
updating with ICD-10 and SNOMED codes 87Professional or Multi-user
workstation installation and setup 20professional or multi-user hardware and software
requirements 2Professional or Multi-User installation 17Professional or Mult-user
server installation and setup 18
Rrecommendations
pre-installation 17Remote Client Connect
defined 99requirements
client/server 4professional or multi-user 2software 7
Sscreens
Electronic Security screen 50security features
Microsoft 9servers
White-box 10setting
permissions for the Lytec MD root drive and folders 95
single user installation 13SNOMED codes
updating existing patient problem lists 87software requirements 7specifying
default SQL server credentials 71SQL database platforms 9
Ttasks
pre-installation 31Templates
defined 99
Uuninstalling
SQL Management Studio Express 2005 93updating existing patient problem lists with ICD-10
and SNOMED codes 87upgrade paths 29upgrading
Practice Partner 34Practice Partner Web View 11.0 30
User Access Control (UAC)disabling 34
utilitiesFixOperatorSwitches 50PPMT 38, 74PRUtils 50

Lytec 2021March 2021 107
Index
WWatchdog
shutting down 35Web View
upgrading to 11.0 30White-box servers 10Windows pagefile 10Windows PowerShell
installing 101