luxor crm 2 · pdf fileluxor crm getting started guide page 5 getting started before you get...
TRANSCRIPT

Luxor CRM 2.0
Getting Started Guide

Luxor CRM Getting Started Guide
Page 2
This Guide is ©Copyright 2009 Luxor Corporation. All Rights Reserved.
Luxor CRM 2.0 is a registered trademark of the Luxor Corporation.
Microsoft ®Outlook® and Microsoft® Excel® are registered trademarks of the Microsoft Corporation.
BlackBerry® is a registered trademark of Research In Motion.
Luxor CRM Getting Started Guide
Page 3
Contents Getting Started ....................................................................................................................................... 5
Technical Requirements ..................................................................................................................... 5
Accessing Luxor CRM .......................................................................................................................... 5
Logging In ........................................................................................................................................... 5
Forgot My Password ....................................................................................................................... 5
Navigating the Tool ........................................................................................................................... 6
Quick Links ...................................................................................................................................... 7
Keyword Search .............................................................................................................................. 7
Calendar.......................................................................................................................................... 8
Views .............................................................................................................................................. 8
Main Module and Hierarchy ................................................................................................................. 11
Settings ................................................................................................................................................. 12
System Settings ................................................................................................................................ 13
Personal Settings .............................................................................................................................. 13
Personal Information .................................................................................................................... 13
Tax Rate Settings .......................................................................................................................... 14
Luxor Alert Settings ...................................................................................................................... 14
Sync Settings ..................................................................................................................................... 14
Contacts ........................................................................................................................................ 15
To Dos ........................................................................................................................................... 15
Calendar Items .............................................................................................................................. 16
Conflict Resolution ....................................................................................................................... 16
Direction of Synchronization ........................................................................................................ 17
My Views .......................................................................................................................................... 17
My Dashboards ................................................................................................................................. 18
User Name and Password ................................................................................................................ 19
Calendar Settings .............................................................................................................................. 19
Device Settings ................................................................................................................................. 20
E-mail Templates .............................................................................................................................. 20
Print Templates ................................................................................................................................ 21
E-mail Client Settings ........................................................................................................................ 22

Luxor CRM Getting Started Guide
Page 4
Working with Leads ............................................................................................................................. 23
Adding a New Lead .......................................................................................................................... 23
Working with Organizations ................................................................................................................ 25
Adding a New Organization ............................................................................................................. 25
Reversing to a Lead .......................................................................................................................... 26
Working with Contacts ......................................................................................................................... 27
Adding New Contacts ....................................................................................................................... 27
Reversing to a Lead .......................................................................................................................... 29
Assigning Contacts ........................................................................................................................... 29
Opportunities ....................................................................................................................................... 30
Adding New Opportunities .............................................................................................................. 30
Assigning Opportunities ................................................................................................................... 31
Advancing Opportunities ................................................................................................................. 31
Support Tickets .................................................................................................................................... 32
Adding New Support Tickets ............................................................................................................ 32
Assigning Tickets .............................................................................................................................. 33
Advancing Tickets............................................................................................................................. 33
Working with Activities ........................................................................................................................ 34
Activities ........................................................................................................................................... 34
To Dos .............................................................................................................................................. 34
Appointments .................................................................................................................................. 35
Mail Merges ......................................................................................................................................... 36
Excel Export .......................................................................................................................................... 37
Alerts .................................................................................................................................................... 37
Mass Edits ............................................................................................................................................ 38
Mass To Dos ......................................................................................................................................... 39
Reports ................................................................................................................................................. 40
Contacting Technical Support .............................................................................................................. 42

Luxor CRM Getting Started Guide
Page 5
Getting Started Before you get started using Luxor CRM 2.0, ensure you have the proper technical requirements.
Technical Requirements To access Luxor CRM you will need one of the following internet browsers:
Microsoft Internet Explorer 7.0 or 8.0
Mozilla Firefox 2 or 3
Chrome 1
Accessing Luxor CRM To access Luxor CRM, browse to http://www.luxorcrm.com/. The login box is in the top right corner
of the screen.
Logging In To access the tool, enter your Username and Password in the top right of the screen.
Click LOGIN.
Forgot My Password
If you cannot log in because of a forgotten password, click “Forgot Password?” on the main login
page.

Luxor CRM Getting Started Guide
Page 6
Enter your Username and e-mail address and click Submit. A temporary password is sent to the
address you provided. Once you log in using the temporary password, update your password using
the Settings page.
Navigating the Tool After you log in, the following Home page is displayed.
To expand any of the Modules in the left-hand navigation pane, hover over or click the module
name.
Recent items view shows the last five items you worked on. What’s New shows activities (for
example, To Dos or Appointments) that need to be completed. To open any item in your view, click
on it. To select an item without opening (for mail merges or mass to-dos) select the check box next
to the item.

Luxor CRM Getting Started Guide
Page 7
Quick Links
Quick links allows you to add links to sites you access often. Click on the yellow plus sign to add a
site.
Enter the caption of the site (this is what you want to refer to it as) and the URL address after the
http//:.
Note: Your view for each Module defaults to Recent Items. You can change your view by
selecting it from the views drop-down list. You can also view selected alpha items by clicking
on the appropriate letter beside the views drop-down list. (For information on how to set up
your own views, see Settings.)
Note: If you conduct a search in the Recent Items view, the search engine will search
through all records, not just those contained in the view. If you search in a custom view, the
search is only conducted on the items displayed in the view. See My Views for information
on adding a custom view.
Keyword Search
A keyword search is available to allow you to search for very specific items.
For example, if you enter the word Insurance, the search will return all the items (in all Modules)
with Insurance in any of the fields displayed in the view.

Luxor CRM Getting Started Guide
Page 8
Calendar
A calendar is shown on the Home page when you log in. To navigate between the months, click on
the left and right arrows.
You can switch your view to weekly or monthly.
On the Home page, three tabs allow you to view appointments and to dos for today, 3 next days and
7 next days.
Views
There are two methods of adding customized views: through the view itself and through the
Settings page. For more details on how to use the Settings page, see Settings.
The Recent Items view is the default view for all Modules. You can add a custom view for a Module
right from the Module page. Click on the double down arrows next to the Views drop-down list.
A Views menu bar is displayed.

Luxor CRM Getting Started Guide
Page 9
To add a new view,
1. Click Add New View.
2. Enter the name for your view. Make this something descriptive of the view, for example “South
Ontario Leads” rather than “Tom’s View”.
3. Select the fields you would like to display in the Available Fields column. You can pres Ctrl on the
keyboard and click with the mouse at the same time to select several fields at the same time.
4. Click the right double arrows to transfer the fields to the View Fields column. These fields will be
displayed in your view. To change the order of the fields, click the blue up and down double
arrows to the right of this column.
5. To filter your view, select the Field to search. Click on the drop-down list to select the criterion
by which you would like to filter. In the example above, the filter is Industry.
6. Select the condition from the Condition drop-down list. In the example above, the Condition is
equals, but you could have greater than, less than, greater and equal to, and so on.
7. Click on the browse button to the right of the Value to search field to select the value.
8. To save the view and continue working, click Save.
9. To close this window and go directly to the view, click Save&View.
You have added a custom view. To set this view as your default view, in the new view, click Set
Default View. A message box is displayed telling you the view has been set as default successfully.

Luxor CRM Getting Started Guide
Page 10
This menu bar also allows you to edit your view. In the view you would like to edit, click Edit View.
Note: You cannot edit the Recent Items view.
Make the necessary edits and click Save&View.

Luxor CRM Getting Started Guide
Page 11
Main Module and Hierarchy The primary Module in Luxor CRM is the Organizations Module. It is the umbrella under which you
can have Contacts, Opportunities, and Support tickets. The Organization module allows you to track
all activities related to all Contacts, Opportunities, and tickets linked to that Organization.
In the diagram above, you can view all the activities related to the Opportunity and Support 1 in the
Contact 1 record as well as the Organization record. You can view activity related to Support 2 in the
Contact 2 record as well as the Organization record.
For example, for ABC Company, you can have several Contacts. You can also have an Opportunity
connected with ABC. All your phone calls, to any of the Contacts, as well as Activities and To Dos
related to the Opportunity are tracked through the ABC record.
Note: For Business to Consumer selling, the Contact becomes the focal point and tracks
activities logged for all Opportunities and Support tickets.
Organization
Contact 1
Opportunity Support 1
Contact 2
Support 2

Luxor CRM Getting Started Guide
Page 12
Settings There are a number of preferences you can set through the Settings options to customize Luxor
CRM to your needs. It is recommended that you set these preferences before you begin working
with Luxor CRM to enable its full feature set.
To access the settings, click Settings on the right top portion of the Luxor CRM window.
The Settings page is displayed.

Luxor CRM Getting Started Guide
Page 13
System Settings The System Settings window allows you to set your time zone, date formatting, format for phone
numbers, currency format and display.
Click on the drop-down lists to select your preferred options. Click Save&Close to exit.
Personal Settings The Personal Settings window allows you three further options: Personal Information, Tax Rate
Settings, and Luxor Alert Settings.
Personal Information
Click on Personal Information to update your own data.
When finished, click Save&Close.

Luxor CRM Getting Started Guide
Page 14
Tax Rate Settings
Click on Tax Rate Settings to add any two taxes that may be applicable to your expense tracking and
taxes you may accrue when capturing your expenses. Enter the % tax rates. Click Save&Close to exit.
Luxor Alert Settings
This window allows you to select whether you would like Luxor to send you e-mail alerts upon
certain events. The e-mail address in your Personal Information window must be entered.
Select the Appointment reminder time by clicking on the drop-down list.
Sync Settings The Sync Settings allow you to control how Luxor CRM synchronizes with your Microsoft Outlook.

Luxor CRM Getting Started Guide
Page 15
Contacts
To set the Contacts synchronization details, click on Filter in the Contacts row. To synchronize all
your contacts, select Owner in the Field to Search drop-down list. In the Value to search enter your
name.
You may choose to synchronize only some of your Contacts. For example, to only synchronize your
Canadian Contacts, select Country in the Field to Search drop-down list and enter Canada in the
Value to Search.
Note: You can add more than one filter.
Click Save to save and continue working with the filters or Save&Close to save the settings and exit.
Synchronization for Leads works the same as for Contacts.
To Dos
The Luxor To Dos synchronize with the Outlook tasks. To set the filter for the task items you would
like to synchronize, click Filter in the To Do row of the Sync Settings page.
Select the appropriate option by clicking on the radio buttons.
Click Save Save&Close to save the settings and exit.

Luxor CRM Getting Started Guide
Page 16
Calendar Items
To set the Calendar synchronization details, click on Filter in the Calendar row of the Sync Settings
page.
You can select to synchronize all appointments or your selection of past and future appointments.
Click Save&Close to save the settings and exit.
Conflict Resolution
As you work with both Outlook and Luxor, you may make updates to your items in either software.
For this reason it is important to specify the conflict resolution you wish Luxor to follow. To set
conflict resolution for each item to be synchronized, click Conflict Resolution in the item’s
corresponding row on the Sync Settings page.
Select the appropriate radio button to set the conflict resolution.
Click Save&Close to save your settings and exit.

Luxor CRM Getting Started Guide
Page 17
Direction of Synchronization
You may wish to set your synchronization to be a one-way-only process, for example, to only upload
your Luxor information to Outlook. Click on the arrows between the Outlook and Luxor icons for
each Module.
Select the appropriate radio button to change the direction of synchronization. The Do Nothing
button removes synchronization for items of this Module. Click Save&Close.
My Views My Views allows you to add a view customized to your needs. You can add views for Leads,
Organizations, Contacts, Opportunities, and Support. The process of adding a new view is similar for
all modules.
To add a view for Leads,
1. Click Leads.
2. Click Add New to add a new view.
Luxor CRM Getting Started Guide
Page 18
3. Enter the name for your view. Make this something descriptive of the view, for example “South
Ontario Leads” rather than “Tom’s View”.
4. Select the fields you would like to display in the Available Fields column. You can pres Ctrl on the
keyboard and click with the mouse at the same time to select several fields at the same time.
5. Click the right double arrows to transfer the fields to the View Fields column. These fields will be
displayed in your view. To change the order of the fields, click the blue up and down double
arrows to the right of this column.
6. To filter your view, select the Field to search. Click on the drop-down list to select the criterion
by which you would like to filter. In the example above, the filter is Industry.
7. Select the condition from the Condition drop-down list. In the example above, the Condition is
equals, but you could have greater than, less than, greater and equal to, and so on.
8. Click on the browse button to the right of the Value to search field to select the value. In the
example above, this is Engineering.
9. To save the view and continue working, click Save.
10. To close this window and go directly to the view, click Save&View.
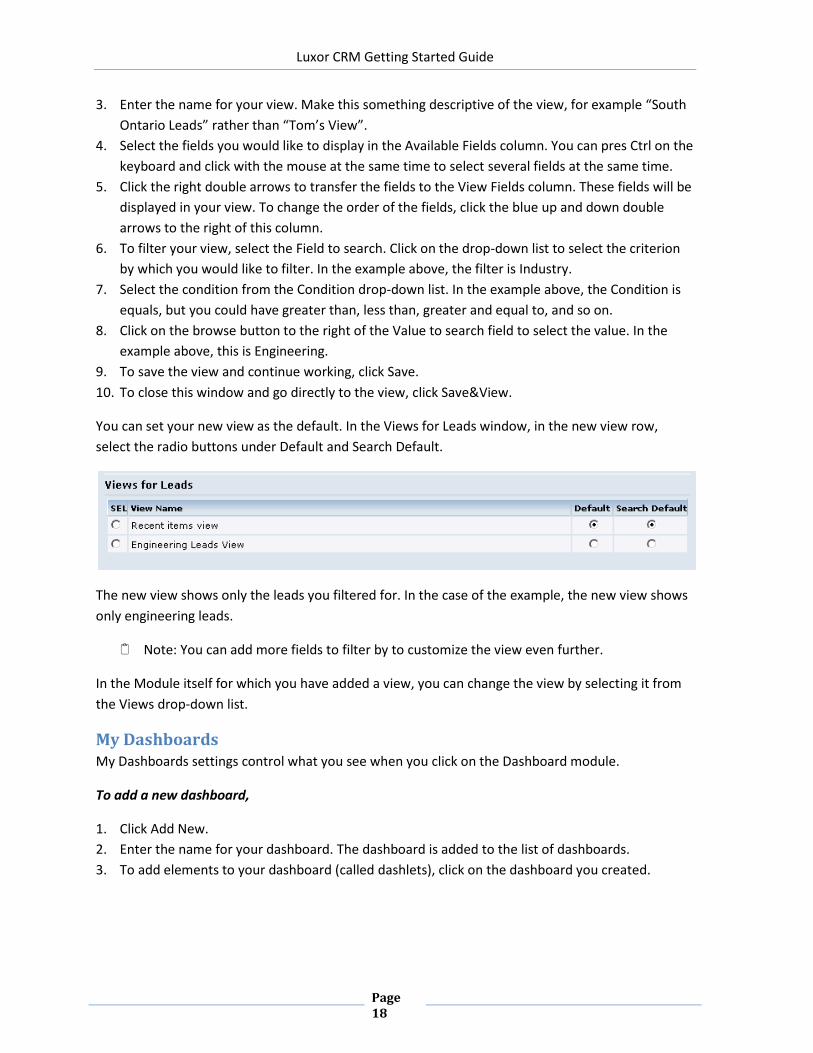
You can set your new view as the default. In the Views for Leads window, in the new view row,
select the radio buttons under Default and Search Default.
The new view shows only the leads you filtered for. In the case of the example, the new view shows
only engineering leads.
Note: You can add more fields to filter by to customize the view even further.
In the Module itself for which you have added a view, you can change the view by selecting it from
the Views drop-down list.
My Dashboards My Dashboards settings control what you see when you click on the Dashboard module.
To add a new dashboard,
1. Click Add New.
2. Enter the name for your dashboard. The dashboard is added to the list of dashboards.
3. To add elements to your dashboard (called dashlets), click on the dashboard you created.

Luxor CRM Getting Started Guide
Page 19
4. To add a dashlet, click Add New.
5. From the Type drop-down list, select what your dashlet will display.
6. Enter a name for the dashlet.
7. Select the screen position for this dashlet from the Row and Column drop-down lists.
8. Click Save.
You have added a dashlet to your new dashboard. Continue adding dashlets as desired. To remove a
dashlet, click on the red x sign by the dashlet name.
User Name and Password Luxor CRM prompts you to change your password every 90 days. To change your password, click
Username and Password.
Enter your current password and your new password. Confirm your new password. Click Save&Close
to save your changes and exit.
Calendar Settings The Calendar settings allow you to set the business hours you normally work. Click Day Start and
End.

Luxor CRM Getting Started Guide
Page 20
The Calendar Settings page also allows you to share your calendar. Click on Calendar Sharing and
select the user with whom you would like to share your calendar. To add a user to your list click Add
User and select from the list.
Device Settings Device Settings allows you to add devices to which you would like to send alerts. To add a device,
click Add New.
Enter the device name, for example BlackBerry and enter the corresponding e-mail address. Click on
the disk symbol to save. This device will now be available from the reminder option on your
Appointments, To Dos, and Opportunities.
E-mail Templates E-mail templates allows you to create templates for e-mail blasts for Leads, Contacts, and
Opportunities.
To create a new template,
1. Click Add New.
2. Enter the Name of the Template, for example, Post Trade Show Thank-you. Select whether this
template will be Private to you or Public. Enter a description.
3. Select whether the e-mail will be Plain Text or HTML.
Note: HTML allows you more formatting capabilities. However, these may be lost if you are
e-mailing handheld devices or the recipients’ e-mail is set to display in plain text.

Luxor CRM Getting Started Guide
Page 21
4. In the Body text box enter the text of your e-mail. Click Insert Field wherever you want a mail-
merge field from your Contact, Lead, or Opportunity record (for example, the client’s name and
company).
5. Click Save.
You have created an e-mail template.
Print Templates Similar to e-mail templates, print templates allow you to create a form letter to a list of Contacts,
Leads, Opportunities, Organizations, or Support ticket items.
To create a new print template,
1. Click Add New.
2. Enter a name for the template. For example, Thank You Letter.
3. Enter the body of the letter. Using the text format controls, format your letter as desired.
4. Click Insert Fields to add mail-merge fields from the Contact, Lead, Organization, Opportunity, or
Support ticket (depending on the template you are creating).
5. Click Save.
You have created a print template.

Luxor CRM Getting Started Guide
Page 22
E-mail Client Settings The E-mail client settings allow you to specify the e-mail client you would like Luxor to display. Luxor
does not host your e-mail, but rather displays the emails and allows you to reply to them.
To add an e-mail client,
1. Click on E-mail Client Settings.
2. Enter your e-mail client information. For information about your imap and smtp settings,
contact your IT representative.
3. Enter your signature in the Signature text box.
4. Click Save.
5. To save and exit, click Save&Close.
You have set up your e-mail client. To use the e-mail client through Luxor, click on the Mail module
on the main display page.

Luxor CRM Getting Started Guide
Page 23
Working with Leads
Adding a New Lead On the left-hand navigation pane, click on Leads to expand the selection.
To add a new Lead,
1. Click Add New Lead.
2. Enter the title, First Name, Last Name, Company, and any other information you have for the
lead.

Luxor CRM Getting Started Guide
Page 24
Note the following options from drop down lists:
Rating – allows you to rate the lead ranging from Hot to Cold.
Industry – give you a selection of industries to choose from.
Source – defines how this lead was obtained.
3. Click Save to save the lead and continue working with it or Save&Close to save and exit the lead
form.
You have created a new Lead. Once the Lead is saved, you can add events to it. The menu bar of the
lead form now contains the following buttons, which allow you to add an Opportunity, assign the
Lead to someone else, print it, and create a mail merge.
The bottom portion of the Lead form now contains an area which tracks the activities associated
with the Lead.
To add an Appointment, To Do, Activity, or Attachment, click on the yellow plus sign. To collapse this
pane, click on the double arrows.

Luxor CRM Getting Started Guide
Page 25
Working with Organizations You may have several contacts that belong to the same company. The Organizations module allows
you to connect these contacts together.
Adding a New Organization To expand the Organizations module, click on Organizations on the left-hand side navigation pane.
To add a new Organization,
1. Click Add New Organization.
2. Enter the Company Name and Address.
3. From the Type drop-down list select the type of Organization (Prospect, Customer, or Past
Customer).
4. From the Industry drop-down list select the industry this Organization belongs to.
5. The Source drop-down list allows you to select the source of the organization information, for
example, Trade Show or Word of Mouth.
6. To save and keep working with the Organization, click Save.
7. To save and exit, click Save&Close.
You have added a new Organization. You can use the menu bar buttons on the Organization window
to print the Organization record or assign it to someone else.
The bottom portion of the Organization window now contains an area which tracks the events
associated with the Organization.

Luxor CRM Getting Started Guide
Page 26
To add an Appointment, To Do, Activity, Attachment, Opportunity, Alert, or Support ticket, click on
the yellow plus sign. To collapse this pane, click on the double arrows.
Reversing to a Lead Contacts and Organizations are qualified leads, but you can reverse a Contact or an Organization
that does not close to a Lead. You may wish to cycle the lead for another rep.
To reverse an Organization to a Lead,
Select the Organization in your view and click Reverse to Lead in the left-hand navigation panel.

Luxor CRM Getting Started Guide
Page 27
Working with Contacts Contacts are the individuals you deal with whereas organizations are the companies. Each
organization can have several contacts. For Business to Client selling, it is the Contacts that will have
Opportunities attached to them. For Business to Business selling, you will attach the Opportunity to
the Organization.
Adding New Contacts There are two methods of adding Contacts: through the Organization window or through the
Contacts module in the left-hand navigation pane. The preferred method is to add a Contact
through the Organization record. The Contact is then pre-populated with the organization
information such as addresses and phone numbers.
To add a new Contact,
1. Click the yellow plus sign to add a Contact through the Organization window or click Add New
Contact in the left-hand navigation pane.

Luxor CRM Getting Started Guide
Page 28
2. Enter the Contact’s demographic information.
3. Select whether this is a Primary Contact.
4. The Related To field allows you to search for the Organization to which this Contact belongs.
Enter the company name in the Related Search Window.
Note: If you’re creating the Contact through the Organization window, this field it pre-
populated.
5. Click Save to save the Contact and continue working with it.
6. To save and exit, Click Save&Close.
You have added a new Contact. You can use the menu bar buttons on the Contact window to print
the record, assign it to someone else, or use it in a Mail Merge.
The bottom portion of the Contact window now contains an area which tracks the activities
associated with the Contact. To add an Appointment, To-do, Activity, Opportunity, Alert, Support
ticket, or Expense, click on the yellow plus sign. To collapse this pane, click on the double arrows.

Luxor CRM Getting Started Guide
Page 29
Reversing to a Lead Contacts are qualified leads, but you can reverse a Contact to a Lead if it doesn’t bring in any
business. You may wish to recycle the lead information for another rep or a later time.
To reverse a Contact to a Lead,
Select the Contact in your view and click Reverse to Lead in the left-hand navigation panel.
Assigning Contacts If you participate in a team selling environment, you may need to assign the Contact to someone
else to continue the qualification process.
To assign the Contact to someone else, click Assign on the menu bar. Select the new Contact owner
and click Save. This Contact will now have a different owner and will be displayed in the other
owner’s views.

Luxor CRM Getting Started Guide
Page 30
Opportunities An Opportunity is the potential for new revenue. Luxor CRM allows you to track the progress of your
Opportunity through the sales cycle.
Adding New Opportunities There are two methods of adding Opportunities. For Business to Business selling, the Opportunity
will be attached to the Organization. For Business to Consumer selling the Opportunity will be
attached to the Contact.
To add a new Opportunity,
1. On either the Contact or Organization window, click on Opportunities in the bottom pane. Click
on the yellow plus sign to add a new Opportunity.
2. Enter the Name for your Opportunity. This should be something meaningful that will allow you
to quickly find this Opportunity at a later time and distinguish it from others.
3. From the Tracking Group drop-down list select the tracking group you will be using.
4. From the Stage drop-down list select the stage of this Opportunity in the sales cycle. A list of
questions and directives is displayed. Enter the appropriate information and click Save.
5. Enter the projected revenue of this Opportunity in the Revenue field.
6. To enter the projected closing date, click on the calendar icon. The calendar is displayed. Select
the closing date.
7. To save the Opportunity and continue working with it, click Save.
8. To save and exit, click Save&Close.
You have created an Opportunity. You can now Assign it to someone else or Print.

Luxor CRM Getting Started Guide
Page 31
The Stage History on the bottom panel of the saved Opportunity record displays the stages of your
sales cycle. This panel also shows all the Appointments, To Dos, Attachment, and Alerts associated
with this Opportunity. To add any of these items to the Opportunity, click on it and then click on the
yellow plus sign. To collapse this pane, click on the double down arrows.
Note: You can set a reminder for the Opportunity. Check the Reminder check box and select
the number of days in which you would like the reminder. The Devices field is displayed.
Click on the device icon to select the devices (for example, e-mail, cell, BlackBerry) to which
you would like the program to send you a reminder.
Assigning Opportunities If you participate in a team selling environment, you may need to assign the opportunity to
someone else at a specified stage of the sales cycle.
To assign the Opportunity to someone else, click Assign on the menu bar. Select the new
Opportunity owner and click Save. This Opportunity will now have a different owner and will be
displayed in the other owner’s views.
Advancing Opportunities As you progress through the sales cycle, it is important to advance the stage of your Opportunity to
assure correct projections and reporting.
To advance the stage of the Opportunity,
1. Open the Opportunity window.
2. In the Stage drop-down list select the new stage of the Opportunity.
The Opportunity Update Stage window is displayed.
3. Answer the questions and directives for the Opportunity at the new stage. Click Save.
The percentage probability to close is updated for you.
4. To save and continue working with the Opportunity, click Save.
5. To save and exit, click Save&Close.
You have advanced the Opportunity. The bottom panel Stage History reflects the stage advance.
Note: Closing the Opportunity is another stage in advancing through the sales cycle. Change
the Opportunity stage to Closed following the instructions in the procedure above.

Luxor CRM Getting Started Guide
Page 32
Support Tickets Luxor CRM allows you to track support tickets as well as Opportunities. Tickets are attached to the
Contact record.
Adding New Support Tickets In the Contact window, expand the bottom panel by clicking on Support.
To add a new Support ticket,
1. Click on the yellow plus sign.
2. In the Support Name field enter the terms by which you would like to identify the ticket.
3. To select the tracking group for the ticket, click on the drop-down Support Tracking Group list.
4. Select the state for this ticket (for example, Information Gathering). Click on the Support State
drop-down list and select the appropriate state.
5. To set a reminder for the ticket, check the Remind Owner check box and select the time interval
from the drop-down list.
The Devices field is displayed.
6. Click the device symbol in the Devices field to select the device which will receive the reminder
(for example, cell phone, BlackBerry).
7. Enter keywords in the Keywords field. This will allow you to build your support database at a
later date.

Luxor CRM Getting Started Guide
Page 33
8. In the Issue text field enter the nature of the problem being resolved in this support ticket.
9. To save and continue working with the ticket, click Save.
10. To save and exit, click Save&Close.
You have added a new Support Ticket.
Assigning Tickets You may need to assign the ticket to someone else who has different expertise or escalate it to a
manager.
To assign a ticket, click Assign on the menu bar of the ticket window. Select the new owner and click
Save. This Support Ticket will now have a different owner and will be displayed in the other owner’s
views.
Advancing Tickets Similarly to Opportunities, tickets have their own cycles of progression. It is important to advance to
the appropriate stage to reflect the progress of the issue resolution.
To advance the stage of the Support ticket,
1. In the Support record, click the Support State drop-down list. Select the new stage.
2. Answer the questions and directives at this stage of the cycle.
If you are changing the state to Resolved, radio buttons for Is Closed will be displayed. If you
wish to close the ticket, select Yes.
3. Click Save.
You have updated the state of the Support ticket.

Luxor CRM Getting Started Guide
Page 34
Working with Activities Luxor CRM allows you to add several types of events to each type of record. Activities can be used to
track phone calls and meetings that have taken place. To Dos serve as reminders to perform
activities (similar to tasks in Microsoft Outlook). Appointments are calendar items like meetings.
Alerts allow you to monitor for activity or lack of activity for specified items.
Events (to-dos, appointments) are shown on the home page when you log in. They are also tracked
through the items to which they are attached.
Activities To create a new Activity,
1. In the item you are updating, click on the Activities tab on the bottom pane.
2. Click on the yellow plus sign.
3. Enter the Activity Name and select the type from the drop-down list (for example, phone call
out).
4. Select the Reminder check box to set a follow-up. Select the date and time for the reminder.
5. Click on the symbol in the Device field to select the device where you would like to receive the
reminder.
6. Click Save&Close.
The Activity is tracked in the Lead, Contact, Opportunity or Support ticket to which it is linked.
To Dos To create a To Do,
1. In the appropriate item click on the To Dos tab on the bottom pane.
2. Click the yellow plus sign.
3. Enter the subject of the To Do.
4. Select the Priority from the drop-down list.
5. Set the due date by clicking on the calendar symbol in the Due Date field.

Luxor CRM Getting Started Guide
Page 35
6. To add a reminder, select the Reminder check box and select the device where you would like
the reminder sent.
7. Click Save&Close.
A message box advises you the To Do has been created. The To Do is displayed on the home
page. To Dos synchronize with your Outlook Task items (see Settings for details on how to set up
synchronization).
Appointments The Luxor CRM appointment items work like Outlook meeting items. You can create appointments
for Leads, Organizations, Contacts, and Opportunities. As with all other activities, Appointments are
shown on your home page when you log in and tracked through the item to which they are
attached.
To create a new Appointment,
1. In the appropriate item click on the To- Dos tab on the bottom pane.
2. Click the yellow plus sign.
3. Enter the Subject of the Appointment.
4. Enter the Location.
5. Set the appropriate time period and reminder.
6. Click Save&Close.
You have created a new Appointment. The Appointment is displayed on the home page.
Appointment items synchronize with your Outlook Calendar (see Settings for details on how to set
up synchronization).

Luxor CRM Getting Started Guide
Page 36
Mail Merges Luxor CRM allows you to merge Lead, Contact, and Opportunity fields into an e-mail or print
template that you can send out to a chosen list of Leads, Contacts, or Opportunities.
Note: You will need to have set up an e-mail or a print template (or both) in your Settings to
take advantage of this feature. See Settings for instructions.
To create a mail merge,
1. In your Leads, Contacts, or Opportunities view, select the items which you would like to base the
merge on.
2. Click Mail Merge on the left-hand navigation bar.
3. Enter your e-mail address.
4. Select the template you would like to use.
5. Select whether you would like to be notified by a reminder or an e-mail when the merge is
completed.
6. Click Merge to Mail for e-mail merges and Merge to Print for print.
A message box is displayed advising that your merge is in progress.
7. Click OK.
You have created a mail merge.
For individual e-mails or printed communications you can still take advantage of the templates you
set up in your Settings. In the individual Contact, Opportunity, or Lead window, click Mail Merge on
the toolbar. The mail merge window is displayed. Proceed as above.

Luxor CRM Getting Started Guide
Page 37
Excel Export Luxor CRM allows you to export your views to a Microsoft Excel spreadsheet. In the left-hand
navigation pane, expand the Module for which you would like to export items. Click Excel Export.
Luxor CRM opens Microsoft Excel and copies all the items in your current view to a spreadsheet.
Alerts You can create Alerts on an item per item basis through the Lead, Organization, Contact, or
Opportunity record. You can also create mass alerts for several items in each Module.
To create mass alerts,
1. Select the appropriate items in Leads, Organizations, Contacts, or Opportunities Modules.
2. Click Create Alerts.
3. Enter the Alert Name.
4. Select the Alert Type from the drop-down list. You can choose from :
Activity – where a specified activity occurs for these items

Luxor CRM Getting Started Guide
Page 38
No Activity (All)- where there are no activities by anyone in your organization with these items
No Activity (Personal) – where you have had no activities for these items.
5. Click the symbol in the Event Type box. Select the appropriate activities from the list of events,
by clicking the right double arrows. The selected events are moved to the Selected column.
6. Click Update.
7. Enter the frequency you would like this alert (in days).
8. Click Save&Close.
A message is displayed confirming the alert has been created.
Mass Edits Luxor CRM allows you to perform mass edits of records. For example, if a company changes hands
and the company name changes, you can change the company name on all the affected Contacts.
To perform a mass edit,
1. Select the items you would like to edit.
2. Click Mass Edit on the left-hand navigation bar.

Luxor CRM Getting Started Guide
Page 39
3. From the Field to Edit drop down list, select the field you would like to change on all the
selected records.
4. Enter the new value of the field in the New Value text box.
5. To mass edit another field, select again from the Field to Edit drop-down list.
6. Click Save.
All the selected records have been changed. You can perform mass edits for Leads, Organizations,
Contacts, Opportunities, and Support tickets.
Mass To Dos Mass To Dos work similarly to mass edits. You can set to dos for several records at a time. For
example, you may want create a to-do to call several Contacts on a given date for follow-up.
To create a mass to-do,
1. Select the appropriate items in your view.
2. Click Mass To Do in the left-hand navigation pane.
3. Enter the subject of the To Do.
4. Select the Priority from the drop-down list.
5. Set the due date by clicking on the calendar symbol in the Due Date field.
6. To add a reminder, select the Reminder check box and select the device where you would like
the reminder sent.
7. Click Save&Close.
A message box advises you the To Do has been created.
You have created a mass To Do. This To Do will be displayed in your To Dos for the date you have set
and for the items you have selected.
Note that if you have set a To Do for ten items, you will see ten to dos.

Luxor CRM Getting Started Guide
Page 40
Reports Luxor CRM offers a series of reports based on the information it houses.
To view the available reports, click Reports on the left-hand navigation pane.
The reports page allows you to create any of the shown reports, customized to your needs.
To create a new report,
1. Click on the report you would like to create, for example, Opportunities Report.
2. Enter the name for the report.
3. To select the fields to be displayed, select them in the Available fields column. Click the right-
hand double arrows. The fields are now in the View Fields column.
4. To narrow the amount of data the report will display, you can add search conditions.
In the Filed to Search drop-down list select the field by which you will search your data (in the
example, Opportunity stage).
5. Select the condition from the Condition drop-down list (if applicable).

Luxor CRM Getting Started Guide
Page 41
6. Click the browse button beside the Value to Search box and select the value from the list (if
applicable—some fields require the Condition only).
In the example, only Opportunities at stage 2.Meeting will be shown.
7. To launch the report, click View.
8. To save the report for later use, click Save&View.
Your report is displayed on a new web page. You can sort the data by clicking on the headings. To
export the report to Excel, click Export beside the Excel icon.

Luxor CRM Getting Started Guide
Page 42
Contacting Technical Support To receive technical support, access the Luxor CRM website and click Support.
Fill out the Support Request.
Ensure you enter the requested call back date and time. Click Submit.