lutron connect app guide connect app guide 1.0 overview the lutron connect mobile application is an...
TRANSCRIPT
Rev. 2.0 9/16/2016 P a g e | 1
Lutron Connect App Guide
1.0 Overview
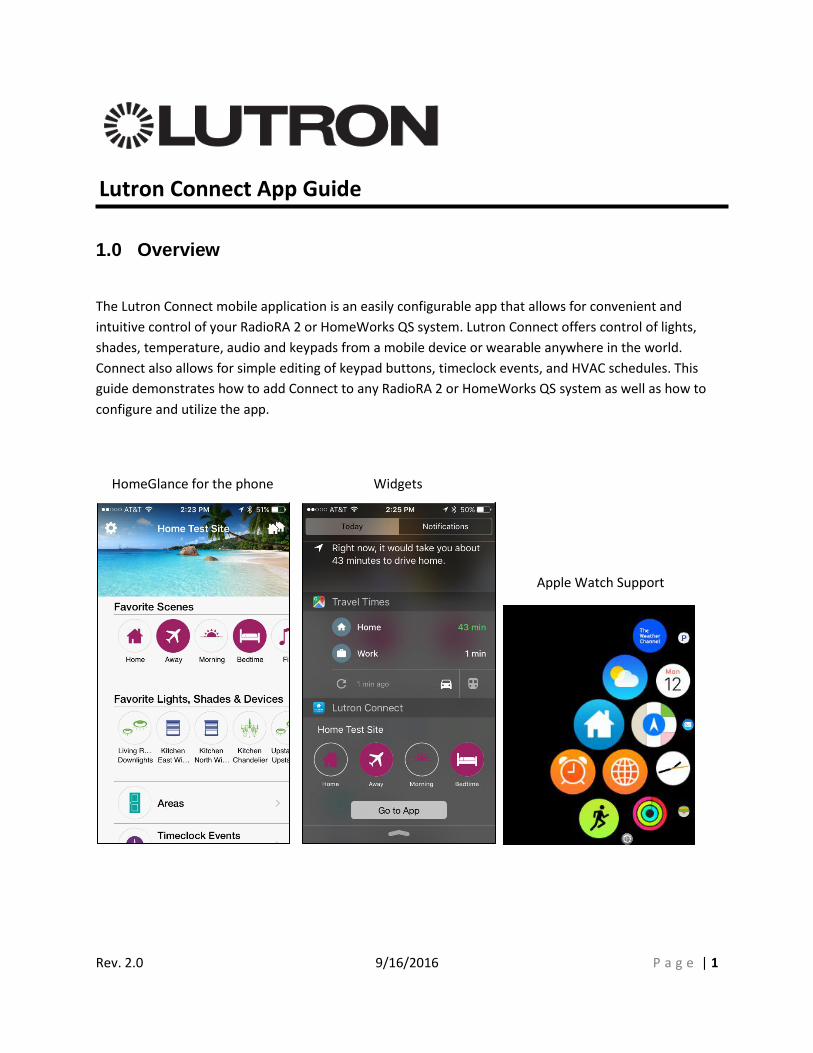
The Lutron Connect mobile application is an easily configurable app that allows for convenient and
intuitive control of your RadioRA 2 or HomeWorks QS system. Lutron Connect offers control of lights,
shades, temperature, audio and keypads from a mobile device or wearable anywhere in the world.
Connect also allows for simple editing of keypad buttons, timeclock events, and HVAC schedules. This
guide demonstrates how to add Connect to any RadioRA 2 or HomeWorks QS system as well as how to
configure and utilize the app.
HomeGlance for the phone Widgets
Apple Watch Support

Rev. 2.0 9/16/2016 P a g e | 2
Table of Contents 1.0 Overview ............................................................................................................................................... 1
2.0 Minimum Hardware and Software Requirements ................................................................................ 4
3.0 Lutron Connect System Diagrams ......................................................................................................... 5
3.1 RadioRA 2 System Diagram ............................................................................................................... 5
3.2 HomeWorks QS System Diagram ...................................................................................................... 5
4.0 Adding the Connect Bridge to the System Design ................................................................................ 6
4.1 RadioRA 2 Programming Software .................................................................................................... 6
4.2 HomeWorks QS Programming Software ........................................................................................... 9
5.0 Downloading the App from the Apple App Store ............................................................................... 11
6.0 Downloading the App from the Google Play Store ............................................................................. 12
7.0 Using the Lutron Connect App ............................................................................................................ 13
7.1 Creating a New Account .................................................................................................................. 13
7.2 Sign into an Existing Account .......................................................................................................... 14
7.3 Guest Access.................................................................................................................................... 15
7.4 Editing an Existing Home ................................................................................................................. 16
7.5 Adding Multiple Homes to an Account ........................................................................................... 17
7.6 Edit an Existing Account .................................................................................................................. 19
7.7 Using the HomeGlance Screen on the Phone ................................................................................. 20
7.7.1 Favorites and Widgets .............................................................................................................. 20
7.7.2 Controlling the System from the Area Tree ............................................................................. 26
7.7.3 Setting the HomeGlance Photo ................................................................................................ 29
7.8 Using the Lutron Connect App on the iPad or Android Tablet ....................................................... 30
7.9 Editing the System from the Connect App ...................................................................................... 35
7.9.1 Editing Keypad Programming ................................................................................................... 35
7.9.2 Adding and Editing Timeclock Events ...................................................................................... 36
7.9.3 Editing HVAC Controller and TouchPRO Schedules ................................................................. 39
7.9.4 Editing Buttons with Advanced Programming ......................................................................... 41
7.9.5 Adding Sonos Rooms to Keypad Buttons ................................................................................. 42
7.10 Arriving/Leaving Home.................................................................................................................. 44
7.11 Adding a Wi-Fi Thermostat to the App ......................................................................................... 47

Rev. 2.0 9/16/2016 P a g e | 3
7.12 System Alerts ................................................................................................................................. 48
7.12.1 Battery Status Alerts .............................................................................................................. 48
8.0 Using the Apple Watch with Lutron Connect ...................................................................................... 51
9.0 Troubleshooting .................................................................................................................................. 54
10.0 Frequently Asked Questions ............................................................................................................. 56

Rev. 2.0 9/16/2016 P a g e | 4
2.0 Minimum Hardware and Software Requirements
Hardware
1. HomeWorks QS or RadioRA 2 system 2. Lutron Connect Bridge (one per system) 3. iOS or Android mobile device 4. Router or switch ports (to connect the Bridge and Lutron system processors to the same LAN)
Software
1. HomeWorks QS or RadioRA 2 programming software version 10.0 and newer 2. Lutron Connect Mobile app running on mobile device 3. iOS version 8.0 or newer; Android Jellybean OS version 4.1 or newer

Rev. 2.0 9/16/2016 P a g e | 5
3.0 Lutron Connect System Diagrams
A typical connection within the home includes the mobile device establishing a Wi-Fi connection to a Wi-
Fi router and the RadioRA 2 Main Repeater(s) or the HomeWorks QS processor(s) making a wired
Ethernet connection to the same router. No Lutron devices should be plugged into the Internet port on
your router.
3.1 RadioRA 2 System Diagram
3.2 HomeWorks QS System Diagram
Rev. 2.0 9/16/2016 P a g e | 6
4.0 Adding the Connect Bridge to the System Design
Prior to using the Lutron Connect app, a Connect Bridge must be added to the system’s programming
database. Only one Connect Bridge is required per residence and it can be added to any new system as
well as retrofitted onto any existing system (software must be upgraded to 10.0). The following sections
demonstrate how to add a Connect Bridge to the RadioRA 2 and HomeWorks QS programming software.
4.1 RadioRA 2 Programming Software
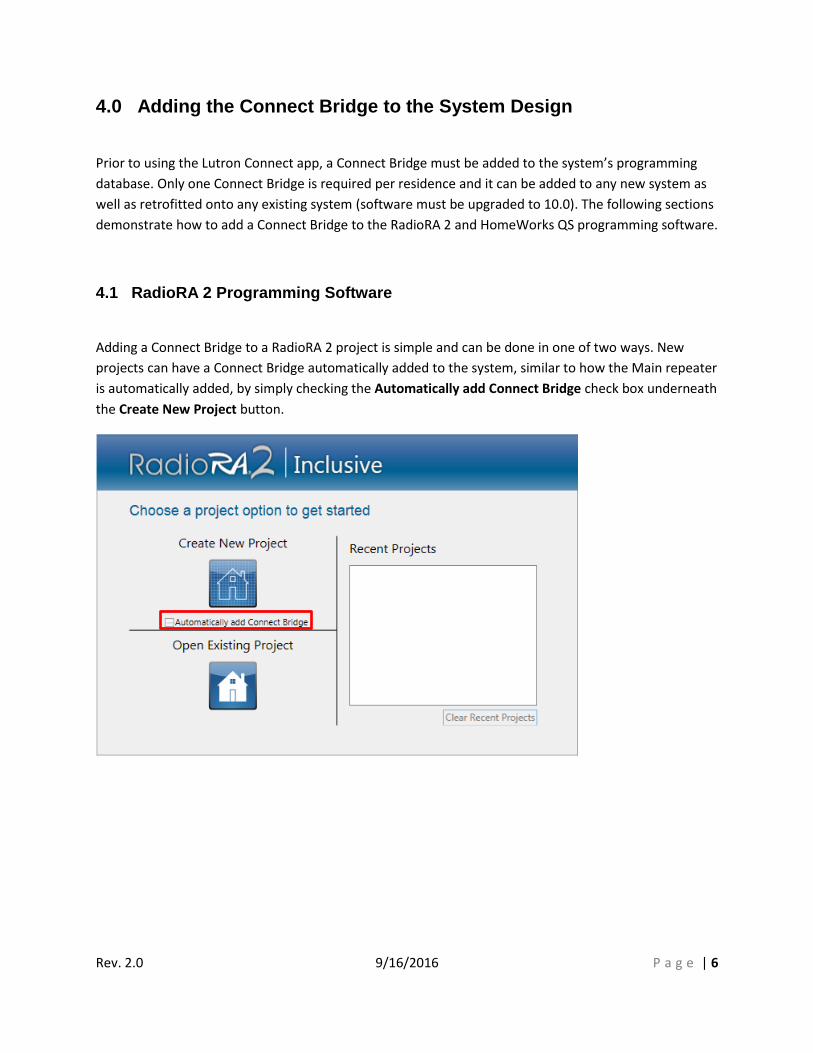
Adding a Connect Bridge to a RadioRA 2 project is simple and can be done in one of two ways. New
projects can have a Connect Bridge automatically added to the system, similar to how the Main repeater
is automatically added, by simply checking the Automatically add Connect Bridge check box underneath
the Create New Project button.
Rev. 2.0 9/16/2016 P a g e | 7
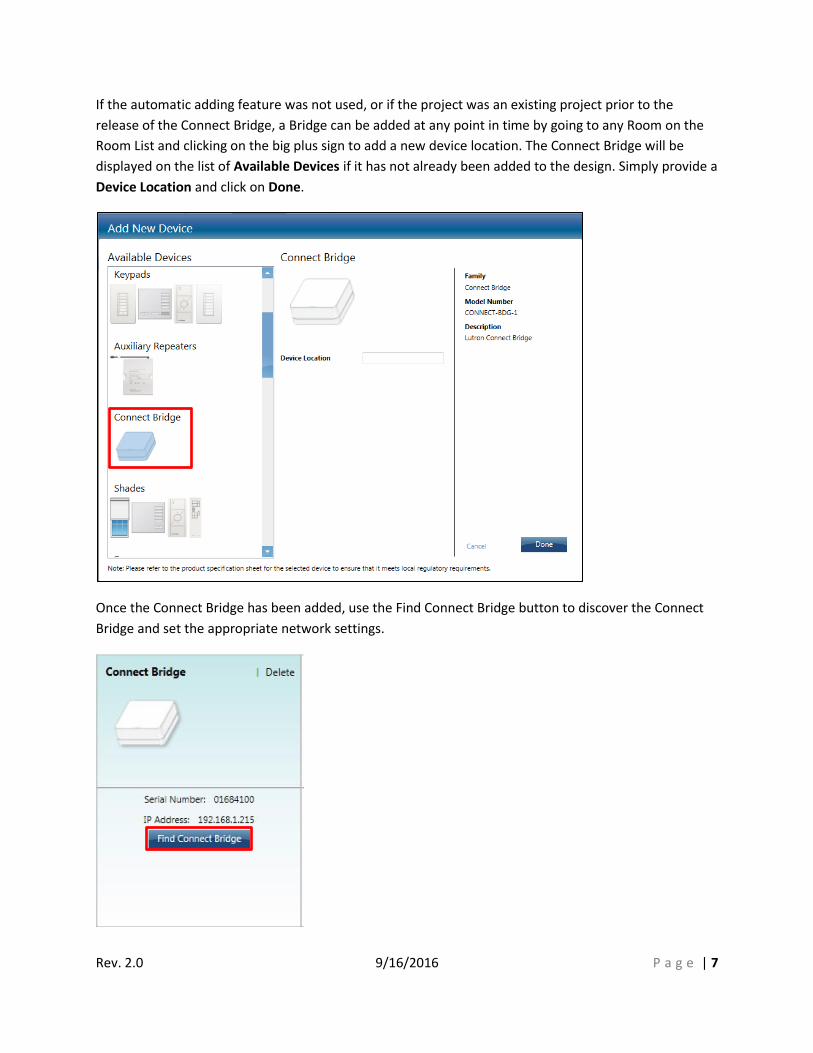
If the automatic adding feature was not used, or if the project was an existing project prior to the
release of the Connect Bridge, a Bridge can be added at any point in time by going to any Room on the
Room List and clicking on the big plus sign to add a new device location. The Connect Bridge will be
displayed on the list of Available Devices if it has not already been added to the design. Simply provide a
Device Location and click on Done.
Once the Connect Bridge has been added, use the Find Connect Bridge button to discover the Connect
Bridge and set the appropriate network settings.

Rev. 2.0 9/16/2016 P a g e | 8
Initially, no Connect Bridge will be discovered. The button on the Connect Bridge must be pressed in
order to place the device into discovery mode. Click on Find Connect Bridge to re-discover the device.
After the Connect Bridge is discovered, adjust the network settings as required and save the settings to
the Connect Bridge. The final step, once the remaining parts of the database are configured, is to
transfer the database prior to connecting the app to the system.
For more information on networking or activating the Connect Bridge, refer to the Residential Systems
Networking Guide in the Application Notes section of www.lutron.com. A myLutron login is required to
view the document. Choose RadioRA 2 as the product and use subcategory Networking.
Rev. 2.0 9/16/2016 P a g e | 9
4.2 HomeWorks QS Programming Software
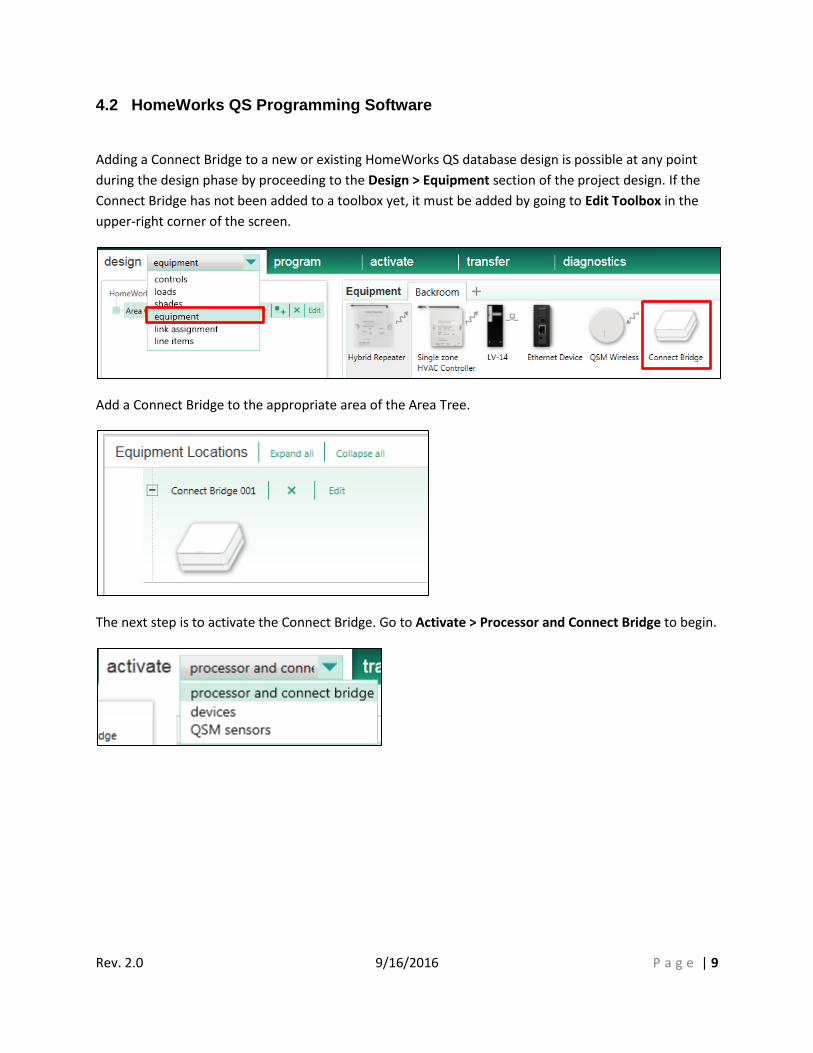
Adding a Connect Bridge to a new or existing HomeWorks QS database design is possible at any point
during the design phase by proceeding to the Design > Equipment section of the project design. If the
Connect Bridge has not been added to a toolbox yet, it must be added by going to Edit Toolbox in the
upper-right corner of the screen.
Add a Connect Bridge to the appropriate area of the Area Tree.
The next step is to activate the Connect Bridge. Go to Activate > Processor and Connect Bridge to begin.

Rev. 2.0 9/16/2016 P a g e | 10
Initially, no Connect Bridge will be discovered. The button on the Connect Bridge must be pressed in
order to place the device into discovery mode. Click on Start Activation to re-discover the device.
The Connect Bridge will be discovered and its current IP address and MAC address displayed on the left-
side of the screen.
Adjust the network settings as required and save the settings to the Connect Bridge.
The final step, once the remaining parts of the database are configured, is to transfer the database prior
to connecting the app to the system.
For more information on networking or activating the Connect Bridge, refer to the Residential Systems
Networking Guide in the Application Notes section of www.lutron.com. A myLutron login is required to
view the document. Choose HomeWorks QS as the product and use subcategory Networking.

Rev. 2.0 9/16/2016 P a g e | 11
5.0 Downloading the App from the Apple App Store
To download the Lutron Connect app onto an Apple device, open the Apple App Store application.
Once inside, use the search feature to search for “lutron connect.” Tap on the Lutron Connect app in the
search results.
Tap on Get to begin downloading the app.

Rev. 2.0 9/16/2016 P a g e | 12
6.0 Downloading the App from the Google Play Store
To download the Lutron Connect app onto an Android device, open the Google Play Store app.
Once inside, use the search feature to search for “lutron connect.” Tap on the Lutron Connect app in the
search results.
Tap on the Install button and then choose to Accept the access request. The Lutron Connect app will
then begin to download onto the device.

Rev. 2.0 9/16/2016 P a g e | 13
7.0 Using the Lutron Connect App
7.1 Creating a New Account
Make sure that the mobile device is connected to the local network that the Connect Bridge
resides on.
The Connect Bridge must be able to connect to the Internet for the initial setup of the account.
Each account requires an email address and a password (must be 8 characters in length and at
least Medium strength).
To start, tap on Sign In. Then select Not registered? Create an account.
Once the account is created, the app will reach out to the network to discover the Connect Bridge and
Lutron system. Once the system is found and selected, the app will download the system configuration
and will be ready for use.

Rev. 2.0 9/16/2016 P a g e | 14
7.2 Sign into an Existing Account
If the user has been logged out of the app, or when setting up the app on multiple devices, it may be
necessary to login to an existing system using an existing account. Tap on Sign in. Enter the email
address and password of the existing account and tap the Sign In button.
Once the account information has been entered and validated, the app will download the system
configuration and be ready for use.

Rev. 2.0 9/16/2016 P a g e | 15
7.3 Guest Access
Guest Access provides local only access to the system, without the need for an account or Internet
access. Guest Access users will not have the ability to use the Arriving/Leaving Home functionality or
remote system access.
To use Guest Access, open the Lutron Connect app and tap on the Guest Access button.

Rev. 2.0 9/16/2016 P a g e | 16
7.4 Editing an Existing Home
To edit the currently selected Home, go to the Settings menu by tapping on the gear symbol in the
upper-left corner of the HomeGlance screen and tap on Edit Home.
Change the name of the Home
Change the HomeGlance photo
Choose where to show the photo;
blue sliders indicate photo shown
Shows the Home name and system type (RA2 or HWQS)
Re-download system configuration or
generate a support file

Rev. 2.0 9/16/2016 P a g e | 17
7.5 Adding Multiple Homes to an Account
If the end user has multiple residences with Lutron Connect, these residences can all be added to the
same remote access account. An account can have a mix of RadioRA 2 and HomeWorks QS systems
(example being a main house that has HomeWorks QS and a beach house which is RadioRA 2). The end
user can use the Connect app to effortlessly switch between systems for control, monitoring, and
editing.
IMPORTANT! Adding another Connect Bridge to an account requires the configuration to be done on-
site, at the additional residence.
To add another home to an account, proceed to the settings menu by tapping on the gear icon. From
the settings menu, tap on Add Home.

Rev. 2.0 9/16/2016 P a g e | 18
After the Connect Bridge has been discovered, press the button on the Bridge to associate it to the
Connect app.
After the app has downloaded the configuration of the additional system, the app will open to the
HomeGlance scene of the newly added system. Use the multiple home icon in the upper-right corner of
the screen to switch between systems.
Rev. 2.0 9/16/2016 P a g e | 19
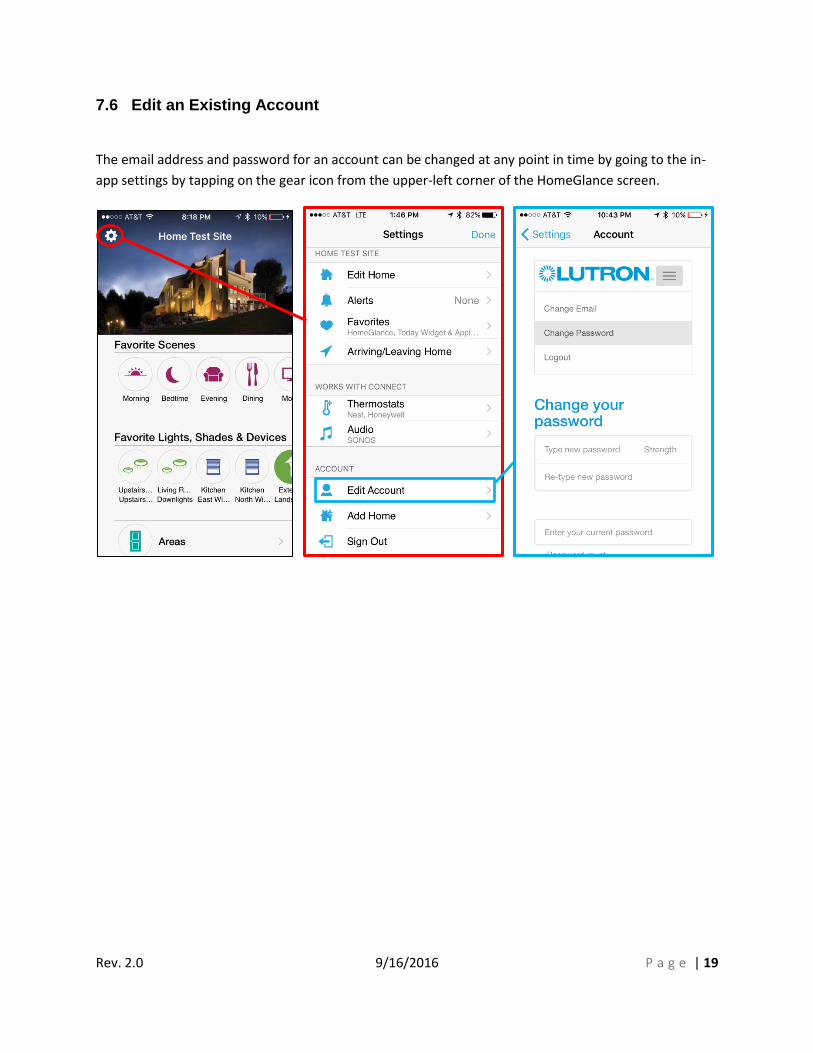
7.6 Edit an Existing Account
The email address and password for an account can be changed at any point in time by going to the in-
app settings by tapping on the gear icon from the upper-left corner of the HomeGlance screen.
Rev. 2.0 9/16/2016 P a g e | 20
7.7 Using the HomeGlance Screen on the Phone
7.7.1 Favorites and Widgets
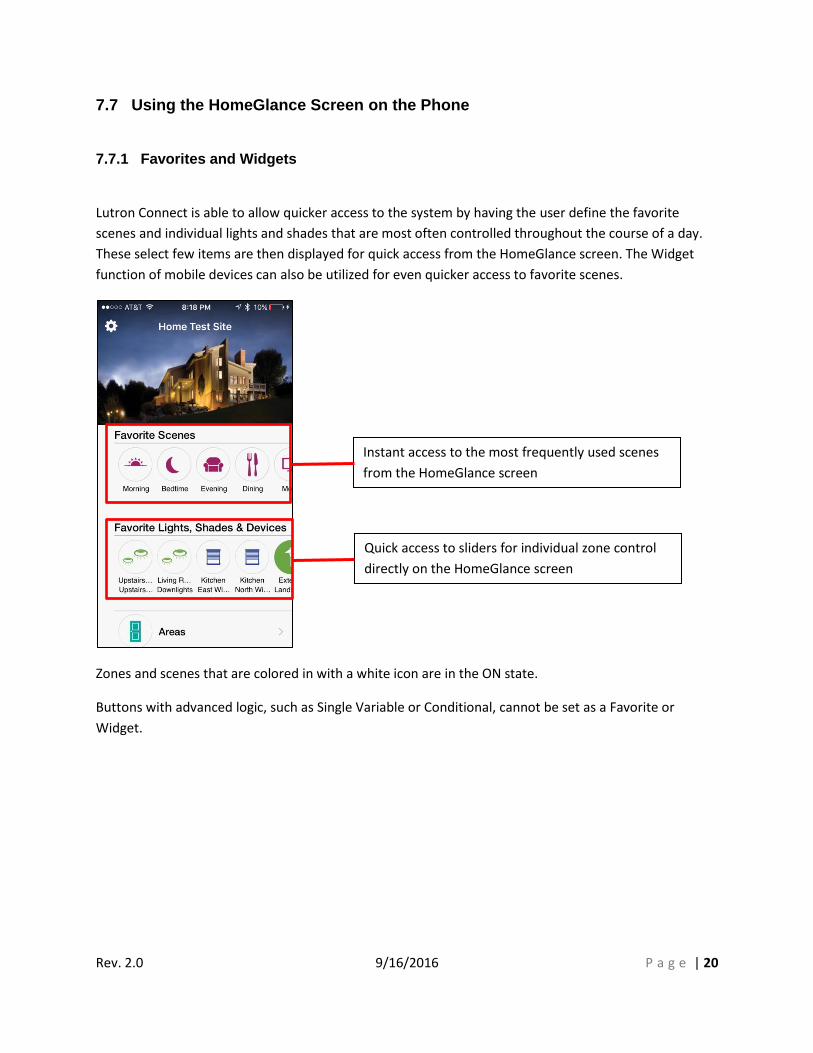
Lutron Connect is able to allow quicker access to the system by having the user define the favorite
scenes and individual lights and shades that are most often controlled throughout the course of a day.
These select few items are then displayed for quick access from the HomeGlance screen. The Widget
function of mobile devices can also be utilized for even quicker access to favorite scenes.
Zones and scenes that are colored in with a white icon are in the ON state.
Buttons with advanced logic, such as Single Variable or Conditional, cannot be set as a Favorite or
Widget.
Instant access to the most frequently used scenes
from the HomeGlance screen
Quick access to sliders for individual zone control
directly on the HomeGlance screen

Rev. 2.0 9/16/2016 P a g e | 21
Configuration of the Favorites and Widgets can be done through the in app Settings which are accessed
by tapping on the gear icon in the upper-left corner of the HomeGlance screen. From there, select the
option for Favorites.
The Favorites configuration has three sections. The first section is where the selection of favorite scenes
is completed.

Rev. 2.0 9/16/2016 P a g e | 22
Tapping on Scenes (Keypad Buttons) leads to the Area Tree, listing all areas in the system which have a
keypad device. As you pass from each level, a tally of the current favorite scenes is displayed, first at a
total level and then down to the area level. Upon entering an area, such as Kitchen in the images above,
all possible scenes are listed. Scenes that are checked are currently selected as favorites and those that
are unchecked are currently not chosen as favorites.
The below image shows all of the items to configure when adding a new favorite scene or editing a
current favorite. It is recommended to identify no more than 10 scenes as favorites and widgets.
Widgets have a hard limit of 10. Limiting all favorites and Apple Watch scenes to 10 ensures that the
user interface does not get too cluttered and maintains the purpose of the favorites/Apple Watch which
is to deliver quicker and user friendly access to the core functions of the system.
Once the favorite scenes have been identified and configured, back out to the Favorites main screen to
begin the selection of favorite Devices (individual zones, shades, relays, etc.).
Currently selected Scene icon
Available icons to choose from for each scene
Use the check boxes to identify if the Scene will
appear on the HomeGlance screen, Apple Watch,
or as a Widget
Go back to the previous screen

Rev. 2.0 9/16/2016 P a g e | 23
Tapping on Devices leads to an area tree where all areas containing lighting, shading, fan, relay, or
contact closure zones appears. A tally of the current favorite devices is displayed at the total level and
at the area level. Devices that are checked are currently selected as favorites.
The below image shows all of the configurable items when adding or editing a favorite device. It is
recommended to identify no more than 10 devices as favorites to ensure quick and intuitive access.
Currently selected Scene icon
Go back to the previous screen
Available icons to choose from for each scene
Use the check boxes to identify if the Scene will
appear on the HomeGlance screen or Apple Watch
Rev. 2.0 9/16/2016 P a g e | 24
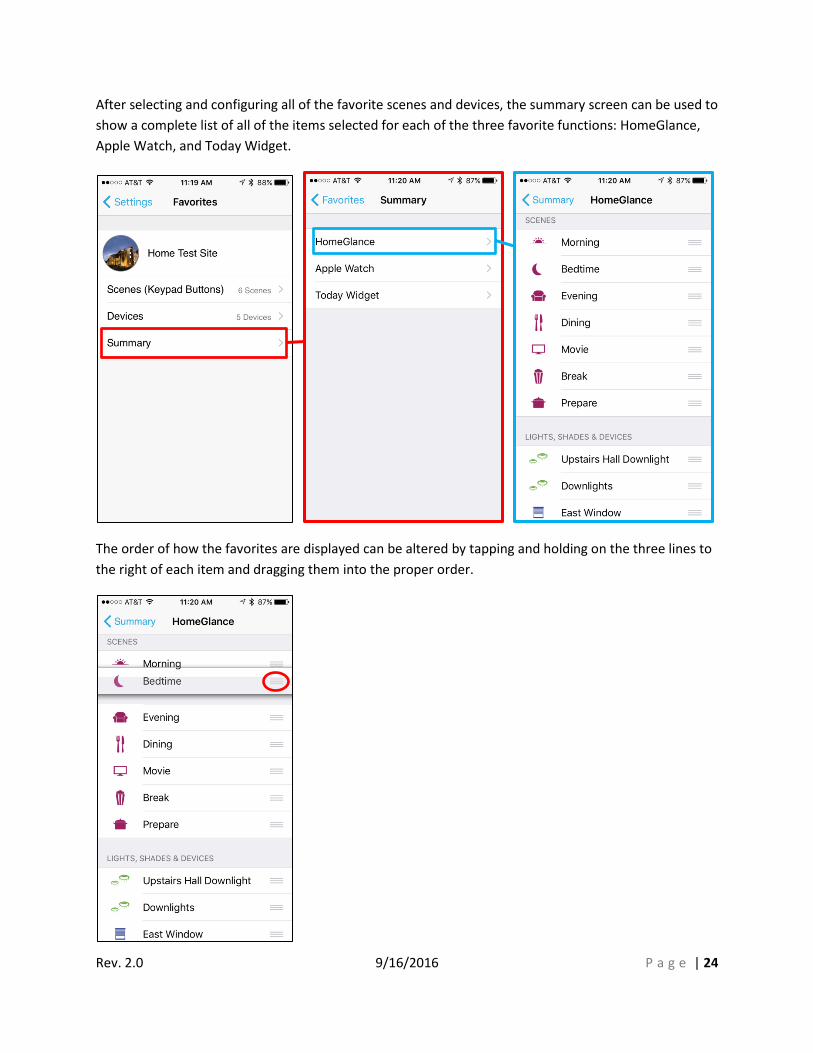
After selecting and configuring all of the favorite scenes and devices, the summary screen can be used to
show a complete list of all of the items selected for each of the three favorite functions: HomeGlance,
Apple Watch, and Today Widget.
The order of how the favorites are displayed can be altered by tapping and holding on the three lines to
the right of each item and dragging them into the proper order.

Rev. 2.0 9/16/2016 P a g e | 25
Scenes configured as a Widget will show in the device’s Widget area or app. On an iPhone, simply swipe
down from the top of the screen while the phone is locked or unclocked to access the Today Widget
allowing for instant access to up to 10 scenes without going to the app or logging in to the phone.
To enable the Lutron Connect in the iPhone’s Today Widgets, pull down the Widgets menu from the top
of the screen and scroll to the bottom. Tap on Edit and tap on the green plus sign for the Connect app.

Rev. 2.0 9/16/2016 P a g e | 26
On an Android device, find a blank area where the Widget for Lutron Connect is to be placed and then
tap and hold. The Widgets app will appear at the bottom of the screen. Tap on the Widgets app and
then drag-and-drop the Lutron Connect Widgets to add them to the blank space on the screen.
7.7.2 Controlling the System from the Area Tree
The Favorites and Widgets allow for instant access to the RadioRA 2 or Homeworks QS system, bringing
the most commonly used actions to the forefront. In addition, the Lutron Connect app allows for
complete control of every system component.
Access to the entire system is based upon the Area Tree structure defined from within the RadioRA 2 or
HomeWorks QS programming software. It is imperative that the names defined in the Area Tree are
names that the end user of the system understands. The Area Tree can be opened by tapping on Areas
at the bottom of the HomeGlance Screen.

Rev. 2.0 9/16/2016 P a g e | 27
The next screen will list all areas in the tree. Selection of an area will take the user to a landing page
where the user can select which component they would like to control within the selected area.
The area’s landing page will allow for control of individual lights, shades, and misc. (ex. relay or contact
closure output) zones. Individual zone control allows for On/Off buttons and, for dimmers and shades, a
slider and raise/lower buttons.
Each keypad in the area will show with buttons names that match the engraving used in the
programming software, intuitively matching the app to the physical keypad. LED status is reflected by a
white button (off) or a colored button with white text (on).
Rev. 2.0 9/16/2016 P a g e | 28
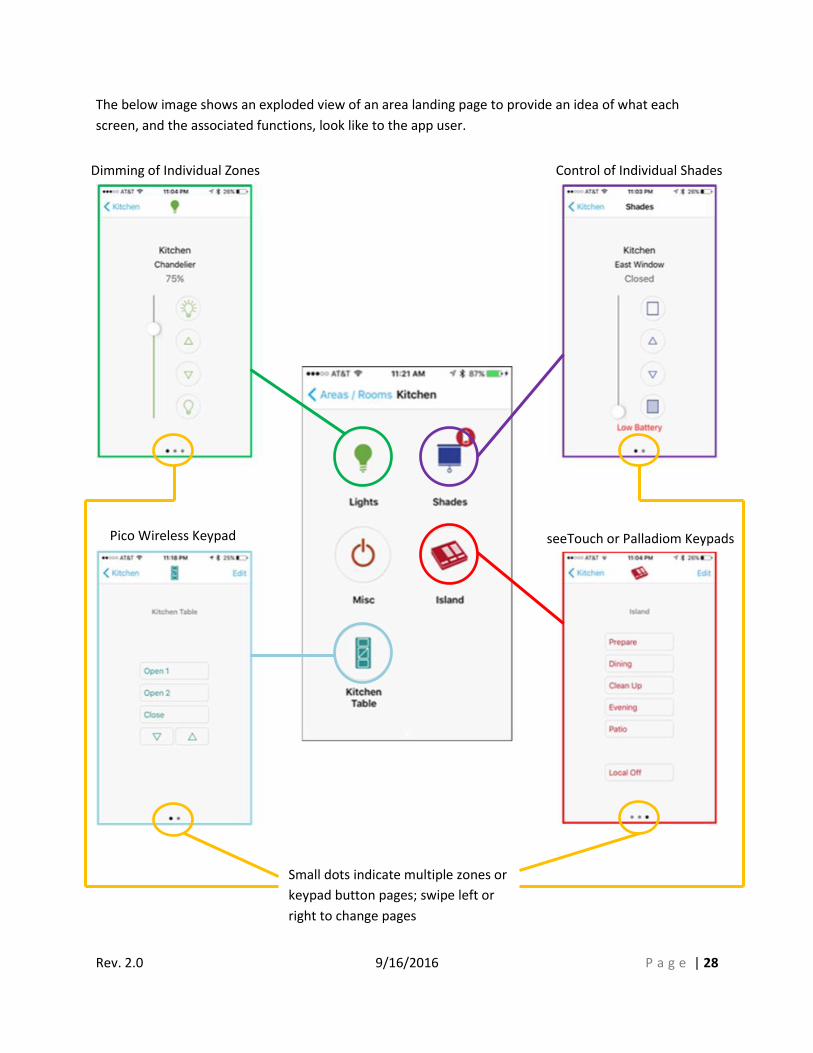
The below image shows an exploded view of an area landing page to provide an idea of what each
screen, and the associated functions, look like to the app user.
Dimming of Individual Zones
Pico Wireless Keypad
Control of Individual Shades
seeTouch or Palladiom Keypads
Small dots indicate multiple zones or
keypad button pages; swipe left or
right to change pages

Rev. 2.0 9/16/2016 P a g e | 29
7.7.3 Setting the HomeGlance Photo
The Lutron Connect app allows the end user to provide a custom and personalized feel to the app by
allowing alteration of the photo that shows on the HomeGlance screen.
From the HomeGlance screen, tap and hold the default image at the top of the screen. After a few
seconds, options will appear at the bottom of the screen which will allow the user to change the image.
Allows the user to take a photo using the mobile
device camera and set it as the HomeGlance photo
Allows the user to set the HomeGlance photo from
and existing photo on their mobile device
Allows the user to choose from one of the included
default photos for their HomeGlance photo
Hides the photo from the HomeGlance screen

Rev. 2.0 9/16/2016 P a g e | 30
7.8 Using the Lutron Connect App on the iPad or Android Tablet
The Lutron Connect app is presented slightly differently on an iPad as a result of having a larger screen.
The HomeGlance screen will still show Favorites and Timeclock events but presents the information in a
way that maximizes the much larger screen.
Use the pencil symbol to
edit the HomeGlance
screen favorites
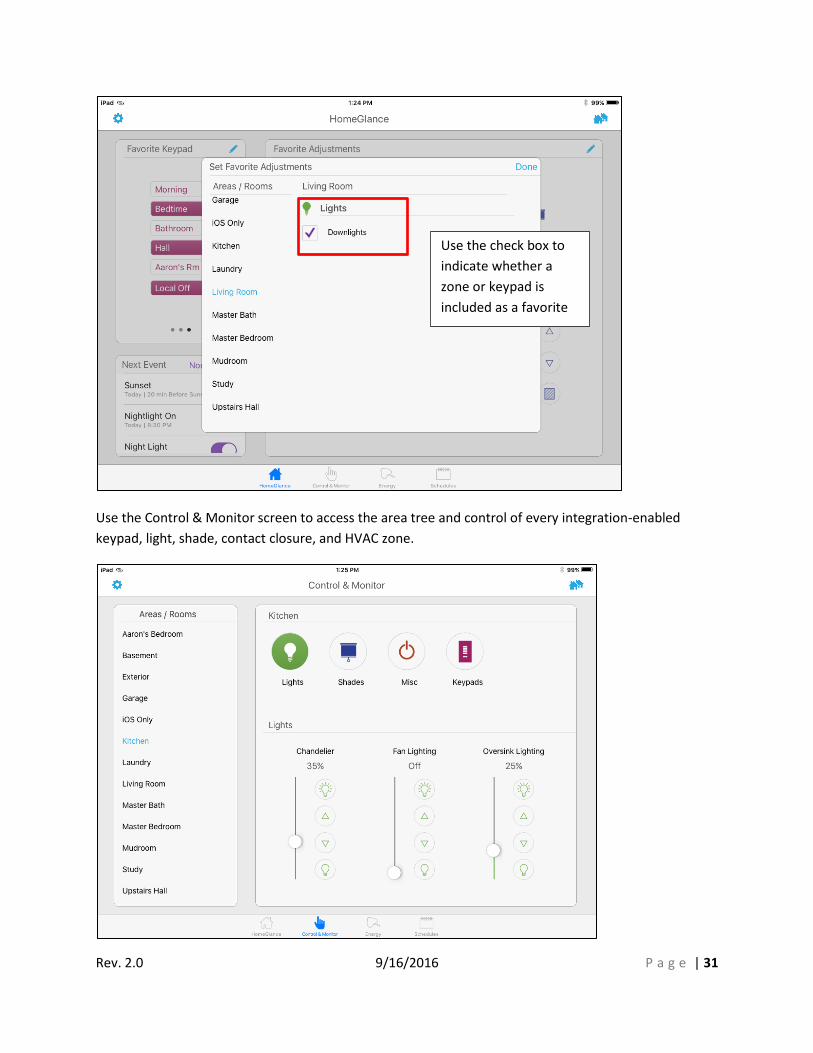
Rev. 2.0 9/16/2016 P a g e | 31
Use the Control & Monitor screen to access the area tree and control of every integration-enabled
keypad, light, shade, contact closure, and HVAC zone.
Use the check box to
indicate whether a
zone or keypad is
included as a favorite

Rev. 2.0 9/16/2016 P a g e | 32
The Energy screen allows for direct control of all Green Modes in the system
View, edit, and add timeclock events and HVAC schedules from the Schedules screen.
Rev. 2.0 9/16/2016 P a g e | 33
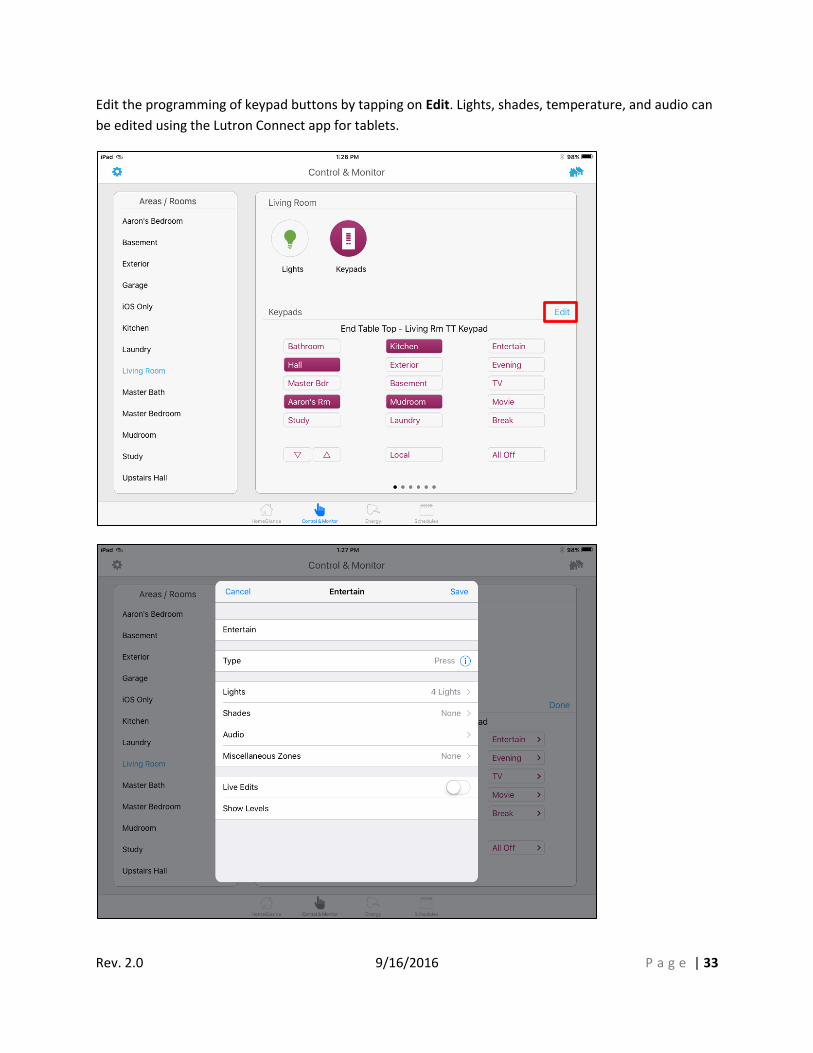
Edit the programming of keypad buttons by tapping on Edit. Lights, shades, temperature, and audio can
be edited using the Lutron Connect app for tablets.

Rev. 2.0 9/16/2016 P a g e | 34
Edit the system, add a new home to an account, sign in to 3rd party thermostat accounts, and generate
support files from the Settings menu by tapping the gear icon in the upper-left corner of any app screen.

Rev. 2.0 9/16/2016 P a g e | 35
7.9 Editing the System from the Connect App
Lutron Connect offers the end user adding and editing capabilities for standard keypad programming,
timeclock events, and HVAC schedules. All homeowner edits can be synchronized with the RadioRA 2 or
Homeworks QS programming software the next time that the software is connected into the system.
7.9.1 Editing Keypad Programming
The Lutron Connect app allows for editing of the “Press On” function of keypad buttons with standard
programming. Lights, shades, switched loads, contact closures, and fans can be added, removed, or
edited on these keypad buttons.
Use the Area Tree to navigate to the keypad that is to be edited and select the keypad by tapping the
icon for it. In the upper-right corner of the screen will be an option to Edit the programming of the
keypad. Tap on the word Edit. Once in editing mode, arrows will appear on each button.

Rev. 2.0 9/16/2016 P a g e | 36
7.9.2 Adding and Editing Timeclock Events
Timeclock events can be edited and added using the Lutron Connect app. To begin, scroll to the bottom
of the HomeGlance screen and tap on Timeclock Events. The list of all system timeclock events will
open, along with the option to Add Daily Event.
Engraving text on button (only
editable on Homeowner Keypads)
Go here to add lights or edit lighting levels,
fades, and delays
Go here to add shades or edit shade levels and
delays
Go here to add or edit relay or CCO load
settings and delays
Use Live Edits while on site to dial in the perfect
level; see the new level in real-time before
saving
Go here to add Sonos Rooms to single action
buttons; see Section 7.8.5 for more information
Rev. 2.0 9/16/2016 P a g e | 37
Choosing to Add Daily event will open up an event configuration window.
Event Name
Select days for the event to run
Fixed or Astronomic Start Time
RA2 only: Timeclock Modes
that the event will run in
Add/remove zones
controlled by the event
Use Live Edits while on site to dial
in the perfect level; see the new
level in real-time before saving
Rev. 2.0 9/16/2016 P a g e | 38
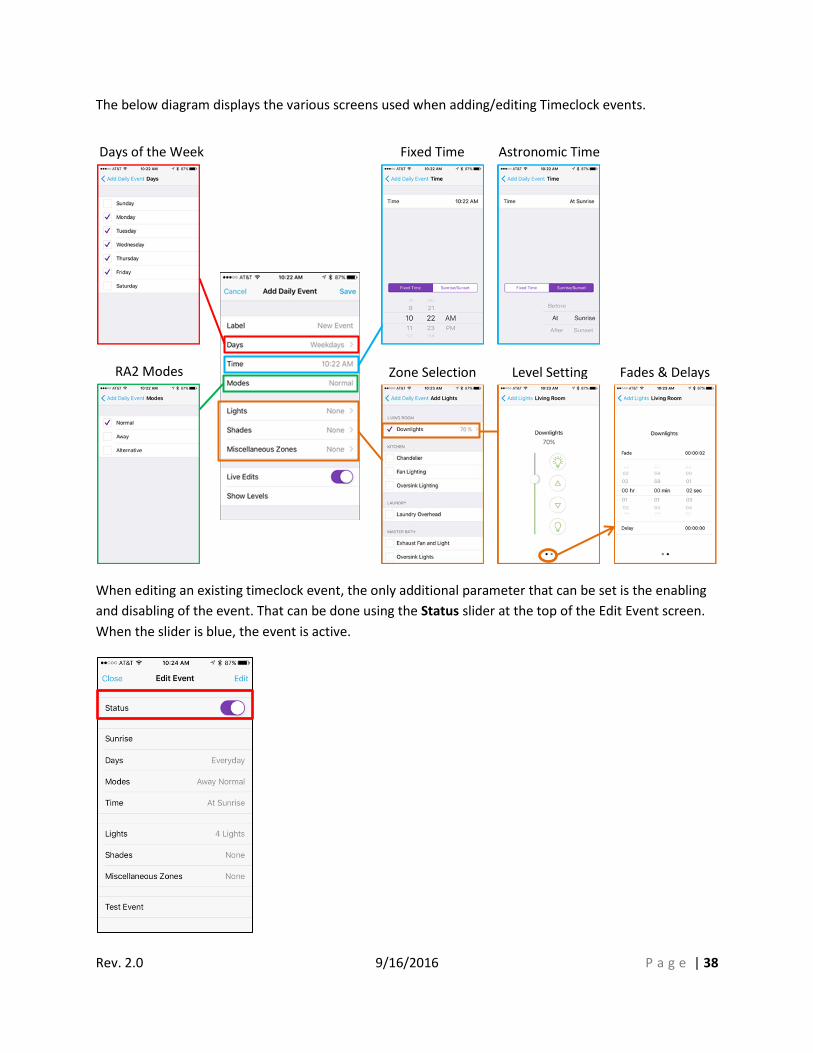
The below diagram displays the various screens used when adding/editing Timeclock events.
When editing an existing timeclock event, the only additional parameter that can be set is the enabling
and disabling of the event. That can be done using the Status slider at the top of the Edit Event screen.
When the slider is blue, the event is active.
Days of the Week Fixed Time Astronomic Time
Zone Selection Level Setting Fades & Delays RA2 Modes
Rev. 2.0 9/16/2016 P a g e | 39
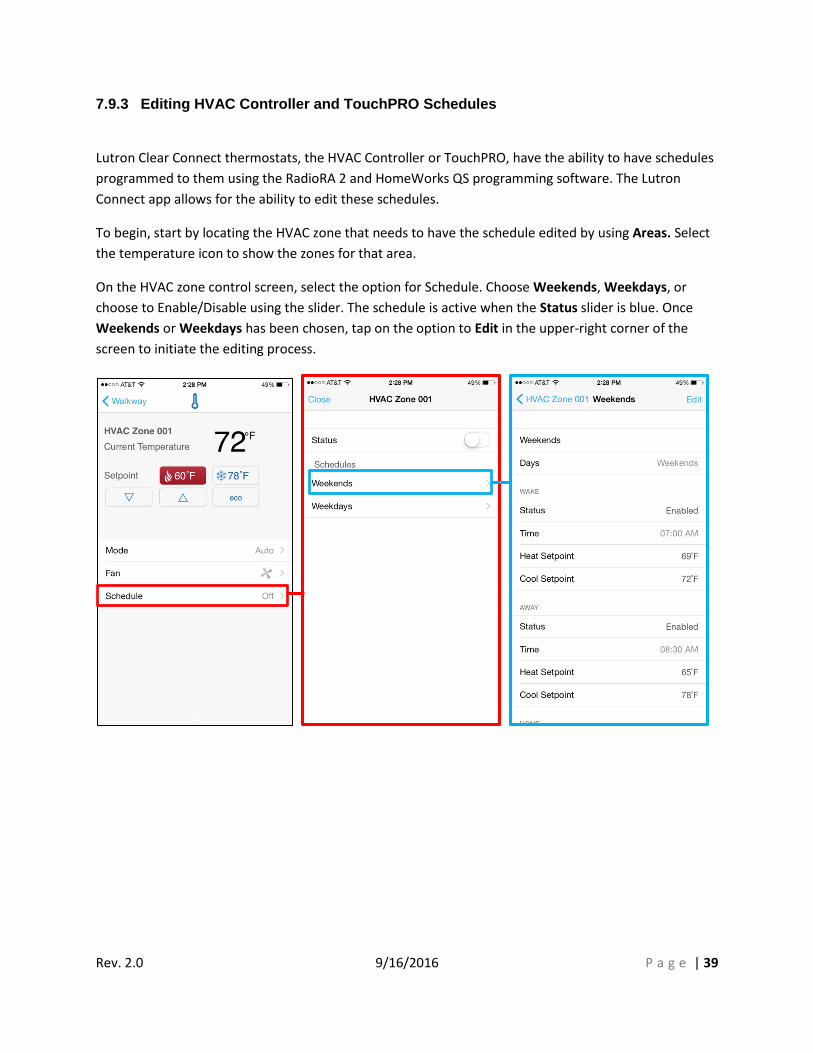
7.9.3 Editing HVAC Controller and TouchPRO Schedules
Lutron Clear Connect thermostats, the HVAC Controller or TouchPRO, have the ability to have schedules
programmed to them using the RadioRA 2 and HomeWorks QS programming software. The Lutron
Connect app allows for the ability to edit these schedules.
To begin, start by locating the HVAC zone that needs to have the schedule edited by using Areas. Select
the temperature icon to show the zones for that area.
On the HVAC zone control screen, select the option for Schedule. Choose Weekends, Weekdays, or
choose to Enable/Disable using the slider. The schedule is active when the Status slider is blue. Once
Weekends or Weekdays has been chosen, tap on the option to Edit in the upper-right corner of the
screen to initiate the editing process.
Rev. 2.0 9/16/2016 P a g e | 40
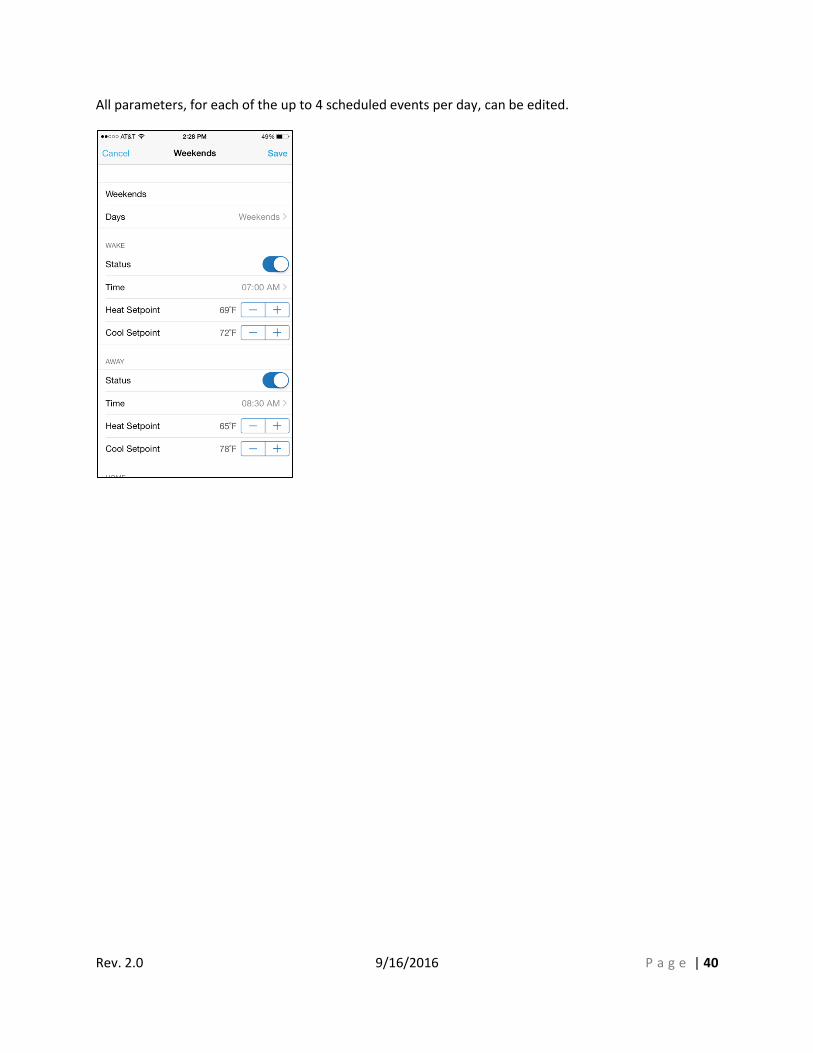
All parameters, for each of the up to 4 scheduled events per day, can be edited.

Rev. 2.0 9/16/2016 P a g e | 41
7.9.4 Editing Buttons with Advanced Programming
Below is a table that highlights how buttons with advanced programming are affected by editing.
Scenario Can Add/ Remove Zones
Can Edit Zone Levels Editor Programming View
Keypad is Homeowner Keypad
Yes Yes Can view and edit programming
Button/Event has a Shared Scene
No Yes Can view/change zone programming
Button/Event has an Area Scene
No Yes Can view/change zone programming
Zone Type is DMX Single Channel
No Yes
Zone is only enabled in zone list if it is affected. Can view whether the zone is affected/unaffected by the button/event
Zone Type is CCO Maintained
No No
Zone is disabled in zone list. Can view whether the zone is affected/unaffected by the button/event
Zone is Locked No No Can view whether the zone is affected/unaffected by the button/event
Keypad is Locked No No Cannot view button programming
Button/Event has conditional programming
No No Cannot view button/event programming
Button has cycle dim enabled
No Yes Can view/change zone programming

Rev. 2.0 9/16/2016 P a g e | 42
7.9.5 Adding Sonos Rooms to Keypad Buttons
This section will demonstrate the ability to add Sonos Rooms utilizing the Lutron Connect app. For a
comprehensive guide on using Sonos with RadioRA 2 or HomeWorks QS systems, refer to the Integrating
Sonos with RadioRA 2 and HomeWorks QS application note on myLutron. Sonos Room control requires
10.4 or newer RadioRA 2 or HomeWorks QS software and the Lutron Connect App version 2.0 or newer.
IMPORTANT! The Sonos Rooms and Sonos Favorites must be configured prior to using the Lutron
Connect app to integrate the two systems. Sonos configuration is completed using the Sonos app.
From the HomeGlance screen of the Connect App on the Phone, proceed to Areas and navigate to the
keypad that is to have Sonos Room control added to it. Once the keypad has been selected, tap Edit and
tap on the chevron to edit the desired button. Tap on Audio to begin adding Sonos Room control to the
button.

Rev. 2.0 9/16/2016 P a g e | 43
Play or pause rooms, Toggle play/pause, Skip next, or Cycle Sonos Favorite capability can be added to
Single Action buttons. To add Sonos to a scene, tap on Play or pause rooms. Play or pause rooms
requires a Favorite to be selected as well as Rooms to be played and paused. For each one being played
as part of the preset, the volume must be set.
For raise and lower buttons on keypads, an Enable Raise/Lower Volume option will appear the raise and
lower buttons have been set to Single Scene Raise/Lower (HWQS) or Raise/Lower Programmed Devices
(RA2) and no other loads have been assigned to them. After enabling the feature, select the Room to be
affected.

Rev. 2.0 9/16/2016 P a g e | 44
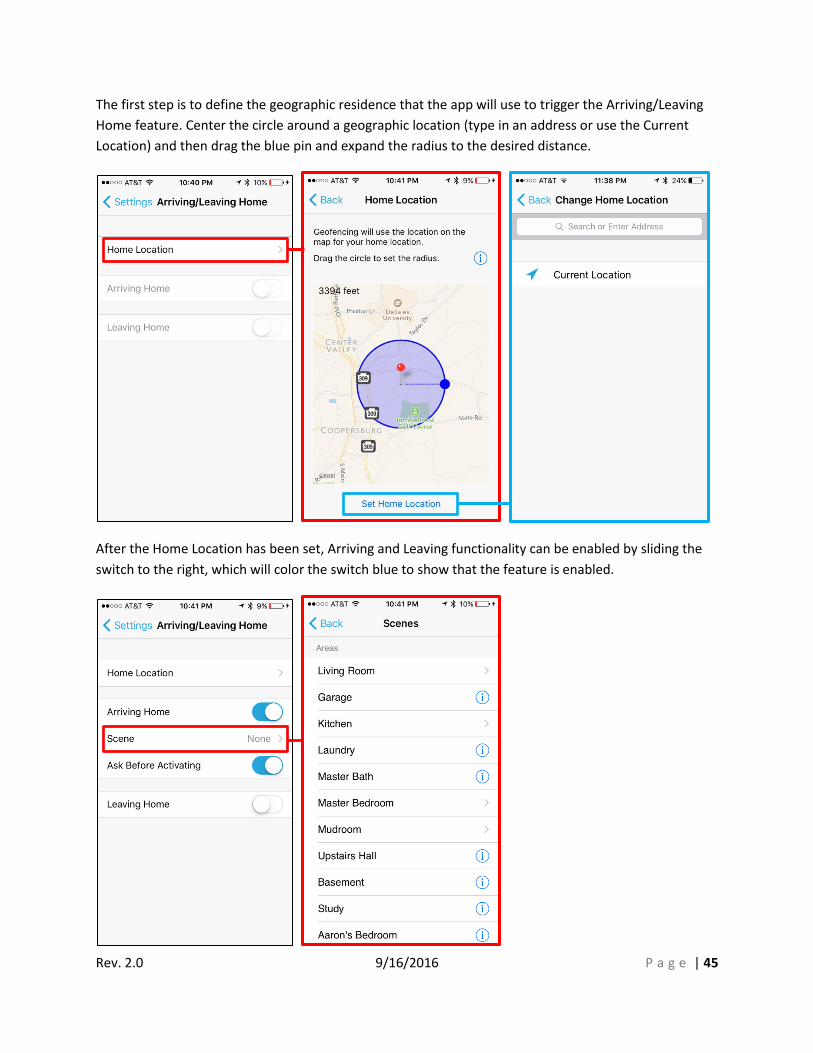
7.10 Arriving/Leaving Home
Arriving/Leaving Home is a function of the mobile device which allows an action to occur in a system
based upon the user entering or exiting a user-defined geographic circle with a minimum radius of
1,000ft and a maximum radius of 10,000ft.
With Lutron Connect, each user can define their own circle (typically centered on their residence) since
the feature is at the mobile device level and not at the system level. Enabling the Arriving/Leaving Home
feature allows each user to automatically trigger an action upon entering or exiting the circle. The user
can also choose to receive a notification prior to triggering the scene.
Begin configuration by tapping the Settings icon in the upper left corner of the HomeGlance screen and
then selecting the option for Arriving/Leaving Home.
Arriving/Leaving Home scenes must be single action presses. Advanced programming (single variable
and conditional) single action buttons cannot be used.
Rev. 2.0 9/16/2016 P a g e | 45
The first step is to define the geographic residence that the app will use to trigger the Arriving/Leaving
Home feature. Center the circle around a geographic location (type in an address or use the Current
Location) and then drag the blue pin and expand the radius to the desired distance.
After the Home Location has been set, Arriving and Leaving functionality can be enabled by sliding the
switch to the right, which will color the switch blue to show that the feature is enabled.

Rev. 2.0 9/16/2016 P a g e | 46
Tap the circle, to the left of the scene name, to check the circle and enable it for the feature.
By default, Ask Before Activating will be enabled for both Arriving and Leaving Home. It is a best
practice to leave enabled as automatic control of entry and exit functionality may interfere with other
users.

Rev. 2.0 9/16/2016 P a g e | 47
7.11 Adding a Wi-Fi Thermostat to the App
The Lutron Connect mobile app can be utilized to control Wi-Fi thermostats. Integration between these
3rd party thermostats and Lutron Connect is accomplished through the Bridge connection to Lutron
servers which communicate back and forth with the remote servers of the 3rd party thermostats.
Currently supported thermostats are:
NEST Learning Thermostat
Honeywell Wi-Fi Thermostats (except for Lyric)
For more information on thermostats and Lutron systems, refer to the Choosing the Right Lutron
Thermostat application note on www.lutron.com.
The first step in configuring this integration is to setup the account for the 3rd party thermostat with its
manufacturer’s remote server. This can usually be done through a 3rd party mobile app or on the
Internet. Once complete, click on the Settings icon in the upper left corner of the Lutron Connect app
HomeGlance screen.

Rev. 2.0 9/16/2016 P a g e | 48
On the Settings screen, select Add Thermostat and then sign into the appropriate thermostat account to
link the thermostats to the Lutron Connect app. Once complete, the Lutron Connect app will be able to
see the current room temperature and alter temperature set points on the thermostat(s).
This sign-in process must be completed on every device that is running the Lutron Connect application
and requires access to these wireless thermostats.
7.12 System Alerts
7.12.1 Battery Status Alerts
Lutron Connect has the ability to show low battery alerts for the following device types:
Sivoia QS Triathlon Shades
Radio Powr Savr Sensors
Pico Wireless Controls
While these products do have exceptional battery life specifications, system alerts of a low battery help
to ensure timely battery replacement and system performance. Low battery alerts will be triggered after
an action from the device with low battery is received.

Rev. 2.0 9/16/2016 P a g e | 49
Upon entering the Lutron Connect app, a pop-up notification will appear showing that new devices have
reported low battery status. Once this pop-up message has been cleared, all recent low battery status
information can be reviewed by going to the Settings screen and selecting Alerts.
Once on the Alerts screen, Zone Name and Area Name are displayed to easily locate the devices
requiring new batteries. Tapping on the blue “i” information icon reveals the reported date of the alert.
Clears the notification,
closing the pop-up
Takes the user to the
Alerts screen

Rev. 2.0 9/16/2016 P a g e | 50
Replacing the batteries and pressing a button on the device which will send an updated battery status
to the system and remove the notification.
Low battery status for Picos and shades is reflected throughout the app, both on the HomeGlance
Screen and also within the Area Tree, represented by a red battery symbol or “Low Battery.”

Rev. 2.0 9/16/2016 P a g e | 51
8.0 Using the Apple Watch with Lutron Connect
Using an Apple Watch with Lutron Connect requires the Apple Watch be paired to an iPhone that is
running the Lutron Connect app. The Watch will work through the iPhone to control the system on-site
or remotely.
First, configure the scenes, lights, and shades that are to be controlled by the Apple Watch. Refer to
section 7.4.1 for information on configuring favorite scenes and zones to show up on the Apple Watch.
It is important to keep the scenes and zones to be controlled by the Watch to a select few favorites as
the screen is not as large as a phone or tablet and too many options will cause the user interface to
become overburdened and difficult to use.
With the Lutron Connect app installed on the iPhone and the Apple Watch paired, go to the Apple
Watch app and locate the Lutron Connect app on the list of available apps. Use the two sliders to allow
the Lutron Connect app to show up on the Apple Watch’s main app screen and Glances, if desired.
Glances is a quicker access option on the Apple Watch, allowing the user to swipe up from the bottom of
the Apple Watch screen and swipe left or right to access commonly used apps.

Rev. 2.0 9/16/2016 P a g e | 52
The below screen shots demonstrate functionality of Lutron Connect on the Apple Watch.
Icon on the main app screen Lutron Connect from Glances
Scene Control Lighting Zone Control

Rev. 2.0 9/16/2016 P a g e | 53
On the scene control page, the user has the ability to show the HomeGlance photo (refer to section
7.6.3 for information on how to set the HomeGlance photo). Showing or hiding this photo from the
Apple Watch is set from with the iPhone app. Go to the Settings menu by tapping on the gear symbol in
the upper-left corner of the HomeGlance screen and then tap on Edit Home.
Once in the Edit Home screen, use the Show Photo on Watch slider to disable or enable the feature.
When the slider is blue, the photo will display on the Apple Watch.
Shade Control HVAC Zone Control
Rev. 2.0 9/16/2016 P a g e | 54
9.0 Troubleshooting
If an issue is encountered while using the app, it is often a best practice, like other apps, to simply close
out the app and re-open it. If the issue seems to be across multiple apps, including Lutron Connect, it
may be an issue with the mobile device and this often is aided by resetting the mobile device.
For help in troubleshooting network related problems, refer to the Residential Systems Networking
Guide in the Application Notes section of www.lutron.com. Choose either HomeWorks QS or RadioRA 2
as the product and use subcategory Networking.
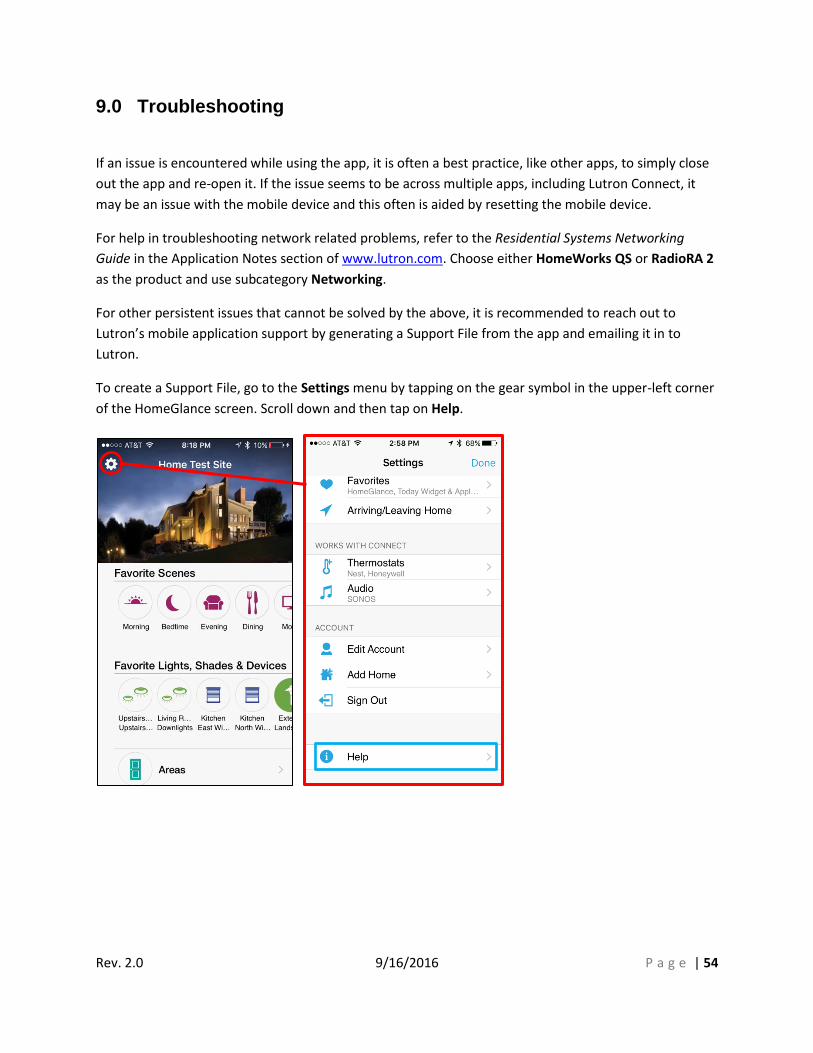
For other persistent issues that cannot be solved by the above, it is recommended to reach out to
Lutron’s mobile application support by generating a Support File from the app and emailing it in to
Lutron.
To create a Support File, go to the Settings menu by tapping on the gear symbol in the upper-left corner
of the HomeGlance screen. Scroll down and then tap on Help.

Rev. 2.0 9/16/2016 P a g e | 55
Select Email Feedback.
An email template will open on the mobile device with a Support File attached. Fill out the information
about the system, add a description of the issue, and send the email to the address pre-populated into
the To field. Sending in Support Files is the recommended approach to troubleshooting persistent issues
as they help Lutron’s engineering team to track down root cause and quickly make the appropriate fix
implementation.

Rev. 2.0 9/16/2016 P a g e | 56
10.0 Frequently Asked Questions
What software versions of RadioRA 2 / HomeWorks QS does Lutron Connect App work with? RadioRA 2 – minimum version 10.0 HomeWorks QS – minimum version 10.0
Note: it is highly recommended to upgrade the RadioRA 2 or HomeWorks QS software to the latest versions prior to use.
Does Lutron Connect work with HomeWorks Illumination systems? No, this feature is only available for RadioRA 2 and HomeWorks QS. HomeWorks Illumination systems can still utilize the Lutron Home Control+ mobile application and requires a VPN to access remotely. Refer to Lutron Application Note #231 for more information on VPN configuration.
How much does it cost? The Lutron Connect App is free and there is no monthly or annual charge for remote access.
Are there any differences between the phone app and tablet app? The user interface does have some slight differences such as on the HomeGlance screen and the energy page. Also, tablets do not typically support Geofencing features so the Arriving/Leaving Home functionality is a phone level feature only.
What do I need to do to enable remote access? 1) Remote access is enabled upon initial set up of the Connect Bridge
2) VERY IMPORTANT - Your Lutron installer MUST verify the network settings are correct on your system. If using a static IP address, the system MUST have the correct settings, including Gateway Address and DNS Server. In the RadioRA 2 software, this can be verified on the Design tab using the Find Main Repeater tool. In the HomeWorks QS software, this can be verified on the Activate tab using Network Settings.
If the network settings are not correct for the system, the app will report the error “This system couldn't connect to the internet to set up remote access” when attempting to enable remote access.
How do I enable remote access for a new system? Note: you must be connected to the same local Wi-Fi network as your HomeWorks QS system or RadioRA 2 Main system and Connect Bridge to utilize remote access.
1) On the main screen, select “Sign In” 2) Select the option to create a new account 3) Type in your email address, create a password (must be 8 or more characters with at least 1 letter and 1 number and be of Medium strength), and press “Register” to create your account 4) Press button on bridge when prompted
5) You’re all done! You can now use the app to control your Lutron lights, shades, temperature, etc. from inside or outside the house.

Rev. 2.0 9/16/2016 P a g e | 57
How do I enable remote access for an existing system? Contact your Lutron dealer to install/activate a Connect Bridge and upgrade your Lutron system to the appropriate version of software.
Can I use the Connect app if there is no internet access and only Wi-Fi? Yes, using the Guest Access feature. Internet access is required to update the Connect Bridge firmware but Guest Access can be used to control the system without an internet connection.
Can I enable remote access when I’m away from home? No, for security reasons you must be connected to the same local Wi-Fi network as your Connect Bridge to set up remote access initially. However, after remote access is set up, you can login from any other mobile device while away from home.
How do I login to my system from a new mobile device? After you’ve setup remote access, if you install the Lutron Connect app on a new device, you can simply login using your previously configured account
How many systems can I add to my account? There is no limit to the number of RadioRA 2 or HomeWorks QS systems that can be added to an account.
Very Important- If you have a Caséta system account, the email address used must be different than the Caséta account.
How can I change my system name? Currently you can change your displayed system name by doing the following:
1) Select the settings button in the upper left corner of the app (looks like a gear) 2) Select “Edit Home” in the settings menu 3) In the “Name” row enter the new name and save.
Note: Changing the displayed name changes the name of that system for that device. Any other device that connects to the same system will need to make the name change as well.
How can I change my email address or password? Currently you can change your email address or password doing the following:
1) Go to the in-app settings by tapping the gear icon in the upper-left of the HomeGlance screen 2) Tap Edit Account 3) Edit your email account under “Edit Account” 4) Choose to either change the email and/or password
How do I know my system is secure? Lutron has used industry leading encryption for all communication over the Internet with the Connect Bridge. This is the same type of encryption used by banks and other secure websites.
Rev. 2.0 9/16/2016 P a g e | 58
How do I delete my remote access account? Please send an email from the email account that was used to setup the system to [email protected] to delete an account.
What ports on my firewall need to be open to use remote access? No port forwarding is required to use remote access.
Remote access uses an outbound connection to the Internet from the RadioRA 2 or HomeWorks QS system with the Connect Bridge, so the vast majority of residential routers do not have to reconfigure any firewall settings to allow it to work.
However, some commercial routers (e.g. Dell’s SonicWall) may block the outbound ports (LAN to WAN) used for remote access by the RadioRA 2 Main Repeater or HomeWorks QS Processor. In this unique case, the following outbound ports need to be accessible through your firewall: 80, 123, 443, 8883, and 7443
What happened to my telnet username and password? Why don’t I need them anymore? The process of adding your Lutron system has been simplified to not require a user-created telnet
username and password for the Lutron Connect app. The system uses your email and password that you configured when signing into the Bridge.
How many devices can simultaneously connect to a system? 1) One RadioRA 2 Main Repeater can accept up to 8 simultaneous connections. This is the total of any local telnet connections as well as connections to the Connect Bridge.
2) One HomeWorks QS processor can accept up to 16 simultaneous connections. This is the total of any
local telnet connections, connections to the Connect Bridge, and “Ethernet”/”3rd Party HVAC” devices on that processor.
Please note that this refers to the number of simultaneous active connections - you can use as many different iOS or Android devices to access your Lutron system.
What is the range of the Arriving/Leaving Home radius? Arriving/Leaving Home has a 10,000ft radius at max range with 1,000ft being the minimum.
I received an Arriving Home notification but had already been home? Sometimes, a notification could be triggered when the phone switches between mobile towers. In these cases, it is a best practice to increase the Arriving/Leaving Home radius.
How many Wi-Fi thermostats can you add to the Connect app? The limitation is set by the manufacturer of the thermostat. Contact the manufacturer of the thermostat for further details.
Rev. 2.0 9/16/2016 P a g e | 59
What are the currently known issues? 1) The gateway address and DNS server of the Connect Bridge must be set correctly for remote
access to work. 2) Only 1 mobile device can download the system configuration (i.e. the system’s XML file) at a
time. If multiple system configuration downloads are started at the same time, they will fail and require you to retry the download.
3) When ‘Larger Text’ is on for iOS devices, a few pages in the app may have a distorted UI.
How can I get additional help with my Lutron system/app/remote access? You can use any of the following methods to get additional help:
From inside the Lutron Connect app, send us feedback: Open the “Settings” menu and select “Help” then select “Email Feedback” Email tech support at [email protected] Call tech support at 1-800-523-9466
Trademarks
Apple, iTunes, and iPod are registered trademarks of Apple, Inc.
iPhone is a trademark of Apple, Inc.
iPad is a trademark of Apple, Inc.
Apple Watch is a trademark of Apple, Inc.
Android is a trademark of Google Inc. Use of this trademark is subject to Google Permissions.
Google Play is a trademark of Google Inc.
App Store is a service mark of Apple, Inc.
Wi-Fi is a registered trademark of the Wi-Fi Alliance.
Lutron, HomeWorks, QS, and the sunburst logo are registered trademarks of Lutron Electronics Co., Inc.
©2016 Lutron Electronics Co., Inc.