low volume irrigation, drip irrigation, design and installaton guide
TRANSCRIPT

8/9/2019 Low Volume Irrigation, Drip Irrigation, Design and Installaton Guide
http://slidepdf.com/reader/full/low-volume-irrigation-drip-irrigation-design-and-installaton-guide 1/24
LOW VOLUMELOW VOLUMEIRRIGATION
• GUIDE •
DESIGN ANDINSTALLATIONDESIGN ANDINSTALLATION

8/9/2019 Low Volume Irrigation, Drip Irrigation, Design and Installaton Guide
http://slidepdf.com/reader/full/low-volume-irrigation-drip-irrigation-design-and-installaton-guide 2/24
FROM THE MAYORCongratulations! You’ve d ecided to tak e the first step in creating a stunn ing, eff i-
cient Xeriscape. Creating a new landscape is a wond erful ad venture — an op portu-
nity to embrace the Desert Southw est with the w arm colors and textures that lured
us h ere, wh ile respecting the relationship between w eather, plant needs an d w ater
availability in the Midd le Rio Gran de Valley.
In add ition to u sing d rought-tolerant p lants that splash color and texture
throughout yo ur yard , you will be installing and operating a w ater-efficient drip irri-
gation system. The tasks ahead of you are both exciting and attainable.
Drip irrigation, which can deliver precise amou nts of irrigation water d irectly
to the rootzone of plants, has several advantages — most importantly the efficient use
of Albuquerque’s precious w ater. Other ad vantages of drip irrigation include:
• easily installed and mod ified
• offers relatively low cost of materials
• reduces weed growth
• virtually eliminates evaporation in delivery
• minimizes water runoff, which occurs when water is applied faster than it can
be absorbed by the soil
• discourages plant leaf diseases
• uses nutrients more eff iciently
• requires smaller, less expensive water meter to operate
This guide will give you specific instructions on planning, designing,installing and managing a drip system. While each xeriscape is unique and individ-
ual, the drip irrigation systems that nou rish them will operate und er the same
design, installation and management principles. With this in mind, let’s pro ceed.
INTRODUCTION
Dear Albuquerqueans,
Water is life —
particularly in the great
Desert Southwest. This
precious resource nour-
ishes our bodies, our
crops, our w ildlife and
our land scapes. Water is
directly related the remarkable qu ality of life
we enjoy in our beautiful City.
Without a dep endable water supp ly, our
quality of life can change swiftly and dra-
matically. Rather than w aiting for a futur e
wat er crisis, the City of Albuqu erqu e is dili-
gently working to preserve our precious
ground water resources today. We know that
our aqu ifer is depleting faster than it can be
replenished, and we’ve identified several
opportu nities to conserve this vital resource
with minimal sacrifice to our daily lives.
One opportu nity is to alter our landscapes
and outdoor w atering practices. Currently
40 percent of our annu al water consump tion
is poured over our landscapes during the
growing season. Since we receive less than
9 inches of rainfall a year, and high-water-
use lawns requ ire a minimum of 40 inches
annu ally, we need to make some changes.
The City has developed four free interactive
tools to encourage you to m ake progressive
water-use changes now, w hile we still have
abund ant choices. Our How To Guide To Drip
Irrigation is a step-by-step drip irrigation
design, installation and management manu -al. This guide is an ideal compan ion to the
City’s Irrigation Training Video and
Xeriscape Guide. These tools guide you
through th e transformation from a lawn-
based land scape to a strikingly beautiful
drough t-tolerant sanctuary for our native
grasses, plants and wildlife. In add ition, the
City’s new Rainwater Harvesting Guide
instructs you on how to take full advan tage
of the precipitation we d o receive.
We’ve m ade incredible water conservation
progress over the last five years — redu cing
per capita w ater use by 22 percent. With
your h elp, we are getting closer to livingwithin our m eans. Please take advantage of
these opportu nities . . . and protect the
natural beauty of our high-desert environ-
ment in the new millennium.
Sincerely,
Jim Baca, May or
TO ORDER:
Albuquerque residents may order this document from the City’s Water
Conservation Office by calling 505-768-3655 (phone), 505-768-3629 (fax),
768-2477 (TTY) or Relay NM 1-800-659-8331.
ww w.cabq.gov/ waterconservation
If you live outside of Albuqu erque, p lease contact the O ffice of the State
Engineer, Water Use and Conservation Bureau, P.O. Box 25102, Santa Fe, N.M.
87504-5102. Ord ers may also be placed by ph one at 1-800-WATERNM.
ACKNOWLEDGEMENTS:
Produced for the City of Albuqu erque
Written by Luke Frank an d Dou g Bennett
Technical review by:
Dr. David Zoldoske, Executive Director -
Center for Irrigation Technology, Fresno, CA
David A . Cristiani, Land scape Designer -
Qu erus SW Land scape Design, Alb., NM
Hu nter Ten Broeck, President -
Waterwise Landscapes, Inc., Alb., NM
Bob England , Land scape Designer -
Alternative Land scape, Alb., NM
For more information on landscaping and xeriscaping, the City of
Albuquerque a lso offers free a Xeriscape Guide, an Irrigation Training Video
and a Rainwa ter Harvesting Guid e. The “Comp lete How -To Guide to
Xeriscaping” and the Irrigation Training Video are companion pieces to this
manu al and provide xeriscape and drip irrigation design basics, planting
instructions and specific plant watering needs. These tools detail color
characteristics, soil and water needs, and maintenance suggestions for your
xeriscape. Free xeriscape workshops are also available during the gro wing
season th rough the City. Call 768-3655 for a schedu le.

8/9/2019 Low Volume Irrigation, Drip Irrigation, Design and Installaton Guide
http://slidepdf.com/reader/full/low-volume-irrigation-drip-irrigation-design-and-installaton-guide 3/24
THE IRRIGATION CONSUMER BILL OF RIGHTS
Discuss these items with you r irrigation d esigner and / or contractor before pur-chasing your irrigation system. This discussion will help you to make wiserselections of design options and equipm ent selection, and help you u nd er-
stand both your and you r contractor/ designer’s commitment in developing yourirrigation system.
CONTRACTOR/ DESIGNER QUALIFICA TIONS• Do the contractor/ designer and em ployees have the necessary license
and insuran ce? To check for contractor licensing in N ew Mexico usewww.newmexlicense.org or call the State Regulation and Licensing Department at(505) 827-7000
• Is the contractor able to secure bonding?• What are the contractor/ designer credentials (formal training, ref erences,
professional certification)?• Does the contractor/ designer belong to a local or national trade association
and abid e by their standard s?
DESIGN / INSTALLATION FEATURES• What is the life expectancy of the system comp onents?• What safety features have been included ?
backflow preventionmaster valve/ isolation valve
• What are the options for future upgrad es?
adding new zonesextra wiring• Does the system meet all local electrical and plum bing codes?
SPECIFIC DESIGN/ OPERATING P ARAMETERS• What w ill be the d istribution u niformity on the irrigated areas? Is water
distributed evenly?matched precipitation sprinkler headshead-to-head coveragesprinkler operating pressureslopeswind considerations
• Does the system provide rain override capability or m oisture sensors?• What is the p recipitation rate for each zone on th e system
(quantity of water ap plied per hour )?
• What is the projected qu antity and cost of water used per year?• What is the recommended programmingfor the sprinkler system timer/ controller?
ESTIMATE• What does the estimate includ e?
– price of system includ ing labor,material, all local taxes and permits;
– sprinkler system design, specifications,parts list, cut sheets, guarantees;
– cost of design, if any.
WARRANTIES• Who provides the equipment installation,
start-up and adjustment, and winterization?• What are the warranties on individual
components and system “design”perf ormance?
• Who is providing warranties and w hatdo the w arranties cover and exclude?
• Are the providers financially capable of standing behind their war ranties?
• What is the availability of replacementparts?
• Does the contractor provide op eratinginstructions to th e consum er?
Bill of Rights courtesy of the Irrigation Association as
developed by Cal Poly, San Luis Obispo.
TABLE OF CONTENTS
LOW-VOLUME IRRIGATION 4
TYPICAL APPLICATIONS 5
EVALUATE YOUR XERISCAPE SITE 6
MICROCLIMATES IN A LANDSCAPE 7
DESIGNINGYOUR PLANTINGS 8
DESIGNINGYOUR DRIP SYSTEM 9
INSTALLINGTHE SYSTEM 11
DISTRIBUTION LINES LAYOUT 12
THE VALVES 13
SCHEDULINGYOUR TIMER 15
MAINTAININGTHE SYSTEM 17
TROUBLESHOOTING 18
GLOSSARY 20
WATER BUDGET SETTINGS 22FOR VARIOUS NM CITIES
8/9/2019 Low Volume Irrigation, Drip Irrigation, Design and Installaton Guide
http://slidepdf.com/reader/full/low-volume-irrigation-drip-irrigation-design-and-installaton-guide 4/24
4
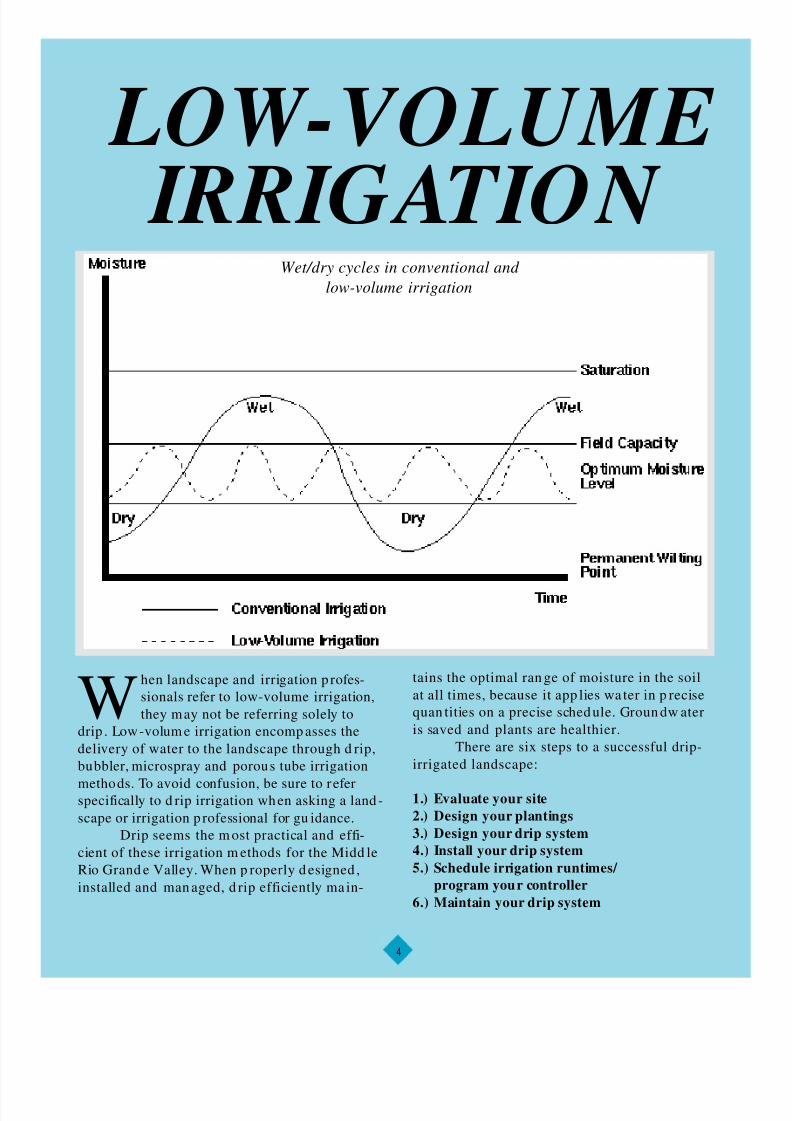
When landscape and irrigation p rof es-
sionals refer to low-volume irrigation,
they may not be referring solely to
drip . Low-volum e irrigation encomp asses the
delivery of water to the landscape through d rip,
bubbler, microspray and porous tube irrigation
methods. To avoid confusion, be sure to ref erspecifically to d rip irrigation when asking a land -
scape or irrigation p rofessional for gu idance.
Drip seems the m ost practical and effi-
cient of these irrigation m ethods for the Midd le
Rio Grand e Valley. When p roperly d esigned ,
installed and man aged, d rip efficiently ma in-
tains the optimal ran ge of moisture in the soil
at all times, because it app lies wa ter in p recise
quan tities on a precise schedule. Groun dw ater
is saved and plants are healthier.
There are six steps to a successful drip-
irrigated landscape:
1.) Evaluate your site
2.) Design your plantings
3.) Design your drip system
4.) Install your drip system
5.) Schedule irrigation runtimes/
program your controller
6.) Maintain your drip system
LOW-VOLUME
I R R I G AT I O N Wet/dry cycles in conventional and
low-volume irrigation

8/9/2019 Low Volume Irrigation, Drip Irrigation, Design and Installaton Guide
http://slidepdf.com/reader/full/low-volume-irrigation-drip-irrigation-design-and-installaton-guide 5/24
5
LOW-VOLUME IRRIGATION
TYPICALAPPLICATIONS
Drip irrigation is appropriate for num erous residen -
tial and comm ercial app lications. Use this guid e
in combination w ith the City’s Xeriscape Gu ide to
help select and p lace specific plants in your land scape.The Xeriscape Gu ide also can serve as a w ater-use guid e
for determining the num ber and placement of emitters for
each of these p lant categories.
Desert Accents and Succulents
(low w ater-use plants in the Xeriscape Guid e)
Many of these attr active South west sp ecies require limit-
ed drip irrigation for establishment, then thrive in the
Desert with only occasional supplemental water after the
first year. These plants are ideally suited for drip .
Targeted applications of water nourish plants without
unn ecessarily irrigating the surround ing landscape.
Flowers and Flowering Groundcovers
(low, med ium or h igh wa ter-use plants in the Xeriscape
Guide)
By using drip to place water at the plant base, healthy
flowering plants eru pt w ith colorful blossoms, while
weeds, grass and other landscape invaders that aren’t
receiving regu lar irrigation water d ecline.
Ornamental Grasses
(low or medium water-use plants in the Xeriscape Guide)
These grasses add green color and attractive winter/ sum-
mer d imension to your landscape, without requ iring
excessive watering in th e Desert. Their deep roots drink
water located lower in the soil profile, requiring less fre-
quent, but longer irrigation runtimes.
Shrubs and Trees
(low, medium or high w ater-use
plants in th e Xeriscape Gu ide)
Because of their size, ma ny of
these species may requ ire larger
volum es of water. Flow rates for
various drip emitter products
range from 0.5 gallons per hou rto 24 gallons per hou r, providing
the flexibility to m atch a v ariety
of tree and shru b watering needs
with your system.
SO YOU ALREAD Y HAVE A SPRINKLER SYSTEM...
Products are available to help you convert lawn sprin-
klers to mu lti-emitter drip “h ydr ants” or 1/ 2-inch flexi-
ble “poly” tu be. To decide if conversion is a pra ctical
option, consider th ese issues:
Watering Zone Layout —Be sure you have an entire sprinkler
zone that can be dedicated to the drip system . Because of sig-
nificant variations in required pressures and scheduling, you
cannot have sprinkler heads and drip em itters operating off
of the same valve.
Valves and Backflow —Many sprinkler valves cannot func-
tion properly at low flow rates. Check w ith the manu facturer
or d ealer to see if your existing valves are suitable for low-
volum e applications. You also need to assure that your back-
flow device can fun ction proper ly at low flow ra tes.
Pipes—If your pipes are galvan ized m etal, consider replacingthem w ith PVC plastic. Galvanized p ipes usually have corro-
sion and m ineral flake that can clog emitters. If you h ave
PVC pipes in good condition, they can be used for your drip
system.
Filtration —Some m anu facturers m ake specialty devices that
replace sprinkler heads. Some of these devices are mu lti-
emitter hydrants that contain built-in pressure regulators and
small-capacity filters. If you choose to u se these devices as
your sole source of filtration, you m ust comm it to clean each
dev ice frequ ently. If you d on’t use these mu lti-function
devices, you w ill need to install a pressure regu lator and filter
(discussed later).
Even if you ar e performing a conv ersion, many of the design
guidelines in this manual will apply.

8/9/2019 Low Volume Irrigation, Drip Irrigation, Design and Installaton Guide
http://slidepdf.com/reader/full/low-volume-irrigation-drip-irrigation-design-and-installaton-guide 6/24
6
LOW-VOLUME IRRIGATION
SOIL TYPES
Water travels diff erently in d iff erent typ es of soil.Knowing your soil “profile” (the top 24 inchesof earth) will help you to determine how often
and how long to irrigate your plants. Take a m oist sam-ple of your soil in hand an d p ush it up you r palm w ithyour thumb. This will help you “feel” your soil’s textureand d etermine just wha t type of soil supp orts your land-scape.
Coarse (sandy and/ or gravelly) soils feel gritty orbumpy to the touch. Water percolates downw ard qu ick-ly in this soil type, leaving an egg-shaped, vertical pat-tern in the soil profile. Horizontal movement of water isminimal; theref ore, frequent, short irrigations keep soilmoisture levels adequate for healthy plants. Once youirrigate pa st a p lant’s rootzone, that water is wasted.
Medium loamy soils feel neither gritty nor smooth. Soilpar ticles in this soil type are closer or “tigh ter.” Waterpercolates slower, and the soil has better water-holdingcapacity, leaving a soil profile pat tern the shape of a cere-al bow l. These soils are m ore receptive to lon ger, less fre-quent irrigations. Always watch for standing water orrunoff, which indicate that you’re overwatering.
Fine, clay soils feel v ery smooth in your hand. Water inclay soil tend s to spread horizontally, leaving m ore of apancake-shaped pattern in the soil profile. Because soilpar ticles are so much smaller and closer together, claysoils have a high er water-holding cap acity. If you canmatch your water application rates to the soil’s ability toabsorb it, water remains in the soil profile much longer,improving your p lants’ ability to better u tilize it. Drip isa great irrigat ion tool in tigh t, clay soils, because the vo l-um e of water app lied is so small.
Clay soils are notorious for creating irrigation ru noff ,because water can’t seep downward as quickly. If yourirrigation system applies water faster than the soil canaccept it, water runs d own the curb and into the stormdra in. If you’re experiencingru noff while watering, trywatering half the amoun t,twice as often w ith some timein between (for example,instead of running on e contin-uous cycle, divide the time inhalf and run two cycles with ahalf hour or m ore between).
LOCAL SOIL TYPES
In Albuquerque, there is a wide var iety of soils. Generally,you will find coarse, gravelly soils in the Heights. Thesesoils enable irrigation water to percolate down through
the p rofile faster, with less water-holding capacity. Clay andsilt loams are common in the Valley. These tighter soils havea greater water-holding capacity, but are more prone toru noff. On the West Mesa, sandy soils tend to offer small,deep wetting pa tterns with lower w ater-holding capacity.
Many land scape sites in Albuquerque are preparedwith fill dirt of various soil mixtures, and some are heavilycompa cted by constru ction and foot traffic. These factors alsoaffect how the soil will accept and hold irrigation water.
Slopes also affect water m ovement in you r land-
scape, often p rodu cing runoff. Hills and berms are particular-ly suited for watering with drip. On a slope, place your irri-gation lines and emitters above the plant m aterial. Pay care-ful attention to p lace the em itters w ithin any w atering wellsthat you create around your plants.
Slopes can create microclimates. Plants on sou th andwest slopes are exposed to more d irect sunlight, heat andwind than those on the east and north side of a slope.
In low spots, you may have to adjust how much irri-gation water is distributed from your system, as water tends tocollect in these areas. This is usually a good location for medi-um and high water-use plants. Also consider how rain water(off your roof and ou t of your gu tters) can be used to w ater
your landscape. Designed togeth-er, drip irrigation and rainw ater
harvesting systems significantlyadvance water conservation andhealthy plan ts. The City has pro-duced a Rainwater HarvestingGuide to assist in d esigning (orredesigning) your landscape tobetter use the 9 or so inches of Nature’s precipitation we receivef ree.
STEP 1
EVALUATE YOUR XERISCAPE SITEBegin the d esign p rocess for your dr ip system w ith some site observations. Pay careful attention to
soil type, slopes, microclimates and plant species.
C or rect Emitter Placement on Slope
I ncor rect Emitter
Placement on Slope
Emitter
WettedArea Emitter
Slope
Soil Type Maximum Wetting MaximumInfiltration Pattern Wetted
Rate Diameter
Coarse .72-1.25 1.0-3.0 feet(sandy loam) inches per
hour
Medium .25-.75 2.0-4.0 feet(loam) inches per
hour
Fine .13-.25 3.0-6.0 feet(clay loam) inches per
hour
Soil Infiltration and Wetting Pattern

8/9/2019 Low Volume Irrigation, Drip Irrigation, Design and Installaton Guide
http://slidepdf.com/reader/full/low-volume-irrigation-drip-irrigation-design-and-installaton-guide 7/24
LOW-VOLUME IRRIGATION
7
MICROCLIMA TES
Most of us und erstand Albuquerque’s climate du r-
ing the irrigation season (generally Marchthrough Septem ber): windy, wa rm sp rings and
falls with occasional cold nights or snow; hot, dry early
summ ers; and hot, humid monsoons in July and August.
Annu al precipitation averages about 9 inches, much of
wh ich falls in the mon soon season, with otherwise spo-
radic rain and snow events throughou t the year.
However, every yard has its own microclimates that
affect how much water specific plants will need. For example,
plants in the south an d w est areas of your land scape m ay face
hotter, windier conditions than those north and east of build-ings, walls, fences or slopes.
Plants in d irect sunlight surround ed by asphalt will
need m ore water than those in shady areas on the north side
of your home. In upcoming p ages, we will help you make
irrigation adjustments to compensate for the microclimates on
your property. Be sure to consider microclimates in both you r
planting and irrigation designs.
Prevailing wind
North Shortest growing season
Cold winter
Cooler in summer
Maintains soil moisture longer
Prevailing wind exposure
EastMost forgivingmicroclimate
Half day
of sun, but
cool in p.m.
South
Warmest in winterLong growing season
Moderate wind protection
Full day sunlight
SouthwestIdeal for natives or plants
with marginal cold-hardinessVery hot in summer
West
Morning shadeHarsh p.m. sun
Reflected heat, light
Prevailing wind exposure
MICROCLIMATES IN A LAN DSCAPE
N
S
EW

8/9/2019 Low Volume Irrigation, Drip Irrigation, Design and Installaton Guide
http://slidepdf.com/reader/full/low-volume-irrigation-drip-irrigation-design-and-installaton-guide 8/24
8
LOW-VOLUME IRRIGATION
DESIGN OVERVIEW
Asimp le landscape and irri-
gation d esign will help you
plan you r installation. Once
you have a d rawing of your design,
you can proceed with your land -
scape conversion at you r own pace
— without losing sight of your
goal. There are no hard -and-fast
rules that force you to design and
install a landscape in one month, or
even one season. Phase it in as time
and expenses allow. Take yourtime. Once installed, your
Xeriscape will last for d ecades.
Design you r landscape —
and your irrigation system — in
zones, grouping p lants together
based on similar w ater need s and m icroclimates. These
“hydrozones“ don’t have to be little bunches of plants
dotting your property — they can be grouped in what-
ever patterns are p leasant an d practical for your land-
scape. In addition to assuring a healthy environment for
your plants, hydrozones help simplify xeriscape and
irrigation design and management requirements as your
yard matures.
DESIGNING YOUR PLAN TINGS
Use the forms in the back of this manu al to help
design your plant placement. Begin with a
detailed p lot plan of your xeriscape site. Group
plants that can be watered together into low, medium or
high w ater-use hyd rozones (try to m inimize the use of
high w ater-use zones). In man y cases, you w ill be zon-
ing these plants by th eir location in the land scape (full
sun on the south side, shady areas, windy areas, and so
forth). Remember, zoning by w ater requirem ent is criti-
cal to plant health a nd effective water conservation. Use
the p lant list in the City’s Xeriscape Guid e to iden tify
low, medium or high w ater-use plants. Knowing thewater requirements will tell you the number of emitters
to place around each plant.
If you are planting a new site, you can control
how your plants are grouped , arranging the land scape so
that plants with similar water requirements are grouped
together. Then these hydrozones can naturally follow the
physical layout of the site. Consider these general hydro-
zoning principles in you r landscape d esign:
Zone 1 — Mini-oasis: The area
nearest to your house is where the
highest water-use plants should be
placed. Shade and rainfall runoff
from your roof can contribute to
creating the lushest zone w ith less
supp lemental water.
Zone 2 — Transition: The transi-
tion zone is used to blend lush
areas with the d rier parts of your
landscap e. Try to select low and
mod erate water-use plants that
need infrequent supplementalwatering.
Zone 3 — Arid: Feature the most
drough t-tolerant p lants in the arid
zone, the driest part of your land-
scape farthest from your house. Native and d rought-
tolerant plants are id eal, as they requ ire only deep, infre-
quent watering after establishment.
Existing sites can be more cha llenging to design.
On many projects, plants with very different watering
need s are located n ext to each other. This is a strength of
dr ip — the ability to target precise applications of wa ter
plant-by-plant. For examp le, if you h ave an ar ea that con-
tains plants with differing water needs, you m ay w ant togroup them into separate irrigation hydrozones according
to low, medium and high water requirements. These hydr o-
zones can be d esigned by adjusting the nu mber and size of
emitters or by add ing more than one ind ependently valved
dripline.
Don’t overlook the important issues below when
you design your landscape (consult your Xeriscape Guide
for sug gestions):
• Desired mix of deciduous and evergreen plantings
• Adequate space for plants to grow to maturity
• Complimentary or rotating blooming seasons
• Special maintenance needs• Shade, privacy and wind-block functions
• Wildlife activity
• Pollen and allergenic properties.
STEP 2
DESIGN YOUR PLANTINGS AND DRIP SYSTEM INTO HYDROZONES
The Three Xeriscape Zones

8/9/2019 Low Volume Irrigation, Drip Irrigation, Design and Installaton Guide
http://slidepdf.com/reader/full/low-volume-irrigation-drip-irrigation-design-and-installaton-guide 9/24
LOW-VOLUME IRRIGATION
9
STEP 3
THE CONTROLLER
Select an automatic controller
that best suits your site and
your willingness to regularly
use it. Ensure that there are
enough stations available to fit
the capacity of your irrigation
system. It’s good planning to
have one or more extra stations
available for future u se, if thetime comes when you w ant to
change your landscape or your irrigation capabilities.
Consider the following featu res for greatest flexi-
bility and water efficiency:
• Digital display to ensure accurate w atering times.
• Multiple programs to allow you to water d iff erent
hydrozones on separate schedu les.
• Multiple starting times on each watering day, which
can prevent runoff and facilitate new landscape p lantings.
• A rain delay program that can automatically reactivate
the system after the desired nu mber d ays.
• Options for even/ odd , mu lti-day interval or day-of-
week scheduling, which provid e add itional scheduling
f lexibility. For example, watering every other day; every
fourth d ay; or every Thursday and Sund ay.
• Water bud get feature to allow simple seasonal adjust-
ments by p ercentage, without reprogramm ing each irri-
gation zone.
• Test fun ction to make efficient inspections of all zones.
• Electrical diagnostic function to wa rn you of faulty
wiring.
Visit an irrigation distributor and ask to experiment pro-
gramm ing some of their controllers.
Consider the following issues to determine the best loca-
tion to mou nt your controller:
1.) Proximity to electrical pow er;
2.) Ease of rout ing control wire to the va lves;
3.) Ease of accessibility for program ming ;
4.) Protection from weather, vand als, etc.
FILTERS
The greatest threats to a drip sys-
tem are d ebris and particles that
can clog emitters. Installing an
appropriate filter and performing
periodic flushing a nd filter m ainte-
nance will help assure that your
system will have a long, trouble-
f ree life. Use a 200-mesh filter for
all drip installations unless other-wise recommen ded by th e emitter
manuf acturer. Filters are best installed up stream of the
valves, und er full water pr essure. This not on ly protects the
valves from debris, but allows you to handle filtration for
ma ny va lves with a single filter. A sequence of 1) filter, 2)
zone valve(s), 3) backflow preventer(s), and 4) pressure
regulator(s) will provide the best performance.
AUTOMATIC VALVES
Due to the very low flow rates in
drip irrigation, be sure to use low-
volume valves. Most manu factur-ers have v alves capable of operat-
ing properly at 1 gallon per m inute
(60 gallons per hour) or less. If you
are attempting to convert an exist-
ing sprinkler system to a d rip sys-
tem, check the man ufacture r’ s
specifications to ensu re your exist-
ing valves will opera te properly at low flow rates. Avoid
designing a system that is near the valve’s lowest flow range
to assure the valve opens and closes more depend ably.
Choosing the best location for the valves requires
you to consider several factors:
• Appropriate elevation for backflow devices;
• Routing for wires to the controller;
• Accessibility for maintenance;
• Routing and length of irrigation lines;
• Visual and safety impact of protrud ing backflow devices.
DESIGNING YOUR DRIP SYSTEM
A DRIP SYSTEM CON SISTS OF SIX MAJOR COMPONENTS:
1. An autom atic controller to progr am and ad just the 4. Pressure regulator(s)frequency and du ration of irrigation 5. Backflow preven tion device(s)
2. Filter(s) 6. A distribution system including a mainline, lateral3. Low-volume electronic valves for each drip zone lines and emitters

8/9/2019 Low Volume Irrigation, Drip Irrigation, Design and Installaton Guide
http://slidepdf.com/reader/full/low-volume-irrigation-drip-irrigation-design-and-installaton-guide 10/24
10
LOW-VOLUME IRRIGATION
PRESSURE REGULATORS
Too much water pressure can dam -
age your drip system by forcing
apart connectors. Most drip equip-
ment is designed to operate at 15 to
30 psi. Most mun icipal water con-
nections will provide 50 to 100 psi.
Pressure can be regulated through
pressure regulating devices
installed at the valve o r just after
the valve. If you are retrofitting an
existing sprinkler system , some
manuf acturers make multiple emitter devices that contain
pressure regulators and filters.
BACKFLOW PREVENTION
Since your irrigation system will be
connected to the public drinkingwater supply, it is very important to
protect the water supply from conta-minan ts. Withou t prop er backflow
protection, contaminants could be
draw n through emitters or sprinkler
heads back into your home. A
device called an Atmospheric
Vacuu m Breaker (AVB) installed
downstream of each valve will pre-
vent water from flowing back into your home’s plumbing.
AVBs mu st be installed according to local plu mbing codes.
In Albuquerque, AVBs are not
acceptable for use in non resi-
den tial irrigation sytems. In
Albuquerque, AVBs must be
mounted on galvanized, not
plastic, pipes. These devices
must be elevated at least 6 inch-
es higher than the highest sprin-
kler or emitter in the landscape.
Contact your local code enforce-
ment office for details.
THE DISTRIBUTION SYSTEM
For long-term d urability, con-
sider using PVC pipe installed
underground to d eliver water
to each zone in the land scape.Flexible, black poly p ipe
should be used only at or near
the surface to deliver waterdirectly to the plants, so that
any dam age to the pipe is
quickly identified and
repaired. Both 1/ 2-inch and
1/ 4-inch p oly tubing can be
used above ground to deliver
water d irectly to the plants.
They are flexible and reliable, and in the finished land scape can
be covered by rock or organic mulch (which also help to hold
water in the landscape).
EMITTERS
There are several emitter styles to
choose from wh en d etermining
how to ap ply water d irectly to the
plant material:
1.) Barbed, punch-in emitters,
which are the most common, can
push directly into 1/ 2-inch tu bing.For ease of inspection and mainte-
nance however, consider pun ching
a barbed connector into the 1/ 2-inch tubing, connect your
1/ 4-inch tubing to the barbed connector and run it to the
desired location beneath th e plant’s canopy. Then attach an
emitter to the end of the 1/ 4-inch tu bing beneath the p lant’scanopy. This way, emitters are located at the ba se of the
plant and always accessible to you — not buried by land-
scape fabric and/ or mu lch, which can complicate any p ossi-
ble changes or repairs later.
Pressure-compensating barbed emitters come in various
color-coded flow rates to accommodate individual plant
needs. When installing barbed connectors or emitters, you
may w ant a special tool that pu nctures the 1/ 4-inch tubing,
so you can accurately direct water to each plant w ith 1/ 4-
inch tu bing and then emitters.
2.) Multi-outlet emission dev ices,
or hyd rants, contain several pres-
sure-compensating d rip emitters towh ich you can attach 1/ 4-inch
tubing that runs directly to each
plan t. They, too, can be color-
coded according to various flow
rates. These devices serve as a cen-
tral point from which 1/ 4-inch
“spaghetti-tubing” is ru n.
3.) In-line drip emitter tubing has
emitters p re-installed at sp ecificinterva ls (ask a p rofessional) or is
available as individual p ressure-
compensating emitters that attach
to 1/ 4-inch tubing. In th isinstance, 1/ 4-inch tubing is snaked
through the planted area, and indi-
vidual emitters are solvent-welded
into the tubing at the desired loca-
tion of emission for each plant.
If installed correctly and inspected regular l y, all of these emission devicesare water-efficient and easy to work with. Talk to an irrigation pro f ession -al about what might be best for your project.
DESIGN TIPS
Water d istribution can involve some fairlyadvanced hydraulic calculations. You can avoidproblems in your design by following a few
basic rules:
• Add up th e flow rates for each valve. The flow rate of every valve should be at least 60 gallons per hour(GPH), or 1 gallon per minu te (GPM), and not morethan 240 GPH, or 4 GPM. ** Some manufacturers makevalves that operate dependably at less than 1 GPM. Consult an irrigation equipment distributor for more information.
• Don’t run 1/ 2-inch poly tubing for more than 250 feet.
• Don’t run 1/ 4-inch d istribution tu bing more than 5feet from th e end of an emitter to a p lant. For longer d is-tances up to 15 feet, connect 1/ 4-inch tubing to 1/ 2-inchtubing w ith a barbed connector, then install the emitters
at the tubing’s end.• Bury long runs of tubing ap proximately 3 inchesbeneath the soil or mulch surface.
• Use metal or plastic stakes to anchor drip tubing to theground.
• Flush all 1/ 2-inch tubing before installing any emitters.
• Use pressure-compensating emitters to ensure thatflows are distributed evenly. Be sure that your tubing andfittings are compatible. Among the manufacturers, thereare as many as five diff erent sizes of tubing and fittings.
8/9/2019 Low Volume Irrigation, Drip Irrigation, Design and Installaton Guide
http://slidepdf.com/reader/full/low-volume-irrigation-drip-irrigation-design-and-installaton-guide 11/24
LOW-VOLUME IRRIGATION
11
Installing und erground p ipe will require that you dig
trenches. Lay out your trenching plan on pap er and
mark key ref erence points in the yard with flags or
landscape paint. If possible, avoid trenching within the
dr ipline of established trees and shrubs. Your m ainline
trench must be a m inimum of 28 inches deep between
the point of connection and the valves. Lateral tre nches
should be approximately 12 inches deep to help p rotect
the pipe from freezing an d futu re excavation dam age.
TAPPING INTO THE WATER SOURCE
Carefully excavate your home’s water service line,
wh ich is generally between your w ater meter outside and
your closest water faucet in the home. Oftentimes, newer
homes will have a mainline “stub out” bur ied beneath the
hose bib in your front and/ or back yard . With the water
off, install a point of connection (if in doubt, consider using
a licensed plumber), install an “isolation” valve near the
point of connection. This man ually operated ball or gate
valve should be p laced w ithin a valve box so that you can
make any required sprinkler system repairs without hav-ing to turn off the water to your hou se.
Once the isolation valve
is properly installed and closed
you can turn on the water to the
home and proceed with the
remaining sprinkler/ drip system
installation. Flush the connection
by opening the isolation valve for
five to 10 seconds, or until the
water runs clear.
If you are unfamiliar with plumbing techniques andcodes, you may require a visit from a licensedplumber. Consult your local city or county buildingcodes for backflow prevention requirements.In the Albuquerque area contact:1.) City of Albuquerque Building Safety Division
information — 924-3304
2.) Bernalillo County Zoning/Building/PlanningDepartment — 924-3700.
From the point of connection, run a ma in PVC line at
least 28 inches deep to the location you have selected in your
yard for your irrigation valves and valve box. For most resi-
den tial applications, 1-inch, sched ule 40 PVC pipe is recom-
mended.
After installing your v alve(s) to the mainline, install a second
isolation valve, which will make it easier to maintain the fil-
ter and valves. Allow time for the fittings to a dequ ately cure,
then flush the m ainline pipe to clear any d ebris that m ay
have entered during assembly. Next, install your filter. “Y”-style filters (wye strainers) should be installed w ith the filter
canister pointing downward or
sideways. A filter installed
upward m ay allow particles to
stay in the line while flushing.
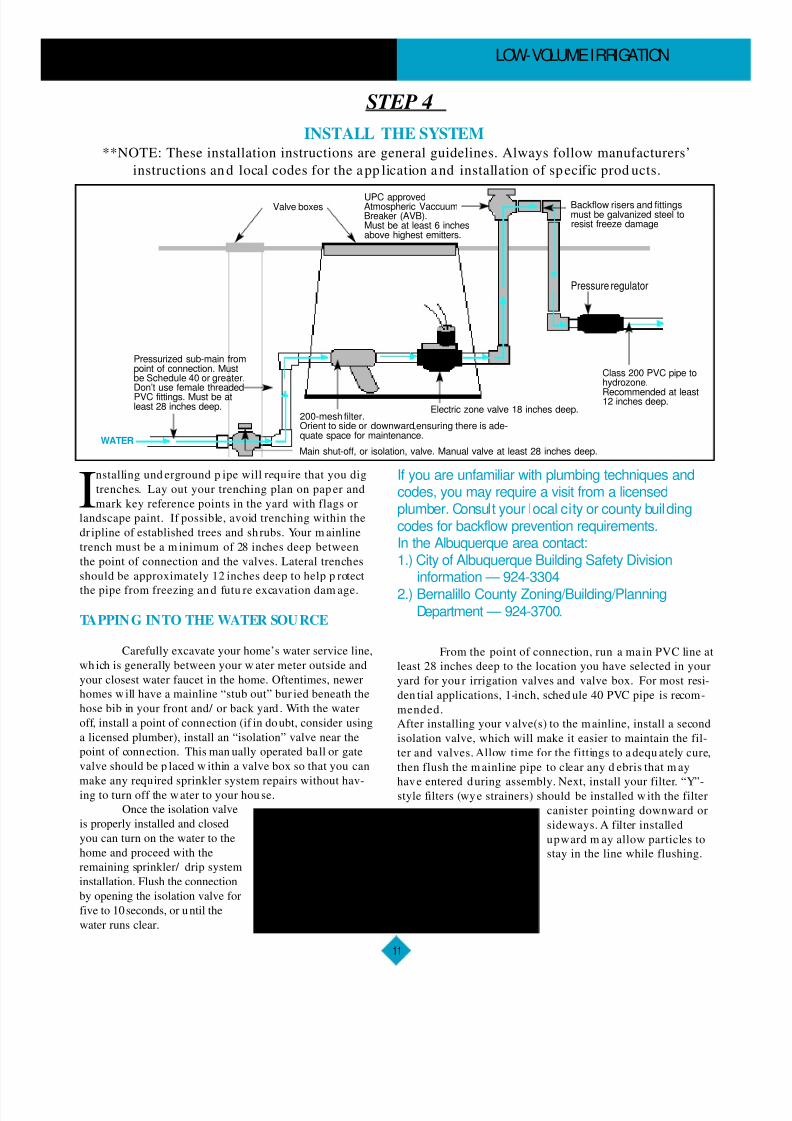
STEP 4
INSTALL THE SYSTEM**NOTE: These installation instructions are general guidelines. Always follow manufacturers’
instructions an d local codes for the app lication and installation of specific prod ucts.
IMPORTANT! Before you dig, you must determine the
location and depth of all underground utility lines on
your property. Start by call ing New Mexico One Call at
1-800-321-ALERT. This free service will assist you in locat-
ing telephone, gas, electric and cable television lines. The
utility and cable companies will come out within a few
days and mark the location of their lines on your site.
Valve boxesUPC approvedAtmospheric VaccuumBreaker (AVB).Must be at least 6 inchesabove highest emitters.
Backflow risers and fittingsmust be galvanized steel toresist freeze damage
Class 200 PVC pipe tohydrozone.
Recommended at least12 inches deep.
Electric zone valve 18 inches deep.
Pressure regulator
200-mesh filter.Orient to side or downward,ensuring there is ade-quate space for maintenance.
Main shut-off, or isolation, valve. Manual valve at least 28 inches deep.
Pressurized sub-main frompoint of connection. Mustbe Schedule 40 or greater.Don’t use female threadedPVC fittings. Must be atleast 28 inches deep.
WATER

8/9/2019 Low Volume Irrigation, Drip Irrigation, Design and Installaton Guide
http://slidepdf.com/reader/full/low-volume-irrigation-drip-irrigation-design-and-installaton-guide 12/24
12
LOW-VOLUME IRRIGATION
DISTRIBUTION LINES LAYOUT
Medium Shrubs(4” spread)
Medium Shrubs
End Cap
LateralDistributionLine
Tree(12’ canopy)
Feeder Tubingwith in-lineemitters
CORRECT
Medium Shrubs
Medium Shrubs
LateralLine
Tree
FeederTubing
FeederTubing
INCORRECT
BuffaloGrassArea
SPRINKLERS
ValveManifold
ElectricalWire
Controller
Buffalo GrassArea
SPRINKLERS
1/2-inch Poly tube Connector
8/9/2019 Low Volume Irrigation, Drip Irrigation, Design and Installaton Guide
http://slidepdf.com/reader/full/low-volume-irrigation-drip-irrigation-design-and-installaton-guide 13/24
LOW-VOLUME IRRIGATION
13
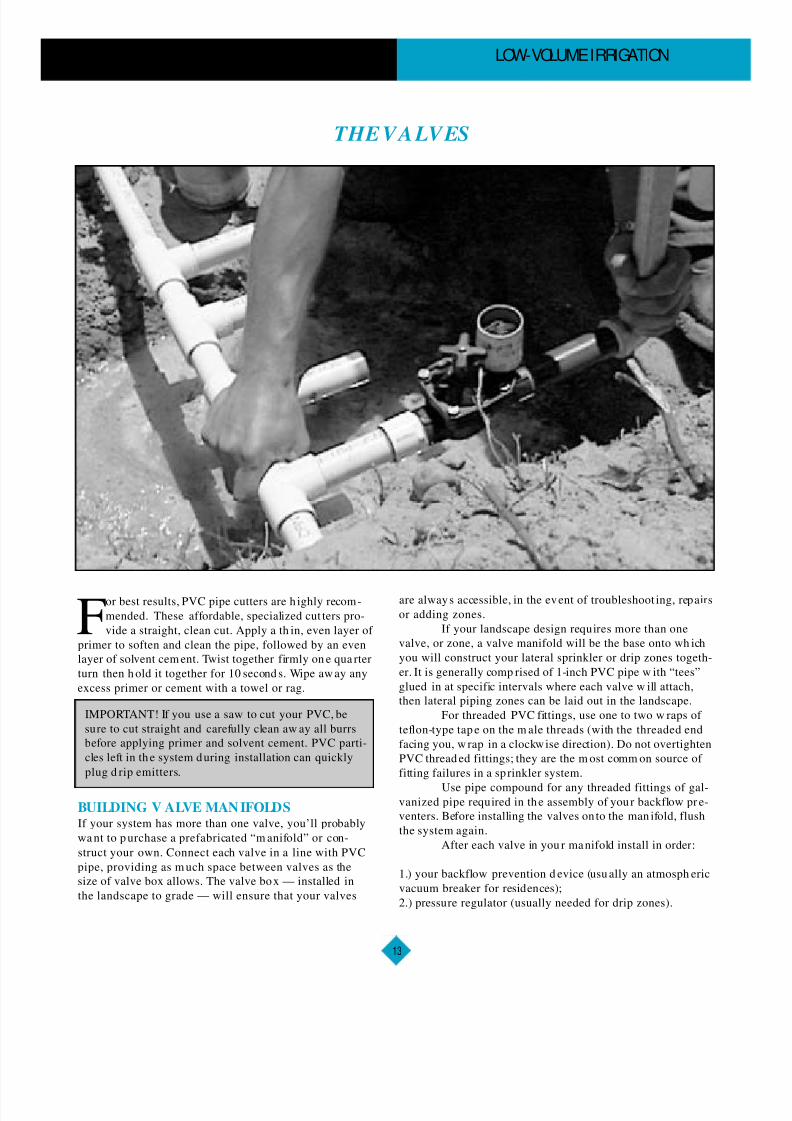
For best results, PVC pipe cutters are h ighly recom-
mended. These aff ordable, specialized cut ters pro-
vide a straight, clean cut. Apply a th in, even layer of
primer to soften and clean the pipe, followed by an even
layer of solvent cem ent. Twist together firmly on e qua rter
turn then h old it together for 10 second s. Wipe aw ay any
excess primer or cement with a towel or rag.
BUILDING V ALVE MANIFOLDSIf your system has more than one valve, you’ll probably
wa nt to p urchase a prefabricated “m anifold” or con-
struct your own. Connect each valve in a line with PVC
pipe, providing as m uch space between valves as the
size of valve box allows. The valve box — installed in
the landscape to grade — will ensure that your valves
are always accessible, in the event of troubleshoot ing, repairs
or adding zones.
If your landscape design requires more than one
valve, or zone, a valve manifold will be the base onto wh ich
you will construct your lateral sprinkler or drip zones togeth-
er. It is generally comp rised of 1-inch PVC pipe w ith “tees”
glued in at specific intervals where each valve w ill attach,
then lateral piping zones can be laid out in the landscape.
For threaded PVC fittings, use one to two w raps of
teflon-type tap e on the m ale threads (with the threaded end
facing you, w rap in a clockwise direction). Do not overtighten
PVC thread ed fittings; they are the m ost comm on source of
fitting failures in a sp rinkler system.
Use pipe compound for any threaded fittings of gal-vanized pipe required in the assembly of your backflow pr e-
venters. Before installing the valves on to the man ifold, flush
the system again.
After each valve in you r manifold install in order:
1.) your backflow prevention d evice (usu ally an atmosph eric
vacuum breaker for residences);
2.) pressure regulator (usually needed for drip zones).
THE VALVES
IMPORTANT! If you use a saw to cut your PVC, be
sure to cut straight and carefully clean aw ay all burrs
bef ore applying primer and solvent cement. PVC parti-
cles left in th e system during installation can quickly
plug d rip emitters.

8/9/2019 Low Volume Irrigation, Drip Irrigation, Design and Installaton Guide
http://slidepdf.com/reader/full/low-volume-irrigation-drip-irrigation-design-and-installaton-guide 14/24
14
LOW-VOLUME IRRIGATION
Water should be delivered out to drip line of plants
(on all four sides) for trees to root.
All subsurface piping including valves should be
buried a minimum of 18 inches (28 inches from the point of
connection to the valve manifold). Your valve box should be
buried flush with the ground. Place a layer of gravel in the
valve box beneath the manifold to help keep it drained of
standing water.
Connect the controller wiring to the au tomatic
valves with water-proof connectors. Test the automatic oper-
ation of the valves from the controller before proceeding.
RUN LATERAL LINES TO PLANTED
AREASAfter your valve manifold is properly installed
and cured, m anually activate and flush each valve for 5 to
10 seconds, or until the water is clear (see valve instruction
manu al). Connect PVC pipe to each valve and out to the
appropriate zones in the landscape. Bury all subsurfacePVC piping after the valve a minimum of 12 inches. Insert
tees or elbows with risers wherever you want to bring
water to th e surface for poly pipe or emitter hyd rants.
After fittings have cured, flush the pipe, then temporarily
cover all open end s with tap e to keep soil or debris out.
Perform planting before continuing with th e irrigation
installation.
RUN DISTRIBUTION TUBING TO PLANTSAfter planting each zone, install your 1/ 2-inch flexi-
ble distribution tubing or your multi-outlet hydrants. If
you’re using 1/ 2-inch tubing, connect it to the riser via an
adaptor and weave it throughout the hydrozone, allowingenough slack for expansion and contraction caused by weath-
er changes. The tubing is easier to work with if you let it
warm in the sun for a little while beforehand. Stake the tubing
in place. Install a flush cap fitting at the end of the 1/ 2-inch
line, flush the line and replace the cap before continuing.
INSTALL EMITTERSInstall the individual emitters, either barbed or inline.
Rather than pu nching barbed emitters directly into 1/ 2-inch p oly
pipe, try inserting a 1/ 4-inch connector into the 1/ 2-inch pipe,
runn ing 1/ 4-inch tubing to the plant and then installing yourpressure-compensating emitter.
Inline emitters are installed by attaching 1/ 4-inch tub-
ing to a riser in the planting bed, snaking it loosely around the
ind ividua l plants, cutt ing the 1/ 4-inch tubing with scissors at
desired locations around the plants, applying a special solvent
and reconnecting the 1/ 4-inch tub ing to run to the next plant.
Ultimately these zones are closed loops that connect tw ice to
the riser fitting.
Install your m ulti-emitter hyd rant either at or below
grade. For below ground installations, ensure that it is protected
by a valve box. Then attach your 1/ 4-inch tubing (in runs no
longer than 5 feet) to deliver w ater to the individual p lants.
TIPSpace emitters evenly around the plant. They should be placedhalfway between the plant’s trunk and the edge of its canopy.Use two emitters per plant minimum, except in dense plantingsof flowers/herbs.
FINISH THE INST ALLATIONOpen all isolation valves and operate the system from the con-
troller to check for leaks and w iring continuity. If system per-formance is satisfactory, fill and tamp the trenches and smooth
the soil surface. App lying w ater to the backfilled trenches will
help settle the soil. Finish grad ing and clean up the site.
Most drip systems will be covered with mulch to hide
the tubing, reduce evaporation and minimize weeds. However,
to ensure that your d rip system is operating properly, wait a
week before adding the mulch. Check that all emitters are oper-
ating, and watch plants for signs of stress. After a week , flush
the system again an d cover with mu lch.
Table 1 provides gu idelines for the v olume of w ater to be d eliveredto plants, according to size and watering n eeds. For example, Table1 recommends a flow rate of 3.0 GPH for a small, low water-useshrub. The recommended flow rate can be acheived using tw o 1.5GPH emitters, three 1.0 GPH emitters or six 0.5 GPH emitters. Theseguidelines are suitable for most N ew Mexico climates and soils.
PLANT TYPE Water Use Gallons per hourper plant
Flowers and Herbs Low 0.5Up to 2 feet in diameter Moderate 1.0
Small Shrubs Low 3.0Up to 6 feet in diameter Moderate 6.0
Large Shrubs & Small Trees Low 6.06 to 10 feet in diameter Moderate 12.0 (minimum
4 emitters)
Large Trees Low 18.0Over 10 feet Moderate 36.0 (minimumin diameter 4 emitters)
TABLE 1

8/9/2019 Low Volume Irrigation, Drip Irrigation, Design and Installaton Guide
http://slidepdf.com/reader/full/low-volume-irrigation-drip-irrigation-design-and-installaton-guide 15/24
TIPS FOR USING THESE TABLES
Because the watering time is dependent upon the amount of water the system discharges, any ad justment m ade to
one, mu st also be mad e to the other. For example, if your system generates only 30 GPH in total flow, and th e
minimum recomm ended flow rate for your valve is 60 GPH, you need to increase the size and/ or num ber of
emitters on th e system. If you d ouble the flow rates in Table 1 for each plan t (to 60 GPH), then you m ust red uce the
suggested run time from Table 2 in half. Likewise, a 30-percent increase in the flow rate w ould merit a 30-percent
decrease in the watering time.
It may be necessary to water new nursery-grown plants every day or two, but for very brief periods. Ensure
that one or m ore emitters are close enough to th e plant to keep th e rootball and sur roun ding soil slightly moist. As
plants become more established, water less often, but for longer times, and move emitters outward from the plant asit grows. Supplemental winter watering is recommended for plantings less than one year old. Established plants can
be watered m onthly during w inter months when precipitation is less than 1/ 2 an inch over the previous month.
Plants native to the desert can d ie if they receive too mu ch water. Most of these plants w ill need infrequ ent or
no su pplemental w ater, except du ring early establishment.
LOW-VOLUME IRRIGATION
15
TABLE 2 – Schedule for Albuquerque, NM, area
STEP 5
SCHEDULING YOUR TIMER
Month Minutes Minutes Waterper per Budgetmonth week Setting
January* 20 5 5%February* 34 8 9%March 76 19 20%April 146 37 38%May 243 61 64%June 337 84 89%July 558 95 100%August 380 85 90%September 341 59 62%October 234 33 35%
November 49 12 13%December 24 6 6%
* Normal precipitation is usually adequate to sustain established plantsthrough winter. Some winter watering may be necessary for plantingsless than one year old, or if conditions are extremely dry.
Provided you u sed Table 1 in the design of your d rip sys-
tem, you can u se Table 2 as a general operating sched ule
for established p lants in the Albuq uerqu e area. (See
schedu ling guid elines for other r egions of New Mexico in
the back of the manu al.)
Table 2 provides a sam ple schedu le for the climate in
the central Rio Grande Valley. When plants are new,
you w ill need to w ater frequen tly for very short
du rations until plant roots extend into the sur rounding
soil (about four to 12 weeks, depend ing on the season).
Remember, since your system has enou gh emitters to sus-
tain full-grown plants, it may take just a p ortion of the
suggested time to thoroug hly moisten the limited root-
zone of a new plant. Eventually, you will be able to run
your d rip system for a longer du ration, but less frequently.
For example, in June, 496 minut es of watering a re sug gest-
ed. If you are watering daily, you w ould w ater about 16
minu tes per day (496 minu tes/ 30 da ys). If you are water-
ing every three da ys, program a ru ntime of 50 minu tes.
The key to effective water m anagem ent is to
water according to weather changes and soil moisturecontent. The figures in Table 2 are for water ing need s in
norm al, dry, calm w eather. This table will give you an
accurate runtime adjusted for historical monthly weather
patterns in Albuquerqu e. Water bud geting features on
some timers enable you to dial up or dow n the p ercent-
age of your ba se (in this case, peak-season July d eman ds)
watering schedule.
For example, the weather deman ds on a land-
scape in Septem ber are only 62 percent of the dem and s in
July. The w ater bud get feature enables you to m ake a sim -
ple adjustment to all the w atering program s. Water bud -
get ad justm ents can also be foun d in tab le 2.

8/9/2019 Low Volume Irrigation, Drip Irrigation, Design and Installaton Guide
http://slidepdf.com/reader/full/low-volume-irrigation-drip-irrigation-design-and-installaton-guide 16/24
16
LOW-VOLUME IRRIGATION
ADJUSTING FOR MICROCLIMATESTo account for m icroclimates in you r land scape,
like full sun, shad e, next to walls or pav ement, and so
forth, make the following a djustmen ts:
• If the zone is in full sun throughou t the day and/ or it
is surroun ded by pavem ent or rock, increase your run-
times or emitter output by about 25 percent.
• If the zone is in full shade throu ghout the d ay,
decrease your ru ntimes or emitter output by about 25
percent.
IMPORTANT!While design and installation are critical to the prop er per-
formance of a d rip system, regular inspection and manage-
ment are equally necessary to keep your plants healthy and
save water. Please adjust your watering month ly, and then
to actual weath er conditions. If it rains, don’t wat er un til
the soil sufficiently dr ies out. If it’s wind y and you h ave a
zone w ith sprinklers for grass areas, don ’t water u ntil the
wind subsides or in early mornings/ late evenings. In a nor-
mal winter, sup plemental watering may not be needed.
Remember, these suggested runtimes and days per month are guidelines. Watch your landscape for symptoms of over andunderwatering and make watering adjustments accordingly.
If only a few plants seem over or underwatered, consider modifying the number or size of emitters. If most of the plantsseem stressed, adjust the programmed runtime at your timer. More xeriscapes fail from too much water rather than not enough.Overwatered plants are usually yellowed, pale and “ leggy.” Too much water eventually suffocates the roots, causing the plant towilt much as it would if it were underwatered.
With the exception of yellow leaves, underwatered plants may exhibit similar symptoms. If plants wil t in the mid after-noon or curl their leaves, they are probably too dry. The best diagnostic tool is to simply touch the soil around the root zone. Soilshould be as damp as a wrung out sponge, with no excess water. Because most xeric plants evolved in desert regions, they arevery forgiving. You wil l usually have an opportunity to make adjustments before a plant dies.
8/9/2019 Low Volume Irrigation, Drip Irrigation, Design and Installaton Guide
http://slidepdf.com/reader/full/low-volume-irrigation-drip-irrigation-design-and-installaton-guide 17/24
LOW-VOLUME IRRIGATION
17
THE FIRST FOUR WEEKS
During the first four weeks following installation,watch plants carefully for signs of stress. Adjust the
schedu le for each zone if all the plan ts on that
zone appear stressed. If individual plants look stressed,
increase or decrease the number and size of emitters
accordingly to correct over- or und er waterin g. Check the
wetting patterns around individual plants to be sure that
the soil beneath th e surface is moist in at least one-half of
the plan t’s canopy area.
Inspect your filters weekly. Drip em itters have
very small openings, so it’s important to have adequate
filters to p rotect against clogging.
ONGOING MAINTENAN CE
Inspect and clean your filters in the spring and
fall, and more often if necessary. If your filter appea rs
clogged, gently remove the screen from the casing and
scrub it with a soft-bristled tooth brush to remove sed i-
men t. If it’s da maged , replace it.
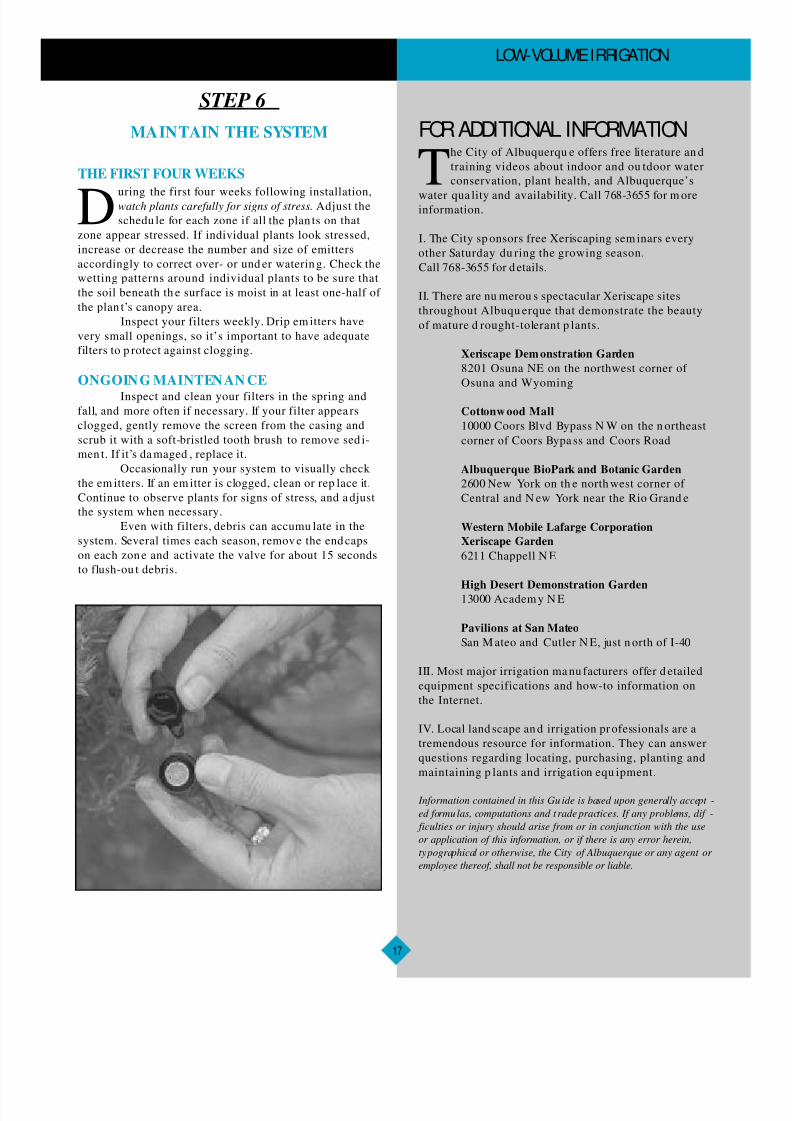
Occasionally run your system to visually check
the em itters. If an em itter is clogged, clean or rep lace it.
Continue to observe plants for signs of stress, and a djust
the system when necessary.
Even with filters, debris can accumu late in the
system. Several times each season, remov e the end caps
on each zon e and activate the valve for about 15 seconds
to flush-ou t debris.
STEP 6
MAINTAIN THE SYSTEM FOR ADDITIONAL INFORMATION
The City of Albuquerqu e offers free literature an d
training videos about indoor and ou tdoor water
conservation, plant health, and Albuquerque’s
water qua lity and availability. Call 768-3655 for m oreinformation.
I. The City sp onsors free Xeriscaping sem inars every
other Saturday du ring the growing season.
Call 768-3655 for d etails.
II. There are nu merou s spectacular Xeriscape sites
throughout Albuqu erque that demonstrate the beauty
of mature d rought-tolerant p lants.
Xeriscape Demonstration Garden
8201 Osuna NE on the northwest corner of
Osuna and Wyoming
Cottonwood Mall
10000 Coors Blvd Bypass N W on the n ortheast
corner of Coors Bypa ss and Coors Road
Albuquerque BioPark and Botanic Garden
2600 New York on th e north west corner of
Central and N ew York near the Rio Grand e
Western Mobile Lafarge Corporation
Xeriscape Garden
6211 Chappell N E
High Desert Demonstration Garden13000 Academ y N E
Pavilions at San Mateo
San M ateo and Cutler N E, just n orth of I-40
III. Most major irrigation ma nu facturers offer d etailed
equipment specifications and how-to information on
the Internet.
IV. Local land scape an d irrigation pr ofessionals are a
tremendous resource for information. They can answer
questions regarding locating, purchasing, planting and
maintaining p lants and irrigation equ ipment.
Information contained in this Gu ide is based upon generally accept -
ed formulas, computations and t rade practices. If any problems, dif -
ficulties or injury should arise from or in conjunction with the use
or application of this information, or if there is any error herein,
typographical or otherwise, the City of Albuquerque or any agent or
employee thereof, shall not be responsible or liable.

8/9/2019 Low Volume Irrigation, Drip Irrigation, Design and Installaton Guide
http://slidepdf.com/reader/full/low-volume-irrigation-drip-irrigation-design-and-installaton-guide 18/24
18
LOW-VOLUME IRRIGATION
PROBLEM POTENTIAL CAUSE SOLUTION
Valve does not operate properly . Check controller to ensure p ower is on.Check that isolation valve is open.
Wrong va lve se lected — flow too low. Replace with correct size valvefor flow.
Valve diaphragm is clogged . Clean or replace d iaphragm.
Solen oid is fa ulty or w ire is sev er ed . Ch eck w ir in g. Rep air or r ep la cesolenoid.
Emitter has uneven or no flow . Line severed up stream of em itter. Check for breaks and rep air.
Filter clogged or inadequate. Check, clean or replace filter .
Emitter clogged or faulty. Flush or replace emitter.
Pressure too high or too low. Check pressure regulation.
Too man y emitters on one lineor line sized improperly for flow. Check and correct.
Tubing comes apart at fittings. Fitting improperly installed . Check and replace.
Pressure too high. Check pressure regulation.
The size of tubing an d fittings is incompat ible. Check and correct.
Emitters come loose from tubing. Emitter installed improperly. Check and replace.
Pressure too high. Check pressure regulation.
Faulty or worn hole punch. Check punch tip and replace.Replace bad section of tubing.Install oversize plu g.
Plant(s) appear stressed. Em itter(s) are on low sid e of slop e. Move em itter(s) to th e highside of slope.
Emitter at plant is clogged. Clean or replace emitter.
Filter is clogged and preven tingflow through the lines. Clean or replace filter.
Br ea k in lin e u p str ea m of t he em it ter . Ch eck for br ea ks a nd rep air.
Runtime inad equate for plant Recalculate water requirem entand / or time of year. and ad just schedule.
Runtime is excessive for plantand/ or time of year. Recalculate and ad just schedule.
Controller faulty, turned off or unplugged. Check controller and reset,repair or replace.
Em itter has strayed from rootzone. Restake or anch or em itterproperly.
TROUBLESHOOTING

8/9/2019 Low Volume Irrigation, Drip Irrigation, Design and Installaton Guide
http://slidepdf.com/reader/full/low-volume-irrigation-drip-irrigation-design-and-installaton-guide 19/24
LOW-VOLUME IRRIGATION
19
INTERVAL ACTION
Design/ installation. Consider accessibility of valves, filters an d emitters for
adjustments or repairs. During installation, ensure that
compon ents are p laced for easy access. Comp letelyflush the system prior to operation to remove all debris.
Be careful to keep p ipe shavings an d bu rrs from PVC
out of the lines.
Weekly during first four weeks of operation. Inspect and clean filters. Establish a cleaning schedu le
based on the am ount of debris found du ring inspections.
Inspect plants for signs of stress. Run system an d
carefully check all emitters for prop er operation.
Listen for running water that could indicate breaks in
lines.
Adjust emitters to ensure th at w etting p atterns are
within p lant rootzones.
After the first two weeks of operation. Flush lines and look for debris in the wa ter, which could
indicate breaks in the lines or failed filters.
Every month Make scheduling adjustments according to historical
weath er data (pa ge 22).
Every one or two months. Examine and clean filters. Replace filters if necessary.Walk through your landscape and look for signs of plant
stress. Check all emitters for location an d flow.
Adjust, clean or rep lace emitters as requ ired.
Every two to four months. Flush all lines. Examine w ater samp le for d ebris.
Flush until water runs clear (should only take a few
seconds).
Spring and Fall Inspect drip or sp rinkler system for leaks or breaks.
Clean filter screens.
RECOMMENDED MAINTENANCE
8/9/2019 Low Volume Irrigation, Drip Irrigation, Design and Installaton Guide
http://slidepdf.com/reader/full/low-volume-irrigation-drip-irrigation-design-and-installaton-guide 20/24
20
LOW-VOLUME IRRIGATION
1/ 2 or 3/ 4-inch tubing
A low-volume d istribution component typically used to
bring w ater from a riser into a hyd rozone. Self-piercing
emitters punch directly into this tubing.
1/ 4-inch tubing
A low-volume d istribution component typ ically used to
bring water directly to the plants (in runs no longer
than 5 feet). Also know n as “spagh etti” tubing.
Backflow preventer
A device that stops water in the irrigation system from
backing up into the water supply du ring a sudd en loss
of pressure. Required by code in one form or anoth er,
these devices protect public health and safety by pre-
venting water system contamination and pollution.
Clock
See “Controller.”
Controller/ Timer/ Clock
A device used to program days of the week, times of
day and num ber of minutes, to autom atically irrigate
your land scape according to seasonal weather and
plant needs. Controllers communicate with your valves
via field w iring.
Drip emitter
A low-volum e emission d evice that d elivers water at
low flow rates. Drip emitters are used to apply w ater
directly to an individual plant rootzone.
FilterA device used to screen d irt and d ebris from the w ater.
Filters are important in low-volume systems because
the sm all emitters can easily become clogged.
Flow
The amount of water, usually m easured in gallons per
minute or gallons per hour, that can pass through an
irrigation system.
GPD
An abbrev iation for Gallons Per Day as required by
landscape plants, and used to formulate irrigation
schedules.
GPH
An abbrev iation for Gallons Per Hour, a measu re of the
flow of water through an irrigation system. GPH is typ-
ically used to m easure flow in low-volum e irrigation
systems.
GPM
An abbrev iation for Gallons Per Minu te, a measure of the
flow of wa ter throu gh an irrigation system. GPM is typi-
cally used to measu re flow in conven tional irrigation sys-
tems.
Hydrant
See “M ulti-outlet emission device.”
Hydrozone
A group of plants with similar water requirements served
by one irrigation valve.
Low-volume irrigation
A type of watering system (drip, bubblers, microspray,
soaker hose) in w hich a precise amoun t of water is
app lied directly to the rootzones of plants.
MainlinePressurized p ipe that run s from th e water source to the
valve manifold, generally und er continuous p ressure.
Manifold
A constructed base of PVC pipe consisting of “tees”
spaced at sp ecific intervals onto which ind ividua l valves
are attached.
Microclimate
Areas on a property that have slightly different exposures
to sun, wind , heat, humidity and precipitation.
Multi-outlet emission device
A low-volume emission d evice that contains several dripemitters connected to 1/ 4-inch distribution tubing. The
tubing is then run to several different plants.
Poly pipe
Polyethylene is black flexible pip e pop ular in Xeriscape
app lications. Poly fittings don’t require glue.
Pressure regulator
A device that redu ces the water pressure in low-volume
control zones to a level the system can han dle, usually
between 15 and 60 pou nd s per squa re inch (PSI).
PVC pipe
Is white in color, is comm only used for irrigation m ain-
lines and valve manifolds, and is more rigid than the
black or brown poly pipe .
GLOSSA RY

8/9/2019 Low Volume Irrigation, Drip Irrigation, Design and Installaton Guide
http://slidepdf.com/reader/full/low-volume-irrigation-drip-irrigation-design-and-installaton-guide 21/24
LOW-VOLUME IRRIGATION
21
Runtime
The num ber of minutes a zone on your irrigation system
should run each time you w ater. Runtimes should be
ad justed each mon th, as well as any time there is signifi-
cant r ainfall.
Schedule
A program or series of programs assigned to the con-
troller that determines the frequency and du ration of
landscape watering. Schedules should be regularly
adjusted a ccording to w eather — at least monthly.
Soil types
Types of soil d etermined by th eir composition. Soil is
mad e up of sand, silt and clay particles, the percentage of
each determ ines the soil type. Soil type w ill affect your
irrigation design and watering schedule.
Station
Location on the controller that op erates an electric valve.
(i.e. station #1 = valve #1, station # 2 = valve #2)
Timer
See “Controller.”
Valve
A device that opens and closes to allow p ressurized w ater
to flow throu gh p ipes.
Valve box
An u ndergroun d enclosure that p rotects the electrical com-
ponents of valves from m oisture and other dam age, and
prov ides accessibility for adjustm ents and repairs.
Water meter
A measuring device installed and ow ned by the City that
records the am ount of water delivered to the p roperty.
GLOSSA RY

8/9/2019 Low Volume Irrigation, Drip Irrigation, Design and Installaton Guide
http://slidepdf.com/reader/full/low-volume-irrigation-drip-irrigation-design-and-installaton-guide 22/24
22
LOW-VOLUME IRRIGATION
AlbuquerqueWater
Minutes Minutes BudgetMonth per month per week SettingJanuary 20 5 5%
February 34 8 9%March 76 19 20%April 146 37 38%May 243 61 64%June 337 84 89%July 380 95 100%August 341 85 90%September 234 59 62%October 133 33 35%November 49 12 13%December 24 6 6%
CarlsbadWater
M inutes M inutes BudgetMonth per month per week SettingJanuary 28 7 7%February 41 10 11%March 89 22 23%April 164 41 42%May 262 66 68%June 360 90 93%July 388 97 100%August 353 88 91%September 248 62 64%October 150 38 39%November 62 15 16%December 35 9 9%
ClovisWater
M inutes M inutes BudgetMonth per month per week Setting
January 19 5 5%February 29 7 8%March 67 17 18%April 134 33 36%May 228 57 62%June 330 82 89%July 371 93 100%August 334 83 90%September 226 56 61%October 128 32 35%November 48 12 13%December 24 6 6%
GallupWater
Minutes Minutes BudgetMonth per month per week Setting
January 0 0 0%February 17 4 5%March 46 11 14%April 99 25 30%May 178 45 55%June 262 66 80%July 326 81 100%August 284 71 87%September 189 47 58%October 101 25 31%November 32 8 10%December 0 0 0%
GrantsWater
M inutes M inutes BudgetMonth per month per week SettingJanuary 14 3 5%
February 22 5 7%March 52 13 17%April 99 25 33%May 171 43 57%June 257 64 86%July 300 75 100%August 262 65 87%September 181 45 60%October 102 25 34%November 38 9 13%December 19 5 6%
Las CrucesWater
Minutes M inutes BudgetMonth per month per week SettingJanuary 30 7 7%February 44 11 11%March 94 24 23%April 165 41 41%May 262 65 64%June 366 91 90%July 406 101 100%August 360 90 89%September 258 65 64%October 157 39 39%November 66 16 16%December 36 9 9%
MountainairWater
M inutes M inutes BudgetMonth per month per week Setting
January 14 3 5%February 22 5 7%March 52 13 18%April 103 26 35%May 176 44 61%June 257 64 89%July 290 73 100%August 255 64 88%September 180 45 62%October 101 25 35%November 38 9 13%December 19 5 6%
Santa FeWater
M inutes M inutes BudgetMonth per month per week Setting
January 0 0 0%February 16 4 6%March 36 9 13%April 83 21 31%May 149 37 56%June 226 56 84%July 267 67 100%August 239 60 89%September 160 40 60%October 86 22 32%November 28 7 10%December 0 0 0%
WATER BUDGET SETTINGS FOR VARIOUS N EW MEXICO CITIES
Evapotranspiration (ET) data provided by Toro Company.Represented as inches of moisture. Rainfall based upon 30 year average.

8/9/2019 Low Volume Irrigation, Drip Irrigation, Design and Installaton Guide
http://slidepdf.com/reader/full/low-volume-irrigation-drip-irrigation-design-and-installaton-guide 23/24

8/9/2019 Low Volume Irrigation, Drip Irrigation, Design and Installaton Guide
http://slidepdf.com/reader/full/low-volume-irrigation-drip-irrigation-design-and-installaton-guide 24/24
CITY OF ALBUQUERQUE
Jim Baca, Mayor
PUBLIC WORKS DEPARTMENT
Larry Blair, Director
WATER RESOURCES DIVISION
John Stomp , Manager
Jean Witherspoon , Water Conservation Officer
ALBUQUERQUE CITY COUN CIL
President Michael Brasher, District 9
Vice President
Alan B. Arm ijo, District 1
Vincent Griego, District 2
Adele Baca-Hu nd ley, District 3
Brad Winter, District 4
Tim Kline, District 5
Hess Yntem a, District 6
Mike McEntee, District 7
Greg Payne, District 8
City of Albuquerque
Public Works Department
Water Resources Division
Water Conservation Office
768-3655
768-2477 TTY
or Relay NM 1-800-659-8331
www.cabq.gov / resources /