low level measurements handbook - 7th edition · ohmmeter circuits, low resistance ohmmeter...
TRANSCRIPT

Low Level Measurements Handbook - 7th EditionPrecision DC Current, Voltage, and Resistance Measurements

Low Level Measurements
HandbookPrecision DC Current, Voltage, and Resistance Measurements
S E V E N T H E D I T I O N

Low Level Measurements Handbook iii
Con t en ts
SECTION 1 Low Level DC Measuring Instruments1.1 Introduction ...............................................................................................1-3
1.2 Theoretical Measurement Limits ..........................................................1-3
1.3 Instrument Definitions ............................................................................1-51.3.1 The Electrometer ......................................................... 1-51.3.2 The DMM ......................................................................1-71.3.3 The Nanovoltmeter .......................................................1-71.3.4 The Picoammeter ......................................................... 1-81.3.5 The Source Measure Unit Instrument ......................... 1-81.3.6 The Low Current Preamp ............................................ 1-91.3.7 The Micro-ohmmeter ................................................... 1-91.3.8 The Low Current Source ............................................. 1-9
1.4 Understanding Instrument Specifications ....................................... 1-101.4.1 Definition of Accuracy Terms .....................................1-101.4.2 Accuracy ......................................................................1-111.4.3 Deratings .....................................................................1-151.4.4 Noise and Noise Rejection ..........................................1-151.4.5 Speed ..........................................................................1-17
1.5 Circuit Design Basics ............................................................................. 1-171.5.1 Voltmeter Circuits .......................................................1-171.5.2 Ammeter Circuits ........................................................1-191.5.3 Coulombmeter Circuit ................................................1-231.5.4 High Resistance Ohmmeter Circuits ..........................1-241.5.5 Low Resistance Ohmmeter Circuits............................1-261.5.6 Complete Instruments ............................................... 1-28
SECTION 2 Measurements from High Resistance Sources2.1 Introduction ...............................................................................................2-2
2.2 Voltage Measurements from High Resistance Sources ...................2-22.2.1 Loading Errors and Guarding ...................................... 2-32.2.2 Insulation Resistance of the Test Circuit ....................2-11
2.3 Low Current Measurements ................................................................ 2-152.3.1 Leakage Currents and Guarding ................................2-152.3.2 Noise and Source Impedance .....................................2-212.3.3 Zero Drift ................................................................... 2-232.3.4 Generated Currents ................................................... 2-232.3.5 Voltage Burden ...........................................................2-31

iv
2.3.6 Overload Protection ................................................... 2-332.3.7 AC Interference and Damping ................................... 2-342.3.8 Using a Coulombmeter to Measure Low Current ..... 2-35
2.4 High Resistance Measurements ......................................................... 2-392.4.1 Constant-Voltage Method ........................................... 2-402.4.2 Constant-Current Method ......................................... 2-41
2.5 Charge Measurements.......................................................................... 2-462.5.1 Error Sources ............................................................. 2-472.5.2 Zero Check ................................................................. 2-482.5.3 Extending the Charge Measurement Range
of the Electrometer .................................................... 2-48
2.6 General Electrometer Considerations............................................... 2-492.6.1 Making Connections .................................................. 2-502.6.2 Electrostatic Interference and Shielding ....................2-512.6.3 Environmental Factors ............................................... 2-552.6.4 Speed Considerations ................................................ 2-562.6.5 Johnson Noise ............................................................ 2-622.6.6 Device Connections ................................................... 2-662.6.7 Analog Outputs .......................................................... 2-692.6.8 Floating Input Signals .................................................2-70
2.7 High Impedance Measurement Optimization Summary .............. 2-71
SECTION 3 Measurements from Low Resistance Sources3.1 Introduction ...............................................................................................3-2
3.2 Low Voltage Measurements ...................................................................3-23.2.1 Effects of Error Sources on Voltage Measurements .... 3-23.2.2 Thermoelectric EMFs ................................................... 3-33.2.3 Internal Offsets ............................................................ 3-73.2.4 Zero Drift ..................................................................... 3-73.2.5 RFI/EMI ........................................................................ 3-93.2.6 Johnson Noise .............................................................3-103.2.7 1/f Noise ......................................................................3-113.2.8 Line Cycle Interference and Line Cycle Integration .. 3-123.2.9 Magnetic Fields .......................................................... 3-133.2.10 Ground Loops .............................................................3-143.2.11 Ways to Reduce Noise .................................................3-163.2.12 Common-Mode Current and Reversal Errors ............3-17

Low Level Measurements Handbook v
3.3 Low Resistance Measurements .......................................................... 3-183.3.1 Lead Resistance and Four-Wire Method .................... 3-183.3.2 Thermoelectric EMFs and
Offset Compensation Methods .................................. 3-203.3.3 Non-Ohmic Contacts ................................................. 3-253.3.4 Device Heating ........................................................... 3-263.3.5 Dry Circuit Testing ..................................................... 3-273.3.6 Testing Inductive Devices .......................................... 3-28
3.4 Measurement Optimization Summary for Low Impedance Measurements ......................................................... 3-29
SECTION 4 Applications4.1 Introduction ..............................................................................................4-2
4.2 Applications for Measuring Voltage from High Resistance Sources ........................................................................4-24.2.1 Capacitor Dielectric Absorption ................................. 4-24.2.2 Electrochemical Measurements .................................. 4-6
4.3 Low Current Measurement Applications ...........................................4-94.3.1 Capacitor Leakage Measurements .............................. 4-94.3.2 Low Current Diode Measurements .......................... 4-134.3.3 Low Current Measurements of MOSFETs ...................4-164.3.4 Light Measurements with Photomultiplier Tubes ..... 4-184.3.5 Ion Beam Measurements .......................................... 4-214.3.6 Photoconductive Current of PIN Photodiode ........... 4-234.3.7 Avalanche Photodiode Reverse Bias Current
Measurements ............................................................ 4-244.3.8 Current-Voltage Characterization of
Carbon Nanotube (CNT) FETs .................................. 4-26
4.4 High Resistance Measurement Applications .................................. 4-284.4.1 Surface Insulation Resistance Testing of
Printed Circuit Boards .............................................. 4-284.4.2 Resistivity Measurements of Insulating Materials .... 4-304.4.3 Resistivity Measurements of Semiconductors .......... 4-344.4.4 Voltage Coefficient Testing of High Ohmic
Value Resistors ..........................................................4-44
4.5 Charge Measurement Applications .................................................. 4-454.5.1 Capacitance Measurements ...................................... 4-45

vi
4.5.2 Using a Faraday Cup to Measure Static Charge on Objects ................................................................. 4-46
4.6 Low Voltage Measurement Applications ........................................ 4-484.6.1 Standard Cell Comparisons ...................................... 4-484.6.2 High Resolution Temperature Measurements
and Microcalorimetry ............................................... 4-504.6.3 Hall Voltage and Resistivity Measurements
of a Six-Terminal Bridge Sample ................................ 4-53
4.7 Low Resistance Measurement Applications .................................. 4-544.7.1 Contact Resistance .................................................... 4-544.7.2 Superconductor Resistance Measurements .............. 4-574.7.3 Resistivity Measurements of Conductive Materials .. 4-59
SECTION 5 Low Level Instrument Selection Guide5.1 Introduction ...............................................................................................5-2
5.2 Instrument and Accessory Selector Guides........................................5-2
APPENDIX A Cable and Connector Assembly
APPENDIX B Glossary
APPENDIX C Safety Considerations Test System Safety ...................................................................................C-2
General Safety Considerations .............................................................C-2
INDEX

S E C T I O N 1
Low Level DC Measuring
Instruments

1-2 SECTION 1
FIGURE 1-1: Standard Symbols Used in this Text
UnitSymbol Quantity
Quantities
VAΩCsWF
HzK
EMFcurrent
resistancechargetime
powercapacitancefrequency
temperature
voltsamperes
ohmscoulombsseconds
wattsfarads
cycles/sKelvin
PrefixSymbol Exponent
Prefixes
yzafpnµm
(none)kMGTPEZY
yocto-zepto-atto-
femto-pico-nano-micro-milli-
(none)kilo-
mega-giga-tera-peta-exa-
zetta-yotta-
10–24
10–21
10–18
10–15
10–12
10–9
10–6
10–3
100
103
106
109
1012
1015
1018
1021
1024

Low Level DC Measuring Instruments 1-3
1.1 IntroductionDC voltage, DC current, and resistance are measured most often with digital multimeters (DMMs). Generally, these instruments are adequate for meas urements at signal levels greater than 1µV or 1µA, or less than 1GW. (See Figure 1-1 for standard symbols used in this text.) However, they don’t approach the theoretical limits of sensitivity. For low level signals, more sensitive instruments such as electrometers, picoammeters, and nanovoltmeters must be used.
Section 1 offers an overview of the theoretical limits of DC measure-ments and the instruments used to make them. It includes instrument descriptions and basic instrument circuit designs. For easier reference, this information is organized into a number of subsections:
1.2 Theoretical Measurement Limits: A discussion of both the theoretical measurement limitations and instrument limitations for low level meas urements.
1.3 Instrument Definitions: Descriptions of electrometers, DMMs, nano-voltmeters, picoammeters, source measure unit (SMU) instruments, SourceMeter® Source Measure Unit (SMU) Instruments, low current preamps, and micro-ohm meters.
1.4 Understanding Instrument Specifications: A review of the terminology used in instrument specifications, such as accuracy (resolution, sensi-tivity, transfer stability), deratings (temperature coefficient, time drift), noise (NMRR and CMRR), and speed.
1.5 Circuit Design Basics: Describes basic circuit design for voltmeter circuits, ammeter circuits, coulombmeter circuit, high resistance ohmmeter circuits, low resistance ohmmeter circuits, and complete instrument block diagrams.
1.2 Theoretical Measurement LimitsThe theoretical limit of sensitivity in any measurement is determined by the noise generated by the resistances present in the circuit. As discussed in Sections 2.6.5 and 3.2.6, voltage noise is proportional to the square root of the resistance, bandwidth, and absolute temperature. Figure 1-2 shows theoretical voltage measurement limits at room temperature (300K) with a response time of 0.1 second to ten seconds. Note that high source resist-ance limits the theoretical sensitivity of the voltage measurement. Although it’s certainly possible to measure a 1µV signal that has a 1W source resist-ance, it’s not possible to measure that same 1µV signal level from a 1TW source. Even with a much lower 1MW source resistance, a 1µV measure-ment is near theoretical limits, so it would be very difficult to make using an ordinary DMM.
In addition to having insufficient voltage or current sensitivity (most DMMs are no more sensitive than 1µV or 1nA per digit), DMMs have high

1-4 SECTION 1
input bias current1 when measuring voltage and lower input resistance compared to more sensitive instruments intended for low level DC meas-urements. These characteristics cause errors in the measurement; refer to Sections 2 and 3 for further discussion of them.
Given these DMM characteristics, it’s not possible to use a DMM to meas ure signals at levels close to theoretical measurement limits, as shown in Figure 1-3. However, if the source resistance is 1MW or less, or if the desired resolution is no better than 0.1µV (with low source resistance), the signal level isn’t “near theoretical limits,” a DMM is adequate. If better voltage sensitivity is desired, and the source resistance is low (as it must be because of theoretical limitations), a nanovoltmeter provides a means of measuring at levels much closer to the theoretical limits of meas ure ment. With very high source resistance values (for example, 1TW), a DMM isn’t a suitable voltmeter. DMM input resistance ranges from 10MW to 10GW—several orders of magnitude less than a 1TW source resistance, resulting in severe input loading errors. Also, input currents are typically many pico-amps, creating large voltage offsets. However, because of its much higher input resistance, an electrometer or high impedance SMU instrument can make voltage measurements at levels that approach theoretical limits. A similar situation exists for low level current measurements; DMMs gener-
1 Input current flows in the input lead of an active device or instrument. With voltage meas ure ments, the input current is ideally zero; thus, any input current represents an error. With current measure-ments, the signal current becomes the input current of the measuring instrument. However, some background current is always present when no signal current is applied to the instrument input. This unwanted current is the input bias current (often called just the offset current) of the instrument.
The source and test connections can also generate unwanted offset currents and offset voltages. A leakage current is another unwanted error current resulting from voltage across an undesired
resist ance path (called leakage resistance). This current, combined with the offset current, is the total error current.
FIGURE 1-2: Theoretical Limits of Voltage Measurements
103
100
10—3
10—6
10—9
10—12
1kV
1V
1mV
1µV
1nV
1pV
100 103 106 109 1012
1Ω 1kΩ 1MΩ 1GΩ 1TΩ
Within theoretical limits
Near theoretica
l limits
Prohibitedby noise
NoiseVoltage
Source Resistance

Low Level DC Measuring Instruments 1-5
ally have a high input voltage drop (input burden), which affects low level current measurements, and DMM resolution is generally no better than 1nA. Thus, an electrometer or picoammeter with its much lower input burden and better sensitivity will operate at levels much closer to the the-oretical (and practical) limits of low current meas urements.
1.3 Instrument DefinitionsA number of different types of instruments are available to make DC meas-urements, including electrometers, DMMs, nanovoltmeters, picoammeters, source measure unit (SMU) instruments, low current preamps, micro-ohm-meters, and low current sources. The following paragraphs discuss and compare the important characteristics of these instruments.
1.3.1 The Electrometer
An electrometer is a highly refined DC multimeter. As such, it can be used for many measurements performed by a conventional DC multimeter. Additionally, an electrometer’s special input characteristics and high sen-sitivity allow it to make voltage, current, resistance, and charge measure-ments far beyond the capabilities of a conventional DMM.
An electrometer must be used when any of the following condi-tions exist:
1. The task requires an extended measurement range unavailable with conventional instruments, such as for detecting or measuring:
• Currents less than 10nA (10–8A).
• Resistances greater than 1GW (109W).
FIGURE 1-3: Typical Digital Multimeter (DMM), Nanovoltmeter (nVM), and Electrometer Limits of Measurement at Various Source Resistances
100
10–3
10–6
10–9
10–12
1V
1mV
1μV
1nV
1pV
100 103 106 109 1012
1Ω 1kΩ 1MΩ 1GΩ 1TΩ
NoiseVoltage
Source Resistance
1015
1PΩ
DMM
Electrometer
nVM
10–3
1mΩ

1-6 SECTION 1
2. Circuit loading must be minimized, such as when:
• Measuring voltage from a source resistance of 100MW or higher.
• Measuring current when input voltage drop (burden) of less than a few hundred millivolts is required (when measuring currents from sources of a few volts or less).
3. Charge measurement is required.
4. Measuring signals at or near Johnson noise limitations (as indicated in Figure 1-2).
Electrometers have four functions: voltmeter, ammeter, ohmmeter, and coulombmeter.
Voltmeter Function
The input resistance of an electrometer voltmeter is extremely high, typ-ically greater than 100TW (1014W). Furthermore, the input bias current is less than 3fA (3×10–15A). These characteristics describe a device that can measure voltage with a very small amount of circuit loading.
Because of the high input resistance and low input bias current, the electrometer voltmeter has minimal effect on the circuit being measured. As a result, the electrometer can be used to measure voltage in situations where an ordinary multimeter would be unusable. For example, the elec-trometer can measure the voltage on a 500pF capacitor without significant-ly discharging the device; it can also measure the potential of piezoelectric crystals and high impedance pH electrodes. Electrometer voltmeters are also used to measure the resistivity of high resistance semiconductor materials.
Ammeter Function
As an ammeter, the electrometer is capable of measuring extremely low currents, limited only by theoretical limits or by the instrument’s input bias current. It also has a much lower voltage burden than conventional DMMs.
With its extremely low input bias current and minimal input voltage burden, it can detect currents as low as 1fA (10–15A). Because of this high sensitivity, it’s suitable for measuring ion beam current, dark current of photodiodes, gate leakage current, and current output of mass spectrom-eters and other devices.
Ohmmeter Function
An electrometer may measure resistance by using either a constant-current or a constant-voltage method. If using the constant-current method, the electrometer’s high input resistance and low offset current enables meas-urements up to 200GW. When using the constant-voltage method, the electrometer applies a constant voltage to the unknown resistance, meas-ures the current, and then calculates the resistance. This is the preferred method because it allows the unknown resistor to be tested at a known voltage. An electrometer can measure resistances up to 10PW (1016W) using

Low Level DC Measuring Instruments 1-7
this method. The constant-voltage method is used to measure the resistivity of insulators and the insulation resistance of devices such as cables, con-nectors, and printed circuit boards.
Coulombmeter Function
Current integration and measurement of charge are electrometer coulomb-meter capabilities not found in multimeters. The electrometer coulombme-ter can detect charge as low as 10fC (10–14C). It’s equivalent to an active integrator and, therefore, has low voltage burden, typically less than 100µV.
The coulombmeter function can measure lower currents than the ammeter function can because no noise is contributed by internal resistors. Currents as low as 1fA (10–15A) may be detected using this function. See Section 2.3.8 for further details. The coulombmeter function can be used with a Faraday cage to measure charge on objects or can be used to meas-ure capacitance using a DC voltage.
1.3.2 The DMMDigital multimeters vary widely in performance, from low cost handheld 31⁄2-digit units to 81⁄2-digit high precision system DMMs. Although there are many models available from a wide variety of manufacturers, none approaches the theoretical limits of measurement discussed previously. These limitations don’t imply that DMMs are inadequate instruments; they simply point out the fact that the vast majority of measurements are made at levels far from theoretical limits, and DMMs are designed to meet these more conventional meas urement needs.
Although low level measurements are by definition those that are close to theoretical limits, and are thus outside the range of DMMs, advances in technology are narrowing the gap between DMMs and dedicated low level instruments. For example, the most sensitive DMMs can detect DC voltages as low as 10nV, resolve DC currents down to 10pA, and measure resistances as low as 100µW and as high as 1GW. Although these characteristics still fall far short of the corresponding capabilities of more sensitive instruments like the electrometer described previously, all the measurement theory and accuracy considerations in this book apply to DMM measurements, as well as to nanovoltmeter, picoammeter, electrometer, or SMU instrument meas-urements. The difference is only a matter of degree; when making meas-urements close to theoretical limits, all measurement considerations are vitally important. When measuring at levels far from theoretical limits, only a few basic considerations (accuracy, loading, etc.) are generally of concern.
1.3.3 The NanovoltmeterA nanovoltmeter is a very sensitive voltage meter. As shown in Figure 1-3, this type of instrument is optimized to provide voltage measurements near the theoretical limits from low source resistances, in contrast to the electrometer, which is optimized for use with high source resistances. Compared to an electrometer, the voltage noise and drift are much lower,

1-8 SECTION 1
and the current noise and drift are much higher. Input resist ance is usually similar to that of a DMM and is much lower than that of an electrometer.
As is the case with electrometers, nanovoltmeters are just as easy to operate as DMMs. Their distinguishing characteristic is their voltage sensitivity, which can be as good as 1nV down to a few picovolts. Most nanovolt meters aren’t multifunction instruments and are correspondingly less complex than electrometers.
1.3.4 The PicoammeterA picoammeter is an ammeter built along the lines of the ammeter function of an electrometer. When compared with an electrometer, a picoammeter has a similar low voltage burden, similar or faster speed, less sensitivity, and a lower price. It may also have special characteristics, such as high speed logarithmic response or a built-in voltage source.
1.3.5 The Source Measure Unit InstrumentSource measure unit (SMU) instruments, including Keithley’s SourceMeter® SMU instruments, combine measuring and sourcing capabilities and can provide four basic functions: measure voltage, measure current, source voltage, and source current. These functions can be used separately or together in the following combinations: simultaneously source voltage and measure current or simultaneously source current and measure voltage. The addition of four-quadrant sourcing functions makes these instruments more convenient and versatile than using separate instruments for appli-cations such as generating I-V curves of semiconductors and other types of devices.
Some SMU instruments may have a number of electrometer-like characteristics that make them suitable for low level measurements. For example, they provide very high input resistance (typically 100TW or more), minimizing circuit loading when making voltage measurements from high impedance sources. Their current measurement sensitivity is also similar to that of the electrometer picoammeter—typically as low as 10fA. Instruments with triax connectors also allow making extremely low noise measurements; banana jacks are usually available for more general- purpose or high throughput production test measurements.
Sweep capabilities are another important advantage that many of these instruments offer. Either voltage or current can be swept across the desired range at specified increments, and the resulting current or voltage can be measured at each step. Built-in source-delay-measure cycles allow optimiz-ing measurement speed while ensuring sufficient circuit settling time to maintain measurement integrity.
SMU instruments can display resistance measurements directly, as well as voltage and current. Unlike a digital multimeter (DMM), which can make a measurement at only one point, an SMU instrument can generate a family of I-V curves, because it has a built-in source. This is especially useful when
Low Level DC Measuring Instruments 1-9
studying semiconductor devices and making materials measurements. When used as a current source, an SMU instrument can be used in conjunc-tion with a nanovoltmeter to measure very low resistances by automatically reversing the polarity of the source to correct for offsets.
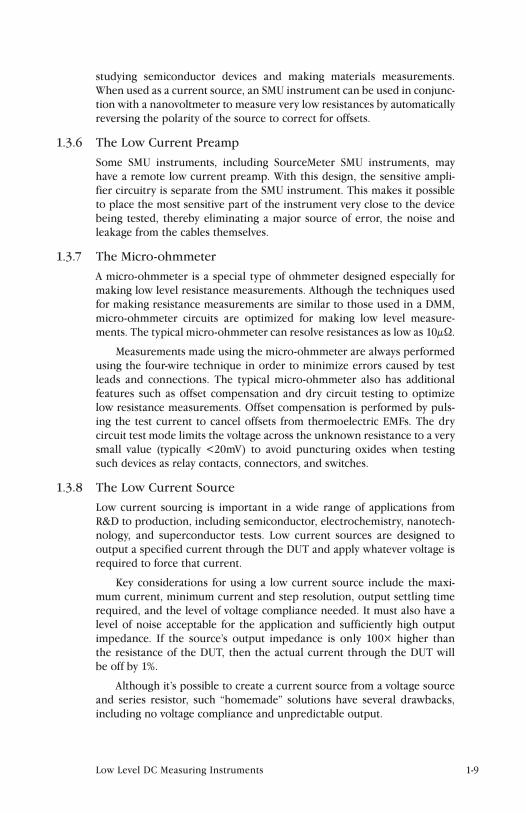
1.3.6 The Low Current Preamp
Some SMU instruments, including SourceMeter SMU instruments, may have a remote low current preamp. With this design, the sensitive ampli-fier circuitry is separate from the SMU instrument. This makes it possible to place the most sensitive part of the instrument very close to the device being tested, thereby eliminating a major source of error, the noise and leakage from the cables themselves.
1.3.7 The Micro-ohmmeter
A micro-ohmmeter is a special type of ohmmeter designed especially for making low level resistance measurements. Although the techniques used for making resistance meas urements are similar to those used in a DMM, micro-ohmmeter circuits are optimized for making low level measure-ments. The typical micro-ohmmeter can resolve resistances as low as 10µW.
Measurements made using the micro-ohmmeter are always performed using the four-wire technique in order to minimize errors caused by test leads and connections. The typical micro-ohmmeter also has additional features such as offset compensation and dry circuit testing to optimize low resistance measurements. Offset compensation is performed by puls-ing the test current to cancel offsets from thermoelectric EMFs. The dry circuit test mode limits the voltage across the unknown resistance to a very small value (typically <20mV) to avoid puncturing oxides when testing such devices as relay contacts, connectors, and switches.
1.3.8 The Low Current Source
Low current sourcing is important in a wide range of applications from R&D to production, including semiconductor, electrochemistry, nanotech-nology, and superconductor tests. Low current sources are designed to output a specified current through the DUT and apply whatever voltage is required to force that current.
Key considerations for using a low current source include the maxi-mum current, minimum current and step resolution, output settling time required, and the level of voltage compliance needed. It must also have a level of noise acceptable for the application and sufficiently high output impedance. If the source’s output impedance is only 100× higher than the resistance of the DUT, then the actual current through the DUT will be off by 1%.
Although it’s possible to create a current source from a voltage source and series resistor, such “homemade” solutions have several drawbacks, including no voltage compliance and unpredictable output.

1-10 SECTION 1
1.4 Understanding Instrument SpecificationsKnowing how to interpret instrument specifications properly is an import-ant aspect of making good low level measurements. Although instrument accuracy is probably the most important of these specifications, there are several other factors to consider when reviewing specifications, including noise, deratings, and speed.
1.4.1 Definition of Accuracy Terms
This section defines a number of terms related to instrument accuracy. Some of these terms are further discussed in subsequent paragraphs. Table 1-1 summarizes conversion factors for various unit specifications associat-ed with instruments.
TABLE 1-1: Specification Conversion Factors
Percent PPM Digits Bits dBPortion of 10V
Number of time constants to settle to rated accuracy
10% 100000 1 3.3 –20 1 V 2.3
1% 10000 2 6.6 –40 100 mV 4.6
0.1% 1000 3 10 –60 10 mV 6.9
0.01% 100 4 13.3 –80 1 mV 9.2
0.001% 10 5 16.6 –100 100 μV 11.5
0.0001% 1 6 19.9 –120 10 μV 13.8
0.00001% 0.1 7 23.3 –140 1 μV 16.1
0.000001% 0.01 8 26.6 –160 100 nV 18.4
0.000001% 0.001 9 29.9 –180 10 nV 20.7
SENSITIVITY - the smallest change in the signal that can be detected.
RESOLUTION - the smallest portion of the signal that can be observed.
REPEATABILITY - the closeness of agreement between successive measure-ments carried out under the same conditions.
REPRODUCIBILITY - the closeness of agreement between measurements of the same quantity carried out with a stated change in conditions.
ABSOLUTE ACCURACY - the closeness of agreement between the result of a meas urement and its true value or accepted standard value, taking into account the uncertainty of the standard value.
RELATIVE ACCURACY - the closeness of agreement between the result of a measurement and its true value or accepted standard value but with-out taking the uncertainty of the standard value into account.
ERROR - the deviation (difference or ratio) of a measurement from its true value. Note that true values are by their nature indeterminate.

Low Level DC Measuring Instruments 1-11
RANDOM ERROR - the mean of a large number of measurements influ-enced by random error matches the true value.
SYSTEMATIC ERROR - the mean of a large number of measurements influ-enced by systematic error deviates from the true value.
UNCERTAINTY - an estimate of the bounded interval around the measured value, which is likely to contain the true value.
“Precision” is a more qualitative term than many of those defined here. It is often applied in the context of repeatability or reproducibility, but it shouldn’t be used in place of “accuracy.”
1.4.2 Accuracy
One of the most important considerations in any measurement situation is reading accuracy. For any given test setup, a number of factors can affect accuracy. The most important factor is the accuracy of the instrument itself, which may be specified in several ways, including a percentage of full scale, a percentage of reading, or a combination of both. Instrument accuracy aspects are covered in the following paragraphs.
Other factors such as input loading, leakage resistance, electrostatic interference, and thermoelectric EMFs may also have a serious impact on overall accuracy. These and many other important measurement consider-ations are discussed in detail in Sections 2 and 3.
Measurement Instrument Specifications
A typical expression of accuracy is ±(gain error + offset error). However, manufacturers can use different formats to express accuracy, so it can be difficult to compare instruments. Gain and offset errors are sometimes combined into a specification that expresses accuracy in terms of a percent-age and counts or parts per million.
The graph in Figure 1-4 shows the relationship of the offset and gain errors over a measurement range. Note that the offset error is constant over a particular range. When the reading is at a lower percentage of full scale of range, the offset error is the dominant term. When a reading is taken near the full-scale value of a selected range, the gain error becomes significant.
Instrument accuracy is often specified as a percentage of reading, plus a percentage of range (or a number of counts of the least significant digit). For example, a typical DMM accuracy specification may be stated as: ±(0.005% of reading + 0.002% of range). The percentage of reading term represents the gain error and the percentage of range term is the offset term.
Accuracy may also be specified in ppm (parts per million). Typically, this accuracy specification is given as ±(ppm of reading + ppm of range). For example, the DC voltage accuracy of a higher resolution DMM might be specified as ±(25ppm of reading + 5ppm of range).

1-12 SECTION 1
Resolution
The resolution of a digital instrument is determined by the number of counts that can be displayed, which depends on the number of digits. A typical digital electrometer might have 51⁄2 digits, meaning five whole digits (each with possible values between 0 and 9) plus a leading half digit that can take on the values 0 or ±1. Thus, a 51⁄2-digit display can show 0 to 199,999, a total of 200,000 counts. The resolution of the display is the ratio of the smallest count to the maximum count (1/200,000 or 0.0005% for a 51⁄2-digit display).
For example, the specification of ±(0.05% + 1 count) on a 41⁄2-digit meter reading 10.000 volts corresponds to a total error of ±(5mV + 1mV) or ±6mV out of 10V, or ±(0.05% of reading + 0.01% of range), totaling ±0.06%. Generally, the higher the resolution, the better the accuracy.
Sensitivity
The sensitivity of a measurement is the smallest change of the measured signal that can be detected. For example, voltage sensitivity may be 1µV, which simply means that any change in input signal less than 1µV won’t show up in the reading. Similarly, a current sensitivity of 10fA implies that only changes in current greater than that value will be detected.
The ultimate sensitivity of a measuring instrument depends on both its resolution and the lowest measurement range. For example, the sensitivity of a 51⁄2-digit DMM with a 200mV measurement range is 1µV.
Absolute and Relative Accuracy
The absolute accuracy is the measure of instrument accuracy that is direct-ly traceable to the International System of Units (SI) through the primary standards at the National Institute of Standards and Technology (NIST) or
FIGURE 1-4: Relationship Between Offset and Gain Errors
Error vs. Percentage of Measurement Range
OffsetError
0% 100%50%
Reading as a % of Full Scale
Max.Gain Error
Max.Gain Error

Low Level DC Measuring Instruments 1-13
other National Metrology Institute (NMI). Absolute accuracy may be spec-ified as ±(% of reading + counts), or it can be stated as ±(ppm of reading + ppm of range), where ppm signifies parts per million of error.
Relative accuracy specifies instrument accuracy without taking the uncertainty of the standard into account. As with absolute accuracy, rel-ative accuracy can be specified as ±(% of reading + counts) or it may be stated as ±(ppm of reading + ppm of range).
Transfer Stability
A special case of relative accuracy is the transfer stability, which defines rel-ative instrument accuracy over a very short time span and narrow ambient temperature range (typically within five minutes and ±1°C). The transfer stability specification is useful in situations where an instrument is used in conjunction with a more accurate standard to transfer a quantity value to a third device.
Calculating Uncertainties from Instrument Accuracy Specifications
Instrument accuracy specifications can be expressed in a variety of ways. To illustrate how to calculate measurement uncertainty from instrument specifications, here are three examples of calculations – one measuring voltage and two measuring resistance.
Example #1: DC Voltmeter Accuracy Calculation
Input Signal = 1.5V
Voltage Range = 2V
Accuracy Specification = ±(25ppm of reading + 5ppm of range)
The potential error contribution based on the specifications is calcu lated as:
Error = ±[1.5V(25 × 10–6) + 2V(5 × 10⁻⁶)]
= ±[(37.5V × 10–6) + (10V × 10–6)]
= ±47.5V × 10–6
= ±47.5µV
Thus, the reading in this example could fall anywhere within the range of 1.5V ± 47.5µV, an uncertainty of ±0.003%.
Example #2: Calculate the Accuracy of a Resistance Measurement Made Using a DC Voltmeter and a Current Source
This example shows how to calculate the accuracy of a resistance measurement that is made using two separate instruments, a voltmeter and a current source. First, the accuracy of each instrument is found separately. Then, the expected resistance accuracy is calculated using the root-sum-square (RSS) method.
Device to be measured = 20W resistor using 100mA test current

1-14 SECTION 1
Current Source Accuracy:Current Output = 100mA on 100mA rangeAccuracy Specification = ±(0.066% of output + 20µA)Error (∆I) = ±[(100mA × 0.00066) + 20µA] = ±(66µA + 20µA) = ±86µA
Voltage Measure Accuracy:Input Signal = (20W × 100mA) = 2VAccuracy Specification of 2V Range = ±(0.012% of reading + 300µV)Error (∆V) = ±[(2V × 0.00012) + 300µV] = ±(240µV + 300µV) = ±540µV
Because R = V/I, the error of the resistance can be calculated using the following root-sum-square equation:
=R
∆R 2 + I
∆I 2
V∆V
Substituting the calculated ∆I and ∆V values into the equation:
Total resistance uncertainty = 2 + 100mA
86µA 2
2V540µV = 9.01 × 10⁻⁴ or ±0.0901%
Example #3: Calculate the Accuracy of a Resistance Measurement Made Using an SMU Instrument
For calculating the resistance accuracy for an SMU instrument, use the summation method. With this method, the accuracy of the source and measurements are found separately and then added together. For higher accuracy measurements, use the Source Readback function of the SMU instrument to measure the source output. In this case, both the current and voltage measurement accuracy specifications are used in the uncer-tainty calculation of a 20W resistor with 100mA test current:
Current Measure Accuracy (Source Readback enabled):Input Signal = 100 mA on 100mA range (this is the current output)Accuracy Specification = ±(0.055% of reading + 6µA)Error% = ±0.061%
Voltage Measure Accuracy:Input Signal = (20W × 100 mA) = 2 VAccuracy Specification of 2V Range = ±(0.012% of reading + 300µV)Error% = ±0.027%
Total resistance uncertainty using Source Readback = ±(0.061% + 0.027%) = ±0.088%
The preceding examples are simplified to demonstrate calculating uncertainties from product specifications and combining them when using multiple instruments. In formal practice, the calculation involves reducing the system uncertainties to a single standard deviation, combining these uncertainties, then expanding the final system uncertainty to describe the

Low Level DC Measuring Instruments 1-15
relationship of the reported value to the true value based on a probability distribution. For details, please refer to the ISO Guide to the Expression of Uncertainty in Measurement.
1.4.3 DeratingsAccuracy specifications are subject to deratings for temperature and time drift, as discussed in the following paragraphs.
Temperature CoefficientThe temperature of the operating environment can affect accuracy. For this reason, instrument specifications are usually given over a defined tem-perature range. Keithley accuracy specifications on newer electrometers, nanovoltmeters, DMMs, and SMU instruments are usually given over the range of 18°C to 28°C. For temperatures outside of this range, a tempera-ture coefficient such as ±(0.005 % + 0.1 count)/°C or ±(5ppm of reading + 1ppm of range)/°C is specified. As with the accuracy specification, this value is given as a percentage of reading plus a number of counts of the least significant digit (or as a ppm of reading plus ppm of range) for digital instruments. If the instrument is operated outside the 18°C to 28°C tem-perature range, this figure must be taken into account, and errors can be calculated in the manner described previously for every degree less than 18°C or greater than 28°C.
Time DriftMost electronic instruments, including electrometers, picoammeters, nanovoltmeters, DMMs, and SMU instruments, are subject to changes in accuracy and other parameters over a long period of time, whether or not the equipment is operating. Because of these changes, instrument specifi-cations usually include a time period beyond which the instrument’s accu-racy cannot be guaranteed. The time period is stated in the specifications, and is typically over specific increments such as 90 days or one year. As noted previously, transfer stability specifications are defined for a much shorter period of time—typically five or 10 minutes.
1.4.4 Noise and Noise RejectionNoise is often a consideration when making virtually any type of electronic measurement, but noise problems can be particularly severe when mak-ing low level meas ure ments. Thus, it’s important that noise specifications and terms are well understood when evaluating the performance of an instrument.
Normal Mode Rejection RatioNormal mode rejection ratio (NMRR) defines how well the instrument rejects or attenuates noise that appears between the HI and LO input terminals. Noise rejection is accomplished by using the integrating A/D converter to attenuate noise at specific frequencies (usually 50 and 60Hz) while passing low frequency or DC normal mode signals. As shown in Figure 1-5, normal mode noise is an error signal that adds to the desired

1-16 SECTION 1
input signal. Normal mode noise is detected as a peak noise or deviation in a DC signal. The ratio is calculated as:
peak normal mode noise NMRR = 20 log _______________________________ [ peak measurement deviation ]
FIGURE 1-5: Normal Mode Noise
MeasuringInstrument
HI
LO
Noise
Signal
Normal mode noise can seriously affect measurements unless steps are taken to minimize the amount added to the desired signal. Careful shield-ing will usually attenuate normal mode noise, and many instruments have internal filtering to reduce the effects of such noise even further.
Common Mode Rejection Ratio
Common mode rejection ratio (CMRR) specifies how well an instrument rejects noise signals that appear between both input high and input low and chassis ground, as shown in Figure 1-6. CMRR is usually measured with a 1kW resistor imbalance in one of the input leads.
FIGURE 1-6: Common Mode Noise
MeasuringInstrument
HI
LO
Noise
SignalRimbalance
(usually 1kΩ)
Although the effects of common mode noise are usually less severe than normal mode noise, this type of noise can still be a factor in sensi-tive measurement situations. To minimize common mode noise, connect shields only to a single point in the test system.

Low Level DC Measuring Instruments 1-17
Noise Specifications
Both NMRR and CMRR are generally specified in dB at 50 and 60Hz, which are the interference frequencies of greatest interest. (CMRR is often spec-ified at DC as well.) Typical values for NMRR and CMRR are >80dB and >120dB respectively.
Each 20dB increase in noise rejection ratio reduces noise voltage or current by a factor of 10. For example, a rejection ratio of 80dB indicates noise reduction by a factor of 104, but a ratio of 120dB shows that the common mode noise would be reduced by a factor of 106. Thus, a 1V noise signal would be reduced to 100µV with an 80dB rejection ratio and down to 1µV with a 120dB rejection ratio.
1.4.5 Speed
Instrument measurement speed is often important in many test situations. When specified, measurement speed is usually stated as a specific number of readings per second for given instrument operating conditions. Certain factors such as integration period and the amount of filtering may affect overall instrument measurement speed. However, changing these oper-ating modes may also alter resolution and accuracy, so there is often a tradeoff between measurement speed and accuracy.
Instrument speed is most often a consideration when making low impedance measurements. At higher impedance levels, circuit settling times become more important and are usually the overriding factor in determining overall measurement speed. Section 2.6.4 discusses circuit settling time considerations in more detail.
1.5 Circuit Design BasicsCircuits used in the design of many low level measuring instruments, whether a voltmeter, ammeter, ohmmeter, or coulombmeter, generally use circuits that can be understood as operational amplifiers. Figure 1-7 shows a basic operational ampli fier. The output voltage is given by:
VO = A (V1 – V2)
The gain (A) of the amplifier is very large, a minimum of 104 to 105, and often 106. The amplifier has a power supply (not shown) referenced to the common lead.
Current into the op amp inputs is ideally zero. The effect of feedback properly applied is to reduce the input voltage difference (V1 – V2) to zero.
1.5.1 Voltmeter Circuits
Electrometer Voltmeter
The operational amplifier becomes a voltage amplifier when connected as shown in Figure 1-8. The input bias current is low, so the current flowing

1-18 SECTION 1
through RA and RB is the same. Assuming the gain (A) is very high, the voltage gain of the circuit is defined as:
VO = V2 (1 + RA/RB)
Thus, the output voltage (VO) is determined both by the input voltage (V2), and amplifier gain set by resistors RA and RB. Given that V2 is applied to the amplifier input lead, the high input resistance of the operational amplifier is the only load on V2, and the only current drawn from the source is the very low input bias current of the operational amplifier. In many electrometer voltmeters, RA is shorted and RB is open, resulting in unity gain.
FIGURE 1-7: Basic Operational Amplifier
V2
+
–V1 VO
A
VO = A (V1 – V2)
COMMON
FIGURE 1-8: Voltage Amplifier
V2
+
–
V1
VO
A
RA
RB
VO = V2 (1 + RA/RB)

Low Level DC Measuring Instruments 1-19
Nanovoltmeter Preamplifier
The same basic circuit configuration shown in Figure 1-8 can be used as an input preamplifier for a nanovoltmeter. Much higher voltage gain is required, so the values of RA and RB are set accordingly; a typical voltage gain for a nanovoltmeter preamplifier is 103.
Electrometer and nanovoltmeter characteristics differ, so the opera-tional amplifier requirements for these two types of instruments are also somewhat different. Although the most important characteristics of the electrometer voltmeter operational amplifier are low input bias current and high input impedance, the most important requirement for the nano-voltmeter input preamplifier is low input noise voltage.
1.5.2 Ammeter CircuitsThere are two basic circuits used for making current measurements: these are the shunt ammeter and the feedback ammeter circuits. DMMs and older electrometers use the shunt method, but picoammeters, SMU instruments, and the ammeter function of electrometers use the feedback ammeter configuration only.
Shunt Ammeter
Shunting the input of a voltmeter with a resistor forms a shunt ammeter, as shown in Figure 1-9. The input current (IIN) flows through the shunt resistor (RS). The output voltage is defined as:
VO = IIN RS (1 + RA/RB)
For several reasons, it’s generally advantageous to use the smallest possible value for RS.
First, low value resistors have better accuracy, time and temperature stability, and voltage coefficient than high value resistors. Second, lower
FIGURE 1-9: Shunt Ammeter
V2
+
—
V1
VO
A
RA
RB
RS
IIN
VO = IIN RS (1 + RA/RB )
1-20 SECTION 1
resistor values reduce the input time constant and result in faster instrument response time. To minimize circuit loading, the input resistance (RS) of an ammeter should be small, thus reducing the voltage burden (V2). However, note that reducing the shunt resistance will degrade the signal-to-noise ratio.
Feedback Ammeter
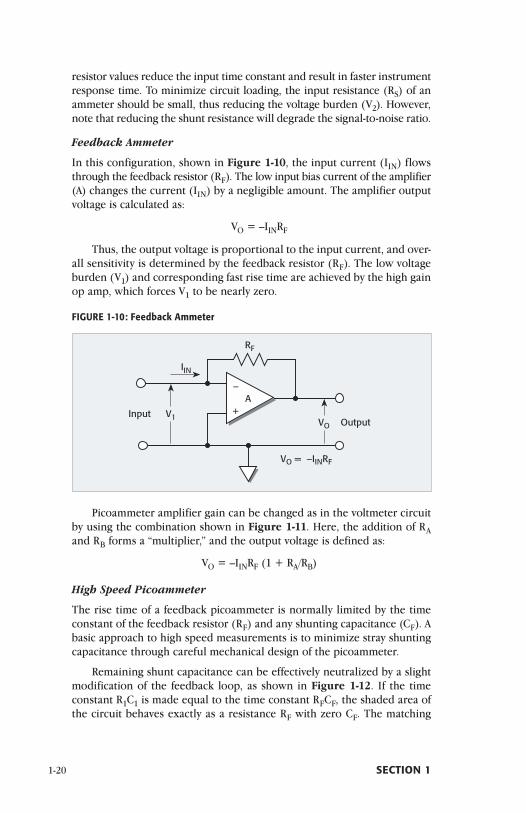
In this configuration, shown in Figure 1-10, the input current (IIN) flows through the feedback resistor (RF). The low input bias current of the amplifier (A) changes the current (IIN) by a negligible amount. The amplifier output voltage is calculated as:
VO = –IINRF
Thus, the output voltage is proportional to the input current, and over-all sensitivity is determined by the feedback resistor (RF). The low voltage burden (V1) and corresponding fast rise time are achieved by the high gain op amp, which forces V1 to be nearly zero.
FIGURE 1-10: Feedback Ammeter
V1
–
+VO
A
IIN
RF
InputOutput
VO = –IINRF
Picoammeter amplifier gain can be changed as in the voltmeter circuit by using the combination shown in Figure 1-11. Here, the addition of RA and RB forms a “multiplier,” and the output voltage is defined as:
VO = –IINRF (1 + RA/RB)
High Speed Picoammeter
The rise time of a feedback picoammeter is normally limited by the time constant of the feedback resistor (RF) and any shunting capacitance (CF). A basic approach to high speed measurements is to minimize stray shunting capacitance through careful mechanical design of the picoammeter.
Remaining shunt capacitance can be effectively neutralized by a slight modification of the feedback loop, as shown in Figure 1-12. If the time constant R1C1 is made equal to the time constant RFCF, the shaded area of the circuit behaves exactly as a resistance RF with zero CF. The matching

Low Level DC Measuring Instruments 1-21
of time constants in this case is fairly straightforward, because the capaci-tances involved are all constant and aren’t affected by input capacitances.
Logarithmic Picoammeter
A logarithmic picoammeter can be formed by replacing the feedback resis-tor in a picoammeter with a diode or transistor exhibiting a logarithmic
FIGURE 1-11: Feedback Ammeter with Selectable Voltage Gain
V1
–
+
VO
A
RA
RB
I IN
RF
VO = –IINRF (1 + RA/RB )
FIGURE 1-12: Neutralizing Shunt Capacitance
–
+VO
A
RF
IIN
CF
C1
R1

1-22 SECTION 1
voltage-current relationship, as shown in Figure 1-13. The output voltage (and the meter display) is then equal to the logarithm of the input current. As a result, several decades of current can be read on the meter without changing the feedback element.
The main advantage of a logarithmic picoammeter is its ability to fol-low current changes over several decades without range changing.
The big disadvantage is the loss of accuracy and resolution, but some digital picoammeters combine accuracy and dynamic range by combining autoranging and digital log conversion.
If two diodes are connected in parallel, back-to-back, this circuit will function with input signals of either polarity.
FIGURE 1-13: Logarithmic Picoammeter
–
+VO
AIIN
FIGURE 1-14: Dual Polarity Log Current to Voltage Converter
–
+Output
1000pF
Input
A

Low Level DC Measuring Instruments 1-23
Using a small-signal transistor in place of a diode produces somewhat better performance. Figure 1-14 shows an NPN transistor and a PNP tran-sistor in the feedback path to provide dual polarity operation.
Remote Preamp Circuit (Source V, Measure I Mode)
Figure 1-15 illustrates a typical preamp circuit. In the Source V, Measure I mode, the SMU instrument applies a programmed voltage and measures the current flowing from the voltage source. The sensitive input is sur-rounded by a guard, which can be carried right up to the DUT for fully guarded measurements. The remote preamp amplifies the low current signal passing through the DUT; therefore, the cable connecting the remote preamp to the meas ure ment mainframe carries only high level signals, minimizing the impact of cable noise.
FIGURE 1-15: Remote Preamp in Source V, Measure I Mode
AIINAIIN
Guard
LO
ForceHI
To DUTTo measurement mainframe of SMU instrument
1.5.3 Coulombmeter CircuitThe coulombmeter measures electrical charge that has been stored in a capacitor or that might be produced by some charge generating process.
For a charged capacitor, Q = CV, where Q is the charge in coulombs on the capacitor, C is the capacitance in farads, and V is the potential across the capacitor in volts. Using this relationship, the basic charge measuring scheme is to transfer the charge to be measured to a capacitor of known value and then measure the voltage across the known capacitor; thus, Q = CV.
The electrometer is ideal for charge measurements because the low input bias current won’t alter the transferred charge during short time intervals and the high input resistance won’t allow the charge to bleed away.
Electrometers use a feedback circuit to measure charge, as shown in Figure 1-16. The input capacitance of this configuration is ACF. Thus, large effect ive values of input capacitance are obtained using reasonably sized capacitors for CF.

1-24 SECTION 1
1.5.4 High Resistance Ohmmeter Circuits
Electrometer Picoammeter and Voltage Source
In this configuration (Figure 1-17), a voltage source (VS) is placed in series with an unknown resistor (RX) and an electrometer picoammeter. The voltage drop across the picoammeter is small, so essentially all the voltage appears across RX, and the unknown resistance can be computed from the sourced voltage and the measured current (I).
The advantages of this method are that it’s fast and, depending on the power supply voltage and insulating materials, it allows measuring extremely high resist ance. Also, with an adjustable voltage source, the voltage dependence of the resist ance under test can be obtained directly.
Usually, this method requires two instruments: a voltage source and a picoammeter or electrometer. Some electrometers and picoammeters, however, have a built-in voltage source and are capable of measuring the resist ance directly. SMU instruments that measure very small currents (less than nanoamps) can also be used.
FIGURE 1-17: High Resistance Measurement Using External Voltage Source
ElectrometerPicoammeter
VS
RX
I
RX =VS
I
HI
LO
FIGURE 1-16: Feedback Coulombmeter
–
+VO
A
CF

Low Level DC Measuring Instruments 1-25
Electrometer Ohmmeter Using Built-In Current Source
Figure 1-18 shows the basic configuration of an alternative form of elec-trometer ohmmeter. A built-in constant-current source, formed by VS and R, forces a known current (I) through the unknown resistance (RX). The resulting voltage drop is proportional to the unknown resistance and is indicated by the meter as resistance, rather than voltage.
FIGURE 1-18: Electrometer Ohmmeter with Built-In Current Source
–
+A
Built-In Current Source
RX CS V1
R I
VO
V1 = I RX
VS
V1 = R IX
I = VSR
The disadvantage of this method is that the voltage across the unknown is a function of its resistance, so it cannot be easily controlled. Very high resistances tend to have large voltage coefficients; therefore, measurements made with a constant voltage are more meaningful. In addi-tion, the response speed for resistances greater than 10GW will be rather slow. This limitation can be partially overcome by guarding.
Electrometer Ohmmeter with Guarded Ohms Mode
Figure 1-19 shows a modification of the circuit in Figure 1-18 in which the HI input node is surrounded with a guard voltage from the operational amplifier output. The amplifier has unity gain, so this guard voltage is vir-tually the same potential as V1 and the capacitance (CS) of the input cable is largely neutralized, resulting in much faster meas ure ments of resistances greater than 10GW.
The guarded mode also significantly reduces the effect of input cable leakage resistance, as discussed in Section 2.4.2.

1-26 SECTION 1
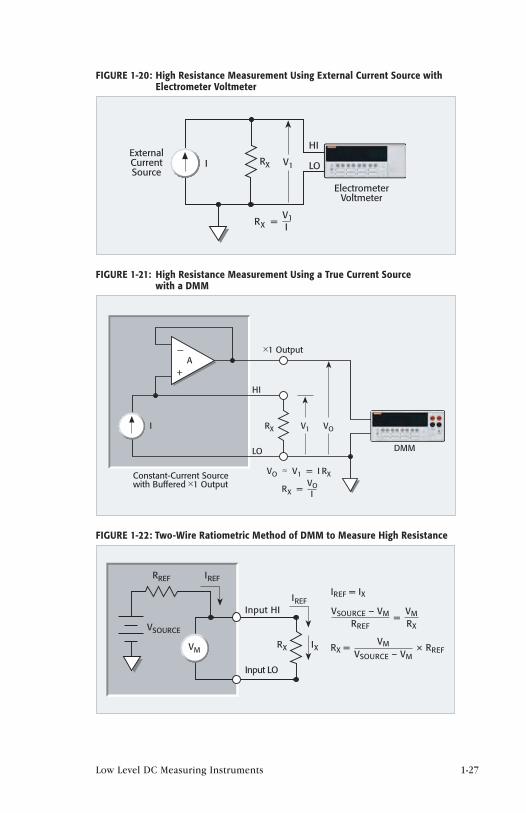
Electrometer Voltmeter and External Current Source
In this method, shown in Figure 1-20, a current source generates current (I), which flows through the unknown resistor (RX). The resulting voltage drop (V1) is measured with an electrometer voltmeter, and the value of RX is calculated from the voltage and current.
If the current source has a buffered ×1 output, a low impedance volt-meter, such as a DMM, may be used to read the voltage across RX. This arrangement is shown in Figure 1-21.
DMM Ohmmeter
For high resistance measurements, a DMM may use the ratiometric method shown in Figure 1-22. This technique is only used on the higher resistance ranges (10MW and 100MW) to allow the lowest noise performance. Test current for this method is generated by a built-in voltage source (VSOURCE) through a reference resistance (RREF) as shown.
Because the DMM voltmeter has very high input impedance (>10GW), current through the voltmeter branch is insignificant and can be discount-ed. Therefore, IREF equals the current of the unknown resistance (IX). The voltage drop across the unknown resistance (RX) is measured by the DMM voltmeter (VM) and the resistance (RX) is calculated.
1.5.5 Low Resistance Ohmmeter Circuits
Nanovoltmeter and External Current Source
If the electrometer in Figure 1-20 is replaced with a nanovoltmeter, the circuit can be used to measure very low resistances (less than micro-ohms). Using a four-wire method eliminates any lead resistance from the measure-
FIGURE 1-19: Electrometer Ohmmeter with Guarded Ohms
–
+A
Built-In Current Source
RX CS V1
R I
VO
VS
Guard
V1 = I RX
V1 = R IX
I = VSR
Low Level DC Measuring Instruments 1-27
FIGURE 1-20: High Resistance Measurement Using External Current Source with Electrometer Voltmeter
ElectrometerVoltmeter
I V1RXExternalCurrentSource
HI
LO
V1 = R IX
FIGURE 1-21: High Resistance Measurement Using a True Current Source with a DMM
DMM
RX
—
+
1
Constant-Current Sourcewith Buffered ×1 Output
VO
×1 OutputA
HI
LO
I V
VO ≈ V1 = I RXVO = R IX
FIGURE 1-22: Two-Wire Ratiometric Method of DMM to Measure High Resistance
VSOURCE
RREF IREF
IREF
IXRX
Input HI
Input LO
IREF = IX
=RREF
VSOURCE – VM
VSOURCE – VM
RX
× RREFRX =
VM
VMVM

1-28 SECTION 1
ment. A current source that can automatically change polarity can be used to correct for offsets. First, a voltage measurement is taken with positive test current, then another voltage measurement is taken with negative test current. Averaging the difference between the two readings cancels the offsets.
DMM Ohmmeter
For making low resistance measurements, the typical DMM will use a four-wire constant-current source method as shown in Figure 1-23. Using this method, the DMM sources a constant current (I) to the device under test (RX) and measures the voltage (VM). Resistance is then calculated using the known current and measured voltage. In the four-wire mode, the voltage is measured at the DUT so that the voltage drops due to the lead resistances will not affect the measurement accuracy. A DMM capable of measuring low resistance usually has a way of compensating for voltage offsets.
The test current sourced to the DUT depends on the selected mea-surement range. For example, a DMM with a 100W range may have a test current of 1mA.
FIGURE 1-23: Four-Wire Constant-Current Source Method
Sense HI
Sense LO
Input HI
DMM
Input LO
RX
RX
I
VM=
I VM
Some DMM ohmmeters may have a dry circuit mode. Dry circuit ohms uses a constant current source with voltage monitoring that is used to clamp the current source voltage. The current source will remain constant as long as the monitoring voltage is <20mV. When voltage exceeds 20mV, the current source shunts current internal to the DMM until 20mV is main-tained at the DUT.
1.5.6 Complete Instruments
Digital Electrometers
Figure 1-24 is a block diagram of a typical digital electrometer. The analog section is similar to the circuitry discussed previously. An electrometer

Low Level DC Measuring Instruments 1-29
preamplifier is used at the input to increase sensitivity and raise input resist ance. The output of the main amplifier is applied to both the analog output and the A/D converter. Range switching and function switching, instead of being performed directly, are controlled by the microprocessor.
The microprocessor also controls the A/D converter and supervises all other operating aspects of the instrument. The input signal to the A/D converter is generally 0–2V DC. After conversion, the digital data is sent to the display and to the communications interface (IEEE-488, RS-232, USB, or Ethernet).
Digital Multimeters (DMMs)
Most DMMs include five measurement functions: DC volts, AC volts, ohms, DC amps, and AC amps. As shown in Figure 1-25, various signal processing circuits are used to convert the input signal into a DC voltage that can be converted to digital information by the A/D converter.
The DC and AC attenuator circuits provide ranging for the AC and DC functions. The AC converter changes AC signals to DC; the ohms converter provides a DC analog signal for resistance measurements. Precision shunts are used to convert currents to voltages for the amps functions.
FIGURE 1-24: Typical Digital Electrometer
RangingAmplifier
ZeroCheck
–
+
HI
A
Amps
Coulombs
Volts
Ohms
Function/Range
Volts, Ohms
Amps, Coulombs
LO
Input2V AnalogOutput
PreampOutput
GuardOutput
Micro-processor
A/DConverter
Display
CommunicationsInterface

1-30 SECTION 1
Once the input signal is appropriately processed, it’s converted to digi-tal information by the A/D converter. Digital data is then sent to the display and to the communications interface (IEEE-488, RS-232, USB, or Ethernet).
Nanovoltmeters
A nanovoltmeter is a sensitive voltmeter optimized to measure very low voltages. As shown in Figure 1-26, the nanovoltmeter incorporates a low noise preamplifier, which amplifies the signal to a level suitable for A/D conversion (typically 2–3V full scale). Specially designed preamplifier circuits ensure that unwanted noise, thermoelectric EMFs, and offsets are kept to an absolute minimum.
FIGURE 1-25: DMM Block Diagram
ACAttenuator
DCAttenuator
ACConverter
OhmsConverter
AC
DC
Ohms
AC
DC
Ohms
DigitalDisplay
A/DConverter
PrecisionReference
PrecisionShunts
HI
Amps
LO
INPUT
CommunicationsInterface
FIGURE 1-26: Typical Nanovoltmeter
OffsetCompensation
Low-NoisePreamplifier
A/DConverter
RangeSwitching
Microprocessor
Display
DCV Input
HI
LO
CommunicationsInterface

Low Level DC Measuring Instruments 1-31
In order to cancel internal offsets, an offset or drift compensation circuit allows the preamplifier offset voltage to be measured during specific phases of the meas ure ment cycle. The resulting offset voltage is subsequently subtracted from the meas ured signal to maximize measure-ment accuracy.
Once the preamplifier amplifies the signal, it’s converted to digital information by the A/D converter. Digital data is then sent to the display and the communications interface.
Source Measure Unit (SMU) Instruments
Source measure unit (SMU) instruments, which include SourceMeter SMU instruments, provide four functions in one instrument: source current, source voltage, measure current, and measure voltage. These instruments have four-quadrant source functionality, which provides for a sink capabil-ity, so they can be used as electronic loads. Some also have resistance mea-surement and pulsing capabilities. Figure 1-27 illustrates the Source I and Measure V mode of an SMU instrument with a driven guard. In this config-uration, the instrument functions as a high impedance current source with voltage and current measurements and voltage limit capability. The driven guard (×1 Buffer) ensures that the Guard and Force HI terminals are always at the same potential. Proper use of guarding virtually eliminates leakage paths in the cable, test fixture, and connectors.
FIGURE 1-27: Source I and Measure V Mode of Source Measure Unit (SMU) Instruments
×1Buffer Guard
Local
Remote
Local
Remote
Force HI
Sense HI
Sense LO
Force LO
VM
IM

1-32 SECTION 1
Selecting either local or remote sense determines where the voltage measurements will be made. In local sense, the voltage is measured between the Force HI and Force LO terminals. In remote sense (Kelvin or 4-wire mode), the voltage is measured at the device under test, between the Sense HI and Sense LO terminals, eliminating any voltage drops due to lead resistance.
When configured to Source V and Measure I (as shown in Figure 1-28), the instrument functions as a low impedance voltage source with current and voltage measurements and current limit capability. Sense circuitry monitors the output voltage continuously and adjusts the voltage source as needed.
FIGURE 1-28: Source V and Measure I Mode of Source Measure Unit (SMU) Instruments
×1Buffer Guard
Local
Remote
Local
Remote
Force HI
Sense HI
Sense LO
Force LO
VM
IM

S E C T I O N 2
Measurements from High Resistance
Sources

2-2 SECTION 2
2.1 Introduction
As described in Section 1 of this handbook, measurements made from high resistance sources include DC voltage, low DC current, high resistance, and charge measurements. The in struments used to make these high impe-dance measurements include electrometers, picoammeters, and source measure unit (SMU) instruments. Section 1 described the basic circuits of these instruments and their measurement functions. Section 2 offers more detailed information about these functions, various interferences and error sources, and ways to maximize the accuracy of measurements made from high resistance sources. For easier reference, the information in Section 2 is organized into these subsections:
2.2 High Impedance Voltage Measurements: A discussion of loading errors and the use of guarding to minimize these errors, as well as information on insulating materials used for making high impedance measurements.
2.3 Low Current Measurements: Information about making successful low current measurements is described with such topics as leakage current and guarding, noise and source impedance, zero drift, generated cur-rents, voltage burden, overload protection, and using a coulombmeter to measure low current.
2.4 High Resistance Measurements: Describes the constant-voltage and constant- current methods for measuring high resistance.
2.5 Charge Measurements: A discussion of the error sources and ways to minimize them, zero check, and extending the range of the charge function of an electrometer.
2.6 General Electrometer Considerations: A discussion of techniques and error sources that affect high impedance measurements in general. Some of the topics include measurement connections, electrostatic interference and shielding, environmental factors, speed consider-ations, etc.
2.7 High Impedance Measurement Optimization Summary
2.2 Voltage Measurements from High Resistance Sources
Measurements from voltage sources with high internal resistance are sub-ject to a number of errors, such as loading errors from the voltmeter’s input resistance and input bias current, as well as from external shunt resistance and capacitance. The following paragraphs discuss these error sources and ways to minimize their effects. For a discussion of errors due to improper connections and electrostatic interference, see Section 2.6.

Measurements from High Resistance Sources 2-3
2.2.1 Loading Errors and Guarding
Input Resistance Loading
Voltage measurements from high resistance sources are subject to loading errors from the meter input resistance, as well as the leakage resistance of the connecting cable. A practical voltmeter may be represented by an ideal infinite input-resistance voltmeter (VM) in parallel with a resistor equal to the specified input resistance (RIN), as shown in Figure 2-1. When a source whose Thevenin equivalent is VS in series with RS is connected to the input, the voltage (VM) appearing across the meter input terminals is reduced by the voltage divider action of RS and RIN as follows:
RIN VM = VS –––––––––– ( RS + RIN
) For example, assume RS = 100kW and RIN = 10MW. If VS = 5V, the
actual voltage measured by the meter is:
107 VM = 5 ––––––––––– ( 105 + 107
)
VM = 4.95V
Thus, input resistance loading would result in an error of 1% in this example.
The meter input resistance should be much higher than the source resistance. For example, if the desired accuracy is 1%, then the meter
FIGURE 2-1: Effects of Input Resistance Loading on Voltage Measurement Accuracy
VS
RS
Voltage Source
RINInputResistance
VM
HI
LO
Voltmeter Measuring VSIndicating VM
VM = VSRIN
RIN + RS

2-4 SECTION 2
resist ance must be more than 100 times the source resistance. For higher accuracy, this ratio must be correspondingly higher.
The connecting cable ordinarily isn’t a factor, but with very high source resist ances (>10GW) or under extreme environmental conditions, it can cause significant loading errors. It may be possible to guard the cable and thus reduce its loading on the measurement. This is discussed in the para-graphs on Shunt Resistance Loading and Guarding.
Input Bias Current Loading
Another consideration when measuring voltages from high resistance sources is the input bias current of the voltmeter. The input bias current flows at the instrument input due to internal instrument circuitry and the internal bias voltage. As shown in Figure 2-2, the input bias current (IBIAS) develops an error voltage across the source resistance (RS). Thus, the actual measured voltage (VM) differs from the source voltage (VS) as follows:
VM = VS ± IBIASRS
For example, assume the following parameters:
IBIAS = 1pA RS = 10GW VS = 10V
The actual voltage measured by the meter is:
VM = 10 ± (10–12 · 1010)
VM = 10 ± 0.01
VM = 9.99V or 10.01V (depending on the input bias current polarity)
FIGURE 2-2: Effects of Input Bias Current on Voltage Measurement Accuracy
VS
RS
Voltage Source
IBIAS
InputBiasCurrent
HI
LO
Voltmeter Measuring VSIndicating VM
VM = VS – IBIAS RS
VM
Measurements from High Resistance Sources 2-5
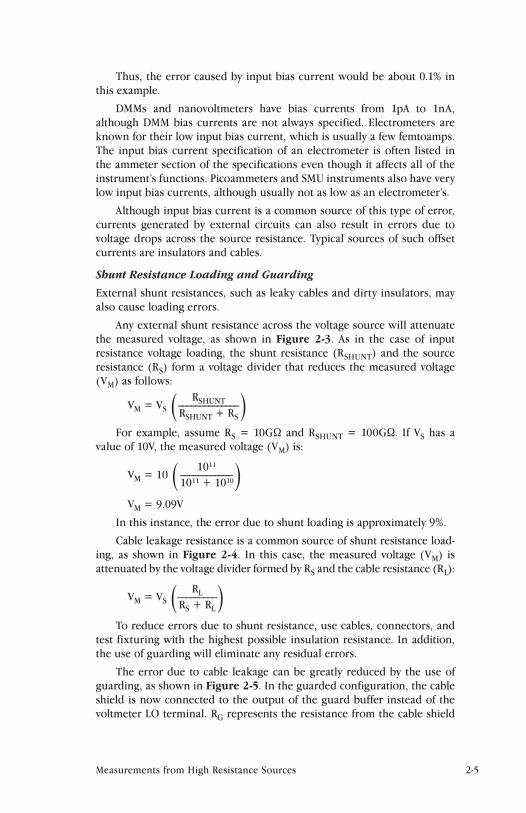
Thus, the error caused by input bias current would be about 0.1% in this example.
DMMs and nanovoltmeters have bias currents from 1pA to 1nA, al though DMM bias currents are not always specified. Electrometers are known for their low input bias current, which is usually a few femtoamps. The input bias current specification of an electrometer is often listed in the ammeter section of the specifications even though it affects all of the instrument’s functions. Picoammeters and SMU instruments also have very low input bias currents, although usually not as low as an electrometer’s.
Although input bias current is a common source of this type of error, currents generated by external circuits can also result in errors due to voltage drops across the source resistance. Typical sources of such offset currents are insulators and cables.
Shunt Resistance Loading and Guarding
External shunt resistances, such as leaky cables and dirty insulators, may also cause loading errors.
Any external shunt resistance across the voltage source will attenuate the meas ured voltage, as shown in Figure 2-3. As in the case of input resist ance voltage loading, the shunt resistance (RSHUNT) and the source resist ance (RS) form a voltage divider that reduces the measured voltage (VM) as follows:
RSHUNT VM = VS –––––––––––––– ( RSHUNT + RS
) For example, assume RS = 10GW and RSHUNT = 100GW. If VS has a
value of 10V, the measured voltage (VM) is:
1011 VM = 10 –––––––––––– ( 1011 + 1010
)
VM = 9.09V In this instance, the error due to shunt loading is approximately 9%.
Cable leakage resistance is a common source of shunt resistance load-ing, as shown in Figure 2-4. In this case, the measured voltage (VM) is attenuated by the voltage divider formed by RS and the cable resistance (RL):
RL VM = VS ––––––––– ( RS + RL
) To reduce errors due to shunt resistance, use cables, connectors, and
test fixturing with the highest possible insulation resistance. In addition, the use of guarding will eliminate any residual errors.
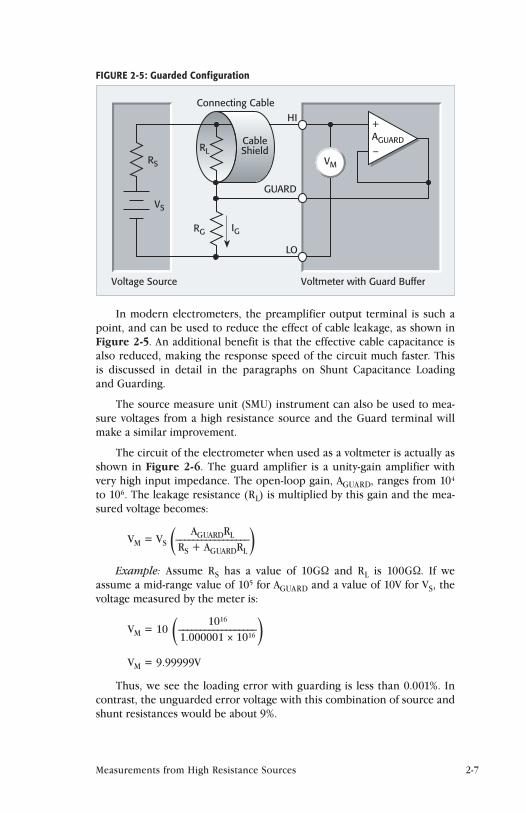
The error due to cable leakage can be greatly reduced by the use of guarding, as shown in Figure 2-5. In the guarded configuration, the cable shield is now connected to the output of the guard buffer instead of the voltmeter LO terminal. RG represents the resistance from the cable shield

2-6 SECTION 2
to voltmeter LO, and IG is the current through RG as a result of driving the shield to the same potential as the input HI terminal. This current is supplied by the guard buffer, not the voltage source. The voltage across RL is now many decades lower, so the leakage current will be negligible in most cases.
By definition, a guard is a low impedance point in the circuit that’s at nearly the same potential as the high impedance input terminal.
FIGURE 2-3: Effects of Shunt Resistance on Voltage Measurement Accuracy
VS
RS
Voltage Source
RSHUNT VM
HI
LO
Voltmeter Measuring VSIndicating VM
VM = VSRSHUNT
RS + RSHUNT
ShuntResistance
FIGURE 2-4: Effect of Cable Leakage Resistance on Voltage Measurement Accuracy
VS
RS
Voltage Source
RL
VM
HI
LO
Voltmeter Measuring VSIndicating VM
VM = VSRL
RS + RL
Connecting Cable
CableShieldCable
LeakageResistance
Measurements from High Resistance Sources 2-7
In modern electrometers, the preamplifier output terminal is such a point, and can be used to reduce the effect of cable leakage, as shown in Figure 2-5. An additional benefit is that the effective cable capacitance is also reduced, making the response speed of the circuit much faster. This is discussed in detail in the paragraphs on Shunt Capacitance Loading and Guarding.
The source measure unit (SMU) instrument can also be used to mea-sure voltages from a high resist ance source and the Guard terminal will make a similar improvement.
The circuit of the electrometer when used as a voltmeter is actually as shown in Figure 2-6. The guard amplifier is a unity-gain amplifier with very high input impe dance. The open-loop gain, AGUARD, ranges from 104 to 106. The leakage resistance (RL) is multiplied by this gain and the mea-sured voltage becomes:
AGUARDRL VM = VS ––––––––––––––––– ( RS + AGUARDRL
) Example: Assume RS has a value of 10GW and RL is 100GW. If we
assume a mid-range value of 105 for AGUARD and a value of 10V for VS, the voltage measured by the meter is:
1016 VM = 10 –––––––––––––––––– ( 1.000001 × 10¹⁶
)
VM = 9.99999V
Thus, we see the loading error with guarding is less than 0.001%. In contrast, the unguarded error voltage with this combination of source and shunt resistances would be about 9%.
FIGURE 2-5: Guarded Configuration
+
–
Voltage Source
RL
GUARD
LO
Voltmeter with Guard Buffer
RG IG
HIConnecting Cable
CableShield
RS
VS
AGUARD
VM

2-8 SECTION 2
Shunt Capacitance Loading and Guarding
The settling time of a voltage measurement depends both on the equiv-alent source resistance and the effective capacitance at the input of the voltmeter; this input capacitance consists of the meter input capacitance in parallel with the input cable capacitance. Even a small amount of shunt capacitance can result in long settling times if the source resistance is high. For example, a shunt capacitance of 100pF (including the input cable) and a source resistance of 20GW will result in an RC time constant of two sec-onds. Ten seconds must be allowed for the measurement to settle to within 1% of the final value.
Figure 2-7 demonstrates the effects of shunt capacitance loading on the input of a typical high impedance voltmeter. The signal source is rep-resented by VS and RS, the shunt capacitance is CSHUNT, and the measured voltage is VM. Initially, the switch is open, and CSHUNT holds zero charge.
When the switch is closed, the source voltage (VS) is applied to the input, but the measured voltage across CSHUNT doesn’t rise instantaneously to its final value. Instead, the voltage rises exponentially as follows:
VM = VS (1 – e–t/RSCSHUNT)
Also, the charge (QIN) transferred to the capacitor is:
QIN = VSCSHUNT
FIGURE 2-6: Guarding Leakage Resistance
+
–
VS
RS
Voltage Source
RL
HI
LO
Voltmeter with Guard Buffer
AGUARD =
AGUARD
VM = VSAGUARD RL
RS + AGUARD RL
104 to 106
GUARD
VM

Measurements from High Resistance Sources 2-9
The charging of CSHUNT yields the familiar exponential curve shown in Figure 2-8. After one time constant (τ = RC), the measured voltage rises to within 63% of its final value; final values for various time constants are summarized in Table 2-1.
FIGURE 2-8: Exponential Response of Voltage Across Shunt Capacitance
Time
100
0 1.0 2.0 3.0 4.0 5.0
63
RS CSHUNT
90807060
403020
50
100
Percent ofFinal Value
(VS)
TABLE 2-1: Settling Times to Percent of Final Value
Time Constant (τ*) Percent of Final Value
1 63 %
2 86 %
3 95 %
4 98 %
5 99.3%
*τ = RC, where R = resistance (ohms), C = capacitance (farads)
FIGURE 2-7: Shunt Capacitance Loading
VS
RS
Voltage Source
CSHUNT
HI
LO
Voltmeter
VM = VS (1 – e–t/RSCSHUNT)
ShuntCapacitance
QIN
QIN = VS CSHUNT
VM

2-10 SECTION 2
Example: Assume RS = 10GW and CSHUNT = 100pF. This combination results in an RC time constant of one second. Thus, it would take five sec-onds for the circuit to settle to within less than 1% of final value. With a 10V change in VS, a total of 1nC of charge would be transferred to CSHUNT using the equation QIN = VSCSHUNT.
Although the primary advantage of guarding is a reduction in the effects of shunt resistance, another important aspect is the reduction in the effects of shunt capacitance. As shown in Figure 2-9, the guard buffer significantly reduces the charging time of CSHUNT because of the open-loop gain (AGUARD), which is typically 104 to 106.
FIGURE 2-9: Guarding Shunt Capacitance
QIN = VS AGUARD
CSHUNT
+
–
VS
RS
Voltage Source
CSHUNT
HI
LO
Voltmeter with Guard Buffer
AGUARD
VM = VS (1 – e–tAGUARD/RSCSHUNT)
AGUARD = 104 to 106
GUARD
VM
With guarding, the rise time of the measured voltage (VM) now becomes:
VM = VS (1 – e–tAGUARD/RSCSHUNT)
and the charge transferred to CSHUNT is:
VSCSHUNT QIN = ––––––––––– ( AGUARD )
Example: Assume RS = 10GW and CSHUNT = 100pF, as in the unguard-ed example given previously. With a nominal value of 105 for AGUARD, we can see the guarded RC settling time to 99.3% of final value is reduced to approximately 5s/105 = 50µs, an insignificant period of time compared to

Measurements from High Resistance Sources 2-11
the time it typically takes an instrument to process a single reading. Note that with a 10V change in VS, the charge transferred (QIN) is only 10fC, a reduction of 105:1.
Example: To illustrate the effects of guarding, a 1.3V voltage source (VS) with an internal resistance of 100GW (RS) was connected to an elec-trometer voltmeter using a 2m triax cable (CSHUNT). Voltage measurements of this high impedance voltage source were taken by an electrometer with and without the use of guarding. The graph in Figure 2-10 indicates the measured voltage as a function of time showing both cases. Without guard-ing, the voltage measurements took about nine seconds to settle. With guarding, the voltage measurements settled within about two seconds. Thus, guarding drastically reduced the effects of the shunt capacitance on timing.
FIGURE 2-10: High Impedance Electrometer Voltage Measurements Taken With and Without Guarding
1.4
1.2
1.0
0.8
0.6
0.4
0.20 2 4 6 8 10 12 14
Time (seconds)
Voltage(Volts)
Without GuardingWith Guarding
2.2.2 Insulation Resistance of the Test Circuit
Electrometers and some SMU instruments as voltmeters are characterized by high input resist ance. High resistance insulation in the test circuits is one of the first requirements of making successful electrometer measure-ments. Thus, a knowledge of the various types of insulating materials and how to apply them properly is important. To measure voltages from high resistance sources accurately, the insulation leakage resistance of the test fixtures, test leads, and measuring voltmeter must be several orders of magnitude higher than the Thevenin equivalent resistance of the circuit under test, depending on the number of decades of precision, resolution, or accuracy required. If the insulation resistances aren’t decades higher,

2-12 SECTION 2
the shunting effects of the insulation will reduce the source voltage being measured, as discussed previously.
Detecting inferior insulation in test setups is difficult because the erroneous reading can appear well-behaved and steady. Therefore, it’s prudent to measure the insulation resistance of the test fixtures and cables periodic ally with an electrometer ohmmeter to ensure their integrity. If
TABLE 2-2: Properties of Various Insulating Materials
Material
Volume Resistivity (Ohm-cm)
Resistance to Water
Absorption
Minimal Piezoelectric
Effects1
Minimal Triboelectric
Effects
Minimal Dielectric
Absorption
Teflon® PTFE >1018 + – – +
Sapphire >1018 + + 0 +
Polyethylene 1016 0 + 0 +
Polystyrene >1016 0 0 – +
Kel-F® >1018 + 0 – 0
Ceramic 1014–1015 – 0 + +
Nylon 1013–1014 – 0 – –
Glass Epoxy 1013 – 0 – –
PVC 5×10¹³ + 0 0 –
KEY: + Material very good in regard to the property.0 Material moderately good in regard to the property.– Material weak in regard to the property.
1 Stored charge effects in non-piezoelectric insulators.
FIGURE 2-11: Approximate Resistivity of Various Insulating Materials
1018
1017
1016
1015
1014
1013
1012
1011
1010
109
108
Insulating Material
Volu
me
Resi
stiv
ity (
Ω-c
m)
FR-4
Epox
yB
oard
Pape
r
Teflo
n
Sapp
hire
PVC
Cer
amic
sN
ylon Po
lyst
yren
ePo
lyet
hyle
ne

Measurements from High Resistance Sources 2-13
deficiencies are discovered, either cleaning or replacement of the defective insulator is in order.
Choosing the Best Insulator
In evaluating an insulating material, consider these material properties:
• Volume resistivity: leakage of current directly through the material.
• Surface resistivity: leakage across the surface, a function primarily of surface contaminants.
• Water absorption: leakage dependent on the amount of water that has been absorbed by the insulator.
• Piezoelectric or stored charge effects: the creation of charge unbalances (and thus current flow or voltage shift) due to mechan-ical stress.
• Triboelectric effects: the creation of charge unbalance due to fric-tional effects when materials rub against each other.
• Dielectric absorption: the tendency of an insulator to store/release charge over long periods.
Table 2-2 summarizes important characteristics of insulators. Figure 2-11 shows their resistivity ranges. Insulator characteristics are described further in the following paragraphs.
Teflon®
Teflon is the most satisfactory and commonly used insulator for the impe-dance levels encountered in measurements of currents greater than 10–14A. It has high volume resistivity and water vapor films don’t form readily on its surface. Its insulating properties, therefore, aren’t severely impaired by humid air. Teflon is chemically inert, is easily machined, and can be readily cleaned. Teflon PTFE is the type of Teflon most commonly used in electronics.
Teflon’s principal shortcoming is that charges appear internally when it’s deformed, causing spurious voltages and currents. With ordinary care, however, these characteristics aren’t serious for currents greater than 10–13A.
Polystyrene
Polystyrene is much less expensive than Teflon, and was the general pur-pose standard before Teflon was available. It machines easily, but internal crazing often develops. This characteristic doesn’t impair its insulating properties unless the cracks reach the surface. The volume resistivity of polystyrene is similar to that of Teflon, but water vapor films form on its surface when humidity becomes high, significantly reducing its surface resistance.

2-14 SECTION 2
Kel-F®
Kel-F has volume and surface characteristics nearly as good as Teflon, it machines easily, and it doesn’t craze.
Polyethylene
Polyethylene has excellent volume resistivity and surface characteristics similar to polystyrene. Because it’s flexible, it’s used extensively for insu-lating coaxial and triaxial cable. These cables are excellent for general-pur-pose electrometer work because the surface leakage in this application is relatively unimportant. However, polyethylene melts at a relatively low temperature, so leads into ovens should use Teflon insulation rather than poly ethylene.
Glass and Ceramics
Glass and ceramics also have high volume resistivity, but poor surface properties at high humidity and often-poor piezoelectric properties. Glass or ceramic cleaned with methanol and dipped in boiling paraffin has a good, but not durable, insulating surface. Various silicone varnishes can also be baked or air-dried onto glass or ceramic surfaces, but even after this treatment, handling can easily spoil the insulators. Glass and ceramics are difficult to machine, although they can be molded. They are used prin-cipally when their mechanical properties are mandatory.
Sapphire
Sapphire is one of the best insulators. Very little charge is generated in it when it’s stressed mechanically. It’s used most often in measuring currents in the 10–18A to 10–15A range. The use of sapphire is restricted by its cost and because the material is difficult to machine and form.
Quartz
Quartz has properties similar to sapphire, but considerably higher piezo-electric output, so it’s rarely used in electrometer circuits.
Other Insulating Materials
Practically all other insulating materials have unacceptably low volume resist ivity or unsatisfactory surface characteristics for electrometer use. Vinyl, nylon, and Lucite® are markedly inferior to Teflon, polystyrene, polyethylene, sapphire, or quartz.
Keeping Insulators Clean
As with any high resistance device, mishandling can destroy the integrity of insulators. Oils and salts from the skin can degrade insulator perfor-mance, and contaminants in the air can be deposited on the insulator surface, reducing its resistance. Therefore, insulator handling should be minimized; under no circumstances should the insulator be touched with the hand or with any material that might contaminate the surface.

Measurements from High Resistance Sources 2-15
If the insulator becomes contaminated, either through careless hand-ling or from deposits, it can be cleaned with a degreaser to remove oils, and de-ionized water to remove ionic contamination. After cleaning, the insulator should be allowed to dry for several hours at low humidity.
2.3 Low Current MeasurementsA number of error sources can have serious impacts on low current meas-urement accuracy. For example, the ammeter may cause measurement errors if not connected properly. (Refer to Sections 2.6.1 and 2.6.2 for more information on how to make properly shielded connections.) The amme-ter’s voltage burden and input bias current may also affect measurement accuracy. The source resistance of the device under test will affect the noise performance of a feedback ammeter. External sources of error can include leakage current from cables and fixtures, as well as currents generated by triboelectric or piezoelectric effects. Section 2.3 addresses low current meas ure ment considerations in detail and outlines methods for minimiz-ing the effects of error sources. It also includes information on using the electrometer’s coulomb function to make very low current measurements.
2.3.1 Leakage Currents and Guarding
Leakage currents are generated by stray resistance paths between the meas urement circuit and nearby voltage sources. Leakage current is an error current that flows (leaks) through insulation resistance when a volt-age is applied. It generally becomes an issue when the impedance of the device under test is comparable to that of the insulators in the test circuit. This current can degrade the accuracy of low current measurements con-siderably. To reduce leakage currents, use good quality insulators, reduce the level of humidity in the test environment, and use guarding. Guarding will also reduce the effect of shunt capacitance in the measurement circuit.
Using good quality insulators when building the test circuit is one way to reduce leakage currents. Teflon, polyethylene, and sapphire are examples of good quality insulators, but avoid materials like phenolics and nylon. Refer to Section 2.2.2 for further discussion on choosing the best insulating materials.
Humidity may also degrade low current measurements. Different types of insulators will absorb varying amounts of water from the air, so it’s best to choose an insulator on which water vapor doesn’t readily form a contin-uous film. Sometimes, this is unavoidable if the material being measured absorbs water easily, so it’s best to make the measurements in an environmen-tally controlled room. In some cases, an insulator may have ionic contam-inants, which can generate a spurious current, especially in high humidity.
Guarding is a very effective way to reduce leakage currents. A guard is a low impedance point in the circuit that’s at nearly the same potential as the high impe dance lead being guarded. The guard on the electrometer

2-16 SECTION 2
ammeter and picoammeter differs from the guard on the SMU instrument ammeter. The use of guarding can best be explained through examples.
The Use of Guarding Using an Electrometer Ammeter or Picoammeter
The guard terminal of the electrometer ammeter or picoammeter is the LO input terminal. The guard can be used to isolate the high impedance input lead of the ammeter from leakage current due to voltage sources. Figures 2-12 and 2-13 illustrate examples of guarding.
Figure 2-12 illustrates guarding as applied to measuring the ion cur-rent (IC) from an ionization chamber. An un guarded ionization chamber and the corresponding equivalent circuit are shown in Figure 2-12a. The equivalent circuit shows that the full bias voltage appears across the insu-lator leakage resistance (RL), therefore, a leakage current (IL) will be added to the measured ion current (IM = IC + IL ). The leakage resistance is due to the insulator of the ionization chamber and the coax cable.
FIGURE 2-12: Guarding as Applied to an Ionization Chamber
HI
LO
HI
LO
HI
LO
HI
LO
GuardConnection
Guard
RL
a) Unguarded Ionization Chamber Equivalent Circuit
IL
RL1
RL2
b) Guarded Ionization Chamber Equivalent Circuit
IL
IC
IM = IC + IL
IC
IM = IC
IMIM
IM IM

Measurements from High Resistance Sources 2-17
In Figure 2-12b, a metal guard ring is added to the ionization cham-ber. This guard circuit splits the leakage resistance into two parts. The volt-age across RL1 is the picoammeter voltage burden, normally less than one millivolt, so the resulting current will be quite small. The full bias voltage appears across RL2. A leakage current will flow around this loop, but won’t affect the measurement, because it doesn’t flow through the ammeter.
Guarding may also be necessary to prevent leakage current due to test fixturing. Figure 2-13 shows a high mega-ohm resistor (RDUT) supported on two insulators mounted in a metal test fixture.
FIGURE 2-13: Guarding to Reduce Leakage Currents
V
Metal Shielded Test Fixture
IDUT
HI
LO
Connection forElectrostatic Shielding
Standoff
HI
LO
IM = IDUT + IL
RDUT
RL RL
Metal Mounting Plate
IL
a) Unguarded Circuit
V
Metal Shielded Test Fixture
IDUT
HI
LO
Shield Connection(LO Terminal toMetal Shield of
Test Fixture)
Standoff
HI
LO
IM = IDUT
RDUT
RL RL
Metal Mounting PlateIL
b) Guarded Circuit
Guard Connection(LO Terminal toMetal Mounting
Plate)
0V
IM
IM

2-18 SECTION 2
Figure 2-13a is the unguarded circuit. The leakage current (IL) through the stand-off insulators will be added to the measured current (IM).
As illustrated in Figure 2-13b, this circuit is guarded by connecting the LO of the picoammeter (IM) to the metal mounting plate. This will put the bottom of the right insulator at almost the same potential as the top. The voltage difference is equal to the voltage burden of the picoammeter. The voltage burden is small, less than 200µV. The top and bottom of the insulator are at nearly the same potential, so no significant current will
FIGURE 2-14: Guarding the Leakage Resistance of a Cable with an SMU Instrument
RL = Coax Cable Leakage Resistance
IL = Leakage Current
RDUT = Resistance of Device Under Test
IM = IDUT + IL
V
SMU Instrument
RL
Z
a) Unguarded Circuit
Force/Output HI
CoaxCable
RDUT
IM
IDUT
×1
Force/Output LO
ILGuard
RL1 = Triax Cable Inside Shield Leakage Resistance
RL2 = Leakage Resistance Between Shields
RDUT = Resistance of Device Under Test
IM = IDUT
V
SMU Instrument
RL1Z
b) Guarded Circuit
Force/Output HI
TriaxCable
RDUT
IM
IDUT
×1
Force/Output LO
0VGuard
RL2

Measurements from High Resistance Sources 2-19
flow through it, and nearly all the current from the device under test will flow through the ammeter as desired.
The Use of Guarding with an SMU Instrument Ammeter
The guard terminal of an SMU instrument is usually the inside shield of the triax connector. This guard is driven by a unity-gain, low impedance amplifier. By definition, the guard terminal is nearly at the same potential as the high impedance terminal, so the guard terminal will be at the same potential as the magnitude of the voltage source.
Figure 2-14 illustrates how a driven guard prevents the leakage resist-ance of a cable from degrading the low current measurements. In the unguarded circuit of Figure 2-14a, the leakage resistance of the coax cable is in parallel with the DUT (RDUT), creating an unwanted leakage current (IL). This leakage current will degrade very low current measurements.
In the guarded circuit shown in Figure 2-14b, the inside shield of the triax cable is connected to the guard terminal of the SMU instrument. Now this shield is driven by a unity-gain, low impedance amplifier (Guard). The difference in potential between the Force/Output HI terminal and the Guard terminal is nearly 0V, so the leakage current (IL) is eliminated.
The dramatic difference between using coax (unguarded) vs. triax (guarded) cabling for low current SMU instrument measurements is shown in Figure 2-15. Both of these curves are the result of sourcing 10V
FIGURE 2-15: Effects of Guarded and Unguarded Circuit When Using an SMU Instrument to Measure a 100GW Resistor by Sourcing 10V and Reading Current as a Function of Time
107.0E–12
106.0E–12
105.0E–12
104.0E–12
103.0E–12
102.0E–12
101.0E–12
100.0E–12 0 10 20 30 40 50 60 70
Coax Cable–Unguarded Circuit
Triax Cable–Guarded Circuit
Curr
ent (
ampe
res)
Time (seconds)
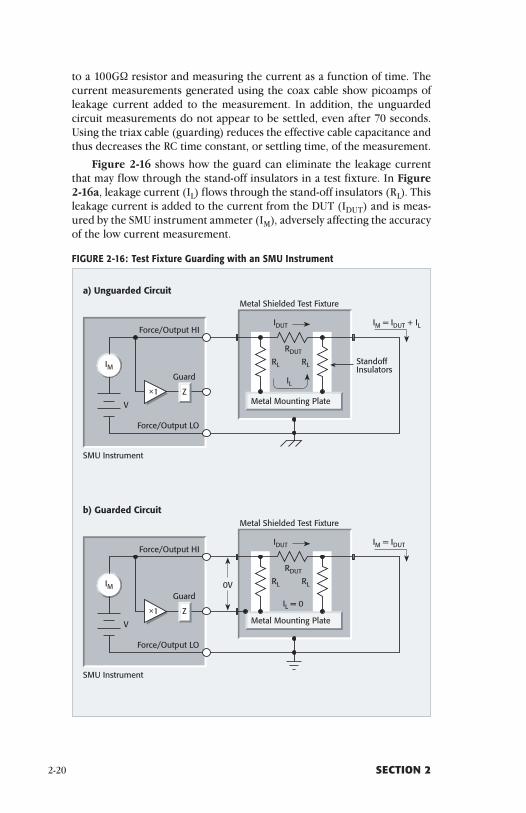
2-20 SECTION 2
to a 100GW resistor and measuring the current as a function of time. The current measurements generated using the coax cable show picoamps of leakage current added to the measurement. In addition, the unguarded circuit measurements do not appear to be settled, even after 70 seconds. Using the triax cable (guarding) reduces the effective cable capacitance and thus decreases the RC time constant, or settling time, of the measurement.
Figure 2-16 shows how the guard can eliminate the leakage current that may flow through the stand-off insulators in a test fixture. In Figure 2-16a, leakage current (IL) flows through the stand-off insulators (RL). This leakage current is added to the current from the DUT (IDUT) and is meas-ured by the SMU instrument ammeter (IM), adversely affecting the accuracy of the low current measurement.
FIGURE 2-16: Test Fixture Guarding with an SMU Instrument
Metal Shielded Test Fixture
IDUT IM = IDUT
RDUT
RL RL
Metal Mounting Plate
IL = 0
V
SMU Instrument
Z
b) Guarded Circuit
Force/Output HI
×1
Force/Output LO
0VGuard
Metal Shielded Test Fixture
IDUT
StandoffInsulators
IM = IDUT + IL
RDUT
RL RL
Metal Mounting Plate
IL
V
SMU Instrument
Z
a) Unguarded Circuit
Force/Output HI
×1
Force/Output LO
Guard
IM
IM

Measurements from High Resistance Sources 2-21
In Figure 2-16b, the metal mounting plate is connected to the guard terminal of the SMU instrument. The voltages at the top and the bottom of the stand-off insulator are nearly at the same potential (0V drop), so no leakage current will flow through the standoffs and affect the measure-ment accuracy. For safety purposes, the metal shield must be connected to earth ground because the metal mounting plate will be at the guard potential.
2.3.2 Noise and Source Impedance
Noise can seriously affect sensitive current measurements. This section discusses how source resistance and source capacitance affect noise performance.
Source Resistance
The source resistance of the DUT will affect the noise performance of a feedback ammeter. As the source resistance is reduced, the noise gain of the ammeter will increase.
Figure 2-17 shows a simplified model of a feedback ammeter. RS and CS represent the source resistance and source capacitance, VS is the source voltage, and VNOISE is the noise voltage of the ammeter. Finally, RF and CF are the feedback resistance and capacitance respectively.
The noise gain of the circuit can be given by the following equation:
Output VNOISE = Input VNOISE (1 + RF/RS)
FIGURE 2-17: Simplified Model of a Feedback Ammeter
—
+
RF
CS
VS
RS
CF
VNOISE
Current Source
VO
ZF
ZS
Feedback Ammeter

2-22 SECTION 2
Note that as RS decreases in value, the output noise increases. For example, when RF = RS, the input noise is multiplied by a factor of two. Too low a source resistance can have a detrimental effect on noise per-formance, so there are usually minimum recommended source resistance values based on the measurement range. Table 2-3 summarizes minimum recommended source resistance values for various measurement ranges for a typical feedback ammeter. Note that the recommended source resistance varies by meas urement range because the RF value also depends on the measurement range. Refer to the instruction manual for the instrument to be used for the appropriate minimum recommended source resistances.
TABLE 2-3: Minimum Recommended Source Resistance Values for a Typical Feedback Ammeter
RangeMinimum Recommended
Source Resistance
pA 1GW
nA 1MW
μA 1kW
mA 1W
Source Capacitance
DUT source capacitance will also affect the noise performance of a feed-back type ammeter. In general, as source capacitance increases, so does the noise gain.
To see how changes in source capacitance can affect noise gain, let’s again refer to the simplified ammeter model in Figure 2-17. The elements of interest for this discussion are the source capacitance (CS) and the feedback capacitance (CF). Taking into account the capacitive reactance of these two elements, our previous noise gain formula must be modified as follows:
ZF Output VNOISE = Input VNOISE (1 + ___ ) ZS
Here, ZF represents the feedback impedance made up of CF and RF, and ZS is the source impedance formed by RS and CS. Furthermore,
and
Note that as CS increases in value, ZS decreases in value, thereby increasing the noise gain. Again, at the point where ZS = ZF, the input noise is amplified by a factor of two.

Measurements from High Resistance Sources 2-23
Most picoammeters will have a maximum recommended value for CS. Although it is usually possible to measure at higher source capacitance values by inserting a resistor in series with the ammeter input, remember that any series resistance will increase the voltage burden by a factor of IIN · RSERIES. Any series resistance will also increase the RC time constant of the measurement. A series diode, or two diodes in parallel back-to-back, can serve as a useful alternative to a series resistor for this purpose. The diodes can be small-signal types and should be in a light-tight enclosure. See Section 4.3.1 for a further discussion of the use of a series diode.
2.3.3 Zero DriftZero drift is a gradual change of the indicated zero offset with no input signal. Unless it’s corrected by “zeroing,” the resulting offset produces an error by adding to the input signal. Drift is normally specified as a function of time and/or temperature. Zero offset over a time period and temperature range will stay within the specified limits. Offset due to step changes in temperatures may exceed the specification before settling. Typical room temperature rates of change (1°C/15 minutes) won’t usually cause overshoot.
Most electrometers include a means to correct for zero drift. A ZERO CHECK switch is used to configure most electrometers and picoammeters to display any internal voltage offsets. This feature allows fast checking and adjustment of the amplifier zero. Typically, the instrument is zero corrected while zero check is enabled. This procedure may need to be performed periodically, depending on ambient conditions. Electrometers perform this function with the touch of a button or upon command from the computer.
In a picoammeter or electrometer ammeter, note that ZERO CHECK and ZERO CORRECT functions are used to correct for internal voltage offsets. SUPPRESS or REL controls are used to correct for external current offsets. For optimum accuracy, zero the instrument on the range to be used for measurement. Refer to Section 2.3.4 for a discussion of correcting for internal bias current.
2.3.4 Generated CurrentsAny extraneous generated currents in the test system will add to the desired current, causing errors. Currents can be internally generated, as in the case of instrument input bias current, or they can come from external sources such as insulators and cables. The following paragraphs discuss the various types of generated currents.
Figure 2-18 summarizes the magnitudes of a number of generated currents discussed in this section.
Internal Error Sources
The ideal ammeter should read zero when its input terminals are left open. Practical ammeters, however, do have some small current that flows when the input is open. This “zero” current measurement error comes from

2-24 SECTION 2
multiple sources; however, the main contributor on the lower current ranges is the input bias current. This current is caused by bias currents of active devices as well as by leakage currents through insulators within the instrument. Current errors can also be caused by voltage offset drifts due to time, temperature, etc., as well as other errors that are more obvious on the higher current ranges. The error currents generated within picoamme-ters, electrometers, and SMU instruments are included in the instrument’s specifications.
Figure 2-19 shows the input bias current (IBIAS) adding to the source current (IS) so the meter measures the sum of the two currents (IM):
IM = IS + IBIAS
However, depending on a particular instrument, the input bias current can add or subtract from the measurement.
The input bias current of an instrument can be measured and com-pared to the instrument’s specifications. Here is a procedure for mea-suring the input bias current for electrometers, picoammeters, and SMU instruments.
1. Turn on the instrument and allow it to warm up for 1 hour in an envi-ronment with stable temperature within the specified operating limits.
2. Place a metal cap on the input terminal to avoid noise pickup. This protective shield/cap is usually included with the sensitive instrument. Both triax and BNC metal caps are shown in Figure 2-20.
3. Select the lowest current range.
FIGURE 2-18: Typical Magnitudes of Generated Currents
10—7
10—8
10—9
10—10
10—11
10—12
10—13
10—14
10—15
Standardcable
Lownoisecable
Dirtysurface
Epoxyboard
Cleansurface
Teflo
n
Cer
amic
s
109Ω
1012Ω
TriboelectricEffects
ElectrochemicalEffects
MechanicalStressEffects
Resistornoise in 1Hzbandwidth
Current-Generating Phenomena
Typi
cal C
urre
nt G
ener
ated
(A)

Measurements from High Resistance Sources 2-25
4. Allow more than five minutes for the reading to settle and then take a reading by observing the instrument’s display. Figure 2-21 shows the input bias current measurement of an electrometer with a capped input. On this particular instrument, the input bias current reads 8 × 10–16 or 0.8fA.
5. Verify the reading is within the instrument’s specification. If not, the instrument may need to be recalibrated.
6. The offset can be subtracted from measurements by using the relative, or zero, function of the ammeter. With the instrument open-circuited, allow the reading to settle and then enable the REL or ZERO function. Once the REL value is established, subsequent readings will be the difference between the actual input value and the REL value. Most instruments will enable the user to perform the REL either from the front panel or remotely.
FIGURE 2-19: Effects of Input Bias Current on Current Measurement Accuracy
VS
RS
IM
HI
LO
Measuring Current ISIndicating IM
IS
Current Source
IM = IS + IBIAS
IBIAS
DMM, Electrometer, SMU Instrument, or Picoammeter
FIGURE 2-20: Metal Caps for Measuring Input Bias Current
Use a metal shield/cap to measure the input bias current of an electrometer, picoammeter, or SMU instrument if the input is terminated with triax or BNC. Do
not use a short; the input should be open.
3-Lug Triax Shield/Cap BNC Shield/Cap

2-26 SECTION 2
In some cases it may be necessary to determine the input bias current graphically. If this is the case, take a few readings as a function of time and observe the readings on a graph of current vs. time. Figure 2-22 shows the open circuit current measurements as a function of a time for an SMU instrument.
FIGURE 2-22: Input Bias Current Measurements as a Function of Time for an SMU Instrument
0 10 20 30 40 50 60 70 80 90 100
Time (seconds)
Cur
rent
(am
ps)
9.0E–15
8.0E–15
7.0E–15
6.0E–15
5.0E–15
4.0E–15
3.0E–15
2.0E–15
1.0E–15
External Offset Current
External offset currents can be generated by ionic contamination in the insulators connected to the ammeter. Offset currents can also be generated externally from such sources as triboelectric and piezoelectric effects. As
FIGURE 2-21: Measuring the Input Bias Current of an Electrometer from the Front Panel
The input bias current of an electrometer is determined by measuring the open circuit current on the lowest range. The input bias current of this electrometer is 0.8fA as shown on the display.
Electrometer

Measurements from High Resistance Sources 2-27
shown in Figure 2-23, the external offset current (IOFFSET) also adds to the source current (IS), and the meter again measures the sum of the two.
External offset currents can be suppressed with the current suppres-sion feature (if available) of the instrument or they can be nulled by using a suitably stable and quiet external current source (ISUPPRESS), as shown in Figure 2-24. With this arrangement, the current meas ured by the meter is:
IM = IS + IOFFSET – ISUPPRESS
FIGURE 2-23: Effects of External Offset Current on Current Measurement Accuracy
VS
RS
IM
HI
LO
Measuring Current ISIndicating IM
IS
Current Source
IM = IS + IOFFSET
IOFFSET
DMM, Electrometer, SMU Instrument, or Picoammeter
FIGURE 2-24: Using External Current Source to Suppress Offset Current
VS
RS
IM
HI
LO
Measuring Current ISIndicating IM
IS
Current Source
IM = IS + IOFFSET – ISUPPRESS
When IOFFSET = ISUPPRESS, IS = IM
ISUPPRESSIOFFSET
DMM, Electrometer, SMU Instrument, or Picoammeter

2-28 SECTION 2
Assuming IOFFSET and ISUPPRESS are equal in magnitude but opposite in polarity,
IM = IS
The advantage of using an external current source is that IOFFSET can be as large or larger than the full-range value, and only IOFFSET – ISUPPRESS need be small.
Triboelectric Effects
Triboelectric currents are generated by charges created between a con-ductor and an insulator due to friction. Here, free electrons rub off the conductor and create a charge imbalance that causes the current flow. A typical example would be electrical currents generated by insulators and conductors rubbing together in a coaxial cable, as shown in Figure 2-25.
FIGURE 2-25: Triboelectric Effect
IFrictional motion atboundary due tocable motion
+ +
– –
Insulation
Coaxialcable
Outerjacket
Outershield
Conductivelubricant inlow noise cable
Innerconductor
I
“Low noise” cable greatly reduces this effect. It typically uses an inner insulator of polyethylene coated with graphite underneath the outer shield. The graphite provides lubrication and a conducting equipotential cylinder to equalize charges and minimize charge generated by frictional effects of cable movement. However, even low noise cable creates some noise when subjected to vibration and expansion or contraction, so all connections should be kept short, away from temperature changes (which would create thermal expansion forces), and preferably supported by taping or tying the cable to a non-vibrating surface such as a wall, bench, or other rigid structure.
There are a variety of other solutions to movement and vibra-tion problems:

Measurements from High Resistance Sources 2-29
• Removal or mechanical decoupling of the source of vibration. Motors, pumps, and other electromechanical devices are the usual sources.
• Stabilization of the test hookup. Securely mount or tie down elec-tronic components, wires, and cables. Shielding should be sturdy.
Triboelectric effects can also occur in other insulators and conduc-tors that touch each other. Therefore, it’s important to minimize contact between insulators as well as conductors in constructing test fixtures and connections for low current and high impedance.
Table 2-2 in Section 2.2.2 summarizes the triboelectric effects of vari-ous insulating materials.
Piezoelectric and Stored Charge Effects
Piezoelectric currents are generated when mechanical stress is applied to certain crystalline materials when used for insulated terminals and inter-connecting hardware. In some plastics, pockets of stored charge cause the material to behave in a manner similar to piezoelectric materials. An exam-ple of a terminal with a piezoelectric insulator is shown in Figure 2-26.
FIGURE 2-26: Piezoelectric Effect
I
Metalterminal
+
+
Appliedforce
– –
Piezoelectricinsulator Conductive plate
I
To minimize the current due to this effect, it’s important to remove mechanical stresses from the insulator and use insulating materials with minimal piezoelectric and stored charge effects. Section 2.2.2 and Table 2-2 summarize the piezoelectric properties of various insulating materials.
This effect is independent of the capacitance change between the plate and terminals. Charges are moved around, resulting in current flow.
In practice, it may be quite difficult to distinguish stored charge effects (in insulators) from piezoelectric effects. Regardless of the phenomenon involved, it’s important to choose good insulating materials and make connecting structures as rigid as possible.

2-30 SECTION 2
Contamination and Humidity
Error currents also arise from electrochemical effects when ionic chemi-cals create weak batteries between two conductors on a circuit board. For example, commonly used epoxy printed circuit boards, when not thor-oughly cleaned of etching solution, flux or other contamination, can gen-erate currents of a few nanoamps between conductors (see Figure 2-27).
Insulation resistance can be dramatically reduced by high humidity or ionic contamination. High humidity conditions occur with condensation or water absorption; ionic contamination may be the result of body oils, salts, or solder flux.
Although the primary result of these contaminants is the reduction of insulation resistance, the combination of high humidity and ionic contami-nation can form a conductive path or they may even act as an electrochem-ical cell with high series resistance. A cell formed in this manner can source picoamps or nanoamps of current for long periods of time.
To avoid the effects of contamination and humidity, select insulators that resist water absorption, and keep humidity to moderate levels. Also, be sure all insulators are kept clean and free of contamination.
If insulators become contaminated, apply a cleaning agent such as methanol to all interconnecting circuitry. It’s important to flush away all contaminants once they’re dissolved in the solvent, so they won’t be rede-posited. Use only very pure solvents for cleaning; lower grades may contain contaminants that leave an electrochemical film.
Dielectric Absorption
Dielectric absorption in an insulator can occur when a voltage across that insulator causes positive and negative charges within the insulator
FIGURE 2-27: Electrochemical Effects
I
PrintedWiring Epoxy Printed
Circuit Board
Flux orother chemical
“track” andmoisture+
–
I

Measurements from High Resistance Sources 2-31
to polarize because various polar molecules relax at different rates. When the voltage is removed, the separated charges generate a decaying current through circuits connected to the insulator as they recombine.
To minimize the effects of dielectric absorption on current measure-ments, avoid applying voltages greater than a few volts to insulators being used for sensitive current measurements. In cases where this practice is unavoidable, it may take minutes or even hours in some cases for the cur-rent caused by dielectric absorption to dissipate.
Table 2-2 in Section 2.2.2 summarizes the relative dielectric absorp-tion of various insulating materials.
2.3.5 Voltage Burden
An ammeter may be represented by an ideal ammeter (IM) with zero internal resist ance, in series with a resistance (RM), as shown in Figure 2-28. When a current source whose Thevenin equivalent circuit is a volt-age (VS) in series with a source resistance (RS) is connected to the input of the ammeter, the current is reduced from what it would be with the ideal ammeter (RM = 0W). This reduction is caused by the internal resist-ance (RM), which creates an additional voltage drop called the voltage burden (VB).
FIGURE 2-28: Effects of Voltage Burden on Current Measurement Accuracy
VS
RS RM
IM
HI
LO
VB
Current Source
IM =RS
VS
VS
VB1 –IM =RS
VS – VB or
DMM, Electrometer, SMU Instrument, or Picoammeter
The voltage burden is specified for a full-scale input. Therefore, the voltage burden at a given current can be calculated by:
VBIS
IFSVB(I) =

2-32 SECTION 2
where IFS is full-scale current and IS is the magnitude of the current source.
Taking into account the voltage burden, the measurement error can be calculated as follows:
IM =
VS – VB
RS
IS
IFS
The percent error in the measured reading due to voltage burden is:
% error =
VB
VS
ISIFS × 100%
Example: In this circuit, VS = 0.7V, IS = 100µA, and IFS = 200µA. Assuming RS = 10kW and the voltage burden at full scale is 200mV:
IM =0.7V – 0.2V
10kΩ
100µA200µA
= 60µA
compared to the ideal case,
IM =
0.7V10kΩ = 70µA
Thus, the ammeter reading is 60µA vs. the ideal case of 70µA—an error of 14%.
In comparison, if a picoammeter is used and the voltage bur-den is 200µV:
IM =
0.7V – 0.0002V
10kΩ
100µA200µA
= 69.99µA
Thus, the picoammeter reading is 69.99µA vs. the ideal measurement of 70µA—an error of only 0.01%.
On a particular current range, the input resistance of the ammeter can be related to the voltage burden specification and the full scale current on that range. The input resistance of a feedback picoammeter or electrometer ammeter is less than the ratio of the specified voltage burden to the full-scale current:
Voltage Burden Input Resistance < _____________________ Full-Scale Current
When determining the voltage burden of an SMU instrument, the offset voltage on the voltage source range being used must be included. Therefore, it’s best to use the lowest possible voltage source range in order to minimize error.

Measurements from High Resistance Sources 2-33
2.3.6 Overload Protection
Electrometers, picoammeters, and SMU instruments may be damaged if excessive voltage is applied to the input. Most instruments have a specifi-cation for the maximum allowable voltage input. In some applications, this maximum voltage may be unavoidably exceeded. Some of these applica-tions may include leakage current of capacitors, reverse diode leakage, or insulation resistance of cables or connectors. If the component or material breaks down, all the voltage would be applied to the ammeter’s input, possibly destroying it. In these cases, additional overload protection is required to avoid damaging the input circuitry of the instrument.
Electrometer or Picoammeter Overload Protection
Figure 2-29 shows a protection circuit for an electrometer ammeter or picoammeter, consisting of a resistor and two diodes (1N3595). The leak-age of the 1N3595 diode is generally less than one picoampere even with 1mV of forward bias, so the circuit won’t interfere with measurements of 10pA or more. This diode is rated to carry 225mA (450mA repeated surge). Because the voltage burden of the electrometer ammeter or picoammeter is less than 1mV, the diodes won’t conduct. With two diodes in parallel back to back, the circuit will provide protection regardless of the signal polarity.
FIGURE 2-29: Overload Protection Circuit for Electrometers and Picoammeters
R
To FeedbackAmmeter
HI
LO
HI
LO
The resistor (R) must be large enough to limit the current through the diodes to prevent damage to the diodes. It also must be large enough to withstand the supply voltage. A good rule of thumb is to use a large enough resistor to cause a 1V drop at the maximum current to be measured.
The protection circuit should be enclosed in a light-tight shield because the diodes are photosensitive. The shield should be connected to the low of the ammeter.
SMU Instrument Overload Protection (in Force Voltage, Measure Current Mode)
Figure 2-30 illustrates an overload protection circuit for an SMU instru-ment in the ammeter mode. This circuit consists of two zener diodes (D3 and D4) connected between the Guard and LO (or Common) terminals, a current limiting resistor (R) in series with the HI terminal, and two low leakage diodes (D1 and D2) between the HI and Guard terminals.

2-34 SECTION 2
The two zener diodes are used to clamp the guard to LO (or the Common terminal). These should be rated slightly higher than the SMU instrument’s maximum measurable voltage. The leakage current through the zener diodes results in a voltage drop across the resistor, so low leakage zener devices are desirable.
The resistor (R) is used to limit the current through the diodes (D1 and D2). The resistance value should be large enough to limit the current flowing through the diodes to one-tenth of their forward current rating, thereby preventing diode damage. The resistor must also be rated high enough to meet the power dissipation requirements while the zeners are conducting.
If an overload occurs, one of the diodes (D1 or D2) will conduct and prevent the input from being damaged. The 1N3595 diode is a good choice for this function because it has low leakage current, typically less than 1pA, even with a forward bias of 1mV.
High impedance circuit construction, such as Teflon standoffs, must be used. The protection circuit should be built into a light-tight, metal- shielded enclosure with the shield connected to the LO terminal of the SMU instrument.
2.3.7 AC Interference and Damping
When measuring low current, electrostatic shielding (as discussed in Section 2.6.2) is the most common way to reduce noise due to AC inter-ference. However, in some cases, shielding the device under test or the connecting cabling isn’t practical. For these applications, a variable damping control may reduce the AC pickup enough to make meaningful measurements.
FIGURE 2-30: Overload Protection Circuit for the SMU Instrument in Force Voltage, Measure Current Mode
RHI
GUARDTo DUT
LO*
D2D1
D3
D4
*For SMU instruments that have the outside shield connected to ground, link the LO terminal to the ground terminal.
To Output of SMU Instrument

Measurements from High Resistance Sources 2-35
A damping circuit is a type of low pass filter that reduces the electrom-eter’s AC response so the low DC current can be measured accurately. The damping circuit may already be built into the electrometer or may be an external circuit. Refer to the instrument’s instruction manual for informa-tion on a particular electrometer’s internal damping feature. However, it may be necessary to increase the damping with an external circuit.
Figure 2-31 illustrates an example of an external damping circuit. This circuit consists of a low leakage polystyrene or polyester capacitor (C) and a potentiometer (R). The potentiometer is connected between the preamp output and the common (or LO) terminal of the ammeter. The capacitor is connected between the HI input terminal of the ammeter and the mov-ing arm of the potentiometer. The value of the capacitor depends on the current range of the ammeter. Higher ranges require the use of higher magnitude capacitors. However, typical values of the capacitor are in the range of hundreds of picofarads. The value of the potentiometer should be chosen to be high enough (>50kW) to avoid loading the preamp output, but still reduce noise effectively.
FIGURE 2-31: External Damping Circuit
–
+
R
HI
LO
To RangingAmplifierand A/D
Preamp Out
Common
GND
Link Commonto GND
C
Electrometer
Shielded Test Fixture
Some experimentation will be needed to choose the best values for the capacitor and the resistance. Connect an oscilloscope to the analog output and observe the AC waveform on the scope. Adjust the potentiometer to make the AC signal as small as possible. If the noise can’t be suppressed enough with the potentiometer, use a bigger capacitor.
The damping circuit should be built into a shielded enclosure.
2.3.8 Using a Coulombmeter to Measure Low Current
In most cases, an ammeter or picoammeter is used to measure current. However, for femtoamp-level currents, it may be better to use the coulombs
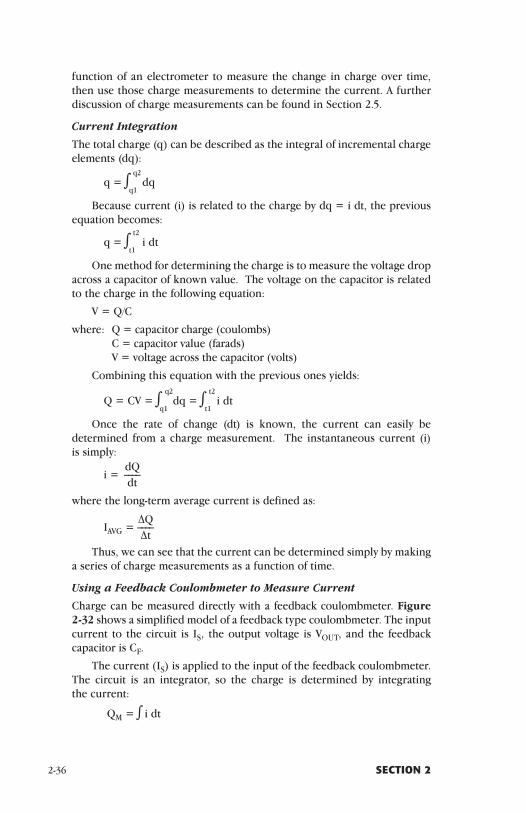
2-36 SECTION 2
function of an electrometer to measure the change in charge over time, then use those charge meas ure ments to determine the current. A further discussion of charge measurements can be found in Section 2.5.
Current Integration
The total charge (q) can be described as the integral of incremental charge elements (dq):
q2 q = ∫ dq q1
Because current (i) is related to the charge by dq = i dt, the previous equation becomes:
t2 q = ∫ i dt t1
One method for determining the charge is to measure the voltage drop across a capacitor of known value. The voltage on the capacitor is related to the charge in the following equation:
V = Q/C
where: Q = capacitor charge (coulombs) C = capacitor value (farads) V = voltage across the capacitor (volts)
Combining this equation with the previous ones yields:
q2 t2 Q = CV = ∫ dq = ∫ i dt q1 t1〗〗
Once the rate of change (dt) is known, the current can easily be determined from a charge measurement. The instantaneous current (i) is simply:
dQ i = ____ dt
where the long-term average current is defined as:
∆Q IAVG = ____ ∆t
Thus, we can see that the current can be determined simply by making a series of charge measurements as a function of time.
Using a Feedback Coulombmeter to Measure Current
Charge can be measured directly with a feedback coulombmeter. Figure 2-32 shows a simplified model of a feedback type coulombmeter. The input current to the circuit is IS, the output voltage is VOUT, and the feedback capacitor is CF.
The current (IS) is applied to the input of the feedback coulombmeter. The circuit is an integrator, so the charge is determined by integrating the current:
QM = ∫ i dt
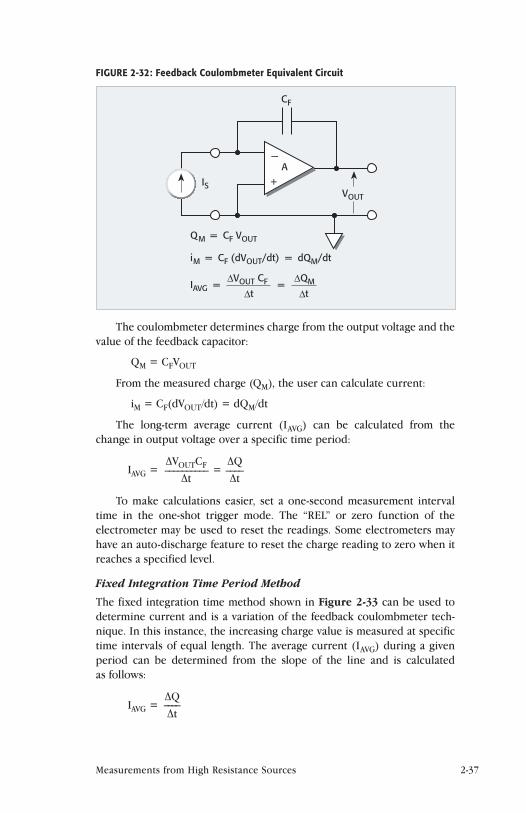
Measurements from High Resistance Sources 2-37
The coulombmeter determines charge from the output voltage and the value of the feedback capacitor:
QM = CFVOUT
From the measured charge (QM), the user can calculate current:
iM = CF(dVOUT/dt) = dQM/dt
The long-term average current (IAVG) can be calculated from the change in output voltage over a specific time period:
∆VOUTCF ∆Q IAVG = __________ = ____ ∆t ∆t
To make calculations easier, set a one-second measurement interval time in the one-shot trigger mode. The “REL” or zero function of the electrometer may be used to reset the readings. Some electrometers may have an auto-discharge feature to reset the charge reading to zero when it reaches a specified level.
Fixed Integration Time Period Method
The fixed integration time method shown in Figure 2-33 can be used to determine current and is a variation of the feedback coulombmeter tech-nique. In this instance, the increasing charge value is measured at specific time intervals of equal length. The average current (IAVG) during a given period can be determined from the slope of the line and is calculated as follows:
∆Q IAVG = ____ ∆t
FIGURE 2-32: Feedback Coulombmeter Equivalent Circuit
QM = CF VOUT
iM = CF (dVOUT/dt) = dQM/dt
∆VOUT CF
∆tIAVG = =
∆QM
∆t
—
+IS
CF
VOUT
A

2-38 SECTION 2
This method gives the average current during the time interval and produces readings at a steady rate determined by the integration period. This method can be accomplished automatically in software by determin-ing the difference between successive readings.
Fixed Threshold Method
The fixed threshold method, which is shown in Figure 2-34, is somewhat similar to the fixed integration time method just described. In this case, however, the charge measurement begins at time t1 and continues until the charge value reaches some predetermined threshold value at time t2. The current is then calculated as follows:
∆Q IAVG = ____ where ∆t = t2 – t1 ∆t
FIGURE 2-33: Fixed Integration Time Method of Determining Current from Charge
∆Q
∆t
∆Q∆tIAVG =
Q
tFixed time intervals
FIGURE 2-34: Fixed Threshold Method of Determining Current from Charge
∆Q
∆t
Q
tt1 t2
Fixed threshold
∆Q∆tIAVG =

Measurements from High Resistance Sources 2-39
Note that the voltage coefficient of the coulombmeter capacitor has little effect on overall current measurement accuracy. As long as the thresh-old point and time periods are accurately known, current measurement accuracy will be quite good. However, readings won’t be evenly spaced when current levels vary, and the interval between readings can be quite long when the average current for a given time period is small.
Advantages of Using a Coulombmeter to Measure Current
There are several advantages to using a coulombmeter instead of an amme-ter for measuring current in certain situations:
• Lower Current Noise: The ammeter uses a feedback resistor, which will have significant Johnson noise. For charge measurement, this resistor is replaced by a capacitor, which theoretically has no Johnson noise. Consequently, the charge method of current meas-urement results in lower noise than measuring currents directly with a feedback ammeter. Thus, the charge method is preferable when current noise performance less than 1fA p-p is required. (Refer to Figure 2-58 in Section 2.6.5 and note that feedback resis-tances higher than 1012W aren’t very practical.)
• Faster Settling Times: The speed of a feedback ammeter is limited by the time constant of its feedback circuit (RFCF). For example, for feedback resist ances greater than 10GW, stray capacitance limits response times to tens of milliseconds. In contrast, a feedback inte-grator will respond immediately and is limited only by the speed of the operational amplifier.
• Random Pulses Can Be Integrated: The average charge trans-ferred per unit time of random pulse trains can be evaluated by integrating the current pulse train for a given period of time. The average current amplitudes can then be expressed as the total charge divided by the time period involved in the meas ure ment. This technique is especially useful when averaging very small, unsteady currents. If the duty cycle is known, the pulse height can also be determined.
• The Noise Effects of Input Shunt Capacitance are Minimized: Noise gain is mainly determined by CIN/CF, and CF is much larger in a coulombmeter than in an ammeter, so much larger input capaci-tance values can be tolerated. This characteristic is beneficial when measuring from high capacitance sources or when long connecting cables are used.
2.4 High Resistance MeasurementsWhen resistances greater than 1GW must be measured, an electrometer, SMU instrument, or picoammeter/voltage source are usually required. An electrometer may measure high resistance by either the constant-voltage or the constant-current method. Some electrometers allow the user to choose

2-40 SECTION 2
either method. The constant-voltage method uses an ammeter and a volt-age source; the constant-current method uses an electrometer voltmeter and a current source. A description of these techniques follows.
2.4.1 Constant-Voltage Method
To make high resistance measurements using the constant-voltage method, an instrument that can measure low current and a constant DC voltage source are required. Some electrometers and picoammeters have voltage sources built into the instrument and automatically can calculate the unknown resistance.
The basic configuration of the constant-voltage method using an elec-trometer or picoammeter is shown in Figure 2-35a. As shown in Figure 2-35b, an SMU instrument can also be used for making high resistance measurements using the constant voltage method.
FIGURE 2-35: Constant-Voltage Method for Measuring High Resistance
V
SMU Instrument
b) Using an SMU Instrument
Force/Output HI
Force/Output LO
IM
R
V
a) Using an Electrometer or Picoammeterand a Voltage Source
IM
R
Electrometer orPicoammeter
HI
LO

Measurements from High Resistance Sources 2-41
In this method, a constant voltage source (V) is placed in series with the un known resistor (R) and an ammeter (IM). The voltage drop across the ammeter is negligible, so essentially all the test voltage appears across R. The resulting current is measured by the ammeter and the resistance is calculated using Ohm’s Law (R= V/I).
High resistance is often a function of the applied voltage, which makes the constant-voltage method preferable to the constant-current method. By testing at selected voltages, a resistance vs. voltage curve can be developed and a “voltage coefficient of resistance” can be determined.
Some of the applications that use this method include testing two- terminal high resistance devices, measuring insulation resistance, and determining the volume and surface resistivity of insulating materials. See Section 4 for descriptions of these applications.
The constant-voltage method requires measuring low current, so all the techniques and error sources described in Section 2.3 (Low Current Measurements) apply to this method. The two most common error sources when measuring high resistance are electrostatic interference and leakage current. As described in Section 2.6.2, electrostatic interference can be minimized by shielding the high impedance circuitry. Interferences due to leakage current can be controlled by guarding as described in Section 2.3.1.
2.4.2 Constant-Current Method
High resistance measurements using the constant-current method may be made using either an electrometer voltmeter and current source or just an electrometer ohmmeter. An SMU instrument that has a voltmeter with high input impe dance and low current source ranges may also be used. Using the electrometer voltmeter with a separate current source or an SMU instru-ment allows the user to make a four-wire measurement and to control the amount of current through the sample. The electrometer ohmmeter makes a two-wire resist ance meas urement at a specific test current, depending on the measurement range.
Using The Electrometer Voltmeter and an External Current Source
The basic configuration for the constant-current method is shown in Figure 2-36. Current from the source (I) flows through the unknown resistance (R) and the voltage drop is measured by the electrometer voltmeter (VM). Using this method, resist ances up to about 1012W can be measured. Even though the basic procedure seems simple enough, some precautionary measures must be taken. The input impedance of the voltmeter must be high enough compared with a source resistance to keep the loading error within acceptable limits. Typically, the input impedance of an electrometer voltmeter is about 1014W. Also, the output resistance of the current source must be much greater than the unknown resistance for the measurement to be linear. The voltage across the sample depends upon the sample resis-tance, which makes it difficult to account for voltage coefficient when using

2-42 SECTION 2
the constant-current method. If voltage coefficient is a concern, it’s best to use the constant- voltage method. When using the electrometer voltmeter to make high resist ance measurements, all the techniques and error sourc-es described in Section 2.2 (Voltage Measurements from High Resistance Sources) apply to these measurements. The electrometer voltmeter and a separate current source are used when determining high resistivity of semi-conductor materials using the four-point probe or van der Pauw technique. These methods of determining the resistivity of semiconductor materials are described in more detail in Section 4.4.3.
Using an SMU Instrument in the Source I, Measure V Mode
An SMU instrument can measure high resistance in the source current/measure voltage mode by using either a two-wire (local sense) or four-wire (remote sense) method. Figure 2-37 illustrates an SMU instrument in four-wire mode.
The four-wire method is used to eliminate contact and lead resistance, which is especially important when measuring resistivity of semiconductor materials. These measurements usually involve measuring low voltages.
FIGURE 2-37: Using the SMU Instrument in the Four-Wire Mode to Measure High Resistance
Force HI
Sense HI
Sense LO
Force LO
SMU Instrument
VM R
Source I, Measure V Mode
FIGURE 2-36: Constant-Current Method Using a Separate Current Source and Electrometer Voltmeter
RCurrentSource
ElectrometerVoltmeter
VM
HI
LO
HI
LO
I
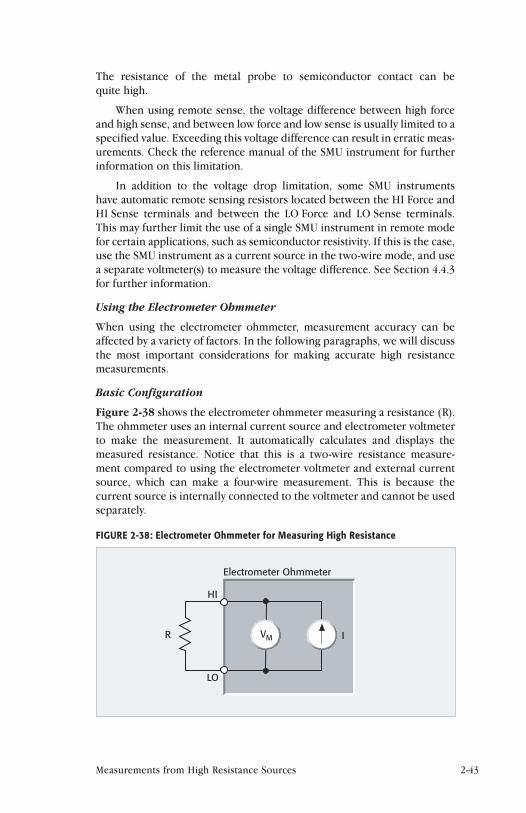
Measurements from High Resistance Sources 2-43
The resistance of the metal probe to semiconductor contact can be quite high.
When using remote sense, the voltage difference between high force and high sense, and between low force and low sense is usually limited to a specified value. Exceeding this voltage difference can result in erratic meas-urements. Check the reference manual of the SMU instrument for further information on this limitation.
In addition to the voltage drop limitation, some SMU instruments have automatic remote sensing resistors located between the HI Force and HI Sense terminals and between the LO Force and LO Sense terminals. This may further limit the use of a single SMU instrument in remote mode for certain applications, such as semiconductor resistivity. If this is the case, use the SMU instrument as a current source in the two-wire mode, and use a separate voltmeter(s) to measure the voltage difference. See Section 4.4.3 for further information.
Using the Electrometer Ohmmeter
When using the electrometer ohmmeter, measurement accuracy can be affected by a variety of factors. In the following paragraphs, we will discuss the most important considerations for making accurate high resistance meas urements.
Basic Configuration
Figure 2-38 shows the electrometer ohmmeter measuring a resistance (R). The ohmmeter uses an internal current source and electrometer voltmeter to make the measurement. It automatically calculates and displays the meas ured resistance. Notice that this is a two-wire resistance measure-ment compared to using the electrometer voltmeter and external current source, which can make a four-wire measurement. This is because the current source is internally connected to the voltmeter and cannot be used separately.
FIGURE 2-38: Electrometer Ohmmeter for Measuring High Resistance
R
HI
Electrometer Ohmmeter
VM
LO
I
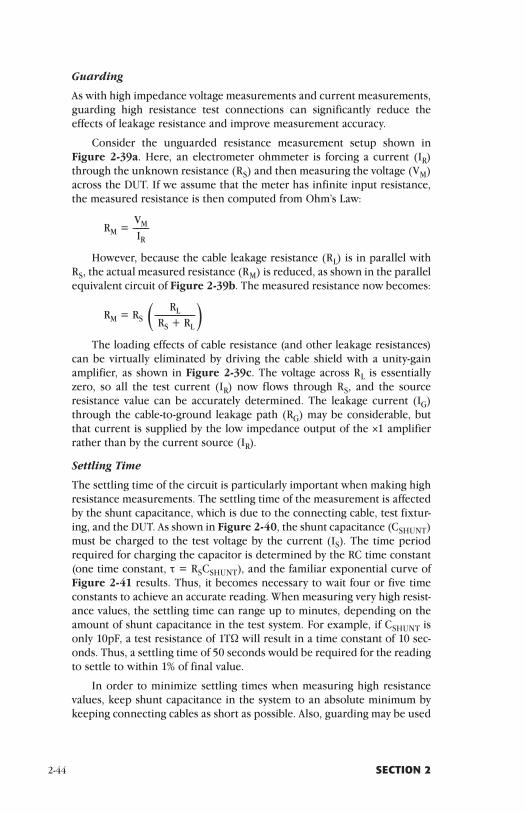
2-44 SECTION 2
Guarding
As with high impedance voltage measurements and current measurements, guarding high resistance test connections can significantly reduce the effects of leakage resist ance and improve measurement accuracy.
Consider the unguarded resistance measurement setup shown in Figure 2-39a. Here, an electrometer ohmmeter is forcing a current (IR) through the unknown resist ance (RS) and then measuring the voltage (VM) across the DUT. If we assume that the meter has infinite input resistance, the measured resistance is then computed from Ohm’s Law:
VM RM = ____ IR
However, because the cable leakage resistance (RL) is in parallel with RS, the actual measured resistance (RM) is reduced, as shown in the parallel equivalent circuit of Figure 2-39b. The measured resistance now becomes:
RL RM = RS ____________
( RS + RL )
The loading effects of cable resistance (and other leakage resistances) can be virtually eliminated by driving the cable shield with a unity-gain amplifier, as shown in Figure 2-39c. The voltage across RL is essentially zero, so all the test current (IR) now flows through RS, and the source resistance value can be accurately determined. The leakage current (IG) through the cable-to-ground leakage path (RG) may be considerable, but that current is supplied by the low impedance output of the ×1 amplifier rather than by the current source (IR).
Settling Time
The settling time of the circuit is particularly important when making high resistance measurements. The settling time of the measurement is affected by the shunt capacitance, which is due to the connecting cable, test fixtur-ing, and the DUT. As shown in Figure 2-40, the shunt capacitance (CSHUNT) must be charged to the test voltage by the current (IS). The time period required for charging the capacitor is determined by the RC time constant (one time constant, τ = RSCSHUNT), and the familiar exponential curve of Figure 2-41 results. Thus, it becomes necessary to wait four or five time constants to achieve an accurate reading. When measuring very high resist-ance values, the settling time can range up to minutes, depending on the amount of shunt capacitance in the test system. For example, if CSHUNT is only 10pF, a test resistance of 1TW will result in a time constant of 10 sec-onds. Thus, a settling time of 50 seconds would be required for the reading to settle to within 1% of final value.
In order to minimize settling times when measuring high resistance values, keep shunt capacitance in the system to an absolute minimum by keeping connecting cables as short as possible. Also, guarding may be used

Measurements from High Resistance Sources 2-45
FIGURE 2-39a: Effects of Cable Resistance on High Resistance Measurements
RS
Electrometer OhmmeterMeasuring RS
Indicating
UnknownResistanceof DUT
RM
HI
LO
RL
VM IR
RM = RSRS + RL
RL
FIGURE 2-39b: Equivalent Circuit of Figure 2-39a Showing Loading Effect of Cable Leakage Resistance RL.
RS RMRL RM = RSRS + RL
RL
FIGURE 2-39c: Guarding Cable Shield to Eliminate Leakage Resistance
IG
RS
Electrometer OhmmeterMeasuring RSIndicating RM = VM / IR
UnknownResistanceof DUT
RM
HI
LO
RG
GUARD ×1
RL
VM IR

2-46 SECTION 2
to decrease settling times substantially. Finally, the source voltage, measure current method of resistance measurement is generally faster because of reduced settling times.
2.5 Charge MeasurementsCharge is the time integral of current, q = ∫ idt. Charge is often measured on a quantity of particles, on a surface, or on a component such as a capac-itor. Sometimes, the charge is measured on a continuous basis, such as when using the coulombmeter to measure very low current, as discussed in Section 2.3.8.
An electrometer makes an ideal coulombmeter because it has very low input bias current and high input resistance. The coulombmeter function of the electrometer measures charge by integrating the input current. An integrating capacitor is used in the feedback loop of the input stage. Refer to Section 1.5.3 for a more detailed discussion of the coulombmeter circuit of the electrometer.
FIGURE 2-40: Settling Time is the Result of RSCSHUNT Time Constant
UnknownResistanceof DUT
RS CSHUNTVM
Ohmmeter
τ = RS CSHUNT
IS
FIGURE 2-41: Exponential Settling Time Caused by Time Constant of Shunt Capacitance and Source Resistance
Time
99
0 1.0 2.0 3.0 4.0 5.0
63Percentof FinalValue
0
τ = RS CSHUNT
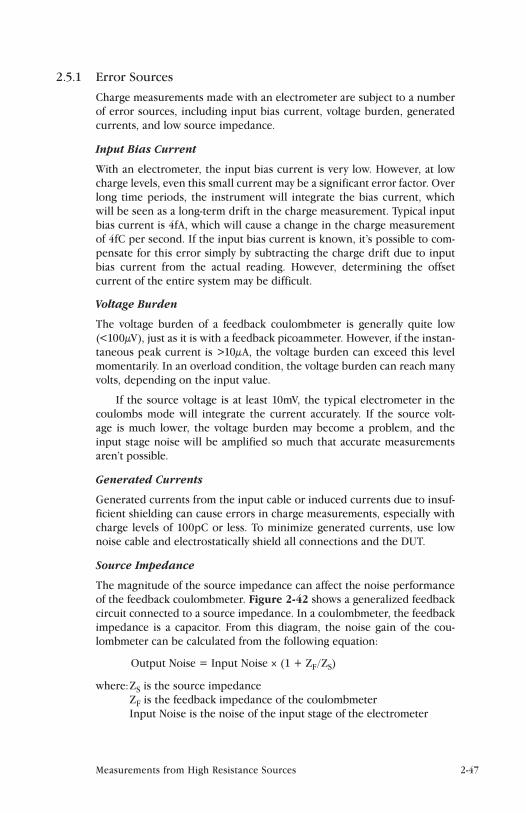
Measurements from High Resistance Sources 2-47
2.5.1 Error Sources
Charge measurements made with an electrometer are subject to a number of error sources, including input bias current, voltage burden, generated currents, and low source impedance.
Input Bias Current
With an electrometer, the input bias current is very low. However, at low charge levels, even this small current may be a significant error factor. Over long time periods, the instrument will integrate the bias current, which will be seen as a long-term drift in the charge measurement. Typical input bias current is 4fA, which will cause a change in the charge measurement of 4fC per second. If the input bias current is known, it’s possible to com-pensate for this error simply by subtracting the charge drift due to input bias current from the actual reading. However, determining the offset current of the entire system may be difficult.
Voltage Burden
The voltage burden of a feedback coulombmeter is generally quite low (<100µV), just as it is with a feedback picoammeter. However, if the instan-taneous peak current is >10µA, the voltage burden can exceed this level momentarily. In an overload condition, the voltage burden can reach many volts, depending on the input value.
If the source voltage is at least 10mV, the typical electrometer in the coulombs mode will integrate the current accurately. If the source volt-age is much lower, the voltage burden may become a problem, and the input stage noise will be amplified so much that accurate measurements aren’t possible.
Generated Currents
Generated currents from the input cable or induced currents due to insuf-ficient shielding can cause errors in charge measurements, especially with charge levels of 100pC or less. To minimize generated currents, use low noise cable and electro static ally shield all connections and the DUT.
Source Impedance
The magnitude of the source impedance can affect the noise performance of the feedback coulombmeter. Figure 2-42 shows a generalized feedback circuit connected to a source impedance. In a coulombmeter, the feedback impedance is a capacitor. From this diagram, the noise gain of the cou-lombmeter can be calculated from the following equation:
Output Noise = Input Noise × (1 + ZF/ZS)
where: ZS is the source impedance ZF is the feedback impedance of the coulombmeter Input Noise is the noise of the input stage of the electrometer
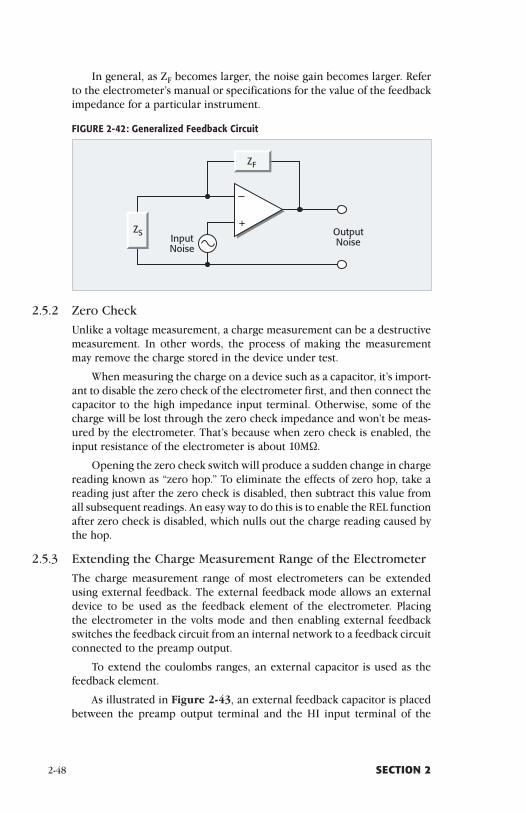
2-48 SECTION 2
In general, as ZF becomes larger, the noise gain becomes larger. Refer to the electrometer’s manual or specifications for the value of the feedback impedance for a particular instrument.
FIGURE 2-42: Generalized Feedback Circuit
—
+ZS
ZF
OutputNoiseInput
Noise
2.5.2 Zero CheckUnlike a voltage measurement, a charge measurement can be a destructive measurement. In other words, the process of making the measurement may remove the charge stored in the device under test.
When measuring the charge on a device such as a capacitor, it’s import-ant to disable the zero check of the electrometer first, and then connect the capacitor to the high impedance input terminal. Otherwise, some of the charge will be lost through the zero check impedance and won’t be meas-ured by the electrometer. That’s because when zero check is enabled, the input resistance of the electrometer is about 10MW.
Opening the zero check switch will produce a sudden change in charge reading known as “zero hop.” To eliminate the effects of zero hop, take a reading just after the zero check is disabled, then subtract this value from all subsequent readings. An easy way to do this is to enable the REL function after zero check is disabled, which nulls out the charge reading caused by the hop.
2.5.3 Extending the Charge Measurement Range of the ElectrometerThe charge measurement range of most electrometers can be extended using external feedback. The external feedback mode allows an external device to be used as the feedback element of the electrometer. Placing the electrometer in the volts mode and then enabling external feedback switches the feedback circuit from an internal network to a feedback circuit connected to the preamp output.
To extend the coulombs ranges, an external capacitor is used as the feedback element.
As illustrated in Figure 2-43, an external feedback capacitor is placed between the preamp output terminal and the HI input terminal of the
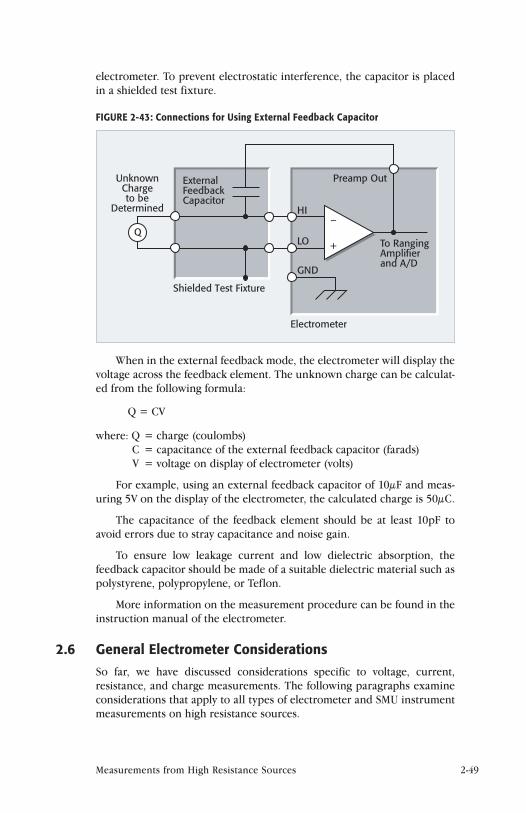
Measurements from High Resistance Sources 2-49
electrometer. To prevent electrostatic interference, the capacitor is placed in a shielded test fixture.
FIGURE 2-43: Connections for Using External Feedback Capacitor
To RangingAmplifierand A/D
–
+
HI
LO
GND
Preamp Out
Electrometer
Q
UnknownChargeto be
Determined
ExternalFeedbackCapacitor
Shielded Test Fixture
When in the external feedback mode, the electrometer will display the voltage across the feedback element. The unknown charge can be calculat-ed from the following formula:
Q = CV
where: Q = charge (coulombs) C = capacitance of the external feedback capacitor (farads) V = voltage on display of electrometer (volts)
For example, using an external feedback capacitor of 10µF and meas-uring 5V on the display of the electrometer, the calculated charge is 50µC.
The capacitance of the feedback element should be at least 10pF to avoid errors due to stray capacitance and noise gain.
To ensure low leakage current and low dielectric absorption, the feedback capacitor should be made of a suitable dielectric material such as polystyrene, polypropylene, or Teflon.
More information on the measurement procedure can be found in the instruction manual of the electrometer.
2.6 General Electrometer Considerations
So far, we have discussed considerations specific to voltage, current, resist ance, and charge measurements. The following paragraphs examine considerations that apply to all types of electrometer and SMU instrument measurements on high resistance sources.

2-50 SECTION 2
2.6.1 Making Connections
To avoid measurement errors, it’s critical to make proper connections from the electrometer, SMU instrument, or picoammeter to the device under test. Always connect the high resistance terminal of the meter to the highest resist ance point of the circuit under test.
Figure 2-44 shows an electrometer connected to a current source that consists of a voltage source in series with a resistor. An AC powered source usually has a significant level (often several volts) of line frequency common mode voltage. As shown in Figure 2-45, this will cause a current (i) to flow through the low to ground capacitance of the electrometer (IM).
FIGURE 2-44: Connecting the HI Terminal of the Ammeter to High Resistance
R
Current Source
HI
LO
IM
FIGURE 2-45: Proper Connection
R
Current Source
HI
LO
IM
i

Measurements from High Resistance Sources 2-51
This circuit is connected properly, so this current doesn’t flow through the electrometer measurement circuitry and, therefore, doesn’t cause any measurement errors. However, when the HI terminal of the electrometer is connected to the low impedance power supply, this AC current (i) flows through the electrometer (IM), as illustrated in Figure 2-46. This current may affect the meas urement accuracy, especially at low signal levels.
See Section 2.6.6 for details on appropriate cabling and connector types for electrometer measurements.
2.6.2 Electrostatic Interference and Shielding
Electrostatic coupling or interference occurs when an electrically charged object approaches the input circuit under test. At low impedance levels, the effects of the interference aren’t noticeable because the charge dissipates rapidly. However, high resistance materials don’t allow the charge to decay quickly, which may result in unstable meas ure ments. Typically, electro-static interference is an issue when making current measurements ≤1nA or resistance measurements ≥1GW. The erroneous readings may be due to either DC or AC electrostatic fields, so electrostatic shielding will help minimize the effects of these fields.
Electrostatic Interference
DC fields can produce noisy readings or undetected errors. These fields can be detected when movement near an experiment (such as the movement of the person operating the instrument or others in the immediate vicinity) causes fluctuations on the electrometer’s display. To perform a quick check
FIGURE 2-46: Improper Connection
R
Current Source
LO
HIi
IM

2-52 SECTION 2
for interference, place a piece of charged plastic, such as a comb, near the circuit. A large change in the meter reading indicates insufficient shielding.
AC fields can be equally troublesome. These are caused most often by power lines and RF fields. If the AC voltage at the input is large, part of this signal is rectified, producing an error in the DC signal being measured. This can be checked by observing the analog output of the electrometer or picoammeter with an oscilloscope. A clipped waveform indicates a need to improve electrostatic shielding. Figure 2-47 illustrates a clipped waveform taken from the 2V analog output of an electrometer. In this example, the amount of clipping reduced the DC current reading by nearly 50%.
FIGURE 2-47: Clipped Waveform from the Analog Output of an Electrometer Caused by AC Pickup
FIGURE 2-48: Electrostatic Coupling
V
C
Electrostaticvoltage source
GroundReferencedSignalConductor
i
Couplingcapacitance
i = C + VdVdt
dCdt

Measurements from High Resistance Sources 2-53
For an SMU instrument, check for AC pickup by connecting the oscillo-scope between the guard terminal and common terminal.
Figure 2-48 shows an example of AC electrostatic coupling. An electro-static voltage source in the vicinity of a conductor, such as a cable or trace on a PC board, generates a current proportional to the rate of change of the voltage and of the coupling capacitance. This current can be calculated with the following equation:
i = C dV/dt + V dC/dt
For example, two conductors, each with 1cm2 area and spaced 1cm apart by air, will have almost 0.1pF of capacitance. With a voltage difference of 100V between the two conductors and a vibration causing a change of capacitance of 0.01pF/second (a 10% fluctuation between them), a current of 1pA AC will be generated.
Shielding
To reduce the effects of the fields, a shield can be built to enclose the circuit being measured. The easiest type of shield to make is a simple metal box or meshed screen that encloses the test circuit. Shielded boxes are also available commercially.
Figure 2-49 illustrates an example of shielding when making meas-urements using an electrometer or picoammeter. Made from a conductive material, the shield is always connected to the low impedance input of the electrometer or picoammeter or to the output LO (or common) terminal of the SMU instrument. If circuit LO is floating above ground, observe special safety precautions to prevent anyone from touching the shield. These safety precautions are discussed in Section 2.6.8.
FIGURE 2-49: Shielding a High Impedance Device
VElectrometer
orPicoammeter
R
HI
LO
IM
The cabling between the HI terminal of the meter and the device under test also requires shielding. Capacitive coupling between an elec-trostatic noise source and the signal conductors or cables can be greatly reduced by surrounding those conductors with a metal shield connected to LO, as shown in Figure 2-50. With this shield in place, the noise current

2-54 SECTION 2
generated by the electro static voltage source and the coupling capacitance flows through the shield to ground rather than through the HI terminal of the electrometer.
Figure 2-51 illustrates the dramatic difference between unshield-ed and shielded current measurements of a 100GW resistor biased at 1V. The unshielded measurements are much noisier than the shielded measurements.
To summarize, follow these guidelines to minimize error currents due to electrostatic coupling:
FIGURE 2-50: Electrostatic Shielding
Electrometer
IsolationImpedance
Shield Shield
V
HI
Source-to-shieldcapacitance
Shield-to-cablecapacitance
Noise
To DUT
current
Electrostaticvoltage source
LO
IM
FIGURE 2-51: Shielded vs. Unshielded Current Measurements of 100GW Resistor
100.5E–12
100.4E–12
100.3E–12
100.2E–12
100.1E–12
100.0E–12
99.9E–12 5 6 7 8 9 10 11 12 13 14 15 16 17
Time (seconds)
Shielded
Unshielded
Curr
ent (
amps
)

Measurements from High Resistance Sources 2-55
• Keep all charged objects (including people) and conductors away from sensi tive areas of the test circuit.
• Avoid movement and vibration near the test area.
• Shield the device under test by surrounding it with a metal enclo-sure and connect the enclosure electrically to the test circuit com-mon terminal.
Shielding vs. Guarding
Shielding usually implies the use of a metallic enclosure to prevent elec-trostatic interference from affecting a high impedance circuit. Guarding implies the use of an added low impedance conductor, maintained at the same potential as the high impedance circuit, which will intercept any interfering voltage or current. A guard doesn’t necessarily provide shield-ing. Guarding is described further in Section 2.2.1 for voltmeters, Section 2.3.1 for ammeters, and Section 2.4.2 for ohmmeters.
2.6.3 Environmental Factors
A stable test environment is essential to making accurate low level meas-urements. This section addresses important environmental factors that may affect the accuracy of low level measurements.
Temperature and Temperature Stability
Varying temperatures can affect low level measurements in several ways, including causing thermal expansion or contraction of insulators and pro-ducing noise currents. Also, a temperature rise can cause an increase in the input bias current of the meter. As a general rule, JFET gate leakage current doubles for every 10°C increase in temperature, but most electrometers are temperature compensated to minimize input current variations over a wide temperature range.
To minimize errors due to temperature variations, operate the entire system in a thermally stable environment. Keep sensitive instruments away from hot locations (such as the top of a rack) and allow the complete system to achieve thermal stability before making measurements. Use the instrument’s zero or suppress feature to null offsets once the system has achieved thermal stability. Repeat the zeroing process whenever the ambi-ent temperature changes. To ensure optimum accuracy, zero the instru-ment on the same range as that to be used for the measurement.
Humidity
Excess humidity can reduce insulation resistance on PC boards and in test connection insulators. A reduction in insulation resistance can, of course, have a serious effect on high impedance measurements. In addition, humidity or moisture can combine with any contaminants present to create electrochemical effects that can produce offset currents.

2-56 SECTION 2
To minimize the effects of moisture, reduce the humidity in the envi-ronment (ideally <50%). Be sure all components and connectors in the test system are clean and free of contamination. When cleaning, use only pure solvents to dissolve oils and other contaminants, then rinse the cleaned area with fresh methanol or deionized water. Allow cleaned areas to dry for several hours before use.
Light
Some components such as diodes and transistors are excellent light detectors. Consequently, these components must be tested in a light-free environment. To ensure measurement accuracy, check the test fixture for light leaks at doors and door hinges, tubing entry points, and connectors or connector panels.
Ionization Interference
Current measurements made at very low levels (<100fA) may be affected by ionization interference from sources such as alpha particles. A single alpha particle generates a track of from 30,000 to 70,000 positive and negative ions per cm, which may be polarized and moved about by ambient electric fields. Also, ions that strike a current-sensing node may generate a “charge hop” of about 10fC per ion.
There are several ways to minimize noise in the test system due to ionization interference. First, minimize the volume of air inside the shield around sensitive input nodes. Also, keep sensitive nodes away from high intensity electric fields.
RFI (Radio Frequency Interference)
Interference from radio frequency sources can affect any sensitive elec-trometer meas urement. This type of interference may be indicated by a sudden change in the reading for no apparent reason.
A non-linear device or junction in the input circuit can rectify the RF energy and cause significant errors. Sources of such RFI are nearby trans-mitters, contactors, solenoid valves, and even cell phones and portable two-way radios.
Once the source is identified, the RF energy may be reduced or elim-inated by shielding and adding snubber networks or filters at appropriate points. Consult Section 3.2.5 for further discussion of RFI.
2.6.4 Speed Considerations
This section discusses speed considerations when making high impedance measurements. This includes an analysis of time and frequency relation-ships and the effects of input capacitance on rise time and noise.

Measurements from High Resistance Sources 2-57
Time and Frequency Relationships
Although this handbook stresses DC measurements, an analysis of noise and instrument response speed requires a brief discussion of time and frequency relationships in electronic circuits.
A steady-state DC signal applied to a voltmeter presents no conceptual difficulty. However, if the signal has a time-varying component such as an AC signal superimposed on the DC signal, the meter will tend to follow the varying signal and show the instantaneous magnitude of the input. As the frequency of the AC component in creases, the DC meter response decreases, until at some frequency only the average input voltage will be displayed. The frequency at which the voltmeter’s response to an AC signal drops to 70% is often denoted as the “3dB point” (f3dB). Digital multimeters have a bandwidth of roughly half the conversion rate (readings per second) at the display. The analog output has a much wider bandwidth unless it’s reconstructed from digital information.
Bandwidth describes the instrument’s ability to respond to time varying signals over a range of frequencies. Another measure of the instru-ment’s response is its ability to respond to a step function; the typical mea-sure of response is the rise time of the instrument. Bandwidth or rise time may be used to describe the instrument’s response to time-varying signals.
Rise time of an analog instrument (or analog output) is generally defined as the time necessary for the output to rise from 10% to 90% of the final value when the input signal rises instantaneously from zero to some fixed value. This relationship is shown in Figure 2-52. In Figure 2-52a, a step function with an assumed rise time of zero is shown; Figure 2-52b shows the instrument’s response and the associated rise time. Rise time, frequency response, and the RC time constant of a first order system are related. The 3dB point is given by the relationship:
1 f3dB = _______ 2πRC
Rise time (tr) is related to the RC time constant as follows:
tr = t90 – t10
where: t90 = 2.3RC t10 = 0.1RC
Thus, tr = 2.2RC.
For example, the rise time of a circuit with a source resistance of 1TW and capacitance of 100pF will be approximately:
tr = (2.2) (1012) (100 × 10–12) = 220 seconds
Using this with the above relationship between RC and f3dB, we see that:
2.2 0.35 tr = ________ or tr = _______ 2πf3dB f3dB

2-58 SECTION 2
Thus, the 1TW source resistance and 100pF capacitance limit the bandwidth to:
0.35 0.35 f3dB = ______ = _____ = 0.0016Hz tr 220
Rise time affects the accuracy of the measurement when it’s of the same order of magnitude as the period of the measurement. If the length of time allowed before taking the reading is equal to the rise time, an error of approximately 10% will result, because the signal will have reached only 90% of its final value. To reduce the error, more time must be allowed. To reduce the error to 1%, about two rise times must be allowed, but reducing the error to 0.1% would require roughly three rise times (or nearly seven time constants).
Beyond the 0.1% error level (and occasionally the 1% level), second- order effects come into play. For example, more than four rise times are generally required to settle to within 0.01% of final value, due to dielectric absorption in insulators and other second-order effects.
In summary, an analog instrument’s response (or the analog output response of most digital instruments) to a changing input signal is a
FIGURE 2-52: Instrument Response to Step Input
Time
tr
Max.
0
Time
Max.
0 RC 2RC 3RC 4RC 5RC
90%
10%
t10 t90
a: Step Input Function
b: Instrument Response

Measurements from High Resistance Sources 2-59
function of its bandwidth, because frequency response and rise time are directly related. To ensure accurate meas ure ments, sufficient settling time must be allowed for the source, the connection to the instrument, and the instrument itself to settle after the input signal is applied.
Effects of Input Capacitance on Rise Time and Noise
Voltage Measurements
In voltage measurements from high impedance sources (Figure 2-53), capacitance (CIN) across the voltmeter (VM) must be charged through RS. The equation for the output voltage as a function of time is:
VM = VS (1 – e–t/RSCIN)
where: VM = voltmeter reading at t seconds VS = step function source t = time in seconds after step occurs RS = equivalent series resistance in ohms CIN = equivalent shunt capacitance in farads (instrument plus cable capacitance)
FIGURE 2-53: Shunt Capacitance Effect of High Impedance Voltage Measurement
RS
C INVS VM
Thus, the familiar exponential curve of Figure 2-54 results, in which it becomes necessary to wait four or five time constants to achieve an accu-rate reading. In the case of large resistors and capacitance, the rise time can range up to minutes. Although increased shunt capacitance causes rise time to increase, it does filter out noise produced in the source and intercon-necting cable simply by reducing the effective bandwidth of the voltmeter.
Shunt Current Measurements
The effects of input capacitance on current measurements using a shunt type ammeter (Figure 2-55) are similar to those for voltage measurements. A shunt ammeter can be modeled as a voltmeter with a resistor across the input. The circuit shows that the input capacitance (CIN) must be charged to ISRS volts, at an exponential rate of the RSCIN time constant. Note that CIN is the sum of the source, connecting cable, and meter capacitance.

2-60 SECTION 2
Feedback Current Measurements
The effect of input capacitance on current meters employing negative feed-back is different than the effect on the shunt ammeter. The circuit for this mode is shown in Figure 2-56.
If A, the gain of the amplifier, is large, then VO = –IINRFB. In such an arrangement, CIN doesn’t shunt RFB, and has only a fraction of the effect it would have with a shunt picoammeter. The resulting speed-up comes from the reduction of the input impedance of the picoammeter due to negative feedback. In other words, only VS = –VO/A volts is developed across CIN instead of the VO that would occur in a shunt picoammeter. Thus, even large values of capacitance shunting the input will have negligible effect on rise time.
Rise time in a feedback picoammeter is a function of the physical or stray capacitance shunting the feedback resistance (RFB). Electrometers, SMU instruments, and pico am meters can be used with relatively large val-ues of source capacitance. It’s important to realize that increasing values of input shunt capacitance (the parallel combination of source, cable and
FIGURE 2-54: Exponential Response to Step Input
Time
1
0 1.0 2.0 3.0 4.0 5.0
1/e = 0.63
RSC
VS
VM
FIGURE 2-55: Shunt Type Ammeter
IS C RS
Shunt Ammeter
VMIN

Measurements from High Resistance Sources 2-61
input capacitances) will degrade the signal-to-noise ratio of a given mea-surement. See Sections 2.3.2 and 4.3.1 for more information on noise and source impedance.
Resistance Measurements (Constant-Current Method)
Input capacitance (CIN) also affects resistance measurements (Figure 2-57) in the same manner. Again, CIN must be charged by the current (IR), hence, the same equation applies. (See Section 2.4.2 for more information on the constant-current method.)
FIGURE 2-57: Constant-Current Resistance Measurement
IRRS VMC
Electrometer Ohmmeter
IN
Electrometer Rise Time Summary
For most measurements of high resistance sources, rise time consider-ations require minimizing the capacitance shunting the meter input. Earlier, it was shown that doing so also minimizes noise gain. In broader terms, the source impedance should be large compared to the feedback impedance of the meter.
The most effective method of minimizing input capacitance is to connect the electrometer, SMU instrument, or picoammeter to the signal
FIGURE 2-56: Feedback Electrometer Ammeter
VS
–
+VO
A
IIN
RFB
InputOutput
CIN

2-62 SECTION 2
source with a shielded cable that is as short as possible. When measuring a voltage from a high source resistance, or when measuring high resistance, guarding can minimize the effects of input capacitance by driving the inner shield of a triax cable or an enclosure surrounding the input with a poten-tial to minimize the effective capacitance, as discussed in Section 2.2.1.
2.6.5 Johnson NoiseThe fundamental limit to measurement is Johnson noise in the source resistance. In any resistance, thermal energy produces motion of charged particles. This charge movement results in noise, which is often called Johnson or thermal noise. The power (P) available from this motion is given by:
P = 4kTB
where: k = Boltzmann’s constant (1.38 × 10⁻²³J/K) T = absolute temperature in K B = noise bandwidth in Hz
Metallic conductors approach this theoretical noise limit, while other materials produce somewhat higher noise. Johnson voltage noise (E) devel-oped in a resistor (R) is:
4kTRB volts, rmsE =
and Johnson current noise (I) developed by a resistor (R) is:
I = R4kTRB
amperes, rms
Statistical considerations show that peak-to-peak noise will be within five times the rms noise more than 99% of the time; therefore, the rms level is commonly multiplied by five to convert to peak-to-peak. At room temperature (300K), the previous equations become:
Ep-p = 6.4 × 10⁻¹⁰ RB
Ip-p = 6.4 × 10⁻¹⁰BR
All real voltage and current sources contain an internal resistance; therefore, they exhibit Johnson noise. Figure 2-58 shows Johnson noise voltage versus source resistance for various bandwidths (or rise times) at room temperature.
For current measurements, Figure 2-59 shows the current noise generated by various resistances at various bandwidths. Note that current noise decreases with increasing resistance, but voltage noise increases.
Johnson noise imposes a theoretical limit to achievable voltage or cur-rent resolution. The previous equations suggest several means for reducing Johnson noise. It might be possible to reduce the bandwidth, the source temperature, or the source resistance.

Measurements from High Resistance Sources 2-63
Bandwidth
Johnson noise is uniformly distributed over a wide frequency range, so reducing the noise bandwidth effectively decreases the noise in the meas-urement. Note that noise bandwidth isn’t necessarily the same as signal bandwidth. The high frequency noise cutoff point is approximately equal to the smallest of:
• π/2 times the upper 3dB frequency limit of the analog DC measur-ing circuitry
• 0.35/tr where tr is the instrument’s 10%–90% rise time
• 1Hz if an analog panel meter is used for readout or
• j/tINT where tINT is the integration period of the A/D converter in a digital instrument, and where j is a function of the A/D converter bandwidth, which is usually in the range of 0.2 to 0.4.
The low frequency noise cut-off point is a function of the signal obser-vation window, regardless of the aperture time of the A/D.
FIGURE 2-58: Noise Voltage vs. Bandwidth at Various Source Resistances
0.1 1 10 100 1k 10k 100k
100
10–1
10–2
10–3
10–4
10–5
10–6
10–7
10–8
10–9
10–10
3.5s 350ms 35ms 3.5ms 350µs 35µs 3.5µs
R = 1012Ω
R = 1010Ω
R = 108Ω
R = 106Ω
R = 104Ω
R = 102Ω
R = 100Ω
Bandwidth (Hz)
Rise Time (seconds)
Noi
se V
olta
ge (
p-p)

2-64 SECTION 2
In high resistance circuits, the noise bandwidth is often limited by the time constant of the source resistance and input capacitance, and this value represents the smallest of the above alternative noise bandwidth calcula-tions. In this case, noise bandwidth is:
BNOISE = (f3dB)π2
12πREFFECTIVECIN
=π2
14REFFECTIVECIN
=
where REFFECTIVE is the source resistance in parallel with the input resistance of the measuring device, and CIN is the sum of all capacitance shunting the input to the instrument (input capacitance, cable capacitance, etc.) Note that this analysis assumes a simple first-order system with one dominant time constant.
FIGURE 2-59: Noise Current vs. Bandwidth at Various Source Resistances
0.1 1 10 100 1k 10k 100k
10–9
10–10
10–11
10–12
10–13
10–14
10–15
10–16
10–17
10–18
10–19
3.5s 350ms 35ms 3.5ms 350µs 35µs 3.5µs
R = 106Ω
R = 108Ω
R = 1010Ω
R = 1012Ω
R = 1014Ω
R = 1016Ω
R = 1018Ω
Bandwidth (Hz)
Rise Time (seconds)N
oise
Cur
rent
(p-
p)

Measurements from High Resistance Sources 2-65
To reduce noise, the bandwidth (B) may be reduced artificially by aver-aging an analog meter reading by eye over an extended period, or by aver-aging a number of digital readings with a computer, or by internal digital filtering. Using low pass filters before the readout device may also reduce bandwidth. There is a practical limit to reducing bandwidth because very long-term measurements become susceptible to other errors, such as time and temperature drift.
Temperature
Reducing the temperature of the signal source from room temperature (300K) to –270°C (3K) decreases noise voltage by a factor of about ten. Similarly, a reduction from room temperature to liquid nitrogen levels (77K) reduces noise by a factor of two. In some applications, the inconve-nience and expense of cryogenic operation may be justified and feasible. However, most experiments are designed to operate within a certain tem-perature range, which in turn determines the noise to be expected from the source.
Source Resistance
After the bandwidth and temperature, the remaining factor in determining the system noise is the effective source resistance. The effective source resist ance includes the device under test as well as the measurement instrument. Changing the source resist ance is usually impractical for noise reduction. However, if a change can be made, the equations show that R should be lowered to decrease voltage noise or raised to decrease current noise.
In voltage measurements, the voltage source resistance is in parallel with the voltmeter input resistance (see Figure 2-1). The input resistance is normally much larger than the source resistance; hence, the source resist-ance value usually determines the Johnson noise voltage.
In current measurements, the source resistance and the sensing resist-ance both contribute noise. The effective resistance is the parallel combina-tion of the source resistance and the feedback (or shunt) sensing resistance. Feedback ammeters with high value sensing resistors in the feedback loop have lower Johnson current noise and thus greater sensitivity than shunt ammeters with lower resistance shunts.
Excess Current Noise
The Johnson noise of a resistor is related only to the resistance, the tem-perature, and the bandwidth. When current passes through a resistor, the noise will increase above the calculated Johnson noise. This increase in noise is sometimes referred to as “excess current noise.” A wirewound resist or is nearly ideal and the noise increase is negligible. Metal film resist-ors have somewhat greater noise and carbon composition resistors are sig-nificantly noisier still. In all cases, this excess noise is directly proportional to the current through the resistor.

2-66 SECTION 2
2.6.6 Device Connections
Although instrument accuracy is of great importance when making low level meas ure ments, the integrity of device connections is equally import-ant. The complete signal path from connectors, through the cables, and into the test fixture must degrade the measured signal as little as possible. The following paragraphs discuss cable and test fixture requirements and types of connectors generally used when making low level measurements.
Cable Requirements
Although DMMs often use unshielded test leads, such connection schemes are generally inadequate for low level measurements made with picoam-meters, electrometers, and SMU instruments. These instruments generally use either coaxial or triaxial cables.
A coaxial cable consists of a single conductor surrounded by a shield (Figure 2-60a); a triaxial cable adds a second shield around the first (Figure 2-60b). With triax cable, the inner shield can be driven at guard potential in order to reduce cable leakage and minimize circuit rise times. The outer shield is usually connected to chassis ground or, in some cases, to the common terminal. In either case, the outer shield must not be allowed to float more than 30Vrms (42.4V peak) above chassis ground for safety considerations. Always use a cable with a tightly woven shield to protect against electrostatic interference.
Both coaxial and triaxial cables are available in low noise versions, which should be used for low level measurements. Low noise cables have internal graphite coatings to minimize current generated by triboelectric effects. (See Section 2.3.4.) In some cases, ordinary coaxial cable such as
FIGURE 2-60: Coaxial and Triaxial Cables
Outerjacket
Outershield
Insulation
Innershield
Insulation
Centerconductor
b. Triaxial Cable
Outerjacket
Shield
Insulation
Centerconductor
a. Coaxial Cable

Measurements from High Resistance Sources 2-67
RG-58 may be adequate, although both leakage and noise currents will be higher than with low noise cables.
When measuring high resistance, the insulation resistance of the cable is important. Good quality triaxial cables use polyethylene insulators and have a typical conductor-to-shield insulation resistance of about 1TW/ft. Refer to Section 2.2.2 for more information on insulation characteristics.
Parameters like cable resistance, capacitance, and leakage currents change as cable length increases. Thus, it’s important to keep all connect-ing cables as short as possible. For example, a ten-foot cable with 1TW/ft resistance and 100pF/ft capacitance will have an insulation resistance of 100GW and a capacitance of 1000pF.
FIGURE 2-61: BNC Connector
a. Configuration
Shield
Centerconductor
b. Connections
Center conductor (HI)
Shield (LO or ground)
FIGURE 2-62: Three-Slot Triaxial Connector
a. Configuration
Outershield
Centerconductor
b. ConnectionsCenter conductor (HI)
Outer shield (chassis ground or LO)
Innershield
Inner shield (LO or GUARD)
Slot (1 of 3)

2-68 SECTION 2
Connector Types
Two general types of connectors are used for electrometer, picoammeter, and SMU instrument measurements. The BNC connector shown in Figure 2-61 is a type of coaxial connector. It includes a center conductor and shell or shield connection; the triax connector shown in Figure 2-62 includes a center conductor, an inner shield, and an outer shield.
The center conductor of the BNC connector is connected to input HI; the outer shell is input LO. Note that the shell may be connected directly to chassis ground at the instrument.
The center conductor of the triax connector is connected to HI. The inner shield is either LO or guard; the outer shield is usually connected to chassis ground. However, with some SMU instruments, the outside shield is connected to the LO terminal (common) and is allowed to float off ground. See the discussion that follows for more information on triaxial cable and guarding.
To maintain high insulation resistance, use proper insulating materi-al between the various conductors of all connectors. Towards that goal, most quality BNC and triax connectors use Teflon® insulation between conductors.
Triaxial connectors are available in both two-slot and three-slot con-figurations. The three-slot design is a more recent development intended to avoid connector damage that could occur when attempting to mate BNC and triax connectors. Most newer equipment uses the three-slot design. Adapters are available to convert between the two types.
Triaxial Cabling and Guarded Connections
As discussed previously, connecting a guard voltage to the shield of a coaxial cable can present a safety hazard if the guard voltage is >30Vrms. Triaxial cabling avoids this problem by surrounding the guard shield with an outer shield connected to earth ground or LO.
For unguarded operation of an electrometer, triaxial cabling is normal-ly connected as follows:
• Center Conductor: High impedance lead (HI)
• Inner Shield: Low impedance lead (LO)
• Outer Shield: Ground (GND)
This arrangement provides the capability of safely carrying two signals, neither of which is at ground potential, while maintaining high impedance integrity by shielding both leads and maintaining a high resistance between each conductor and ground.
When an electrometer is in the guarded mode or if an SMU instrument is used, a triaxial cable is connected in the following manner:
• Center Conductor: HI
• Inner Shield: GUARD

Measurements from High Resistance Sources 2-69
• Outer Shield: Ground or LO
With an electrometer, the guard connection is useful when measuring high resistance or when meas uring voltage from a high source resistance. It’s not needed when measuring low current, because the guard in a feed-back ammeter circuit of an electrometer is always LO. Newer electrometers provide internal switching to change between guarded and unguarded connections.
When using an SMU instrument to measure low current, the guard terminal is used to reduce leakage current of the cable and test fixturing.
Test Fixture Requirements
Test fixtures used for low level measurements have several important requirements:
• Insulation Resistance: The insulation resistance of all connectors, internal wiring, terminals, and sockets should be as high as possi-ble. Generally, a good-quality fixture will use Teflon insulation in all connectors and sockets.
• Shielding and Guarding: The fixture should provide adequate shielding for sensitive circuits. For high impedance measurements, provisions should be included to carry guard into the fixture as close to the DUT as possible.
• Light: A light-tight fixture is a necessity when testing light-sensitive components.
• Special Fixture Requirements: Special applications, such as high resistance or very low current measurements, often require fixtures designed with good insulation characteristics, which may only be possible by using special materials, such as sapphire.
2.6.7 Analog Outputs
Some electrometers have two analog outputs, a 2V analog output as well as a preamplifier, or unity gain output. The 2V analog output is useful for con-necting to recorders; the preamp output is useful for buffering, guarding, and external feedback. This section discusses these outputs and possible loading errors when using these outputs. Refer to Section 2.6.8 for details on using the analog output with a floating input.
2V Analog Output
The typical analog output is ±2V for a full scale input signal. Depending on the instrument design and function, the output may be inverting or non-inverting. The output resistance may range from 1W to 10kW. Any device connected to the output, such as a chart recorder or oscilloscope, will have a finite input resistance and will attenuate the analog output. See the section on Loading Errors for more information.

2-70 SECTION 2
Preamp Output
The preamp output follows the signal amplitude applied to the input terminal of the electrometer. The preamp out is the guard voltage for volts and ohms (constant- current method only). It’s useful for buffering the input signal. It may be inverting or non-inverting, depending on the function selected.
Loading Errors
Although the output resistance of a typical analog output is low, it isn’t zero, so consider the possibility of loading by external instrumentation. In principle, the concepts of analog output loading are identical to those for source loading, discussed in Section 2.2.1.
Figure 2-63 demonstrates how loading can affect the accuracy of the analog output. A voltage to be measured (VS) is applied to the electrometer input. The signal is amplified by an amplifier (A) with output resistance (RO), then connected to a recording device. The input resistance of the recording device (RL) and the analog output resistance (RO) form a voltage divider that attenuates the output signal. For a typical analog output resist-ance of 1kW, the recording device must have an input resistance of at least 1MW if error due to loading is to be kept under 0.1%. This error can be cal cu lated using the equation shown in Figure 2-63.
FIGURE 2-63: Analog Output Loading
A
VS
Electrometer
RO
RL VM
AnalogOutput
Recording Device
VOUT
VM = VOUTRL
RL + RO
2.6.8 Floating Input SignalsThe majority of electrometer or picoammeter applications involve an input signal referred to earth ground. However, in some applications, it’s neces-sary that the electrometer or picoammeter be biased off ground. Examples of such applications include the flame ionization detector of a gas chro-matograph and the Faraday cup in a mass spectrometer.
In a typical low level test setup, shielding is required to reduce noise, as shown in Figure 2-64. In most cases, this “noise” shield is connected

Measurements from High Resistance Sources 2-71
to the LO input terminal of the meter. If the LO terminal must be biased more than 30V with respect to earth ground, the noise shield will be at a hazardous voltage and will pose a shock hazard. To avoid shock hazards with floating circuits, a second grounded safety shield must be added to enclose the noise shield completely.
Most picoammeters and electrometers use a triaxial input connector with the outside shield connected to earth ground for safety. By using a triaxial connector at the safety shield and a triaxial cable between the test setup and the instrument, a completely shielded and safe system will result. Note: Maximum float voltage ratings must be observed to prevent breakdown between the inner conductors and the outer grounded shield.
For SMU instruments with the outside shield connected to LO and for picoammeters with a coax input, the input should not be allowed to float more than 30Vrms (42V peak) from ground.
FIGURE 2-64: Safety Shielding with Floating Circuits
VBIAS
HI
LOIM
LOSignalSource
GroundedSafety Shield
2.7 High Impedance Measurement Optimization SummarySection 2 describes various high impedance measurement techniques, sources of error, and ways to reduce them. In summary, here are some steps to ensure making optimal high impedance measurements:
• Choose an instrument sensitive enough to measure low cur-rent: picoammeter, electrometer, or SMU instrument with low current measurement ranges. Understand the manufacturer’s instrument specifications, including the accuracy. Allow the instru-ment to warm up for at least an hour and make sure the instrument has periodic recalibration to ensure it is within specification.
• Ensure cables, connectors, and test fixtures are appropriate for high impedance measurements. If necessary, verify the insulation resistance specification of these components from the manufacturer

2-72 SECTION 2
or directly measure the insulation resistance or leakage current of the test circuit with no DUT connected. Use shielded cables.
• Allow sufficient settling time for the readings. To verify there is sufficient settling time for the device under test, make a graph of the measurement as a function of time and observe the time it takes for the DUT reading to settle. Use this time as the measurement delay time of the DUT.
• Apply the proper measurement techniques to minimize mea-surement errors. Some of these techniques include shielding, guarding, avoiding vibration, measuring the input bias current, etc.
• Verify the capabilities of the test system. Verification procedures for individual instruments are usually described in the reference manual of the instrument. One of the first steps in setting up a system for making high impedance measurements is to determine the offset and/or leakage current of the entire measurement system. This identifies the noise floor limit of the entire system and sets a starting point for troubleshooting potential problems and making improvements to the system, if necessary. The remainder of this section outlines simple verification tests and error symptoms by measurement type, along with possible causes and ways to mini-mize these errors.
Low Current Measurements
To check the ammeter, verify its input bias current using the following steps:
1. Turn on the power and allow the meter to warm up for the time spec-ified in the user manual.
2. Place a shield cap over the input connector and link the low impedance input terminal to ground.
3. For an electrometer or picoammeter, the zero check should be enabled. For an SMU instrument, the voltage source should be set to zero volts.
4. Set the ammeter to the most sensitive current range, zero or REL the meter, and then disable the zero-check switch (for picoammeter or electrometer) or turn on the output (for SMU instrument).
5. After several seconds, the meter reading should settle to within a few digits. The indicated current is the input bias current. If it exceeds the instrument specifications, repeat the test after the instrument has warmed up overnight. If the current is still excessive, the instrument should be repaired.
Never verify a feedback ammeter by short-circuiting the input (like a voltmeter is verified). Shorting the input will increase the noise gain (see Section 2.3.2). The ammeter’s voltage burden divided by the low impe-dance short will generate a non-zero current measured by the feedback ammeter. The resulting measurements will be meaningless.

Measurements from High Resistance Sources 2-73
Table 2-4 lists potential error symptoms of low current measurements along with possible causes and ways to minimize these errors.
High Resistance Measurements
Resistance measurements should be verified using a resistor of known value that is similar in magnitude to the resistance under test. The verifi-cation measurements should be made using the same voltage as the test voltage of the DUT. Table 2-5 lists some potential error sources and ways to minimize them. Also, review error sources in Table 2-4 if using the source voltage, measure current method.
Voltage Measurements from a High Resistance Source
The simplest way to make a rough check of an electrometer voltmeter is to connect a single flashlight cell or a 9V battery across the input. Be sure to try both polarities. Table 2-6 describes potential error sources and ways to minimize them when making voltage measurements from high impe-dance sources.
Charge Measurements
The coulombs function can be checked using a low leakage capacitor and a voltage source. A capacitor of known value in the range of 100pF to 1000pF can be charged to a known voltage via a flashlight cell. The capacitor is then connected to the electrometer input after setting the meter to cou-lombs and disabling the zero check function. Conversely, this procedure can be used to determine the value of the capacitor, if unknown.

2-74 SECTION 2
TABLE 2-4: Potential Error Symptoms of Low Current Measurements
Error Symptom Possible Causes How to Minimize or Avoid
Refer to Section
Noisy readings
Electrostatic coupling Use shielding and avoid nearby movements. Use low noise cabling.
2.6.2
Source resistance too low
Use shunt ammeter. 2.3.2
Source capacitance too high
Add series resistance or series diode. 2.3.2
Temperature variations of test circuit. Offset current drift.
Operate measurement system in a thermally stable environment. Allow system to warm up to achieve thermal stability.
2.3.3 2.6.3
Noisy input signal. Johnson noise.
Use filtering. Reduce temperature of DUT, if possible.
2.6.5
50Hz or 60Hz interference
Identify and remove offending source, if possible. Use shielding. Increase PLC setting of ammeter.
2.6.2
Offset current
Input bias current of meter
Use instrument with low input bias current such as an electrometer. Zero or REL the offset. Check instrument calibration.
2.3.4
Cable, connectors, or test fixtures
First measure the input bias current of the ammeter. Then, verify the open circuit offset current of the entire system by adding one piece of cabling and/or connector at a time and repeating the open circuit current measurements. Use cabling appropriate for high impedance applications.
Offset current drift due to temperature changes in the test circuit
Stabilize the temperature of the entire test circuit including the ammeter.
Excessive humidity Keep humidity to moderate levels, <50% R.H., the lower the better.
Gain error at low voltage
Voltage burden too high
Use feedback ammeter. Use higher range.
2.3.5
Readings too high
Insufficient settling time
Allow a longer time delay before taking a reading.
2.6.4
One or two digits of resolution
Range selected is too high or instrument not sensitive enough
Select a lower current range or use autoranging. Use a more sensitive ammeter. Check instrument specifications.

Measurements from High Resistance Sources 2-75
TABLE 2-5: Potential Error Symptoms of High Resistance Measurements
Error Symptom Possible Causes How to Minimize or Avoid
Refer to Section
Readings too low
Fixture in parallel with DUT
Use fixture and cables with higher insulation resistance. Guarding will effectively increase shunt resistance.
2.3.1
Low voltmeter input resistance (Force I, Measure V method)
Use force voltage, measure current method.
2.2.1
Offset current Suppress or REL the current offset with test voltage off. Use alternating voltage method.
2.3.4 4.4.2
Insufficient settling time Increase measurement time to ensure a settled reading.
2.6.4 2.4.1
Contamination and humidity
Select insulators that resist water absorption, keep humidity to moderate levels, keep all insulators clean and free of contamination.
2.3.4 2.6.3
Noisy readings Electrostatic coupling Shield test circuit and avoid movement and fluctuating voltages nearby.
2.6.2
50Hz or 60Hz interference
Identify and remove offending source, if possible. Shield. Increase PLC setting of ammeter.
2.6.2
Negative readings, or readings that are much higher or lower than expected
Background currents due to dielectric absorption, triboelectric charge or piezoelectric effects
Use offset correction technique such as the alternating polarity method or the alternating voltage method.
4.4.2 2.3.4
Current measure range too high
Use more sensitive current range or use auto ranging
TABLE 2-6: Potential Error Symptoms of Voltage Measurements from a High Resistance Source
Error Symptom Possible Causes How to Minimize or Avoid
Refer to Section
Readings too low (loading error)
Shunt resistance loading
Use fixtures and cables with higher insulation resistance. Guarding will effectively increase shunt resistance.
2.2.1
Offset current loading Input bias current of meter is too high. Use electrometer.
2.2.1
Noisy readings Electrostatic coupling Use shielding. Avoid movement and fluctuating voltages nearby.
2.6.2
Noisy input signal, Johnson noise
Use filtering. Reduce temperature of DUT, if possible.
2.6.5
S E C T I O N 3
Measurements from Low Resistance
Sources

3-2 SECTION 3
3.1 IntroductionLow voltage and low resistance measurements are often made on devices and materials with low source impedance. Section 1 described instru-ments for measuring low voltage and low resistance. Section 3 describes how to use these instruments to make accurate measurements, including a discussion of various error sources and ways to minimize their effect on measurement integrity:
3.2 Low Voltage Measurements: Discussion of potential error sources and how to minimize their impact on low voltage measurement accuracy. These error sources include offset voltages, noise and common-mode current, and reversal errors.
3.3 Low Resistance Measurements: Topics include lead resistance, thermo-electric EMFs, non-ohmic contacts, device heating, dry circuit testing, and measuring inductive devices.
3.4 Low Impedance Measurement Optimization Summary
3.2 Low Voltage MeasurementsSignificant errors may be introduced into low voltage measurements by offset voltages (DC) and noise sources (AC) that can normally be ignored when measuring higher voltage levels. Electrical noise is simply any unde-sired signal that corrupts a desired signal to produce an erroneous meas-urement. Noise can cause a steady-state offset that results in inaccurate readings or it can result in erratic measurements that are difficult to read. In either case, noise can seriously degrade measurement accuracy and cause significant errors. The following paragraphs discuss various error sources and ways to minimize them.
3.2.1 Effects of Error Sources on Voltage MeasurementsIdeally, when a voltmeter is connected to a relatively low impedance circuit in which no voltages are present, it should read zero. However, a number of error sources in the circuit may be seen as a non-zero DC voltage offset. These sources include thermoelectric EMFs and offsets in the voltmeter input circuit.
As shown in Figure 3-1, any DC offset voltage (VOFFSET) will add to or subtract from the source voltage (VS) so that the voltage measured by the meter (VM) becomes:
VM = VS ± VOFFSET
The relative polarities of the two voltages will determine whether the offset voltage adds to or subtracts from the source voltage. For example, assume VS = 5µV and VOFFSET = 250nV. If the voltage polarities are in oppo-sition, the voltmeter reading will be:
VM = (5 × 10⁻⁶) – (250 × 10–9)
VM = 4.75 × 10⁻⁶
VM = 4.75µV (an error of –5%)

Measurements from Low Resistance Sources 3-3
Steady offsets can generally be nulled out by shorting the ends of the test leads together, then enabling the instrument’s zero (REL) feature. Note, however, that cancellation of offset drift may require frequent re- zeroing, particularly in the case of thermoelectric EMFs.
Error sources can also be AC voltage that can cause erratic voltmeter readings. Some of these error sources include Johnson noise, 1/f noise, and line cycle interference.
3.2.2 Thermoelectric EMFsThermoelectric voltages (thermoelectric EMFs) are the most common source of errors in low voltage measurements. These voltages are generat-ed when different parts of a circuit are at different temperatures and when conductors made of dissimilar materials are joined together, as shown in Figure 3-2. A few microvolts of thermal voltages can be generated by tem-perature gradients in the test circuit caused by fluctuating temperatures in the lab or a draft near the sensitive circuitry. The Seebeck coefficients (QAB) of various materials with respect to copper are summarized in Table 3-1.
Constructing circuits using the same material for all conductors min-imizes thermoelectric EMF generation. For example, connections made by crimping copper sleeves or lugs on copper wires results in copper-to- copper junctions, which generate minimal thermoelectric EMFs. Also, con-nections must be kept clean and free of oxides. Crimped copper-to-copper connections, called “cold welded,” do not allow oxygen penetration and may have a Seebeck coefficient of ≤0.2µV/°C. Cu-CuO connections may have a coefficient as high as 1mV/°C.
FIGURE 3-1: Effects of Offset Voltages on Voltage Measurement Accuracy
VS
RS
Voltage Source
VM
HI
LO
Voltmeter
VM = VS ± VOFFSET
VOFFSET

3-4 SECTION 3
Minimizing temperature gradients within the circuit also reduces ther-moelectric EMFs. A technique for minimizing such gradients is to place corresponding pairs of junctions in close proximity to one another and to provide good thermal coupling to a common, massive heat sink. Electrical insulators having high thermal conductivity must be used, but given that most electrical insulators don’t conduct heat well, special insulators such as hard anodized aluminum, beryllium oxide, specially filled epoxy resins, sapphire, or diamond must be used to couple junctions to the heat sink.
Allowing test equipment to warm up and reach thermal equilibrium in a constant ambient temperature also minimizes thermoelectric EMF
FIGURE 3-2: Thermoelectric EMFs
Nanovoltmeter
T2
EAB
HI
LO
T1ABA
EAB = QAB ( T1 – T2 )
The thermoelectric voltage developed by dissimilarmetals A and B in a series circuit is:
Temperature of the A to Bjunction in °C
Temperature of the B to Ajunction in °C
Seebeck coefficient ofmaterial A with respectto B, in µV/°C
TABLE 3-1: Seebeck Coefficients
Paired Materials* Seebeck Coefficient, QAB
Cu - Cu ≤0.2 μV/°CCu - Ag 0.3 μV/°CCu - Au 0.3 μV/°CCu - Pb/Sn 1–3 μV/°CCu - Si 400 μV/°CCu - Kovar ~40–75 μV/°CCu - CuO ~1000 μV/°C
* Ag = silver Au = gold Cu = copper CuO = copper oxide Pb = lead Si = silicon Sn = tin

Measurements from Low Resistance Sources 3-5
effects. The instrument zero feature can compensate for any remaining thermoelectric EMF, provided it is relatively constant. To keep ambient temperatures constant, equipment should be kept away from direct sunlight, exhaust fans, and similar sources of heat flow or moving air. Wrapping connections in insulating foam (e.g., polyurethane) also mini-mizes ambient temperature fluctuations caused by air movement.
Connections to Avoid Thermoelectric EMFs
Connections in a simple low voltage circuit, as shown in Figure 3-3, will usually include dissimilar materials at different temperatures. This results in a number of thermoelectric EMF sources, all connected in series with the voltage source and the meter. The meter reading will be the algebraic sum of all these sources. Therefore, it is important that the connection between the signal source and the measuring instrument doesn’t interfere with the reading. The following paragraphs provide tips on making good connections to minimize thermoelectric voltages.
FIGURE 3-3: Connections from Voltage Source to Voltmeter
VEMF1—VEMF4 represent thermoelectric EMFsources at various points in the circuit.
VS
RS
Voltage Source
VM
Voltmeter
VEMF1 VEMF2
VEMF4 VEMF3
If all the connections can be made of one metal, the amount of ther-moelectric EMF added to the measurement will be negligible. However, this may not always be possible. Test fixtures often use spring contacts, which may be made of phosphor-bronze, beryllium-copper, or other mate-rials with high Seebeck coefficients. In these cases, a small temperature difference may generate a large enough thermoelectric voltage to affect the accuracy of the measurement.
If dissimilar metals cannot be avoided, an effort should be made to reduce the temperature gradients throughout the test circuit by use of a heat sink or by shielding the circuit from the source of heat.
Measurements of sources at cryogenic temperatures pose special prob-lems because the connections between the sample in the cryostat and the voltmeter are often made of metals with lower thermal conductivity than

3-6 SECTION 3
copper, such as iron, which introduces dissimilar metals into the circuit. In addition, because the source may be near zero Kelvin while the meter is at 300K, there is a very large temperature gradient. Matching the compo-sition of the wires between the cryostat and the voltmeter and keeping all dissimi lar metal junction pairs at the same temperature allows making very low voltage measurements with good accuracy.
Reversing Sources to Cancel Thermoelectric EMFs
When measuring a small voltage, such as the difference between two stan-dard cells or the difference between two thermocouples connected back-to-back, the error caused by stray thermoelectric EMFs can be canceled by taking one measurement, then carefully reversing the two sources and taking a second measurement. The average of the difference between these two readings is the desired voltage difference.
In Figure 3-4, the voltage sources, Va and Vb, represent two standard cells (or two thermocouples). The voltage measured in Figure 3-4a is:
V1 = Vemf + Va – Vb
The two cells are reversed in Figure 3-4b and the measured voltage is:
V2 = Vemf + Vb – Va
The average of the difference between these two measurements is:
V1 – V2 Vemf + Va – Vb – Vemf – Vb + Va ________ = ____________________________________ or Va – Vb 2 2
FIGURE 3-4: Reversing Sources to Cancel Thermoelectric EMFs
Va
Vb
Vemf
HI
LO
a. Measure V1 b. Measure V2
Vb
Va
Vemf
HI
LO
VM VM
Notice that this measurement technique effectively cancels out the thermoelectric EMF term (Vemf), which represents the algebraic sum of all thermoelectric EMFs in the circuit except those in the connections between Va and Vb. If the measured voltage is the result of a current flowing through an unknown resistance, then either the current-reversal

Measurements from Low Resistance Sources 3-7
method or the offset-compensated ohms method may be used to cancel the thermoelectric EMFs. These methods are described in Section 3.3.2.
3.2.3 Internal OffsetsNanovoltmeters will rarely indicate zero when no voltage is applied to the input, because there are unavoidable voltage offsets present in the input of the instrument. A short circuit can be connected across the input terminals and the output can then be set to zero, either by front panel zero controls or by computer control. If the short circuit has a very low thermoelectric EMF, this can be used to verify input noise and zero drift with time. Clean, pure copper wire will usually be suitable. However, the zero established in this manner is useful only for verification purposes and is of no value in the end application of the instrument.
If the instrument is being used to measure a small voltage drop result-ing from the flow of current through a resistor, the following procedure will result in a proper zero. First, the instrument should be allowed to warm up for the specified time, usually one to two hours. During this time, the connections should be made between the device under test and the instrument. No current should be supplied to the device under test to allow the temperature gradients to settle to a minimum, stable level. Next, the zero adjustment should be made. In some instruments, this is done by pressing REL (for Relative) or ZERO button. The instrument will now read zero. When the test current is applied, the instrument will indicate the resulting voltage drop.
In some applications, the voltage to be measured is always present and the preceding procedure cannot be used. For example, the voltage differ-ence between two standard cells is best observed by reversing the instru-ment connections to the cells and averaging the two readings. This same technique is used to cancel offsets when measuring the output of differen-tial thermocouples. This is the same method used to cancel thermoelectric EMFs and is described in more detail in the paragraph entitled, “Reversing Sources to Cancel Thermoelectric EMFs.” See Figure 3-4.
3.2.4 Zero DriftZero drift is a change in the meter reading with no input signal (measured with the input shorted) over a period of time. The zero drift of an instru-ment is almost entirely determined by the input stage. Most nanovoltmeters use some form of chopping or modulation of the input signal to minimize the drift.
The zero reading may also vary as the ambient temperature changes. This effect is usually referred to as the temperature coefficient of the voltage offset.
In addition, an instrument may display a transient temperature effect. After a step change in the ambient temperature, the voltage offset may change by a relatively large amount, possibly exceeding the published

3-8 SECTION 3
FIGURE 3-5: Voltage Noise Frequency Spectrum
10–3
Freq
uenc
y (H
z)
10–2
10–1
100
101
102
103
104
105
106
107
108
100
101
102
103
104
105
106
Relative Amplitude
Whi
te N
oise
Lev
el1/
f Noi
se
Rada
r Pu
lse
Repe
titio
n Ra
tes
Mec
hani
cal
Vibr
atio
n
Hum
Ripp
le
Satu
rate
dTr
ansf
orm
ers
Con
tact
Arc
ing
and
SCR
Switc
hing
TV a
ndRa
dar
AM/F
M B
road
cast
sPo
wer
Sup
ply
Switc
hing
Freq
uenc
ies
Pow
er L
ine
Pick
up
Typi
cal S
pect
ral
Enve
lope
of P
ulse
dIn
terf
eren
ce
Tem
pera
ture
Varia
tions

Measurements from Low Resistance Sources 3-9
specifications. The offset will then gradually decrease and eventually settle to a value close to the original value. This is the result of dissimilar metal junctions in the instrument with different thermal time constants. Although one junction will adjust to the new ambient temperature quickly, another changes slowly, resulting in a temporary change in voltage offset.
To minimize voltage offsets due to ambient temperature changes in junctions, make measurements in a temperature controlled environment and/or slow down temperature changes by thermally shielding the circuit.
3.2.5 RFI/EMIRFI (Radio Frequency Interference) and EMI (Electromagnetic Interference) are general terms used to describe electromagnetic interference over a wide range of frequencies across the spectrum. Figure 3-5 shows the gen-eral frequency spectrum of these interference sources in comparison with other noise signals such as 1/f and thermal noise.
RFI or EMI can be caused by sources such as TV or radio broadcast signals or it can be caused by impulse sources, as in the case of high voltage arcing (see Figure 3-5). In either case, the effects on the measurement can be considerable if enough of the unwanted signal is present.
RFI/EMI interference may manifest itself as a steady reading offset or it may result in noisy or erratic readings. A reading offset may be caused by input amplifier overload or DC rectification at the input.
RFI and EMI can be minimized by taking several precautions when making sensitive measurements. The most obvious precaution is to keep all instruments, cables, and DUTs as far from the interference source as possible. Shielding the test leads and the DUT (Figure 3-6) will often
FIGURE 3-6: Shielding to Attenuate RFI/EMI Interference
MeasuringInstrument
HI
LOLO
ShieldedCableMetal
Noise Shield
MetalSafety Shield
Connectingsafety shield toearth ground
Connectingnoise shield toLO
WARNINGSafety shield is required whenthe noise shield is more than
30V DC or rms off earth ground.
HI
DUT

3-10 SECTION 3
reduce interference effects to an acceptable level. Noise shields should be connected to input LO. In extreme cases, a specially constructed screen room may be necessary to attenuate the troublesome signal sufficiently.
If all else fails to prevent RF interference from being introduced into the input, external filtering of the device input paths may be required, as shown in Figure 3-7. In many cases, a simple one-pole filter may be sufficient; in more difficult cases, multiple-pole notch or band-stop filters may be required. In particular, multiple capacitors of different values may be connected in parallel to provide low impedance over a wide frequency range. Keep in mind, however, that such filtering may have other detrimen-tal effects, such as increased response time on the measurement.
3.2.6 Johnson NoiseThe ultimate limit of resolution in an electrical measurement is defined by Johnson or thermal noise. This noise is the voltage associated with the motion of electrons due to their thermal energy at temperatures above absolute zero. All voltage sources have internal resistance, so all voltage sources develop Johnson noise.
A plot of thermal noise voltage as a function of resistance and band-width at a temperature of 290K is shown in Figure 3-8. This voltage is related to the temperature, noise bandwidth, and the source resistance. The noise voltage developed by a metallic resistance can be calculated from the following equation:
V = 4kTBR
where: V = rms noise voltage developed in source resistance
k = Boltzmann’s constant, 1.38 × 10⁻²³ joule/K
T = absolute temperature of the source in kelvin
B = noise bandwidth in hertz
R = resistance of the source in ohms
For example, at room temperature (290K), a source resistance of 10kW with a measurement bandwidth of 5kHz will have almost 1µV rms of noise.
FIGURE 3-7: Shielded Connections to Reduce RFI/EMI
Measuring Instrument
HI
LO
Decouple RFIto earth ground
MetalShield
DUT

Measurements from Low Resistance Sources 3-11
Johnson noise may be reduced by lowering the temperature of the source resistance and by decreasing the bandwidth of the measurement. Cooling the sample from room temperature (290K) to liquid nitrogen temperature (77K) decreases the voltage noise by approximately a fac-tor of two.
If the voltmeter has adjustable filtering and integration, the bandwidth can be reduced by increasing the amount of filtering and/or by integrating over multiple power line cycles. Decreasing the bandwidth of the measure-ment is equivalent to increasing the response time of the instrument, and as a result, the measurement time is much longer. However, if the mea-surement response time is long, the thermoelectric EMFs associated with the temperature gradients in the circuit become more important. Sensitive measurements may not be achieved if the thermal time constants of the measurement circuit are of the same order as the response time. If this occurs, distinguishing between a change in signal voltage and a change in thermoelectric EMFs becomes impossible.
Johnson noise is discussed in more detail in Section 2.6.5.
3.2.7 1/f NoiseIn contrast with Johnson noise or white noise, the spectral density of 1/f noise varies inversely with frequency. Although 1/f noise is present in all electronic devices, it is most often associated with carbon-composition
FIGURE 3-8: Thermal Noise Voltage as a Function of Resistance and Bandwidth
100
10
1.0
0.1
0.010.01 0.1 1.0 10 1000
ThermalNoise VoltageVt (µV)
Bandwidth1MHz
100kHz
10kHz
1kHz
100Hz
V = 4kTBRwhere 4kT = 1.6 × 10⁻²⁰
at 17°C (290K)
Reproduced from: Henry W. Ott, Noise Reduction Techniques inElectronic Systems, 2nd Edition, New York: Wiley-Interscience, 1988
100

3-12 SECTION 3
resistors and semiconductor devices. Because 1/f noise is at a maximum at low frequencies, this type of noise may seriously affect low voltage measurements.
3.2.8 Line Cycle Interference and Line Cycle Integration
The most common form of external noise is 50Hz or 60Hz line cycle “pick-up” noise. This interference is a noise signal that may be coupled to the test signal from other instruments in the measurement system or other electrical equipment. This noise, superimposed on the sensitive DC signal being measured, may result in highly inaccurate and fluctuating measurements. Millivolts of noise can be a common occurrence near fluo-rescent lights.
Figure 3-9 illustrates the effects of pickup noise on voltmeter readings. In this example, line cycle interference may cause a voltmeter with a 1ms integration time to read 100.7mV or 99.1mV instead of the actual signal of 100mV DC.
To minimize the effects of 50Hz or 60Hz line pickup, use line cycle integration. Line cycle noise will “average out” when the measuring instru-
FIGURE 3-9: Line Cycle Noise Superimposed on 100mV DC Signal
1ms100.7mV 1mV Peak 60Hz Noise
1ms99.1mV1ms
IntegrationTime
Time
Volta
ge
DC Voltage Level(100.0mV)
FIGURE 3-10: Line Cycle Integration Averages Out 60Hz Noise
60Hz NoiseAC Average = 0DC = 100mV
1/60s16.667ms
1 PLC
Time
Volta
ge
DC Voltage Level(100.0mV)
Measurements from Low Resistance Sources 3-13
ment’s integration time is equal to an integral number of power line cycles. By integrating over one power line cycle, as depicted in Figure 3-10, the positive and negative noise contributions cancel out each other, and the AC component of the signal averages to zero leaving only the DC component to be measured. By default, most instruments will use integration of one line cycle (1 PLC), however this parameter is often user defined to improve measurement accuracy, if needed.
3.2.9 Magnetic Fields
Magnetic fields generate error voltages in two circumstances: 1) if the field is changing with time, and 2) if there is relative motion between the circuit and the field. Voltages in conductors can be generated from the motion of a conductor in a magnetic field, from local AC currents caused by compo-nents in the test system, or from the deliberate ramping of the magnetic field, such as for magneto-resistance measurements. Even the earth’s rel-atively weak magnetic field can generate nanovolts in dangling leads, so leads must be kept short and rigidly tied down.
Basic physics shows that the amount of voltage a magnetic field induces in a circuit is proportional to the area the circuit leads enclose and the rate of change in magnetic flux density, as shown in Figure 3-11. The induced voltage (VB) is calculated as follows:
dφdt
d(BA)VB =dt
dAdt dt
= = B + A dB
where: VB = induced voltage
A = loop area
B = magnetic flux density
φ = BA = magnetic flux
The induced voltage is proportional both to the magnitude of A and B, as well as to the rate of change in A and B, so there are two ways to minimize the induced voltage:
• Keep both A and B to a minimum by reducing loop area and avoid-ing magnetic fields, if possible; and
• Keep both A and B constant by minimizing vibration and move-ment, and by keeping circuits away from AC and RF fields.
To minimize induced magnetic voltages, leads must be run close together and magnetically shielded and they should be tied down to min-imize movement. Mu-metal, a special alloy with high permeability at low magnetic flux densities and at low frequencies, is a commonly used mag-netic shielding material.
Figure 3-12 shows two ways of locating the leads from the source to the voltmeter. In Figure 3-12a, a large area is enclosed; thus, a large volt-age is developed. In Figure 3-12b, a much smaller area is enclosed because

3-14 SECTION 3
the leads are twisted together, and the voltage induced is considerably reduced. Twisted pair also cancels magnetically induced voltages because each adjacent twist couples a small but alternating polarity (equal) voltage.
FIGURE 3-12: Minimizing Interference from Magnetic Fields
Voltmeter
Source
VoltmeterSource
b.
a.
V
V
Conductors that carry large currents should also be shielded or run as twisted pairs to avoid generating magnetic fields that can affect nearby circuits. In addition to these techniques, AC signals from magnetic fields can be filtered at the input of the instrument. If possible, the signal source and the instrument should be physically relocated further away from the interfering magnetic field.
3.2.10 Ground Loops
Noise and error voltages also arise from ground loops. When there are two connections to earth, such as when the source and measuring instruments
FIGURE 3-11: Low Voltages Generated by Magnetic Fields
Voltmeter
Area A(enclosed)
The voltage developed due to a field passingthrough a circuit enclosing a prescribed area is:
B
VB =dt
d (BA)dt
dAdt
dBdt
= = B + Ad

Measurements from Low Resistance Sources 3-15
FIGURE 3-13a: Multiple Grounds (Ground Loops)
Experiment(source) VS R
VIN
HI
Nanovoltmeter
LO
IGround 2
Ground bus
VG
Input voltage to the nanovoltmeter is:
VIN = VS + VG
where VG = IRR = Resistance of input LO connection (typically
around 100mΩ)I = Current passing through input LO connection
due to ground voltages (VG) in the ground bus(magnitude may be amperes)
VS = Source voltage (desired signal)VG may exceed VS by orders of magnitude.
Ground 1
FIGURE 3-13b: Reduced Ground Loops
Experiment(source) VS
RVIN
HI
Nanovoltmeter
LO
ZCM
I
Ground bus
VG
VIN ≈ VS, since VG is now insignificant compared to VS.
ZCM = Common mode impedance of nanovoltmeter

3-16 SECTION 3
are both connected to a common ground bus, a loop is formed as shown in Figure 3-13a. A voltage (VG) between the source and instrument grounds will cause a current (I) to flow around the loop. This current will create an unwanted voltage in series with the source voltage. From Ohm’s Law:
VG = IR
where VG = ground loop interfering voltage, R = the resistance in the signal path through which the ground loop current flows, and I = the ground loop current. A typical example of a ground loop can be seen when a number of instruments are plugged into power strips on different instru-ment racks. Frequently, there is a small difference in potential between the ground points. This potential difference can cause large currents to circulate and create unexpected voltage drops.
The cure for such ground loops is to ground all equipment at a single point. The easiest way of accomplishing this is to use isolated power sourc-es and instruments, then find a single, good earth-ground point for the entire system. Avoid connecting sensitive instruments to the same ground system used by other instruments, machinery, or other high power equip-ment. As shown in Figure 3-13b, ground loops can also be reduced by using a voltmeter with high common mode impedance (ZCM), also known as common mode isolation.
3.2.11 Ways to Reduce NoiseThe best ways to reduce the impact of external noise sources are to isolate the measurement setup from the noise sources whenever possible, use proper shielding, and use filtering.
Eliminating Noise Sources
If possible, avoid operating the voltmeter and test circuitry in electrically noisy environments. Keep the measuring instrument, connecting cables and the device under test as far away as possible from noise sources such as power cables and power transformers.
Shielding
Proper shielding of all signal paths and sources being measured is import-ant to minimize noise pickup in a low-level measurement application. In order to minimize noise, a closed metal shield, surrounding the DUT, may be necessary (see Figure 3-6). The shield should be connected to input LO in most cases, although better noise performance may result with the shield connected to chassis ground in some situations. Use only shielded cables for the test connections.
Using Filtering to Reduce Noise
Even with careful shielding and test methods, external noise may still be a problem. Also, noise generated by the DUT itself such as thermal and 1/f noise may be a factor. In such cases, it may be necessary to use the voltme-ter’s analog or digital filters to reduce noise to an acceptable level.

Measurements from Low Resistance Sources 3-17
Although filtering reduces reading noise, there are certain disadvantag-es to using it: reading rates may be reduced, and instrument step response times (response to sudden changes in the input signal) are increased. In general, increasing the amount of filtering slows down the overall measure-ment speed because of lower reading rates and longer step response times.
Often, some compromise between acceptable noise levels and read-ing rates and settling times is required. Some experimentation may be required to determine the optimum amount of filtering.
3.2.12 Common-Mode Current and Reversal ErrorsExcessive common-mode current can significantly affect low-level voltage measurements. Although common-mode currents are most often associat-ed with noise problems, they can result in large DC offsets in some cases. In the following paragraphs, we will briefly discuss the basic principles behind errors generated by common-mode currents and ways to avoid lead reversal errors.
Common-Mode Current
Common-mode current is the current that flows between the instrument’s LO terminal and chassis or earth ground. As shown in Figure 3-14, com-mon-mode current (ICM) is caused by capacitive coupling (CCOUPLING) from the power line through the power transformer. The amplitude of the com-mon-mode current is defined as:
ICM = 2π fCCOUPLING (V2 ± V1)
where f is the power line frequency.
FIGURE 3-14: Common Mode Current Generation by Power Line Coupling
LO
ZCM
VCM
V1 CCOUPLING
V2
ICM
Line
Neutral
Voltmeter Power Supply
ICM = 2πf CCOUPLING (V2 ± 1)

3-18 SECTION 3
Note that the common-mode current flows through the impedance (ZCM), which is present between input LO and chassis ground. As a result, the amplitude of voltage (VCM) depends on the magnitude of ZCM as well as the value of ICM.
Common-Mode Reversal Errors
Reversing leads can result in errors caused by common-mode currents. As shown in Figure 3-15, many low voltage sources have internal resistive dividers, which attenuate an internal voltage source to the desired level. For example, the output voltage from the source is defined as:
R2 VOUTPUT = VS
_________ ( R1 + R2 )
With the correct connection scheme shown in Figure 3-15a, the low or chassis side of the voltage source is connected to input LO of the measuring instrument. Any common-mode current (ICM) that may be present flows from the voltmeter input LO to instrument chassis common, through earth ground to voltage source ground. Note that no common-mode current flows through either of the two divider resistors of the voltage source when this connection scheme is used.
If the input leads of the voltmeter are reversed, we have the situation shown in Figure 3-15b. Now, the common-mode current (ICM) flows through R2, developing a voltage drop, which is added to the voltage to be measured. This added voltage is mainly power line frequency and its effect on the voltmeter reading will depend upon the normal-mode rejection capability of the meter. The reading may become noisy or it may have a constant offset. In some cases, the sensitivity of the meter may be reduced, because the input stages are overloaded.
To minimize common-mode reversal errors, choose an instrument with the lowest possible common-mode current. If possible, the voltage source being measured should be isolated from ground.
3.3 Low Resistance MeasurementsIn addition to all the low voltage measurement considerations described in Section 3.2, low resistance measurements are subject to other error sources, including lead resistance, non-ohmic contacts, and device heating. This section describes these error sources and methods to eliminate or minimize them. Other measurement considerations, including dry circuit testing and testing inductive devices, are also described.
3.3.1 Lead Resistance and Four-Wire Method
Resistance measurements are often made using the two-wire method shown in Figure 3-16. The test current is forced through the test leads and the resistance (R) being measured. The meter then measures the voltage

Measurements from Low Resistance Sources 3-19
FIGURE 3-15: Effects of Reversing Leads on Common Mode Errors
Low voltage sourceusing resistive divider
VS
R1
R2
HI
ICM
LO
Voltmeter
a. With proper connections, ICM generates no noise or offset.
Low voltage sourceusing resistive divider
VS
R1
R2
HI
ICM
LO
Voltmeter
b. With reversed connections, ICM generates noise and possible offset.
VM
VM
ICM
ICM
3-20 SECTION 3
across the resistance through the same set of test leads and computes the resistance value accordingly.
The main problem with the two-wire method as applied to low resist-ance measurements is that the total lead resistance (RLEAD) is added to the measurement. Given that the test current (I) causes a small but significant voltage drop across the lead resistances, the voltage (VM) measured by the meter won’t be exactly the same as the voltage (VR) directly across the test resistance (R), and considerable error can result. Typical lead resistances lie in the range of 1mW to 10mW, so it’s very difficult to obtain accurate two-wire resistance measurements when the resistance under test is lower than 10W to 100W (depending on lead resistance).
Due to the limitations of the two-wire method, the four-wire (Kelvin) connection method shown in Figure 3-17 is generally preferred for low resistance measurements. These measurements can be made using a DMM, micro-ohmmeter, a separate current source and voltmeter, or an SMU instrument. With this configuration, the test current (I) is forced through the test resistance (R) through one set of test leads, while the voltage (VM) across the DUT is meas ured through a second set of leads called sense leads. Although some small current may flow through the sense leads, it is usually negligible and can generally be ignored for all practical purposes. The voltage drop across the sense leads is negligible, so the voltage meas-ured by the meter (VM) is essentially the same as the voltage (VR) across the resistance (R). Consequently, the resistance value can be determined much more accurately than with the two-wire method. Note that the voltage-sensing leads should be connected as close to the resistor under test as possible to avoid including the resist ance of the test leads in the measurement.
3.3.2 Thermoelectric EMFs and Offset Compensation Methods
Thermoelectric voltages, as described in Section 3.2.2, can seriously affect low resistance measurement accuracy. The current-reversal method, the delta method, and the offset-compensated ohms method are three com-mon ways to overcome these unwanted offsets.
Current-Reversal Method
Thermoelectric EMFs can be canceled by making two measurements with currents of opposite polarity, as shown in Figure 3-18. In this diagram, a voltmeter with a separate bipolar current source is used. With the positive current applied as in Figure 3-18a, the measured voltage is:
VM+ = VEMF + IR
Reversing the current polarity as shown in Figure 3-18b yields the following voltage measurement:
VM– = VEMF – IR
The two measurements can be combined to cancel thermoelectric EMFs:
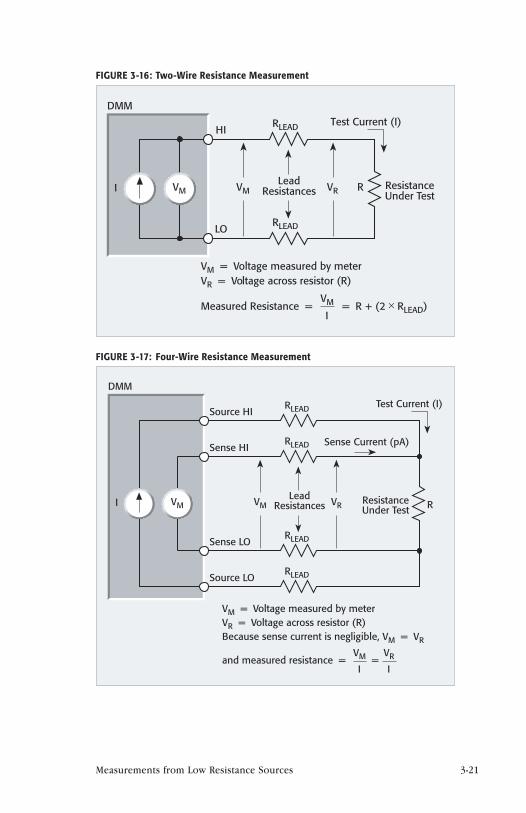
Measurements from Low Resistance Sources 3-21
FIGURE 3-16: Two-Wire Resistance Measurement
Measured Resistance =I
VM = R + (2 × RLEAD)
Test Current (I)RLEAD
I VM
HI
LO
VM
RLEAD
VR R ResistanceUnder Test
LeadResistances
DMM
VM = Voltage measured by meterVR = Voltage across resistor (R)
FIGURE 3-17: Four-Wire Resistance Measurement
Test Current (I)
RLEAD
I VM
Sense HI
Sense LO
VM
RLEAD
VR RResistanceUnder Test
LeadResistances
DMM
VM = Voltage measured by meterVR = Voltage across resistor (R)Because sense current is negligible, VM = VR
RLEAD
RLEADSource HI
Source LO
Sense Current (pA)
=I
VMand measured resistance =I
VR

3-22 SECTION 3
VM+ – VM– (VEMF + IR) – (VEMF – IR) VM = ___________ = ____________________________ = IR 2 2
The measured resistance is computed in the usual manner:
VM R = ___ I
Note that the thermoelectric voltage (VEMF) is completely canceled out by this method of resistance calculation.
For the current-reversal method to be effective, it’s important to use a low noise voltmeter with a response speed that is fast compared with the thermal time constant of the circuit under test. If the response speed is too slow, any changes in the circuit temperature during the measurement cycle will cause changes in the thermoelectric EMFs that won’t be completely canceled, and some error will result.
Delta Method
When the thermoelectric voltages are constant with respect to the meas-ure ment cycle, the current-reversal method will successfully compensate for these offsets. However, if changing thermoelectric voltages are caus-ing inaccurate results, then the delta method should be used. The delta method is similar to the current-reversal method in terms of alternating the current source polarity, but it differs in that it uses three voltage mea-surements to make each resistance calculation. This method can best be explained through an illustration and mathematical computations.
Figure 3-19 shows the voltage drop of a DUT as a function of time with an alternating polarity current applied. A voltage measurement (VM1, VM2,
FIGURE 3-18: Canceling Thermoelectric EMFs with Current Reversal
VM = = I RVM+ – VM–
2
a. Measurement with Positive Polarity
b. Measurement with Negative Polarity
R
VEMF
M+
VM+ = VEMF + I
I I V
R
R
VEMF
M–
VM– = VEMF – I R
V

Measurements from Low Resistance Sources 3-23
VM3, etc.) is taken each time the polarity is changed. Each voltage meas-ure ment includes a constant thermal voltage offset (VEMF) and a linearly changing voltage offset (dV). The thermal voltage drift may be approximat-ed as a linear function over short periods, so the rate of change of voltage as a function of time (dV) can also be treated as a constant. The first three voltage measurements include the following voltages:
VM1 = V1 + VEMF
VM2 = V2 + VEMF + dV
VM3 = V3 + VEMF + 2dV
where: VM1, VM2, and VM3 are voltage measurements
VM1 is presumed to be taken at time = 0
V1, V2, and V3 are the voltage drop of the DUT due to the applied current
VEMF is the constant thermoelectric voltage offset at the time the VM1 meas ure ment is taken
dV is the thermoelectric voltage change
Cancellation of both the thermoelectric voltage offset (VEMF) term and the thermoelectric voltage change (dV) term is possible through mathe-matical computation using three voltage measurements. First, take one-half the difference of the first two voltage measurements and call this term VA:
VM1–VM2 (V1+VEMF) – (V2+VEMF+dV) (V1–V2) dV VA = __________ = _______________________________ = ________ – ___ 2 2 2 2
FIGURE 3-19: Canceling Thermoelectric EMFs with Delta Method
VEMF
DUTVoltage
VM1
VM3
VM2
TestCurrent
δV = linearly changingthermoelectricvoltages
Time

3-24 SECTION 3
Then, take one-half the difference of the second (VM2) and third (VM3) voltage measurements and call this term VB:
VM3–VM2 (V3+VEMF+2dV) – (V2+VEMF+dV) (V3–V2) dV VB = __________ = _____________________________________ = ________ – ___ 2 2 2 2
Both VA and VB are affected by the drift in the thermoelectric EMF, but the effect on VA and VB is equal and opposite. The final voltage reading is the average of VA and VB and is calculated as:
VA – VB (V1 + V3 – 2V2) VFinal = ________ = _________________ 2 4
Notice that both the VEMF and dV terms are canceled out of the final voltage calculation.
In the delta method, each data point is the moving average of three voltage readings. This additional averaging of the voltage measurements means that the data resulting from the delta method has lower noise than the data derived when the current-reversal method is used to calculate it, even when both sets of data are taken over the same time period.
The success of the delta method depends on the linear approxima-tion of the thermal drift, which must be viewed over a short period. Compensating successfully for changing thermoelectric voltages dictates that the measurement cycle time must be faster than the thermal time constant of the DUT. Therefore, an appropriately fast current source and voltmeter must be used for the delta method to be successful. Refer to Section 4.7.2 for information on specific test equipment.
Offset-Compensated Ohms Method
Another offset-canceling method used by micro-ohmmeters and many DMMs is the offset-compensated ohms method. This method is similar to the current-reversal method except that the measurements are alternated between a fixed source current and zero current.
As shown in Figure 3-20a, the source current is applied to the resist-ance being measured during only part of the cycle. When the source cur-rent is on, the total voltage measured by the instrument (Figure 3-20b) includes the voltage drop across the resistor as well as any thermoelectric EMFs, and it is defined as:
VM1 = VEMF + IRDuring the second half of the measurement cycle, the source current
is set to zero amps and the only voltage measured by the meter (Figure 3-20c) is any thermoelectric EMF present in the circuit:
VM2 = VEMF
Given that VEMF is accurately measured during the second half of the cycle, it can be subtracted from the voltage measurement made during the first half of the cycle, so the offset-compensated voltage measure-ment becomes:
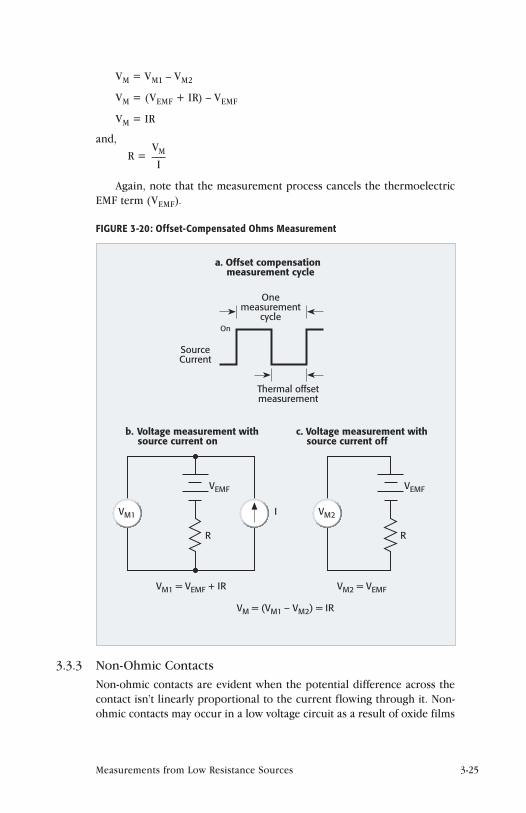
Measurements from Low Resistance Sources 3-25
VM = VM1 – VM2
VM = (VEMF + IR) – VEMF
VM = IR
and, VM R = ___ I
Again, note that the measurement process cancels the thermoelectric EMF term (VEMF).
FIGURE 3-20: Offset-Compensated Ohms Measurement
a. Offset compensationmeasurement cycle
SourceCurrent
Thermal offsetmeasurement
On
Onemeasurement
cycle
b. Voltage measurement withsource current on
R
VEMF
IVM1
VM1 = VEMF + IR
c. Voltage measurement withsource current off
R
VEMF
VM2
VM2 = VEMF
VM = (VM1 – VM2) = IR
3.3.3 Non-Ohmic ContactsNon-ohmic contacts are evident when the potential difference across the contact isn’t linearly proportional to the current flowing through it. Non-ohmic contacts may occur in a low voltage circuit as a result of oxide films

3-26 SECTION 3
or other non-linear connections. A non-ohmic connection is likely to rec-tify any radio frequency energy (RFI) present, causing an offset voltage to appear in the circuit. (A further discussion on RFI can be found in Section 3.2.5.) There are several ways to check for non-ohmic contacts and meth-ods to reduce them.
If using a micro-ohmmeter or DMM to make low resistance measure-ments, change the range to check for non-ohmic contacts. Changing the measurement range usually changes the test current as well. A normal condition would indicate the same reading but with higher or lower resolu-tion, depending on whether the instrument was up or down ranged. If the reading is significantly different, this may indicate a non-ohmic condition.
If using a separate current source and voltmeter to make low resistance measurements, each instrument must be checked for non-ohmic contacts. If the current source contacts are non-ohmic, there may be a significant differ-ence in the compliance voltage when the source polarity is reversed. If the voltmeter contacts are non-ohmic, they may rectify any AC pickup present and cause a DC offset error. If this is the case, the offset compensated ohms method is preferred to the current-reversal method for canceling offsets.
To prevent non-ohmic contacts, choose an appropriate contact mate-rial, such as indium or gold. Make sure the compliance voltage is high enough to avoid problems due to source contact non-linearity. To reduce error due to voltmeter non-ohmic contacts, use shielding and appropriate grounding to reduce AC pickup.
3.3.4 Device HeatingDevice heating can be a consideration when making resistance measure-ments on temperature-sensitive devices such as thermistors or nanoscale devices. The test currents used for low resistance measurements are often much higher than the currents used for high resistance measurements, so power dissipation in the device can be a consideration if it is high enough to cause the device’s resist ance value to change.
Recall that the power dissipation in a resistor is given by this formula:
P = I2R
From this relationship, we see that the power dissipated in the device increases by a factor of four each time the current doubles. Thus, one way to minimize the effects of device heating is to use the lowest current possible while still maintaining the desired voltage across the device being tested. If the current cannot be reduced, use a narrow current pulse and a fast responding voltmeter.
Most micro-ohmmeters and DMMs don’t have provisions for setting the test current. It is generally determined by the range. In those cases, alternate means must be found to minimize device heating. One simple but effective way to do so is to use the instrument’s one-shot trigger mode during measurements. When in this mode, the instrument will apply only

Measurements from Low Resistance Sources 3-27
a single, brief current pulse to the DUT during the measurement cycle, thereby minimizing errors caused by device heating. Some instruments, like SMU instruments, may have a pulsed mode for source current to min-imize heating effects.
3.3.5 Dry Circuit Testing
Many low resistance measurements are made on devices such as switches, connectors, and relay contacts. If these devices are to be used under “dry circuit” conditions, that is, with an open-circuit voltage less than 20mV and a short-circuit current less than 100mA, the devices should be tested in a manner that won’t puncture any oxide film that may have built up on the contacts. If the film is punctured, the measured contact resistance will be lower than if the film remains intact, compromising the validity of the test results.
To avoid oxidation puncture, such measurements are usually made using dry circuit testing, which typically limits the voltage across the DUT to 20mV or less. Some micro-ohmmeters and DMMs have this capability built in, as shown in Figure 3-21. In this micro-ohmmeter, a precision shunt resistor (RSH) is connected across the source terminals to clamp or limit the voltage across the DUT to <20mV. The remaining aspects of the circuit are very similar to the conventional four-wire measurement method: V and RREF make up the current source, which forces current through the unknown resistance (R). This current should be no more than 100mA. The value of the unknown resistance is computed from the sense voltage (VM), the voltage across clamping resistor (VSH), the known value of RSH, and the source current.
If dry circuit testing is to be done with a separate current source and voltmeter or an SMU instrument, the compliance voltage, or source limit, on the current source must be limited to 20mV or less. If it isn’t possible to limit the compliance voltage to this level, a compliance limiting resistor must be used, as shown in Figure 3-22. In this circuit, RC is the resistor used to limit the voltage to 20mV and R is the unknown resistance.
The value of RC must be chosen to limit the voltage at a given test cur-rent. For example, if the voltage limit is 20mV and the test current is 200µA, RC can be calculated as:
RC = 20mV/200µA = 100W
If the unknown resistance (R) is 250mW, then RC will cause a 0.25% error in the measured resistance.
The exact value of the unknown resistance (R) can then be calculated by the following equation:
(RMEASURED × RC) R = ___________________ (RC – RMEASURED)

3-28 SECTION 3
where RMEASURED is the calculated resistance measurement from the meas-ured voltage (VM) and the source current (I).
3.3.6 Testing Inductive DevicesInductive devices usually have a small resistance in addition to the inductance. This small resistance is normally measured with a DMM or a micro-ohmmeter. However, the measurements are often difficult because of the interaction between the inductance and the measuring instrument. This is particularly true with high L/R ratios.
Some of the problems that may result include oscillations, negative readings and generally unstable readings. An oscilloscope picture of an unstable measurement of a 200H inductor is shown in Figure 3-23.
When problems occur, try to take measurements on more than one range and check if the values correspond.
FIGURE 3-21: Dry Circuit Testing
Micro-ohmmeter
VSH SH
RREF
Input LO
LO
Sense HI
Input HI
R
SourceTest Current
V R VM
Sense
FIGURE 3-22: Dry Circuit Testing Using Current Source and Voltmeter
RC R
RC = Compliance limiting resistorR = Unknown resistance to be measured
MI V

Measurements from Low Resistance Sources 3-29
If possible, do not use offset compensation (pulsed current) because inductive reaction to the current pulse may cause unstable measure-ments or make autoranging difficult. Try using a higher resistance range when possible.
Check for oscillations by connecting an oscilloscope in parallel with the device and the meter. Sometimes, a diode across the inductor may set-tle down the oscillations by reducing the inductive kick.
3.4 Measurement Optimization Summary for Low Impedance Measurements
Section 3 describes various low impedance measurement techniques, sources of error and ways to reduce them. In summary, here are some steps to ensure making optimal low impedance measurements:
• Choose an instrument sensitive enough to measure low voltage or low resistance: sensitive DMM, micro-ohmmeter, nanovolt-meter, or a combination of a sensitive voltmeter with a current source. Understand the manufacturer’s instrument specifications including the accuracy. Allow the instrument to warm-up for at least an hour and make sure the instrument has periodic recalibration to ensure it is within specification.
• Ensure cables, connectors, and test fixtures are appropriate for low impedance measurements. Use shielded cables and follow suggestions for minimizing thermoelectric EMFs in the test circuit.
FIGURE 3-23: Unstable Measurement of 200H Inductor

3-30 SECTION 3
• Apply the proper measurement techniques to minimize measurement errors. Some of these techniques include avoiding thermoelectric EMFs, eliminating noise sources, using offset com-pensation, increase filtering and line cycle integration, etc.
• Verify the capabilities of the test system. Verification procedures for individual instruments are usually described in the reference manual of the instrument. One of the first steps in setting up a sys-tem for making low voltage and/or low resistance measurements is to determine the offsets of the measurement system. This identifies the noise floor limit of the entire system and sets a starting point for troubleshooting potential problems and making improvements to the system, if necessary. The remainder of this section outlines simple verification tests and error symptoms for both low voltage and low resistance measurements along with possible causes and ways to minimize these errors.
Low Voltage Measurements
To verify the performance of a nanovoltmeter, it is best to follow the instructions described in the instrument’s manual. However, here are steps for a simple way to check the performance of a sensitive voltmeter:
1. Turn on the power and allow the instrument to warm up for the time specified in the service manual.
2. Place an appropriate short on the input of the voltmeter as suggested in the manual of the instrument.
3. Set the voltmeter to the most sensitive voltage range and zero or REL the meter.
4. Verify the voltage is within specification.
Table 3-2 lists potential error symptoms of low voltage measurements along with possible causes and ways to minimize these errors.
Low Resistance Measurements
Low resistance measurements should be verified with a low resistance of known value that is similar in magnitude to the resistance under test, if possible. Table 3-3 lists potential error symptoms of low resistance meas-urements along with possible causes and ways to minimize these errors. In addition, error sources for low voltage measurements should be reviewed.

Measurements from Low Resistance Sources 3-31
TABLE 3-2: Potential Error Symptoms of Low Voltage Measurements
Error Symptom Possible Causes How to Minimize or Avoid
Refer to Section
Noisy readings
Thermoelectric EMFs Construct circuits using same type of conductive materials. Minimize temperature gradients. Allow test equipment to warm up.
3.2.2
Line Cycle Interference Identify and remove offending source, if possible. Use noise shields. Use integer value of line cycle integration (e.g., 1, 2, etc.).
3.2.8
RFI/EMI Keep sensitive test circuitry away from interference source. Use noise shields.
3.2.5
Johnson Noise Lower temperature of source resistance. Increase instrument filtering. Increase integration time.
3.2.6
Magnetic Fields Reduce loop area of test leads. Minimize vibration of test circuit.
3.2.9
Ground Loops Ground all equipment at a single point. 3.2.10
DC voltage offsets
Internal voltmeter offsets
Use proper zeroing techniques. Make sure voltmeter is in calibration.
3.2.3
Thermoelectric EMFs Construct circuits using same type of conductive materials. Minimize temperature gradients. Allow test equipment to warm up.
3.2.2
RFI/EMI Keep sensitive test circuitry away from interference source. Use noise shields.
3.2.5
One or two digits of resolution
Range selected is too high or instrument not sensitive enough
Select a lower voltage range, or use autoranging. Use a more sensitive voltmeter. Check instrument specifications.
TABLE 3-3: Potential Error Symptoms of Low Resistance Measurements
Error Symptom Possible Causes How to Minimize or Avoid
Refer to Section
Readings too high
Lead Resistance Use four-wire method. 3.3.1
Ohmic Contacts Use appropriate contact material. Use four-wire method.
3.3.1
Thermoelectric EMFs Use an offset compensation method. 3.3.2
Self Heating Effects Reduce test current. Use pulsed current. 3.3.4
Readings too high or too low
Thermoelectric EMFs Use an offset compensation method. 3.3.2
Non-Ohmic Contacts Use appropriate contact material. Use four-wire method.
3.3.1


S E C T I O N 4
Applications

4-2 SECTION 4
4.1 Introduction The applications for today’s low-level measurement instruments are no longer limited to the calibration department or R&D lab. Low-level instru-ments have proven invaluable in many other areas, including product design, device characterization, quality assurance, and production test. This section offers insights into this growing range of applications and the most appropriate instruments and test techniques to solve specific test and meas urement challenges.
Section 4 covers a variety of low-level measurement applications:
4.2 Applications for Measuring Voltage from High Resistance Sources: Capacitor dielectric absorption and electrochemical measurements.
4.3 Low Current Measurement Applications: Capacitor leakage measure-ments, low current semiconductor (diodes and MOSFETs) measure-ments, light measurements with photomultiplier tubes, ion beam measurements, and I-V characteristics of CNT FETs.
4.4 High Resistance Measurement Applications: Surface insulation resist-ance testing of printed circuit boards, resistivity measurements of insulating materials, resistivity measurements of semiconductors, and voltage coefficient testing of high ohmic value resistors.
4.5 Charge Measurement Applications: Capacitance measurements and static charge measurements using a Faraday cup.
4.6 Low Voltage Measurement Applications: Standard cell compari-sons, high resolution temperature measurements, and Hall voltage measurements.
4.7 Low Resistance Measurement Applications: Contact resistance, super-conductor resistance measurements, and resistivity measurements of conductive materials.
4.2 Applications for Measuring Voltage from High Resistance Sources Electrometer voltmeters and voltage measurements on high resistance sources were described in Sections 1 and 2 respectively. In particular, Section 2.2 discussed error sources and ways to minimize their effects. Voltage measurements on high impedance sources include applications such as capacitor dielectric absorption and some electrochemical experi-ments, including pH measurements and measurements with ion-selective electrodes.
4.2.1 Capacitor Dielectric Absorption Overview
Dielectric absorption occurs when randomly oriented permanent dipoles of molecules within a dielectric are aligned by an applied electric field. After a capacitor is disconnected from a discharge circuit, a residual charge
4-2 SECTION 4

Applications 4-3
remains on the capacitor, so a voltage is re-established across the capacitor terminals.
For timing and integrating applications, dielectric absorption (or a residual capacitor voltage) can seriously degrade the accuracy of the circuit. Thus, a capacitor’s dielectric absorption must be known and compensated for in circuits where capacitance tolerance is a significant factor in circuit accuracy.
Dielectric absorption is measured using a voltage source and a volt-meter with high input impedance. Figure 4-1 illustrates the basic timing for the test. First, the capacitor is charged to the rated voltage for a specified time period (t1). Next, the capacitor is discharged for a second time inter-val (t2). Then, the capacitor is open-circuited; after a third time interval (t3), the residual or recovery voltage across the capacitor is measured. The dielectric absorption can then be determined from the recovery voltage:
Residual Voltage Dielectric Absorption = __________________ × 100% Soak Voltage
FIGURE 4-1: Voltage vs. Time in Dielectric Absorption Test
Soak Recovery
Discharge
Time
V
t1 t2 t3
The following paragraphs describe how to make these measurements using both SMU instruments and electrometers.
Using a SourceMeter SMU Instrument to Determine Dielectric Absorption
Residual capacitor voltage can be measured with an SMU instrument, which must source voltage and then measure voltage with a high input impedance. Because an SMU instrument must output 0A while monitoring voltage, it is important to use an instrument that has the lowest possible input bias current to avoid charging the capacitor while monitoring the recovery voltage. The Model 4200-SCS Parameter Analyzer equipped with an SMU instrument and a preamp and the Model 6430 Sub-Femtoamp
Applications 4-3
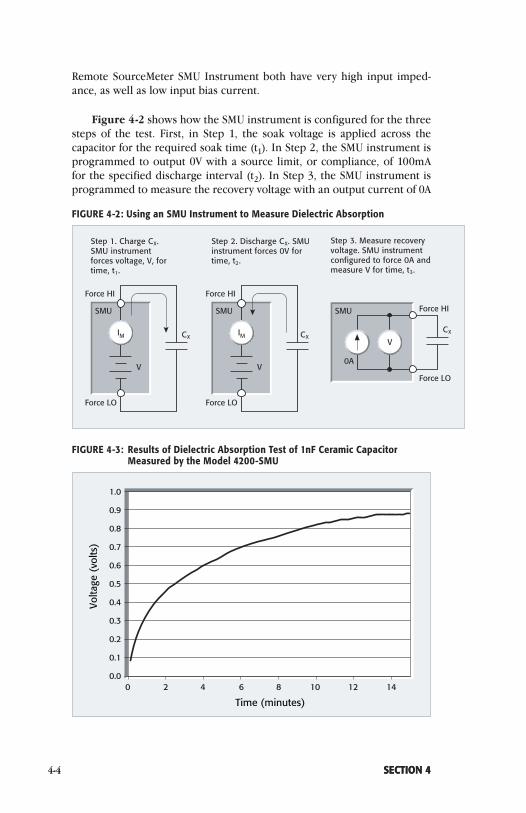
4-4 SECTION 44-4 SECTION 4
Remote SourceMeter SMU Instrument both have very high input imped-ance, as well as low input bias current.
Figure 4-2 shows how the SMU instrument is configured for the three steps of the test. First, in Step 1, the soak voltage is applied across the capacitor for the required soak time (t1). In Step 2, the SMU instrument is programmed to output 0V with a source limit, or compliance, of 100mA for the specified discharge interval (t2). In Step 3, the SMU instrument is programmed to measure the recovery voltage with an output current of 0A
FIGURE 4-2: Using an SMU Instrument to Measure Dielectric Absorption
IM CX CX
Force HI
Force LO
V
SMU
Step 1. Charge CX. SMU instrument forces voltage, V, for time, t1.
IM
Force HI
Force LO
V
SMU
Step 2. Discharge CX. SMU instrument forces 0V for time, t2.
CX
Force HI
Force LO
V
SMU
0A
Step 3. Measure recovery voltage. SMU instrument configured to force 0A and measure V for time, t3.
FIGURE 4-3: Results of Dielectric Absorption Test of 1nF Ceramic Capacitor Measured by the Model 4200-SMU
1.0
0.9
0.8
0.7
0.6
0.5
0.4
0.3
0.2
0.1
0.0 0 2 4 6 8 10 12 14
Volta
ge (
volts
)
Time (minutes)
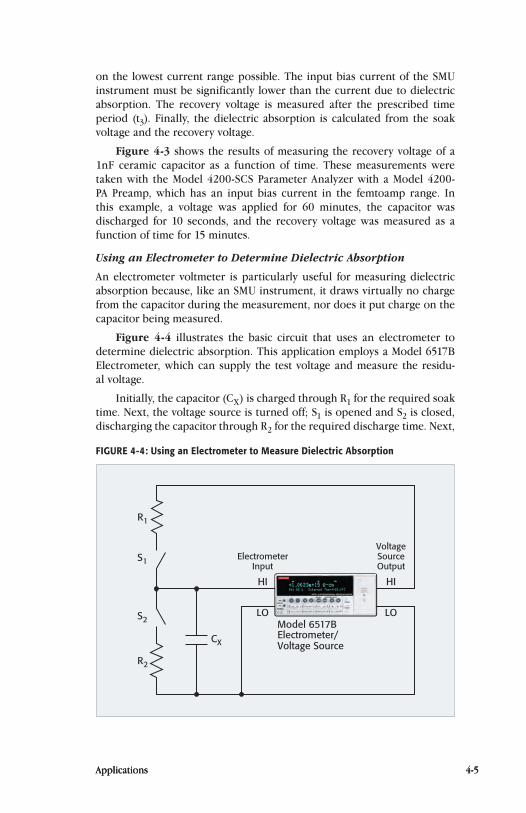
Applications 4-5
on the lowest current range possible. The input bias current of the SMU instrument must be significantly lower than the current due to dielectric absorption. The recovery voltage is measured after the prescribed time period (t3). Finally, the dielectric absorption is calculated from the soak voltage and the recovery voltage.
Figure 4-3 shows the results of measuring the recovery voltage of a 1nF ceramic capacitor as a function of time. These measurements were taken with the Model 4200-SCS Parameter Analyzer with a Model 4200-PA Preamp, which has an input bias current in the femtoamp range. In this example, a voltage was applied for 60 minutes, the capacitor was discharged for 10 seconds, and the recovery voltage was measured as a function of time for 15 minutes.
Using an Electrometer to Determine Dielectric Absorption
An electrometer voltmeter is particularly useful for measuring dielectric absorption because, like an SMU instrument, it draws virtually no charge from the capacitor during the measurement, nor does it put charge on the capacitor being measured.
Figure 4-4 illustrates the basic circuit that uses an electrometer to determine dielectric absorption. This application employs a Model 6517B Electrometer, which can supply the test voltage and measure the residu-al voltage.
Initially, the capacitor (CX) is charged through R1 for the required soak time. Next, the voltage source is turned off; S1 is opened and S2 is closed, discharging the capacitor through R2 for the required discharge time. Next,
Applications 4-5
FIGURE 4-4: Using an Electrometer to Measure Dielectric Absorption
Model 6517BElectrometer/Voltage Source
S1
R1
R2
S2
CX
HI
LO
ElectrometerInput
HI
LO
VoltageSourceOutput

4-6 SECTION 4
S2 is opened and the capacitor must remain undisturbed for the specified recovery time, at the end of which the electrometer voltmeter is used to measure the residual voltage. The dielectric absorption is then calculated using the equation given previously.
4.2.2 Electrochemical Measurements Overview
To ensure the accuracy of measurements when determining the potentials of electrochemical electrodes or cells, these measurements must be made without drawing appreciable current from the cells. Otherwise, the current drawn from the cell electrodes will cause a voltage drop across the internal resistance of the electrode and may polarize the cell. Therefore, a voltmeter with high input resistance, such as an electrometer, is required.
Electrometers are commonly used for pH measurements and other ion-selective electrodes to determine a specific ionic concentration. They are also often used for measuring liquid conductivity. This section discuss-es a number of measurement fundamentals related to these applications. Keep in mind that these measurements typically require close temperature regulation.
Measurements with Ion-Selective Electrodes
These measurements are particularly useful where continuous measure-ments of ionic activity are needed. Such monitoring is important to prevent loss of valuable material or to detect possible pollutants in the effluents from industrial processes.
The cell potential of an ion-selective electrode varies directly with the logarithm of ionic activity. At room temperature, the potential of most ion- selective electrodes will change about 57mV when the activity of an equivalent ion is changed by a factor of ten. This log response enables con-stant precision over dynamic ranges of ionic activity of up to eight orders of magnitude. Figure 4-5 shows a typical circuit. Note that the ion-selective
4-6 SECTION 4
FIGURE 4-5: Ion-Selective Electrode Measurements
Model 6514 or6517B Electrometer
Ion-SelectiveElectrode
ReferenceElectrode
TestSolution
Shielded Cable
HI
LO
Guard Output usedto drive shield

Applications 4-7
electrode usually has higher impedance than the reference electrode and should be connected to the HI terminal of the electrometer input with shielded cable. The shield can be driven by the Guard (Preamp) Output to improve the response speed. With the Model 6517B or Model 6514 elec-trometers, this can be done by either an external connection to the preamp output (as shown) or using the volts guard function on the front panel.
pH Measurements
Any pH electrode system (Figure 4-6) can be seen as a large resistor (from 10MW to 1GW) in series with a voltage source. This resistance is the sum of the ion-selective electrode wall (typically glass) and the electrolyte, which has low mobility. The potential in this system cannot be measured with an ordinary DMM.
FIGURE 4-6: pH Electrode System
Glass electrode
Reference electrode
Electrolyte
Model 6514Electrometer
HI
LO
If current flows, the electrodes will become polarized. Therefore, the electrode potential should be measured with an electrometer, which draws negligible current from the electrodes. The electrometer should not be zero-checked while connected to the glass electrode; the instrument’s normally near-infinite input resistance drops to 10MW in zero check and the resulting current flow may polarize the electrodes.
If the approximate pH to be measured is known, the electrodes should be standardized, using two values of buffer solutions to calibrate the sys-tem at each end of the desired pH scale. This step is necessary to obtain the best accuracy. For example, to measure from 6.5pH (29.6mV at 25°C) to 1pH (355mV at 25°C), it is advisable to use one buffer solution with a pH of six and another with a pH of one.
When placed in the buffer solution, the voltage reading from the elec-trodes may differ from the theoretical value by several hundred microvolts. The voltage is also highly temperature dependent. For a given cell and tem-perature, the pH-to-voltage relationship is linear. For example, the theoret-ical voltage with a pH of 4.0 is 177.5mV at 25°C, assuming the calomel cell
Applications 4-7

4-8 SECTION 4
is used as the reference electrode. Other reference electrodes, such as the silver/silver chloride cell, will give a slightly different voltage. The reference electrode doesn’t change with pH, so its contribution to the measurement can be corrected for by measuring known buffer solutions. The electrode voltages measured by the electrometer may be converted to pH values by using appropriate conversion data. Figure 4-7 is a typical plot of millivolt difference versus pH value.
FIGURE 4-7: Electrode Output Voltage at Various pH Values
14
12
10
8
6
4
2
0–400 –200 0 200 400
mV
pH
T = 25°C
T –T
T +T
Conductivity Cells
Measuring the electrical conductivity of many chemical solutions is difficult if the ionic concentration is very low. In these instances, an electrometer voltmeter with a current source can be used to make this measurement; Figure 4-8 shows a typical configuration.
The conductivity of a solution is sensitive to the presence of impurities, so its value is meant to be more an index of impurity than a characteristic constant. Therefore, high accuracy is unnecessary and the test equipment need not be elaborate.
As with pH measurements, the current should be kept as low as possi-ble. Its polarity can be alternated to avoid electrode polarization.
The electrodes of the cell must be rigidly mounted to prevent vibration and motion from creating noise and pickup. Additionally, shielding the leads to the electrodes helps reduce interference.
Each cell arrangement has a particular constant, which is a function of the volume of the conducting solution between the electrodes. Elec trom e-ters can be very useful where electrode areas are very small and solution
4-8 SECTION 4

Applications 4-9
conductivities are very low. Temperature control is essential to making reliable measurements.
Conductivity is computed from the known value of current (I), the voltage reading (V), and the area and spacing between the electrodes:
I L s = ___ · ___ V A
where: s = conductivity (Siemens/cm)
A = surface area of the electrodes (cm2)
L = distance between the electrodes (cm)
4.3 Low Current Measurement Applications Electrometer ammeters, picoammeters, SMU instruments, and methods of making low current measurements were described in Sections 1 and 2 respectively. In particular, Section 2.3 discussed a number of error sources that can seriously affect measurement accuracy. The following sections dis-cuss several low current measurement applications in more detail: capaci-tor leakage measurements, low current semiconductor device (diodes and MOSFETs) measurements, light measurements with photo multiplier tubes, ion beam measurements, and I-V characteristics of CNT FETs. To ensure greater accuracy in these measurements, be sure to use the low current optimization techniques discussed in previous sections.
4.3.1 Capacitor Leakage Measurements Overview
Capacitors are essential components of virtually every type of electronic equipment. They are widely used for bypassing, coupling, filtering, and tuning electronic circuits. However, to be useful, they must be charac-
Applications 4-9
FIGURE 4-8: Conductivity Cell Measurements
Model 6514ElectrometerVoltmeter
Electrodeof area “A”
SolutionL
Model 6220Current Source
LO
HI
LO
HI

4-10 SECTION 4
terized for capacitance value, voltage rating, temperature coefficient, and leakage current or resist ance. The capacitor manufacturer performs these tests; end users may also perform them. Depending on the device under test, the leakage current is typically very small, usually <10nA.
This application focuses on the measurement of leakage resistance using either a Model 6487 Picoammeter/Source, a Model 6517B Elec trom e-ter, or a Model 2450 SourceMeter SMU Instrument. This leakage resistance may be referred to as “IR” (Insulation Resist ance) and is expressed in megohm-microfarads (the resistance may be computed by dividing the “IR” value by the capacitance). In other cases, leakage may be expressed as a leakage current at a given voltage, usually the operating voltage.
Description of Test Method Using a Picoammeter or Electrometer
Capacitor leakage is measured by applying a fixed voltage to the capacitor under test and measuring the resulting current. The leakage current will decay exponentially with time, so it’s usually necessary to apply the voltage for a known period (the “soak” time) before measuring the current.
Figure 4-9 depicts a general circuit for testing capacitor leakage using a picoammeter and a voltage source. Here, the voltage is placed across the capacitor (CX) for the soak period, then the ammeter measures the current after this period has elapsed. The resistor (R), which is in series with the capacitor, is an important component in this test system. The resistor has two functions:
1. The resistor limits the current in case the capacitor becomes shorted.
2. As discussed in Section 2.3.2, the decreasing reactance of the capacitor with increasing frequency will increase the gain of the feedback amme-ter. The resistor limits this increase in gain to a finite value. A reason-able value is one that results in an RC product from 0.5 to 2 seconds.
4-10 SECTION 4
FIGURE 4-9: Simple Capacitor Leakage Test Circuit
Picoammeter
CXV
S R
Voltage Source
CapacitorUnder Test
HI
LO
IM

Applications 4-11
Even better performance will result if a forward-biased diode (D) is included in the circuit, as shown in Figure 4-10. The diode acts like a variable resistance, low when the charging current to the capacitor is high, then increasing in value as the current decreases with time. The series resistor can be much smaller because it is only needed to prevent overload of the voltage source and damage to the diode if the capacitor becomes short-circuited. The diode should be a small signal diode, such as 1N914 or 1N3595, and must be in a light-tight enclosure. For dual-polarity tests, use two diodes back-to-back in parallel.
Using an SMU Instrument to Measure Capacitor Leakage
The same technique used to perform capacitor leakage testing with a picoammeter or electrometer can be used when testing with an SMU instrument. However, in the case of the SMU instrument, the ammeter is internally connected to the voltage source, as shown in Figure 4-11. The current limiting resistor is no longer necessary because a source limit, or compliance, value is set to limit the current.
Applications 4-11
FIGURE 4-10: Capacitor Leakage Test Circuit with Diode
DS R
Picoammeter
CX
V
HI
LO
IM
Voltage Source
FIGURE 4-11: SMU Instrument Connections for Capacitor Leakage
IMCX
Ileakage
Force HI
Force LO
V
Model 2450SMU

4-12 SECTION 4
If the current readings are noisy, then a forward-biased diode should be added in series with the capacitor under test to reduce the noise gain. Some SMU instruments, like the Model 2450 SourceMeter SMU Instrument, have a high capacitance mode that can be enabled to make stable leakage current measurements. In this case, the series diode may not be necessary.
Figure 4-12 illustrates the results of measuring the leakage current of a 10µF ceramic capacitor as a function of time. These current measure-ments were taken with the Model 2450 SourceMeter SMU Instrument using a 1N3595 diode in series with the capacitor to reduce the noise gain.
FIGURE 4-12: Leakage Current Measurements of a 10µF Capacitor Taken with a Model 2450 SourceMeter SMU Instrument
1.E–09
1.E–10
1.E–11 0 10 20 30 40 50 60
Leak
age
Cur
rent
(am
ps)
Time (seconds)
Test Circuit for Testing Multiple Capacitors
For statistical purposes, a quantity of capacitors is often tested to produce useful data. Obviously, it is impractical to perform these tests manually, so some sort of automated test system is required. Figure 4-13 illustrates such a system, which employs a Model 6487 Picoammeter/Voltage Source, Model 7158 Low Current Scanner Cards, and Model 7111-S Form C Switch Cards. The cards must be installed in a switching mainframe, such as a Model 7002. A computer controls the instruments to perform the tests automatically.
In this test system, a single instrument, the Model 6487 Pico am meter/ Source, provides both the voltage sourcing and low current measure-ment functions. This instrument is particularly useful for this application because it can display either resistance or leakage current and will source DC voltage. The Model 6517B can also be used in this system for lower current meas ure ments.
4-12 SECTION 4

Applications 4-13
Depending on the polarity of the voltage source, one of the two diodes (D) in parallel is used to reduce noise while the other provides a discharge path. The normally closed contact of the Model 7111-S serves to discharge the capacitor after it has been measured.
One set of switches is used to apply the test voltage to each capacitor in turn; a second set of switches connects each capacitor to the picoammeter after a suitable soak period.
4.3.2 Low Current Diode Measurements Overview
The current-voltage (I-V) characterization of diodes often involves measur-ing very small currents while sourcing voltage. Because of their wide range of current measuring capability, SMU instruments are often used to make these measurements. This section describes how to measure diode current with forward bias as well as the reverse leakage at high voltage.
Forward Bias I-V Characterization of a Diode
The forward bias current of a diode spans many decades. The measuring instrument must be configured using a Kelvin (four-wire) technique to
Applications 4-13
FIGURE 4-13: Capacitor Leakage Test System
Model 6487 Picoammeter/Voltage Sourceor
Model 6517B Electrometer/Voltage Source
R
Model 7111-SForm C Switch Card
Model 7158Low Current Card
LO
HI
VoltageSourceOutput LO
HI
PicoammeterInput
R
R
C
C
C
D

4-14 SECTION 4
avoid unwanted voltage drops in the test leads while measuring the diode current, which can be in the milliamp range when forward biased. The use of low current measurement techniques is also critical. Figure 4-14 shows the test configuration for measuring the forward bias current of a diode using a Model 2450 SourceMeter SMU Instrument. The Model 2450 can measure currents from picoamps to 1A, as well as sweep the bias voltage.
FIGURE 4-14: Connections For Performing Forward Bias I-V Characterization of a Diode
Sense HI
Sense LO
Force HIModel 2450SMU
Force LO
DiodeV
IM
M
Figure 4-15 shows the results of measuring the forward I-V charac-teristics of the 1N3595 diode. This diode curve was generated using the Model 2450, which has a touchscreen display and built-in graph. Note that because the current spans 11 decades, the log of the current is plotted as a function of the applied voltage.
4-14 SECTION 4
FIGURE 4-15: Model 2450 SourceMeter SMU Instrument Touchscreen Display Showing Forward Bias Diode Curve on Built-in Graph

Applications 4-15Applications 4-15
Reverse Leakage Current of a High Voltage Diode
Ideally, the reverse current of a diode should be 0A; however, a small reverse current does flow when a reverse voltage is applied. The reverse leakage is often measured as the voltage is swept from 0V to a specified reverse voltage. A large current will flow when the voltage is at the reverse breakdown level. An SMU instrument is an ideal instrument for measuring the reverse leakage characteristics of a diode because it can measure low current and sweep voltage.
FIGURE 4-16: Connecting the Model 2657A High Power SourceMeter SMU Instrument to a High Voltage Diode
IM
Output HI
HV Diode
Output LO
Model 2657A
Note: For high voltage diodes, use safety triax cables and a properly grounded safety enclosure such as Model 8010.
FIGURE 4-17: Reverse Breakdown Voltage Characteristics of High Voltage Diode Generated by Model 2657A SourceMeter SMU Instrument
1.0E–07
1.0E–08
1.0E–09
1.0E–10
1.0E–11
1.0E–12 0 100 200 300 400 500 600
Leak
age
Cur
rent
(A)
Reverse Voltage (V)
Leakage Current vs. Reverse Voltageof SiC High Voltage Diode

4-16 SECTION 4
Figure 4-16 shows how the Model 2657A High Power SourceMeter SMU Instrument can be used to test the leakage current of a high voltage diode. The Model 2657A can measure the current with 1fA resolution, as well as source voltage up to 3kV. When testing high voltage diodes, it is important to ensure the diode is placed in a properly grounded safety enclosure and that high voltage cabling is used.
Figure 4-17 shows the results of performing a reverse voltage sweep from 0V to 600V in 2V steps on a SiC high voltage diode that is rated to 600V. This curve was generated using the Model 2657A; the high voltage SiC diode was placed in the Model 8010 High Power Test Fixture, which enhances operator safety and provides electrostatic shielding.
4.3.3 Low Current Measurements of MOSFETs
Overview
Various MOSFET tests require making low current measurements. Some of these tests include gate leakage current, drain-source leakage current, gate induced drain leakage (GIDL) current, and sub-threshold current. These measurements are performed at the wafer level and on packaged devices. The following sections describe how to measure gate leakage current and sub-threshold current.
Gate Leakage Current
Gate leakage current is usually determined by sourcing a DC voltage ramp and measuring the resulting current. The leakage current can be due to the quality of the oxide or it can be due to the physics of the materials. The leakage current could be ohmic or due to tunneling.
The gate leakage current is measured between the gate terminal and the other terminals of the device. Figure 4-18 shows a typical test configuration for measuring the gate leakage current of a MOSFET. In this setup, SMU1 is connected to the Gate terminal and sweeps the gate voltage and measures the resulting leakage current. SMU2, connected to the Drain terminal, and SMU3, connected to the Source terminal, are both set to bias 0V.
Figure 4-19 shows a gate leakage measurement curve for a packaged n-MOSFET. Note that the magnitude of this curve is less than 1pA so it requires a very sensitive ammeter. This curve was generated with the Model 4200-SCS Parameter Analyzer equipped with three SMU instru-ments and preamps, which provide 100aA resolution.
Sub-Threshold Current of MOSFETs
The sub-threshold current test of a MOSFET, which is often done at the wafer level, is a measure of how quickly the device will turn on and off. Figure 4-20 shows a typical test set-up for measuring the sub-threshold current. In this setup, a Model 4200-SCS Parameter Analyzer equipped with two SMU instruments and preamps uses one SMU instrument to
4-16 SECTION 4

Applications 4-17
supply a constant drain-to-source voltage (VDS) and measures the resulting drain current (IDS). Another SMU instrument is used to sweep the gate-to-source voltage (VGS). For this SMU instrument, the current compliance or measure current value should be set to the highest expected gate current on a fixed measurement range.
Applications 4-17
FIGURE 4-18: Gate Leakage Test Configuration Using Multiple SMU Instruments
Drain
Gate
Source
IM
Force LO
Force HI
MOSFET
SMU1
IM
Force LO
0V
Force HISMU3
IM
Force LO
Force HISMU2
Sweeps Gate Voltage and Measures Leakage Current
0V
FIGURE 4-19: Gate Leakage Current vs. Gate Voltage of a Packaged n-MOSFET Measured by the Model 4200-SCS Parameter Analyzer
300 E–15
250 E–15
200 E–15
150 E–15
100 E–15
50 E–15
0 E–15 0 5 10 15 20 25 30 35 40
Gat
e C
urre
nt (
Amps
)
Gate Voltage (Volts)
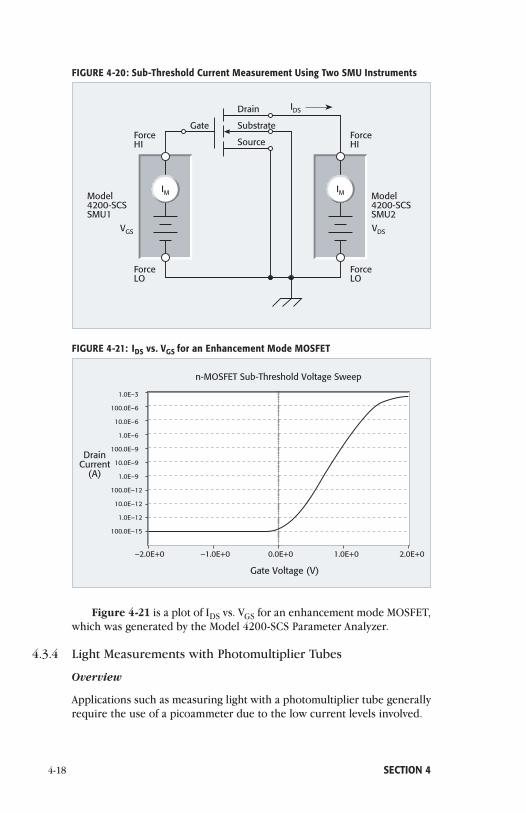
4-18 SECTION 4
Figure 4-21 is a plot of IDS vs. VGS for an enhancement mode MOSFET, which was generated by the Model 4200-SCS Parameter Analyzer.
4.3.4 Light Measurements with Photomultiplier Tubes
Overview
Applications such as measuring light with a photomultiplier tube generally require the use of a picoammeter due to the low current levels involved.
FIGURE 4-20: Sub-Threshold Current Measurement Using Two SMU Instruments
Drain
Substrate
Source
Gate
IM
ForceHI
ForceLO
Model4200-SCSSMU1
IM
ForceHI
ForceLO
Model4200-SCSSMU2
VGS VDS
IDS
FIGURE 4-21: IDS vs. VGS for an Enhancement Mode MOSFET
1.0E–3
100.0E–6
10.0E–6
1.0E–6
100.0E–9
10.0E–9
1.0E–9
100.0E–12
10.0E–12
1.0E–12
100.0E–15
n-MOSFET Sub-Threshold Voltage Sweep
DrainCurrent
(A)
Gate Voltage (V)
–2.0E+0 –1.0E+0 0.0E+0 1.0E+0 2.0E+0

Applications 4-19
A photomultiplier tube (PMT) is a device for converting light to elec-trical current. The tube consists of a light-sensitive cathode that emits electrons in proportion to the photons striking it. These electrons are then accelerated to the next stage, where they impinge and cause the emission of three to six secondary electrons. The process continues through six to fourteen stages (called “dynodes”), depending on tube type. Overall gains of one million or more are commonly attained.
Detailed Operation
Electrons are accelerated by making the voltage of each successive dynode of the tube more positive than the previous one. The easiest way to accom-plish this is to apply a potential across the entire tube and tap the dynode voltages off a voltage divider, as shown in Figure 4-22.
FIGURE 4-22: Voltage Supply for Photomultiplier Tube
R1
Photomultiplier Tube
Cathode AnodeDynodes
R2 R3 R4 R5 R6
— +
The voltages that should be applied to each dynode are a function of PMT design and are specified for each tube type.
The total resistance of the dynode resistors should be such that the cur-rent flowing through the series resistance is at least 100 times the expected anode current of the tube:
Voltage, Anode-to-Cathode RT = ______________________________ 100 × Anode Current
Most photomultiplier tubes require anode-to-cathode potentials from 1000 to 3000V. The anode is the readout point, so it is usually operated at near-ground potential and the cathode at a high negative potential. The Keithley Model 248 High Voltage Supply provides up to 5000V for such applications.
The anode current of most photomultiplier tubes ranges from just pico-amps to 100µA. The picoammeter is commonly used as a readout because of its high sensitivity. The low input voltage drop (voltage burden) of such

4-20 SECTION 4
a picoammeter keeps the anode at virtually ground potential. Figure 4-23 illustrates a typical test configuration using a Model 6485 Picoammeter. If the PMT requires no more than 1000V, the 6517B Electrometer/Source would provide a convenient solution because it can measure the current as well as supply the voltage.
With this connection method, the picoammeter reads a negative current. Occasionally, the current must be measured as a positive value. In such cases, a simple re-arrangement and an additional power supply permit reading positive current. The configuration for measuring positive PMT current is shown in Figure 4-24. The picoammeter reads the current at the last dynode, which is equal to the anode current minus the current flowing to the previous dynode. In effect, a slight amount of PMT gain is sacrificed to make the measurement.
4-20 SECTION 4
FIGURE 4-23: Basic Photomultiplier Tube Connections
– +
R1
Photomultiplier Tube
Cathode AnodeDynodes
R2 R3 R4 R5 R6
Model 6485Picoammeter
HILO
FIGURE 4-24: Reading Positive PMT Current
Photomultiplier Tube
Cathode AnodeDynodes
Model 6485Picoammeter
HILO
– +

Applications 4-21
A PMT usually has a small amount of current flowing even when the cathode is not illuminated. This phenomenon is known as “dark current,” and is insignificant in most measurements. In other cases, it can either be subtracted from the reading by using the REL (zero) feature or simply canceled out by using built-in zero suppression if the instrument has this feature.
4.3.5 Ion Beam Measurements Overview
Ion beams are used in a variety of applications, such as with mass spec-trometers and ion implanters. Ion beam current is usually very small (<µA), so an electrometer or picoammeter is needed to make this mea-surement. This section describes how to make these measurements with a Model 6485 Picoammeter and a Model 6487 Picoammeter/Voltage Source. An electrometer can be substituted for greater current sensitivity.
Test Method
If the source of ions is biased off ground, then the ion collector will most likely be at ground potential. If this is the case, a simple coaxial vacuum feedthrough can be used to make connections from the collector to the picoammeter. Figure 4-25 shows a Model 6485 Picoammeter measuring the current from the ion collector, which is operating at ground potential.
However, if the source of ions is at ground potential, then the ion col-lector must be biased off ground. The Model 6485 Picoammeter can float off round by only 42V. Therefore, a picoammeter such as the Model 6487, which can float off ground up to 500V, must be used. Figure 4-26 is an example of the Model 6487 biased off ground and measuring an ion beam. The HI terminal of the picoammeter is connected to the ion collector via a triax vacuum feedthrough. The LO terminal of the picoammeter is biased
FIGURE 4-25: Ion Collector with Grounded BNC Receptacle
Ion Beam
BNC Vacuum Feedthrough(grounded to vacuum chamber wall)
HI
LO
Model 6485Picoammeter IM

4-22 SECTION 4
off ground by the voltage source. For safety reasons, a triaxial vacuum feedthrough should be used if the bias voltage is more than 42V. The Model 6487 can supply up to 500V of bias.
If a triaxial vacuum feedthrough is unavailable, a metal safety shield should be built around the isolated BNC connection (Figure 4-27). The metal safety shield is connected to ground. Floating input signals are dis-cussed in detail in Section 2.6.8.
If the bias voltage is less than 42V off ground, the isolated BNC vacuum feedthrough will not need a safety shield.
FIGURE 4-26: Ion Collector with Triax Receptacle
Ion Beam
Triax VacuumFeedthrough
Guard(if needed)
HI
LO
Model 6487Picoammeter/Source
IM
FIGURE 4-27: Ion Collector with BNC Receptacle
Ion Beam
Floating BNCVacuum
Feedthrough
Guard(if needed)
Grounded metal shield to protectagainst touching the BNC connector
HI
LO
Model 6487Picoammeter/Source
IM

Applications 4-23
After the connections are made, verify the system is working properly by turning the bias voltage on and taking a current measurement with no ion beam current. If there is significant current compared to the current to be measured, there must be a stray leakage path, which should be corrected.
Often, the beam current is plotted as a function of time. This can be done by using either the analog output of the picoammeter or the commu-nications interface to collect readings, then plotting them with a graphical programming software package (such as ExceLINX) or a spreadsheet.
4.3.6 Photoconductive Current of PIN Photodiode
Overview
A photodiode is a type of diode or photo detector that converts light into a current or voltage, depending on whether it is in the photovoltaic (zero-bi-as) or photoconductive (reverse-bias) mode. When the photodiode is in the reverse-bias mode, the output current is directly proportional to the light intensity applied to the photodiode junction. Consequently, photodiodes can be used to detect even very small quantities of light in a wide range of applications, including photography, light detectors, medical imaging instrumentation, and optical communications.
When the photodiode is reverse biased, the resulting current is a com-bination of the photocurrent (obtained with light) and the dark current (no light). The photocurrent is typically constant as a function of the applied voltage. However, the dark current is a small leakage current induced by an applied voltage. The dark current is a thermally activated leakage of the PN junction and is often measured as a function of temperature. The photocurrent and dark current measurements can be made with an SMU instrument that can sweep voltage and measure current over a wide range.
Applications 4-23
FIGURE 4-28: Low Current SourceMeter SMU Instrument Connected to Perform I-V Characterization of a Photodiode
IM
Force HI
Force LO
PhotodiodeModel2635B SystemSourceMeter

4-24 SECTION 4
Test Configuration
Figure 4-28 shows a Model 2635B System SourceMeter SMU Instrument connected to measure the photocurrent of a reverse-biased photodiode. This instrument can sweep the voltage and measure the current with <1fA resolution. It can also measure the forward bias I-V characteristics of the photodiode. In that case, make Kelvin connections to the DUT to prevent unwanted voltage drops from affecting measurement accuracy.
Figure 4-29 illustrates the results of measuring the reverse-bias current of a PIN silicon photodiode using the Model 2635B. In this example, the I-V curves were generated at different low levels of light intensity (L1–L3).
FIGURE 4-29: Photoconductive Current vs. Reverse Bias Voltage of PIN Photodiode at Different Light Intensities (L) Measured by the Model 2635B
1.0E–09
5.0E–10
0.0E–00
–5.0E–10
–1.0E–09
–1.5E–09
Cur
rent
(Am
ps)
Voltage (Volts)
L1 < L2 < L3
L1
L2
L3
–2.0 –1.5 –1.0 –0.5 0.0 0.5
4.3.7 Avalanche Photodiode Reverse Bias Current MeasurementsOverview
An avalanche photodiode (APD) is a high sensitivity, high speed photo-diode that has an internal gain mechanism activated by applying a reverse voltage. The gain of the APD can be controlled by the magnitude of the reverse bias voltage. A larger reverse bias voltage results in a larger gain. APDs are operated with an electric field strength such that an avalanche multiplication of photocurrent occurs similar to a chain reaction. APDs are used in a variety of applications requiring high sensitivity to light such as fiberoptic communications and scintillation detectors.
Common electrical measurements of APDs typically include the break-down voltage, responsivity, and reversed bias current measurements. The

Applications 4-25
maximum current rating for a typical APD is 10–4 to 10–2A, while the dark current can be as low as the 10–12 to 10–13A range. The maximum reverse bias voltage will vary, depending on the material of the APD, but can be up to 100V for InGaAs APDs or up to 500V for Si devices.
Test Description
Measuring the reverse bias current of an APD requires an instrument that can measure current over a wide range as well as output a voltage sweep. Because of these requirements, instruments such as the Model 6487 Picoammeter/Voltage Source or the Model 6430 Sub-Femtoamp Source-Meter SMU Instrument are ideal for these measurements.
FIGURE 4-30: APD Connected to a Model 6430 Sub-Femtoamp Remote SourceMeter SMU Instrument
IM
HI
LO
APD
Model 6430 Sub-femtoamp SourceMeter
ShieldedBox
FIGURE 4-31: Current vs. Reverse Voltage Sweep of an InGaAs APD Measured by the Model 6430
1.0E–4
1.0E–5
1.0E–6
1.0E–7
1.0E–8
1.0E–9
1.0E–10
1.0E–11
1.0E–12
Cur
rent
(A)
Voltage (V)
0 10 20 30 40 50 60
Avalanche
Breakdown

4-26 SECTION 4
Figure 4-30 shows a Model 6430 connected to a photodiode. The photodiode is placed in an electrically shielded dark box. To shield the sensitive current measurements from electrostatic interference, connect the box to the LO terminal of the Model 6430.
Figure 4-31 shows a current vs. reverse voltage sweep of an InGaAs APD, generated by the Model 6430 SourceMeter SMU Instrument. Note the wide range of current measurements. The avalanche region becomes more pronounced with increasing light. The breakdown voltage will cause the current to flow freely since electron-hole pairs will form without the need for light striking the diode to generate current.
4.3.8 Current-Voltage Characterization of Carbon Nanotube (CNT) FETs
Overview
Carbon nanotube transistors (CNTs) have been the subject of much sci-entific research in recent years, due not only to their small size but their remarkable electronic and mechanical properties and wide range of poten-tial applications. In particular, researchers are studying CNT-based devices, such as CNT FETs, for possible use in applications such as sensors, transis-tors, memory devices, etc. Characterizing the electrical properties of deli-cate nanoelectronic devices requires instruments and measurement tech-niques optimized for low power levels and high measurement sensitivity.
Test Configuration
CNT FETs are three-terminal devices and require two or three SMU instru-ments for I-V characterization. Figure 4-32 shows a typical test configu-
FIGURE 4-32: Circuit for Measuring the DC I-V Characteristics of a CNT FET
Model 4200-SCSSMU1Sweeps VG
Ground Unit orSMU3(if required)
IM
IM
SourceCNT
Drain
Si Gate
SiO2
Model 4200-SCS SMU2Constant Bias VD
Measures ID

Applications 4-27
ration for generating an ID-VG curve. In this setup, two SMU instruments in a Model 4200-SCS Parameter Analyzer are connected to the Gate and Drain terminals of a CNT FET. The Source terminal is either connected to a third SMU instrument or to the Ground Unit. For the drain current vs. gate voltage test, SMU1 sweeps the gate voltage (VG) and SMU2 outputs a constant DC drain voltage (VD) and measures the resulting drain current (ID). This configuration allows obtaining a DC I-V drain family of curves easily by changing the function of SMU1 to step the gate voltage and SMU2 to sweep the drain voltage and measure the drain current.
Figure 4-33 is an ID-VG plot of a CNT FET. In this curve, the drain voltage was set to a constant 2V. The SMU instruments with preamps in this system allow measuring current over a wide range from 100mA down to 100aA resolution.
To prevent damage to the device while performing I-V characteriza-tion, it’s important to limit the amount of current that can flow through the device, which can be done by adjusting the source limit (compliance) on the SMU instrument.
When measuring low current on CNT FETs, a variety of sources can generate noise, including particle collisions, defects, AC pickup, and elec-trostatic interference. Always use shielding techniques and the appropriate line cycle integration time to minimize noise.
Make sure the probes are in the up position (not in contact with the device) when connecting and disconnecting instruments from the termi-nals of the device. The process of moving cables has the potential to inject charge into the device and cause damage.
FIGURE 4-33: Drain Current vs. Gate Voltage of CNT FET Measured with a Model 4200-SCS Parameter Analyzer
100E–6
10E–6
1E–9
100E–9
100E–9
1E–12 –10 –8 –6 –4 –2 0 2 4 6 8 10
Dra
in C
urre
nt (
Amps
)
Gate Voltage (Volts)
Note: the CNT FET sample was supplied by Sandia National Labs, Livermore, California.
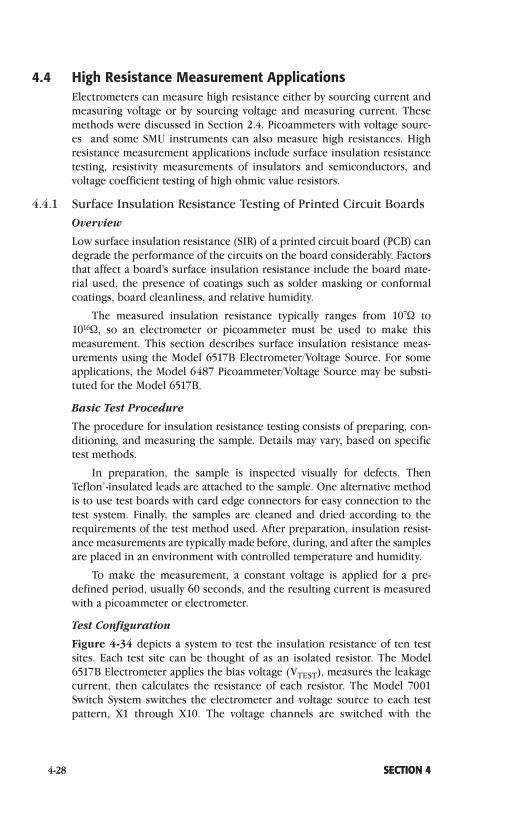
4-28 SECTION 4
4.4 High Resistance Measurement ApplicationsElectrometers can measure high resistance either by sourcing current and measuring voltage or by sourcing voltage and measuring current. These methods were discussed in Section 2.4. Picoammeters with voltage sourc-es and some SMU instruments can also measure high resistances. High resistance measurement applications include surface insulation resistance testing, resistivity measurements of insulators and semiconductors, and voltage coefficient testing of high ohmic value resistors.
4.4.1 Surface Insulation Resistance Testing of Printed Circuit Boards Overview
Low surface insulation resistance (SIR) of a printed circuit board (PCB) can degrade the performance of the circuits on the board considerably. Factors that affect a board’s surface insulation resistance include the board mate-rial used, the presence of coatings such as solder masking or conformal coatings, board cleanliness, and relative humidity.
The measured insulation resistance typically ranges from 107W to 1016W, so an electrometer or picoammeter must be used to make this measurement. This section describes surface insulation resistance meas-urements using the Model 6517B Electrometer/Voltage Source. For some applications, the Model 6487 Picoammeter/Voltage Source may be substi-tuted for the Model 6517B.
Basic Test Procedure
The procedure for insulation resistance testing consists of preparing, con-ditioning, and measuring the sample. Details may vary, based on specific test methods.
In preparation, the sample is inspected visually for defects. Then Teflon®-insulated leads are attached to the sample. One alternative method is to use test boards with card edge connectors for easy connection to the test system. Finally, the samples are cleaned and dried according to the requirements of the test method used. After preparation, insulation resist-ance measurements are typically made before, during, and after the samples are placed in an environment with controlled temperature and humidity.
To make the measurement, a constant voltage is applied for a pre-defined period, usually 60 seconds, and the resulting current is measured with a picoammeter or electrometer.
Test Configuration
Figure 4-34 depicts a system to test the insulation resistance of ten test sites. Each test site can be thought of as an isolated resistor. The Model 6517B Electrometer applies the bias voltage (VTEST), measures the leakage current, then calculates the resistance of each resistor. The Model 7001 Switch System switches the electrometer and voltage source to each test pattern, X1 through X10. The voltage channels are switched with the
4-28 SECTION 4

Applications 4-29
Model 7111-S 40-Channel Form C Switch Card, while the current channels are switched with the Model 7158 Low Current Scanner Card. Note that the maximum source voltage is limited to 110V when using the Model 7111-S Card.
To measure X1, Channel 1 on the 7111-S Card and Channel 1 on the 7158 Card are closed. This will bias the X1 resistor and, after a specified “soak” time, the resulting current is measured. To measure the X2 resistor, Channel 1 on both the 7111-S and 7158 cards is opened, and Channel 2 on both cards is closed. Again, the current is measured after the desired soak time.
The resistors (RL) are current limiting resistors used to protect the switches and electrometer from high current. These resistor values should be such that the voltage drop at the maximum measured current will not affect measurement accuracy.
Note that when a channel is opened, the corresponding resistor termi-nal is connected to circuit LO. This allows any charge across the resistance to be discharged to circuit LO when the resistance is not being measured.
Even though the system described here measures just ten test sites, it can be expanded easily to test more sites by adding scanner cards and substituting the Model 7002 Scanner Mainframe, which can control up to ten scanner cards, for the Model 7001.
FIGURE 4-34: SIR Test System to Measure Ten Test Sites
RLX10
RLX2
RLX1
VTEST
1
2
10
1
2
10
Card 1Model 7111-SForm C Switch Card
Card 2Model 7158Low Current Card
HI
LO
X1 through X10 are SIRTest Sites and may allbe on one PCB.
IM
Model 6517B Electrometer/Voltage Source or Model 6487 Picoammeter/Voltage Source

4-30 SECTION 4
4.4.2 Resistivity Measurements of Insulating Materials Overview
Resistivity is determined by measuring resistance, then converting to sur-face or volume resistivity by taking geometric considerations into account. The ideal way to measure the resistance of an insulating material is to apply a known potential to the sample and measure the resulting current with an electrometer or picoammeter. To account for the sample’s geometry, electrodes with convenient dimensions should be used, such as Keithley’s Model 8009 Resistivity Chamber. The electrodes follow the ASTM Standard D257 entitled “DC Resistance or Conductance of Insulating Materials.” This section details how to make surface and volume resistivity measurements with these test fixtures, as well as the Alternating Polarity and Alternating Voltage techniques for measuring resistivity.
Volume Resistivity Measurements
Volume resistivity is a measure of the leakage current directly through a material. It is defined as the electrical resistance through a one-centimeter cube of insulating material and is expressed in ohm-centimeters. When meas uring the volume resistivity, the test sample is placed between two electrodes and a potential difference is applied between them. The result-ing current is distributed through the volume of the test sample and is meas ured using a picoammeter or electrometer. The resistivity is calculated from the geometry of the electrodes and the thickness of the sample:
KV V r = ___ · ___ t I
where: r = volume resistivity (ohm-cm)
KV = test cell constant for volume resistivity based on cell geome-try (cm2)
V = applied voltage (volts)
I = measured current (amperes)
t = sample thickness (cm)
Figure 4-35 depicts a measurement configuration that complies with ASTM D257 for volume resistivity measurements. In this circuit, the HI of the ammeter is placed on the bottom electrode and the HI of the voltage source to the top electrode. The LO of the ammeter and the LO of the source are connected together. The bottom outside electrode is connected to guard (LO of the ammeter) to prevent surface leakage currents from being added into the measurement.
Surface Resistivity Measurements
Surface resistivity is defined as the electrical resistance of the surface of a material and is expressed in ohms (usually referred to as ohms per square). It is measured by placing two electrodes on the surface of the test sample,
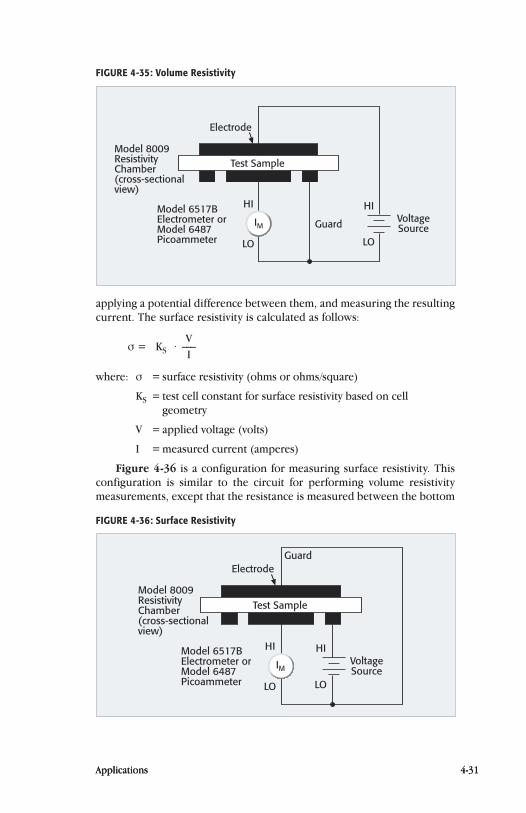
Applications 4-31
applying a potential difference between them, and measuring the resulting current. The surface resistivity is calculated as follows:
V s = KS · ___ I
where: s = surface resistivity (ohms or ohms/square)
KS = test cell constant for surface resistivity based on cell geometry
V = applied voltage (volts)
I = measured current (amperes)
Figure 4-36 is a configuration for measuring surface resistivity. This configuration is similar to the circuit for performing volume resistivity meas urements, except that the resistance is measured between the bottom
Applications 4-31
FIGURE 4-35: Volume Resistivity
Test Sample
HI
LO
Guard VoltageSource
HI
LO
Electrode
IM
Model 8009ResistivityChamber(cross-sectionalview)
Model 6517BElectrometer orModel 6487Picoammeter
FIGURE 4-36: Surface Resistivity
Test Sample
Guard
VoltageSource
Electrode
HI
LO
HI
LO
IM
Model 8009ResistivityChamber(cross-sectionalview)
Model 6517BElectrometer orModel 6487Picoammeter

4-32 SECTION 4
two electrodes. Note the top electrode is guarded, so that only current flowing across the insulator is measured by the picoammeter.
Test Parameters
Several factors can affect volume and surface resistivity measurements of insulators. First, these measurements are functions of the applied voltage. Sometimes, the voltage is varied intentionally to determine an insulator’s voltage dependency. To illustrate the voltage dependency of resistivity measurements, the Model 6517B Electrometer/Voltage Source was used to measure the resistivity of a Bakelite® plastic sample at four test voltages: 25V, 50V, 100V, and 200V. Figure 4-37 shows the results of these resistivity measurements as a function of time. Notice how, in this example, the resis-tivity decreases as the voltage increases.
The resistivity of insulators also varies as a function of the electrifi-cation time. The longer the voltage is applied, the lower the measured current (and the higher the resistivity) becomes because the material continues to charge exponentially. This time dependency is illustrated in Figure 4-38. In this example, a constant DC bias was applied to a Bakelite plastic sample and the resistivity as a function of time was measured with the Model 6517B Electrometer/Voltage Source. At time t=10s, the resistivity (r) was 3.23E+12 W-cm. However, at t=60s, the resistivity was 3.54E+12 W-cm. This is a difference of about 10%. When comparing samples, it is always important to use the same electrification time.
4-32 SECTION 4
FIGURE 4-37: Voltage Dependency of Volume Resistivity Measurements of Bakelite Sample Measured with Model 6517B
25V
50V
100V
200V
1.10E+11
1.05E+11
1.00E+11
9.50E+10
9.00E+10
8.50E+10
8.00E+10
7.50E+10
7.00E+10
6.50E+10
6.00E+10 0 10 20 30 40 50 60
Resi
stiv
ity (
Ohm
-cm
)
Time (Seconds)

Applications 4-33
Humidity greatly affects the results of surface resistivity measurements and, to a lesser degree, volume resistivity measurements, as well. Moisture will cause the surface resistivity measurements to be lower than normal.
To make accurate comparisons between specific tests, the applied voltage, electrification time, and environmental conditions should be kept constant from one test to the next.
Using the Model 8009 Resistivity Chamber
No sample preparation is necessary when using the Model 8009 Resistivity Chamber. This fixture ensures a standardized electrode configuration, eliminating the need to paint electrodes on the sample. The recommended sample size for using this test fixture is 2.5–4 inches in diameter and up to 0.125 inch thick.
Some extremely rigid samples, such as glass epoxy and ceramics, require an interface between stainless steel electrodes and the sample sur-face. The Model 8009 includes conductive rubber for the top and bottom electrodes to enhance surface contact between the sample and the fixture. Care must be taken because the electrode area becomes the area of the contact medium. If it is not the same configuration and size as the elec-trodes, the conversion constants furnished with the system may be invalid.
The Model 8009 employs a safety interlock to prevent the high voltage from being applied to the electrode until the test fixture lid is closed. This fixture also shields the sample from electrostatic interference.
Applications 4-33
FIGURE 4-38: Resistivity vs. Time of Bakelite Plastic Sample at Constant DC Bias Measured with the Model 6517B
3.8E+12
3.6E+12
3.4E+12
3.2E+12
3.0E+12
2.8E+12
2.6E+12
2.4E+12
2.2E+12
2.0E+12 0 10 20 30 40 50 60
Resi
stiv
ity (
Ohm
-cm
)
Time (Seconds)
At t = 60s, ρ = 3.54E+12
At t = 10s,ρ = 3.23E+12

4-34 SECTION 4
Offset Correction Techniques
When measuring materials with very high resistivity, background currents may cause measurement errors. Background currents may be due to charge stored in the material (dielectric absorption), static or triboelectric charge, or piezoelectric effects. Background currents can be equal to or greater than the current stimulated by the applied voltage. If the background cur-rent is the same polarity as the measured current, the resultant measured current value will be much higher than the true value. If the background current is the opposite polarity, these unwanted currents could cause a reverse polarity current reading. That is, the current polarity is opposite the polarity of the applied voltage, so the calculated resistance will be neg-ative. To counter these problems, the Alternating Polarity and Alternating Voltage Methods can virtually eliminate the effects of background currents in the sample.
Alternating Polarity Method
The Alternating Polarity Method applies a bias voltage of positive polarity, then the current is measured after a specified delay. Next, the polarity is reversed and the current is measured again, using the same delay. The polarity reversal process can be repeated any number of times. The resist-ance is calculated based on a weighted average of the most recent current measurements.
The Model 6517B Electrometer has the Alternating Polarity Method built into a test sequence. With this method, the user enters the test volt-age, measurement time and the number of iterations. The final resistance value is calculated and stored in memory.
Alternating Voltage Method
The Model 6487 Picoammeter/Voltage Source offers a built-in alternating voltage ohms mode, which consists of taking two current measurements—one at a user-specified test voltage and one at 0V. By determining the current difference that results from the step voltage, this mode allows for nulling out the effects of background current.
4.4.3 Resistivity Measurements of Semiconductors
Overview
Semiconductor materials may have high resistivities depending on the level of doping. Several factors can complicate measuring the resistivity of these materials, including problems in making good contact with the material. Special probes have been designed for making resistivity measurements on semiconductor wafers and bars. These probes typically use a hard metal such as tungsten, which is ground to a sharp point. Contact resistance is very high in these cases, so either a four-point collinear probe or four iso-lated probes should be used. While two contacts supply a constant current, the other two contacts measure the voltage drop across a portion of the
4-34 SECTION 4

Applications 4-35
sample. The resistivity can be calculated by applying geometrical factors to the measured resistance.
These measurements may seem straightforward, but certain precau-tions should be observed. Good shielding of the contacts and electrical leads is important for three reasons:
1. The circuit involves high impedance, so it’s susceptible to electrostatic interference.
2. The contact points on the semiconductor material can cause a diode action and, thus, rectify any pickup and display it as a DC offset.
3. The material is usually sensitive to light.
The following paragraphs discuss measuring semiconductor resistivity using both the four-point collinear probe and van der Pauw techniques.
Four-Point Probe Technique
The four-point collinear probe resistivity measurement technique involves bringing four equally spaced probes in contact with the material of unknown resistance. The probe array is placed in the center of the materi-al. Figure 4-39 is a diagram of this technique.
A known current is passed through the two outside probes and the voltage is sensed at the two inside probes. The resistivity is calculated as follows:
π V r = ____ × ___ × t × k ln2 I
where: V = the measured voltage (volts)
I = the source current (amps)
t = the wafer thickness (cm)
k = a correction factor based on the ratio of the probe to wafer diameter and on the ratio of wafer thickness to probe separation
As shown in Figure 4-40, a more realistic circuit would include a contact or spreading resistance at each probe (r1 through r4), the finite resist ance from LO to earth ground of both the current source (RC) and the voltmeter (RV), and the input resistance of the voltmeter (RIN). Depending upon the material, the contact resistance (r) may be as much as 300 times or more than the measured resistance (R2). This requires the current source to have considerably higher compliance voltage than might be expected and the voltmeter must have a much higher input resistance.
The current source is not completely isolated from earth ground, so as the sample resistance increases, it becomes increasingly necessary to use a differential electrometer. The problem exists because the sample may have a very high resistance (108W or higher), which is of the same order of magnitude as the isolation (Input LO to chassis, RV) of the electrometer
Applications 4-35

4-36 SECTION 4
voltmeter. As shown in Figure 4-40, an AC current will flow from the LO terminal of the current source through the sample and to the voltmeter’s LO terminal, then back to ground. The resulting voltage drop across r3 will cause erroneous results when the voltmeter measures the voltage drop between probes 2 and 3.
4-36 SECTION 4
FIGURE 4-39: Four-Point Collinear Probe Method of Measuring Resistivity
VM
Semiconductor Wafer
4-PointProbe
LOHI
1 2 3 4
LOHI
FIGURE 4-40: Realistic Circuit of the Four-Point Collinear Probe Method
R1 R2 R3
r1 r2 r3 r4
RIN
1 2 3 4
AC
AC
RV
RC
Common-ModeCurrent
LO
Voltmeter
VM
HI
LOHI
Current Source
I
r1 – r4 = Contact resistance
R1 – R3 = Material resistance between probes

Applications 4-37
Using two electrometers eliminates this problem, as shown in Figure 4-41. The voltmeter will read the difference between the two electrome-ters’ buffer outputs, which is equal to the voltage across R2. The values (r1, r2, r3, and r4) represent the resistance due to the probe in contact with the material. The unity-gain buffers have very high input impedance, so little common-mode current will flow through r3 and the value of R2 can be calculated easily. The buffers can be a pair of JFET op amps or two elec-trometers with unity-gain outputs.
To avoid leakage currents, use either isolated or guarded probes to make contact with the sample. The current source should be in the guard-ed mode. See Section 2.2.1 for a more detailed discussion of guarding.
van der Pauw Technique
The van der Pauw technique for measuring resistivity also employs a con-stant-current method. This method is particularly useful for measuring very small samples because the dimensions of the sample and the spacing of the contacts are unimportant. This technique uses four isolated contacts on the boundary of a flat, arbitrarily shaped sample. Eight measurements are made around the sample, as illustrated in Figure 4-42.
Two values of resistivity, rA and rB, are then computed as follows:
π (V2 + V4 – V1 – V3) rA = ____ fAts
_____________________ ln2 4I
Applications 4-37
FIGURE 4-41: Making Differential Four-Point Probe Measurements
R1 R2 R3
×1Buffer
×1Buffer
r1 r2 r3 r4
1 2 3 4
HI LO
Voltmeter
VM
HI LO
HI LOLO HI

4-38 SECTION 44-38 SECTION 4
FIGURE 4-42: van der Pauw Resistivity Measurement Conventions
1 2
V1
1 2
4 3
V2
1 2
4 3
V4
1 2
4 3
V3
1 2
4 3
1 2
4 3
1 2
4 3
1 2
4 3
V8
4 3
V7
V5 V6

Applications 4-39Applications 4-39
π (V6 + V8 – V5 – V7) rB = ____ fBts
_____________________ ln2 4I
where: rA and rB are resistivities in ohm-cm;
ts is the sample thickness in cm;
V1–V8 represent the voltages measured by the voltmeter;
I is the current through the sample in amperes;
fA and fB are geometrical factors based on sample symmetry, and are related to the two voltage ratios QA and QB as shown in the following equations (fA = fB = 1 for perfect symmetry).
QA and QB can be calculated using the measured voltages as follows:
V2 – V1 QA = ________ V4 – V3
V6 – V5 QB = ________ V8 – V7
Also, Q and f are related as follows:
Q – 1 f e0.693/f _______ = _______ arc cosh _______ Q + 1 0.693 ( 2 )
A plot of this function is shown in Figure 4-43. The value of f can be found from this plot once Q has been determined.
FIGURE 4-43: Plot of f vs. Q
101 1000.4
0.5
0.6
0.7
0.8
0.9
1.0
Q
f

4-40 SECTION 44-40 SECTION 4
Note that if rA and rB are not within 10% of one another, the sample is not sufficiently uniform to determine resistivity accurately, and should be discarded.
Once rA and rB are known, the average resistivity (rAVG) can be deter-mined as follows:
rA + rB rAVG = _________ 2
As with the four-point collinear probe method, a differential measure-ment may be required if the sample resistance is of the same magnitude as the isolation (meter common to ground) of the voltmeter. As Figure 4-44a shows, common-mode current may flow between terminals 4 and 3 of the sample. Figure 4-44b illustrates how this problem can be resolved
FIGURE 4-44a: Erroneous Measurements Caused by Common-Mode Problems
VM
1 2
4 3
Model 6220Current Source
AC AC
Model 6514Electrometer
I common mode
HI
LO
HI
LO
Isolation (Input LO to chassis)1010Ω, 500pF
FIGURE 4-44b: Eliminating Common-Mode Errors with a Differential Measurement
DMM
1 2
4 3
Model 6220Current Source
AC
HI HI
LO
×1
×1
LO
LO
LO

Applications 4-41Applications 4-41
by using unity-gain buffers and a differential measurement. Now, very little common-mode current flows between terminals 4 and 3.
The system shown in Figure 4-45 employs the Keithley Model 7065 Hall Effect Card to make van der Pauw measurements. The system includes the following instruments: Model 7065 Hall Card, Model 2000 DMM, Model 6220 Current Source, Model 6485 Picoammeter, and Model 7001 Switch System. The current source and voltmeter are automatically switched to all sides of the sample using the Hall Effect Card. This elimi-nates the need to connect and disconnect the leads four times. Also, the card has built-in unity-gain buffers, so differential measurements can be made easily on high resistivity samples. With the addition of a controlled magnetic field, this system can also be used to determine the Hall coeffi-cient of the sample.
The Model 4200-SCS Parameter Analyzer can meas ure resistivity using either the four-point collinear probe or van der Pauw methods. Testing high resistance samples requires the use of voltmeters with very high input
FIGURE 4-45: van der Pauw Measurement System
1
3
4 2
+
–
+
–
+
–
+
–
Model 2000 DMM orModel 2182A Nanovoltmeter
HI
LOModel 6485Picoammeter
HI
LO
Model7065Card
Sample
LO R
HI R
LO R
HI R
LO R
HI R
LO R
HI R
3 4 5Buffers
Used forbar typesamples
LOHI
1 2
Model 6220Current Source
HI
LO
Columns
1
2
3
4
Rows
×1
×1
×1
×1

4-42 SECTION 4
FIGURE 4-46: Model 4200-SCS SMU Configurations for van der Pauw Measurements
4 3
1 2
Current Bias (+) Voltmeter
Common Voltmeter
4 3
1 2
Current Bias (–) Voltmeter
Common Voltmeter
ITM NAME:I1_V23
4 3
1 2
Voltmeter Voltmeter
Current Bias (+) Common
V12
4 3
1 2
Voltmeter Voltmeter
Current Bias (–) Common
V12
ITM NAME:I4_V12
4 3
1 2
Voltmeter Common
Voltmeter Current Bias (+)
V414 3
1 2
Voltmeter Common
Voltmeter Current Bias (–)
ITM NAME:I3_V41
4 3
1 2
Common Current Bias (+)
Voltmeter VoltmeterV34
4 3
1 2
Common Current Bias (–)
Voltmeter VoltmeterV34
ITM NAME:I2_V34
V41
V23 V23
SMU3
SMU2
SMU4
SMU1
SMU3
SMU2
SMU4
SMU1
SMU3
SMU2
SMU4
SMU1
SMU3
SMU2
SMU4
SMU1
SMU3
SMU2
SMU4
SMU1
SMU3
SMU2
SMU4
SMU1
SMU3
SMU2
SMU4
SMU1
SMU3
SMU2
SMU4
SMU1

Applications 4-434-43 SECTION 4
impedance (>1014W) and a current source that can output very small cur-rent (<1nA) and which has high output impedance. The Model 4200-SCS is suitable for this application because it can be configured with multiple SMU instruments that have high input impedance (>1016W) and accurate low current sourcing.
A Model 4200-SCS configured with four SMU instruments and four preamps can be used to make van der Pauw resistivity measurements. One SMU instrument is connected to each terminal of the sample, as shown in Figure 4-46. Interactive Test Modules (ITMs) are used to control the func-tions of the SMU instruments.
Through interactive programming, the function of each SMU instru-ment can change automatically from a current source, voltmeter, or com-mon in order to source current and meas ure voltage around all sides of the sample. Changing the function of each SMU instrument interactively makes it unnecessary to use external switches to switch the current source and voltmeter to all terminals of the sample.
Keithley’s Model 4200-SCS application for measuring van der Pauw resist ivity is included with the Model 4200-SCS. Figure 4-47 is a screen cap-ture from that application. In this example, SMU1 is configured as a common, SMU2 as a current bias, and SMU3 and SMU4 are configured as voltmeters.
An electromagnet can be used with the Model 4200-SCS for determin-ing Hall coefficient.
FIGURE 4-47: Screen Capture of van der Pauw Resistivity Application on Model 4200-SCS

4-44 SECTION 4
4.4.4 Voltage Coefficient Testing of High Ohmic Value Resistors
Overview
Very high ohmic value resistors may exhibit a significant change in resist-ance with a change in applied voltage. This effect is known as the voltage coefficient. The voltage coefficient is the percent change in resistance per unit change in applied voltage and is defined as follows:
(R2 – R1) 1 Voltage Coefficient (%/V) = __________ × __________ × 100% R1 (V2 – V1)
Alternately, the voltage coefficient may be expressed in ppm as follows:
(R2 – R1) 1 Voltage Coefficient (ppm/V) = __________ × __________ × 106 R1 (V2 – V1)
where: R1 = resistance calculated with first applied voltage (V1).
R2 = resistance calculated with second applied voltage (V2).
V2 > V1
A typical voltage coefficient for a 10GW resistor can be about –0.008%/V or –80ppm/V. Thus, if a high resistance is required in a measurement circuit, the error analysis must account for the error due to the voltage coefficient of the resistor, in addition to all other time and temperature error factors.
Using the Model 6517B to Determine Voltage Coefficient
Measuring the voltage coefficient of a high resistance requires sourcing a voltage and measuring a low current. An electrometer, such as the Model 6517B, is required to make this measurement. The Model 6517B has a built-in test sequence for determining voltage coefficient. This test makes resist ance measurements at two different voltage levels, then calculates the voltage coefficient. The voltage coefficient is displayed as a percent change in resistance per volt.
Figure 4-48 is a typical test configuration for voltage coefficient meas-urements with the 6517B. To minimize noise and leakage resistance, the resistor should be placed in a shielded, guarded test fixture. Connect the shield of the test fixture to the LO of the electrometer and connect the LO of the electrometer to the LO of the source. Connect the HI terminal of the electrometer to one end of the resistor and the HI of the voltage source to the other end.
The resistor is first measured with test voltage V1, giving R1. Next, it is measured with test voltage V2 (where V2 is greater than V1), giving R2. The voltage coefficient for the resistor is then calculated using the equation given in the overview.
Applications 4-44

Applications 4-45
4.5 Charge Measurement Applications The coulombmeter and the techniques used to make charge measurements were described in Sections 1 and 2 respectively. Charge measurements include applications such as measuring capacitance and static charge on objects. As discussed in Section 2.3.8, charge measurement techniques can also be used to measure very low currents (<10fA).
4.5.1 Capacitance Measurements Overview
The coulombs function of an electrometer can be used with a step voltage source to measure capacitance. This technique is especially useful for testing cables and connectors because it can measure capacitances ranging from <10pF to hundreds of nanofarads. The unknown capacitance is con-nected in series with the electrometer input and the step voltage source. The calculation of the capacitance is based on this equation:
Q C = ___ V
Test Method
The basic configuration for measuring capacitance with a Model 6517B Electrometer is shown in Figure 4-49. The instrument is used in the charge (or coulombs) mode and its internal voltage source provides the step voltage. Just before the voltage source is turned on, disable the meter’s zero check and suppress the charge reading by using the REL function to zero the display. Then, turn on the voltage source and note the charge reading immediately. The capacitance is calculated from:
Q2 – Q1 C = _________ V2 – V1
where: Q2 = final charge Q1 = initial charge assumed to be zero V2 = step voltage V1 = initial voltage assumed to be zero
FIGURE 4-48: Connecting the Model 6517B Electrometer for Voltage Coefficient Testing
R
HI
LO
HI
LO
Model 6517BVoltageSource
Model 6517BElectrometerIM

4-46 SECTION 44-46 SECTION 4
After the reading has been recorded, reset the voltage source to 0V to dissipate the charge from the device. Before handling the device, verify the capacitance has been discharged to a safe level.
The unknown capacitance should be in a shielded test fixture. The shield is connected to the LO input terminal of the electrometer. The HI input terminal should be connected to the highest impedance terminal of the unknown capacitance. For example, when measuring the capacitance of a length of coaxial cable, connect the HI terminal of the electrometer to the center conductor of the cable, allowing the cable shield to minimize electrostatic interference to the measurement.
If the rate of charge is too great, the resulting measurement will be in error because the input stage becomes temporarily saturated. To limit the rate of charge transfer at the input of the electrometer, add a resistor in series between the voltage source and the capacitance. This is espe-cially true for capacitance values >1nF. A typical series resistor would be 10kW to 1MW.
4.5.2 Using a Faraday Cup to Measure Static Charge on Objects
Overview
Insulators permit only a slight motion of electrons; therefore, electrostat-ic charges can build up on a material and create hazards. The problem generally is not the static charge itself on the object, but rather the spark generated when the object discharges. Therefore, in order to understand and control these problems, it’s necessary to measure the static electricity on an object. This can be done by placing the object in a Faraday cup and meas uring the charge with an electrometer. The Faraday cup method can be used to measure the charge on a wide range of substances and objects, such as plastics, films, liquids, gases, and electronic components.
A Faraday cup (sometimes called a Faraday cage or icepail) is an enclo-sure made of sheet metal or conductive mesh. The electric field within a closed, empty conductor is zero, so the cup shields the object placed inside
FIGURE 4-49: Capacitance Measurement Using Model 6517B Electrometer
V2Model 6517BVoltageSource
Model 6517Bin Coulombs
Mode
HI
LO
C
V1Step
Voltage
Q

Applications 4-47
it from any atmospheric or stray electric fields. This allows measuring the charge on the object accurately.
Description of a Faraday Cup
Figure 4-50 illustrates a Faraday cup. It consists of two electrodes, one inside the other, separated by an insulator. The inside electrode is con-nected to the electrometer HI and the outside electrode is connected to the electrometer LO. When a charged object is placed within the inside electrode, an induced charge will flow into the electrometer.
FIGURE 4-50: Faraday Cup
To ElectrometerOutside Electrode
Inside Electrode
Support Insulator
A Faraday cup can have virtually any dimensions, depending on the size and shape of the object to be tested. Cylindrical and spherical shapes are typically the most convenient choices—simple metal containers like paint cans are often used. The electrodes can be made of any conductive material. The support insulators should be made of materials with very high resistance, such as Teflon® or ceramic.
For convenience in making connections, mount a BNC connector on the outside electrode. Connect the outer or shield connection of the BNC connector to the outside electrode, then connect the inner conductor of the BNC connector to the inside electrode. Use an adapter to connect the BNC connector to the triax input of the electrometer.
Test Procedure
To perform the test, connect an electrometer to the Faraday cup using a shielded cable. Turn on the electrometer, select the coulombs function, then disable “Zero Check.” Press “Rel” to zero the display. Drop the charged object to be tested into the Faraday cup. Note the charge reading on the electrometer immediately; don’t wait for the reading to settle because the input bias current of the electrometer will continue charging the input of the meter. This is particularly important when the unknown charge is at the pico-coulomb level. If the object is conductive, it will be discharged as soon as it touches the electrode. Enable “Zero Check” to re-zero the meter in preparation for the next measurement.
Applications 4-47
4-48 SECTION 4
4.6 Low Voltage Measurement Applications
Nanovoltmeters and techniques for measuring low voltage were described in Sections 1 and 3 respectively. In particular, Section 3.2 discussed a num-ber of error sources that can seriously affect precision measurements. Low voltage measurement applications include standard cell comparisons, high resolution temperature measurements, and microcalorimetry, and Hall voltage measurements.
4.6.1 Standard Cell Comparisons
Overview
Standard cells are electrochemical cells used as voltage references in many electrical standards laboratories. If cared for properly, standard cells are very stable. The voltage of the individual cell is determined by calculating the present value, based on a series of measured cell differences, from an accepted reference.
Because individual cells may differ by only a few microvolts, making accurate measurements requires using a nanovoltmeter and low voltage measurement techniques. This application describes comparing two stan-dard cells and comparing a standard cell with a precision voltage reference.
Comparing Two Standard Cells
Standard cell intercomparisons require measuring the potential difference between a reference and an unknown standard cell. All cell differences are determined in a series opposition configuration. As shown in Figure 4-51, the negative terminals of the standard cells, V1 and V2, are connected. Copper conductors connect the cells to the voltmeter to minimize errors due to thermoelectric EMFs (VEMF).
Once the measurement connections are made, take care to avoid errors due to thermally generated potentials. To minimize the effects of thermo-electric EMFs, a second measurement is taken with the cells reversed, as shown in Figure 4-52. The small voltage difference is calculated by averag-ing the absolute values of the two readings, as discussed in Section 3.2.2.
Throughout the entire intercomparison process, it’s desirable to estab-lish the stability of a measured cell difference by calculating a standard deviation across several redundant readings.
Once stability is achieved, the voltage for each cell is calculated based on the group mean. Several readings are usually averaged for each comparison. This process of intercomparing cells is repeated at intervals established by the standards laboratory. The results can be plotted and compared over time. This process is useful for maintaining fewer than six cells. If more cells must be maintained, an automated scanner with com-puter control can be used to manage them more effectively.
4-48 SECTION 4

Applications 4-49Applications 4-49
FIGURE 4-51: Connections for Standard Cell Comparison, Reading #1
+Model 2182ANanovoltmeter
VEMF
HI
LO
V1
V2
–
–
+
Standard Cells
+ –
Reading #1 = V1 – V2 + VEMF
Unknown
Reference
FIGURE 4-52: Connections for Standard Cell Comparison, Reading #2
–Model 2182ANanovoltmeter
VEMF
HI
LO
V1
V2
+
+
–
Standard Cells
+ –
Reading #2 = –V1 + V2 + VEMF
Unknown
Reference
FIGURE 4-53: Connections for Comparing Precision DC Source to Standard Cell
Model 2182ANanovoltmeter
HI
LO
StandardCell
PrecisionVoltageSource
PrecisionDivider Box

4-50 SECTION 4
Comparing a Precision Voltage Source with a Standard Cell
A standard cell can be used to determine the value of a precision DC volt-age source, as shown in Figure 4-53. A precision divider box divides the voltage source down to roughly the standard cell voltage. A nanovoltmeter is used as a null detector to determine the difference between the divider output and the standard cell. Once the divider ratio and the standard cell voltage are known, the precision DC source voltage can be determined. Take care to avoid drawing any current from the standard cell, which would cause the cell voltage to drift.
The output impedance of the divider is likely to be much higher than the standard cell impedance, so the nanovoltmeter HI terminal must be connected to the divider output, as shown in Figure 4-53, to prevent common-mode current from creating additional voltage drop to the resis-tive divider.
4.6.2 High Resolution Temperature Measurements and Microcalorimetry
Overview
Microcalorimetry measurements are used to determine various energy relationships. Microcalorimetry techniques are often required when per-forming calorimetric experiments with small sample sizes or slow heating rates. The design of a microcalorimeter can vary greatly, depending on the specific application, and many are custom made. When running tests, differential thermometry techniques allow users to measure small changes in temperature. Microcalorimetry experiments may require measuring temperature changes as small as 100µ°C. This section describes two types of temperature sensors and a microcalorimetry measurement system using thermocouples and a Model 2182A Nanovoltmeter.
Temperature Sensors
Thermistors and thermocouples are common types of transducers used in differential thermometry. The choice of transducer depends on the specific microcalorimetry application.
Thermistors are temperature-sensitive resistors with good linearity and accuracy characteristics. These devices require an excitation signal, so they will dissipate power in the form of heat, which may lead to a measure-ment error.
Thermocouples are the most widely used type of temperature sensor. These rugged and inexpensive devices are formed by the junction of two dissimilar metals. Several different types, covering a wide temperature range, are available. Thermocouple linearity varies, depending on thermo-couple type and temperature range.
4-50 SECTION 4

Applications 4-51
Description
Microcalorimeter design can vary greatly, depending on the experiment being performed. The application described here uses a simple calorim-eter to perform microcalorimetry measurements. Temperature is meas-ured with a differential thermocouple thermometer. In the differential configuration, one thermocouple is placed inside the calorimeter and the other is placed outside the device. The difference voltage is proportional to the temperature differential. Measurement sensitivity is approximately 25m°C/µV (depending on the thermocouple type). Figure 4-54 shows a typical micro calorimeter setup, which uses a Model 2182A Nanovoltmeter to make the necessary voltage measurements.
FIGURE 4-54: Microcalorimeter with Differential Temperature Measurement
Model 2182ANanovoltmeter
Energy beingmeasured
T2 Ambient
T1
Cu HI
LO
1. Constantan wires are connected together.2. Copper (Cu) wires are directly connected to the Model 2182A.
Result is there are no unwanted junctions formed.
CuConstantan
The temperature inside the calorimeter need only be known with moderate accuracy; however, to measure the small changes that occur during the experiment, the greatest precision and resolution are essential. Measuring the differential thermocouple’s signal to sub-millidegree res-olution demands a very sensitive voltmeter. The Model 2182A can detect temperature changes of about 100µ°C, depending on the type of thermo-couple used. Each thermocouple type is unique in terms of the amount of potential for a given change in temperature.
The thermocouples may be calibrated in a separate apparatus or they may be an integral part of the calorimeter and calibrated in place. Cali bra-tion can be performed using a standardized thermometer at the approxi-mate temperature range of the test or with a fixed point reference (e.g., the boiling point of oxygen).
Before a test can be performed, the heat capacity of the calorimeter must be determined. This can be determined by directly measuring the
Applications 4-51

4-52 SECTION 4
temperature increase associated with the introduction of a known quantity of heat. Heat can be precisely determined by sourcing a current accurately through a known resistance. Heat can also be introduced by a standard chemical reaction.
Making low temperature measurements with thermocouples means that low level voltages are being measured, so take special care to con-sider the effects of both thermoelectric EMFs and magnetic fields on measurement accuracy. See Sections 3.2.2 and 3.2.9 for more details on these aspects.
Running the Test
For best results, set the Model 2182A for the 10mV range and for line cycle integration (1NPLC) for maximum line frequency noise rejection. Enabling the filter can reduce noise further. Take care that the response time of the filter doesn’t cause errors in the peaks of the heat curve. A slow respond-ing filter will smooth the peaks of the data, which could allow vital tem-perature information to be lost. The Model 2182A provides a selection of filter settings to optimize system noise rejection and ensure proper peak detection.
The temperature inside and outside the calorimeter must be the same before the experiment begins. A temperature difference of 0° corresponds to a differential thermocouple output voltage of 0V. If a change in tempera-ture occurs, it’s assumed to be caused by the phenomena of the experiment.
After the test is complete, the data can be applied to the calibration curve, converted to temperature, and analyzed. Figure 4-55 is a typi-cal heat curve graph of a chemical reaction. The final result is usually expressed as heat (calories) or energy (joules).
FIGURE 4-55: Typical Heat Reaction Curve
Time
Tem
pera
ture
Cha
nge
4-52 SECTION 4
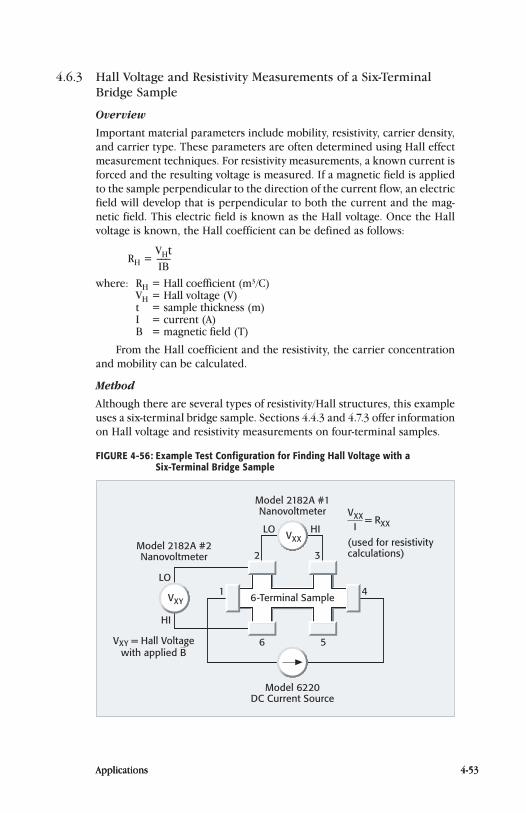
Applications 4-53
4.6.3 Hall Voltage and Resistivity Measurements of a Six-Terminal Bridge Sample
Overview
Important material parameters include mobility, resistivity, carrier density, and carrier type. These parameters are often determined using Hall effect measurement techniques. For resistivity measurements, a known current is forced and the resulting voltage is measured. If a magnetic field is applied to the sample perpendicular to the direction of the current flow, an electric field will develop that is perpendicular to both the current and the mag-netic field. This electric field is known as the Hall voltage. Once the Hall voltage is known, the Hall coefficient can be defined as follows:
VHt RH = ___ IB
where: RH = Hall coefficient (m3/C) VH = Hall voltage (V) t = sample thickness (m) I = current (A) B = magnetic field (T)
From the Hall coefficient and the resistivity, the carrier concentration and mobility can be calculated.
Method
Although there are several types of resistivity/Hall structures, this example uses a six-terminal bridge sample. Sections 4.4.3 and 4.7.3 offer information on Hall voltage and resistivity measurements on four-terminal samples.
Applications 4-53
FIGURE 4-56: Example Test Configuration for Finding Hall Voltage with a Six-Terminal Bridge Sample
LO
2
1 4
6 5
3
Model 2182A #1Nanovoltmeter
Model 6220DC Current Source
6-Terminal Sample
Model 2182A #2Nanovoltmeter
HIXXV
LO
HI
XYV
XXVXX= R
I
(used for resistivity calculations)
VXY = Hall Voltage with applied B

4-54 SECTION 4
Figure 4-56 illustrates an example test configuration for a six-terminal bridge sample. For this example, a Model 6220 Current Source is connect-ed between terminals 1 and 4 of the sample. One nanovoltmeter (Model 2182A #1) measures the voltage drop between terminals 2 and 3. This voltage (VXX) is used for determining the resistivity of the sample. A second nanovoltmeter (Model 2182A #2) is connected between terminals 2 and 6 and is used to measure the Hall voltage (VXY). This voltage measurement is made with an applied magnetic field and is perpendicular to the current flow. Notice the LO terminals of both voltmeters are connected to terminal 2. A nanovoltmeter is used because the Hall voltage is usually very small, in the millivolt or microvolt range.
4.7 Low Resistance Measurement Applications Low resistance measurement applications include contact resistance, superconductor resistance, and resistivity measurements of conductors. These measurements can be made with either a sensitive ohmmeter or a nanovoltmeter with a current source. See Section 3.3 for a discussion of precision low resistance measurement methods.
4.7.1 Contact Resistance
Overview
Contact resistance is the resistance to current flow through a closed pair of contacts. These types of measurements are made on components such as connectors, relays, and switches. This resistance is normally very small, ranging from micro-ohms to a few ohms. Test procedures may vary, depend-ing on the type of device and the application. ASTM Method B539, “Meas ur-ing Resistance of Electrical Connections” and MIL-STD-1344 Method 3002, “Low-Signal Level Contact Resistance” are two published test procedures commonly used to measure contact resistance. In general, certain basic principles apply to four-terminal contact resistance measurements.
Measurement Method
Figure 4-57 illustrates a basic configuration for testing contact resistance of a contact. A sensitive ohmmeter with four-terminal measurement capa-bility is used to prevent lead resistance from being added to the measure-ment. The source terminals are connected on either end of the contact pair. The sense terminals are connected as closely as possible to the voltage drop across the contact. This is intended to keep the voltage drop due to the test leads and bulk resistance from being included in the measurement. The bulk resist ance is the resistance the total contact would have if it were a solid piece of metal having an identical geometry so that the actual con-tact area had zero resistance.
It is sometimes difficult to make a four-wire connection to a device designed for just two wires. The style of device will determine how to make the connections. In general, devices should be prepared for testing
4-54 SECTION 4

Applications 4-55
as much as possible as they would be used in a normal application. Voltage probes should be placed on the sample in a manner that does not mechan-ically disturb the contact. For instance, soldering the probes may cause unexpected changes in the contact resistance. In some cases, however, soldering may be unavoidable. Each connection point to the test contact can create thermoelectric EMFs; however, these can be compensated for by using either the current-reversal or offset-compensation method, which are described in Section 3.3.2.
Dry Circuit Testing
Often, the purpose of the contact resistance test is to determine whether contact oxidation or other surface film buildup has increased the resistance of the device under test. If the voltage across the device is too high for even a short time, the oxide layer or film will be ruptured, compromising the validity of the test. The level of voltage required to break down a film usually ranges from 30mV to 100mV.
Excessive current through the contacts during testing can cause a phys-ical change in the contact area on a microscopic level. Current can cause heating, which can soften or melt the contact points and the surrounding area. As a result, the contact area enlarges, resulting in a reduction in resist ance.
To avoid these problems, the dry circuit method is usually employed for contact resistance tests. A dry circuit is one in which the voltage and current are limited to levels that can’t cause changes in the physical and electrical condition of the contact junction. In general, that means the open circuit voltage is 20mV or less and the short circuit current is 100mA or less.
Because of the low test current level used, a very sensitive voltmeter is required to measure the voltage drop, which is usually in the microvolt range. Because of the potential for physical or electrical changes to the contact that other test methods pose, dry circuit measurements should be done on the device before any other electrical tests are made.
Refer to Section 3.3.5 for further information on dry circuit testing.
Applications 4-55
FIGURE 4-57: Using a DMM to Measure Four-Wire Resistance Across Contact
Sense Source
Sense Source
Contact(mated connector,switch, relay)
Model 2010 DMM,Model 2750 DMM/Data Acquisition System, or Model 3706A System Switch/Multimeter

4-56 SECTION 4
Using a Sensitive DMM
Figure 4-57 shows a basic configuration for making four-wire contact resist ance measurements with a Model 3706A System Switch/Multimeter, Model 2010 DMM, or Model 2750 DMM/Data Acquisition System. These instruments can automatically compensate for thermoelectric offsets in the sense circuit by using the Offset Compensation mode. They also have built-in dry circuit meas urement capability. For most applications, the DMM is sufficient for contact resistance measurements. If the short circuit current or measured resistance values are much smaller than the DMM’s specifications, a nanovoltmeter and a current source or SMU instrument must be used.
Using a Nanovoltmeter and SMU Instrument
Figure 4-58 illustrates a test configuration that employs a Model 2182A Nanovoltmeter and a Model 2450 SourceMeter SMU Instrument for contact resist ance measurements. The SMU instrument forces a current through the contact and the nanovoltmeter measures the voltage drop developed across the contact. For dry circuit testing, the open circuit voltage is clamped to 20mV by setting the SMU instrument compliance to 20mV. To ensure the compliance voltage is measured only across the contact and not across the test leads, the SMU instrument is configured for the four-wire mode. This is especially important when higher currents are used because the voltage drop across the test leads may be large compared to the voltage drop across the contact. To prevent transients, always turn the source off while switching contacts in and out of the test fixture. A resistor, such as 100W, can be placed directly across the current source output terminals to reduce transients still further.
The current-reversal method can be used to minimize thermoelectric voltage offsets. The Model 2182A’s Delta Mode feature and the SMU instru-ment make it possible to implement this technique automatically. In this mode, the Model 2182A automatically triggers the current source to alter-
4-56 SECTION 4
FIGURE 4-58: Using a Model 2182A Nanovoltmeter and Model 2450 SourceMeter SMU Instrument to Measure Contact Resistance
Sense Output
Sense Output
Rcontact
Model 2182ANanovoltmeter
Input
HI
LOModel 2450 SourceMeter SMU Instrument

Applications 4-57
nate the polarity, then triggers a reading at each polarity. Then, the Model 2182A displays the “compensated” voltage value:
V1 – V2 Delta V = ________ 2
The contact resistance may be calculated by:
Delta V Rcontact = ________ I
where I = absolute value of test current.
4.7.2 Superconductor Resistance Measurements Overview
At extremely low temperatures, some metals and alloys lose their resist-ance to electrical current and become superconductive. A superconductor’s transition temperature and critical current density are two commonly measured parameters. The superconducting transition temperature is the point at which a material’s resistance changes from a finite value to zero. The critical current density is the maximum current density a material can carry under specific temperature and magnetic field conditions before it becomes resistive. The higher these two parameters are, the better the superconductor is. Determining these two parameters requires measuring very small resistances, so a nanovoltmeter and a programmable current source or SMU instrument are essential for precision measurements.
Test Description
Figure 4-59 shows a basic superconductor resistance measurement test system using the combination of a Model 2182A Nanovoltmeter and a Model 6220 Current Source for measuring the resistance. The voltage leads should be made of a material with a low Seebeck coefficient with respect to the sample. The sensitivity of the Model 2182A Nanovoltmeter is crucial to obtaining precision measurements because the application demands the ability to measure extremely low voltages.
For transition temperature measurements, the current source must be kept below the critical current of the sample. If the current becomes too high, the power dissipated may damage the sample and the cryostat. For critical current measurements, however, the current source must be able to exceed the critical current of the sample. If that means that more than 100mA is needed (the current the Model 6220 Current Source can provide), a Model 2440 5A SourceMeter SMU Instrument may be an appropriate solu-tion. For up to 20A DC, use the Model 2651A High Power SourceMeter SMU Instrument. The current source should have programmable polarity, so the test can be performed using the current-reversal method.
The resistance is measured using the techniques described in Sections 3.2 and 3.3 for low voltage and low resistance measurements. It is essential
Applications 4-57

4-58 SECTION 4
that a four-wire measurement be made. This technique eliminates lead resist ance by forcing a current through the sample with one pair of leads while measuring the voltage drop with a second pair of leads. In addition, the Delta method is essential to eliminate the effects of changing thermo-electric EMFs, which may interfere with measurement accuracy.
The Delta method consists of measuring the voltage drop across the material with the current in one direction, then reversing the polarity of the current source and taking a second voltage measurement. Three volt-age measurements are used to calculate each resistance value. The Delta method is discussed in greater detail in Section 3.3.2. In cases where hys-teresis, non-linearity, or asymmetry is apparent, the current can be varied from one value to another of the same polarity. This will provide the aver-age resistance between these two currents.
4-58 SECTION 4
FIGURE 4-59: Superconductor Resistance Test System
TemperatureController
Low Thermal Connector
Solid Copper Twisted Pair
HI LO
Tube (part ofsample holder)
Electrically isolatedfrom holder
SuperconductorSample
Sample Probe
Cryostat
HI LO
Model 6220Current Source
Model 2182ANanovoltmeter

Applications 4-59
The Model 2182A Nanovoltmeter and Model 6220 Current Source work together to implement the Delta method automatically. In this mode, the Model 6220 automatically alternates the polarity, then triggers the nano-voltmeter to take a reading at each polarity. Then, the Model 6220 displays the “compensated” resistance value.
As shown in Figure 4-60, the resistance can be plotted vs. temperature as the sample temperature is changing.
FIGURE 4-60: Resistance vs. Temperature of Superconductor
Temperature(10K per division)
80 90 1000
0.006
Resistance(0.0005Ω
per division)
77
For determining the critical current, the Model 2182A and Model 6220 Current Source can be used together to produce a precision I-V curve over a range of currents.
4.7.3 Resistivity Measurements of Conductive Materials
Overview
The resistivity of a conductor is determined by measuring the resistance of a sample of known geometry by forcing a current through the sample with one pair of leads while measuring the voltage drop with a second pair of leads. While the specific method used for determining the resistivity depends on the size and shape of the sample, all methods require a sensi-tive voltmeter with a current source or a sensitive ohmmeter to make the meas ure ments because the measured resistance is usually very low.
Resistivity of Bulk Materials
Figure 4-61 shows a system for testing the resistivity of a bulk material such as a metal bar or rod. The current source is connected to both ends of the sample. The voltmeter leads are placed a known distance apart. The resist ivity is calculated from the cross-sectional area of the sample and the distance between the voltmeter leads:
Applications 4-59

4-60 SECTION 4
V A r = ___ ___ ( I ) ( L )
where: r = resistivity in ohm-cm
V = voltage measured by voltmeter
I = source current
A = cross sectional area of sample (w × t) in cm2
L = length of distance between voltmeter leads in cm
FIGURE 4-61: Measuring Resistivity of Metal Bar
L
t w
VM
To compensate for thermoelectric voltages, one voltage reading is taken with positive test current and another taken with negative current. The absolute values of these two readings are then averaged and used in the equation for V/I. Most materials have a significant temperature coeffi-cient, so be certain to maintain the sample at a known temperature.
Using a Four-Point Probe
The four-point probe method is used on very thin samples such as epitax-ial wafers and conductive coatings. Figure 4-62 is a diagram of four-point collinear probe setup for resistivity measurements. The current is sourced through the two outer probes and the voltage drop is measured between the two inner probes. The surface or sheet resistivity is calculated by:
π V s = ____ ___ ( ln2 ) ( I )
where: s = sheet resistivity in ohms/square
V = voltage measured by voltmeter (V)
I = source current (A)
Note that the units for sheet resistivity are expressed as ohms per square in order to distinguish this number from the measured resistance (V/I). Correction factors to the resistivity calculation may be required for extremely thin or thick samples.
If the thickness of the sample is known, the bulk or volume resistivity can be calculated from
4-60 SECTION 4
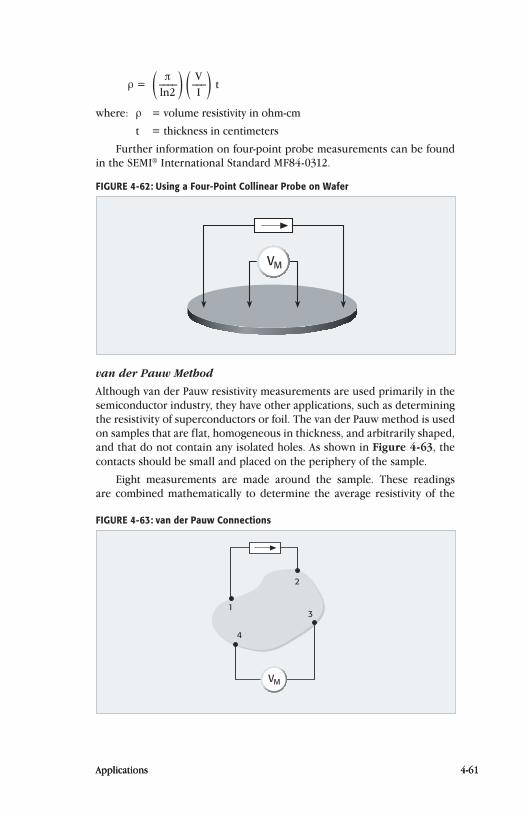
Applications 4-61
π V r = ____ ___ t ( ln2 ) ( I )
where: r = volume resistivity in ohm-cm
t = thickness in centimeters
Further information on four-point probe measurements can be found in the SEMI® International Standard MF84-0312.
FIGURE 4-62: Using a Four-Point Collinear Probe on Wafer
VM
van der Pauw Method
Although van der Pauw resistivity measurements are used primarily in the semiconductor industry, they have other applications, such as determining the resistivity of superconductors or foil. The van der Pauw method is used on samples that are flat, homogeneous in thickness, and arbitrarily shaped, and that do not contain any isolated holes. As shown in Figure 4-63, the contacts should be small and placed on the periphery of the sample.
Eight measurements are made around the sample. These readings are combined mathematically to determine the average resistivity of the
Applications 4-61
FIGURE 4-63: van der Pauw Connections
4
3
2
1
VM

4-62 SECTION 4
sample and compensate for offsets. The formula for determining the resistivity is given in Section 4.4.3. Further information on van der Pauw measurements can be found in the ASTM method F76.
Figure 4-64 illustrates a complete system for determining the resis-tivity of a conductive sample using the van der Pauw method. The system includes a Model 6220 Current Source to supply the current through the sample and a Model 2182A Nanovoltmeter to measure the resulting voltage drop. A switching matrix switches the voltmeter and current source among the four sample terminals. Either the Model 7012 4×10 Matrix Card in a Model 7001 Scanner Mainframe or a Model 3730 6×16 Matrix Card in a Model 3706A System Switch can be used. The mainframes provide power and control to the scanner cards.
4-62 SECTION 4
FIGURE 4-64: van der Pauw Connections Using Matrix Switching
1
3
4 2
Model 2182ANanovoltmeter
Model 6220Current Source
LO
HI
LO
HI
Row 1
Row 2
Row 3
Row 4
Col1 Col2 Col3 Col4
Sample
V
Model 7001 Scanner with 7012 4×10 Matrix Card, or Model 3706A System Switch with 3730 6×16 Matrix Card
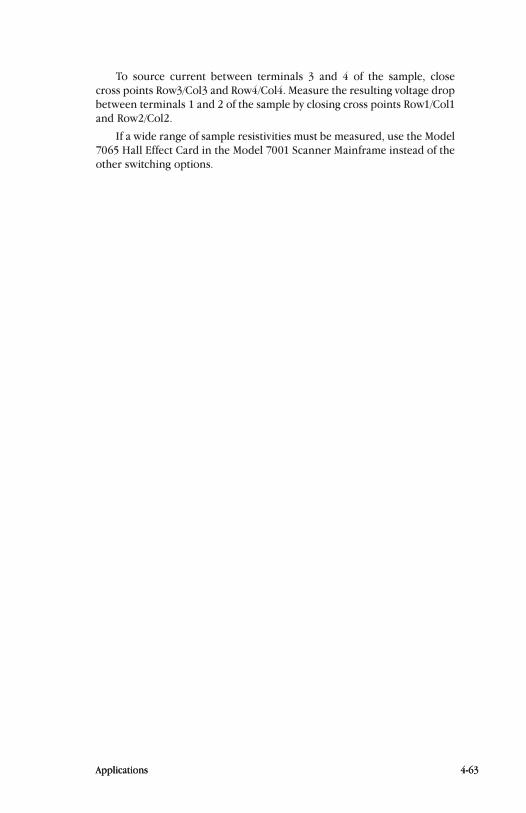
Applications 4-63Applications 4-63
To source current between terminals 3 and 4 of the sample, close cross points Row3/Col3 and Row4/Col4. Measure the resulting voltage drop between terminals 1 and 2 of the sample by closing cross points Row1/Col1 and Row2/Col2.
If a wide range of sample resistivities must be measured, use the Model 7065 Hall Effect Card in the Model 7001 Scanner Mainframe instead of the other switching options.

S E C T I O N 5
Low Level Instrument
Selection Guide

5.1 IntroductionChoosing a specific low level instrument for a given application depends on a variety of factors, including:
• Functions (voltage, current, resistance, charge)
• Ranges and sensitivity
• Special features required (sourcing, floating operation, etc.)
• Convenience features (programmability, dual-channel, data storage, etc.)
• Price
• Compatibility with other equipment in the test setup (analog out-put, overload protection, external triggers, etc.)
This section provides an overview of low level instruments available from Keithley. Consult Keithley’s Test and Measurement Products Catalog for further details on any of the products covered in this book (and many other products not listed).
5.2 Instrument and Accessory Selector GuidesFigure 5-1 is a function/range comparison chart for Keithley’s low level instrumentation. Tables 5-1 through 5-9 summarize the capabilities of these instruments and the various accessories designed for use with them.
5-2 SECTION 5
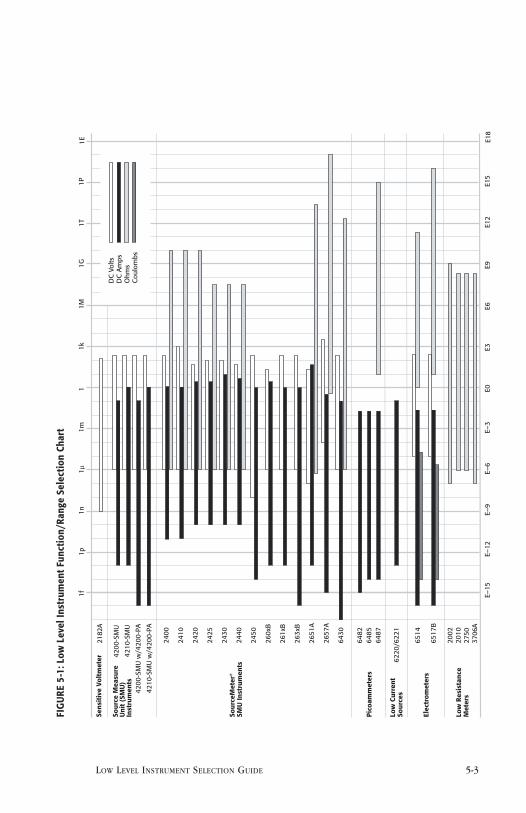
Low LeveL Instrument seLeCtIon GuIde 5-3
FIG
URE
5-1
: Low
Lev
el In
stru
men
t Fun
ctio
n/Ra
nge
Sele
ctio
n Ch
art
Sen
siti
ve V
olt
met
er
Sou
rce
Mea
sure
Un
it (
SMU
)In
stru
men
ts
Sou
rceM
eter
®
SMU
In
stru
men
ts
Pic
oam
met
ers
Elec
tro
met
ers
Low
Res
ista
nce
Met
ers
2182
A
4200
-SM
U
4210
-SM
U
4200
-SM
U w
/420
0-PA
4210
-SM
U w
/420
0-PA
2400
2410
2420
2425
2430
2440
2450
260x
B
261x
B
263x
B
2651
A
2657
A
6430
6485
6487
6482
DC
Am
ps
E–15
E–12
E–9
E–6
E–3
E0E3
E6E9
E15
E12
E18
1f1p
1n1µ
1m1
1k1M
1G1P
1T1E
2010
2002
2750
3706
A
6514
6517
B
Low
Cu
rren
tSo
urc
es62
20/6
221
DC
Vol
ts
Ohm
sC
oulo
mbs

5-4 SECTION 5
TABL
E 5-
1a: L
ow C
urre
nt/H
igh
Resi
stan
ce In
stru
men
ts
Curr
ent
Sour
ces
Pico
amm
eter
sEl
ectr
omet
ers
MO
DEL
6220
6221
6482
6485
6487
6514
6517
B
CUR
REN
T
From
100
fA D
C10
0 fA
DC
(1
pA
AC)
1 fA
10 fA
10 fA
100
aA10
0 aA
To10
0 m
A D
C10
0 m
A D
C
(100
mA
AC)
20 m
A20
mA
20 m
A20
mA
20 m
A
RES
ISTA
NCE
From
110
W10
mW
100 W
To 2
1 PW
320
0 GW
10 PW
3
CHA
RGE
Fro
m 4
10 fC
10 fC
To
20 µ
C2
µC
Inpu
t Con
nect
ion
Out
put
conn
ectio
ns:
3 Sl
ot T
riax.
Out
put
conn
ectio
ns:
3 Sl
ot T
riax
3 Sl
ot T
riax
BNC
3 Sl
ot T
riax
3 Sl
ot T
riax
3 Sl
ot T
riax
FEAT
UR
ES10
14 W
out
put
impe
danc
e. 6
5000
-po
int s
ourc
e m
emor
y. RS
-232
, G
PIB,
Trig
ger L
ink,
an
d di
gita
l I/O
.
1014
W o
utpu
t im
peda
nce.
650
00-
poin
t sou
rce
mem
ory.
RS-2
32,
GPI
B, T
rigge
r Lin
k,
Ethe
rnet
, and
dig
ital
I/O in
terfa
ces.
6½ d
igits
. Dua
l ±
30V
bias
sou
rces
.5½
dig
its.
Auto
rang
ing.
10
00 rd
g/s.
5½ d
igits
. Bui
lt-in
500
V so
urce
. Al
tern
atin
g vo
ltage
m
etho
d fo
r H
I-R s
wee
ps.
5½ d
igits
. Re
plac
es M
odel
s 65
12, 6
17-H
IQ
5½ d
igits
. Bui
lt-in
±1k
V so
urce
. Te
mpe
ratu
re, R
H
mea
sure
men
ts.
Alte
rnat
ing
pola
rity
met
hod
for H
I-R.
Plug
-in s
witc
h ca
rds
avai
labl
e
CEYe
sYe
sYe
sYe
sYe
sYe
sYe
s
1. L
owes
t res
istan
ce m
easu
rabl
e w
ith b
ette
r tha
n 1%
acc
urac
y.2.
Hig
hest
resis
tanc
e m
easu
rabl
e w
ith b
ette
r tha
n 10
% a
ccur
acy.
3. PW
(Pet
aohm
s) =
1015W
.4.
Dig
ital r
esol
utio
n lim
it. N
oise
may
hav
e to
be
adde
d.

Low LeveL Instrument seLectIon GuIde 5-5
TABL
E 5-
1a: L
ow C
urre
nt/H
igh
Resi
stan
ce In
stru
men
ts (
cont
inue
d)
Sour
ceM
eter
® S
ourc
e M
easu
re U
nit (
SMU
) Ins
trum
ents
MO
DEL
6430
2450
260x
B26
1xB
263x
B26
51A
2657
ACU
RREN
T
Fro
m10
aA
10 fA
100
fA10
0 fA
100
aA 4
100
fA1
fA
To
100
mA
1 A
3 A
1.5
A1.
5 A
50 A
120
mA
VOLT
AGE
Fro
m1
µV10
nV
100
nV10
0 nV
100
nV10
0 nV
100
µV T
o20
0 V
200
V40
V20
0 V
200
V40
V30
00 V
RESI
STA
NCE
Fro
m 1
100
µW1
µW0.
5 µW
0.5
µW0.
5 µW
0.1
µW0.
4 W
To 2
10 PW
3>
200
MW
40 TW
100
TW10
PW
320
TW
100
PW 3
Inpu
t Co
nnec
tion
3 Sl
ot T
riax
Fron
t: Ba
nana
Re
ar: 3
Slo
t Tria
xSc
rew
Ter
min
alSc
rew
Ter
min
al3
Slot
Tria
xSc
rew
Ter
min
alH
V Tr
iax
FEAT
URE
SSo
urce
Met
er S
MU
inst
rum
ent w
ith
Rem
ote
PreA
mp
to
min
imiz
e ca
ble
nois
e.
5 in
ch c
apac
itive
to
uchs
cree
n.
6½-d
igit
reso
lutio
n.
Built
-in “
Qui
ckse
t”
conf
igur
atio
n m
odes
. Co
ntex
t-sen
sitiv
e he
lp. S
cala
ble
to 3
2 ch
anne
ls w
ith T
SP-L
ink
Tech
nolo
gy.
6½-d
igit
reso
lutio
n.
Scal
able
to 6
4 ch
anne
ls w
ith T
SP-
Link
Tec
hnol
ogy
(not
av
aila
ble
for 2
604B
). Bu
ilt-in
Web
-bas
ed
char
acte
riza
tion
soft
war
e.
6½-d
igit
reso
lutio
n.
Scal
able
to 6
4 ch
anne
ls w
ith T
SP-L
ink
Tech
nolo
gy (n
ot
avai
labl
e fo
r 261
4B.)
Built
-in W
eb-b
ased
ch
arac
teriz
atio
n so
ftwar
e.
6½-d
igit
mea
sure
men
t re
solu
tion.
Sca
labl
e to
64
chan
nels
with
TS
P-Li
nk T
echn
olog
y (n
ot a
vaila
ble
for
2634
B.) B
uilt-
in W
eb-
base
d ch
arac
teriz
atio
n so
ftwar
e.
6½-d
igit
reso
lutio
n.
Scal
able
to 3
2 ch
anne
ls w
ith T
SP-
Link
Tec
hnol
ogy.
Built
-in W
eb-b
ased
ch
arac
teriz
atio
n so
ftwar
e. L
abVi
ew
driv
ers.
6½-d
igit
reso
lutio
n.
Scal
able
to 3
2 ch
anne
ls w
ith T
SP-
Link
Tec
hnol
ogy.
Bu
ilt-in
Web
-bas
ed
char
acte
rizat
ion
softw
are.
Lab
View
dr
iver
s.
CEYe
sYe
sYe
sYe
sYe
sYe
sYe
s1.
Low
est r
esist
ance
mea
sura
ble
with
bet
ter t
han
1% a
ccur
acy.
2. H
ighe
st re
sista
nce
mea
sura
ble
with
bet
ter t
han
10%
acc
urac
y.3.
PW
(Pet
aohm
s) =
1015W
.4.
Mod
el 2
634B
: 1fA
.

5-6 SECTION 5
Tabl
e 5-
1b: S
ourc
e M
easu
re In
stru
men
tati
on
MO
DEL
2400
24
00-C
24
00-L
V24
10
2410
-C24
20
2420
-C24
25
2425
-C24
30
2430
-C24
40
2440
-C64
3042
00
Des
crip
tion
Gen
eral
Pu
rpos
eH
igh
Volta
ge3
AH
igh
Pow
erPu
lse5
AUl
tra-
Low
Cu
rren
tM
ulti-
Chan
nel I
-V
Char
acte
rizat
ion
Curr
ent S
ourc
e/Si
nk•
••
••
••
•Vo
ltage
Sou
rce/
Sink
••
••
••
••
POW
ER O
UTP
UT
22 W
22 W
66 W
110W
1100
W 1
55 W
2 W
20 W
(421
0)
or 2
W (4
200)
CUR
REN
T C
APA
BIL
ITY
Min
.±
10 p
A±
10 p
A±
100
pA±
100
pA±
100
pA±
100
pA±
10 a
A 2±
1 aA
w/p
ream
pM
ax±
1.05
A±
1.05
A±
3.15
A±
3.15
A±
10.5
A 1
±5.
25 A
±10
5 m
A±
1 A
w/4
210-
SMU
VOLT
AG
E C
APA
BIL
ITY
Min
. ±
1 µV
±1
µV±
1 µV
±1
µV±
1 µV
±1
µV±
1 µV
±1
µVM
ax.
±21
/±21
0 V
±11
00 V
±63
V±
105
V±
105
V±
42 V
±21
0 V
±21
0 V
OH
MS
RA
NG
E<
0.2 W
to
>20
0 MW
<0.
2 W
to
>20
0 MW
<0.
2 W
to
>20
0 MW
<0.
2 W
to
>20
0 MW
<0.
2 W
to
>20
0 MW
<2.
0 W
to
>20
0 MW
<2.
0 W
to
>20
TW
N/A
BA
SIC
ACC
UR
ACY
I0.
025%
0.02
5%0.
025%
0.02
5%0.
025%
0.02
5%0.
025%
0.05
% 3
V0.
012%
0.01
2%0.
012%
0.01
2%0.
012%
0.01
2%0.
012%
0.01
2% 3
W0.
06 %
0.07
%0.
06 %
0.06
%0.
06 %
0.06
%0.
06 %
N/A
1.
In p
ulse
mod
e.2.
1aA
= 1
×10
–18 A
.3.
App
roxi
mat
e av
erag
e.
4. S
cala
ble
from
4 to
36
chan
nels
in g
roup
s of
4. M
axim
um o
f 32
high
pow
er c
hann
els
or 3
6 m
ediu
m p
ower
cha
nnel
s.

Low LeveL Instrument seLectIon GuIde 5-7
Tabl
e 5-
1c: L
ow V
olta
ge a
nd L
ow R
esis
tanc
e M
easu
rem
ent I
nstr
umen
ts
MO
DEL
2182
A20
0220
1027
5037
06A
VOLT
AG
E F
rom
1 nV
1 nV
10 n
V 10
0 nV
10 n
V T
o10
0 V
1000
V10
00 V
1000
V30
0 V
Inpu
t Vol
tage
Noi
se1.
2 nV
rms
150
nV rm
s10
0 nV
rms
<1.
5 µV
rms
12.5
nV
rms
RES
ISTA
NCE
Fro
m1
10 nW
310
0 nW
1
µW
1 µW
100
nW T
o210
0 MW
31
GW
100
MW
100
MW
100
MW
THER
MO
COU
PLE
TEM
PER
ATU
RE
Fro
m–2
00°C
–2
00°C
–2
00°C
–200
°C–2
00°C
To
1820
°C18
20°C
1372
°C18
20°C
1820
°C
Inpu
t Con
nect
ion
Spec
ial l
ow
ther
moe
lect
ric w
/co
pper
pin
s
Bana
na ja
cks (
4)Ba
nana
jack
s (4)
Bana
na ja
cks (
4)Ba
ckpl
ane
Spec
ial F
eatu
res
DEL
TA m
ode,
ana
log
outp
ut, I
EEE-
488,
RS
-232
.
8½ d
igits
, DM
M, I
EEE-
488,
plu
g-in
scan
ner
card
s.
Dry
circ
uit,
offse
t co
mpe
nsat
ion,
DM
M,
IEEE
-488
, RS-
232,
plu
g-in
scan
ner c
ards
.
Dry
circ
uit,
offse
t co
mpe
nsat
ion,
DM
M,
IEEE
-488
, RS-
232,
dig
ital
I/O, p
lug-
in m
odul
es.
Dry
circ
uit,
offse
t co
mpe
nsat
ion,
DM
M,
IEEE
-488
, USB
, Eth
erne
t, di
gita
l I/O
, plu
g-in
m
odul
es.
CEYe
sYe
sYe
sYe
sYe
s
1. L
owes
t res
istan
ce m
easu
rabl
e w
ith b
ette
r tha
n 10
% a
ccur
acy.
2. H
ighe
st re
sista
nce
mea
sura
ble
with
bet
ter t
han
1% a
ccur
acy.
3. D
elta
mod
e, o
ffset
vol
tage
com
pens
atio
n w
ith e
xter
nal c
urre
nt s
ourc
e. 1
0nW
if u
sed
with
5A
test
cur
rent
with
Mod
el 2
440.

5-8 SECTION 55-8 SECTION 5
Tabl
e 5-
2: H
igh
Spee
d Po
wer
Sup
plie
s
Mod
el22
00-2
0-5
2200
-30-
522
00-3
2-3
2200
-60-
222
00-7
2-1
2220
-30-
122
30-3
0-1
Nu
mb
er o
f C
han
nel
s1
11
11
23
Po
wer
Ou
tpu
t10
0 W
150
W96
W15
0 W
86 W
90 W
120
W
Volt
age
Ou
tpu
t0
to 2
0 V
0 to
30
V0
to 3
2 V
0 to
60
V0
to 7
2 V
Ch. 1
and
2:
0 to
30
V
Ch. 1
and
2:
0 to
30
VCh
. 3: 0
to 6
V
Max
imu
m
Co
nti
nu
ou
s C
urr
ent
Ou
tpu
t0
to 5
A0
to 5
A0
to 3
A0
to 2
.5 A
0 to
1.2
ACh
. 1 a
nd 2
: 0
to 1
.5 A
Ch. 1
and
2:
0 to
1.5
ACh
. 3: 0
to 5
ASe
ttin
g an
d R
ead
bac
k R
eso
luti
on
:
Vo
ltag
e1
mV
1 m
V1
mV
1 m
V1
mV
1 m
V1
mV
Cu
rren
t0.
1 m
A0.
1 m
A0.
1 m
A0.
1 m
A0.
1 m
A1
mA
1 m
AA
ccu
racy
:
V
olt
age
±0.
03%
±0.
03%
±0.
03%
±0.
03%
±0.
03%
±0.
03%
±0.
03%
C
urr
ent
±0.
05%
±0.
05%
±0.
05%
±0.
05%
±0.
05%
±0.
1%±
0.1%
Feat
ure
s:
Prog
ram
min
gIE
EE-4
88
and
USB
IEEE
-488
an
d US
B IE
EE-4
88
and
USB
IEEE
-488
an
d US
B IE
EE-4
88
and
USB
USB
USB

Low LeveL Instrument seLectIon GuIde 5-9
Tabl
e 5-
3: C
onne
ctor
s, A
dapt
ers,
and
Too
ls
Mod
elN
ame
Use
Wit
h:
237-
BAN
-3A
Tria
x to
Ban
ana
Plug
2450
, 420
0-SC
S, 7
072,
707
2-H
V, D
MM
s
237-
BNC
-TR
X3-
Lug
Fem
ale
Tria
x to
Mal
e BN
C Co
nnec
tor w
ith g
uard
dis
conn
ecte
d42
00-S
CS, 6
517A
, 651
7B, 7
078-
TRX
cabl
es
237-
TRX-
BAR
3-Lu
g Tr
iax
Fem
ale
to F
emal
e Ba
rrel
Ada
pter
2634
B, 2
635B
, 263
6B, 4
200-
SCS,
648
2, T
riax
inte
rcon
nect
237-
TRX-
NG
Tria
x M
ale-
Fem
ale
Adap
ter w
ith g
uard
dis
conn
ecte
d65
17A,
651
7B, 7
072,
707
2-H
V
237-
TRX-
T3-
slot
Mal
e to
Dua
l 3-L
ug F
emal
e Tr
iax
Tee
Adap
ter
4200
-SCS
, 651
7B, 7
072,
707
2-H
V, 7
078-
TRX
cabl
es
237-
TRX-
TBC
3-Lu
g Fe
mal
e Tr
iax
Bulk
head
Con
nect
or70
72, 7
072-
HV,
707
8-TR
X ca
bles
, cus
tom
pan
els
and
inte
rfac
e co
nnec
tions
2182
-325
ASi
lver
Sol
der f
or u
se w
ith 2
182-
KIT
2182
A
2182
-KIT
Low
-The
rmal
Con
nect
or w
ith S
trai
n Re
lief (
LEM
O)
2182
A
2188
Low
-The
rmal
Cal
ibra
tion
Shor
ting
Plug
2182
A
2499
-DIG
IOD
igita
l I/O
Exp
ansio
n M
odul
e24
XX
Sour
ceM
eter
SM
U In
stru
men
ts (n
ot in
clud
ing
2450
)
2657
A-LI
M-3
Low
Inte
rcon
nect
Mod
ule
2657
A
2657
A-PM
-200
200V
Pro
tect
ion
Mod
ule
2657
A
4851
BNC
Shor
ting
Plug
Inst
rum
ents
with
BN
C co
nnec
tors
7078
-TR
X-BN
C3-
slot
Mal
e Tr
iax
to B
NC
Adap
ter
4210
-CVU
, 480
1, 6
482,
648
7, 6
514,
651
7A, 6
517B
, 707
2, 7
072-
HV
7078
-TR
X-G
ND
3-sl
ot M
ale
Tria
x to
BN
C Ad
apte
r (gu
ard
rem
oved
)42
00-S
CS, 4
801,
651
7A, 6
517B
, 707
2, 7
072-
HV,
Ser
ies 2
600B
8610
Low
The
rmal
Sho
rtin
g Pl
ug20
00, 2
001,
200
2, 2
010
8620
4-W
ire
DM
M S
hort
ing
Plug
2000
, 200
1, 2
002,
201
0, 2
015,
201
6, 2
100,
211
0, S
erie
s 24
00, S
erie
s 27
00, S
erie
s 37
00A
8680
RTD
Pro
be A
dapt
er20
01, 2
002,
201
0, 2
110

5-10 SECTION 5
Mod
elN
ame
Use
Wit
h:
BG-1
8D
ual B
anan
a to
BN
C Co
axia
l Ada
pter
Seri
es 2
000,
210
0, 2
110,
Ser
ies
2400
, 270
0, 2
750
CAP
-18
Prot
ectiv
e Sh
ield
/Cap
BNC,
2-lu
g tr
iax
conn
ecto
rs
CAP
-31
Prot
ectiv
e Sh
ield
/Cap
3-lu
g tr
iax
conn
ecto
rs
CS-4
58In
terlo
ck C
onne
ctor
Kit
6517
-ILC-
3
CS-5
65BN
C Ba
rrel
, 420
0-SC
SBN
C in
terc
onne
ct
CS-6
303-
Lug
Fem
ale
Tria
x Bu
lkhe
ad C
onne
ctor
6487
, 651
7A, 6
517B
CS-6
313-
Lug
Mal
e Tr
iax
Cabl
e M
ount
Con
nect
or42
00-S
CS, S
C-22
cab
le
CS-9
ç70
Hig
h Vo
ltage
Bul
khea
d Co
nnec
tor
248,
248
-SH
V ca
ble
CS-1
592-
2Sc
rew
Ter
min
al P
lug
2651
A
CS-1
626-
2Sc
rew
Ter
min
al R
ecep
tacl
e26
51A
CS-1
629-
8Sc
rew
Ter
min
al C
onne
ctor
2651
A
HV-
CS-1
613
Hig
h Vo
ltag
e Tr
iax
Feed
Thr
ough
Con
nect
or/B
arre
l (fe
mal
e to
fem
ale)
26
57A,
260
0-PC
T-x,
420
0-PC
T-x
Tabl
e 5-
3: C
onne
ctor
s, A
dapt
ers,
and
Too
ls (
cont
inue
d)

Low LeveL Instrument seLectIon GuIde 5-11
Tabl
e 5-
4: C
able
s
Mod
elD
escr
ipti
onTy
pe
TER
MIN
ATI
ON
SLE
NG
TH
USE
WIT
H:
From
Tom
ft
237-
ALG
-2Lo
w N
oise
Inpu
tTr
iax
3-sl
ot m
ale
tria
xAl
ligat
or c
lips
(3)
26.
6Se
ries
220
0, 2
450,
Ser
ies
2600
B, 4
200-
PA,
6220
, 622
1, 6
482,
648
7, 6
514,
651
7A, 6
517B
237-
ALG
-15
Low
Noi
se In
put
Tria
x3-
slot
mal
e tr
iax
Allig
ator
clip
s (3
)15
50Se
ries
220
0, S
erie
s 26
00B,
420
0-PA
, 622
0,
6221
, 648
2, 6
487,
651
4, 6
517A
, 651
7B
2107
-4In
put C
able
Shie
lded
twis
ted
pair
LEM
OCo
pper
spa
de lu
gs (4
)1.
24
2182
A
2107
-30
Inpu
t Cab
leSh
ield
ed tw
iste
d pa
irLE
MO
Copp
er s
pade
lugs
(4)
9.1
3021
82A,
Ser
ies
2200
2450
-TR
X-B
ANAd
apte
r Cab
leTr
iax
3-sl
ot m
ale
tria
xBa
nana
inpu
t jac
k0.
31
2450
2600
-ALG
-2Lo
w N
oise
Inpu
tTr
iax
3-sl
ot m
ale
tria
xAl
ligat
or c
lips
(3)
26.
626
35B,
263
6B, 4
200-
PA
2651
A-K
IT-1
Cabl
e As
sem
bly
Coax
2-pi
n pl
ug2-
pin
plug
13.
326
51A,
801
1
2651
A-K
IT-2
Cabl
e As
sem
bly
Coax
2-pi
n pl
ug2-
pin
plug
26.
626
51A,
801
1
2651
A-K
IT-3
Cabl
e As
sem
bly
Coax
2-pi
n pl
ug2-
pin
plug
310
2651
A, 8
011
4801
Low
Noi
se In
put
Coax
Mal
e BN
CM
ale
BNC
1.2
464
82, 6
485,
715
8
4802
-10
Low
Noi
se In
put
Coax
Mal
e BN
CUn
term
inat
ed3
1064
82, 6
485,
715
8
4803
Low
Noi
se C
able
Kit
Coax
Mal
e BN
C (1
0)Fe
mal
e BN
C (5
)15
.250
6482
, 648
5, 7
158
6011
Inpu
t Lea
dsTr
iax
2-sl
ot m
ale
tria
xAl
ligat
or c
lips
(3)
1.5
5In
stru
men
ts w
ith 2
-slo
t tri
ax c
onne
ctor
s
6011
-10
Inpu
t Lea
dsTr
iax
2-sl
ot m
ale
tria
xAl
ligat
or c
lips
(3)
310
Inst
rum
ents
with
2-s
lot t
riax
con
nect
ors
6517
-ILC
-34-
pin
Inte
rlock
Cab
leSh
ield
ed4-
pin
fem
ale
DIN
4-pi
n fe
mal
e D
IN1
3.3
6517
A, 8
009
6517
B-I
LC-3
Inte
rlock
Cab
leSh
ield
ed4-
pin
Phoe
nix
4-pi
n D
IN1
3.3
6517
B, 8
009
7009
-5Sh
ield
ed R
S-23
2Sh
ield
edM
ale
DB-
9Fe
mal
e D
B-9
1.5
5Al
l RS-
232
capa
ble
inst
rum
ents
7024
-3Lo
w N
oise
Tria
x2-
slot
mal
e tr
iax
2-sl
ot m
ale
tria
x0.
93
Inst
rum
ents
with
2-s
lot t
riax
con
nect
ors
7024
-10
Low
Noi
seTr
iax
2-sl
ot m
ale
tria
x2-
slot
mal
e tr
iax
310
Inst
rum
ents
with
2-s
lot t
riax
con
nect
ors
7025
-10
Low
Noi
se In
put
Tria
x2-
slot
mal
e tr
iax
Unte
rmin
ated
310
Inst
rum
ents
with
2-s
lot t
riax
con
nect
ors
7051
-*BN
C In
terc
onne
ctCo
axBN
CBN
C
20
15, 2
016,
339
0

5-12 SECTION 5
Tabl
e 5-
4: C
able
s (c
ont’d
)
Mod
elD
escr
ipti
onTy
pe
TER
MIN
ATI
ON
SLE
NG
TH
USE
WIT
H:
From
Tom
ft
7078
-TR
X-1
Low
Noi
se
Tria
x3-
slot
mal
e tr
iax
3-sl
ot m
ale
tria
x0.
31
2634
B, 2
635B
, 263
6B, 6
482,
648
7,
6514
, 651
7A, 6
517B
, 707
2, 7
174A
7078
-TR
X-3
Low
Noi
se
Tria
x3-
slot
mal
e tr
iax
3-sl
ot m
ale
tria
x0.
93
2634
B, 2
635B
, 263
6B, 6
482,
648
7,
6514
, 651
7A, 6
517B
, 707
2, 7
174A
7078
-TR
X-5
Low
Noi
se
Tria
x3-
slot
mal
e tr
iax
3-sl
ot m
ale
tria
x1.
55
2634
B, 2
635B
, 263
6B, 6
482,
648
7,
6514
, 651
7A, 6
517B
, 707
2, 7
174A
7078
-TR
X-10
Low
Noi
se
Tria
x3-
slot
mal
e tr
iax
3-sl
ot m
ale
tria
x3
1026
34B,
263
5B, 2
636B
, 648
2, 6
487,
65
14, 6
517A
, 651
7B, 7
072,
717
4A
7078
-TR
X-12
Low
Noi
se
Tria
x3-
slot
mal
e tr
iax
3-sl
ot m
ale
tria
x4
1226
34B,
263
5B, 2
636B
, 648
2, 6
487,
65
14, 6
517A
, 651
7B, 7
072,
717
4A
7078
-TR
X-20
Low
Noi
se
Tria
x3-
slot
mal
e tr
iax
3-sl
ot m
ale
tria
x6.
1 20
2634
B, 2
635B
, 263
6B, 6
482,
648
7,
6514
, 651
7A, 6
517B
, 707
2, 7
174A
7078
-TR
X-6I
NLo
w N
oise
Tr
iax
3-sl
ot m
ale
tria
x3-
slot
tria
x0.
150.
564
30
7754
-3BN
CCo
axBN
C M
ale
Allig
ator
clip
s0.
93
Inst
rum
ents
with
2-s
lot B
NC
conn
ecto
rs
8007
-GN
D-3
Safe
ty G
roun
d W
ire
Sing
le w
ire
Crim
p lu
gCr
imp
lug
310
8007
8542
-301
LIV
Cabl
eM
ultip
le c
ondu
ctor
DB9
fem
ale
Mul
tiple
term
inat
ions
: Tr
iax
(250
0), 2
dua
l ba
nana
s (2
4XX
) GN
D w
ire
1.8
625
00, S
erie
s 24
00, S
yste
m
25, 8
544,
854
4-TE
C
8607
1kV
Test
Cab
les
Sing
le w
ire
(2)
Safe
ty b
anan
aSa
fety
ban
ana
13.
324
10, 6
487,
651
7A, 6
517B
CA-
18-1
Shie
lded
Coax
Dua
l ban
ana
plug
Dua
l ban
ana
plug
1.2
4Bi
nd in
g po
st in
puts
CA-
180-
3ACr
osso
ver C
able
Twis
ted
pair
RJ45
RJ45
310
Seri
es 2
600B
, 270
1, 3
390,
Ser
ies
3700
A,
6221
, all
TSP-
enab
led
inst
rum
ents
CA-
557-
1ACa
ble
Asse
mbl
yM
ultip
le c
ondu
ctor
8-pi
n re
cept
acle
8-pi
n re
cept
acle
13.
326
51A,
801
1
CA-
557-
2ACa
ble
Asse
mbl
yM
ultip
le c
ondu
ctor
8-pi
n re
cept
acle
8-pi
n re
cept
acle
26.
626
51A,
801
1
CA-
557-
3Ca
ble
Asse
mbl
yM
ultip
le c
ondu
ctor
8-pi
n re
cept
acle
8-pi
n re
cept
acle
310
2651
A, 8
011

Low LeveL Instrument seLectIon GuIde 5-13
Tabl
e 5-
4: C
able
s (c
ont’d
)
Mod
elD
escr
ipti
onTy
pe
TER
MIN
ATI
ON
SLE
NG
TH
USE
WIT
H:
From
Tom
ft
CA-
558-
xIn
terlo
ck C
able
Twis
ted
pair
(2)
25-p
in D
-sub
3-pi
n1,
2, 3
3.3,
6.6
, 10
Seri
es 2
600B
, 265
7A
HV-
CA-
554-
x3k
V Ra
ted
Hig
h vo
ltage
Tria
xTr
iax
0.5,
1, 2
, 31.
6, 3
.2, 6
.6, 1
080
10, 2
657A
HV-
CA-
571-
3H
igh
Volta
geTr
iax
Tria
xUn
term
inat
ed26
57A
SC-9
Low
Noi
seCo
axUn
term
inat
edUn
term
inat
edSo
ld b
y th
e fo
ot
SC-2
2Lo
w N
oise
Tria
xUn
term
inat
edUn
term
inat
edSo
ld b
y th
e fo
otCS
-631
SC-9
3Lo
w T
herm
alSh
ield
edUn
term
inat
edUn
term
inat
edSo
ld b
y th
e fo
ot21
82-K
IT
SC-2
06H
igh
Curr
ent C
oax
Cabl
eCo
axUn
term
inat
edUn
term
inat
edSo
ld b
y th
e in
ch26
51A
SHV-
CA-
553-
x3k
V Ra
ted
Hig
h vo
ltage
Tria
xSH
V1,
2, 3
3.2,
6.6
, 10
2657
A

5-14 SECTION 55-14 SECTION 5
Tabl
e 5-
5: T
est L
eads
and
Pro
bes
MO
DEL
NA
ME
USE
WIT
H:
1600
AH
igh
Volta
ge P
robe
DM
Ms
1651
50-A
mpe
re S
hunt
DM
Ms
1681
Clip
-On
Test
Lea
d Se
tD
MM
s
1751
Safe
ty T
est L
eads
All D
MM
s, Se
ries
240
0
1752
Prem
ium
Saf
ety
Test
Lea
d Ki
tAl
l DM
Ms,
Seri
es 2
400
1754
Safe
ty U
nive
rsal
Tes
t Lea
d Ki
tAl
l DM
Ms,
Seri
es 2
400
2187
-4Lo
w T
herm
al T
est L
ead
Kit
2182
A, 6
22x
Curr
ent S
ourc
es
5804
Gen
eral
-Pur
pose
, 4-T
erm
inal
Tes
t Lea
d Se
tSe
ries
240
0, 2
750,
DM
Ms
5805
Kelv
in P
robe
s, 0.
9m (3
ft)
Seri
es 2
400,
275
0, D
MM
s
5805
-12
Kelv
in P
robe
s, 3.
6m (1
2 ft)
Seri
es 2
400,
275
0, D
MM
s
5806
Kelv
in C
lip L
ead
Set,
0.9m
(3 ft
)Se
ries
240
0, 2
750,
DM
Ms
5807
-7H
elic
al S
prin
g Po
int T
est L
eads
, 2.1
m (
7 ft)
Seri
es 2
400,
275
0, D
MM
s
5808
Sing
le-p
in K
elvi
n Pr
obe
2700
, 270
1, 2
750,
Ser
ies
2400
, DM
Ms
5809
Kelv
in C
lip L
ead
Set
2700
, 270
1, 2
750,
Ser
ies
2400
, DM
Ms
6517
-RH
Hum
idity
Pro
be w
ith E
xten
sion
Cabl
e65
17A,
651
7B
6517
-TP
Ther
moc
oupl
e Be
ad P
robe
6517
A, 6
517B
8605
Hig
h Pe
rfor
man
ce M
odul
ar T
est L
eads
All D
MM
s, Se
ries
240
0
8606
Hig
h Pe
rfor
man
ce M
odul
ar P
robe
Kit
All D
MM
s, Se
ries
240
0, S
erie
s 26
00B,
Ser
ies
3700
A
8608
Hig
h Pe
rfor
man
ce C
lip L
ead
Set
2450
, Ser
ies
2400
, DM
Ms
8681
Low
Cos
t RTD
2001
, 200
2, 2
010
DM
Ms
(with
868
0)
CA-
109A
Test
Lea
d Se
t for
Out
put C
onne
ctio
ns20
00-S
CAN
, 200
1-SC
AN, 2
001-
TCSC
AN

A P P E N D I X A
Cable and Connector Assembly

A-2 APPENDIX A
Proper cable and connector assembly is an important factor in maintaining the integrity of low level measurements. Generally, three types of cable are used with low level instruments: coaxial, triaxial, and shielded twisted pair. In addition, the cable is often of low noise or low thermoelectric EMF design. To prepare a low noise coaxial or triaxial cable for either direct connection to a source or for connector assembly, follow the steps illus-trated in Figure A-1:
1. Gently cut through outer insulation without cutting the shield.
2. Using a sharp point, unravel the shield braid.
3. Twist the braid and thoroughly clean off all traces of graphite with methanol. For triax cable, repeat the previous steps with the inner shield.
4. Cut center conductor to proper length, strip insulation off center con-ductor, and “tin” leads.
5. For insertion into connectors, the braid is cut back in accordance with the assembly instructions for the particular connector type.
Connectors should have high resistance insulation. Teflon® is usually preferred because of its resistance to surface contaminants. Coaxial or triaxial connectors are available with Teflon insulation.
Note that the BNC and two-slot triaxial connectors are very similar; take care to ensure the connector is used only with a properly mating variety. If BNC and two-slot triax connectors are mated, the result will be permanent damage to the plug and receptacle. Using three-slot triaxial connectors where appropriate will eliminate this problem.
Although some low level instruments use coaxial connections, most use triaxial connectors. Triaxial cable provides the grounded shielding nec-essary for high common-mode measurements; generally, the outer shield is connected to power-line ground, while the inner shield is connected to signal LO. Also, triaxial connections make it easy to use guarding. In this configuration, the inner shield is connected to guard potential, and the outer shield is connected to ground. Safety hazards can exist when using this scheme in situations where exposed metal is at guard potential and the guard voltage is above 30Vrms.
As with any insulated device, connector insulation must be kept clean to avoid reducing its leakage resistance. Avoid touching insulating material. If the connector becomes contaminated, it can be cleaned with methanol or distilled water. When cleaning, use only the purest cleaning agents and thoroughly flush contaminants away from the affected area. After all con-taminants are removed, allow the connector to dry for several hours in a low humidity environment before use.
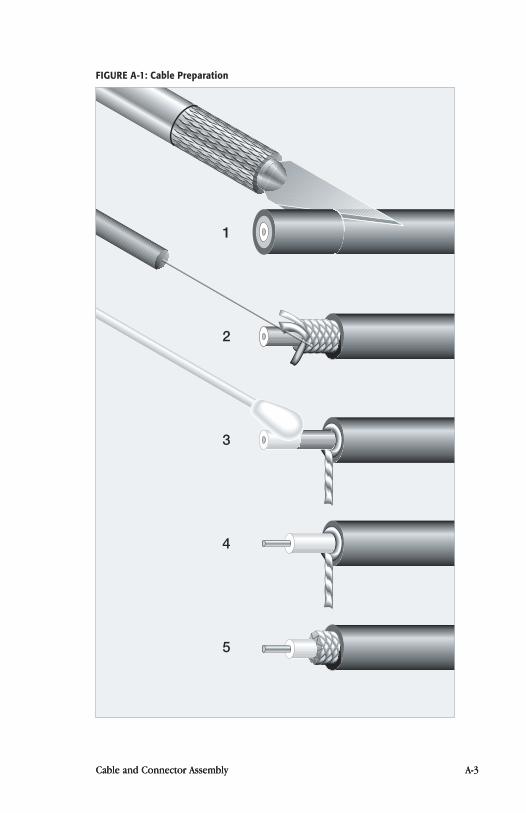
Cable and Connector Assembly A-3Cable and Connector Assembly A-3
1
2
3
4
5
FIGURE A-1: Cable Preparation

A P P E N D I X B
Glossary

B-2 APPENDIX B
AbsoLute ACCurACy. A measure of the closeness of agreement of an instrument reading compared to that of a primary standard having absolute traceability to a standard sanctioned by a recognized stand ards organization. Accuracy is often separated into gain and offset terms. See also reLAtIve ACCurACy.
A/d (AnALoG-to-dIGItAL) Converter. A circuit used to convert an analog input signal into digital information. All digital meters use an A/D converter to convert the input signal into digital information.
AnALoG output. An output that is directly proportional to the input signal.AssembLer. A molecular manufacturing device that can be used to guide chem-
ical reactions by positioning molecules. An assembler can be programmed to build virtually any molecular structure or device from simpler chemical building blocks.
Auto-rAnGInG. The ability of an instrument to automatically switch among ranges to determine the range offering the highest resolution. The ranges are usually in decade steps.
Auto-rAnGInG tIme. For instruments with auto-ranging capability, the time interval between application of a step input signal and its display, including the time for determining and changing to the correct range.
bAndwIdth. The range of frequencies that can be conducted or amplified within certain limits. Bandwidth is usually specified by the –3dB (half-pow-er) points.
bIAs voLtAGe. A voltage applied to a circuit or device to establish a reference level or operating point of the device during testing.
CApACItAnCe. In a capacitor or system of conductors and dielectrics, that prop-erty which permits the storage of electrically separated charges when poten-tial differences exist between the conductors. Capacitance is related to the charge and voltage as follows: C = Q/V, where C is the capacitance in farads, Q is the charge in coulombs, and V is the voltage in volts.
CArbon nAnotube. A tube-shaped nanodevice formed from a sheet of single-layer carbon atoms that has novel electrical and tensile properties. These fibers may exhibit electrical conductivity as high as copper, thermal conductivity as high as diamond, strength 100 times greater than steel at one-sixth of steel’s weight, and high strain to failure. They can be superconducting, insulating, semiconducting, or conducting (metallic). Non-carbon nanotubes, often called nanowires, are often created from boron nitride or silicon.
ChAnneL (swItChInG). One of several signal paths on a switching card. For scanner or multiplexer cards, the channel is used as a switched input in measuring circuits, or as a switched output in sourcing circuits. For switch cards, each channel’s signals paths are inde pend ent of other channels. For matrix cards, a channel is established by the actuation of a relay at a row and column crosspoint.
CoAxIAL CAbLe. A cable formed from two or more coaxial cylindrical con-ductors insulated from each other. The outermost conductor is often earth grounded.
Common-mode rejeCtIon rAtIo (Cmrr). The ability of an instrument to reject interference from a common voltage at its input terminals with respect to ground. Usually expressed in decibels at a given frequency.
Common-mode Current. The current that flows between the input low terminal and chassis ground of an instrument.

Glossary B-3Glossary B-3
Common-mode voLtAGe. A voltage between input low and earth ground of an instrument.
ContACt resIstAnCe. The resistance in ohms between the contacts of a relay or connector when the contacts are closed or in contact.
ContAmInAtIon. Generally used to describe the unwanted material that adverse-ly affects the physical, chemical, or electrical properties of a semi conductor or insulator.
d/A (dIGItAL-to-AnALoG) Converter. A circuit used to convert digital informa-tion into an analog signal. D/A converters are used in many instruments to provide an isolated analog output.
dIeLeCtrIC AbsorptIon. The effect of residual charge storage after a previously charged capacitor has been discharged momentarily.
dIGItAL muLtImeter (dmm). An electronic instrument that measures voltage, current, resistance, or other electrical parameters by converting the analog signal to digital information and display. The typi cal five-function DMM measures DC volts, DC amps, AC volts, AC amps, and resistance.
drIft. A gradual change of a reading with no change in input signal or oper-ating conditions.
dry CIrCuIt testInG. The process of measuring a device while keeping the voltage across the device below a certain level (e.g., <20mV) in order to prevent disturbance of oxidation or other degradation of the device being measured.
eLeCtroChemICAL effeCt. A phenomenon whereby currents are generated by galvanic battery action caused by contamination and humidity.
eLeCtrometer. A highly refined DC multimeter. In comparison with a digital multimeter, an electrometer is characterized by higher input resist ance and greater current sensitivity. It can also have functions not generally available on DMMs (e.g., measuring electric charge, sourcing voltage).
emf. Electromotive force or voltage. EMF is generally used in context of a voltage difference caused by electromagnetic, electrochemical, or ther-mal effects.
eLeCtrostAtIC CoupLInG. A phenomenon whereby a current is generated by a varying or moving voltage source near a conductor.
error. The deviation (difference or ratio) of a measurement from its true value. True values are by their nature indeterminate. See also rAndom error and systemAtIC error.
fALL tIme. The time required for a signal to change from a large percentage (usually 90%) to a small percentage (usually 10%) of its peak-to-peak value. See also rIse tIme.
fArAdAy Cup. A Faraday cup (sometimes called a Faraday cage or icepail) is an enclosure made of sheet metal or mesh. It consists of two electrodes, one inside the other, separated by an insulator. While the inner electrode is connected to the electrometer, the outer electrode is connected to ground. When a charged object is placed inside the inner electrode, all the charge will flow into themeasurement instrument. The electric field inside a closed, empty conductor is zero, so the cup shields the object placed inside it from any atmospheric or stray electric fields. This allows measuring the charge on the object accurately.
B-4 APPENDIX B
feedbACk pICoAmmeter. A sensitive ammeter that uses an operational amplifier feedback configuration to convert an input current into voltage for measurement.
fLoAtInG. The condition where a common-mode voltage exists between an earth ground and the instrument or circuit of interest. (Circuit low is not tied to earth potential.)
four-poInt probe. The four-point collinear probe resistivity measurement technique involves bringing four equally spaced probes in contact with the material of unknown resistance. The array is placed in the center of the material. A known current is passed through the two outside probes and the voltage is sensed at the two inside probes. The resistivity is calculated as follows: π V r = —— × — × t × k ln2 I
where: V = the measured voltage in volts, I = the source current in amps, t = the wafer thickness in centimeters, k = a correction factor based on the ratio of the probe to wafer diameter and on the ratio of wafer thickness to probe separation.
four-termInAL resIstAnCe meAsurement. A measurement where two leads are used to supply a current to the unknown, and two different leads are used to sense the voltage drop across the resistance. The four-terminal configura-tion provides maximum benefits when measuring low resist ances.
fuLLerene. Refers to C60, an approximately spherical, hollow, carbon molecule containing 60 carbon atoms arranged in interlocking hexagons and penta-gons, reminiscent of the geodesic dome created by architect R. Buckminster Fuller. Sometimes called “buckminsterfullerene” or “buckyball.”
Ground Loop. A situation resulting when two or more instruments are connect-ed to different points on the ground bus and to earth or power line ground. Ground loops can develop undesired offset voltages or noise.
GuArdInG. A technique that reduces leakage errors and decreases response time. Guarding consists of a conductor driven by a low impedance source surrounding the lead of a high impedance signal. The guard voltage is kept at or near the potential of the signal voltage.
hALL effeCt. The measurement of the transverse voltage across a conductor when placed in a magnetic field. With this measurement, it is possible to determine the type, concentration, and mobility of carriers in silicon.
hIGh ImpedAnCe termInAL. A terminal where the source resistance times the expected stray current (for example, 1µA) exceeds the required voltage measurement sensitivity.
Input bIAs Current. The current that flows at the instrument input due to inter-nal instrument circuitry and bias voltage.
Input ImpedAnCe. The shunt resistance and capacitance (or inductance) as measured at the input terminals, not including effects of input bias or off-set currents.
Input offset Current. The difference between the two currents that must be supplied to the input measuring terminals of a differential instrument to reduce the output indication to zero (with zero input voltage and offset voltage). Sometimes informally used to refer to input bias current.

Glossary B-5
Input offset voLtAGe. The voltage that must be applied directly between the input measuring terminals, with bias current supplied by a resistance path, to reduce the output indication to zero.
Input resIstAnCe. The resistive component of input impedance.InsuLAtIon resIstAnCe. The ohmic resistance of insulation. Insulation resist ance
degrades quickly as humidity increases.johnson noIse. The noise in a resistor caused by the thermal motion of charge
carriers. It has a white noise spectrum and is determined by the tempera-ture, bandwidth, and resistance value.
LeAkAGe Current. Error current that flows (leaks) through insulation resist-ance when a voltage is applied. Even high resistance paths between low current conductors and nearby voltage sources can generate significant leakage currents.
LonG-term ACCurACy. The limit that errors will not exceed during a 90-day or longer time period. It is expressed as a percentage of reading (or sourced value) plus a number of counts over a specified temperature range.
mAxImum ALLowAbLe Input. The maximum DC plus peak AC value (voltage or current) that can be applied between the high and low input measuring terminals without damaging the instrument.
mems. Microelectromechanical systems. Describes systems that can re spond to a stimulus or create physical forces (sensors and actuators) and that have dimensions on the micrometer scale. They are typically manufactured using the same lithographic techniques used to make silicon-based ICs.
mICro-ohmmeter. An ohmmeter that is optimized for low resistance meas-urements. The typical micro-ohmmeter uses the four-terminal measure-ment method and has special features for optimum low level measure-ment accuracy.
moLeCuLAr eLeCtronICs. Any system with atomically precise electronic devices of nanometer dimensions, especially if made of discrete molecular parts, rather than the continuous materials found in today’s semiconductor devices.
moLeCuLAr mAnIpuLAtor. A device combining a proximal-probe mechanism for atomically precise positioning with a molecule binding site on the tip; can serve as the basis for building complex structures by positional synthesis.
moLeCuLAr mAnufACturInG. Manufacturing using molecular machinery, giving molecule-by-molecule control of products and by-products via positional chemical synthesis.
moLeCuLAr nAnoteChnoLoGy. Thorough, inexpensive control of the structure of matter based on molecule-by-molecule control of products and by-products; the products and processes of molecular manufacturing, including molecu-lar machinery.
mosfet. A metal oxide field effect transistor. A unipolar device characterized by extremely high input resistance.
nAno-. A prefix meaning one billionth (1/1,000,000,000).nAnoeLeCtronICs. Electronics on a nanometer scale. Includes both molecular
electronics and nanoscale devices that resemble current semiconductor devices.
nAnoteChnoLoGy. Fabrication of devices with atomic or molecular scale preci-sion. Devices with minimum feature sizes less than 100 nanometers (nm) are considered products of nanotechnology. A nanometer [one- billionth of a

B-6 APPENDIX B
meter (10–9m)] is the unit of length generally most appropriate for describing the size of single molecules.
nAnovoLtmeter. A voltmeter optimized to provide nanovolt sensitivity (gener-ally uses low thermoelectric EMF connectors, offset compensation, etc.).
noIse. Any unwanted signal imposed on a desired signal.normAL-mode rejeCtIon rAtIo (nmrr). The ability of an instrument to reject
interference across its input terminals. Usually expressed in decibels at a specific frequency such as that of the AC power line.
normAL-mode voLtAGe. A voltage applied between the high and low input ter-minals of an instrument.
offset Current. A current generated by a circuit even though no signals are applied. Offset currents are generated by triboelectric, piezoelectric, or electrochemical effects present in the circuit.
overLoAd proteCtIon. A circuit that protects the instrument from excessive current or voltage at the input terminals.
pICoAmmeter. An ammeter optimized for the precise measurement of small currents. Generally, a feedback ammeter.
pIezoeLeCtrIC effeCt. A term used to describe currents generated when mechanical stress is applied to certain types of insulators.
preCIsIon. Refers to the freedom of uncertainty in the measurement. It is often applied in the context of repeatability or reproducibility and should not be used in place of accuracy. See also unCertAInty.
QuAntum dot. A nanoscale object (usually a semiconductor island) that can con-fine a single electron (or a few) and in which the electrons occupy discrete energy states, just as they would in an atom. Quantum dots have been called “artificial atoms.”
rAndom error. The mean of a large number of measurements influenced by random error matches the true value. See also systemAtIC error.
rAnGe. A continuous band of signal values that can be measured or sourced. In bipolar instruments, range includes positive and negative values.
reAdInG. The displayed number that represents the characteristic of the input signal.
reAdInG rAte. The rate at which the reading number is updated. The reading rate is the reciprocal of the time between readings.
reLAtIve ACCurACy. The accuracy of a measuring instrument in reference to a secondary standard. See also AbsoLute ACCurACy.
repeAtAbILIty. The closeness of agreement between successive meas ure ments carried out under the same conditions.
reproduCIbILIty. The closeness of agreement between measurements of the same quantity carried out with a stated change in conditions.
resoLutIon. The smallest portion of the input (or output) signal that can be measured (or sourced) and displayed.
response tIme. For a measuring instrument, the time between application of a step input signal and the indication of its magnitude within a rated accuracy. For a sourcing instrument, the time between a programmed change and the availability of the value at its output terminals. Also known as settLInG tIme.

Glossary B-7
rIse tIme. The time required for a signal to change from a small percentage (usually 10%) to a large percentage (usually 90%) of its peak-to-peak ampli-tude. See also fALL tIme.
sensItIvIty. The smallest quantity that can be measured and displayed.settLInG tIme. For a measuring instrument, the time between application of a
step input signal and the indication of its magnitude within a rated accuracy. For a sourcing instrument, the time between a programmed change and the availability of the value at its output terminals. Also known as response tIme.
shIeLdInG. A metal enclosure around the circuit being measured, or a metal sleeve surrounding the wire conductors (coax or triax cable) to lessen interference, interaction, or leakage. The shield is usually grounded or connected to input LO.
shunt Ammeter. A type of ammeter that measures current by converting the input current into a voltage by means of shunt resistance. Shunt ammeters have higher voltage burden and lower sensitivity than do feed-back ammeters.
shunt CApACItAnCe LoAdInG. The effect on a measurement of the capacitance across the input terminals, such as from cables or fixtures. Shunt capaci-tance increases both rise time and settling time.
short-term ACCurACy. The limit that errors will not exceed during a short, specified time period (such as 24 hours) of continuous opera tion. Unless specified, no zeroing or adjustment of any kind are permitted. It is expressed as percentage of reading (or sourced value) plus a number of counts over a specified temperature range.
sInGLe eLeCtron trAnsIstor. A switching device that uses controlled electron tunneling to amplify current. An SET is made from two tunnel junctions that share a common electrode. A tunnel junction consists of two pieces of metal separated by a very thin (~1nm) insulator. The only way for electrons in one of the metal electrodes to travel to the other electrode is to tunnel through the insulator. Tunneling is a discrete process, so the electric charge that flows through the tunnel junction flows in multiples of e, the charge of a single electron.
sourCe ImpedAnCe. The combination of resistance and capacitive or induc-tive reactance the source presents to the input terminals of a measuring instrument.
sourCe meAsure unIt (smu). An electronic instrument that sources and measures DC voltage and current. Generally, SMU instruments have two modes of operation: source voltage and measure current, or source current and measure voltage. Also known as source-monitor unit or stimulus- measurement unit.
sourCemeter. A SourceMeter SMU instrument is very similar to the source measure unit (SMU) instrument in many ways, including its ability to source and measure both current and voltage and to perform sweeps. In addition, a SourceMeter SMU instrument can display the measurements directly in resist ance, as well as voltage and current. It is designed for general-purpose, high speed production test applications. It can also be used as a source for moderate to low level meas urements and for research applications.
sourCe resIstAnCe. The resistive component of source impedance. See also thevenIn eQuIvALent CIrCuIt.

B-8 APPENDIX B
spIntronICs. Electronics that take advantage of the spin of an electron in some way, rather than just its charge.
stAndArd CeLL. An electrochemical cell used as a voltage reference in laboratories.
superConduCtor. A conductor that has zero resistance. Such materials usually become superconducting only at very low temperatures.
swItCh CArd. A type of card with independent and isolated relays for switching inputs and outputs on each channel.
swItChInG mAInfrAme. A switching instrument that connects signals among sourcing and measuring instruments and devices under test. A mainframe is also referred to as a scanner, multiplexer, matrix, or programmable switch.
systemAtIC error. The mean of a large number of measurements influenced by systematic error deviates from the true value. See also rAndom error.
temperAture CoeffICIent. A measure of the change in reading (or sourced value) with a change in temperature. It is expressed as a percentage of reading (or sourced value), plus a number of counts per degree change in temperature.
temperAture CoeffICIent of resIstAnCe. The change of resistance of a material or device per degree of temperature change, usually expressed in ppm/°C.
thermoeLeCtrIC emfs. Voltages resulting from temperature differences within a measuring circuit or when conductors of dissimilar materials are joined together.
thevenIn eQuIvALent CIrCuIt. A circuit used to simplify analysis of complex, two-terminal linear networks. The Thevenin equivalent voltage is the open-circuit voltage and the Thevenin equivalent resist ance equals the open-circuit voltage divided by the short- circuit current.
trAnsfer ACCurACy. A comparison of two nearly equal measurements over a limited temperature range and time period. It is expressed in ppm. See also reLAtIve ACCurACy, short-term ACCurACy.
trIboeLeCtrIC effeCt. A phenomenon whereby currents are generated by charges created by friction between a conductor and an insulator.
trIGGer. An external stimulus that initiates one or more instrument functions. Trigger stimuli include: an input signal, the front panel, an external trigger pulse, and IEEE-488 bus X, talk, and GET triggers.
two-termInAL resIstAnCe meAsurement. A measurement where the source cur-rent and sense voltage are applied through the same set of test leads.
unCertAInty. An estimate of the possible error in a measurement; in other words, the estimated possible deviation from its actual value.
vAn der pAuw meAsurement. A measurement technique used to meas ure the resistivity of arbitrarily shaped samples.
voLtAGe burden. The voltage drop across the input terminals of an ammeter.voLtAGe CoeffICIent. The change in resistance value with applied voltage.
Usually expressed in percent/V or in ppm/V.wArm-up tIme. The time required after power is applied to an instrument to
achieve rated accuracy at reference conditions.zero offset. The reading that occurs when the input terminals of a meas uring
instrument are shorted (voltmeter) or open-circuited (ammeter).

A P P E N D I X C
Safety Considerations

C-2 APPENDIX C
Test System SafetyMany electrical test systems or instruments are capable of measuring or sourcing hazardous voltage and power levels. It is also possible, under single fault conditions (e.g., a programming error or an instrument fail-ure), to output hazardous levels even when the system indicates no hazard is present.
These high voltage and power levels make it essential to protect oper-ators from any of these hazards at all times.
Protection methods include:
• Design test fixtures to prevent operator contact with any hazard-ous circuit.
• Make sure the device under test is fully enclosed to protect the operator from any flying debris.
• Double insulate all electrical connections that an operator could touch. Double insulation ensures the operator is still protected, even if one insulation layer fails.
• Use high-reliability, fail-safe interlock switches to disconnect power sources when a test fixture cover is opened.
• Where possible, use automated handlers so operators do not require access to the inside of the test fixture or have a need to open guards.
• Provide proper training to all users of the system so they under-stand all potential hazards and know how to protect themselves from injury.
WARNING: During power-up, the output states of data acquisition products are uncontrolled until hardware and software initialization has been completed. Users must make sure their designs can tolerate this or provide suitable interlocks to prevent dangerous voltages or actions from reaching users.
General Safety ConsiderationsThe following safety precautions should be observed before using any Keithley product and any associated instrumentation. Although some instruments and accessories would normally be used with nonhazardous voltages, there are situations where hazardous conditions may be present.
Keithley products are intended for use by qualified personnel who rec-ognize shock hazards and are familiar with the safety precautions required to avoid possible injury. Read and follow all installation, operation, and maintenance information carefully before using the product. Refer to the user documentation for complete product specifications.
If the product is used in a manner not specified, the protection provid-ed by the product warranty may be impaired.
The types of product users are:

Safety Considerations C-3
Responsible body is the individual or group responsible for the use and maintenance of equipment, for ensuring that the equipment is oper-ated within its specifications and operating limits, and for ensuring that operators are adequately trained.
Operators use the product for its intended function. They must be trained in electrical safety procedures and proper use of the instrument. They must be protected from electric shock and contact with hazardous live circuits.
Maintenance personnel perform routine procedures on the prod-uct to keep it operating properly, for example, setting the line voltage or replacing consumable materials. Maintenance procedures are described in the user documentation. The procedures explicitly state if the operator may perform them. Otherwise, they should be performed only by service personnel.
Service personnel are trained to work on live circuits, perform safe installations, and repair products. Only properly trained service personnel may perform installation and service procedures.
Keithley Instruments products are designed for use with electrical signals that are measurement, control, and data I/O connections, with low transient overvoltages, and must not be directly connected to mains volt-age or to voltage sources with high transient overvoltages. Measurement Category II (as referenced in IEC 60664) connections require protection for high transient overvoltages often associated with local AC mains con-nections. Certain Keithley measuring instruments may be connected to mains. These instruments will be marked as category II or higher.
Unless explicitly allowed in the specifications, operating manual, and instrument labels, do not connect any instrument to mains.
Exercise extreme caution when a shock hazard is present. Lethal volt-age may be present on cable connector jacks or test fixtures. The American National Standards Institute (ANSI) states that a shock hazard exists when voltage levels greater than 30 V RMS, 42.4 V peak, or 60 VDC are present. A good safety practice is to expect that hazardous voltage is present in any unknown circuit before measuring.
Operators of these products must be protected from electric shock at all times. The responsible body must ensure that operators are prevented access and/or insulated from every connection point. In some cases, con-nections must be exposed to potential human contact. Product operators in these circumstances must be trained to protect themselves from the risk of electric shock. If the circuit is capable of operating at or above 1000 V, no conductive part of the circuit may be exposed.
Do not connect switching cards directly to unlimited power circuits. They are intended to be used with impedance-limited sources. NEVER connect switching cards directly to AC mains. When connecting sources to
C-4 APPENDIX C
switching cards, install protective devices to limit fault current and voltage to the card.
Before operating an instrument, ensure that the line cord is connected to a properly grounded power receptacle. Inspect the connecting cables, test leads, and jumpers for possible wear, cracks, or breaks before each use.
When installing equipment where access to the main power cord is restricted, such as rack mounting, a separate main input power disconnect device must be provided in close proximity to the equipment and within easy reach of the operator.
For maximum safety, do not touch the product, test cables, or any other instruments while power is applied to the circuit under test. ALWAYS remove power from the entire test system and discharge any capacitors before: connecting or disconnecting cables or jumpers, installing or removing switching cards, or making internal changes, such as installing or removing jumpers.
Do not touch any object that could provide a current path to the com-mon side of the circuit under test or power line (earth) ground. Always make measurements with dry hands while standing on a dry, insulated surface capable of withstanding the voltage being measured.
For safety, instruments and accessories must be used in accordance with the operating instructions. If the instruments or accessories are used in a manner not specified in the operating instructions, the protection provided by the equipment may be impaired.
Do not exceed the maximum signal levels of the instruments and accessories, as defined in the specifications and operating information, and as shown on the instrument or test fixture panels, or switching card.
When fuses are used in a product, replace with the same type and rating for continued protection against fire hazard.
Chassis connections must only be used as shield connections for meas-uring circuits, NOT as protective earth (safety ground) connections.
If you are using a test fixture, keep the lid closed while power is applied to the device under test. Safe operation requires the use of a lid interlock.
If a screw is present, connect it to protective earth (safety ground) using the wire recommended in the user documentation.
The symbol on an instrument means caution, risk of danger. The user must refer to the operating instructions located in the user documen-tation in all cases where the symbol is marked on the instrument.
The symbol on an instrument means caution, risk of electric shock. Use standard safety precautions to avoid personal contact with these voltages.

Safety Considerations C-5
The symbol on an instrument shows that the surface may be hot. Avoid personal contact to prevent burns.
The symbol indicates a connection terminal to the equipment frame.
If this symbol is on a product, it indicates that mercury is present in the display lamp. Please note that the lamp must be properly disposed of according to federal, state, and local laws.
The WARNING heading in the user documentation explains dangers that might result in personal injury or death. Always read the associated information very carefully before performing the indicated procedure.
The CAUTION heading in the user documentation explains haz-ards that could damage the instrument. Such damage may invalidate the warranty.
Instrumentation and accessories shall not be connected to humans.
Before performing any maintenance, disconnect the line cord and all test cables.
To maintain protection from electric shock and fire, replacement com-ponents in mains circuits — including the power transformer, test leads, and input jacks — must be purchased from Keithley Instruments. Standard fuses with applicable national safety approvals may be used if the rating and type are the same. Other components that are not safety-related may be purchased from other suppliers as long as they are equivalent to the original component (note that selected parts should be purchased only through Keithley Instruments to maintain accuracy and functionality of the product). If you are unsure about the applicability of a replacement component, call a Keithley Instruments office for information.
To clean an instrument, use a damp cloth or mild, water-based cleaner. Clean the exterior of the instrument only. Do not apply cleaner directly to the instrument or allow liquids to enter or spill on the instrument. Products that consist of a circuit board with no case or chassis (e.g., a data acquisition board for installation into a computer) should never require cleaning if handled according to instructions. If the board becomes con-taminated and operation is affected, the board should be returned to the factory for proper cleaning/servicing.
Safety precaution revision of January 2013.

INDEX

1/f noise, 3-3, 3-9, 3-11 to 3-12, 3-163dB point, 2-57
Absolute accuracy, 1-10, 1-12 to 1-13AC interference and damping, 2-34 to
2-35AC pickup, 2-34, 2-52 to 2-53, 3-26, 4-27Accuracy, 1-10 to 1-15Alternating polarity technique
(resistivity measurements), 2-75, 4-34
Alternating voltage method (resistivity measurements), 2-75, 4-34
Ammeter, 1-6, 1-19 to 1-23Analog outputs, 2-69 to 2-70Avalanche photodiode (APD), 4-24 to
4-26
Bandwidth, 2-57 to 2-59, 2-62 to 2-65, 3-10 to 3-11
Cabling, 2-66 to 2-69Capacitance measurements, 4-45 to
4-46Capacitors
dielectric absorption measurements, 4-2 to 4-6
leakage measurements, 4-9 to 4-13Ceramic insulators, 2-12, 2-14, 2-24Charge measurements, 1-7, 1-23 to 1-24,
2-36 to 2-39, 2-46 to 2-49, 2-73, 4-45 to 4-47
Circuit design basics, 1-17 to 1-32Common-mode current errors, 3-17
to 3-18Common-mode rejection ratio (CMRR),
1-16 to 1-17Conductivity measurements, 4-8 to 4-9Connections
BNC connectors, 2-67 to 2-68cables, 2-66 to 2-67instrument to DUT, 2-50 to 2-51prevention of thermoelectric
EMFs, 3-5 to 3-6triax cabling and connectors,
2-68 to 2-69
Constant-current method (resistance measurement), 1-6, 1-28, 2-41 to 2-46, 2-61, 2-70, 4-37 to 4-43
Constant-voltage method (resistance measurement), 1-6 to 1-7, 2-40 to 2-41
Contact resistance, 4-54 to 4-57Contamination, 2-26, 2-30, 2-56Coulombmeter, 1-7, 1-23 to 1-24
for charge measurements, 2-46 to 2-47
for current measurements, 2-35 to 2-39
Cryogenic temperatures, 2-65, 3-5Current measurements, 2-65, 2-72, 2-74,
4-9 to 4-27Current noise, 2-39, 2-62, 2-65Current-reversal method (for canceling
thermoelectric EMFs), 3-20, 4-56 to 4-57
Damping, 2-34 to 2-35Dark current, 4-21, 4-23, 4-25Delta method (for canceling
thermoelectric EMFs), 3-22 to 3-24, 4-56 to 4-59
Deratings, 1-15Device heating, 3-26 to 3-27Dielectric absorption, 2-12 to 2-13,
2-30 to 2-31, 4-2 to 4-6Digital multimeter (DMM), 1-3 to 1-5,
1-7, 1-26 to 1-30Dry circuit testing, 1-9, 1-28, 3-27 to
3-28, 4-55 to 4-56
Electrochemical effects (current generation), 2-24, 2-30, 2-55
Electrochemical measurements, 4-6 to 4-9
Electrometerapplications
capacitor leakage measurements, 4-9 to 4-13
charge measurements, 4-45 to 4-47
conductivity measurements, 4-8 to 4-9
I-2 INDEX

Low Level Measurements Handbook I-3
determining dielectric absorption, 4-5 to 4-6
high resistance measurements, 4-28 to 4-45
low current semiconductor measurements, 4-13 to 4-18
pH measurements, 4-7 to 4-8
description, 1-5 to 1-7, 1-29general measurement
considerations, 2-49 to 2-71Electromagnetic interference (EMI), 3-9
to 3-10Electrostatic coupling/interference, 2-51
to 2-55Error, 1-10 to 1-12, 3-2 to 3-10
calculating from instrument specifications, 1-13 to 1-15
common-mode reversal errors, 3-17 to 3-18, 4-40
random, 1-11External offset current, 2-26 to 2-28
Faraday cup, 4-46 to 4-47Feedback ammeter, 1-20 to 1-21, 2-21 to
2-22, 2-32, 2-36 to 2-37, 2-39Filtering (device input paths to prevent
RFI), 3-10Floating input signals, 2-70 to 2-71Four-point collinear probe resistivity
measurement technique, 4-35 to 4-37, 4-41, 4-60 to 4-61
Four-wire measurements, 1-9, 1-28, 2-41 to 2-42, 3-18 to 3-21
FrequencyAC signals, 2-57voltage noise, 3-8 to 3-10
Generated currents, 2-23 to 2-31Ground loops, 3-14 to 3-16Guarding, 1-25, 1-31, 2-3 to 2-11, 2-15
to 2-21, 2-44 to 2-45, 2-55
Humidity, 2-13, 2-15, 2-30, 2-55 to 2-56
Inductive devices, 3-28 to 3-29
Input bias current, 1-4, 1-6, 1-17 to 1-18, 2-4 to 2-5, 2-23 to 2-26, 2-47
Input burden, 1-5Instrument response speed, 2-57 to
2-59Insulation resistance of the test circuit,
2-11 to 2-15, 2-30Insulator handling and cleaning, 2-14 to
2-15, 2-30Ion beam measurements, 4-21 to 4-23Ionization interference, 2-56Ion-selective electrodes, 4-6 to 4-7
Johnson noise, 2-39, 2-62 to 2-65, 2-74 to 2-75, 3-10 to 3-11, 3-31
Kel-F® insulators, 2-12, 2-14
Lead resistance, 1-26, 2-42, 3-18 to 3-20Leakage current, 1-4, 2-15 to 2-21Leakage resistance, 1-4, 2-5Light interference, 2-33Light measurements, 4-18 to 4-21Loading errors, 2-2 to 2-7
Magnetic fields and error voltage generation, 3-13 to 3-14, 3-31, 4-52
Measurement speed, 1-17, 2-56 to 2-62Microcalorimetry, 4-50 to 4-52Micro-ohmmeter, 1-9, 3-26 to 3-28MOSFETs, 4-16 to 4-18
Nanovoltmeter, 1-4 to 1-5, 1-7 to 1-8, 1-19, 1-30 to 1-31, 3-7, 3-30, 4-48 to 4-54
National Institute of Standards and Technology (NIST), 1-12
Noise, 1-15 to 1-17, 2-21 to 2-23bandwidth, 2-62 to 2-64,
3-10 to 3-11frequency, 3-8rejection, 1-15 to 1-17, 4-52reduction methods, 3-16 to 3-17specifications, 1-17temperature of signal
source and, 2-65Non-ohmic contacts, 3-25 to 3-26

I-4 INDEX
Normal mode rejection ratio (NMRR), 1-15 to 1-16
Nylon insulators, 2-12, 2-14, 2-15
Offset-compensated ohms method (of canceling thermoelectric EMFs), 3-24 to 3-25
Offset compensation, 1-9, 3-20 to 3-25, 3-29, 3-31, 4-56
Overload protection, 2-33 to 2-34
pH measurements, 4-7 to 4-8Photomultiplier tubes, 4-18 to 4-21Picoammeters, 1-22 to 1-23, 2-23Piezoelectric effects, 2-12 to 2-14, 2-29Polyethylene insulators, 2-12, 2-14Polystyrene insulators, 2-12 to 2-13Preamp, 1-9, 1-19, 1-23Precision, 1-11PVC insulators, 2-12
Quartz insulators, 2-14
Radio Frequency Interference (RFI), 2-56, 3-9 to 3-10, 3-26, 3-31
Relative accuracy, 1-10Repeatability, 1-10Reproducibility, 1-10Resistance measurements
dry circuit test mode, 1-28, 3-27 to 3-28, 4-55 to 4-56
four-wire, 1-26 to 1-28, 2-42, 3-18 to 3-21
high, 2-39 to 2-46, 4-28 to 4-45low, 3-18 to 3-28, 4-55 to 4-63ratiometric technique, 1-26 to
1-27superconductor, 4-57 to 4-59two-wire, 3-18 to 3-21voltage dependence of resistance
under test, 1-24Resistivity measurements
bulk materials, 4-59 to 4-60four-point collinear probe
technique, 4-35 to 4-36, 4-60 to 4-61
offset correction techniques, 4-34semiconductors, 4-34 to 4-43
surface, 2-13, 4-30 to 4-34van der Pauw technique, 4-37 to
4-43, 4-61 to 4-63volume, 2-12 to 2-14, 4-30 to 4-31
Resolution, 1-10, 1-12Rise time, 2-57 to 2-58
Sapphire insulators, 2-12, 2-14Seebeck coefficients, 3-3 to 3-5Sensitivity, 1-3 to 1-5, 1-10, 1-12Settling time, 2-8 to 2-10, 2-44 to 2-46Shielding, 2-34
electrostatic interference, 2-51 to 2-55
magnetic, 3-13Shunt ammeter, 1-19 to 1-20, 2-59Shunt capacitance, 2-8 to 2-11, 2-39,
2-44 to 2-46Source capacitance (effect on noise
performance), 2-21Source impedance, 2-21 to 2-22Source Measure Unit (SMU), 1-8 to 1-9,
1-31 to 1-32, 2-42 to 2-43, 4-3 to 4-5
SourceMeter® Source Measure Unit (SMU) Instrument, 1-8 to 1-9, 1-31 to 1-32, 4-3 to 4-5, 4-11 to 4-12, 4-14 to 4-15, 4-19, 4-56 to 4-57
Source resistance (effect on noise performance), 1-3 to 1-5, 2-21 to 2-22, 2-65
Specification conversion factors, 1-10Standard cells, 4-48 to 4-50Surface insulation resistance (SIR)
measurements, 4-28 to 4-29Systematic error, 1-11
Teflon® insulators, 2-12 to 2-15, 2-24, 2-34
Temperaturederating, 1-15gradients, 3-3, 3-4, 3-5, 3-7,
3-11, 3-31measurements, 4-50 to 4-52stability, 2-55
Test environment, 2-55 to 2-56Test fixtures, 2-69, 3-5, 4-33

Low Level Measurements Handbook I-5
Theoretical measurement limits, 1-3 to 1-5
Thermistors, 4-50Thermocouples, 4-50Thermoelectric EMFs, 3-3 to 3-7, 3-11,
3-20 to 3-25current-reversal method, 3-20delta method, 3-22 to 3-24,
4-56 to 4-57offset-compensated ohms method,
3-24 to 3-25Time drift derating, 1-15Transfer stability, 1-13Transient temperature effect, 3-7 to 3-9Triboelectric effects, 2-12, 2-13, 2-24,
2-26, 2-28 to 2-29, 2-66
Uncertainty, 1-11, 1-13 to 1-15
van der Pauw technique (resistivity measurement), 4-37 to 4-43, 4-61 to 4-63
Voltage amplifier, 1-17 to 1-18Voltage burden, 2-31 to 2-32, 2-47, 2-72Voltage coefficient of resistance, 2-41 to
2-42, 4-44Voltage measurements
high resistance sources, 2-2 to 2-15, 4-2 to 4-9
low, 3-2 to 3-18, 4-49 to 4-54Voltage noise, 2-62 to 2-65, 3-8 to 3-11Voltmeter, 1-6, 1-13 to 1-15, 1-17 to
1-18, 2-3, 3-2
Water absorption, 2-12 to 2-13, 2-30White noise, 3-8
Zero check, 2-23, 2-48, 2-72Zero drift, 2-23, 3-7 to 3-9Zero hop, 2-48Zeroing an instrument, 2-23, 2-55, 3-3

Contact Information
Australia 1 800 709 465
Austria 00800 2255 4835
Balkans, Israel, South Africa and other ISE Countries +41 52 675 3777
Belgium 00800 2255 4835
Brazil +55 (11) 3759 7627
Canada 1 800 833 9200
Central East Europe / Baltics +41 52 675 3777
Central Europe / Greece +41 52 675 3777
Denmark +45 80 88 1401
Finland +41 52 675 3777
France 00800 2255 4835
Germany 00800 2255 4835
Hong Kong 400 820 5835
India 000 800 650 1835
Indonesia 007 803 601 5249
Italy 00800 2255 4835
Japan 81 (3) 6714 3010
Luxembourg +41 52 675 3777
Malaysia 1 800 22 55835
Mexico, Central/South America and Caribbean 52 (55) 56 04 50 90
Middle East, Asia, and North Africa +41 52 675 3777
The Netherlands 00800 2255 4835
New Zealand 0800 800 238
Norway 800 16098
People’s Republic of China 400 820 5835
Philippines 1 800 1601 0077
Poland +41 52 675 3777
Portugal 80 08 12370
Republic of Korea +82 2 6917 5000
Russia / CIS +7 (495) 6647564
Singapore 800 6011 473
South Africa +41 52 675 3777
Spain 00800 2255 4835
Sweden 00800 2255 4835
Switzerland 00800 2255 4835
Taiwan 886 (2) 2656 6688
Thailand 1 800 011 931
United Kingdom / Ireland 00800 2255 4835
USA 1 800 833 9200
Vietnam 12060128Rev. 020916
Find more valuable resources at TEK.COM
Copyright © Tektronix. All rights reserved. Tektronix products are covered by U.S. and foreign patents, issued and pending. Information in this
publication supersedes that in all previously published material. Specification and price change privileges reserved. TEKTRONIX and TEK are registered trademarks of Tektronix, Inc. All other trade names referenced are the service marks, trademarks or registered trademarks of their respective companies. 02/16 1KW-1559-0 / No. 1559 (Print Version)