logility - ro - api guide portal technical documents/mid... · chapter 21: header allocation ......
TRANSCRIPT

Last Updated: 8/22/2015
Logility – RO API Guide
Version 8.6

Last Updated: 9/30/2015
Logility, Inc. 603 East Washington Street, Suite 400 Indianapolis, Indiana 46204, USA Telephone: 317-222-3100 FAX: 317-222-3101 Web Page: http://www.Logility.com/
Copyright © Logility 2015. All rights reserved
No part of this document may be reproduced, stored in a retrieval system, or transmitted in any form or by any means—electronic, mechanical, photocopying, recording, or otherwise—without the prior written permission of Logility, Inc.

Table of Contents Chapter 1: Overview .................................................................................................................... 1
Scope of this document ............................................................................................................................ 1
Intended Audience ................................................................................................................................... 1 Business Analysts ............................................................................................................................................. 1 System Analysts/Developers............................................................................................................................. 1
Operating Environment .......................................................................................................................... 1
History Interface Background ................................................................................................................ 2 Unit Open to Ship Forecasting ............................................................................................................................. 2 Style or Style/Color Selling ................................................................................................................................. 2 Allocation ............................................................................................................................................................. 2 Size Need or Fill Size Holes ................................................................................................................................ 2 Size Curve ............................................................................................................................................................ 2 Strategy ................................................................................................................................................................ 3
Daily/Weekly History Interface ........................................................................................................................ 3 Initial History Load ........................................................................................................................................... 3
API Data Flow .......................................................................................................................................... 4
Chapter 2: Store Profiles ............................................................................................................. 5
Overview ................................................................................................................................................... 5
Transaction Definition ............................................................................................................................. 5 Store Options ........................................................................................................................................................... 5 Store Definitions ..................................................................................................................................................... 6
Removing Store Values (Delimited) .................................................................................................................... 8 Removing Characteristic Values (Delimited) ...................................................................................................... 8 Removing Store and Characteristic Values (XML) ............................................................................................. 8 More about Store Characteristics ......................................................................................................................... 8 Examples .............................................................................................................................................................. 9
Characteristic Definitions ...................................................................................................................................... 11 Examples ............................................................................................................................................................ 12
Store Delete Definitions ........................................................................................................................................ 12 Examples ............................................................................................................................................................ 12
Store Recover Definitions ..................................................................................................................................... 13 Examples ............................................................................................................................................................ 13
Command Processing ............................................................................................................................ 13 Command Format .............................................................................................................................................. 14 Command Sample .............................................................................................................................................. 14
Chapter 3: Product Hierarchy Profiles .................................................................................... 15
Overview ................................................................................................................................................. 15
Transaction Definition ........................................................................................................................... 15 Hierarchy Definition ............................................................................................................................................. 15 Level Definitions ................................................................................................................................................... 16 Product Definitions ............................................................................................................................................... 17
Removing Product Values (Delimited) .............................................................................................................. 21 Removing Product Characteristic Values (Delimited) ....................................................................................... 21 Removing Product and Characteristic Values (XML) ....................................................................................... 21
Characteristic Definitions ...................................................................................................................................... 22

Reclassification Options ........................................................................................................................................ 23 Base Options ...................................................................................................................................................... 23 Rollup Options ................................................................................................................................................... 24 Reclassification Actions ..................................................................................................................................... 25
Move Action ................................................................................................................................................... 25 Delete Action .................................................................................................................................................. 26 Rename Action ............................................................................................................................................... 30
Determining Available Folder Colors ................................................................................................................ 30
Command Processing ............................................................................................................................ 31 Command Format .............................................................................................................................................. 31 Command Sample .............................................................................................................................................. 31
Reclass Procedures ................................................................................................................................. 32
Reclass Audit .......................................................................................................................................... 34
Chapter 4: Hierarchy Reclass ................................................................................................... 36
Overview ................................................................................................................................................. 36
Command Processing ............................................................................................................................ 36 Command Format .............................................................................................................................................. 36
Chapter 5: Color Code Load ..................................................................................................... 38
Overview ................................................................................................................................................. 38
Transaction Definition ........................................................................................................................... 38 Color Definition ................................................................................................................................................. 38
Command Processing ............................................................................................................................ 39 Command Format .............................................................................................................................................. 39 Command Sample .............................................................................................................................................. 39
Chapter 6: Size Code Load ........................................................................................................ 40
Overview ................................................................................................................................................. 40
Transaction Definition ........................................................................................................................... 40 Size Definition ................................................................................................................................................... 40
Command Processing ............................................................................................................................ 41 Command Format .............................................................................................................................................. 41 Command Sample .............................................................................................................................................. 41
Chapter 7: History / Plans......................................................................................................... 42
Overview ................................................................................................................................................. 42
Transaction Definition ........................................................................................................................... 42 History/Plan Options ............................................................................................................................................. 42 History/Plan Values............................................................................................................................................... 44
Command Processing ............................................................................................................................ 47 Command Format .............................................................................................................................................. 47 Command Sample .............................................................................................................................................. 47
Chapter 8: Allocation Header ................................................................................................... 48
Overview ................................................................................................................................................. 48
Generating the Header ID ..................................................................................................................... 48 Header Load API Flow ......................................................................................................................................... 48

Transaction Definition ........................................................................................................................... 49 Options .................................................................................................................................................................. 49 Base ....................................................................................................................................................................... 50 Bulk Color ............................................................................................................................................................. 54 Pack ....................................................................................................................................................................... 55
Status Output Definition ....................................................................................................................... 58
Command Processing ............................................................................................................................ 59 Command Format .............................................................................................................................................. 59 Command Sample .............................................................................................................................................. 60
Generating the Header ID ..................................................................................................................... 60
Chapter 9: Header Reconcile .................................................................................................... 61
Overview ................................................................................................................................................. 61 Header Reconcile API Process Flow ..................................................................................................................... 62 Header Reconcile API Process .............................................................................................................................. 63
Configurations ........................................................................................................................................ 66 Header Reconcile Configuration ........................................................................................................................... 66 Header “Match” Configuration ............................................................................................................................. 67
Sample HeaderKeysToMatch ............................................................................................................................ 68 Header ID Keys Configuration .............................................................................................................................. 68
Sample HeaderIdKeys ........................................................................................................................................ 69
Command Processing ............................................................................................................................ 69 Command Format .............................................................................................................................................. 69 Command Sample .............................................................................................................................................. 69
Chapter 10: Allocation Header Release ................................................................................... 70
Overview ................................................................................................................................................. 70
Transaction Definition ........................................................................................................................... 70 Base ....................................................................................................................................................................... 70 Bulk Color ............................................................................................................................................................. 72 Pack ....................................................................................................................................................................... 75 Total ...................................................................................................................................................................... 78
Chapter 11: Relieve Intransit .................................................................................................... 80
Overview ................................................................................................................................................. 80
Transaction Definition ........................................................................................................................... 80 Relieve Intransit ................................................................................................................................................. 80
Command Processing ............................................................................................................................ 81 Command Format .............................................................................................................................................. 81 Command Sample .............................................................................................................................................. 82
Chapter 12: Rollup .................................................................................................................... 83
Overview ................................................................................................................................................. 83
Transaction Definition ........................................................................................................................... 83 Options .................................................................................................................................................................. 83 Variables ............................................................................................................................................................... 84
Requests ............................................................................................................................................................. 86
Command Processing ............................................................................................................................ 88 Command Format .............................................................................................................................................. 88

Command Sample .............................................................................................................................................. 88
Chapter 13: Purge ..................................................................................................................... 89
Overview ................................................................................................................................................. 89
Command Processing ............................................................................................................................ 89 Command Format .............................................................................................................................................. 89 Command Sample .............................................................................................................................................. 89
Chapter 14: Size Day to Week Summary .................................................................................. 90
Overview ................................................................................................................................................. 90
Command Processing ............................................................................................................................ 90 Command Format .............................................................................................................................................. 90 Command Sample .............................................................................................................................................. 91
Chapter 15: Size Curve Generate ............................................................................................. 92
Overview ................................................................................................................................................. 92
Command Processing ............................................................................................................................ 92 Command Format .............................................................................................................................................. 92 Command Sample .............................................................................................................................................. 92
Chapter 16: Determine Hierarchy Activity ............................................................................... 93
Overview ................................................................................................................................................. 93
Command Processing ............................................................................................................................ 93 Command Format .............................................................................................................................................. 93 Command Sample .............................................................................................................................................. 93
Chapter 17: Relieve Intransit Builder ...................................................................................... 94
Overview ................................................................................................................................................. 94
Selecting Headers ................................................................................................................................... 94 Query Sample ..................................................................................................................................................... 94
Command Processing ............................................................................................................................ 94 Command Format .............................................................................................................................................. 95 Command Sample .............................................................................................................................................. 95
Chapter 18: Size Curve Load .................................................................................................... 96
Overview ................................................................................................................................................. 96
Size Curve Group ................................................................................................................................... 96 Overview ............................................................................................................................................................ 96
Transaction Definition ........................................................................................................................... 96 Size Curve Group Definition .......................................................................................................................... 97
Status Output Definition .................................................................................................................................... 98
Size Curve ............................................................................................................................................... 99 Overview ............................................................................................................................................................ 99
Transaction Definition ........................................................................................................................... 99 Size Curve Definition ..................................................................................................................................... 99
Status Output Definition .................................................................................................................................... 99
Command Processing .......................................................................................................................... 100 Command Format ............................................................................................................................................ 100
Command Sample ............................................................................................................................................ 100
Chapter 19: Size Constraints Load ......................................................................................... 101
Overview ............................................................................................................................................... 101
Transaction Definition ......................................................................................................................... 101 Size Constraints Model Transactions ............................................................................................................... 101
Command Processing .......................................................................................................................... 103 Command Format ............................................................................................................................................ 103 Command Sample ............................................................................................................................................ 103
Chapter 20: Build Pack Criteria Load ................................................................................... 104
Overview ............................................................................................................................................... 104
Transaction Definition ......................................................................................................................... 104 Delimited File Format ...................................................................................................................................... 104
Command Processing .......................................................................................................................... 105 Command Format ............................................................................................................................................ 105 Command Sample ............................................................................................................................................ 105
Chapter 21: Header Allocation Load ..................................................................................... 106
Overview ............................................................................................................................................... 106
Database Table Definition ................................................................................................................... 106
Database Table Samples ...................................................................................................................... 107 MID_alloc_bulk ............................................................................................................................................... 107 MID_alloc_pack ............................................................................................................................................... 107
Output Log Files................................................................................................................................... 108
Command Processing .......................................................................................................................... 108 Command Format ............................................................................................................................................ 109 Command Sample ............................................................................................................................................ 109
Chapter 22: Chain Set Percent ............................................................................................... 110
Overview ............................................................................................................................................... 110
Transaction Definition ......................................................................................................................... 110
Command Processing .......................................................................................................................... 111 Command Format ............................................................................................................................................ 111
Chapter 23: Daily Percentages Load ...................................................................................... 112
Overview ............................................................................................................................................... 112
Transaction Definition ......................................................................................................................... 112 Daily Percentages ................................................................................................................................................ 112 Fiscal Period ........................................................................................................................................................ 112
Command Processing .......................................................................................................................... 113 Command Format ............................................................................................................................................ 114
Chapter 24: Store Eligibility Load .......................................................................................... 115
Overview ............................................................................................................................................... 115
Transaction Definition ......................................................................................................................... 115

Eligibility Transactions ....................................................................................................................................... 115
Command Processing .......................................................................................................................... 116 Command Format ............................................................................................................................................ 116
Chapter 25: VSW Load ........................................................................................................... 117
Overview ............................................................................................................................................... 117
Transaction Definition ......................................................................................................................... 117 VSW Load Transactions ..................................................................................................................................... 117
Command Processing .......................................................................................................................... 118 Command Format ............................................................................................................................................ 118
Chapter 26: Push to Backstock ............................................................................................... 119
Overview ............................................................................................................................................... 119
Command Processing .......................................................................................................................... 119 Command Format ............................................................................................................................................ 119 Command Sample ............................................................................................................................................ 119
Chapter 27: Batch Comp ......................................................................................................... 120
Overview ............................................................................................................................................... 120
Command Processing .......................................................................................................................... 120 Command Format ............................................................................................................................................ 120 Command Sample ............................................................................................................................................ 120
Chapter 28: Scheduler API ..................................................................................................... 121
Overview ............................................................................................................................................... 121
Command Processing .......................................................................................................................... 121 Schedule Interface Command Format (Jobs) ................................................................................................... 121 Schedule Interface Command Sample ............................................................................................................. 121 Schedule Interface Return Codes ..................................................................................................................... 122 Allocation Scheduler Command Format .......................................................................................................... 122 Allocation Scheduler Command Sample ......................................................................................................... 122 Plan Forecast Command Format ...................................................................................................................... 123 Plan Forecast Command Sample...................................................................................................................... 123
Chapter 29: Delete Variable Values ....................................................................................... 124
Overview ............................................................................................................................................... 124
Command Processing .......................................................................................................................... 124 Command Format ............................................................................................................................................ 124 Command Sample ............................................................................................................................................ 126 Return Codes .................................................................................................................................................... 127
Chapter 30: Remove Size Curves from Size Group................................................................ 128
Overview ............................................................................................................................................... 128
Command Processing .......................................................................................................................... 128 Command Format ............................................................................................................................................ 128 Command Sample ............................................................................................................................................ 128
Chapter 31: Remove Size Constraints from Model ................................................................ 129
Overview ............................................................................................................................................... 129

Command Processing .......................................................................................................................... 129 Command Format ............................................................................................................................................ 129 Command Sample ............................................................................................................................................ 129
Chapter 32: Upload Eligibility ................................................................................................ 130
Overview ............................................................................................................................................... 130
Command Processing .......................................................................................................................... 130 Command Format ............................................................................................................................................ 130 Command Sample ............................................................................................................................................ 130 Return Codes .................................................................................................................................................... 131
Chapter 33: Retrieve Hierarchy Characteristics .................................................................... 132
Overview ............................................................................................................................................... 132
Command Processing .......................................................................................................................... 132 Command Format ............................................................................................................................................ 132 Command Sample (By Node) ......................................................................................................................... 133 Command Sample (By Level) ......................................................................................................................... 133 Return Codes .................................................................................................................................................... 133
Chapter 34: Check Hierarchies .............................................................................................. 134
Overview ............................................................................................................................................... 134 Conditions ........................................................................................................................................................ 134
Command Processing .......................................................................................................................... 134 Command Format ............................................................................................................................................ 134 Command Sample ............................................................................................................................................ 135 Output Report ................................................................................................................................................... 136
Chapter 35: API Return Codes ............................................................................................... 137

O v e r v i e w - S c o p e o f t h i s d o c u m e n t
Page | 1
Chapter 1: Overview The Logility - RO system is the new generation allocation / replenishment and planning system. It is the first system to combine automated allocation and replenishment. Much of the tedious system configuration and customization may be interfaced from other systems.
Scope of this document This document defines and describes the Interfaces available for use in the Logility - RO system. Although most of the interfaced information is customization based, all of the information described in this document may be interfaced manually by a user as well.
Intended Audience Business Analysts
The Business Analyst will define the business aspects and needs of the system. This includes structures, definitions, and options that will be required by the system for each installation’s customization.
System Analysts/Developers
The System Analysts and Developers will utilize this document in order to design and implement interfaces of required information for the Logility - RO system. The requirements of each API are included. The input file format is either XML or delimited and is noted within the sections. Each API field is defined and described in order for the System Analysts and/or Developers to work with the Business Analyst to ensure that the correct data is being interfaced.
Operating Environment The Logility - RO system operates under the Microsoft ® .NET technology and framework under Windows operating systems. The application is componentized to scale over multiple processors/servers. Review the Logility – RO Architecture document for details.

O v e r v i e w - H i s t o r y I n t e r f a c e B a c k g r o u n d
Page | 2
History Interface Background The Logility - RO system is designed to support and host data by the various defined merchandising levels by store, by time. The system has the capability to hold data at its lowest level by size by store by day. The system can house various “data” variables, and can sum data to all levels in the merchandise hierarchy by store. The retention period for data can be set at any level in the merchandise hierarchy. The by-product of the above is that the interface design and documentation appear very generic and give the illusion to the reader that everything has to be posted at the lowest level; this not the case.
The reality is that certain data are used in different ways for the various business functions within the Logility - RO system so we will discuss approaching it from that standpoint. The other reality is the sheer volumes of the retail environment require we have a logical and prudent approach to “loading the history”. We need to consider what the daily/weekly posting will require and then what we need to do for the “one time” initial history load. If the two can be designed as one process then that is better, although this may not be practical. Below is a broad stroke of the business functionality mapped to the data required in a “typical” apparel retailer.
Unit Open to Ship Forecasting Forecasting requires 78 weeks of unit sales and stock history at the “plan level”, which is typically the class or sub-class level, by store. This data is primarily used as the basis in forecasting the plans. In season actuals are also used to review current store status. This data is typically rolled up to the higher merchandise levels. In some cases we may want the style or style/color to be planned, for those instances we would retain more history.
Style or Style/Color Selling In reviewing the actual selling of a style or style/color for fashion replenishment or re-order type styles, we generally want to keep the in-season or rolling 26 weeks of the style and style/colors. We want the sales and inventory by style and style/color. In some cases for a seasonal type style or style/color we may need to keep the Last Year (LY) sales.
On a daily basis of the current week, we want the sales and inventory by style and color and size. This will provide the current Week-To-Date (WTD) sales and the current day’s on-hand. The daily values should not be retained for more than the current week at the color level and above. The daily values for the size level will be summed by week and utilized when generating Size Curves by Store or Store Groups.
Allocation Typically uses the current on-hand of the “plan level” as defined above for the forecasted plan level.
Size Need or Fill Size Holes The size need and fill size holes allocation uses the current on-hand of the style/color/size being allocated and the size curve of the stores.
Size Curve The Size Curves can be manually entered into the system by store or store set for any level in the merchandise hierarchy. The size curves can also be generated by the system from the raw daily sales and inventory data retained within the Logility - RO system. The retailer may pick a time period of data, probably a season, and a merchandise level for the curve. The system then creates a unique Size Selling Curve per store for that level. For example, we can take 26 weeks of sales summed by class/color for each store size and create a unique

O v e r v i e w - H i s t o r y I n t e r f a c e B a c k g r o u n d
Page | 3
curve for that store. Specifying different size curves for different merchandise levels are accomplished through Logility - RO setup and is maintained with the Size Curve naming conventions.
Strategy Given the above we now want to develop a strategy for designing and building the daily, weekly, and historical loads; considering the business process, start up and on-going volumes. The Logility - RO system is designed for high volume load in that it does employ n-way processing where we can spray loads over multiple processors and servers. This does not give us the right to not consider the overall processing “window” in terms of getting both the client extract and Logility - RO posting completed. We also need to consider levels at which the client has the data “summed” in the source system. This will save processing window time to post data directly as opposed to the system or the client summing it.
Daily /Weekly History Interface
o Style, color, size, store sales and on-hand (daily only)
o Style, color, store, sales and on-hand by price point
o Style, store, sales and on-hand by price point
At the end of the week the Logility - RO system can, upon request, roll the daily values to the weekly values and then roll the weekly values up the hierarchy. For those clients who would not do a daily load, all of the above would be done for the weekly.
Init ial History Load
Mandatory
o “Plan level”, typically class or sub-class, 78 weeks of sales and Inventory
Optional
o Style, color, store, sales and on-hand by price point, 26 – 52 weeks
o Style, store, sales and on-hand by price point, 26 – 52-weeks
o Style, color, size, store, sales and on-hand for regular price, 13 – 52 weeks of daily data (this data provides the ability to generate Size Curves by Store or Store Groups)

O v e r v i e w - A P I D a t a F l o w
Page | 4
API Data Flow Below is a generic data flow of the Logility - RO API processes.

S t o r e P r o f i l e s - O v e r v i e w
Page | 5
Chapter 2: Store Profiles
Overview The Store Profile contains specific characteristics pertaining to each individual store. There are predefined store characteristics as well as dynamic store characteristics which must be defined to the system prior to defining to the stores. Characteristics will create an Attribute to be used throughout the system as well as be available to use in combination for custom Attributes.
Transaction Definition There are three types of Store transaction as described below. They are Store Options, Store Definitions and Store Characteristics.
Transactions can be provided using either a delimited or an XML format. Refer to the provided StoreLoadSchema.xsd for the XML file layout. The delimited transactions are structured using the format below with each field separated by the delimiter identified to the application.
Sample transactions can be found in the “\Batch\Transactions” folder.
Store Options Store Options provide processing settings for loading stores. This record is optional.
Store Options
# Field Name XML Identifier Description Characteristics
1. Transaction Type Options Designates the transaction as a store options transaction.
o Required o Options
2. Automatically Add Store Characteristics Flag
AutoAddCharacteristics Designates whether undefined store characteristics are to be added.
o Optional o True o False
o Defaults to False
3. Characteristics Type Delimiter
CharacteristicDelimiter Designates the character used to separate store characteristics from the characteristic type.
o Single Character o Defaults to \
(backslash)
4. Use Characteristic Transaction
UseCharacteristicTransaction Designates whether the store characteristics will be on separate transactions.
o Optional o True o False
o Defaults to False

S t o r e P r o f i l e s - T r a n s a c t i o n D e f i n i t i o n
Page | 6
Store Definitions Store Definitions provide information about the stores being loaded. The store transactions define the properties and may contain the characteristics of each store. These characteristics include the pre-defined system store characteristics as well as the dynamic client defined store characteristics of each store.
The format of store definition transactions varies based on the setting of the UseCharacteristicTransaction parameter of the configuration file. If the value is False, store characteristics may be included on the store transaction, but the field to assign the Virtual Store Warehouse ID is not available. To set the Virtual Store Warehouse ID field, you must use the format that has the UseCharacteristicTransaction parameter set to True.
Note: Valid date values are 50 years plus-or-minus from the first calendar MODEL year.
Store Definitions – UseCharacteristicTransaction = False
# Field Name XML Identifier Description Characteristics
1. Store Identifier ID Defines the Store ID
Note: This is an alpha field. If store ID’s are numeric, it is suggested that the number be left justified zero filled in order to keep the stores in numerical sequence.
o Required o String o Maximum length 50 o Must
2. Store Name Name Defines the Store Name o Optional o String o Maximum length 50
3. Store Description Description Description of the store. o Optional o String o Maximum length 50 o Default is Name
4. City City City in which the store is located. o Optional o String o Maximum length 50
5. State State State in which the store is located.
Dynamic State Store Attribute is created.
o Optional o String o Maximum length 50
6. Selling Square Footage SellingSquareFeet
Square Footage of selling space in the store. This may be either exact or rounded. It will be used for store groupings only.
o Optional o Integer
7. Selling Open Date SellingOpenDate The date in which the store opens for sales.
This date is utilized throughout the application for store status options relative to the Selling Open Date.
This date is an extension of eligibility for Sales. A store will be ineligible for sales until the week of the open date.
o Optional o Date
o XML: Format – yyyy-mm-dd.
o Delimited: yyyy-mm-dd, mm-dd-yyyy, yyyy/mm/dd, or mm/dd/yyyy.

S t o r e P r o f i l e s - T r a n s a c t i o n D e f i n i t i o n
Page | 7
Store Definitions – UseCharacteristicTransaction = False
# Field Name XML Identifier Description Characteristics
8. Selling Close Date SellingCloseDate The date in which the store no longer is open for sales.
This date is an extension of eligibility for Sales. A store will be ineligible for sales after the week of the close date.
o Optional o Date
o XML: Format – yyyy-mm-dd.
o Delimited: yyyy-mm-dd, mm-dd-yyyy, yyyy/mm/dd, or mm/dd/yyyy.
9. Stock Open Date StockOpenDate The date in which the store begins accepting Stock.
This date is an extension of eligibility for Stock. A store will be ineligible for stock until the week of the open date.
o Optional o Date
o XML: Format – yyyy-mm-dd.
o Delimited: yyyy-mm-dd, mm-dd-yyyy, yyyy/mm/dd, or mm/dd/yyyy.
10. Stock Close Date StockCloseDate The date in which the store no longer accepts Stock.
This date is an extension of eligibility for Stock. A store will be ineligible for stock after the week of the close date.
o Optional o Date
o XML: Format – yyyy-mm-dd.
o Delimited: yyyy-mm-dd, mm-dd-yyyy, yyyy/mm/dd, or mm/dd/yyyy.
11. Active Indicator Flag ActiveIndicator Designates whether or not the store is active within the system. When the store is inactive, it will no longer be visible in all other functions.
o Optional o Boolean
o True o False
o Default is True
12. Shipping Lead Time LeadTime The average number of days before the shipment arrives in the store after it has been picked/shipped.
o Optional o Integer
13. Shipping Days ShipDate Designates the days of the week the store is picked for shipment. Any or all days may be designated.
o Optional o String / Pattern
o M|Tu|W|Th|F|Sa|Su
14. Virtual Store Warehouse ID
VSWID Virtual Store Warehouse for this store. o Optional o Text
15. Characteristic Name Characteristic : Name Designates the dynamic characteristic name of the characteristic for each store.
o Required o String o Maximum length 50
as pre-defined

S t o r e P r o f i l e s - T r a n s a c t i o n D e f i n i t i o n
Page | 8
Store Definitions – UseCharacteristicTransaction = False
# Field Name XML Identifier Description Characteristics
16. Characteristic Type Characteristic : CharType
Used in conjunction with auto adding new store characteristics. This describes the data type of the new characteristic.
o Optional o Text o Date
o Format: yyyy/mm/dd, yyyy-mm-dd, mm/dd/yyyy, mm-dd-yyyy.
o Number o Dollar
o Format: 999, 999.999, -999 (No comma separators or $ signs).
o Defaults to Text
17. Characteristic Value Characteristic : Value The value of the pre-defined characteristic. If the characteristic is defined with a value list, this value must match one of the list items.
o Required o String o As pre-defined
Removing Store Values (Delimited) For non-characteristic store values, inputting “no value” for a field will cause its value to remain unchanged. To remove a value, enter a space for text fields, 0 for Numeric fields, and 0001-01-01 for date fields if XML or 1/1/0001 if delimited.
Removing Characteristic Values (Delimited) For store characteristic values, inputting “no value” for a field will cause its value to be removed.
Removing Store and Characteristic Values (XML) Not including the XML tag and value in the XML transaction will cause the field to remain unchanged. To remove a value, enter “” (<double-quote><double-quote>) for text fields, “0” for numeric fields, and “0001-01-01” for date fields.
More about Store Characteristics Repeat Characteristic Name, Type and Value (in pairs) as needed. Order of characteristics does not affect processing since they are paired (name and value).
If a data type other than text is desired for a new characteristic, a delimiter can be specified. This delimiter is then used in the characteristic name to split the name from the data type: <characteristic name><delimiter><date type>. The delimiter should be a single character. A backslash is the default characteristic type delimiter.

S t o r e P r o f i l e s - T r a n s a c t i o n D e f i n i t i o n
Page | 9
Examples Below is an example of a store record where a new characteristic called ‘Region’ is added as a number and will contain the value of 4. Note that the type is only used when the characteristic does not already exist. Otherwise it is simply ignored.
Store Definitions – UseCharacteristicTransaction = True
# Field Name XML Identifier Description Characteristics
1. Transaction Type NA Designates the transaction as a store transaction.
o Required. o S
2. Store Identifier ID Defines the Store ID
Note: This is an alpha field. If store ID’s are numeric, it is suggested that the number be left justified zero filled in order to keep the stores in numerical sequence.
o Required o String o Maximum length 50 o Must
3. Store Name Name Defines the Store Name o Optional o String o Maximum length 50
4. Store Description Description Description of the store. o Optional o String o Maximum length 50 o Default is Name
5. City City City in which the store is located. o Optional o String o Maximum length 50
6. State State State in which the store is located.
Dynamic State Store Attribute is created.
o Optional o String o Maximum length 50
7. Selling Square Footage SellingSquareFeet
Square Footage of selling space in the store. This may be either exact or rounded. It will be used for store groupings only.
o Optional o Integer
8. Selling Open Date SellingOpenDate The date in which the store opens for sales.
This date is utilized throughout the application for store status options relative to the Selling Open Date.
This date is an extension of eligibility for Sales. A store will be ineligible for sales until the week of the open date.
o Optional o Date
o Format – yyyy-mm-dd
Example of store transaction that is adding the Region characteristic for store 1101:1101,The Mall,,Cityville,CA,10000,,,11/3/2003,,TRUE,3,M W F,Region\Number,4
Example of store transaction that is removing a value from the Region characteristic for store 1101: 1101,The Mall,,Cityville,CA,10000,,,11/3/2003,,TRUE,3,M W F,Region,
Example of store transaction that is removing a value from the Region characteristic for store 1101 when another characteristic definition follows it in the transaction: 1101,The Mall,,Cityville,CA,10000,,,11/3/2003,,TRUE,3,M W F,Region,,Location,Mall

S t o r e P r o f i l e s - T r a n s a c t i o n D e f i n i t i o n
Page | 10
Store Definitions – UseCharacteristicTransaction = True
# Field Name XML Identifier Description Characteristics
9. Selling Close Date SellingCloseDate The date in which the store no longer is open for sales.
This date is an extension of eligibility for Sales. A store will be ineligible for sales after the week of the close date.
o Optional o Date
o Format – yyyy-mm-dd
10. Stock Open Date StockOpenDate The date in which the store begins accepting Stock.
This date is an extension of eligibility for Stock. A store will be ineligible for stock until the week of the open date.
o Optional o Date
o Format – yyyy-mm-dd
11. Stock Close Date StockCloseDate The date in which the store no longer accepts Stock.
This date is an extension of eligibility for Stock. A store will be ineligible for stock after the week of the close date.
o Optional o Date
o Format – yyyy-mm-dd
12. Active Indicator Flag ActiveIndicator Designates whether or not the store is active within the system. When the store is inactive, it will no longer be visible in all other functions.
o Optional o Boolean
o True o False
o Default is True
13. Shipping Lead Time LeadTime The average number of days before the shipment arrives in the store after it has been picked/shipped.
o Optional o Integer
14. Shipping Days ShipDate Designates the days of the week the store is picked for shipment. Any or all days may be designated.
o Optional o String / Pattern
o M|Tu|W|Th|F|Sa|Su
15. Virtual Store Warehouse ID
VSWID Designates the identifier for the virtual store warehouse.
o Optional o Text
16. Action Action Available in XML only. See “Store Delete Definitions” and “Store Recover Definitions” below.
o Optional o Delete o Restore o Update o Default is Update
Below is an example of a store record that set the Virtual Store Warehouse ID.
Delimited Example: S,1101,The Mall,,Cityville,CA,10000,,,11/3/2003,,TRUE,3,M W F,VSW123 XML Example: <?xml version="1.0" encoding="utf-8" ?> <Stores xmlns="http://tempuri.org/StoreLoadSchema.xsd"> <Options AutoAddCharacteristics="true"/>
<Store ID="1101" Name="The Mall" City="Cityville" State="CA" SellingSquareFeet="10000" SellingOpenDate="2003-03-11" ActiveIndicator="true" LeadTime="3" ShipDate="M,W,F" VSWID="VSW123">
</Store> </Stores>

S t o r e P r o f i l e s - T r a n s a c t i o n D e f i n i t i o n
Page | 11
Characteristic Definitions The characteristic transaction type defines the characteristics for the stores. This transaction type is only valid if the UseCharacteristicTransaction parameter of the configuration file is set to True. The store must already be complete in order to process the characteristics transactions. When defining the stores and characteristics within the same transaction file, the characteristic transactions must follow the store transactions.
Characteristic Definitions
# Field Name XML Identifier Description Characteristics
1. Transaction Type NA Designates the transaction as a characteristic transaction.
o Required. o C
2. Store Identifier ID Defines the Store ID
Note: This is an alpha field. If store ID’s are numeric, it is suggested that the number be left justified zero filled in order to keep the stores in numerical sequence.
o Required o String o Maximum length 50 o Must
3. Characteristic Name Characteristic : Name Designates the dynamic characteristic name of the characteristic for each store.
o Required o String o Maximum length 50
as pre-defined
4. Characteristic Type Characteristic : CharType
Used in conjunction with auto adding new store characteristics. This describes the data type of the new characteristic.
o Optional o Text o Date
o Format: yyyy/mm/dd, yyyy-mm-dd, mm/dd/yyyy, mm-dd-yyyy
o Number o Dollar
o Format: 999, 999.999, -999 (No comma separators or $ signs).
o Defaults to Text
5. Characteristic Value Characteristic : Value The value of the pre-defined characteristic. If the characteristic is defined with a value list, this value must match one of the list items.
o Required o String o As pre-defined
Note: This format is only used for delimited transactions. These values may also be provided on the store definitions transactions. Using separate characteristics transactions will not require changes if additional fields are added to the stores definitions transaction.
To remove a value from a characteristic, refer to Removing Characteristic Values above.
If a data type other than text is desired for a new characteristic, a delimiter can be specified. This delimiter is then used in the characteristic name to split the name from the data type: <characteristic name><delimiter><date type>. The delimiter should be a single character.

S t o r e P r o f i l e s - T r a n s a c t i o n D e f i n i t i o n
Page | 12
Examples Below is an example of a characteristic record where a new characteristic called ‘Region’ is added as a number and will contain the value of 4. Note that the type is only used when the characteristic does not already exist. Otherwise it is simply ignored.
Store Delete Definitions The store delete transaction type defines stores that are to be marked for deletion. Stores must be set to “Inactive” prior to marking them for delete. Stores will not be physically deleted until the Store Delete process is run. See Logility - RO Store Delete Guide.
Store Delete Definitions
# Field Name XML Identifier Description Characteristics
6. Transaction Type Action Designates the transaction to mark a store for deletion. The store must have already been set to inactive (ActiveInd = False).
o Required. o D
7. Store Identifier ID Defines the Store ID
Note: This is an alpha field. If store ID’s are numeric, it is suggested that the number be left justified zero filled in order to keep the stores in numerical sequence.
o Required o String o Maximum length 50 o Must
Examples
Delimited Example: C,1101,Region\Number,4 XML Example: <?xml version="1.0" encoding="utf-8" ?> <Stores xmlns="http://tempuri.org/StoreLoadSchema.xsd"> <Options AutoAddCharacteristics="true"/> <Store ID="1101" Name="The Mall" City="Cityville" State="CA" SellingSquareFeet="10000" SellingOpenDate="2003-03-11" ActiveIndicator="true" LeadTime="3" ShipDate="M,W,F" VSWID="VSW123"> <Characteristic Name="Region" Value="4" CharType="Number" /> </Store> </Stores>
Delimited Example: D,1101 XML Example: <?xml version="1.0" encoding="utf-8" ?> <Stores xmlns="http://tempuri.org/StoreLoadSchema.xsd"> <Store ID="1101" Action="Delete"> </Store> </Stores>

S t o r e P r o f i l e s - C o m m a n d P r o c e s s i n g
Page | 13
Store Recover Definitions The store recover transaction type reverses the effects of the store delete transaction above. Stores will be left as “Inactive”, but will no longer be marked for delete.
Store Restore Definitions
# Field Name XML Identifier Description Characteristics
8. Transaction Type Action Designates the transaction to restore a store that has been previously marked for deletion by mistake.
o Required. o R
9. Store Identifier ID Defines the Store ID
Note: This is an alpha field. If store ID’s are numeric, it is suggested that the number be left justified zero filled in order to keep the stores in numerical sequence.
o Required o String o Maximum length 50 o Must
Examples
Command Processing The Store Load may be processed from outside of the Logility - RO system using a command prompt or a command file. This allows for the Store Load to be processed within a client’s third party scheduling package along with standard scheduling.
The Store Load Task Lists may be included in a Job to be processed as well. See Scheduler API section.
Delimited Example: R,1101 XML Example: <?xml version="1.0" encoding="utf-8" ?> <Stores xmlns="http://tempuri.org/StoreLoadSchema.xsd"> <Store ID="1101" Action="Recover"> </Store> </Stores>

S t o r e P r o f i l e s - C o m m a n d P r o c e s s i n g
Page | 14
Command Format
StoreLoad.exe [<Input File> [<Delimiter>] ]
# Field Identifier Description
1. StoreLoad.exe o The file path and executable to be processed.
2. Input File o Optional o The input file containing input transactions o Defaults to “InputFile” setting in the config file if not specified.
3. Delimiter o Optional o The field delimiter for text input files. o Defaults to “Delimiter” setting in the config file if not specified.
Note: Parameters must be surrounded by double quotes (“) when spaces are imbedded. Recommended practice is to always use double quotes around each parameter.
Command Sample
"C:\MIDRetail\Batch\StoreLoad.exe" "C:\MIDRetailData\Stores\StoreProfile.xml"

P r o d u c t H i e r a r c h y P r o f i l e s - O v e r v i e w
Page | 15
Chapter 3: Product Hierarchy Profiles
Overview The Product Hierarchy is a company’s product organization. Each level in the hierarchy is an organizational category. Examples of levels are chain, divisions, subdivisions, departments, sub-departments, classes, sub-classes, styles, and color.
This API may also be used in order to reclassify products. Reclassification provides the ability to reorganize the Merchandise Hierarchy to accommodate changing business needs. It does affect all aspects of the application, and therefore should be processed with caution. Additional information concerning Reclass is provided later in this section.
Note: The input transactions for this API must be in a location relative to the Hierarchy Service machine. (i.e.: The location must either be physically on the Hierarchy Service machine, or on a mapped drive of the Hierarchy Service machine).
Transaction Definition Product Hierarchy transactions include multiple types of data. They include Hierarchy Definitions, Level Definitions, Product Definitions, Reclassification Options, and Reclassification Actions as described below. Each type of transaction is identified by the Transaction Type.
Transactions can be provided using either a delimited or an XML format. Refer to the provided HierarchyLoadSchema.xsd for the XML file layout. The delimited transactions are structured using the format below with each field separated by the delimiter identified to the application.
Sample transactions can be found in the “\Batch\Transactions” folder.
Hierarchy Definition The hierarchy definitions are only defined once and are typically defined interactively within the application and the API is not used for this definition. If the API is used to define the organizational hierarchy and/or the alternate hierarchies, they should be processed only once and as a separate file.
The hierarchy transaction type defines a hierarchy name and type. Organizational and Alternate Hierarchies may be defined through the API or in the application. These transactions must be the first transactions in the input file or a separate input file that is processed first.
Hierarchy Definition
# Field Name XML Identifier Description Characteristics
1. Transaction Type NA Designates the transaction as a hierarchy transaction.
o Required o H
2. Hierarchy Identifier ID Defines the name of the hierarchy being defined.
o Required o String o Maximum length 50

P r o d u c t H i e r a r c h y P r o f i l e s - T r a n s a c t i o n D e f i n i t i o n
Page | 16
Hierarchy Definition
# Field Name XML Identifier Description Characteristics
3. Update definition flag UpdateDefinition Designates the Hierarchy definition to be updated when set to “True”
o Optional o True o False
o Defaults to False
4. Hierarchy Type Type Defines the type of hierarchy being defined. Must be either organizational or open. There is a single organizational hierarchy defined. Multiple open type hierarchies may be defined as Alternate Hierarchies in order to group specific products together.
o Required o String
o Organizational o Open
5. Folder Color Color Defines the color of the folder to be used for the hierarchy being defined. See Determining Available Colors to get the list of colors.
o Optional o String o Maximum length 30
Level Definitions The level definitions are only defined once and are typically defined interactively within the application and the API is not used for this definition. If the API is used to define the organizational hierarchy levels it should be processed only once and as a separate file, or with the organizational hierarchy definition.
The level transactions define the levels of an organizational hierarchy only. The hierarchy must already be defined in order to process the level transactions. When defining the hierarchy within the same transaction file, the level transactions must follow the hierarchy transactions.
Level Definitions
# Field Name XML Identifier Description Characteristics
1. Transaction Type NA Designates the transaction as a hierarchy level transaction.
o Required o L
2. Hierarchy Identifier Hierarchy : ID Designates the ID of the hierarchy being defined.
o Match Hierarchy in “H” transaction
3. Level Name Name Defines the name of the level within the hierarchy being defined.
o Required o String o Maximum length 50
4. Level Type Type Designates the level as a specific type. Style designates the lowest level for hardlines and the lowest level above color for softlines.
o Optional o String
o Undefined o Style o Color o Size
o Defaults to Undefined
5. Level Length Type LengthType Designates the length restrictions, if any, of every product node ID at this level. Unrestricted designates a free form style for each node ID. Required Size designates that each node ID must be the specified length. Range designates that each node ID must adhere to a minimum and maximum length.
o Optional – default is unrestricted
o String o Unrestricted o Required o Range
o Defaults to Unrestricted

P r o d u c t H i e r a r c h y P r o f i l e s - T r a n s a c t i o n D e f i n i t i o n
Page | 17
Level Definitions
# Field Name XML Identifier Description Characteristics
6. Folder Color Color Defines the color of the folder to be used for the level being defined. See Determining Available Colors to get the list of colors.
o Optional o String o Maximum length 30
7. Required Size RequiredSize Defines the specific length that each node ID must adhere to when the length type is set to Required Size.
o Required if LengthType is Required
o String o Integer o Zero when
LengthType is unrestricted or range
8. Size Range From SizeRangeFrom Defines the minimum length that each node ID must adhere to when the length type is set to Range.
o Required if LengthType is Range
o String o Integer o Zero when
LengthType is unrestricted or required size
9. Size Range To SizeRangeTo Defines the maximum length that each node ID must adhere to when the length type is set to Range.
o Required if LengthType is Range
o String o Integer o Must be greater than
SizeRangeFrom o Zero when
LengthType is unrestricted or required size
10. Plan Level Type PlanLevelType Designates the type of plans which are developed at the Plan Level. This option is only valid if the Type is PlanLevel.
o Optional o String
o Undefined o Regular o Total
o Defaults to Undefined
11. Is OTS Forecast Level Flag IsOTSForecastLevel Defines the default OTS Forecast level of the hierarchy.
o Optional – the default is false o True o False
o Defaults to False
Note: Color and Size levels will be automatically added when Softlines is designated. Do not include these levels through the API or try to create them interactively within the application.
Product Definitions The product transaction type defines the products within the levels of the hierarchy. The hierarchy and the level definitions must already be complete (typically defined interactively within the application) in order to process the product transactions. When defining the hierarchy and levels within the same transaction file, the product transactions must follow the hierarchy and level transactions.

P r o d u c t H i e r a r c h y P r o f i l e s - T r a n s a c t i o n D e f i n i t i o n
Page | 18
The format of product definition transaction varies based on the setting of the UseCharacteristicTransaction parameter of the configuration file. If the value is False, product characteristics may be included on the product transaction, but the field to apply node properties for an alternate hierarchy node from an organizational hierarchy node is not available. To set the apply node properties field, you must use the format that has the UseCharacteristicTransaction parameter set to True.
Note: Logility - RO recommends that the product definitions be separated into several input files. This provides for better manageability and performance. The products will be added or updated within the Hierarchy. The Hierarchy does not have a “replace” option. Any product definitions that need to be moved or deleted must be processed using the “Reclassification” option described in a later section.
Product Definitions – UseCharacteristicTransaction = False
# Field Name XML Identifier Description Characteristics
1. Transaction Type NA Designates the transaction as a product definition transaction.
o Required o P
2. Hierarchy Identifier Hierarchy : ID Designates the ID of the hierarchy being defined.
o Match Hierarchy in “H” transaction
3. Parent Identifier Parent Designates the “parent” node in which the product is being defined. When defining a size, the parent is the concatenation of style\color using the defined level delimiter (backslash is the default and can be modified in Administration>Options). It is not recommended to load the sizes into the hierarchy.
o Required o String o Maximum length 50
4. Product Identifier ID Defines the unique ID or code of the product level being defined.
When defining a color or size the ID is not required to be unique.
For a color, the style is the parent and for a size the style\color is the parent (using the defined level delimiter).
o Required o String o Must be unique –
except if color or size o Maximum length 50
5. Product Name Name Defines the specific name of the product level being defined.
The name will default to the ID if it is not specified.
o Optional o String o Maximum length 50
6. Product Description Description Defines the description of the product level being defined.
o Optional o String o Maximum length 250
7. Product Type Type Designates the line of product, hardlines or softlines, of the product level being defined. The system defaults to softlines.
o Optional o Undefined o Hardlines o Softlines
o Defaults to Softlines
8. Size Category SizeCodeProductCategory Identifies each corresponding product category of the size code on the size node. This is used during the auto-add of the size codes. It is not recommended to load the sizes into the hierarchy.
o Optional o String
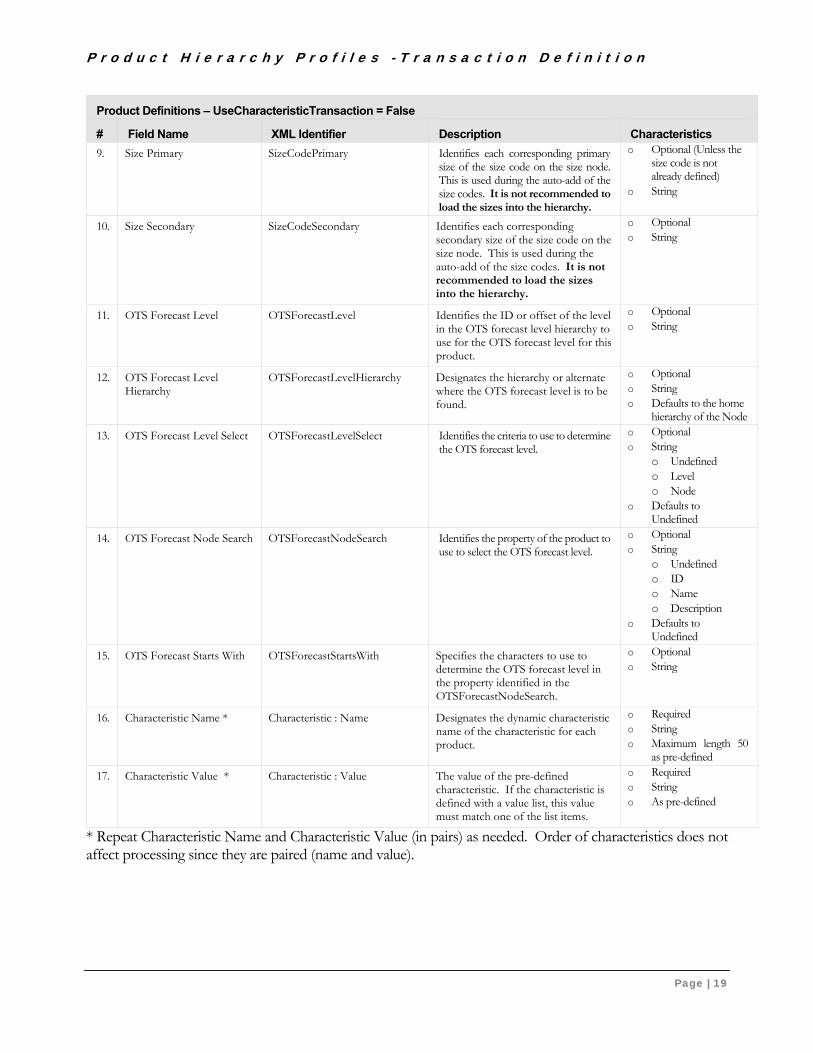
P r o d u c t H i e r a r c h y P r o f i l e s - T r a n s a c t i o n D e f i n i t i o n
Page | 19
Product Definitions – UseCharacteristicTransaction = False
# Field Name XML Identifier Description Characteristics
9. Size Primary SizeCodePrimary Identifies each corresponding primary size of the size code on the size node. This is used during the auto-add of the size codes. It is not recommended to load the sizes into the hierarchy.
o Optional (Unless the size code is not already defined)
o String
10. Size Secondary SizeCodeSecondary Identifies each corresponding secondary size of the size code on the size node. This is used during the auto-add of the size codes. It is not recommended to load the sizes into the hierarchy.
o Optional o String
11. OTS Forecast Level OTSForecastLevel Identifies the ID or offset of the level in the OTS forecast level hierarchy to use for the OTS forecast level for this product.
o Optional o String
12. OTS Forecast Level Hierarchy
OTSForecastLevelHierarchy Designates the hierarchy or alternate where the OTS forecast level is to be found.
o Optional o String o Defaults to the home
hierarchy of the Node
13. OTS Forecast Level Select OTSForecastLevelSelect Identifies the criteria to use to determine the OTS forecast level.
o Optional o String
o Undefined o Level o Node
o Defaults to Undefined
14. OTS Forecast Node Search OTSForecastNodeSearch Identifies the property of the product to use to select the OTS forecast level.
o Optional o String
o Undefined o ID o Name o Description
o Defaults to Undefined
15. OTS Forecast Starts With OTSForecastStartsWith Specifies the characters to use to determine the OTS forecast level in the property identified in the OTSForecastNodeSearch.
o Optional o String
16. Characteristic Name * Characteristic : Name Designates the dynamic characteristic name of the characteristic for each product.
o Required o String o Maximum length 50
as pre-defined
17. Characteristic Value * Characteristic : Value The value of the pre-defined characteristic. If the characteristic is defined with a value list, this value must match one of the list items.
o Required o String o As pre-defined
* Repeat Characteristic Name and Characteristic Value (in pairs) as needed. Order of characteristics does not affect processing since they are paired (name and value).
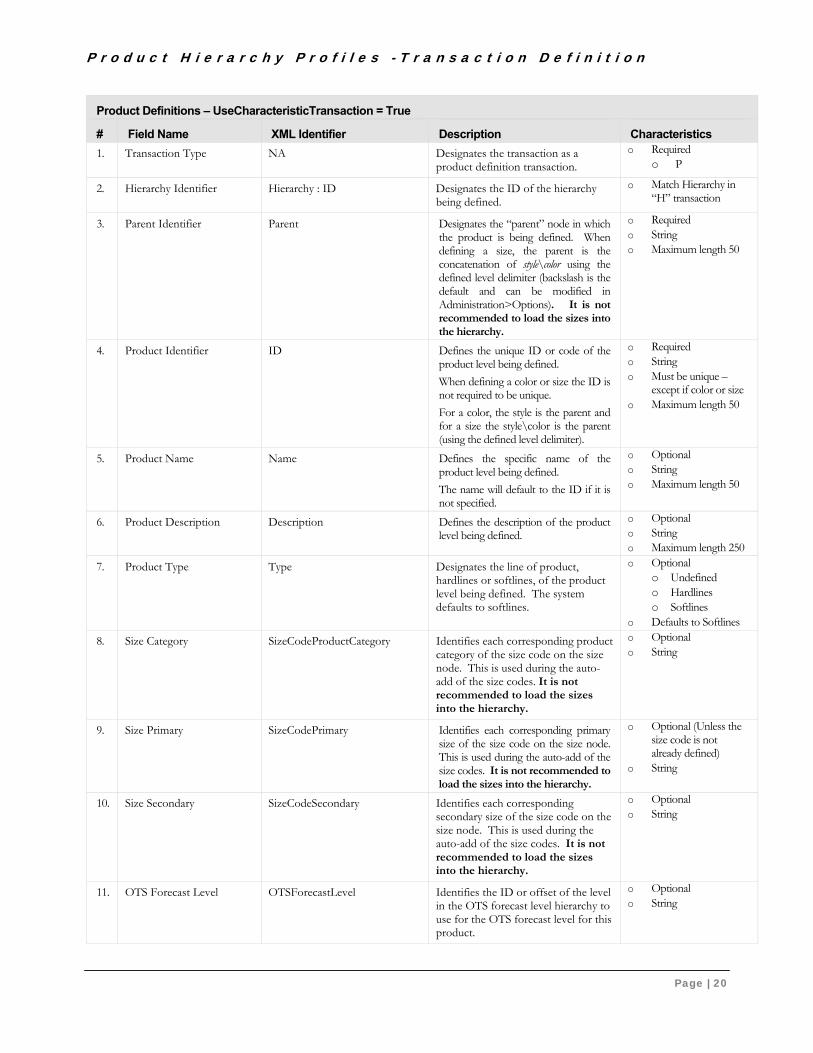
P r o d u c t H i e r a r c h y P r o f i l e s - T r a n s a c t i o n D e f i n i t i o n
Page | 20
Product Definitions – UseCharacteristicTransaction = True
# Field Name XML Identifier Description Characteristics
1. Transaction Type NA Designates the transaction as a product definition transaction.
o Required o P
2. Hierarchy Identifier Hierarchy : ID Designates the ID of the hierarchy being defined.
o Match Hierarchy in “H” transaction
3. Parent Identifier Parent Designates the “parent” node in which the product is being defined. When defining a size, the parent is the concatenation of style\color using the defined level delimiter (backslash is the default and can be modified in Administration>Options). It is not recommended to load the sizes into the hierarchy.
o Required o String o Maximum length 50
4. Product Identifier ID Defines the unique ID or code of the product level being defined.
When defining a color or size the ID is not required to be unique.
For a color, the style is the parent and for a size the style\color is the parent (using the defined level delimiter).
o Required o String o Must be unique –
except if color or size o Maximum length 50
5. Product Name Name Defines the specific name of the product level being defined.
The name will default to the ID if it is not specified.
o Optional o String o Maximum length 50
6. Product Description Description Defines the description of the product level being defined.
o Optional o String o Maximum length 250
7. Product Type Type Designates the line of product, hardlines or softlines, of the product level being defined. The system defaults to softlines.
o Optional o Undefined o Hardlines o Softlines
o Defaults to Softlines
8. Size Category SizeCodeProductCategory Identifies each corresponding product category of the size code on the size node. This is used during the auto-add of the size codes. It is not recommended to load the sizes into the hierarchy.
o Optional o String
9. Size Primary SizeCodePrimary Identifies each corresponding primary size of the size code on the size node. This is used during the auto-add of the size codes. It is not recommended to load the sizes into the hierarchy.
o Optional (Unless the size code is not already defined)
o String
10. Size Secondary SizeCodeSecondary Identifies each corresponding secondary size of the size code on the size node. This is used during the auto-add of the size codes. It is not recommended to load the sizes into the hierarchy.
o Optional o String
11. OTS Forecast Level OTSForecastLevel Identifies the ID or offset of the level in the OTS forecast level hierarchy to use for the OTS forecast level for this product.
o Optional o String

P r o d u c t H i e r a r c h y P r o f i l e s - T r a n s a c t i o n D e f i n i t i o n
Page | 21
Product Definitions – UseCharacteristicTransaction = True
# Field Name XML Identifier Description Characteristics
12. OTS Forecast Level Hierarchy
OTSForecastLevelHierarchy Designates the hierarchy or alternate where the OTS forecast level is to be found.
o Optional o String o Defaults to the
organizational hierarchy
13. OTS Forecast Level Select OTSForecastLevelSelect Identifies the criteria to use to determine the OTS forecast level.
o Optional o String
o Undefined o Level o Node
o Defaults to Undefined
14. OTS Forecast Node Search OTSForecastNodeSearch Identifies the property of the product to use to select the OTS forecast level.
o Optional o String
o Undefined o ID o Name o Description
o Defaults to Undefined
15. OTS Forecast Starts With OTSForecastStartsWith Specifies the characters to use to determine the OTS forecast level in the property identified in the OTSForecastNodeSearch.
o Optional o String
16. Apply Node Properties ApplyNodeProperties Specifies the ID of the node in the organizational hierarchy from which alternate hierarchy nodes are to inherit node property settings.
o Optional o String
Removing Product Values (Delimited) For non-characteristic product values, inputting “no value” for a field will cause its value to remain unchanged. To remove a value, enter a space for text fields, 0 for Numeric fields, and 0001-01-01 for date fields.
Removing Product Characteristic Values (Delimited) For product characteristic values, inputting “no value” for a field will cause its value to be removed.
Removing Product and Characteristic Values (XML) Not including the XML tag and value in the XML transaction will cause the field to remain unchanged. To remove a value, enter “” (<double-quote><double-quote>) for text fields, “0” for numeric fields, and “0001-01-01” for date fields.

P r o d u c t H i e r a r c h y P r o f i l e s - T r a n s a c t i o n D e f i n i t i o n
Page | 22
Characteristic Definitions The characteristics transaction type defines the characteristics for the products. This transaction type is only valid if the UseCharacteristicTransaction parameter of the configuration file is set to True. The product must already be complete in order to process the characteristics transactions. When defining the products and characteristics within the same transaction file, the characteristic transactions must follow the product transactions.
Characteristics Definitions
# Field Name XML Identifier Description Characteristics
1. Transaction Type NA Designates the transaction as a product definition transaction.
o Required o C
2. Hierarchy Identifier Hierarchy : ID Designates the ID of the hierarchy being defined.
o Match Hierarchy in “H” transaction
3. Parent Identifier Parent Designates the “parent” node in which the product is being defined. When defining a size, the parent is the concatenation of style\color using the defined level delimiter (backslash is the default and can be modified in Administration>Options). It is not recommended to load the sizes into the hierarchy.
o Required o String o Maximum length 50
4. Product Identifier ID Defines the unique ID or code of the product level being defined.
When defining a color or size the ID is not required to be unique.
For a color, the style is the parent and for a size the style\color is the parent (using the defined level delimiter).
o Required o String o Must be unique –
except if color or size o Maximum length 50
5. Characteristic Name * Characteristic : Name Designates the dynamic characteristic name of the characteristic for each product.
o Required o String o Maximum length 50
as pre-defined
6. Characteristic Value * Characteristic : Value The value of the pre-defined characteristic. If the characteristic is defined with a value list, this value must match one of the list items.
o Required o String o As pre-defined
* Repeat Characteristic Name and Characteristic Value (in pairs) as needed. Order of characteristics does not affect processing since they are paired (name and value).
Note: This format is only used for delimited transactions. These values may also be provided on the product transactions. Using separate characteristics transactions will not require changes if additional fields are added to the product transaction.

P r o d u c t H i e r a r c h y P r o f i l e s - T r a n s a c t i o n D e f i n i t i o n
Page | 23
Reclassification Options Reclassification Options provide processing settings to control the reclassification process. The options include Preview and Rollup options.
The Reclass Preview option will generate a report of what will be affected if the actual Reclassification were to be processed. This will allow for verification before the process.
The Reclass Rollup option provides the ability to have the reclassification process schedule rollup requests based on the actions that are processed. The Reclass Forecast Version allows the rollup option to be set based on the Forecast Version (i.e.: Actual, Action, etc.). What-if type Forecast Versions may need to be rolled up manually by the users to avoid conflicts at higher levels. Rollup requests can also optionally be generated for external intransit and alternate hierarchies designated at Rollup API. The rollup requests will be generated based on the action:
Delete Action – the rollup option will generate rollup requests from the level in which the delete is requested up the hierarchy.
Move Action – the rollup option will generate rollup requests for the level in which the move is requested for both the From and the To paths up the hierarchy.
Note: When a style is reclassified, and the style history has been purged for older time periods, the older time periods cannot be corrected through rollup since the style history is no longer available. (This applies to higher levels as well based on purge criteria). When this is the case, older time periods history may need to be re-loaded in order to correct history.
The options settings are separated into two categories, base and rollup options.
Base Options Base options identify settings to be used during the reclassification process. This record is optional.
Reclassification Base Options
# Field Name XML Identifier Description Characteristics
1. Transaction Type NA Designates the transaction as an options transaction.
o Required o O
2. Option Type NA Designates the transaction as a base type transaction
o Required o B
3. Reclass Preview ReclassPreview This option allows a preview only of the reclassification. A reclass audit is generated, allowing verification of the processes before the actual reclassification takes place.
A similar audit is generated during the actual reclassification process.
o Optional o True o False
o Defaults to False
4. Roll External Intransit RollExternalIntransit Designates that external intransit rollup items are to be generated.
o Optional o True o False
o Defaults to False
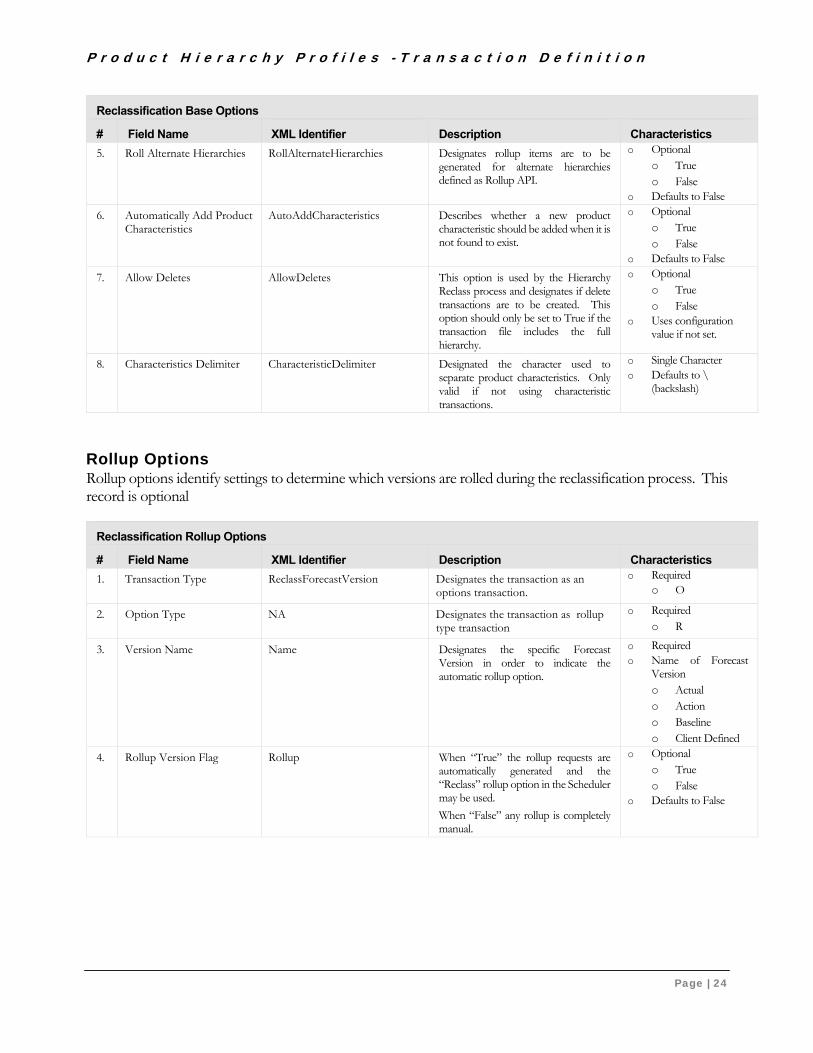
P r o d u c t H i e r a r c h y P r o f i l e s - T r a n s a c t i o n D e f i n i t i o n
Page | 24
Reclassification Base Options
# Field Name XML Identifier Description Characteristics
5. Roll Alternate Hierarchies RollAlternateHierarchies Designates rollup items are to be generated for alternate hierarchies defined as Rollup API.
o Optional o True o False
o Defaults to False
6. Automatically Add Product Characteristics
AutoAddCharacteristics Describes whether a new product characteristic should be added when it is not found to exist.
o Optional o True o False
o Defaults to False
7. Allow Deletes AllowDeletes This option is used by the Hierarchy Reclass process and designates if delete transactions are to be created. This option should only be set to True if the transaction file includes the full hierarchy.
o Optional o True o False
o Uses configuration value if not set.
8. Characteristics Delimiter CharacteristicDelimiter Designated the character used to separate product characteristics. Only valid if not using characteristic transactions.
o Single Character o Defaults to \
(backslash)
Rollup Options Rollup options identify settings to determine which versions are rolled during the reclassification process. This record is optional
Reclassification Rollup Options
# Field Name XML Identifier Description Characteristics
1. Transaction Type ReclassForecastVersion Designates the transaction as an options transaction.
o Required o O
2. Option Type NA Designates the transaction as rollup type transaction
o Required o R
3. Version Name Name Designates the specific Forecast Version in order to indicate the automatic rollup option.
o Required o Name of Forecast
Version o Actual o Action o Baseline o Client Defined
4. Rollup Version Flag Rollup When “True” the rollup requests are automatically generated and the “Reclass” rollup option in the Scheduler may be used.
When “False” any rollup is completely manual.
o Optional o True o False
o Defaults to False

P r o d u c t H i e r a r c h y P r o f i l e s - T r a n s a c t i o n D e f i n i t i o n
Page | 25
Reclassification Actions Reclassification actions are used to manipulate existing products. The actions include Move, Delete, and Rename.
Move Action
Move transactions relocate the product from the current parent to a new parent. The product must be style level or above in order to process the move. The following fields are used to accomplish the Move.
Reclassification Move Action
# Field Name XML Identifier Description Characteristics
1. Transaction Type NA Designates the transaction as a reclassification transaction.
o Required o R
2. Move Action Flag Action=”Move” Designates the product is to be moved to a new parent
o Required o M or MOVE
3. Hierarchy Identifier Hierarchy : ID Designates the ID of the hierarchy being defined.
o Match Hierarchy in “H” transaction
4. Parent Identifier Parent Designates the current “parent” node in which the product will be moved from.
o Required o String o Maximum length 50
5. Product Identifier ID Defines the unique ID or code of the product level being moved. Must be style level or above.
o Required o String o Must be unique o Maximum length 50
6. New Parent Identifier ToParent Designates the new “parent” node in which the product will be moved to.
o Required o String o Maximum length 50
7. New Product Identifier NewID Defines the new unique ID or code of the product level being renamed.
The ID will remain unchanged if not specified.
o Optional o String o Must be unique –
except if color or size o Maximum length 50 o Only applicable to the
Rename action
8. New Name Name Defines the new name of the product level being renamed.
The Name will remain unchanged if not specified.
o Optional o String o Maximum length 50
9. New Description Description Defines the new description of the product level being renamed.
The Description will remain unchanged if not specified.
o Optional o String o Maximum length 250
Organizational nodes can only be moved to the same level in another path of the hierarchy.
Moving nodes from one Alternate to another is allowed. Depending on the data associated with the node, it may be best to remove the node from the current Alternate and add it to the new Alternate. (Alternates roll Actual data on the fly.)
Moving nodes from an Alternate to the Organizational hierarchy is not allowed. If it is only to be removed from the Alternate, then a Delete transaction should be used.

P r o d u c t H i e r a r c h y P r o f i l e s - T r a n s a c t i o n D e f i n i t i o n
Page | 26
Delete Action
The Delete transactions will remove the product and all of its descendants. The product must be style level or above. It can also be used to remove references from alternate hierarchies. The following fields are used to accomplish the Delete.
Reclassification Delete Action
# Field Name XML Identifier Description Characteristics
1. Transaction Type NA Designates the transaction as a reclassification transaction.
o Required o R
2. Delete Action Flag Action=”Delete” Designates the product is to be deleted.
o Required o D or DELETE
3. Hierarchy Identifier Hierarchy : ID Designated the ID of the hierarchy being defined.
o Match Hierarchy in “H” transaction
4. Parent Identifier Parent Designates the current “parent” node in which the product will be moved from.
o Required o String o Maximum length 50
5. Product Identifier ID Defines the unique ID or code of the product level being moved. Must be style level or above.
o Required o String o Must be unique o Maximum length 50
6. Replace Product With Identifier
ReplaceWith Designates another ID in which to replace the deleted ID within Methods, Task Lists, Workspace Filter, etc. (see details below)
o Optional o String o Maximum length 50 o Must be an existing
product ID
7. Force Delete Flag ForceDelete Determines what is to be done with Headers that include the deleted ID. When “True” all Headers with the Style that is to be deleted will also be deleted. (see details below)
o Optional o True o False
o Defaults to False
Note: When a Header is rejected from delete, the Header ID and status is written to the database in the RECLASS_REJECTED_HEADER table. This information can then be used to clean up any existing headers that may impede the reclass process.
The Replace With option allows the deleted ID to be replaced with another existing ID in areas throughout the application as specified below:
Forecast Methods
o Forecast Merchandise – ID will be replaced. If the Replace With option is not specified, the Forecast Method will be deleted
o Basis Merchandise – ID will be replaced. If the Replace With option is not specified, the Basis row will be deleted. This may invalidate the Method and must be reviewed before processing.
Replace With

P r o d u c t H i e r a r c h y P r o f i l e s - T r a n s a c t i o n D e f i n i t i o n
Page | 27
Matrix Balance Methods
o High Level – ID will be replaced. If the Replace With option is not specified, the Matrix Balance Method will be deleted.
Forecast Spread Methods
o Spread From Merchandise - ID will be replaced. If the Replace With option is not specified, the Forecast Spread Method will be deleted.
o Lower Levels Merchandise – ID will not be replaced. If a lower level has been overridden, it will be deleted. This may invalidate the Method and must be reviewed before processing.
Copy Chain Forecast Methods
o Copy To Merchandise - ID will be replaced. If the Replace With option is not specified, the Copy Chain Method will be deleted.
o Basis Merchandise - ID will be replaced. If the Replace With option is not specified, the Basis row will be deleted. This may invalidate the Method and must be reviewed before processing.
Copy Store Forecast Methods
o Copy To Merchandise - ID will be replaced. If the Replace With option is not specified, the Copy Store Method will be deleted.
o Basis Merchandise - ID will be replaced. If the Replace With option is not specified, the Basis row will be deleted. This may invalidate the Method and must be reviewed before processing.
General Allocation Methods
o OTS Forecast Basis Merchandise - ID will be replaced. If the Replace With option is not specified, the Basis will be deleted, reverting back to the OTS Forecast Level default. This may invalidate the Method and must be reviewed before processing.
Allocation Override Methods
o OTS Forecast Basis Merchandise – ID will be replaced. If the Replace With option is not specified, the Basis will be deleted, reverting back to the OTS Forecast Level default. This may invalidate the Method and must be reviewed before processing.
o On-hand Basis Merchandise – ID will be replaced. If the Replace With option is not specified, the Basis will be deleted, reverting back to the OTS Forecast Level default. This may invalidate the Method and must be reviewed before processing.

P r o d u c t H i e r a r c h y P r o f i l e s - T r a n s a c t i o n D e f i n i t i o n
Page | 28
Velocity Method
o Basis Merchandise – ID will be replaced. If the Replace With option is not specified, the Basis will be deleted, reverting back to the OTS Forecast Level default. This may invalidate the Method and must be reviewed before processing.
Fill Size Holes
o Merchandise Basis – ID will be replaced. If the Replace With option is not specified, the Basis will be deleted, reverting back to the OTS Forecast Level default. This may invalidate the Method and must be reviewed before processing.
Size Need Methods
o Merchandise Basis – ID will be replaced. If the Replace With option is not specified, the Basis will be deleted, reverting back to the OTS Forecast Level default. This may invalidate the Method and must be reviewed before processing.
Allocation Header
o Style ID – ID will not be replaced. The Style ID will not be eligible for delete unless the Force Delete option for Allocation Headers is active.
o Forecast ID – ID will be replaced. If the Replace With option is not specified, the node will not be eligible for delete in order to maintain the integrity of the Allocation.
o On-Hand ID – ID will be replaced. If the Replace With option is not specified, the node will not be eligible for delete in order to maintain the integrity of the Allocation.
Task Lists
o Allocate Task – Merchandise – ID will be replaced. If the Replace With option is not specified, the task row will be deleted. This may invalidate the Task List and must be reviewed before processing.
o Forecast Task - Merchandise – ID will be replaced. If the Replace With option is not specified, the task row will be deleted. This may invalidate the Task List and must be reviewed before processing.
o Rollup Task - Merchandise – ID will be replaced. If the Replace With option is not specified, the task row will be deleted. This may invalidate the Task List and must be reviewed before processing.
User “Current” settings
o Allocation Workspace Filter – Merchandise – ID will be replaced. If the Replace With option is not specified, the ID will be removed.

P r o d u c t H i e r a r c h y P r o f i l e s - T r a n s a c t i o n D e f i n i t i o n
Page | 29
o Allocation Review Selection – Merchandise Basis – ID will be replaced. If the Replace With option is not specified, the ID will be removed.
o OTS Forecast Review Selection
OTS Forecast Store – ID will be replaced. If the Replace With option is not specified, the ID will be removed.
OTS Forecast Chain – ID will be replaced. If the Replace With option is not specified, the ID will be removed.
OTS Forecast Basis – ID will be replaced. If the Replace With option is not specified, the Basis detail row will be removed.
The Force Delete option applies to Allocation Headers. When the Style being deleted has Allocation Headers, they will be deleted as well regardless of their status. If the Force Delete
option is “False”, then only Allocation Headers that are either “Received In Balance”, or “Released” and “Shipping Complete” statuses will be deleted.
If an Allocation Header used an OTS Forecast Basis or On-hand Basis of a node that is to be deleted, the Header will not be included in the Force Delete and the node will not be eligible for delete. This is to secure the integrity of the Allocation. In this case, these Allocation Headers must be manually (either through the Header Load API or the Allocation Workspace) deleted before processing Reclassification if the specific node must be deleted.
Headers participating in a Multi-Header as well as Multi-Headers will not be included in the Force Purge and the node will not be eligible for delete. All Multi-Headers must be “cleaned up” manually.
Force Delete

P r o d u c t H i e r a r c h y P r o f i l e s - T r a n s a c t i o n D e f i n i t i o n
Page | 30
Rename Action
The Rename transactions will update the product identifier, name, and description of the specified node. The product must be color level or above. The following fields are used to accomplish the Rename.
Reclassification Rename Action
# Field Name XML Identifier Description Characteristics
1. Transaction Type NA Designates the transaction as a reclassification transaction.
o Required o R
2. Rename Action Flag Action=”Rename” Designates the product is to be renamed.
o Required o R or RENAME
3. Hierarchy Identifier Hierarchy : ID Designates the ID of the hierarchy being defined.
o Match Hierarchy in “H” transaction
4. Parent Identifier Parent Designates the “parent” node in which the product is being renamed.
o Required o String o Must Exist o Maximum length 50
5. Product Identifier ID Defines the unique ID or code of the product level being moved. Must be style level or above.
o Required o String o Must be unique o Maximum length 50
6. New Product Identifier NewID Designates another ID in which to replace the deleted ID within Methods, Task Lists, Workspace Filter, etc. (see details below)
o Optional o String o Maximum length 50 o Must be an existing
product ID
7. New Product Name Name Defines the new name of the product level being renamed.
The Name will remain unchanged if not specified.
o Optional o String o Maximum length 50
8. New Product Description Description Defines the new description of the product level being renamed.
The Name will remain unchanged if not specified.
o Optional o String o Maximum length 250
Note: Rename of an Organizational node from any hierarchy (Organizational or Alternate) will rename the node in the Organizational hierarchy as well as all shortcuts for the node within Alternate hierarchies. (A node that is a shortcut cannot have a different name in an Alternate.)
Determining Available Folder Colors The available colors to use when defining the folder color for the hierarchy or the levels can be determined by referring to the C:\MIDRetail\Client\Graphics folder. They can be identified by looking for files with the names color.openfolder.gif where color is replaced by the actual color of the folder.

P r o d u c t H i e r a r c h y P r o f i l e s - C o m m a n d P r o c e s s i n g
Page | 31
Command Processing The Hierarchy Load may be processed from outside of the Logility - RO system using a command prompt or a command file. This allows for the Hierarchy Load to be processed within a client’s third party scheduling package along with standard scheduling.
The Hierarchy Load Task Lists may be included in a Job to be processed as well. See Scheduler API section.
Command Format
HierarchyLoad.exe [<Input File> [<Delimiter>] ]
# Field Identifier Description
1. HierarchyLoad.exe o The file path and executable to be processed.
2. Input File o Optional o The input file containing input
transactions o Defaults to “InputFile” setting in the
config file if not specified.
3. Delimiter o Optional o The field delimiter for text input files. o Defaults to “Delimiter” setting in the
config file if not specified.
Note: Parameters must be surrounded by double quotes (“) when spaces are imbedded. Recommended practice is to always use double quotes around each parameter.
Command Sample
"C:\MIDRetail\Batch\HierarchyLoad.exe" "C:\MIDRetailData\Hierarchy\Hierarchy.xml"

P r o d u c t H i e r a r c h y P r o f i l e s - R e c l a s s P r o c e d u r e s
Page | 32
Reclass Procedures The following is recommended when processing a Reclassification.
1. Determine the Reclass transactions types to be processed.
2. Process the Reclass in Preview mode prior to the actual Reclass. Analyze the Reclass Preview Audit to ensure that the transactions are correct and will process as expected. The Preview should be “clean” of all errors and rejects before the actual Reclass is processed.
3. Take a full backup of the database before processing Reclass.
4. Process the Hierarchy Load with the Reclass transactions.
Note: the HeaderReleaseFilePath is now required for the HierarchyLoad in the case of Header deletes. It is recommended to be included in the MIDSettings.config file.
5. Process the Rollup if any data is associated with any of the Reclass merchandise. If lower levels are not in balance with the higher levels prior to reclass, then a manual rollup is recommended. Also, if lower level data has been purged, a history re-load for older time periods may be required.
A. Generated - Reclass will generate rollup requests based upon the rollup option settings.
a. Actual version, if requested, for the weeks that the merchandise has history.
b. Each forecast version requested, for the weeks that the merchandise has a forecast.
c. External Intransit (loaded through HistoryPlanLoad) for the current and future days that the merchandise has Intransit loaded.
d. Internal Intransit (controlled by Allocation Headers charged to Intransit) for all the days that the merchandise has Intransit charged.
B. Manual – The rollup processes based upon specified requests such as merchandise levels and type of data.
a. Actual version (history) for stores should be rolled up the hierarchy for all historical weeks and all days of the current week. The beginning (lowest) level depends on the purge criteria and where history is retained. If Chain Actuals are normally rolled from the Store Actuals, then the Store to Chain rollup needs to be processed and then Chain rolled up the hierarchy as well.
b. Forecast versions should be rolled up the hierarchy for all applicable weeks (store and chain) based upon the business needs.
c. Intransit (Internal and External) should be rolled from style/SKU to parent of style only. Levels below style are not always in balance with the style. The highest level that Intransit is retained is parent of style. The levels above parent of style are rolled real-time.
6. Verify the new hierarchy.

P r o d u c t H i e r a r c h y P r o f i l e s - R e c l a s s P r o c e d u r e s
Page | 33
7. Review the Reclass Audit to ensure that all transactions processed without error or rejects.
A. If a transaction fails, the Reclass proceeds in Preview mode only.
B. If any transaction fails, it is most likely that an Allocation Header was in a status that prevented the Reclass operation. In this case, be aware that a partial Reclass may have occurred.
a. When the Replace With option on a Delete is used and an Allocation Header is rejected the style will not be available for delete, although the Replace With option will have already been processed and will not be backed out.
b. When an Allocation Header is rejected from delete, the Header ID and status is written to the database in the RECLASS_REJECTED_HEADER table. This information can then be used to clean up any existing headers that may impede the reclass process.
c. Any successful merchandise node deletes prior to a reject will have been committed to the database and will not be backed out.
8. If a partial Reclass occurred due to errors or rejects of the transactions, a restore of the database may be recommended.

P r o d u c t H i e r a r c h y P r o f i l e s - R e c l a s s A u d i t
Page | 34
Reclass Audit Once the Hierarchy Load Reclassification process is complete, the Audit for the Reclassification may be viewed within the application. It is available for the Preview process as well as the actual reclassification processing. Security access must be granted within the application for viewing.
The Reclass Audit report is available from the Reports option on the Main Toolbar and select Audit – Reclass.
The Reclass Audit report will then be displayed.
Clicking on a specific date and time on the left will drill down into the report where that process date and time is located. The report toolbar provides additional navigation and actions.

P r o d u c t H i e r a r c h y P r o f i l e s - R e c l a s s A u d i t
Page | 35
Export – Allows the report to be exported to the following formats: Crystal Reports, PDF; CSV, Microsoft Excel; Microsoft Word; Rich Text Format, or XML.
Print – Opens the print dialog box in order to print the current report.
Copy – This copies the report.
Toggle Parameter Panel – This turns the parameter panel on or off.
Toggle Group Tree – Clicking the toggle button allows for the Group Tree to be hidden.
Paging – Go to First Page, Previous Page, Next Page, Last Page, and Goto Page is provided with the arrow buttons.
Search Text - Allows searching of the report for specific text. The text will be highlighted when found.
Zoom – The zoom option allows the resizing of the report for ease of viewing (larger or smaller).

H i e r a r c h y R e c l a s s - O v e r v i e w
Page | 36
Chapter 4: Hierarchy Reclass
Overview The Hierarchy Reclass interface will act as a pre-processor to the Hierarchy Load API. It accepts standard Hierarchy Load transactions and determines the action to be performed for each transaction. It will compare the current hierarchy extract files to the current hierarchy definitions loaded in Logility - RO. Any differences will generate either Reclass (Move or Delete) along with Create and Update transactions. It will also filter update transactions to only those that contain changes to improve performance loading the hierarchy transactions.
Create and Update transactions are written to the same file. Move and Delete transactions are written to separate files. The files must be processed in the following order: 1) Create and Update; 2) Move; 3) Delete. The order is controlled by providing different trigger suffixes in the configuration file and then creating a task list that processes the files in this order.
The Hierarchy Reclass interface compares using node identifiers only and cannot detect if either the parent identifier or the child identifier has been renamed. It will process the renamed node identifier as a new node. Transactions for renamed identifiers must be generated outside of this process.
Note: The Hierarchy Reclass process may be referenced in a task list as an external program.
Command Processing The Hierarchy Reclass may be processed from outside of the Logility - RO system using a command prompt or a command file. This allows for the Logility - RO Scheduler’s Jobs and/or Task Lists to be processed within a client’s third party scheduling package along with standard scheduling.
Command Format
HierarchyReclass.exe [<Input Directory> [<Output Directory> [<Trigger Suffix>]]]
# Field Identifier Description
1. HierarchyReclass.exe o The file path and executable to be processed.
2. Input Directory o Optional o The folder containing input transactions o Defaults to “InputDirectory” setting in
the config file if not specified.
3. Output Directory o Optional o The folder where output transactions are
to be written. This folder must be the input folder for the Hierarchy Load process.
o Defaults to “OutputDirectory” setting in the config file if not specified.

H i e r a r c h y R e c l a s s - C o m m a n d P r o c e s s i n g
Page | 37
# Field Identifier Description
4. Trigger Suffix o Optional o The suffix used to create trigger files. o Defaults to “TriggerSuffix” setting in the
config file if not specified.
Note: Parameters must be surrounded by double quotes (“) when spaces are imbedded. Recommended practice is to always use double quotes around each parameter.
Command Sample
"C:\MIDRetail\Batch\HierarchyReclass.exe" "C:\MIDRetailData\Hierarchy Reclass\Hierarchy.xml"

C o l o r C o d e L o a d - O v e r v i e w
Page | 38
Chapter 5: Color Code Load
Overview Colors are defined globally to the application. These colors are then available to the Product Hierarchy and Allocation Headers. If the color codes are not pre-loaded, they will be added during the Hierarchy Load, the Header Load, or the History Load if sufficient information is provided.
Transaction Definition There is one type of Color Code transaction as described below.
Transactions can be provided using either a delimited or an XML format. Refer to the provided ColorCodesLoadSchema.xsd for the XML file layout. The delimited transactions are structured using the format below with each field separated by the delimiter identified to the application.
Sample transactions can be found in the “\Batch\Transactions” folder.
Color Definition The color transaction type defines a color code to be used within the application. These color codes are global.
Color
# Field Name XML Identifier Description Characteristics
1. Color Code Code Identifies the internal code assigned to the specific color.
o Required o String
2. Color Name Name Identifies the name of the color. o Required o String
3. Color Group Group Identifies the group of the color.
For Future Use – not used at this time.
o Optional o String

C o l o r C o d e L o a d - C o m m a n d P r o c e s s i n g
Page | 39
Command Processing The Color Code Load may be processed from outside of the Logility - RO system using a command prompt or a command file. This allows for the Color Code Load to be processed within a client’s third party scheduling package along with standard scheduling.
The Color Codes Load Task List may be included in a Job to be processed as well. See Scheduler API section.
Command Format
ColorCodesLoad.exe [<Input File> [<Delimiter>] ]
# Field Identifier Description
1. ColorCodesLoad.exe o The file path and executable to be processed.
2. Input File o Optional o The input file containing input
transactions o Defaults to “InputFile” setting in the
config file if not specified.
3. Delimiter o Optional o The field delimiter for text files. o Defaults to “Delimiter” setting in the
config file if not specified.
Note: Parameters must be surrounded by double quotes (“) when spaces are imbedded. Recommended practice is to always use double quotes around each parameter.
Command Sample
"C:\MIDRetail\Batch\ColorCodesLoad.exe" "C:\ MIDRetailData\Color\ColorCodes.xml"

S i z e C o d e L o a d - O v e r v i e w
Page | 40
Chapter 6: Size Code Load
Overview Sizes are defined globally to the application. Sizes are defined with a Size Code that is used internally that designates a Primary Size and a Secondary Size (usually a width or length). The size definition also requires a product category. (Examples are Men’s, Women’s, Children’s, Bed & Bath, Kitchen, All, etc.) These sizes are then available to the Product Hierarchy and Allocation Headers. If the size codes are not pre-loaded, they will be added during the Hierarchy Load, the Header Load, or the History Load if sufficient information is provided.
Note: Logility - RO recommends loading the Size Codes, if available, in order to reduce the information required within the other API’s for auto-add purposes.
Transaction Definition There is one type of Size Code transactions as described below.
Transactions can be provided using either a delimited or an XML format. Refer to the provided SizeCodesLoadSchema.xsd for the XML file layout. The delimited transactions are structured using the format below with each field separated by the delimiter identified to the application.
Sample transactions can be found in the “\Batch\Transactions” folder.
Size Definition The size transaction type defines a size code to be used within the application. These size codes are global. When a Header with sizes is loaded, those sizes will be attached to the style/color of the Header within the Hierarchy. The size codes may also be loaded through the Hierarchy Load, Header Load, or the History Load.
Size Codes
# Field Name XML Identifier Description Characteristics
1. Size Code Code Identifies the internal size code assigned to the specific Primary/Secondary size.
o Required o String o Must be unique
2. Size Primary Primary Identifies the Primary size name. o Required o String
3. Size Secondary Secondary Identifies the Secondary size name. (normally a width or length)
o Optional o String
4. Size Category ProductCategory Identifies the product area that the size is used. For example Men’s, Women’s, Children’s, Bed & Bath, Kitchen, All, etc.
o Required o String
Note: The combination of size primary and size secondary must be unique within the size category.

S i z e C o d e L o a d - C o m m a n d P r o c e s s i n g
Page | 41
Command Processing The Size Code Load may be processed from outside of the Logility - RO system using a command prompt or a command file. This allows for the Size Code Load to be processed within a client’s third party scheduling package along with standard scheduling.
The Size Codes Load Task List may be included in a Job to be processed as well. See Scheduler API section.
Command Format
SizeCodesLoad.exe [<Input File> [<Delimiter>] ]
# Field Identifier Description
1. SizeCodesLoad.exe o The file path and executable to be processed.
2. Input File o Optional o The input file containing input
transactions o Defaults to “InputFile” setting in the
config file if not specified.
3. Delimiter o Optional o The field delimiter for text files. o Defaults to “Delimiter” parameter in
config file if not specified.
Note: Parameters must be surrounded by double quotes (“) when spaces are imbedded. Recommended practice is to always use double quotes around each parameter.
Command Sample
"C:\MIDRetail\Batch\SizeCodesLoad.exe" "C:\MIDRetailData\Size\SizeCodes.xml"

H i s t o r y / P l a n s - O v e r v i e w
Page | 42
Chapter 7: History / Plans
Overview The sales and stock store history, current external intransit, as well as store OTS plans data may be interfaced. The history data may be interfaced as daily and/or weekly. The history data must be interfaced at the style/sku level of the Product Hierarchy. As part of the interface, the history data may be summed and rolled up to the higher levels of the Product Hierarchy. The Rollup API is required to be processed – see the Rollup section. The OTS Plan data may be interfaced as weekly. The OTS Plan data should be interfaced at relevant levels of the Product Hierarchy. The Intransit data is the current external intransit not being managed within the Logility - RO system and must be interfaced at the style/sku level of the Product Hierarchy as well for the current selling day (a day greater than the Sales Ending posting date). This information may be interfaced into the system via a text or XML file.
The Sales Ending date is also interfaced with the History / Plans API. This date is essential to the application to determine the current day and onhands. The date should be updated when the daily History Load is completed successfully and before the daily Rollup process.
Transaction Definition There are two types of History/Plan transactions as described below. They are History/Plan Options and History/Plan Values. The transaction provides for Actual, Intransit, and Plan, Store and Chain, as well as Daily and Weekly where applicable.
Transactions can be provided using either a delimited or an XML format. Refer to the provided HistoryPlanLoadSchema.xsd for the XML file layout. The delimited transactions are structured using the format below with each field separated by the delimiter identified to the application.
Sample transactions can be found in the “\Batch\Transactions” folder.
History/Plan Options History/Plan Options provide processing settings for loading values. This record is optional.
History/Plan Options
# Field Name XML Identifier Description Characteristics
1. Transaction Type Options Designates the transaction as a store options transaction.
o Required o Options
2. Sales Ending Date SalesEndingDate Designates the ending date for which sales are being posted.
If the transactions do not contain a date, then this date will be used for the transaction as well.
Note: Intransit transactions must have a date greater than the Sales Ending Date in order to specify current client intransit.
o Optional o String o Gregorian o Defaults to current
week/day

H i s t o r y / P l a n s - T r a n s a c t i o n D e f i n i t i o n
Page | 43
History/Plan Options
# Field Name XML Identifier Description Characteristics
3. Schedule Rolling Store Daily Values to Store Weekly Values Flag
RollStoreDailyToWeekly This option identifies that the process is to generate rollup items for the rollup process to create store weekly history values from daily values. The rollup process must then be run with the “posting” option to complete the rollup process.
o Optional o Default (use setting
from configuration file)
o True o False o Defaults to Config
setting
4. Schedule Rolling Store Daily Values Up The Hierarchy Flag
RollStoreDailyUpHierarchy This option identifies that the process is to generate rollup items for the rollup process to aggregate store daily history values up the hierarchy. The rollup process must then be run with the “posting” option to complete the rollup process.
o Optional o Default (use setting
from configuration file)
o True o False o Defaults to Config
setting
5. Schedule Rolling Store Weekly Values Up The Hierarchy Flag
RollStoreWeeklyUpHierarchy This option identifies that the process is to generate rollup items for the rollup process to aggregate store weekly history and forecast values up the hierarchy. The rollup process must then be run with the “posting” option to complete the rollup process.
o Optional o Default (use setting
from configuration file)
o True o False o Defaults to Config
setting
6. Schedule Rolling Store Weekly Values To Chain Values Flag
RollStoreToChain This option identifies that the process is to generate rollup items for the rollup process to aggregate store weekly history and forecast values to chain values. The rollup process must then be run with the “posting” option to complete the rollup process.
o Optional o Default (use setting
from configuration file)
o True o False o Defaults to Config
setting
7. Schedule Rolling Chain Weekly Values Up The Hierarchy Flag
RollChainUpHierarchy This option identifies that the process is to generate rollup items for the rollup process to aggregate chain weekly history and forecast values up the hierarchy. The rollup process must then be run with the “posting” option to complete the rollup process.
o Optional o Default (use setting
from configuration file)
o True o False o Defaults to Config
setting
8. Roll Ending Stock Date To Next Day Flag
RollStockForward Designates that the stock values in the file are ending stock values (EOD or EOW) and will be rolled to beginning stock (BOD or BOW) values.
o Optional o Default (use setting
from configuration file)
o True o False o Defaults to Config
setting

H i s t o r y / P l a n s - T r a n s a c t i o n D e f i n i t i o n
Page | 44
History/Plan Options
# Field Name XML Identifier Description Characteristics
9. Schedule Rolling Store Intransit Values Up The Hierarchy Flag
RollIntransit This option identifies that the process is to generate rollup items for the rollup process to aggregate intransit values up the hierarchy. The rollup process must then be run with the “posting” option to complete the rollup process.
o Optional o Default (use setting
from configuration file)
o True o False o Defaults to Config
setting
10. Transaction Hint TransactionHint Identifies the hierarchy level of products found in the transactions. It optimizes the processing of the products that meet the criteria. This is a performance tuning option. This does not limit the transactions to only the levels specified.
o Optional o All o StyleAndAbove o Color o Size o Defaults to All
11. Computation Model ComputationModel This option identifies the model to use to determine if computations must be executed after posting. The computation process must then be run to complete the process.
o Optional o Defaults to Config
setting
History/Plan Values History/Plan values provide information about the data being loaded.
History/Plan Values
# Field Name XML Identifier Description Characteristics
1. Timeframe Indicator Period Designates the amount as a Weekly or Daily value
o Optional o Week o Day
o Defaults to Week
2. Forecast Version Version Designates the version description in which the amount is being posted. Daily transactions are only valid for the “Actual” version.
Versions are defined in the application under Administration > Options. The Version name must match what has been defined within the application.
o Optional o String o Maximum length 50 o Defaults to Actual
3. Product Identifier Product The unique product ID as defined in the Product Hierarchy. If this product has not been defined to the Product Hierarchy, the “parent” field is required in order for the product to be automatically defined.
If this product is a color or size level, the ID must be concatenated with the style delimited with the defined level delimiter (backslash is the default and can be modified in Administration>Options) – (style\color or style\color\size).
o Required o String o Maximum length 50
per level

H i s t o r y / P l a n s - T r a n s a c t i o n D e f i n i t i o n
Page | 45
History/Plan Values
# Field Name XML Identifier Description Characteristics
4. Store Identifier Store Designates the store ID of the amount being posted. In order to post a chain amount, omit the Store attribute.
o Required for store transactions
o String o Maximum length 50 o Defaults to Chain
5. Date Type Indicator DateType Designates the type of date the transaction contains.
o Optional o Calendar o Fiscal
o Defaults to Calendar
6. Date Date Designates the day or week of the amount being posted.
o Optional – Required for Intransit only
o String o Gregorian or fiscal
Date o Defaults to current
week/day o Gregorian format –
yyyy-mm-dd o Fiscal format
o Daily – yyyyddd o Weekly –
yyyyww o Intransit transactions
o Required o Must be greater
than the Sales Ending Date
o Daily format only
7. Variable VariableAmount : Variable Designates the variable name in which the amount is being posted.
o Required o String o Includes Sales, Stock,
and Intransit type variables. Base variables:
o For actual history: o Sales Reg o Sales Mkdn o Sales Promo o Stock Reg o Stock Mkdn
o For Forecasts: o Sales o Sales Reg o Sales Promo o Stock o Stock Reg
o For Intransit – Daily only:
o Intransit
8. Variable Amount VariableAmount : Amount Designates the value being posted. o Required o Integer

H i s t o r y / P l a n s - T r a n s a c t i o n D e f i n i t i o n
Page | 46
History/Plan Values
# Field Name XML Identifier Description Characteristics
9. Parent Identifier Parent Designates the “parent” node of the product being posted as defined in the Product Hierarchy.
If the product is a color or size, the parent is the parent of style.
This is used during the auto-add of the product.
o Optional (Unless the product is not already defined in the hierarchy)
o String o Maximum length 50
10. Size Category SizeCodeProductCategory Identifies each corresponding product category of the size code on the size node. This is used during the auto-add of the size codes.
o Optional o String
11. Size Primary SizeCodePrimary Identifies each corresponding primary size of the size code on the size node. This is used during the auto-add of the size codes.
o Optional (Unless the size code is not already defined)
o String o
12. Size Secondary SizeCodeSecondary Identifies each corresponding secondary size of the size code on the size node. This is used during the auto-add of the size codes.
o Optional o String o
13. Product Description ProductDescription The description to use for the product if the item is to be added to the product hierarchy.
If this product is a color or size level, the description must be concatenated with the style delimited with the defined level delimiter (backslash is the default and can be modified in Administration>Options) - (style\color or style\color\size).
If a description is not provided, the product ID will be used for the description.
o Optional o String
14. Product Name ProductName The name to use for the product if the item is to be added to the product hierarchy.
o Optional o String
Note: The following applies to the base variables only. For history, the regular, promotional, and markdown variables must be used and are summed for the Sales or Stock total amounts. For forecasts, Sales and Stock must be used when the plan level is set to total. Sales Reg, Sales Promo, and Stock Reg must be used when the plan level is set to regular.
Note: When loading Intransit at the Size Level, a “Posting” Rollup is required after the load.

H i s t o r y / P l a n s - C o m m a n d P r o c e s s i n g
Page | 47
Command Processing The History/Forecast/Intransit Load may be processed from outside of the Logility - RO system using a command prompt or a command file. This allows for the History / Forecast / Intransit Load to be processed within a client’s third party scheduling package along with standard scheduling.
The History Plan Load Task Lists may be included in a Job to be processed as well. See Scheduler API section.
Command Format
HistoryPlanLoad.exe [<Input File> [<Posting Date> [<Delimiter>] ] ]
# Field Identifier Description
1. HistoryPlanLoad.exe o The file path and executable to be processed.
2. Input File o Optional o The input file containing input
transactions o Defaults to “InputFile” setting in the
config file if not specified.
3. Posting Date o Optional o The posting date. o Defaults to date specified in input file if
not specified.
4. Delimiter o Optional o The field delimiter for text files. o Defaults to “Delimiter” setting in the
config file if not specified.
Note: Parameters must be surrounded by double quotes (“) when spaces are imbedded. Recommended practice is to always use double quotes around each parameter.
Command Sample
"C:\MIDRetail\Batch\HistoryPlanLoad.exe" "C:\MIDRetailData\Daily History\Tran1.xml" “01/28/2006” "C:\MIDRetail\Batch\HistoryPlanLoad.exe" "C:\MIDRetailData\Daily History\Tran2.xml" “01/28/2006” "C:\MIDRetail\Batch\HistoryPlanLoad.exe" "C:\MIDRetailData\Daily History\Tran3.xml" “01/28/2006”

A l l o c a t i o n H e a d e r - O v e r v i e w
Page | 48
Chapter 8: Allocation Header
Overview The Allocation Header contains details of the product to be allocated. This includes ticket information, product level and style/sku codes, quantities as well as basic allocation data. The Allocation Headers may be reviewed in the Allocation Workspace and then processed through the application.
When defining an Allocation Header, if the style, color, size, or SKU has not been previously defined for the product level, the style, color, size, or SKU will automatically be added to the Product Hierarchy.
The status of the load request will be returned via a XML file. This output file will have the same name as the input file with the exception of .out.xml will replace the .xml.
Generating the Header ID The Allocation Header API may optionally generate the Header ID for the products to be allocated. The Header configuration must be setup to specify which fields and characteristics in the XML transactions will make an Allocation Header unique within Logility - RO. This is determined by a “Header Keys to Match” definition. The fields that are used to generate the Header ID must also be defined. This is determined by the “Header ID Keys” definition. Both of these definitions are found in the HeaderKeys.txt file. See “Configurations” in the Header Reconcile chapter for more details on the setup and requirements.
When Header ID is be generated based on the Header ID configuration settings, a sequence number is always required.
When only the sequence number is used to generate the Header ID, the sequence number is 9 digits with leading zeroes
When fields are combined to generate the Header ID, the fields are separated with an underscore and appended with a sequence number. The number of digits for the sequence number will default to 5, although may be configured to a minimum of 3 and maximum of 7.
Header Load API Flow

A l l o c a t i o n H e a d e r - T r a n s a c t i o n D e f i n i t i o n
Page | 49
Transaction Definition There are two types of Header transactions as described below. They are Options and Definitions. Definitions are defined from Base Definitions and Component Definitions including Bulk Color and Pack.
Transactions can only be provided using the XML format. Refer to the provided HeaderLoadSchema.xsd for the XML file layout.
Sample transactions can be found in the “\Batch\Transactions” folder.
Options Header Options provide processing settings for loading headers. This record is optional.
Options
# Field Name XML Identifier Description Characteristics
1. Transaction Type Options Designates the transaction as a header options transaction.
o Required o Options
2. Automatically Add Header Characteristics Flag
AutoAddCharacteristics Designates whether undefined header characteristics are to be added.
o Optional o True o False
o Defaults to False

A l l o c a t i o n H e a d e r - T r a n s a c t i o n D e f i n i t i o n
Page | 50
Base Header Base Definitions provide general information about the headers being loaded. The transactions define the headers and the characteristics of each header. These characteristics include the pre-defined system header characteristics as well as the dynamic client defined header characteristics of each header.
Base
# Field Name XML Identifier Description Characteristics
1. Header Identifier HeaderId Identifies the Allocation Header o Required if Header ID is NOT to be generated
o Optional if Header ID is to be generated
o String
2. New Header Identifier NewHeaderId Allows modification of the Header ID during a “Modify” action.
o Optional o String
3. Action HeaderAction Identifies the action in which the API will process for the specified Allocation Header.
o Create will create a new Allocation Header;
o Modify will allow modifications to a non-shipped Allocation Header. If units or packs/multiple are set to zero, the component will be deleted. When a header is released and the modify request changes the Total Units, Pack units, Color Units, or Size Units the request will be rejected.
o Modifications to characteristics may be done at any time regardless of the status.
o Modify will create a new header when it does not already exist, if the “CreateOnModify” option is set to true within the configuration file.
o Remove will delete an existing non-released Allocation Header;
o Reset will cancel a released non-shipped Allocation Header, and allow modifications – if modifications are made to the Allocation Header (as stated above – units changed), intransit will be cancelled as well.
o Required o String
o Create o Modify o Remove o Reset
4. Description HeaderDescription Description of the item defined in the Allocation Header.
The Header Description will be used as the Style Description in the case of a style auto-add.
o Optional o String o Default is the current
Style Description
5. Date HeaderDate Specifies the date of the Allocation Header. This will default to the current date unless specified.
o Optional o Date o Default is current date
6. Retail Price UnitRetail Selling price of the item defined in the Allocation Header.
o Optional o Double / Currency
7. Cost UnitCost Cost of the item defined in the Allocation Header.
o Optional o Double / Currency
8. Total Units TotalUnits The summed units included on the Allocation Header. The Total Units must be greater than zero.
o Required o Integer greater than
zero
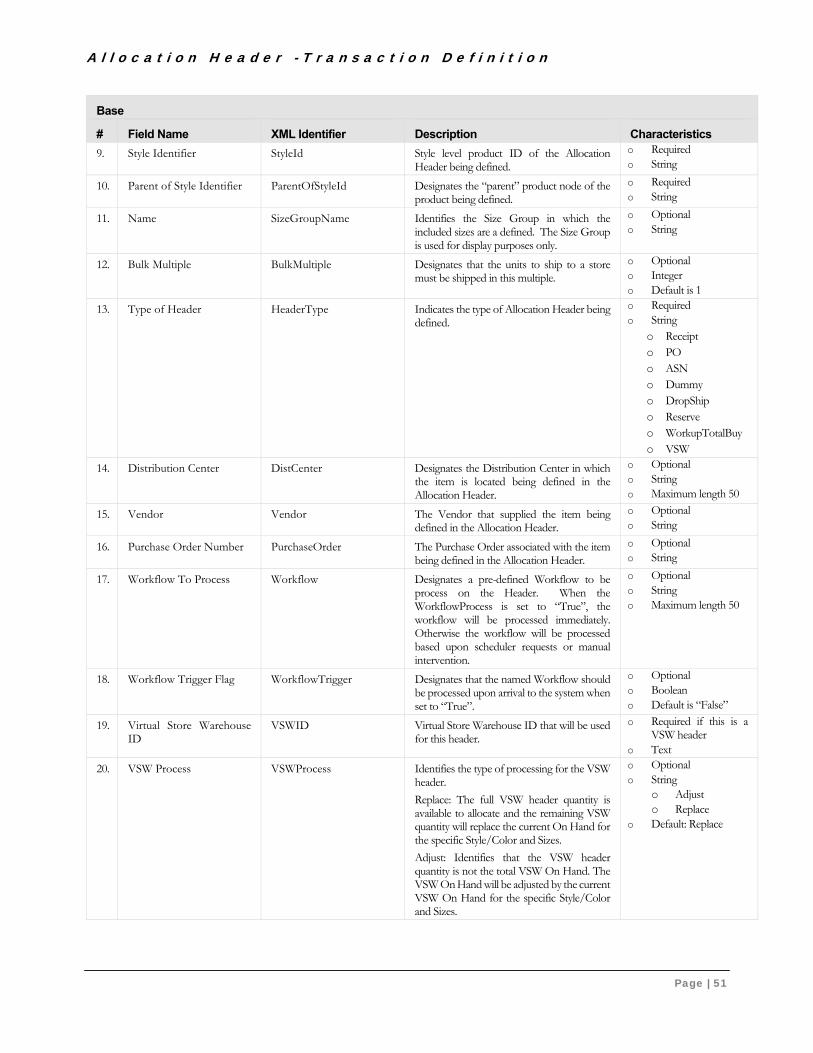
A l l o c a t i o n H e a d e r - T r a n s a c t i o n D e f i n i t i o n
Page | 51
Base
# Field Name XML Identifier Description Characteristics
9. Style Identifier StyleId Style level product ID of the Allocation Header being defined.
o Required o String
10. Parent of Style Identifier ParentOfStyleId Designates the “parent” product node of the product being defined.
o Required o String
11. Name SizeGroupName Identifies the Size Group in which the included sizes are a defined. The Size Group is used for display purposes only.
o Optional o String
12. Bulk Multiple BulkMultiple Designates that the units to ship to a store must be shipped in this multiple.
o Optional o Integer o Default is 1
13. Type of Header HeaderType Indicates the type of Allocation Header being defined.
o Required o String
o Receipt o PO o ASN o Dummy o DropShip o Reserve o WorkupTotalBuy o VSW
14. Distribution Center DistCenter Designates the Distribution Center in which the item is located being defined in the Allocation Header.
o Optional o String o Maximum length 50
15. Vendor Vendor The Vendor that supplied the item being defined in the Allocation Header.
o Optional o String
16. Purchase Order Number PurchaseOrder The Purchase Order associated with the item being defined in the Allocation Header.
o Optional o String
17. Workflow To Process Workflow Designates a pre-defined Workflow to be process on the Header. When the WorkflowProcess is set to “True”, the workflow will be processed immediately. Otherwise the workflow will be processed based upon scheduler requests or manual intervention.
o Optional o String o Maximum length 50
18. Workflow Trigger Flag WorkflowTrigger Designates that the named Workflow should be processed upon arrival to the system when set to “True”.
o Optional o Boolean o Default is “False”
19. Virtual Store Warehouse ID
VSWID Virtual Store Warehouse ID that will be used for this header.
o Required if this is a VSW header
o Text
20. VSW Process VSWProcess Identifies the type of processing for the VSW header.
Replace: The full VSW header quantity is available to allocate and the remaining VSW quantity will replace the current On Hand for the specific Style/Color and Sizes.
Adjust: Identifies that the VSW header quantity is not the total VSW On Hand. The VSW On Hand will be adjusted by the current VSW On Hand for the specific Style/Color and Sizes.
o Optional o String
o Adjust o Replace
o Default: Replace

A l l o c a t i o n H e a d e r - T r a n s a c t i o n D e f i n i t i o n
Page | 52
Base
# Field Name XML Identifier Description Characteristics
21. Header Notes Notes Any special notes to be associated with the Allocation Header being defined.
o Optional o String o Maximum length
1000
22. Style Name StyleName Style name of the Allocation Header being defined.
The Style Name will be used in the case of a style auto-add.
o Optional o String
23. Characteristic Name Characteristic : Name Designates the dynamic characteristic name of the characteristic for each store.
o Required o String o Maximum length 50
as pre-defined
24. Characteristic Type Characteristic : CharType Used in conjunction with auto adding new store characteristics. This describes the data type of the new characteristic.
o Optional o Text o Date
o Format: yyyy/mm/dd, yyyy-mm-dd, mm/dd/yyyy, mm-dd-yyyy
o Number o Dollar
o Format: 999, 999.999, -999 (No comma separators or $ signs).
o Defaults to Text
25. Characteristic Value Characteristic : Value The value of the pre-defined characteristic. If the characteristic is defined with a value list, this value must match one of the list items.
o Required o String o As pre-defined
26. Characteristic Protection Flag
Characteristic : Protect Designates if an automatically added characteristic will allow online users to change the value.
o Optional o True o False
o Defaults to True
27. Method Name Method : Name Designates a pre-defined Allocation Method or list of Methods to be process on the Header within a “generated” workflow. When the “WorkflowTrigger” is set to “true”, the “generated” workflow consisting of the list of Methods that are included will be processed immediately. Otherwise the “generated” workflow will be processed based on manual intervention or the processing of the General Allocation Method.
o Optional o String o Maximum length 50 o Multiple Method
Names may be included
o Methods must be Global type

A l l o c a t i o n H e a d e r - T r a n s a c t i o n D e f i n i t i o n
Page | 53
Base
# Field Name XML Identifier Description Characteristics
28. Method Type Method : Type Designates the Type of Method that is being named.
o Required if Name is present
o String o Types are:
o General Allocation
o Allocation Override
o Rule o Velocity o Fill Sizes o Basis Size
o Size Need
29. Bulk Color BulkColor Designates a Color being defined for the Allocation Header.
o Optional o See BulkColor
30. Pack Pack Designates a Pack being defined for the Allocation Header.
o Optional o See Pack
Repeat Characteristic information as needed. Order of characteristics does not affect processing.
Repeat Method information as needed. Order determines the sequence which the methods are processed.

A l l o c a t i o n H e a d e r - T r a n s a c t i o n D e f i n i t i o n
Page | 54
Bulk Color The Header Bulk Component can be defined with or without sizes.
BulkColor
# Field Name XML Identifier Description Characteristics
1. Color Identifier ColorCodeID Identifies each color code ID of the item being defined on the Allocation Header.
This is also used during the auto-add of the color as the “Code”.
o Required o String
2. Color Name ColorCodeName Identifies each corresponding color code Name of the item being defined on the Allocation Header.
This is also used during the auto-add of the color as the color “Name”.
o Optional o String
3. Color Description ColorCodeDescription Identifies each corresponding color code description of the item being defined on the Allocation Header.
This is also used during the auto-add of the color codes in order to display the description (if different than color name) on the hierarchy.
o Optional o String
4. Color Group ColorCodeGroup For future use. o Optional o String
5. Units Units Identifies the number of units for this Color on the Allocation Header.
o Required o Integer
6. Size for Color BulkColorSize Designates a Size being defined for the Color on the Allocation Header
o Optional o See BulkColorSize
BulkColorSize
# Field Name XML Identifier Description Characteristics
1. Size Identifier SizeCodeID Identifies each size code ID of the color being defined on the Allocation Header.
This is also used during the auto-add of the sizes as the “Code”.
o Required o String
2. Size Name SizeCodeName Identifies each corresponding size code name of the item being defined on the Allocation Header.
o Optional o String o Defaults to
SizeCodePrimary/SizeCodeSecondary
3. Size Description SizeCodeDescription Identifies each corresponding size code description of the item being defined on the Allocation Header.
This is also used during the auto-add of the size codes in order to display the description (if different than the size primary/secondary) on the hierarchy.
(It is NOT recommended to include the sizes on the hierarchy.)
o Optional o String o Defaults to
SizeCodePrimary/SizeCodeSecondary

A l l o c a t i o n H e a d e r - T r a n s a c t i o n D e f i n i t i o n
Page | 55
BulkColorSize
# Field Name XML Identifier Description Characteristics
4. Size Primary SizeCodePrimary Identifies each corresponding primary size of the size code on the color being defined on the Allocation Header. This is used during the auto-add of the size codes.
o Optional o String o Defaults to
Primary Size of the predefined Size Code
5. Size Secondary SizeCodeSecondary Identifies each corresponding secondary size of the size code on the color being defined on the Allocation Header. This is used during the auto-add of the size codes.
o Optional o String o Defaults to the
Secondary Size of the predefined Size Code
6. Size Category SizeCodeProductCategory Identifies each corresponding product category of the size code on the color being defined on the Allocation Header. This is used during the auto-add of the size codes.
o Optional – only required when using Auto-add of the size.
o String
7. Units Units Identifies the number of units for this Size of the color on the Allocation Header.
o Required o Integer
Pack The Header Pack Component can be defined with or without colors and sizes.
Header Pack
# Field Name XML Identifier Description Characteristics
1. Pack Name Name Identifies the name of the pack being defined in the Allocation Header
o Required o String
2. Number of Packs Packs Identifies the number of packs included for the Pack being defined in the Allocation Header
o Required o Integer
3. Pack Multiple Multiple Identifies the number of units within the pack being defined in the Allocation Header.
o Required o Integer
4. Generic Pack Flag IsGeneric Designates a generic type pack when set to “true”.
When the Pack is Generic, colors and sizes may be defined for tracking purposes only. The allocation will only consider the style/sku.
When the Pack is not Generic (Detail type), then the color and/or size will be tracked as well as be considered during allocation.
o Required o Boolean o Default is “true”
5. Colors in Pack PackColor Designates a Color being defined for the Pack on the Allocation Header.
o Optional o Detail packs only o See PackColor
6. Sizes in Pack PackSize Designates a Size being defined for the Pack on the Allocation Header
o Optional o Detail packs only o See PackSize

A l l o c a t i o n H e a d e r - T r a n s a c t i o n D e f i n i t i o n
Page | 56
PackColor - Detail Packs only
# Field Name XML Identifier Description Characteristics
1. Color Identifier ColorCodeID Identifies each color code ID of the pack being defined on the Allocation Header.
This is also used during the auto-add of the color as the “Code”.
o Required o String
2. Color Name ColorCodeName Identifies each corresponding color code Name on the pack being defined on the Allocation Header.
This is also used during the auto-add of the color as the “Name”.
o Optional o String
3. Color Description ColorCodeDescription Identifies each corresponding color code description on the pack being defined on the Allocation Header.
This is also used during the auto-add of the color codes in order to display the description (if different than color name) on the hierarchy.
o Optional o String
4. Color Group ColorCodeGroup For future use. o Optional o String
5. Units Units Identifies the number of units for this Color within the Pack on the Allocation Header.
o Required o Integer
6. Sizes for Color in Pack PackColorSize Designates a Size being defined for the Color on the Pack on the Allocation Header.
o Optional o Detail packs
only o See PackColorSize
PackColorSize - Detail Packs only (with Color)
# Field Name XML Identifier Description Characteristics
1. Size Identifier SizeCodeID Identifies each size code ID of the color on the pack being defined on the Allocation Header.
This is also used during the auto-add of the sizes as the “Code”.
o Required o String
2. Size Name SizeCodeName Identifies each corresponding size code name of the item being defined on the Allocation Header.
o Optional o String o Defaults to
SizeCodePrimary/SizeCodeSecondary
3. Size Description SizeCodeDescription Identifies each corresponding size code description of the item being defined on the Allocation Header.
This is also used during the auto-add of the size codes in order to display the description (if different than the size primary/secondary) on the hierarchy.
(It is NOT recommended to include the sizes on the hierarchy.)
o Optional o String o Defaults to
SizeCodeName

A l l o c a t i o n H e a d e r - T r a n s a c t i o n D e f i n i t i o n
Page | 57
PackColorSize - Detail Packs only (with Color)
# Field Name XML Identifier Description Characteristics
4. Size Primary SizeCodePrimary Identifies each corresponding primary size of the size code of the color on the pack being defined on the Allocation Header. This is used during the auto-add of the size codes.
o Optional o String o Defaults to
Primary Size of the predefined Size Code
5. Size Secondary SizeCodeSecondary Identifies each corresponding secondary size of the size code of the color on the pack being defined on the Allocation Header. This is used during the auto-add of the size codes.
o Optional o String o Defaults to the
Secondary Size of the predefined Size Code
6. Size Category SizeCodeProductCategory Identifies each corresponding product category of the size code of the color on the pack being defined on the Allocation Header. This is used during the auto-add of the size codes.
o Optional o String
7. Units Units Identifies the number of units for this Size of the color on the pack being defined on the Allocation Header.
o Required o Integer
PackSize - Detail Packs only (No color)
# Field Name XML Identifier Description Characteristics
1. Size Identifier SizeCodeID Identifies each size code ID of the pack being defined on the Allocation Header.
This is also used during the auto-add of the sizes as the “Code”.
o Required o String
2. Size Name SizeCodeName Identifies each corresponding size code name of the item being defined on the Allocation Header.
o Optional o String o Defaults to
SizeCodePrimary/SizeCodeSecondary
3. Size Description SizeCodeDescription Identifies each corresponding size code description of the item being defined on the Allocation Header.
This is also used during the auto-add of the size codes in order to display the description (if different than the size primary/secondary) on the hierarchy.
(It is NOT recommended to include the sizes on the hierarchy.)
o Optional o String o Defaults to
SizeCodeName
4. Size Primary SizeCodePrimary Identifies each corresponding primary size of the size code on the pack being defined on the Allocation Header. This is used during the auto-add of the size codes.
o Optional o String o Defaults to
Primary Size of the predefined Size Code

A l l o c a t i o n H e a d e r - S t a t u s O u t p u t D e f i n i t i o n
Page | 58
PackSize - Detail Packs only (No color)
# Field Name XML Identifier Description Characteristics
5. Size Secondary SizeCodeSecondary Identifies each corresponding secondary size of the size code on the pack being defined on the Allocation Header. This is used during the auto-add of the size codes.
o Optional o String o Defaults to the
Secondary Size of the predefined Size Code
6. Size Category SizeCodeProductCategory
Identifies each corresponding product category of the size code on the pack being defined on the Allocation Header. This is used during the auto-add of the size codes.
o Optional o String
7. Units Units Identifies the number of units for this Size of the pack being defined on the Allocation Header.
o Required o Integer
Status Output Definition The Header Status output file identifies the load status of each header in the transaction file.
The output file only uses the XML format. Refer to the provided HeaderLoadStatusSchema.xsd for the XML file layout.
Header Status
# Field Name XML Identifier Description Characteristics
1. Header Identifier HeaderStatus : HeaderId
Identifies the Allocation Header. o Required o String
2. Action HeaderStatus : HeaderAction
Identifies the action in which the API processed for the specified Allocation Header.
o Required o String
o Create o Modify o Remove o Reset
3. Load Status Flag HeaderStatus : LoadStatus
Identifies whether or not the load process was successful.
o Required o Boolean
o true o false

A l l o c a t i o n H e a d e r - C o m m a n d P r o c e s s i n g
Page | 59
Command Processing The Allocation Header Load may be processed from outside of the Logility - RO system using a command prompt or a command file. This allows for the Allocation Header Load to be processed within a client’s third party scheduling package along with standard scheduling.
The Header Load Task Lists may be included in a Job to be processed as well. See Scheduler API section.
Command Format
HeaderLoad.exe [<Input File>] [<End Suffix>]
# Field Identifier Description
1. HeaderLoad.exe o The file path and executable to be processed.
2. Input File o Optional o The input file containing input transactions o Defaults to “InputFile” setting in the config file if not specified. o The input file may also be a directory with a file mask in order to
process multiple files within a single execution o No trigger files are needed
3. End Suffix o Optional o Specify the suffix of the file used to terminate the process. o When using the directory option, the end file triggers the header
load to stop processing files. o Defaults to “EndSuffix” setting in the config file if not specified.
Note: Parameters must be surrounded by double quotes (“) when spaces are imbedded. Recommended practice is to always use double quotes around each parameter.
Processing Options:
1. Input File – specify a single input file per HeaderLoad execution. This will process a single file as designated.
2. Input Directory with File Mask – specify the directory of the files with a File Mask. The HeaderLoad will process all files currently in the directory matching the mask. Specify *.* in order to process all files. All files must be present within the directory before the command is executed; any files added to the directory after the HeaderLoad has started will be ignored.
3. Input Directory with File Mask and End File – specify the directory of the files with a File Mask as above, although add an End File designation. The HeaderLoad will begin processing the files in the directory matching the mask upon command execution. It will then continue to loop through the directory and process each file that has not already been processed. The processing loop will continue until the end file is present within the directory; at this time the Header Load will process the remaining files in the directory matching the mask and terminate the process loop.

A l l o c a t i o n H e a d e r - G e n e r a t i n g t h e H e a d e r I D
Page | 60
Command Sample
Generating the Header ID The Allocation Header API can generate the Header ID for the products to be allocated. The Header configuration must be setup to specify which fields and characteristics in the XML transactions will make an Allocation Header unique within Logility - RO. This is determined by a “Header Keys to Match” definition. What fields are used to generate the Header ID must also be defined. This is determined by the “Header ID Keys” definition. Both of these definitions are found in the HeaderKeys.txt file. See “Configurations” under the “Header Reconcile” chapter for more information on the HeaderKeys.txt file.
-- The following example uses specific input files"C:\MIDRetail\Batch\HeaderLoad.exe" "C:\MIDRetailData\Headers\Header1.xml" "C:\MIDRetail\Batch\HeaderLoad.exe" "C:\MIDRetailData\Headers\Header2.xml" "C:\MIDRetail\Batch\HeaderLoad.exe" "C:\MIDRetailData\Headers\Header3.xml" -- The following example uses a directory with file mask "C:\MIDRetail\Batch\HeaderLoad.exe" "C:\MIDRetailData\Headers\*.*.xml" -- The following example uses a directory with file mask and an end file suffix "C:\MIDRetail\Batch\HeaderLoad.exe" "C:\MIDRetailData\Headers\Hdr1*.xml" “end”

H e a d e r R e c o n c i l e - O v e r v i e w
Page | 61
Chapter 9: Header Reconcile
Overview The Header Reconcile API compares the existing Allocation Headers to the input Allocation Header XML files for a specific Header Type (or all types) and adds, updates, or removes Headers as needed.
Note: This API can only be processed when ALL headers are processed in an overnight “reconcile” process which includes all Styles or Style/Colors that are “active” for the specified Header Type.
Note: The use of the Header Reconcile API requires that the Header ID be generated by the Logility – RO application.
Note: Header Load API cannot be processing while the Header Reconcile API is processing.
The Header configuration must be setup to specify which fields and characteristics in the XML transactions will make an Allocation Header unique within Logility - RO. This is determined by a “Header Keys to Match” definition. This definition is found in the HeaderKeys.txt file. See “Configurations” for more information on the HeaderKeys.txt file.
As the Allocation Header input XML files are processed, the resulting transactions are written out to the specified directory for later processing by the Header Load API.
Lastly, the Header Reconcile process creates “Remove” transactions for existing headers (not released) where there were no matching input transactions.
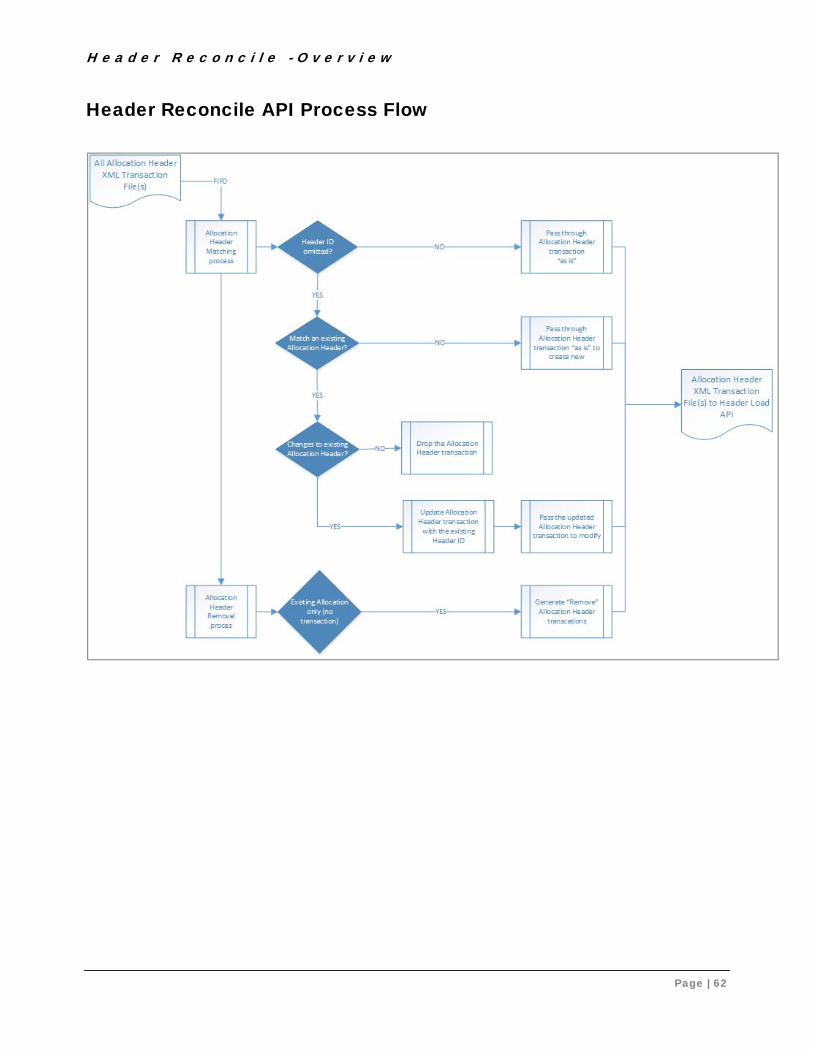
H e a d e r R e c o n c i l e - O v e r v i e w
Page | 62
Header Reconcile API Process Flow

H e a d e r R e c o n c i l e - O v e r v i e w
Page | 63
Header Reconcile API Process The Header Reconcile process will compare the input Allocation Header transactions to the existing Headers within Logility - RO.
The Allocation Header input XML transaction files will be processed all at the same time and in sequential order (FIFO).
Existing Allocation Headers that are in “Released” or “Release Approved” status where Relieve Intransit has not started (Shipping not Started), will only be included in the “matching” process when the Allocation Header transaction action is “Reset”. Allocation Headers that are in “Released” status and Relieve Intransit has been processed (Shipping Started or Shipping Complete) will never be included in the “matching” process.
When the Allocation Header transaction includes a Header ID, the transaction will be passed through to the Header Load API input file.
When the Allocation Header transaction does not include a Header ID, the transaction will be compared against existing Logility – RO Allocation Headers for matching.
o When the Allocation Header ”Modify” transaction matches exactly to an existing non-Released Header’s Style or Style/Color, required matching fields, and all other fields, there will be no update, so the transaction is not passed through to the Header Load API.
o When the Allocation Header ”Modify” transaction matches an existing Header’s Style or Style/Color and required matching fields although any of the other fields are different, the “Modify” transaction will be updated per below and passed through to the Header Load API processing.
Action is “Modify”
Header Type is the transaction Header Type (If the Header Type is not included in the matching fields, then the Header Type is allowed to be changed as needed)
Header ID is the existing matching Header ID
Compare the current size components of the Allocation Header transaction to the existing Allocation Header when applicable.
If a size on the Allocation Header no longer exists, the size must be removed from the Logility - RO Allocation Header (send zero units).
If the size exists on the Allocation Header and the Allocation Header transaction quantity has changed, update the size on the Allocation Header with the current units – will be the units in the incoming XML file.
If the size does NOT exist on the Allocation Header, then add the size to the Allocation Header with the current units – will be the units in the incoming XML file.
If Pack Name is not included for Header Matching, compare the current pack(s) and components of the Allocation Header transaction to the existing Allocation Header.
H e a d e r R e c o n c i l e - O v e r v i e w
Page | 64
If the pack exists on the Allocation Header and the Allocation Header transaction pack quantity has changed, update the pack on the Allocation Header with the current quantities – will be the units in the incoming XML file (pass through).
If the pack does NOT exist on the Allocation Header, then add the pack to the Allocation Header with the current quantities – will be the pack quantity and multiple in the incoming XML file (pass through).
If a pack on the Allocation Header no longer exists, the pack must be removed from the Logility - RO Allocation Header. To remove a pack component, set the pack multiple to 0 and the pack quantity to 0. This will also remove any colors and sizes that may belong to that pack. Do not specify anything about the colors or sizes in this pack – setting the multiple and pack quantity to zero will include the sub-components.
If Pack Name is included for Header Matching, compare the current pack components of the Allocation Header transaction to the existing Allocation Header.
The pack must exist on the Allocation Header, so if the Allocation Header transaction pack quantity has changed, update the pack on the Allocation Header with the current quantities – will be the units in the incoming XML file (pass through).
All other fields are as defined on the incoming XML transaction
o When the Allocation Header ”Modify” transaction does not match an existing non-released Header’s Style or Style/Color and required matching fields, the “Modify” transaction will be passed through to the Header Load API processing to create a new Allocation Header (where a new Header ID will be generated).
Action is “Modify”
Header Type is the transaction Header Type (If the Header Type is not included in the matching fields, then the Header Type is allowed to be changed as needed)
Header ID is omitted
All other fields are as defined on the incoming XML transaction
o When an Allocation Header exists for a Style or Style/Color and required fields that is NOT Released and there are no matching input headers for the specified Header Type for the process (or All Types), the existing Header within Logility - RO must be deleted. Generate a “Remove” Allocation Header XML transaction to be passed through to the Header Load API processing.
Action is “Remove”
Header Type is the existing Header Type
Header ID is the existing matching Header ID
All other fields are as defined for the existing Allocation Headers (no components needed).
H e a d e r R e c o n c i l e - O v e r v i e w
Page | 65
o When the Allocation Header transaction’s action is “Reset”, it must match exactly to an existing Released / Not Shipped Header’s Style or Style/Color and required matching fields although any of the other fields may be different.
If a “matching” non-Released Header already exists, then reject the “Reset” transaction since this would create duplicate non-Released Headers.
If a “matching non-Released Header does NOT already exist, the “Reset” transaction will be updated per below and passed through to the Header Load API processing
Action is “Reset”
Header ID is the existing matching Header ID
Use the update logic per the “Modify” (below) if there are any other changes to the components.
All other fields are as defined on the incoming XML transaction

H e a d e r R e c o n c i l e - C o n f i g u r a t i o n s
Page | 66
Configurations Header Reconcile Configuration The Header Reconcile configuration will need to be setup (in the Header Reconcile Task List or the Header Reconcile API configuration through the Installer) to specify various information needed to process Header Reconcile.
Header Reconcile Configuration
# Field Description
1. Input Directory The input directory containing the XML transactions to process.
2. Output Directory The output directory where updated transaction are written. The Remove Transactions file are also be written here.
3. TriggerSuffix Trigger file suffix used to process input files. Also used when creating the trigger files for the output files.
4. RemoveTransactionsFileName The name of the Remove Transactions file which contains “Remove” transactions for existing headers (not released) where there were no matching input transactions.
5. RemoveTransactionsTriggerSuffix Trigger file suffix used when writing the Remove Transactions file.
6. HeaderTypes Header types that will be processed during the current Header Reconcile process. “All” is used to process all header types.
7. HeaderProcessingKeysFile Name and location of the file containing the information to match exiting headers to the transactions. Also includes information on how to create a unique header ID.

H e a d e r R e c o n c i l e - C o n f i g u r a t i o n s
Page | 67
Header “Match” Configuration The Header “Match” Configuration options are set up in the “HeaderKeys.txt” file located in the “Batch” directory. It is used by both the Header Reconcile API and Header Load API.
Within the HeaderKeys.txt file is a line containing “HeaderKeysToMatch”. On this line are the Allocation Header fields that will be used to match an input Allocation Header XML file transaction with an existing allocation header. These “HeaderKeysToMatch” will include Header fields that make this Header unique in order to assign the correct Header ID. The base fields include Header Type, Style, Color, Pack, Pack Type, and any additional fields as needed (such as DC and PO). Any additional Header Characteristics that are required to make this Header unique may also be included.
Note: Any base field or characteristic included in the “HeaderKeysToMatch” definition must be included in the Allocation Header XML file in order to match the existing Allocation Header.
Note: Header characteristics used for matching must already be defined in the application. Header Reconcile does not auto-add characteristics. Also, header characteristics must include both the “Name” and the “Value” tags in the XML transaction (even if the value is null).
HeaderKeysToMatch Configuration
# Header Match Key Description
1. HeaderType Optional - The Header Type – PO, ASN, Receipt, Reserve, Workup Buy
2. StyleId Required - The Style ID of the Allocation Header
3. Color Required if Color is included on the Header - The Color ID of the Allocation Header (Bulk and/or Pack color)
4. Pack Name Optional if Pack is included on the Header – The Pack Name(s) on the Allocation Header
5. Pack Type Implied if Pack Name option (above) is included– designates whether the Pack is Generic or Detail type.
6. Base Header Field(s)* Optional - Any additional fields that will make this Header unique in order to assign the correct Header ID.
7. Custom Characteristic(s) Optional - Any additional characteristics that will make this Header unique in order to assign the correct Header ID.
*Valid Base Header Fields: DistCenter, HeaderDate, HeaderDescription, HeaderType, ParentOfStyleId, PurchaseOrder, SizeGroupName, StyleId, UnitCost, UnitRetail, Vendor, VSWID, Workflow.

H e a d e r R e c o n c i l e - C o n f i g u r a t i o n s
Page | 68
Sample HeaderKeysToMatch
Header ID Keys Configuration The Header ID Keys Configuration options are also set up in the “HeaderKeys.txt” file located in the “Batch” directory. It is used by the Header Load API, although should be set up at the same time as the Header “Match” configuration as they work hand-in-hand.
Within the HeaderKeys.txt file is a line containing “HeaderIdKeys”. On this line are the Allocation Header fields that will be used to create a unique header ID from information given in the header transaction. The base fields include Sequence, Style, Color, Pack Name, plus a select number of base header fields. In addition, Header Characteristics can be included as well.
Note: Any base field or characteristic included in the “HeaderIdKeys” definition must be included in the Allocation Header XML file in order to create the most complete Header ID as possible. Also, header characteristics must include both the “Name” and the “Value” tags in the XML transaction (even if the value is null).
HeaderIdKeys Configuration
# Header ID Key Description
1. Sequence Only used if the generated Header ID is strickly a sequence number. In this case a unique 9-digit number will be created as the Header ID. Sequence should not be combined with any other Header ID Keys.
2. StyleId Required - The Style ID of the Allocation Header
3. Color Required if Color is included on the Header - The Color ID of the Allocation Header (Bulk and/or Pack color)
4. Pack Name Optional if Pack is included on the Header – The Pack Name(s) on the Allocation Header
6. Base Header Field(s)* Optional - Any additional fields that will make this Header unique in order to assign the correct Header ID.
7. Custom Characteristic(s) Optional - Any additional characteristics that will make this Header unique in order to assign the correct Header ID.
*Valid Base Header Fields: DistCenter, HeaderDate, PurchaseOrder, Vendor, and VSWID.
HeaderKeysToMatch: StyleId, PurchaseOrder, Color, Servicing DC
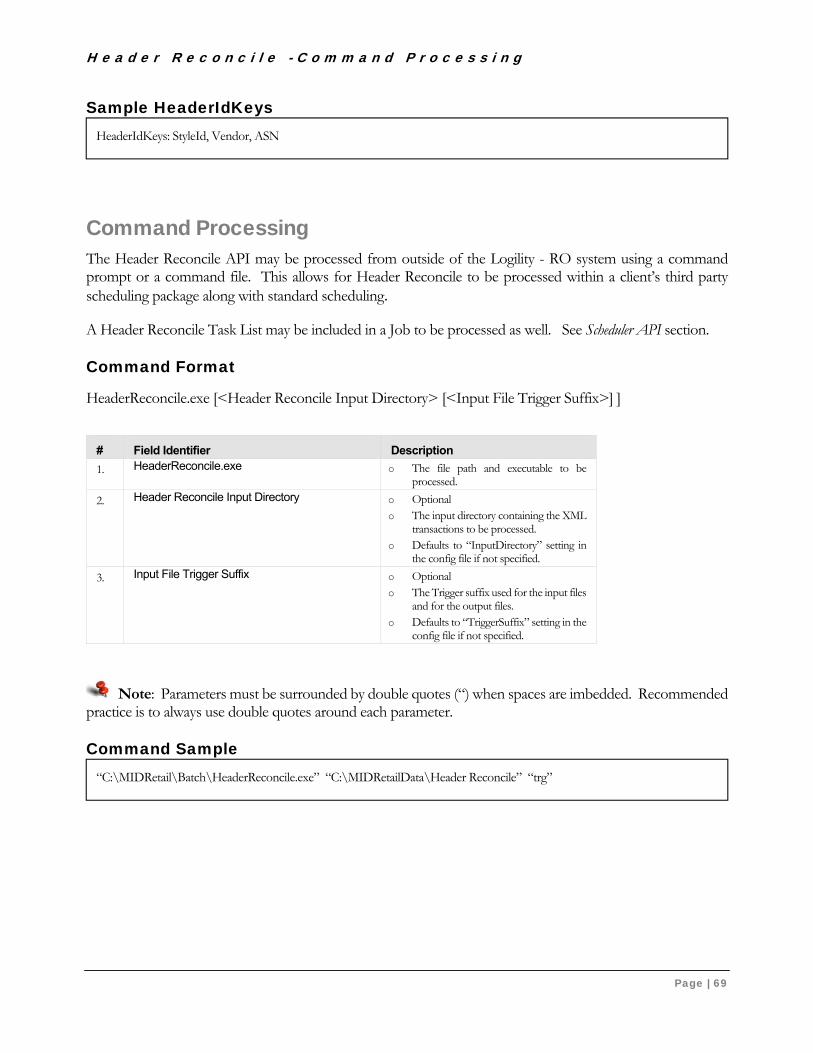
H e a d e r R e c o n c i l e - C o m m a n d P r o c e s s i n g
Page | 69
Sample HeaderIdKeys
Command Processing The Header Reconcile API may be processed from outside of the Logility - RO system using a command prompt or a command file. This allows for Header Reconcile to be processed within a client’s third party scheduling package along with standard scheduling.
A Header Reconcile Task List may be included in a Job to be processed as well. See Scheduler API section.
Command Format
HeaderReconcile.exe [<Header Reconcile Input Directory> [<Input File Trigger Suffix>] ]
# Field Identifier Description
1. HeaderReconcile.exe o The file path and executable to be processed.
2. Header Reconcile Input Directory o Optional o The input directory containing the XML
transactions to be processed. o Defaults to “InputDirectory” setting in
the config file if not specified.
3. Input File Trigger Suffix o Optional o The Trigger suffix used for the input files
and for the output files. o Defaults to “TriggerSuffix” setting in the
config file if not specified.
Note: Parameters must be surrounded by double quotes (“) when spaces are imbedded. Recommended practice is to always use double quotes around each parameter.
Command Sample
HeaderIdKeys: StyleId, Vendor, ASN
“C:\MIDRetail\Batch\HeaderReconcile.exe” “C:\MIDRetailData\Header Reconcile” “trg”

A l l o c a t i o n H e a d e r R e l e a s e - O v e r v i e w
Page | 70
Chapter 10: Allocation Header Release
Overview The Allocation Header Release contains details of the product that has been allocated and is ready to be shipped to the stores. This information is interfaced out of the Logility - RO system via an XML file.
The allocation header release is executed within the application client. The high level output directory is specified within the MIDSettings.config file and each Header Type has its own sub-directory.
Transaction Definition There is one type of Allocation Header Release transaction as described below. The transaction contains Base Release values and Component Values.
Transactions can only be provided using an XML format. Refer to the provided HeaderReleaseSchema.xsd for the XML file layout.
Sample transactions can be found in the “\Batch\Transactions” folder.
Base Header Release Base provides general information about the headers being released.
Base
# Field Name XML Identifier Description Characteristics
1. Header Identifier HeaderId Identifies the Allocation Header being released.
o Required o String
2. Header Description HeaderDescription Description of the item defined in the Allocation Header.
o Optional o String
3. Header Date HeaderDate Specifies the date of the Allocation Header.
o Required o Date
4. Release Date ReleaseDate Specifies the date that the Allocation Header was released
o Required o Date
5. Release By User UserName The name of the user that released the header
o Optional o String
6.
Retail Price UnitRetail Selling price of the item defined in the Allocation Header.
o Optional o Double / Currency
7. Retail Cost UnitCost Cost of the item defined in the Allocation Header.
o Optional o Double / Currency
8. Total Units Received TotalReceivedUnits The total units included on the Allocation Header.
o Required o Integer

A l l o c a t i o n H e a d e r R e l e a s e - T r a n s a c t i o n D e f i n i t i o n
Page | 71
Base
# Field Name XML Identifier Description Characteristics
9. Total Units Allocated TotalAllocatedUnits The total summed units included on the Allocation Header that were allocated.
o Required o Integer
10. Total Units In Reserve TotalReserveUnits The total summed units included on the Allocation Header that were placed in the Reserve location.
o Required o Integer
11. Total VSW Allocated Units TotalVSWAllocatedUnits The total VSW units included on the Allocation Header.
o Required o Integer
12. Style Identifier StyleId Style level product ID of the Allocation Header being Released.
o Required o String
13. Parent of Style Identifier ParentOfStyleId Designates the “parent” product node of the product being Released.
o Required o String
14. Header Type HeaderType Indicates the type of Allocation Header being Released.
o Required o String
o Receipt o PO o ASN o Dummy o DropShip o Reserve o WorkupTotalBuy o VSW
15. Distribution Center DistCenter Designates the Distribution Center associated with the Allocation Header being Released.
o Optional o String
16. Vendor Vendor The Vendor that supplied the item of the Allocation Header being Released.
o Optional o String
17. Purchase Order Number PurchaseOrder The Purchase Order associated with the item of the Allocation Header being Released.
o Optional o String
18. Header Notes Notes Any special notes that is associated with the Allocation Header being Released.
o Optional o String o Maximum length
1000
19. Master Header Identifier Master The ID of the master header if the header is subordinate to a master.
o Optional o String
20. Units Allocated AllocatedUnits The total units allocated to stores. o Integer
21. Original Units Allocated OrigAllocatedUnits The total units allocated to stores during a prior release.
o Integer
22. Units in Reserve ReserveUnits The total units allocated to reserve o Integer
23. VSW Allocated Units VSW Allocated Units The total VSW units allocated to the stores.
o Integer
24. VSW ID VSWID The VSW ID for this header. o String
25. VSW Process VSWProcess The VSW Process that was used for this header.
o String o Replace o Adjust
26. Characteristic Name Characteristic : Name Designates the dynamic characteristic name of the characteristic for each store.
o Required o String o Maximum length 50
as pre-defined

A l l o c a t i o n H e a d e r R e l e a s e - T r a n s a c t i o n D e f i n i t i o n
Page | 72
Base
# Field Name XML Identifier Description Characteristics
27. Characteristic Value Characteristic : Value The value of the pre-defined characteristic. If the characteristic is defined with a value list, this value must match one of the list items.
o Required o String o As pre-defined
28. Released Bulk Color BulkColor Designates a Color being released for the Allocation Header.
o Optional o See Bulk Color
29. Released Pack Pack Designates a Pack being released for the Allocation Header.
o Optional o See Pack
30. Released Total Total Designates the total units for the store o Optional o See Total
Bulk Color The Header Bulk Color Component can be released with or without sizes.
Bulk/Color
# Field Name XML Identifier Description Characteristics
1. Color Identifier ColorCodeID Designates a Color ID of the Allocation Header being released.
o Required if Color is defined on the Allocation Header
2. Color Name ColorCodeName Designates the Color Name of the Allocation Header being released
o Required o String
3. Color Description ColorCodeDescription Designates the Color Description of the Allocation Header being released
o Required o String
4. Color Units Received ColorReceivedUnits The color units included on the Allocation Header.
o Required o Integer
5. Color Units Allocated ColorAllocatedUnits The color units included on the Allocation Header that were allocated.
o Required o Integer
6. Color Units to Reserve ColorReserveUnits The color units included on the Allocation Header that were placed in the Reserve location.
o Required o Integer
7. Released Bulk Color Size BulkColorSize Designates the size for the Color of the Allocation Header being released.
o Optional o See Bulk/Color/Size
8. Released Bulk Color Store BulkColorStore Designates the store/units for the Color of the Allocation Header being released.
o Optional o See Bulk/Color Store

A l l o c a t i o n H e a d e r R e l e a s e - T r a n s a c t i o n D e f i n i t i o n
Page | 73
Bulk/Color/Size
# Field Name XML Identifier Description Characteristics
1. Size Identifier SizeCodeID Identifies each size code ID of the color of the Allocation Header being released.
o Required o String
2. Size Name SizeCodeName Identifies each corresponding size code Name on the color of the Allocation Header being released.
o Optional o String
3. Size Description SizeCodeDescription Identifies each corresponding size code Description on the color being of the Allocation Header being released. This can be unique for each Style/Color/Size.
o Optional o String
4. Size Primary SizeCodePrimary Identifies each corresponding primary size of the size code on the color of the Allocation Header being released.
o Optional o String
5. Size Secondary SizeCodeSecondary Identifies each corresponding secondary size of the size code on the color of the Allocation Header being released.
o Optional o String
6. Size Category SizeCodeProductCategory Identifies each corresponding product category of the size code of the Allocation Header being released.
o Optional o String
7. Size Units Received SizeReceivedUnits The size units for the color included on the Allocation Header being released.
o Required o Integer
8. Size Units Allocated SizeAllocatedUnits The size units for the color included on the Allocation Header being released that were allocated.
o Required o Integer
9. Size Units to Reserve SizeReserveUnits The size units for the color included on the Allocation Header being released that were placed in the Reserve location.
o Required o Integer
10. Released Bulk Color Size Store
BulkColorStore Designates the store/units for the Color of the Allocation Header being released.
o Optional o See Bulk/Color/Size
Store
Bulk/Color/Size Store
# Field Name XML Identifier Description Characteristics
1. Store Identifier StoreID Designates the store in which the released allocation units for the color/size will be shipped.
o Required o String
2. Units for Store Units Designates the number of allocated units for the color/size in which the store will be shipped.
o Required o Integer
3. Virtual Store Warehouse ID
VSWID Virtual Store Warehouse for this store. o Required o Text
4. Virtual Store Warehouse Units
VSWUnits Virtual Store Warehouse units for this store.
o Required o Integer

A l l o c a t i o n H e a d e r R e l e a s e - T r a n s a c t i o n D e f i n i t i o n
Page | 74
Bulk/Color Store
# Field Name XML Identifier Description Characteristics
1. Store Identifier StoreID Designates the store in which the released allocation units for the color will be shipped.
o Required o String
2. Units for Store Units Designates the number of allocated units for the color in which the store will be shipped
o Required o Integer
3. Virtual Store Warehouse ID
VSWID Virtual Store Warehouse for this store. o Required o Text
4. Virtual Store Warehouse Units
VSWUnits Virtual Store Warehouse units for this store.
o Required o Integer

A l l o c a t i o n H e a d e r R e l e a s e - T r a n s a c t i o n D e f i n i t i o n
Page | 75
Pack The Header Bulk Component can be released with or without sizes.
Pack
# Field Name XML Identifier Description Characteristics
1. Pack Name Name Identifies the pack name of each item being of the Allocation Header being released.
o Required o String
2. Pack Multiple Multiple Identifies the number of units within the pack included in the Allocation Header being released.
o Required o Integer
3. Packs Received PackReceivedPacks The pack number of packs included on the Allocation Header being released.
o Required o Integer
4. Packs Allocated PackAllocatedPacks The pack number of packs included on the Allocation Header being released that were allocated.
o Required o Integer
5. Packs to Reserve PackReservePacks The pack number of packs included on the Allocation Header being released that were placed in the Reserve location.
o Required o Integer
6. Released Pack Color PackColor Designates the store/units for the Pack/Color of the Allocation Header being released.
o Optional o See Pack Color
7. Released Pack Size PackSize Designates the store/units for the Pack/Color/Size of the Allocation Header being released.
o Optional o See Pack Size
8. Released Pack Store PackStore Designates the store/units for the Pack of the Allocation Header being released.
o Optional o See Pack Store
Pack Color - Detail Packs only
# Field Name XML Identifier Description Characteristics
1. Color Identifier ColorCodeID Identifies each color code ID of the pack of the Allocation Header being released.
o Required o String
2. Color Name ColorCodeName Identifies each corresponding color code Name on the pack of the Allocation Header being released.
o Optional o String
3. Color Description ColorCodeDescription Identifies each corresponding color code description on the pack of the Allocation Header being released.
o Optional o String
4. Released Color Units ColorUnits The pack number of units for the color included on the Allocation Header.
o Required o Integer
5. Released Pack Color Size PackColorSize Designates the sizes of the color for the Pack of the Allocation Header being released.
o Optional o See Pack Color Size …
6. Released Pack Color Store PackColorStore Designates the store/units of the color for the Pack of the Allocation Header being released.
o Optional o See Pack Color Store …

A l l o c a t i o n H e a d e r R e l e a s e - T r a n s a c t i o n D e f i n i t i o n
Page | 76
Pack Color Size - Detail Packs only (with Color)
# Field Name XML Identifier Description Characteristics
1. Size Identifier SizeCodeID Identifies each size code ID of the color on the pack of the Allocation Header being released.
o Required o String
2. Size Name SizeCodeName Identifies each corresponding size code Name of the color on the pack of the Allocation Header being released.
o Optional o String o Defaults to Size Code
Name of the predefined Size Code
3. Size Description SizeCodeDescription Identifies each corresponding size code Description on the color of the Allocation Header being released. This can be unique for each Style/Color/Size.
o Optional o String o Defaults to the Size
Code ID
4. Size Primary SizeCodePrimary Identifies each corresponding primary size of the size code of the color on the pack of the Allocation Header being released.
o Optional o String o Defaults to Primary
Size of the predefined Size Code
5. Size Secondary SizeCodeSecondary Identifies each corresponding secondary size of the size code of the color on the pack of the Allocation Header being released.
o Optional o String o Defaults to the
Secondary Size of the predefined Size Code
6. Size Category SizeCodeProductCategory Identifies each corresponding product category of the size code of the color on the pack of the Allocation Header being released.
o Optional o String
7. Released Size Units SizeUnits The pack number of units for the color/size included on the Allocation Header.
o Required o Integer
8. Release Pack Color Size Store
PackColorSizeStore Designates the store/units for the Pack of the color/size of the Allocation Header being released.
o Optional o See Pack Color Size
Store
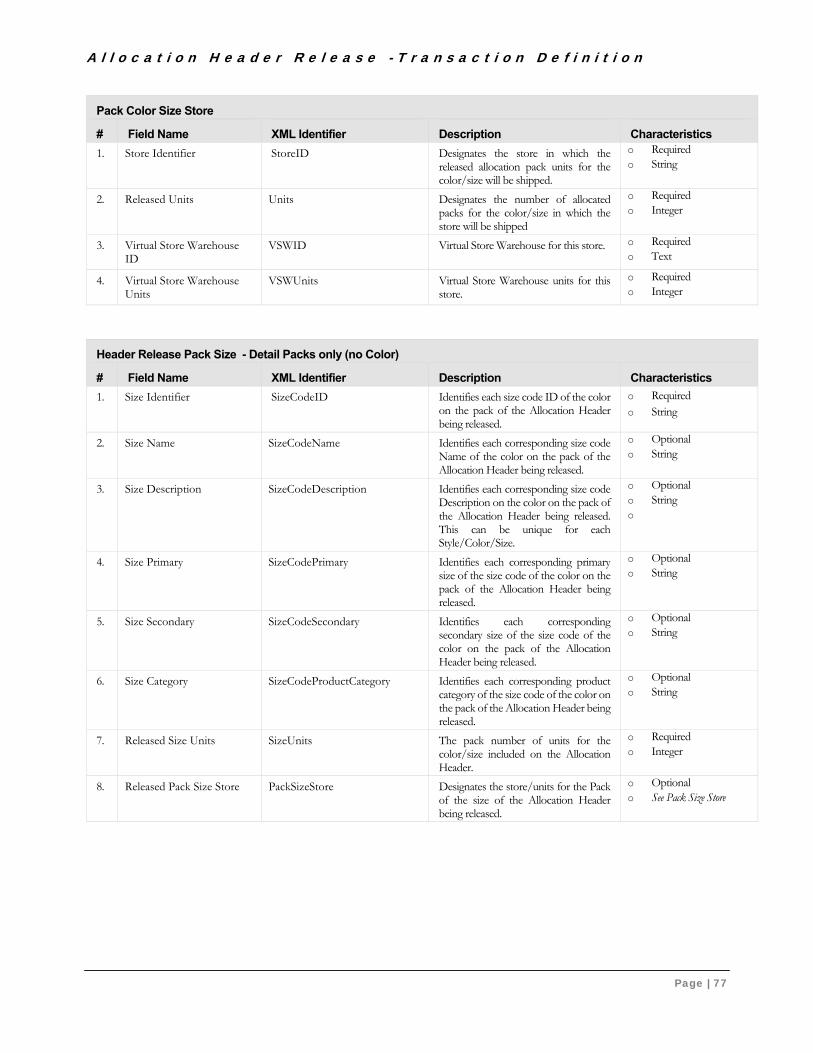
A l l o c a t i o n H e a d e r R e l e a s e - T r a n s a c t i o n D e f i n i t i o n
Page | 77
Pack Color Size Store
# Field Name XML Identifier Description Characteristics
1. Store Identifier StoreID Designates the store in which the released allocation pack units for the color/size will be shipped.
o Required o String
2. Released Units Units Designates the number of allocated packs for the color/size in which the store will be shipped
o Required o Integer
3. Virtual Store Warehouse ID
VSWID Virtual Store Warehouse for this store. o Required o Text
4. Virtual Store Warehouse Units
VSWUnits Virtual Store Warehouse units for this store.
o Required o Integer
Header Release Pack Size - Detail Packs only (no Color)
# Field Name XML Identifier Description Characteristics
1. Size Identifier SizeCodeID Identifies each size code ID of the color on the pack of the Allocation Header being released.
o Required o String
2. Size Name SizeCodeName Identifies each corresponding size code Name of the color on the pack of the Allocation Header being released.
o Optional o String
3. Size Description SizeCodeDescription Identifies each corresponding size code Description on the color on the pack of the Allocation Header being released. This can be unique for each Style/Color/Size.
o Optional o String o
4. Size Primary SizeCodePrimary Identifies each corresponding primary size of the size code of the color on the pack of the Allocation Header being released.
o Optional o String
5. Size Secondary SizeCodeSecondary Identifies each corresponding secondary size of the size code of the color on the pack of the Allocation Header being released.
o Optional o String
6. Size Category SizeCodeProductCategory Identifies each corresponding product category of the size code of the color on the pack of the Allocation Header being released.
o Optional o String
7. Released Size Units SizeUnits The pack number of units for the color/size included on the Allocation Header.
o Required o Integer
8. Released Pack Size Store PackSizeStore Designates the store/units for the Pack of the size of the Allocation Header being released.
o Optional o See Pack Size Store

A l l o c a t i o n H e a d e r R e l e a s e - T r a n s a c t i o n D e f i n i t i o n
Page | 78
Pack Size Store
# Field Name XML Identifier Description Characteristics
1. Store Identifier StoreID Designates the store in which the released allocation pack units will be shipped.
o Required o String
2. Released Units Units Designates the number of allocated packs in which the store will be shipped
o Required o Integer
3. Virtual Store Warehouse ID
VSWID Virtual Store Warehouse for this store. o Required o Text
4. Virtual Store Warehouse Units
VSWUnits Virtual Store Warehouse units for this store.
o Required o Integer
Pack Store
# Field Name XML Identifier Description Characteristics
1. Store Identifier StoreID Designates the store in which the released allocation pack units will be shipped.
o Required o String
2. Released Packs Packs Designates the number of allocated packs in which the store will be shipped
o Required o Integer
3. Virtual Store Warehouse ID
VSWID Virtual Store Warehouse for this store.
o Required o Text
4. Virtual Store Warehouse Packs
VSWPacks Virtual Store Warehouse packs for this store.
o Required o Integer
Total The Header Total Component can be released by store. This format is provided when there are no components (packs or bulk) included on the Allocation Header.
Total
# Field Name XML Identifier Description Characteristics
1. Allocation Multiple Multiple Designates the allocation multiple for the header.
o Optional o Int o
2. Release Store Total TotalStore Designates the store/units of the total Allocation Header being released.
o Optional o See Total Store

A l l o c a t i o n H e a d e r R e l e a s e - T r a n s a c t i o n D e f i n i t i o n
Page | 79
Total Store
# Field Name XML Identifier Description Characteristics
1. Store Identifier StoreID Designates the store in which the released allocation total units will be shipped.
o Required o String
2. Released Units Units Designates the number of allocated total units in which the store will be shipped
o Required o Integer
3. Virtual Store Warehouse ID
VSWID Virtual Store Warehouse for this store. o Required o Text
4. Virtual Store Warehouse Units
VSWUnits Virtual Store Warehouse units for this store.
o Required o Integer

R e l i e v e I n t r a n s i t - O v e r v i e w
Page | 80
Chapter 11: Relieve Intransit
Overview When an Allocation Header is released from Logility - RO, the store units are placed Intransit. When the merchandise is received in the store, these units are then interfaced as part of the current on hand stock and must be relieved (or removed) from Logility - RO Intransit. Alternately, the Logility - RO Intransit can be removed and be included in the current external intransit until it is moved to the on hand. Relieve (or removal) of Logility – RO Intransit is interfaced to the system via an XML file.
Transaction Definition There is one type of Relieve Intransit transaction.
Transactions can be provided using either a delimited or an XML format. Refer to the provided RelieveIntransitSchema.xsd for the XML file layout.
Sample transactions can be found in the “\Batch\Transactions” folder.
Relieve Intransit
Relieve Intransit
# Field Name XML Identifier Description Characteristics
1. Header Identifier HeaderID Designates the associated Allocation Header in which the intransit is to be relieved.
o Required o String
2. Product Identifier ProductID Designates the Style/Sku Product ID as defined in the Product Hierarchy in which the intransit is to be relieved.
o Required o String
3. Store Identifier StoreID Designates the store in which the released allocation pack units will be shipped. This value is required if the Relieve All Stores option is not being used.
o Optional o String
4. Relieve Units Units Designates the quantity in units of the intransit to be relieved. This value is required if the Relieve All Stores option is not being used.
o Optional o Double

R e l i e v e I n t r a n s i t - C o m m a n d P r o c e s s i n g
Page | 81
Relieve Intransit
# Field Name XML Identifier Description Characteristics
5. Relieve All Stores Flag RelieveAllStores When this attribute is specified for a header, it overrides the default value as specified in the RelieveIntransit.exe.config file.
Value of true relieves the intransit for all stores on the header (StoreID and Units are optional in this case but will be ignored if specified).
Value of false requires that the StoreID and Units attributes be present to identify the stores whose intransit will be relieved for the specified header.
If this attribute is specified on multiple RelieveStoreIntransit elements for the same header, it must be the same Boolean value.
o Optional o Boolean value “true”
or “false”
Command Processing The Relieve Intransit may be processed from outside of the Logility - RO system using a command prompt or a command file. This allows for the Relieve Intransit to be processed within a client’s third party scheduling package along with standard scheduling.
The Relieve Intransit Task List may be included in a Job to be processed as well. See Scheduler API section.
Command Format
RelieveIntransit.exe [<Input File>]
# Field Identifier Description
1. RelieveIntransit.exe o The file path and executable to be processed.
2. Input File o Optional o The input file containing input
transactions o Defaults to “InputFile” setting in the
config file if not specified.
Note: Parameters must be surrounded by double quotes (“) when spaces are imbedded. Recommended practice is to always use double quotes around each parameter.

R e l i e v e I n t r a n s i t - C o m m a n d P r o c e s s i n g
Page | 82
Command Sample
"C:\MIDRetail\Batch\RelieveIntransit.exe" "C:\MIDRetailData\Relieve Intransit\Relieve1.xml"
"C:\MIDRetail\Batch\RelieveIntransit.exe" "C:\MIDRetailData\Relieve Intransit\Relieve2.xml"

R o l l u p - O v e r v i e w
Page | 83
Chapter 12: Rollup
Overview The Rollup must be processed separately, although the requests may be generated as part of the History Load (see HistoryPlanLoad.exe.config) or the Hierarchy Load during reclassification (see HierarchyLoad.exe.config). The Rollup may also be processed through the task list or job where the Rollup criteria is specified in the task. When processing standalone, an input XML file is required in order to determine the Rollup criteria.
When External Intransit for Size Level is loaded through the History Load, a Posting type rollup is required for internal processing.
Transaction Definition There are three types of Rollup transactions as described below. They are Options, Variables and Requests. The transaction provides for Actual, Intransit, and Plan, Store and Chain, as well as Daily and Weekly where applicable.
Transactions can only be provided using either an XML format.
Sample transactions can be found in the “\Batch\Transactions” folder.
Note: When a Task List is setup for the Rollup and processed from the Task List or a Job, the transactions below are generated from the Rollup task criteria and the following transactions are not required.
Options Rollup Options provide processing options for Rollup. This record is optional.
Rollup Options
# Field Name XML Identifier Description Characteristics
1. Rollup Days Flag RollupDays Designates which days of a selected week are to be rolled.
o Optional o Current (roll only the
current sales and stock days)
o All o Defaults to All
2. Honor Locks Flag HonorLocks Designates if locks are to be maintained while rolling forecasted values.
Note: Honoring locks may cause the rolled values to be out of balance.
o Optional o True o False o Defaults to False

R o l l u p - T r a n s a c t i o n D e f i n i t i o n
Page | 84
Variables The Variables definition defines restrictions for the levels each variable is to roll. If a value is not provided, rollup assumes all values are to be rolled.
Rollup Variables
# Field Name XML Identifier Description Characteristics
1. Variable Name Name The name of the variable. The name must match the same name used to post the variable.
o Required o String
2. Chain History Begin Level ChainHistoryLevel Designates the lowest level which chain history values are to be rolled.
o Optional o String. The levels can
either be a level name or level number in the organizational hierarchy.
o Default is to roll all levels.
o A value of 0 (zero) designates that the variable is not to be rolled for this type of data.
3. Chain Forecast Begin Level ChainForecastLevel Designates the lowest level which chain forecast values are to be rolled.
o Optional o String. The levels can
either be a level name or level number in the organizational hierarchy.
o Default is to roll all levels.
o A value of 0 (zero) designates that the variable is not to be rolled for this type of data.
4. Store Daily History Begin Level
StoreDailyHistoryLevel Designates the lowest level which store daily history values are to be rolled.
o Optional o String. The levels can
either be a level name or level number in the organizational hierarchy.
o Default is to roll all levels.
o A value of 0 (zero) designates that the variable is not to be rolled for this type of data.
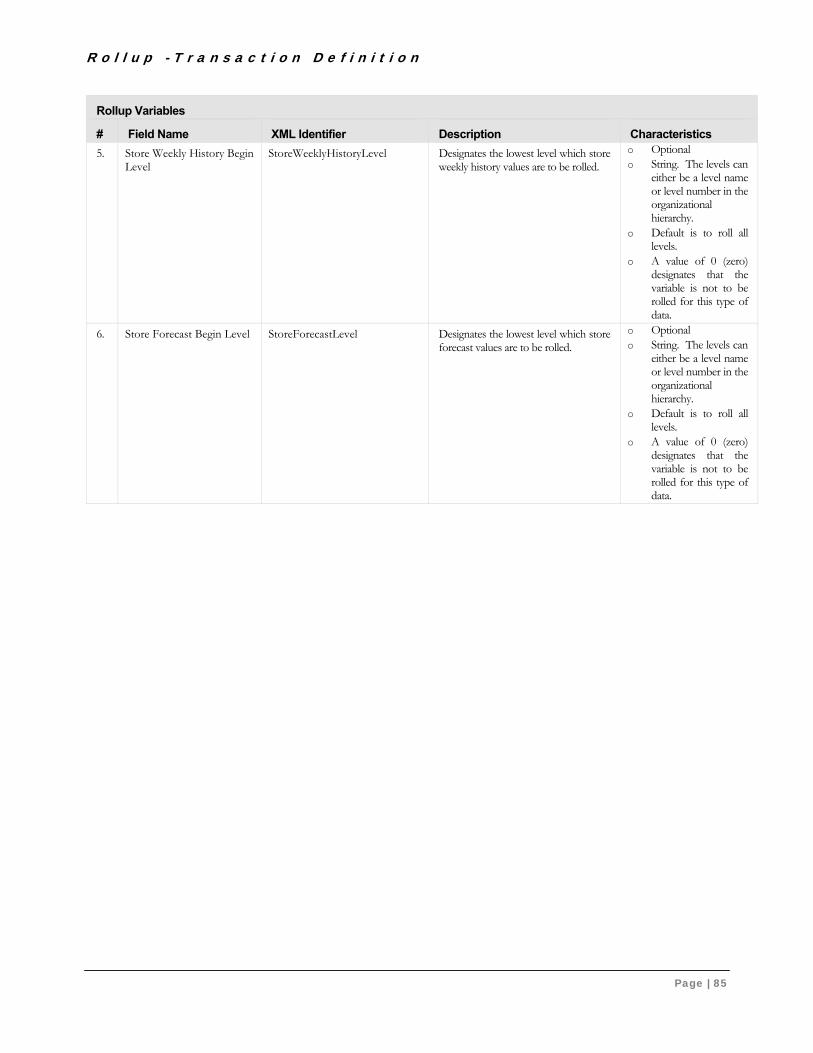
R o l l u p - T r a n s a c t i o n D e f i n i t i o n
Page | 85
Rollup Variables
# Field Name XML Identifier Description Characteristics
5. Store Weekly History Begin Level
StoreWeeklyHistoryLevel Designates the lowest level which store weekly history values are to be rolled.
o Optional o String. The levels can
either be a level name or level number in the organizational hierarchy.
o Default is to roll all levels.
o A value of 0 (zero) designates that the variable is not to be rolled for this type of data.
6. Store Forecast Begin Level StoreForecastLevel Designates the lowest level which store forecast values are to be rolled.
o Optional o String. The levels can
either be a level name or level number in the organizational hierarchy.
o Default is to roll all levels.
o A value of 0 (zero) designates that the variable is not to be rolled for this type of data.

R o l l u p - T r a n s a c t i o n D e f i n i t i o n
Page | 86
Requests The Rollup Request defines the data to be rolled.
Rollup Requests
# Field Name XML Identifier Description Characteristics
1. Rollup Type Type Designates the type of rollup to be done.
o Optional o String
o Level – Rolls values up the hierarchy levels
o StoreToChain – Rolls the all store totals to the specified level(s)
o Posting – Rolls all “posting” generated requests. The Posting Rollup is required to process after Size Level External Intransit is loaded.
o Reclass – Rolls all “reclass” generated requests
o Intransit – Rolls External Intransit up the hierarchy (only rolls as far as Parent of Style).
o DayToWeek – Rolls the daily values into the appropriate week values.
o Default is Level
2. Product Identifier Product The unique product ID as defined in the Product Hierarchy, designating the Hierarchy or specific node path in with the roll will be processed.
o Required o String
3. Forecast Version Version Designates the version description in which the Rollup request will be processed.
Versions are defined in the application under Administration > Options. The Version name must match what has been defined within the application.
o Optional o String o Default is Actual
4. Data Type Data Designates the type of data to be rolled.
o Optional o String
o All o Store o Chain
o Default is All
5. Timeframe Period Designates the time frame of data to be rolled.
o Optional o String
o Day o Week
o Default is Week

R o l l u p - T r a n s a c t i o n D e f i n i t i o n
Page | 87
Rollup Requests
# Field Name XML Identifier Description Characteristics
6. Date Type DateType Designates the type of date the transaction contains.
o Optional o String
o Calendar o Fiscal
o Default is Calendar
7. Beginning Date FromDate Designates the beginning week in which the Rollup will be processed.
o Required o Fiscal format – yyyyww o Calendar format – yyyy-mm-dd
8. Ending Date ToDate Designates the last week in which the Rollup will be processed.
o Required o Fiscal format – yyyyww o Calendar format – yyyy-mm-dd
9. Ending Level ToLevel Designates the level in the designated hierarchy path (Product from above) in which the Rollup process will roll up to (top level)
o Optional
10. Beginning Level FromLevel Designates the level in the designated hierarchy path (Product from above) in which the Rollup process will roll from (bottom level)
o Required
11. Override Variable Levels Flag
OverrideVariableLevels Designates to restrict the roll levels to be within the ToLevel and FromLevel for this transaction.
o Optional o String
o True o False
o Default is False

R o l l u p - C o m m a n d P r o c e s s i n g
Page | 88
Command Processing The Rollup may be processed from outside of the Logility - RO systems using a command prompt or a command file, utilizing the Logility - RO Task List within the scheduler. This allows for the Rollup to be processed within a client’s third party scheduling package along with standard scheduling.
The Rollup Task Lists may be included in a Job to be processed as well. See Scheduler API section.
Command Format
Rollup.exe [<Task List RID>] [<Task Sequence>]
# Field Identifier Description
1. Rollup.exe o The file path and executable to be processed.
2. Task List RID o Optional o Task List RID of the Task list being
executed. o No default.
3. Task Sequence o Required if Task List is used o Task Sequence of the Task being
executed within Task List. Sequence is relative to zero.
o No default.
4. Input File o Optional o The directory and name of the input
transactions.
Note: Parameters must be surrounded by double quotes (“) when spaces are imbedded. Recommended practice is to always use double quotes around each parameter.
Note: When no Task Lists are specified, the rollup requests are taken from the input file specified in the config file or on the command line.
Command Sample
"C:\MIDRetail\Batch\Rollup.exe" “103” “0” -- The following example uses the input file from the config file -- "C:\MIDRetail\Batch\Rollup.exe" -- The following example uses the input file from the command line -- "C:\MIDRetail\Batch\Rollup.exe" "C:\MIDRetailData\Rollup\RollupTransactions.XML" -- The following example uses the scheduler tasks and the input file from the command line -- "C:\MIDRetail\Batch\Rollup.exe" “103” “0” "C:\MIDRetailData\Rollup\RollupTransactions.XML"

P u r g e - O v e r v i e w
Page | 89
Chapter 13: Purge
Overview The Purge process will remove specific data based on purge criteria designated in the Merchandise Hierarchy by level as well as any overrides by Product. The following types of data will be purged: Daily History, Weekly History, Weekly Forecasts (Store and Chain), and Released Headers. The purge process will interrogate each Product Node for the purge criteria. If a Product Node does not have purge criteria defined, the node will inherit the purge criteria defined at the node’s level. If the level does not have purge criteria defined, the node will then inherit from the parent node or the parent node level and so on until purge criteria is found. If there has been no purge criteria defined in the application, the default purge criteria is not to purge. In order to purge all data of a specific type or area of the Merchandise Hierarchy, simply define purge criteria of zero weeks and all data will be cleared for that specific type and area. The purge after number of weeks designated is the number of weeks prior to the current sales week as designated in the History Load API.
The Purge process will also remove Audit entries and Completed Schedule entries based on the settings within the configuration file. When Users and/or Security Groups have been marked for delete, the purge will physically remove those items after the number of days to keep have expired.
There is no input file to the purge process.
Command Processing The Purge may be processed from outside of the Logility - RO system using a command prompt or a command file. This allows for the Purge to be processed within a client’s third party scheduling package along with standard scheduling.
The Purge Task List may be included in a Job to be processed as well. See Scheduler API section.
Command Format
Purge.exe
# Field Identifier Description
1. Purge.exe o The file path and executable to be processed.
Note: Parameters must be surrounded by double quotes (“) when spaces are imbedded. Recommended practice is to always use double quotes around each parameter.
Note: There is no input file, and no overrides for the command processing.
Command Sample
"C:\MIDRetail\Batch\Purge.exe"

S i z e D a y t o W e e k S u m m a r y - O v e r v i e w
Page | 90
Chapter 14: Size Day to Week Summary
Overview The daily size history is summed on a weekly basis and determines the total Sales, “In Stock” Sales, BOW Stock, and accumulated Sales and Stock by SKU, Store, and Week in order to process Size Curves using weekly sales data.
The Size Day to Week Summary API must be processed at the end of each week after the last day of the week’s sales and on hands have been loaded. Once the weekly Size History is summarized, the weekly values will then be utilized when generating Size Curves. See Size Curve Generate section
There is no input file to the Size Day to Week Summary process.
The process will default to processing the current week ending only. Therefore, this process must be processed at week end – after the Sales Ending Date has been updated. In order to override the week(s) to be processed, the Size Day to Week Summary Task List must be created and processed.
Command Processing The Size Day To Week Summary may be processed from outside of the Logility - RO system using a command prompt or a command file. This allows for the Size Day To Week Summary to be processed within a client’s third party scheduling package along with standard scheduling. It is recommended to process the Size Day To Week Summary from an Logility - RO Job to allow for any date overrides.
The Size Day to Week Summary Task List may be included in a Job to be processed as well. See Scheduler API section.
Command Format
SizeDayToWeekSummary.exe [<Date Range > [<Merchandise ID>] ]
# Field Identifier Description
1. SizeDayToWeekSummary.exe o The file path and executable to be processed.
2. Date Range o Optional. o Fiscal weeks to process. o Processes current week if not provided. o Format:
Offset: -1,-5 or -1 for a single week. Static: YYYYWW-YYYYWW or YYYYWW for a single week.
o Note: Must be included if using Merchandise ID.
3. Merchandise ID o Optional o Filters processing to only the sizes under this node.
o Note: Can be used to separate work load so multiple processes can be executed at the same time.

S i z e D a y t o W e e k S u m m a r y - C o m m a n d P r o c e s s i n g
Page | 91
Note: Parameters must be surrounded by double quotes (“) when spaces are imbedded. Recommended practice is to always use double quotes around each parameter.
Command Sample
"C:\MIDRetail\Batch\SizeDayToWeekSummary.exe"
"C:\MIDRetail\Batch\SizeDayToWeekSummary.exe" “201101-201104”
"C:\MIDRetail\Batch\SizeDayToWeekSummary.exe" “201101-201104” “Dept10”
"C:\MIDRetail\Batch\SizeDayToWeekSummary.exe" “-1,-5”

S i z e C u r v e G e n e r a t e - O v e r v i e w
Page | 92
Chapter 15: Size Curve Generate
Overview When size selling data is available, a Size Curve may be generated to collect the basis data and calculate the Size Curve percentages. During the Size Curve generation process, the raw sales data selected will be summed by size and the curve percentages created by store. Additional tolerance constraints may also be applied as defined in the Size Curve criteria.
The Size Curve Generate processes two types of Task Lists within Logility - RO. The Size Curve Method Task provides a Size Curve Method and an optional date range for processing. The Size Curve Task provides a merchandise node in which to pull the Size Curve criteria from the Hierarchy Node Properties (the criteria may be inherited from higher levels within the hierarchy).
Command Processing The Size Curve Generator may be processed from outside of the Logility - RO system using a command prompt or a command file. This allows for the Size Curve Generator to be processed within a client’s third party scheduling package along with standard scheduling.
The Size Curve Generator Task Lists may be included in a Job to be processed as well. See Scheduler API section.
Command Format
SizeCurveGenerate.exe <Task List RID> <Task Sequence>
# Field Identifier Description
1. SIZECURVEGENERATE.EXE o The file path and executable to be processed.
2. TASK LIST RID o Required o Task List RID of the Task list being executed.
3. TASK SEQUENCE o Required if Task List is used o Task Sequence of the Task being executed within Task
List. Sequence is relative to zero.
Note: Parameters must be surrounded by double quotes (“) when spaces are imbedded. Recommended practice is to always use double quotes around each parameter.
Command Sample
"C:\MIDRetail\Batch\SizeCurveGenerate.exe" "18" “0”

D e t e r m i n e H i e r a r c h y A c t i v i t y - O v e r v i e w
Page | 93
Chapter 16: Determine Hierarchy Activity
Overview The Determine Hierarchy Activity process will identify “active” hierarchy nodes based on criteria identified to the process. This activity indicator can be used in conjunction with Low Level Override Models to only process “active” nodes to reduce processing time.
A node is considered active if a header contains the hierarchy node. It is also considered active if it falls within the criteria identified to the process. The criteria includes amount of history, intransit and forecasts relative to the sales ending date. All ancestor nodes for each active node are also considered active.
There is no input file to the Determine Hierarchy Activity process.
Command Processing The Determine Hierarchy Activity process may be executed from outside of the Logility - RO system using a command prompt or a command file. This allows for the Determine Hierarchy Activity procedure to be processed within a client’s third party scheduling package along with standard scheduling.
The Determine Hierarchy Activity process can be included in a task list as an External Program. See Scheduler API section.
Command Format
DetermineHierarchyActivity.exe
# Field Identifier Description
1. DetermineHierarchyActivity.exe o The file path and executable to be processed.
Note: There is no input file, and no overrides for the command processing.
Command Sample
"C:\MIDRetail\Batch\DetermineHierarchyActivity.exe"
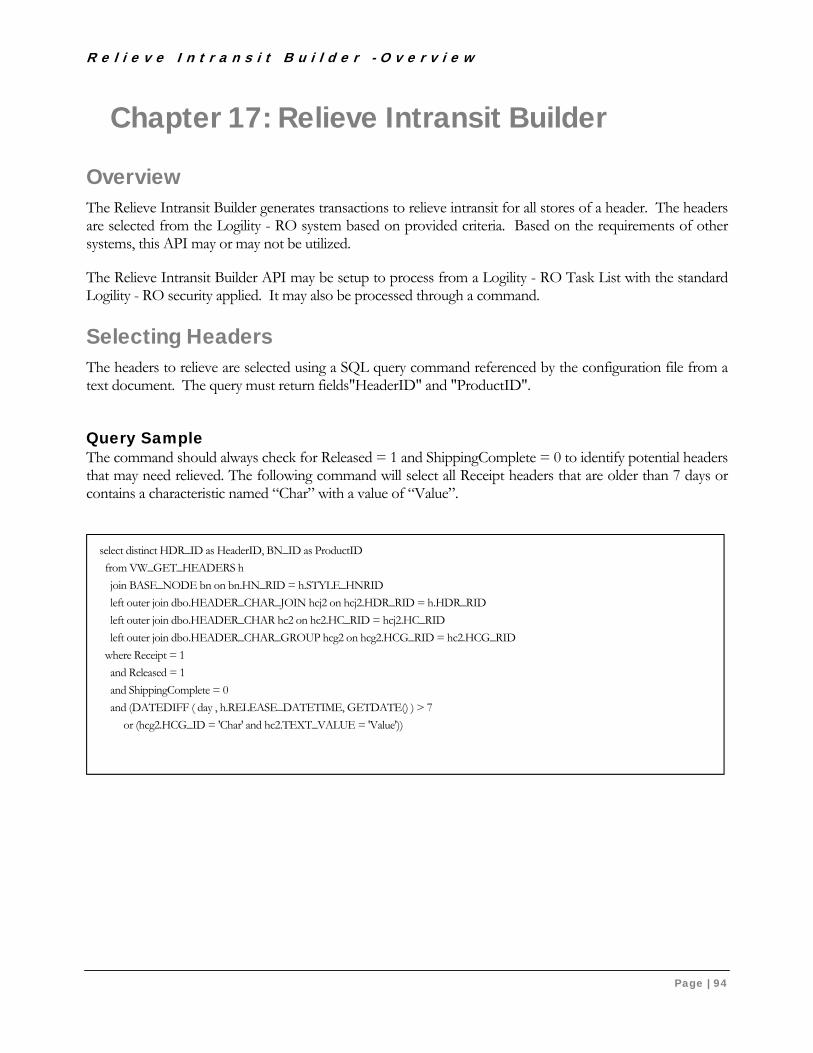
R e l i e v e I n t r a n s i t B u i l d e r - O v e r v i e w
Page | 94
Chapter 17: Relieve Intransit Builder
Overview The Relieve Intransit Builder generates transactions to relieve intransit for all stores of a header. The headers are selected from the Logility - RO system based on provided criteria. Based on the requirements of other systems, this API may or may not be utilized.
The Relieve Intransit Builder API may be setup to process from a Logility - RO Task List with the standard Logility - RO security applied. It may also be processed through a command.
Selecting Headers The headers to relieve are selected using a SQL query command referenced by the configuration file from a text document. The query must return fields"HeaderID" and "ProductID".
Query Sample The command should always check for Released = 1 and ShippingComplete = 0 to identify potential headers that may need relieved. The following command will select all Receipt headers that are older than 7 days or contains a characteristic named “Char” with a value of “Value”.
select distinct HDR_ID as HeaderID, BN_ID as ProductID
from VW_GET_HEADERS h
join BASE_NODE bn on bn.HN_RID = h.STYLE_HNRID
left outer join dbo.HEADER_CHAR_JOIN hcj2 on hcj2.HDR_RID = h.HDR_RID
left outer join dbo.HEADER_CHAR hc2 on hc2.HC_RID = hcj2.HC_RID
left outer join dbo.HEADER_CHAR_GROUP hcg2 on hcg2.HCG_RID = hc2.HCG_RID
where Receipt = 1
and Released = 1
and ShippingComplete = 0
and (DATEDIFF ( day , h.RELEASE_DATETIME, GETDATE() ) > 7
or (hcg2.HCG_ID = 'Char' and hc2.TEXT_VALUE = 'Value'))

R e l i e v e I n t r a n s i t B u i l d e r - C o m m a n d P r o c e s s i n g
Page | 95
Command Processing The Relieve Intransit Builder may be processed from outside of the Logility - RO system using a command prompt or a command file. This allows for the Relieve Intransit Builder to be processed within a client’s third party scheduling package along with standard scheduling.
Command Format
RelieveHeaders.exe
# Field Identifier Description
1. RelieveHeaders.exe o The file path and executable to be processed.
Note: There are no parameters for this executable
Command Sample
"C:\MIDRetail\Batch\RelieveHeaders.exe"

S i z e C u r v e L o a d - O v e r v i e w
Page | 96
Chapter 18: Size Curve Load
Overview Size Curve Groups and Size Curves define the size contribution goal across a group of sizes by store. Values are loaded using two files, one for Size Curve Groups and on for Size Curves.
When the Size Curve Generate API is utilized, the Size Curve Load may or may not be utilized. The usage of this API will be determined during the process definitions.
Size Curve Group Overview The Size Curve Group defines the size contribution goal across a group of sizes. Each size may include raw sales data, in which the application will calculate the percent of contribution for that size across the group of sizes. Or, each size may be assigned the actual percent. Once a Size Curve Group is defined, it can then be associated to a specific store or a group of stores for use during Size Need calculations.
Transaction Definition There is one type of Size Curve Group transactions as described below. The Size Curve Group is the name used by the user throughout the application containing the associated Store Size Curves.
Transactions can only be provided using an XML format. Refer to the provided SizeCurveGroupLoadSchema.xsd for the XML file layout.
Sample transactions can be found in the “\Batch\Transactions” folder.

S i z e C u r v e L o a d - T r a n s a c t i o n D e f i n i t i o n
Page | 97
S ize Curve Group Definit ion
Size Curve Group
# Field Name XML Identifier Description Characteristics
1. Group Name SizeCurveGroupName Defines the name of the Size Curve Group. This is the name used throughout the Size functionality.
o Required o String
2. Action SizeCurveGroupAction Identifies the action in which the API will process for the specified Size Curve Group
o Modify will create a new Size Curve Group when it does not already exist, if the “CreateOnModify” option is set to true within the configuration file.
o Required o Create o Modify o Remove
3. Size Curve SizeCurve Designates a Size Curve being defined within the Size Curve Group
o Required o See Size Curve
Size Curve
# Field Name XML Identifier Description Characteristics
1. Size Curve Name SizeCurveName Identifies the name of the Size Curve being defined.
This is the name that will be associated with the store(s).
o Optional – if omitted, the curve will be defined as the default curve. Otherwise the Size Curve Name is Required
o String
2. Size Category ProductCategory Identifies the product category of the Size Curve. The product categories must match the product categories defined for the size codes.
o Required o String
3. Action SizeCurveAction Identifies the action in which the API will process for the specified Size Curve
o Required o Create o Modify o Remove
4. Sizes Size Designates a Size being defined within the Size Curve
o Required o See Size
Size
# Field Name XML Identifier Description Characteristics
1. Size Identifier CodeID Identifies the size code ID being defined in the Size Curve.
o Required o String
2. Size Primary Primary Identifies the primary size of the size code being defined in the Size Curve.
o Required o String

S i z e C u r v e L o a d - T r a n s a c t i o n D e f i n i t i o n
Page | 98
Size
# Field Name XML Identifier Description Characteristics
3. Size Secondary Secondary Identifies the secondary size of the size code ID being defined in the Size Curve.
o Required o String
4. Size Value Value Identifies the raw sales value or the percent value to be associated with the size code ID being defined in the Size Curve.
o Required o Double
5. Action SizeAction Identifies the action in which the API will process for the specified Size
o Required o Create o Modify o Remove
Status Output Definition The Size Curve Group Load Status output file identifies the load status of each size curve group in the transaction file.
The output file only uses the XML format. Refer to the provided SizeCurveGroupLoadStatusSchema.xsd for the XML file layout.
Size Curve Group Load Status
# Field Name XML Identifier Description Characteristics
1. Group Name SizeCurveGroupName Designates a Size Curve Group name being defined.
o Required o See Size Curve
2. Action SizeCurveGroupAction Identifies the action in which the API processed for the specified Size Curve Group
o Required o String
o Create o Modify o Remove
3. Status LoadStatus Identifies the whether or not the load process was successful
o Required o Boolean
o true o false
o
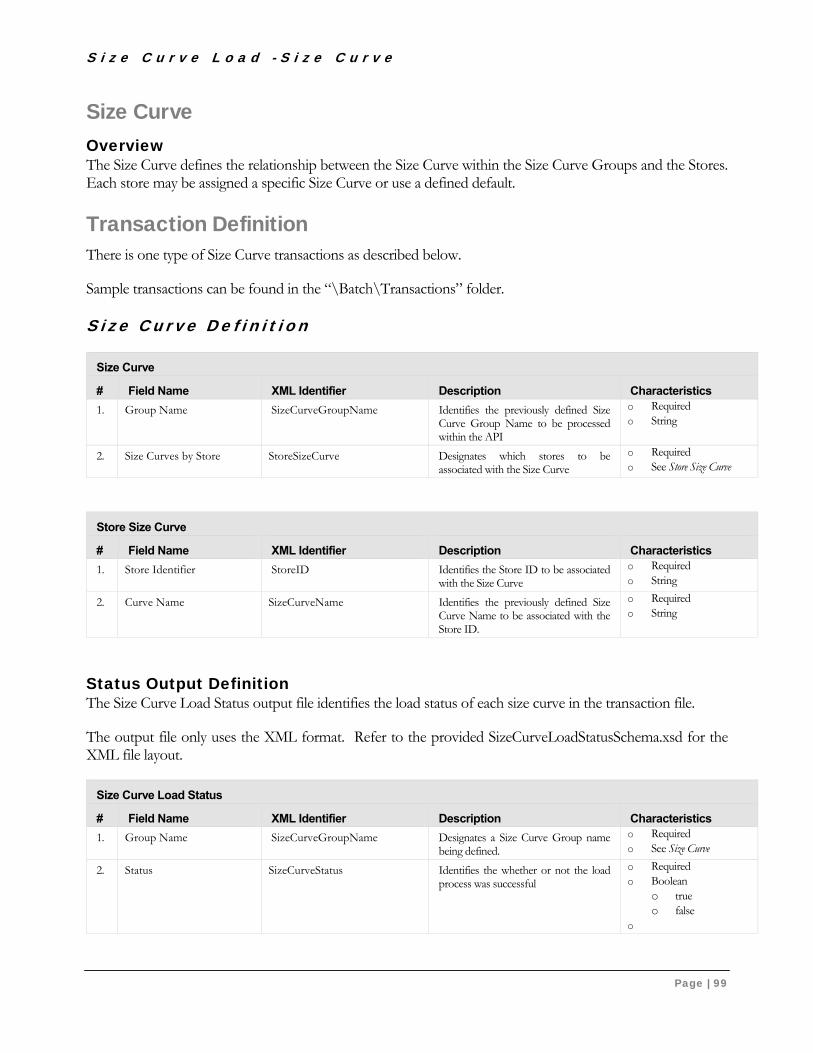
S i z e C u r v e L o a d - S i z e C u r v e
Page | 99
Size Curve Overview The Size Curve defines the relationship between the Size Curve within the Size Curve Groups and the Stores. Each store may be assigned a specific Size Curve or use a defined default.
Transaction Definition There is one type of Size Curve transactions as described below.
Sample transactions can be found in the “\Batch\Transactions” folder.
Size Curve Definit ion
Size Curve
# Field Name XML Identifier Description Characteristics
1. Group Name SizeCurveGroupName Identifies the previously defined Size Curve Group Name to be processed within the API
o Required o String
2. Size Curves by Store StoreSizeCurve Designates which stores to be associated with the Size Curve
o Required o See Store Size Curve
Store Size Curve
# Field Name XML Identifier Description Characteristics
1. Store Identifier StoreID Identifies the Store ID to be associated with the Size Curve
o Required o String
2. Curve Name SizeCurveName Identifies the previously defined Size Curve Name to be associated with the Store ID.
o Required o String
Status Output Definition The Size Curve Load Status output file identifies the load status of each size curve in the transaction file.
The output file only uses the XML format. Refer to the provided SizeCurveLoadStatusSchema.xsd for the XML file layout.
Size Curve Load Status
# Field Name XML Identifier Description Characteristics
1. Group Name SizeCurveGroupName Designates a Size Curve Group name being defined.
o Required o See Size Curve
2. Status SizeCurveStatus Identifies the whether or not the load process was successful
o Required o Boolean
o true o false
o

S i z e C u r v e L o a d - C o m m a n d P r o c e s s i n g
Page | 100
Command Processing The Size Curve Load may be processed from outside of the Logility - RO system using a command prompt or a command file. This allows for the Size Code Load to be processed within a client’s third party scheduling package along with standard scheduling.
The Size Curve Load Task List may be included in a Job to be processed as well. See Scheduler API section.
Command Format
SizeCurveLoad.exe [<Size Curve Group Input File> [<Size Curve Input File>] ]
# Field Identifier Description
4. SizeCurveLoad.exe o The file path and executable to be processed.
5. Size Curve Group Input File o Optional o The input file containing Size Curve
Group input transactions. o Defaults to “CurveGroupTransFile”
setting in the config file if not specified.
6. Size Curve Input File o Optional o The input file containing Size Curve
input transactions. o Defaults to “CurveTransFile” setting in
the config file if not specified.
Note: Parameters must be surrounded by double quotes (“) when spaces are imbedded. Recommended practice is to always use double quotes around each parameter.
Command Sample
“C:\MIDRetail\Batch \SizeCurveLoad.exe” “C:\MIDRetailData\Size Curve\CurveGroup.xml” “C:\MIDRetailData\Size Curve\Curve.xml”

S i z e C o n s t r a i n t s L o a d - O v e r v i e w
Page | 101
Chapter 19: Size Constraints Load
Overview Size Constraints Models may be loaded through an XML format in order to populate a named Size Constraint Model. This information may be interfaced for the default of all of the stores or with different settings by Sets of stores. Each setting may be set globally or specifically by color and/or size. The Size Constraints Models may also be created interactively within the application.
When creating a Size Constraints Model per store, an Attribute must be created using the Store ID characteristic. The Store Attribute/Sets must be defined before creating the Size Constraints Models.
Transaction Definition There is one type of Size Constraints Model transaction as described below.
Transactions can only be provided using an XML format. Refer to the provided SizeConstraintsLoadSchema.xsd for the XML file layout.
Sample transactions can be found in the “\Batch\Transactions” folder.
Size Constraints Model Transactions SizeConstraintsModel
# Field Name XML Identifier Description Characteristics
1. Action Action Designates the action to be taken for the Model.
The Modify action will create a new Model if it does not already exist.
o Required o Create o Modify o Remove
2. Model ModelName Identifies the Size Constraints Model Name.
o Required o String
3. Size Curve SizeCurve Identifies the sizes to be included based on the Size Curve definition. Either the Size Curve or Size Group may be used to identify the sizes to be included.
o Required unless Size Group is specified
o String
4. Size Group SizeGroup Identifies the sizes to be included based on the Size Group definition.
Either the Size Curve or Size Group may be used to identify the sizes to be included.
o Required unless Size Curve is specified
o String
5. Attribute Attribute Identifies the Store Attribute in defining the size constraints by Set
o Required o String
6. Set Set Designates that an Attribute Set is being set for the constraints.
o Required o See Set

S i z e C o n s t r a i n t s L o a d - T r a n s a c t i o n D e f i n i t i o n
Page | 102
Set
# Field Name XML Identifier Description Characteristics
1. Set Name SetName Identifies the Attribute Set for the constraints.
o Optional o Default of null is the
“Default” for All Stores
o String
2. Color Identifier ColorCode Identifies the Color being set for the constraints.
o Optional o Default of null is for
“All Colors”
3. Size Primary SizePrimary Identifies the primary size being set for the constraints.
o Optional, if Size Code is included
4. Size Secondary SizeSecondary Identifies the Size Dimension being set for the constraints.
o Optional o String
5. Size Identifier SizeCode Identifies the Size being set for the constraints.
When Size Code is designated, the Primary and Secondary will be implied from the size code.
o Optional, if Size Primary / Secondary are included
o String
6. Size Minimum SizeMin Identifies the Size Minimum quantity o Optional o Positive Integer
7. Size Maximum SizeMax Identifies the Size Maximum quantity o Optional o Positive Integer
8. Size Multiple SizeMult Identifies the Size Multiple quantity o Optional o Positive Integer

S i z e C o n s t r a i n t s L o a d - C o m m a n d P r o c e s s i n g
Page | 103
Command Processing The Size Constraints Load may be processed from outside of the Logility - RO system using a command prompt or a command file. This allows for the Size Constraints Load to be processed within a client’s third party scheduling package along with standard scheduling.
The Size Constraints Load Task List may be included in a Job to be processed as well. See Scheduler API section.
Command Format
SizeConstraintsLoad.exe [<Input File>]
# Field Identifier Description
1. SIZECONSTRAINTSLOAD.EXE o The file path and executable to be processed.
2. Input File o Optional o The input file containing input
transactions o Defaults to “InputFile” setting in the
config file if not specified.
Note: Parameters must be surrounded by double quotes (“) when spaces are imbedded. Recommended practice is to always use double quotes around each parameter.
Command Sample
"C:\MIDRetail\Batch\SizeConstraintsLoad.exe" "C:\MIDRetailData\Size Constraints\SizeConstraints.xml"

B u i l d P a c k C r i t e r i a L o a d - O v e r v i e w
Page | 104
Chapter 20: Build Pack Criteria Load
Overview The Logility - RO allocation system builds “optimal” pre-packs to enable accurate buying decisions based on anticipated store allocation needs by style, color, and size. In order to supply the process with the Vendor pre-pack and bulk constraints by the Vendor, this information must be interfaced into Logility _ RO.
The Build Pack Criteria Load API may be setup to process from a Logility - RO Task List with the standard Logility - RO security applied. It may also be processed through a command.
Transaction Definition There is one type of Build Pack Criteria transactions as described below. The format is a delimited file only. There is not an XML format for this API.
The delimited transactions are structured using the format below with each field separated by the delimiter identified to the application in the MIDSettings.config file.
Sample transactions can be found in the “\Batch\Transactions” folder.
Delimited File Format The fields in the delimited file are described above, only the order of the fields and any differences in characteristics are noted.
Set
# Field Name XML Identifier Description Characteristics
1. Name NA The name of the criteria to be used. Typically a Vendor name or Vendor item name.
o Required o Max Length 50
2. Component Minimum NA The minimum quantity for any pack configuration as required by the vendor.
o Required o Integer
3. Size Multiple NA The bulk size multiple required by the vendor.
o Required o Integer
4. Pack Combo Name NA The name of the combinations of pack(s) that are accepted on an order by the vendor. This name can be a sequential number or a meaningful name.
o Required o Max Length 50
5. Pack Multiple NA The pack multiple for the specified Pack. o Required o Integer

B u i l d P a c k C r i t e r i a L o a d - C o m m a n d P r o c e s s i n g
Page | 105
Set
# Field Name XML Identifier Description Characteristics
6. Combo Max Packs SizeMin The maximum number of packs with different internal combinations of sizes of the specified Pack Multiple.
For example, the vendor may allow 3 different size run configurations of a 6 pack.
o Optional o Integer o Default to ‘1’
Command Processing The Build Pack Criteria Load may be processed from outside of the Logility - RO system using a command prompt or a command file. This allows for the Build Pack Criteria Load to be processed within a client’s third party scheduling package along with standard scheduling.
Command Format
BuildPackCriteriaLoad.exe [<Input File> [<Delimiter>] ]
# Field Identifier Description
1. BuildPackCriteriaLoad.exe o The file path and executable to be processed.
2. Input File o Optional o The input file containing input transactions o Defaults to “InputFile” setting in the config file if not specified.
3. Delimiter o Optional o The field delimiter for text files. o Defaults to “Delimiter” setting in the config file if not specified.
Note: Parameters must be surrounded by double quotes (“) when spaces are imbedded. Recommended practice is to always use double quotes around each parameter.
Command Sample
"C:\MIDRetail\Batch\BuildPackCriteriaLoad.exe" "C:\MIDRetailData\BuildPack\BuildPackCriteriaLoadSample.txt "

H e a d e r A l l o c a t i o n L o a d - O v e r v i e w
Page | 106
Chapter 21: Header Allocation Load
Overview The Header Allocation Load provides a means to import a store allocation to be applied to an existing Allocation Header within Logility - RO. Once the Store Allocation is loaded against the existing Allocation Header, the allocation will be released as long as it is allocated in balance.
This API is typically utilized to import allocations from another system during conversion.
Database Table Definition There are two required database tables in which the Store Allocation data must be imported to in order for the API to read and convert to an Logility - RO Store Allocation.
The tables must be added to the Logility - RO database. The table definitions are included as SQL scripts in the database folder of the installation package. The table names may be changed and then must be updated in the HeaderAllocationLoad.exe.config file as well.
MID_alloc_bulk
# Field Identifier Description Characteristics
1. HEADER_ID The header in which the store allocation is to be applied.
Note: The Allocation Header must already exist within the Logility - RO application.
o Required o String – Max 32
2. SIZE_CODE The Logility - RO Size Code in which the color size Store Allocation is to be applied.
o Required o String – Max 10
3. STORE_ID The Logility – RO Store ID in which the color size Store Allocation is to be applied
Note: The “Reserve” quantity (not allocated to a store – for back stock) must also be included in order for the allocation to be in balance. The store ID must be “Reserve”.
o Required o String – Max 50
4. QTY The number of units to be applied to the color size Store Allocation.
o Required o Integer

H e a d e r A l l o c a t i o n L o a d - D a t a b a s e T a b l e S a m p l e s
Page | 107
MID_alloc_pack
# Field Identifier Description Characteristics
1. HEADER_ID The header in which the store allocation is to be applied.
Note: The Allocation Header must already exist within the Logility - RO application.
o Required o String – Max 32
2. PACK_ID The Logility - RO Pack name in which the pack Store Allocation is to be applied
o Required o String – Max 30
3. STORE_ID The Logility – RO Store ID in which the pack Store Allocation is to be applied.
Note: The “Reserve” quantity (not allocated to a store – for back stock) must also be included. The store ID must be “Reserve”.
o Required o String – Max 50
4. NO_OF_PACKS The number of Packs to be applied to the Store Allocation for this pack.
o Required o Integer
NOTE: The Store Allocation quantities, including the Reserve quantities, must be in balance in order to have the Header Released from Logility - RO during this process.
Database Table Samples MID_alloc_bulk
HEADER_ID SIZE_CODE STORE_ID QTYTST-010-7764-002 LARGE Reserve 53 TST-010-7764-002 MED Reserve 25 TST-010-7764-002 XXXL Reserve 43 TST-010-7764-002 LARGE 00005 45 TST-010-7764-002 MED 00001 40 TST-010-7764-002 XLRG 00006 64 TST-010-7764-002 XXLRG 00008 75 TST-010-7764-002 XXXL 00016 55
MID_alloc_pack HEADER_ID PACK_ID STORE_ID NO_OF_PACKS
TST-010-7764-002 8847225 Reserve 30 TST-010-7764-002 8847225 00001 10 TST-010-7764-002 8847225 00005 5 TST-010-7764-002 8847225 00006 5 TST-010-7764-002 8847225 00017 50

H e a d e r A l l o c a t i o n L o a d - O u t p u t L o g F i l e s
Page | 108
Output Log Files The Header Allocation load provides external log files. There is a Log for the entire process as well as a Log for the Errors only. These files are written to the same directory in which the executable resides.
HeaderAllocationLoadLog.txt This Log contains messages for the entire process including the number of Headers processed as well as any errors.
HeaderAllocationLoadErrorLog.txt This Log contains the error messages only.
2010-06-28 13:00:59,789 INFO Activity - 7 headers will be processed. 2010-06-28 13:01:15,891 ERROR Errors - Header: TST-373829-010-7764-003 *ERROR* is allocated OUT OF BALANCE! Could not be set to Released. 2010-06-28 13:01:15,954 ERROR Errors - Header: TST-373861-100-7299-001 *ERROR* rows were found on tfl_alloc_bulk table, but no bulk colors were found on header in Allocation. 2010-06-28 13:01:15,969 ERROR Errors - Header: TST-373861-100-7299-001 *ERROR* Review above errors! Could not be set to Released. 2010-06-28 13:01:18,029 INFO Activity - PROCESS COMPLETED 2010-06-28 13:01:18,029 INFO Activity - Headers processed: 7 2010-06-28 13:01:18,029 INFO Activity - Headers successfully allocated: 5 2010-06-28 13:01:18,029 INFO Activity - Headers with errors: 2
2010-06-28 13:01:15,891 ERROR Errors - Header: TST-373829-010-7764-003 *ERROR* is allocated OUT OF BALANCE! Could not be set to Released. 2010-06-28 13:01:15,954 ERROR Errors - Header: TST-373861-100-7299-001 *ERROR* rows were found on tfl_alloc_bulk table, but no bulk colors were found on header in Allocation. 2010-06-28 13:01:15,969 ERROR Errors - Header: TST-373861-100-7299-001 *ERROR* Review above errors! Could not be set to Released.

H e a d e r A l l o c a t i o n L o a d - C o m m a n d P r o c e s s i n g
Page | 109
Command Processing The Header Allocation Load may be processed from outside of the Logility - RO system using a command prompt or a command file. This allows for the Header Allocation Load to be processed within a client’s third party scheduling package along with standard scheduling. The Header Allocation Load is not available in the list of tasks that can be executed from Logility - RO Task List. However, it may be executed from a Task List using the “External Program” option.
Command Format
HeaderAllocationLoad.exe
# Field Identifier Description
1. HeaderAllocationLoad.exe o The file path and executable to be processed.
Note: There are no parameters for this executable
Command Sample
"C:\MIDRetail\Batch\HeaderAllocationLoad.exe"

C h a i n S e t P e r c e n t - O v e r v i e w
Page | 110
Chapter 22: Chain Set Percent
Overview The Chain Set Percent Load provides a means to import percentages that will be applied to chain plans by attribute set within Logility - RO. These Attributes may be “Country”, “Climate”, “DC”, or any other applicable Attribute Set. Chain Set Percentages will be created in order to incorporate the Chain Plan breakout by Attribute Set.
The Chain Set Percent Load API may be setup to process from a Logility - RO Task List with the standard Logility - RO security applied. It may also be processed through a command.
Transaction Definition The transactions include the base information as well as the Attribute Set information.
The Chain Set Percentages may be loaded through an XML or delimited format in order to populate the Chain Set percentages for a merchandise level and date range. The Chain Set Percentages may also be created and maintained interactively within the Node Properties of the application.
Sample transactions can be found in the “\Batch\Transactions” folder.
Chain Set Percentages Attributes
# Field Name XML Identifier Description Characteristics
1. Week yearWeek Identifies the week of the percent being loaded for the merchandise.
o Required o Format: yyyyww
2. Product nodeId Identifies the Merchandise ID in which to apply the Chain Set Percentages. When applying Chain Set Percentages to a higher level, all lower levels will inherit the Chain Set Percentages unless overridden.
o Required
3. Attribute storeAttribute Identifies the Store Attribute in defining the Chain percentages by Set
o Required o String

C h a i n S e t P e r c e n t - C o m m a n d P r o c e s s i n g
Page | 111
Set Attributes
# Field Name XML Identifier Description Characteristics
4. Attribute Set storeAttributeSet Identifies the Store Attribute Set in which the percentage is to be applied.
o Required o String
5. Percentage percentage Identifies the percentage to be applied for the specified Set.
If the total of all Sets percentages do NOT equal 100, then all Sets percentages will be proportionally balanced to equal a total of 100 percent.
o Required o Positive Number
(may include decimal places).
Command Processing The Chain Set Percent Load may be processed from outside of the Logility - RO system using a command prompt or a command file. This allows for the Chain Set Percent Load to be processed within a client’s third party scheduling package along with standard scheduling.
The Chain Set Percent Load Task List may be included in a Job to be processed as well. See Scheduler API section.
Command Format
ChainSetPercent.exe
# Field Identifier Description
1. DailyPercentages.exe o The file path and executable to be processed.
2. Input File o Optional o The input file containing input transactions o Defaults to “InputFile” setting in the config file if
not specified.
3. Delimiter o Optional o The field delimiter for text files. o Defaults to “Delimiter” setting in the config file if
not specified.

D a i l y P e r c e n t a g e s L o a d - O v e r v i e w
Page | 112
Chapter 23: Daily Percentages Load
Overview The Daily Percentages Load provides a means to import percentages that will be applied to the merchandise daily sales percentages for each store by specific date or date range or if no date range is provided then the store default percentages will be loaded/updated for that merchandise.
The Daily Percentages Load API may be setup to process from a Logility - RO Task List with the standard Logility - RO security applied. It may also be processed through the command prompt.
Transaction Definition The transactions include the base information as well as the store and date range.
The Daily Percentages may be loaded through an XML or delimited format in order to populate the Daily Percentages for the merchandise level and date range. The Daily Percentages may also be created and maintained interactively within the Node Properties screen in the application.
Sample transactions can be found in the “\Batch\Transactions” folder.
Daily Percentages Daily Percentages Attributes
# Field Name XML Identifier Description Characteristics
1. Product ID ID Identifies the Merchandise ID in which to apply the Daily Percentages. When applying Daily Percentages to a higher level, all lower levels will inherit the Daily Percentages unless overridden.
o Required
2. Store ID ID Designates a Store being defined for the Daily Percentages.
o Required o See Store
3. Fiscal Period FiscalPeriod Designates the Fiscal Period and Daily values being defined for the Daily Percentages.
o Required o See Fiscal Period
Fiscal Period Fiscal Period Attributes
# Field Name XML Identifier Description Characteristics
1. Begin Date BeginDate Identifies the beginning date of the date range that the percentages will be applied to.
o Required o Dates can be fiscal yyyyww
or calendar yyyy-mm-dd o For Default Percentages
enter 0

D a i l y P e r c e n t a g e s L o a d - C o m m a n d P r o c e s s i n g
Page | 113
Fiscal Period Attributes
# Field Name XML Identifier Description Characteristics
2. End Date EndDate Identifies the ending date of the date range that the percentages will be applied to.
o Required o Dates can be fiscal yyyyww
or calendar yyyy-mm-dd o For Default Percentages
enter 0
3. Percentages Day1 Day1 Identifies the percentage to be applied for the first day of the Fiscal Period
o Required o Positive Number (may
include decimal places).
4. Percentages Day2 Day2 Identifies the percentage to be applied for the second day of the Fiscal Period
o Required o Positive Number (may
include decimal places).
5. Percentages Day3 Day3 Identifies the percentage to be applied for the third day of the Fiscal Period
o Required o Positive Number (may
include decimal places).
6. Percentages Day4 Day4 Identifies the percentage to be applied for the fourth day of the Fiscal Period
o Required o Positive Number (may
include decimal places).
7. Percentages Day5 Day5 Identifies the percentage to be applied for the fifth day of the Fiscal Period
o Required o Positive Number (may
include decimal places).
8. Percentages Day6 Day6 Identifies the percentage to be applied for the sixth day of the Fiscal Period
o Required o Positive Number (may
include decimal places).
9. Percentages Day7 Day7 Identifies the percentage to be applied for the seventh day of the Fiscal Period
o Required o Positive Number (may
include decimal places).
Command Processing The Daily Percentages Load may be processed from outside of the Logility - RO system using a command prompt or a command file. This allows for the Daily Percentages Load to be processed within a client’s third party scheduling package along with standard scheduling.
The Daily Percentages Load Task List may be included in a Job to be processed as well. See Scheduler API section.

D a i l y P e r c e n t a g e s L o a d - C o m m a n d P r o c e s s i n g
Page | 114
Command Format
DailyPercentages.exe
# Field Identifier Description
1. DailyPercentages.exe o The file path and executable to be processed.
2. Input File o Optional o The input file containing input transactions o Defaults to “InputFile” setting in the config file if not
specified.
3. Delimiter o Optional o The field delimiter for text files. o Defaults to “Delimiter” setting in the config file if not
specified.

S t o r e E l i g i b i l i t y L o a d - O v e r v i e w
Page | 115
Chapter 24: Store Eligibility Load
Overview The Store Eligibility Load provides a means to import Node Properties – Eligibility values by store. The Eligibility values include
o Similar Store (Similar Stores, Index, and Thru Date)
o Store Eligibility
o Stock Modifier
o Sales Modifier
o FWOS Override
The Store Eligibility Load API may be setup to process from a Logility - RO Task List with the standard Logility – Ro security applied. It may also be processed through the command prompt.
Transaction Definition The transactions include the base information as well as the store and date range.
The Store Eligibility values may be loaded through an XML or delimited format in order to populate the eligibility options for each store. Store Eligibility may also be created and maintained interactively within the Node Properties screen in the application.
Sample transactions can be found in the “\Batch\Transactions” folder.
Eligibility Transactions
Store Eligibility
# Field Name XML Identifier Description Characteristics
1. PRODUCT IDENTIFIER ID Designates the Product ID as defined in the Product Hierarchy in which to apply the Store Eligibility.
o Required o String
2. STORE IDENTIFIER ID Defines the Store ID
Note: This is an alpha field. If store ID’s are numeric, it is suggested that the number be left justified zero filled in order to keep the stores in numerical sequence.
o Required o String o Maximum length 50
3. STORE INELIGIBLE INELIGIBLE Sets the stores eligibility. Default is false. (Making the store eligible)
o Required o Boolean
4. SIMILAR STORE ID ID The specific Store List to be assigned to the store as the similar store (one or list of many for an average separated using the defined level delimiter (backslash is the default and can be modified in Administration>Options)).
o Optional o String o Maximum length 1000
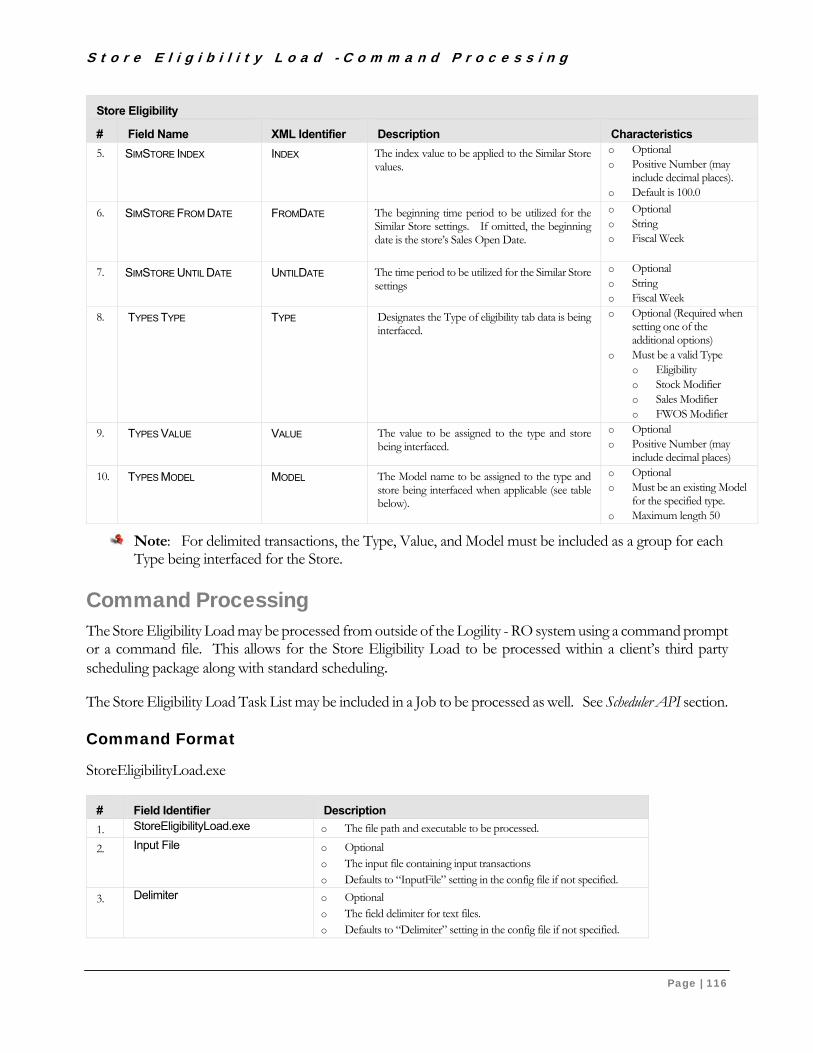
S t o r e E l i g i b i l i t y L o a d - C o m m a n d P r o c e s s i n g
Page | 116
Store Eligibility
# Field Name XML Identifier Description Characteristics
5. SIMSTORE INDEX INDEX The index value to be applied to the Similar Store values.
o Optional o Positive Number (may
include decimal places). o Default is 100.0
6. SIMSTORE FROM DATE FROMDATE The beginning time period to be utilized for the Similar Store settings. If omitted, the beginning date is the store’s Sales Open Date.
o Optional o String o Fiscal Week
7. SIMSTORE UNTIL DATE UNTILDATE The time period to be utilized for the Similar Store settings
o Optional o String o Fiscal Week
8. TYPES TYPE TYPE Designates the Type of eligibility tab data is being interfaced.
o Optional (Required when setting one of the additional options)
o Must be a valid Type o Eligibility o Stock Modifier o Sales Modifier o FWOS Modifier
9. TYPES VALUE VALUE The value to be assigned to the type and store being interfaced.
o Optional o Positive Number (may
include decimal places)
10. TYPES MODEL MODEL The Model name to be assigned to the type and store being interfaced when applicable (see table below).
o Optional o Must be an existing Model
for the specified type. o Maximum length 50
Note: For delimited transactions, the Type, Value, and Model must be included as a group for each Type being interfaced for the Store.
Command Processing The Store Eligibility Load may be processed from outside of the Logility - RO system using a command prompt or a command file. This allows for the Store Eligibility Load to be processed within a client’s third party scheduling package along with standard scheduling.
The Store Eligibility Load Task List may be included in a Job to be processed as well. See Scheduler API section.
Command Format
StoreEligibilityLoad.exe
# Field Identifier Description
1. StoreEligibilityLoad.exe o The file path and executable to be processed.
2. Input File o Optional o The input file containing input transactions o Defaults to “InputFile” setting in the config file if not specified.
3. Delimiter o Optional o The field delimiter for text files. o Defaults to “Delimiter” setting in the config file if not specified.

V S W L o a d - O v e r v i e w
Page | 117
Chapter 25: VSW Load
Overview The VSW Load provides a means import Node Properties – VSW values by Store. The VSW values include
o Minimum Ship Quantity
o % Pack Threshold
o Item Max
o FWOS Max
o Push to Backstock
The VSW Load API may be setup to process from a Logility - RO Task List with the standard Logility - RO security applied. It may also be processed through the command prompt.
Transaction Definition The transactions include the base information as well as the store and date range.
The VSW values may be loaded through an XML or delimited format in order to populate the VSW options for each store. VSW values may also be created and maintained interactively within the Node Properties screen in the application.
Sample transactions can be found in the “\Batch\Transactions” folder.
VSW Load Transactions VSW
# Field Name XML Identifier Description Characteristics
1. MERCHANDISE ID ID Designates the Product ID as defined in the Product Hierarchy in which to apply for VSW.
o Requiredo String
2. STORE IDENTIFIER ID Defines the Store ID
Note: This is an alpha field. If store ID’s are numeric, it is suggested that the number be left justified zero filled in order to keep the stores in numerical sequence.
o Required o String o Maximum length 50
3. MIN SHIP QUANTITY MINSHPQTY The specific Minimum Ship Quantity value to be assigned to the store
o Optional o Integer o Default 0
4. % PACK THRESHOLD PCTTHRESHOLD Specific % pack threshold value to be assigned to the store.
o Optional o Double o Default 0.5
5. ITEM MAX ITEMMAX The specific Item Max value to be assigned to the store
o Optional o Integer

V S W L o a d - C o m m a n d P r o c e s s i n g
Page | 118
VSW
# Field Name XML Identifier Description Characteristics
6. FWOS MAX FWOSMAXVALUE
The specific FWOS Max value to be assigned to the store without any specific time period.
o Optional o Value - Positive
Number (may include decimal places).
7. FWOS MAX MODEL FWOSMAXMODEL The FWOS Max Model name to be assigned to the store may be interfaced. Model settings must be maintained within the application.
o Optional o String
8. PUSH TO BACK STOCK PUSHTOBKSTK The specific Push to Backstock value to be assigned to the store.
o Optional o Integer
Command Processing The VSW Load may be processed from outside of the Logility - RO system using a command prompt or a command file. This allows for the VSW Load to be processed within a client’s third party scheduling package along with standard scheduling.
The VSW Load Task List may be included in a Job to be processed as well. See Scheduler API section.
Command Format
VSWLoad.exe
# Field Identifier Description
1. VSWLoad.exe o The file path and executable to be processed.
2. Input File o Optional o The input file containing input transactions o Defaults to “InputFile” setting in the config file if not specified.
3. Delimiter o Optional o The field delimiter for text files. o Defaults to “Delimiter” setting in the config file if not specified.

P u s h t o B a c k s t o c k - O v e r v i e w
Page | 119
Chapter 26: Push to Backstock
Overview The Push to Backstock API reviews all VSW type Headers to determine (based on Header Characteristic settings) which VSW Headers have “expired”. When a VSW Header is set to expire, all units are removed from VSW On Hand, allocated to “Reserve”, and are sent to general back stock. Two Header Characteristics need to be setup in the application. These will be used for comparison purposes during the Push to Backstock processing. The first is a date that is compared against the “Push to Backstock” number of weeks defined in Node Properties. The second is a force option which will always override the date comparison. The Push to Backstock API needs to be aware of the names of the two Header Characteristics. To accomplish this, three configuration keys are needed in the Push to Backstock configuration file. See the Push To Backstock portion of the Logility - RO Installation and Maintenance Guide for more information. There is no input file to the Push to Backstock process.
Command Processing The Push to Backstock API may be processed from outside of the Logility - RO system using a command prompt or a command file. This allows for the Push to Backstock API to be processed within a client’s third party scheduling package along with standard scheduling.
The Push to Backstock API may be added to a Task List, which in turn, may be included in a Job to be processed as well. See Scheduler API section.
Command Format
PushToBackStock.exe
# Field Identifier Description
1. PushToBackStock.exe The file path and executable to be processed.
Note: There are no parameters for this process.
Command Sample
"C:\MIDRetail\Batch\PushToBackStock.exe"

B a t c h C o m p - O v e r v i e w
Page | 120
Chapter 27: Batch Comp
Overview The Batch Comp API provides a way to implement special non-forecasting computations using daily or weekly planning database variables. Additional data items that are not available in Forecasting can be included in the Batch Computations as required and designed for each client.
The Batch Comp API is configurable and customizable based on each client’s computation requirements. This requires coordination with Logility – RO during the requirements phase in order to setup the criteria and computations. The computations are then be developed and provided in a Logility – RO release.
Command Processing The Batch Comp API may be processed from outside of the Logility - RO system using a command prompt or a command file. This allows for Batch Comp to be processed within a client’s third party scheduling package along with standard scheduling.
A Batch Comp Task List may be included in a Job to be processed as well. See Scheduler API section.
Command Format
BatchComp.exe [<Header Reconcile Input Directory>]
# Field Identifier Description
4. BatchComp.exe o The file path and executable to be processed.
5. Input Name o Optional o The Batch Comp “Name” to be processed. o Defaults to process all Batch Computations defined.
Note: Parameters must be surrounded by double quotes (“) when spaces are imbedded. Recommended practice is to always use double quotes around each parameter.
Command Sample
“C:\MIDRetail\Batch\BatchComp.exe” “Rolling Average”
--- Omitting the Name will default to processing “All” batch computations
“C:\MIDRetail\Batch\BatchComp.exe”

S c h e d u l e r A P I - O v e r v i e w
Page | 121
Chapter 28: Scheduler API
Overview The Logility - RO Scheduler can be used to set up Task Lists and Jobs to be processed outside of Logility - RO. Each task list must be specific to the type of process. A task list may not contain differing tasks. The executables that may be accessed include Allocation, Plan Forecasting, and Rollup (as documented earlier). A Job may be set up to include multiple Task Lists and is not specific to a type of process.
Command Processing The Scheduler API may be processed from outside of the Logility - RO system using a command prompt or a command file. This allows for the Logility - RO Scheduler’s Jobs and/or Task Lists to be processed within a client’s third party scheduling package along with standard scheduling.
Schedule Interface Command Format (Jobs) Any number of Task Lists may be included in a Job. This allows for the users to determine the order of processes and include them all in a single or multiple jobs. Then the Job is executed from a third party scheduler for ease of execution.
ScheduleInterface.exe <Job Name>
# Field Identifier Description
1. ScheduleInterface.exe o The file path and executable to be processed.
2. Job Name o Required o Job name being executed
Note: Parameters must be surrounded by double quotes (“) when spaces are imbedded. Recommended practice is to always use double quotes around each parameter.
Schedule Interface Command Sample
“C:\MIDRetail\Batch\ScheduleInterface.exe” “Forecast Dept. 101”

S c h e d u l e r A P I - C o m m a n d P r o c e s s i n g
Page | 122
Schedule Interface Return Codes When executing the Schedule Interface from a command the following standard return codes when Job has completed. These are the same return codes that are displayed in the Schedule Browser.
Return Code Description 800500 None 800501 Successful 800503 Failed 800504 Conditional Failed 800505 Cancelled 800506 Unexpected
Allocation Scheduler Command Format Only the Allocate task(s) may be included in the Task List for the Allocation Scheduler command.
AllocationScheduler.exe <Task List RID> <Task Sequence>
# Field Identifier Description
1. AllocationScheduler.exe o The file path and executable to be processed.
2. Task List RID o Required o Task List RID of the Task list being executed.
3. Task Sequence o Required if Task List is used o Task Sequence of the Task being executed within Task List.
Sequence is relative to zero.
Note: Parameters must be surrounded by double quotes (“) when spaces are imbedded. Recommended practice is to always use double quotes around each parameter.
Allocation Scheduler Command Sample
"C:\MIDRetail\Batch\AllocationScheduler.exe" "15" “0”

S c h e d u l e r A P I - C o m m a n d P r o c e s s i n g
Page | 123
Plan Forecast Command Format Only the Forecasting task(s) may be included in the Task List for the Plan Forecast command.
PlanForecast.exe <Task List RID> <Task Sequence>
# Field Identifier Description
1. PlanForecast.exe o The file path and executable to be processed.
2. Task List RID o Required o Task List RID of the Task list being executed.
3. Task Sequence o Required if Task List is used o Task Sequence of the Task being executed within Task List.
Sequence is relative to zero.
Plan Forecast Command Sample
"C:\MIDRetail\Batch\PlanForecasting.exe" "5" “0”

D e l e t e V a r i a b l e V a l u e s - O v e r v i e w
Page | 124
Chapter 29: Delete Variable Values
Overview The delete variable values stored procedure can be used to remove values from the Logility - RO system. This stored procedure accepts many different parameters to allow the processing to be customized. This may be needed when reloading specific variables with the History Plan Load API.
Command Processing The stored procedure can be executed using any number of methods that allow invoking stored procedures.
Command Format This stored procedure allows for many parameters. The parameters are positional so all parameters must be provided.
SP_MID_DELETE_VARIABLES <parameters>
# Field Identifier Description
1. @Delete_Chain_Values o Input o Bit (0:false;1:true) o Flag identifying if chain values are to be deleted. o Defaults to 0 (false)
2. @DELETE_STORE_DAILY_VALUES o Input o Bit (0:false;1:true) o Flag identifying if store daily values are to be deleted. o Defaults to 0 (false)
3. @DELETE_STORE_WEEKLY_VALUES o Input o Bit (0:false;1:true) o Flag identifying if store weekly values are to be deleted. o Defaults to 0 (false)
4. @DELETE_ALL_VARIABLES o Input o Bit (0:false;1:true) o Flag identifying if all variable values are to be deleted. Row will be
deleted. o Defaults to 0 (false)
5. @DELETE_VARIABLES_LIST o Input o varchar(250): Database variable column names delimited by ‘|’. o List of variables to be deleted. This will be ignored if Delete All
Variables is true. o Defaults to ‘ ‘
6. @DELETE_ALL_DATES o Input o Bit (0:false;1:true) o Flag identifying if all dates are to be deleted. o Defaults to 0 (false)
7. @FROM_FISCAL_WEEK o Input o Integer (YYYYWW) o Beginning week to delete. This will be ignored if Delete All Dates is
true. o Defaults to 0

D e l e t e V a r i a b l e V a l u e s - C o m m a n d P r o c e s s i n g
Page | 125
# Field Identifier Description
8. @TO_FISCAL_WEEK o Input o Integer (YYYYWW) o Ending week to delete. This will be ignored if Delete All Dates is true. o Defaults to 0
9. @VERSION o Input o varchar(50) o The name of the version to be deleted. o Defaults to ‘Actual’
10. @DELETE_ALL_NODES o Input o Bit (0:false;1:true) o Flag identifying if all nodes are to be deleted. o Defaults to 1 (true)
11. @DELETE_NODE_ID o Input o varchar(50) o The ID of the highest node in the path that is to be deleted. This must
be style or above. o Defaults to ‘ ‘
12. @DELETE_FROM_OFFSET o Input o Integer o The beginning offset of the level of nodes to delete. o Defaults to 0
13. @DELETE_TO_OFFSET o Input o Integer o The ending offset of the level of the nodes to delete. o Defaults to 999
14. @DELETE_ALL_STORES o Input o Bit (0:false;1:true) o Flag identifying if all stores are to be deleted. o Defaults to 1 (true)
15. @DELETE_STORES_LIST o Input o varchar(250): Store IDs delimited by ‘|’. o List of stores to be deleted. This will be ignored if Delete All Stores is
true. o Defaults to ‘ ‘
16. @CHAIN_RECORDS_AFFECTED o Output o Integer o The number of chain records affected by the process.
17. @STORE_DAILY_RECORDS_AFFECTED o Output o Integer o The number of store daily records affected by the process
18. @STORE_WEEKLY_RECORDS_AFFECTE
D o Output o Integer o The number of store weekly records affected by the process
19. @RETURN_CODE o Output o Integer o The execution status of the procedure. See below for details)
20. @DEBUG o Input o Format - bit o Used to verify the procedure. This will show what will be deleted
without processing the delete. o Defaults to 0 (false)

D e l e t e V a r i a b l e V a l u e s - C o m m a n d P r o c e s s i n g
Page | 126
Command Sample
DECLARE @return_value int, @Chain_Records_Affected int, @Store_Daily_Records_Affected int, @Store_Weekly_Records_Affected int, @Return_Code int EXEC @return_value = [dbo].[SP_MID_DELETE_VARIABLES] @Delete_Chain_Values = 0, @Delete_Store_Daily_Values = 0, @Delete_Store_Weekly_Values = 1, @Delete_All_Variables = 0, @Delete_Variables_List = N'SALES_REG', @Delete_All_Dates = 0, @From_Fiscal_Week = 200901, @To_Fiscal_Week = 201152, @Version = N'Actual', @Delete_All_Nodes = 0, @Delete_Node_ID = N'1', @Delete_From_Offset = 0, @Delete_To_Offset = 0, @Delete_All_Stores = 0, @Delete_Stores_List = N'1101', @Chain_Records_Affected = @Chain_Records_Affected OUTPUT, @Store_Daily_Records_Affected = @Store_Daily_Records_Affected OUTPUT, @Store_Weekly_Records_Affected = @Store_Weekly_Records_Affected OUTPUT, @Return_Code = @Return_Code OUTPUT, @debug = 0 SELECT @Chain_Records_Affected as N'@Chain_Records_Affected', @Store_Daily_Records_Affected as N'@Store_Daily_Records_Affected', @Store_Weekly_Records_Affected as N'@Store_Weekly_Records_Affected', @Return_Code as N'@Return_Code' SELECT 'Return Value' = @return_value

D e l e t e V a r i a b l e V a l u e s - C o m m a n d P r o c e s s i n g
Page | 127
Return Codes The process will return the following codes.
Return Code Error Level Description Action 0 None None 1 Nothing selected to delete Verify parameters 2 No variables to delete Verify @Delete_All_Variables and @Delete_Variables_List 3 From fiscal week not found Verify format of @From_Fiscal_Week 4 To fiscal week not found Verify format of @To_Fiscal_Week 5 Version not found Verify version including case. 6 Node not found Verify node ID including case.

R e m o v e S i z e C u r v e s f r o m S i z e G r o u p - O v e r v i e w
Page | 128
Chapter 30: Remove Size Curves from Size Group
Overview The clear size curve stored procedure can be used to remove all size curves from a size group. This may be needed when reloading Size Curves with the Size Curve Load API.
Command Processing The stored procedure can be executed using any number of methods that allow invoking stored procedures.
Command Format This stored procedure allows for the name of the size group to be cleared.
SP_MID_REMOVE_ALL_SIZE_CURVES_FROM_GROUP <parameters>
# Field Identifier Description
1. @INSIZECURVEGROUP o Input o varchar(250). o The name of the size curve group which is to be cleared.
Command Sample
DECLARE @RC int DECLARE @inSizeCurveGroup varchar(250) SELECT @nSizeCurveGroup = 'group1' EXEC @RC =[dbo].[SP_MID_REMOVE_ALL_SIZE_CURVES_FROM_GROUP] @inSizeCurveGroup

R e m o v e S i z e C o n s t r a i n t s f r o m M o d e l - O v e r v i e w
Page | 129
Chapter 31: Remove Size Constraints from Model
Overview The clear size constraints stored procedure can be used to remove all size constraints from a size constraint model. This may be needed when reloading Size Constraints Models with the Size Constraints Load API.
Command Processing The stored procedure can be executed using any number of methods that allow invoking stored procedures.
Command Format This stored procedure allows for the name of the size group to be cleared.
SP_MID_REMOVE_SIZE_CONSTRAINTS_FROM_MODEL <parameters>
# Field Identifier Description
1. @INSIZECONSTRAINTMODEL o Input o varchar(250). o The name of the size constraint model which is to be cleared.
Command Sample
DECLARE @RC int DECLARE @inSizeConstraintModel varchar(250) SELECT @inSizeConstraintModel = 'model1' EXEC @RC =[dbo].[SP_MID_REMOVE_SIZE_CONSTRAINTS_FROM_MODEL] @ inSizeConstraintModel

U p l o a d E l i g i b i l i t y - O v e r v i e w
Page | 130
Chapter 32: Upload Eligibility
Overview The upload eligibility stored procedure can be used to set a store to eligible or ineligible for a product.
The Hierarchy Service must be restarted after uploading eligibility.
Command Processing The stored procedure can be executed using any number of methods that allow invoking stored procedures.
Command Format This stored procedure allows eligibility to be set for a product/store.
SP_MID_STORE_ELIGIBILTY_UPDATE <parameters>
# Field Identifier Description
1. @PRODUCTID o Input o varchar(50). o The product for which the eligibility is to be set. This must be style
level or above.
2. @STOREID o Input o varchar(50). o The store for which the eligibility is to be set.
3. @ISELIGIBLE o Input o Char (Y:eligible;N:ineligible) o The eligibility of the store.
Command Sample
DECLARE @return_value int, @Return_Code int EXEC @return_value = [dbo].[SP_MID_STORE_ELIGIBILITY_UPDATE] @ProductID = N'ProductID', @StoreID = N'StoreID', @IsEligible = N'Y', @Return_Code = @Return_Code OUTPUT SELECT @Return_Code as N'@Return_Code' SELECT 'Return Value' = @return_value
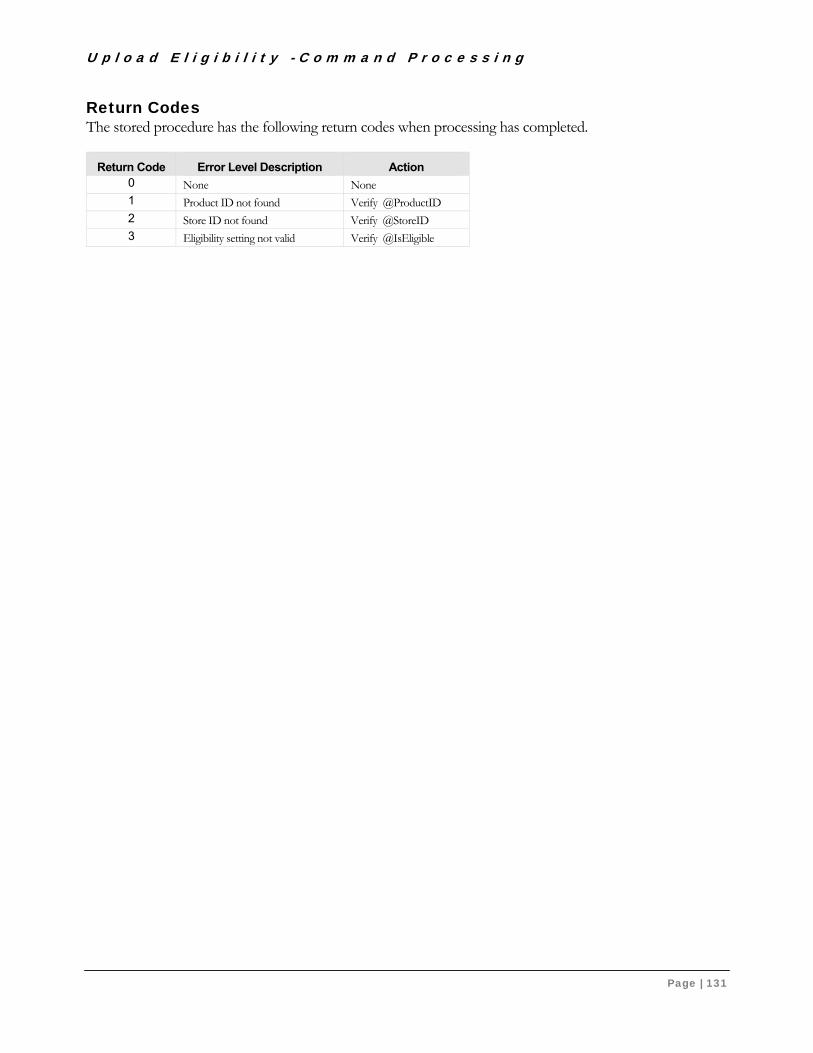
U p l o a d E l i g i b i l i t y - C o m m a n d P r o c e s s i n g
Page | 131
Return Codes The stored procedure has the following return codes when processing has completed.
Return Code Error Level Description Action 0 None None 1 Product ID not found Verify @ProductID 2 Store ID not found Verify @StoreID 3 Eligibility setting not valid Verify @IsEligible

R e t r i e v e H i e r a r c h y C h a r a c t e r i s t i c s - O v e r v i e w
Page | 132
Chapter 33: Retrieve Hierarchy Characteristics
Overview The retrieve characteristics stored procedure can be used to get product characteristics from the Logility - RO database. The information can be retrieved for a single node or for all nodes at a level of a hierarchy.
Note: This procedure does not retrieve values inherited from other levels.
Command Processing The stored procedure can be executed using any number of methods that allow invoking stored procedures.
Command Format This stored procedure allows eligibility to be set for a product/store.
SP_MID_GET_HIERARCHY_CHARACTERISTICS <parameters>
# Field Identifier Description
1. @NODEID o Input o varchar(50). o The product for which the hierarchy characteristics are to be retrieved.
This must be null if retrieving characteristics for a level.
2. @LEVELID o Input o varchar(50). o The level for which the characteristics are to be retrieved. This must be
null if retrieving characteristics for a node. Use offset (+1, +2) if alternate hierarchy.
3. @HIERARCHYID o Input o varchar(50). o The hierarchy for which the characteristics are to be retrieved. This must
be null if retrieving characteristics for a node.

R e t r i e v e H i e r a r c h y C h a r a c t e r i s t i c s - C o m m a n d P r o c e s s i n g
Page | 133
Command Sample (By Node)
Command Sample (By Level)
Return Codes The stored procedure has the following return codes when processing has completed.
Return Code Error Level Description Action 0 None None 1 Node ID not found Verify @NodeID 2 Hierarchy ID not found Verify @HierarchyID
DECLARE @return_value int, @Return_Code int EXEC @return_value = [dbo].[ SP_MID_GET_HIERARCHY_CHARACTERISTICS] @NodeID = N'NodeID', @LevelID = NULL, @HierarchyID = NULL', @Return_Code = @Return_Code OUTPUT SELECT @Return_Code as N'@Return_Code' SELECT 'Return Value' = @return_value
DECLARE @return_value int, @Return_Code int EXEC @return_value = [dbo].[ SP_MID_GET_HIERARCHY_CHARACTERISTICS] @NodeID = NULL, @LevelID = N'LevelID', @HierarchyID = N'HierarchyID', @Return_Code = @Return_Code OUTPUT SELECT @Return_Code as N'@Return_Code' SELECT 'Return Value' = @return_value

C h e c k H i e r a r c h i e s - O v e r v i e w
Page | 134
Chapter 34: Check Hierarchies
Overview The check hierarchies stored procedure can be used to look for problems in the structure of the hierarchies in the Logility RO application. The procedure will check for the conditions below.
Note: if any of the following conditions exist, contact Logility.
Conditions Orphaned node: this occurs when a node does not exist as a child in a parent/child relationship.
Duplicate child: this occurs when the same child node occurs multiple times under the same parent.
Incorrect home level: this occurs when the home level of either the parent or child node in a parent/child relationship does not match the depth of the node based on the relationships. The stored procedure accepts an optional parameter to repair the home level of the nodes if this condition occurs.
Note: the option to repair the home level should only be used when instructed by Logility.
Invalid parent/child levels: this occurs when the home level of the child is not 1 level greater than the home level of the parent.
Invalid parent/child hierarchy: this occurs when the home hierarchy of the parent is not the same as the hierarchy of the relationship.
Command Processing The stored procedure can be executed using any number of methods that allow invoking stored procedures.
Command Format This stored procedure allows for many parameters. The parameters are positional so all parameters must be provided.
SP_MID_CHECK_HIERARCHIES <parameters>
# Field Identifier Description
1. @FIX_HOME_LEVEL o Input (Optional) o Char (N:No;Y:Yes) o Flag identifying if home levels are to be repaired. o Defaults to N (No)

C h e c k H i e r a r c h i e s - C o m m a n d P r o c e s s i n g
Page | 135
Command Sample
DECLARE @return_value int EXEC @return_value = [dbo].[SP_MID_CHECK_HIERARCHIES] @FIX_HOME_LEVEL = N'N' SELECT 'Return Value' = @return_value

C h e c k H i e r a r c h i e s - C o m m a n d P r o c e s s i n g
Page | 136
Output Report The process will output a report with the findings to the SQL Messages.
Report with fix home level option enabled.
Checking hierarchies for orphans No orphans were found Checking hierarchies for duplicates and invalid Parent/Child relationships Processing hierarchy MID Retail (Key=1) No duplicates found for this hierarchy No invalid Parent/Child relationships found for this hierarchy Processing hierarchy test 1 (Key=75) No duplicates found for this hierarchy Invalid Parent/Child levels found. Parent ID=node 2 [node 2](Key=4184) at level 1 : Child ID=node 3 [node 3](Key=4186) at level 3 Invalid Parent/Child hierarchy found. Parent ID=885621 [Basic LS Denim 12 Oz](Key=272) parent home hierarchy 1 at level 5 : Child ID=409 [q](Key=273) at level 6
Checking hierarchies for orphans No orphans were found Checking hierarchies for duplicates and invalid Parent/Child relationships Processing hierarchy MID Retail (Key=1) No duplicates found for this hierarchy No invalid Parent/Child relationships found for this hierarchy Processing hierarchy test 1 (Key=75) Home level incorrect. ID=node 3(Key=4186) - level fixed No invalid Parent/Child relationships found for this hierarchy

A P I R e t u r n C o d e s - C o m m a n d P r o c e s s i n g
Page | 137
Chapter 35: API Return Codes All of the API’s executed from a command have the following standard return codes when processing has completed.
Return Code Error Level Description 0 None 1 Debug 2 Information 3 Nothing to do 4 Edit 5 Warning 6 Error 7 Severe
These return codes are returned to the system and are available for inquiry by a third party scheduler or system.
The return code may be viewed from the command prompt where the process was executed using the following command:
Echo %errorlevel%