logging in via peoplesoft portal
TRANSCRIPT

LOGGING IN VIA PEOPLESOFT PORTAL
Log onto your PeopleSoft account directly via https://my.uh.edu and enter your Employee ID
and Password:
Log into P.A.S.S. HR and Campus Solutions.
Select Human Resources

ACCESSING TIME MANAGEMENT
All of the Time Management menus are located under Manager Self Service. Click onto the
Time Management Folder to open up the menu of options.
Main Menu>Manager Self Service>Time Management

TIME APPROVER (TA) ROLE
In order to have access as a TA, the following is required:
o The required training
o PeopleSoft Security Form completed, signed and sent to HRMS
The TA is responsible for
o Managing schedules
o Reviewing and approving reported time
o Making corrections to reported time
o Managing exceptions
o Approving absence requests
When a TA needs to add a punch/make a correction on the Reported Time Timesheet
screen
o The TA needs to enter comments next to the punch entered to justify why the
employee did not enter the punch and then hit submit to save the punch entered.
o After the punch is submitted, the TA will need to approve the time.
Regular hours and holidays should not be adjusted.
TAs need to approve all Reported Time by noon every Wednesday (once the work week
has ended; a work week is from Wednesday – Tuesday)

RULES & WORKGROUPS
Rules: are generated by the Time Administration process that is run for each Pay Period. The process calculates all approved time and applies rules based on the approved time and workgroup the employee is assigned to. The main rules that are applied are:
Overtime or Extra hours for hours over 40o If an employee is assigned to a workgroup that pays overtime and he works over
40 hours the system will apply the overtime rule that will automatically take thehours over 40 and pay as overtime.
Comp Time 1.0 or 1.5 for hours over 40o If an employee is assigned to a workgroup that earns comp time and he works
over 40 hours the system will apply the comp time rules that will automaticallytake the hours over 40 and pay as comp time earned.
Rules are applied at the end of each week for hourly employees after the Time Administration process has run. This will ensure that all time is processed and paid accurately.
Keep in mind that if corrections are made after the initial Time Administration process has run, you will need to reapprove the reported time, then approve the payable time after Time Administration has run (remember this is the process that converts approved reported time to unapproved payable time and applies the rules). The correction that is processed can change the rules that are applied.
Workgroup: is a set of time reporters who share compensation requirements such as pay frequency and work location.
Examples are: Hourly employees and Salary employees. When an employee’s HR data changes for reasons such as promotions, demotions, or transfers, their characteristics for Workgroup membership may change, requiring an update in the Time and Labor Workgroup enrollment. When employees are terminated, their Workgroup enrollment in Time and Labor must be inactivated.

MAINTAIN TIME APPROVERS
Add Proxy
Add Employees
Transfer Employees
Delete Employees
Main Menu > Manager Self Service > Time Management > Maintain Time Approvers
The system refreshes three times a day. Information entered will be available after a
refresh occurs.
Click onto the “Maintain Time Approvers” file.
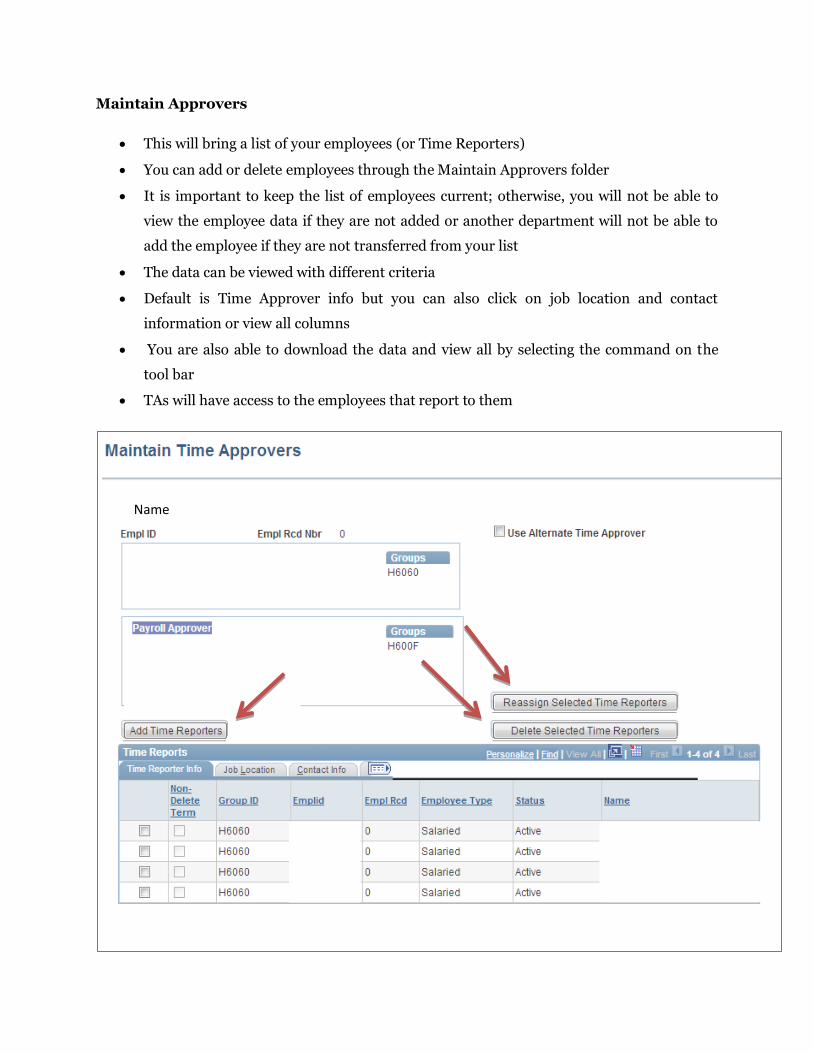
Maintain Approvers
This will bring a list of your employees (or Time Reporters)
You can add or delete employees through the Maintain Approvers folder
It is important to keep the list of employees current; otherwise, you will not be able to
view the employee data if they are not added or another department will not be able to
add the employee if they are not transferred from your list
The data can be viewed with different criteria
Default is Time Approver info but you can also click on job location and contact
information or view all columns
You are also able to download the data and view all by selecting the command on the
tool bar
TAs will have access to the employees that report to them
Name

Adding Employees
You can add employees by clicking on “Add Time Reporters”. Enter the Empl ID and search for
the new employee.
Add Time Reporters
o Click “Add Time Reporters”
o Enter criteria and search for Time Reporter(s)
o Check “Add” box to Select Time Reporter(s)
o Click “Add Selected as Time Reports” to add Time Reporters
o Click “Return to Time Approvers”
o Click “Save”
Reassign Selected Time Reporters
Reassign Selected Time Reporters
o Click “Reassign Selected Time Reporters”
o Enter criteria and search for Time Reporter(s)
o Check “Add” box to Select Time Reporter(s)
o Click “Select this Approver for Reassignment”
o Click “Return to Time Approvers”
o Click “Save”

(Note: Do not delete or transfer Time Reporters until all reported time and leave
requests have been processed and approved)
Adding Proxies
Manager Self Service > Time Management > Maintain Time Approvers
Assign Alternate Time Approvers
o Check “Use Alternate Time Approver”
o Enter Empl ID of Alternate
o Click Save
Alternate users will have the same access as the primary approver. The alternate or
proxy will log in using the Group ID of the primary user.

Delete Time Reporters
Reassign all Time Reporters to a new TA
Select the Time Approver by clicking the box in the corresponding row
Click Delete Selected Time Approvers
The entry will be deleted
No confirmation will appear
Name


MANAGE SCHEDULES
Assign Schedules
View Schedules
Employees can punch in/out even if they are not assigned to the correct work schedule
If an employee is not assigned the correct work schedule, then employee will be unable
to submit an absence request for a day on when he/she is scheduled to be off
If you require a schedule that has not already been created, please contact HRMS.
(Schedules must equal 40 hours/week)
ASSIGN WORK SCHEDULES
Manager Self Service > Time Management > Manage Schedules > Assign Work Schedule
MANAGE SCHEDULES

Under the Assign Work Schedules, TA’s are able to assign work schedules.
Please note: employees’ schedules will automatically default into the system
New employees’ schedule will be uploaded based on their department
The TA will only have to utilize the Assign Work schedule option if the schedule changes
All employees will have schedules for the following reasons
o This field is required
o Absence Management
o Time Reporting for Benefit Eligible Bi-weekly employees
To assign a new work schedule, start by selecting the employee by entering the Empl ID or
employee name.
Once the employee is selected…
Click the plus sign to insert a new row. The effective date should be the beginning of a
new pay period.
To view past schedules, click on “view history of scheduled assignments”
o E=Elapsed time (salaried employees schedule)
o P=Punch time (hourly employees schedule)
New employees will have their schedule automatically added depending on their
department

Employees will always be able to check in even if the schedule is not correct
For Benefit Eligible bi-weekly employees, missed punches and late punches when
punching into work will cause an exception
Employees will be paid based on a rounding scale of when they punch in and punch out
Multiple lines can be added for future schedules. From the drop down menu, click Select
Predefined Schedule. This will open up the Schedule Group and Schedule ID fields.

Click the magnifying glass to open up a list of schedules. You can search by description
or scroll down to select the correct schedule. Click on the schedule that you wish to add.
If you do not see the correct schedule, email HRMS to create a customized schedule.
Click on Schedule ID to view the schedule that shows off days and hours scheduled for
each day.
o E=Elapsed time (salaried employees schedule)
o P=Punch time (hourly employees schedule)
Temporary bi-weekly employees will not need to have a specific schedule; they will have
a default schedule. Nothing will be tied to the schedules. Rules will not be associated
and exceptions will not be created for temporary employees.
To delete a schedule, click the minus sign
o Schedules can only be deleted if they are under a future effective date

This will now be the default schedule for the employee. If the schedule needs to be changed
back, a new entry will need to be added. Click “Save”

MANAGE SCHEDULES
To view an Employees’ Schedule that includes planned absences, holidays, and scheduled days
off:
Manager Self Service > Time Management > Manage Schedules > View Schedules

View Schedules by entering in a group id or Empil ID.
You are able to view the employee, job title, schedule and requested leave.
View Schedule Key
This view includes a key at the bottom of the page that includes the icons on the calendar.

ABSENCE REQUESTS
Approve
Adjustments
Submitting on behalf of an Employee
View
WORKFLOW
Employee initiates the workflow by submitting an Absence Request
If the employee has enough hours, the system will allow the employee to successfully
submit the request, if not, it is denied.
The absence request is sent to the Time Approver (TA). The following roles have the
ability to approve the Absence Request
o The TA and TA Alternate
o The PA and PA Alternate
The Time Approver has the ability to:
o Approve: The Absence Request is only approved once. Once it is approved, it is
final and becomes approved payable time.
o Deny: The approver can deny the request, whereby the employee would need to
go back and re-enter a new request
o Push Back: The approver can push back the request to the employee to edit,
update, or cancel.
Any changes after the Absence Request is approved are completed on the timesheet by
the Time Approver (TA)

To Approve Absence Requests
Manager Self Service > Time Management > Approve Time and Exceptions > Absence Request
Click onto Absence Requests to view the pending absence requests for your employees.
The page displays the name of the employee, employee ID, job title, type of absence, the
start and end date and when the request was submitted.
To view the details and take action on the request, click on the employee’s name.

Once you click on the employee’s name, you will be able to review the details for this
request.
o This will also show the current and projected balance of leave for the employee.
In this view, you are able to take action on this request which includes approving,
denying or pushing the request back.
o An email will be sent to the Time Approver and the Alternate and the Payroll
Approver and Alternate
o An Absence Request only has to be approved by the Time Approver
o Approve (1): will approve the request. No other action can be taken. If the
Absence Request needs to be modified, the TA will have to create an Absence
Adjustment on the employee’s electronic timesheet.
o Deny (2): will deny the request. No other action can be taken.
o Push Back (3): will send the Absence Request back to the employee. The
employee is then able to edit and make corrections to the form and resubmit or
cancel the request.
o An email will be sent to the employee after any action is taken on the Absence
Request
For any comments, you can add them in the approver comments field.
o Comments should be provided if request is denied or pushed back.
Name

Current Balance reflects the hours that the employee currently has available and includes
any hours pending
o For example, if an employee currently has 40 hours, but has an approve absence
request for 16 hours next month, and has an absence request pending for 8
hours:
Current balance: 16 hours
If an absence request is for a future month, a Projected Balance displays, which includes
the current balance plus projected leave accruals for the future months

Name
2 3
1

ABSENCE REQUEST CORRECTIONS
Manager Self Service > Time Management > Report Time > Timesheet
Delete or correct on the employee’s Timesheet. If the absence request has already been
approved, the time must be corrected on the timesheet.
Absences on the timesheets are view only; they must be adjusted by adding additional
entries
Click on the plus sign on the row where you wish to correct the time. This will add a row
below the entry. (1)
Select the correct Time Reporting Code (TRC) from the drop down menu.
1

o For a vacation correction, select B71-Vacation Adj. (2)
In the quantity field, select the number of hours to reverse. (3)
o This time will need to be negative since you will be taking away the hours.
To correct the type of leave, click the plus sign to add an additional row for a new entry.
Add the correct TRC.
o If it is a correction from vacation hours to sick hours, select the TRC B81-Sick
Adj.
Add the hours for the new leave; this number will be positive. (4)
2
3

CREATING AN ABSENCE REQUEST ON BEHALF OF AN EMPLOYEE
Manager Self Service > Time Management > Report Time > Absence Request
When submitting absence requests, the end date should be the last day of the leave
request
If an employee is not assigned the correct work schedule, the employee will be unable to
submit an absence request for a date on when he/she is scheduled to be off. Please
ensure that your employees are assigned the correct work schedule.
4

With the Absence Request, you are able to add requests for employees.
Enter today’s date (1)
Click continue (2)
Select the group from the list (3)
o Only one group can be selected at a time
1
2

3

Select an employee (4)
o Once again, only one employee can be selected at a time
Create a Leave Request by selecting the start date and selecting the type of absence (5)
4

Through this system, you can filter the types of absences by the drop down menu to
"Filter by Type" (6)
o This will only show the absence types associated with this type of leave
Name
6
5

Or you can simply select the type of leave you wish to request by selecting from the
"Absence Name" drop down menu (7)
o This menu will include all absence types
Select the type of absence; multiple fields will open on the form.
Complete the required fields that include the end date of the absence as well as if partial
days will be taken.
o To complete the end date, (8)
Enter the last day of the employee’s leave in the field with the
MO/DY/YEAR format
7

Click on the calendar icon and select the date
If there are partial days, you will need to indicate what days will be partial days and enter
the hours that will be missed in the duration field. (9)
Multiple absence types will require an additional reason. (10)
o As an example, for sick days, you will need to indicate if it is for you, a spouse, a
child, or a parent
If there is additional information needed, you can add it to the comments field (11)
After you complete the information requested, you can save for later or submit it. (12)
8
9

When you submit the form, you will receive a confirmation
Click "OK" (13)
This absence will be automatically approved
10
11
12
13

To View an Absence Request
Manager Self Service > Time Management > View Time > View Absence Request History
Click Continue to select your employees or the appropriate Group ID of Employees (1).
Select the appropriate Group ID and click Continue (2).
Select the appropriate Employee to view Absence Request History (3).
1
2

3
Corrections to Reported Time
Manager Self Service > Time Management > Report Time > Timesheet
Review time
Make corrections if necessary
There are a few instances when a correction is needed on a timesheet. These corrections
include:
o Missed punch: When the employee misses a required punch, it is the TA
responsibility to enter the correct punch
o Call out time: When an employee returns to work and does not work the
minimum number of department call-out hours, it is the responsibility of the TA
to enter the additional time required on the timesheet.
o Disciplinary Action: If an employee is off work due to disciplinary action, it is
the TA responsibility to record this in TRAM
o Off-Campus work (i.e. campus training): If an employee is working off
campus, such as offsite training, the TA will record the employee’s time in the
system
o Leave time corrections: Corrections to absence requests after they have been
approved must be adjusted by the TA on the timesheet
o Reg Hrs, except as described above, and Holidays should NOT be changed
When such an instance occurs, it becomes unapproved reported time and must be
“reapproved” as reported time by the Time Approver. It is imperative that the reported
time be approved before the Time Administration process is run. Time Administration is
the process that converts the approved reported time into unapproved payable time that
needs to be approved by the Payroll Approver.
Auditing will occur to view any changes to timesheets. It is important that any
corrections to the timesheet are accompanied by a comment regarding the reason for the
adjustment.
Approve the unapproved reported time

Look up data by Group ID, Empil ID or employee name (1)
Enter the information
Click Get Employees (2)
1
2

It will bring up a list of employees and a snap shot view of their reported hours, hours to
be approved, scheduled hours, approved hours, denied hours
Click on the Employee Name to access the timesheet.
Review the time on the Timesheet for the selected individual
Select the time period you wish to view by selecting the date (3)
The timesheet will appear
Review the punches
3

Leave Request Adjustments
For some corrections, such as an Absence Request, you will need to insert a row and add
a TRC code
If the absence has already been approved, the time must be corrected on the timesheet.
Absences on the timesheets are view only, they must be adjusted by adding additional
entries
Click on the plus sign (4) on the row where you wish to adjust the time. This will add a
row below the entry.
Select the correct Time Reporting Code (TRC) from the drop down menu. (5)
o For a vacation correction, select B71-Vacation Adj.
4

In the quantity field, select the number of hours to reverse. (6)
o This time will need to be negative since you will be taking away the hours.
To correct the type of leave, click the plus sign to add an additional row for a new entry.
Add the correct TRC.
o If it is a correction from vacation hours to sick hours, select the TRC B81-Sick
Adj.
Add the hours for the new leave; this number will be positive. (7)
5
6

Adjustment by Quantity
To create an correction for a Call out time, disciplinary or off campus time:
o Enter the quantity (1)
o Enter the TRC code (2)
o Enter a comment (see Adding Comments)
o Save
7
1
2

Missed Punch Correction
When an employee misses a punch, it is the responsibility of the TA to enter the punch
on the timesheet with a comment.
To enter a miss punch, enter the time on the same line as the other punches for the day.
Enter a comment (see Adding Comments)
Save
Adding Comments
If you must enter a correction or punch, a comment will be required.
o To add a comment, click the callout icon (1)
o This will open a field to enter comments

Type in your comments in the comment field (2)
Click Save (3)
1
2
3

If time is adjusted and no comment is entered, the system will not allow you to move
forward. It will prompt you with the following message:

APPROVING REPORTED TIME
Time Approvers are responsible for approving reported time; reported time can be approved
daily 24.7; however, all reported time must be approved by Wednesday at noon every week. The
following is reported time that needs to be reviewed and approved
Punches from TCDs or Web Clock
Corrections entered by the TA
To identify employees with pending Reported Time, please use the following
method:
Review Reported Time to be Approved in PeopleSoft
Manager Self Service > Time Management > Approve Time and Exceptions > Reported Time

Group ID: Enter your Group ID (1)
View by: Select “All Time Before” (2)
Date: Enter the date (usually the day after the pay period ends to you will see everything
for the period) (3)
Get Employees: Click “Get employees” to generate a list based on the criteria you
selected. (4)
Select Employee: Click on the name of the employee. Review the timesheet and approve.
(5)
1
3
2
4
5

A Time Administration process is run weekly that converts Reported Time into
Payable Time. After the process is run, Payable Time generated and the associated
Reported Time can be viewed by employee and week.
Review Payable/Reported Time by Week
Manager Self Service > Time Management > View Time > View Payable/Reported Time

Group ID: Enter your Group ID (1)
Get Employees: Click “Get employees” to generate a list based on the criteria you
selected. (2)
Select Employee: Click on the name of the employee. View Payable/Reported Time. (3)
1
2
3

EXCEPTIONS
Clearing exceptions is the responsibility of the Department Time and Payroll Approvers and/or
the HRMS/Payroll Office. There are two types of exceptions:
o Low Severity: Exception allowed; no action required.
o Late Punch
o Long Lunch
o High Severity: Must be corrected.
o Invalid punch order: This is the exception the departments should fix. This
exception is when a punch is out of order.
o Missed punch: When the employee misses a required punch, it is the TA’s
responsibility to enter the correct punch
o Once a correction is made, it becomes unapproved reported time that must then go back
through the approval process
o When corrections are made in the system, they must be accompanied by a comment
ADDING COMMENTS
If you must enter a punch, a comment will be required.
o To add a comment, click the callout icon (1)
o This will open a field to enter comments

This will open a field to enter comments
Type in your comments in the comment field (2)
Click Save (3)
1
2
3

If time is corrected and no comment is entered, the system will not allow you to move
forward. It will prompt you with the following message:
To identify employees with High Severity Exceptions, please use either of the following
methods:
Options 1: Review Exceptions in PeopleSoft:
Manager Self Service > Time Management > Approve Time and Exceptions > Exceptions
o Group Id: Enter Group ID (1)
o Click on Filter Option
o Date Filter: Select “between” (2)
o Start Date: Enter the beginning date of the pay period. (3)
o End Date: Enter the ending date of the pay period. (4)
o Severity: Select “High” (5)
o Click OK: This will provide the results based on your filter options. (6)

o Click on “Details”: This will show you the detail of the exception and the employees ID.

TRAM TIME & PAYROLL APPROVER GLOSSARY: Absence Management: is the process for managing absences. Absence Management is an Electronic Leave request form that employees use to request leave via P.A.S.S. Cancel: is an action taken when an absence request for a time frame was denied or pushed backed to be edited or cancelled. Deny: is a term used when a Time Approver denies an employee’s absence request for leave. Dynamic Group: of time reporters is set up for reporting or processing purposes for example, a group of employees in the same department or who have the same supervisor. The members of a dynamic group may belong to different workgroups. As an example, a dynamic group for a facilities department might include clerical staff or a painter. Exceptions: are errors generated after Time Administration has been run and rules are applied. These exceptions occur due to missed punches, invalid punch order, late punches and long lunches. However, only high severity exceptions need to be corrected (Missed punches and Invalid punch order only). Final Verification: is a Payroll process that runs to produce a paycheck for time submitted by time reporters. Load to Payroll: After all absences have been finalized and all payable time has been approved, Payroll runs the Load to Payroll process which loads all time to payroll for processing. Time that is not approved by the designated deadlines will result in a delay of payment. Late approvals will be processed on the next payroll period. Payable Time: is the term used once the time administration process has been run against the reported time. Time administration is the process that converts approved reported time into unapproved payable time and calculates rules such as overtime and generates exceptions if errors are found. Payroll Approver (PA): reviews, corrects and approves unapproved payable time. They are responsible for reviewing time before it is submitted to Payroll and making sure that employees are in the system under the correct Workgroups. Payroll Approvers are responsible for ensuring all Time Approvers have reviewed and approved absence request, unapproved reported time, corrected High Severity Exceptions and corrections for all Monthly and Biweekly employees for each Pay Period by the designated deadlines. Proxy: is an alternate. TAs and PAs have the option of setting up a proxy or alternate approver. The proxy will have the same access as the original user. Punch: is the term used to describe the action when a time reporter enters their time via a time clock or time collection device. Punches include, punching in, meal, in and out. A typical day for a time reporter would include the following punches: In (arrive to work) Start Meal (leave for lunch) End Meal (arrive back to work) Out (leave for the day)

Push Back: is an action that a TA or PA can perform on the absence request. When an absence request is pushed back, it is sent to the employee to edit, resubmit or cancel fi the request isn’t going to be modified or taken. Reported Time: is the time entered by time reporters and managers. Rules: are generated by the Time Administration process that is run for each Pay Period. The process calculates all approved time and applies rules based on the approved time and workgroup the employee is assigned to. The main rules that are applied are:
Overtime or Extra hours for hours over 40 o If an employee is assigned to a workgroup that pays overtime and he works over 40 hours the
system will apply the overtime rule that will automatically take the hours over 40 and pay as overtime.
Comp Time 1.0 or 1.5 for hours over 40 o If an employee is assigned to a workgroup that earns comp time and he works over 40 hours
the system will apply the comp time rules that will automatically take the hours over 40 and pay as comp time earned.
Time Administration: Time Administration is the process that converts approved reported time to unapproved payable time that needs to be approved. It also applies the rules that create the exceptions. This process takes 30 minutes to 1 hour to run, so please allow this amount of time before approving any time. This process runs on a schedule that will be communicated each pay period. Time Approver (TA): signs off on the time for an employee or group of employees. They are responsible for reviewing and cleaning up exceptions as well as enrolling employees in the system. A Time Approver reviews, corrects and approves reported time in PeopleSoft on a weekly basis. Time Collection Device (TCD): is an electronic device used for hourly employees to punch in and out. TCDs are located in designated areas where the employee is responsible for clocking in by scanning their thumb or fingerprint to report their time worked. Data from TCDs are collected and loaded to the University’s HR system for processing. Time Reporter: (an hourly employee) enters his or her time into PeopleSoft on a daily basis via TCD or Webclock and submits Absence requests via PASS. Time Reporting Code (TRC): is a time reporting code that corresponds to the time reported for an employee. Regular time is TRC020, overtime is TRC315, and comp time earned is TRC 190or 300. There are also time reporting codes associated with absence requests and corrections made to absence requests on the timesheet. Time Reporting and Absence Management: The University of Houston System (UHS) is excited to introduce the new TRAM (Time Reporting and Absence Management) system. TRAM is an automated and updated application for capturing and processing time and leave that will eliminate current paper processes. Trial Verification: is a Payroll process that calculates the time entered for employees. This generates a report (Trial) that is run by the Department Payroll Approvers (PA’s) to review time and pay generated for their employees. The report is reviewed and any necessary corrections are made before Payroll is finalized.

Web Clock: is a time collection system for hourly employees and is located in P.A.S.S. Hourly employees assigned to the web clock are responsible for punching in and out via the web clock to report their time worked. Time is transmitted from the web clock punches to the University’s HR system for processing. Workgroup: is a set of time reporters who share compensation requirements such as pay frequency and work location. Examples are: Hourly employees and Salary employees. When an employee’s HR data changes for reasons such as promotions, demotions, or transfers, their characteristics for Workgroup membership may change, requiring an update in the Time and Labor Workgroup enrollment. When employees are terminated, their Workgroup enrollment in Time and Labor must be inactivated.

12/16/13/S.Nester TRAM Reports Page 1 of 3
TRAM Reports Navigation:
Manager Self Service > Time Management > TRAM Reports 1. TRAM Absence Report
Review Absence Requests Purpose
Displays Absence Requests, including hours, and status of request by Employee and Empl Rcd #
Displays Total Hours Approved, Submitted, Pushed Back by Employee, Empl Rcd #, and Absence Type; and by Report by Absence Type and Status
Provides Absence Request history for Employee, including whether Employee or Manager submitted request, Date request Submitted and Date request Approved
Provides Absence Requests for a pay period by Employee, Empl Rcd #
Identifies Absence Requests Needing Approval Run Parameters
By Business Unit (Campus), Division, College, Department, Group ID, Empl ID
By Hourly Time Reporters, Salary (Monthly) Time Reporters, or all Time Reporters
By From Date and Thru Date (Report includes Absence Requests with a Begin Date in the time period requested)
Process Name: UPAY204 2. TRAM Available Leave Report
Review Leave Balances Purpose
Displays Projected Leave Balances by Employee; Projected Leave Balances include hours pending in Payroll, Time Reporting, and Absence Management
Displays Maximum Vacation Accrual Hours at end of Fiscal Year to monitor employees at risk of losing vacation
Identifies Employees with Negative Leave Balances Run Parameters
By Business Unit (Campus), Division, College, Department, Group ID, Empl ID
By Hourly Time Reporters, Salary (Monthly) Time Reporters, or all Time Reporters
By All Leave Types, Sick Leave Only, Vacation Leave Only, Sick & Vacation Leave Only, or Comp Time Only
Options: o Only Display Employees with Projected Negative Leave Balances (Check to
identify employees with negative leave balances) Process Name: UPAY207
3. TRAM Absence Audit Report
Review Absence Request Transactions Purpose
Displays Absence Requests, including hours, by Employee and detailed Workflow Transaction History
Provides Absence Request Workflow Transaction History for a pay period by Employee, Empl Rcd #
Provides Absence Request Workflow Transaction History to research approvals and discrepancies

12/16/13/S.Nester TRAM Reports Page 2 of 3
Run Parameters
By Business Unit (Campus), Division, College, Department, Group ID, Empl ID
By Hourly Time Reporters, Salary (Monthly) Time Reporters, or all Time Reporters
By From Date and Thru Date (Report includes Absence Requests with a Begin Date in the time period requested)
Process Name: UPAY208 4. TRAM Time Report
Evaluate Reported Time to Payable Time Purpose
Displays Payable Time and associated Reported Time by Employee, Empl ID, and Date; totals Payable Time Hours by Employee, Emp Rcd #, and Time Reporting Code (TRC)
Displays Total Payable Time Hours Approved, Needs Approval, and Taken by Payroll and Rejected by Payroll once hours have been loaded into Payroll
Allows Time Approvers and Payroll Approvers to compare Reported Time to Payable Time generated
Identifies Payable Time to be approved and Payable Time Rejected by Payroll Run Parameters
By Business Unit (Campus), Division, College, Department, Group ID, Empl ID
By Hourly Time Reporters, Salary (Monthly) Time Reporters, or all Time Reporters
By From Date and Thru Date (Enter Pay Period Begin and End Dates to review by Pay Period)
Process Name: UPAY205 5. TRAM Time Audit Report
Review Time Approver Corrections Purpose
Displays Reported Time Added, Deleted, and/or Changed and Comments entered by Time Approver or Payable Approver by Employee, Empl ID, and Date
Displays Number of Days Corrected by Employee and Empl ID
Identifies Corrections entered by Time Approvers and Payable Approvers for review for Comments and appropriate justification
Run Parameters
By Business Unit (Campus), Division, College, Department, Group ID, Empl ID
By Hourly Time Reporters, Salary (Monthly) Time Reporters, or all Time Reporters
By From Date and Thru Date (Enter Pay Period Begin and End Dates to review by Pay Period)
Process Name: UPAY206 6. TRAM Hierarchy Report
Review Time Reporter assignment to TAs and PAs Purpose
Displays Time Reporters assigned to Time Approvers, and Time Approvers assigned to Payroll Approvers
Displays Time Approver Alternates (Proxy) and Payroll Approver Alternates (Proxy)
Displays Time Approver and Payroll Approver Group IDs
Identifies unassigned Time Reporters and unassigned Time Approvers Run Parameters
By Business Unit (Campus), Division, College, Department
By Hourly Time Reporters, Salary (Monthly) Time Reporters, or all Time Reporters

12/16/13/S.Nester TRAM Reports Page 3 of 3
By “As of Date” (Enter Current Date unless report is to review historical data)
Options: o Display Time Reporters (Uncheck to display only Time Approvers and Payroll
Approvers) o Display Time Reporters with No Approver (Uncheck to remove unassigned Time
Reporters from report) Process Name: UPAY160
Helpful Queries HRMS_AM_LV_RQS_PND_APR_DEPT
Absence Requests Pending Approval by Division, College, or Department ID Prompts:
Leave Begin Date Leave End Date Div/Coll/Dept #
(Leave Begin/End Dates are based upon Absence Request Begin Dates) HRMS_TR_BW_RT_NA_BY_DEPT Bi-Weekly Reported Time Pending Approval by Division, College, or Department ID
Prompts: TR Report Date >= TR Report Date <= Div/Coll/Dept #
(Enter Pay Period Begin and End Dates for TR Report Dates) HRMS_TR_MO_RT_NA_BY_DEPT Monthly Reported Time Pending Approval by Division, College, or Department ID
Prompts: TR Report Date >= TR Report Date <= Div/Coll/Dept #
(Enter Pay Period Begin and End Dates for TR Report Dates) HRMS_TR_BW_PT_NA_BY_DEPT Bi-Weekly Payable Time Pending Approval by Division, College, or Department ID
Prompts: TR Report Date >= TR Report Date <= Div/Coll/Dept #
(Enter Pay Period Begin and End Dates for TR Report Dates) HRMS_TR_MO_PT_NA_BY_DEPT
Monthly Payable Time Pending Approval by Division, College, or Department ID Prompts:
TR Report Date >= TR Report Date <= Div/Coll/Dept #
(Enter Pay Period Begin and End Dates for TR Report Dates)