log entry and student referral
TRANSCRIPT

PowerSchool Handbook
Log Entry
and
Student Referral Version 4.4
December 20, 2021

PowerSchool Log Entries • Page 2
Copyright ©2021, San Diego Unified School District. All rights reserved.
This document may be reproduced internally by San Diego Unified School District. Except as noted, all rights are reserved. No part of this
publication may be reproduced, transcribed, stored in retrieval systems, or translated into any language in any form by any means without written
permission of San Diego Unified School District, Integrated Technology Support Services (ITSS), 4100 Normal St, San Diego, CA 92103

PowerSchool Log Entries • Page 3
Table of Contents About This Handbook.......................................................................................................................... 4
Part 1: Create a Log Entry ....................................................................................................................... 5
Log Type Descriptions ........................................................................................................................ 6
PowerSchool Security Settings Required .......................................................................................... 6
Administrator Log Entry ...................................................................................................................... 7
School Counselor Log Entry .............................................................................................................. 11
Records Access Log Entry ................................................................................................................. 13
Part 2: Edit Log Entry............................................................................................................................ 16
Delete Log Entry ............................................................................................................................... 17
Edit a Log Entry ................................................................................................................................ 19
Part 3: Mass Assign Log Entry .............................................................................................................. 21
Mass Assign Log Entry – Using Current Student Selection ................................................................ 22
Select a Group of Students: By Teacher Class Roster ..................................................................... 22
Select a Group of Students: By Grade Level................................................................................... 26
Part 4: (For Administrators) Student Referral ......................................................................................... 28
How to Process Student Referrals from PowerTeacher ....................................................................... 29
First, Run Student Referral Report ................................................................................................. 29
Next, Preview the Student Referral ................................................................................................ 31
Last, Edit the Subtype Dropdown ................................................................................................... 33
Part 5: Reports ....................................................................................................................................... 34
Log Entry Reports ............................................................................................................................. 35
Print a Single Log Entry by Student Name ..................................................................................... 35
School Counselor Reports for Log Entries...................................................................................... 35
Administrator and Records Access Log Entry Reports ................................................................... 36
Student Referral Report (For Administrators) ................................................................................. 37
Part 6: Search Log Entries ..................................................................................................................... 39
Special Function ................................................................................................................................ 40
PowerSchool Log Entries • Page 4
About This Handbook
This handbook was created by the San Diego Unified IT Training Team as
reference material for school counselors and administrators using Log
Entries in PowerSchool. It is updated periodically by the San Diego Unified
IT Training Team. The student names and data are fictitious. If you have
any questions about how to execute these tasks in PowerSchool, please
contact the IT Help Desk: (619)209-Help.
Department Contacts
• If you are a School Counselor and have questions regarding
district policies or procedures, please contact The Counseling and Guidance Department at
(619)725-7330.
• If you are an administrator and have questions about district policy or procedures, please contact
Rick McFall in Placement and Appeals Office at (619) 725-5660.

PowerSchool Log Entries • Page 5
Part 1:
Create a Log
Entry

PowerSchool Log Entries • Page 6
Log Type Descriptions
Currently there are 5 types of Log Entries recorded in PowerSchool.
▪ Administrator - This Log Type can be used by school administrators and other authorized school staff to enter information related to student conferences, notifications, and behavior incidents that are not part of the Incident Management system (i.e., behaviors not associated with a numerical or
[NS] code).
▪ School Counselor- This Log Type can be used by school counselors to enter information related to counseling services, student conferences, site-based interventions, and behavior supports.
▪ School Counselor Archive-This is the original school counselor log type. In September 2018, it was replaced by the current School Counselor log type.
▪ Records Access - This Log Type can be used by registrars and other authorized school staff to enter information related to requests for student records from parents, school districts, or other
inquiring parties.
▪ Student Referral from PowerTeacher– These Log Entries are submitted for rostered students by classroom teachers within the Student Referral page located in PowerTeacher. Site administrators will access these entries via PowerSchool to review and process the submissions.
Important: Log Entries are not intended for private use. Data is not confidential. Log Entries are not
to be used for keeping personal records on students or note taking. DO NOT enter student names. Use
either first name/last name initials OR student ID number.
PowerSchool Security Settings Required
All Log Entry access requires particular security settings to be enabled. If you are authorized to have access
to Administrator, School Counselor or Student Referrals, your site or department Power User will enable
security access upon request. Without appropriate security access you will not be able to view any of the
Student Referrals or Log Entry data. Consult with your Power User if you have questions.

PowerSchool Log Entries • Page 7
Administrator Log Entry
This Log Type can be used by school administrators and other authorized school staff to enter information related to student conferences, notifications, and behavior incidents that are not part of the Incident Management (i.e., behaviors not associated with a numerical or [NS] code). For a complete list of suspension and non-suspension behavior codes, refer to the PowerSchool Incident Management handbook. You may use the link located on the Start Page in PowerSchool for Handbooks and Job Aids.
To create a new Administrator log entry:
1. From the start page, search and select a student name.
2. Click Log Entries from the Student Menu.
3. Select Log Type of Administrator, then click New.
PowerSchool Log Entries • Page 8
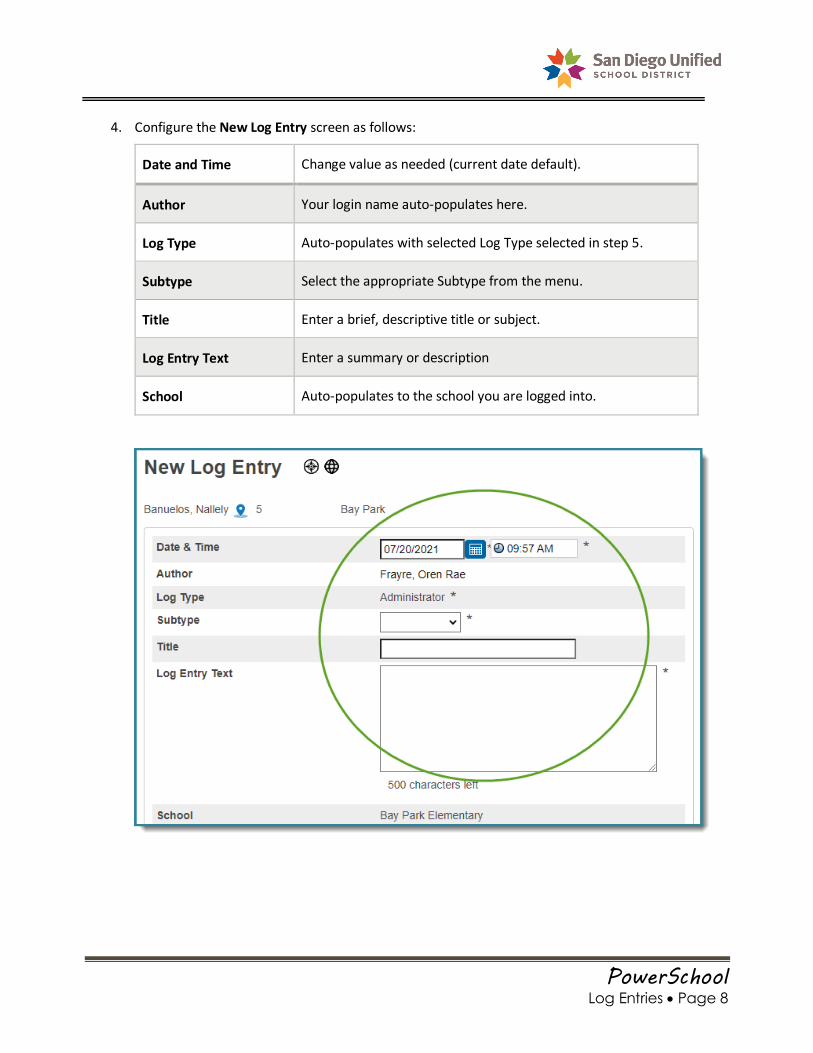
4. Configure the New Log Entry screen as follows:
Date and Time Change value as needed (current date default).
Author Your login name auto-populates here.
Log Type Auto-populates with selected Log Type selected in step 5.
Subtype Select the appropriate Subtype from the menu.
Title Enter a brief, descriptive title or subject.
Log Entry Text Enter a summary or description
School Auto-populates to the school you are logged into.
PowerSchool Log Entries • Page 9
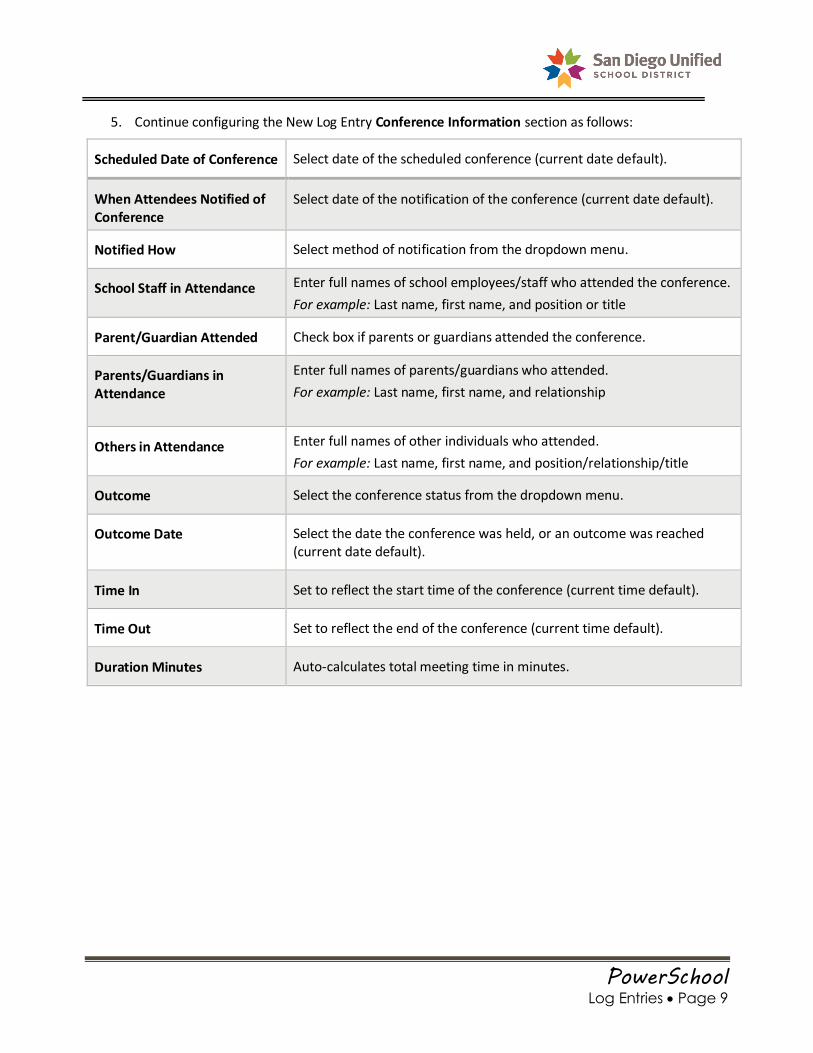
5. Continue configuring the New Log Entry Conference Information section as follows:
Scheduled Date of Conference Select date of the scheduled conference (current date default).
When Attendees Notified of Conference
Select date of the notification of the conference (current date default).
Notified How Select method of notification from the dropdown menu.
School Staff in Attendance Enter full names of school employees/staff who attended the conference.
For example: Last name, first name, and position or title
Parent/Guardian Attended Check box if parents or guardians attended the conference.
Parents/Guardians in Attendance
Enter full names of parents/guardians who attended.
For example: Last name, first name, and relationship
Others in Attendance Enter full names of other individuals who attended.
For example: Last name, first name, and position/relationship/title
Outcome Select the conference status from the dropdown menu.
Outcome Date Select the date the conference was held, or an outcome was reached (current date default).
Time In Set to reflect the start time of the conference (current time default).
Time Out Set to reflect the end of the conference (current time default).
Duration Minutes Auto-calculates total meeting time in minutes.

PowerSchool Log Entries • Page 10
6. Click Submit to complete your Log Entry.
7. If you successfully filled in all the required fields, the Changes Recorded screen will display. If you have incomplete required fields, the system will require you to fill them in.
PowerSchool Log Entries • Page 11
School Counselor Log Entry
This Log Type is only to be used by school counselors to enter information related to counseling services, student conferences, site-based interventions, and behavior supports. If you are a School Counselor and have questions regarding district policies or procedures, please contact The Counseling and Guidance
Department at (619)725-7330.
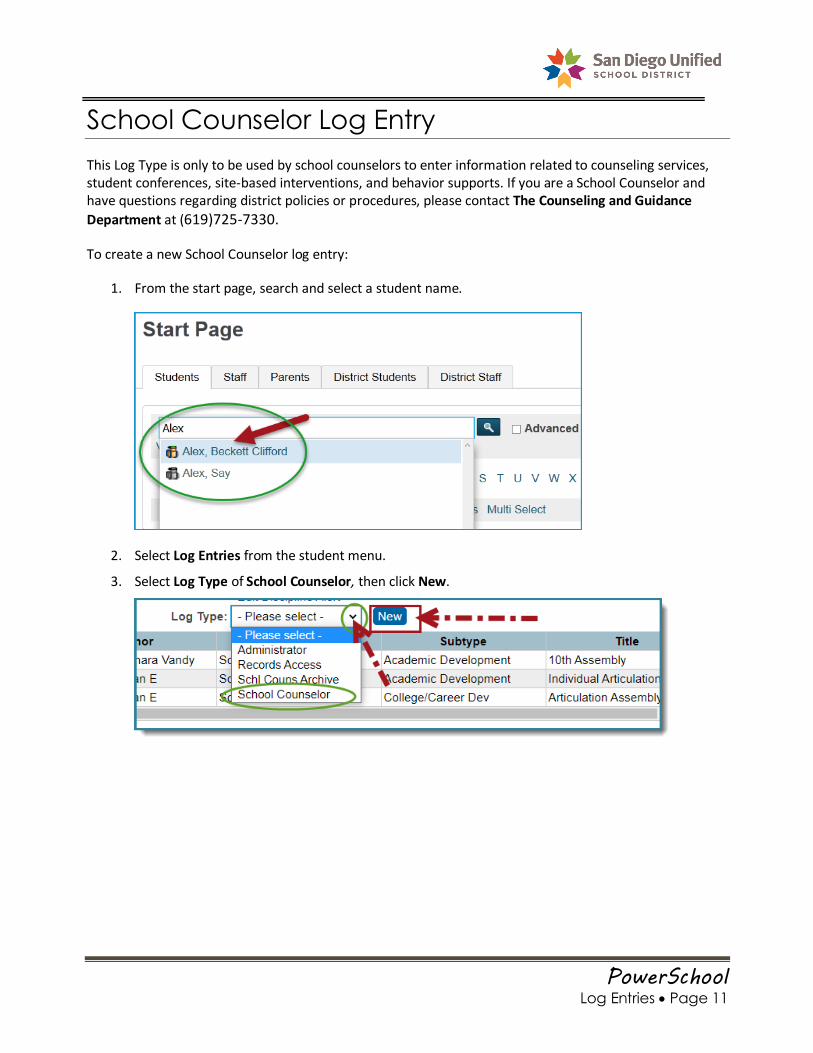
To create a new School Counselor log entry:
1. From the start page, search and select a student name.
2. Select Log Entries from the student menu.
3. Select Log Type of School Counselor, then click New.

PowerSchool Log Entries • Page 12
4. Configure the New Log Entry screen:
5. Click Submit.

PowerSchool Log Entries • Page 13
Records Access Log Entry
This Log Type can be used by registrars and other authorized school staff to enter information related to requests for student records from parents, school districts, or other inquiring parties.
To create a new Records Access log entry:
1. From the start page, search and select a student name.
2. Select Log Entries from the Student Menu.
Select Log Type of Records Access, then click New.

PowerSchool Log Entries • Page 14
3. Configure the New Log Entry screen as follows:
Date and Time Change value as needed (current date default).
Author Your name auto-populates here.
Log Type Auto-populates with selected Log Type selected in step 5.
Subtype Select the appropriate Subtype from the menu.
Title Enter a brief, descriptive title or subject.
Log Entry Text Enter the conference summary.
School Auto-populates to the school you are logged into.

PowerSchool Log Entries • Page 15
4. Complete Records Access Details, then click Submit.
5. If you have successfully filled in all the required fields, the Changes Recorded screen will display.

PowerSchool Log Entries • Page 16
Part 2:
Edit Log Entry
PowerSchool Log Entries • Page 17
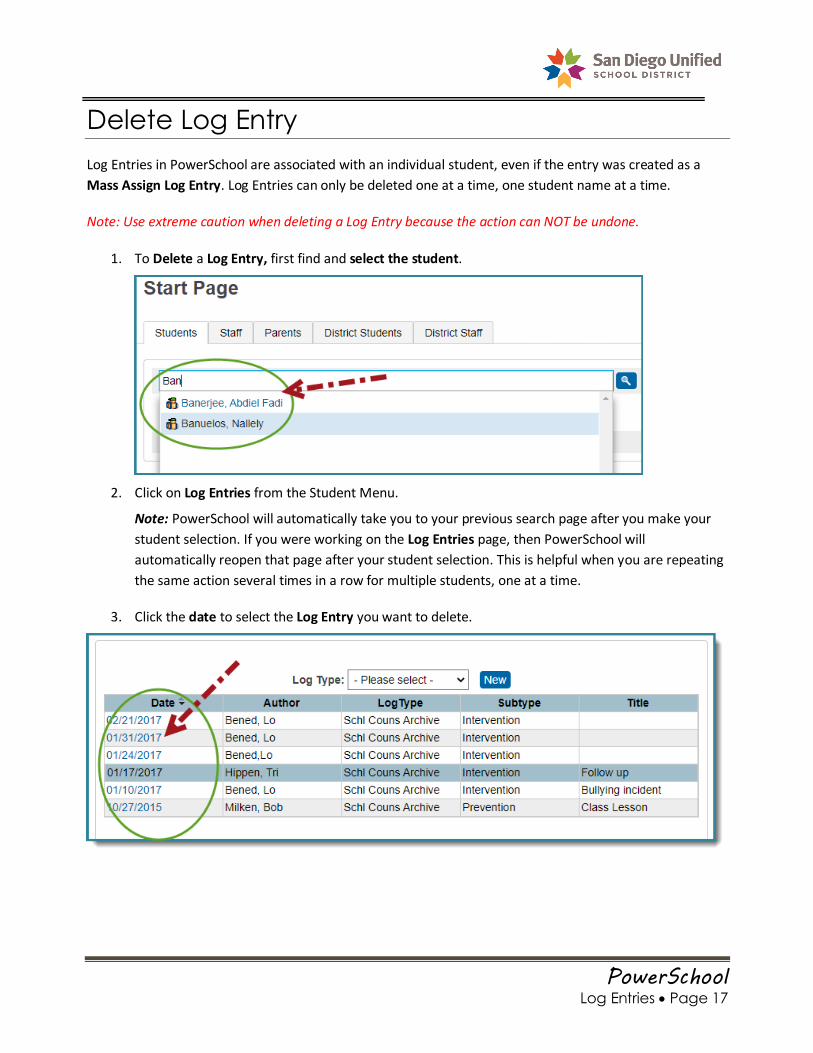
Delete Log Entry
Log Entries in PowerSchool are associated with an individual student, even if the entry was created as a
Mass Assign Log Entry. Log Entries can only be deleted one at a time, one student name at a time.
Note: Use extreme caution when deleting a Log Entry because the action can NOT be undone.
1. To Delete a Log Entry, first find and select the student.
2. Click on Log Entries from the Student Menu.
Note: PowerSchool will automatically take you to your previous search page after you make your
student selection. If you were working on the Log Entries page, then PowerSchool will
automatically reopen that page after your student selection. This is helpful when you are repeating
the same action several times in a row for multiple students, one at a time.
3. Click the date to select the Log Entry you want to delete.

PowerSchool Log Entries • Page 18
4. Review the information in the Log Entry to confirm that you indeed want to continue with the deletion. Then, scroll to the bottom of the page and Click Delete.
5. Click Confirm Delete to permanently remove the Log Entry. Click Cancel if you do not wish to
delete the record.
Important: Use extreme caution when deleting a Log Entry because the action can NOT be undone.
6. A message will display to confirm the deletion.

PowerSchool Log Entries • Page 19
Edit a Log Entry
1. To edit a Log Entry, first find and select the student.
2. Select Log Entries from the Student Menu.
Note: PowerSchool will automatically take you to your previous search page after you make your
student selection. If you were working on the Log Entries page, then PowerSchool will
automatically reopen that page after your student selection. This is helpful when you are repeating
the same action several times in a row for multiple students, one at a time.
3. Click the date to select the Log Entry you want to edit.

PowerSchool Log Entries • Page 20
4. Make changes to the Log Entry fields as needed and then Click Submit.
5. If you successfully filled in the required fields, the Changes Recorded screen will display.
PowerSchool Log Entries • Page 21
Part 3:
Mass Assign
Log Entry
PowerSchool Log Entries • Page 22
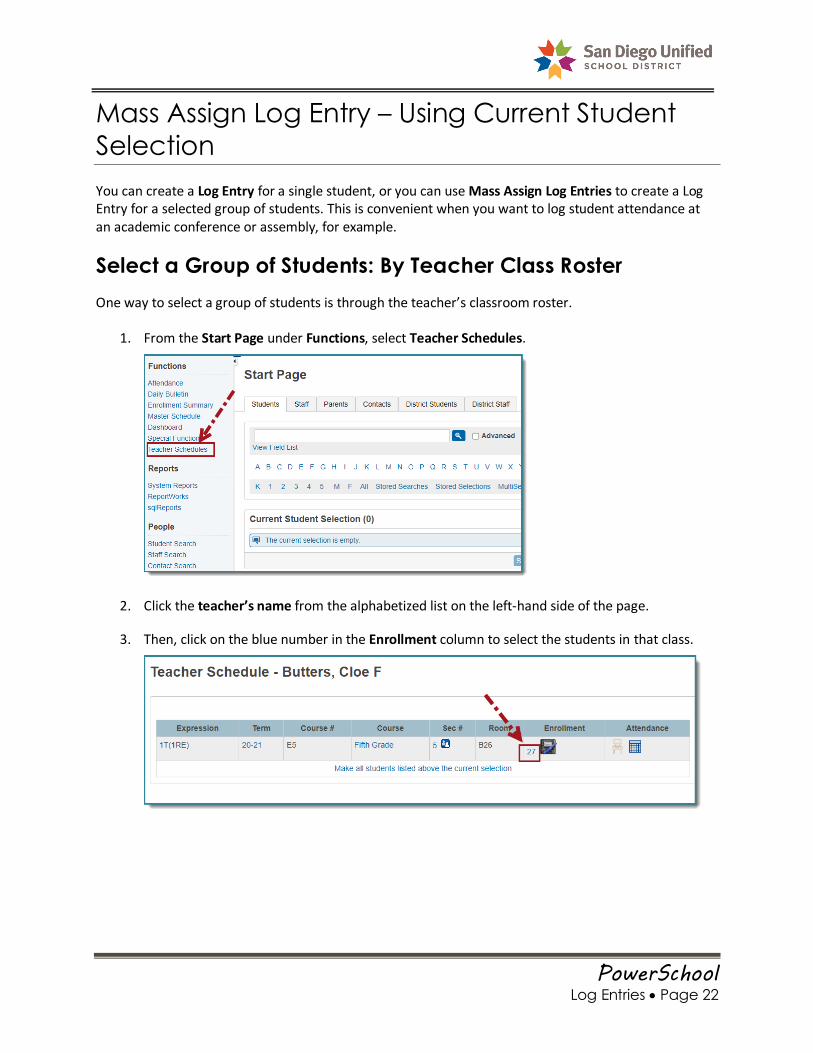
Mass Assign Log Entry – Using Current Student
Selection
You can create a Log Entry for a single student, or you can use Mass Assign Log Entries to create a Log Entry for a selected group of students. This is convenient when you want to log student attendance at an academic conference or assembly, for example.
Select a Group of Students: By Teacher Class Roster
One way to select a group of students is through the teacher’s classroom roster.
1. From the Start Page under Functions, select Teacher Schedules.
2. Click the teacher’s name from the alphabetized list on the left-hand side of the page.
3. Then, click on the blue number in the Enrollment column to select the students in that class.

PowerSchool Log Entries • Page 23
4. After clicking on the Enrollment number, the complete class roster will display. The default setting pre-selects all the students. You may deselect students by clicking on the check box next to the student’s name. After you have your selected group of students, click Make Current Student Selection.
5. The students selected have become your Current student selection group.
Note: If you would like to add another class roster to this Mass Log Entry, simply click on the Teacher Schedules link on the Main Menu on the left and repeat the steps #2 and #3 above. Then click the button Add to Current Student Selection.
This will give you the sum of the class rosters so that you may do one Mass Log Entry. You may
add as many class rosters as you wish. Just remember to use Add to Current Student Selection
so you can create your complete group of students.

PowerSchool Log Entries • Page 24
6. Select Special Functions from the Main Menu.
7. Scroll down and select Mass Assign Log Entries.

PowerSchool Log Entries • Page 25
8. The New Mass Log Entry page will display. You will find the number of selected students as the default selection at the top.
9. Enter the date and time. Select a Log Type from dropdown. The Log Type selected will enable the aligned Log Entry Fields to complete.
The Log Type cannot be edited once selected. If you incorrectly select a Log Type, you must return to the Special Functions page to begin with a New Mass Log Entry.
Please note the screenshot below for sequence importance between Log Type and Subtype when completing Mass Log Entry.
10. Complete the data fields and click Submit.

PowerSchool Log Entries • Page 26
Select a Group of Students: By Grade Level
To assign a New Mass Log Entry by a specific grade level, first go to the Start Page of PowerSchool.
1. Click on the grade level to bring up the complete list of students in that grade. Then select Special Functions.
2. Select Mass Assign Log Entries.

PowerSchool Log Entries • Page 27
3. Edit the date and time as needed.
4. Select a Log Type from the dropdown.
5. Then select a Subtype from the dropdown.
The Log Type selected will enable the aligned Log Entry Fields to complete.
The Log Type cannot be edited once selected. If you incorrectly select a Log Type, you must return to the Special Functions page to begin with a New Mass Log Entry.
Please note the screenshot below for sequence importance between Log Type and Subtype when completing Mass Log Entry.
6. Enter information for the Log Entry. Then click submit.

PowerSchool Log Entries • Page 28
Part 4: (For Administrators)
Student
Referral

PowerSchool Log Entries • Page 29
How to Process Student Referrals from
PowerTeacher
Student Referrals are submitted for rostered students by classroom teachers within the Student Referral
page located in PowerTeacher. Site administrators access these entries via PowerSchool to review and
process each submission. Teachers are unable to edit or delete a referral once it is submitted.
A Student Referral cannot be created in PowerSchool Log Entries. If a behavior incident needs to be
recorded on the administrative end it can be done within PowerSchool Incident Management. Please
refer to the PowerSchool Incident Management handbook. For district policy and procedure questions,
contact Rick McFall in Placement and Appeals Office at (619)725-5660.
If you are authorized to have access to Student Referrals, your site or department Power User will
enable security access upon request. Without appropriate security access you will not be able to view
any of the Student Referrals or Log Entry data. The Student Referral access is separate from Log Entry
access and School Counselor Log Entry access. Consult with your Power User if you have questions about
access.
First, Run Student Referral Report
Site administrators will systematically run the Student Referral sqlReport report in PowerSchool to
preview and process each referral.
1. From the Start Page in PowerSchool, click sqlReports.
2. Click on Log Entries to expand. Then click Student Referral. (If you don’t see the Log Entries link,
consult with your Power User for appropriate security access)
PowerSchool Log Entries • Page 30
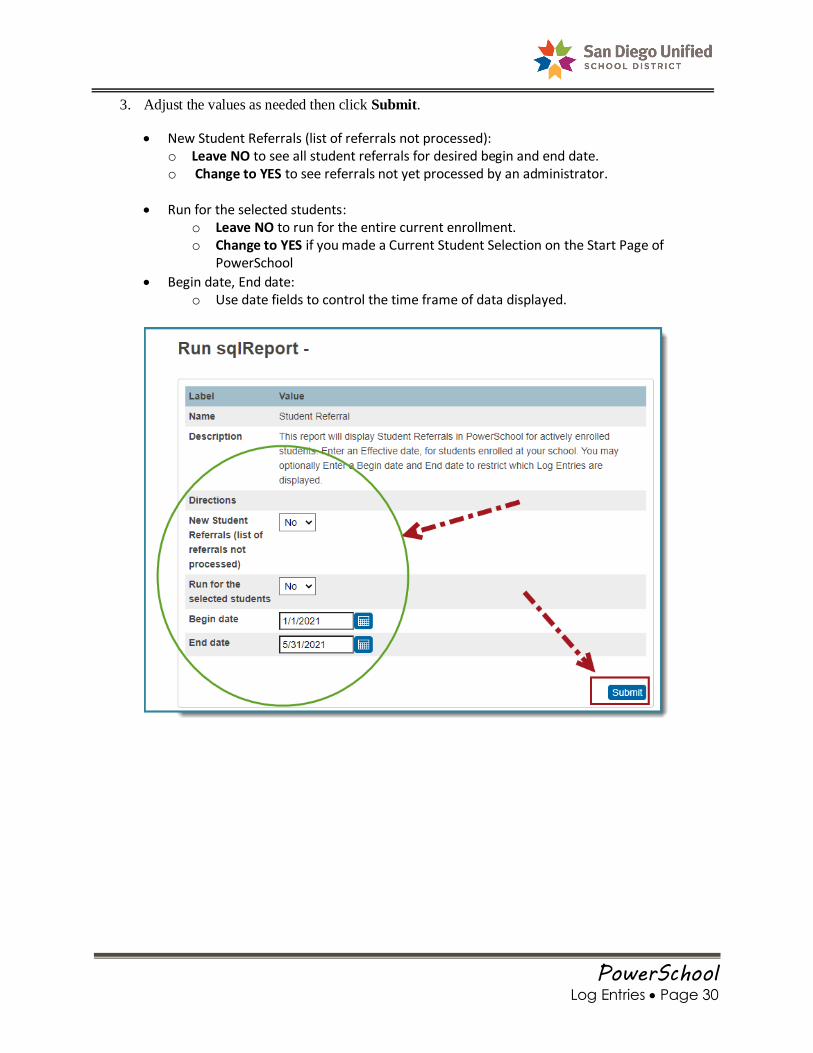
3. Adjust the values as needed then click Submit.
• New Student Referrals (list of referrals not processed): o Leave NO to see all student referrals for desired begin and end date. o Change to YES to see referrals not yet processed by an administrator.
• Run for the selected students: o Leave NO to run for the entire current enrollment. o Change to YES if you made a Current Student Selection on the Start Page of
PowerSchool
• Begin date, End date: o Use date fields to control the time frame of data displayed.

PowerSchool Log Entries • Page 31
4. The Student Referral report renders with all the data fields collected from the teacher
submission.
Next, Preview the Student Referral
The last three columns in the report: Subtype, Who Processed, and When Processed, will be
automatically populated after you:
✓ Open the Student Referral from the link in the report or from the student page of Log Entries
✓ Edit the Subtype dropdown (Previewed or Processed)
✓ Click Submit
Access from the Student Referral Report:
1. After running the Student Referral report, hover your cursor over the Student Number, right
click your mouse, and select Open Link in new tab. Locate and open the new student tab.
1
2
1
1
1
1
22233
2
2

PowerSchool Log Entries • Page 32
2. Click on Log Entries from the student menu. Locate and click the Student Referral you wish
to view.
Access from the Start Page:
1. On the Start Page, type and select the student’s name.
2. Click on Log Entries from the student menu. Locate and click the Student Referral you wish
to view.

PowerSchool Log Entries • Page 33
Last, Edit the Subtype Dropdown
1. Now that you have located the Student Referral, use the subtype dropdown to select Reviewed
or Processed. Click Submit.

PowerSchool Log Entries • Page 34
Part 5:
Reports

PowerSchool Log Entries • Page 35
Log Entry Reports
Print a Single Log Entry by Student Name
1. From the Start Page, select a student.
2. Select Log Entries, from the Main Menu.
3. Select the Log Entry you wish to print.
4. Click the Printer icon, in the upper, right-hand corner of the page.
School Counselor Reports for Log Entries
If you are authorized to have School Counselor Log Entry access, your site or department Power User
will enable security access upon request. Without appropriate security access you will not be able to
view any of the School Counselor Log Entry data. Consult with your Power User if you have questions.
1. To reach the reports, from the start page in PowerSchool, click on sqlReports.
2. Click to expand the School Counselor Log Entries or the School Counselor Log Entries Archive.
3. Click on the report name to select. Adjust the parameter dates (if applicable) and click submit.
PowerSchool Log Entries • Page 36
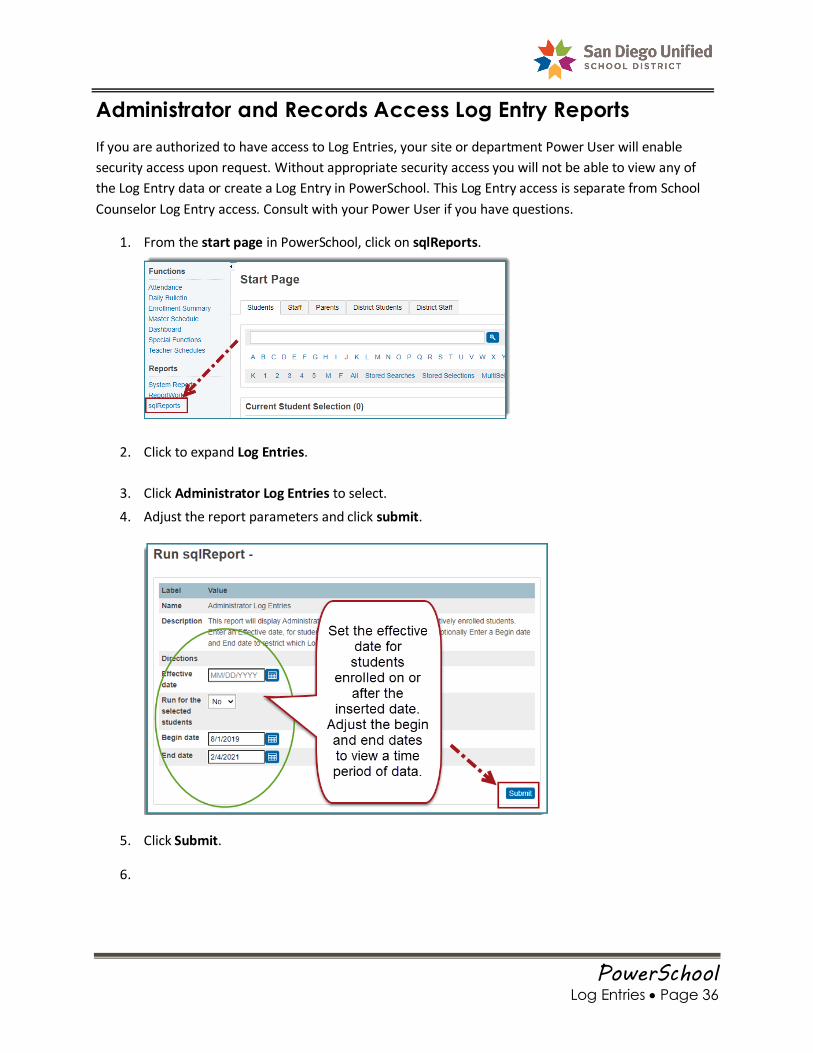
Administrator and Records Access Log Entry Reports
If you are authorized to have access to Log Entries, your site or department Power User will enable
security access upon request. Without appropriate security access you will not be able to view any of
the Log Entry data or create a Log Entry in PowerSchool. This Log Entry access is separate from School
Counselor Log Entry access. Consult with your Power User if you have questions.
1. From the start page in PowerSchool, click on sqlReports.
2. Click to expand Log Entries.
3. Click Administrator Log Entries to select.
4. Adjust the report parameters and click submit.
5. Click Submit.
6.

PowerSchool Log Entries • Page 37
Student Referral Report (For Administrators)
If you are authorized to have access to Student Referrals, your site or department Power User will
enable security access upon request. Without appropriate security access you will not be able to view
any of the Student Referrals or Log Entry data. The Student Referral access is separate from Log Entry
access and School Counselor Log Entry access. Consult with your Power User if you have questions.
Student Referrals are submitted by classroom teachers from the Student Referral page located within
PowerTeacher. Site administrators will access these entries via PowerSchool to follow up and process
the submissions.
1. From the Start Page, select sqlReports.
2. Scroll down and click Log Entries to expand. Then select the report to view.

PowerSchool Log Entries • Page 38
3. Adjust the parameters as needed:
• New Student Referrals (list of referrals not processed): o Leave NO to see all student referrals for desired begin and end date. o Change to YES to see referrals not yet processed by an administrator.
• Run for the selected students: o Leave NO to run for the entire current enrollment. o Change to YES if you made a Current Student Selection on the Start Page of
PowerSchool
• Begin date, End date: o Use date fields to control the time frame of data displayed.
4. Click Submit.

PowerSchool Log Entries • Page 39
Part 6:
Search Log
Entries

PowerSchool Log Entries • Page 40
Special Function
PowerSchool has a feature that allows you to search Log Entries by a variety of data fields. Searches can be conducted by dates, text, title or author, to name a few.
1. From the PowerSchool Start Page, click Special Functions.
2. Select Search Log Entries.

PowerSchool Log Entries • Page 41
3. Select a Log Type from the dropdown menu.
4. Enter additional information in the search fields. Narrow your search results by filling in the search fields.
5. Click Submit.
6. The list of Log Entries will appear, based on your search criteria. Click the Student Number or
Student Name to open the Log Entries page, in a new tab.
7. Click the Print icon, in the upper, right-hand corner of the page, if you would like to print the search
results. Please note that if you searched for many fields, they may not all appear when you print
your results. You may also highlight, copy, and paste the results into Excel.