loan origination 9nt1316-oracle fc ubs v.um 11.0.0.0.0.0.0 ... · 2.2.5 verification of loan...
TRANSCRIPT

Loan Origination Version-11.0
9NT1316-ORACLE FC UBS V.UM 11.0.0.0.0.0.0 [January] [2010]
Oracle Part Number E51712-01
Document Control Author: Documentation Team Group: UBPG
Created on: October 01, 2008 Revision No: Final
Updated by: Documentation Team Reviewed by: Development/Testing teams
Approved by: Software Quality Assurance Team
Updated on: January 07, 2010 Reviewed on: January 07, 2010
Approved on: January 07, 2010
Loan Origination
Table of Contents 1. ABOUT THIS MANUAL................................................................................................................................ 1-1
1.1 INTRODUCTION........................................................................................................................................... 1-1 1.1.1 Audience ............................................................................................................................................ 1-1 1.1.2 Organization ...................................................................................................................................... 1-1 1.1.3 Related Documents ............................................................................................................................ 1-1 1.1.4 Glossary of Icons ............................................................................................................................... 1-2
2. LOAN ORIGINATION................................................................................................................................... 2-1 2.1 INTRODUCTION........................................................................................................................................... 2-1 2.2 STAGES INVOLVED IN LOAN ORIGINATION................................................................................................. 2-1
2.2.1 Maintaining Credit Rule .................................................................................................................... 2-2 2.2.2 Mapping Function Id with Policy Code............................................................................................. 2-5 2.2.3 Input Details for Loan Account Opening........................................................................................... 2-6 2.2.4 Enrichment of Loan Account Opening Details ................................................................................ 2-22 2.2.5 Verification of Loan Account Opening Details............................................................................... 2-26 2.2.6 KYC – Review .................................................................................................................................. 2-27 2.2.7 Credit Scoring.................................................................................................................................. 2-30 2.2.8 Credit Evaluation............................................................................................................................. 2-32 2.2.9 Customer Agreement........................................................................................................................ 2-33 2.2.10 Customer Acceptance ...................................................................................................................... 2-35 2.2.11 Funding............................................................................................................................................ 2-36
1-1
1. About this Manual 1.1 Introduction
This manual is designed to help acquaint you with the Loan Origination module of Oracle FLEXCUBE.
It provides an overview of the module and guides you, through the various steps involved in granting loans to the customers of your bank.
In addition to this User Manual, you can find answers to specific features and procedures, in the Online Help. It can be invoked by choosing Help Contents from the Help Menu of the software. You can further obtain information about to a particular field by placing the cursor on the relevant field and striking the <F1> key on the keyboard.
1.1.1 Audience
This manual is intended for the following User/User Roles:
Role Function
Back office data entry clerk Input functions for contracts
Back office managers/officers Authorization functions
Product Managers Product definition and authorization
End of Day operators Processing during End of Day/ Beginning of Day
Financial Controller / Product Managers Generation of reports
1.1.2 Organization
This manual is organized into the following chapters:
Chapter 1 About this Manual gives information on the intended audience. It also lists the various chapters covered in this User Manual.
Chapter 2 Loan Origination— Loan Origination describes the different stages involved in capturing a loan application along with mandatory documents and prerequisites.
1.1.3 Related Documents
You may need to refer to any or all of the User Manuals while working on the Loan Origination module:
• Core • Procedures • Settlements • Interest • User Defined

1-2
1.1.4 Glossary of Icons
This User Manual may refer to all or some of the following icons.
Icons Function
New
Copy
Save
Delete
Unlock
Close
Re-open
Reverse
Template
Roll-over
Hold
Authorize
Liquidate
Exit
Sign-off
Help
Add
Delete
Refer the Procedures User Manual for further details about the icons.
2-1
2. Loan Origination 2.1 Introduction
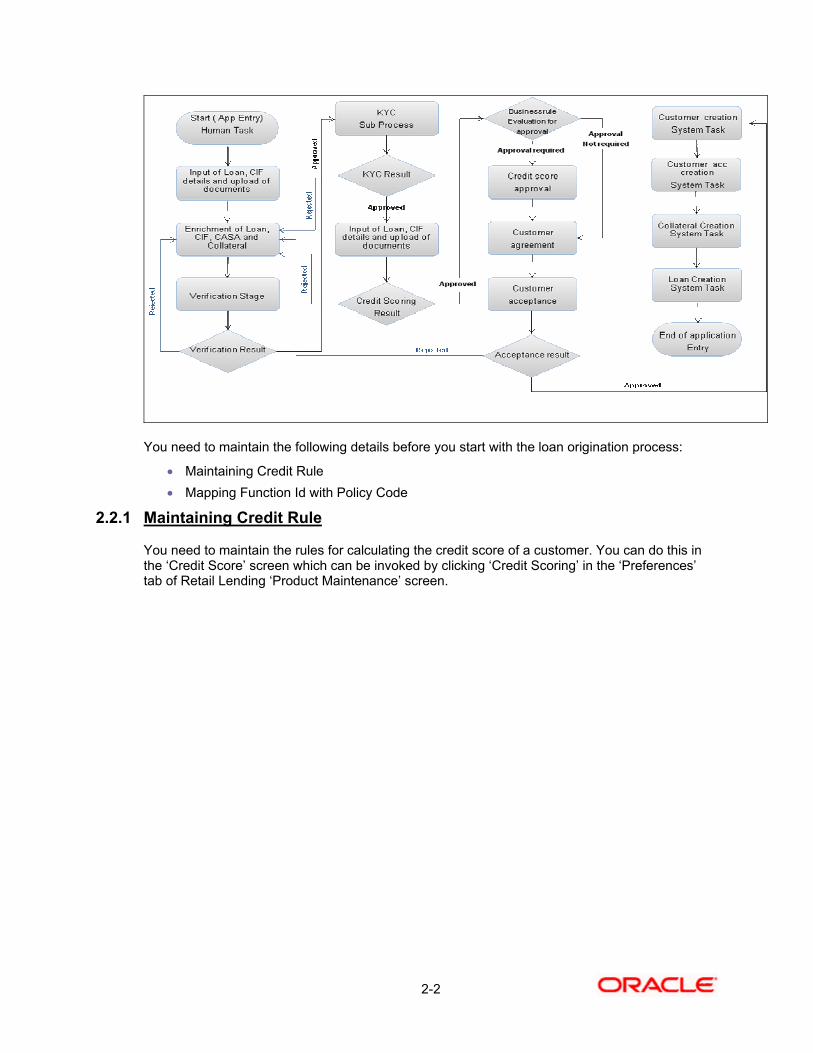
The process of loan origination gets initiated when a prospective customer approaches the bank, with a loan account opening request or when the bank approaches a prospective customer, taking lead from its database. In case of a bank–initiated request, the process moves forward only if the prospective customer is interested. The entire process is carried out in multiple stages and on successful completion of each stage, it moves automatically to the next stage.
For opening a loan account, the bank needs to receive the relevant set of documents for verification. The details of the loan account, customer and collateral are captured. The details are verified and a Know Your Customer (KYC) check is carried out. A credit rating is performed for the customer who clears the KYC check. Approval of the credit score is sought, in case required. On approval of the credit score, customer, customer account, collateral and loan are created in the system.
2.2 Stages Involved in Loan Origination The process of loan origination consists of several manual as well as system tasks, carried out in a sequential manner. Many users can be involved in the completion of a transaction and at each stage of the process, a user or a group of users, assigned with a task, acquire and work on the relevant transaction.
The loan origination process involves the following steps:
• Input Details for Loan Account Opening • Enrichment of Loan Account Opening Details • Verification of Loan Account Opening Details • KYC - Check • Credit Rating • Check whether Approval is required for Credit Rating • Approval of Credit Rating • Contract Generation • Customer Approval • Funding
Creation of Customer Creation of Customer Account Creation of Collateral Creation of Loan
Only users who have procured the relevant access rights can perform activities under a stage.
The following diagram illustrates the series of events involved in the process of loan origination.
2-2
You need to maintain the following details before you start with the loan origination process:
• Maintaining Credit Rule • Mapping Function Id with Policy Code
2.2.1 Maintaining Credit Rule
You need to maintain the rules for calculating the credit score of a customer. You can do this in the ‘Credit Score’ screen which can be invoked by clicking ‘Credit Scoring’ in the ‘Preferences’ tab of Retail Lending ‘Product Maintenance’ screen.

2-3
For more details on Retail Lending product categories, refer chapter ‘Defining Product Categories and Products’ in this User manual.
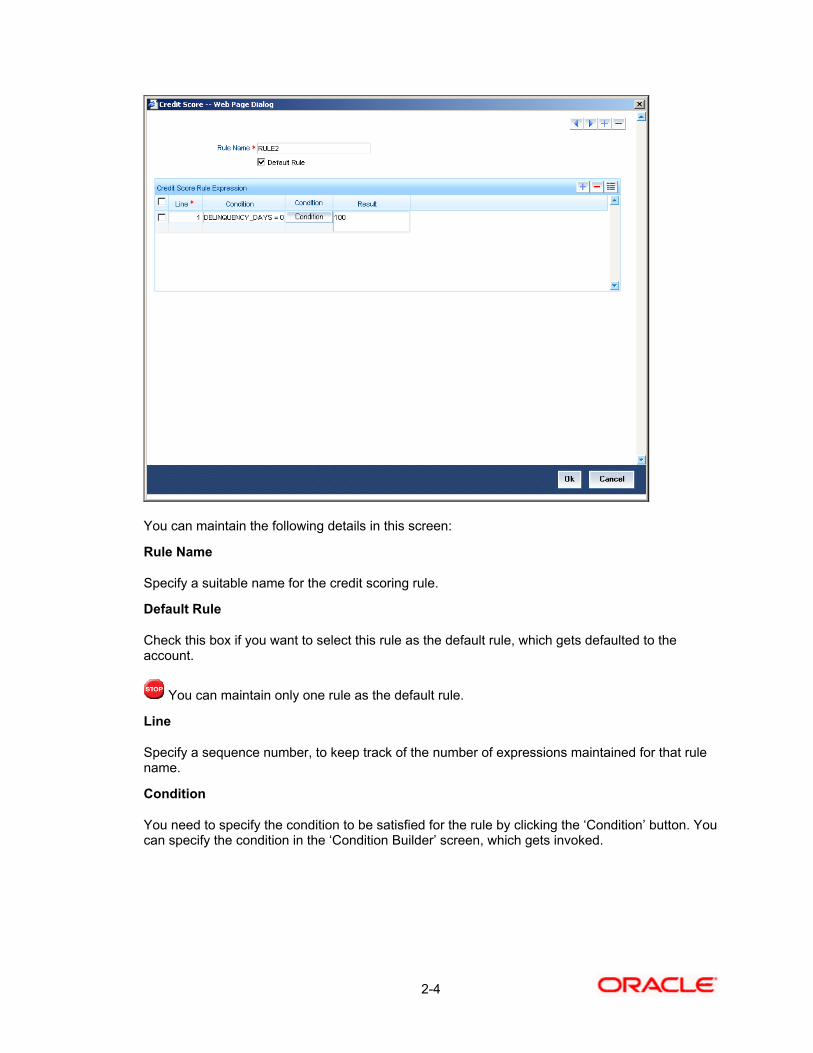
The ‘Credit Score’ screen is invoked when you click the ‘Credit Scoring’ button.
2-4
You can maintain the following details in this screen:
Rule Name
Specify a suitable name for the credit scoring rule.
Default Rule
Check this box if you want to select this rule as the default rule, which gets defaulted to the account.
You can maintain only one rule as the default rule.
Line
Specify a sequence number, to keep track of the number of expressions maintained for that rule name.
Condition
You need to specify the condition to be satisfied for the rule by clicking the ‘Condition’ button. You can specify the condition in the ‘Condition Builder’ screen, which gets invoked.

2-5
To specify the condition, you need to select the field name, operator and the value and click ‘Accept’.
Result
Specify the expected result of the condition to be satisfied.
2.2.2 Mapping Function Id with Policy Code
You need to maintain a mapping of the various stages of the workflow with the policies to be used for validating the details in each stage. At each stage, validation of the details specified is carried out by executing the policy associated with that stage. You can maintain the mapping in ‘Product Category’ screen. You can invoke this screen by typing ‘CLDPRCMT’ in the field at the top right corner of the Application tool bar and clicking the adjoining arrow button.

2-6
You need to specify the following details to perform the mapping between the function and the policy code:
Function
Select the loan origination function for which you want to specify the validation policy, from the option list provided.
Policy Code
Select the validation policy to be attached to the function selected.
For more details on Retail Lending product categories, refer chapter ‘Defining Product Categories and Products’ in this User manual.
2.2.3 Input Details for Loan Account Opening
The following activities constitute this task:
• Keying in loan account details • Uploading relevant documents • Capturing Asset Details • Capturing Financial Details • Querying existing customer details or specifying details for a new customer • Querying existing customer account details or specifying details for a new customer
account • Querying existing collateral details or specifying details for a new collateral
Users belonging to user role ‘CL-INPUT’ are authorized to perform these tasks.
2.2.3.1 Key-in loan account details
You need to key-in all details required for loan account opening, as part of this activity. You can specify the details for loan account opening in ‘Input Details’ screen. You can invoke this screen by typing ‘CLDOR001’ in the field at the top right corner of the Application tool bar and clicking the adjoining arrow button.

2-7
Refer the chapter ‘Account Creation’ in this user manual for details about this screen.
The following details are defaulted in this screen:
Branch
The unique identification code of the branch gets displayed here.
Workflow Number
Workflow number is automatically generated by the system.
User Defined Status
User Defined Status is displayed as ‘NORM’, by default.
You need to specify the following details here:
Product Category
Select the category of the product you wish to use, from the option list provided.
Product Code
Select the identification code of the product you wish to use, from the option list provided.
Click ‘Def’ button adjacent to Product Code. Maturity Date gets defaulted. You can modify this, if required.
Currency
Select the transaction currency from the option list provided.
2.2.3.2 Query Existing Customer / Input New Customer Details
You can query and check if the customer is an existing customer of the bank in the ‘Customer Information’ screen. To invoke this screen, click ‘Qry’ button adjacent to ‘Customer Id’ in Input Details screen. You can also invoke this screen by typing ‘STSCLCIF’ in the field at the top right corner of the Application tool bar and clicking the adjoining arrow button.

2-8
You can search for an existing customer by specifying any of following as search criteria:
• Authorization Status • Record Status • Customer Number • Customer Type • Name • Short Name • Liability Number • Customer Category • Country • Nationality • Language • Exposure • Location • SSN
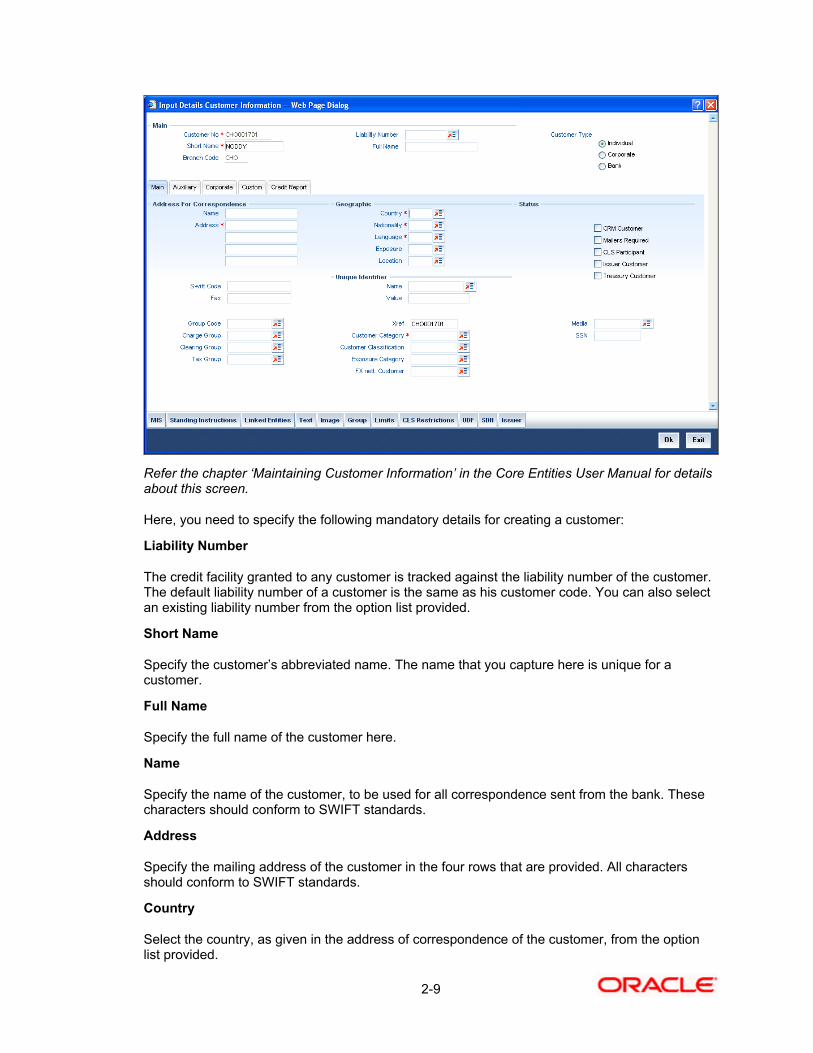
If the loan applicant is a new customer, you need to capture the customer details using the ‘Input Details Customer Information’. To invoke this screen, click ‘New’ button adjacent to ‘Customer Id’ in Input Details screen. You can also invoke this screen by typing ‘STDCLC01’ in the field at the top right corner of the Application tool bar and clicking the adjoining arrow button.
2-9
Refer the chapter ‘Maintaining Customer Information’ in the Core Entities User Manual for details about this screen.
Here, you need to specify the following mandatory details for creating a customer:
Liability Number
The credit facility granted to any customer is tracked against the liability number of the customer. The default liability number of a customer is the same as his customer code. You can also select an existing liability number from the option list provided.
Short Name
Specify the customer’s abbreviated name. The name that you capture here is unique for a customer.
Full Name
Specify the full name of the customer here.
Name
Specify the name of the customer, to be used for all correspondence sent from the bank. These characters should conform to SWIFT standards.
Address
Specify the mailing address of the customer in the four rows that are provided. All characters should conform to SWIFT standards.
Country
Select the country, as given in the address of correspondence of the customer, from the option list provided.
2-10
Nationality
Select the nationality of the customer from the option list provided.
Language
Select the language in which the customer wants the statements and advices to be generated, from the option list.
Customer Category
Select the category under which the particular customer is to be categorized, from the option list provided.
Click ‘Ok’ to save the details specified and return to ‘Input Details’ screen. The customer Id of the newly created customer gets displayed in ‘Input Details’ screen.
2.2.3.3 Query Existing Customer Account / Input New Customer Account Details
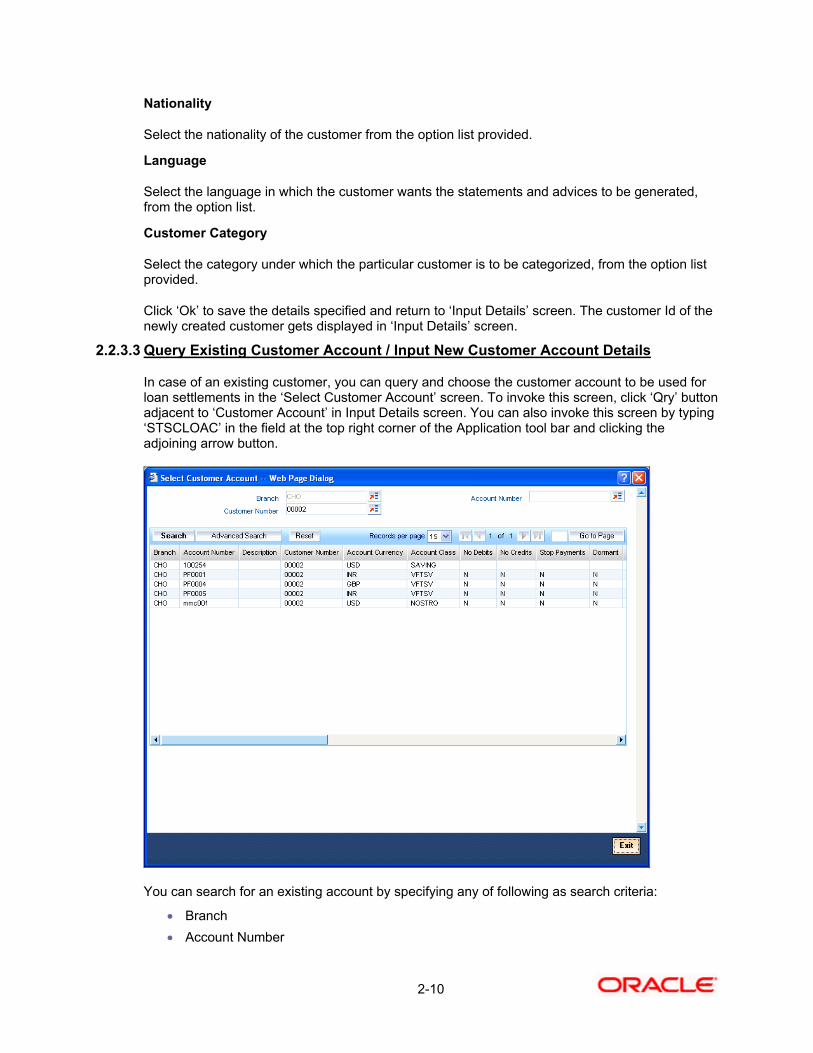
In case of an existing customer, you can query and choose the customer account to be used for loan settlements in the ‘Select Customer Account’ screen. To invoke this screen, click ‘Qry’ button adjacent to ‘Customer Account’ in Input Details screen. You can also invoke this screen by typing ‘STSCLOAC’ in the field at the top right corner of the Application tool bar and clicking the adjoining arrow button.
You can search for an existing account by specifying any of following as search criteria:
• Branch • Account Number
2-11
• Customer Number
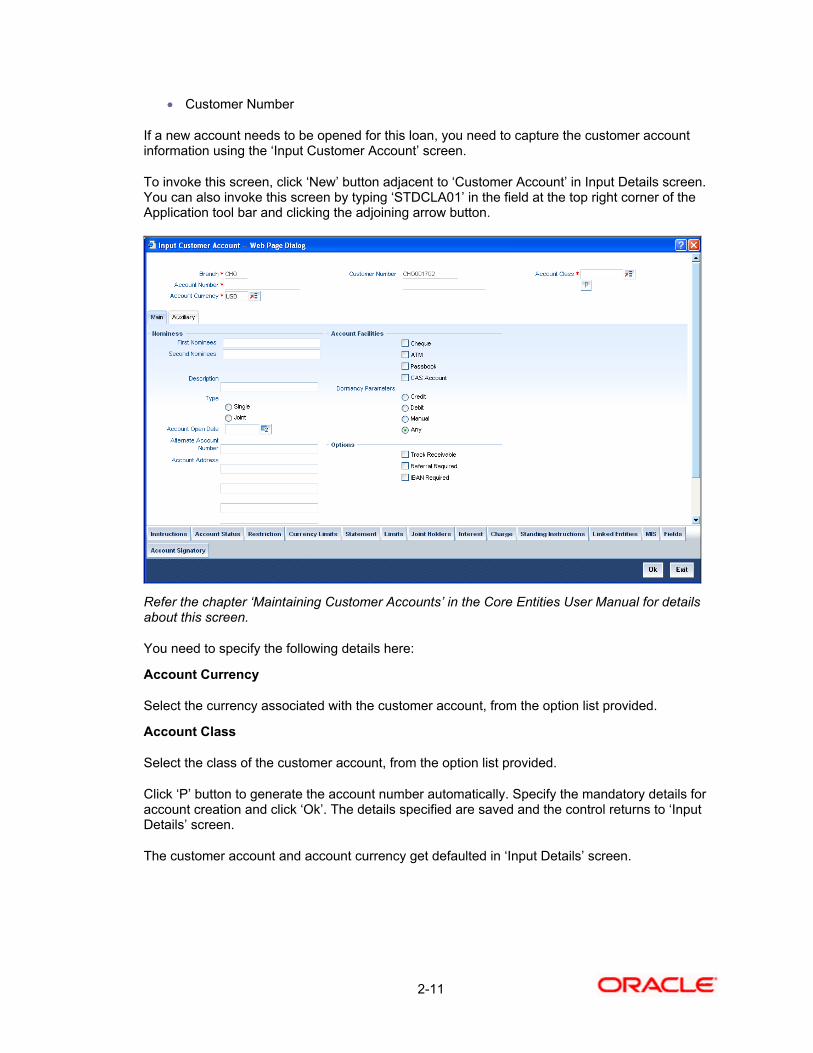
If a new account needs to be opened for this loan, you need to capture the customer account information using the ‘Input Customer Account’ screen.
To invoke this screen, click ‘New’ button adjacent to ‘Customer Account’ in Input Details screen. You can also invoke this screen by typing ‘STDCLA01’ in the field at the top right corner of the Application tool bar and clicking the adjoining arrow button.
Refer the chapter ‘Maintaining Customer Accounts’ in the Core Entities User Manual for details about this screen.
You need to specify the following details here:
Account Currency
Select the currency associated with the customer account, from the option list provided.
Account Class
Select the class of the customer account, from the option list provided.
Click ‘P’ button to generate the account number automatically. Specify the mandatory details for account creation and click ‘Ok’. The details specified are saved and the control returns to ‘Input Details’ screen.
The customer account and account currency get defaulted in ‘Input Details’ screen.

2-12
2.2.3.4 Query Existing Collateral /Input New Collateral Details
You can query and choose existing collateral for the loan in the ‘Collaterals Summary’ screen. To invoke this screen, click ‘Qry’ button adjacent to ‘Collateral’ in Input Details screen. You can also invoke this screen by typing ‘CLSCOLLT’ in the field at the top right corner of the Application tool bar and clicking the adjoining arrow button.
You can search for existing collateral by specifying any of the following:
• Authorization Status • Record Status • Liability Identification • Collateral Code
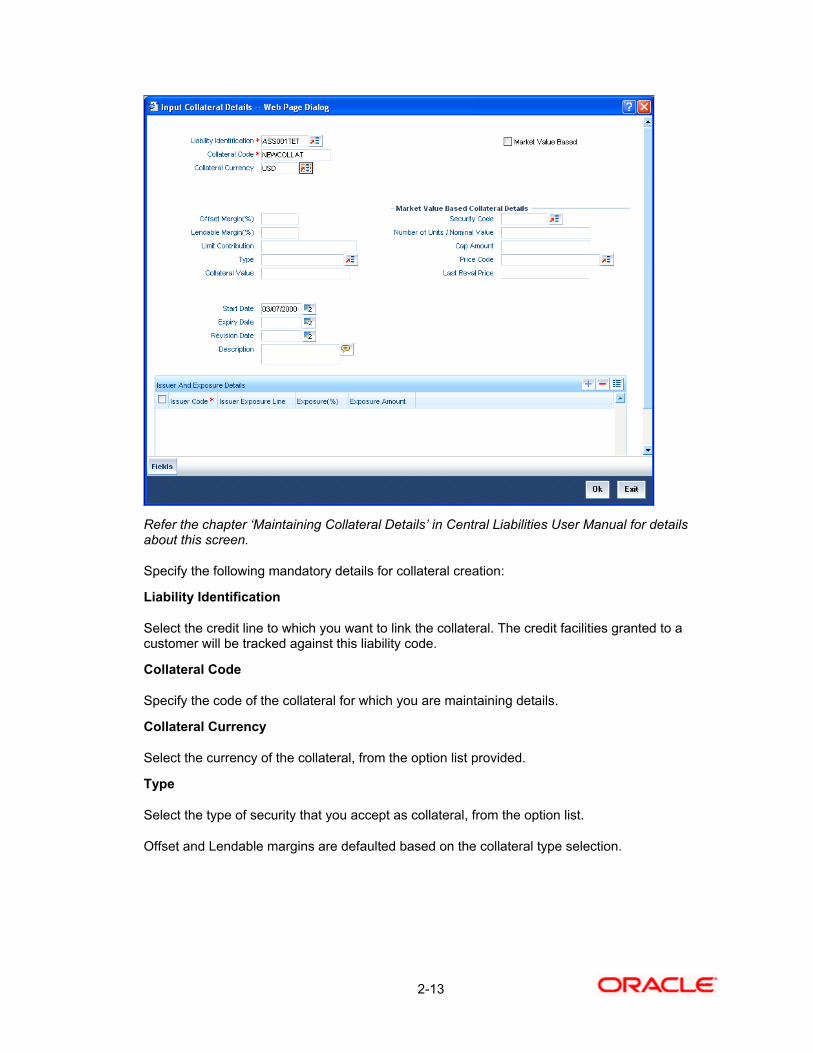
If you need to create a new collateral for the loan, you can capture the collateral details in the ‘Input Collateral Details’ screen. To invoke this screen, click ‘New’ button adjacent to ‘Collateral’ in Input Details screen. You can also invoke this screen by typing ‘CLDCO001’ in the field at the top right corner of the Application tool bar and clicking the adjoining arrow button.
2-13
Refer the chapter ‘Maintaining Collateral Details’ in Central Liabilities User Manual for details about this screen.
Specify the following mandatory details for collateral creation:
Liability Identification
Select the credit line to which you want to link the collateral. The credit facilities granted to a customer will be tracked against this liability code.
Collateral Code
Specify the code of the collateral for which you are maintaining details.
Collateral Currency
Select the currency of the collateral, from the option list provided.
Type
Select the type of security that you accept as collateral, from the option list.
Offset and Lendable margins are defaulted based on the collateral type selection.

2-14
Collateral Value
Specify the contribution that the collateral should make to the credit limit of the customer.
This is applicable can only for non-marketable collaterals.
Click ‘Ok’ to save the details specified and return to ‘Input Details’ screen. The collateral Id gets defaulted in ‘Input Details’ screen.
Specify the other mandatory details in the Input Details screen and click ‘Default’ to auto-generate the following details:
• Account Number • Alternate Account Number • User Reference Number
2.2.3.5 Upload Relevant Documents
You can upload the relevant documents for loan account opening, using ‘Upload Documents required for each stage’ screen.
To invoke this screen, click ‘Documents’ button in ‘Input Details’ screen.
Here you need to specify the following details:
Document Code
Specify a unique code to identify the document to be uploaded.
Document Description
Give a brief description for the document.
Document Path
Specify the directory location from where the document has to be uploaded.
Upload
After specifying the document path, click this button to upload documents.

2-15
Click ‘Upload’ button to upload the documents. Once the documents are uploaded, click ‘Ok’ to save the details and return to ‘Input Details’ screen.
2.2.3.6 Capture Asset Details
You can capture the details corresponding to the collateral being provided for the current loan in the ‘Assets’ screen. To invoke this screen, click ‘Assets’ in Input Details screen.
Here, you can specify the following details related to your assets like vehicle, home, etc.
Assets
Select the type of asset from the drop-down list. The following values are provided for selection:
• Vehicle • Home • Others
Valuation Dt
Specify the valuation date for the selected asset, or select the date by clicking Calendar button..
Source
Specify the source associated with the asset selected.
Supplement
Specify the supplement of the valuation source used for the valuation.
Edition
Specify edition of the valuation source used for the valuation.
2-16
Wholesale
Specify the wholesale rate associated with the asset selected.
Retail
Specify the retail rate associated with the asset selected.
Usage
Specify usage level at the time of the valuation.
Usage Value +
Specify the initial usage value.
Total
Specify the total usage of the asset.
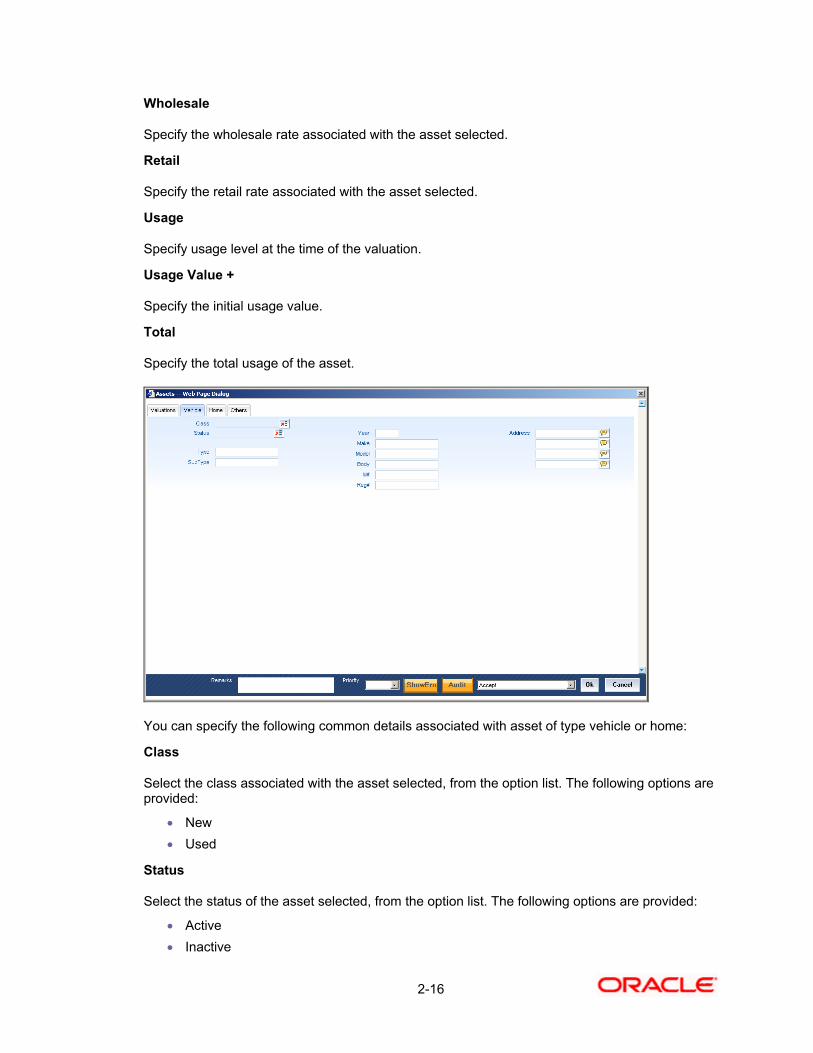
You can specify the following common details associated with asset of type vehicle or home:
Class
Select the class associated with the asset selected, from the option list. The following options are provided:
• New • Used
Status
Select the status of the asset selected, from the option list. The following options are provided:
• Active • Inactive
2-17
• Inventory • Undefined
Type
Specify the type of the selected asset here.
Sub Type
Specify the subtype associated with the asset, if any.
Year
Specify the year of association with the selected asset.
Make
Specify the make of the selected asset. For vehicle, you can specify the manufacturing company name and for home you can specify the name of the builder or developer.
Model
Specify the model of the selected asset.
Address
Specify the address associated with the asset.
You need to specify the following details additional related to vehicle type of asset:
Body
Specify the body number associated with the vehicle.
Id Number
Specify the unique identification number associated with the vehicle.
Reg. Number
Specify the registration number of the vehicle.

2-18
You can specify the following additional details for home type of asset:
Occupancy
Specify the number of people occupying the house.
Width
Specify the width associated with the selected asset.
Length
Specify the length associated with the selected asset.
PO #
Specify the post office number of the location of the property.
GEO
Specify the property GEO code (Geospatial Entity Object Code) for the asset.
BNA
Specify the census tract/BNA code (Block Numbering Area) for the asset.
MSA
Specify the metropolitan statistical area (MSA) code for the asset.
Click ‘Ok’ to save the details and return to ‘Input Details’ screen.
2.2.3.7 Financials Tab
You can capture the income or liability details of the customer in the ‘Financials’ screen. To invoke this screen, click ‘Financials’ in Input Details screen.

2-19
You can specify the following details related to the customer’s income here:
Type
Select the type of the income from the option list provided.
Source
Specify the source of the income.
Currency
Select the currency associated with the income, from the option list provided.
Amount
Specify the amount associated with the income.
Comment
Specify any remarks or comments for the income.
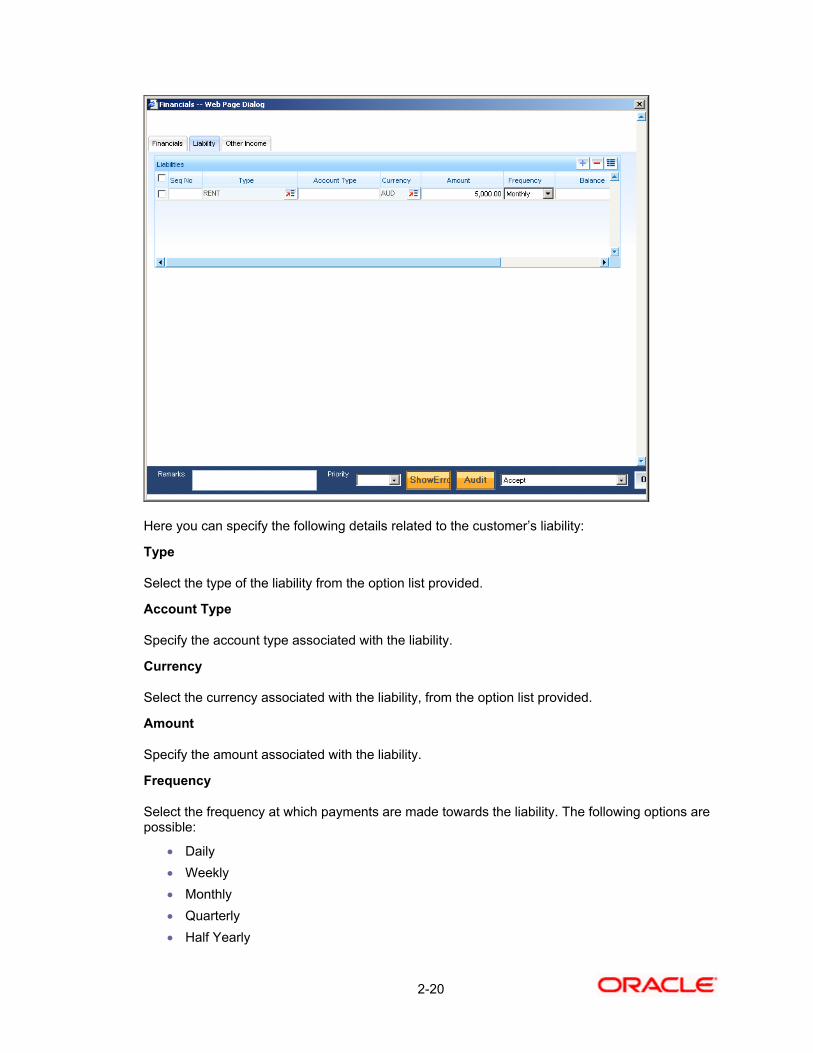
2.2.3.8 Liability Tab
You can capture the liability details here.
2-20
Here you can specify the following details related to the customer’s liability:
Type
Select the type of the liability from the option list provided.
Account Type
Specify the account type associated with the liability.
Currency
Select the currency associated with the liability, from the option list provided.
Amount
Specify the amount associated with the liability.
Frequency
Select the frequency at which payments are made towards the liability. The following options are possible:
• Daily • Weekly • Monthly • Quarterly • Half Yearly

2-21
• Yearly
Balance
Specify the current amount outstanding.
Comment
Specify any remarks or comments to be associated with the liability.
2.2.3.9 Other Income Tab
You can capture other income details here.
You can also capture the details related to other sources of income, if exists.
Click ‘Ok’ to save the details and return to ‘Input Details’ screen.
There are two sub-stages involved for the Input stage where you can perform a review of the details specified, i.e., the ‘NEW’ sub-stage and the ‘REVIEW’ sub-stage. The details input during the sub stage New can be reviewed in the sub stage Review.
In the ‘Input Details’ screen, you can perform the review by selecting an action in the textbox adjoining ‘Audit’ button. If you select ‘AUTOMOVENEXT’ option in sub-stage ‘NEW’, the next sub-stage for ‘REVIEW’ is acquired automatically. If you select ‘MOVENEXT’ option in sub-stage ‘NEW’, you need to acquire the next stage for REVIEW manually.

2-22
In the REVIEW sub-stage, you can select any of the following actions:
If you select ‘MOVEPREV’ option in sub stage ‘REVIEW’, the work flow moves to the previous stage (Input Detail screen with sub stage NEW) and has to be manually acquired. If you select ‘PROCEED’ option in sub stage ‘REVIEW’, the next stage for Enrichment Details can be acquired.
You need to save the details in the ‘Input Details’ screen by selecting ‘PROCEED’ action and then clicking Save icon in the tool bar. On successful completion, the following screen gets displayed.
The task moves to the Pending task list in the Tasks menu, for the next stage (Enrichment) of the process.
2.2.4 Enrichment of Loan Account Opening Details
At this stage you can perform an enrichment of the details specified in the previous step. You can modify or update any of the following details, if required:
• Loan Details • Customer Details • Customer Account Details

2-23
• Collateral Details
Only users belonging to the ‘CL-ENRICH’ role can perform this task. You need to acquire the Enrichment task from the pending task list, if you have the required rights for the same.
Click ‘Acquire’ button adjoining the desired task to acquire it. The following screen will be displayed.
Once you acquire a task, it moves from the ‘Pending’ list to the ‘Assigned’ list. Click the Assigned task list and search for the task you need to perform.
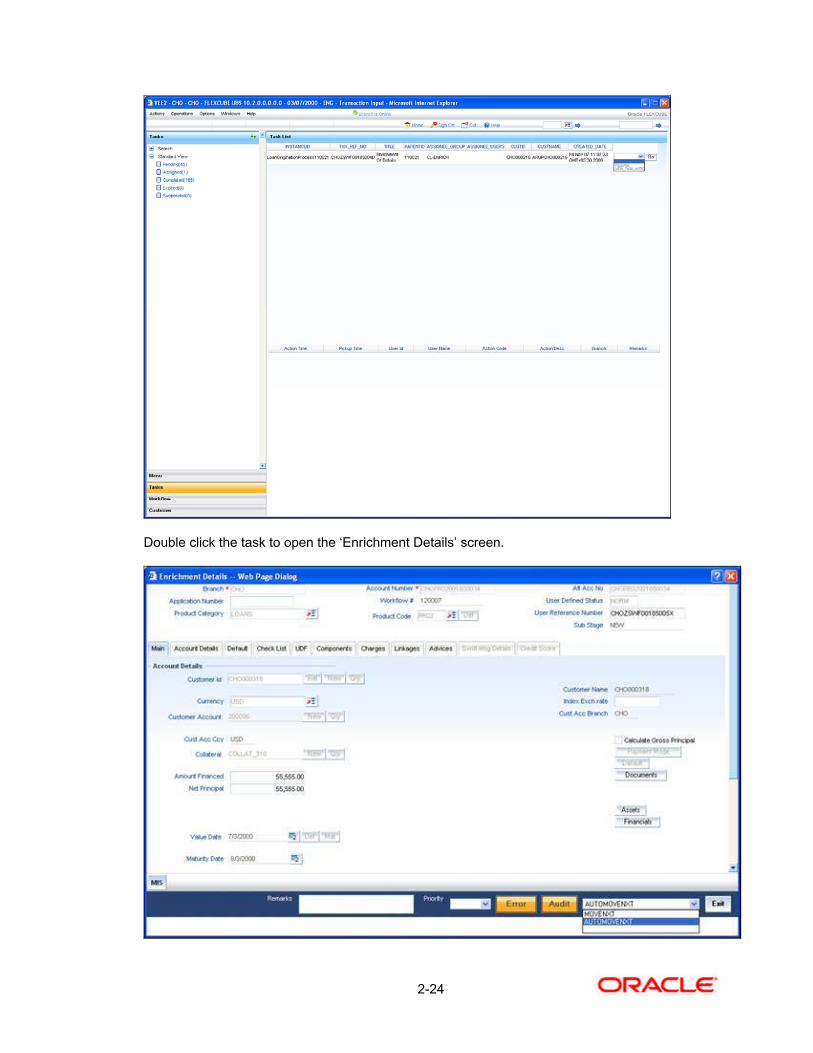
2-24
Double click the task to open the ‘Enrichment Details’ screen.
2-25
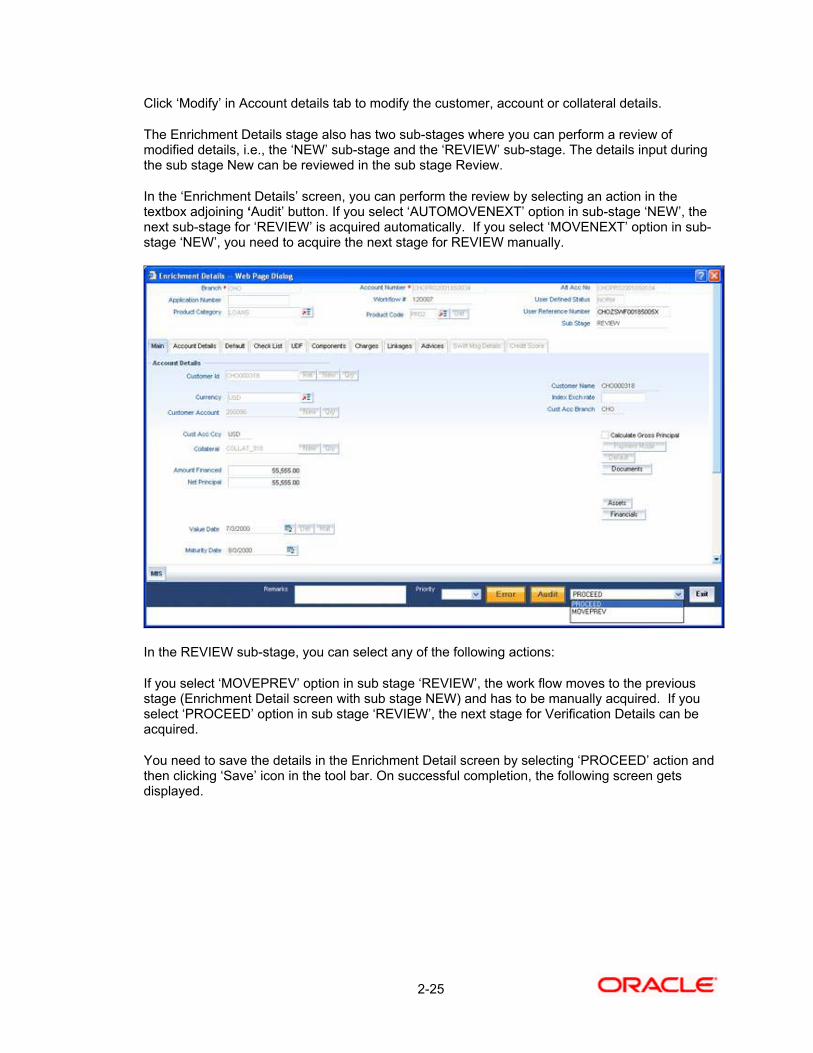
Click ‘Modify’ in Account details tab to modify the customer, account or collateral details.
The Enrichment Details stage also has two sub-stages where you can perform a review of modified details, i.e., the ‘NEW’ sub-stage and the ‘REVIEW’ sub-stage. The details input during the sub stage New can be reviewed in the sub stage Review.
In the ‘Enrichment Details’ screen, you can perform the review by selecting an action in the textbox adjoining ‘Audit’ button. If you select ‘AUTOMOVENEXT’ option in sub-stage ‘NEW’, the next sub-stage for ‘REVIEW’ is acquired automatically. If you select ‘MOVENEXT’ option in sub-stage ‘NEW’, you need to acquire the next stage for REVIEW manually.
In the REVIEW sub-stage, you can select any of the following actions:
If you select ‘MOVEPREV’ option in sub stage ‘REVIEW’, the work flow moves to the previous stage (Enrichment Detail screen with sub stage NEW) and has to be manually acquired. If you select ‘PROCEED’ option in sub stage ‘REVIEW’, the next stage for Verification Details can be acquired.
You need to save the details in the Enrichment Detail screen by selecting ‘PROCEED’ action and then clicking ‘Save’ icon in the tool bar. On successful completion, the following screen gets displayed.

2-26
The task moves to the Pending task list for the next stage (Verification) of the process.
2.2.5 Verification of Loan Account Opening Details
All details specified during loan account opening are verified during this activity. A verifier checks for any errors input during the previous stages. The process moves to the next stage, once the verifier approves the details. The process moves back to the ‘Enrichment’ stage, on rejection of the details by the verifier.
Only users belonging to the ‘CL-AUTH’ role can perform this task. You need to acquire the Verification task from the pending task list, if you have the required rights for the same.
Click ‘Acquire’ button adjoining the desired task to acquire it. Once you acquire a task, it moves from the ‘Pending’ list to the ‘Assigned’ list. Click the Assigned task list and search for the task you need to perform.
Double click the required task to open ‘Verify Details’ screen.
Here you can view all details captured during the input stage. If all details are accurate, select the action ‘APPROVE’ from the drop-down list adjoining the ‘Audit’ button. Click Save icon in the tool bar to save the record.

2-27
On successful completion, the task moves to the Pending task list for the next stage (KYC - Review) of the process.
2.2.6 KYC – Review
After verification of the loan account opening details, KYC (Know Your Customer) check is initiated for a new customer. In case of an existing customer, this check is carried out only if the customer details have been modified during the enrichment stage. This task consists of three sub task performed at the Regulatory, Supervisory and Managerial levels.
2.2.6.1 Verifying Customer Identity
The first stage in KYC check is the verification of customer identity. This task needs to be performed for new customers and also for existing customers, if the customer details are modified in the enrichment stage. Only users belonging to the ‘CMROLE’ role can perform this task. You need to acquire the required task from the pending task list, if you have the required rights for the same.
Click ‘Acquire’ button adjoining the desired task to acquire it. Once you acquire a task, it moves from the ‘Pending’ list to the ‘Assigned’ list. Click the Assigned task list and search for the task you need to perform. Double click the required task to open ‘Verification of customer identity’ screen.

2-28
Here you can view all details captured during customer information input. If all details are accurate, select the action ‘CLEARED’ from the drop-down list adjoining the ‘Audit’ button. Click ‘Save’ icon in the tool bar to save the record.
2.2.6.2 KYC Decision by User
The task moves to the Pending task list for the next stage (KYC – Decision by User) of the process. Only users belonging to the ‘KYCEROLE’ role can perform this task. If you have the required rights, go to the ‘Pending’ task list and acquire it from the list by clicking ‘Acquire’ button adjoining the desired task.
The task moves from ‘Pending’ list to the ‘Assigned’ list, once you acquire it. Search the Assigned task list for the task you need to perform and double click to open ‘KYC Decision by User’ screen.
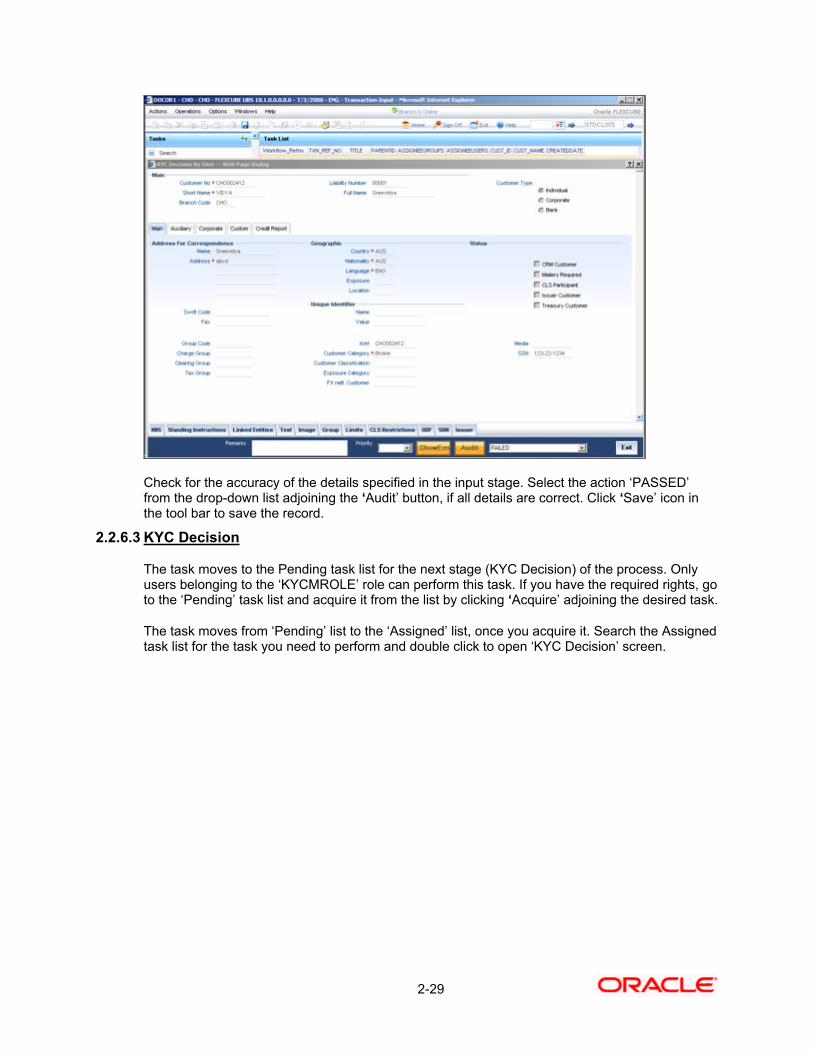
2-29
Check for the accuracy of the details specified in the input stage. Select the action ‘PASSED’ from the drop-down list adjoining the ‘Audit’ button, if all details are correct. Click ‘Save’ icon in the tool bar to save the record.
2.2.6.3 KYC Decision
The task moves to the Pending task list for the next stage (KYC Decision) of the process. Only users belonging to the ‘KYCMROLE’ role can perform this task. If you have the required rights, go to the ‘Pending’ task list and acquire it from the list by clicking ‘Acquire’ adjoining the desired task.
The task moves from ‘Pending’ list to the ‘Assigned’ list, once you acquire it. Search the Assigned task list for the task you need to perform and double click to open ‘KYC Decision’ screen.

2-30
At this stage a managerial level check and approval of the customer details is sought. If all details are acceptable for the customer, select the action ‘PASSED’ from the drop-down list adjoining the ‘Audit’ button. Click ‘Save’ icon in the tool bar to save the record.
On successful completion, the task moves to the Pending task list for the next stage (Credit Scoring) of the process.
2.2.7 Credit Scoring
Credit score of the customer is calculated based on the evaluation of the rule defined for the loan product. Only users belonging to the ‘CL-SCORE’ role can perform this task. You need to acquire the required task from the pending task list, if you have the required rights for the same.

2-31
Click ‘Acquire’ button adjoining the desired task to acquire it. Once you acquire a task, it moves from the ‘Pending’ list to the ‘Assigned’ list. Click the Assigned task list and search for the task you need to perform. Double click the required task to open ‘Credit Score’ screen. Click
‘Credit Score’ tab to specify the details for calculating the credit score.
You need to specify the following details here:
Rule Name
The rule associated with the loan product gets defaulted here. You can modify this, if required.
2-32
User Input Score
Specify the credit score associated with the customer.
Automated Score
The credit score calculated by the system based on the rules maintained at the product level gets displayed here.
Agency Code
Select the code of the external agency, to be approached for calculating the score.
External Credit Score
The score as calculated by the external agency is displayed here.
Click ‘Score’ to auto-generate the credit score for the customer.
After calculating the credit score, select ‘PROCEED’ from the drop-down list adjoining the ‘Audit' button. Click ‘Save’ icon in the tool bar to save the record.
On successful completion, the task moves to the Pending task list for the next stage (Credit Evaluation) of the process.
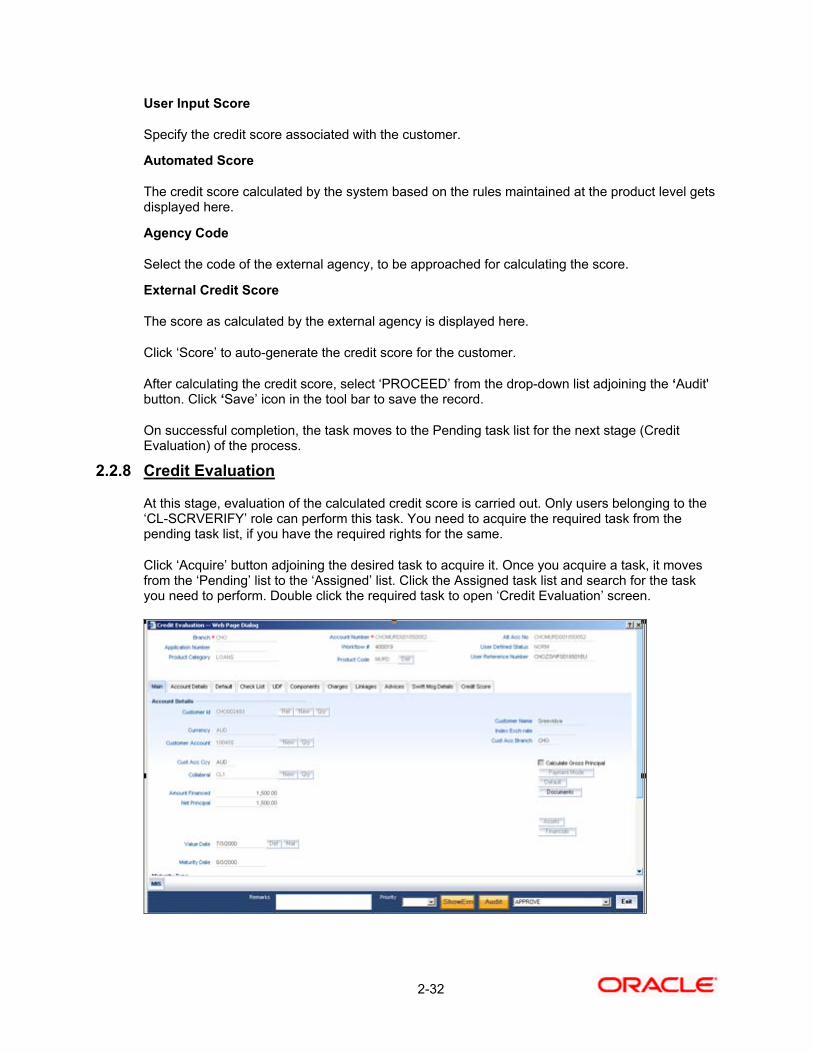
2.2.8 Credit Evaluation
At this stage, evaluation of the calculated credit score is carried out. Only users belonging to the ‘CL-SCRVERIFY’ role can perform this task. You need to acquire the required task from the pending task list, if you have the required rights for the same.
Click ‘Acquire’ button adjoining the desired task to acquire it. Once you acquire a task, it moves from the ‘Pending’ list to the ‘Assigned’ list. Click the Assigned task list and search for the task you need to perform. Double click the required task to open ‘Credit Evaluation’ screen.

2-33
Check if the credit score calculated in the previous stage needs approval. If the credit score can be approved, select ‘APPROVE’ from the drop-down list adjoining the ‘Audit’ button. Click ‘Save’ icon in the tool bar to save the record.
On successful completion, the task moves to the Pending task list for the next stage (Customer Agreement) of the process.
2.2.9 Customer Agreement
The loan contract agreement is generated at this stage. Only users belonging to the ‘CUS-AGREE’ role can perform this task. You need to acquire the required task from the pending task list, if you have the required rights for the same.
Click ‘Acquire’ button adjoining the desired task to acquire it. Once you acquire a task, it moves from the ‘Pending’ list to the ‘Assigned’ list. Click the Assigned task list and search for the task you need to perform. Double click the required task to open ‘Customer Agreement’ screen.

2-34
Check if all the details specified are acceptable. If all details are correct, select ‘PROCEED’ from the drop-down list adjoining the ‘Audit’ button. Click ‘Save’ icon in the tool bar to save the record. A Customer Loan Agreement report can be generated by clicking the ‘Agreement’ button.

2-35
On successful completion, the task moves to the Pending task list for the next stage (Customer Acceptance) of the process.
2.2.10 Customer Acceptance
At this stage the customer accepts the loan application. Only users belonging to the ‘CUS-ACCEPT’ role can perform this task. You need to acquire the required task from the pending task list, if you have the required rights for the same.
Click ‘Acquire’ button adjoining the desired task to acquire it. Once you acquire a task, it moves from the ‘Pending’ list to the ‘Assigned’ list. Click the Assigned task list and search for the task you need to perform. Double click the required task to open ‘Customer Acceptance’ screen.
If all the details specified are acceptable to the customer, select ‘ACCEPT’ from the drop-down list adjoining the ‘Audit’ button. Click ‘Save’ icon in the tool bar to save the record.
On successful completion, the task moves to the Funding stage, which is an automated stage.

2-36
2.2.11 Funding
This is an automated stage where accounts are created automatically, on successful completion of the previous stages. The following are created automatically:
• Customer • Customer Account • Collateral

2-1
Loan Origination [January] [2010] Version 11.0 Oracle Corporation World Headquarters 500 Oracle Parkway Redwood Shores, CA 94065 U.S.A. Worldwide Inquiries: Phone: +1.650.506.7000 Fax: +1.650.506.7200 www.oracle.com/ financial_services/ Copyright © [2010] Oracle Financial Services Software Limited. All rights reserved. No part of this work may be reproduced, stored in a retrieval system, adopted or transmitted in any form or by any means, electronic, mechanical, photographic, graphic, optic recording or otherwise, translated in any language or computer language, without the prior written permission of Oracle Financial Services Software Limited. Due care has been taken to make this document and accompanying software package as accurate as possible. However, Oracle Financial Services Software Limited makes no representation or warranties with respect to the contents hereof and shall not be responsible for any loss or damage caused to the user by the direct or indirect use of this document and the accompanying Software System. Furthermore, Oracle Financial Services Software Limited reserves the right to alter, modify or otherwise change in any manner the content hereof, without obligation of Oracle Financial Services Software Limited to notify any person of such revision or changes. All company and product names are trademarks of the respective companies with which they are associated.