load testing documentum wdk apps with apache...
TRANSCRIPT
Load testing Documentum WDK apps with Apache JMeterJeff Potts, Navigator Systems, Inc.
September, 2005
IntroductionLoad testing WDK applications is a critical activity prior to any production rollout. The problem is that, for the uninitiated, it seems harder than it ought to be. And the commercial tools are expensive and complex. This can sometimes mean load testing is performed too late in the game or not at all.
When a development team incorporates a tool like Apache JMeter into their process, application problems can be identified earlier, tests can be repeated more often, and a higher quality product can be delivered to the customer.
This article is a brief tutorial on using Apache JMeter to load test WDK applications. WDK developers can use this article to learn how to perform their own load-testing when formal load-testing isn't planned or isn't available, or to help tune their applications before turning them over to the testing team. Although this is focused on JMeter, it might help testing teams using other tools learn how to work with WDK applications.
This article does not discuss WDK application tuning or strategies for effective load testing.
Why Apache JMeter?I have been involved with many load-testing efforts from WDK applications to mainframe applications, but I am, by no means, an expert on the subject. Nor did I do an extensive comparison of freely-available web application load testing tools. I chose JMeter because I've successfully worked with a lot of Apache technologies in the past.
With that said, JMeter is a feature-rich tool that is freely-available and easy to setup and use. In addition to traditional web applications, you can also use JMeter to test JMS, LDAP, Web Services, Java classes, and FTP. It seems flexible--it saves its output in an open format and runs on any platform that has a JVM. So far I have found no reason to spend a lot of time analyzing open source load testing tools.
Setup
Software infrastructureFor the examples in this article I've chosen to use the Documentum Administrator (DA) WDK application, version 5.3 sp1 running on Tomcat 5.0.28 on RedHat Enterprise Linux 3. I figure DA is something everyone has to have somewhere. I chose 5.3 sp1 because it's
Load testing Documentum WDK Apps with Apache JMeterJeff Potts, Navigator Systems, Inc.
what I had handy. If you aren't on 5.3 sp1 yet this will give you a good excuse to practice what you've learned!
Disclaimer! Meaningful results require a meaningful infrastructure. It is impossible to draw meaningful conclusions based on your load-testing results if the load test was not executed against your production infrastructure (or a testing infrastructure configured to match production). Obviously, script development can take place on a very modest setup, but when you are ready to test for real, make sure you are testing the app as it will exist in production.
The Documentum content server is also at version 5.3 sp1 running with Oracle 10g as the backend. Both also reside on the Linux box. The Linux box is actually a VMWare image running on my Windows XP machine.
Disclaimer! Do not run your content server, database server, and application server on the same machine. For best performance these should each be on their own box. I run all three on the same machine as a convenience and only for demonstration purposes.
Installing JMeterSetting up and running JMeter is easy:
1. Download the zipped binary from http://jakarta.apache.org/jmeter/. The examples use Apache JMeter 2.1.
2. Unzip the file to an install location of your choosing. On my windows laptop, I run all of my pre-built Apache software out of /apache/build, so my JMeter install directory is c:\apache\build\jakarta-jmeter-2.1.
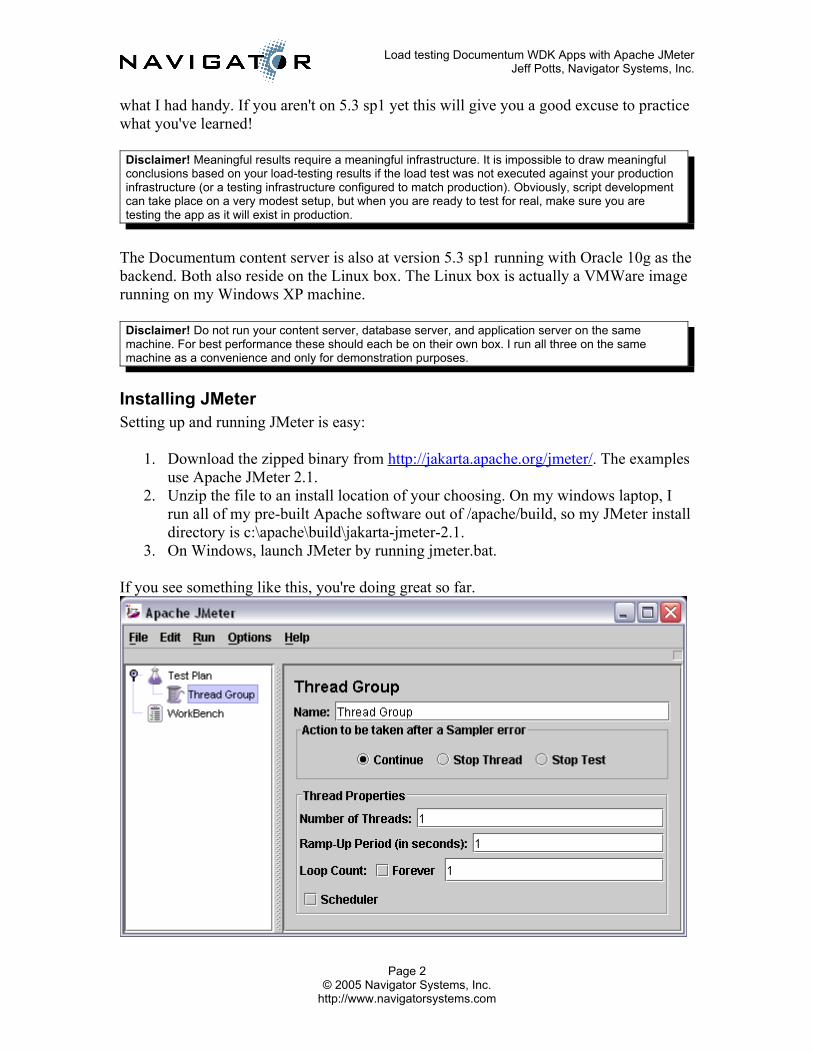
3. On Windows, launch JMeter by running jmeter.bat.
If you see something like this, you're doing great so far.
Page 2© 2005 Navigator Systems, Inc.
http://www.navigatorsystems.com
Load testing Documentum WDK Apps with Apache JMeterJeff Potts, Navigator Systems, Inc.
JMeter TerminologyBefore we go further it would probably be helpful to discuss some basic terminology. You might want to refer to the JMeter GUI as you read this section to follow along.
Thread: For all intents and purposes, a thread can be thought of as a user.
Thread Group: Think of a thread group as the scenario or use case being tested. A test script that has a user log in to webtop, execute a search, and log out might be one thread group. During a test there might be one or several hundred users executing a thread group. The thread group might contain conditional logic that loops through parts of the web application. I use the words "script" and "thread group" interchangeably. Script seems more intuitive.
Test plan: A test plan is one or more thread groups. In a previous example we discussed a thread group that performs a search in webtop. Suppose we also had a thread group that performed a checkout on a randomly-selected object in the user's default cabinet and another that simply browsed through all of the folders in a given cabinet. All three thread groups could be included in a test plan to simulate the various activities different types of users might perform over a period of time.
Sampler: A sampler is something that sends a request to a server. JMeter comes with many different types of samplers. The sampler we'll use for testing our WDK application is called HTTP Request.
Listener: A listener listens to the responses generated by samplers. Listeners can be used to compile the results of the test run and to check that a sampler generates the expected response.
Assertion: An assertion is used to specify what a response should or should not contain. There are several different types of assertions depending on what kind of response you are expecting and what sort of check you'd like to perform. If you want to specify that a response should be of a given size, you would use the Size Assertion. If you want to specify that a response should return in a given amount of time you would use the Duration Assertion. In this tutorial we'll be checking the HTML that gets sent back to us after we send a request to the server so we'll use Response Assertions.
Logic Controller: Logic controllers provide a mechanism for controlling the flow of the thread group. Adding a logic controller to your thread group is like adding if-then or do-while logic to a program. Your test script can make run-time decisions about how to execute. Suppose you want to open every object in a list but you do not know how many objects will be in the list ahead of time. A "Loop Controller" could be used to execute an action (opening an object) a certain number of times without requiring you to hard-code the requests into the script.
Workbench: The Workbench is like a working area. When recording scripts, JMeter places the automatically-generated samplers under the workbench. They will not get
Page 3© 2005 Navigator Systems, Inc.
http://www.navigatorsystems.com
Load testing Documentum WDK Apps with Apache JMeterJeff Potts, Navigator Systems, Inc.
executed as part of a thread group until you move them from the workbench to a thread group.
Birds-eye view of the processThe overall process of setting up a script is:
1. Record a script.2. Edit the script to remove hard-coded values.3. Add assertions to validate that the test is getting the expected results.4. Test the basic script.5. Enhance the script with logic, randomness, etc.6. Run the script, analyze the results, tune the application, and repeat.
Once created and tested, scripts can be saved, shared, and reused. Pieces of scripts can be used in other scripts, and multiple scripts can be merged into a single test plan.
Example 1: Create a simple scriptNow that JMeter is installed on your machine, you are familiar with the terminology, and you understand a little bit about the process, it is time to get your hands dirty. Our ultimate goal is to create a script that will log in to DA using a user selected from a list of users, go to the home cabinet, and then open the properties on a randomly-selected object. We'll start out with a more modest goal--creating a script that simply logs in to DA as a hard-coded user, goes to the home cabinet, and then logs out. We'll do this in five steps:
1. Record the requests,2. Create the initial script with the recorded requests,3. Test the script,4. Add assertions,5. Run the script under load.
If you would rather follow along than do this yourself, or if you get stuck and need help, I have included links to the working files in the "Resources" section at the end of this document.
Step 1: Recording the requestsA thread group is just a collection of samplers. In our case, the samplers are HTTP requests. In setting up the thread group, one option is to manually create the list of URLs that need to be requested. For a WDK application (or any moderately complex web application, for that matter), this isn't practical.
JMeter gives us a much easier way to set up the thread group. It uses an HTTP Proxy Server to listen to the requests being sent from the web browser to the server. It automatically creates HTTP Request samplers for each request sent. We can then copy-and-paste these into our thread group.
Page 4© 2005 Navigator Systems, Inc.
http://www.navigatorsystems.com
Load testing Documentum WDK Apps with Apache JMeterJeff Potts, Navigator Systems, Inc.
Let's set up our test plan and record the requests sent to DA during a login, home cabinet browse, and logout.
1. Start JMeter if it isn't running already. You should see two empty nodes in the tree: Test Plan and WorkBench.
2. Go ahead and name the test plan by clicking the Test Plan node and specifying a name. We'll call it DA 5.3sp1. Note that fields are saved when you type the data. There is no "OK" or "Apply" needed.
3. Next, set up the WorkBench to capture our requests. Right-click WorkBench then click Add, Non-Test Elements, HTTP Proxy Server. We'll configure it momentarily.
4. We need something to capture the results. Right-click WorkBench then click Logic Controller, Recording Controller. All recorded requests will show up as children of the Recording Controller node.
5. We could stop here and start recording. But we want our samplers to leverage defaults for the app server host name and port, so we need to add something to our workbench to handle that. Right-click WorkBench then click Add, Config Element, HTTP Request Defaults. If you don't use an HTTP Request Defaults config element, all samplers will have the server name specified instead of having them in one place.
6. We might also want to make the username, password, and docbase variable. If you define those ahead of time, JMeter will automatically substitute the matching strings in the response with the variable names. Right-click WorkBench then click Add, Config Element, User Defined Variables.
There should be four nodes under WorkBench: HTTP Proxy Server, Recording Controller, and HTTP Request Defaults. Now we need to do some configuration.
7. Click HTTP Proxy Server. The default port is 8080. If your app server is running on the same machine as JMeter and it also uses 8080, you're obviously going to have to pick an unused port.
8. Uncheck "Capture HTTP Headers" and "Set Keep-Alive". We don't need those.9. Change the Grouping dropdown to "Add separators between groups". This will
make it a little bit easier to look through the list of requests that get captured.10. The Patterns to Include/Exclude areas are used to tell JMeter which requests are
important or unimportant. For our purposes we don't want to capture requests for static HTML files, GIFs, CSS files, JS files, or ICO files. Patterns are specified using regular expressions. For help using regular expressions, see the "Resources" section at the end of this article. Use the Add button to add each of the following to the list of Patterns to Exclude:
.*\.jpg
.*\.png
.*\.gif
.*\.ico
.*\.css
.*\.js
Page 5© 2005 Navigator Systems, Inc.
http://www.navigatorsystems.com
Load testing Documentum WDK Apps with Apache JMeterJeff Potts, Navigator Systems, Inc.
.*\.htm11. Click HTTP Request Defaults. Specify the following:
Protocol: httpServer Name or IP: The name of the application server where DA runs. I'll use dctmnx01.Path: The virtual directory for my installation of Documentum Administrator is "/da".Port Number: My Tomcat application server listens on port 8080.
12. Click User Defined Variables. Use the Add button to add username, password, and docbase variables with the appropriate values.
That's it. We're ready to record the requests.
TIP! If you'd like to save this setup for later, right click WorkBench then click Save As. Note that when you save the test plan it does not save the WorkBench. Later, when you are working in a test plan and you want your saved WorkBench settings, don't do a File, Open. Instead, do a File, Merge and select the saved WorkBench file.
Now we'll start the proxy server, configure the browser to use the proxy, and log in to DA.
TIP! It's a good idea to shut down anything that might make auto-refreshed requests. An example is Microsoft Outlook Webmail. I've also seen deli.cio.us bookmarklets make calls that get captured by the proxy.
1. Click HTTP Proxy Server. Click the Start button at the bottom of the page. The only indicator that the proxy is running is that the start button is disabled.
2. Start a browser. Firefox is supported with WDK 5.3 sp1 so that's what I'll use but that is not a requirement. Change the proxy settings to point to localhost and the port you specified on the proxy server configuration.
3. Specify the URL for DA. Typically, this would be your virtual root ("/da" in my case). But that actually redirects to the main component. We don't need the redirect in our test so specify the actual DA URL which, in my case, would be:
http://dctmnx01:8080/da/component/main
4. Login using the username, password, and docbase values specified in the HTTP Request Defaults configuration.
5. You'll notice that when the proxy is turned on the login won't redirect to the main component. That's because WDK handles this through JavaScript. We're already logged in so simply specify the DA main component URL again. Now the start page for DA should appear.
6. Click the Home Cabinet link.7. Click Logout.8. Change the proxy settings to not use the proxy server. I do this to prevent any
bookmarklets from making requests that clutter my recording controller.
Page 6© 2005 Navigator Systems, Inc.
http://www.navigatorsystems.com
Load testing Documentum WDK Apps with Apache JMeterJeff Potts, Navigator Systems, Inc.
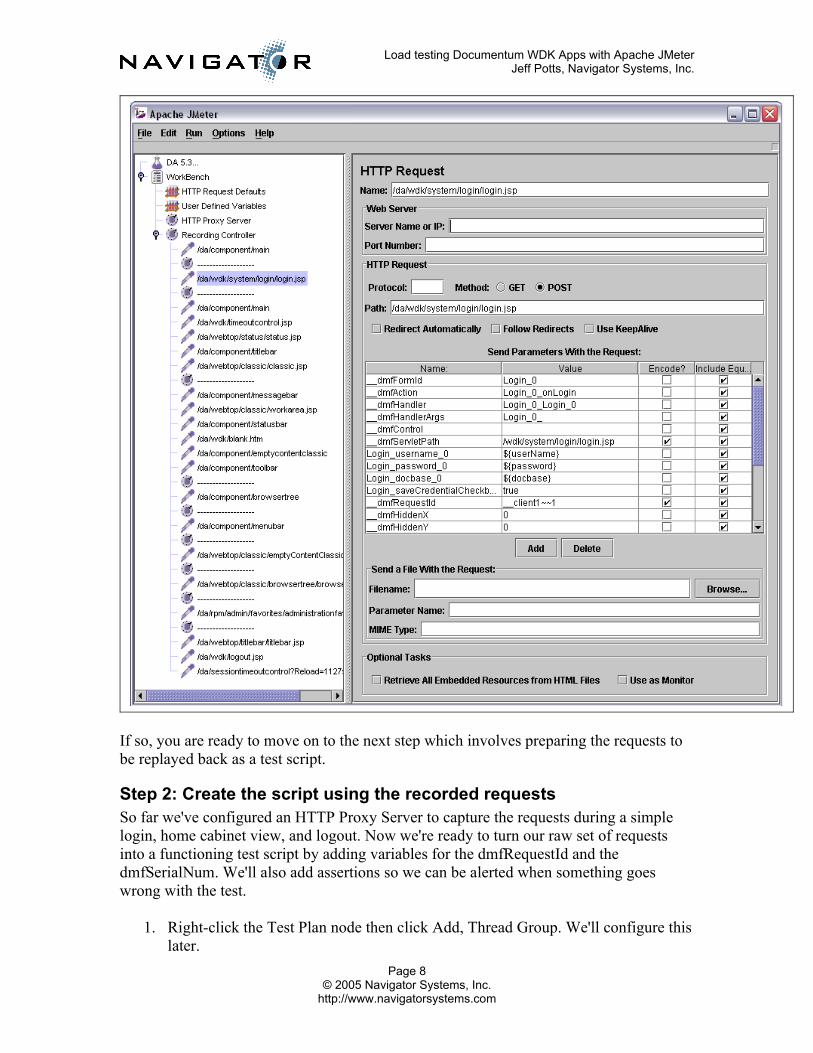
9. Switch back over to JMeter. Notice that the Recording Controller node has children. Expand the node. You should see about 20 samplers—one for each HTTP request that was sent to the application server.
10. Click the sampler named "/da/wdk/system/login/login.jsp". Notice the web server and protocol fields are blank. That's because you specified default values for these in your HTTP Request Defaults node. If you skipped that step, each sampler will have the appropriate values automatically populated which would make your script less flexible.
11. Notice the request parameters named "Login_username_0", "Login_password_0", and "Login_docbase_0". JMeter automatically changed the values from the hard-coded strings you specified to the variables you set up in the User Defined Variables node.
12. Finally, take special note of two parameters: "__dmfRequestId" and "__dmfSerialNumber". These two parameters cannot be hard-coded when you re-run the script. And, the value depends on previous requests. The tedious part of scripting WDK applications is making sure you are sending the correct dmfRequestId with each request.
At this point, your JMeter WorkBench should look something like this:
Page 7© 2005 Navigator Systems, Inc.
http://www.navigatorsystems.com
Load testing Documentum WDK Apps with Apache JMeterJeff Potts, Navigator Systems, Inc.
If so, you are ready to move on to the next step which involves preparing the requests to be replayed back as a test script.
Step 2: Create the script using the recorded requestsSo far we've configured an HTTP Proxy Server to capture the requests during a simple login, home cabinet view, and logout. Now we're ready to turn our raw set of requests into a functioning test script by adding variables for the dmfRequestId and the dmfSerialNum. We'll also add assertions so we can be alerted when something goes wrong with the test.
1. Right-click the Test Plan node then click Add, Thread Group. We'll configure this later.
Page 8© 2005 Navigator Systems, Inc.
http://www.navigatorsystems.com
Load testing Documentum WDK Apps with Apache JMeterJeff Potts, Navigator Systems, Inc.
2. We'll use the same request defaults and user-defined variables when we run our script so copy and paste those two nodes from the WorkBench to the Thread Group.
3. Web applications maintain state through cookies or, when cookies aren't available, URL re-writing. We want our script to handle cookies. Right-click Thread Group then click Add, Config Element, HTTP Cookie Manager.
4. We'll start our script with the raw set of requests captured by the Recording Controller. Select all of the child nodes under WorkBench, Recording Controller, then right-click the selected nodes and click Copy. Right-click Thread Group then click Paste to copy-and-paste the samplers to our thread group.
Recall that the dmfRequestId parameter that gets sent to the login.jsp page is hard-coded. We need to use the previous request to figure out what that value (and the value for dmfSerialNum) should be. Go to your browser (the proxy does not need to be on) and go to the /da/component/main. You should see the login page. View the source for the page and search for dmfRequestId. Do the same for dmfSerialNum. You should find text that looks like:
<input type='hidden' name='__dmfRequestId' value='__client1~~1'><input type='hidden' name='__dmfSerialNumber' value='0'>
So when the main page comes up we need to parse the response so we can snag these values and pass them as parameters to the login page. To do this, we'll use a regular expression. If your regular expressions are rusty refer to the "Resources" section at the end of this article. The appropriate regular expressions for these two values look like:
<input type='hidden' name='__dmfRequestId' value='(__client[0-9]*~~[0-9]*)'><input type='hidden' name='__dmfSerialNumber' value='([0-9]*)'>
TIP! If you've got Perl handy, you can test out your regular expressions quickly and easily. Here's a three-line Perl script that tests the dmfSerialNumber regex:
$testString = "<input type='hidden' name='__dmfSerialNumber' value='0'>"; ($result) = $testString =~ /<input type='hidden' name='__dmfSerialNumber' value='([0-9]*)'>/; print $result;
6. Now that we've got our regular expressions figured out let's parse the response and pass the parsed value to the next request. Right-click the sampler named "/da/component/main" then click Add, Post-Processor, Regular Expression Extractor. Specify the following:
Name: getRequestId (This is an arbitrary name but I like to use something descriptive here because we may have several).
Page 9© 2005 Navigator Systems, Inc.
http://www.navigatorsystems.com
Load testing Documentum WDK Apps with Apache JMeterJeff Potts, Navigator Systems, Inc.
Reference name: requestId (This is the variable name for the value extracted).Regular expression: <input type='hidden' name='__dmfRequestId' value='(__client[0-9]*~~[0-9]*)'>Template: $1$ (This is a regular expression back-reference to the first "group" in our regex).Default value: leave blank
7. Repeat the previous step for the dmfSerialNumber:Name: getSerialNumberReference name: serialNumberRegular expression: <input type='hidden' name='__dmfSerialNumber' value='([0-9]*)'>Template: $1$Default value: leave blank
8. Now we can replace the hard-coded values in the login.jsp request with the reference names. Click the sampler named "/da/wdk/system/login/login.jsp". Change the value for __dmfRequestId to "${requestId}" (without the quotes). Change the value for __dmfSerialNumber to "${serialNumber}" (again, without the quotes).
The next request with a hard-coded dmfRequestId is "/da/webtop/classic/emptyContentClassic.jsp". The key question is, "Where am I supposed to get the request ID this request is expecting?" The answer is that the WDK ties request IDs to frames. If you can figure out which frame the request is happening in, you simply find the previous request for that frame, drop in a regular expression extractor and you're all set. The following steps simply repeat this exercise for the remaining hard-coded dmfRequestId and dmfSerialNumber values.
9. Copy the getRequestId and getSerialNumber nodes we created previously and paste them into the Sampler named "/da/webtop/classic/emptyContentClassic.jsp".
10. Change the name and reference name to append the word "Content". We need the variable name to be unique because we may be juggling many request IDs. I chose "Content" because this request is taking place in the content frame.
11. Click the sampler named "/da/webtop/classic/emptyContentClassic.jsp". Change the value for __dmfRequestId to "${requestIdContent}" (without the quotes). Change the value for __dmfSerialNumber to "${serialNumberContent}" (again, without the quotes).
12. Copy the getRequestId and getSerialNumber nodes we created previously and paste them into the Sampler named "/da/component/browsertree".
13. Change the name and reference name to append the word "Tree".14. Click the sampler named "/da/webtop/classic/browsertree/browsertree.jsp".
Change the value for __dmfRequestId to "${requestIdTree}" (without the quotes). Change the value for __dmfSerialNumber to "${serialNumberTree}" (again, without the quotes).
Page 10© 2005 Navigator Systems, Inc.
http://www.navigatorsystems.com
Load testing Documentum WDK Apps with Apache JMeterJeff Potts, Navigator Systems, Inc.
15. Copy the getRequestId and getSerialNumber nodes we created previously and paste them into the Sampler named /da/webtop/classic/emptyContentClassic.jsp".
16. Click the sampler named "/da/rpm/admin/favorites/administrationfavorites.jsp". Change the value for __dmfRequestId to "${requestIdContent}" (without the quotes). Change the value for __dmfSerialNumber to "${serialNumberContent}" (again, without the quotes).
17. Copy the getRequestId and getSerialNumber nodes we created previously and paste them into the Sampler named "/da/component/titlebar".
18. Change the name and reference name to append the word "TitleBar".19. Click the sampler named "/da/webtop/classic/browsertree/browsertree.jsp".
Change the value for __dmfRequestId to "${requestIdTitleBar}" (without the quotes). Change the value for __dmfSerialNumber to "${serialNumberTitleBar}" (again, without the quotes).
Now, before you do another thing, save your work! Click the Test Plan node first. Then, click File, Save.
Step 3: Test the scriptYou might think the next step is to run the script and you're partially right. The script will run as it is. But if we ran it right now we'd have no way of knowing whether or not the test was actually doing what we wanted it to do. The quickest way to test out the script is to add a listener that will show us the requests and the results. Let's do that, run the test, and if everything is okay we will then add assertions to automate error checking.
1. Click Thread Group. Note that the number of threads (number of users) is set to 1 by default. The ramp-up period (the time it takes to log in all of the users) is set to 1 by default. The loop count (how many times the thread group will be executed) is set to 1 by default. Leave these alone for now. I just wanted you to know they were there.
2. Right-click Thread Group then click Add, Listener, View Results Tree. The new listener will get added below the samplers. You can drag it up to the top of the tree to make it easier to work with. We'll be referring to it a lot.
3. Run the script. Click Run, Start. The small square in the upper right-hand corner of the JMeter GUI will turn green while the test is running and back to grey when the test is complete.
4. Click the View Results Tree. The requests sent to the server are listed. For each request you can see the response headers, the request that was sent, and the response data. The response data can be viewed as the raw text that came back from the server or JMeter can try to render it. Are any of the requests in red text? If so you've got errors.
TIP! If any of your requests failed they were most likely caused by bad dmfRequestId values. You can verify this by looking at the application server log. Foul-ups with the dmfRequestId cause a "component base has not been established" exception. In the View Request Tree look at the request data for the failed sampler. Here are some things to check:
- Is the dmfRequestId specified? If the variable name appears in the request you may have mis-typed the variable name on the sampler request parameter.
Page 11© 2005 Navigator Systems, Inc.
http://www.navigatorsystems.com
Load testing Documentum WDK Apps with Apache JMeterJeff Potts, Navigator Systems, Inc.
- If the request ID appears make sure it is in the right format. If the format is wrong the you may have a problem with the regex.
- If the request ID appears to be properly-formatted maybe it is the wrong request ID. Double-check that you have parsed the appropriate response.
If you get tired of debugging and are ready to give up, download the article example files (see "Resources"), open the test plan file and run the script. Be sure to change the HTTP Request Defaults and the User Defined Variables to match your environment.
Step 4: Add assertionsNow that your script is running without errors it is time to add assertions. Assertions tell JMeter how to check for valid responses. You probably noticed when you did your test run that the View Results Tree told you when it received Error 500 messages (unless you were lucky enough to run error free the first time out!). But it is quite possible that an application will respond with an unexpected result that does not necessarily throw an application server error response. That is where assertions come in.
Let's add an assertion for the login page, the main DA page, and the Home Cabinet.
1. Right-click the sampler named "/da/component/main" then click Add, Assertion, Response Assertion.
2. In Patterns to Test add "Documentum Administrator Login" (without the quotes).3. Right-click the sampler named "/da/webtop/classic/emptyContentClassic.jsp" then
click Add, Assertion, Response Assertion.4. In Patterns to Test add "System Information".5. Right-click the sampler named
"/da/rpm/admin/favorites/administrationfavorites.jsp" then click Add, Assertion, Response Assertion.
6. In Patterns to Test add "Workspace Customizations".7. If we do nothing else we won't know when an assertion fails. To listen for
assertion failures add an Assertion Listener. Right-click Thread Group then click Add, Listener, Assertion Results.
Now run your script again. If any of the assertions fail, a message will show up in the Assertion Results listener. If you aren't convinced that the assertions feature works, try adding a pattern to one of your assertions that you know will not come back in the response.
TIP! On the Assertion Results listener check the "Log Errors Only" checkbox to avoid seeing successful requests.
Step 5: Run the script under loadOur script runs successfully with a single user one time through. Our assertions are making sure that the expected responses are being returned. Now it is time to put the hurt on the app server by cranking up the load.
Page 12© 2005 Navigator Systems, Inc.
http://www.navigatorsystems.com
Load testing Documentum WDK Apps with Apache JMeterJeff Potts, Navigator Systems, Inc.
Disclaimer! Running a surprise load test on a corporate network is not a good way to make friends. Documentum footprints are typically highly-distributed and, in large companies, cross many different organizations. If you are running against a shared infrastructure make sure you have coordinated with teams responsible for all aspects of the infrastructure.
Running the script under load involves deciding how many concurrent users to run, how long the test should last, and how the results should be tracked.
1. Set the thread group parameters. These parameters tell JMeter how many users to run and how long the test should run. We'll start with a meager load of 5 users. We do not want all 5 users to log in at the same time. Instead we'll spread the logins over 10 seconds (or one new user every two seconds). We want the load to be sustained for a while so we will have JMeter run through our script 5 times. Click Thread Group. Specify the following:
a. Number of Threads: 5b. Ramp-up Period: 10c. Loop count: 5
2. Unless told otherwise, JMeter will send the requests to the server as fast as it can. There are two problems with this. First, it doesn't simulate reality. Second, the application server might not be able to keep up. Timers can be used to address this. There are all sorts of timers available. We'll use a simple Constant Timer to cause the script to pause for a specific time between every request. Right-click Thread Group then click Add, Timer, Constant Timer. Take the default of 300 milliseconds.
3. Running a load test without capturing performance metrics is kind of pointless. JMeter offers a variety of listeners to capture metrics. The graphical listeners have the potential to slow down test script performance. We'll use a simple table listener. Right click Thread Group then click Add, Listener, View Results in Table.
4. Saving the responses adds too much overhead. Rather than removing the View Results Tree we will simply disable it. That way if we need to debug later we can simply enable it. Right-click View Results Tree and click Disable.
5. Clear the results from the previous script runs by clicking Run, Clear All (or use ctrl+e).
6. Run the script by clicking Run, Start (or use ctrl+r). Watch the View Results in Table. Every request and its response time will be listed. The bottom shows the average and standard deviation.
Make sure when you run your test that you check the Assertion Results listener. If the assertions are failing it could mean that the server is overwhelmed.
It may be tempting to run hundreds of test users from your workstation. At some point the local machine will be unable to service requests fast enough. The more threads you run on a single-CPU machine the longer they have to wait for CPU time. Eventually the response times degrade because of the local machine, not the web application. JMeter can handle this, though. See "Generating high-volume loads with multiple machines".
Page 13© 2005 Navigator Systems, Inc.
http://www.navigatorsystems.com

Load testing Documentum WDK Apps with Apache JMeterJeff Potts, Navigator Systems, Inc.
Examples 2 & 3: Enhancing the thread groupFor the rest of the article I will avoid the step-by-step format. Instead I will provide the general steps that need to happen to add the functionality. If you get stuck, download the example files for help.
Example 2: Running multiple threads as different usersIt is generally a bad idea to test concurrent users with the same user name. For starters, it just is not a realistic test. Depending on the application being tested you may see some interesting results when two users attempt to work with the same object at the same time. To avoid this, use different user names and let each user work with their own set of objects.
For this section I am assuming the docbase being tested has a set of test users named tuserX where X is a number from 1 through 5. Each user has their own Home Cabinet and each home cabinet has its own set of test documents named test_doc_X.txt where X is a number from 1 through 5.
Once the test users and test data are in place, all we have to do is tell JMeter to use it. Add a new User Parameters pre-processor to the node named "/da/wdk/system/login/login.jsp". Use the "Add User" button to add four new user columns. Use the "Add Variable" button to add a new variable row. Remember the userName variable we defined? We'll use that with five different values for each user corresponding to each test user name.
Your user parameters node should look like this:
Now, when you run your script, if you use the same number of threads as the number of user columns in your user parameters node, each thread will use its own user.
Before running the test, though, let's add a new assertion to validate that the test is running properly. To the node named "/da/rpm/admin/favorites/administrationfavorites.jsp" add a new Response Assertion with two patterns. One pattern is the username. The other is for the file name. The two patterns are:
${userName}
Page 14© 2005 Navigator Systems, Inc.
http://www.navigatorsystems.com
Load testing Documentum WDK Apps with Apache JMeterJeff Potts, Navigator Systems, Inc.
test_doc_[0-9].txt
This assertion shows that you can test using variable substitution and shows how you can use regular expressions to match string patterns.
Test the script by running a single time through (loop count = 1) and five threads. All assertions should pass with flying colors.
Example 3: Randomly selecting an object properties linkRunning a test that selects the same object repeatedly is not a realistic test. It also makes the script somewhat inflexible and difficult to maintain. It may be tough to determine which objects will be available for the user when the script is written. To address this we will enhance our current script to randomly choose an object in their home cabinet.
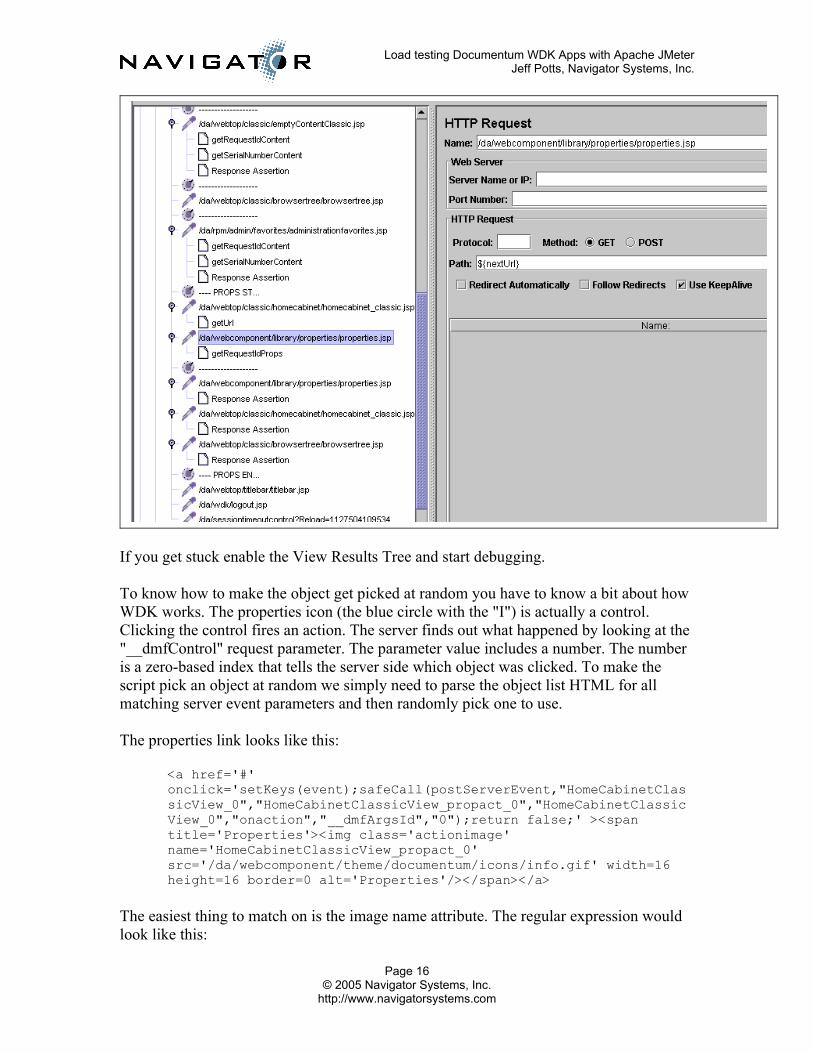
First, get the script to select a hard-coded object properties link. After that is working we can randomize it. A good approach is to add a couple of separators to mark where you are going to add the new requests. In this case it will be between the node named "/da/rpm/admin/favorites/administrationfavorites.jsp" and "/da/webtop/titlebar/titlebar.jsp". Use the HTTP Proxy Server and the Recording Controller to capture the requests and add them to your thread group. Hint: I added five new requests to the script.
Now that the requests have been added you must replace the hard-coded dmfRequestId and dmfSerialNum parameters. Remember that request IDs are tied to frames. A new frame is used with the properties page. So pay attention to where you are retrieving your request ID and which request it is getting passed to.
There's one more spot that will trip you up. When you follow the object properties link, WDK uses JavaScript to open the appropriate URL. That means your HTTP Proxy Server may not have caught the proper request. You will have to parse the JavaScript that comes back from the properties icon click to figure out the right URL to open up using a Regular Expression Extractor like we've done in the past for request ID and serial number.
This screenshot shows the new requests necessary to open the properties page (with new assertions to check the results), the getUrl regex expression extractor, and the result of the extraction being used in the next request by placing the ${nextUrl} variable in the path field.
Page 15© 2005 Navigator Systems, Inc.
http://www.navigatorsystems.com
Load testing Documentum WDK Apps with Apache JMeterJeff Potts, Navigator Systems, Inc.
If you get stuck enable the View Results Tree and start debugging.
To know how to make the object get picked at random you have to know a bit about how WDK works. The properties icon (the blue circle with the "I") is actually a control. Clicking the control fires an action. The server finds out what happened by looking at the "__dmfControl" request parameter. The parameter value includes a number. The number is a zero-based index that tells the server side which object was clicked. To make the script pick an object at random we simply need to parse the object list HTML for all matching server event parameters and then randomly pick one to use.
The properties link looks like this:
<a href='#' onclick='setKeys(event);safeCall(postServerEvent,"HomeCabinetClassicView_0","HomeCabinetClassicView_propact_0","HomeCabinetClassicView_0","onaction","__dmfArgsId","0");return false;' ><span title='Properties'><img class='actionimage' name='HomeCabinetClassicView_propact_0' src='/da/webcomponent/theme/documentum/icons/info.gif' width=16 height=16 border=0 alt='Properties'/></span></a>
The easiest thing to match on is the image name attribute. The regular expression would look like this:
Page 16© 2005 Navigator Systems, Inc.
http://www.navigatorsystems.com
Load testing Documentum WDK Apps with Apache JMeterJeff Potts, Navigator Systems, Inc.
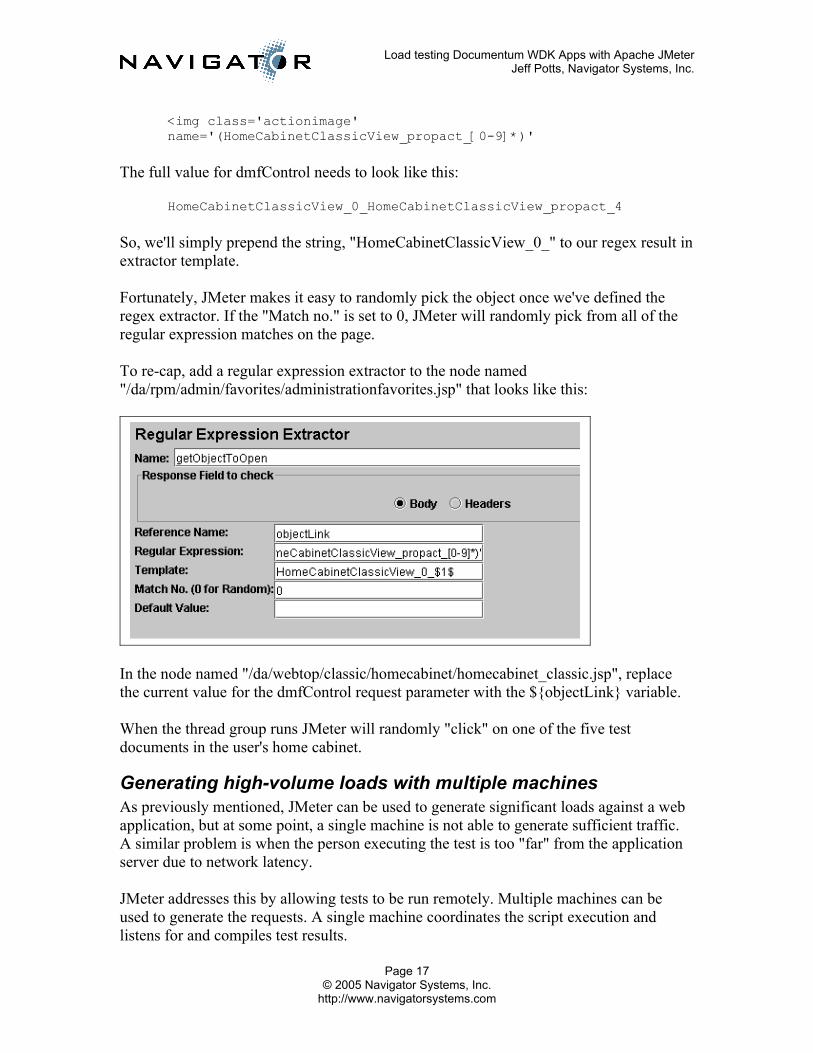
<img class='actionimage' name='(HomeCabinetClassicView_propact_[0-9]*)'
The full value for dmfControl needs to look like this:
HomeCabinetClassicView_0_HomeCabinetClassicView_propact_4
So, we'll simply prepend the string, "HomeCabinetClassicView_0_" to our regex result in extractor template.
Fortunately, JMeter makes it easy to randomly pick the object once we've defined the regex extractor. If the "Match no." is set to 0, JMeter will randomly pick from all of the regular expression matches on the page.
To re-cap, add a regular expression extractor to the node named "/da/rpm/admin/favorites/administrationfavorites.jsp" that looks like this:
In the node named "/da/webtop/classic/homecabinet/homecabinet_classic.jsp", replace the current value for the dmfControl request parameter with the ${objectLink} variable.
When the thread group runs JMeter will randomly "click" on one of the five test documents in the user's home cabinet.
Generating high-volume loads with multiple machinesAs previously mentioned, JMeter can be used to generate significant loads against a web application, but at some point, a single machine is not able to generate sufficient traffic. A similar problem is when the person executing the test is too "far" from the application server due to network latency.
JMeter addresses this by allowing tests to be run remotely. Multiple machines can be used to generate the requests. A single machine coordinates the script execution and listens for and compiles test results.
Page 17© 2005 Navigator Systems, Inc.
http://www.navigatorsystems.com
Load testing Documentum WDK Apps with Apache JMeterJeff Potts, Navigator Systems, Inc.
Do the following to set this up:1. Install JMeter on the boxes that will be generating the requests against the web
application. (I'll call these the "remote" boxes.).2. Run the jmeter-server script on each remote box as well as the machine that will
be coordinating the test (I'll call this the "local" box).3. Edit the jmeter.properties file on the local box. Set the remote_hosts parameter to
a comma-separated list of the fully-qualified hosts that will be generating requests including "localhost" if the local machine will also be used to generate traffic.
4. Start the JMeter GUI on the local box.5. Click Run, Remote Start All to start the test script on all boxes.
Here are a few things to watch out for:- Make sure all boxes can resolve the appropriate host names. This includes resolving
the application server's host name from the remote testing boxes. Obviously, if the remote boxes cannot find the application server it won't be much of a test.
- In jmeter.properties, don't specify localhost as a remote host unless you want your local box to execute test scripts during a "remote start all". If the local box is "close" to the web application server, and there are not a lot of other processes running, this might be okay. If the local machine is VPN'd from home you probably do not want the local machine generating traffic.
- On Linux, the Sun JVM has a bug in which the hostname resolves to the loopback IP address instead of the actual IP address of the machine. Google can help you fix this. Just know that JMeter uses RMI to communicate between the local JMeter GUI and the remote boxes and that RMI requires fully-qualified host names that can be resolved by both ends of the communication.
I do not have a good rule-of-thumb for knowing how many users can be run on a given JMeter instance. You will have to do some experimentation to figure out what works best for you given your infrastructure.
SummaryThis article showed how Apache JMeter, a powerful open-source tool for load-testing, can be used to test Documentum WDK applications. It barely scratched the surface with regard to how complex and robust test plans can be. Hopefully you've seen enough that you will consider using the tool on your next project.
ResourcesFiles used in this example are in: wdk_examples.zip. The zip includes:
• Sample workbench file (workbench.jmx) • Example 1: Recording a simple script (DA53sp1_simple.jmx) • Example 2: Running multiple threads as different users (DA53sp1_users.jmx)• Example 3a: Selecting a hard-coded object link (DA53sp1_hc_props.jmx) • Example 3b: Randomly selecting an object properties link
(DA53sp1_rnd_props.jmx)Page 18
© 2005 Navigator Systems, Inc.http://www.navigatorsystems.com
Load testing Documentum WDK Apps with Apache JMeterJeff Potts, Navigator Systems, Inc.
Apache JMeter Home Pagehttp://jakarta.apache.org/jmeter/
JMeter Wikihttp://wiki.apache.org/jakarta-jmeter/
"Tips for Developing WDK Benchmarks" Documentum white paperAvailable for download to registered users at http://developer.documentum.com
Webtop 5.2.5 LoadRunner Scripts (BMKit 2.0)Available for download to registered users at http://developer.documentum.com
Regular Expressions helphttp://www.regular-expressions.info/quickstart.html
Page 19© 2005 Navigator Systems, Inc.
http://www.navigatorsystems.com