lms 9 - georgia department of transportation 9.2 user guide lms 9.2 external user guide page 3 1....
TRANSCRIPT

LMS 9.2 User Guide

LMS 9.2 User Guide
LMS 9.2 External User Guide Page 2
Table of Contents
1. CHAPTER ONE: EXTERNAL USERS .................................................................................................................. 3
1.1. HOW TO CLEAR YOUR BROWSER CACHE .............................................................................................................. 3 1.2. HOW TO DISABLE YOUR POP-UP BLOCKER ........................................................................................................... 6 1.3. HOW TO CREATE ACCOUNT ............................................................................................................................. 6 1.4. HOW TO REGISTER FOR A PROGRAM ................................................................................................................. 9 1.5. ENROLL FOR CLASSES ................................................................................................................................... 12 1.6 ADD SUPPLEMENTAL LEARNING ..................................................................................................................... 16 1.7 VIEW ALL LEARNING .................................................................................................................................... 21 1.8 USER ID AND PASSWORD ............................................................................................................................. 26 1.9 FORGOT YOUR PASSWORD OR EMAIL ID? ......................................................................................................... 28 1.10 UPDATE PROFILE INFORMATION ..................................................................................................................... 30

LMS 9.2 User Guide
LMS 9.2 External User Guide Page 3
1. Chapter One: External Users
1.1. How to clear your browser cache
How to clear browser cache step by step instructions
Step Action Results
1. Open your Internet Explorer browser.
2. Click on the Tools tab. Then, click on Internet Options.

LMS 9.2 User Guide
LMS 9.2 External User Guide Page 4
Step Action Results
3. Make sure that the ‘Delete browsing history on exit’ box is checked. Then, click on the ‘Delete’ button.
4. Make sure that all the checkboxes have
been selected. Click on the ‘Delete’ button.

LMS 9.2 User Guide
LMS 9.2 External User Guide Page 5
Step Action Results
5. Click on the ‘Apply’ button.
6. Click on the ‘OK’ button.
You have cleared the Internet Explorer browser cache.

LMS 9.2 User Guide
LMS 9.2 External User Guide Page 6
1.2. How to disable your pop-up blocker
How to clear browser cache step by step instructions
Step Action Results
1. Open your Internet Explorer browser.
2. Click on the Tools tab.
3. Click on ‘Popup Blocker’.
Then, click on ‘Turn off Pop-up Blocker’
You have disabled the pop-up blocker.
1.3. How to Create Account
How to Register Learners step by step instructions

LMS 9.2 User Guide
LMS 9.2 External User Guide Page 7
Step Action Results
7. From the Learning Management System and you are a First time user?, Click the link: Obtain a logon ID and password.
The Welcome to GDOT’s Learning Management System page is displayed.
8. Click the Register link. Check for Existing Account page is displayed.
9. Enter your email address in the User ID field.
10. Click the Accept terms and Conditions
checkbox.
11. You will receive a verification indicating: You will shortly receive a 4 digit code to your email account. Also check your SPAM/JUNK folder. Do Not close this page.
12. Click the OK button.

LMS 9.2 User Guide
LMS 9.2 External User Guide Page 8
Step Action Results
13. When you receive the verification Code, Enter it in the field provided.
14. Click Continue Registration. The New User Registration page is displayed.
15. From Create New Account, Your email address is your user id.
16. Enter your password. This is a number made up of:
At least 1 upper case.
One number: for example, the number 2
One special symbol. !, #, etc…
17. Select the Certificates Required drop-down. Choose the certificate for which you will apply.
18. Under User Information: Enter Your:
First name
Last Name
Phone number
Company
Class type
Drive Sate, Drive License #, and
Select your Date of Birth.
19. Under Primary Address: Select your
Country
City
Enter your Address in the Address 1 field.
Select your State
And Enter your Postal Code.
20. Under Security Questions: you need to complete this section in the event you forget your password. These questions are used to aid in the password reset process.
You must answer each question and provide a response.
21. Click the Create Account button. You have now completed the New Registration process.
LMS 9.2 User Guide
LMS 9.2 External User Guide Page 9
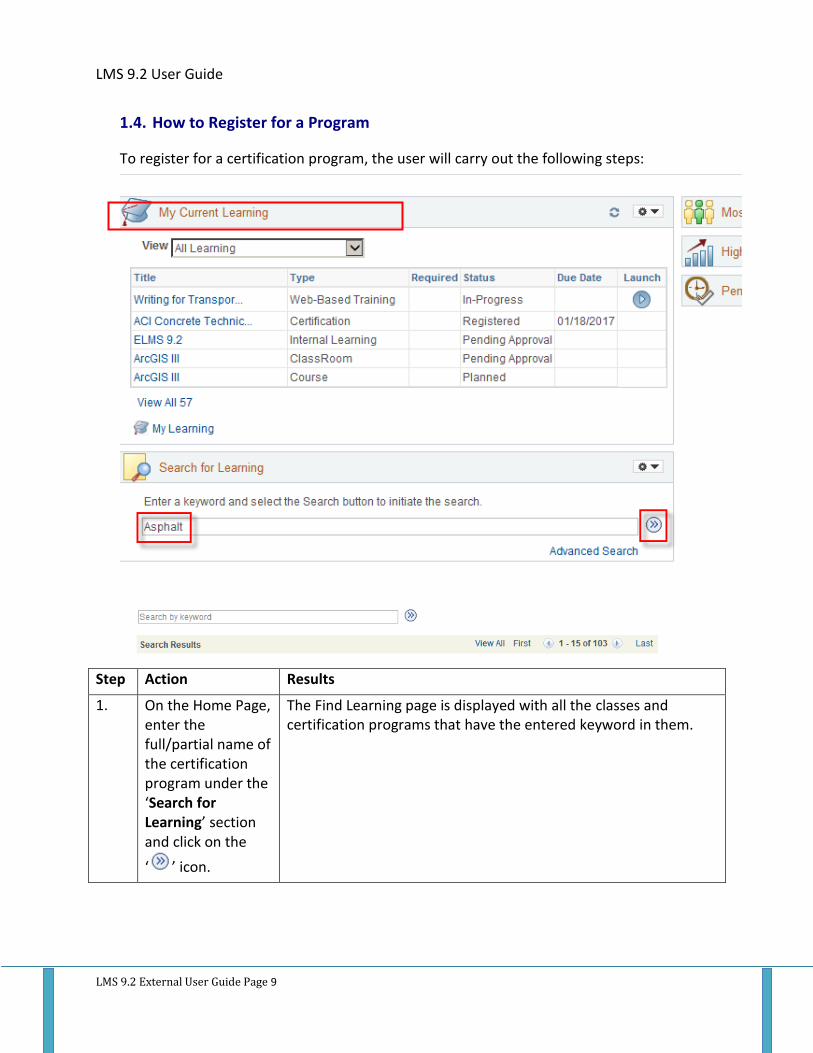
1.4. How to Register for a Program
To register for a certification program, the user will carry out the following steps:
Step Action Results
1. On the Home Page, enter the full/partial name of the certification program under the ‘Search for Learning’ section and click on the
‘ ’ icon.
The Find Learning page is displayed with all the classes and certification programs that have the entered keyword in them.
LMS 9.2 User Guide
LMS 9.2 External User Guide Page 10
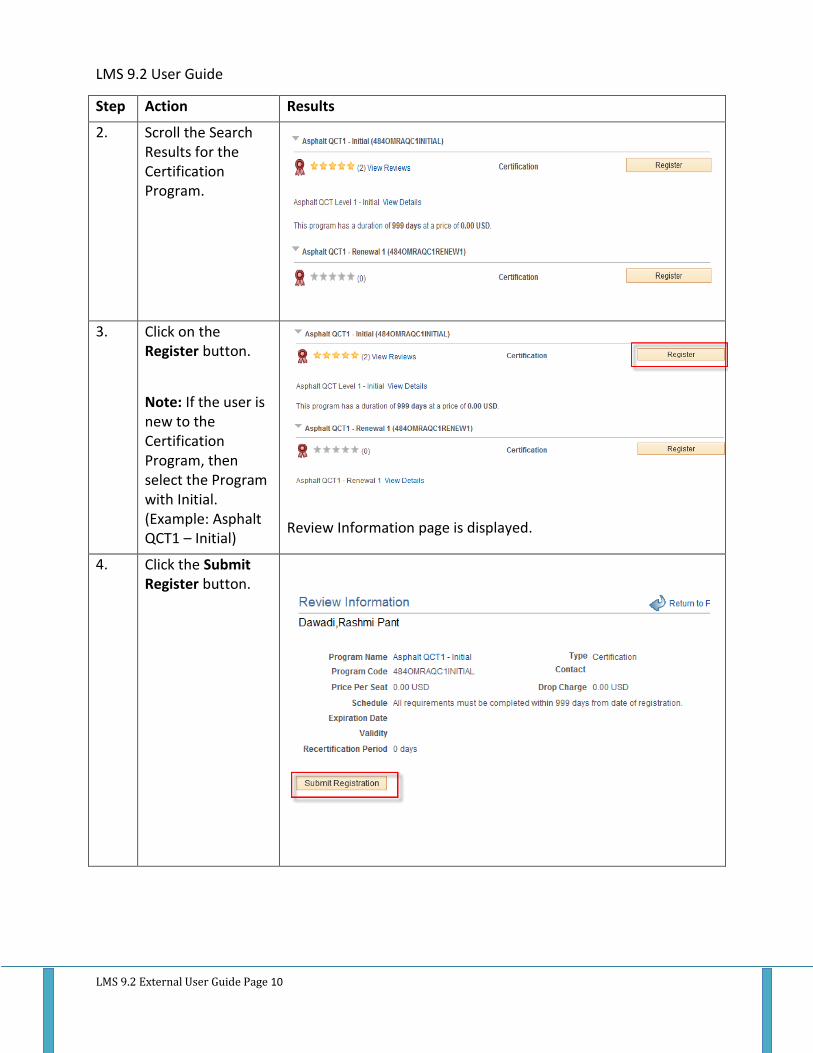
Step Action Results
2. Scroll the Search Results for the Certification Program.
3. Click on the Register button.
Note: If the user is new to the Certification Program, then select the Program with Initial. (Example: Asphalt QCT1 – Initial)
Review Information page is displayed.
4. Click the Submit Register button.

LMS 9.2 User Guide
LMS 9.2 External User Guide Page 11
Step Action Results
5. Click the Submit Registration button.
6. Registration Confirmation page displays.
7. Click the Home link.

LMS 9.2 User Guide
LMS 9.2 External User Guide Page 12
1.5. Enroll for Classes
As an Internal User you can enroll for classes.
Enroll for Classes step by step instructions
Step Action Results
1. On the Home Page, enter the full/partial name of the class under the ‘Search for Learning’ section and
click on the ‘ ’ icon.
The Find Learning page is displayed with all the classes and certification programs (if any) that have the entered keyword in them.
LMS 9.2 User Guide
LMS 9.2 External User Guide Page 13
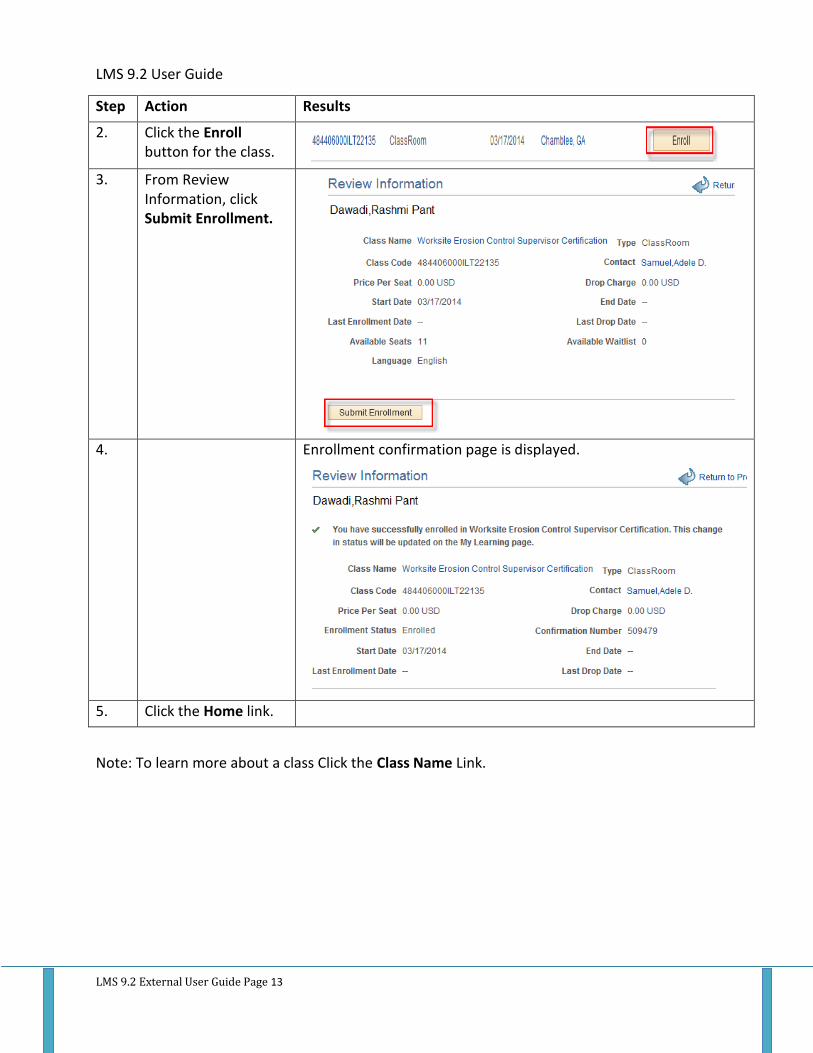
Step Action Results
2. Click the Enroll button for the class.
3. From Review Information, click Submit Enrollment.
4. Enrollment confirmation page is displayed.
5. Click the Home link.
Note: To learn more about a class Click the Class Name Link.

LMS 9.2 User Guide
LMS 9.2 External User Guide Page 14

LMS 9.2 User Guide
LMS 9.2 External User Guide Page 15
The Class Details page is displayed.
This page provides you with a lot of detailed information such as the name of the Instructor, Contact information, Enrollment Status, your Confirmation Number, Type of Training, (for example, Classroom) Price per seat (if any), and the Class Syllabus. (For example, to receive credit for this class you must complete all required tasks)

LMS 9.2 User Guide
LMS 9.2 External User Guide Page 16
1.6 Add Supplemental Learning
Learners might complete learning opportunities beyond the cataloged classes and programs, for which you need to, keep a record. For example, they might attend, have equivalent external work experience, or acquire some form of on-the-job training. For these types of equivalent training you will use Supplemental Learning.
Add Supplemental Learning Step by step instructions
Step Action Results
1. From the Main Menu select Self Service, Learning, and then Supplemental Learning.
The Add Supplemental Learning page is displayed.
2. From the *Type drop-down select the type of Supplemental learning.
Based on your user login only those supplemental learning type that match your login ID will be displayed.

LMS 9.2 User Guide
LMS 9.2 External User Guide Page 17
Step Action Results
3. Click the Add Supplemental Learning button.
The Add Supplemental Learning page is displayed.
4. Complete the form.
*Enter the title
*Description
Select the Status.
Enter Education units
*Required Fields.
5. Click the Save button. You will recive a message indicating that you have successsfully added the supplemental learning Asphalt

LMS 9.2 User Guide
LMS 9.2 External User Guide Page 18
Step Action Results
101 with Submit for Approval status.
6. If you need to add supporting Documents click the Documents button.
7. From the Attachments page Click the Add Attachment button.
8. From File Attachment click the Browse button.

LMS 9.2 User Guide
LMS 9.2 External User Guide Page 19
Step Action Results
9. Navigate to the file location in your folders.
Select the file from your folder.
10. Click Upload.
11. Your file is now attached to the supplemental learning you created.
12. Enter a brief description of the file you just uploaded.
13. Click the Apply Button if your are finished adding attachments.
If not Click the Add Attachment button and repeat the above steps.
Note: You can always change your mind and Click Cancel. At this point none of your attachments will be saved.
14. If you are finished click the Apply button.
Note: If you change your mind and realize that you uploaded the wrong document, click the Delete Attachment button.
15. Click the OK button.
You are returned to the Add Supplemental Learning Page.
The Documents button and the Save button are no longer available.

LMS 9.2 User Guide
LMS 9.2 External User Guide Page 20
Step Action Results
16. Click either Return to Previous Page or go to Learning Home.

LMS 9.2 User Guide
LMS 9.2 External User Guide Page 21
1.7 View All Learning
As an LMS learner you have the option to view all of your learning history using “View All Learning.” The new LMS 9.2 provides you with two ways to view all of your learning history. From View All Under My Current Learning and from the Main Menu. Both methods of viewing all of your learning are included in the step by step instructions.
View All Learning step by step instructions
Step Action Results/Descriptions
View All from the Landing page
1. From the Landing Page select View All
For example, View All 25
2. The Learning Page is displayed.
This page displays all of your Learning by; title, Status, Due date, Start Date, and Completion date.

LMS 9.2 User Guide
LMS 9.2 External User Guide Page 22
Step Action Results/Descriptions
3. To view Class Details click the title Link.
View All from the Main Menu
1. From the Main Menu Select Self Service.
2. Select Learning from the sub-table of content.
3. Select My Learning. My Learning page is displayed.

LMS 9.2 User Guide
LMS 9.2 External User Guide Page 23
Step Action Results/Descriptions
4. From this view you have the ability to:
Drop a class: when selecting this option you will be asked, “Are you sure you want to drop this program?” You will not be dropped from any learning classes in which you have enrolled to complete this program – you will need to drop them separately.
Modify your class: You will have the ability to Add documents and save the changes.
Review your class: Let’s you rate and review the class.
Rate Classes. By 1 to 5 stars. 1 being the lowest 5 is the highest.
5. To Rate a class click the Review button.
6. The Rate/Review dialog is displayed.

LMS 9.2 User Guide
LMS 9.2 External User Guide Page 24
Step Action Results/Descriptions
7. Select Ratings by clicking on each of the star(s).
From My Certification Status
8. Select the Rectify link. Rectify lets you Register for the program (again). (For example, you need a higher passing score, or you had to drop the class at the last minute, you can re-register for the class from Rectify.)

LMS 9.2 User Guide
LMS 9.2 External User Guide Page 25
Step Action Results/Descriptions
9. You also have the ability to view your Status. (For example you Waived a class and now you need to Rectify (register) to take the class.
10. To Register for the class Click the Register button.
11. Return to the Previous Page to continue with Recertification or Click the Learning Home link.

LMS 9.2 User Guide
LMS 9.2 External User Guide Page 26
1.8 User ID and Password
General Profile Information may get lost or misplaced. LMS from “General Profile” will let you change your password but not your email address. (The email address is your user id. Please keep both your password and User ID in a safe place. )
The General Information page is divided into seven sections. Password, Personalization’s, Alternate User, workflow Attributes, Email and IM Information.
General Information step by step instructions
Step Action Results
Password

LMS 9.2 User Guide
LMS 9.2 External User Guide Page 27
Step Action Results
1. Select Change password.
2. Enter your Current Password.
3. Enter your New Password. This is a number made up of:
At least 1 upper case.
One number 2 One special symbol. !, #, etc…
4. Confirm your password. Both the new password and Confirmation password should match.
5. Click OK

LMS 9.2 User Guide
LMS 9.2 External User Guide Page 28
1.9 Forgot your password or Email ID?
From the LMS Welcome page are two links. Forgot Your Password and Forgot your Email ID. Click the link that you need help with.
Forgot Your Password? By the way, you have 5 attempts to try and enter your password after the sixth attempt you will receive an error message that you will need to have your password sent to you.
1. Click the Forgot your Password? Link.
a. Forgot My password page is displayed.

LMS 9.2 User Guide
LMS 9.2 External User Guide Page 29
2. Enter your Email ID in the text field.
3. Click the Continue button.
a. Your Password will be emailed to you.
Forgot your Email ID?
1. Please place your email id somewhere safe. This is the only reference you and GDOT will have to update your password. However if you do forget your email address contact the Solutions Center.

LMS 9.2 User Guide
LMS 9.2 External User Guide Page 30
1.10 Update Profile Information
Use the Personal Information page to review and update your personal profile information. External learners can update their personal profile information through self-service pages.
Personal Information step by step instructions
Step Action Results
1. From the Main Menu select Self Service.
2. Select Personal Information from the Submenu.
The Personal Information Home page is displayed.

LMS 9.2 User Guide
LMS 9.2 External User Guide Page 31
Step Action Results
3. From this page you can update:
Name: Last name first, then first name (for example, Morgan, Kristi)
Add a Photo:
Address: Home or business mailing address.
Email Address: Company Email address.
Phone numbers
Learner Preferences: for example, how you want your Catalog Search listed, either Advanced Search or Basic Search, number of items displayed per search.
o Certificate Access: choose to Show All Certificates or only those that match your learning preference (for example, Pilot Car)
o Classification Type: for example, Contractor.
Driver License information
4. Once you have made all of your updates, Click Save.
5. Click Learning Home to return to the Home page.