linux system administration ii - rutgers school of …coe guide for linux system administration ii...
TRANSCRIPT
Study Guide for
Linux System Administration II
Lab work for LPI 102
released under the GFDL by LinuxIT
Licence Agreement__________________________________________________________________________
Copyright (c) 2003 LinuxIT.
Permission is granted to copy, distribute and/or modify this document under the terms of the GNU Free Documentation License, Version 1.2 or any later version published by the Free Software Foundation; with the Invariant Sections being History, Acknowledgements, with the
Front-Cover Texts being “released under the GFDL by LinuxIT”.
GNU Free Documentation LicenseVersion 1.2, November 2002
Copyright (C) 2000,2001,2002 Free Software Foundation, Inc.59 Temple Place, Suite 330, Boston, MA 02111-1307 USAEveryone is permitted to copy and distribute verbatim copiesof this license document, but changing it is not allowed.
0. PREAMBLE
The purpose of this License is to make a manual, textbook, or other functional and useful document "free" in the senseof freedom: to assure everyone the effective freedom to copy and redistribute it, with or without modifying it, eithercommercially or noncommercially. Secondarily, this License preserves for the author and publisher a way to get creditfor their work, while not being considered responsible for modifications made by others.
This License is a kind of "copyleft", which means that derivative works of the document must themselves be free in thesame sense. It complements the GNU General Public License, which is a copyleft license designed for free software.
We have designed this License in order to use it for manuals for free software, because free software needs freedocumentation: a free program should come with manuals providing the same freedoms that the software does. Butthis License is not limited to software manuals; it can be used for any textual work, regardless of subject matter orwhether it is published as a printed book. We recommend this License principally for works whose purpose isinstruction or reference.
1. APPLICABILITY AND DEFINITIONS
This License applies to any manual or other work, in any medium, that contains a notice placed by the copyright holdersaying it can be distributed under the terms of this License. Such a notice grants a world-wide, royalty-free license,unlimited in duration, to use that work under the conditions stated herein. The "Document", below, refers to any suchmanual or work. Any member of the public is a licensee, and is addressed as "you". You accept the license if you copy,modify or distribute the work in a way requiring permission under copyright law.
A "Modified Version" of the Document means any work containing the Document or a portion of it, either copiedverbatim, or with modifications and/or translated into another language.
A "Secondary Section" is a named appendix or a front-matter section of the Document that deals exclusively with therelationship of the publishers or authors of the Document to the Document's overall subject (or to related matters) andcontains nothing that could fall directly within that overall subject. (Thus, if the Document is in part a textbook ofmathematics, a Secondary Section may not explain any mathematics.) The relationship could be a matter of historicalconnection with the subject or with related matters, or of legal, commercial, philosophical, ethical or political positionregarding them.
The "Invariant Sections" are certain Secondary Sections whose titles are designated, as being those of InvariantSections, in the notice that says that the Document is released under this License. If a section does not fit the abovedefinition of Secondary then it is not allowed to be designated as Invariant. The Document may contain zero InvariantSections. If the Document does not identify any Invariant Sections then there are none.
The "Cover Texts" are certain short passages of text that are listed, as Front-Cover Texts or Back-Cover Texts, in thenotice that says that the Document is released under this License. A Front-Cover Text may be at most 5 words, and aBack-Cover Text may be at most 25 words.
A "Transparent" copy of the Document means a machine-readable copy, represented in a format whose specification is
_____________________________________________________________________
2
Licence Agreement__________________________________________________________________________available to the general public, that is suitable for revising the document straightforwardly with generic text editors or(for images composed of pixels) generic paint programs or (for drawings) some widely available drawing editor, andthat is suitable for input to text formatters or for automatic translation to a variety of formats suitable for input to textformatters. A copy made in an otherwise Transparent file format whose markup, or absence of markup, has beenarranged to thwart or discourage subsequent modification by readers is not Transparent. An image format is notTransparent if used for any substantial amount of text. A copy that is not "Transparent" is called "Opaque".
Examples of suitable formats for Transparent copies include plain ASCII without markup, Texinfo input format,LaTeX input format, SGML or XML using a publicly available DTD, and standard-conforming simple HTML,PostScript or PDF designed for human modification. Examples of transparent image formats include PNG, XCF andJPG. Opaque formats include proprietary formats that can be read and edited only by proprietary word processors,SGML or XML for which the DTD and/or processing tools are not generally available, and the machine-generatedHTML, PostScript or PDF produced by some word processors for output purposes only.
The "Title Page" means, for a printed book, the title page itself, plus such following pages as are needed to hold,legibly, the material this License requires to appear in the title page. For works in formats which do not have any titlepage as such, "Title Page" means the text near the most prominent appearance of the work's title, preceding thebeginning of the body of the text.
A section "Entitled XYZ" means a named subunit of the Document whose title either is precisely XYZ or containsXYZ in parentheses following text that translates XYZ in another language. (Here XYZ stands for a specific sectionname mentioned below, such as "Acknowledgements", "Dedications", "Endorsements", or "History".) To "Preserve theTitle" of such a section when you modify the Document means that it remains a section "Entitled XYZ" according tothis definition.
The Document may include Warranty Disclaimers next to the notice which states that this License applies to theDocument. These Warranty Disclaimers are considered to be included by reference in this License, but only as regardsdisclaiming warranties: any other implication that these Warranty Disclaimers may have is void and has no effect onthe meaning of this License.
2. VERBATIM COPYING
You may copy and distribute the Document in any medium, either commercially or noncommercially, provided thatthis License, the copyright notices, and the license notice saying this License applies to the Document are reproducedin all copies, and that you add no other conditions whatsoever to those of this License. You may not use technicalmeasures to obstruct or control the reading or further copying of the copies you make or distribute. However, you mayaccept compensation in exchange for copies. If you distribute a large enough number of copies you must also followthe conditions in section 3.
You may also lend copies, under the same conditions stated above, and you may publicly display copies.
3. COPYING IN QUANTITY
If you publish printed copies (or copies in media that commonly have printed covers) of the Document, numberingmore than 100, and the Document's license notice requires Cover Texts, you must enclose the copies in covers thatcarry, clearly and legibly, all these Cover Texts: Front-Cover Texts on the front cover, and Back-Cover Texts on theback cover. Both covers must also clearly and legibly identify you as the publisher of these copies. The front covermust present the full title with all words of the title equally prominent and visible. You may add other material on thecovers in addition. Copying with changes limited to the covers, as long as they preserve the title of the Document andsatisfy these conditions, can be treated as verbatim copying in other respects.
If the required texts for either cover are too voluminous to fit legibly, you should put the first ones listed (as many asfit reasonably) on the actual cover, and continue the rest onto adjacent pages.
If you publish or distribute Opaque copies of the Document numbering more than 100, you must either include amachine-readable Transparent copy along with each Opaque copy, or state in or with each Opaque copy a computer-network location from which the general network-using public has access to download using public-standard networkprotocols a complete Transparent copy of the Document, free of added material. If you use the latter option, you musttake reasonably prudent steps, when you begin distribution of Opaque copies in quantity, to ensure that thisTransparent copy will remain thus accessible at the stated location until at least one year after the last time youdistribute an Opaque copy (directly or through your agents or retailers) of that edition to the public.
_____________________________________________________________________
3
Licence Agreement__________________________________________________________________________It is requested, but not required, that you contact the authors of the Document well before redistributing any largenumber of copies, to give them a chance to provide you with an updated version of the Document.
4. MODIFICATIONS
You may copy and distribute a Modified Version of the Document under the conditions of sections 2 and 3 above,provided that you release the Modified Version under precisely this License, with the Modified Version filling the roleof the Document, thus licensing distribution and modification of the Modified Version to whoever possesses a copy ofit. In addition, you must do these things in the Modified Version:
• A. Use in the Title Page (and on the covers, if any) a title distinct from that of the Document, and from thoseof previous versions (which should, if there were any, be listed in the History section of the Document). Youmay use the same title as a previous version if the original publisher of that version gives permission.
• B. List on the Title Page, as authors, one or more persons or entities responsible for authorship of themodifications in the Modified Version, together with at least five of the principal authors of the Document (allof its principal authors, if it has fewer than five), unless they release you from this requirement.
• C. State on the Title page the name of the publisher of the Modified Version, as the publisher. • D. Preserve all the copyright notices of the Document. • E. Add an appropriate copyright notice for your modifications adjacent to the other copyright notices. • F. Include, immediately after the copyright notices, a license notice giving the public permission to use the
Modified Version under the terms of this License, in the form shown in the Addendum below. • G. Preserve in that license notice the full lists of Invariant Sections and required Cover Texts given in the
Document's license notice. • H. Include an unaltered copy of this License. • I. Preserve the section Entitled "History", Preserve its Title, and add to it an item stating at least the title, year,
new authors, and publisher of the Modified Version as given on the Title Page. If there is no section Entitled"History" in the Document, create one stating the title, year, authors, and publisher of the Document as givenon its Title Page, then add an item describing the Modified Version as stated in the previous sentence.
• J. Preserve the network location, if any, given in the Document for public access to a Transparent copy of theDocument, and likewise the network locations given in the Document for previous versions it was based on.These may be placed in the "History" section. You may omit a network location for a work that was publishedat least four years before the Document itself, or if the original publisher of the version it refers to givespermission.
• K. For any section Entitled "Acknowledgements" or "Dedications", Preserve the Title of the section, andpreserve in the section all the substance and tone of each of the contributor acknowledgements and/ordedications given therein.
• L. Preserve all the Invariant Sections of the Document, unaltered in their text and in their titles. Sectionnumbers or the equivalent are not considered part of the section titles.
• M. Delete any section Entitled "Endorsements". Such a section may not be included in the Modified Version. • N. Do not retitle any existing section to be Entitled "Endorsements" or to conflict in title with any Invariant
Section. • O. Preserve any Warranty Disclaimers.
If the Modified Version includes new front-matter sections or appendices that qualify as Secondary Sections andcontain no material copied from the Document, you may at your option designate some or all of these sections asinvariant. To do this, add their titles to the list of Invariant Sections in the Modified Version's license notice. Thesetitles must be distinct from any other section titles.
You may add a section Entitled "Endorsements", provided it contains nothing but endorsements of your ModifiedVersion by various parties--for example, statements of peer review or that the text has been approved by anorganization as the authoritative definition of a standard.
You may add a passage of up to five words as a Front-Cover Text, and a passage of up to 25 words as a Back-CoverText, to the end of the list of Cover Texts in the Modified Version. Only one passage of Front-Cover Text and one ofBack-Cover Text may be added by (or through arrangements made by) any one entity. If the Document alreadyincludes a cover text for the same cover, previously added by you or by arrangement made by the same entity you areacting on behalf of, you may not add another; but you may replace the old one, on explicit permission from theprevious publisher that added the old one.
_____________________________________________________________________
4
Licence Agreement__________________________________________________________________________The author(s) and publisher(s) of the Document do not by this License give permission to use their names for publicityfor or to assert or imply endorsement of any Modified Version.
5. COMBINING DOCUMENTS
You may combine the Document with other documents released under this License, under the terms defined in section4 above for modified versions, provided that you include in the combination all of the Invariant Sections of all of theoriginal documents, unmodified, and list them all as Invariant Sections of your combined work in its license notice,and that you preserve all their Warranty Disclaimers.
The combined work need only contain one copy of this License, and multiple identical Invariant Sections may bereplaced with a single copy. If there are multiple Invariant Sections with the same name but different contents, makethe title of each such section unique by adding at the end of it, in parentheses, the name of the original author orpublisher of that section if known, or else a unique number. Make the same adjustment to the section titles in the list ofInvariant Sections in the license notice of the combined work.
In the combination, you must combine any sections Entitled "History" in the various original documents, forming onesection Entitled "History"; likewise combine any sections Entitled "Acknowledgements", and any sections Entitled"Dedications". You must delete all sections Entitled "Endorsements."
6. COLLECTIONS OF DOCUMENTS
You may make a collection consisting of the Document and other documents released under this License, and replacethe individual copies of this License in the various documents with a single copy that is included in the collection,provided that you follow the rules of this License for verbatim copying of each of the documents in all other respects.
You may extract a single document from such a collection, and distribute it individually under this License, providedyou insert a copy of this License into the extracted document, and follow this License in all other respects regardingverbatim copying of that document.
7. AGGREGATION WITH INDEPENDENT WORKS
A compilation of the Document or its derivatives with other separate and independent documents or works, in or on avolume of a storage or distribution medium, is called an "aggregate" if the copyright resulting from the compilation isnot used to limit the legal rights of the compilation's users beyond what the individual works permit. When theDocument is included in an aggregate, this License does not apply to the other works in the aggregate which are notthemselves derivative works of the Document.
If the Cover Text requirement of section 3 is applicable to these copies of the Document, then if the Document is lessthan one half of the entire aggregate, the Document's Cover Texts may be placed on covers that bracket the Documentwithin the aggregate, or the electronic equivalent of covers if the Document is in electronic form. Otherwise they mustappear on printed covers that bracket the whole aggregate.
8. TRANSLATION
Translation is considered a kind of modification, so you may distribute translations of the Document under the terms ofsection 4. Replacing Invariant Sections with translations requires special permission from their copyright holders, butyou may include translations of some or all Invariant Sections in addition to the original versions of these InvariantSections. You may include a translation of this License, and all the license notices in the Document, and any WarrantyDisclaimers, provided that you also include the original English version of this License and the original versions ofthose notices and disclaimers. In case of a disagreement between the translation and the original version of this Licenseor a notice or disclaimer, the original version will prevail.
If a section in the Document is Entitled "Acknowledgements", "Dedications", or "History", the requirement (section 4)to Preserve its Title (section 1) will typically require changing the actual title.
9. TERMINATION
You may not copy, modify, sublicense, or distribute the Document except as expressly provided for under this License.Any other attempt to copy, modify, sublicense or distribute the Document is void, and will automatically terminateyour rights under this License. However, parties who have received copies, or rights, from you under this License willnot have their licenses terminated so long as such parties remain in full compliance.
_____________________________________________________________________
5

Licence Agreement__________________________________________________________________________10. FUTURE REVISIONS OF THIS LICENSE
The Free Software Foundation may publish new, revised versions of the GNU Free Documentation License from timeto time. Such new versions will be similar in spirit to the present version, but may differ in detail to address newproblems or concerns. See http://www.gnu.org/copyleft/.
Each version of the License is given a distinguishing version number. If the Document specifies that a particularnumbered version of this License "or any later version" applies to it, you have the option of following the terms andconditions either of that specified version or of any later version that has been published (not as a draft) by the FreeSoftware Foundation. If the Document does not specify a version number of this License, you may choose any versionever published (not as a draft) by the Free Software Foundation.
_____________________________________________________________________
6
LinuxIT Technical Education Centre Introduction_______________________________________________________________________
Introduction:
AcknowledgmentsThe original material was made available by LinuxIT's technical training centre www.linuxit.com.Many thanks to Andrew Meredith for suggesting the idea in the first place. A special thanks to allthe students who have helped dilute the technical aspects of Linux administration through theirmany questions, this has led to the inclusion of more illustrations attempting to introduce conceptsin a userfriendly way. Finally, many thanks to Paul McEnery for the technical advice and forstarting off some of the most difficult chapters such as the ones covering the X server (101),modems (102), security (102) and the Linux kernel (102).
The manual is available online at http://savannah.nongnu.org/projects/lpi-manuals/. Thank you tothe Savannah Volunteers for assessing the project and providing us with the Web space.
HistoryFirst release (version 0.0) October 2003. Reviewed by Adrian Thomasset.
AudienceThis course is designed as a 3 to 4 days practical course preparing for the LPI 102 exam. It isrecommended that candidates have at least one year experience doing Linux administrationprofessionally. However for those who are ready for a challenge the training is designed to provideas much insight and examples as possible to help non specialists understand the basic concepts andcommand sets which form the core of Linux computing.
The LPI Certification ProgramThere are currently two LPI certification levels. The first level LPIC-1 is granted after passing bothexams LPI 101 and LPI 102. Similarly passing the LPI 201 and LPI 202 exams will grant thesecond level certification LPIC-2.
There are no pre-requisites for LPI 101 and 102. However the exams for LPIC-2 can only beattempted once LPIC-1 has been obtained.
No GuaranteeThe manual comes with no guarantee at all.
_____________________________________________________________________
7
LinuxIT Technical Education Centre Introduction_______________________________________________________________________Resourceswww.lpi.orgwww.linux-praxis.dewww.lpiforums.comwww.tldp.orgwww.fsf.orgwww.linuxit.com
NotationsCommands and filenames will appear in the text in bold.
The <> symbols are used to indicate a non optional argument.The [] symbols are used to indicate an optional argument
Commands that can be typed directly in the shell are highlighted as below
command
or
command
_____________________________________________________________________
8
LinuxIT Technical Education Centre
Contents_____________________________________________________________________
Table of Contents
Introduction:...............................................................................................................................................8Acknowledgments....................................................................................................................................8History......................................................................................................................................................8
The Linux Kernel......................................................................................................................................121. Kernel Concepts ............................................................................................................................... 122. The Modular Kernel............................... ............................................................. ............................... 133. Routine Kernel Recompilation....................... ............... ............... ................ ............... ............... ........134. Exercises........................ .............................................. .............................................. .......................17
Booting Linux...........................................................................................................................................201. Understanding Runlevels...................................................................................................................202. The joys of inittab...............................................................................................................................213. LILO the Linux boot Loader................................. ...................... ...................... ...................... ............235. Exercises........................ .............................................. .............................................. .......................25
Managing Groups and Users.................................................................................................................. 271. Creating new users............................................................................................................................272. Working with groups............................... ............................................................ ............................... 273. Configuration files..............................................................................................................................294. Command options..............................................................................................................................315. Modifying accounts and default settings............................................................................................316. Exercises........................ .............................................. .............................................. .......................34
Network Configuration.............................................................................................................................351. The Network Interface........................................................................................................................352. Host Information.................................................................................................................................363. Stop and Start Networking.................................................................................................................364. Routing...............................................................................................................................................375. Common Network Tools............... ............................. ............................ ............................. ...............396. Exercises........................ .............................................. .............................................. .......................42
TCP/IP Networks.......................................................................................................................................431. Binary Numbers and the Dotted Quad...............................................................................................432. Broadcast Netmask and Network......................................................................................................433. Network Classes................................................................................................................................454. Subnets..............................................................................................................................................465. The TCP/IP Suite...............................................................................................................................476. TCP/IP Services and Ports.......................................... ............................ ............................ ..............487. Exercices........................ .............................................. .............................................. .......................50
_____________________________________________________________________
9
LinuxIT Technical Education Centre
Contents_____________________________________________________________________
Network Services............................. ................... ................... .................. ................... ................... ..........511. The inetd daemon..............................................................................................................................512. TCP wrappers....................................................................................................................................523. Setting up NFS...................................................................................................................................534. SMB and NMB...................................................................................................................................545. DNS services.....................................................................................................................................566. Sendmail main Configuration.............................................................................................................617. The Apache server.............................................................................................................................618. Exercises........................ .............................................. .............................................. .......................63
Bash Scripting..........................................................................................................................................651. The bash environment.............................. .................... ................... .................... .................... ..........652. Scripting Essentials............................................................................................................................663. Logical evaluations.............................................................. .............................................................. 674. Loops.................................................................................................................................................685. Expecting user input............................... ............................................................ ............................... 706. Working with Numbers.......................................................................................................................70
Basic Security...........................................................................................................................................721. Local Security.................................................................. .................................................................. 722. Network Security................................................................................................................................733. The Secure Shell............................................................................................................................... 774. Kernel security...................................................................................................................................78
Linux System Administration..................................................................................................................801. Logfiles and configuration files...........................................................................................................802. Log Utilities....................... ............................................. ............................................. .......................813. Automatic Tasks................................................................................................................................ 834. Backups and Compressions................... .................................... .................................... ...................845. Exercises........................ .............................................. .............................................. .......................86
Setting up PPP..........................................................................................................................................871. Serial Modems...................................................................................................................................872. USB Modems.....................................................................................................................................883. Dialup Configuration .............................. ............................................................ ............................... 894. pppd and chat ...................................................................................................................................905. PPPD peers.......................................................................................................................................916. Wvdial................................................................................................................................................91
Printing......................................................................................................................................................941. Filters and gs.................................. .................................................................. ................................. 942. Printers and print queues...................................................................................................................943. Printing Tools.....................................................................................................................................954. The configuration files........................................................................................................................965. Exercises........................ .............................................. .............................................. .......................99
LPI 102 Objectives..................................................................................................................................100
Index........................................................................................................................................................105
_____________________________________________________________________
10
LinuxIT Technical Education Centre
The Linux Kernel_____________________________________________________________________
The Linux Kernel
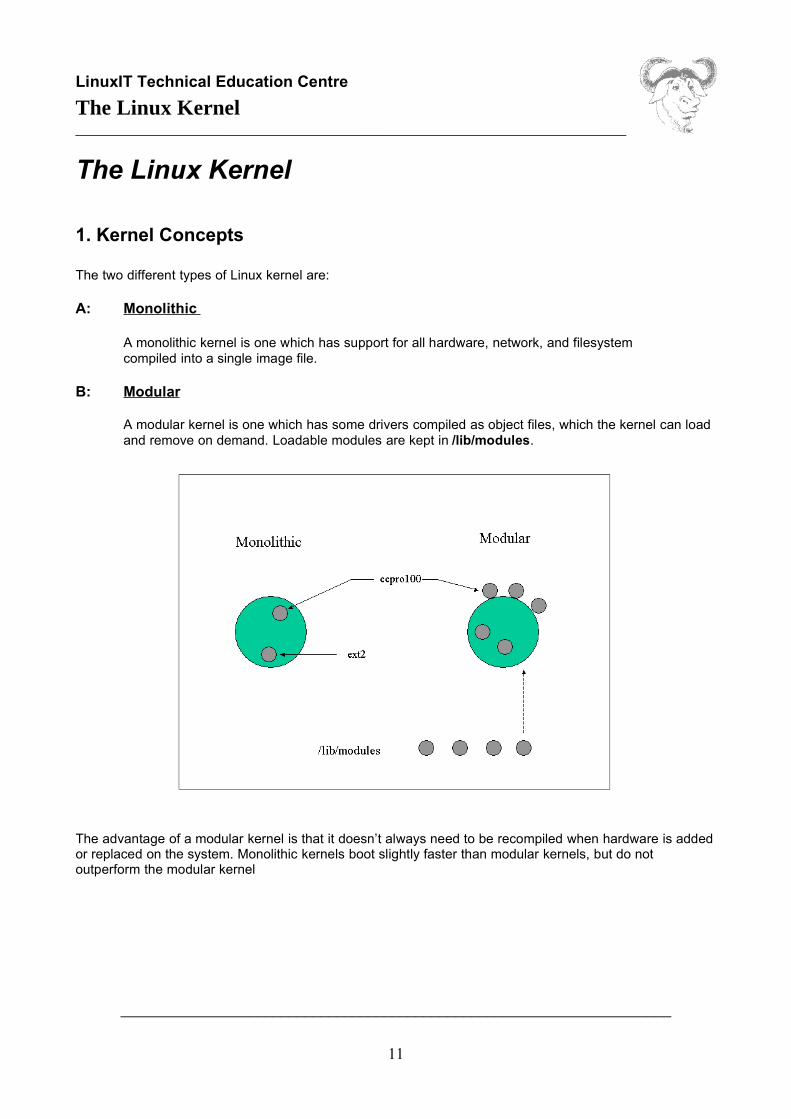
1. Kernel Concepts
The two different types of Linux kernel are:
A: Monolithic
A monolithic kernel is one which has support for all hardware, network, and filesystemcompiled into a single image file.
B: Modular
A modular kernel is one which has some drivers compiled as object files, which the kernel can loadand remove on demand. Loadable modules are kept in /lib/modules.
The advantage of a modular kernel is that it doesn’t always need to be recompiled when hardware is addedor replaced on the system. Monolithic kernels boot slightly faster than modular kernels, but do notoutperform the modular kernel
_____________________________________________________________________
11
LinuxIT Technical Education Centre
The Linux Kernel_____________________________________________________________________
2. The Modular Kernel
Many components of the Linux kernel may be compiled as modules which the kernel can dynamically loadand remove as required.
The modules for a particular kernel are stored in /lib/modules/<kernel-version>.
The best components to modularise are ones not required at boot time, for example peripheral devicesand supplementary file systems.
Kernel modules are controlled by utilities supplied by the modutils package:
– lsmod– rmmod– insmod– modprobe– modinfo
Many modules are dependant on the presence of other modules. A flat file database of moduledependencies /lib/modules/<kernel-version>/modules.dep is generated by the depmod command. Thiscommand is run by the rc.sysinit script when booting the system.
-- modprobe will load any module and dependent modules listed in modules.dep
-- /etc/modules.conf is consulted for module parameters (IRQ and IO ports) but most often contains a listof aliases. These aliases allow applications to refere to a device using a common name. For example thefirst ethernet device is always refered to as eth0 and not by the name of the particular driver.
Fig1: Sample /etc/modules.conf file:
alias eth0 e100alias usb-core usb-uhcalias sound-slot-0 i810_audioalias char-major-108 ppp_genericalias ppp-compress-18 ppp_mppe
# 100Mbps full duplexoptions eth0 e100_speed_duplex=4
_____________________________________________________________________
12
LinuxIT Technical Education Centre
The Linux Kernel_____________________________________________________________________
3. Routine Kernel Recompilation
3.1 Source extraction
The kernel source is stored in the /usr/src/linux directory tree, which is a symbolic link to the /usr/src/(kernel-version) directory. When extracting a new kernel source archive it is recommended to:
• remove the symbolic link to the old kernel source directory tree
rm linux
• extract the new source archive (e.g linux-2.4.20.tar.bz2)
tar xjf linux-2.4.29.tar.bz2
Note: sometimes the archive creates a directory called linux instead of linux-version. This is why thefirst step is important, otherwise you may overwrite an old source tree with the new one.
• create a symbolic link called linux from the newly created directory
ln -s linux-2.4.20 linux
The kernel is almost ready to be configured now, but first we need to make sure that all old binary files arecleared out of the source tree, and this is done with the make mrproper command.
3.2 Kernel Configuration
The kernel is now ready to be configured. This essentially means creating a configuration file called .config.This is done from the kernel source tree directory /usr/src/linux with either of the following
make menuconfig make xconfig make config
All these methods will save the configuration file as /usr/src/linux/.config
_____________________________________________________________________
13
LinuxIT Technical Education Centre
The Linux Kernel_____________________________________________________________________
It is often easier to configure a new kernel using an older .config file by using the make oldconfigcommand. This will prompt the user only for new features in the kernel source tree (if the kernel is newer orhas been patched).
To enable kernel features (with make menuconfig) you will enter the top level category by moving with thearrow keys and pressing enter to access the desired category. Once in the particular category, pressing thespace bar will change the kernel support for a feature or driver.
Possible support types are
• supported (statically compiled) [*] • modular (dynamically compiled) [M] • not supported [ ]
The same choices are available with the other menu editors config and xconfig.
Fig 2: The make xconfig top level menu:
3.3 Kernel Compilation
make dep
Once the kernel configuration is complete, it is necessary to reflect these choices in all the subdirectories ofthe kernel source tree. This is done with the make dep command. Files called .depend containing paths toheader files present in the kernel source tree (/usr/src/linux/include) are generated with the dep target..
_____________________________________________________________________
14
LinuxIT Technical Education Centre
The Linux Kernel_____________________________________________________________________
make clean
The make command gets instructions from the Makefile and will build what is needed. If some files arealready present make will use them as is. In particular files with *.o extensions. To make sure that all theconfiguration options in .config are used to rebuild the files needed one has to run make clean (this deletes*.o files)
make [zImage or bzImage]
The kernel itself is compiled compiled with one of the commands: makemake zImagemake bzImage
When the command exits without any errors, there will be a file in the /usr/src/linux/ directory calledvmlinux. This is the uncompressed kernel.
The two other commands will write an additional file in /usr/src/linux/arch/i386/boot/ called zImage andbzImage respectively. These are compressed kernels using gzip and bzip2. See the next section Installingthe New Kernel to find out how to proceed with these files.
make modules
The modules are compiled with make modules.
make modules_install
Once the modules are compiled they need to be copied to the corresponding subdirectory in /lib/modules.The make modules_install command will do that.
The sequence of commands are depicted in Fig 3.
Fig 3: kernel compilation commands:
make depmake cleanmake bzImagemake modulesmake modules_install
3.4 Installing a New Kernel
The new kernel can be found in /usr/src/linux/arch/i386/boot/bzImage, depending on your architecture ofyour system. This file must be copied to the /boot directory, and named vmlinuz-2.X.X
/usr/src/linux/arch/i386/boot/bzImage /boot/vmlinuz-x
_____________________________________________________________________
15
LinuxIT Technical Education Centre
The Linux Kernel_____________________________________________________________________
Next the /etc/lilo.conf file needs to be edited to add our newly compiled kernel to the boot menu. Copy the“image” section from your existing kernel and add a new image section at the bottom of the file, as shownbelow:
Editing the /etc/lilo.conf fileprompttimeout=50message=/boot/message
image=/boot/vmlinuz label=linux root=/dev/hda6 Existing section read-only
image=/boot/vmlinuz-2.4.9 label=linux-new Added section root=/dev/hda6 read-only----------snip-------------------------------
The symbol table for the various kernel procedures can be copied to the /boot directory:
cp /usr/src/linux/System.map /boot/System.map-x
3.5 Initial Ramdisks
If any dynamically compiled kernel modules are required at boot time (e.g a scsi driver, or the filesystemmodule for the root partition) they will be loaded in an initial ramdisk.
The initial ramdisk is created with the mkinitrd command which only takes two parameters: the filename,and the kernel version number.
If you use an initial ramdisk then you will need to add an initrd= line in your /etc/lilo.conf
Example:
mkinitrd /boot/initrd-2.4.9.img 2.4.9
3.6 Optional
It is recommended to copy the /usr/src/linux/.config file to /boot/config-x, just to keep track of thecapabilities for the different kernels that have been compiled.
_____________________________________________________________________
16

LinuxIT Technical Education Centre
The Linux Kernel_____________________________________________________________________
3.7 Rerunning LILO
Finally lilo needs to be run in order to update the boot loader . First lilo can be run in test mode to see ifthere are any errors in the configuration file:
lilo -v -t
If there are no errors then lilo can be run without the -t option, and the bootloader will be updated.
NOTICE
The LILO bootloader needs to be updated using lilo everytime a changed is made in /etc/lilo.conf
4. Exercises
Before starting with the exercises make sure you don’t have an existing kernel tree in /usr/src/. If youdo, pay attention to the /usr/src/linux symbolic link.
1. Manually recompile the kernel following the compilation steps.
- Get the kernel-version.src.rpm package from rpmfind or a CD (this will also give you a list ofdependencies, such as the gcc compiler or binutils package)
- Install the package with –i (this will put all the code in /usr/src/ )
- Go into the /usr/src/linux-version directory and list the configs directory
- Copy the kernel config file that matches your architecture into the current directory and call it .config
- Run
make oldconfig
at the command line to take into account this new .config file.
- Edit the Makefile and make sure the version is not the same as your existing kernel. You can getinformation on your current kernel by running uname –a at the command line or list the /lib/modulesdirectory.
- Run
make menuconfig (or menu or xconfig)
- When you exit the above program the .config file is altered but the changes have not yet taken place inthe rest of the source tree. You next need to run
make dep
_____________________________________________________________________
17

LinuxIT Technical Education Centre
The Linux Kernel_____________________________________________________________________- Finally to force new object files (.o) to be compiled with these changes you delete all previously compiledcode with
make clean
- You can now build the kernel the modules and install the modules with:
make bzImage; make modules; make modules_install
- The modules are now installed in the /lib/modules/version directory. The kernel is called bzImageand is in the following directory:
/usr/src/linux/arch/i386/boot/ We need to manually install this kernel (2 steps):
(i)cp /usr/src/linux/arch/i386/boot/bzImage /boot/mykernel
(ii) That was easy! now edit /etc/lilo.conf and add an ‘image’ paragraph that will tell LILO where tofind this kernel and the root filesystem.
- Run /sbin/lilo and reboot
2. Since we downloaded the kernel-version.src.rpm package we can now use this package torecompile a ‘RedHat preconfigured’ kernel. Notice that although no intervention is needed you won’t be ableto change the .config menu.
- First rebuild the compiled binary package with
rpm --rebuild kernel-version.src.rpm (...wait!)
- This will eventually generate the kernel-version.i368.rpm in /usr/src/redhat/RPMS/i386/.
- Next, upgrade you kernel with the RPM manager using the –U option.
_____________________________________________________________________
18
LinuxIT Technical Education Centre
Booting Linux____________________________________________________________________
Booting Linux
Overview
Taking a closer look at the booting process helps troubleshooting when dealing with both hardware andadministrative tasks.
We first focus on the role of the init program and its' associated configuration file /etc/inittab. The role ofLILO at boot time is investigated in greater depth. Finally we summarize the booting process. Thedocument "From Power to Bash Prompt" written by Greg O'Keefe as well as the boot(7) manpage are bothgood references for this module.
1. Understanding Runlevels
Unlike most non-UNIX operating systems which only have 2 modes of functionality (on and off), UNIXoperating systems, including Linux, have different runlevels such as "maintenance" runlevel or "multi-user"runlevel, etc. Runlevels are numbered from 0 to 6.
Listing 1: Linux runlevelsRunlevel 0 shuts down the machine safely, Runlevel 6 restarts the machine safelyRunlevel 1 is single user modeRunlevel 2 is multi-user mode, but does not start NFSRunlevel 3 is full multi-user modeRunlevel 4 is not defined and generally unusedRunlevel 5 is like runlevel 3 but runs a Display Manager as well
Both init and telinit are used to switch from one runlevel to another. Remember that init is the first programlaunched after the kernel has been initialised at boot time. The PID for init is always 1.
Listing 2: The PID for init is always 1[root@nasaspc /proc]# ps uax |grep initUSER PID %CPU %MEM VSZ RSS TTY STAT START TIMECOMMANDroot 1 0.2 0.0 1368 52 ?S 20:17 0:04 init [3]
At each runlevel the system will stop or start a set of specific services. These programs are kept in /etc/rc.d/init.d. This directory contains all the services that the system may run. Once these programs arelaunched they will stay active until a new runlevel is called. The following services are also called daemons.
_____________________________________________________________________
19
LinuxIT Technical Education Centre
Booting Linux____________________________________________________________________
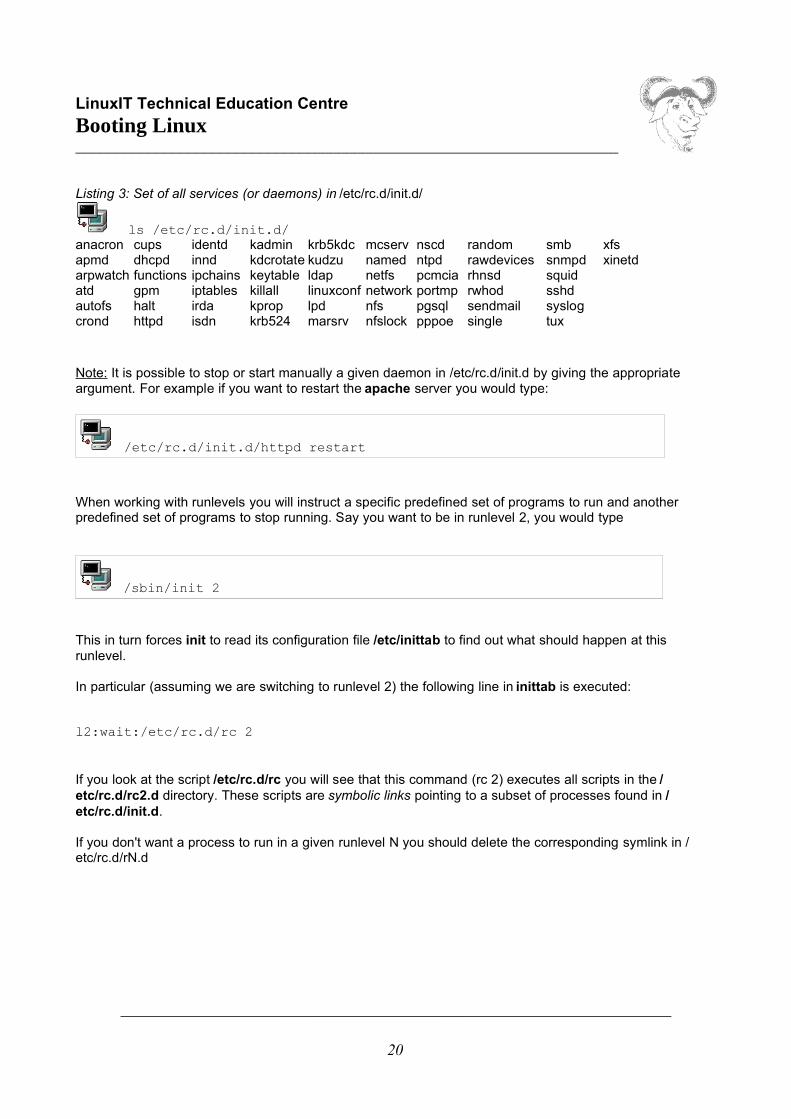
Listing 3: Set of all services (or daemons) in /etc/rc.d/init.d/
ls /etc/rc.d/init.d/anacron cups identd kadmin krb5kdc mcserv nscd random smb xfsapmd dhcpd innd kdcrotate kudzu named ntpd rawdevices snmpd xinetdarpwatch functions ipchains keytable ldap netfs pcmcia rhnsd squidatd gpm iptables killall linuxconf network portmp rwhod sshdautofs halt irda kprop lpd nfs pgsql sendmail syslogcrond httpd isdn krb524 marsrv nfslock pppoe single tux
Note: It is possible to stop or start manually a given daemon in /etc/rc.d/init.d by giving the appropriateargument. For example if you want to restart the apache server you would type:
/etc/rc.d/init.d/httpd restart
When working with runlevels you will instruct a specific predefined set of programs to run and anotherpredefined set of programs to stop running. Say you want to be in runlevel 2, you would type
/sbin/init 2
This in turn forces init to read its configuration file /etc/inittab to find out what should happen at thisrunlevel.
In particular (assuming we are switching to runlevel 2) the following line in inittab is executed:
l2:wait:/etc/rc.d/rc 2
If you look at the script /etc/rc.d/rc you will see that this command (rc 2) executes all scripts in the /etc/rc.d/rc2.d directory. These scripts are symbolic links pointing to a subset of processes found in /etc/rc.d/init.d.
If you don't want a process to run in a given runlevel N you should delete the corresponding symlink in /etc/rc.d/rN.d
_____________________________________________________________________
20
LinuxIT Technical Education Centre
Booting Linux____________________________________________________________________
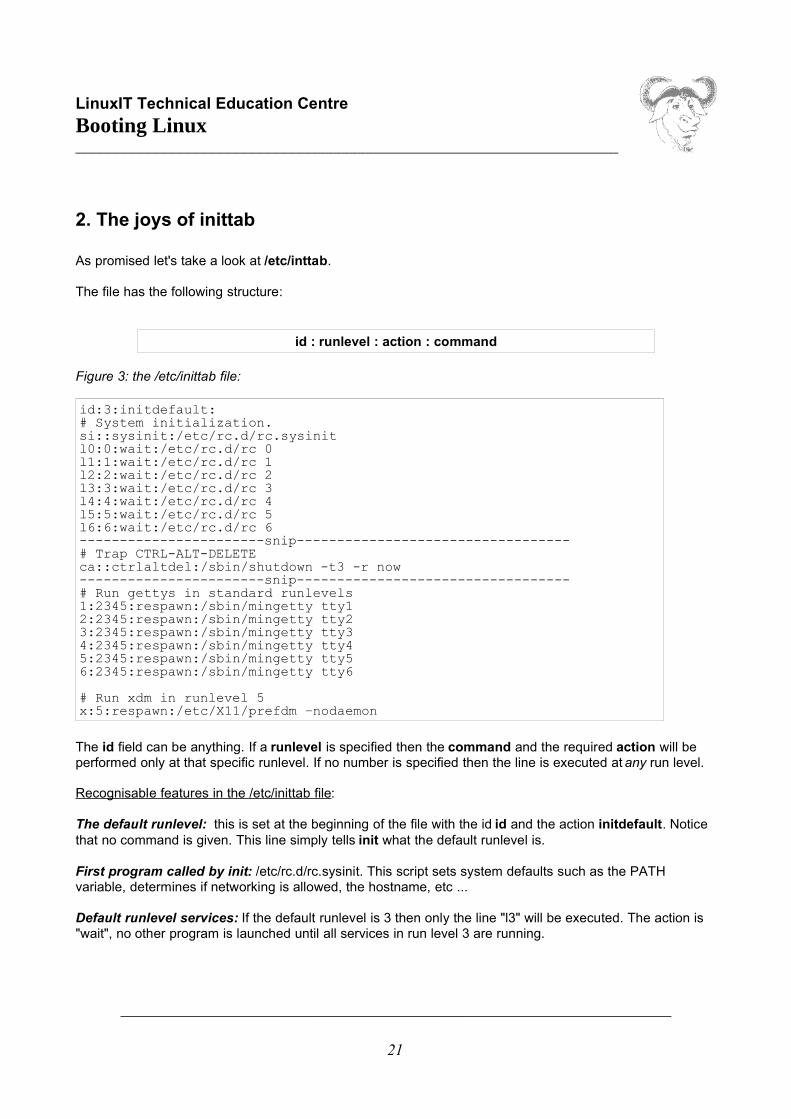
2. The joys of inittab
As promised let's take a look at /etc/inttab.
The file has the following structure:
id : runlevel : action : command
Figure 3: the /etc/inittab file:
id:3:initdefault:# System initialization.si::sysinit:/etc/rc.d/rc.sysinitl0:0:wait:/etc/rc.d/rc 0l1:1:wait:/etc/rc.d/rc 1l2:2:wait:/etc/rc.d/rc 2l3:3:wait:/etc/rc.d/rc 3l4:4:wait:/etc/rc.d/rc 4l5:5:wait:/etc/rc.d/rc 5l6:6:wait:/etc/rc.d/rc 6-----------------------snip----------------------------------# Trap CTRL-ALT-DELETEca::ctrlaltdel:/sbin/shutdown -t3 -r now-----------------------snip----------------------------------# Run gettys in standard runlevels1:2345:respawn:/sbin/mingetty tty12:2345:respawn:/sbin/mingetty tty23:2345:respawn:/sbin/mingetty tty34:2345:respawn:/sbin/mingetty tty45:2345:respawn:/sbin/mingetty tty56:2345:respawn:/sbin/mingetty tty6
# Run xdm in runlevel 5x:5:respawn:/etc/X11/prefdm –nodaemon
The id field can be anything. If a runlevel is specified then the command and the required action will beperformed only at that specific runlevel. If no number is specified then the line is executed at any run level.
Recognisable features in the /etc/inittab file:
The default runlevel: this is set at the beginning of the file with the id id and the action initdefault. Noticethat no command is given. This line simply tells init what the default runlevel is.
First program called by init: /etc/rc.d/rc.sysinit. This script sets system defaults such as the PATHvariable, determines if networking is allowed, the hostname, etc ...
Default runlevel services: If the default runlevel is 3 then only the line "l3" will be executed. The action is"wait", no other program is launched until all services in run level 3 are running.
_____________________________________________________________________
21
LinuxIT Technical Education Centre
Booting Linux____________________________________________________________________The getty terminals: The lines with id's 1-to-6 launch the virtual terminals. This is where you can alter thenumber of virtual terminals.
Runlevel 5: The final line in inittab launches the Xwindow manager if runlevel 5 is reached.
Remarks:
1. You can set a modem to listen for connections in inittab. If your modem is linked to /dev/ttyS1 then thefollowing line will allow data connections (no fax) after 2 rings:
S1:12345:respawn:/sbin/mgetty -D -x 2 /dev/ttyS1
2. When making changes to /etc/inittab you need to force init to reread this configuration file. This is mosteasily done using:
/sbin/init q
3. LILO the Linux boot Loader
Information needed by the loader is updated by /sbin/lilo (the bootloader installer) which in turn reads its'configuration file /etc/lilo.conf.
During bootup LILO needs to know essential information such as where the kernel is kept (usually in /boot)and where the filesystem root partition is. LILO has no understanding of filesystem layout or of where things are. Only offsets on the physical disks. Ifyou are installing a second Linux distribution B that is not running while setting up lilo.conf, you will need tomount partitions such as the /boot partition of B. You must also keep track of where B's root partition is.
init parameters :
Likewise, LILO can also parse the runlevel parameters to init. Once the kernel is loaded, init takes over thebooting process. If no parameters are given, init will launch the default runlevel specified in /etc/inittab.
Parsing runlevel instructions to init at the LILO prompt
Boot: linux s
_____________________________________________________________________
22
LinuxIT Technical Education Centre
Booting Linux____________________________________________________________________
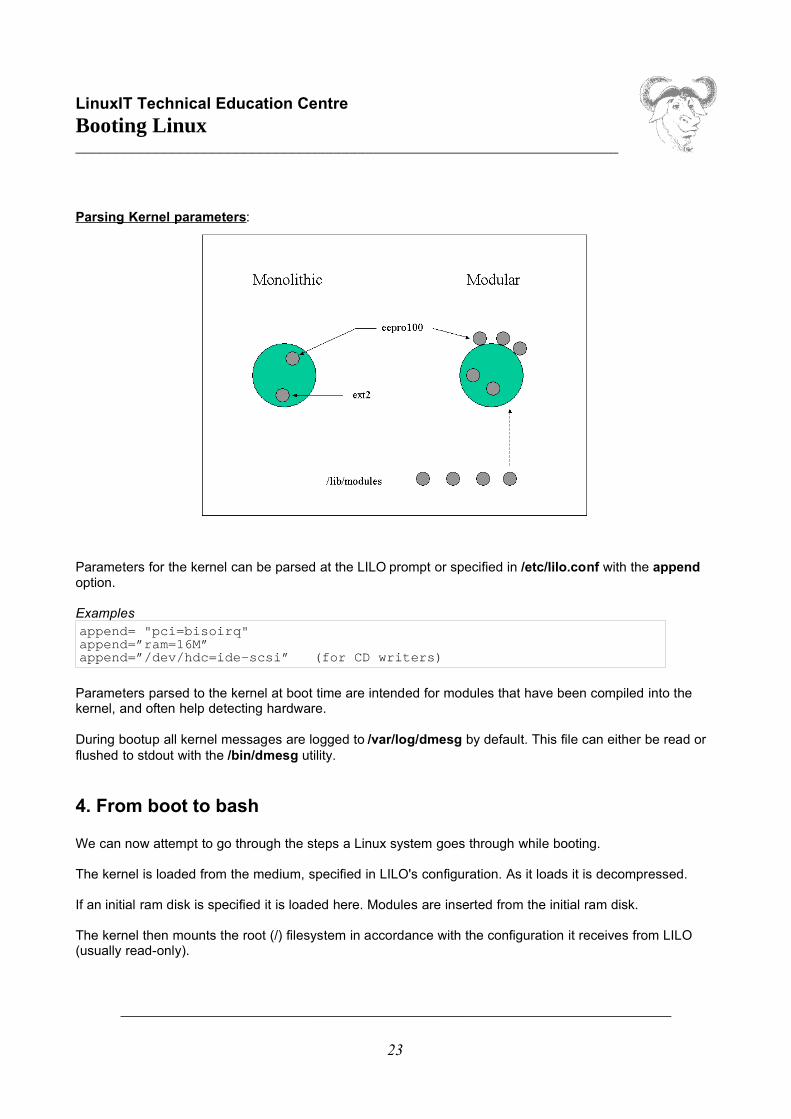
Parsing Kernel parameters:
Parameters for the kernel can be parsed at the LILO prompt or specified in /etc/lilo.conf with the appendoption.
Examplesappend= "pci=bisoirq"append=”ram=16M”append=”/dev/hdc=ide-scsi” (for CD writers)
Parameters parsed to the kernel at boot time are intended for modules that have been compiled into thekernel, and often help detecting hardware.
During bootup all kernel messages are logged to /var/log/dmesg by default. This file can either be read orflushed to stdout with the /bin/dmesg utility.
4. From boot to bash
We can now attempt to go through the steps a Linux system goes through while booting.
The kernel is loaded from the medium, specified in LILO's configuration. As it loads it is decompressed.
If an initial ram disk is specified it is loaded here. Modules are inserted from the initial ram disk.
The kernel then mounts the root (/) filesystem in accordance with the configuration it receives from LILO(usually read-only).
_____________________________________________________________________
23
LinuxIT Technical Education Centre
Booting Linux____________________________________________________________________Hence essential programs in /bin and /sbin are made available.
The kernel then loads init - the first 'userspace' process.
Init reads /etc/inittab and follows its' instructions. In particular rc.sysinit is run. A FileSystem integrity ChecK(FSCK) is done on the filesystems in accordance with entries in /etc/fstab.
Next init goes into the default runlevel, the gettys start and the boot process is over.
The prompt to login is now managed by the gettys on the ttys. After the user has typed in their usernameand pressed return;
/bin/login is started.
The user is prompted by /bin/login for the password. The user enters a password and presses return.
The password the user enters is encrypted the same way the user's password is by the passwd command,and compared to the password in /etc/passwd or /etc/shadow.
_____________________________________________________________________
24

LinuxIT Technical Education Centre
Booting Linux____________________________________________________________________
5. Exercises
Take a look at the boot(7) manpage, it covers most of this what we did in this module.
1. Change the system’s default run level to 3 and then 5.- How do you know your current runlevel?
2. Enable the Ctrl+Alt+Del in runlevel 3 only.
3. Add a new login prompt on tty7.- How can you force init to read its’ configuration file?
4. Use dmesg to read the chipset of your ethernet card.
5. Investigate differences between shutdown, halt and reboot.- Which option to shutdown will force an fsck at the next boot?
6. Use the tools chkconfig or ntsysv to disable the sshd daemon in runlevel 2,3,4, and 5Verify that the symbolic links in the rc2.d, rc3.d, rc4.d and rc5.d directories have changed.
7. Reboot the system. At the boot prompt give the appropriate init= parameter to skip /sbin/init and start asimple bash session.
_____________________________________________________________________
25
LinuxIT Technical Education Centre
Managing Groups and Users______________________________________________________________________
Managing Groups and Users
1. Creating new users
Step 1: Create an account
The /usr/sbin/useradd command adds new users to the system and the symbolic link adduser points to it.
Syntax:useradd [options] login-name
Example: add a user with login-name rufus
useradd rufus
Default values will be used when no options are specified. You can list these values with useradd –D.
Default options listed with useradd –DGROUP=100HOME=/homeINACTIVE=-1EXPIRE=SHELL=/bin/bashSKEL=/etc/skel
Notice that this information is also available in the file /etc/default/useradd
Step 2: Activate the account with a new password
To allow a user to access his or her account the administrator must allocate a password to the user usingthe passwd tool.
Syntax:passwd login-name
These steps create a new user. This has also defined the user’s environment such as a home directory anda default shell. The user has also been assigned to a group, his primary group.
_____________________________________________________________________
26
LinuxIT Technical Education Centre
Managing Groups and Users______________________________________________________________________
2. Working with groups
Every new user is assigned to an initial (or primary) group. Two conventions exist.
Traditionally this primary group is the same for all users and is called users with a group id (GID) of 100.Many Linux distributions adhere to this convention such as Suse and Debian.
The User Private Group scheme (UPG) was introduced by RedHat and changes this convention withoutchanging the way in which UNIX groups work. With UPG each new user belongs to their own primarygroup. The group has the same name as the login-name (default), and the GID is in the 500 to 60000 range(same as UIDs).
As a consequence, when using the traditional scheme for groups the user’s umask (see LPI 101) is set to022, whereas in the UPG scheme the umask is set to 002.
Belonging to groups
A user can belong to any number of groups. However at any one time (when creating a file for example)only one group is the effective group.
The list of all groups a user belongs to is obtained with either the groups or id commands.
Example for user root:
List all ID's :
id
➔ ► uid=0(root) gid=0(root) groups=0(root), 1(bin), 2(daemon), 3(sys),4(adm), 6(disk), 10(wheel), 600(sales)
List all groups :
groups
➔ ► root bin daemon sys adm disk wheel sales
_____________________________________________________________________
27
LinuxIT Technical Education Centre
Managing Groups and Users______________________________________________________________________
Joining a group
Joining a group changes the user’s effective group and starts a new session from which the user can thenlogout. This is done with the newgrp command.
Example: joining the sales group
newgrp sales
If the groups command is issued, the first group on the list would no longer be root but sales.
Creating a new group
The groupadd tool is used to administer groups. This will add an entry in the /etc/group file.
Example: Create the group devel
groupadd devel
Adding a user to a group
Administration tasks can be carried out with the gpasswd tool. One can add (-a) or remove (-d) users from agroup and assign an administrator (-A). The tool was originally designed to set a single password on agroup, allowing members of the same group to login with the same password. For security reasons thisfeature no longer works.
Example: Add rufus to the group devel
gpasswd -a rufus devel
_____________________________________________________________________
28
LinuxIT Technical Education Centre
Managing Groups and Users______________________________________________________________________
3. Configuration files
The /etc/passwd and /etc/shadow files:
The names of all the users on the system are kept in /etc/passwd. This file has the following stucture:
1. Login name2. Password (or x if using a shadow file)3. The UID4. The GID5. Text description for the user6. The user's home directory7.The user's shell
These 7 fields are separated by colons. As in the example below.
/etc/passwd entry with encrypted passwd:
george:$1$K05gMbOv$b7ryoKGTd2hDrW2sT.h:Dr G Micheal:/home/georges:/bin/bash
In order to hide the encrypted passwords from idle users you should use a shadow file. The /etc/shadowfile then holds the user names and encrypted passwords and is readable only by root.
If you don't have a shadow file in /etc then you should issue the following command:
/usr/sbin/pwconv (passwd -> shadow)
This will leave an 'x' in the 2nd field of /etc/passwd and create the /etc/shadow file. If you don't whish to useshadow passwords you can do so using
/usr/sbin/pwunconv (shadow -> passwd)
Caution: Be careful to assign the proper permissions to the /etc/password file
_____________________________________________________________________
29
LinuxIT Technical Education Centre
Managing Groups and Users______________________________________________________________________
The /etc/group and gshadow files:
In the same way, information about groups is kept in /etc/group. This file has 4 fields separated by colons.
1. Group name2. The group password (or x if gshadow file exists)3. The GID4. A comma separated list of members
Example /etc/group entry:
java:x:550:jade, eric, rufus
As for users there is a /etc/gshadow file that is created when using shadow group passwords. The utilitiesused to switch backwards and forward from shadow to non-shadow files are as follow
/usr/sbin/grpconv creates the /etc/gshadow file
/usr/sbin/grpunconv deletes the gshadow file
The /etc/login.defs and /etc/skel/ files
The /etc/login.defs file contains the following information:
• the mail spool directory: MAIL_DIR
• password aging controls: PASS_MAX_DAYS, PASS_MIN_DAYS, PASS_MAX_LEN, PASS_WARN_AGE
• max/min values for automatic UID selection in useradd:UID_MIN, UID_MAX
• max/min values for automatic GID selection in groupadd:GID_MIN, GID_MAX
• automatically create a home directory with useradd:CREATE_HOME
The /etc/skel directory contains default files that will be copied to the home directory of newly created users:.bashrc, .bash_profiles, ...
_____________________________________________________________________
30

LinuxIT Technical Education Centre
Managing Groups and Users______________________________________________________________________
4. Command options
useradd (options)
-c comment (Full Name) -d path to home directory -g initial group (GID). The GID must already exist -G comma separated list of supplementary groups -u user’s UID -s user’s default shell -p password (md5 encrypted, use quotes!) -e account expiry date -k the skel directory -n switch off the UPG group scheme
groupadd (options)
-g assign a GID
5. Modifying accounts and default settings
All available options while creating a user or a group can be modified. The usermod utility has the followingmain options:
usermod (options)
-d the users directory-g the users initial GID-l the user's login name-u the user's UID-s the default shell.
Notice these options are the same as for useradd.
Likewise, you can change details about a group with the groupmod utility. There are mainly two options:
groupmod (options)
-g the GID-n the group name.
_____________________________________________________________________
31
LinuxIT Technical Education Centre
Managing Groups and Users______________________________________________________________________
Locking an account
• A user’s account can be locked by prefixing an exclamation mark to the user’s password. This canalso be done with the following command line tools:
Lock Unlockpasswd -l passwd -uusermod -L usermod -U
• When using shadow passwords, replace the x with a *
• A less useful option is to remove the password entirely with passwd -d.
• Finally, one can also assign /bin/false to the user’s default shell in /etc/passwd.
Changing the password expiry dates:
By default a user’s password is valid for 99999 days, that is 2739 years (default PASS_MAX_DAYS). Theuser is warned for 7 days that his password will expire (default PASS_WARN_AGE) with the followingmessage as he logs in:
Warning: your password will expire in 6 days
There is another password aging policy number that is called PASS_MIN_DAYS. This is the minimumnumber of days before a user can change his password; it is set to zero by default.
The chage tool allows an administrator to change all these options.
Usage: chage [ -l ] [ -m min_days ] [ -M max_days ] [ -W warn ] [ -I inactive ] [ -E expire ] [ -d last_day ] user
The first option –l lists the current policy values for a user. We will only discuss the –E option. This locks anaccount at a given date. The date is either in UNIX days or in YYYY/MM/DD format.
Notice that all these values are stored in the /etc/shadow file, and can be edited directly.
Removing an account:
A user’s account may be removed with the userdel command line. To make sure that the user’s homedirectory is also delete use the -r option.
userdel -r jade
_____________________________________________________________________
32
LinuxIT Technical Education Centre
Managing Groups and Users______________________________________________________________________
6. Exercises
1. Creating users
Use adduser to create a user called tux with user ID 600 and group ID 550
Use usermod to change this user’s home directory.Does the new directory need to be created? Is the content of /etc/skel copied to the new directory?Can the contents of the old home directory still be accessed by user tux?
Use usermod to add tux to the group wheel.
2. Working with groups
Create a group called sales using groupadd.
Add tux to this group using gpasswd.
Login as tux and join the group sales using newgrp.
3. Conifiguration files
Add a user to the system by editing /etc/passwd and /etc/groupCreate a group called share and add user tux to this group by manually editing /etc/group
4. Modifying an Account
Change the expiry date for user tux’s account using usermod.Lock the user’s account. (Use tools or edit /etc/shadow ...)Prevent the user from login in by changing the user’s default shell to /bin/falseChange the PASS_MAX_DAYS for user tux to 1 in /etc/shadow
5. Changing default settings
Use useradd -D to change the system's default settings such that every new user will be assigned /bin/sh instead of /bin/bash. (Notice that this will change the file in /etc/defaults/)
Edit /etc/login.defs and change the default PASS_MAX_DAYS so that new users need to change theirpassword every 5 days
_____________________________________________________________________
33

LinuxIT Technical Education Centre
Network Configuration______________________________________________________________________
Network Configuration
1. The Network Interface
The network interface card (NIC) must be supported by the kernel. To determine which card you are usingyou can get information from dmesg, /proc/interrupts, /sbin/lsmod. or /etc/modules.conf
Example:
dmesg
► Linux Tulip driver version 0.9.14 (February 20, 2001)
PCI: Enabling device 00:0f.0 (0004 -> 0007)
PCI: Found IRQ 10 for device 00:0f.0
eth0: Lite-On 82c168 PNIC rev 32 at 0xf800, 00:A0:CC:D3:6E:0F, IRQ 10.
eth0: MII transceiver #1 config 3000 status 7829 advertising 01e1.
cat /proc/interrupts
► 0: 8729602 XT-PIC timer
1: 4 XT-PIC keyboard
2: 0 XT-PIC cascade
7: 0 XT-PIC parport0
8: 1 XT-PIC rtc
10: 622417 XT-PIC eth0
11: 0 XT-PIC usb-uhci
14: 143040 XT-PIC ide0
15: 180 XT-PIC ide1
/sbin/lsmod
► Module Size Used by
tulip 37360 1 (autoclean)
From the example above we see that the Ethernet card’s chipset is Tulip, the i/o address is 0xf800 and theIRQ is 10. This information can be used either if the wrong module is being used or if the resources (i/o orIRQ) are not available.
_____________________________________________________________________
34
LinuxIT Technical Education Centre
Network Configuration______________________________________________________________________This information can either be used to insert a module with a different i/o address (using the modprobe orinsmod utilities) or can be saved in /etc/modules.conf (this will save the settings for the next bootup).
2. Host Information
The following files are used to store networking information.
• /etc/resolv.conf contains a list of DNS servers
nameserver 192.168.1.108
nameserver 192.168.1.1
search linuxit.org
• /etc/HOSTNAME your machine's name (rather use the /etc/sysconfig/network-scripts/ifcfg-eth0
file).
• /etc/hosts contains your machine's IP number as well as a list of known hosts # Do not remove the following line, or various programs
# that require network functionality will fail.
127.0.0.1 localhost localhost.localdomain mypc
# other hosts
192.168.1.108 mypc mypc.linuxit.org mypc
192.168.1.119 hp
• /etc/sysconfig/network the default gateway is set here
NETWORKING=yes
HOSTNAME=mypc.linuxit.org
GATEWAY=192.168.1.1
GATEWAYDEV=
• /etc/sysconfig/network-scripts/ifcfg-eth0 The configuration parameters for eth0
DEVICE=eth0
BOOTPROTO=none
BROADCAST=192.168.1.255
IPADDR=192.168.1.108
NETMASK=255.255.255.0
NETWORK=192.168.1.0
ONBOOT=yes
USERCTL=no
_____________________________________________________________________
35
LinuxIT Technical Education Centre
Network Configuration______________________________________________________________________
3. Stop and Start Networking
● From the command line
The main tool used to bring up the network interface is /sbin/ifconfig. Once initialised the kernel modulealiased to eth0 in /etc/modules.conf (e.g tulip.o) is loaded and assigned an IP and netmask value.
As a result the interface can be switched on and off without loosing this information as long as the kernelmodule is inserted.
Examples: Using ifconfig.
/sbin/ifconfig eth0 192.168.10.1 netmask 255.255.128.0
/sbin/ifconfig eth0 down
/sbin/ifconfig eth0 up
Another tool is /sbin/ifup. This utility reads the system’s configuration files in /etc/sysconfig/ and assignsthe stored values for a given interface. The script for eth0 is called ifcfg-eth0 and has to be configured. If aboot protocol such as DHCP is defined then ifup will start the interface with the boot protocol.
Examples: Using ifup.
/sbin/ifup eth0
/sbin/ifup ppp0
/sbin/ifdown eth0
●. Using the network script
At boot time the ethernet card is initialised with the /etc/rc.d/init.d/network script. All the relevantnetworking files are sourced in /etc/sysconfig/. In addition the script also reads the sysctl options in /etc/sysctl.conf, this is where you can configure the system as a router (allow IP forwarding in the kernel).
/etc/rc.d/init.d/network restart
●. Renewing a DHCP lease
The following tools can query the DHCP server for a new IP:pumpdhcpclient A client daemon exists called dhcpcd (do not confuse with the DHCP server daemon dhcpd)
_____________________________________________________________________
36
LinuxIT Technical Education Centre
Network Configuration______________________________________________________________________4. Routing
A noticeable difference when using ifup is the system’s routing table. This is because either the /etc/sysconfig/network file is read, where a default gateway is stored, or the DHCP server has sent thisinformation together with the IP number.The routing tables are configured, checked and changed with the /sbin/route tool.
Routing examples:
Add a static route to the network 10.0.0.0 through the device eth1 and use 192.168.1.108 as the gatewayfor that network:
/sbin/route add -net 10.0.0.0 gw 192.168.1.108 dev eth1
Add a default gateway:
/sbin/route add default gw 192.168.1.1 eth0
Listing the kernel routing table:
/sbin/route -n
► Kernel IP routing table
Destination Gateway Genmask Iface
192.168.1.0 0.0.0.0 255.255.255.0 eth0
10.1.8.0 192.168.1.108 255.0.0.0 eth1
127.0.0.0 0.0.0.0 255.0.0.0 lo
0.0.0.0 192.168.1.1 0.0.0.0 eth0
Default Gateway: In the last listing, the Destination field is a list of networks. In particular, 0.0.0.0 means‘anywhere’. With this in mind, there are two IP’s in the Gateway field. Which one is the default gateway ?
To avoid having to enter static routes by hand special daemons such as gated or routed can be run todynamically update routing tables across a network
If you belong to the 192.168.10.0 network and you add a route to the 192.168.1.0 network you may findthat machines in the latter network are not responding. This is because no route has been set from the192.168.1.0 network back to your host!! This problem is solved using dynamic routing.
Permanent Static Routes
_____________________________________________________________________
37
LinuxIT Technical Education Centre
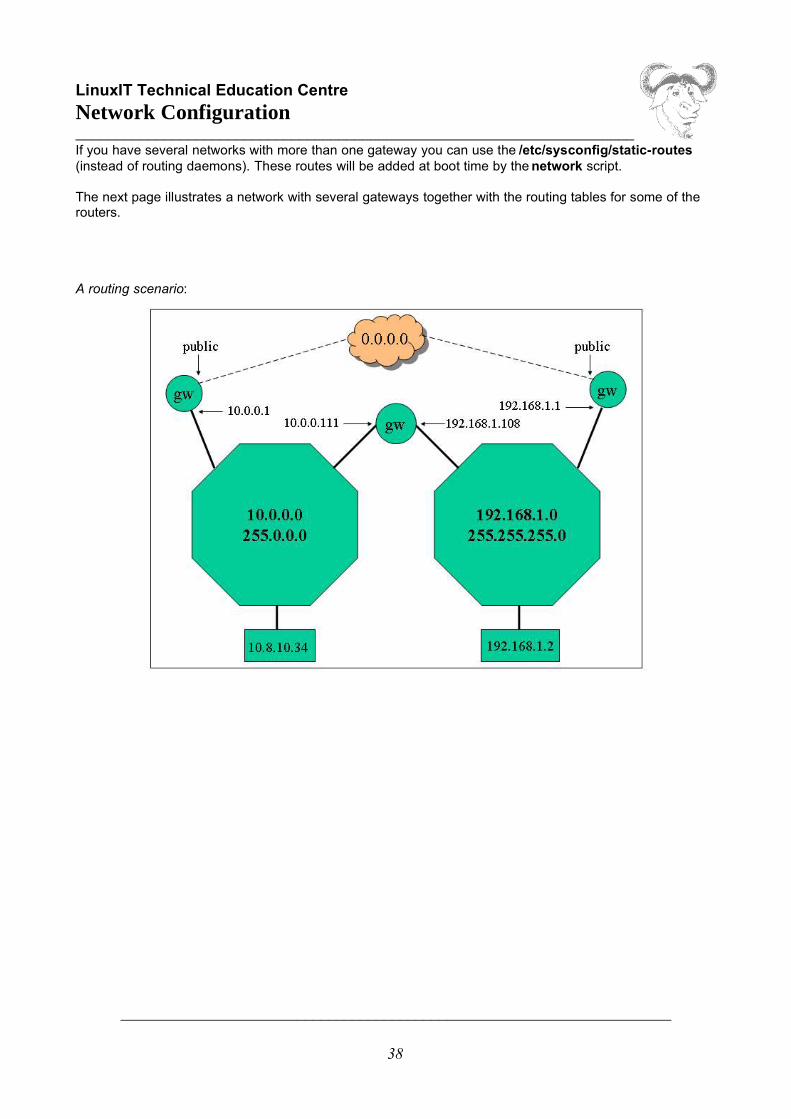
Network Configuration______________________________________________________________________If you have several networks with more than one gateway you can use the /etc/sysconfig/static-routes(instead of routing daemons). These routes will be added at boot time by the network script.
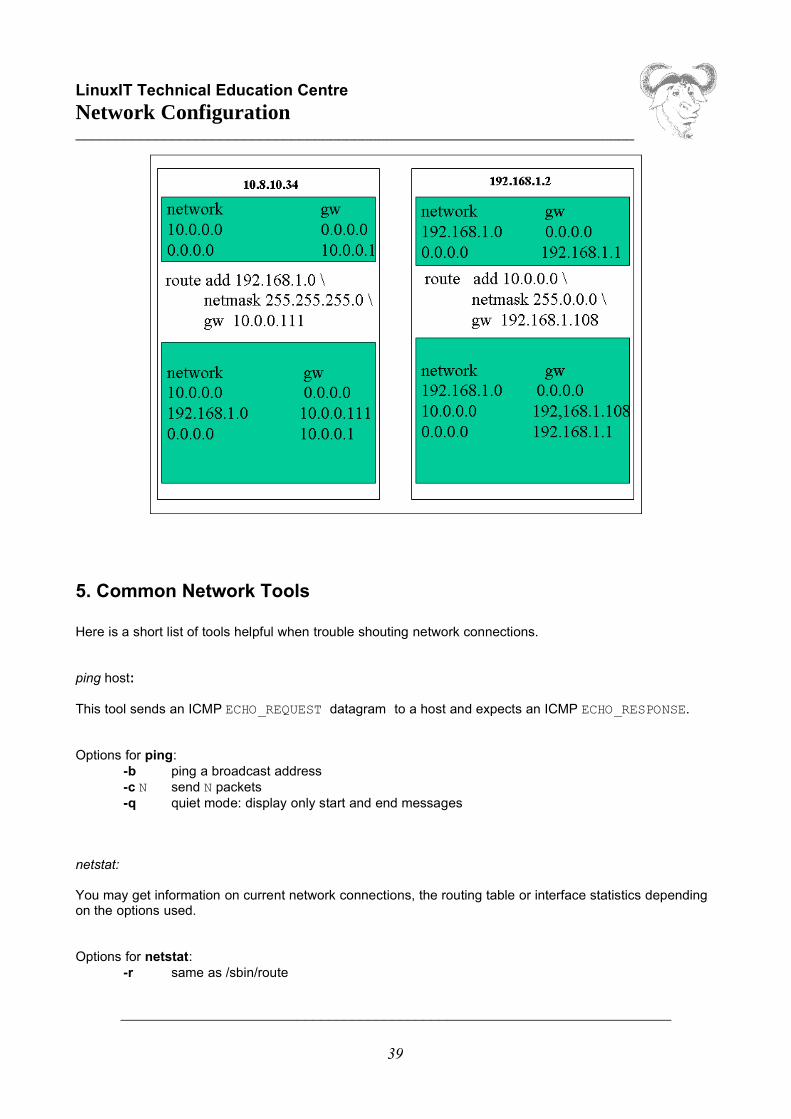
The next page illustrates a network with several gateways together with the routing tables for some of therouters.
A routing scenario:
_____________________________________________________________________
38
LinuxIT Technical Education Centre
Network Configuration______________________________________________________________________
5. Common Network Tools
Here is a short list of tools helpful when trouble shouting network connections.
ping host:
This tool sends an ICMP ECHO_REQUEST datagram to a host and expects an ICMP ECHO_RESPONSE.
Options for ping:-b ping a broadcast address-c N send N packets-q quiet mode: display only start and end messages
netstat:
You may get information on current network connections, the routing table or interface statistics dependingon the options used.
Options for netstat:-r same as /sbin/route
_____________________________________________________________________
39

LinuxIT Technical Education Centre
Network Configuration______________________________________________________________________
-I display list of interfaces-n don’t resolve IP addresses-p returns the PID and names of programs (only for root)-v verbose-c continuous update
Example: Output of netstat –-inet –n :
► Active Internet connections (w/o servers)Proto Recv-Q Send-Q Local Address Foreign Address Statetcp 0 0 192.168.1.10:139 192.168.1.153:1992 ESTABLISHEDtcp 0 0 192.168.1.10:22 192.168.1.138:1114 ESTABLISHEDtcp 0 0 192.168.1.10:80 192.168.1.71:18858 TIME_WAIT
In the above listing you can see that the local host has established connections on ports 139, 22 and 80.
arp:
Display the kernel address resolution cache.
Example:arp
► Address HWtype HWaddress Iface
192.168.1.71 ether 00:04:C1:D7:CA:2D eth0
traceroute:
Displays the route taken from the local host to the destination host. Traceroute forces intermediate routersto send back error messages (ICMP TIME_EXCEEDED) by deliberately setting the tty (time to live) value toolow. After each TIME_EXEEDED notification traceroute increments the tty value, forcing the next packet totravel further, until it reaches its’ destination.
Example: CMD: /usr/sbin/traceroute -n www.redhat.com► traceroute: Warning: www.redhat.com has multiple addresses; using
216.148.218.197traceroute to www.redhat.com (216.148.218.197), 30 hops max, 38 bytepackets
1 192.168.1.1 0.440 ms 0.347 ms 0.341 ms---- snip ---
_____________________________________________________________________
40

LinuxIT Technical Education Centre
Network Configuration______________________________________________________________________14 12.122.2.145 112.116 ms 110.908 ms 112.002 ms15 12.122.2.74 156.629 ms 157.028 ms 156.857 ms16 12.122.255.222 156.867 ms 156.641 ms 156.623 ms17 216.148.209.66 159.982 ms 157.462 ms 158.537 ms18 216.148.218.197 157.395 ms 156.789 ms 156.080 ms
Options for traceroute:-f ttl change the initial time to live value to ttl instead of 1-n do not resolve IP numbers-v verbose-w sec set the timeout on returned packets to sec
_____________________________________________________________________
41
LinuxIT Technical Education Centre
Network Configuration______________________________________________________________________
6. Exercises
1. In the Routing Scenario section of this chapter give the routing table for the LAN’s gateway.
2. Start your network interface manuallyifconfig eth0 192.168.0.x
List the kernel modules. Make sure that the eth0 module is loaded (check /etc/modules.conf).
3. Stop the network interface with:
(i) ifconfig eth0 down
Verify that you can bring the interface back up without entering new information:
(ii) ifconfig eth0 up
4. Stop the interface and remove the kernel module (rmmod module). What happens if you repeat step 3(ii)?
5. Divide the class into two networks A (192.168.1.0) and B (10.0.0.0).
• Try accessing machines across networks• Choose an existing machine to be the gateway (on either network)• On the gateway machine only! do the following:
-- allow IP forwarding:
echo 1 > /proc/sys/net/ipv4/ip_forward
-- bring up an aliased interface (this will work as a second interface). If you are on the 192.168.1.0 network then do the following
ifup eth0:1 10.0.0.x (where x is a an available IP).add a route to the new network forcing it to use the eth0:1 device
-- add a route to the other network using the gateway machine (you will need to know either the eth0or eth0:1 setting of this gw depending on which network you are on)
_____________________________________________________________________
42
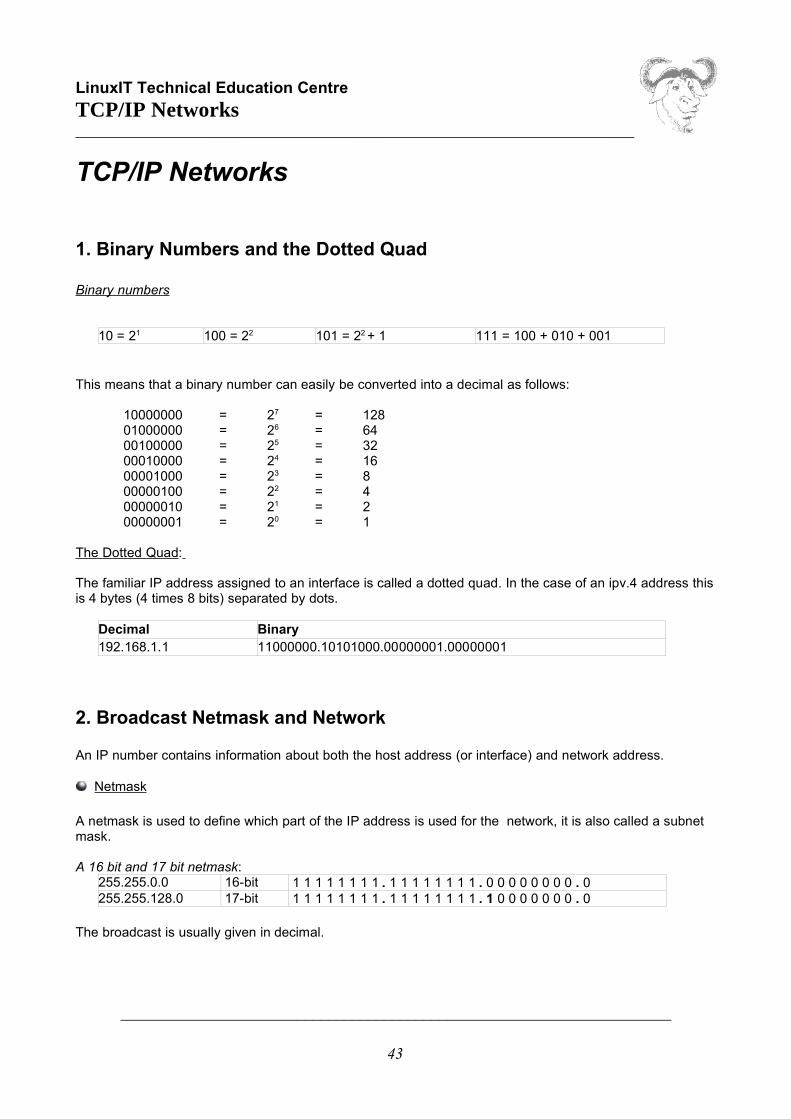
LinuxIT Technical Education Centre
TCP/IP Networks______________________________________________________________________
TCP/IP Networks
1. Binary Numbers and the Dotted Quad
Binary numbers
10 = 21 100 = 22 101 = 22 + 1 111 = 100 + 010 + 001
This means that a binary number can easily be converted into a decimal as follows:
10000000 = 27 = 12801000000 = 26 = 6400100000 = 25 = 3200010000 = 24 = 1600001000 = 23 = 800000100 = 22 = 400000010 = 21 = 200000001 = 20 = 1
The Dotted Quad:
The familiar IP address assigned to an interface is called a dotted quad. In the case of an ipv.4 address thisis 4 bytes (4 times 8 bits) separated by dots.
Decimal Binary192.168.1.1 11000000.10101000.00000001.00000001
2. Broadcast Netmask and Network
An IP number contains information about both the host address (or interface) and network address.
Netmask
A netmask is used to define which part of the IP address is used for the network, it is also called a subnetmask.
A 16 bit and 17 bit netmask: 255.255.0.0 16-bit 1 1 1 1 1 1 1 1 . 1 1 1 1 1 1 1 1 . 0 0 0 0 0 0 0 0 . 0255.255.128.0 17-bit 1 1 1 1 1 1 1 1 . 1 1 1 1 1 1 1 1 . 1 0 0 0 0 0 0 0 . 0
The broadcast is usually given in decimal.
_____________________________________________________________________
43
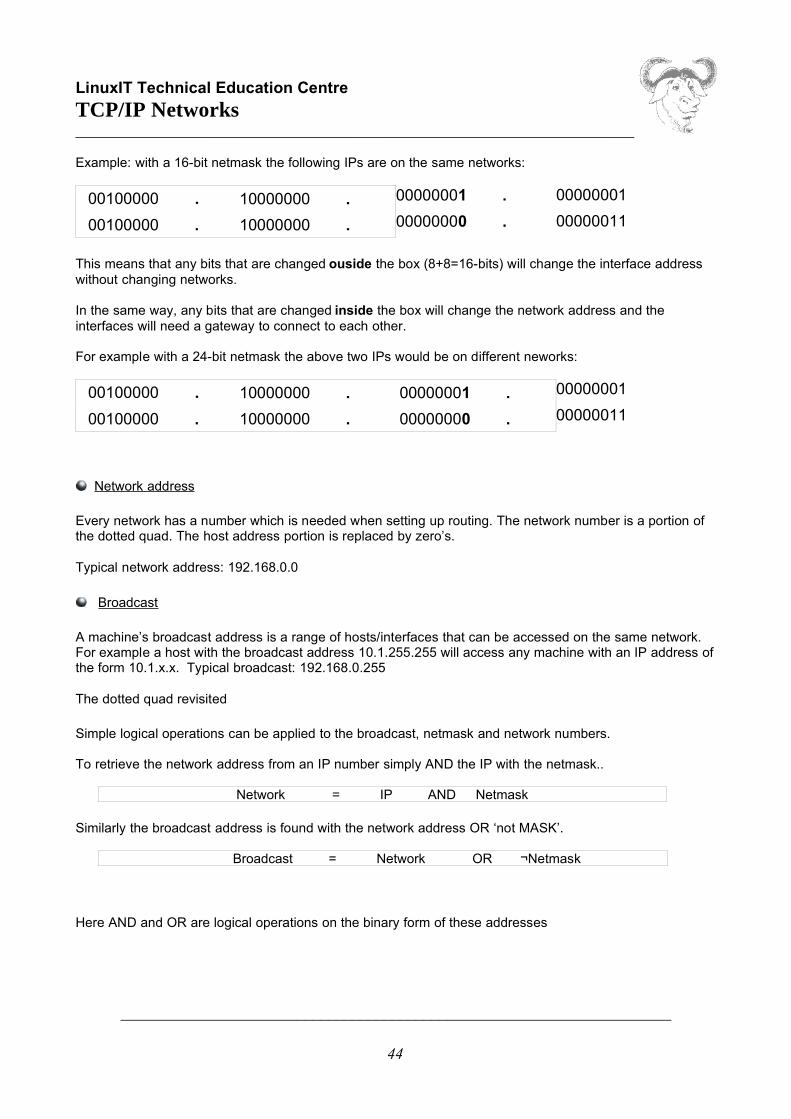
LinuxIT Technical Education Centre
TCP/IP Networks______________________________________________________________________
Example: with a 16-bit netmask the following IPs are on the same networks:
00100000 . 10000000 . 00000001 . 00000001
00100000 . 10000000 . 00000000 . 00000011
This means that any bits that are changed ouside the box (8+8=16-bits) will change the interface addresswithout changing networks.
In the same way, any bits that are changed inside the box will change the network address and theinterfaces will need a gateway to connect to each other.
For example with a 24-bit netmask the above two IPs would be on different neworks:
00100000 . 10000000 . 00000001 . 00000001
00100000 . 10000000 . 00000000 . 00000011
Network address
Every network has a number which is needed when setting up routing. The network number is a portion ofthe dotted quad. The host address portion is replaced by zero’s.
Typical network address: 192.168.0.0
Broadcast
A machine’s broadcast address is a range of hosts/interfaces that can be accessed on the same network. For example a host with the broadcast address 10.1.255.255 will access any machine with an IP address ofthe form 10.1.x.x. Typical broadcast: 192.168.0.255
The dotted quad revisited
Simple logical operations can be applied to the broadcast, netmask and network numbers.
To retrieve the network address from an IP number simply AND the IP with the netmask..
Network = IP AND Netmask
Similarly the broadcast address is found with the network address OR ‘not MASK’.
Broadcast = Network OR ¬Netmask
Here AND and OR are logical operations on the binary form of these addresses
_____________________________________________________________________
44
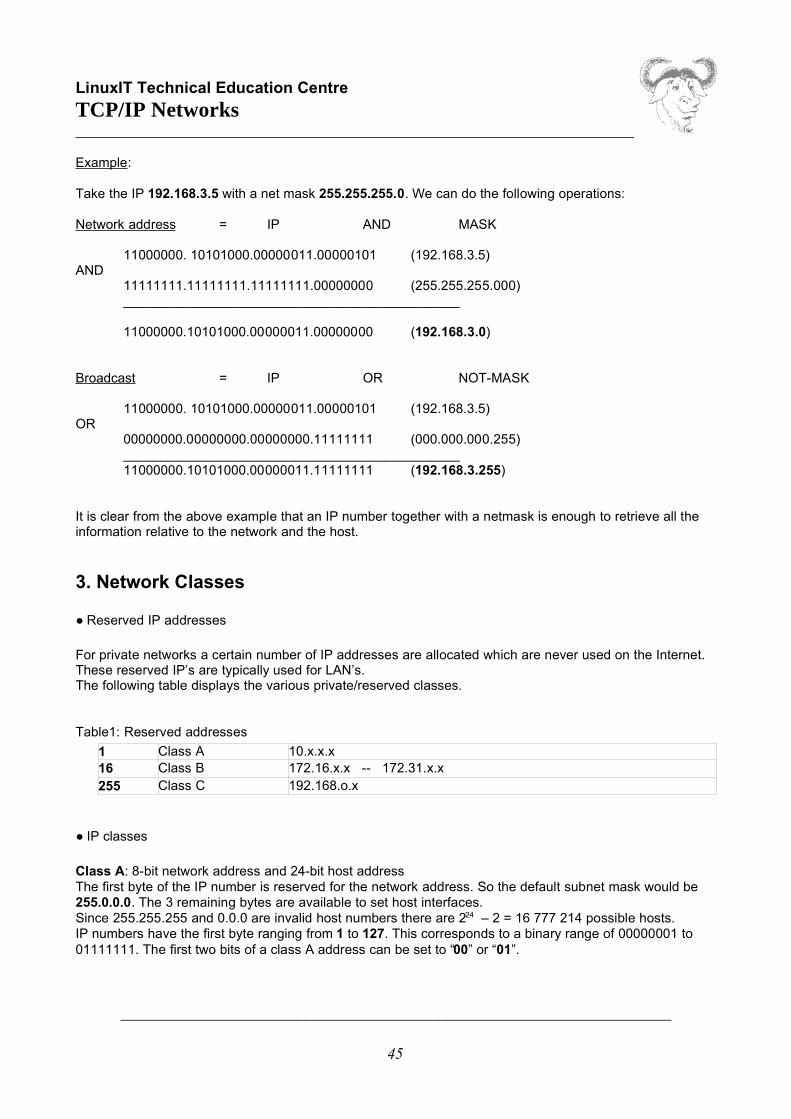
LinuxIT Technical Education Centre
TCP/IP Networks______________________________________________________________________
Example:
Take the IP 192.168.3.5 with a net mask 255.255.255.0. We can do the following operations:
Network address = IP AND MASK
11000000. 10101000.00000011.00000101 (192.168.3.5)AND
11111111.11111111.11111111.00000000 (255.255.255.000)_____________________________________________
11000000.10101000.00000011.00000000 (192.168.3.0)
Broadcast = IP OR NOT-MASK
11000000. 10101000.00000011.00000101 (192.168.3.5)OR
00000000.00000000.00000000.11111111 (000.000.000.255)_____________________________________________11000000.10101000.00000011.11111111 (192.168.3.255)
It is clear from the above example that an IP number together with a netmask is enough to retrieve all theinformation relative to the network and the host.
3. Network Classes
● Reserved IP addresses
For private networks a certain number of IP addresses are allocated which are never used on the Internet.These reserved IP’s are typically used for LAN’s. The following table displays the various private/reserved classes.
Table1: Reserved addresses
1 Class A 10.x.x.x16 Class B 172.16.x.x -- 172.31.x.x255 Class C 192.168.o.x
● IP classes
Class A: 8-bit network address and 24-bit host address The first byte of the IP number is reserved for the network address. So the default subnet mask would be255.0.0.0. The 3 remaining bytes are available to set host interfaces.Since 255.255.255 and 0.0.0 are invalid host numbers there are 224 – 2 = 16 777 214 possible hosts. IP numbers have the first byte ranging from 1 to 127. This corresponds to a binary range of 00000001 to01111111. The first two bits of a class A address can be set to “00” or “01”.
_____________________________________________________________________
45
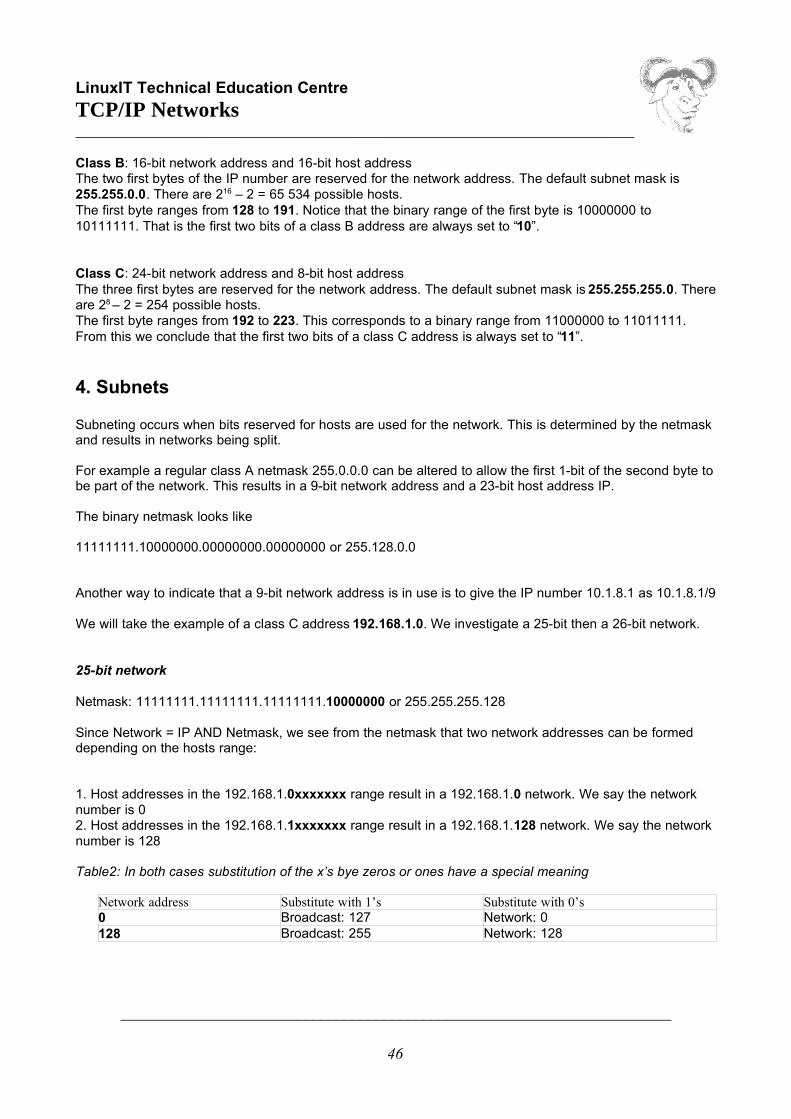
LinuxIT Technical Education Centre
TCP/IP Networks______________________________________________________________________
Class B: 16-bit network address and 16-bit host addressThe two first bytes of the IP number are reserved for the network address. The default subnet mask is255.255.0.0. There are 216 – 2 = 65 534 possible hosts. The first byte ranges from 128 to 191. Notice that the binary range of the first byte is 10000000 to10111111. That is the first two bits of a class B address are always set to “10”.
Class C: 24-bit network address and 8-bit host addressThe three first bytes are reserved for the network address. The default subnet mask is 255.255.255.0. Thereare 28 – 2 = 254 possible hosts. The first byte ranges from 192 to 223. This corresponds to a binary range from 11000000 to 11011111.From this we conclude that the first two bits of a class C address is always set to “11”.
4. Subnets
Subneting occurs when bits reserved for hosts are used for the network. This is determined by the netmaskand results in networks being split.
For example a regular class A netmask 255.0.0.0 can be altered to allow the first 1-bit of the second byte tobe part of the network. This results in a 9-bit network address and a 23-bit host address IP.
The binary netmask looks like
11111111.10000000.00000000.00000000 or 255.128.0.0
Another way to indicate that a 9-bit network address is in use is to give the IP number 10.1.8.1 as 10.1.8.1/9
We will take the example of a class C address 192.168.1.0. We investigate a 25-bit then a 26-bit network.
25-bit network
Netmask: 11111111.11111111.11111111.10000000 or 255.255.255.128
Since Network = IP AND Netmask, we see from the netmask that two network addresses can be formeddepending on the hosts range:
1. Host addresses in the 192.168.1.0xxxxxxx range result in a 192.168.1.0 network. We say the networknumber is 02. Host addresses in the 192.168.1.1xxxxxxx range result in a 192.168.1.128 network. We say the networknumber is 128
Table2: In both cases substitution of the x’s bye zeros or ones have a special meaning
Network address Substitute with 1’s Substitute with 0’s0 Broadcast: 127 Network: 0128 Broadcast: 255 Network: 128
_____________________________________________________________________
46
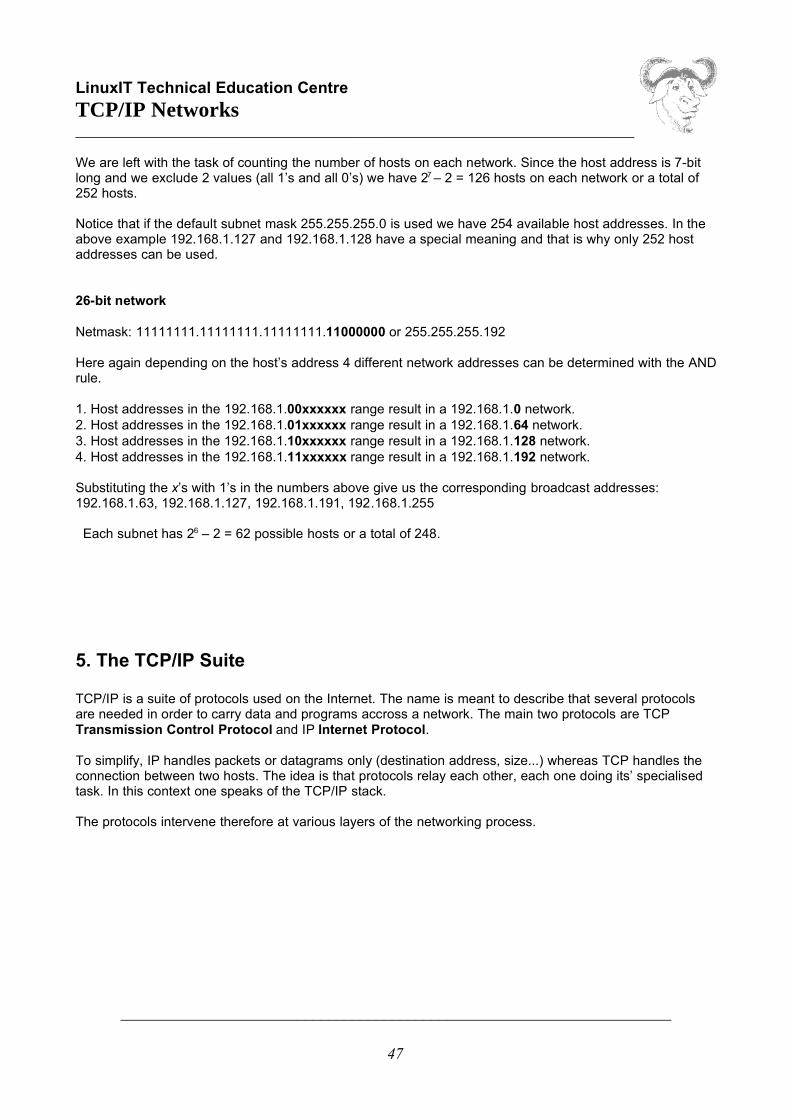
LinuxIT Technical Education Centre
TCP/IP Networks______________________________________________________________________
We are left with the task of counting the number of hosts on each network. Since the host address is 7-bitlong and we exclude 2 values (all 1’s and all 0’s) we have 27 – 2 = 126 hosts on each network or a total of252 hosts.
Notice that if the default subnet mask 255.255.255.0 is used we have 254 available host addresses. In theabove example 192.168.1.127 and 192.168.1.128 have a special meaning and that is why only 252 hostaddresses can be used.
26-bit network
Netmask: 11111111.11111111.11111111.11000000 or 255.255.255.192
Here again depending on the host’s address 4 different network addresses can be determined with the ANDrule.
1. Host addresses in the 192.168.1.00xxxxxx range result in a 192.168.1.0 network.2. Host addresses in the 192.168.1.01xxxxxx range result in a 192.168.1.64 network.3. Host addresses in the 192.168.1.10xxxxxx range result in a 192.168.1.128 network.4. Host addresses in the 192.168.1.11xxxxxx range result in a 192.168.1.192 network.
Substituting the x’s with 1’s in the numbers above give us the corresponding broadcast addresses:192.168.1.63, 192.168.1.127, 192.168.1.191, 192.168.1.255
Each subnet has 26 – 2 = 62 possible hosts or a total of 248.
5. The TCP/IP Suite
TCP/IP is a suite of protocols used on the Internet. The name is meant to describe that several protocolsare needed in order to carry data and programs accross a network. The main two protocols are TCPTransmission Control Protocol and IP Internet Protocol.
To simplify, IP handles packets or datagrams only (destination address, size...) whereas TCP handles theconnection between two hosts. The idea is that protocols relay each other, each one doing its’ specialisedtask. In this context one speaks of the TCP/IP stack.
The protocols intervene therefore at various layers of the networking process.
_____________________________________________________________________
47
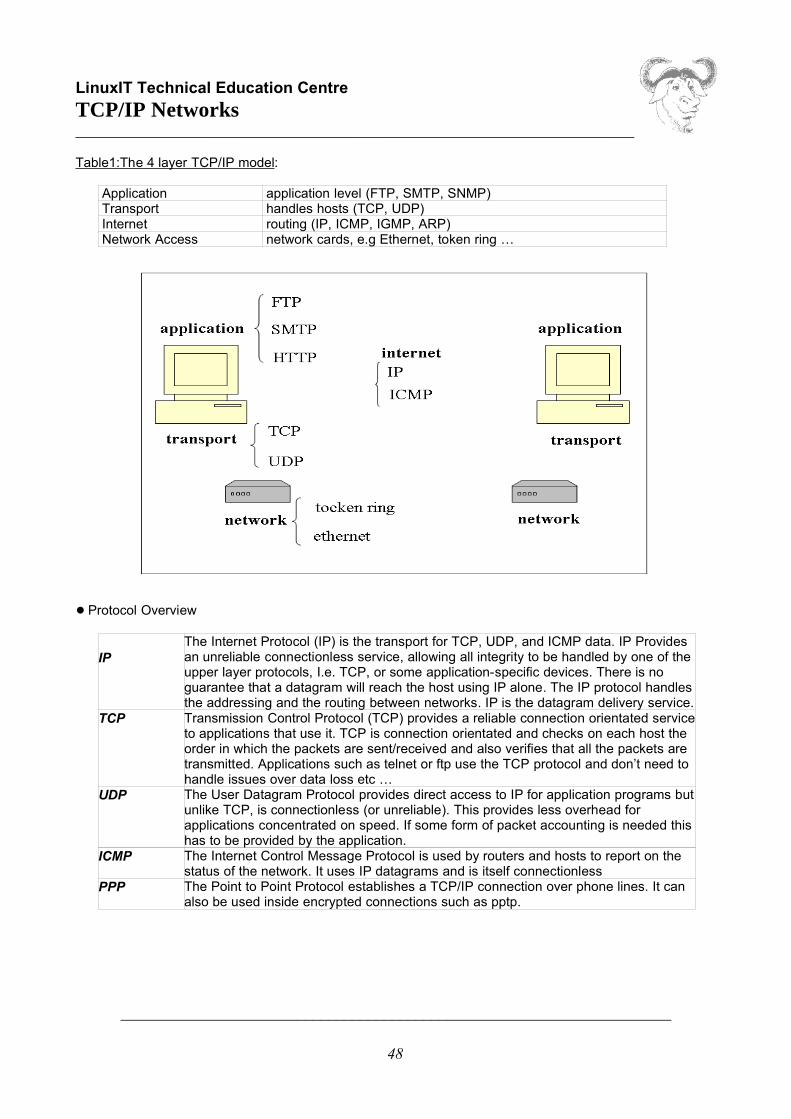
LinuxIT Technical Education Centre
TCP/IP Networks______________________________________________________________________
Table1:The 4 layer TCP/IP model:
Application application level (FTP, SMTP, SNMP) Transport handles hosts (TCP, UDP) Internet routing (IP, ICMP, IGMP, ARP) Network Access network cards, e.g Ethernet, token ring …
● Protocol Overview
IPThe Internet Protocol (IP) is the transport for TCP, UDP, and ICMP data. IP Providesan unreliable connectionless service, allowing all integrity to be handled by one of theupper layer protocols, I.e. TCP, or some application-specific devices. There is noguarantee that a datagram will reach the host using IP alone. The IP protocol handlesthe addressing and the routing between networks. IP is the datagram delivery service.
TCP Transmission Control Protocol (TCP) provides a reliable connection orientated serviceto applications that use it. TCP is connection orientated and checks on each host theorder in which the packets are sent/received and also verifies that all the packets aretransmitted. Applications such as telnet or ftp use the TCP protocol and don’t need tohandle issues over data loss etc …
UDP The User Datagram Protocol provides direct access to IP for application programs butunlike TCP, is connectionless (or unreliable). This provides less overhead forapplications concentrated on speed. If some form of packet accounting is needed thishas to be provided by the application.
ICMP The Internet Control Message Protocol is used by routers and hosts to report on thestatus of the network. It uses IP datagrams and is itself connectionless
PPP The Point to Point Protocol establishes a TCP/IP connection over phone lines. It canalso be used inside encrypted connections such as pptp.
_____________________________________________________________________
48
LinuxIT Technical Education Centre
TCP/IP Networks______________________________________________________________________
6. TCP/IP Services and Ports
Part of the information contained in a packet’s header is a 16-bit number which specifies which port addressit should connect to on the host. However if this isn’t specified at the IP level then the application type canalso be used to determine which port to use. The list of known services and their relative ports is generallyfound in /etc/services. The official list of services and associated ports is managed by the IANA (InternetAssigned Numbers Authority).
Since the port field is a 16-bit digit there are 65535 available numbers. Numbers from 1 to 1023 areprivileged ports and are reserved for services run by root. Most known applications will listen on one ofthese ports. If the application is multi-threaded then the port is freed and the connection is resumed at a portin the 1024 to 65535 range.
We will look at the output of portscans. Beware that portscanning is illegal although many people use them.
Here is the output of a portscan:
Port State Service21/tcp open ftp22/tcp open ssh23/tcp open telnet25/tcp open smtp70/tcp open gopher79/tcp open finger80/tcp open http
This shows open ports, these are ports being used by an application. Since these applications continuouslylisten on these ports they are also known as services.
The /etc/services main ports:
ftp-data 20/tcpftp 21/tcptelnet 23/tcpsmtp 25/tcp maildomain 53/tcpdomain 53/udphttp 80/tcp # www is used by some brokenwww 80/tcp # progs, http is more correctkerberos 88/udp kdc # Kerberos authentication--udpkerberos 88/tcp kdc # Kerberos authentication--tcppop-2 109/tcp # PostOffice V.2pop-3 110/tcp # PostOffice V.3sunrpc 111/tcpsftp 115/tcpuucp-path 117/tcpnntp 119/tcp usenet # Network News Transferntp 123/tcp # Network Time Protocolnetbios-ns 137/tcp nbnsnetbios-ns 137/udp nbnsnetbios-dgm 138/tcp nbdgm
_____________________________________________________________________
49
LinuxIT Technical Education Centre
TCP/IP Networks______________________________________________________________________netbios-dgm 138/udp nbdgmnetbios-ssn 139/tcp nbssnimap 143/tcp # imap network mail protocolNeWS 144/tcp news # Window Systemsnmp 161/udpsnmp-trap 162/udp
7. Exercices
Registering a service with xinetd
1. Write a bash script that echo’s “Welcome” to stdout. Save it in /usr/sbin/2. In /etc/xinetd.d create a new file called fudge with the following:
service fudge{
socket_type = stream server =/usr/sbin/hi user = root wait = no disable = no
}3. Add a service called fudge in /etc/services that will use port 60000. 4. Restart xinetd and telnet to port 60000
_____________________________________________________________________
50
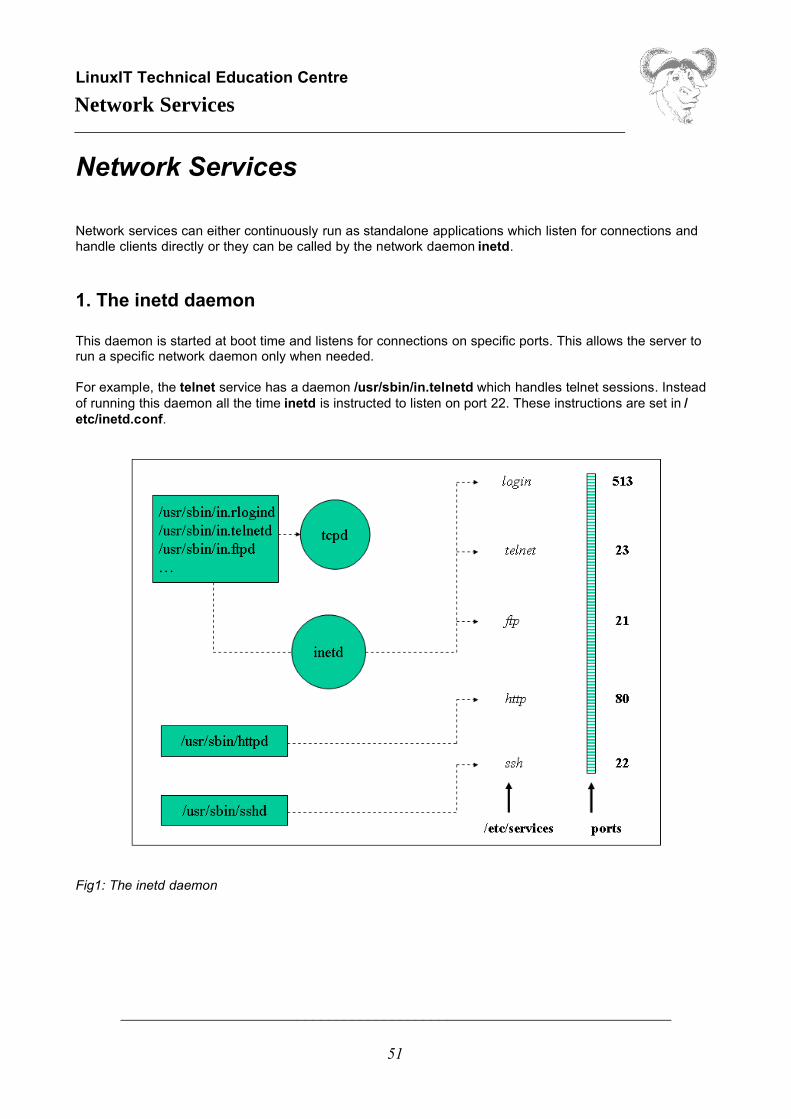
LinuxIT Technical Education Centre Network Services_____________________________________________________________________
Network Services
Network services can either continuously run as standalone applications which listen for connections andhandle clients directly or they can be called by the network daemon inetd.
1. The inetd daemon
This daemon is started at boot time and listens for connections on specific ports. This allows the server torun a specific network daemon only when needed.
For example, the telnet service has a daemon /usr/sbin/in.telnetd which handles telnet sessions. Insteadof running this daemon all the time inetd is instructed to listen on port 22. These instructions are set in /etc/inetd.conf.
Fig1: The inetd daemon
_____________________________________________________________________
51

LinuxIT Technical Education Centre Network Services_____________________________________________________________________
The fields of /etc/inetd.conf contain the following:
service-name valid name from /etc/services
socket type stream for TCP and dgram for UDP
protocol valid protocol from /etc/protocols
flag nowait if multithreaded and wait if single-threaded
user/group run application as user or group.
program usually tcpd
argument the name of the daemon that needs to be run
Example:
pop-3 stream tcp nowait root /usr/sbin/tcpd ipop3d
The /etc/services file is used to make the correspondence between service names and socket portnumbers. The fields in services are as follows:
service-name port/protocol [aliases]
Example /etc/services entries:
smtp 25/tcp mail
pop-3 110/tcp
nfs 2049/udp
2. TCP wrappers
If programs have been compiled with libwrap then they can be listed in /etc/hosts.allow and /etc/hosts.deny. The tcpd daemon will verify these files for matching hosts.
Default format for /etc/hosts.{allow,deny} :
DAEMON : hosts [EXCEPT hosts ] [: spawn command]
One can also use these files to log unauthorised services. This can help as an early warning system. Hereare a few examples.
_____________________________________________________________________
52
LinuxIT Technical Education Centre Network Services_____________________________________________________________________
Get information about a host:
• /etc/hosts.allowin.telnetd: LOCAL, .my.domain
• /etc/hosts.denyin.telnetd: ALL : spawn (/usr/sbin/safe_finger –l @%h | mail root) &
Redirect to a bogus service or “honey pot” :
• /etc/hosts.allowin.telnetd: ALL : twist /dtk/Telnetd.pl
The last example comes from the dtk (Deception Tool Kit) that can be downloaded fromhttp://all.net/dtk/download.html
3. Setting up NFS
Client settings
For a Linux client to mount remote file systems
1. the nfs file system must be supported by the kernel2. the portmapper daemon must be running.
The portmapper is started by the /etc/rc.d/init.d/portmap script. The mount utility will mount thefilesystem. A typical entry in /etc/fstab would be:
nfs-server:/shared/dir /mnt/nfs nfs defaults 0 0
Server settings
A NFS server needs portmap to be running before starting the nfs server. The nfs server should be startedor stopped with the /etc/rc.d/init.d/nfs script.The main configuration file is /etc/exports.
Sample /etc/exports file:
/usr/local/docs *(ro) *.local.org(rw, no_root_squash)
The /usr/local/docs directory is exported to all hosts as read-only, and read-write to all hosts in the .local.orgdomain. The no_root_squash option avoids remote root user (uid = 0) interference on the server.
_____________________________________________________________________
53
LinuxIT Technical Education Centre Network Services_____________________________________________________________________ The /etc/exports file matches hosts such as *.machine.com where as /etc/hosts.allow/deny match hostssuch as .machine.com
If the /etc/exports file has been changed then the exportfs utility should be run. If existing directories in /etc/exportfs are modified then it may be necessary to unmount all nfs shares before remounting them all.Individual directories can be mount or unmounted with exportfs.
Unmount and mounting all directories in /etc/exports:
exportfs -ua ; exportfs -a
4. SMB and NMB
Linux machines can access Windows shared resources (directories and printers). The protocol used for thisis the MS Windows Server Message Block SMB. Samba is the most common Linux tool which providesclient and server software.
From the Command Line
The smbclient utility is used to list shared resources. Remote directories are typically mounted withsmbmount although ‘mount –t smbfs’ can also be used.
Examples:
Send a pop up message to the win98desk computer
smbclient -M win98desk
Mount the shared directory of the winserv computer
smbmount //winserver/shared /mnt/winserver/shared
The Samba server is configured with the /etc/smb.conf file. The server is stopped and started with the /etc/rc.d/init.d/smb script. Notice that smb will also starts the NMB services. This is the NetBIOS MessageBlock which enables name resolution in the Windows realm.
_____________________________________________________________________
54
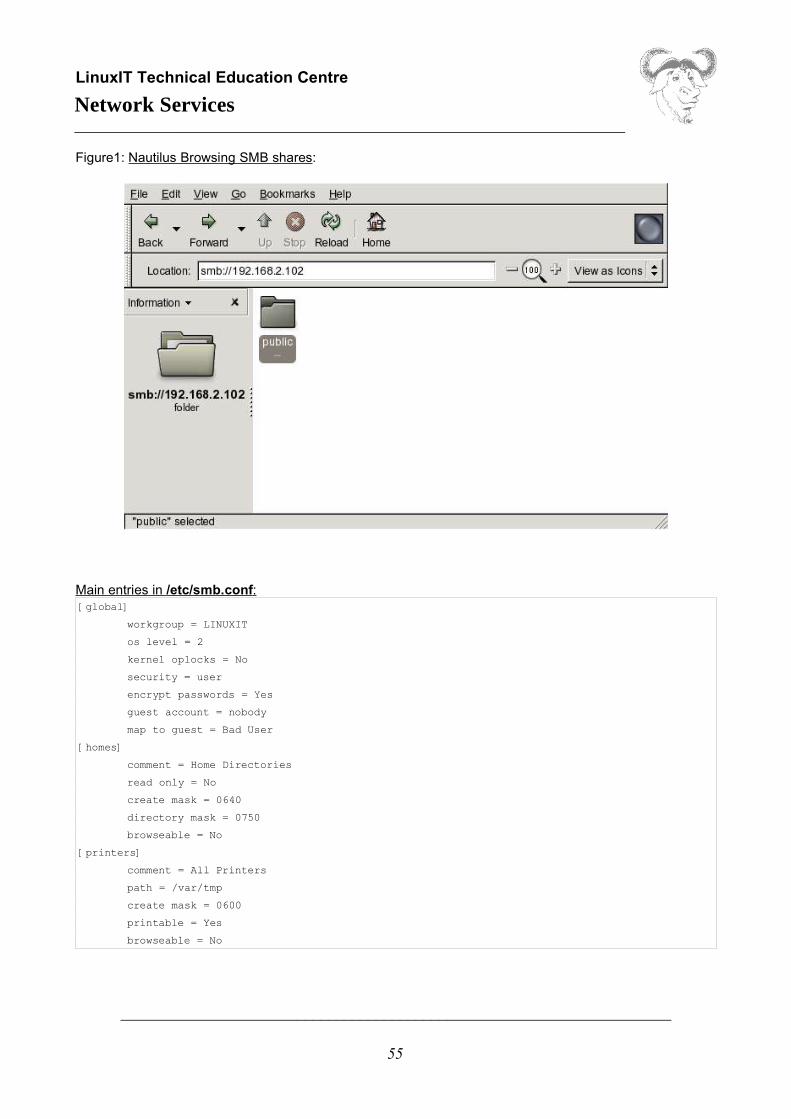
LinuxIT Technical Education Centre Network Services_____________________________________________________________________
Figure1: Nautilus Browsing SMB shares:
Main entries in /etc/smb.conf : [global]
workgroup = LINUXIT
os level = 2
kernel oplocks = No
security = user
encrypt passwords = Yes
guest account = nobody
map to guest = Bad User
[homes]
comment = Home Directories
read only = No
create mask = 0640
directory mask = 0750
browseable = No
[printers]
comment = All Printers
path = /var/tmp
create mask = 0600
printable = Yes
browseable = No
_____________________________________________________________________
55

LinuxIT Technical Education Centre Network Services_____________________________________________________________________
SWAT and Webmin GUI Configuration
If you install the swat package then you can administrate a samba server via a web-based GUI on port 901.
Another popular general administration tool is webmin. It can be downloaded at www.webmin.com
NOTICE
The configuration file /etc/samba/smb.conf is a good source of documentation. All options areexplained and can be switch on by deleting the comment character ;̀` Also read thesmb.conf(5) manpage
5. DNS services
The Resolvers
When a program needs to resolve a host name it uses a mechanism called a resolver. The resolver will firstconsult the /etc/nsswitch file (previously /etc/host.conf) and determine which method should be used toresolve host names (local files, name server, NIS, or ldap server)
The /etc/host.conf (or /etc/nsswitch.conf) fileThese files are scanned by the resolver. They indicate whether files, dns servers, ldap databases or nisservers should be consulted.
Example (/etc/nsswitch):
hosts: files dns nisnetworks: files
The first line indicates that files (here /etc/hosts) should be queried first and then a DNS server if this fails.The second line instructs to use the /etc/network file for network information.
The /etc/hosts file
With a small number of networked computers it is possible to convert decimal IP numbers into names usingthe /etc/hosts file. The fields are as follows:
IP machine machine.domain alias
Example /etct/hosts file:
192.168.1.233 io io.my.domain io
61.20.187.42 callisto callisto.physics.edu
_____________________________________________________________________
56
LinuxIT Technical Education Centre Network Services_____________________________________________________________________
The /etc/resolv.conf file
If the resolver needs to use a domain name server (DNS) then it will consult the /etc/resolv.conf file for alist of available servers to query from.
Hierarchical structure
The Internet network has a hierarchical structure. Depending on the location in the fully qualified domainname (FQDM) a domain is called top-level, second-level or third-level.
Example of top-level domains
com Commercial organisationsedu US educational institutionsgov US government institutionsmil US military institutionsnet Gateways and network providersorg Non commercial sites
Types of DNS servers
Each domain is further broken into zones. This limits the amount of information needed to administer adomain. Zones have a master domain name server (previously called a primary DNS) and one or severalslave domain name servers (previously called secondary). Administration of a name server consists ofupdating the information about a particular zone. The servers are said to be authoratative. Zone files usedby the servers start with the keyword SOA which means Start of Authority.
However one can also set up a non-authoritative name server. The information is gathered from otherdomain name servers and locally cached in memory. Such servers are called caching-only DNS servers.
DNS Configuration Files
In old versions of BIND (prior to BIND version 8) the configuration file was /etc/named.boot. With BINDversion 8 the /etc/named.conf file is used instead. One can use the named-bootconf.pl utility to convertold configuration files.
_____________________________________________________________________
57
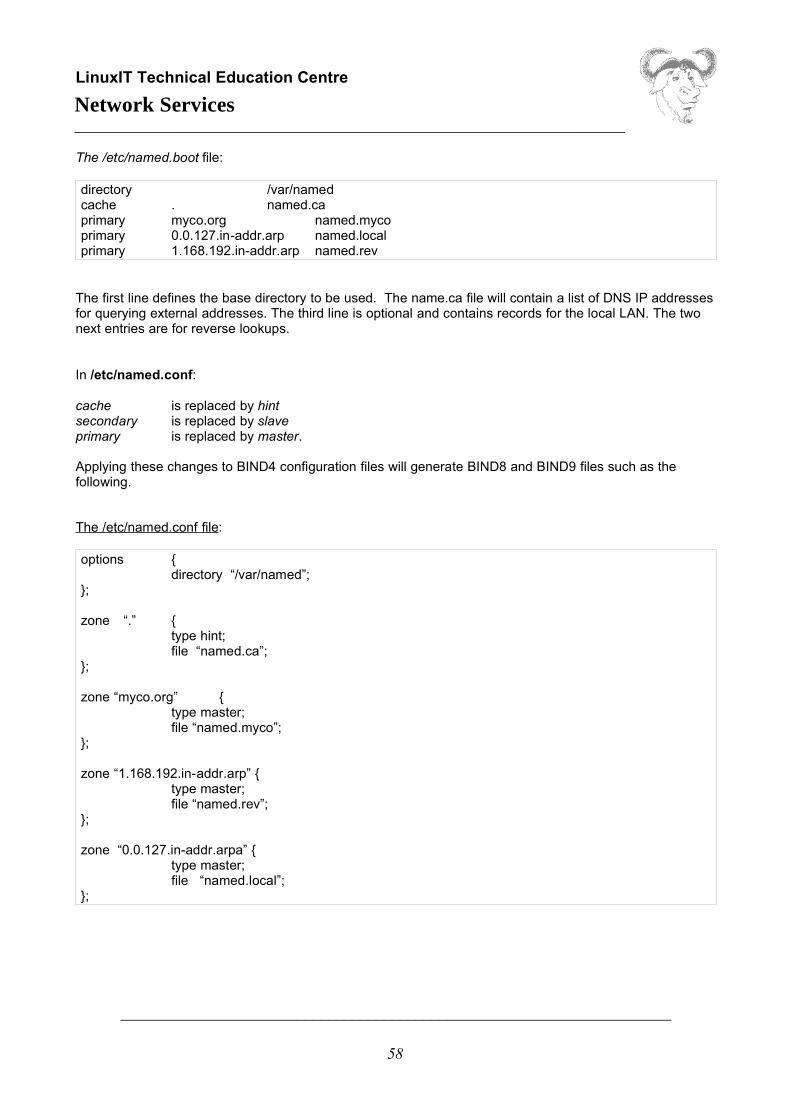
LinuxIT Technical Education Centre Network Services_____________________________________________________________________
The /etc/named.boot file:
directory /var/namedcache . named.caprimary myco.org named.mycoprimary 0.0.127.in-addr.arp named.localprimary 1.168.192.in-addr.arp named.rev
The first line defines the base directory to be used. The name.ca file will contain a list of DNS IP addressesfor querying external addresses. The third line is optional and contains records for the local LAN. The twonext entries are for reverse lookups.
In /etc/named.conf:
cache is replaced by hint secondary is replaced by slaveprimary is replaced by master.
Applying these changes to BIND4 configuration files will generate BIND8 and BIND9 files such as thefollowing.
The /etc/named.conf file:
options {directory “/var/named”;
};
zone “.” {type hint;file “named.ca”;
};
zone “myco.org” {type master;file “named.myco”;
};
zone “1.168.192.in-addr.arp” {type master;file “named.rev”;
};
zone “0.0.127.in-addr.arpa” {type master;file “named.local”;
};
_____________________________________________________________________
58
LinuxIT Technical Education Centre Network Services_____________________________________________________________________
DNS zone files
In this example the server is set as a caching-only server. All the zone files contain resource records.
Sample named.local for a caching-only server:
@ IN SOA localhost. root.localhost. ( 2001022700 ; Serial 28800 ; Refresh 14400 ; Retry 3600000 ; Expire 86400 ) ; Minimum IN NS localhost.
1 IN PTR localhost.
This is the zone file for a caching-only server but it gives us enough information to understand the basicmechanism of a name server.
The @ sign will resolve to the zone declared in /etc/named.conf. This allows any zone file to be used as atemplate for further zones (see the exercises).
Table1:Common Record Types
NS Specify the zones primary name serverPTR Reverse mapping of IP numbers to hostnamesMX Mail exchange recordA Associate an IP address with a hostnameCNAME Associate an alias with the host’s canonical name
Table2: Zone parameters
@ IN SOA Start Of Authority. Identifies the zone, usually followed by optionsenclosed in brackets.
serial Is manually incremented when data is changed. Secondary serversquery the master server’s serial number. If it has changed, the entirezone file is downloaded
refresh Time in seconds before the secondary server should query the SOArecord of the primary domain. This should be at least a day.
retry Time interval in seconds before attempting a new zone transfer if theprevious download failed
expire Time after which the secondary server discards all zone data if it contactthe primary server. Should be a week at least
minimum This is the ttl for the cached data. The default is one day (86400seconds) but should be longer on stable LANs
_____________________________________________________________________
59

LinuxIT Technical Education Centre Network Services_____________________________________________________________________
6. Sendmail main Configuration
Sendmail is the most popular mail transfer agent (MTA) on the Internet. It uses the Simple Mail TransferProtocol (SMTP) and runs as a daemon listening for connections on port 25.
The sendmail script which stops or starts the sendmail daemon is usually located in the /etc/rc.d/init.d/directory.
The main configuration file is /etc/sendmail.cf. Here you can specify the name of the server as well as thenames of the hosts from which and to which mail relay is allowed.
When collecting mail from a remote POP server (say an ISP) sendmail can match the names used for theISP to local users with the /etc/aliases file. This file contains two fields as follows:
alias: user
When changes to /etc/aliases have been made the newaliases command must be run to build thedatabase /etc/aliases.db.
When mail is accepted by the server it is concatenated in a single file with the name of the user. These filesare stored in /var/spool/mail/. Depending on the Mail User Agent used, a user can either store thesemessages in his home directory or download them on another machine.
If the server is relaying, or if the network is slow and many messages are being sent, mail is stored in themail queue /var/spool/mqueue. You can query the queue with the mailq utility or sendmail –bp. Anadministrator can flush the server’s queue with sendmail –q.
Finally in order to register a domain name as a valid email address an MX record needs to be added to theDNS database (this should be done by your ISP).
For example if mail.company.com is a fully qualified domain name (FQDN) then in order for it to acceptmail such as [email protected] you should have the following configuration:
1. Cwcompany.com in /etc/sendmail.cf2. company.com MX 10 mail.company.com in a DNS zone file
7. The Apache server
Configuration Files
The /etc/httpd/conf/httpd.conf file contains all the configuration settings Older releases of apache had two extra files, one called access.conf where restricted directories weredeclared, and another file called srm.conf specifying the server’s root directory.
_____________________________________________________________________
60
LinuxIT Technical Education Centre Network Services_____________________________________________________________________
Configuration Highlights: ServerType standalone/inetd
ServerRoot “/etc/httpd”
DocumentRoot “/var/www/html”
<Directory “/var/www/cgi-bin”>AllowOverride NoneOptions ExecCGIOrder allow,denyAllow from all
</Directory>
<VirtualHost 122.234.32.12>DocumentRoot “/www/docs/server1”ServerName virtual.mydomain.org
</VirtualHost>
Running Apache
To stop and start the server one can use the /etc/rc.d/init.d/httpd script. On a busy server it is preferable touse apachectl especially with the graceful option which will restart the server only when currentconnections have been deakt with.
The main log files are in /var/log/httpd/. It may be useful for security reasons to regularly check theerror_log and access_log files.
_____________________________________________________________________
61

LinuxIT Technical Education Centre Network Services_____________________________________________________________________
8. Exercises
Setting up a DNS master server
s an exercise we will install the BIND9 rpm package bind9-9.1.3-252.i386.rpm and configure a domaincalled gogo.com. 1. Carry out the following alterations in /etc/named.conf: Copy/Paste the following paragraphs and alter as follows:
zone "localhost" in { becomes type master; file "localhost.zone";}
zone "gogo.com" in { type master; file "gogo.zone";}
zone "0.0.127.in-addr.arpa" in { becomes
type master;
file "127.0.0.zone";
};
zone "2.168.192.in-addr.arpa" in {
type master;
file "192.168.2.zone";
};
2. In /var/named:
cp 127.0.0.zone 192.168.2.zonecp local.zone gogo.zone
3. Change the appropriate fields in the new zone files. Add a host called harissa.
4. Add the line “nameserver 127.0.0.1” to /etc/resolv.conf.
5. Use host to resolve harissa.gogo.com
Apache administration
Basic configurations in /etc/httpd/conf/httpd.conf
1. Change the port directive Port from 80 to 8080.
2. Check that apache is responding with telnet localhost 8080. You should get:
Trying 127.0.0.1...Connected to localhost.linuxit.org.Escape character is '^]'.
Next type ‘GET /’ to download the index file.
_____________________________________________________________________
62
LinuxIT Technical Education Centre Network Services_____________________________________________________________________3. Turn the HostnameLookup option on. Verify that hosts are resolved in the access_log file.
IP based virtual server
Your ethernet card must be aliased to a new IP (say new-IP)
ifconfig eth0:0 new-IP
I you want to make use of the ServerName directive make sure you update the DNS server to resolve new-IP . In this example it should resolve to www1and vis-versa.
Add the following paragraph to /etc/httpd/conf/httpd.conf:
<VirtualHost 10.0.0.108>DocumentRoot /var/www/html/virtualServerName www1</VirtualHost>
Setting up a shared SMB directory
In most cases you won’t need to add smbusers to the system to do this. Simply edit smb.conf and add thefollowing:
[public] comment = Example Shared Directory path = /home/samba guest ok = yes writeable = yes
Setting up a shared printer:
[global] --- snip --- printcap name = /etc/printcap load printers = yes
[printers] comment = All Printers path = /var/spool/samba browseable = no# Set public = yes to allow user 'guest account' to print guest ok = yes writable = no printable = yes
_____________________________________________________________________
63
LinuxIT Technical Education Centre
Bash Scripting____________________________________________________________________
Bash Scripting
1. The bash environment
We will cover essential aspects of the bash command line in this section. As well as being a programmingenvironment the UNIX and Linux shell is also what is used to interact with the computer.
Variables
When you type a command at the prompt the bash shell will use the PATH variable to find which executableon the system you want to run. You can check the value of path using the echo command:
echo $PATH/usr/bin:/bin:/usr/sbin:/usr/X11R6/bin:/usr/local/bin:/sbin/:/usr/local/sbin/
In fact many variables are needed by the shell to accommodate for each user’s environment. For examplePWD, HOME, TERM and DISPLAY are such variables.
To initialise and declare a variable the syntax is as follows:
VARIABLE=VALUE
Remember not to put any spaces around the ‘=’ sign. Once a variable is declared and initialised it can bereferenced by using the dollar symbol in front as here:
echo $VARIABLE
When a shell session is started a number of configuration files are read and most of the variables are set.
To free a variable from its current value use unset.
Configuration files
One can distinguish configuration files which are read at login time and configuration files which are read foreach new bash session.
Login configuration files:
The files which are read at login are /etc/profile and ~/.bash_profile (bash will look for alternative files toosuch as ~/.profile). Next bash will read it’s runtime control files ~/.bashrc and (if it exists) /etc/bashrc.
_____________________________________________________________________
64
LinuxIT Technical Education Centre
Bash Scripting____________________________________________________________________
The bashrc files:
These files are read each time a new shell session is launched (such as a new xterm). The files are /etc/bashrc and ~/.bashrc.
Alias and functions can be saved in the ~/.bashrc
Function syntax:
function-name (){ command1; command2;}
You can test which files are being read by adding an echo Profile line in /etc/profile, the type:
bash No profile is read, you shouldn’t see anythingbash -login This forces bash to act as a login bash, the word
Profile should show up.
The following commands control the way bash starts:
bash -norcbash -noprofile
Notice that any new bash session will inherit the parent’s global variables defined in /etc/profile and~/.bash_profile.
2. Scripting Essentials
The script file
A shell script is a list of instructions saved in a flat file. Only two things are necessary.
1. The script’s first line must be #!/bin/bash2. The file must be readable and executable (with 755 permission for example)
If these lines are not present it is possible to run the script program by typing bash program.
Parsing variables
Variables entered at the command line are referenced inside the script as $1 for the first argument, $2 forthe second, etc …
_____________________________________________________________________
65
LinuxIT Technical Education Centre
Bash Scripting____________________________________________________________________
Example script, mycat:
#!/bin/bashcat $1
This script is expecting one argument, a file, and will display the content of the file using cat. To run thisscript on the lilo.conf file, you would run:
./mycat /etc/lilo.conf
Another way of parsing variables to a script is by letting the script prompt the user for input interactively.This is achieved using the read command. The default name of the read variable is REPLY. Here is themodified script:
Interactive parsing:
#!/bin/bashecho -n "Which file shall I display ?"readcat $REPLY
Special Variables
Special variables can only be referenced and are automatically set be bash. These are the most commonspecial variables you will encounter:
$* List of all variables entered at the command line$# Number of arguments entered at the command line$0 The name of the script$! PID of the most recent background command$$ PID of the current shell$? Status of the most last command executed
For the positional parameters $1, $2 etc … there is a shift operator which renames each parameter in acyclic way as follows. $2 becomes $1$3 becomes $2 … etcThis can be summarised as $(n+1) $n
3. Logical evaluations
There are two ways to evaluate if a statement is true. The modern syntax is to use a pair of square brackets[ ]. This replaces the older test operator. In both case the result is stored in the $? variable such that:
if $? is 0 the statement is trueif $? is not 0 the statement is false
_____________________________________________________________________
66
LinuxIT Technical Education Centre
Bash Scripting____________________________________________________________________Here are some examples to illustrate:
using test using [ ] meaningtest –f /bin/bash [ -f /bin/bash ] test if /bin/bash is a filetest -x = /etc/passwd [ -x /bin/passwd ] test if /etc/passwd is executable
One can evaluate more than one statement at a time using the || (OR) and && (AND) logical operators.
Example of compound evaluations:
test -x /bin/bash && test -f /etc/smb.conf[ -e /bin/kbash ] || [ -f /etc/passwd ]
4. Loops
if then loop
Syntax: if CONDITION ; then command1
command2fi
if then else
Syntax: if CONDITION ; then command1 command2else command3fi
if then else if
Syntax: if CONDITION1 ; then command1 command2
else if CONDITION2; then command3 fifi
while loop
Syntax: while CONDITION is true; do
_____________________________________________________________________
67

LinuxIT Technical Education Centre
Bash Scripting____________________________________________________________________
commanddone
Example: Aligne 10 hashes (#) then exit
#!/bin/bashCOUNTER=0while [ $COUNTER -lt 100 ]; do
echo -n "#" sleep 1
let COUNTER=COUNTER+1done
Until loop
Syntax: until CONDITION is false; docommand
done
Example: Same as above, notice the C style increment for COUNTER
#!/bin/bashCOUNTER=20until [ $COUNTER -lt 10 ]; do
echo -n "#" sleep 1 let COUNTER-=1
done
for loop
Syntax for VARIABLE in SET; docommand
done
Example: SET can be the lines of a file
#!/bin/bashfor line in `cat /etc/lilo.conf`; do
echo $linedone
5. Expecting user input
We assume that the script is waiting for user input, depending on the answer, the rest of the program willexecute something accordingly. There are two possible ways to achieve this: select and case.
_____________________________________________________________________
68
LinuxIT Technical Education Centre
Bash Scripting____________________________________________________________________
Using case
Syntax: case $VARIABLE inCHOICE command ;;CHOICE command ;;esac
Using select
Syntax: select VARIABLE in SET; doif [ $VARIABLE = CHOICE ]; then
commandfi if [ $VARIABLE = CHOICE ]; then
commandfi
done
6. Working with Numbers
While shell scripts seamlessly handle character stings, a little effort is needed to perform very basicarithmetic operations.
Binary operations
Adding or multiplying numbers together can be achieved using either expr or the $(( )) construct.
Example:
expr 7 + 3; expr 2 \* 10; expr 40 / 4; expr 30 – 11$((7+3)); $((2*10)); $((40/4)); $((30-11))
Notice that expr requires spaces around the operation sign. The $(( )) method on the other hand is avariable and would often be referenced using echo $((..))
Comparing values
Test operators:-lt <-gt >-le <=-ge >=-eq =-ne !=
_____________________________________________________________________
69

LinuxIT Technical Education Centre
Bash Scripting____________________________________________________________________
_____________________________________________________________________
70

LinuxIT Technical Education Centre
Basic Security_____________________________________________________________________
Basic Security
1. Local Security
The BIOS
If anyone has access to a rescue disks or a linux disk that boots from a floppy or a CDROM it is extremelyeasy to gain read access to any files on the system. To prevent this the BIOS should be set to boot only offthe hard drive. Once this is done set a password on the BIOS.
LILO
LILO can be given options at boot time. In particular some Linux distributions will not ask for a passwordwhen starting the system in single user mode or runlevel 1.
There are two options that should be added to the /etc/lilo.conf: the restricted option prompts the user for a passwordthe password="" option, set the password string. Restricted means that LILO cannot be given any parameters without the "password" specified in lilo.conf.
boot=/dev/hda
install=/boot/boot.b
prompt
timeout=50
password="password"
restricted
File permissions
To prevent attackers causing too much damage it is recommended to take the following steps.
1) Make vital system tools immutable, or logfiles append-only:
chattr +i /bin/loginchattr +i /bin/pschattr +a /var/log/messages
2) Make directories /tmp and /home nosuid or noexec:
Lines to be changed in /etc/fstab/tmp /tmp ext2 nosuid 1 2/home /home ext2 noexec 1 2
3) Find all files on the system that don't belong to a user or a group:
_____________________________________________________________________
71
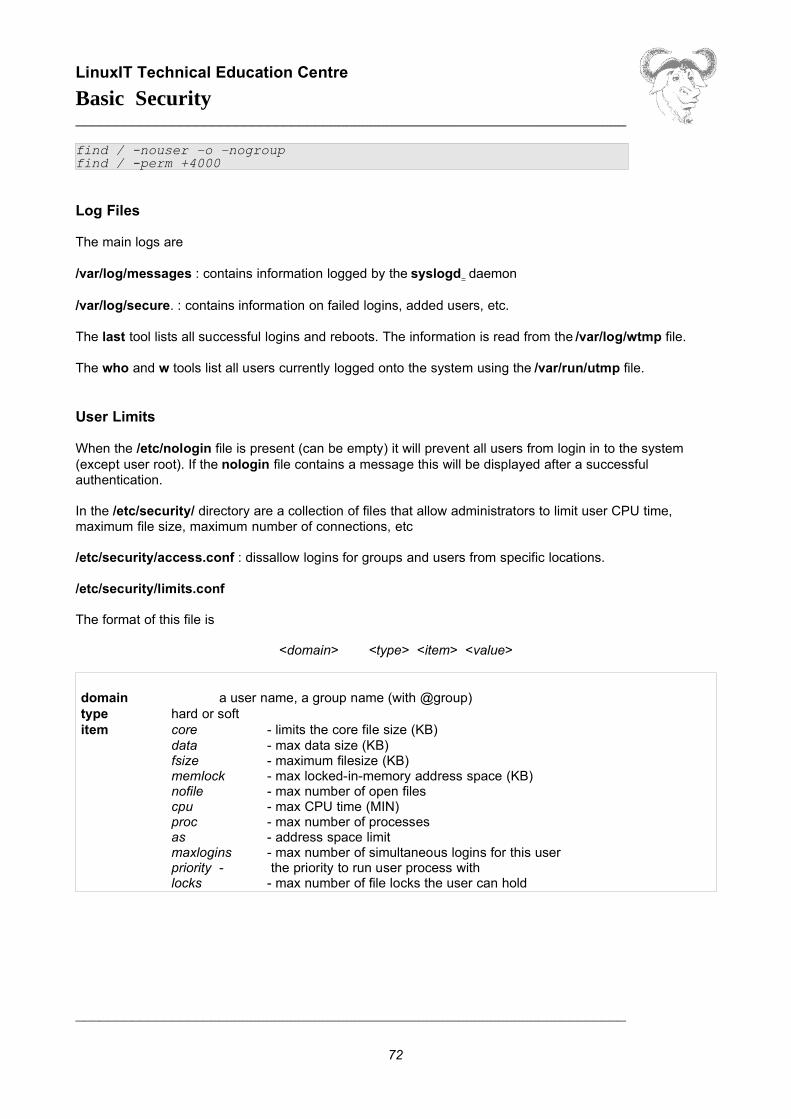
LinuxIT Technical Education Centre
Basic Security_____________________________________________________________________
find / -nouser –o –nogroupfind / -perm +4000
Log Files
The main logs are
/var/log/messages : contains information logged by the syslogd daemon
/var/log/secure. : contains information on failed logins, added users, etc.
The last tool lists all successful logins and reboots. The information is read from the /var/log/wtmp file.
The who and w tools list all users currently logged onto the system using the /var/run/utmp file.
User Limits
When the /etc/nologin file is present (can be empty) it will prevent all users from login in to the system(except user root). If the nologin file contains a message this will be displayed after a successfulauthentication.
In the /etc/security/ directory are a collection of files that allow administrators to limit user CPU time,maximum file size, maximum number of connections, etc
/etc/security/access.conf : dissallow logins for groups and users from specific locations.
/etc/security/limits.conf
The format of this file is
<domain> <type> <item> <value>
domain a user name, a group name (with @group)type hard or softitem core - limits the core file size (KB) data - max data size (KB) fsize - maximum filesize (KB) memlock - max locked-in-memory address space (KB) nofile - max number of open files cpu - max CPU time (MIN) proc - max number of processes as - address space limit maxlogins - max number of simultaneous logins for this user priority - the priority to run user process with locks - max number of file locks the user can hold
_____________________________________________________________________
72
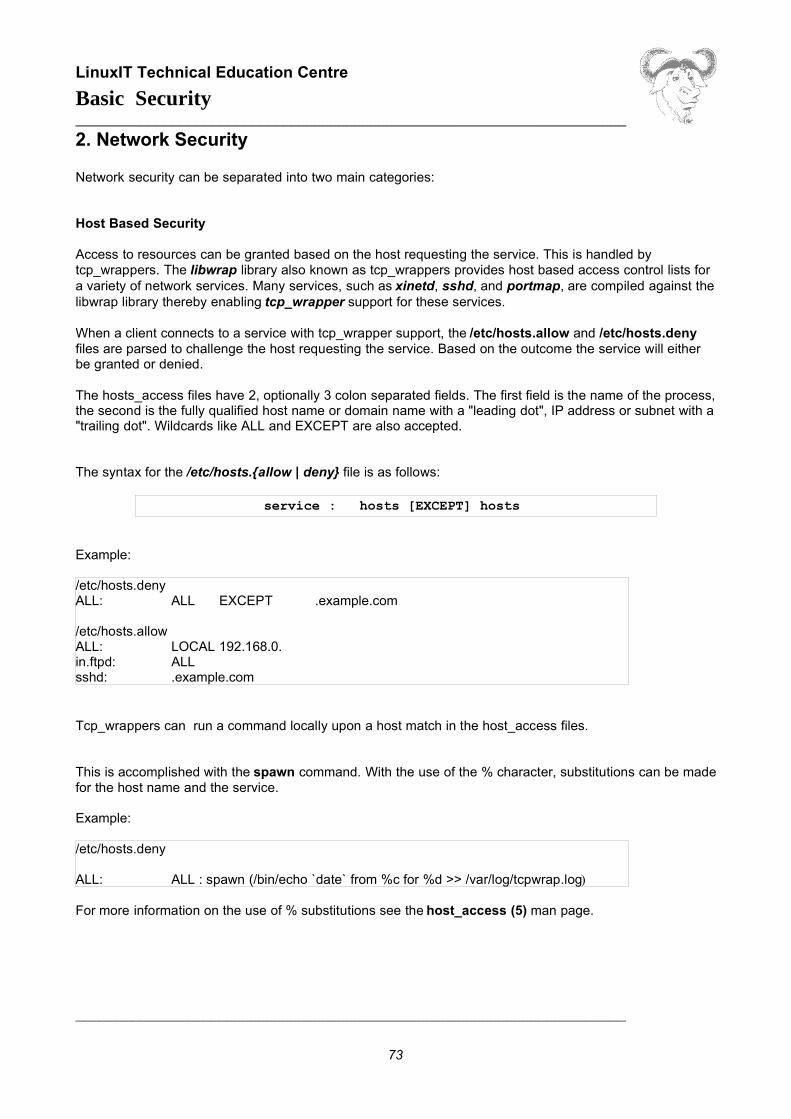
LinuxIT Technical Education Centre
Basic Security_____________________________________________________________________2. Network Security
Network security can be separated into two main categories:
Host Based Security
Access to resources can be granted based on the host requesting the service. This is handled bytcp_wrappers. The libwrap library also known as tcp_wrappers provides host based access control lists fora variety of network services. Many services, such as xinetd, sshd, and portmap, are compiled against thelibwrap library thereby enabling tcp_wrapper support for these services.
When a client connects to a service with tcp_wrapper support, the /etc/hosts.allow and /etc/hosts.denyfiles are parsed to challenge the host requesting the service. Based on the outcome the service will eitherbe granted or denied.
The hosts_access files have 2, optionally 3 colon separated fields. The first field is the name of the process,the second is the fully qualified host name or domain name with a "leading dot", IP address or subnet with a"trailing dot". Wildcards like ALL and EXCEPT are also accepted.
The syntax for the /etc/hosts.{allow | deny} file is as follows:
service : hosts [EXCEPT] hosts
Example:
/etc/hosts.denyALL: ALL EXCEPT .example.com
/etc/hosts.allowALL: LOCAL 192.168.0.in.ftpd: ALLsshd: .example.com
Tcp_wrappers can run a command locally upon a host match in the host_access files.
This is accomplished with the spawn command. With the use of the % character, substitutions can be madefor the host name and the service.
Example:
/etc/hosts.deny
ALL: ALL : spawn (/bin/echo `date` from %c for %d >> /var/log/tcpwrap.log)
For more information on the use of % substitutions see the host_access (5) man page.
_____________________________________________________________________
73
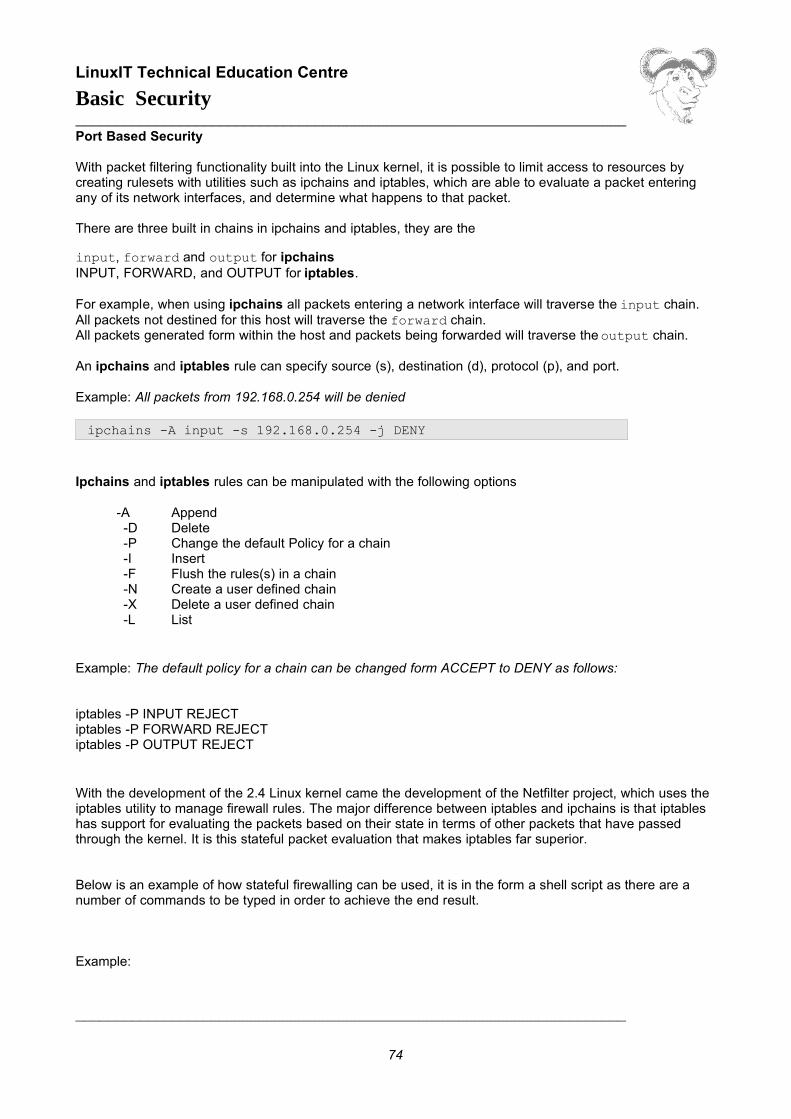
LinuxIT Technical Education Centre
Basic Security_____________________________________________________________________Port Based Security
With packet filtering functionality built into the Linux kernel, it is possible to limit access to resources bycreating rulesets with utilities such as ipchains and iptables, which are able to evaluate a packet enteringany of its network interfaces, and determine what happens to that packet.
There are three built in chains in ipchains and iptables, they are the
input, forward and output for ipchainsINPUT, FORWARD, and OUTPUT for iptables.
For example, when using ipchains all packets entering a network interface will traverse the input chain.All packets not destined for this host will traverse the forward chain. All packets generated form within the host and packets being forwarded will traverse the output chain.
An ipchains and iptables rule can specify source (s), destination (d), protocol (p), and port.
Example: All packets from 192.168.0.254 will be denied
ipchains -A input -s 192.168.0.254 -j DENY
Ipchains and iptables rules can be manipulated with the following options
-A Append-D Delete-P Change the default Policy for a chain-I Insert-F Flush the rules(s) in a chain-N Create a user defined chain-X Delete a user defined chain-L List
Example: The default policy for a chain can be changed form ACCEPT to DENY as follows:
iptables -P INPUT REJECTiptables -P FORWARD REJECTiptables -P OUTPUT REJECT
With the development of the 2.4 Linux kernel came the development of the Netfilter project, which uses theiptables utility to manage firewall rules. The major difference between iptables and ipchains is that iptableshas support for evaluating the packets based on their state in terms of other packets that have passedthrough the kernel. It is this stateful packet evaluation that makes iptables far superior.
Below is an example of how stateful firewalling can be used, it is in the form a shell script as there are anumber of commands to be typed in order to achieve the end result.
Example:
_____________________________________________________________________
74
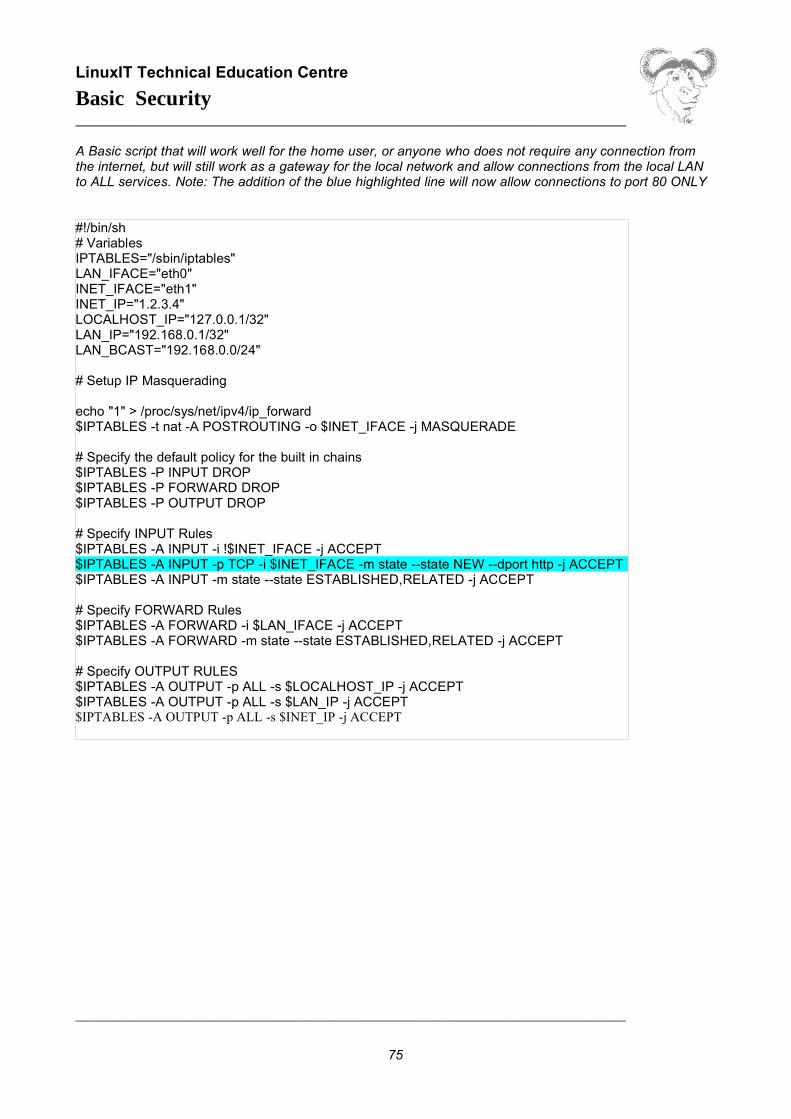
LinuxIT Technical Education Centre
Basic Security_____________________________________________________________________
A Basic script that will work well for the home user, or anyone who does not require any connection fromthe internet, but will still work as a gateway for the local network and allow connections from the local LANto ALL services. Note: The addition of the blue highlighted line will now allow connections to port 80 ONLY
#!/bin/sh# VariablesIPTABLES="/sbin/iptables"LAN_IFACE="eth0"INET_IFACE="eth1"INET_IP="1.2.3.4"LOCALHOST_IP="127.0.0.1/32"LAN_IP="192.168.0.1/32"LAN_BCAST="192.168.0.0/24"
# Setup IP Masquerading
echo "1" > /proc/sys/net/ipv4/ip_forward$IPTABLES -t nat -A POSTROUTING -o $INET_IFACE -j MASQUERADE
# Specify the default policy for the built in chains$IPTABLES -P INPUT DROP$IPTABLES -P FORWARD DROP$IPTABLES -P OUTPUT DROP
# Specify INPUT Rules$IPTABLES -A INPUT -i !$INET_IFACE -j ACCEPT$IPTABLES -A INPUT -p TCP -i $INET_IFACE -m state --state NEW --dport http -j ACCEPT$IPTABLES -A INPUT -m state --state ESTABLISHED,RELATED -j ACCEPT
# Specify FORWARD Rules$IPTABLES -A FORWARD -i $LAN_IFACE -j ACCEPT$IPTABLES -A FORWARD -m state --state ESTABLISHED,RELATED -j ACCEPT
# Specify OUTPUT RULES$IPTABLES -A OUTPUT -p ALL -s $LOCALHOST_IP -j ACCEPT$IPTABLES -A OUTPUT -p ALL -s $LAN_IP -j ACCEPT$IPTABLES -A OUTPUT -p ALL -s $INET_IP -j ACCEPT
_____________________________________________________________________
75

LinuxIT Technical Education Centre
Basic Security_____________________________________________________________________
3. The Secure Shell
● Host Authentication
With ssh both the host and the user authenticate. The host authentication is done by swapping keys. Thehost’s public and private keys are usually kept in /etc/ssh if you are using OpenSSH. Depending on theprotocol used the host key file will be called ssh_host_key for Protocol 1 and ssh_host_rsa_key orssh_host_dsa_key for Protocol 2. Each of these keys have their corresponding public key, for examplessh_host_key.pub.
When an ssh client connects to a server, the server will give the hosts public key. At this stage the user willbe prompted with something like this:
The authenticity of host 'neptune (10.0.0.8)' can't be established.RSA key fingerprint is 8f:29:c2:b8:b5:b2:e3:e7:ec:89:80:b3:db:42:07:f4.Are you sure you want to continue connecting (yes/no)?
If you accept to continue the connection the server’s public key will be added to the local$HOME/.ssh/known_hosts file.
● User Authentication (using passwords)
Then the user is prompted for the password for his account on the remote server and logs in.
● User Authentication (using keys)
The user authentication can also involve swapping keys. For this the user will need to generate a pair ofprivate/public keys. For example:
ssh-keygen -t dsa -b 1024
will generate a 1024 bit DSA key. By default these keys will be saved in $HOME/.ssh and in this exampleare called id_dsa and id_dsa.pub.
If we assume we have a id_dsa.pub we can ‘plant’ this key on a remote account and avoid typingpasswords for further connections. To do this we need to copy the content of the file id_dsa.pub into a filecalled authorized_keys2 kept in the $HOME/.ssh directory.
WARNING
All private keys in /etc/ssh and ~/.ssh should have a permission of 600
_____________________________________________________________________
76

LinuxIT Technical Education Centre
Basic Security_____________________________________________________________________
● sshd configuration file
Sample /etc/ssh/sshd_config file:
#Port 22#Protocol 2,1#ListenAddress 0.0.0.0#ListenAddress ::
# HostKey for protocol version 1#HostKey /etc/ssh/ssh_host_key# HostKeys for protocol version 2#HostKey /etc/ssh/ssh_host_rsa_key#HostKey /etc/ssh/ssh_host_dsa_key
●ssh configuration file
Sample /etc/ssh/ssh_config or $HOME/.ssh/config file:
# Host *# ForwardX11 no# RhostsAuthentication no# RhostsRSAAuthentication no# RSAAuthentication yes# PasswordAuthentication yes# HostbasedAuthentication no# CheckHostIP yes# IdentityFile ~/.ssh/identity# IdentityFile ~/.ssh/id_rsa# IdentityFile ~/.ssh/id_dsa# Port 22# Protocol 2,1# Cipher 3des
4. Kernel security
There are several security options available in the Linux kernel. These include mainly the syn_cookiemechanism. Stack overflow is handled by a security patch called openwall or OWL.
● tcp_syncookies
To enable this option you simply do the following:
[root@nasaspc /proc]#echo "1" > /proc/sys/net/ipv4/tcp_syncookies
This will instruct the kernel to send a cookie to the client in it's SYN+ACK response. In this mode the serverthen closes the socket and waits for the client's ACK with the appropriate cookie.
If the tcp_syncookies file is not present in the /proc directory then you need to recompile the kernel withsyncookies support.
Notice: By default, even if syncookies are supported by the kernel, you need to activate the support byadding a "1" to /proc/sys/net/ipv4/tcp_syncookies. This is usually done in /etc/rc.d/rc.local. However amore efficient solution would be to add an entry to /etc/sysctl.conf
_____________________________________________________________________
77
LinuxIT Technical Education Centre
Basic Security_____________________________________________________________________
● The owl security patch (this section is not an LPI objective)
This patch takes care of most stack related issues and is beyond the scope of this course. It is howevereasy to test weather or not your system is vulnerable with binaries provided with the downloaded patch.
Resources for the owl patch and the Linux kernel:http://www.openwall.co m http://www.kernel.org/pub/linux/kernel/v2.2 /
There is only support for kernel 2.2-19 so far.After downloading linux-2.2.19.tar.gz and linux-2.2.19-ow1.tar.gz in the /usr/src/ directory, make sure youdelete the linux symbolic link.
[root@nasaspc src]#pwd/usr/src/[root@nasaspc src]#rm -rf linux
You next unbundle the packages.[root@nasaspc src]#tar xvzf linux-2.2.19.tar.gz[root@nasaspc src]#tar xvzf linux-2.2.19-owl.tar.gz
To test your system go into the linux-2.2-19-owl directory. There is a directory called optional that contains afile called stacktest.c.
[root@nasaspc optional]#pwd/usr/src/linux-2.2.19-ow1/optional[root@nasaspc optional]#gcc stacktest.c -o stacktest
If you run stacktest you will get a list of options. Run the overflow emulation.
A successful buffer overflow attack:
[root@nasaspc optional]#stacktestUsage: ./stacktest OPTIONNon-executable user stack area tests
-t call a GCC trampoline-e simulate a buffer overflow exploit-b simulate an exploit after a trampoline call
[root@nasaspc optional]#stacktest -eAttempting to simulate a buffer overflow exploit...Succeeded.
To apply the patch you need to go into the linux directory. Here are the commands.
Applying the openwall patch:
[root@nasaspc linux]#pwd/usr/src/linux[root@nasaspc linux]#patch -p1 < /usr/src/linux-2.2-19-owl/linux-2.2.19-ow1.diff
_____________________________________________________________________
78

LinuxIT Technical Education Centre
Basic Security_____________________________________________________________________
Now if you do make menuconfig you should see a new entry called Security options. The defaultselections are fine. From here you proceed with the compilation and installation of the kernel as usual.
_____________________________________________________________________
79
LinuxIT Technical Education Centre
Linux System Administration____________________________________________________________________
Linux System Administration
Overview
We will concentrate on the main tasks of system administration such as monitoring log files, schedulingjobs using at and cron. This also includes an overview of the documentation available (manpages andonline resources) as well as some backup concepts.
1. Logfiles and configuration files
The /var/log/ directory
This is the directory where most logfiles are kept. Some applications generate their own log files (such assquid or samba). Most of the system logs are managed by the syslogd daemon. Common system files are :
cron keeps track of messages generated when cron executesmail messages relating to mailmessages logs all messages except private authentication authpriv, cron, mail and newssecure logs all failed authentications, users added/deleted etc
The most important log file is messages where most of the application's activities are logged.
The /etc/syslog.conf file
When syslogd is started it reads the /etc/syslog.conf configuration file by default. One can also startsyslogd with -f and the path to an alternative config file. This file must contain a list of items followed by apriority, followed by the path to the log-file:
item1.priority1 ; item2.priority2 /path-to-log-file
Valid items are :auth and authpriv user general and private authenticationcron cron daemon messageskern kernel messagesmailnewsuser user processesuucp
________________________________________________________________________
80
LinuxIT Technical Education Centre
Linux System Administration____________________________________________________________________
Valid priorities are: (from highest to lowest) emerg alert crit err warning notice info debug * none
Priorities are minimal! All higher priorities will be logged too. To force a priority to be info only you need touse an '=' sign as in: user.=info /var/log/user_activity
Listing of /etc/syslog.conf
# Log all kernel messages to the console.# Logging much else clutters up the screen.#kern.* /dev/console# Log anything (except mail) of level info or higher.# Don't log private authentication messages!*.info;mail.none;news.none;authpriv.none /var/log/messages # The authpriv file has restricted access.authpriv.* /var/log/secure # Log all the mail messages in one place.mail.* /var/log/maillog # Log cron stuffcron.* /var/log/cron # Everybody gets emergency messages, plus log them on another# machine.*.emerg * # Save boot messages also to boot.loglocal7.* /var/log/boot.log #news.=crit /var/log/news/news.critnews.=err /var/log/news/news.errnews.notice /var/log/news/news.notice
________________________________________________________________________
81
LinuxIT Technical Education Centre
Linux System Administration____________________________________________________________________
2. Log Utilities
The logger command
The first utility logger conveniently logs messages to the /var/log/messages file:If you type the following:
logger program myscipt ERR
The end of /var/log/messages should now have a message similar to this:
Jul 17 19:31:00 localhost penguin: program myscipt ERR
local settings
The logger utility logs messages to /var/log/messages by default. There are local items defined that canhelp you create your own logfiles as follows. local0 to local7 are available items for administrators to use.The availability depends on the system (RedHat local7 logs boot-time information in /var/log/boot.log). Addthe following line to /etc/syslog.conf:
local4.* /dev/tty9
Restart the syslogd
killall -HUP syslogd
The next command will be logged on the /dev/tty9
logger -p local4.notice "This script is writing to /dev/tty9"
An interesting device is the /dev/speech this is installed with the Festival tools.
logrotate
The log files are updated using logrotate. Usually logrotate is run daily as a cron job. The configuration file/etc/logrotate.conf contains commands to create or compress files.
________________________________________________________________________
82
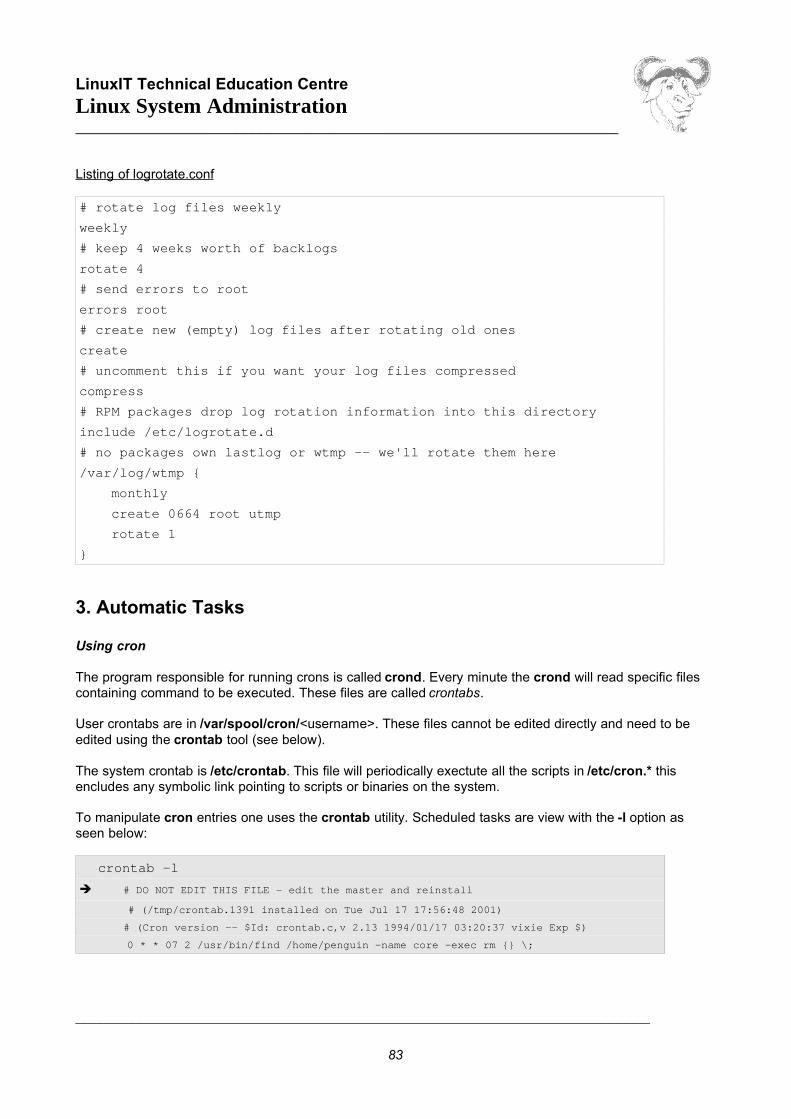
LinuxIT Technical Education Centre
Linux System Administration____________________________________________________________________
Listing of logrotate.conf
# rotate log files weekly
weekly
# keep 4 weeks worth of backlogs
rotate 4
# send errors to root
errors root
# create new (empty) log files after rotating old ones
create
# uncomment this if you want your log files compressed
compress
# RPM packages drop log rotation information into this directory
include /etc/logrotate.d
# no packages own lastlog or wtmp -- we'll rotate them here
/var/log/wtmp {
monthly
create 0664 root utmp
rotate 1
}
3. Automatic Tasks
Using cron
The program responsible for running crons is called crond. Every minute the crond will read specific filescontaining command to be executed. These files are called crontabs.
User crontabs are in /var/spool/cron/<username>. These files cannot be edited directly and need to beedited using the crontab tool (see below).
The system crontab is /etc/crontab. This file will periodically exectute all the scripts in /etc/cron.* thisencludes any symbolic link pointing to scripts or binaries on the system.
To manipulate cron entries one uses the crontab utility. Scheduled tasks are view with the -l option asseen below:
crontab -l
➔ # DO NOT EDIT THIS FILE - edit the master and reinstall
# (/tmp/crontab.1391 installed on Tue Jul 17 17:56:48 2001)
# (Cron version -- $Id: crontab.c,v 2.13 1994/01/17 03:20:37 vixie Exp $)
0 * * 07 2 /usr/bin/find /home/penguin -name core -exec rm {} \;
________________________________________________________________________
83
LinuxIT Technical Education Centre
Linux System Administration____________________________________________________________________Does the user root have any crontabs?
Similarly the -e option will open your default editor and lets you enter a cron entry. User root can use the -u to view and change any user's cron entriesTo delete your crontab file use crontab -r.
This is the format for crontabs :
Minutes(0-59) Hours(0-23) Day of Month(1-31) Month(1-12) Day of Week(0-6) command
Permissions:
By default any user can use crontab. However you can control the accessibility with /etc/cron.deny and /etc/cron.allow.
Scheduling with “at”
The at jobs are run by the atd daemon. At jobs are spooled in /var/spool/at/
The at command is used to schedule a one off task with the syntax
at [time]
Where time can be expressed as:
now3am + 2daysmidnight10:15 Apr 12teatime
For a complete list of valid time formats see /usr/share/doc/at-xxx/timespec.
You can list commands that are scheduled with atq or at -l. The at jobs are saved in /var/spool/at/:
ls /var/spool/at/
➔ a0000100fd244d spool
When using atq you should have a list of jobs proceeded by a number. You can use this number todequeue it:
atq
➔ 1 2001-07-17 18:21 a root
________________________________________________________________________
84
LinuxIT Technical Education Centre
Linux System Administration____________________________________________________________________
From the atq listing we see that the job number is 1, so we can remove the job from the spool as follows:
at -d 1
Permissions:
By default at is restricted to the root user. To override this you must either have an empty /etc/at.denyor have a /etc/at.allow with the appropriate names.
4. Backups and Compressions
Backup strategies
There are three main strategies to back up a system:
Full: copy all filesIncremental: The first incremental copies all files added or changed since the last full backup, andsubsequently copies all the files added or changed since the last incremental backupDifferential: Copies all files added or changed since the last full backup
Example: If you made a full backup and 3 differential backups before a crash, how many tapes would youneed to restore ?
Creating archives with tar
The main option to create an archive with tar is -c. You can also specify the name of the archive as the firstargument if you use the -f flag.
tar -cf home.tar /home/
If you don't specify the file as an argument tar -c will simply output the archive as standard output:
tar -c /home/ > home.tar
Extracting archives with tar
Extracting is straight forward. Replace the -c flag with an -x. This will cause the archive file to createdirectories if necessary and copy the archived files in your current directory. To redirect the output of theextracted archive into the directory /usr/share/doc, for example, you can do:
tar xf backeddocs.tar -C /usr/share/doc
________________________________________________________________________
85
LinuxIT Technical Education Centre
Linux System Administration____________________________________________________________________
Compressions
All archives can be compressed using different compression utilities. These flags are available whencreating, testing or extracting an archive:
tar option compression type Z compress z gzip j bzip2.
The cpio utility
The cpio utility is used to copy files to and from archives. List of files must be given to cpio either through apipe (as when used with find) or via a file redirection such as with;
- Extract an archive on a tape:
cpio -i < /dev/tape
- Create an archive for the /etc directory:
find /etc | cpio -o > etc.cpio
5. Documentation
Manpages and the whatis database
The manpages are organised in sectionsNAME the name of the item followed by a short one line description.SYNOPSYS the syntax for the commandDESCRIPTION a longer descriptionOPTIONS a review of all possible options and their functionFILES files that are related to the current item (configuration files etc)SEE ALSO other manpages related to the current topic
These are the main sections one would expect within a manpage.
The whatis database stores the NAME section of all the manpages on the system. This is done through adaily cron. The whatis database has the following two entries:
name(key) – one line description
________________________________________________________________________
86
LinuxIT Technical Education Centre
Linux System Administration____________________________________________________________________The syntax for whatis is:whatis <string>
The output is the full NAME section of the manpages where string matched named(key)
One can also use the man command to query the whatis database. The syntax is
man -k <string>
Unlike whatis this will query both the “name” and the “one line description” entries of the database. If thestring matches a word in any of these fields the above query will return the full NAME section.
Example: (the matching string has been highlighted)
whatis lilo
lilo (8) - install boot loader
lilo.conf [lilo] (5) - configuration file for lilo
man -k lilo
grubby (8) - command line tool for configuring grub, lilo, and elilo
lilo (8) - install boot loader
lilo.conf [lilo] (5) - configuration file for lilo
The FHS recommends manpages to be kept in /usr/share/man
Manpage Sections
Section 1 Information on executables
Section 2 System calls, e.g mkdir(2)
Section 3 Library calls, e.g stdio(3)
Section 4 Devices (files in /dev)
Section 5 Configuration files and formats
Section 6 Games
Section 7 Macro packages
Section 8 Administration commands
Section 9 Kernel routines
To access a specific section N one has to enter:
man N command
Examples:
man mkdir
man 2 mkdir
________________________________________________________________________
87
LinuxIT Technical Education Centre
Linux System Administration____________________________________________________________________
man crontab
man 5 crontab
Info pages
The FHS recommends info pages be kept in /usr/share/info. These pages are compressed files that can beread with the info tool.
The original GNU tools used info pages rather than manpages. Since then most info pages have beenrewritten as manpages. However information about GNU projects such as gcc or glibc is still moreextensive in the info pages compared to the manpages.
Online documents
GNU projects include documents such as a FAQ, README, CHANGELOG and sometimes user/adminguides. The formats can either be ASCII text, HTML, LateX or postscript.
These documents are kept in the /usr/share/doc/ directory.
HOWTOs and The Linux Documentation Project
The Linux Documentation Project provides many detailed documents on specific topics. These arestructured guides explaining concepts and implementations. The website URL is www.tldp.org.The LDP documents are freely redistributable and can be contributed too using a GPL type licence.
Usenet News Groups
The main newsgroups for Linux are the comp.os.linux.* groups (e.g comp.os.linux.networking,comp.os.linux.security ...). Once you have setup a news reader to connect to a news server (usuallyavailable through an ISP or a University campus) one downloads a list of all existing discussion groups andsubscribes/unsubscribes to a given group. There are many experienced as well as new users which rely on the newsgroups to get information onspecific tasks or projects. Take the time to answer some of these questions if you feel you have the relevantexperience.
NOTICE
The man -k option queries both fields in the whatis database. This will find everything about a given item.There is a tool called apropos (meaning about) which will do the same thing as man -k.
________________________________________________________________________
88
LinuxIT Technical Education Centre
Linux System Administration____________________________________________________________________
5. Exercises
Logging
1. Change /etc/syslog.conf to output some of the logs to /dev/tty9 (make sure you restart syslogd and thatthe output is properly redirected)
2. Add a custom local5 item with critical priority to /ect/syslog.conf and direct the output to /dev/tty10.Restart syslogd and use logger to write information via local5.
3. Change the /etc/rc.d/init.d/syslog script to allow remote hosts to send log outputs.
Scheduling
4.Create a cron entry which starts xclock every 2 minutes. Remember that cron is unaware of systemvariables such as PATH and DISPLAY.
5. Use at.to start xclock in the next five minutes.
Archiving
6. Use find to list all files that have been modified during the past 24 hours.(hint: Redirect the output of find -mtime –1 to a file)
7.Use cpio to create an archive called Incremental.cpio.
(ans: Use the file created above and do cat FILE | cpio –ov > Incremental.cpio)
8 Use xargs and tar to create an archive of all files last accessed or changed 5 mins ago.
9. Do the same using the –exec option to find. Note that the files listed by find can be referenced by the {}symbol.
10. Extract the archive you have just created.
________________________________________________________________________
89
LinuxIT Technical Education Centre
Setting up PPP_____________________________________________________________________
Setting up PPP
1. Serial Modems
Linux assumes in general that serial modems are connected to a serial port (one of the /dev/ttySN devices).So you first need to find out which serial port the modem is connected to.
The setserial –g command will query the serial ports. If the resource is not available then the UART outputwill be unknown.
Sample output for setserial :
setserial -g /dev/ttyS[0-3]/dev/ttyS0, UART: 16550A, Port: 0x03f8, IRQ: 4/dev/ttyS1, UART: 16550A, Port: 0x02f8, IRQ: 3/dev/ttyS2, UART: unknown, Port: 0x03e8, IRQ: 4/dev/ttyS3, UART: unknown, Port: 0x02e8, IRQ: 3
For non-serial modems it is possible to get information about available resources in /proc/pci. Here the i/oand IRQ settings can be transferred to a free /dev/ttyS? device. This is achieved with the following 2 lines:
setserial /dev/ttyS2 port 0x2000 irq 3setserial /dev/ttyS2 autoconfig
The last line simply deals with setting up the proper UART settings.
These settings will be lost at the next boot and can be saved in /etc/rc.serial. This script is own of the lastscripts executed by rc.sysinit at boot time.
The rc.serial script :
#!/bin/bash
TTY=/dev/ttyS2PORT=0x2000IRQ=3
echo "Setting up Serial Card ..."/bin/setserial $TTY port $PORT irq $IRQ 2>/dev/null/bin/setserial $TTY autoconfig 2>/dev/null
__________________________________________________________________________
90
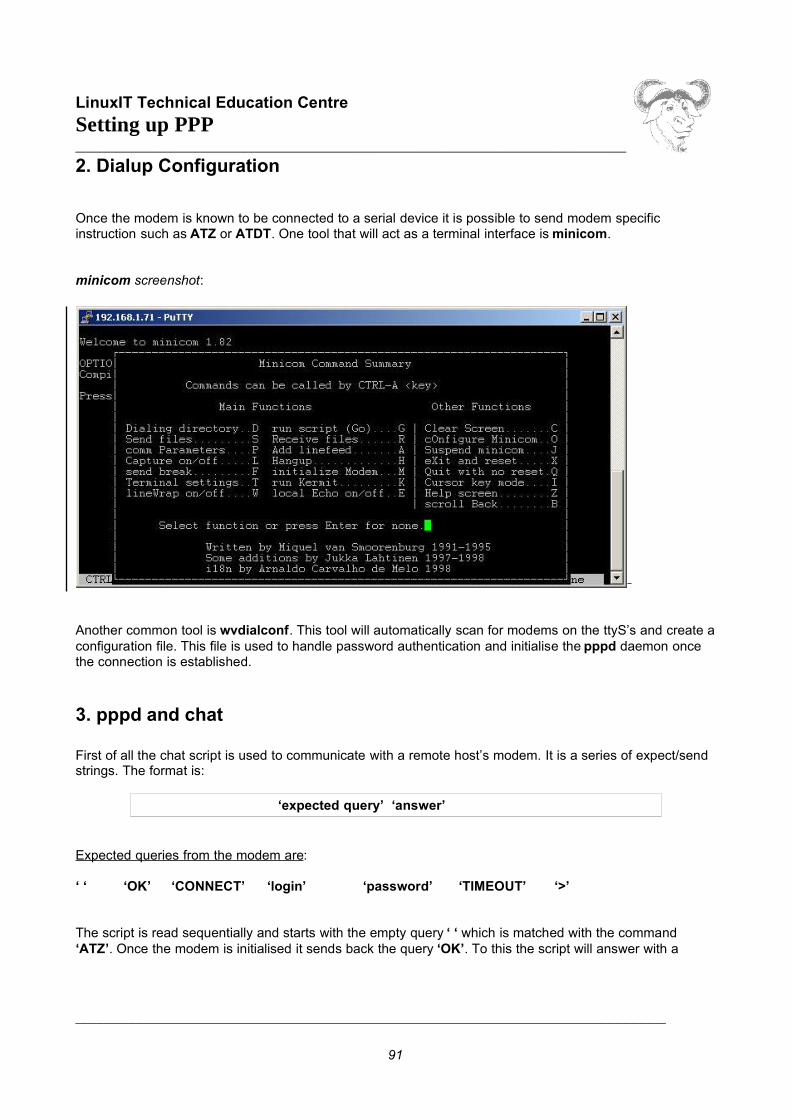
LinuxIT Technical Education Centre
Setting up PPP_____________________________________________________________________2. Dialup Configuration
Once the modem is known to be connected to a serial device it is possible to send modem specificinstruction such as ATZ or ATDT. One tool that will act as a terminal interface is minicom.
minicom screenshot:
Another common tool is wvdialconf. This tool will automatically scan for modems on the ttyS’s and create aconfiguration file. This file is used to handle password authentication and initialise the pppd daemon oncethe connection is established.
3. pppd and chat
First of all the chat script is used to communicate with a remote host’s modem. It is a series of expect/sendstrings. The format is:
‘expected query’ ‘answer’
Expected queries from the modem are:
‘ ‘ ‘OK’ ‘CONNECT’ ‘login’ ‘password’ ‘TIMEOUT’ ‘>’
The script is read sequentially and starts with the empty query ‘ ‘ which is matched with the command‘ATZ’. Once the modem is initialised it sends back the query ‘OK’. To this the script will answer with a
__________________________________________________________________________
91

LinuxIT Technical Education Centre
Setting up PPP_____________________________________________________________________‘ATDT’ dialing command. This conversation goes on and on until the ‘>’ prompt is reached at which stageone can run pppd.
Sample chat script:'ABORT' 'BUSY''ABORT' 'ERROR''ABORT' 'NO CARRIER''ABORT' 'NO DIALTONE''ABORT' 'Invalid Login''ABORT' 'Login incorrect''' 'ATZ''OK' 'ATDT01172341212''CONNECT' '''ogin:' 'adrian''ord:' 'adrianpasswd''TIMEOUT' '5''>' pppd
Of course this is one way of doing things. One can also start pppd manually and then invoke the chat scriptas follows:
pppd /dev/ttyS2 115200 \nodetach \lock \debug \crtscts \asyncmap 0000000 \connect "/usr/sbin/chat -f /etc/sysconfig/network-scripts/chat-ppp0"
The lines below the pppd commands can be saved in /etc/ppp/options. This file contains most of thefeatures which makes the strength and flexibility of pppd. For example require-chap will use the /etc/ppp/chap-secrets for authentication.
4. PPPD peers
There is a directory called peers in /etc/ppp/. In this directory one can create a file that contains all thenecessary command line options for pppd. In this way peer connections can be started by all users.
Typically you would name this file with the name that you would refer to this connection as. E.g., the samename as your ISP, etc. Below is an example of a PPP peer file:
# This optionfile was generated by pppconfig 2.0.10. hide-password noauthconnect "/usr/sbin/chat -f /etc/sysconfig/network-scripts/chat-ppp0"/dev/ttyS0115200defaultroutenoipdefault user uk2
The previous peer file (called uk2) would be used as follows:
__________________________________________________________________________
92
LinuxIT Technical Education Centre
Setting up PPP_____________________________________________________________________
# pppd call uk2
This will dial the number specified in the “chat script” and authenticate as the user “uk2”. Please noteNote thatthis requires a corresponding entry in the /etc/ppp/chap-secrets, and /etc/ppp/pap-secrets. The format forpap and chap secrets is as follows:
# Secrets for authentication using CHAP# client server secret IP addresses
uk2 * "uk2" *
This format allows different passwords to be used if you connect to different servers. It also allows you tospecify an IP address. This is probably not going to work when connecting to an ISP, but when makingprivate connections, you can specify IP addresses if there is a need. One example would be where youneed to audit your network activity, and want to specify which users get a certain IP address.
5. Wvdial
This is the default method used by Red Hat to connect to a dial up network. To configure wvdial, it is easierto use one of the configuration tools provided with either Gnome or KDE. They configure the /etc/wvdial.conf file.
Below is a sample wvdial.conf file:
[Modem0]Modem = /dev/ttyS0Baud = 115200Dial Command = ATDTInit1 = ATZFlowControl = Hardware (CRTSCTS)[Dialer UK2]Username = uk2Password = uk2Phone = 08456091370 Inherits = Modem0
To use wvdial from the command line, you would execute it with the following syntax:
# wvdial <dialer-name>
In the example configuration file the following command would dial the connection called “uk2”
# wvdial uk2
__________________________________________________________________________
93
LinuxIT Technical Education Centre
Printing____________________________________________________________________
Printing
The two objectives of this chapter are firstly to introduce the printing GNU tools available on Linux machinesand secondly to understand the configuration files for a print server.
1. Filters and gs
For non-text formats Linux and UNIX systems generally use filters. These filters translate JPEG or trofffile formats into a postscript type format. This could directly be sent to a postscript printer, but since not allgeneric printers can handle postscript, an intermediate ‘virtual postscript printer’ is used called gs(ghostscript), finally translating the postscript into PCL.
The commercial version of ghostscript is Aladdin Ghostscript and the GNU version is only an older versionof Aladdin’s.
The gs utility has a database of printer drivers it can handle (this list is usually up to date, for example manyUSB printers are supported) and converts the postscript directly into PCL for these known models. The gsutility plays a central role in Linux printing.
2. Printers and print queues
As seen above simple ascii text printing is not handled in the same way as image or postscript files. If youonly have one printer and you would like to printout your mail for example, it may not be necessary to use afilter. You may want to define a queue without filters, which would print mail faster. You could also define onthe same printer a queue, which would only handle postscript files.
All queues and printers are defined in /etc/printcap. Here is the full configuration of a remote printer192.168.1.20 using the remote queue named ‘lp’:
lp:\:sd=/var/spool/lpd/lp:\
:mx#0:\ :sh:\ :rm=192.168.1.20:\ :rp=lp:
The essential options here are rm the remote host, sd the spool directory and rp the name of the remotequeue. Notice that no filters are specified (you would use if for input filter). All the filtering is done on thehost.
_________________________________________________________________________
94

LinuxIT Technical Education Centre
Printing____________________________________________________________________
3. Printing Tools
lpr:
The lpr utility is used to submit jobs to a printer. This is a modern version of lp (line print). From a user’spoint of view it is helpful to understand that a printer can be associated with more than one queue. Here aretwo examples to print a file called LETTER.
Send job to default printer:lpr LETTER
Send job to the’ ljet’ queue: lpr -Pljet LETTER
Table1: Main Options for lpr
-#num Print num copies -Ppq Specify the print queue pq -s Make a symbolic link in the spool directory (for large files)
lpq:
A user can monitor the status of print queues with the lpq utility. Here are a few examples.
Show jobs in default queue:lpq
Show jobs for all queues on the system:lpq -a
Show jobs in the ‘remote’ queue: lpq -Premote
lprm:
Depending on the options in /etc/lpd.perms users may be allowed to delete queued jobs using lprm.
Remove last job submitted:lprm
Remove jobs submitted by user dhill:lprm dhill
_________________________________________________________________________
95
LinuxIT Technical Education Centre
Printing____________________________________________________________________Remove all submitted jobs:lprm -a (or simply lprm -)
It is possible to remove a specific spooled job by referencing the job number; this number is given by lpq.
lpc:
The Line Printer Control utility is used to control the print queues and the printers. The print queues can bedisabled or enabled. Notice that lprm on the other hand can remove jobs from the queue but doesn’t stopthe queue.
One can either use lpc interactively (lpc has its’ own prompt), or on the command line.
Here is an output of lpc –help:
CMD: /usr/sbin/lpc help► Commands may be abbreviated. Commands are:
abort enable disable help restart status topq ? clean exit down quit start stop up
The enable/disable/topq/up options relate to queuesThe start/stop/down options relate to printers
4. The configuration files
/etc/printcap
As seen earlier in the chapter, this file defines all printers and queues that the system can use (remote andlocal).
The default printer can be specified with either variables LPDEST or PRINTER: PRINTER=lpIf no environmental variable is set the default printer is the first printer defined in /etc/printcap.
The main definitions are:lp device name, usually /dev/lp0 for the parallel portmx maximum file size (zero=nolimit)sd spool directory (/var/spool/lpd/<queuename>/)if input filterrm remote host address or IPrp remote queue name
If this file is modified you will need to restart the lpd daemon.
/etc/lpd.conf
This is a very lengthy file and by default all options are commented out. This file is used if an administratorwishes to have more control (i.e remote access authentication, user permissions …) over the printing.
_________________________________________________________________________
96
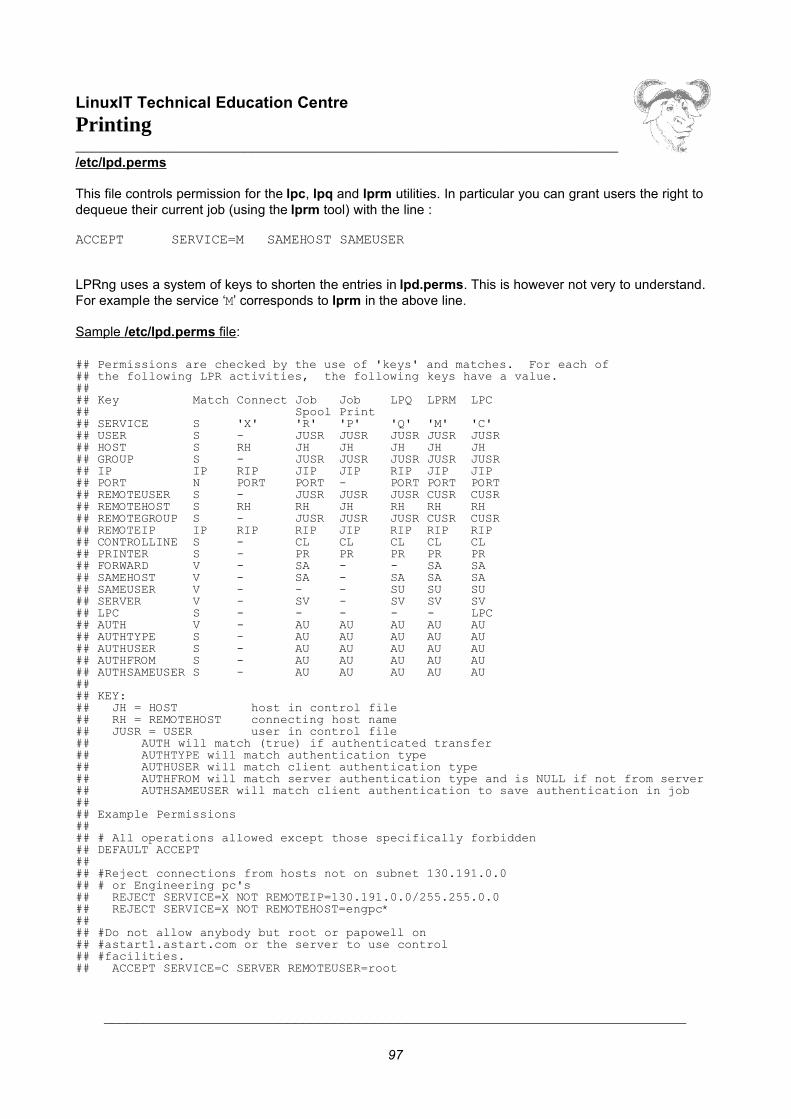
LinuxIT Technical Education Centre
Printing____________________________________________________________________/etc/lpd.perms
This file controls permission for the lpc, lpq and lprm utilities. In particular you can grant users the right todequeue their current job (using the lprm tool) with the line :
ACCEPT SERVICE=M SAMEHOST SAMEUSER
LPRng uses a system of keys to shorten the entries in lpd.perms. This is however not very to understand.For example the service ‘M’ corresponds to lprm in the above line.
Sample /etc/lpd.perms file :
## Permissions are checked by the use of 'keys' and matches. For each of## the following LPR activities, the following keys have a value. ## ## Key Match Connect Job Job LPQ LPRM LPC## Spool Print## SERVICE S 'X' 'R' 'P' 'Q' 'M' 'C'## USER S - JUSR JUSR JUSR JUSR JUSR## HOST S RH JH JH JH JH JH## GROUP S - JUSR JUSR JUSR JUSR JUSR## IP IP RIP JIP JIP RIP JIP JIP## PORT N PORT PORT - PORT PORT PORT## REMOTEUSER S - JUSR JUSR JUSR CUSR CUSR## REMOTEHOST S RH RH JH RH RH RH## REMOTEGROUP S - JUSR JUSR JUSR CUSR CUSR## REMOTEIP IP RIP RIP JIP RIP RIP RIP## CONTROLLINE S - CL CL CL CL CL## PRINTER S - PR PR PR PR PR## FORWARD V - SA - - SA SA## SAMEHOST V - SA - SA SA SA## SAMEUSER V - - - SU SU SU## SERVER V - SV - SV SV SV## LPC S - - - - - LPC## AUTH V - AU AU AU AU AU## AUTHTYPE S - AU AU AU AU AU## AUTHUSER S - AU AU AU AU AU## AUTHFROM S - AU AU AU AU AU## AUTHSAMEUSER S - AU AU AU AU AU## ## KEY:## JH = HOST host in control file## RH = REMOTEHOST connecting host name## JUSR = USER user in control file## AUTH will match (true) if authenticated transfer## AUTHTYPE will match authentication type## AUTHUSER will match client authentication type## AUTHFROM will match server authentication type and is NULL if not from server## AUTHSAMEUSER will match client authentication to save authentication in job## ## Example Permissions## ## # All operations allowed except those specifically forbidden## DEFAULT ACCEPT## ## #Reject connections from hosts not on subnet 130.191.0.0## # or Engineering pc's## REJECT SERVICE=X NOT REMOTEIP=130.191.0.0/255.255.0.0## REJECT SERVICE=X NOT REMOTEHOST=engpc*## ## #Do not allow anybody but root or papowell on## #astart1.astart.com or the server to use control## #facilities.## ACCEPT SERVICE=C SERVER REMOTEUSER=root
_________________________________________________________________________
97
LinuxIT Technical Education Centre
Printing____________________________________________________________________## ACCEPT SERVICE=C REMOTEHOST=astart1.astart.com REMOTEUSER=papowell## ## #Allow root on talker.astart.com to control printer hpjet## ACCEPT SERVICE=C HOST=talker.astart.com PRINTER=hpjet REMOTEUSER=root## #Reject all others## REJECT SERVICE=C## ## #Do not allow forwarded jobs or requests## REJECT SERVICE=R,C,M FORWARD## ## allow root on server to control jobsACCEPT SERVICE=C SERVER REMOTEUSER=root# allow anybody to get server, status, and printcapACCEPT SERVICE=C LPC=lpd,status,printcap# reject all othersREJECT SERVICE=C## allow same user on originating host to remove a jobACCEPT SERVICE=M SAMEHOST SAMEUSER# allow root on server to remove a jobACCEPT SERVICE=M SERVER REMOTEUSER=rootREJECT SERVICE=M# all other operations allowedDEFAULT ACCEPT
/etc/hosts.{lpd,equiv}
These files where used by the LPR printing suite and presented a security risk. When running a print serveryou needed to specify which hosts could access the printer in /etc/hosts.lpd. You also needed to add thehosts to /etc/hosts.equiv.
These files are now replaced in LPRng by the /etc/lpd.perms file
_________________________________________________________________________
98

LinuxIT Technical Education Centre
Printing____________________________________________________________________
5. Exercises
1. Start printtool and create a new local queue called lp.
2. Customise the device /dev/tty10 as the printer device (remember to do chmod 666 /dev/tty10 to allow printing on this device). You now have a virtual printer on your system!
3. Send jobs to the print queue using lpr and pr (pre-formatting tool)
4. With your system’s print tool, define different remote queues:- a UNIX queue- a SMB queue
If you are the server, make sure the appropriate rules are defined in /etc/lpd.perms
In each case - check the /etc/printcap file. Which filter is used? How is the remote host defined?- check the /var/spool/lpd/ directory.
5. Stop the various printer queues and printers with lpc.
6. Check the contents of each queue with lpq
7. De-queue selected jobs with lprm
_________________________________________________________________________
99
LinuxIT Technical Education Centre
Appendix__________________________________________________________________________
LPI 102 Objectives
1. Kernel
Manage/Query kernel and kernel modules at runtimeManage a kernel and kernel loadable modules. Use command-line utilities to get information about thekernel modules and the running kernel. Load modules with correct parameters and unload them. Loadmodules using aliases. Keywords: /lib/modules/kernel-version/modules.dep, /etc/modules.conf, /etc/conf.modules depmod, insmod, lsmod, rmmod, modinfo, modprobe, uname
Reconfigure, build, and install a custom kernel and kernel modulesCustomise, build, and install a kernel and kernel loadable modules from source Customise the currentkernel. Build a new kernel or new kernel modules as needed. Install the new kernel and reconfigure the bootloader. Keywords: /usr/src/linux/*, /usr/src/linux/.config, /lib/modules/kernel-version/*, /boot/* make, config, menuconfig, xconfig, oldconfig, modules, install, modules_install, depmod
2. Boot, Initialisation, Shutdown and Runlevels
Boot the systemFollow the system through the booting process. Parse parameters to the boot loader (runlevel and kerneloptions). Check events in the log files. Keywords: dmesg, /var/log/messages, /etc/modules.conf, LILO, GRUB
Change runlevels and shutdown or reboot systemManage the system’s runlevels. The default runlevel. The single user mode. Shutdown and reboot. Alertusers before switching runlevel. Keywords: shutdown, init, /etc/inittab
3. Printing
Manage printers and print queuesManage print queues and print jobs. Monitor print server and user print queues. Troubleshoot generalprinting problems. Keywords: lpc, lpq, lprm, lpr, /etc/printcap
Print filesManage print queues and manipulate print jobs. Add and remove jobs from printer queues. Convert text filesto postscript for printing. Keywords: lpr, lpq, mpage
Install and configure local and remote printersInstall a printer daemon. Install and configure a print filter (e.g.: apsfilter, magicfilter). Make local and remoteprinters accessible for a Linux system. SMB shared printers.
_________________________________________________________________________ All original materials are ©2002 LinuxIT. All Rights Reserved. Kleesh Consultants Ltd T/A LinuxIT
registered in England No:04470427. Visit www.linuxit.com for more information.
100
LinuxIT Technical Education Centre
Appendix__________________________________________________________________________Keywords: lpd, /etc/printcap, /etc/apsfilter/*, /var/lib/apsfilter/*,/etc/magicfilter/*, /var/spool/lpd/*
4. Documentation
Use and manage local system documentationUse and administer the manpages and the material in /usr/share/doc. Find relevant man pages. Searchman page sections. Find a command and all the documentation related to it. Configure access to mansources and the man system. Keywords: man, apropos, whatis, MANPATH
Find Linux documentation on the InternetFind and use Linux documentation. Use Linux documentation from sources such as the LinuxDocumentation Project (LDP), vendors and third-party websites. Linux specific newsgroups. Newsgrouparchives. Mailing lists. Notify users on system-related issuesNotify users about current issues related to the system. Logon messages. Keywords: /etc/issue, /etc/issue.net, /etc/motd
5. Shells, Scripting, Programming and Compiling
Customise and use the shell environmentCustomise shell environments to meet users' needs. Set environment variables at login, or when spawninga new shell. Write bash functions for frequently used sequences of commands. Keywords: ~/.bash_profile, ~/.bash_login, ~/.profile, ~/.bashrc, ~/.bash_logout,~/.inputrc function, export, env, set, unset
Customise or write simple scriptsCustomise existing scripts. Write simple new shell scripts. Use standard sh syntax (loops, tests). Usecommand substitution. Test command return-values and file status. Conditionally mailing the superuser.The she-bang (#!) sign. Manage location, ownership, execution and suid rights of scripts. Keywords: while, for, test, chmod
6. Administrative Tasks
Manage users and group accounts and related system filesAdd, remove, suspend and change user accounts. Manage groups. Change user/group info inpasswd/group databases. Create special purpose and limited accounts. Keywords: chage, gpasswd, groupadd, groupdel, groupmod, grpconv, grpunconv,passwd, pwconv, pwunconv, useradd, userdel, usermod /etc/passwd, /etc/shadow, /etc/group, /etc/gshadow
Tune the user environment and system environment variablesModify global and user profiles. Set up environment variables. Maintain the skel directory. Set commandsearch path. Keywords: env, export, set, unset, /etc/profile, /etc/skel
_________________________________________________________________________ All original materials are ©2002 LinuxIT. All Rights Reserved. Kleesh Consultants Ltd T/A LinuxIT
registered in England No:04470427. Visit www.linuxit.com for more information.
101
LinuxIT Technical Education Centre
Appendix__________________________________________________________________________
Configure and use system log files to meet administrative and security needs Configure system logs. Manage type and level of information logged. Manually scan log files for notableactivity. Monitoring log files: automatic rotation and archiving. Track down problems noted in logs. Keywords: logrotate, tail –f, /etc/syslog.conf, /var/log/*
Automate system administration tasks by scheduling jobs to run in the futureUse cron or anacron to run jobs at regular intervals. Use at to run jobs once. Manage cron and at jobs.Configure user access to cron and at services. Keywords: at, atq, atrm, crontab /etc/anacrontab, /etc/at.deny, /etc/at.allow, /etc/crontab, /etc/cron.allow, /etc/cron.deny, /var/spool/cron/*
Maintain an effective data backup strategyPlan a backup strategy. Automatically backup filesystems to various media. Dump a raw device to a file andvice versa. Perform partial and manual backups. Verify the integrity of backup files. Partially or fully restorbackups. Keywords: cpio, dd, dump, restore, tar
Maintain system timeMaintain the system time and synchronize the clock over NTP. Set the system date and time. Set the BIOSclock to the correct time in UTC, configuring the correct timezone for the system and configuring the systemto correct clock drift to match NTP clock. Keywords: date, hwclock, ntpd, ntpdate /usr/share/zoneinfo, /etc/timezone, /etc/localtime, /etc/ntp.conf, /etc/ntp.drift
7. Networking Fundamentals
Fundamentals of TCP/IPUnderstand IP-addresses, network masks and broadcast address. Determine the network address,broadcast address and netmask when given an IP-address and the number of bits. Network classes andclassless subnets (CIDR) and the reserved addresses for private network use. It includes the understandingof the function and application of a default route. It also includes the understanding of basic internetprotocols (IP, ICMP, TCP, UDP) and the more common TCP and UDP ports (20, 21, 23, 25, 53, 80, 110,119, 139, 143, 161). Keywords: /etc/services, ftp, telnet, host, ping, dig, traceroute, whois
TCP/IP configuration and troubleshootingView, change and verify configuration settings for various network interfaces. Manual and onbootconfiguration for interfaces and routing tables. Configure and correct routing tables. Configure Linux as aDHCP client. Keywords: /etc/HOSTNAME or /etc/hostname, /etc/hosts, /etc/networks, /etc/host.conf, /etc/resolv.conf, /etc/nsswitch.confifconfig, route, dhcpcd, dhcpclient, pump, host, hostname (domainname, dnsdomainname), netstat, ping,
_________________________________________________________________________ All original materials are ©2002 LinuxIT. All Rights Reserved. Kleesh Consultants Ltd T/A LinuxIT
registered in England No:04470427. Visit www.linuxit.com for more information.
102

LinuxIT Technical Education Centre
Appendix__________________________________________________________________________traceroute, tcpdump Configure Linux as a PPP clientUnderstand the basics of the PPP protocol. Configure PPP for outbound connections. Define the chatsequence when connecting. Initialisation and termination of a PPP connection with a modem, ISDN orADSL. Set up PPP to automatically reconnect if disconnected. Keywords: /etc/ppp/options.*, /etc/ppp/peers/*, /etc/wvdial.conf /etc/ppp/ip-up, /etc/ppp/ip-down, wvdial, pppd
8. Networking Services
Configure and manage inetd, xinetd, and related servicesConfigure services available through inetd. Use tcpwrappers. Start, stop, and restart internet services.Configure basic network services including telnet and ftp. Set a service to run as another user instead of thedefault in inetd.conf. Keywords: /etc/inetd.conf, /etc/hosts.allow, /etc/hosts.deny, /etc/services, /etc/xinetd.conf, /etc/xinetd.log
Operate and perform basic configuration of sendmailModify simple parameters in sendmail configuration files. Create mail aliases. Manage the mail queue. Startand stop sendmail. Configure mail forwarding and perform basic troubleshooting of sendmail. The objectiveincludes checking for and closing open relay on the mailserver. It does not include advanced customconfiguration of Sendmail.Keywords: /etc/sendmail.cf, /etc/aliases, /etc/mail/*, ~/.forward mailq, sendmail, newaliases
Operate and perform basic configuration of Apache Modify simple parameters in Apache configuration files. Start, stop, and restart httpd. Does not includeadvanced custom configuration of Apache. Keywords: apachectl, httpd, httpd.conf
Properly manage the NFS, smb, and nmb daemons Mount remote filesystems using NFS. Configure NFS for exporting local filesystems. Start, stop, and restartthe NFS services. Install and configure Samba using GUI tools or direct edit of the /etc/smb.conf file.Sharing of home directories and printers, as well as correctly setting the nmbd as a WINS client. Keywords: /etc/exports, /etc/fstab, /etc/smb.conf, mount, umount
Setup and configure basic DNS servicesConfigure hostname lookups and troubleshoot problems with local caching-only name server. Understandthe domain registration and DNS translation process. Differences between bind 4 and bind 8 configurationfiles. Keywords: /etc/hosts, /etc/resolv.conf, /etc/nsswitch.conf, /etc/named.boot (v.4) or/etc/named.conf (v.8), named
Set up secure shell (OpenSSH)
_________________________________________________________________________ All original materials are ©2002 LinuxIT. All Rights Reserved. Kleesh Consultants Ltd T/A LinuxIT
registered in England No:04470427. Visit www.linuxit.com for more information.
103
LinuxIT Technical Education Centre
Appendix__________________________________________________________________________Obtain and configure OpenSSH. Basic OpenSSH installation and troubleshooting. Configure sshd to startat system boot. Keywords: /etc/hosts.allow, /etc/hosts.deny, /etc/nologin, /etc/ssh/sshd_config, /etc/ssh_known_hosts, /etc/sshrc sshd, ssh-keygen
9. Security
Perform security administration tasksEnsure local security policies. Configure TCP wrappers. Find files with SUID/SGID bit set. Verify packages.Set or change user passwords and password aging information. Update binaries as recommended byCERT, BUGTRAQ or distribution's security alerts. Basic knowledge of ipchains and iptables.Keywords: /proc/net/ip_fwchains, /proc/net/ip_fwnames, /proc/net/ip_masquerade,find, ipchains, passwd, socket, iptables
Setup host securitySet up a basic level of host security. Configure syslog , shadowed passwords. Set up a mail alias for root.Turn off unused network services. Keywords: /etc/inetd.conf or /etc/inet.d/*, /etc/nologin, /etc/passwd, /etc/shadow, /ets/syslog.conf
Setup user level securityConfigure user level security. Limits on user logins, processes, and memory usage. Keywords: quota, usermod
_________________________________________________________________________ All original materials are ©2002 LinuxIT. All Rights Reserved. Kleesh Consultants Ltd T/A LinuxIT
registered in England No:04470427. Visit www.linuxit.com for more information.
104

LinuxIT Technical Education Centre
Index__________________________________________________________________________
Index /etc/shadow 29chage32cron79, 81date93depmod 12gpasswd28groupadd30, 31groupadd 28groups 27id 27init19, 20, 21, 22insmod12LILO17, 22, 23logrotate81lpd94lsmod12make bzImage 15make clean15make config13make dep14make menuconfig13make modules 15
make modules_install15make oldconfig14make xconfig13make zImage 15man72modinfo12modprobe 12modules.conf12modules.dep12passwd26peers91rmmod12, 41route37sendmail59shutdown21socket51syslog.conf79tar84test77useradd26, 30, 31usermod31