limited edition adobe photoshop adobe photoshop le classroom in a book getting started adobe...
TRANSCRIPT

LIMITEDEDITION
®
The official training workbook developed by the staff of Adobe
Photoshop® LE
Adobe®

© 1999 Adobe Systems Incorporated. All rights reserved.
Adobe® Photoshop® LE Classroom in a Book®
This book, as well as the software described in it, is furnished under license and may be used or copied only in accordance with the terms of such license. The content of this book is furnished for informational use only, is subject to change without notice, and should not be construed as a commitment by Adobe Systems Incorporated. Adobe Systems Incorporated assumes no responsibility or liability for any errors or inaccuracies that may appear in this book.
Except as permitted by such license, no part of this publication may be reproduced, stored in a retrieval system, or transmitted, in any form or by any means, electronic, mechanical, recording, or otherwise, without the prior written permission of Adobe Systems Incorporated.
Please remember that existing artwork or images that you may desire to scan as a template for your new image may be protected under copyright law. The unauthorized incorporation of such artwork or images into your new work could be a violation of the rights of the copyright owner. Please be sure to obtain any permission required from such copyright owner.
Adobe, the Adobe logo, Acrobat, the Acrobat logo, Classroom in a Book, FrameMaker, GoLive, Illustrator, ImageReady, InDesign, Minion, Myriad, PageMaker, Photoshop, and PostScript are trademarks of Adobe Systems Incorporated. Apple, Mac OS, and Macintosh are trademarks of Apple Computer, Inc. registered in the U.S. and other countries. Microsoft, Windows, and Windows NT are either registered trademarks or trademarks of Microsoft Corporation in the U.S. and/or other countries. Kodak and Photo CD are trademarks of Eastman Kodak Company. All other trademarks are the property of their respective owners.
Contains an implementation of the LZW algorithm licensed under U.S. Patent 4,558,302.
Protected by U.S. Patents 4,837,613; 5,146,346; 5,546,528; 5,808,623; and 5,819,278. Patents pending.
Written and designed at Adobe Systems Incorporated, 345 Park Avenue, San Jose, California 95110, USA
Printed in the U.S.A.

iii
ADOBE PHOTOSHOP LE
Classroom in a Book
Contents
Getting Started
About Classroom in a Book . . . . . . . . . . . . . . . . . . . . . . . . . . . . . .1
Prerequisites . . . . . . . . . . . . . . . . . . . . . . . . . . . . . . . . . . . . . . . . . . .1
Installing Adobe Photoshop LE . . . . . . . . . . . . . . . . . . . . . . . . . .1
Copying the Classroom in a Book files . . . . . . . . . . . . . . . . . . . .2
Restoring default preferences . . . . . . . . . . . . . . . . . . . . . . . . . . .2
Using the documentation . . . . . . . . . . . . . . . . . . . . . . . . . . . . . . .3
Other learning resources . . . . . . . . . . . . . . . . . . . . . . . . . . . . . . . .4
A Quick Tour of Adobe Photoshop LE
Selecting . . . . . . . . . . . . . . . . . . . . . . . . . . . . . . . . . . . . . . . . . . . . . .7
Layers . . . . . . . . . . . . . . . . . . . . . . . . . . . . . . . . . . . . . . . . . . . . . . . . .9
Painting . . . . . . . . . . . . . . . . . . . . . . . . . . . . . . . . . . . . . . . . . . . . . 12
Retouching . . . . . . . . . . . . . . . . . . . . . . . . . . . . . . . . . . . . . . . . . . 15
Masks . . . . . . . . . . . . . . . . . . . . . . . . . . . . . . . . . . . . . . . . . . . . . . . 16
Getting to Know the Work Area
Lesson 1
Starting the Adobe Photoshop LE program . . . . . . . . . . . . . 22
Opening files . . . . . . . . . . . . . . . . . . . . . . . . . . . . . . . . . . . . . . . . . 22
Using the Photoshop tools . . . . . . . . . . . . . . . . . . . . . . . . . . . . 24
Viewing images . . . . . . . . . . . . . . . . . . . . . . . . . . . . . . . . . . . . . . 26
Working with palettes . . . . . . . . . . . . . . . . . . . . . . . . . . . . . . . . 30
Using online Help . . . . . . . . . . . . . . . . . . . . . . . . . . . . . . . . . . . . 33
Using Adobe online services . . . . . . . . . . . . . . . . . . . . . . . . . . . 36
Review questions . . . . . . . . . . . . . . . . . . . . . . . . . . . . . . . . . . . . . 37
Review answers . . . . . . . . . . . . . . . . . . . . . . . . . . . . . . . . . . . . . . 37
Image Basics
Lesson 2
Getting started . . . . . . . . . . . . . . . . . . . . . . . . . . . . . . . . . . . . . . . 40
Vector and raster images . . . . . . . . . . . . . . . . . . . . . . . . . . . . . . 40
Digital images versus printed images . . . . . . . . . . . . . . . . . . 41
What is resolution, and how does it affect an image? . . . . 41
Color models and modes . . . . . . . . . . . . . . . . . . . . . . . . . . . . . . 45

CONTENTS
iv
Measuring color . . . . . . . . . . . . . . . . . . . . . . . . . . . . . . . . . . . . . . 48
Getting images into Photoshop . . . . . . . . . . . . . . . . . . . . . . . . 48
Scanning basics . . . . . . . . . . . . . . . . . . . . . . . . . . . . . . . . . . . . . . . 49
Review questions . . . . . . . . . . . . . . . . . . . . . . . . . . . . . . . . . . . . . 56
Review answers . . . . . . . . . . . . . . . . . . . . . . . . . . . . . . . . . . . . . . 56
Working with Selections
Lesson 3
Getting started . . . . . . . . . . . . . . . . . . . . . . . . . . . . . . . . . . . . . . . 58
Tool overview . . . . . . . . . . . . . . . . . . . . . . . . . . . . . . . . . . . . . . . . 59
Selecting with the rectangular marquee tool . . . . . . . . . . . . 60
Selecting with the elliptical marquee tool . . . . . . . . . . . . . . 61
Moving a selection . . . . . . . . . . . . . . . . . . . . . . . . . . . . . . . . . . . 62
Selecting with the magic wand tool . . . . . . . . . . . . . . . . . . . . 65
Selecting with the lasso tool . . . . . . . . . . . . . . . . . . . . . . . . . . . 67
Adding and subtracting selections . . . . . . . . . . . . . . . . . . . . . 68
Selecting with the magnetic lasso tool . . . . . . . . . . . . . . . . . 69
Transforming a selection . . . . . . . . . . . . . . . . . . . . . . . . . . . . . . 70
Combining selection tools . . . . . . . . . . . . . . . . . . . . . . . . . . . . . 72
Cropping the completed image . . . . . . . . . . . . . . . . . . . . . . . . 74
Review questions . . . . . . . . . . . . . . . . . . . . . . . . . . . . . . . . . . . . . 75
Review answers . . . . . . . . . . . . . . . . . . . . . . . . . . . . . . . . . . . . . . 75
Layer Basics
Lesson 4
Getting started . . . . . . . . . . . . . . . . . . . . . . . . . . . . . . . . . . . . . . . 78
Organizing artwork on layers . . . . . . . . . . . . . . . . . . . . . . . . . . 79
Viewing a layered document . . . . . . . . . . . . . . . . . . . . . . . . . . 79
Using the Layers palette . . . . . . . . . . . . . . . . . . . . . . . . . . . . . . . 80
Moving layers between files . . . . . . . . . . . . . . . . . . . . . . . . . . 89
Moving selections on layers . . . . . . . . . . . . . . . . . . . . . . . . . . . 90
Erasing artwork on a layer . . . . . . . . . . . . . . . . . . . . . . . . . . . . . 91
Deleting a layer . . . . . . . . . . . . . . . . . . . . . . . . . . . . . . . . . . . . . . 92
Scaling and rotating objects . . . . . . . . . . . . . . . . . . . . . . . . . . 92
Linking layers . . . . . . . . . . . . . . . . . . . . . . . . . . . . . . . . . . . . . . . . 94
How layers affect file size . . . . . . . . . . . . . . . . . . . . . . . . . . . . . . 95

v
ADOBE PHOTOSHOP LE
Classroom in a Book
Merging layers . . . . . . . . . . . . . . . . . . . . . . . . . . . . . . . . . . . . . . . 95
Flattening files . . . . . . . . . . . . . . . . . . . . . . . . . . . . . . . . . . . . . . . 96
Review questions . . . . . . . . . . . . . . . . . . . . . . . . . . . . . . . . . . . . . 97
Review answers . . . . . . . . . . . . . . . . . . . . . . . . . . . . . . . . . . . . . . 97
Painting and Editing
Lesson 5
Getting started . . . . . . . . . . . . . . . . . . . . . . . . . . . . . . . . . . . . . . 100
Using the painting tools . . . . . . . . . . . . . . . . . . . . . . . . . . . . . . 101
Selecting foreground and background colors . . . . . . . . . . 104
Creating gradients . . . . . . . . . . . . . . . . . . . . . . . . . . . . . . . . . . . 111
Painting with a watercolor effect . . . . . . . . . . . . . . . . . . . . . . 115
Review questions . . . . . . . . . . . . . . . . . . . . . . . . . . . . . . . . . . . . 122
Review answers . . . . . . . . . . . . . . . . . . . . . . . . . . . . . . . . . . . . . 122
Creating a CD Cover
Lesson 6
Getting started . . . . . . . . . . . . . . . . . . . . . . . . . . . . . . . . . . . . . . 124
Using the Info palette . . . . . . . . . . . . . . . . . . . . . . . . . . . . . . . . 125
Changing the size of an image . . . . . . . . . . . . . . . . . . . . . . . . 129
Using blending modes . . . . . . . . . . . . . . . . . . . . . . . . . . . . . . . 131
Creating a gradient . . . . . . . . . . . . . . . . . . . . . . . . . . . . . . . . . . 135
Merging layers . . . . . . . . . . . . . . . . . . . . . . . . . . . . . . . . . . . . . . 137
Adding canvas around an image . . . . . . . . . . . . . . . . . . . . . . 139
Adding type . . . . . . . . . . . . . . . . . . . . . . . . . . . . . . . . . . . . . . . . 140
Masking a selection . . . . . . . . . . . . . . . . . . . . . . . . . . . . . . . . . . 142
Review questions . . . . . . . . . . . . . . . . . . . . . . . . . . . . . . . . . . . . 144
Review answers . . . . . . . . . . . . . . . . . . . . . . . . . . . . . . . . . . . . . 144
Using Quick Masks
Lesson 7
Getting started . . . . . . . . . . . . . . . . . . . . . . . . . . . . . . . . . . . . . . 146
Using quick masks . . . . . . . . . . . . . . . . . . . . . . . . . . . . . . . . . . . 147
Saving a selection as a layer . . . . . . . . . . . . . . . . . . . . . . . . . . 151
Masking with partial transparency . . . . . . . . . . . . . . . . . . . . 153
Review questions . . . . . . . . . . . . . . . . . . . . . . . . . . . . . . . . . . . . 155
Review answers . . . . . . . . . . . . . . . . . . . . . . . . . . . . . . . . . . . . . 155

CONTENTS
vi
Advanced Layer Techniques
Lesson 8
Getting started . . . . . . . . . . . . . . . . . . . . . . . . . . . . . . . . . . . . . . 158
Working with layer masks . . . . . . . . . . . . . . . . . . . . . . . . . . . . 159
Creating a clipping group . . . . . . . . . . . . . . . . . . . . . . . . . . . . 166
Adding an embossed effect . . . . . . . . . . . . . . . . . . . . . . . . . . 169
Lightening and darkening areas of an image . . . . . . . . . . . 170
Removing layer masks . . . . . . . . . . . . . . . . . . . . . . . . . . . . . . . 171
Flattening a layered image . . . . . . . . . . . . . . . . . . . . . . . . . . . 171
Review questions . . . . . . . . . . . . . . . . . . . . . . . . . . . . . . . . . . . . 172
Review answers . . . . . . . . . . . . . . . . . . . . . . . . . . . . . . . . . . . . . 172
Basic Image Correction
Lesson 9
Getting started . . . . . . . . . . . . . . . . . . . . . . . . . . . . . . . . . . . . . . 174
Determining the tonal range of an image . . . . . . . . . . . . . . 174
Determining the image type . . . . . . . . . . . . . . . . . . . . . . . . . 175
Working with the adjustment tools . . . . . . . . . . . . . . . . . . . 177
Using Brightness/Contrast to adjust an image . . . . . . . . . . 177
Using auto levels . . . . . . . . . . . . . . . . . . . . . . . . . . . . . . . . . . . . 178
Using levels . . . . . . . . . . . . . . . . . . . . . . . . . . . . . . . . . . . . . . . . . 178
Using curves . . . . . . . . . . . . . . . . . . . . . . . . . . . . . . . . . . . . . . . . 183
Removing a color cast . . . . . . . . . . . . . . . . . . . . . . . . . . . . . . . . 186
Review questions . . . . . . . . . . . . . . . . . . . . . . . . . . . . . . . . . . . . 188
Review answers . . . . . . . . . . . . . . . . . . . . . . . . . . . . . . . . . . . . . 188
Photo Retouching
Lesson 10
Getting started . . . . . . . . . . . . . . . . . . . . . . . . . . . . . . . . . . . . . . 190
Cropping and straightening . . . . . . . . . . . . . . . . . . . . . . . . . . 191
Removing unwanted objects . . . . . . . . . . . . . . . . . . . . . . . . . 192
Adjusting levels and color balance . . . . . . . . . . . . . . . . . . . . 193
Using the toning tools . . . . . . . . . . . . . . . . . . . . . . . . . . . . . . . 195
Copying textures from another file . . . . . . . . . . . . . . . . . . . . 196
Applying the Unsharp Mask filter . . . . . . . . . . . . . . . . . . . . . 197
Review questions . . . . . . . . . . . . . . . . . . . . . . . . . . . . . . . . . . . . 198
Review answers . . . . . . . . . . . . . . . . . . . . . . . . . . . . . . . . . . . . . 198

vii
ADOBE PHOTOSHOP LE
Classroom in a Book
Preparing Images for Web Publication
Lesson 11
Getting started . . . . . . . . . . . . . . . . . . . . . . . . . . . . . . . . . . . . . . 200
Preparing images for the Web . . . . . . . . . . . . . . . . . . . . . . . . 200
Review questions . . . . . . . . . . . . . . . . . . . . . . . . . . . . . . . . . . . . 213
Review answers . . . . . . . . . . . . . . . . . . . . . . . . . . . . . . . . . . . . . 213
Index
. . . . . . . . . . . . . . . . . . . . . . . . . . . . . . . . . . . . . . . . . . . . . . 215


1
ADOBE PHOTOSHOP LE
Classroom in a Book
Getting Started
Adobe Photoshop LE
®
software is an image-editing program that lets you create and
produce high-quality digital images. The program contains a large number of editing
tools and special effects capabilities that let you manipulate scanned images, slides, and
original artwork.
The ability to work with multiple layers gives you the flexibility to isolate various parts of
an image for experimentation and easy editing.
About Classroom in a Book
Adobe Photoshop LE Classroom in a Book®
is part of the official training series for Adobe
graphics and publishing software developed by experts at Adobe Systems. The lessons are
designed to let you learn at your own pace. You’ll learn the fundamental concepts and
features you’ll need to master the program.
Although each lesson provides step-by-step instructions for creating a specific project,
there’s room for exploration and experimentation. You can follow the lesson sequence
from start to finish or do only the lessons that correspond to your interests and needs.
Each lesson concludes with a review section summarizing what you’ve covered.
Prerequisites
Before beginning to use Adobe Photoshop LE, you should have a working knowledge of
your operating system and its conventions, including how to use a mouse and standard
menus and commands, and how to open, save, and close files. For help with any of these
techniques, please see your Windows
®
or Mac OS documentation.
Installing Adobe Photoshop LE
Before you begin using
Adobe Photoshop LE Classroom in a Book
, make sure that your
system is set up correctly and that you’ve installed the required software and hardware.
You must purchase the Adobe Photoshop LE software separately. For complete instruc-
tions on installing the software, see the
InstallReadMe
file. Follow the on-screen instruc-
tions. Make sure that your serial number is accessible before installing the application.

2
Getting Started
Copying the Classroom in a Book files
The
Classroom in a Book
electronic files contain folders for the
Classroom in a Book
lessons. Each lesson has its own folder. You must install these folders on your hard disk to
use the files for the lessons. To save room on your hard disk, you can install the folders for
each lesson as you need them.
To install the
Classroom in a Book
files for Windows:
1
Create a folder on your hard disk and name it
PSLE_CIB
.
2
Copy the Lessons folder from the CD-ROM or the subdirectory you have downloaded
into the PSLE_CIB folder.
To install the
Classroom in a Book
files for Mac OS:
1
Create a folder on your hard disk and name it
PSLE_CIB
.
2
Drag the Lessons folder from the CD-ROM or the subdirectory you have downloaded
into the PSLE_CIB
folder.
Restoring default preferences
The Preferences file controls how palettes and command settings appear on your screen
when you open the Adobe Photoshop LE program. Each time you quit Adobe
Photoshop, the position of the palettes and certain command settings are recorded in the
Preferences file.
To ensure that the tools and palettes function exactly as described in each lesson, delete
the Preferences file before you begin each lesson.
To locate and delete the Photoshop Preferences file quickly, create a shortcut (Windows)
or an alias (Mac OS) for the Preferences folder.
To delete the Photoshop preferences file in Windows:
Delete the Adobe Photoshop 5 LE Prefs file in the Adobe Photoshop 5.0 LE/Prefs folder.
(The default location is C:/Program Files/Adobe/Photoshop 5.0 LE/Prefs.)

3
ADOBE PHOTOSHOP LE
Classroom in a Book
To delete the Photoshop preferences file on the Macintosh:
1
Locate the Adobe Photoshop 5 LE Prefs file in the Preferences folder in the System
folder.
2
If you can’t find the file, choose Find from the desktop File menu, enter
Adobe
Photoshop 5 LE Prefs
in the text box, and click Find.
Note:
If you still can’t find the file, you probably haven’t started Adobe Photoshop for the first
time yet. The preferences file is created when you start the program.
3
Drag the
Adobe Photoshop 5 LE Prefs file to the Trash.
4
Choose Special > Empty Trash.
Important:
If you want to save the current settings, rename the Adobe Photoshop 5 LE Prefs
file rather than throwing it away. When you are ready to restore the settings, rename the file
as
Adobe Photoshop 5 LE Prefs
and make sure that the file is located in the Adobe/
Photoshop 5.0 LE\Prefs directory (Windows) or Preferences folder (Mac OS).
Using the documentation
The following documentation is included with Adobe Photoshop LE.
Adobe Photoshop LE User Guide
Provides cross-platform instructions for using Photoshop
LE on both the Windows and Mac OS platforms. The text notes any differences in proce-
dures and commands between platforms. Complete documentation of all Photoshop LE
features is also available in the online Help system.
This user guide assumes you have a working knowledge of your computer and its
operating conventions, including how to use a mouse and standard menus and
commands. It also assumes you know how to open, save, and close files. For help with any
of these techniques, please see your Windows or Mac OS documentation.
Adobe Photoshop LE Quick Reference Card
Contains basic information about the Adobe
Photoshop LE tools and palettes and shortcuts for using them.

4
Getting Started
Other learning resources
Other learning resources are available but are not included with your application.
Official Adobe Print Publishing Guide
Provides in-depth information on successful print
production, including topics such as color management, commercial printing,
constructing a publication, imaging and proofing, and project management guidelines.
For information on purchasing the
Official Adobe Print Publishing Guide
, visit the Adobe
Web site at www.adobe.com.
Official Adobe Electronic Publishing Guide
Tackles the fundamental issues essential to
ensuring quality online publications in Hypertext Markup Language (HTML) and
Portable Document Format (PDF). Using simple, expertly illustrated explanations,
design and publishing professionals tell you how to design electronic publications for
maximum speed, legibility, and effectiveness. For information on purchasing the
Official
Adobe Electronic Publishing Guide
, visit the Adobe Web site at www.adobe.com.
The Adobe Training and Certification program
Designed to help Adobe customers improve
and promote their product proficiency skills. The Adobe Certified Expert (ACE) program
is designed to recognize the high-level skills of expert users. Adobe Certified Training
Providers (ACTP) use only Adobe Certified Experts to teach Adobe software classes.
Available in either ACTP classrooms or on site, the ACE program is the best way to master
Adobe products. For Adobe Certified Training Programs information, visit the
Partnering with Adobe Web site at partners.adobe.com.
The Adobe Web site
Can be viewed by choosing File > Adobe Online if you have a
connection to the World Wide Web.

A Quick Tour of Adobe Photoshop LE
This interactive tour you will give you
hands-on experience using some of the
basic features of Photoshop LE. You will
create the image shown above by manip-
ulating and combining images as you
learn how to navigate within the work
area and between files. You will learn
about tools and palettes, and will practice
working with layers and masks.

6
A Quick Tour of Adobe Photoshop LE
This interactive tour of Adobe Photoshop LE provides an overview of key features of the
program in approximately one hour.
You will begin by opening several image files that you will combine and manipulate to
create a new image.
You can get images into Adobe Photoshop in a variety of ways. Most projects begin with
a scanned image or stock digital art or are created from scratch using a drawing program,
such as Adobe Illustrator, or a painting program, such as Adobe Photoshop. For this tour,
you’ll use files that were created from all of these sources.
1
Start Adobe Photoshop LE.
2
Choose File > Open, and open the TourEnd.psd file, located in the Lessons/Tour folder.
3
When you have finished viewing the file, either leave the End file open on your desktop
for reference, or close it without saving changes.
Now you’ll open the start file and begin the lesson.
4
Choose File > Open, and open the TourStart.psd file. Choose File > Save As, rename
the file
01Tour.psd
, and save it in the Lessons/Tour folder.
Important
: Rename and save a copy of the lesson files, to avoid overwriting the originals in
case you need them later.
5
Choose File > Open, and open the Frame.psd and Fish.psd files, located in the
Lessons/Tour folder.
6
Arrange the windows by dragging them by the title bar so that you can work with
them easily.

7
ADOBE PHOTOSHOP LE
Classroom in a Book
Selecting
In Adobe Photoshop, you modify part of an image by first selecting that area. You’ll begin
your tour by making selections in files using the selection tools. (Don’t worry. If you make
a mistake at any point in the tour, simply choose Edit > Undo, and try again.)
First, you’ll make a simple rectangular selection, and drag an image from one document
into another.
1
Click the Frame.psd window to make it the active window.
2
Select the rectangular marquee tool ( ) in the toolbox. Then drag a rectangular
selection marquee from one corner of the frame to the opposite corner, to select
the image.
3
Select the move tool ( ) in the toolbox. Drag the frame into the 01Tour.psd window.
The frame is now part of that file.
Now you’ll resize the frame.

8
A Quick Tour of Adobe Photoshop LE
4
Choose Edit > Transform > Scale. Move the pointer onto one of the corner handles of
the bounding box that appears around the selection. Hold down Shift and drag a corner
handle inward toward the image center to shrink the frame to about three-fourths its
current size. Holding down Shift constrains the image’s proportions as you resize it.
To cancel a transformation, press the Escape key.
5
Press Enter or Return to apply the transformation.
6
If necessary, use the rectangular marquee tool to reselect the frame graphic.
7
Choose Edit > Transform > Rotate. Move the pointer outside the selection handles
and drag clockwise to rotate the frame about 25°. Press Enter or Return to apply the
transformation.
Next, you’ll make a selection with the magic wand tool. This tool selects areas based on
their similarity in color.
8
Select the magic wand tool ( ); then click the Fish.psd window to make it the
active window.
9
Click the tan background in the image to select it. Notice that the background inside
the hooks is not selected.

9
ADOBE PHOTOSHOP LE
Classroom in a Book
10
Choose Select > Similar to add the rest of the background to the selection. You’ve now
selected everything except the fish, string, and hooks.
11
Choose Select > Inverse to select the fish. The Inverse command selects everything
that wasn’t selected—in this case, the fish.
12
Hold down Ctrl+Shift (Windows) or Command+Shift (Mac OS) and drag the image
onto the 01Tour.psd window. Holding down Ctrl/Command changes to the move tool,
and holding down the Shift key as you drag places the copied image in the center of the
artwork.
13
To rotate the fish image, choose Edit > Transform > Rotate. Move the pointer outside
the selection handles and drag counterclockwise to rotate the fish graphic about 30°. Press
Enter or Return to apply the transformation.
14
Choose File > Save to save your work so far.
15
Close the Frame.psd and Fish.psd windows without saving changes.
Layers
Photoshop lets you organize artwork on separate transparent layers so that you can easily
construct composite images and experiment with various effects.
1
To display the Layers palette, choose Window > Show Layers. Click the
minimize/maximize box (Windows) or size box (Mac OS) located near the top right of
the Layers palette to expand the palette.
Notice that each layer has a name, as well as a
thumbnail
, or miniature version, of the
image on that layer. Photoshop automatically created separate layers for the frame image
(Layer 1) and fish image (Layer 2) when you brought them into the 01Tour.psd file.
10
A Quick Tour of Adobe Photoshop LE
2
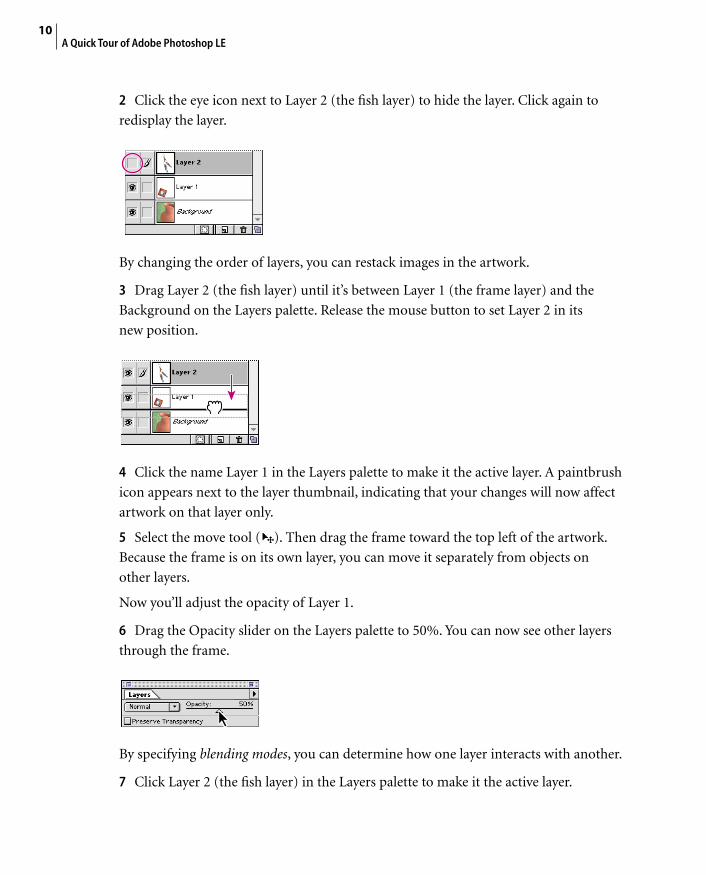
Click the eye icon next to Layer 2 (the fish layer) to hide the layer. Click again to
redisplay the layer.
By changing the order of layers, you can restack images in the artwork.
3
Drag Layer 2 (the fish layer) until it’s between Layer 1 (the frame layer) and the
Background on the Layers palette. Release the mouse button to set Layer 2 in its
new position.
4
Click the name Layer 1 in the Layers palette to make it the active layer. A paintbrush
icon appears next to the layer thumbnail, indicating that your changes will now affect
artwork on that layer only.
5
Select the move tool ( ). Then drag the frame toward the top left of the artwork.
Because the frame is on its own layer, you can move it separately from objects on
other layers.
Now you’ll adjust the opacity of Layer 1.
6
Drag the Opacity slider on the Layers palette to 50%. You can now see other layers
through the frame.
By specifying
blending modes
, you can determine how one layer interacts with another.
7
Click Layer 2 (the fish layer) in the Layers palette to make it the active layer.

11
ADOBE PHOTOSHOP LE
Classroom in a Book
8
Choose Screen from the mode menu at the top left of the Layers palette. This blending
mode makes the fish look bleached.
9
Choose File > Save to save your work. It’s a good idea to save your work often.
Filters
Photoshop provides a wide variety of filters that let you quickly add special effects to your
artwork. In this part of the tour, you’ll apply two filters and adjust the color to completely
transform the background.
1
Click the Background layer in the Layers palette to make it active.
2
Choose Filter > Brush Strokes > Sprayed Strokes. Click OK to accept the default
settings. The Sprayed Strokes filter adds brush strokes to the background.
3
Choose Filter > Artistic > Rough Pastels to make the background look as if it were
drawn with pastel chalks. Click OK to accept the default settings.
4
Choose Image > Adjust > Hue/Saturation to adjust the color of the background. Drag
the sliders to change the hue (we used +92), saturation (we used +13), and lightness (we
used – 42). Click OK.

12
A Quick Tour of Adobe Photoshop LE
Painting
The painting tools in Photoshop let you add color to your artwork using preset swatches
or colors you create. Next, you’ll paint part of the image using the paintbrush tool, and
add colored type.
You’ll begin by zooming in on the frame using the Navigator palette.
1
Click the Navigator palette tab to make the palette active. (If the palette isn’t visible on-
screen, choose Window > Show Navigator.)
The Navigator palette lets you specify which part of the image to magnify, and gives you
precise control over the magnification level, making it easier to select small areas.
2
Drag the zoom slider in the Navigator palette to the right to about 200%. Then drag
the red rectangle in the preview box over the frame image. Continue dragging the zoom
slider until the frame image fills the 01Tour.psd window.
Next you’ll create a new layer to paint on.
3 Click Layer 1 (the frame layer) in the Layers palette to make it the active layer. Hold
down Alt (Windows) or Option (Mac OS) and click the New Layer button at the bottom
of the palette. Holding down Alt/Option lets you name the new layer you create.
4 Enter Paint in the Name text box and click OK. A new, active layer named Paint is
added above Layer 1.

13ADOBE PHOTOSHOP LEClassroom in a Book
Now you’ll select a paint color.
5 Click the Swatches palette tab to make the Swatches palette active. (If the palette isn’t
visible on-screen, choose Window > Show Swatches.)
6 Click a color in the Swatches palette to select a paint color from an existing swatch. This
sets it as the foreground color—the color you’ll paint with.
Sampledcolor
Notice that the foreground color appears in a swatch near the bottom of the toolbox,
along with a swatch representing the background color, which is used when you erase part
of an image.
7 Select the paintbrush tool ( ). Click the Brushes palette tab, and click a small brush in
the Brushes palette.
8 Click the Options palette tab (located in the Navigator palette group), and select the
Wet Edges option. The Wet Edges option gives a watercolor effect by building up the paint
along the edges of the brush stroke. Drag the Opacity slider to the left to make the paint
slightly transparent.
14A Quick Tour of Adobe Photoshop LE
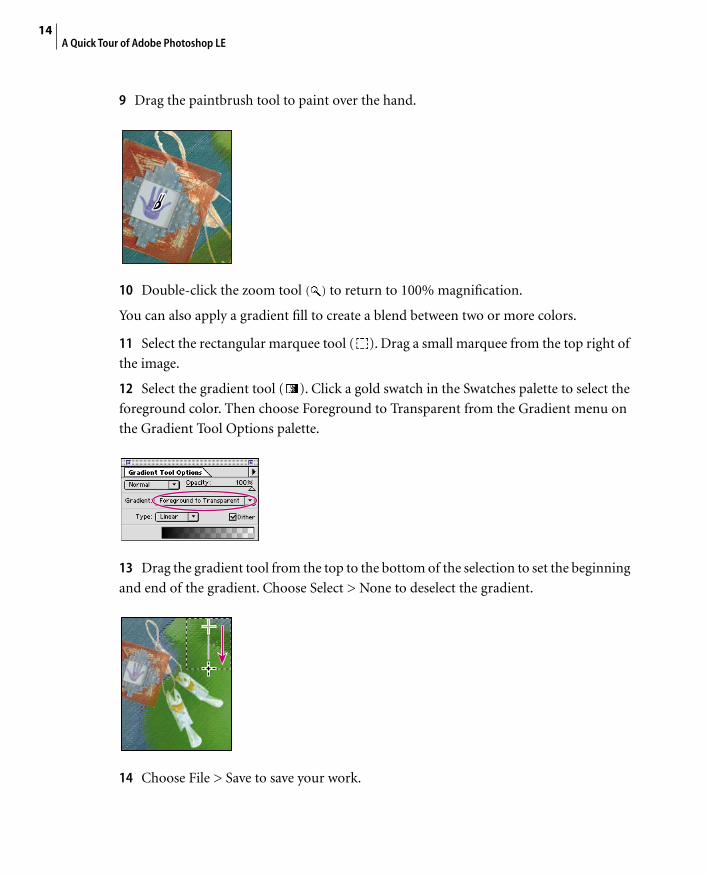
9 Drag the paintbrush tool to paint over the hand.
10 Double-click the zoom tool ( ) to return to 100% magnification.
You can also apply a gradient fill to create a blend between two or more colors.
11 Select the rectangular marquee tool ( ). Drag a small marquee from the top right of
the image.
12 Select the gradient tool ( ). Click a gold swatch in the Swatches palette to select the
foreground color. Then choose Foreground to Transparent from the Gradient menu on
the Gradient Tool Options palette.
13 Drag the gradient tool from the top to the bottom of the selection to set the beginning
and end of the gradient. Choose Select > None to deselect the gradient.
14 Choose File > Save to save your work.

15ADOBE PHOTOSHOP LEClassroom in a Book
Now you’re ready to create and manipulate some type. You can modify type as you would
any other image in Photoshop. In this part of the lesson, you’ll begin by selecting a color
for the type.
15 Click a cream-colored swatch in the Swatches palette to select the type’s color. Select
the type tool ( ); then click the image.
16 Enter PORT in the large text box at the bottom of the Type Tool dialog box. Choose
a font from the Font menu, enter a point size in the Size text box, and click OK. (We used
22-point Lucida Sans bold font.) The type is automatically placed on a new layer.
17 Choose Edit > Transform > Rotate 90° CW to rotate the text 90° clockwise. Select the
move tool ( ), and drag the text on top of the gradient you just created.
18 Click in the eye column next to the X layer in the Layers palette to add a hand drawn
“X” to the type logo.
19 Choose File > Save.
RetouchingAdobe Photoshop provides a full range of tools for retouching images, including dodge
and burn tools, as well as features for adjusting color, contrast, hue, and saturation. Next,
you’ll do some basic color correction and editing on an image.
1 Click the Plate layer in the Layers palette to make it the active layer.
2 To set the basic contrast and tonal range between the highlights and shadows in the
Plate image, choose Image > Adjust > Auto Levels.
The midtones in the plate need to be more red. To correct them, you’ll adjust the mixture
of colors in the image with the Color Balance command.

16A Quick Tour of Adobe Photoshop LE
3 Choose Image > Adjust > Color Balance. Select the Preview option, drag the top slider
toward Red, and click OK.
Next you’ll remove a chip on the plate with the rubber stamp tool. This tool lets you
sample part of an image and then paint with a copy of the sampled area.
4 Select the rubber stamp tool ( ). Click the Brushes palette tab, and choose a medium-
sized brush.
5 Place the rubber stamp tool over the plate next to the chip. Hold down Alt (Windows)
or Option (Mac OS), and click to sample this area. Release Alt/Option. Then drag the
rubber stamp tool to paint over the chip.
6 Choose File > Save to save your work.
MasksNext you’ll work with a mask. A mask covers the image, so that only the unmasked part
shows through and is affected by any changes you apply. Adobe Photoshop provides
several ways of creating and working with masks. In this part of the tour, you’ll work with
a layer mask, which affects only the image on the same layer as the mask.
1 Click the Plate layer on the Layers palette. Click the Mask button ( ) at the bottom of
the palette to add a layer mask to the Plate layer. Notice that you can see the plate through
the unmasked area.

17ADOBE PHOTOSHOP LEClassroom in a Book
You can modify the mask by painting on it. Black paint adds to the mask, hiding the plate;
white paint removes from the mask, revealing the plate.
2 Select the eraser tool ( ). Then drag the tool to erase to the black background color,
masking the plate.
3 Double-click the paintbrush tool ( ). Choose Reset Tool from the menu on the Paint-
brush Tool Options palette. Then drag the paintbrush tool to paint with the white
foreground color, unmasking the plate.
Next you’ll apply a gradient to the layer mask, creating a mask that ranges from opaque to
transparent.
4 Double-click the gradient tool ( ) in the toolbox. Then choose Foreground to
Background from the Gradient menu in the Gradient Tool Options palette.

18A Quick Tour of Adobe Photoshop LE
5 Drag the gradient tool across the plate. Where the gradient is darker, the layer mask is
more opaque and hides the plate; where the gradient is lighter, the layer mask is more
transparent and exposes the plate.
Now you’ll use the teapot on one layer as a mask for the texture on the layer above it.
Layers connected in this way are called a clipping group.
6 Click the Teapot layer in the Layers palette so you can view the layer. Then click the
Texture layer so you can view and make it the active layer.
7 Choose Layer > Group with Previous to turn the layers into a clipping group.
The solid line separating the layers on the Layers palette changes to a dotted line,
indicating the layers are now linked as a clipping group. The texture is now clipped to
the teapot.

19ADOBE PHOTOSHOP LEClassroom in a Book
You can apply blending modes and opacity to clipping groups the same as with layers, but
the modes will apply only to the clipping group and won’t affect any of the layers below
the clipping group.
8 Choose Overlay from the mode menu on the Layers palette. This mode lets the
highlights and shadows on the teapot image show through the texture, making the texture
more realistic.
You’ve added all the elements to the artwork. At this point, you’re ready to save the file.
9 Choose File > Save.
You can save a file in a variety of formats, depending on how you plan to use the file.
For example, you could flatten this file and then save it in the JPEG format to publish the
image on the World Wide Web. (To save in most formats other than Photoshop format,
you must flatten the file into a single layer. See “Flattening files” on page 96.)
10 Choose File > Close to close the file.
Congratulations, you’ve finished the tour!
The lessons that follow will help you master the basics of creating art in Adobe
Photoshop LE, as well as learn tips and shortcuts for creating professional-quality
artwork quickly and easily.


1 Getting to Know the Work Area
As you work with Adobe Photoshop,
you’ll discover that there is often more
than one way to accomplish the same
task. To make the best use of Adobe
Photoshop’s extensive editing
capabilities, you first must learn to
navigate the work area. The work area
consists of the image window, the
toolbox, and the default set of floating
palettes, which are used repeatedly
during the editing process.

LESSON 122Getting to Know the Work Area
In this introduction to the work area, you’ll learn how to do the following:
• Open an Adobe Photoshop file.
• Select tools from the toolbox.
• Use viewing options to enlarge and reduce the display of an image.
• Work with palettes.
• Use online Help.
Starting the Adobe Photoshop LE programWhen you start Adobe Photoshop LE, the menu bar, the toolbox, and four palette groups
appear on screen.
Before beginning this lesson, you’ll rename or delete the Adobe Photoshop preferences
file to restore the application’s default settings. See “Restoring default preferences” on
page 2. Then restart Adobe Photoshop.
Opening filesAdobe Photoshop works with bitmapped, digitized images (that is, continuous-tone
images that have been converted into a series of small squares, or picture elements,
called pixels). You can create original artwork in Adobe Photoshop, or you can bring
images into the program by scanning a photograph, a slide, or a graphic; by capturing
a video image; or by importing artwork created in drawing programs. You can also
import previously digitized images—such as those produced by a digital camera or by
the Kodak PhotoCD process.

23ADOBE PHOTOSHOP LEClassroom in a Book
For more information on the kinds of files you can use with Adobe Photoshop,
see “Getting Images into Photoshop” in online Help or Chapter 2 of the Adobe
Photoshop LE User Guide.
1 Choose File > Open, and open the 01Start.psd file, located in the Lessons/Lesson01
folder on your hard drive.
The Classroom in a Book files are stored in individual lesson folders within the
Photoshop LE CIB folder.
2 Choose File > Save As, rename the file 01Work.psd, and save it in the Lessons/Lesson01
folder.
Important: Rename and save a copy of the lesson files, to avoid overwriting the originals in
case you need them later.

LESSON 124Getting to Know the Work Area
Using the Photoshop toolsThe toolbox contains selection tools, painting and editing tools, foreground and background
color selection boxes, and viewing tools. This section introduces the toolbox and shows you
how to select tools. As you work through the lessons, you’ll learn more about each tool’s
specific function.
1 To select a tool, you can either click the tool in the toolbox or you can press the tool’s
keyboard shortcut. For example, you can press M to select the marquee tool from the
keyboard. Selected tools remain active until you click a different tool.
2 If you don’t know the keyboard shortcut for a tool, position the mouse over the
tool until its name and shortcut are displayed. (All keyboard shortcuts are also listed
in the Quick Reference section of online Help. You’ll learn to use online Help later in
this lesson.)
(M) Marquee
(L) Lasso
(A) Airbrush
(E) Eraser
(S) Rubber stamp
(R) Blur
(P) Type mask
(N) Line
(K) Paint bucket
(H) Hand
Foreground color
Move (V)
Magic wand (W)
Paintbrush (B)
Pencil (Y)
Smudge (U)
Dodge (O)
Type (T)
Gradient (G)
Eyedropper (I)
Zoom (Z)
Background color
Switch colors (X)
(Q) Standard mode
(D) Default colors
Quick mask mode (Q)
Full screen mode (F)(F) Standardscreen mode
Full screen mode with menu bar (F)
Ellipse marqueeSingle row marquee
Single column marquee
Crop (C)
Sharpen Burn
Sponge
Polygon lasso
Magnetic lasso

25ADOBE PHOTOSHOP LEClassroom in a Book
Some of the tools in the toolbox display a small triangle at the bottom right corner,
indicating the presence of additional hidden tools.
Name and shortcut displayed Hidden tools
3 Select a hidden tool in any of the following ways:
• Click and hold down the mouse button on a tool that has additional hidden tools. Then
drag to the desired tool, and release the mouse button.
• Hold down Alt (Windows) or Option (Mac OS), and click the tool in the toolbox. Each
click selects the next hidden tool in the hidden tool sequence.
• Press Shift + the tool’s keyboard shortcut repeatedly until the tool you want is selected.
4 Change the screen display of an image by clicking a screen mode button at the bottom
of the toolbox.
5 Click the Standard Screen Mode button to return to the default work area.
Standardscreen mode

LESSON 126Getting to Know the Work Area
Viewing imagesYou can view your image at any magnification level from 0.29% to 1600%. Adobe
Photoshop displays the percentage of an image’s actual size in the title bar. When you use
any of the viewing tools and commands, you effect the display of the image, not the
image’s dimensions or file size.
Using the View menu
To enlarge or reduce the view of an image using the View menu, do one of the
following:
• Choose View > Zoom In to enlarge the display of the 01Work image.
• Choose View > Zoom Out to reduce the view of the 01Work image.
Each time you choose a Zoom command, the view of the image and the surrounding
window are resized. The percentage at which the image is viewed is displayed in the title
bar and at the bottom left corner of the Adobe Photoshop window.
View percentage
You can also use the View menu to fit an image to your screen.
1 Choose View > Fit on Screen. The size of the image and the size of your monitor
determine how large the image appears on-screen.
2 Double-click the zoom tool in the toolbox to return to a 100% view.

27ADOBE PHOTOSHOP LEClassroom in a Book
Using the zoom tool
In addition to the View commands, you can use the zoom tool to magnify and reduce the
view of an image.
1 Click the zoom tool ( ) in the toolbox to select the tool, and move the tool pointer
onto the 01Work image. Notice that a plus sign appears at the center of the zoom tool.
2 Position the zoom tool over one of the skaters in the 01Work image, and click. The
image is magnified to a 200% view.
3 With the zoom tool selected and positioned in the image area, hold down Alt
(Windows) or Option (Mac OS). A minus sign appears at the center of the zoom
tool ( ).
4 Click once; the view of the image is reduced to a 100% view.
You can also drag a marquee with the zoom tool to magnify a specific area of an image.
5 Drag a marquee around the head of one of the skaters using the zoom tool.
Area selected Resulting view
The percentage at which the area is magnified is determined by the size of the marquee
you draw with the zoom tool. (The smaller the marquee you draw, the larger the level of
magnification.)
Note: You can draw a marquee with the zoom-in tool to enlarge the view of an image, but you
cannot draw a marquee with the zoom-out tool to reduce the view of an image.
You can use the zoom tool to quickly return to a 100% view, regardless of the current
magnification level.
6 Double-click the zoom tool in the toolbox to return the 01Work image to a 100% view.

LESSON 128Getting to Know the Work Area
Because the zoom tool is used frequently during the editing process to enlarge and reduce
the view of an image, you can select it from the keyboard at any time without deselecting
the active tool.
7 To select the zoom tool from the keyboard, hold down spacebar+Ctrl (Windows) or
spacebar+Command (Mac OS). Click to zoom in on the desired area, and then release
the keys.
8 To select the zoom-out tool from the keyboard, hold down spacebar+Ctrl+Alt
(Windows) or spacebar+Command+Option (Mac OS). Click the desired area to reduce
the view of the image, and then release the keys.
Scrolling an image
You use the hand tool to scroll through an image that does not fit in the active window. If
the image fits in the active window, the hand tool has no effect when you drag it in the
image window.
1 Resize the image window to make it smaller than the image.
2 Click the hand tool in the toolbox. Then drag in the image window to bring another
skater into view. As you drag, the image moves with the hand.
Like the zoom tool, you can select the hand tool from the keyboard without deselecting
the active tool.
3 First, click any tool but the hand tool in the toolbox.
4 Hold down the spacebar to select the hand tool from the keyboard. Drag to reposition
the image. Then release the spacebar.
5 Double-click the zoom tool in the toolbox to return the 01Work image to a 100% view.
Using the Navigator palette
The Navigator palette lets you scroll an image at different magnification levels without
scrolling or resizing an image in the image window.
1 Make sure that the Navigator palette is at the front of the palette group. (If necessary,
click the Navigator palette tab, or choose Window > Show Navigator.)
2 In the Navigator palette, drag the slider to the right to about 200% to magnify the view
of the skater. As you drag the slider to increase the level of magnification, the red outline
in the Navigator window decreases in size.

29ADOBE PHOTOSHOP LEClassroom in a Book
3 In the Navigator palette, position the pointer inside the red outline. The pointer
becomes a hand.
Dragging slider to 200% 200% view of image View in Navigator palette
4 Drag the hand to scroll to different parts of the image.
You can also drag a marquee in the Navigator palette to identify the area of the image you
want to view.
5 With the pointer still positioned in the Navigator palette, hold down Ctrl (Windows)
or Command (Mac OS), and drag a marquee over an area of the image. The smaller the
marquee you draw, the greater the magnification level in the image window.
Using the Info bar
The Info bar is positioned at the lower left corner of the application window (Windows)
or of the image window (Mac OS) and provides information about a file’s view, size, disk
space and memory, and placement on the printed page.
Info bar displaying view percentage and document sizes
By default, the Info bar displays the view percentage and the document sizes: the left
number represents the amount of data sent to a printer, which is the same as a flattened
file in Adobe Photoshop format; the right value represents the file’s approximate size in
its layered format.
1 Move the pointer to the arrow in the lower left of the window and hold down the
mouse button to display the pop-up menu.

LESSON 130Getting to Know the Work Area
2 If desired, choose from the following options:
• Scratch Sizes displays information on the amount of RAM used to process the image.
• Efficiency shows the percentage of Photoshop operations being performed using RAM
(as compared to using scratch disk space).
• Timing displays the amount of time it took to complete the last operation.
3 If you changed the display, choose Document Sizes from the pop-up menu.
Working with palettesPalettes help you monitor and modify images. By default, they appear in stacked groups.
To show or hide a palette as you work, choose the appropriate Window > Show or
Window > Hide command. Show displays the selected palette at the front of its group;
Hide conceals the entire group.
Changing the palette display
You can reorganize your work space in various ways. Experiment with several techniques:
• To hide or display all open palettes and the toolbox, press Tab. To hide or display the
palettes only, press Shift+Tab.
• To make a palette appear at the front of its group, click the palette’s tab.
Click the Swatches tab to move it to the front.
• To move an entire palette group, drag its title bar.

31ADOBE PHOTOSHOP LEClassroom in a Book
• To rearrange or separate a palette group, drag a palette’s tab. Dragging a palette outside
of an existing group creates a new group.
Palettes are grouped. Click the palette tab, and drag the palette to separate it from its group.
• To move a palette to another group, drag the palette’s tab to that group.
• To display a palette menu, position the pointer on the triangle in the upper right corner
of the palette, and hold down the mouse button.
• To change the height of a palette (except the Color, Options, or Info palette), drag its
lower right corner. To return the palette to its default size, click the minimize/maximize
box (Windows) or the resize box (Mac OS) in the right of the title bar. (A second click
collapses the palette group.)
Click to collapse or expand palette. A. Windows B. Mac OS
A
B

LESSON 132Getting to Know the Work Area
• To collapse a group to palette titles only, Alt-click the minimize/maximize box
(Windows) or Option-click the resize box (Mac OS); or double-click a palette’s tab. You
can still access the menu of a collapsed palette.
Setting the positions of palettes and dialog boxes
The positions of all open palettes and moveable dialog boxes are saved by default when
you exit the program. Alternatively, you can always start with default palette positions or
restore default positions at any time:
• To reset palettes to the default positions, choose File > Preferences > General. Click
Reset Palette Locations to Defaults.
• To start always with the preset palette and dialog box positions, choose File >
Preferences > General. Deselect Save Palette Locations. The change takes effect the
next time you start Adobe Photoshop.
Using context-sensitive menus
In addition to the menus at the top of your screen, context-sensitive menus display
commands relevant to the active tool, selection, or palette.
To display context-sensitive menus, position the pointer over the image or over an item
in a palette list. Then click with the right mouse button (Windows), or press Control and
hold down the mouse button (Mac OS).
This example shows the eyedropper tool. The Sample Size options appear in the tool’s
context-sensitive menu. (You access these same options by double-clicking the tool to
display its Options palette.)

33ADOBE PHOTOSHOP LEClassroom in a Book
Using online HelpFor complete information on using palettes and tools, you can use online Help. Online
Help includes all of the information from the Adobe Photoshop LE User Guide, plus
keyboard shortcuts and some additional information. All of the illustrations in online
Help are in color.
Online Help is easy to use, because you can look for topics in several ways:
• Scanning a table of contents.
• Searching for keywords.
• Using an index.
• Jumping from topic to topic using related topic links.
First you’ll try looking for a topic using the Contents screen.
1 Display online Help:
• In Windows, press F1 to display the Help Contents menu, choose Help > Contents, or
choose another topic from the Help menu.
• In Mac OS, choose Help > Help Contents.
The Adobe Photoshop 5.0 LE Help Contents screen appears.
In Windows, you can also use context-sensitive Help. Press Shift+F1 (a question mark
appears next to the pointer), and choose a command or click in a palette to display the
appropriate Help topic. Or with a dialog box open, press F1 to display the Help topic for that
dialog box.
2 Click Contents at the upper left of the Help screen to display the Contents menu.

LESSON 134Getting to Know the Work Area
3 Drag the scroll bar or click the arrows to navigate through the contents. The contents
are organized in a hierarchy of topics, much like the chapters of a book. Each book icon
represents a chapter of information in Help.
4 Position the pointer on the Quick Reference book, and click to display its contents.
5 Locate the Toolbox overview topic, and double-click to display it. An illustration of the
toolbox and toolbar shortcut information appear.
The online Help system is interactive. You can click any red underlined text, called a link,
to jump to another topic. The pointer icon indicates links and appears when you move
the mouse pointer over a link or a hot spot.
6 Position the pointer over a tool in the toolbox, and click. The tool topic appears. At the
top of the tool topic, click Next to display the next topic. You can continue to click Next
or Previous to display the individual tool topics. You can also click Print to print the topic.
Click a tool. The tool topic appears. Show the next tool topic.
7 When you have finished browsing the topics, click the Close box to close the topic and
return to the toolbox overview.

35ADOBE PHOTOSHOP LEClassroom in a Book
Using keywords, links, and the index
If you can’t find the topic you are interested in by scanning the Contents page, then you
can try searching using a keyword.
1 Move the pointer to the Keyword text box, and begin typing the words Correcting
mistakes. Notice that as soon as you type Cor, the entire phrase appears in the text box.
Press Enter or Return to go to that topic.
2 Read through the topic, and if desired, click some of the links to go to the related topics.
When you have finished browsing, click the Close box to close the topic window.
You can also search for a topic using the index.
3 In the Topics window, click Index to display index entries. These entries appear alpha-
betically by topic and subtopic, like the index of a book.
4 In the text box under the instructions in step 1, type the word background. Notice that
entries for background appear as you begin typing. Add an s to the entry to change it to
backgrounds. Then find the subentry adding to an image and select it.
5 Click Display to display the entry.
6 Close the topic, and then close the Help Contents window.

LESSON 136Getting to Know the Work Area
Using Adobe online servicesAnother way to get information on Adobe Photoshop or related Adobe products is to use
the Adobe online services. If you have an Internet connection and a Web browser installed
on your system, you can access the U.S. Adobe Systems Web site (at
http://www.adobe.com) for information on services, products, and tips pertaining to
Photoshop.
1 If you have an Internet connection, choose File > Adobe Online, or click the icon at the
top of the toolbox. The first time you do this, click Refresh, and download the latest
version of Welcome to Adobe Online. Then you can click a topic to go to the Adobe
Web site.
2 In the next screen, click Support.
You can easily find information specifically on Photoshop—including tips and
techniques, galleries of artwork by Adobe designers and artists around the world, the
latest product information, and troubleshooting and technical information. Or you can
learn about other Adobe products and news.
3 When you have finished browsing the Adobe page, close the browser and exit it.
4 Close the Adobe Online window.
5 Choose File > Close to close the lesson file.
You’re ready to begin learning how to create and edit images.

37ADOBE PHOTOSHOP LEClassroom in a Book
Review questions1 Describe two ways to change your view of an image.
2 How do you select tools in Photoshop?
3 Describe two ways to get more information about the Photoshop program.
4 Describe two ways to create images in Photoshop.
Review answers1 You can select commands from the View menu to zoom in or out of an image, or fit it
to your screen; you can also use the zoom tools in the toolbox and click or drag over an
image to enlarge or reduce the view. In addition, you can use keyboard shortcuts to
magnify or reduce the display of an image. You can also use the Navigator palette to scroll
an image or change its magnification without using the image window.
2 To select a tool, you can either click the tool in the toolbox or you can press the tool’s
keyboard shortcut. For example, you can press M to select the marquee tool from the
keyboard. Selected tools remain active until you click a different tool.
3 Adobe Photoshop contains online Help, with all the information in the Adobe
Photoshop LE User Guide, plus keyboard shortcuts and some additional information and
full-color illustrations. Photoshop also has context-sensitive help about tools and
commands and online services, including a link to the Adobe Systems home page for
additional information on services, products, and tips pertaining to Photoshop.
4 You can create original artwork in Adobe Photoshop, or you can get images into the
program by scanning a photograph, a slide, or a graphic; by capturing a video image;
or by importing artwork created in drawing programs. You can also import previously
digitized images—such as those produced by a digital camera or by the Kodak PhotoCD
process.


2 Image Basics
Whether you create artwork for display
on-screen or for print, you must under-
stand several basic concepts about how
Adobe Photoshop LE works with images
before preparing your images for final
output.

LESSON 240Image Basics
In this lesson, you’ll learn how to do the following:
• Recognize the difference between the two basic types of computer images—vector
and raster.
• Recognize the differences between electronic images and printed images.
• Recognize three types of resolution—image, monitor, and output device resolution—
and their relationship to one another.
• Recognize a variety of ways to get images into Adobe Photoshop.
• Determine the correct scan resolution for an image based on the method of final
output.
• Resample an image, which is the process of increasing or decreasing the resolution of
an image.
Getting startedBefore beginning this lesson, you’ll rename or delete the Adobe Photoshop LE preferences
file to restore the application’s default settings. See “Restoring default preferences” on
page 2.
Vector and raster imagesComputers generate two basic types of images—vector and raster. As you begin working
with Adobe Photoshop, knowing the difference between these image types will help you
understand how Adobe Photoshop defines and interprets images.
Vector images, such as those created by Adobe Illustrator™, are composed of mathemati-
cally defined lines and curves called vectors. For example, a figure drawn in a vector-based
program can be moved, resized, or rotated as an independent object because the program
retains the definition of the figure mathematically. For this reason, vector-based
programs work best for type and other shapes that require crisp, clear boundaries.
Raster images, such as those created by Adobe Photoshop, are composed of a grid, or
raster of small squares, called pixels. For example, a figure drawn in a raster-based
program is composed of a group of pixels in a particular location, which create the
appearance of a figure. To edit a raster image, you edit a group of pixels instead of a
mathematically defined object. Raster- or pixel-based images work best with photo-
graphic images or with images created in painting programs.

41ADOBE PHOTOSHOP LEClassroom in a Book
Digital images versus printed images Most photographs are called continuous-tone images, because the method used to
develop the photograph creates the illusion of perfect continuous tone throughout the
image. Digital, or pixel-based images, like those created in Adobe Photoshop, also create
the illusion of continuous tone, because each pixel can be colored independently, creating
a smooth, continuous transition of color throughout the image.
Printing presses are not capable of reproducing continuous tones in an image, and so
create the illusion of continuous tone using halftone dots. Halftone dots are rows of small,
variously sized dots that create the appearance of different shades of color when printed.
What is resolution, and how does it affect an image?In broad terms, resolution refers to the unit of measurement used to determine the size of
an image, the way an image is displayed on your monitor, and the device on which an
image is output.
Specifically, you must consider three types of resolution when preparing images in Adobe
Photoshop:
• Image resolution refers to the size of the file in pixels, called pixels per inch (ppi).
• Monitor resolution determines how your image is displayed on your monitor, called dots
per inch (dpi).
• Output device resolution determines the quality of a final printed image, which is
measured in both dots per inch (dpi) and lines per inch (lpi).
The following sections describe each type of resolution in detail, and will help you under-
stand the relationship each has to the others.
Image resolution
Digital images are represented in pixels. Image resolution refers to the number of pixels in
the image and is generally measured in pixels per inch, or ppi. The more pixels per square
inch of the image, the higher its resolution, and subsequently, the larger the file. For
example, a 1-inch square of an image scanned at 72 ppi contains 5,184 pixels (72 pixels
wide x 72 pixels high), and has a file size of 6K, while the same 1-inch square of an image
scanned at 144 ppi contains 20736 pixels (144 pixels wide x 144 pixels high), and has a file
size of 21K.

LESSON 242Image Basics
To see how image resolution affects an image, you’ll open two identical images scanned
at different resolutions and examine the differences between them.
1 Choose File > Open, and open the Skate72.psd file, located in the Lessons/Lesson02
folder. An image of a skater appears at a 100% view on your desktop.
2 Choose Image > Image Size. At the top of the dialog box, the pixel dimensions (file size)
and the width and height of the image appear.
3 Make a note of the pixel dimensions and the width and height of the image, and then
click Cancel to close the dialog box.
Now you’ll open an image of the skater scanned at a higher resolution and compare the
differences between the files.
4 Choose File > Open, and open the Skate144.psd file, located in the Lessons/Lesson02
folder.
The second skater image appears larger on-screen than the first image (You’ll learn why
in the next section, “Monitor resolution” on page 43.)

43ADOBE PHOTOSHOP LEClassroom in a Book
5 Choose Image > Image Size. Notice that although the print dimensions remain the
same as those of the first image, the file is larger and the resolution is higher.
6 Click Cancel to close the dialog box.
7 Align the two images side by side on your screen, and make sure that the Skate144.psd
image is the active window.
8 Choose View > Print Size. The Print Size command displays the size at which each
image will be printed, which in this example is the same size.
9 Choose File > Close to close the skater files. If prompted, do not save changes.
Next, you’ll discover why the second skater image, scanned at a higher resolution than the
first, appeared larger on your monitor than the first image, even though the print size for
each image was the same.
Monitor resolution
Monitors have a fixed resolution, determined by the manufacturer. Typically PC monitors
display images at 96 dots per inch, and most Macintosh monitors display images at 72 dpi.
The monitor’s resolution determines the size of the image displayed on-screen, and
should not be confused with image resolution. Because an image may have a higher
resolution than the monitor on which it’s displayed, an image with a higher resolution
will appear larger on-screen than in print.
In this example, the first file, Skate72.psd, is displayed on the monitor in actual size—
the monitor in the example displays 72 pixels per inch (ppi), and the image is scanned
at 72 ppi.

LESSON 244Image Basics
The second file, Skate144.psd, with a resolution of 144 ppi appears at twice its actual size
on the 72 dpi monitor, because only 72 of the 144 ppi can be displayed in 1 inch on the
monitor.
72-ppi image displayed on a 144-ppi image displayed on a72-dpi monitor 72-dpi monitor
In addition to the resolution at which a monitor displays pixels, each pixel has a particular
depth, called bit resolution. Bit resolution measures the amount (number of bits) of color
information stored per pixel. The bit resolution of a pixel is a measurement of the amount
of color information stored in a single pixel. The greater the pixel depth, the larger the
range of available colors, resulting in a more accurate representation of the colors in an
image. For example, a pixel with a bit depth of 1 has two possible values: on or off (black
or white). A pixel with a bit depth of 8 has 28, or 256 possible values; a pixel with a bit
depth of 24 has 224, or 16 million color values.
Note: For best results when working with Adobe Photoshop, it is recommended that you use
a 24- or 32-bit monitor.
Output resolution
Output device resolution refers to the number of dpi that the output device produces. For
example, laser writers typically have a resolution of 300 or 600 dpi, and a high-quality
imagesetter can print at a range between 1200 dpi and 2400 dpi or higher.

45ADOBE PHOTOSHOP LEClassroom in a Book
Coupled with the dpi resolution of an output device is its screen frequency. Screen
frequency determines the number of halftone cells printed per inch in a grayscale image
or a color separation. Also known as the screen ruling or line screen, screen frequency is
measured in lines per inch (lpi). The combination of resolution and screen frequency
determines the detail in a printed image. For example, newspapers are usually printed
with a line screen of 75 lpi to 85 lpi, while a high-quality art book might be printed at a
line screen as high as 200 lpi.
Color models and modesA color model is a method for displaying and measuring color. The human eye perceives
color according to the wavelength of the light it receives. Light containing the full color
spectrum is perceived as white. When no light is present, the eye perceives black. The
gamut of a color model is the range of colors that can be displayed or printed. The largest
color gamut is that viewed in nature. The RGB gamut is smaller than the natural color
gamut.
Adobe Photoshop can use a number of color modes for displaying, printing, and storing
images. The red, green, and blue (RGB) mode and the hue, saturation, and brightness
(HSB) mode are based on established color models for describing and reproducing color.
In addition to modes based on color models, Photoshop includes modes with restricted
color ranges, such as Bitmap, Grayscale, and Indexed color modes.
HSB model
The HSB model is based on the human perception of color. In the HSB model, all colors
are described in terms of three fundamental characteristics:
• Hue is the wavelength of light reflected from or transmitted through an object. More
commonly, hue is identified by the name of the color such as red, orange, or green. Hue
is measured as a location on the standard color wheel and is expressed as a degree between
0° and 360°.
• Saturation, sometimes called chroma, is the strength or purity of the color. Saturation
represents the amount of gray in proportion to the hue and is measured as a percentage
from 0% (gray) to 100% (fully saturated). On the standard color wheel, saturation
increases as one approaches the edge of the wheel; saturation decreases as one approaches
the center.

LESSON 246Image Basics
• Brightness is the relative lightness or darkness of the color and is usually measured as a
percentage from 0% (black) to 100% (white).
In Photoshop, you can use the HSB model to define a color in the Color palette or Color
Picker dialog box.
Note: Adobe Photoshop LE offers all of the features from the Adobe Photoshop 5.0 application
designed for producing professional-quality images for electronic publications. Adobe
Photoshop 5.0 includes additional features, such as CMYK color model editing, spot color,
color management, and color separations for professional-quality print publications.
The RGB color model
A large percentage of the visible spectrum of color can be represented by mixing three
basic components of colored light in various proportions. These components are known
as the primary colors: red, green, and blue (RGB). Because various percentages of each
color are added to create new colors, the RGB color model is known as additive color.
Equal amounts of red, green, and blue produce white.
All monitors display color using a mixture of the primary additive colors of red, green,
and blue. As a general rule, you should edit your color images in the RGB model for the
following reasons:
• RGB files are smaller than files created in other color models.
• Monitors display RGB colors best.
• The RGB color model provides a larger color spectrum than other color models on a
monitor.
Bitmap mode
Bitmap mode uses one of two color values (black or white) to represent the pixels in an
image. Images in Bitmap mode are called bitmapped, or 1-bit, images because they have
a pixel depth of 1.

47ADOBE PHOTOSHOP LEClassroom in a Book
Grayscale mode
Grayscale mode uses up to 256 shades of gray to represent an image. In Adobe Photoshop,
every pixel of a grayscale image has a brightness value ranging from 0 (black) to 255
(white). The values between 0 and 255 correspond to points on the grayscale spectrum.
Grayscale values can also be measured as percentages of black ink coverage (0% is equal
to white and 100% is equal to black). Images produced using black-and-white or
grayscale scanners are typically displayed in Grayscale mode.
You can convert both Bitmap-mode and color images to grayscale. Grayscale mode lets
you convert a color image to a high-quality black-and-white image. In this case, Adobe
Photoshop discards all color information in the original image; the gray levels (shades) of
the converted pixels represent the luminosity of the original pixels.
When you convert a grayscale image to an RGB image, the color values for each pixel are
assigned that pixel’s previous gray value.
Indexed color mode
An indexed-color image is a single-channel image and is based on a palette of at most 256
colors. When you convert an image to indexed color, Photoshop builds a color lookup
table, which stores and indexes the colors in the image. If a color in the original image
does not appear in the table, the program matches the color to the closest color in the
color table or simulates the color using the available colors.
Indexed Color mode is useful when you want to limit the palette of colors used in an
image—for example, when you want to use the image in a multimedia animation appli-
cation or on a Web page. Using an indexed color table lets you reduce the file size of an
image while maintaining the visual quality that you need.

LESSON 248Image Basics
Measuring colorYou’ll begin work in the lesson by looking at an image of an RGB color model, and then
you’ll learn how to measure the colors in the model using the Info palette.
1 Choose File > Open, and open the RGB.psd file, located in the Lessons/Lesson02
folder. The RGB color model image appears.
Now you’ll use the Info palette and the eyedropper tool to measure the color information
in the RGB model. When you position the eyedropper over the colors in an image, the
Info palette displays the color values, depending on the color model you’re working in.
2 Choose Window > Show Info to open the Info palette.
3 Select the eyedropper tool ( ) in the toolbox, and move the tool onto the image area.
4 Position the eyedropper tool over the red area of the color model image. The Info
palette displays a value of 255 for red, 0 for green, and 0 for blue.
5 Position the eyedropper tool over the green area of the color model image. Now the
Info palette displays a value of 0 for red, 255 for green, and 0 for blue.
6 Repeat the process for the blue portion of the color model image.
7 Position the eyedropper in the white area of the color model, where the three colors
intersect. Notice that the value is 255 for each of the red, green, and blue color values,
indicating that equal portions of red, green, and blue create white.
8 As a final step, position the eyedropper anywhere in the black area of the color model
image. Notice the value is 0 for each of the red, green, and blue color values, indicating
the absence of color.
9 Choose File > Close to close the RGB.psd file. If prompted, do not save changes.
Getting images into PhotoshopThere are several ways to get images into Adobe Photoshop. You can use a scanner to scan
an image or import vector artwork from a drawing application like Adobe Illustrator.
Images can also come from a digital camera or from a photo CD. The rest of this lesson
focuses on scanned images.

49ADOBE PHOTOSHOP LEClassroom in a Book
Scanning basicsThis section provides general information about scanning techniques to help you
determine the best input settings for your images.
Each scanner has its own software that controls how it works. Scanning software may be
a plug-in module to Adobe Photoshop, or it may be a stand-alone application. For infor-
mation specific to your scanner, consult your scanner documentation.
Before you scan
The choices you make before scanning an image affect the quality and usefulness of the
resulting digital file. Before scanning an image, be sure to do the following:
• Determine the scan resolution of the image, based on the desired quality of the final
output. (See “Scanning for electronic publication” on page 52.)
• On the scanner bed, define the area of the image you want to scan; then crop the area a
bit larger than the actual size of the area you want. You should do final cropping in Adobe
Photoshop after scanning.
• Determine the optimal dynamic range (if your scanner lets you set black points and
white points).
• Check for color casts (imbalance in one or more colors) that should be eliminated
during the scan.
The following sections describe how to select the correct resolution for electronic or
printed images. The exercises show you two different methods for determining scan
resolution.
Determining the scan resolution
The optimal resolution of an image depends on the desired output of the final image. If
an image’s resolution is too low, Adobe Photoshop may use the color value of a single
pixel to create several halftone dots. This results in pixelization, or very coarse-looking
output. If the resolution is too high, the file contains more information than the printer
needs and becomes unnecessarily large.

LESSON 250Image Basics
Scanning for printed publication
In general, the combination of image resolution and screen frequency determines the
detail in a printed image.
As you learned earlier in this lesson, screen frequency is measured in lines per inch (lpi)
and determines the number of halftone cells printed per inch. (To determine the screen
frequency for an image you’re going to print, check with your printer.) If you plan to print
your images, a good rule of thumb is to scan the image at 1.5 to 2 times the screen
frequency to be used for printing.
The following table shows the typical screen frequency (line screen) and scan resolution
used by various types of publications.
When setting a scan resolution, the goal is to balance the resolution with a manageable
file size.
If you plan to print your image using a halftone screen, the range of suitable image resolu-
tions depends on the screen frequency of your output device. You can have Photoshop
determine a recommended resolution for your image based on your device’s screen
frequency.
In this section, you’ll look at the attributes of the Auto Resolution dialog box. You
won’t be entering settings for the dialog box; you’ll just become familiar with how the
settings work.
1 Choose File > New. Accept the default settings and click OK to open a new, blank
image. (You must have a file open to use the Image Size command.)
2 Choose Image > Image Size.
3 Click Auto.
Publication Screen frequency Scan resolution
Newspaper 85–150 lpi 125–225
Magazine 135–175 lpi 200–265
Art books 150–200 lpi 225–300

51ADOBE PHOTOSHOP LEClassroom in a Book
4 For Screen, enter the screen frequency for the output device. If desired, choose a new
unit of measurement. Note that the screen value is used only to calculate the image
resolution; it does not set the screen for printing.
Important: To specify the halftone screen frequency for printing, you must use the Halftone
Screens dialog box, accessible through the Page Setup dialog box. For more information
on defining halftone screens, see “Selecting halftone screen attributes” in the Adobe
Photoshop LE User Guide.
5 For Quality, select one of the following options:
• Draft, to produce a resolution that is the same as the screen frequency (not less than
72 ppi).
• Good, to produce a resolution that is 1.5 times the screen frequency.
• Best, to produce a resolution that is 2 times the screen frequency.
6 Click Cancel to close the Auto Resolution dialog box; then click Cancel to close the
Image Size dialog box.
Adobe Photoshop software supports the Microsoft push model for scanners under
Windows 98. Check with your scanner manufacturer to find out if your scanner supports
this scanning model. You can use the Windows 98 Scanners and Cameras Control Panel
to notify an application that a scanner wants to initiate a data transfer.
To have a scanner choose Adobe Photoshop as the application to initiate a data transfer:
7 In Windows 98, choose Start Menu > Settings > Control Panel > Scanners and
Cameras.
8 Select the scanner you want to configure and select Properties.
9 Click the Event tab.
10 From the pop-up menu list, choose Scanner Event. Select Photoshop.
11 On your scanner, push the Scan button to activate the scanner’s date transfer.
Windows 98 launches Adobe Photoshop and displays the scanner’s Import dialog box.

LESSON 252Image Basics
Scanning for electronic publication
If you are preparing images for on-screen viewing, the scan resolution need not be greater
than the resolution of the target monitor. However, keep in mind that on-screen images
are displayed at a 1:1 ratio (1 image pixel to 1 monitor pixel), so the size of an image may
vary based on the dpi of the monitor on which the image is displayed.
Scanning using the file size setting
The best way to ensure that you have all the data you need for your Adobe Photoshop
image is to create a dummy file that tells you exactly how much data—that is, what file
size—you need for your final output.
Using this method is helpful if you have an original image that is smaller than the final
image you want to produce. For example, if you want to increase a 2-inch-by-3-inch
original image to create a 4-inch-by-6-inch scanned image printed at a line screen of
150 lpi, use the file size method to determine how much data you’ll need.
Now, you’ll use the File > New method using the information from the previous example.
1 Choose File > New.
2 Enter 4 inches for Width, 6 inches for Height, and 300 for Resolution. (The resolution
should be 1.5 times to 2 times the screen frequency you will use to print, which you’ve
determined to be 150.)
The New dialog box displays the image size above the dimensions. The final image is
4 inches wide by 6 inches high, printed at a screen frequency of 150 lpi (hence the 300-lpi
resolution, which is two times the line screen). The file size must be 6.18 megabytes.
To produce the scan, select the area of the image you want to scan. Then adjust the
resolution up or down until the file size is equal to or larger than the file size in the
Photoshop File > New dialog box. You can fine-tune the image size and resolution later.

53ADOBE PHOTOSHOP LEClassroom in a Book
Once you have scanned the image and imported it into Photoshop, use the Image Size
command to enter the correct width and height for the image.
Scanning using the resolution setting
If you can’t use file size as the determining factor in choosing your scanner settings, you
can calculate a scan resolution using the original and final image dimensions and the
screen frequency of your output device.
1 Multiply the screen frequency by 2. (Two is the typical ratio of image resolution to
screen frequency needed to produce a good-quality image.) For the typical screen
frequency by publication type, see “Scanning for printed publication” on page 50.
2 Multiply the result in step 1 by the size change factor (the ratio of the final image dimen-
sions to the original) to get the estimated scan resolution you need.
For example, suppose you are scanning an image that is 2 inches wide by 3 inches high.
You want to produce a final image that is 6 inches wide by 9 inches high. You are using a
screen frequency of 85 lpi.
To calculate the scan resolution, you first multiply 85 (the screen frequency) by 2 to
get 170. You then multiply 170 by 3 (the ratio of the final image to the original image
dimensions) to get a scan resolution of 510 ppi.
Different printing procedures may require different ratios of image resolution to screen
frequency. It’s a good idea to check with your service provider or printer to finalize your
requirements before you scan the image.
Resampling an image
Resampling refers to changing the pixel dimensions (and therefore the file size) of an
image. In Adobe Photoshop, you can change the pixel dimensions directly, or you can
change the pixel dimensions by changing either the print dimensions or the resolution
while the Resample Image option is selected.
When you sample down (decrease the number of pixels), Photoshop deletes information
from the image. When you resample up (increase the number of pixels), Photoshop
creates new pixel information based on the color values of the existing pixels. In both
cases, Photoshop uses an interpolation method to determine how pixels are added or
deleted.

LESSON 254Image Basics
Downsampling and then resampling up to the original resolution causes the quality of an
image to deteriorate. This is because once an image has been downsampled, some of the
original color information is lost. When Photoshop resamples the image back up, it
attempts to reconstruct the image data based on the new color information. Because the
added pixels are interpolated (inserted) from the new downsampled color information,
the resulting image can appear blurry or out of focus.
It’s best to scan in or create your image using a high enough resolution so that you don’t
have to increase the pixel dimensions from within Adobe Photoshop. If you want to
preview the effects of changing the pixel dimensions on-screen, or print proofs at
different resolutions, resample a duplicate of your original file.
Sampling down the skater image
You’ll start by sampling down the skater image, and then sample it back up to see how
resampling affects the image.
1 Choose File > Open, and open the Skate144.psd file, located in the Lessons/Lesson02
folder.
2 Choose Image > Image Size. First, make sure that the Constrain Proportions and
Resample Image options are selected.
3 Enter 72 in the Resolution text box. You’ll notice that the pixel dimensions of the image
change, but the print size remains the same.
4 Click OK. Because information was deleted from the Skate144.psd image when the
image was sampled down to a lower resolution, the quality of the image remains intact.

55ADOBE PHOTOSHOP LEClassroom in a Book
Sampling up the skater image
Next, you’ll sample up the 72-ppi image. You’ll see how the image quality deteriorates
when you increase the resolution after having decreased it, while maintaining the
print size.
1 Make sure that the Skate144.psd window is still active; then choose Image > Image Size.
2 Enter 300 in the Resolution text box.
Notice that although the pixel dimensions increase, the print size remains the same.
3 Click OK. The image is badly out of focus, because the image was sampled back up by
inserting color information from the sampled down file.
4 Choose File > Close, and do not save changes.
You have completed the Image Basics lesson. For in-depth information about all the
image options, see Chapter 2, “Getting Images into Photoshop,” in the Adobe
Photoshop LE User Guide.

LESSON 256Image Basics
Review questions1 What is the difference between a vector image and a raster image?
2 Define resampling. How does sampling up an image differ from sampling down an
image?
3 Name two or three ways to get images into Photoshop.
4 How do you determine the resolution at which an image should be scanned?
5 How does scanning an image for electronic publication differ from scanning an image
for printed publication?
6 What is screen frequency, and what effect does it have on a printed image?
Review answers1 Vector images are composed of mathematically defined lines and curves called vectors.
Raster images are composed of a grid of small squares called pixels.
2 Resampling is the process of removing pixels from an image or adding pixels to an
image. Sampling up adds pixels to an image, and so increases file size, while sampling
down discards pixels from the image and so decreases file size.
3 You can use a scanner to scan an image, or import vector artwork from a drawing
application like Adobe Illustrator. Images can also come from a digital camera or from a
photo CD.
4 You determine the scanning resolution of an image by determining where the image
will be output. For example, if an image is going to be output to screen, the resolution
need not be higher than the screen resolution; if the image is going to be output to print,
the resolution should be 1.5 to 2 times the line screen of the printing device.
5 The scan resolution for an electronic image is typically lower than the scan resolution
for a printed image.
6 The screen frequency, or line screen, of an image is the number of lines per inch printed
by the output device. The higher the screen frequency, the higher the quality of the
printed output.

3 Working with Selections
Learning how to select areas of an image
is of primary importance when working
with Adobe Photoshop LE—you must
first select what you want to affect.
Once you’ve made a selection, only the
area within a selection can be edited.
Areas outside the selection are
protected from change.

LESSON 358Working with Selections
In this lesson, you’ll learn how to do the following:
• Use the marquee, lasso, and magic wand tools to select parts of an image in
various ways.
• Reposition a selection marquee.
• Deselect a selection.
• Move and duplicate a selection.
• Constrain the movement of a selection.
• Adjust a selection with the arrow keys.
• Add to and subtract from selections.
• Rotate, scale, and transform a selection.
• Combine selection tools.
• Crop an image.
Getting startedBefore beginning this lesson, you’ll rename or delete the Adobe Photoshop LE preferences
file to restore the application’s default settings. See “Restoring default preferences” on
page 2.
You’ll start the lesson by viewing the final lesson file to see what you’ll accomplish.
1 Restart Adobe Photoshop.
2 Choose File > Open, and open the 03End.psd file, located in the Lessons/Lesson03
folder. An image of a face, constructed using various types of fruits and vegetables, is
displayed.
3 When you have finished viewing the file, either leave the End file open on your desktop
for reference or close it without saving changes.
Now you’ll open the start file and begin the lesson.
4 Choose File > Open, and open the 03Start.psd file, located in the Lessons/Lesson03
folder on your hard drive.

59ADOBE PHOTOSHOP LEClassroom in a Book
5 Choose File > Save As, rename the file 03Work.psd, and save it in the Lessons/Lesson03
folder.
Important: Rename and save a copy of the lesson files, to avoid overwriting the originals in
case you need them later.
Tool overviewIn Adobe Photoshop LE, you can make selections based on size, shape, and color using
three basic sets of tools—the marquee, lasso, and magic wand tools. In addition, you can
use a fourth tool, the move tool, to reposition the selections you create.
A. Marquee toolB. Move toolC. Lasso toolD. Magic wand tool
The marquee and lasso tool icons contain hidden tools, which you can select by holding
down the mouse button on the toolbox icon and dragging to the desired tool in the
pop-up menu.
The rectangular marquee tool ( ) lets you select a rectangular area in an image. The ellip-
tical marquee tool ( ) lets you select elliptical areas. The single row and single column
marquee tools ( ) ( ) let you select a 1-pixel-high row and 1-pixel-wide column. You can
also use the crop tool ( ) to crop an image.
The lasso tool ( ) lets you make a freehand selection around an area. The polygon lasso
tool ( ) lets you make a straight-line selection around an area. The magnetic lasso tool
( ) lets you draw a freehand border that snaps to the edges of an area.
The magic wand tool ( ) lets you select parts of an image based on the similarity in color
of adjacent pixels. This tool is useful for selecting odd-shaped areas without having to
trace a complex outline using the lasso tool.
B
D
A
C

LESSON 360Working with Selections
Selecting with the rectangular marquee toolYou’ll start by practicing selection techniques using the rectangular marquee tool.
1 Click the rectangular marquee tool ( ) in the toolbox.
2 Drag the tool diagonally from the top left to the bottom right corner of the melon to
create a rectangular selection.
Initial selection Marquee tool placed Selection border within selection repositioned
You can move a selection border after you’ve created it by positioning the tool within the
selection and dragging. Notice this technique changes the location of just the selection
border; it does not affect the size or shape of the selection.
3 Place the marquee tool anywhere inside the selection surrounding the melon. The
pointer becomes an arrow with a small selection icon next to it.
4 Drag to reposition the border around the melon.
Note: Repositioning techniques for selection borders work with any of the marquee, lasso, and
magic wand tools.
If you are still not happy with the selection after repositioning it, you can deselect it and
redraw it.
5 Deselect the selection by using either of these methods:
• Choose Select > None.
• Click anywhere in the window outside the selection border.
6 Reselect the melon using the rectangular marquee tool.
Note: To back up one action at any point in the lesson, choose Edit > Undo.

61ADOBE PHOTOSHOP LEClassroom in a Book
Selecting with the elliptical marquee toolNext you’ll use the elliptical marquee tool to select eyes for the face. Note that in most
cases, making a new selection replaces the existing selection.
1 Select the zoom tool ( ), and click twice or three times on the blueberry to zoom in to
a 300% view.
2 Hold down the mouse button on the rectangular marquee tool, and drag to the
elliptical marquee tool ( ).
3 Move the pointer over the blueberry, and drag it diagonally from the top left to the
bottom right edge of the blueberry to create a selection. Do not release the mouse button.
Repositioning a selection border while creating it
If a selection border isn’t placed exactly where you want it, you can adjust its position and
size while creating it.
1 Still holding down the mouse button, hold down the spacebar, and drag the selection.
The border moves as you drag.
2 Release the spacebar (but not the mouse button), and drag again. Notice that when you
drag without the spacebar, the size and shape of the selection change, but its point of
origin does not.
Incorrect point of origin Corrected point of origin Adjusted border(click and drag) (spacebar depressed) (spacebar released)
3 When the selection border is positioned and sized correctly, release the mouse button.

LESSON 362Working with Selections
Selecting from a center point
Sometimes it’s easier to make elliptical or rectangular selections by drawing a selection
from the center point of the object to the outside edge. Using this method, you’ll reselect
the blueberry.
1 Choose Select > None.
2 Position the marquee tool at the approximate center of the blueberry.
3 Click and begin dragging. Then without releasing the mouse button, hold down Alt
(Windows) or Option (Mac OS), and continue dragging the selection to the blueberry’s
outer edge. Notice that the selection is centered over its starting point.
4 When you have selected the entire blueberry, release first the mouse button and
then Alt/Option.
If necessary, adjust the selection border using one of the methods you learned earlier.
Moving a selectionNow you’ll use the move tool to move the blueberry onto the carrot slice to create an eye
for the face. Then you’ll duplicate and move the selection to make a second eye.
1 Make sure that the blueberry is selected.
2 If necessary, zoom out or double-click the zoom tool to return to a 100% view.
3 Click the move tool ( ), and position the pointer within the blueberry’s selection. The
pointer becomes an arrow with a pair of scissors to indicate that dragging the selection
will cut it from its present location and move it to the new location.
4 Drag the blueberry onto the carrot slice.
Move tool placed Blueberry moved ontowithin blueberry carrot sliceselection

63ADOBE PHOTOSHOP LEClassroom in a Book
5 Choose Select > None.
6 Choose File > Save.
Moving and duplicating simultaneously
Next you’ll move and duplicate a selection simultaneously.
1 Choose View > Fit on Screen to resize the document to fit on your screen.
2 Select the elliptical marquee tool.
3 Drag a selection around the carrot slice containing the blueberry. If necessary, adjust
the selection border using one of the methods you learned earlier.
4 Click the move tool, then hold down Alt (Windows) or Option (Mac OS), and position
the pointer within the selection. The pointer becomes a double arrow, which indicates
that a duplicate will be made when you move the selection.
5 Continue holding down Alt/Option, and drag a duplicate of the eye onto the left side
of the melon face. Release the mouse button and Alt/Option, but do not deselect the eye.
Holding down Shift when you move a selection constrains the movement horizontally or
vertically. Using this technique, you’ll drag a copy of the left eye to the right side of the
face so that the two eyes are level.
6 Hold down Shift+Alt (Windows) or Shift+Option (Mac OS), and drag a copy of the
eye to the right side of the face.

LESSON 364Working with Selections
7 Choose File > Save.
Eye moved onto left side of face Duplicate of eye moved with Shift+Alt/Option
Moving with a keyboard shortcut
Next you’ll select the kiwi fruit for the melon’s mouth and then move it onto the melon
using a keyboard shortcut. The shortcut allows you to temporarily access the move tool
instead of selecting it from the toolbox.
1 Select the elliptical marquee tool from the toolbox.
2 Drag a selection around the kiwi fruit using one of the methods you learned earlier.
3 With the marquee tool still selected, hold down Control (Windows) or Command
(Mac OS), and position the pointer within the selection. A pair of scissors appears with
the pointer to indicate the selection will be cut from its current location.
4 Drag the kiwi mouth onto the face. Do not deselect.
Selection to be cut Selection moved onto melon

65ADOBE PHOTOSHOP LEClassroom in a Book
Moving with the arrow keys
You can make minor adjustments to the position of a selection using the arrow keys,
which allow you to nudge the selection 1 pixel or 10 pixels at a time.
Note: The arrow keys adjust the position of a selection only if you’ve already moved the
selection or if you have the move tool selected. Using the arrow keys on a selection that has not
yet been moved adjusts the selection border, not the part of the image that is selected.
1 Press the Up Arrow ( ) key a few times to move the mouth upward. Notice that each
time you press the arrow key, the mouth moves in 1-pixel increments. Experiment with
the other arrow keys to see how they affect the selection.
Sometimes the border around a selected area can distract you as you make adjustments.
You can hide the edges of a selection temporarily without actually deselecting and then
display the selection border once you’ve completed the adjustments.
2 Choose View > Hide Edges. The selection border around the mouth disappears.
3 Now hold down Shift, and press an arrow key. The selection moves in 10-pixel
increments.
4 Use the arrow keys to nudge the mouth until it is positioned where you want it. Then
choose View > Show Edges.
5 Choose File > Save.
Selecting with the magic wand toolThe magic wand tool lets you select adjacent pixels in an image based on their similarity
in color. You’ll use the magic wand tool to select the pear tomato, which you’ll use as a
nose for the face.
1 Double-click the magic wand tool ( ) in the toolbox to select the tool and display its
Options palette. Notice that the Options palette has moved to the front of the
Info/Navigator/Options palette group.
Note: Most tools in the toolbox come with their own Options palettes, which allow you to
change the way the tools work.
In the Magic Wand Options palette, the Tolerance setting controls how many similar
tones of a color are selected when you click an area. The default value is 32, indicating that
32 similar lighter tones and 32 similar darker tones will be selected.

LESSON 366Working with Selections
2 For Tolerance, enter 50 to increase the number of shades that will be selected.
3 Click the magic wand tool anywhere within the pear tomato. Most of it will be selected.
4 To select the remaining area of the pear tomato, hold down Shift, and click the
unselected areas. Notice that a plus sign appears with the magic wand pointer indicating
that you’re adding to the current selection.
Initial selection Adding to selection Complete selection(Shift key depressed)
5 When the pear tomato is completely selected, hold down Control (Windows) or
Command (Mac OS), position the pointer within the selection, and drag the tomato nose
onto the melon face.
6 Choose Select > None.
7 Choose File > Save.

67ADOBE PHOTOSHOP LEClassroom in a Book
Selecting with the lasso toolYou can use the lasso tool to make selections that require both freehand and straight lines.
You’ll select a bow tie for the face using the lasso tool this way. It takes a bit of practice to
use the lasso tool to alternate between straight-line and freehand selections—if you make
a mistake while you’re selecting the bow tie, simply deselect and start again.
1 Select the zoom tool, and click twice or three times on the bow tie pasta to enlarge its
view to 300%.
2 Select the lasso tool ( ). Starting at the top left corner of the bow tie pasta, drag to the
right to create a freehand outline across the curves at the top of the bow tie. Continue
holding down the mouse button.
3 To select the right edge of the bow tie, hold down Alt (Windows) or Option (Mac OS),
release the mouse button, and then begin outlining with short, straight lines by clicking
along the edge. (Notice that the pointer changes from the lasso icon to the polygon lasso
icon.) When you reach the bottom right corner of the bow tie, do not release the
mouse button.
Freehand outline with Straight-line outline with Completed selection (outlinelasso tool polygon lasso tool crosses starting point)
4 Release Alt/Option, and drag to the left to create a freehand outline across the bottom
of the bow tie. (The pointer returns to the lasso icon.)
5 Hold down Alt/Option again, and click the mouse button along the left edge of the bow
tie to draw straight lines.
6 To complete the selection, make sure that the last straight line crosses the start of the
selection, release Alt/Option, and then release the mouse button.
7 Choose View > Fit on Screen to resize the document to fit on your screen.

LESSON 368Working with Selections
8 Hold down Control (Windows) or Command (Mac OS), and drag the bow tie
selection to the bottom of the melon face.
9 Choose File > Save.
Adding and subtracting selectionsHolding down Shift while you are selecting an area adds to the current selection. Holding
down Alt (Windows) or Option (Mac OS) subtracts from the selection. You’ll now use
these techniques with the lasso tool to perfect a rough selection of the mushroom image.
The mushroom will become a hat for the melon face.
1 Select the zoom tool, and click twice on the mushroom to enlarge its view to 300%.
2 Select the lasso tool, and drag a rough outline around the mushroom (include some of
the area outside the mushroom and some of the stem).
3 Hold down Shift. A plus sign appears with the lasso tool pointer.
4 Drag the lasso tool around an area you want to add to the selection. Then release the
mouse button. The area is added to the current selection.
Initial selection Adding to selection Result(Shift key depressed)
Note: If you release the mouse button while drawing a selection with the lasso tool, the
selection closes itself by drawing a straight line between the starting point and the point where
you release the mouse. To create a more precise border, end the selection by crossing the
starting point.
Next, you’ll remove, or subtract, part of the selection.
5 Hold down Alt (Windows) or Option (Mac OS). A minus sign appears with the lasso
tool pointer.

69ADOBE PHOTOSHOP LEClassroom in a Book
6 Drag the lasso tool around an area you want to remove from the selection. Then repeat
the process until you’ve finished removing all the unwanted parts of the selection.
Selection Subtracting from selection Result(Alt/Option depressed)
7 Choose View > Fit on Screen.
8 To move the mushroom hat onto the melon head, hold down Alt+Control (Windows)
or Option+Command (Mac OS), and drag a copy of the mushroom to the top of
the melon.
9 Choose File > Save.
Selecting with the magnetic lasso toolYou can use the magnetic lasso tool to make freehand selections of areas with high-
contrast edges. When you draw with the magnetic lasso, the border automatically snaps
to the edge you are tracing. You can also control the direction of the tool’s path by clicking
the mouse to place occasional fastening points in the selection border.
You’ll now make an ear for the melon face by using the magnetic lasso to select the red
part of the grapefruit slice.
1 Select the zoom tool, and click the grapefruit slice to zoom in.
2 Hold down the mouse button on the lasso tool in the toolbox, and drag to the magnetic
lasso tool ( ) to select it.
3 Now click once at the lower left corner of the red flesh of the grapefruit slice, release the
mouse button, and begin tracing the outline of the flesh by dragging to the right over the
curved upper edge. Notice that the tool snaps to the edge and automatically puts in
fastening points.

LESSON 370Working with Selections
If you think the tool is not following the edge closely enough (in low-contrast areas), you
can place your own fastening point in the border by clicking the mouse button. You can
add as many fastening points as you feel necessary. You can also remove fastening points
and undo portions of the path by pressing Delete and moving the mouse back to the last
remaining fastening point.
4 When you reach the lower right corner of the grapefruit flesh, double-click the mouse
button, which signals the magnetic lasso tool to return to the starting point and close the
selection. Notice that the tool automatically follows the remaining edge of the flesh as it
completes the border.
Laying down fastening points Removing fastening points Double-clicking at corner toclose path
You can now move the selected part of the grapefruit next to the melon.
5 Double-click the hand tool ( ) to fit the image on-screen.
6 Click the move tool, and drag the grapefruit ear to the middle of the left side of the
melon face. Do not deselect.
7 Choose File > Save.
Transforming a selectionNext you’ll use the Transform command to rotate and scale the melon’s left ear, and then
you’ll duplicate and flip a copy to create a right ear.
1 Choose Edit > Transform > Rotate. A bounding box appears around the ear selection.
2 To rotate the ear, position the pointer outside a corner handle until you see a double-
headed arrow, and then drag in the direction you want the ear to rotate.
3 Press Enter (Windows) or Return (Mac OS) to apply the transformation change. The
bounding box disappears, but the ear remains selected.

71ADOBE PHOTOSHOP LEClassroom in a Book
4 To scale the ear, choose Edit > Transform > Scale. Position the pointer directly on one
of the corner handles, and drag to reduce the size of the ear. To scale the ear proportion-
ately, hold down Shift as you drag.
5 To reposition the ear, place your pointer within the bounding box and drag.
Dragging outside border to Dragging on corner to scale ear Dragging within border torotate ear reposition ear
If you don’t like the results of a Transform command, press Esc and start over.
6 When you have the ear positioned correctly, press Enter (Windows) or Return
(Mac OS) to apply the transformation. The ear remains selected.
You will now move a copy of the ear to the right side of the face, flip the ear horizontally,
and fine-tune its placement.
7 Position the pointer within the ear selection, hold down Shift+Alt (Windows) or
Shift+Option (Mac OS), and drag a copy of the ear to the right side of the face.
8 Choose Edit > Transform > Flip Horizontal.
9 If necessary, place the pointer within the selection, and drag to reposition it next to the
melon face.
10 If necessary, choose Edit > Transform > Rotate, rotate the ear to fit the right side of
the face, and press Enter (Windows) or Return (Mac OS) to complete the transformation.
11 Choose File > Save.
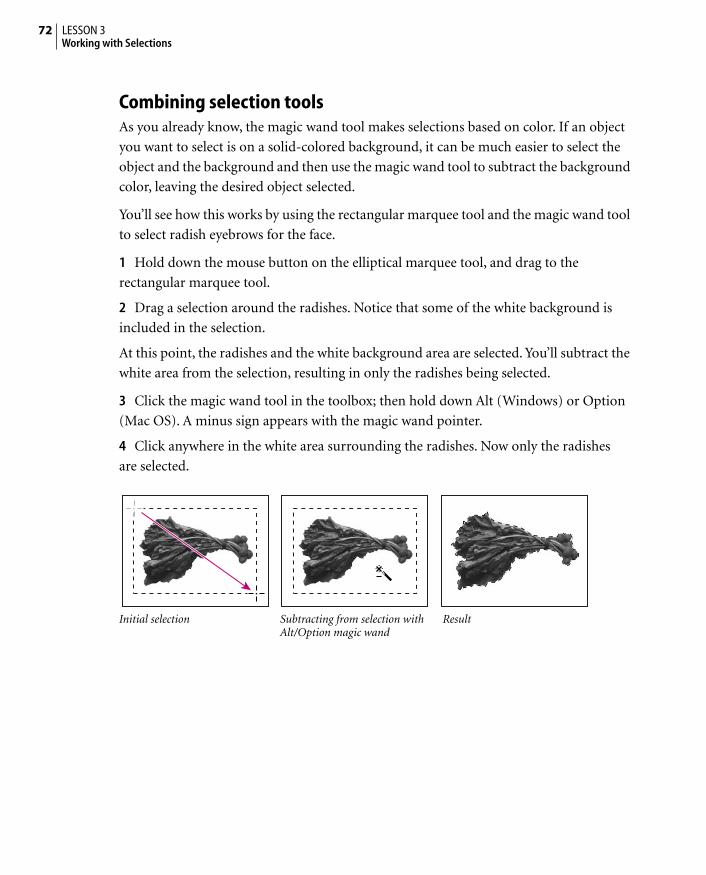
LESSON 372Working with Selections
Combining selection toolsAs you already know, the magic wand tool makes selections based on color. If an object
you want to select is on a solid-colored background, it can be much easier to select the
object and the background and then use the magic wand tool to subtract the background
color, leaving the desired object selected.
You’ll see how this works by using the rectangular marquee tool and the magic wand tool
to select radish eyebrows for the face.
1 Hold down the mouse button on the elliptical marquee tool, and drag to the
rectangular marquee tool.
2 Drag a selection around the radishes. Notice that some of the white background is
included in the selection.
At this point, the radishes and the white background area are selected. You’ll subtract the
white area from the selection, resulting in only the radishes being selected.
3 Click the magic wand tool in the toolbox; then hold down Alt (Windows) or Option
(Mac OS). A minus sign appears with the magic wand pointer.
4 Click anywhere in the white area surrounding the radishes. Now only the radishes
are selected.
Initial selection Subtracting from selection with ResultAlt/Option magic wand

73ADOBE PHOTOSHOP LEClassroom in a Book
5 To duplicate and move the radish eyebrow to the melon face, hold down Alt+Control
(Windows) or Option+Command (Mac OS), and drag the radish above the left eye on
the melon face. Do not deselect.
Left eyebrow placed with Right eyebrow placed with Right eyebrow flipped Alt+Control/ Shift+Alt+Control/ horizontallyOption+Command Shift+Option+Command
6 Hold down Shift+Alt+Control (Windows) or Shift+Option+Command (Mac OS),
position the pointer within the selection, and drag to duplicate and reposition another
eyebrow above the right eye.
7 Choose Edit > Transform > Flip Horizontal to adjust the right eyebrow. If you like,
reposition the eyebrow using any of the methods you’ve learned.
8 Choose File > Save.

LESSON 374Working with Selections
Cropping the completed imageTo complete the artwork, you’ll crop the image to a final size.
1 Choose the crop tool ( ) from the toolbox. The crop tool is located in the Hidden
Tools palette under the marquee tool.
2 Move the pointer into the image window, and drag diagonally from the top left to the
bottom right corner of the completed artwork to create a crop marquee.
3 If you need to reposition the crop marquee, position the pointer anywhere inside the
marquee and drag.
4 If you want to resize the marquee, drag a handle.
5 When the marquee is positioned where you want it, press Enter (Windows) or Return
(Mac OS) to crop the image.
6 Choose File > Save.
The fruit-and-vegetable face is complete.
7 Choose File > Close to close the file.

75ADOBE PHOTOSHOP LEClassroom in a Book
Review questions1 Once you’ve made a selection, what area of the image can be edited?
2 How do you add to and subtract from a selection?
3 How can you move a selection while you’re drawing it?
4 When drawing a selection with the lasso tool, how should you finish drawing the
selection to ensure that the selection is the shape you want?
5 How does the magic wand tool determine which areas of an image to select? What is
tolerance, and how does it affect a selection?
Review answers1 Only the area within the selection can be edited.
2 To add to a selection, hold down Shift, and then drag or click the active selection tool
on the area you want to add to the selection. To subtract from a selection, hold down Alt
(Windows) or Option (Mac OS), and then drag or click the active selection tool on the
area you want to remove from the selection.
3 You can move a selection as you draw it by continuing to depress the mouse button,
and then holding down the spacebar and dragging to reposition the selection.
4 To make sure that the selection is the shape you want, end the selection by dragging
across the starting point of the selection. If you start and stop the selection at different
points, Photoshop draws a straight line between the start point of the selection and the
end point of the selection.
5 The magic wand selects adjacent pixels based on their similarity in color. The Tolerance
setting determines how many shades of color the magic wand will select. The higher the
Tolerance setting, the more shades the magic wand selects.


4 Layer Basics
Adobe Photoshop LE lets you isolate
different parts of an image on layers. The
artwork on each layer can be edited as a
discrete image, allowing for unlimited
flexibility in editing.

LESSON 478Layer Basics
In this lesson, you’ll learn how to do the following:
• Organize your artwork on layers.
• View and hide layers.
• Select layers.
• View the transparent area of a layer.
• Reorder layers to change the placement of artwork in the image.
• Create a new layer.
• Apply modes to layers to vary the effect of artwork on the layer.
• Move layers from one file to another.
• Erase objects on layers and delete layers.
• Link layers in order to affect them simultaneously.
• Merge like layers to reduce the size of a file.
• Save a layered file.
Getting startedBefore beginning this lesson, you’ll rename or delete the Adobe Photoshop LE preferences
file to restore the application’s default settings. See “Restoring default preferences” on
page 2.
You’ll start the lesson by viewing the final lesson file to see what you’ll accomplish.
1 Restart Adobe Photoshop.
2 Choose File > Open, and open the 04End.psd file, located in the Lessons/Lesson04
folder. An image of a figure on a beach is displayed.
3 When you have finished viewing the file, either leave the End file open on your desktop
for reference or close it without saving changes.
Now you’ll open the start file and begin the lesson.
4 Choose File > Open, and open the 04Start.psd file, located in the Lessons/Lesson04
folder on your hard drive.
5 Choose File > Save As, rename the file 04Work.psd, and save it in the Lessons/Lesson04
folder.

79ADOBE PHOTOSHOP LEClassroom in a Book
Important: Rename and save a copy of the lesson files, to avoid overwriting the originals in
case you need them later.
Organizing artwork on layersEvery Adobe Photoshop image contains one or more layers. Every new file is created with
a background, which can be converted to a layer. When you scan an image and open it in
Adobe Photoshop LE, it is placed on the background.
Layers in Adobe Photoshop are analogous to placing portions of a drawing on sheets of
acetate—when the sheets are stacked, the entire drawing is visible, but individual sheets
of acetate may be edited, repositioned, or deleted without affecting the overall drawing.
In Adobe Photoshop, the order in which the layers of a drawing are organized is called the
stacking order. The stacking order of layers determines how the image is viewed—you can
change the layer order to make certain parts of the image appear in front of or behind
other layers.
Viewing a layered documentAll layers in an image are transparent until you add artwork (pixel values) to the layer.
After you’ve added artwork to a layer, the areas that remain transparent are represented
by a checkerboard.

LESSON 480Layer Basics
Using the Layers paletteThe Layers palette lets you control the layers in your document. You can create new
layers, reposition layers, delete or merge layers, and apply effects, called modes, to
individual layers.
A. Selected layer is active B. Selected layer iconC. Link/unlink D. Show/hide E. New layer F. Trash
1 If the Layers palette is not visible on your screen, choose Window > Show Layers.
2 Click the maximize box (Windows) or the size box (Mac OS) in the top right area of
the Layers palette to expand to the full size of the palette. (The palette size depends on the
number of layers in the document.)
Click to collapse and expand palette.
C
D
B
A
E F
Macintosh
Windows

81ADOBE PHOTOSHOP LEClassroom in a Book
The Layers palette displays the layers in the active window from top to bottom. A
thumbnail of the layer appears to the left of the layer name and is automatically updated
as you edit the layer.
Viewing and hiding layers
The eye icon in the column to the left of the layer names indicates that a layer is visible.
You can view or hide one or more layers by clicking the eye icon next to the layer name
you want to view or hide. You can also drag through the eye column to turn multiple
layers on or off.
1 Drag through the eye column from the top to the bottom to turn on all layers in
the image.
2 Drag through the eye column again from the top to the bottom to turn off all the
layers and the background in the image. The entire image disappears because all the layers
and background are hidden.
The checkerboard indicates that with all the layers hidden, the image area is transparent.
3 Try showing and hiding different combinations of layers by clicking, or by clicking and
dragging the eye column next to various layers.
4 Drag through the eye column from the top to the bottom to turn on all the layers in
the image.
You can also hide all but a single layer.
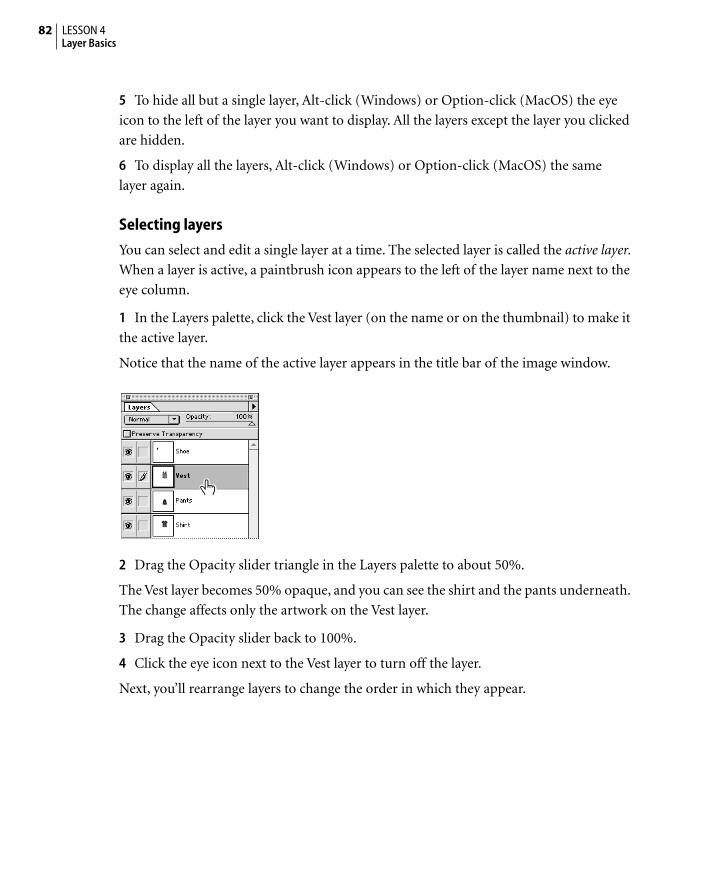
LESSON 482Layer Basics
5 To hide all but a single layer, Alt-click (Windows) or Option-click (MacOS) the eye
icon to the left of the layer you want to display. All the layers except the layer you clicked
are hidden.
6 To display all the layers, Alt-click (Windows) or Option-click (MacOS) the same
layer again.
Selecting layers
You can select and edit a single layer at a time. The selected layer is called the active layer.
When a layer is active, a paintbrush icon appears to the left of the layer name next to the
eye column.
1 In the Layers palette, click the Vest layer (on the name or on the thumbnail) to make it
the active layer.
Notice that the name of the active layer appears in the title bar of the image window.
2 Drag the Opacity slider triangle in the Layers palette to about 50%.
The Vest layer becomes 50% opaque, and you can see the shirt and the pants underneath.
The change affects only the artwork on the Vest layer.
3 Drag the Opacity slider back to 100%.
4 Click the eye icon next to the Vest layer to turn off the layer.
Next, you’ll rearrange layers to change the order in which they appear.

83ADOBE PHOTOSHOP LEClassroom in a Book
Rearranging layers
You can rearrange layers to change the stacking order of the elements on individual layers.
You’ll rearrange the Shirt layer to move it in front of the Pants layer.
1 Click the Shirt layer in the Layers palette to select it, and then drag upward to position
it above the Pants layer. When you see a thick black line above the Pants layer, release the
mouse button. The Shirt layer moves in front of the Pants layer.
Repositioning layer Result
Renaming layers
You can change the name of a layer using the Layer Options dialog box.
1 In the Layers palette, double-click the Pants layer.
2 In the Layer Options dialog box, enter the name Shorts and click OK.
3 Choose File > Save to save your work.
Editing the background
By default, the background in an image cannot be moved and always appears in italic type
at the bottom of the Layers palette. If you try to move the background, an icon appears to
indicate that it can’t be moved. If you want to move the background or change its opacity,
you must first convert it to a layer by renaming it.
1 In the Layers palette, double-click the background to open the Make Layer dialog box.

LESSON 484Layer Basics
2 Type the name Seascape and click OK. The background is renamed and can be edited
as any other layer in the file.
3 In the Layers palette, drag the Opacity slider to about 60% to make the Seascape layer
semitransparent.
Changing the view of the transparent areas in an image
At the beginning of this lesson, you learned that the transparent areas on a layer or in an
image are represented by a checkerboard. You can modify the color and size of the check-
erboard, or you can make the checkerboard invisible.
1 In the Layers palette, Alt-click (Windows) or Option-click (MacOS) the eye icon next
to the Figure layer to turn off all the layers except the Figure layer.
The area surrounding the figure is transparent, as indicated by the checkerboard.

85ADOBE PHOTOSHOP LEClassroom in a Book
2 Choose File > Preferences > Transparency.
Checkerboard indicating transparency
3 For Grid Size, choose Small to change the size of the squares in the checkerboard.
4 For Grid Colors, choose one of the predefined colors to change the color of the
checkerboard.
5 Experiment with various checkerboard sizes and colors.
6 Before closing the Transparency dialog box, choose None for Grid Size to turn off
the grid.
Note: When you choose None for the Checkerboard option, the white area surrounding the
artwork on a layer represents the transparent area.
7 Click OK.
8 In the Layers palette, Alt-click (Windows) or Option-click (MacOS) the eye icon next
to the Figure layer to turn on all the layers in the image.
Adding a new layer
Next, you’ll create a new layer and add a gradient to it.
1 In the Layers palette, click the Seascape layer to make it the active layer.

LESSON 486Layer Basics
2 Choose New Layer from the Layers palette menu.
3 In the New Layer dialog box, type the name Gradient and click OK. The Gradient layer
appears above the Seascape layer in the Layers palette.
4 Click the maximize box (Windows) or the size box (MacOS) in the Layers palette to
display the full size of the Layers palette.
Adding a gradient to a layer
A gradient is a gradual blend from one color to another. The transition from one color
to another may be subtle or sharp, which can be controlled using the gradient tool. You’ll
apply a gradient to the layer above the Seascape layer.
1 Double-click the gradient tool ( ) in the toolbox to select the tool and to open its
Options palette.
2 In the Gradient Tool Options palette, for Gradient choose the Foreground to Trans-
parent option.

87ADOBE PHOTOSHOP LEClassroom in a Book
3 Click the Swatches palette tab to bring it to the front of its palette group. You’ll select a
shade of purple for the starting color of the gradient.
4 In the Swatches palette, click a shade of purple that appeals to you.
5 Make sure that the Gradient layer is the selected layer in the Layers palette.
6 In the image window, drag the gradient tool from the top of the image to the bottom
of the image.
The gradient is applied over the length of the layer, starting with purple and gradually
blending to transparent.
7 In the Layers palette, drag the Opacity slider to 60% to lighten the gradient.
Note: If you are working on a 256-color monitor, you may see banding in the gradient.

LESSON 488Layer Basics
Applying modes to a layer
Blending modes let you change the effect of artwork on a layer. For example, if you want
to add color to a grayscale image to create a hand-painted look, you would select a mode.
You’ll experiment with a few modes on the Gradient layer to see how they affect the
gradient and the Seascape layer beneath it.
1 With the Gradient layer still the active layer, choose Darken from the mode menu (to
the left of the Opacity slider in the Layers palette).
The Darken mode applies the colors in the gradient to only the pixels on the Seascape
layer that are lighter than the gradient colors.
2 Next, choose Lighten from the mode menu.
The Lighten mode applies the colors in the gradient to only the pixels on the Seascape
layer that are darker than the gradient colors.
3 Experiment by selecting other modes to apply a variety of effects to the Gradient layer.
For a complete explanation of each layer mode, see the Adobe Photoshop LE User Guide.
4 Choose File > Save to save your work.
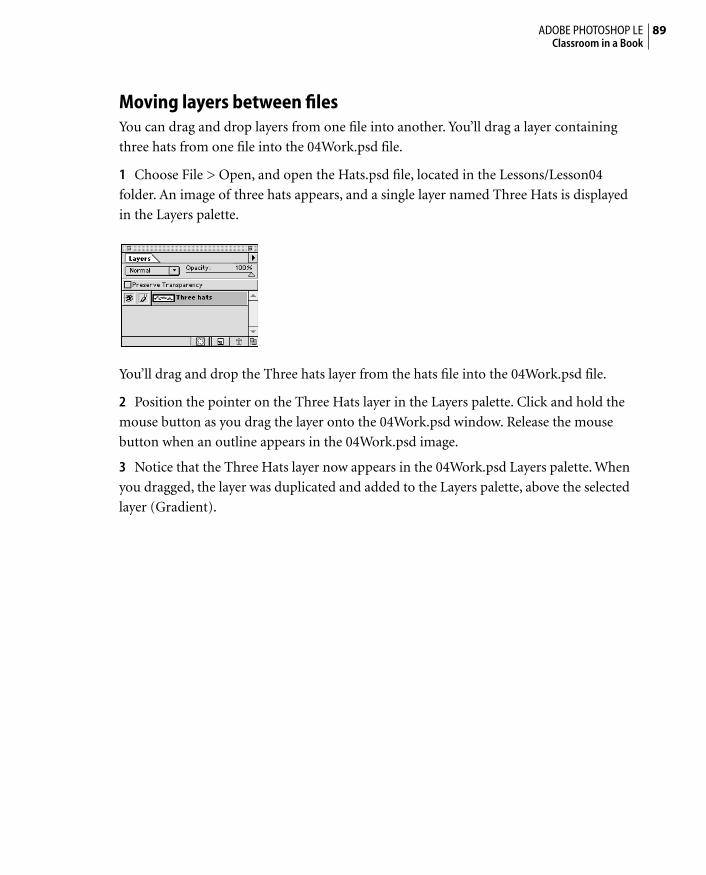
89ADOBE PHOTOSHOP LEClassroom in a Book
Moving layers between files You can drag and drop layers from one file into another. You’ll drag a layer containing
three hats from one file into the 04Work.psd file.
1 Choose File > Open, and open the Hats.psd file, located in the Lessons/Lesson04
folder. An image of three hats appears, and a single layer named Three Hats is displayed
in the Layers palette.
You’ll drag and drop the Three hats layer from the hats file into the 04Work.psd file.
2 Position the pointer on the Three Hats layer in the Layers palette. Click and hold the
mouse button as you drag the layer onto the 04Work.psd window. Release the mouse
button when an outline appears in the 04Work.psd image.
3 Notice that the Three Hats layer now appears in the 04Work.psd Layers palette. When
you dragged, the layer was duplicated and added to the Layers palette, above the selected
layer (Gradient).

LESSON 490Layer Basics
4 Drag the Three Hats layer to the top of the Layers palette to position it at the top level
of the image.
5 Close the hats file and do not save changes, if prompted.
Moving selections on layersYou can use the move tool to reposition the artwork on individual layers.
1 Click the move tool ( ) in the toolbox.
2 In the Layers palette, make sure that the Three Hats layer is the active layer.
3 Decide which hat you want to place on the figure’s head. Then with the move tool, drag
the hat into position. (Don’t worry about the other two hats just yet.)

91ADOBE PHOTOSHOP LEClassroom in a Book
Erasing artwork on a layer You can erase parts of a layer or an entire layer. You’ll use the eraser tool to edit the image
a few different ways.
1 Double-click the eraser tool ( ) in the toolbox. The Eraser Options palette appears.
2 Choose Block from the Erase Options menu; then move the eraser tool into the
window. The eraser becomes a square block.
3 With the Three Hats layer still selected, drag the eraser over the hats you didn’t select.
4 In the Layers palette, click the Figure layer to make it active.
5 In the Eraser Options palette, select the Paintbrush option, set Opacity to 65%, and
then drag the eraser tool over the figure’s right leg to immerse it in the water.

LESSON 492Layer Basics
Deleting a layerYou can delete unwanted or unused layers from an image.
Delete the Shoe layer in either of the following ways:
• Make sure that the Shoe layer is the active layer, and then choose Delete Layer from the
Layers palette menu.
• Drag the Shoe layer in the Layers palette onto the Trash button at the bottom of the
Layers palette.
Scaling and rotating objects You can scale and rotate a selection using the Transform command in the Edit menu.
You’ll rotate a basket and then scale it for the figure.
1 Choose File > Open, and open the Basket.psd file, located in the Lessons/Lesson04
folder.
2 In the Layers palette, position the pointer on the Basket layer, and drag the layer onto
the 04Work.psd window. Release the mouse button when an outline appears in the
04Work.psd window.
3 Close the basket image and do not save changes, if prompted.

93ADOBE PHOTOSHOP LEClassroom in a Book
4 Click the move tool in the toolbox, and then drag the basket into position on the
figure’s right arm.
5 Choose Edit > Transform > Rotate. The transformation boundary appears around
the basket.
6 Rotate the basket by positioning the pointer outside one of the handles and dragging.
Position pointer and drag to rotate outside handles. . . an object.
7 Press Enter or Return to apply the transformation.
8 Scale the basket to a smaller size by choosing Edit > Transform > Scale. The transfor-
mation boundary appears around the basket.
9 To scale the basket maintaining the correct aspect ration, move the pointer to one
of the corner handles. When the pointer changes to a diagonal arrow, drag to resize
the basket.
10 Adjust the position of the basket by moving the pointer inside the transformation
boundary and dragging to the desired position.
11 Press Enter or Return.

LESSON 494Layer Basics
To make the basket handle fit the figure’s arm, you’ll use the eraser tool.
12 Zoom in on the figure’s arm.
13 Double-click the eraser tool in the toolbox. In the Eraser Options palette, drag
the Opacity slider to 100%. In the Brushes palette, select a small brush. Then erase a
portion of the basket handle to fit it on the figure’s arm.
14 Double-click the zoom tool to return to a 100% view.
Linking layersYou can link two or more layers in a document to affect them as a group. You’ll link all the
layers except the background Seascape layer.
1 In the Layers palette, click the Basket layer to make it the active layer.
2 Next, click the small box to the right of the eye icon in each of the remaining layers,
with the exception of the Gradient layer, the Shadow layer, and the Seascape layer.
When you click in this box, a link icon appears. (The active layer does not display a link
icon, but it is part of the linked layers.)
3 Click the move tool in the toolbox, then position it in the image window and begin
dragging. You’ll notice that the figure, the clothing, and the accessories move simulta-
neously. Align the figure with the shadow to complete the image.

95ADOBE PHOTOSHOP LEClassroom in a Book
4 Unlink all the linked layers by clicking the link icon next to each linked layer.
How layers affect file sizeEach layer you add to an image increases the file size. The amount that the file size
increases is related to how much pixel information is on the layer—transparent areas of
the layer do not add to the file size. To keep the file size manageable, it’s a good idea to
merge layers you’ve finished working with and delete any unused layers in the image.
However, don’t merge or delete layers until you’ve made final design decisions.
Merging layersYou can merge all visible layers in a file, or you can merge all of the layers below the
selected layer. You’ll use the Merge Visible Layers command to merge only the visible
layers in the image.
1 In the Layers palette, click the eye icon next to the Shadow, Gradient, and Seascape
layers to hide them.
2 Choose Merge Visible from the Layers palette menu.
All of the layers are merged, with the exception of the Shadow, Gradient, and Seascape
layers. You can rename the merged layer by double-clicking the layer name in the Layer
palette or choosing Rename Layer from the Layers palette menu.

LESSON 496Layer Basics
3 Drag through the column next to the Shadow, Gradient, and Seascape layers to make
them visible before continuing.
Flattening filesWhen you have edited all the layers in your image, you use the Flatten Image command
to merge all the layers in the image into a single background layer, thus greatly reducing
the file size.
In most cases, you shouldn’t flatten an image until you are absolutely certain that you
have finished all of your design decisions.
1 Choose File > Save As to save a copy of the 04Work.psd file.
It’s a good idea to keep a copy of the layered version of the file, in case you need to edit it
later.
2 From the Layers palette menu, choose Flatten Image.
All the layers in the 04Work.psd image are merged onto a single background.
3 Choose File > Save As, rename the file 04Flat.psd, and save it in the Lessons/Lesson04
folder. Choose File > Close to close the image.
To compare the flattened image with the layered version of the file, you must close the file.
4 To see the difference in the size of the two files, choose File > Open, and select the
04Work.psd and 04Flat.psd file in turn in the Lessons/Lesson04 folder. When you select a
file in a list of files, its size is displayed at the bottom of the Open dialog box.
5 Choose File > Close to close any open lesson files.
You’ve completed the layer basics lesson. In Lesson 8, “Advanced Layer Techniques,” you’ll
learn advanced layer concepts.

97ADOBE PHOTOSHOP LEClassroom in a Book
Review questions1 What is the advantage of using layers?
2 How can you make artwork on one layer appear in front of artwork on another layer?
3 How can you move a layer from one image into another image?
4 How can you adjust multiple layers simultaneously?
5 When you’ve completed your artwork, what can you do to a file to minimize its size?
Review answers1 Using layers lets you edit different parts of an image as discrete objects.
2 To reposition artwork on one layer in front of that on another layer, drag the layer
name in the Layers palette or use the Layer > Arrange > Bring to Front command.
3 To move a layer from one image to another, drag the layer name from the Layers palette
onto the image window of the image to which you want to move the layer.
4 You can link the layers you want by clicking the square box to the left of the Layer name
in the Layers palette.
5 You can merge layers that don’t need to be maintained as individual layers. You can also
flatten the image, which merges all the layers in an image onto a single background.


5 Painting and Editing
The Adobe Photoshop LE painting tools
let you create original artwork or retouch
existing artwork. You can apply paint at
various opacity levels, creating a trans-
parent effect, and you can select from
several different types of painting tools.

LESSON 5100Painting and Editing
In this lesson, you’ll learn how to do the following:
• Use the painting tools to create original artwork and to apply a variety of painting
effects to existing artwork.
• Understand the relationship between a painting tool, its Options palette, and its
brush size.
• Select paint colors from the Color palette, the Swatches palette, and the Adobe
Photoshop color picker.
• Select options for the painting tools to enhance the behavior of the tools.
Getting startedBefore beginning this lesson, you’ll rename or delete the Adobe Photoshop LE preferences
file to restore the application’s default settings. See “Restoring default preferences” on
page 2.
You’ll start the lesson by viewing the final lesson file to see what you’ll accomplish.
1 Restart Adobe Photoshop.
2 Choose File > Open, and open the 05End.psd file, located in the Lessons/Lesson05
folder.
3 When you have finished viewing the file, either leave the End file open on your desktop
for reference or close it without saving changes.
You’ll begin by opening a black-and-white line drawing of the coyote, and then you’ll
color the drawing using a variety of painting tools and options.
4 Choose File > Open, and open the 05Start.psd file, located in the Lessons/Lesson05
folder on your hard drive.
5 Choose File > Save As, rename the file 05Work.psd, and save it in the Lessons/Lesson05
folder.
Important: Rename and save a copy of the lesson files, to avoid overwriting the originals in
case you need them later.
As you work with the painting tools to complete the drawing, don’t worry about selecting
the “right” colors or creating an exact replica of the drawing. The purpose of the lesson is
to help you become familiar with the various painting tools to create a piece of artwork
that reflects your personal preferences.

101ADOBE PHOTOSHOP LEClassroom in a Book
Using the painting toolsIn general, the airbrush tool, the paintbrush tool, the line tool, the pencil tool, and the
rubber stamp tool are referred to as the painting tools. Sometimes the paint bucket tool,
the eyedropper tool, the eraser tool, and the gradient tool are also included in this
category.
A. Airbrush B. Rubber stampC. Paint bucket D. PaintbrushE. Pencil F. Eyedropper
Tools, tool size, and tool options
By default, each painting tool is of a certain size and paints at a particular opacity. The
default size of a painting tool is displayed in the Brushes palette; the default opacity of a
tool is displayed in its corresponding Options palette. It’s very important to understand
the relationship between a tool, its brush size, and its Options palette, because they have
a cumulative effect when you paint.
Selected tool, its Options palette, and current brush size
A
B
C
D
E
F

LESSON 5102Painting and Editing
1 Double-click the paintbrush tool ( ) in the toolbox.
Notice that the default Opacity setting in the Paintbrush Options palette is 100%.
2 Now, click the Brushes palette tab to bring the palette to the front of its group. The
default brush size for the paintbrush tool is highlighted.
Displaying painting tools
Each tool has a hot spot, the point from which the tool’s action begins. By default, when
you select a tool and move it into the image window, the pointer becomes an icon of the
tool in the toolbox.
For painting tools, it’s helpful to change the way they’re displayed so you can see the actual
size of the painting tool in pixels.
1 Choose File > Preferences > General to open the Preferences dialog box.

103ADOBE PHOTOSHOP LEClassroom in a Book
The Preferences dialog box contains several groups of settings that apply to various
aspects of the program. You can select a group of settings from the menu at the top of the
dialog box, or you can click the Next and Prev buttons to move through the settings.
2 Click the Next button twice to get to the Display & Cursors section of the Preferences
dialog box.
3 In the Painting Cursors section of the dialog box, click Brush Size.
4 Click OK.
5 Position the paintbrush tool in the window again; the pointer displays the paintbrush
by its size in pixels.
6 Drag with the paintbrush tool to try out the cursor. Then choose Edit > Undo.
You’ll reset the cursor so that you can continue to see the tool icon as you work.
7 Choose File > Preferences Display & Cursors. Reset the Painting Cursor setting to
Standard, and click OK.

LESSON 5104Painting and Editing
Changing brush opacity
The transparency of brush strokes is determined by the opacity level set in the Paintbrush
Options palette. The lower the value you set, the more transparent the paint.
1 Click the Paintbrush Options tab to bring the palette to the front of its group.
2 Change the opacity level of paint in either of the following ways:
• By dragging the Opacity slider in the painting tool’s Options palette.
Opacity slider
• By typing a number on your keypad. If you type a number from 1 to 10, the opacity
changes in 10% increments. (If you want to set the opacity to an increment other than
10%, type the two-digit number quickly.)
Note: For Windows, the NumLock key must be on to use the keypad to set brush opacity.
Take a few moments to experiment with both of these options before you begin painting.
Selecting foreground and background colorsAdobe Photoshop uses the foreground color to paint, to fill selections, and as the beginning
color for gradient fills. The background color is displayed when you delete pixels in a trans-
parent area of color, and as the ending color for gradient fills. Think of the background
color as the canvas behind a painting—when you remove paint, the canvas shows
through.
The default foreground color is black, and the default background color is white. The
current foreground and background colors are shown in the color selection boxes in the
toolbox.

105ADOBE PHOTOSHOP LEClassroom in a Book
Clicking the switch colors icon reverses the colors. Clicking the default colors icon returns
the foreground color to black and the background color to white.
A. Foreground colorB. Default colorsC. Switch colorsD. Background color
Take a few moments to try the color selection box options.
Adding detail to the line drawing
You’ll begin working with the pencil tool to add detail to the cactus in the line drawing.
The pencil tool draws hard-edged lines.
1 Select the pencil tool ( ) in the toolbox. You draw with the pencil tool in the same way
that you draw with a pencil on paper.
2 Draw some detail lines and prickly stems to add detail to the cactus.
Note: If you don’t like your results, you can use the Undo command to undo your last stroke
or you can use the eraser tool to erase multiple strokes.
Next, you’ll extend the horizon line using the line tool.
3 In the toolbox, double-click the line tool ( ). For Line Width, enter a value of 2. Make
sure the opacity level is set to 100%.
A
B
C
D

LESSON 5106Painting and Editing
4 Hold down Shift, and drag to extend the horizon line to the cactus and from the edges
of the cactus to the edge of the drawing. Holding down Shift constrains the line to a
straight line.
Selecting a new foreground color
Next, you’ll select a new foreground color from the Swatches palette and paint the coyote.
The Swatches palette contains 122 color swatches from the default Adobe Photoshop
palette. To select a foreground color, you click the desired swatch. When you click a color
swatch, the new color appears in the foreground color selection box in the toolbox.
1 Click the Swatches palette tab to bring the palette to the front of its group. (If the palette
is not visible, choose Window > Show Swatches.)
2 Click one of the brown swatches that appeals to you; the foreground swatch in the
toolbox is updated to reflect the change.
3 In the toolbox, select the magic wand tool.
4 Click within the coyote’s body. Then hold down Shift and click within the coyote’s head
and tail.

107ADOBE PHOTOSHOP LEClassroom in a Book
When you select an area, any painting you do affects only the area within the selection. By
selecting the area within the coyote first, you won’t get any paint outside the edges of the
selection.
Before you begin painting, you’ll create a new layer on which to paint so you can edit your
painting repeatedly without affecting the black-and-white line drawing.
5 In the Layers palette, click the New Layer button.
6 Double-click the layer, enter the name Painting, and then click OK to rename the layer.
Now you’ll paint within the selection of the coyote using the paintbrush tool.
7 In the toolbox, double-click the paintbrush tool ( ) to select it and to open its Options
palette.
8 Make sure that the opacity is set to 100% in the Paintbrush Options palette.
9 Paint a few areas within the coyote selection (don’t fill in the selection completely).
Notice that where you applied the brown paint at an opacity level of 100%, the
checkerboard is no longer visible.

LESSON 5108Painting and Editing
10 Now drag the Opacity slider to about 60% in the Paintbrush Options palette.
11 Select another shade of brown (or any other color you like) and continue painting
within the selection until you’ve painted the entire selection.
Notice that where you painted with the brown color at 60% opacity, part of the checker-
board shows through, indicating partial transparency.
12 Choose Select > None to deselect.
13 Choose Filter > Blur > Gaussian Blur.
Make sure that the Preview option is turned on. If the selection does not appear in the
preview window, move the pointer into the window. When the pointer changes to a hand,
click and drag to reposition the selection in the preview box.
Experiment with the Gaussian Blur effect by dragging the Radius slider to the right. The
higher the value in the Radius text box, the more blurred the colors in the selection. Click
OK to apply the blur.
Painted areas Gaussian Blur applied
At this point, you’ll turn off the checkerboard so you can easily see the changes you make.
14 Choose File > Preferences > Transparency. For Grid Size, choose None; then click OK.
15 Now that you’ve painted the coyote, drag the Painting layer down to position it below
the Drawing layer in the Layers palette (so that the outline of the coyote remains black).
16 Choose File > Save to save your work so far.

109ADOBE PHOTOSHOP LEClassroom in a Book
Painting with the airbrush tool
The airbrush tool applies paint in the same way as a traditional airbrush. The default
opacity for the airbrush tool is 50%, but the rate at which you drag the tool also influences
the density of the paint. The more slowly you drag, the more dense the application of
the paint.
You’ll paint the clouds using the airbrush tool. To choose colors for the clouds, you’ll
select them from the Swatches palette and from the existing colors in the border of the
drawing. Choosing a color within an image is called sampling a color. You can save
sampled colors for future use by storing them in the Swatches palette.
1 In the Layers palette, make sure that the Painting layer is the active layer (so you can
paint without affecting the black-and-white line drawing).
2 Double-click the airbrush tool ( ) in the toolbox to select the tool and its Options
palette. Notice that the default pressure for the airbrush tool is 50%.
3 Click the Brushes tab and select a small soft-edged brush from the second row of
brushes.
4 In the Swatches palette, click a gray swatch and paint a portion of the clouds using the
airbrush. Don’t worry if you paint a bit outside the outlines of the clouds.
Next, you’ll sample a color from the border of the image to add as a color for the clouds.
5 With the airbrush tool still selected, hold down Alt (Windows) or Option (Mac OS).
The pointer becomes the eyedropper ( ).

LESSON 5110Painting and Editing
6 Click the eyedropper in the green border to sample the green color and to make it the
new foreground color.
7 Release Alt/Option. The pointer becomes the airbrush tool again. Continue painting
the clouds with the airbrush tool.
Note: Although you can always select the eyedropper tool from the toolbox to sample a color,
you can select the eyedropper tool using Alt (Windows) or Option (Mac OS) whenever a
painting tool is selected.
Before you select another color, you’ll save the green color in the Swatches palette.
8 Click the Swatches palette tab.
9 Position the pointer in the blank area at the bottom of the Swatches palette; the pointer
becomes a paint bucket.
10 Click the paint bucket in the blank area; the green color is added to the Swatches
palette.
Note: You don’t have to save a sampled color to work with it—you’ve done it here just to learn
how to save colors in the Swatches palette.
11 Finish painting the clouds using either sampled colors or colors from the Swatches
palette.

111ADOBE PHOTOSHOP LEClassroom in a Book
As a final touch, you’ll use the smudge tool to smudge the colors in the clouds. The
smudge tool moves and mixes different colored pixels as you drag.
12 Select the smudge tool ( ) and drag to create swirls in the clouds.
Creating gradientsAs you learned in Lesson 4, “Layer Basics,” a gradient is a gradual transition from one
color to another over the length of a selection. You can choose from several predefined
gradients in the Gradient Options palette, or you can create your own gradients.
You’ll create your own gradient and apply it to the cactus.
1 In the Layers palette, make sure that the Painting layer is the active layer.
2 In the toolbox, double-click the lasso tool ( ) to select the tool and its Options palette.
3 In the Lasso Options palette, enter a value of 3 in the Feather text box.
4 Create a rough selection around the inside of the cactus using the cactus outline as a
guide. (Don’t worry if the selection is a little inside or outside the outline of the cactus,
you can add to or subtract from the selection later.)
5 End the selection by crossing the starting point.
6 Double-click the gradient tool ( ) in the toolbox.
7 In the Gradient Tool Options palette, for Gradient select a gradient that appeals to you.
A sample of the gradient you select based on the current color selection appears at the
bottom of the Gradient palette.

LESSON 5112Painting and Editing
8 Drag the gradient tool from the bottom of the cactus to the top of the cactus. The
gradient is applied within the selection.
Create the selection. Drag the gradient tool.
9 Choose Select > None to deselect.
Next, you’ll apply a radial gradient to the sun.
10 Select the ellipse marquee tool ( ) in the toolbox. If it is not visible, choose it from
the hidden tools under the rectangle marquee tool ( ).
11 In the Marquee Options palette, enter a value of 2 in the Feather text box.
12 Hold down the Alt (Windows) or Option (Mac OS) key and then drag from the center
point of the sun to the outside edge to create a circular selection.
13 Click the gradient tool in the toolbox. In the Gradient Tool Options palette choose
Foreground to Background, and choose Radial for Type.
14 Using the Swatches palette, change the foreground color to orange and the back-
ground color to yellow. (See “Selecting foreground and background colors” on page 104.)
15 Drag from the center of the sun to the outside edge to apply the gradient.
Create a circular Drag the gradient tool.selection.

113ADOBE PHOTOSHOP LEClassroom in a Book
16 Choose Select > None to deselect everything.
Making paint fade
You can use the Fade option to cause paint to fade to the background color or to fade to
transparent over the length of a brush stroke. You’ll use this option to create rays around
the sun.
First, you’ll learn another way to select a foreground color using the Color palette. The
Color palette contains sliders and a color bar that let you change the foreground and
background colors. The current foreground and background colors are displayed in the
Color palette; the swatch with the outline determines which swatch is selected.
1 Click the Color palette tab to bring it to the front of the palette group.
2 Make sure that the swatch in the top left corner of the Color palette is selected. When
a swatch is selected, it has a border.
Active swatch (foreground color)
Note: If the swatch is already selected and you click it, you’ll open the Adobe Photoshop color
picker. If necessary, click Cancel to close the color picker.
You can select colors in the Color palette either by dragging the sliders or by dragging in
the color bar at the bottom of the palette. You’ll select a color from the color bar.
3 Position the pointer in the color bar; the pointer becomes an eyedropper.
4 Just for fun, hold down the mouse button and drag the eyedropper through the color
bar to see how the foreground swatch changes color as you drag.

LESSON 5114Painting and Editing
5 Select a reddish-brown color from the color bar to paint the rays around the sun.
6 Double-click the airbrush tool in the toolbox to select the tool and its Options palette.
7 In the Airbrush Options palette, turn on the Fade option and then enter a value of 15
in the Fade text box.
The value you enter in the Fade text box determines how long the painting tool will apply
paint before it begins to fade. The higher the value you set, the longer the brush paints
before beginning to fade.
8 Make sure that Transparent is selected in the Airbrush Options palette.
9 Click the Brushes palette tab to bring it to the front; then select a small, soft-edged
brush to paint with.
10 Position the pointer in the window and drag to draw rays around the sun. You’ll notice
that they begin to fade as you drag.

115ADOBE PHOTOSHOP LEClassroom in a Book
Painting with a watercolor effect The Wet Edges option creates a watercolor effect by building up (darkening) the edges of
brush strokes. You’ll paint the mountains using the Wet Edges options with the paint-
brush tool.
To choose colors for the mountains, you’ll use the Adobe Photoshop color picker. The
color picker lets you select the foreground or background color from a color spectrum or
enter values to define a color.
To open the color picker, click the foreground or background swatch in the toolbox.
1 In the toolbox, click the foreground color swatch to open the Adobe Photoshop
color picker.
The swatch in the top right of the Color Picker dialog box indicates the current
foreground color.
A. Color field B. Color bar C. New foreground color swatchD. Current foreground color swatch
2 Drag the triangles along the color bar to find a color range that appeals to you for
painting the mountains.
A B
C
D

LESSON 5116Painting and Editing
As you drag, the swatch at the right side of the dialog box is updated. The top half of the
swatch displays the new color, and the bottom half of the swatch displays the previous
foreground or background color.
3 To select a different shade of the new color, click the desired shade in the color field at
the left side of the color picker.
4 Click OK to close the color picker.
The foreground color selection box in the toolbox displays the new foreground color.
5 Double-click the paintbrush tool in the toolbox.
6 In the Paintbrush Options palette, turn on the Wet Edges option.
7 Move the paintbrush into the window and begin painting the mountains. Don’t worry
if you paint a little outside the edges of the mountains. You’ll have a chance to clean up
any stray paint in the next section.
If you’d like to paint with some straight lines, hold down Shift as you drag the paintbrush.
8 Select a variety of foreground colors to add different colors to the mountains as
you paint.
9 Choose File > Save to save your work.

117ADOBE PHOTOSHOP LEClassroom in a Book
Making changes
You use the eraser tool to delete pixels in a drawing. Depending on the option you choose,
you can erase all of the pixels in an area, or you can erase only the pixels that were not
saved with the last version of the image.
1 Click the eraser tool ( ) in the toolbox and move the pointer into the image area. By
default, the eraser is the same shape and size as the default paintbrush.
2 Drag the eraser tool over any area around the mountains where you want to erase any
stray paint.
Applying a background to the drawing
To add a background to the drawing, you’ll create a new layer and apply two gradients—
one for the sky and one for the ground.
1 In the Layers palette, click the New Layer button to add a new layer.
2 Double-click the layer, enter the name Gradients, and click OK.
3 Drag the Gradients layer to the bottom of the Layers palette, to position it behind the
rest of the artwork.
4 Select the rectangle marquee tool ( ) in the toolbox. Drag a selection marquee from
the horizon line to the top of the image.
5 Select a foreground color and a background color that appeal to you. In the Gradient
palette, for Type select Linear; for Gradient select Foreground to Background.

LESSON 5118Painting and Editing
6 Select the gradient tool ( ) in the toolbox.
7 Drag from the top of the image to the horizon line to apply it to the selection.
Note: The length of the line you draw with the gradient tool determines how gradient colors
are applied. If you draw a short line with the gradient tool, a sharp transition from one color
to the next occurs. The longer the line you draw, the softer the transition from one color to
another.
8 Choose Select > None. Drag the selection marquee to select the opposite area of the
image (the ground).
9 To apply a gradient to the ground, select a new foreground color and background color.
10 Drag from the bottom of the selection to the top of the selection to apply the gradient.
11 In the Layers palette, drag the Opacity slider to lower the opacity of the gradient.
Working with brushes
In addition to the round brushes, Adobe Photoshop provides several additional brush
shapes you can paint with, and even lets you create your own custom brush shapes.
You’ll start by painting with a star-shaped brush, and then you’ll create your own brush
shape to add a final lizardy touch to your drawing!
1 In the Layers palette, make sure that the Painting layer is the active layer.

119ADOBE PHOTOSHOP LEClassroom in a Book
2 Click the Brushes palette tab; then choose Load Brushes from the Brushes menu.
3 In the Lesson05 folder, select Assorted.abr, and then click Open to add the custom
brushes to the Brushes palette.
Note: For this lesson, we’ve placed the custom brushes in the Lesson05 folder. For future
reference, the custom brushes are located in Adobe Photoshop 5.0 LE/ Goodies/Brushes.
4 In the toolbox, click the default colors icon to reset the color selection to black and
white, then click the switch colors icon in the color selection box area to swap the default
colors: White becomes the foreground color.
Switchcolors icon
5 Select the paintbrush tool, and then select one of the star brushes and add some stars
to the sky. If desired, vary the opacity of the stars by changing the opacity level in the
Paintbrush Options palette.
Next, you’ll define your own brush and use it to create a footprint in the desert.
6 Choose File > Open, and open the Gekofoot.psd file, located in the Lessons/Lesson05
folder on your hard drive.

LESSON 5120Painting and Editing
7 Choose Select > All to select the entire image; then choose Define Brush from the
Brushes menu. The gecko footprint is added to the Brushes palette.
You can create a brush shape from any selection.
8 Double-click the gecko brush. In the Brush Options dialog box, enter 200 in the
Spacing text box; then click OK.
The amount you enter for brush spacing controls the distance between brush strokes. (We
used a spacing of 150% for the stars.)
Brush spacing set to different values
9 Select a green color from the border of the drawing by holding down Alt (Windows)
or Option (Mac OS), and sampling the color from the border.
100%
150%
200%

121ADOBE PHOTOSHOP LEClassroom in a Book
10 In the Paintbrush Options palette, enter a fade rate of 8 and select Transparent for the
fade option.
11 Drag to create a footprint in the desert that fades over the length of the brush stroke.
12 Choose File > Save to save your artwork.
13 Choose File > Close to close any open lesson files.
You’ve completed the painting lesson. You’re well on your way to learning Adobe
Photoshop!
LESSON 5122Painting and Editing
Review questions1 What is the benefit of making a selection before starting to paint in an area?
2 How are a painting tool, its Options palette, and the Brushes palette related? For
example, if you click the paintbrush tool in the toolbox, what effect do the Brushes palette
and the Paintbrush Options palette have on the tool?
3 How can you display a painting tool by its size in pixels?
4 How do you create a custom brush?
Review answers1 Once you’ve made a selection, you cannot paint outside the boundary of the selection
marquee.
2 When you select a painting tool, the Brushes palette displays the size of the painting
tool, and the tool’s Options palette displays the opacity, the mode, and any other options
you may have previously selected. If a tool does not perform the way you expect it to,
check the Brushes palette and the tool’s Options palette to make sure the options are set
the way you want.
3 To display a painting tool by its size in pixels, choose File > Preferences > Display &
Cursors, and then choose Brush Size from the Painting Cursors section of the Preferences
dialog box.
4 Select the area you want to define as a brush, and then choose Define Brush from the
Brushes palette menu.

6 Creating a CD Cover
Once you’ve learned the basic techniques
for selecting, painting, and layering,
you can begin to focus on using Adobe
Photoshop as a design tool. You’ll use the
techniques you’ve learned, plus a few new
ones, to design and create a CD cover.

LESSON 6124Creating a CD Cover
In this lesson, you’ll learn how to do the following:
• Use the Info palette to measure a selection.
• Set the marquee tool to a constrained size to make selections of the same shape.
• Select blending modes to apply various color effects to parts of an image.
• Use the type tool and the type mask tool to create type.
• Paint type while preserving the transparent areas around the type.
• Use the Brightness/Contrast command to adjust a selection.
Getting startedBefore beginning this lesson, you’ll rename or delete the Adobe Photoshop LE preferences
file to restore the application’s default settings. See “Restoring default preferences” on
page 2.
You’ll start the lesson by viewing the final lesson file to see what you’ll accomplish.
1 Restart Adobe Photoshop.
2 Choose File > Open, and open the 06End.psd file, located in the Lessons/Lesson06
folder.
3 When you have finished viewing the file, either leave the End file open on your desktop
for reference or close it without saving changes.
Now you’ll open a partially completed file, to which you’ll add images and type to
complete the CD cover.
4 Choose File > Open, and open the 06Start.psd file, located in the Lessons/Lesson06
folder on your hard drive.
5 Choose File > Save As, rename the file 06Work.psd, and save it in the Lessons/Lesson06
folder.
Important: Rename and save a copy of the lesson files, to avoid overwriting the originals in
case you need them later.

125ADOBE PHOTOSHOP LEClassroom in a Book
Using the Info paletteThe Info palette displays information about the location of the pointer in the image
window, as well as information about the size of selections and the color values in an
image. Depending on the tool you’re using and the action you’re performing, the Info
palette may display additional information, such as the selection’s angle of rotation.
You’ll use the Info palette to measure a selection, and then use the information to set an
aspect ratio option for the marquee tool.
1 Click the Info palette tab to bring the palette to the front of the group. (If the palette is
hidden, choose Window > Show Info.)
2 Drag the palette by its tab from its group so that you can also see the Options palette.
A. Actual color values B. Pointer locationC. Hue, saturation, brightness valuesD. Selection size
3 Choose Palette Options from the Info palette menu.
A
B
C
D

LESSON 6126Creating a CD Cover
4 In the Mouse Coordinates section of the Info Options dialog box, choose Pixels as the
unit of measurement. Click OK.
You can use any unit of measure you’re comfortable with; in this example, we’ve
used pixels.
5 Select the zoom tool ( ) in the toolbox, and then click the zoom tool once on the
flower in the upper right corner to magnify its view.
6 Select the rectangular marquee tool ( ) in the toolbox, and move the pointer into the
window. The pointer becomes a cross hair ( ).
Sometimes it can be difficult to get an accurate measurement using the default tool
pointer. To display a tool’s hot spot—the point from which any action takes place—you
can turn on the Precise Cursor option by pressing the Caps Lock key.
7 Press the Caps Lock key to turn on precise cursors. You’ll notice a single pixel at the
center of the marquee cross hairs ( ), indicating the tool’s hot spot.
8 Position the pointer hot spot at the top left corner of the flower, and drag diagonally to
the lower right corner to select the flower.

127ADOBE PHOTOSHOP LEClassroom in a Book
To adjust the position of the selection marquee over the flower while creating the selection
marquee, hold down the spacebar and drag as you draw the marquee and before releasing
the mouse.
9 As you drag, watch the W(idth) and H(eight) values in the Info palette. Once you’ve
selected the flower, the width and height should be the same (a square).
When a selection is square, it has a 1:1 aspect ratio, meaning that the width and height are
identical. You’ll set a 1:1 aspect ratio in the Marquee Options palette to select the
remaining flowers for the CD cover.
10 Choose Select > None to deselect the artwork.
11 Double-click the zoom tool in the toolbox to return the display of the image to
actual size.
12 Select the marquee tool in the toolbox. In the Marquee Options palette, for Style,
choose Constrained Aspect Ratio. The default ratio is 1:1.
You’ll open and select two additional flowers for the CD cover using the constrained
aspect ratio, ensuring that each selection is square.
13 Choose File > Open, and open the Dahlia.psd file, located in the Lessons/Lesson06
folder. If necessary, reposition the window so you can see part of both windows.

LESSON 6128Creating a CD Cover
14 Using the rectangular marquee tool, drag diagonally from the top left corner of the
flower to the lower right corner. (You won’t be able to select the entire flower because the
Constrained Aspect Ratio option is turned on, allowing you to select only a square area.)
15 To adjust the position of the selection marquee after drawing it, press the Shift and
arrow keys to move to the right or the left in 10-pixel increments, or position the pointer
within the selection and drag to reposition the marquee.
16 In the Info palette tab, note its values. The width and height of the selection are
identical.
17 Select the move tool ( ) in the toolbox and drag the dahlia into the CD window.

129ADOBE PHOTOSHOP LEClassroom in a Book
18 With the move tool still selected, drag the flower into the lower right corner of the CD
window to align it at the bottom right corner of the image.
Once you’ve positioned the flower approximately where you want it, use the arrow keys
to align it precisely.
At the top of the Layers palette, a new layer named Layer 1 appears. Each time you move
a selection from one image to another using the drag-and-drop method, a new layer is
created automatically for the selection.
19 In the Layers palette, double-click Layer 1, rename it Dahlia, and then click OK.
20 Close the Dahlia.psd file without saving changes.
21 Choose File > Save to save your work.
Changing the size of an imageThe Image Size command lets you change the dimensions and resolution of an image. For
this part of the project, you’ll open a flower image and resize it to fit the CD cover. The
CD cover and image have the same image resolution, so you won’t need to adjust that. For
information about changing the resolution of an image, see “What is resolution, and how
does it affect an image?” on page 41.
1 Choose File > Open, and open the Rose.psd file, located in the Lessons/Lesson06
folder. If necessary, reposition the window so you can see part of both windows.
2 Choose Image > Image Size.

LESSON 6130Creating a CD Cover
In the Pixel Dimensions section of the dialog box, the link icon to the right of the Width
and Height text boxes indicates that the width and height of the image are proportionately
linked. If the value in either of the text boxes is changed, both values change. The
Constrain Proportions option at the bottom of the dialog box controls the link between
the width, height, and resolution of an image.
A. Constrain proportions B. Link icon
3 In the Pixel Dimensions section, for Height, enter 188. The value in the Height field is
automatically adjusted, as are the values in the Print Size section of the dialog box.
4 Click OK to resize the rose image.
5 Select the move tool in the toolbox, position the pointer in the Rose.psd window, and
then drag the rose into the CD cover window.
6 Align the rose with the top left corner of the flower located in the upper right corner of
the image.
7 If necessary, select the zoom tool in the toolbox, and drag a marquee around the top
right corner of the rose to zoom in and verify that the rose is properly aligned.
A
B

131ADOBE PHOTOSHOP LEClassroom in a Book
8 If you need to adjust the rose, hold down Ctrl (Windows) or Command (Mac OS) and
press the arrow keys.
When a tool other than the move tool is selected and you want to use the arrow keys to
move a selection, hold down Ctrl (Windows) or Command (Mac OS) to select the move tool
from the keyboard; then press the arrow keys to move the selection.
A new layer named Layer 1 appears at the top of the Layers palette.
9 In the Layers palette, double-click the new layer, rename it Rose, and click OK.
10 Close the Rose.psd file without saving changes.
11 In the Layers palette, drag the Rose layer beneath the Dahlia layer to reposition the
rose behind the dahlia.
Repositioning Rose layer beneath Dahlia layer
12 Choose File > Save to save your work.
Using blending modesAt this point, you’ve combined all the elements of the CD cover into a single image. Now
you’ll paint the flowers using a variety of painting tools and blending modes.
In Lesson 4, “Layer Basics,” you learned about selecting modes for layers to produce
different effects on individual layers. You can also select modes for painting tools, called
blending modes, for different effects. When selecting blending modes, it’s helpful to think
of the effects in terms of the following three colors:
• The base color is the color of the pixels in the original image.

LESSON 6132Creating a CD Cover
• The blend color is the color you’re painting with (the current foreground color).
• The result color is the color produced when the base and blend colors are mixed.
1 In the Layers palette, make the Poppy layer the active layer.
Next, you’ll select the artwork on the Poppy layer using a shortcut.
2 In the Layers palette, Ctrl-click (Windows) or Command-click (Mac OS) the
Poppy layer.
When you use this keyboard sequence to create a selection, only the areas containing pixel
values (in this case, the poppy image) are selected. Any areas that don’t have pixel values
are considered transparent and are not selected.
3 Click the Swatches tab to display the Swatches palette; then click a color that appeals
to you.
4 Choose Edit > Fill, for Mode select Color, enter 70 in the Opacity text box, and then
click OK.

133ADOBE PHOTOSHOP LEClassroom in a Book
The Color blending mode adds the luminance of the original color in the image to the
hue and saturation of the blend color (the color you selected from the Swatches palette).
The Color mode preserves the gray levels in the image and is useful for coloring
grayscale images.
5 Choose Select > None to deselect everything.
6 Choose File > Save to save your work.
7 In the Layers palette, make the Dahlia layer the active layer.
Now you’ll select an area of the dahlia before painting it, to create a mask effect.
8 Double-click the lasso tool ( ) in the toolbox. In the Marquee Options palette, set a
Feather value of 1.
9 Using the lasso tool, drag a fairly accurate selection around the center of the flower.
10 In the Swatches palette, select a yellow foreground color. You’ll use this color to paint
the flower’s center.
11 Choose File > Preferences > Display & Cursors. For Painting Cursors, select Brush
Size, and then click OK.

LESSON 6134Creating a CD Cover
12 Click the paintbrush tool ( ) in the toolbox. In the Paintbrush Options palette, set
the opacity to about 50%; for Mode select Color.
13 Paint the center of the flower using the paintbrush.
The Color mode maintains the luminance of the pixels in the underlying image while
replacing the hue and saturation with the yellow color you selected.
14 Choose File > Save to save your work.
Now, you’ll paint the flower petals.
15 In the Layers palette, select Preserve Transparency.
16 With the center of the flower still selected, choose Select > Inverse. Although the
selection marquee will appear around the entire layer, the changes you make will affect
only the nontransparent pixels in that layer.
17 Select a new foreground color from the Swatches palette for the flower petals.
18 In the Paintbrush Options palette, set the opacity to about 50% and choose the
Multiply mode.
The Multiply mode multiplies the base color by the blend color. Each time you paint over
a part of the image, the color is built up, resulting in a darker color.
19 Click the Brushes palette tab and select a large, soft-edged brush. (If necessary, turn
off the Caps Lock key.)
20 With the paintbrush tool, paint the petals without lifting the brush.

135ADOBE PHOTOSHOP LEClassroom in a Book
21 Now choose a smaller soft-edged brush from the Brushes palette, and paint around
the inside edges of the petals to multiply (darken) the paint color.
22 Choose Select > None to deselect everything.
23 Choose File > Save to save your work.
Creating a gradientNow, you’ll create your own gradient and apply it to the rose image.
1 Using colors from the Swatches palette, select a foreground color and background
color that appeal to you. (To select a background color, hold down Alt (Windows) or
Option (Mac OS) before clicking a color in the Swatches palette.)
2 Double-click the gradient tool ( ) in the toolbox.
3 In the Gradient Options palette, for Gradient, choose Foreground to Background. Set
the opacity to 55%; for mode, choose Color; and for Type, choose Radial.
4 In the Layers palette, select the Rose layer; then Ctrl-click (Windows) or Command-
click (Mac OS) to load the rose as the selection.

LESSON 6136Creating a CD Cover
5 Drag the gradient tool from the center of the rose to the outside edge of the selection.
The gradient you created is applied to the rose selection.
6 Choose Select > None to deselect everything; then choose File > Save to save
your work.
Now you’ll continue painting the other flowers.
7 In the Layers palette, select the Sweet Peas layer; then Ctrl-click (Windows) or
Command-click (Mac OS) the layer to load the sweet peas as a selection.
8 Choose a new foreground color that appeals to you.
9 Double-click the paintbrush tool in the toolbox.
10 In the Paintbrush Options palette, for mode, choose Screen.
The Screen mode multiplies the opposite of the original image color with the selected
painting color, to produce a lighter color.
11 Set the opacity to about 60%.
Press a number on the keyboard to set the opacity in 10% increments, where 1 is 10%, 9
is 90%, and 0 is 100%. Press two digits in quick sequence to set the opacity precisely; for
example, press 45 for 45%.
12 In the Brushes palette, choose a large soft-edged brush. Paint the sweet peas.
13 Choose Select > None to deselect everything.
14 Choose File > Save to save your work.

137ADOBE PHOTOSHOP LEClassroom in a Book
Merging layersTo complete the flower compositions, you’ll merge the individual flower layers onto a
single layer and then outline them. Merging layers reduces the size of a file, but shouldn’t
be done until you’ve finalized design decisions and finished editing individual layers
within the image.
There are two ways to merge layers. You can either merge all the visible layers, or you can
use the Merge Down command to merge one layer at a time. You’ll use both of these
methods to get an idea of how merging works.
1 In the Layers palette, select the Dahlia layer to make it the active layer.
2 Choose Merge Down from the Layers palette menu. The Dahlia layer is merged with
the Rose layer.
To use the Merge Visible command, turn off the layers you don’t want included in the
merge operation.
3 Click the eye icon next to the background layer to turn it off; then choose Merge Visible
from the Layers palette menu.

LESSON 6138Creating a CD Cover
4 Click the eye icon next to the background layer to make it visible.
5 Double-click the remaining flower layer (Rose), name it Flowers, and then click OK.
6 Now you’ll add a border to all the flowers.
7 In the Layers palette, Alt-click (Windows) or Option-click (Mac OS) the New Layer
button to create a new layer. Name it Outlines, and click OK.
8 In the Layers palette, Ctrl-click (Windows) or Command-click (Mac OS) the Flowers
layer to load all the flowers as a selection.
9 Click the default colors icon to set the foreground color and background color to their
default colors (black and white).
10 Choose Edit > Stroke. For Width, choose 1 pixel; for Location, choose Center. Click
OK to draw a border around the flowers.
11 Choose Select > None to deselect everything.
To add the border where the images intersect, you’ll use the pencil tool.
12 Click the zoom tool in the toolbox, and then click once over the area where the two
large flowers intersect.
13 From the toolbox, select the pencil tool ( ). Click the pencil at the top left corner of
the dahlia where the flowers intersect; then hold down Shift, and click to the right where
the first border ends.
14 Repeat the previous step to add the border along the left side of the image.
15 Double-click the zoom tool in the toolbox to return to a 100% view.
16 Choose File > Save to save your work.

139ADOBE PHOTOSHOP LEClassroom in a Book
Adding canvas around an image Now you’ll add some area around the flowers to make room for the name of the CD. Using
the Canvas Size command, you can increase the area around an image without changing
the size or resolution of the image data.
1 Choose Image > Canvas Size. Select Pixels from the menu to the right of the Width text
box; then for Width, enter 350. Click the middle square in the far right row to indicate
that the image should be positioned to the right of the added area; then click OK.
You’ll create a new layer for the border and fill it with black, and then add type to the
border.
2 In the Layers palette, Alt-click (Windows) or Option-click (Mac OS) the New Layer
button, name the layer Border, and then click OK.
3 Click the rectangle marquee tool in the toolbox. In the Marquee Options palette,
choose Normal for Style.
4 Drag a marquee the size of the new area to select it.

LESSON 6140Creating a CD Cover
5 Select the paint bucket tool ( ) in the toolbox. Then click within the rectangular
selection to fill it with black (the current foreground color).
6 Choose Select > None to deselect everything; then choose File > Save to save
your work.
Adding type To complete the CD cover, you’ll add type to the cover and paint the type. When you
create type in Adobe Photoshop, it is automatically placed on a separate layer.
1 In the Layers palette, make sure that the top layer (the Border layer) is selected.
2 Click the switch colors icon ( ) in the toolbox to make the foreground color white and
the background color black.
3 Click the type tool in the toolbox; then position it near the top left area of the black
border and click. The Type dialog box appears.
4 Select a font and size. (We used 16-point type.) Type THE in the text box at the bottom
of the dialog box, and then click OK. The type is placed on its own layer and is added to
the image.
5 Press Ctrl (Windows) or Command (Mac OS) to select the move tool, drag the type
into position at the top left area of the black border.
To select the move tool without deselecting the type tool, hold down Ctrl (Windows) or
Command (Mac OS), and drag.
6 Position the type tool under the word The and click to open the Type dialog box.

141ADOBE PHOTOSHOP LEClassroom in a Book
7 Select the Vertical Centered text option. Choose a font and size for the type. (We used
38-point type.) Type ARCHIVE and click OK.
8 Drag the type or press the arrow keys on the keyboard to nudge the type into place.
9 Each time you add type, a new layer is created in the Layers palette. To merge the two
type layers, choose Merge Down from the Layers menu. Both words are now on the
same layer.
As a final step, you’ll paint type with different colors from the artwork.
10 In the Layers palette, make sure that the Preserve Transparency option is selected for
the Type layer.
The Preserve Transparency option lets you paint only where there are already pixel values
on the layer. In this case, with the Preserve Transparency option selected, you’ll only be
able to paint only on the type.
11 Select the eyedropper tool ( ) in the toolbox; then click a color you like in the
artwork. The color becomes the foreground color.
12 Double-click the paintbrush tool in the toolbox. In the Paintbrush Options palette,
set the opacity to 100% and for mode, choose Normal.
13 Use the paintbrush tool to paint individual letters of the ARCHIVE text.
14 To create multicolored text, paint a small amount with one color and then sample
another color using the eyedropper tool and continue painting.
You can switch between a painting tool and the eyedropper tool as you paint by pressing
the Alt (Windows) or Option (Mac OS) key.
15 Choose File > Save to save your work.

LESSON 6142Creating a CD Cover
Masking a selectionAs a final step, you’ll use the type mask tool. This tool lets you create type that has a
selection outline, but no fill color. When you use the type mask tool, only the selection
appears on-screen. (It is not filled with the foreground color.)
You’ll position the type mask on the background, and then adjust the brightness and
contrast of the background to make it appear through the type mask for a textured effect.
1 In the Layers palette, select the background layer.
2 Select the type mask tool ( ) in the toolbox.
3 Click the type mask tool about 1 1/2 inches to the left of the top right corner.
4 In the Type dialog box, select a horizontal type option; enter a font size of about 14,
and then type VOLUME ONE in the text box. Click OK.
The type mask appears on the background. If you need to reposition the type, zoom in
and position the pointer anywhere within the type outline and drag.
Note: When you use the type mask tool, the type mask is added to the selected layer in the
Layers palette.
5 Choose Image > Adjust > Brightness/ Contrast. Enter –40 in the Brightness text box
and 50 in the Contrast text box. The brightness and contrast of the reeds are adjusted and
show through the type outline.

143ADOBE PHOTOSHOP LEClassroom in a Book
6 Click OK.
7 To preview the adjustment without deselecting, choose View > Hide Edges.
8 If you’re satisfied with the results, choose View > Show Edges to see the selection and
then choose Select > None to deselect everything.
9 In the Layers palette, choose Flatten Image to flatten the file into a single layer and to
reduce the file size.
10 Choose File > Save to save your work.
You’ve completed the CD cover image. If desired, open the 06Start.psd file and rebuild the
CD cover, but this time select other blending modes to see what other effects you create
when you paint the flowers.
11 Choose File > Close to close any open lesson files.

LESSON 6144Creating a CD Cover
Review questions1 What kind of information does the Info palette display?
2 How can you change the size of an image?
3 When using blending modes for painting tools, what three colors should be kept
in mind?
4 How can you add to the area around an image without changing the size of the
image itself?
5 What is the difference between using the type tool and the type mask tool?
Review answers1 The Info palette displays information about the location of the pointer in the image
window, as well as information about the size of the selections and color values in an
image. It may also display additional information, such as the selection’s angle of rotation.
2 To change the size of an image, choose Image > Image Size and type new values
reflecting the desired dimensions of the image.
3 When using blending modes, you must consider the interaction among the base color,
or the color of the pixels in the original image; the blend color, or the color being used to
paint with; and the result color, or the color produced when the base and blend colors are
combined.
4 Using the Canvas Size command, you can increase the area around an image without
changing the size of the resolution of the image data.
5 Type created using the type tool is filled with the current foreground color. Type
created using the type mask tool appears as a selection on the screen, but is not filled with
the foreground color.

7 Using Quick Masks
Adobe Photoshop LE uses masks to
isolate and manipulate specific parts of
an image. A mask is like a stencil: The
cutout portion of the mask can be altered,
but the area surrounding the cutout is
protected from change. The Quick Mask
feature allows you to quickly and easily
define the area of an image you want
to modify.

LESSON 7146Using Quick Masks
In this lesson, you’ll learn how to do the following:
• Refine a partial selection using a quick mask.
• Paint in a mask to modify a selection.
• Save selections using layers.
• Mask a layer.
• Create partial transparency in an image.
Getting startedBefore beginning this lesson, you’ll rename or delete the Adobe Photoshop LE preferences
file to restore the application’s default settings. See “Restoring default preferences” on
page 2.
You’ll start the lesson by viewing the final lesson file to see what you’ll accomplish.
1 Restart Adobe Photoshop.
2 Choose File > Open, and open the 07End.psd file, located in the Lessons/Lesson07
folder.
3 When you have finished viewing the file, either leave the End file open on your desktop
for reference or close it without saving changes.
You’ll begin your work in the lesson by opening a photograph of an egret, and then work
with masks to edit the image.
4 Choose File > Open, and open the 07Start.psd file, located in the Lessons/Lesson07
folder on your hard drive. An image of an egret appears.
5 Choose File > Save As, rename the file 07Work.psd, and save it in the Lessons/Lesson07
folder.
Important: Rename and save a copy of the lesson files, to avoid overwriting the originals in
case you need them later.

147ADOBE PHOTOSHOP LEClassroom in a Book
Using quick masksThe Adobe Photoshop Quick Mask option lets you create temporary masks, which are
discarded once the mask has been converted to a selection.
When you apply a quick mask to a partial selection, everything that is not selected is
masked (hidden), and everything that is selected is visible. The parts of the image that are
masked are covered with a red-colored overlay, which is like a traditional rubylith overlay.
(You can make the overlay any color, but for now you’ll work with red, the default color.)
To add to or subtract from a selection in Quick Mask mode, you “paint” or “erase” the red
overlay color using the default foreground and background colors, black and white.
Painting with white erases the red overlay color, thereby increasing the selected area.
Painting with black adds red to the overlay, thereby decreasing the selected area.
Applying a quick mask
You’ll begin by making a partial selection of the egret using the magic wand tool, and
then you’ll edit the selection using a quick mask.
Note: A partial selection must exist to see the overlay color in Quick Mask mode.
1 Double-click the magic wand tool ( ) in the toolbox to select the tool and its
Options palette.
2 In the Magic Wand Options palette, for Tolerance, enter a value of 25.
3 Click anywhere in the white area of the egret to begin the selection process.
4 Hold down Shift and click the magic wand on another white portion of the egret to
extend the selection. You’ll notice that when you hold down Shift, a plus sign appears next
to the magic wand tool, indicating that it is adding to the selection.
Clicking to make Adding to selectioninitial selection

LESSON 7148Using Quick Masks
At this point, some of the egret isn’t selected. Don’t add any more to the selection because
you’ll add to it using a quick mask.
5 In the toolbox, click the Quick Mask icon.
A. Standard modeB. Quick Mask mode
A red overlay appears over the parts of the image that were not selected with the magic
wand tool. This overlay color depicts the hidden, or masked, areas in the image.
Now you’ll refine the selection of the egret by “painting” on the mask.
Editing a quick mask
Adobe Photoshop uses black and white to identify the hidden and visible areas in a mask.
In Quick Mask mode, the red overlay color is equal to black and the transparent areas are
equal to white. Where the mask is red (black), the underlying artwork is not selected;
where the mask is transparent (white), the artwork is visible, or selected.
You’ll edit the quick mask by painting with white to increase the selected area within the
egret. As you work with the egret image, you’ll move back and forth between Quick Mask
mode and Standard mode to see exactly how painting in the mask alters the selected area.
1 Click the switch colors icon above the foreground and background swatches in the
toolbox to make the foreground color white.
Switch colors
2 Choose Preferences > Display & Cursors. In the Painting Cursors section of the dialog
box, select the Brush Size option, and click OK.
A B
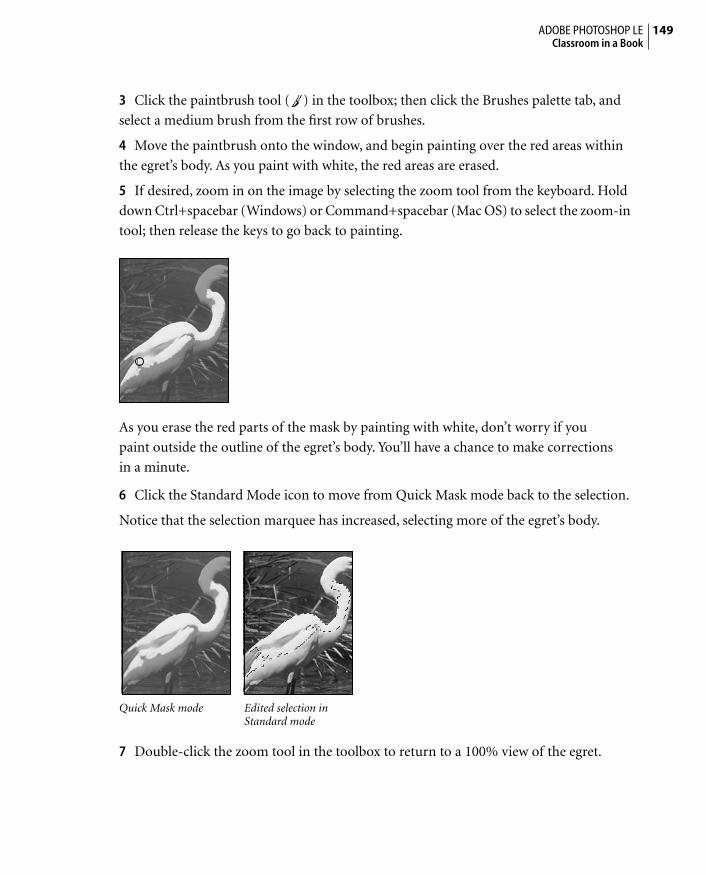
149ADOBE PHOTOSHOP LEClassroom in a Book
3 Click the paintbrush tool ( ) in the toolbox; then click the Brushes palette tab, and
select a medium brush from the first row of brushes.
4 Move the paintbrush onto the window, and begin painting over the red areas within
the egret’s body. As you paint with white, the red areas are erased.
5 If desired, zoom in on the image by selecting the zoom tool from the keyboard. Hold
down Ctrl+spacebar (Windows) or Command+spacebar (Mac OS) to select the zoom-in
tool; then release the keys to go back to painting.
As you erase the red parts of the mask by painting with white, don’t worry if you
paint outside the outline of the egret’s body. You’ll have a chance to make corrections
in a minute.
6 Click the Standard Mode icon to move from Quick Mask mode back to the selection.
Notice that the selection marquee has increased, selecting more of the egret’s body.
Quick Mask mode Edited selection inStandard mode
7 Double-click the zoom tool in the toolbox to return to a 100% view of the egret.

LESSON 7150Using Quick Masks
8 Click the Quick Mask icon again to return to the masked view, and continue painting
with white to erase the remainder of the mask (red) in the egret, including its beak and
legs. If necessary, use the zoom tool to zoom in on parts of the bird.
9 Click the Standard Mode icon to move from Quick Mask mode back to the selection.
Note that using a quick mask to create a selection is similar to creating a selection using a
combination of the magic wand tool and the lasso tool.
If there are areas within the body of the egret that appear to still be selected, it means that
you haven’t erased all of the mask.
10 If necessary, go back to Quick Mask mode and erase the remaining parts of
the mask.
Selection in Standard Erasing in Quick Maskmode mode
11 Once you’ve erased all of the red areas within the egret, click the Standard Mode icon
again. The entire egret is selected!

151ADOBE PHOTOSHOP LEClassroom in a Book
12 Choose File > Save to save your work.
At this point, if you’ve erased the mask outside the edges of the egret and subsequently
included part of the background in the selection, return to Quick Mask mode and restore
the mask to those edge areas by painting with the mask color (red).
13 Click the Quick Mask icon to return to Quick Mask mode.
14 Click the switch colors icon at the corner of the foreground and background swatches
in the toolbox to make black (which will paint as red in Quick Mask mode) the
foreground color.
15 From the Brushes palette, select a small brush from the first row of brushes.
You’ll paint the mask back in where you erased too much of it around the edges of
the egret.
16 Using the zoom tool, zoom in on an area where you need to repaint the mask.
17 Select the paintbrush tool, and repaint the mask where needed.
Saving a selection as a layerTo make sure you don’t accidently lose your selection, you can copy it to a new layer.
1 Select the Standard Mode icon in the toolbox to make the selection active.
2 Choose Edit > Copy to copy the selection.
3 Alt-click (Windows) or Option-click (Mac OS) the new layer icon on the bottom of the
Layers palette. Rename the layer Egret. The new layer is active.

LESSON 7152Using Quick Masks
4 Choose Edit > Paste. A copy of the egret is placed on the new layer.
Now that you have isolated the egret, you’ll adjust its tonal balance before adding a filter
to the background.
5 With the Egret layer selected in the Layers palette, choose Image > Adjust > Auto
Levels. The tonal balance of the egret is automatically adjusted.
6 Using the magic wand tool, click outside the egret to select the transparency on the
Egret layer.
You’ll apply a filter to the background. The selection you just made protects the egret
image.
7 In the Layers palette, click the background layer to make it active.
8 Choose Filter > Artistic > Colored Pencil. If desired, experiment with the sliders to see
the changes before you apply the filter.
If you want to preview different areas of the background, you can drag in the preview
window of the Color Pencil dialog box. This preview option is available with all filters.
Colored Pencil filter Result

153ADOBE PHOTOSHOP LEClassroom in a Book
9 Click OK when you’re satisfied with the Colored Pencil settings. The filter is applied to
the background selection.
10 Deselect the background by choosing Selection > None.
11 From the Layers palette menu, choose Merge Visible to merge the Egret layer with the
background.
12 Choose File > Save to save your work.
You’ve successfully saved a Quick Mask selection, inverted the selection, and modified the
background. To complete the background, you’ll add a gradient to a layer mask.
Masking with partial transparency In addition to using black to indicate what’s hidden and white to indicate what’s selected,
you can paint masks with shades of gray to indicate partial transparency. For example, if
you paint a mask with a shade of gray that is halfway between black and white, the under-
lying image becomes partially (50%) visible.
You’ll experiment by adding a gradient (which makes a transition from black to gray to
white) to a layer mask and to see how the transparency levels of the black, gray, and white
in the gradient affect the image.
To apply a mask to the background, you must first rename it to convert it to a layer.
1 In the Layers palette, double-click the background layer, and rename it Gradient.
2 Choose Layer > Add Layer Mask > Reveal All.
3 Select the gradient tool. Make sure that the foreground and background colors are set
to their defaults; if necessary, click the default colors icon.
4 In the Gradient Tools Option palette, set the opacity to 100%. For Gradient choose
Foreground to Background, and for Type choose Linear.

LESSON 7154Using Quick Masks
5 Hold down Shift, and drag the gradient tool from the center of the image to the bottom
of the window. The gradient is applied to the layer.
Where the gradient is black, the background layer is not visible. Where the gradient is
gray, the white background layer is partially visible. Where the gradient is white, the
background layer is completely visible.
Gradient options Dragging with the Resultgradient tool
6 From the Layers palette menu, choose Flatten Image to create the final image. Notice
that the layer mask has merged with the image, and the layer has been automatically
renamed Background.
7 Choose File > Save to save your work.
8 Choose File > Close to close the lesson file.
You have completed the Quick Masks lesson. Although it takes some practice to become
comfortable using masks, you’ve learned all the fundamental concepts and skills you need
to get started with quick masks and layer masks.

155ADOBE PHOTOSHOP LEClassroom in a Book
Review questions1 What is the benefit of using a quick mask?
2 What happens to a quick mask when you deselect?
3 How can a quick mask selection be saved for later use?
4 How can you edit a mask?
5 In addition to the brush tool, what other tool is commonly used to edit a mask?
6 How can you use layers as masks?
7 How do you add a layer mask to a background?
Review answers1 Quick masks are helpful for creating quick, one-time selections. In addition, using a
quick mask is an easy way to edit a selection using the painting tools.
2 Quick masks disappear when you deselect.
3 Before deselecting, copy the selection and paste it to a new layer.
4 You can edit a mask by painting on it with white to reveal the image through the mask;
by painting on it with gray, to partially reveal the image through the mask; or by painting
on it with black to hide the image behind the mask.
5 The gradient tool can be used to apply a gradient of black to white on a mask.
6 You use create a masking effect with layers by copying a selection to a new layer, and
then applying changes to that layer.
7 To add a layer mask to the background, you must first rename the background to
convert it to a layer. Then choose Layer > Add Layer Mask > Reveal All or Hide All.

LESSON 7156Using Quick Masks
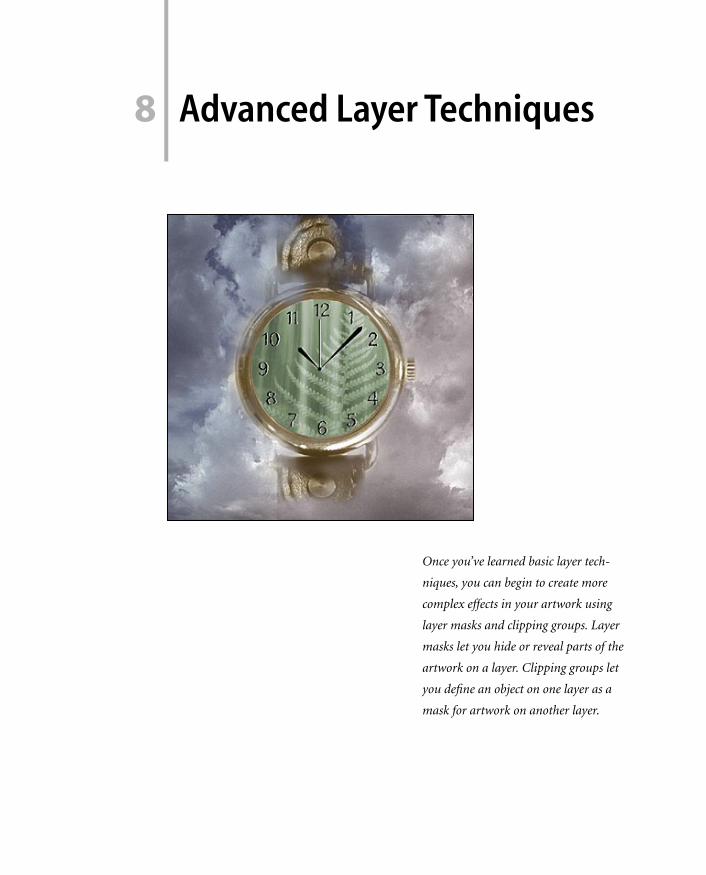
8 Advanced Layer Techniques
Once you’ve learned basic layer tech-
niques, you can begin to create more
complex effects in your artwork using
layer masks and clipping groups. Layer
masks let you hide or reveal parts of the
artwork on a layer. Clipping groups let
you define an object on one layer as a
mask for artwork on another layer.

LESSON 8158Advanced Layer Techniques
In this lesson, you’ll learn how to do the following:
• Create and edit layer masks to selectively hide and reveal portions of artwork on a layer.
• Create clipping groups, using an image on one layer as a mask for artwork on
another layer.
• Use the Preserve Transparency option to affect only the areas of a layer that contain
pixel values, thereby preserving the transparency of the blank areas of a layer.
• Add an embossed effect to an image.
• Delete a layer mask.
• Save layered files.
Getting startedBefore beginning this lesson, you’ll rename or delete the Adobe Photoshop LE preferences
file to restore the application’s default settings. See “Restoring default preferences” on
page 2.
You’ll start the lesson by viewing the final lesson file to see what you’ll accomplish.
1 Restart Adobe Photoshop.
Choose File > Open, and open the 08End.psd file, located in the Lessons/Lesson08 folder.
A photo collage of a watch suspended in clouds appears.
2 When you have finished viewing the file, either leave the End file open on your desktop
for reference or close it without saving changes.
You’ll start this lesson by opening an image that contains two layers, and then you’ll work
with various layering and masking techniques to complete the image.
3 Choose File > Open, and open the 08Start.psd file, located in the Lessons/Lesson08
folder on your hard drive.
4 Choose File > Save As, rename the file 08Work.psd, and save it in the Lessons/Lesson08
folder.
Important: Rename and save a copy of the lesson files, to avoid overwriting the originals in
case you need them later.

159ADOBE PHOTOSHOP LEClassroom in a Book
In the Layers palette, notice that there are two layers in the document—the Watch layer
and the Clouds layer. At this point, you can see only the Watch layer, because the Clouds
layer is positioned under the watch.
5 In the Layers palette, click the eye icon next to the Watch layer to hide it; the clouds on
the layer beneath the Watch layer are revealed. Make the Watch layer visible before
continuing to the next step.
Working with layer masksLayer masks let you hide or reveal portions of the artwork on an individual layer. You can
control how much of the artwork is hidden or revealed by painting on the mask using
black, white, or a shade of gray.
Where you paint with black, the mask is completely opaque, hiding the artwork on the
layer. Where you paint with white, the mask is completely transparent, revealing the
artwork on the layer. Where you paint with a shade of gray, the mask is semitransparent,
making the artwork on the layer partially transparent.
You’ll start by adding a layer mask to the Watch layer. You will paint on the layer mask to
hide and reveal portions of the watch, letting the clouds on the underlying layer show
through.
1 In the Layers palette, click the Watch layer to make it the active layer.

LESSON 8160Advanced Layer Techniques
2 Select the lasso tool ( ) in the toolbox; then drag a loose selection around the watch,
including a portion of the watchband.
3 Choose Select > Feather, enter 25 in the Feather Radius text box, and then click OK.
Adding a feather radius to the selection will soften the edges of the selected area when you
add the layer mask.
4 Choose Layer > Add Layer Mask > Reveal Selection. The Reveal Selection option
displays the selected portion of the watch and makes the unselected areas on the Watch
layer transparent.
In the Layers palette, a layer mask thumbnail appears to the right of the layer thumbnail
of the watch, indicating that a layer mask has been added.

161ADOBE PHOTOSHOP LEClassroom in a Book
Two additional icons appear when you create a layer mask—a small square with a dotted
circle appears in the column next to the eye icon, indicating that the layer mask is selected;
and a link icon appears between the layer thumbnail and the layer mask thumbnail to
indicate that the layer and the mask are linked.
A. Layer mask selected B. Link iconC. Layer mask thumbnail
5 Choose File > Save to save your work.
Painting on a layer mask
Now you will paint on the mask using black, white, and a shade of gray to hide, reveal,
and partially reveal the clouds on the underlying layer. As a reminder, painting with black
hides the artwork on the layer, painting with white reveals the artwork on the layer, and
painting with a shade of gray makes the artwork on the layer partially transparent.
1 In the Layers palette, click the layer mask thumbnail on the Watch layer to make sure
that the layer mask is selected.
Click the layer mask thumbnail.
2 Make sure that black is the foreground color and white is the background color.
A B C
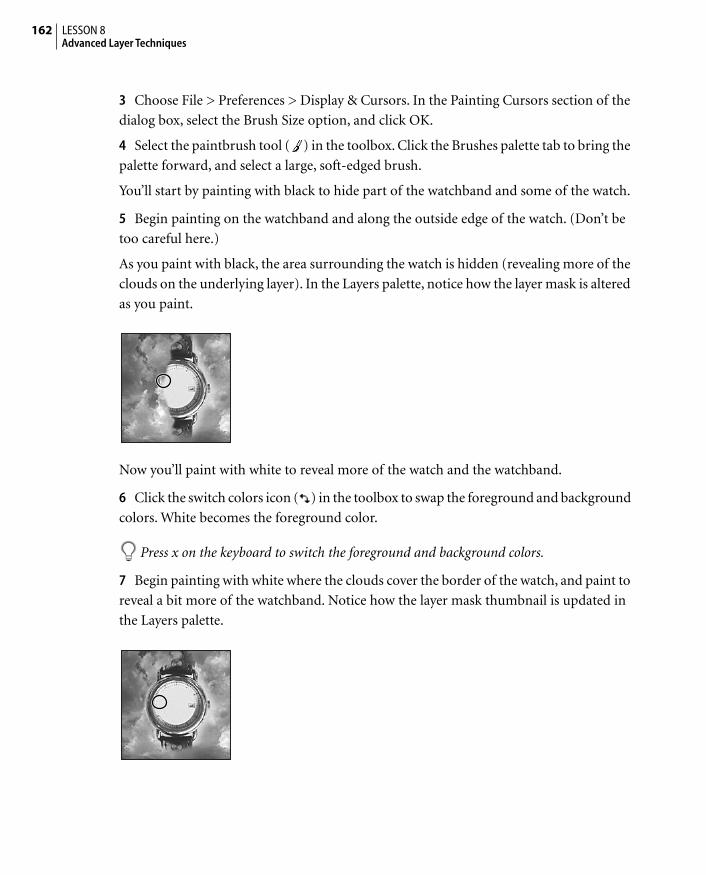
LESSON 8162Advanced Layer Techniques
3 Choose File > Preferences > Display & Cursors. In the Painting Cursors section of the
dialog box, select the Brush Size option, and click OK.
4 Select the paintbrush tool ( ) in the toolbox. Click the Brushes palette tab to bring the
palette forward, and select a large, soft-edged brush.
You’ll start by painting with black to hide part of the watchband and some of the watch.
5 Begin painting on the watchband and along the outside edge of the watch. (Don’t be
too careful here.)
As you paint with black, the area surrounding the watch is hidden (revealing more of the
clouds on the underlying layer). In the Layers palette, notice how the layer mask is altered
as you paint.
Now you’ll paint with white to reveal more of the watch and the watchband.
6 Click the switch colors icon ( ) in the toolbox to swap the foreground and background
colors. White becomes the foreground color.
Press x on the keyboard to switch the foreground and background colors.
7 Begin painting with white where the clouds cover the border of the watch, and paint to
reveal a bit more of the watchband. Notice how the layer mask thumbnail is updated in
the Layers palette.

163ADOBE PHOTOSHOP LEClassroom in a Book
Now that you’ve experimented using black and white to hide and reveal the artwork on
the layer, you’ll paint with a shade of gray to partially reveal some of the watch.
8 Click the Swatches palette tab to bring the palette to the front of its group; then select
a medium-gray color.
Note: Although you are working with an RGB image, only shades of gray are displayed in the
Swatches palette when editing a layer mask.
9 Begin painting over a portion of the watch border and a small area along a part of the
watch face.
As you paint, you’ll notice that the watch becomes partially visible, letting you see part of
the watch and part of the clouds. (The lighter the shade of gray you paint with, the more
the clouds are revealed.)
10 Choose File > Save to save your work.
Unlinking layer masks
By default, layer masks are linked to the artwork on the layer. When you move a mask or
the artwork, both the mask and the artwork are repositioned. You can unlink the layer
mask and the artwork on the layer if you want to move them independently.
1 In the Layers palette, click the link icon between the layer thumbnail and the layer mask
thumbnail to turn off linking.

LESSON 8164Advanced Layer Techniques
2 In the Layers palette, click the watch thumbnail in the Watch layer.
Clicking link icon Clicking watch thumbnail to turn off link
3 Select the move tool ( ) in the toolbox and drag in the image window to move the
artwork. Notice that the layer mask thumbnail does not move with the artwork.
Moving the artwork on the layer
4 Choose Edit > Undo to undo the move.
5 Now click the layer mask thumbnail and drag the move tool to move the layer mask.
The layer mask moves independently of the layer mask.
Moving the layer mask
6 Choose Edit > Undo to undo the move.
7 Click the area between the layer thumbnail and the layer mask thumbnail to relink the
layer mask and the artwork.

165ADOBE PHOTOSHOP LEClassroom in a Book
You can also turn off a layer mask to view the artwork on the layer without the mask.
8 To turn off the layer mask, Shift-click the layer mask thumbnail on the Watch layer in
the Layers palette. A large red x appears on the layer mask thumbnail.
9 To turn on the layer mask, click the layer mask thumbnail in the Layers palette. The x
disappears.
10 Choose File > Revert to return to the last saved version of the file.
Creating masks using marquee tools
Next, you’ll create a new layer and use a marquee tool to draw a circle that will be used as
a mask.
1 In the Layers palette, make sure that the Watch layer is selected.
2 Alt-click (Windows) or Option-click (Mac OS) the New Layer button at the bottom of
the palette. In the Layer Options dialog box, name the new layer Circle, and click OK. The
Circle layer should be at the top of the Layers palette.
3 Select the ellipse marquee tool ( ) from the hidden tools palette under the rectangle
marquee.

LESSON 8166Advanced Layer Techniques
4 Hold down Alt+Shift (Windows) or Option+Shift (Mac OS), and then drag from the
center point of the face of the watch to the inside edge of the watch face. Release the mouse
button; then release the modifier keys.
Holding down Alt (Windows) or Option (Mac OS) draws the circle from the center point,
and Shift constrains the selection marquee to a circle.
Now you’ll fill the circle with black.
5 Make sure that the foreground and background colors are set to black and white.
Press d on the keyboard to return to the default foreground and background colors.
6 Choose Edit > Fill. Make sure that Foreground is selected and that the opacity is set to
100%; then click OK to fill the circle with black.
Dragging to select Filling with blacka circle
Try the shortcut to fill a selection with 100% of the foreground color: press Alt+Backspace
(Windows) or Option+Delete (Mac OS).
7 Choose Select > None to deselect everything.
8 Choose File > Save to save your work.
Creating a clipping group You can mask an object on one layer using an image from another layer by creating a
clipping group. In a clipping group, the bottom, or base layer, of the group controls the
shape, opacity, and mode of any successive layers. (You can also set opacity levels and
modes for individual layers.) The layer or layers above the base layer are clipped to (or
masked by) the shape of the object or objects on the base layer.
You’ll use the circle you drew as the base layer of a clipping group.

167ADOBE PHOTOSHOP LEClassroom in a Book
1 Choose File > Open, and open the Fern.psd file, located in the Lessons/Lesson08 folder
on your hard drive.
You’ll move the fern image onto the 08Work.psd window and then clip the fern to
the circle.
2 If necessary, reposition both windows so that you can see a part of each of them. Then
click the Fern window to make it the active window.
3 In the Layers palette, hold down Shift and drag the Fern layer onto the 08Work.psd
image.
Holding down Shift as you drag centers the fern in the 08Work.psd window. The Fern
layer should now be positioned at the top of the Layers palette in the 08Work.psd window.
New Fern layer Fern centered in window
The next step is to clip the fern to the Circle layer. (In effect, you’ll be masking the fern
with the circular shape.)
4 With the Fern layer selected in the Layers palette, choose Layer > Group with Previous.
The fern is clipped to the circle.
In the Layers palette, the base layer in the clipping group (the circle) is underlined, and
any layers above the base layer that are part of the clipping group (the fern) are indented.
Clipping fern to Circle layer Result

LESSON 8168Advanced Layer Techniques
5 If you want to adjust the position of the fern within the circle, click the move tool in
the toolbox and drag.
Next, you’ll add another image to the clipping group.
6 Choose File > Open, and open the Waterfal.psd file, located in the Lessons/Lesson08
folder on your hard drive. If necessary, reposition both windows so that you can see a part
of each of them.
7 In the Layers palette, hold down Shift and drag the Waterfall layer onto the 08Work.psd
image. The Waterfall layer should be positioned at the top of the Layers palette in the
08Work.psd window.
You can make adjustments to each individual layer in a clipping group. You’ll change the
mode and opacity of the waterfall before adding it to the clipping group.
8 In the Layers palette, drag the Opacity slider to 80% (or enter 8), and for mode choose
Screen. You’ll be able to see through the waterfall.
Drag the Opacity slider. Result
This time, you’ll try a keyboard shortcut to add the waterfall to the clipping group.
9 In the Layers palette, hold down Alt (Windows) or Option (Mac OS), position the
pointer on the line between the Waterfall layer and the Fern layer, and then click to add
the waterfall to the clipping group.

169ADOBE PHOTOSHOP LEClassroom in a Book
10 Close the Fern.psd image and the Waterfal.psd images, and do not save changes.
Adding an embossed effectYou’ll add a face to the watch and then create an embossed effect to the watch face to add
depth to the image.
1 Choose File > Open, and open the Face.psd file, located in the Lessons/Lesson08 folder
on your hard drive.
2 Hold down Shift, and drag the Face layer from the Layers palette into the
Newwatch.psd window. The Face layer is added at the top of the Layers palette.
3 Close the Face.psd file before continuing.
Creating depth effects such as embossing and drop shadows is a simple task when using
layers. All you have to do is duplicate and paint a copy of the original layer, and then
reposition the copy behind the original layer.
4 Drag the Face layer onto the New Layer button at the bottom of the Layers palette to
duplicate the Face layer.
5 With the Face copy layer active, click the Preserve Transparency option.
With the Preserve Transparency option turned on, you don’t have to make a selection
before you paint; only the areas where pixel values already exist are affected when
you paint.

LESSON 8170Advanced Layer Techniques
Now, you’ll paint the numbers white, using a keyboard shortcut.
6 Make sure that the foreground and background colors are set to the defaults.
7 Hold down Ctrl (Windows) or Command (Mac OS), and press Delete. The hands are
filled with the background color, which is white.
8 Hold down Ctrl/Command to select the move tool from the keyboard; then press the
Right Arrow key twice and the Down Arrow key twice to reposition the white numbers.
9 In the Layers palette, drag the Face copy layer below the Face layer to reposition the
layer. Voila! The numbers on the watch face appear to be embossed. Experiment with
these techniques, substituting shades of gray and adding blur filters to create professional-
looking drop shadows and other relief effects.
Lightening and darkening areas of an imageThe dodge and burn tools let you lighten and darken areas of an image selectively. You’ll
add highlights to the watch face using these tools.
1 Select the dodge tool ( ) in the toolbox.
2 In the Brushes palette, select a soft-edged brush from the second row of brushes.
3 In the Layers palette, click the Waterfall layer to make it the active layer; then drag
a curved stroke in the upper left quadrant of the watch face. As you drag, the area
becomes lighter.
You can hold down the mouse button and drag repeatedly over the same area to lighten
the area more, or you can use short single strokes to lighten the area incrementally.
4 Select the burn tool ( ) tool in the Hidden Tools palette under the dodge tool.

171ADOBE PHOTOSHOP LEClassroom in a Book
5 Drag the burn tool over the lower right quadrant of the watch face to darken the area.
Removing layer masksEach layer mask in a file increases the file’s size. To minimize the size of your files, it’s
important to remove or merge layer masks after you’ve made final design decisions.
You’ll merge the layer mask on the Watch layer with the artwork on the layer.
1 In the Layers palette, select the Watch layer.
2 Choose Layer > Remove Layer Mask.
3 When the prompt appears, click Apply to merge the layer mask with the artwork on
the layer.
4 Choose File > Save to save your work.
Flattening a layered image If you plan to print your document or publish it on the Web, it’s a good idea to save two
versions of your file—one containing all the layers and layer masks so that you can edit
the file if necessary, and one flattened version for output.
1 First, note the file size in the lower left corner of the 08Work.psd image.
2 Choose Image > Duplicate, name the duplicate file 08Final.psd, and click OK.
3 Choose Flatten Image from the Layers palette menu. The 08Final.psd file is combined
onto a single background.
4 Now check the file size of the 08Final.psd image. You’ll notice that it is significantly
smaller than the 08Work.psd image, because it has been flattened onto the background.
5 Choose File > Close, and close any open lesson files.
You’ve completed the Advanced Layers lesson. Experiment with your own work to see
how you can use layer masks.

LESSON 8172Advanced Layer Techniques
Review questions1 Why would you paint with black on a layer mask? With white? With gray?
2 How do you turn off a layer mask to view only the artwork on the layer?
3 What is a clipping group? Can you think of how you might use one in your own work?
4 What is the purpose of flattening an image?
Review answers1 To hide part of the artwork on a layer, you paint with black on the layer mask. To reveal
more of the artwork on a layer, you paint with white on the layer mask. To partially reveal
artwork on a layer, you paint with shades of gray on the layer mask. The darker the shade
of gray, the higher the level of transparency.
2 Hold down the Shift key and click the layer mask icon in the Layers palette.
3 A clipping group consists of at least two layers, where the artwork on one of the layers
is used as a mask for the artwork on another layer. Clipping groups are often used to
“show” a texture on one layer through a selection on another layer.
4 Flattening an image consolidates all layers and layer masks in a document into one file
with only a background, and reduces the file size. To flatten an image, choose Flatten
Image from the Layers palette menu.

9 Basic Image Correction
Adobe Photoshop LE’s tonal adjustment
and color correction tools let you make
adjustments to grayscale or color images
and compensate for some of the differ-
ences between the original scanned image
and the final on-screen image
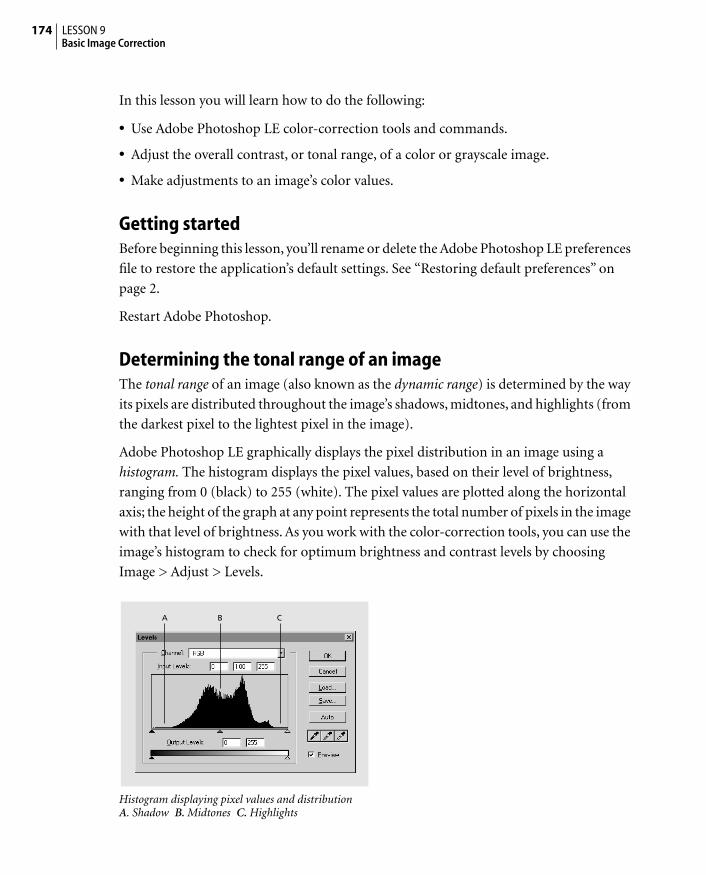
LESSON 9174Basic Image Correction
In this lesson you will learn how to do the following:
• Use Adobe Photoshop LE color-correction tools and commands.
• Adjust the overall contrast, or tonal range, of a color or grayscale image.
• Make adjustments to an image’s color values.
Getting startedBefore beginning this lesson, you’ll rename or delete the Adobe Photoshop LE preferences
file to restore the application’s default settings. See “Restoring default preferences” on
page 2.
Restart Adobe Photoshop.
Determining the tonal range of an imageThe tonal range of an image (also known as the dynamic range) is determined by the way
its pixels are distributed throughout the image’s shadows, midtones, and highlights (from
the darkest pixel to the lightest pixel in the image).
Adobe Photoshop LE graphically displays the pixel distribution in an image using a
histogram. The histogram displays the pixel values, based on their level of brightness,
ranging from 0 (black) to 255 (white). The pixel values are plotted along the horizontal
axis; the height of the graph at any point represents the total number of pixels in the image
with that level of brightness. As you work with the color-correction tools, you can use the
image’s histogram to check for optimum brightness and contrast levels by choosing
Image > Adjust > Levels.
Histogram displaying pixel values and distributionA. Shadow B. Midtones C. Highlights
A B C
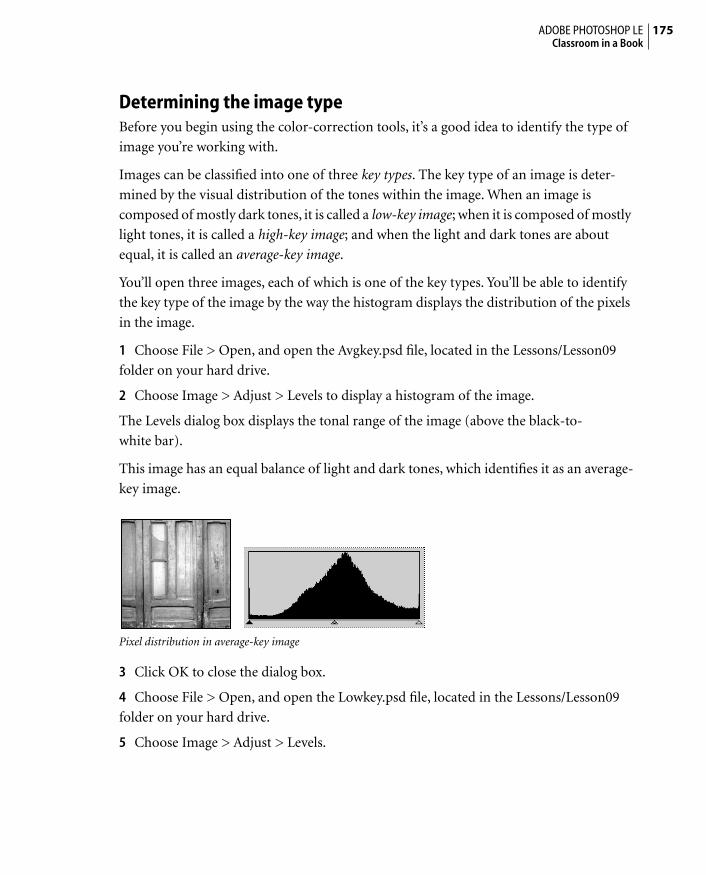
175ADOBE PHOTOSHOP LEClassroom in a Book
Determining the image typeBefore you begin using the color-correction tools, it’s a good idea to identify the type of
image you’re working with.
Images can be classified into one of three key types. The key type of an image is deter-
mined by the visual distribution of the tones within the image. When an image is
composed of mostly dark tones, it is called a low-key image; when it is composed of mostly
light tones, it is called a high-key image; and when the light and dark tones are about
equal, it is called an average-key image.
You’ll open three images, each of which is one of the key types. You’ll be able to identify
the key type of the image by the way the histogram displays the distribution of the pixels
in the image.
1 Choose File > Open, and open the Avgkey.psd file, located in the Lessons/Lesson09
folder on your hard drive.
2 Choose Image > Adjust > Levels to display a histogram of the image.
The Levels dialog box displays the tonal range of the image (above the black-to-
white bar).
This image has an equal balance of light and dark tones, which identifies it as an average-
key image.
Pixel distribution in average-key image
3 Click OK to close the dialog box.
4 Choose File > Open, and open the Lowkey.psd file, located in the Lessons/Lesson09
folder on your hard drive.
5 Choose Image > Adjust > Levels.

LESSON 9176Basic Image Correction
This image is composed of predominantly dark tones, so it is a low-key image.
Pixel distribution in low-key image
6 Click OK to close the dialog box.
7 Choose File > Open, and open the Highkey.psd file, located in the Lessons/Lesson09
folder on your hard drive.
8 Choose Image > Adjust > Levels.
This image is composed of predominantly light tones, so it is a high-key image.
Pixel distribution in high-key image
9 Click OK to close the dialog box.
10 Once you’re taken a few minutes to look at the differences in the key types, close all
the images, and do not save changes.
You’ll learn more about the level controls and how to adjust an image’s tonal balance later
in this lesson.

177ADOBE PHOTOSHOP LEClassroom in a Book
Working with the adjustment tools The most commonly used adjustment tools are the Brightness/Contrast, Levels, and
Curves commands. The Brightness/Contrast command provides the simplest but most
limited adjustment controls. The Levels command has more sophisticated adjustment
controls, while the Curves command has the most sophisticated controls of all. In
addition, the Auto Levels command is useful for automatically adjusting the tonal range
of an image. You’ll learn more about each command as you work through the sections
that follow.
Using Brightness/Contrast to adjust an imageThe Brightness/Contrast command offers the least amount of control over the tonal
range of an image because the adjustment affects the image globally. For example, if you
increase the brightness value by 20, all pixels in the image increase in brightness by a value
of 20.
Dragging the Brightness slider lightens or darkens an image; dragging the Contrast slider
increases or decreases the contrast in the image.
1 Choose File > Open, and open the Bright.psd file, located in the Lessons/Lesson09
folder on your hard drive.
2 Choose Image > Adjust > Brightness/Contrast.
3 Drag the Brightness slider to 27, and drag the Contrast slider to 14. Click OK to adjust
the brightness and contrast of the image.
4 Click OK to exit the dialog box; then close the file. Do not save changes.

LESSON 9178Basic Image Correction
Using auto levelsThe Auto Levels command adjusts the overall contrast of an image by defining the lightest
and darkest (highlight and shadow) pixels in an image as white and black, and then
distributes the remaining tones in the image between them. The result that Auto Levels
produces is determined by the characteristics of the original image.
You’ll apply the Auto Levels command to an image to see how the quality of the original
scan affects the result.
1 Choose File > Open, and open the Blossom.psd file, located in the Lessons/Lesson09
folder on your hard drive.
2 Choose Image > Adjust > Auto Levels. The image looks great!
3 Choose File > Close. Do not save changes.
Note: If the Auto Levels command produces an undesirable result, use the Levels dialog box to
obtain greater control of the tonal range in the image. For information about how to use
levels, see the next section, “Using levels.”
Using levelsWhile the Auto Levels command controls the tonal balance of an image by automatically
setting the lightest and darkest points in the image, the Levels command lets you control
the tonal balance of an image by setting the lightest and darkest points in the image
yourself. You can use Levels to affect an entire image, or just a selection.
In addition, the Levels command lets you adjust the gamma in an image. Gamma
measures the contrast that affects the mid-level grays (midtones), and can be adjusted
without significantly affecting the shadows and highlights in an image.
You’ll work with the controls in the Levels dialog box to adjust the highlights and shadows
of an image using two methods. First, you’ll drag the sliders in the dialog box to adjust the
highlights and shadows, and then you’ll define and set the highlights and shadows by
choosing values from the image.

179ADOBE PHOTOSHOP LEClassroom in a Book
Adjusting the tonal range of an initial scan using Levels sliders
Most initial scans require an adjustment to the tonal balance of the image before making
other color adjustments. You’ll use the Levels dialog box first to adjust the tonal range of
a scanned image.
1 Choose File > Open, and open the Fruit.psd file, located in the Lessons/Lesson09 folder
on your hard drive.
2 Choose Image > Adjust > Levels.
The Levels dialog box displays a histogram of the image and a variety of controls that let
you adjust the tonal range of the image. At this point, focus on the three triangles at the
bottom of the histogram. The white triangle represents the highlight areas of the image;
the gray triangle represents the midtones, or gamma, in the image; and the black triangle
represents the shadow areas of the image.
A. Shadow B. Midtones (gamma) C. Highlights
Notice that the black triangle (at the left end of the histogram) is positioned to the left of
the point at which the pixels in the image actually start. The same is true of the white
triangle at the right end of the histogram; it is positioned to the right of the point where
the pixels in the image actually end.
A B C

LESSON 9180Basic Image Correction
When the black and white triangles are positioned outside the actual starting and ending
pixels in the image, the image looks “flat,” because there is a lack of contrast in both the
highlights and the shadows of the image. As a general rule, most initial scans come in
flat and need an initial adjustment to redefine the black point, the gamma, and the
white point.
3 Drag the black slider to the right to position it under the starting pixels in the
histogram; then drag the white slider to the left to position it under the ending pixels in
the image.
4 Drag the middle, or gamma, slider to the right to lighten the midtones of the image a
bit. The value should be about 0.80, but each monitor looks slightly different, so the level
of adjustment may vary slightly.
5 Click OK. The pixels are redistributed from black to white, extending the tonal range
of the image.
6 Choose Edit > Undo several times to see the difference before and after the adjustment.
7 Choose Image > Adjust > Levels. Now the histogram reflects the redistribution of the
pixels from black to white.
8 Choose File > Close. Do not save changes.
It’s a good practice to follow this procedure for all initial scans.

181ADOBE PHOTOSHOP LEClassroom in a Book
Assigning values to the black and white points
Now that you’ve learned one method to adjust the tonal range of an initial scan, you’ll use
some of the other controls in the Levels dialog box to define and set your own shadows
and highlights (called black and white points) in an image.
This time, instead of using the sliders to adjust the contrast of the image (by moving the
triangles), you’ll enter values to define the darkest and lightest points in the image.
When you define the values of the black and white points, you ensure that both areas
hold detail when printed. If the highlight area of an image contains no detail, no ink is
printed on the paper; this white without detail is called specular white. If the shadow area
of an image contains no detail, the paper is saturated with black ink, producing a solid-
black area.
1 Choose File > Open, and open the Market.psd file, located in the Lessons/Lesson09
folder on your hard drive.
2 Choose Image > Adjust > Levels; then double-click the white eyedropper tool to open
the Adobe Photoshop color picker, where you enter values to define the white point.
3 Enter the RGB values of 244 for R, 244 for G, and 244 for B. Click OK. These values
correspond to the white point (highlight area) for an average-key image.
4 Now double-click the black eyedropper tool in the Levels dialog box to open the color
picker and set the value for the black point.
5 Enter the RGB values of 10 for R, 10 for G, and 10 for B. Click OK. These values corre-
spond to the black point (shadow area) for an average-key image.
Now that you have defined the values for the black and white points, you’ll use the
eyedropper to select and define the black and white areas in the image.

LESSON 9182Basic Image Correction
6 With the black eyedropper tool in the Levels dialog box still selected, position the
pointer in the dark area of the lower left corner of the image. Click the eyedropper tool to
define this area as the darkest point in the image.
7 Click the white eyedropper tool, and then position it in the price slip labeled $1.99 near
the center of the image. Click the white area to define the lightest point in the image.
8 Adjust midtones by dragging the middle (gamma) Levels slider.
9 Click OK to close the dialog box.
10 Choose Edit > Undo several times to see the difference before and after the
adjustment.
11 Choose File > Close. Do not save changes.

183ADOBE PHOTOSHOP LEClassroom in a Book
Using curvesThe Curves dialog box provides the most sophisticated controls of the tonal adjustment
tools. In addition to using Curves to set the black and white points, you can control the
midtones in an image with greater precision.
You’ll use the Curves dialog box to adjust the midtones in an image. (The highlights and
shadows have already been set.)
1 Choose File > Open, and open the Floral.psd file, located in the Lessons/Lesson09
folder on your hard drive.
2 Choose Image > Adjust > Curves.
The Curves dialog box displays a graph that represents the original and new brightness
values of the pixels in the image. The horizontal axis represents the original values of the
pixels, and the vertical axis represents the new (adjusted) values of the pixels. At this
point, the original pixel values, called input values, and the new pixels values, called output
values, are the same, because you haven’t made an adjustment to the image.
The diagonal line in the graph represents the current relationship between the input
values and output values. The bottom left corner of the diagonal line represents the
shadows in the image; the midpoint in the line represents the midtones in the image, and
the top right corner represents the highlights in the image.
A. Shadow B. Midtones C. Highlights
A B C

LESSON 9184Basic Image Correction
Below the graph, a black-to-white bar displays the pixel brightness values from black to
white (0 to 255, respectively).
A. 0 (black) pixel value B. 255 (white) pixel value
3 To get an idea of how the Curves graph identifies pixel brightness values in an image,
move the pointer into the floral image window (the pointer becomes an eyedropper).
Hold down the mouse button, and slowly drag the eyedropper on different areas of
the image.
As you drag, you’ll notice a moving circle on the diagonal line on the graph. When you
drag the eyedropper in a dark area of the image, the circle is near the lower left of the
diagonal line; when you drag in a light area of the image, the circle moves toward the top
of the diagonal line, representing the highlights and shadows.
Dragging the eyedropper in the image window to display the pixel values in the Curves dialog box
A B

185ADOBE PHOTOSHOP LEClassroom in a Book
This image requires an adjustment to the midtone and shadow areas, but not to the
highlights. To make the adjustment to only the midtones and shadows, you can set points
along the diagonal line to isolate the areas you don’t want affected. You’ll set two points
along the diagonal line.
4 Click the pointer on the quarter-tone point along the diagonal line (the curve).
Quarter tone
5 Click the pointer on the three-quarter-tone point along the diagonal line (the curve).
Three-quarter tone

LESSON 9186Basic Image Correction
6 Now drag the three-quarter-tone point upward to lighten the shadows and midtones
in the image. By anchoring the curve at the three-quarter-tone point, none of the
highlights in the image is affected.
Using curves to lighten Resultshadows and midtones
7 Click OK to make the adjustment to the floral image.
8 Choose File > Close. Do not save changes.
Removing a color castNow that you’ve worked with the tonal correction tools, you’ll use a color correction
command to remove a color cast from an image. The Color Balance command lets you
change the mixture of colors in a color image. Like the Brightness/Contrast command,
this tool provides generalized color correction.
1 Choose File > Open, and open the Brdhouse.psd file, located in the Lessons/Lesson09
folder on your hard drive.
2 Choose Image > Adjust > Color Balance to open the Color Balance dialog box.
3 Before you begin making adjustments, make sure that the Preview option is selected in
the dialog box.

187ADOBE PHOTOSHOP LEClassroom in a Book
4 Drag the first slider to –22 (toward cyan); then drag the second slider to 29 (toward
green). These settings remove the magenta cast from the image.
5 Click OK. To compare the effect of the new settings, choose Edit > Undo.
6 Choose File > Close to close the file. Do not save changes.
You’ve completed the Basic Color Correction lesson. The lesson that follows, “Photo
Retouching,” shows additional color-correction tools you can use once you’ve learned the
basic techniques.
Look over the questions and answers in the Review section to help you identify and retain
key concepts about color correction.

LESSON 9188Basic Image Correction
Review questions1 What is tonal range?
2 How does a histogram depict the tonal range of an image?
3 Describe the three categories of adjustment tools, and why you would use one
over another.
Review answers1 Tonal range is the distribution of detail in highlights, midtones, and shadows of
an image.
2 A histogram displays the distribution of all pixels in an image, from the shadows to
the highlights.
3 The degree of precision you want determines which of the following adjustment tools
you use:
• Brightness/Contrast offers the least amount of control over the tonal range of an image
because the tool adjusts all image pixels the same amount.
• Levels offers more control over the tonal range by letting you adjust the highlights,
midtones, and shadows in an image individually.
• Curves provides the most precise control of the tonal adjustment tools, letting you
adjust up to 16 points across the tonal range of an image.

10 Photo Retouching
In the following lesson, you will learn the
basics of photo retouching using Adobe
Photoshop LE. You will learn to adjust
levels and color balance, as well as use
special features such as the sponge and
dodge tools to edit selected portions of the
photograph.

LESSON 10190Photo Retouching
In this lesson you will learn how to retouch scanned photos using the following
techniques:
• Realign a scanned image.
• Crop an image to a final size.
• Remove unwanted objects.
• Make typical tonal corrections needed for a digitized image.
Getting startedBefore beginning this lesson, you’ll rename or delete the Adobe Photoshop LE preferences
file to restore the application’s default settings. See “Restoring default preferences” on
page 2.
1 Restart Adobe Photoshop.
You’ll start the lesson by viewing the final lesson file to see what you’ll accomplish.
2 Choose File > Open, and open the 10End.psd file, located in the Lessons/Lesson10
folder.
An image of a gondola floating in a Venetian lagoon appears.
3 When you have finished viewing the file, either leave the End file open on your desktop
for reference or close it without saving changes.
Now you’ll open the start file and begin the lesson.
4 Choose File > Open, and open the 10Start.psd file, located in the Lessons/Lesson10
folder on your hard drive.
This image is crooked, slightly blurred, and has a reddish cast.
5 Choose File > Save As, rename the file 10Work.psd, and save it in the Lessons/Lesson10
folder.
Important: Rename and save a copy of the lesson files, to avoid overwriting the originals in
case you need them later.

191ADOBE PHOTOSHOP LEClassroom in a Book
Cropping and straighteningIn this lesson, you’ll retouch a scanned photograph, making typical corrections needed
for a digitized image. Adobe Photoshop contains retouching tools that let you burn,
dodge, saturate, and even clone areas, as well as adjust the color balance and color levels
in an image.
The photo you’ll work on is crooked, slightly blurred, and has a reddish cast. In addition
to fixing these problems, you’ll remove the small boat in the center of the image, adjust
the tonal range and color balance of the image, and even replace the current sky with
another one.
The first thing you’ll do is crop and straighten the image.
1 Select the crop tool ( ) in the toolbox. Then drag to select the part of the image you
want to crop.
2 Move the pointer outside a selection handle; then drag counterclockwise until the crop
rectangle is parallel with the image. Drag the selection handles if you need to adjust the
size of the crop rectangle.

LESSON 10192Photo Retouching
3 Press Enter (Windows) or Return (Mac OS). The image is now cropped and squared.
Removing unwanted objectsNext you’ll eliminate the small boat near the center of the image by painting over it with
a copy of the water.
1 Select the zoom tool ( ); then click the small boat to magnify that part of the image.
2 Double-click the rubber stamp tool ( ) in the toolbox to select the tool and display its
Options palette.
3 In the Rubber Stamp Options palette, choose Clone (non-aligned). Click the Brushes
tab, and select a medium-size, feathered brush.
First you’ll select the cloning area.
4 Center the rubber stamp tool over the water between the large gondola and the post to
its right; then hold down Alt (Windows) or Option (Mac OS), and click to sample that
part of the image.
Above the rubber stamp location, you’ll notice a cross hair. The cross hair represents the
point from which the rubber stamp tool duplicates, or clones, the area.

193ADOBE PHOTOSHOP LEClassroom in a Book
5 Drag the rubber stamp tool over the boat to paint over it with a copy of the area you
just sampled.
Sampling part of the Painting with a copy of image the sample
For best results, use short strokes when replacing areas of an image with the rubber
stamp tool.
To vary the cloning area a bit, resample different areas of the lagoon by holding down the
Alt (Windows) or Option (Mac OS) key and clicking the rubber stamp. Sampling
different cloning areas makes the completed image look realistic.
6 Double-click the zoom tool ( ) in the toolbox to return to 100% magnification.
Adjusting levels and color balanceNext, you’ll expand the tonal range of the image so that the colors extend through the full
range of dark to light.
1 Choose Image > Adjust > Levels, and select the Preview option.
2 Notice the histogram in the dialog box: if your image had colors across the entire
brightness range, the graph would extend across the full width of the histogram. Instead,
the graph is clumped toward the center, indicating there are no very dark or light colors.

LESSON 10194Photo Retouching
3 Drag the left and right sliders inward to where the histogram indicates the darkest and
lightest colors begin. Click OK.
Original image Dragging slider to increase tonal range
4 Choose Image > Adjust > Levels again to view the new histogram. The tonal range now
extends throughout the entire range of the histogram. Click Cancel.
Resulting image and histogram
Notice that the image has a color cast; it’s too red. To further refine color correction in the
image, you’ll now adjust the color balance. The Color Balance dialog box lets you adjust
up to three values in the image: the shadows, midtones, and highlights.
5 Choose Image > Adjust > Color Balance. Select the Preview option.
6 To adjust the midtones so that they’re less red, drag the top slider toward Cyan (we
used –15) and the middle slider toward Green (we used +8). Click OK.

195ADOBE PHOTOSHOP LEClassroom in a Book
Using the toning toolsThe toning tools include the dodge ( ) and burn tools ( ), which let you lighten or
darken, respectively, specific areas of an image, and the sponge tool ( ), which lets you
change the color saturation of an area.
Now, you’ll saturate the color of the gondolas in the foreground using the sponge tool.
1 Select the sponge tool ( ). In the Brushes palette, select a medium-size, feathered
brush.
2 Click the Toning Tools Options palette tab. Choose Saturate from the pop-up menu,
and drag the Pressure slider to 40% to set the intensity of the saturation effect.
3 Drag the sponge back and forth over the center gondola to saturate its color.
Setting saturation Dragging with sponge tool
Next you’ll lighten the highlights along the gondola’s hull to sharpen the reflection of the
water there.
4 Select the dodge tool ( ). In the Toning Tool Options palette, choose Highlights from
the menu.

LESSON 10196Photo Retouching
5 Drag the dodge tool back and forth over the gondola’s hull.
Selecting highlights Dragging dodge tool
Copying textures from another fileThe sky is fairly drab and overcast, so you’ll replace it with a more interesting one from
another file. You’ll begin by selecting the current sky.
1 Select the magic wand tool ( ). Click to select part of the sky. Hold down the Shift key
and click the rest of the sky to select it.
2 Choose File > Open, and open the Clouds.psd file, located in the Lessons/Lesson10
folder.
3 Choose Select > All; then choose Edit > Copy. Close the Clouds.psd file with saving any
changes.
4 Choose Edit > Paste Into to paste the clouds into the current selection. Select the move
tool ( ), and drag the clouds into the position you want.
Pasting into selection Resultand dragging to adjust

197ADOBE PHOTOSHOP LEClassroom in a Book
5 Press any key from 1 (10%) through 0 (100%) to set the new cloud’s opacity. (We
used 40%.)
6 Choose Layer > Flatten Image to flatten the images into a single layer.
Applying the Unsharp Mask filterNow that the image is a single layer, as your final step, you’ll sharpen the entire image.
The last step you take when retouching a photo is to apply the Unsharp Mask filter to the
image. The Unsharp Mask filter adjusts the contrast of edge detail in an image, creating
the illusion of a sharper image.
1 Choose Filter > Sharpen > Unsharp Mask.
2 Select the Preview option to view the effect before you apply it.
3 Then drag the Amount slider until the image is as sharp as you want (we used 120%).
Click OK.
Unsharp Mask settings Result
4 Choose File > Close to close the lesson file.
You’ve completed all of the steps necessary to retouch a photo. Try these steps and
techniques on your own scanned images.

LESSON 10198Photo Retouching
Review questions1 How can you straighten a crooked image?
2 What tool would you use to copy a background or texture from one portion of an
image to paint over another portion?
3 How can you remove a red cast from a photograph?
4 What are the toning tools and what is their effect on an image?
5 What keyboard command can be used to set the opacity of a selection that has been
created using the Paste Into command?
Review answers1 Drag the crop tool to select the portion of the image to be straightened, rotating and
sizing the crop selection bounding box to fit the selection. Then press Enter or Return.
The selection will be cropped and straightened.
2 The rubber stamp tool is used to copy background or texture.
3 Choose Image > Adjust > Color balance. Decrease the red level by dragging the
Cyan/Red slider toward Cyan and the Magenta/Green slider toward Green.
4 The toning tools are the dodge tool, which lightens an area; the burn tool, which
darkens an area; and the sponge tool, which changes the color saturation.
5 Pressing the number keys will set the opacity of the selection from 10% (1) to
100% (0).

11 Preparing Images for Web Publication
The file formats and compression options
you choose for images to be distributed on
the World Wide Web are determined by
the image type. For example, a full-color
image is saved with a different file format
than a flat-color image. When preparing
images for distribution on the Web, the
goal is to create the smallest file possible
that still maintains the integrity of
the image.

LESSON 11200Preparing Images for Web Publication
This lesson shows you how to do the following:
• Determine which file formats and compression options are appropriate for publishing
specific types of images on the Web.
• Use techniques that reduce the file size of images intended for the Web.
• Learn to distinguish among the different palette options for Web images.
• Prepare four types of images—grayscale, flat-color, full-color, and an image with a
gradient—for distribution on the Web.
• Select, edit, and save areas that will appear transparent on the Web.
Getting startedBefore beginning this lesson, you’ll rename or delete the Adobe Photoshop LE preferences
file to restore the application’s default settings. See “Restoring default preferences” on
page 2. Restart Adobe Photoshop LE.
Preparing images for the WebThis lesson shows you how to prepare four different types of images for distribution
on the World Wide Web—a grayscale image, a flat-color image, a full-color image, and
an image containing a gradient. It is not intended to show you how to serve images to
the Web.
When preparing images for distribution on the Web, keep in mind that the smaller the
image, the faster the download time. However, it’s also important that your image look
good, so the trick is in maintaining the quality of the image while keeping the file size at
a minimum.

201ADOBE PHOTOSHOP LEClassroom in a Book
For future reference, the following table shows which file formats and color modes should
be used when preparing specific types of images for online distribution. Flat-color images
refer to images with areas of repetitive, solid color, such as line art, logos, and illustrations
with type. Full-color images refer to images that contain broad color range and continuous
tones, such as photographs and images with flesh tones.
Turning off image previews
One of the ways you can reduce the size of images for the Web is to turn off the Image
Preview option in the Preferences dialog box. Turning off the Image Preview option saves
files without a preview icon.
1 Choose File > Preferences > Saving Files.
2 Choose Never Save from the Image Previews menu; then click OK.
Note: If you throw away your Preferences file, you will have to reselect the Image Preview
option.
Preparing a flat-color image for the Web
For best results, flat-color images should be converted to Indexed Color mode, and then
saved as GIF files. Flat-color images appear best on the Web without any dithering—
mixing colors to approximate those not present in the image.
You’ll prepare a flat-color image of a map.
1 Choose File > Open, and open the Africa.psd file, located in the Lessons/Lesson11
folder.
Image Color mode File format
Flat color Indexed color GIF
Full color(continuous tone)
RGB or Grayscale JPEG
Gradient RGB or Grayscale JPEG
Grayscale Grayscale Export GIF89a
Black and White Bitmap Export GIF89a

LESSON 11202Preparing Images for Web Publication
2 Choose File > Save As, rename the file Africa1.psd, and save it in the Lessons/Lesson11
folder.
Important: Rename and save a copy of the lesson files, to avoid overwriting the originals in
case you need them later.
3 Note the file size of the image before continuing.
You’ll start by converting the flat-color image to Indexed Color mode. Indexed Color
mode converts 24-bit images to 8-bit images, which display up to 256 colors (or shades of
gray). If the original image has more than 256 colors, all but 256 of the colors are removed
from the image. If the original image contains fewer than 256 colors, the palette defaults
to Exact and the number of colors in the image appears in the text box.
4 Choose Image > Mode > Indexed Color to convert the RGB image to indexed color.
The Indexed Color dialog box appears, where you set options for the color values and the
number of colors used to display the image.
The Palette menu in the Indexed Color dialog box lets you select a color palette option,
which determines the colors used to display your image.
• The Exact option uses exactly the same colors for the palette as those that appear in the
RGB image. No dithering option is available for the Exact palette, because all the colors
in the image are present in the palette. The Exact option is available only if 256 or fewer
colors are used in the RGB image.
• The System (Windows or Mac OS) option builds a color table using the color table of
the system you select. It is an 8-bit palette, capable of displaying 256 colors.
• The Web palette is a cross-platform 8-bit color palette. Use this palette option if you
plan to display more than one image on a page—for example, side-by-side images—so
that all the images are composed of the same colors on any platform.

203ADOBE PHOTOSHOP LEClassroom in a Book
• The Uniform option creates a palette based on a uniform sampling of colors from the
color spectrum based on the selected color depth.
• The Adaptive option builds a color table using the colors from your image. If you’re
displaying one image at a time, choose the Adaptive palette option.
5 For Palette, select Web.
The Color Depth menu lets you select how many colors you want to use to display
the image.
6 For Dither, select None. (Dithering makes the flat color look spotted.)
Note: When the Dither option is set to None, colors in the image shift to the nearest color. Keep
this in mind when designing your flat-color images.
7 Click OK to apply the color mode change to the map image.
8 If desired, choose Edit > Undo; then choose Image > Mode > Indexed Color again.
9 Choose File > Save As. Name the file Africa1.gif; for format choose CompuServe GIF;
and then click Save.
10 In the GIF Options dialog box, select Normal for Row Order; then click OK.
11 To see how the file size of the GIF image differs from the original image, use one of
the following methods:
• In Windows, use Windows Explorer to select Africa1.gif in the file list, and choose
File > Properties. Note the size of the file, and close the Properties box. Repeat, selecting
Africa1.psd, and note the difference in the file size.

LESSON 11204Preparing Images for Web Publication
• In Mac OS, return to the desktop, select Africa1.gif in the file list, and choose File > Get
Info. For the most accurate file size, note the value enclosed in parentheses next to Size.
12 Repeat the step, selecting Africa1.psd, and note the difference in file size.
13 Choose File > Close, and do not save changes.
Preparing a grayscale image for the Web
Grayscale images should be converted to RGB mode and then exported to the GIF89
Export module. By converting a grayscale image to RGB mode, the GIF89a Export
module lets you select the number of colors (in this case, shades of gray) you want to use
to display the image.
1 Choose File > Open, and open the Hands.psd file, located in the Lessons/Lesson11
folder on your hard drive.
2 Choose File > Save As, rename the file Hands1.psd, and save it in the Lessons/Lesson11
folder.
First, you’ll convert the hands image to RGB Color mode.
3 Choose Image > Mode > RGB Color.
Once you’ve changed the grayscale image to RGB mode, you use the GIF89a Export
module to select the number of grays you want the image to display.

205ADOBE PHOTOSHOP LEClassroom in a Book
4 Choose File > Export > GIF89a Export.
Note: If the GIF89a Export dialog box doesn’t appear, make sure that the GIF89a Export
module is installed in the Import/Export folder in the Plug-ins folder, and then restart Adobe
Photoshop.
When you export an RGB image in GIF89a format, the image is converted to indexed
color (which displays an 8-bit color preview).
5 In the GIF89a Export dialog box, deselect the Interlaced option to minimize the
file size.
The Interlaced option displays a large file as a low-resolution proxy first, and then redraws
it at a higher resolution as it downloads it from a Web server. (In this case, you don’t need
to use interlacing because the file you’re working with is small enough to download
quickly.)
6 Click Preview to see a preview of the hands image.
7 Click OK to return to the GIF89a Export dialog box.

LESSON 11206Preparing Images for Web Publication
8 To reduce the number of grays used to display the image, select Adaptive from the
Palette menu, and enter 32 for Colors.
9 Click Preview to display a preview of the hands image with 32 shades of gray instead of
the default value of 256 shades of gray. You’ll notice that there isn’t much difference.
10 Experiment by selecting different values from the Colors menu and then clicking
Preview to see how the image is affected.
When working with grayscale images, you can usually use fewer than 256 shades of gray
without significantly affecting the display quality of the image. Reducing the number of
grays used to display a grayscale image reduces the file size, thus speeding download time
on the Web.
11 When you’ve decided how many shades of gray you want to use to represent the hands
image, click OK to close the GIF89a Export dialog box.
The Save dialog box appears with the current filename and a .gif extension.
12 Name the file Hands2.gif (for Mac OS, remove the .psd extension from the filename),
and click Save to save the image in the Lessons/Lesson11 folder.
13 To see the difference between the original file and the GIF file you just saved, choose
File > Open, open the Hands2.gif file, and align it next to the original file. The GIF image
is about half the size of the original image.
14 Choose File > Close to close both files, and do not save changes.
Preparing a full-color image
Full-color images should be saved as JPEG files. The compression option you use deter-
mines how the color information in the image is preserved and the overall size of
the file.
You’ll save two copies of an identical RGB image as JPEG files using two different
compression options. After you’ve saved the images, you’ll close and then reopen them to
compare the differences in file size and image quality.
1 Choose File > Open, and open the Lion.psd file, located in the Lessons/Lesson11 folder
on your hard drive.

207ADOBE PHOTOSHOP LEClassroom in a Book
2 Choose File > Save As, and rename the file Lionlow.jpg. Select JPEG from the Save As
menu (Windows) or Format menu (Mac OS), and then click Save to save it in the
Lessons/Lesson11 folder.
Now you’ll experiment with JPEG compression settings.
3 In the JPEG Options dialog box, drag the slider to the left to Small File to select low
quality compression. Click OK.
4 Choose File > Close to close the Lionlow.jpg file.
5 Choose File > Open, and reopen the Lion.psd file, located in the Lessons/Lesson11
folder.
You’ll apply low compression to this file, to maintain the highest quality.
6 Choose File > Save As, rename the file Lionhi.jpg. Select JPEG from the Save As menu
(Windows) or Format menu (Mac OS), and then click Save.
7 In the JPEG Options dialog box, drag the slider all the way to the right to Large File to
select maximum quality compression. Click OK.
8 Choose File > Close to close the Lionhi.jpg file.

LESSON 11208Preparing Images for Web Publication
Now you’ll compare the size and quality of the two images. Before you open the files,
you’ll check their size in the Open dialog box.
9 Choose File > Open. Locate the Lionlow.jpg image, and select it in the file list. The size
of the file is displayed at the bottom of the dialog box.
10 Next, select the Lionhi.jpg image, and note its file size.
11 Now, open both the Lionlow.jpg image and the Lionhi.jpg file, and compare the
differences between the quality of the images.
You’ll probably notice a difference in image quality around the eyes and nose of the lion,
but because the files are small, the difference in image quality is not substantial. In
general, your choice of JPEG options will depend on your image size and quality needs.
12 Close all open files and do not save changes.
Preparing an image containing a gradient
Images containing gradients should be saved to the JPEG format. For gradients, the JPEG
format produces a smaller file than the GIF format with an Adaptive palette. (In addition,
saving a gradient to the GIF format may cause banding in the gradient.)
Now you’ll work with an image containing a gradient.
1 Choose File > Open, and open the Economy.psd file, located in the Lessons/Lesson11
folder on your hard drive.
You’ll duplicate the image, so that you can compare gradients at different compression
settings.
2 Choose Image > Duplicate, name the copy Gradlow.jpg, and click OK.
3 Repeat step 2, this time naming the copy Gradhi.jpg, and click OK.
4 Close the original Economy.psd file.
You’ll select two different compression options for these images.
5 Align the Gradlow.jpg and Gradhi.jpg images side-by-side.
6 Click the Gradlow.jpg window to make it active, and save it as a low-quality JPEG file:
• Choose File > Save As. For format, choose JPEG, and click Save.
• In the JPEG Options dialog box, drag the slider to the left to select Small File/Low, and
then click OK.

209ADOBE PHOTOSHOP LEClassroom in a Book
7 Click the Gradhi.jpg window to make it active, and save it as a high-quality JPEG file:
• Choose File > Save As. For Format, choose JPEG, and then click Save.
• In the JPEG Options dialog box, drag the slider to the right to select Large
File/Maximum, and click OK.
8 Before continuing, close both images. You must reopen them to compare the difference
in image quality.
9 Choose File > Open, and open Gradhi.jpg, located in the Lessons/Lesson11 folder.
Repeat the step for the Gradlow.jpg file. Align them side by side by dragging them by the
title bar.
10 Compare the quality of the gradient in both images, zooming in on details in the
images if necessary. You’ll notice that the quality of the gradient saved with Large
File/Maximum compression is significantly better than the image saved with Small
File/Low compression.
Select the Medium, High, or Maximum compression options for images containing
gradients; these options preserve most of the color information in the gradient.
11 Close the files and do not save changes.
Saving an image with transparency
You can create transparent areas in an image using the GIF89a Export module. To define
areas as transparent, you must first convert the image to Indexed Color mode. You’ll
define the edges of an image as transparent to create a soft-edged effect around the image.
The transparency will show up when you export the image and view it in a Web browser;
the browser must support the transparent GIF file format.
1 Choose File > Open, and open the Zebra.psd file, located in the Lessons/Lesson11
folder on your hard drive.
2 Choose File > Save As, rename the file Zebra1.psd, and save it in the Lessons/Lesson11
folder.
First, you’ll take a closer look at the image’s border.
3 Select the zoom tool in the toolbox, and zoom in on a corner of the zebra image.

LESSON 11210Preparing Images for Web Publication
Notice the solid gray background outside the scalloped edges of the image. This gray area
is the area you’ll define as transparent, so that only the scalloped edges are visible when
the image is opened in a Web browser.
To do this, you will first isolate the border before converting the image to Indexed Color
mode. You will use the magic wand tool to isolate the border.
4 Double-click the magic wand tool to select it and display its Options palette. In the
Magic Wand Options palette, set the tolerance to 0, and deselect Anti-aliased.
5 Click in the border portion of the image, near the edge of the image. Double-click the
zoom tool to zoom out and view the image. You will see that the entire border is selected.
6 With the border selected, select a color from the Swatches palette that doesn’t exist in
the image and that stands out easily from the rest of the image. (We chose 255 red, 0 green,
and 0 blue.)
Entire border selected Selecting a color
You’ll use the selected color to isolate visually the area that will become transparent.
7 Select the paint bucket tool, and click anywhere in the border to fill the selection with
the current foreground color.

211ADOBE PHOTOSHOP LEClassroom in a Book
8 Choose Select > None to deselect the border.
Now you’ll convert the RGB image to indexed color.
9 Choose Image > Mode > Indexed Color. For Palette choose Adaptive, and for Dither
choose Diffusion; then click OK.
Both the Adaptive and Web palettes build a color table from the image with 216 colors. If
you experiment with a Web palette and no dithering, you’ll notice that the Web palette
makes the background appear too grainy, and no dithering makes it appear posterized.
10 Choose File > Export > GIF89a Export.
11 Click the hand tool in the GIF89a Export dialog box and drag the image in the
preview window so that you can see the border.
12 Click the eyedropper tool in the GIF89a Export dialog box. You’ll use it to select the
colors you want to make transparent.
13 To select the area you want to make transparent, click the eyedropper tool in the
border area you isolated.
The border changes to the default transparency index color, which matches the Web
browser’s background color. The color you selected to be transparent is outlined in the
color swatches below the preview of the zebra.
Now, you’ll change the background color in the image preview to match the background
color of your Web browser. Changing this preview color lets you see exactly how the
image will appear in your Web browser.

LESSON 11212Preparing Images for Web Publication
14 Click the Transparency Preview Color (Windows) or the Transparency Index Color
(Mac OS) swatch. (By default, this swatch matches the background color of the Netscape®
Navigator browser—that is, about 192 red, 192 green, and 192 blue.)
Selecting the default transparency color Selecting a new color from the color picker
15 Select a color that matches the background color of your Web browser. (For this
example, try selecting a color that isn’t present in the image so that the result is obvious.)
Click OK.
The image is displayed against the background color you selected.
16 Double-click the hand tool in the dialog box to zoom out of the image. Notice that
the color you just picked for your Web browser background appears only in the image’s
border.
The original image contained many areas of gray. By isolating the gray in the border, you
confined the transparency to the border only.
17 Click OK to close the GIF89a Export dialog box. The Save dialog box appears.
18 Name the file Zebra1.gif, and click Save to save the image. It’s important to add
the .gif extension.
19 To view the GIF file you just created and compare it to the original, choose File >
Open, and select Zebra1.gif.
20 Choose File > Close, and close the files without saving changes.
You’ve completed preparing different images for electronic publication and the Web.

213ADOBE PHOTOSHOP LEClassroom in a Book
Review questions1 What determines the file format you should use when saving images for Web
publication?
2 What is interlacing?
3 What is a Web palette? What is an Adaptive palette?
4 What is the benefit of selecting the Web palette when preparing images for publication
on the World Wide Web?
5 In what format should you save your final image if you wish to maintain transparent
portions of the image when it is displayed in a browser?
6 Describe some techniques for optimizing files for the Web so that they download
more quickly.
Review answers1 The type of image you’re working with determines the file format you should use to
save an image for publication on the Web.
2 Interlacing displays a large file on the Web as a low-resolution approximation first, and
then redraws it at a higher resolution as the image downloaded from a Web server. Inter-
lacing is useful for large files that take a while to download.
3 The Web palette is a cross-platform 8-bit color palette that displays colors the same on
the Windows or the Mac OS platform. This palette is useful for displaying more than one
image per page, so that all images share the same palette. The Adaptive palette builds a
color table using the colors from an image, and is useful for displaying just one image at
a time.
4 Selecting the Web palette ensures that your images are displayed using the same color
palette, regardless of the platform on which the image is displayed.
5 To specify transparencies, the file should be exported as a GIF89a file.

LESSON 11214Preparing Images for Web Publication
6 Depending on the type of image, you can reduce the file size in Photoshop without
compromising image quality using these techniques:
• Turn off image previews so that files save without a preview icon.
• When converting an image to Indexed Color mode, choose a palette that uses as few
colors as needed to display the image at the desired quality.
• When possible, reduce the number of colors in the image.
• In grayscale images, reduce the shades of gray in the image.
• For full-color images and images with gradients, experiment with JPEG compression
settings.

215ADOBE PHOTOSHOP LEClassroom in a Book
Index
A
Adaptive Palette option 203
Add Layer Mask command 153
additive color 46
Adobe Certification program 4
Adobe Illustrator
artwork compared to Photoshop artwork 40
Adobe Online 36
Adobe Photoshop color picker 115
airbrush tool 101, 109–110, 114
arrow keys 128
aspect ratio 127
Auto Levels command 177, 178
compared to Levels 178
Auto Screen Frequency option 50
B
background
converting to layer 83
masking 153
replacing 196
background color
choosing 104, 135
filling with 170
of Web browser 212
selecting from color picker 115–116
Background color icon 24
base color 131
base layer 166
bit depth 44
Bitmap mode 46
black point value 181
blend color, explained 132
blending modes
explained 131
layers and 88
Block option 91
brightness
adjusting 174, 177
explained 46
Brightness slider 177
Brightness/Contrast command 142, 177, 186
Brush Size option 103
brushes
choosing 101
creating 118–120
customizing 118–120
loading 119
setting options 101
spacing 120
burn tool 195
C
Canvas Size command 139
center point
selecting from 62
checkerboard 79, 84
chroma 45
Classroom in a Book
installing files 2
clipping groups
creating 166–169
explained 157
Clone (non-aligned) option 192
cloning images 192
Color Balance command 186, 194
Color Balance dialog box 187
color bar 113
color casts
correcting 186, 194
in scanner 49
color corrections
brightness and contrast adjustments 177
generalized 178
highlight and shadow adjustments 179–182
midtone adjustments 179–180, 183–186
special-purpose adjustments 183–186
tonal range check 174–176
using tools and commands for 173–187
color depth 44
Color Depth option 203
Color mode 133, 134
color models
color gamuts and 45
editing images and 46
explained 45
HSB 45–46
RGB 45
color modes
Bitmap mode 46
for online distribution 201
Grayscale mode 47
Indexed Color mode 47, 202–204
Color palette 113–114
color picker 181
Color Picker dialog box 115
color selection boxes 104
compressions, comparing 206, 209
Constrain Proportions option 54, 130
Constrained Aspect Ratio option 127
constraining
file size 130
lines 106
moves 63
selections 127–128, 166

INDEX216
Contents screen 33
context-sensitive
Help 33
menus 32
continuous tone 41
continuous-tone images 22
Contrast slider 177
contrast, adjusting 174, 177, 197
copying 63
images 208
layers 89
selections 63
crop tool 59, 191
cropping images 74, 191–192
Curves command 177
Curves dialog box 183–187
D
Darken mode 88
darkening selectively 170, 195
data transfer, initiating 51
Default colors icon 24, 105, 138
defaults
palettes 32
restoring palette positions 32
restoring preferences to 2–3
Define Brush command 120
Delete Layer command 92
deleting
layers 92
masks 171
deselecting 60
dialog boxes
saving position 32
See names of individual dialog boxes
digitized images 22
Display & Cursors command 148, 162
Dither option 203
dithering 201
Document Sizes option 29
documentation overview 3
dodge tool 170, 195
dots per inch (dpi)
See output device resolution
download time
improving 206, 214
downsampling 53
duplicating and moving 63
duplicating images 208
dynamic range 174
E
edges See
selection borders
Efficiency display option 30
elliptical marquee tool 59
embossing 169–170
enlarging magnification 26, 28
eraser tool 91, 101, 117
erasing 117
See also deleting
Exact Palette option 202
exporting
gradients to JPEG format 208
indexed-color images to GIF 209–212
RGB images to GIF format 204–206
eyedropper tool 101, 110
F
Fade option 113
fastening points 69, 70
Feather command 160
Feather Radius option 160
file formats
for online distribution 201
file size
constraining 130
layers and 95
reducing 201
resampling and 53
files
dummy 52
flattening 96, 143
opening bitmap images 22
Fill dialog box 166
filling
with background color 170
with foreground color 166
Fit on Screen command 26, 63, 67, 69
flat-color images 201
Flatten Image command 96, 143, 171
flattening images 143, 171
flipping 71, 73
foreground color
choosing 104, 106
editing with Color palette 113–114
selecting from color picker 115–116
selecting with eyedropper tool 109–110
Foreground Color icon 24
Free Transform command 92–94
full-color images 201
G
gamma 178
gamuts, explained 45
Gaussian Blur filter 108
GIF format
compared to JPEG 208
exporting indexed color images to 201–204
GIF Options dialog box 203
GIF89a Export dialog box 205, 211–212
GIF89a Export module 205
gradient tool 86, 101
gradients
applying 86–87
banding in 87
creating 111–113, 117–118, 135
creating transparency with 153–154
online distribution and 208
grayscale images
colorizing 133
definition 47
preparing for online distribution 204–206

217ADOBE PHOTOSHOP LEClassroom in a Book
Grayscale mode 47
Grid Colors option 85
Grid Size option 85
Group with Previous command 167
H
halftone dots. See halftone screens 41
halftone screens 41
hand tool 28, 70
Height option 130
Help. See online Help
Hide command 30
Hide Edges command 65, 143
hiding and showing
layers 81–82
palettes 30
selections 143
Highlights option 195
highlights, adjusting 178, 181, 194
histogram 174, 179–180
compressed tonal range 193
hot spot 102, 126
HSB color model 45–46
hues
defined 45
I
image previews, turning off 201
image resolution 41–43
ratio to screen frequency 53
image size
original versus final dimensions 53
resolution and 43–44
specifying 129–130
Image Size command 42, 129–130
image window 21, 29
images
adding type to 140
canvas and 139
continuous-tone 22, 41
copying layers between 89, 129
cropping 74
darkening selectively 170
editing, color model for 46
exporting to GIF format 204–206
flat-color 201
flattening 171
full-color 201
getting into Photoshop 22
key types 175
lightening selectively 170
preparing for online distribution 199–212
raster (pixels) 40
resampling 53–55
scanning 49–54
scrolling 28–29
sharpening 197
types of 41
vector 40
viewing 26–29
Index (Help) 35
Indexed Color dialog box 202
Indexed Color mode. See indexed color images
indexed color images
exporting to GIF format 202–204, 209–212
Info bar 29
Info palette 125–126
RGB values in 48
Info/Navigator/Options palette group 65
input values 183
installing Classroom in a Book files 2
Interlaced option 205
interpolation 53
J
JPEG format
compared to GIF 208
online distribution and 206–208
JPEG Options dialog box 207, 208
K
key types 175
keyboard shortcuts 24
clipping groups 168
default colors 162, 166
filling with background color 170
filling with foreground color 166
loading selections 132
selecting 64
Kodak PhotoCD 22
L
Large File/Maximum Quality option 209
lasso tool 59, 67–69
layer masks
adding 153, 159–160
editing 161–163
explained 157, 159
merging 171
removing 171
turning on 165
unlinking from layer 163–164
viewing mask channel 160
Layer Options dialog box 83, 165
layers
background 79
blending modes 88
changing order of 83
clipping groups 166–169
converting background to 83
copying between images 89, 129
creating 85–86
deleting 92
duplicating 169
explained 79
file size and 95
flattening 171
hiding and showing 81–82
linking 94
masking with 153

INDEX218
merging 95, 96, 137
opacity 82
renaming 83
selecting 82
selections as 90
stacking order 79
thumbnail 81
unlinking 95
viewing 79
Layers palette 80–96
Layers palette menu 86
Levels command 177
Levels dialog box 178, 179–180
Lighten mode 88
lightening selectively 170, 195
line screen 45
line tool 101, 105
lines per inch (lpi). See also screen frequency 45
lines, drawing 106
link icon 94, 130, 161
linking layers 94
links, in Help 34
Load Brushes command 119
loading selections into images 132
Low Quality option 207
M
magic wand tool 59, 65
magnetic lasso tool 59, 69–70
Make Layer dialog box 83
marquee tool 59, 60, 126–128
masks
creating 147
editing 148–151
explained 145
removing 171
type 142
Maximum Quality option 207
Merge Down command 137
Merge Visible command 137
Merge Visible Layers command 95
midtones, adjusting 179–180, 183–186, 194
Mouse Coordinates option 126
moving selections 63
MS Windows 98
scanning images 51
Multiply mode 134
N
Navigator palette 28
Netscape Navigator 212
New Layer button 138, 165, 169
New Layer dialog box 86
None command 60
O
Official Adobe Print Publishing Guide 4
online distribution
preparing files for 199–212
online Help 33–34
online services 36
on-screen presentation 52
Opacity slider 82
opacity, setting 104
output device resolution 44
output values 183
P
Paintbrush Options palette 102
paintbrush tool 101
paintbucket tool 140
painting tools 99–121
palettes
changing display of 30–32
for converting to indexed color images 202–204
moving groups 30
setting position of 32
showing or hiding 30
See also color tables, color pickers, names of individual palettes
See also names of individual palettes
Paste Into command 196
pencil tool 101, 105, 138
pixel depth 44
Pixel Dimensions option 42, 130
pixelization 49
pixels
defined 22
explained 40
plotted values 174
resolution and 41
selecting adjacent 65
pointers. See tool pointers
polygon lasso tool 59, 67
Precise Cursor option 126
preferences 32
palettes 32
restoring to defaults 2–3
Preferences dialog box 102
Preserve Transparency option 141, 169
previewing
color values 205
transparency 212
primary colors 46
Print Size command 43
Print Size option 130
push scanning 51
Q
Quick Mask icon 24
Quick Mask mode 148
quick masks
editing 148–151
explained 147
Quick Reference Card 3
R
Radial option 135
Radius slider 108
rasters 40
red outline (Navigator palette) 29
red overlay 147

219ADOBE PHOTOSHOP LEClassroom in a Book
reducing magnification 26–28
reference card 3
Refresh command 36
Remove Layer Mask command 171
Resample Image option 53, 54
resampling 53–55
Reset Palette Locations to Default option 32
resizing images 129–130
resolution. See bit resolution, image resolution, monitor resolution, output device resolution
result color 132
Reveal Selection option 160
Revert command 165
RGB images
color correcting 173–187
exporting to GIF 204–206
RGB model 46
Rotate command 70
rotating, layers and selections 70–71, 92
Row Order option 203
rubber stamp tool 101, 192
rubylith 147
S
sampling colors 109
Saturate option 195
saturation, defined 45
Save Palette Locations option 32
Scale command 71
scaling, layers and selections 71, 92, 93
scan resolution 49–54
publication type and 49
scanning images
determining resolution 49–53
file size setting 52–53
preparation for 49
scissors icon 64
Scratch Sizes display option 30
screen frequency 45
calculating scan resolution with 53
setting in Photoshop 50
Screen mode 136, 168
screen mode icons 24
screen ruling 45
selecting
by color 59, 65–66, 72
elliptical area 59, 61–62
freehand 59, 67–70
from center 62
from center outward 166
nontransparent areas 132
parts of a selection 72, 147
quick mask vs. tools 150
rectangular area 59, 60
straight line 67–69
tools 59, 72–74
unselected areas 66
selection borders
constraining 166
hiding and showing 65, 143
repositioning 60, 61
selection marquees. See selection borders
selections
adding to and subtracting from 68–69
as layers 90
constraining 127–128
copying while moving 63
copying within Photoshop 63
flipping or rotating 70–71
hiding or showing borders 65
inverting 72
loading into images 132
masks and 147
moving 62, 129
nontransparent 132
nudging 65
revealing 160
softening edges of 160
stroking 138
subtracting from 72
shadows
adjusting 178, 181, 186, 194
sharpening images 197
Show command 30
Show Edges command 65, 143
Show Info command 125
Show Layers command 80
Show Swatches command 106
single column marquee tool 59
single row marquee tool 59
size change factor 53
Small File/Low Quality option 208
smudge tool 111
Spacing option 120
specular white 181
sponge tool 195
stacking order 79
Standard mode 148
Standard mode icon 149
Standard Screen mode 25
starting the program 22
Stroke command 138
stroking selections 138
Swatches palette 106
Switch colors icon 24, 105, 148, 162
System Palette option 202
T
texture, adding 196
thumbnails, layer mask 160
Timing display option 30
tonal range 174
brightness and contrast adjustments 174, 177
generalized adjustments 178
highlight and shadow adjustments 179–182
midtone adjustments 178–180, 183–186
special-purpose adjustments 183–187
toning tools 195

INDEX220
tool pointers
changing appearance of 103
hot spots of 102
toolbox
illustrated 24
overview 24–25
tools
color correction 177–186
hidden 25, 59
hot spot 126
painting 99–121
selecting 24, 59, 72–74, 126–128
See also individual tool names
Topics window 35
tour 5–19
Transform command 70
transformations 70–71, 92–94
transparency
exporting 209–212
partial 153
preserving on a layer 141
setting preferences for 84
viewing 84
Transparency command 85, 108
Transparency Index Color (Mac OS) option 212
Transparency Preview Color (Windows) option 212
Transparent option 114, 121
type 140
Type dialog box 140, 142
type mask tool 142
type masks 142
type tool 140
U
Undo command 60
Unsharp Mask command 197
V
vectors 40
Vertical Centered text option 141
View menu 26
view percentage 26, 27
viewing
layers 81–82
transparency 212
W
Web browser 212
Web Palette option 202
Web publishing 199–212
Wet Edges option 115, 116
white point value 181
windows, setting position of 32
work area 21
Z
Zoom commands 26
zoom tool 27–28

Production NotesThis book was created electronically using Adobe FrameMaker. Art was produced
using Adobe Illustrator, Adobe ImageReady, and Adobe Photoshop. The Minion® and
Myriad® families of typefaces are used throughout the book.


Adobe Certified Expert Program
What is an ACE?An Adobe Certified Expert (ACE) is an individual who has passed an Adobe Product Proficiency Exam for a specific Adobe software product. Adobe Certified Experts are eligible to promote themselves to clients or employers as highly skilled, expert-level users of Adobe software. ACE certification is a recognized worldwide standard for excellence in Adobe soft-ware knowledge.
An Adobe Certified Training Provider (ACTP) is a certified teacher or trainer who has passed an Adobe Product Proficiency Exam. Training organ-izations that use ACTPs can become certified aswell. Adobe promotes ACTPs to customers who need training.
ACE BenefitsWhen you become an ACE, you enjoy these special benefits: • Professional recognition • An ACE program certificate • Use of the Adobe Certified Expert program logo
Additional benefits for ACTPs• Listing on the Adobe Web site• Access to beta software releases when available• Classroom in a Book in PDF
For information on the ACE and ACTP programs, go to partners.adobe.com, and look for Certified TrainingPrograms under the Support section.
The Adobe Photoshop CertificationGuide contains comprehensive studymaterial as well as Practice ProficiencyExams to help better prepare usersfor the Adobe Photoshop ProficiencyExamination!

Check out other titles from Adobe PressFor more information on Adobe Press books, visit www.adobe.com/adobepress.
Classroom in a Book
Classroom in a Book®, the world’s best-selling series of hands-on software training workbooks, offers complete self-paced training based on real-world projects. Books include intermediate and advanced techniques for both Windows and Macintosh. Use the specially created files on the CD as you work through the lessons and special projects in the book.
Print Publishing Guide and Electronic Publishing Guide
Essential resources for pub- lishing professionals and novices, these books provide succinct, expertly illustrated explanations of the basic concepts and issues involved in electronic and print pro-duction, along with Adobe’s tried-and-true guidelines, tips, and checklists for ensuring high-quality output.
Electronic Publishing Guide ISBN: 1-56830-469-2 US $35
Print Publishing Guide ISBN: 1-56830-468-4 US $35
Productivity Kit
Adobe Classroom in a Book Productivity Kits are sets of real-world projects that extend the Classroom in a Book series. Each book includes templates, artwork, and other ingredients made to help you get quick results with professionally designed templates. Step-by-step instructions guide you through the design and development of publications for print and the Web.
Design Essentials, Third Edition
This is the completely revised third edition of the best-selling Design Essentials. This creative guide provides innovative and inspiring design tech-niques broken into illustrated steps. ISBN: 1-56830-472-2 US $39.99
Stop Stealing Sheep
This acclaimed and lively guidebook shows that type is easy to use, easy to understand, and a powerful communication tool. It includes practical explanations on what type is, and how to use it to your advantage.
ISBN: 0-672-48543-5 US $19.95
For other Adobe publications, go to:www.adobe.com/adobepress orwww1.fatbrain.com/documentation/adobe