lightboard - duke university
TRANSCRIPT

LightboardPrimerThis is an open hardware project based on the Michael Peshkin Lightboard from Northwestern University:
https://sites.google.com/site/northwesternlightboard/
Concept
A simple design that allows a lecturer presenting to a camera to write as they would on a white board but facing students. This eliminates the need for complicated computer generated graphics.
Differences between the Duke Lightboard and the original Peshkin Lightboard
The Duke Lightboard focuses on smaller, lighter construction the goal of eliminating the need for many studio accessories. As a result, the design is somewhat portable and reduces the need for complicated lighting arrangements. The three key technical elements are the use of an electronic "flipper" to mirror the video, the use of a custom designed LED clip, and the exclusive use of bolt-together 80/20 aluminum framing as opposed to a welded steel frame. A project goal is also to create a design that is simple enough a lower level technician could build it. It was also desirable to use common, easily sourced components for the construction.
The electronic flipper processes the reversed image as opposed to shooting the camera through an actual physical mirror as spec'ed in the original design. This eliminates complication and geometry from the design as well as increasing the light input to the camera. The LED Clip is also a key element. The design holds cheap 3528 sized LED's on standard 8mm strips precisely up to the glass. The design is extremely light and includes framing for a second LED strip that can illuminate the face of the lecturer without the need for industrial studio lighting. The second Subject LED Strip is set to a warm 3000K temperature which is more appropriate for human skin. The clip can be reproduced using simple extruding or 3D printing technologies. The use of 80/20 components considerably reduces the weight of the final product while making it easier for someone who does not have access to a welder or other metal working equipment.
Design Evolution
The project progressed through two stages where a small prototype was built to test various concepts while providing an example instructional development teams could use in designing course concepts and material.
NOTE
Thank you to all who have built a version of our design, the support and feedback has been overwhelming. It has been a while since this project was executed. We have received correspondence from several people recently saying a few of the links we refer are now discontinued. In chasing down a few of these notices, we have found that most of the items are still available and unchanged but under different model numbers that reflect cosmetic packaging differences. We encourage our community members to help. When you find a dead link and research the current component, please edit this page with the current part.
PrototypeBill of Goods for Prototype (3'x2') Lightboard
Standard Fabrication Components
Item Qnty Est. Cost Each
Total Cost
Link

80/20 - 24" 15 Series sections 2 http://www.amazon.com/80-20-SERIES-T-SLOTTED-EXTRUSION/dp/B001F0F14E/
80/20 - 36" 15 Series sections 4 http://www.amazon.com/80-20-SERIES-T-SLOTTED-EXTRUSION/dp/B00BL104NU/
80/20 - Inside Gusset 4 http://www.amazon.com/80-20-Series-4-HOLE-INSIDE/dp/B001IA12YE
80/20 - 7-Hole Tee Joining Plate 2 http://www.amazon.com/80-20-Series-5-HOLE-JOINING/dp/B001IA4PQ6/
80/20 - 4-Hole 90-degree Joining Plate
2 www.amazon.com/80-20-Series-4-Hole-Joining/dp/B001IA2LX0/
80/20 - Leveling Feet 4 http://www.amazon.com/80-20-Inc-Series-Leveling/dp/B006YVZ04A/
80/20 - Inside Corner Brackets 4 http://www.amazon.com/80-20-Series-2-HOLE-BRACKET/dp/B001IA4Q7Y
80/20 - 5/16 Button Head Bolts 30 http://www.amazon.com/80-20-Inc-Series-Flanged/dp/B006ZCLWE0/
80/20 - 5/16 T-Nuts 30
60 watt power supply 1 http://www.amazon.com/LEDwholesalers-Waterproof-Transformer-3-prong-3204/dp/B003WOIVRU/
8mm - 5m 6000K 3528 8mm LED Strip
1 http://www.amazon.com/HitLights-Density-Flexible-Adapter-included/dp/B005ST2I9O/
8mm - 5m 3000K 3528 8mm LED Strip
1 http://www.amazon.com/HitLights-White-Double-Density-Flexible/dp/B00710K0DE/
LED Strip Connector 2 http://www.amazon.com/dp/B00JJ4SRSA/
Custom Fabrication Components
LED Clips 24 $5.99 http://www.thingiverse.com/thing:307144
1/4 Tempered Glass
Bill of Goods for Desktop (6'x4') Lightboard
Standard Components
Item Qnty Cost Per
Cost Total
Link
80/20 - 72" 15 Series sections 6 $40.11 $240.66 http://www.amazon.com/80-20-SERIES-T-SLOTTED-EXTRUSION/dp/B001F0I3FI
80/20 - 24" 15 Series sections 2 $14.67 $29.34 http://www.amazon.com/80-20-SERIES-T-SLOTTED-EXTRUSION/dp/B001F0F14E/
80/20 - 24" 15 Series sections 2 $21.03 $42.06 http://www.amazon.com/dp/B00BL104NU/
80/20 - 5-Hole Tee Joining Plate 4 $31.20 http://www.amazon.com/dp/B001IA4PQ6
80/20 Inside Corner Bracket 2 $2.95 http://www.amazon.com/dp/B001IA4Q7Y/
80/20 - 45 Degree 15 Series Support (18")
2 $17.75 $35.50 http://www.amazon.com/dp/B006YVZ4UU/
80/20 - 45 Degree 15 Series Support (12")
2 $15.40 $30.80 www.amazon.com/80-20-Series-1515-UL-Support/dp/B00OCWXSKG/
80/20 - Caster Mount 4 $74.60 www.amazon.com/dp/B00J0934RI/
80/20 - Casters 4 $124.00 http://www.amazon.com/dp/B006YVZ2IO/
80/20 - Inside Gusset 4 $6.25 $25.00 http://www.amazon.com/80-20-Series-4-HOLE-INSIDE/dp/B001IA12YE
80/20 - Pivot Arm 2 $7.00 $14.00 http://www.amazon.com/gp/product/B001IA2M3O
80/20 - Living Nub 2 $4.80 $9.60 http://www.amazon.com/gp/product/B001IA2M34
80/20 - 5/16 Button Head Bolts 15 $.36 $5.40 http://www.amazon.com/80-20-Inc-Series-Flanged/dp/B006ZCLWE0/
80/20 15 Series 3355 Bolt Kit 22 $1.50 $33.00 http://www.amazon.com/80-20-Inc-Slide-In-Economy/dp/B006ZCLYVQ/
80/20 15 Series 3357 Bolt Kit 2 $2.25 $4.50 http://www.amazon.com/80-20-Inc-Slide-In-Economy/dp/B006ZCM0CS/
8mm - 5m 6000K 3528 8mm LED Strip 2 $22.95 $45.90 http://www.amazon.com/dp/B005ST2I9O/
8mm - 5m 3000K 3528 8mm LED Strip 2 $22.95 $45.90 http://www.amazon.com/dp/B00710K0DE/
LED Clips 24 $5.99 http://www.thingiverse.com/thing:307144
Dimmer 4 $2.99 $12.96 http://www.amazon.com/dp/B003L4KKF2/
150 Watt DC Power Supply 2 $68.00 $136.00 http://www.amazon.com/dp/B00IHZ9ME0/
Terminal Block 1 $7.99 $7.99 http://www.amazon.com/dp/B0055HOK7C/
Fuse block 2 $2.25 www.amazon.com/Fuse-Block-Full-Molded-3AG/dp/B00E3X6MGQ/
5/16-18 Tap 1 $6.44 $6.44 www.amazon.com/Vermont-American-20270-Fractional-Bottoming/dp/B000I1NZJY/
Tap Wrench 1 $10.23 $10.23 http://www.amazon.com/Vermont-American-21914-Economy-through/dp/B000BQLW6Y
Total
Custom Fabrication Components
****If you have no access to a 3D printer, simple versions of the mounting systems can be created from wood or plastic in any local fab shop. Dimensions and specs are provided below.
3/8 Low Iron Tempered Glass 1 $1026.89 $1026.89 Source Locally, freight shipping is cost prohibitive
LED Clip 48 Link: http://www.thingiverse.com/thing:379661
LED Dimmer Bracket 1 Link: http://www.thingiverse.com/thing:347864
Glass Standoffs 8 Link: http://www.thingiverse.com/thing:348064
Fuse Block and Cover 1 Link: http://www.thingiverse.com/thing:379691
Power Standoff 1 Link: http://www.thingiverse.com/thing:348049
Terminal Standoff 1 Link:
Optional
Electronic Mirroring System 1 $600 $600 http://www.ensembledesigns.com/products/brighteye/be72
Mirroring System Mount 1 Link:
Studio Lightboard Construction
80/20 Primer
This version of the Lightboard makes heavy use of 80/20 T-Slot extruded aluminum. T-Slot uses special nuts slid into slots then tightened to make a joint. Joint pieces come in a variety of shapes and sizes for various applications but the concept is the same. The special nuts (called T nuts) in this project are either single, double, or triple length. Note that using double and triple T-nuts where possible makes construction easier. An example is demonstrated in the video below.
80:20.m4v
LED Clip Primer
This project uses specialized clips to hold the LED strips precisely to the glass and provide subject lighting for the presenting lecturer. The clips are easily manufactured with 3D printing. The LED strips must then be inserted into the LED clip. This is demonstrated in the video below.
LED Clip.m4v
Principle Construction
Construction Of The Frame
Instructions Diagram Example Photo Example Photo

Construct left and right side frame by joining 1x 72" 80/20 extrusion to 1x 80/20 24" extrusion with a 5-hole T-Joining Plate, build two of these T shaped structures
Add supports for left side of frame by joining 1x 45 degree 15 series support to the T shaped structure created in step 1. The 45 degree supports have their own joints built in
Add 5 hole corner bracket to what will be the back side of the left and right frame
Add rear bracing by first taping the bottom 24" 80/20 1515 section. Add a pivot nub to
Add 5 hole T-Joining plate to the bottom of the frame at the same location as the vertical 72" piece of 80/20 1515

Add corner gusset to the middle and top of the frame near the centerline of the holes you had cut in the glass. Subtract3/4" for the center line of the 80/20 1515 crossbar we will be adding.
With both the left and right side of the stand complete, join them together at the bottom with two pieces of 72" 80/20 1515 acting as crossbars.
Attach 2x 45 degree 18" or 12" supports to the inside of the two frames and against the bottom, center crossbar.
Insert 4x 5/16 T-Nuts into the remaining 2 72" 80/20 1515 crossbars, latter these will support the glass. With the side containing the T-nuts facing forward, mounting them as cross bars to the structure.
Tap the top crossbar and top of the right and left sides of frame. Add a right angle connector.
At this point you should have a completed frame. Stop to check all connections and make sure everything is secure and tight
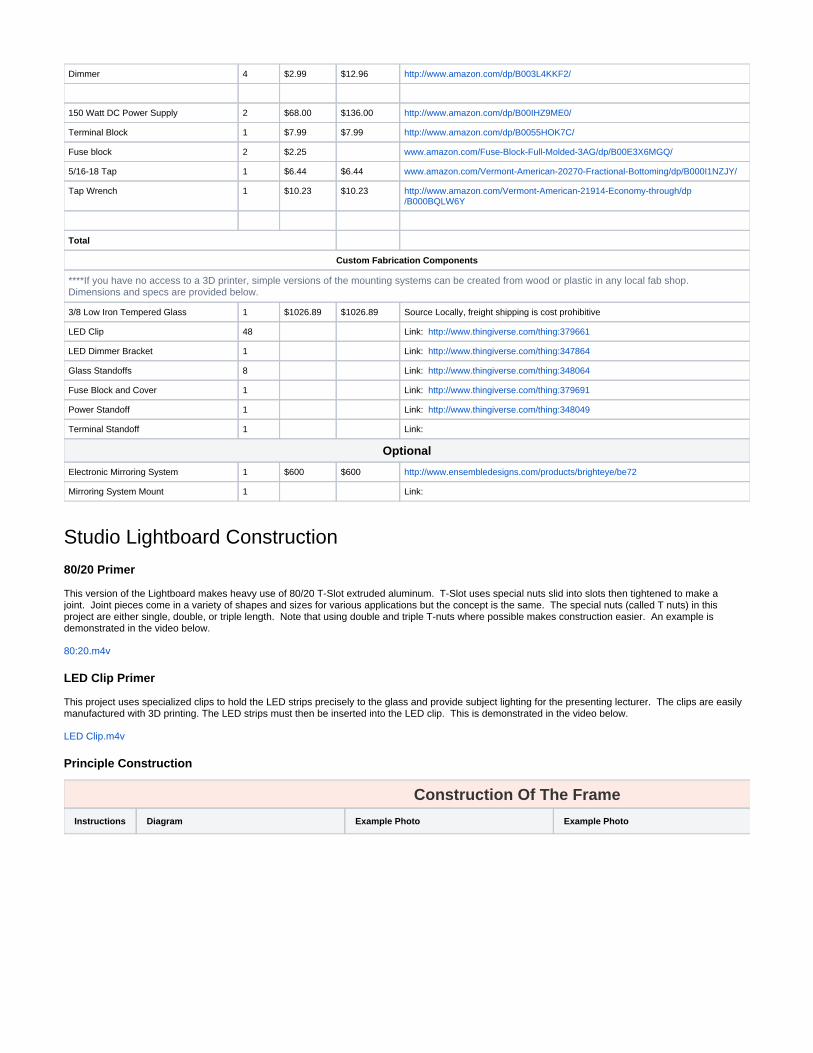
If 3D Printing the various custom mounts and brackets we used, start printing from this list:
Dimmer Bracket: http://www.thingiverse.com/thing:347864Glass Standoffs: http://www.thingiverse.com/thing:348064Power Supply Mount: http://www.thingiverse.com/thing:348049LED Clip: http://www.thingiverse.com/thing:379659Fuse Block and Cover: http://www.thingiverse.com/thing:379691Terminal Mounting Bracket: http://www.thingiverse.com/thing:379717
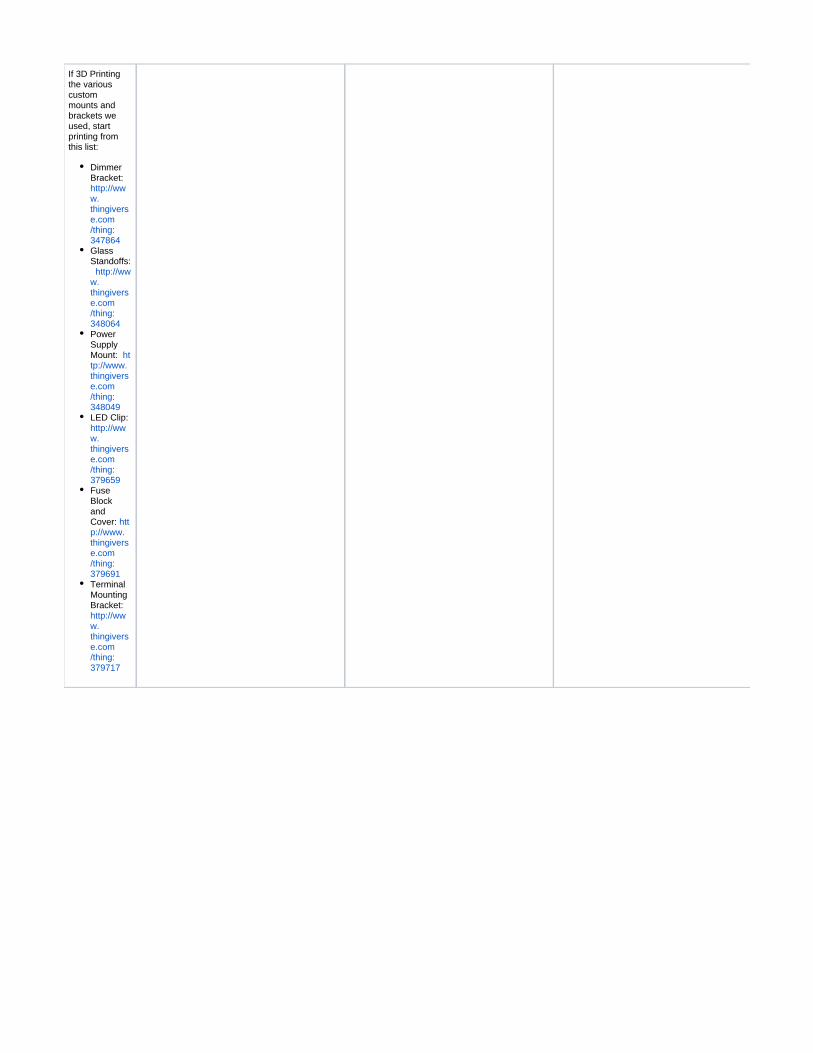
Attach the stand offs to the glass and insert a 2" 5/16-18 bolt and 5/16 fender washer on the outside. We found it best secure them with super glue to they don't fall off during assembly. The insert of the stand off should be in the glass as to prevent metal on glass contact. Standoffs may be sourced locally or custom stand offs easily fabricated from wood or plastic can be used. If using the 3D printing portion of this project, the standoffs file is here: http://www.thingiverse.com/thing:348064
Lay the stand down and put soft material over the frame (such as a towel). With several people helping, place the glass over the frame and secure it, making adjustments to the top cross bars as necessary. Bolt the glass to the frame, DO NOT OVER TIGHTEN
While stand is laying flat, attach casters and caster mounts to the bottom "corners" of the unit. BE SURE TO LOCK THE WHEELS. With everything attached, stand the unit up raising it evenly from the top corners. Be careful not to apply torsional force or twisting motions.

Secure power supplies to the left or right side of the stand. If using a 3D Printer you can download and manufacture the part: http://www.thingiverse.com
. /thing:348049If you do not have access to a 3D Printer a block of wood can be easily cut and fabricated to the dimensions in the example photo. The power supplies require two of these units, a lower and an upper.
Secure the power terminal block to the frame near the power supply. The power supply cables are short so a distance of no more than a few inches is suggested. The printable file is here: http://www.thingiverse.com
, /thing:379717while something similar can be fashioned with traditional carpentry as well.
Secure the 3D printed fuse block and fuse holders to the chassis. It is of critical importance that none of the power leads can come in contact with the metal frame. If you have no access to a 3D printer, a simple version of this mounting system can be created by using a wooden or plastic spacer of approximately the same dimensions.

Mount the Dimmer Bracket to the frame. Using heavy grade double stick tape, adhere the LED dimmers to the bracket. The Dimmer bracket can be fashioned out of a simple block of wood by a carpenter or if you have access to a 3D Printer you can use our design here: http://www.thingiverse.com/thing:347864
Using 16 gauge hookup wire, connect:
The power supply hot lead to the fuse holder using female spade connectorsConnect the hot output of the fuse holder to the power side of the terminal blockConnect the negative side of the power supplies to the terminal blockConnect a power lead to the power input of each dimmerConnect a negative lead to the negative input of each dimmerConnect a 12v 15 amp fuse to the fuse box
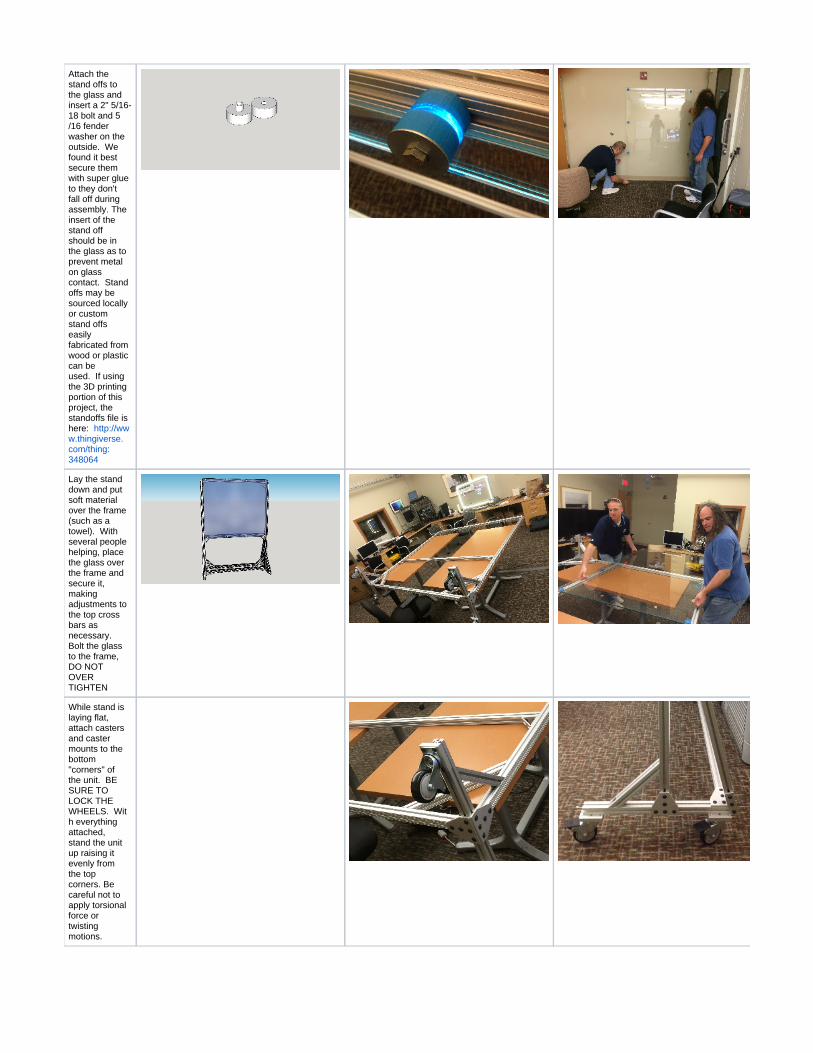
If using 3D printed components, manufacture a batch of LED Clips. Slide clips onto glass. LED strips can be inserted into the LED clips along the track lines. Add strips for the length of each side. It is possible to put LEDs along the bottom of the project but cleaning fluid drips can cause issues. LED File: http://www.thingiverse.com/thing:379659
LED Clip.m4v
Connect the LED strips to one another at the corners with the LED connectors.
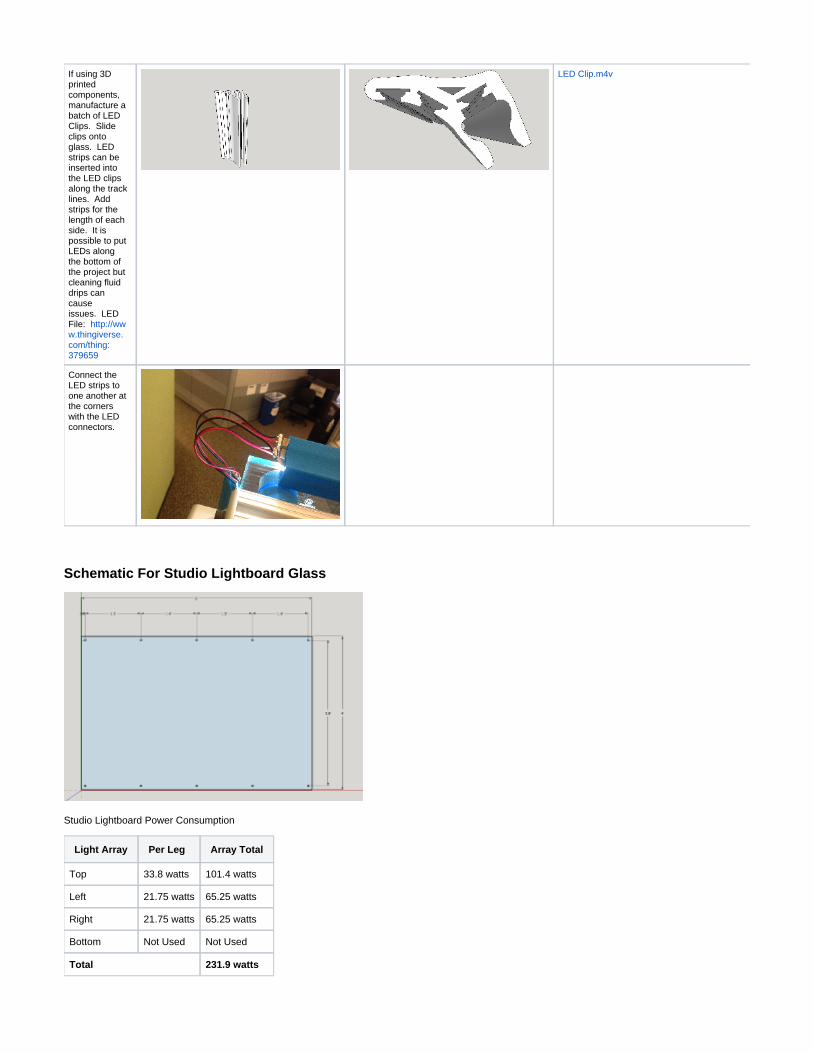
Schematic For Studio Lightboard Glass
Studio Lightboard Power Consumption
Light Array Per Leg Array Total
Top 33.8 watts 101.4 watts
Left 21.75 watts 65.25 watts
Right 21.75 watts 65.25 watts
Bottom Not Used Not Used
Total 231.9 watts

Markers:
We've found that these liquid markers work best and are easiest to clean with a dry cloth (not paper towel): Sanford Wet Bright Sticks Wet-Erase Fluorescent Markers, Assorted Fluorescent Colors, 5-Pack