liebert multilink 1.5 user manual - emerson network power
TRANSCRIPT

MONITORING
MultiLink 1.5�USER MANUAL

i
TABLE OF CONTENTS1.0 WHAT IS MULTILINK?. . . . . . . . . . . . . . . . . . . . . . . . . . . . . . . . . . . . . . . . . . . . . . . . . . . . .2
2.0 HOW DOES MULTILINK WORK? . . . . . . . . . . . . . . . . . . . . . . . . . . . . . . . . . . . . . . . . . . . . .3
3.0 HOW DO YOU CONTACT LIEBERT FOR TECHNICAL SUPPORT? . . . . . . . . . . . . . . . . . . . . . . .4
4.0 WHO CAN BENEFIT FROM MULTILINK?. . . . . . . . . . . . . . . . . . . . . . . . . . . . . . . . . . . . . . . .54.1 Configurations . . . . . . . . . . . . . . . . . . . . . . . . . . . . . . . . . . . . . . . . . . . . . . . . . . . . . . . . . . . . . . 5
4.2 Connections. . . . . . . . . . . . . . . . . . . . . . . . . . . . . . . . . . . . . . . . . . . . . . . . . . . . . . . . . . . . . . . . . 5
4.3 Platforms. . . . . . . . . . . . . . . . . . . . . . . . . . . . . . . . . . . . . . . . . . . . . . . . . . . . . . . . . . . . . . . . . . . 5
5.0 WHAT IS REQUIRED TO USE MULTILINK? . . . . . . . . . . . . . . . . . . . . . . . . . . . . . . . . . . . . . .6
6.0 WHAT DO YOU NEED TO DO BEFORE INSTALLING MULTILINK?. . . . . . . . . . . . . . . . . . . . . .7
7.0 DETERMINING YOUR CONFIGURATION . . . . . . . . . . . . . . . . . . . . . . . . . . . . . . . . . . . . . . . . .8
8.0 INSTALLING THE SOFTWARE . . . . . . . . . . . . . . . . . . . . . . . . . . . . . . . . . . . . . . . . . . . . . . . .98.1 Executing the Downloaded File, Unzipping if Necessary . . . . . . . . . . . . . . . . . . . . . . . . . . . . 9
8.2 Installing MultiLink. . . . . . . . . . . . . . . . . . . . . . . . . . . . . . . . . . . . . . . . . . . . . . . . . . . . . . . . . . 9
8.3 Checking Permissions for Multiple Users, if Needed. . . . . . . . . . . . . . . . . . . . . . . . . . . . . . . 11
8.4 Starting the Configuration Editor . . . . . . . . . . . . . . . . . . . . . . . . . . . . . . . . . . . . . . . . . . . . . . 12
9.0 CONFIGURING MULTILINK FOR YOUR SYSTEM . . . . . . . . . . . . . . . . . . . . . . . . . . . . . . . . . .139.1 Setting Up the Computer With Monitoring Agent . . . . . . . . . . . . . . . . . . . . . . . . . . . . . . . . . 13
9.1.1 Upgrade the MultiLink License. . . . . . . . . . . . . . . . . . . . . . . . . . . . . . . . . . . . . . . . . . . . . . . . . 149.1.2 Designate Targeted Client Computers . . . . . . . . . . . . . . . . . . . . . . . . . . . . . . . . . . . . . . . . . . . 159.1.3 Verify Configuration. . . . . . . . . . . . . . . . . . . . . . . . . . . . . . . . . . . . . . . . . . . . . . . . . . . . . . . . . . 15
9.2 Configuring the UPS Polling Rate and Serial Port . . . . . . . . . . . . . . . . . . . . . . . . . . . . . . . . 16
9.3 Configuring the Timing of Events . . . . . . . . . . . . . . . . . . . . . . . . . . . . . . . . . . . . . . . . . . . . . . 17
9.4 Setting Up the Log File . . . . . . . . . . . . . . . . . . . . . . . . . . . . . . . . . . . . . . . . . . . . . . . . . . . . . . 18
9.5 Checking Network Settings . . . . . . . . . . . . . . . . . . . . . . . . . . . . . . . . . . . . . . . . . . . . . . . . . . . 19
9.6 Saving Changes . . . . . . . . . . . . . . . . . . . . . . . . . . . . . . . . . . . . . . . . . . . . . . . . . . . . . . . . . . . . 19
9.7 Checking MultiLink Version . . . . . . . . . . . . . . . . . . . . . . . . . . . . . . . . . . . . . . . . . . . . . . . . . . 20
9.8 Closing the Configuration Editor . . . . . . . . . . . . . . . . . . . . . . . . . . . . . . . . . . . . . . . . . . . . . . 20
10.0 VIEWING UPS STATUS . . . . . . . . . . . . . . . . . . . . . . . . . . . . . . . . . . . . . . . . . . . . . . . . . . .2110.1 Opening the Status Viewer . . . . . . . . . . . . . . . . . . . . . . . . . . . . . . . . . . . . . . . . . . . . . . . . . . . 21
10.2 Adding or Deleting a UPS in the Status Viewer List . . . . . . . . . . . . . . . . . . . . . . . . . . . . . . . 22
11.0 RUNNING MULTILINK . . . . . . . . . . . . . . . . . . . . . . . . . . . . . . . . . . . . . . . . . . . . . . . . . . . .23
12.0 NOTIFYING CLIENTS OF EVENTS . . . . . . . . . . . . . . . . . . . . . . . . . . . . . . . . . . . . . . . . . . . .24
13.0 UNINSTALLING MULTILINK FROM YOUR SYSTEM . . . . . . . . . . . . . . . . . . . . . . . . . . . . . . . .27
14.0 LIEBERT SOFTWARE PROGRAM LICENSE AGREEMENT. . . . . . . . . . . . . . . . . . . . . . . . . . . .28

ii
APPENDIX A - OPERATING SYSTEM DETAILS . . . . . . . . . . . . . . . . . . . . . . . . . . . . . . . . . . . . . . . .30A.1 Windows XP/2000/NT/Me/98/95 . . . . . . . . . . . . . . . . . . . . . . . . . . . . . . . . . . . . . . . . . . . . . . . 31
A.1.1 Platform-Specific Requirements . . . . . . . . . . . . . . . . . . . . . . . . . . . . . . . . . . . . . . . . . . . . . . . . 31A.1.2 Installation Notes . . . . . . . . . . . . . . . . . . . . . . . . . . . . . . . . . . . . . . . . . . . . . . . . . . . . . . . . . . . . 31A.1.3 Notes on Running MultiLink . . . . . . . . . . . . . . . . . . . . . . . . . . . . . . . . . . . . . . . . . . . . . . . . . . . 31A.1.4 Uninstalling MultiLink . . . . . . . . . . . . . . . . . . . . . . . . . . . . . . . . . . . . . . . . . . . . . . . . . . . . . . . 34
A.2 Sun Solaris . . . . . . . . . . . . . . . . . . . . . . . . . . . . . . . . . . . . . . . . . . . . . . . . . . . . . . . . . . . . . . . . 35A.2.1 Platform-Specific Requirements . . . . . . . . . . . . . . . . . . . . . . . . . . . . . . . . . . . . . . . . . . . . . . . . 35A.2.2 Installation Notes . . . . . . . . . . . . . . . . . . . . . . . . . . . . . . . . . . . . . . . . . . . . . . . . . . . . . . . . . . . . 35A.2.3 Notes on Running MultiLink . . . . . . . . . . . . . . . . . . . . . . . . . . . . . . . . . . . . . . . . . . . . . . . . . . . 35A.2.4 Uninstalling MultiLink . . . . . . . . . . . . . . . . . . . . . . . . . . . . . . . . . . . . . . . . . . . . . . . . . . . . . . . 36
A.3 Linux . . . . . . . . . . . . . . . . . . . . . . . . . . . . . . . . . . . . . . . . . . . . . . . . . . . . . . . . . . . . . . . . . . . . . 37A.3.1 Platform-Specific Requirements . . . . . . . . . . . . . . . . . . . . . . . . . . . . . . . . . . . . . . . . . . . . . . . . 37A.3.2 Installation Notes . . . . . . . . . . . . . . . . . . . . . . . . . . . . . . . . . . . . . . . . . . . . . . . . . . . . . . . . . . . . 37A.3.3 Notes on Running MultiLink . . . . . . . . . . . . . . . . . . . . . . . . . . . . . . . . . . . . . . . . . . . . . . . . . . . 38A.3.4 Uninstalling MultiLink . . . . . . . . . . . . . . . . . . . . . . . . . . . . . . . . . . . . . . . . . . . . . . . . . . . . . . . 38
A.4 Hewlett Packard HP-UX . . . . . . . . . . . . . . . . . . . . . . . . . . . . . . . . . . . . . . . . . . . . . . . . . . . . . 39A.4.1 Platform-Specific Requirements . . . . . . . . . . . . . . . . . . . . . . . . . . . . . . . . . . . . . . . . . . . . . . . . 39A.4.2 Installation Notes . . . . . . . . . . . . . . . . . . . . . . . . . . . . . . . . . . . . . . . . . . . . . . . . . . . . . . . . . . . . 39A.4.3 Notes on Running MultiLink . . . . . . . . . . . . . . . . . . . . . . . . . . . . . . . . . . . . . . . . . . . . . . . . . . . 39A.4.4 Uninstalling MultiLink . . . . . . . . . . . . . . . . . . . . . . . . . . . . . . . . . . . . . . . . . . . . . . . . . . . . . . . 40
A.5 IBM AIX . . . . . . . . . . . . . . . . . . . . . . . . . . . . . . . . . . . . . . . . . . . . . . . . . . . . . . . . . . . . . . . . . . 41A.5.1 Platform-Specific Requirements . . . . . . . . . . . . . . . . . . . . . . . . . . . . . . . . . . . . . . . . . . . . . . . . 41A.5.2 Installation Notes . . . . . . . . . . . . . . . . . . . . . . . . . . . . . . . . . . . . . . . . . . . . . . . . . . . . . . . . . . . . 41A.5.3 Notes on Running MultiLink . . . . . . . . . . . . . . . . . . . . . . . . . . . . . . . . . . . . . . . . . . . . . . . . . . . 41A.5.4 Uninstalling MultiLink . . . . . . . . . . . . . . . . . . . . . . . . . . . . . . . . . . . . . . . . . . . . . . . . . . . . . . . 42
A.6 Novell NetWare . . . . . . . . . . . . . . . . . . . . . . . . . . . . . . . . . . . . . . . . . . . . . . . . . . . . . . . . . . . . 43A.6.1 Platform-Specific Requirements . . . . . . . . . . . . . . . . . . . . . . . . . . . . . . . . . . . . . . . . . . . . . . . . 43A.6.2 Installation on the Novell Server. . . . . . . . . . . . . . . . . . . . . . . . . . . . . . . . . . . . . . . . . . . . . . . . 43A.6.3 Determining Your Configuration. . . . . . . . . . . . . . . . . . . . . . . . . . . . . . . . . . . . . . . . . . . . . . . . 44A.6.4 Starting the Configuration Editor . . . . . . . . . . . . . . . . . . . . . . . . . . . . . . . . . . . . . . . . . . . . . . . 44A.6.5 Installation Notes . . . . . . . . . . . . . . . . . . . . . . . . . . . . . . . . . . . . . . . . . . . . . . . . . . . . . . . . . . . . 44A.6.6 Upgrading from MultiLink 1.5 Build 037 and Earlier . . . . . . . . . . . . . . . . . . . . . . . . . . . . . . . 45A.6.7 Upgrading from MultiLink 1.1 . . . . . . . . . . . . . . . . . . . . . . . . . . . . . . . . . . . . . . . . . . . . . . . . . 46A.6.8 Starting MultiLink Applications . . . . . . . . . . . . . . . . . . . . . . . . . . . . . . . . . . . . . . . . . . . . . . . . 47A.6.9 Notes on Running MultiLink . . . . . . . . . . . . . . . . . . . . . . . . . . . . . . . . . . . . . . . . . . . . . . . . . . . 47A.6.10 Stopping MultiLink Services . . . . . . . . . . . . . . . . . . . . . . . . . . . . . . . . . . . . . . . . . . . . . . . . . . . 47A.6.11 Adding or Deleting a UPS . . . . . . . . . . . . . . . . . . . . . . . . . . . . . . . . . . . . . . . . . . . . . . . . . . . . . 48A.6.12 Identifying a Computer�s IP Address . . . . . . . . . . . . . . . . . . . . . . . . . . . . . . . . . . . . . . . . . . . . 48A.6.13 Uninstalling MultiLink . . . . . . . . . . . . . . . . . . . . . . . . . . . . . . . . . . . . . . . . . . . . . . . . . . . . . . . 48
APPENDIX B - MAKING YOUR OWN MULTILINK UPS CABLE. . . . . . . . . . . . . . . . . . . . . . . . . . . . .49B.1 Materials You Will Need . . . . . . . . . . . . . . . . . . . . . . . . . . . . . . . . . . . . . . . . . . . . . . . . . . . . . 49
B.2 Instructions. . . . . . . . . . . . . . . . . . . . . . . . . . . . . . . . . . . . . . . . . . . . . . . . . . . . . . . . . . . . . . . . 49
APPENDIX C - TECHNICAL INFORMATION & FREQUENTLY ASKED QUESTIONS . . . . . . . . . . . . . . . .51
APPENDIX D - ORDERING PARTS FROM LIEBERT . . . . . . . . . . . . . . . . . . . . . . . . . . . . . . . . . . . . .53
iii
FIGURESFigure 1 Serial Port Connectors . . . . . . . . . . . . . . . . . . . . . . . . . . . . . . . . . . . . . . . . . . . . . . . . . . . . . . . . . . . 49
TABLESTable 1 Configuration Descriptions. . . . . . . . . . . . . . . . . . . . . . . . . . . . . . . . . . . . . . . . . . . . . . . . . . . . . . . . . 8Table 2 Configuration Options for Installation . . . . . . . . . . . . . . . . . . . . . . . . . . . . . . . . . . . . . . . . . . . . . . 10Table 3 Configuration Options for Novell Installation. . . . . . . . . . . . . . . . . . . . . . . . . . . . . . . . . . . . . . . . . 44Table 4 Cables to Connect UPS and Computer . . . . . . . . . . . . . . . . . . . . . . . . . . . . . . . . . . . . . . . . . . . . . . 53Table 5 MultiLink License Kits . . . . . . . . . . . . . . . . . . . . . . . . . . . . . . . . . . . . . . . . . . . . . . . . . . . . . . . . . . . 53

1
MULTILINK�
Version 1.5 ReleaseUser Manual
Liebert® Corporation
SL-53620 (June18, 2004)
Liebert Corporation Liebert Europe Liebert Asia1050 Dearborn DriveP.O. Box 29186Columbus, Ohio 43229Sales
Phone: 1 800 877 9222 FAX: 1 614 841 6022
Technical SupportPhone: 1 800 222 5877 FAX: 1 614 841 5471E-mail: [email protected]
Via G. Rossini, 620098 S. GiulianoMilanese MilanoItalyPhone: 39 02 98250324FAX: 39 02 9844633
23/F, Allied Kajima Bldg.138 Gloucester RoadWanchaiHong KongPhone: 852 2 572 2201FAX: 852 2 831 0114
Liebert Web Site: http://www.liebert.com

What Is MultiLink?
2
1.0 WHAT IS MULTILINK?
Liebert developed the MultiLink software to protect computers from costly damage such as loss of data resulting from power failures�from single computers to large networks. The MultiLink software constantly monitors Liebert�s Uninterruptible Power Supply (UPS), warns computer users of impend-ing power loss, and initiates graceful operating system shutdowns when needed. See 2.0 - How Does MultiLink Work? for details on how the software monitors the UPS.
How Does MultiLink Work?
3
2.0 HOW DOES MULTILINK WORK?
MultiLink uses the SNMP protocol and IP addresses to communicate with targeted client computers (running MultiLink 1.5) using the network�instead of requiring separate, expensive hardware and cables that might run alongside network lines.
When utility power fails and the UPS begins powering the computer network, the UPS senses this, triggering MultiLink to activate timers and issue notifications that utility power has been inter-rupted. If the timers expire before utility power is returned, the software begins executing scripts to control certain applications and shut down the operating system, preventing loss of valuable data.
When utility power is restored, the UPS prompts MultiLink to cancel the timers and notify targeted computers of the return to normal status.
All targeted computers must be running MultiLink 1.5.

How Do You Contact Liebert for Technical Support?
4
3.0 HOW DO YOU CONTACT LIEBERT FOR TECHNICAL SUPPORT?
For help on deciding how to set up MultiLink or any other Liebert product, contact Software Techni-cal Applications Support Center at:
UNITED STATES Phone: 1 800 222 5877
FRANCE Phone: +33 (0) 1 46 87 51 52
GERMANY Phone: +49 (0) 89 99 19 220
ITALY Phone: +39 (0) 2 98250 324
NETHERLANDS Phone: +31 (0) 475 503333
UNITED KINGDOM Phone: +44 1628403200
WORLDWIDE Phone: 1 614 841 6755
FAX: 1 614 841 5471
All Products: http://www.liebert.comMultiLink: http://multilink.liebert.comE-mail: [email protected]
Who Can Benefit From MultiLink?
5
4.0 WHO CAN BENEFIT FROM MULTILINK?
Any computer user�from the person with a single computer to the business with a multiple network system�can protect valuable data using Liebert�s UPS and MultiLink to perform an orderly shut-down of the operating system.
4.1 ConfigurationsThe application can monitor virtually any configuration (see examples in Table 1):
� Any individual computer with a single Liebert UPS � Any single network with multiple computers and a single Liebert UPS � Interconnected network segments with computers powered by one or more Liebert UPSs
4.2 ConnectionsMultiLink works with either type of connection between the Liebert UPS and computers:
� Serial port connection to a single computer that can be networked to other computers � SNMP card in the Liebert UPS
MultiLink 3.x can notify computers running MultiLink 1.5 of �On Battery� and �Low Battery� events for coordinated shutdown of the operating system. MultiLink 3.x also can notify 1.5 clients of �Return to Normal� events, indicating that utility power has been restored. For more information about MultiLink 3.x, refer to its user manual, available from Liebert.
4.3 PlatformsMultiLink 1.5 functions on multiple platforms. Visit the Liebert Web site for a list of currently sup-ported platforms.

What is Required to Use MultiLink?
6
5.0 WHAT IS REQUIRED TO USE MULTILINK?
Visit the Liebert Web site at http://multilink.liebert.com for links to currently supported systems. The Web site always has the most detailed and up-to-date information on system requirements.
The prospective user must have:
� The MultiLink software (downloadable from the Liebert Web site, http://multilink.liebert.com). Visit the Web site or contact your local Liebert representative, value-added reseller or distributor for information.
� This manual (downloadable from the Liebert Web site).� A supported Liebert UPS linked to a computer by a serial port connection or to a network by an
SNMP card. � If using a serial port connection to the UPS:
� A special cable for communication between the UPS and the computer�available from Lie-bert or built with instructions in Appendix B - Making Your Own MultiLink UPS Cable.
� Serial port availability on one computer protected by each UPS (see Appendix C - Technical Information & Frequently Asked Questions).
� IP port availability (see Appendix C - Technical Information & Frequently Asked Ques-tions).
� TCP/IP connectivity throughout the network.� A supported Java� Runtime Environment (JRE), downloadable from your operating system ven-
dor�s Web site. For more details, visit the Liebert Web site at http://multilink.liebert.com (Novell only).
� For other requirements specific to various operating systems, see Appendix A - Operating Sys-tem Details.

What Do You Need to Do Before Installing MultiLink?
7
6.0 WHAT DO YOU NEED TO DO BEFORE INSTALLING MULTILINK?
To set up MultiLink properly, you will need to take certain steps in advance of installation:
1. MultiLink can be configured four basic ways, and you will need to determine which method is right for your system. See 7.0 - Determining Your Configuration for details on the four configurations.
2. Check with your System Administrator about the need to disable certain network software (see Appendix C - Technical Information & Frequently Asked Questions).
3. For platform-specific requirements, see Appendix A - Operating System Details.4. If using a serial port connection to the UPS:
� You will need to buy or make a custom cable. MultiLink will NOT function properly with an ordinary serial cable connected to the UPS.
� You may purchase a MultiLink UPS cable by contacting your local Liebert representative, value-added reseller, or distributor.
� To make a cable, see Appendix B - Making Your Own MultiLink UPS Cable for instruc-tions.
Determining Your Configuration
8
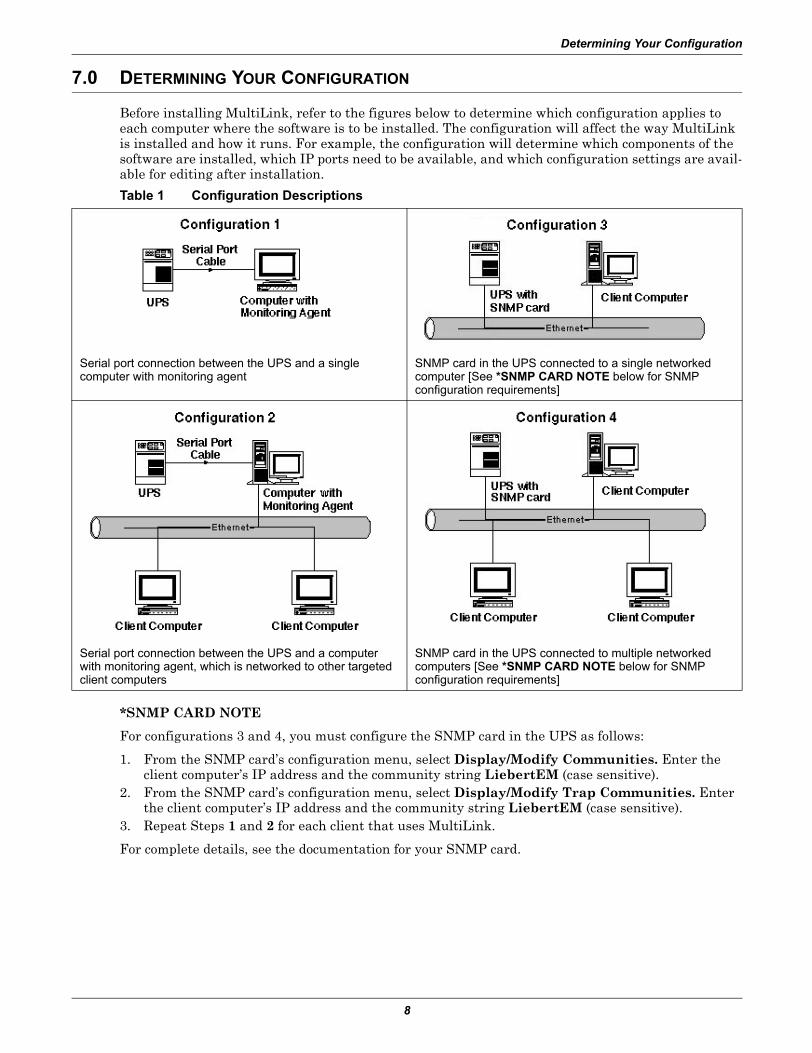
7.0 DETERMINING YOUR CONFIGURATION
Before installing MultiLink, refer to the figures below to determine which configuration applies to each computer where the software is to be installed. The configuration will affect the way MultiLink is installed and how it runs. For example, the configuration will determine which components of the software are installed, which IP ports need to be available, and which configuration settings are avail-able for editing after installation.
*SNMP CARD NOTE
For configurations 3 and 4, you must configure the SNMP card in the UPS as follows:
1. From the SNMP card�s configuration menu, select Display/Modify Communities. Enter the client computer�s IP address and the community string LiebertEM (case sensitive).
2. From the SNMP card�s configuration menu, select Display/Modify Trap Communities. Enter the client computer�s IP address and the community string LiebertEM (case sensitive).
3. Repeat Steps 1 and 2 for each client that uses MultiLink.
For complete details, see the documentation for your SNMP card.
Table 1 Configuration Descriptions
Serial port connection between the UPS and a single computer with monitoring agent
SNMP card in the UPS connected to a single networked computer [See *SNMP CARD NOTE below for SNMP configuration requirements]
Serial port connection between the UPS and a computer with monitoring agent, which is networked to other targeted client computers
SNMP card in the UPS connected to multiple networked computers [See *SNMP CARD NOTE below for SNMP configuration requirements]

Installing the Software
9
8.0 INSTALLING THE SOFTWARE
After downloading the file from the Web site, follow these instructions to install the software.
8.1 Executing the Downloaded File, Unzipping if NecessaryFor detailed instructions, see Appendix A - Operating System Details.
8.2 Installing MultiLinkFollow instructions on the screen for installation.
� Read the Liebert Software Program License Agreement. If you do not accept the terms and condi-tions, cancel the installation and delete the files you downloaded.
� Install the program in the default location or specify an alternate location, if you prefer.� Specify the type of connection between your UPS and your computer or network. The options are:
1. Serial Port on computer �name� 2. MultiLink Source (Computer with MultiLink software using SNMP port 3029)3. Liebert UPS (using SNMP port 162)
� You must enter this information correctly for proper installation and configuration of MultiLink. For help in deciding which option to choose, see 7.0 - Determining Your Configuration or the following table.
NOTE ON UPGRADING FROM MULTILINK 1.1When you upgrade from MultiLink 1.1 to MultiLink 1.5, the software will maintain your configuration, including settings for IP and serial ports.

Installing the Software
10
Table 2 Configuration Options for InstallationFor this configuration: Choose this option:
For the computer with monitoring agent in Configuration 1 (one-on-one serial port configuration), choose:
Serial Port on computer �name�
For the computer with monitoring agent in Configuration 2, choose:
Serial Port on computer �name�(This computer will monitor the UPS and notify targeted client computers of UPS-related events.)
For each targeted client computer in Configuration 2, choose:
Network directly via an SNMP card or a Serial Port on another computer
For the targeted client computer in Configuration 3 (one-on-one SNMP card configuration), choose:
Network directly via an SNMP card or a Serial Port on another computer
For each targeted client computer in Configuration 4 (SNMP network configuration), choose:
Network directly via an SNMP card or a Serial Port on another computer
Installing the Software
11
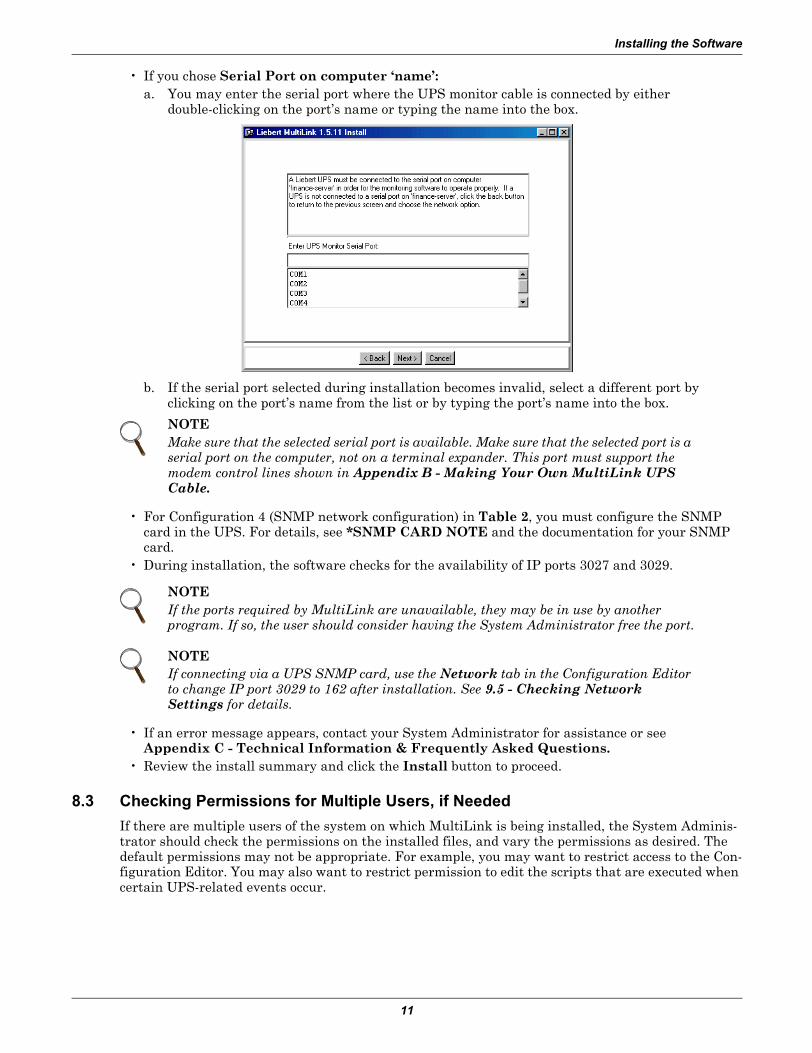
� If you chose Serial Port on computer �name�: a. You may enter the serial port where the UPS monitor cable is connected by either
double-clicking on the port�s name or typing the name into the box.
b. If the serial port selected during installation becomes invalid, select a different port by clicking on the port�s name from the list or by typing the port�s name into the box.
� For Configuration 4 (SNMP network configuration) in Table 2, you must configure the SNMP card in the UPS. For details, see *SNMP CARD NOTE and the documentation for your SNMP card.
� During installation, the software checks for the availability of IP ports 3027 and 3029.
� If an error message appears, contact your System Administrator for assistance or see Appendix C - Technical Information & Frequently Asked Questions.
� Review the install summary and click the Install button to proceed.
8.3 Checking Permissions for Multiple Users, if NeededIf there are multiple users of the system on which MultiLink is being installed, the System Adminis-trator should check the permissions on the installed files, and vary the permissions as desired. The default permissions may not be appropriate. For example, you may want to restrict access to the Con-figuration Editor. You may also want to restrict permission to edit the scripts that are executed when certain UPS-related events occur.
NOTEMake sure that the selected serial port is available. Make sure that the selected port is a serial port on the computer, not on a terminal expander. This port must support the modem control lines shown in Appendix B - Making Your Own MultiLink UPS Cable.
NOTEIf the ports required by MultiLink are unavailable, they may be in use by another program. If so, the user should consider having the System Administrator free the port.
NOTEIf connecting via a UPS SNMP card, use the Network tab in the Configuration Editor to change IP port 3029 to 162 after installation. See 9.5 - Checking Network Settings for details.

Installing the Software
12
8.4 Starting the Configuration EditorAfter installation, MultiLink prompts you to begin configuration. Liebert recommends opening the Configuration Editor now to review or modify the configuration settings. (For details on configuring MultiLink, see 9.0 - Configuring MultiLink for Your System.)
� To open the Configuration Editor now, click Yes in the dialog box.
Configuring MultiLink for Your System
13
9.0 CONFIGURING MULTILINK FOR YOUR SYSTEM
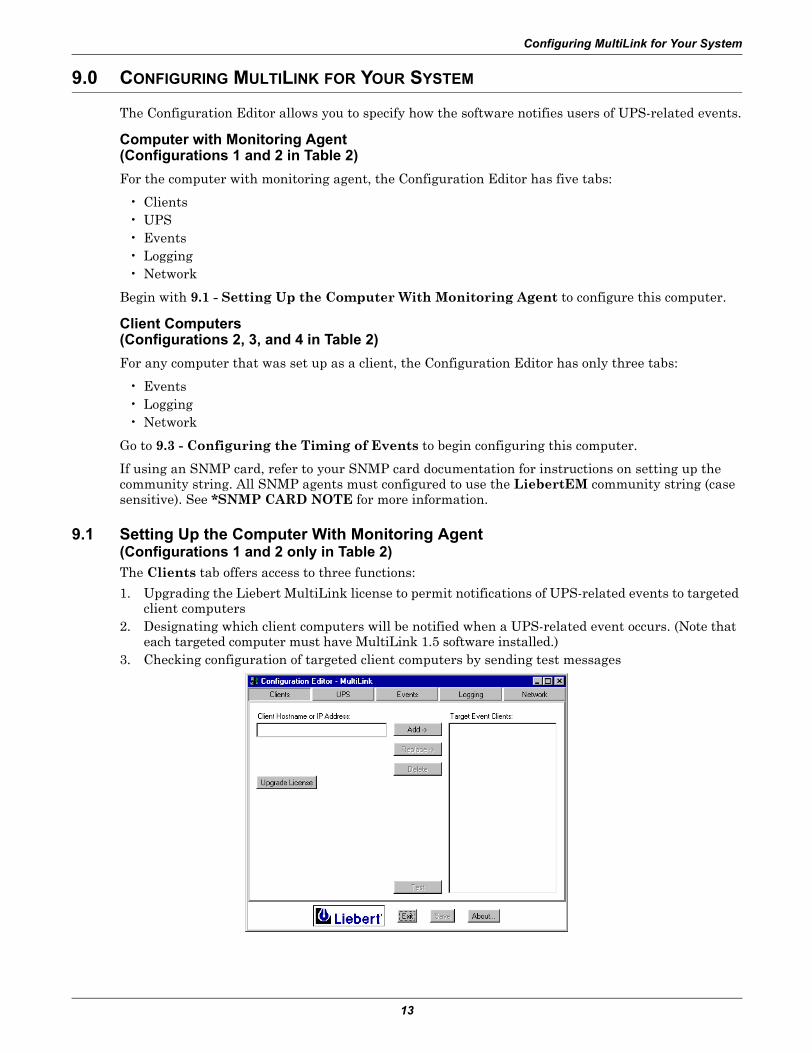
The Configuration Editor allows you to specify how the software notifies users of UPS-related events.
Computer with Monitoring Agent (Configurations 1 and 2 in Table 2)For the computer with monitoring agent, the Configuration Editor has five tabs:
� Clients � UPS� Events� Logging � Network
Begin with 9.1 - Setting Up the Computer With Monitoring Agent to configure this computer.
Client Computers (Configurations 2, 3, and 4 in Table 2)For any computer that was set up as a client, the Configuration Editor has only three tabs:
� Events� Logging� Network
Go to 9.3 - Configuring the Timing of Events to begin configuring this computer.
If using an SNMP card, refer to your SNMP card documentation for instructions on setting up the community string. All SNMP agents must configured to use the LiebertEM community string (case sensitive). See *SNMP CARD NOTE for more information.
9.1 Setting Up the Computer With Monitoring Agent(Configurations 1 and 2 only in Table 2)The Clients tab offers access to three functions:
1. Upgrading the Liebert MultiLink license to permit notifications of UPS-related events to targeted client computers
2. Designating which client computers will be notified when a UPS-related event occurs. (Note that each targeted computer must have MultiLink 1.5 software installed.)
3. Checking configuration of targeted client computers by sending test messages

Configuring MultiLink for Your System
14
9.1.1 Upgrade the MultiLink LicenseThe Upgrade License button permits the System Administrator to configure MultiLink to perform an orderly shutdown of multiple workstations on a computer network when all workstations are pow-ered by the same UPS.
Contact your local Liebert representative or distributor to obtain an upgrade license. The license is available for various numbers of workstations (see Table 5 - MultiLink License Kits for part num-bers). Each targeted computer must have MultiLink 1.5 software installed.
� To set up a MultiLink upgrade license, click on the Upgrade License button to open the Upgrade License window.
� In the License File box, enter the name of the appropriate file�license.key�with its full path, or click on the Browse button to locate the file, which is available from your local Liebert repre-sentative or distributor.
� Click on the Install button to begin the installation.
� Read the Liebert MultiLink Software License agreement, which opens next. If you do not accept the terms and conditions, cancel the installation and delete the license file from your computer.
� If you accept the terms and conditions, click Accept and the new capabilities license will be installed.A message box appears after successful installation.
After installing the upgrade license, configure the targeted MultiLink 1.5 clients as described in 9.1.2 - Designate Targeted Client Computers.

Configuring MultiLink for Your System
15
9.1.2 Designate Targeted Client ComputersAfter installing the upgrade license, you can proceed to add workstations (IP addresses or hostnames) to the list of targeted client computers. Computers in that list must have MultiLink 1.5 installed if they are to receive notification of specified UPS-related events. See Appendix C - Technical Infor-mation & Frequently Asked Questions for information about IP addresses and hostnames.
This section also describes how to make changes to the list of targeted clients by replacing or deleting listed computers.
To Add a Targeted Client Computer:� In the Client Hostname or IP Address box, enter the IP address or hostname of each targeted
client computer to be notified of a UPS-related event.� Click on the Add button and the computer will appear in the Target Event Clients list. See
Appendix C - Technical Information & Frequently Asked Questions for information about IP addresses and hostnames.
To Replace a Targeted Client Computer:� Enter the IP address or hostname of the replacement computer in the Client Hostname or IP
Address box.� In the Target Event Clients list, click on the name of the computer to be replaced. (Click a sec-
ond time on a computer to deselect it. Double-clicking on the name of a targeted client computer in the Target Event Clients list copies it to the Client Hostname or IP Address box where it can be edited.)
� Click on the Replace button.
To Delete a Targeted Client Computer:� Click on one or more entries in the Target Event Clients list. (Click a second time on a computer
to deselect it.)� Click on the Delete button, and a message box asks for confirmation that you wish to delete the
selected client(s).
9.1.3 Verify ConfigurationThe Test feature has been provided to verify that the client configuration is correct. See Appendix C - Technical Information & Frequently Asked Questions for use of the Test but-ton.
Configuring MultiLink for Your System
16
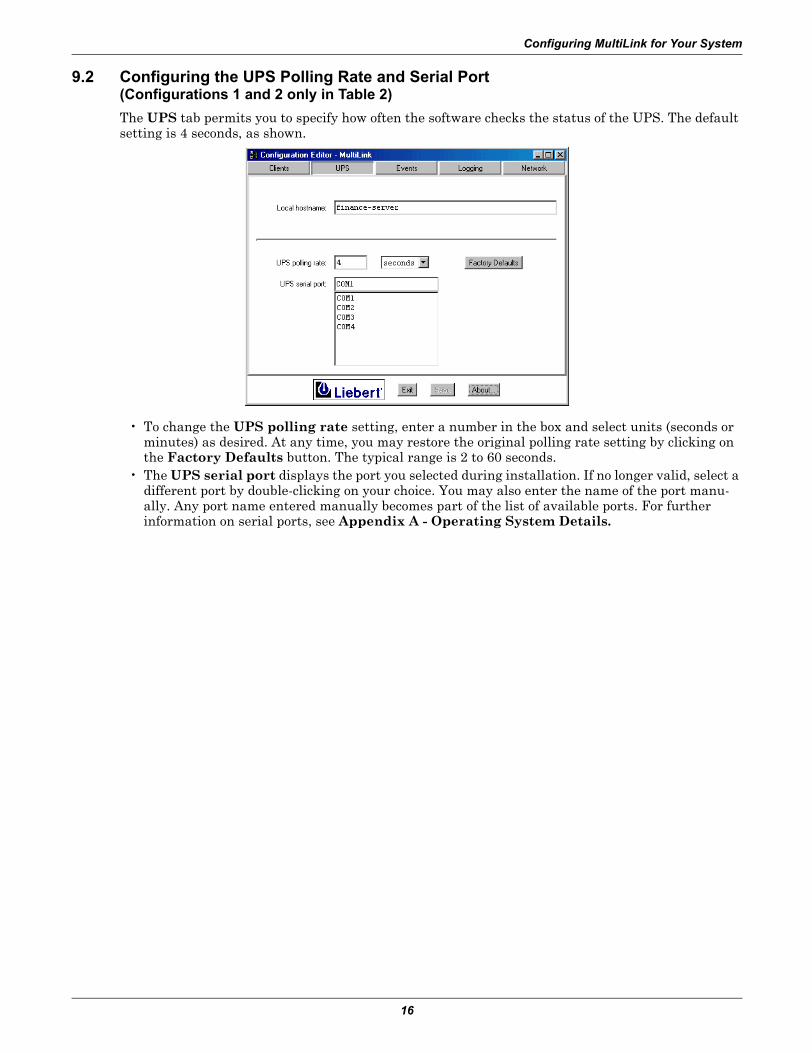
9.2 Configuring the UPS Polling Rate and Serial Port (Configurations 1 and 2 only in Table 2)The UPS tab permits you to specify how often the software checks the status of the UPS. The default setting is 4 seconds, as shown.
� To change the UPS polling rate setting, enter a number in the box and select units (seconds or minutes) as desired. At any time, you may restore the original polling rate setting by clicking on the Factory Defaults button. The typical range is 2 to 60 seconds.
� The UPS serial port displays the port you selected during installation. If no longer valid, select a different port by double-clicking on your choice. You may also enter the name of the port manu-ally. Any port name entered manually becomes part of the list of available ports. For further information on serial ports, see Appendix A - Operating System Details.
Configuring MultiLink for Your System
17
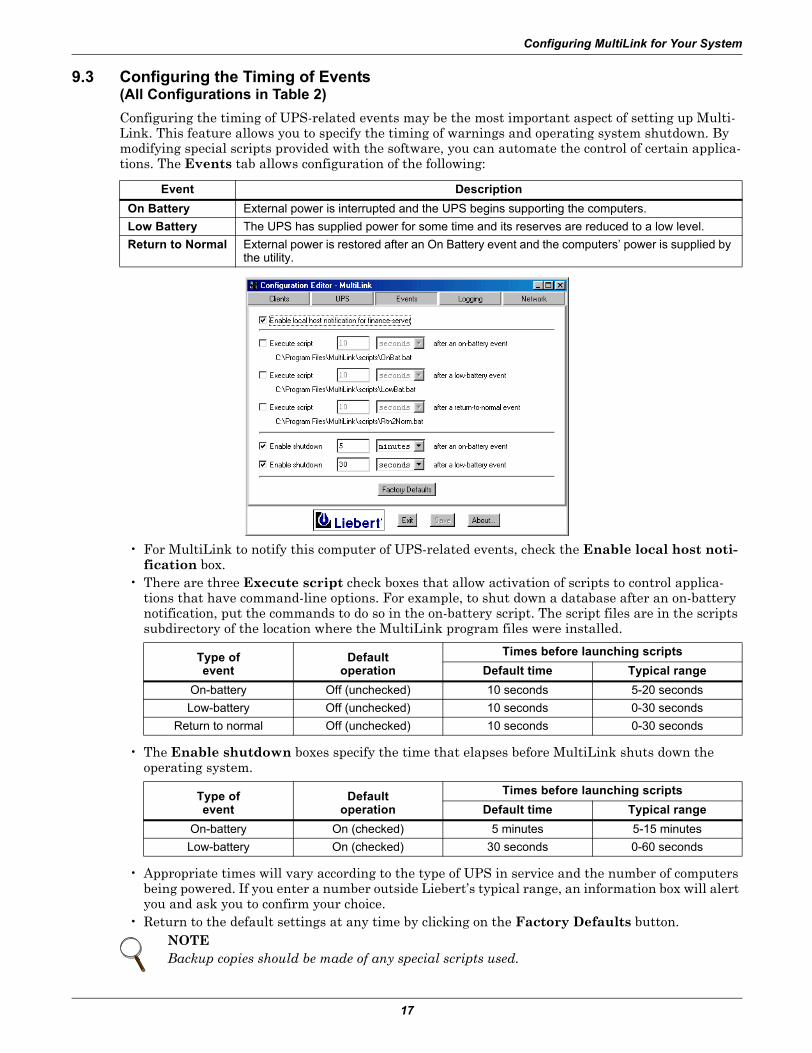
9.3 Configuring the Timing of Events (All Configurations in Table 2)Configuring the timing of UPS-related events may be the most important aspect of setting up Multi-Link. This feature allows you to specify the timing of warnings and operating system shutdown. By modifying special scripts provided with the software, you can automate the control of certain applica-tions. The Events tab allows configuration of the following:
� For MultiLink to notify this computer of UPS-related events, check the Enable local host noti-fication box.
� There are three Execute script check boxes that allow activation of scripts to control applica-tions that have command-line options. For example, to shut down a database after an on-battery notification, put the commands to do so in the on-battery script. The script files are in the scripts subdirectory of the location where the MultiLink program files were installed.
� The Enable shutdown boxes specify the time that elapses before MultiLink shuts down the operating system.
� Appropriate times will vary according to the type of UPS in service and the number of computers being powered. If you enter a number outside Liebert�s typical range, an information box will alert you and ask you to confirm your choice.
� Return to the default settings at any time by clicking on the Factory Defaults button.
Event DescriptionOn Battery External power is interrupted and the UPS begins supporting the computers. Low Battery The UPS has supplied power for some time and its reserves are reduced to a low level. Return to Normal External power is restored after an On Battery event and the computers� power is supplied by
the utility.
Type of event
Default operation
Times before launching scriptsDefault time Typical range
On-battery Off (unchecked) 10 seconds 5-20 secondsLow-battery Off (unchecked) 10 seconds 0-30 seconds
Return to normal Off (unchecked) 10 seconds 0-30 seconds
Type of event
Default operation
Times before launching scriptsDefault time Typical range
On-battery On (checked) 5 minutes 5-15 minutesLow-battery On (checked) 30 seconds 0-60 seconds
NOTEBackup copies should be made of any special scripts used.
Configuring MultiLink for Your System
18
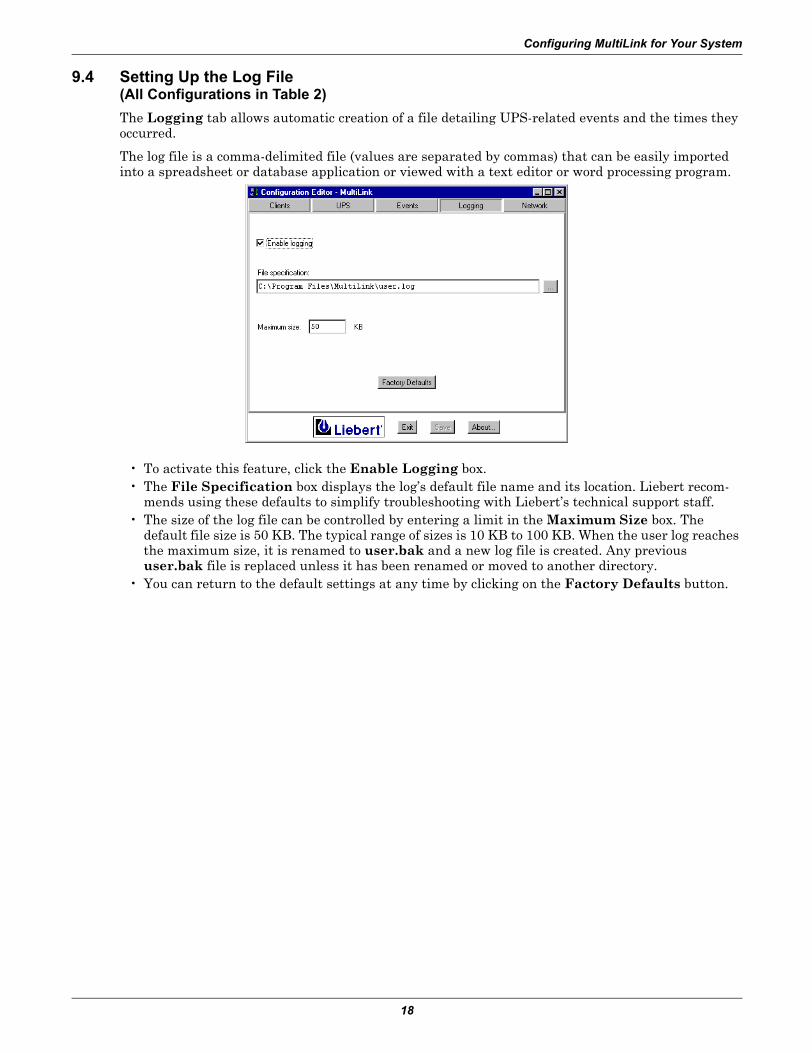
9.4 Setting Up the Log File (All Configurations in Table 2)The Logging tab allows automatic creation of a file detailing UPS-related events and the times they occurred.
The log file is a comma-delimited file (values are separated by commas) that can be easily imported into a spreadsheet or database application or viewed with a text editor or word processing program.
� To activate this feature, click the Enable Logging box. � The File Specification box displays the log�s default file name and its location. Liebert recom-
mends using these defaults to simplify troubleshooting with Liebert�s technical support staff. � The size of the log file can be controlled by entering a limit in the Maximum Size box. The
default file size is 50 KB. The typical range of sizes is 10 KB to 100 KB. When the user log reaches the maximum size, it is renamed to user.bak and a new log file is created. Any previous user.bak file is replaced unless it has been renamed or moved to another directory.
� You can return to the default settings at any time by clicking on the Factory Defaults button.
Configuring MultiLink for Your System
19
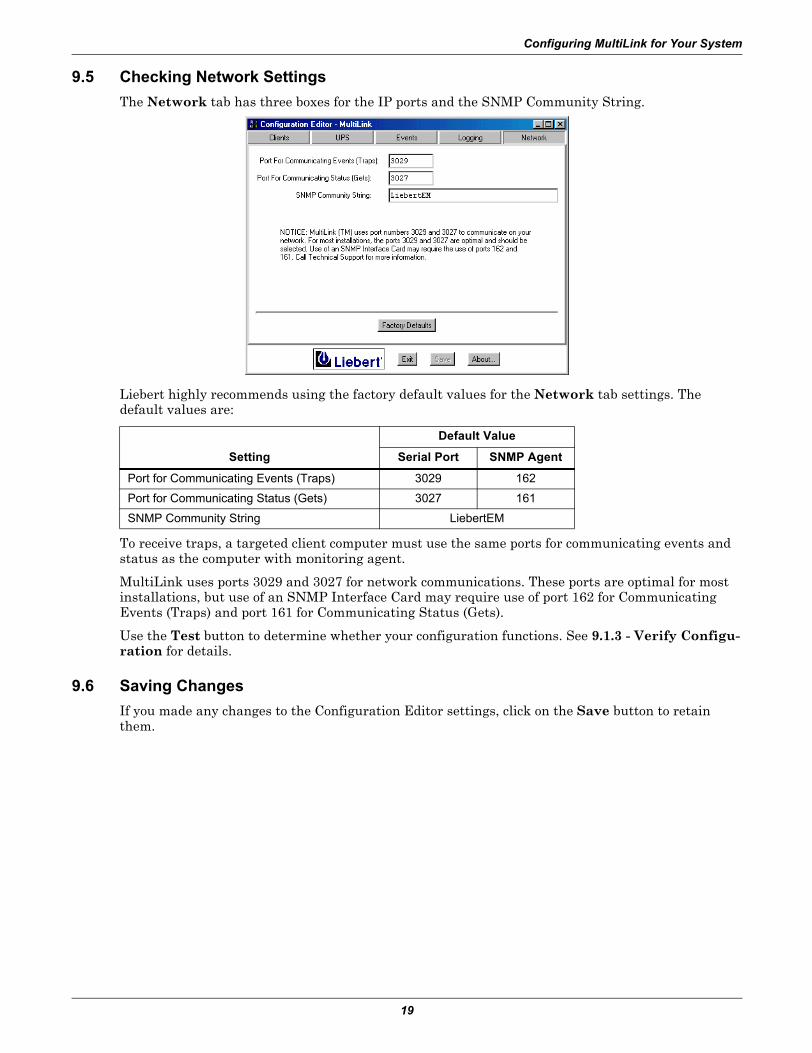
9.5 Checking Network SettingsThe Network tab has three boxes for the IP ports and the SNMP Community String.
Liebert highly recommends using the factory default values for the Network tab settings. The default values are:
To receive traps, a targeted client computer must use the same ports for communicating events and status as the computer with monitoring agent.
MultiLink uses ports 3029 and 3027 for network communications. These ports are optimal for most installations, but use of an SNMP Interface Card may require use of port 162 for Communicating Events (Traps) and port 161 for Communicating Status (Gets).
Use the Test button to determine whether your configuration functions. See 9.1.3 - Verify Configu-ration for details.
9.6 Saving ChangesIf you made any changes to the Configuration Editor settings, click on the Save button to retain them.
Setting
Default Value
Serial Port SNMP Agent
Port for Communicating Events (Traps) 3029 162
Port for Communicating Status (Gets) 3027 161
SNMP Community String LiebertEM

Configuring MultiLink for Your System
20
9.7 Checking MultiLink VersionClick on the About button for details about the version of MultiLink on your system and other infor-mation about the software.
As shown above, the details include:
� the MultiLink version number� the number of targeted client computers allowed by your upgrade license� the operating system and its version� the Java vendor and its version
9.8 Closing the Configuration EditorClick the Exit button to end the Configuration Editor session. If you have not saved your changes, MultiLink will warn you to do so. Unsaved changes will be lost.

Viewing UPS Status
21
10.0 VIEWING UPS STATUS
This feature allows a user to determine the status of the UPS(s):
� Normal (utility power is intact) � On battery (the UPS is supplying power to the computers) � Low battery (power drain has reduced the reserves of the UPS to a low level) � Weak battery (utility supplying power, but UPS battery weak)
The Status Viewer may also alert the user to communication or configuration problems. See Appendix C - Technical Information & Frequently Asked Questions.
10.1 Opening the Status ViewerThe Status Viewer displays the time of the last update and the condition of all configured UPSs in the list. For instructions on opening the UPS Status Viewer, see information about your platform in Appendix A - Operating System Details.
� Click on the Update button to get new information on the status of each configured UPS. During the update, an hourglass icon appears to the left of each UPS being checked.
� To alter the list of configured UPSs, click on the Configuration button as described in 10.2 - Adding or Deleting a UPS in the Status Viewer List. (After making changes, you must return to this window and click on the Update button to view the status of each changed UPS.)
� To close the window, click on the Exit button.

Viewing UPS Status
22
10.2 Adding or Deleting a UPS in the Status Viewer ListThe Status Viewer Configuration window allows you to make changes to the list of configured UPSs.
� In the UPS Status Viewer window (see 10.1 - Opening the Status Viewer), click on the Config-uration button to update the list of UPSs.
� Follow these instructions to add a UPS, make a change to a UPS or remove a UPS from the Viewer List.
To Add a UPS:� Enter the IP address or hostname of the UPS in the UPS Hostname or IP Address box.� Click on the Add button and the UPS will appear in the Viewer List box.
To Replace a UPS:� Enter the IP address or hostname of the replacement UPS in the UPS Hostname or IP Address
box. � In the Viewer List, click on the name of the UPS to be replaced. (Click a second time on a UPS to
deselect it. Double-clicking on the name of a UPS in the Viewer List list copies it to the UPS Hostname or IP Address box where it can be edited.)
� Click on the Replace button.
To Delete a UPS:� Click on one or more entries in the Viewer List. (Click a second time on a UPS to deselect it.)� Click on the Delete button, and a message box asks for confirmation that you wish to delete the
UPS(s).
To Save Changes:� Click on the Save button to save any changes to the Configuration file. To close the window with-
out saving any changes, click on Cancel. � When you have completed any changes, click on OK. If you have not saved your changes, a mes-
sage box will display a warning to save your changes or they will be lost.This returns you to the Status Viewer window where you must click on the Update button to display the changes. See 10.1 - Opening the Status Viewer above.
NOTEWhen entering the IP address or hostname of the UPS in the following steps, try the port number specified in the Port for Communicating Status (Gets) box in the Network tab, as shown in 9.5 - Checking Network Settings.If that fails, you might need to use the following format to specify a full URL to view SNMP agent, for example:
snmp://hostname or IP address:port_number
where hostname is the name of the computer (for example, critical-server) and port_number is the port number specified in the Port for Communicating Status (Gets) box in the Network tab (for example, 3027 or 161).
Running MultiLink
23
11.0 RUNNING MULTILINK
After installation and configuration, MultiLink is constantly running in the background, protecting your system from data loss.
The installation modifies the computer�s configuration so that certain services are always running and are automatically restarted every time the computer is started up.
To verify that MultiLink services are running, see Appendix A - Operating System Details.
Notifying Clients of Events
24
12.0 NOTIFYING CLIENTS OF EVENTS
MultiLink constantly monitors the UPS according to the settings in the configuration file. The soft-ware notifies targeted client computers when any of the following events occur:
� On Battery - UPS supplying power to the computers � Low Battery - power drain has reduced the reserves of the UPS to a low level� Return to Normal - utility power is restored after an on-battery or low-battery event� Weak Battery - utility supplying power, but UPS battery weak
Notification may appear on the screen in the form of a graphic (dialog box) or as text (console mes-sage). The method depends on your operating system and choices made during configuration.
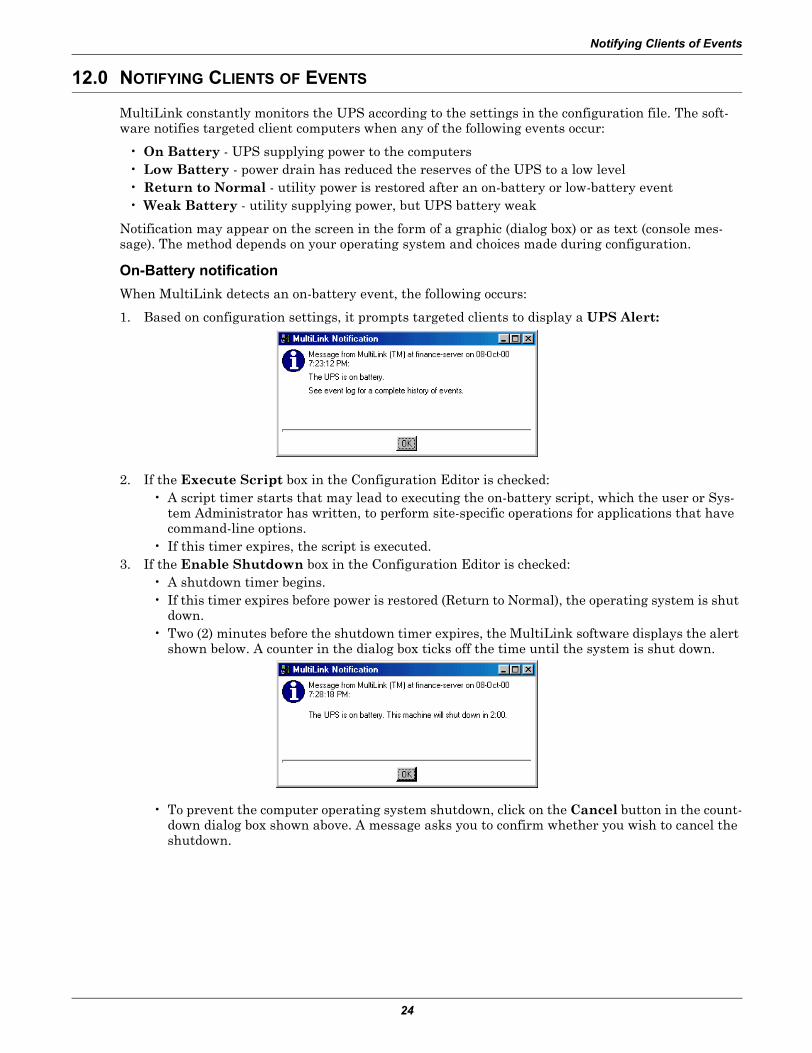
On-Battery notificationWhen MultiLink detects an on-battery event, the following occurs:
1. Based on configuration settings, it prompts targeted clients to display a UPS Alert:
2. If the Execute Script box in the Configuration Editor is checked:� A script timer starts that may lead to executing the on-battery script, which the user or Sys-
tem Administrator has written, to perform site-specific operations for applications that have command-line options.
� If this timer expires, the script is executed.3. If the Enable Shutdown box in the Configuration Editor is checked:
� A shutdown timer begins. � If this timer expires before power is restored (Return to Normal), the operating system is shut
down.� Two (2) minutes before the shutdown timer expires, the MultiLink software displays the alert
shown below. A counter in the dialog box ticks off the time until the system is shut down.
� To prevent the computer operating system shutdown, click on the Cancel button in the count-down dialog box shown above. A message asks you to confirm whether you wish to cancel the shutdown.

Notifying Clients of Events
25
Low-Battery notificationThe Low-Battery event functions as a safety net, prompting an orderly shutdown of the operating sys-tem before power is lost. The Low-Battery event will override a longer on-battery timer. Timers for this event typically are set for much shorter times than for other UPS-related events.
When MultiLink detects a low-battery event:
1. It displays a UPS Alert.
2. If the Execute Script box in the Configuration Editor is checked:� A script timer starts that may lead to executing the low-battery script, which the user or Sys-
tem Administrator has written, to perform site-specific operations for applications that have command-line options.
� If this timer expires, the script is executed.3. If the Enable Shutdown box in the Configuration Editor is checked:
� A shutdown timer begins. � If this timer expires before power is restored (Return to Normal), the operating system is shut
down.� Twenty (20) seconds before the shutdown timer expires, the MultiLink software displays an
alert. A counter ticks off the time until the system is shut down.� To prevent the computer operating system shutdown, click on the Cancel button. That
prompts MultiLink to ask you to confirm whether you wish to cancel the shutdown. � Click on Yes to prevent the operating system shutdown; click on No to proceed with the shut-
down.
Return-to-Normal notificationWhen MultiLink detects a Return-to-Normal event:
1. It displays a UPS Alert:
2. If the Execute Script box in the Configuration Editor is checked:� A script timer starts that may lead to executing the return-to-normal script, which the user or
System Administrator has written, to perform site-specific operations for applications that have command-line options.
� If this timer expires, the script is executed.3. MultiLink will cancel any timers that are running, such as those for on-battery events, low-
battery events, and scripts.
Exercise caution in scripting for reopening an application or database in the Return-to-Normal event. For example, if power is restored before a script has closed a database, a Return-to-Normal script might attempt to reopen it.

Notifying Clients of Events
26
Weak-Battery notificationWeak Battery is a maintenance indicator with a status separate and apart from the Low-Battery event. It occurs when the UPS� capacity falls below 15-20 percent and utility power is intact. The Weak Battery feature is not supported by all UPS models.
When MultiLink detects a weak-battery event:
� It displays a UPS Alert.
The Weak Battery script performs only a notification.

Uninstalling MultiLink from Your System
27
13.0 UNINSTALLING MULTILINK FROM YOUR SYSTEM
To remove the MultiLink software from your network, run the uninstall program that came with Mul-tiLink. For details, see Appendix A - Operating System Details.

Liebert Software Program License Agreement
28
14.0 LIEBERT SOFTWARE PROGRAM LICENSE AGREEMENT
LIEBERT MULTILINK® SOFTWARE LICENSE AGREEMENT
This MultiLink® Software License Agreement (�Agreement�) is a legal agreement between you and Liebert Corporation, an Ohio, United States of America, corporation, (�Liebert�). Liebert's MultiLink® software, including enhancements, upgrades, and any future releases is made available exclusively for use with Liebert products (�Products�). The foregoing, including any accompanying program(s), documentation, images, animation, and text incorporated therein, (collectively �Software�), is pro-vided solely for commercial and industrial use under the license terms specified herein. READ THESE TERMS AND CONDITIONS CAREFULLY BEFORE ATTEMPTING TO DOWNLOAD, INSTALL, OR USE THE SOFTWARE. BY DOWNLOADING, INSTALLING, OR USING THE SOFT-WARE, YOU AGREE TO BE BOUND BY THESE TERMS AND CONDITIONS. IF YOU DO NOT ACCEPT THESE TERMS AND CONDITIONS DO NOT DOWNLOAD, INSTALL OR USE THE SOFTWARE. IN SUCH A CIRCUMSTANCE, THE SOFTWARE MAY BE RETURNED WITHIN THIRTY (30) DAYS OF YOUR RECEIPT FOR A FULL SOFTWARE REFUND. YOU REPRESENT THAT YOU (I) ARE NOT LOCATED IN, UNDER THE CONTROL OF, OR A NATIONAL RESI-DENT OF ANY COUNTRY TO WHICH THE UNITED STATES HAS EMBARGOED GOODS, (II) ARE NOT ON THE U.S. TREASURY DEPARTMENT'S LIST OF SPECIALLY DESIGNATED NATIONALS, (III) ARE NOT ON THE U.S. COMMERCE DEPARTMENT'S LIST OF DENIED PER-SONS OR (IV) ARE NOT OTHERWISE PROHIBITED BY U.S. LAW FROM RECEIVING OR USING THE SOFTWARE (COLLECTIVELY �EXPORT RESTRICTIONS�). IF YOU DO NOT HAVE AUTHORITY TO ACCEPT THIS AGREEMENT FOR YOUR ORGANIZATION, IT IS YOUR OBLI-GATION TO ENSURE THAT AN AUTHORIZED INDIVIDUAL MAKES THE DETERMINATION THAT YOUR ORGANIZATION IS NOT SUBJECT TO THE ABOVE EXPORT RESTRICTIONS PRIOR TO DOWNLOADING, INSTALLING, OR USING THE SOFTWARE.
COPYRIGHT: This Software is the proprietary property of Liebert and is protected by United States copyright laws, other applicable copyright laws, and international treaty provisions. Title and owner-ship of all copyrights to the Software remain in Liebert or third parties. Accordingly, your rights to use, copy and modify the Software are strictly limited to the specific rights provided in this Agree-ment or as may otherwise be required by applicable copyright law.
GRANT OF RIGHTS: Liebert grants a non-exclusive, non-transferable license to you to install and use the Software solely for use with Products and in accordance with these license terms provided, however, that you warrant and represent that you will not use this software in violation of applicable laws and regulations or where such use detrimentally affects Liebert�s rights in the Software or sub-jects Liebert to liability. You assume responsibility for the selection of the Software to achieve your intended results, and for the installation, use, and the results obtained from the Software. Software key(s) are available under the terms of this Agreement, upon payment of any applicable license fee(s), to incorporate special features such as (a) sending shutdown signals over a network to other comput-ers and (b) remote network administration. A separate license fee is required for each computer where such software key(s) are utilized. By use of the Software, you agree that Liebert may, at its option, perform an audit of your usage of the Software to determine the number of computers and Products that are using the Software and applicable software key(s).
TERMINATION OF LICENSE: Your license is automatically terminated if you:
(1) use the Software with anything other than Products, (2) attempt to copy or reconstruct any part of the object code, source code, or algorithms, (3) provide, disclose, sell, rent, lease, license, sublicense, transfer or assign the Software to any third party, (4) attempt to decompile, disassemble or reverse engineer the Software, in whole or in part, or otherwise attempt to derive the source code of the Soft-ware, (5) use the Software in excess of the licensed coverage purchased, (6) write or develop any deriv-ative software or any other software program based upon the Software, (7) modify or alter the Software or (8) fail to comply with other license terms. You may elect to terminate this license at any time by destroying the Software together with all copies and any portions thereof in any form.
LIMITED WARRANTY: Liebert represents that it has the right and authority to grant the license herein. Liebert warrants solely to you for a period of thirty (30) days from the date of Liebert ship-ment that the distribution media (if supplied) on which the Software is furnished under normal use will be free from defects and material and workmanship and the Software will substantially conform to Liebert published documentation. EXCEPT FOR THE ABOVE EXPRESS WARRANTIES, THIS

Liebert Software Program License Agreement
29
SOFTWARE IS PROVIDED �AS IS� WITHOUT WARRANTY OF ANY KIND, EXPRESS OR IMPLIED, INCLUDING, WITHOUT LIMITATION, IMPLIED WARRANTIES OF MERCHANT-ABILITY OR FITNESS FOR INTENDED PURPOSE. LIEBERT DOES NOT WARRANT THAT THE SOFTWARE FUNCTIONS WILL MEET YOUR REQUIREMENTS OR THAT THE SOFTWARE WILL OPERATE UNINTERRUPTED OR ERROR FREE.
LIMITATION OF REMEDIES/DAMAGES:
(A) Liebert's entire liability and your exclusive remedy arising from use or inability to use the Soft-ware is:
(1) The replacement of any distribution media not meeting Liebert's warranty, or
(2) If Liebert is unable to provide you a replacement that conforms to Liebert's warranty, to refund the purchase price.
(B) IN NO EVENT WILL LIEBERT BE LIABLE FOR ANY DAMAGES, INCLUDING, WITHOUT LIMITATION, LOST PROFITS, LOST REVENUE, LOSS OF USE, OR LOSS OF DATA OR OTHER INCIDENTAL OR CONSEQUENTIAL OR OTHER ECONOMIC DAMAGES ARISING OUT OF THE USE OR INABILITY TO USE THE SOFTWARE, EVEN IF ADVISED OF THE POSSIBILITY OF THESE DAMAGES. YOU ACKNOWLEDGE THAT THIS LICENSE REFLECTS THIS ALLOCA-TION OF RISK.
U.S. GOVERNMENT RESTRICTED RIGHTS. This Software is developed at private expense and is provided with �Restricted Rights.� Use, duplication, or disclosure by the United States Government is subject to restrictions set forth in the Federal Acquisition Regulations and its Supplements. The man-ufacturer is Liebert Corporation, 1050 Dearborn Drive, Columbus, Ohio 43085.
ASSIGNMENT: You may not sublicense, assign, or otherwise transfer this license of the Software without the prior written consent of Liebert. Any such transfer of rights, duties, or obligations is void.
EXPORT RESTRICTIONS: You may not export the Software in violation of applicable export laws and regulations of the applicable countries. You agree to comply with all laws, regulations, decrees and orders of the United States of America that restrict the exportation (or re-exportation) of the Soft-ware to other countries, including, without limitation, the U.S. Export Administration Regulations.
UPDATE POLICY: Liebert may create, from time to time, updated versions of the Software. Liebert reserves the right to make changes to or improvements in any aspect of the Software at any time without prior notice to you and without an obligation to supply such changed and/or improved Soft-ware to you.
COMPLETE AGREEMENT/GOVERNING LAW/VENUE: This Software license agreement com-prises the final and complete agreement between the parties. No person is authorized to change or modify this Agreement except an executive officer of Liebert Corporation and then only in writing. The laws of the United States and the State of Ohio shall apply to this Agreement and its interpreta-tion without reference to choice or conflict of laws principles. Liebert and you hereby irrevocably sub-mit to the personal and subject matter jurisdiction of any State of Ohio or federal court sitting in Columbus, Ohio, in any action or proceeding arising from or relating to this MultiLink® Software License Agreement.
MultiLink® Software License revision January 10, 2003

Operating System Details
30
APPENDIX A - OPERATING SYSTEM DETAILS
For details on your operating system, see:
Operating System Refer to:
Windows XP/2000/NT/Me/98/95 A.1 - Windows XP/2000/NT/Me/98/95Sun Solaris A.2 - Sun Solaris
Linux A.3 - LinuxHewlett Packard HP-UX A.4 - Hewlett Packard HP-UX
IBM AIX A.5 - IBM AIXNovell NetWare A.6 - Novell NetWare

Operating System Details
31
A.1 WINDOWS XP/2000/NT/ME/98/95
A.1.1 Platform-Specific RequirementsIn addition to the general requirements listed in 5.0 - What is Required to Use MultiLink?, pro-spective MultiLink users must also have:
� Windows XP, 2000, NT�, Me (Millennium Edition), 98 or 95 on an Intel Pentium-class processor� At least 10 MB of free disk space� At least 64 MB of RAM� A mouse� TCP/IP network protocol
A.1.2 Installation Notes
Pre-Installation Checklist1. If you are not using an SNMP hardware card with your UPS, then MultiLink can use its default
port settings of 3029/3027, and there is no need to disable the SNMP service with Windows XP/2000/NT.If you are using an SNMP hardware card with your UPS, there can be a conflict with the SNMP ports used on Windows XP/2000/NT. MultiLink must take ownership of ports 162/161 to commu-nicate with the SNMP-enabled UPS. In this case, the Windows SNMP services (if running) will cause a conflict. If you are using an SNMP hardware card, you must disable the SNMP services. To check these services, see below.
� Windows XP/2000�run the Computer Management application by pressing the Start button, then clicking on Programs, Administrative Tools, and finally Computer Management. Expand the Services and Applications item in the tree and then click on Services.
� Windows NT�open the Services window by pressing the Start button, then clicking on Set-tings, Control Panel, and finally Services.
If the services SNMP and SNMP Trap Service are not present or are shown as not running (blank status) and Disabled, you may proceed. Otherwise, these services must be stopped and/or disabled before you can install MultiLink.
2. Installation on Windows XP/2000/NT requires Administrative privileges.3. On Windows Me/98/95, no additional pre-installation checks are required.
Serial Port SelectionThe preconfigured serial ports are COM1 through COM4. You may select one of these or enter another as appropriate.
A.1.3 Notes on Running MultiLink
Starting MultiLink ApplicationsDuring installation, shortcuts are created in the MultiLink folder in the Start menu of the user per-forming the installation. There are shortcuts for these MultiLink applications:
� Configuration Editor� UPS Status Viewer� Uninstall
To execute one of these programs, click on the Start button, then click on Programs, MultiLink, and finally on the desired program shortcut.
Verify MultiLink is Running�Windows XP/2000When operating properly, MultiLink is running constantly in the background. To verify that it is doing so:
� Right-click on My Computer to open a pop-up menu, then click on Manage to open the Com-puter Management window as shown below. In that window, click on Services and Applica-

Operating System Details
32
tions, then on Services. If the MultiLink service is running, Liebert MultiLink appears in the list with a status of Started.
Verify MultiLink is Running�Windows NTWhen operating properly, MultiLink is running constantly in the background. To verify that it is doing so:
� Open the Services window as shown below by pressing the Start button, then clicking on Set-tings, Control Panel, and finally Services. If the MultiLink service is running, Liebert Multi-Link appears in the list with a status of Started.
Appearance in window shows MultiLink service is running

Operating System Details
33
Verify MultiLink is Running�Windows Me/98When operating properly, MultiLink is running constantly in the background. To verify that it is doing so:
� Run the System Information utility as shown below by pressing the Start button, then clicking on Programs, Accessories, System Tools, and finally System Information. In the System Information tree, click on Software Environment, then Running Tasks. The Liebertm.exe program should appear in the list.
Verify MultiLink is Running�Windows 95When operating properly, MultiLink is running constantly in the background. To verify that it is doing so:
� Press the Ctrl, Alt, and Delete keys simultaneously to display the Close Program dialog box. The Liebertm program should appear in the list.

Operating System Details
34
Identifying a Computer�s IP addressThere are several ways to determine a computer�s IP address. Use the one you are familiar with or the applicable method below.
For Windows XP/2000/NT/Me/98:
1. For Windows XP, 2000 and NT, launch a Command Prompt window;for Windows Me and 98, launch an MS-DOS Prompt window.
2. At the prompt enter:ipconfig /all | more
3. Execute the command by pressing the Enter key.4. The screen will display the IP address. If the computer has more than one network adapter, the
IP address will be the numbers associated with the active Network Interface Card.
For Windows 95 (also available for Windows Me/98):
1. Launch an MS-DOS prompt window.2. At the prompt enter:
winipcfg /all
3. Execute the command by pressing the Enter key.4. This opens the IP Configuration window; select the active network adapter from the drop-down
list.5. The computer�s IP address will show automatically beside IP Address.
A.1.4 Uninstalling MultiLinkTo remove the MultiLink software from your computer, use the Uninstall shortcut created during installation:
� Press the Start button, then click on Programs, MultiLink, and finally the Uninstall icon. This opens the following window.
� Click on the Uninstall button. A confirmation box asks if you are sure you want to uninstall the software.
� Pressing the Yes button will begin removing the software.� A message box appears when the process is completed.
The uninstall process stops the MultiLink service and removes all MultiLink files from the hard drive

Operating System Details
35
A.2 SUN SOLARIS
A.2.1 Platform-Specific RequirementsIn addition to the general requirements listed in 5.0 - What is Required to Use MultiLink?, pro-spective MultiLink users must also have:
� SunSoft Solaris on a SPARC processor� At least 20 MB of free disk space (during installation, the /tmp directory must have at least
30 MB free)� Common Desktop Environment or Sun OpenWindows (X Window System)� A mouse� TCP/IP network protocol
A.2.2 Installation Notes
Pre-Installation ChecklistComply with the following requirements, then return to 8.2 - Installing MultiLink.
1. During installation you must be logged in as �root.�2. If using a serial port connection to the UPS, use the pmadm utility to disable ttymon from
monitoring the port. To disable ttymon, you must perform the following commands:pmadm -l
This command lists the PMTAG and SVCTAG for each port. You will substitute the values of these tags in the following command:
pmadm -d -p {PMTAG} -s {SVCTAG}
3. If you are using an SNMP card, check for SNMP daemons. Execute the commandps -ef | grep -i snmp. If the processes snmpdx or snmpdm are running, they must be disabled before you can install MultiLink.If you are not using an SNMP hardware card with your UPS, then MultiLink can use its default port settings of 3029/3027, and there is no need to disable the SNMP daemons.
4. Make sure the MultiLink distribution file has execute permission (chmod +x <file>), then execute it.
Serial Port SelectionThe preconfigured serial ports are /dev/term/a and /dev/term/b. You may select one of these or enter another as appropriate.
Post-Installation NotesThe MultiLink installation program places the script LiebertM in the /etc/init.d directory. It also creates K30LiebertM and S90LiebertM links in the /etc/rc1.d and /etc/rc2.d directories.
A.2.3 Notes on Running MultiLinkIf running the Common Desktop Environment (CDE), all users meant to receive pop-up messages must allow access to their desktop. This can be accomplished by adding the following command to a common logon script (e.g., /etc/profile). See the CDE documentation or xhost man page for more infor-mation about the desktop security mechanism.
/usr/openwin/bin/xhost +`hostname`
Note: The characters surrounding hostname are the grave accent (`) that is usually found on the same keyboard key as the tilde (~).

Operating System Details
36
Starting MultiLink ApplicationsDuring installation, shell scripts are created in the product installation directory tree (e.g.,/opt/MultiLink). These scripts may be used to execute these MultiLink applications:
� bin/ConfigEditor�Configuration Editor� bin/UpsViewer�UPS Status Viewer� Uninstall�Uninstall MultiLink
For convenience, you may want to add the bin subdirectory to your PATH.
Verify MultiLink is RunningWhen operating properly, MultiLink is running constantly in the background. To verify that it is doing so, use /etc/init.d/LiebertM show to get a list of the active MultiLink processes.
Identifying a Computer�s IP AddressRun the following command:
hostname
You will next see output similar to this:
frodo
The result of this command will show your machine name. In this example, the machine name is frodo. Then run the following command:
more /etc/hosts
You will next see output similar to this:
127.0.0.1 localhost10.0.0.10 frodo10.0.0.11 bilbo
The result of this command will list one or more entries of IP address and name pairs. In this exam-ple:
The IP address for machine name frodo is 10.0.0.10
The IP address for machine name bilbo is 10.0.0.11
A.2.4 Uninstalling MultiLink� Go to the directory where the MultiLink files are located (e.g., /opt/MultiLink) and run Unin-
stall.� Click the Uninstall button. A confirmation box asks if you are sure you want to uninstall the soft-
ware.� Pressing the Yes button will begin removing the software.� A message box appears when the process is completed. The uninstall process stops MultiLink ser-
vices that are running and removes all MultiLink files from the hard drive.

Operating System Details
37
A.3 LINUX
A.3.1 Platform-Specific RequirementsIn addition to the general requirements listed in 5.0 - What is Required to Use MultiLink?. Pro-spective MultiLink users must also have:
� A Linux distribution with a version 2.4.18 or later kernel running on a 333 MHz Intel Pentium II-class processor. Use uname –r to determine the version of your kernel and note that, in most cases, this will be different from the version of your Linux distribution.
� GNU C Runtime Library (glibc) version 2.1 or greater. To check the version of glibc that you have, use ls -l /lib/libc.so.6. If this is not found, you do not have glibc on your system. If the file to which this is linked begins with libc-2.1, libc-2.2, etc., then you have an acceptable version of glibc. Consult the documentation for your Linux distribution for more information on upgrading to the required version of glibc.
� Additional packages as may be required by the Sun JRE v1.4.2. For more information, see:http://java.sun.com/j2se/1.4.2/jre/install-linux.html
� A Linux distribution that manages services (daemons) using the System V method. This uses an init.d directory and several rc?.d directories located either in /etc/rc.d or just /etc (e.g., /etc/rc.d/init.d).
� 45 MB of free disk space (during installation, the /tmp partition must have 60 MB free)� 128 MB of RAM� Xfree86 (X Window System) with either the KDE or Gnome desktop environment� A mouse or other pointing device� TCP/IP network protocol
Most recent popular Linux distributions meet these requirements. MultiLink has been tested on:
Red Hat® Linux 8.0 and 9.0SuSE Linux 7.3 and 8.0
MultiLink has been tested with both KDE and Gnome desktop environments.
A.3.2 Installation Notes
Pre-Installation ChecklistComply with the following requirements, then return to 8.2 - Installing MultiLink.
1. During installation you must be logged in as �root.�2. If using a serial port connection to the UPS, you must disable getty or ttymon from monitoring
that port. These services may be started during initialization via entries in/etc/inittab or startup scripts located in /etc/rc.d depending on your particular Linux distribution. MultiLink will not function properly if it is using the same serial port as one of these processes. Consult the documentation for your Linux distribution for more information on how to disable getty/ttymon on the UPS serial port.
3. If you are using an SNMP card, check for SNMP daemons. Execute the commandps -ef | grep -i snmp. If the process snmpd is running, it must be disabled before you can install MultiLink. Consult the documentation for your Linux distribution for more information on how to uninstall SNMP.If you are not using an SNMP hardware card with your UPS, MultiLink can use its default port settings of 3029/3027, and there is no need to disable the SNMP daemons.
4. Make sure the MultiLink distribution file has execute permission (chmod +x <file>), then execute it.
Serial Port SelectionThe preconfigured serial ports are /dev/ttyS0 and /dev/ttyS1. You may select one of these or enter another as appropriate.
Note: Be careful to not pick the port used by the serial mouse if your system has one.
Operating System Details
38
Post-Installation NotesThe MultiLink installation program places the script LiebertM in the /etc/rc.d/init.d (or/etc/init.d) directory. It also creates K30LiebertM and S90LiebertM links in several of the/etc/rc.d/rc?.d (or /etc/rc?.d) directories.
A.3.3 Notes on Running MultiLinkIf running an X Window system window manager, all users meant to receive pop-up messages must allow access to their desktop. This can be accomplished by adding the following command to a com-mon logon script (e.g., /etc/profile). See the xhost documentation for more information about the desktop security mechanism.
/usr/bin/X11/xhost +`hostname`
Note: the characters surrounding hostname are the grave accent (`) that is usually found on the same keyboard key as the tilde (~).
Starting MultiLink ApplicationsDuring installation, shell scripts are created in the product installation directory tree (e.g., /opt/Mul-tiLink). These scripts may be used to execute these MultiLink applications:
� bin/ConfigEditor�Configuration Editor� bin/UpsViewer�UPS Status Viewer� Uninstall�Uninstall MultiLink
For convenience, you may want to add the bin subdirectory to your PATH.
Verify MultiLink is RunningWhen operating properly, MultiLink is running constantly in the background. To verify that it is doing so, use /etc/rc.d/init.d/LiebertM show to get a list of the active MultiLink processes. You may see what appears to be a large number of processes for MultiLink. Most of these are not actual processes but are due to the implementation of Java native threads on Linux.
Identifying a Computer�s IP AddressRun the following command:
hostname
You will next see output similar to this:frodo
The result of this command will show your machine name. In this example, the machine name is frodo. Then run the following command:
more /etc/hosts
You will next see output similar to this:127.0.0.1 localhost
10.0.0.10 frodo
10.0.0.11 bilbo
The result of this command will list one or more entries of IP address and name pairs. In this exam-ple:
The IP address for machine name frodo is 10.0.0.10
The IP address for machine name bilbo is 10.0.0.11
A.3.4 Uninstalling MultiLink� Go to the directory where the MultiLink files are located (e.g., /opt/MultiLink) and run Unin-
stall.� Click the Uninstall button. A confirmation box asks if you are sure you want to uninstall the soft-
ware.� Pressing the Yes button will begin removing the software.� A message box appears when the process is completed. The uninstall process stops MultiLink ser-
vices that are running and removes all MultiLink files from the hard drive.

Operating System Details
39
A.4 HEWLETT PACKARD HP-UX
A.4.1 Platform-Specific RequirementsIn addition to the general requirements listed in 5.0 - What is Required to Use MultiLink?, pro-spective MultiLink users must also have:
� Hewlett Packard HP-UX 11.0 or 11i for HP 9000� At least 20 MB of free disk space (during installation, the /tmp directory must have at least
30 MB free)� Common Desktop Environment (X Window System)� A mouse� TCP/IP network protocol
A.4.2 Installation Notes
Pre-Installation ChecklistComply with the following requirements, then return to 8.2 - Installing MultiLink.
1. During installation you must be logged in as �root.�2. If using a serial port connection to the UPS, use the SAM utility to disable getty or uugetty at
system startup from monitoring the port where you are connecting the UPS. Optionally, you can delete or comment the following line (or similar) from the /etc/inittab file:
ttp1:234:respawn:/usr/sbin/getty –h tty0p1 9600
3. If you are using an SNMP card, check for SNMP daemons. Execute the commandps -ef | grep -i snmp. If the processes snmpd or snmpdm are running, they must be disabled before you can install MultiLink.If you are not using an SNMP hardware card with your UPS, MultiLink can use its default port settings of 3029/3027, and there is no need to disable the SNMP daemons.
4. Make sure the MultiLink distribution file has execute permission (chmod +x <file>), then execute it.
Serial Port SelectionThe preconfigured serial ports are /dev/tty0p0 and /dev/tty1p0. You may select one of these or enter another as appropriate.
Post-Installation NotesThe MultiLink installation program places the script LiebertM in the /sbin/init.d directory. It also creates K300LiebertM and S900LiebertM links in the /sbin/rc1.d and /sbin/rc2.d directories.
A.4.3 Notes on Running MultiLinkIf running the Common Desktop Environment (CDE), all users meant to receive pop-up messages must allow access to their desktop. This can be accomplished by adding the following command to a common logon script (e.g., /etc/profile). See the CDE documentation or xhost man page for more information about the desktop security mechanism.
/usr/bin/X11/xhost +`hostname`
Note: The characters surrounding hostname are the grave accent (`) that is usually found on the same keyboard key as the tilde (~).
Starting MultiLink ApplicationsDuring installation, shell scripts are created in the product installation directory tree (e.g., /opt/Mul-tiLink). These scripts may be used to execute these MultiLink applications:
� bin/ConfigEditor�Configuration Editor� bin/UpsViewer�UPS Status Viewer� Uninstall�Uninstall MultiLink
For convenience, you may want to add the bin subdirectory to your PATH.

Operating System Details
40
Verify MultiLink is RunningWhen operating properly, MultiLink is running constantly in the background. To verify that it is doing so, use /sbin/init.d/LiebertM show to get a list of the active MultiLink processes.
Identifying a Computer�s IP AddressRun the following command:
hostname
You will next see output similar to this:
frodo
The result of this command will show your machine name. In this example, the machine name is frodo. Then run the following command:
more /etc/hosts
You will next see output similar to this:
127.0.0.1 localhost10.0.0.10 frodo10.0.0.11 bilbo
The result of this command will list one or more entries of IP address and name pairs. In this exam-ple:
The IP address for machine name frodo is 10.0.0.10
The IP address for machine name bilbo is 10.0.0.11
A.4.4 Uninstalling MultiLink� Go to the directory where the MultiLink files are located (e.g., /opt/MultiLink) and run Unin-
stall.� Click the Uninstall button. A confirmation box asks if you are sure you want to uninstall the soft-
ware.� Pressing the Yes button will begin removing the software.� A message box appears when the process is completed. The uninstall process stops MultiLink ser-
vices that are running and removes all MultiLink files from the hard drive.
Operating System Details
41
A.5 IBM AIX
A.5.1 Platform-Specific RequirementsIn addition to the general requirements listed in 5.0 - What is Required to Use MultiLink?, pro-spective MultiLink users must also have:
� AIX 4.3 or 5.1 for RISC System/6000� At least 20 MB of free disk space (during installation, the /tmp directory must have at least
30 MB free)� Common Desktop Environment (X Window System)� A mouse� TCP/IP network protocol
A.5.2 Installation Notes
Pre-Installation ChecklistComply with the following requirements, then return to 8.2 - Installing MultiLink.
1. During installation you must be logged in as �root.�2. If using a serial port connection to the UPS, use the SMIT utility to disable getty at system
startup from monitoring the port where you are connecting the UPS.3. If you are using an SNMP card, check for SNMP daemons. Execute the command
ps -ef | grep -i snmp. If the process snmpd (or similar) is running, it must be disabled before you can install MultiLink.If you are not using an SNMP hardware card with your UPS, MultiLink can use its default port settings of 3029/3027, and there is no need to disable the SNMP daemons.
4. Make sure the MultiLink distribution file has execute permission (chmod +x <file>), then execute it.
Serial Port SelectionThe preconfigured serial ports are /dev/tty0 and /dev/tty1. You may select one of these or enter another as appropriate.
Post-Installation NotesThe MultiLink installation program places the script LiebertM in the /usr/sbin directory and modi-fies the /etc/rc.tcpip file to execute this script.
A.5.3 Notes on Running MultiLinkIf running the Common Desktop Environment (CDE), all users meant to receive pop-up messages must allow access to their desktop. This can be accomplished by adding the following command to a common logon script (e.g., /etc/profile). See the CDE documentation or xhost man page for more information about the desktop security mechanism.
/usr/bin/X11/xhost +`hostname`
Note: The characters surrounding hostname are the grave accent (`) that is usually found on the same keyboard key as the tilde (~).
Starting MultiLink ApplicationsDuring installation, shell scripts are created in the product installation directory tree (e.g.,/opt/MultiLink). These scripts may be used to execute these MultiLink applications:
� bin/ConfigEditor�Configuration Editor� bin/UpsViewer�UPS Status Viewer� Uninstall�Uninstall MultiLink
For convenience, you may want to add the bin subdirectory to your PATH.

Operating System Details
42
Verify MultiLink is RunningWhen operating properly, MultiLink is running constantly in the background. To verify that it is doing so, use /usr/sbin/LiebertM show to get a list of the active MultiLink processes.
Identifying a Computer�s IP AddressRun the following command:
hostname
You will next see output similar to this:
frodo
The result of this command will show your machine name. In this example, the machine name is frodo. Then run the following command:
more /etc/hosts
You will next see output similar to this:
127.0.0.1 localhost10.0.0.10 frodo10.0.0.11 bilbo
The result of this command will list one or more entries of IP address and name pairs. In this exam-ple:
The IP address for machine name frodo is 10.0.0.10
The IP address for machine name bilbo is 10.0.0.11
A.5.4 Uninstalling MultiLink� Go to the directory where the MultiLink files are located (e.g., /opt/MultiLink) and run Unin-
stall.� Click the Uninstall button. A confirmation box asks if you are sure you want to uninstall the soft-
ware.� Pressing the Yes button will begin removing the software.� A message box appears when the process is completed. The uninstall process stops MultiLink ser-
vices that are running and removes all MultiLink files from the hard drive.

Operating System Details
43
A.6 NOVELL NETWARE
A.6.1 Platform-Specific RequirementsIn addition to the general requirements listed in 5.0 - What is Required to Use MultiLink?, pro-spective MultiLink users must also have:
� NetWare 4.11, 4.2, 5.0, 5.1 or 6.0 server with JAVA and NETDB modules loaded� At least 20 MB of free disk space on SYS: volume� Novell�s NetWare Client on Windows XP, 2000, NT�, 98 or 95 on an Intel Pentium-class proces-
sor� Read/write access to SYS:\System\
(SYS must be mapped to a drive on the client for installation and for operating the Configuration Editor and Status Viewer)
� At least 20 MB of free disk space in the client�s %TEMP% directory for installation� A mouse on the client workstation� TCP/IP network protocol� Novell Java Virtual Machine (JVM)�your operating system and JVM version determine which
MultiLink download you will need. Refer to the following table to select the proper download for your system based on server version and Java type. For the most up-to-date information on this topic, visit the Liebert Web site at:
http://www.liebert.com
A.6.2 Installation on the Novell Server� Download the self-extracting MultiLink file and execute it on a NetWare client workstation.
This workstation must be set up as a NetWare client and have Windows XP, 2000, NT, Me, 98, or 95 installed. The target for the installation will be the Novell server.
� The program will be installed into SYS:\System\ML (this cannot be changed) on the server that you select.
Platform Release Download
Novell NetWare 4.11-12, 5.0-1 With Java 1.1.7b ONLY
MultiLink Version 1.5 - build 37, September 26, 2001
ML_15_037_NW.exe (self-extracting zip file)
Novell NetWare 5.1, 6.0 With Java 1.2.x or 1.3.x ONLY
MultiLink Version 1.5 - build 42, September 3, 2002
ML_15_042_NW_j2.exe (self-extracting zip file)
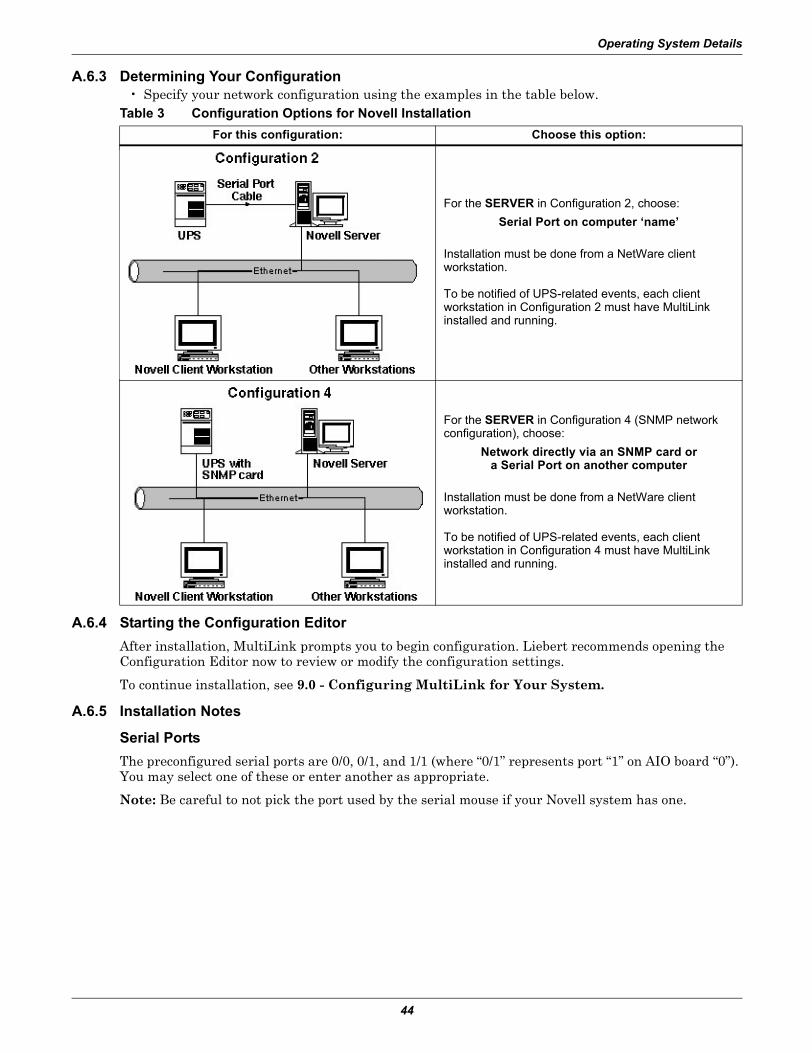
Operating System Details
44
A.6.3 Determining Your Configuration� Specify your network configuration using the examples in the table below.
A.6.4 Starting the Configuration EditorAfter installation, MultiLink prompts you to begin configuration. Liebert recommends opening the Configuration Editor now to review or modify the configuration settings.
To continue installation, see 9.0 - Configuring MultiLink for Your System.
A.6.5 Installation Notes
Serial PortsThe preconfigured serial ports are 0/0, 0/1, and 1/1 (where �0/1� represents port �1� on AIO board �0�). You may select one of these or enter another as appropriate.
Note: Be careful to not pick the port used by the serial mouse if your Novell system has one.
Table 3 Configuration Options for Novell InstallationFor this configuration: Choose this option:
For the SERVER in Configuration 2, choose: Serial Port on computer �name�
Installation must be done from a NetWare client workstation.
To be notified of UPS-related events, each client workstation in Configuration 2 must have MultiLink installed and running.
For the SERVER in Configuration 4 (SNMP network configuration), choose:
Network directly via an SNMP card or a Serial Port on another computer
Installation must be done from a NetWare client workstation.
To be notified of UPS-related events, each client workstation in Configuration 4 must have MultiLink installed and running.
Operating System Details
45
A.6.6 Upgrading from MultiLink 1.5 Build 037 and EarlierIf you are upgrading your software from MultiLink 1.5 build 037 (or an earlier build) to MultiLink 1.5 build 042 (and later builds), you must first upgrade the JVM on the server from version 1.1 or 1.2 to version 1.3:
� Stop the MultiLink 1.5 service, which is running on the server, by issuing the LIEBERTM STOP command at the server console.
� Verify that the service has stopped by issuing the LIEBERTM STATUS command at the server con-sole.
� Open the SYS:\SYSTEM\AUTOEXEC.NCF file in a text editor. Search for (ignoring case) and delete any instances of "SYS:\SYSTEM\ML\LIEBERTM.NCF" (the MultiLink service startup command) that appear in that file.
� Install the 1.3 JVM on the NetWare server. Follow the instructions provided with the JVM instal-lation package.
� Reboot the server after the JVM installation is complete.� Verify that JAVA is loaded on the server by issuing the command MODULES JAVA at the server con-
sole. You may also want to verify the version of the JAVA NLM that is loaded to ensure the JVM upgrade was successful.
� Execute the new MultiLink 1.5 installation program and follow the instructions as you would dur-ing a normal installation or upgrade.
Operating System Details
46
A.6.7 Upgrading from MultiLink 1.1If you are upgrading your software from MultiLink 1.1 to MultiLink 1.5 build 042 (and later builds):
� Stop the MultiLink 1.1 service, which is running on the server, by executing the UNLOAD JAVA command at the server console. (This method will kill ALL Java processes running on the server.)
� To verify that the MultiLink 1.1 service has stopped and all NLMs have been unloaded, execute these two commands on the server:
MODULES LX232MODULES LXNWSERV
� If nothing is returned from these commands, the modules have been unloaded. If they produce output, the associated NLM still needs to be unloaded.
� To unload an NLM, use the command UNLOAD ****, where �****� is the name of the NLM. For example, the command to unload LXNWSERV.NLM would be UNLOAD LXNWSERV.
� Before beginning the install, issue the command UNLOAD AIOCOMX for each instance of AIOCOMX related to the use of MultiLink.
� Open the SYS:\SYSTEM\AUTOEXEC.NCF file in a text editor. Search for and delete any lines containing instances of �com.liebert.dpg.executor.LxM1Executor� (the MultiLink 1.1 service star-tup command) that appear in that file.
� Install the 1.3 JVM on the NetWare server. Follow the instructions provided with the JVM instal-lation package.
� Reboot the server after the JVM installation is complete.� Verify JAVA is loaded on the server by issuing the command MODULES JAVA at the server console.
You may also want to verify the version of the JAVA NLM that is loaded to ensure the JVM upgrade was successful.
� Execute the new MultiLink 1.5 installation program and follow the instructions as you would dur-ing a normal installation/upgrade.
Upgrading to MultiLink 1.5 from MultiLink 1.1 leaves two lines in the AUTOEXEC.NCF file:
LOAD NWSNUTLOAD AIOCOMX
These are loads of NetWare system NLMs. Because of the way the AUTOEXEC.NCF file is �cleaned,� removing these would be dangerous because every instance of them would be removed. These other instances of the NetWare system NLMs might be required by other programs.
The old AUTOEXEC.NCF (the file�s name prior to �cleaning�) is renamed to AUTOEXEC.M15.
Upgrades do NOT delete the old SYS:\System\SNML search path. Uninstalling does NOT delete the SYS:\System\ML search path. However, both of these search paths will disappear when the system is rebooted.
NOTEDo NOT use the commands JAVA -SHOW and JAVA -KILL######## to stop the MultiLink 1.1 service. Attempting to do so will result in two LX*NLMs that cannot be unloaded. It is impossible to continue the upgrade installation with LXNWSERV.NLM still loaded. The JAVA NLM must be unloaded and then reloaded for the upgrade to proceed.
NOTEIf the UPS is connected to a local serial port, MultiLink will detect at startup whether AIOCOMX is running. If it is not running, MultiLink 1.5 will load one instance of AIOCOMX. This is all that is required if you are using 0/0. If MultiLink detects any instance of AIOCOMX at startup, it will not load any additional instances. If you are using 0/1 or 1/1 for MultiLink, you will need to make sure there is an appropriate number of LOAD AIOCOMX statements in the AUTOEXEC.NCF file.

Operating System Details
47
A.6.8 Starting MultiLink ApplicationsMultiLink services are configured and started during installation. Installation also creates .NCF and .LNK command files in the bin subdirectory of the product installation directory (e.g., SYS:\Sys-tem\ML\bin). These scripts may be used to execute the following MultiLink GUI applications:
� Configuration Editor (MLconfig.ncf & MLconfig.lnk)� UPS Status Viewer (UPSview.ncf & UPSview.lnk)
This path (e.g., SYS:\System\ML\bin) is added to the server�s search path during installation so that the GUI applications may be started from the console by typing the command filename.
The server must be configured to support Java�s GUI (NWGFX) in order to run the GUI applications on the server.
The .LNK files are provided for the convenience of starting the GUI on your NetWare client worksta-tion. To run the applications on the NetWare client, you must have access to SYS:\System\ML.
A.6.9 Notes on Running MultiLink1. When operating properly, MultiLink is running constantly in the background. To verify that it is
doing so, get a list of all active Java programs running through the java -show command (there should be an entry with �Classname� of �com.liebert.dpg.executor.LxM1Executor� if the MultiLink service is running).
2. The Configuration Editor may be run at either the Novell server or a client workstation. However, when setting up the log file to track UPS-related events, the Configuration Editor�s Browse button is operable only when the Configuration Editor is being run at the server. The Browse button is disabled when the Configuration Editor is opened at a client workstation. Setting up or altering the log file at a workstation requires specifying the file�s entire path.
Message FormatMultiLink notification appears in the format below. The MultiLink console application may display one or two countdown timers simultaneously.
A.6.10 Stopping MultiLink ServicesStop the MultiLink services by entering �LiebertM stop� at the server console.
The MultiLink services may then be restarted by entering �LiebertM start� at the server console.

Operating System Details
48
A.6.11 Adding or Deleting a UPSThe Status Viewer Configuration window allows you to make changes to the list of configured UPSs.
� In the UPS Status Viewer window (see 10.1 - Opening the Status Viewer), click on the Config-uration button to update the list of UPSs.
� Follow these instructions to add a UPS, make a change to a UPS or remove a UPS from the Viewer List.
To Add a UPS:� Enter the IP address or hostname of the UPS in the UPS Hostname or IP Address box.� Click on the Add button and the UPS will appear in the Viewer List box.
To Replace a UPS:� Enter the IP address or hostname of the replacement UPS in the UPS Hostname or IP Address
box. � In the Viewer List, click on the name of the UPS to be replaced. (Click a second time on a UPS to
deselect it. Double-clicking on the name of a UPS in the Viewer List list copies it to the UPS Hostname or IP Address box where it can be edited.)
� Click on the Replace button.
To Delete a UPS:� Click on one or more entries in the Viewer List. (Click a second time on a UPS to deselect it.)� Click on the Delete button, and a message box asks for confirmation that you wish to delete the
UPS(s).
A.6.12 Identifying a Computer�s IP AddressRefer to Novell�s INETCFG instructions.
A.6.13 Uninstalling MultiLinkTo remove the MultiLink software from your server, use the Uninst.lnk created during installation.

Making Your Own MultiLink UPS Cable
49
APPENDIX B - MAKING YOUR OWN MULTILINK UPS CABLE
If you have a serial port connection to the UPS, you will need a custom cable. MultiLink will NOT function properly with ordinary serial cables. To make your own cable, follow the instructions in this appendix. (You may purchase a MultiLink UPS cable by contacting your local Liebert representative, value-added reseller, or distributor.)
You should prepare and attach the cable before installing MultiLink so that the system will be ready to use the software.
B.1 MATERIALS YOU WILL NEED
� Two connectors, one with pins, the other with sockets, either DB25 or DB9 � RJ11 or RJ12 cable � Two connectors, RJ11 or RJ12, depending on the cable being used
B.2 INSTRUCTIONS
Follow these directions to build the cable:
1. Determine the connector your UPS needsExamine the back of your UPS.
� Does it have a 9-pin or 25-pin connector? � Is the connector a pin or socket type? (A pin connector has protruding pins; a socket connector
has holes.) � If the back of the UPS has a socket connector, the cable connector must have a pin connector
and vice versa. � The diagrams in Figure 1 - Serial Port Connectors will help determine the type of connec-
tor you have. The circles denote pins and the dots denote sockets.
Figure 1 Serial Port Connectors
2. Determine the connector your computer needsExamine the back of your computer.
� Does it have a 9-pin or 25-pin connector? � Is the connector a pin or socket type? (A pin connector has protruding pins; a socket connector
has holes.) � If the back of the UPS has a socket connector, the cable connector must have pins and vice
versa. � The diagrams in Figure 1 - Serial Port Connectors will help determine the type of connec-
tor you have. The circles denote pins and the dots denote sockets.3. Determine the length of the cable you need
Measure the distance between the UPS and the computer. The cable must be long enough to reach each machine�s connector and to go around obstructions. Keep the cable as short as possible, pref-erably less than 25 feet. Do not lay the cable near electromagnetic interference sources such as AC power lines, fluorescent lights, and induction motors.

Making Your Own MultiLink UPS Cable
50
4. Buy the partsThe parts are available at most electronics stores or large computer stores as well as through mail-order companies. The following illustration shows some of the parts you may need.
5. Assemble the UPS and computer connectorsAssemble the UPS and computer connectors according to the table below. The face of the connec-tor has a number assigned to each hole or pin.
The following picture shows a possible pin-wire insertion for a connector.
6. Assemble the connector housing and connect the cable to it7. Connect the cable to the computer and UPS
UPS Interface Port Wire Color
Computer Interface Port
DB25 DB9 Function Signal DB9 DB25
16 9 ON Battery Red <<<TX 3 2
17 8 ON Battery Green RX>>> 2 3
11 1 LOW Battery Black <<<RTS 7 4
9 7 LOW Battery Yellow DCD>>> 1 8
7 5 UPS Ground If cable has shield, connect shield at UPS
Not connected
Not connected
19 4 UPS Off Must NOT be connected
Not connected
Not connected
NOTEUnlisted pins and sockets are not connected.

Technical Information & Frequently Asked Questions
51
APPENDIX C - TECHNICAL INFORMATION & FREQUENTLY ASKED QUESTIONS
1. What is a DHCP server?DHCP is the acronym for Dynamic Host Configuration Protocol. This protocol allows hostnames to be allocated dynamically when computers are connected to a network. This protocol is often used to remotely grant a hostname to a computer for a limited time, as when a student uses a computer for a quarter or longer. See RFC-1541 for more detailed information. (RFCs are Request For Comment documents that set forth regulations on how communication occurs on the Internet. These documents are controlled by the Internet Engineering Task Force (IETF) and are available for viewing at the IETF Web site.)
2. How do I identify possible IP port conflicts? How do I resolve the conflict?Conflicts with ports 161, 162, 3027 and 3029 can be resolved by stopping SNMP services or dae-mons from running. This product does not support running the �monitor� or the �shutdown-client� on the same machine as a Network Management System (NMS).For the proper procedure to stop the SNMP services or daemons, see 3.0 - How Do You Contact Liebert for Technical Support? to get assistance.
3. What do the following errors mean?These are error messages that can be generated by the UPS Status Viewer application.
� UPS configuration errorUPS configuration error means that the device that we are communicating with has responded, but does not understand the SNMP status request that we sent. This can occur if (for example) we are communicating with an SNMP-aware device that is not a UPS, such as an SNMP-manageable file server.
� Communication send errorCommunication send error means that an unknown problem has occurred trying to communi-cate with the target UPS.
� Communication timeoutThe Communication timeout error occurs whenever we do not hear back from the device we attempted communication with. This can occur if, for example, the specified device has been turned off, your computer has been unplugged from the network, or the SNMP community string is misconfigured on one of the systems.
� UPS destination unknownUPS destination unknown means that we are unable to find the specified address. Looking for IP address 300.0.-1.-1, for example, will generate an UPS destination unknown error.
4. What is a service or a daemon?Both are processes initiated at boot time that require no user intervention to start and run. Some platforms, such as Windows NT, call them services; Unix terms them daemons.
5. Why do I see the screen flash when the UPS goes to on-battery or returns to normal?The flash is caused by display of an empty script window (windows that are devoid of text).
6. Should I use IP addresses or hostnames to configure MultiLink? How do I use the Test button in the Configuration Editor? (Applies to Configurations 1 and 2 in Table 2)MultiLink routes alerts and notifications by IP addresses. It utilizes name service lookup to trans-late between IP addresses and hostnames, which are more easily understood by computer users who see them in the notification messages and in the user log. DNS configuration problems may delay display of MultiLink notification messages. If this is a persistent problem, Liebert suggests using IP addresses instead of hostnames. However, if IP addresses are dynamically assigned on your network, you may have to use hostnames.

Technical Information & Frequently Asked Questions
52
In general, notification messages should appear within five seconds of the triggering event. A longer delay may indicate problems with the local DNS configuration. If this is suspected, check the following:a. From a machine running the UPS monitor, launch the Configuration Editor.b. Click on the Clients tab.c. Select one or more configured hostnames and click on the Test button. This causes the
MultiLink software to send a test message to each selected computer.d. If any test messages are successful, the following message appears on the computer running
the Configuration Editor, showing the total number of successful test messages. (For Novell, the following message is displayed only if the Configuration Editor is running on the server.)
For each test message that fails to reach the targeted computer, the following message appears on the computer running the Configuration Editor.
The error message shown above indicates there is a name service configuration problem. The selected entry probably is not configured in the name service. This should be corrected. If it is configured with its associated reverse lookup entry, there might be a problem accessing the name service. You should try to ping the name server and correct any problems there with your System Administrator. Assuming everything is working properly to this point, you should check the configuration at the client end.
e. A test message is successful if a targeted computer receives the following message:
This message should appear within five seconds of the triggering test event. If it does not, compare the time it is displayed with the time on the message. If the lapse is more than 10 seconds, there is a local name service problem. If the message is received within two seconds, the local name service configuration is correct.If test messages are received in a timely fashion and the entry was a hostname, DNS or other name services are correctly configured.For NetWare servers, the message above will appear on the MultiLink screen.
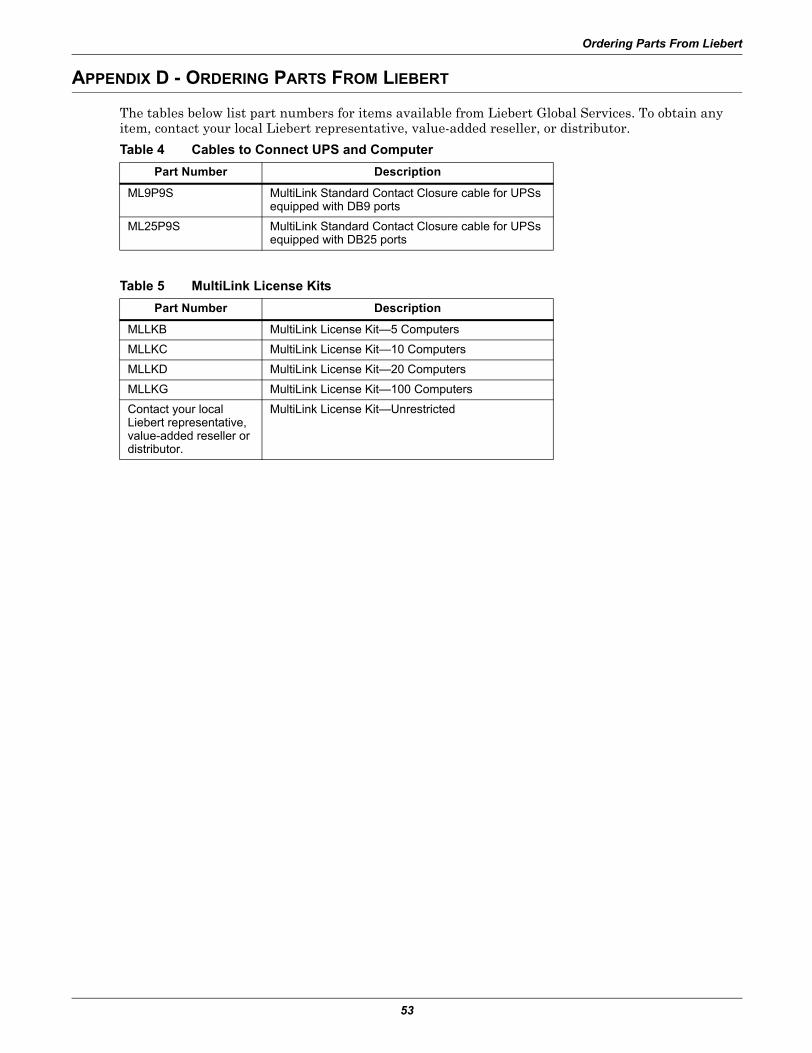
Ordering Parts From Liebert
53
APPENDIX D - ORDERING PARTS FROM LIEBERT
The tables below list part numbers for items available from Liebert Global Services. To obtain any item, contact your local Liebert representative, value-added reseller, or distributor.
Table 4 Cables to Connect UPS and ComputerPart Number Description
ML9P9S MultiLink Standard Contact Closure cable for UPSs equipped with DB9 ports
ML25P9S MultiLink Standard Contact Closure cable for UPSs equipped with DB25 ports
Table 5 MultiLink License KitsPart Number Description
MLLKB MultiLink License Kit�5 Computers
MLLKC MultiLink License Kit�10 Computers
MLLKD MultiLink License Kit�20 Computers
MLLKG MultiLink License Kit�100 Computers
Contact your local Liebert representative, value-added reseller or distributor.
MultiLink License Kit�Unrestricted

The Company Behind the ProductsWith over a million installations around the globe,Liebert is the world leader in computer protectionsystems. Since its founding in 1965, Liebert hasdeveloped a complete range of support andprotection systems for sensitive electronics:
� Environmental systems�close-control airconditioning from 1 to 60 tons
� Power conditioning and UPS with powerranges from 300 VA to more than 1000 kVA
� Integrated systems that provide bothenvironmental and power protection in asingle, flexible package
� Monitoring and control�from systems of anysize or location, on-site or remote
� Service and support through more than 100service centers around the world and a 24/7Customer Response Center
While every precaution has been taken to ensurethe accuracy and completeness of this literature,Liebert Corporation assumes no responsibility anddisclaims all liability for damages resulting fromuse of this information or for any errors oromissions.
© 2004 Liebert CorporationAll rights reserved throughout the world.Specifications subject to change without notice.
® Liebert and the Liebert logo are registeredtrademarks of Liebert Corporation. All namesreferred to are trademarks or registeredtrademarks of their respective owners.
SL-53620 (6/04)
Technical Support/ServiceWeb Site
www.liebert.comMonitoring
Outside the US: 614-841-6755Single-Phase UPS
Outside the US: 614-841-6755Three-Phase UPS
Environmental Systems800-543-2778
Outside the United States614-888-0246
LocationsUnited States
1050 Dearborn DriveP.O. Box 29186
Columbus, OH 43229Italy
Via Leonardo Da Vinci 8Zona Industriale Tognana
35028 Piove Di Sacco (PD)+39 049 9719 111
Fax: +39 049 5841 257Asia
23F, Allied Kajima Bldg.138 Gloucester Road
WanchaiHong Kong
+852 2 572 2201Fax: +852 2 831 0114
MONITORING
MultiLink 1.5�USER MANUAL