license plate recognition setup and field ... plate recognition setup and field installation guide...
TRANSCRIPT

LICENSE PLATE RECOGNITIONSETUP AND FIELD INSTALLATION GUIDE

This document was created to benchmark the settings and tools needed to successfully deploy LPR with the ipConfigure’s Enterprise Surveillance Manager. Specific hardware and software was used to obtain optimal settings, namely: Axis Q1604 IP Camera, Fujinon 3MP 8/80mm lens (Part # DV10X8SA-‐1). Testing was conducted with the following environmental conditions: daylight hours, no extra light included (white or infrared), and dawn to dusk timeframe for normal operation
ipConfigure LPR Setup and Field Installation Guide | 2 updated: 07/10/2014

TABLE OF CONTENTS Testing Scenarios _______________________________________________ 2 Axis Recommended Settings for Q1604 Camera __________________ 4 Adjusting Camera LPR FOV ____________________________________ 7 Explanation of Camera Setting ____________________________________ 10 IPConfigure LPR Camera Setup ____________________________________ 12 Environmental Considerations _____________________________________ 18
ipConfigure LPR Setup and Field Installation Guide | 3 updated: 07/10/2014

AXIS RECOMMENDED SETTINGS FOR Q1604 CAMERA
INITIAL CAMERA SETUP
1. Log onto the camera directly. Axis cameras default IP Address is: 192.168.0.90.
2. Check that the camera is running the latest firmware for that model (can be obtained from Axis’s main webpage) and the Fujinon 5/50 mm or 8/80mm lens is attached.
3. Select Setup | Basic Setup | Video Stream | Image. The first time you login to the
camera you will be asked to apply a CAPTURE MODE -‐ we require this to be set to 1 MP
1280x720 (16:9). (Note: If you have to factory default the camera at some point in the
future you will need to re-‐apply this setting).
At initial login to camera or under Basic Setup | Video Stream set to the following:
a. Under Image Appearance | Capture mode set Resolution to: 1280x960 (4:3) b. Set Compression level to 0 c. Save these settings
ipConfigure LPR Setup and Field Installation Guide | 4 updated: 07/10/2014

UNDER VIDEO & AUDIO | CAMERA SETTINGS set the following:
Image Appearance:
1. Set Color level to 50 2. Set Brightness to 50 3. Set Sharpness to 50 4. Set Contrast to 50 (The above settings should be used as a starting point for operation on a sunny day.)
Exposure Settings:
5. Set the Exposure value to: 70 (ideal range is 60-‐70)
ipConfigure LPR Setup and Field Installation Guide | 5 updated: 07/10/2014
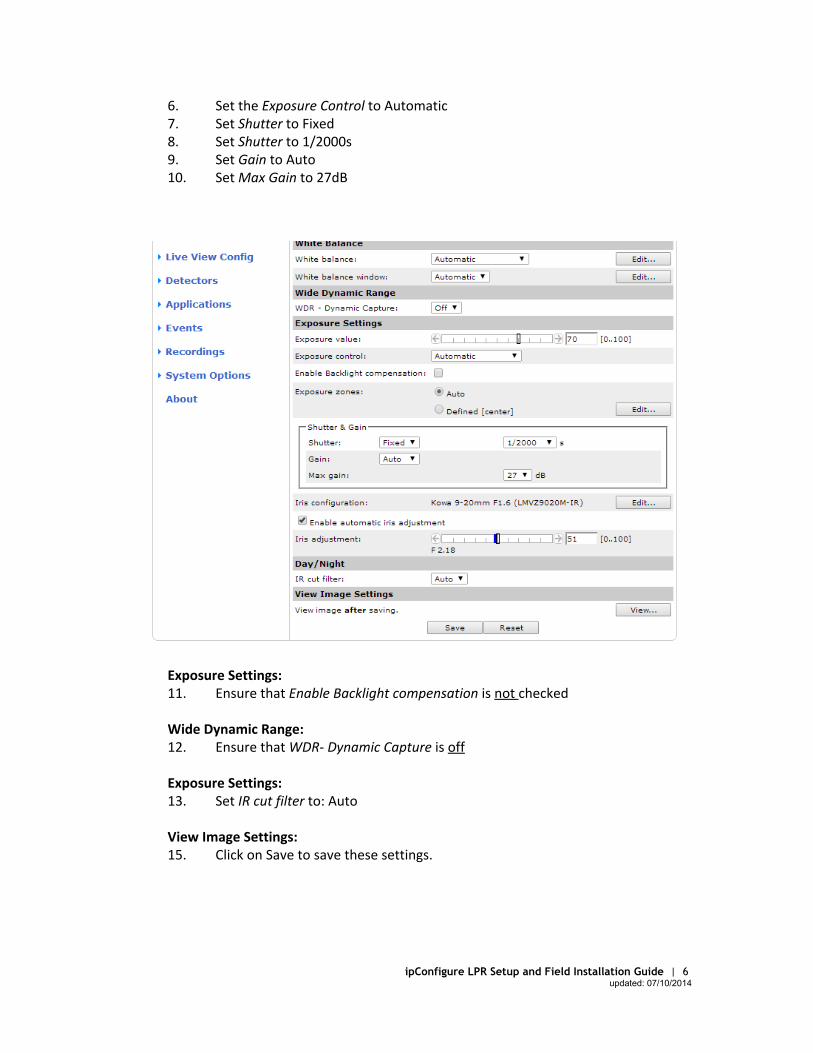
6. Set the Exposure Control to Automatic 7. Set Shutter to Fixed 8. Set Shutter to 1/2000s 9. Set Gain to Auto 10. Set Max Gain to 27dB
Exposure Settings:
11. Ensure that Enable Backlight compensation is not checked
Wide Dynamic Range:
12. Ensure that WDR-‐ Dynamic Capture is off
Exposure Settings: 13. Set IR cut filter to: Auto
View Image Settings:
15. Click on Save to save these settings.
ipConfigure LPR Setup and Field Installation Guide | 6 updated: 07/10/2014

ADJUSTING CAMERA LPR FOV
Before continuing, it is important to understand FOV and how this relates to the camera and the optimal settings related to distance, height, FOV, depth of field, and width of view. The following diagram will help understand Camera Placement, width and height of FOV and the LPR capture range.
Scenarios
Gate or Parking Garage
Lens: Fujinon 5-‐50mm lens
Distance: ≈ 8 feet Angle: 10 degrees
Frames Per Second: 1 fps
Assumptions:
● Vehicles come to a complete stop before entering and leaving a controlled area
● Entrance and Exits are well lit
● At least 150 pixels of plate data
ipConfigure LPR Setup and Field Installation Guide | 7
updated: 07/10/2014
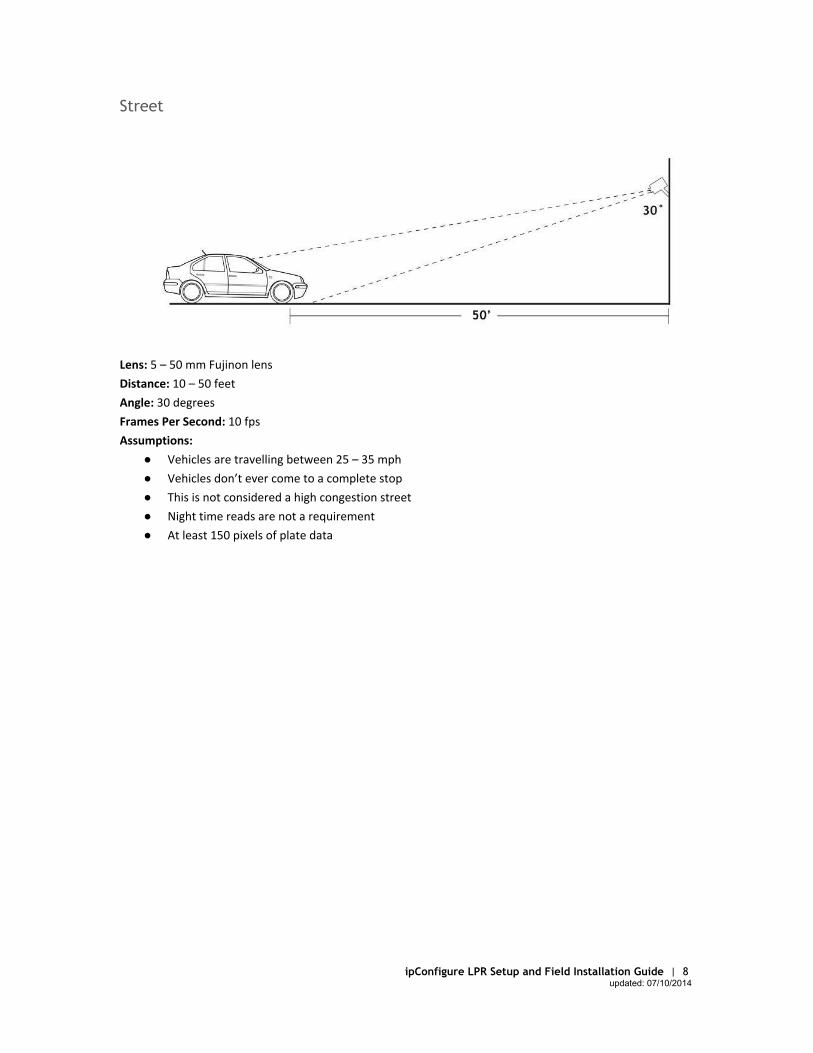
Street
Lens: 5 – 50 mm Fujinon lens
Distance: 10 – 50 feet
Angle: 30 degrees
Frames Per Second: 10 fps
Assumptions:
● Vehicles are travelling between 25 – 35 mph
● Vehicles don’t ever come to a complete stop
● This is not considered a high congestion street
● Night time reads are not a requirement
● At least 150 pixels of plate data
ipConfigure LPR Setup and Field Installation Guide | 8 updated: 07/10/2014

Country Road
Lens: 8 – 80 mm Fujinon lens
Distance: 50 – 80 feet
Angle: 20 degrees
Frames Per Second: 10 fps
IR Illuminator: Axis T90A42
Assumptions:
● Fujinon lens is a day night lens
● Lights in the enclosure would be disabled
● Cars are travelling less than 40 mph
● The IR illuminator is long range and can reach 80 feet
● At least 150 pixels of plate data
ipConfigure LPR Setup and Field Installation Guide | 9 updated: 07/10/2014
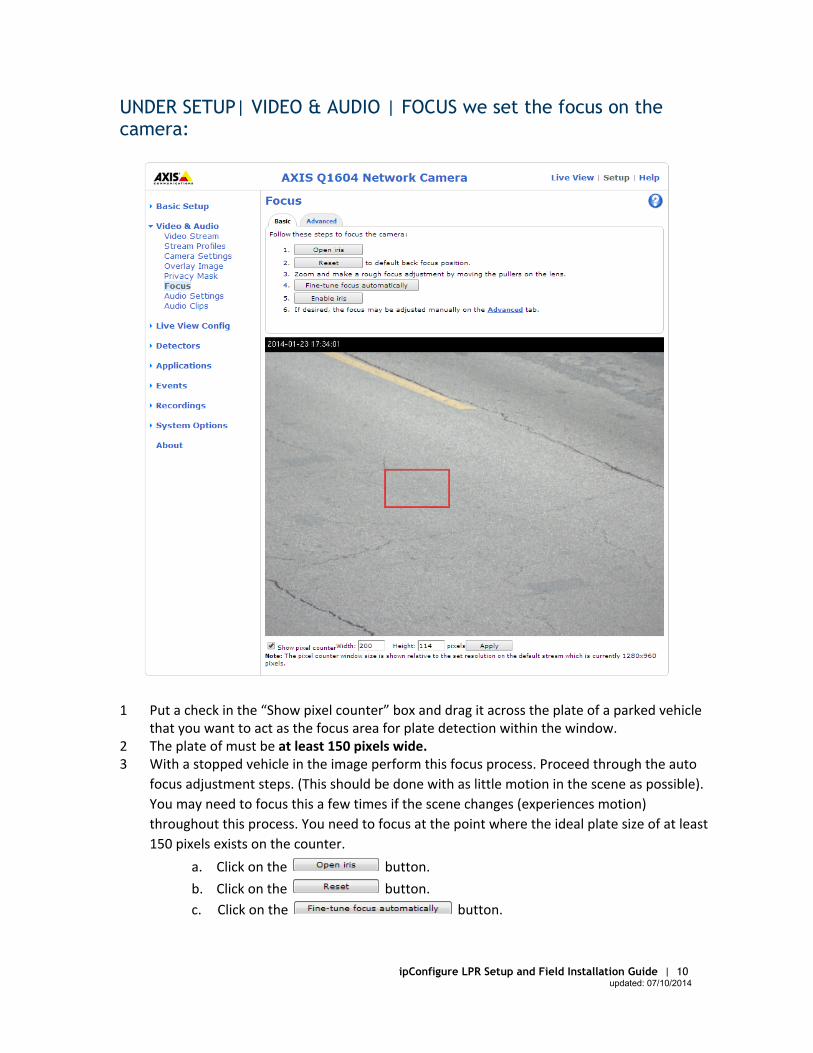
UNDER SETUP| VIDEO & AUDIO | FOCUS we set the focus on the camera:
1 Put a check in the “Show pixel counter” box and drag it across the plate of a parked vehicle
that you want to act as the focus area for plate detection within the window. 2 The plate of must be at least 150 pixels wide. 3 With a stopped vehicle in the image perform this focus process. Proceed through the auto
focus adjustment steps. (This should be done with as little motion in the scene as possible).
You may need to focus this a few times if the scene changes (experiences motion)
throughout this process. You need to focus at the point where the ideal plate size of at least
150 pixels exists on the counter.
a. Click on the button.
b. Click on the button.
c. Click on the button.
ipConfigure LPR Setup and Field Installation Guide | 10 updated: 07/10/2014

d. NOTE: You can click on the tab at this point to fine tune the auto
focus manually after it resets. This should be done if the image does not
automatically refocus to an ideal picture.
e. Click on the button to close this session of Focusing the FOV on
the camera.
ipConfigure LPR Setup and Field Installation Guide | 11 updated: 07/10/2014

IPCONFIGURE LPR CAMERA SETUP
Before calibrating an LPR camera it needs to be added into ESM. Adding the camera for the most part is just like any normal surveillance camera with a few exceptions explained here.
CAMERA SETTINGS IN ESM ADMIN UI:
1. Camera Application: By default this will be set to Surveillance, change this to LPR and
select Apply
2. Overview Camera: This allows a secondary camera already configured in the ESM
system to be linked to this LPR camera. This will link that cameras recording with the LPR
reads captured.
3. Image Resolution: For LPR application this needs to be set to (1280x960).
4. Frame Rate: Best results are at 10 fps.
5. Compression: Best results are at 0%.
*Quick Tip* Once all settings have been made make sure there is a check box in the “Enabled”
field and then click “Apply” to start up the process.
ipConfigure LPR Setup and Field Installation Guide | 12 updated: 07/10/2014
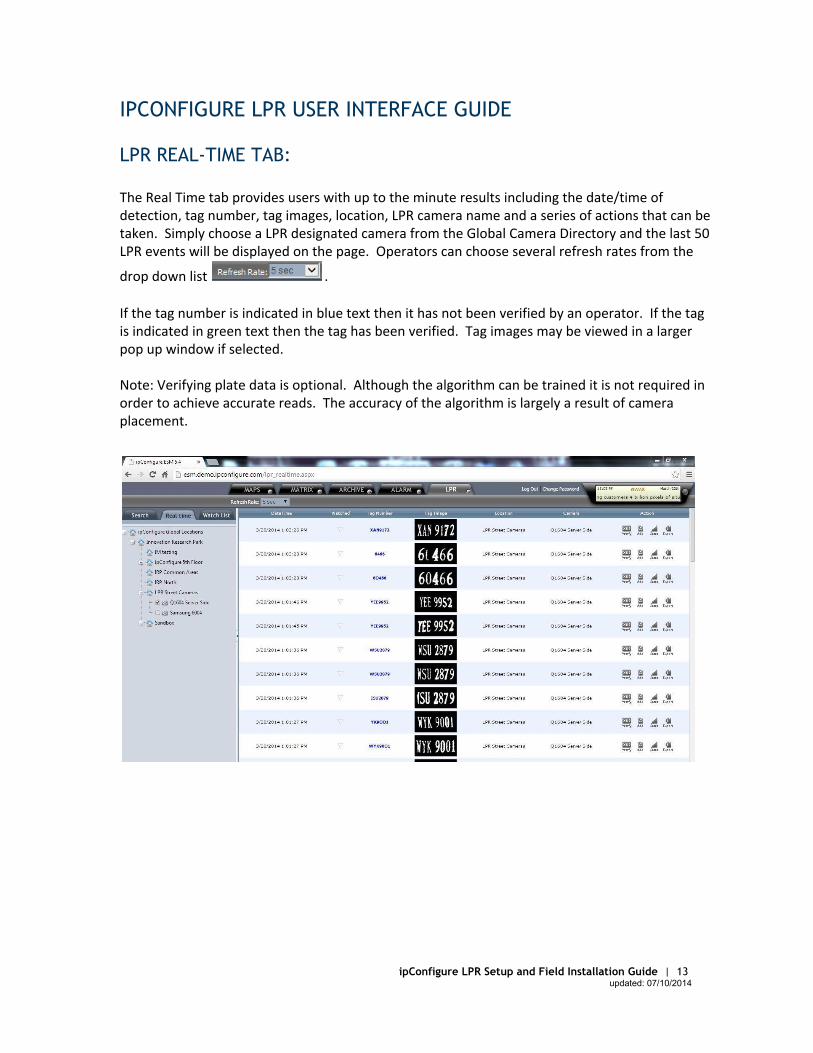
IPCONFIGURE LPR USER INTERFACE GUIDE LPR REAL-‐TIME TAB: The Real Time tab provides users with up to the minute results including the date/time of detection, tag number, tag images, location, LPR camera name and a series of actions that can be taken. Simply choose a LPR designated camera from the Global Camera Directory and the last 50 LPR events will be displayed on the page. Operators can choose several refresh rates from the
drop down list . If the tag number is indicated in blue text then it has not been verified by an operator. If the tag is indicated in green text then the tag has been verified. Tag images may be viewed in a larger pop up window if selected. Note: Verifying plate data is optional. Although the algorithm can be trained it is not required in order to achieve accurate reads. The accuracy of the algorithm is largely a result of camera placement.
ipConfigure LPR Setup and Field Installation Guide | 13 updated: 07/10/2014

LPR SEARCH TAB: Plate Search:
The LPR search screen allows users to define searches against specific tag numbers based on accuracy, repetitive visits, or predefined watch lists. Additionally, users can playback video from the assigned overview camera if one is installed.
1. In order to perform a LPR search a LPR camera has to be setup and available in the Global
Camera Directory. LPR cameras are designated by the LPR icon . Check the
box next to the LPR camera to enable a search.
2. Users can enter any number of characters in the Search Plate Number field or none at all.
If no characters are entered and accuracy is lowered to 25% all results will be displayed
in a given time/date range. Wildcard characters are also available if the entire plate
number is not known:
3. The Defined Searches field allows users to run a Sequential Search or a search based on
Repetitive Plate Visits.
4. The Search Watch List field allows a user to search based on the contents of a specific
watch list. Leave this field set to “None selected” to search all plates.
5. Select the date and time parameters for your search.
6. Select the Search button .
ipConfigure LPR Setup and Field Installation Guide | 14 updated: 07/10/2014
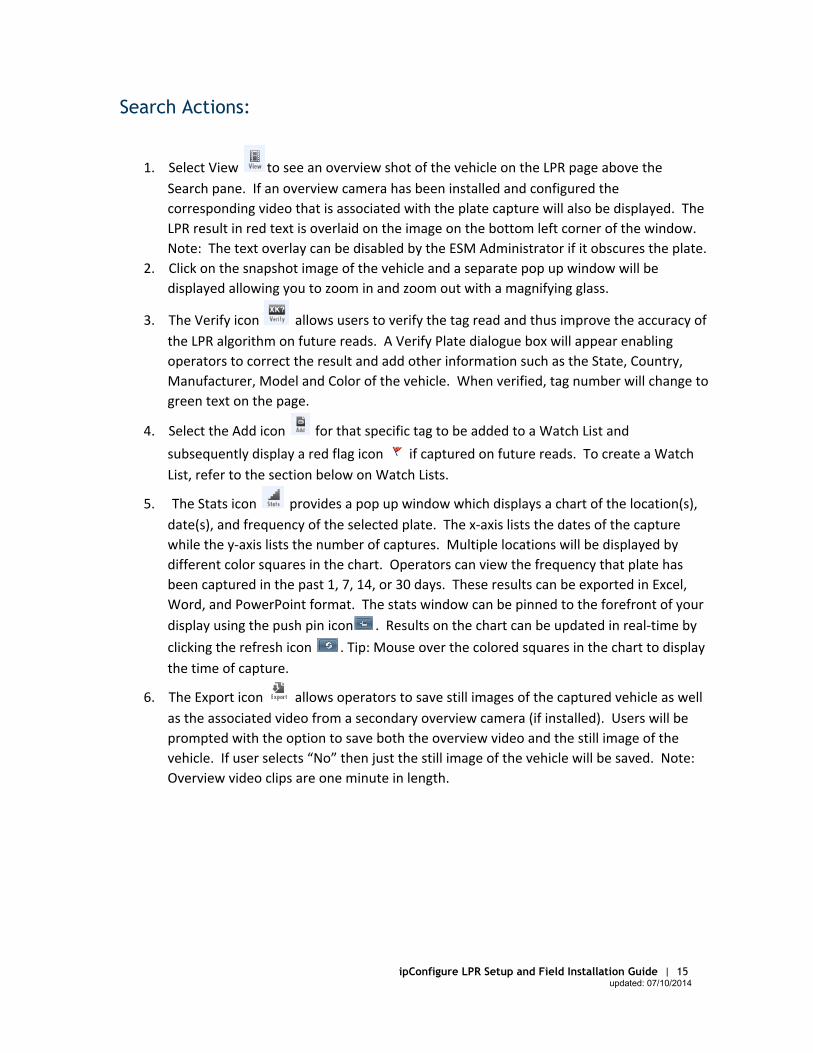
Search Actions:
1. Select View to see an overview shot of the vehicle on the LPR page above the
Search pane. If an overview camera has been installed and configured the
corresponding video that is associated with the plate capture will also be displayed. The
LPR result in red text is overlaid on the image on the bottom left corner of the window.
Note: The text overlay can be disabled by the ESM Administrator if it obscures the plate.
2. Click on the snapshot image of the vehicle and a separate pop up window will be
displayed allowing you to zoom in and zoom out with a magnifying glass.
3. The Verify icon allows users to verify the tag read and thus improve the accuracy of
the LPR algorithm on future reads. A Verify Plate dialogue box will appear enabling
operators to correct the result and add other information such as the State, Country,
Manufacturer, Model and Color of the vehicle. When verified, tag number will change to
green text on the page.
4. Select the Add icon for that specific tag to be added to a Watch List and
subsequently display a red flag icon if captured on future reads. To create a Watch
List, refer to the section below on Watch Lists.
5. The Stats icon provides a pop up window which displays a chart of the location(s),
date(s), and frequency of the selected plate. The x-‐axis lists the dates of the capture
while the y-‐axis lists the number of captures. Multiple locations will be displayed by
different color squares in the chart. Operators can view the frequency that plate has
been captured in the past 1, 7, 14, or 30 days. These results can be exported in Excel,
Word, and PowerPoint format. The stats window can be pinned to the forefront of your
display using the push pin icon . Results on the chart can be updated in real-‐time by
clicking the refresh icon . Tip: Mouse over the colored squares in the chart to display
the time of capture.
6. The Export icon allows operators to save still images of the captured vehicle as well
as the associated video from a secondary overview camera (if installed). Users will be
prompted with the option to save both the overview video and the still image of the
vehicle. If user selects “No” then just the still image of the vehicle will be saved. Note:
Overview video clips are one minute in length.
ipConfigure LPR Setup and Field Installation Guide | 15 updated: 07/10/2014

LPR WATCH LIST TAB:
Operators can create custom watch lists of plates that once detected can trigger flags on the LPR Real Time page and are indicated on the LPR Search page.
1. To create a watch list select the Watch List tab and right click on the Global Watch List
and select Add. You will be prompted to enter a name for your watch list.
2. To manually add a plate to a Watch List select the Watch List then click Add at
the top of the page. Enter plate information in the fields provided and click the Add
button to save. Operators can also input a confidence level which will affect how close
the algorithm has to come to a match in order to flag a watch list hit. Your watch list is
now available for use by all operators. Users can automatically add plates on the LPR
Search page and on the Real Time page using the Add icon. Note: Email alerts can also
be triggered from Watch List hits if configured by your ESM administrator.
3. Other actions include the Edit icon which enables operators to edit the plate number,
state, or trigger confidence. After making edits, select Update to save the changes or
Cancel to discard the changes. The Delete icon removes a plate from the Watch List. The
Stats icon graphs the frequency that particular plate has been detected at a location(s)
over a specified period of time.
ipConfigure LPR Setup and Field Installation Guide | 16 updated: 07/10/2014

4. Email alerts can be sent when a plate number matches a Watch List entry if your ESM
Administrator has enabled this feature. User simply types in email addresses (separated
by commas) in the Email field at the top of the page to receive notifications of flagged
plates. Hit the update button to save changes.
NCIC Watch List:
ESM supports the Federal Bureau of Investigation (FBI) import of the National Crime Information Center (NCIC) license plate file. The NCIC has been called the lifeline of law enforcement-‐ an electronic clearinghouse of crime data that can be tapped into by virtually every criminal justice agency nationwide, 24 hours a day, and 365 days a year. Once you obtain access to the NCIC license plate file you can manually add it to ESM or if you require the file more frequently you can automate the file being placed on the ESM server and it will be processed daily. There are two way to add a NCIC watch list to LPR. By User Interface:
1. Login to ESM and navigate to the LPR tab.
2. Select the Watch List tab.
3. Right click Global Watch List and click Add
4. Type in a name for this watch list
5. Right click your new watch list and select Update with NCIC file
6. Find the file you want to upload
7. Reload browser
By Folder: 1. Locate NCIC file
2. Go to C:\\ipconfigure\watchlist
3. Drop the NCIC file into the watch list folder
4. User interface will update with the name given on the file
ipConfigure LPR Setup and Field Installation Guide | 17 updated: 07/10/2014

ENVIRONMENTAL CONSIDERATIONS
Dusk certainly presents issues and it seems to come in about 5 minute clips. Once you get the settings working with the current available light and the LPR engine is reading good data, wait 5 minutes, the accuracy will go down. This sort of manual tweaking is not really worth the 5 extra minutes per day of valid plate data that would be obtained. Not to mention you can interrupt normal daytime operations if you start to mess with Max Shutter Speeds and Exposure values to increase the light of the image.
What sort of lighting is notice for the environment? There may be some image quality issues around the thermal off the ground, especially in Texas on hot days where blacktop is present. This can be noticed in the images if they seem wavy and rigid when zoomed in on them. Due to the height at which we hang the cameras off the side of the building, this should dissipate from our view. We saw it when the camera was about 3 feet off the ground, it disappeared when moving the camera to 10 feet and higher.
ipConfigure LPR Setup and Field Installation Guide | 18 updated: 07/10/2014