library technology services - temple university sites · library technology services ... -204-xxxx...
TRANSCRIPT

1
Library Technology Services LTS STUDENT HANDBOOK
UPDATED: SUMMER 2014

2
Table of Contents
Library Technology Services ............................................................................................................. 1
Why is Training Important? .............................................................................................................. 3
Important Contact Phone Numbers ................................................................................................ 3
Things You Need to Know................................................................................................................... 4
Printing ..................................................................................................................................................... 4
Printing Troubleshooting................................................................................................................... 6
Printer Maintenance ............................................................................................................................ 6
Photocopying .......................................................................................................................................... 7
Logging TU Alumni into Computers ................................................................................................. 7
Self-Checkout Book Machines........................................................................................................... 8
Wireless Network in Paley Library .................................................................................................... 8
Express Printing .................................................................................................................................... 8
Wireless Printing .................................................................................................................................. 9
Fixing Wi-Fi Mac Problems .............................................................................................................. 10
Reset PRAM ........................................................................................................................................... 10
Computer Document Recovery ...................................................................................................... 11
Submitting Work Orders (TUhelp Tickets)................................................................................ 14
Computer Printer Queues ................................................................................................................ 14
Using the Digibook Scanners........................................................................................................... 14
Evening & Weekend Printer Service.......................................................................................................... 14
Answering the Phone ......................................................................................................................... 14
Dress Code and Conduct ...................................................................................................................... 15
Missing a Scheduled Shift ................................................................................................................. 15
Weather Related Closings ................................................................................................................ 15
Library Services for Alumni ............................................................................................................ 16
3
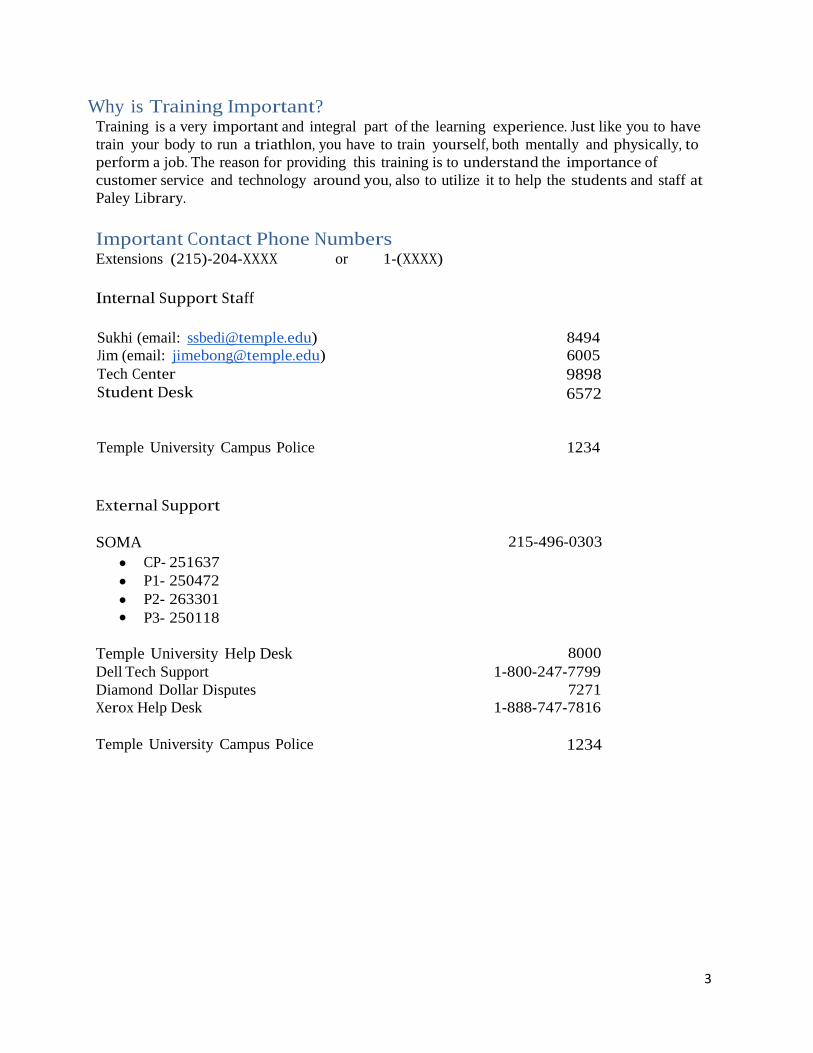
Why is Training Important? Training is a very important and integral part of the learning experience. Just like you to have
train your body to run a triathlon, you have to train yourself, both mentally and physically, to
perform a job. The reason for providing this training is to understand the importance of
customer service and technology around you, also to utilize it to help the students and staff at
Paley Library.
Important Contact Phone Numbers Extensions (215)-204-XXXX or 1-(XXXX)
Internal Support Staff
Sukhi (email: [email protected]) 8494
Jim (email: [email protected]) 6005
Tech Center
Student Desk 9898
6572
Temple University Campus Police 1234
External Support SOMA
CP- 251637
P1- 250472
P2- 263301 P3- 250118
215-496-0303
Temple University Help Desk 8000
Dell Tech Support 1-800-247-7799
Diamond Dollar Disputes 7271
Xerox Help Desk 1-888-747-7816
Temple University Campus Police 1234

4
Things You Need to Know Clocking in and out is through the Kronos system. To login, select “record time stamp”.
o You can visit Kronos through the link below or go to temple.edu/hr. and click on
o “Kronos”. https://prd-
kronos.erp.temple.edu/wfc/applications/suitenav/navigation.do?ESS=true
For every 5 hours of work, you MUST take a 30 minute break. This is done by clocking out and then back in through Kronos.
Every effort must be made to find a replacement if you cannot make your scheduled shift.
Keep all of the printers stocked with paper, they run out fairly quickly. The paper is stored in
Systems along with toners for the printer.
Use the Tally List Document to keep track of the number of people that are helped and what they are
helped with. Please use the following sheet for keeping a count on helping patrons.
Printing
The printing default is double-sided printing, if this option is not desired; manually change it to
one-sided printing only.
All print jobs accept print quota, diamond dollars, or cash.
To print in black and white with a Student ID, click on File --- Print. The student’s accessnet username
(tu...) should be entered in the dialog box when prompted. Proceed to have the student swipe his or her
ID on the touchscreen pad next to the printers. Do NOT push print unless the printer says “Ready”.
Each print job should be selected individually. It is $0.07 per page (a double-sided sheet is 1 page).
To print in color with a Student ID, click on File --- Print. Select the printer that says PALEY-COLOR-
LASER-QUEUE (50 cents per page). Proceed to type in the student’s accessnet username and swipe
his or her ID on the cash-printing monitor on the LEFT of the cash printing station. (there are 2
monitors, only the LEFT monitor accepts Student IDs)

5

6
To print using a Guest-Cash Printing Card, click on File --- Print. Then select the CASH-
ONLY-LASER-QUEUE or CASH-LASER-COLOR-QUEUE (10 cents or 50 cents per page,
respectively) in the printer’s dropdown
menu. There is a printing ID on the top-left
corner of the card that must be entered
when prompted. If cash only (no color)
printing is selected, a second dialog box will
appear. Proceed to type in “10”, meaning 10
cents per page. Swipe the printing card
where it says “Cash Printer” (black monitor
near printer #1) and insert appropriate
amount of change.
Printing Troubleshooting If cash printer monitor is not functioning properly, push and hold the power button on
the tower to restart the machine. When machine has started up, if program does not
start automatically, go to the Start button --- “Uniprint/Pharos” --- then “Uniprint/Pharos
Station” to start the cash-printing program.
If cash receptacle in front of the cash printing monitor is not functioning properly, unplug
and then plug back into the power source to restart the machine.
If there are paper jams, look at the LCD screen on the printer. It shows where the jam is
located and how to fix it. Jammed documents will be reprinted, printed jobs are NOT
lost.
Slowly printing documents cannot be helped. It may have been a large file; there is nothing
to do to speed up this process.
If patron loses money from their Temple ID, he or she can call Diamond Dollars (1-
3140).
If patron loses cash from a guest printing ID, he or she can call Business Services (1-
7271).
If swiping terminal freezes, restart the unit by unplugging and then plugging back into
the black cord (power source). User MUST swipe on the same terminal when it has
started up again (the user is locked onto that specific terminal).
Computer Services: 1-9898 or 1-6572.
Printer Maintenance Check the printer status on your browser. The links to the printers are on the reference
desk and on the bookmarks.
Fill printers during EVERY SHIFT at the Reference Tech Desk and fill file cabinet
with paper located near the LTS office. (The key to the cabinet at the Reference Tech
Desk)
Use file cabinet during weekends to fill printer paper.
If the Printer is not printing, and/or giving an error. Note down the error, the SOMA
ID# on the printer (located on the front of the printer), and call SOMA representative at
215-496-0303.
Login to TUhelp and enter a ticket relating to the printer issue. In the ticket, add referral
representative to Sukhvinder Bedi.

7
Photocopying
If the copier says the paper tray is empty, look under “paper supply” and select the “Multiple Trays” or go to “More” for more trays to print from.
Xerox only accepts Diamond Dollars or Cash, NOT printing allocation.
The E-Book scanners are located near the Reference Desk.
Logging TU Alumni into Computers With an Alumni Card, alumni can logon to computers in the Tuttleman Learning Center.
Alumni may also use workstations in the reference area of Paley Library, when
available, and the Ambler Library and the Science and Engineering Library. Temple
alumni may apply for a Temple University network access account (at Circulation) that
allows them to log on to computers at multiple campus locations.
If you are an alumnus/ae, you can renew your Accessnet account on an annual basis.
This will enable you to continue using your TU Gmail account. If you never had a
Temple e-mail address, you can obtain an
annually renewable Accessnet account as
well.
If you do not have a Temple e-mail address and would like to request one,
contact the Help Desk at
[email protected] or 215-204-8000. If
sending e-mail, please include your first
and last name as well as your Temple ID
number (TUid).

8
Self-Checkout Book Machines There are keys to the receipt paper of the self-checkout machines. The screen will notify
you when the receipt paper is out. The receipt paper is available in room 110 for refills.
Wireless Network in Paley Library TUsecure wireless is a secure wireless network available to the Temple community. Coverage
for these networks is the same throughout the following campuses: Main, HSC, Ambler, TUCC,
School of Podiatric Medicine, and Fort Washington. (Please note that, for now, the Beasley
School of Law will continue to use the Wireless4owls network.)
The TUsecure wireless network offers you remote printing capability. As you move to various
locations throughout the University for classes or meetings, use TUsecure wireless to connect
to numerous University resources using a secure, state-of-the-art wireless connection. For
example, faculty can mount folders stored on departmental servers for use in the classroom.
Students can access files made available by their schools and colleges. In addition, authorized
staff can access many administrative resources.
Express Printing The "Express" Printer is
available on Monday-Friday:
7am-10pm, Saturday: 9am-
5pm, Sunday: 12pm-8pm.
Prior to printing, please inform
the patron that Express printer
is a service provided to print 10
sheets per job. If more needs to
printed, direct them to the 3 HP
LaserJet 9050's on the main
floor. The purpose of Express
printer is sort of like "express
check out" of 10 items or less.
Limitations
o The patron may only use 10 sheets of paper per print. (double sided is allowed)
o The patron must present his/her ID as part of paper control.
9
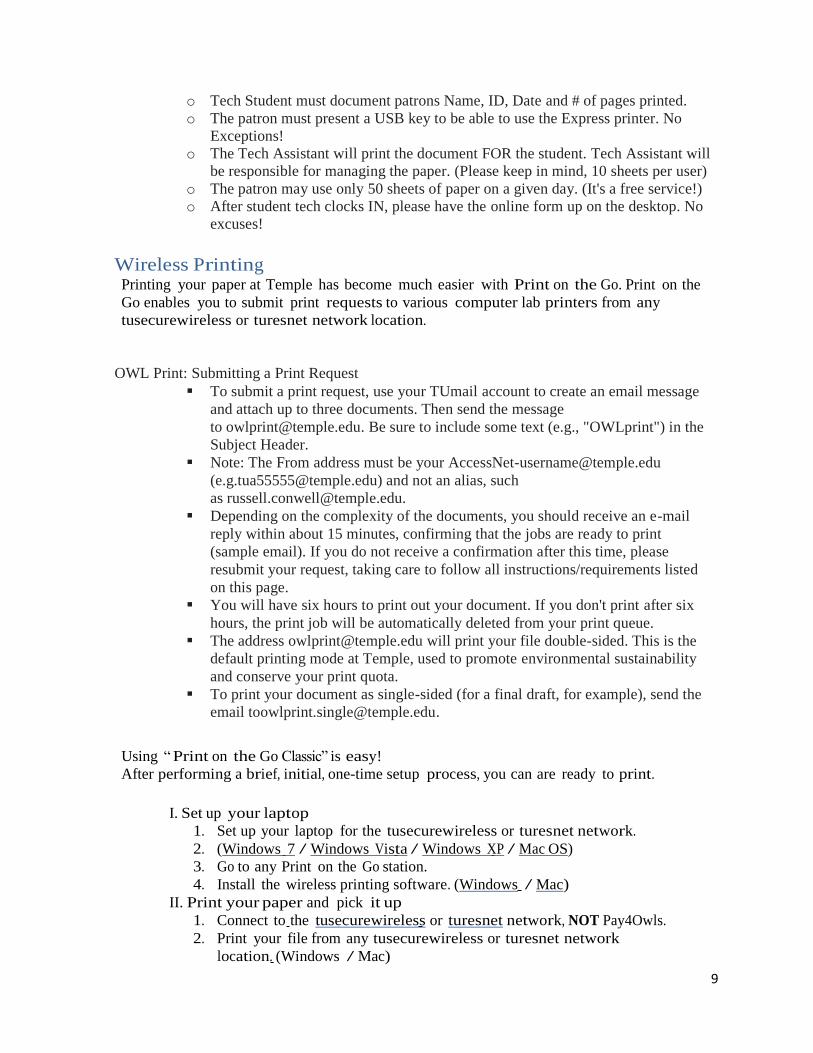
o Tech Student must document patrons Name, ID, Date and # of pages printed.
o The patron must present a USB key to be able to use the Express printer. No
Exceptions!
o The Tech Assistant will print the document FOR the student. Tech Assistant will
be responsible for managing the paper. (Please keep in mind, 10 sheets per user)
o The patron may use only 50 sheets of paper on a given day. (It's a free service!)
o After student tech clocks IN, please have the online form up on the desktop. No
excuses!
Wireless Printing Printing your paper at Temple has become much easier with Print on the Go. Print on the
Go enables you to submit print requests to various computer lab printers from any
tusecurewireless or turesnet network location.
OWL Print: Submitting a Print Request
To submit a print request, use your TUmail account to create an email message
and attach up to three documents. Then send the message
to [email protected]. Be sure to include some text (e.g., "OWLprint") in the
Subject Header.
Note: The From address must be your [email protected]
([email protected]) and not an alias, such
Depending on the complexity of the documents, you should receive an e-mail
reply within about 15 minutes, confirming that the jobs are ready to print
(sample email). If you do not receive a confirmation after this time, please
resubmit your request, taking care to follow all instructions/requirements listed
on this page.
You will have six hours to print out your document. If you don't print after six
hours, the print job will be automatically deleted from your print queue.
The address [email protected] will print your file double-sided. This is the
default printing mode at Temple, used to promote environmental sustainability
and conserve your print quota.
To print your document as single-sided (for a final draft, for example), send the
email [email protected].
Using “ Print on the Go Classic” is easy!
After performing a brief, initial, one-time setup process, you can are ready to print.
I. Set up your laptop
1. Set up your laptop for the tusecurewireless or turesnet network.
2. (Windows 7 / Windows Vista / Windows XP / Mac OS)
3. Go to any Print on the Go station.
4. Install the wireless printing software. (Windows / Mac)
II. Print your paper and pick it up
1. Connect to the tusecurewireless or turesnet network, NOT Pay4Owls.
2. Print your file from any tusecurewireless or turesnet network
location. (Windows / Mac)

10
3. Go to any Print on the Go station. Print on the Go stations are
indicated by the following sticker:
4. Swipe your OWLcard and select your file to have it printed.
Benefits
Print on the Go saves you time. No need to transfer your file to a USB drive or upload
it to Google Docs for printing. No need to wait for a lab computer to become
available and to log in.
Things to Know
Your document will be available to print for up to four hours at any Print on the
Go station.
When you swipe and print, the pages will be deducted from your standard print
quota.
Wireless color printing is not available at this time.
For more information about printing, see the Student Printing in Temple
University Computer Labs policy on Computer Services website.
Fixing Wi-Fi Mac Problems
Turn off Wi-Fi
Open Network Preferences --- Advanced
From the Preferred Networks tab, delete all Temple Networks
In the TCP/IP tab, renew the DHCP lease
In the 802.1X tab, delete any connection profiles
Save all changes and restart the computer
Connect to tusecurewireless
Reset PRAM Click the "Apple" icon at the top of the screen and select "Shut Down" from the
drop- down menu. Click "Shut Down" on the dialog box.
Press the "Power" button on your computer, and hold down "Command," "Option," "P" and "R" at the same time before the gray screen appears.
Continue holding the keys until your computer restarts and the startup sound plays. Release the keys.

11
Computer Document Recovery
Microsoft Word will "lose" documents in certain situations. For example, it may lose
a document if Word is forced to quit unexpectedly, or if your computer has a power
interruption while you're writing, or if you close the document without saving
changes.
If you don't know how the Word document was lost, if it was deleted a long time ago,
then it is best to use Data Recovery Wizard (Data Recovery Wizard can only recover
files, not the content of the files.). This product is often able to recover Word
documents even when parts of the original file have been overwritten, by searching
for previously saved copies made while the document was being created and edited.
Search for the Original Document
1. In Windows, click Start, Search, and then For Files or Folders.
2. In the Search for files or folders named box, type the file name.
3. In the Look in box, click "My Computer". (This searches your entire computer - if
you know that the file is in a specific area, for example, “My Documents”, and then
changes this accordingly.)
4. Click "Search Now". If the Search Results box does not show the file, continue with the following steps to search for all Word Documents.
5. In the Search for files or folders named box, type *.doc. Tip: In computer
terminology, the asterisk * is used to select all options. By entering *.doc you're
telling the computer to search for all files with the .doc extension.
6. Click "Search Now".
If you still cannot find the file, open the Recycle Bin and follow these steps.
1. Open the Recycle Bin.
2. On the View menu, click Details.
3. Click Arrange Icons and click by Delete Date. This allows you to filter this list according
to the date when the files were deleted. If you know that your files were lost
yesterday, you can look at this date.
4. When you find the document that you are looking for, right-click on it, and click
Restore.
This returns the document to its original location. Open the file and examine its contents.
Search for Word Backup Files.
Many users rely on the Always create backup copy setting (see Tools > Options > Save
tab) to automatically create a backup copy of their files.
While the obvious advantage is that it always creates a backup file, the downside is that
it makes Word work with difficulty. As it has to continually save backup copies, it will
reduce your computer's performance. Quite often, Word will freeze when it backs up a
large file.
To find the backup file, follow these steps:

12
1. Open the folder where you last saved the lost files.
2. Search for files with the .wbk extension. (Word Backup)
When you find a file that has the name "Backup of" followed by the name of the lost
files:
1. In Word, click File > Open.
2. In the File of type box, click All Files *.*, select the file, and then click Open.
If the .wbk file is not located in the original folder, search the computer as follows:
1. In Windows, click Start, point to Search, and then click For Files or Folders.
2. In the Search for files or folders named box, type *.WBK.
3. In the Look in box, point to the arrow, and then click My Computer.
4. Click Search Now.
Search for AutoRecover Files.
Word creates AutoRecover files of the documents that you are working on
whenever it crashes. When you re-open Word, it displays these AutoRecover files
in the Document Recovery task pane.
If Word finds the AutoRecover file, the Document Recovery task pane opens on the
left side of the screen, and the missing document is listed as "document name
[Original]" or as "document name [Recovered]".
1. Double-click the file in the Document Recovery pane.
2. Click Save As.
3. Save the document as a .doc file.
Use Task Manager to close Word after a Crash.
When Word crashes, the Winword.exe file may still remain open. You need to close this
before you re-open Word as otherwise system conflicts may arise, i.e. you may not be
able to open Word, as the system sees that Winword.exe is currently running.
To close Winword.exe using the Task Manager, please follow these steps:
1. Press CTRL+ALT+DEL. In the Windows Security dialog box, click Task
Manager.
2. On the Processes tab, click any instance of Winword.exe, and then click End
Process.
3. Close the Windows Task Manager, and then re-start Word.
Search Manually.
You can also manually search for AutoRecover files:
1. On the Tools menu, click Options.
2. Click the File Locations tab, double-click AutoRecover files, and write down
the path. Click Cancel and Close.
3. Close Word.
4. Open the AutoRecover file location (based on the path you wrote down).

13
5. Search for files that end with .asd.
Search for Temporary Files.
If you cannot find the file by these methods, you can search for temporary files:
1. Click Start, click Search, and then click For Files or Folders.
2. In the Search for files or folders named box, type *.TMP.
3. In the Look in box, point to the arrow, and then click My Computer.
4. If the Search Options are not visible, click Search Options.
5. Click to select the Date check box, click in the last "n" days, and then change
"n" to the number of days since you last opened the file.
6. Click Search Now.
7. On the View menu, click Details, point to Arrange Icons, and click by Date.
8. Scroll down searching for files that match the last few dates and times that
you edited the document.
Search for "~" Files.
Some temporary file names start with the tilde (~) symbol. To find these files, please
follow these steps:
1. In Windows, click Start, click Search, and then click For Files or Folders. 2. In the Search for files or folders named box, type ~*.*.
3. Click Search Now.
4. On the View menu, click Details and then sort by Date. 5. Scroll through the files for documents that match the last date that you edited the document.
If the recovered Word document is still damaged.
Microsoft Word tries to automatically recover a damaged document if it detects a
problem with the file. You can also "force" Word to try to recover a document when
you open it.
1. On the File menu, click Open.
2. In the File of type list, click All Files *.*.
3. In the Open dialog box, select your document.
4. Point to the arrow on the Open button, and then click Open and Repair.
Or try using some Microsoft Word document fix tool. These products are often
able to repair corrupt Word documents using text found in previously saved
copies of the file. Our product will have the word fix function. You can send the
files to us, and we will help you repair.

14
Submitting Work Orders (TUhelp Tickets) The help desk can be reached at ext. 1-8000 Visit https://tuhelp.temple.edu/ to submit tickets.
Computer Printer Queues Call ext. 1-9898 for help with the specific problem Visit https://tuhelp.temple.edu/ to submit tickets.
Using the Digibook Scanners Once logged into the computer
with the Digibook Scanner use
the buttons on the Digibook
scanner to scan accordingly.
There is a preview button, a color
scan button, a grayscale scan
button, and a text scan button.
Once one of these buttons are
pressed while logged into a
computer with the Digibook the
Digibook program will pop up
and you will be able to change the
settings of your image. If you are
saving the image as a jpeg file
then you will not be able to
scan multiple documents inside one document. If you are saving the image as a pdf file
however, you will be able to scan multiple documents and have them be in the same file.
To save multiple files as 1 document: Scan each individual page and then click Transfer
once all of the pages have been scanned.
Evening & Weekend Printer Service Printing workstations are available for use during library hours. Students will need to use
their TUID at Uniprint station. If problems arise, please go to https://tuhelp.temple.edu/ to submit tickets.
Answering the Phone “Paley Library Technology Services, speaking, how may I help you?”
“Paley Library Tech Desk, speaking, how may I help you?”

15
Dress Code and Conduct
Students are expected to dress and behave appropriately for the work environment. It
is also MANDATORY for Tech Assistants to wear the red vests while on duty at the
Reference Desk and Guest Tech desk.
When working, Tech assistant should focus on attending patrons and limit discussions
with friends and such.
Missing a Scheduled Shift
If you know you are going to miss your scheduled shift, you are responsible for
informing your supervisor.
If you are going to be late, you should call or email your supervisor.
Weather Related Closings Temple University will assume normal operations unless otherwise specified by the
senior officer designated by the President. To the degree which the weather or
emergency indicates, closings may occur at various levels:
Campus Closed - Only employees designated as essential by their supervisors should
report to work on campus. Campuses included in the scope of this policy are Main,
Ambler, Center City, Podiatry, Health Sciences, Fort Washington and Harrisburg.
16
Library Services for Alumni Access
Alumni may access any Temple library facility (Paley, the Science & Engineering Library (SEL),
or Ambler) during any open hours of operation. Please have either your Alumni Card or a valid
photo ID to show to the door guard. If you need an alumni card you can get one at the Alumni
Welcome Center. Guests are welcome daily from 8:30 a.m. to 5:00 p.m. Questions? Contact
Alumni Relations at [email protected] or 215.204.7521.
Alumni Welcome Center
Sullivan Hall, Suite 100
1330 Polett Walk
Philadelphia, PA 19122
Borrowing Books and DVDs with an Alumni Borrowing Card
Alumni can obtain a free alumni borrowing card that enables them to borrow ten books/dvds
for a four-week period (dvd's only circulate for one week). To obtain an alumni borrowing
card, please go to the Paley Library Circulation Desk in the Tuttleman Learning Center. The
alumni borrowing card may also be obtained at the Ambler campus library. For additional
information call Paley Circulation at: 215-204-0744.
Library Resources
Owing to license restrictions, alumni may only use the Temple University Library databases on
campus (such as LexisNexis, EBSCO, Proquest Newsstand and Historical New York Times). To
get logged onto a computer in any library, speak to a staff member at the reference or main
service desk for that library. To see our list of databases that Temple Libraries subscribes to
see the Database Finder. The Libraries' online catalog, Diamond, unlike the library databases,
is accessible from remote locations. Please use Diamond to determine if the Temple University
Libraries own a book, journal, or other material of interest.
Using a computer with the Alumni Borrowing Card
With an alumni Borrowing card, alumni can logon to one of the dedicated Alumni workstations
in the Tuttleman Learning Center. Alumni may also use workstations in the reference area of
Paley Library, when available, and the Ambler Library and the Science and Engineering Library.
Temple alumni may apply for a Temple University network access account that allows them to
log on to computers at multiple campus locations. Temple University Libraries does not
provide these accounts. For more information about obtaining these accounts see:
http://www.temple.edu/cs/catalog/accessnet.html
Inter Library Loan
Owing to heavy demand for interlibrary loan services from current students and faculty, we are
unable to extend this service to our alumni. We recommend that those in need of interlibrary
loan services seek them out at any local community library. All public libraries have the
capacity to receive materials from other libraries via interlibrary loan.
Consulting with Temple University Librarians
We encourage our alumni to take advantage of our reference librarians' expertise. Use our Ask
a Librarian service for assistance. See List of Subject Specialists. to contact a reference
librarian.