lhlp3500g owners manual 11-6-15€¦ · operation of the lift gate lhlp3500g operation 4 hand pump...
TRANSCRIPT

Owner’s Manual
LHLP3500G Hide-A-Way® Tuckunder Style
LML00348-11/6/2015
LEYMAN MANUFACTURING CORPORATION
10900 Kenwood Road Cincinnati, OH 45242
1-866-LEYMAN-1· 1-866-539-6261· 513-891-6210 Fax 513-891-4761
www.leymanlift.com [email protected]

Page 1
TABLE OF CONTENTS Introduction 2 Words of Caution 3 Operation of the Lift Gate LHLP3500G Operation 4 Hand Pump Operation 5 Maintaining the Lift Gate Recommended Oils and Lubrication 6 Preventative Maintenance Schedule 7 Trouble Shooting Trouble Shooting Chart 8 Electric Diagram – Hydraulic Diagram 9 Walk Around Push Button Option 10 Emergency Hand Pump Option 11 Battery Hook Up 12 Charge Line Recommendations 13 Maintenance Minder2® Overview (Optional) 14 Maintenance Minder2® Controller Menus (Optional) 15 - 16 Parts Replacement Power Unit Parts 17 - 18 Switch Wiring 19 Hydraulic Assembly 20 - 21 Pivot Pins, Bushings, Springs 22 - 23 Installation Safety Decals 24 Notes 25

Page 2
INTRODUCTION
This manual contains the operating procedures on the equipment your company is using that was manufactured by Leyman Manufacturing Corporation. Past experience has indicated that it is most unwise to operate these units without proper instructions which should be instituted by the purchaser. While these products have certain safety features engineered into their design, they are all operated by human beings. Therein lies the problem of safety and one should always have caution in mind when operating this or any other machine that has parts that weight several hundred pounds. Again, let us remind you that there are moving parts on this product that weight several hundred pounds. These parts, when not under proper control can cause physical damage to the operator. Because of the weights that are involved: carelessness and neglect of training can make these units dangerous. Do not overload this product. Maintain it properly. Stand clear of moving parts. Operate as instructed. This lift gate has a long life expectancy and will take some abuse. Use good judgment when operating this equipment.
PLEASE FILL IN FOR YOUR RECORDS
Customer: Model: LHLP3500G-8060CS
Capacity: 3500 lbs. Type: Hide-A-Way
Power: 12 volts Platform: Two piece
Serial #: Options: _____________________________________
_____________________________________ _____________________________________ _____________________________________
Hydraulic Pressure: 2,500 psi MAX. at by-pass
WHEN PLACING PARTS ORDER, YOU WILL NEED THE SERIAL NUMBER AND MODEL OF THE LIFT
GATE.

Page 3
WORDS OF CAUTION
1. Before any maintenance is performed on this unit, read and understand this manual completely.
2. Do not stand in front or behind the platform when lowering from the stored position
or when operating the gate in folded position.
3. Make sure the ground is clear under the platform when lowering, check the area around the gate for any persons before operating the gate.
4. This lift gate should operate smoothly and the only noise that you should be heard is
the power unit. Any audible sounds other than normal power unit operation sound should be thoroughly inspected and the cause of noise should be pin-pointed and corrected.
5. Never exceed the rated load capacity of this gate.
6. Always load as close to the center of the platform and close to the truck or trailer sill.
7. Do not allow persons to operate the unit unless they have been properly trained to do
so.
8. Inspect the hydraulic cylinders seals for leakage every six (6) months.
9. Inspect hydraulic lines for cracks or deterioration every six (6) months.
10. Check the level of the hydraulic oil in the power unit tank once a month.
11. Clean the hydraulic power unit strainer and in-line filter every three (3) months.
12. Always disconnect the battery from the power source before servicing the unit.
13. Use only factory authorized parts for replacement.
WARNING: SINCE THIS GATE HAS POLYMER GREASELESS BEARINGS IN THE SOME OF THE MAIN PIVOT POINTS, (TENSION ARM, COMPRESSION ARM AND CYLINDER PIVOTS) ATTACH GROUND WIRE CLOSE TO WHERE YOU ARE WELDING OR YOU WILL DAMAGE CYLINDER AND OTHER COMPONENTS.

Page 4
LHLP 3500G OPERATING INSTRUCTIONS
Before operating the lift gate, read and understand this decal, urgent warning decal and the Owner manual.
Do not stand behind the lift gate while unfolding or using the platform.

Page 5
OPERATING THE HAND PUMP (OPTIONAL)
1. Optional Hand Pump is located inside power unit box. 2. Insert handle into pump and stroke to raise.
3. Twist valve at pump base counter-clockwise to lower.
4. Close valve (turn clockwise) at pump base when finished.

Page 6
RECOMMENDED OILS AND LUBRICATION
HIDE-A-WAY® TUCKUNDER STYLE GATE MODEL LHLP3500G
HYDRAULIC OILS MANUFACTURER TYPE TEMP. RANGE Level 1 Normal Conditions Mobile DTE 11 -15º F to + 150º F
Shell TELLUS-T15 -15º F to + 150º F Chevron RYKON ISO-15 -15º F to + 150º F
Level 2 Cold Conditions Mobile AERO-HFA -50º F to + 80º F Shell AERO FLUID#4 -50º F to + 80º F Chevron AVIATION-A -50º F to + 80º F
HYDRAULIC TANK CAPACITY 3.60 quarts
LUBRICATION
Grease Militec #1 (or Lithium base NLGI grade 1 grease)
BATTERIES
Two (2) 12 V D.C. Group 31 Heavy-Duty lead acid DUAL PURPOSE, or AGM
ELECTRICAL COMPONENT CONNECTIONS Use Fluid Film Rust and Corrosion Protection by Eureka, except on Start Solenoid.
On Start Solenoid, use Color Guard by Loctite, or Liquid Electrical Tape.
AMPERAGE DRAW OF MOTOR When raising platform (empty) approximately 120 AMP @ 12 volts.
At bypass approximately 250 AMP @ 12 volts
LIFTING PRESURE SETTING With platform at floor level and pump in bypass 2500 psi
MINIMUM VEHICLE FLOOR HEIGHT LADEN
46” vehicle floor height
MAXIMUM VEHICLE FLOOR HEIGHT UNLADEN 59” vehicle floor height
APPROXIMATE TIME EMPTY AT 80º F WITH 2 BATTERIES SPECIFIED
Time up: 17 – 19 seconds Time down: 17-19 seconds (power down)

Page 7
PREVENTIVE MAINTENANCE SCHEDULE
MAINTENANCE BY MONTHS COSTUMER: LOCATION: VEHICLE: MODEL: SERIAL#:
= OK A=ADJUSTED N= NOT APLICABLE = REPAIR
3 mos.
6 mos.
12 mos.
MOTOR – PUMP COMPONENTS
Check battery(ies) for water level and corrosion.
Check battery(ies) for proper charge level. CHARGE LEVEL:
Check the voltage of battery(ies).
Check all wiring connections for corrosion and tightness.
Check solenoids for loose fittings and operation.
Check reservoir for correct amount of fluid (platform on ground and tilted)
Inspect fuse links and/or circuit breakers and replace if necessary.
Check the charge line or power line and connections.
Remove and clean all pump solenoids cartridges.
Replace hydraulic fluid in reservoir.
Check and adjust the relief valve setting.
Check brushes and armature in motor.
Check amperage draw of motor.
3 mos.
6 mos.
12 mos.
LUBRICATION
Lubricate pivot points using specified grease.
Steam clean the lifting gear.
3 mos.
6 mos.
12 mos.
STRUCTURE INSPECTION
Raise and lower the lift gate. Check both power and gravity down operations.
Check lifting gear for impact damage. Repair if necessary.
Check up and down cylinder for leaks. Repack or replace if necessary
Inspect for broken and/or missing roll pins.
Inspect for worn bushings and/or bearings. Replace if necessary.
Steam clean gate. Repair any structural welds as needed.
Repaint where needed and replace any worn or missing safety decals.
SERVICED BY: ___________________________ DATE: ___________
INSPECTION NOT REQUIRED INSPECT

Page 8
TROUBLE SHOOTING CHART LHLP3500G
PROBLEM POSIBLE CAUSE SOLUTION The platform will not go up or reach floor level.
1. Battery is low 2. Slave line is disconnected or
connections are loose (battery and motor).
3. Insufficient oil in power unit tank
4. Poor switch connections
1. Recharge battery 2. Connect the slave line
property. 3. Fill the power unit tank 4. Clean and check switch
connections.
Platform will not lower 1. Battery is low 2. Poor switch connections 3. Check lowering valve (2-
way valve).
1. Recharge battery 2. Clean and check switch
connections. 3. Clean/replace as necessary.
Platform creeps down 1. Dirt under the ball of the check valve, the ball is pitted, worn or the spring is weak.
2. Hydraulic leak. 3. Cylinder piston seals
failing.
1. Clean 2. Check all hoses and
fittings. 3. Replace cylinder seals.
Platform goes down slowly
1. Excessive wear of mechanical components.
2. Restriction in hydraulic system.
3. Incorrect hydraulic oil in system for cold weather.
1. Insure free movement of all mechanical parts.
2. Check strainers on valve stems.
3. Use Mobile Aero-HFA in extreme cold weather.
Platform comes down crooked
1. Flow control valve problem. 2. Air in system.
1. Replace flow control. 2. Bleed cylinder.
Gate will not lift the rated load.
1. Hydraulic pump is worn. 2. Battery is too low. 3. Hoses switched at power
unit.
1. Change the pump. 2. Recharged the battery to
full charge. 3. Switch hoses.
Pump will not operate 1. Battery too low. 2. Electrical hookup to motor
not making contact. 3. Control switches are not
making good contact. 4. Optional Maintenance
Minder2® Controller has shut down the system due to the low voltage. Must maintain 8 volts minimum under load.
1. Recharge the battery and check to be sure that slave line has a good connection.
2. Clean connection and re-tighten.
3. Clean and check the connections.
4. Use the “Last Lift Menu” data on screen to read maximum and minimum voltages, recharge battery.

Page 9
ELECTRICAL & HYDRAULIC DIAGRAM

Page 10
WALK AROUND PUSH BUTTON OPTION

Page 11
EMERGENCY HAND PUMP OPTION 224
ITEM # QTY PART # DESCRIPTION 1 1 P33902 Hand pump with handle 2 1 AA-658-249 Spacer block 3 2 P16504 ¼-20 SHCS 4 2 P23502 Lock nut 5 2 P34006 Adapter 6 1 AT-501-354-018 Hydraulic hose 7 1 AT-501-354-035 Hydraulic hose 8 1 P34076 Tee 9 1 P34020 90 Deg. Elbow 10 2 P17518 Self Tapping Screw
HAND PUMP OPERATIONS
1) INSERT HANDLE INTO HAND PUMP TO RAISE. 2) TWIST VALVE AT PUMP BASE TO LOWER 3) CLOSE VALVE AT PUMP BASE WHEN FINISHED

Page 12
BATTERY HOOK UP
WE RECOMMEND BATTERIES WITH THE FOLLOWING SPECIFICATION:
12 Volt Heavy Duty Dual Purpose or AGM B.C.I. Group – Size 31 Terminal Type – TS Cold Cranking Amp - 580
FAILURE TO USE CORRECT BATTERIES WILL VOID WARRANTY

Page 13
CHARGE LINE RECOMMENDATIONS
FOR TRACTOR & TRAILER
Utilization of a single positive cable does not provide sufficient ground. Therefore, our recommendations for grounding trailers with a LHLP gate are as follow: Two (2) cables: one (1) positive and one (1) negative, both running to the tractor batteries. The Maintenance Minder 2® controller (optional) requires that a minimum of 8 volts be maintained under load in order for the LHLP 3500G to operate. NOTE: The use of a battery charger as the sole power source to operate the LHLP is unauthorized and will prevent the LHLP from working properly. The lift gate must always be operated in conjunction with a least one (1) 12 volt heavy duty lift gate battery. The LHLP Power Unit must be properly grounded. A 5/16” Ground Screw is provide on the pump block to connect a ground wire to the vehicle frame.
Page 14
MAINTENANCE MINDER 2® OVERVIEW (OPTIONAL) Power unit is equipped with the Maintenance Minder 2® Controller. It will:
Automatically keep track of maintenance intervals and warn the user when maintenance is due, based on the number of lifts.
Record low voltage occurrences. Record of high temperature faults. Record of maximum run time faults, when a single operation exceeded the maximum
continuous run time limit. Give helpful trouble-shooting information on MENU 4, “Last Lift Info”.
FAULTS CODES A decal in the power unit enclosure lists the following signal codes for these faults: 1 BEEP Service Fault (reached the number of lifts when maintenance is due) 2 BEEPS Low Voltage Fault (check battery condition and power line connections) 3 BEEPS Max. Time Fault (exceeded the maximum continuous run time allowed) 4 BEEPS High Temperature Fault (unit will not run until motor cools) All faults signals will be repeated FOUR times, except the service fault signal. Controller will prevent power unit form operating during the time period when a fault signal is sounding (about 5 to 10 sec.) except for the service fault signal. The controller is also equipped with an anti-doorbelling feature, which prevents rapid ON/OFF operation of the power unit. RESETTING after MAINTENANCE IS PERFORMED To RESET the Maintenance Minder 2® after maintenance has been performed:
1. Go to MENU 2, hit “ENTER”, and toggle down to the “Reset All Info” screen. 2. Press the hidden RESET button under Maintenance Minder 2® logo at top of
faceplate. 3. Follow the instructions on the screen regarding a second button, which must be
pressed to complete the reset operation.

Page 15
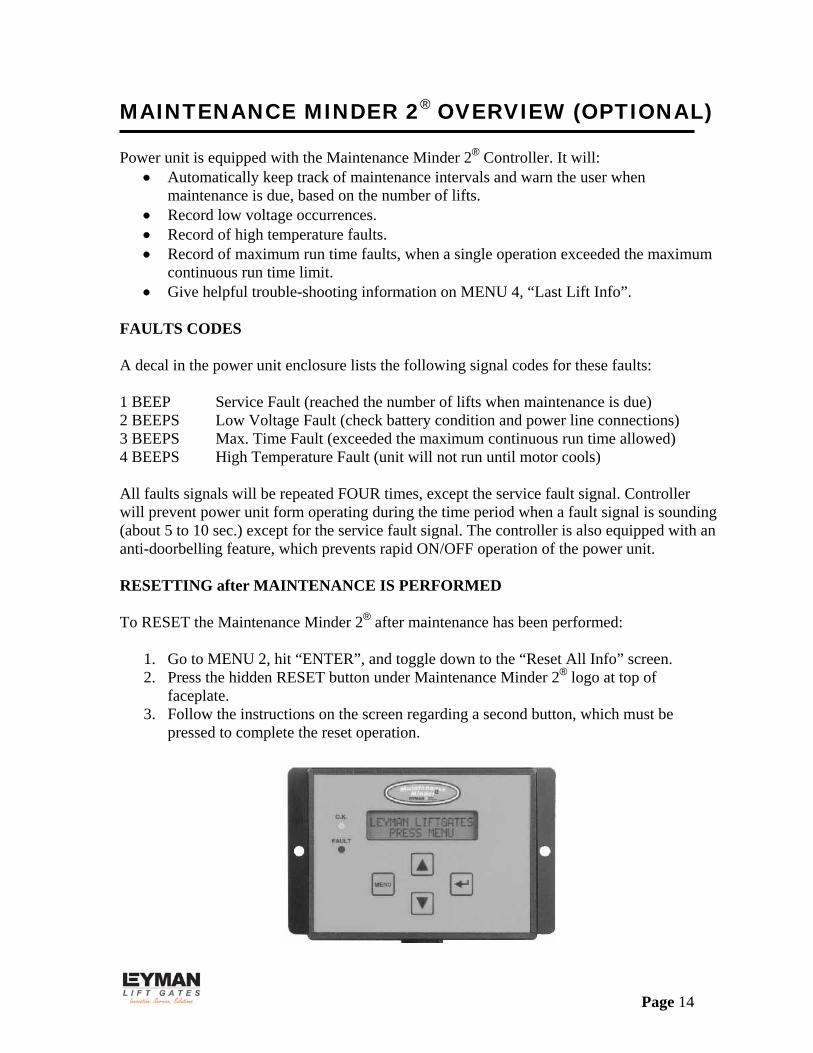
MAINTENANCE MINDER 2® CONTROLLER MENUS
(Press MENU) MENU 1 – LIFT GATE INFO (Press ENTER, then ARROW DOWN for each item) Model Number, Serial Number, Manufacture Date, Vehicle ID, Hardware Version, Firmware Version, Software Version.
(Press MENU and ARROW DOWN once) MENU 2 – PERIOD INFO (data for current maintenance period) (Press ENTER, then ARROW DOWN for each item) Number of Lifts (gives the number during this maintenance interval and the set of number when maintenance is due) Motor ON (total motor run time in minutes for this maintenance period) Service Fault (number of times gate was operate while PAST the maintenance limit) Max. Time Faults (times motor exceeded its maximum allowable continuous run time) High Temperature Faults (Times thermal switch in motor tripped, if switch provided) Low Voltage Faults (times low voltage occurred) Reset all Info (Reset data after performing maintenance, once maintenance limit is reached – instructions will flash on screen after limit reached)

Page 16
MAINTENANCE MINDER 2® CONTROLLER MENUS
NOTE: Controller has an anti-doorbelling feature. Motor will not operate if UP switch is toggled rapidly. This prevents welding of the start solenoid contacts.
(Press MENU and ARROW DOWN twice) MENU 3 – LIFE TIME INFO (data for the total life time of the gate) (Press ENTER, then ARROW DOWN for each item) Same items will appear as under PERIOD INFO, except this is LIFE TIME data. Reset History (reviews history for each maintenance interval) Press ENTER, then ARROW DOWN to show history. Most recent period is highest#. Screen shows Period #, # of Lifts, and Total Run Time in minutes.
(Press MENU and ARROW DOWN three times) MENU 4 – LAST LIFT INFO (Trouble Shooting Screen – it records data that occurred during the last lift made) (Press ENTER, then ARROW DOWN for each item) Supply Voltage (first voltage is the minimum voltage that occurred during the last lift – if below 6 volts gate will stop / second voltage is the supply voltage just before gate operation, must be at least 10 volts). Motor ON (motor run time in seconds during last lift, gate will stop at 180 seconds). Window Time (time in milliseconds during the last lift that the voltage dropped in between 6 and 8 volts – must not be any longer than 3 seconds or gate will stop).

Page 17
POWER UNIT PARTS BEFORE 10-2015
ITEM # PART # DESCRIPTION
P34073 Power Unit (complete) 1 P33992A Motor 2 P34016 Start Solenoid 3 LH150015 Breather Cap 4 P34121 C1, 2 Way, 2 Pos. Solenoid Valve 5 P34026 C2, 4 Way, 2 Pos. Solenoid Valve 6 P34056 Pump Kit 7 P34089 Suction Screen 8 P34100 Poly Tank

Page 18
POWER UNIT PARTS AFTER 10-2015
ITEM PART NO. DESCRIPTION
P34219 Power Unit (complete) 1 P34221 Motor 2 P34222 Pump Kit 3 P34229 Reservoir Tank 4 P34230 C2 Valve Stem 2P4W 5 P34231 C2 Coil (Size 10) 6 P34232 C1 Valve Stem 22P2W 7 P34233 C1 Coil (Size 8) 8 P34016 Starter Solenoid 9 P34234 Breather Fill Cap

Page 19
SWITCH WIRING COMPONENTS
ITEM PART NO. DESCRIPTION 1 AA-551-546 Replacement switch (switch only) before 9-2015 2 BA-551-620 Switch assembly (complete) after 9-2015
NOTE: BA-551-620 can be used to replace older switch supplied before 9-2015.
Page 20
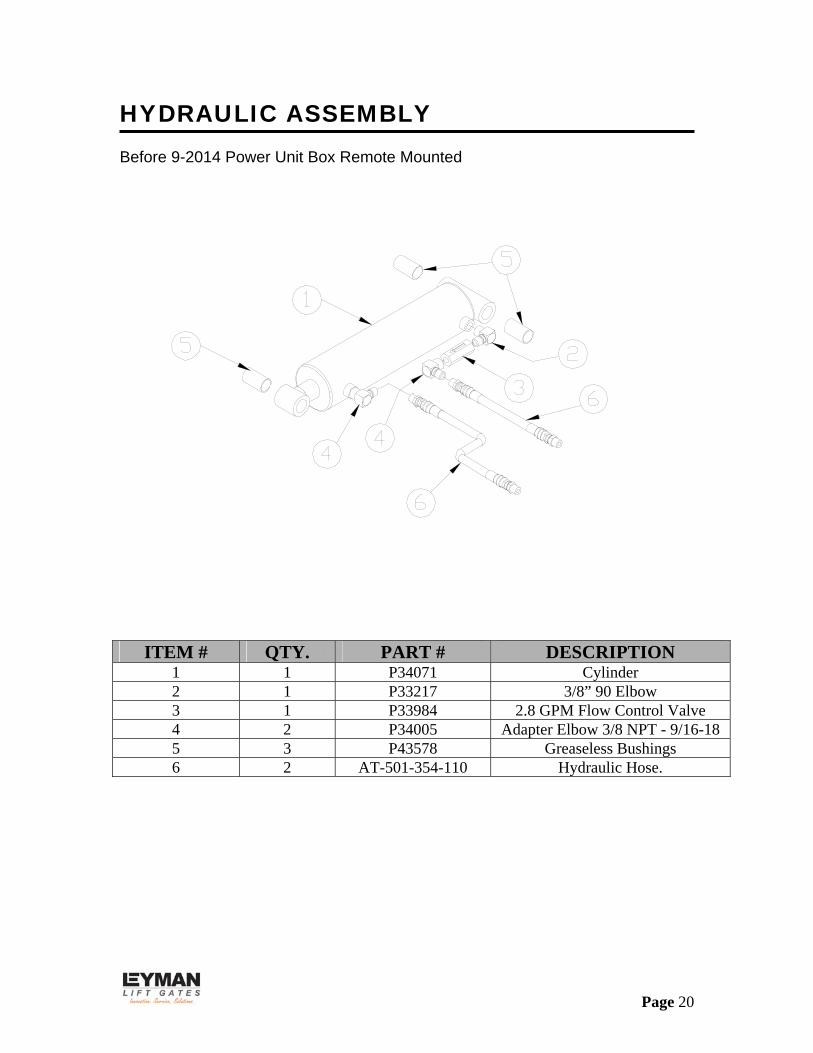
HYDRAULIC ASSEMBLY Before 9-2014 Power Unit Box Remote Mounted
ITEM # QTY. PART # DESCRIPTION 1 1 P34071 Cylinder 2 1 P33217 3/8” 90 Elbow 3 1 P33984 2.8 GPM Flow Control Valve 4 2 P34005 Adapter Elbow 3/8 NPT - 9/16-18 5 3 P43578 Greaseless Bushings 6 2 AT-501-354-110 Hydraulic Hose.
Page 21
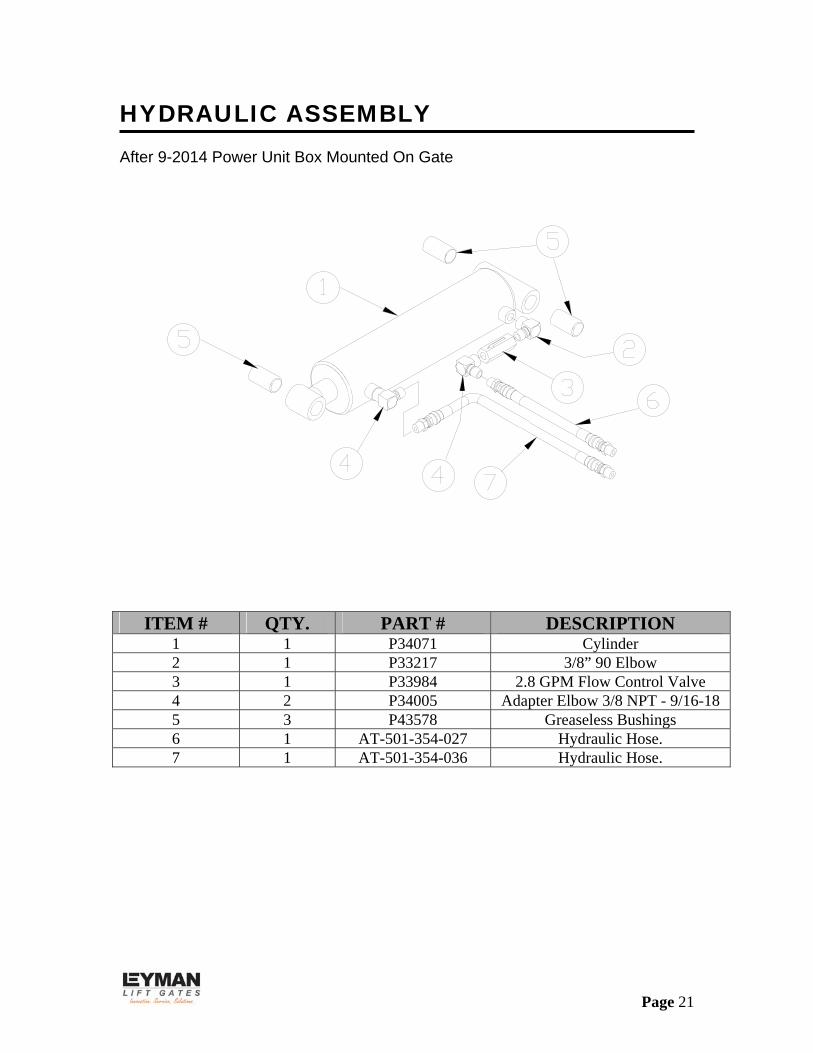
HYDRAULIC ASSEMBLY After 9-2014 Power Unit Box Mounted On Gate
ITEM # QTY. PART # DESCRIPTION 1 1 P34071 Cylinder 2 1 P33217 3/8” 90 Elbow 3 1 P33984 2.8 GPM Flow Control Valve 4 2 P34005 Adapter Elbow 3/8 NPT - 9/16-18 5 3 P43578 Greaseless Bushings 6 1 AT-501-354-027 Hydraulic Hose. 7 1 AT-501-354-036 Hydraulic Hose.

Page 22
PIVOT PINS, BUSHINGS, SPRINGS

Page 23
PIVOT PINS, BUSHINGS, SPRINGS
ITEM # QTY PART # DESCRIPTION REMARKS 1 1 BA-711-114 Pivot Bracket for Radius Arm NOT SHOWN 2 1 P14517 Soc Head Set screw ½-13 x 2 for Rad. Arm NOT SHOWN 3 1 P23533 Hex Jam Nut ½-13 for Radius Arm NOT SHOWN 4 2 P43596 BRG 1-1/4 ID x 1-3/8 OD x 7/8 LG. 5 4 P43593 BRG 1-3/8 ID x 1-1/2 OD x 1-3/8 LG 6 6 P43608 Pre-lubricated Bearing 1-1/4 ID x 1-3/8 OD 1-3/8 LG 7 2 P43594 BRG 1-3/8 ID x 1-1/2 OD x 1-3/8 LG 8 2 P10070 HHCS ¾-10 x 1-3/4 LG. Plated 9 2 P22500 Nut Hex Jam ¾-10 10 1 BA-712-157 Radius Arm Assembly, less Roller NOT SHOWN 11 2 BP-712-125 Platform Bracket Pin 12 1 AP-800-227 Base End Pin 13 1 AP-800-233 Rod End Pin 14 2 AP-712-044 Compression Arm Pin 15 2 AP-712-047 Tilt Tube Pin 16 2 AP-712-046 Tension Arm Pin 17 4 P24024 Retaining Ring 18 1 AP-711-101 Radius Arm Pin NOT SHOWN 19 24 P26028 Nylon Washer Nom 2 OD x 1-1/2 ID x 1/8 20 1 P25206 RH Spring 21 1 P25207 LH Spring 22 2 P17566 U-Bolt ¼ x 1 x 1-3/4 LG 23 4 P23502 Lock Nut ¼-20 24 2 P32017 Grease Fitting ¼ NPT 25 2 P32016 Grease Fitting ¼ - 28 26 2 AP-712-104 Compression Arm Pin – Cam End 27 1 P37553 Radius Arm Roller NOT SHOWN 28 1 P11029 Hex Bolt for Roller NOT SHOWN 29 1 P23511 Lock Nut for Roller NOT SHOWN

Page 24
INSTALLING SAFETY DECALS IMPORTANT ! All decals should be positioned so they can be seen with the LHLP-3500G both in operation and in rest position, and must NEVER be covered by components or elements of the vehicle (hooks, locks, cloths, etc.).
Location “A”
DESCRIPTION DIMENSIONS PART # Urgent Warning 4 ½” x 4 ½” P55199
After using Lift Gate 4” x 2” P55201 READ & UNDERSTAND 4” x 3” P55203
LHLP Operation Instructions 6” x 3” P55329 CAUTION Maximum Load 3500 lbs 4” x 7” P55381
Location “B” (on face of tension arm tube with gate UP)
DESCRIPTION DIMENSIONS PART # Secure Latch 4” x 2” P55202
Location “C”, on the UP/DOWN switch box (only if gray switch box used)
DESCRIPTION DIMENSIONS PART # UP – DOWN POWER DOWN 3 1/8” X 1 3/8” P55221
If any decals are missing or become damaged, free replacements are always available from LEYMAN.
Location “A” Decals
Location “C” Decals
Location “B” Decals

Page 25
NOTES ______________________________________________________________________________________________________________________________________________________________________________________________________________________________________________________________________________________________________________________________________________________________________________________________________________________________________________________________________________________________________________________________________________________________________________________________________________________________________________________________________________________________________________________________________________________________________________________________________________________________________________________________________________________________________________________________________________________________________________________________________________________________________________________________________________________________________________________________________________________________________________________________________________________________________________________________________________________________________________________________________________________________________________________________________________________________________________________________________________________________________________________________________________________________________________________________________________________________________________________________________________________________________________________________________________________________________________________________________________________________________________________________________________________________________________________________________________________________________________________________________________________________________________________________________________________________________________________________________________________________________________________________________________________________________________________________________________________________________________________________________________________________________________________________________________________________________________________________________________________________________________________________________________________________________________________________________________________________________________________________________________________________