levsˆsˇ˘ s sˆs˘ ˘ ˆ levslˇ˘ ˇe ˘ l˘v l˘l ˆe ˆlˇ˘ · about cogat ... grade test...
TRANSCRIPT

LEVELS 9–17/18 FORM 7
ONLINE COMPARABILITY STUDY 2012
Directions for Online Administration
Cognitive Abilities Test™

Copyright © 2012 by The Riverside Publishing Company. All rights reserved. No part of this work may be reproduced or transmitted in any form or by any means, electronic or mechanical, including photocopying and recording, or by any information storage or retrieval system without the prior written permission of The Riverside Publishing Company unless such copying is expressly permitted by federal copyright law. Address inquiries to Permissions, Riverside, 3800 Golf Rd., Suite 200, Rolling Meadows, IL 60008.
These tests contain questions that are to be used solely for testing purposes. No test items may be disclosed or used for any other reason. By accepting delivery of or using these tests, the recipient acknowledges responsibility for maintaining test security that is required by professional standards and applicable state and local policies and regulations governing proper use of tests and for complying with federal copyright law which prohibits unauthorized reproduction and use of copyrighted test materials.
Cognitive Abilities Test™
David F. Lohman

Contents i
Contents
Part 1 Prepare for Testing ......................................................... 1
About This Guide................................................................................................. 1 Purpose ............................................................................................................ 1 How to Use This Guide ..................................................................................... 1
About CogAT ....................................................................................................... 1 Testing with Levels 9–17/18 ................................................................................. 2
Question and Answer Format ........................................................................... 2 Sample Questions ............................................................................................. 2 Test Descriptions and Administration Times ..................................................... 3
Online Testing with DataManager ....................................................................... 4 About DataManager ......................................................................................... 4 Using the Proctor Application .......................................................................... 4 About the Student View ................................................................................... 4 About the Navigation Tour............................................................................... 5
Test Administration Guidelines............................................................................ 5 Schedule the Test ................................................................................................ 6
Recommendations ............................................................................................ 6 Set Up Test Sessions .......................................................................................... 6
Obtain Materials and Equipment ......................................................................... 6 Supply List ........................................................................................................ 6
Emergencies and Irregularities During Testing .................................................... 7 Guidelines ........................................................................................................ 7 Troubleshooting ............................................................................................... 8
Pre-Testing Checklist ........................................................................................... 9
Part 2 Administer the Tests ..................................................... 11
Overview of the Test Administration Process ..................................................... 11 Log On to the DataManager Proctor Application .............................................. 12
Logging On with a Session Code..................................................................... 12 Logging On without a Session Code ............................................................... 13 Logging On with Additional Permissions ........................................................ 13
Open the Test Session........................................................................................ 15 Introduce the Test and Instruct Students to Log On .......................................... 15 Confirm the Student Roster for this Session ...................................................... 16

ii CogAT Directions for Online Administration
Begin Testing .................................................................................................... 17 Follow On-Screen Directions ........................................................................... 17 During-Testing Checklist ................................................................................. 17 Start the Test (or Navigation Tour) ................................................................. 18 Additional Administration Notes by Test ........................................................ 19
Part 3 DataManager Quick Reference ..................................... 21
About the Directions for Administration Area ................................................... 21 About the Student Area .................................................................................... 22 Creating a Test Session ...................................................................................... 23 Deleting a Test Session ...................................................................................... 24 Exporting a Test Session List .............................................................................. 24 Finding Student Status Information................................................................... 25 Pausing and Resuming a Test Session for an Individual Student ........................ 26 Pausing and Resuming a Test Session for All Students ....................................... 26 Terminating a Test Session for an Individual Student ........................................ 26 Terminating a Test Session for All Students ....................................................... 27

Prepare for Testing 1
Part 1 Prepare for Testing
About This Guide Purpose
The Directions for Online Test Administration describes the procedures that test administrators should follow when administering the Cognitive Abilities Test™ (CogAT®) Online with Riverside DataManager™. It is important that you read this guide thoroughly before the first day of testing and follow the directions carefully. This will ensure that your test administration will be consistent with all others and that the scores will be meaningful and useful.
How to Use This Guide
This guide is to be used during the administration of Form 7 of the Cognitive Abilities Test (CogAT) Online, Levels 9–17/18.
• Part 1 provides information you will need in order to prepare for testing.
• Part 2 contains instructions for administering the tests using DataManager.
• Part 3 provides instructions for performing selected DataManager tasks.
About CogAT CogAT appraises the cognitive development of students from kindergarten through grade 12. The test measures students’ learned reasoning abilities. Although grounded in biological processes, these abilities are developed through in-school and out-of-school experiences.
The questions on CogAT require students to demonstrate their reasoning abilities in each of the three symbol systems most closely related to success in school: verbal reasoning, quantitative reasoning, and nonverbal reasoning.
• The Verbal Battery assesses students’ abilities to use search, retrieval, and comparison processes that are essential for verbal reasoning.
• The Quantitative Battery assesses students’ abilities to reason about patterns and relations using concepts that are essential in quantitative thinking.
• The Nonverbal Battery assesses students’ abilities to reason with somewhat more novel questions that use spatial and figural content.

2 CogAT Directions for Online Administration
CogAT scores are used for three primary purposes:
• to guide efforts to adapt instruction to the needs and abilities of students
• to provide a measure of each student’s level of cognitive development that captures important information not represented in school grades or in other measures of school achievement
• to identify students whose predicted levels of achievement are markedly discrepant from their observed levels of achievement
For each of the nine tests, the class answers one or two sample questions together. The sample questions demonstrate how to answer the items on that test. They are kept simple to be certain all of the students understand what they are supposed to do. Questions in the tests range from those that most students will be able to answer correctly to those that only the most able students will answer correctly.
Testing with Levels 9–17/18 The Levels 9–17/18 tests are developmentally appropriate for students in the following grades.
Grade Test Level Grade Test Level
3 9 7/8 13/14
4 10 9/10 15/16
5 11 11/12 17/18
6 12
The questions in the tests show how well students use their reasoning skills to solve problems they have not been directly taught. For this reason, the test questions do not parallel what the students are learning in school. You and your students need not be concerned if the material is new. The Levels 9–17/18 tests are timed, but there should be sufficient time for most students to attempt to answer every question.
Question and Answer Format
Questions are in multiple-choice format. Students read the questions and answer choices and either click an answer choice with the mouse or press the number or letter key corresponding to the position of the answer choice. For example, students can type 1 or A for the first answer choice listed, 2 or B for the second answer choice listed, and so on.
Sample Questions
Each test begins with one or more sample questions to give students practice with the content and format of the test.

Prepare for Testing 3
Test Descriptions and Administration Times
The following table describes each test and provides the testing time.
• Allow 10–15 minutes of additional time per testing session to log students on to the system, read directions to the students, and answer any questions.
• Allow an additional 5 minutes before the first testing session for students to take the Navigation Tour.
Battery/Test Description Testing Time
(Minutes)
Verbal Battery
Verbal Analogies Students examine a pair of words and think of ways in which they are related. Then they apply this relationship to a third word to generate a new pair of words related to each other in the same way as the first pair.
10
Sentence Completion Students read an incomplete sentence and then select the answer choice that best completes the sentence.
10
Verbal Classification Students examine three words and think of ways in which they are alike. Then they select the answer choice that belongs in the same group.
10
Quantitative Battery
Number Analogies Students examine two pairs of numbers and determine the rule both pairs follow. Then they apply the rule to a given number and choose the answer that generates a third pair of numbers that follows the same rule. The test questions require the same processes as the Verbal Analogies test, but use quantitative concepts rather than verbal concepts.
10
Number Puzzles Each question presents an equation in which elements are missing. The students must substitute numbers for the missing elements and solve the equation.
10
Number Series (Level 9) Some questions in this test show several strings of beads with the number of beads shown beneath each string. The numbers make a pattern. Students must discover the pattern and then select the string of beads that comes next in the sequence. Other questions show only the series of numbers and require the same processes.
(Levels 10–17/18) Each question contains a series of numbers that follows a pattern. First students identify the rule the numbers follow. Then they apply the rule to find the next number in the series.
10
Continued on next page…

4 CogAT Directions for Online Administration
Test Descriptions and Administration Times, continued
Battery/Test Description Testing Time
(Minutes)
Nonverbal Battery
Figure Matrices Each question presents a matrix in which one figure is missing. Students determine the rule(s) that the existing figures follow. Then they apply the rule(s) to choose the figure that completes the matrix.
10
Paper Folding Each question shows a piece of paper being folded and holes being punched in the folded paper. Students must choose the answer that shows how the paper looks when it is unfolded.
10
Figure Classification For each question, students must determine how three figures are similar and then select the answer choice that is most like the first three figures.
10
Online Testing with DataManager About DataManager
DataManager is a comprehensive online resource for managing your assessment program. DataManager enables you to organize, assign, and implement your test events and also to access and manage your test results online.
Using the Proctor Application
You will use the DataManager Proctor application to administer online tests. The Proctor application enables you to begin, pause, and end test sessions and monitor student progress during a session. The Proctor application also presents you with the exact words you will use to administer the test.
All tests at Levels 9–17/18 begin as proctor led. You will read the directions, work through the sample questions with the students, and then advance the students’ screens to the first test question. Students take the test by reading each question, working on their own, and advancing through the test at their own pace.
About the Student View
The student view presents each question and the answer choices. Students either click an answer choice with the mouse or press the number or letter key corresponding to the position of the answer choice. For example, students can type 1 or A for the first answer choice listed, 2 or B for the second answer choice listed, and so on. Students click the Next button to advance the test to the next question.
The student view provides several tools for students to use during testing. For example, students can click the Mark button to select a question to review later. Once they have marked an answer, the button changes to Unmark. Clicking Unmark will remove the question from the review list. At the end of the test, the Review page appears. Students may also go to the Review page any time by clicking the Review button. The Review page lists

Prepare for Testing 5
marked questions and any questions the student skipped. Students also have the option of reviewing all questions. The Navigation Tour describes these tools and how to use them.
About the Navigation Tour
All students must complete the Navigation Tour before the first testing session. The Navigation Tour helps familiarize students with the online testing environment. The tour presents one practice question that students will answer with your guidance. The tour shows students how to move through the test, answer questions, and review their work.
Test Administration Guidelines The test author and the publisher recommend the following guidelines.
• Decide how the test will be administered and by whom. CogAT is designed to be a group-administered test. The tests and directions are constructed for relatively easy administration by classroom teachers. The tests should be administered by someone who is familiar to the students and who has a good rapport with them. No special training in educational or psychological testing is required.
• Monitor students. Monitor students to make sure they understand the test instructions and are using the computer to answer questions properly. If a class is large or if there are many students who are likely to need assistance, arrange for qualified proctors to assist you during testing. Proctors can assist students as needed, allowing you to remain at your computer during proctor-led sections of the test. If possible, have one proctor for every 20 students.
• Review sample questions with students. Students cannot do their best if they do not understand the directions and the sample questions. Always try to ensure that students understand what they are supposed to do before starting the test. Follow the script as it is written, but feel free to repeat, explain, or provide additional examples as necessary before testing begins.

6 CogAT Directions for Online Administration
Schedule the Test Recommendations
When determining the testing schedule, please keep in mind the following points.
• The test administration schedule should allow sufficient time for:
− logging students on to the system
− explaining the testing task to students
− completing the Navigation Tour
− reading directions and working through sample questions
− answering students’ questions
− managing technical issues such as slow Internet speeds
• For Levels 9–17/18, it is recommended that the three test batteries be administered in three separate testing periods.
Set Up Test Sessions
For this research study, test sessions will be set up in DataManager for you in advance of testing.
Obtain Materials and Equipment Supply List
The following items must be available when testing begins.
Directions for Online Administration
You will need a printed copy of this Directions for Online Administration booklet.
Pencils Each student will need one sharpened pencil with a good eraser for the Quantitative Battery. Have some extra pencils on hand.
Scratch Paper Each student should have a few sheets of scratch paper for the Quantitative Battery only. Do not allow the use of scratch paper for the Verbal and Nonverbal Batteries.
Student Logon Information
You will need the first name, last name, birth month, and birth day of each student. The logon information was provided to you by the Riverside research group.
Session Code You will need the session code corresponding to the test session you
are administering. You can find the session code on the DataManager Manage tab in the Created Sessions area.
Spare Computers Verify that one or two spare computers are available.

Prepare for Testing 7
Emergencies and Irregularities During Testing Guidelines
It is not possible to provide specific guidance for emergencies and irregularities, but there are some principles that seem reasonable to consider under many circumstances.
• The welfare of the students should always be of primary concern. Whatever action might need to be taken should put the health and safety of students first.
• If the testing room must be evacuated, click Pause All to pause testing if possible. Tests that are not paused may time out after a period of inactivity. Tests that have timed out can be resumed at the point where students left off. If students resume testing the same day, the same session code may be used to log students back on to the test. If testing resumes on a different day, you must create a new session, which will generate a new session code.
• The security of the test must be maintained. If the testing room must be evacuated, lock the door if possible.
• Communicate the details of all testing irregularities to the Riverside research group at 1‐800‐767‐8420, extension 6071. These details will help to determine what actions may need to be taken so that useful scores can still be obtained. Notes on areas of confusion or unusual behavior of particular students can greatly assist in understanding unexpected test scores.

8 CogAT Directions for Online Administration
Troubleshooting
Certain types of interruptions are recoverable and will permit a continuation of the testing; others may require you to terminate the testing session.
Problem Resolution
A student’s behavior disrupts testing for the group.
Click Pause All to pause testing; remove the source of the problem and then click Resume All to resume testing when the group has calmed down.
A student is clearly ill or upset. Terminate the student’s test. See “Terminating a Test Session for an Individual Student” on page 26.
Noise or weather interrupts testing.
Click Pause All to pause testing; click Resume All to resume testing when the noise ceases or it is safe to begin testing again.
A power outage interrupts testing.
Resume testing when power is restored. Students will need to log on again using the same session code. You will resume testing at the same place you left off before power was interrupted.
The Internet connection is lost. If Internet connectivity is lost for only a few students, click Pause All to pause testing, and have the students log on to another computer. The students will resume the test where they left off. Click Resume All to resume testing.
If Internet connectivity is lost for all students, click Pause All to pause testing, and wait for connectivity to be restored. Click Resume All to resume testing.
• If testing resumes during the same day, you can use the same test session and test session code to restore testing.
• If testing resumes the next day, you will need to create a new test session. After students log on to the new test session, you will resume testing at the same place you left off in the previous session.

Prepare for Testing 9
Pre-Testing Checklist The following checklist will help you get ready for testing.
Day Before Testing
Read Part 2 of this guide to familiarize yourself with the administration procedures.
Review the online help topics for the DataManager Proctor application and ensure you are familiar with how to operate the application. You can access the DataManager online help by clicking Help in the upper right corner of the DataManager window.
Check the availability of the materials listed in “Obtain Materials and Equipment” on page 6.
Confirm the phone number of your local technical support personnel.
Verify that you have the user name and password for logging on to DataManager.
Verify that you have log-on information for each student. You will need the first name, last name, birth month, and birth day of each student. This information was provided to you by the Riverside research group.
Arrange for a testing area that is comfortable and well lit.
Day of Testing
If possible, arrange the room so the test administrator can see the students’ screens; for example, locate the test administrator’s computer in the back of the room to enable the test administrator to see the students’ screens.
Arrange the room so students will be separated from one another as much as the room allows. If needed, place dividers between computers to ensure students are separated.
Ensure proctors know what is expected of them during testing.
Open the browser on each student computer and display the DataManager Log In page.
Take steps to avoid interruptions of the testing sessions by fire drills or announcements over the public address system. Prepare a “Testing—Please do not disturb” sign to place on the door during testing.

10 CogAT Directions for Online Administration

Administer the Tests 11
Part 2 Administer the Tests
Overview of the Test Administration Process This section provides an overview of the online test administration process. Detailed instructions for performing each of the steps listed below appear in this part of the guide.
You must administer the Navigation Tour first, followed by each test in the order given in “Test Descriptions and Administration Times” on page 3.
Step 1: Log on to the DataManager Proctor application
Log on to DataManager and start the Proctor application.
Step 2: Open the test session
Find and open the test session for the Navigation Tour or for the test you are administering.
Step 3: Introduce the test and instruct students to log on
Follow the instructions in this guide to direct students to log on to the test.
Step 4: Confirm the student roster for this session
Review the list of students logged on, and assist students who are having problems. Resolve any student roster issues such as last-minute additions or deletions.
Step 5: Begin testing
Begin the testing session or Navigation Tour.
Step 6: Complete the test session
Verify that students have completed the test.

12 CogAT Directions for Online Administration
Log On to the DataManager Proctor Application To log on to the DataManager Proctor application, do one of the following:
If you are assigned these DataManager permissions…
And you… Follow these instructions…
Proctor only Have a session code “Logging On with a Session Code” below
Proctor only Do not have a session code “Logging On without a Session Code” on page 13
Proctor and other permissions “Logging On with Additional Permissions” on page 13
Logging On with a Session Code
If you are assigned Proctor permissions only and know your session code, you can log on directly to your test session in the Proctor application from the DataManager Log On page.
After you launch DataManager, the Log On page appears and you are prompted to enter your log-on information.
To log on to DataManager with a session code:
1. In the User Name box, type your user name.
2. In the Password box, type your password.
3. Click Proctor my online testing session now. The Session Code box appears.
4. In the Session Code box, enter your session code and then click Log On. The Proctor Session and Proctor Led tabs appear.
5. Continue with “Introduce the Test and Instruct Students to Log On” on page 15.

Administer the Tests 13
Logging On without a Session Code
If you are assigned Proctor permissions only and do not have a session code or do not know your session code, you can log on to the Proctor application from the DataManager Log On page.
After you launch DataManager, the Log On page appears and you are prompted to enter your log on information.
To log on to DataManager without a session code:
1. In the User Name box, type your user name.
2. In the Password box, type your password.
3. Click Log On. The Proctor application and Manage tab appear, with all of your created and expired sessions.
4. Continue with “Open the Test Session” on page 15.
Logging On with Additional Permissions
If you have been assigned additional permissions beyond Proctor, you can access the Proctor application through DataManager.
After you launch DataManager, the Log On page appears and you are prompted to enter your log on information.

14 CogAT Directions for Online Administration
To log on to the Proctor application with additional permissions:
1. In the User Name box, type your user name.
2. In the Password box, type your password.
3. Click Log On. The DataManager Overview page appears.
4. Click the Application Switcher button ( ). The Application Switcher appears.
5. Click Assessments. The Find Assessments page appears.
6. Select your test event. To narrow your search by year, scope, or both:
a. In the Year list, click None. The available test years appear. Select a school year.
b. In the Scope list, click None. The available test types appear. Select CogAT.
c. Click Search. The test events that meet the year and scope criteria appear.
7. In the Title column, select the test assessment to view details about a specific event. The Edit Test Event page appears and displays the test event details.

Administer the Tests 15
8. Click Proctor an online testing session in the Complete Tasks for this Test Event area.
The Manage tab in the Proctor application appears and displays all of your existing and expired test sessions.
9. Continue with “Open the Test Session” below.
Open the Test Session To open a test session (or Navigation Tour) from the Manage tab:
1. On the Manage tab, find the test session or Navigation Tour by sorting any of the columns with the sort button ( ) next to them.
You must administer the Navigation Tour first, followed by each test in the order given in “Test Descriptions and Administration Times” on page 3.
2. In the Session Name column, click the name of the test session you want to proctor. The Proctor Session tab appears.
Introduce the Test and Instruct Students to Log On Follow the steps in this section to explain the test to the students and instruct them to log on to the test.
To introduce the test and instruct students to log on:
1. Read the information in “Additional Administration Notes by Test” on page 19 to familiarize yourself with any special testing instructions for the test you are administering.
2. Write the session code on the board.
3. Tell students about the test (or Navigation Tour) they are about to take. Remind them to remain quiet during the test and to stay in their seats during and after the test.
4. Distribute student log-on information cards to each student. Log-on information consists of each student’s first and last name, birth month, and birth day.

16 CogAT Directions for Online Administration
5. If students are taking a test in which scratch paper is allowed, distribute one sheet of scratch paper and a pencil to each student. Refer to “Additional Administration Notes by Test” on page 19 to determine if scratch paper is allowed for the test you are administering.
6. Tell students to type their name, exactly as shown on their log-on information cards, into the First Name and Last Name boxes on the student log-in page. Tell students to click the down arrow in the Birth Month box and select their birth month from the list. Then tell students to click the down arrow in the Birth Day box and select their birth day from the list.
7. Tell students to type the session code shown on the board into the Session Code box.
8. Tell students to click the Login button. Students should see the “Draw Here” page.
Confirm the Student Roster for this Session After students have logged on, you must confirm that the student roster for the testing session includes the students you want to test.
To confirm the student roster:
1. Click the Proctor Sessions tab. The Proctor Session page appears.
2. Review the students listed in the Exceptions area. Students appear in the Exceptions area if they are not assigned to the test session for one of the following reasons:
− The student is not assigned to take the test.
− The student is not assigned to take the test at the level being tested.
3. For each student in the Exceptions area, do one of the following:
− If the student should take the test, approve the student by clicking the approve button ( ) in the Actions column on the row where the student’s name appears. The student moves to the Approved Students area.
− If the student should not take the test, deny the student by clicking the deny button ( ) in the Actions column on the row where the student’s name appears. The student is removed from the Exceptions area.
4. Review the list of students in the Waiting for Approval area to verify that all students listed should take the test.
Ensure that the student roster includes all students who should take the test. You will not be able to add students after testing begins. If you need assistance, contact the Riverside research group at 1‐800‐767‐8420, extension 6071.

Administer the Tests 17
Begin Testing Follow On-Screen Directions
Follow the on-screen directions exactly.
• Read aloud word for word the text preceded by the word SAY in red type. The text that is not preceded by SAY is important information, but it should not be read to students.
• Use a natural speech pattern when administering the test. Read all directions and sample questions clearly. Pause frequently to give students time to think about test procedures.
• You may repeat the directions as many times as needed.
During-Testing Checklist
During the assessment, check student activities regularly.
When the test session is approximately half over, remind students of the time remaining.
Make sure students understand the test directions and the sample questions before you begin each test.
• Answer any questions about the sample questions, and help any students having difficulty.
• Do not begin the test until students understand what they are supposed to do.
• Once testing begins, you may not answer questions about specific items. For example, do not identify pictures for students. However, questions about procedures and the mechanics of test taking may be answered anytime.
Check that each student is working independently.
Note and report to your test coordinator any incident that could have an adverse effect on the test results.

18 CogAT Directions for Online Administration
Start the Test (or Navigation Tour)
Before starting the test, read the notes in “Additional Administration Notes by Test” on page 19 to familiarize yourself with additional testing procedures that may apply to the test you are administering.
To approve students and start the test:
1. Students who meet the assigned criteria appear in the Waiting for Approval area. Review the students listed in the Waiting for Approval area, and do one of the following:
− Approve all students to begin testing by clicking Approve All on the Waiting for Approval bar. All of the students in the Waiting for Approval area move to the Approved Students area. Approved students see a “Draw Here” page until you begin the test.
− Approve individual students by clicking the approve button ( ) in the Actions column on the row where each student’s name appears. The student moves to the Approved Students area. Approved students see a “Draw Here” page until you begin the test.
− Deny all students by clicking Deny All in the Waiting for Approval bar. All students are removed from the Waiting for Approval area.
− Deny individual students by clicking the deny button ( ) in the Actions column on the row where each student’s name appears. The student is removed from the Waiting for Approval area.
2. After all students have been approved, click the Proctor Led tab. The Welcome page appears.
3. Click Next in the lower right corner to advance to the first sample question. Follow the directions in the Directions for Administration area. You may need to scroll down in the Directions for Administration area to see all of the directions. See “About the Directions for Administration Area” on page 21 for more information on this section.
4. After you have completed the sample questions and are confident that students know what to do, click Next in the lower right corner to start the test. The students’ screens advance to the first question, and the remainder of the test is self paced. Students work on their own, advancing through the test at their own pace.
5. Circulate around the room and use the tools on the Proctor Led tab to monitor testing.
− A pacing clock above the Student area starts when the test begins. Use the pacing clock to help you gauge the amount of time to give students to answer the question before advancing to the next question.
− The question the students are working on appears in the Question column of the student’s row.

Administer the Tests 19
− When the student answers the current question, a green check mark appears in the Answered column on the student’s row. Note that the check mark does not indicate whether the student answered correctly.
6. To end the test, do one of the following:
− If you want to end the test before time has run out (for example, if all students have finished), advance to any question on the test and click the Review button. The Review page appears. Click Finished to close the test.
− Wait for time to run out and follow the on-screen instructions.
Additional Administration Notes by Test
• Number Analogies
− Distribute a pencil and a sheet of scratch paper to each student before the test, and collect the pencils and scratch paper after the test.
− After testing, collect and destroy scratch paper that was used during testing.
• Number Puzzles
− Distribute a pencil and a sheet of scratch paper to each student before the test, and collect the pencils and scratch paper after the test.
− After testing, collect and destroy scratch paper that was used during testing.
• Number Series
− Distribute a pencil and a sheet of scratch paper to each student before the test, and collect the pencils and scratch paper after the test.
− After testing, collect and destroy scratch paper that was used during testing.

20 CogAT Directions for Online Administration

DataManager Quick Reference 21
Part 3 DataManager Quick Reference
About the Directions for Administration Area The Directions for Administration area of the Proctor Led tab provides instructions and text that you read to the students. The Directions for Administration area looks like this:
The top pane displays the Directions for Administration:
• Verify that all students are on the correct question.
• Read the text preceded by SAY to students.
• Follow the instructions not preceded by SAY, but do not read them out loud to students. You may need to scroll down to see all of the directions.
Note: If you are using Microsoft Internet Explorer®, press F11 to change the browser to full screen and expand the viewable space for the Directions for Administration area.
The lower section displays the question that students see. You may need to scroll down to see the entire question.
22 CogAT Directions for Online Administration
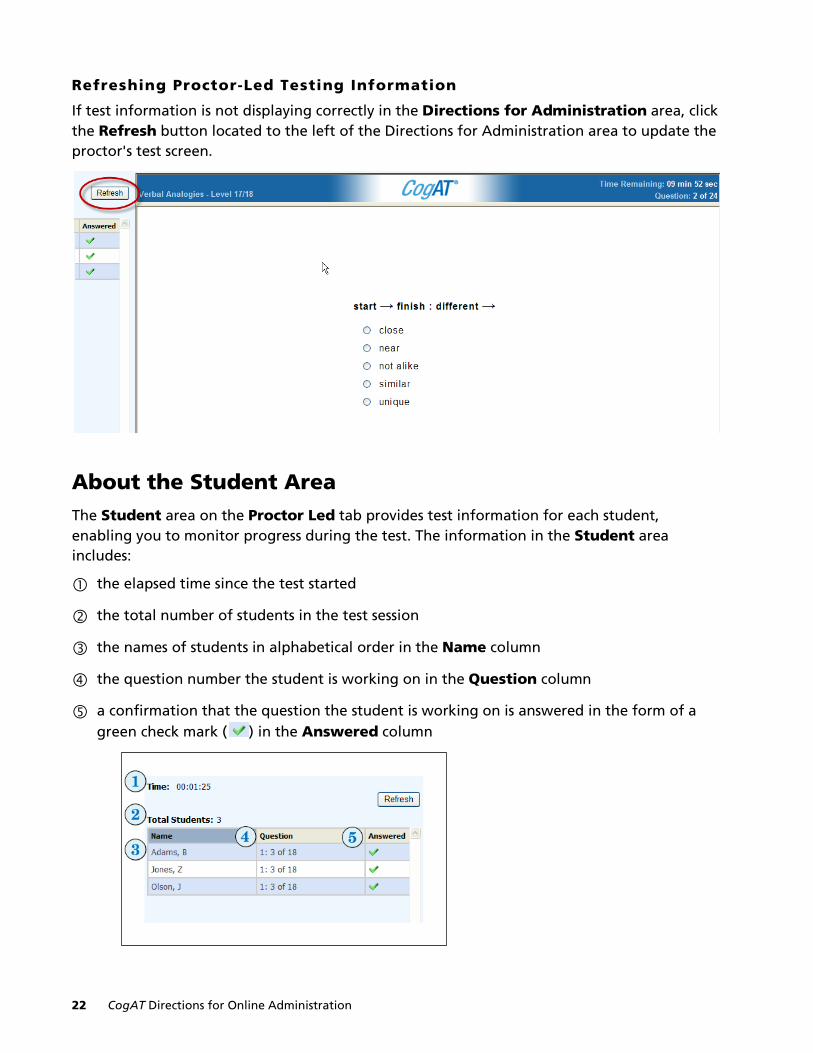
Refreshing Proctor-Led Testing Information
If test information is not displaying correctly in the Directions for Administration area, click the Refresh button located to the left of the Directions for Administration area to update the proctor's test screen.
About the Student Area The Student area on the Proctor Led tab provides test information for each student, enabling you to monitor progress during the test. The information in the Student area includes:
the elapsed time since the test started
the total number of students in the test session
the names of students in alphabetical order in the Name column
the question number the student is working on in the Question column
a confirmation that the question the student is working on is answered in the form of a green check mark ( ) in the Answered column

DataManager Quick Reference 23
Refreshing the Student Area
If student information is not displaying correctly in the Student area, click the browser Refresh button to update each column of student information.
Note: The Refresh button may look different and be positioned in a different location based on the browser application you are using.
Creating a Test Session For this research study, test sessions will be set up for you in advance of testing. The following directions are included in case a situation arises where you will need to set up your own test sessions.
To create a test session:
1. Open the Proctor application.
− If you open the Proctor application without a session code, the Manage tab appears automatically.
− If you open the Proctor application with a session code, click the Manage tab, and the Manage tab appears.
2. In the Test Event list, select CogAT.
3. In the Grade list, select your grade.
4. In the Test Group list, select CogAT 7 Complete.
5. In the Level list, select the test level that you will be administering or that is assigned to the students you will be testing.
6. In the Battery/Subtest list, select the battery or subtest to administer.
7. In the Test Admin Type list, select Proctor Led.
8. In the Session Name box, type a session name. You can type any name for the session. It is recommended that you enter a logical name to help you identify the session, such as using the following format: teacher name/grade/subtest (for example, Hanson 4 Number Series). The session name must be unique.

24 CogAT Directions for Online Administration
9. Click Create Session. Your session appears in the Created Sessions area below and is ready for you to proctor.
Deleting a Test Session You can delete a test session to remove sessions that were created incorrectly or are no longer needed. A test session cannot be deleted if students are logged in and are approved for testing.
To delete a test session:
1. On the Manage tab, find the test session you want to delete by sorting any of the columns with the sort button ( ) next to them.
2. In the Actions column, click the delete button ( ) to delete the test session.
Exporting a Test Session List You can export test session information to better organize test administration tasks on the day of testing and to help prepare for test set-up between periods.
1. On the Manage tab, click the print button ( ) on the Created Sessions bar. The File Download dialog box appears.

DataManager Quick Reference 25
Note: The File Download dialog box may be different based on the browser application you are using.
2. Do one of the following from the File Download dialog box:
− Click Open to open a PDF file of the session list in Adobe Acrobat. A list of all the sessions appears in a PDF file in the same order in which they appear on the tab.
− Click Save to save the list as a PDF file. On the Save As dialog box, select the folder and enter a file name, and then click Save. The file is saved to the folder you selected.
− Click Cancel to return to the Manage tab without creating a PDF file.
Finding Student Status Information The Student Status tab provides a Search area to enter rostered student search criteria. You can search for students using one or more of the search fields.
Note: If your search criteria do not return an expected result, contact your test administrator to see whether the student was incorrectly assigned to a test or the student was not rostered.
To find student status information:
1. Click the Student Lookup button located in the upper right of the Proctor Session page. The Student Status tab appears.
2. Enter and/or select search criteria in one or more of the following search criteria fields to narrow your results:
a. In the First Name box, type the student's first name.
b. In the Last Name box, type the student's last name.
c. In the Date of Birth drop-down list boxes, select the month, day, and year.
d. In the Test Event drop-down list box, select a test event.
e. In the Location box, select a level. If you search by location, the location must be made at the building level or below.

26 CogAT Directions for Online Administration
3. Click Search. The Student Status table appears and lists the results that meet the selected search criteria.
Note: If the search returns more than 100 items, a dialog box appears and asks you to refine your search criteria.
4. Click Reset to clear the Search area and enter new search criteria.
Pausing and Resuming a Test Session for an Individual Student To pause a test session for an individual student:
• On the Proctor Session tab, click the pause button ( ) in the Approved Students area in the row where the student’s name appears. The student's test session is paused and the pause button becomes a play button ( ).
To resume a test session for an individual student:
• On the Proctor Session tab, click the play button ( ) in the Approved Students area in the row where the student’s name appears. The student's test session resumes
and the play button becomes a pause button ( ).
Pausing and Resuming a Test Session for All Students To pause a test session for all students:
• On the Proctor Session tab, click Pause All on the Approved Students bar. The students’ test sessions are paused, and the Pause All button becomes the Resume All button.
To resume a test session for all students:
• On the Proctor Session tab, click Resume All on the Approved Students bar. The students’ test sessions resume.
Terminating a Test Session for an Individual Student To terminate a test session for an individual student:
• On the Proctor Session tab, click the Terminate button ( ) in the Approved Students area in the row where the student’s name appears. The student is removed from the Approved Students area, and that student’s test session ends.
Note: Terminating a student erases all completed test answers and returns the student to the testing pool. Use this action with discretion.

DataManager Quick Reference 27
Terminating a Test Session for All Students To terminate a test session for all students:
• On the Proctor Session tab, click Terminate All on the Approved Students bar. All of the students are removed from the Approved Students area, and their test sessions are ended.
Note: Terminating a student erases all completed test answers and returns the student to the testing pool. Use this action with discretion.


