levelone onesecure for android - download.level1.comdownload.level1.com/level1/manual/levelone...
TRANSCRIPT

LevelOne OneSecure
for Android
User’s Manual Version 1.0.06
2014/04/18

LevelOne OneSecure for Android V1.0.06
2
Conventions Used in This Manual
The following are typographic conventions used in this manual:
Bold: Bold typeface is used for a keyword, major functions of NVR, or a title of a
section/column.
Italic: Italic typeface is used for a filename or location path.
Underlined: Underlined typeface is used for a document name or hyperlink.
“Bold”: Bold interface enclosed in double quotation marks indicates the name of a button or
a choice item.
Some notices are placed within the following boxes; each type of the box indicates different
purposes or levels of importance for system:
Important Notice
Tip
The content within this box is a tip. A tip gives you an alternative method to easily or quickly
achieve an objective, usually for specific conditions.
The content within this box is an important notice. This notice is important for you to get
certain function to work properly, or to prevent from certain potential problems that may damage
your system. Make sure you read this notice and follow the instructions.
Note
The content within this box is a note. A note is some necessary information you need to know
about the LevelOneon you are currently taking, like what will happen after you follow or don’t
follow certain procedure.

LevelOne OneSecure for Android V1.0.06
3
Table of Contents
1 Overview 4
Introduction ....................................................................................... 4
Network Architecture ...................................................................... 4
2 Setup 5
Pre-requisites .................................................................................... 5
Download & Installation ................................................................... 6
Add a Server / Camera ..................................................................... 7
Manage Sites ..................................................................................... 9
Enter Edit Mode ............................................................................. 9
Delete/Modify a Site ....................................................................... 9
3 Connect a Site / Device 10
4 Operation Instructions 11
View Screen ..................................................................................... 11
Single Channel Screen ................................................................... 12
On-screen Alerts .......................................................................... 13
On-screen Controls ...................................................................... 14
Navigation Menu .......................................................................... 15
Enable PTZ .................................................................................. 15
Preset Points ................................................................................ 15
Take Snapshot ............................................................................. 15
Manual Recording ........................................................................ 15
Manual DO Trigger ....................................................................... 15
Stream Switcher ........................................................................... 15
Operate PTZ Functions ................................................................ 16
Optical PTZ 16
Digital PTZ 17
Go to Preset Points 18
Send To TV Wall .............................................................................. 19

LevelOne OneSecure for Android V1.0.06
4
Overview
Introduction
LevelOne OneSecure is a free app running on mobile Android devices, allowing you to
remotely monitor camera live view output from LevelOne video management system.
This app can manage up to 256 sites, and can provide 6-grid live view, single channel live view,
and screen snapshots on mobile devices.
LevelOne OneSecure is ready to connect with an LevelOne central management system
server, an LevelOne software network video recorder server, an LevelOne standalone network
video recorder and an LevelOne camera without further configuration or installation.
Network Architecture
The service architecture is described in the following figure. Please note that the architecture
may change to fit different applications.
Scenario 1
LevelOne OneSecure connects with software NVR server.
Scenario 2
LevelOne OneSecure connects standalone NVR server.
Scenario 3
LevelOne OneSecure connects central management system server.
Scenario 4
LevelOne OneSecure connects with a camera.
LevelOne
OneSecure
CMS Server
Software NVR Server
Standalone NVR Server
1
2
3
3G / WiFi
Camera
4

LevelOne OneSecure for Android V1.0.06
5
Setup
Pre-requisites
Before using LevelOne OneSecure, please make sure pre-requisites below are fulfilled:
1. Your server sites (software NVR servers, CMS servers or standalone NVR servers)
have been upgraded to compatible versions. Please refer to LevelOne OneSecure
Release Notes on http://global.level1.com/for compatible version information.
2. Your Android device has been upgrade to firmware version 2.3 or later.

LevelOne OneSecure for Android V1.0.06
6
Download & Installation
To start using LevelOne OneSecure, please download and install this app in your device.
In “Google play”, search the keyword
“LevelOne OneSecure” and install the app
directly. It requires Internet access for the
mobile device.
After installation is complete, the
application icon will appear on main
screen.

LevelOne OneSecure for Android V1.0.06
7
Add a Server / Camera
Tap on to execute LevelOne OneSecure.
Step 1The Sites list is empty when you first
enter LevelOne OneSecure. Tap the
Add button “ + ” to start editing a new
site/camera.
Step 2
On “Choose Type” window, select the
video source type.
Select “Device” for a camera or a
video encoder; select “Server” for a
CMS server, a software NVR server or
a standalone NVR server.
LevelOne OneSecure for Android V1.0.06
8
Step 3
Enter Edit page to fill in the
connection properties for LevelOne
OneSecure to connect the site, and
then click to save this site.
●Name: Server site name
●Host: Server ip / domain name address
●Port: Server port number
●Account: Server site account
●Password: The password for this
account
If this is a camera, please click the “Get Device Setting” button
before saving to make sure this device is accessible.
Note The permission to see certain views or devices on an NVR / CMS server is defined by the
access level of the User Group your account belongs to. If you cannot see certain views or
devices, ask the system administrator to modify your user group settings.

LevelOne OneSecure for Android V1.0.06
9
Manage Sites
Every time you execute LevelOne OneSecure, you will first enter the Sites list.
Enter Edit Mode
To edit the existing server sites, tap
on the bottom to enter the edit screen.
Delete/Modify a Site
In edit mode, select a site, tap to
delete it or tap on to modify the
site’s properties.
Note On LevelOne OneSecure interface,
you can always tap on title bar to
return to the upper layer. The title bar
will only reveal when the device
screen is in Portrait orientation mode.
LevelOne OneSecure for Android V1.0.06
10
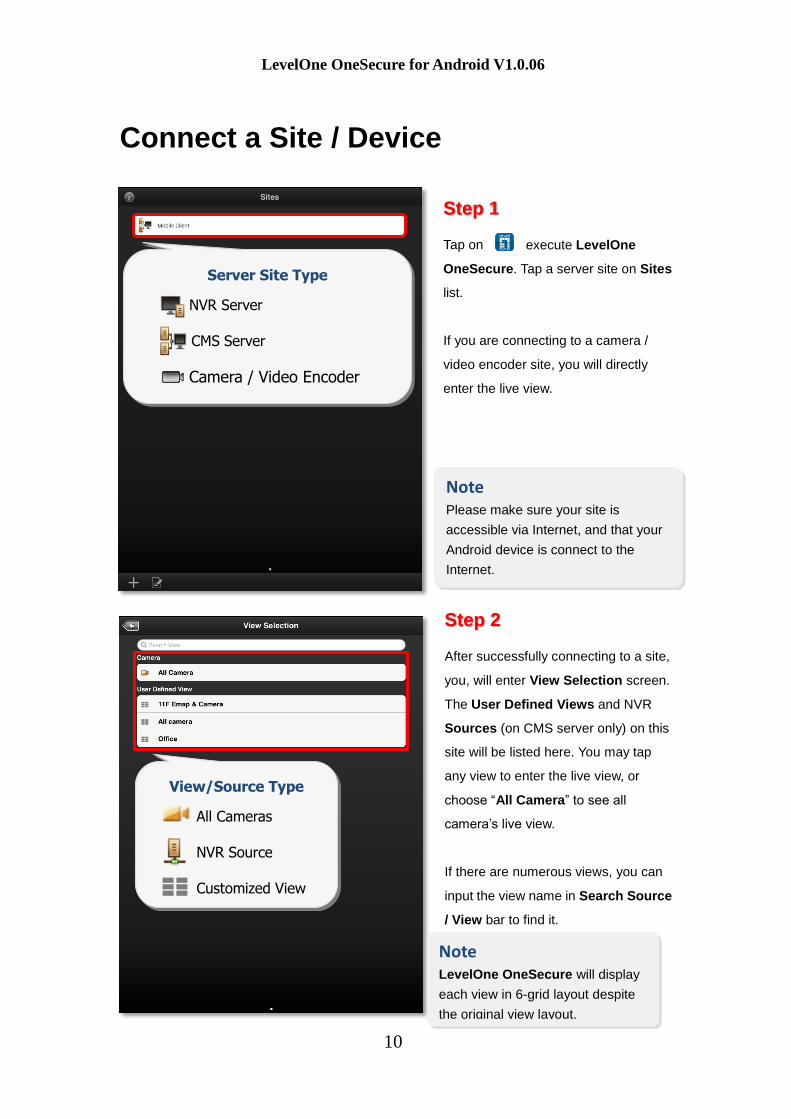
Connect a Site / Device
Step 1
Tap on execute LevelOne
OneSecure. Tap a server site on Sites
list.
If you are connecting to a camera /
video encoder site, you will directly
enter the live view.
Step 2
After successfully connecting to a site,
you, will enter View Selection screen.
The User Defined Views and NVR
Sources (on CMS server only) on this
site will be listed here. You may tap
any view to enter the live view, or
choose “All Camera” to see all
camera’s live view.
If there are numerous views, you can
input the view name in Search Source
/ View bar to find it.
Note LevelOne OneSecure will display
each view in 6-grid layout despite
the original view layout.
Note Please make sure your site is
accessible via Internet, and that your
Android device is connect to the
Internet.
Server Site Type
NVR Server
CMS Server
Camera / Video Encoder
View/Source Type
All Cameras
NVR Source
Customized View

LevelOne OneSecure for Android V1.0.06
11
Operation Instructions
View Screen
Upon entering a View, you will be provided with a 6-grid layout screen despite the original
layout style presented on original interface; each mini channel will display continuous live
snapshots at 1 frame per second.
To enter a Single Channel Screen, tap the channel, and tap “Live View” on the popup
window. If there are more than six camera channels in this view, the page indicator will appear
on the bottom, and you may swipe horizontally to navigate other pages.
View Name
Page Indicator
Previous Page Next Page
Single Channel

LevelOne OneSecure for Android V1.0.06
12
Single Channel Screen
On a single channel screen displays the camera’s live streaming. You may:
● Watch live streaming of a camera by its original resolution.
● Switch to another camera channel or another View at ease.
● Observe triggered motion/DI indications.
● Take a snaphot of live view.
● Manipulate digital/optical PTZ operation
● Perform manual-recording
● Manually trigger DO device.
Previous Channel Next Channel

LevelOne OneSecure for Android V1.0.06
13
On-screen Alerts
You may observe two kinds of event alerts: detected motion and triggered digital input.
If the digital input connected with this camera is triggered, the
icon will turn red from gray.
21
11
If you have set motion regions for
this camera (has to be Stream 1),
the red frame will appear when
this motion region is detected.

LevelOne OneSecure for Android V1.0.06
14
On-screen Controls
Take Snapshot
Stream Switcher
Manual Recording
Manual DO Trigger
Preset Points
Enable PTZ
Navigation Menu

LevelOne OneSecure for Android V1.0.06
15
Function Description
Navigation Menu The Navigation Menu offers shortcuts to other screens:
Enable PTZ Tap to enable PTZ manipulation. For detailed instructions, please
refer to the Operate PTZ Functions section in this document.
Preset Points Tap to see list of Preset Points available. For detailed instructions,
please refer to the Go To Preset Points section in this document.
Take Snapshot The snapshot will be saved as *.JPEG file to the default photo
album on your device.
Manual Recording Click to start / stop manual recording. As the video is being
recorded, this button will appear red until you click it again to
stop recording, and the recording is saved on your NVR server
site.
Manual DO Trigger Tap it to bring up the DO buttons. If the DO device is connected,
the button will be enabled, and you may tap it to trigger the device.
You have to make sure the DO device has been well connected
and configured with the camera first.
Stream Switcher Click to switch between showing Stream 1 or Stream 2 of your
device or server.
6-grid View screen
Sites list
Source/View list
Send View to TV Wall
Note
Some icons, including “Preset Points”, “Manual DO Trigger”, and “Stream Switcher” may only
appear if related settings are supported or have already been set in your device / NVR / CMS
server.

LevelOne OneSecure for Android V1.0.06
16
Operate PTZ Functions
You may control Optical PTZ functions (for models with Pan/Tilt/Zoom capabilities) or Digital
PTZ Functions (with all camera models) on the single channel screen.
Optical PTZ
To manipulate the Optical PTZ function, please make sure the PTZ functions have been
successfully enabled and properly set on the NVR server. To start,
1. Tap to enable PTZ manipulation.
2. Select the icon to enter Optical PTZ mode. You can use hand gestures to
manipulate the movements and zoom levels.
3. To return to normal live view, tap again and click on .
Function Zoom in Zoom out Pan / Tilt
Hand
Gesture
Spread Pinch
Swipe
PTZ Mode Switch
PTZ Switch Status
Optical PTZ (PTZ device only)
Digital PTZ

LevelOne OneSecure for Android V1.0.06
17
Digital PTZ
LevelOne OneSecure supports Digital PTZ operation by hand gestures on screen for all
camera models. To start,
1. Tap to enable PTZ manipulation.
2. Select the icon to enter Digital PTZ mode. Use hand gestures to perform
digital zooming, panning or tilting.
3. To return to normal live view, tap again and click on .
Function Zoom in Zoom out Pan / Tilt
Hand
Gesture
Spread Double-tap Pinch Double-tap Swipe
PTZ Switch Status
Optical PTZ (PTZ device only)
Digital PTZ PTZ Mode Switch

LevelOne OneSecure for Android V1.0.06
18
Go to Preset Points
If you have previously set the preset points for a PTZ device through an NVR interface, you
can tap on the icon to go to a Present Point. Once you tap on it, a list of pre-defined preset
points will be shown. Tap on a present point to make the device go to this point.
Close Button
Preset Point List
Preset Point Icon
Note
Current NVR v3.0.08 and previous versions do not support ePTZ operation of 6VGA streaming
mode. If camera is 6VGA mode, please operate the PTZ function through camera web
configurator.

LevelOne OneSecure for Android V1.0.06
19
Send To TV Wall
To be able to send a camera view to a TV Wall, please make sure the TV Wall has been set up
to work with the CMS server you are connecting to.
To send a camera view to a TV wall, follow these steps:
1) Click on the “Send to TV Wall” function. There are two ways to access the “Send To
TV Wall” function:
a) You can tap on a channel in the View Screen, and select “Send to TV Wall”.
b) You can click on the Navigation Menu in the Single Channel Screen, and select
“Sent to TV Wall”.

LevelOne OneSecure for Android V1.0.06
20
2) After clicking on “Send to TV Wall”, you will be taken to the TV Wall List. If your CMS
server is connected to more than 1 TV Wall Server, you can select which server you
would like to use by clicking on it.
3) After selecting a TV Wall Server, you will be taken to Screen Selection. If your TV
Wall Server is composed of more than 1 screens/monitors, you can select the
screen/monitor that you would like to send your camera view to.
4) After choosing a screen/monitor, you will be taken to Layout Selection. The
screen/monitor your chose may have layouts with multiple channels. Select the
channel on the layout that you would like to send your camera view to.