level 1 ict developing, presenting and communicating ... · sometimes it is appropriate to begin a...
TRANSCRIPT
Level 1
ICT
Developing, Presenting and Communicating Information
Word Processing L1.7a
Compatible with Microsoft Office 2010
ICT Learning Resources
© ForSkills Ltd 2015 2
At this level learners should be able to: “Enter, develop and refine information using appropriate software to meet the requirements of straightforward tasks” Functional Skills Standards for ICT 2011
Learning Objective
To be able to apply editing, formatting and layout techniques to meet needs, including text, tables, graphics, records, numbers, charts, graphs or other digital content.
FS 7a
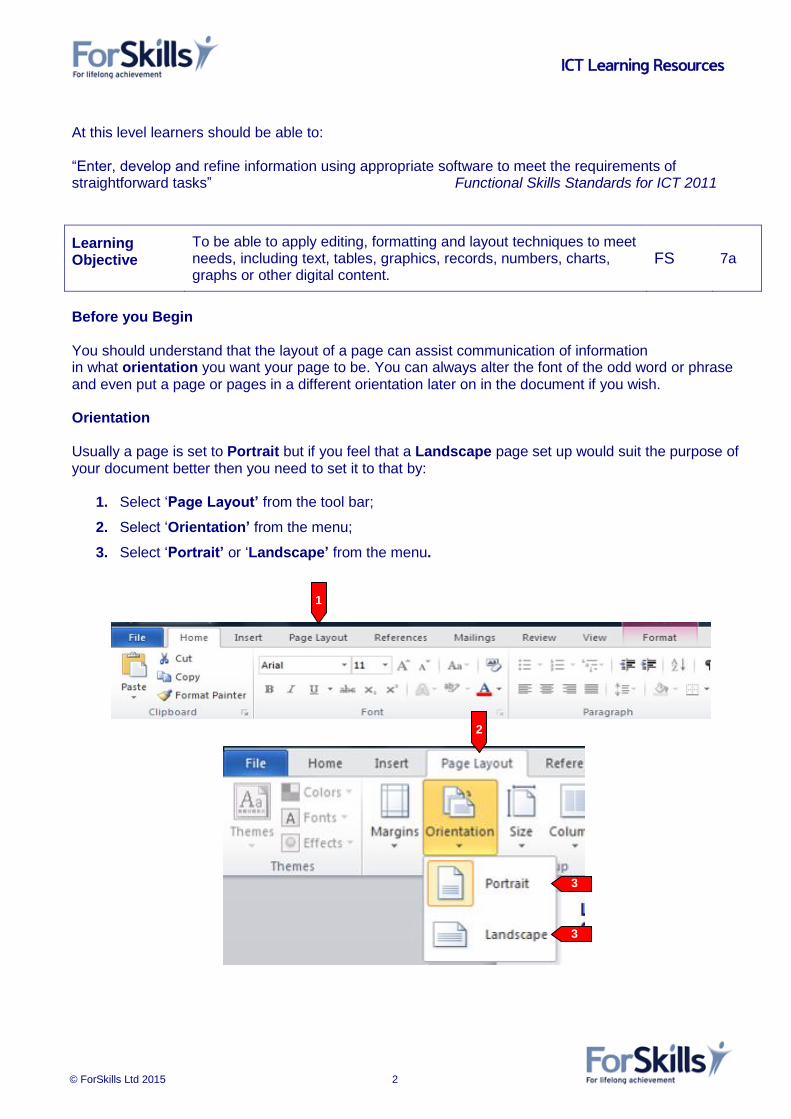
Before you Begin You should understand that the layout of a page can assist communication of information in what orientation you want your page to be. You can always alter the font of the odd word or phrase and even put a page or pages in a different orientation later on in the document if you wish. Orientation Usually a page is set to Portrait but if you feel that a Landscape page set up would suit the purpose of your document better then you need to set it to that by:
1. Select ‘Page Layout’ from the tool bar;
2. Select ‘Orientation’ from the menu;
3. Select ‘Portrait’ or ‘Landscape’ from the menu.
1
2
3
3
ICT Learning Resources
© ForSkills Ltd 2015 3
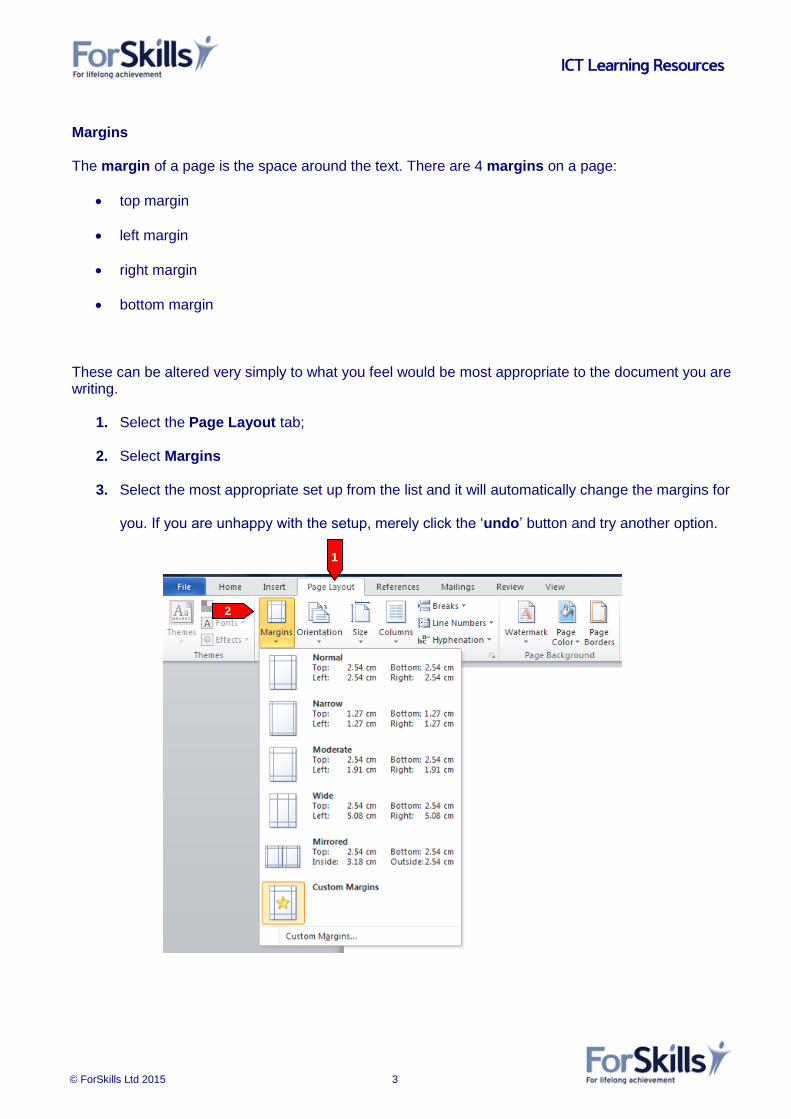
Margins The margin of a page is the space around the text. There are 4 margins on a page:
top margin
left margin
right margin
bottom margin
These can be altered very simply to what you feel would be most appropriate to the document you are writing.
1. Select the Page Layout tab;
2. Select Margins
3. Select the most appropriate set up from the list and it will automatically change the margins for
you. If you are unhappy with the setup, merely click the ‘undo’ button and try another option.
2
1
ICT Learning Resources
© ForSkills Ltd 2015 4
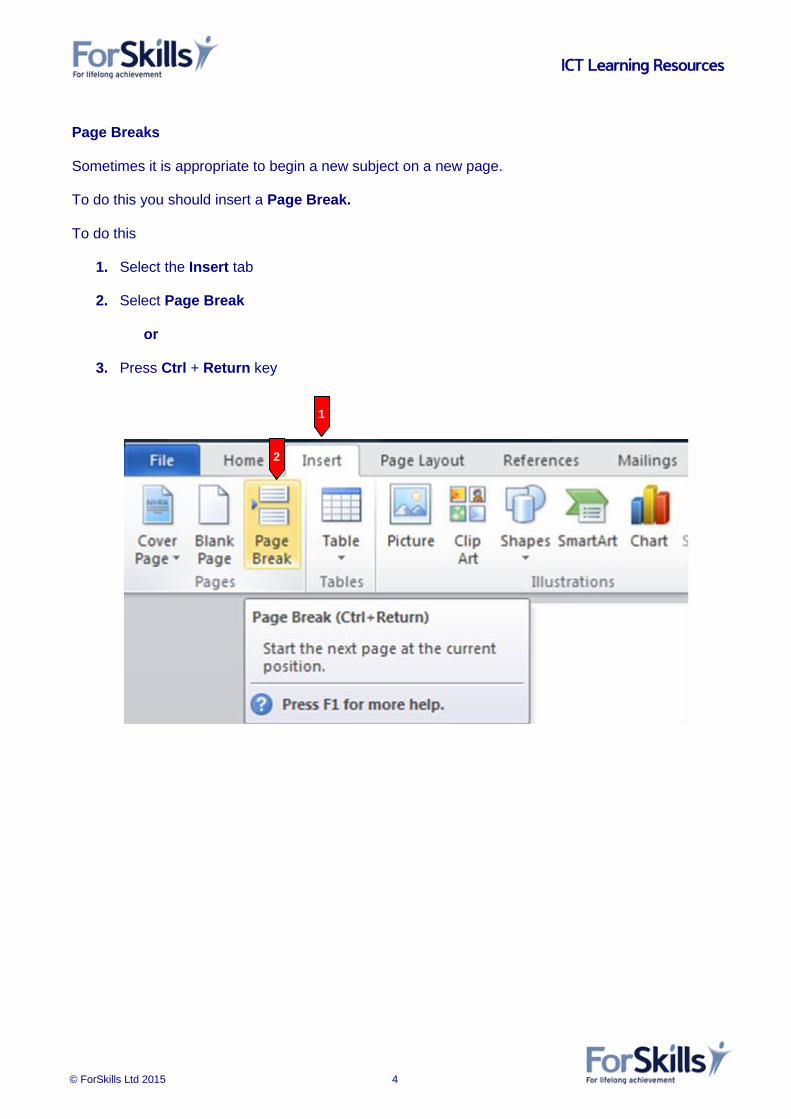
Page Breaks Sometimes it is appropriate to begin a new subject on a new page. To do this you should insert a Page Break. To do this
1. Select the Insert tab
2. Select Page Break
or
3. Press Ctrl + Return key
1
2
ICT Learning Resources
© ForSkills Ltd 2015 5
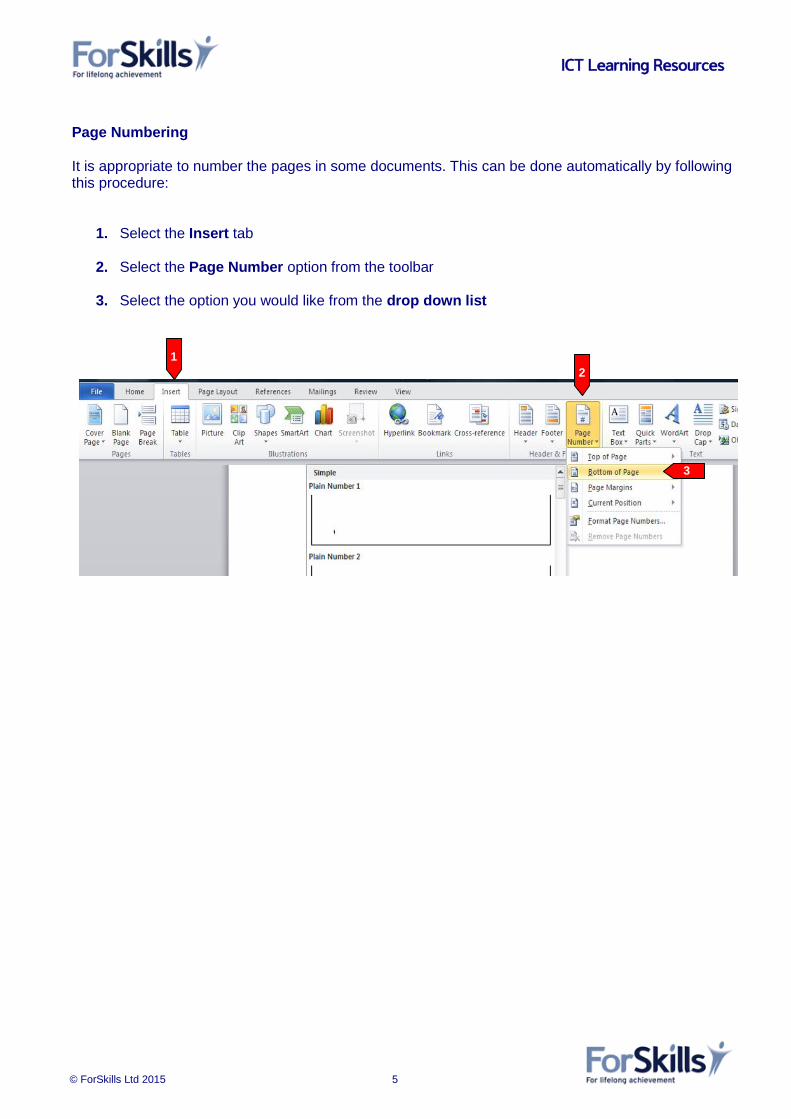
Page Numbering It is appropriate to number the pages in some documents. This can be done automatically by following this procedure:
1. Select the Insert tab
2. Select the Page Number option from the toolbar
3. Select the option you would like from the drop down list
1
2
3
ICT Learning Resources
© ForSkills Ltd 2015 6
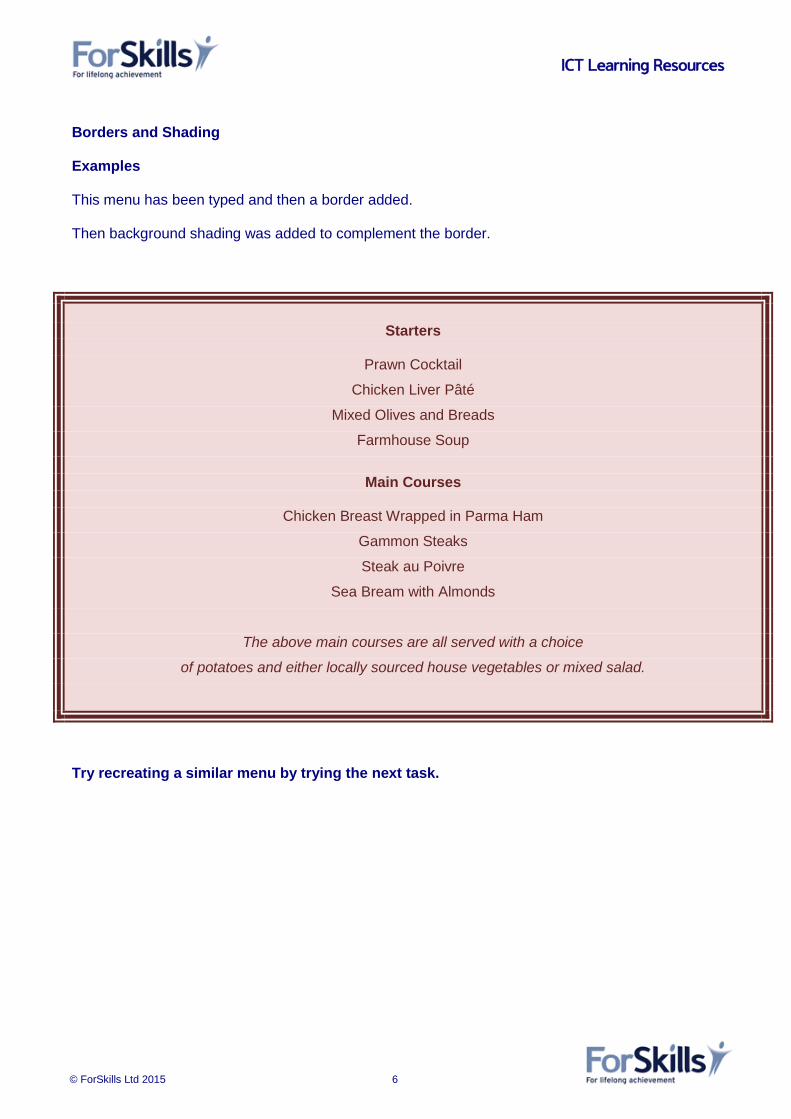
Borders and Shading Examples This menu has been typed and then a border added. Then background shading was added to complement the border.
Starters
Prawn Cocktail
Chicken Liver Pâté
Mixed Olives and Breads
Farmhouse Soup
Main Courses
Chicken Breast Wrapped in Parma Ham
Gammon Steaks
Steak au Poivre
Sea Bream with Almonds
The above main courses are all served with a choice
of potatoes and either locally sourced house vegetables or mixed salad.
Try recreating a similar menu by trying the next task.

ICT Learning Resources
© ForSkills Ltd 2015 7
Task 1 Page Layout Imagine you have been asked to create a menu for a small restaurant which is offering a choice of 4 starters and 4 main courses.
1. Open a word document.
2. Set out with a emboldened titles for ‘Starters’ and ‘Main Courses’
3. Make up 4 starters and 4 main courses or copy the ones of the previous screen and type them under the titles, each beginning on a new line.
4. Centre align everything.
5. Now highlight all the text and go to the ‘Page Layout’ tab and choose ‘Page Borders’.
6. Make sure you only have selected the ‘Borders’ page rather than ‘Page Border’.
7. From there you can choose an appropriate Style, Colour and Width for your border, before selecting OK.
8. Now select ‘Shading’.
9. Choose an appropriate pale
shade to compliment the border.
10. Don’t forget to select OK.
5 5
6
7
7
7
7
8
10

ICT Learning Resources
© ForSkills Ltd 2015 8
Headers and Footers Headers and footers can be used to insert various pre-set text e.g. a company logo, copyright mark or page numbers on a document so that each page looks uniform. They will look paler than the rest of the text on the page. To insert a header:
1. Select the ‘Insert’ tab
2. Select ‘Header’
Select the style you want from the drop down list
Type in the header the text you would like to see
Once you have selected to type in the header, the ‘Header and Footer Tools’ become available From here many additional features are available – all very obvious from the titles. For example, adding page numbers, date and time, or clip art, etc Adding a footer follows exactly the same guidelines but by selecting the ‘Footer’ icon.
1 2
ICT Learning Resources
© ForSkills Ltd 2015 9
Task 2 Adding Headers and Footers Imagine you are setting up a template advertising sheet/letterhead for your new gardening business. You want your business name and an appropriate image in the header and an address and phone number in the footer. If you are unsure of what to do to add an image check Page ………….. ‘Adding Images’ first. You may choose an appropriate name and font of your choice and an appropriate image from clip art. Make up an address and phone number.
ICT Learning Resources
© ForSkills Ltd 2015 10
Font
Learning Objectives: “To be able to apply editing, formatting and layout techniques to meet needs, including text, tables, graphics, records, numbers, charts, graphs or other digital content.”
FS
7a
“To be able to format text”
ACC
D1/L1.6a.4
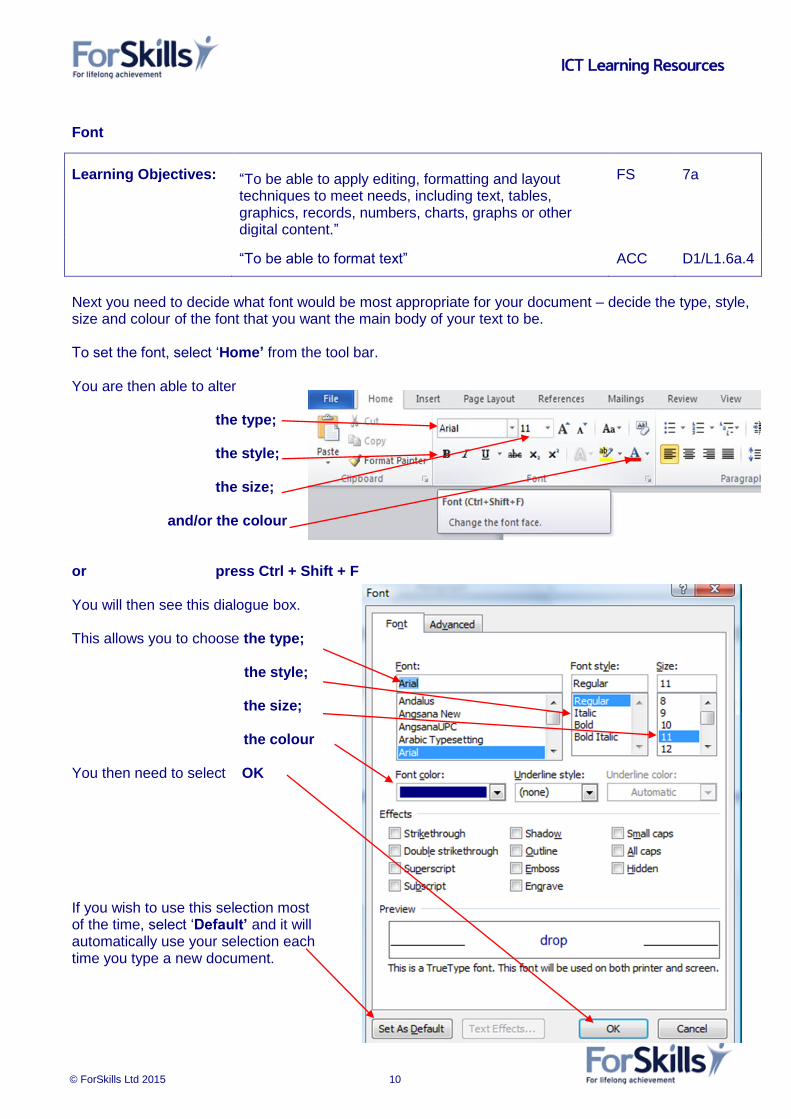
Next you need to decide what font would be most appropriate for your document – decide the type, style, size and colour of the font that you want the main body of your text to be. To set the font, select ‘Home’ from the tool bar. You are then able to alter
the type; the style; the size; and/or the colour or press Ctrl + Shift + F You will then see this dialogue box. This allows you to choose the type;
the style;
the size; the colour
You then need to select OK If you wish to use this selection most of the time, select ‘Default’ and it will automatically use your selection each time you type a new document.
ICT Learning Resources
© ForSkills Ltd 2015 11
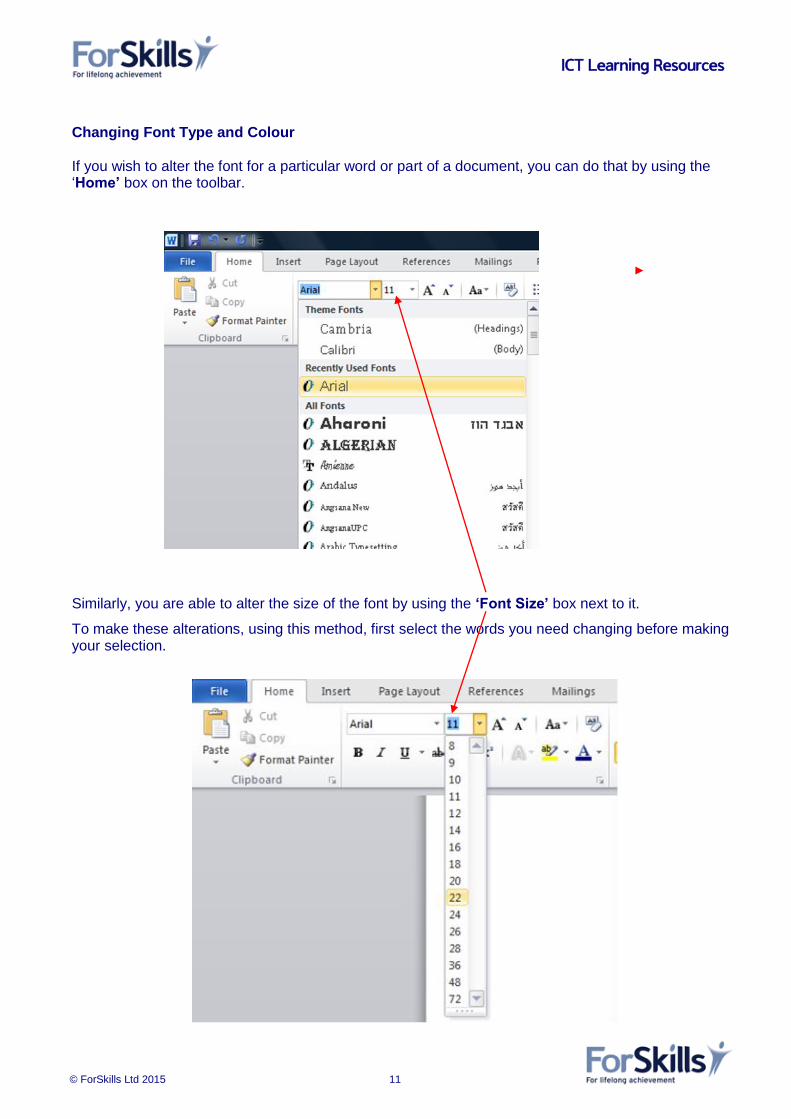
Changing Font Type and Colour If you wish to alter the font for a particular word or part of a document, you can do that by using the ‘Home’ box on the toolbar.
Similarly, you are able to alter the size of the font by using the ‘Font Size’ box next to it.
To make these alterations, using this method, first select the words you need changing before making your selection.
ICT Learning Resources
© ForSkills Ltd 2015 12
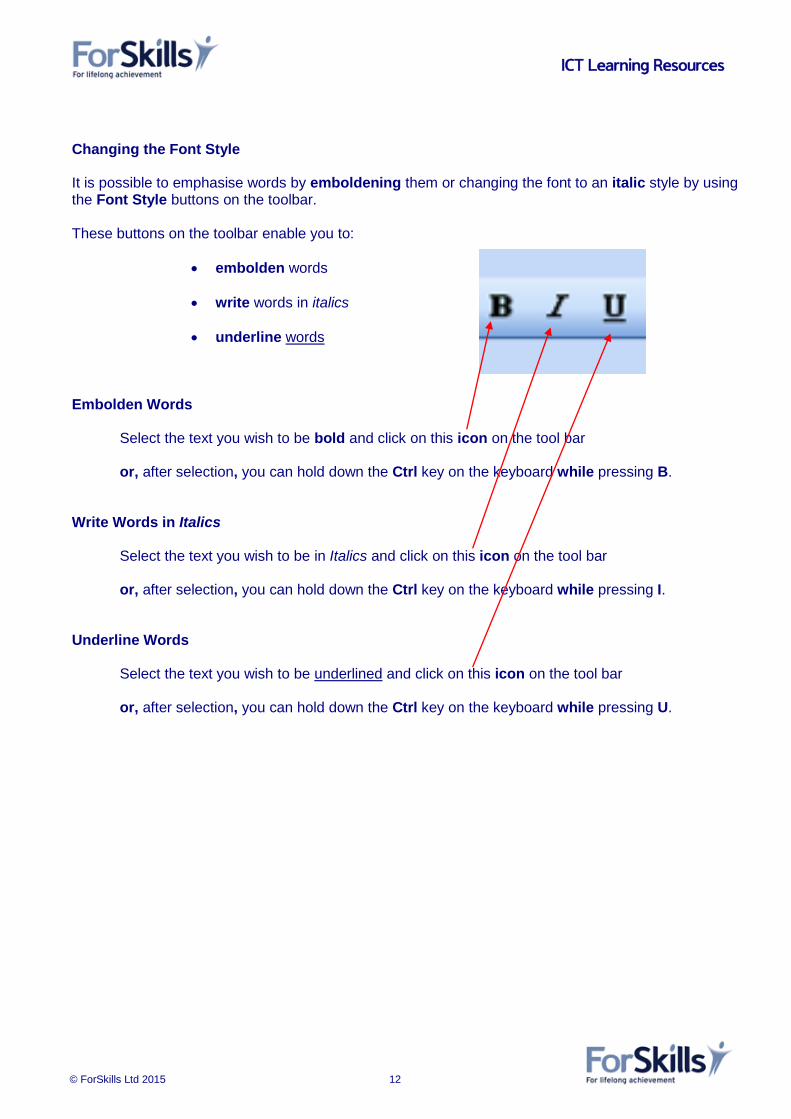
Changing the Font Style It is possible to emphasise words by emboldening them or changing the font to an italic style by using the Font Style buttons on the toolbar. These buttons on the toolbar enable you to:
embolden words
write words in italics
underline words
Embolden Words Select the text you wish to be bold and click on this icon on the tool bar or, after selection, you can hold down the Ctrl key on the keyboard while pressing B. Write Words in Italics
Select the text you wish to be in Italics and click on this icon on the tool bar or, after selection, you can hold down the Ctrl key on the keyboard while pressing I. Underline Words
Select the text you wish to be underlined and click on this icon on the tool bar or, after selection, you can hold down the Ctrl key on the keyboard while pressing U.
ICT Learning Resources
© ForSkills Ltd 2015 13
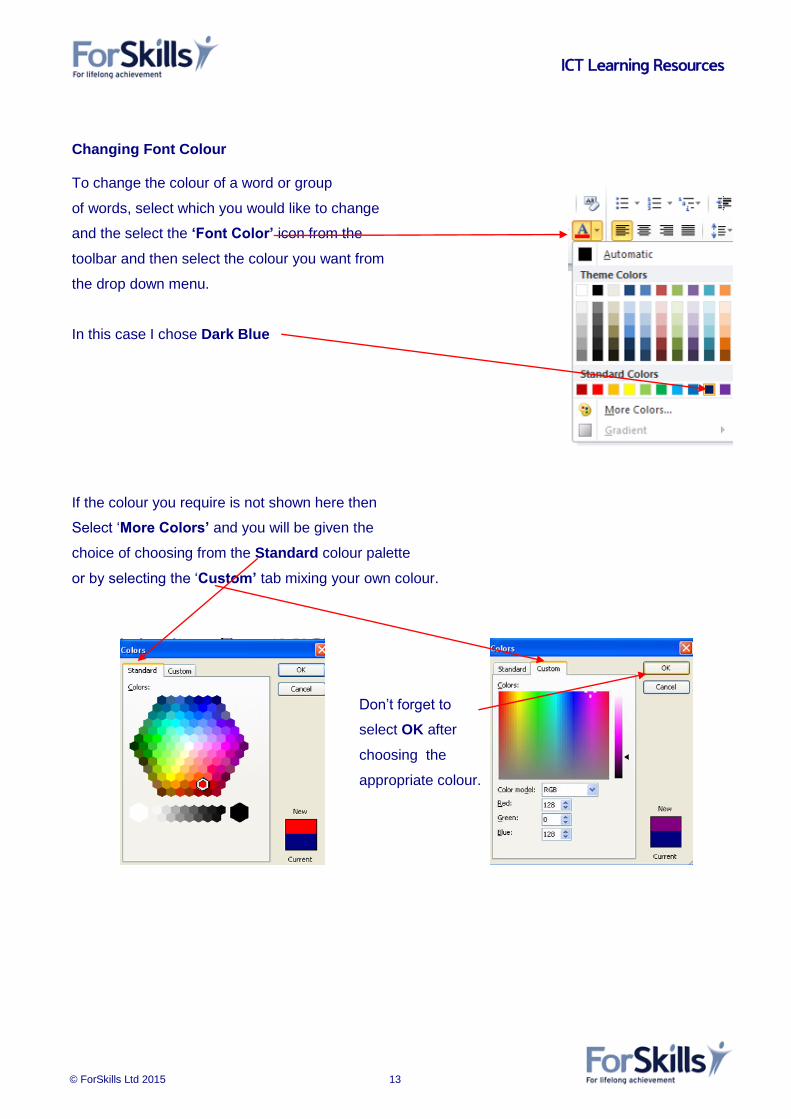
Changing Font Colour To change the colour of a word or group
of words, select which you would like to change
and the select the ‘Font Color’ icon from the
toolbar and then select the colour you want from
the drop down menu.
In this case I chose Dark Blue If the colour you require is not shown here then
Select ‘More Colors’ and you will be given the
choice of choosing from the Standard colour palette
or by selecting the ‘Custom’ tab mixing your own colour.
Don’t forget to
select OK after
choosing the
appropriate colour.
ICT Learning Resources
© ForSkills Ltd 2015 14
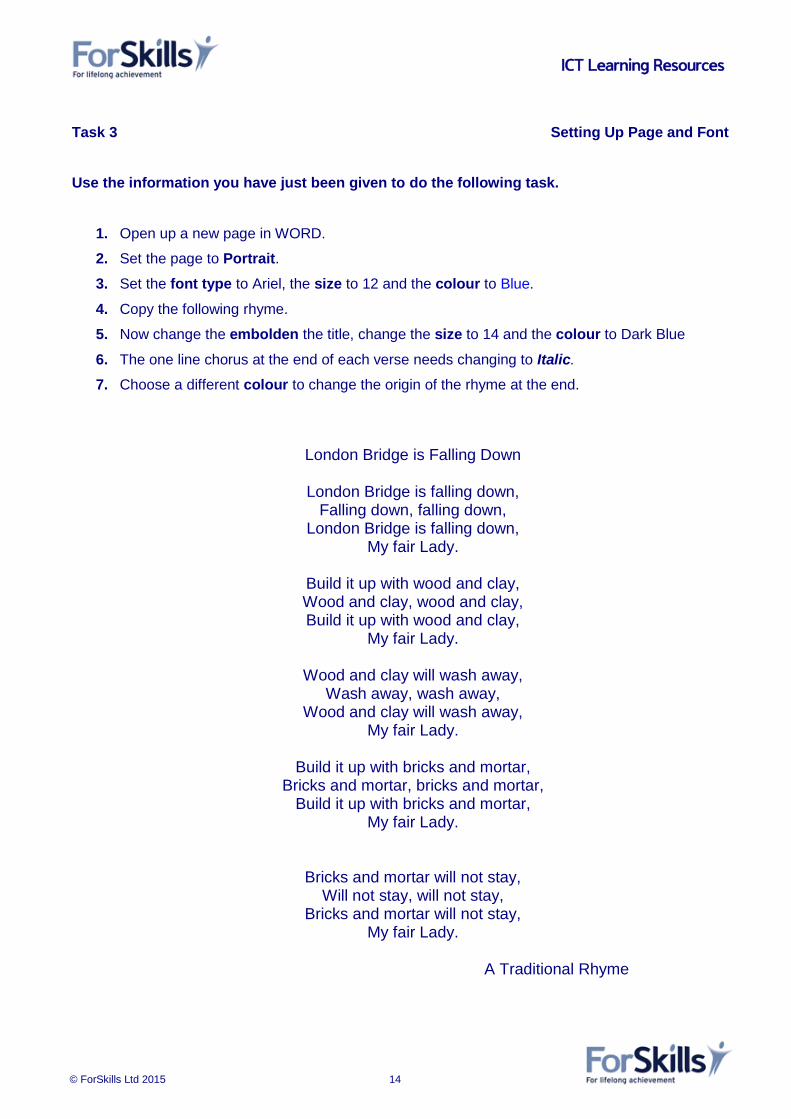
Task 3 Setting Up Page and Font
Use the information you have just been given to do the following task.
1. Open up a new page in WORD.
2. Set the page to Portrait.
3. Set the font type to Ariel, the size to 12 and the colour to Blue.
4. Copy the following rhyme.
5. Now change the embolden the title, change the size to 14 and the colour to Dark Blue
6. The one line chorus at the end of each verse needs changing to Italic.
7. Choose a different colour to change the origin of the rhyme at the end.
London Bridge is Falling Down
London Bridge is falling down, Falling down, falling down,
London Bridge is falling down, My fair Lady.
Build it up with wood and clay, Wood and clay, wood and clay, Build it up with wood and clay,
My fair Lady.
Wood and clay will wash away, Wash away, wash away,
Wood and clay will wash away, My fair Lady.
Build it up with bricks and mortar,
Bricks and mortar, bricks and mortar, Build it up with bricks and mortar,
My fair Lady.
Bricks and mortar will not stay, Will not stay, will not stay,
Bricks and mortar will not stay, My fair Lady.
A Traditional Rhyme
ICT Learning Resources
© ForSkills Ltd 2015 15
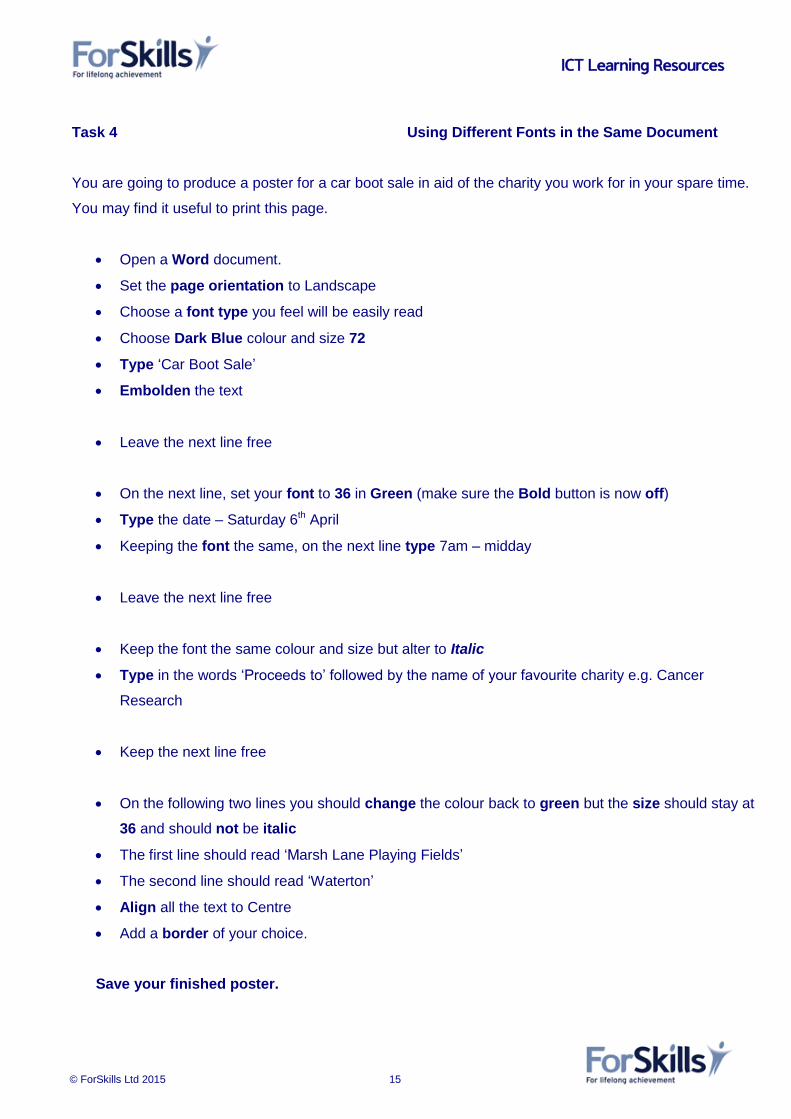
Task 4 Using Different Fonts in the Same Document
You are going to produce a poster for a car boot sale in aid of the charity you work for in your spare time.
You may find it useful to print this page.
Open a Word document.
Set the page orientation to Landscape
Choose a font type you feel will be easily read
Choose Dark Blue colour and size 72
Type ‘Car Boot Sale’
Embolden the text
Leave the next line free
On the next line, set your font to 36 in Green (make sure the Bold button is now off)
Type the date – Saturday 6th April
Keeping the font the same, on the next line type 7am – midday
Leave the next line free
Keep the font the same colour and size but alter to Italic
Type in the words ‘Proceeds to’ followed by the name of your favourite charity e.g. Cancer
Research
Keep the next line free
On the following two lines you should change the colour back to green but the size should stay at
36 and should not be italic
The first line should read ‘Marsh Lane Playing Fields’
The second line should read ‘Waterton’
Align all the text to Centre
Add a border of your choice.
Save your finished poster.

ICT Learning Resources
© ForSkills Ltd 2012 16
Your poster should look something like this:
Car Boot Sale
Saturday 6th April
7am – midday
Proceeds to Cancer Research
The Marsh Lane Playing Fields Waterton
ICT Learning Resources
© ForSkills Ltd 2012 17
Editing Text
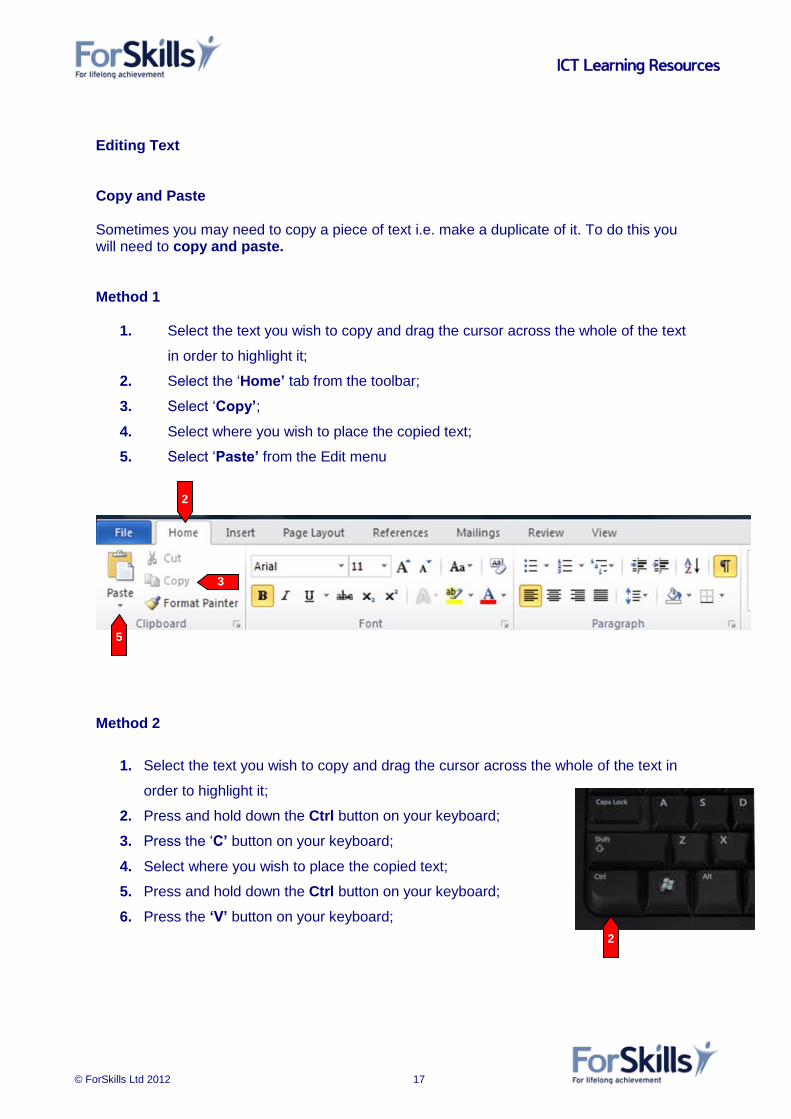
Copy and Paste Sometimes you may need to copy a piece of text i.e. make a duplicate of it. To do this you will need to copy and paste. Method 1
1. Select the text you wish to copy and drag the cursor across the whole of the text
in order to highlight it;
2. Select the ‘Home’ tab from the toolbar;
3. Select ‘Copy’;
4. Select where you wish to place the copied text;
5. Select ‘Paste’ from the Edit menu
Method 2
1. Select the text you wish to copy and drag the cursor across the whole of the text in
order to highlight it;
2. Press and hold down the Ctrl button on your keyboard;
3. Press the ‘C’ button on your keyboard;
4. Select where you wish to place the copied text;
5. Press and hold down the Ctrl button on your keyboard;
6. Press the ‘V’ button on your keyboard;
2
3
5
2

ICT Learning Resources
© ForSkills Ltd 2012 18
Method 3
1. Select the text you wish to copy and drag the cursor across the whole of the text in
order to highlight it;
2. Press down the right button on your mouse;
3. Select ‘Copy’;
4. Select where you wish to place the copied text;
5. Select ‘Paste’ from the menu.
3
5
ICT Learning Resources
© ForSkills Ltd 2012 19
Task 5 Copying and Pasting
Select a piece of text you would like to copy. This may be an email you have received, a piece of word processing you have typed and saved or a piece of text on the Internet.
Follow the instructions on the previous 2 pages – using each of the 3 methods in turn.
Decide which you feel you were most confident with using.
Now choose another piece of text and use your favourite method to copy it.

ICT Learning Resources
© ForSkills Ltd 2012 20
Cut and Paste
When you are proofreading a piece of text you have written, you may wish to reorder what
you have written. In order to do this, you need to be able to cut out certain sections of the
text and paste them elsewhere.
Example:
This is what I originally wrote:
Thank you very much for your order I received today. Unfortunately we have no stocks of the
special offer tea left at the moment. The earliest I could send you some would be next
Wednesday. I will send you some next week by special delivery. Please accept this as an
apology for us running out of stock. It should arrive by Thursday morning.
I wish to relocate the highlighted sentence to the end of the text.
As with copying and pasting there are several methods you can use.
Method 1
1. Select the text you wish to copy and drag the cursor across the whole of the text in
order to highlight it;
2. Select the ‘Home’ tab from the toolbar;
3. Select ‘Cut’;
4. Select where you wish to place the copied text;
5. ‘Paste’ from the menu
2
3
5

ICT Learning Resources
© ForSkills Ltd 2012 21
Method 2
1. Select the text you wish to copy and drag the cursor across the whole of the text in
order to highlight it;
2. Press and hold down the Ctrl button on your keyboard;
3. Press the ‘X’ button on your keyboard;
4. Select where you wish to place the copied text;
5. Press and hold down the Ctrl button on your keyboard;
6. Press the ‘V’ button on your keyboard;
Method 3
1. Select the text you wish to copy and drag the cursor across the whole of the text in
order to highlight it;
2. Press down the right button on your mouse;
3. Select ‘Cut’;
4. Select where you wish to place the copied text;
5. Select ‘Paste’ from the Edit menu.
2
3
5

ICT Learning Resources
© ForSkills Ltd 2012 22
Task 6 Cut and Paste
Copy and Paste the following text into a Word document.
The new TV series of Fallows Way is expected to hit screens in September it has been revealed today. It will be at a much slower pace than the furious Second World War series the producer, Mr Billy Davies, reported. The first episode is scheduled for 15th September.
Speaking on Radio 2’s Daily Dozen, star of the show, Mike Brown, said the relentless rain, earlier in the year, had taken its toll on the set and some scenes were being adjusted or ‘rescheduled.’ All this had led to much frustration on behalf of acting personnel and backstage crew alike. Cast were spotted clutching large umbrellas as they did their best to continue filming the drama despite the terrible weather.
Martin who won the best actress Oscar in the 80s for her part in Medley of Murder and was nominated for a further six Academy Awards, began filming with the rest of the cast in February and the next series is set to air in September. Mary Martin joined the familiar faces in the Fallows Way cast in Season last month.
Cut the pink highlighted section using Method 1. Paste it where you think it would make better sense.
Cut the blue highlighted section using Method 2. Paste it where you think it would make better sense.
Cut the green highlighted section using Method 3. Paste it where you think it would make better sense.
Save your document
ICT Learning Resources
© ForSkills Ltd 2012 23
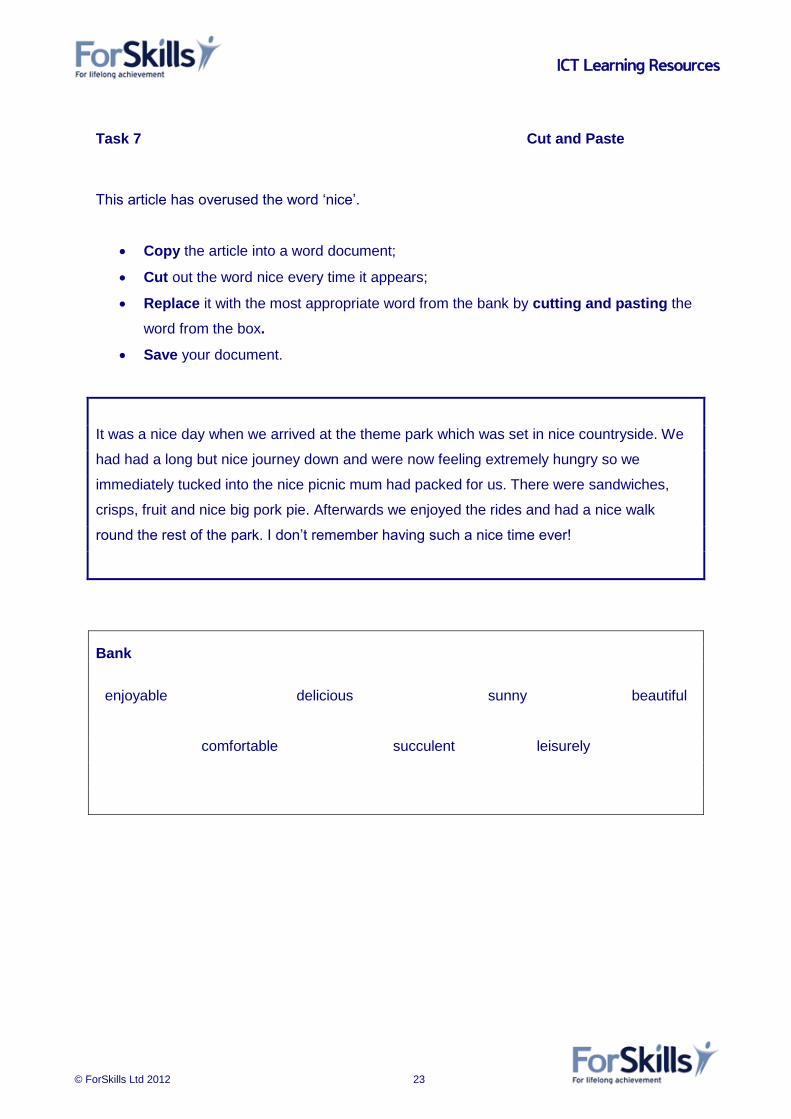
Task 7 Cut and Paste
This article has overused the word ‘nice’.
Copy the article into a word document;
Cut out the word nice every time it appears;
Replace it with the most appropriate word from the bank by cutting and pasting the
word from the box.
Save your document.
It was a nice day when we arrived at the theme park which was set in nice countryside. We
had had a long but nice journey down and were now feeling extremely hungry so we
immediately tucked into the nice picnic mum had packed for us. There were sandwiches,
crisps, fruit and nice big pork pie. Afterwards we enjoyed the rides and had a nice walk
round the rest of the park. I don’t remember having such a nice time ever!
Bank
enjoyable delicious sunny beautiful
comfortable succulent leisurely

ICT Learning Resources
© ForSkills Ltd 2012 24
Deleting Text
If you wish to delete text permanently rather than cut it and reposition it, simply select the text you wish to delete and press the ‘Delete’ key.
Delete the text you wish to remove.
Or For text to the left of the cursor click on the backspace key until you have deleted all the letters you wish to delete.
Remove the text by clicking the backspace key.
Find and Replace
1. Select the ‘Home’ tab.
2. Next select the ‘Find’ menu and click on ‘Find’.
3. This is what you will then see. Click on the yellow arrow box. A drop down menu will appear. Choose ‘Replace’
4. The second box will appear.
5. Write the word/s which is/are wrong in ‘Find what’ and the correct word/s in the box
marked ‘Replace with’.
1
2
3
3 4
4

ICT Learning Resources
© ForSkills Ltd 2012 25
Task 8 Deleting and Editing Read the following text.
Teachers in schools are being encouraged to use ICT in all their lessons. But is this necissary? Do teachers really need to use ICT in all lessons? ICT involves a necissary change of approach. It can be stimulating, motivating and challenging. It can provide support for the less able pupils or challenge at the top end of the class. It encourages drafting and editing and can be a real boon to improving writing. It motivates and gives a fresh response to the skills of reading and writing particularly for unmotivated boys. Research also shows that children concentrate longer with a screen in front of them than they do with a book. Computers can be powerful and effective tools but much teacher training in ICT is necissary first before they can be used in all classrooms by all teachers in all subjects.
The third sentence is unnecessary – it has merely repeated the information given in the previous sentence in a different way. The word necessary has been spelled wrongly, as necissary, 3 times.
1. Copy the text into a Word document;
2. Delete the 3rd sentence using the delete button;
3. Use the find and replace facility to change the incorrect spelling to ‘necessary’;
4. Save your amended text.
ICT Learning Resources
© ForSkills Ltd 2012 26
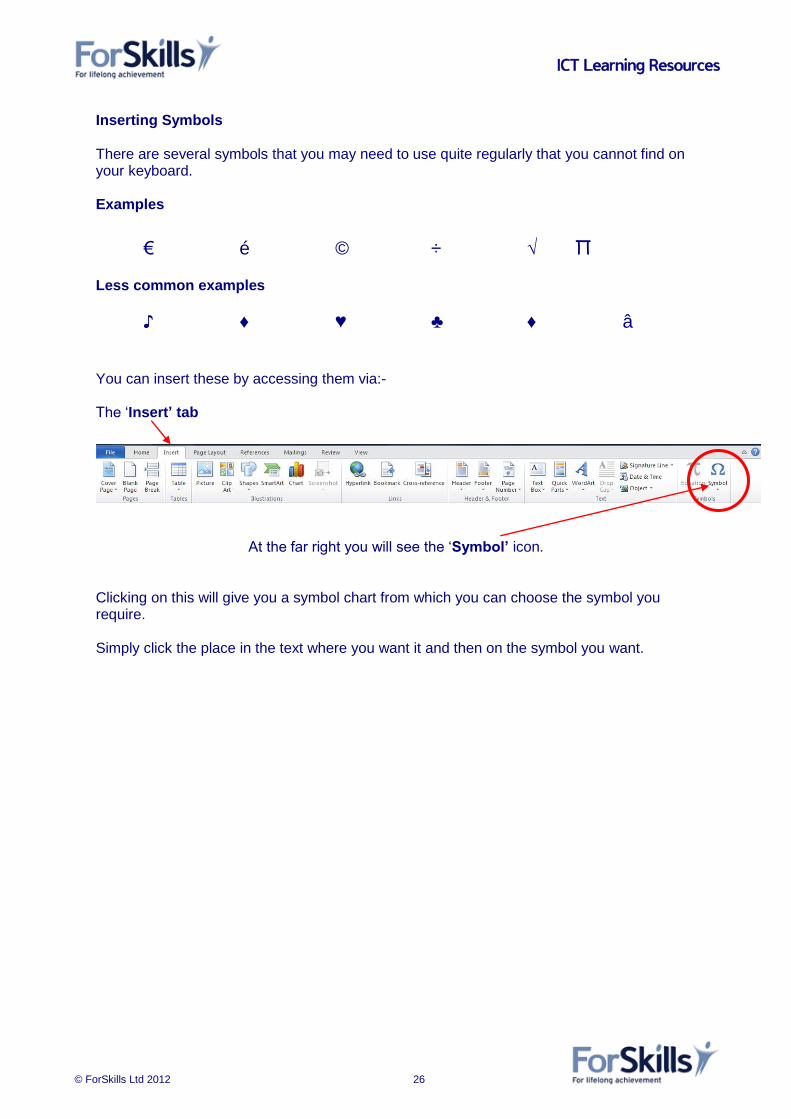
Inserting Symbols
There are several symbols that you may need to use quite regularly that you cannot find on your keyboard. Examples
€ é © ÷ √ Π Less common examples
♪ ♦ ♥ ♣ ♦ â You can insert these by accessing them via:- The ‘Insert’ tab
At the far right you will see the ‘Symbol’ icon. Clicking on this will give you a symbol chart from which you can choose the symbol you require. Simply click the place in the text where you want it and then on the symbol you want.
ICT Learning Resources
© ForSkills Ltd 2012 27
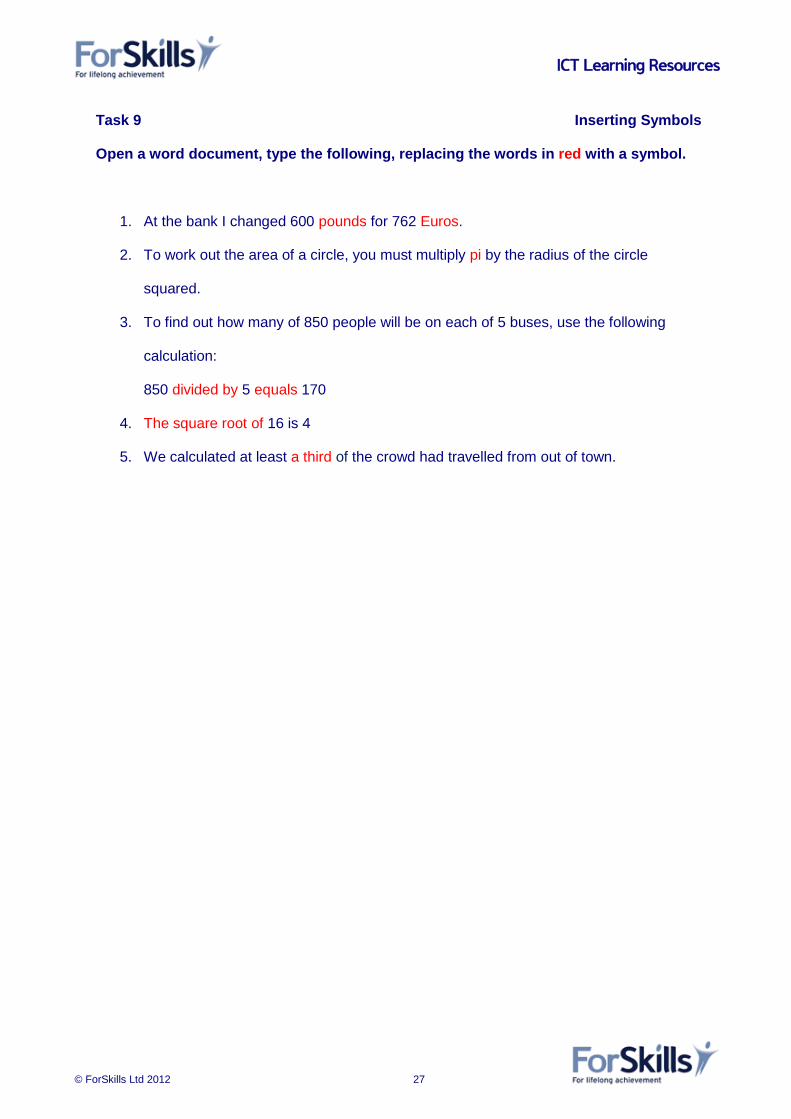
Task 9 Inserting Symbols
Open a word document, type the following, replacing the words in red with a symbol.
1. At the bank I changed 600 pounds for 762 Euros.
2. To work out the area of a circle, you must multiply pi by the radius of the circle
squared.
3. To find out how many of 850 people will be on each of 5 buses, use the following
calculation:
850 divided by 5 equals 170
4. The square root of 16 is 4
5. We calculated at least a third of the crowd had travelled from out of town.

ICT Learning Resources
© ForSkills Ltd 2012 28
Paragraphs
The definition of a paragraph for ICT purposes is any text - even a single word – that is separated from the previous text by the Enter key. There are different ways of formatting paragraphs to enhance communication and make your document more appropriate for its purpose. These include:
Line spacing
Alignment
Using pre-set tab stops
Using bullets and numbering
Line Spacing It is possible to alter the spacing between the lines of text. Usually the default is for single spacing but if you want a spare line between the lines of text or double spacing this can be set up automatically. It is also possible to set the text to 1.5 spacing, 2.5 spacing and 3 spacing Select the ‘Home’ tab Select the ‘line and paragraph spacing’ icon in the paragraph section Select which spacing option you require. In this example, single line spacing has been chosen.
ICT Learning Resources
© ForSkills Ltd 2012 29
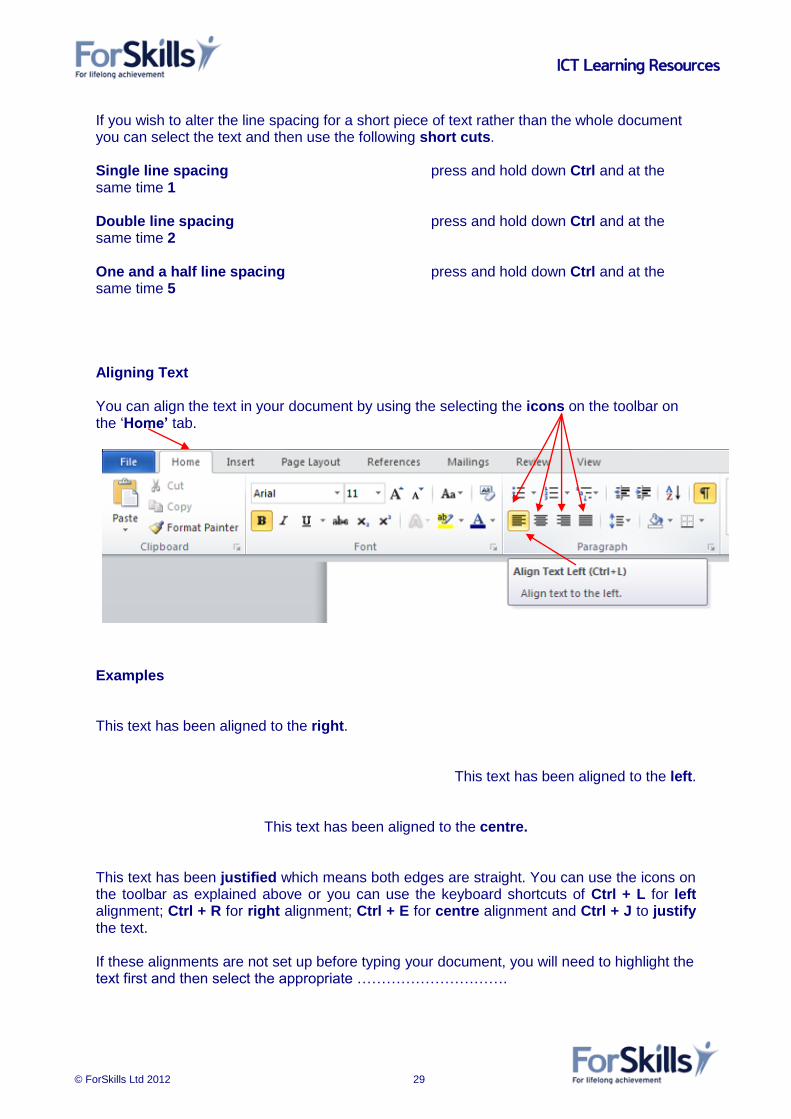
If you wish to alter the line spacing for a short piece of text rather than the whole document you can select the text and then use the following short cuts. Single line spacing press and hold down Ctrl and at the same time 1 Double line spacing press and hold down Ctrl and at the same time 2 One and a half line spacing press and hold down Ctrl and at the same time 5 Aligning Text You can align the text in your document by using the selecting the icons on the toolbar on the ‘Home’ tab. Examples This text has been aligned to the right.
This text has been aligned to the left.
This text has been aligned to the centre.
This text has been justified which means both edges are straight. You can use the icons on the toolbar as explained above or you can use the keyboard shortcuts of Ctrl + L for left alignment; Ctrl + R for right alignment; Ctrl + E for centre alignment and Ctrl + J to justify the text. If these alignments are not set up before typing your document, you will need to highlight the text first and then select the appropriate ………………………….

ICT Learning Resources
© ForSkills Ltd 2012 30
Using Pre-Set Tab Stops
Tab stops are markers set across the width of a document which allow you to line up text neatly. They allow you to indent text to exactly the same position on each new line of text. To move across the width of the page use the tab key which looks like this: Take care to press the key the same number of times on each line if you wish to line up your text on subsequent lines. To set a precise tab If you wish to set these indents to precise measurements follow these instructions.

ICT Learning Resources
© ForSkills Ltd 2012 31
Bulleted and Numbered Lists
Bulleted and Numbered Lists are an important way of presenting information particularly that which needs to be presented into a specific order. Examples:
To make an omelette you need to:
Break eggs into a bowl
Whisk them well with some seasoning
Melt butter in a pan
Pour in the eggs
Gently cook working the runny mixture constantly towards the edge.
To get to the bus station:
1. Walk to the end of Station Road
2. Turn right onto Falcon Square
3. At the post office turn left.
On the Home tab, you will see the icons to use to produce a bulleted or numbered list.
On selected the appropriate icon you will find these options.

ICT Learning Resources
© ForSkills Ltd 2012 32
Task 10 Formatting Paragraphs
Use the text below to format a letter to the regional manager of your bank. Be sure to align your address – 6 Apple Grove, Barnswell, FD6 7 BR - to the right at the beginning of the letter. Line spacing should be set to single but double spacing to divide the paragraphs and the greetings at the beginning and end of the letter. The main body of the letter should be justified. Dear Sir I am writing to complain about the treatment I received when I visited your Barnswell branch last Friday 13th March. (new paragraph) I have been a customer at your bank for over 10 years and have never had reason to complain before but the rudeness and lack of respect I received from the counter staff on Friday was unacceptable. I know the young man in question (Wayne) had just been dealing with a very demanding customer and indeed it was, by the time he came to deal with my request, 10 minutes before closing time but his attitude left a lot to be desired. When I didn’t understand what he was explaining to me the first time, he showed a lack of patience and understanding and made me feel uncomfortable in asking for him to reiterate his instructions. When I asked to speak to the manager about the problem, I was told, quite abruptly with no apology or explanation, he was not available. (new paragraph) I should feel happy if you could assure me that the assistant in question has been reprimanded about his attitude so that no other customers have to experience this kind of behaviour in the future. Yours faithfully J Thompson.
ICT Learning Resources
© ForSkills Ltd 2012 33
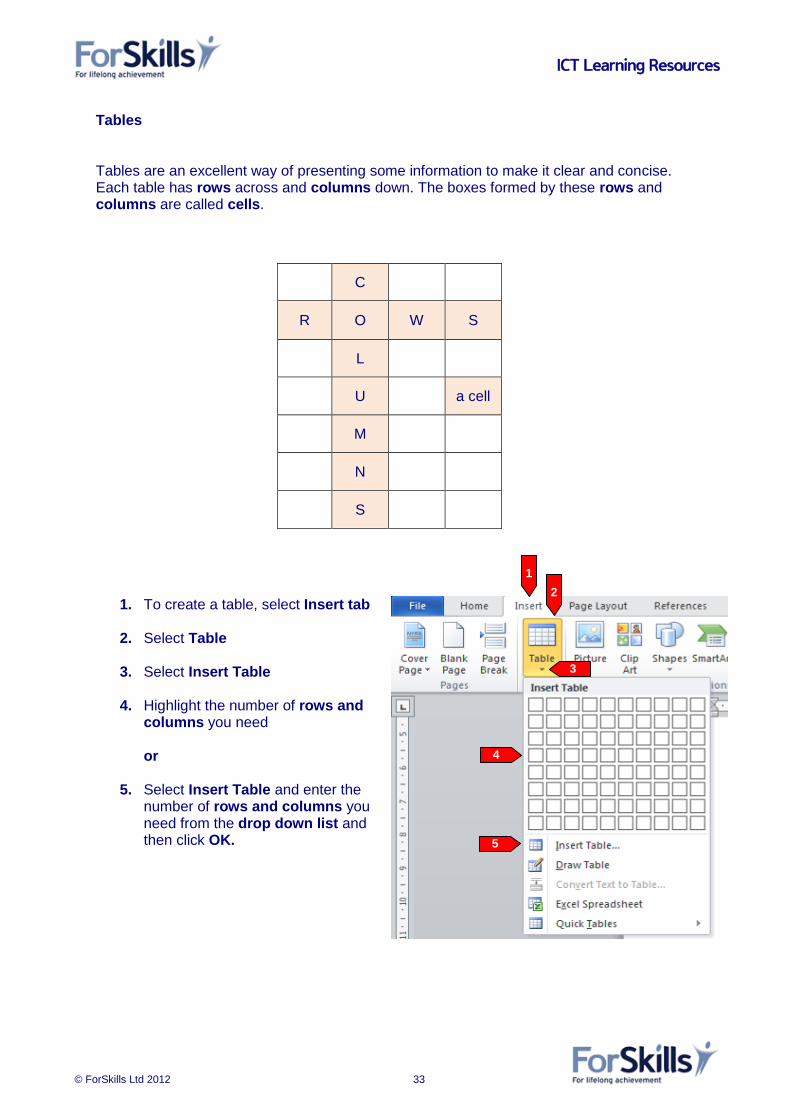
Tables
Tables are an excellent way of presenting some information to make it clear and concise. Each table has rows across and columns down. The boxes formed by these rows and columns are called cells.
C
R O W S
L
U a cell
M
N
S
1. To create a table, select Insert tab
2. Select Table
3. Select Insert Table
4. Highlight the number of rows and columns you need
or
5. Select Insert Table and enter the
number of rows and columns you need from the drop down list and then click OK.
4
1
2
4
3
5
ICT Learning Resources
© ForSkills Ltd 2012 34
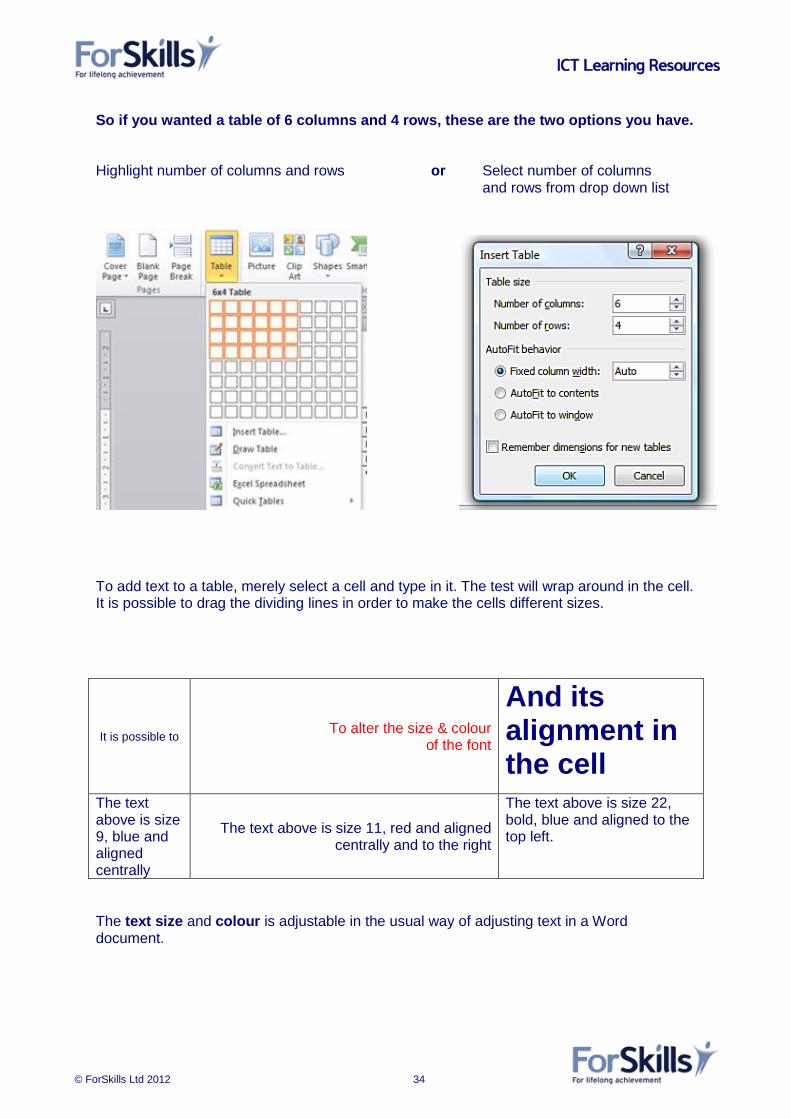
So if you wanted a table of 6 columns and 4 rows, these are the two options you have. Highlight number of columns and rows or Select number of columns
and rows from drop down list
To add text to a table, merely select a cell and type in it. The test will wrap around in the cell. It is possible to drag the dividing lines in order to make the cells different sizes.
It is possible to To alter the size & colour
of the font
And its alignment in the cell
The text above is size 9, blue and aligned centrally
The text above is size 11, red and aligned centrally and to the right
The text above is size 22, bold, blue and aligned to the top left.
The text size and colour is adjustable in the usual way of adjusting text in a Word document.

ICT Learning Resources
© ForSkills Ltd 2012 35
However, to choose the alignment:
Highlight the cells, rows or columns in which you wish to align the text;
You will then see a ‘Table Tools’ tab appear above the tool bar.
Select ‘layout’
Choose which alignment you want for your highlighted text

ICT Learning Resources
© ForSkills Ltd 2012 36
When is a table useful to present information? Example It is so much easier to read and understand this information if it is put in a table. Mrs Thompson teaches Group 6 in Room 18 on Monday and Tuesday and Group 4 in Room 14 on Wednesday and Thursday; Mr Birkin teaches Group 4 on Monday and Friday in Room 12 and Group 6 on Wednesday and Thursday in Room 15. Mr Hunt teaches Group 4 on Tuesday in Room 12 and Group 6 on Friday in Room 19. Group 5 is always taught in Room 16 - Mr Hunt teaches them on Monday, Wednesday and Thursday, Mrs Thompson teaches them on Friday and Mr Birkin on Tuesday. Look how much easier it is to read and refer back to in a table.
Monday Tuesday Wednesday Thursday Friday
MrsT Group 6 Room 18
Group 6 Room 18
Group 4 Room 14
Group 4 Room 14
Group 5 Room 16
Mr B Group 4 Room 12
Group 5 Room 16
Group 6 Room 15
Group 6 Room 15
Group 4 Room 12
Mr H Group 5 Room 16
Group 4 Room 12
Group 5 Room 16
Group 5 Room 16
Group 6 Room 19
What processes did I go through to get here?
Inserted table with 6 columns and 4 rows
I dragged the rows down to make them longer
I typed the days of the weeks along columns 2 – 6
I typed the teachers’ names in rows 2 – 4
I then highlighted all these cells to embolden the text
I highlighted the cells containing the teacher’s names and aligned them to Centre Left from the Table Tools Layout tab
I highlighted all the other cells aligned them to Centre from the Table Tools Layout tab
I highlighted all the top row cells and left hand cells and filled them with colour by choosing Table Tools Design and then Shading. From Shading I chose Light Blue
I then typed in the information from the text into the appropriate boxes.
Now go to the next screen to attempt to create a similar table for yourself.
ICT Learning Resources
© ForSkills Ltd 2012 37
Task 11 Presenting Information in a Table Open a new Word document. Present this data from the 2012 Olympic Games in a table to show the information most effectively. Great Britain won 29 gold medals while USA won 42. USA won 29 bronze and 29 silver medals. China won 23 bronze medals, 27 silver medals and 38 gold medals. Great Britain won 17 silver medals and 19 bronze.
ICT Learning Resources
© ForSkills Ltd 2012 38
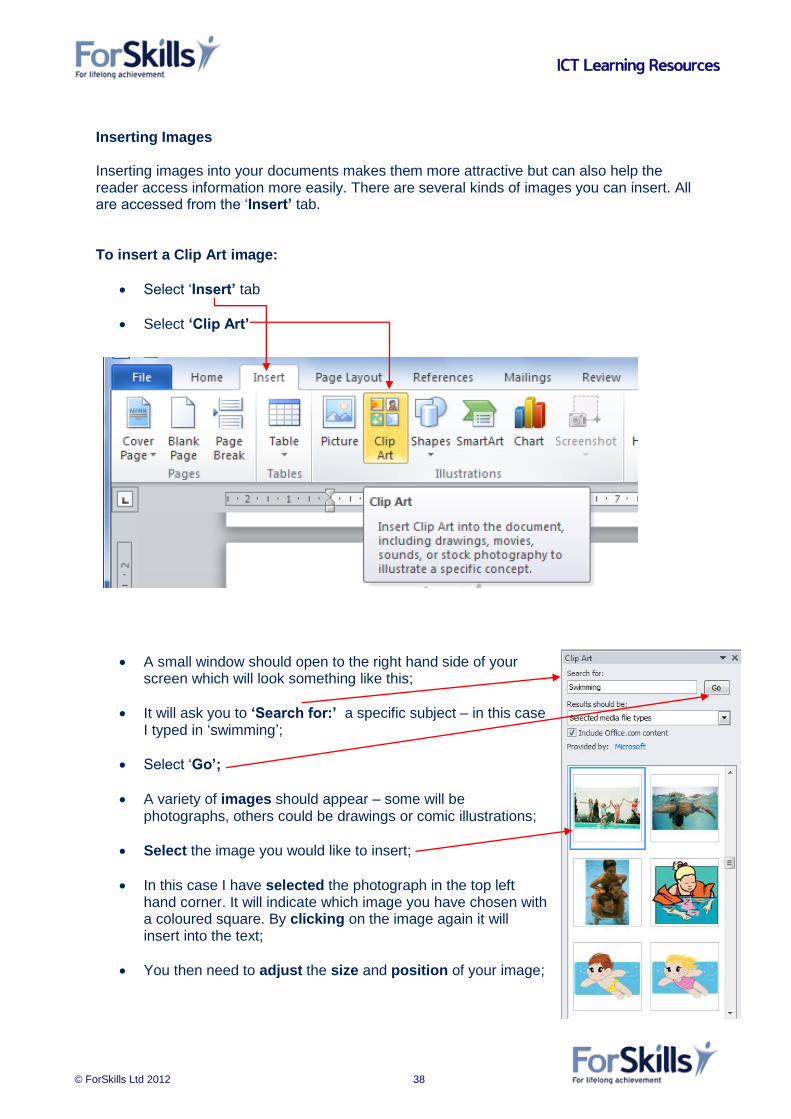
Inserting Images Inserting images into your documents makes them more attractive but can also help the reader access information more easily. There are several kinds of images you can insert. All are accessed from the ‘Insert’ tab. To insert a Clip Art image:
Select ‘Insert’ tab
Select ‘Clip Art’
A small window should open to the right hand side of your screen which will look something like this;
It will ask you to ‘Search for:’ a specific subject – in this case I typed in ‘swimming’;
Select ‘Go’;
A variety of images should appear – some will be photographs, others could be drawings or comic illustrations;
Select the image you would like to insert;
In this case I have selected the photograph in the top left hand corner. It will indicate which image you have chosen with a coloured square. By clicking on the image again it will insert into the text;
You then need to adjust the size and position of your image;

ICT Learning Resources
© ForSkills Ltd 2012 39
To do this you should first format your image;
When you insert your image the ‘Picture Tools’ tab will automatically pop up. This enables you first of all to format your picture – to choose whether you would like to be able to place your image behind the text or in line with it or wrap the text around the image.
Once you have formatted your image you are able to:
resize your picture or crop it;
alter the brightness or contrast;
add shadow effects or borders This is a copy of the image I selected from ‘Clip Art’ earlier. I have selected to wrap the text around it. And placed it to the right of the text. I also selected to add a light blue picture border and a drop shadow effect to the right in an even lighter blue. Try selecting an image from Clip Art and inserting it into a Word document. Format it and then investigate what you can do with the different tools on the tool bar. Once you have done this you can insert and format other images in a similar way.

ICT Learning Resources
© ForSkills Ltd 2012 40
Other Examples Pictures – you can insert pictures that you have saved on file from other sources. They may be photographs you have taken yourself or images you have downloaded from elsewhere. Shapes – you can insert read made shapes, such as rectangles & circles, arrows, lines, flowchart & symbols, and callouts. (see the examples from the drop down) Charts – you can insert a chart to illustrate or compare data. You can choose from bar or pie charts, line graphs or area and surface charts Smart Art – allows you to insert graphics like graphical lists, Venn diagrams and or organisational charts. Here is the page you are given after you have selected Smart Art showing the various choices you are given. Once you have investigated all these ways try the task on the next screen.

ICT Learning Resources
© ForSkills Ltd 2012 41
Task 12 Inserting Images You are going to produce a short flyer to try and persuade people to recycle. The following information may prove useful.
Most households now have a roadside collection of recyclable waste
73% of packaging in the UK can be recycled, only 35% is.
Most packaging contains marks to explain what the packaging is made of and how widely the material is recycled.
In recycling, used materials are converted into new products, reducing the need to consume natural resources from places forests and mines.
Using recycled materials uses considerably less energy than producing new materials does.
Recycling helps protect the environment
It cuts air and water pollution
It reduces the amount of refuse sent to landfill. Choose an eye catching title. Select an attractive border for your text. Decorate your flyer with a recycling logo of your choice from Clip Art. Insert a graph to show the following data.
Figures for recycling for 4 years 2007 – 2011 rose from 7,000 tonnes to 10,000 tonnes at a rate of 1,000 tonnes pa.