let’s go biking! basic traffic - ncdot.gov
TRANSCRIPT

1
Bas
ic T
raffi
c S
kills4-5
Lesson 5
Grades
Time: 30-45 minutes
Studies have demonstrated that skill-building activities are the most effective way to promote student retention of bicycling safety skills. Lesson objectives set the stage for building safety skills, which are emphasized through students’ participation in class activities. This curriculum does not cover every possible scenario that a child may encounter as a bicyclist but instead addresses the basic skills needed to be a safe bicyclist. Teachers should use their discretion to break up material to accommodate their daily schedules. The following Skill-Building Activities are an essential component to this curriculum, and all lessons should be complemented with the reinforcement of safe bicycling behavior. More time can be spent on practicing skills if children are already familiar with the core material.
Lesson ObjectivesThe objective of this lesson is the further development and refinement of bike handling skills and cooperative interaction with other vehicles and pedestrians in preparation for riding in traffic.
The children will be able to:
• Ride cooperatively with pedestrians, bicyclists and other vehicles.• Negotiate more challenging traffic situations which demand more advanced interaction between
pedestrians, bicyclists and other vehicles.• Recognize and respond appropriately to traffic signs. • Recognize and respond appropriate to the red and green phases of a traffic signal.
Why This Lesson is ImportantA practical understanding of the traffic environment is crucial. Many conflicts, collisions and crashes involve a failure to communicate effectively and ride cooperatively, so that all pedestrians, bicyclists and other vehicles can mutually predict each other’s behavior.
45
Let ’s Go Biking!Let ’s Go Biking!Basic Traffic Skills

2
4-5Lesson 5
Grades
Bas
ic T
raffi
c S
kills
Applicable Standards of Learning
Essential Standards
4.PCH.4.2: Identify personal protection equipment needed for sports or recreational activities.
PE.4.MS.1.2: Create movement skill sequences commonly associated with various sports and activities.
PE.4.PR.4.2: Use cooperation and communication skills to achieve common goals.
P.E.5.MS.1.2: Use increasingly complex skills with power and accuracy.
PE.5.HF.3.2: Implement strategies to achieve health-related physical fitness.
PE.5.PR.4.2: Use cooperation and communication skills to achieve common goals.
5.NPA.3.2: Explain the benefits of regular physical activity on physical, mental, emotional, and social health.
Common Core
CCSS.ELA-Literacy.SL.4.1: Engage effectively in a range of collaborative discussions with diverse partners on topics and texts, building on others’ ideas and expressing their own clearly.
CCSS.ELA-Literacy.SL.5.1: Engage effectively in a range of collaborative discussions with diverse partners on topics and texts, building on others’ ideas and expressing their own clearly.
CCSS.Math.Content.5.G.A.1: Use a pair of perpendicular number lines, called axes, to define a coordinate system, with […]
Guidance
RED.C.2.1: Identify situations from your daily life in terms of problems and solution strategies.EEE.SE.1.2: Illustrate personal responsibility in a variety of settings and situations.P.SE.1.2: Use self determination to build independence.I.SE.1.2: Integrate personal responsibility into the way you live your life on a daily basis.
Let ’s Go Biking!

3
4-5Lesson 5
Grades
Bas
ic T
raffi
c S
kills
Basic Traffic Skills
Materials• Instructor’s bicycle• One bicycle for each child• Bicycle helmet for each child and instructor• Extra helmet sizing pads of various thicknesses• Surgical or painter’s cap for each child (wear under helmet to keep
it clean)• Small zip lock bag for each child, labeled with his/her name (to store
caps between lessons)• Bicycle tools (2 sets): assortment of crescent and open-end wrenches
for seat and handlebar adjustments, straight and Phillips-head screwdrivers, Allen wrenches
• Bike pump(s)• Whistle• Intersection Course Set Up Diagram• 2 rolls of 2” masking tape• 10’ to 12’ tape measure• Props: 4 free-standing Stop signs, traffic signal (to be operated by a
volunteer), section of bushes (optional - represents a visual barrier in the roadway that children must negotiate to see around)
• Parent/Caregiver Tip Sheet• Child Assessment – Final Skills Checklist for Grades 4-5 (Class)• Child Assessment – Final Skills Checklist for Grades 4-5 (Individual)• Pencils• Clipboards for assessments (optional)• Child Assessment – Worksheet (Post-Test)• Child Assessment – Answer Key
PreparationCheck general condition of helmets and bikes.
Create the traffic signal prop. See the Instructor’s Guide for tips.
With masking tape, lay out the course according to Intersection Course diagram found in the materials section.
NOTE: It may be most efficient to set up all skills courses, including those found in Lessons 3 and 4, at the same time.
Review and prepare the Final Skills Checklist for Grades 4-5. The checklist should be sent home after the Skill-Building Activity along with the Parent/Guardian Tip sheets included in this lesson. Copy the individual checklist onto the back of the Parent/Caregiver Tip Sheet.
An assistant is needed for the Traffic Signal activity. In addition, have people on hand during class time to assist with preparing bicycles and helmets or conducting skill building activities. Coordinate with assistants in advance.
Let ’s Go Biking!

4
4-5Lesson 5
Grades
Bas
ic T
raffi
c S
kills
Lesson 5 – Demonstration and Skill-Building Activity
► Time: 30-45 minutes
1. Bike and Helmet Check2. Review Traffic Principles3. Two-Way Stop on a Through Street4. Four-Way Stop5. Traffic Signal6. Post-Test
IntroductionThis lesson introduces fundamental traffic concepts. The course layout and instruction teaches children how to negotiate a two-way stop controlled intersection, a four-way stop controlled intersection, and then a traffic signal. Finally, after being introduced to stop controlled and traffic light controlled intersections, pedestrians are introduced at a crosswalk, so bicyclists must demonstrate appropriate yielding behavior. Children should gain an understanding from both the bicyclist and pedestrian point of view. The fence and bushes props can be added near the intersection, so children have to adjust their positions due to visual barriers to see oncoming traffic.
Assess skills using the Child Assessment – Final Skills Checklist for Grades 4-5 (Class) during the lesson.
1. Bike and Helmet CheckHave children fit their helmets and check their bikes before starting the activity.
• Ask each child to do a quick check of his or her bike, including fit.• Have children check helmets for proper placement and fit.
2. Review Traffic PrinciplesGo over the following before children enter the course:
• Yield to pedestrians.• Obey traffic signs and signals. A stop sign and traffic signal will be used in this course. Come to
a complete stop at a stop sign or traffic signal. ook both ways, and proceed when it is clear or when the light has turned green.
• Bicycles are vehicles, so you ride on the right side of the road with traffic.• Signal the direction you want to go before turning. Scan ahead and behind before turning. • Check over your left shoulder before making a left turn to make sure no other vehicles
are coming.
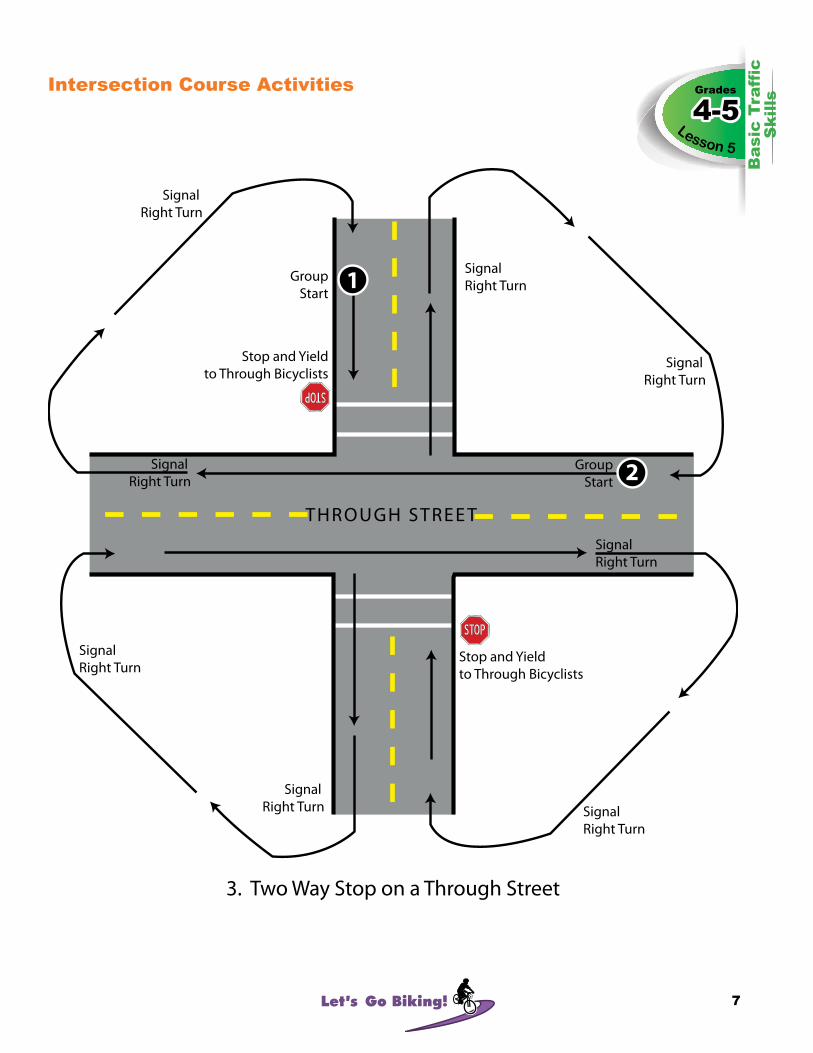
3. Two-Way Stop on a Through StreetThis activity focuses on stopping at stop signs, signaling right turns, and looking for vehicles before crossing through the intersection in the Intersection Course.
• Divide class in half forming two groups. Position one group at the #1 Group Start and the second group at the #2 Group Start.
Let ’s Go Biking!

5
4-5Lesson 5
Grades
Bas
ic T
raffi
c S
kills
• Group #1 will ride one at a time through the intersection, stopping at the stop sign, yielding to any bicyclists on the through street before they proceed through the intersection. Ensure that children stop behind the stop sign, looking both ways for traffic before proceeding. When they get through the intersection, they will signal and turn right, then signal and turn right again to ride the through street.
• Concurrently, Group #2 will ride one at a time through the intersection, slowing and looking both ways as they approach the cross street. Even though approaching vehicles are supposed to stop, they may not. After the group crosses through the intersection, they signal and turn right then signal and turn right again to ride through the stop controlled street.
• Have children continue to ride the pattern until the instructor blows the whistle.
Add Pedestrians• Using the intersection, introduce pedestrians crossing the intersection crosswalk. Ask a group of
four children to become pedestrians. Emphasize that the pedestrians need to look both ways — even though they have the right of way — to be sure that vehicles are stopping. Instruct the pedestrians to cross in the crosswalks from various directions creating a situation where the bicyclists must yield.
If time permits, have the groups switch starting locations and perform the same activity with everyone signaling and making left turns at the end of the first street followed by another signal and left turn at the next street.
4. Four-Way Stop This activity adds complexity because children have to identify who has the right of way before crossing through the intersection in the Intersection Course layout.
• Regroup the children with a whistle stop. Add 2 Stop signs on the through street to create a 4-way stop.
• Introduce the 4-way stop, and the concept of “right of way.” Ask for suggestions as to how to determine who goes first (i.e. first come/first served; vehicle on right goes first).
a. Vehicles leave the stop sign in the same order in which they arrived. (The first vehicle to arrive at a complete stop is the first vehicle allowed to leave the stop sign.)
b. If there is more than one vehicle arriving at the same time at the 4-way stop, the vehicle on the right is allowed to leave first.
• Position one group at the #1 Group Start and the other group at the #2 Group Start. Have the groups ride through the intersection one person at a time, stopping at the stop signs and determining “right of way” as they arrive. At the end of the street, allow children to signal either a right or left turn, ride to the next street, signal and turn right or left onto that street.
• Have riders continue this pattern until the instructor blows the whistle.
5. Traffic SignalFor this activity, riders will have to interpret a traffic signal and obey the phases. They will stop at the red phase and start/proceed straight through the intersection during the green phase in the Intersection Course layout.
• Remove the stop signs and add a traffic signal in the center of the intersection, operated by an assistant.
• Position one group at the #1 Group Start and the other group at the #2 Group Start. Have the assistant stand and position the traffic signal facing the approaching bicyclists. One group will have a red light to start; the other will have a green.
Let ’s Go Biking!
6
4-5Lesson 5
Grades
Bas
ic T
raffi
c S
kills
• Review meaning of red, green and yellow lights. Even though only red and green lights are used in this course, review the meaning of a yellow light for bicyclists (e.g. the traffic light is about to change, and there is not enough time for bicyclists to cross the intersection, so they should stop). Instruct children that they should ride carefully past the assistant.
• Have children ride through the intersection. Children should ride up to the intersection, obey the traffic signal, and then ride through the intersection when they are given a green light. At the end of the street, allow children to signal either a right or left turn, ride to the next street, signal and turn right or left turn onto that street.
• Have riders continue this pattern until the instructor blows the whistle.
Add Pedestrians• Using the intersection, introduce pedestrians crossing the intersection crosswalk. Ask a new
group of four children to become pedestrians, crossing only on a green light. Emphasize that the pedestrians need to look both ways — even though they have the right of way when crossing at a green light — to be sure that vehicles are stopping. Create a situation where the pedestrians cross in the crosswalks to create a situation where the bicyclists must yield.
6. Post-Test [Distribute the Child Assessment – “What Do You Know About Bicycling?” Post-Test. Allow children a few minutes to complete, and collect completed assessments.]
Review (optional) ► Time: 5 minutesReview the answers to the Post Test after children have corrected their tests. Discuss any items that children failed to answer correctly. Children should take worksheets home to discuss with their parent/caregiver along with the Child Assessment – Final Skills Checklist for Grades 4-5 (Individual).
Let ’s Go Biking!
7
4-5Lesson 5
Grades
Bas
ic T
raffi
c S
kills
Intersection Course Activities
Let ’s Go Biking!

8
4-5Lesson 5
Grades
Bas
ic T
raffi
c S
kills
Let ’s Go Biking!

9
4-5Lesson 5
Grades
Bas
ic T
raffi
c S
kills
Let ’s Go Biking!
10
4-5Lesson 5
Grades
Bas
ic T
raffi
c S
kills
Discussion Opportunity
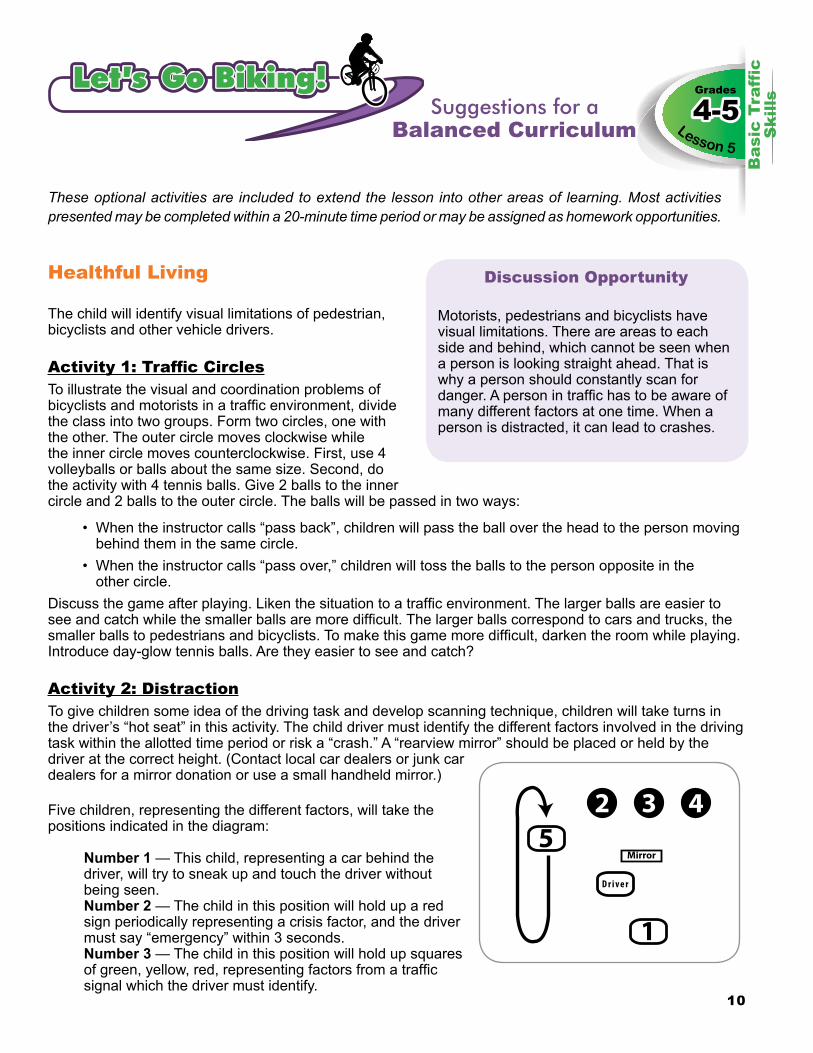
Motorists, pedestrians and bicyclists have visual limitations. There are areas to each side and behind, which cannot be seen when a person is looking straight ahead. That is why a person should constantly scan for danger. A person in traffic has to be aware of many different factors at one time. When a person is distracted, it can lead to crashes.
These optional activities are included to extend the lesson into other areas of learning. Most activities presented may be completed within a 20-minute time period or may be assigned as homework opportunities.
Healthful Living
The child will identify visual limitations of pedestrian, bicyclists and other vehicle drivers.
Activity 1: Traffic CirclesTo illustrate the visual and coordination problems of bicyclists and motorists in a traffic environment, divide the class into two groups. Form two circles, one with the other. The outer circle moves clockwise while the inner circle moves counterclockwise. First, use 4 volleyballs or balls about the same size. Second, do the activity with 4 tennis balls. Give 2 balls to the inner circle and 2 balls to the outer circle. The balls will be passed in two ways:
• When the instructor calls “pass back”, children will pass the ball over the head to the person moving behind them in the same circle.
• When the instructor calls “pass over,” children will toss the balls to the person opposite in the other circle.
Discuss the game after playing. Liken the situation to a traffic environment. The larger balls are easier to see and catch while the smaller balls are more difficult. The larger balls correspond to cars and trucks, the smaller balls to pedestrians and bicyclists. To make this game more difficult, darken the room while playing. Introduce day-glow tennis balls. Are they easier to see and catch?
Activity 2: DistractionTo give children some idea of the driving task and develop scanning technique, children will take turns in the driver’s “hot seat” in this activity. The child driver must identify the different factors involved in the driving task within the allotted time period or risk a “crash.” A “rearview mirror” should be placed or held by the driver at the correct height. (Contact local car dealers or junk car dealers for a mirror donation or use a small handheld mirror.)
Five children, representing the different factors, will take the positions indicated in the diagram:
Number 1 — This child, representing a car behind the driver, will try to sneak up and touch the driver without being seen.Number 2 — The child in this position will hold up a red sign periodically representing a crisis factor, and the driver must say “emergency” within 3 seconds.Number 3 — The child in this position will hold up squares of green, yellow, red, representing factors from a traffic signal which the driver must identify.
Let ’s Go Biking!Let ’s Go Biking!Suggestions for a
Balanced Curriculum

11Balanced CurriculumSuggestions for a
Bas
ic T
raffi
c S
kills4-5
Lesson 5
GradesNumber 4 — This child is a bicyclist, who will give hand signals occasionally. The “driver” must call out saying “bicyclist left” or “bicyclist right” within 5 seconds. Number 5 — This child, representing another vehicle, will walk a small loop in the classroom. The driver must say “now” when the child comes toward and passes the driver.
Every few minutes, have the children rotate to a new position, so each experiences a new role. Children not directly participating can be involved as timekeepers or observers.
At the end of the activity, discuss with child “drivers” the challenges they experienced. Ask them to watch their parents drive, and help their parents look for these distractions.
Mathematics
Discuss stopping distance with your class. Vehicles can’t just stop — they are big and heavy. The faster a car is going, the more time and distance it needs to stop, and the less time there is to react. Discuss the two components of stopping distance:
• Reaction Time: How far you will continue to travel before you can physically hit the brakes in response to an obstacle seen ahead.
• Braking Distance: How far you will travel while you are applying the brakes.
Have them calculate the last column (Total Stopping Distance) by adding the Reaction Time and Braking Distance together.
Speed(mph)
Reaction Time Distance (ft.)
Braking Distance (ft.)
Total Stopping Distance (ft.)
2030405060
2233445566
204072118182
4273116173248
Have children measure the distance on the playground in feet (ft.) required for stopping a car traveling at various speeds — in miles per hour (mph).
Work as a class to graph the Speed and Stopping distance using a coordinate plane. Put “Speed” on the X-Axis and “Stopping Distance” on the Y-Axis.
Have children collaborate in small groups to answer: What can increase stopping distance? [Hint: Think about each component of stopping distance.]
Braking distance is affected by:• Car — worn brakes, extra weight, bald tires;• Road — poor surface, spilled oil; and• Weather — wet or icy conditions.
Reaction time is affected by:• Distractions in the car (kids);• Distractions outside the car (sunlight in eyes); and• Age (thinking process slows as you get older).
M4-
5 B
5
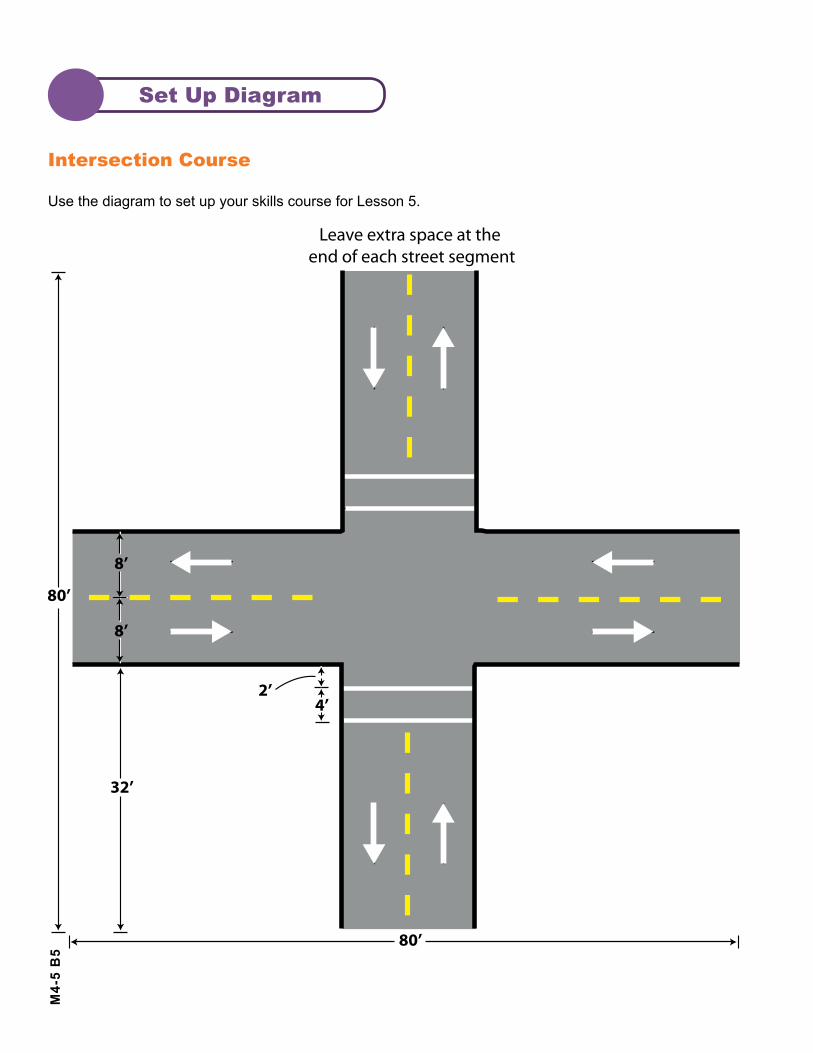
Set Up Diagram
Intersection Course
Use the diagram to set up your skills course for Lesson 5.

M4-
5 B
5
Did
you know?
Basic Traffic Skills
Today your child completed the fifth and final lesson of Let’s Go Biking!, the bicycle component to Let’s Go NC! A Pedestrian and Bicycle Safety Skills Program for Healthy Active Children.
The course was designed to help your child learn to bike safely on the street around pedestrians, other bicyclists and motor vehicles in a safe and simulated environment. Review the Final Skills Checklist to see how your child performed and ask your child to tell you what he or she learned during the course.
PRACTICE AT HOME!
Encourage your child to continue working on these skills, especially those on the checklist where the child needs more work. If possible, bicycle with your child to observe how well he or she handles the bicycle and demonstrates knowledge of rules of the road. It is better for children not to bicycle on the street without adult supervision until they have demonstrated mastery of these skills.
Consider your child’s level of maturity, traffic skills, and the amount of traffic on the streets adjacent to your home when deciding whether to permit your child to ride on the street. Establishing boundaries is a good way to keep your child within a specified distance from home. Note that some jurisdictions limit or prohibit bicycling on the sidewalk.
Children in fourth and fifth grade:
• Are capable of bicycling as far as 10 miles with sufficient snacks and rest periods,
• Need outdoor time and physical challenges,• Have generally developed enough cognitive capacity
to understand more complex road rules, and• Have improved coordination and reaction time.
On-bike practice is a critical part of safety training for fourth and fifth graders. By addressing bicycle safety issues and working with your child on basic traffic rules now, you can help reduce your child’s chance of having an injury later on.
Parent/Caregiver Tip Sheet
Let ’s Go Biking!Let ’s Go Biking!

M4-
5 B
5
Child Assessment – Final Skills Checklist for Grades 4-5
At the end of Lesson 5, children should be able to do the following successfully. Use the following scoring symbols to indicate their level of achievement:
Good +Satisfactory
Needs more work –
Child Name Rides in a straight line in correct lane position
Scans for traffic before entering intersection
Joins or crosses traffic without problems
Scans behind before turning left or merging
Signals correctly before turning
Determines correct Right of Way at a stop sign
Obeys red light and green light on traffic signal
Yields to pedestrians
Let ’s Go Biking!Let ’s Go Biking!Class Child Assessment

M4-
5 B
5
Name_______________________________
Child Assessment – Final Skills Checklist for Grades 4-5
During the Basics of Bicycling course, your child worked on the bicycle skills shown below to help prepare him or her to bicycle safely in traffic. The following scoring symbols indicate your child’s level of achievement:
Good +Satisfactory
Needs more work –
Please encourage your child to continue working on these skills to master them.
Rides in a straight line in correct lane position
Scans for traffic before entering intersection
Joins or crosses traffic without problems
Scans behind before turning left or merging
Signals correctly before turning
Determines correct Right of Way at a stop sign
Obeys red light and green light on traffic signal
Yields to pedestrians
Comments:
_______________________________________________________Signature of parent/guardian
________________________________Date
Child Assessment
Let ’s Go Biking!Let ’s Go Biking!

M4-
5 B
5
Name_______________________________
“What Do You Know About Bicycling?” Post-Test
TRUE or FALSE
1. I should ride my bike facing traffic, so I can see what’s coming.
2. All bicycle riders must stop at all stop signs and red lights just like car drivers do.
3. I have to stop my bike when I hear a siren coming from an ambulance, police car or fire truck.
4. I don’t need lights on my bike to ride at night because I already have reflectors.
5. Bicycle riders can safely carry packages in one hand because they can steer with the other.
6. Bicycle riders must give hand signals before making turns.
7. On my bike, I only have to look for cars straight ahead when crossing a road or riding out of a driveway.
8. It’s OK for two people to ride on a bike if one sits on the seat and the other sits on the handlebars.
9. I don’t need to wear a bike helmet because I never ride my bike around cars.
10. It’s OK to ride a bike that’s a little too big for me now, so that I can grow into it next year.
11. Cyclists don’t have to worry about the color of the clothing they wear.
12. Bicyclists should always stop at the end of driveways to check for pedestrians and other vehicles before entering the street.
Child Assessment
Let ’s Go Biking!Let ’s Go Biking!

M4-
5 B
5
Bas
ic T
raffi
c S
kills
Instructor’s Question and Answer Key4-5
Lesson 5
Grades
Explanation of answers: 1. False.
Riding facing traffic (against traffic) is dangerous for many reasons:• The bicycle rider will not see stop signs and other traffic signs. • Car drivers are not used to looking for any type of vehicle coming at them
from the opposite direction. • The impact is much greater when a bike and a car hit each other head on.• Wrong-way riding is dangerous and confusing to other bicyclists riding the right way.
For these reasons, it’s illegal to ride against traffic. Ride on the right side of the road, with traffic. 2. True.
When you ride your bike, the law says you must obey the traffic laws and rules just like car drivers and other vehicle operators.
3. True. Like car drivers, bicyclists must stop for emergency vehicles.
4. False. Reflectors alone are not enough for night riding. The law requires bicycle riders to use a headlight at night to see better and to be seen by others. Bicyclists should also use a bright red taillight in addition to rear reflectors, which are also required by law. Even with lights, night riding is dangerous and is not a good idea.
5. False. Bicycle riders should never carry anything in their hands. Instead, they should use backpacks or saddlebags. They need both hands for stability, for steering and for signaling turns.
6. True. Since bicycles are vehicles, riders are required to signal all turns just like car drivers. Through hand signals, bicycle riders communicate with other pedestrians, bicyclists and other vehicles. This helps prevent crashes.
7. False. Bicyclists should check for cars not only straight ahead, but also approaching from either side or behind them.
8. False. The rule is one person per seat on a bicycle. Riding double changes the way the bicycle handles, puts weight where it doesn’t belong, and makes it harder to steer and use the brakes. Very young children can be carried on a bicycle, but only in a separate seat specifically designed for that purpose.
9. False. No other injury can be as serious as a head injury, which can cause death or permanent damage to your brain. No other injury is as easy to prevent. Helmets save lives and prevent injuries. Every bicycle rider needs the protection of a bicycle helmet on every ride.
10. False. All bicycle riders need bikes that fit them now. A bike that is too big is difficult to control and stop. Children need to be able to stand over the bar comfortably (if it’s a diamond frame) and be able to touch at least one foot on the ground while sitting on the seat.
11. False. A cyclist’s clothing is important in helping motorists to see him or her. Brightly colored clothing is recommended during daylight riding, and highly reflective clothing is essential for riding in low light or at night.
12. True. Bicyclists should always yield right of way to pedestrians and other vehicles whenever they enter a street from a driveway.