lesson plans - amazon web servicesssww.s3.amazonaws.com/share/crayola_lessonsweb.pdf · •...
TRANSCRIPT

Lesson Plans
A Jewel of a Book
crayola supplies
• Crayons
• Erasable Colored Pencils
• Markers
• No-Run School Glue
• Pointed Tip Scissors
• Construction Paper
• Color Sticks™ Colored Pencils
household supplies
• hole punch
• ribbon
• decorative craft items
Why
What a charming way to write a book report! Each illustrated bracelet charm captures a
character, an event in the plot, setting, or other detail.
Overview
grades
• Grades 1 to 3
• Grades 4 to 6
• Special Needs
subjects
• Language Arts
• Visual Arts
time
• 30 to 60 minutes
• Multiple Sessions
benefits
• Students read a book, noting the characters, setting, plot, and events.

• Children gather, synthesize, and then select the most important data from their book.
• Students prepare a book report by decorating a charm bracelet with pertinent
information about their literary work.
Steps
1. Read a book of your choice. As you read, take notes about the most important characters,
key settings, plot and themes, and major events using Crayola® Erasable Colored Pencils or
Crayola Color Sticks.
2. To make a charm bracelet book report, trace your hand and wrist on construction paper. Cut
it out with Crayola Scissors.
3. Using construction paper, ribbon, or other craft items, make a charm bracelet.
4. Draw and cut out as many construction paper charms as you need to tell about your book.
Using Crayola Erasable Colored Pencils, Color Sticks, Crayons, or Markers, write words and draw
pictures on both sides of each charm to report on your book.
5. Punch holes in charms and the bracelet. Tie short ribbons through holes to attach charms.
Attach the bracelet to your paper wrist using Crayola School Glue.
6. Print the name of the book and its author on the palm of your hand. Decorate your hand with
nail polish, rings, or other ideas.
Adaptations
• Children with special needs could work with a partner or use assistive technology to
prepare their book reports.
• Design a Charming Books bulletin board to display book reports.
• Plan an oral book reading. Students introduce their book and author, then read
highlights from their charms.
• Take the details on charms and rewrite them in paragraph form.
Safety Guidelines
Adult supervision is required for any arts & crafts project. Observe children closely and
intervene as necessary to prevent potential safety problems and ensure appropriate use of arts
and crafts materials. Some craft items, particularly beads and buttons, are potential choking
hazards for young children. Avoid use of such small parts with children younger than 3 years.
Craft items such as scissors, push pins and chenille sticks may have sharp points or edges. Avoid
use of materials with sharp points by children younger than 4 years. Read all manufacturers'
safety warnings before using arts and craft supplies.
Scissors—ATTENTION: The cutting edges of scissors are sharp and care should be taken
whenever cutting or handling. Blunt-tip scissors should be used only by children 4 years and
older. Pointed-tip scissors should be used only by children 6 years and older.
String-Like Materials—Includes string, raffia, lacing, yarn, ribbon, and other similar material.
Children 3 years and younger should not be given any string-like material that is longer than 12
inches. Close adult supervision is essential whenever children use string-like material. When
crafts are to be worn around the necks of children 8 years and younger, attach the ends of the
“string-like material” with clear adhesive tape, which allows easy release of the bond if the craft
becomes entangled or caught on equipment. For children older than 8 years, the ends of the
“string-like material” may be tied and knotted.
Shop Crayola at S&S Worldwide!
http://www.ssww.com/arts-and-crafts-supplies/crayola/
© 2012 Crayola

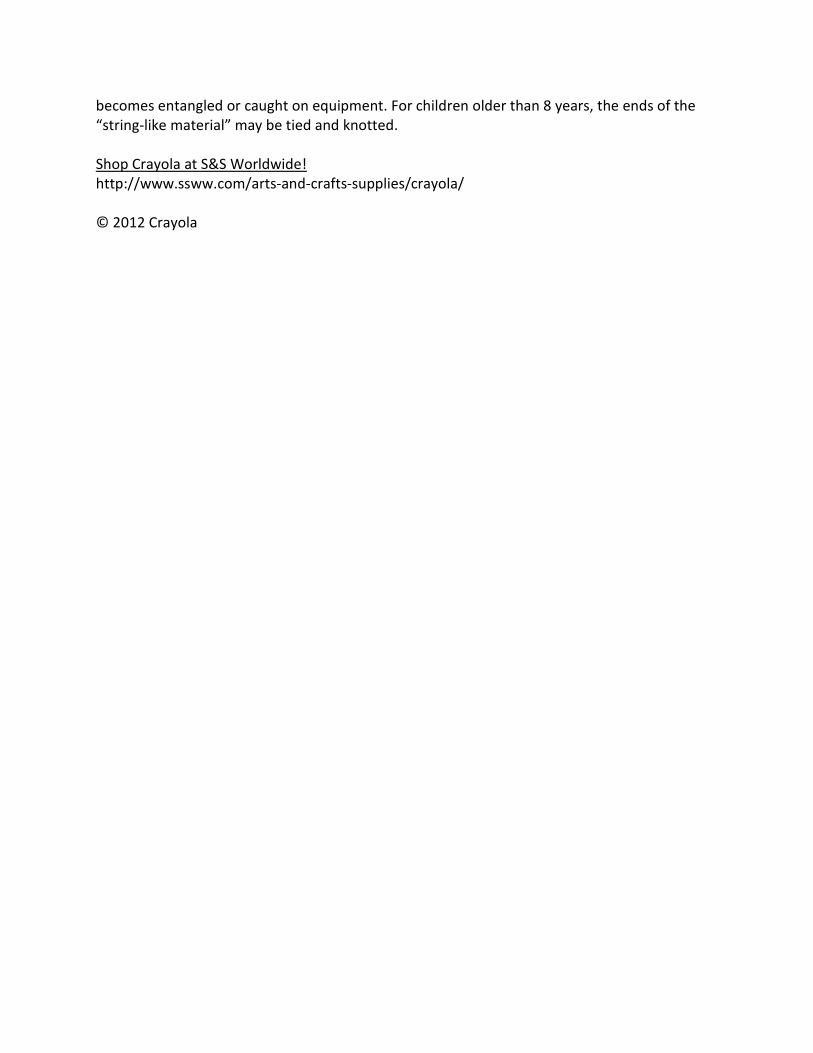
Aboriginal Mask
crayola supplies
• Model Magic®
• Model Magic® Presto Dots™
household supplies
• Plastic mask armature
Why
Connect with an ancient culture with these Model Magic Presto Dot masks! Discover what role
masks played in Aboriginal life, and apply their distinctive artistic style to your own creation.
Overview
grades
• Grades 4 to 6
• Grades 7 to 12
• Grades 1 to 3
subjects
• Language Arts
• Social Studies
• Visual Arts
time
• Multiple Sessions
• 30 to 60 minutes
benefits
• Students gather information on ancient Aboriginal rituals and traditions by researching
the uses of the culture’s masks.
• Students recognize shapes used to represent facial features on masks.
• Students apply the Aboriginal style to their own masks, and plan which shapes, colors
and designs to incorporate into their designs.

Steps
1. Aboriginal masks were used for a variety of ceremonies, rituals, dances, and to honor ancient
spirits in the culture. Examine traditional Aboriginal masks. How are they decorated? What
shapes do you recognize? Do the shapes, colors, and designs have special meanings to the
Aboriginal people?
2. Use the information you find to inspire your own Aboriginal mask creation! Cover a blank
mask armature with a thin layer of Crayola Model Magic®. Be sure to tightly cover any unused
Model Magic to prevent it from drying out.
3. Decorate your mask using Model Magic Presto Dots™! Flatten a small amount of Model
Magic on a hard surface, like a table. Firmly press into the Model Magic using a Presto Dots
tool. Twist the tool slightly and lift away from the flattened modeling compound. Gently press
onto the mask. Model Magic that is fresh from the pack will stick to itself. Dried pieces can be
glued together.
4. Experiment with different Presto Dots tools. What shapes work best for the facial features
you want to create? How can you blend and swirl the Model Magic colors to create interesting
effects?
5. Be creative! Embellish your mask by layering dots, weaving braids, and molding unique 3D
forms!
Adaptations
• Invite an expert to the classroom to share authentic Aboriginal objects and talk about
the daily lives of the people. What is the Aboriginal culture like today? How does it
compare and contrast from your lifestyle?
• Let’s celebrate! Masks were commonly used in Aboriginal celebrations and dances.
What event will you celebrate together as a class? Maybe the first day of spring or a
successful science experiment? How will you modify the decoration of your masks to
reflect the occasion you’re celebrating?
• Display all the students’ masks. What is common between each? Does each mask reflect
the artistic style of the Aboriginal people? What can the different facial features be
interpreted to represent?
Safety Guidelines
Adult supervision is required for any arts & crafts project. Observe children closely and
intervene as necessary to prevent potential safety problems and ensure appropriate use of arts
and crafts materials. Some craft items, particularly beads and buttons, are potential choking
hazards for young children. Avoid use of such small parts with children younger than 3 years.
Craft items such as scissors, push pins and chenille sticks may have sharp points or edges. Avoid
use of materials with sharp points by children younger than 4 years. Read all manufacturers'
safety warnings before using arts and craft supplies.
Costumes & Masks— CAUTION: When children wear hand-crafted costumes and masks,
make sure the crafts do not obstruct the child’s vision, hearing, or impede movement. Do not
use feathers, fabric, or raffia on wearable costumes and masks because these items do not pass
costume flammability tests. Wearable masks are those held in place on the face with elastic,
yarn, or other materials. Keep away from open flames.
Crayola Modeling Materials including Crayola Model Magic®, and Model Magic Fusion™,
Crayola Air-Dry Clay, and Crayola Dough—
• Keep away from open flames. Do not use to make candleholders, hot plates, trivets, or
other similar objects that will be used or placed near fire and other heat sources.
• Do not put in an oven, microwave, or kiln.
• Do not make into vessels/containers that will hold unpackaged food.
• The use of modeling material to make items that look like food is discouraged for
children younger than age 5 to avoid their confusion with real food.
• Unless sealed with a water-resistant glaze, do not make projects exposed to or
immersed in water, such as boats or outdoor bird feeders. They would disintegrate
when exposed to moisture.
• Crayola Dough—contains gluten (wheat flour) as an ingredient.
• Crayola Air-Dry Clay, Crayola Model Magic and Model Magic Fusion are gluten-free.
However, they are produced on the same machinery as Crayola Dough which does
contain gluten. Although the machines are cleaned prior to the start of each production
run, there is a slight possibility that trace amounts of gluten from Crayola Dough may be
present in the other modeling compound products. For information regarding specific
ingredients or allergic concerns, please call our Consumer Affairs department at 1-800-
272-9652 weekdays between 9 AM and 4 PM Eastern Standard Time.
Modeling Tools—Use the least dangerous point or edge sufficient to do the job. For example,
craft sticks, plastic knives and forks, and cookie cutters can cut or carve modeling materials.
Shop Crayola at S&S Worldwide!
http://www.ssww.com/arts-and-crafts-supplies/crayola/
© 2012 Crayola

Across the Landscape
crayola supplies
• Color Sticks
• Erasable Colored Pencils
• Gel Markers
• No-Run School Glue
• Pointed Tip Scissors
household supplies
• aluminum foil
• posterboard
• sandpaper
Why
Create a unique, stunning display of the Earth’s landforms. Showcase learning with textured
materials such as sandpaper, aluminum foil, and corrugated paper.
Overview
grades
• Grades 1 to 3
• Grades 4 to 6
• Special Needs
subjects
• Science
• Social Studies
• Visual Arts
time
• Multiple Sessions
benefits
• Students identify various landforms found throughout the world.
• Students understand the components and characteristics of each landform.

• Students analyze various landforms and match them to textured materials, such as
sandpaper to portray a desert.
• Students create and label their own landscape bulletin board.
Steps
1. Find out about the many different types of the Earth’s landforms such as deserts, mountains,
oceans, plateaus, coastlines, and marshlands. What characteristics make each of them unique?
With a small group of classmates, design a huge bulletin board to highlight what you’re
learning.
2. For the background, overlap big pieces of poster board. Hold the seams together with
Crayola® School Glue. Air-dry the background.
3. Use your imagination and Crayola Erasable Colored Pencils to sketch various areas of
landforms on the background.
4. Choose materials that best portray the textures of each area. For instance, sandpaper is great
for deserts or plateaus. Aluminum foil makes shiny water. Consider corrugated paper, cotton
balls, and other items, too.
5. With Crayola Gel Markers, color in areas such as sky, evergreens, and coastline.
6. Using Crayola Scissors, cut out pieces of textured materials such as sandpaper, aluminum foil,
or corrugated paper. Glue them in place on the landscape.
7. Gel Markers write on many surfaces. Color aluminum foil blue to represent water. Try these
markers on sandpaper and other surfaces for a unique look.
8. Draw objects such as animals, grasses, wildlife, rocks, cacti, and mountain ranges with
colored pencils on construction paper. Color them, cut them out, and glue on the bulletin board
landscape.
9. Write labels for the landforms. Cut them out and glue in place. Invite your friends and
families to see your magnificent display of what you learned about the Earth!
Adaptations
• Research landforms to find out what animals use these areas as habitats in various
climates.
• Find out what plants are native to each landform. Identify locations on a world map.
• Younger children and those with special needs might sketch their ideas before drawing
them on the poster board. If possible, view as many local landforms as possible. Provide
pictures and illustrations for reference.
• Research the affects of global warming on the earth's landforms.
Safety Guidelines
Adult supervision is required for any arts & crafts project. Observe children closely and
intervene as necessary to prevent potential safety problems and ensure appropriate use of arts
and crafts materials. Some craft items, particularly beads and buttons, are potential choking
hazards for young children. Avoid use of such small parts with children younger than 3 years.
Craft items such as scissors, push pins and chenille sticks may have sharp points or edges. Avoid
use of materials with sharp points by children younger than 4 years. Read all manufacturers'
safety warnings before using arts and craft supplies.

Scissors—ATTENTION: The cutting edges of scissors are sharp and care should be taken
whenever cutting or handling. Blunt-tip scissors should be used only by children 4 years and
older. Pointed-tip scissors should be used only by children 6 years and older.
Shop Crayola at S&S Worldwide!
http://www.ssww.com/arts-and-crafts-supplies/crayola/
© 2012 Crayola

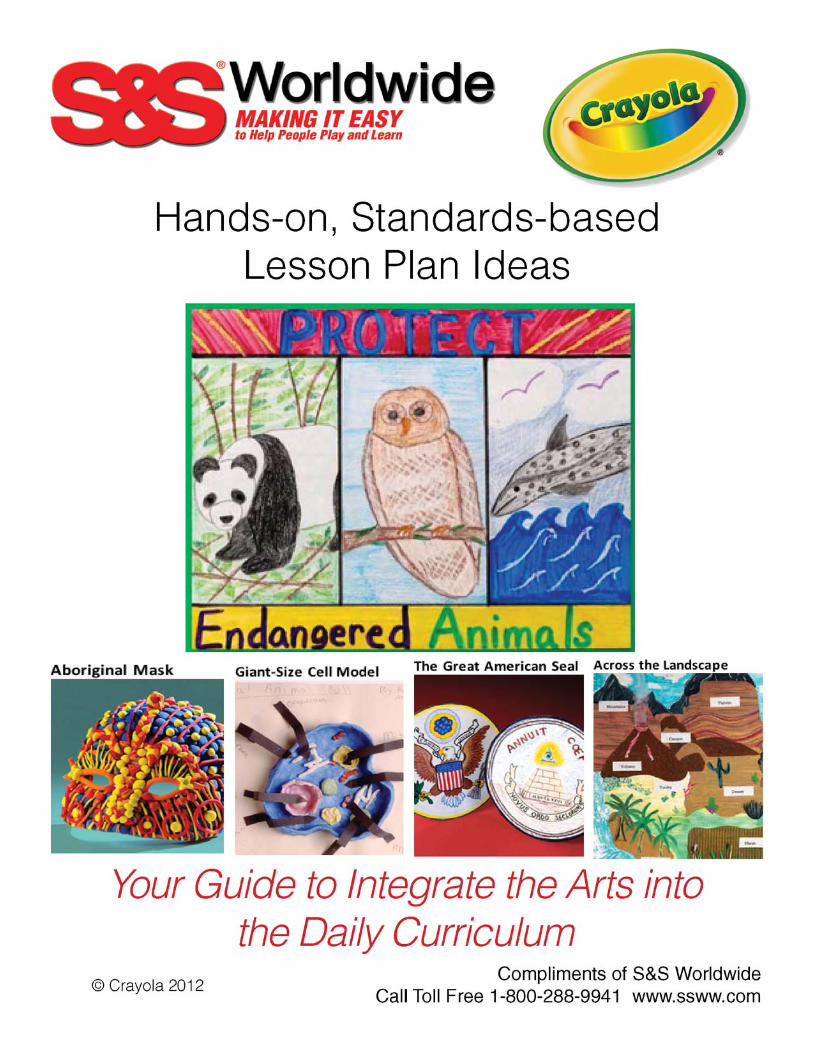
Erase It! Endangered Animals
crayola supplies
• Erasable Colored Pencils
• Construction Paper
Why
From pandas to penguins, as many as 6,000 plant and animal species become extinct each year.
How can you help to erase the problem of these endangered creatures?
Overview
grades
• Pre-K and Kindergarten
• Grades 1 to 3
• Grades 4 to 6
• Grades 7 to 12
• Special Needs
subjects
• Language Arts
• Science
• Social Studies
• Visual Arts
time
• 30 to 60 minutes
• Multiple Sessions
benefits
• Students learn why many animals, insects, and birds are becoming extinct. They
understand the importance of the food chain and how disturbing one area of it can
cause havoc with wildlife.
• Students discover how they can make a difference in protecting endangered species by
respecting animal habitats and teaching others to do the same.
• Students draw a scene depicting ways to erase the worldwide problem of endangered
animals.

Steps
1. Why do animals become endangered? Changes in the environment, poachers, chemicals and
toxic materials, human overpopulation, and demands for certain species and just some of the
reasons animals become endangered or extinct.
2. Research how you can help to erase the problem of endangered animals. Brainstorm what
you and your classmates can do locally. What changes need to happen in the world? While the
ideas are flowing, draw a picture with Crayola® Erasable Colored Pencils showing what you
learned on white paper.
3. You might show part of the rainforest being chopped down, taking away habitats for many
animals. How about drawing houses being built on farmland or in a forest, causing animals to
lose their homes and nesting sites? Include a way to stop this destruction to save precious
animals, insects, and birds.
4. Use the eraser on your drawing tools to add meaning to your picture. You can erase words
from large areas of color. Or you can add dimension, shading, and texture by removing some
color. After erasing, add another color in that spot to form stripes, dots, or textured feathers or
fur.
5. With your classmates, hang your posters where lots of people will see your message!
Libraries, Extension Services, and other groups often welcome student displays.
Adaptations
• Younger children and those with disabilities will find it helpful to see lots of photographs
of and read stories about endangered or extinct animals. When possible, visit local areas
where animal habitats are endangered.
• Research the efforts being made to protect endangered animals such as the African
elephant and the humpback whale. Learn the names of environmental groups that help
solve these problems and find out what they do. Perhaps your class could raise money
to send to a local agency or volunteer your services.
• Find out which animals, birds, and insects are in danger of becoming or are extinct.
Draw pictures of several. Link pictures with yarn to a world map to see where species
are vanishing.
• Invite knowledgeable people from local environmental agencies to speak. Perhaps
building of new homes threatens wetlands where a specific type of turtle or bird has its
habitat. Find out what can be done by individuals to prevent this loss.
• Assessment: Ask students to draw five animals that are endangered (excluding
dinosaurs). Next to each picture write a few sentences on why the creature could be lost
and what could be done to save it.
Safety Guidelines
Adult supervision is required for any arts & crafts project. Observe children closely and
intervene as necessary to prevent potential safety problems and ensure appropriate use of arts
and crafts materials. Some craft items, particularly beads and buttons, are potential choking
hazards for young children. Avoid use of such small parts with children younger than 3 years.
Craft items such as scissors, push pins and chenille sticks may have sharp points or edges. Avoid

use of materials with sharp points by children younger than 4 years. Read all manufacturers'
safety warnings before using arts and craft supplies.
Shop Crayola at S&S Worldwide!
http://www.ssww.com/arts-and-crafts-supplies/crayola/
© 2012 Crayola

Flying in the Sky
crayola supplies
• Washable Watercolors
household supplies
• paper towels
• water
• recycled plastic containers
Why
Ever wonder how a hot air balloon rises in the sky? Discover the facts and paint a beautiful
balloon. Could it circle the world without stopping?
Overview
grades
• Grades 4 to 6
subjects
• Science
• Social Studies
• Visual Arts
time
• 30 to 60 minutes
benefits
• Students can begin to understand the source and properties of energy and how it is
created. Hot air and cold air expand and contract at different rates.
Steps
1. Hot air balloons are found in many parts of the world. Their colorful designs dot the skies in
many festivals during the warmer months. Design and draw your own hot air balloon using
Crayola Washable Water Color Paints.

2. Start your painting by drawing a large tear drop shape. This will form the main part of your
balloon. Decorate as you wish. Make sure to rinse your brush after each color to keep your
palette clean.
3. Underneath the balloon is a firebox used to make the hot air that fills the balloon, causing it
to rise. The firebox is usually square in shape. Paint that next.
4. Add a basket that is used to carry people. Attach it to the balloon with a series of ropes called
flying lines.
5. Add a background to your painting. Imagine flying over the Atlantic or Pacific Ocean. What
would it look like? Draw a desert or mountain landscape. You can be the travel guide and send
your balloon wherever you want to go.
6. Always wash your brush in clean water when finished.
Adaptations
• Most children have had a balloon that rises by itself for a birthday or at a party. These
balloons are filled with helium. Discuss why helium rises just like hot air.
• A hot air balloon is just one type of vehicle that allows air travel. Have a discussion
about different ones. What is the main difference between these and a hot air balloon?
• Hot air balloons cannot be steered. In fact they are at the complete mercy of the wind.
Crews follow them in cars so that they can pick up the passengers when they land.
Discuss why this might be a problem.
• Assessment: Hot air balloons cannot fly in rain. Have a discussion to see if anyone can
determine why. The hot air from inside the balloon is so hot that it causes water on top
of the balloon to boil. This action ruins the fabric.
• Hot air is a form of energy. Discuss different types of energy that we use everyday.
Electricity, solar power, fossil fuel. How do these differ from hot air?
Safety Guidelines
Adult supervision is required for any arts & crafts project. Observe children closely and
intervene as necessary to prevent potential safety problems and ensure appropriate use of arts
and crafts materials. Some craft items, particularly beads and buttons, are potential choking
hazards for young children. Avoid use of such small parts with children younger than 3 years.
Craft items such as scissors, push pins and chenille sticks may have sharp points or edges. Avoid
use of materials with sharp points by children younger than 4 years. Read all manufacturers'
safety warnings before using arts and craft supplies.
Crayola Washable Paints—Not for use as body/face paint.
Shop Crayola at S&S Worldwide!
http://www.ssww.com/arts-and-crafts-supplies/crayola/
© 2012 Crayola

Exploring Triangles
crayola supplies
• Colored Pencils
• Glue Sticks
• Pointed Tip Scissors
• Construction Paper
household supplies
• ruler
• posterboard
Why
Display your geometry genius by creating a poster of popping triangles.
Overview
grades
• Grades 1 to 3
• Grades 4 to 6
• Grades 7 to 12
• Special Needs
subjects
• Math
• Visual Arts
• Language Arts
time
• Less than 1/2 hour
• 30 to 60 minutes
• Multiple Sessions
benefits
• Children learn about the characteristics of various types of triangles.
• Students draw triangles.
• Students use appropriate vocabulary to describe characteristics of and identify the
names of triangles.

Steps
1. Find out about different kinds of triangles, including right, isosceles, scalene, and equilateral
triangles. Identify characteristics of each triangle.
2. Use a ruler and Crayola® Colored Pencils to make samples of each kind of triangle. Decorate
triangles with colorful patterns, then cut out with Crayola Scissors.
3. Cut and fold small strips of paper in fourths to make tabs to attach to the backs of each
triangle. Glue one end to the other with a Crayola Glue Stick. Apply glue to the outward faces of
the tabs to attach triangles on poster board.
4. Use colored pencils to label each triangle on the poster board. Add descriptive captions
identifying characteristics of each triangle. Draw arrows pointing out particular angles typical of
specific triangles. Design a title for your poster using block lettering and bold colors.
Adaptations
Adult supervision is required for any arts & crafts project. Observe children closely and
intervene as necessary to prevent potential safety problems and ensure appropriate use of arts
and crafts materials. Some craft items, particularly beads and buttons, are potential choking
hazards for young children. Avoid use of such small parts with children younger than 3 years.
Craft items such as scissors, push pins and chenille sticks may have sharp points or edges. Avoid
use of materials with sharp points by children younger than 4 years. Read all manufacturers'
safety warnings before using arts and craft supplies.
Scissors—ATTENTION: The cutting edges of scissors are sharp and care should be taken
whenever cutting or handling. Blunt-tip scissors should be used only by children 4 years and
older. Pointed-tip scissors should be used only by children 6 years and older.
Safety Guidelines
• For each triangle, cut out a sample triangle template, then trace it to make a pattern
picture, coloring in triangles with colored pencils. Try to make each traced triangle
border on another triangle. Display in a gallery of triangles.
• Create colorful study cards. Make a bright triangle border around each index card. Write
notes about the triangle's characteristics in the center of the card in colored pencil.
• Students and their parents search for samples of each of the different types of triangles
at home and in their neighborhood. Make a chart showing the variety of triangles found.
• Younger students and those with special needs may need to trace templates of basic
triangles. Provide assistance with scissors as needed.
Shop Crayola at S&S Worldwide!
http://www.ssww.com/arts-and-crafts-supplies/crayola/
© 2012 Crayola

Eye-Popping Color Name Game
crayola supplies
• Twistables®
• Pointed Tip Scissors
household supplies
• recycled file folders
Why
Have fun with your friends and family when you ask for the juice naranja or point out your
sneakers blanc. Design and play this game to learn cool color names in other languages.
Overview
grades
• Grades 1 to 3
• Grades 4 to 6
subjects
• Language Arts
• Math
• Social Studies
• Visual Arts
time
• 30 to 60 minutes
• Multiple Sessions
benefits
• Students research to find English, French, and Spanish color words.
• Students produce a game that involves matching colors to their English, French, and
Spanish names.
• Students participate in playing the game they created.
Steps
1. If you ever felt angry and were seeing red, you would see rojo in Spanish and rouge in
French. Feeling blue? You would feel azul in Spanish and bleu in French. Find Spanish and
French (or any other language) color names and their pronunciations. Notice that some of the
names sound or are spelled almost the same, such as apricot in English and abricot in French.
Practice saying and writing the names of your favorite colors in another language.
2. Make a fun color-matching game to read and pronounce your new color vocabulary. To make
the game, use Crayola Twistables® to create bold and bright designs all over one side of two
recycled file folders. With Crayola Scissors, cut the folder into card-size rectangles. You’ll need
at least 15 cards.
3. Turn the cards over. Color half of each blank rectangle. Create eye-popping designs such as
stripes, zigzags, plaids, or dotted patterns.
4. On the other half of the rectangle, use black to write a color word in English, French, and/or
Spanish. Make sure the color word is different than the color next to it on the card. Draw a
black frame around the color word to make it more visible. Each color word should have a color
to match, but not on the same card.
5. Play the game with rules you agree on, perhaps like dominoes. Challenge friends and family
to play and learn new color words with you.
Adaptations
• Spend time delving deeper into the science of color by exploring and experimenting
with light, reflection, and refraction. Research to learn why the sky is blue and a sunset
is red.
• Investigate color terms by creating your own custom colors. Begin with a basic color or
hue. Change the lightness or darkness (value) of the color. Make it lighter by adding
white to create a tint. Darken the color by adding black to create a shade. Try mixing
two colors together. Choose a name for your invented color. Research to find your new
color name in another language.
• Assess students’ mastery of English, French, and Spanish color words by holding friendly
Color Bees, patterned after Spelling Bees. Call out a word (azul) and ask for its
equivalent in another language (blue). Start with team responses, move on to pair
responses, and then use individual responses as the students become more confident
and competent.
Safety Guidelines
Adult supervision is required for any arts & crafts project. Observe children closely and
intervene as necessary to prevent potential safety problems and ensure appropriate use of arts
and crafts materials. Some craft items, particularly beads and buttons, are potential choking
hazards for young children. Avoid use of such small parts with children younger than 3 years.
Craft items such as scissors, push pins and chenille sticks may have sharp points or edges. Avoid
use of materials with sharp points by children younger than 4 years. Read all manufacturers'
safety warnings before using arts and craft supplies.

Scissors—ATTENTION: The cutting edges of scissors are sharp and care should be taken
whenever cutting or handling. Blunt-tip scissors should be used only by children 4 years and
older. Pointed-tip scissors should be used only by children 6 years and older.
Shop Crayola at S&S Worldwide!
http://www.ssww.com/arts-and-crafts-supplies/crayola/
© 2012 Crayola

Fancy Math Facts
crayola supplies
• Glue Sticks
• Glitter Glue
• Blunt-Tip Scissors
• Construction Paper
• Dry-Erase Crayons
household supplies
• clear plastic adhesive
• recycled CD
Why
Practice your math facts in style! Use recycled CD’s along with Crayola® Dry-Erase Crayons to
create a spectacular classwork or homework helper.
Overview
grades
• Grades 1 to 3
• Grades 4 to 6
subjects
• Math
• Visual Arts
time
• Multiple Sessions
benefits
• Students practice basic math facts using Crayola® Dry-Erase crayons and E-Z Erase Mitt.
The ability to wipe off and repeat provides for easy repetition and interest.
• Students can easily draw counters to represent the value of numbers to aid in solving
simple addition and subtraction problems.
Steps
1. Trace a recycled CD on a piece of Crayola® construction paper. Cut out the construction
paper circle with Crayola® scissors. Use a Crayola® glue stick to attach the construction paper
circle to the printed side of a recycled CD.
2. Trace a recycled CD on a piece of clear plastic adhesive. Cut out the clear plastic adhesive
with scissors. Peel the backing off the clear plastic adhesive and place over the construction
paper side of the recycled CD. Write your name or draw a picture on the covered construction
paper side using Crayola® Dry-Erase Crayons. Dry-Erase Crayons wipe off easily from clear
plastic adhesive.
3. Measure and cut out 4 narrow strips of construction paper. Attach the narrow strips of
construction paper in a "V" shape at the top and bottom of the shiny side of the recycled CD
with a glue stick
4. Use glitter glue to decorate the narrow strips. Allow to dry completely.
5. Use Dry-Erase Crayons to write math facts and the E-Z Erase Mitt to wipe off. Practice your
math facts by writing a math sign in the top "V" area. Then write a number on each side and
write the answer in the bottom "V" area. Change the math signs and numbers over and over
again. Younger children can take the added step of drawing dots to help them figure out the
answer.
Adaptations
• Students can work in groups of two to create problems and have their partners solve
them. Observe how they use teamwork and problem-solving skills to get their answers.
• Teachers can read word problems aloud to the class while students write out the
number sentence on their CD’s and solve the problem.
• Assessment: Assess students’ understandings of mathematical concepts by changing a
sign or numeral in a problem. Ask students to explain and demonstrate how this alters
the solution.
Safety Guidelines
Adult supervision is required for any arts & crafts project. Observe children closely and
intervene as necessary to prevent potential safety problems and ensure appropriate use of arts
and crafts materials. Some craft items, particularly beads and buttons, are potential choking
hazards for young children. Avoid use of such small parts with children younger than 3 years.
Craft items such as scissors, push pins and chenille sticks may have sharp points or edges. Avoid
use of materials with sharp points by children younger than 4 years. Read all manufacturers'
safety warnings before using arts and craft supplies.
Glitter Glue— WARNING: CHOKING HAZARD—Small parts. Not for children under 3 years.
Not for use on skin.
Adult Assistance is required for this arts & crafts project.
Scissors—ATTENTION: The cutting edges of scissors are sharp and care should be taken
whenever cutting or handling. Blunt-tip scissors should be used only by children 4 years and
older. Pointed-tip scissors should be used only by children 6 years and older.
© 2012 Crayola
Shop Crayola at S&S Worldwide! http://www.ssww.com/arts-and-crafts-supplies/crayola/
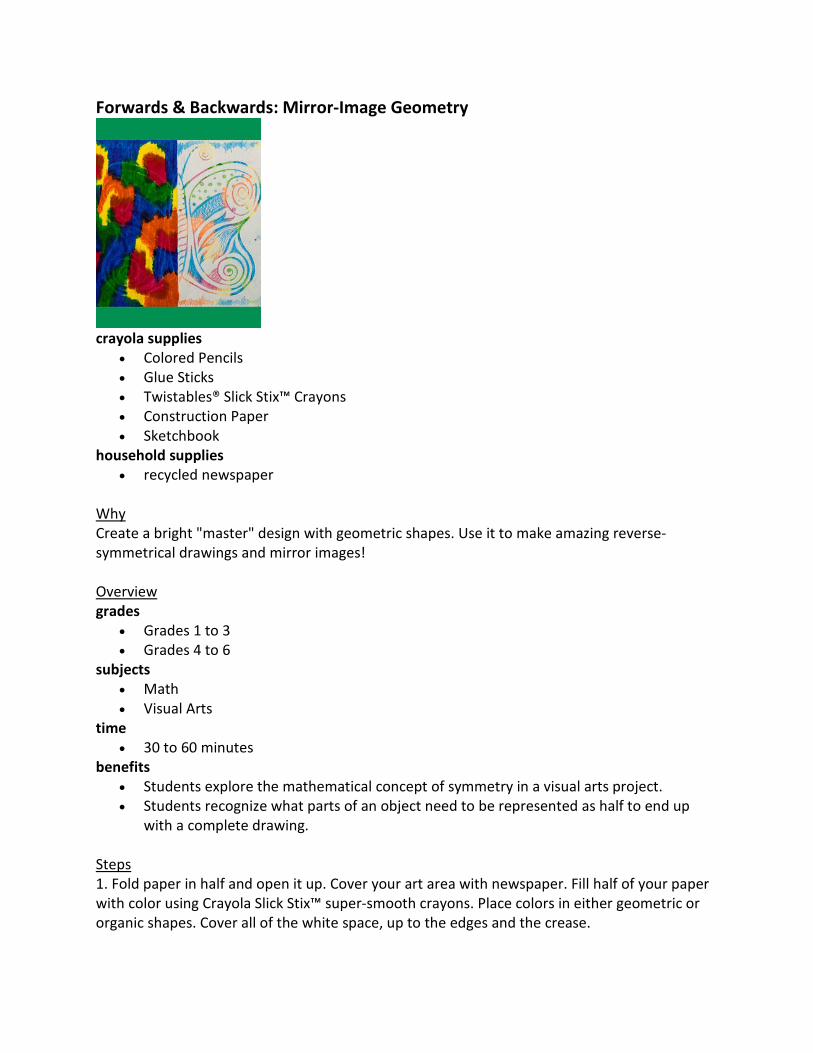
Forwards & Backwards: Mirror-Image Geometry
crayola supplies
• Colored Pencils
• Glue Sticks
• Twistables® Slick Stix™ Crayons
• Construction Paper
• Sketchbook
household supplies
• recycled newspaper
Why
Create a bright "master" design with geometric shapes. Use it to make amazing reverse-
symmetrical drawings and mirror images!
Overview
grades
• Grades 1 to 3
• Grades 4 to 6
subjects
• Math
• Visual Arts
time
• 30 to 60 minutes
benefits
• Students explore the mathematical concept of symmetry in a visual arts project.
• Students recognize what parts of an object need to be represented as half to end up
with a complete drawing.
Steps
1. Fold paper in half and open it up. Cover your art area with newspaper. Fill half of your paper
with color using Crayola Slick Stix™ super-smooth crayons. Place colors in either geometric or
organic shapes. Cover all of the white space, up to the edges and the crease.
2. Refold the paper. Remove the newspaper so you can work on a hard surface to draw half of a
picture. You MUST begin AND end your outline shape on the fold. The first time you try this,
choose a simple shape, such as a butterfly or half an apple.
3. Press hard with Crayola Colored Pencils to outline your shape. Begin at the folded edge and
end on the fold. Make your lines thick. Add lots of details inside your outline.
4. Open up the paper. Inside you’ll find a complete image! Half of your background is colored
and half is white! This kind of drawing, which has two halves exactly the same (but reversed), is
called symmetrical.
5. Glue your drawing on a large piece of construction paper to be your frame.
Adaptations
• Color a whole piece of paper and then place another piece of paper (the same size) on
top of it. The Slick Stix "master" paper can be re-used for several drawings, and even
"re-charged" by coloring over the pale spots, and used again.
• Explore the fraction concepts of half and whole with this technique. Can you figure out
how to write words using this technique? Try it!
• Assessment: Success is measured by the completeness of the object being drawn.
Greater attention to detail will also show more advanced understanding of the concept.
Safety Guidelines
Adult supervision is required for any arts & crafts project. Observe children closely and
intervene as necessary to prevent potential safety problems and ensure appropriate use of arts
and crafts materials. Some craft items, particularly beads and buttons, are potential choking
hazards for young children. Avoid use of such small parts with children younger than 3 years.
Craft items such as scissors, push pins and chenille sticks may have sharp points or edges. Avoid
use of materials with sharp points by children younger than 4 years. Read all manufacturers'
safety warnings before using arts and craft supplies.
Shop Crayola at S&S Worldwide!
http://www.ssww.com/arts-and-crafts-supplies/crayola/
© 2012 Crayola

Fragile Reefs
crayola supplies
• Erasable Colored Pencils
• Markers
• Model Magic®
• No-Run School Glue
• Pointed Tip Scissors
• Giant Floor Pad
household supplies
• textured items, such as sandpaper, screen, paper doilies, rubber sink mat
• recycled cardboard box
Why
Adjust your goggles and tighten your swim fins! Dive beneath the ocean surface to explore
breathtakingly beautiful coral reefs and the thousands of species they shelter. Create a coral
reef ecosystem in your own undersea diorama.
Overview
grades
• Grades 4 to 6
• Grades 7 to 12
subjects
• Math
• Science
• Social Studies
• Visual Arts
time
• 30 to 60 minutes
• Multiple Sessions
benefits
• Students research to learn how coral reefs form, where they are located, and what plant
and animal species find shelter in the reefs.
• Students build and display a diorama to represent coral and animals that live in a coral
reef.
• Students participate in a discussion about what could be done to preserve the possible
extinction of coral reefs.
Steps
1. A coral reef resembles a large, busy city, with more species of sea creatures and plants than
anywhere else in the ocean. Although a coral reef looks like a colorful rock formation on the sea
floor, it’s really millions of tiny coral polyps living together in huge groups. Polyps are small,
soft-bodied animals, about 1/4 inch wide. Some of them grow hard outer structures called
exoskeletons. When the polyps die, they leave behind their exoskeletons. Live polyps attach
themselves to the exoskeletons of dead polyps and so the reef builds. It takes about a year for a
coral clump to grow outward 1 inch, so it takes a long time for a coral reef to form! There are
about 230,000 square miles of coral reef in the world.
2. Polyps need warm, shallow, sea water to grow, so coral reefs are often near land. There are
three main types of reefs. A fringing reef is attached to the shore. An atoll is a ring of coral
formed around a sunken volcano. A barrier reef has a channel of water between it and the
shore. Although all types of coral polyps grow in similar ways, the many different polyps form
more than 2,500 different kinds of coral! It may resemble tree branches, the human brain, tiny
pipes, fans, feathers, lace, or mushrooms. It may be bright pink, glowing orange, rich purple, or
brilliant yellow. The warm, sunlit water and many hiding places of a coral reef attract thousands
of different animals. Learn more about the creatures who live in a coral reef and then use your
imagination to create your own diorama using ideas like these.
3. Use Crayola® Scissors to cut paper to fit inside a recycled box. With Crayola Markers, create
the shallow, light-reflecting water you might find near a coral reef. Use Crayola Erasable
Colored Pencils to draw small, brightly colored fish. Color with markers, cut out, and glue in
several group formations, or schools, with Crayola School Glue. Glue the paper inside the shoe
box, covering the sides, top, and bottom.
4. Create a coral reef with Crayola Model Magic. Use the neon and white modeling compound
to create spirals and folds. Imprint interesting textures into the modeling material with
household items. Create layers of textured and sculpted coral. The compound will stick to itself
when fresh from the pack or may be glued after air drying. Use markers to create brightly
colored shrimp, sea horses, or other tiny creatures. Cut out and glue to the coral. Add larger sea
animals, such as angel fish or an octopus, to your seascape. Glue them around the edges of the
box to add more depth to your diorama.
5. Explain to classmates, other students, or your families how coral reefs are in danger today
due to overfishing, tourist activity, pollution, and global warming. Decide, as a group, on a
possible course of action to prevent the loss of this very valuable habitat.
Adaptations
• Find The Great Barrier Reef on a world map. It runs alongside the northeast coast of
Queensland, Australia, and is the largest coral reef in the world. It stretches for 1,260
miles and is home to 4,000 species of shell fish, 2,000 species of fish, 500 species of
seaweed, 500 species of coral, 16 species of sea snakes, and 6 species of sea turtles. Use
this information to create math word problems using measurement, addition,
subtraction, or estimation. Neatly write each problem on an index card. Number each
card, then number a corresponding sheet of paper with the problem number and
solution. Exchange cards, solving each problem in turn. Review problems and solutions
together.
• There are more kinds of animals in coral reefs than in any other earth habitat except
rain forests. Choose different species to research, including microscopic algae and
plankton, tiny animals like polyps, small animals, medium animals, and the largest
predators. Draw and color your creature and note its prey and predators, how it
protects itself, and how it catches its food. On a large wall, create a coral reef food
chain, using yarn or paper strips to join one creature with the next. Start with algae and
plankton and link each creature to the one it eats for energy and nourishment, ending
with the largest predators such as sharks, manta rays, moray eels, and barracudas.
Discuss what would happen if even one of the species in the food chain disappeared.
• Assessment: Set aside a day on which dioramas are displayed around the perimeter of
the room. Students walk around the room to see and hear each other’s diorama
presentations that include: the type of coral reef depicted (atoll, fringing, or barrier), the
type of coral, and the species of sea life represented. Allow time for students to ask
questions of one another.
Safety Guidelines
Adult supervision is required for any arts & crafts project. Observe children closely and
intervene as necessary to prevent potential safety problems and ensure appropriate use of arts
and crafts materials. Some craft items, particularly beads and buttons, are potential choking
hazards for young children. Avoid use of such small parts with children younger than 3 years.
Craft items such as scissors, push pins and chenille sticks may have sharp points or edges. Avoid
use of materials with sharp points by children younger than 4 years. Read all manufacturers'
safety warnings before using arts and craft supplies.
Crayola Modeling Materials including Crayola Model Magic®, and Model Magic Fusion™,
Crayola Air-Dry Clay, and Crayola Dough—
• Keep away from open flames. Do not use to make candleholders, hot plates, trivets, or
other similar objects that will be used or placed near fire and other heat sources.
• Do not put in an oven, microwave, or kiln.
• Do not make into vessels/containers that will hold unpackaged food.
• The use of modeling material to make items that look like food is discouraged for
children younger than age 5 to avoid their confusion with real food.
• Unless sealed with a water-resistant glaze, do not make projects exposed to or
immersed in water, such as boats or outdoor bird feeders. They would disintegrate
when exposed to moisture.
• Crayola Dough—contains gluten (wheat flour) as an ingredient.
• Crayola Air-Dry Clay, Crayola Model Magic and Model Magic Fusion are gluten-free.
However, they are produced on the same machinery as Crayola Dough which does

contain gluten. Although the machines are cleaned prior to the start of each production
run, there is a slight possibility that trace amounts of gluten from Crayola Dough may be
present in the other modeling compound products. For information regarding specific
ingredients or allergic concerns, please call our Consumer Affairs department at 1-800-
272-9652 weekdays between 9 AM and 4 PM Eastern Standard Time.
Scissors—ATTENTION: The cutting edges of scissors are sharp and care should be taken
whenever cutting or handling. Blunt-tip scissors should be used only by children 4 years and
older. Pointed-tip scissors should be used only by children 6 years and older.
Shop Crayola at S&S Worldwide!
http://www.ssww.com/arts-and-crafts-supplies/crayola/
© 2012 Crayola

Giant-Size Cell Model
crayola supplies
• Model Magic®
• No-Run School Glue
• Pointed Tip Scissors
• Washable Markers
• Construction Paper
household supplies
• recycled cardboard
Why
Cellular models transform the microscopic unseen into everyday reality. These cells represent
plants or animals—not the telephone variety!
Overview
grades
• Grades 4 to 6
• Grades 7 to 12
subjects
• Science
• Visual Arts
time
• 30 to 60 minutes
• Multiple Sessions
benefits
• Students gather information about cellular structure.
• Students reproduce the parts of a cell in a 3-D model.
• Students label their work.
Steps
1. Cells come in almost any shape—disks, cubes, boxes, chopsticks, pea pods, globs, blobs, and
splats! Find a detailed illustration of a plant or animal cell that interests you. Learn the names
and functions of each part. Here is one way to make a 3-D replica of the cell to demonstrate
what you learned.
2. Mold a handful of Crayola Model Magic® compound into your cell’s shape. With your fingers,
sculpt the cell walls, nucleus (the cell’s control center), and other features. Use different colors
of compound so each part shows up well.
3. Add Crayola School Glue to represent the cell’s cytoplasm (matter between the cell
membrane and the nuclear envelope). Air-dry your model at least 24 hours.
4. Glue construction paper to recycled cardboard. Glue your model in the center. Cut paper
strips. Glue one end to each part and the other end to the base. Write the names of each part
on the base.
Adaptations
• Explore the differences between animal and plant cellular structures.
• Create additional models of cell reproduction, featuring the various stages of division.
• Assessment: Students can name cell parts, describe their characteristics, and explain
their functions.
Safety Guidelines
Adult supervision is required for any arts & crafts project. Observe children closely and
intervene as necessary to prevent potential safety problems and ensure appropriate use of arts
and crafts materials. Some craft items, particularly beads and buttons, are potential choking
hazards for young children. Avoid use of such small parts with children younger than 3 years.
Craft items such as scissors, push pins and chenille sticks may have sharp points or edges. Avoid
use of materials with sharp points by children younger than 4 years. Read all manufacturers'
safety warnings before using arts and craft supplies.
Crayola Modeling Materials including Crayola Model Magic®, and Model Magic Fusion™,
Crayola Air-Dry Clay, and Crayola Dough—
• Keep away from open flames. Do not use to make candleholders, hot plates, trivets, or
other similar objects that will be used or placed near fire and other heat sources.
• Do not put in an oven, microwave, or kiln.
• Do not make into vessels/containers that will hold unpackaged food.
• The use of modeling material to make items that look like food is discouraged for
children younger than age 5 to avoid their confusion with real food.
• Unless sealed with a water-resistant glaze, do not make projects exposed to or
immersed in water, such as boats or outdoor bird feeders. They would disintegrate
when exposed to moisture.
• Crayola Dough—contains gluten (wheat flour) as an ingredient.
• Crayola Air-Dry Clay, Crayola Model Magic and Model Magic Fusion are gluten-free.
However, they are produced on the same machinery as Crayola Dough which does
contain gluten. Although the machines are cleaned prior to the start of each production
run, there is a slight possibility that trace amounts of gluten from Crayola Dough may be

present in the other modeling compound products. For information regarding specific
ingredients or allergic concerns, please call our Consumer Affairs department at 1-800-
272-9652 weekdays between 9 AM and 4 PM Eastern Standard Time.
Scissors—ATTENTION: The cutting edges of scissors are sharp and care should be taken
whenever cutting or handling. Blunt-tip scissors should be used only by children 4 years and
older. Pointed-tip scissors should be used only by children 6 years and older.
Shop Crayola at S&S Worldwide!
http://www.ssww.com/arts-and-crafts-supplies/crayola/
© 2012 Crayola

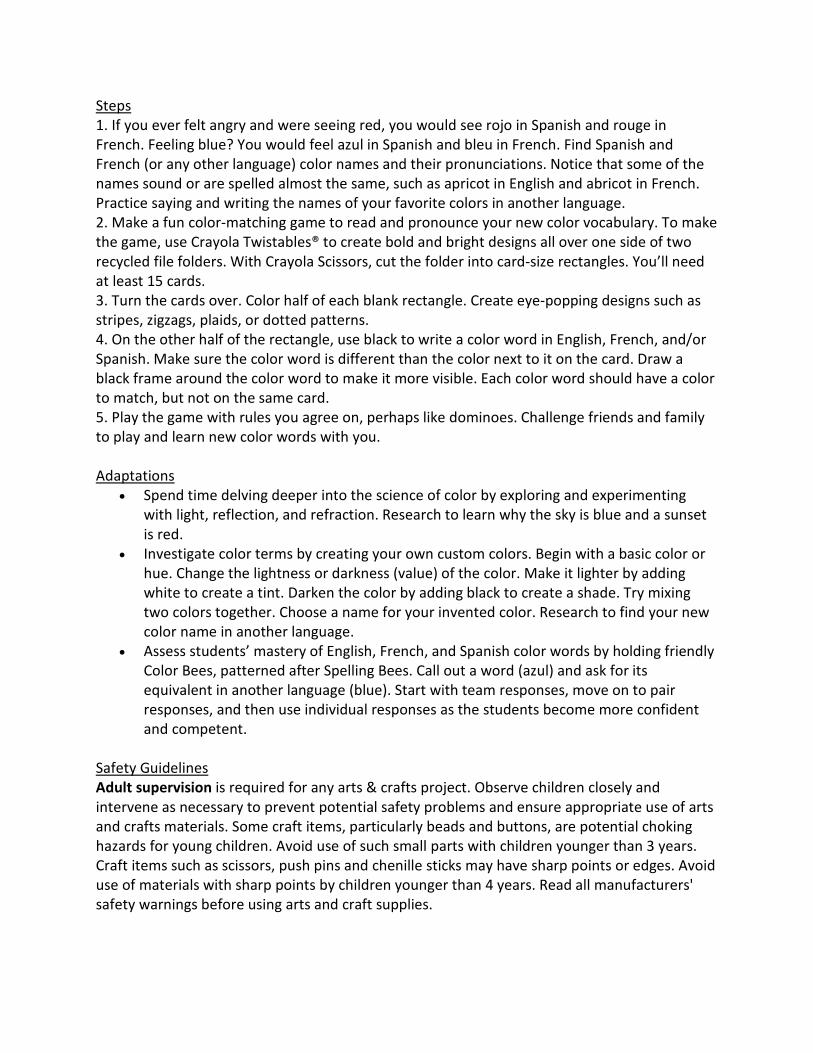
The Great American Seal
crayola supplies
• Markers
• Glue Sticks
• Pointed Tip Scissors
• Color Sticks™ Colored Pencils
household supplies
• cardboard
Why
Discover the beauty of the Great American Seal. Recreate this national emblem with Crayola™
Color Sticks™ Colored Pencils.
Overview
grades
• Grades 4 to 6
• Grades 7 to 12
subjects
time
• 30 to 60 minutes
• Multiple Sessions
benefits
• Students will research the history of the Great American Seal. Who created this national
emblem and why and report findings.
• Students will be able to identify the symbols from nature and history found on the great
seal.
• Students will translate the three Latin phrases or mottoes written on the great seal.
Students will discuss the meaning and messages conveyed in these mottoes.
• Students will define what a seal is and how the Great Seal is used to seal documents.
They will also include information about why the Great Seal has two sides.
Steps
1. Use a medium size plate as a template to draw two circles on a piece of white construction
paper and a piece of cardboard. Cut out the construction paper and cardboard circles with
scissors.
2. Look in a book or on the Internet for a colorful picture of the Great American Seal. Use this as
a reference when drawing your seal.
3. Using Color Sticks™ Colored Pencils, draw the front and back of the Great American Seal on
two circles of construction paper. Lay the Color Sticks flat to shade a large background area.
Add details and words with Crayola™ Markers.
4. Attach the finished seals to the cardboard circles with a glue stick.
Adaptations
• Students can gather information about how the great seal ended up on the dollar bill
and the role of Henry A. Wallace in this process.
• Students can research and identify the myths and misinformation associated with the
Great Seal.
Safety Guidelines
Adult supervision is required for any arts & crafts project. Observe children closely and
intervene as necessary to prevent potential safety problems and ensure appropriate use of arts
and crafts materials. Some craft items, particularly beads and buttons, are potential choking
hazards for young children. Avoid use of such small parts with children younger than 3 years.
Craft items such as scissors, push pins and chenille sticks may have sharp points or edges. Avoid
use of materials with sharp points by children younger than 4 years. Read all manufacturers'
safety warnings before using arts and craft supplies.
Scissors—ATTENTION: The cutting edges of scissors are sharp and care should be taken
whenever cutting or handling. Blunt-tip scissors should be used only by children 4 years and
older. Pointed-tip scissors should be used only by children 6 years and older.
Shop Crayola at S&S Worldwide!
http://www.ssww.com/arts-and-crafts-supplies/crayola/
© 2012 Crayola

Go to ssww.com and search "Crayola" or call 800-243-9232.
* To receive your discount, use offer code B3567 Offer expires 12/31/2012. This offer is not valid on purchases made with any other offers
Stock Up and Save!Special Offer from S&S Worldwide
on Classrom Supplies from Crayola®
All Orders over $50*Offer Code: B3567Expires: 12/31/2012
$10 off
SHOP NOW