legal information getting to know your device...
TRANSCRIPT

MF275R
Quick Start Guide
LEGAL INFORMATION
Copyright © 2016 ZTE CORPORATION.
All rights reserved.
No part of this publication may be excerpted, reproduced,
translated or utilized in any form or by any means,
electronic or mechanical, including photocopying and
microfilm, without the prior written permission of ZTE Corporation.
The manual is published by ZTE Corporation. We reserve the right to make modifications on print errors or update specifications without prior notice.
Version No. : R1.0
Getting to Know Your Device
The device operates on 4G/LTE networks and supports voice and data services.
Appearance
1. SIM Card slot Insert your micro-SIM Card.
2. Reset button Reset your device.
3. External antenna connector
To strengthen signal.
4. WPS button To activate the WPS function.
5. PhoneRJ11 connector for connection
to telephone.
6. LANRJ45 Ethernet connector for connection to computer.
7. Power SocketConnector for the external power supply.
8. Power Switch Turn your device on or off.
9. IndicatorsIndicates the status of your
device.
Indicators
Indicator State Description
Power Green steady AC power present
Off No AC power
Voicemail
Green blinking New voicemail waiting
Off No new voicemail
Battery
Green steadyMore than 50% discharging
(charger not present)
Green blinkingMore than 50% charging
(charger present)
Yellow steady20%-50% discharging
(charger not present)
Yellow blinking20%-50% charging (charger
present)
Red steady
Less than 20% discharging(charger not
present)
Red blinkingLess than 20% charging (charger present)
Off Battery not present
Wi-FiGreen steady Wi-Fi on
BlinkingActive data connection or FOTA
Off Wi-Fi off
Network
Green steadyConnected to the LTE network
Green blinking Roaming (LTE network)
Yellow steadyConnected to the 4G network
Yellow blinking Roaming(4G network)
Red steady
No service, limited service, searching for network, no SIM Card or other abnormal
status
Signal
Strength
Green steady Strong signal
Yellow steady Weak signal
Red steadyNo service, limited service, or searching for signal
Installation Guide
Installing the micro-SIM Card and battery
1. Install the micro-SIM Card.
WARNING!
• Switch off your device before installing or replacing the micro-SIM card.
• Your device only supports a micro-SIM card. • To avoid damaging the device, please only use the card
that is provided by your service provider and ensure that the micro-SIM card contacts are facing up when inserting it into the micro-SIM slot.
1 2 3 4 5 6
2. Slide the back cover and remove it.
3. Insert the battery.
Before You Begin
Charge your device using the included power adapter• Insert the charger lead carefully into the power socket of
the device.• Do not use excessive force when inserting the lead.
Connecting Your Device
Please refer to the following picture before connecting to your device. If you want to use the mobile network to connect to the Internet or use your land line phone, you will need to insert your micro-SIM card first.
Switching On Your Device
1. Press and hold the Power Switch to get started. Make sure that the phone is on the hook before you power on.
2. Wait 1~2 minutes and then the Power and battery indicator should be lit.
Connecting to the Internet
Via Ethernet
1. Connect the Ethernet cable to the LAN port and your computer.
2. Visit a familiar website to verify that the connection is active and that the device is able to access the Internet as expected.
Via Wi-Fi
1. Open the Wi-Fi application on a client to search for available wireless networks.
NOTE:
Please set the client to use DHCP to obtain an IP address automatically, and the client will get an IP address like “192.168.0.100”.
2. Select the SSID (wireless network name) of your device, and then click Connect.
NOTE:
You can find the default SSID and password information on the label of your Smart Hub.
3. Enter the password, and then click OK.
4. After a few moments, the client will connect to your MF275R successfully.
5. Go Visit a familiar website to verify that the connection is active and that the device is able to access the Internet as expected.
Connect the Device to a Phone
1. Unplug your phone from the home phone wall jack.2. Plug your phone into the ‘PHONE 1’ port on the device
through a phone cable.
NOTE:
The “Phone 2” port can be used to connect an additional phone, or cordless base station. All telephones connected to the MF275R will use the same telephone number.
Make a Test Call
1. Pick up the handset of the connected home phone.2. Dial a phone number.3. Wait 4 ~ 8 seconds for the call to be connected.
NOTE:
You will need to dial 10 digits even for local numbers.
Useful Tips
• Press “1” to access your voicemail. To access or set-up your voice mail, simply press the “1” key and wait for 2~4 seconds.
• When powered off, the MF275R will no longer send or receive calls.
• When not using the battery for a long period, remove it from your MF275R and store it in a cool dry place.
7 8 9 10 11 12 13
MF275R
Guide de démarrage rapide
MENTIONS JURIDIQUES
Copyright © 2016 ZTE CORPORATION.
Tous droits réservés.
Aucune partie de cette publication ne peut être citée, reproduite, traduite ou utilisée sous quelque forme ou par quelque moyen que ce soit, électronique ou mécanique, y compris la photocopie et le microfilm, sans l’autorisation écrite préalable de ZTE Corporation.
Le manuel est publié par ZTE Corporation. Nous nous réservons le droit d’apporter des modifications aux erreurs d’impression ou de mettre à jour les caractéristiques techniques dans ce guide sans préavis.
Version nº R1.0
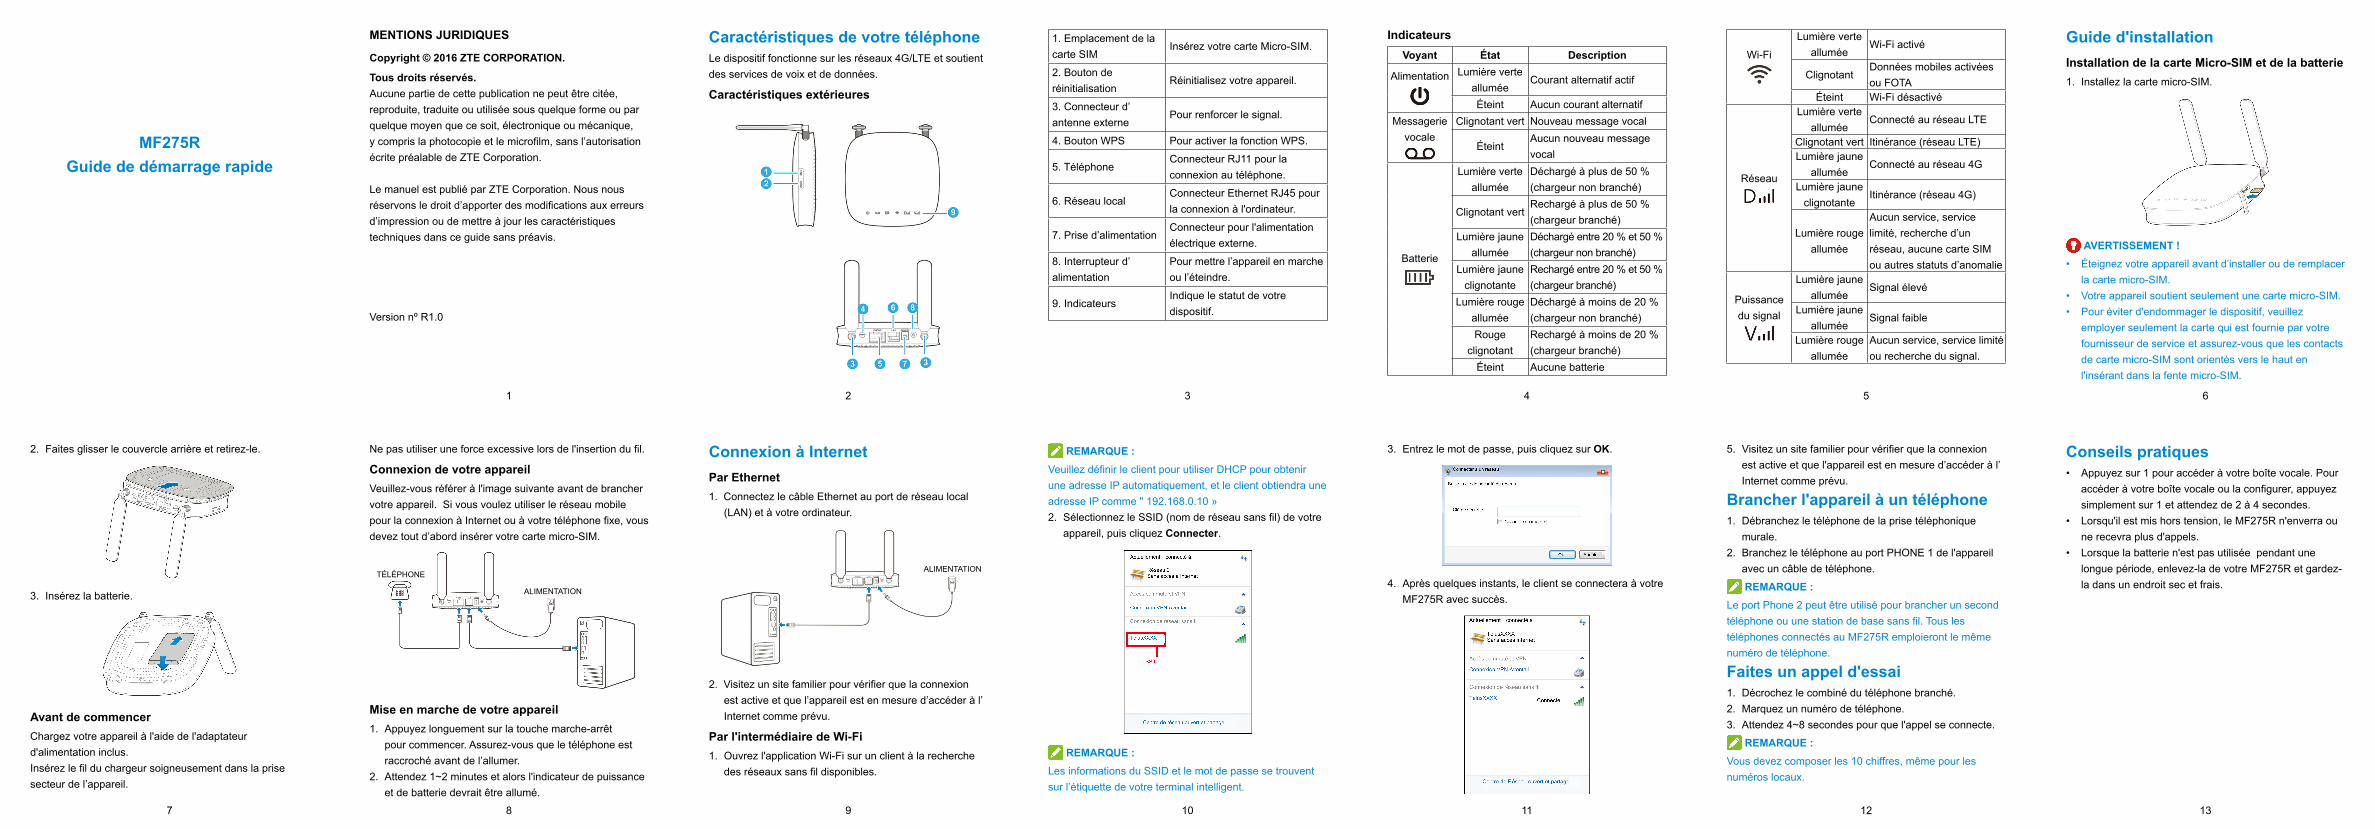
Caractéristiques de votre téléphone
Le dispositif fonctionne sur les réseaux 4G/LTE et soutient des services de voix et de données.
Caractéristiques extérieures
1. Emplacement de la carte SIM
Insérez votre carte Micro-SIM.
2. Bouton de
réinitialisationRéinitialisez votre appareil.
3. Connecteur d’antenne externe
Pour renforcer le signal.
4. Bouton WPS Pour activer la fonction WPS.
5. TéléphoneConnecteur RJ11 pour la
connexion au téléphone.
6. Réseau localConnecteur Ethernet RJ45 pour la connexion à l'ordinateur.
7. Prise d’alimentationConnecteur pour l'alimentation électrique externe.
8. Interrupteur d’alimentation
Pour mettre l’appareil en marche ou l’éteindre.
9. IndicateursIndique le statut de votre dispositif.
Indicateurs
Voyant État Description
Alimentation
Lumière verte allumée
Courant alternatif actif
Éteint Aucun courant alternatifMessagerie
vocale
Clignotant vert Nouveau message vocal
ÉteintAucun nouveau message vocal
Batterie
Lumière verte allumée
Déchargé à plus de 50 % (chargeur non branché)
Clignotant vertRechargé à plus de 50 % (chargeur branché)
Lumière jaune allumée
Déchargé entre 20 % et 50 % (chargeur non branché)
Lumière jaune clignotante
Rechargé entre 20 % et 50 % (chargeur branché)
Lumière rouge allumée
Déchargé à moins de 20 % (chargeur non branché)
Rouge
clignotant
Rechargé à moins de 20 % (chargeur branché)
Éteint Aucune batterie
Wi-Fi
Lumière verte allumée
Wi-Fi activé
ClignotantDonnées mobiles activées ou FOTA
Éteint Wi-Fi désactivé
Réseau
Lumière verte allumée
Connecté au réseau LTE
Clignotant vert Itinérance (réseau LTE)Lumière jaune
alluméeConnecté au réseau 4G
Lumière jaune clignotante
Itinérance (réseau 4G)
Lumière rouge allumée
Aucun service, service limité, recherche d’un réseau, aucune carte SIM ou autres statuts d’anomalie
Puissance du signal
Lumière jaune allumée
Signal élevé
Lumière jaune allumée
Signal faible
Lumière rouge allumée
Aucun service, service limité ou recherche du signal.
Guide d'installation
Installation de la carte Micro-SIM et de la batterie
1. Installez la carte micro-SIM.
AVERTISSEMENT !
• Éteignez votre appareil avant d’installer ou de remplacer la carte micro-SIM.
• Votre appareil soutient seulement une carte micro-SIM. • Pour éviter d'endommager le dispositif, veuillez
employer seulement la carte qui est fournie par votre fournisseur de service et assurez-vous que les contacts de carte micro-SIM sont orientés vers le haut en l'insérant dans la fente micro-SIM.
1 2 3 4 5 6
2. Faites glisser le couvercle arrière et retirez-le.
3. Insérez la batterie.
Avant de commencer
Chargez votre appareil à l'aide de l'adaptateur d'alimentation inclus.Insérez le fil du chargeur soigneusement dans la prise secteur de l’appareil.
Ne pas utiliser une force excessive lors de l'insertion du fil.
Connexion de votre appareil
Veuillez-vous référer à l'image suivante avant de brancher votre appareil. Si vous voulez utiliser le réseau mobile pour la connexion à Internet ou à votre téléphone fixe, vous devez tout d’abord insérer votre carte micro-SIM.
TÉLÉPHONE
ALIMENTATION
Mise en marche de votre appareil
1. Appuyez longuement sur la touche marche-arrêt pour commencer. Assurez-vous que le téléphone est raccroché avant de l’allumer.
2. Attendez 1~2 minutes et alors l'indicateur de puissance et de batterie devrait être allumé.
Connexion à Internet
Par Ethernet
1. Connectez le câble Ethernet au port de réseau local (LAN) et à votre ordinateur.
ALIMENTATION
2. Visitez un site familier pour vérifier que la connexion est active et que l’appareil est en mesure d’accéder à l’Internet comme prévu.
Par l'intermédiaire de Wi-Fi
1. Ouvrez l'application Wi-Fi sur un client à la recherche des réseaux sans fil disponibles.
REMARQUE :
Veuillez définir le client pour utiliser DHCP pour obtenir une adresse IP automatiquement, et le client obtiendra une adresse IP comme " 192.168.0.10 »2. Sélectionnez le SSID (nom de réseau sans fil) de votre
appareil, puis cliquez Connecter.
REMARQUE :
Les informations du SSID et le mot de passe se trouvent sur l’étiquette de votre terminal intelligent.
3. Entrez le mot de passe, puis cliquez sur OK.
4. Après quelques instants, le client se connectera à votre MF275R avec succès.
5. Visitez un site familier pour vérifier que la connexion est active et que l'appareil est en mesure d’accéder à l’Internet comme prévu.
Brancher l'appareil à un téléphone
1. Débranchez le téléphone de la prise téléphonique murale.
2. Branchez le téléphone au port PHONE 1 de l'appareil avec un câble de téléphone.
REMARQUE :
Le port Phone 2 peut être utilisé pour brancher un second téléphone ou une station de base sans fil. Tous les téléphones connectés au MF275R emploieront le même numéro de téléphone.
Faites un appel d'essai
1. Décrochez le combiné du téléphone branché.2. Marquez un numéro de téléphone.3. Attendez 4~8 secondes pour que l'appel se connecte.
REMARQUE :
Vous devez composer les 10 chiffres, même pour les numéros locaux.
Conseils pratiques
• Appuyez sur 1 pour accéder à votre boîte vocale. Pour accéder à votre boîte vocale ou la configurer, appuyez simplement sur 1 et attendez de 2 à 4 secondes.
• Lorsqu'il est mis hors tension, le MF275R n'enverra ou ne recevra plus d'appels.
• Lorsque la batterie n'est pas utilisée pendant une longue période, enlevez-la de votre MF275R et gardez-la dans un endroit sec et frais.
7 8 9 10 11 12 13