learning : php, mysql, javascript, css & html5 by robin nixon (3rd edition)
DESCRIPTION
Learning : PHP, MySQL, JavaScript, CSS & HTML5 by Robin Nixon (3rd Edition) Note: I share this book for educational purpose only. If you really like this book please buy it and help the authors, they deserve it. All The Best. :) If this book is helpful to you then don't forget to like, share and comment. Facebook: www.facebook.com/pran93TRANSCRIPT


Robin Nixon
THIRD EDITION
Learning PHP, MySQL, JavaScript,CSS & HTML5

Learning PHP, MySQL, JavaScript, CSS & HTML5, Third Editionby Robin Nixon
Copyright © 2014 Robin Nixon. All rights reserved.
Printed in the United States of America.
Published by O’Reilly Media, Inc., 1005 Gravenstein Highway North, Sebastopol, CA 95472.
O’Reilly books may be purchased for educational, business, or sales promotional use. Online editions arealso available for most titles (http://my.safaribooksonline.com). For more information, contact our corporate/institutional sales department: 800-998-9938 or [email protected].
Editor: Andy OramProduction Editor: Kristen BrownCopyeditor: Rachel MonaghanProofreader: Jasmine Kwityn
Indexer: Lucie HaskinsCover Designer: Karen MontgomeryInterior Designer: David FutatoIllustrator: Rebecca Demarest
June 2014: Third Edition
Revision History for the Third Edition:
2014-05-19: First release
See http://oreilly.com/catalog/errata.csp?isbn=9781491949467 for release details.
Nutshell Handbook, the Nutshell Handbook logo, and the O’Reilly logo are registered trademarks of O’ReillyMedia, Inc. Learning PHP, MySQL, JavaScript, CSS & HTML5, the image of sugar gliders, and related tradedress are trademarks of O’Reilly Media, Inc.
Many of the designations used by manufacturers and sellers to distinguish their products are claimed astrademarks. Where those designations appear in this book, and O’Reilly Media, Inc. was aware of a trademarkclaim, the designations have been printed in caps or initial caps.
While every precaution has been taken in the preparation of this book, the publisher and author assume noresponsibility for errors or omissions, or for damages resulting from the use of the information containedherein.
ISBN: 978-1-491-94946-7
[LSI]

For Julie


Table of Contents
Preface. . . . . . . . . . . . . . . . . . . . . . . . . . . . . . . . . . . . . . . . . . . . . . . . . . . . . . . . . . . . . . . . . . . . . . xxi
1. Introduction to Dynamic Web Content. . . . . . . . . . . . . . . . . . . . . . . . . . . . . . . . . . . . . . . . . . 1HTTP and HTML: Berners-Lee’s Basics 2The Request/Response Procedure 2The Benefits of PHP, MySQL, JavaScript, CSS, and HTML5 5
Using PHP 6Using MySQL 7Using JavaScript 8Using CSS 9
And Then There’s HTML5 10The Apache Web Server 11About Open Source 12Bringing It All Together 12Questions 14
2. Setting Up a Development Server. . . . . . . . . . . . . . . . . . . . . . . . . . . . . . . . . . . . . . . . . . . . . 15What Is a WAMP, MAMP, or LAMP? 16Installing a WAMP on Windows 16
Testing the Installation 28Alternative WAMPs 31
Installing a MAMP on Mac OS X 31Configuring MySQL 35Ensuring MySQL Starts on Booting 36Testing the Installation 36
Installing a LAMP on Linux 38Working Remotely 38
Logging In 38Using FTP 39
v

Using a Program Editor 40Using an IDE 41Questions 43
3. Introduction to PHP. . . . . . . . . . . . . . . . . . . . . . . . . . . . . . . . . . . . . . . . . . . . . . . . . . . . . . . . . 45Incorporating PHP Within HTML 45This Book’s Examples 47The Structure of PHP 48
Using Comments 48Basic Syntax 49Variables 50Operators 55Variable Assignment 57Multiple-Line Commands 60Variable Typing 62Constants 63Predefined Constants 64The Difference Between the echo and print Commands 64Functions 65Variable Scope 66
Questions 71
4. Expressions and Control Flow in PHP. . . . . . . . . . . . . . . . . . . . . . . . . . . . . . . . . . . . . . . . . . 73Expressions 73
TRUE or FALSE? 73Literals and Variables 75
Operators 76Operator Precedence 77Associativity 78Relational Operators 80
Conditionals 84The if Statement 84The else Statement 85The elseif Statement 87The switch Statement 88The ? Operator 91
Looping 92while Loops 93do ... while Loops 94for Loops 95Breaking Out of a Loop 97The continue Statement 98
vi | Table of Contents

Implicit and Explicit Casting 98PHP Dynamic Linking 99Dynamic Linking in Action 100Questions 101
5. PHP Functions and Objects. . . . . . . . . . . . . . . . . . . . . . . . . . . . . . . . . . . . . . . . . . . . . . . . . . 103PHP Functions 104
Defining a Function 106Returning a Value 106Returning an Array 108Passing by Reference 108Returning Global Variables 110Recap of Variable Scope 111
Including and Requiring Files 111The include Statement 111Using include_once 112Using require and require_once 112
PHP Version Compatibility 113PHP Objects 113
Terminology 114Declaring a Class 115Creating an Object 116Accessing Objects 116Cloning Objects 118Constructors 119PHP 5 Destructors 120Writing Methods 120Static Methods in PHP 5 121Declaring Properties 122Declaring Constants 122Property and Method Scope in PHP 5 123Static Properties and Methods 124Inheritance 125
Questions 129
6. PHP Arrays. . . . . . . . . . . . . . . . . . . . . . . . . . . . . . . . . . . . . . . . . . . . . . . . . . . . . . . . . . . . . . . 131Basic Access 131
Numerically Indexed Arrays 131Associative Arrays 133Assignment Using the array Keyword 134
The foreach ... as Loop 135Multidimensional Arrays 137
Table of Contents | vii

Using Array Functions 140is_array 140count 140sort 140shuffle 141explode 141extract 142compact 143reset 144end 144
Questions 144
7. Practical PHP. . . . . . . . . . . . . . . . . . . . . . . . . . . . . . . . . . . . . . . . . . . . . . . . . . . . . . . . . . . . . 147Using printf 147
Precision Setting 148String Padding 150Using sprintf 151
Date and Time Functions 151Date Constants 154Using checkdate 154
File Handling 155Checking Whether a File Exists 155Creating a File 155Reading from Files 157Copying Files 158Moving a File 158Deleting a File 158Updating Files 159Locking Files for Multiple Accesses 160Reading an Entire File 162Uploading Files 162
System Calls 167XHTML or HTML5? 169Questions 169
8. Introduction to MySQL. . . . . . . . . . . . . . . . . . . . . . . . . . . . . . . . . . . . . . . . . . . . . . . . . . . . . 171MySQL Basics 171Summary of Database Terms 172Accessing MySQL via the Command Line 172
Starting the Command-Line Interface 173Using the Command-Line Interface 177MySQL Commands 178
viii | Table of Contents

Data Types 183Indexes 192
Creating an Index 192Querying a MySQL Database 198Joining Tables Together 207Using Logical Operators 209
MySQL Functions 209Accessing MySQL via phpMyAdmin 210Using phpMyAdmin 214Questions 214
9. Mastering MySQL. . . . . . . . . . . . . . . . . . . . . . . . . . . . . . . . . . . . . . . . . . . . . . . . . . . . . . . . . . 217Database Design 217Primary Keys: The Keys to Relational Databases 218Normalization 219
First Normal Form 220Second Normal Form 222Third Normal Form 224When Not to Use Normalization 226
Relationships 227One-to-One 227One-to-Many 228Many-to-Many 229Databases and Anonymity 230
Transactions 230Transaction Storage Engines 231Using BEGIN 232Using COMMIT 232Using ROLLBACK 233
Using EXPLAIN 234Backing Up and Restoring 235
Using mysqldump 235Creating a Backup File 237Restoring from a Backup File 239Dumping Data in CSV Format 239Planning Your Backups 240
Questions 240
10. Accessing MySQL Using PHP. . . . . . . . . . . . . . . . . . . . . . . . . . . . . . . . . . . . . . . . . . . . . . . . . 241Querying a MySQL Database with PHP 241
The Process 242Creating a Login File 242
Table of Contents | ix

Connecting to MySQL 243A Practical Example 248
The $_POST Array 251Deleting a Record 252Displaying the Form 252Querying the Database 253Running the Program 254
Practical MySQL 255Creating a Table 255Describing a Table 256Dropping a Table 257Adding Data 257Retrieving Data 258Updating Data 259Deleting Data 260Using AUTO_INCREMENT 260Performing Additional Queries 262Preventing SQL Injection 263Using Placeholders 265Preventing HTML Injection 266
Questions 268
11. Using the mysqli Extension. . . . . . . . . . . . . . . . . . . . . . . . . . . . . . . . . . . . . . . . . . . . . . . . . 269Querying a MySQL Database with mysqli 269
Creating a Login File 269Connecting to MySQL 270
A Practical Example 274Using mysqli Procedurally 276Questions 277
12. Form Handling. . . . . . . . . . . . . . . . . . . . . . . . . . . . . . . . . . . . . . . . . . . . . . . . . . . . . . . . . . . . 279Building Forms 279Retrieving Submitted Data 281
register_globals: An Old Solution Hangs On 282Default Values 283Input Types 284Sanitizing Input 291
An Example Program 292What’s New in HTML5? 295
The autocomplete Attribute 295The autofocus Attribute 295The placeholder Attribute 296
x | Table of Contents

The required Attribute 296Override Attributes 296The width and height Attributes 297
Features Awaiting Full Implementation 297The form Attribute 297The list Attribute 297The min and max Attributes 298The step Attribute 298The color Input Type 298The number and range Input Types 298Date and time Pickers 298
Questions 299
13. Cookies, Sessions, and Authentication. . . . . . . . . . . . . . . . . . . . . . . . . . . . . . . . . . . . . . . . 301Using Cookies in PHP 301
Setting a Cookie 303Accessing a Cookie 304Destroying a Cookie 304
HTTP Authentication 304Storing Usernames and Passwords 307Salting 308
Using Sessions 312Starting a Session 312Ending a Session 315Setting a Timeout 317Session Security 317
Questions 320
14. Exploring JavaScript. . . . . . . . . . . . . . . . . . . . . . . . . . . . . . . . . . . . . . . . . . . . . . . . . . . . . . . 323JavaScript and HTML Text 324
Using Scripts Within a Document Head 325Older and Nonstandard Browsers 325Including JavaScript Files 326Debugging JavaScript Errors 327
Using Comments 329Semicolons 329Variables 330
String Variables 330Numeric Variables 330Arrays 331
Operators 332Arithmetic Operators 332
Table of Contents | xi
Assignment Operators 332Comparison Operators 333Logical Operators 333Variable Incrementing and Decrementing 334String Concatenation 334Escaping Characters 334
Variable Typing 335Functions 336Global Variables 336Local Variables 336The Document Object Model 338
But It’s Not That Simple 340Another Use for the $ Symbol 340Using the DOM 341
Questions 342
15. Expressions and Control Flow in JavaScript. . . . . . . . . . . . . . . . . . . . . . . . . . . . . . . . . . . . 343Expressions 343Literals and Variables 344Operators 345
Operator Precedence 346Associativity 346Relational Operators 347
The with Statement 350Using onerror 351Using try ... catch 352Conditionals 353
The if Statement 353The else Statement 353The switch statement 354The ? Operator 355
Looping 356while Loops 356do ... while Loops 357for Loops 357Breaking Out of a Loop 358The continue Statement 359
Explicit Casting 360Questions 360
16. JavaScript Functions, Objects, and Arrays. . . . . . . . . . . . . . . . . . . . . . . . . . . . . . . . . . . . . 363JavaScript Functions 363
xii | Table of Contents

Defining a Function 363The arguments Array 364Returning a Value 365Returning an Array 367
JavaScript Objects 368Declaring a Class 368Creating an Object 369Accessing Objects 370The prototype Keyword 370
JavaScript Arrays 372Numeric Arrays 373Associative Arrays 374Multidimensional Arrays 375Using Array Methods 376
Questions 380
17. JavaScript and PHP Validation and Error Handling. . . . . . . . . . . . . . . . . . . . . . . . . . . . . . 381Validating User Input with JavaScript 381
The validate.html Document (Part One) 382The validate.html Document (Part Two) 384
Regular Expressions 387 388Using Regular Expressions in JavaScript 395Using Regular Expressions in PHP 396
Redisplaying a Form After PHP Validation 397Questions 403
18. Using Ajax. . . . . . . . . . . . . . . . . . . . . . . . . . . . . . . . . . . . . . . . . . . . . . . . . . . . . . . . . . . . . . . . 405What Is Ajax? 405Using XMLHttpRequest 406
Your First Ajax Program 408Using GET Instead of POST 413Sending XML Requests 415Using Frameworks for Ajax 420
Questions 421
19. Introduction to CSS. . . . . . . . . . . . . . . . . . . . . . . . . . . . . . . . . . . . . . . . . . . . . . . . . . . . . . . . 423Importing a Style Sheet 424
Importing CSS from Within HTML 424Embedded Style Settings 425
Using IDs 425Using Classes 425
Table of Contents | xiii

Using Semicolons 426CSS Rules 426
Multiple Assignments 426Using Comments 427
Style Types 428Default Styles 428User Styles 428External Style Sheets 429Internal Styles 429Inline Styles 430
CSS Selectors 430The Type Selector 430The Descendant Selector 430The Child Selector 431The ID Selector 432The Class Selector 433The Attribute Selector 434The Universal Selector 434Selecting by Group 435
The CSS Cascade 435Style Sheet Creators 436Style Sheet Methods 436Style Sheet Selectors 437Calculating Specificity 437The Difference Between Div and Span Elements 439
Measurements 440Fonts and Typography 442
font-family 442font-style 443font-size 443font-weight 444
Managing Text Styles 444Decoration 445Spacing 445Alignment 446Transformation 446Indenting 446
CSS Colors 447Short Color Strings 447Gradients 448
Positioning Elements 449Absolute Positioning 449
xiv | Table of Contents

Relative Positioning 450Fixed Positioning 450
Pseudo-Classes 452Shorthand Rules 454The Box Model and Layout 454
Setting Margins 455Applying Borders 457Adjusting Padding 458Object Contents 459
Questions 459
20. Advanced CSS with CSS3. . . . . . . . . . . . . . . . . . . . . . . . . . . . . . . . . . . . . . . . . . . . . . . . . . . . 461Attribute Selectors 461
The ^ Operator 462The $ Operator 462The * Operator 463
The box-sizing Property 463CSS3 Backgrounds 463
The background-clip Property 464The background-origin Property 465The background-size Property 466
Multiple Backgrounds 467CSS3 Borders 469
The border-color Property 469The border-radius Property 469
Box Shadows 472Element Overflow 473Multicolumn Layout 473Colors and Opacity 475
HSL Colors 475HSLA Colors 476RGB Colors 476RGBA Colors 477The opacity Property 477
Text Effects 477The text-shadow Property 477The text-overflow Property 478The word-wrap Property 479
Web Fonts 479Google Web Fonts 480Transformations 4813D Transformations 483
Table of Contents | xv

Transitions 483Properties to Transition 484Transition Duration 484Transition Delay 484Transition Timing 485Shorthand Syntax 485
Questions 487
21. Accessing CSS from JavaScript. . . . . . . . . . . . . . . . . . . . . . . . . . . . . . . . . . . . . . . . . . . . . . . 489Revisiting the getElementById Function 489
The O function 489The S Function 490The C Function 491Including the Functions 492
Accessing CSS Properties from JavaScript 493Some Common Properties 494Other Properties 495
Inline JavaScript 497The this Keyword 497Attaching Events to Objects in a Script 498Attaching to Other Events 499
Adding New Elements 500Removing Elements 501Alternatives to Adding and Removing Elements 502
Using Interrupts 503Using setTimeout 503Canceling a Timeout 504Using setInterval 504Using Interrupts for Animation 506
Questions 508
22. Introduction to HTML5. . . . . . . . . . . . . . . . . . . . . . . . . . . . . . . . . . . . . . . . . . . . . . . . . . . . . 509The Canvas 510Geolocation 511Audio and Video 513Forms 514Local Storage 515Web Workers 515Web Applications 515Microdata 516Summary 516
xvi | Table of Contents

Questions 516
23. The HTML5 Canvas. . . . . . . . . . . . . . . . . . . . . . . . . . . . . . . . . . . . . . . . . . . . . . . . . . . . . . . . . 517Creating and Accessing a Canvas 517
The toDataURL Function 519Specifying an Image Type 521The fillRect Method 521The clearRect Method 521The strokeRect Method 522Combining These Commands 522The createLinearGradient Method 523The addColorStop Method in Detail 525The createRadialGradient Method 526Using Patterns for Fills 528
Writing Text to the Canvas 530The strokeText Method 530The textBaseLine Property 531The font Property 531The textAlign Property 531The fillText Method 532The measureText Method 533
Drawing Lines 533The lineWidth Property 533The lineCap and lineJoin Properties 533The miterLimit Property 535
Using Paths 536The moveTo and LineTo Methods 536The stroke Method 537The rect Method 537
Filling Areas 537The clip Method 539The isPointInPath Method 542Working with Curves 543
The arc Method 543The arcTo Method 546The quadraticCurveTo Method 547The bezierCurveTo Method 548
Manipulating Images 549The drawImage Method 549Resizing an Image 550Selecting an Image Area 550Copying from a Canvas 552
Table of Contents | xvii

Adding Shadows 552Editing at the Pixel Level 554
The getImageData Method 554The data Array 555The putImageData Method 557The createImageData Method 557
Advanced Graphical Effects 558The globalCompositeOperation Property 558The globalAlpha Property 561
Transformations 561The scale Method 561The save and restore Methods 562The rotate Method 562The translate Method 564The transform Method 565The setTransform Method 567
Summary 567Questions 567
24. HTML5 Audio and Video. . . . . . . . . . . . . . . . . . . . . . . . . . . . . . . . . . . . . . . . . . . . . . . . . . . . 569About Codecs 570The <audio> Element 571Supporting Non-HTML5 Browsers 573The <video> Element 574
The Video Codecs 575Supporting Older Browsers 578
Summary 580Questions 580
25. Other HTML5 Features. . . . . . . . . . . . . . . . . . . . . . . . . . . . . . . . . . . . . . . . . . . . . . . . . . . . . 581Geolocation and the GPS Service 581Other Location Methods 582Geolocation and HTML5 583Local Storage 586
Using Local Storage 587The localStorage Object 587
Web Workers 589Offline Web Applications 591Drag and Drop 593Cross Document Messaging 595Microdata 598Other HTML5 Tags 601
xviii | Table of Contents

Summary 601Questions 602
26. Bringing It All Together. . . . . . . . . . . . . . . . . . . . . . . . . . . . . . . . . . . . . . . . . . . . . . . . . . . . 603Designing a Social Networking Site 603On the Website 604functions.php 604The Functions 605header.php 607setup.php 608index.php 610signup.php 610
Checking for Username Availability 611Logging In 611
checkuser.php 614login.php 615profile.php 617
Adding the “About Me” Text 618Adding a Profile Image 618Processing the Image 618Displaying the Current Profile 619
members.php 622Viewing a User’s Profile 622Adding and Dropping Friends 622Listing All Members 622
friends.php 625messages.php 628logout.php 631styles.css 632javascript.js 636
A. Solutions to the Chapter Questions. . . . . . . . . . . . . . . . . . . . . . . . . . . . . . . . . . . . . . . . . . . 639
B. Online Resources. . . . . . . . . . . . . . . . . . . . . . . . . . . . . . . . . . . . . . . . . . . . . . . . . . . . . . . . . . 659
C. MySQL’s FULLTEXT Stopwords. . . . . . . . . . . . . . . . . . . . . . . . . . . . . . . . . . . . . . . . . . . . . . . . 663
D. MySQL Functions. . . . . . . . . . . . . . . . . . . . . . . . . . . . . . . . . . . . . . . . . . . . . . . . . . . . . . . . . . 667
Index. . . . . . . . . . . . . . . . . . . . . . . . . . . . . . . . . . . . . . . . . . . . . . . . . . . . . . . . . . . . . . . . . . . . . . . 677
Table of Contents | xix


Preface
The combination of PHP and MySQL is the most convenient approach to dynamic,database-driven web design, holding its own in the face of challenges from integratedframeworks—such as Ruby on Rails—that are harder to learn. Due to its open sourceroots (unlike the competing Microsoft .NET Framework), it is free to implement andis therefore an extremely popular option for web development.
Any would-be developer on a Unix/Linux or even a Windows/Apache platform willneed to master these technologies. And, combined with the partner technologies ofJavaScript, CSS, and HTML5, you will be able to create websites of the caliber of industrystandards like Facebook, Twitter, and Gmail.
AudienceThis book is for people who wish to learn how to create effective and dynamic websites.This may include webmasters or graphic designers who are already creating static web‐sites but wish to take their skills to the next level, as well as high school and collegestudents, recent graduates, and self-taught individuals.
In fact, anyone ready to learn the fundamentals behind the Web 2.0 technology knownas Ajax will obtain a thorough grounding in all of these core technologies: PHP, MySQL,JavaScript, CSS, and HTML5.
Assumptions This Book MakesThis book assumes that you have a basic understanding of HTML and can at least puttogether a simple, static website, but does not assume that you have any prior knowledgeof PHP, MySQL, JavaScript, CSS, or HTML5—although if you do, your progress throughthe book will be even quicker.
xxi

Organization of This BookThe chapters in this book are written in a specific order, first introducing all of the coretechnologies it covers and then walking you through their installation on a web devel‐opment server so that you will be ready to work through the examples.
In the first section, you will gain a grounding in the PHP programming language, cov‐ering the basics of syntax, arrays, functions, and object-oriented programming.
Then, with PHP under your belt, you will move on to an introduction to the MySQLdatabase system, where you will learn everything from how MySQL databases are struc‐tured to how to generate complex queries.
After that, you will learn how you can combine PHP and MySQL to start creating yourown dynamic web pages by integrating forms and other HTML features. Following that,you will get down to the nitty-gritty practical aspects of PHP and MySQL developmentby learning a variety of useful functions and how to manage cookies and sessions, aswell as how to maintain a high level of security.
In the next few chapters, you will gain a thorough grounding in JavaScript, from simplefunctions and event handling to accessing the Document Object Model and in-browservalidation and error handling.
With an understanding of all three of these core technologies, you will then learn howto make behind-the-scenes Ajax calls and turn your websites into highly dynamic en‐vironments.
Next, you’ll spend two chapters learning all about using CSS to style and lay out yourweb pages, before moving on to the final section on the new features built into HTML5,including geolocation, audio, video, and the canvas. After this, you’ll put together ev‐erything you’ve learned in a complete set of programs that together constitute a fullyfunctional social networking website.
Along the way, you’ll also find plenty of pointers and advice on good programmingpractices and tips that could help you find and solve hard-to-detect programming er‐rors. There are also plenty of links to websites containing further details on the topicscovered.
Supporting BooksOnce you have learned to develop using PHP, MySQL, JavaScript, CSS, and HTML5,you will be ready to take your skills to the next level using the following O’Reilly refer‐ence books. To learn more about any of these titles, simply search the O’Reilly websiteor any good online book seller’s website:
xxii | Preface

• Dynamic HTML: The Definitive Reference by Danny Goodman• PHP in a Nutshell by Paul Hudson• MySQL in a Nutshell by Russell J.T. Dyer• JavaScript: The Definitive Guide by David Flanagan• CSS: The Definitive Guide by Eric A. Meyer• HTML5: The Missing Manual by Matthew MacDonald
Conventions Used in This BookThe following typographical conventions are used in this book:Plain text
Indicates menu titles, options, and buttons.
ItalicIndicates new terms, URLs, email addresses, filenames, file extensions, pathnames,directories, and Unix utilities.
Constant width
Indicates command-line options, variables and other code elements, HTML tags,macros, and the contents of files.
Constant width bold
Shows program output or highlighted sections of code that are being discussed inthe text.
Constant width italic
Shows text that should be replaced with user-supplied values.
This element signifies a tip, suggestion, or general note.
This element indicates a warning or caution.
Preface | xxiii

Using Code ExamplesSupplemental material (code examples, exercises, etc.) is available at http://lpmj.net.
This book is here to help you get your job done. In general, if example code is offeredwith this book, you may use it in your programs and documentation. You do not needto contact us for permission unless you’re reproducing a significant portion of the code.For example, writing a program that uses several chunks of code from this book doesnot require permission. Selling or distributing a CD-ROM of examples from O’Reillybooks does require permission. Answering a question by citing this book and quotingexample code does not require permission. Incorporating a significant amount of ex‐ample code from this book into your product’s documentation does require permission.
We appreciate, but do not require, attribution. An attribution usually includes thetitle, author, publisher, and ISBN. For example: “Learning PHP, MySQL, JavaScript,CSS & HTML5, Third Edition, by Robin Nixon. Copyright 2014 Robin Nixon,978-1-4919-4946-7.”
If you feel your use of code examples falls outside fair use or the permission given here,feel free to contact us at [email protected].
We’d Like to Hear from YouEvery example in this book has been tested on various platforms, but occasionally youmay encounter problems—for example, if you have a nonstandard installation or adifferent version of PHP. The information in this book has also been verified at eachstep of the production process. However, mistakes and oversights can occur and we willgratefully receive details of any you find, as well as any suggestions you would like tomake for future editions. You can contact the author and editors at:
O’Reilly Media, Inc.1005 Gravenstein Highway NorthSebastopol, CA 95472(800) 998-9938 (in the United States or Canada)(707) 829-0515 (international or local)(707) 829-0104 (fax)
We have a web page for this book, where we list errata, examples, and any additionalinformation. You can access this page at http://bit.ly/lpmjch_3e.
There is also a companion website to this book at http://lpmj.net, where you can down‐load all the examples from this book in a single zip file.
To comment or ask technical questions about this book, send email to [email protected].
xxiv | Preface

For more information about our books, courses, conferences, and news, see our websiteat http://www.oreilly.com.
Find us on Facebook: http://facebook.com/oreilly
Follow us on Twitter: http://twitter.com/oreillymedia
Watch us on YouTube: http://www.youtube.com/oreillymedia
Safari® Books OnlineSafari Books Online (www.safaribooksonline.com) is an on-demand digital library that delivers expert content in bothbook and video form from the world’s leading authors intechnology and business.
Technology professionals, software developers, web designers, and business and crea‐tive professionals use Safari Books Online as their primary resource for research, prob‐lem solving, learning, and certification training.
Safari Books Online offers a range of product mixes and pricing programs for organi‐zations, government agencies, and individuals. Subscribers have access to thousands ofbooks, training videos, and prepublication manuscripts in one fully searchable databasefrom publishers like O’Reilly Media, Prentice Hall Professional, Addison-Wesley Pro‐fessional, Microsoft Press, Sams, Que, Peachpit Press, Focal Press, Cisco Press, JohnWiley & Sons, Syngress, Morgan Kaufmann, IBM Redbooks, Packt, Adobe Press, FTPress, Apress, Manning, New Riders, McGraw-Hill, Jones & Bartlett, Course Technol‐ogy, and dozens more. For more information about Safari Books Online, please visit usonline.
AcknowledgmentsI would like to once again thank my editor, Andy Oram, and everyone who worked sohard on this book, including Albert Wiersch for his comprehensive technical review,Kristen Brown for overseeing production, Rachel Monaghan for her copyediting, Jas‐mine Kwityn for proofreading, Robert Romano for his original illustrations, RebeccaDemarest for her new illustrations, David Futato for interior design, Lucie Haskins forcreating the index, Karen Montgomery for the original sugar glider front cover design,Randy Comer for the latest book cover, and everyone else too numerous to name whosubmitted errata and offered suggestions for this new edition.
Preface | xxv


CHAPTER 1
Introduction to Dynamic Web Content
The World Wide Web is a constantly evolving network that has already traveled farbeyond its conception in the early 1990s, when it was created to solve a specific problem.State-of-the-art experiments at CERN (the European Laboratory for Particle Physics—now best known as the operator of the Large Hadron Collider) were producing incred‐ible amounts of data—so much that the data was proving unwieldy to distribute to theparticipating scientists who were spread out across the world.
At this time, the Internet was already in place, with several hundred thousand computersconnected to it, so Tim Berners-Lee (a CERN fellow) devised a method of navigatingbetween them using a hyperlinking framework, which came to be known as HypertextTransfer Protocol, or HTTP. He also created a markup language called HTML, orHypertext Markup Language. To bring these together, he wrote the first web browserand web server, tools that we now take for granted.
But back then, the concept was revolutionary. The most connectivity so far experiencedby at-home modem users was dialing up and connecting to a bulletin board that washosted by a single computer, where you could communicate and swap data only withother users of that service. Consequently, you needed to be a member of many bulletinboard systems in order to effectively communicate electronically with your colleaguesand friends.
But Berners-Lee changed all that in one fell swoop, and by the mid-1990s, there werethree major graphical web browsers competing for the attention of five million users.It soon became obvious, though, that something was missing. Yes, pages of text andgraphics with hyperlinks to take you to other pages was a brilliant concept, but the resultsdidn’t reflect the instantaneous potential of computers and the Internet to meet theparticular needs of each user with dynamically changing content. Using the Web was avery dry and plain experience, even if we did now have scrolling text and animatedGIFs!
1

Shopping carts, search engines, and social networks have clearly altered how we use theWeb. In this chapter, we’ll take a brief look at the various components that make up theWeb, and the software that helps make it a rich and dynamic experience.
It is necessary to start using some acronyms more or less right away.I have tried to clearly explain them before proceeding. But don’t wor‐ry too much about what they stand for or what these names mean,because the details will all become clear as you read on.
HTTP and HTML: Berners-Lee’s BasicsHTTP is a communication standard governing the requests and responses that takeplace between the browser running on the end user’s computer and the web server. Theserver’s job is to accept a request from the client and attempt to reply to it in a meaningfulway, usually by serving up a requested web page—that’s why the term server is used. Thenatural counterpart to a server is a client, so that term is applied both to the web browserand the computer on which it’s running.
Between the client and the server there can be several other devices, such as routers,proxies, gateways, and so on. They serve different roles in ensuring that the requestsand responses are correctly transferred between the client and server. Typically, theyuse the Internet to send this information.
A web server can usually handle multiple simultaneous connections and—when notcommunicating with a client—spends its time listening for an incoming connection.When one arrives, the server sends back a response to confirm its receipt.
The Request/Response ProcedureAt its most basic level, the request/response process consists of a web browser askingthe web server to send it a web page and the server sending back the page. The browserthen takes care of displaying the page (see Figure 1-1).
2 | Chapter 1: Introduction to Dynamic Web Content

Figure 1-1. The basic client/server request/response sequence
Each step in the request and response sequence is as follows:
1. You enter http://server.com into your browser’s address bar.2. Your browser looks up the IP address for server.com.3. Your browser issues a request for the home page at server.com.4. The request crosses the Internet and arrives at the server.com web server.5. The web server, having received the request, looks for the web page on its hard disk.6. The web page is retrieved by the server and returned to the browser.7. Your browser displays the web page.
For an average web page, this process takes place once for each object within the page:a graphic, an embedded video or Flash file, and even a CSS template.
In step 2, notice that the browser looked up the IP address of server.com. Every machineattached to the Internet has an IP address—your computer included. But we generallyaccess web servers by name, such as google.com. As you probably know, the browserconsults an additional Internet service called the Domain Name Service (DNS) to findits associated IP address and then uses it to communicate with the computer.
The Request/Response Procedure | 3

For dynamic web pages, the procedure is a little more involved, because it may bringboth PHP and MySQL into the mix (see Figure 1-2).
Figure 1-2. A dynamic client/server request/response sequence
Here are the steps for a dynamic client/server request/response sequence:
1. You enter http://server.com into your browser’s address bar.2. Your browser looks up the IP address for server.com.3. Your browser issues a request to that address for the web server’s home page.4. The request crosses the Internet and arrives at the server.com web server.5. The web server, having received the request, fetches the home page from its hard
disk.
4 | Chapter 1: Introduction to Dynamic Web Content

6. With the home page now in memory, the web server notices that it is a file incor‐porating PHP scripting and passes the page to the PHP interpreter.
7. The PHP interpreter executes the PHP code.8. Some of the PHP contains MySQL statements, which the PHP interpreter now
passes to the MySQL database engine.9. The MySQL database returns the results of the statements back to the PHP
interpreter.10. The PHP interpreter returns the results of the executed PHP code, along with the
results from the MySQL database, to the web server.11. The web server returns the page to the requesting client, which displays it.
Although it’s helpful to be aware of this process so that you know how the three elementswork together, in practice you don’t really need to concern yourself with these details,because they all happen automatically.
HTML pages returned to the browser in each example may well contain JavaScript,which will be interpreted locally by the client, and which could initiate another request—the same way embedded objects such as images would.
The Benefits of PHP, MySQL, JavaScript, CSS, and HTML5At the start of this chapter, I introduced the world of Web 1.0, but it wasn’t long beforethe rush was on to create Web 1.1, with the development of such browser enhancementsas Java, JavaScript, JScript (Microsoft’s slight variant of JavaScript), and ActiveX. On theserver side, progress was being made on the Common Gateway Interface (CGI) usingscripting languages such as Perl (an alternative to the PHP language) and server-sidescripting—inserting the contents of one file (or the output of a system call) into anotherone dynamically.
Once the dust had settled, three main technologies stood head and shoulders above theothers. Although Perl was still a popular scripting language with a strong following,PHP’s simplicity and built-in links to the MySQL database program had earned it morethan double the number of users. And JavaScript, which had become an essential partof the equation for dynamically manipulating CSS (Cascading Style Sheets) and HTML,now took on the even more muscular task of handling the client side of the Ajax process.Under Ajax, web pages perform data handling and send requests to web servers in thebackground—without the web user being aware that this is going on.
No doubt the symbiotic nature of PHP and MySQL helped propel them both forward,but what attracted developers to them in the first place? The simple answer has to bethe ease with which you can use them to quickly create dynamic elements on websites.MySQL is a fast and powerful, yet easy-to-use, database system that offers just about
The Benefits of PHP, MySQL, JavaScript, CSS, and HTML5 | 5

anything a website would need in order to find and serve up data to browsers. WhenPHP allies with MySQL to store and retrieve this data, you have the fundamental partsrequired for the development of social networking sites and the beginnings of Web 2.0.
And when you bring JavaScript and CSS into the mix too, you have a recipe for buildinghighly dynamic and interactive websites.
Using PHPWith PHP, it’s a simple matter to embed dynamic activity in web pages. When you givepages the .php extension, they have instant access to the scripting language. From adeveloper’s point of view, all you have to do is write code such as the following:
<?php echo " Today is " . date("l") . ". ";?>
Here's the latest news.
The opening <?php tells the web server to allow the PHP program to interpret all thefollowing code up to the ?> tag. Outside of this construct, everything is sent to the clientas direct HTML. So the text Here's the latest news. is simply output to the browser;within the PHP tags, the built-in date function displays the current day of the weekaccording to the server’s system time.
The final output of the two parts looks like this:Today is Wednesday. Here's the latest news.
PHP is a flexible language, and some people prefer to place the PHP construct directlynext to PHP code, like this:
Today is <?php echo date("l"); ?>. Here's the latest news.
There are also other ways of formatting and outputting information, which I’ll explainin the chapters on PHP. The point is that with PHP, web developers have a scriptinglanguage that, although not as fast as compiling your code in C or a similar language,is incredibly speedy and also integrates seamlessly with HTML markup.
If you intend to enter the PHP examples in this book to work alongwith me, you must remember to add <?php in front and ?> after themto ensure that the PHP interpreter processes them. To facilitate this,you may wish to prepare a file called example.php with those tags inplace.
Using PHP, you have unlimited control over your web server. Whether you need tomodify HTML on the fly, process a credit card, add user details to a database, or fetch
6 | Chapter 1: Introduction to Dynamic Web Content

information from a third-party website, you can do it all from within the same PHPfiles in which the HTML itself resides.
Using MySQLOf course, there’s not much point to being able to change HTML output dynamicallyunless you also have a means to track the changes that users make as they use yourwebsite. In the early days of the Web, many sites used “flat” text files to store data suchas usernames and passwords. But this approach could cause problems if the file wasn’tcorrectly locked against corruption from multiple simultaneous accesses. Also, a flat filecan get only so big before it becomes unwieldy to manage—not to mention the difficultyof trying to merge files and perform complex searches in any kind of reasonable time.
That’s where relational databases with structured querying become essential. AndMySQL, being free to use and installed on vast numbers of Internet web servers, risessuperbly to the occasion. It is a robust and exceptionally fast database managementsystem that uses English-like commands.
The highest level of MySQL structure is a database, within which you can have one ormore tables that contain your data. For example, let’s suppose you are working on a tablecalled users, within which you have created columns for surname, firstname, andemail, and you now wish to add another user. One command that you might use to dothis is:
INSERT INTO users VALUES('Smith', 'John', '[email protected]');
Of course, as mentioned earlier, you will have issued other commands to create thedatabase and table and to set up all the correct fields, but the INSERT command hereshows how simple it can be to add new data to a database. The INSERT command is anexample of SQL (Structured Query Language), a language designed in the early 1970sand reminiscent of one of the oldest programming languages, COBOL. It is well suited,however, to database queries, which is why it is still in use after all this time.
It’s equally easy to look up data. Let’s assume that you have an email address for a userand need to look up that person’s name. To do this, you could issue a MySQL query suchas:
SELECT surname,firstname FROM users WHERE email='[email protected]';
MySQL will then return Smith, John and any other pairs of names that may be asso‐ciated with that email address in the database.
As you’d expect, there’s quite a bit more that you can do with MySQL than just simpleINSERT and SELECT commands. For example, you can join multiple tables according tovarious criteria, ask for results in a variety of orders, make partial matches when youknow only part of the string that you are searching for, return only the nth result, anda lot more.
The Benefits of PHP, MySQL, JavaScript, CSS, and HTML5 | 7

Using PHP, you can make all these calls directly to MySQL without having to run theMySQL program yourself or use its command-line interface. This means you can savethe results in arrays for processing and perform multiple lookups, each dependent onthe results returned from earlier ones, to drill right down to the item of data you need.
For even more power, as you’ll see later, there are additional functions built right intoMySQL that you can call up for common operations and extra speed.
Using JavaScriptThe oldest of the three core technologies in this book, JavaScript, was created to enablescripting access to all the elements of an HTML document. In other words, it providesa means for dynamic user interaction such as checking email address validity in inputforms, displaying prompts such as “Did you really mean that?”, and so on (note, however,that it cannot be relied upon for security, which should always be performed on the webserver).
Combined with CSS (see the following section), JavaScript is the power behind dynamicweb pages that change in front of your eyes rather than when a new page is returned bythe server.
However, JavaScript can also be tricky to use, due to some major differences in the waysdifferent browser designers have chosen to implement it. This mainly came about whensome manufacturers tried to put additional functionality into their browsers at the ex‐pense of compatibility with their rivals.
Thankfully, the developers have mostly now come to their senses and have realized theneed for full compatibility with one another, so they don’t have to write multi-exceptioncode. But there remain millions of legacy browsers that will be in use for a good manyyears to come. Luckily, there are solutions for the incompatibility problems, and laterin this book we’ll look at libraries and techniques that enable you to safely ignore thesedifferences.
For now, let’s take a quick look at how you can use basic JavaScript, accepted by allbrowsers:
<script type="text/javascript"> document.write("Today is " + Date() );</script>
This code snippet tells the web browser to interpret everything within the script tagsas JavaScript, which the browser then does by writing the text Today is to the currentdocument, along with the date, by using the JavaScript function Date. The result willlook something like this:
Today is Sun Jan 01 2017 01:23:45
8 | Chapter 1: Introduction to Dynamic Web Content

Unless you need to specify an exact version of JavaScript, you cannormally omit the type="text/javascript" and just use <script>to start the interpretation of the JavaScript.
As previously mentioned, JavaScript was originally developed to offer dynamic controlover the various elements within an HTML document, and that is still its main use. Butmore and more, JavaScript is being used for Ajax. This is a term for the process ofaccessing the web server in the background. (It originally meant “Asynchronous Java‐Script and XML,” but that phrase is already a bit outdated.)
Ajax is the main process behind what is now known as Web 2.0 (a term popularized byTim O’Reilly, the founder and CEO of this book’s publishing company), in which webpages have started to resemble standalone programs, because they don’t have to bereloaded in their entirety. Instead, a quick Ajax call can pull in and update a singleelement on a web page, such as changing your photograph on a social networking siteor replacing a button that you click with the answer to a question. This subject is fullycovered in Chapter 18.
Using CSSWith the emergence of the CSS3 standard in recent years, CSS now offers a level ofdynamic interactivity previously supported only by JavaScript. For example, not onlycan you style any HTML element to change its dimensions, colors, borders, spacing,and so on, but now you can also add animated transitions and transformations to yourweb pages, using only a few lines of CSS.
Using CSS can be as simple as inserting a few rules between <style> and </style> tagsin the head of a web page, like this:
<style> p { text-align:justify; font-family:Helvetica; }</style>
These rules will change the default text alignment of the <p> tag so that paragraphscontained in it will be fully justified and will use the Helvetica font.
As you’ll learn in Chapter 19, there are many different ways you can lay out CSS rules,and you can also include them directly within tags or save a set of rules to an externalfile to be loaded in separately. This flexibility not only lets you style your HTML precisely,but it can also, for example, provide built-in hover functionality to animate objects asthe mouse passes over them. You will also learn how to access all of an element’s CSSproperties from JavaScript as well as HTML.
The Benefits of PHP, MySQL, JavaScript, CSS, and HTML5 | 9

And Then There’s HTML5As useful as all these additions to the web standards became, they were not enough forever more ambitious developers. For example, there was still no simple way to manip‐ulate graphics in a web browser without resorting to plug-ins such as Flash. And thesame went for inserting audio and video into web pages. Plus, several annoying incon‐sistencies had crept into HTML during its evolution.
So, to clear all this up and take the Internet beyond Web 2.0 and into its next iteration,a new standard for HTML was created to address all these shortcomings. It was calledHTML5 and it began development as long ago as 2004, when the first draft was drawnup by the Mozilla Foundation and Opera Software (developers of two popular webbrowsers). But it wasn’t until the start of 2013 that the final draft was submitted to the World Wide Web Consortium (W3C), the international governing body for webstandards.
With nine years for it to develop, you might think that would be the end of the specifi‐cation, but that’s not how things work on the Internet. Although websites come and goat great speed, the underlying software is developed slowly and carefully, and so thestable recommendation for HTML5 is not expected until after this edition of the bookhas been published—in late 2014. And then guess what? Work will move on to versions5.1 and higher, beginning in 2015. It’s a never-ending cycle of development.
However, while HTML5.1 is planned to bring some handy improvements (mainly tothe canvas), basic HTML5 is the new standard web developers now need to work to,and it will remain in place for many years to come. So learning everything you can aboutit now will stand you in very good stead.
There’s actually a great deal of new stuff in HTML (and quite a few things that have beenchanged or removed), but in summary, here’s what you get:Markup
Including new elements such as <nav> and <footer>, and deprecated elements like<font> and <center>.
New APIsFor example, the <canvas> element for writing and drawing on a graphics canvas,<audio> and <video> elements, offline web apps, microdata, and local storage.
ApplicationsIncluding two new rendering technologies: MathML (Math Markup Language) fordisplaying mathematical formulae) and SVG (Scalable Vector Graphics) for creat‐ing graphical elements outside of the new <canvas> element. However, MathMLand SVG are somewhat specialist, and are so feature-packed they would need a bookof their own, so I don’t cover them here.
All these things (and more) are covered in detail starting in Chapter 22.
10 | Chapter 1: Introduction to Dynamic Web Content

One of the little things I like about the HTML5 specification is that XHTML syntax is no longer required for self-closing elements. In thepast you could display a line break using the <br> element. Then, toensure future compatibility with XHTML (the planned replacementfor HTML that never happened), this was changed to <br />, in whicha closing / character was added (because all elements were expectedto include a closing tag featuring this character). But now things havegone full circle, and you can use either version of these element types.So, for the sake of brevity and fewer keystrokes, in this book I havereverted to the former style of <br>, <hr>, and so on.
The Apache Web ServerIn addition to PHP, MySQL, JavaScript, CSS, and HTML5, there’s actually a sixth heroin the dynamic Web: the web server. In the case of this book, that means the Apacheweb server. We’ve discussed a little of what a web server does during the HTTP server/client exchange, but it actually does much more behind the scenes.
For example, Apache doesn’t serve up just HTML files—it handles a wide range of filesfrom images and Flash files to MP3 audio files, RSS (Really Simple Syndication) feeds,and so on. To do this, each element a web client encounters in an HTML page is alsorequested from the server, which then serves it up.
But these objects don’t have to be static files such as GIF images. They can all be generatedby programs such as PHP scripts. That’s right: PHP can even create images and otherfiles for you, either on the fly or in advance to serve up later.
To do this, you normally have modules either precompiled into Apache or PHP or calledup at runtime. One such module is the GD (Graphics Draw) library, which PHP usesto create and handle graphics.
Apache also supports a huge range of modules of its own. In addition to the PHP module,the most important for your purposes as a web programmer are the modules that handlesecurity. Other examples are the Rewrite module, which enables the web server to handlea varying range of URL types and rewrite them to its own internal requirements, andthe Proxy module, which you can use to serve up often-requested pages from a cacheto ease the load on the server.
Later in the book, you’ll see how to actually use some of these modules to enhance thefeatures provided by the three core technologies.
The Apache Web Server | 11

About Open SourceWhether the open source quality of these technologies is the reason they are so popularhas often been debated, but PHP, MySQL, and Apache are the three most commonlyused tools in their categories.
What can be said definitively, though, is that their being open source means that theyhave been developed in the community by teams of programmers writing the featuresthey themselves want and need, with the original code available for all to see and change.Bugs can be found and security breaches can be prevented before they happen.
There’s another benefit: all these programs are free to use. There’s no worrying abouthaving to purchase additional licenses if you have to scale up your website and add moreservers. And you don’t need to check the budget before deciding whether to upgrade tothe latest versions of these products.
Bringing It All TogetherThe real beauty of PHP, MySQL, JavaScript, CSS, and HTML5 is the wonderful way inwhich they all work together to produce dynamic web content: PHP handles all themain work on the web server, MySQL manages all the data, and the combination of CSSand JavaScript looks after web page presentation. JavaScript can also talk with your PHPcode on the web server whenever it needs to update something (either on the server oron the web page). And with the powerful new features in HTML5, such as the canvas,audio and video, and geolocation, you can make your web pages highly dynamic, in‐teractive, and multimedia packed.
Without using program code, let’s summarize the contents of this chapter by looking atthe process of combining some of these technologies into an everyday Ajax feature thatmany websites use: checking whether a desired username already exists on the site whena user is signing up for a new account. A good example of this can be seen with Gmail(see Figure 1-3).
12 | Chapter 1: Introduction to Dynamic Web Content

Figure 1-3. Gmail uses Ajax to check the availability of usernames
The steps involved in this Ajax process would be similar to the following:
1. The server outputs the HTML to create the web form, which asks for the necessarydetails, such as username, first name, last name, and email address.
2. At the same time, the server attaches some JavaScript to the HTML to monitor theusername input box and check for two things: (a) whether some text has been typedinto it, and (b) whether the input has been deselected because the user has clickedon another input box.
3. Once the text has been entered and the field deselected, in the background theJavaScript code passes the username that was entered back to a PHP script on theweb server and awaits a response.
4. The web server looks up the username and replies back to the JavaScript regardingwhether that name has already been taken.
5. The JavaScript then places an indication next to the username input box to showwhether the name is one available to the user—perhaps a green checkmark or a redcross graphic, along with some text.
6. If the username is not available and the user still submits the form, the JavaScriptinterrupts the submission and reemphasizes (perhaps with a larger graphic and/oran alert box) that the user needs to choose another username.
7. Optionally, an improved version of this process could even look at the usernamerequested by the user and suggest an alternative that is currently available.
Bringing It All Together | 13

All of this takes place quietly in the background and makes for a comfortable andseamless user experience. Without Ajax, the entire form would have to be submitted tothe server, which would then send back HTML, highlighting any mistakes. It would bea workable solution, but nowhere near as tidy or pleasurable as on-the-fly form fieldprocessing.
Ajax can be used for a lot more than simple input verification and processing, though;we’ll explore many additional things that you can do with it in the Ajax chapters laterin this book.
In this chapter, you have read a good introduction to the core technologies of PHP,MySQL, JavaScript, CSS, and HTML5 (as well as Apache), and have learned how theywork together. In Chapter 2, we’ll look at how you can install your own web developmentserver on which to practice everything that you will be learning.
Questions1. What four components (at the minimum) are needed to create a fully dynamic web
page?2. What does HTML stand for?3. Why does the name MySQL contain the letters SQL?4. PHP and JavaScript are both programming languages that generate dynamic results
for web pages. What is their main difference, and why would you use both of them?5. What does CSS stand for?6. List three major new elements introduced in HTML5.7. If you encounter a bug (which is rare) in one of the open source tools, how do you
think you could get it fixed?
See “Chapter 1 Answers” on page 639 in Appendix A for the answers to these questions.
14 | Chapter 1: Introduction to Dynamic Web Content
CHAPTER 2
Setting Up a Development Server
If you wish to develop Internet applications but don’t have your own development server,you will have to upload every modification you make to a server somewhere else on theWeb before you can test it.
Even on a fast broadband connection, this can still represent a significant slowdown indevelopment time. On a local computer, however, testing can be as easy as saving anupdate (usually just a matter of clicking once on an icon) and then hitting the Refreshbutton in your browser.
Another advantage of a development server is that you don’t have to worry about em‐barrassing errors or security problems while you’re writing and testing, whereas youneed to be aware of what people may see or do with your application when it’s on apublic website. It’s best to iron everything out while you’re still on a home or small officesystem, presumably protected by firewalls and other safeguards.
Once you have your own development server, you’ll wonder how you ever managedwithout one, and it’s easy to set one up. Just follow the steps in the following sections,using the appropriate instructions for a PC, a Mac, or a Linux system.
In this chapter, we cover just the server side of the web experience, as described inChapter 1. But to test the results of your work—particularly when we start using Java‐Script, CSS, and HTML5 later in this book—you should also have an instance of everymajor web browser running on some system convenient to you. Whenever possible, thelist of browsers should include at least Internet Explorer, Mozilla Firefox, Opera, Safari,and Google Chrome.
If you plan to ensure your sites look good on mobile devices too, then you should alsotry to arrange access to a wide range of Apple iOS and Google Android phones andtablets.
15

What Is a WAMP, MAMP, or LAMP?WAMP, MAMP, and LAMP are abbreviations for “Windows, Apache, MySQL, andPHP,” “Mac, Apache, MySQL, and PHP,” and “Linux, Apache, MySQL, and PHP.” Theseabbreviations describe a fully functioning setup used for developing dynamic Internetweb pages.
WAMPs, MAMPs, and LAMPs come in the form of a package that binds the bundledprograms together so that you don’t have to install and set them up separately. Thismeans you can simply download and install a single program, and follow a few easyprompts, to get your web development server up and running in the quickest time witha minimum hassle.
During installation, several default settings are created for you. The security configu‐rations of such an installation will not be as tight as on a production web server, becauseit is optimized for local use. For these reasons, you should never install such a setup asa production server.
But for developing and testing websites and applications, one of these installationsshould be entirely sufficient.
If you choose not to go the WAMP/MAMP/LAMP route for build‐ing your own development system, you should know that down‐loading and integrating the various parts yourself can be very time-consuming and may require a lot of research in order to configureeverything fully. But if you already have all the components in‐stalled and integrated with one another, they should work with theexamples in this book.
Installing a WAMP on WindowsThere are several available WAMP servers, each offering slightly different configura‐tions, but the best is probably Zend Server Free Edition, because it’s free and is from thedevelopers of PHP itself. You can download it at http://tinyurl.com/zendfree, as shownin Figure 2-1.
16 | Chapter 2: Setting Up a Development Server

Throughout this book, whenever there’s a long URL to type, I use theTinyURL web address shortening service to save you time and re‐duce typos. For example, the URLs http://tinyurl.com/zendfree andhttp://tinyurl.com/zenddocs are much shorter than the URLs that theylead to:
• http://www.zend.com/en/products/server/free-edition• http://files.zend.com/help/Zend-Server-6/zend-server.htm
Figure 2-1. You can download the Free Edition from the Zend website
I recommend that you always download the latest stable release (in this instance, it’s6.3.0/PHP 5.5 for Windows). It will probably be listed first in the Download section ofthe web page, which should display the correct installer for your computer out of Linux,Windows OS X, and IBM i.
During the lifetime of this edition, some of the screens and optionsshown in the following walkthrough may change. If so, just use yourcommon sense to proceed in as similar a manner as possible to thesequence of actions described.
Installing a WAMP on Windows | 17

Once you’ve downloaded the installer, run it to bring up the window shown inFigure 2-2.
Figure 2-2. The main installation window of the installer
Click Next and accept the license agreement that follows to move on to the Setup Typescreen (see Figure 2-3), then select the Custom option so that the MySQL server canalso be installed.
18 | Chapter 2: Setting Up a Development Server

Figure 2-3. Choose the Custom install option
When the Custom Setup window appears, scroll down the list of options to the bottomand ensure that MySQL Server is checked, as shown in Figure 2-4, then click Next.
Installing a WAMP on Windows | 19

Figure 2-4. Check MySQL Server before continuing
On the following screen (see Figure 2-5), even if you already have an IIS web serverinstalled, I recommend that you choose to install the Apache web server, because theexamples in this book are for Apache. Then click Next.
20 | Chapter 2: Setting Up a Development Server
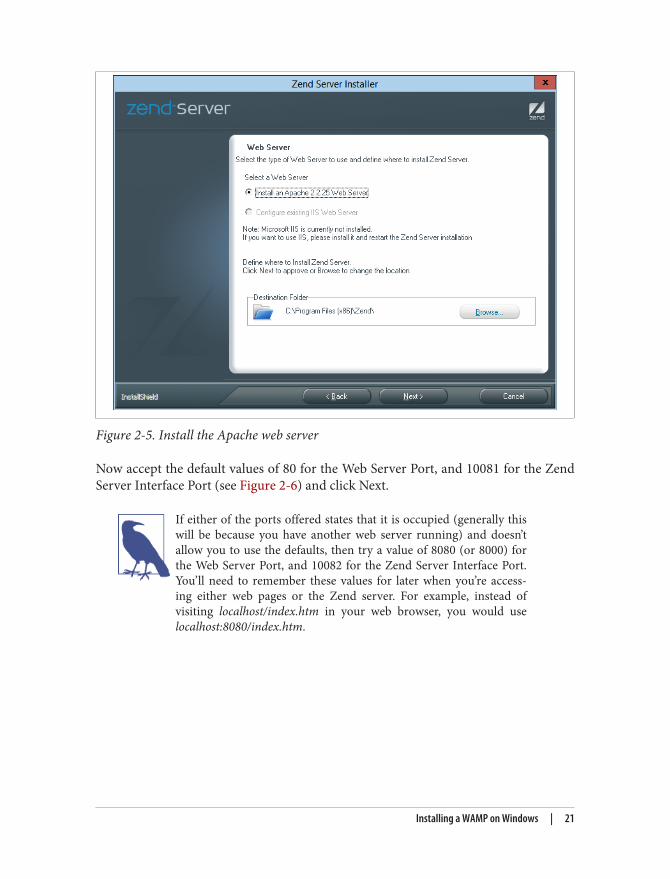
Figure 2-5. Install the Apache web server
Now accept the default values of 80 for the Web Server Port, and 10081 for the ZendServer Interface Port (see Figure 2-6) and click Next.
If either of the ports offered states that it is occupied (generally thiswill be because you have another web server running) and doesn’tallow you to use the defaults, then try a value of 8080 (or 8000) forthe Web Server Port, and 10082 for the Zend Server Interface Port.You’ll need to remember these values for later when you’re access‐ing either web pages or the Zend server. For example, instead ofvisiting localhost/index.htm in your web browser, you would uselocalhost:8080/index.htm.
Installing a WAMP on Windows | 21

Figure 2-6. Accept the default values offered for the ports
Once the ports have been assigned, you will reach the screen in Figure 2-7, where youshould click Install to start the installation.
22 | Chapter 2: Setting Up a Development Server

Figure 2-7. Now you are ready to click Install to proceed
During installation some extra files may be downloaded, so it may take a few minutesfor the programs to get set up. During installation you might also see a pop-up dialogbox from Windows Firewall. If so, accept the request to give it access. When the fileshave been installed, you will be notified and prompted to start using the software byclicking Finish. When you do so, your default browser will be opened with the pageshown in Figure 2-8, where, to continue, you must check the box to agree with the terms.
Installing a WAMP on Windows | 23

Figure 2-8. You must agree to the terms in order to use the server
Next, you are asked how you will be using the server. I recommend that you select theDevelopment option for the purposes of working through the exercises in this book (seeFigure 2-9).
24 | Chapter 2: Setting Up a Development Server

Figure 2-9. Select the Development option
Now you are ready to set a password for the user admin (see Figure 2-10). You do notneed to enter a password for the user developer. Make sure you choose a password youwill remember and click Next. After the library packages show as deployed, click Nextagain to proceed to the screen shown in Figure 2-11, where you can now click Launchto finish installation. Note that the Cluster Configuration option may not appear on theOS X version of the installer.
Installing a WAMP on Windows | 25
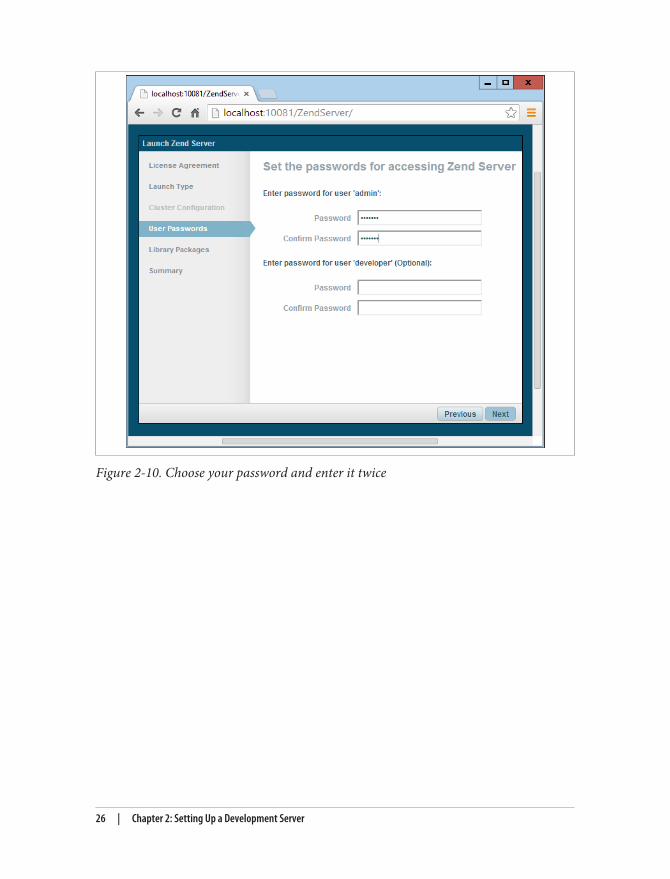
Figure 2-10. Choose your password and enter it twice
26 | Chapter 2: Setting Up a Development Server

Figure 2-11. Click Submit to complete setup
After a short wait, your browser will show the Dashboard screen in Figure 2-12, whichis where you can administer the server.
Installing a WAMP on Windows | 27

Figure 2-12. The Zend Server administration screen
You can return to this screen at any time by entering http://localhost:10081 into yourbrowser. Or, if you entered a value other than 10081 for the Zend Server Interface Port(or 10088 on a Mac), then you can get to this screen by using that value after the coloninstead.
Testing the InstallationThe first thing to do at this point is verify that everything is working correctly. To dothis, you are going to try to display the default web page, which will have been saved inthe server’s document root folder (see Figure 2-13). Enter either of the following twoURLs into the address bar of your browser:
localhost127.0.0.1
28 | Chapter 2: Setting Up a Development Server
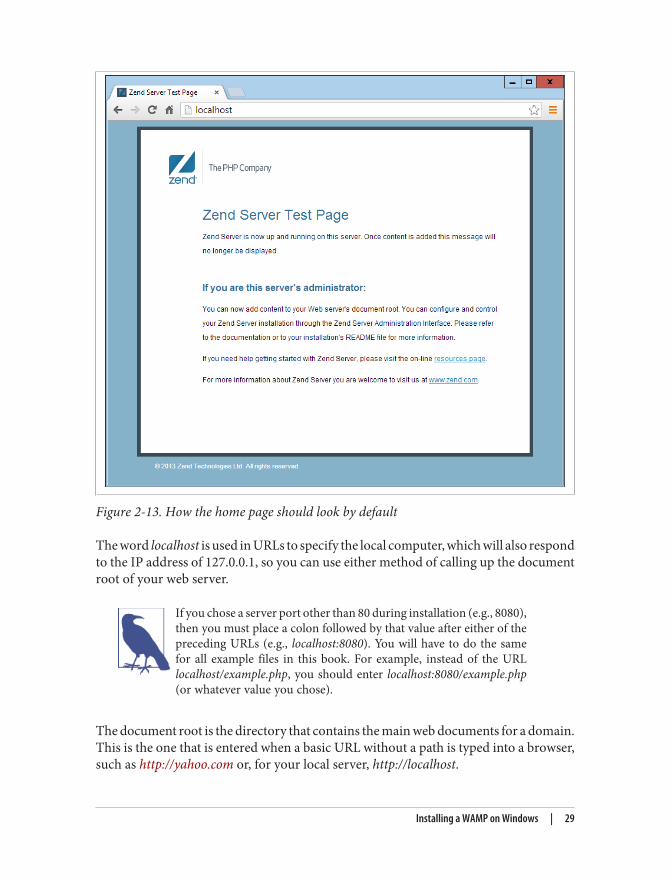
Figure 2-13. How the home page should look by default
The word localhost is used in URLs to specify the local computer, which will also respondto the IP address of 127.0.0.1, so you can use either method of calling up the documentroot of your web server.
If you chose a server port other than 80 during installation (e.g., 8080),then you must place a colon followed by that value after either of thepreceding URLs (e.g., localhost:8080). You will have to do the samefor all example files in this book. For example, instead of the URLlocalhost/example.php, you should enter localhost:8080/example.php(or whatever value you chose).
The document root is the directory that contains the main web documents for a domain.This is the one that is entered when a basic URL without a path is typed into a browser,such as http://yahoo.com or, for your local server, http://localhost.
Installing a WAMP on Windows | 29

By default, Zend Server uses one of the following locations for this directory (the formerfor 32-bit computers, and the latter for 64-bit):
C:/Program Files/Zend/Apache2/htdocsC:/Program Files (x86)/Zend/Apache2/htdocs
If you are not sure whether your computer is 32-bit or 64-bit, try tonavigate to the first directory and, if it exists, you have a 32-bit ma‐chine. If not, open up the second directory because you have a 64-bit computer. When they include spaces, older versions of Windowsmay require you to place path and filenames in quotation marks, likethis:
cd "C:/Program Files/Zend/Apache2/htdocs"
To ensure that you have everything correctly configured, you should now create theobligatory “Hello World” file. So create a small HTML file along the following linesusing Windows Notepad or any other program or text editor, but not a rich word pro‐cessor such as Microsoft Word (unless you save as plain text):
<html> <head> <title>A quick test</title> </head> <body> Hello World! </body></html>
Once you have typed this, save the file into the document root directory previouslydiscussed, using the filename test.htm. If you are using Notepad, make sure that the“Save as type” box is changed from “Text Documents (*.txt)” to “All Files (*.*)”. Or, ifyou prefer, you can save the file using the .html file extension; either is acceptable.
You can now call this page up in your browser by entering one of the following URLs(according to the extension you used) in its address bar (see Figure 2-14):
http://localhost/test.htmhttp://localhost/test.html
You should now have had a trouble-free installation, resulting in a fully working WAMP.But if you encountered any difficulties, check out the comprehensive documentation athttp://tinyurl.com/zenddocs, which should sort out your problem.
30 | Chapter 2: Setting Up a Development Server

Figure 2-14. Your first web page
Alternative WAMPsWhen software is updated, it sometimes works differently than you’d expected, and bugscan even be introduced. So if you encounter difficulties that you cannot resolve, youmay prefer to choose one of the various other solutions available on the Web instead.
You will still be able to make use of all the examples in this book, but you’ll have to followthe instructions supplied with each WAMP, which may not be as easy to follow as thepreceding guide.
Here’s a selection of the best in my opinion:
• EasyPHP• XAMPP• WAMPServer• Glossword WAMP
Installing a MAMP on Mac OS XZend Server Free Edition is also available on OS X, and you can download it from http://tinyurl.com/zendfree, as shown in Figure 2-15.
I recommend that you always download the latest stable release (in this instance, it’s6.3.0/PHP 5.5 for OS X). It will usually be listed first in the Download section of the webpage, which should display the correct installer for your computer out of Linux, Win‐dows, OS X, and IBM i. You may be asked to log in before you download, but you canalso click a link to get the file without logging in or registering, although you’ll miss outon product update emails and other news.
Installing a MAMP on Mac OS X | 31

Figure 2-15. You can download the server from the Zend website
Once the installer is downloaded, double-click the .dmg file and wait for the downloadto verify, and then you should see the window shown in Figure 2-16.
32 | Chapter 2: Setting Up a Development Server

Figure 2-16. Double-click Zend Server to install it
Here you can double-click the README file for instructions, or double-click ZendServer to open up the installation window shown in Figure 2-17.
Installing a MAMP on Mac OS X | 33

Figure 2-17. The Zend Server installer
Now click Continue, read the instructions that are displayed, and then click Continueagain to reach the screen shown in Figure 2-18, where you can decide where to put theinstalled software (the default being Macintosh HD). Click Install when you are ready,and enter your password if prompted for it.
During installation, you may be asked whether you wish to install additional software.If so, I recommend accepting everything offered to you by clicking the Install button.Upon completion of the installation, you can click Close to close the installer.
Once the software is installed, locate the ZendServer program in your Applicationsfolder and double-click it to proceed with completing the setup. This will bring up apage in your default web browser similar to that shown in Figure 2-8. Now follow theprompts you are given (shown in Figure 2-8 through Figure 2-11), in which you mustaccept the license agreement and choose a password before being taken to the maindashboard, as shown earlier in Figure 2-12.
34 | Chapter 2: Setting Up a Development Server

Figure 2-18. Choosing the destination for installation
Configuring MySQLUnfortunately, the installer doesn’t set up the commands needed to be able to start, stop,and restart the MySQL server, so you’re going to have to do this manually by openingthe Terminal and entering the following command:
sudo nano /usr/local/zend/bin/zendctl.sh
After entering your password you will now be in the Nano text editor, so move the cursordown a few lines using the down cursor key, and where you see the line that readsMySQL_EN="false", change the word false to true.
Now scroll down some more until you find these two lines:case $1 in "start")
Below that, you’ll see an indented line that reads: $0 start-apache %
Just after this line, insert a new one that reads as follows: $0 start-MySQL %
This will allow MySQL to start, but now you need to scroll down a little more until youget to the section that starts with:
"stop")
Installing a MAMP on Mac OS X | 35

Then below it, you’ll see an indented line that reads: $0 stop-apache %
Just after this line, insert a new one that reads as follows: $0 stop-MySQL %
This will allow MySQL to be stopped. Now you can press Ctrl-X to exit from edit mode,press the Y key when prompted to save the changes, and then press Return to save theedited file.
Ensuring MySQL Starts on BootingUnfortunately, there’s another edit you have to make so that MySQL will start whenyour Mac does, and that’s to issue the following commands from the Terminal (sup‐plying your password in the relevant place if prompted for it):
cd /Library/StartupItems/ZendServer_init/sudo rm zendctl.shsudo ln -s /usr/local/zend/bin/zendctl.sh ./
Your Mac is now configured, but MySQL has not yet been started, so now you mustissue the following command (along with password if prompted) after which you shouldbe all set to go:
sudo /Library/StartupItems/ZendServer_init/zendctl.sh restart
Testing the InstallationYou can now test the installation by entering either of the following URLs into your webbrowser to call up the screen shown in Figure 2-13:
localhost:10088127.0.0.1:10088
The word localhost specifies the local computer (which will also respond to the IP ad‐dress of 127.0.0.1). And the reason for having to enter :10088 is because many Maccomputers will already have a web server running, so this avoids any clash.
You must therefore remember to place :10088 after every localhost for all examples inthis book. So, for example, if the filename test.php is being accessed, you would call itup from the browser using the URL localhost:10088/test.php.
36 | Chapter 2: Setting Up a Development Server

If you are sure that there isn’t another web server running on yourMac, you can edit the configuration file at the following URL (ensur‐ing you have permission to do so), changing the command (at aroundline 40) that reads Listen 10088 to Listen 80:
/usr/local/zend/apache2/conf/httpd.conf
You will then need to restart the server by opening the Terminal utilityand issuing the following command (along with your password ifprompted), and you will then no longer need to add the :10088 tolocal URLs:
sudo /usr/local/zend/bin/zendctl.sh restart
The page that gets displayed in the browser when you go to http://localhost or http://localhost:10088 is the file index.html in the server’s document root (the directory thatcontains the main web documents for a domain). This is the directory that is enteredwhen a basic URL without a path is typed into a browser, such as http://yahoo.com, orin the case of your local web server, http://localhost, and so on.
By default, Zend Server on OS X uses the following as its document root folder:/usr/local/zend/apache2/htdocs
To ensure that you have everything correctly configured, you should now load a testfile. So create a small HTML file along the following lines using Windows TextEdit orany other program or text editor (such as the popular TextWrangler), but not a richword processor like Microsoft Word (unless you save as plain text):
<html> <head> <title>A quick test</title> </head> <body> Hello World! </body></html>
Once you have typed this, save the file into the document root directory using thefilename test.htm. Or, if you prefer, use the .html file extension. You can now call thispage up in your browser by entering one of the following URLs (according to the ex‐tension you saved with) in its address bar (see Figure 2-14):
http://localhost:10088/test.htmhttp://localhost:10088/test.html
You should now have had a trouble-free installation, resulting in a fully working MAMP.But if you encountered any difficulties, check out the comprehensive documentation athttp://tinyurl.com/zenddocs, which should sort out your problem.
Installing a MAMP on Mac OS X | 37

Installing a LAMP on LinuxThis book is aimed mostly at PC and Mac users, but its contents will work equally wellon a Linux computer. However, there are dozens of popular flavors of Linux, and eachof them may require installing a LAMP in a slightly different way, so I can’t cover themall in this book.
Nonetheless, many Linux versions come preinstalled with a web server and MySQL,and the chances are that you may already be all set to go. To find out, try entering thefollowing into a browser and see whether you get a default document root web page:
http://localhost
If this works, you probably have the Apache server installed and may well also haveMySQL up and running too; check with your system administrator to be sure, though.
If you don’t yet have a web server installed, however, there’s a version of Zend ServerFree Edition available that you can download at http://tinyurl.com/zendfree.
All the instructions and help you need are detailed on the Download page. Follow themclosely or use the provided scripts, and you should be able to work through all theexamples in this book.
Working RemotelyIf you have access to a web server already configured with PHP and MySQL, you canalways use that for your web development. But unless you have a high-speed connection,it is not always your best option. Developing locally allows you to test modificationswith little or no upload delay.
Accessing MySQL remotely may not be easy either. You may have to Telnet or SSH intoyour server to manually create databases and set permissions from the command line.Your web hosting company will advise you on how best to do this and provide you withany password it has set for your MySQL access (as well as, of course, for getting into theserver in the first place).
Logging InI recommend that, at minimum, Windows users should install a program such asPuTTY for Telnet and SSH access (remember that SSH is much more secure than Tel‐net).
38 | Chapter 2: Setting Up a Development Server

On a Mac, you already have SSH available. Just select the Applications folder, followedby Utilities, and then launch Terminal. In the terminal window, log into a server usingSSH as follows:
where server.com is the name of the server you wish to log into and mylogin is theusername you will log in under. You will then be prompted for the correct password forthat username and, if you enter it correctly, you will be logged in.
Using FTPTo transfer files to and from your web server, you will need an FTP program. If you gosearching the Web for a good one, you’ll find so many that it could take you quite awhile to come across one with all the right features for you.
Nowadays I always recommend FireFTP, because of these advantages:
• It is an add-on for the Firefox web browser, and will therefore work on any platformon which Firefox runs.
• Calling it up can be as simple as selecting a bookmark.• It is one of the fastest and easiest-to-use FTP programs that I have encountered.
You may say, “But I use only Microsoft Internet Explorer, and FireFTPis not available for it,” but I would counter that if you are going todevelop web pages, you need a copy of each of the main browsersinstalled on your PC anyway, as suggested at the start of this chapter.
To install FireFTP, visit http://fireftp.mozdev.org using Firefox and click on the Down‐load FireFTP link. It’s about half a megabyte in size and installs very quickly. Once it’sinstalled, restart Firefox; you can then access FireFTP from the Tools menu (seeFigure 2-19).
Another excellent FTP program is the open source FileZilla, available for Windows,Linux, and Mac OS X 10.5 or newer.
Of course, if you already have an FTP program, all the better—stick with what you know.
Working Remotely | 39

Figure 2-19. FireFTP offers full FTP access from within Firefox
Using a Program EditorAlthough a plain-text editor works for editing HTML, PHP, and JavaScript, there havebeen some tremendous improvements in dedicated program editors, which now in‐corporate very handy features such as colored syntax highlighting. Today’s programeditors are smart and can show you where you have syntax errors before you even runa program. Once you’ve used a modern editor, you’ll wonder how you ever managedwithout one.
There are a number of good programs available, but I have settled on Editra, becauseit’s free and available on Mac, Windows, and Linux/Unix. You can download a copy byvisiting http://editra.org and selecting the Download link toward the top left of the page,where you can also find the documentation for it.
As you can see from Figure 2-20, Editra highlights the syntax appropriately using colorsto help clarify what’s going on. What’s more, you can place the cursor next to bracketsor braces and Editra will highlight the matching pair so that you can check whether youhave too many or too few. In fact, Editra offers a wealth of additional features, whichyou will discover and enjoy as you use it.
40 | Chapter 2: Setting Up a Development Server
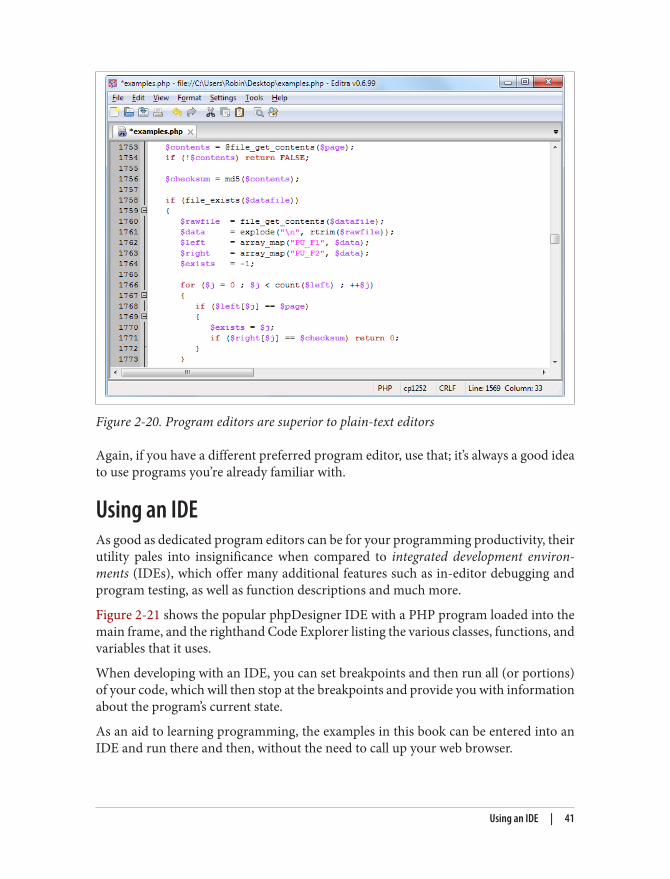
Figure 2-20. Program editors are superior to plain-text editors
Again, if you have a different preferred program editor, use that; it’s always a good ideato use programs you’re already familiar with.
Using an IDEAs good as dedicated program editors can be for your programming productivity, theirutility pales into insignificance when compared to integrated development environ‐ments (IDEs), which offer many additional features such as in-editor debugging andprogram testing, as well as function descriptions and much more.
Figure 2-21 shows the popular phpDesigner IDE with a PHP program loaded into themain frame, and the righthand Code Explorer listing the various classes, functions, andvariables that it uses.
When developing with an IDE, you can set breakpoints and then run all (or portions)of your code, which will then stop at the breakpoints and provide you with informationabout the program’s current state.
As an aid to learning programming, the examples in this book can be entered into anIDE and run there and then, without the need to call up your web browser.
Using an IDE | 41

Figure 2-21. When you’re using an IDE such as phpDesigner, PHP development be‐comes much quicker and easier
There are several IDEs available for different platforms, most of which are commercial,but there are some free ones too. Table 2-1 lists some of the most popular PHP IDEs,along with their download URLs.
Choosing an IDE can be a very personal thing, so if you intend to use one, I advise youto download a couple or more to try them out first; they all either have trial versions orare free to use, so it won’t cost you anything.
Table 2-1. A selection of PHP IDEsIDE Download URL Cost Win Mac Lin
Eclipse PDT http://eclipse.org/pdt/downloads/ Free ☑ ☑ ☑Komodo IDE http://activestate.com/Products/komodo_ide $245 ☑ ☑ ☑NetBeans http://www.netbeans.org Free ☑ ☑ ☑phpDesigner http://mpsoftware.dk $39 ☑ ☐ ☐PHPEclipse http://phpeclipse.de Free ☑ ☑ ☑PhpED http://nusphere.com $119 ☑ ☐ ☑PHPEdit http://www.phpedit.com $119 ☑ ☐ ☐Zend Studio http://zend.com/en/downloads $189 ☑ ☑ ☑
42 | Chapter 2: Setting Up a Development Server

You should take the time to install a program editor or IDE you are comfortable withand you’ll then be ready to try out the examples in the coming chapters.
Armed with these tools, you are now ready to move on to Chapter 3, where we’ll startexploring PHP in further depth and find out how to get HTML and PHP to worktogether, as well as how the PHP language itself is structured. But before moving on, Isuggest you test your new knowledge with the following questions.
Questions1. What is the difference between a WAMP, a MAMP, and a LAMP?2. What do the IP address 127.0.0.1 and the URL http://localhost have in common?3. What is the purpose of an FTP program?4. Name the main disadvantage of working on a remote web server.5. Why is it better to use a program editor instead of a plain-text editor?
See “Chapter 2 Answers” on page 640 in Appendix A for the answers to these questions.
Questions | 43


CHAPTER 3
Introduction to PHP
In Chapter 1, I explained that PHP is the language that you use to make the servergenerate dynamic output—output that is potentially different each time a browser re‐quests a page. In this chapter, you’ll start learning this simple but powerful language; itwill be the topic of the following chapters up through Chapter 7.
I encourage you to develop your PHP code in one of the IDEs listed in Chapter 2. It willhelp you catch typos and speed up learning tremendously in comparison to less feature-rich editors.
Many of these development environments let you run the PHP code and see the outputdiscussed in this chapter. I’ll also show you how to embed the PHP in an HTML file sothat you can see what the output looks like in a web page (the way your users willultimately see it). But that step, as thrilling as it may be at first, isn’t really important atthis stage.
In production, your web pages will be a combination of PHP, HTML, and JavaScript,and some MySQL statements laid out using CSS, and possibly utilizing various HTML5elements. Furthermore, each page can lead to other pages to provide users with ways toclick through links and fill out forms. We can avoid all that complexity while learningeach language, though. Focus for now on just writing PHP code and making sure thatyou get the output you expect—or at least that you understand the output you actuallyget!
Incorporating PHP Within HTMLBy default, PHP documents end with the extension .php. When a web server encountersthis extension in a requested file, it automatically passes it to the PHP processor. Ofcourse, web servers are highly configurable, and some web developers choose to forcefiles ending with .htm or .html to also get parsed by the PHP processor, usually becausethey want to hide the fact that they are using PHP.
45

Your PHP program is responsible for passing back a clean file suitable for display in aweb browser. At its very simplest, a PHP document will output only HTML. To provethis, you can take any normal HTML document such as an index.html file and save itas index.php, and it will display identically to the original.
To trigger the PHP commands, you need to learn a new tag. The first part is:<?php
The first thing you may notice is that the tag has not been closed. This is because entiresections of PHP can be placed inside this tag, and they finish only when the closing partis encountered, which looks like this:
?>
A small PHP “Hello World” program might look like Example 3-1.
Example 3-1. Invoking PHP<?php echo "Hello world";?>
The way you use this tag is quite flexible. Some programmers open the tag at the startof a document and close it right at the end, outputting any HTML directly from PHPcommands.
Others, however, choose to insert only the smallest possible fragments of PHP withinthese tags wherever dynamic scripting is required, leaving the rest of the document instandard HTML.
The latter type of programmer generally argues that their style of coding results in fastercode, while the former says that the speed increase is so minimal that it doesn’t justifythe additional complexity of dropping in and out of PHP many times in a singledocument.
As you learn more, you will surely discover your preferred style of PHP development,but for the sake of making the examples in this book easier to follow, I have adopted theapproach of keeping the number of transfers between PHP and HTML to a minimum—generally only once or twice in a document.
By the way, there is a slight variation to the PHP syntax. If you browse the Internet forPHP examples, you may also encounter code where the opening and closing syntaxlooks like this:
<? echo "Hello world";?>
Although it’s not as obvious that the PHP parser is being called, this is a valid, alternativesyntax that also usually works, but should be discouraged, as it is incompatible with
46 | Chapter 3: Introduction to PHP

XML and its use is now deprecated (meaning that it is no longer recommended andcould be removed in future versions).
If you have only PHP code in a file, you may omit the closing ?>. Thiscan be a good practice, as it will ensure that you have no excesswhitespace leaking from your PHP files (especially important whenyou’re writing object-oriented code).
This Book’s ExamplesTo save you the time it would take to type them all in, all the examples from this bookhave been archived onto the companion website, which you can download to yourcomputer by clicking the Download Examples link in the heading section (seeFigure 3-1).
Figure 3-1. Viewing examples from this book at http://lpmj.net
In addition to having all the examples saved by chapter and example number (such asexample3-1.php), the archive also contains an extra folder called named_examples, in
This Book’s Examples | 47

which you’ll find all the examples I suggest you save using a specific filename (such asthe upcoming Example 3-4, which should be saved as test1.php).
The Structure of PHPWe’re going to cover quite a lot of ground in this section. It’s not too difficult, but Irecommend that you work your way through it carefully, as it sets the foundation foreverything else in this book. As always, there are some useful questions at the end ofthe chapter that you can use to test how much you’ve learned.
Using CommentsThere are two ways in which you can add comments to your PHP code. The first turnsa single line into a comment by preceding it with a pair of forward slashes, like this:
// This is a comment
This version of the comment feature is a great way to temporarily remove a line of codefrom a program that is giving you errors. For example, you could use such a commentto hide a debugging line of code until you need it, like this:
// echo "X equals $x";
You can also use this type of comment directly after a line of code to describe its action,like this:
$x += 10; // Increment $x by 10
When you need multiple-line comments, there’s a second type of comment, which lookslike Example 3-2.
Example 3-2. A multiline comment<?php/* This is a section of multiline comments which will not be interpreted */?>
You can use the /* and */ pairs of characters to open and close comments almostanywhere you like inside your code. Most, if not all, programmers use this construct totemporarily comment out entire sections of code that do not work or that, for one reasonor another, they do not wish to be interpreted.
48 | Chapter 3: Introduction to PHP

A common error is to use /* and */ to comment out a large sec‐tion of code that already contains a commented-out section that usesthose characters. You can’t nest comments this way; the PHP inter‐preter won’t know where a comment ends and will display an errormessage. However, if you use a program editor or IDE with syntaxhighlighting, this type of error is easier to spot.
Basic SyntaxPHP is quite a simple language with roots in C and Perl, yet it looks more like Java. Itis also very flexible, but there are a few rules that you need to learn about its syntax andstructure.
Semicolons
You may have noticed in the previous examples that the PHP commands ended with asemicolon, like this:
$x += 10;
Probably the most common cause of errors you will encounter with PHP is forgettingthis semicolon. This causes PHP to treat multiple statements like one statement, whichit is unable to understand, prompting it to produce a Parse error message.
The $ symbol
The $ symbol has come to be used in many different ways by different programminglanguages. For example, if you have ever written in the BASIC language, you will haveused the $ to terminate variable names to denote them as strings.
In PHP, however, you must place a $ in front of all variables. This is required to makethe PHP parser faster, as it instantly knows whenever it comes across a variable. Whetheryour variables are numbers, strings, or arrays, they should all look something like thosein Example 3-3.
Example 3-3. Three different types of variable assignment<?php $mycounter = 1; $mystring = "Hello"; $myarray = array("One", "Two", "Three");?>
And really that’s pretty much all the syntax that you have to remember. Unlike languagesthat are very strict about how you indent and lay out your code (e.g., Python), PHPleaves you completely free to use (or not use) all the indenting and spacing you like. Infact, sensible use of whitespace is generally encouraged (along with comprehensive
The Structure of PHP | 49

commenting) to help you understand your code when you come back to it. It also helpsother programmers when they have to maintain your code.
VariablesThere’s a simple metaphor that will help you understand what PHP variables are allabout. Just think of them as little (or big) matchboxes! That’s right—matchboxes thatyou’ve painted over and written names on.
String variables
Imagine you have a matchbox on which you have written the word username. You thenwrite Fred Smith on a piece of paper and place it into the box (see Figure 3-2). Well,that’s the same process as assigning a string value to a variable, like this:
$username = "Fred Smith";
Figure 3-2. You can think of variables as matchboxes containing items
The quotation marks indicate that “Fred Smith” is a string of characters. You must en‐close each string in either quotation marks or apostrophes (single quotes), althoughthere is a subtle difference between the two types of quote, which is explained later.When you want to see what’s in the box, you open it, take the piece of paper out, andread it. In PHP, doing so looks like this:
echo $username;
Or you can assign it to another variable (photocopy the paper and place the copy inanother matchbox), like this:
$current_user = $username;
50 | Chapter 3: Introduction to PHP

If you are keen to start trying out PHP for yourself, you could try entering the examplesin this chapter into an IDE (as recommended at the end of Chapter 2) to see instantresults, or you could enter the code in Example 3-4 into a program editor and save it toyour server’s document root directory (also discussed in Chapter 2) as test1.php.
Example 3-4. Your first PHP program<?php // test1.php $username = "Fred Smith"; echo $username; echo "<br>"; $current_user = $username; echo $current_user;?>
Now you can call it up by entering the following into your browser’s address bar:http://localhost/test1.php
If during installation of your web server (as detailed in Chapter 2)you changed the port assigned to the server to anything other than80, then you must place that port number within the URL in this andall other examples in this book. So, for example, if you changed theport to 8080, the preceding URL becomes:
http://localhost:8080/test1.php
I won’t mention this again, so just remember to use the port num‐ber if required when trying out any examples or writing your owncode.
The result of running this code should be two occurrences of the name “Fred Smith,”the first of which is the result of the echo $username command, and the second of theecho $current_user command.
Numeric variables
Variables don’t contain just strings—they can contain numbers, too. If we return to thematchbox analogy, to store the number 17 in the variable $count, the equivalent wouldbe placing, say, 17 beads in a matchbox on which you have written the word count:
$count = 17;
You could also use a floating-point number (containing a decimal point); the syntax isthe same:
$count = 17.5;
The Structure of PHP | 51

To read the contents of the matchbox, you would simply open it and count the beads.In PHP, you would assign the value of $count to another variable or perhaps just echoit to the web browser.
Arrays
So what are arrays? Well, you can think of them as several matchboxes glued together.For example, let’s say we want to store the player names for a five-person soccer teamin an array called $team. To do this, we could glue five matchboxes side by side and writedown the names of all the players on separate pieces of paper, placing one in eachmatchbox.
Across the whole top of the matchbox assembly we would write the word team (seeFigure 3-3). The equivalent of this in PHP would be:
$team = array('Bill', 'Mary', 'Mike', 'Chris', 'Anne');
Figure 3-3. An array is like several matchboxes glued together
This syntax is more complicated than the ones I’ve explained so far. The array-buildingcode consists of the following construct:
array();
with five strings inside. Each string is enclosed in apostrophes.
If we then wanted to know who player 4 is, we could use this command:echo $team[3]; // Displays the name Chris
52 | Chapter 3: Introduction to PHP

The reason the previous statement has the number 3, not 4, is because the first elementof a PHP array is actually the zeroth element, so the player numbers will therefore be 0through 4.
Two-dimensional arrays
There’s a lot more you can do with arrays. For example, instead of being single-dimensional lines of matchboxes, they can be two-dimensional matrixes or can evenhave three or more dimensions.
As an example of a two-dimensional array, let’s say we want to keep track of a game oftic-tac-toe, which requires a data structure of nine cells arranged in a 3×3 square. Torepresent this with matchboxes, imagine nine of them glued to each other in a matrixof three rows by three columns (see Figure 3-4).
Figure 3-4. A multidimensional array simulated with matchboxes
You can now place a piece of paper with either an “x” or an “o” in the correct matchboxfor each move played. To do this in PHP code, you have to set up an array containingthree more arrays, as in Example 3-5, in which the array is set up with a game alreadyin progress.
Example 3-5. Defining a two-dimensional array<?php $oxo = array(array('x', ' ', 'o'), array('o', 'o', 'x'), array('x', 'o', ' '));?>
The Structure of PHP | 53

Once again, we’ve moved up a step in complexity, but it’s easy to understand if you havea grasp of the basic array syntax. There are three array() constructs nested inside theouter array() construct.
To then return the third element in the second row of this array, you would use thefollowing PHP command, which will display an x:
echo $oxo[1][2];
Remember that array indexes (pointers at elements within an array)start from zero, not one, so the [1] in the previous command refersto the second of the three arrays, and the [2] references the thirdposition within that array. It will return the contents of the match‐box three along and two down.
As mentioned, we can support arrays with even more dimensions by simply creatingmore arrays within arrays. However, we will not be covering arrays of more than twodimensions in this book.
And don’t worry if you’re still having difficulty coming to grips with using arrays, as thesubject is explained in detail in Chapter 6.
Variable naming rules
When creating PHP variables, you must follow these four rules:
• Variable names must start with a letter of the alphabet or the _ (underscore)character.
• Variable names can contain only the characters a–z, A–Z, 0–9, and _ (underscore).• Variable names may not contain spaces. If a variable must comprise more than one
word, it should be separated with the _ (underscore) character (e.g., $user_name).• Variable names are case-sensitive. The variable $High_Score is not the same as the
variable $high_score.
To allow extended ASCII characters that include accents, PHP alsosupports the bytes from 127 through 255 in variable names. But un‐less your code will be maintained only by programmers who arefamiliar with those characters, it’s probably best to avoid them, be‐cause programmers using English keyboards will have difficulty ac‐cessing them.
54 | Chapter 3: Introduction to PHP

OperatorsOperators are the mathematical, string, comparison, and logical commands such asplus, minus, multiply, and divide. PHP looks a lot like plain arithmetic; for instance, thefollowing statement outputs 8:
echo 6 + 2;
Before moving on to learn what PHP can do for you, take a moment to learn about thevarious operators it provides.
Arithmetic operators
Arithmetic operators do what you would expect. They are used to perform mathematics.You can use them for the main four operations (plus, minus, multiply, and divide) aswell as to find a modulus (the remainder after a division) and to increment or decrementa value (see Table 3-1).
Table 3-1. Arithmetic operatorsOperator Description Example
+ Addition $j + 1
− Subtraction $j − 6
* Multiplication $j * 11
/ Division $j / 4
% Modulus (division remainder) $j % 9
++ Increment ++$j
−− Decrement −−$j
Assignment operators
These operators are used to assign values to variables. They start with the very simple= and move on to +=, −=, and so on (see Table 3-2). The operator += adds the value onthe right side to the variable on the left, instead of totally replacing the value on the left.Thus, if $count starts with the value 5, the statement:
$count += 1;
sets $count to 6, just like the more familiar assignment statement:$count = $count + 1;
Strings have their own operator, the period (.), detailed in the section “String concat‐enation” on page 58.
The Structure of PHP | 55

Table 3-2. Assignment operatorsOperator Example Equivalent to
= $j = 15 $j = 15
+= $j += 5 $j = $j + 5
−= $j −= 3 $j = $j − 3
*= $j *= 8 $j = $j * 8
/= $j /= 16 $j = $j / 16
.= $j .= $k $j = $j . $k
%= $j %= 4 $j = $j % 4
Comparison operators
Comparison operators are generally used inside a construct such as an if statement inwhich you need to compare two items. For example, you may wish to know whether avariable you have been incrementing has reached a specific value, or whether anothervariable is less than a set value, and so on (see Table 3-3).
Note the difference between = and ==. The first is an assignment operator, and the secondis a comparison operator. Even more advanced programmers can sometimes transposethe two when coding hurriedly, so be careful.
Table 3-3. Comparison operatorsOperator Description Example
== Is equal to $j == 4
!= Is not equal to $j != 21
> Is greater than $j > 3
< Is less than $j < 100
>= Is greater than or equal to $j >= 15
<= Is less than or equal to $j <= 8
Logical operators
If you haven’t used them before, logical operators may at first seem a little daunting. Butjust think of them the way you would use logic in English. For example, you might sayto yourself, “If the time is later than 12 p.m. and earlier than 2 p.m., then have lunch.”In PHP, the code for this might look something like the following (using military time):
if ($hour > 12 && $hour < 14) dolunch();
Here we have moved the set of instructions for actually going to lunch into a functionthat we will have to create later called dolunch. The then of the statement is left out,because it is implied and therefore unnecessary.
56 | Chapter 3: Introduction to PHP

As the previous example shows, you generally use a logical operator to combine theresults of two of the comparison operators shown in the previous section. A logicaloperator can also be input to another logical operator (“If the time is later than 12 p.m.and earlier than 2 p.m., or if the smell of a roast is permeating the hallway and there areplates on the table”). As a rule, if something has a TRUE or FALSE value, it can be inputto a logical operator. A logical operator takes two true-or-false inputs and produces atrue-or-false result.
Table 3-4 shows the logical operators.
Table 3-4. Logical operatorsOperator Description Example
&& And $j == 3 && $k == 2
and Low-precedence and $j == 3 and $k == 2
|| Or $j < 5 || $j > 10
or Low-precedence or $j < 5 or $j > 10
! Not ! ($j == $k)
xor Exclusive or $j xor $k
Note that && is usually interchangeable with and; the same is true for || and or. But andand or have a lower precedence, so in some cases, you may need extra parentheses toforce the required precedence. On the other hand, there are times when only and or oris acceptable, as in the following statement, which uses an or operator (to be explainedin Chapter 10):
mysql_select_db($database) or die("Unable to select database");
The most unusual of these operators is xor, which stands for exclusive or and returns aTRUE value if either value is TRUE, but a FALSE value if both inputs are TRUE or both inputsare FALSE. To understand this, imagine that you want to concoct your own cleaner forhousehold items. Ammonia makes a good cleaner, and so does bleach, so you want yourcleaner to have one of these. But the cleaner must not have both, because the combi‐nation is hazardous. In PHP, you could represent this as:
$ingredient = $ammonia xor $bleach;
In the example snippet, if either $ammonia or $bleach is TRUE, $ingredient will also beset to TRUE. But if both are TRUE or both are FALSE, $ingredient will be set to FALSE.
Variable AssignmentThe syntax to assign a value to a variable is always variable = value. Or, to reassign thevalue to another variable, it is other variable = variable.
The Structure of PHP | 57

There are also a couple of other assignment operators that you will find useful. Forexample, we’ve already seen:
$x += 10;
which tells the PHP parser to add the value on the right (in this instance, the value 10)to the variable $x. Likewise, we could subtract as follows:
$y −= 10;
Variable incrementing and decrementing
Adding or subtracting 1 is such a common operation that PHP provides special oper‐ators for it. You can use one of the following in place of the += and −= operators:
++$x;−−$y;
In conjunction with a test (an if statement), you could use the following code:if (++$x == 10) echo $x;
This tells PHP to first increment the value of $x and then test whether it has the value10; if it does, output its value. But you can also require PHP to increment (or, in thefollowing example, decrement) a variable after it has tested the value, like this:
if ($y−− == 0) echo $y;
which gives a subtly different result. Suppose $y starts out as 0 before the statement isexecuted. The comparison will return a TRUE result, but $y will be set to −1 after thecomparison is made. So what will the echo statement display: 0 or −1? Try to guess, andthen try out the statement in a PHP processor to confirm. Because this combination ofstatements is confusing, it should be taken as just an educational example and not as aguide to good programming style.
In short, whether a variable is incremented or decremented before or after testing de‐pends on whether the increment or decrement operator is placed before or after thevariable.
By the way, the correct answer to the previous question is that the echo statement willdisplay the result −1, because $y was decremented right after it was accessed in the ifstatement, and before the echo statement.
String concatenation
String concatenation uses the period (.) to append one string of characters to another.The simplest way to do this is as follows:
echo "You have " . $msgs . " messages.";
Assuming that the variable $msgs is set to the value 5, the output from this line of codewill be:
58 | Chapter 3: Introduction to PHP

You have 5 messages.
Just as you can add a value to a numeric variable with the += operator, you can appendone string to another using .= like this:
$bulletin .= $newsflash;
In this case, if $bulletin contains a news bulletin and $newsflash has a news flash, thecommand appends the news flash to the news bulletin so that $bulletin now comprisesboth strings of text.
String types
PHP supports two types of strings that are denoted by the type of quotation mark thatyou use. If you wish to assign a literal string, preserving the exact contents, you shoulduse the single quotation mark (apostrophe) like this:
$info = 'Preface variables with a $ like this: $variable';
In this case, every character within the single-quoted string is assigned to $info. If youhad used double quotes, PHP would have attempted to evaluate $variable as a variable.
On the other hand, when you want to include the value of a variable inside a string, youdo so by using double-quoted strings:
echo "This week $count people have viewed your profile";
As you will realize, this syntax also offers a simpler form of concatenation in which youdon’t need to use a period, or close and reopen quotes, to append one string to another.This is called variable substitution, and you will notice some applications using it ex‐tensively and others not using it at all.
Escaping characters
Sometimes a string needs to contain characters with special meanings that might beinterpreted incorrectly. For example, the following line of code will not work, becausethe second quotation mark encountered in the word spelling’s will tell the PHP parserthat the string end has been reached. Consequently, the rest of the line will be rejectedas an error:
$text = 'My spelling's atroshus'; // Erroneous syntax
To correct this, you can add a backslash directly before the offending quotation markto tell PHP to treat the character literally and not to interpret it:
$text = 'My spelling\'s still atroshus';
And you can perform this trick in almost all situations in which PHP would otherwisereturn an error by trying to interpret a character. For example, the following double-quoted string will be correctly assigned:
$text = "She wrote upon it, \"Return to sender\".";
The Structure of PHP | 59

Additionally, you can use escape characters to insert various special characters intostrings such as tabs, newlines, and carriage returns. These are represented, as you mightguess, by \t, \n, and \r. Here is an example using tabs to lay out a heading; it is includedhere merely to illustrate escapes, because in web pages there are always better ways todo layout:
$heading = "Date\tName\tPayment";
These special backslash-preceded characters work only in double-quoted strings. Insingle-quoted strings, the preceding string would be displayed with the ugly \t sequen‐ces instead of tabs. Within single-quoted strings, only the escaped apostrophe (\') andescaped backslash itself (\\) are recognized as escaped characters.
Multiple-Line CommandsThere are times when you need to output quite a lot of text from PHP, and using severalecho (or print) statements would be time-consuming and messy. To overcome this,PHP offers two conveniences. The first is just to put multiple lines between quotes, asin Example 3-6. Variables can also be assigned, as in Example 3-7.
Example 3-6. A multiline string echo statement<?php $author = "Steve Ballmer";
echo "Developers, Developers, developers, developers, developers, developers, developers, developers, developers!
- $author.";?>
Example 3-7. A multiline string assignment<?php $author = "Bill Gates";
$text = "Measuring programming progress by lines of code is like measuring aircraft building progress by weight.
- $author.";?>
PHP also offers a multiline sequence using the <<< operator—commonly referred to asa here-document or heredoc—as a way of specifying a string literal, preserving the linebreaks and other whitespace (including indentation) in the text. Its use can be seen inExample 3-8.
60 | Chapter 3: Introduction to PHP

Example 3-8. Alternative multiline echo statement<?php $author = "Brian W. Kernighan";
echo <<<_END Debugging is twice as hard as writing the code in the first place. Therefore, if you write the code as cleverly as possible, you are, by definition, not smart enough to debug it.
- $author._END;?>
This code tells PHP to output everything between the two _END tags as if it were adouble-quoted string (except that quotes in a heredoc do not need to be escaped). Thismeans it’s possible, for example, for a developer to write entire sections of HTML directlyinto PHP code and then just replace specific dynamic parts with PHP variables.
It is important to remember that the closing _END; tag must appear right at the start ofa new line and it must be the only thing on that line—not even a comment is allowedto be added after it (nor even a single space). Once you have closed a multiline block,you are free to use the same tag name again.
Remember: using the <<<_END ... _END; heredoc construct, youdon’t have to add \n linefeed characters to send a linefeed—just pressReturn and start a new line. Also, unlike either a double-quote- orsingle-quote-delimited string, you are free to use all the single anddouble quotes you like within a heredoc, without escaping them bypreceding them with a slash (\).
Example 3-9 shows how to use the same syntax to assign multiples lines to a variable.
Example 3-9. A multiline string variable assignment<?php $author = "Scott Adams";
$out = <<<_END Normal people believe that if it ain't broke, don't fix it. Engineers believe that if it ain't broke, it doesn't have enough features yet.
- $author._END;?>
The Structure of PHP | 61

The variable $out will then be populated with the contents between the two tags. If youwere appending, rather than assigning, you could also have used .= in place of = toappend the string to $out.
Be careful not to place a semicolon directly after the first occurrence of _END, becausethat would terminate the multiline block before it had even started and cause a Parseerror message. The only place for the semicolon is after the terminating _END tag,although it is safe to use semicolons within the block as normal text characters.
By the way, the _END tag is simply one I chose for these examples because it is unlikelyto be used anywhere else in PHP code and is therefore unique. But you can use any tagyou like, such as _SECTION1 or _OUTPUT and so on. Also, to help differentiate tags suchas this from variables or functions, the general practice is to preface them with anunderscore, but you don’t have to use one if you choose not to.
Laying out text over multiple lines is usually just a convenience tomake your PHP code easier to read, because once it is displayed in aweb page, HTML formatting rules take over and whitespace is sup‐pressed (but $author is still replaced with the variable’s value).So, for example, if you load these multiline output examples into abrowser they will not display over several lines, because all browserstreat newlines just like spaces. However, if you use the browser’s viewsource feature, you will find that the newlines are correctly placed,and the output does appear over several lines.
Variable TypingPHP is a very loosely typed language. This means that variables do not have to be de‐clared before they are used, and that PHP always converts variables to the type requiredby their context when they are accessed.
For example, you can create a multiple-digit number and extract the nth digit from itsimply by assuming it to be a string. In the following snippet of code, the numbers 12345and 67890 are multiplied together, returning a result of 838102050, which is then placedin the variable $number, as shown in Example 3-10.
Example 3-10. Automatic conversion from a number to a string<?php $number = 12345 * 67890; echo substr($number, 3, 1);?>
At the point of the assignment, $number is a numeric variable. But on the second line,a call is placed to the PHP function substr, which asks for one character to be returnedfrom $number, starting at the fourth position (remembering that PHP offsets start from
62 | Chapter 3: Introduction to PHP

zero). To do this, PHP turns $number into a nine-character string, so that substr canaccess it and return the character, which in this case is 1.
The same goes for turning a string into a number, and so on. In Example 3-11, thevariable $pi is set to a string value, which is then automatically turned into a floating-point number in the third line by the equation for calculating a circle’s area, whichoutputs the value 78.5398175.
Example 3-11. Automatically converting a string to a number<?php $pi = "3.1415927"; $radius = 5; echo $pi * ($radius * $radius);?>
In practice, what this all means is that you don’t have to worry too much about yourvariable types. Just assign them values that make sense to you and PHP will convertthem if necessary. Then, when you want to retrieve values, just ask for them (e.g., withan echo statement).
ConstantsConstants are similar to variables, holding information to be accessed later, except thatthey are what they sound like—constant. In other words, once you have defined one,its value is set for the remainder of the program and cannot be altered.
One example of a use for a constant might be to hold the location of your server root(the folder with the main files of your website). You would define such a constant likethis:
define("ROOT_LOCATION", "/usr/local/www/");
Then, to read the contents of the variable, you just refer to it like a regular variable (butit isn’t preceded by a dollar sign):
$directory = ROOT_LOCATION;
Now, whenever you need to run your PHP code on a different server with a differentfolder configuration, you have only a single line of code to change.
The main two things you have to remember about constants are thatthey must not be prefaced with a $ (as with regular variables), andthat you can define them only using the define function.
It is generally considered a good practice to use only uppercase for constant variablenames, especially if other people will also read your code.
The Structure of PHP | 63

Predefined ConstantsPHP comes ready-made with dozens of predefined constants that you generally will beunlikely to use as a beginner to PHP. However, there are a few—known as the magicconstants—that you will find useful. The names of the magic constants always have twounderscores at the beginning and two at the end, so that you won’t accidentally try toname one of your own constants with a name that is already taken. They are detailedin Table 3-5. The concepts referred to in the table will be introduced in future chapters.
Table 3-5. PHP’s magic constantsMagic constant Description
__LINE__ The current line number of the file.
__FILE__ The full path and filename of the file. If used inside an include, the name of the included file is returned.In PHP 4.0.2, __FILE__ always contains an absolute path with symbolic links resolved, whereas in olderversions it might contain a relative path under some circumstances.
__DIR__ The directory of the file. If used inside an include, the directory of the included file is returned. This isequivalent to dirname(__FILE__). This directory name does not have a trailing slash unless it is theroot directory. (Added in PHP 5.3.0.)
__FUNCTION__ The function name. (Added in PHP 4.3.0.) As of PHP 5, returns the function name as it was declared (case-sensitive). In PHP 4, its value is always lowercase.
__CLASS__ The class name. (Added in PHP 4.3.0.) As of PHP 5, returns the class name as it was declared (case-sensitive). In PHP 4, its value is always lowercase.
__METHOD__ The class method name. (Added in PHP 5.0.0.) The method name is returned as it was declared (case-sensitive).
__NAMESPACE__ The name of the current namespace (case-sensitive). This constant is defined at compile time. (Added inPHP 5.3.0.)
One handy use of these variables is for debugging purposes, when you need to insert aline of code to see whether the program flow reaches it:
echo "This is line " . __LINE__ . " of file " . __FILE__;
This causes the current program line in the current file (including the path) being ex‐ecuted to be output to the web browser.
The Difference Between the echo and print CommandsSo far, you have seen the echo command used in a number of different ways to outputtext from the server to your browser. In some cases, a string literal has been output. Inothers, strings have first been concatenated or variables have been evaluated. I’ve alsoshown output spread over multiple lines.
But there is also an alternative to echo that you can use: print. The two commands arequite similar, but print is a function-like construct that takes a single parameter and
64 | Chapter 3: Introduction to PHP

has a return value (which is always 1), whereas echo is purely a PHP language construct.Because both commands are constructs, neither requires the use of parentheses.
By and large, the echo command will be a tad faster than print in general text output,because it doesn’t set a return value. On the other hand, because it isn’t implementedlike a function, echo cannot be used as part of a more complex expression, whereasprint can. Here’s an example to output whether the value of a variable is TRUE or FALSEusing print, something you could not perform in the same manner with echo, becauseit would display a Parse error message:
$b ? print "TRUE" : print "FALSE";
The question mark is simply a way of interrogating whether variable $b is TRUE orFALSE. Whichever command is on the left of the following colon is executed if $b isTRUE, whereas the command to the right is executed if $b is FALSE.
Generally, though, the examples in this book use echo, and I recommend that you doso as well until you reach such a point in your PHP development that you discover theneed for using print.
FunctionsFunctions are used to separate out sections of code that perform a particular task. Forexample, maybe you often need to look up a date and return it in a certain format. Thatwould be a good example to turn into a function. The code doing it might be only threelines long, but if you have to paste it into your program a dozen times, you’re makingyour program unnecessarily large and complex, unless you use a function. And if youdecide to change the data format later, putting it in a function means having to changeit in only one place.
Placing it into a function not only shortens your source code and makes it more readable,it also adds extra functionality (pun intended), because functions can be passed pa‐rameters to make them perform differently. They can also return values to the callingcode.
To create a function, declare it in the manner shown in Example 3-12.
Example 3-12. A simple function declaration<?php function longdate($timestamp) { return date("l F jS Y", $timestamp); }?>
This function takes a Unix timestamp (an integer number representing a date and timebased on the number of seconds since 00:00 a.m. on January 1, 1970) as its input and
The Structure of PHP | 65

then calls the PHP date function with the correct format string to return a date in theformat Tuesday May 2nd 2017. Any number of parameters can be passed between theinitial parentheses; we have chosen to accept just one. The curly braces enclose all thecode that is executed when you later call the function.
To output today’s date using this function, place the following call in your code:echo longdate(time());
This call uses the built-in PHP time function to fetch the current Unix timestamp andpasses it to the new longdate function, which then returns the appropriate string to theecho command for display. If you need to print out the date 17 days ago, you now justhave to issue the following call:
echo longdate(time() - 17 * 24 * 60 * 60);
which passes to longdate the current Unix timestamp less the number of seconds since17 days ago (17 days × 24 hours × 60 minutes × 60 seconds).
Functions can also accept multiple parameters and return multiple results, using tech‐niques that I’ll develop over the following chapters.
Variable ScopeIf you have a very long program, it’s quite possible that you could start to run out ofgood variable names, but with PHP you can decide the scope of a variable. In otherwords, you can, for example, tell it that you want the variable $temp to be used onlyinside a particular function and to forget it was ever used when the function returns. Infact, this is the default scope for PHP variables.
Alternatively, you could inform PHP that a variable is global in scope and thus can beaccessed by every other part of your program.
Local variables
Local variables are variables that are created within, and can only be accessed by, afunction. They are generally temporary variables that are used to store partially pro‐cessed results prior to the function’s return.
One set of local variables is the list of arguments to a function. In the previous section,we defined a function that accepted a parameter named $timestamp. This is meaningfulonly in the body of the function; you can’t get or set its value outside the function.
For another example of a local variable, take another look at the longdate function,which is modified slightly in Example 3-13.
66 | Chapter 3: Introduction to PHP

Example 3-13. An expanded version of the longdate function<?php function longdate($timestamp) { $temp = date("l F jS Y", $timestamp); return "The date is $temp"; }?>
Here we have assigned the value returned by the date function to the temporary variable$temp, which is then inserted into the string returned by the function. As soon as thefunction returns, the value of $temp is cleared, as if it had never been used at all.
Now, to see the effects of variable scope, let’s look at some similar code inExample 3-14. Here $temp has been created before we call the longdate function.
Example 3-14. This attempt to access $temp in function longdate will fail<?php $temp = "The date is "; echo longdate(time());
function longdate($timestamp) { return $temp . date("l F jS Y", $timestamp); }?>
However, because $temp was neither created within the longdate function nor passedto it as a parameter, longdate cannot access it. Therefore, this code snippet outputs onlythe date, not the preceding text. In fact, it will first display the error message Notice:Undefined variable: temp.
The reason for this is that, by default, variables created within a function are local tothat function, and variables created outside of any functions can be accessed only bynon-function code.
Some ways to repair Example 3-14 appear in Examples 3-15 and 3-16.
Example 3-15. Rewriting to refer to $temp within its local scope fixes the problem<?php $temp = "The date is "; echo $temp . longdate(time());
function longdate($timestamp) { return date("l F jS Y", $timestamp); }?>
The Structure of PHP | 67

Example 3-15 moves the reference to $temp out of the function. The reference appearsin the same scope where the variable was defined.
The solution in Example 3-16 passes $temp to the longdate function as an extra argu‐ment. longdate reads it into a temporary variable that it creates called $text and outputsthe desired result.
Example 3-16. An alternative solution: passing $temp as an argument<?php $temp = "The date is "; echo longdate($temp, time());
function longdate($text, $timestamp) { return $text . date("l F jS Y", $timestamp); }?>
Forgetting the scope of a variable is a common programming error,so remembering how variable scope works will help you debug somequite obscure problems. Suffice it to say that unless you have de‐clared a variable otherwise, its scope is limited to being local: eitherto the current function, or to the code outside of any functions, de‐pending on whether it was first created or accessed inside or out‐side a function.
Global variables
There are cases when you need a variable to have global scope, because you want allyour code to be able to access it. Also, some data may be large and complex, and youdon’t want to keep passing it as arguments to functions.
To declare a variable as having global scope, use the keyword global. Let’s assume thatyou have a way of logging your users into your website and want all your code to knowwhether it is interacting with a logged-in user or a guest. One way to do this is to createa global variable such as $is_logged_in:
global $is_logged_in;
Now your login function simply has to set that variable to 1 upon a successful loginattempt, or 0 upon its failure. Because the scope of the variable is global, every line ofcode in your program can access it.
You should use global variables with caution, though. I recommend that you create themonly when you absolutely cannot find another way of achieving the result you desire.In general, programs that are broken into small parts and segregated data are less buggyand easier to maintain. If you have a thousand-line program (and some day you will)
68 | Chapter 3: Introduction to PHP

in which you discover that a global variable has the wrong value at some point, howlong will it take you to find the code that set it incorrectly?
Also, if you have too many global variables, you run the risk of using one of those namesagain locally, or at least thinking you have used it locally, when in fact it has already beendeclared as global. All manner of strange bugs can arise from such situations.
Sometimes I adopt the convention of making all global variable namesuppercase (just as it’s recommended that constants should be upper‐case) so that I can see at a glance the scope of a variable.
Static variables
In the section “Local variables” on page 66, I mentioned that the value of the variable iswiped out when the function ends. If a function runs many times, it starts with a freshcopy of the variable and the previous setting has no effect.
Here’s an interesting case. What if you have a local variable inside a function that youdon’t want any other parts of your code to have access to, but you would also like tokeep its value for the next time the function is called? Why? Perhaps because you wanta counter to track how many times a function is called. The solution is to declare astatic variable, as shown in Example 3-17.
Example 3-17. A function using a static variable<?php function test() { static $count = 0; echo $count; $count++; }?>
Here the very first line of function test creates a static variable called $count and ini‐tializes it to a value of 0. The next line outputs the variable’s value; the final one incre‐ments it.
The next time the function is called, because $count has already been declared, the firstline of the function is skipped. Then the previously incremented value of $count isdisplayed before the variable is again incremented.
If you plan to use static variables, you should note that you cannot assign the result ofan expression in their definitions. They can be initialized only with predeterminedvalues (see Example 3-18).
The Structure of PHP | 69

Example 3-18. Allowed and disallowed static variable declarations<?php static $int = 0; // Allowed static $int = 1+2; // Disallowed (will produce a Parse error) static $int = sqrt(144); // Disallowed?>
Superglobal variables
Starting with PHP 4.1.0, several predefined variables are available. These are known assuperglobal variables, which means that they are provided by the PHP environment butare global within the program, accessible absolutely everywhere.
These superglobals contain lots of useful information about the currently running pro‐gram and its environment (see Table 3-6). They are structured as associative arrays, atopic discussed in Chapter 6.
Table 3-6. PHP’s superglobal variablesSuperglobal name Contents
$GLOBALS All variables that are currently defined in the global scope of the script. The variable names are the keysof the array.
$_SERVER Information such as headers, paths, and script locations. The entries in this array are created by the webserver, and there is no guarantee that every web server will provide any or all of these.
$_GET Variables passed to the current script via the HTTP GET method.
$_POST Variables passed to the current script via the HTTP POST method.
$_FILES Items uploaded to the current script via the HTTP POST method.
$_COOKIE Variables passed to the current script via HTTP cookies.
$_SESSION Session variables available to the current script.
$_REQUEST Contents of information passed from the browser; by default, $_GET, $_POST, and $_COOKIE.
$_ENV Variables passed to the current script via the environment method.
All of the superglobals (except for $GLOBALS) are named with a single initial underscoreand only capital letters; therefore, you should avoid naming your own variables in thismanner to avoid potential confusion.
To illustrate how you use them, let’s look at a bit of information that many sites employ.Among the many nuggets of information supplied by superglobal variables is the URLof the page that referred the user to the current web page. This referring page informa‐tion can be accessed like this:
$came_from = $_SERVER['HTTP_REFERER'];
It’s that simple. Oh, and if the user came straight to your web page, such as by typing itsURL directly into a browser, $came_from will be set to an empty string.
70 | Chapter 3: Introduction to PHP
Superglobals and security
A word of caution is in order before you start using superglobal variables, because theyare often used by hackers trying to find exploits to break into your website. What theydo is load up $_POST, $_GET, or other superglobals with malicious code, such as Unixor MySQL commands that can damage or display sensitive data if you naïvely accessthem.
Therefore, you should always sanitize superglobals before using them. One way to dothis is via the PHP htmlentities function. It converts all characters into HTML entities.For example, less-than and greater-than characters (< and >) are transformed into thestrings < and > so that they are rendered harmless, as are all quotes and back‐slashes, and so on.
Therefore, a much better way to access $_SERVER (and other superglobals) is:$came_from = htmlentities($_SERVER['HTTP_REFERER']);
Using the htmlentities function for sanitization is an importantpractice in any circumstance where user or other third-party data isbeing processed for output, not just with superglobals.
This chapter has provided you with a solid background in using PHP. In Chapter 4, we’llstart using what you’ve learned to build expressions and control program flow—in otherwords, do some actual programming.
But before moving on, I recommend that you test yourself with some (if not all) of thefollowing questions to ensure that you have fully digested the contents of this chapter.
Questions1. What tag is used to cause PHP to start interpreting program code? And what is the
short form of the tag?2. What are the two types of comment tags?3. Which character must be placed at the end of every PHP statement?4. Which symbol is used to preface all PHP variables?5. What can a variable store?6. What is the difference between $variable = 1 and $variable == 1?7. Why do you suppose an underscore is allowed in variable names (e.g.,
$current_user) whereas hyphens are not (e.g., $current-user)?8. Are variable names case-sensitive?
Questions | 71

9. Can you use spaces in variable names?10. How do you convert one variable type to another (say, a string to a number)?11. What is the difference between ++$j and $j++?12. Are the operators && and and interchangeable?13. How can you create a multiline echo or assignment?14. Can you redefine a constant?15. How do you escape a quotation mark?16. What is the difference between the echo and print commands?17. What is the purpose of functions?18. How can you make a variable accessible to all parts of a PHP program?19. If you generate data within a function, what are a couple of ways to convey the data
to the rest of the program?20. What is the result of combining a string with a number?
See “Chapter 3 Answers” on page 640 in Appendix A for the answers to these questions.
72 | Chapter 3: Introduction to PHP

CHAPTER 4
Expressions and Control Flow in PHP
The previous chapter introduced several topics in passing that this chapter covers morefully, such as making choices (branching) and creating complex expressions. In theprevious chapter, I wanted to focus on the most basic syntax and operations in PHP, butI couldn’t avoid touching on more advanced topics. Now I can fill in the backgroundthat you need to use these powerful PHP features properly.
In this chapter, you will get a thorough grounding in how PHP programming works inpractice and in how to control the flow of the program.
ExpressionsLet’s start with the most fundamental part of any programming language: expressions.
An expression is a combination of values, variables, operators, and functions that resultsin a value. It’s familiar to anyone who has taken high-school algebra:
y = 3(abs(2x) + 4)
which in PHP would be:$y = 3 * (abs(2 * $x) + 4);
The value returned (y, or $y in this case) can be a number, a string, or a Boolean value(named after George Boole, a nineteenth-century English mathematician and philos‐opher). By now, you should be familiar with the first two value types, but I’ll explain thethird.
TRUE or FALSE?A basic Boolean value can be either TRUE or FALSE. For example, the expression “20 >9” (20 is greater than 9) is TRUE, and the expression “5 == 6” (5 is equal to 6) is FALSE.
73

(You can combine Boolean operations using operators such as AND, OR, and XOR, whichare covered later in this chapter.)
Note that I am using uppercase letters for the names TRUE and FALSE.This is because they are predefined constants in PHP. You can alsouse the lowercase versions, if you prefer, as they are also predefined.In fact, the lowercase versions are more stable, because PHP does notallow you to redefine them; the uppercase ones may be redefined—something you should bear in mind if you import third-party code.
Example 4-1 shows some simple expressions: the two I just mentioned, plus a couplemore. For each line, it prints out a letter between a and d, followed by a colon and theresult of the expressions. The <br> tag is there to create a line break and thus separatethe output into four lines in HTML.
Now that we are fully into the age of HTML5, and XHTML is nolonger being planned to supersede HTML, you do not need to use theself-closing <br /> form of the <br> tag, or any void elements (oneswithout closing tags), because the / is now optional. Therefore, I havechosen to use the simpler style in this book. If you ever made HTMLnon-void tags self-closing (such as <div />), they will not work inHTML5 because the / will be ignored, and you will need to replacethem with, for example, <div> ... </div>. However, you must stilluse the <br /> form of HTML syntax when using XHTML.
Example 4-1. Four simple Boolean expressions<?php echo "a: [" . (20 > 9) . "]<br>"; echo "b: [" . (5 == 6) . "]<br>"; echo "c: [" . (1 == 0) . "]<br>"; echo "d: [" . (1 == 1) . "]<br>";?>
The output from this code is as follows:a: [1]b: []c: []d: [1]
Notice that both expressions a: and d: evaluate to TRUE, which has a value of 1. But b:and c:, which evaluate to FALSE, do not show any value, because in PHP the constantFALSE is defined as NULL, or nothing. To verify this for yourself, you could enter the codein Example 4-2.
74 | Chapter 4: Expressions and Control Flow in PHP

Example 4-2. Outputting the values of TRUE and FALSE<?php // test2.php echo "a: [" . TRUE . "]<br>"; echo "b: [" . FALSE . "]<br>";?>
which outputs the following:a: [1]b: []
By the way, in some languages FALSE may be defined as 0 or even −1, so it’s worthchecking on its definition in each language.
Literals and VariablesThe simplest form of an expression is a literal, which simply means something thatevaluates to itself, such as the number 73 or the string "Hello". An expression couldalso simply be a variable, which evaluates to the value that has been assigned to it. Theyare both types of expressions, because they return a value.
Example 4-3 shows three literals and two variables, all of which return values, albeit ofdifferent types.
Example 4-3. Literals and variables<?php $myname = "Brian"; $myage = 37;
echo "a: " . 73 . "<br>"; // Numeric literal echo "b: " . "Hello" . "<br>"; // String literal echo "c: " . FALSE . "<br>"; // Constant literal echo "d: " . $myname . "<br>"; // String variable echo "e: " . $myage . "<br>"; // Numeric variable?>
And, as you’d expect, you see a return value from all of these with the exception of c:,which evaluates to FALSE, returning nothing in the following output:
a: 73b: Helloc:d: Briane: 37
In conjunction with operators, it’s possible to create more complex expressions thatevaluate to useful results.
When you combine assignment or control-flow constructs with expressions, the resultis a statement. Example 4-4 shows one of each. The first assigns the result of the
Expressions | 75

expression 366 - $day_number to the variable $days_to_new_year, and the secondoutputs a friendly message only if the expression $days_to_new_year < 30 evaluatesto TRUE.
Example 4-4. An expression and a statement<?php $days_to_new_year = 366 - $day_number; // Expression
if ($days_to_new_year < 30) { echo "Not long now till new year"; // Statement }?>
OperatorsPHP offers a lot of powerful operators that range from arithmetic, string, and logicaloperators to assignment, comparison, and more (see Table 4-1).
Table 4-1. PHP operator typesOperator Description Example
Arithmetic Basic mathematics $a + $b
Array Array union $a + $b
Assignment Assign values $a = $b + 23
Bitwise Manipulate bits within bytes 12 ^ 9
Comparison Compare two values $a < $b
Execution Executes contents of back ticks `ls -al`
Increment/decrement Add or subtract 1 $a++
Logical Boolean $a and $b
String Concatenation $a . $b
Each operator takes a different number of operands:
• Unary operators, such as incrementing ($a++) or negation (-$a), which take a singleoperand.
• Binary operators, which represent the bulk of PHP operators, including addition,subtraction, multiplication, and division.
• One ternary operator, which takes the form ? x : y. It’s a terse, single-line ifstatement that chooses between two expressions, depending on the result of a thirdone.
76 | Chapter 4: Expressions and Control Flow in PHP

Operator PrecedenceIf all operators had the same precedence, they would be processed in the order in whichthey are encountered. In fact, many operators do have the same precedence, so let’s lookat a few in Example 4-5.
Example 4-5. Three equivalent expressions1 + 2 + 3 − 4 + 52 − 4 + 5 + 3 + 15 + 2 − 4 + 1 + 3
Here you will see that although the numbers (and their preceding operators) have beenmoved, the result of each expression is the value 7, because the plus and minus operatorshave the same precedence. We can try the same thing with multiplication and division(see Example 4-6).
Example 4-6. Three expressions that are also equivalent1 * 2 * 3 / 4 * 52 / 4 * 5 * 3 * 15 * 2 / 4 * 1 * 3
Here the resulting value is always 7.5. But things change when we mix operators withdifferent precedencies in an expression, as in Example 4-7.
Example 4-7. Three expressions using operators of mixed precedence1 + 2 * 3 − 4 * 52 − 4 * 5 * 3 + 15 + 2 − 4 + 1 * 3
If there were no operator precedence, these three expressions would evaluate to 25, −29,and 12, respectively. But because multiplication and division take precedence over ad‐dition and subtraction, there are implied parentheses around these parts of the expres‐sions, which would look like Example 4-8 if they were visible.
Example 4-8. Three expressions showing implied parentheses1 + (2 * 3) − (4 * 5)2 − (4 * 5 * 3) + 15 + 2 − 4 + (1 * 3)
Clearly, PHP must evaluate the subexpressions within parentheses first to derive thesemi-completed expressions in Example 4-9.
Example 4-9. After evaluating the subexpressions in parentheses1 + (6) − (20)2 − (60) + 15 + 2 − 4 + (3)
Operators | 77
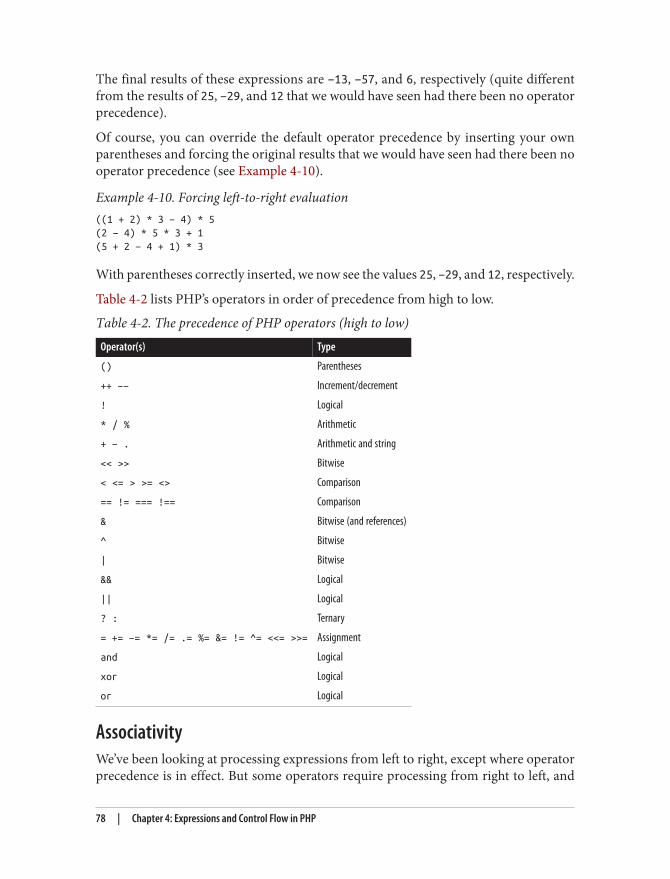
The final results of these expressions are −13, −57, and 6, respectively (quite differentfrom the results of 25, −29, and 12 that we would have seen had there been no operatorprecedence).
Of course, you can override the default operator precedence by inserting your ownparentheses and forcing the original results that we would have seen had there been nooperator precedence (see Example 4-10).
Example 4-10. Forcing left-to-right evaluation((1 + 2) * 3 − 4) * 5(2 − 4) * 5 * 3 + 1(5 + 2 − 4 + 1) * 3
With parentheses correctly inserted, we now see the values 25, −29, and 12, respectively.
Table 4-2 lists PHP’s operators in order of precedence from high to low.
Table 4-2. The precedence of PHP operators (high to low)Operator(s) Type
() Parentheses
++ −− Increment/decrement
! Logical
* / % Arithmetic
+ − . Arithmetic and string
<< >> Bitwise
< <= > >= <> Comparison
== != === !== Comparison
& Bitwise (and references)
^ Bitwise
| Bitwise
&& Logical
|| Logical
? : Ternary
= += −= *= /= .= %= &= != ^= <<= >>= Assignment
and Logical
xor Logical
or Logical
AssociativityWe’ve been looking at processing expressions from left to right, except where operatorprecedence is in effect. But some operators require processing from right to left, and
78 | Chapter 4: Expressions and Control Flow in PHP

this direction of processing is called the operator’s associativity. For some operatorsthere is no associativity.
Associativity becomes important in cases in which you do not explicitly force prece‐dence, so you need to be aware of the default actions of operators, as detailed inTable 4-3, which lists operators and their associativity.
Table 4-3. Operator associativityOperator Description Associativity
CLONE NEW Create a new object None
< <= >= == != === !== <> Comparison None
! Logical NOT Right
~ Bitwise NOT Right
++ −− Increment and decrement Right
(int) Cast to an integer Right
(double) (float) (real) Cast to a floating-point number Right
(string) Cast to a string Right
(array) Cast to an array Right
(object) Cast to an object Right
@ Inhibit error reporting Right
= += −= *= /= Assignment Right
.= %= &= |= ^= <<= >>= Assignment Right
+ Addition and unary plus Left
− Subtraction and negation Left
* Multiplication Left
/ Division Left
% Modulus Left
. String concatenation Left
<< >> & ^ | Bitwise Left
?: Ternary Left
|| && and or xor Logical Left
, Separator Left
For example, let’s take a look at the assignment operator in Example 4-11, where threevariables are all set to the value 0.
Example 4-11. A multiple-assignment statement<?php $level = $score = $time = 0;?>
Operators | 79

This multiple assignment is possible only if the rightmost part of the expression is eval‐uated first and then processing continues in a right-to-left direction.
As a beginner to PHP, you should avoid the potential pitfalls of op‐erator associativity by always nesting your subexpressions withinparentheses to force the order of evaluation. This will also help oth‐er programmers who may have to maintain your code to under‐stand what is happening.
Relational OperatorsRelational operators test two operands and return a Boolean result of either TRUE orFALSE. There are three types of relational operators: equality, comparison, and logical.
Equality
As we’ve already encountered a few times in this chapter, the equality operator is ==(two equals signs). It is important not to confuse it with the = (single equals sign) as‐signment operator. In Example 4-12, the first statement assigns a value and the secondtests it for equality.
Example 4-12. Assigning a value and testing for equality<?php $month = "March";
if ($month == "March") echo "It's springtime";?>
As you see, by returning either TRUE or FALSE, the equality operator enables you to testfor conditions using, for example, an if statement. But that’s not the whole story, becausePHP is a loosely typed language. If the two operands of an equality expression are ofdifferent types, PHP will convert them to whatever type makes best sense to it.
For example, any strings composed entirely of numbers will be converted to numberswhenever compared with a number. In Example 4-13, $a and $b are two different strings,and we would therefore expect neither of the if statements to output a result.
Example 4-13. The equality and identity operators<?php $a = "1000"; $b = "+1000";
if ($a == $b) echo "1"; if ($a === $b) echo "2";?>
80 | Chapter 4: Expressions and Control Flow in PHP

However, if you run the example, you will see that it outputs the number 1, which meansthat the first if statement evaluated to TRUE. This is because both strings were firstconverted to numbers, and 1000 is the same numerical value as +1000.
In contrast, the second if statement uses the identity operator—three equals signs in arow—which prevents PHP from automatically converting types. $a and $b are thereforecompared as strings and are now found to be different, so nothing is output.
As with forcing operator precedence, whenever you have any doubt about how PHPwill convert operand types, you can use the identity operator to turn this behavior off.
In the same way that you can use the equality operator to test for operands being equal,you can test for them not being equal using !=, the inequality operator. Take a look atExample 4-14, which is a rewrite of Example 4-13 in which the equality and identityoperators have been replaced with their inverses.
Example 4-14. The inequality and not identical operators<?php $a = "1000"; $b = "+1000";
if ($a != $b) echo "1"; if ($a !== $b) echo "2";?>
And, as you might expect, the first if statement does not output the number 1, becausethe code is asking whether $a and $b are not equal to each other numerically.
Instead, it outputs the number 2, because the second if statement is asking whether $aand $b are not identical to each other in their present operand types, and the answer isTRUE; they are not the same.
Comparison operators
Using comparison operators, you can test for more than just equality and inequality. PHP also gives you > (is greater than), < (is less than), >= (is greater than or equal to),and <= (is less than or equal to) to play with. Example 4-15 shows these operators inuse.
Example 4-15. The four comparison operators<?php $a = 2; $b = 3;
if ($a > $b) echo "$a is greater than $b<br>"; if ($a < $b) echo "$a is less than $b<br>"; if ($a >= $b) echo "$a is greater than or equal to $b<br>"; if ($a <= $b) echo "$a is less than or equal to $b<br>";?>
Operators | 81

In this example, where $a is 2 and $b is 3, the following is output:2 is less than 32 is less than or equal to 3
Try this example yourself, altering the values of $a and $b, to see the results. Try settingthem to the same value and see what happens.
Logical operators
Logical operators produce true-or-false results, and therefore are also known as Booleanoperators. There are four of them (see Table 4-4).
Table 4-4. The logical operatorsLogical operator Description
AND TRUE if both operands are TRUE
OR TRUE if either operand is TRUE
XOR TRUE if one of the two operands is TRUE
NOT TRUE if the operand is FALSE, or FALSE if the operand is TRUE
You can see these operators used in Example 4-16. Note that the ! symbol is requiredby PHP in place of the word NOT. Furthermore, the operators can be lower- or uppercase.
Example 4-16. The logical operators in use<?php $a = 1; $b = 0;
echo ($a AND $b) . "<br>"; echo ($a or $b) . "<br>"; echo ($a XOR $b) . "<br>"; echo !$a . "<br>";?>
This example outputs NULL, 1, 1, NULL, meaning that only the second and third echostatements evaluate as TRUE. (Remember that NULL—or nothing—represents a value ofFALSE.) This is because the AND statement requires both operands to be TRUE if it is goingto return a value of TRUE, while the fourth statement performs a NOT on the value of$a, turning it from TRUE (a value of 1) to FALSE. If you wish to experiment with this, tryout the code, giving $a and $b varying values of 1 and 0.
When coding, remember to bear in mind that AND and OR have low‐er precedence than the other versions of the operators, && and ||. Incomplex expressions, it may be safer to use && and || for this reason.
82 | Chapter 4: Expressions and Control Flow in PHP

The OR operator can cause unintentional problems in if statements, because the secondoperand will not be evaluated if the first is evaluated as TRUE. In Example 4-17, thefunction getnext will never be called if $finished has a value of 1.
Example 4-17. A statement using the OR operator<?php if ($finished == 1 OR getnext() == 1) exit;?>
If you need getnext to be called at each if statement, you could rewrite the code as hasbeen done in Example 4-18.
Example 4-18. The “if ... OR” statement modified to ensure calling of getnext<?php $gn = getnext();
if ($finished == 1 OR $gn == 1) exit;?>
In this case, the code in function getnext will be executed and the value returned willbe stored in $gn before the if statement.
Another solution is to simply switch the two clauses to make sure thatgetnext is executed, as it will then appear first in the expression.
Table 4-5 shows all the possible variations of using the logical operators. You shouldalso note that !TRUE equals FALSE and !FALSE equals TRUE.
Table 4-5. All possible PHP logical expressionsInputs Operators and results
a b AND OR XOR
TRUE TRUE TRUE TRUE FALSE
TRUE FALSE FALSE TRUE TRUE
FALSE TRUE FALSE TRUE TRUE
FALSE FALSE FALSE FALSE FALSE
Operators | 83

ConditionalsConditionals alter program flow. They enable you to ask questions about certain thingsand respond to the answers you get in different ways. Conditionals are central to dy‐namic web pages—the goal of using PHP in the first place—because they make it easyto create different output each time a page is viewed.
There are three types of non-looping conditionals: the if statement, the switch state‐ment, and the ? operator. By non-looping, I mean that the actions initiated by the state‐ment take place and program flow then moves on, whereas looping conditionals (whichwe’ll get to shortly) execute code over and over until a condition has been met.
The if StatementOne way of thinking about program flow is to imagine it as a single-lane highway thatyou are driving along. It’s pretty much a straight line, but now and then you encountervarious signs telling you where to go.
In the case of an if statement, you could imagine coming across a detour sign that youhave to follow if a certain condition is TRUE. If so, you drive off and follow the detouruntil you return to where it started and then continue on your way in your originaldirection. Or, if the condition isn’t TRUE, you ignore the detour and carry on driving(see Figure 4-1).
Figure 4-1. Program flow is like a single-lane highway
The contents of the if condition can be any valid PHP expression, including equality,comparison, tests for 0 and NULL, and even the values returned by functions (either built-in functions or ones that you write).
84 | Chapter 4: Expressions and Control Flow in PHP

The actions to take when an if condition is TRUE are generally placed inside curly braces,{ }. However, you can ignore the braces if you have only a single statement to execute.But if you always use curly braces, you’ll avoid having to hunt down difficult-to-tracebugs, such as when you add an extra line to a condition and it doesn’t get evaluated dueto lack of braces. (Note that for space and clarity, many of the examples in this bookignore this suggestion and omit the braces for single statements.)
In Example 4-19, imagine that it is the end of the month and all your bills have beenpaid, so you are performing some bank account maintenance.
Example 4-19. An if statement with curly braces<?php if ($bank_balance < 100) { $money = 1000; $bank_balance += $money; }?>
In this example, you are checking your balance to see whether it is less than $100 (orwhatever your currency is). If so, you pay yourself $1,000 and then add it to the balance.(If only making money were that simple!)
If the bank balance is $100 or greater, the conditional statements are ignored and pro‐gram flow skips to the next line (not shown).
In this book, opening curly braces generally start on a new line. Some people like toplace the first curly brace to the right of the conditional expression; others start a newline with it. Either of these is fine, because PHP allows you to set out your whitespacecharacters (spaces, newlines, and tabs) any way you choose. However, you will find yourcode easier to read and debug if you indent each level of conditionals with a tab.
The else StatementSometimes when a conditional is not TRUE, you may not want to continue on to themain program code immediately but might wish to do something else instead. This iswhere the else statement comes in. With it, you can set up a second detour on yourhighway, as in Figure 4-2.
Conditionals | 85

Figure 4-2. The highway now has an if detour and an else detour
With an if ... else statement, the first conditional statement is executed if the con‐dition is TRUE. But if it’s FALSE, the second one is executed. One of the two choices mustbe executed. Under no circumstance can both (or neither) be executed. Example 4-20shows the use of the if ... else structure.
Example 4-20. An if ... else statement with curly braces<?php if ($bank_balance < 100) { $money = 1000; $bank_balance += $money; } else { $savings += 50; $bank_balance −= 50; }?>
86 | Chapter 4: Expressions and Control Flow in PHP

In this example, now that you’ve ascertained that you have $100 or more in the bank,the else statement is executed, by which you place some of this money into your savingsaccount.
As with if statements, if your else has only one conditional statement, you can opt toleave out the curly braces. (Curly braces are always recommended, though. First, theymake the code easier to understand. Second, they let you easily add more statements tothe branch later.)
The elseif StatementThere are also times when you want a number of different possibilities to occur, basedupon a sequence of conditions. You can achieve this using the elseif statement. As youmight imagine, it is like an else statement, except that you place a further conditionalexpression prior to the conditional code. In Example 4-21, you can see a completeif ... elseif ... else construct.
Example 4-21. An if ... elseif ... else statement with curly braces<?php if ($bank_balance < 100) { $money = 1000; $bank_balance += $money; } elseif ($bank_balance > 200) { $savings += 100; $bank_balance −= 100; } else { $savings += 50; $bank_balance −= 50; }?>
In the example, an elseif statement has been inserted between the if and else state‐ments. It checks whether your bank balance exceeds $200 and, if so, decides that youcan afford to save $100 of it this month.
Although I’m starting to stretch the metaphor a bit too far, you can imagine this as amulti-way set of detours (see Figure 4-3).
Conditionals | 87

Figure 4-3. The highway with if, elseif, and else detours
An else statement closes either an if ... else or an if ... elseif ... else statement. You can leave out a final else if it is notrequired, but you cannot have one before an elseif; neither can youhave an elseif before an if statement.
You may have as many elseif statements as you like. But as the number of elseifstatements increases, you would probably be better advised to consider a switch state‐ment if it fits your needs. We’ll look at that next.
The switch StatementThe switch statement is useful in cases in which one variable or the result of an ex‐pression can have multiple values, which should each trigger a different function.
For example, consider a PHP-driven menu system that passes a single string to the mainmenu code according to what the user requests. Let’s say the options are Home, About,
88 | Chapter 4: Expressions and Control Flow in PHP

News, Login, and Links, and we set the variable $page to one of these, according to theuser’s input.
If we write the code for this using if ... elseif ... else, it might look likeExample 4-22.
Example 4-22. A multiple-line if ... elseif ... statement<?php if ($page == "Home") echo "You selected Home"; elseif ($page == "About") echo "You selected About"; elseif ($page == "News") echo "You selected News"; elseif ($page == "Login") echo "You selected Login"; elseif ($page == "Links") echo "You selected Links";?>
If we use a switch statement, the code might look like Example 4-23.
Example 4-23. A switch statement<?php switch ($page) { case "Home": echo "You selected Home"; break; case "About": echo "You selected About"; break; case "News": echo "You selected News"; break; case "Login": echo "You selected Login"; break; case "Links": echo "You selected Links"; break; }?>
As you can see, $page is mentioned only once at the start of the switch statement.Thereafter, the case command checks for matches. When one occurs, the matchingconditional statement is executed. Of course, in a real program you would have codehere to display or jump to a page, rather than simply telling the user what was selected.
With switch statements, you do not use curly braces inside casecommands. Instead, they commence with a colon and end with thebreak statement. The entire list of cases in the switch statement isenclosed in a set of curly braces, though.
Conditionals | 89

Breaking out
If you wish to break out of the switch statement because a condition has been fulfilled,use the break command. This command tells PHP to break out of the switch and jumpto the following statement.
If you were to leave out the break commands in Example 4-23 and the case of Homeevaluated to be TRUE, all five cases would then be executed. Or if $page had the valueNews, then all the case commands from then on would execute. This is deliberate andallows for some advanced programming, but generally you should always remember toissue a break command every time a set of case conditionals has finished executing. Infact, leaving out the break statement is a common error.
Default action
A typical requirement in switch statements is to fall back on a default action if none ofthe case conditions are met. For example, in the case of the menu code inExample 4-23, you could add the code in Example 4-24 immediately before the finalcurly brace.
Example 4-24. A default statement to add to Example 4-23default: echo "Unrecognized selection"; break;
Although a break command is not required here because the default is the final sub-statement, and program flow will automatically continue to the closing curly brace,should you decide to place the default statement higher up it would definitely need abreak command to prevent program flow from dropping into the following statements.Generally, the safest practice is to always include the break command.
Alternative syntax
If you prefer, you may replace the first curly brace in a switch statement with a singlecolon, and the final curly brace with an endswitch command, as in Example 4-25.However, this approach is not commonly used and is mentioned here only in case youencounter it in third-party code.
Example 4-25. Alternate switch statement syntax<?php switch ($page): case "Home": echo "You selected Home"; break;
// etc...
90 | Chapter 4: Expressions and Control Flow in PHP

case "Links": echo "You selected Links"; break; endswitch;?>
The ? OperatorOne way of avoiding the verbosity of if and else statements is to use the more compactternary operator, ?, which is unusual in that it takes three operands rather than thetypical two.
We briefly came across this in Chapter 3 in the discussion about the difference betweenthe print and echo statements as an example of an operator type that works well withprint but not echo.
The ? operator is passed an expression that it must evaluate, along with two statementsto execute: one for when the expression evaluates to TRUE, the other for when it is FALSE.Example 4-26 shows code we might use for writing a warning about the fuel level of acar to its digital dashboard.
Example 4-26. Using the ? operator<?php echo $fuel <= 1 ? "Fill tank now" : "There's enough fuel";?>
In this statement, if there is one gallon or less of fuel (i.e., if $fuel is set to 1 or less), thestring Fill tank now is returned to the preceding echo statement. Otherwise, the stringThere's enough fuel is returned. You can also assign the value returned in a ? state‐ment to a variable (see Example 4-27).
Example 4-27. Assigning a ? conditional result to a variable<?php $enough = $fuel <= 1 ? FALSE : TRUE;?>
Here $enough will be assigned the value TRUE only when there is more than a gallon offuel; otherwise, it is assigned the value FALSE.
If you find the ? operator confusing, you are free to stick to if statements, but you shouldbe familiar with it, because you’ll see it in other people’s code. It can be hard to read,because it often mixes multiple occurrences of the same variable. For instance, codesuch as the following is quite popular:
$saved = $saved >= $new ? $saved : $new;
If you take it apart carefully, you can figure out what this code does:
Conditionals | 91

$saved = // Set the value of $saved to... $saved >= $new // Check $saved against $new ? // Yes, comparison is true ... $saved // ... so assign the current value of $saved : // No, comparison is false ... $new; // ... so assign the value of $new
It’s a concise way to keep track of the largest value that you’ve seen as a program pro‐gresses. You save the largest value in $saved and compare it to $new each time you geta new value. Programmers familiar with the ? operator find it more convenient than ifstatements for such short comparisons. When not used for writing compact code, it istypically used to make some decision inline, such as when you are testing whether avariable is set before passing it to a function.
LoopingOne of the great things about computers is that they can repeat calculating tasks quicklyand tirelessly. Often you may want a program to repeat the same sequence of code againand again until something happens, such as a user inputting a value or reaching a naturalend. PHP’s various loop structures provide the perfect way to do this.
To picture how this works, take a look at Figure 4-4. It is much the same as the highwaymetaphor used to illustrate if statements, except that the detour also has a loop sectionthat—once a vehicle has entered—can be exited only under the right program condi‐tions.
Figure 4-4. Imagining a loop as part of a program highway layout
92 | Chapter 4: Expressions and Control Flow in PHP

while LoopsLet’s turn the digital car dashboard in Example 4-26 into a loop that continuously checksthe fuel level as you drive, using a while loop (Example 4-28).
Example 4-28. A while loop<?php $fuel = 10;
while ($fuel > 1) { // Keep driving ... echo "There's enough fuel"; }?>
Actually, you might prefer to keep a green light lit rather than output text, but the pointis that whatever positive indication you wish to make about the level of fuel is placedinside the while loop. By the way, if you try this example for yourself, note that it willkeep printing the string until you click the Stop button in your browser.
As with if statements, you will notice that curly braces are requiredto hold the statements inside the while statements, unless there’s onlyone.
For another example of a while loop that displays the 12 times table, see Example 4-29.
Example 4-29. A while loop to print the 12 times table<?php $count = 1;
while ($count <= 12) { echo "$count times 12 is " . $count * 12 . "<br>"; ++$count; }?>
Here the variable $count is initialized to a value of 1, then a while loop is started withthe comparative expression $count <= 12. This loop will continue executing until thevariable is greater than 12. The output from this code is as follows:
1 times 12 is 122 times 12 is 243 times 12 is 36and so on...
Looping | 93

Inside the loop, a string is printed along with the value of $count multiplied by 12. Forneatness, this is also followed with a <br> tag to force a new line. Then $count is in‐cremented, ready for the final curly brace that tells PHP to return to the start of the loop.
At this point, $count is again tested to see whether it is greater than 12. It isn’t, but itnow has the value 2, and after another 11 times around the loop, it will have the value13. When that happens, the code within the while loop is skipped and execution passeson to the code following the loop, which, in this case, is the end of the program.
If the ++$count statement (which could equally have been $count++) had not been there,this loop would be like the first one in this section. It would never end and only theresult of 1 * 12 would be printed over and over.
But there is a much neater way this loop can be written, which I think you will like. Takea look at Example 4-30.
Example 4-30. A shortened version of Example 4-29<?php $count = 0;
while (++$count <= 12) echo "$count times 12 is " . $count * 12 . "<br>";?>
In this example, it was possible to remove the ++$count statement from inside the whileloop and place it directly into the conditional expression of the loop. What now happensis that PHP encounters the variable $count at the start of each iteration of the loop and,noticing that it is prefaced with the increment operator, first increments the variableand only then compares it to the value 12. You can therefore see that $count now hasto be initialized to 0, not 1, because it is incremented as soon as the loop is entered. Ifyou keep the initialization at 1, only results between 2 and 12 will be output.
do ... while LoopsA slight variation to the while loop is the do ... while loop, used when you want ablock of code to be executed at least once and made conditional only after that.Example 4-31 shows a modified version of the code for the 12 times table that uses sucha loop.
Example 4-31. A do ... while loop for printing the times table for 12<?php $count = 1; do echo "$count times 12 is " . $count * 12 . "<br>"; while (++$count <= 12);?>
94 | Chapter 4: Expressions and Control Flow in PHP

Notice how we are back to initializing $count to 1 (rather than 0) because the code isbeing executed immediately, without an opportunity to increment the variable. Otherthan that, though, the code looks pretty similar.
Of course, if you have more than a single statement inside a do ... while loop, re‐member to use curly braces, as in Example 4-32.
Example 4-32. Expanding Example 4-31 to use curly braces<?php $count = 1;
do { echo "$count times 12 is " . $count * 12; echo "<br>"; } while (++$count <= 12);?>
for LoopsThe final kind of loop statement, the for loop, is also the most powerful, as it combinesthe abilities to set up variables as you enter the loop, test for conditions while iteratingloops, and modify variables after each iteration.
Example 4-33 shows how you could write the multiplication table program with a forloop.
Example 4-33. Outputting the times table for 12 from a for loop<?php for ($count = 1 ; $count <= 12 ; ++$count) echo "$count times 12 is " . $count * 12 . "<br>";?>
See how the entire code has been reduced to a single for statement containing a singleconditional statement? Here’s what is going on. Each for statement takes threeparameters:
• An initialization expression• A condition expression• A modification expression
These are separated by semicolons like this: for (expr1 ; expr2 ; expr3). At the startof the first iteration of the loop, the initialization expression is executed. In the case ofthe times table code, $count is initialized to the value 1. Then, each time around theloop, the condition expression (in this case, $count <= 12) is tested, and the loop isentered only if the condition is TRUE. Finally, at the end of each iteration, the modification
Looping | 95

expression is executed. In the case of the times table code, the variable $count is incre‐mented.
All this structure neatly removes any requirement to place the controls for a loop withinits body, freeing it up just for the statements you want the loop to perform.
Remember to use curly braces with a for loop if it will contain more than one statement,as in Example 4-34.
Example 4-34. The for loop from Example 4-33 with added curly braces<?php for ($count = 1 ; $count <= 12 ; ++$count) { echo "$count times 12 is " . $count * 12; echo "<br>"; }?>
Let’s compare when to use for and while loops. The for loop is explicitly designedaround a single value that changes on a regular basis. Usually you have a value thatincrements, as when you are passed a list of user choices and want to process each choicein turn. But you can transform the variable any way you like. A more complex form ofthe for statement even lets you perform multiple operations in each of the threeparameters:
for ($i = 1, $j = 1 ; $i + $j < 10 ; $i++ , $j++){ // ...}
That’s complicated and not recommended for first-time users. The key is to distinguishcommas from semicolons. The three parameters must be separated by semicolons.Within each parameter, multiple statements can be separated by commas. Thus, in theprevious example, the first and third parameters each contain two statements:
$i = 1, $j = 1 // Initialize $i and $j$i + $j < 10 // Terminating condition$i++ , $j++ // Modify $i and $j at the end of each iteration
The main thing to take from this example is that you must separate the three parametersections with semicolons, not commas (which should be used only to separate state‐ments within a parameter section).
So, when is a while statement more appropriate than a for statement? When yourcondition doesn’t depend on a simple, regular change to a variable. For instance, if youwant to check for some special input or error and end the loop when it occurs, use awhile statement.
96 | Chapter 4: Expressions and Control Flow in PHP

Breaking Out of a LoopJust as you saw how to break out of a switch statement, you can also break out of a forloop using the same break command. This step can be necessary when, for example,one of your statements returns an error and the loop cannot continue executing safely.
One case in which this might occur is when writing a file returns an error, possiblybecause the disk is full (see Example 4-35).
Example 4-35. Writing a file using a for loop with error trapping<?php $fp = fopen("text.txt", 'wb');
for ($j = 0 ; $j < 100 ; ++$j) { $written = fwrite($fp, "data");
if ($written == FALSE) break; }
fclose($fp);?>
This is the most complicated piece of code that you have seen so far, but you’re readyfor it. We’ll look into the file handling commands in a later chapter, but for now all youneed to know is that the first line opens the file text.txt for writing in binary mode, andthen returns a pointer to the file in the variable $fp, which is used later to refer to theopen file.
The loop then iterates 100 times (from 0 to 99) writing the string data to the file. Aftereach write, the variable $written is assigned a value by the fwrite function representingthe number of characters correctly written. But if there is an error, the fwrite functionassigns the value FALSE.
The behavior of fwrite makes it easy for the code to check the variable $written to seewhether it is set to FALSE and, if so, to break out of the loop to the following statementclosing the file.
If you are looking to improve the code, the line:if ($written == FALSE) break;
can be simplified using the NOT operator, like this:if (!$written) break;
In fact, the pair of inner loop statements can be shortened to the following singlestatement:
if (!fwrite($fp, "data")) break;
Looping | 97

The break command is even more powerful than you might think because if you havecode nested more than one layer deep that you need to break out of, you can follow thebreak command with a number to indicate how many levels to break out of, like this:
break 2;
The continue StatementThe continue statement is a little like a break statement, except that it instructs PHPto stop processing the current loop and to move right to its next iteration. So, insteadof breaking out of the whole loop, PHP exits only the current iteration.
This approach can be useful in cases where you know there is no point continuingexecution within the current loop and you want to save processor cycles or prevent anerror from occurring by moving right along to the next iteration of the loop. InExample 4-36, a continue statement is used to prevent a division-by-zero error frombeing issued when the variable $j has a value of 0.
Example 4-36. Trapping division-by-zero errors using continue<?php $j = 10;
while ($j > −10) { $j--;
if ($j == 0) continue;
echo (10 / $j) . "<br>"; }?>
For all values of $j between 10 and −10, with the exception of 0, the result of calculating10 divided by $j is displayed. But for the particular case of $j being 0, the continuestatement is issued and execution skips immediately to the next iteration of the loop.
Implicit and Explicit CastingPHP is a loosely typed language that allows you to declare a variable and its type simplyby using it. It also automatically converts values from one type to another wheneverrequired. This is called implicit casting.
However, there may be times when PHP’s implicit casting is not what you want. InExample 4-37, note that the inputs to the division are integers. By default, PHP convertsthe output to floating point so it can give the most precise value—4.66 recurring.
98 | Chapter 4: Expressions and Control Flow in PHP

Example 4-37. This expression returns a floating-point number<?php $a = 56; $b = 12; $c = $a / $b;
echo $c;?>
But what if we had wanted $c to be an integer instead? There are various ways in whichwe could achieve this, one of which is to force the result of $a/$b to be cast to an integervalue using the integer cast type (int), like this:
$c = (int) ($a / $b);
This is called explicit casting. Note that in order to ensure that the value of the entireexpression is cast to an integer, we place the expression within parentheses. Otherwise,only the variable $a would have been cast to an integer—a pointless exercise, as thedivision by $b would still have returned a floating-point number.
You can explicitly cast to the types shown in Table 4-6, but you canusually avoid having to use a cast by calling one of PHP’s built-infunctions. For example, to obtain an integer value, you could use theintval function. As with some other sections in this book, this oneis mainly here to help you understand third-party code that you mayencounter.
Table 4-6. PHP’s cast typesCast type Description
(int) (integer) Cast to an integer by dropping the decimal portion.
(bool) (boolean) Cast to a Boolean.
(float) (double) (real) Cast to a floating-point number.
(string) Cast to a string.
(array) Cast to an array.
(object) Cast to an object.
PHP Dynamic LinkingBecause PHP is a programming language, and the output from it can be completelydifferent for each user, it’s possible for an entire website to run from a single PHP webpage. Each time the user clicks on something, the details can be sent back to the sameweb page, which decides what to do next according to the various cookies and/or othersession details it may have stored.
PHP Dynamic Linking | 99
Although it is possible to build an entire website this way, it’s not recommended, becauseyour source code will grow and grow and start to become unwieldy, as it has to accountfor every possible action a user could take.
Instead, it’s much more sensible to split your website development into different parts.For example, one distinct process is signing up for a website, along with all the checkingthis entails to validate an email address, determine whether a username is already taken,and so on.
A second module might well be one for logging users in before handing them off to themain part of your website. Then you might have a messaging module with the facilityfor users to leave comments, a module containing links and useful information, anotherto allow uploading of images, and more.
As long as you have created a way to track your user through your website by means ofcookies or session variables (both of which we’ll look at more closely in later chapters),you can split up your website into sensible sections of PHP code, each one self-contained, and therefore treat yourself to a much easier future developing each newfeature and maintaining old ones.
Dynamic Linking in ActionOne of the more popular PHP-driven applications on the Web today is the bloggingplatform WordPress (see Figure 4-5). As a blogger or a blog reader, you might not realizeit, but every major section has been given its own main PHP file, and a whole raft ofgeneric, shared functions have been placed in separate files that are included by themain PHP pages as necessary.
The whole platform is held together with behind-the-scenes session tracking, so thatyou hardly know when you are transitioning from one subsection to another. So, as aweb developer, if you want to tweak WordPress, it’s easy to find the particular file youneed, modify it, and test and debug it without messing around with unconnected partsof the program.
Next time you use WordPress, keep an eye on your browser’s address bar, particularlyif you are managing a blog, and you’ll notice some of the different PHP files that it uses.
100 | Chapter 4: Expressions and Control Flow in PHP

Figure 4-5. The WordPress blogging platform is written in PHP
This chapter has covered quite a lot of ground, and by now you should be able to puttogether your own small PHP programs. But before you do, and before proceeding withthe following chapter on functions and objects, you may wish to test your new knowl‐edge on the following questions.
Questions1. What actual underlying values are represented by TRUE and FALSE?2. What are the simplest two forms of expressions?3. What is the difference between unary, binary, and ternary operators?4. What is the best way to force your own operator precedence?5. What is meant by operator associativity?6. When would you use the === (identity) operator?7. Name the three conditional statement types.
Questions | 101

8. What command can you use to skip the current iteration of a loop and move on tothe next one?
9. Why is a for loop more powerful than a while loop?10. How do if and while statements interpret conditional expressions of different data
types?
See “Chapter 4 Answers” on page 641 in Appendix A for the answers to these questions.
102 | Chapter 4: Expressions and Control Flow in PHP

CHAPTER 5
PHP Functions and Objects
The basic requirements of any programming language include somewhere to store data,a means of directing program flow, and a few bits and pieces such as expression evalu‐ation, file management, and text output. PHP has all these, plus tools like else andelseif to make life easier. But even with all these in our toolkit, programming can beclumsy and tedious, especially if you have to rewrite portions of very similar code eachtime you need them.
That’s where functions and objects come in. As you might guess, a function is a set ofstatements that performs a particular function and—optionally—returns a value. Youcan pull out a section of code that you have used more than once, place it into a function,and call the function by name when you want the code.
Functions have many advantages over contiguous, inline code. For example, they:
• Involve less typing• Reduce syntax and other programming errors• Decrease the loading time of program files• Decrease execution time, because each function is compiled only once, no matter
how often you call it• Accept arguments and can therefore be used for general as well as specific cases
Objects take this concept a step further. An object incorporates one or more functions,and the data they use, into a single structure called a class.
In this chapter, you’ll learn all about using functions, from defining and calling themto passing arguments back and forth. With that knowledge under your belt, you’ll startcreating functions and using them in your own objects (where they will be referred to as methods).
103

PHP FunctionsPHP comes with hundreds of ready-made, built-in functions, making it a very richlanguage. To use a function, call it by name. For example, you can see the print functionin action here:
print("print is a pseudo-function");
The parentheses tell PHP that you’re referring to a function. Otherwise, it thinks you’rereferring to a constant. You may see a warning such as this:
Notice: Use of undefined constant fname - assumed 'fname'
followed by the text string fname, under the assumption that you must have wanted toput a literal string in your code. (Things are even more confusing if there is actually aconstant named fname, in which case PHP uses its value.)
Strictly speaking, print is a pseudo-function, commonly called aconstruct. The difference is that you can omit the parentheses, asfollows:
print "print doesn't require parentheses";
You do have to put parentheses after any other functions you call,even if they’re empty (i.e., if you’re not passing any argument to thefunction).
Functions can take any number of arguments, including zero. For example, phpinfo, asshown here, displays lots of information about the current installation of PHP andrequires no argument (the result of calling this function can be seen in Figure 5-1):
phpinfo();
The phpinfo function is extremely useful for obtaining informationabout your current PHP installation, but that information could alsobe very useful to potential hackers. Therefore, never leave a call to thisfunction in any web-ready code.
104 | Chapter 5: PHP Functions and Objects

Figure 5-1. The output of PHP’s built-in phpinfo function
Some of the built-in functions that use one or more arguments appear in Example 5-1.
Example 5-1. Three string functions<?php echo strrev(" .dlrow olleH"); // Reverse string echo str_repeat("Hip ", 2); // Repeat string echo strtoupper("hooray!"); // String to uppercase?>
This example uses three string functions to output the following text:Hello world. Hip Hip HOORAY!
As you can see, the strrev function reversed the order of characters in the string,str_repeat repeated the string "Hip " twice (as required by a second argument), andstrtoupper converted "hooray!" to uppercase.
PHP Functions | 105

Defining a FunctionThe general syntax for a function is:
function function_name([parameter [, ...]]){ // Statements}
I’ll explain all the square brackets, in case you find them confusing. The first line of thesyntax indicates that:
• A definition starts with the word function.• A name follows, which must start with a letter or underscore, followed by any
number of letters, numbers, or underscores.• The parentheses are required.• One or more parameters, separated by commas, are optional.
Function names are case-insensitive, so all of the following strings can refer to the printfunction: PRINT, Print, and PrInT.
The opening curly brace starts the statements that will execute when you call the func‐tion; a matching curly brace must close it. These statements may include one or morereturn statements, which force the function to cease execution and return to the callingcode. If a value is attached to the return statement, the calling code can retrieve it, aswe’ll see next.
Returning a ValueLet’s take a look at a simple function to convert a person’s full name to lowercase andthen capitalize the first letter of each name.
We’ve already seen an example of PHP’s built-in strtoupper function in Example 5-1.For our current function, we’ll use its counterpart, strtolower:
$lowered = strtolower("aNY # of Letters and Punctuation you WANT");echo $lowered;
The output of this experiment is:any # of letters and punctuation you want
We don’t want names all lowercase, though; we want the first letter of each name capi‐talized. (We’re not going to deal with subtle cases such as Mary-Ann or Jo-En-Lai forthis example.) Luckily, PHP also provides a ucfirst function that sets the first characterof a string to uppercase:
$ucfixed = ucfirst("any # of letters and punctuation you want");echo $ucfixed;
106 | Chapter 5: PHP Functions and Objects

The output is:Any # of letters and punctuation you want
Now we can do our first bit of program design: to get a word with its initial lettercapitalized, we call strtolower on a string first, and then ucfirst. The way to do thisis to nest a call to strtolower within ucfirst. Let’s see why, because it’s important tounderstand the order in which code is evaluated.
If you make a simple call to the print function:print(5-8);
The expression 5-8 is evaluated first, and the output is -3. (As you saw in the previouschapter, PHP converts the result to a string in order to display it.) If the expressioncontains a function, that function is evaluated first as well:
print(abs(5-8));
PHP is doing several things in executing that short statement:
1. Evaluate 5-8 to produce -3.2. Use the abs function to turn -3 into 3.3. Convert the result to a string and output it using the print function.
It all works, because PHP evaluates each element from the inside out. The same proce‐dure is in operation when we call the following:
ucfirst(strtolower("aNY # of Letters and Punctuation you WANT"))
PHP passes our string to strtolower and then to ucfirst, producing (as we’ve alreadyseen when we played with the functions separately):
Any # of letters and punctuation you want
Now let’s define a function (shown in Example 5-2) that takes three names and makeseach one lowercase with an initial capital letter.
Example 5-2. Cleaning up a full name<?php echo fix_names("WILLIAM", "henry", "gatES");
function fix_names($n1, $n2, $n3) { $n1 = ucfirst(strtolower($n1)); $n2 = ucfirst(strtolower($n2)); $n3 = ucfirst(strtolower($n3));
return $n1 . " " . $n2 . " " . $n3; }?>
PHP Functions | 107

You may well find yourself writing this type of code, because users often leave their CapsLock key on, accidentally insert capital letters in the wrong places, and even forgetcapitals altogether. The output from this example is:
William Henry Gates
Returning an ArrayWe just saw a function returning a single value. There are also ways of getting multiplevalues from a function.
The first method is to return them within an array. As you saw in Chapter 3, an arrayis like a bunch of variables stuck together in a row. Example 5-3 shows how you can usean array to return function values.
Example 5-3. Returning multiple values in an array<?php $names = fix_names("WILLIAM", "henry", "gatES"); echo $names[0] . " " . $names[1] . " " . $names[2];
function fix_names($n1, $n2, $n3) { $n1 = ucfirst(strtolower($n1)); $n2 = ucfirst(strtolower($n2)); $n3 = ucfirst(strtolower($n3));
return array($n1, $n2, $n3); }?>
This method has the benefit of keeping all three names separate, rather than concate‐nating them into a single string, so you can refer to any user simply by first or last name,without having to extract either name from the returned string.
Passing by ReferenceIn PHP, prefacing a variable with the & symbol tells the parser to pass a reference to thevariable’s value, not the value itself. This concept can be hard to get your head around,so let’s go back to the matchbox metaphor from Chapter 3.
Imagine that, instead of taking a piece of paper out of a matchbox, reading it, copyingit to another piece of paper, putting the original back, and passing the copy to a function(phew!), you simply attach a piece of thread to the original piece of paper and pass oneend of it to the function (see Figure 5-2).
108 | Chapter 5: PHP Functions and Objects

Figure 5-2. Imagining a reference as a thread attached to a variable
Now the function can follow the thread to find the data to be accessed. This avoids allthe overhead of creating a copy of the variable just for the function’s use. What’s more,the function can now modify the variable’s value.
This means you can rewrite Example 5-3 to pass references to all the parameters, andthen the function can modify these directly (see Example 5-4).
Example 5-4. Returning values from a function by reference<?php $a1 = "WILLIAM"; $a2 = "henry"; $a3 = "gatES";
echo $a1 . " " . $a2 . " " . $a3 . "<br>"; fix_names($a1, $a2, $a3); echo $a1 . " " . $a2 . " " . $a3;
function fix_names(&$n1, &$n2, &$n3) { $n1 = ucfirst(strtolower($n1)); $n2 = ucfirst(strtolower($n2)); $n3 = ucfirst(strtolower($n3)); }?>
Rather than passing strings directly to the function, you first assign them to variablesand print them out to see their “before” values. Then you call the function as before,but put an & symbol in front of each parameter, which tells PHP to pass the variables’references only.
PHP Functions | 109

Now the variables $n1, $n2, and $n3 are attached to “threads” that lead to the values of$a1, $a2, and $a3. In other words, there is one group of values, but two sets of variablenames are allowed to access them.
Therefore, the function fix_names only has to assign new values to $n1, $n2, and $n3to update the values of $a1, $a2, and $a3. The output from this code is:
WILLIAM henry gatESWilliam Henry Gates
As you see, both of the echo statements use only the values of $a1, $a2, and $a3.
Be careful when passing values by reference. If you need to keep theoriginal values, make copies of your variables and then pass thecopies by reference.
Returning Global VariablesYou can also give a function access to an externally created variable by declaring it aglobal variable from within the function. The global keyword followed by the variablename gives every part of your code full access to it (see Example 5-5).
Example 5-5. Returning values in global variables<?php $a1 = "WILLIAM"; $a2 = "henry"; $a3 = "gatES";
echo $a1 . " " . $a2 . " " . $a3 . "<br>"; fix_names(); echo $a1 . " " . $a2 . " " . $a3;
function fix_names() { global $a1; $a1 = ucfirst(strtolower($a1)); global $a2; $a2 = ucfirst(strtolower($a2)); global $a3; $a3 = ucfirst(strtolower($a3)); }?>
Now you don’t have to pass parameters to the function, and it doesn’t have to acceptthem. Once declared, these variables remain global and available to the rest of yourprogram, including its functions.
110 | Chapter 5: PHP Functions and Objects

In order to retain as much local scope as possible, you should tryreturning arrays or using variables by association. Otherwise, you willbegin to lose some of the benefits of functions.
Recap of Variable ScopeA quick reminder of what you know from Chapter 3:
• Local variables are accessible just from the part of code where you define them. Ifthey’re outside of a function, they can be accessed by all code outside of functions,classes, and so on. If a variable is inside a function, only that function can accessthe variable, and its value is lost when the function returns.
• Global variables are accessible from all parts of your code.• Static variables are accessible only within the function that declared them but retain
their value over multiple calls.
Including and Requiring FilesAs you progress in your use of PHP programming, you are likely to start building alibrary of functions that you think you will need again. You’ll also probably start usinglibraries created by other programmers.
There’s no need to copy and paste these functions into your code. You can save them inseparate files and use commands to pull them in. There are two types of commands toperform this action: include and require.
The include StatementUsing include, you can tell PHP to fetch a particular file and load all its contents. It’sas if you pasted the included file into the current file at the insertion point. Example 5-6shows how you would include a file called library.php.
Example 5-6. Including a PHP file<?php include "library.php";
// Your code goes here?>
Including and Requiring Files | 111
Using include_onceEach time you issue the include directive, it includes the requested file again, even ifyou’ve already inserted it. For instance, suppose that library.php contains a lot of usefulfunctions, so you include it in your file, but also include another library that includeslibrary.php. Through nesting, you’ve inadvertently included library.php twice. This willproduce error messages, because you’re trying to define the same constant or functionmultiple times. So you should use include_once instead (see Example 5-7).
Example 5-7. Including a PHP file only once<?php include_once "library.php";
// Your code goes here?>
Then, whenever another include or include_once is encountered, if it has already beenexecuted, it will be completely ignored. To determine whether the file has already beenexecuted, the absolute file path is matched after all relative paths are resolved and thefile is found in your include path.
In general, it’s probably best to stick with include_once and ignorethe basic include statement. That way, you will never have the prob‐lem of files being included multiple times.
Using require and require_onceA potential problem with include and include_once is that PHP will only attempt toinclude the requested file. Program execution continues even if the file is not found.
When it is absolutely essential to include a file, require it. For the same reasons I gavefor using include_once, I recommend that you generally stick with require_oncewhenever you need to require a file (see Example 5-8).
Example 5-8. Requiring a PHP file only once<?php require_once "library.php";
// Your code goes here?>
112 | Chapter 5: PHP Functions and Objects

PHP Version CompatibilityPHP is in an ongoing process of development, and there are multiple versions. If youneed to check whether a particular function is available to your code, you can use thefunction_exists function, which checks all predefined and user-created functions.
Example 5-9 checks for the function array_combine, which is specific to PHPversion 5.
Example 5-9. Checking for a function’s existence<?php if (function_exists("array_combine")) { echo "Function exists"; } else { echo "Function does not exist - better write our own"; }?>
Using code such as this, you can take advantage of features in newer versions of PHPand yet still have your code run on earlier versions, as long as you replicate any featuresthat are missing. Your functions may be slower than the built-in ones, but at least yourcode will be much more portable.
You can also use the phpversion function to determine which version of PHP your codeis running on. The returned result will be similar to the following, depending on version:
5.4.21
PHP ObjectsIn much the same way that functions represent a huge increase in programming powerover the early days of computing, where sometimes the best program navigation avail‐able was a very basic GOTO or GOSUB statement, object-oriented programming (OOP)takes the use of functions to a whole new level.
Once you get the hang of condensing reusable bits of code into functions, it’s not thatgreat a leap to consider bundling the functions and their data into objects.
Let’s take a social networking site that has many parts. One part handles all user func‐tions; that is, code to enable new users to sign up and existing users to modify theirdetails. In standard PHP, you might create a few functions to handle this and embedsome calls to the MySQL database to keep track of all the users.
Imagine how much easier it would be to create an object to represent the current user.To do this, you could create a class, perhaps called User, that would contain all the code
PHP Version Compatibility | 113
required for handling users and all the variables needed for manipulating the data withinthe class. Then, whenever you need to manipulate a user’s data, you could simply createa new object with the User class.
You could treat this new object as if it were the actual user. For example, you could passthe object a name, password, and email address; ask it whether such a user already exists;and, if not, have it create a new user with those attributes. You could even have an instantmessaging object, or one for managing whether two users are friends.
TerminologyWhen creating a program to use objects, you need to design a composite of data andcode called a class. Each new object based on this class is called an instance (or occur‐rence) of that class.
The data associated with an object is called its properties; the functions it uses are calledmethods. In defining a class, you supply the names of its properties and the code for itsmethods. See Figure 5-3 for a jukebox metaphor for an object. Think of the CDs that itholds in the carousel as its properties; the method of playing them is to press buttonson the front panel. There is also the slot for inserting coins (the method used to activatethe object), and the laser disc reader (the method used to retrieve the music, or prop‐erties, from the CDs).
When you’re creating objects, it is best to use encapsulation, or writing a class in sucha way that only its methods can be used to manipulate its properties. In other words,you deny outside code direct access to its data. The methods you supply are known asthe object’s interface.
This approach makes debugging easy: you have to fix faulty code only within a class.Additionally, when you want to upgrade a program, if you have used proper encapsu‐lation and maintained the same interface, you can simply develop new replacementclasses, debug them fully, and then swap them in for the old ones. If they don’t work,you can swap the old ones back in to immediately fix the problem before further de‐bugging the new classes.
Once you have created a class, you may find that you need another class that is similarto it but not quite the same. The quick and easy thing to do is to define a new class usinginheritance. When you do this, your new class has all the properties of the one it hasinherited from. The original class is now called the superclass, and the new one is thesubclass (or derived class).
114 | Chapter 5: PHP Functions and Objects
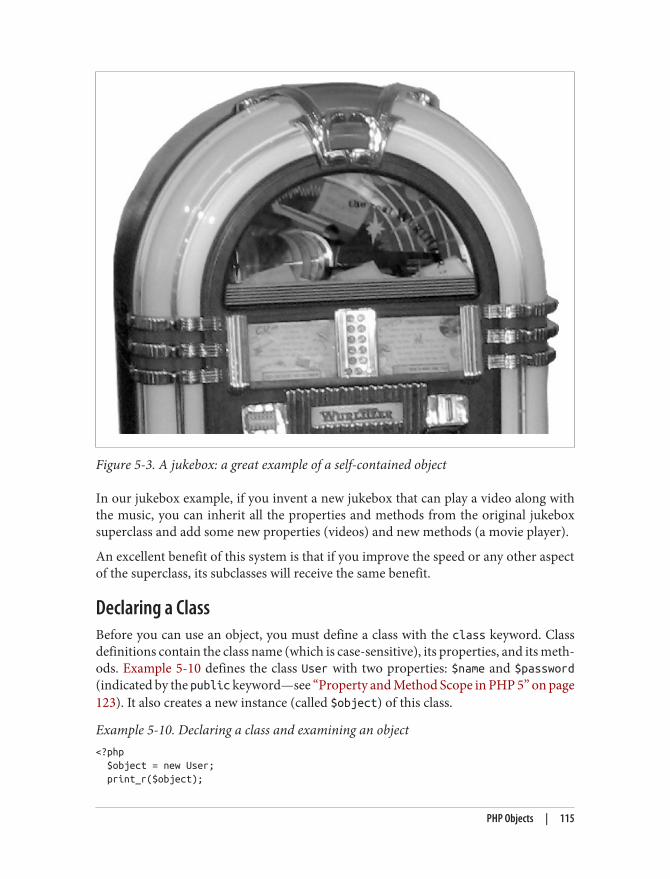
Figure 5-3. A jukebox: a great example of a self-contained object
In our jukebox example, if you invent a new jukebox that can play a video along withthe music, you can inherit all the properties and methods from the original jukeboxsuperclass and add some new properties (videos) and new methods (a movie player).
An excellent benefit of this system is that if you improve the speed or any other aspectof the superclass, its subclasses will receive the same benefit.
Declaring a ClassBefore you can use an object, you must define a class with the class keyword. Classdefinitions contain the class name (which is case-sensitive), its properties, and its meth‐ods. Example 5-10 defines the class User with two properties: $name and $password(indicated by the public keyword—see “Property and Method Scope in PHP 5” on page123). It also creates a new instance (called $object) of this class.
Example 5-10. Declaring a class and examining an object<?php $object = new User; print_r($object);
PHP Objects | 115

class User { public $name, $password;
function save_user() { echo "Save User code goes here"; } }?>
Here I have also used an invaluable function called print_r. It asks PHP to displayinformation about a variable in human-readable form. The _r stands for “in human-readable format.” In the case of the new object $object, it prints the following:
User Object( [name] => [password] => )
However, a browser compresses all the whitespace, so the output in a browser is slightlyharder to read:
User Object ( [name] => [password] => )
In any case, the output says that $object is a user-defined object that has the propertiesname and password.
Creating an ObjectTo create an object with a specified class, use the new keyword, like this: object = newClass. Here are a couple of ways in which we could do this:
$object = new User;$temp = new User('name', 'password');
On the first line, we simply assign an object to the User class. In the second, we passparameters to the call.
A class may require or prohibit arguments; it may also allow arguments, but not requirethem.
Accessing ObjectsLet’s add a few lines more to Example 5-10 and check the results. Example 5-11 extendsthe previous code by setting object properties and calling a method.
116 | Chapter 5: PHP Functions and Objects

Example 5-11. Creating and interacting with an object<?php $object = new User; print_r($object); echo "<br>";
$object->name = "Joe"; $object->password = "mypass"; print_r($object); echo "<br>";
$object->save_user();
class User { public $name, $password;
function save_user() { echo "Save User code goes here"; } }?>
As you can see, the syntax for accessing an object’s property is $object->property.Likewise, you call a method like this: $object->method().
You should note that the example property and method do not have $ signs in front ofthem. If you were to preface them with $ signs, the code would not work, as it wouldtry to reference the value inside a variable. For example, the expression $object->$property would attempt to look up the value assigned to a variable named $property(let’s say that value is the string brown) and then attempt to reference the property$object->brown. If $property is undefined, an attempt to reference $object->NULLwould occur and cause an error.
When looked at using a browser’s View Source facility, the output from Example 5-11is:
User Object( [name] => [password] =>)User Object( [name] => Joe [password] => mypass)Save User code goes here
Again, print_r shows its utility by providing the contents of $object before and afterproperty assignment. From now on, I’ll omit print_r statements, but if you are working
PHP Objects | 117

along with this book on your development server, you can put some in to see exactlywhat is happening.
You can also see that the code in the method save_user was executed via the call to thatmethod. It printed the string reminding us to create some code.
You can place functions and class definitions anywhere in your code,before or after statements that use them. Generally, though, it is con‐sidered good practice to place them toward the end of a file.
Cloning ObjectsOnce you have created an object, it is passed by reference when you pass it as a parameter.In the matchbox metaphor, this is like keeping several threads attached to an objectstored in a matchbox, so that you can follow any attached thread to access it.
In other words, making object assignments does not copy objects in their entirety. You’llsee how this works in Example 5-12, where we define a very simple User class with nomethods and only the property name.
Example 5-12. Copying an object?<?php $object1 = new User(); $object1->name = "Alice"; $object2 = $object1; $object2->name = "Amy";
echo "object1 name = " . $object1->name . "<br>"; echo "object2 name = " . $object2->name;
class User { public $name; }?>
We’ve created the object $object1 and assigned the value Alice to the name property.Then we create $object2, assigning it the value of $object1, and assign the value Amyjust to the name property of $object2—or so we might think. But this code outputs thefollowing:
object1 name = Amyobject2 name = Amy
What has happened? Both $object1 and $object2 refer to the same object, so changingthe name property of $object2 to Amy also sets that property for $object1.
118 | Chapter 5: PHP Functions and Objects

To avoid this confusion, you can use the clone operator, which creates a new instanceof the class and copies the property values from the original instance to the new instance.Example 5-13 illustrates this usage.
Example 5-13. Cloning an object<?php $object1 = new User(); $object1->name = "Alice"; $object2 = clone $object1; $object2->name = "Amy";
echo "object1 name = " . $object1->name . "<br>"; echo "object2 name = " . $object2->name;
class User { public $name; }?>
Voilà! The output from this code is what we initially wanted:object1 name = Aliceobject2 name = Amy
ConstructorsWhen creating a new object, you can pass a list of arguments to the class being called.These are passed to a special method within the class, called the constructor, whichinitializes various properties.
In the past, you would normally give this method the same name as the class, as inExample 5-14.
Example 5-14. Creating a constructor method<?php class User { function User($param1, $param2) { // Constructor statements go here public $username = "Guest"; } }?>
However, PHP 5 provides a more logical approach to naming the constructor, which isto use the function name __construct (i.e., construct preceded by two underscorecharacters), as in Example 5-15.
PHP Objects | 119

Example 5-15. Creating a constructor method in PHP 5<?php class User { function __construct($param1, $param2) { // Constructor statements go here public $username = "Guest"; } }?>
PHP 5 DestructorsAlso new in PHP 5 is the ability to create destructor methods. This ability is useful whencode has made the last reference to an object or when a script reaches the end.Example 5-16 shows how to create a destructor method.
Example 5-16. Creating a destructor method in PHP 5<?php class User { function __destruct() { // Destructor code goes here } }?>
Writing MethodsAs you have seen, declaring a method is similar to declaring a function, but there are afew differences. For example, method names beginning with a double underscore (__)are reserved and you should not create any of this form.
You also have access to a special variable called $this, which can be used to access thecurrent object’s properties. To see how it works, take a look at Example 5-17, whichcontains a different method from the User class definition called get_password.
Example 5-17. Using the variable $this in a method<?php class User { public $name, $password;
function get_password() { return $this->password;
120 | Chapter 5: PHP Functions and Objects

} }?>
get_password uses the $this variable to access the current object and then return thevalue of that object’s password property. Note how the preceding $ of the property$password is omitted when we use the -> operator. Leaving the $ in place is a typicalerror you may run into, particularly when you first use this feature.
Here’s how you would use the class defined in Example 5-17:$object = new User;$object->password = "secret";
echo $object->get_password();
This code prints the password secret.
Static Methods in PHP 5If you are using PHP 5, you can also define a method as static, which means that it iscalled on a class, not on an object. A static method has no access to any object propertiesand is created and accessed as in Example 5-18.
Example 5-18. Creating and accessing a static method<?php User::pwd_string();
class User { static function pwd_string() { echo "Please enter your password"; } }?>
Note how we call the class itself, along with the static method, using a double colon (alsoknown as the scope resolution operator), not ->. Static functions are useful for perform‐ing actions relating to the class itself, but not to specific instances of the class. You cansee another example of a static method in Example 5-21.
If you try to access $this->property, or other object properties fromwithin a static function, you will receive an error message.
PHP Objects | 121

Declaring PropertiesIt is not necessary to explicitly declare properties within classes, as they can be implicitlydefined when first used. To illustrate this, in Example 5-19 the class User has no prop‐erties and no methods but is legal code.
Example 5-19. Defining a property implicitly<?php $object1 = new User(); $object1->name = "Alice";
echo $object1->name;
class User {}?>
This code correctly outputs the string Alice without a problem, because PHP implicitlydeclares the variable $object1->name for you. But this kind of programming can leadto bugs that are infuriatingly difficult to discover, because name was declared from out‐side the class.
To help yourself and anyone else who will maintain your code, I advise that you get intothe habit of always declaring your properties explicitly within classes. You’ll be glad youdid.
Also, when you declare a property within a class, you may assign a default value to it.The value you use must be a constant and not the result of a function or expression.Example 5-20 shows a few valid and invalid assignments.
Example 5-20. Valid and invalid property declarations<?php class Test { public $name = "Paul Smith"; // Valid public $age = 42; // Valid public $time = time(); // Invalid - calls a function public $score = $level * 2; // Invalid - uses an expression }?>
Declaring ConstantsIn the same way that you can create a global constant with the define function, you candefine constants inside classes. The generally accepted practice is to use uppercase lettersto make them stand out, as in Example 5-21.
122 | Chapter 5: PHP Functions and Objects

Example 5-21. Defining constants within a class<?php Translate::lookup();
class Translate { const ENGLISH = 0; const SPANISH = 1; const FRENCH = 2; const GERMAN = 3; // ...
static function lookup() { echo self::SPANISH; } }?>
You can reference constants directly, using the self keyword and double colon operator.Note that this code calls the class directly, using the double colon operator at line 1,without creating an instance of it first. As you would expect, the value printed whenyou run this code is 1.
Remember that once you define a constant, you can’t change it.
Property and Method Scope in PHP 5PHP 5 provides three keywords for controlling the scope of properties and methods:public
These properties are the default when you are declaring a variable using the var orpublic keywords, or when a variable is implicitly declared the first time it is used.The keywords var and public are interchangeable because, although deprecated,var is retained for compatibility with previous versions of PHP. Methods are as‐sumed to be public by default.
protected
These properties and methods (members) can be referenced only by the object’sclass methods and those of any subclasses.
private
These members can be referenced only by methods within the same class—not bysubclasses.
PHP Objects | 123

Here’s how to decide which you need to use:
• Use public when outside code should access this member and extending classesshould also inherit it.
• Use protected when outside code should not access this member but extendingclasses should inherit it.
• Use private when outside code should not access this member and extendingclasses also should not inherit it.
Example 5-22 illustrates the use of these keywords.
Example 5-22. Changing property and method scope<?php class Example { var $name = "Michael"; // Same as public but deprecated public $age = 23; // Public property protected $usercount; // Protected property
private function admin() // Private method { // Admin code goes here } }?>
Static Properties and MethodsMost data and methods apply to instances of a class. For example, in a User class, youwant to do such things as set a particular user’s password or check when the user hasbeen registered. These facts and operations apply separately to each user and thereforeuse instance-specific properties and methods.
But occasionally you’ll want to maintain data about a whole class. For instance, to reporthow many users are registered, you will store a variable that applies to the whole Userclass. PHP provides static properties and methods for such data.
As shown briefly in Example 5-18, declaring members of a class static makes themaccessible without an instantiation of the class. A property declared static cannot bedirectly accessed within an instance of a class, but a static method can.
Example 5-23 defines a class called Test with a static property and a public method.
124 | Chapter 5: PHP Functions and Objects

Example 5-23. Defining a class with a static property<?php $temp = new Test();
echo "Test A: " . Test::$static_property . "<br>"; echo "Test B: " . $temp->get_sp() . "<br>"; echo "Test C: " . $temp->static_property . "<br>";
class Test { static $static_property = "I'm static";
function get_sp() { return self::$static_property; } }?>
When you run this code, it returns the following output:Test A: I'm staticTest B: I'm static
Notice: Undefined property: Test::$static_propertyTest C:
This example shows that the property $static_property could be directly referencedfrom the class itself via the double colon operator in Test A. Also, Test B could obtainits value by calling the get_sp method of the object $temp, created from class Test. ButTest C failed, because the static property $static_property was not accessible to theobject $temp.
Note how the method get_sp accesses $static_property using the keyword self. Thisis the way in which a static property or constant can be directly accessed within a class.
InheritanceOnce you have written a class, you can derive subclasses from it. This can save lots ofpainstaking code rewriting: you can take a class similar to the one you need to write,extend it to a subclass, and just modify the parts that are different. You achieve this usingthe extends operator.
In Example 5-24, the class Subscriber is declared a subclass of User by means of theextends operator.
PHP Objects | 125

Example 5-24. Inheriting and extending a class<?php $object = new Subscriber; $object->name = "Fred"; $object->password = "pword"; $object->phone = "012 345 6789"; $object->email = "[email protected]"; $object->display();
class User { public $name, $password;
function save_user() { echo "Save User code goes here"; } }
class Subscriber extends User { public $phone, $email;
function display() { echo "Name: " . $this->name . "<br>"; echo "Pass: " . $this->password . "<br>"; echo "Phone: " . $this->phone . "<br>"; echo "Email: " . $this->email; } }?>
The original User class has two properties, $name and $password, and a method to savethe current user to the database. Subscriber extends this class by adding an additionaltwo properties, $phone and $email, and includes a method of displaying the propertiesof the current object using the variable $this, which refers to the current values of theobject being accessed. The output from this code is:
Name: FredPass: pwordPhone: 012 345 6789Email: [email protected]
The parent operator
If you write a method in a subclass with the same name as one in its parent class, itsstatements will override those of the parent class. Sometimes this is not the behavioryou want and you need to access the parent’s method. To do this, you can use the parentoperator, as in Example 5-25.
126 | Chapter 5: PHP Functions and Objects

Example 5-25. Overriding a method and using the parent operator<?php $object = new Son; $object->test(); $object->test2();
class Dad { function test() { echo "[Class Dad] I am your Father<br>"; } }
class Son extends Dad { function test() { echo "[Class Son] I am Luke<br>"; }
function test2() { parent::test(); } }?>
This code creates a class called Dad and then a subclass called Son that inherits its prop‐erties and methods, and then overrides the method test. Therefore, when line 2 callsthe method test, the new method is executed. The only way to execute the overriddentest method in the Dad class is to use the parent operator, as shown in function test2of class Son. The code outputs the following:
[Class Son] I am Luke[Class Dad] I am your Father
If you wish to ensure that your code calls a method from the current class, you can usethe self keyword, like this:
self::method();
Subclass constructors
When you extend a class and declare your own constructor, you should be aware thatPHP will not automatically call the constructor method of the parent class. If you wantto be certain that all initialization code is executed, subclasses should always call theparent constructors, as in Example 5-26.
PHP Objects | 127
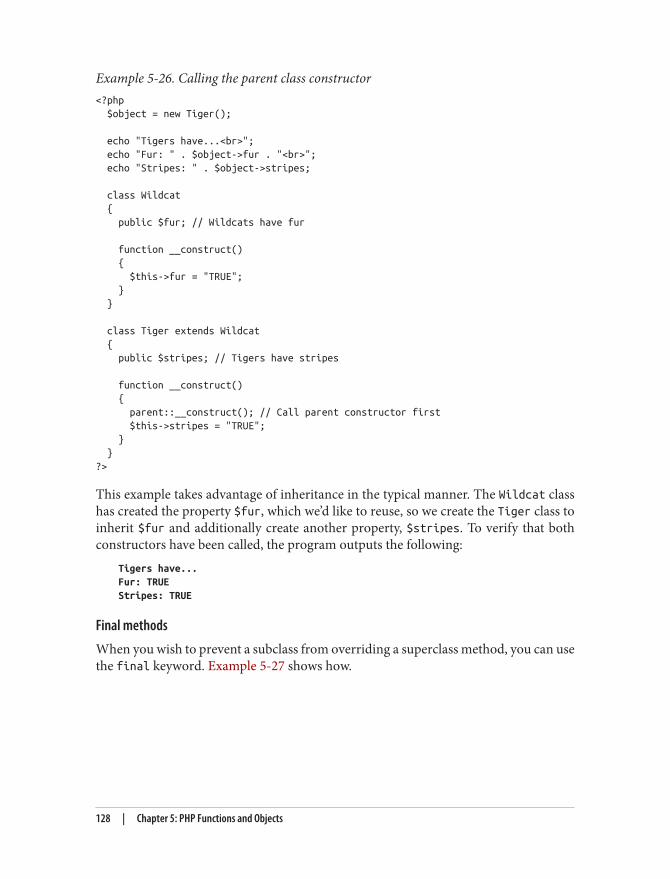
Example 5-26. Calling the parent class constructor<?php $object = new Tiger();
echo "Tigers have...<br>"; echo "Fur: " . $object->fur . "<br>"; echo "Stripes: " . $object->stripes;
class Wildcat { public $fur; // Wildcats have fur
function __construct() { $this->fur = "TRUE"; } }
class Tiger extends Wildcat { public $stripes; // Tigers have stripes
function __construct() { parent::__construct(); // Call parent constructor first $this->stripes = "TRUE"; } }?>
This example takes advantage of inheritance in the typical manner. The Wildcat classhas created the property $fur, which we’d like to reuse, so we create the Tiger class toinherit $fur and additionally create another property, $stripes. To verify that bothconstructors have been called, the program outputs the following:
Tigers have...Fur: TRUEStripes: TRUE
Final methods
When you wish to prevent a subclass from overriding a superclass method, you can usethe final keyword. Example 5-27 shows how.
128 | Chapter 5: PHP Functions and Objects

Example 5-27. Creating a final method<?php class User { final function copyright() { echo "This class was written by Joe Smith"; } }?>
Once you have digested the contents of this chapter, you should have a strong feel forwhat PHP can do for you. You should be able to use functions with ease and, if you wish,write object-oriented code. In Chapter 6, we’ll finish off our initial exploration of PHPby looking at the workings of PHP arrays.
Questions1. What is the main benefit of using a function?2. How many values can a function return?3. What is the difference between accessing a variable by name and by reference?4. What is the meaning of scope in PHP?5. How can you incorporate one PHP file within another?6. How is an object different from a function?7. How do you create a new object in PHP?8. What syntax would you use to create a subclass from an existing one?9. How can you call an initializing piece of code when an object is created?
10. Why is it a good idea to explicitly declare properties within a class?
See “Chapter 5 Answers” on page 642 in Appendix A for the answers to these questions.
Questions | 129

CHAPTER 6
PHP Arrays
In Chapter 3, I gave a very brief introduction to PHP’s arrays—just enough for a littletaste of their power. In this chapter, I’ll show you many more things that you can dowith arrays, some of which—if you have ever used a strongly typed language such asC—may surprise you with their elegance and simplicity.
Arrays are an example of what has made PHP so popular. Not only do they remove thetedium of writing code to deal with complicated data structures, they also provide nu‐merous ways to access data while remaining amazingly fast.
Basic AccessWe’ve already looked at arrays as if they were clusters of matchboxes glued together.Another way to think of an array is like a string of beads, with the beads representingvariables that can be numeric, string, or even other arrays. They are like bead strings,because each element has its own location and (with the exception of the first and lastones) each has other elements on either side.
Some arrays are referenced by numeric indices; others allow alphanumeric identifiers.Built-in functions let you sort them, add or remove sections, and walk through them tohandle each item through a special kind of loop. And by placing one or more arraysinside another, you can create arrays of two, three, or any number of dimensions.
Numerically Indexed ArraysLet’s assume that you’ve been tasked with creating a simple website for a local officesupply company and you’re currently working on the section devoted to paper. One wayto manage the various items of stock in this category would be to place them in a numericarray. You can see the simplest way of doing so in Example 6-1.
131

Example 6-1. Adding items to an array<?php $paper[] = "Copier"; $paper[] = "Inkjet"; $paper[] = "Laser"; $paper[] = "Photo";
print_r($paper);?>
In this example, each time you assign a value to the array $paper, the first empty locationwithin that array is used to store the value, and a pointer internal to PHP is incrementedto point to the next free location, ready for future insertions. The familiar print_rfunction (which prints out the contents of a variable, array, or object) is used to verifythat the array has been correctly populated. It prints out the following:
Array( [0] => Copier [1] => Inkjet [2] => Laser [3] => Photo)
The previous code could also have been written as shown in Example 6-2, where theexact location of each item within the array is specified. But, as you can see, that approachrequires extra typing and makes your code harder to maintain if you want to insert orremove supplies from the array. So unless you wish to specify a different order, it’s usuallybetter to simply let PHP handle the actual location numbers.
Example 6-2. Adding items to an array using explicit locations<?php $paper[0] = "Copier"; $paper[1] = "Inkjet"; $paper[2] = "Laser"; $paper[3] = "Photo";
print_r($paper);?>
The output from these examples is identical, but you are not likely to use print_r in adeveloped website, so Example 6-3 shows how you might print out the various types ofpaper the website offers using a for loop.
132 | Chapter 6: PHP Arrays

Example 6-3. Adding items to an array and retrieving them<?php $paper[] = "Copier"; $paper[] = "Inkjet"; $paper[] = "Laser"; $paper[] = "Photo";
for ($j = 0 ; $j < 4 ; ++$j) echo "$j: $paper[$j]<br>";?>
This example prints out the following:0: Copier1: Inkjet2: Laser3: Photo
So far, you’ve seen a couple of ways in which you can add items to an array and one wayof referencing them, but PHP offers many more—which I’ll get to shortly. But first, we’lllook at another type of array.
Associative ArraysKeeping track of array elements by index works just fine, but can require extra work interms of remembering which number refers to which product. It can also make codehard for other programmers to follow.
This is where associative arrays come into their own. Using them, you can reference theitems in an array by name rather than by number. Example 6-4 expands on the previouscode by giving each element in the array an identifying name and a longer, more ex‐planatory string value.
Example 6-4. Adding items to an associative array and retrieving them<?php $paper['copier'] = "Copier & Multipurpose"; $paper['inkjet'] = "Inkjet Printer"; $paper['laser'] = "Laser Printer"; $paper['photo'] = "Photographic Paper";
echo $paper['laser'];?>
In place of a number (which doesn’t convey any useful information, aside from theposition of the item in the array), each item now has a unique name that you can use toreference it elsewhere, as with the echo statement—which simply prints out LaserPrinter. The names (copier, inkjet, etc.) are called indexes or keys and the itemsassigned to them (such as “Laser Printer”) are called values.
Basic Access | 133

This very powerful feature of PHP is often used when you are extracting informationfrom XML and HTML. For example, an HTML parser such as those used by a searchengine could place all the elements of a web page into an associative array whose namesreflect the page’s structure:
$html['title'] = "My web page";$html['body'] = "... body of web page ...";
The program would also probably break down all the links found within a page intoanother array, and all the headings and subheadings into another. When you use asso‐ciative rather than numeric arrays, the code to refer to all of these items is easy to writeand debug.
Assignment Using the array KeywordSo far, you’ve seen how to assign values to arrays by just adding new items one at a time.Whether you specify keys, specify numeric identifiers, or let PHP assign numeric iden‐tifiers implicitly, this is a long-winded approach. A more compact and faster assignmentmethod uses the array keyword. Example 6-5 shows both a numeric and an associativearray assigned using this method.
Example 6-5. Adding items to an array using the array keyword<?php $p1 = array("Copier", "Inkjet", "Laser", "Photo");
echo "p1 element: " . $p1[2] . "<br>";
$p2 = array('copier' => "Copier & Multipurpose", 'inkjet' => "Inkjet Printer", 'laser' => "Laser Printer", 'photo' => "Photographic Paper");
echo "p2 element: " . $p2['inkjet'] . "<br>";?>
The first half of this snippet assigns the old, shortened product descriptions to the array$p1. There are four items, so they will occupy slots 0 through 3. Therefore, the echostatement prints out the following:
p1 element: Laser
The second half assigns associative identifiers and accompanying longer product de‐scriptions to the array $p2 using the format index => value. The use of => is similar tothe regular = assignment operator, except that you are assigning a value to an index andnot to a variable. The index is then inextricably linked with that value, unless it is as‐signed a new value. The echo command therefore prints out:
p2 element: Inkjet Printer
134 | Chapter 6: PHP Arrays

You can verify that $p1 and $p2 are different types of array, because both of the followingcommands, when appended to the code, will cause an Undefined index or Undefinedoffset error, as the array identifier for each is incorrect:
echo $p1['inkjet']; // Undefined indexecho $p2[3]; // Undefined offset
The foreach ... as LoopThe creators of PHP have gone to great lengths to make the language easy to use. So,not content with the loop structures already provided, they added another one especiallyfor arrays: the foreach ... as loop. Using it, you can step through all the items in anarray, one at a time, and do something with them.
The process starts with the first item and ends with the last one, so you don’t even haveto know how many items there are in an array.
Example 6-6 shows how foreach ... as can be used to rewrite Example 6-3.
Example 6-6. Walking through a numeric array using foreach ... as<?php $paper = array("Copier", "Inkjet", "Laser", "Photo"); $j = 0;
foreach($paper as $item) { echo "$j: $item<br>"; ++$j; }?>
When PHP encounters a foreach statement, it takes the first item of the array and placesit in the variable following the as keyword; and each time control flow returns to theforeach, the next array element is placed in the as keyword. In this case, the variable$item is set to each of the four values in turn in the array $paper. Once all values havebeen used, execution of the loop ends. The output from this code is exactly the same asExample 6-3.
Now let’s see how foreach works with an associative array by taking a look atExample 6-7, which is a rewrite of the second half of Example 6-5.
Example 6-7. Walking through an associative array using foreach ... as<?php $paper = array('copier' => "Copier & Multipurpose", 'inkjet' => "Inkjet Printer", 'laser' => "Laser Printer", 'photo' => "Photographic Paper");
The foreach ... as Loop | 135

foreach($paper as $item => $description) echo "$item: $description<br>";?>
Remember that associative arrays do not require numeric indexes, so the variable $j isnot used in this example. Instead, each item of the array $paper is fed into the key/valuepair of variables $item and $description, from which they are printed out. The dis‐played result of this code is as follows:
copier: Copier & Multipurposeinkjet: Inkjet Printerlaser: Laser Printerphoto: Photographic Paper
As an alternative syntax to foreach ... as, you can use the list function in conjunc‐tion with the each function, as in Example 6-8.
Example 6-8. Walking through an associative array using each and list<?php $paper = array('copier' => "Copier & Multipurpose", 'inkjet' => "Inkjet Printer", 'laser' => "Laser Printer", 'photo' => "Photographic Paper");
while (list($item, $description) = each($paper)) echo "$item: $description<br>";?>
In this example, a while loop is set up and will continue looping until the each functionreturns a value of FALSE. The each function acts like foreach: it returns an array con‐taining a key/value pair from the array $paper and then moves its built-in pointer tothe next pair in that array. When there are no more pairs to return, each returns FALSE.
The list function takes an array as its argument (in this case, the key/value pair returnedby the function each) and then assigns the values of the array to the variables listedwithin parentheses.
You can see how list works a little more clearly in Example 6-9, where an array iscreated out of the two strings Alice and Bob and then passed to the list function, whichassigns those strings as values to the variables $a and $b.
Example 6-9. Using the list function<?php list($a, $b) = array('Alice', 'Bob'); echo "a=$a b=$b";?>
The output from this code is:a=Alice b=Bob
136 | Chapter 6: PHP Arrays

So you can take your pick when walking through arrays. Use foreach ... as to createa loop that extracts values to the variable following the as, or use the each function andcreate your own looping system.
Multidimensional ArraysA simple design feature in PHP’s array syntax makes it possible to create arrays of morethan one dimension. In fact, they can be as many dimensions as you like (although it’sa rare application that goes further than three).
That feature makes it possible to include an entire array as a part of another one, andto be able to keep doing so, just like the old rhyme: “Big fleas have little fleas upon theirbacks to bite ’em. Little fleas have lesser fleas, add flea, ad infinitum.”
Let’s look at how this works by taking the associative array in the previous example andextending it; see Example 6-10.
Example 6-10. Creating a multidimensional associative array<?php $products = array(
'paper' => array(
'copier' => "Copier & Multipurpose", 'inkjet' => "Inkjet Printer", 'laser' => "Laser Printer", 'photo' => "Photographic Paper"),
'pens' => array(
'ball' => "Ball Point", 'hilite' => "Highlighters", 'marker' => "Markers"),
'misc' => array(
'tape' => "Sticky Tape", 'glue' => "Adhesives", 'clips' => "Paperclips" ) );
echo "<pre>";
foreach($products as $section => $items) foreach($items as $key => $value) echo "$section:\t$key\t($value)<br>";
Multidimensional Arrays | 137

echo "</pre>";?>
To make things clearer now that the code is starting to grow, I’ve renamed some of theelements. For example, because the previous array $paper is now just a subsection of alarger array, the main array is now called $products. Within this array, there are threeitems—paper, pens, and misc—each of which contains another array with key/valuepairs.
If necessary, these subarrays could have contained even further arrays. For example,under ball there might be many different types and colors of ballpoint pens availablein the online store. But for now, I’ve restricted the code to a depth of just two.
Once the array data has been assigned, I use a pair of nested foreach ... as loops toprint out the various values. The outer loop extracts the main sections from the top levelof the array, and the inner loop extracts the key/value pairs for the categories withineach section.
As long as you remember that each level of the array works the same way (it’s a key/value pair), you can easily write code to access any element at any level.
The echo statement makes use of the PHP escape character \t, which outputs a tab.Although tabs are not normally significant to the web browser, I let them be used forlayout by using the <pre> ... </pre> tags, which tell the web browser to format thetext as preformatted and monospaced, and not to ignore whitespace characters such astabs and line feeds. The output from this code looks like the following:
paper: copier (Copier & Multipurpose)paper: inkjet (Inkjet Printer)paper: laser (Laser Printer)paper: photo (Photographic Paper)pens: ball (Ball Point)pens: hilite (Highlighters)pens: marker (Markers)misc: tape (Sticky Tape)misc: glue (Adhesives)misc: clips (Paperclips)
You can directly access a particular element of the array using square brackets, like this:echo $products['misc']['glue'];
which outputs the value Adhesives.
You can also create numeric multidimensional arrays that are accessed directly by in‐dexes rather than by alphanumeric identifiers. Example 6-11 creates the board for achess game with the pieces in their starting positions.
138 | Chapter 6: PHP Arrays

Example 6-11. Creating a multidimensional numeric array<?php $chessboard = array( array('r', 'n', 'b', 'q', 'k', 'b', 'n', 'r'), array('p', 'p', 'p', 'p', 'p', 'p', 'p', 'p'), array(' ', ' ', ' ', ' ', ' ', ' ', ' ', ' '), array(' ', ' ', ' ', ' ', ' ', ' ', ' ', ' '), array(' ', ' ', ' ', ' ', ' ', ' ', ' ', ' '), array(' ', ' ', ' ', ' ', ' ', ' ', ' ', ' '), array('P', 'P', 'P', 'P', 'P', 'P', 'P', 'P'), array('R', 'N', 'B', 'Q', 'K', 'B', 'N', 'R') );
echo "<pre>";
foreach($chessboard as $row) { foreach ($row as $piece) echo "$piece ";
echo "<br>"; }
echo "</pre>";?>
In this example, the lowercase letters represent black pieces and the uppercase white.The key is r = rook, n = knight, b = bishop, k = king, q = queen, and p = pawn. Again,a pair of nested foreach ... as loops walks through the array and displays its contents.The outer loop processes each row into the variable $row, which itself is an array, becausethe $chessboard array uses a subarray for each row. This loop has two statements withinit, so curly braces enclose them.
The inner loop then processes each square in a row, outputting the character ($piece)stored in it, followed by a space (to square up the printout). This loop has a singlestatement, so curly braces are not required to enclose it. The <pre> and </pre> tagsensure that the output displays correctly, like this:
r n b q k b n rp p p p p p p p
P P P P P P P PR N B Q K B N R
You can also directly access any element within this array using square brackets, likethis:
echo $chessboard[7][3];
Multidimensional Arrays | 139

This statement outputs the uppercase letter Q, the eighth element down and the fourthalong (remembering that array indexes start at 0, not 1).
Using Array FunctionsYou’ve already seen the list and each functions, but PHP comes with numerous otherfunctions for handling arrays. The full list is at http://tinyurl.com/arraysinphp. However,some of these functions are so fundamental that it’s worth taking the time to look atthem here.
is_arrayArrays and variables share the same namespace. This means that you cannot have astring variable called $fred and an array also called $fred. If you’re in doubt and yourcode needs to check whether a variable is an array, you can use the is_array functionlike this:
echo (is_array($fred)) ? "Is an array" : "Is not an array";
Note that if $fred has not yet been assigned a value, an Undefined variable messagewill be generated.
countAlthough the each function and foreach ... as loop structure are excellent ways towalk through an array’s contents, sometimes you need to know exactly how many ele‐ments there are in your array, particularly if you will be referencing them directly. Tocount all the elements in the top level of an array, use a command such as the following:
echo count($fred);
Should you wish to know how many elements there are altogether in a multidimensionalarray, you can use a statement such as:
echo count($fred, 1);
The second parameter is optional and sets the mode to use. It should be either a 0 tolimit counting to only the top level, or 1 to force recursive counting of all subarrayelements too.
sortSorting is so common that PHP provides a built-in function. In its simplest form, youwould use it like this:
sort($fred);
140 | Chapter 6: PHP Arrays

Unlike some other functions, sort will act directly on the supplied array rather thanreturning a new array of sorted elements. Instead, it returns TRUE on success and FALSEon error and also supports a few flags, but the main two that you might wish to use forcesorting to be made either numerically or as strings, like this:
sort($fred, SORT_NUMERIC);sort($fred, SORT_STRING);
You can also sort an array in reverse order using the rsort function, like this:rsort($fred, SORT_NUMERIC);rsort($fred, SORT_STRING);
shuffleThere may be times when you need the elements of an array to be put in random order,such as when you’re creating a game of playing cards:
shuffle($cards);
Like sort, shuffle acts directly on the supplied array and returns TRUE on success orFALSE on error.
explodeThis is a very useful function with which you can take a string containing several itemsseparated by a single character (or string of characters) and then place each of theseitems into an array. One handy example is to split up a sentence into an array containingall its words, as in Example 6-12.
Example 6-12. Exploding a string into an array using spaces<?php $temp = explode(' ', "This is a sentence with seven words"); print_r($temp);?>
This example prints out the following (on a single line when viewed in a browser):Array( [0] => This [1] => is [2] => a [3] => sentence [4] => with [5] => seven [6] => words)
Using Array Functions | 141

The first parameter, the delimiter, need not be a space or even a single character.Example 6-13 shows a slight variation.
Example 6-13. Exploding a string delimited with *** into an array<?php $temp = explode('***', "A***sentence***with***asterisks"); print_r($temp);?>
The code in Example 6-13 prints out the following:Array( [0] => A [1] => sentence [2] => with [3] => asterisks)
extractSometimes it can be convenient to turn the key/value pairs from an array into PHPvariables. One such time might be when you are processing the $_GET or $_POST vari‐ables as sent to a PHP script by a form.
When a form is submitted over the Web, the web server unpacks the variables into aglobal array for the PHP script. If the variables were sent using the GET method, theywill be placed in an associative array called $_GET; if they were sent using POST, they willbe placed in an associative array called $_POST.
You could, of course, walk through such associative arrays in the manner shown in theexamples so far. However, sometimes you just want to store the values sent into variablesfor later use. In this case, you can have PHP do the job automatically for you:
extract($_GET);
So, for example, if the query string parameter q is sent to a PHP script along with theassociated value Hi there, a new variable called $q will be created and assigned thatvalue.
Be careful with this approach, though, because if any extracted variables conflict withones that you have already defined, your existing values will be overwritten. To avoidthis possibility, you can use one of the many additional parameters available to thisfunction, like this:
extract($_GET, EXTR_PREFIX_ALL, 'fromget');
In this case, all the new variables will begin with the given prefix string followed by anunderscore, so $q will become $fromget_q. I strongly recommend that you use thisversion of the function when handling the $_GET and $_POST arrays, or any other array
142 | Chapter 6: PHP Arrays

whose keys could be controlled by the user, because malicious users could submit keyschosen deliberately to overwrite commonly used variable names and compromise yourwebsite.
compactThere are also times when you want to use compact, the inverse of extract, to createan array from variables and their values. Example 6-14 shows how you might use thisfunction.
Example 6-14. Using the compact function<?php $fname = "Doctor"; $sname = "Who"; $planet = "Gallifrey"; $system = "Gridlock"; $constellation = "Kasterborous";
$contact = compact('fname', 'sname', 'planet', 'system', 'constellation');
print_r($contact);?>
The result of running Example 6-14 is:Array( [fname] => Doctor [sname] => Who [planet] => Gallifrey [system] => Gridlock [constellation] => Kasterborous)
Note how compact requires the variable names to be supplied in quotes, not precededby a $ symbol. This is because compact is looking for a list of variable names.
Another use of this function is for debugging, when you wish to quickly view severalvariables and their values, as in Example 6-15.
Example 6-15. Using compact to help with debugging<?php $j = 23; $temp = "Hello"; $address = "1 Old Street"; $age = 61;
print_r(compact(explode(' ', 'j temp address age')));?>
Using Array Functions | 143

This works by using the explode function to extract all the words from the string intoan array, which is then passed to the compact function, which in turn returns an arrayto print_r, which finally shows its contents.
If you copy and paste the print_r line of code, you only need to alter the variablesnamed there for a quick printout of a group of variables’ values. In this example, theoutput is:
Array( [j] => 23 [temp] => Hello [address] => 1 Old Street [age] => 61)
resetWhen the foreach ... as construct or the each function walks through an array, itkeeps an internal PHP pointer that makes a note of which element of the array it shouldreturn next. If your code ever needs to return to the start of an array, you can issuereset, which also returns the value of that element. Examples of how to use this functionare:
reset($fred); // Throw away return value$item = reset($fred); // Keep first element of the array in $item
endAs with reset, you can move PHP’s internal array pointer to the final element in anarray using the end function, which also returns the value of the element, and can beused as in these examples:
end($fred);$item = end($fred);
This chapter concludes your basic introduction to PHP, and you should now be able towrite quite complex programs using the skills you have learned. In the next chapter,we’ll look at using PHP for common, practical tasks.
Questions1. What is the difference between a numeric and an associative array?2. What is the main benefit of the array keyword?3. What is the difference between foreach and each?4. How can you create a multidimensional array?
144 | Chapter 6: PHP Arrays

5. How can you determine the number of elements in an array?6. What is the purpose of the explode function?7. How can you set PHP’s internal pointer into an array back to the first element of
the array?
See “Chapter 6 Answers” on page 643 in Appendix A for the answers to these questions.
Questions | 145


CHAPTER 7
Practical PHP
Previous chapters went over the elements of the PHP language. This chapter builds onyour new programming skills to teach you some common but important practical tasks.You will learn the best ways to manage string handling to achieve clear and concise codethat displays in web browsers exactly how you want it to, including advanced date andtime management. You’ll also find out how to create and otherwise modify files, in‐cluding those uploaded by users.
Using printfYou’ve already seen the print and echo functions, which simply output text to thebrowser. But a much more powerful function, printf, controls the format of the outputby letting you put special formatting characters in a string. For each formatting char‐acter, printf expects you to pass an argument that it will display using that format. Forinstance, the following example uses the %d conversion specifier to display the value 3in decimal:
printf("There are %d items in your basket", 3);
If you replace the %d with %b, the value 3 would be displayed in binary (11). Table 7-1shows the conversion specifiers supported.
Table 7-1. The printf conversion specifiersSpecifier Conversion action on argument arg Example (for an arg of 123)
% Display a % character (no arg is required). %
b Display arg as a binary integer. 1111011
c Display ASCII character for the arg. {
d Display arg as a signed decimal integer. 123
e Display arg using scientific notation. 1.23000e+2
147

Specifier Conversion action on argument arg Example (for an arg of 123)
f Display arg as floating point. 123.000000
o Display arg as an octal integer. 173
s Display arg as a string. 123
u Display arg as an unsigned decimal. 123
x Display arg in lowercase hexadecimal. 7b
X Display arg in uppercase hexadecimal. 7B
You can have as many specifiers as you like in a printf function, as long as you pass amatching number of arguments, and as long as each specifier is prefaced by a % symbol.Therefore, the following code is valid, and will output "My name is Simon. I'm 33years old, which is 21 in hexadecimal":
printf("My name is %s. I'm %d years old, which is %X in hexadecimal", 'Simon', 33, 33);
If you leave out any arguments, you will receive a parse error informing you that a rightbracket, ), was unexpectedly encountered.
A more practical example of printf sets colors in HTML using decimal. For example,suppose you know you want a color that has a triplet value of 65 red, 127 green, and 245blue, but don’t want to convert this to hexadecimal yourself. An easy solution is:
printf("<span style='color:#%X%X%X'>Hello</span>", 65, 127, 245);
Check the format of the color specification between the apostrophes ('') carefully. Firstcomes the pound, or hash, sign (#) expected by the color specification. Then come three%X format specifiers, one for each of your numbers. The resulting output from thiscommand is:
<span style='color:#417FF5'>Hello</span>
Usually, you’ll find it convenient to use variables or expressions as arguments toprintf. For instance, if you stored values for your colors in the three variables $r, $g,and $b, you could create a darker color with:
printf("<span style='color:#%X%X%X'>Hello</span>", $r-20, $g-20, $b-20);
Precision SettingNot only can you specify a conversion type, you can also set the precision of the displayedresult. For example, amounts of currency are usually displayed with only two digits ofprecision. However, after a calculation, a value may have a greater precision than this,such as 123.42 / 12, which results in 10.285. To ensure that such values are correctlystored internally, but displayed with only two digits of precision, you can insert thestring ".2" between the % symbol and the conversion specifier:
printf("The result is: $%.2f", 123.42 / 12);
148 | Chapter 7: Practical PHP

The output from this command is:The result is $10.29
But you actually have even more control than that, because you can also specify whetherto pad output with either zeros or spaces by prefacing the specifier with certain values.Example 7-1 shows four possible combinations.
Example 7-1. Precision setting<?php echo "<pre>"; // Enables viewing of the spaces
// Pad to 15 spaces printf("The result is $%15f\n", 123.42 / 12);
// Pad to 15 spaces, fill with zeros printf("The result is $%015f\n", 123.42 / 12);
// Pad to 15 spaces, 2 decimal places precision printf("The result is $%15.2f\n", 123.42 / 12);
// Pad to 15 spaces, 2 decimal places precision, fill with zeros printf("The result is $%015.2f\n", 123.42 / 12);
// Pad to 15 spaces, 2 decimal places precision, fill with # symbol printf("The result is $%'#15.2f\n", 123.42 / 12);?>
The output from this example looks like this:The result is $ 10.285000The result is $00000010.285000The result is $ 10.29The result is $000000000010.29The result is $##########10.29
The way it works is simple if you go from right to left (see Table 7-2). Notice that:
• The rightmost character is the conversion specifier. In this case, it is f for floatingpoint.
• Just before the conversion specifier, if there is a period and a number together, thenthe precision of the output is specified as the value of the number.
• Regardless of whether there’s a precision specifier, if there is a number, then thatrepresents the amount of characters to which the output should be padded. In theprevious example, this is 15 characters. If the output is already equal to or greaterthan the padding length, then this argument is ignored.
• The leftmost parameter allowed after the % symbol is a 0, which is ignored unless apadding value has been set, in which case the output is padded with zeros instead
Using printf | 149

of spaces. If a pad character other than zero or a space is required, you can use anyone of your choice as long as you preface it with a single quotation mark, like this:'#.
• On the left is the % symbol, which starts the conversion.
Table 7-2. Conversion specifier componentsStart conversion Pad character Number of pad
charactersDisplay precision Conversion
specifierExamples
% 15 f 10.285000
% 0 15 .2 f 000000000010.29
% '# 15 .4 f ########10.2850
String PaddingYou can also pad strings to required lengths (as you can with numbers), select differentpadding characters, and even choose between left and right justification. Example 7-2shows various examples.
Example 7-2. String padding<?php echo "<pre>"; // Enables viewing of the spaces
$h = 'Rasmus';
printf("[%s]\n", $h); // Standard string output printf("[%12s]\n", $h); // Right justify with spaces to width 12 printf("[%-12s]\n", $h); // Left justify with spaces printf("[%012s]\n", $h); // Zero padding printf("[%'#12s]\n\n", $h); // Use the custom padding character '#'
$d = 'Rasmus Lerdorf'; // The original creator of PHP
printf("[%12.8s]\n", $d); // Right justify, cutoff of 8 characters printf("[%-12.12s]\n", $d); // Left justify, cutoff of 12 characters printf("[%-'@12.10s]\n", $d); // Left justify, pad '@', cutoff 10 chars?>
Note how for purposes of layout in a web page, I’ve used the <pre> HTML tag to preserveall the spaces and the \n newline character after each of the lines to be displayed. Theoutput from this example is as follows:
[Rasmus][ Rasmus][Rasmus ][000000Rasmus][######Rasmus]
150 | Chapter 7: Practical PHP

[ Rasmus L][Rasmus Lerdo][Rasmus Ler@@]
When you are specifying a padding value, if a string is already of equal or greater lengththan that value it will be ignored, unless a cutoff value is given that shortens the stringback to less than the padding value.
Table 7-3 shows a breakdown of the components available to string conversionspecifiers.
Table 7-3. String conversion specifier componentsStart
conversionLeft/right
justifyPadding
characterNumber of pad
charactersCutoff Conversion
specifierExamples (using
“Rasmus”)
% s [Rasmus]
% - 10 s [Rasmus ]
% '# 8 .4 s [####Rasm]
Using sprintfOften, you don’t want to output the result of a conversion but need it to use elsewherein your code. This is where the sprintf function comes in. With it, you can send theoutput to another variable rather than to the browser.
You might use it simply to make a conversion, as in the following example, which returnsthe hexadecimal string value for the RGB color group 65, 127, 245 in $hexstring:
$hexstring = sprintf("%X%X%X", 65, 127, 245);
Or you may wish to store output ready to display later on:$out = sprintf("The result is: $%.2f", 123.42 / 12);echo $out;
Date and Time FunctionsTo keep track of the date and time, PHP uses standard Unix timestamps, which aresimply the number of seconds since the start of January 1, 1970. To determine the currenttimestamp, you can use the time function:
echo time();
Because the value is stored as seconds, to obtain the timestamp for this time next week,you would use the following, which adds 7 days times 24 hours times 60 minutes times60 seconds to the returned value:
echo time() + 7 * 24 * 60 * 60;
Date and Time Functions | 151

If you wish to create a timestamp for a given date, you can use the mktime function. Itsoutput is the timestamp 946684800 for the first second of the first minute of the firsthour of the first day of the year 2000:
echo mktime(0, 0, 0, 1, 1, 2000);
The parameters to pass are, in order from left to right:
• The number of the hour (0–23)• The number of the minute (0–59)• The number of seconds (0–59)• The number of the month (1–12)• The number of the day (1–31)• The year (1970–2038, or 1901–2038 with PHP 5.1.0+ on 32-bit signed systems)
You may ask why you are limited to the years 1970 through 2038.Well, it’s because the original developers of Unix chose the start of theyear 1970 as the base date that no programmer should need to gobefore! Luckily, because (as of version 5.1.0) PHP supports systemsusing a signed 32-bit integer for the timestamp, dates from 1901 to2038 are allowed on them. However, that introduces a problem evenworse than the original because the Unix designers also decided thatnobody would be using Unix after about 70 years or so, and there‐fore believed they could get away with storing the timestamp as a 32-bit value—which will run out on January 19, 2038! This will createwhat has come to be known as the Y2K38 bug (much like the mil‐lennium bug, which was caused by storing years as two-digit values,and which also had to be fixed). PHP introduced the DateTime class in version 5.2 to overcome this issue, but it will work only on 64-bitarchitecture.
To display the date, use the date function, which supports a plethora of formattingoptions, enabling you to display the date any way you could wish. The format is asfollows:
date($format, $timestamp);
The parameter $format should be a string containing formatting specifiers as detailedin Table 7-4, and $timestamp should be a Unix timestamp. For the complete list ofspecifiers, see http://php.net/manual/en/function.date.php. The following commandwill output the current date and time in the format "Thursday July 6th, 2017 -1:38pm":
echo date("l F jS, Y - g:ia", time());
152 | Chapter 7: Practical PHP

Table 7-4. The major date function format specifiersFormat Description Returned value
Day specifiers
d Day of month, two digits, with leading zeros 01 to 31
D Day of the week, three letters Mon to Sun
j Day of the month, no leading zeros 1 to 31
l Day of week, full names Sunday to Saturday
N Day of week, numeric, Monday to Sunday 1 to 7
S Suffix for day of month (useful with specifier j) st, nd, rd, or th
w Day of week, numeric, Sunday to Saturday 0 to 6
z Day of year 0 to 365
Week specifier
W Week number of year 01 to 52
Month specifiers
F Month name January to December
m Month number with leading zeros 01 to 12
M Month name, three letters Jan to Dec
n Month number, no leading zeros 1 to 12
t Number of days in given month 28 to 31
Year specifiers
L Leap year 1 = Yes, 0 = No
y Year, 2 digits 00 to 99
Y Year, 4 digits 0000 to 9999
Time specifiers
a Before or after midday, lowercase am or pm
A Before or after midday, uppercase AM or PM
g Hour of day, 12-hour format, no leading zeros 1 to 12
G Hour of day, 24-hour format, no leading zeros 00 to 23
h Hour of day, 12-hour format, with leading zeros 01 to 12
H Hour of day, 24-hour format, with leading zeros 00 to 23
i Minutes, with leading zeros 00 to 59
s Seconds, with leading zeros 00 to 59
Date and Time Functions | 153

Date ConstantsThere are a number of useful constants that you can use with the date command toreturn the date in specific formats. For example, date(DATE_RSS) returns the currentdate and time in the valid format for an RSS feed. Some of the more commonly used constants are:DATE_ATOM
This is the format for Atom feeds. The PHP format is "Y-m-d\TH:i:sP" and ex‐ample output is "2018-08-16T12:00:00+00:00".
DATE_COOKIE
This is the format for cookies set from a web server or JavaScript. The PHP formatis "l, d-M-y H:i:s T" and example output is "Thursday, 16-Aug-18 12:00:00UTC".
DATE_RSS
This is the format for RSS feeds. The PHP format is "D, d M Y H:i:s O" andexample output is "Thu, 16 Aug 2018 12:00:00 UTC".
DATE_W3C
This is the format for the World Wide Web Consortium. The PHP format is "Y-m-d\TH:i:sP" and example output is "2018-08-16T12:00:00+00:00".
The complete list can be found at http://php.net/manual/en/class.datetime.php.
Using checkdateYou’ve seen how to display a valid date in a variety of formats. But how can you checkwhether a user has submitted a valid date to your program? The answer is to pass themonth, day, and year to the checkdate function, which returns a value of TRUE if thedate is valid, or FALSE if it is not.
For example, if February 30 of any year is input, it will always be an invalid date.Example 7-3 shows code that you could use for this. As it stands, it will find the given date invalid.
Example 7-3. Checking for the validity of a date<?php $month = 9; // September (only has 30 days) $day = 31; // 31st $year = 2018; // 2018
if (checkdate($month, $day, $year)) echo "Date is valid"; else echo "Date is invalid";?>
154 | Chapter 7: Practical PHP

File HandlingPowerful as it is, MySQL is not the only (or necessarily the best) way to store all data ona web server. Sometimes it can be quicker and more convenient to directly access fileson the hard disk. Cases in which you might need to do this are modifying images suchas uploaded user avatars, or log files that you wish to process.
First, though, a note about file naming: if you are writing code that may be used onvarious PHP installations, there is no way of knowing whether these systems are case-sensitive. For example, Windows and Mac OS X filenames are not case-sensitive, butLinux and Unix ones are. Therefore, you should always assume that the system is case-sensitive and stick to a convention such as all lowercase filenames.
Checking Whether a File ExistsTo determine whether a file already exists, you can use the file_exists function, whichreturns either TRUE or FALSE, and is used like this:
if (file_exists("testfile.txt")) echo "File exists";
Creating a FileAt this point, testfile.txt doesn’t exist, so let’s create it and write a few lines to it. TypeExample 7-4 and save it as testfile.php.
Example 7-4. Creating a simple text file<?php // testfile.php $fh = fopen("testfile.txt", 'w') or die("Failed to create file");
$text = <<<_ENDLine 1Line 2Line 3_END;
fwrite($fh, $text) or die("Could not write to file"); fclose($fh); echo "File 'testfile.txt' written successfully";?>
When you run this in a browser, all being well, you will receive the message File 'testfile.txt' written successfully. If you receive an error message, your hard diskmay be full or, more likely, you may not have permission to create or write to the file,in which case you should modify the attributes of the destination folder according toyour operating system. Otherwise, the file testfile.txt should now be residing in the same
File Handling | 155

folder in which you saved the testfile.php program. Try opening the file in a text orprogram editor—the contents will look like this:
Line 1Line 2Line 3
This simple example shows the sequence that all file handling takes:
1. Always start by opening the file. You do this through a call to fopen.2. Then you can call other functions; here we write to the file (fwrite), but you can
also read from an existing file (fread or fgets) and do other things.3. Finish by closing the file (fclose). Although the program does this for you when
it ends, you should clean up after yourself by closing the file when you’re finished.
Every open file requires a file resource so that PHP can access and manage it. Thepreceding example sets the variable $fh (which I chose to stand for file handle) to thevalue returned by the fopen function. Thereafter, each file handling function that ac‐cesses the opened file, such as fwrite or fclose, must be passed $fh as a parameter toidentify the file being accessed. Don’t worry about the content of the $fh variable; it’s anumber PHP uses to refer to internal information about the file—you just pass thevariable to other functions.
Upon failure, FALSE will be returned by fopen. The previous example shows a simpleway to capture and respond to the failure: it calls the die function to end the programand give the user an error message. A web application would never abort in this crudeway (you would create a web page with an error message instead), but this is fine forour testing purposes.
Notice the second parameter to the fopen call. It is simply the character w, which tellsthe function to open the file for writing. The function creates the file if it doesn’t alreadyexist. Be careful when playing around with these functions: if the file already exists, thew mode parameter causes the fopen call to delete the old contents (even if you don’twrite anything new!).
There are several different mode parameters that can be used here, as detailed inTable 7-5.
Table 7-5. The supported fopen modesMode Action Description
'r' Read from file start. Open for reading only; place the file pointer at the beginning of the file. Return FALSEif the file doesn’t already exist.
'r+' Read from file start andallow writing.
Open for reading and writing; place the file pointer at the beginning of the file. ReturnFALSE if the file doesn’t already exist.
156 | Chapter 7: Practical PHP

Mode Action Description
'w' Write from file start andtruncate file.
Open for writing only; place the file pointer at the beginning of the file and truncate thefile to zero length. If the file doesn’t exist, attempt to create it.
'w+' Write from file start,truncate file, and allowreading.
Open for reading and writing; place the file pointer at the beginning of the file and truncatethe file to zero length. If the file doesn’t exist, attempt to create it.
'a' Append to file end. Open for writing only; place the file pointer at the end of the file. If the file doesn’t exist,attempt to create it.
'a+' Append to file end and allowreading.
Open for reading and writing; place the file pointer at the end of the file. If the file doesn’texist, attempt to create it.
Reading from FilesThe easiest way to read from a text file is to grab a whole line through fgets (think ofthe final s as standing for string), as in Example 7-5.
Example 7-5. Reading a file with fgets<?php $fh = fopen("testfile.txt", 'r') or die("File does not exist or you lack permission to open it");
$line = fgets($fh); fclose($fh); echo $line;?>
If you created the file as shown in Example 7-4, you’ll get the first line:Line 1
Or you can retrieve multiple lines or portions of lines through the fread function, asin Example 7-6.
Example 7-6. Reading a file with fread<?php $fh = fopen("testfile.txt", 'r') or die("File does not exist or you lack permission to open it");
$text = fread($fh, 3); fclose($fh); echo $text;?>
I’ve requested three characters in the fread call, so the program displays the following:Lin
The fread function is commonly used with binary data. But if you use it on text datathat spans more than one line, remember to count newline characters.
File Handling | 157

Copying FilesLet’s try out the PHP copy function to create a clone of testfile.txt. Type in Example 7-7and save it as copyfile.php, and then call up the program in your browser.
Example 7-7. Copying a file<?php // copyfile.php copy('testfile.txt', 'testfile2.txt') or die("Could not copy file"); echo "File successfully copied to 'testfile2.txt'";?>
If you check your folder again, you’ll see that you now have the new file testfile2.txt init. By the way, if you don’t want your programs to exit on a failed copy attempt, youcould try the alternate syntax in Example 7-8.
Example 7-8. Alternate syntax for copying a file<?php // copyfile2.php if (!copy('testfile.txt', 'testfile2.txt')) echo "Could not copy file"; else echo "File successfully copied to 'testfile2.txt'";?>
Moving a FileTo move a file, rename it with the rename function, as in Example 7-9.
Example 7-9. Moving a file<?php // movefile.php if (!rename('testfile2.txt', 'testfile2.new')) echo "Could not rename file"; else echo "File successfully renamed to 'testfile2.new'";?>
You can use the rename function on directories, too. To avoid any warning messages, ifthe original file doesn’t exist, you can call the file_exists function first to check.
Deleting a FileDeleting a file is just a matter of using the unlink function to remove it from the file‐system, as in Example 7-10.
Example 7-10. Deleting a file<?php // deletefile.php if (!unlink('testfile2.new')) echo "Could not delete file"; else echo "File 'testfile2.new' successfully deleted";?>
158 | Chapter 7: Practical PHP

Whenever you access files on your hard disk directly, you must alsoalways ensure that it is impossible for your filesystem to be compro‐mised. For example, if you are deleting a file based on user input,you must make absolutely certain it is a file that can be safely de‐leted and that the user is allowed to delete it.
As with moving a file, a warning message will be displayed if the file doesn’t exist, whichyou can avoid by using file_exists to first check for its existence before calling unlink.
Updating FilesOften, you will want to add more data to a saved file, which you can do in many ways.You can use one of the append write modes (see Table 7-5), or you can simply open afile for reading and writing with one of the other modes that supports writing, and movethe file pointer to the correct place within the file that you wish to write to or read from.
The file pointer is the position within a file at which the next file access will take place,whether it’s a read or a write. It is not the same as the file handle (as stored in the variable$fh in Example 7-4), which contains details about the file being accessed.
You can see this in action by typing Example 7-11 and saving it as update.php. Then callit up in your browser.
Example 7-11. Updating a file<?php // update.php $fh = fopen("testfile.txt", 'r+') or die("Failed to open file"); $text = fgets($fh);
fseek($fh, 0, SEEK_END); fwrite($fh, "$text") or die("Could not write to file"); fclose($fh);
echo "File 'testfile.txt' successfully updated";?>
This program opens testfile.txt for both reading and writing by setting the mode with'r+', which puts the file pointer right at the start. It then uses the fgets function toread in a single line from the file (up to the first line feed). After that, the fseek functionis called to move the file pointer right to the file end, at which point the line of text thatwas extracted from the start of the file (stored in $text) is then appended to file’s endand the file is closed. The resulting file now looks like this:
Line 1Line 2Line 3Line 1
File Handling | 159

The first line has successfully been copied and then appended to the file’s end.
As used here, in addition to the $fh file handle, the fseek function was passed two otherparameters, 0 and SEEK_END. SEEK_END tells the function to move the file pointer to theend of the file and 0 tells it how many positions it should then be moved backward fromthat point. In the case of Example 7-11, a value of 0 is used, because the pointer is requiredto remain at the file’s end.
There are two other seek options available to the fseek function: SEEK_SET andSEEK_CUR. The SEEK_SET option tells the function to set the file pointer to the exactposition given by the preceding parameter. Thus, the following example moves the filepointer to position 18:
fseek($fh, 18, SEEK_SET);
SEEK_CUR sets the file pointer to the current position plus the value of the given offset.Therefore, if the file pointer is currently at position 18, the following call will move itto position 23:
fseek($fh, 5, SEEK_CUR);
Although this is not recommended unless you have very specific reasons for it, it is evenpossible to use text files such as this (but with fixed line lengths) as simple flat filedatabases. Your program can then use fseek to move back and forth within such a fileto retrieve, update, and add new records. You can also delete records by overwritingthem with zero characters, and so on.
Locking Files for Multiple AccessesWeb programs are often called by many users at the same time. If more than one persontries to write to a file simultaneously, it can become corrupted. And if one person writesto it while another is reading from it, the file is all right but the person reading it canget odd results. To handle simultaneous users, you must use the file locking flockfunction. This function queues up all other requests to access a file until your programreleases the lock. So, whenever your programs use write access on files that may beaccessed concurrently by multiple users, you should also add file locking to them, as inExample 7-12, which is an updated version of Example 7-11.
Example 7-12. Updating a file with file locking<?php $fh = fopen("testfile.txt", 'r+') or die("Failed to open file"); $text = fgets($fh);
if (flock($fh, LOCK_EX)) { fseek($fh, 0, SEEK_END); fwrite($fh, "$text") or die("Could not write to file"); flock($fh, LOCK_UN);
160 | Chapter 7: Practical PHP

}
fclose($fh); echo "File 'testfile.txt' successfully updated";?>
There is a trick to file locking to preserve the best possible response time for your websitevisitors: perform it directly before a change you make to a file, and then unlock it im‐mediately afterward. Having a file locked for any longer than this will slow down yourapplication unnecessarily. This is why the calls to flock in Example 7-12 are directlybefore and after the fwrite call.
The first call to flock sets an exclusive file lock on the file referred to by $fh using theLOCK_EX parameter:
flock($fh, LOCK_EX);
From this point onward, no other processes can write to (or even read from) the fileuntil you release the lock by using the LOCK_UN parameter, like this:
flock($fh, LOCK_UN);
As soon as the lock is released, other processes are again allowed access to the file. Thisis one reason why you should reseek to the point you wish to access in a file each timeyou need to read or write data, because another process could have changed the filesince the last access.
However, did you notice that the call to request an exclusive lock is nested as part of anif statement? This is because flock is not supported on all systems; thus, it is wise tocheck whether you successfully secured a lock, just in case one could not be obtained.
Something else you must consider is that flock is what is known as an advisory lock.This means that it locks out only other processes that call the function. If you have anycode that goes right in and modifies files without implementing flock file locking, itwill always override the locking and could wreak havoc on your files.
By the way, implementing file locking and then accidentally leaving it out in one sectionof code can lead to an extremely hard-to-locate bug.
flock will not work on NFS and many other networked filesystems.Also, when using a multithreaded server like ISAPI, you may not beable to rely on flock to protect files against other PHP scripts run‐ning in parallel threads of the same server instance. Additionally,flock is not supported on any system using the old FAT filesystem(such as older versions of Windows).
File Handling | 161

Reading an Entire FileA handy function for reading in an entire file without having to use file handles isfile_get_contents. It’s very easy to use, as you can see in Example 7-13.
Example 7-13. Using file_get_contents<?php echo "<pre>"; // Enables display of line feeds echo file_get_contents("testfile.txt"); echo "</pre>"; // Terminates pre tag?>
But the function is actually a lot more useful than that, because you can also use it tofetch a file from a server across the Internet, as in Example 7-14, which requests theHTML from the O’Reilly home page, and then displays it as if the user had surfed to thepage itself. The result will be similar to Figure 7-1.
Example 7-14. Grabbing the O’Reilly home page<?php echo file_get_contents("http://oreilly.com");?>
Figure 7-1. The O’Reilly home page grabbed with file_get_contents
Uploading FilesUploading files to a web server is a subject that seems daunting to many people, but itactually couldn’t be much easier. All you need to do to upload a file from a form is choose
162 | Chapter 7: Practical PHP

a special type of encoding called multipart/form-data, and your browser will handle therest. To see how this works, type the program in Example 7-15 and save it as upload.php.When you run it, you’ll see a form in your browser that lets you upload a file of yourchoice.
Example 7-15. Image uploader upload.php<?php // upload.php echo <<<_END <html><head><title>PHP Form Upload</title></head><body> <form method='post' action='upload.php' enctype='multipart/form-data'> Select File: <input type='file' name='filename' size='10'> <input type='submit' value='Upload'> </form>_END;
if ($_FILES) { $name = $_FILES['filename']['name']; move_uploaded_file($_FILES['filename']['tmp_name'], $name); echo "Uploaded image '$name'<br><img src='$name'>"; }
echo "</body></html>";?>
Let’s examine this program a section at a time. The first line of the multiline echostatement starts an HTML document, displays the title, and then starts the document’sbody.
Next we come to the form that selects the POST method of form submission, sets thetarget for posted data to the program upload.php (the program itself), and tells the webbrowser that the data posted should be encoded via the content type of multipart/form-data.
With the form set up, the next lines display the prompt “Select File:” and then requesttwo inputs. The first request is for a file; it uses an input type of file, a name offilename, and an input field with a width of 10 characters.
The second requested input is just a Submit button that is given the label Upload (whichreplaces the default button text of Submit Query). And then the form is closed.
This short program shows a common technique in web programming in which a singleprogram is called twice: once when the user first visits a page, and again when the userpresses the Submit button.
The PHP code to receive the uploaded data is fairly simple, because all uploaded filesare placed into the associative system array $_FILES. Therefore, a quick check to see
File Handling | 163

whether $_FILES contains anything is sufficient to determine whether the user has up‐loaded a file. This is done with the statement if ($_FILES).
The first time the user visits the page, before uploading a file, $_FILES is empty, so theprogram skips this block of code. When the user uploads a file, the program runs againand discovers an element in the $_FILES array.
Once the program realizes that a file was uploaded, the actual name, as read from theuploading computer, is retrieved and placed into the variable $name. Now all that’s nec‐essary is to move the file from the temporary location in which PHP stored the uploadedfile to a more permanent one. We do this using the move_uploaded_file function,passing it the original name of the file, with which it is saved to the current directory.
Finally, the uploaded image is displayed within an IMG tag, and the result should looklike Figure 7-2.
If you run this program and then receive warning messages such asPermission denied for the move_uploaded_file function call, thenyou may not have the correct permissions set for the folder in whichthe program is running.
Figure 7-2. Uploading an image as form data
Using $_FILES
Five things are stored in the $_FILES array when a file is uploaded, as shown in Table 7-6(where file is the file upload field name supplied by the submitting form).
164 | Chapter 7: Practical PHP

Table 7-6. The contents of the $_FILES arrayArray element Contents
$_FILES['file']['name'] The name of the uploaded file (e.g., smiley.jpg)
$_FILES['file']['type'] The content type of the file (e.g., image/jpeg)
$_FILES['file']['size'] The file’s size in bytes
$_FILES['file']['tmp_name'] The name of the temporary file stored on the server
$_FILES['file']['error'] The error code resulting from the file upload
Content types used to be known as MIME (Multipurpose Internet Mail Extension) types,but because their use later expanded to the whole Internet, now they are often calledInternet media types. Table 7-7 shows some of the more frequently used types that turnup in $_FILES['file']['type'].
Table 7-7. Some common Internet media content typesapplication/pdf image/gif multipart/form-data text/xml
application/zip image/jpeg text/css video/mpeg
audio/mpeg image/png text/html video/mp4
audio/x-wav image/tiff text/plain video/quicktime
Validation
I hope it now goes without saying (although I’ll do so anyway) that form data validationis of the utmost importance, due to the possibility of users attempting to hack into yourserver.
In addition to maliciously formed input data, some of the things you also have to checkare whether a file was actually received and, if so, whether the right type of data wassent.
Taking all this into account, Example 7-16, upload2.php, is a rewrite of upload.php.
Example 7-16. A more secure version of upload.php<?php // upload2.php echo <<<_END <html><head><title>PHP Form Upload</title></head><body> <form method='post' action='upload2.php' enctype='multipart/form-data'> Select a JPG, GIF, PNG or TIF File: <input type='file' name='filename' size='10'> <input type='submit' value='Upload'></form>_END;
if ($_FILES) { $name = $_FILES['filename']['name'];
File Handling | 165

switch($_FILES['filename']['type']) { case 'image/jpeg': $ext = 'jpg'; break; case 'image/gif': $ext = 'gif'; break; case 'image/png': $ext = 'png'; break; case 'image/tiff': $ext = 'tif'; break; default: $ext = ''; break; } if ($ext) { $n = "image.$ext"; move_uploaded_file($_FILES['filename']['tmp_name'], $n); echo "Uploaded image '$name' as '$n':<br>"; echo "<img src='$n'>"; } else echo "'$name' is not an accepted image file"; } else echo "No image has been uploaded";
echo "</body></html>";?>
The non-HTML section of code has been expanded from the half-dozen lines ofExample 7-15 to more than 20 lines, starting at if ($_FILES).
As with the previous version, this if line checks whether any data was actually posted,but there is now a matching else near the bottom of the program that echoes a messageto screen when nothing has been uploaded.
Within the if statement, the variable $name is assigned the value of the filename asretrieved from the uploading computer (just as before), but this time we won’t rely onthe user having sent us valid data. Instead, a switch statement is used to check theuploaded content type against the four types of image this program supports. If a matchis made, the variable $ext is set to the three-letter file extension for that type. Shouldno match be found, the file uploaded was not of an accepted type and the variable $extis set to the empty string "".
The next section of code then checks the variable $ext to see whether it contains a stringand, if so, creates a new filename called $n with the base name image and the extensionstored in $ext. This means that the program is in full control over the name of the fileto be created, as it can be only one of image.jpg, image.gif, image.png, or image.tif.
Safe in the knowledge that the program has not been compromised, the rest of the PHPcode is much the same as in the previous version. It moves the uploaded temporaryimage to its new location and then displays it, while also displaying the old and newimage names.
166 | Chapter 7: Practical PHP

Don’t worry about having to delete the temporary file that PHP cre‐ates during the upload process, because if the file has not been movedor renamed, it will be automatically removed when the program exits.
After the if statement there is a matching else, which is executed only if an unsupportedimage type was uploaded, in which case it displays an appropriate error message.
When you write your own file uploading routines, I strongly advise you to use a similarapproach and have pre-chosen names and locations for uploaded files. That way, noattempts to add pathnames and other malicious data to the variables you use can getthrough. If this means that more than one user could end up having a file uploaded withthe same name, you could prefix such files with their user’s name, or save them toindividually created folders for each user.
But if you must use a supplied filename, you should sanitize it by allowing only alpha‐numeric characters and the period, which you can do with the following command,using a regular expression (see Chapter 17) to perform a search and replace on $name:
$name = preg_replace("/[^A-Za-z0-9.]/", "", $name);
This leaves only the characters A–Z, a–z, 0–9, and periods in the string $name, and stripsout everything else.
Even better, to ensure that your program will work on all systems, regardless of whetherthey are case-sensitive or case-insensitive, you should probably use the following com‐mand instead, which changes all uppercase characters to lowercase at the same time:
$name = strtolower(ereg_replace("[^A-Za-z0-9.]", "", $name));
Sometimes you may encounter the media type of image/pjpeg, whichindicates a progressive JPEG, but you can safely add this to your codeas an alias of image/jpeg, like this:
case 'image/pjpeg':case 'image/jpeg': $ext = 'jpg'; break;
System CallsSometimes PHP will not have the function you need to perform a certain action, butthe operating system it is running on may. In such cases, you can use the exec systemcall to do the job.
For example, to quickly view the contents of the current directory, you can use a programsuch as Example 7-17. If you are on a Windows system, it will run as is using the Windows dir command. On Linux, Unix, or Mac OS X, comment out or remove the
System Calls | 167
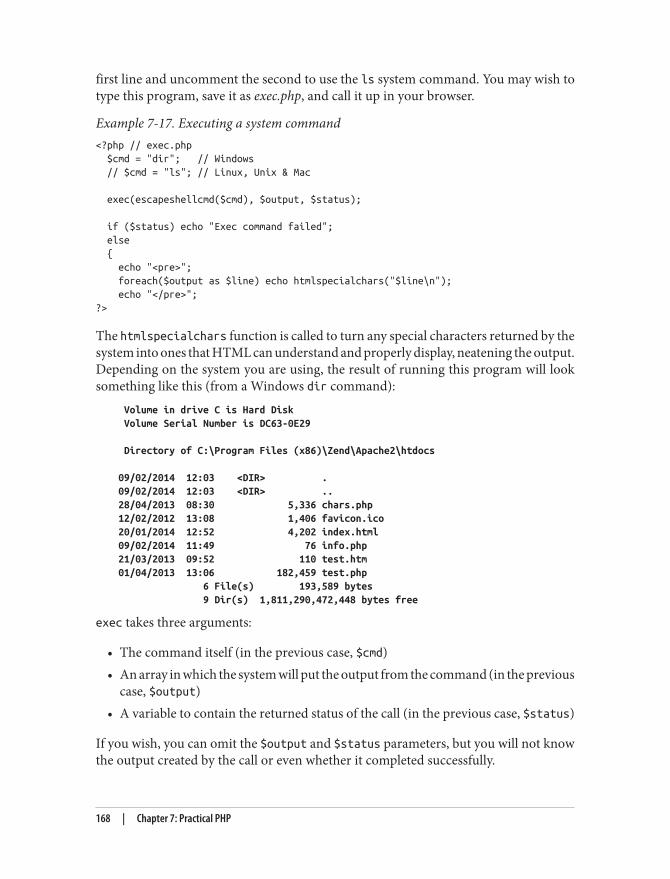
first line and uncomment the second to use the ls system command. You may wish totype this program, save it as exec.php, and call it up in your browser.
Example 7-17. Executing a system command<?php // exec.php $cmd = "dir"; // Windows // $cmd = "ls"; // Linux, Unix & Mac
exec(escapeshellcmd($cmd), $output, $status);
if ($status) echo "Exec command failed"; else { echo "<pre>"; foreach($output as $line) echo htmlspecialchars("$line\n"); echo "</pre>";?>
The htmlspecialchars function is called to turn any special characters returned by thesystem into ones that HTML can understand and properly display, neatening the output.Depending on the system you are using, the result of running this program will looksomething like this (from a Windows dir command):
Volume in drive C is Hard Disk Volume Serial Number is DC63-0E29
Directory of C:\Program Files (x86)\Zend\Apache2\htdocs
09/02/2014 12:03 <DIR> .09/02/2014 12:03 <DIR> ..28/04/2013 08:30 5,336 chars.php12/02/2012 13:08 1,406 favicon.ico20/01/2014 12:52 4,202 index.html09/02/2014 11:49 76 info.php21/03/2013 09:52 110 test.htm01/04/2013 13:06 182,459 test.php 6 File(s) 193,589 bytes 9 Dir(s) 1,811,290,472,448 bytes free
exec takes three arguments:
• The command itself (in the previous case, $cmd)• An array in which the system will put the output from the command (in the previous
case, $output)• A variable to contain the returned status of the call (in the previous case, $status)
If you wish, you can omit the $output and $status parameters, but you will not knowthe output created by the call or even whether it completed successfully.
168 | Chapter 7: Practical PHP

You should also note the use of the escapeshellcmd function. It is a good habit to alwaysuse this when issuing an exec call, because it sanitizes the command string, preventingthe execution of arbitrary commands, should you supply user input to the call.
The system calling functions are typically disabled on shared webhosts, as they pose a security risk. You should always try to solve yourproblems within PHP if you can, and go to the system directly onlyif it is really necessary. Also, going to the system is relatively slowand you need to code two implementations if your application isexpected to run on both Windows and Linux/Unix systems.
XHTML or HTML5?Because XHTML documents need to be well formed, you can parse them using standardXML parsers—unlike HTML, which requires a lenient HTML-specific parser. For thisreason, XHTML never really caught on, and when the time came to devise a new stan‐dard, the World Wide Web Consortium chose to support HTML5 rather than the newerXHTML2 standard.
HTML5 has some of the features of both HTML4 and XHTML, but is much simpler touse and less strict to validate and, happily, there is now just a single document type youneed to place at the head of an HTML5 document (instead of the variety of strict, tran‐sitional, and frameset types previously required), namely:
<!DOCTYPE html>
Just the simple word html is sufficient to tell the browser that your web page is designedfor HTML5 and, because all the latest versions of the most popular browsers have beensupporting most of the HTML5 specification since 2011 or so, this document type isgenerally the only one you need, unless you choose to cater to older browsers.
For all intents and purposes, when writing HTML documents, web developers can safelyignore the old XHTML document types and syntax (such as using <br /> instead of thesimpler <br> tag). But if you find yourself having to cater to a very old browser or anunusual application that relies on XHTML, then you can get more information on howto do that at http://xhtml.com.
Questions1. Which printf conversion specifier would you use to display a floating-point
number?2. What printf statement could be used to take the input string "Happy Birthday"
and output the string "**Happy"?
XHTML or HTML5? | 169

3. To send the output from printf to a variable instead of to a browser, what alternativefunction would you use?
4. How would you create a Unix timestamp for 7:11 a.m. on May 2, 2016?5. Which file access mode would you use with fopen to open a file in write and read
mode, with the file truncated and the file pointer at the start?6. What is the PHP command for deleting the file file.txt?7. Which PHP function is used to read in an entire file in one go, even from across
the Web?8. Which PHP superglobal variable holds the details on uploaded files?9. Which PHP function enables the running of system commands?
10. Which of the following tag styles is preferred in HTML5: <hr> or <hr />?
See “Chapter 7 Answers” on page 643 in Appendix A for the answers to these questions.
170 | Chapter 7: Practical PHP

CHAPTER 8
Introduction to MySQL
With well over 10 million installations, MySQL is probably the most popular databasemanagement system for web servers. Developed in the mid-1990s, it’s now a maturetechnology that powers many of today’s most-visited Internet destinations.
One reason for its success must be the fact that, like PHP, it’s free to use. But it’s alsoextremely powerful and exceptionally fast—it can run on even the most basic of hard‐ware, and it hardly puts a dent in system resources.
MySQL is also highly scalable, which means that it can grow with your website (for thelatest benchmarks, see http://mysql.com/why-mysql/benchmarks).
MySQL BasicsA database is a structured collection of records or data stored in a computer system andorganized in such a way that it can be quickly searched and information can be rapidlyretrieved.
The SQL in MySQL stands for Structured Query Language. This language is looselybased on English and also used in other databases such as Oracle and Microsoft SQLServer. It is designed to allow simple requests from a database via commands such as:
SELECT title FROM publications WHERE author = 'Charles Dickens';
A MySQL database contains one or more tables, each of which contains records orrows. Within these rows are various columns or fields that contain the data itself.Table 8-1 shows the contents of an example database of five publications detailing theauthor, title, type, and year of publication.
171

Table 8-1. Example of a simple databaseAuthor Title Type Year
Mark Twain The Adventures of Tom Sawyer Fiction 1876
Jane Austen Pride and Prejudice Fiction 1811
Charles Darwin The Origin of Species Non-Fiction 1856
Charles Dickens The Old Curiosity Shop Fiction 1841
William Shakespeare Romeo and Juliet Play 1594
Each row in the table is the same as a row in a MySQL table, and each element withina row is the same as a MySQL field.
To uniquely identify this database, I’ll refer to it as the publications database in theexamples that follow. And, as you will have observed, all these publications are consid‐ered to be classics of literature, so I’ll call the table within the database that holds thedetails classics.
Summary of Database TermsThe main terms you need to acquaint yourself with for now are:Database
The overall container for a collection of MySQL data
TableA subcontainer within a database that stores the actual data
RowA single record within a table, which may contain several fields
ColumnThe name of a field within a row
I should note that I’m not trying to reproduce the precise terminology used in academicliterature about relational databases, but just to provide simple, everyday terms to helpyou quickly grasp basic concepts and get started with a database.
Accessing MySQL via the Command LineThere are three main ways in which you can interact with MySQL: using a commandline, via a web interface such as phpMyAdmin, and through a programming languagelike PHP. We’ll start doing the third of these in Chapter 10, but for now, let’s look at thefirst two.
172 | Chapter 8: Introduction to MySQL

Starting the Command-Line InterfaceThe following sections describe relevant instructions for Windows, OS X, and Linux.
Windows users
If you installed the Zend Server Free Edition WAMP (as explained in Chapter 2), youwill be able to access the MySQL executable from one of the following directories (thefirst on 32-bit computers, and the second on 64-bit machines):
C:\Program Files\Zend\MySQL55\binC:\Program Files (x86)\Zend\MySQL55\bin
If you installed Zend Server in a place other than \Program Files (or\Program Files (x86)), you will need to use that directory instead.
By default, the initial MySQL user will be root and will not have had a password set.Seeing as this is a development server that only you should be able to access, we won’tworry about creating one yet.
So, to enter MySQL’s command-line interface, select Start→Run, enter CMD into the Runbox, and press Return. This will call up a Windows Command Prompt. From there,enter one of the following (making any appropriate changes as just discussed):
"C:\Program Files\Zend\MySQL55\bin\mysql" -u root"C:\Program Files (x86)\Zend\MySQL55\bin\mysql" -u root
Note the quotation marks surrounding the path and filename. Theseare present because the name contains spaces, which the CommandPrompt doesn’t correctly interpret, and the quotation marks groupthe parts of the filename into a single string for the command pro‐gram to understand.
This command tells MySQL to log you in as user root, without a password. You will nowbe logged into MySQL and can start entering commands. So, to be sure everything isworking as it should be, enter the following (the results should look similar to the outputshown in Figure 8-1):
SHOW databases;
Accessing MySQL via the Command Line | 173

Figure 8-1. Accessing MySQL from a Windows Command Prompt
If this has not worked and you get an error, make sure that you have correctly installedMySQL along with Zend Server (as described in Chapter 2). Otherwise, you are readyto move on to the next section, “Using the Command-Line Interface” on page 177.
OS X users
To proceed with this chapter, you should have installed Zend Server as detailed inChapter 2. You should also have the web server already running and the MySQL serverstarted.
To enter the MySQL command-line interface, start the Terminal program (which shouldbe available in Finder→Utilities). Then call up the MySQL program, which will havebeen installed in the directory /usr/local/zend/mysql/bin.
By default, the initial MySQL user is root, and it will have a password of root too. So, tostart the program, type the following:
/usr/local/zend/mysql/bin/mysql -u root
This command tells MySQL to log you in as user root and not to request your password.To verify that all is well, type the following (the result should look like the output shownin Figure 8-2):
SHOW databases;
174 | Chapter 8: Introduction to MySQL

Figure 8-2. Accessing MySQL from the OS X Terminal program
If you receive an error such as Can't connect to local MySQL server throughsocket, you haven’t started up the MySQL server, so make sure you followed the advicein Chapter 2 about configuring MySQL to start when OS X starts.
You should now be ready to move on to the next section, “Using the Command-LineInterface” on page 177.
Linux users
On a system running a Unix-like operating system such as Linux, you will almost cer‐tainly already have PHP and MySQL installed and running, and you will be able to enterthe examples in the next section. But first you should type the following to log into yourMySQL system:
mysql -u root -p
This tells MySQL to log you in as the user root and to request your password. If youhave a password, enter it; otherwise, just press Return.
Once you are logged in, type the following to test the program (you should see somethinglike Figure 8-3 in response):
SHOW databases;
Accessing MySQL via the Command Line | 175

Figure 8-3. Accessing MySQL using Linux
If this procedure fails at any point, refer to the section “Installing a LAMP on Linux”on page 38 in Chapter 2 to ensure that you have MySQL properly installed. Otherwise,you should now be ready to move on to the next section, “Using the Command-LineInterface” on page 177.
MySQL on a remote server
If you are accessing MySQL on a remote server, you should Telnet (or preferably, forsecurity, use SSH) into the remote machine, which will probably be a Linux/FreeBSD/Unix type of box. Once in there, you might find that things are a little different, de‐pending on how the system administrator has set the server up, especially if it’s a sharedhosting server. Therefore, you need to ensure that you have been given access to MySQLand that you have your username and password. Armed with these, you can then typethe following, where username is the name supplied:
mysql -u username -p
Enter your password when prompted. You can then try the following command, whichshould result in something like Figure 8-3:
SHOW databases;
There may be other databases already created, and the test database may not be there.
Bear in mind also that system administrators have ultimate control over everything andthat you can encounter some unexpected setups. For example, you may find that youare required to preface all database names that you create with a unique identifyingstring to ensure that you do not conflict with databases created by other users.
176 | Chapter 8: Introduction to MySQL

Therefore, if you have any problems, talk with your system administrator, who will getyou sorted out. Just let the sysadmin know that you need a username and password.You should also ask for the ability to create new databases or, at a minimum, to have atleast one database created for you ready to use. You can then create all the tables yourequire within that database.
Using the Command-Line InterfaceFrom here on out, it makes no difference whether you are using Windows, Mac OS X,or Linux to access MySQL directly, as all the commands used (and errors you mayreceive) are identical.
The semicolon
Let’s start with the basics. Did you notice the semicolon (;) at the end of the SHOWdatabases; command that you typed? The semicolon is used by MySQL to separate orend commands. If you forget to enter it, MySQL will issue a prompt and wait for youto do so. The required semicolon was made part of the syntax to let you enter multiple-line commands, which can be convenient because some commands get quite long. Italso allows you to issue more than one command at a time by placing a semicolon aftereach one. The interpreter gets them all in a batch when you press the Enter (or Return)key and executes them in order.
It’s very common to receive a MySQL prompt instead of the resultsof your command; it means that you forgot the final semicolon. Justenter the semicolon and press the Enter key, to get what you want.
There are six different prompts that MySQL may present you with (see Table 8-2), soyou will always know where you are during a multiline input.
Table 8-2. MySQL’s six command promptsMySQL prompt Meaning
mysql> Ready and waiting for a command
-> Waiting for the next line of a command
'> Waiting for the next line of a string started with a single quote
"> Waiting for the next line of a string started with a double quote
`> Waiting for the next line of a string started with a backtick
/*> Waiting for the next line of a comment started with /*
Accessing MySQL via the Command Line | 177

Canceling a command
If you are partway through entering a command and decide you don’t wish to executeit after all, whatever you do don’t press Control-C! That will close the program. Instead,you can enter \c and press Return. Example 8-1 shows how to use it.
Example 8-1. Canceling a line of inputmeaningless gibberish to mysql \c
When you enter that line, MySQL will ignore everything you typed and issue a newprompt. Without the \c, it would have displayed an error message. Be careful, though:if you have opened a string or comment, close it first before using the \c or MySQL willthink the \c is just part of the string. Example 8-2 shows the right way to do this.
Example 8-2. Canceling input from inside a stringthis is "meaningless gibberish to mysql" \c
Also note that using \c after a semicolon will not work, as it is then a new statement.
MySQL CommandsYou’ve already seen the SHOW command, which lists tables, databases, and many otheritems. The commands you’ll probably use most often are listed in Table 8-3.
Table 8-3. A selection of common MySQL commandsCommand Action
ALTER Alter a database or table
BACKUP Backup a table
\c Cancel input
CREATE Create a database
DELETE Delete a row from a table
DESCRIBE Describe a table’s columns
DROP Delete a database or table
EXIT (CTRL-C) Exit
GRANT Change user privileges
HELP (\h, \?) Display help
INSERT Insert data
LOCK Lock table(s)
QUIT (\q) Same as EXIT
RENAME Rename a table
SHOW List details about an object
SOURCE Execute a file
178 | Chapter 8: Introduction to MySQL

Command Action
STATUS (\s) Display the current status
TRUNCATE Empty a table
UNLOCK Unlock table(s)
UPDATE Update an existing record
USE Use a database
I’ll cover most of these as we proceed, but first, you need to remember a couple of pointsabout MySQL commands:
• SQL commands and keywords are case-insensitive. CREATE, create, and CrEaTe allmean the same thing. However, for the sake of clarity, the recommended style is touse uppercase.
• Table names are case-sensitive on Linux and OS X, but case-insensitive on Win‐dows. So for portability purposes, you should always choose a case and stick to it.The recommended style is to use lowercase for tables.
Creating a database
If you are working on a remote server and have only a single user account and accessto a single database that was created for you, move on to the section “Creating a table”on page 181. Otherwise, get the ball rolling by issuing the following command to create anew database called publications:
CREATE DATABASE publications;
A successful command will return a message that doesn’t mean much yet—Query OK,
1 row affected (0.00 sec)—but will make sense soon. Now that you’ve created thedatabase, you want to work with it, so issue:
USE publications;
You should now see the message Database changed and will then be set to proceed withthe following examples.
Creating users
Now that you’ve seen how easy it is to use MySQL, and created your first database, it’stime to look at how you create users, as you probably won’t want to grant your PHPscripts root access to MySQL; it could cause a real headache should you get hacked.
To create a user, issue the GRANT command, which takes the following form (don’t typethis in; it’s not an actual working command):
GRANT PRIVILEGES ON database.object TO 'username'@'hostname' IDENTIFIED BY 'password';
Accessing MySQL via the Command Line | 179

All this should be pretty straightforward, with the possible exception of the database.object part, which refers to the database itself and the objects it contains, suchas tables (see Table 8-4).
Table 8-4. Example parameters for the GRANT commandArguments Meaning
*.* All databases and all their objects
database.* Only the database called database and all its objects
database.object Only the database called database and its object called object
So let’s create a user who can access just the new publications database and all its objects,by entering the following (replacing the username jim and the password mypasswd withones of your choosing):
GRANT ALL ON publications.* TO 'jim'@'localhost' IDENTIFIED BY 'mypasswd';
What this does is allow the user jim@localhost full access to the publications databaseusing the password mypasswd. You can test whether this step has worked by enteringquit to exit and then rerunning MySQL the way you did before, but instead of entering-u root -p, type -u jim -p, or whatever username you created. See Table 8-5 for thecorrect command for your operating system. Modify it as necessary if the mysql clientprogram is installed in a different directory on your system.
Table 8-5. Starting MySQL and logging in as jim@localhostOS Example command
Windows "C:\Program Files\Zend\MySQL55\bin\mysql" -u jim -p
Mac OS X /Applications/MAMP/Library/bin/mysql -u jim -p
Linux mysql -u jim –p
All you have to do now is enter your password when prompted and you will be loggedin. By the way, if you prefer, you can place your password immediately following the -p(without any spaces) to avoid having to enter it when prompted. But this is considereda poor practice, because if other people are logged into your system, there may be waysfor them to look at the command you entered and find out your password.
180 | Chapter 8: Introduction to MySQL

You can grant only privileges that you already have, and you must alsohave the privilege to issue GRANT commands. There is a whole rangeof privileges you can choose to grant if you are not granting all priv‐ileges. For further details, visit http://tinyurl.com/mysqlgrant, whichalso covers the REVOKE command, which can remove privileges oncegranted.Also be aware that if you create a new user but do not specify anIDENTIFIED BY clause, the user will have no password, a situation thatis very insecure and should be avoided.
Creating a table
At this point, you should now be logged into MySQL with ALL privileges granted for thedatabase publications (or a database that was created for you), so you’re ready to createyour first table. Make sure the correct database is in use by typing the following (re‐placing publications with the name of your database if it is different):
USE publications;
Now enter the commands in Example 8-3 one line at a time.
Example 8-3. Creating a table called classicsCREATE TABLE classics ( author VARCHAR(128), title VARCHAR(128), type VARCHAR(16), year CHAR(4)) ENGINE MyISAM;
You could also issue this command on a single line like this:CREATE TABLE classics (author VARCHAR(128), title VARCHAR(128), type VARCHAR(16), year CHAR(4)) ENGINE MyISAM;
but MySQL commands can be long and complicated, so I recom‐mend one line per instruction until you are comfortable with longerlines.
MySQL should then issue the response Query OK, 0 rows affected, along with howlong it took to execute the command. If you see an error message instead, check yoursyntax carefully. Every parenthesis and comma counts, and typing errors are easy tomake. In case you are wondering, the ENGINE MyISAM tells MySQL the type of databaseengine to use for this table.
To check whether your new table has been created, type:DESCRIBE classics;
Accessing MySQL via the Command Line | 181

All being well, you will see the sequence of commands and responses shown inExample 8-4, where you should particularly note the table format displayed.
Example 8-4. A MySQL session: creating and checking a new tablemysql> USE publications;Database changedmysql> CREATE TABLE classics ( -> author VARCHAR(128), -> title VARCHAR(128), -> type VARCHAR(16), -> year CHAR(4)) ENGINE MyISAM;Query OK, 0 rows affected (0.03 sec)
mysql> DESCRIBE classics;+--------+--------------+------+-----+---------+-------+| Field | Type | Null | Key | Default | Extra |+--------+--------------+------+-----+---------+-------+| author | varchar(128) | YES | | NULL | || title | varchar(128) | YES | | NULL | || type | varchar(16) | YES | | NULL | || year | char(4) | YES | | NULL | |+--------+--------------+------+-----+---------+-------+4 rows in set (0.00 sec)
The DESCRIBE command is an invaluable debugging aid when you need to ensure thatyou have correctly created a MySQL table. You can also use it to remind yourself abouta table’s field or column names and the types of data in each one. Let’s look at each ofthe headings in detail:Field
The name of each field or column within a table.
Type
The type of data being stored in the field.
Null
Whether a field is allowed to contain a value of NULL.
Key
MySQL supports keys or indexes, which are quick ways to look up and search fordata. The Key heading shows what type of key (if any) has been applied.
Default
The default value that will be assigned to the field if no value is specified when anew row is created.
Extra
Additional information, such as whether a field is set to auto-increment.
182 | Chapter 8: Introduction to MySQL

Data TypesIn Example 8-3, you may have noticed that three of the table’s fields were given the datatype of VARCHAR, and one was given the type CHAR. The term VARCHAR stands for VARiablelength CHARacter string, and the command takes a numeric value that tells MySQL themaximum length allowed for a string stored in this field.
This data type is very useful, as MySQL can then plan the size of databases and performlookups and searches more easily. The downside is that if you ever attempt to assign astring value longer than the length allowed, it will be truncated to the maximum lengthdeclared in the table definition.
The year field, however, has more predictable values, so instead of VARCHAR we use themore efficient CHAR(4) data type. The parameter of 4 allows for four bytes of data,supporting all years from −999 to 9999; a byte comprises 8 bits and can have the values00000000 through 11111111, which are 0 to 255 in decimal.
You could, of course, just store two-digit values for the year, but if your data is going tostill be needed in the following century, or may otherwise wrap around, it will have tobe sanitized first—much like the “millennium bug” that would have caused dates be‐ginning on January 1, 2000, to be treated as 1900 on many of the world’s biggest com‐puter installations.
The reason I didn’t use the YEAR data type in the classics table is becauseit supports only the year 0000, and years 1901 through 2155. This isbecause MySQL stores the year in a single byte for reasons of effi‐ciency, but it also means that only 256 years are available, and thepublication years of the titles in the classics table are well before this.
Both CHAR and VARCHAR accept text strings and impose a limit on the size of the field.The difference is that every string in a CHAR field has the specified size. If you put in asmaller string, it is padded with spaces. A VARCHAR field does not pad the text; it lets thesize of the field vary to fit the text that is inserted. But VARCHAR requires a small amountof overhead to keep track of the size of each value. So CHAR is slightly more efficient ifthe sizes are similar in all records, whereas VARCHAR is more efficient if sizes can vary alot and get large. In addition, the overhead causes access to VARCHAR data to be slightlyslower than to CHAR data.
The CHAR data type
Table 8-6 lists the CHAR data types. All these types offer a parameter that sets the maxi‐mum (or exact) length of the string allowed in the field. As the table shows, each typehas a built-in maximum number of bytes it can occupy.
Accessing MySQL via the Command Line | 183

Table 8-6. MySQL’s CHAR data typesData type Bytes used Examples
CHAR(n) exactly n (< 256) CHAR(5) “Hello” uses 5 bytesCHAR(57) “Goodbye” uses 57 bytes
VARCHAR(n) up to n (< 65,536) VARCHAR(7) “Morning” uses 7 bytesVARCHAR(100) “Night” uses 5 bytes
The BINARY data type
The BINARY data type is used for storing strings of full bytes that do not have an associatedcharacter set. For example, you might use the BINARY data type to store a GIF image (seeTable 8-7).
Table 8-7. MySQL’s BINARY data typesData type Bytes used Examples
BINARY(n) or BYTE(n) exactly n (< 256) As CHAR but contains binary data
VARBINARY(n) up to n (< 65,536) As VARCHAR but for binary data
The TEXT and VARCHAR data types
The differences between TEXT and VARCHAR are small:
• Prior to version 5.0.3, MySQL would remove leading and trailing spaces fromVARCHAR fields.
• TEXT fields cannot have default values.• MySQL indexes only the first n characters of a TEXT column (you specify n when
you create the index).
What this means is that VARCHAR is the better and faster data type to use if you need tosearch the entire contents of a field. If you will never search more than a certain numberof leading characters in a field, you should probably use a TEXT data type (see Table 8-8).
Table 8-8. MySQL’s TEXT data typesData type Bytes used Attributes
TINYTEXT(n) up to n (< 256) Treated as a string with a character set
TEXT(n) up to n (< 65,536) Treated as a string with a character set
MEDIUMTEXT(n) up to n (< 1.67e+7) Treated as a string with a character set
LONGTEXT(n) up to n (< 4.29e+9) Treated as a string with a character set
The BLOB data type
The term BLOB stands for Binary Large OBject and therefore, as you would think, theBLOB data type is most useful for binary data in excess of 65,536 bytes in size. The main
184 | Chapter 8: Introduction to MySQL

other difference between the BLOB and BINARY data types is that BLOBs cannot havedefault values (see Table 8-9).
Table 8-9. MySQL’s BLOB data typesData type Bytes used Attributes
TINYBLOB(n) up to n (< 256) Treated as binary data—no character set
BLOB(n) up to n (<= 65,536) Treated as binary data—no character set
MEDIUMBLOB(n) up to n (< 1.67e+7) Treated as binary data—no character set
LONGBLOB(n) up to n (< 4.29e+9) Treated as binary data—no character set
Numeric data types
MySQL supports various numeric data types from a single byte up to double-precisionfloating-point numbers. Although the most memory that a numeric field can use up is8 bytes, you are well advised to choose the smallest data type that will adequately handlethe largest value you expect. Your databases will be small and quickly accessible.
Table 8-10 lists the numeric data types supported by MySQL and the ranges of valuesthey can contain. In case you are not acquainted with the terms, a signed number is onewith a possible range from a minus value, through 0, to a positive one, and an unsignedone has a value ranging from 0 to a positive one. They can both hold the same numberof values; just picture a signed number as being shifted halfway to the left so that halfits values are negative and half are positive. Note that floating-point values (of anyprecision) may only be signed.
Table 8-10. MySQL’s numeric data typesData type Bytes
usedMinimum value Maximum value
Signed Unsigned Signed Unsigned
TINYINT 1 −128 0 127 255
SMALLINT 2 −32,768 0 32,767 65,535
MEDIUMINT 3 −8.38e+6 0 8.38e+6 1.67e+7
INT or INTEGER 4 −2.15e+9 0 2.15e+9 4.29e+9
BIGINT 8 −9.22e+18 0 9.22e+18 1.84e+19
FLOAT 4 −3.40e+38 n/a 3.40e+38 n/a
DOUBLE or REAL 8 −1.80e+308 n/a 1.80e+308 n/a
To specify whether a data type is signed or unsigned, use the UNSIGNED qualifier. Thefollowing example creates a table called tablename with a field in it called fieldname ofthe data type UNSIGNED INTEGER:
CREATE TABLE tablename (fieldname INT UNSIGNED);
Accessing MySQL via the Command Line | 185

When creating a numeric field, you can also pass an optional number as a parameter,like this:
CREATE TABLE tablename (fieldname INT(4));
But you must remember that, unlike BINARY and CHAR data types, this parameter doesnot indicate the number of bytes of storage to use. It may seem counterintuitive, butwhat the number actually represents is the display width of the data in the field when itis retrieved. It is commonly used with the ZEROFILL qualifier like this:
CREATE TABLE tablename (fieldname INT(4) ZEROFILL);
What this does is cause any numbers with a width of less than four characters to bepadded with one or more zeros, sufficient to make the display width of the field fourcharacters long. When a field is already of the specified width or greater, no paddingtakes place.
DATE and TIME
The main remaining data types supported by MySQL relate to the date and time and can be seen in Table 8-11.
Table 8-11. MySQL’s DATE and TIME data typesData type Time/date format
DATETIME '0000-00-00 00:00:00'
DATE '0000-00-00'
TIMESTAMP '0000-00-00 00:00:00'
TIME '00:00:00'
YEAR 0000 (Only years 0000 and 1901–2155)
The DATETIME and TIMESTAMP data types display the same way. The main difference isthat TIMESTAMP has a very narrow range (from the years 1970 through 2037), whereasDATETIME will hold just about any date you’re likely to specify, unless you’re interestedin ancient history or science fiction.
TIMESTAMP is useful, however, because you can let MySQL set the value for you. If youdon’t specify the value when adding a row, the current time is automatically inserted.You can also have MySQL update a TIMESTAMP column each time you change a row.
The AUTO_INCREMENT data type
Sometimes you need to ensure that every row in your database is guaranteed to beunique. You could do this in your program by carefully checking the data you enter andmaking sure that there is at least one value that differs in any two rows, but this approachis error-prone and works only in certain circumstances. In the classics table, for instance,an author may appear multiple times. Likewise, the year of publication will also be
186 | Chapter 8: Introduction to MySQL

frequently duplicated, and so on. It would be hard to guarantee that you have no du‐plicate rows.
The general solution is to use an extra column just for this purpose. In a while, we’lllook at using a publication’s ISBN (International Standard Book Number), but first I’dlike to introduce the AUTO_INCREMENT data type.
As its name implies, a column given this data type will set the value of its contents tothat of the column entry in the previously inserted row, plus 1. Example 8-5 shows howto add a new column called id to the table classics with auto-incrementing.
Example 8-5. Adding the auto-incrementing column idALTER TABLE classics ADD id INT UNSIGNED NOT NULL AUTO_INCREMENT KEY;
This is your introduction to the ALTER command, which is very similar to the CREATEcommand. ALTER operates on an existing table, and can add, change, or delete columns.Our example adds a column named id with the following characteristics:INT UNSIGNED
Makes the column take an integer large enough for you to store more than 4 billionrecords in the table.
NOT NULL
Ensures that every column has a value. Many programmers use NULL in a field toindicate that the field doesn’t have any value. But that would allow duplicates, whichwould violate the whole reason for this column’s existence. So we disallow NULLvalues.
AUTO_INCREMENT
Causes MySQL to set a unique value for this column in every row, as describedearlier. We don’t really have control over the value that this column will take in eachrow, but we don’t care: all we care about is that we are guaranteed a unique value.
KEY
An auto-increment column is useful as a key, because you will tend to search forrows based on this column, as explained in the section “Indexes” on page 192.
Each entry in the column id will now have a unique number, with the first starting at 1and the others counting upward from there. And whenever a new row is inserted, its idcolumn will automatically be given the next number in sequence.
Rather than applying the column retroactively, you could have included it by issuingthe CREATE command in slightly different format. In that case, the command inExample 8-3 would be replaced with Example 8-6. Check the final line in particular.
Accessing MySQL via the Command Line | 187

Example 8-6. Adding the auto-incrementing id column at table creationCREATE TABLE classics ( author VARCHAR(128), title VARCHAR(128), type VARCHAR(16), year CHAR(4), id INT UNSIGNED NOT NULL AUTO_INCREMENT KEY) ENGINE MyISAM;
If you wish to check whether the column has been added, use the following commandto view the table’s columns and data types:
DESCRIBE classics;
Now that we’ve finished with it, the id column is no longer needed, so if you created itusing Example 8-5, you should now remove the column using the command inExample 8-7.
Example 8-7. Removing the id columnALTER TABLE classics DROP id;
Adding data to a table
To add data to a table, use the INSERT command. Let’s see this in action by populatingthe table classics with the data from Table 8-1, using one form of the INSERT commandrepeatedly (Example 8-8).
Example 8-8. Populating the classics tableINSERT INTO classics(author, title, type, year) VALUES('Mark Twain','The Adventures of Tom Sawyer','Fiction','1876');INSERT INTO classics(author, title, type, year) VALUES('Jane Austen','Pride and Prejudice','Fiction','1811');INSERT INTO classics(author, title, type, year) VALUES('Charles Darwin','The Origin of Species','Non-Fiction','1856');INSERT INTO classics(author, title, type, year) VALUES('Charles Dickens','The Old Curiosity Shop','Fiction','1841');INSERT INTO classics(author, title, type, year) VALUES('William Shakespeare','Romeo and Juliet','Play','1594');
After every second line, you should see a Query OK message. Once all lines have beenentered, type the following command, which will display the table’s contents (the resultshould look like Figure 8-4):
SELECT * FROM classics;
Don’t worry about the SELECT command for now—we’ll come to it in the section“Querying a MySQL Database” on page 198. Suffice it to say that, as typed, it will displayall the data you just entered.
188 | Chapter 8: Introduction to MySQL

Figure 8-4. Populating the classics table and viewing its contents
Let’s go back and look at how we used the INSERT command. The first part, INSERT INTOclassics, tells MySQL where to insert the following data. Then, within parentheses,the four column names are listed—author, title, type, and year—all separated by com‐mas. This tells MySQL that these are the fields into which the data is to be inserted.
The second line of each INSERT command contains the keyword VALUES followed byfour strings within parentheses, and separated by commas. This supplies MySQL withthe four values to be inserted into the four columns previously specified. (As always,my choice of where to break the lines was arbitrary.)
Each item of data will be inserted into the corresponding column, in a one-to-one cor‐respondence. If you accidentally listed the columns in a different order from the data,the data would go into the wrong columns. And the number of columns must matchthe number of data items.
Renaming a table
Renaming a table, like any other change to the structure or meta information about atable, is achieved via the ALTER command. So, for example, to change the name of tableclassics to pre1900, use the following command:
ALTER TABLE classics RENAME pre1900;
If you tried that command, you should revert the table name by entering the following,so that later examples in this chapter will work as printed:
ALTER TABLE pre1900 RENAME classics;
Accessing MySQL via the Command Line | 189

Changing the data type of a column
Changing a column’s data type also makes use of the ALTER command, this time inconjunction with the MODIFY keyword. So to change the data type of column year fromCHAR(4) to SMALLINT (which requires only two bytes of storage and so will save diskspace), enter the following:
ALTER TABLE classics MODIFY year SMALLINT;
When you do this, if the conversion of data type makes sense to MySQL, it will auto‐matically change the data while keeping the meaning. In this case, it will change eachstring to a comparable integer, and so on, as the string is recognizable as referring to aninteger.
Adding a new column
Let’s suppose that you have created a table and populated it with plenty of data, only todiscover you need an additional column. Not to worry. Here’s how to add the newcolumn pages, which will be used to store the number of pages in a publication:
ALTER TABLE classics ADD pages SMALLINT UNSIGNED;
This adds the new column with the name pages using the UNSIGNED SMALLINT data type,sufficient to hold a value of up to 65,535—hopefully that’s more than enough for anybook ever published!
And, if you ask MySQL to describe the updated table using the DESCRIBE command, asfollows, you will see the change has been made (see Figure 8-5):
DESCRIBE classics;
Figure 8-5. Adding the new pages column and viewing the table
190 | Chapter 8: Introduction to MySQL

Renaming a column
Looking again at Figure 8-5, you may decide that having a column named type can beconfusing, because that is the name used by MySQL to identify data types. Again, noproblem—let’s change its name to category, like this:
ALTER TABLE classics CHANGE type category VARCHAR(16);
Note the addition of VARCHAR(16) on the end of this command. That’s because theCHANGE keyword requires the data type to be specified, even if you don’t intend to changeit, and VARCHAR(16) was the data type specified when that column was initially createdas type.
Removing a column
Actually, upon reflection, you might decide that the page count column pages isn’t ac‐tually all that useful for this particular database, so here’s how to remove that column using the DROP keyword:
ALTER TABLE classics DROP pages;
Remember that DROP is irreversible and you should always use it withcaution, because you could inadvertently delete entire tables (andeven databases) with it if you are not careful!
Deleting a table
Deleting a table is very easy indeed. But, because I don’t want you to have to reenter allthe data for the classics table, let’s quickly create a new table, verify its existence, andthen delete it by typing the commands in Example 8-9. The result of these four com‐mands should look like Figure 8-6.
Example 8-9. Creating, viewing, and deleting a tableCREATE TABLE disposable(trash INT);DESCRIBE disposable;DROP TABLE disposable;SHOW tables;
Accessing MySQL via the Command Line | 191

Figure 8-6. Creating, viewing, and deleting a table
IndexesAs things stand, the table classics works and can be searched without problem byMySQL—until it grows to more than a couple of hundred rows, that is. At that point,database accesses will get slower and slower with every new row added, because MySQLhas to search through every row whenever a query is issued. This is like searchingthrough every book in a library whenever you need to look something up.
Of course, you don’t have to search libraries that way, because they have either a cardindex system or, most likely, a database of their own. And the same goes for MySQL,because at the expense of a slight overhead in memory and disk space, you can create a“card index” for a table that MySQL will use to conduct lightning-fast searches.
Creating an IndexThe way to achieve fast searches is to add an index, either when creating a table or atany time afterward. But the decision is not so simple. For example, there are differentindex types such as a regular INDEX, PRIMARY KEY, and FULLTEXT. Also, you must decidewhich columns require an index, a judgment that requires you to predict whether youwill be searching any of the data in that column. Indexes can also get complicated,because you can combine multiple columns in one index. And even when you’ve decidedthat, you still have the option of reducing index size by limiting the amount of eachcolumn to be indexed.
192 | Chapter 8: Introduction to MySQL

If we imagine the searches that may be made on the classics table, it becomes apparentthat all of the columns may need to be searched. However, if the pages column createdin the section “Adding a new column” on page 190 had not been deleted, it would prob‐ably not have needed an index, as most people would be unlikely to search for books bythe number of pages they have. Anyway, go ahead and add an index to each of thecolumns, using the commands in Example 8-10.
Example 8-10. Adding indexes to the classics tableALTER TABLE classics ADD INDEX(author(20));ALTER TABLE classics ADD INDEX(title(20));ALTER TABLE classics ADD INDEX(category(4));ALTER TABLE classics ADD INDEX(year);DESCRIBE classics;
The first two commands create indexes on both the author and title columns, limitingeach index to only the first 20 characters. For instance, when MySQL indexes the fol‐lowing title:
The Adventures of Tom Sawyer
It will actually store in the index only the first 20 characters:The Adventures of To
This is done to minimize the size of the index, and to optimize database access speed.I chose 20 because it’s likely to be sufficient to ensure uniqueness for most strings inthese columns. If MySQL finds two indexes with the same contents, it will have to wastetime going to the table itself and checking the column that was indexed to find out whichrows really matched.
With the category column, currently only the first character is required to identify astring as unique (F for Fiction, N for Non-Fiction, and P for Play), but I chose an indexof four characters to allow for future category types that may be unique only after fourcharacters. You can also re-index this column later, when you have a more complete setof categories. And finally, I set no limit to the year column’s index, because it’s an integer,not a string.
The results of issuing these commands (and a DESCRIBE command to confirm that theyworked) can be seen in Figure 8-7, which shows the key MUL for each column. This keymeans that multiple occurrences of a value may occur within that column, which isexactly what we want, as authors may appear many times, the same book title could beused by multiple authors, and so on.
Indexes | 193

Figure 8-7. Adding indexes to the classics table
Using CREATE INDEX
An alternative to using ALTER TABLE to add an index is to use the CREATE INDEX com‐mand. They are equivalent, except that CREATE INDEX cannot be used to create a PRIMARYKEY (see the section “Primary keys” on page 195). The format of this command is shownin the second line of Example 8-11.
Example 8-11. These two commands are equivalentALTER TABLE classics ADD INDEX(author(20));CREATE INDEX author ON classics (author(20));
Adding indexes when creating tables
You don’t have to wait until after creating a table to add indexes. In fact, doing so canbe time consuming, as adding an index to a large table can take a very long time. There‐fore, let’s look at a command that creates the table classics with indexes already in place.
Example 8-12 is a reworking of Example 8-3 in which the indexes are created at thesame time as the table. Note that to incorporate the modifications made in this chapter,this version uses the new column name category instead of type and sets the data typeof year to SMALLINT instead of CHAR(4). If you want to try it out without first deletingyour current classics table, change the word classics in line 1 to something else likeclassics1, then drop classics1 after you have finished with it.
Example 8-12. Creating the table classics with indexesCREATE TABLE classics ( author VARCHAR(128), title VARCHAR(128), category VARCHAR(16), year SMALLINT,
194 | Chapter 8: Introduction to MySQL

INDEX(author(20)), INDEX(title(20)), INDEX(category(4)), INDEX(year)) ENGINE MyISAM;
Primary keys
So far, you’ve created the table classics and ensured that MySQL can search it quicklyby adding indexes, but there’s still something missing. All the publications in the tablecan be searched, but there is no single unique key for each publication to enable instantaccessing of a row. The importance of having a key with a unique value for each rowwill come up when we start to combine data from different tables.
The section “The AUTO_INCREMENT data type” on page 186 briefly introduced theidea of a primary key when creating the auto-incrementing column id, which couldhave been used as a primary key for this table. However, I wanted to reserve that taskfor a more appropriate column: the internationally recognized ISBN number.
So let’s go ahead and create a new column for this key. Now, bearing in mind that ISBNsare 13 characters long, you might think that the following command would do the job:
ALTER TABLE classics ADD isbn CHAR(13) PRIMARY KEY;
But it doesn’t. If you try it, you’ll get the error Duplicate entry for key 1. The reasonis that the table is already populated with some data and this command is trying to adda column with the value NULL to each row, which is not allowed, as all values must beunique in any column having a primary key index. However, if there were no data alreadyin the table, this command would work just fine, as would adding the primary key indexupon table creation.
In our current situation, we have to be a bit sneaky and create the new column withoutan index, populate it with data, and then add the index retrospectively using the com‐mands in Example 8-13. Luckily, each of the years is unique in the current set of data,so we can use the year column to identify each row for updating. Note that this exampleuses the UPDATE and WHERE keywords, which are explained in more detail in the section“Querying a MySQL Database” on page 198.
Example 8-13. Populating the isbn column with data and using a primary keyALTER TABLE classics ADD isbn CHAR(13);UPDATE classics SET isbn='9781598184891' WHERE year='1876';UPDATE classics SET isbn='9780582506206' WHERE year='1811';UPDATE classics SET isbn='9780517123201' WHERE year='1856';UPDATE classics SET isbn='9780099533474' WHERE year='1841';UPDATE classics SET isbn='9780192814968' WHERE year='1594';ALTER TABLE classics ADD PRIMARY KEY(isbn);DESCRIBE classics;
Indexes | 195

Once you have typed these commands, the results should look like Figure 8-8. Note thatthe keywords PRIMARY KEY replace the keyword INDEX in the ALTER TABLE syntax(compare Examples 8-10 and 8-13).
Figure 8-8. Retrospectively adding a primary key to the classics table
To have created a primary key when the table classics was created, you could have usedthe commands in Example 8-14. Again, rename classics in line 1 to something else ifyou wish to try this example for yourself, and then delete the test table afterward.
Example 8-14. Creating the table classics with a primary keyCREATE TABLE classics ( author VARCHAR(128), title VARCHAR(128), category VARCHAR(16), year SMALLINT, isbn CHAR(13), INDEX(author(20)), INDEX(title(20)), INDEX(category(4)), INDEX(year), PRIMARY KEY (isbn)) ENGINE MyISAM;
Creating a FULLTEXT index
Unlike a regular index, MySQL’s FULLTEXT allows super-fast searches of entire columnsof text. It stores every word in every data string in a special index that you can searchusing “natural language,” in a similar manner to using a search engine.
196 | Chapter 8: Introduction to MySQL

Actually, it’s not strictly true that MySQL stores all the words in aFULLTEXT index, because it has a built-in list of more than 500 wordsthat it chooses to ignore because they are so common that they aren’tvery helpful for searching anyway. This list, called stopwords, in‐cludes the, as, is, of, and so on. The list helps MySQL run much morequickly when performing a FULLTEXT search and keeps database sizesdown. Appendix C contains the full list of stopwords.
Here are some things that you should know about FULLTEXT indexes:
• FULLTEXT indexes can be used only with MyISAM tables, the type used by MySQL’sdefault storage engine (MySQL supports at least 10 different storage engines). Ifyou need to convert a table to MyISAM, you can usually use the MySQL commandALTER TABLE tablename ENGINE = MyISAM;.
• FULLTEXT indexes can be created for CHAR, VARCHAR, and TEXT columns only.• A FULLTEXT index definition can be given in the CREATE TABLE statement when a
table is created, or added later using ALTER TABLE (or CREATE INDEX).• For large data sets, it is much faster to load your data into a table that has no FULLTEXT
index and then create the index than to load data into a table that has an existingFULLTEXT index.
To create a FULLTEXT index, apply it to one or more records as in Example 8-15, whichadds a FULLTEXT index to the pair of columns author and title in the table classics (thisindex is in addition to the ones already created and does not affect them).
Example 8-15. Adding a FULLTEXT index to the table classicsALTER TABLE classics ADD FULLTEXT(author,title);
You can now perform FULLTEXT searches across this pair of columns. This feature couldreally come into its own if you could now add the entire text of these publications tothe database (particularly as they’re out of copyright protection) and they would be fullysearchable. See the section “MATCH ... AGAINST” on page 202 for a description of searches using FULLTEXT.
If you find that MySQL is running slower than you think it should bewhen accessing your database, the problem is usually related to yourindexes. Either you don’t have an index where you need one, or theindexes are not optimally designed. Tweaking a table’s indexes willoften solve such a problem. Performance is beyond the scope of thisbook, but in Chapter 9 I give you a few tips so you know what to lookfor.
Indexes | 197

Querying a MySQL DatabaseSo far, we’ve created a MySQL database and tables, populated them with data, and addedindexes to make them fast to search. Now it’s time to look at how these searches areperformed, and the various commands and qualifiers available.
SELECT
As you saw in Figure 8-4, the SELECT command is used to extract data from a table. Inthat section, I used its simplest form to select all data and display it—something youwill never want to do on anything but the smallest tables, because all the data will scrollby at an unreadable pace. Let’s now examine SELECT in more detail.
The basic syntax is:SELECT something FROM tablename;
The something can be an * (asterisk) as you saw before, which means “every column,”or you can choose to select only certain columns. For instance, Example 8-16 showshow to select just the author and title and just the title and isbn. The result of typingthese commands can be seen in Figure 8-9.
Example 8-16. Two different SELECT statementsSELECT author,title FROM classics;SELECT title,isbn FROM classics;
Figure 8-9. The output from two different SELECT statements
SELECT COUNT
Another replacement for the something parameter is COUNT, which can be used in manyways. In Example 8-17, it displays the number of rows in the table by passing * as a
198 | Chapter 8: Introduction to MySQL

parameter, which means “all rows.” As you’d expect, the result returned is 5, as there arefive publications in the table.
Example 8-17. Counting rowsSELECT COUNT(*) FROM classics;
SELECT DISTINCT
This qualifier (and its synonym DISTINCTROW) allows you to weed out multiple entrieswhen they contain the same data. For instance, suppose that you want a list of all authorsin the table. If you select just the author column from a table containing multiple booksby the same author, you’ll normally see a long list with same author names over andover. But by adding the DISTINCT keyword, you can show each author just once. So let’stest that out by adding another row that repeats one of our existing authors(Example 8-18).
Example 8-18. Duplicating dataINSERT INTO classics(author, title, category, year, isbn) VALUES('Charles Dickens','Little Dorrit','Fiction','1857', '9780141439969');
Now that Charles Dickens appears twice in the table, we can compare the results ofusing SELECT with and without the DISTINCT qualifier. Example 8-19 and Figure 8-10show that the simple SELECT lists Dickens twice, and the command with the DISTINCTqualifier shows him only once.
Example 8-19. With and without the DISTINCT qualifierSELECT author FROM classics;SELECT DISTINCT author FROM classics;
Figure 8-10. Selecting data with and without DISTINCT
Indexes | 199

DELETE
When you need to remove a row from a table, use the DELETE command. Its syntax issimilar to the SELECT command and allows you to narrow down the exact row or rowsto delete using qualifiers such as WHERE and LIMIT.
Now that you’ve seen the effects of the DISTINCT qualifier, if you enteredExample 8-18, you should remove Little Dorrit by entering the commands inExample 8-20.
Example 8-20. Removing the new entryDELETE FROM classics WHERE title='Little Dorrit';
This example issues a DELETE command for all rows whose title column contains thestring Little Dorrit.
The WHERE keyword is very powerful, and important to enter correctly; an error couldlead a command to the wrong rows (or have no effect in cases where nothing matchesthe WHERE clause). So now we’ll spend some time on that clause, which is the heart andsoul of SQL.
WHERE
The WHERE keyword enables you to narrow down queries by returning only those wherea certain expression is true. Example 8-20 returns only the rows where the columnexactly matches the string Little Dorrit, using the equality operator =. Example 8-21shows a couple more examples of using WHERE with =.
Example 8-21. Using the WHERE keywordSELECT author,title FROM classics WHERE author="Mark Twain";SELECT author,title FROM classics WHERE isbn="9781598184891 ";
Given our current table, the two commands in Example 8-21 display the same results.But we could easily add more books by Mark Twain, in which case the first line woulddisplay all titles he wrote and the second line would continue (because we know theISBN is unique) to display The Adventures of Tom Sawyer. In other words, searchesusing a unique key are more predictable, and you’ll see further evidence later of thevalue of unique and primary keys.
You can also do pattern matching for your searches using the LIKE qualifier, whichallows searches on parts of strings. This qualifier should be used with a % characterbefore or after some text. When placed before a keyword, % means “anything before”and after a keyword it means “anything after.” Example 8-22 performs three differentqueries, one for the start of a string, one for the end, and one for anywhere in a string.You can see the results of these commands in Figure 8-11.
200 | Chapter 8: Introduction to MySQL

Example 8-22. Using the LIKE qualifierSELECT author,title FROM classics WHERE author LIKE "Charles%";SELECT author,title FROM classics WHERE title LIKE "%Species";SELECT author,title FROM classics WHERE title LIKE "%and%";
Figure 8-11. Using WHERE with the LIKE qualifier
The first command outputs the publications by both Charles Darwin and CharlesDickens because the LIKE qualifier was set to return anything matching the stringCharles followed by any other text. Then just The Origin of Species is returned,because it’s the only row whose column ends with the string Species. Last, both Prideand Prejudice and Romeo and Juliet are returned, because they both matched thestring and anywhere in the column.
The % will also match if there is nothing in the position it occupies; in other words, itcan match an empty string.
LIMIT
The LIMIT qualifier enables you to choose how many rows to return in a query, andwhere in the table to start returning them. When passed a single parameter, it tellsMySQL to start at the beginning of the results and just return the number of rows givenin that parameter. If you pass it two parameters, the first indicates the offset from thestart of the results where MySQL should start the display, and the second indicates howmany to return. You can think of the first parameter as saying, “Skip this number ofresults at the start.”
Example 8-23 includes three commands. The first returns the first three rows from thetable. The second returns two rows starting at position 1 (skipping the first row). The
Indexes | 201

last command returns a single row starting at position 3 (skipping the first three rows).Figure 8-12 shows the results of issuing these three commands.
Example 8-23. Limiting the number of results returnedSELECT author,title FROM classics LIMIT 3;SELECT author,title FROM classics LIMIT 1,2;SELECT author,title FROM classics LIMIT 3,1;
Figure 8-12. Restricting the rows returned with LIMIT
Be careful with the LIMIT keyword, because offsets start at 0, but thenumber of rows to return starts at 1. So LIMIT 1,3 means returnthree rows starting from the second row.
MATCH ... AGAINST
The MATCH ... AGAINST construct can be used on columns that have been given aFULLTEXT index (see the section “Creating a FULLTEXT index” on page 196). With it,you can make natural-language searches as you would in an Internet search engine.Unlike the use of WHERE ... = or WHERE ... LIKE, MATCH ... AGAINST lets you entermultiple words in a search query and checks them against all words in the FULLTEXTcolumns. FULLTEXT indexes are case-insensitive, so it makes no difference what case isused in your queries.
Assuming that you have added a FULLTEXT index to the author and title columns, enterthe three queries shown in Example 8-24. The first asks for any of these columns thatcontain the word and to be returned. Because and is a stopword, MySQL will ignore itand the query will always produce an empty set—no matter what is stored in the
202 | Chapter 8: Introduction to MySQL

columns. The second query asks for any rows that contain both of the words old andshop anywhere in them, in any order, to be returned. And the last query applies the samekind of search for the words tom and sawyer. Figure 8-13 shows the results of thesequeries.
Example 8-24. Using MATCH ... AGAINST on FULLTEXT indexesSELECT author,title FROM classics WHERE MATCH(author,title) AGAINST('and');SELECT author,title FROM classics WHERE MATCH(author,title) AGAINST('old shop');SELECT author,title FROM classics WHERE MATCH(author,title) AGAINST('tom sawyer');
Figure 8-13. Using MATCH ... AGAINST on a FULLTEXT index
MATCH ... AGAINST ... IN BOOLEAN MODE
If you wish to give your MATCH ... AGAINST queries even more power, use Booleanmode. This changes the effect of the standard FULLTEXT query so that it searches for anycombination of search words, instead of requiring all search words to be in the text. Thepresence of a single word in a column causes the search to return the row.
Boolean mode also allows you to preface search words with a + or − sign to indicatewhether they must be included or excluded. If normal Boolean mode says, “Any of thesewords will do,” a plus sign means “This word must be present; otherwise, don’t returnthe row.” A minus sign means “This word must not be present; its presence disqualifiesthe row from being returned.”
Example 8-25 illustrates Boolean mode through two queries. The first asks for all rowscontaining the word charles and not the word species to be returned. The second uses
Indexes | 203

double quotes to request that all rows containing the exact phrase origin of be returned.Figure 8-14 shows the results of these queries.
Example 8-25. Using MATCH ... AGAINST ... IN BOOLEAN MODESELECT author,title FROM classics WHERE MATCH(author,title) AGAINST('+charles -species' IN BOOLEAN MODE);SELECT author,title FROM classics WHERE MATCH(author,title) AGAINST('"origin of"' IN BOOLEAN MODE);
Figure 8-14. Using MATCH ... AGAINST ... IN BOOLEAN MODE
As you would expect, the first request returns only The Old Curiosity Shop by CharlesDickens, because any rows containing the word species have been excluded, so CharlesDarwin’s publication is ignored.
There is something of interest to note in the second query: the stop‐word of is part of the search string, but is still used by the searchbecause the double quotation marks override stopwords.
UPDATE ... SET
This construct allows you to update the contents of a field. If you wish to change thecontents of one or more fields, you need to first narrow in on just the field or fields tobe changed, in much the same way you use the SELECT command. Example 8-26 showsthe use of UPDATE ... SET in two different ways. You can see the results in Figure 8-15.
204 | Chapter 8: Introduction to MySQL

Example 8-26. Using UPDATE ... SETUPDATE classics SET author='Mark Twain (Samuel Langhorne Clemens)' WHERE author='Mark Twain';UPDATE classics SET category='Classic Fiction' WHERE category='Fiction';
Figure 8-15. Updating columns in the classics table
In the first query, Mark Twain’s real name of Samuel Langhorne Clemens was appendedto his pen name in brackets, which affected only one row. The second query, however,affected three rows, because it changed all occurrences of the word Fiction in the cate‐gory column to the term Classic Fiction.
When performing an update, you can also make use of the qualifiers you have alreadyseen, such as LIMIT, and the following ORDER BY and GROUP BY keywords.
ORDER BY
ORDER BY sorts returned results by one or more columns in ascending or descendingorder. Example 8-27 shows two such queries, the results of which can be seen inFigure 8-16.
Example 8-27. Using ORDER BYSELECT author,title FROM classics ORDER BY author;SELECT author,title FROM classics ORDER BY title DESC;
Indexes | 205

Figure 8-16. Sorting the results of requests
As you can see, the first query returns the publications by author in ascending alpha‐betical order (the default), and the second returns them by title in descending order.
If you wanted to sort all the rows by author and then by descending year of publication(to view the most recent first), you would issue the following query:
SELECT author,title,year FROM classics ORDER BY author,year DESC;
This shows that each ascending and descending qualifier applies to a single column.The DESC keyword applies only to the preceding column, year. Because you allow au‐thor to use the default sort order, it is sorted in ascending order. You could also haveexplicitly specified ascending order for that column, with the same results:
SELECT author,title,year FROM classics ORDER BY author ASC,year DESC;
GROUP BY
In a similar fashion to ORDER BY, you can group results returned from queries usingGROUP BY, which is good for retrieving information about a group of data. For example,if you want to know how many publications there are of each category in the classicstable, you can issue the following query:
SELECT category,COUNT(author) FROM classics GROUP BY category;
which returns the following output:
206 | Chapter 8: Introduction to MySQL

+-----------------+---------------+| category | COUNT(author) |+-----------------+---------------+| Classic Fiction | 3 || Non-Fiction | 1 || Play | 1 |+-----------------+---------------+3 rows in set (0.00 sec)
Joining Tables TogetherIt is quite normal to maintain multiple tables within a database, each holding a differenttype of information. For example, consider the case of a customers table that needs tobe able to be cross-referenced with publications purchased from the classics table. Enterthe commands in Example 8-28 to create this new table and populate it with threecustomers and their purchases. Figure 8-17 shows the result.
Example 8-28. Creating and populating the customers tableCREATE TABLE customers ( name VARCHAR(128), isbn VARCHAR(13), PRIMARY KEY (isbn)) ENGINE MyISAM;INSERT INTO customers(name,isbn) VALUES('Joe Bloggs','9780099533474');INSERT INTO customers(name,isbn) VALUES('Mary Smith','9780582506206');INSERT INTO customers(name,isbn) VALUES('Jack Wilson','9780517123201');SELECT * FROM customers;
Figure 8-17. Creating the customers table
Indexes | 207

There’s also a shortcut for inserting multiple rows of data, as in Ex‐ample 8-28, in which you can replace the three separate INSERT INTOqueries with a single one listing the data to be inserted, separated bycommas, like this:
INSERT INTO customers(name,isbn) VALUES('Joe Bloggs','9780099533474'),('Mary Smith','9780582506206'),('Jack Wilson','9780517123201');
Of course, in a proper table containing customers’ details there would also be addresses,phone numbers, email addresses, and so on, but they aren’t necessary for this explan‐ation. While creating the new table, you should have noticed that it has something incommon with the classics table: a column called isbn. Because it has the same meaningin both tables (an ISBN refers to a book, and always the same book), we can use thiscolumn to tie the two tables together into a single query, as in Example 8-29.
Example 8-29. Joining two tables into a single SELECTSELECT name,author,title from customers,classics WHERE customers.isbn=classics.isbn;
The result of this operation is the following:+-------------+-----------------+------------------------+| name | author | title |+-------------+-----------------+------------------------+| Joe Bloggs | Charles Dickens | The Old Curiosity Shop || Mary Smith | Jane Austen | Pride and Prejudice || Jack Wilson | Charles Darwin | The Origin of Species |+-------------+-----------------+------------------------+3 rows in set (0.00 sec)
See how this query has neatly tied both tables together to show the publications pur‐chased from the classics table by the people in the customers table?
NATURAL JOIN
Using NATURAL JOIN, you can save yourself some typing and make queries a little clearer.This kind of join takes two tables and automatically joins columns that have the samename. So, to achieve the same results as from Example 8-29, you would enter:
SELECT name,author,title FROM customers NATURAL JOIN classics;
JOIN...ON
If you wish to specify the column on which to join two tables, use the JOIN ... ONconstruct, as follows, to achieve results identical to those of Example 8-29:
SELECT name,author,title FROM customers JOIN classics ON customers.isbn=classics.isbn;
208 | Chapter 8: Introduction to MySQL

Using AS
You can also save yourself some typing and improve query readability by creating aliasesusing the AS keyword. Follow a table name with AS and the alias to use. The followingcode, therefore, is also identical in action to Example 8-29. Aliases can be particularlyuseful when you have long queries that reference the same table names many times.
SELECT name,author,title from customers AS cust, classics AS class WHERE cust.isbn=class.isbn;
The result of this operation is the following:+-------------+-----------------+------------------------+| name | author | title |+-------------+-----------------+------------------------+| Joe Bloggs | Charles Dickens | The Old Curiosity Shop || Mary Smith | Jane Austen | Pride and Prejudice || Jack Wilson | Charles Darwin | The Origin of Species |+-------------+-----------------+------------------------+3 rows in set (0.00 sec)
Using Logical OperatorsYou can also use the logical operators AND, OR, and NOT in your MySQL WHERE queries tofurther narrow down your selections. Example 8-30 shows one instance of each, butyou can mix and match them in any way you need.
Example 8-30. Using logical operatorsSELECT author,title FROM classics WHERE author LIKE "Charles%" AND author LIKE "%Darwin";SELECT author,title FROM classics WHERE author LIKE "%Mark Twain%" OR author LIKE "%Samuel Langhorne Clemens%";SELECT author,title FROM classics WHERE author LIKE "Charles%" AND author NOT LIKE "%Darwin";
I’ve chosen the first query, because Charles Darwin might be listed in some rows by hisfull name, Charles Robert Darwin. Thus, the query returns publications as long as theauthor column starts with Charles and ends with Darwin. The second query searchesfor publications written using either Mark Twain’s pen name or his real name, SamuelLanghorne Clemens. The third query returns publications written by authors with thefirst name Charles but not the surname Darwin.
MySQL FunctionsYou might wonder why anyone would want to use MySQL functions when PHP comeswith a whole bunch of powerful functions of its own. The answer is very simple: theMySQL functions work on the data right there in the database. If you were to use PHP,
MySQL Functions | 209

you would first have to extract raw data from MySQL, manipulate it, and then performthe database query you first wanted.
Having functions built into MySQL substantially reduces the time needed for perform‐ing complex queries, as well as their complexity. If you wish to learn more about theavailable string and date/time functions, you can visit the following URLs:
• http://tinyurl.com/mysqlstrings• http://tinyurl.com/mysqldates
However, to get you started, Appendix D describes a subset containing the most usefulof these functions.
Accessing MySQL via phpMyAdminAlthough to use MySQL you have to learn these main commands and how they work,once you understand them, it can be much quicker and simpler to use a program suchas phpMyAdmin to manage your databases and tables.
However, you will need to install phpMyAdmin before you can use it. To do this, callup the Zend UI by entering the following into your browser, and log in (as shown inFigure 8-18):
http://localhost:10081/ZendServer/
Figure 8-18. The Zend Dashboard
210 | Chapter 8: Introduction to MySQL
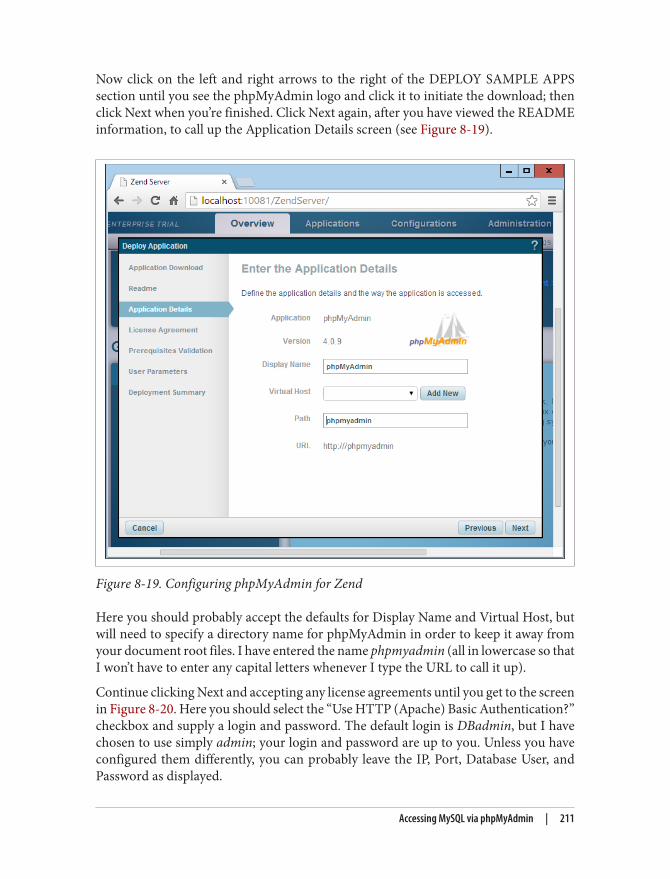
Now click on the left and right arrows to the right of the DEPLOY SAMPLE APPSsection until you see the phpMyAdmin logo and click it to initiate the download; thenclick Next when you’re finished. Click Next again, after you have viewed the READMEinformation, to call up the Application Details screen (see Figure 8-19).
Figure 8-19. Configuring phpMyAdmin for Zend
Here you should probably accept the defaults for Display Name and Virtual Host, butwill need to specify a directory name for phpMyAdmin in order to keep it away fromyour document root files. I have entered the name phpmyadmin (all in lowercase so thatI won’t have to enter any capital letters whenever I type the URL to call it up).
Continue clicking Next and accepting any license agreements until you get to the screenin Figure 8-20. Here you should select the “Use HTTP (Apache) Basic Authentication?”checkbox and supply a login and password. The default login is DBadmin, but I havechosen to use simply admin; your login and password are up to you. Unless you haveconfigured them differently, you can probably leave the IP, Port, Database User, andPassword as displayed.
Accessing MySQL via phpMyAdmin | 211

Figure 8-20. Entering phpMyAdmin user parameters
Now click Next, review the summary displayed, and when ready, click the Deploy but‐ton. After a few seconds, you should see that the application was successfully deployed,at which point you’ll be ready to access phpMyAdmin by entering the following intoyour browser:
http://localhost/phpmyadmin
This will bring up the dialog shown in Figure 8-21, where you should enter your user‐name and password before clicking the Log In button.
212 | Chapter 8: Introduction to MySQL

Figure 8-21. Logging into phpMyAdmin
Your browser should now look like Figure 8-22, and you’re ready to use phpMyAdminin place of the MySQL command line.
Figure 8-22. The phpMyAdmin main screen
Accessing MySQL via phpMyAdmin | 213

Full details on this installation process are on the Zend website at thefollowing (shortened) URL: http://tinyurl.com/installpma.
Using phpMyAdminIn the lefthand pane of the main phpMyAdmin screen, you can click on the drop-downmenu that says “(Databases)” to select any database you wish to work with. This willopen the database and display its tables.
From here you can perform all the main operations, such as creating new databases,adding tables, creating indexes, and much more. To read the supporting documentationfor phpMyAdmin, visit https://docs.phpmyadmin.net.
If you worked with me through the examples in this chapter, congratulations—it’s beenquite a long journey. You’ve come all the way from learning how to create a MySQLdatabase through issuing complex queries that combine multiple tables, to usingBoolean operators and leveraging MySQL’s various qualifiers.
In the next chapter, we’ll start looking at how to approach efficient database design,advanced SQL techniques, and MySQL functions and transactions.
Questions1. What is the purpose of the semicolon in MySQL queries?2. Which command would you use to view the available databases or tables?3. How would you create a new MySQL user on the local host called newuser with a
password of newpass and with access to everything in the database newdatabase?4. How can you view the structure of a table?5. What is the purpose of a MySQL index?6. What benefit does a FULLTEXT index provide?7. What is a stopword?8. Both SELECT DISTINCT and GROUP BY cause the display to show only one output
row for each value in a column, even if multiple rows contain that value. What arethe main differences between SELECT DISTINCT and GROUP BY?
214 | Chapter 8: Introduction to MySQL

9. Using the SELECT ... WHERE construct, how would you return only rows contain‐ing the word Langhorne somewhere in the author column of the classics table usedin this chapter?
10. What needs to be defined in two tables to make it possible for you to join themtogether?
See “Chapter 8 Answers” on page 644 in Appendix A for the answers to these questions.
Questions | 215


CHAPTER 9
Mastering MySQL
Chapter 8 provided you with a good grounding in the practice of using relationaldatabases with structured query language. You’ve learned about creating databases andthe tables they comprise, as well as inserting, looking up, changing, and deleting data.
With that knowledge under your belt, we now need to look at how to design databasesfor maximum speed and efficiency. For example, how do you decide what data to placein which table? Well, over the years, a number of guidelines have been developed that—if you follow them—ensure your databases will be efficient and capable of growing asyou feed them more and more data.
Database DesignIt’s very important that you design a database correctly before you start to create it;otherwise, you are almost certainly going to have to go back and change it by splittingup some tables, merging others, and moving various columns about in order to achievesensible relationships that MySQL can easily use.
Sitting down with a sheet of paper and a pencil and writing down a selection of thequeries that you think you and your users are likely to ask is an excellent starting point.In the case of an online bookstore’s database, some of your questions could be:
• How many authors, books, and customers are in the database?• Which author wrote a certain book?• Which books were written by a certain author?• What is the most expensive book?• What is the best-selling book?• Which books have not sold this year?
217

• Which books did a certain customer buy?• Which books have been purchased together?
Of course, there are many more queries that you could make on such a database, buteven this small sample will begin to give you insights into how to lay out your tables.For example, books and ISBNs can probably be combined into one table, because theyare closely linked (we’ll examine some of the subtleties later). In contrast, books andcustomers should be in separate tables, because their connection is very loose. A cus‐tomer can buy any book, and even multiple copies of a book, yet a book can be boughtby many customers and be ignored by still more potential customers.
When you plan to do a lot of searches on something, it can often benefit by having itsown table. And when couplings between things are loose, it’s best to put them in separatetables.
Taking into account those simple rules of thumb, we can guess we’ll need at least threetables to accommodate all these queries:Authors
There will be lots of searches for authors, many of whom have collaborated on titles,and many of whom will be featured in collections. Listing all the information abouteach author together, linked to that author, will produce optimal results forsearches—hence an authors table.
BooksMany books appear in different editions. Sometimes they change publisher andsometimes they have the same titles as other, unrelated books. So the links betweenbooks and authors are complicated enough to call for a separate table.
CustomersIt’s even more clear why customers should get their own table, as they are free topurchase any book by any author.
Primary Keys: The Keys to Relational DatabasesUsing the power of relational databases, we can define information for each author,book, and customer in just one place. Obviously, what interests us is the links betweenthem—such as who wrote each book and who purchased it—but we can store thatinformation just by making links between the three tables. I’ll show you the basic prin‐ciples, and then it just takes practice for it to feel natural.
The magic involves giving every author a unique identifier. Do the same for every bookand for every customer. We saw the means of doing that in the previous chapter: theprimary key. For a book, it makes sense to use the ISBN, although you then have to dealwith multiple editions that have different ISBNs. For authors and customers, you can
218 | Chapter 9: Mastering MySQL

just assign arbitrary keys, which the AUTO_INCREMENT feature that you saw in the lastchapter makes easy.
In short, every table will be designed around some object that you’re likely to search fora lot—an author, book, or customer, in this case—and that object will have a primarykey. Don’t choose a key that could possibly have the same value for different objects.The ISBN is a rare case for which an industry has provided a primary key that you canrely on to be unique for each product. Most of the time, you’ll create an arbitrary keyfor this purpose, using AUTO_INCREMENT.
NormalizationThe process of separating your data into tables and creating primary keys is callednormalization. Its main goal is to make sure each piece of information appears in thedatabase only once. Duplicating data is very inefficient, because it makes databaseslarger than they need to be and therefore slows down access. But, more importantly, thepresence of duplicates creates a strong risk that you’ll update only one row of duplicateddata, creating inconsistencies in a database and potentially causing serious errors.
Thus, if you list the titles of books in the authors table as well as the books table, and youhave to correct a typographic error in a title, you’ll have to search through both tablesand make sure you make the same change every place the title is listed. It’s better to keepthe title in one place and use the ISBN in other places.
But in the process of splitting a database into multiple tables, it’s important not to gotoo far and create more tables than is necessary, which would also lead to inefficientdesign and slower access.
Luckily, E. F. Codd, the inventor of the relational model, analyzed the concept of nor‐malization and split it into three separate schemas called First, Second, and Third NormalForm. If you modify a database to satisfy each of these forms in order, you will ensurethat your database is optimally balanced for fast access, and minimum memory anddisk space usage.
To see how the normalization process works, let’s start with the rather monstrousdatabase in Table 9-1, which shows a single table containing all of the author names,book titles, and (fictional) customer details. You could consider it a first attempt at atable intended to keep track of which customers have ordered books. Obviously this isinefficient design, because data is duplicated all over the place (duplications are high‐lighted), but it represents a starting point.
Normalization | 219

Table 9-1. A highly inefficient design for a database tableAuthor 1 Author 2 Title ISBN Price
$USCustomerName
Customer Address PurchaseDate
David Sklar AdamTrachtenberg
PHP Cookbook 0596101015 44.99 EmmaBrown
1565 RainbowRoad, Los Angeles,CA 90014
Mar 032009
DannyGoodman
Dynamic HTML 0596527403 59.99 DarrenRyder
4758 Emily Drive,Richmond, VA23219
Dec 19 2008
Hugh EWilliams
David Lane PHPand MySQL
0596005436 44.95 Earl B.Thurston
862 Gregory Lane,Frankfort, KY40601
Jun 222009
David Sklar AdamTrachtenberg
PHP Cookbook 0596101015 44.99 DarrenRyder
4758 Emily Drive,Richmond, VA23219
Dec 19 2008
RasmusLerdorf
Kevin Tatroe &Peter MacIntyre
ProgrammingPHP
0596006815 39.99 David Miller 3647 Cedar Lane,Waltham, MA02154
Jan 162009
In the following three sections, we will examine this database design, and you’ll see howwe can improve it by removing the various duplicate entries and splitting the singletable into multiple tables, each containing one type of data.
First Normal FormFor a database to satisfy the First Normal Form, it must fulfill three requirements:
• There should be no repeating columns containing the same kind of data.• All columns should contain a single value.• There should be a primary key to uniquely identify each row.
Looking at these requirements in order, you should notice straightaway that the Author 1and Author 2 columns constitute repeating data types. So we already have a target col‐umn for pulling into a separate table, as the repeated Author columns violate Rule 1.
Second, there are three authors listed for the final book, Programming PHP. I’ve handledthat by making Kevin Tatroe and Peter MacIntyre share the Author 2 column, whichviolates Rule 2—yet another reason to transfer the Author details to a separate table.
However, Rule 3 is satisfied, because the primary key of ISBN has already been created.
Table 9-2 shows the result of removing the Authors columns from Table 9-1. Already itlooks a lot less cluttered, although there remain duplications that are highlighted.
220 | Chapter 9: Mastering MySQL

Table 9-2. The result of stripping the Authors columns from Table 9-1Title ISBN Price
$USCustomerName
Customer Address Purchase Date
PHP Cookbook 0596101015 44.99 Emma Brown 1565 Rainbow Road, Los Angeles, CA 90014 Mar 03 2009
Dynamic HTML 0596527403 59.99 Darren Ryder 4758 Emily Drive, Richmond, VA 23219 Dec 19 2008
PHP and MySQL 0596005436 44.95 Earl B. Thurston 862 Gregory Lane, Frankfort, KY 40601 Jun 22 2009
PHP Cookbook 0596101015 44.99 Darren Ryder 4758 Emily Drive, Richmond, VA 23219 Dec 19 2008
Programming PHP 0596006815 39.99 David Miller 3647 Cedar Lane, Waltham, MA 02154 Jan 16 2009
The new Authors table shown in Table 9-3 is small and simple. It just lists the ISBN ofa title along with an author. If a title has more than one author, additional authors gettheir own rows. At first, you may feel ill at ease with this table, because you can’t tellwhich author wrote which book. But don’t worry: MySQL can quickly tell you. All youhave to do is tell it which book you want information for, and MySQL will use its ISBNto search the Authors table in a matter of milliseconds.
Table 9-3. The new Authors tableISBN Author
0596101015 David Sklar
0596101015 Adam Trachtenberg
0596527403 Danny Goodman
0596005436 Hugh E Williams
0596005436 David Lane
0596006815 Rasmus Lerdorf
0596006815 Kevin Tatroe
0596006815 Peter MacIntyre
As I mentioned earlier, the ISBN will be the primary key for the Books table, when weget around to creating that table. I mention that here in order to emphasize that theISBN is not, however, the primary key for the Authors table. In the real world, theAuthors table would deserve a primary key, too, so that each author would have a keyto uniquely identify him or her.
So, in the Authors table, the ISBN is just a column for which—for the purposes ofspeeding up searches—we’ll probably make a key, but not the primary key. In fact, itcannot be the primary key in this table, because it’s not unique: the same ISBN appearsmultiple times whenever two or more authors have collaborated on a book.
Because we’ll use it to link authors to books in another table, this column is called aforeign key.
Normalization | 221

Keys (also called indexes) have several purposes in MySQL. The fun‐damental reason for defining a key is to make searches faster. You’veseen examples in Chapter 8 in which keys are used in WHERE clausesfor searching. But a key can also be useful to uniquely identify an item.Thus, a unique key is often used as a primary key in one table, and asa foreign key to link rows in that table to rows in another table.
Second Normal FormThe First Normal Form deals with duplicate data (or redundancy) across multiple col‐umns. The Second Normal Form is all about redundancy across multiple rows. In orderto achieve Second Normal Form, your tables must already be in First Normal Form.Once this has been done, we achieve Second Normal Form by identifying columnswhose data repeats in different places and then removing them to their own tables.
So let’s look again at Table 9-2. Notice how Darren Ryder bought two books and thereforehis details are duplicated. This tells us that the Customer columns need to be pulled intotheir own tables. Table 9-4 shows the result of removing the Customer columns fromTable 9-2.
Table 9-4. The new Titles tableISBN Title Price
0596101015 PHP Cookbook 44.99
0596527403 Dynamic HTML 59.99
0596005436 PHP and MySQL 44.95
0596006815 Programming PHP 39.99
As you can see, all that’s left in Table 9-4 are the ISBN, Title, and Price columns for fourunique books, so this now constitutes an efficient and self-contained table that satisfiesthe requirements of both the First and Second Normal Forms. Along the way, we’vemanaged to reduce the information to data closely related to book titles. This table couldalso include years of publication, page counts, numbers of reprints, and so on, as thesedetails are also closely related. The only rule is that we can’t put in any column that couldhave multiple values for a single book, because then we’d have to list the same book inmultiple rows and would thus violate Second Normal Form. Restoring an Author col‐umn, for instance, would violate this normalization.
However, looking at the extracted Customer columns, now in Table 9-5, we can see thatthere’s still more normalization work to do, because Darren Ryder’s details are still du‐plicated. And it could also be argued that First Normal Form Rule 2 (all columns shouldcontain a single value) has not been properly complied with, because the addresses reallyneed to be broken into separate columns for Address, City, State, and Zip code.
222 | Chapter 9: Mastering MySQL

Table 9-5. The Customer details from Table 9-2ISBN Customer Name Customer Address Purchase Date
0596101015 Emma Brown 1565 Rainbow Road, Los Angeles, CA 90014 Mar 03 2009
0596527403 Darren Ryder 4758 Emily Drive, Richmond, VA 23219 Dec 19 2008
0596005436 Earl B. Thurston 862 Gregory Lane, Frankfort, KY 40601 Jun 22 2009
0596101015 Darren Ryder 4758 Emily Drive, Richmond, VA 23219 Dec 19 2008
0596006815 David Miller 3647 Cedar Lane, Waltham, MA 02154 Jan 16 2009
What we have to do is split this table further to ensure that each customer’s details areentered only once. Because the ISBN is not and cannot be used as a primary key toidentify customers (or authors), a new key must be created.
Table 9-6 is the result of normalizing the Customers table into both First and SecondNormal Forms. Each customer now has a unique customer number called CustNo,which is the table’s primary key and will most likely have been created via AUTO_INCREMENT. All the parts of customer addresses have also been separated into distinct columnsto make them easily searchable and updateable.
Table 9-6. The new Customers tableCustNo Name Address City State Zip
1 Emma Brown 1565 Rainbow Road Los Angeles CA 90014
2 Darren Ryder 4758 Emily Drive Richmond VA 23219
3 Earl B. Thurston 862 Gregory Lane Frankfort KY 40601
4 David Miller 3647 Cedar Lane Waltham MA 02154
At the same time, in order to normalize Table 9-6, we had to remove the informationon customer purchases, because otherwise, there would be multiple instances of cus‐tomer details for each book purchased. Instead, the purchase data is now placed in anew table called Purchases (see Table 9-7).
Table 9-7. The new Purchases tableCustNo ISBN Date
1 0596101015 Mar 03 2009
2 0596527403 Dec 19 2008
2 0596101015 Dec 19 2008
3 0596005436 Jun 22 2009
4 0596006815 Jan 16 2009
Here the CustNo column from Table 9-6 is reused as a key to tie both the Customers andthe Purchases tables together. Because the ISBN column is also repeated here, this tablecan be linked with either of the Authors or the Titles tables, too.
Normalization | 223

The CustNo column can be a useful key in the Purchases table, but it’s not a primarykey. A single customer can buy multiple books (and even multiple copies of one book),so the CustNo column is not a primary key. In fact, the Purchases table has no primarykey. That’s all right, because we don’t expect to need to keep track of unique purchases.If one customer buys two copies of the same book on the same day, we’ll just allow tworows with the same information. For easy searching, we can define both CustNo andISBN as keys—just not as primary keys.
There are now four tables, one more than the three we had initiallyassumed would be needed. We arrived at this decision through thenormalization processes, by methodically following the First andSecond Normal Form rules, which made it plain that a fourth tablecalled Purchases would also be required.
The tables we now have are Authors (Table 9-3), Titles (Table 9-4), Customers(Table 9-6), and Purchases (Table 9-7), and we can link each table to any other usingeither the CustNo or the ISBN keys.
For example, to see which books Darren Ryder has purchased, you can look him up inTable 9-6, the Customers table, where you will see his CustNo is 2. Armed with thisnumber, you can now go to Table 9-7, the Purchases table; looking at the ISBN columnhere, you will see that he purchased titles 0596527403 and 0596101015 on December19, 2008. This looks like a lot of trouble for a human, but it’s not so hard for MySQL.
To determine what these titles were, you can then refer to Table 9-4, the Titles table, andsee that the books he bought were Dynamic HTML and PHP Cookbook. Should youwish to know the authors of these books, you could also use the ISBNs you just lookedup on Table 9-3, the Authors table, and you would see that ISBN 0596527403, DynamicHTML, was written by Danny Goodman, and that ISBN 0596101015, PHP Cookbook,was written by David Sklar and Adam Trachtenberg.
Third Normal FormOnce you have a database that complies with both the First and Second Normal Forms,it is in pretty good shape and you might not have to modify it any further. However, ifyou wish to be very strict with your database, you can ensure that it adheres to the ThirdNormal Form, which requires that data that is not directly dependent on the primarykey but is dependent on another value in the table should also be moved into separatetables, according to the dependence.
For example, in Table 9-6, the Customers table, it could be argued that the State, City,and Zip code keys are not directly related to each customer, because many other peoplewill have the same details in their addresses, too. However, they are directly related toeach other, in that the street Address relies on the City, and the City relies on the State.
224 | Chapter 9: Mastering MySQL

Therefore, to satisfy Third Normal Form for Table 9-6, you would need to split it intoTables 9-8 through 9-11.
Table 9-8. Third Normal Form Customers tableCustNo Name Address Zip
1 Emma Brown 1565 Rainbow Road 90014
2 Darren Ryder 4758 Emily Drive 23219
3 Earl B. Thurston 862 Gregory Lane 40601
4 David Miller 3647 Cedar Lane 02154
Table 9-9. Third Normal Form Zip codes tableZip CityID
90014 1234
23219 5678
40601 4321
02154 8765
Table 9-10. Third Normal Form Cities tableCityID Name StateID
1234 Los Angeles 5
5678 Richmond 46
4321 Frankfort 17
8765 Waltham 21
Table 9-11. Third Normal Form States tableStateID Name Abbreviation
5 California CA
46 Virginia VA
17 Kentucky KY
21 Massachusetts MA
So, how would you use this set of four tables instead of the single Table 9-6? Well, youwould look up the Zip code in Table 9-8, then find the matching CityID in Table 9-9.Given this information, you could then look up the city Name in Table 9-10 and thenalso find the StateID, which you could use in Table 9-11 to look up the State’s Name.
Although using the Third Normal Form in this way may seem like overkill, it can haveadvantages. For example, take a look at Table 9-11, where it has been possible to includeboth a state’s name and its two-letter abbreviation. It could also contain populationdetails and other demographics, if you desired.
Normalization | 225

Table 9-10 could also contain even more localized demographics thatcould be useful to you and/or your customers. By splitting up thesepieces of data, you can make it easier to maintain your database inthe future, should it be necessary to add columns.
Deciding whether to use the Third Normal Form can be tricky. Your evaluation shouldrest on what data you may need to add at a later date. If you are absolutely certain thatthe name and address of a customer is all that you will ever require, you probably willwant to leave out this final normalization stage.
On the other hand, suppose you are writing a database for a large organization such asthe U.S. Postal Service. What would you do if a city were to be renamed? With a tablesuch as Table 9-6, you would need to perform a global search and replace on everyinstance of that city. But if you have your database set up according to the Third NormalForm, you would have to change only a single entry in Table 9-10 for the change to bereflected throughout the entire database.
Therefore, I suggest that you ask yourself two questions to help you decide whether toperform a Third Normal Form normalization on any table:
• Is it likely that many new columns will need to be added to this table?• Could any of this table’s fields require a global update at any point?
If either of the answers is yes, you should probably consider performing this final stageof normalization.
When Not to Use NormalizationNow that you know all about normalization, I’m going to tell you why you should throwthese rules out of the window on high-traffic sites. That’s right—you should never fullynormalize your tables on sites that will cause MySQL to thrash.
Normalization requires spreading data across multiple tables, and this means makingmultiple calls to MySQL for each query. On a very popular site, if you have normalizedtables, your database access will slow down considerably once you get above a few dozenconcurrent users, because they will be creating hundreds of database accesses betweenthem. In fact, I would go so far as to say you should denormalize any commonly looked-up data as much as you can.
226 | Chapter 9: Mastering MySQL
You see, if you have data duplicated across your tables, you can substantially reduce thenumber of additional requests that need to be made, because most of the data you wantis available in each table. This means that you can simply add an extra column to a queryand that field will be available for all matching results.
Of course, you have to deal with the downsides previously mentioned, such as using uplarge amounts of disk space, and ensuring that you update every single duplicate copyof data when one of them needs modifying.
Multiple updates can be computerized, though. MySQL provides a feature called trig‐gers that make automatic changes to the database in response to changes you make.(Triggers are, however, beyond the scope of this book.) Another way to propagate re‐dundant data is to set up a PHP program to run regularly and keep all copies in sync.The program reads changes from a “master” table and updates all the others. (You’ll seehow to access MySQL from PHP in the next chapter.)
However, until you are very experienced with MySQL, I recommend that you fullynormalize all your tables (at least to First and Second Normal Form), as this will instillthe habit and put you in good stead. Only when you actually start to see MySQL logjamsshould you consider looking at denormalization.
RelationshipsMySQL is called a relational database management system because its tables store notonly data, but the relationships among the data. There are three categories of relation‐ships.
One-to-OneA one-to-one relationship is like a (traditional) marriage: each item has a relationshipto only one item of the other type. This is surprisingly rare. For instance, an author canwrite multiple books, a book can have multiple authors, and even an address can beassociated with multiple customers. Perhaps the best example in this chapter so far ofa one-to-one relationship is the relationship between the name of a state and its two-character abbreviation.
However, for the sake of argument, let’s assume that there can only ever be one customerat any address. In such a case, the Customers–Addresses relationship in Figure 9-1 is aone-to-one relationship: only one customer lives at each address, and each address canhave only one customer.
Relationships | 227
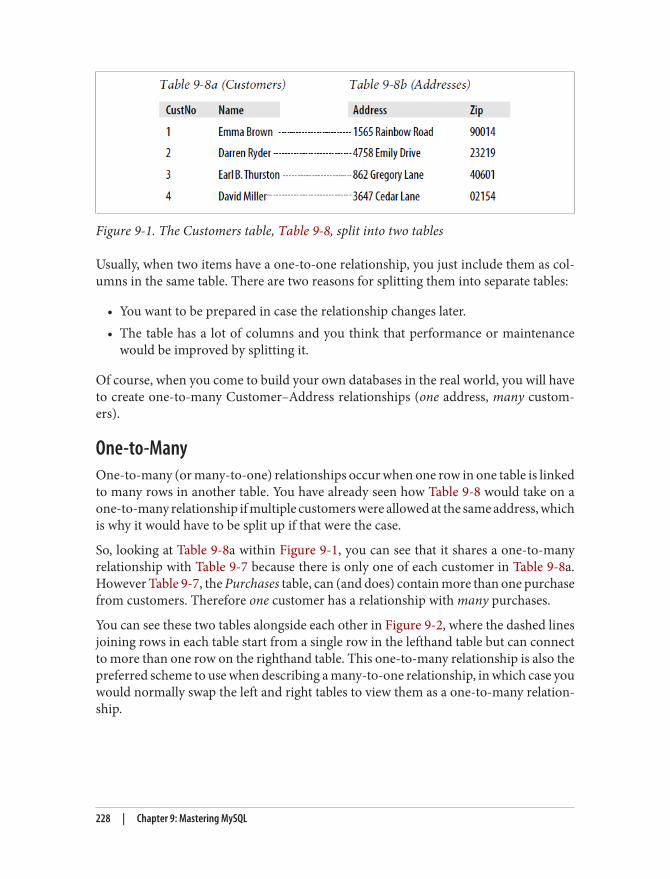
Figure 9-1. The Customers table, Table 9-8, split into two tables
Usually, when two items have a one-to-one relationship, you just include them as col‐umns in the same table. There are two reasons for splitting them into separate tables:
• You want to be prepared in case the relationship changes later.• The table has a lot of columns and you think that performance or maintenance
would be improved by splitting it.
Of course, when you come to build your own databases in the real world, you will haveto create one-to-many Customer–Address relationships (one address, many custom‐ers).
One-to-ManyOne-to-many (or many-to-one) relationships occur when one row in one table is linkedto many rows in another table. You have already seen how Table 9-8 would take on aone-to-many relationship if multiple customers were allowed at the same address, whichis why it would have to be split up if that were the case.
So, looking at Table 9-8a within Figure 9-1, you can see that it shares a one-to-manyrelationship with Table 9-7 because there is only one of each customer in Table 9-8a.However Table 9-7, the Purchases table, can (and does) contain more than one purchasefrom customers. Therefore one customer has a relationship with many purchases.
You can see these two tables alongside each other in Figure 9-2, where the dashed linesjoining rows in each table start from a single row in the lefthand table but can connectto more than one row on the righthand table. This one-to-many relationship is also thepreferred scheme to use when describing a many-to-one relationship, in which case youwould normally swap the left and right tables to view them as a one-to-many relation‐ship.
228 | Chapter 9: Mastering MySQL

Figure 9-2. Illustrating the relationship between two tables
Many-to-ManyIn a many-to-many relationship, many rows in one table are linked to many rows inanother table. To create this relationship, add a third table containing the same keycolumn from each of the other tables. This third table contains nothing else, as its solepurpose is to link up the other tables.
Table 9-12 is just such a table. It was extracted from Table 9-7, the Purchases table, butomits the purchase date information. It contains a copy of the ISBN of every title sold,along with the customer number of each purchaser.
Table 9-12. An intermediary tableCustomer ISBN
1 0596101015
2 0596527403
2 0596101015
3 0596005436
4 0596006815
With this intermediary table in place, you can traverse all the information in the databasethrough a series of relations. You can take an address as a starting point and find outthe authors of any books purchased by the customer living at that address.
For example, let’s suppose that you want to find out about purchases in the 23219 zipcode. Look that zip code up in Table 9-8b, and you’ll find that customer number 2 hasbought at least one item from the database. At this point, you can use Table 9-8a to findout his or her name, or use the new intermediary Table 9-12 to see the book(s) purchased.
From here, you will find that two titles were purchased and can follow them back toTable 9-4 to find the titles and prices of these books, or to Table 9-3 to see who theauthors were.
Relationships | 229

If it seems to you that this is really combining multiple one-to-many relationships, thenyou are absolutely correct. To illustrate, Figure 9-3 brings three tables together.
Figure 9-3. Creating a many-to-many relationship via a third table
Follow any zip code in the lefthand table to associated customer IDs. From there, youcan link to the middle table, which joins the left and right tables by linking customerIDs and ISBNs. Now all you have to do is follow an ISBN over to the righthand table tosee which book it relates to.
You can also use the intermediary table to work your way backward from book titles tozip codes. The Titles table can tell you the ISBN, which you can use in the middle tableto find ID numbers of customers who bought the books, and finally, the Customers tablematches the customer ID numbers to the customers’ zip codes.
Databases and AnonymityAn interesting aspect of using relations is that you can accumulate a lot of informationabout some item—such as a customer—without actually knowing who that customeris. Note that in the previous example we went from customers’ zip codes to customers’purchases, and back again, without finding out the name of a customer. Databases canbe used to track people, but they can also be used to help preserve people’s privacy whilestill finding useful information.
TransactionsIn some applications, it is vitally important that a sequence of queries runs in the correctorder and that every single query successfully completes. For example, suppose that youare creating a sequence of queries to transfer funds from one bank account to another.You would not want either of the following events to occur:
230 | Chapter 9: Mastering MySQL

• You add the funds to the second account, but when you try to subtract them fromthe first account the update fails, and now both accounts have the funds.
• You subtract the funds from the first bank account, but the update request to addthem to the second account fails, and the funds have now disappeared into thin air.
As you can see, not only is the order of queries important in this type of transaction,but it is also vital that all parts of the transaction complete successfully. But how canyou ensure this happens, because surely after a query has occurred, it cannot be undone?Do you have to keep track of all parts of a transaction and then undo them all one at atime if any one fails? The answer is absolutely not, because MySQL comes with powerfultransaction handling features to cover just these types of eventualities.
In addition, transactions allow concurrent access to a database by many users or pro‐grams at the same time. MySQL handles this seamlessly by ensuring that all transactionsare queued and that users or programs take their turns and don’t tread on each other’stoes.
Transaction Storage EnginesTo be able to use MySQL’s transaction facility, you have to be using MySQL’s InnoDBstorage engine. This is easy to do, as it’s simply another parameter that you use whencreating a table. So go ahead and create a table of bank accounts by typing the commandsin Example 9-1. (Remember that to do this you will need access to the MySQL commandline, and must also have already selected a suitable database in which to create this table.)
Example 9-1. Creating a transaction-ready tableCREATE TABLE accounts (number INT, balance FLOAT, PRIMARY KEY(number)) ENGINE InnoDB;DESCRIBE accounts;
The final line of this example displays the contents of the new table so you can ensurethat it was correctly created. The output from it should look like this:
+---------+---------+------+-----+---------+-------+| Field | Type | Null | Key | Default | Extra |+---------+---------+------+-----+---------+-------+| number | int(11) | NO | PRI | 0 | || balance | float | YES | | NULL | |+---------+---------+------+-----+---------+-------+2 rows in set (0.00 sec)
Now let’s create two rows within the table so that you can practice using transactions.Enter the commands in Example 9-2.
Transactions | 231
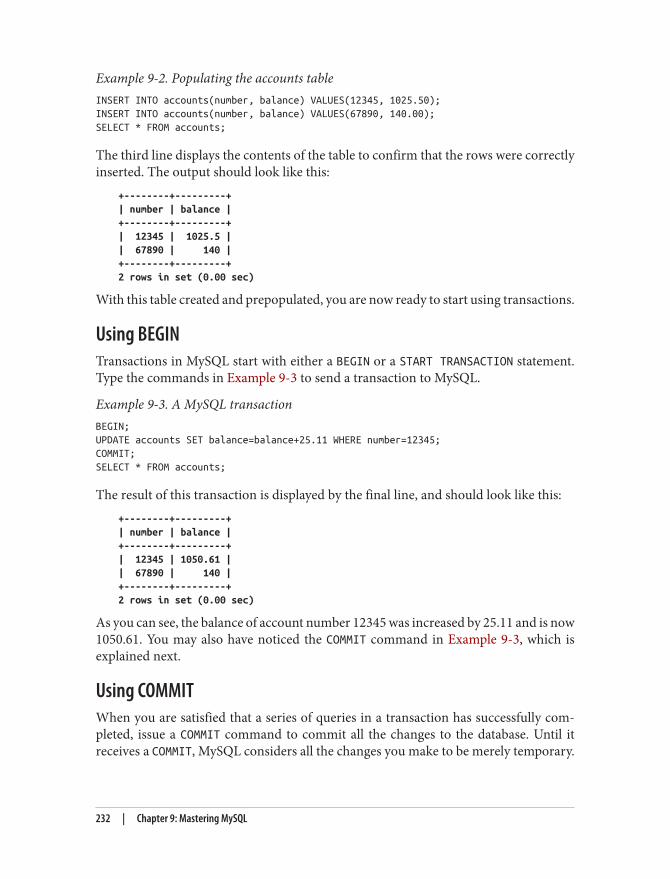
Example 9-2. Populating the accounts tableINSERT INTO accounts(number, balance) VALUES(12345, 1025.50);INSERT INTO accounts(number, balance) VALUES(67890, 140.00);SELECT * FROM accounts;
The third line displays the contents of the table to confirm that the rows were correctlyinserted. The output should look like this:
+--------+---------+| number | balance |+--------+---------+| 12345 | 1025.5 || 67890 | 140 |+--------+---------+2 rows in set (0.00 sec)
With this table created and prepopulated, you are now ready to start using transactions.
Using BEGINTransactions in MySQL start with either a BEGIN or a START TRANSACTION statement.Type the commands in Example 9-3 to send a transaction to MySQL.
Example 9-3. A MySQL transactionBEGIN;UPDATE accounts SET balance=balance+25.11 WHERE number=12345;COMMIT;SELECT * FROM accounts;
The result of this transaction is displayed by the final line, and should look like this:+--------+---------+| number | balance |+--------+---------+| 12345 | 1050.61 || 67890 | 140 |+--------+---------+2 rows in set (0.00 sec)
As you can see, the balance of account number 12345 was increased by 25.11 and is now1050.61. You may also have noticed the COMMIT command in Example 9-3, which isexplained next.
Using COMMITWhen you are satisfied that a series of queries in a transaction has successfully com‐pleted, issue a COMMIT command to commit all the changes to the database. Until itreceives a COMMIT, MySQL considers all the changes you make to be merely temporary.
232 | Chapter 9: Mastering MySQL

This feature gives you the opportunity to cancel a transaction by not sending a COMMITbut by issuing a ROLLBACK command instead.
Using ROLLBACKUsing the ROLLBACK command, you can tell MySQL to forget all the queries made sincethe start of a transaction and to end the transaction. See this in action by entering thefunds transfer transaction in Example 9-4.
Example 9-4. A funds transfer transactionBEGIN;UPDATE accounts SET balance=balance-250 WHERE number=12345;UPDATE accounts SET balance=balance+250 WHERE number=67890;SELECT * FROM accounts;
Once you have entered these lines, you should see the following result:+--------+---------+| number | balance |+--------+---------+| 12345 | 800.61 || 67890 | 390 |+--------+---------+2 rows in set (0.00 sec)
The first bank account now has a value that is 250 less than before, and the second hasbeen incremented by 250; you have transferred a value of 250 between them. But let’sassume that something went wrong and you wish to undo this transaction. All you haveto do is issue the commands in Example 9-5.
Example 9-5. Canceling a transaction using ROLLBACKROLLBACK;SELECT * FROM accounts;
You should now see the following output, showing that the two accounts have had theirprevious balances restored, due to the entire transaction being canceled via the ROLLBACK command:
+--------+---------+| number | balance |+--------+---------+| 12345 | 1050.61 || 67890 | 140 |+--------+---------+2 rows in set (0.00 sec)
Transactions | 233

Using EXPLAINMySQL comes with a powerful tool for investigating how the queries you issue to it areinterpreted. Using EXPLAIN, you can get a snapshot of any query to find out whetheryou could issue it in a better or more efficient way. Example 9-6 shows how to use itwith the accounts table you created earlier.
Example 9-6. Using the EXPLAIN commandEXPLAIN SELECT * FROM accounts WHERE number='12345';
The results of this EXPLAIN command should look like the following:+--+-----------+--------+-----+-------------+-------+-------+-----+----+-----+|id|select_type|table |type |possible_keys|key |key_len|ref |rows|Extra|+--+-----------+--------+-----+-------------+-------+-------+-----+----+-----+| 1|SIMPLE |accounts|const|PRIMARY |PRIMARY|4 |const| 1| |+--+-----------+--------+-----+-------------+-------+-------+-----+----+-----+1 row in set (0.00 sec)
The information that MySQL is giving you here is as follows:select_type
The selection type is SIMPLE. If you were joining tables together, this would showthe join type.
table
The current table being queried is accounts.
type
The query type is const. From worst to best, the possible values can be ALL, index,range, ref, eq_ref, const, system, and NULL.
possible_keys
There is a possible PRIMARY key, which means that accessing should be fast.
key
The key actually used is PRIMARY. This is good.
key_len
The key length is 4. This is the number of bytes of the index that MySQL will use.
ref
The ref column displays which columns or constants are used with the key. In thiscase, a constant key is being used.
rows
The number of rows that needs to be searched by this query is 1. This is good.
234 | Chapter 9: Mastering MySQL

Whenever you have a query that seems to be taking longer than you think it should toexecute, try using EXPLAIN to see where you can optimize it. You will discover whichkeys (if any) are being used, their lengths, and so on, and will be able to adjust yourquery or the design of your table(s) accordingly.
When you have finished experimenting with the temporary ac‐counts table, you may wish to remove it by entering the followingcommand:
DROP TABLE accounts;
Backing Up and RestoringWhatever kind of data you are storing in your database, it must have some value to you,even if it’s only the cost of the time required for reentering it should the hard disk fail.Therefore, it’s important that you keep backups to protect your investment. Also, therewill be times when you have to migrate your database over to a new server; the best wayto do this is usually to back it up first. It is also important that you test your backupsfrom time to time to ensure that they are valid and will work if they need to be used.
Thankfully, backing up and restoring MySQL data is easy with the mysqldump command.
Using mysqldumpWith mysqldump, you can dump a database or collection of databases into one or morefiles containing all the instructions necessary to re-create all your tables and repopulatethem with your data. It can also generate files in CSV (Comma-Separated Values) andother delimited text formats, or even in XML format. Its main drawback is that you mustmake sure that no one writes to a table while you’re backing it up. There are variousways to do this, but the easiest is to shut down the MySQL server before mysqldump andstart up the server again after mysqldump finishes.
Or you can lock the tables you are backing up before running mysqldump. To lock tablesfor reading (as we want to read the data), issue the following command from the MySQLcommand line:
LOCK TABLES tablename1 READ, tablename2 READ ...
Then, to release the lock(s), enter:UNLOCK TABLES;
By default, the output from mysqldump is simply printed out, but you can capture it ina file through the > redirect symbol.
Backing Up and Restoring | 235

The basic format of the mysqldump command is:mysqldump -u user -ppassword database
However, before you can dump the contents of a database, you must make sure thatmysqldump is in your path, or that you specify its location as part of your command.Table 9-13 shows the likely locations of the program for the different installations andoperating systems covered in Chapter 2. If you have a different installation, it may bein a slightly different location.
If you are using OS X with mysqldump and receive the error 2002:Can't connect to local MySQL server through socket '/tmp/
mysql.sock' (2) when trying to connect, you may be able toremedy this by issuing the following instruction:
ln -s /usr/local/zend/mysql/tmp/mysql.sock /tmp/mysql.sock
Table 9-13. Likely locations of mysqldump for different installationsOperating System & Program Likely folder location
Windows 32-bit Zend Server C:\Program Files\Zend\MySQL55\binWindows 64-bit Zend Server C:\Program Files (x86)\Zend\MySQL55\binOS X Zend Server /usr/local/zend/mysql/binLinux Zend Server /usr/local/zend/mysql/bin
So, to dump the contents of the publications database that you created in Chapter 8 tothe screen, enter mysqldump (or the full path if necessary) and the command inExample 9-7.
Example 9-7. Dumping the publications database to screenmysqldump -u user -ppassword publications
Make sure that you replace user and password with the correct details for your instal‐lation of MySQL. If there is no password set for the user, you can omit that part of thecommand, but the -u user part is mandatory—unless you have root access without apassword and are executing as root (not recommended). The result of issuing this com‐mand will look something like Figure 9-4.
236 | Chapter 9: Mastering MySQL

Figure 9-4. Dumping the publications database to screen
Creating a Backup FileNow that you have mysqldump working, and have verified it outputs correctly to thescreen, you can send the backup data directly to a file using the > redirect symbol.Assuming that you wish to call the backup file publications.sql, type the command inExample 9-8 (remembering to replace user and password with the correct details).
Example 9-8. Dumping the publications database to filemysqldump -u user -ppassword publications > publications.sql
The command in Example 9-8 stores the backup file into the cur‐rent directory. If you need it to be saved elsewhere, you should in‐sert a file path before the filename. You must also ensure that thedirectory you are backing up to has the right permissions set to al‐low the file to be written.
If you echo the backup file to screen or load it into a text editor, you will see that itcomprises sequences of SQL commands such as the following:
DROP TABLE IF EXISTS `classics`;CREATE TABLE `classics` ( `author` varchar(128) default NULL, `title` varchar(128) default NULL, `category` varchar(16) default NULL, `year` smallint(6) default NULL, `isbn` char(13) NOT NULL default '', PRIMARY KEY (`isbn`), KEY `author` (`author`(20)), KEY `title` (`title`(20)),
Backing Up and Restoring | 237

KEY `category` (`category`(4)), KEY `year` (`year`), FULLTEXT KEY `author_2` (`author`,`title`)) ENGINE=MyISAM DEFAULT CHARSET=latin1;
This is smart code that can be used to restore a database from a backup, even if itcurrently exists, because it will first drop any tables that need to be re-created, thusavoiding potential MySQL errors.
Backing up a single table
To back up only a single table from a database (such as the classics table from thepublications database), you should first lock the table from within the MySQL commandline, by issuing a command such as the following:
LOCK TABLES publications.classics READ;
This ensures that MySQL remains running for read purposes, but writes cannot bemade. Then, while keeping the MySQL command line open, use another terminal win‐dow to issue the following command from the operating system command line:
mysqldump -u user -ppassword publications classics > classics.sql
You must now release the table lock by entering the following command from theMySQL command line in the first terminal window, which unlocks all tables that havebeen locked during the current session:
UNLOCK TABLES;
Backing up all tables
If you want to back up all your MySQL databases at once (including the system databasessuch as mysql), you can use a command such as the one in Example 9-9, which wouldenable you to restore an entire MySQL database installation. Remember to use lockingwhere required.
Example 9-9. Dumping all the MySQL databases to filemysqldump -u user -ppassword --all-databases > all_databases.sql
Of course, there’s a lot more than just a few lines of SQL code inbacked-up database files. I recommend that you take a few minutesto examine a couple in order to familiarize yourself with the types ofcommands that appear in backup files and how they work.
238 | Chapter 9: Mastering MySQL

Restoring from a Backup FileTo perform a restore from a file, call the mysql executable, passing it the file to restorefrom using the < symbol. So, to recover an entire database that you dumped using the--all-databases option, use a command such as that in Example 9-10.
Example 9-10. Restoring an entire set of databasesmysql -u user -ppassword < all_databases.sql
To restore a single database, use the -D option followed by the name of the database, asin Example 9-11, where the publications database is being restored from the backupmade in Example 9-8.
Example 9-11. Restoring the publications databasemysql -u user -ppassword -D publications < publications.sql
To restore a single table to a database, use a command such as that in Example 9-12,where just the classics table is being restored to the publications database.
Example 9-12. Restoring the classics table to the publications databasemysql -u user -ppassword -D publications < classics.sql
Dumping Data in CSV FormatAs previously mentioned, the mysqldump program is very flexible and supports varioustypes of output, such as the CSV format. Example 9-13 shows how you can dump thedata from the classics and customers tables in the publications database to the filesclassics.txt and customers.txt in the folder c:/temp. By default, on Zend Server the usershould be root and no password is used. On OS X or Linux systems, you should modifythe destination path to an existing folder.
Example 9-13. Dumping data to CSV format filesmysqldump -u user -ppassword --no-create-info --tab=c:/temp --fields-terminated-by=',' publications
This command is quite long and is shown here wrapped over several lines, but you musttype it all as a single line. The result is the following:
Mark Twain (Samuel Langhorne Clemens)','The Adventures of Tom Sawyer','Classic Fiction','1876','9781598184891Jane Austen','Pride and Prejudice','Classic Fiction','1811','9780582506206Charles Darwin','The Origin of Species','Non-Fiction','1856','9780517123201Charles Dickens','The Old Curiosity Shop','Classic Fiction','1841','9780099533474William Shakespeare','Romeo and Juliet','Play','1594','9780192814968
Mary Smith','9780582506206Jack Wilson','9780517123201
Backing Up and Restoring | 239

Planning Your BackupsThe golden rule to backing up is to do so as often as you find practical. The more valuablethe data, the more often you should back it up, and the more copies you should make.If your database gets updated at least once a day, you should really back it up on a dailybasis. If, on the other hand, it is not updated very often, you could probably get by withless frequent backups.
You should also consider making multiple backups and storing themin different locations. If you have several servers, it is a simple mat‐ter to copy your backups between them. You would also be well ad‐vised to make physical backups of removable hard disks, thumbdrives, CDs or DVDs, and so on, and to keep these in separate loca‐tions—preferably somewhere like a fireproof safe.
Once you’ve digested the contents of this chapter, you will be proficient in using bothPHP and MySQL; the next chapter will show you how to bring these two technologies together.
Questions1. What does the word relationship mean in reference to a relational database?2. What is the term for the process of removing duplicate data and optimizing tables?3. What are the three rules of the First Normal Form?4. How can you make a table satisfy the Second Normal Form?5. What do you put in a column to tie together two tables that contain items having
a one-to-many relationship?6. How can you create a database with a many-to-many relationship?7. What commands initiate and end a MySQL transaction?8. What feature does MySQL provide to enable you to examine how a query will work
in detail?9. What command would you use to back up the database publications to a file called
publications.sql?
See “Chapter 9 Answers” on page 645 in Appendix A for the answers to these questions.
240 | Chapter 9: Mastering MySQL
CHAPTER 10
Accessing MySQL Using PHP
If you worked through the previous chapters, you’re proficient in using both MySQLand PHP. In this chapter, you will learn how to integrate the two by using PHP’s built-in functions to access MySQL.
Querying a MySQL Database with PHPThe reason for using PHP as an interface to MySQL is to format the results of SQLqueries in a form visible in a web page. As long as you can log into your MySQL instal‐lation using your username and password, you can also do so from PHP. However,instead of using MySQL’s command line to enter instructions and view output, you willcreate query strings that are passed to MySQL. When MySQL returns its response, itwill come as a data structure that PHP can recognize instead of the formatted outputyou see when you work on the command line. Further PHP commands can retrieve thedata and format it for the web page.
To get you started, in this chapter I use the standard, procedural mysqlfunction calls, so that you’ll be up and running quickly, and able tomaintain older PHP code. However, the new object-oriented mysqlifunctions (the i stands for improved) are becoming therecommended way to interface with MySQL from PHP, so in thefollowing chapter I’ll show you how to use these too (or instead,because the old functions have become deprecated and could be re‐moved from PHP at some point).
241

The ProcessThe process of using MySQL with PHP is:
1. Connect to MySQL.2. Select the database to use.3. Build a query string.4. Perform the query.5. Retrieve the results and output them to a web page.6. Repeat Steps 3 to 5 until all desired data has been retrieved.7. Disconnect from MySQL.
We’ll work through these sections in turn, but first it’s important to set up your logindetails in a secure manner so people snooping around on your system have troublegetting access to your database.
Creating a Login FileMost websites developed with PHP contain multiple program files that will requireaccess to MySQL and will thus need the login and password details. Therefore, it’s sen‐sible to create a single file to store these and then include that file wherever it’s needed.Example 10-1 shows such a file, which I’ve called login.php. Type the example, replacingplaceholder values (such as username) with the actual values you use for your MySQLdatabase, and save it to the web development directory you set up in Chapter 2. We’llbe making use of the file shortly. The hostname localhost should work as long as you’reusing a MySQL database on your local system, and the database publications shouldwork if you’re typing the examples I’ve used so far.
Example 10-1. The login.php file<?php // login.php $db_hostname = 'localhost'; $db_database = 'publications'; $db_username = 'username'; $db_password = 'password';?>
The enclosing <?php and ?> tags are especially important for the login.php file inExample 10-1, because they mean that the lines between can be interpreted only as PHPcode. If you were to leave them out and someone were to call up the file directly fromyour website, it would display as text and reveal your secrets. But, with the tags in place,all that person will see is a blank page. The file will correctly include in your other PHPfiles.
242 | Chapter 10: Accessing MySQL Using PHP

The $db_hostname variable will tell PHP which computer to use when connecting to adatabase. This is required, because you can access MySQL databases on any computerconnected to your PHP installation, and that potentially includes any host anywhere onthe Web. However, the examples in this chapter will be working on the local server. So,in place of specifying a domain such as mysql.myserver.com, you can just use the wordlocalhost (or the IP address 127.0.0.1).
The database we’ll be using, $db_database, is the one called publications, which youprobably created in Chapter 8, or the one you were provided with by your server ad‐ministrator (in which case you have to modify login.php accordingly).
The variables $db_username and $db_password should be set to the username andpassword that you have been using with MySQL.
Another benefit of keeping these login details in a single place is thatyou can change your password as frequently as you like and there willbe only one file to update when you do, no matter how many PHPfiles access MySQL.
Connecting to MySQLNow that you have the login.php file saved, you can include it in any PHP files that willneed to access the database by using the require_once statement. This is preferable toan include statement, as it will generate a fatal error if the file is not found. And believeme, not finding the file containing the login details to your database is a fatal error.
Also, using require_once instead of require means that the file will be read in onlywhen it has not previously been included, which prevents wasteful duplicate disk ac‐cesses. Example 10-2 shows the code to use.
Example 10-2. Connecting to a MySQL server<?php require_once 'login.php'; $db_server = mysql_connect($db_hostname, $db_username, $db_password);
if (!$db_server) die("Unable to connect to MySQL: " . mysql_error());?>
This example runs PHP’s mysql_connect function, which requires three parameters:the hostname, username, and password of a MySQL server. Upon success it returns anidentifier to the server; otherwise, FALSE is returned. Notice that the second line usesan if statement with the die function, which does what it sounds like and quits fromPHP with an error message if $db_server is not TRUE.
Querying a MySQL Database with PHP | 243

The die message explains that it was not possible to connect to the MySQL database,and—to help identify why this happened—includes a call to the mysql_error function.This function outputs the error text from the last called MySQL function.
The database server pointer $db_server will be used in some of the following examplesto identify the MySQL server to be queried. By using identifiers this way, we can connectto and access multiple MySQL servers from a single PHP program.
The die function is great for when you are developing PHP code, butof course you will want more user-friendly error messages on a pro‐duction server. In this case you won’t abort your PHP program, butformat a message that will be displayed when the program exits nor‐mally, such as:
function mysql_fatal_error($msg) { $msg2 = mysql_error(); echo <<< _END We are sorry, but it was not possible to complete the requested task. The error message we got was:
<p>$msg: $msg2</p>
Please click the back button on your browser and try again. If you are still having problems, please <a href="mailto:[email protected]">email our administrator</a>. Thank you. _END; }
Selecting a database
Having successfully connected to MySQL, you are now ready to select the database thatyou will be using. Example 10-3 shows how to do this.
Example 10-3. Selecting a database<?php mysql_select_db($db_database) or die("Unable to select database: " . mysql_error());?>
The command to select the database is mysql_select_db. Pass it the name of the data‐base you want and the server to which you connected. As with the previous example, adie statement has been included to provide an error message and explanation, shouldthe selection fail—the only difference being that there is no need to retain the returnvalue from the mysql_select_db function, as it simply returns either TRUE or FALSE.Therefore the PHP or statement was used, which means “if the previous commandfailed, do the following.” Note that for the or to work, there must be no semicolon atthe end of the first line of code.
244 | Chapter 10: Accessing MySQL Using PHP

Building and executing a query
Sending a query to MySQL from PHP is as simple as issuing it using the mysql_queryfunction. Example 10-4 shows you how to use it.
Example 10-4. Querying a database<?php $query = "SELECT * FROM classics"; $result = mysql_query($query);
if (!$result) die ("Database access failed: " . mysql_error());?>
First, the variable $query is set to the query to be made. In this case, it is asking to seeall rows in the table classics. Note that, unlike with MySQL’s command line, no semicolonis required at the tail of the query, because the mysql_query function is used to issue acomplete query; it cannot be used for queries sent in multiple parts, one at a time.Therefore, MySQL knows the query is complete and doesn’t look for a semicolon.
This function returns a result that we place in the variable $result. Having used MySQLat the command line, you might think that the contents of $result will be the same asthe result returned from a command-line query, with horizontal and vertical lines, andso on. However, this is not the case with the result returned to PHP. Instead, uponsuccess, $result will contain a resource that can be used to extract the results of thequery. You’ll see how to extract the data in the next section. Upon failure, $resultcontains FALSE. So the example finishes by checking $result. If it’s FALSE, it means thatthere was an error, and the die command is executed.
Fetching a result
Once you have a resource returned from a mysql_query function, you can use it toretrieve the data you want. The simplest way to do this is to fetch the cells you want,one at a time, using the mysql_result function. Example 10-5 combines and extendsthe previous examples into a program that you can type and run yourself to retrieve thereturned results. I suggest that you save it in the same folder as login.php and give it thename query.php.
Example 10-5. Fetching results one cell at a time<?php // query.php require_once 'login.php'; $db_server = mysql_connect($db_hostname, $db_username, $db_password);
if (!$db_server) die("Unable to connect to MySQL: " . mysql_error());
mysql_select_db($db_database) or die("Unable to select database: " . mysql_error());
Querying a MySQL Database with PHP | 245

$query = "SELECT * FROM classics"; $result = mysql_query($query);
if (!$result) die ("Database access failed: " . mysql_error());
$rows = mysql_num_rows($result);
for ($j = 0 ; $j < $rows ; ++$j) { echo 'Author: ' . mysql_result($result,$j,'author') . '<br>'; echo 'Title: ' . mysql_result($result,$j,'title') . '<br>'; echo 'Category: ' . mysql_result($result,$j,'category') . '<br>'; echo 'Year: ' . mysql_result($result,$j,'year') . '<br>'; echo 'ISBN: ' . mysql_result($result,$j,'isbn') . '<br><br>'; }?>
The final 10 lines of code are the new ones, so let’s look at them. They start by settingthe variable $rows to the value returned by a call to mysql_num_rows. This functionreports the number of rows returned by a query.
Armed with the row count, we enter a for loop that extracts each cell of data from eachrow using the mysql_result function. The parameters supplied to this function are theresource $result, which was returned by mysql_query, the row number $j, and thename of the column from which to extract the data.
The results from each call to mysql_result are then incorporated within echo state‐ments to display one field per line, with an additional line feed between rows. Figure 10-1shows the result of running this program.
As you may recall, we populated the classics table with five rows in Chapter 8, and indeed,five rows of data are returned by query.php. But, as it stands, this code is actually ex‐tremely inefficient and slow, because a total of 25 calls are made to the functionmysql_result in order to retrieve all the data, a single cell at a time. Luckily, there is amuch better way of retrieving the data, which is getting a single row at a time using themysql_fetch_row function.
In Chapter 9, I talked about First, Second, and Third Normal Form,so you may have now noticed that the classics table doesn’t satisfythese, because both author and book details are included within thesame table. That’s because we created this table before encounteringnormalization. However, for the purposes of illustrating access toMySQL from PHP, reusing this table avoids the hassle of typing in anew set of test data, so we’ll stick with it for the time being.
246 | Chapter 10: Accessing MySQL Using PHP

Figure 10-1. The output from the query.php program in Example 10-5
Fetching a row
It was important to show how you can fetch a single cell of data from MySQL, but nowlet’s look at a much more efficient method. Replace the for loop of query.php (inExample 10-5) with the new loop in Example 10-6, and you will find that you get exactlythe same result that was displayed in Figure 10-1.
Example 10-6. Replacement for loop for fetching results one row at a time<?php for ($j = 0 ; $j < $rows ; ++$j) { $row = mysql_fetch_row($result);
echo 'Author: ' . $row[0] . '<br>'; echo 'Title: ' . $row[1] . '<br>'; echo 'Category: ' . $row[2] . '<br>'; echo 'Year: ' . $row[3] . '<br>'; echo 'ISBN: ' . $row[4] . '<br><br>'; }?>
Querying a MySQL Database with PHP | 247

In this modified code, only one-fifth of the calls are made to a MySQL-calling function(a full 80% less), because each row is fetched in its entirety via the mysql_fetch_rowfunction. This returns a single row of data in an array, which is then assigned to thevariable $row.
All that’s necessary, then, is to reference each element of the array $row in turn (startingat an offset of 0). Therefore $row[0] contains the Author data, $row[1] the Title, andso on, because each column is placed in the array in the order in which it appears in theMySQL table. Also, by using mysql_fetch_row instead of mysql_result, you use sub‐stantially less PHP code and achieve much faster execution time, due to simply refer‐encing each item of data by offset rather than by name.
Closing a connection
When you have finished using a database, you should close the connection. You do soby issuing the command in Example 10-7.
Example 10-7. Closing a MySQL server connection<?php mysql_close($db_server);?>
We have to pass the identifier returned by mysql_connect back in Example 10-2, whichwe stored in the variable $db_server.
All database connections are automatically closed when PHP exits, soit doesn’t matter that the connection wasn’t closed in Example 10-5.But in longer programs, where you may continually open and closedatabase connections, you are strongly advised to close each one assoon as you’re finished accessing it.
A Practical ExampleIt’s time to write our first example of inserting data in and deleting it from a MySQLtable using PHP. I recommend that you type Example 10-8 and save it to your webdevelopment directory using the filename sqltest.php. You can see an example of theprogram’s output in Figure 10-2.
Example 10-8 creates a standard HTML form. Chapter 12 explainsforms in detail, but in this chapter I take form handling for grantedand just deal with database interaction.
248 | Chapter 10: Accessing MySQL Using PHP
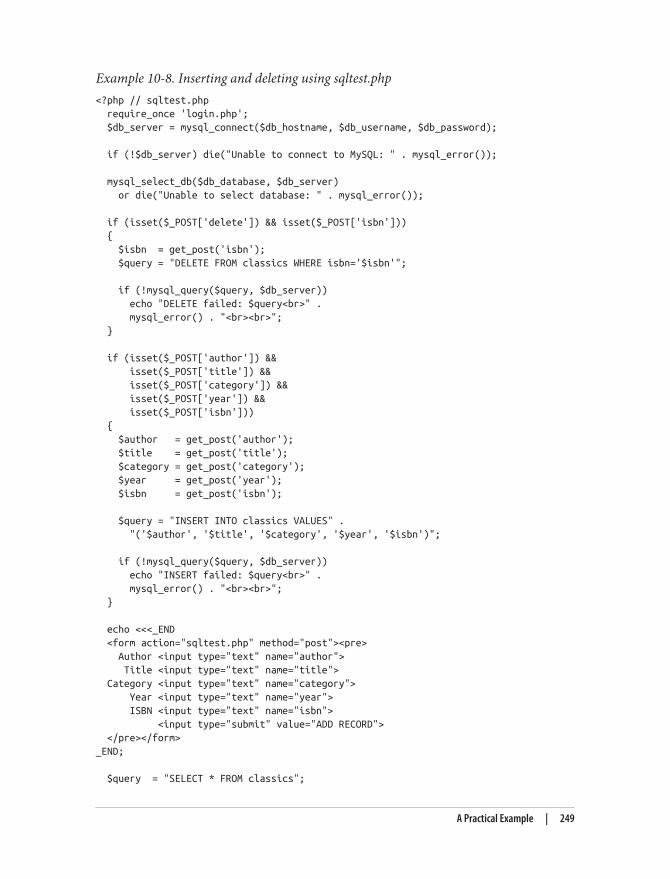
Example 10-8. Inserting and deleting using sqltest.php<?php // sqltest.php require_once 'login.php'; $db_server = mysql_connect($db_hostname, $db_username, $db_password);
if (!$db_server) die("Unable to connect to MySQL: " . mysql_error());
mysql_select_db($db_database, $db_server) or die("Unable to select database: " . mysql_error());
if (isset($_POST['delete']) && isset($_POST['isbn'])) { $isbn = get_post('isbn'); $query = "DELETE FROM classics WHERE isbn='$isbn'";
if (!mysql_query($query, $db_server)) echo "DELETE failed: $query<br>" . mysql_error() . "<br><br>"; }
if (isset($_POST['author']) && isset($_POST['title']) && isset($_POST['category']) && isset($_POST['year']) && isset($_POST['isbn'])) { $author = get_post('author'); $title = get_post('title'); $category = get_post('category'); $year = get_post('year'); $isbn = get_post('isbn');
$query = "INSERT INTO classics VALUES" . "('$author', '$title', '$category', '$year', '$isbn')";
if (!mysql_query($query, $db_server)) echo "INSERT failed: $query<br>" . mysql_error() . "<br><br>"; }
echo <<<_END <form action="sqltest.php" method="post"><pre> Author <input type="text" name="author"> Title <input type="text" name="title"> Category <input type="text" name="category"> Year <input type="text" name="year"> ISBN <input type="text" name="isbn"> <input type="submit" value="ADD RECORD"> </pre></form>_END;
$query = "SELECT * FROM classics";
A Practical Example | 249

$result = mysql_query($query);
if (!$result) die ("Database access failed: " . mysql_error()); $rows = mysql_num_rows($result);
for ($j = 0 ; $j < $rows ; ++$j) { $row = mysql_fetch_row($result); echo <<<_END <pre> Author $row[0] Title $row[1] Category $row[2] Year $row[3] ISBN $row[4] </pre> <form action="sqltest.php" method="post"> <input type="hidden" name="delete" value="yes"> <input type="hidden" name="isbn" value="$row[4]"> <input type="submit" value="DELETE RECORD"></form>_END; }
mysql_close($db_server);
function get_post($var) { return mysql_real_escape_string($_POST[$var]); }?>
At over 80 lines of code, this program may appear daunting, but don’t worry—you’vealready covered many of them in Example 10-5, and what the code does is actually quitesimple.
It first checks for any inputs that may have been made and then either inserts new datainto the table classics of the publications database or deletes a row from it, according tothe input supplied. Regardless of whether there was input, the program then outputsall rows in the table to the browser. So let’s see how it works.
The first section of new code starts by using the isset function to check whether valuesfor all the fields have been posted to the program. Upon confirmation, each of the lineswithin the if statement calls the function get_post, which appears at the end of theprogram. This function has one small but critical job: fetching the input from thebrowser.
250 | Chapter 10: Accessing MySQL Using PHP

Figure 10-2. The output from Example 10-8, sqltest.php
The $_POST ArrayI mentioned in an earlier chapter that a browser sends user input through either a GETrequest or a POST request. The POST request is usually preferred, and we use it here. Theweb server bundles up all of the user input (even if the form was filled out with a hundredfields) and puts in into an array named $_POST.
$_POST is an associative array, which you encountered in Chapter 6. Depending onwhether a form has been set to use the POST or the GET method, either the $_POST or the$_GET associative array will be populated with the form data. They can both be read inexactly the same way.
Each field has an element in the array named after that field. So, if a form contained afield named isbn, the $_POST array contains an element keyed by the word isbn. ThePHP program can read that field by referring to either $_POST['isbn'] or$_POST["isbn"] (single and double quotes have the same effect in this case).
If the $_POST syntax still seems complex to you, rest assured that you can just use theconvention I’ve shown in Example 10-8, copy the user’s input to other variables, and
A Practical Example | 251

forget about $_POST after that. This is normal in PHP programs: they retrieve all thefields from $_POST at the beginning of the program and then ignore it.
There is no reason to write to an element in the $_POST array. Its onlypurpose is to communicate information from the browser to the pro‐gram, and you’re better off copying data to your own variables be‐fore altering it.
So, back to the get_post function: it passes each item it retrieves through themysql_real_escape_string function to strip out any characters that a hacker may haveinserted in order to break into or alter your database.
Deleting a RecordPrior to checking whether new data has been posted, the program checks whether thevariable $_POST['delete'] has a value. If so, the user has clicked on the DELETERECORD button to erase a record. In this case, the value of $isbn will also have beenposted.
As you’ll recall, the ISBN uniquely identifies each record. The HTML form appends theISBN to the DELETE FROM query string created in the variable $query, which is thenpassed to the mysql_query function to issue it to MySQL. mysql_query returns eitherTRUE or FALSE, and FALSE causes an error message to be displayed explaining what wentwrong.
If $_POST['delete']) is not set (and there is therefore no record to be deleted),$_POST['author']) and other posted values are checked. If they have all been givenvalues, then $query is set to an INSERT INTO command, followed by the five values tobe inserted. The variable is then passed to mysql_query, which upon completion returnseither TRUE or FALSE. If FALSE is returned, an error message is displayed.
Displaying the FormNext we get to the part of code that displays the little form at the top of Figure 10-2. Youshould recall the echo <<<_END structure from previous chapters, which outputs ev‐erything between the _END tags.
252 | Chapter 10: Accessing MySQL Using PHP

Instead of the echo command, the program could also drop out ofPHP using ?>, issue the HTML, and then reenter PHP processing with<?php. Whichever style used is a matter of programmer preference,but I always recommend staying within PHP code for these reasons:
• It makes it very clear when debugging (and also for other users)that everything within a .php file is PHP code. Therefore, thereis no need to go hunting for dropouts to HTML.
• When you wish to include a PHP variable directly within HTML,you can just type it. If you had dropped back to HTML, youwould have had to temporarily reenter PHP processing, outputthe variable, and then drop back out again.
The HTML form section simply sets the form’s action to sqltest.php. This means thatwhen the form is submitted, the contents of the form fields will be sent to the filesqltest.php, which is the program itself. The form is also set up to send the fields as aPOST rather than a GET request. This is because GET requests are appended to the URLbeing submitted to and can look messy in your browser. They also allow users to easilymodify submissions and try to hack your server. Therefore, whenever possible, youshould use POST submissions, which also have the benefit of hiding the posted data fromview.
Having output the form fields, the HTML displays a Submit button with the name ADDRECORD and closes the form. Note the use of the <pre> and </pre> tags here, whichhave been used to force a monospaced font and allow all the inputs to line up neatly.The carriage returns at the end of each line are also output when inside <pre> tags.
Querying the DatabaseNext, the code returns to the familiar territory of Example 10-5 where, in the followingfour lines of code, a query is sent to MySQL asking to see all the records in the classicstable. After that, $rows is set to a value representing the number of rows in the table anda for loop is entered to display the contents of each row.
I have altered the next bit of code to simplify things. Instead of using the <br> tags forline feeds in Example 10-5, I have chosen to use a <pre> tag to line up the display ofeach record in a pleasing manner.
After the display of each record, there is a second form that also posts to sqltest.php (theprogram itself) but this time contains two hidden fields: delete and isbn. The deletefield is set to “yes” and isbn to the value held in $row[4], which contains the ISBN forthe record. Then a Submit button with the name DELETE RECORD is displayed andthe form is closed. A curly brace then completes the for loop, which will continue untilall records have been displayed.
A Practical Example | 253

Finally, you see the definition for the function get_post, which we’ve already lookedat. And that’s it—our first PHP program to manipulate a MySQL database. So, let’s checkout what it can do.
Once you have typed the program (and corrected any typing errors), try entering thefollowing data into the various input fields to add a new record for the book MobyDick to the database:
Herman MelvilleMoby DickFiction18519780199535729
Running the ProgramWhen you have submitted this data using the ADD RECORD button, scroll down tothe bottom of the web page to see the new addition. It should look like Figure 10-3.
Figure 10-3. The result of adding Moby Dick to the database
254 | Chapter 10: Accessing MySQL Using PHP
Now let’s look at how deleting a record works by creating a dummy record. So tryentering just the number 1 in each of the five fields and click on the ADD RECORDbutton. If you now scroll down, you’ll see a new record consisting just of 1s. Obviouslythis record isn’t useful in this table, so now click on the DELETE RECORD button andscroll down again to confirm that the record has been deleted.
Assuming that everything worked, you are now able to add and de‐lete records at will. Try doing this a few times, but leave the mainrecords in place (including the new one for Moby Dick), as we’ll beusing them later. You could also try adding the record with all 1s againa couple of times and note the error message that you receive thesecond time, indicating that there is already an ISBN with the num‐ber 1.
Practical MySQLYou are now ready to look at some practical techniques that you can use in PHP to accessthe MySQL database, including tasks such as creating and dropping tables; inserting,updating, and deleting data; and protecting your database and website from malicioususers. Note that the following examples assume that you’ve created the login.php pro‐gram discussed earlier in this chapter.
Creating a TableLet’s assume you are working for a wildlife park and need to create a database to holddetails about all the types of cats it houses. You are told that there are nine families ofcats—Lion, Tiger, Jaguar, Leopard, Cougar, Cheetah, Lynx, Caracal, and Domestic—soyou’ll need a column for that. Then each cat has been given a name, so that’s anothercolumn, and you also want to keep track of their ages, which is another. Of course, youwill probably need more columns later, perhaps to hold dietary requirements, inocu‐lations, and other details, but for now that’s enough to get going. A unique identifier isalso needed for each animal, so you also decide to create a column for that called id.
Example 10-9 shows the code you might use to create a MySQL table to hold this data,with the main query assignment in bold text.
Example 10-9. Creating a table called cats<?php require_once 'login.php'; $db_server = mysql_connect($db_hostname, $db_username, $db_password);
if (!$db_server) die("Unable to connect to MySQL: " . mysql_error());
mysql_select_db($db_database) or die("Unable to select database: " . mysql_error());
Practical MySQL | 255

$query = "CREATE TABLE cats ( id SMALLINT NOT NULL AUTO_INCREMENT, family VARCHAR(32) NOT NULL, name VARCHAR(32) NOT NULL, age TINYINT NOT NULL, PRIMARY KEY (id) )";
$result = mysql_query($query);
if (!$result) die ("Database access failed: " . mysql_error());?>
As you can see, the MySQL query looks pretty similar to how you would type it directlyin the command line, except that there is no trailing semicolon, as none is needed whenyou are accessing MySQL from PHP.
Describing a TableWhen you aren’t logged into the MySQL command line, here’s a handy piece of codethat you can use to verify that a table has been correctly created from inside a browser.It simply issues the query DESCRIBE cats and then outputs an HTML table with fourheadings—Column, Type, Null, and Key—underneath which all columns within thetable are shown. To use it with other tables, simply replace the name cats in the querywith that of the new table (see Example 10-10).
Example 10-10. Describing the table cats<?php require_once 'login.php'; $db_server = mysql_connect($db_hostname, $db_username, $db_password);
if (!$db_server) die("Unable to connect to MySQL: " . mysql_error());
mysql_select_db($db_database) or die("Unable to select database: " . mysql_error());
$query = "DESCRIBE cats"; $result = mysql_query($query);
if (!$result) die ("Database access failed: " . mysql_error());
$rows = mysql_num_rows($result);
echo "<table><tr><th>Column</th><th>Type</th><th>Null</th><th>Key</th></tr>";
for ($j = 0 ; $j < $rows ; ++$j) { $row = mysql_fetch_row($result); echo "<tr>";
256 | Chapter 10: Accessing MySQL Using PHP

for ($k = 0 ; $k < 4 ; ++$k) echo "<td>$row[$k]</td>";
echo "</tr>"; }
echo "</table>";?>
The output from the program should look like this:Column Type Null Keyid smallint(6) NO PRIfamily varchar(32) NOname varchar(32) NOage tinyint(4) NO
Dropping a TableDropping a table is very easy to do and is therefore very dangerous, so be careful.Example 10-11 shows the code that you need. However, I don’t recommend that youtry it until you have been through the other examples, as it will drop the table cats andyou’ll have to re-create it using Example 10-9.
Example 10-11. Dropping the table cats<?php require_once 'login.php'; $db_server = mysql_connect($db_hostname, $db_username, $db_password);
if (!$db_server) die("Unable to connect to MySQL: " . mysql_error());
mysql_select_db($db_database) or die("Unable to select database: " . mysql_error());
$query = "DROP TABLE cats"; $result = mysql_query($query);
if (!$result) die ("Database access failed: " . mysql_error());?>
Adding DataLet’s add some data to the table using the code in Example 10-12.
Example 10-12. Adding data to table cats<?php require_once 'login.php'; $db_server = mysql_connect($db_hostname, $db_username, $db_password);
Practical MySQL | 257

if (!$db_server) die("Unable to connect to MySQL: " . mysql_error());
mysql_select_db($db_database) or die("Unable to select database: " . mysql_error());
$query = "INSERT INTO cats VALUES(NULL, 'Lion', 'Leo', 4)"; $result = mysql_query($query);
if (!$result) die ("Database access failed: " . mysql_error());?>
You may wish to add a couple more items of data by modifying $query as follows andcalling up the program in your browser again:
$query = "INSERT INTO cats VALUES(NULL, 'Cougar', 'Growler', 2)";$query = "INSERT INTO cats VALUES(NULL, 'Cheetah', 'Charly', 3)";
By the way, notice the NULL value passed as the first parameter? This is because the idcolumn is of type AUTO_INCREMENT, and MySQL will decide what value to assign ac‐cording to the next available number in sequence, so we simply pass a NULL value, whichwill be ignored.
Of course, the most efficient way to populate MySQL with data is to create an array andinsert the data with a single query.
Retrieving DataNow that some data has been entered into the cats table, Example 10-13 shows how youcan check that it was correctly inserted.
Example 10-13. Retrieving rows from the cats table<?php require_once 'login.php'; $db_server = mysql_connect($db_hostname, $db_username, $db_password);
if (!$db_server) die("Unable to connect to MySQL: " . mysql_error());
mysql_select_db($db_database) or die("Unable to select database: " . mysql_error());
$query = "SELECT * FROM cats"; $result = mysql_query($query);
if (!$result) die ("Database access failed: " . mysql_error());
$rows = mysql_num_rows($result);
echo "<table><tr> <th>Id</th> <th>Family</th><th>Name</th><th>Age</th></tr>";
for ($j = 0 ; $j < $rows ; ++$j) {
258 | Chapter 10: Accessing MySQL Using PHP

$row = mysql_fetch_row($result); echo "<tr>";
for ($k = 0 ; $k < 4 ; ++$k) echo "<td>$row[$k]</td>";
echo "</tr>"; }
echo "</table>";?>
This code simply issues the MySQL query SELECT * FROM cats and then displays allthe rows returned. Its output is as follows:
Id Family Name Age1 Lion Leo 42 Cougar Growler 23 Cheetah Charly 3
Here you can see that the id column has correctly auto-incremented.
Updating DataChanging data that you have already inserted is also quite simple. Did you notice thespelling of Charly for the cheetah’s name? Let’s correct that to Charlie, as inExample 10-14.
Example 10-14. Renaming Charly the cheetah to Charlie<?php require_once 'login.php'; $db_server = mysql_connect($db_hostname, $db_username, $db_password);
if (!$db_server) die("Unable to connect to MySQL: " . mysql_error());
mysql_select_db($db_database) or die("Unable to select database: " . mysql_error());
$query = "UPDATE cats SET name='Charlie' WHERE name='Charly'"; $result = mysql_query($query);
if (!$result) die ("Database access failed: " . mysql_error());?>
If you run Example 10-13 again, you’ll see that it now outputs the following:Id Family Name Age1 Lion Leo 42 Cougar Growler 23 Cheetah Charlie 3
Practical MySQL | 259

Deleting DataGrowler the cougar has been transferred to another zoo, so it’s time to remove him fromthe database; see Example 10-15.
Example 10-15. Removing Growler the cougar from the cats table<?php require_once 'login.php'; $db_server = mysql_connect($db_hostname, $db_username, $db_password);
if (!$db_server) die("Unable to connect to MySQL: " . mysql_error());
mysql_select_db($db_database) or die("Unable to select database: " . mysql_error());
$query = "DELETE FROM cats WHERE name='Growler'"; $result = mysql_query($query);
if (!$result) die ("Database access failed: " . mysql_error());?>
This uses a standard DELETE FROM query, and when you run Example 10-13, you cansee that the row has been removed in the following output:
Id Family Name Age1 Lion Leo 43 Cheetah Charlie 3
Using AUTO_INCREMENTWhen using AUTO_INCREMENT, you cannot know what value has been given to a columnbefore a row is inserted. Instead, if you need to know it, you must ask MySQL afterwardusing the mysql_insert_id function. This need is common: for instance, when youprocess a purchase, you might insert a new customer into a Customers table and thenrefer to the newly created CustId when inserting a purchase into the purchase table.
Example 10-12 can be rewritten as Example 10-16 to display this value after each insert.
Example 10-16. Adding data to table cats and reporting the insertion id<?php require_once 'login.php'; $db_server = mysql_connect($db_hostname, $db_username, $db_password);
if (!$db_server) die("Unable to connect to MySQL: " . mysql_error());
mysql_select_db($db_database) or die("Unable to select database: " . mysql_error());
$query = "INSERT INTO cats VALUES(NULL, 'Lynx', 'Stumpy', 5)"; $result = mysql_query($query);
260 | Chapter 10: Accessing MySQL Using PHP

echo "The Insert Id was: " . mysql_insert_id();
if (!$result) die ("Database access failed: " . mysql_error());?>
The contents of the table should now look like the following (note how the previous idvalue of 2 is not reused, as this could cause complications in some instances):
Id Family Name Age1 Lion Leo 43 Cheetah Charlie 34 Lynx Stumpy 5
Using insert IDs
It’s very common to insert data in multiple tables: a book followed by its author, or acustomer followed by his purchase, and so on. When doing this with an auto-incrementcolumn, you will need to retain the insert ID returned for storing in the related table.
For example, let’s assume that these cats can be “adopted” by the public as a means ofraising funds, and that when a new cat is stored in the cats table, we also want to createa key to tie it to the animal’s adoptive owner. The code to do this is similar to that inExample 10-16, except that the returned insert ID is stored in the variable $insertID,and is then used as part of the subsequent query:
$query = "INSERT INTO cats VALUES(NULL, 'Lynx', 'Stumpy', 5)";$result = mysql_query($query);$insertID = mysql_insert_id();
$query = "INSERT INTO owners VALUES($insertID, 'Ann', 'Smith')";$result = mysql_query($query);
Now the cat is connected to its “owner” through the cat’s unique ID, which was createdautomatically by AUTO_INCREMENT.
Using locks
A completely safe procedure for linking tables through the insert ID is to use locks (ortransactions, as described in Chapter 9). It can slow down response time a bit whenthere are many people submitting data to the same table, but it can also be worth it. Thesequence is:
1. Lock the first table (e.g., cats).2. Insert data into the first table.3. Retrieve the unique ID from the first table through mysql_insert_id.4. Unlock the first table.
Practical MySQL | 261

5. Insert data into the second table.
You can safely release the lock before inserting data into the second table, because theinsert ID has been retrieved and is stored in a program variable. You could also use atransaction instead of locking, but that slows down the MySQL server even more.
Performing Additional QueriesOK, that’s enough feline fun. To explore some slightly more complex queries, we needto revert to using the customers and classics tables that you created in Chapter 8. Therewill be two customers in the customers table; the classics table holds the details of a fewbooks. They also share a common column of ISBNs, called isbn, that we can use toperform additional queries.
For example, to display all of the customers along with the titles and authors of the booksthey have bought, you can use the code in Example 10-17.
Example 10-17. Performing a secondary query<?php require_once 'login.php'; $db_server = mysql_connect($db_hostname, $db_username, $db_password);
if (!$db_server) die("Unable to connect to MySQL: " . mysql_error());
mysql_select_db($db_database) or die("Unable to select database: " . mysql_error());
$query = "SELECT * FROM customers"; $result = mysql_query($query);
if (!$result) die ("Database access failed: " . mysql_error());
$rows = mysql_num_rows($result);
for ($j = 0 ; $j < $rows ; ++$j) { $row = mysql_fetch_row($result); echo "$row[0] purchased ISBN $row[1]:<br>";
$subquery = "SELECT * FROM classics WHERE isbn='$row[1]'"; $subresult = mysql_query($subquery);
if (!$subresult) die ("Database access failed: " . mysql_error());
$subrow = mysql_fetch_row($subresult);
echo " '$subrow[1]' by $subrow[0]<br>"; }?>
262 | Chapter 10: Accessing MySQL Using PHP

This program uses an initial query to the customers table to look up all the customersand then, given the ISBN of the book each customer purchased, makes a new query tothe classics table to find out the title and author for each. The output from this codeshould be as follows:
Mary Smith purchased ISBN 9780582506206: 'Pride and Prejudice' by Jane AustenJack Wilson purchased ISBN 9780517123201: 'The Origin of Species' by Charles Darwin
Of course, although it wouldn’t illustrate performing additional quer‐ies, in this particular case you could also return the same informa‐tion using a NATURAL JOIN query (see Chapter 8), like this:
SELECT name,isbn,title,author FROM customers NATURAL JOIN classics;
Preventing SQL InjectionIt may be hard to understand just how dangerous it is to pass user input unchecked toMySQL. For example, suppose you have a simple piece of code to verify a user, and itlooks like this:
$user = $_POST['user'];$pass = $_POST['pass'];$query = "SELECT * FROM users WHERE user='$user' AND pass='$pass'";
At first glance, you might think this code is perfectly fine. If the user enters values offredsmith and mypass for $user and $pass, respectively, then the query string, as passedto MySQL, will be as follows:
SELECT * FROM users WHERE user='fredsmith' AND pass='mypass'
This is all well and good, but what if someone enters the following for $user (and doesn’teven enter anything for $pass)?
admin' #
Let’s look at the string that would be sent to MySQL:SELECT * FROM users WHERE user='admin' #' AND pass=''
Do you see the problem there? In MySQL, the # symbol represents the start of a com‐ment. Therefore, the user will be logged in as admin (assuming there is a user admin),without having to enter a password. In the following, the part of the query that will beexecuted is shown in bold; the rest will be ignored.
SELECT * FROM users WHERE user='admin' #' AND pass=''
But you should count yourself very lucky if that’s all a malicious user does to you. Atleast you might still be able to go into your application and undo any changes the user
Practical MySQL | 263

makes as admin. But what about the case in which your application code removes a userfrom the database? The code might look something like this:
$user = $_POST['user'];$pass = $_POST['pass'];$query = "DELETE FROM users WHERE user='$user' AND pass='$pass'";
Again, this looks quite normal at first glance, but what if someone entered the followingfor $user?
anything' OR 1=1 #
This would be interpreted by MySQL as:DELETE FROM users WHERE user='anything' OR 1=1 #' AND pass=''
Ouch—that SQL query will always be TRUE and therefore you’ve lost your whole usersdatabase! So what can you do about this kind of attack?
Well, the first thing is not to rely on PHP’s built-in magic quotes, which automaticallyescape any characters such as single and double quotes by prefacing them with a back‐slash (\). Why? Because this feature can be turned off; many programmers do so inorder to put their own security code in place. So there is no guarantee that this hasn’thappened on the server you are working on. In fact, the feature was deprecated as ofPHP 5.3.0 and has been removed in PHP 6.0.0.
Instead, you should always use the function mysql_real_escape_string for all calls toMySQL. Example 10-18 is a function you can use that will remove any magic quotesadded to a user-inputted string and then properly sanitize it for you.
Example 10-18. How to properly sanitize user input for MySQL<?php function mysql_fix_string($string) { if (get_magic_quotes_gpc()) $string = stripslashes($string); return mysql_real_escape_string($string); }?>
The get_magic_quotes_gpc function returns TRUE if magic quotes are active. In thatcase, any slashes that have been added to a string have to be removed, or the functionmysql_real_escape_string could end up double-escaping some characters, creatingcorrupted strings. Example 10-19 illustrates how you would incorporatemysql_fix_string within your own code.
Example 10-19. How to safely access MySQL with user input<?php $user = mysql_fix_string($_POST['user']); $pass = mysql_fix_string($_POST['pass']); $query = "SELECT * FROM users WHERE user='$user' AND pass='$pass'";
264 | Chapter 10: Accessing MySQL Using PHP

function mysql_fix_string($string) { if (get_magic_quotes_gpc()) $string = stripslashes($string); return mysql_real_escape_string($string); }?>
Remember that you can use mysql_real_escape_string only whena MySQL database is actively open; otherwise, an error will occur.
Using PlaceholdersAnother way—this one virtually bulletproof—to prevent SQL injections is to use a fea‐ture called placeholders. The idea is to predefine a query using ? characters where thedata will appear. Then, instead of calling a MySQL query directly, you call the predefinedone, passing the data to it. This has the effect of ensuring that every item of data enteredis inserted directly into the database and cannot be interpreted as SQL queries. In otherwords, SQL injections become impossible.
The sequence of queries to execute when using MySQL’s command line would be likethat in Example 10-20.
Example 10-20. Using placeholdersPREPARE statement FROM "INSERT INTO classics VALUES(?,?,?,?,?)";
SET @author = "Emily Brontë", @title = "Wuthering Heights", @category = "Classic Fiction", @year = "1847", @isbn = "9780553212587";
EXECUTE statement USING @author,@title,@category,@year,@isbn;
DEALLOCATE PREPARE statement;
The first command prepares a statement called statement for inserting data into theclassics table. As you can see, in place of values or variables for the data to insert, thestatement contains a series of ? characters. These are the placeholders.
The next five lines assign values to MySQL variables according to the data to be inserted.Then the predefined statement is executed, passing these variables as parameters. Fi‐nally, the statement is removed, in order to return the resources it was using.
Practical MySQL | 265

In PHP, the code for this procedure looks like Example 10-21 (assuming that you havecreated login.php with the correct details to access the database).
Example 10-21. Using placeholders with PHP<?php require 'login.php'; $db_server = mysql_connect($db_hostname, $db_username, $db_password);
if (!$db_server) die("Unable to connect to MySQL: " . mysql_error());
mysql_select_db($db_database) or die("Unable to select database: " . mysql_error());
$query = 'PREPARE statement FROM "INSERT INTO classics VALUES(?,?,?,?,?)"'; mysql_query($query);
$query = 'SET @author = "Emily Brontë",' . '@title = "Wuthering Heights",' . '@category = "Classic Fiction",' . '@year = "1847",' . '@isbn = "9780553212587"'; mysql_query($query);
$query = 'EXECUTE statement USING @author,@title,@category,@year,@isbn'; mysql_query($query);
$query = 'DEALLOCATE PREPARE statement'; mysql_query($query);?>
Once you have prepared a statement, until you deallocate it you can use it as often asyou wish. Such statements are commonly used within a loop to quickly insert data intoa database by assigning values to the MySQL variables and then executing the statement.This approach is more efficient than creating the entire statement from scratch on eachpass through the loop.
Preventing HTML InjectionThere’s another type of injection you need to concern yourself about—not for the safetyof your own websites, but for your users’ privacy and protection. That’s cross-site script‐ing, also referred to as XSS.
This occurs when you allow HTML, or more often JavaScript code, to be input by a userand then displayed back by your website. One place this is common is in a commentform. What happens most often is that a malicious user will try to write code that stealscookies from your site’s users, allowing him or her to discover username and passwordpairs or other information. Even worse, the malicious user might launch an attack todownload a Trojan onto a user’s computer.
266 | Chapter 10: Accessing MySQL Using PHP

But preventing this is as simple as calling the htmlentities function, which strips outall HTML markup codes and replaces them with a form that displays the characters,but does not allow a browser to act on them. For example, consider the following HTML:
<script src='http://x.com/hack.js'></script><script>hack();</script>
This code loads in a JavaScript program and then executes malicious functions. But ifit is first passed through htmlentities, it will be turned into the following, totallyharmless string:
<script src='http://x.com/hack.js'> </script><script>hack();</script>
Therefore, if you are ever going to display anything that your users enter, either imme‐diately or after storing it in a database, you need to first sanitize it with htmlentities.To do this, I recommend that you create a new function, like the first one inExample 10-22, which can sanitize for both SQL and XSS injections.
Example 10-22. Functions for preventing both SQL and XSS injection attacks<?php function mysql_entities_fix_string($string) { return htmlentities(mysql_fix_string($string)); }
function mysql_fix_string($string) { if (get_magic_quotes_gpc()) $string = stripslashes($string); return mysql_real_escape_string($string); }?>
The mysql_entities_fix_string function first calls mysql_fix_string and thenpasses the result through htmlentities before returning the fully sanitized string.Example 10-23 shows your new “ultimate protection” version of Example 10-19.
Example 10-23. How to safely access MySQL and prevent XSS attacks<?php $user = mysql_entities_fix_string($_POST['user']); $pass = mysql_entities_fix_string($_POST['pass']); $query = "SELECT * FROM users WHERE user='$user' AND pass='$pass'";
function mysql_entities_fix_string($string) { return htmlentities(mysql_fix_string($string)); }
function mysql_fix_string($string) {
Practical MySQL | 267

if (get_magic_quotes_gpc()) $string = stripslashes($string); return mysql_real_escape_string($string); }?>
Now that you have learned how to integrate PHP with MySQL and avoid malicious userinput, the next chapter will explain how to use the improved MySQLi extension for yourMySQL queries.
Questions1. What is the standard PHP function for connecting to a MySQL database?2. When is the mysql_result function not optimal?3. Give one reason why using the POST form method is usually better than GET.4. How can you determine the most recently entered value of an AUTO_INCREMENT
column?5. Which PHP function escapes a string, making it suitable for use with MySQL?6. Which function can be used to prevent XSS injection attacks?
See “Chapter 10 Answers” on page 646 in Appendix A for the answers to these questions.
268 | Chapter 10: Accessing MySQL Using PHP

CHAPTER 11
Using the mysqli Extension
Now that you understand how to access a MySQL database using PHP and the proce‐dural mysql extensions, it’s time to learn how to do this with the improved mysqliextension. This is an object-oriented system, but there is a procedural version availableif you prefer, and I’ll show you how to use both.
Querying a MySQL Database with mysqliIn this chapter, I replicate a number of the previous one’s examples, but rewrite themto use mysqli. This should serve as an excellent example of how you can bring any legacycode you encounter up-to-date.
Creating a Login FileCreating a login file is no different with mysqli than before, so it will look somethinglike Example 11-1.
Example 11-1. The login.php file<?php // login.php $db_hostname = 'localhost'; $db_database = 'publications'; $db_username = 'username'; $db_password = 'password';?>
As in the previous chapter, the database we’ll be using is the one called publications, andthe variables $db_username and $db_password should be set to the username and pass‐word that you have been using with MySQL.
269
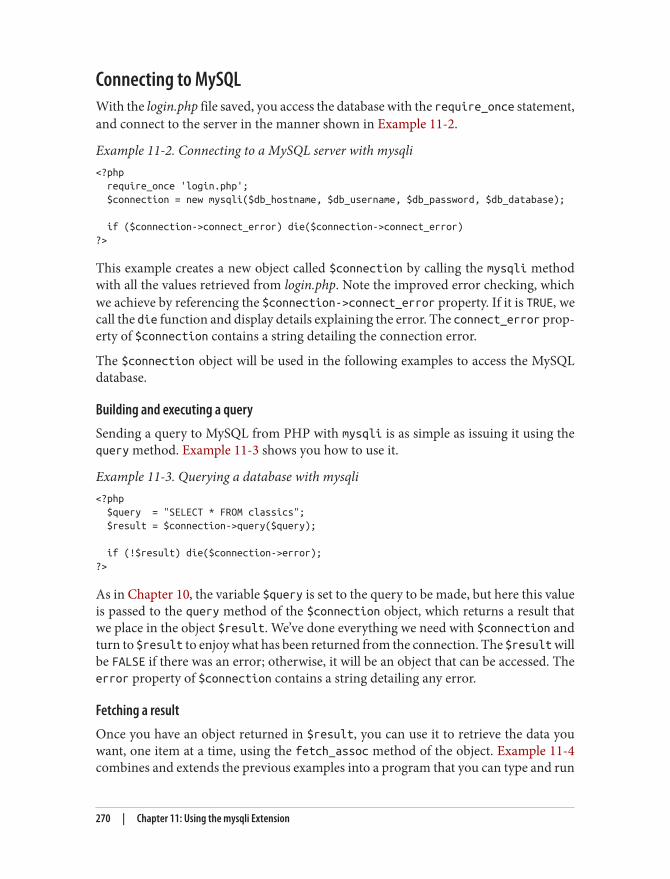
Connecting to MySQLWith the login.php file saved, you access the database with the require_once statement,and connect to the server in the manner shown in Example 11-2.
Example 11-2. Connecting to a MySQL server with mysqli<?php require_once 'login.php'; $connection = new mysqli($db_hostname, $db_username, $db_password, $db_database);
if ($connection->connect_error) die($connection->connect_error)?>
This example creates a new object called $connection by calling the mysqli methodwith all the values retrieved from login.php. Note the improved error checking, whichwe achieve by referencing the $connection->connect_error property. If it is TRUE, wecall the die function and display details explaining the error. The connect_error prop‐erty of $connection contains a string detailing the connection error.
The $connection object will be used in the following examples to access the MySQLdatabase.
Building and executing a query
Sending a query to MySQL from PHP with mysqli is as simple as issuing it using thequery method. Example 11-3 shows you how to use it.
Example 11-3. Querying a database with mysqli<?php $query = "SELECT * FROM classics"; $result = $connection->query($query);
if (!$result) die($connection->error);?>
As in Chapter 10, the variable $query is set to the query to be made, but here this valueis passed to the query method of the $connection object, which returns a result thatwe place in the object $result. We’ve done everything we need with $connection andturn to $result to enjoy what has been returned from the connection. The $result willbe FALSE if there was an error; otherwise, it will be an object that can be accessed. Theerror property of $connection contains a string detailing any error.
Fetching a result
Once you have an object returned in $result, you can use it to retrieve the data youwant, one item at a time, using the fetch_assoc method of the object. Example 11-4combines and extends the previous examples into a program that you can type and run
270 | Chapter 11: Using the mysqli Extension

yourself to retrieve these results (as depicted in Figure 11-1). I suggest that you save thisscript using the filename query-mysqli.php.
Example 11-4. Fetching results with mysqli, one cell at a time<?php // query-mysqli.php require_once 'login.php'; $connection = new mysqli($db_hostname, $db_username, $db_password, $db_database);
if ($connection->connect_error) die($connection->connect_error)
$query = "SELECT * FROM classics"; $result = $connection->query($query);
if (!$result) die($connection->error);
$rows = $result->num_rows;
for ($j = 0 ; $j < $rows ; ++$j) { $result->data_seek($j); echo 'Author: ' . $result->fetch_assoc()['author'] . '<br>'; $result->data_seek($j); echo 'Title: ' . $result->fetch_assoc()['title'] . '<br>'; $result->data_seek($j); echo 'Category: ' . $result->fetch_assoc()['category'] . '<br>'; $result->data_seek($j); echo 'Year: ' . $result->fetch_assoc()['year'] . '<br>'; $result->data_seek($j); echo 'ISBN: ' . $result->fetch_assoc()['isbn'] . '<br><br>'; }
$result->close(); $connection->close();?>
Here, to seek to the correct row each time around the loop, we call the data_seek methodof $result before fetching each item of data. Then we call the fetch_assoc method toretrieve the value stored in each cell, and output the result using echo commands.
You will probably agree that all this data seeking is rather cumbersome and that thereought to be a more efficient method of achieving the same result. And, indeed, there isa better method, which is to extract a row at a time.
Querying a MySQL Database with mysqli | 271

Figure 11-1. The result of running Example 11-4
Fetching a row
To fetch one row at a time, replace the for loop from Example 11-4 with the one high‐lighted in bold in Example 11-5, and you will find that you get exactly the same resultthat was displayed in Figure 11-1. You may wish to save this revised file as fetchrow-mysqli.php.
Example 11-5. Fetching results with mysqli, one row at a time<?php //fetchrow-mysqli.php require_once 'login.php'; $connection = new mysqli($db_hostname, $db_username, $db_password, $db_database);
if ($connection->connect_error) die($connection->connect_error);
$query = "SELECT * FROM classics"; $result = $connection->query($query);
if (!$result) die($connection->error);
$rows = $result->num_rows;
272 | Chapter 11: Using the mysqli Extension

for ($j = 0 ; $j < $rows ; ++$j) { $result->data_seek($j); $row = $result->fetch_array(MYSQLI_ASSOC);
echo 'Author: ' . $row['author'] . '<br>'; echo 'Title: ' . $row['title'] . '<br>'; echo 'Category: ' . $row['category'] . '<br>'; echo 'Year: ' . $row['year'] . '<br>'; echo 'ISBN: ' . $row['isbn'] . '<br><br>'; }
$result->close(); $connection->close();?>
In this modified code, only one-fifth of the interrogations of the $result object aremade, and only one seek into the object is made in each iteration of the loop, becauseeach row is fetched in its entirety via the fetch_array method. This returns a singlerow of data as an array, which is then assigned to the array $row.
The fetch_array method can return three types of array according to the value passedto it:MYSQLI_NUM
Numeric array. Each column appears in the array in the order in which you definedit when you created (or altered) the table. In our case, the zeroth element of thearray contains the Author column, element 1 contains the Title, and so on.
MYSQLI_ASSOC
Associative array. Each key is the name of a column. Because items of data arereferenced by column name (rather than index number), use this option wherepossible in your code to make debugging easier and help other programmers bettermanage your code.
MYSQLI_BOTH
Associative and numeric array.
Associative arrays are usually more useful than numeric ones because you can refer toeach column by name, such as $row['author'], instead of trying to remember whereit is in the column order. So this script uses an associative array, leading us to passMYSQLI_ASSOC.
Closing a connection
PHP will eventually return the memory it has allocated for objects after you have fin‐ished with the script, so in small scripts, you don’t usually need to worry about releasingmemory yourself. However, if you’re allocating a lot of result objects or fetching large
Querying a MySQL Database with mysqli | 273

amounts of data, it can be a good idea to free the memory you have been using to preventproblems later in your script.
This becomes particularly important on higher traffic pages, because the amount ofmemory consumed in a session can rapidly grow. Therefore, note the calls to the closemethods of the objects $result and $connection in the preceding scripts, as soon aseach object is no longer needed.
Ideally, you should close each result object when you have finished using it, and thenclose the connection object when your script will not be accessing MySQL anymore.This best practice ensures that resources are returned to the system as quickly as possibleto keep MySQL running optimally, and alleviates doubt over whether PHP will returnunused memory in time for when you next need it.
A Practical ExampleNow let’s rewrite the procedural sqltest.php program from the previous chapter usingmysqli. The conversion is pretty straightforward, as you can see in Example 11-6 (whichyou should save as mysqlitest.php if you intend to test it, because it continuously callsitself).
Example 11-6. Inserting and deleting using mysqlitest.php<?php // mysqlitest.php require_once 'login.php'; $connection = new mysqli($db_hostname, $db_username, $db_password, $db_database);
if ($connection->connect_error) die($connection->connect_error);
if (isset($_POST['delete']) && isset($_POST['isbn'])) { $isbn = get_post($connection, 'isbn'); $query = "DELETE FROM classics WHERE isbn='$isbn'"; $result = $connection->query($query);
if (!$result) echo "DELETE failed: $query<br>" . $connection->error . "<br><br>"; }
if (isset($_POST['author']) && isset($_POST['title']) && isset($_POST['category']) && isset($_POST['year']) && isset($_POST['isbn'])) { $author = get_post($connection, 'author'); $title = get_post($connection, 'title'); $category = get_post($connection, 'category');
274 | Chapter 11: Using the mysqli Extension

$year = get_post($connection, 'year'); $isbn = get_post($connection, 'isbn'); $query = "INSERT INTO classics VALUES" . "('$author', '$title', '$category', '$year', '$isbn')"; $result = $connection->query($query);
if (!$result) echo "INSERT failed: $query<br>" . $connection->error . "<br><br>"; }
echo <<<_END <form action="mysqlitest.php" method="post"><pre> Author <input type="text" name="author"> Title <input type="text" name="title"> Category <input type="text" name="category"> Year <input type="text" name="year"> ISBN <input type="text" name="isbn"> <input type="submit" value="ADD RECORD"> </pre></form>_END;
$query = "SELECT * FROM classics"; $result = $connection->query($query);
if (!$result) die ("Database access failed: " . $connection->error);
$rows = $result->num_rows;
for ($j = 0 ; $j < $rows ; ++$j) { $result->data_seek($j); $row = $result->fetch_array(MYSQLI_NUM);
echo <<<_END <pre> Author $row[0] Title $row[1] Category $row[2] Year $row[3] ISBN $row[4] </pre> <form action="mysqlitest.php" method="post"> <input type="hidden" name="delete" value="yes"> <input type="hidden" name="isbn" value="$row[4]"> <input type="submit" value="DELETE RECORD"></form>_END; }
$result->close(); $connection->close();
function get_post($connection, $var)
A Practical Example | 275

{ return $connection->real_escape_string($_POST[$var]); }?>
How this code works is explained in Chapter 10, so all we need to examine here are thedifferences between Examples 10-8 and 11-6. Let’s work through them in order.
The first couple of lines pull in the code from login.php and create a $connection objectto gain access to the database. Then there’s the code for deleting an entry, which simplyissues a DELETE command to the $connection object using the query method, andreturns an error message if there’s a problem.
Then, if new data has been posted to the program, it issues an INSERT command, againon the $connection object using the query method. In both instances, the $resultobject is given the result of this operation, which should be either TRUE or FALSE.
The final main part of the program deals with extracting data from the database anddisplaying it using the data_seek and fetch_array methods of the $result object.Unlike Example 11-5, however, in which an associative array was returned, here thefetch_array method is given the value MYSQLI_NUM so that a numeric array is returned;accordingly, the cells are referenced numerically (e.g., $row[0] for the author). Theresults are then displayed in each iteration of the loop, and finally the result object andconnection are closed.
The function get_post has also been modified here to use the new real_escape_stringmethod of a connection object, so now two values are passed to it (the connection andthe string value).
Using mysqli ProcedurallyIf you prefer, there is an alternative set of functions you can use to access mysqli in aprocedural (rather than object-oriented) manner.
So, instead of creating a $connection object like this:$connection = new mysqli($db_hostname, $db_username, $db_password, $db_database);
You can use the following:$link = mysqli_connect($db_hostname, $db_username, $db_password, $db_database);
To check that the connection has been made and handle it, you could use code such asthis:
if (mysqli_connect_errno()) die(mysqli_connect_error());
276 | Chapter 11: Using the mysqli Extension

And to make a MySQL query, you would use code such as the following:$result = mysqli_query($link, "SELECT * FROM classics");
Upon return, $result will contain the data. You can find out the number of rows re‐turned as follows:
$rows = mysqli_num_rows($result));
An integer is returned in $rows. You can fetch the actual data one row at a time in thefollowing way, which returns a numeric array:
$row = mysqli_fetch_array($result, MYSQLI_NUM);
In this instance, $row[0] will contain the first column of data, $row[1] the second, andso on. As described in Example 11-5, rows can also be returned as associative arrays oras both types, depending on the value passed in the second argument.
Escaping strings procedurally with mysqli is as easy as using the following:$escaped = mysqli_real_escape_string($link, $val);
For full details on using mysqli procedurally (and all other aspects of mysqli), visithttp://tinyurl.com/usingmysqli.
Now that you have learned how to integrate PHP with MySQL in several different ways,the next chapter moves on to creating user-friendly forms and dealing with the datasubmitted from them.
Questions1. How do you connect to a MySQL database using mysqli?2. How do you submit a query to MySQL using mysqli?3. How can you retrieve a string containing an error message when a mysqli error
occurs?4. How can you determine the number of rows returned by a mysqli query?5. How can you retrieve a particular row of data from a set of mysqli results?6. Which mysqli method can be used to properly escape user input to prevent code
injection?7. What negative effects can happen if you do not close the objects created by mysqli
methods?
See “Chapter 11 Answers” on page 646 in Appendix A for the answers to these questions.
Questions | 277


CHAPTER 12
Form Handling
The main way that website users interact with PHP and MySQL is through the use ofHTML forms. These were introduced very early on in the development of the WorldWide Web in 1993—even before the advent of ecommerce—and have remained amainstay ever since, due to their simplicity and ease of use.
Of course, enhancements have been made over the years to add extra functionality toHTML form handling, so this chapter will bring you up to speed on state-of-the-artform handling and show you the best ways to implement forms for good usability andsecurity. Plus, as you will see a little later on, the HTML5 specification has further im‐proved the use of forms.
Building FormsHandling forms is a multipart process. First a form is created, into which a user canenter the required details. This data is then sent to the web server, where it is interpreted,often with some error checking. If the PHP code identifies one or more fields that requirereentering, the form may be redisplayed with an error message. When the code is sat‐isfied with the accuracy of the input, it takes some action that usually involves thedatabase, such as entering details about a purchase.
To build a form, you must have at least the following elements:
• An opening <form> and closing </form> tag• A submission type specifying either a GET or POST method• One or more input fields• The destination URL to which the form data is to be submitted
Example 12-1 shows a very simple form created with PHP. Type it and save it asformtest.php.
279

Example 12-1. formtest.php—a simple PHP form handler<?php // formtest.php echo <<<_END <html> <head> <title>Form Test</title> </head> <body> <form method="post" action="formtest.php"> What is your name? <input type="text" name="name"> <input type="submit"> </form> </body> </html>_END;?>
The first thing to notice about this example is that, as you have already seen in this book,rather than dropping in and out of PHP code, the echo <<<_END ... _END construct isused whenever multiline HTML must be output.
Inside of this multiline output is some standard code for commencing an HTML docu‐ment, displaying its title, and starting the body of the document. This is followed by theform, which is set to send its data using the POST method to the PHP programformtest.php, which is the name of the program itself.
The rest of the program just closes all the items it opened: the form, the body of theHTML document, and the PHP echo <<<_END statement. The result of opening thisprogram in a web browser is shown in Figure 12-1.
Figure 12-1. The result of opening formtest.php in a web browser
280 | Chapter 12: Form Handling

Retrieving Submitted DataExample 12-1 is only one part of the multipart form handling process. If you enter aname and click the Submit Query button, absolutely nothing will happen other thanthe form being redisplayed. So now it’s time to add some PHP code to process the datasubmitted by the form.
Example 12-2 expands on the previous program to include data processing. Type it ormodify formtest.php by adding in the new lines, save it as formtest2.php, and try theprogram for yourself. The result of running this program and entering a name is shownin Figure 12-2.
Example 12-2. Updated version of formtest.php<?php // formtest2.php if (isset($_POST['name'])) $name = $_POST['name']; else $name = "(Not entered)";
echo <<<_END <html> <head> <title>Form Test</title> </head> <body> Your name is: $name<br> <form method="post" action="formtest2.php"> What is your name? <input type="text" name="name"> <input type="submit"> </form> </body> </html>_END;?>
The only changes are a couple of lines at the start that check the $_POST associative arrayfor the field name having been submitted. Chapter 10 introduced the $_POST associativearray, which contains an element for each field in an HTML form. In Example 12-2, theinput name used was name and the form method was POST, so element name of the$_POST array contains the value in $_POST['name'].
The PHP isset function is used to test whether $_POST['name'] has been assigned avalue. If nothing was posted, the program assigns the value (Not entered); otherwise,it stores the value that was entered. Then a single line has been added after the <body>statement to display that value, which is stored in $name.
Retrieving Submitted Data | 281

Figure 12-2. formtest.php with data handling
Notice how the <input> elements in this example do not use the />form of self-closing, because in the new world of HTML5 this style isoptional (and it was never actually required in HTML4 anyway; it wasrecommended purely because XHTML was planned to supersedeHTML at some point—but this never happened). I’m always in fa‐vor of less work when programming, so I no longer use these char‐acters except for actual XHTML (where this type of closing remainsnecessary), saving both a space and a slash for every self-closing tag.
register_globals: An Old Solution Hangs OnBefore security became such a big issue, the default behavior of PHP was to assign the$_POST and $_GET arrays directly to PHP variables. For example, there would be no needto use the instruction $name=$_POST['name']; because $name would already be giventhat value automatically by PHP at the program start!
Initially (prior to version 4.2.0 of PHP), this seemed a very useful idea that saved a lotof extra code writing, but this practice has now been discontinued and the feature isdisabled by default. Should you find register_globals enabled on a production webserver for which you are developing, you should urgently ask your server administratorto disable it.
So why disable register_globals? It enables anyone to enter a GET input on the tail ofa URL, like this: http://myserver.com?override=1. If your code were ever to use the vari‐able $override and you forgot to initialize it (e.g., through $override=0;), the programcould be compromised by such an exploit.
In fact, because many installations on the Web still have this gaping hole, I advise youto always initialize every variable you use, just in case your code will ever run on sucha system. Initialization is also good programming practice, because you can commenteach initialization to remind yourself and other programmers what each variable is for.
282 | Chapter 12: Form Handling

If you find yourself maintaining code that seems to assume values forcertain variables for no apparent reason, you can make an educatedguess that the programmer wrote the code using register_globals,and that these values are intended to be extracted from a POST or GET.If so, I recommend that you rewrite the code to load these variablesexplicitly from the correct $_POST or $_GET array.
Default ValuesSometimes it’s convenient to offer your site visitors a default value in a web form. Forexample, suppose you put up a loan repayment calculator widget on a real estate website.It could make sense to enter default values of, say, 25 years and 6% interest, so that theuser can simply type either the principle sum to borrow or the amount that she canafford to pay each month.
In this case, the HTML for those two values would be something like Example 12-3.
Example 12-3. Setting default values<form method="post" action="calc.php"><pre> Loan Amount <input type="text" name="principle">Monthly Repayment <input type="text" name="monthly"> Number of Years <input type="text" name="years" value="25"> Interest Rate <input type="text" name="rate" value="6"> <input type="submit"></pre></form>
If you wish to try this (and the other HTML code samples), save itwith an .html (or .htm) file extension, such as test.html (or test.htm),and then load that file into your browser.
Take a look at the third and fourth inputs. By populating the value attribute, you displaya default value in the field, which the users can then change if they wish. With sensibledefault values, you can often make your web forms more user-friendly by minimizingunnecessary typing. The result of the previous code looks like Figure 12-3. Of course,this was created just to illustrate default values and, because the program calc.php hasnot been written, the form will not do anything if submitted.
Default values are also used for hidden fields if you want to pass extra information fromyour web page to your program, in addition to what users enter. We’ll look at hiddenfields later in this chapter.
Retrieving Submitted Data | 283

Figure 12-3. Using default values for selected form fields
Input TypesHTML forms are very versatile and allow you to submit a wide range of input types,from text boxes and text areas to checkboxes, radio buttons, and more.
Text boxes
The input type you will probably use most often is the text box. It accepts a wide rangeof alphanumeric text and other characters in a single-line box. The general format of atext box input is:
<input type="text" name="name" size="size" maxlength="length" value="value">
We’ve already covered the name and value attributes, but two more are introduced here:size and maxlength. The size attribute specifies the width of the box (in characters ofthe current font) as it should appear on the screen, and maxlength specifies the maxi‐mum number of characters that a user is allowed to enter into the field.
The only required attributes are type, which tells the web browser what type of inputto expect, and name, for giving the input a name that will be used to process the fieldupon receipt of the submitted form.
Text areas
When you need to accept input of more than a short line of text, use a text area. This issimilar to a text box, but, because it allows multiple lines, it has some different attributes.Its general format looks like this:
<textarea name="name" cols="width" rows="height" wrap="type"></textarea>
The first thing to notice is that <textarea> has its own tag and is not a subtype of the<input> tag. It therefore requires a closing </textarea> to end input.
284 | Chapter 12: Form Handling

Instead of a default attribute, if you have default text to display, you must put it beforethe closing </textarea>, and it will then be displayed and be editable by the user, likethis:
<textarea name="name" cols="width" rows="height" wrap="type"> This is some default text.</textarea>
To control the width and height, use the cols and rows attributes. Both use the characterspacing of the current font to determine the size of the area. If you omit these values, adefault input box will be created that will vary in dimensions depending on the browserused, so you should always define them to be certain about how your form will appear.
Lastly, you can control how the text entered into the box will wrap (and how any suchwrapping will be sent to the server) using the wrap attribute. Table 12-1 shows the wraptypes available. If you leave out the wrap attribute, soft wrapping is used.
Table 12-1. The wrap types available in a textarea inputType Action
off Text does not wrap and lines appear exactly as the user types them.
soft Text wraps but is sent to the server as one long string without carriage returns and line feeds.
hard Text wraps and is sent to the server in wrapped format with soft returns and line feeds.
Checkboxes
When you want to offer a number of different options to a user, from which he canselect one or more items, checkboxes are the way to go. The format to use is:
<input type="checkbox" name="name" value="value" checked="checked">
If you include the checked attribute, the box is already checked when the browser isdisplayed. The string you assign to the attribute should be either a double quote or thevalue "checked", or there should be no value assigned. If you don’t include the attribute,the box is shown unchecked. Here is an example of creating an unchecked box:
I Agree <input type="checkbox" name="agree">
If the user doesn’t check the box, no value will be submitted. But if he does, a value of"on" will be submitted for the field named agree. If you prefer to have your own valuesubmitted instead of the word on (such as the number 1), you could use the followingsyntax:
I Agree <input type="checkbox" name="agree" value="1">
On the other hand, if you wish to offer a newsletter to your readers when submitting aform, you might want to have the checkbox already checked as the default value:
Subscribe? <input type="checkbox" name="news" checked="checked">
Retrieving Submitted Data | 285

If you want to allow groups of items to be selected at one time, assign them all the samename. However, only the last item checked will be submitted, unless you pass an arrayas the name. For example, Example 12-4 allows the user to select his favorite ice creams(see Figure 12-4 for how it displays in a browser).
Example 12-4. Offering multiple checkbox choices Vanilla <input type="checkbox" name="ice" value="Vanilla"> Chocolate <input type="checkbox" name="ice" value="Chocolate">Strawberry <input type="checkbox" name="ice" value="Strawberry">
Figure 12-4. Using checkboxes to make quick selections
If only one of the checkboxes is selected, such as the second one, only that item will besubmitted (the field named ice would be assigned the value "Chocolate"). But if twoor more are selected, only the last value will be submitted, with prior values being ig‐nored.
If you want exclusive behavior—so that only one item can be submitted—then youshould use radio buttons (see the next section), but to allow multiple submissions, youhave to slightly alter the HTML, as in Example 12-5 (note the addition of the squarebrackets, [], following the values of ice).
Example 12-5. Submitting multiple values with an array Vanilla <input type="checkbox" name="ice[]" value="Vanilla"> Chocolate <input type="checkbox" name="ice[]" value="Chocolate">Strawberry <input type="checkbox" name="ice[]" value="Strawberry">
Now, when the form is submitted, if any of these items have been checked, an arraycalled ice will be submitted that contains any and all values. In each case, you can extracteither the single submitted value, or the array of values, to a variable like this:
$ice = $_POST['ice'];
If the field ice has been posted as a single value, $ice will be a single string, such as"Strawberry". But if ice was defined in the form as an array (like Example 12-5), $icewill be an array, and its number of elements will be the number of values submitted.Table 12-2 shows the seven possible sets of values that could be submitted by this HTML
286 | Chapter 12: Form Handling

for one, two, or all three selections. In each case, an array of one, two, or three items iscreated.
Table 12-2. The seven possible sets of values for the array $iceOne value submitted Two values submitted Three values submitted
$ice[0] => Vanilla
$ice[0] => Chocolate
$ice[0] => Strawberry
$ice[0] => Vanilla$ice[1] => Chocolate
$ice[0] => Vanilla$ice[1] => Strawberry
$ice[0] => Chocolate$ice[1] => Strawberry
$ice[0] => Vanilla$ice[1] => Chocolate$ice[2] => Strawberry
If $ice is an array, the PHP code to display its contents is quite simple and might looklike this:
foreach($ice as $item) echo "$item<br>";
This uses the standard PHP foreach construct to iterate through the array $ice andpass each element’s value into the variable $item, which is then displayed via the echocommand. The <br> is just an HTML formatting device to force a new line after eachflavor in the display. By default, checkboxes are square.
Radio buttons
Radio buttons are named after the push-in preset buttons found on many older radios,where any previously depressed button pops back up when another is pressed. They areused when you want only a single value to be returned from a selection of two or moreoptions. All the buttons in a group must use the same name and, because only a singlevalue is returned, you do not have to pass an array.
For example, if your website offers a choice of delivery times for items purchased fromyour store, you might use HTML like that in Example 12-6 (see Figure 12-5 to see howit displays).
Example 12-6. Using radio buttons8am-Noon<input type="radio" name="time" value="1">Noon-4pm<input type="radio" name="time" value="2" checked="checked"> 4pm-8pm<input type="radio" name="time" value="3">
Here, the second option of Noon–4pm has been selected by default. This default choiceensures that at least one delivery time will be chosen by the user, which can be changedto one of the other two options if preferred. Had one of the items not been alreadychecked, the user might forget to select an option, and no value would be submitted atall for the delivery time. By default, radio buttons are round.
Retrieving Submitted Data | 287

Figure 12-5. Selecting a single value with radio buttons
Hidden fields
Sometimes it is convenient to have hidden form fields so that you can keep track of thestate of form entry. For example, you might wish to know whether a form has alreadybeen submitted. You can achieve this by adding some HTML in your PHP code, suchas the following:
echo '<input type="hidden" name="submitted" value="yes">'
This is a simple PHP echo statement that adds an input field to the HTML form. Let’sassume the form was created outside the program and displayed to the user. The firsttime the PHP program receives the input, this line of code has not run, so there will beno field named submitted. The PHP program re-creates the form, adding the inputfield. So when the visitor resubmits the form, the PHP program receives it with thesubmitted field set to "yes". The code can simply check whether the field is present:
if (isset($_POST['submitted'])){...
Hidden fields can also be useful for storing other details, such as a session ID string thatyou might create to identify a user, and so on.
Never treat hidden fields as secure—because they are not. Some‐one could easily view the HTML containing them using a brows‐er’s View Source feature.
<select>
The <select> tag lets you create a drop-down list of options, offering either single ormultiple selections. It conforms to the following syntax:
<select name="name" size="size" multiple="multiple">
The attribute size is the number of lines to display. Clicking on the display causes a listto drop down showing all the options. If you use the multiple attribute, a user can selectmultiple options from the list by pressing the Ctrl key when clicking. So to ask a user
288 | Chapter 12: Form Handling

for his or her favorite vegetable from a choice of five, you might use HTML as inExample 12-7, which offers a single selection.
Example 12-7. Using selectVegetables<select name="veg" size="1"> <option value="Peas">Peas</option> <option value="Beans">Beans</option> <option value="Carrots">Carrots</option> <option value="Cabbage">Cabbage</option> <option value="Broccoli">Broccoli</option></select>
Figure 12-6. Creating a drop-down list with select
This HTML offers five choices, with the first one, Peas, preselected (due to it being thefirst item). Figure 12-6 shows the output where the list has been clicked on to drop itdown, and the option Carrots has been highlighted. If you want to have a different defaultoption offered first (such as Beans), use the <selected> tag, like this:
<option selected="selected" value="Beans">Beans</option>
You can also allow users to select more than one item, as in Example 12-8.
Example 12-8. Using select with the multiple attributeVegetables<select name="veg" size="5" multiple="multiple"> <option value="Peas">Peas</option> <option value="Beans">Beans</option> <option value="Carrots">Carrots</option> <option value="Cabbage">Cabbage</option> <option value="Broccoli">Broccoli</option></select>
This HTML is not very different; only the size has been changed to "5" and the attributemultiple has been added. But, as you can see from Figure 12-7, it is now possible toselect more than one option by using the Ctrl key when clicking. You can leave out the
Retrieving Submitted Data | 289

size attribute if you wish, and the output will be the same; however, with a larger list,the drop-down box might take up too much screen space, so I recommend that you picka suitable number of rows and stick with it. I also recommend against multiple selectboxes smaller than two rows in height—some browsers may not correctly display thescroll bars needed to access it.
Figure 12-7. Using a select with the multiple attribute
You can also use the selected attribute within a multiple select and can, in fact, havemore than one option preselected if you wish.
Labels
You can provide an even better user experience by utilizing the <label> tag. With it,you can surround a form element, making it selectable by clicking any visible part con‐tained between the opening and closing <label> tags.
For example, going back to the example of choosing a delivery time, you could allowthe user to click on the radio button itself and the associated text, like this:
<label>8am-Noon<input type="radio" name="time" value="1"></label>
The text will not be underlined like a hyperlink when you do this, but as the mousepasses over, it will change to an arrow instead of a text cursor, indicating that the wholeitem is clickable.
The submit button
To match the type of form being submitted, you can change the text of the submit buttonto anything you like by using the value attribute, like this:
<input type="submit" value="Search">
You can also replace the standard text button with a graphic image of your choice, usingHTML such as this:
<input type="image" name="submit" src="image.gif">
290 | Chapter 12: Form Handling

Sanitizing InputNow we return to PHP programming. It can never be emphasized enough that handlinguser data is a security minefield, and that it is essential to learn to treat all such data withutmost caution from the word go. It’s actually not that difficult to sanitize user inputfrom potential hacking attempts, but it must be done.
The first thing to remember is that regardless of what constraints you have placed in anHTML form to limit the types and sizes of inputs, it is a trivial matter for a hacker touse a browser’s View Source feature to extract the form and modify it to provide mali‐cious input to your website.
Therefore, you must never trust any variable that you fetch from either the $_GET or$_POST arrays until you have processed it. If you don’t, users may try to inject JavaScriptinto the data to interfere with your site’s operation, or even attempt to add MySQLcommands to compromise your database.
Therefore, instead of just using code such as the following when reading in user input:$variable = $_POST['user_input'];
you should also use one or more of the following lines of code. For example, to preventescape characters from being injected into a string that will be presented to MySQL, usethe following. Remember that this function takes into account the current character setof a MySQL connection, so it must be used with a mysqli connection object (in thisinstance, $connection), as discussed in Chapter 11.
$variable = $connection->real_escape_string($variable);
To get rid of unwanted slashes, use:$variable = stripslashes($variable);
And to remove any HTML from a string, use the following:$variable = htmlentities($variable);
For example, this would change a string of interpretable HTML code like <b>hi</b>into <b>hi</b>, which displays as text, and won’t be interpreted as HTMLtags.
Finally, if you wish to strip HTML entirely from an input, use the following:$variable = strip_tags($variable);
In fact, until you know exactly what sanitization you require for a program,Example 12-9 shows a pair of functions that brings all these checks together to providea very good level of security.
Retrieving Submitted Data | 291

Example 12-9. The sanitizeString and sanitizeMySQL functions<?php function sanitizeString($var) { $var = stripslashes($var); $var = htmlentities($var); $var = strip_tags($var); return $var; }
function sanitizeMySQL($connection, $var) { // Using the mysqli extension $var = $connection->real_escape_string($var); $var = sanitizeString($var); return $var; }?>
Add this code to the end of your PHP programs, and you can then call it for each userinput to sanitize, like this:
$var = sanitizeString($_POST['user_input']);
Or, when you have an open MySQL connection, and a mysqli connection object (inthis case, called $connection):
$var = sanitizeMySQL($connection, $_POST['user_input']);
If you use the procedural version of the mysqli extension, you willneed to modify sanitizeMySQL to call the mysqli_real_es
cape_string function, like this (in which case $connection will thenbe a handle, not an object):
$var = mysqli_real_escape_string($connection, $var);
An Example ProgramSo let’s look at how a real life PHP program integrates with an HTML form by creatingthe program convert.php listed in Example 12-10. Enter it as shown and try it for your‐self.
Example 12-10. A program to convert values between Fahrenheit and Celsius<?php // convert.php $f = $c = '';
if (isset($_POST['f'])) $f = sanitizeString($_POST['f']); if (isset($_POST['c'])) $c = sanitizeString($_POST['c']);
if ($f != '')
292 | Chapter 12: Form Handling
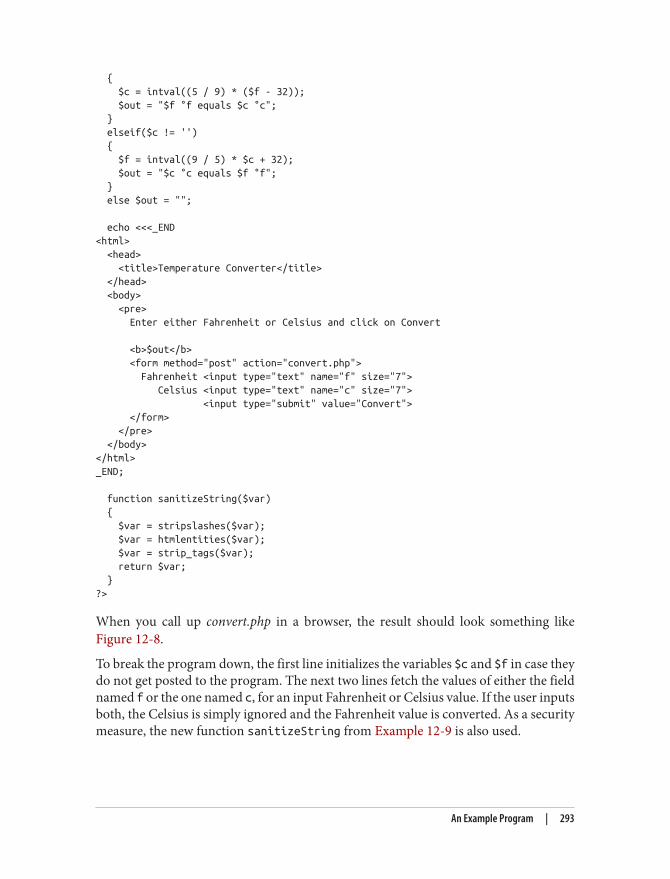
{ $c = intval((5 / 9) * ($f - 32)); $out = "$f °f equals $c °c"; } elseif($c != '') { $f = intval((9 / 5) * $c + 32); $out = "$c °c equals $f °f"; } else $out = "";
echo <<<_END<html> <head> <title>Temperature Converter</title> </head> <body> <pre> Enter either Fahrenheit or Celsius and click on Convert
<b>$out</b> <form method="post" action="convert.php"> Fahrenheit <input type="text" name="f" size="7"> Celsius <input type="text" name="c" size="7"> <input type="submit" value="Convert"> </form> </pre> </body></html>_END;
function sanitizeString($var) { $var = stripslashes($var); $var = htmlentities($var); $var = strip_tags($var); return $var; }?>
When you call up convert.php in a browser, the result should look something likeFigure 12-8.
To break the program down, the first line initializes the variables $c and $f in case theydo not get posted to the program. The next two lines fetch the values of either the fieldnamed f or the one named c, for an input Fahrenheit or Celsius value. If the user inputsboth, the Celsius is simply ignored and the Fahrenheit value is converted. As a securitymeasure, the new function sanitizeString from Example 12-9 is also used.
An Example Program | 293

Figure 12-8. The temperature conversion program in action
So, having either submitted values or empty strings in both $f and $c, the next portionof code constitutes an if ... elseif ... else structure that first tests whether $fhas a value. If not, it checks $c; otherwise, the variable $out is set to the empty string(more on that in a moment).
If $f is found to have a value, the variable $c is assigned a simple mathematical expres‐sion that converts the value of $f from Fahrenheit to Celsius. The formula used is Celsius= (5 ÷ 9) × (Fahrenheit – 32). The variable $out is then set to a message string explainingthe conversion.
On the other hand, if $c is found to have a value, a complementary operation is per‐formed to convert the value of $c from Celsius to Fahrenheit and assign the result to$f. The formula used is Fahrenheit = (9 ÷ 5) × Celsius + 32. As with the previous section,the string $out is then set to contain a message about the conversion.
In both conversions, the PHP intval function is called to convert the result of theconversion to an integer value. It’s not necessary, but looks better.
With all the arithmetic done, the program now outputs the HTML, which starts withthe basic head and title and then contains some introductory text before displaying thevalue of $out. If no temperature conversion was made, $out will have a value of NULLand nothing will be displayed, which is exactly what we want when the form hasn’t yetbeen submitted. But if a conversion was made, $out contains the result, which is dis‐played.
After this, we come to the form, which is set to submit using the POST method to thefile convert.php (the program itself). Within the form, there are two inputs for either aFahrenheit or Celsius value to be entered. A submit button with the text Convert is thendisplayed, and the form is closed.
After outputting the HTML to close the document, we come finally to the functionsanitizeString from Example 12-9. Try playing with the example by inputting
294 | Chapter 12: Form Handling
different values into the fields; for a bit of fun, can you find a value for which Fahrenheitand Celsius are the same?
All the examples in this chapter have used the POST method to sendform data. I recommend this, as it’s the neatest and most securemethod. However, the forms can easily be changed to use the GETmethod, as long as values are fetched from the $_GET array instead ofthe $_POST array. Reasons to do this might include making the re‐sult of a search bookmarkable or directly linkable from another page.
What’s New in HTML5?With HTML5, developers can draw on a number of useful enhancements to form han‐dling to make using forms easier than ever, including new attributes; color, date, andtime pickers; and new input types—although some of these features are not yet im‐planted across all major browsers. The following new features, however, will work onall browsers.
The autocomplete AttributeYou can apply the autocomplete attribute to either the <form> element, or to any of thecolor, date, email, password, range, search, tel, text, or url types of the <input>element.
With autocomplete enabled, previous user inputs are recalled and automatically enteredinto fields as suggestions. You can also disable this feature by turning autocomplete off.Here’s how to turn autocomplete on for an entire form but disable it for specific fields(highlighted in bold):
<form action='myform.php' method='post' autocomplete='on'> <input type='text' name='username'> <input type='password' name='password' autocomplete='off'></form>
The autofocus AttributeThe autofocus attribute gives immediate focus to an element when a page loads. It canbe applied to any <input>, <textarea>, or <button> element, like this:
<input type='text' name='query' autofocus='autofocus'>
Browsers that use touch interfaces (such as Android, iOS, or Win‐dows Phone) usually ignore the autofocus attribute, leaving it to theuser to tap on a field to give it focus; otherwise, the zoom in, focus‐ing, and pop-up keyboards this attribute would generate could quick‐ly become very annoying.
What’s New in HTML5? | 295

Because this feature will cause the focus to move in to an input element, the backspacekey will no longer take the user back a web page (although Alt-Left and Alt-Right willstill move backward and forward within the browsing history).
The placeholder AttributeThe placeholder attribute lets you place into any blank input field a helpful hint toexplain to users what they should enter. You use it like this:
<input type='text' name='name' size='50' placeholder='First & Last name'>
The input field will display the placeholder text as a prompt until the user starts typing,at which point the placeholder will disappear.
The required AttributeThe required attribute is used to ensure that a field has been completed before a formis submitted. You use it like this:
<input type='text' name='creditcard' required='required'>
If the browser detects attempted form submission with an uncompleted required input,a message is displayed prompting the user to complete the field.
Override AttributesWith override attributes, you can override form settings on an element-by-elementbasis. So, for example, using the formaction attribute you can specify that a submitbutton should submit a form to a different URL than is specified in the form itself, likethe following (in which the default and overridden action URLs are shown in bold):
<form action='url1.php' method='post'> <input type='text' name='field'> <input type='submit' formaction='url2.php'></form>
HTML5 also brings support for the formenctype, formmethod, formnovalidate, andformtarget override attributes, which can be used in the same manner as formaction to override one of these settings.
The form overrides have been supported in most major browsers fora few years, but have only been featured in Internet Explorer sinceversion 10.
296 | Chapter 12: Form Handling
The width and height AttributesUsing these new attributes, you can alter the dimensions of an input image, like this:
<input type='image' src='picture.png' width='120' height='80'>
Features Awaiting Full ImplementationBecause HTML5 is still in its early days (even though it’s been around for many years),browser developers have been implementing features according to their own schedules,so many parts of the specification are available only on some browsers. However, duringthe life of this edition more and more of them will become available across the board,so it’s worth mentioning what’s coming here so that you’ll be ready to use them soonerrather than later.
The form AttributeWith HTML5, you no longer have to place <input> elements within <form> elements,because you can specify the form to which an input applies by supplying a form attribute.The following code shows a form being created, but with its input outside of the <form>and </form> tags:
<form action='myscript.php' method='post' id='form1'></form>
<input type='text' name='username' form='form1'>
To do this, you must give the form an ID using the id attribute, and this is the ID towhich the form attribute of an input element must refer.
At the time of writing, this attribute is unsupported by Internet Explorer.
The list AttributeHTML5 supports attaching lists to inputs to enable users to easily select from a prede‐fined list. But, at the time of writing, only Firefox, Chrome, Opera, and IE support thelist attribute. Nevertheless, once Safari picks it up, it will be a very handy feature, whichyou’ll be able to use like this:
Select destination:<input type='url' name='site' list='links'>
<datalist id='links'> <option label='Google' value='http://google.com'> <option label='Yahoo!' value='http://yahoo.com'> <option label='Bing' value='http://bing.com'> <option label='Ask' value='http://ask.com'></datalist>
Features Awaiting Full Implementation | 297

The min and max AttributesWith the min and max attributes you can specify minimum and maximum values forinputs, but currently not in Firefox or IE. You use the attributes like this:
<input type='time' name='alarm' value='07:00' min='05:00' max='09:00'>
The browser will then either offer up and down selectors for the range of values allowed,or simply disallow values outside of that range. In tests, however, I have found thisattribute to be flaky in some implementations, and suggest you fully test before imple‐menting this feature, even when it is available on all browsers.
The step AttributeOften used with min and max, the step attribute supports stepping through number ordate values, like this:
<input type='time' name='meeting' value='12:00' min='09:00' max='16:00' step='3600'>
When you are stepping through date or time values, each unit represents one second.This attribute is not yet supported by Firefox or IE.
The color Input TypeThe color input type calls up a color picker so that you can simply click on the color ofyour choice. You use it like this:
Choose a color <input type='color' name='color'>
Neither Firefox nor IE supports this input type at the time of writing.
The number and range Input TypesThe number and range input types restrict input to either a number or a number withina specified range, like this:
<input type='number' name='age'><input type='range' name='num' min='0' max='100' value='50' step='1'>
Firefox does not appear to support the number input type at the time of writing.
Date and time PickersWhen you choose an input type of date, month, week, time, datetime, or datetime-local, a picker will pop up on supported browsers from which the user can make aselection, like this one, which inputs the time:
<input type='time' name='time' value='12:34'>
298 | Chapter 12: Form Handling

However, without support from IE or Firefox, these pickers are probably not worthusing in your web pages yet.
There are a few other form-related enhancements to HTML5 that are still under de‐velopment, and you can keep abreast of them at http://tinyurl.com/h5forms.
The next chapter will show you how to use cookies and authentication to store users’preferences and keep them logged in, and how to maintain a complete user session.
Questions1. You can submit form data using either the POST or the GET method. Which asso‐
ciative arrays are used to pass this data to PHP?2. What is register_globals, and why is it a bad idea?3. What is the difference between a text box and a text area?4. If a form has to offer three choices to a user, each of which is mutually exclusive so
that only one of the three can be selected, which input type would you use, given achoice between checkboxes and radio buttons?
5. How can you submit a group of selections from a web form using a single fieldname?
6. How can you submit a form field without displaying it in the browser?7. Which HTML tag is used to encapsulate a form element and supporting text or
graphics, making the entire unit selectable with a mouse-click?8. Which PHP function converts HTML into a format that can be displayed but will
not be interpreted as HTML by a browser?9. What form attribute can be used to help users complete input fields?
10. How can you ensure that an input is completed before a form gets submitted?
See “Chapter 12 Answers” on page 647 in Appendix A for the answers to these questions.
Questions | 299


CHAPTER 13
Cookies, Sessions, and Authentication
As your web projects grow larger and more complicated, you will find an increasingneed to keep track of your users. Even if you aren’t offering logins and passwords, youwill still often need to store details about a user’s current session and possibly also rec‐ognize people when they return to your site.
Several technologies support this kind of interaction, ranging from simple browsercookies to session handling and HTTP authentication. Between them, they offer theopportunity for you to configure your site to your users’ preferences and ensure asmooth and enjoyable transition through it.
Using Cookies in PHPA cookie is an item of data that a web server saves to your computer’s hard disk via aweb browser. It can contain almost any alphanumeric information (as long as it’s under4 KB) and can be retrieved from your computer and returned to the server. Commonuses include session tracking, maintaining data across multiple visits, holding shoppingcart contents, storing login details, and more.
Because of their privacy implications, cookies can be read only from the issuing domain.In other words, if a cookie is issued by, for example, oreilly.com, it can be retrieved onlyby a web server using that domain. This prevents other websites from gaining access todetails for which they are not authorized.
Due to the way the Internet works, multiple elements on a web page can be embeddedfrom multiple domains, each of which can issue its own cookies. When this happens,they are referred to as third-party cookies. Most commonly, these are created by adver‐tising companies in order to track users across multiple websites.
301

Because of this, most browsers allow users to turn cookies off either for the currentserver’s domain, third-party servers, or both. Fortunately, most people who disablecookies do so only for third-party websites.
Cookies are exchanged during the transfer of headers, before the actual HTML of a webpage is sent, and it is impossible to send a cookie once any HTML has been transferred.Therefore, careful planning of cookie usage is important. Figure 13-1 illustrates a typicalrequest and response dialog between a web browser and web server passing cookies.
Figure 13-1. A browser/server request/response dialog with cookies
This exchange shows a browser receiving two pages:
1. The browser issues a request to retrieve the main page, index.html, at the websitehttp://www.webserver.com. The first header specifies the file, and the second headerspecifies the server.
2. When the web server at webserver.com receives this pair of headers, it returns someof its own. The second header defines the type of content to be sent (text/html), andthe third one sends a cookie of the name name and with the value value. Only thenare the contents of the web page transferred.
3. Once the browser has received the cookie, it will then return it with every futurerequest made to the issuing server until the cookie expires or is deleted. So, whenthe browser requests the new page /news.html, it also returns the cookie name withthe value value.
302 | Chapter 13: Cookies, Sessions, and Authentication

4. Because the cookie has already been set, when the server receives the request tosend /news.html, it does not have to resend the cookie, but just returns the requestedpage.
Setting a CookieSetting a cookie in PHP is a simple matter. As long as no HTML has yet been transferred,you can call the setcookie function, which has the following syntax (see Table 13-1):
setcookie(name, value, expire, path, domain, secure, httponly);
Table 13-1. The setcookie parametersParameter Description Example
name The name of the cookie. This is the name that your server will use to access the cookieon subsequent browser requests.
username
value The value of the cookie, or the cookie’s contents. This can contain up to 4 KB ofalphanumeric text.
Hannah
expire (Optional.) Unix timestamp of the expiration date. Generally, you will probably usetime() plus a number of seconds. If not set, the cookie expires when the browsercloses.
time() + 2592000
path (Optional.) The path of the cookie on the server. If this is a / (forward slash), the cookieis available over the entire domain, such as www.webserver.com. If it is a subdirectory,the cookie is available only within that subdirectory. The default is the current directorythat the cookie is being set in, and this is the setting you will normally use.
/
domain (Optional.) The Internet domain of the cookie. If this is .webserver.com, the cookie isavailable to all of webserver.com and its subdomains, such as www.webserver.com andimages.webserver.com. If it is images.webserver.com, the cookie is available only toimages.webserver.com and its subdomains such as sub.images.webserver.com, but not,say, to www.webserver.com.
.webserver.com
secure (Optional.) Whether the cookie must use a secure connection (https://). If this value isTRUE, the cookie can be transferred only across a secure connection. The default isFALSE.
FALSE
httponly (Optional; implemented since PHP version 5.2.0.) Whether the cookie must use theHTTP protocol. If this value is TRUE, scripting languages such as JavaScript cannotaccess the cookie. (Not supported in all browsers.) The default is FALSE.
FALSE
So, to create a cookie with the name username and the value Hannah that is accessibleacross the entire web server on the current domain, and will be removed from thebrowser’s cache in seven days, use the following:
setcookie('username', 'Hannah', time() + 60 * 60 * 24 * 7, '/');
Using Cookies in PHP | 303

Accessing a CookieReading the value of a cookie is as simple as accessing the $_COOKIE system array. Forexample, if you wish to see whether the current browser has the cookie called username already stored and, if so, to read its value, use the following:
if (isset($_COOKIE['username'])) $username = $_COOKIE['username'];
Note that you can read a cookie back only after it has been sent to a web browser. Thismeans that when you issue a cookie, you cannot read it in again until the browser reloadsthe page (or another with access to the cookie) from your website and passes the cookieback to the server in the process.
Destroying a CookieTo delete a cookie, you must issue it again and set a date in the past. It is important forall parameters in your new setcookie call except the timestamp to be identical to theparameters when the cookie was first issued; otherwise, the deletion will fail. Therefore,to delete the cookie created earlier, you would use the following:
setcookie('username', 'Hannah', time() - 2592000, '/');
As long as the time given is in the past, the cookie should be deleted. However, I haveused a time of 2592000 seconds (one month) in the past in case the client computer’sdate and time are not correctly set.
You can try PHP cookies for yourself using the file php-cookies.php inthis chapter’s matching folder of the accompanying examples archive(available for free at http://lpmj.net). The folder also contains the filejavascript-cookies.htm, which does the same thing using JavaScript.
HTTP AuthenticationHTTP authentication uses the web server to manage users and passwords for the ap‐plication. It’s adequate for most applications that ask users to log in, although someapplications have specialized needs or more stringent security requirements that callfor other techniques.
To use HTTP authentication, PHP sends a header request asking to start an authenti‐cation dialog with the browser. The server must have this feature turned on in order forit to work, but because it’s so common, your server is very likely to offer the feature.
304 | Chapter 13: Cookies, Sessions, and Authentication

Although it is usually installed with Apache, HTTP authenticationmay not necessarily be installed on the server you use. So attempt‐ing to run these examples may generate an error telling you that thefeature is not enabled, in which case you must install the module,change the configuration file to load the module, or ask your sys‐tem administrator to do these fixes.
After entering your URL into the browser or visiting via a link, the user will see an“Authentication Required” prompt pop up requesting two fields: User Name and Pass‐word (Figure 13-2 shows how this looks in Firefox).
Figure 13-2. An HTTP authentication login prompt
Example 13-1 shows the code to make this happen.
Example 13-1. PHP authentication<?php if (isset($_SERVER['PHP_AUTH_USER']) && isset($_SERVER['PHP_AUTH_PW'])) { echo "Welcome User: " . $_SERVER['PHP_AUTH_USER'] . " Password: " . $_SERVER['PHP_AUTH_PW']; } else { header('WWW-Authenticate: Basic realm="Restricted Section"'); header('HTTP/1.0 401 Unauthorized'); die("Please enter your username and password"); }?>
HTTP Authentication | 305

By default, the type of interface Zend Server uses is cgi-fcgi, which isincompatible with basic authentication. However, configuring Zendis beyond the scope of this book, so if you are using it for Examples13-1 through 13-5, you may prefer to test them on a different serv‐er. To determine the interface of a server, you can call thephp_sapi_name function, which will return a string such as 'cgi-fcgi', 'cli', and so on. Basic authentication is not recommendedanyway on a production website, as it is very insecure, but you needto know how it works for maintaining legacy code. For further de‐tails, refer to http://php.net/php_sapi_name.
The first thing the program does is look for two particular values:$_SERVER['PHP_AUTH_USER'] and $_SERVER['PHP_AUTH_PW']. If they both exist, theyrepresent the username and password entered by a user into an authentication prompt.
If either of the values does not exist, the user has not yet been authenticated and youdisplay the prompt in Figure 13-2 by issuing the following header, where Basicrealm is the name of the section that is protected and appears as part of the pop-upprompt:
WWW-Authenticate: Basic realm="Restricted Area"
If the user fills out the fields, the PHP program runs again from the top. But if the userclicks the Cancel button, the program proceeds to the following two lines, which sendthe following header and an error message:
HTTP/1.0 401 Unauthorized
The die statement causes the text “Please enter your username and password” to bedisplayed (see Figure 13-3).
Figure 13-3. The result of clicking the Cancel button
306 | Chapter 13: Cookies, Sessions, and Authentication

Once a user has been authenticated, you will not be able to get theauthentication dialog to pop up again unless the user closes and re‐opens all browser windows, as the web browser will keep returningthe same username and password to PHP. You may need to close andreopen your browser a few times as you work through this sectionand try different things out.
Now let’s check for a valid username and password. The code in Example 13-1 doesn’trequire you to change much to add this check, other than modifying the previous wel‐come message code to test for a correct username and password, and then issuing awelcome message. A failed authentication causes an error message to be sent (seeExample 13-2).
Example 13-2. PHP authentication with input checking<?php $username = 'admin'; $password = 'letmein';
if (isset($_SERVER['PHP_AUTH_USER']) && isset($_SERVER['PHP_AUTH_PW'])) { if ($_SERVER['PHP_AUTH_USER'] == $username && $_SERVER['PHP_AUTH_PW'] == $password) echo "You are now logged in"; else die("Invalid username / password combination"); } else { header('WWW-Authenticate: Basic realm="Restricted Section"'); header('HTTP/1.0 401 Unauthorized'); die ("Please enter your username and password"); }?>
Incidentally, take a look at the wording of the error message: Invalid username /password combination. It doesn’t say whether the username or the password or bothwere wrong—the less information you can give to a potential hacker, the better.
A mechanism is now in place to authenticate users, but only for a single username andpassword. Also, the password appears in clear text within the PHP file, and if someonemanaged to hack into your server, he would instantly know it. So let’s look at a betterway to handle usernames and passwords.
Storing Usernames and PasswordsObviously MySQL is the natural way to store usernames and passwords. But again, wedon’t want to store the passwords as clear text, because our website could be compro‐
HTTP Authentication | 307

mised if the database were accessed by a hacker. Instead, we’ll use a neat trick called aone-way function.
This type of function is easy to use and converts a string of text into a seemingly randomstring. Due to their one-way nature, such functions are virtually impossible to reverse,so their output can be safely stored in a database—and anyone who steals it will be nonethe wiser as to the passwords used.
In previous editions of this book I recommended using the md5 hashing algorithm foryour data security. Time marches on, however, and now md5 is considered easily hack‐able and therefore unsafe, while even its previously recommended replacement of sha1can apparently be hacked (plus sha1 and sha2 were designed by the NSA and thereforeconsiderable caution is recommended for their use in highly secure implementations).
So now I have moved on to using the PHP hash function, passing it a version of theripemd algorithm, which was designed by the open academic community and which(like md5) returns a 32-character hexadecimal number—so it can easily replace md5 inmost databases. Use it like this:
$token = hash('ripemd128', 'mypassword');
That example happens to give $token the value:7b694600c8a2a2b0897c719958713619
By using the hash function, you can keep up with future developments in security andsimply pass the hashing algorithm to it that you wish to implement, resulting in lesscode maintenance (although you will probably have to accommodate larger hash lengthsthan 32 characters in your databases).
SaltingUnfortunately, hash on its own is not enough to protect a database of passwords, becauseit could still be susceptible to a brute force attack that uses another database of known32-character hexadecimal tokens. Such databases do exist, as a quick Google search willverify, although probably only for md5 and sha1 or sha2 at the moment.
Thankfully, though, we can put a spanner in the works of any such attempts by saltingall the passwords before they are sent to hash. Salting is simply a matter of adding sometext that only we know about to each parameter to be encrypted, like this (with the salthighlighted in bold):
$token = hash('ripemd128', 'saltstringmypassword');
In this example, the text saltstring has been prepended to the password. Of course, themore obscure you can make the salt, the better. I like to use salts such as this:
$token = hash('ripemd128', 'hqb%$tmypasswordcg*l');
308 | Chapter 13: Cookies, Sessions, and Authentication

Here some random characters have been placed both before and after the password.Given just the database, and without access to your PHP code, it should now be next toimpossible to work out the stored passwords.
All you have to do when verifying someone’s login password is to add these same randomstrings back in before and after it, and then check the resulting token from a hash callagainst the one stored in the database for that user.
Let’s create a MySQL table to hold some user details and add a couple of accounts. Sotype and save the program in Example 13-3 as setupusers.php, then open it in yourbrowser.
Example 13-3. Creating a users table and adding two accounts<?php // setupusers.php require_once 'login.php'; $connection = new mysqli($db_hostname, $db_username, $db_password, $db_database);
if ($connection->connect_error) die($connection->connect_error);
$query = "CREATE TABLE users ( forename VARCHAR(32) NOT NULL, surname VARCHAR(32) NOT NULL, username VARCHAR(32) NOT NULL UNIQUE, password VARCHAR(32) NOT NULL )"; $result = $connection->query($query); if (!$result) die($connection->error);
$salt1 = "qm&h*"; $salt2 = "pg!@";
$forename = 'Bill'; $surname = 'Smith'; $username = 'bsmith'; $password = 'mysecret'; $token = hash('ripemd128', "$salt1$password$salt2");
add_user($connection, $forename, $surname, $username, $token);
$forename = 'Pauline'; $surname = 'Jones'; $username = 'pjones'; $password = 'acrobat'; $token = hash('ripemd128', "$salt1$password$salt2");
add_user($connection, $forename, $surname, $username, $token);
function add_user($connection, $fn, $sn, $un, $pw) { $query = "INSERT INTO users VALUES('$fn', '$sn', '$un', '$pw')";
HTTP Authentication | 309

$result = $connection->query($query); if (!$result) die($connection->error); }?>
This program will create the table users within your publications database (or whicheverdatabase you set up for the login.php file in Chapter 10). In this table, it will create twousers: Bill Smith and Pauline Jones. They have the usernames and passwords of bsmith/mysecret and pjones/acrobat, respectively.
Using the data in this table, we can now modify Example 13-2 to properly authenticateusers, and Example 13-4 shows the code needed to do this. Type it, save it as authenticate.php, and call it up in your browser.
Example 13-4. PHP authentication using MySQL<?php // authenticate.php require_once 'login.php'; $connection = new mysqli($db_hostname, $db_username, $db_password, $db_database);
if ($connection->connect_error) die($connection->connect_error);
if (isset($_SERVER['PHP_AUTH_USER']) && isset($_SERVER['PHP_AUTH_PW'])) { $un_temp = mysql_entities_fix_string($connection, $_SERVER['PHP_AUTH_USER']); $pw_temp = mysql_entities_fix_string($connection, $_SERVER['PHP_AUTH_PW']);
$query = "SELECT * FROM users WHERE username='$un_temp'"; $result = $connection->query($query); if (!$result) die($connection->error); elseif ($result->num_rows) { $row = $result->fetch_array(MYSQLI_NUM);
$result->close();
$salt1 = "qm&h*"; $salt2 = "pg!@"; $token = hash('ripemd128', "$salt1$pw_temp$salt2");
if ($token == $row[3]) echo "$row[0] $row[1] : Hi $row[0], you are now logged in as '$row[2]'"; else die("Invalid username/password combination"); } else die("Invalid username/password combination"); } else { header('WWW-Authenticate: Basic realm="Restricted Section"'); header('HTTP/1.0 401 Unauthorized');
310 | Chapter 13: Cookies, Sessions, and Authentication
die ("Please enter your username and password"); }
$connection->close();
function mysql_entities_fix_string($connection, $string) { return htmlentities(mysql_fix_string($connection, $string)); }
function mysql_fix_string($connection, $string) { if (get_magic_quotes_gpc()) $string = stripslashes($string); return $connection->real_escape_string($string); }?>
As you might expect at this point in the book, some of the examples such as this one arestarting to get quite a bit longer. But don’t be put off. The final 10 lines are simplyExample 10-22 from Chapter 10. They are there to sanitize the user input—veryimportant.
The only lines to really concern yourself with at this point start with the assigning oftwo variables, $un_temp and $pw_temp, using the submitted username and password,highlighted in bold text. Next, a query is issued to MySQL to look up the user $un_tempand, if a result is returned, to assign the first row to $row. (Because usernames are unique,there will be only one row.) Then the two salts are created in $salt1 and $salt2, whichare then added before and after the submitted password $pw_temp. This string is thenpassed to the hash function, which returns a 32-character hexadecimal value in $token.
Now all that’s necessary is to check $token against the value stored in the database,which happens to be in the fourth column—which is column 3 when starting from 0.So $row[3] contains the previous token calculated for the salted password. If the twomatch, a friendly welcome string is output, calling the user by his or her first name (seeFigure 13-4). Otherwise, an error message is displayed. As mentioned before, the errormessage is the same regardless of whether such a username exists, as this providesminimal information to potential hackers or password guessers.
You can try this out for yourself by calling up the program in your browser and enteringa username of bsmith and password of mysecret (or pjones and acrobat), the valuesthat were saved in the database by Example 13-3.
HTTP Authentication | 311

Figure 13-4. Bill Smith has now been authenticated
By sanitizing input immediately after it is encountered, you will blockany malicious HTML, JavaScript, or MySQL attacks before they canget any further, and will not have to sanitize this data again. Remem‐ber, however, that if a user has characters such as < or & in a pass‐word (for example), these will be expanded to < or & by thehtmlemtities function. But as long as your code allows for stringsthat may end up larger than the provided input width, and as long asyou always run passwords through this sanitization, you’ll be just fine.
Using SessionsBecause your program can’t tell what variables were set in other programs—or evenwhat values the same program set the previous time it ran—you’ll sometimes want totrack what your users are doing from one web page to another. You can do this by settinghidden fields in a form, as seen in Chapter 10, and checking the value of the fields afterthe form is submitted, but PHP provides a much more powerful and simpler solutionin the form of sessions. These are groups of variables that are stored on the server butrelate only to the current user. To ensure that the right variables are applied to the rightusers, PHP saves a cookie in the users’ web browsers to uniquely identify them.
This cookie has meaning only to the web server and cannot be used to ascertain anyinformation about a user. You might ask about those users who have their cookies turnedoff. Well, that’s not a problem as of PHP 4.2.0, because it will identify when this is thecase and place a cookie token in the GET portion of each URL request instead. Eitherway, sessions provide a solid way of keeping track of your users.
Starting a SessionStarting a session requires calling the PHP function session_start before any HTMLhas been output, similarly to how cookies are sent during header exchanges. Then, tobegin saving session variables, you just assign them as part of the $_SESSION array, likethis:
312 | Chapter 13: Cookies, Sessions, and Authentication

$_SESSION['variable'] = $value;
They can then be read back just as easily in later program runs, like this:$variable = $_SESSION['variable'];
Now assume that you have an application that always needs access to the username,password, first name, and last name of each user, as stored in the table users, which youshould have created a little earlier. So let’s further modify authenticate.php fromExample 13-4 to set up a session once a user has been authenticated.
Example 13-5 shows the changes needed. The only difference is the content of the if($token == $row[3]) section, which we now start by opening a session and savingthese four variables into it. Enter this program (or modify Example 13-4) and save it asauthenticate2.php. But don’t run it in your browser yet, as you will also need to createa second program in a moment.
Example 13-5. Setting a session after successful authentication<?php //authenticate2.php require_once 'login.php'; $connection = new mysqli($db_hostname, $db_username, $db_password, $db_database);
if ($connection->connect_error) die($connection->connect_error);
if (isset($_SERVER['PHP_AUTH_USER']) && isset($_SERVER['PHP_AUTH_PW'])) { $un_temp = mysql_entities_fix_string($connection, $_SERVER['PHP_AUTH_USER']); $pw_temp = mysql_entities_fix_string($connection, $_SERVER['PHP_AUTH_PW']);
$query = "SELECT * FROM users WHERE username='$un_temp'"; $result = $connection->query($query);
if (!$result) die($connection->error); elseif ($result->num_rows) { $row = $result->fetch_array(MYSQLI_NUM);
$result->close();
$salt1 = "qm&h*"; $salt2 = "pg!@"; $token = hash('ripemd128', "$salt1$pw_temp$salt2");
if ($token == $row[3]) { session_start(); $_SESSION['username'] = $un_temp; $_SESSION['password'] = $pw_temp; $_SESSION['forename'] = $row[0];
Using Sessions | 313

$_SESSION['surname'] = $row[1]; echo "$row[0] $row[1] : Hi $row[0], you are now logged in as '$row[2]'"; die ("<p><a href=continue.php>Click here to continue</a></p>"); } else die("Invalid username/password combination"); } else die("Invalid username/password combination"); } else { header('WWW-Authenticate: Basic realm="Restricted Section"'); header('HTTP/1.0 401 Unauthorized'); die ("Please enter your username and password"); }
$connection->close();
function mysql_entities_fix_string($connection, $string) { return htmlentities(mysql_fix_string($connection, $string)); }
function mysql_fix_string($connection, $string) { if (get_magic_quotes_gpc()) $string = stripslashes($string); return $connection->real_escape_string($string); }?>
One other addition to the program is the “Click here to continue” link with a destinationURL of continue.php. This will be used to illustrate how the session will transfer toanother program or PHP web page. So create continue.php by entering the program inExample 13-6 and saving it.
Example 13-6. Retrieving session variables<?php // continue.php session_start();
if (isset($_SESSION['username'])) { $username = $_SESSION['username']; $password = $_SESSION['password']; $forename = $_SESSION['forename']; $surname = $_SESSION['surname'];
echo "Welcome back $forename.<br> Your full name is $forename $surname.<br> Your username is '$username' and your password is '$password'."; }
314 | Chapter 13: Cookies, Sessions, and Authentication
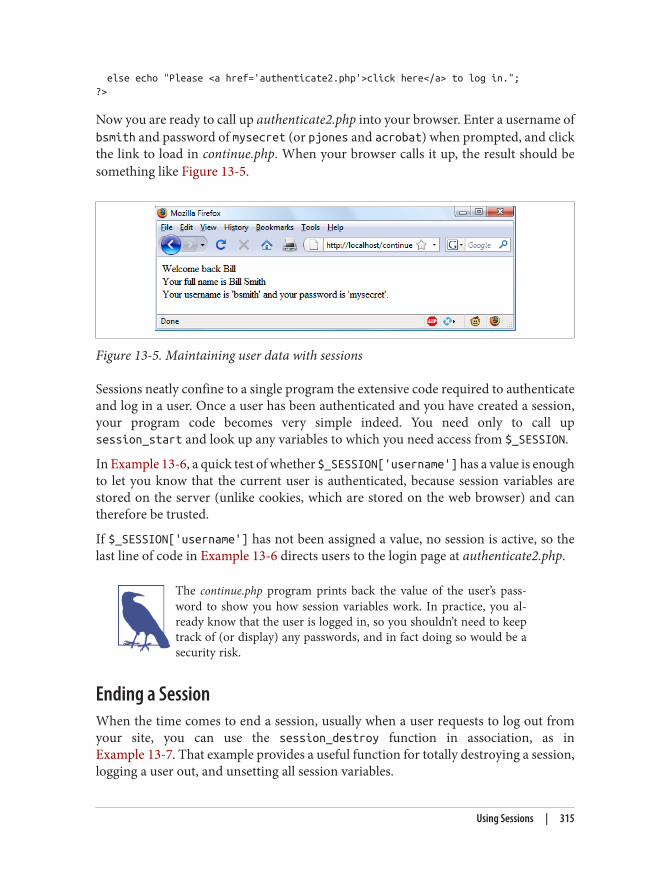
else echo "Please <a href='authenticate2.php'>click here</a> to log in.";?>
Now you are ready to call up authenticate2.php into your browser. Enter a username ofbsmith and password of mysecret (or pjones and acrobat) when prompted, and clickthe link to load in continue.php. When your browser calls it up, the result should besomething like Figure 13-5.
Figure 13-5. Maintaining user data with sessions
Sessions neatly confine to a single program the extensive code required to authenticateand log in a user. Once a user has been authenticated and you have created a session,your program code becomes very simple indeed. You need only to call upsession_start and look up any variables to which you need access from $_SESSION.
In Example 13-6, a quick test of whether $_SESSION['username'] has a value is enoughto let you know that the current user is authenticated, because session variables arestored on the server (unlike cookies, which are stored on the web browser) and cantherefore be trusted.
If $_SESSION['username'] has not been assigned a value, no session is active, so thelast line of code in Example 13-6 directs users to the login page at authenticate2.php.
The continue.php program prints back the value of the user’s pass‐word to show you how session variables work. In practice, you al‐ready know that the user is logged in, so you shouldn’t need to keeptrack of (or display) any passwords, and in fact doing so would be asecurity risk.
Ending a SessionWhen the time comes to end a session, usually when a user requests to log out fromyour site, you can use the session_destroy function in association, as inExample 13-7. That example provides a useful function for totally destroying a session,logging a user out, and unsetting all session variables.
Using Sessions | 315

Example 13-7. A handy function to destroy a session and its data<?php function destroy_session_and_data() { session_start(); $_SESSION = array(); setcookie(session_name(), '', time() - 2592000, '/'); session_destroy(); }?>
To see this in action, you could modify continue.php as in Example 13-8.
Example 13-8. Retrieving session variables and then destroying the session<?php session_start();
if (isset($_SESSION['username'])) { $username = $_SESSION['username']; $password = $_SESSION['password']; $forename = $_SESSION['forename']; $surname = $_SESSION['surname'];
destroy_session_and_data();
echo "Welcome back $forename.<br> Your full name is $forename $surname.<br> Your username is '$username' and your password is '$password'.";
} else echo "Please <a href='authenticate2.php'>click here</a> to log in.";
function destroy_session_and_data() { $_SESSION = array(); setcookie(session_name(), '', time() - 2592000, '/'); session_destroy(); }?>
The first time you navigate from authenticate2.php to continue.php, it will display allthe session variables. But, because of the call to destroy_session_and_data, if you thenclick on your browser’s Reload button, the session will have been destroyed and you’llbe prompted to return to the login page.
316 | Chapter 13: Cookies, Sessions, and Authentication

Setting a TimeoutThere are other times when you might wish to close a user’s session yourself, such aswhen the user has forgotten or neglected to log out, and you want the program to doso for his for her own security. You do this by setting the timeout after which a logoutwill automatically occur if there has been no activity.
To do this, use the ini_set function as follows. This example sets the timeout to exactlyone day:
ini_set('session.gc_maxlifetime', 60 * 60 * 24);
If you wish to know what the current timeout period is, you can display it using thefollowing:
echo ini_get('session.gc_maxlifetime');
Session SecurityAlthough I mentioned that once you had authenticated a user and set up a session youcould safely assume that the session variables were trustworthy, this isn’t exactly thecase. The reason is that it’s possible to use packet sniffing (sampling of data) to discoversession IDs passing across a network. Additionally, if the session ID is passed in the GETpart of a URL, it might appear in external site server logs. The only truly secure way ofpreventing these from being discovered is to implement a Secure Socket Layer (SSL) andrun HTTPS instead of HTTP web pages. That’s beyond the scope of this book, althoughyou may like to take a look at http://apache-ssl.org for details on setting up a secure webserver.
Preventing session hijacking
When SSL is not a possibility, you can further authenticate users by storing their IPaddress along with their other details by adding a line such as the following when youstore their session:
$_SESSION['ip'] = $_SERVER['REMOTE_ADDR'];
Then, as an extra check, whenever any page loads and a session is available, performthe following check. It calls the function different_user if the stored IP address doesn’tmatch the current one:
if ($_SESSION['ip'] != $_SERVER['REMOTE_ADDR']) different_user();
What code you place in your different_user function is up to you. I recommend thatyou simply delete the current session and ask the user to log in again due to a technicalerror. Don’t say any more than that, or you’re giving away potentially useful information.
Of course, you need to be aware that users on the same proxy server, or sharing the sameIP address on a home or business network, will have the same IP address. Again, if this
Using Sessions | 317

is a problem for you, use SSL. You can also store a copy of the browser user agentstring (a string that developers put in their browsers to identify them by type and ver‐sion), which might also distinguish users due to the wide variety of browser types,versions, and computer platforms. Use the following to store the user agent:
$_SESSION['ua'] = $_SERVER['HTTP_USER_AGENT'];
And use this to compare the current agent string with the saved one:if ($_SESSION['ua'] != $_SERVER['HTTP_USER_AGENT']) different_user();
Or, better still, combine the two checks like this and save the combination as a hashhexadecimal string:
$_SESSION['check'] = hash('ripemd128', $_SERVER['REMOTE_ADDR'] . $_SERVER['HTTP_USER_AGENT']);
And use this to compare the current and stored strings:if ($_SESSION['check'] != hash('ripemd128', $_SERVER['REMOTE_ADDR'] . $_SERVER['HTTP_USER_AGENT'])) different_user();
Preventing session fixation
Session fixation happens when a malicious user tries to present a session ID to the serverrather than letting the server create one. It can happen when a user takes advantage ofthe ability to pass a session ID in the GET part of a URL, like this:
http://yourserver.com/authenticate.php?PHPSESSID=123456789
In this example, the made-up session ID of 123456789 is being passed to the server.Now, consider Example 13-9, which is susceptible to session fixation. To see how, saveit as sessiontest.php.
Example 13-9. A session susceptible to session fixation<?php // sessiontest.php session_start();
if (!isset($_SESSION['count'])) $_SESSION['count'] = 0; else ++$_SESSION['count'];
echo $_SESSION['count'];?>
Once it’s saved, call it up in your browser using the following URL (prefacing it withthe correct pathname, such as http://localhost/):
sessiontest.php?PHPSESSID=1234
Press Reload a few times, and you’ll see the counter increase. Now try browsing to:sessiontest.php?PHPSESSID=5678
318 | Chapter 13: Cookies, Sessions, and Authentication

Press Reload a few times here, and you should see it count up again from 0. Leave thecounter on a different number than the first URL and then go back to the first URL andsee how the number changes back. You have created two different sessions of your ownchoosing here, and you could easily create as many as you needed.
The reason this approach is so dangerous is that a malicious attacker could try to dis‐tribute these types of URLs to unsuspecting users, and if any of them followed theselinks, the attacker would be able to come back and take over any sessions that had notbeen deleted or expired!
In order to prevent this, add a simple check to change the session ID using session_regenerate_id. This function keeps all current session variable values, but replaces thesession ID with a new one that an attacker cannot know.
To do this, check for a special session variable that you arbitrarily invent. If it doesn’texist, you know that this is a new session, so you simply change the session ID and setthe special session variable to note the change.
Example 13-10 shows how the code to do this might look, using the session variableinitiated.
Example 13-10. Session regeneration<?php session_start();
if (!isset($_SESSION['initiated'])) { session_regenerate_id(); $_SESSION['initiated'] = 1; }
if (!isset($_SESSION['count'])) $_SESSION['count'] = 0; else ++$_SESSION['count'];
echo $_SESSION['count'];?>
This way, an attacker can come back to your site using any of the session IDs that he orshe generated, but none of them will call up another user’s session, as they will all havebeen replaced with regenerated IDs. If you want to be ultra-paranoid, you can evenregenerate the session ID on each request.
Forcing cookie-only sessions
If you are prepared to require your users to enable cookies on your website, you can usethe ini_set function like this:
ini_set('session.use_only_cookies', 1);
Using Sessions | 319

With that setting, the ?PHPSESSID= trick will be completely ignored. If you use thissecurity measure, I also recommend you inform your users that your site requirescookies, so they know what’s wrong if they don’t get the results they want.
Using a shared server
On a server shared with other accounts, you will not want to have all your session datasaved into the same directory as theirs. Instead, you should choose a directory to whichonly your account has access (and that is not web-visible) to store your sessions, byplacing an ini_set call near the start of a program, like this:
ini_set('session.save_path', '/home/user/myaccount/sessions');
The configuration option will keep this new value only during the program’s execution,and the original configuration will be restored at the program’s ending.
This sessions folder can fill up quickly; you may wish to periodically clear out oldersessions according to how busy your server gets. The more it’s used, the less time youwill want to keep a session stored.
Remember that your websites can and will be subject to hackingattempts. There are automated bots running riot around the Inter‐net trying to find sites vulnerable to exploits. So whatever you do,whenever you are handling data that is not 100% generated withinyour own program, you should always treat it with the utmost caution.
At this point, you should now have a very good grasp of both PHP and MySQL, so inthe next chapter it’s time to introduce the third major technology covered by this book,JavaScript.
Questions1. Why must a cookie be transferred at the start of a program?2. Which PHP function stores a cookie on a web browser?3. How can you destroy a cookie?4. Where are the username and password stored in a PHP program when you are
using HTTP authentication?5. Why is the hash function a powerful security measure?6. What is meant by “salting” a string?7. What is a PHP session?8. How do you initiate a PHP session?
320 | Chapter 13: Cookies, Sessions, and Authentication

9. What is session hijacking?10. What is session fixation?
See “Chapter 13 Answers” on page 648 in Appendix A for the answers to these questions.
Questions | 321


CHAPTER 14
Exploring JavaScript
JavaScript brings a dynamic functionality to your websites. Every time you see some‐thing pop up when you mouse over an item in the browser, or see new text, colors, orimages appear on the page in front of your eyes, or grab an object on the page and dragit to a new location—all those things are done through JavaScript. It offers effects thatare not otherwise possible, because it runs inside the browser and has direct access toall the elements in a web document.
JavaScript first appeared in the Netscape Navigator browser in 1995, coinciding withthe addition of support for Java technology in the browser. Because of the initial incor‐rect impression that JavaScript was a spin-off of Java, there has been some long-termconfusion over their relationship. However, the naming was just a marketing ploy tohelp the new scripting language benefit from the popularity of the Java programminglanguage.
JavaScript gained new power when the HTML elements of the web page got a moreformal, structured definition in what is called the Document Object Model, or DOM.The DOM makes it relatively easy to add a new paragraph or focus on a piece of textand change it.
Because both JavaScript and PHP support much of the structured programming syntaxused by the C programming language, they look very similar to each other. They areboth fairly high-level languages, too; for instance, they are weakly typed, so it’s easy tochange a variable to a new type just by using it in a new context.
Now that you have learned PHP, you should find JavaScript even easier. And you’ll beglad you did, because it’s at the heart of the Web 2.0 Ajax technology that provides thefluid web frontends that (along with HTML5 features) savvy web users expect thesedays.
323

JavaScript and HTML TextJavaScript is a client-side scripting language that runs entirely inside the web browser.To call it up, you place it between opening <script> and closing </script> HTML tags.A typical HTML 4.01 “Hello World” document using JavaScript might look likeExample 14-1.
Example 14-1. “Hello World” displayed using JavaScript<html> <head><title>Hello World</title></head> <body> <script type="text/javascript"> document.write("Hello World") </script> <noscript> Your browser doesn't support or has disabled JavaScript </noscript> </body></html>
You may have seen web pages that use the HTML tag <script language="javascript">, but that usage has now been deprecated. Thisexample uses the more recent and preferred <script type="text/javascript">, or you can just use <script> on its own if you like.
Within the <script> tags is a single line of JavaScript code that uses its equivalent ofthe PHP echo or print commands, document.write. As you’d expect, it simply outputsthe supplied string to the current document, where it is displayed.
You may also have noticed that, unlike with PHP, there is no trailing semicolon (;). Thisis because a newline serves the same purpose as a semicolon in JavaScript. However, ifyou wish to have more than one statement on a single line, you do need to place asemicolon after each command except the last one. Of course, if you wish, you can adda semicolon to the end of every statement and your JavaScript will work fine.
The other thing to note in this example is the <noscript> and </noscript> pair of tags.These are used when you wish to offer alternative HTML to users whose browser doesnot support JavaScript or who have it disabled. Using these tags is up to you, as they arenot required, but you really ought to use them because it’s usually not that difficult toprovide static HTML alternatives to the operations you provide using JavaScript. How‐ever, the remaining examples in this book will omit <noscript> tags, because we’refocusing on what you can do with JavaScript, not what you can do without it.
324 | Chapter 14: Exploring JavaScript
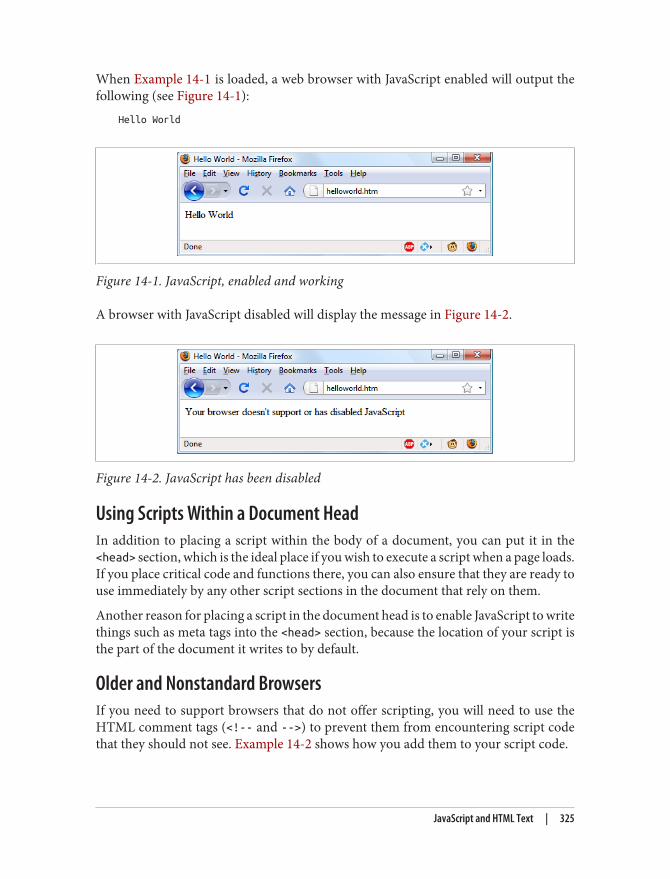
When Example 14-1 is loaded, a web browser with JavaScript enabled will output thefollowing (see Figure 14-1):
Hello World
Figure 14-1. JavaScript, enabled and working
A browser with JavaScript disabled will display the message in Figure 14-2.
Figure 14-2. JavaScript has been disabled
Using Scripts Within a Document HeadIn addition to placing a script within the body of a document, you can put it in the<head> section, which is the ideal place if you wish to execute a script when a page loads.If you place critical code and functions there, you can also ensure that they are ready touse immediately by any other script sections in the document that rely on them.
Another reason for placing a script in the document head is to enable JavaScript to writethings such as meta tags into the <head> section, because the location of your script isthe part of the document it writes to by default.
Older and Nonstandard BrowsersIf you need to support browsers that do not offer scripting, you will need to use theHTML comment tags (<!-- and -->) to prevent them from encountering script codethat they should not see. Example 14-2 shows how you add them to your script code.
JavaScript and HTML Text | 325

Example 14-2. The “Hello World” example modified for non-JavaScript browsers<html> <head><title>Hello World</title></head> <body> <script type="text/javascript"><!-- document.write("Hello World") // --></script> </body></html>
Here an opening HTML comment tag (<!--) has been added directly after the opening<script> statement and a closing comment tag (// -->) directly before the script isclosed with </script>.
The double forward slash (//) is used by JavaScript to indicate that the rest of the lineis a comment. It is there so that browsers that do support JavaScript will ignore thefollowing -->, but non-JavaScript browsers will ignore the preceding //, and act on the--> by closing the HTML comment.
Although the solution is a little convoluted, all you really need to remember is to usethe two following lines to enclose your JavaScript when you wish to support very oldor non-standard browsers:
<script type="text/javascript"><!- (Your JavaScript goes here...)// --></script>
However, the use of these comments is unnecessary for any browser released over thepast several years.
There are a couple of other scripting languages you should knowabout. These include Microsoft’s VBScript, which is based on theVisual Basic programming language, and Tcl, a rapid prototypinglanguage. They are called up in a similar way to JavaScript, except theyuse types of text/vbscript and text/tcl, respectively. VBScriptworks only in Internet Explorer; use of it in other browsers requiresa plugin. Tcl always needs a plug-in. So both should be considerednonstandard, and neither is covered in this book.
Including JavaScript FilesIn addition to writing JavaScript code directly in HTML documents, you can includefiles of JavaScript code either from your website or from anywhere on the Internet. Thesyntax for this is:
<script type="text/javascript" src="script.js"></script>
326 | Chapter 14: Exploring JavaScript

Or, to pull a file in from the Internet, use:<script type="text/javascript" src="http://someserver.com/script.js"></script>
As for the script files themselves, they must not include any <script> or </script>tags, because they are unnecessary: the browser already knows that a JavaScript file isbeing loaded. Putting them in the JavaScript files will cause an error.
Including script files is the preferred way for you to use third-party JavaScript files onyour website.
It is possible to leave out the type="text/javascript" parameters;all modern browsers default to assuming that the script containsJavaScript.
Debugging JavaScript ErrorsWhen you’re learning JavaScript, it’s important to be able to track typing or other codingerrors. Unlike PHP, which displays error messages in the browser, JavaScript handleserror messages in a way that changes according to the browser used. Table 14-1 listshow to access JavaScript error messages in each of the five most commonly usedbrowsers.
Table 14-1. Accessing JavaScript error messages in different browsersBrowser How to access JavaScript error messages
Apple Safari Safari does not have an Error Console enabled by default, but you can turn it on by selectingSafari→Preferences→Advanced→“Show Develop menu in menu bar.” However, you may prefer touse the Firebug Lite JavaScript module, which many people find easier to use.
Google Chrome Click the menu icon that looks like a page with a corner turned, then select Developer→JavaScriptConsole. You can also use the shortcut Ctrl-Shift-J on a PC, or Command-Shift-J on a Mac.
Microsoft Internet Explorer Select Tools→Internet Options→Advanced, then uncheck the Disable Script Debugging box andcheck the “Display a Notification about Every Script Error” box.
Mozilla Firefox Select Tools→Error Console or use the shortcut Ctrl-Shift-J on a PC, or Command-Shift-J on a Mac.
Opera Select Tools→Advanced→Error Console.
OS X users: although I have shown you how to create an Error Con‐sole for JavaScript, you may prefer to use Google Chrome (for IntelOS X 10.5 or higher).
JavaScript and HTML Text | 327

To try out whichever Error Console you are using, let’s create a script with a minor error.Example 14-3 is much the same as Example 14-1, but the final double quotation markhas been left off the end of the string "Hello World"—a common syntax error.
Example 14-3. A JavaScript “Hello World” script with an error<html> <head><title>Hello World</title></head> <body> <script type="text/javascript"> document.write("Hello World) </script> </body></html>
Enter the example and save it as test.html, then call it up in your browser. It shouldsucceed only in displaying the title, not anything in the main browser window. Now callup the Error Console in your browser, and you should see a message such as the one inExample 14-4. To the right there will be a link to the source, which, when clicked, showsthe error line highlighted (but does not indicate the position at which the error wasencountered).
Example 14-4. A Mozilla Firefox Error Console messageSyntaxError: unterminated string literal
In Microsoft Internet Explorer, the error message will look like Example 14-5, and there’sno helpful arrow, but you are given the line and position.
Example 14-5. A Microsoft Internet Explorer Error Console messageUnterminated string constant
Google Chrome and Opera will give the message in Example 14-6. Again, you’ll be giventhe line error number but not the exact location.
Example 14-6. A Google Chrome/Opera Error Console messageUncaught SyntaxError: Unexpected token ILLEGAL
And Apple Safari provides the message in Example 14-7, with a link to the source onthe right stating the line number of the error. You can click the link to highlight the line,but it will not show where on the line the error occurred.
Example 14-7. An Opera Error Console messageSyntaxError: Unexpected EOF
If you find this support a little underwhelming, the Firebug plug-in for Firefox (andnow Chrome too) is very popular among JavaScript developers for debugging code, andis definitely worth a look.
328 | Chapter 14: Exploring JavaScript

If you will be entering the following code snippets to try them out,don’t forget to surround them with <script> and </script> tags.
Using CommentsDue to their shared inheritance from the C programming language, PHP and JavaScripthave many similarities, one of which is commenting. First, there’s the single-line com‐ment, like this:
// This is a comment
This style uses a pair of forward slash characters (//) to inform JavaScript that every‐thing following is to be ignored. And then you also have multiline comments, like this:
/* This is a section of multiline comments that will not be interpreted */
Here you start a multiline comment with the sequence /* and end it with */. Just re‐member that you cannot nest multiline comments, so make sure that you don’t commentout large sections of code that already contain multiline comments.
SemicolonsUnlike PHP, JavaScript generally does not require semicolons if you have only onestatement on a line. Therefore, the following is valid:
x += 10
However, when you wish to place more than one statement on a line, you must separatethem with semicolons, like this:
x += 10; y −= 5; z = 0
You can normally leave the final semicolon off, because the newline terminates the finalstatement.
There are exceptions to the semicolon rule. If the first character ofa line is either a left parenthesis or a left bracket, then JavaScript willassume it follows on from the previous line. If this is not what youintend, then insert a semicolon between the two lines to separatethem. Semicolons are also required by JavaScript bookmarklets be‐cause all the code must be on a single line. So, when in doubt, use asemicolon.
Using Comments | 329

VariablesNo particular character identifies a variable in JavaScript as the dollar sign does in PHP.Instead, variables use the following naming rules:
• A variable may include only the letters a–z, A–Z, 0–9, the $ symbol, and the under‐score (_).
• No other characters, such as spaces or punctuation, are allowed in a variable name.• The first character of a variable name can be only a–z, A–Z, $, or _ (no numbers).• Names are case-sensitive. Count, count, and COUNT are all different variables.• There is no set limit on variable name lengths.
And yes, you’re right, that is a $ there in that list. It is allowed by JavaScript and may bethe first character of a variable or function name. Although I don’t recommend keepingthe $ symbols, it means that you can port a lot of PHP code more quickly to JavaScriptthat way.
String VariablesJavaScript string variables should be enclosed in either single or double quotation marks,like this:
greeting = "Hello there"warning = 'Be careful'
You may include a single quote within a double-quoted string or a double quote withina single-quoted string. But you must escape a quote of the same type using the backslashcharacter, like this:
greeting = "\"Hello there\" is a greeting"warning = '\'Be careful\' is a warning'
To read from a string variable, you can assign it to another one, like this:newstring = oldstring
or you can use it in a function, like this:status = "All systems are working"document.write(status)
Numeric VariablesCreating a numeric variable is a simple as assigning a value, like these examples:
count = 42temperature = 98.4
Like strings, numeric variables can be read from and used in expressions and functions.
330 | Chapter 14: Exploring JavaScript

ArraysJavaScript arrays are also very similar to those in PHP, in that an array can contain stringor numeric data, as well as other arrays. To assign values to an array, use the followingsyntax (which in this case creates an array of strings):
toys = ['bat', 'ball', 'whistle', 'puzzle', 'doll']
To create a multidimensional array, nest smaller arrays within a larger one. So, to createa two-dimensional array containing the colors of a single face of a scrambled Rubik’sCube (where the colors red, green, orange, yellow, blue, and white are represented bytheir capitalized initial letters), you could use the following code:
face =[ ['R', 'G', 'Y'], ['W', 'R', 'O'], ['Y', 'W', 'G']]
The previous example has been formatted to make it obvious what is going on, but itcould also be written like this:
face = [['R', 'G', 'Y'], ['W', 'R', 'O'], ['Y', 'W', 'G']]
or even like this:top = ['R', 'G', 'Y']mid = ['W', 'R', 'O']bot = ['Y', 'W', 'G']
face = [top, mid, bot]
To access the element two down and three along in this matrix, you would use thefollowing (because array elements start at position 0):
document.write(face[1][2])
This statement will output the letter O for orange.
JavaScript arrays are powerful storage structures, so Chapter 16 dis‐cusses them in much greater depth.
Variables | 331

OperatorsOperators in JavaScript, as in PHP, can involve mathematics, changes to strings, andcomparison and logical operations (and, or, etc.). JavaScript mathematical operatorslook a lot like plain arithmetic; for instance, the following statement outputs 15:
document.write(13 + 2)
The following sections teach you about the various operators.
Arithmetic OperatorsArithmetic operators are used to perform mathematics. You can use them for the mainfour operations (addition, subtraction, multiplication, and division) as well as to findthe modulus (the remainder after a division) and to increment or decrement a value(see Table 14-2).
Table 14-2. Arithmetic operatorsOperator Description Example
+ Addition j + 12
− Subtraction j − 22
* Multiplication j * 7
/ Division j / 3.13
% Modulus (division remainder) j % 6
++ Increment ++j
−− Decrement −−j
Assignment OperatorsThe assignment operators are used to assign values to variables. They start with the verysimple =, and move on to +=, −=, and so on. The operator += adds the value on the rightside to the variable on the left, instead of totally replacing the value on the left. Thus, ifcount starts with the value 6, the statement:
count += 1
sets count to 7, just like the more familiar assignment statement:count = count + 1
Table 14-3 lists the various assignment operators available.
332 | Chapter 14: Exploring JavaScript

Table 14-3. Assignment operatorsOperator Example Equivalent to
= j = 99 j = 99
+= j += 2 j = j + 2
+= j += 'string' j = j + 'string'
−= j −= 12 j = j − 12
*= j *= 2 j = j * 2
/= j /= 6 j = j / 6
%= j %= 7 j = j % 7
Comparison OperatorsComparison operators are generally used inside a construct such as an if statementwhere you need to compare two items. For example, you may wish to know whether avariable you have been incrementing has reached a specific value, or whether anothervariable is less than a set value, and so on (see Table 14-4).
Table 14-4. Comparison operatorsOperator Description Example
== Is equal to j == 42
!= Is not equal to j != 17
> Is greater than j > 0
< Is less than j < 100
>= Is greater than or equal to j >= 23
<= Is less than or equal to j <= 13
=== Is equal to (and of the same type) j ===56
!== Is not equal to (and of the same type) j !== '1'
Logical OperatorsUnlike PHP, JavaScript’s logical operators do not include and and or equivalents to &&and ||, and there is no xor operator (see Table 14-5).
Table 14-5. Logical operatorsOperator Description Example
&& And j == 1 &&k == 2
|| Or j < 100 ||j > 0
! Not ! (j == k)
Operators | 333

Variable Incrementing and DecrementingThe following forms of post- and pre-incrementing and decrementing you learned touse in PHP are also supported by JavaScript:
++x−−yx += 22y −= 3
String ConcatenationJavaScript handles string concatenation slightly differently from PHP. Instead of the .(period) operator, it uses the plus sign (+), like this:
document.write("You have " + messages + " messages.")
Assuming that the variable messages is set to the value 3, the output from this line ofcode will be:
You have 3 messages.
Just as you can add a value to a numeric variable with the += operator, you can alsoappend one string to another the same way:
name = "James"name += " Dean"
Escaping CharactersEscape characters, which you’ve seen used to insert quotation marks in strings, can alsoinsert various special characters such as tabs, newlines, and carriage returns. Here is anexample using tabs to lay out a heading; it is included here merely to illustrate escapes,because in web pages, there are better ways to do layout:
heading = "Name\tAge\tLocation"
Table 14-6 details the escape characters available.
Table 14-6. JavaScript’s escape charactersCharacter Meaning
\b Backspace
\f Form feed
\n New line
\r Carriage return
\t Tab
\' Single quote (or apostrophe)
\" Double quote
334 | Chapter 14: Exploring JavaScript

Character Meaning
\\ Backslash
\XXX An octal number between 000 and 377 that represents the Latin-1 character equivalent (such as \251 for the ©symbol)
\xXX A hexadecimal number between 00 and FF that represents the Latin-1 character equivalent (such as \xA9 for the© symbol)
\uXXXX A hexadecimal number between 0000 and FFFF that represents the Unicode character equivalent (such as \u00A9for the © symbol)
Variable TypingLike PHP, JavaScript is a very loosely typed language; the type of a variable is determinedonly when a value is assigned and can change as the variable appears in different con‐texts. Usually, you don’t have to worry about the type; JavaScript figures out what youwant and just does it.
Take a look at Example 14-8, in which:
1. The variable n is assigned the string value 838102050, the next line prints out itsvalue, and the typeof operator is used to look up the type.
2. n is given the value returned when the numbers 12345 and 67890 are multipliedtogether. This value is also 838102050, but it is a number, not a string. The type ofvariable is then looked up and displayed.
3. Some text is appended to the number n and the result is displayed.
Example 14-8. Setting a variable’s type by assignment<script> n = '838102050' // Set 'n' to a string document.write('n = ' + n + ', and is a ' + typeof n + '<br>')
n = 12345 * 67890; // Set 'n' to a number document.write('n = ' + n + ', and is a ' + typeof n + '<br>')
n += ' plus some text' // Change 'n' from a number to a string document.write('n = ' + n + ', and is a ' + typeof n + '<br>')</script>
The output from this script looks like:n = 838102050, and is a stringn = 838102050, and is a numbern = 838102050 plus some text, and is a string
Variable Typing | 335

If there is ever any doubt about the type of a variable, or you need to ensure that avariable has a particular type, you can force it to that type using statements such as thefollowing (which respectively turn a string into a number and a number into a string):
n = "123"n *= 1 // Convert 'n' into a number
n = 123n += "" // Convert 'n' into a string
Or, of course, you can always look up a variable’s type using the typeof operator.
FunctionsAs with PHP, JavaScript functions are used to separate out sections of code that performa particular task. To create a function, declare it in the manner shown in Example 14-9.
Example 14-9. A simple function declaration<script> function product(a, b) { return a * b }</script>
This function takes the two parameters passed, multiplies them together, and returnsthe product.
Global VariablesGlobal variables are ones defined outside of any functions (or within functions, butdefined without the var keyword). They can be defined in the following ways:
a = 123 // Global scopevar b = 456 // Global scopeif (a == 123) var c = 789 // Global scope
Regardless of whether you are using the var keyword, as long as a variable is definedoutside of a function, it is global in scope. This means that every part of a script canhave access to it.
Local VariablesParameters passed to a function automatically have local scope; that is, they can bereferenced only from within that function. However, there is one exception. Arrays arepassed to a function by reference, so if you modify any elements in an array parameter,the elements of the original array will be modified.
336 | Chapter 14: Exploring JavaScript

To define a local variable that has scope only within the current function, and has notbeen passed as a parameter, use the var keyword. Example 14-10 shows a function thatcreates one variable with global scope and two with local scope.
Example 14-10. A function creating variables with global and local scope<script> function test() { a = 123 // Global scope var b = 456 // Local scope if (a == 123) var c = 789 // Local scope }</script>
To test whether scope setting has worked in PHP, we can use the isset function. Butin JavaScript there isn’t one, so Example 14-11 makes use of the typeof operator, whichreturns the string undefined when a variable is not defined.
Example 14-11. Checking the scope of the variables defined in function test<script> test()
if (typeof a != 'undefined') document.write('a = "' + a + '"<br>') if (typeof b != 'undefined') document.write('b = "' + b + '"<br>') if (typeof c != 'undefined') document.write('c = "' + c + '"<br>')
function test() { a = 123 var b = 456
if (a == 123) var c = 789 }</script>
The output from this script is the following single line:a = "123"
This shows that only the variable a was given global scope, which is exactly what wewould expect, because the variables b and c were given local scope by being prefacedwith the var keyword.
If your browser issues a warning about b being undefined, the warning is correct butcan be ignored.
Local Variables | 337

The Document Object ModelThe designers of JavaScript were very smart. Rather than just creating yet anotherscripting language (which would have still been a pretty good improvement at the time),they had the vision to build it around the Document Object Model, or DOM. This breaksdown the parts of an HTML document into discrete objects, each with its own proper‐ties and methods and each subject to JavaScript’s control.
JavaScript separates objects, properties, and methods using a period (one good reasonwhy + is the string concatenation operator in JavaScript, rather than the period). Forexample, let’s consider a business card as an object we’ll call card. This object containsproperties such as a name, address, phone number, and so on. In the syntax of JavaScript,these properties would look like this:
card.namecard.phonecard.address
Its methods are functions that retrieve, change, and otherwise act on the properties. Forinstance, to invoke a method that displays the properties of object card, you might usesyntax such as:
card.display()
Have a look at some of the earlier examples in this chapter and look at where the statement document.write is used. Now that you understand how JavaScript is basedaround objects, you will see that write is actually a method of the document object.
Within JavaScript, there is a hierarchy of parent and child objects, which is what isknown as the Document Object Model (see Figure 14-3).
Figure 14-3. Example of DOM object hierarchy
338 | Chapter 14: Exploring JavaScript
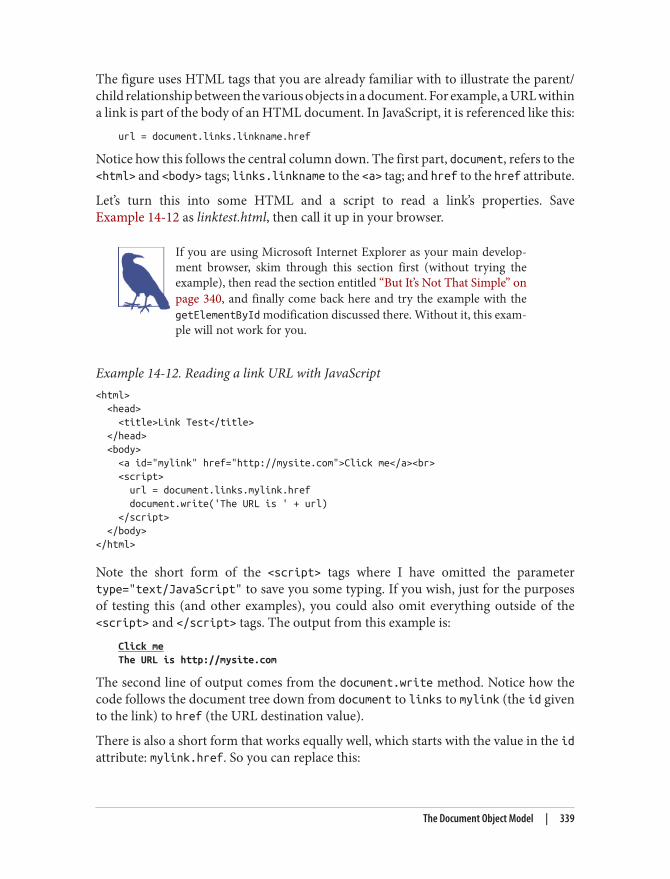
The figure uses HTML tags that you are already familiar with to illustrate the parent/child relationship between the various objects in a document. For example, a URL withina link is part of the body of an HTML document. In JavaScript, it is referenced like this:
url = document.links.linkname.href
Notice how this follows the central column down. The first part, document, refers to the<html> and <body> tags; links.linkname to the <a> tag; and href to the href attribute.
Let’s turn this into some HTML and a script to read a link’s properties. SaveExample 14-12 as linktest.html, then call it up in your browser.
If you are using Microsoft Internet Explorer as your main develop‐ment browser, skim through this section first (without trying theexample), then read the section entitled “But It’s Not That Simple” onpage 340, and finally come back here and try the example with thegetElementById modification discussed there. Without it, this exam‐ple will not work for you.
Example 14-12. Reading a link URL with JavaScript<html> <head> <title>Link Test</title> </head> <body> <a id="mylink" href="http://mysite.com">Click me</a><br> <script> url = document.links.mylink.href document.write('The URL is ' + url) </script> </body></html>
Note the short form of the <script> tags where I have omitted the parametertype="text/JavaScript" to save you some typing. If you wish, just for the purposesof testing this (and other examples), you could also omit everything outside of the<script> and </script> tags. The output from this example is:
Click meThe URL is http://mysite.com
The second line of output comes from the document.write method. Notice how thecode follows the document tree down from document to links to mylink (the id givento the link) to href (the URL destination value).
There is also a short form that works equally well, which starts with the value in the idattribute: mylink.href. So you can replace this:
The Document Object Model | 339

url = document.links.mylink.href
with the following:url = mylink.href
But It’s Not That SimpleIf you tried Example 14-12 in Safari, Firefox, Opera, or Chrome, it will have workedjust great. But in Internet Explorer it will fail, because Microsoft’s implementation ofJavaScript, called JScript, has many subtle differences from the recognized standards.Welcome to the world of advanced web development!
So what can we do about this? Well, in this case, instead of using the links child objectof the parent document object, which Internet Explorer balks at, you have to replace itwith a method to fetch the element by its id. Therefore, the following line:
url = document.links.mylink.href
can be replaced with this one:url = document.getElementById('mylink').href
And now the script will work in all major browsers. Incidentally, when you don’t haveto look up the element by id, the short form that follows will still work in InternetExplorer, as well as the other browsers:
url = mylink.href
Another Use for the $ SymbolAs mentioned earlier, the $ symbol is allowed in JavaScript variable and function names.Because of this, you may sometimes encounter strange-looking code like this:
url = $('mylink').href
Some enterprising programmers have decided that the getElementById function is soprevalent in JavaScript that they have written a function to replace it called $, shown inExample 14-13.
Example 14-13. A replacement function for the getElementById method<script> function $(id) { return document.getElementById(id) }</script>
Therefore, as long as you have included the $ function in your code, syntax such as:$('mylink').href
340 | Chapter 14: Exploring JavaScript

can replace code such as:document.getElementById('mylink').href
Using the DOMThe links object is actually an array of URLs, so the mylink URL in Example 14-12 canalso be safely referred to on all browsers in the following way (because it’s the first, andonly, link):
url = document.links[0].href
If you want to know how many links there are in an entire document, you can querythe length property of the links object like this:
numlinks = document.links.length
You can therefore extract and display all links in a document like this:for (j=0 ; j < document.links.length ; ++j) document.write(document.links[j].href + '<br>')
The length of something is a property of every array, and many objects as well. Forexample, the number of items in your browser’s web history can be queried like this:
document.write(history.length)
However, to stop websites from snooping on your browsing history, the history objectstores only the number of sites in the array: you cannot read from or write to thesevalues. But you can replace the current page with one from the history, if you knowwhat position it has within the history. This can be very useful in cases in which youknow that certain pages in the history came from your site, or you simply wish to sendthe browser back one or more pages, which you do with the go method of the historyobject. For example, to send the browser back three pages, issue the following command:
history.go(-3)
You can also use the following methods to move back or forward a page at a time:history.back()history.forward()
In a similar manner, you can replace the currently loaded URL with one of your choos‐ing, like this:
document.location.href = 'http://google.com'
Of course, there’s a whole lot more to the DOM than reading and modifying links. Asyou progress through the following chapters on JavaScript, you’ll become quite familiarwith the DOM and how to access it.
The Document Object Model | 341
Questions1. Which tags do you use to enclose JavaScript code?2. By default, to which part of a document will JavaScript code output?3. How can you include JavaScript code from another source in your documents?4. Which JavaScript function is the equivalent of echo or print in PHP?5. How can you create a comment in JavaScript?6. What is the JavaScript string concatenation operator?7. Which keyword can you use within a JavaScript function to define a variable that
has local scope?8. Give two cross-browser methods to display the URL assigned to the link with an
id of thislink.9. Which two JavaScript commands will make the browser load the previous page in
its history array?10. What JavaScript command would you use to replace the current document with
the main page at the oreilly.com website?
See “Chapter 14 Answers” on page 648 in Appendix A for the answers to these questions.
342 | Chapter 14: Exploring JavaScript

CHAPTER 15
Expressions and Control Flow in JavaScript
In the previous chapter, I introduced the basics of JavaScript and the DOM. Now it’stime to look at how to construct complex expressions in JavaScript and how to controlthe program flow of your scripts using conditional statements.
ExpressionsJavaScript expressions are very similar to those in PHP. As you learned in Chapter 4, anexpression is a combination of values, variables, operators, and functions that resultsin a value; the result can be a number, a string, or a Boolean value (which evaluates toeither true or false).
Example 15-1 shows some simple expressions. For each line, it prints out a letter betweena and d, followed by a colon and the result of the expressions. The <br> tag is there tocreate a line break and separate the output into four lines (remember that both <br>and <br /> are acceptable in HTML5, so I choose to use the former style for brevity).
Example 15-1. Four simple Boolean expressions<script> document.write("a: " + (42 > 3) + "<br>") document.write("b: " + (91 < 4) + "<br>") document.write("c: " + (8 == 2) + "<br>") document.write("d: " + (4 < 17) + "<br>")</script>
The output from this code is as follows:a: trueb: falsec: falsed: true
343

Notice that both expressions a: and d: evaluate to true. But b: and c: evaluate tofalse. Unlike PHP (which would print the number 1 and nothing, respectively), actualstrings of true and false are displayed.
In JavaScript, when you are checking whether a value is true or false, all values evaluateto true with the exception of the following, which evaluate to false: the string falseitself, 0, −0, the empty string, null, undefined, and NaN (Not a Number, a computerengineering concept for an illegal floating-point operation such as division by zero).
Note how I am referring to true and false in lowercase. This is because, unlike in PHP,these values must be in lowercase in JavaScript. Therefore, only the first of the twofollowing statements will display, printing the lowercase word true, because the secondwill cause a 'TRUE' is not defined error:
if (1 == true) document.write('true') // Trueif (1 == TRUE) document.write('TRUE') // Will cause an error
Remember that any code snippets you wish to type and try for your‐self in an HTML file need to be enclosed within <script> and </script> tags.
Literals and VariablesThe simplest form of an expression is a literal, which means something that evaluatesto itself, such as the number 22 or the string Press Enter. An expression could also bea variable, which evaluates to the value that has been assigned to it. They are both typesof expressions, because they return a value.
Example 15-2 shows three different literals and two variables, all of which return values,albeit of different types.
Example 15-2. Five types of literals<script> myname = "Peter" myage = 24 document.write("a: " + 42 + "<br>") // Numeric literal document.write("b: " + "Hi" + "<br>") // String literal document.write("c: " + true + "<br>") // Constant literal document.write("d: " + myname + "<br>") // String variable document.write("e: " + myage + "<br>") // Numeric variable</script>
And, as you’d expect, you see a return value from all of these in the following output:
344 | Chapter 15: Expressions and Control Flow in JavaScript

a: 42b: Hic: trued: Petere: 24
Operators let you create more complex expressions that evaluate to useful results. Whenyou combine assignment or control-flow constructs with expressions, the result is astatement.
Example 15-3 shows one of each. The first assigns the result of the expression 366 -day_number to the variable days_to_new_year, and the second outputs a friendly mes‐sage only if the expression days_to_new_year < 30 evaluates to true.
Example 15-3. Two simple JavaScript statements<script> days_to_new_year = 366 - day_number; if (days_to_new_year < 30) document.write("It's nearly New Year")</script>
OperatorsJavaScript offers a lot of powerful operators that range from arithmetic, string, andlogical operators to assignment, comparison, and more (see Table 15-1).
Table 15-1. JavaScript operator typesOperator Description Example
Arithmetic Basic mathematics a + b
Array Array manipulation a + b
Assignment Assign values a = b + 23
Bitwise Manipulate bits within bytes 12 ^ 9
Comparison Compare two values a < b
Increment/decrement Add or subtract one a++
Logical Boolean a && b
String Concatenation a + 'string'
Each operator takes a different number of operands:
• Unary operators, such as incrementing (a++) or negation (-a), take a single operand.• Binary operators, which represent the bulk of JavaScript operators—including ad‐
dition, subtraction, multiplication, and division—take two operands.• One ternary operator, which takes the form ? x : y. It’s a terse single-line if
statement that chooses between two expressions depending on a third one.
Operators | 345
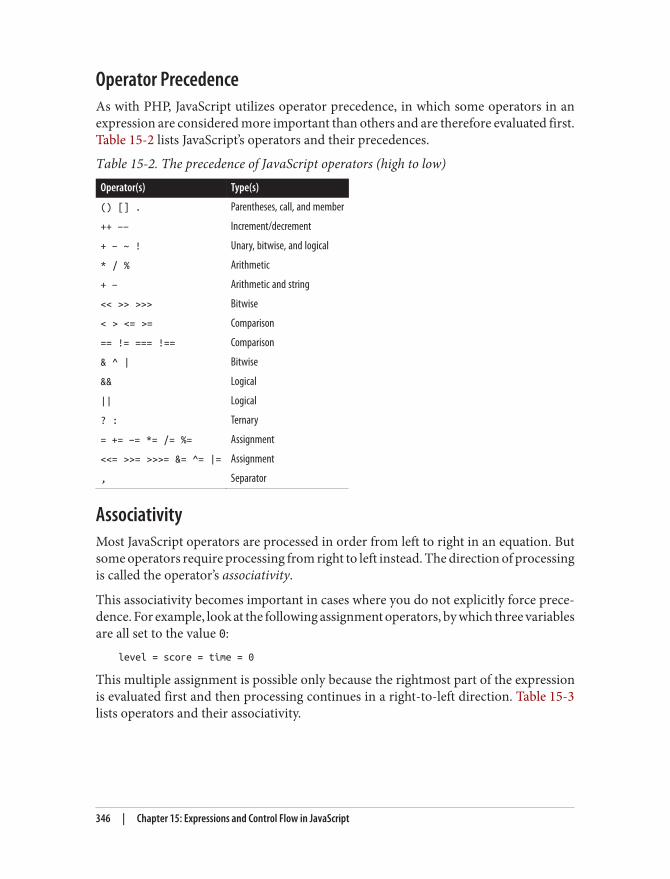
Operator PrecedenceAs with PHP, JavaScript utilizes operator precedence, in which some operators in anexpression are considered more important than others and are therefore evaluated first.Table 15-2 lists JavaScript’s operators and their precedences.
Table 15-2. The precedence of JavaScript operators (high to low)Operator(s) Type(s)
() [] . Parentheses, call, and member
++ −− Increment/decrement
+ − ~ ! Unary, bitwise, and logical
* / % Arithmetic
+ − Arithmetic and string
<< >> >>> Bitwise
< > <= >= Comparison
== != === !== Comparison
& ^ | Bitwise
&& Logical
|| Logical
? : Ternary
= += −= *= /= %= Assignment
<<= >>= >>>= &= ^= |= Assignment
, Separator
AssociativityMost JavaScript operators are processed in order from left to right in an equation. Butsome operators require processing from right to left instead. The direction of processingis called the operator’s associativity.
This associativity becomes important in cases where you do not explicitly force prece‐dence. For example, look at the following assignment operators, by which three variablesare all set to the value 0:
level = score = time = 0
This multiple assignment is possible only because the rightmost part of the expressionis evaluated first and then processing continues in a right-to-left direction. Table 15-3lists operators and their associativity.
346 | Chapter 15: Expressions and Control Flow in JavaScript

Table 15-3. Operators and associativityOperator Description Associativity
++ −− Increment and decrement None
new Create a new object Right
+ − ~ ! Unary and bitwise Right
?: Ternary Right
= *= /= %= += −= Assignment Right
<<= >>= >>>= &= ^= |= Assignment Right
, Separator Left
+ − * / % Arithmetic Left
<< >> >>> Bitwise Left
< <= > >= == != === !== Arithmetic Left
Relational OperatorsRelational operators test two operands and return a Boolean result of either true orfalse. There are three types of relational operators: equality, comparison, and logical.
Equality operators
The equality operator is == (which should not be confused with the = assignment op‐erator). In Example 15-4, the first statement assigns a value and the second tests it forequality. As it stands, nothing will be printed out, because month is assigned the stringvalue July, and therefore the check for it having a value of October will fail.
Example 15-4. Assigning a value and testing for equality<script> month = "July" if (month == "October") document.write("It's the Fall")</script>
If the two operands of an equality expression are of different types, JavaScript will con‐vert them to whatever type makes best sense to it. For example, any strings composedentirely of numbers will be converted to numbers whenever compared with a number.In Example 15-5, a and b are two different values (one is a number and the other is astring), and we would therefore normally expect neither of the if statements to outputa result.
Operators | 347

Example 15-5. The equality and identity operators<script> a = 3.1415927 b = "3.1415927" if (a == b) document.write("1") if (a === b) document.write("2")</script>
However, if you run the example, you will see that it outputs the number 1, which meansthat the first if statement evaluated to true. This is because the string value of b wasfirst temporarily converted to a number, and therefore both halves of the equation hada numerical value of 3.1415927.
In contrast, the second if statement uses the identity operator, three equals signs in arow, which prevents JavaScript from automatically converting types. This means that aand b are therefore found to be different, so nothing is output.
As with forcing operator precedence, whenever you’re in doubt about how JavaScriptwill convert operand types, you can use the identity operator to turn this behavior off.
Comparison operators
Using comparison operators, you can test for more than just equality and inequality.JavaScript also gives you > (is greater than), < (is less than), >= (is greater than or equalto), and <= (is less than or equal to) to play with. Example 15-6 shows these operatorsin use.
Example 15-6. The four comparison operators<script> a = 7; b = 11 if (a > b) document.write("a is greater than b<br>") if (a < b) document.write("a is less than b<br>") if (a >= b) document.write("a is greater than or equal to b<br>") if (a <= b) document.write("a is less than or equal to b<br>")</script>
In this example, where a is 7 and b is 11, the following is output (because 7 is less than11, and also less than or equal to 11):
a is less than ba is less than or equal to b
Logical operators
Logical operators produce true-or-false results, and are also known as Boolean opera‐tors. There are three of them in JavaScript (see Table 15-4).
348 | Chapter 15: Expressions and Control Flow in JavaScript

Table 15-4. JavaScript’s logical operatorsLogical operator Description
&& (and) true if both operands are true
|| (or) true if either operand is true
! (not) true if the operand is false, or false if the operand is true
You can see how these can be used in Example 15-7, which outputs 0, 1, and true.
Example 15-7. The logical operators in use<script> a = 1; b = 0 document.write((a && b) + "<br>") document.write((a || b) + "<br>") document.write(( !b ) + "<br>")</script>
The && statement requires both operands to be true if it is going to return a value oftrue, the || statement will be true if either value is true, and the third statement per‐forms a NOT on the value of b, turning it from 0 into a value of true.
The || operator can cause unintentional problems, because the second operand will notbe evaluated if the first is evaluated as true. In Example 15-8, the function getnext willnever be called if finished has a value of 1.
Example 15-8. A statement using the || operator<script> if (finished == 1 || getnext() == 1) done = 1</script>
If you need getnext to be called at each if statement, you should rewrite the code asshown in Example 15-9.
Example 15-9. The if...or statement modified to ensure calling of getnext<script> gn = getnext() if (finished == 1 OR gn == 1) done = 1;</script>
In this case, the code in function getnext will be executed and its return value storedin gn before the if statement.
Table 15-6 shows all the possible variations of using the logical operators. You shouldalso note that !true equals false and !false equals true.
Operators | 349

Table 15-5. All possible logical expressionsInputs Operators and results
a b && ||
true true true true
true false false true
false true false true
false false false false
The with StatementThe with statement is not one that you’ve seen in earlier chapters on PHP, because it’sexclusive to JavaScript. With it (if you see what I mean), you can simplify some types ofJavaScript statements by reducing many references to an object to just one reference.References to properties and methods within the with block are assumed to apply tothat object.
For example, take the code in Example 15-10, in which the document.write functionnever references the variable string by name.
Example 15-10. Using the with statement<script> string = "The quick brown fox jumps over the lazy dog"
with (string) { document.write("The string is " + length + " characters<br>") document.write("In uppercase it's: " + toUpperCase()) }</script>
Even though string is never directly referenced by document.write, this code stillmanages to output the following:
The string is 43 charactersIn uppercase it's: THE QUICK BROWN FOX JUMPS OVER THE LAZY DOG
This is how the code works: the JavaScript interpreter recognizes that the length prop‐erty and toUpperCase() method have to be applied to some object. Because they standalone, the interpreter assumes they apply to the string object that you specified in thewith statement.
350 | Chapter 15: Expressions and Control Flow in JavaScript

Using onerrorThere are more constructs not available in PHP. Using either the onerror event, or acombination of the try and catch keywords, you can catch JavaScript errors and dealwith them yourself.
Events are actions that can be detected by JavaScript. Every element on a web page hascertain events that can trigger JavaScript functions. For example, the onclick event ofa button element can be set to call a function and make it run whenever a user clicksthe button.
Example 15-11 illustrates how to use the onerror event.
Example 15-11. A script employing the onerror event<script> onerror = errorHandler document.writ("Welcome to this website") // Deliberate error
function errorHandler(message, url, line) { out = "Sorry, an error was encountered.\n\n"; out += "Error: " + message + "\n"; out += "URL: " + url + "\n"; out += "Line: " + line + "\n\n"; out += "Click OK to continue.\n\n"; alert(out); return true; }</script>
The first line of this script tells the error event to use the new errorHandler functionfrom now onward. This function takes three parameters—a message, a url, and a linenumber—so it’s a simple matter to display all these in an alert pop up.
Then, to test the new function, we deliberately place a syntax error in the code with acall to document.writ instead of document.write (the final e is missing). Figure 15-1shows the result of running this script in a browser. Using onerror this way can also bequite useful during the debugging process.
Using onerror | 351

Figure 15-1. Using the onerror event with an alert method pop up
Using try ... catchThe try and catch keywords are more standard and more flexible than the onerrortechnique shown in the previous section. These keywords let you trap errors for a se‐lected section of code, rather than all scripts in a document. However, they do not catchsyntax errors, for which you need onerror.
The try ... catch construct is supported by all major browsers and is handy whenyou want to catch a certain condition that you are aware could occur in a specific partof your code.
For example, in Chapter 18 we’ll be exploring Ajax techniques that make use of theXMLHttpRequest object. Unfortunately, this isn’t available in the Internet Explorerbrowser (although it is in all other major browsers). Therefore, we can use try andcatch to trap this case and do something else if the function is not available.Example 15-12 shows how.
Example 15-12. Trapping an error with try and catch<script> try { request = new XMLHTTPRequest() } catch(err) { // Use a different method to create an XML HTTP Request object }</script>
352 | Chapter 15: Expressions and Control Flow in JavaScript
I won’t go into how we implement the missing object in Internet Explorer here, but youcan see how the system works. There’s also another keyword associated with try andcatch called finally that is always executed, regardless of whether an error occurs inthe try clause. To use it, just add something like the following statements after a catchstatement:
finally{ alert("The 'try' clause was encountered")}
ConditionalsConditionals alter program flow. They enable you to ask questions about certain thingsand respond to the answers you get in different ways. There are three types of non-looping conditionals: the if statement, the switch statement, and the ? operator.
The if StatementSeveral examples in this chapter have already made use of if statements. The code withinsuch a statement is executed only if the given expression evaluates to true. Multiline ifstatements require curly braces around them, but as in PHP, you can omit the bracesfor single statements. Therefore, the following statements are valid:
if (a > 100){ b=2 document.write("a is greater than 100")}
if (b == 10) document.write("b is equal to 10")
The else StatementWhen a condition has not been met, you can execute an alternative using an elsestatement, like this:
if (a > 100){ document.write("a is greater than 100")}else{ document.write("a is less than or equal to 100")}
Unlike PHP, JavaScript has no elseif statement, but that’s not a problem, because youcan use an else followed by another if to form the equivalent of an elseif statement,like this:
Conditionals | 353

if (a > 100){ document.write("a is greater than 100")}else if(a < 100){ document.write("a is less than 100")}else{ document.write("a is equal to 100")}
As you can see, you can use another else after the new if, which could equally befollowed by another if statement, and so on. Although I have shown braces on thestatements, because each is a single line, the whole previous example could be writtenas follows:
if (a > 100) document.write("a is greater than 100")else if(a < 100) document.write("a is less than 100")else document.write("a is equal to 100")
The switch statementThe switch statement is useful when one variable or the result of an expression canhave multiple values, for each of which you want to perform a different function.
For example, the following code takes the PHP menu system we put together in Chap‐ter 4 and converts it to JavaScript. It works by passing a single string to the main menucode according to what the user requests. Let’s say the options are Home, About, News,Login, and Links, and we set the variable page to one of these according to the user’sinput.
The code for this written using if ... else if ... might look like Example 15-13.
Example 15-13. A multiline if...else if... statement<script> if (page == "Home") document.write("You selected Home") else if (page == "About") document.write("You selected About") else if (page == "News") document.write("You selected News") else if (page == "Login") document.write("You selected Login") else if (page == "Links") document.write("You selected Links")</script>
But using a switch construct, the code could look like Example 15-14.
Example 15-14. A switch construct<script> switch (page) {
354 | Chapter 15: Expressions and Control Flow in JavaScript

case "Home": document.write("You selected Home") break case "About": document.write("You selected About") break case "News": document.write("You selected News") break case "Login": document.write("You selected Login") break case "Links": document.write("You selected Links") break }</script>
The variable page is mentioned only once at the start of the switch statement. There‐after, the case command checks for matches. When one occurs, the matching condi‐tional statement is executed. Of course, a real program would have code here to displayor jump to a page, rather than simply telling the user what was selected.
Breaking out
As you can see in Example 15-14, just as with PHP, the break command allows yourcode to break out of the switch statement once a condition has been satisfied. Rememberto include the break unless you want to continue executing the statements under thenext case.
Default action
When no condition is satisfied, you can specify a default action for a switch statementusing the default keyword. Example 15-15 shows a code snippet that could be insertedinto Example 15-14.
Example 15-15. A default statement to add to Example 15-14default: document.write("Unrecognized selection") break
The ? OperatorThe ternary operator (?), combined with the : character, provides a quick way of doingif ... else tests. With it you can write an expression to evaluate, then follow it witha ? symbol and the code to execute if the expression is true. After that, place a : andthe code to execute if the expression evaluates to false.
Conditionals | 355

Example 15-16 shows a ternary operator being used to print out whether the variable ais less than or equal to 5, and prints something either way.
Example 15-16. Using the ternary operator<script> document.write( a <= 5 ? "a is less than or equal to 5" : "a is greater than 5" )</script>
The statement has been broken up into several lines for clarity, but you would be morelikely to use such a statement on a single line, in this manner:
size = a <= 5 ? "short" : "long"
LoopingAgain, you will find many close similarities between JavaScript and PHP when it comesto looping. Both languages support while, do ... while, and for loops.
while LoopsA JavaScript while loop first checks the value of an expression and starts executing thestatements within the loop only if that expression is true. If it is false, execution skipsover to the next JavaScript statement (if any).
Upon completing an iteration of the loop, the expression is again tested to see if it istrue and the process continues until such a time as the expression evaluates to false,or until execution is otherwise halted. Example 15-17 shows such a loop.
Example 15-17. A while loop<script> counter=0
while (counter < 5) { document.write("Counter: " + counter + "<br>") ++counter }</script>
This script outputs the following:Counter: 0Counter: 1Counter: 2
356 | Chapter 15: Expressions and Control Flow in JavaScript

Counter: 3Counter: 4
If the variable counter were not incremented within the loop, it isquite possible that some browsers could become unresponsive dueto a never-ending loop, and the page may not even be easy to ter‐minate with Escape or the Stop button. So be careful with yourJavaScript loops.
do ... while LoopsWhen you require a loop to iterate at least once before any tests are made, use a do ...while loop, which is similar to a while loop, except that the test expression is checkedonly after each iteration of the loop. So, to output the first seven results in the seventimes table, you could use code such as that in Example 15-18.
Example 15-18. A do ... while loop<script> count = 1
do { document.write(count + " times 7 is " + count * 7 + "<br>") } while (++count <= 7)</script>
As you might expect, this loop outputs the following:1 times 7 is 72 times 7 is 143 times 7 is 214 times 7 is 285 times 7 is 356 times 7 is 427 times 7 is 49
for LoopsA for loop combines the best of all worlds into a single looping construct that allowsyou to pass three parameters for each statement:
• An initialization expression• A condition expression• A modification expression
Looping | 357

These are separated by semicolons, like this: for (expr1 ; expr2 ; expr3). At the startof the first iteration of the loop, the initialization expression is executed. In the case ofthe code for the multiplication table for 7, count would be initialized to the value 1.Then, each time around the loop, the condition expression (in this case, count <= 7)is tested, and the loop is entered only if the condition is true. Finally, at the end of eachiteration, the modification expression is executed. In the case of the multiplication tablefor 7, the variable count is incremented. Example 15-19 shows what the code wouldlook like.
Example 15-19. Using a for loop<script> for (count = 1 ; count <= 7 ; ++count) { document.write(count + "times 7 is " + count * 7 + "<br>"); }</script>
As in PHP, you can assign multiple variables in the first parameter of a for loop byseparating them with a comma, like this:
for (i = 1, j = 1 ; i < 10 ; i++)
Likewise, you can perform multiple modifications in the last parameter, like this:for (i = 1 ; i < 10 ; i++, −−j)
Or you can do both at the same time:for (i = 1, j = 1 ; i < 10 ; i++, −−j)
Breaking Out of a LoopThe break command, which you’ll recall is important inside a switch statement, is alsoavailable within for loops. You might need to use this, for example, when searching fora match of some kind. Once the match is found, you know that continuing to searchwill only waste time and make your visitor wait. Example 15-20 shows how to use thebreak command.
Example 15-20. Using the break command in a for loop<script> haystack = new Array() haystack[17] = "Needle"
for (j = 0 ; j < 20 ; ++j) { if (haystack[j] == "Needle") { document.write("<br>- Found at location " + j) break
358 | Chapter 15: Expressions and Control Flow in JavaScript

} else document.write(j + ", ") }</script>
This script outputs the following:0, 1, 2, 3, 4, 5, 6, 7, 8, 9, 10, 11, 12, 13, 14, 15, 16,- Found at location 17
The continue StatementSometimes you don’t want to entirely exit from a loop, but instead wish to skip theremaining statements just for this iteration of the loop. In such cases, you can use thecontinue command. Example 15-21 shows this in use.
Example 15-21. Using the continue command in a for loop<script> haystack = new Array() haystack[4] = "Needle" haystack[11] = "Needle" haystack[17] = "Needle"
for (j = 0 ; j < 20 ; ++j) { if (haystack[j] == "Needle") { document.write("<br>- Found at location " + j + "<br>") continue }
document.write(j + ", ") }</script>
Notice how the second document.write call does not have to be enclosed in an elsestatement (as it did before), because the continue command will skip it if a match hasbeen found. The output from this script is as follows:
0, 1, 2, 3,- Found at location 45, 6, 7, 8, 9, 10,- Found at location 1112, 13, 14, 15, 16,- Found at location 1718, 19,
Looping | 359

Explicit CastingUnlike PHP, JavaScript has no explicit casting of types such as (int) or (float). Instead,when you need a value to be of a certain type, use one of JavaScript’s built-in functions,shown in Table 15-6.
Table 15-6. JavaScript’s type-changing functionsChange to type Function to use
Int, Integer parseInt()
Bool, Boolean Boolean()
Float, Double, Real parseFloat()
String String()
Array split()
So, for example, to change a floating-point number to an integer, you could use codesuch as the following (which displays the value 3):
n = 3.1415927i = parseInt(n)document.write(i)
Or you can use the compound form:document.write(parseInt(3.1415927))
That’s it for control flow and expressions. The next chapter focuses on the use of func‐tions, objects, and arrays in JavaScript.
Questions1. How are Boolean values handled differently by PHP and JavaScript?2. What characters are used to define a JavaScript variable name?3. What is the difference between unary, binary, and ternary operators?4. What is the best way to force your own operator precedence?5. When would you use the === (identity) operator?6. What are the simplest two forms of expressions?7. Name the three conditional statement types.8. How do if and while statements interpret conditional expressions of different data
types?
360 | Chapter 15: Expressions and Control Flow in JavaScript

9. Why is a for loop more powerful than a while loop?10. What is the purpose of the with statement?
See “Chapter 15 Answers” on page 649 in Appendix A for the answers to these questions.
Questions | 361


CHAPTER 16
JavaScript Functions, Objects, and Arrays
Just like PHP, JavaScript offers access to functions and objects. In fact, JavaScript isactually based on objects, because—as you’ve seen—it has to access the DOM, whichmakes every element of an HTML document available to manipulate as an object.
The usage and syntax are also quite similar to those of PHP, so you should feel right athome as I take you through using functions and objects in JavaScript, as well as throughan in-depth exploration of array handling.
JavaScript FunctionsIn addition to having access to dozens of built-in functions (or methods) such aswrite, which you have already seen being used in document.write, you can easily createyour own functions. Whenever you have a more complex piece of code that is likely tobe reused, you have a candidate for a function.
Defining a FunctionThe general syntax for a function is:
function function_name([parameter [, ...]]){ statements}
The first line of the syntax indicates that:
• A definition starts with the word function.• A name follows that must start with a letter or underscore, followed by any number
of letters, digits, dollar symbols, or underscores.
363

• The parentheses are required.• One or more parameters, separated by commas, are optional (indicated by the
square brackets, which are not part of the function syntax).
Function names are case-sensitive, so all of the following strings refer to different func‐tions: getInput, GETINPUT, and getinput.
In JavaScript there is a general naming convention for functions: the first letter of eachword in a name is capitalized except for the very first letter, which is lowercase. There‐fore, of the previous examples, getInput would be the preferred name used by mostprogrammers. This convention is commonly referred to as bumpyCaps, bumpyCase, orcamelCase.
The opening curly brace starts the statements that will execute when you call the func‐tion; a matching curly brace must close it. These statements may include one or morereturn statements, which force the function to cease execution and return to the callingcode. If a value is attached to the return statement, the calling code can retrieve it.
The arguments ArrayThe arguments array is a member of every function. With it, you can determine thenumber of variables passed to a function and what they are. Take the example of afunction called displayItems. Example 16-1 shows one way of writing it.
Example 16-1. Defining a function<script> displayItems("Dog", "Cat", "Pony", "Hamster", "Tortoise")
function displayItems(v1, v2, v3, v4, v5) { document.write(v1 + "<br>") document.write(v2 + "<br>") document.write(v3 + "<br>") document.write(v4 + "<br>") document.write(v5 + "<br>") }</script>
When you call up this script in your browser, it will display the following:DogCatPonyHamsterTortoise
All of this is fine, but what if you wanted to pass more than five items to the function?Also, reusing the document.write call multiple times instead of employing a loop is
364 | Chapter 16: JavaScript Functions, Objects, and Arrays

wasteful programming. Luckily, the arguments array gives you the flexibility to handlea variable number of arguments. Example 16-2 shows how you can use it to rewrite theexample in a much more efficient manner.
Example 16-2. Modifying the function to use the arguments array<script> function displayItems() { for (j = 0 ; j < displayItems.arguments.length ; ++j) document.write(displayItems.arguments[j] + "<br>") }</script>
Note the use of the length property, which you already encountered in the previouschapter, and also how the array displayItems.arguments is referenced using the vari‐able j as an offset into it. I also chose to keep the function short and sweet by notsurrounding the contents of the for loop in curly braces, as it contains only a singlestatement.
Using this technique, you now have a function that can take as many (or as few) argu‐ments as you like and act on each argument as you desire.
Returning a ValueFunctions are not used just to display things. In fact, they are mostly used to performcalculations or data manipulation and then return a result. The function fixNames inExample 16-3 uses the arguments array (discussed in the previous section) to take aseries of strings passed to it and return them as a single string. The “fix” it performs isto convert every character in the arguments to lowercase except for the first characterof each argument, which is set to a capital letter.
Example 16-3. Cleaning up a full name<script> document.write(fixNames("the", "DALLAS", "CowBoys"))
function fixNames() { var s = ""
for (j = 0 ; j < fixNames.arguments.length ; ++j) s += fixNames.arguments[j].charAt(0).toUpperCase() + fixNames.arguments[j].substr(1).toLowerCase() + " "
return s.substr(0, s.length-1) }</script>
JavaScript Functions | 365

When called with the parameters the, DALLAS, and CowBoys, for example, the functionreturns the string The Dallas Cowboys. Let’s walk through the function.
The function first initializes the temporary (and local) variable s to the empty string.Then a for loop iterates through each of the passed parameters, isolating the parameter’sfirst character using the charAt method and converting it to uppercase with thetoUpperCase method. The various methods shown in this example are all built intoJavaScript and available by default.
Then the substr method is used to fetch the rest of each string, which is converted tolowercase using the toLowerCase method. A fuller version of the substr method herewould specify how many characters are part of the substring as a second argument:
substr(1, (arguments[j].length) - 1 )
In other words, this substr method says, “Start with the character at position 1 (thesecond character) and return the rest of the string (the length minus one).” As a nicetouch, though, the substr method assumes that you want the rest of the string if youomit the second argument.
After the whole argument is converted to our desired case, a space character is addedto the end and the result is appended to the temporary variable s.
Finally, the substr method is used again to return the contents of the variable s, exceptfor the final space—which is unwanted. We remove this by using substr to return thestring up to, but not including, the final character.
This example is particularly interesting in that it illustrates the use of multiple propertiesand methods in a single expression. For example:
fixNames.arguments[j].substr(1).toLowerCase()
You have to interpret the statement by mentally dividing it into parts at the periods.JavaScript evaluates these elements of the statement from left to right as follows:
1. Start with the name of the function itself: fixNames.2. Extract element j from the array arguments representing fixNames arguments.3. Invoke substr with a parameter of 1 to the extracted element. This passes all but
the first character to the next section of the expression.4. Apply the method toLowerCase to the string that has been passed this far.
This practice is often referred to as method chaining. So, for example, if the stringmixedCASE is passed to the example expression, it will go through the following trans‐formations:
mixedCASEixedCASEixedcase
366 | Chapter 16: JavaScript Functions, Objects, and Arrays

One final reminder: the s variable created inside the function is local, and thereforecannot be accessed outside the function. By returning s in the return statement, wemade its value available to the caller, which could store or use it any way it wanted. Buts itself disappears at the end of the function. Although we could make a function operateon global variables (and sometimes that’s necessary), it’s much better to just return thevalues you want to preserve and let JavaScript clean up all the other variables used bythe function.
Returning an ArrayIn Example 16-3, the function returned only one parameter, but what if you need toreturn multiple parameters? You can do this by returning an array, as in Example 16-4.
Example 16-4. Returning an array of values<script> words = fixNames("the", "DALLAS", "CowBoys")
for (j = 0 ; j < words.length ; ++j) document.write(words[j] + "<br>")
function fixNames() { var s = new Array()
for (j = 0 ; j < fixNames.arguments.length ; ++j) s[j] = fixNames.arguments[j].charAt(0).toUpperCase() + fixNames.arguments[j].substr(1).toLowerCase()
return s}</script>
Here the variable words is automatically defined as an array and populated with thereturned result of a call to the function fixNames. Then a for loop iterates through thearray and displays each member.
As for the fixNames function, it’s almost identical to Example 16-3, except that thevariable s is now an array, and after each word has been processed it is stored as anelement of this array, which is returned by the return statement.
This function enables the extraction of individual parameters from its returned values,like the following (the output from which is simply The Cowboys):
words = fixNames("the", "DALLAS", "CowBoys")document.write(words[0] + " " + words[2])
JavaScript Functions | 367

JavaScript ObjectsA JavaScript object is a step up from a variable, which can contain only one value at atime, in that objects can contain multiple values and even functions. An object groupsdata together with the functions needed to manipulate it.
Declaring a ClassWhen creating a script to use objects, you need to design a composite of data and codecalled a class. Each new object based on this class is called an instance (or occurrence)of that class. As you’ve already seen, the data associated with an object is called itsproperties, while the functions it uses are called methods.
Let’s look at how to declare the class for an object called User that will contain detailsabout the current user. To create the class, just write a function named after the class.This function can accept arguments (I’ll show later how it’s invoked) and can createproperties and methods for the objects in that class. The function is called a constructor.
Example 16-5 shows a constructor for the class User with three properties: forename,username, and password. The class also defines the method showUser.
Example 16-5. Declaring the User class and its method<script> function User(forename, username, password) { this.forename = forename this.username = username this.password = password
this.showUser = function() { document.write("Forename: " + this.forename + "<br>") document.write("Username: " + this.username + "<br>") document.write("Password: " + this.password + "<br>") } }</script>
The function is different from other functions we’ve seen so far in two ways:
• It refers to an object named this. When the program creates an instance of Userby running this function, this refers to the instance being created. The same func‐tion can be called over and over with different arguments, and will create a newUser each time with different values for the properties forename, and so on.
368 | Chapter 16: JavaScript Functions, Objects, and Arrays

• A new function named showUser is created within the function. The syntax shownhere is new and rather complicated, but its purpose is to tie showUser to the Userclass. Thus, showUser comes into being as a method of the User class.
The naming convention I have used is to keep all properties in lowercase and to use atleast one uppercase character in method names, following the camelCase conventionmentioned earlier in the chapter.
Example 16-5 follows the recommended way to write a class constructor, which is toinclude methods in the constructor function. However, you can also refer to functionsdefined outside the constructor, as in Example 16-6.
Example 16-6. Separately defining a class and method<script> function User(forename, username, password) { this.forename = forename this.username = username this.password = password this.showUser = showUser }
function showUser() { document.write("Forename: " + this.forename + "<br>") document.write("Username: " + this.username + "<br>") document.write("Password: " + this.password + "<br>") }</script>
I show you this form because you are certain to encounter it when perusing other pro‐grammers’ code.
Creating an ObjectTo create an instance of the class User, you can use a statement such as the following:
details = new User("Wolfgang", "w.a.mozart", "composer")
Or you can create an empty object, like this:details = new User()
and then populate it later, like this:details.forename = "Wolfgang"details.username = "w.a.mozart"details.password = "composer"
You can also add new properties to an object, like this:
JavaScript Objects | 369

details.greeting = "Hello"
You can verify that adding such new properties works with the following statement:document.write(details.greeting)
Accessing ObjectsTo access an object, you can refer to its properties, as in the following two unrelatedexample statements:
name = details.forenameif (details.username == "Admin") loginAsAdmin()
So, to access the showUser method of an object of class User, you would use the followingsyntax, in which the object details has already been created and populated with data:
details.showUser()
Assuming the data supplied earlier, this code would display:Forename: WolfgangUsername: w.a.mozartPassword: composer
The prototype KeywordThe prototype keyword can save you a lot of memory. In the User class, every instancewill contain the three properties and the method. Therefore, if you have 1,000 of theseobjects in memory, the method showUser will also be replicated 1,000 times. However,because the method is identical in every case, you can specify that new objects shouldrefer to a single instance of the method instead of creating a copy of it. So, instead ofusing the following in a class constructor:
this.showUser = function()
you could replace it with this:User.prototype.showUser = function()
Example 16-7 shows what the new constructor would look like.
Example 16-7. Declaring a class using the prototype keyword for a method<script> function User(forename, username, password) { this.forename = forename this.username = username this.password = password
User.prototype.showUser = function() { document.write("Forename: " + this.forename + "<br>")
370 | Chapter 16: JavaScript Functions, Objects, and Arrays

document.write("Username: " + this.username + "<br>") document.write("Password: " + this.password + "<br>") } }</script>
This works because all functions have a prototype property, designed to hold propertiesand methods that are not replicated in any objects created from a class. Instead, theyare passed to its objects by reference.
This means that you can add a prototype property or method at any time and all objects(even those already created) will inherit it, as the following statements illustrate.
User.prototype.greeting = "Hello"document.write(details.greeting)
The first statement adds the prototype property of greeting with a value of Hello tothe class User. In the second line, the object details, which has already been created,correctly displays this new property.
You can also add to or modify methods in a class, as the following statements illustrate:User.prototype.showUser = function(){ document.write("Name " + this.forename + " User " + this.username + " Pass " + this.password)}
details.showUser()
You might add these lines to your script in a conditional statement (such as if), so theyrun if user activities cause you to decide you need a different showUser method. Afterthese lines run, even if the object details has been created already, further calls todetails.showUser will run the new function. The old definition of showUser has beenerased.
Static methods and properties
When reading about PHP objects, you learned that classes can have static propertiesand methods as well as properties and methods associated with a particular instance ofa class. JavaScript also supports static properties and methods, which you can conven‐iently store and retrieve from the class’s prototype. Thus, the following statements setand read a static string from User:
User.prototype.greeting = "Hello"document.write(User.prototype.greeting)
JavaScript Objects | 371

Extending JavaScript objects
The prototype keyword even lets you add functionality to a built-in object. For example,suppose that you would like to add the ability to replace all spaces in a string withnonbreaking spaces in order to prevent it from wrapping around. You can do this byadding a prototype method to JavaScript’s default String object definition, like this:
String.prototype.nbsp = function(){ return this.replace(/ /g, ' ')}
Here the replace method is used with a regular expression (see Chapter 17) to find andreplace all single spaces with the string . If you then enter the following com‐mand:
document.write("The quick brown fox".nbsp())
It will output the string The quick brown fox. Or here’s a methodyou can add that will trim leading and trailing spaces from a string (once again using aregular expression):
String.prototype.trim = function(){ return this.replace(/^\s+|\s+$/g, '')}
If you issue the following statement, the output will be the string Please trim me (withthe leading and trailing spaces removed).
document.write(" Please trim me ".trim())
If we break down the expression into its component parts, the two / characters markthe start and end of the expression, and the final g specifies a global search. Inside theexpression, the ^\s+ part searches for one or more whitespace characters appearing atthe start of the search string, while the \s+$ part searches for one or more whitespacecharacters at the end of the search string. The | character in the middle acts to separatethe alternatives.
The result is that when either of these expressions matches, the match is replaced withthe empty string, thus returning a trimmed version of the string without any leading ortrailing whitespace.
JavaScript ArraysArray handling in JavaScript is very similar to PHP, although the syntax is a little dif‐ferent. Nevertheless, given all you have already learned about arrays, this section shouldbe relatively straightforward for you.
372 | Chapter 16: JavaScript Functions, Objects, and Arrays
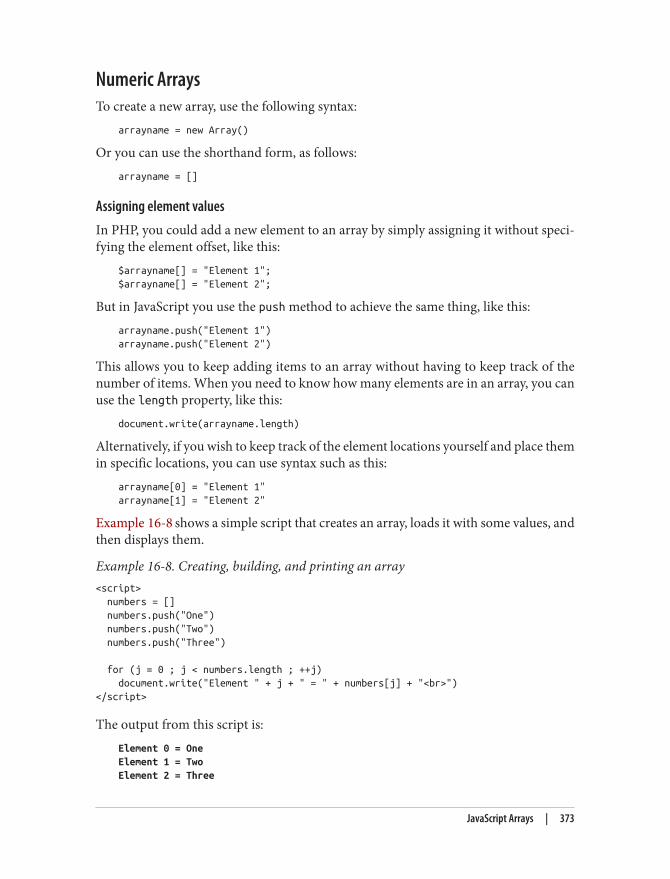
Numeric ArraysTo create a new array, use the following syntax:
arrayname = new Array()
Or you can use the shorthand form, as follows:arrayname = []
Assigning element values
In PHP, you could add a new element to an array by simply assigning it without speci‐fying the element offset, like this:
$arrayname[] = "Element 1";$arrayname[] = "Element 2";
But in JavaScript you use the push method to achieve the same thing, like this:arrayname.push("Element 1")arrayname.push("Element 2")
This allows you to keep adding items to an array without having to keep track of thenumber of items. When you need to know how many elements are in an array, you canuse the length property, like this:
document.write(arrayname.length)
Alternatively, if you wish to keep track of the element locations yourself and place themin specific locations, you can use syntax such as this:
arrayname[0] = "Element 1"arrayname[1] = "Element 2"
Example 16-8 shows a simple script that creates an array, loads it with some values, andthen displays them.
Example 16-8. Creating, building, and printing an array<script> numbers = [] numbers.push("One") numbers.push("Two") numbers.push("Three")
for (j = 0 ; j < numbers.length ; ++j) document.write("Element " + j + " = " + numbers[j] + "<br>")</script>
The output from this script is:Element 0 = OneElement 1 = TwoElement 2 = Three
JavaScript Arrays | 373

Assignment using the array keyword
You can also create an array together with some initial elements using the Array key‐word, like this:
numbers = Array("One", "Two", "Three")
There is nothing stopping you from adding more elements afterward as well.
So now you have a couple of ways you can add items to an array, and one way of refer‐encing them, but JavaScript offers many more, which I’ll get to shortly. But first we’lllook at another type of array.
Associative ArraysAn associative array is one in which its elements are referenced by name rather than bynumeric offset. To create an associative array, define a block of elements within curlybraces. For each element, place the key on the left and the contents on the right of acolon (:). Example 16-9 shows how you might create an associative array to hold thecontents of the “balls” section of an online sports equipment retailer.
Example 16-9. Creating and displaying an associative array<script> balls = {"golf": "Golf balls, 6", "tennis": "Tennis balls, 3", "soccer": "Soccer ball, 1", "ping": "Ping Pong balls, 1 doz"}
for (ball in balls) document.write(ball + " = " + balls[ball] + "<br>")</script>
To verify that the array has been correctly created and populated, I have used anotherkind of for loop using the in keyword. This creates a new variable to use only withinthe array (ball, in this example) and iterates through all elements of the array to theright of the in keyword (balls, in this example). The loop acts on each element ofballs, placing the key value into ball.
Using this key value stored in ball, you can also get the value of the current element ofballs. The result of calling up the example script in a browser is as follows:
golf = Golf balls, 6tennis = Tennis balls, 3soccer = Soccer ball, 1ping = Ping Pong balls, 1 doz
To get a specific element of an associative array, you can specify a key explicitly, in thefollowing manner (in this case, outputting the value Soccer ball, 1):
document.write(balls['soccer'])
374 | Chapter 16: JavaScript Functions, Objects, and Arrays

Multidimensional ArraysTo create a multidimensional array in JavaScript, just place arrays inside other arrays.For example, to create an array to hold the details of a two-dimensional checkerboard(8×8 squares), you could use the code in Example 16-10.
Example 16-10. Creating a multidimensional numeric array<script> checkerboard = Array( Array(' ', 'o', ' ', 'o', ' ', 'o', ' ', 'o'), Array('o', ' ', 'o', ' ', 'o', ' ', 'o', ' '), Array(' ', 'o', ' ', 'o', ' ', 'o', ' ', 'o'), Array(' ', ' ', ' ', ' ', ' ', ' ', ' ', ' '), Array(' ', ' ', ' ', ' ', ' ', ' ', ' ', ' '), Array('O', ' ', 'O', ' ', 'O', ' ', 'O', ' '), Array(' ', 'O', ' ', 'O', ' ', 'O', ' ', 'O'), Array('O', ' ', 'O', ' ', 'O', ' ', 'O', ' '))
document.write("<pre>")
for (j = 0 ; j < 8 ; ++j) { for (k = 0 ; k < 8 ; ++k) document.write(checkerboard[j][k] + " ")
document.write("<br>") }
document.write("</pre>")</script>
In this example, the lowercase letters represent black pieces, and the uppercase white.A pair of nested for loops walks through the array and displays its contents.
The outer loop contains two statements, so curly braces enclose them. The inner loopthen processes each square in a row, outputting the character at location [j][k], fol‐lowed by a space (to square up the printout). This loop contains a single statement, socurly braces are not required to enclose it. The <pre> and </pre> tags ensure that theoutput displays correctly, like this:
o o o oo o o o o o o o
O O O O O O O OO O O O
JavaScript Arrays | 375

You can also directly access any element within this array using square brackets, asfollows:
document.write(checkerboard[7][2])
This statement outputs the uppercase letter O, the eighth element down and the thirdalong—remember that array indexes start at 0, not 1.
Using Array MethodsGiven the power of arrays, JavaScript comes ready-made with a number of methods formanipulating them and their data. Here is a selection of the most useful ones.
concat
The concat method concatenates two arrays, or a series of values within an array. Forexample, the following code outputs Banana,Grape,Carrot,Cabbage:
fruit = ["Banana", "Grape"]veg = ["Carrot", "Cabbage"]
document.write(fruit.concat(veg))
You can specify multiple arrays as arguments, in which case concat adds all their ele‐ments in the order that the arrays are specified.
Here’s another way to use concat. This time, plain values are concatenated with thearray pets, which outputs Cat,Dog,Fish,Rabbit,Hamster:
pets = ["Cat", "Dog", "Fish"]more_pets = pets.concat("Rabbit", "Hamster")
document.write(more_pets)
forEach (for non-IE browsers)
The forEach method in JavaScript is another way of achieving functionality similar tothe PHP foreach keyword, but only for browsers other than Internet Explorer. To use it,you pass it the name of a function, which will be called for each element within the array.Example 16-11 shows how.
Example 16-11. Using the forEach method<script> pets = ["Cat", "Dog", "Rabbit", "Hamster"] pets.forEach(output)
function output(element, index, array) { document.write("Element at index " + index + " has the value " + element + "<br>")
376 | Chapter 16: JavaScript Functions, Objects, and Arrays

}</script>
In this case, the function passed to forEach is called output. It takes three parameters:the element, its index, and the array. These can be used as required by your function.In this example, just the element and index values are displayed using the functiondocument.write.
Once an array has been populated, the method is called like this:pets.forEach(output)
The output from which is:Element at index 0 has the value CatElement at index 1 has the value DogElement at index 2 has the value RabbitElement at index 3 has the value Hamster
forEach (a cross-browser solution)
Of course, as is its way, Microsoft chose not to support the forEach method, so theprevious example will work only on non–Internet Explorer browsers. Therefore, untilIE does support it, and to ensure cross-browser compatibility, you should use a state‐ment such as the following instead of pets.forEach(output):
for (j = 0 ; j < pets.length ; ++j) output(pets[j], j)
join
With the join method, you can convert all the values in an array to strings and thenjoin them together into one large string, placing an optional separator between them.Example 16-12 shows three ways of using this method.
Example 16-12. Using the join method<script> pets = ["Cat", "Dog", "Rabbit", "Hamster"]
document.write(pets.join() + "<br>") document.write(pets.join(' ') + "<br>") document.write(pets.join(' : ') + "<br>")</script>
Without a parameter, join uses a comma to separate the elements; otherwise, the stringpassed to join is inserted between each element. The output of Example 16-12 lookslike this:
Cat,Dog,Rabbit,HamsterCat Dog Rabbit HamsterCat : Dog : Rabbit : Hamster
JavaScript Arrays | 377

push and pop
You already saw how the push method can be used to insert a value into an array. Theinverse method is pop. It deletes the most recently inserted element from an array andreturns it. Example 16-13 shows an example of its use.
Example 16-13. Using the push and pop methods<script> sports = ["Football", "Tennis", "Baseball"] document.write("Start = " + sports + "<br>")
sports.push("Hockey") document.write("After Push = " + sports + "<br>")
removed = sports.pop() document.write("After Pop = " + sports + "<br>") document.write("Removed = " + removed + "<br>")</script>
The three main statements of this script are shown in bold type. First, the script createsan array called sports with three elements and then pushes a fourth element into thearray. After that, it pops that element back off. In the process, the various current valuesare displayed via document.write. The script outputs the following:
Start = Football,Tennis,BaseballAfter Push = Football,Tennis,Baseball,HockeyAfter Pop = Football,Tennis,BaseballRemoved = Hockey
The push and pop functions are useful in situations where you need to divert from someactivity to do another, then return, as in Example 16-14.
Example 16-14. Using push and pop inside and outside of a loop<script> numbers = []
for (j = 0 ; j < 3 ; ++j) { numbers.push(j); document.write("Pushed " + j + "<br>") }
// Perform some other activity here document.write("<br>")
document.write("Popped " + numbers.pop() + "<br>") document.write("Popped " + numbers.pop() + "<br>") document.write("Popped " + numbers.pop() + "<br>")</script>
378 | Chapter 16: JavaScript Functions, Objects, and Arrays
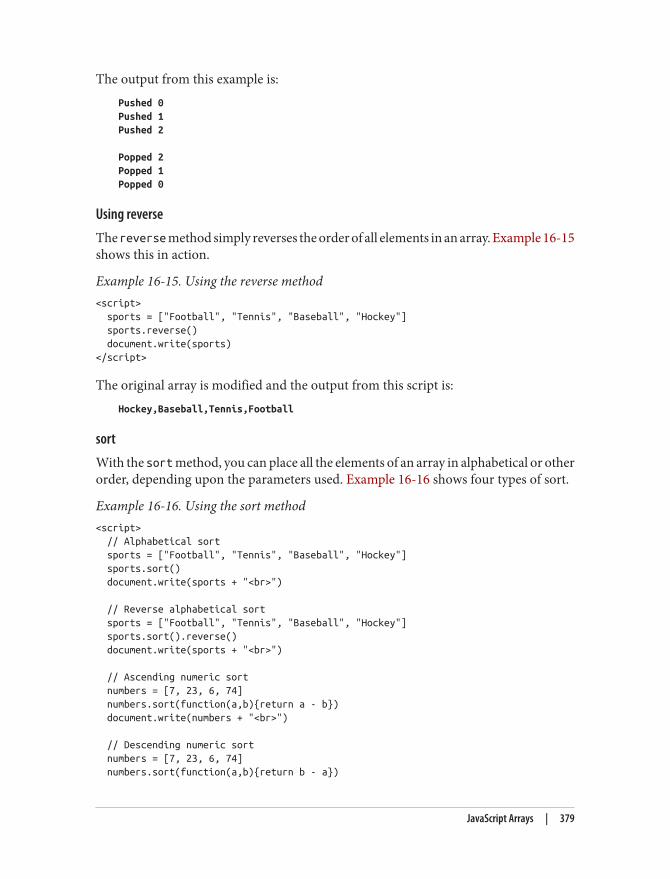
The output from this example is:Pushed 0Pushed 1Pushed 2
Popped 2Popped 1Popped 0
Using reverse
The reverse method simply reverses the order of all elements in an array. Example 16-15shows this in action.
Example 16-15. Using the reverse method<script> sports = ["Football", "Tennis", "Baseball", "Hockey"] sports.reverse() document.write(sports)</script>
The original array is modified and the output from this script is:Hockey,Baseball,Tennis,Football
sort
With the sort method, you can place all the elements of an array in alphabetical or otherorder, depending upon the parameters used. Example 16-16 shows four types of sort.
Example 16-16. Using the sort method<script> // Alphabetical sort sports = ["Football", "Tennis", "Baseball", "Hockey"] sports.sort() document.write(sports + "<br>")
// Reverse alphabetical sort sports = ["Football", "Tennis", "Baseball", "Hockey"] sports.sort().reverse() document.write(sports + "<br>")
// Ascending numeric sort numbers = [7, 23, 6, 74] numbers.sort(function(a,b){return a - b}) document.write(numbers + "<br>")
// Descending numeric sort numbers = [7, 23, 6, 74] numbers.sort(function(a,b){return b - a})
JavaScript Arrays | 379

document.write(numbers + "<br>")</script>
The first of the four example sections is the default sort method, alphabetical sort, whilethe second uses the default sort and then applies the reverse method to get a reversealphabetical sort.
The third and fourth sections are a little more complicated; they use a function to com‐pare the relationships between a and b. The function doesn’t have a name, because it’sused only in the sort. You have already seen the function named function to create ananonymous function; we used it to define a method in a class (the showUser method).
Here, function creates an anonymous function meeting the needs of the sort method.If the function returns a value greater than zero, the sort assumes that b comes beforea. If the function returns a value less than zero, the sort assumes that a comes before b.The sort runs this function across all the values in the array to determine their order.
By manipulating the value returned (a - b in contrast to b - a), the third and fourthsections of Example 16-16 choose between an ascending numerical sort and a descendingnumerical sort.
And, believe it or not, this marks the end of your introduction to JavaScript. You shouldnow have a core knowledge of the three main technologies covered in this book. Thenext chapter will look at some advanced techniques used across these technologies, suchas pattern matching and input validation.
Questions1. Are JavaScript functions and variable names case-sensitive or case-insensitive?2. How can you write a function that accepts and processes an unlimited number of
parameters?3. Name a way to return multiple values from a function.4. When you’re defining a class, what keyword do you use to refer to the current object?5. Do all the methods of a class have to be defined within the class definition?6. What keyword is used to create an object?7. How can you make a property or method available to all objects in a class without
replicating the property or method within the object?8. How can you create a multidimensional array?9. What syntax is used to create an associative array?
10. Write a statement to sort an array of numbers in descending numerical order.
See “Chapter 16 Answers” on page 650 in Appendix A for the answers to these questions.
380 | Chapter 16: JavaScript Functions, Objects, and Arrays
CHAPTER 17
JavaScript and PHP Validation andError Handling
With your solid foundation in both PHP and JavaScript, it’s time to bring these tech‐nologies together to create web forms that are as user-friendly as possible.
We’ll be using PHP to create the forms and JavaScript to perform client-side validationto ensure that the data is as complete and correct as it can be before it is submitted. Finalvalidation of the input will then be made by PHP, which will, if necessary, present theform again to the user for further modification.
In the process, this chapter will cover validation and regular expressions in both Java‐Script and PHP.
Validating User Input with JavaScriptJavaScript validation should be considered an assistance more to your users than to yourwebsites because, as I have already stressed many times, you cannot trust any data sub‐mitted to your server, even if it has supposedly been validated with JavaScript. This isbecause hackers can quite easily simulate your web forms and submit any data of theirchoosing.
Another reason you cannot rely on JavaScript to perform all your input validation isthat some users disable JavaScript, or use browsers that don’t support it.
So the best types of validation to do in JavaScript are checking that fields have contentif they are not to be left empty, ensuring that email addresses conform to the properformat, and ensuring that values entered are within expected bounds.
381

The validate.html Document (Part One)Let’s begin with a general signup form, common on most sites that offer membershipsor registered users. The inputs being requested will be forename, surname, username,password, age, and email address. Example 17-1 provides a good template for such aform.
Example 17-1. A form with JavaScript validation (part one)<!DOCTYPE html><html> <head> <title>An Example Form</title> <style> .signup { border:1px solid #999999; font: normal 14px helvetica; color: #444444; } </style> <script> function validate(form) { fail = validateForename(form.forename.value) fail += validateSurname(form.surname.value) fail += validateUsername(form.username.value) fail += validatePassword(form.password.value) fail += validateAge(form.age.value) fail += validateEmail(form.email.value)
if (fail == "") return true else { alert(fail); return false } } </script> </head> <body> <table border="0" cellpadding="2" cellspacing="5" bgcolor="#eeeeee"> <th colspan="2" align="center">Signup Form</th> <form method="post" action="adduser.php" onsubmit="return validate(this)"> <tr><td>Forename</td> <td><input type="text" maxlength="32" name="forename"></td></tr> <tr><td>Surname</td> <td><input type="text" maxlength="32" name="surname"></td></tr> <tr><td>Username</td> <td><input type="text" maxlength="16" name="username"></td></tr> <tr><td>Password</td> <td><input type="text" maxlength="12" name="password"></td></tr> <tr><td>Age</td> <td><input type="text" maxlength="3" name="age"></td></tr> <tr><td>Email</td> <td><input type="text" maxlength="64" name="email"></td></tr> <tr><td colspan="2" align="center"><input type="submit"
382 | Chapter 17: JavaScript and PHP Validation and Error Handling

value="Signup"></td></tr> </form> </table> </body></html>
As it stands, this form will display correctly but will not self-validate, because the mainvalidation functions have not yet been added. Even so, save it as validate.html, and whenyou call it up in your browser, it will look like Figure 17-1.
Figure 17-1. The output from Example 17-1
Let’s look at how this document is made up. The first few lines set up the document anduse a little CSS to make the form look a little less plain. The parts of the document relatedto JavaScript come next and are shown in bold.
Between the <script> and </script> tags lies a single function called validate whichitself calls up six other functions to validate each of the form’s input fields. We’ll get tothese functions shortly. For now I’ll just explain that they return either an empty stringif a field validates, or an error message if it fails. If there are any errors, the final line ofthe script pops up an alert box to display them.
Upon passing validation, the validate function returns a value of true; otherwise, itreturns false. The return values from validate are important, because if it returnsfalse, the form is prevented from being submitted. This allows the user to close thealert pop up and make changes. If true is returned, no errors were encountered in theform’s fields and so the form is allowed to be submitted.
Validating User Input with JavaScript | 383

The second part of this example features the HTML for the form with each field and itsname placed within its own row of a table. This is pretty straightforward HTML, withthe exception of the onSubmit="return validate(this)" statement within the open‐ing <form> tag. Using onSubmit, you can cause a function of your choice to be calledwhen a form is submitted. That function can perform some checking and return a valueof either true or false to signify whether the form should be allowed to be submitted.
The this parameter is the current object (i.e., this form) and is passed to the just dis‐cussed validate function. The validate function receives this parameter as the objectform.
As you can see, the only JavaScript used within the form’s HTML is the call to returnburied in the onSubmit attribute. Browsers with JavaScript disabled or not available willsimply ignore the onSubmit attribute, and the HTML will display just fine.
The validate.html Document (Part Two)Now we come to Example 17-2, a set of six functions that do the actual form fieldvalidation. I suggest that you type all of this second part and save it in the <script> ...</script> section of Example 17-1, which you should already have saved asvalidate.html.
Example 17-2. A form with JavaScript validation (part two)function validateForename(field){ return (field == "") ? "No Forename was entered.\n" : ""}
function validateSurname(field){ return (field == "") ? "No Surname was entered.\n" : ""}
function validateUsername(field){ if (field == "") return "No Username was entered.\n" else if (field.length < 5) return "Usernames must be at least 5 characters.\n" else if (/[^a-zA-Z0-9_-]/.test(field)) return "Only a-z, A-Z, 0-9, - and _ allowed in Usernames.\n" return ""}
function validatePassword(field){ if (field == "") return "No Password was entered.\n" else if (field.length < 6) return "Passwords must be at least 6 characters.\n" else if (!/[a-z]/.test(field) || ! /[A-Z]/.test(field) ||
384 | Chapter 17: JavaScript and PHP Validation and Error Handling

!/[0-9]/.test(field)) return "Passwords require one each of a-z, A-Z and 0-9.\n" return ""}
function validateAge(field){ if (isNaN(field)) return "No Age was entered.\n" else if (field < 18 || field > 110) return "Age must be between 18 and 110.\n" return ""}
function validateEmail(field){ if (field == "") return "No Email was entered.\n" else if (!((field.indexOf(".") > 0) && (field.indexOf("@") > 0)) || /[^a-zA-Z0-9.@_-]/.test(field)) return "The Email address is invalid.\n" return ""}
We’ll go through each of these functions in turn, starting with validateForename, soyou can see how validation works.
Validating the forename
validateForename is quite a short function that accepts the parameter field, which isthe value of the forename passed to it by the validate function.
If this value is the empty string, an error message is returned; otherwise, an empty stringis returned to signify that no error was encountered.
If the user entered spaces in this field, it would be accepted by validateForename, eventhough it’s empty for all intents and purposes. You can fix this by adding an extra state‐ment to trim whitespace from the field before checking whether it’s empty, use a regularexpression to make sure there’s something besides whitespace in the field, or—as I dohere—just let the user make the mistake and allow the PHP program to catch it on theserver.
Validating the surname
The validateSurname function is almost identical to validateForename in that an erroris returned only if the surname supplied was the empty string. I chose not to limit thecharacters allowed in either of the name fields to allow for possibilities such as non-English and accented characters.
Validating User Input with JavaScript | 385

Validating the username
The validateUsername function is a little more interesting, because it has a more com‐plicated job. It has to allow through only the characters a–z, A–Z, 0–9, _ and -, and ensurethat usernames are at least five characters long.
The if ... else statements commence by returning an error if field has not beenfilled in. If it’s not the empty string, but is fewer than five characters in length, anothererror message is returned.
Then the JavaScript test function is called, passing a regular expression (which matchesany character that is not one of those allowed) to be matched against field (see the“Regular Expressions” on page 387 section). If even one character that isn’t one of theacceptable characters is encountered, then the test function returns true, and subse‐quently validateUser returns an error string.
Validating the password
Similar techniques are used in the validatePassword function. First the function checkswhether field is empty, and if it is, returns an error. Next, an error message is returnedif a password is shorter than six characters.
One of the requirements we’re imposing on passwords is that they must have at leastone each of a lowercase, uppercase, and numerical character, so the test function iscalled three times, once for each of these cases. If any one of them returns false, oneof the requirements was not met and so an error message is returned. Otherwise, theempty string is returned to signify that the password was OK.
Validating the age
validateAge returns an error message if field is not a number (determined by a callto the isNaN function), or if the age entered is lower than 18 or greater than 110. Yourapplications may well have different or no age requirements. Again, upon successfulvalidation the empty string is returned.
Validating the email
In the last and most complicated example, the email address is validated withvalidateEmail. After checking whether anything was actually entered, and returningan error message if it wasn’t, the function calls the JavaScript indexOf function twice.The first time a check is made to ensure there is a period (.) somewhere from at leastthe second character of the field, and the second checks that an @ symbol appears some‐where at or after the second character.
If those two checks are satisfied, the test function is called to see whether any disallowedcharacters appear in the field. If any of these tests fail, an error message is returned. Theallowed characters in an email address are uppercase and lowercase letters, numbers,
386 | Chapter 17: JavaScript and PHP Validation and Error Handling

and the _, -, period and @ characters, as detailed in the regular expression passed to thetest method. If no errors are found, the empty string is returned to indicate successfulvalidation. On the last line, the script and document are closed.
Figure 17-2 shows the result of the user clicking on the Signup button without havingcompleted any fields.
Figure 17-2. JavaScript form validation in action
Using a separate JavaScript file
Of course, because they are generic in construction and could apply to many types ofvalidations you might require, these six functions make ideal candidates for moving outinto a separate JavaScript file. For example, you could name the file something likevalidate_functions.js and include it right after the initial script section inExample 17-1, using the following statement:
<script src="validate_functions.js"></script>
Regular ExpressionsLet’s look a little more closely at the pattern matching we have been doing. We’veachieved it using regular expressions, which are supported by both JavaScript and PHP.They make it possible to construct the most powerful of pattern-matching algorithmswithin a single expression.
Regular Expressions | 387

Matching through metacharacters
Every regular expression must be enclosed in slashes. Within these slashes, certaincharacters have special meanings; they are called metacharacters. For instance, an as‐terisk (*) has a meaning similar to what you have seen if you use a shell or WindowsCommand Prompt (but not quite the same). An asterisk means, “the text you’re tryingto match may have any number of the preceding characters—or none at all.”
For instance, let’s say you’re looking for the name “Le Guin” and know that someonemight spell it with or without a space. Because the text is laid out strangely (for instance,someone may have inserted extra spaces to right-justify lines), you could have to searchfor a line such as:
The difficulty of classifying Le Guin's works
So you need to match “LeGuin,” as well as “Le” and “Guin” separated by any number ofspaces. The solution is to follow a space with an asterisk:
/Le *Guin/
There’s a lot more than the name “Le Guin” in the line, but that’s OK. As long as theregular expression matches some part of the line, the test function returns a true value.What if it’s important to make sure the line contains nothing but “Le Guin”? I’ll showyou how to ensure that later.
Suppose that you know there is always at least one space. In that case, you could use theplus sign (+), because it requires at least one of the preceding character to be present:
/Le +Guin/
Fuzzy character matching
The dot (.) is particularly useful, because it can match anything except a newline. Sup‐pose that you are looking for HTML tags, which start with < and end with >. A simpleway to do so is:
/<.*>/
The dot matches any character and the * expands it to match zero or more characters,so this is saying, “match anything that lies between < and >, even if there’s nothing.” Youwill match <>, <em>, <br>, and so on. But if you don’t want to match the empty case,<>, you should use + instead of *, like this:
/<.+>/
The plus sign expands the dot to match one or more characters, saying, “match anythingthat lies between < and > as long as there’s at least one character between them.” You willmatch <em> and </em>, <h1> and </h1>, and tags with attributes such as:
<a href="www.mozilla.org">
388 | Chapter 17: JavaScript and PHP Validation and Error Handling

Unfortunately, the plus sign keeps on matching up to the last > on the line, so you mightend up with:
<h1><b>Introduction</b></h1>
A lot more than one tag! I’ll show a better solution later in this section.
If you use the dot on its own between the angle brackets, withoutfollowing it with either a + or *, then it matches a single character;you will match <b> and <i> but not <em> or <textarea>.
If you want to match the dot character itself (.), you have to escape it by placing abackslash (\) before it, because otherwise it’s a metacharacter and matches anything. Asan example, suppose you want to match the floating-point number 5.0. The regularexpression is:
/5\.0/
The backslash can escape any metacharacter, including another backslash (in case you’retrying to match a backslash in text). However, to make things a bit confusing, you’ll seelater how backslashes sometimes give the following character a special meaning.
We just matched a floating-point number. But perhaps you want to match 5. as well as5.0, because both mean the same thing as a floating-point number. You also want tomatch 5.00, 5.000, and so forth—any number of zeros is allowed. You can do this byadding an asterisk, as you’ve seen:
/5\.0*/
Grouping through parentheses
Suppose you want to match powers of increments of units, such as kilo, mega, giga, andtera. In other words, you want all the following to match:
1,0001,000,0001,000,000,0001,000,000,000,000...
The plus sign works here, too, but you need to group the string ,000 so the plus signmatches the whole thing. The regular expression is:
/1(,000)+ /
The parentheses mean “treat this as a group when you apply something such as a plussign.” 1,00,000 and 1,000,00 won’t match because the text must have a 1 followed byone or more complete groups of a comma followed by three zeros.
Regular Expressions | 389

The space after the + character indicates that the match must end when a space is en‐countered. Without it, 1,000,00 would incorrectly match because only the first 1,000would be taken into account, and the remaining ,00 would be ignored. Requiring aspace afterward ensures that matching will continue right through to the end of anumber.
Character classes
Sometimes you want to match something fuzzy, but not so broad that you want to usea dot. Fuzziness is the great strength of regular expressions: they allow you to be asprecise or vague as you want.
One of the key features supporting fuzzy matching is the pair of square brackets, []. Itmatches a single character, like a dot, but inside the brackets you put a list of things thatcan match. If any of those characters appears, the text matches. For instance, if youwanted to match both the American spelling “gray” and the British spelling “grey,” youcould specify:
/gr[ae]y/
After the gr in the text you’re matching, there can be either an a or an e. But there mustbe only one of them: whatever you put inside the brackets matches exactly one character.The group of characters inside the brackets is called a character class.
Indicating a range
Inside the brackets, you can use a hyphen (-) to indicate a range. One very commontask is matching a single digit, which you can do with a range as follows:
/[0-9]/
Digits are such a common item in regular expressions that a single character is providedto represent them: \d. You can use it in place of the bracketed regular expression tomatch a digit:
/\d/
Negation
One other important feature of the square brackets is negation of a character class. Youcan turn the whole character class on its head by placing a caret (^) after the openingbracket. Here it means, “Match any characters except the following.” So let’s say you wantto find instances of “Yahoo” that lack the following exclamation point. (The name ofthe company officially contains an exclamation point!) You could do it as follows:
/Yahoo[^!]/
390 | Chapter 17: JavaScript and PHP Validation and Error Handling

The character class consists of a single character—an exclamation point—but it is in‐verted by the preceding ^. This is actually not a great solution to the problem—forinstance, it fails if “Yahoo” is at the end of the line, because then it’s not followed byanything, whereas the brackets must match a character. A better solution involves neg‐ative lookahead (matching something that is not followed by anything else), but that’sbeyond the scope of this book.
Some more complicated examples
With an understanding of character classes and negation, you’re ready now to see abetter solution to the problem of matching an HTML tag. This solution avoids goingpast the end of a single tag, but still matches tags such as <em> and </em> as well as tagswith attributes such as:
<a href="www.mozilla.org">
One solution is:/<[^>]+>/
That regular expression may look like I just dropped my teacup on the keyboard, but itis perfectly valid and very useful. Let’s break it apart. Figure 17-3 shows the variouselements, which I’ll describe one by one.
Figure 17-3. Breakdown of a typical regular expression
The elements are:/
Opening slash that indicates this is a regular expression.
<
Opening bracket of an HTML tag. This is matched exactly; it is not a metacharacter.
[^>]
Character class. The embedded ^> means “match anything except a closing anglebracket.”
+
Allows any number of characters to match the previous [^>], as long as there is atleast one of them.
Regular Expressions | 391

>
Closing bracket of an HTML tag. This is matched exactly.
/
Closing slash that indicates the end of the regular expression.
Another solution to the problem of matching HTML tags is to use anongreedy operation. By default, pattern matching is greedy, return‐ing the longest match possible. Nongreedy matching finds the short‐est possible match, and its use is beyond the scope of this book, butthere are more details at http://oreilly.com/catalog/regex/chapter/ch04.html.
We are going to look now at one of the expressions from Example 17-1, where thevalidateUsername function used:
/[^a-zA-Z0-9_-]/
Figure 17-4 shows the various elements.
Figure 17-4. Breakdown of the validateUsername regular expression
Let’s look at these elements in detail:/
Opening slash that indicates this is a regular expression.
[
Opening bracket that starts a character class.
^
Negation character: inverts everything else between the brackets.
a-z
Represents any lowercase letter.
392 | Chapter 17: JavaScript and PHP Validation and Error Handling

A-Z
Represents any uppercase letter.
0-9
Represents any digit.
_
An underscore.
-
A dash.
]
Closing bracket that ends a character class.
/
Closing slash that indicates the end of the regular expression.
There are two other important metacharacters. They “anchor” a regular expression byrequiring that it appear in a particular place. If a caret (^) appears at the beginning ofthe regular expression, the expression has to appear at the beginning of a line of text;otherwise, it doesn’t match. Similarly, if a dollar sign ($) appears at the end of the regularexpression, the expression has to appear at the end of a line of text.
It may be somewhat confusing that ^ can mean “negate the charac‐ter class” inside square brackets and “match the beginning of the line”if it’s at the beginning of the regular expression. Unfortunately, thesame character is used for two different things, so take care whenusing it.
We’ll finish our exploration of regular expression basics by answering a question raisedearlier: suppose you want to make sure there is nothing extra on a line besides the regularexpression? What if you want a line that has “Le Guin” and nothing else? We can dothat by amending the earlier regular expression to anchor the two ends:
/^Le *Guin$/
Summary of metacharacters
Table 17-1 shows the metacharacters available in regular expressions.
Table 17-1. Regular expression metacharactersMetacharacters Description
/ Begins and ends the regular expression
. Matches any single character except the newline
element* Matches element zero or more times
Regular Expressions | 393

Metacharacters Description
element+ Matches element one or more times
element? Matches element zero or one times
[characters] Matches a character out of those contained within the brackets
[^characters] Matches a single character that is not contained within the brackets
(regex) Treats the regex as a group for counting or a following *, +, or ?
left|right Matches either left or right
[l-r] Matches a range of characters between l and r
^ Requires match to be at the string’s start
$ Requires match to be at the string’s end
\b Matches a word boundary
\B Matches where there is not a word boundary
\d Matches a single digit
\D Matches a single nondigit
\n Matches a newline character
\s Matches a whitespace character
\S Matches a nonwhitespace character
\t Matches a tab character
\w Matches a word character (a-z, A-Z, 0-9, and _)
\W Matches a nonword character (anything but a-z, A-Z, 0-9, and _)
\x x (useful if x is a metacharacter, but you really want x)
{n} Matches exactly n times
{n,} Matches n times or more
{min,max} Matches at least min and at most max times
Provided with this table, and looking again at the expression /[^a-zA-Z0-9_]/, you cansee that it could easily be shortened to /[^\w]/ because the single metacharacter \w(with a lowercase w) specifies the characters a-z, A-Z, 0-9, and _.
In fact, we can be cleverer than that, because the metacharacter \W (with an uppercaseW) specifies all characters except for a-z, A-Z, 0-9, and _. Therefore, we could also dropthe ^ metacharacter and simply use /[\W]/ for the expression.
To give you more ideas of how this all works, Table 17-2 shows a range of expressionsand the patterns they match.
394 | Chapter 17: JavaScript and PHP Validation and Error Handling
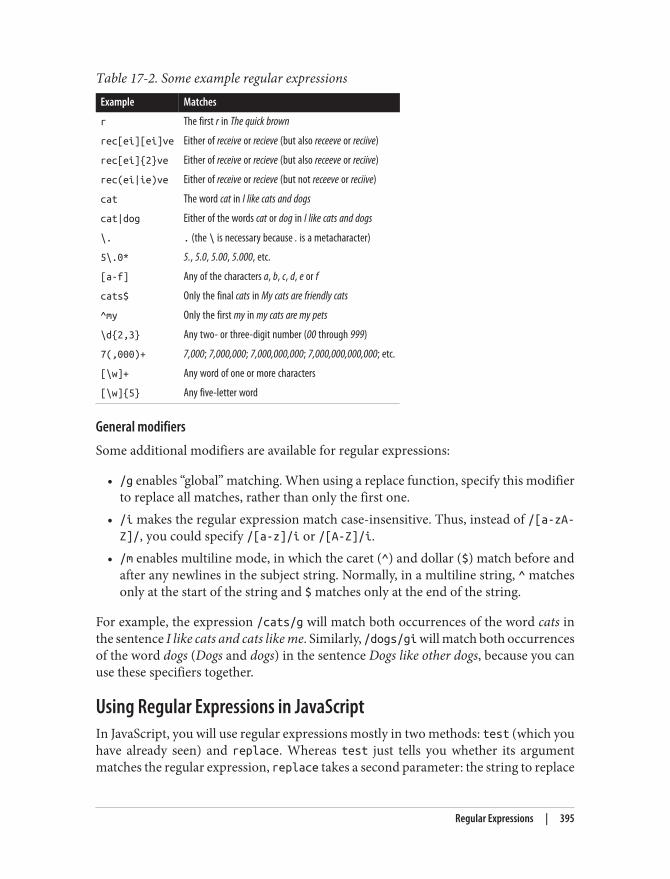
Table 17-2. Some example regular expressionsExample Matches
r The first r in The quick brown
rec[ei][ei]ve Either of receive or recieve (but also receeve or reciive)
rec[ei]{2}ve Either of receive or recieve (but also receeve or reciive)
rec(ei|ie)ve Either of receive or recieve (but not receeve or reciive)
cat The word cat in I like cats and dogs
cat|dog Either of the words cat or dog in I like cats and dogs
\. . (the \ is necessary because . is a metacharacter)
5\.0* 5., 5.0, 5.00, 5.000, etc.
[a-f] Any of the characters a, b, c, d, e or f
cats$ Only the final cats in My cats are friendly cats
^my Only the first my in my cats are my pets
\d{2,3} Any two- or three-digit number (00 through 999)
7(,000)+ 7,000; 7,000,000; 7,000,000,000; 7,000,000,000,000; etc.
[\w]+ Any word of one or more characters
[\w]{5} Any five-letter word
General modifiers
Some additional modifiers are available for regular expressions:
• /g enables “global” matching. When using a replace function, specify this modifierto replace all matches, rather than only the first one.
• /i makes the regular expression match case-insensitive. Thus, instead of /[a-zA-Z]/, you could specify /[a-z]/i or /[A-Z]/i.
• /m enables multiline mode, in which the caret (^) and dollar ($) match before andafter any newlines in the subject string. Normally, in a multiline string, ^ matchesonly at the start of the string and $ matches only at the end of the string.
For example, the expression /cats/g will match both occurrences of the word cats inthe sentence I like cats and cats like me. Similarly, /dogs/gi will match both occurrencesof the word dogs (Dogs and dogs) in the sentence Dogs like other dogs, because you canuse these specifiers together.
Using Regular Expressions in JavaScriptIn JavaScript, you will use regular expressions mostly in two methods: test (which youhave already seen) and replace. Whereas test just tells you whether its argumentmatches the regular expression, replace takes a second parameter: the string to replace
Regular Expressions | 395

the text that matches. Like most functions, replace generates a new string as a returnvalue; it does not change the input.
To compare the two methods, the following statement just returns true to let us knowthat the word cats appears at least once somewhere within the string:
document.write(/cats/i.test("Cats are funny. I like cats."))
But the following statement replaces both occurrences of the word cats with the worddogs, printing the result. The search has to be global (/g) to find all occurrences, andcase-insensitive (/i) to find the capitalized Cats:
document.write("Cats are friendly. I like cats.".replace(/cats/gi,"dogs"))
If you try out the statement, you’ll see a limitation of replace: because it replaces textwith exactly the string you tell it to use, the first word Cats is replaced by dogs insteadof Dogs.
Using Regular Expressions in PHPThe most common regular expression functions that you are likely to use in PHP arepreg_match, preg_match_all, and preg_replace.
To test whether the word cats appears anywhere within a string, in any combination ofupper- and lowercase, you could use preg_match like this:
$n = preg_match("/cats/i", "Cats are crazy. I like cats.");
Because PHP uses 1 for TRUE and 0 for FALSE, the preceding statement sets $n to 1. Thefirst argument is the regular expression and the second is the text to match. Butpreg_match is actually a good deal more powerful and complicated, because it takes athird argument that shows what text matched:
$n = preg_match("/cats/i", "Cats are curious. I like cats.", $match);echo "$n Matches: $match[0]";
The third argument is an array (here, given the name $match). The function puts thetext that matches into the first element, so if the match is successful you can find thetext that matched in $match[0]. In this example, the output lets us know that thematched text was capitalized:
1 Matches: Cats
If you wish to locate all matches, you use the preg_match_all function, like this:$n = preg_match_all("/cats/i", "Cats are strange. I like cats.", $match);echo "$n Matches: ";for ($j=0 ; $j < $n ; ++$j) echo $match[0][$j]." ";
As before, $match is passed to the function and the element $match[0] is assigned thematches made, but this time as a subarray. To display the subarray, this example iteratesthrough it with a for loop.
396 | Chapter 17: JavaScript and PHP Validation and Error Handling

When you want to replace part of a string, you can use preg_replace as shown here.This example replaces all occurrences of the word cats with the word dogs, regardlessof case:
echo preg_replace("/cats/i", "dogs", "Cats are furry. I like cats.");
The subject of regular expressions is a large one and entire books havebeen written about it. If you would like further information, I sug‐gest the Wikipedia entry, or Jeffrey Friedl’s excellent book MasteringRegular Expressions.
Redisplaying a Form After PHP ValidationOK, back to form validation. So far we’ve created the HTML document validate.html,which will post through to the PHP program adduser.php, but only if JavaScript validatesthe fields or if JavaScript is disabled or unavailable.
So now it’s time to create adduser.php to receive the posted form, perform its ownvalidation, and then present the form again to the visitor if the validation fails.Example 17-3 contains the code that you should type and save (or download from thecompanion website).
Example 17-3. The adduser.php program<?php // adduser.php
// The PHP code
$forename = $surname = $username = $password = $age = $email = "";
if (isset($_POST['forename'])) $forename = fix_string($_POST['forename']); if (isset($_POST['surname'])) $surname = fix_string($_POST['surname']); if (isset($_POST['username'])) $username = fix_string($_POST['username']); if (isset($_POST['password'])) $password = fix_string($_POST['password']); if (isset($_POST['age'])) $age = fix_string($_POST['age']); if (isset($_POST['email'])) $email = fix_string($_POST['email']);
$fail = validate_forename($forename); $fail .= validate_surname($surname); $fail .= validate_username($username); $fail .= validate_password($password); $fail .= validate_age($age); $fail .= validate_email($email);
Redisplaying a Form After PHP Validation | 397

echo "<!DOCTYPE html>\n<html><head><title>An Example Form</title>";
if ($fail == "") { echo "</head><body>Form data successfully validated: $forename, $surname, $username, $password, $age, $email.</body></html>";
// This is where you would enter the posted fields into a database, // preferably using hash encryption for the password.
exit; }
echo <<<_END
<!-- The HTML/JavaScript section -->
<style> .signup { border: 1px solid #999999; font: normal 14px helvetica; color:#444444; } </style>
<script> function validate(form) { fail = validateForename(form.forename.value) fail += validateSurname(form.surname.value) fail += validateUsername(form.username.value) fail += validatePassword(form.password.value) fail += validateAge(form.age.value) fail += validateEmail(form.email.value)
if (fail == "") return true else { alert(fail); return false } }
function validateForename(field) { return (field == "") ? "No Forename was entered.\n" : "" }
function validateSurname(field) { return (field == "") ? "No Surname was entered.\n" : "" }
function validateUsername(field) { if (field == "") return "No Username was entered.\n"
398 | Chapter 17: JavaScript and PHP Validation and Error Handling

else if (field.length < 5) return "Usernames must be at least 5 characters.\n" else if (/[^a-zA-Z0-9_-]/.test(field)) return "Only a-z, A-Z, 0-9, - and _ allowed in Usernames.\n" return "" }
function validatePassword(field) { if (field == "") return "No Password was entered.\n" else if (field.length < 6) return "Passwords must be at least 6 characters.\n" else if (!/[a-z]/.test(field) || ! /[A-Z]/.test(field) || !/[0-9]/.test(field)) return "Passwords require one each of a-z, A-Z and 0-9.\n" return "" }
function validateAge(field) { if (isNaN(field)) return "No Age was entered.\n" else if (field < 18 || field > 110) return "Age must be between 18 and 110.\n" return "" }
function validateEmail(field) { if (field == "") return "No Email was entered.\n" else if (!((field.indexOf(".") > 0) && (field.indexOf("@") > 0)) || /[^a-zA-Z0-9.@_-]/.test(field)) return "The Email address is invalid.\n" return "" } </script> </head> <body>
<table border="0" cellpadding="2" cellspacing="5" bgcolor="#eeeeee"> <th colspan="2" align="center">Signup Form</th>
<tr><td colspan="2">Sorry, the following errors were found<br> in your form: <p><font color=red size=1><i>$fail</i></font></p> </td></tr>
<form method="post" action="adduser.php" onSubmit="return validate(this)"> <tr><td>Forename</td> <td><input type="text" maxlength="32" name="forename" value="forename"> </td></tr><tr><td>Surname</td> <td><input type="text" maxlength="32" name="surname" value="surname"> </td></tr><tr><td>Username</td>
Redisplaying a Form After PHP Validation | 399

<td><input type="text" maxlength="16" name="username" value="username"> </td></tr><tr><td>Password</td> <td><input type="text" maxlength="12" name="password" value="password"> </td></tr><tr><td>Age</td> <td><input type="text" maxlength="3" name="age" value="age"> </td></tr><tr><td>Email</td> <td><input type="text" maxlength="64" name="email" value="email"> </td></tr><tr><td colspan="2" align="center"><input type="submit" value="Signup"></td></tr> </form> </table> </body></html>
_END;
// The PHP functions
function validate_forename($field) { return ($field == "") ? "No Forename was entered<br>": ""; }
function validate_surname($field) { return($field == "") ? "No Surname was entered<br>" : ""; }
function validate_username($field) { if ($field == "") return "No Username was entered<br>"; else if (strlen($field) < 5) return "Usernames must be at least 5 characters<br>"; else if (preg_match("/[^a-zA-Z0-9_-]/", $field)) return "Only letters, numbers, - and _ in usernames<br>"; return ""; }
function validate_password($field) { if ($field == "") return "No Password was entered<br>"; else if (strlen($field) < 6) return "Passwords must be at least 6 characters<br>"; else if (!preg_match("/[a-z]/", $field) || !preg_match("/[A-Z]/", $field) || !preg_match("/[0-9]/", $field)) return "Passwords require 1 each of a-z, A-Z and 0-9<br>"; return ""; }
function validate_age($field) {
400 | Chapter 17: JavaScript and PHP Validation and Error Handling

if ($field == "") return "No Age was entered<br>"; else if ($field < 18 || $field > 110) return "Age must be between 18 and 110<br>"; return ""; }
function validate_email($field) { if ($field == "") return "No Email was entered<br>"; else if (!((strpos($field, ".") > 0) && (strpos($field, "@") > 0)) || preg_match("/[^a-zA-Z0-9.@_-]/", $field)) return "The Email address is invalid<br>"; return ""; }
function fix_string($string) { if (get_magic_quotes_gpc()) $string = stripslashes($string); return htmlentities ($string); }?>
In this example, all input is sanitized prior to use, even passwords,which, because they may contain characters used to format HTML,will be changed into HTML entities. For example, & will become &and < will become <, and so on. If you will be using a hash func‐tion to store encrypted passwords, this will not be an issue as long aswhen you later check the password entered, it is sanitized in the sameway, so that the same inputs will be compared.
The result of submitting the form with JavaScript disabled (and two fields incorrectlycompleted) is shown in Figure 17-5.
I have put the PHP section of this code (and changes to the HTML section) in a boldtypeface so that you can more clearly see the difference between this and Examples 17-1and 17-2.
If you browsed through this example (or typed it or downloaded it from the companionwebsite), you’ll have seen that the PHP code is almost a clone of the JavaScript code; thesame regular expressions are used to validate each field in very similar functions.
But there are a couple of things to note. First, the fix_string function (right at the end)is used to sanitize each field and prevent any attempts at code injection from succeeding.
Also, you will see that the HTML from Example 17-1 has been repeated in the PHP codewithin a <<<_END ... _END; structure, displaying the form with the values that thevisitor entered the previous time. You do this by simply adding an extra value parameterto each <input> tag (such as value="$forename").
Redisplaying a Form After PHP Validation | 401

This courtesy is highly recommended so that the user has to edit only the previouslyentered values, and doesn’t have to type the fields all over again.
Figure 17-5. The form as represented after PHP validation fails
In the real world, you probably wouldn’t start with an HTML formsuch as the one in Example 17-1. Instead, you’d be more likely to gostraight ahead and write the PHP program in Example 17-3, whichincorporates all the HTML. And, of course, you’d also need to makea minor tweak for the case when it’s the first time the program is calledup, to prevent it from displaying errors when all the fields are emp‐ty. You also might drop the six JavaScript functions into their own .jsfile for separate inclusion.
Now that you’ve seen how to bring all of PHP, HTML, and JavaScript together, the nextchapter will introduce Ajax (Asynchronous JavaScript and XML), which uses JavaScriptcalls to the server in the background to seamlessly update portions of a web page, withouthaving to resubmit the entire page to the web server.
402 | Chapter 17: JavaScript and PHP Validation and Error Handling
Questions1. What JavaScript method can you use to send a form for validation prior to sub‐
mitting it?2. What JavaScript method is used to match a string against a regular expression?3. Write a regular expression to match any characters that are not in a word, as defined
by regular expression syntax.4. Write a regular expression to match either of the words fox or fix.5. Write a regular expression to match any single word followed by any nonword
character.6. Using regular expressions, write a JavaScript function to test whether the word fox
exists in the string The quick brown fox.7. Using regular expressions, write a PHP function to replace all occurrences of the
word the in The cow jumps over the moon with the word my.8. What HTML attribute is used to precomplete form fields with a value?
See “Chapter 17 Answers” on page 651 in Appendix A for the answers to these questions.
Questions | 403


CHAPTER 18
Using Ajax
The term Ajax was first coined in 2005. It stands for Asynchronous JavaScript and XML,which, in simple terms, means using a set of methods built into JavaScript to transferdata between the browser and a server in the background. An excellent example of thistechnology is Google Maps (see Figure 18-1), in which new sections of a map are down‐loaded from the server when needed, without requiring a page refresh.
Using Ajax not only substantially reduces the amount of data that must be sent backand forth, it also makes web pages seamlessly dynamic—allowing them to behave morelike self-contained applications. The results are a much improved user interface andbetter responsiveness.
What Is Ajax?The beginnings of Ajax as used today started with the release of Internet Explorer 5 in1999, which introduced a new ActiveX object, XMLHttpRequest. ActiveX is Microsoft’stechnology for signing plug-ins that install additional software to your computer. Otherbrowser developers later followed suit, but rather than using ActiveX, they all imple‐mented the feature as a native part of the JavaScript interpreter.
However, even before then, an early form of Ajax had already surfaced that used hiddenframes on a page that interacted with the server in the background. Chat rooms wereearly adopters of this technology, using it to poll for and display new message postswithout requiring page reloads.
So let’s see how to implement Ajax using JavaScript.
405

Figure 18-1. Google Maps is an excellent example of Ajax in action
Using XMLHttpRequestDue to the differences between browser implementations of XMLHttpRequest, you mustcreate a special function in order to ensure that your code will work on all major browsers.
To do this, you must understand the three ways of creating an XMLHttpRequest object:
• IE 5: request = new ActiveXObject("Microsoft.XMLHTTP")• IE 6+: request = new ActiveXObject("Msxml2.XMLHTTP")• All others: request = new XMLHttpRequest()
This is the case because Microsoft chose to implement a change with the release ofInternet Explorer 6, while all other browsers use a slightly different method. Therefore,the code in Example 18-1 will work for all major browsers released over the last fewyears.
406 | Chapter 18: Using Ajax

Example 18-1. A cross-browser Ajax function<script> function ajaxRequest() { try // Non IE Browser? { // Yes var request = new XMLHttpRequest() } catch(e1) { try // IE 6+? { // Yes request = new ActiveXObject("Msxml2.XMLHTTP") } catch(e2) { try // IE 5? { // Yes request = new ActiveXObject("Microsoft.XMLHTTP") } catch(e3) // There is no AJAX Support { request = false } } } return request }</script>
You may remember the introduction to error handling in the previous chapter, usingthe try ... catch construct. Example 18-1 is a perfect illustration of its utility, becauseit uses the try keyword to execute the non-IE Ajax command, and upon success, jumpson to the final return statement, where the new object is returned.
Otherwise, a catch traps the error and the subsequent command is executed. Again,upon success, the new object is returned; otherwise, the final of the three commands istried. If that attempt fails, then the browser doesn’t support Ajax and the request objectis set to false; otherwise, the object is returned. So there you have it: a cross-browserAjax request function that you may wish to add to your library of useful JavaScriptfunctions.
OK, so now you have a means of creating an XMLHttpRequest object, but what can youdo with these objects? Well, each one comes with a set of properties (variables) andmethods (functions), which are detailed in Tables 18-1 and 18-2.
Using XMLHttpRequest | 407

Table 18-1. An XMLHttpRequest object’s propertiesProperties Description
onreadystatechange Specifies an event handling function to be called whenever the readyState property of anobject changes.
readyState An integer property that reports on the status of a request. It can have any of these values: 0 =Uninitialized, 1 = Loading, 2 = Loaded, 3 = Interactive, and 4 = Completed.
responseText The data returned by the server in text format.
responseXML The data returned by the server in XML format.
status The HTTP status code returned by the server.
statusText The HTTP status text returned by the server.
Table 18-2. An XMLHttpRequest object’s methodsMethods Description
abort() Aborts the current request.
getAllResponseHeaders() Returns all headers as a string.
getResponseHeader(param) Returns the value of param as a string.
open('method', 'url', 'asynch') Specifies the HTTP method to use (GET or POST), the target URL, andwhether the request should be handled asynchronously (true orfalse).
send(data) Sends data to the target server using the specified HTTP method.
setRequestHeader('param', 'value') Sets a header with a parameter/value pair.
These properties and methods give you control over what data you send to the serverand receive back, as well as a choice of send and receive methods. For example, you canchoose whether to request data in plain text (which could include HTML and othertags) or in XML format. You can also decide whether you wish to use the POST or GETmethod to send to the server.
Let’s look at the POST method first by creating a very simple pair of documents: a com‐bination of HTML and JavaScript, and a PHP program to interact via Ajax with the first.Hopefully you’ll enjoy these examples, because they illustrate just what Web 2.0 andAjax are all about. With a few lines of JavaScript, they request a web document from athird-party web server, which is then returned to the browser by your server and placedwithin a section of the current document.
Your First Ajax ProgramType and save the code in Example 18-2 as urlpost.html, but don’t load it into yourbrowser yet.
408 | Chapter 18: Using Ajax

Example 18-2. urlpost.html<!DOCTYPE html><html> <head> <title>AJAX Example</title> </head> <body style='text-align:center'> <h1>Loading a web page into a DIV</h1> <div id='info'>This sentence will be replaced</div>
<script> params = "url=amazon.com/gp/aw" request = new ajaxRequest()
request.open("POST", "urlpost.php", true) request.setRequestHeader("Content-type", "application/x-www-form-urlencoded") request.setRequestHeader("Content-length", params.length) request.setRequestHeader("Connection", "close")
request.onreadystatechange = function() { if (this.readyState == 4) { if (this.status == 200) { if (this.responseText != null) { document.getElementById('info').innerHTML = this.responseText } else alert("Ajax error: No data received") } else alert( "Ajax error: " + this.statusText) } }
request.send(params)
function ajaxRequest() { try { var request = new XMLHttpRequest() } catch(e1) { try { request = new ActiveXObject("Msxml2.XMLHTTP") } catch(e2)
Using XMLHttpRequest | 409

{ try { request = new ActiveXObject("Microsoft.XMLHTTP") } catch(e3) { request = false } } } return request } </script> </body></html>
Let’s go through this document and look at what it does, starting with the first six lines,which simply set up an HTML document and display a heading. The next line createsa DIV with the ID info, containing the text This sentence will be replaced bydefault. Later on, the text returned from the Ajax call will be inserted here.
The next six lines are required for making an HTTP POST Ajax request. The first setsthe variable params to a parameter=value pair, which is what we’ll send to the server.Then the Ajax object request is created. After this, the open method is called to set theobject to make a POST request to urlpost.php in asynchronous mode. The last three linesin this group set up headers that are required for the receiving server to know that aPOST request is coming.
The readyState property
Now we get to the nitty-gritty of an Ajax call, which all hangs on the readyStateproperty. The “asynchronous” aspect of Ajax allows the browser to keep accepting userinput and changing the screen, while our program sets the onreadystatechange prop‐erty to call a function of our choice each time readyState changes. In this case, anameless (or anonymous) inline function has been used, as opposed to a separate,named function. This type of function is known as a callback function, as it is calledback each time readyState changes.
The syntax to set up the callback function using an inline, anonymous function is asfollows:
request.onreadystatechange = function(){ if (this.readyState == 4) { // do something }}
410 | Chapter 18: Using Ajax

If you wish to use a separate, named function, the syntax is slightly different:request.onreadystatechange = ajaxCallback
function ajaxCallback(){ if (this.readyState == 4) { // do something }}
Looking at Table 18-1, you’ll see that readyState can have five different values. But onlyone of them concerns us: value 4, which represents a completed Ajax call. Therefore,each time the new function gets called, it returns without doing anything until readyState has a value of 4. When our function detects that value, it next inspects the statusof the call to ensure it has a value of 200, which means that the call succeeded. If it’s not200, an alert pop up displays the error message contained in statusText.
You will notice that all of these object properties are referenced us‐ing this.readyState, this.status, and so on, rather than the ob‐ject’s current name, request, as in request.readyState orrequest.status. This is so that you can easily copy and paste thecode and it will work with any object name, because the this key‐word always refers to the current object.
So, having ascertained that the readyState is 4 and the status is 200, we test theresponseText value to see whether it contains a value. If not, an error message is dis‐played in an alert box. Otherwise, the inner HTML of the DIV is assigned the value ofresponseText, like this:
document.getElementById('info').innerHTML = this.responseText
In this line, the element info is referenced via the getElementByID method, and thenits innerHTML property is assigned the value that was returned by the Ajax call.
After all this setting up and preparation, the Ajax request is finally sent to the server viathe following command, which passes the parameters already defined in the variableparams:
request.send(params)
After that, all the preceding code is activated each time readyState changes.
The remainder of the document is the ajaxRequest function from Example 18-1, andthe closing script and HTML tags.
Using XMLHttpRequest | 411

The server half of the Ajax process
Now we get to the PHP half of the equation, which you can see in Example 18-3. Typeit and save it as urlpost.php.
Example 18-3. urlpost.php<?php // urlpost.php if (isset($_POST['url'])) { echo file_get_contents('http://' . SanitizeString($_POST['url'])); }
function SanitizeString($var) { $var = strip_tags($var); $var = htmlentities($var); return stripslashes($var); }?>
As you can see, this is short and sweet, and as should be done with all posted data, italso makes use of the ever-important SanitizeString function. In this instance, un‐sanitized data could result in the user gaining an advantage over your code.
This program uses the file_get_contents PHP function to load in the web page at theURL supplied to it in the POST variable $_POST['url']. The file_get_contents func‐tion is versatile in that it loads in the entire contents of a file or web page from either alocal or a remote server; it even takes into account moved pages and other redirects.
Once you have typed the program, you are ready to call up urlpost.html into your webbrowser and, after a few seconds, you should see the contents of the Amazon mobilefront page loaded into the DIV that we created for that purpose. It won’t be as fast asdirectly loading the web page, because it is transferred twice: once to the server andagain from the server to your browser. The result should look like Figure 18-2.
Not only have we succeeded in making an Ajax call and having a response returned toJavaScript, we’ve also harnessed the power of PHP to enable the merging in of a totallyunrelated web object. Incidentally, if we had tried to find a way to fetch the Amazonmobile web page directly via Ajax (without recourse to the PHP server-side module),we wouldn’t have succeeded, because there are security blocks preventing cross-domainAjax. So this little example also illustrates a handy solution to a very practical problem.
412 | Chapter 18: Using Ajax

Figure 18-2. The Amazon mobile website has been loaded into a DIV
Using GET Instead of POSTAs with submitting any form data, you have the option of submitting your data in theform of GET requests, and you will save a few lines of code if you do so. However, thereis a downside: some browsers may cache GET requests, whereas POST requests will neverbe cached. You don’t want to cache a request, because the browser will just redisplaywhat it got the last time instead of going to the server for fresh input. The solution tothis is to use a workaround that adds a random parameter to each request, ensuring thateach URL requested is unique.
Example 18-4 shows how you would achieve the same result as with Example 18-2, butusing an Ajax GET request instead of POST.
Example 18-4. urlget.html<!DOCTYPE html><html> <head> <title>AJAX Example</title> </head> <body style='text-align:center'>
Using XMLHttpRequest | 413

<h1>Loading a web page into a DIV</h1> <div id='info'>This sentence will be replaced</div>
<script> nocache = "&nocache=" + Math.random() * 1000000 request = new ajaxRequest() request.open("GET", "urlget.php?url=amazon.com/gp/aw" + nocache, true)
request.onreadystatechange = function() { if (this.readyState == 4) { if (this.status == 200) { if (this.responseText != null) { document.getElementById('info').innerHTML = this.responseText } else alert("Ajax error: No data received") } else alert( "Ajax error: " + this.statusText) } }
request.send(null)
function ajaxRequest() { try { var request = new XMLHttpRequest() } catch(e1) { try { request = new ActiveXObject("Msxml2.XMLHTTP") } catch(e2) { try { request = new ActiveXObject("Microsoft.XMLHTTP") } catch(e3) { request = false } } } return request
414 | Chapter 18: Using Ajax

} </script> </body></html>
The differences to note between the two documents are highlighted in bold, and de‐scribed as follows:
• It is not necessary to send headers for a GET request.• We call the open method using a GET request, supplying a URL with a string com‐
prising a ? symbol followed by the parameter/value pair url=amazon.com/gp/aw.• We start a second parameter/value pair using an & symbol, then set the value of the
parameter nocache to a random value between 0 and a million. This is used toensure that each URL requested is different, and therefore that no requests will becached.
• The call to send now contains only a parameter of null, as no parameters are beingpassed via a POST request. Note that leaving the parameter out is not an option, asit would result in an error.
To accompany this new document, the PHP program must be modified to respond toa GET request, as in Example 18-5, urlget.php.
Example 18-5. urlget.php<?php if (isset($_GET['url'])) { echo file_get_contents("http://".sanitizeString($_GET['url'])); }
function sanitizeString($var) { $var = strip_tags($var); $var = htmlentities($var); return stripslashes($var); }?>
All that’s different between this and Example 18-3 is that the references to $_POST havebeen replaced with $_GET. The end result of calling up urlget.html in your browser isidentical to loading in urlpost.html.
Sending XML RequestsAlthough the objects we’ve been creating are called XMLHttpRequest objects, so far wehave made absolutely no use of XML. This is where the Ajax term is a bit of a misnomer,because the technology actually allows you to request any type of textual data, only one
Using XMLHttpRequest | 415

of which is XML. As you have seen, we have requested an entire HTML document viaAjax, but we could equally have asked for a text page, a string or number, or evenspreadsheet data.
So let’s modify the previous example document and PHP program to fetch some XMLdata. To do this, first take a look at the PHP program, xmlget.php, shown inExample 18-6.
Example 18-6. xmlget.php<?php if (isset($_GET['url'])) { header('Content-Type: text/xml'); echo file_get_contents("http://".sanitizeString($_GET['url'])); }
function sanitizeString($var) { $var = strip_tags($var); $var = htmlentities($var); return stripslashes($var); }?>
This program has been very slightly modified (shown in bold highlighting) to outputthe correct XML header before returning a fetched document. No checking is madehere, as it is assumed that the calling Ajax will request an actual XML document.
Now on to the HTML document, xmlget.html, shown in Example 18-7.
Example 18-7. xmlget.html<!DOCTYPE html><html> <head> <title>AJAX Example</title> </head> <body> <h1>Loading a web page into a DIV</h1> <div id='info'>This sentence will be replaced</div>
<script> nocache = "&nocache=" + Math.random() * 1000000 url = "rss.news.yahoo.com/rss/topstories" out = "";
request = new ajaxRequest() request.open("GET", "xmlget.php?url=" + url + nocache, true)
request.onreadystatechange = function() {
416 | Chapter 18: Using Ajax

if (this.readyState == 4) { if (this.status == 200) { if (this.responseText != null) { titles = this.responseXML.getElementsByTagName('title')
for (j = 0 ; j < titles.length ; ++j) { out += titles[j].childNodes[0].nodeValue + '<br>' } document.getElementById('info').innerHTML = out } else alert("Ajax error: No data received") } else alert( "Ajax error: " + this.statusText) } }
request.send(null)
function ajaxRequest() { try { var request = new XMLHttpRequest() } catch(e1) { try { request = new ActiveXObject("Msxml2.XMLHTTP") } catch(e2) { try { request = new ActiveXObject("Microsoft.XMLHTTP") } catch(e3) { request = false } } } return request } </script> </body></html>
Using XMLHttpRequest | 417
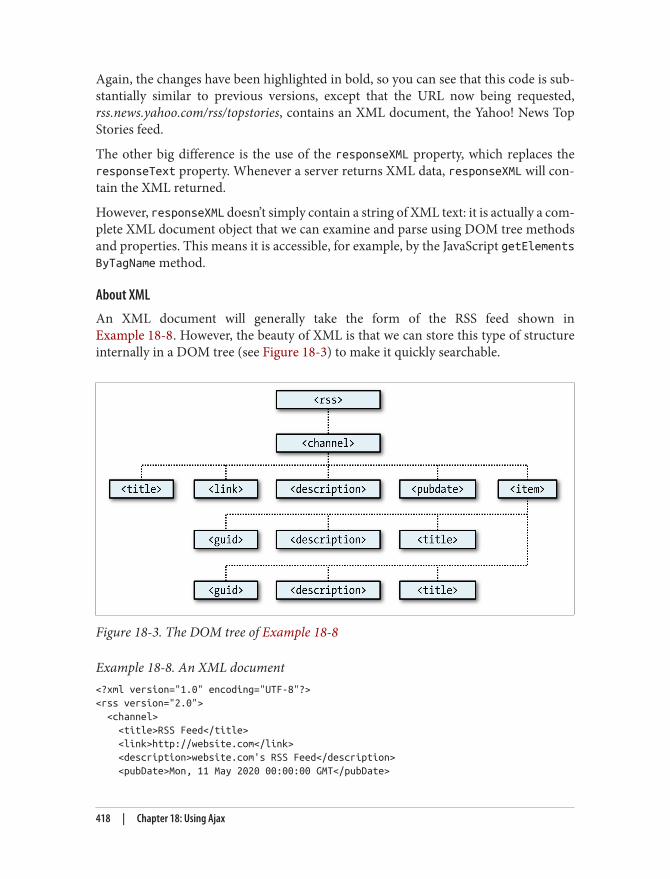
Again, the changes have been highlighted in bold, so you can see that this code is sub‐stantially similar to previous versions, except that the URL now being requested,rss.news.yahoo.com/rss/topstories, contains an XML document, the Yahoo! News TopStories feed.
The other big difference is the use of the responseXML property, which replaces theresponseText property. Whenever a server returns XML data, responseXML will con‐tain the XML returned.
However, responseXML doesn’t simply contain a string of XML text: it is actually a com‐plete XML document object that we can examine and parse using DOM tree methodsand properties. This means it is accessible, for example, by the JavaScript getElementsByTagName method.
About XML
An XML document will generally take the form of the RSS feed shown inExample 18-8. However, the beauty of XML is that we can store this type of structureinternally in a DOM tree (see Figure 18-3) to make it quickly searchable.
Figure 18-3. The DOM tree of Example 18-8
Example 18-8. An XML document<?xml version="1.0" encoding="UTF-8"?><rss version="2.0"> <channel> <title>RSS Feed</title> <link>http://website.com</link> <description>website.com's RSS Feed</description> <pubDate>Mon, 11 May 2020 00:00:00 GMT</pubDate>
418 | Chapter 18: Using Ajax

<item> <title>Headline</title> <guid>http://website.com/headline</guid> <description>This is a headline</description> </item> <item> <title>Headline 2</title> <guid>http://website.com/headline2</guid> <description>The 2nd headline</description> </item> </channel></rss>
Therefore, using the getElementsByTagName method, you can quickly extract the valuesassociated with various tags without a lot of string searching. This is exactly what we doin Example 18-7, where the following command is issued:titles = this.responseXML.getElementsByTagName('title')
This single command has the effect of placing all the values of the title elements intothe array titles. From there, it is a simple matter to extract them with the followingexpression (where j is the title to access):
titles[j].childNodes[0].nodeValue
All the titles are then appended to the string variable out and, once all have been pro‐cessed, the result is inserted into the empty DIV at the document start. When you callup xmlget.html in your browser, the result will be something like Figure 18-4.
As with all form data, you can use either the POST or the GET meth‐od when requesting XML data; your choice will make little differ‐ence to the result.
Why use XML?
You may ask why you would use XML other than for fetching XML documents such asRSS feeds. Well, the simple answer is that you don’t have to, but if you wish to passstructured data back to your Ajax applications, it could be a real pain to send a simple,unorganized jumble of text that would need complicated processing in JavaScript.
Instead, you can create an XML document and pass that back to the Ajax function,which will automatically place it into a DOM tree, as easily accessible as the HTMLDOM object with which you are now familiar.
Using XMLHttpRequest | 419

Figure 18-4. Fetching a Yahoo! XML news feed via Ajax
Using Frameworks for AjaxNow that you know how to code your own Ajax routines, you might like to investigatesome of the free frameworks that are available to make it even easier, as they offer manymore advanced features. In particular, I would suggest you check out jQuery, which isprobably the most commonly used framework.
You can download it (and get full documentation) from http://jquery.com, but be awarethat there’s an initially steep learning curve, as you have to familiarize yourself with the$ function it provides, which is used extensively for accessing jQuery’s features. Thatsaid, once you understand how jQuery works, you’ll find it can make your web devel‐opment much easier and quicker due to the large number of ready-made features itoffers.
420 | Chapter 18: Using Ajax

Questions1. Why is it necessary to write a function for creating new XMLHttpRequest objects?2. What is the purpose of the try ... catch construct?3. How many properties and how many methods does an XMLHttpRequest object
have?4. How can you tell when an Ajax call has completed?5. How do you know whether an Ajax call completed successfully?6. What XMLHttpRequest object’s property returns an Ajax text response?7. What XMLHttpRequest object’s property returns an Ajax XML response?8. How can you specify a callback function to handle Ajax responses?9. What XMLHttpRequest method is used to initiate an Ajax request?
10. What are the main differences between an Ajax GET and POST request?
See “Chapter 18 Answers” on page 651 in Appendix A for the answers to these questions.
Questions | 421


CHAPTER 19
Introduction to CSS
Using CSS (Cascading Style Sheets), you can apply styles to your web pages to make themlook exactly how you want. This works because CSS is connected to the DOM (Docu‐ment Object Model), which I explained in Chapter 14.
With CSS and its integration with the DOM, you can quickly and easily restyle anyelement. For example, if you don’t like the default look of the <h1>, <h2>, and otherheading tags, you can assign new styles to override the default settings for the font familyand size used, or whether bold or italics should be set, and many more properties too.
One way you can add styling to a web page is by inserting the required statements intothe head of a web page between the <head> and </head> tags. So, to change the style ofthe <h1> tag, you might use the following code (I’ll explain the syntax later):
<style> h1 { color:red; font-size:3em; font-family:Arial; }</style>
Within an HTML page this might look like Example 19-1 (see Figure 19-1), which, likeall the examples in this chapter, uses the standard HTML5 DOCTYPE declaration.
Example 19-1. A simple HTML page<!DOCTYPE html><html> <head> <title>Hello World</title> <style> h1 { color:red; font-size:3em; font-family:Arial; } </style> </head> <body> <h1>Hello there</h1> </body></html>
423

Figure 19-1. Styling a tag, with the original style shown in the inset
Importing a Style SheetWhen you wish to style a whole site, rather than a single page, a better way to managestyle sheets is to move them completely out of your web pages to separate files, and thenimport the ones you need. This lets you apply different style sheets for different layouts(such as web and print), without changing the HTML.
There are a couple of different ways you can achieve this, the first of which is by usingthe CSS @import directive like this:
<style> @import url('styles.css');</style>
This statement tells the browser to fetch a style sheet with the name styles.css. The@import command is quite flexible in that you can create style sheets that themselvespull in other style sheets, and so on. You need to just make sure that there are no <style>or </style> tags in any of your external style sheets, or they will not work.
Importing CSS from Within HTMLYou can also include a style sheet with the HTML <link> tag like this:
<link rel='stylesheet' type='text/css' href='styles.css'>
This has the exact same effect as the @import directive, except that <link> is an HTML-only tag and is not a valid style directive, so it cannot be used from within one stylesheet to pull in another, and also cannot be placed within a pair of <style> ... </style> tags.
424 | Chapter 19: Introduction to CSS

Just as you can use multiple @import directives within your CSS to include multipleexternal style sheets, you can also use as many <link> elements as you like in yourHTML.
Embedded Style SettingsThere’s also nothing stopping you from individually setting or overriding certain stylesfor the current page on a case-by-case basis by inserting style declarations directly withinHTML, like this (which results in italic, blue text within the tags):
<div style='font-style:italic; color:blue;'>Hello there</div>
But this should be reserved only for the most exceptional circumstances, as it breaksthe separation of content and presentation.
Using IDsA better solution for setting the style of an element is to assign an ID to it in the HTML,like this:
<div id='welcome'>Hello there</div>
This states that the contents of the <div> with the ID welcome should have applied tothem the style defined in the welcome style setting. The matching CSS statement for thismight look like the following
#welcome { font-style:italic; color:blue; }
Note the use of the # symbol, which specifies that only the ID withthe name welcome should be styled with this statement.
Using ClassesIf you would like to apply the same style to many elements, you do not have to give eachone a different ID because you can specify a class to manage them all, like this:
<div class='welcome'>Hello</div>
This states that the contents of this element (and any others that use the class) shouldhave applied to them the style defined in the welcome class. Once a class is applied youcan use the following rule, either in the page header or within an external style sheet forsetting the styles for the class:
.welcome { font-style:italic; color:blue; }
Using IDs | 425

Instead of the # symbol, which is reserved for IDs, class statements are prefaced witha . (period).
Using SemicolonsIn CSS, semicolons are used to separate multiple CSS statements on the same line. Butif there is only one statement in a rule (or in an inline style setting within an HTMLtag), you can omit the semicolon, as you can for the final statement in a group.
However, to avoid hard-to-find CSS errors, you may prefer to always use a semicolonafter every CSS setting. You can then copy and paste them, and otherwise modify prop‐erties, without worrying about removing semicolons where they aren’t strictly necessaryor having to add them where they are required.
CSS RulesEach statement in a CSS rule starts with a selector, which is the item to which the rulewill be applied. For example, in this assignment, h1 is the selector being given a font size240% larger than the default:
h1 { font-size:240%; }
font-size is a property. Providing a value of 240% to the font-size property of theselector ensures that the contents of all <h1> ... </h1> pairs of tags will be displayedat a font size that is 240% of the default size. All changes in rules must be within the {and } symbols that follow the selector. In font-size:240%; the part before the : (colon)is the property, while the remainder is the value applied to it.
Last comes a ; (semicolon) to end the statement. In this instance, because font-sizeis the last property in the rule, the semicolon is not required (but it would be if anotherassignment were to follow).
Multiple AssignmentsYou can create multiple style declarations in a couple of different ways. First, you canconcatenate them on the same line, like this:
h1 { font-size:240%; color:blue; }
This adds a second assignment that changes the color of all <h1> headings to blue. Youcan also place the assignments one per line, like the following:
h1 { font-size:240%;color:blue; }
Or you can space out the assignments a little more, so that they line up below each otherin a column at the colons, like this:
426 | Chapter 19: Introduction to CSS

h1 { font-size:240%; color :blue;}
This way, you can easily see where each new set of rules begins, because the selector isalways in the first column, and the assignments that follow are neatly lined up with allproperty values starting at the same horizontal offset. In the preceding examples, thefinal semicolon is unnecessary, but should you ever want to concatenate any such groupsof statements into a single line, it is very quick to do with all semicolons already in place.
You can specify the same selector as many times as you want, and CSS combines all theproperties. So the previous example could also be specified as:
h1 { font-size: 240%; }h1 { color : blue; }
There is no right or wrong way to lay out your CSS, but I recom‐mend that you at least try to keep each block of CSS consistent withitself, so that other people can take it in at a glance.
What if you specified the same property to the same selector twice?h1 { color : red; }h1 { color : blue; }
The last value specified—in this case, blue—would apply. In a single file, repeating thesame property for the same selector would be pointless, but such repetition happensfrequently in real-life web pages when multiple style sheets are applied. It’s one of thevaluable features of CSS, and where the term cascading comes from.
Using CommentsIt is a good idea to comment your CSS rules, even if you describe only the main groupsof statements rather than all or most of them. You can do this in two different ways.First, you can place a comment within a pair of /* ... */ tags, like this:
/* This is a CSS comment */
Or you can extend a comment over many lines, like this:/* A Multi line comment*/
CSS Rules | 427

When using multiline comments, note that you cannot nest single-line (or any other) comments within them. Doing so can lead tounpredictable errors.
Style TypesThere are a number of different style types, ranging from the default styles set up byyour browser (and any user styles you may have applied in your browser to override itsdefaults), through inline or embedded styles, to external style sheets. The styles definedin each type have a hierarchy of precedence, from low to high.
Default StylesThe lowest level of style precedence is the default styling applied by a web browser. Thesestyles are created as a fallback for when a web page doesn’t have any styles, and they areintended to be a generic set of styles that will display reasonably well in most instances.
Pre-CSS, these were the only styles applied to a document, and only a handful of themcould be changed by a web page (such as font face, color, and size, and a few elementsizing arguments).
User StylesThese are the next highest precedence of styles, and they are supported by most modernbrowsers but are implemented differently by each. If you would like to learn how tocreate your own default styles for browsing, use a search engine to enter your browsername followed by “user styles” (e.g., “Firefox user styles” or “Opera user styles”) to findout how. Figure 19-2 shows a user style sheet being applied to Microsoft InternetExplorer.
If a user style is assigned that has already been defined as a browser default, it will thenoverride the browser’s default setting. Any styles not defined in a user style sheet willretain their default values as set up in the browser.
428 | Chapter 19: Introduction to CSS

Figure 19-2. Applying a user style to Internet Explorer
External Style SheetsThe next types of styles are those assigned in an external style sheet. These settings willoverride any assigned either by the user or by the browser. External style sheets are therecommended way to create your styles because you can produce different style sheetsfor different purposes such as styling for general web use, for viewing on a mobilebrowser with a smaller screen, for printing purposes, and so on. Just apply the oneneeded for each type of media when you create the web page.
Internal StylesThen there are internal styles, which you create within <style> ... </style> tags, andwhich take precedence over all the preceding style types. At this point, though, you arebeginning to break the separation between styling and content, as any external stylesheets loaded in at the same time will have a lower precedence.
Style Types | 429

Inline StylesFinally, inline styles are where you assign a property directly to an element. They havethe highest precedence of any style type, and are used like this:
<a href="http://google.com" style="color:green;">Visit Google</a>
In this example, the link specified will be displayed in green, regardless of any defaultor other color settings applied by any other type of style sheet, whether directly to thislink or generically for all links.
When you use this type of styling, you are breaking the separationbetween layout and content; therefore, it is recommended that youdo so only when you have a very good reason.
CSS SelectorsThe means by which you access one or more elements is called selection, and the partof a CSS rule that does this is known as a selector. As you might expect, there are manyvarieties of selector.
The Type SelectorThe type selector works on types of HTML elements such as <p> or <i>. For example,the following rule will ensure that all text within <p> ... </p> tags is fully justified:
p { text-align:justify; }
The Descendant SelectorDescendant selectors let you apply styles to elements that are contained within otherelements. For example, the following rule sets all text within <b> ... </b> tags to red, butonly if they occur within <p> ... </p> tags (like this: <p><b>Hello</b> there</p>):
p b { color:red; }
Descendant selectors can continue nesting indefinitely, so the following is a perfectlyvalid rule to make the text blue within bold text, inside a list element of an unorderedlist:
ul li b { color:blue; }
As a practical example, suppose you want to use a different numbering system for anordered list that is nested within another ordered list. You can achieve this in the fol‐lowing way, which will replace the default numeric numbering (starting from 1) withlowercase letters (starting from a):
430 | Chapter 19: Introduction to CSS

<!DOCTYPE html><html> <head> <style> ol ol { list-style-type:lower-alpha; } </style> </head> <body> <ol> <li>One</li> <li>Two</li> <li>Three <ol> <li>One</li> <li>Two</li> <li>Three</li> </ol> </li> </ol> </body></html>
The result of loading this HTML into a web browser is as follows, in which you can seethat the second list elements display differently:
1. One2. Two3. Three a. One b. Two c. Three
The Child SelectorThe child selector is similar to the descendant selector but is more restrictive aboutwhen the style will be applied, by selecting only those elements that are direct childrenof another element. For example, the following code uses a descendant selector that willchange any bold text within a paragraph to red, even if the bold text is itself within italics(like this <p><i><b>Hello</b> there</i></p>):
p b { color:red; }
In this instance, the word Hello displays in red. However, when this more general typeof behavior is not required, a child selector can be used to narrow the scope of theselector. For example, the following child selector will set bold text to red only if theelement is a direct child of a paragraph, and is not itself contained within anotherelement:
p > b { color:red; }
CSS Selectors | 431

Now the word Hello will not change color because it is not a direct child of theparagraph.
For a practical example, suppose you wish to embolden only those <li> elements thatare direct children of <ol> elements. You can achieve this as follows, where the <li>elements that are direct children of <ul> elements do not get emboldened:
<!DOCTYPE html><html> <head> <style> ol > li { font-weight:bold; } </style> </head> <body> <ol> <li>One</li> <li>Two</li> <li>Three</li> </ol> <ul> <li>One</li> <li>Two</li> <li>Three</li> </ul> </body></html>
The result of loading this HTML into a browser will be as follows:1. One2. Two3. Three
• One • Two • Three
The ID SelectorIf you give an element an ID name (like this: <div id='mydiv'>) then you can directlyaccess it from CSS in the following way, which changes all the text in the element toitalic:
#mydiv { font-style:italic; }
IDs can be used only once within a document, so only the first occurrence found willreceive the new property value assigned by a CSS rule. But in CSS you can directlyreference any IDs that have the same name, as long as they occur within different elementtypes, like this:
<div id='myid'>Hello</div> <span id='myid'>Hello</span>
432 | Chapter 19: Introduction to CSS

Because IDs normally apply only to unique elements, the following rule will apply anunderline to only the first occurrence of myid:
#myid { text-decoration:underline; }
However, you can ensure that CSS applies the rule to both occurrences like this:span#myid { text-decoration:underline; }div#myid { text-decoration:underline; }
Or more succinctly like this (see “Selecting by Group” on page 435):
span#myid, div#myid { text-decoration:underline; }
I don’t recommend using this form of selection because any Java‐Script that also must access these elements cannot easily do so be‐cause the commonly used getElementByID() function will returnonly the first occurrence. To reference any other instances, a pro‐gram would have to search through the whole list of elements in thedocument—a trickier task to undertake. So it’s generally better toalways use unique ID names.
The Class SelectorWhen there are a number of elements in a page that you want to share the same styling,you can assign them all the same class name (like this: <span class='myclass'>); then,create a single rule to modify all those elements at once, as in the following rule, whichcreates a 10-pixel left margin offset for all elements using the class:
.myclass { margin-left:10px; }
In modern browsers, you can have HTML elements use more than one class by sepa‐rating the class names with spaces, like this: <span class='class1 class2 class3'>.Remember, though, that some very old browsers only allow a single class name in aclass argument.
You can narrow the scope of action of a class by specifying the types of elements towhich it should apply. For example, the following rule applies the setting only to para‐graphs that use the class main:
p.main { text-indent:30px; }
In this example, only paragraphs using the class main (like this: <p class="main">) willreceive the new property value. Any other element types that may try to use the class(such as <div class="main">) will not be affected by this rule.
CSS Selectors | 433

The Attribute SelectorMany HTML tags support attributes, and using this type of selector can save you fromhaving to use IDs and classes to refer to them. For example, you can directly referenceattributes in the following manner, which sets all elements with the attribute type="submit" to a width of 100 pixels:
[type="submit"] { width:100px; }
If you wish to narrow down the scope of the selector to, for example, only form inputelements with that attribute type, you could use the following rule instead:
form input[type="submit"] { width:100px; }
Attribute selectors also work on IDs and classes so that, for exam‐ple, [class~="classname"] works exactly like the class selec‐tor .classname (except that the latter has a higher precedence). Like‐wise, [id="idname"] is equivalent to using the ID selector #idname.The class and ID selectors prefaced by # and . can therefore be viewedas shorthand for attribute selectors, but with a higher precedence. The~= operator matches an attribute even if it is one of a space-separated group of attributes.
The Universal SelectorThe * wildcard or universal selector matches any element, so the following rule willmake a complete mess of a document by giving a green border to all of its elements:
* { border:1px solid green; }
It’s therefore unlikely that you will use the * on its own, but as part of a compound ruleit can be very powerful. For example, the following rule will apply the same styling asthe preceding one, but only to all paragraphs that are sub-elements of the element withthe ID boxout, and only as long as they are not direct children:
#boxout * p {border:1px solid green; }
Let’s look at what’s going on here. The first selector following #boxout is a * symbol, soit refers to any element within the boxout object. The following p selector then narrowsdown the selection focus by changing the selector to apply only to paragraphs (as definedby the p) that are sub-elements of elements returned by the * selector. Therefore, thisCSS rule performs the following actions (in which I use the terms object and elementinterchangeably):
1. Find the object with the ID of boxout.2. Find all sub-elements of the object returned in step 1.
434 | Chapter 19: Introduction to CSS

3. Find all p sub-elements of the objects returned in step 2 and, because this is the finalselector in the group, also find all p sub- and sub-sub-elements (and so on) of theobjects returned in step 2.
4. Apply the styles within the {and } characters to the objects returned in step 3.
The net result of this is that the green border is applied only to paragraphs that aregrandchildren (or great-grandchildren, etc.) of the main element.
Selecting by GroupUsing CSS you can apply a rule to more than one element, class, or any other type ofselector at the same time by separating the selectors with commas. So, for example, thefollowing rule will place a dotted orange line underneath all paragraphs, the elementwith the ID of idname, and all elements that use the class classname:
p, #idname, .classname { border-bottom:1px dotted orange; }
Figure 19-3 shows various selectors in use, with the rules applied to them alongside.
Figure 19-3. Some HTML and the CSS rules used by it
The CSS CascadeOne of the most fundamental things about CSS properties is that they cascade, whichis why they are called Cascading Style Sheets. But what does this mean?
The CSS Cascade | 435

Cascading is a method used to resolve potential conflicts between the various types ofstyle sheet a browser supports, and apply them in order of precedence by who createdthem, the method used to create the style, and the types of properties selected.
Style Sheet CreatorsThere are three main types of style sheet supported by all modern browsers. In orderof precedence from high to low, they are:
1. Those created by a document’s author2. Those created by the user3. Those created by the browser
These three sets of style sheets are processed in reverse order. First, the defaults in theweb browser are applied to the document. Without these defaults, web pages that don’tuse style sheets would look terrible. They include the font face, size, and color; elementspacing; table borders and spacing; and all the other reasonable standards a user wouldexpect.
Next, if the user has created any styles to use instead of the standard ones, these areapplied, replacing any of the browser’s default styles that may conflict.
Last, any styles created by the current document’s author are then applied, replacing anythat have been created either as browser defaults or by the user.
Style Sheet MethodsStyle sheets can be created via three different methods. In order of precedence fromhigh to low, they are:
1. As inline styles2. In an embedded style sheet3. As an external style sheet
Again, these methods of style sheet creation are applied in reverse order of precedence.Therefore, all external style sheets are processed first, and their styles are applied to thedocument.
Next, any embedded styles (within <style> ... </style> tags) are processed, and anythat conflict with external rules are given precedence and will override them.
Last, any styles applied directly to an element as an inline style (such as <divstyle="..."> ... </div>) are given the highest precedence, and override all previouslyassigned properties.
436 | Chapter 19: Introduction to CSS

Style Sheet SelectorsThere are three different ways of selecting elements to be styled. Going from highest tolowest order of precedence, they are:
• Referencing by individual ID or attribute selector• Referencing in groups by class• Referencing by element tags (such as <p> or <b>)
Selectors are processed according to the number and types of elements affected by arule, which is a little different from the previous two methods for resolving conflicts.This is because rules do not have to apply only to one type of selector at a time, and mayreference many different selectors.
Therefore, we need a method to determine the precedence of rules that can contain anycombinations of selectors. It does this by calculating the specificity of each rule by or‐dering them from the widest to narrowest scope of action.
Calculating SpecificityWe calculate the specificity of a rule by creating three-part numbers based on the selectortypes in the numbered list in the previous section. These compound numbers start offlooking like [0,0,0]. When processing a rule, each selector that references an ID in‐crements the first number by 1, so that the compound number would become [1,0,0].
Let’s look at the following rule, which has seven references, with three of them to theIDs #heading, #main, and #menu. So the compound number becomes [3,0,0].
#heading #main #menu .text .quote p span { // Rules go here;}
Then the number of classes in the selector is placed in the second part of the compoundnumber. In this example, there are two of them (.text and .quote), so the compoundnumber becomes [3,2,0].
Finally, all selectors that reference element tags are counted, and this number is placedin the last part of the compound number. In the example, there are two (p and span),so the final compound number becomes [3,2,2], which is all that is needed to comparethis rule’s specificity with another, such as the following:
#heading #main .text .quote .news p span { // Rules go here;}
Here, although seven elements are also referenced, there are now only two ID references,but there are three class references, which results in the compound number [2,3,2].Because 322 is greater than 232, the former example has precedence over the latter.
The CSS Cascade | 437

In cases where there are nine or fewer of each type in a compound number, you canconvert it directly to a decimal number, which in this case is 352. Rules with a lowernumber than this will have lower precedence, and those with a higher number will havegreater precedence. Where two rules share the same value, the most recently appliedone wins.
Using a different number base
Where there are more than nine of a type in a number, you have to work in a highernumber base. For example, you can’t convert the compound number [11,7,19] to dec‐imal by simply concatenating the three parts. Instead, you can convert the number to ahigher base such as base 20 (or higher if there are more than 19 of any type).
To do this, multiply the three parts out and add the results like this, starting with therightmost number and working left:
20 × 19 = 380 20×20 × 7 = 2800 20×20×20 × 11 = 88000 Total in decimal = 91180
On the left, replace the values of 20 with the base you are using. Once all of the compoundnumbers of a set of rules are converted from this base to decimal, it is easy to determinethe specificity, and therefore the precedence, of each.
Thankfully, the CSS processor handles all of this for you, but knowing how it workshelps you to properly construct rules and understand what precedence they will have.
Some rules are more equal than others
Where two or more style rules are exactly equivalent, only the most recently processedrule will take precedence. However, you can force a rule to a higher precedence thanother equivalent rules using the !important declaration, like this:
p { color:#ff0000 !important; }
When you do this, all previous equivalent settings are overridden (including ones us‐ing !important) and any equivalent rules that are processed later will be ignored. So,for example, the second of the two following rules would normally take precedence, butbecause of the use of !important in the prior assignment, the second one is ignored:
p { color:#ff0000 !important; }p { color:#ffff00 }
User style sheets can be created for specifying default browser styles,and they may use the !important declaration, in which case the user’sstyle setting will take precedence over the same properties specifiedin the current web page. However, on very old browsers using CSS 1,this feature isn’t supported.
438 | Chapter 19: Introduction to CSS

The Difference Between Div and Span ElementsBoth <div> and <span> elements are types of containers, but with some different qual‐ities. By default, a <div> element has infinite width (at least to the browser edge), whichyou can see by applying a border to one, like this:
<div style="border:1px solid green;">Hello</div>
A <span> element, however, is only as wide as the text it contains. Therefore, the fol‐lowing line of HTML creates a border only around the word Hello, which does notextend to the righthand edge of the browser.
<span style="border:1px solid green;">Hello</span>
Also, <span> elements follow text or other objects as they wrap around, and can there‐fore have a complicated border. For example, in Example 19-2, I used CSS to make thebackground of all <div> elements yellow, to make all <span> elements cyan, and to adda border to both, before then creating a few example <span> and <div> sections.
Example 19-2. Div and span example<!DOCTYPE html><html> <head> <title>Div and span example</title> <style> div, span { border :1px solid black; } div { background-color:yellow; } span { background-color:cyan; } </style> </head> <body> <div>This text is within a div tag</div> This isn't. <div>And this is again.</div><br>
<span>This text is inside a span tag.</span> This isn't. <span>And this is again.</span><br><br>
<div>This is a larger amount of text in a div that wraps around to the next line of the browser</div><br>
<span>This is a larger amount of text in a span that wraps around to the next line of the browser</span> </body></html>
Figure 19-4 shows what this example looks like in a web browser. Although it is printedonly in shades of gray in this book, the figure clearly shows how <div> elements extendto the righthand edge of a browser, and force the following content to appear at the startof the first available position below them.
The CSS Cascade | 439

Figure 19-4. A variety of elements of differing width
The figure also shows how <span> elements keep to themselves and take up only thespace required to hold their content, without forcing subsequent content to appearbelow them.
For example, in the bottom two examples of the figure, you can also see that when <div>elements wrap around the screen edge they retain a rectangular shape, whereas <span>elements simply follow the flow of the text (or other contents) they contain.
Because <div> tags can only be rectangular, they are better suited forcontaining objects such as images, boxouts, quotations, and so on,while <span> tags are best used for holding text or other attributesthat are placed one after another inline, and which should flow fromleft to right (or right to left in some languages).
MeasurementsCSS supports an impressive range of units of measurement, enabling you to tailor yourweb pages precisely to specific values, or by relative dimensions. The ones I generallyuse (and believe you will also find the most useful) are pixels, points, ems, and percent,but here’s the complete list:Pixels
The size of a pixel varies according to the dimensions and pixel depth of the user’smonitor. One pixel equals the width/height of a single dot on the screen, and so thismeasurement is best suited to monitors. For example:
.classname { margin:5px; }
440 | Chapter 19: Introduction to CSS

PointsA point is equivalent in size to 1/72 of an inch. The measurement comes from aprint design background and is best suited for that medium, but is also commonlyused on monitors. For example:
.classname { font-size:14pt; }
InchesAn inch is the equivalent of 72 points and is also a measurement type best suitedfor print. For example:
.classname { width:3in; }
CentimetersCentimeters are another unit of measurement best suited for print. One centimeteris a little over 28 points. For example:
.classname { height:2cm; }
MillimetersA millimeter is 1/10 of a centimeter (or almost 3 points). Millimeters are anothermeasure best suited to print. For example:
.classname { font-size:5mm; }
PicasA pica is another print typographic measurement, which is equivalent to 12 points.For example:
.classname { font-size:1pc; }
EmsAn em is equal to the current font size and is therefore one of the more usefulmeasurements for CSS because it is used to describe relative dimensions. Forexample:
.classname { font-size:2em; }
ExsAn ex is also related to the current font size; it is equivalent to the height of alowercase letter x. This is a less popular unit of measurement that is most often usedas a good approximation for helping to set the width of a box that will contain sometext. For example:
.classname { width:20ex; }
PercentThis unit is related to the em in that it is exactly 100 times greater (when used on afont). Whereas 1 em equals the current font size, the same size is 100 in percent.When not relating to a font, this unit is relative to the size of the container of theproperty being accessed. For example:
Measurements | 441

.classname { height:120%; }
Figure 19-5 shows each of these measurement types in turn being used to display textin almost identical sizes.
Figure 19-5. Different measurements that display almost the same
Fonts and TypographyThere are four main font properties that you can style using CSS: family, style, size,and weight. Between them, you can fine-tune the way text displays in your web pagesand/or when printed.
font-familyThe font-family property assigns the font to use. It also supports listing a variety offonts in order of preference from left to right, so that styling can fall back gracefullywhen the user doesn’t have the preferred font installed. For example, to set the defaultfont for paragraphs, you might use a CSS rule such as this:
p { font-family:Verdana, Arial, Helvetica, sans-serif; }
Where a font name is made up of two or more words, you must enclose the name inquotation marks, like this:
442 | Chapter 19: Introduction to CSS

p { font-family:"Times New Roman", Georgia, serif; }
Because they should be available on virtually all web browsers andoperating systems, the safest font families to use on a web page areArial, Helvetica, Times New Roman, Times, Courier New, and Couri‐er. The Verdana, Georgia, Comic Sans MS, Trebuchet MS, Arial Black,and Impact fonts are safe for Mac and PC use, but may not be in‐stalled on other operating systems such as Linux. Other common butless safe fonts are Palatino, Garamond, Bookman, and Avant Garde.If you use one of the less safe fonts, make sure you offer fallbacks ofone or more safer fonts in your CSS so that your web pages willdegrade gracefully on browsers without your preferred fonts.
Figure 19-6 shows these two sets of CSS rules being applied.
Figure 19-6. Selecting font families
font-styleWith the font-style property you can choose to display a font normally, in italics, orobliquely. The following rules create three classes (normal, italic, and oblique) thatcan be applied to elements to create these effects:
.normal { font-style:normal; }
.italic { font-style:italic; }
.oblique { font-style:oblique; }
font-sizeAs described in the earlier section on measurements, there are a large number of waysyou can change a font’s size. But these all boil down to two main types: fixed and relative.A fixed setting looks like the following rule, which sets the default paragraph font sizeto 14 point:
Fonts and Typography | 443

p { font-size:14pt; }
Alternatively, you may wish to work with the current default font size, using it to stylevarious types of text such as headings. In the following rules, relative sizes of someheaders are defined, with the <h4> tag starting off 20% bigger than the default, and witheach greater size another 40% larger than the previous one:
h1 { font-size:240%; }h2 { font-size:200%; }h3 { font-size:160%; }h4 { font-size:120%; }
Figure 19-7 shows a selection of font sizes in use.
Figure 19-7. Setting four heading sizes and the default paragraph size
font-weightUsing the font-weight property you can choose how boldly to display a font. It supportsa number of values, but the main ones you will use are likely to be normal and bold, likethis:
.bold { font-weight:bold; }
Managing Text StylesRegardless of the font in use, you can further modify the way text displays by alteringits decoration, spacing, and alignment. There is a crossover between the text and fontproperties, though, in that effects such as italics or bold text are achieved via the font-
444 | Chapter 19: Introduction to CSS

style and font-weight properties, while others such as underlining require the text-decoration property.
DecorationWith the text-decoration property, you can apply effects to text such as underline,line-through, overline, and blink. The following rule creates a new class called overthat applies overlines to text (the weight of over, under, and through lines will matchthat of the font):
.over { text-decoration:overline; }
In Figure 19-8 you can see a selection of font styles, weight, and decorations.
Figure 19-8. Examples of the styles and decoration rules available
SpacingA number of different properties allow you to modify line, word, and letter spacing. Forexample, the following rules change the line spacing for paragraphs by modifying theline-height property to be 25% greater, while the word-spacing property is set to 30pixels, and letter-spacing is set to 3 pixels:
p { line-height :125%; word-spacing :30px; letter-spacing:3px;}
Managing Text Styles | 445

AlignmentFour types of text alignment are available in CSS: left, right, center, and justify. Inthe following rule, default paragraph text is set to full justification:
p { text-align:justify; }
TransformationThere are four properties available for transforming text: none, capitalize, uppercase, and lowercase. The following rule creates a class called upper that will ensurethat all text is displayed in uppercase when it is used:
.upper { text-transform:uppercase; }
IndentingUsing the text-indent property, you can indent the first line of a block of text by aspecified amount. The following rule indents the first line of every paragraph by 20pixels, although a different unit of measurement or a percent increase could also beapplied:
p { text-indent:20px; }
In Figure 19-9, the following rules have been applied to a section of text:p { line-height :150%; word-spacing :10px; letter-spacing:1px;}.justify { text-align :justify; }.uppercase { text-transform:uppercase; }.indent { text-indent :20px; }
Figure 19-9. Indenting, uppercase, and spacing rules being applied
446 | Chapter 19: Introduction to CSS

CSS ColorsYou can apply colors to the foreground and background of text and objects using thecolor and background-color properties (or by supplying a single argument to thebackground property). The colors specified can be one of the named colors (such as redor blue), colors created from hexadecimal RGB triplets (such as #ff0000 or #0000ff),or colors created using the rgb CSS function.
The standard 16 color names as defined by the W3C standards organization are: aqua,black, blue, fuchsia, gray, green, lime, maroon, navy, olive, purple, red, silver,teal, white, and yellow. The following rule uses one of these names to set the back‐ground color for an object with the ID of object:
#object { background-color:silver; }
In this rule, the foreground color of text in all <div> elements is set to yellow (becauseon a computer display, hexadecimal levels of ff red, plus ff green, plus 00 blue createsthe color yellow):
div { color:#ffff00; }
Or, if you don’t wish to work in hexadecimal, you can specify your color triplets usingthe rgb function, as in the following rule, which changes the background color of thecurrent document to aqua:
body { background-color:rgb(0, 255, 255); }
If you prefer not to work in ranges of 256 levels per color, you canuse percentages in the rgb function instead, with values from 0 to 100ranging from the lowest (0) through to the highest (100) amount ofa primary color, like this: rgb(58%, 95%, 74%). You can also usefloating-point values for even finer color control, like this: rgb(23.4%,67.6%, 15.5%).
Short Color StringsThere is also a short form of the hex digit string in which only the first of each 2-bytepair is used for each color. For example, instead of assigning the color #fe4692, youinstead use #f49, omitting the second hex digit from each pair, which equates to a colorvalue of #ff4499.
This results in almost the same color and is useful where exact colors are not required.The difference between a six-digit and three-digit string is that the former supports 16million different colors, while the latter supports four thousand.
CSS Colors | 447

Wherever you intend to use a color such as #883366, this is the direct equivalent of #836(because the repeated digits are implied by the shorter version), and you can use eitherstring to create the exact same color.
GradientsIn place of using a solid background color, you can choose to apply a gradient, whichwill then automatically flow from a given initial color to a final color of your choice. Itis best used in conjunction with a simple color rule so that browsers that don’t supportgradients will at least display a solid color.
Example 19-3 uses a rule to display an orange gradient (or simply plain orange on non-supporting browsers) as shown in the middle section of Figure 19-10.
Example 19-3. Creating a linear gradient<!DOCTYPE html><html> <head> <title>Creating a linear gradient</title> <style> .orangegrad { background:orange; background:linear-gradient(top, #fb0, #f50); background:-moz-linear-gradient(top, #fb0, #f50); background:-webkit-linear-gradient(top, #fb0, #f50); background:-o-linear-gradient(top, #fb0, #f50); background:-ms-linear-gradient(top, #fb0, #f50); } </style> </head> <body> <div class='orangegrad'>Black text<br> on an orange<br>linear gradient</div> </body></html>
As shown in the preceding example, many CSS rules require browser-specific prefixes such as -moz-, -webkit-, -o-, and -ms- (for Mozilla-based browsers such as Firefox; WebKit-based browsers such as AppleSafari, Google Chrome, and the iOS and Android browsers; and theOpera and Microsoft browsers). http://caniuse.com lists the majorCSS rules and attributes, and whether browser-specific versions arerequired.
448 | Chapter 19: Introduction to CSS

Figure 19-10. A solid background color, a linear gradient, and a radial gradient
To create a gradient, choose where it will begin out of top, bottom, left, right, andcenter (or any combination, such as top left or center right), enter the start andend colors you require, and then apply either the linear-gradient or radial-gradient rule, making sure you also supply rules for all browsers that you are targeting.
You can also use more than just a start and end color by also supplying what are termedstop colors in between as additional arguments. In this case, for example, if five argu‐ments are supplied, each argument will control the color change over a fifth of the arearepresented by its location in the argument list.
Positioning ElementsElements within a web page fall where they are placed in the document, but you canmove them about by changing an element’s position property from the default ofstatic to one of absolute, relative, or fixed.
Absolute PositioningAn element with absolute positioning is removed from the document, and any otherelements that are capable will flow into its released space. You can then position theobject anywhere you like within the document using the top, right, bottom, and leftproperties. It will then rest on top of (or behind) other elements.
So, for example, to move an object with the ID of object to the absolute location of 100pixels down from the document start and 200 pixels in from the left, you would applythe following rules to it (you can also use any of the other units of measurement sup‐ported by CSS):
Positioning Elements | 449

#object { position:absolute; top :100px; left :200px;}
Relative PositioningLikewise, you can move the object relative to the location it would occupy in the normaldocument flow. So, for example, to move object 10 pixels down and 10 pixels to theright of its normal location, you would use the following rules:
#object { position:relative; top :10px; left :10px;}
Fixed PositioningThe final positioning property setting lets you move an object to an absolute location,but only within the current browser viewport. Then, when the document is scrolled,the object remains exactly where it has been placed, with the main document scrollingbeneath it—a great way to create dock bars and other similar devices. To fix the objectto the top-left corner of the browser window, you would use the following rules:
#object { position:fixed; top :0px; left :0px;}
In Figure 19-11, Example 19-4 has been loaded into a browser, and the browser has beenreduced in width and height so that you must scroll down to see all of the web page.
Figure 19-11. Using different positioning values
450 | Chapter 19: Introduction to CSS

When this is done, it is immediately obvious that the element with fixed positioningremains in place even through scrolling. You can also see that the element with absolutepositioning is located exactly at 100 pixels down, with 0 horizontal offset, while theelement with relative positioning is actually moved up by 8 pixels and then offset fromthe left margin by 110 pixels in order to line up alongside the first element.
Example 19-4. Applying different positioning values<!DOCTYPE html><html> <head> <title>Positioning</title> <style> #object1 { position :absolute; background:pink; width :100px; height :100px; top :100px; left :0px; } #object2 { position :relative; background:lightgreen; width :100px; height :100px; top :-8px; left :110px; } #object3 { position :fixed; background:yellow; width :100px; height :100px; top :100px; left :236px; } </style> </head> <body> <br><br><br><br><br> <div id='object1'>Absolute Positioning</div> <div id='object2'>Relative Positioning</div> <div id='object3'>Fixed Positioning</div> </body></html>
In the figure, the element with fixed positioning initially lines up with the other twoelements, but has stayed put while the others have been scrolled up the page, and nowappears offset below them.
Positioning Elements | 451

Pseudo-ClassesThere are a number of selectors and classes that are used only within a style sheet anddo not have any matching tags or attributes within any HTML. Their task is to classifyelements using characteristics other than their name, attributes, or content—that is,characteristics that cannot be deduced from the document tree. These include pseudo-classes such as link and visited. There are also pseudo-elements that make a selection,which may consist of partial elements such as first-line or first-letter.
Pseudo-classes and pseudo-elements are separated by a : (colon) character. For exam‐ple, to create a class called bigfirst for emphasizing the first letter of an element, youwould use a rule such as the following:
.bigfirst:first-letter { font-size:400%; float :left;}
When the bigfirst class is applied to an element, the first letter will be displayed muchenlarged, with the remaining text shown at normal size, neatly flowing around it (dueto the float property) as if the first letter were an image or other object. Pseudo-classesinclude hover, link, active, and visited, all of which are mostly useful for applyingto anchor elements, as in the following rules, which set the default color of all links toblue, and that of links that have already been visited to light blue:
a:link { color:blue; }a:visited { color:lightblue; }
The following rules are interesting in that they use the hover pseudo-class so that theyare applied only when the mouse is placed over the element. In this example, they changethe link to white text on a red background, providing a dynamic effect you would nor‐mally only expect from using JavaScript code:
a:hover { color :white; background:red;}
Here I have used the background property with a single argument, instead of the longerbackground-color property.
The active pseudo-class is also dynamic in that it effects a change to a link during thetime between the mouse button being clicked and released, as with this rule, whichchanges the link color to dark blue:
a:active { color:darkblue; }
Another interesting dynamic pseudo-class is focus, which is applied only when anelement is given focus by the user selecting it with the keyboard or mouse. The following
452 | Chapter 19: Introduction to CSS

rule uses the universal selector to always place a mid-gray, dotted, 2-pixel border aroundthe currently focused object:
*:focus { border:2px dotted #888888; }
Example 19-5 displays two links and an input field, as shown in Figure 19-12. The firstlink shows up as gray because it has already been visited in this browser, but the secondlink has not and displays in blue. The Tab key has been pressed and the focus of inputis now the input field, so its background has changed to yellow. When either of the linksis clicked it will display in purple, and when hovered over it will appear red.
Example 19-5. Link and focus pseudo-classes<!DOCTYPE html><html> <head> <title>Pseudo-classes</title> <style> a:link { color:blue; } a:visited { color:gray; } a:hover { color:red; } a:active { color:purple; } *:focus { background:yellow; } </style> </head> <body> <a href='http://google.com'>Link to Google'</a><br> <a href='nowhere'>Link to nowhere'</a><br> <input type='text'> </body></html>
Figure 19-12. Pseudo-classes applied to a selection of elements
Other pseudo-classes are also available, and you can get more information on them athttp://tinyurl.com/pseudoclasses.
Pseudo-Classes | 453

Beware of applying the focus pseudo-class to the universal selector,*, as shown in this example; Internet Explorer regards an unfocuseddocument as actually having focus applied to the entire web page, and(in this instance) the whole page will turn yellow until Tab is press‐ed or focus is otherwise applied to one of the page’s elements.
Shorthand RulesTo save space, groups of related CSS properties can be concatenated into a single short‐hand assignment. For example, I have already used the shorthand for creating a bordera few times, as in the focus rule in the previous section:
*:focus { border:2px dotted #ff8800; }
This is actually a shorthand concatenation of the following rule set:*:focus { border-width:2px; border-style:dotted; border-color:#ff8800;}
When using a shorthand rule, you need only apply the properties up to the point whereyou wish to change values. So you could use the following to set only a border’s widthand style, choosing not to set its color:
*:focus { border:2px dotted; }
The order in which the properties are placed in a shorthand rule canbe important, and misplacing them is a common way to get unex‐pected results. There are far too many to detail in this chapter, so ifyou wish to use shorthand CSS you will need to look up the defaultproperties and their order of application using a CSS manual or searchengine. To get you started, I recommend visiting http://dustindiaz.com/css-shorthand.
The Box Model and LayoutThe CSS properties affecting the layout of a page are based around the box model (seeChapter 14 for more details), a nested set of properties surrounding an element. Vir‐tually all elements have (or can have) these properties, including the document body,whose margin you can, for example, remove with the following rule:
body { margin:0px; }
454 | Chapter 19: Introduction to CSS

The box model of an object starts at the outside, with the object’s margin. Inside this isthe border, then there is padding between the border and the inner contents, and finallythere’s the object’s contents.
Once you have the hang of the box model, you will be well on your way to creatingprofessionally laid-out pages, as these properties alone will make up much of your pagestyling.
Setting MarginsThe margin is the outermost level of the box model. It separates elements from eachother and its use is quite smart. For example, assume you have chosen to give a numberof elements a default margin of 10 pixels around each. When they are placed on top ofeach other, this would create a gap of 20 pixels (the total of the adjacent border widths).
CSS overcomes this potential issue, however: when two elements with borders are posi‐tioned directly one above the other, only the larger of the two margins is used to separatethem. If both margins are the same width, just one of the widths is used. This way, youare much more likely to get the result you want. But you should note that the marginsof absolutely positioned or inline elements do not collapse.
The margins of an element can be changed en masse with the margin property, orindividually with margin-left, margin-top, margin-right, and margin-bottom.When setting the margin property, you can supply one, two, three, or four arguments,which have the effects commented in the following rules:
/* Set all margins to 1 pixel */margin:1px;
/* Set top and bottom to 1 pixel, and left and right to 2 */margin:1px 2px;
/* Set top to 1 pixel, left and right to 2, and bottom to 3 */margin:1px 2px 3px;
/* Set top to 1 pixel, right to 2, bottom to 3, and left to 4 */margin:1px 2px 3px 4px;
Figure 19-13 shows Example 19-6 loaded into a browser, with the margin property rule(highlighted in bold) applied to a square element that has been placed inside a tableelement. The table has been given no dimensions, so it will simply wrap as closely aroundthe inner <div> element as it can. As a consequence, there is a margin of 10 pixels aboveit, 20 pixels to its right, 30 pixels below it, and 40 pixels to its left.
The Box Model and Layout | 455

Example 19-6. How margins are applied<!DOCTYPE html><html> <head> <title>Margins</title> <style> #object1 { background :lightgreen; border-style:solid; border-width:1px; font-family :"Courier New"; font-size :9px; width :100px; height :100px; padding :5px; margin :10px 20px 30px 40px; } table { padding :0; border :1px solid black; background :cyan; } </style> </head> <body> <table> <tr> <td> <div id='object1'>margin:<br>10px 20px 30px 40px;</div> </td> </tr> </table> </body></html>
Figure 19-13. The outer table expands according to the margin widths
456 | Chapter 19: Introduction to CSS

Applying BordersThe border level of the box model is similar to the margin except that there is no col‐lapsing. It is the next level as we move into the box model. The main properties used tomodify borders are border, border-left, border-top, border-right, and border-bottom, and each of these can have other subproperties added as suffixes, such as -color,-style, and -width.
The four ways to access individual property settings used for the margin property alsoapply with the border-width property, so all the following are valid rules:
/* All borders */border-width:1px;
/* Top/bottom left/right */border-width:1px 5px;
/* Top left/right bottom */border-width:1px 5px 10px;
/* Top right bottom left */border-width:1px 5px 10px 15px;
Figure 19-14 shows each of these rules applied in turn to a group of square elements.In the first one, you can clearly see that all borders have a width of 1 pixel. The secondelement, however, has a top and bottom border width of 1 pixel, while its side widthsare 5 pixels each.
Figure 19-14. Applying long- and shorthand border rule values
The Box Model and Layout | 457

The third element has a 1 pixel wide top, its sides are 5 pixels wide, and its bottom is 10pixels wide. The fourth element has a 1-pixel top border width, a 5-pixel right borderwidth, a 10-pixel bottom border width, and a 15-pixel left border width.
The final element, under the previous ones, doesn’t use the shorthand rules; instead, ithas each of the border widths set separately. As you can see, it takes a lot more typingto achieve the same result.
Adjusting PaddingThe deepest of the box model levels (other than the contents of an element) is thepadding, which is applied inside any borders and/or margins. The main properties usedto modify padding are padding, padding-left, padding-top, padding-right, andpadding-bottom.
The four ways of accessing individual property settings used for the margin and borderproperties also apply with the padding property, so all the following are valid rules:
/* All padding */padding:1px;
/* Top/bottom and left/right */padding:1px 2px;
/* Top, left/right and bottom */padding:1px 2px 3px;
/* Top, right, bottom and left */padding:1px 2px 3px 4px;
Figure 19-15 shows the padding rule (shown in bold) in Example 19-7 applied to sometext within a table cell (as defined by the rule display:table-cell;, which makes theencapsulating <div> element display like a table cell), which has been given no dimen‐sions so it will simply wrap as closely around the text as it can. As a consequence thereis padding of 10 pixels above the inner element, 20 pixels to its right, 30 pixels below it,and 40 pixels to its left.
Example 19-7. Applying padding<!DOCTYPE html><html> <head> <title>Padding</title> <style> #object1 { border-style:solid; border-width:1px; background :orange; color :darkred; font-family :Arial;
458 | Chapter 19: Introduction to CSS

font-size :12px; text-align :justify; display :table-cell; width :148px; padding :10px 20px 30px 40px; } </style> </head> <body> <div id='object1'>To be, or not to be that is the question: Whether 'tis Nobler in the mind to suffer The Slings and Arrows of outrageous Fortune, Or to take Arms against a Sea of troubles, And by opposing end them.</div> </body></html>
Figure 19-15. Applying different padding values to an object
Object ContentsDeep within the box model levels, at its center, lies an element that can be styled in allthe ways discussed in this chapter, and which can (and usually will) contain further sub-elements, which in turn may contain sub-sub-elements, and so on, each with its ownstyling and box model settings.
Questions1. Which directive do you use to import one style sheet into another (or the <style>
section of some HTML)?2. What HTML tag can you use to import a style sheet into a document?3. Which HTML tag attribute is used to directly embed a style into an element?4. What is the difference between a CSS ID and a CSS class?
Questions | 459

5. Which characters are used to prefix (a) IDs, and (b) class names in a CSS rule?6. In CSS rules, what is the purpose of the semicolon?7. How can you add a comment to a style sheet?8. Which character is used by CSS to represent any element?9. How can you select a group of different elements and/or element types in CSS?
10. Given a pair of CSS rules with equal precedence, how can you make one have greaterprecedence over the other?
See “Chapter 19 Answers” on page 652 in Appendix A for the answers to these questions.
460 | Chapter 19: Introduction to CSS

CHAPTER 20
Advanced CSS with CSS3
The first implementation of CSS was drawn up in 1996, was released in 1999, and hasbeen supported by all browser releases since 2001. The standard for this version, CSS1,was revised in 2008. Beginning in 1998, developers began drawing up the second spec‐ification, CSS2; its standard was completed in 2007 and revised in 2009.
Development for the CSS3 specification commenced in 2001, with some features beingproposed as recently as 2009. Therefore, the development process will likely continuefor some time before a final recommendation for CSS3 is approved. And even thoughCSS3 isn’t yet complete, people are already beginning to put forward suggestions forCSS4.
In this chapter, I’ll take you through the CSS3 features that have already been generallyadopted by the major browsers. Some of these features provide functionality that hith‐erto could be provided only with JavaScript.
I recommend using CSS3 to implement dynamic features where you can, instead ofJavaScript. The features provided by CSS make document attributes part of the docu‐ment itself, instead of being tacked on through JavaScript. Making them part of thedocument is a cleaner design.
Attribute SelectorsIn the previous chapter, I detailed the various CSS attribute selectors, which I will nowquickly recap. Selectors are used in CSS to match HTML elements, and there are 10different types, as detailed in Table 20-1.
461

Table 20-1. CSS selectors, pseudo-classes, and pseudo-elementsSelector type Example
Universal selector * { color:#555; }
Type selectors b { color:red; }
Class selectors .classname { color:blue; }
ID selectors #idname { background:cyan; }
Descendant selectors span em { color:green; }
Child selectors div > em { background:lime; }
Adjacent sibling selectors i + b { color:gray; }
Attribute selectors a[href='info.htm'] { color:red; }
Pseudo-classes a:hover { font-weight:bold; }
Pseudo-elements P::first-letter { font-size:300%; }
The CSS3 designers decided that most of these selectors work just fine the way they are,but they made three enhancements so that you can more easily match elements basedon the contents of their attributes.
For example, in CSS2, you can use a selector such as a[href='info.htm'] to match thestring info.htm when found in an href attribute, but there’s no way to match only aportion of a string. That’s where CSS3’s three new operators—^, $, and *—come to therescue. If one directly precedes the = symbol, you can match the start, end, or any partof a string, respectively.
The ^ OperatorThis operator matches at the start of a string so, for example, the following will matchany href attribute whose value begins with the string http://website:
a[href^='http://website']
Therefore, the following element will match:<a href='http://website.com'>
But this will not:<a href='http://mywebsite.com'>
The $ OperatorTo match only at the end of a string, you can use a selector such as the following, whichwill match any img tag whose src attribute ends with .png:
img[src$='.png']
462 | Chapter 20: Advanced CSS with CSS3

For example, the following will match:<img src='photo.png'>
But this will not:<img src='snapshot.jpg'>
The * OperatorTo match any substring anywhere in the attribute, you can use a selector such as thefollowing to find any links on a page that have the string google anywhere within them:
a[href*='google']
For example, the HTML segment <a href='http://google.com'> will match, whilethe segment <a href='http://gmail.com'> will not.
The box-sizing PropertyThe W3C box model specifies that the width and height of an object should refer onlyto the dimensions of an element’s content, ignoring any padding or border. But someweb designers have expressed a desire to specify dimensions that refer to an entireelement, including any padding and border.
To provide this feature, CSS3 lets you choose the box model you wish to use with thebox-sizing property. For example, to use the total width and height of an object in‐cluding padding and borders, you would use this declaration:
box-sizing:border-box;
Or, to have an object’s width and height refer only to its content, you would use thisdeclaration (the default):
box-sizing:content-box;
Safari and Mozilla-based browsers (such as Firefox) require their ownprefixes to this declaration (-webkit- and -moz-). For further de‐tails, refer to http://caniuse.com.
CSS3 BackgroundsCSS3 provides two new properties: background-clip and background-origin. Be‐tween them, you can specify where a background should start within an element, andhow to clip the background so that it doesn’t appear in parts of the box model whereyou don’t want it to.
The box-sizing Property | 463

To accomplish these, both properties support the following values:border-box
Refers to the outer edge of the border
padding-box
Refers to the outer edge of the padding area
content-box
Refers to the outer edge of the content area
The background-clip PropertyThe background-clip property specifies whether the background should be ignored(clipped) if it appears within either the border or padding area of an element. For ex‐ample, the following declaration states that the background may display in all parts ofan element, all the way to the outer edge of the border:
background-clip:border-box;
To keep the background from appearing within the border area of an element, you canrestrict it to only the section of an element inside the outer edge of its padding area, likethis:
background-clip:padding-box;
Or to restrict the background to display only within the content area of an element, youwould use this declaration:
background-clip:content-box;
Figure 20-1 shows three rows of elements displayed in the Safari web browser, in whichthe first row uses border-box for the background-clip property, the second usespadding-box, and the third uses content-box.
In the first row, the inner box (an image file that has been loaded into the top left of theelement, with repeating disabled) is allowed to display anywhere in the element. Youcan also clearly see it displayed in the border area of the first box because the borderhas been set to dotted.
In the second row, neither the background image nor the background shading displaysin the border area, because they have been clipped to the padding area with abackground-clip property value of padding-box.
Then, in the third row, both the background shading and the image have been clippedto display only within the inner content area of each element (shown inside a light-colored, dotted box), using a background-clip property of content-box.
464 | Chapter 20: Advanced CSS with CSS3

Figure 20-1. Different ways of combining CSS3 background properties
The background-origin PropertyWith the background-origin property, you can control where a background image willbe located by specifying where the top left of the image should start. For example, thefollowing declaration states that the background image’s origin should be the top-leftcorner of the outer edge of the border:
background-origin:border-box;
To set the origin of an image to the top-left outer corner of the padding area, you woulduse this declaration:
CSS3 Backgrounds | 465

background-origin:padding-box;
Or to set the origin of an image to the top-left corner of an element’s inner contentsection, you would use this declaration:
background-origin:content-box;
Looking again at Figure 20-1, you can see in each row the first box uses a background-origin property of border-box, the second uses padding-box, and the third usescontent-box. Consequently, in each row the smaller inner box displays at the top leftof the border in the first box, the top left of the padding in the second, and the top leftof the content in the third box.
The only differences to note between the rows, with regard to theorigins of the inner box in Figure 20-1, are that in rows two and threethe inner box is clipped to the padding and content areas, respectively;therefore, outside these areas no portion of the box is displayed.
The background-size PropertyIn the same way that you can specify the width and height of an image when used inthe <img> tag, you can now also do so for background images on the latest versions ofall browsers.
You apply the property as follows (where ww is the width and hh is the height):background-size:wwpx hhpx;
If you prefer, you can use only one argument, and then both dimensions will be set tothat value. Also, if you apply this property to a block-level element such as a <div>(rather than one that is inline such as a <span>), you can specify the width and/or heightas a percentage, instead of a fixed value.
If you wish to scale only one dimension of a background image, and then have the otherone scale automatically to retain the same proportions, you can use the value auto forthe other dimension, like this:
background-size:100px auto;
This sets the width to 100 pixels, and the height to a value proportionate to the increaseor decrease in width.
Different browsers may require different versions of the variousbackground property names, so refer to http://caniuse.com when us‐ing them to ensure you are applying all the versions required for thebrowsers you are targeting.
466 | Chapter 20: Advanced CSS with CSS3

Multiple BackgroundsWith CSS3 you can now attach multiple backgrounds to an element, each of which canuse the previously discussed CSS3 background properties. Figure 20-2 shows an exam‐ple of this; eight different images have been assigned to the background, to create thefour corners and four edges of the certificate border.
Figure 20-2. A background created with multiple images
To display multiple background images in a single CSS declaration, separate them withcommas. Example 20-1 shows the HTML and CSS that was used to create the back‐ground in Figure 20-2.
Multiple Backgrounds | 467

Example 20-1. Using multiple images in a background<!DOCTYPE html><html> <!-- backgroundimages.html --> <head> <title>CSS3 Multiple Backgrounds Example</title> <style> .border { font-family:'Times New Roman'; font-style :italic; font-size :170%; text-align :center; padding :60px; width :350px; height :500px; background :url('b1.gif') top left no-repeat, url('b2.gif') top right no-repeat, url('b3.gif') bottom left no-repeat, url('b4.gif') bottom right no-repeat, url('ba.gif') top repeat-x, url('bb.gif') left repeat-y, url('bc.gif') right repeat-y, url('bd.gif') bottom repeat-x } </style> </head> <body> <div class='border'> <h1>Employee of the month</h1> <h2>Awarded To:</h2> <h3>__________________</h3> <h2>Date:</h2> <h3>___/___/_____</h3> </div> </body></html>
Looking at the CSS section, you see that the first four lines of the background declarationplace the corner images into the four corners of the element, and the final four placethe edge images, which are handled last because the order of priority for backgroundimages goes from high to low. In other words, where they overlap, additional back‐ground images will appear behind already placed images. If the GIFs were in the reverseorder, the repeating edge images would display on top of the corners, which would beincorrect.
Using this CSS, you can resize the containing element to any dimen‐sions and the border will always correctly resize to fit, which is mucheasier than using tables or multiple elements for the same effect.
468 | Chapter 20: Advanced CSS with CSS3
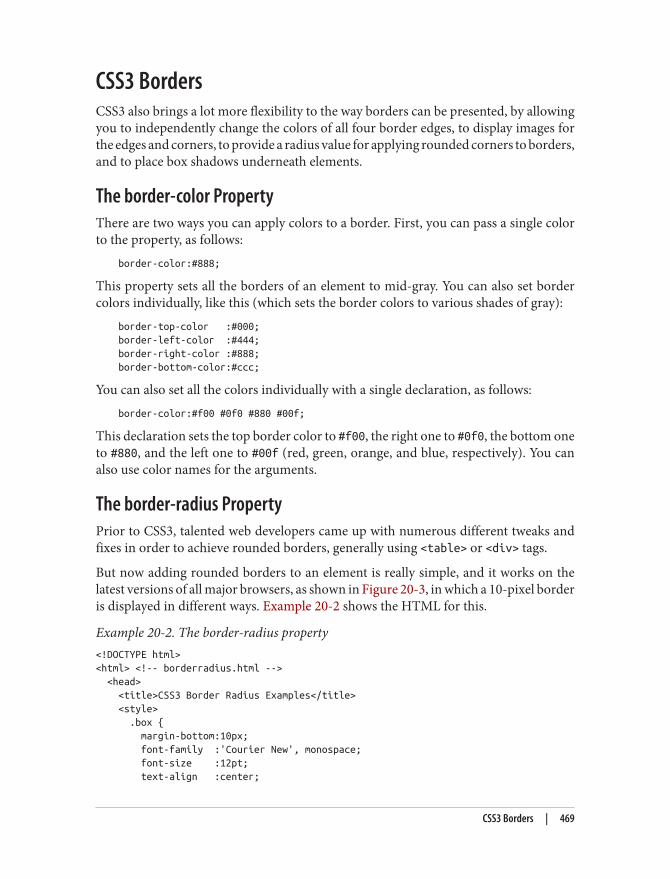
CSS3 BordersCSS3 also brings a lot more flexibility to the way borders can be presented, by allowingyou to independently change the colors of all four border edges, to display images forthe edges and corners, to provide a radius value for applying rounded corners to borders,and to place box shadows underneath elements.
The border-color PropertyThere are two ways you can apply colors to a border. First, you can pass a single colorto the property, as follows:
border-color:#888;
This property sets all the borders of an element to mid-gray. You can also set bordercolors individually, like this (which sets the border colors to various shades of gray):
border-top-color :#000;border-left-color :#444;border-right-color :#888;border-bottom-color:#ccc;
You can also set all the colors individually with a single declaration, as follows:border-color:#f00 #0f0 #880 #00f;
This declaration sets the top border color to #f00, the right one to #0f0, the bottom oneto #880, and the left one to #00f (red, green, orange, and blue, respectively). You canalso use color names for the arguments.
The border-radius PropertyPrior to CSS3, talented web developers came up with numerous different tweaks andfixes in order to achieve rounded borders, generally using <table> or <div> tags.
But now adding rounded borders to an element is really simple, and it works on thelatest versions of all major browsers, as shown in Figure 20-3, in which a 10-pixel borderis displayed in different ways. Example 20-2 shows the HTML for this.
Example 20-2. The border-radius property<!DOCTYPE html><html> <!-- borderradius.html --> <head> <title>CSS3 Border Radius Examples</title> <style> .box { margin-bottom:10px; font-family :'Courier New', monospace; font-size :12pt; text-align :center;
CSS3 Borders | 469

padding :10px; width :380px; height :75px; border :10px solid #006; } .b1 { -moz-border-radius :40px; -webkit-border-radius:40px; border-radius :40px; } .b2 { -moz-border-radius :40px 40px 20px 20px; -webkit-border-radius:40px 40px 20px 20px; border-radius :40px 40px 20px 20px; } .b3 { -moz-border-radius-topleft :20px; -moz-border-radius-topright :40px; -moz-border-radius-bottomleft :60px; -moz-border-radius-bottomright :80px; -webkit-border-top-left-radius :20px; -webkit-border-top-right-radius :40px; -webkit-border-bottom-left-radius :60px; -webkit-border-bottom-right-radius:80px; border-top-left-radius :20px; border-top-right-radius :40px; border-bottom-left-radius :60px; border-bottom-right-radius :80px; } .b4 { -moz-border-radius-topleft :40px 20px; -moz-border-radius-topright :40px 20px; -moz-border-radius-bottomleft :20px 40px; -moz-border-radius-bottomright :20px 40px; -webkit-border-top-left-radius :40px 20px; -webkit-border-top-right-radius :40px 20px; -webkit-border-bottom-left-radius :20px 40px; -webkit-border-bottom-right-radius:20px 40px; border-top-left-radius :40px 20px; border-top-right-radius :40px 20px; border-bottom-left-radius :20px 40px; border-bottom-right-radius :20px 40px; } </style> </head> <body> <div class='box b1'> border-radius:40px; </div>
<div class='box b2'> border-radius:40px 40px 20px 20px;
470 | Chapter 20: Advanced CSS with CSS3

</div>
<div class='box b3'> border-top-left-radius :20px;<br> border-top-right-radius :40px;<br> border-bottom-left-radius :60px;<br> border-bottom-right-radius:80px; </div>
<div class='box b4'> border-top-left-radius :40px 20px;<br> border-top-right-radius :40px 20px;<br> border-bottom-left-radius :20px 40px;<br> border-bottom-right-radius:20px 40px; </div> </body></html>
Figure 20-3. Mixing and matching various border radius properties
CSS3 Borders | 471

So, for example, to create a rounded border with a radius of 20 pixels, you could simplyuse the following declaration:
border-radius:20px;
Although most browsers will work fine with border radius proper‐ties (including IE), some current (and many older) versions of themajor browsers use different property names. So, if you wish to sup‐port them all, you will need to also use the relevant browser-specificprefixes, such as -moz- and -webkit-. To ensure that Example 20-2works in all browsers, I have included all the required prefixes.
You can specify a separate radius for each of the four corners, like this (applied in aclockwise direction starting from the top-left corner):
border-radius:10px 20px 30px 40px;
If you prefer, you can also address each corner of an element individually, like this:border-top-left-radius :20px;border-top-right-radius :40px;border-bottom-left-radius :60px;border-bottom-right-radius:80px;
And, when referencing individual corners, you can supply two arguments to choose adifferent vertical and horizontal radius (giving more interesting and subtle borders) likethis:
border-top-left-radius :40px 20px;border-top-right-radius :40px 20px;border-bottom-left-radius :20px 40px;border-bottom-right-radius:20px 40px;
The first argument is the horizontal, and the second is the vertical radius.
Box ShadowsTo apply a box shadow, specify a horizontal and vertical offset from the object, theamount of blurring to add to the shadow, and the color to use, like this:
box-shadow:15px 15px 10px #888;
The two instances of 15px specify the vertical and horizontal offset from the element,and these values can be negative, zero, or positive. The 10px specifies the amount ofblurring, with smaller values resulting in less blurring. And the #888 is the color for theshadow, which can be any valid color value. The result of this declaration can be seenin Figure 20-4.
472 | Chapter 20: Advanced CSS with CSS3

Figure 20-4. A box shadow displayed under an element
You must use the WebKit and Mozilla prefixes to this property forthose browsers.
Element OverflowIn CSS2, you can indicate what to do when one element is too large to be fully containedby its parent by setting the overflow property to hidden, visible, scroll, or auto. Butwith CSS3, you can now separately apply these values in the horizontal or vertical di‐rections, too, as with these example declarations:
overflow-x:hidden;overflow-x:visible;overflow-y:auto;overflow-y:scroll;
Multicolumn LayoutOne of the most requested features by web developers is multiple columns, and this hasfinally been realized in CSS3, with Internet Explorer 10 being the last major browser toadopt it.
Now, flowing text over multiple columns is as easy as specifying the number of columns,and then (optionally) choosing the spacing between them and the type of dividing line(if any), as shown in Figure 20-5 (created using Example 20-3).
Element Overflow | 473

Figure 20-5. Flowing text in multiple columns
Example 20-3. Using CSS to create multiple columns<!DOCTYPE html><html> <!-- multiplecolumns.html --> <head> <title>Multiple Columns</title> <style> .columns { text-align :justify; font-size :16pt; -moz-column-count :3; -moz-column-gap :1em; -moz-column-rule :1px solid black; -webkit-column-count:3; -webkit-column-gap :1em; -webkit-column-rule :1px solid black; column-count :3; column-gap :1em; column-rule :1px solid black; } </style> </head> <body> <div class='columns'> Now is the winter of our discontent Made glorious summer by this sun of York; And all the clouds that lour'd upon our house In the deep bosom of the ocean buried. Now are our brows bound with victorious wreaths; Our bruised arms hung up for monuments; Our stern alarums changed to merry meetings, Our dreadful marches to delightful measures. Grim-visaged war hath smooth'd his wrinkled front; And now, instead of mounting barded steeds To fright the souls of fearful adversaries,
474 | Chapter 20: Advanced CSS with CSS3

He capers nimbly in a lady's chamber To the lascivious pleasing of a lute. </div> </body></html>
Within the .columns class, the first two lines simply tell the browser to right-justify thetext and to set it to a font size of 16pt. These declarations aren’t needed for multiplecolumns, but they improve the text display. The remaining lines set up the element sothat, within it, text will flow over three columns, with a gap of 1em between the columns,and with a single-pixel border down the middle of each gap.
In Example 20-3, Mozilla- and WebKit-based browsers requirebrowser-specific prefixes to the declarations.
Colors and OpacityThe ways in which you can define colors have been greatly expanded with CSS3, andyou can now also use CSS functions to apply colors in the common formats RGB (Red,Green, and Blue), RGBA (Red, Green, Blue, and Alpha), HSL (Hue, Saturation, andLuminance), and HSLA (Hue, Saturation, Luminance, and Alpha). The Alpha valuespecifies a color’s transparency, which allows underlying elements to show through.
HSL ColorsTo define a color with the hsl function, you must first choose a value for the hue between0 and 359 from a color wheel. Any higher color numbers simply wrap around to thebeginning again, so the value of 0 is red, and so are the values 360 and 720.
In a color wheel, the primary colors of red, green, and blue are separated by 120 degrees,so that pure red is 0, green is 120, and blue is 240. The numbers between these valuesrepresent shades comprising different proportions of the primary colors on either side.
Next you need the saturation level, which is a value between 0% and 100%. This specifieshow washed-out or vibrant a color will appear. The saturation values commence in thecenter of the wheel with a mid-gray color (a saturation of 0%) and then become moreand more vivid as they progress to the outer edge (a saturation of 100%).
All that’s left then is for you to decide how bright you want the color to be, by choosinga luminance value of between 0% and 100%. A value of 50% for the luminance gives thefullest, brightest color; decreasing the value (down to a minimum of 0%) darkens thecolor until it displays as black; and increasing the value (up to a maximum of 100%)
Colors and Opacity | 475

lightens the color until it shows as white. You can visualize this as if you are mixinglevels of either black or white into the color.
Therefore, for example, to choose a fully saturated yellow color with standard percentbrightness, you would use a declaration such as this:
color:hsl(60, 100%, 50%);
Or, for a darker blue color, you might use a declaration such as:color:hsl(240, 100%, 40%);
You can also use this (and all other CSS color functions) with any property that expectsa color, such as background-color, and so on.
HSLA ColorsTo provide even further control over how colors will appear, you can use the hslafunction, supplying it with a fourth (or alpha) level for a color, which is a floating-pointvalue between 0 and 1. A value of 0 specifies that the color is totally transparent, while1 means it is fully opaque.
Here’s how you would choose a fully saturated yellow color with standard brightnessand 30% opacity:
color:hsla(60, 100%, 50%, 0.3);
Or, for a fully saturated but lighter blue color with 82% opacity, you might use thisdeclaration:
color:hsla(240, 100%, 60%, 0.82);
RGB ColorsYou will probably be more familiar with using the RGB system of selecting a color, asit’s similar to using the #nnnnnn and #nnn color formats. For example, to apply a yellowcolor to a property, you can use either of the following declarations (the first supporting16 million colors, and the second four thousand):
color:#ffff00;color:#ff0;
You can also use the CSS rgb function to achieve the same result, but you use decimalnumbers instead of hexadecimal (where 255 decimal is ff hexadecimal):
color:rgb(255, 255, 0);
But even better than that, you don’t even have to think in amounts of up to 256 anymore,because you can specify percentage values, like this:
color:rgb(100%, 100%, 0);
476 | Chapter 20: Advanced CSS with CSS3

In fact, you can now get very close to a desired color by simply thinking about its primarycolors. For example, green and blue make cyan, so to create a color close to cyan, butwith more blue in it than green, you could make a good first guess at 0% red, 40% green,and 60% blue, and try a declaration such as this:
color:rgb(0%, 40%, 60%);
RGBA ColorsAs with the hsla function, the rgba function supports a fourth alpha argument, so youcan, for example, apply the previous cyan-like color with an opacity of 40% by using adeclaration such as this:
color:rgba(0%, 40%, 60%, 0.4);
The opacity PropertyThe opacity property provides the same alpha control as the hsla and rgba functions,but lets you modify an object’s opacity (or transparency if you prefer) separately fromits color.
To use it, apply a declaration such as the following to an element (which in this examplesets the opacity to 25%, or 75% transparent):
opacity:0.25;
WebKit- and Mozilla-based browsers require browser-specific pre‐fixes to this property. And for backward compatibility with releasesof Internet Explorer prior to version 9, you should add the follow‐ing declaration (in which the opacity value is multiplied by 100):
filter:alpha(opacity='25');
Text EffectsA number of new effects can now be applied to text with the help of CSS3, includingtext shadows, text overlapping, and word wrapping.
The text-shadow PropertyThe text-shadow property is similar to the box-shadow property and takes the sameset of arguments: a horizontal and vertical offset, an amount for the blurring, and thecolor to use. For example, the following declaration offsets the shadow by 3 pixels bothhorizontally and vertically, and displays the shadow in dark gray, with a blurring of 4pixels:
text-shadow:3px 3px 4px #444;
Text Effects | 477

The result of this declaration looks like Figure 20-6, and works in all recent versions ofall major browsers (but not IE9 or lower).
Figure 20-6. Applying a shadow to text
The text-overflow PropertyWhen using any of the CSS overflow properties with a value of hidden, you can also usethe text-overflow property to place an ellipsis (three dots) just before the cutoff toindicate that some text has been truncated, like this:
text-overflow:ellipsis;
Without this property, when the text “To be, or not to be. That is the question.” istruncated, the result will look like Figure 20-7; with the declaration applied, however,the result is like Figure 20-8.
Figure 20-7. The text is automatically truncated
Figure 20-8. Instead of being cut off, the text trails off using an ellipsis
For this to work, three things are required:
• The element should have an overflow property that is not visible, such asoverflow:hidden.
• The element must have the white-space:nowrap property set to constrain the text.• The width of the element must be less than that of the text to truncate.
478 | Chapter 20: Advanced CSS with CSS3

The word-wrap PropertyWhen you have a really long word that is wider than the element containing it, it willeither overflow or be truncated. But as an alternative to using the text-overflow prop‐erty and truncating text, you can use the word-wrap property with a value of break-word to wrap long lines, like this:
word-wrap:break-word;
For example, in Figure 20-9 the word Honorificabilitudinitatibus is too wide for thecontaining box (whose righthand edge is shown as a solid vertical line between the letterst and a) and, because no overflow properties have been applied, it has overflowed itsbounds.
Figure 20-9. The word is too wide for its container and has overflowed
But in Figure 20-10 the word-wrap property of the element has been assigned a valueof break-word, so the word has neatly wrapped around to the next line.
Figure 20-10. The word now wraps at the righthand edge
Web FontsThe use of CSS3 web fonts vastly increases the typography available to web designersby allowing fonts to be loaded in and displayed from across the Web, not just from theuser’s computer. To achieve this, declare a web font using @font-face, like this:
@font-face{ font-family:FontName; src:url('FontName.otf');}
The url function requires a value containing the path or URL of a font. On mostbrowsers, you can use either TrueType (.ttf) or OpenType (.otf) fonts, but Internet Ex‐plorer restricts you to TrueType fonts that have been converted to EOT (.eot).
Web Fonts | 479

To tell the browser the type of font, you can use the format function, like this (forOpenType fonts):
@font-face{ font-family:FontName; src:url('FontName.otf') format('opentype');}
Or this for TrueType fonts:@font-face{ font-family:FontName; src:url('FontName.ttf') format('truetype');}
However, because Microsoft Internet Explorer accepts only EOT fonts, it ignores @font-face declarations that contain the format function.
Google Web FontsOne of the best ways to use web fonts is to load them in for free from Google’s servers.To find out more about this, check out the Google Fonts website (see Figure 20-11),where you can get access to over 630 font families, and counting!
To show you how easy it is to use one of these fonts, here’s how you load a Google font(in this case, Lobster) into your HTML for use in <h1> headings:
<!DOCTYPE html><html> <head> <style> h1 { font-family:'Lobster', arial, serif; } </style> <link href='http://fonts.googleapis.com/css?family=Lobster' rel='stylesheet' type='text/css'> </head> <body> <h1>Hello</h1> </body></html>
480 | Chapter 20: Advanced CSS with CSS3

Figure 20-11. It’s easy to include Google’s web fonts
TransformationsUsing transformations, you can skew, rotate, stretch, and squash elements in any of upto three dimensions (yes, 3D is supported, but only in WebKit-based browsers for now).This makes it easy to create great effects by stepping out of the uniform rectangularlayout of <div> and other elements, because now they can be shown at a variety of anglesand in many different forms.
To perform a transformation, use the transform property (which unfortunately hasbrowser-specific prefixes for Mozilla, WebKit, Opera, and Microsoft browsers, so onceagain you’ll need to refer to http://caniuse.com).
You can apply various properties to the transform property, starting with the valuenone, which resets an object to a nontransformed state:
transform:none;
Transformations | 481

You can supply one or more of the following functions to the transform property:matrix
Transforms an object by applying a matrix of values to it
translate
Moves an element’s origin
scale
Scales an object
rotate
Rotates an object
skew
Skews an object
There are also single versions of many of these functions, such as translateX, scaleY,and so on.
So, for example, to rotate an element clockwise by 45 degrees, you could apply thisdeclaration to it:
transform:rotate(45deg);
At the same time, you could enlarge this object, as in the following declaration, whichenlarges its width by 1.5 times and its height by 2 times, and then performs the rotation(Figure 20-12 shows an object before the transformations are applied, and then after‐ward):
transform:scale(1.5, 2) rotate(45deg);
Figure 20-12. An object before and after transformation
482 | Chapter 20: Advanced CSS with CSS3

3D TransformationsYou can also transform objects in three dimensions using the following CSS3 3D trans‐formation features:perspective
Releases an element from 2D space and creates a third dimension within which itcan move
transform-origin
Sets the location at which all lines converge to a single point
translate3d
Moves an element to another location in its 3D space
scale3d
Rescales one or more dimensions
rotate3d
Rotates an element around any of the X, Y, and Z axes.
Figure 20-13 shows a 2D object that has been rotated in 3D space with a CSS rule suchas the following:
transform:perspective(200px) rotateX(10deg) rotateY(20deg) rotateZ(30deg);
Figure 20-13. A figure rotated in 3D space
For more information, refer to the tutorial at http://tinyurl.com/3dcsstransforms.
TransitionsAlso appearing on all the latest versions of the major browsers (including Internet Ex‐plorer 10, but not lower versions) is a dynamic new feature called transitions. These
3D Transformations | 483

specify an animation effect you want to occur when an element is transformed, and thebrowser will automatically take care of all the in-between frames for you.
There are four properties you should supply in order to set up a transition, as follows:transition-property :property;transition-duration :time;transition-delay :time;transition-timing-function:type;
You must preface these properties with the relevant browser prefix‐es for Mozilla, WebKit, Opera, and Microsoft browsers.
Properties to TransitionTransitions have properties such as height and border-color. Specify the propertiesyou want to change in the CSS property named transition-property (here the wordproperty is used by different tools to mean different things). You can include multipleproperties by separating them with commas, like this:
transition-property:width, height, opacity;
Or, if you want absolutely everything about an element to transition (including colors),use the value all, like this:
transition-property:all;
Transition DurationThe transition-duration property requires a value of 0 seconds or greater, like thefollowing, which specifies that the transition should take 1.25 seconds to complete:
transition-duration:1.25s;
Transition DelayIf the transition-delay property is given a value greater than 0 seconds (the default),it introduces a delay between the initial display of the element and the beginning of thetransition. The following starts the transition after a 0.1-second delay:
transition-delay:0.1s;
If the transition-delay property is given a value of less than 0 seconds (in other words,a negative value), the transition will execute the moment the property is changed, butwill appear to have begun execution at the specified offset, partway through its cycle.
484 | Chapter 20: Advanced CSS with CSS3

Transition TimingThe transition-timing function property requires one of the following values:ease
Start slowly, get faster, and then end slowly.
linear
Transition at constant speed.
ease-in
Start slowly, and then go quickly until finished.
ease-out
Start quickly, stay fast until near the end, and then end slowly.
ease-in-out
Start slowly, go fast, and then end slowly.
Using any of the values containing the word ease ensures that the transition looks extrafluid and natural, unlike a linear transition that somehow seems more mechanical. Andif these aren’t sufficiently varied for you, you can also create your own transitions usingthe cubic-bezier function.
For example, following are the declarations used to create the preceding five transitiontypes, illustrating how you can easily create your own:
transition-timing-function:cubic-bezier(0.25, 0.1, 0.25, 1);transition-timing-function:cubic-bezier(0, 0, 1, 1);transition-timing-function:cubic-bezier(0.42, 0, 1, 1);transition-timing-function:cubic-bezier(0, 0, 0.58, 1);transition-timing-function:cubic-bezier(0.42, 0, 0.58, 1);
Shorthand SyntaxYou may find it easier to use the shorthand version of this property and include all thevalues in a single declaration like the following, which will transition all properties in alinear fashion, over a period of .3 seconds, after an initial (optional) delay of .2 seconds:
transition:all .3s linear .2s;
Doing so will save you the trouble of entering many very similar declarations, particu‐larly if you are supporting all the major browser prefixes.
Example 20-4 illustrates how you might use transitions and transformations together.The CSS creates a square, orange element with some text in it, and a hover pseudo-classspecifying that when the mouse passes over the object it should rotate by 180 degreesand change from orange to yellow (see Figure 20-14).
Transitions | 485
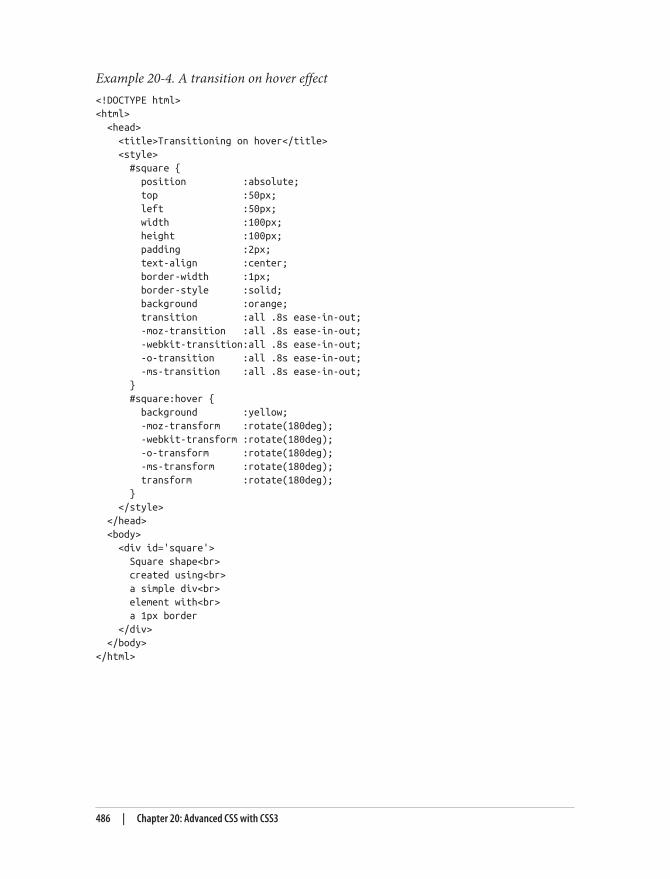
Example 20-4. A transition on hover effect<!DOCTYPE html><html> <head> <title>Transitioning on hover</title> <style> #square { position :absolute; top :50px; left :50px; width :100px; height :100px; padding :2px; text-align :center; border-width :1px; border-style :solid; background :orange; transition :all .8s ease-in-out; -moz-transition :all .8s ease-in-out; -webkit-transition:all .8s ease-in-out; -o-transition :all .8s ease-in-out; -ms-transition :all .8s ease-in-out; } #square:hover { background :yellow; -moz-transform :rotate(180deg); -webkit-transform :rotate(180deg); -o-transform :rotate(180deg); -ms-transform :rotate(180deg); transform :rotate(180deg); } </style> </head> <body> <div id='square'> Square shape<br> created using<br> a simple div<br> element with<br> a 1px border </div> </body></html>
486 | Chapter 20: Advanced CSS with CSS3

Figure 20-14. The object rotates and changes color when hovered over
The sample code caters to all the different browsers by providing browser-specific ver‐sions of the declarations. On all the latest browsers (including IE10 or higher), the objectwill rotate clockwise when hovered over, while slowly changing from orange to yellow.
CSS transitions are smart in that when they are canceled, they smoothly return to theiroriginal value. So if you move the mouse away before the transition has completed, itwill instantly reverse and start transition back to its initial state.
Questions1. What do the CSS3 attribute selector operators ^=, $=, and *= do?2. What property do you use to specify the size of a background image?3. With which property can you specify the radius of a border?4. How can you flow text over multiple columns?5. Name the four functions with which you can specify CSS colors.6. How would you create a gray text shadow under some text, offset diagonally to the
bottom right by 5 pixels, with a blurring of 3 pixels?7. How can you indicate with an ellipsis that text is truncated?8. How can you include a Google Web Font in a web page?9. What CSS declaration would you use to rotate an object by 90 degrees?
10. How do you set up a transition on an object so that when any of its properties arechanged, the change will transition immediately in a linear fashion over the courseof half a second?
See “Chapter 20 Answers” on page 653 in Appendix A for the answers to these questions.
Questions | 487


CHAPTER 21
Accessing CSS from JavaScript
With a good understanding of the DOM and CSS now under your belt, you’ll learn inthis chapter how to access both the DOM and CSS directly from JavaScript, enablingyou to create highly dynamic and responsive websites.
I’ll also show you how to use interrupts so that you can create animations or provideany code that must continue running (such as a clock). Finally, I’ll explain how you canadd new elements to or remove existing ones from the DOM so that you don’t have topre-create elements in HTML just in case JavaScript may need to access them later.
Revisiting the getElementById FunctionIn Chapter 14, I mentioned the common usage of the $ character as a function name toprovide easier access to the getElementById function. In fact, major frameworks suchas jQuery use this new $ function, and substantially extend its functionality too.
I would also like to provide you with an enhanced version of this function, so that youcan handle DOM elements and CSS styles quickly and efficiently. However, to avoidconflicting with frameworks that use the $ character, I’ll simply use the uppercase O,because it’s the first letter of the word Object, which is what will be returned when thefunction is called (the object represented by the ID passed to the function).
The O functionHere’s what the bare-bones O function looks like:
function O(obj){ return document.getElementById(obj)}
489
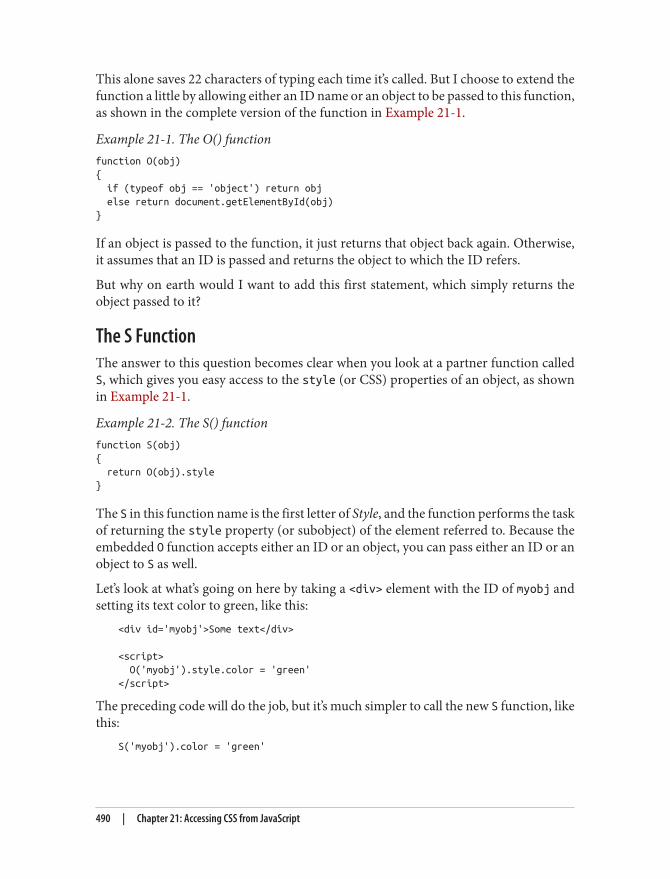
This alone saves 22 characters of typing each time it’s called. But I choose to extend thefunction a little by allowing either an ID name or an object to be passed to this function,as shown in the complete version of the function in Example 21-1.
Example 21-1. The O() functionfunction O(obj){ if (typeof obj == 'object') return obj else return document.getElementById(obj)}
If an object is passed to the function, it just returns that object back again. Otherwise,it assumes that an ID is passed and returns the object to which the ID refers.
But why on earth would I want to add this first statement, which simply returns theobject passed to it?
The S FunctionThe answer to this question becomes clear when you look at a partner function calledS, which gives you easy access to the style (or CSS) properties of an object, as shownin Example 21-1.
Example 21-2. The S() functionfunction S(obj){ return O(obj).style}
The S in this function name is the first letter of Style, and the function performs the taskof returning the style property (or subobject) of the element referred to. Because theembedded O function accepts either an ID or an object, you can pass either an ID or anobject to S as well.
Let’s look at what’s going on here by taking a <div> element with the ID of myobj andsetting its text color to green, like this:
<div id='myobj'>Some text</div>
<script> O('myobj').style.color = 'green'</script>
The preceding code will do the job, but it’s much simpler to call the new S function, likethis:
S('myobj').color = 'green'
490 | Chapter 21: Accessing CSS from JavaScript

Now consider the case in which the object returned by calling O is stored in, for example,an object called fred, like this:
fred = O('myobj')
Because of the way function S works, we can still call it to change the text color to green,like this:
S(fred).color = 'green'
This means that whether you wish to access an object directly or via its ID, you can doso by passing it to either the O or S function as required. Just remember that when youpass an object (rather than an ID), you must not place it in quotation marks.
The C FunctionSo far I’ve provided you with two simple functions that make it easy for you to accessany element on a web page, and any style property of an element. Sometimes, though,you will want to access more than one element at a time, and you can do this by assigninga CSS class name to each such element, like these examples, which both employ the classmyclass:
<div class='myclass'>Div contents</fiv><p class='myclass'>Paragraph contents</p>
If you want to access all elements on a page that use a particular class, you can use theC function (for the first letter of Class), shown in Example 21-3, to return an arraycontaining all the objects that match a class name provided.
Example 21-3. The C() functionfunction C(name){ var elements = document.getElementsByTagName('*') var objects = []
for (var i = 0 ; i < elements.length ; ++i) if (elements[i].className == name) objects.push(elements[i])
return objects}
Let’s break this example down. First, the argument name contains the class name forwhich you are trying to retrieve objects. Then, inside the function, a new object calledelements is created that contains all the elements in the document, as returned by a callto getElementsByTagName with an argument of '*', which means “find all elements”:
var elements = document.getElementsByTagName('*')
Revisiting the getElementById Function | 491

Then a new array called objects is created, into which all the matching objects foundwill be placed:
var objects = []
Next, a for loop iterates through all the elements in the elements object using thevariable i as the index:
for (var i = 0 ; i < elements.length ; ++i)
Each time around the loop, if an element’s className property is the same as the stringvalue passed in the argument name, the object is pushed onto the objects array:
if (elements[i].className == name) objects.push(elements[i])
Finally, once the loop has completed, the objects array will contain all the elements inthe document that use the class name in name, so it is returned by the function:
return objects
To use this function simply call it as follows, saving the returned array so that you canaccess each of the elements individually as required or (more likely to be the case) enmasse via a loop:
myarray = C('myclass')
Now you can do whatever you like with the objects returned, such as, for example, settingtheir textDecoration style property to 'underline', as follows:
for (i = 0 ; i < myarray.length ; ++i) S(myarray[i]).textDecoration = 'underline'
This code iterates through the objects in myarray[] and then uses the S function toreference each one’s style property, setting its textDecoration property to 'underline'.
Including the FunctionsI use the O and S functions in the examples for the remainder of this chapter, as theymake the code shorter and easier to follow. Therefore, I have saved them in the fileOSC.js (along with the C function, as I think you’ll find it extremely useful) in the Chapter21 folder of the accompanying archive of examples, freely downloadable from the com‐panion website.
You can include these functions in any web page using the following statement—preferably in its <head> section, anywhere before any script that relies on calling them:
<script src='OSC.js'></script>
The contents of OSC.js are shown in Example 21-4.
492 | Chapter 21: Accessing CSS from JavaScript
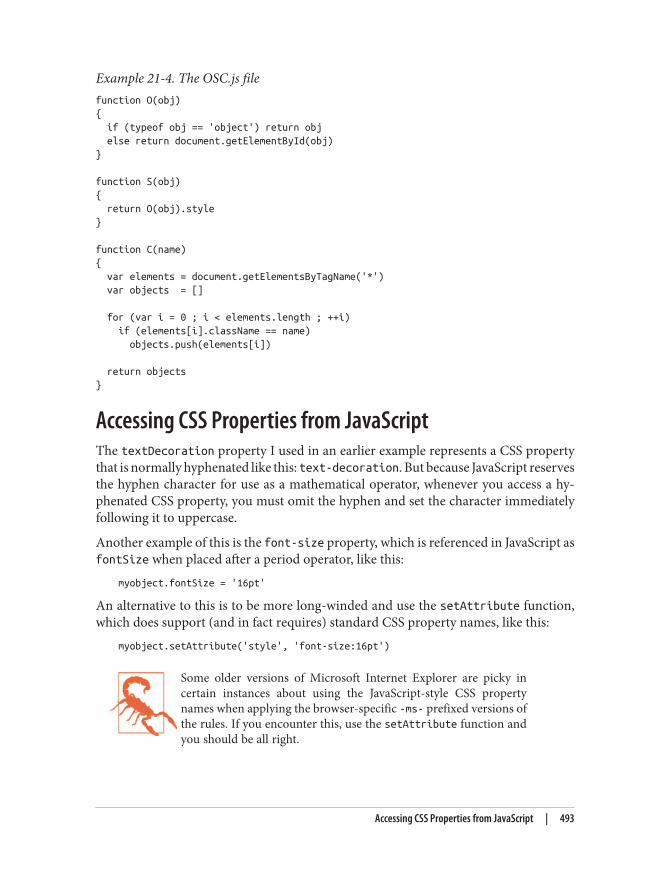
Example 21-4. The OSC.js filefunction O(obj){ if (typeof obj == 'object') return obj else return document.getElementById(obj)}
function S(obj){ return O(obj).style}
function C(name){ var elements = document.getElementsByTagName('*') var objects = []
for (var i = 0 ; i < elements.length ; ++i) if (elements[i].className == name) objects.push(elements[i])
return objects}
Accessing CSS Properties from JavaScriptThe textDecoration property I used in an earlier example represents a CSS propertythat is normally hyphenated like this: text-decoration. But because JavaScript reservesthe hyphen character for use as a mathematical operator, whenever you access a hy‐phenated CSS property, you must omit the hyphen and set the character immediatelyfollowing it to uppercase.
Another example of this is the font-size property, which is referenced in JavaScript asfontSize when placed after a period operator, like this:
myobject.fontSize = '16pt'
An alternative to this is to be more long-winded and use the setAttribute function,which does support (and in fact requires) standard CSS property names, like this:
myobject.setAttribute('style', 'font-size:16pt')
Some older versions of Microsoft Internet Explorer are picky incertain instances about using the JavaScript-style CSS propertynames when applying the browser-specific -ms- prefixed versions ofthe rules. If you encounter this, use the setAttribute function andyou should be all right.
Accessing CSS Properties from JavaScript | 493

Some Common PropertiesUsing JavaScript, you can modify any property of any element in a web document, in asimilar manner to using CSS. I’ve already shown you how to access CSS properties usingeither the JavaScript short form or the setAttribute function to use exact CSS propertynames, so I won’t bore you by detailing all of these hundreds of properties. Rather, I’dlike to show you how to access just a few of the CSS properties as an overview of someof the things you can do.
First, then, let’s look at modifying a few CSS properties from JavaScript usingExample 21-5, which loads in the three earlier functions, creates a <div> element, andthen issues JavaScript statements within a <script> section of HTML, to modify variousof its attributes (see Figure 21-1).
Example 21-5. Accessing CSS properties from JavaScript<!DOCTYPE html><html> <head> <title>Accessing CSS Properties</title> <script src='OSC.js'></script> </head> <body> <div id='object'>Div Object</div>
<script> S('object').border = 'solid 1px red' S('object').width = '100px' S('object').height = '100px' S('object').background = '#eee' S('object').color = 'blue' S('object').fontSize = '15pt' S('object').fontFamily = 'Helvetica' S('object').fontStyle = 'italic' </script> </body></html>
You gain nothing by modifying properties like this, because you could just as easily haveincluded some CSS directly, but shortly we’ll be modifying properties in response touser interaction—and then you’ll see the real power of combining JavaScript and CSS.
494 | Chapter 21: Accessing CSS from JavaScript

Figure 21-1. Modifying styles from JavaScript
Other PropertiesJavaScript also opens up access to a very wide range of other properties, such as thewidth and height of the browser and of any pop-up or in-browser windows or frames,handy information such as the parent window (if there is one), and the history of URLsvisited this session.
All these properties are accessed from the window object via the period operator (e.g.,window.name), and Table 21-1 lists them all, along with descriptions of each.
Table 21-1. Common window propertiesProperties Sets and/or returns
closed Returns a Boolean value indicating whether a window has been closed or not
defaultStatus Sets or returns the default text in the status bar of a window
document Returns the document object for the window
frames Returns an array of all the frames and iframes in the window
history Returns the history object for the window
innerHeight Sets or returns the inner height of a window’s content area
innerWidth Sets or returns the inner width of a window’s content area
length Returns the number of frames and iframes in a window
location Returns the location object for the window
name Sets or returns the name of a window
navigator Returns the navigator object for the window
opener Returns a reference to the window that created the window
outerHeight Sets or returns the outer height of a window, including tool and scroll bars
outerWidth Sets or returns the outer width of a window, including tool and scroll bars
pageXOffset Returns the pixels the document has been scrolled horizontally from the left of the window
Accessing CSS Properties from JavaScript | 495

Properties Sets and/or returns
pageYOffset Returns the pixels the document has been scrolled vertically from the top of the window
parent Returns the parent window of a window
screen Returns the screen object for the window
screenLeft Returns the x coordinate of the window relative to the screen in all recent browsers except Mozilla Firefox(for which you should use screenX)
screenTop Returns the y coordinate of the window relative to the screen in all recent browsers except Mozilla Firefox(for which you should use screenY)
screenX Returns the x coordinate of the window relative to the screen in all recent browsers except Opera, whichreturns incorrect values; not supported in versions of IE prior to 9
screenY Returns the y coordinate of the window relative to the screen in all recent browsers except Opera, whichreturns incorrect values; not supported in versions of IE prior to 9
self Returns the current window
status Sets or returns the text in the status bar of a window
top Returns the top browser window
There are a few points to note about some of these properties:
• The defaultStatus and status properties can be set only if users have modifiedtheir browsers to allow it (very unlikely).
• The history object cannot be read from (so you cannot see where your visitorshave been surfing). But it supports the length property to determine how long thehistory is, and the back, forward, and go methods to navigate to specific pages inthe history.
• When you need to know how much space there is available in a current window ofthe web browser, just read the values in window.innerHeight and window.innerWidth. I often use these values for centering in-browser pop-up alert or “confirmdialog” windows.
• The screen object supports the read properties availHeight, availWidth, colorDepth, height, pixelDepth, and width, and is therefore great for determining in‐formation about the user’s display.
Many of these properties can be invaluable when you’re targetingmobile phones and tablet devices, as they will tell you exactly howmuch screen space you have to work with, the type of browser be‐ing used, and more.
496 | Chapter 21: Accessing CSS from JavaScript

These few items of information will get you started and already provide you with manynew and interesting things you can do with JavaScript. But, in fact, there are far moreproperties and methods available than can be covered in this chapter. However, nowthat you know how to access and use properties, all you need is a resource listing themall, so I recommend that you check out http://tinyurl.com/domproperties as a goodstarting point.
Inline JavaScriptUsing <script> tags isn’t the only way you can execute JavaScript statements; you canalso access JavaScript from within HTML tags, which makes for great dynamic inter‐activity.
For example, to add a quick effect when the mouse passes over an object, you can usecode such as that in the <img> tag in Example 21-6, which displays an apple by default,but replaces it with an orange when the mouse passes over, and restores the apple againwhen the mouse leaves.
Example 21-6. Using inline JavaScript<!DOCTYPE html><html> <head> <title>Inline JavaScript</title> </head> <body> <img src='apple.png' onmouseover="this.src='orange.png'" onmouseout="this.src='apple.png'"> </body></html>
The this KeywordIn the preceding example, you see the this keyword in use. It tells the JavaScript tooperate on the calling object, namely the <img> tag. You can see the result inFigure 21-2, where the mouse has yet to pass over the apple.
Inline JavaScript | 497

Figure 21-2. Inline mouse hover JavaScript example
When supplied from an inline JavaScript call, the this keyword rep‐resents the calling object. When used in class methods, it representsan object to which the method applies.
Attaching Events to Objects in a ScriptThe preceding code is the equivalent of providing an ID to the <img> tag, and thenattaching the actions to the tag’s mouse events, like Example 21-7.
Example 21-7. Non-inline JavaScript<!DOCTYPE html><html> <head> <title>Non-inline JavaScript</title> <script src='OSC.js'></script> </head> <body> <img id='object' src='apple.png'>
<script> O('object').onmouseover = function() { this.src = 'orange.png' } O('object').onmouseout = function() { this.src = 'apple.png' } </script> </body></html>
In the HTML section, this example gives the <img> element an ID of object, thenproceeds to manipulate it separately in the JavaScript section, by attaching anonymousfunctions to each event.
498 | Chapter 21: Accessing CSS from JavaScript

Attaching to Other EventsWhether you’re using inline or separate JavaScript, there are several events to which youcan attach actions, providing a wealth of additional features you can offer your users.Table 21-2 lists these events and details when they will be triggered.
Table 21-2. Events and when they are triggeredEvent Occurs
onabort When an image’s loading is stopped before completion
onblur When an element loses focus
onchange When any part of a form has changed
onclick When an object is clicked
ondblclick When an object is double-clicked
onerror When a JavaScript error is encountered
onfocus When an element gets focus
onkeydown When a key is being pressed (including Shift, Alt, Ctrl, and Esc)
onkeypress When a key is being pressed (not including Shift, Alt, Ctrl, and Esc)
onkeyup When a key is released
onload When an object has loaded
onmousedown When the mouse button is pressed over an element
onmousemove When the mouse is moved over an element
onmouseout When the mouse leaves an element
onmouseover When the mouse passes over an element from outside it
onmouseup When the mouse button is released
onsubmit When a form is submitted
onreset When a form is reset
onresize When the browser is resized
onscroll When the document is scrolled
onselect When some text is selected
onunload When a document is removed
Make sure you attach events to objects that make sense. For exam‐ple, an object that is not a form will not respond to the onsubmitevent.
Inline JavaScript | 499

Adding New ElementsWith JavaScript you are not limited to manipulating the elements and objects suppliedto a document in its HTML. In fact, you can create objects at will by inserting them intothe DOM.
For example, suppose you need a new <div> element. Example 21-8 shows one way youcan add it to the web page.
Example 21-8. Inserting an element into the DOM<!DOCTYPE html><html> <head> <title>Adding Elements</title> <script src='OSC.js'></script> </head> <body> This is a document with only this text in it.<br><br>
<script> alert('Click OK to add an element')
newdiv = document.createElement('div') newdiv.id = 'NewDiv' document.body.appendChild(newdiv)
S(newdiv).border = 'solid 1px red' S(newdiv).width = '100px' S(newdiv).height = '100px' newdiv.innerHTML = "I'm a new object inserted in the DOM" tmp = newdiv.offsetTop
alert('Click OK to remove the element') pnode = newdiv.parentNode pnode.removeChild(newdiv) tmp = pnode.offsetTop </script> </body></html>
Figure 21-3 shows this code being used to add a new <div> element to a web document.First, the new element is created with createElement, then the appendChild function is called and the element gets inserted into the DOM.
500 | Chapter 21: Accessing CSS from JavaScript

Figure 21-3. Inserting a new element into the DOM
After this, various properties are assigned to the element, including some text for itsinner HTML. And then, to make sure the new element is instantly revealed, its offsetTop property is read into the throwaway variable tmp. This forces a DOM refresh andmakes the element display in any browser that might otherwise delay before doing so—particularly Internet Explorer.
This new element is exactly the same as if it had been included in the original HTML,and has all the same properties and methods available.
I sometimes use the technique of creating new elements when I wantto create in-browser pop-up windows, because it doesn’t rely on therehaving to be a spare <div> element available in the DOM.
Removing ElementsYou can also remove elements from the DOM, including ones that you didn’t insertusing JavaScript; it’s even easier than adding an element. It works like this, assuming theelement to remove is in the object element:
element.parentNode.removeChild(element)
This code accesses the element’s parentNode object so that it can remove the elementfrom that node. Then it calls the removeChild method on that object, passing the objectto be removed. However, to ensure the DOM instantly refreshes on all browsers, youmay prefer to replace the preceding single statement with something like the following:
pnode = element.parentNodepnode.removeChild(element)tmp = pnode.offsetTop
Adding New Elements | 501

This first statement makes a copy of element.parentNode (the parent element of theobject) in pnode, which (after the child element is removed) has its offsetTop propertylooked up (and discarded in the throwaway variable tmp), thus ensuring that the DOMis fully refreshed.
Alternatives to Adding and Removing ElementsInserting an element is intended for adding totally new objects into a web page. But ifall you intend to do is hide and reveal objects according to an onmouseover or otherevent, don’t forget that there are always a couple of CSS properties you can use for thispurpose, without taking such drastic measures as creating and deleting DOM elements.
For example, when you want to make an element invisible but leave it in place (and withall the elements surrounding it remaining in their positions), you can simply set the object’s visibility property to 'hidden', like this:
myobject.visibility = 'hidden'
And to redisplay the object, you can use the following:myobject.visibility = 'visible'
You can also collapse elements down to occupy zero width and height (with all objectsaround it filling in the freed-up space), like this:
myobject.display = 'none'
To then restore an element to its original dimensions, you would use the following:myobject.display = 'block'
And, of course, there’s always the innerHTML property, with which you can change theHTML applied to an element, like this for example:
mylement.innerHTML = '<b>Replacement HTML</b>'
Or you can use the O function I outlined earlier, like this:O('someid').innerHTML = 'New contents'
Or you can make an element seem to disappear, like this:O('someid').innerHTML = ''
Don’t forget other useful CSS properties you can access from Java‐Script, such as opacity for setting the visibility of an object to some‐where between visible and invisible, or width and height for resiz‐ing an object. And, of course, using the position property with val‐ues of 'absolute', 'static', or 'relative', you can even locate anobject anywhere in (or outside) the browser window that you like.
502 | Chapter 21: Accessing CSS from JavaScript

Using InterruptsJavaScript provides access to interrupts, a method by which you can ask the browser tocall your code after a set period of time, or even to keep calling it at specified intervals.This gives you a means of handling background tasks such as Ajax communications, oreven things like animating web elements.
To accomplish this, you have two types of interrupt: setTimeout and setInterval,which have accompanying clearTimeout and clearInterval functions for turningthem off again.
Using setTimeoutWhen you call setTimeout, you pass it some JavaScript code or the name of a function,and the value in milliseconds representing how long to wait before the code should beexecuted, like this:
setTimeout(dothis, 5000)
And your dothis function might look like this:function dothis(){ alert('This is your wakeup alert!');}
In case you’re wondering, you cannot simply specify alert() (withbrackets) as a function to be called by setTimeout, because the func‐tion would be executed immediately. Only when you provide a func‐tion name without argument brackets (e.g., alert) can you safely passthe function name so that its code will be executed only when thetimeout occurs.
Passing a string
When you need to provide an argument to a function, you can also pass a string valueto the setTimeout function, which will not be executed until the correct time, like this:
setTimeout("alert('Hello!')", 5000)
In fact, you can provide as many lines of JavaScript code as you like, if you place asemicolon after each statement, like this:
setTimeout("document.write('Starting'); alert('Hello!')", 5000)
Using Interrupts | 503
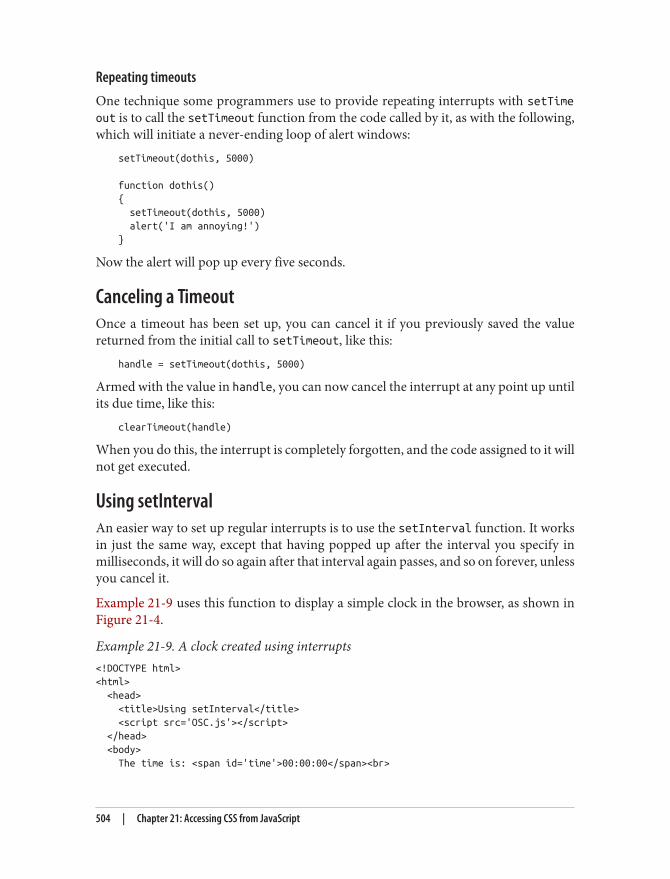
Repeating timeouts
One technique some programmers use to provide repeating interrupts with setTimeout is to call the setTimeout function from the code called by it, as with the following,which will initiate a never-ending loop of alert windows:
setTimeout(dothis, 5000)
function dothis(){ setTimeout(dothis, 5000) alert('I am annoying!')}
Now the alert will pop up every five seconds.
Canceling a TimeoutOnce a timeout has been set up, you can cancel it if you previously saved the valuereturned from the initial call to setTimeout, like this:
handle = setTimeout(dothis, 5000)
Armed with the value in handle, you can now cancel the interrupt at any point up untilits due time, like this:
clearTimeout(handle)
When you do this, the interrupt is completely forgotten, and the code assigned to it willnot get executed.
Using setIntervalAn easier way to set up regular interrupts is to use the setInterval function. It worksin just the same way, except that having popped up after the interval you specify inmilliseconds, it will do so again after that interval again passes, and so on forever, unlessyou cancel it.
Example 21-9 uses this function to display a simple clock in the browser, as shown inFigure 21-4.
Example 21-9. A clock created using interrupts<!DOCTYPE html><html> <head> <title>Using setInterval</title> <script src='OSC.js'></script> </head> <body> The time is: <span id='time'>00:00:00</span><br>
504 | Chapter 21: Accessing CSS from JavaScript

<script> setInterval("showtime(O('time'))", 1000)
function showtime(object) { var date = new Date() object.innerHTML = date.toTimeString().substr(0,8) } </script> </body></html>
Figure 21-4. Maintaining the correct time with interrupts
Every time ShowTime is called, it sets the object date to the current date and time witha call to Date:
var date = new Date()
Then the innerHTML property of the object passed to showtime (namely, object) is setto the current time in hours, minutes, and seconds, as determined by a call to toTimeString. This returns a string such as 09:57:17 UTC+0530, which is then truncated tojust the first eight characters with a call to the substr function:
object.innerHTML = date.toTimeString().substr(0,8)
Using the function
To use this function, you first have to create an object whose innerHTML property willbe used for displaying the time, like this HTML:
The time is: <span id='time'>00:00:00</span>
Then, from a <script> section of code, a call is placed to the setInterval function,like this:
setInterval("showtime(O('time'))", 1000)
Using Interrupts | 505

It then passes a string to setInterval, containing the following statement, which is setto execute once a second (every 1,000 milliseconds):
showtime(O('time'))
In the rare situation where somebody has disabled JavaScript (which people sometimesdo for security reasons), your JavaScript will not run and the user will see the original00:00:00.
Canceling an interval
In order to stop a repeating interval, when you first set up the interval with a call tosetInterval, you must make a note of the interval’s handle, like this:
handle = setInterval("showtime(O('time'))", 1000)
Now you can stop the clock at any time by issuing the following call:clearInterval(handle)
You can even set up a timer to stop the clock after a certain amount of time, like this:setTimeout("clearInterval(handle)", 10000)
This statement will issue an interrupt in 10 seconds that will clear the repeating intervals.
Using Interrupts for AnimationBy combining a few CSS properties with a repeating interrupt, you can produce allmanner of animations and effects.
For example, the code in Example 21-10 moves a square shape across the top of abrowser, all the time ballooning in size, as shown in Figure 21-5, before starting all overagain when LEFT is reset to 0.
Example 21-10. A simple animation<!DOCTYPE html><html> <head> <title>Simple Animation</title> <script src='OSC.js'></script> <style> #box { position :absolute; background:orange; border :1px solid red; } </style> </head> <body> <div id='box'></div>
506 | Chapter 21: Accessing CSS from JavaScript

<script> SIZE = LEFT = 0
setInterval(animate, 30)
function animate() { SIZE += 10 LEFT += 3
if (SIZE == 200) SIZE = 0 if (LEFT == 600) LEFT = 0
S('box').width = SIZE + 'px' S('box').height = SIZE + 'px' S('box').left = LEFT + 'px' } </script> </body></html>
Figure 21-5. This object slides in from the left while changing size
In the document’s <head>, the box object is set to a background color of 'orange' witha border value of '1px solid red', and its position property is set to absolute sothat it is allowed to be moved around in the browser.
Then, in the animate function, the global variables SIZE and LEFT are continuouslyupdated and then applied to the width, height, and left style attributes of the boxobject (with 'px' added after each to specify that the values are in pixels), thus animatingit at a frequency of once every 30 milliseconds—giving a rate of 33.33 frames per second(1,000/30 milliseconds).
Using Interrupts | 507

Questions1. What are the O, S, and C functions provided to do?2. Name two ways to modify a CSS attribute of an object.3. Which properties provide the width and height available in a browser window?4. How can you make something happen when the mouse passes both over and out
of an object?5. Which JavaScript function creates new elements, and which appends them to the
DOM?6. How can you make an element (a) invisible, and (b) collapse to zero dimensions?7. Which function creates a single event at a future time?8. Which function sets up repeating events at set intervals?9. How can you release an element from its location in a web page to enable it to be
moved around?10. What delay between events should you set (in milliseconds) to achieve an animation
rate of 50 frames per second?
See “Chapter 21 Answers” on page 654 in Appendix A for the answers to these questions.
508 | Chapter 21: Accessing CSS from JavaScript

CHAPTER 22
Introduction to HTML5
HTML5 represents a substantial leap forward in web design, layout, and usability. Itprovides a simple way to manipulate graphics in a web browser without resorting toplug-ins such as Flash, offers methods to insert audio and video into web pages (againwithout plug-ins), and irons out several annoying inconsistencies that crept into HTMLduring its evolution.
In addition, HTML5 includes numerous other enhancements such as geolocation han‐dling, web workers to manage background tasks, improved form handling, access tobundles of local storage (far in excess of the limited capabilities of cookies), and eventhe facility to turn web pages into web applications for mobile browsers.
What’s curious about HTML5, though, is that it has been an ongoing evolution, in whichdifferent browsers have adopted different features at different times. Fortunately, all thebiggest and most popular HTML5 additions are finally now supported by all majorbrowsers (those with more than 1% or so of the market, such as Chrome, InternetExplorer, Firefox, Safari, and Opera, and the Android and iOS browsers).
But with HTML5 having only been officially submitted to the W3C in early 2013, thereremain a number of features outstanding in several browsers, which I outline later inthe book so you will be prepared when they are adopted.
Nevertheless, we are now fully into the second big surge toward dynamic web interac‐tivity (the first being the adoption of what became known as Web 2.0). I would hesitateto call it Web 3.0, though, because the term HTML5 says it all to most people, and inmy view it could be considered a later version of Web 2.0 (maybe something like Web2.7).
Actually, I think it will be very interesting to see what Web 3.0 will turn out to be. If Iwere to hazard a prediction, though, I would say it will result from the application ofartificial intelligence (AI) in the form of much more capable versions of software suchas Apple’s Siri, Microsoft’s Cortana, and IBM’s Watson, combined with wearable
509

technology that uses visual and voice input—like Google Glass and the Galaxy Gearwatch—rather than keyboards. I look forward to covering these things in future editionsof this book.
But for now, having written about what’s to come in HTML5 for some years, and nowthat so many parts of the specification are usable on virtually all devices and browsers,I’m pleased to finally be able to bring it into this edition of the book. So let me take youon an overview of what’s available to you in HTML5 right now.
The CanvasOriginally introduced by Apple for the WebKit rendering engine (which had itself or‐iginated in the KDE HTML layout engine) for its Safari browser (and now also imple‐mented in iOS, Android, Kindle, Chrome, BlackBerry, Opera, and Tizen), the canvaselement enables us to draw graphics in a web page without having to rely on a plug-insuch as Java or Flash. After being standardized, the canvas was adopted by all otherbrowsers and is now a mainstay of modern web development.
Like other HTML elements, a canvas is simply an element within a web page with defineddimensions, and within which you can use JavaScript to draw graphics. You create acanvas using the <canvas> tag, to which you must also assign an ID so that JavaScriptwill know which canvas it is accessing (as you can have more than one canvas on a page).
In Example 22-1, I’ve created a <canvas> element, with the ID mycanvas, that containssome text that is displayed only in browsers that don’t support the canvas. Beneath thisthere is a section of JavaScript, which draws the Japanese flag on the canvas (as shownin Figure 22-1).
Example 22-1. Using the HTML5 canvas element<!DOCTYPE html><html> <head> <title>The HTML5 Canvas</title> <script src='OSC.js'></script> </head> <body> <canvas id='mycanvas' width='320' height='240'> This is a canvas element given the ID <i>mycanvas</i> This text is only visible in non-HTML5 browsers </canvas>
<script> canvas = O('mycanvas') context = canvas.getContext('2d') context.fillStyle = 'red' S(canvas).border = '1px solid black'
510 | Chapter 22: Introduction to HTML5

context.beginPath() context.moveTo(160, 120) context.arc(160, 120, 70, 0, Math.PI * 2, false) context.closePath() context.fill() </script> </body></html>
Figure 22-1. Drawing the Japanese flag using an HTML5 canvas
At this point it’s not necessary to detail exactly what is going on, as I explain that in thefollowing chapter, but you should already see how using the canvas is not hard, but doesrequire learning a few new JavaScript functions. Note that this example draws on theOSC.js set of functions from the previous chapter to help keep the code neat andcompact.
GeolocationUsing geolocation, your browser can return information to a web server about yourlocation. This information can come from a GPS chip in the computer or mobile deviceyou’re using, from your IP address, or from analysis of nearby WiFi hotspots. For se‐curity purposes, the user is always in control and can refuse to provide this informationon a one-off basis, or can enable settings to either permanently block or allow access tothis data from one or all websites.
There are numerous uses for this technology, including giving you turn-by-turn navi‐gation; providing local maps; notifying you of nearby restaurants, WiFi hotspots, or
Geolocation | 511

other places; letting you know which friends are near you; directing you to the nearestgas station; and more.
Example 22-2 will display a Google map of the user’s location, as long as the browsersupports geolocation and the user grants access to his location (as shown inFigure 22-2). Otherwise, it will display an error.
Example 22-2. Displaying the map at a user’s location<!DOCTYPE html><html> <head> <title>Geolocation Example</title> <script src='OSC.js'></script> <script src="https://maps.googleapis.com/maps/api/js?sensor=false"></script> </head> <body> <div id='status'></div> <div id='map'></div>
<script> if (typeof navigator.geolocation == 'undefined') alert("Geolocation not supported.") else navigator.geolocation.getCurrentPosition(granted, denied)
function granted(position) { O('status').innerHTML = 'Permission Granted' S('map').border = '1px solid black' S('map').width = '640px' S('map').height = '320px'
var lat = position.coords.latitude var long = position.coords.longitude var gmap = O('map') var gopts = { center: new google.maps.LatLng(lat, long), zoom: 9, mapTypeId: google.maps.MapTypeId.ROADMAP } var map = new google.maps.Map(gmap, gopts) }
function denied(error) { var message
switch(error.code) { case 1: message = 'Permission Denied'; break; case 2: message = 'Position Unavailable'; break;
512 | Chapter 22: Introduction to HTML5

case 3: message = 'Operation Timed Out'; break; case 4: message = 'Unknown Error'; break; }
O('status').innerHTML = message } </script> </body></html>
Figure 22-2. The user’s location has been used to display a map
Again, here is not the place to describe how this all works, as I will detail that in Chap‐ter 25. For now, though, this example serves to show you how easy managing geolocationcan be, especially given that much of the code is dedicated to handling errors and callingup the Google map, so the core geolocation code you need is actually minimal.
Audio and VideoAnother great addition to HTML5 is support for in-browser audio and video. Whileplaying these types of media can be a little complicated due to the variety of encodingtypes and licenses, the <audio> and <video> elements provide the flexibility you needto display the types of media you have available.
Audio and Video | 513

In Example 22-3, the same video file has been encoded in different formats to ensurethat all major browsers are accounted for. Browsers will simply select the first type theyrecognize and play it, as shown in Figure 22-3.
Example 22-3. Playing a video with HTML5<!DOCTYPE html><html> <head> <title>HTML5 Video</title> </head> <body> <video width='560' height='320' controls> <source src='movie.mp4' type='video/mp4'> <source src='movie.webm' type='video/webm'> <source src='movie.ogv' type='video/ogg'> </video> </body></html>
Figure 22-3. Displaying video using HTML5
Inserting audio into a web page is just as easy, as you will discover in Chapter 24.
FormsAs you already saw in Chapter 12, HTML5 forms are in the process of being enhanced,but support across all browsers remains patchy. What you can safely use today has been
514 | Chapter 22: Introduction to HTML5

detailed in Chapter 12, and future editions of this book will include other aspects offorms as they become adopted across the board. In the meantime, you can keep up-to-date with the latest developments on HTML5 forms at http://tinyurl.com/h5forms.
Local StorageWith local storage, your ability to save data on a local device is substantially increasedfrom the meager space provided by cookies. This opens up the possibility of your usingweb apps to work on documents offline and then only syncing them with the web serverwhen an Internet connection is available. It also raises the prospect of storing smalldatabases locally for access with WebSQL, perhaps for keeping a copy of your musiccollection’s details, or all your personal statistics as part of a diet or weight loss plan, forexample. In Chapter 25, I show you how to make the most of this new facility in yourweb projects.
Web WorkersIt has been possible to run interrupt-driven applications in the background using Java‐Script for many years, but it is a clumsy and inefficient process. It makes much moresense to let the underlying browser technology run background tasks on your behalf,which it can do far more quickly than you can by continuously interrupting the browserto check how things are going.
Instead, with web workers you set everything up and pass your code to the web browser,which then runs it. When anything significant occurs, your code simply has to notifythe browser, which then reports back to your main code. In the meantime, your webpage can be doing nothing or a number of other tasks, and can forget about the back‐ground task until it makes itself known.
In Chapter 25, I demonstrate how you can use web workers to create a simple clock andto calculate prime numbers.
Web ApplicationsMore and more these days, web pages are beginning to resemble apps, and with HTML5they can become web apps very easily. All you have to do is tell the web browser aboutthe resources used in your application, and it will download them to where they can berun and accessed locally, offline, and without any Internet connection if necessary.
Chapter 25 shows how you can do this to turn the clock example in the web workerssection into a web app.
Local Storage | 515
MicrodataAlso in Chapter 25, I show how you can mark up your code with microdata to make ittotally understandable to any browser or other technology that needs to access it.Microdata is sure to become more and more important to search engine optimizationtoo, so it’s important that you begin to incorporate it or at least understand what infor‐mation it can provide about your websites.
SummaryAs you can see, there’s quite a lot to HTML5, and it’s all goodies that many people waiteda long time for—but they’re finally here. Starting with the canvas, the following fewchapters will explain these features to you in glorious detail, so you can be up andrunning with them, and enhancing your websites, in no time.
Questions1. What new HTML5 element enables drawing of graphics in web pages?2. What programming language is required to access many of the advanced HTML5
features?3. Which tags would you use to incorporate audio and video in a web page?4. What feature is new in HTML5 and offers greater capability than cookies?5. Which HTML5 technology supports running background JavaScript tasks?
See “Chapter 22 Answers” on page 655 in Appendix A for the answers to these questions.
516 | Chapter 22: Introduction to HTML5

CHAPTER 23
The HTML5 Canvas
Although the collective term given to the new web technologies is HTML5, they are notall simply HTML tags and properties. Such is the case with the canvas element. Yes, youcreate a canvas using the <canvas> tag, and maybe supply a width and height, and canmodify it a little with CSS, but to actually write to (or read from) a canvas, you must useJavaScript.
Thankfully, the JavaScript you need to learn is minimal and very easy to implement,plus I’ve already provided you with a set of three ready-made functions in Chapter 21(in the file OSC.js) that make accessing objects such as the canvas even more straight‐forward. So let’s dive right in and start using the new <canvas> tag.
Creating and Accessing a CanvasIn the previous chapter, I showed you how to draw a simple circle to display the Japaneseflag, as in Example 23-1. Let’s now look at what exactly is going on.
Example 23-1. Displaying the Japanese flag using a canvas<!DOCTYPE html><html> <head> <title>The HTML5 Canvas</title> <script src='OSC.js'></script> </head> <body> <canvas id='mycanvas' width='320' height='240'> This is a canvas element given the ID <i>mycanvas</i> This text is only visible in non-HTML5 browsers </canvas>
<script> canvas = O('mycanvas')
517

context = canvas.getContext('2d') context.fillStyle = 'red' S(canvas).border = '1px solid black'
context.beginPath() context.moveTo(160, 120) context.arc(160, 120, 70, 0, Math.PI * 2, false) context.closePath() context.fill() </script> </body></html>
First, the <!DOCTYPE html> declaration is issued to tell the browser that the documentwill use HTML5. After this, a title is displayed and the three functions in the OSC.js fileare loaded in.
In the body of the document, a canvas element is defined, given an ID of mycanvas, andgiven a width and height of 320 by 240 pixels.
This is followed by a section of JavaScript that styles and draws on the canvas. We beginby creating a canvas object by calling the O function on the canvas element. As you willrecall, this calls the document.getElementById function, and is therefore a much short‐er way of referencing the element.
This is all stuff you’ve seen before, but next comes something new:context = canvas.getContext('2d')
This command calls the getContext method of the new canvas object just created,requesting two-dimensional access to the canvas by passing the value '2d'.
As you might guess, there are plans for a three-dimensional contextavailable for the canvas (probably based on the OpenGL ES API),which will support the argument '3d'. But for now, if you want todisplay 3D on a canvas you’ll need to do the math yourself and “fake”it in 2D. Or you could investigate WebGL (which is based on Open‐GL ES). There’s no room to cover it here, but you can find a greattutorial at http://learningwebgl.com.
Armed with this context in the object context, we prime the subsequent drawing com‐mands by setting the fillStyle property of context to the value 'red':
context.fillStyle = 'red'
Then the S function is called to set the border property of the canvas to a 1-pixel, solidblack line to outline the flag image:
S(canvas).border = '1px solid black'
518 | Chapter 23: The HTML5 Canvas

With everything prepared, a path is opened on the context and the drawing position ismoved to the location 160,120:
context.beginPath()context.moveTo(160, 120)
After that, an arc is drawn centered on that coordinate, with a radius of 70 pixels, be‐ginning at an angle of 0 degrees (which is the righthand edge of the circle as you lookat it), and continuing all the way around the circle in radians as determined by a valueof 2 × π:
context.arc(160, 120, 70, 0, Math.PI * 2, false)
The final value of false indicates a clockwise direction for drawing the arc; a value oftrue would indicate that the drawing should occur in a counterclockwise direction.
Finally, we close and fill the path, using the preselected value in the fillStyle propertythat we set to 'red' a few lines earlier:
context.closePath()context.fill()
The result of loading this document into a web browser looks like Figure 22-1 in theprevious chapter.
The toDataURL FunctionWhen you have created an image in a canvas, you will sometimes want to make a copyof it, perhaps to repeat elsewhere on a web page, to save to local storage, or to uploadto a web server. This is particularly handy because users cannot use drag and drop tosave a canvas image.
To illustrate how you do this, for Example 23-2 I have added a few lines of code to theprevious example (highlighted in bold). These create a new <img> element with the ID'myimage', give it a solid black border, and then copy the canvas image into the <img>element (see Figure 23-1).
Example 23-2. Copying a canvas image<!DOCTYPE html><html> <head> <title>The HTML5 Canvas</title> <script src='OSC.js'></script> </head> <body> <canvas id='mycanvas' width='320' height='240'> This is a canvas element given the ID <i>mycanvas</i> This text is only visible in non-HTML5 browsers </canvas>
Creating and Accessing a Canvas | 519

<img id='myimage'>
<script> canvas = O('mycanvas') context = canvas.getContext('2d') context.fillStyle = 'red' S(canvas).border = '1px solid black'
context.beginPath() context.moveTo(160, 120) context.arc(160, 120, 70, 0, Math.PI * 2, false) context.closePath() context.fill()
S('myimage').border = '1px solid black' O('myimage').src = canvas.toDataURL() </script> </body></html>
Figure 23-1. The image on the right is copied from the lefthand canvas
If you try this code for yourself, you will notice that while you cannot drag and dropthe lefthand canvas image, you can do so with the righthand picture, which you couldalso save to local storage or upload to a web server using the right JavaScript (and PHPon the server end).
520 | Chapter 23: The HTML5 Canvas
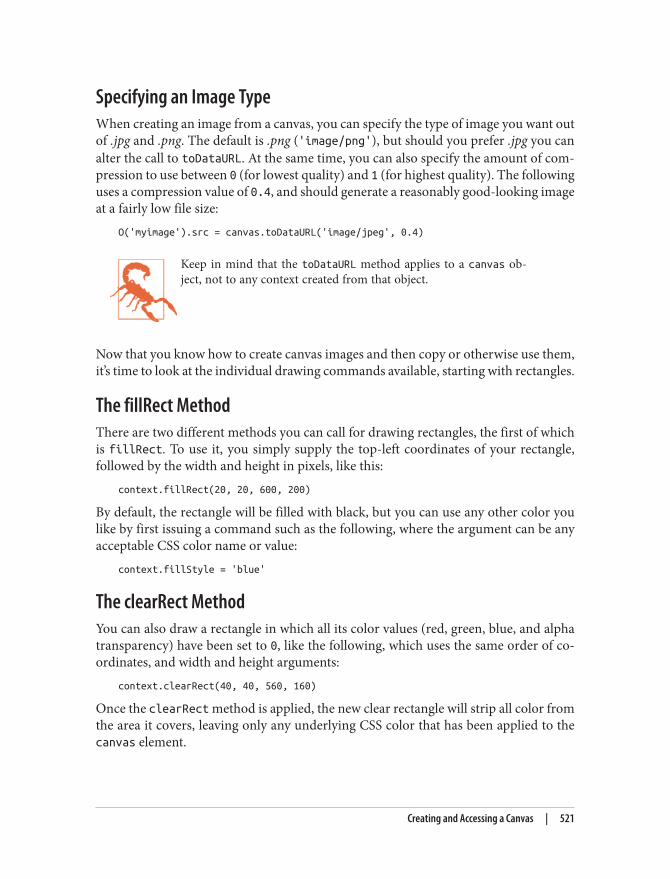
Specifying an Image TypeWhen creating an image from a canvas, you can specify the type of image you want outof .jpg and .png. The default is .png ('image/png'), but should you prefer .jpg you canalter the call to toDataURL. At the same time, you can also specify the amount of com‐pression to use between 0 (for lowest quality) and 1 (for highest quality). The followinguses a compression value of 0.4, and should generate a reasonably good-looking imageat a fairly low file size:
O('myimage').src = canvas.toDataURL('image/jpeg', 0.4)
Keep in mind that the toDataURL method applies to a canvas ob‐ject, not to any context created from that object.
Now that you know how to create canvas images and then copy or otherwise use them,it’s time to look at the individual drawing commands available, starting with rectangles.
The fillRect MethodThere are two different methods you can call for drawing rectangles, the first of whichis fillRect. To use it, you simply supply the top-left coordinates of your rectangle,followed by the width and height in pixels, like this:
context.fillRect(20, 20, 600, 200)
By default, the rectangle will be filled with black, but you can use any other color youlike by first issuing a command such as the following, where the argument can be anyacceptable CSS color name or value:
context.fillStyle = 'blue'
The clearRect MethodYou can also draw a rectangle in which all its color values (red, green, blue, and alphatransparency) have been set to 0, like the following, which uses the same order of co‐ordinates, and width and height arguments:
context.clearRect(40, 40, 560, 160)
Once the clearRect method is applied, the new clear rectangle will strip all color fromthe area it covers, leaving only any underlying CSS color that has been applied to thecanvas element.
Creating and Accessing a Canvas | 521

The strokeRect MethodWhen you want only an outlined rectangle, you can use a command such as the fol‐lowing, which will use the default of black or the currently selected stroke color:
context.strokeRect(60, 60, 520, 120)
To change the color used, you can first issue a command such as the following, supplyingany valid CSS color argument:
context.strokeStyle = 'green'
Combining These CommandsIn Example 23-3, the preceding rectangle-drawing commands have been combined todisplay the image shown in Figure 23-2.
Example 23-3. Drawing several rectangles<!DOCTYPE html><html> <head> <title>Drawing Rectangles</title> <script src='OSC.js'></script> </head> <body> <canvas id='mycanvas' width='640' height='240'></canvas>
<script> canvas = O('mycanvas') context = canvas.getContext('2d') S(canvas).background = 'lightblue' context.fillStyle = 'blue' context.strokeStyle = 'green'
context.fillRect( 20, 20, 600, 200) context.clearRect( 40, 40, 560, 160) context.strokeRect(60, 60, 520, 120) </script> </body></html>
Later in this chapter, you’ll see how you can further modify output by changing stroketypes and widths, but first let’s turn to modifying fills by applying gradients.
522 | Chapter 23: The HTML5 Canvas

Figure 23-2. Drawing concentric rectangles
The createLinearGradient MethodThere are a couple of different ways you can apply a gradient to a fill, but the simplestis with the createLinearGradient method. You specify start and end x and y coordi‐nates relative to the canvas (not the object being filled). This allows for greater subtlety.For example, you can specify that a gradient begin at the far left and end at the far rightof a canvas, but apply it only within the area defined in a fill command, as done inExample 23-4.
Example 23-4. Applying a gradient fillgradient = context.createLinearGradient(0, 80, 640,80)gradient.addColorStop(0, 'white')gradient.addColorStop(1, 'black')context.fillStyle = gradientcontext.fillRect(80, 80, 480,80)
For brevity and clarity in this and many of the following examples,only the salient lines of code are shown. The complete examples withthe surrounding HTML, setup, and other sections of code are avail‐able to freely download from the companion website.
In Example 23-4, we create a gradient fill object named gradient using the createLinearGradient method of the context object. The start position of 0,80 is halfway downthe lefthand canvas edge, while the end of 640,80 is halfway down the righthand edge.
Creating and Accessing a Canvas | 523

Then a couple of color stops are provided such that the very first color of the gradientis white, and the final color is black. The gradient will then transition smoothly betweenthese colors across the canvas from left to right.
With the gradient object now ready, it is applied to the fillStyle property of context, so that the final fillRect call can use it. In this call, the fill is applied only in acentral rectangular area of the canvas, so, although the gradient goes from the far leftto the far right of the canvas, the portion of it shown is only from 80 pixels in and downfrom the top-left corner, to a width of 480 and depth of 80 pixels. The result (whenadded to the previous example code) looks like Figure 23-3.
Figure 23-3. The central rectangle has a horizontal gradient fill
By specifying different start and end coordinates for a gradient, you can make it slantin any direction, as demonstrated with Example 23-5 and shown in Figure 23-4.
Example 23-5. A variety of gradients at different angles and colorsgradient = context.createLinearGradient(0, 0, 160, 0)gradient.addColorStop(0, 'white')gradient.addColorStop(1, 'black')context.fillStyle = gradientcontext.fillRect(20, 20, 135, 200)
gradient = context.createLinearGradient(0, 0, 0, 240)gradient.addColorStop(0, 'yellow')gradient.addColorStop(1, 'red')context.fillStyle = gradientcontext.fillRect(175, 20, 135, 200)
gradient = context.createLinearGradient(320, 0, 480, 240)gradient.addColorStop(0, 'green')
524 | Chapter 23: The HTML5 Canvas
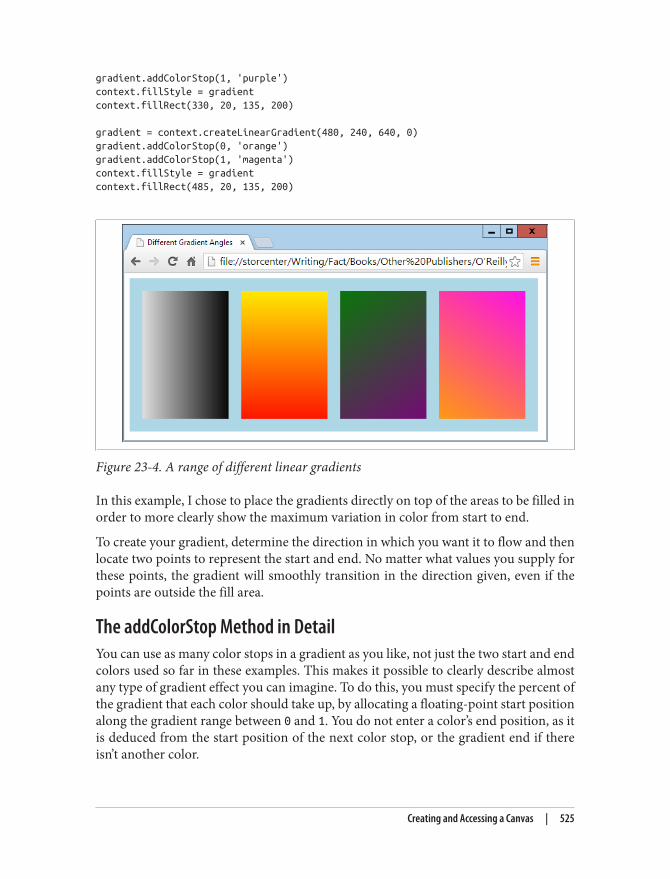
gradient.addColorStop(1, 'purple')context.fillStyle = gradientcontext.fillRect(330, 20, 135, 200)
gradient = context.createLinearGradient(480, 240, 640, 0)gradient.addColorStop(0, 'orange')gradient.addColorStop(1, 'magenta')context.fillStyle = gradientcontext.fillRect(485, 20, 135, 200)
Figure 23-4. A range of different linear gradients
In this example, I chose to place the gradients directly on top of the areas to be filled inorder to more clearly show the maximum variation in color from start to end.
To create your gradient, determine the direction in which you want it to flow and thenlocate two points to represent the start and end. No matter what values you supply forthese points, the gradient will smoothly transition in the direction given, even if thepoints are outside the fill area.
The addColorStop Method in DetailYou can use as many color stops in a gradient as you like, not just the two start and endcolors used so far in these examples. This makes it possible to clearly describe almostany type of gradient effect you can imagine. To do this, you must specify the percent ofthe gradient that each color should take up, by allocating a floating-point start positionalong the gradient range between 0 and 1. You do not enter a color’s end position, as itis deduced from the start position of the next color stop, or the gradient end if thereisn’t another color.
Creating and Accessing a Canvas | 525

In the preceding examples, only the two start and end values were chosen, but to createa rainbow effect you could set up your color stops as shown in Example 23-6 (anddisplayed in Figure 23-5).
Example 23-6. Adding multiple color stopsgradient.addColorStop(0.00, 'red')gradient.addColorStop(0.14, 'orange')gradient.addColorStop(0.28, 'yellow')gradient.addColorStop(0.42, 'green')gradient.addColorStop(0.56, 'blue')gradient.addColorStop(0.70, 'indigo')gradient.addColorStop(0.84, 'violet')
Figure 23-5. A rainbow effect with seven stop colors
In Example 23-6, all the colors are spaced roughly equidistantly (with each color given14% of the gradient, and the final one 16%), but you don’t have to stick to that; you cansquish several colors near each other, while spacing others out. It’s entirely up to you asto how many colors you use and where in the gradient they start and end.
The createRadialGradient MethodYou aren’t restricted to only linear gradients in HTML; you can create radial gradientson a canvas too. It’s a little more complex than with a linear gradient, but not muchmore so.
526 | Chapter 23: The HTML5 Canvas

What you need to do is pass the center location as a pair of x and y coordinates, alongwith a radius in pixels. These are used as the start of the gradient and outer circumfer‐ence, respectively. Then you also pass another set of coordinates and a radius to specifythe end of the gradient.
So, for example, to create a gradient that simply starts at the center of a circle and thenexpands out, you could issue a command such as the one in Example 23-7 (and displayedin Figure 23-6).
Example 23-7. Creating a radial gradientgradient = context.createRadialGradient (320, 120, 0, 320, 120, 320)
Figure 23-6. A centered radial gradient
Or you can be fancy and move the location of the start and end of a radial gradient, asin Example 23-8 (displayed in Figure 23-7), which starts centered on location 0,120 witha radius of 0 pixels, and ends centered at 480,120 with a radius of 480 pixels.
Example 23-8. Stretching a radial gradientgradient = context.createRadialGradient(0, 120, 0, 480, 120, 480)
By manipulating the figures supplied to this method, you can createa wide range of weird and wonderful effects—try it for yourself withthe supplied examples.
Creating and Accessing a Canvas | 527

Figure 23-7. A stretched radial gradient
Using Patterns for FillsIn a similar manner to gradient fills, you can also apply an image as a fill pattern. Thiscan be an image anywhere in the current document, or even one created from a canvasvia the toDataURL method (explained earlier in this chapter).
Example 23-9 loads a 100×100-pixel image (the yin-yang symbol) into the new imageobject image, and then the onload event of the object has a function attached to it thatcreates a repeating pattern for the fillStyle property of the context. This is then usedto fill a 600×200-pixel area within the canvas, as shown in Figure 23-8.
Example 23-9. Using an image for a pattern fillimage = new Image()image.src = 'image.png'
image.onload = function(){ pattern = context.createPattern(image, 'repeat') context.fillStyle = pattern context.fillRect(20, 20, 600, 200)}
528 | Chapter 23: The HTML5 Canvas

Figure 23-8. Tiling an image by using it as a pattern fill
We create the pattern using the createPattern method, which also supports nonrep‐eating patterns, or ones that just repeat in the x- or y-axes. We achieve this by passingone of the following values to it as the second argument after the image to use:repeat
Repeat the image both vertically and horizontally.
repeat-x
Repeat the image horizontally.
repeat-y
Repeat the image vertically.
no-repeat
Do not repeat the image.
The fill pattern is based on the entire canvas area, so where the fill command is set toapply only to a smaller area within the canvas, the images appear cut off at the top andleft.
If the onload event had not been used in this example and, instead,the code was simply executed as soon as encountered, the imagemight not have already loaded in time, and may not be displayed.Attaching to this event ensures that the image is available for use inthe canvas, because the event triggers only upon successful loadingof an image.
Creating and Accessing a Canvas | 529

Writing Text to the CanvasAs you would expect from a set of graphics features, writing to the canvas with text isfully supported with a variety of font, alignment, and fill methods. But why would youwant to write text to the canvas when there’s already such good support for web fontsin CSS these days?
Well, suppose you wish to display a graph or table with graphical elements. You’ll surelyalso want to label parts of it. What’s more, using the available commands you can pro‐duce much more than simply a colored font. So let’s start by assuming you’ve been taskedto create a header for a website on basket weaving, called WickerpediA (actually there’salready one of these, but let’s go ahead anyway).
To start with, you need to select a suitable font and size it appropriately, perhaps as inExample 23-10, in which a font style of bold, a size of 140 pixels, and a typeface of Timeshave been selected. Also, the textBaseline property has been set to top so that thestrokeText method can pass coordinates of 0,0 for the top-left origin of the text, placingit at the top left of the canvas. Figure 23-9 shows what this looks like.
Example 23-10. Writing text to the canvascontext.font = 'bold 140px Times'context.textBaseline = 'top'context.strokeText('WickerpediA', 0, 0)
Figure 23-9. The text has been written to the canvas
The strokeText MethodTo write text to the canvas, send the text string and a pair of coordinates to the strokeText method, like this:
context.strokeText('WickerpediA', 0, 0)
The x and y coordinates supplied will be used as a relative reference by the textBaseLine and textAlign properties.
530 | Chapter 23: The HTML5 Canvas

This method—using line drawing—is only one way of drawing text to the canvas. So,in addition to all the following properties that affect text, line drawing properties suchas lineWidth (detailed later in this chapter) will also affect how text displays.
The textBaseLine PropertyThe textBaseLine property can be given any of the following values:top
Aligns to the top of the text
middle
Aligns to the middle of the text
alphabetic
Aligns to the alphabetic baseline of the text
bottom
Aligns to the bottom of the font
The font PropertyThe font style can be any of bold, italic, or normal (the default), or a combination ofitalic bold, and the size values can be specified in em, ex, px, %, in, cm, mm, pt, or pcmeasures, just as with CSS. The font should be one available to the current browser,which generally means one of Helvetica, Impact, Courier, Times, or Arial, or you canchoose the default Serif or Sans-serif font of the user’s system. However, if you knowthat a particular font is available to the browser, you can use it.
If you want to use a font such as Times New Roman, which incorpo‐rates spaces in its name, you should change the relevant line tosomething like this, in which the outer quotes are different than theones surrounding the font name:
context.font = 'bold 140px "Times New Roman"'
The textAlign PropertyAs well as choosing how to align your text vertically, you can specify horizontal align‐ment by giving the textAlign property one of the following values:start
Aligns the text to the left if the document direction is left to right; otherwise, right.This is the default setting.
end
Aligns the text to the right if the document direction is left to right; otherwise, left.
Writing Text to the Canvas | 531

left
Aligns the text to the left.
right
Aligns the text to the right.
center
Centers the text.
You use the property like this:context.textAlign = 'center'
In the case of the current example, you need the text left-aligned so that it butts up neatlyto the edge of the canvas, so the textAlign property is not used, and therefore the defaultleft alignment occurs.
The fillText MethodYou can also choose to use a fill property to fill in canvas text, which can be any of asolid color, a linear or radial gradient, or a pattern fill. So let’s use a pattern fill for yourheading, based on the texture of a wicker basket, as in Example 23-11, the result of whichis shown in Figure 23-10.
Example 23-11. Filling in the text with a patternimage = new Image()image.src = 'wicker.jpg'
image.onload = function(){ pattern = context.createPattern(image, 'repeat') context.fillStyle = pattern context.fillText( 'WickerpediA', 0, 0) context.strokeText('WickerpediA', 0, 0)}
Figure 23-10. The text now has a pattern fill
532 | Chapter 23: The HTML5 Canvas

For good measure I also kept the strokeText call in this example to ensure a blackoutline to the text; without it, there wasn’t enough definition at the edges.
A wide variety of other fill types or patterns can also be used here, and the simplicity ofthe canvas makes it easy to experiment. What’s more: if you wish, once you have theheading just right, you can also choose to save a copy by issuing a call toDataURL, asdetailed earlier in the chapter. Then you can use the image as a logo for uploading toother sites, for example.
The measureText MethodWhen working with canvas text, you may sometimes need to know how much space itwill occupy so that you can best position it. You can achieve this with the measureText method, as follows (assuming all the various text properties have already beendefined at this point):
metrics = context.measureText('WickerpediA')width = metrics.width
Because the height of the text in pixels is equal to the font size in points when the fontis defined, the metrics object doesn’t provide a height metric.
Drawing LinesThe canvas provides a plethora of line drawing functions to cater to almost every need,including choices of lines, line caps and joins, and paths and curves of all types. But let’sstart with a property I touched on in the previous section on writing text to the canvas.
The lineWidth PropertyAll the canvas methods that draw using lines make use of lineWidth and a number ofother line properties. Using it is as simple as specifying a line width in pixels, like this,which sets the width to 3 pixels:
context.lineWidth = 3
The lineCap and lineJoin PropertiesWhen lines you draw come to an end and they are more than a pixel wide, you canchoose how this line cap (as it is called) should appear by using the lineCap property,which can have the values butt, round, or square. For example:
context.lineCap = 'round'
Also, when you are joining lines together that are wider than a single pixel, it is importantto specify exactly how they should meet. You achieve this with the lineJoin property,which can have values of round, bevel, or miter, like this:
Drawing Lines | 533

context.lineJoin = 'bevel'
Example 23-12 (shown here in full because it’s a little more complicated) applies all threevalues of each property used in combination, creating the informative result shown inFigure 23-11. The beginPath, closePath, moveTo, and lineTo methods used by thisexample are explained next.
Example 23-12. Displaying combinations of line caps and joins<!DOCTYPE html><html> <head> <title>Drawing Lines</title> <script src='OSC.js'></script> </head> <body> <canvas id='mycanvas' width='535' height='360'></canvas>
<script> canvas = O('mycanvas') context = canvas.getContext('2d') S(canvas).background = 'lightblue' context.fillStyle = 'red' context.font = 'bold 13pt Courier' context.strokeStyle = 'blue' context.textBaseline = 'top' context.textAlign = 'center' context.lineWidth = 20 caps = [' butt', ' round', 'square'] joins = [' round', ' bevel', ' miter']
for (j = 0 ; j < 3 ; ++j) { for (k = 0 ; k < 3 ; ++k) { context.lineCap = caps[j] context.lineJoin = joins[k]
context.fillText(' cap:' + caps[j], 88 + j * 180, 45 + k * 120) context.fillText('join:' + joins[k], 88 + j * 180, 65 + k * 120)
context.beginPath() context.moveTo( 20 + j * 180, 100 + k * 120) context.lineTo( 20 + j * 180, 20 + k * 120) context.lineTo(155 + j * 180, 20 + k * 120) context.lineTo(155 + j * 180, 100 + k * 120) context.stroke() context.closePath() } } </script>
534 | Chapter 23: The HTML5 Canvas

</body></html>
This code sets up a few properties and then nests a pair of loops: one for the line capsand one for the joins. Inside the central loop, the current values for the lineCap andlineJoin properties are first set, and then displayed in the canvas with the fillTextmethod.
Using these settings, the code then draws nine shapes with a 20-pixel-wide line, each ofwhich has a different combination of line cap and join settings, as shown in Figure 23-11.
Figure 23-11. All the combinations of line caps and joins
As you can see, butted line caps are short, square ones are longer, and the round onesare somewhere between the two. At the same time, rounded line joins are curved, bev‐eled ones are cut across the corner, and mitered ones have sharp corners. Line joins alsoapply to joins at angles other than 90 degrees.
The miterLimit PropertyIf you find that your mitered joins get cut off too short, you can extend them using themiterLimit property, like this:
context.miterLimit = 15
Drawing Lines | 535

The default value is 10, so you can reduce the miter limit too. If miterLimit is not setto a sufficiently large enough value for a miter, then sharply mitered joins will simplybevel instead. So, if you are having trouble with your pointed miters, simply increasethe value you supply for miterLimit until the miter displays.
Using PathsThe previous example made use of two methods to set up paths for the line drawingmethods to follow. The beginPath method sets the start of a path, and closePath setsthe end. Inside each path you can then use various methods for moving the location ofdrawing, and creating lines, curves, and other shapes. So let’s examine the relevant sec‐tion from Example 23-12, simplified to create just a single instance of the pattern:
context.beginPath()context.moveTo(20, 100)context.lineTo(20, 20)context.lineTo(155, 20)context.lineTo(155,100)context.stroke()context.closePath()
In this code snippet, a path is started in the first line, and then the drawing location ismoved to a position 20 pixels across and 100 down from the top-left corner of the canvas,using a call to the moveTo method.
This is followed by three calls to lineTo, which then draw three lines, first upward tothe location 20,20, then to the right to 155,20, and then down again to 155,100. Oncethis path has been set out, the stroke method is called to lay it down, and finally thepath is closed because it’s no longer needed.
It is essential to close paths as soon as you finish with them; other‐wise, you can get some very unexpected results when using multiplepaths.
The moveTo and LineTo MethodsThe moveTo and LineTo methods both take simple x and y coordinates as their argu‐ments, with the difference being that MoveTo picks up an imaginary pen from the currentlocation and then moves it to a new one, while LineTo draws a line from the currentlocation of the imaginary pen to the new one specified. Or, at least, a line will be drawnif the stroke method is called, but not otherwise. So let’s just say that LineTo creates apotential drawn line, but it could equally be part of the outline for a fill area, for example.
536 | Chapter 23: The HTML5 Canvas

The stroke MethodThe stroke method has the job of actually drawing all the lines created so far in a pathonto the canvas. If it is issued from inside an unclosed path, this has the effect of im‐mediately drawing everything up to the most recent imaginary pen location.
However, if you close a path and then issue a call to stroke, it has the effect of alsojoining a path from the current location back to the start location, which in this examplewould turn the shapes into rectangles (which we don’t want because we need to see theline caps as well as joins).
This joining effect on closing a path is required (as you will see a littlelater) so that paths are properly closed before any fill methods areused on them; otherwise, they might overflow the bounds of the path.
The rect MethodShould it have been necessary to create four-sided rectangles instead of the three-sidedshapes in the preceding example (and you didn’t wish to close the path yet), anotherlineTo call could have been issued to join everything up, like this (highlighted in bold):
context.beginPath()context.moveTo(20, 100)context.lineTo(20, 20)context.lineTo(155, 20)context.lineTo(155, 100)context.lineTo(20, 100)context.closePath()
But there’s a much simpler way to draw outlined rectangles, which is with the rectmethod, like this:
rect(20, 20, 155, 100)
In just a single call, this command takes two pairs of x and y coordinates and draws arectangle with its top-left corner at location 20,20, and bottom-right corner at 155,100.
Filling AreasUsing paths, you can create complicated areas that can also be filled in with solid, gra‐dient, or pattern fills. In Example 23-13, some basic trigonometry is used to create acomplex star pattern. I won’t detail how the math works because that’s not important tothe example (although if you want to play with the code, try changing the values assignedto points, and the scale1 and scale2 variables, for different effects).
Filling Areas | 537

All you really need to look at, however, are the lines highlighted in bold, in which a pathis started, a pair of lineTo calls defines the shape, the path is closed, and then the strokeand fill methods are used to draw the shape outline in orange and fill it in with yellow(as shown in Figure 23-12).
Example 23-13. Filling in a complex path<!DOCTYPE html><html> <head> <title>Drawing Lines</title> <script src='OSC.js'></script> </head> <body> <canvas id='mycanvas' width='320' height='320'></canvas>
<script> canvas = O('mycanvas') context = canvas.getContext('2d') S(canvas).background = 'lightblue' context.strokeStyle = 'orange' context.fillStyle = 'yellow'
orig = 160 points = 21 dist = Math.PI / points * 2 scale1 = 150 scale2 = 80
context.beginPath()
for (j = 0 ; j < points ; ++j) { x = Math.sin(j * dist) y = Math.cos(j * dist) context.lineTo(orig + x * scale1, orig + y * scale1) context.lineTo(orig + x * scale2, orig + y * scale2) }
context.closePath() context.stroke() context.fill() </script> </body></html>
538 | Chapter 23: The HTML5 Canvas

Figure 23-12. Drawing and filling in a complex path
With paths it’s possible to create as complex an object as you like,either using formulae or loops (as in this example), or simply with along string of moveTo and/or LineTo or other calls.
The clip MethodSometimes when you are building a path, you may want to ignore sections of the canvas(perhaps if you are drawing partly “behind” another object, and wish only the visiblepart to display. You can achieve this using the clip method, which creates a boundaryoutside of which stroke, fill, or other methods will not have any effect.
To illustrate this, Example 23-14 creates an effect similar to window blinds by movingthe imaginary pen pointer to the lefthand edge, then drawing a lineTo over to therighthand edge, another down by 30 pixels, and then another back to the lefthand edge,and so on. This creates a sort of snaking pattern in which a series of 30-pixel-deep,horizontal bars are drawn on the canvas, as shown in Figure 23-13.
The clip Method | 539

Example 23-14. Creating a clip areacontext.beginPath()
for (j = 0 ; j < 10 ; ++j){ context.moveTo(20, j * 48) context.lineTo(620, j * 48) context.lineTo(620, j * 48 + 30) context.lineTo(20, j * 48 + 30)}
context.stroke()context.closePath()
Figure 23-13. A path of horizontal bars
To turn this example into a clipped area of the canvas, you simply need to replace thecall to stroke (highlighted in bold in the example) with one to clip, like this:
context.clip()
540 | Chapter 23: The HTML5 Canvas

Now the outline of the bars won’t be seen, but the clipping area will be in place. Toillustrate this, Example 23-15 makes this method substitution and then adds to theprevious example by drawing a simple picture on the canvas, of green grass below a bluesky containing a shining sun (modified from Example 23-12), with the changes high‐lighted in bold, and as shown in Figure 23-14.
Example 23-15. Drawing within the clipped area’s boundscontext.fillStyle = 'white'context.strokeRect(20, 20, 600, 440) // Black bordercontext.fillRect( 20, 20, 600, 440) // White background
context.beginPath()
for (j = 0 ; j < 10 ; ++j){ context.moveTo(20, j * 48) context.lineTo(620, j * 48) context.lineTo(620, j * 48 + 30) context.lineTo(20, j * 48 + 30)}
context.clip()context.closePath()
context.fillStyle = 'blue' // Blue skycontext.fillRect(20, 20, 600, 320)context.fillStyle = 'green' // Green grasscontext.fillRect(20, 320, 600, 140)context.strokeStyle = 'orange'context.fillStyle = 'yellow'
orig = 170points = 21dist = Math.PI / points * 2scale1 = 130scale2 = 80
context.beginPath()
for (j = 0 ; j < points ; ++j){ x = Math.sin(j * dist) y = Math.cos(j * dist) context.lineTo(orig + x * scale1, orig + y * scale1) context.lineTo(orig + x * scale2, orig + y * scale2)}
context.closePath()context.stroke() // Sun outlinecontext.fill() // Sun fill
The clip Method | 541
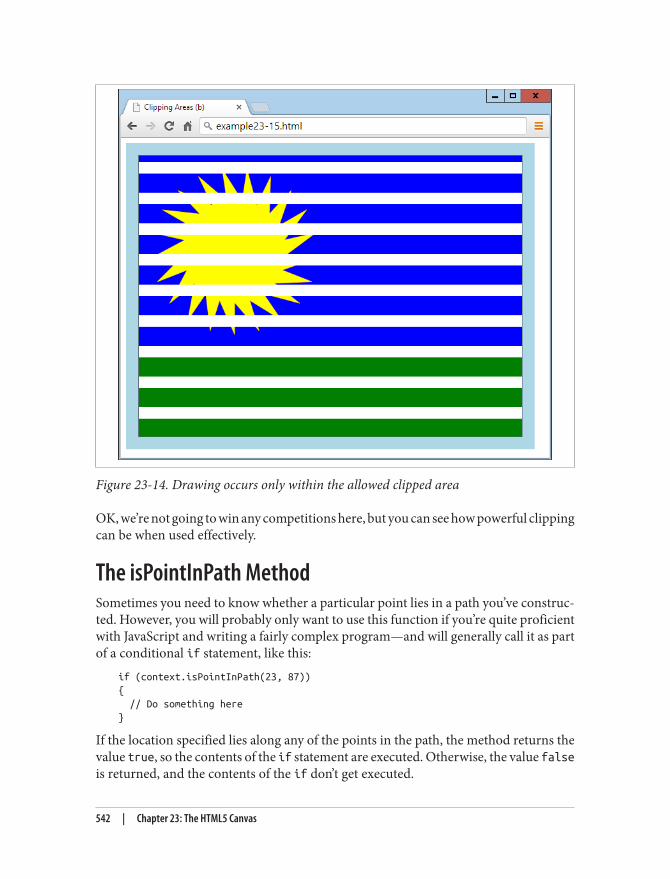
Figure 23-14. Drawing occurs only within the allowed clipped area
OK, we’re not going to win any competitions here, but you can see how powerful clippingcan be when used effectively.
The isPointInPath MethodSometimes you need to know whether a particular point lies in a path you’ve construc‐ted. However, you will probably only want to use this function if you’re quite proficientwith JavaScript and writing a fairly complex program—and will generally call it as partof a conditional if statement, like this:
if (context.isPointInPath(23, 87)){ // Do something here}
If the location specified lies along any of the points in the path, the method returns thevalue true, so the contents of the if statement are executed. Otherwise, the value falseis returned, and the contents of the if don’t get executed.
542 | Chapter 23: The HTML5 Canvas

A perfect use for the isPointInPath method is for creating gamesusing the canvas in which you wish to check for a missile hitting atarget, a ball hitting a wall or bat, or similar boundary conditions.
Working with CurvesIn addition to straight paths, you can create an almost infinite variety of curved paths,with a selection of different methods, ranging from simple arcs and circles to complexquadratic and Bézier curves.
Actually, you don’t need to use paths to create many lines, rectangles, and curves, becauseyou can draw them directly by simply calling their methods. But using paths gives youmore precise control, so I tend to almost always draw on the canvas within definedpaths, as with the following examples.
The arc MethodThe arc method requires you to pass it the x and y location of the center of the arc, andthe radius in pixels. As well as these values, you need to pass a pair of radian offsets andan optional direction, like this:
context.arc(55, 85, 45, 0, Math.PI / 2, false)
Because the default direction is clockwise (a value of false), this can be omitted, orchanged to true to draw the arc in a counterclockwise direction.
Example 23-16 creates three sets of four arcs, the first two of which draw in a clockwisedirection, and the third of which draws counterclockwise. Additionally, the first set offour arcs has its paths closed before the stroke method is called, so the start and endpoints are joined up, whereas the other two sets of arcs are drawn before the path isclosed, so they are not joined up.
Example 23-16. Drawing a variety of arcscontext.strokeStyle = 'blue'arcs =[ Math.PI, Math.PI * 2, Math.PI / 2, Math.PI / 180 * 59]
for (j = 0 ; j < 4 ; ++j){ context.beginPath() context.arc(80 + j * 160, 80, 70, 0, arcs[j])
Working with Curves | 543

context.closePath() context.stroke()}
context.strokeStyle = 'red'
for (j = 0 ; j < 4 ; ++j){ context.beginPath() context.arc(80 + j * 160, 240, 70, 0, arcs[j]) context.stroke() context.closePath()}
context.strokeStyle = 'green'
for (j = 0 ; j < 4 ; ++j){ context.beginPath() context.arc(80 + j * 160, 400, 70, 0, arcs[j], true) context.stroke() context.closePath()}
To create shorter code, I drew all the arcs using loops, so that the length of each arc isstored in the array arcs. These values are in radians, and because a radian is equivalentto 180 ÷ π (π being the ratio of a circle’s circumference to its diameter, or approximately3.1415927), they evaluate as follows:Math.PI
Equivalent to 180 degrees
Math.PI * 2
Equivalent to 360 degrees
Math.PI / 2
Equivalent to 90 degrees
Math.PI / 180 * 59
Equivalent to 59 degrees
Figure 23-15 shows the three rows of arcs and illustrates both the use of the directionargument true in the final set, and the importance of carefully choosing where you closepaths depending on whether you want to draw a line connecting the start and end points.
544 | Chapter 23: The HTML5 Canvas

Figure 23-15. A variety of arc types
If you prefer to work with degrees instead of radians, you could cre‐ate a new Math library function, like this:
Math.degreesToRadians = function(degrees){ return degrees * Math.PI / 180}
And then replace the array-creating code, starting at the second lineof Example 23-16, with the following:
arcs =[ Math.degreesToRadians(180), Math.degreesToRadians(360), Math.degreesToRadians(90), Math.degreesToRadians(59)]
Working with Curves | 545

The arcTo MethodRather than creating a whole arc at once, you can choose to arc from the current locationin the path to another one, like the following call to arcTo (which simply requires twopairs of x and y coordinates and a radius):
context.arcTo(100, 100, 200, 200, 100)
The locations you pass to the method represent the points where imaginary tangentlines touch the circumference of the arc at its start and end points.
To illustrate how this works, Example 23-17 draws eight different arcs with radii from0 up to 280 pixels. Each time around the loop, a new path is created with a start pointat location 20,20. Then an arc is drawn using imaginary tangent lines from that locationto position 240,20, and from there to location 460,20. In this instance, it defines a pairof tangents at 90 degrees to each other, in a V shape.
Example 23-17. Drawing eight arcs of different radiifor (j = 0 ; j <= 280 ; j += 40){ context.beginPath() context.moveTo(20, 20) context.arcTo(240, 240, 460, 20, j) context.lineTo(460, 20) context.stroke() context.closePath()}
The arcTo method draws only up to the point at which the arc touches the secondimaginary tangent. So, after each call to arcTo, the lineTo method creates the remainderof the line from wherever arcTo left off to location 460,20. Then the result is drawn tothe canvas with a call to stroke, and the path is closed.
As you can see in Figure 23-16, when arcTo is called with a radius value of 0 it createsa sharp join. In this case, it’s a right angle (but if the two imaginary tangents are at otherangles to each other, then the join will be at that angle). Then, as the radius increases insize, you can see the arcs getting larger and larger.
Essentially, what you can best use arcTo for is to curve from one section of drawing toanother, following an arc based on the previous and subsequent positions, as if theywere tangential to the arc to be created. If this sounds complicated, don’t worry: you’llsoon get the hang of it and find it’s actually a handy and logical way to draw arcs.
546 | Chapter 23: The HTML5 Canvas

Figure 23-16. Drawing arcs of different radii
The quadraticCurveTo MethodUseful as arcs are, they are only one type of curve and can be limiting for more complexdesigns. But have no fear: there are still more ways to draw curves—for example, byusing the quadraticCurveTo method. With this method, you can place an imaginaryattractor near (or far from) a curve to pull it in that direction, in a similar way to thepath of an object in space being pulled by the gravity of the planets and stars it passes.Unlike with gravity, though, the farther away the attractor is, the more it pulls!
In Example 23-18, there are six calls to this method, creating the path for a fluffy cloud,which is then filled in white. Figure 23-17 illustrates how the angles of the dashed lineoutside the cloud represent the attractor points applied to each curve.
Example 23-18. Drawing a cloud with quadratic curvescontext.beginPath()context.moveTo(180, 60)context.quadraticCurveTo(240, 0, 300, 60)context.quadraticCurveTo(460, 30, 420, 100)context.quadraticCurveTo(480, 210, 340, 170)context.quadraticCurveTo(240, 240, 200, 170)context.quadraticCurveTo(100, 200, 140, 130)context.quadraticCurveTo( 40, 40, 180, 60)context.fillStyle = 'white'context.fill()context.closePath()
Working with Curves | 547

Figure 23-17. Drawing with quadratic curves
Incidentally, to achieve the dotted line around the cloud in this im‐age I used the stroke method in conjunction with the setLineDashmethod, which takes a list representing the dash and space lengths.In this instance, I used setLineDash([2, 3]), but you can create dashlines as complicated as you like, such as setLineDash([1, 2, 1, 3,5, 1, 2, 4]). However, I haven’t documented this feature becauseit’s been implemented only in IE, Opera, and Chrome so far. Fingerscrossed that it’ll be added to the other browsers soon, though, as itwill be a great enhancement for creating contours and boundaries formapping purposes, for example.
The bezierCurveTo MethodIf you still don’t find quadratic curves flexible enough for your needs, how about havingaccess to two attractors for each curve? Using this method, you can do just that, as inExample 23-19, where a curve is created between location 24,20 and 240,220, but withinvisible attractors off the canvas (in this case) at locations 720,480 and −240,−240.Figure 23-18 shows how this curve gets warped.
Example 23-19. Creating a Bézier curve with two attractorscontext.beginPath()context.moveTo(240, 20)context.bezierCurveTo(720, 480, −240, −240, 240, 220)context.stroke()context.closePath()
548 | Chapter 23: The HTML5 Canvas

Figure 23-18. A Bézier curve with two attractors
Attractors do not need to be at opposite sides of a canvas, because you can place themanywhere, and when they are near each other, they will exert a combined pull (ratherthan opposing pulls, as in the preceding example). Using these various types of curvemethods, it’s possible for you to draw every type of curve you could ever need.
Manipulating ImagesNot only can you draw and write on the canvas with graphical methods, you can alsoplace images on or extract them from a canvas. And you’re not limited to simple copyand paste commands, because you can stretch and distort images when reading orwriting them, and also have full control over compositing and shadow effects.
The drawImage MethodUsing the drawImage method, you can take an image object that was loaded from awebsite, uploaded to a server, or even extracted from a canvas, and draw it onto a canvas.The method supports a wide variety of arguments, many of which are optional, but atits simplest you call drawImage as follows, in which just the image and a pair of x and ycoordinates are passed:
context.drawImage(myimage, 20, 20)
This command draws the image contained in the myimage object onto the canvas withthe context of context, with its top-left corner at location 20,20.
Manipulating Images | 549

To ensure that an image has been loaded before you use it, bestpractice is to enclose your image-handling code within a functionthat is triggered only upon image load, like this:
myimage = new Image()myimage.src = 'image.gif'
myimage.onload = function(){ context.drawImage(myimage, 20, 20)}
Resizing an ImageIf you need to resize an image when it is placed on the canvas, you add a second pair ofarguments to the call representing the width and height you require, like this (high‐lighted in bold):
context.drawImage(myimage, 140, 20, 220, 220)context.drawImage(myimage, 380, 20, 80, 220)
Here the image is placed at two locations: the first is at 140,20, where the image isenlarged (from a 100-pixel square to a 220-pixel square), while the second goes to lo‐cation 380,20 with the image being squashed horizontally and expanded vertically, to awidth and height of 80×220 pixels.
Selecting an Image AreaYou’re not stuck having to use an entire image; it’s also possible to choose an area withinan image when using drawImage. This can be handy, for example, if you wish to placeall the graphical images you intend to use in a single image file, and then just grab thesections of the image that you need. This is a trick developers often use to speed up pageloading and decrease server hits.
It’s a little trickier to do this, though, because rather than add more arguments at theend of the list for this method, when extracting a portion of an image you must placethose arguments first.
So, for example, to place an image at location 20,140, you might issue this command:context.drawImage(myimage, 20, 140)
And to give it a width and height of 100×100 pixels, you would modify the call like this(highlighted in bold):
context.drawImage(myimage, 20, 140, 100, 100)
But, for example, to grab (or crop) just a 40×40-pixel subsection with its top-left cornerat location 30,30 of the image, you would call the method like this (with the new argu‐ments in bold):
550 | Chapter 23: The HTML5 Canvas

context.drawImage(myimage, 30, 30, 40, 40, 20, 140)
And to resize the grabbed portion to 100 pixels square, you would use the following:context.drawImage(myimage, 30, 30, 40, 40, 20, 140, 100, 100)
I find this very confusing and cannot think of a logical reason forwhy this method works this way. But, because it does, I’m afraidthere’s nothing you can do other than force yourself to rememberwhich arguments go where under which conditions.
Example 23-20 uses a variety of calls to the drawImage method to obtain the result shownin Figure 23-19. To make things clearer, I have spaced out the arguments so that valuesin each column provide the same information.
Example 23-20. Various ways of drawing an image on the canvasmyimage = new Image()myimage.src = 'image.png'
myimage.onload = function(){ context.drawImage(myimage, 20, 20 ) context.drawImage(myimage, 140, 20, 220, 220) context.drawImage(myimage, 380, 20, 80, 220) context.drawImage(myimage, 30, 30, 40, 40, 20, 140, 100, 100)}
Figure 23-19. Drawing images to a canvas with resizing and cropping
Manipulating Images | 551

Copying from a CanvasYou can also use a canvas as a source image for drawing to the same (or another) canvas.Just supply the canvas object name in place of an image object, and use all the remainingarguments in the same way as you would with an image.
At this point, I would have loved to show you how to use a <video>element (explained in the following chapter) as an image source fordrawing on the canvas. But sadly, Internet Explorer doesn’t yet sup‐port this functionality, so it’s still too early to recommend the excit‐ing features you can create this way—such as live video manipula‐tion, colorization, embossing, and much more. However, if you’recurious, you can learn more about how you can combine video withthe canvas at http://html5doctor.com/video-canvas-magic.
Adding ShadowsWhen you draw an image (or image section) or, indeed, anything else on the canvas,you can also specify a shadow that should be placed under it by setting one or more ofthe following properties:shadowOffsetX
The horizontal offset, in pixels, by which the shadow should be shifted to the right(or to the left if the value is negative).
shadowOffsetY
The vertical offset, in pixels, by which the shadow should be shifted down (or up ifthe value is negative).
shadowBlur
The number of pixels over which to blur the shadow’s outline.
shadowColor
The base color to use for the shadow. If a blur is in use, this color will blend withthe background in the blurred area.
These properties can apply to text and lines as well as solid images, as inExample 23-21, in which some text, an image, and an object created using a path allhave shadows added to them. In Figure 23-20, you can see the shadows intelligentlyflow around the visible portions of images, not just their rectangular boundaries.
552 | Chapter 23: The HTML5 Canvas

Example 23-21. Applying shadows when drawing on the canvasmyimage = new Image()myimage.src = 'apple.png'
orig = 95points = 21dist = Math.PI / points * 2scale1 = 75scale2 = 50
myimage.onload = function(){ context.beginPath()
for (j = 0 ; j < points ; ++j) { x = Math.sin(j * dist) y = Math.cos(j * dist) context.lineTo(orig + x * scale1, orig + y * scale1) context.lineTo(orig + x * scale2, orig + y * scale2) }
context.closePath()
context.shadowOffsetX = 5 context.shadowOffsetY = 5 context.shadowBlur = 6 context.shadowColor = '#444' context.fillStyle = 'red' context.stroke() context.fill()
context.shadowOffsetX = 2 context.shadowOffsetY = 2 context.shadowBlur = 3 context.shadowColor = 'yellow' context.font = 'bold 36pt Times' context.textBaseline = 'top' context.fillStyle = 'green' context.fillText('Sale now on!', 200, 5)
context.shadowOffsetX = 3 context.shadowOffsetY = 3 context.shadowBlur = 5 context.shadowColor = 'black' context.drawImage(myimage, 245, 45)}
Manipulating Images | 553

Figure 23-20. Shadows under different types of drawing objects
Editing at the Pixel LevelNot only does the HTML5 canvas provide you with a powerful range of drawing meth‐ods, it also lets you get your hands dirty and work under the hood directly at the pixellevel with a trio of powerful methods.
The getImageData MethodWith the getImageData method, you can grab a portion (or all) of a canvas so that youcan alter the retrieved data in any way you like, and then save it back or elsewhere inthe canvas (or to another canvas).
To illustrate how this works, Example 23-22 first loads in a ready-made image and drawsit onto a canvas. Then the canvas data is read back into an object called idata, whereall the colors are averaged together to change each pixel to greyscale, and then tweakeda little to shift each color toward sepia, as shown in Figure 23-21.
Example 23-22. Manipulating image datamyimage = new Image()myimage.src = 'photo.jpg'
myimage.onload = function(){ context.drawImage(myimage, 0, 0) idata = context.getImageData(0, 0, myimage.width, myimage.height)
for (y = 0 ; y < myimage.height ; ++y) { pos = y * myimage.width * 4
for (x = 0 ; x < myimage.width ; ++x)
554 | Chapter 23: The HTML5 Canvas

{ average = ( idata.data[pos] + idata.data[pos + 1] + idata.data[pos + 2] ) / 3
idata.data[pos] = average + 50 idata.data[pos + 1] = average idata.data[pos + 2] = average - 50 pos += 4; } } context.putImageData(idata, 320, 0)}
Figure 23-21. Converting an image to sepia
The data ArrayThis image manipulation works thanks to the data array, which is a property of theidata object returned by the call to getImageData. This method returns an array con‐taining all the picture pixel data in its component parts of red, green, blue, and alphatransparency. Therefore, four items of data are used to store each colored pixel.
All the data is stored sequentially in the data array, such that the value for red is followedby that for blue, then green, and then alpha; then, the next item in the array is the redvalue for the following pixel, and so on, like the following (for the pixel at location 0,0):
idata.data[0] // Red levelidata.data[1] // Green levelidata.data[2] // Blue levelidata.data[3] // Alpha level
Editing at the Pixel Level | 555

Location 1,0 then follows, like this:idata.data[4] // Red levelidata.data[5] // Green levelidata.data[6] // Blue levelidata.data[7] // Alpha level
In this image, everything continues in the same fashion until the rightmost pixel of theimage in row 0 (which is the 320th pixel, at location 319,0) is reached. At that point, thevalue 319 is multiplied by 4 (the number of items of data in each pixel) to arrive at thefollowing array elements, which contain this pixel’s data:
idata.data[1276] // Red levelidata.data[1277] // Green levelidata.data[1278] // Blue levelidata.data[1279] // Alpha level
Then the data pointer moves all the way back to the first column of the image, but thistime of row 1, at location 0,1 which (because each row in this image is 320 pixels wide),is at an offset of (0 × 4) + (1 × 320 × 4), or 1,280:
idata.data[1280] // Red levelidata.data[1281] // Green levelidata.data[1282] // Blue levelidata.data[1283] // Alpha level
So, if the image data is stored in idata, the image width in w, and the pixel location toaccess in x and y, the key formulae to use when directly accessing image data is:
red = idata.data[x * 4 + y * w * 4 ]green = idata.data[x * 4 + y * w * 4 + 1]blue = idata.data[x * 4 + y * w * 4 + 2]alpha = idata.data[x * 4 + y * w * 4 + 3]
Using this knowledge, we create the sepia effect in Figure 32-12 by taking just the red,blue, and green components of each pixel and averaging them, like this (where pos is avariable pointer to the location in the array of the current pixel):
average =( idata.data[pos] + idata.data[pos + 1] + idata.data[pos + 2]) / 3
With average now containing the average color value (which we attain by adding allthe pixel values and dividing by three), this value is written back to all colors of the pixel,but with the red boosted by a value of 50, and the blue reduced by the same amount:
idata.data[pos] = average + 50idata.data[pos + 1] = averageidata.data[pos + 2] = average - 50
556 | Chapter 23: The HTML5 Canvas

The result is to increase the red and reduce the blue level of each pixel (of what wouldotherwise now become a monochrome image, if only the average value were writtenback to these colors), giving it a sepia cast.
If you’d like to perform more advanced image manipulations, youmay wish to refer to the following (third-party) web pages, whichcover using convolution on an HTML5 canvas in detail:
• http://tinyurl.com/convolut1• http://tinyurl.com/convolut2
The putImageData MethodWhen you’ve modified the image data array to your requirements, all you need to doto write it to the canvas is call the putImageData method, passing it the idata objectand the coordinates of the top-left corner at which it should appear—as in the previousexample, and as follows, which (in this case) places the modified copy of the image tothe right of the original:
context.putImageData(idata, 320, 0)
If you wish to modify only part of a canvas, you don’t have to grabthe entire canvas; just fetch a section containing the area in which youare interested. And neither do you have to write back image data tothe location from where you got it; image data can be written to anypart of a canvas.
The createImageData MethodYou don’t have to create an object directly from a canvas; you can also create a new onewith blank data by calling the createImageData method. The following example createsan object with a width of 320 and height of 240 pixels:
idata = createImageData(320, 240)
Alternatively, you can create a new object from an existing object, like this:newimagedataobject = createImageData(imagedata)
It’s then up to you what you do with these objects to add pixel data to them or otherwisemodify them, how you paste them onto the canvas or create other objects from them,and so on.
Editing at the Pixel Level | 557

Advanced Graphical EffectsAmong the more advanced features available on the HTML5 canvas are the ability toassign various compositing and transparency effects, as well as to apply powerful trans‐formations such as scaling, stretching, and rotating.
The globalCompositeOperation PropertyThere are 12 different methods available to fine-tune the way you place an object on thecanvas, taking into account existing and future objects. These are called compositingoptions, and they are applied like this:
context.globalCompositeOperationProperty = 'source-over'
The compositing types are as follows:source-over
The default. The source image is copied over the destination image.
source-in
Only parts of the source image that will appear within the destination are shown,and the destination image is removed. Any alpha transparency in the source imagecauses the destination under it to be removed.
source-out
Only parts of the source image that do not appear within the destination are shown,and the destination image is removed. Any alpha transparency in the source imagecauses the destination under it to be removed.
source-atop
The source image is displayed where it overlays the destination. The destinationimage is displayed where the destination image is opaque and the source image istransparent. Other regions are transparent.
destination-over
The source image is drawn under the destination image.
destination-in
The destination image displays where the source and destination image overlap,but not in any areas of source image transparency. The source image does notdisplay.
destination-out
Only those parts of the destination outside of the source image’s nontransparentsections are shown. The source image does not display.
558 | Chapter 23: The HTML5 Canvas

destination-atop
The source image displays where the destination is not displayed. Where the des‐tination and source overlap, the destination image is displayed. Any transparencyin the source image prevents that area of the destination image being shown.
lighter
The sum of the source and destination is applied such that where they do not over‐lap, they display as normal; where they do overlap, the sum of both images is shown,but lightened.
darker
The sum of the source and destination is applied such that where they do not over‐lap, they display as normal; where they do overlap, the sum of both images is shown,but darkened.
copy
The source image is copied over the destination. Any transparent area of the sourcecauses any destination that it overlaps to not display.
xor
Where the source and destination images do not overlap, they display as normal.Where they do overlap, their color values are exclusive-ored.
Example 23-23 illustrates the effect of all of these compositing types by creating 12different canvases, each with two objects (a filled circle and the yin-yang image) offsetfrom each other but overlapping.
Example 23-23. Using all 12 types of compositing effectsimage = new Image()image.src = 'image.png'
image.onload = function(){ types = [ 'source-over', 'source-in', 'source-out', 'source-atop', 'destination-over', 'destination-in', 'destination-out', 'destination-atop', 'lighter', 'darker', 'copy', 'xor' ]
for (j = 0 ; j < 12 ; ++j) { canvas = O('c' + (j + 1)) context = canvas.getContext('2d') S(canvas).background = 'lightblue' context.fillStyle = 'red'
context.arc(50, 50, 50, 0, Math.PI * 2, false)
Advanced Graphical Effects | 559

context.fill() context.globalCompositeOperation = types[j] context.drawImage(image, 20, 20, 100, 100) }}
As with some others in this chapter, this example (downloadable fromthe companion website) includes some HTML and/or CSS to en‐hance the display, which isn’t shown here because it’s not essential tothe program’s operation.
This program uses a for loop to iterate through each compositing type, as stored in thearray types. Each time around the loop, a new context is created on the next of the 12canvas elements already created in some earlier HTML (not shown), with the IDs of c1through c12.
In each canvas a 100-pixel-diameter red circle is first placed at the top left, and then thecompositing type is selected and the yin-yang image is placed over the circle but offsetto the right and down by 20 pixels. Figure 23-22 shows the results of each compositingtype in action. As you can see, it’s possible to achieve a very wide variety of effects.
Figure 23-22. The 12 compositing effects in action
560 | Chapter 23: The HTML5 Canvas

The globalAlpha PropertyWhen drawing on the canvas, you can specify the amount of transparency to apply usingthe globalAlpha property, which supports values from 0 (fully transparent) to 1 (fullyopaque). The following command sets the alpha to a value of 0.9, such that future drawoperations will be 90% opaque (or 10% transparent):
context.globalAlpha = 0.9
This property can be used with all other properties, including the compositing options.
TransformationsThe canvas supports four functions for applying transformations to elements whendrawing them to the HTML5 canvas: scale, rotate, translate, and transform. Theycan be used alone, or together to produce even more interesting effects.
The scale MethodYou can scale future drawing operations by first calling the scale method, supplyinghorizontal and vertical scaling factors, which can be negative, zero, or positive values.
In Example 23-24, the yin-yang image is drawn to the canvas at its original size of100×100 pixels. Then scaling of 3 times horizontally and 2 times vertically is applied,and the drawImage function is called again to place the stretched image next to theoriginal. Finally, scaling is reapplied with values of 0.33 and 0.5 to restore everythingback to normal, and the image is once more drawn, this time below the original.Figure 23-23 shows the result.
Example 23-24. Scaling up and down in sizecontext.drawImage(myimage, 0, 0)context.scale(3, 2)context.drawImage(myimage, 40, 0)context.scale(.33, .5)context.drawImage(myimage, 0, 100)
If you look carefully, you may notice that the copy image under the original is a littlebit fuzzy due to the scaling up and then down.
If you use negative values for one or more scaling parameters, youcan reverse an element in either the horizontal or vertical direction(or both), at the same time as (or instead of) scaling. For example, thefollowing flips the context to create a mirror image:
context.scale(-1, 1)
Transformations | 561

Figure 23-23. Scaling an image up and then down again
The save and restore MethodsIf you need to use several scaling operations on different drawing elements, not onlycan you introduce fuzziness into the results, but it can be very time-consuming to cal‐culate that a three times upward scaling requires a 0.33 value to scale back down again(and a two times upscale requires a value of 0.5 to reverse).
For this reason, you can call save to save the current context before issuing a scale call,and later return scaling back to normal by issuing a restore call. Check out the fol‐lowing, which can replace the code in Example 23-24:
context.drawImage(myimage, 0, 0)context.save()context.scale(3, 2)context.drawImage(myimage, 40, 0)context.restore()context.drawImage(myimage, 0, 100)
The save and restore methods are very powerful because they don’t just apply to imagescaling. In fact, they apply across all the following properties, and can therefore be usedat any time to save the current properties, and then restore them later: fillStyle, font,globalAlpha, globalCompositeOperation, lineCap, lineJoin, lineWidth, miterLimit, shadowBlur, shadowColor, shadowOffsetX, shadowOffsetY, strokeStyle, textAlign, and textBaseline. The properties of the following methods are also managed bysave and restore: scale, rotate, translate, and transform.
The rotate MethodUsing the rotate method, you can choose the angle at which to apply an object (orany of the drawing methods) to the canvas, specified in radians, which are the same as180 / π, or about 57 degrees, each.
562 | Chapter 23: The HTML5 Canvas

Rotation takes place around the canvas origin, which, by default, is its top-left corner(but as you’ll see shortly, this can be changed). Example 23-25 displays the yin-yangimage four times, rotating each consecutive image by Math.PI / 25 radians.
Example 23-25. Rotating an imagefor (j = 0 ; j < 4 ; ++j){ context.drawImage(myimage, 20 + j * 120 , 20) context.rotate(Math.PI / 25)}
As you can see in Figure 23-24, the result may not be quite what you expect, becausethe image hasn’t been rotated about itself. Rather, the rotations have taken place aroundthe canvas origin at location 0,0. What’s more, each new rotation has compounded theprevious one. However, to correct for these things you can use the translate methodin conjunction with the save and restore methods.
Figure 23-24. An image at four different rotations
Radians are a sensible unit of measurement because there are π × 2radians in a complete circle. So π radians is a half circle, π ÷ 2 radi‐ans is a quarter circle, and π ÷ 2 × 3 (or π × 1.5) radians is three-quarters of a circle, and so on. To save having to remember the valueof π, you can always refer to the value in Math.PI.
Transformations | 563

The translate MethodTo change the origin of a rotation, you can call the translate method to shift it tosomewhere else, which can be anywhere inside (or outside) the canvas or, more usually,somewhere within the destination location of the object (usually its center).
Example 23-26 performs this translation prior to each call to rotate, now resulting inthe effect that was probably intended. Additionally, the save and restore methods arecalled before and after each operation to ensure that each rotation is applied independ‐ently, not compounded on the previous one.
Example 23-26. Rotating objects in placew = myimage.widthh = myimage.height
for (j = 0 ; j < 4 ; ++j){ context.save() context.translate(20 + w / 2 + j * (w + 20), 20 + h / 2) context.rotate(Math.PI / 5 * j) context.drawImage(myimage, -(w / 2), -(h / 2)) context.restore()}
In this example, before each rotation the context is saved and the origin is translated toa point exactly in the center of where each image will be drawn. We then issue therotation and draw the image up and to the left of the new origin by supplying negativevalues, such that its center matches the origin point. The result of this is shown inFigure 23-25.
Figure 23-25. Rotating images in place
To recap: when you wish to rotate or transform (described next) an object in place, youshould perform the following actions:
564 | Chapter 23: The HTML5 Canvas

1. Save the context.2. Translate the canvas origin to the center of where the object is to be placed.3. Issue the rotation or transformation instruction.4. Draw the object with any of the drawing methods supported, using a negative des‐
tination location point half the object’s width to the left, and half its height upward.5. Restore the context to revert the origin.
The transform MethodWhen you’ve exhausted all the other canvas features and still can’t manipulate objectsin just the way you need, it’s time to turn to the transform method. With it you canapply a transformation matrix to the objects you draw to the canvas, giving you a mul‐titude of possibilities, and powerful features that can combine scaling and rotating in asingle instruction.
The transformation matrix used by this method is a 3×3 matrix of nine values, but onlysix of these are supplied externally to the transform method. So, rather than explainhow this matrix multiplication works, I only need to explain the effects of its six argu‐ments, which, in order, are:
1. Horizontal scale2. Horizontal skew3. Vertical skew4. Vertical scale5. Horizontal translate6. Vertical translate
You can apply these values in many ways—for example, by emulating the scale methodfrom Example 23-24 by replacing this call:
context.scale(3, 2)
with the following:context.transform(3, 0, 0, 2, 0, 0)
Or, in the same way, you can replace this call from Example 23-26:context.translate(20 + w / 2 + j * (w + 20), 20 + h / 2)
with the following:context.transform(1, 0, 0, 1, 20 + w / 2 + j * (w + 20), 20 + h / 2)
Transformations | 565

Note how the horizontal and vertical scaling arguments are givenvalues of 1 to ensure a 1:1 result, while the skew values are 0 to pre‐vent the result from being skewed.
You could even combine the previous two lines of code to get a translation and scale atthe same time, like this:
context.transform(3, 0, 0, 2, 20 + w / 2 + j * (w + 20), 20 + h / 2)
As you look at the skew arguments, as you might expect they result in an element beingskewed in the direction specified (e.g., creating a rhombus from a square).
For example, Example 23-27 draws the yin-yang image on the canvas, followed by askewed copy created with the transform method. The skew value can be any negative,zero, or positive amount, but I chose a horizontal value of 1, which has skewed thebottom of the image by one image width to the right, and pulled everything else alongwith it proportionally (see Figure 23-26).
Example 23-27. Creating an original and skewed imagecontext.drawImage(myimage, 20, 20)context.transform(1, 0, 1, 1, 0, 0)context.drawImage(myimage, 140, 20)
Figure 23-26. Horizontally skewing an object to the right
You can even rotate an object with transform by supplying one neg‐ative and one opposite positive skew value. But beware: when you dothis you’ll modify the size of an element, and will therefore also needto adjust the scale arguments at the same time. Plus, you’ll need toremember to translate the origin. Thus, I recommend sticking withthe rotate method for this until you are fully experienced with us‐ing transform.
566 | Chapter 23: The HTML5 Canvas

The setTransform MethodAs an alternative to using the save and restore methods, you can set an absolutetransform, which has the effect of resetting the transformation matrix and then applyingthe supplied values. Use the setTransform method just like transform, as in this ex‐ample (which applies a horizontal positive skew with the value 1):
context.setTransform(1, 0, 1, 1, 0, 0)
To learn more about transformation matrixes, see the comprehen‐sive Wikipedia article on the subject.
SummaryAs of writing, the HTML5 standard is still not 100% applied across all major browsersbut, thankfully, most of the canvas functionality is. And even though there’s more tocome, such as 3D contexts, the HTML5 canvas already represents a tremendous newasset for web developers to continue making bigger, better, and more professional andcompelling websites. In the following chapter, we’ll take a look at two other major newenhancements to HTML: in-browser, plug-in-free audio and video.
Questions1. How do you create a canvas element in HTML?2. How do you give JavaScript access to a canvas element?3. How do you start and finish the creation of a canvas path?4. What method can you use to extract data from a canvas into an image?5. How can you create gradient fills of more than two colors?6. How can you adjust the width of lines when drawing?7. Which method would you use to specify a section of a camera such that future
drawing takes place only within that area?8. How can you draw a complex curve with two imaginary attractors?9. How many items of data per pixel are returned by the getImageData method?
10. Which two parameters to the transform method apply to scaling operations?
See “Chapter 23 Answers” on page 655 in Appendix A for the answers to these questions.
Summary | 567


CHAPTER 24
HTML5 Audio and Video
One of the biggest driving forces behind the growth of the Internet has been the insa‐tiable demand from users for ever more multimedia in the form of audio and video.Initially, bandwidth was so precious that there was no such thing as live streaming, andit could take minutes or even hours to download an audio track, let alone a video.
The high cost of bandwidth and limited availability of fast modems drove the develop‐ment of faster and more efficient compression algorithms, such MP3 audio and MPEGvideo, but even then the only way to download files in any reasonable length of timewas to drastically reduce their quality.
One of my earlier Internet projects, back in 1997, was the UK’s first online radio stationlicensed by the music authorities. Actually, it was more of a podcast (before the termwas coined) because we made a daily half-hour show and then compressed it down to8-bit, 11KHz mono using an algorithm originally developed for telephony, and it soun‐ded like phone quality, or worse. Still, we quickly gained thousands of listeners whowould download the show and then listen to it as they surfed to the sites discussed in itby means of a pop-up browser window containing a plug-in.
Thankfully for us, and everyone publishing multimedia, it soon became possible to offergreater audio and video quality, but still only by asking the user to download and installa plug-in player. Flash became the most popular of these players, after beating rivalssuch as RealAudio, but it gained a bad reputation as the cause of many a browser crash,and constantly required upgrading when new versions were released.
So it was generally agreed that the way ahead was to come up with some web standardsfor supporting multimedia directly within the browser. Of course, browser developerssuch as Microsoft and Google had differing visions of what these standards should looklike, but after the dust had settled they had agreed on a subset of file types that allbrowsers should play natively, and these were introduced into the HTML5 specification.
569

Finally, it is now possible (as long as you encode your audio and video in a few differentformats) to upload multimedia to a web server, place a couple of HTML tags in a webpage, and have the media play on any major desktop browser, smartphone, or tabletdevice, without the user ever having to download a plug-in or make any other changes.
There are still a lot of older browsers out there, so Flash remainsimportant for supporting them. In this chapter, I show you how toadd code to use Flash as a backup to HTML5 audio and video, to coveras many hardware and software combinations as possible.
About CodecsThe term codec stands for encoder/decoder. It describes the functionality provided bysoftware that encodes and decodes media such as audio and video. In HTML5 there area number of different sets of codecs available, depending on the browser used.
Following are the codecs supported by the HTML5 <audio> tag (and also when audiois attached to HTML5 video):AAC
This audio codec, which stands for Advanced Audio Encoding, is the one used byApple’s iTunes store, and is a proprietary patented technology supported by Apple,Google, and Microsoft. It generally uses the .aac file extension. Its MIME type isaudio/aac.
MP3This audio codec, which stands for MPEG Audio Layer 3, has been available formany years. While the term is often (incorrectly) used to refer to any type of digitalaudio, it is a proprietary patented technology that is supported by Apple, Google,Mozilla Firefox, and Microsoft. The file extension it uses is .mp3. Its MIME type isaudio/mpeg.
PCMThis audio codec, which stands for Pulse Coded Modulation, stores the full data asencoded by an analog-to-digital convertor, and is the format used for storing dataon audio CDs. Because it does not use compression, it is called a lossless codec andits files are generally many times larger than AAC or MP3 files. It is supported byApple, Mozilla Firefox, and Opera. Usually this type of file has the extension .wav.Its MIME type is audio/wav, but you may also see audio/wave.
VorbisSometimes referred to as Ogg Vorbis—because it generally uses the .ogg file exten‐sion—this audio codec is unencumbered by patents and free of royalty payments.
570 | Chapter 24: HTML5 Audio and Video

It is supported by Google Chrome, Mozilla Firefox, and Opera. Its MIME type isaudio/ogg, or sometimes audio/oga.
The following list summarizes the major operating systems and browsers, along withthe audio types their latest versions support:
• Apple iOS: AAC, MP3, PCM• Apple Safari: AAC, MP3, PCM• Google Android: 2.3+ AAC, MP3, Vorbis• Google Chrome: AAC, MP3, Vorbis• Microsoft Internet Explorer: AAC, MP3• Mozilla Firefox: MP3, PCM, Vorbis• Opera: PCM, Vorbis
The outcome of these different levels of codec support is that you always need at leasttwo versions of each audio file to ensure it will play on all platforms. One of these shouldbe Vorbis to support Opera, but for the second you have a choice of either AAC or MP3.
The <audio> ElementTo cater to all platforms, you need to record or convert your content using multiplecodecs and then list them all within <audio> and </audio> tags, as in Example 24-1.The nested <source> tags then contain the various media you wish to offer to a browser.Because the controls attribute is supplied, the result looks like Figure 24-1.
Example 24-1. Embedding three different types of audio files<audio controls> <source src='audio.m4a' type='audio/aac'> <source src='audio.mp3' type='audio/mp3'> <source src='audio.ogg' type='audio/ogg'></audio>
Figure 24-1. Playing an audio file
The <audio> Element | 571

In this example, I included three different audio types, because that’s perfectly accept‐able, and can be a good idea if you wish to ensure that each browser can locate itspreferred format rather than just one it knows how to handle. However, the examplewill still play on all platforms if one or the other (but not both) of the MP3 or the AACfiles is dropped.
The <audio> element and its partner <source> tag support several attributes, as follows:autoplay
Causes the audio to start playing as soon as it is ready
controls
Causes the control panel to be displayed
loop
Sets the audio to play over and over
preload
Causes the audio to begin loading even before the user selects Play
src
Specifies the source location of an audio file
type
Specifies the codec used in creating the audio
If you don’t supply the controls attribute to the <audio> tag, and don’t use the autoplay attribute either, the sound will not play and there won’t be a Play button for theuser to click to start playback. This would leave you no option other than to offer thisfunctionality in JavaScript, as in Example 24-2 (with the additional code required high‐lighted in bold), which provides the ability to play and pause the audio, as shown inFigure 24-2.
Example 24-2. Playing audio using JavaScript<!DOCTYPE html><html> <head> <title>Playing Audio with JavaScript</title> <script src='OSC.js'></script> </head> <body> <audio id='myaudio'> <source src='audio.m4a' type='audio/aac'> <source src='audio.mp3' type='audio/mp3'> <source src='audio.ogg' type='audio/ogg'> </audio>
<button onclick='playaudio()'>Play Audio</button> <button onclick='pauseaudio()'>Pause Audio</button>
572 | Chapter 24: HTML5 Audio and Video

<script> function playaudio() { O('myaudio').play() } function pauseaudio() { O('myaudio').pause() } </script> </body></html>
Figure 24-2. HTML5 audio can be controlled with JavaScript
This works by calling the play or pause methods of the myaudio element when thebuttons are clicked.
Supporting Non-HTML5 BrowsersIt will probably be necessary to support older browsers for the foreseeable future byproviding a fallback to Flash. Example 24-3 shows how you can do this using a Flashplug-in saved as audioplayer.swf (available, along with all the examples, in the freedownload at the companion website). The code to add is highlighted in bold.
Example 24-3. Providing a Flash fallback for non-HTML5 browsers<audio controls> <object type="application/x-shockwave-flash" data="audioplayer.swf" width="300" height="30"> <param name="FlashVars" value="mp3=audio.mp3&showstop=1&showvolume=1"> </object>
<source src='audio.m4a' type='audio/aac'> <source src='audio.mp3' type='audio/mp3'> <source src='audio.ogg' type='audio/ogg'></audio>
Supporting Non-HTML5 Browsers | 573

Here we take advantage of the fact that on non-HTML5 browsers, anything inside the<audio> tag (other than the <source> elements, which are ignored) will be acted on bythe browser. Therefore, by placing an <object> element there that calls up a Flash player,we ensure that any non-HTML5 browsers will at least have a chance of playing the audio,as long as they have Flash installed, as shown in Figure 24-3.
Figure 24-3. The Flash audio player has been loaded
The particular audio player used in this example, audioplayer.swf, takes the followingarguments and values to the FlashVars attribute of the <param> element:mp3
The URL of an MP3 audio file
showstop
If 1, shows the stop button; otherwise, it is not displayed
showvolume
If 1, shows the volume bar; otherwise, it is not displayed
As with many elements, you can easily resize the object to, for example, 300×30 pixelsby providing these values to its width and height attributes.
The <video> ElementPlaying video in HTML5 is quite similar to audio; you just use the <video> tag andprovide <source> elements for the media you are offering. Example 24-4 shows howyou do this with three different video codec types, as displayed in Figure 24-4.
Example 24-4. Playing HTML5 video<video width='560' height='320' controls> <source src='movie.mp4' type='video/mp4'> <source src='movie.webm' type='video/webm'> <source src='movie.ogv' type='video/ogg'></video>
574 | Chapter 24: HTML5 Audio and Video

Figure 24-4. Playing HTML5 video
The Video CodecsAs with audio, there are a number of video codecs available, with differing supportacross multiple browsers. These codecs come in different containers, as follows:MP4
A license-encumbered, multimedia container format standard specified as a partof MPEG-4, supported by Apple, Microsoft, and, to a lesser extent Google, whichhas its own WebM container format. Its MIME type is video/mp4.
OGGA free, open container format maintained by the Xiph.Org Foundation. The crea‐tors of the Ogg format state that it is unrestricted by software patents and is designedto provide for efficient streaming and manipulation of high-quality digital multi‐media. Its MIME type is video/ogg, or sometimes video/ogv.
WebMAn audio-video format designed to provide a royalty-free, open video compressionformat for use with HTML5 video. The project’s development is sponsored byGoogle. There are two versions: VP8 and the newer VP9. Its MIME type is video/webm.
The <video> Element | 575

These may then contain one of the following video codecs:H.264
A patented, proprietary video codec for which playback is free for the end user, butwhich may incur royalty fees for all parts of the encoding and transmission process.At the time of writing, all of Apple, Google, Mozilla Firefox, and Microsoft InternetExplorer support this codec, while Opera (the remaining major browser) doesn’t.
TheoraThis is a video codec unencumbered by patents, and free of royalty payments at alllevels of encoding, transmission, and playback. This codec is supported by GoogleChrome, Mozilla Firefox, and Opera.
VP8This video codec is similar to Theora but is owned by Google, which has publishedit as open source, making it royalty free. It is supported by Google Chrome, MozillaFirefox, and Opera.
VP9Provides the same benefits as VP8, but is more powerful and uses half the bitrate.
The following list details the major operating systems and browsers, along with the videotypes their latest versions support:
• Apple iOS: MP4/H.264• Apple Safari: MP4/H.264• Google Android: MP4, OGG, WebM/H.264, Theora, VP8• Google Chrome: MP4, OGG, WebM/H.264, Theora, VP8, VP9• Internet Explorer: MP4/H.264• Mozilla Firefox: MP4, OGG, WebM/H.264, Theora, VP8, VP9• Opera: OGG, WebM/Theora, VP8
From this list, it’s clear that MP4/H.264 is almost unanimously supported, except forthe Opera browser. So if you’re prepared to ignore the 1% or so of users this comprises(and hope that Opera will soon have to adopt the format anyway), you only need tosupply your video using one file type: MP4/H.264. But for maximum viewing, you reallyought to encode in OGG/Theora or OGG/VP8 as well (but not VP9, as it’s not yet beenadopted by Opera).
Therefore, the movie.webm file in Example 24-4 isn’t strictly needed, but shows howyou can add all the different file types you like, to give browsers the opportunity to playback the formats they prefer.
The <video> element and accompanying <source> tag support the following attributes:
576 | Chapter 24: HTML5 Audio and Video

autoplay
Causes the video to start playing as soon as it is ready
controls
Causes the control panel to be displayed
height
Specifies the height at which to display the video
loop
Sets the video to play over and over
muted
Mutes the audio output
poster
Lets you choose an image to display where the video will play
preload
Causes the video to begin loading before the user selects Play
src
Specifies the source location of a video file
type
Specifies the codec used in creating the video
width
Specifies the width at which to display the video
If you wish to control video playback from JavaScript, you can do so using code suchas that in Example 24-5 (with the additional code required highlighted in bold), andshown in Figure 24-5.
Example 24-5. Controlling video playback from JavaScript<!DOCTYPE html><html> <head> <title>Playing Video with JavaScript</title> <script src='OSC.js'></script> </head> <body> <video id='myvideo' width='560' height='320'> <source src='movie.mp4' type='video/mp4'> <source src='movie.webm' type='video/webm'> <source src='movie.ogv' type='video/ogg'> </video><br>
<button onclick='playvideo()'>Play Video</button> <button onclick='pausevideo()'>Pause Video</button>
The <video> Element | 577

<script> function playvideo() { O('myvideo').play() } function pausevideo() { O('myvideo').pause() } </script> </body></html>
Figure 24-5. JavaScript is being used to control the video
This code is just like controlling audio from JavaScript. Simply call the play and/orpause methods of the myvideo object to play and pause the video.
Supporting Older BrowsersAlso as with audio, older versions of browsers will still be in general use for a while tocome, so it makes sense to offer a Flash video fallback to people with non-HTML5browsers. Example 24-6, which uses the flowplayer.swf file (available in the free down‐load at http://lpmj.net), shows how to do this (highlighted in bold), and Figure 24-6shows how it displays in a browser that doesn’t support HTML5 video.
578 | Chapter 24: HTML5 Audio and Video

Example 24-6. Providing Flash as a fallback video player<video width='560' height='320' controls> <object width='560' height='320' type='application/x-shockwave-flash' data='flowplayer.swf'> <param name='movie' value='flowplayer.swf'> <param name='flashvars' value='config={"clip": { "url": "http://tinyurl.com/html5video-mp4", "autoPlay":false, "autoBuffering":true}}'> </object>
<source src='movie.mp4' type='video/mp4'> <source src='movie.webm' type='video/webm'> <source src='movie.ogv' type='video/ogg'></video>
Figure 24-6. Flash provides a handy fallback for non-HTML5 browsers
This Flash video player is particular about security, so it won’t play videos from a localfilesystem, only from a web server, so I have supplied a file on the Web for this exampleto play.
The arguments to supply to the flashvars attribute of the <param> element are:url
A URL on a web server of a .mp4 file to play
The <video> Element | 579

autoPlay
If true, plays automatically; otherwise, waits for the play button to be clicked
autoBuffering
If true, in order to minimize buffering later on with slow connections, before itstarts playing the video will be preloaded sufficiently for the available bandwidth
For more information on the Flash flowplayer program (and anHTML5 version), check out http://flowplayer.org.
SummaryUsing the information in this chapter, you will be able to embed any audio and videoon almost all browsers and platforms without worrying about whether users may ormay not be able to play it.
In the following chapter, I’ll demonstrate the use of a number of other HTML5 features,including geolocation and local storage.
Questions1. Which two HTML element tags are used to insert audio and video into an HTML5
document?2. Which two audio codecs should you use to guarantee maximum playability on all
platforms?3. Which methods can you call to play and pause HTML5 media playback?4. How can you support media playback in a non-HTML5 browser?5. Which two video codecs should you use to guarantee maximum playability on all
platforms?
See “Chapter 24 Answers” on page 656 in Appendix A for the answers to these questions.
580 | Chapter 24: HTML5 Audio and Video

CHAPTER 25
Other HTML5 Features
In this final chapter on HTML5 I explain how to use geolocation, local storage, and webworkers; show you how to allow web apps to run offline; and demonstrate the use ofin-browser dragging and dropping.
Strictly speaking, most of these features (like much of HTML5) aren’t really extensionsto HTML, because you access them with JavaScript rather than with HTML markup.They are simply technologies that are being embraced by browser developers, and havebeen given the handy umbrella name of HTML5.
This means, though, that you need to have fully understood the JavaScript tutorial inthis book in order to use them properly. That said, once you get the hang of them, you’llwonder how you ever did without these powerful new features.
Geolocation and the GPS ServiceThe GPS (Global Positioning System) service consists of multiple satellites orbiting theearth whose positions are very precisely known. When a GPS-enabled device tunes intothem, the different times at which signals from these various satellites arrive enable thedevice to quite accurately know where it is; because the speed of light (and thereforeradio waves) is a known constant, the time it takes a signal to get from a satellite to aGPS device indicates the satellite’s distance.
By noting the different times at which signals arrive from different satellites, which arein precisely known orbital locations at any one time, a simple triangulation calculationgives the device its position relative to the satellites within a few meters or less.
Many mobile devices, such as phones and tablets, have GPS chips and can provide thisinformation. But some don’t, others have them tuned off, and others may be used in‐doors where they are shielded from the GPS satellites and therefore cannot receive any
581

signals. In these cases, additional techniques may be used to attempt to determine yourlocation.
Other Location MethodsIf your device has mobile phone hardware but not GPS, it may attempt to triangulateits location by checking the timing of signals received from the various communicationtowers with which it can communicate (and whose positions are very precisely known).If there are a few towers, this can get almost as close to your location as GPS. But wherethere’s only a single tower, the signal strength can be used to determine a rough radiusaround the tower, and the circle it creates represents the area in which you are likely tobe located. This could place you anywhere within a mile or two of your actual location,down to within a few tens of meters.
Failing that, there may be known WiFi access points whose positions are known withinrange of your device, and because all access points have a unique identifying addresscalled a MAC (Media Access Control) address, a reasonably good approximation oflocation can be obtained, perhaps to within a street or two. This is the type of informationthat Google Street View vehicles have been collecting.
And if that fails, the IP (Internet Protocol) address used by your device can be queriedand used as a rough indicator of your location. Often, though, this provides only thelocation of a major switch belonging to your Internet provider, which could be dozensor even hundreds of miles away. But at the very least, your IP address can (usually)narrow down the country and sometimes the region you are in.
IP addresses are commonly used by media companies for restrict‐ing playback of their content by territory. However, it’s a simple mat‐ter to set up proxy servers that use a forwarding IP address (in theterritory that is blocking outside access) to fetch and pass contentthrough the blockade directly to a “foreign” browser. Proxy serversare also often employed to disguise a user’s real IP address or by‐pass censorship restrictions, and can be shared across many users ona WiFi hotspot. Therefore, if you locate someone by IP address, youcan’t be completely sure that you have identified the right location, oreven country, and should treat this information as only a best guess.
582 | Chapter 25: Other HTML5 Features

Geolocation and HTML5In Chapter 22, I briefly introduced HTML5 geolocation. Now it’s time to look at it indepth, starting with the example I gave you before, shown again in Example 25-1.
Example 25-1. Displaying a map of your current location<!DOCTYPE html><html> <head> <title>Geolocation Example</title> <script src='OSC.js'></script> <script src="https://maps.googleapis.com/maps/api/js?sensor=false"></script> </head> <body> <div id='status'></div> <div id='map'></div>
<script> if (typeof navigator.geolocation == 'undefined') alert("Geolocation not supported.") else navigator.geolocation.getCurrentPosition(granted, denied)
function granted(position) { O('status').innerHTML = 'Permission Granted' S('map').border = '1px solid black' S('map').width = '640px' S('map').height = '320px'
var lat = position.coords.latitude var long = position.coords.longitude var gmap = O('map') var gopts = { center: new google.maps.LatLng(lat, long), zoom: 9, mapTypeId: google.maps.MapTypeId.ROADMAP } var map = new google.maps.Map(gmap, gopts) }
function denied(error) { var message
switch(error.code) { case 1: message = 'Permission Denied'; break; case 2: message = 'Position Unavailable'; break; case 3: message = 'Operation Timed Out'; break;
Geolocation and HTML5 | 583

case 4: message = 'Unknown Error'; break; }
O('status').innerHTML = message } </script> </body></html>
Let’s walk through this code and see how it works, starting with the <head> section,which displays a title; loads in the OSC.js file containing the O, S, and C functions Iprovided to make accessing HTML elements from JavaScript easier; and then also pullsin the JavaScript code for the Google Maps service, which is drawn on later in theprogram.
After this, two div elements are created—one for displaying the connection status, andthe other for the map:
<div id='status'></div><div id='map'></div>
The remainder of the document is JavaScript, which immediately starts by interrogatingthe navigator.geolocation property. If the value returned is undefined, then geolo‐cation is not supported by the browser and an error alert window is popped up.
Otherwise, the getCurrentPosition method of the property is called, passing it thenames of two functions: granted and denied (remember that by passing function nameswe pass the actual function code, not the result of calling the function, which would bethe case if the function names had brackets attached):
navigator.geolocation.getCurrentPosition(granted, denied)
These functions appear later in the script and are for handling the two possibilities ofpermission to provide the user’s location data: granted or denied. The granted functioncomes first and is entered only if the data can be accessed.
In this function, the innerHTML property of the div element with the ID of status is setto the string Permission Granted to indicate success during the delay while the mapis being fetched. Then the map div has some CSS styles applied to give it a border andset its dimensions:
O('status').innerHTML = 'Permission Granted'S('map').border = '1px solid black'S('map').width = '640px'S('map').height = '320px'
Next, the variables lat and long are given the values returned by the geolocation rou‐tines in the browser, and the object gmap is created to access the map div element:
584 | Chapter 25: Other HTML5 Features

var lat = position.coords.latitudevar long = position.coords.longitudevar gmap = O('map')
After this, the object gopts is populated with the values in lat and long, the zoom levelis set (in this case to 9), and the ROADMAP map type is selected:
var gopts ={ center: new google.maps.LatLng(lat, long), zoom: 9, mapTypeId: google.maps.MapTypeId.ROADMAP}
Lastly, in this function, we create a new map object by passing gmap and gopts to the Mapmethod of the google.maps object (the code for which you will recall was loaded in justafter the OSC.js file).
var map = new google.maps.Map(gmap, gopts)
If permission is granted to access the user’s location, the result looks like Figure 25-1.
Figure 25-1. An interactive map of the user’s location is displayed
If permission is denied or there is another issue, an error message is the only thingdisplayed, as output to the innerHTML property of the status div by the denied function,according to the problem encountered:
Geolocation and HTML5 | 585

switch(error.code){ case 1: message = 'Permission Denied'; break; case 2: message = 'Position Unavailable'; break; case 3: message = 'Operation Timed Out'; break; case 4: message = 'Unknown Error'; break;}
O('status').innerHTML = message
The Google map will be fully interactive and zoomable by the user, who can also changethe map type to satellite imagery.
You can set a different zoom level or imagery type by providing different values to thegopts object. For example, a value of 1 for zoom will zoom out the furthest, and 20 willzoom in the most. A value of SATELLITE for the google.maps.MapTypeId property willswitch to satellite imagery, or HYBRID will combine map and satellite data together.
The sensor=false setting from the tail of the URL where the scriptis loaded in (near the start of the document) should be set to true ifyou know that the user’s device has a GPS sensor; otherwise, leave itas it is. If you simply want to display a Google map for a specificlocation, and not access the user’s location data, you can use the corecode in the granted function, replacing the lat and long (and oth‐er) values with ones of your choosing. Also, if you would prefer touse Bing maps instead of Google, refer to http://tinyurl.com/bingmapsapi.
Local StorageCookies are an essential part of the modern Internet because they enable websites tosave on each user’s machine small snippets of information that can be used for trackingpurposes. Now this isn’t as ominous as it sounds, because most of the tracking going onhelps web surfers by saving usernames and passwords, keeping them logged into a socialnetwork such as Twitter or Facebook, and more.
Cookies can also locally save your preferences for the way you access a website (ratherthan having those settings stored on the website’s server) or can be used to keep trackof a shopping cart as you build up an order on an ecommerce website.
But yes, they can also be used more aggressively to track the websites you frequent andgain a picture of your interests to try to target advertising more effectively. That’s whythe European Union now requires all websites within its borders to alert you to this,and let you disable cookies if you so choose.
But, as a web developer, think how useful it can be keeping data on user’s devices,especially if you have a small budget for computer servers and disk space. For example,
586 | Chapter 25: Other HTML5 Features

you could create in-browser web apps and services for editing word processing docu‐ments, spreadsheets, and graphic images, saving all this data offsite on users’ computersand keeping your server purchasing budget as low as possible.
From the user’s point of view, think about how much faster a document can be loadedup locally than from across the Web, especially on a slow connection. Plus, there’s moresecurity if you know that a website is not storing copies of your documents. Of course,you can never guarantee that a website or web app is totally secure, and should neverwork on highly sensitive documents using software (or hardware) that can go online.But for minimally private documents such as family photographs, you might feel morecomfortable using a web app that saves locally than one that saves files to an externalserver.
Using Local StorageThe biggest problem with using cookies for local storage is that you can save a maximumof 4KB of data in each. Cookies also have to be passed back and forth on every pagereload. And, unless your server uses SSL (Secure Sockets Layer) encryption, each timea cookie is transmitted it travels in the clear.
But with HTML5 you have access to a much larger local storage space (typically between5MB and 10MB per domain depending on the browser) that remains over page loads,and between website visits (and even after powering a computer down and back upagain). Also, the local storage data is not sent to the server on each page load.
You handle local storage data in key/value pairs. The key is the name assigned for ref‐erencing the data, and the value can hold any type of data, but it is saved as a string. Alldata is unique to the current domain, and for security reasons any local storage createdby websites with different domains is separate from the current local storage, and is notaccessible by any domain other than the one that stored the data.
The localStorage ObjectYou gain access to local storage by means of the localStorage object. To test whetherthis object is available, you query its type to check whether or not it has been defined,like this:
if (typeof localStorage == 'undefined'){ // Local storage is not available, tell the user and quit. // Or maybe offer to save data on the web server instead?}
How you handle the lack of local storage being available will depend on what you intendto use it for, so the code you place inside the if statement will be up to you.
Local Storage | 587

Once you’ve ascertained that local storage is available, you can start making use of itwith the setItem and getItem methods of the localStorage object, like this:
localStorage.setItem('username', 'ceastwood')localStorage.setItem('password', 'makemyday')
To later retrieve this data, pass the keys to the getItem method, like this:username = localStorage.getItem('username')password = localStorage.getItem('password')
Unlike saving and reading cookies, you can call these methods at any time you like, notsimply before any headers have been sent by the web server. The saved values will remainin local storage until erased in the following manner:
localStorage.removeItem('username')localStorage.removeItem('password')
Or, you can totally wipe the local storage for the current domain by calling the clearmethod, like this:
localStorage.clear()
Example 25-2 combines the preceding examples into a single document that displaysthe current values of the two keys in a pop-up alert message, which initially will benull. Then the keys and values are saved to local storage, retrieved, and redisplayed,this time having assigned values. Finally, the keys are removed and then an attempt atretrieving these values is again made, but the returned values are once again null.Figure 25-2 shows the second of these three alert messages.
Example 25-2. Getting, setting, and removing local storage dataif (typeof localStorage == 'undefined'){ alert("Local storage is not available")}else{ username = localStorage.getItem('username') password = localStorage.getItem('password') alert("The current values of 'username' and 'password' are\n\n" + username + " / " + password + "\n\nClick OK to assign values")
localStorage.setItem('username', 'ceastwood') localStorage.setItem('password', 'makemyday') username = localStorage.getItem('username') password = localStorage.getItem('password') alert("The current values of 'username' and 'password' are\n\n" + username + " / " + password + "\n\nClick OK to clear values")
localStorage.removeItem('username') localStorage.removeItem('password') username = localStorage.getItem('username')
588 | Chapter 25: Other HTML5 Features

password = localStorage.getItem('password') alert("The current values of 'username' and 'password' are\n\n" + username + " / " + password)}
Figure 25-2. Two keys and their values are read from local storage
You are not restricted to just storing usernames and passwords; youcan include virtually any and all data, and as many key/value pairs asyou like, up to the available storage limit for your domain.
Web WorkersWith web workers, you can create sections of JavaScript code that will run in the back‐ground, without having to set up and monitor interrupts. Instead, whenever it hassomething to report, your background process communicates with the main JavaScriptthrough the use of an event.
This means the JavaScript interpreter gets to decide how to allocate time slices mostefficiently, and your code only needs to worry about communicating with the back‐ground task whenever there’s information to convey.
Example 25-3 shows how you can set up web workers to compute a repetitive task inthe background—in this instance, calculating prime numbers.
Web Workers | 589

Example 25-3. Setting up and communicating with a web worker<!DOCTYPE html><html> <head> <title>Web Workers</title> <script src='OSC.js'></script> </head> <body> Current highest prime number: <span id='result'>0</span>
<script> if (!!window.Worker) { var worker = new Worker('worker.js')
worker.onmessage = function (event) { O('result').innerHTML = event.data; } } else { alert("Web workers not supported") } </script> </body></html>
This example first creates a <span> element with the ID of result in which output fromthe web worker will be placed. Then, in the <script> section, window.Worker is testedvia a !! pair of not operators. This has the effect of returning a Boolean value of trueif the Worker method exists, and false otherwise. If it is not true, a message is displayedin the else section alerting us that web workers are not available.
Otherwise, a new worker object is created by calling Worker, passing it the filenameworker.js (shown shortly). Then the onmessage event of the new worker object is at‐tached to an anonymous function that places any message passed to it by worker.js intothe innerHTML property of the previously created <span> element.
The web worker itself is saved in the file worker.js, in Example 25-4.
Example 25-4. The worker.js web workervar n = 1
search: while (true){ n += 1
590 | Chapter 25: Other HTML5 Features

for (var i = 2; i <= Math.sqrt(n); i += 1) { if (n % i == 0) continue search }
postMessage(n)}
This file assigns the value 1 to the variable n. It then loops continuously, incrementingn and checking it for primality by a brute-force method of testing all values from 1 tothe square root of n to see if they divide exactly into n, with no remainder. Should afactor be found, the continue command stops the brute-force attack immediately be‐cause the number is not prime, and starts processing again at the next higher value of n.
However, if all possible factors are tested and none result in a zero remainder, then nmust be prime, so its value is passed to postMessage, which sends a message back tothe onmessage event of the object that set up this web worker.
The result looks like the following:Current highest prime number: 30477191
To stop a web worker from running, issue a call to the terminate method of the workerobject, like this:
worker.terminate()
If you wish to stop this particular example from running, you canenter the following into your browser’s address bar:
javascript:worker.terminate()
Also note that due to the way Chrome handles security, you cannotuse web workers on a filesystem, only from a web server (or run‐ning the files from localhost on a development server such as ZendServer, detailed in Chapter 2).
Offline Web ApplicationsBy providing the right information to a browser, you can tell it how to download all thecomponents of a web page to enable it to be loaded and run offline. The main file youneed is a manifest file with the file extension .appcache. To illustrate a simple web app,I chose to create a clock, so the manifest file is given the filename clock.appcache, andlooks like Example 25-5.
Offline Web Applications | 591

Example 25-5. The clock.appcache fileCACHE MANIFESTclock.htmlOSC.jsclock.cssclock.js
The first line in this file declares it to be a manifest file. The lines following list the filesthe browser needs to download and store, starting with Example 25-6, the clock.htmlfile, and followed by the OSC.js file, which is the same one used by many examples inthis book.
Example 25-6. The clock.html file<!DOCTYPE html><html manifest='clock.appcache'> <head> <title>Offline Web Apps</title> <script src='OSC.js'></script> <script src='clock.js'></script> <link rel='stylesheet' href='clock.css'> </head> <body> <p>The time is: <output id='clock'></output></p> </body></html>
This file declares that it has a manifest file available from within the <html> tag, likethis:
<html manifest='clock.appcache'>
To support offline web apps, you will need to add the MIME typetext/cache-manifest for the file extension .appcache to your serv‐er, in order for it to send the manifest file using the correct type.There’s a neat shortcut you can use for this, which is to create a filecalled .htaccess in the same folder as the files to be made availableoffline, with the following contents:
AddType text/cache-manifest .appcache
The files OSC.js, clock.js, and clock.css are then imported and used by the document.The JavaScript in clock.js is listed in Example 25-7.
Example 25-7. The clock.js filesetInterval(function(){ O('clock').innerHTML = new Date()}, 1000)
592 | Chapter 25: Other HTML5 Features

This is a very simple anonymous function attached to an interval that repeats once asecond to save the current date and time into the innerHTML property of the <output>element that has the ID of clock.
The final file is the clock.css file (see Example 25-8), which simply applies bold stylingto the <output> element.
Example 25-8. The clock.css fileoutput { font-weight:bold; }
As long as the clock.appcache file lists them all, these four files (clock.html, OSC.js,clock.css, and clock.js) together make up a working offline web application, which willbe downloaded and made available locally by any web browser that understands offlineweb apps. When run, the output looks like this:
The time is: Thu Jul 19 2018 15:24:26 GMT+0000 (GMT Standard Time)
For full details on the offline web applications specifications, you cancheck out the official website.
Drag and DropYou can easily support dragging and dropping of objects on a web page by setting upevent handlers for the ondragstart, ondragover, and ondrop events, as in Example 25-9.
Example 25-9. Dragging and dropping objects<!DOCTYPE HTML><html> <head> <title>Drag and Drop</title> <script src='OSC.js'></script> <style> #dest { background:lightblue; border :1px solid #444; width :320px; height :100px; padding :10px; } </style> </head> <body> <div id='dest' ondrop='drop(event)' ondragover='allow(event)'></div><br> Drag the image below into the above element<br><br>
Drag and Drop | 593

<img id='source1' src='image1.png' draggable='true' ondragstart='drag(event)'> <img id='source2' src='image2.png' draggable='true' ondragstart='drag(event)'> <img id='source3' src='image3.png' draggable='true' ondragstart='drag(event)'>
<script> function allow(event) { event.preventDefault() }
function drag(event) { event.dataTransfer.setData('image/png', event.target.id) }
function drop(event) { event.preventDefault() var data=event.dataTransfer.getData('image/png') event.target.appendChild(O(data)) } </script> </body></html>
After setting up the HTML, title, and loading in the OSC.js file, this document styles thediv element with the ID of dest, giving it a background color, border, set dimensions,and padding.
Then, in the <body> section, the div element is created, and its ondrop and ondragover events have the event handler functions drop and allow attached to them. Afterthis there’s some text, and then three images are displayed with their draggable prop‐erties set to true, and the function drag is attached to the ondragstart event of each.
In the <script> section, the allow event handler function simply prevents the defaultaction for dragging (which is to disallow it), while the drag event handler function callsthe setData method of the dataTransfer object of the event, passing it the MIME typeimage/png and the target.id of the event (which is the object being dragged). ThedataTransfer object holds the data that is being dragged during a drag-and-dropoperation.
Finally, the drop event handler function also intercepts its default action so that droppingis allowed, and then it fetches the contents of the object being dragged from the dataTransfer object, passing it the MIME type of the object. Then the dropped data isappended to the target (which is the dest div) using its appendChild method.
If you try this example for yourself, you’ll be able to drag and drop the images into thediv element, where they will stay, as shown in Figure 25-3.
594 | Chapter 25: Other HTML5 Features

Figure 25-3. Two images have been dragged and dropped
Other events you can attach to include ondragenter for when a drag operation entersan element, ondragleave for when one leaves an element, and ondragend for when adragging operation ends, which you can use, for example, to modify the cursor duringthese operations.
Cross Document MessagingYou’ve already seen messaging in use a little earlier, in the web worker section. I didn’tgo into any details, however, as it wasn’t the core topic being discussed, and the messagewas being posted only to the same document anyway. But for obvious security reasons,cross-document messaging does need to be applied with caution, so you need to fullyunderstand its workings if you plan to use it.
Before HTML5, browser developers disallowed cross-site scripting, but as well as block‐ing potential attack sites, this prevented communication between legitimate pages—meaning document interaction of any kind generally had to occur through Ajax and athird-party web server, which was cumbersome and fiddly to build and maintain.
But web messaging now allows scripts to interact across these boundaries by using somesensible security restraints to prevent malicious hacking attempts. It is achieved throughuse of the postMessage method, allowing plain-text messages to be sent from one do‐main to another.
This requires that JavaScript first obtain the Window object of the receiving document,letting messages post to a variety of other windows, frames, or iframes directly relatedto the sender’s document. The received message event has the following attributes:
Cross Document Messaging | 595

data
The incoming message
origin
The origin of the sender document, including the scheme, hostname, and port
source
The source window of the sender document
The code to send messages is just a single instruction, in which you pass the messageto be sent and the domain to which it applies, as in Example 25-10.
Example 25-10. Sending web messages to an iframe<!DOCTYPE HTML><html> <head> <title>Web Messaging (a)</title> <script src='OSC.js'></script> </head> <body> <iframe id='frame' src='example25-11.html' width='360' height='75'></iframe>
<script> count = 1
setInterval(function() { O('frame').contentWindow.postMessage('Message ' + count++, '*') }, 1000) </script> </body></html>
Here the usual use is made of the OSC.js file to pull in the O function, and then an iframeelement with the ID of frame is created, which loads in Example 25-11. Then, withinthe <script> section, the variable count is initialized to 1 and a repeating interval is setup to occur every second to post the string 'Message ' (using the postMessage method)along with the current value of count, which is then incremented. The postMessage callis attached to the contentWindow property of the iframe object, not the iframe objectitself. This is important because web messaging requires posts to be made to a window,not to an object within a window.
Example 25-11. Receiving messages from another document<!DOCTYPE HTML><html> <head> <title>Web Messaging (b)</title> <style> #output {
596 | Chapter 25: Other HTML5 Features

font-family:"Courier New"; white-space:pre; } </style> <script src='OSC.js'></script> </head> <body> <div id='output'>Received messages will display here</div>
<script> window.onmessage = function(event) { O('output').innerHTML = '<b>Origin:</b> ' + event.origin + '<br>' + '<b>Source:</b> ' + event.source + '<br>' + '<b>Data:</b> ' + event.data } </script> </body></html>
This example sets up a little styling to make output clearer, then creates a div elementwith the ID output, in which the contents of received messages will be placed. In the<script> section there’s a single anonymous function attached to the onmessage eventof the window. In this function, the event.origin, event.source, and event.dataproperty values are then displayed, as shown in Figure 25-4.
Figure 25-4. The iframe has so far received 17 messages
Web messaging works only across domains, so you cannot test it by loading files in froma filesystem; you must use a web server. As you can see from Figure 25-4, the origin ishttp://localhost because these examples are running on a local development server. Thesource is the Window object, and the current message value is Message 17.
At the moment, Example 25-10 is not at all secure because the domain value passed topostMessage is the wildcard *:
O('frame').contentWindow.postMessage('Message ' + count++, '*')
Cross Document Messaging | 597

To direct messages only to documents originating from a particular domain, you canchange this parameter. In the current case, a value of http://localhost would ensurethat only documents loaded from the local server will be sent any messages, like this:
O('frame').contentWindow.postMessage('Message ' + count++, 'http://localhost')
Likewise, as it stands, the listener program displays any and all messages it receives. Thisis also not a very secure state of affairs, because malicious documents also present inthe browser can attempt to send messages that unwary listener code in other documentsmight otherwise access. Therefore, you can restrict the messages your listeners react tousing an if statement, like this:
window.onmessage = function(event){ if (event.origin) == 'http://localhost') { O('output').innerHTML = '<b>Origin:</b> ' + event.origin + '<br>' + '<b>Source:</b> ' + event.source + '<br>' + '<b>Data:</b> ' + event.data }}
If you always use the proper domain for the site you are workingwith, your web messaging communications will be more secure.However, be aware that because messages are sent in the clear, theremay be insecurities in some browsers or browser plug-ins that mightmake this kind of communication insecure. One way to boost yoursecurity, then, is to create your own obfuscation or encryptionscheme for all your web messages, and also consider introducingyour own two-way communication protocols to verify each mes‐sage as being authentic.
Normally, you won’t alert the user to the origin or source values, and will simply makeuse of them for security checking. These examples, however, display those values to helpyou experiment with web messaging and see what is going on. As well as iframes, docu‐ments in pop-up windows and other tabs may also talk to each other using this method.
MicrodataMicrodata is a subset of HTML designed to provide metadata to a document in orderto make it have meaning to software, just as it has meaning to a reader of the document.
Microdata makes available the following new tag attributes: itemscope, itemtype,itemid, itemref, and itemprop. Using these, you can clearly define the properties ofan item such as a book, providing a range of information that a computer can use tounderstand, for example, its authors, publishers, contents, and so on.
598 | Chapter 25: Other HTML5 Features
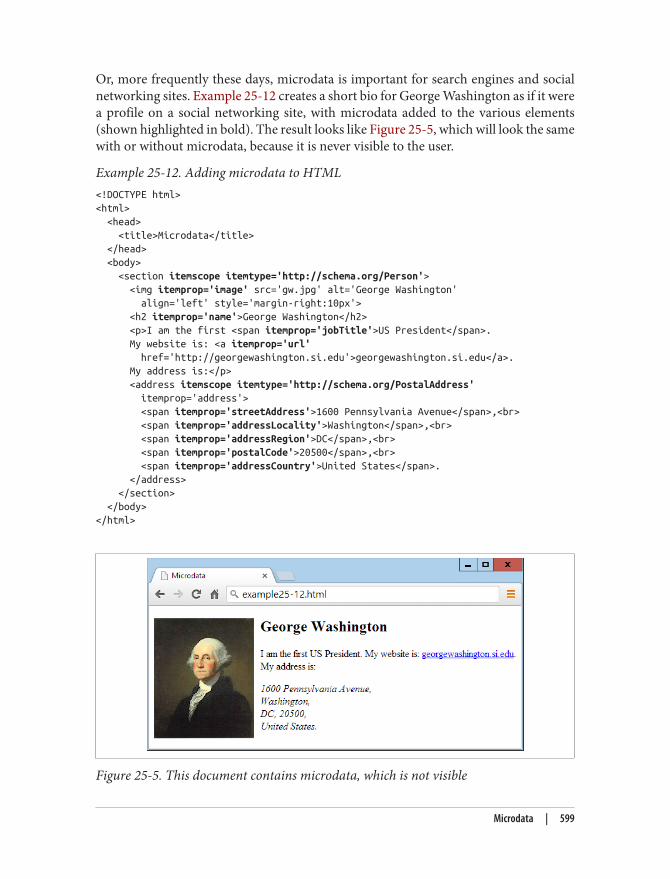
Or, more frequently these days, microdata is important for search engines and socialnetworking sites. Example 25-12 creates a short bio for George Washington as if it werea profile on a social networking site, with microdata added to the various elements(shown highlighted in bold). The result looks like Figure 25-5, which will look the samewith or without microdata, because it is never visible to the user.
Example 25-12. Adding microdata to HTML<!DOCTYPE html><html> <head> <title>Microdata</title> </head> <body> <section itemscope itemtype='http://schema.org/Person'> <img itemprop='image' src='gw.jpg' alt='George Washington' align='left' style='margin-right:10px'> <h2 itemprop='name'>George Washington</h2> <p>I am the first <span itemprop='jobTitle'>US President</span>. My website is: <a itemprop='url' href='http://georgewashington.si.edu'>georgewashington.si.edu</a>. My address is:</p> <address itemscope itemtype='http://schema.org/PostalAddress' itemprop='address'> <span itemprop='streetAddress'>1600 Pennsylvania Avenue</span>,<br> <span itemprop='addressLocality'>Washington</span>,<br> <span itemprop='addressRegion'>DC</span>,<br> <span itemprop='postalCode'>20500</span>,<br> <span itemprop='addressCountry'>United States</span>. </address> </section> </body></html>
Figure 25-5. This document contains microdata, which is not visible
Microdata | 599
Browsers don’t yet really do anything with microdata, but it’s still very worth getting toknow it. Using the right microdata gives lots of information to search engines like Googleor Bing, and may help to promote clearly annotated pages in the rankings as comparedto sites that don’t implement microdata.
However, at some point browsers may also find a use for this information, and you’ll beable to determine whether or not they support it by checking whether the getItemsmethod exists, like this:
if (!!document.getItems){ // Microdata is supported}else{ // Microdata is not supported}
The !! pair of not operators is a shorthand way of returning a Boolean value repre‐senting the existence (or lack thereof) of the getItems method. If it exists, then true isreturned and microdata is supported; otherwise, false is returned.
Currently, only the Mozilla Firefox and Opera browsers support accessing microdata,but the other browsers are sure to follow soon. When they do, you’ll be able to extractthis data in the following manner, in which (after the page has loaded) the data objectis retrieved from a call to getItems, and the value for the key 'jobTitle' (just as anexample) is retrieved by accessing the data object’s properties object, and then fetchingthe latter object’s textContent property:
window.onload = function(){ if (!!document.getItems) { data = document.getItems('http://schema.org/Person')[0] alert(data.properties['jobTitle'][0].textContent) }}
Browsers that support this feature will display as Figure 25-6, but other browsers willnot trigger the pop-up window.
600 | Chapter 25: Other HTML5 Features

Figure 25-6. Displaying the value for the ‘jobTitle’ microdata key
Google has stated that it definitely uses microdata when it finds it, and that microdatais also the preferred snippet format for Google+, so it’s well worth starting to add it toyour HTML where applicable. For a complete breakdown of the myriad of microdataproperties available, check out http://schema.org, which is also the reference for themicrodata schemes as declared in the itemType properties.
Other HTML5 TagsThere are a number of other new HTML5 tags that have not yet been implemented inmany browsers, and therefore I won’t cover them (particularly because their specs couldchange). But, for the sake of completeness, these tags are <article>, <aside>,<details>, <figcaption>, <figure>, <footer>, <header>, <hgroup>, <keygen>,<mark>, <menuitem>, <meter>, <nav>, <output>, <progress>, <rp>, <rt>, <ruby>, <section>, <summary>, <time>, and <wbr>. You can get more information on these and allother HTML5 tags at http://tinyurl.com/h5markup (check out the elements sporting aNEW icon).
SummaryThis concludes your introduction to HTML5. You now have a number of powerful newfeatures with which to make even more dynamic and compelling websites. In the finalchapter, I’ll show you how you can bring all the different technologies in this booktogether to create a mini social networking site.
Other HTML5 Tags | 601

Questions1. What method do you call to request geolocation data from a web browser?2. How can you determine whether or not a browser supports local storage?3. What method can you call to erase all local storage data for the current domain?4. What is the best way for web workers to communicate with a main program?5. How can your code inform a web browser that the document can be run offline as
a local web app?6. To support drag-and-drop operations, how can you prevent the default action of
disallowing drag and drop for these events?7. How can you make cross-document messaging more secure?8. What is the purpose of microdata?
See “Chapter 25 Answers” on page 657 in Appendix A for the answers to these questions.
602 | Chapter 25: Other HTML5 Features

CHAPTER 26
Bringing It All Together
Now that you’ve reached the end of your journey into learning the hows, whys, andwherefores of dynamic web programming, I want to leave you with a real example thatyou can sink your teeth into. In fact, it’s a collection of examples, because I’ve put togethera simple social networking project comprising all the main features you’d expect fromsuch a site.
Across the various files, there are examples of MySQL table creation and database access,CSS style sheets, file inclusion, session control, DOM access, Ajax calls, event and errorhandling, file uploading, image manipulation, the HTML5 canvas, and a whole lot more.
Each example file is complete and self-contained, yet works with all the others to builda fully working social networking site, even including a style sheet you can modify tocompletely change the look and feel of the project. Being small and light, the end productis particularly usable on mobile platforms such as a smartphone or tablet, but will runequally well on a full-size desktop computer.
I leave it up to you to take any pieces of code you think you can use and expand on themfor your own purposes. Perhaps you may even wish to build on these files to create asocial networking site of your own.
Designing a Social Networking SiteBefore writing any code, I sat down and came up with several things that I decided wereessential to such a site. These included:
• A signup process• A login form• A logout facility• Session control
603

• User profiles with uploaded thumbnails• A member directory• Adding members as friends• Public and private messaging between members• How to style the project
I decided to name the project Robin’s Nest, but you have to modify only one line of code(in functions.php) to change this to a name of your choice.
On the WebsiteAll the examples in this chapter can be found on the companion website. You can alsodownload the examples from there to your computer by clicking on the DownloadExamples link. This will download an archive file called examples.zip, which you shouldextract to a suitable location on your computer.
Of particular interest to this chapter, within the ZIP file is a folder called robinsnest, inwhich all the following examples have been saved with the correct filenames requiredby this sample application. So you can easily copy them all to your web developmentfolder to try them out.
functions.phpLet’s jump right into the project, starting with Example 26-1, functions.php, the includefile of the main functions. This file contains a little more than just the functions, though,because I have added the database login details here instead of using yet another separatefile. So the first half-dozen lines of code define the host, database name, username, andpassword of the database to use.
It doesn’t matter what you call the database, as long as it already exists (see Chapter 8for instructions on how to create a new database). Also make sure to correctly assign aMySQL username and password to $dbuser and $dbpass. With correct values, the sub‐sequent two lines will open a connection to MySQL and select the database. The last ofthe initial instructions sets the name of the social networking site by assigning the valueRobin's Nest to the variable $appname. If you want to change the name, this is the placeto do so.
604 | Chapter 26: Bringing It All Together

The FunctionsThe project uses five main functions:createTable
Checks whether a table already exists and, if not, creates it
queryMysql
Issues a query to MySQL, outputting an error message if it fails
destroySession
Destroys a PHP session and clears its data to log users out
sanitizeString
Removes potentially malicious code or tags from user input
showProfile
Displays a user’s image and “about me” message if he has one
All of these should be obvious in their action to you by now, with the possible exceptionof showProfile, which looks for an image of the name user.jpg (where user is the user‐name of the current user), and if it finds it, displays it. It also displays any “about me”text the user may have saved.
I have ensured that error handling is in place for all the functions that need it, so thatthey can catch any typographical or other errors you may introduce, and generate errormessages. However, if you use any of this code on a production server, you will probablywant to provide your own error-handling routines to make the code more user-friendly.
So enter Example 26-1 and save it as functions.php (or download it from the companionwebsite), and you’ll be ready to move on to the next section.
Example 26-1. functions.php<?php $dbhost = 'localhost'; // Unlikely to require changing $dbname = 'robinsnest'; // Modify these... $dbuser = 'robinsnest'; // ...variables according $dbpass = 'rnpassword'; // ...to your installation $appname = "Robin's Nest"; // ...and preference
$connection = new mysqli($dbhost, $dbuser, $dbpass, $dbname); if ($connection->connect_error) die($connection->connect_error);
function createTable($name, $query) { queryMysql("CREATE TABLE IF NOT EXISTS $name($query)"); echo "Table '$name' created or already exists.<br>"; }
The Functions | 605

function queryMysql($query) { global $connection; $result = $connection->query($query); if (!$result) die($connection->error); return $result; }
function destroySession() { $_SESSION=array();
if (session_id() != "" || isset($_COOKIE[session_name()])) setcookie(session_name(), '', time()-2592000, '/');
session_destroy(); }
function sanitizeString($var) { global $connection; $var = strip_tags($var); $var = htmlentities($var); $var = stripslashes($var); return $connection->real_escape_string($var); }
function showProfile($user) { if (file_exists("$user.jpg")) echo "<img src='$user.jpg' style='float:left;'>";
$result = queryMysql("SELECT * FROM profiles WHERE user='$user'");
if ($result->num_rows) { $row = $result->fetch_array(MYSQLI_ASSOC); echo stripslashes($row['text']) . "<br style='clear:left;'><br>"; } }?>
If you read a previous edition of this book, in which these examplesused the old mysql extension, you should note that in order to refer‐ence the MySQL database using mysqli, you must apply the globalkeyword in the queryMysql and sanitizeString functions, to allowthem to use the value in $connection.
606 | Chapter 26: Bringing It All Together

header.phpFor uniformity, each page of the project needs to have access to the same set of features.Therefore I placed these things in Example 26-2, header.php. This is the file that isactually included by the other files and it, in turn, includes functions.php. This meansthat only a single require_once is needed in each file.
header.php starts by calling the function session_start. As you’ll recall from Chap‐ter 12, this sets up a session that will remember certain values we want stored acrossdifferent PHP files.
With the session started, the program then checks whether the session variable user iscurrently assigned a value. If so, a user has logged in and the variable $loggedin is setto TRUE.
After the main setup code in which a style sheet is loaded, a canvas element is createdfor the logo, and a div is also created. The file javascript.js (see Example 26-14, later on)is loaded to pull in the O, S, and C functions; these would normally be in the OSC.js file,but to keep the number of files down I’ve added them to the JavaScript used to createthe logo.
Using the value of $loggedin, an if block displays one of two sets of menus. The non-logged-in set simply offers options of Home, Sign up, and Log in, whereas the logged-in version offers full access to the project’s features. Additionally, if a user is logged in,his or her username is appended in brackets to the page title and placed after the mainheading. We can freely refer to $user wherever we want to put in the name, because ifthe user is not logged in, that variable is empty and will have no effect on the output.
The styling applied to this file is in the file styles.css (Example 26-13, detailed at the endof this chapter) and includes creating a wide heading with a colored background, andturning the links in the lists to rounded buttons.
Example 26-2. header.php<?php session_start();
echo "<!DOCTYPE html>\n<html><head>";
require_once 'functions.php';
$userstr = ' (Guest)';
if (isset($_SESSION['user'])) { $user = $_SESSION['user']; $loggedin = TRUE; $userstr = " ($user)"; }
header.php | 607

else $loggedin = FALSE;
echo "<title>$appname$userstr</title><link rel='stylesheet' " . "href='styles.css' type='text/css'>" . "</head><body><center><canvas id='logo' width='624' " . "height='96'>$appname</canvas></center>" . "<div class='appname'>$appname$userstr</div>" . "<script src='javascript.js'></script>";
if ($loggedin) echo "<br ><ul class='menu'>" . "<li><a href='members.php?view=$user'>Home</a></li>" . "<li><a href='members.php'>Members</a></li>" . "<li><a href='friends.php'>Friends</a></li>" . "<li><a href='messages.php'>Messages</a></li>" . "<li><a href='profile.php'>Edit Profile</a></li>" . "<li><a href='logout.php'>Log out</a></li></ul><br>"; else echo ("<br><ul class='menu'>" . "<li><a href='index.php'>Home</a></li>" . "<li><a href='signup.php'>Sign up</a></li>" . "<li><a href='login.php'>Log in</a></li></ul><br>" . "<span class='info'>⇒ You must be logged in to " . "view this page.</span><br><br>");?>
Using the <br> tag, as in the preceding example, is a quick-and-dirty way of creating spacing in page layout. In this instance it workswell, but generally you will probably want to use CSS margins to fine-tune the spacing around elements.
setup.phpWith the pair of included files written, it’s now time to set up the MySQL tables theywill use. We do this with Example 26-3, setup.php, which you should type and load intoyour browser before calling up any other files; otherwise, you’ll get numerous MySQLerrors.
The tables created are kept short and sweet, and have the following names and columns:
• members: username user (indexed), password pass• messages: ID id (indexed), author auth (indexed), recipient recip, message typepm, message message
• friends: username user (indexed), friend’s username friend• profiles: username user (indexed), “about me” text
608 | Chapter 26: Bringing It All Together

Because the function createTable first checks whether a table already exists, this pro‐gram can be safely called multiple times without generating any errors.
It is very likely that you will need to add many more columns to these tables if youchoose to expand on this project. If so, you may need to issue a MySQL DROP TABLEcommand before re-creating a table.
Example 26-3. setup.php<!DOCTYPE html><html> <head> <title>Setting up database</title> </head> <body>
<h3>Setting up...</h3>
<?php require_once 'functions.php';
createTable('members', 'user VARCHAR(16), pass VARCHAR(16), INDEX(user(6))');
createTable('messages', 'id INT UNSIGNED AUTO_INCREMENT PRIMARY KEY, auth VARCHAR(16), recip VARCHAR(16), pm CHAR(1), time INT UNSIGNED, message VARCHAR(4096), INDEX(auth(6)), INDEX(recip(6))');
createTable('friends', 'user VARCHAR(16), friend VARCHAR(16), INDEX(user(6)), INDEX(friend(6))');
createTable('profiles', 'user VARCHAR(16), text VARCHAR(4096), INDEX(user(6))');?>
<br>...done. </body></html>
setup.php | 609

For Example 26-3 to work, you must first ensure that you have al‐ready created the database specified in the variable $dbname in Ex‐ample 26-1, and also have granted access to it by the user given thename in $dbuser, with the password in $dbpass.
index.phpThis file is a trivial file but necessary nonetheless to give the project a home page. All itdoes is display a simple welcome message. In a finished application, this would be whereyou sell the virtues of your site to encourage signups.
Incidentally, seeing as all the MySQL tables have been created and the include files saved,you can now load Example 26-4, index.php, into your browser to get your first peek atthe new application. It should look like Figure 26-1.
Example 26-4. index.php<?php require_once 'header.php';
echo "<br><span class='main'>Welcome to $appname,";
if ($loggedin) echo " $user, you are logged in."; else echo ' please sign up and/or log in to join in.';?>
</span><br><br> </body></html>
signup.phpNow we need a module to enable users to join the new network, and that’s Example 26-5,signup.php. This is a slightly longer program, but you’ve seen all its parts before.
Let’s start by looking at the end block of HTML. This is a simple form that allows ausername and password to be entered. But note the use of the empty span given the idof 'info'. This will be the destination of the Ajax call in this program that checkswhether a desired username is available. See Chapter 18 for a complete description ofhow this works.
610 | Chapter 26: Bringing It All Together

Figure 26-1. The main page of the site
Checking for Username AvailabilityNow go back to the program start and you’ll see a block of JavaScript that starts withthe function checkUser. This is called by the JavaScript onBlur event when focus isremoved from the username field of the form. First it sets the contents of the span Imentioned (with the id of info) to an empty string, which clears it in case it previouslyhad a value.
Next a request is made to the program checkuser.php, which reports whether the user‐name user is available. The returned result of the Ajax call, a friendly message, is thenplaced in the info span.
After the JavaScript section comes some PHP code that you should recognize from theChapter 16 discussion of form validation. This section also uses the sanitizeStringfunction to remove potentially malicious characters before looking up the username inthe database and, if it’s not already taken, inserting the new username $user and pass‐word $pass.
Logging InUpon successfully signing up, the user is then prompted to log in. A more fluid responseat this point might be to automatically log in a newly created user, but because I don’t
signup.php | 611

want to overly complicate the code, I have kept the signup and login modules separatefrom each other. I’m sure you can easily implement this if you want to, however.
Example 26-5 uses the CSS class fieldname to arrange the form fields, aligning themneatly under each other in columns. When loaded into a browser (and in conjunctionwith checkuser.php, shown later), this program will look like Figure 26-2, where you cansee that the Ajax call has identified that the username Robin is available. If you wouldlike the password field to show only asterisks, change its type from text to password.
Example 26-5. signup.php<?php require_once 'header.php';
echo <<<_END <script> function checkUser(user) { if (user.value == '') { O('info').innerHTML = '' return }
params = "user=" + user.value request = new ajaxRequest() request.open("POST", "checkuser.php", true) request.setRequestHeader("Content-type", "application/x-www-form-urlencoded") request.setRequestHeader("Content-length", params.length) request.setRequestHeader("Connection", "close")
request.onreadystatechange = function() { if (this.readyState == 4) if (this.status == 200) if (this.responseText != null) O('info').innerHTML = this.responseText } request.send(params) }
function ajaxRequest() { try { var request = new XMLHttpRequest() } catch(e1) { try { request = new ActiveXObject("Msxml2.XMLHTTP") } catch(e2) { try { request = new ActiveXObject("Microsoft.XMLHTTP") } catch(e3) { request = false } } }
612 | Chapter 26: Bringing It All Together

return request } </script> <div class='main'><h3>Please enter your details to sign up</h3>_END;
$error = $user = $pass = ""; if (isset($_SESSION['user'])) destroySession();
if (isset($_POST['user'])) { $user = sanitizeString($_POST['user']); $pass = sanitizeString($_POST['pass']);
if ($user == "" || $pass == "") $error = "Not all fields were entered<br><br>"; else { $result = queryMysql("SELECT * FROM members WHERE user='$user'");
if ($result->num_rows) $error = "That username already exists<br><br>"; else { queryMysql("INSERT INTO members VALUES('$user', '$pass')"); die("<h4>Account created</h4>Please Log in.<br><br>"); } } }
echo <<<_END <form method='post' action='signup.php'>$error <span class='fieldname'>Username</span> <input type='text' maxlength='16' name='user' value='$user' onBlur='checkUser(this)'><span id='info'></span><br> <span class='fieldname'>Password</span> <input type='text' maxlength='16' name='pass' value='$pass'><br>_END;?>
<span class='fieldname'> </span> <input type='submit' value='Sign up'> </form></div><br> </body></html>
signup.php | 613

Figure 26-2. The signup page
On a production server, I wouldn’t recommend storing user pass‐words in the clear as I’ve done here (for reasons of space and sim‐plicity). Instead, you should salt them and store them as one-wayhash strings. See Chapter 13 for more details on how to do this.
checkuser.phpTo go with signup.php, here’s Example 26-6, checkuser.php, which looks up a usernamein the database and returns a string indicating whether it has already been taken. Becauseit relies on the functions sanitizeString and queryMysql, the program first includesthe file functions.php.
Then, if the $_POST variable user has a value, the function looks it up in the databaseand, depending on whether it exists as a username, outputs either “Sorry, this usernameis taken” or “This username is available.” Just checking the function mysql_num_rowsagainst the result is sufficient for this, as it will return 0 for not found, or 1 if it is found.
614 | Chapter 26: Bringing It All Together

The HTML entities ✘ and ✔ are also used to preface the string witheither a cross or a checkmark.
Example 26-6. checkuser.php<?php require_once 'functions.php';
if (isset($_POST['user'])) { $user = sanitizeString($_POST['user']); $result = queryMysql("SELECT * FROM members WHERE user='$user'");
if ($result->num_rows) echo "<span class='taken'> ✘ " . "This username is taken</span>"; else echo "<span class='available'> ✔ " . "This username is available</span>"; }?>
login.phpWith users now able to sign up to the site, Example 26-7, login.php, provides the codeneeded to let them log in. Like the signup page, it features a simple HTML form andsome basic error checking, as well as using sanitizeString before querying the MySQLdatabase.
The main thing to note here is that, upon successful verification of the username andpassword, the session variables user and pass are given the username and passwordvalues. As long as the current session remains active, these variables will be accessibleby all the programs in the project, allowing them to automatically provide access tologged-in users.
You may be interested in the use of the die function upon successfully logging in. Thisis there because it combines an echo and an exit command in one, thus saving a lineof code. For styling, this (and most of the files) applies the class main to indent thecontent from the lefthand edge.
When you call this program up in your browser, it should look like Figure 26-3. Notehow the input type of password has been used here to mask the password with asterisksto prevent it from being viewed by anyone looking over the user’s shoulder.
login.php | 615

Example 26-7. login.php <?php require_once 'header.php'; echo "<div class='main'><h3>Please enter your details to log in</h3>"; $error = $user = $pass = "";
if (isset($_POST['user'])) { $user = sanitizeString($_POST['user']); $pass = sanitizeString($_POST['pass']);
if ($user == "" || $pass == "") $error = "Not all fields were entered<br>"; else { $result = queryMySQL("SELECT user,pass FROM members WHERE user='$user' AND pass='$pass'");
if ($result->num_rows == 0) { $error = "<span class='error'>Username/Password invalid</span><br><br>"; } else { $_SESSION['user'] = $user; $_SESSION['pass'] = $pass; die("You are now logged in. Please <a href='members.php?view=$user'>" . "click here</a> to continue.<br><br>"); } } }
echo <<<_END <form method='post' action='login.php'>$error <span class='fieldname'>Username</span><input type='text' maxlength='16' name='user' value='$user'><br> <span class='fieldname'>Password</span><input type='password' maxlength='16' name='pass' value='$pass'>_END;?>
<br> <span class='fieldname'> </span> <input type='submit' value='Login'> </form><br></div> </body></html>
616 | Chapter 26: Bringing It All Together

Figure 26-3. The login page
profile.phpOne of the first things that new users may want to do after signing up and logging in isto create a profile, which can be done via Example 26-8, profile.php. I think you’ll findsome interesting code here, such as routines to upload, resize, and sharpen images.
Let’s start by looking at the main HTML at the end of the code. This is like the formsyou’ve just seen, but this time it has the parameter enctype='multipart/form-data'.This allows us to send more than one type of data at a time, enabling the posting of animage as well as some text. There’s also an input type of file, which creates a Browsebutton that a user can press to select a file to be uploaded.
When the form is submitted, the code at the start of the program is executed. The firstthing it does is ensure that a user is logged in before allowing program execution toproceed. Only then is the page heading displayed.
profile.php | 617

Adding the “About Me” TextThen the POST variable text is checked to see whether some text was posted to theprogram. If so, it is sanitized and all long whitespace sequences (including returns andline feeds) are replaced with a single space. This function incorporates a double securitycheck, ensuring that the user actually exists in the database and that no attempted hack‐ing can succeed before inserting this text into the database, where it will become theuser’s “about me” details.
If no text was posted, the database is queried to see whether any text already exists inorder to prepopulate the textarea for the user to edit it.
Adding a Profile ImageNext we move on to the section where the $_FILES system variable is checked to seewhether an image has been uploaded. If so, a string variable called $saveto is created,based on the user’s username followed by the extension .jpg. For example, user Jill willcause $saveto to have the value Jill.jpg. This is the file where the uploaded image willbe saved for use in the user’s profile.
Following this, the uploaded image type is examined and is accepted only if it is a jpeg,png, or gif image. Upon success, the variable $src is populated with the uploaded imageusing one of the imagecreatefrom functions according to the image type uploaded. Theimage is now in a raw format that PHP can process. If the image is not of an allowedtype, the flag $typeok is set to FALSE, preventing the final section of image upload codefrom being processed.
Processing the ImageFirst, we store the image’s dimensions in $w and $h using the following statement, whichis a quick way of assigning values from an array to separate variables:
list($w, $h) = getimagesize($saveto);
Then, using the value of $max (which is set to 100), we calculate new dimensions thatwill result in a new image of the same ratio, but with no dimension greater than 100pixels. This results in giving the variables $tw and $th the new values needed. If youwant smaller or larger thumbnails, simply change the value of $max accordingly.
Next, the function imagecreatetruecolor is called to create a new, blank canvas $twwide and $th high in $tmp. Then imagecopyresampled is called to resample the imagefrom $src, to the new $tmp. Sometimes resampling images can result in a slightly blurredcopy, so the next piece of code uses the imageconvolution function to sharpen the imageup a bit.
618 | Chapter 26: Bringing It All Together

Finally, the image is saved as a jpeg file in the location defined by the variable $saveto,after which we remove both the original and the resized image canvases from memoryusing the imagedestroy function, returning the memory that was used.
Displaying the Current ProfileLast but not least, so that the user can see what the current profile looks like beforeediting it, the showProfile function from functions.php is called prior to outputting theform HTML. If no profile exists yet, nothing will be displayed.
When a profile image is displayed, CSS is applied to it to provide a border, shadow, anda margin to its right—to separate the profile text from the image. The result of loadingExample 26-8 into a browser is shown in Figure 26-4, where you can see that thetextarea has been prepopulated with the “about me” text.
Example 26-8. profile.php<?php require_once 'header.php';
if (!$loggedin) die();
echo "<div class='main'><h3>Your Profile</h3>";
$result = queryMysql("SELECT * FROM profiles WHERE user='$user'");
if (isset($_POST['text'])) { $text = sanitizeString($_POST['text']); $text = preg_replace('/\s\s+/', ' ', $text);
if ($result->num_rows) queryMysql("UPDATE profiles SET text='$text' where user='$user'"); else queryMysql("INSERT INTO profiles VALUES('$user', '$text')"); } else { if ($result->num_rows) { $row = $result->fetch_array(MYSQLI_ASSOC); $text = stripslashes($row['text']); } else $text = ""; }
$text = stripslashes(preg_replace('/\s\s+/', ' ', $text));
if (isset($_FILES['image']['name'])) { $saveto = "$user.jpg"; move_uploaded_file($_FILES['image']['tmp_name'], $saveto);
profile.php | 619

$typeok = TRUE;
switch($_FILES['image']['type']) { case "image/gif": $src = imagecreatefromgif($saveto); break; case "image/jpeg": // Both regular and progressive jpegs case "image/pjpeg": $src = imagecreatefromjpeg($saveto); break; case "image/png": $src = imagecreatefrompng($saveto); break; default: $typeok = FALSE; break; }
if ($typeok) { list($w, $h) = getimagesize($saveto);
$max = 100; $tw = $w; $th = $h;
if ($w > $h && $max < $w) { $th = $max / $w * $h; $tw = $max; } elseif ($h > $w && $max < $h) { $tw = $max / $h * $w; $th = $max; } elseif ($max < $w) { $tw = $th = $max; }
$tmp = imagecreatetruecolor($tw, $th); imagecopyresampled($tmp, $src, 0, 0, 0, 0, $tw, $th, $w, $h); imageconvolution($tmp, array(array(−1, −1, −1), array(−1, 16, −1), array(−1, −1, −1)), 8, 0); imagejpeg($tmp, $saveto); imagedestroy($tmp); imagedestroy($src); } }
showProfile($user);
echo <<<_END <form method='post' action='profile.php' enctype='multipart/form-data'> <h3>Enter or edit your details and/or upload an image</h3> <textarea name='text' cols='50' rows='3'>$text</textarea><br>_END;?>
620 | Chapter 26: Bringing It All Together

Image: <input type='file' name='image' size='14'> <input type='submit' value='Save Profile'> </form></div><br> </body></html>
Figure 26-4. Editing a user profile
profile.php | 621

members.phpUsing Example 26-9, members.php, your users will be able to find other members andchoose to add them as friends (or drop them if they are already friends). This programhas two modes. The first lists all members and their relationships to you, and the secondshows a user’s profile.
Viewing a User’s ProfileThe code for the latter mode comes first, where a test is made for the GET variableview. If it exists, a user wants to view someone’s profile, so the program does that usingthe showProfile function, along with providing a couple of links to the user’s friendsand messages.
Adding and Dropping FriendsAfter that, the two GET variables, add and remove, are tested. If one or the other has avalue, it will be the username of a user to either add or drop as a friend. We achieve thisby looking up the user in the MySQL friends table and either inserting a friend user‐name or removing it from the table.
And, of course, every posted variable is first passed through sanitizeString to ensurethat it is safe to use with MySQL.
Listing All MembersThe final section of code issues a SQL query to list all usernames. The code places thenumber returned in the variable $num before outputting the page heading.
A for loop then iterates through each and every member, fetching their details and thenlooking them up in the friends table to see if they are either being followed by or afollower of the user. If someone is both a follower and a followee, she is classed as amutual friend.
The variable $t1 is nonzero when the user is following another member, and $t2 isnonzero when another member is following the user. Depending on these values, textis displayed after each username showing the relationship (if any) to the current user.
Icons are also displayed to show the relationships. A double pointing arrow means thatthe users are mutual friends. A left-pointing arrow indicates the user is following anothermember. And a right-pointing arrow indicates that another member is following theuser.
Finally, depending on whether the user is following another member, a link is providedto either add or drop that member as a friend.
622 | Chapter 26: Bringing It All Together

When you call Example 26-9 up in a browser, it will look like Figure 26-5. See how theuser is invited to “follow” a non-following member, but if the member is already fol‐lowing the user, a “recip” link to reciprocate the friendship is offered. In the case of auser already following another member, the user can select “drop” to end the following.
Example 26-9. members.php<?php require_once 'header.php';
if (!$loggedin) die();
echo "<div class='main'>";
if (isset($_GET['view'])) { $view = sanitizeString($_GET['view']);
if ($view == $user) $name = "Your"; else $name = "$view's";
echo "<h3>$name Profile</h3>"; showProfile($view); echo "<a class='button' href='messages.php?view=$view'>" . "View $name messages</a><br><br>"; die("</div></body></html>"); }
if (isset($_GET['add'])) { $add = sanitizeString($_GET['add']);
$result = queryMysql("SELECT * FROM friends WHERE user='$add' AND friend='$user'"); if (!$result->num_rows) queryMysql("INSERT INTO friends VALUES ('$add', '$user')"); } elseif (isset($_GET['remove'])) { $remove = sanitizeString($_GET['remove']); queryMysql("DELETE FROM friends WHERE user='$remove' AND friend='$user'"); }
$result = queryMysql("SELECT user FROM members ORDER BY user"); $num = $result->num_rows;
echo "<h3>Other Members</h3><ul>";
for ($j = 0 ; $j < $num ; ++$j) { $row = $result->fetch_array(MYSQLI_ASSOC); if ($row['user'] == $user) continue;
members.php | 623
echo "<li><a href='members.php?view=" . $row['user'] . "'>" . $row['user'] . "</a>"; $follow = "follow";
$result1 = queryMysql("SELECT * FROM friends WHERE user='" . $row['user'] . "' AND friend='$user'"); $t1 = $result1->num_rows; $result1 = queryMysql("SELECT * FROM friends WHERE user='$user' AND friend='" . $row['user'] . "'"); $t2 = $result1->num_rows;
if (($t1 + $t2) > 1) echo " ↔ is a mutual friend"; elseif ($t1) echo " ← you are following"; elseif ($t2) { echo " → is following you"; $follow = "recip"; }
if (!$t1) echo " [<a href='members.php?add=" . $row['user'] . "'>$follow</a>]"; else echo " [<a href='members.php?remove=" . $row['user'] . "'>drop</a>]"; }?>
</ul></div> </body></html>
On a production server, there could be thousands or even hundredsof thousands of users, so you would probably substantially modifythis program to include searching the “about me” text, support pag‐ing of the output a screen at a time, and so on.
624 | Chapter 26: Bringing It All Together

Figure 26-5. Using the members module
friends.phpThe module that shows a user’s friends and followers is Example 26-10, friends.php. Thisinterrogates the friends table just like the members.php program, but only for a singleuser. It then shows all of that user’s mutual friends and followers along with the peoplehe is following.
All the followers are saved into an array called $followers, and all the people beingfollowed are placed in an array called $following. Then a neat piece of code is used toextract all those who are both following and followed by the user, like this:
$mutual = array_intersect($followers, $following);
The array_intersect function extracts all members common to both arrays and re‐turns a new array containing only those people. This array is then stored in $mutual.Now it’s possible to use the array_diff function for each of the $followers and$following arrays to keep only those people who are not mutual friends, like this:
friends.php | 625

$followers = array_diff($followers, $mutual);$following = array_diff($following, $mutual);
This results in the array $mutual containing only mutual friends, $followers contain‐ing only followers (and no mutual friends), and $following containing only peoplebeing followed (and no mutual friends).
Now that we’re armed with these arrays, it’s a simple matter to separately display eachcategory of members, as can be seen in Figure 26-6. The PHP sizeof function returnsthe number of elements in an array; here I use it just to trigger code when the size isnonzero (i.e., friends of that type exist).
Note how, by using the variables $name1, $name2, and $name3 in the relevant places, thecode can tell when you’re looking at your own friends list, using the words Your andYou are, instead of simply displaying the username. The commented line can be un‐commented if you wish to display the user’s profile information on this screen.
Example 26-10. friends.php<?php require_once 'header.php';
if (!$loggedin) die();
if (isset($_GET['view'])) $view = sanitizeString($_GET['view']); else $view = $user;
if ($view == $user) { $name1 = $name2 = "Your"; $name3 = "You are"; } else { $name1 = "<a href='members.php?view=$view'>$view</a>'s"; $name2 = "$view's"; $name3 = "$view is"; }
echo "<div class='main'>";
// Uncomment this line if you wish the user's profile to show here // showProfile($view);
$followers = array(); $following = array();
$result = queryMysql("SELECT * FROM friends WHERE user='$view'"); $num = $result->num_rows;
for ($j = 0 ; $j < $num ; ++$j) {
626 | Chapter 26: Bringing It All Together

$row = $result->fetch_array(MYSQLI_ASSOC); $followers[$j] = $row['friend']; }
$result = queryMysql("SELECT * FROM friends WHERE friend='$view'"); $num = $result->num_rows;
for ($j = 0 ; $j < $num ; ++$j) { $row = $result->fetch_array(MYSQLI_ASSOC); $following[$j] = $row['user']; }
$mutual = array_intersect($followers, $following); $followers = array_diff($followers, $mutual); $following = array_diff($following, $mutual); $friends = FALSE;
if (sizeof($mutual)) { echo "<span class='subhead'>$name2 mutual friends</span><ul>"; foreach($mutual as $friend) echo "<li><a href='members.php?view=$friend'>$friend</a>"; echo "</ul>"; $friends = TRUE; }
if (sizeof($followers)) { echo "<span class='subhead'>$name2 followers</span><ul>"; foreach($followers as $friend) echo "<li><a href='members.php?view=$friend'>$friend</a>"; echo "</ul>"; $friends = TRUE; }
if (sizeof($following)) { echo "<span class='subhead'>$name3 following</span><ul>"; foreach($following as $friend) echo "<li><a href='members.php?view=$friend'>$friend</a>"; echo "</ul>"; $friends = TRUE; }
if (!$friends) echo "<br>You don't have any friends yet.<br><br>";
echo "<a class='button' href='messages.php?view=$view'>" . "View $name2 messages</a>";?>
</div><br>
friends.php | 627

</body></html>
Figure 26-6. Displaying a user’s friends and followers
messages.phpThe last of the main modules is Example 26-11, messages.php. The program starts bychecking whether a message has been posted in the POST variable text. If so, it is insertedinto the messages table. At the same time, the value of pm is also stored. This indicateswhether a message is private or public. A 0 represents a public message and 1 is private.
Next, the user’s profile and a form for entering a message are displayed, along with radiobuttons to choose between a private or public message. After this, all the messages areshown, depending on whether they are private or public. If they are public, all users cansee them, but private messages are visible only to the sender and recipient. This is all
628 | Chapter 26: Bringing It All Together
handled by a couple of queries to the MySQL database. Additionally, when a messageis private, it is introduced by the word whispered and shown in italic.
Finally, the program displays a couple of links to refresh the messages (in case anotheruser has posted one in the meantime) and to view the user’s friends. The trick using thevariables $name1 and $name2 is again used so that when you view your own profile theword Your is displayed instead of the username.
You can see the result of viewing this program with a browser in Figure 26-7. Note howusers viewing their own messages are provided with links to erase any they don’t want.
Example 26-11. messages.php<?php require_once 'header.php';
if (!$loggedin) die();
if (isset($_GET['view'])) $view = sanitizeString($_GET['view']); else $view = $user;
if (isset($_POST['text'])) { $text = sanitizeString($_POST['text']);
if ($text != "") { $pm = substr(sanitizeString($_POST['pm']),0,1); $time = time(); queryMysql("INSERT INTO messages VALUES(NULL, '$user', '$view', '$pm', $time, '$text')"); } }
if ($view != "") { if ($view == $user) $name1 = $name2 = "Your"; else { $name1 = "<a href='members.php?view=$view'>$view</a>'s"; $name2 = "$view's"; }
echo "<div class='main'><h3>$name1 Messages</h3>"; showProfile($view);
echo <<<_END <form method='post' action='messages.php?view=$view'> Type here to leave a message:<br> <textarea name='text' cols='40' rows='3'></textarea><br> Public<input type='radio' name='pm' value='0' checked='checked'> Private<input type='radio' name='pm' value='1'>
messages.php | 629

<input type='submit' value='Post Message'></form><br>_END;
if (isset($_GET['erase'])) { $erase = sanitizeString($_GET['erase']); queryMysql("DELETE FROM messages WHERE id=$erase AND recip='$user'"); }
$query = "SELECT * FROM messages WHERE recip='$view' ORDER BY time DESC"; $result = queryMysql($query); $num = $result->num_rows;
for ($j = 0 ; $j < $num ; ++$j) { $row = $result->fetch_array(MYSQLI_ASSOC);
if ($row['pm'] == 0 || $row['auth'] == $user || $row['recip'] == $user) { echo date('M jS \'y g:ia:', $row['time']); echo " <a href='messages.php?view=" . $row['auth'] . "'>" . $row['auth']. "</a> ";
if ($row['pm'] == 0) echo "wrote: "" . $row['message'] . "" "; else echo "whispered: <span class='whisper'>"" . $row['message'] . ""</span> ";
if ($row['recip'] == $user) echo "[<a href='messages.php?view=$view" . "&erase=" . $row['id'] . "'>erase</a>]";
echo "<br>"; } } }
if (!$num) echo "<br><span class='info'>No messages yet</span><br><br>";
echo "<br><a class='button' href='messages.php?view=$view'>Refresh messages</a>";?>
</div><br> </body></html>
630 | Chapter 26: Bringing It All Together

Figure 26-7. The messaging module
logout.phpThe final ingredient in our social networking recipe is Example 26-12, logout.php, thelogout page that closes a session and deletes any associated data and cookies. The resultof calling up this program is shown in Figure 26-8, where the user is now asked to clickon a link that will take her to the un-logged-in home page and remove the logged-in
logout.php | 631

links from the top of the screen. Of course, you could write a JavaScript or PHP redirectto do this (probably a good idea if you wish to keep logout looking clean).
Example 26-12. logout.php<?php require_once 'header.php';
if (isset($_SESSION['user'])) { destroySession(); echo "<div class='main'>You have been logged out. Please " . "<a href='index.php'>click here</a> to refresh the screen."; } else echo "<div class='main'><br>" . "You cannot log out because you are not logged in";?>
<br><br></div> </body></html>
Figure 26-8. The logout page
styles.cssThe style sheet used for this project is shown in Example 26-13. There are a number ofsets of declarations, as follows:
632 | Chapter 26: Bringing It All Together

*
Sets the default font family and size for the project using the universal selector.
body
Sets the width of the project window, centers it horizontally, specifies a backgroundcolor, and gives it a border.
html
Sets the background color of the HTML section.
img
Gives all images a border, shadow, and a righthand margin.
li a and .buttonRemove underlines from hyperlinks in all <a> tags that are within a <li> element,and all elements employing the button class.
li a:hover and .button:hoverSet the color in which <li> elements and the button class should display text whenhovered over.
.appname
Sets the properties for the heading (which uses the appname class), including cen‐tering, background and text colors, the font family and size, and the padding.
.fieldname
Sets the width of elements using the fieldname class by first floating them.
.main
This class applies an indent to elements that use it.
.info
This class is used for displaying important information. It sets a background andforeground text color, applies a border and padding, and indents elements thatemploy it.
.menu li and .buttonThese declarations ensure that all <li> elements and the button class display inline,have padding applied, and include a border, a background and foreground textcolor, a right margin, rounded borders, and a shadow—resulting in a button effect.
.subhead
Emphasizes sections of text.
.taken, .available, .error, and .whisperThese declarations set the colors and font styles to be used for displaying differenttypes of information.
styles.css | 633

#logo
These rules style the logo text as a fallback in case a non-HTML5 browser is in useand the canvas logo doesn’t get created.
Example 26-13. styles.css* { font-family:verdana,sans-serif; font-size :14pt;}
body { width :700px; margin :20px auto; background:#f8f8f8; border :1px solid #888;}
html { background:#fff}
img { border :1px solid black; margin-right :15px; -moz-box-shadow :2px 2px 2px #888; -webkit-box-shadow:2px 2px 2px #888; box-shadow :2px 2px 2px #888;}
li a, .button { text-decoration:none;}
li a:hover, .button:hover { color:green;}
.appname { text-align :center; background :#eb8; color :#40d; font-family:helvetica; font-size :20pt; padding :4px;}
.fieldname { float:left; width:120px;}
634 | Chapter 26: Bringing It All Together

.main { margin-left:40px;}
.info { background :lightgreen; color :blue; border :1px solid green; padding :5px 10px; margin-left:40px;}
.menu li, .button { display :inline; padding :4px 6px; border :1px solid #777; background :#ddd; color :#d04; margin-right :8px; border-radius :5px; -moz-box-shadow :2px 2px 2px #888; -webkit-box-shadow:2px 2px 2px #888; box-shadow :2px 2px 2px #888;}
.subhead { font-weight:bold;}
.taken, .error { color:red;}
.available { color:green;}
.whisper { font-style:italic; color :#006600;}
#logo { font-family:Georgia; font-weight:bold; font-style :italic; font-size :97px;}
styles.css | 635

javascript.jsFinally, there’s the JavaScript file (see Example 26-14), which contains the O, S, and Cfunctions used throughout this book, along with some code to draw the logo for the siteusing an HTML5 canvas, as explained in Chapter 23.
Example 26-14. javascript.jscanvas = O('logo')context = canvas.getContext('2d')context.font = 'bold italic 97px Georgia'context.textBaseline = 'top'image = new Image()image.src = 'robin.gif'
image.onload = function(){ gradient = context.createLinearGradient(0, 0, 0, 89) gradient.addColorStop(0.00, '#faa') gradient.addColorStop(0.66, '#f00') context.fillStyle = gradient context.fillText( "R bin's Nest", 0, 0) context.strokeText("R bin's Nest", 0, 0) context.drawImage(image, 64, 32)}
function O(obj){ if (typeof obj == 'object') return obj else return document.getElementById(obj)}
function S(obj){ return O(obj).style}
function C(name){ var elements = document.getElementsByTagName('*') var objects = []
for (var i = 0 ; i < elements.length ; ++i) if (elements[i].className == name) objects.push(elements[i])
return objects}
636 | Chapter 26: Bringing It All Together

And that, as they say, is that. If you write anything based on this code or any otherexamples in this book, or have gained in any other way from it, then I am glad to havebeen of help and thank you for reading this book.
But before you go and try out your newly learned skills on the Web at large, browsethrough the appendixes that follow, as there’s a lot of additional information there youshould find useful.
javascript.js | 637


APPENDIX A
Solutions to the Chapter Questions
Chapter 1 Answers1. A web server (such as Apache), a server-side scripting language (PHP), a database
(MySQL), and a client-side scripting language (JavaScript).2. HyperText Markup Language: the web page itself, including text and markup tags.3. Like nearly all database engines, MySQL accepts commands in Structured Query
Language (SQL). SQL is the way that every user (including a PHP program) com‐municates with MySQL.
4. PHP runs on the server, whereas JavaScript runs on the client. PHP can commu‐nicate with the database to store and retrieve data, but it can’t alter the user’s webpage quickly and dynamically. JavaScript has the opposite benefits and drawbacks.
5. Cascading Style Sheets: styling and layout rules applied to the elements in an HTMLdocument.
6. Probably the most interesting new elements in HTML5 are <audio>, <video>, and<canvas>, although there are many others such as <article>, <summary>,<footer>, and more.
7. Some of these technologies are controlled by companies that accept bug reportsand fix the errors like any software company. But open source software also dependson a community, so your bug report may be handled by any user who understandsthe code well enough. You may someday fix bugs in an open source tool yourself.
639

Chapter 2 Answers1. WAMP stands for “Windows, Apache, MySQL, and PHP”; M in MAMP stands for
Mac instead of Windows; and the L in LAMP stands for Linux. They all refer to acomplete solution for hosting dynamic web pages.
2. Both 127.0.0.1 and http://localhost are ways of referring to the local computer.When a WAMP or MAMP is properly configured, you can type either into a brows‐er’s address bar to call up the default page on the local server.
3. FTP stands for File Transfer Protocol. An FTP program is used to transfer files backand forth between a client and a server.
4. It is necessary to FTP files to a remote server in order to update it, which cansubstantially increase development time if this action is carried out many times ina session.
5. Dedicated program editors are smart and can highlight problems in your codebefore you even run it.
Chapter 3 Answers1. The tag used to start PHP interpreting code is <?php ... ?>, which can be short‐
ened to <? ... ?> but is not recommended practice.2. You can use // for a single-line comment or /* ... */ to span multiple lines.3. All PHP statements must end with a semicolon (;).4. With the exception of constants, all PHP variables must begin with $.5. Variables hold a value that can be a string, a number, or other data.6. $variable = 1 is an assignment statement, whereas $variable == 1 is a compar‐
ison operator. Use $variable = 1 to set the value of $variable. Use $variable ==1 to find out later in the program whether $variable equals 1. If you mistakenlyuse $variable = 1 where you meant to do a comparison, it will do two things youprobably don’t want: set $variable to 1 and return a true value all the time, nomatter what its previous value was.
7. A hyphen is reserved for the subtraction operators. A construct like $current-user would be harder to interpret if hyphens were also allowed in variable namesand, in any case, would lead programs to be ambiguous.
8. Variable names are case-sensitive. So, for example,$This_Variable is not the sameas $this_variable.
9. You cannot use spaces in variable names, as this would confuse the PHP parser.Instead, try using the _ (underscore).
640 | Appendix A: Solutions to the Chapter Questions
10. To convert one variable type to another, reference it and PHP will automaticallyconvert it for you.
11. There is no difference between ++$j and $j++ unless the value of $j is being tested,assigned to another variable, or passed as a parameter to a function. In such cases,++$j increments $j before the test or other operation is performed, whereas $j++performs the operation and then increments $j.
12. Generally, the operators && and and are interchangeable except where precedenceis important, in which case && has a high precedence, while and has a low one.
13. You can use multiple lines within quotations marks or the <<<_END ... _END;construct to create a multiline echo or assignment. The closing tag must begin atthe start of a line, and end with a semicolon followed by a new line.
14. You cannot redefine constants because, by definition, once defined they retain theirvalue until the program terminates.
15. You can use \' or \" to escape either a single or double quote.16. The echo and print commands are similar in that they are both constructs, except
that print behaves like a PHP function and takes a single argument, while echo cantake multiple arguments.
17. The purpose of functions is to separate discrete sections of code into their own, self-contained sections that can be referenced by a single function name.
18. You can make a variable accessible to all parts of a PHP program by declaring it asglobal.
19. If you generate data within a function, you can convey the data to the rest of theprogram by returning a value or modifying a global variable.
20. When you combine a string with a number, the result is another string.
Chapter 4 Answers1. In PHP, TRUE represents the value 1 and FALSE represents NULL, which can be
thought of as “nothing” and is output as the empty string.2. The simplest forms of expressions are literals (such as numbers and strings) and
variables, which simply evaluate to themselves.3. The difference between unary, binary, and ternary operators is the number of
operands each requires (one, two, and three, respectively).4. The best way to force your own operator precedence is to place parentheses around
subexpressions to which you wish to give high precedence.5. Operator associativity refers to the direction of processing (left to right or right to
left).
Chapter 4 Answers | 641

6. You use the identity operator when you wish to bypass PHP’s automatic operandtype changing (also called type casting).
7. The three conditional statement types are if, switch, and the ?: operator.8. To skip the current iteration of a loop and move on to the next one, use a continue
statement.9. Loops using for statements are more powerful than while loops, because they
support two additional parameters to control the loop handling.10. Most conditional expressions in if and while statements are literal (or Boolean)
and therefore trigger execution when they evaluate to TRUE. Numeric expressionstrigger execution when they evaluate to a nonzero value. String expressions triggerexecution when they evaluate to a nonempty string. A NULL value is evaluated asfalse and therefore does not trigger execution.
Chapter 5 Answers1. Using functions avoids the need to copy or rewrite similar code sections many times
over by combining sets of statements together so that they can be called by a simplename.
2. By default, a function can return a single value. But by utilizing arrays, references,and global variables, any number of values can be returned.
3. When you reference a variable by name, such as by assigning its value to anothervariable or by passing its value to a function, its value is copied. The original doesnot change when the copy is changed. But if you reference a variable, only a pointer(or reference) to its value is used, so that a single value is referenced by more thanone name. Changing the value of the reference will change the original as well.
4. Scope refers to which parts of a program can access a variable. For example, avariable of global scope can be accessed by all parts of a PHP program.
5. To incorporate one file within another, you can use the include or require direc‐tives, or their safer variants, include_once and require_once.
6. A function is a set of statements referenced by a name that can receive and returnvalues. An object may contain zero or many functions (which are then called meth‐ods) as well as variables (which are called properties), all combined in a single unit.
7. To create a new object in PHP, use the new keyword like this:$object = new Class;
8. To create a subclass, use the extends keyword with syntax such as this:class Subclass extends Parentclass ...
642 | Appendix A: Solutions to the Chapter Questions

9. To call a piece of initializing code when an object is created, create a constructormethod called __construct within the class and place your code there.
10. Explicitly declaring properties within a class is unnecessary, as they will be implicitlydeclared upon first use. But it is considered good practice as it helps with codereadability and debugging, and is especially useful to other people who may haveto maintain your code.
Chapter 6 Answers1. A numeric array can be indexed numerically using numbers or numeric variables.
An associative array uses alphanumeric identifiers to index elements.2. The main benefit of the array keyword is that it enables you to assign several values
at a time to an array without repeating the array name.3. Both the each function and the foreach ... as loop construct return elements
from an array; both start at the beginning and increment a pointer to make surethe next element is returned each time; and both return FALSE when the end of thearray is reached. The difference is that the each function returns just a single ele‐ment, so it is usually wrapped in a loop. The foreach ... as construct is alreadya loop, executing repeatedly until the array is exhausted or you explicitly break outof the loop.
4. To create a multidimensional array, you need to assign additional arrays to elementsof the main array.
5. You can use the count function to count the number of elements in an array.6. The purpose of the explode function is to extract sections from a string that are
separated by an identifier, such as extracting words separated by spaces within asentence.
7. To reset PHP’s internal pointer into an array back to the first element, call the resetfunction.
Chapter 7 Answers1. The conversion specifier you would use to display a floating-point number is %f.2. To take the input string "Happy Birthday" and output the string "**Happy", you
could use a printf statement such as:printf("%'*7.5s", "Happy Birthday");
3. To send the output from printf to a variable instead of to a browser, you woulduse sprintf instead.
Chapter 6 Answers | 643

4. To create a Unix timestamp for 7:11am on May 2nd 2016, you could use thecommand:
$timestamp = mktime(7, 11, 0, 5, 2, 2016);
5. You would use the “w+” file access mode with fopen to open a file in write and readmode, with the file truncated and the file pointer at the start.
6. The PHP command for deleting the file file.txt is:unlink('file.txt');
7. The PHP function file_get_contents is used to read in an entire file in one go. Itwill also read them from across the Internet if provided with a URL.
8. The PHP superglobal associative array $_FILES contains the details about uploadedfiles.
9. The PHP exec function enables the running of system commands.10. In HTML5 you can use either the XHTML style of tag (such as <hr />) or the
standard HTML4 style (such as <hr>). It’s entirely up to you or your company’scoding style.
Chapter 8 Answers1. The semicolon is used by MySQL to separate or end commands. If you forget to
enter it, MySQL will issue a prompt and wait for you to enter it. (In the answers inthis section, I’ve left off the semicolon, because it looks strange in the text. But itmust terminate every statement.)
2. To see the available databases, type SHOW databases. To see tables within a databasethat you are using, type SHOW tables. (These commands are case-insensitive.)
3. To create this new user, use the GRANT command like this:GRANT PRIVILEGES ON newdatabase.* TO 'newuser'@'localhost' IDENTIFIED BY 'newpassword';
4. To view the structure of a table, type DESCRIBE tablename.5. The purpose of a MySQL index is to substantially decrease database access times
by maintaining indexes of one or more key columns, which can then be quicklysearched to locate rows within a table.
6. A FULLTEXT index enables natural-language queries to find keywords, whereverthey are in the FULLTEXT column(s), in much the same way as using a search engine.
7. A stopword is a word that is so common that it is considered not worth includingin a FULLTEXT index or using in searches. However, it does participate in a searchwhen it is part of a larger string bounded by double quotes.
644 | Appendix A: Solutions to the Chapter Questions

8. SELECT DISTINCT essentially affects only the display, choosing a single row andeliminating all the duplicates. GROUP BY does not eliminate rows, but combines allthe rows that have the same value in the column. Therefore, GROUP BY is useful forperforming an operation such as COUNT on groups of rows. SELECT DISTINCT is notuseful for that purpose.
9. To return only those rows containing the word Langhorne somewhere in the col‐umn author of the table classics, use a command such as:
SELECT * FROM classics WHERE author LIKE "%Langhorne%";
10. When you’re joining two tables together, they must share at least one commoncolumn such as an ID number or, as in the case of the classics and customers tables,the isbn column.
Chapter 9 Answers1. The term relationship refers to the connection between two pieces of data that have
some association, such as a book and its author, or a book and the customer whobought the book. A relational database such as MySQL specializes in storing andretrieving such relations.
2. The process of removing duplicate data and optimizing tables is called normaliza‐tion.
3. The three rules of First Normal Form are:
• There should be no repeating columns containing the same kind of data.• All columns should contain a single value.• There should be a primary key to uniquely identify each row.
4. To satisfy Second Normal Form, columns whose data repeats across multiple rowsshould be removed to their own tables.
5. In a one-to-many relationship, the primary key from the table on the “one” sidemust be added as a separate column (a foreign key) to the table on the “many” side.
6. To create a database with many-to-many relationship, you create an intermediarytable containing keys from two other tables. The other tables can then referenceeach other via the third.
7. To initiate a MySQL transaction, use either the BEGIN or the START TRANSACTIONcommand. To terminate a transaction and cancel all actions, issue a ROLLBACKcommand. To terminate a transaction and commit all actions, issue a COMMIT com‐mand.
8. To examine how a query will work in detail, you can use the EXPLAIN command.
Chapter 9 Answers | 645

9. To back up the database publications to a file called publications.sql, you would usea command such as:
mysqldump -u user -ppassword publications > publications.sql
Chapter 10 Answers1. The standard MySQL function used for connecting to a MySQL database is
mysql_connect.2. The mysql_result function is not optimal when more than one cell is being re‐
quested, because it fetches only a single cell from a database and therefore has tobe called multiple times, whereas mysql_fetch_row will fetch an entire row.
3. The POST form method is generally better than GET, because the fields are posteddirectly, rather than being appended to the URL. This has several advantages, par‐ticularly in removing the possibility to enter spoof data at the browser’s address bar.(It is not a complete defense against spoofing, however.)
4. To determine the last entered value of an AUTO_INCREMENT column, use themysql_insert_id function.
5. The PHP function that escapes characters in a string, making it suitable for use withMySQL, is mysql_real_escape_string.
6. The function htmlentities can be used to prevent cross-site scripting injectionattacks.
Chapter 11 Answers1. To connect to a MySQL database with mysqli call the mysqli method, passing the
hostname, username, password, and database. A connection object will be returnedon success.
2. To submit a query to MySQL using mysqli, ensure you have first created a con‐nection object to a database, and call its query method, passing the query string.
3. When a mysqli error occurs, the error property of the connection object containsthe error message. If the error was in connecting to the database, then the connect_error property will contain the error message.
4. To determine the number of rows returned by a mysqli query, use the num_rowsproperty of the result object.
5. To retrieve a specific row from a set of mysqli results, call the data_seek methodof the result object, passing it the row number (starting from 0), then call thefetch_array or other retrieval method to obtain the required data.
646 | Appendix A: Solutions to the Chapter Questions

6. To escape special characters in strings, you can call the real_escape_string meth‐od of a mysqli connection object, passing it the string to be escaped.
7. If you neglect to properly close objects created with mysqli methods, your programscarry the risk of running out of memory, especially on high-traffic websites. If there’sa program flow logic error in your code, it also ensures you won’t accidentally accessold results.
Chapter 12 Answers1. The associative arrays used to pass submitted form data to PHP are $_GET for the
GET method and $_POST for the POST method.2. The register_globals setting was the default in versions of PHP prior to 4.2.0. It
was not a good idea, because it automatically assigned submitted form field data toPHP variables, thus opening up a security hole for potential hackers who couldattempt to break into PHP code by initializing variables to values of their choice.
3. The difference between a text box and a text area is that although they both accepttext for form input, a text box is a single line, whereas a text area can be multiplelines and include word wrapping.
4. To offer three mutually exclusive choices in a web form, you should use radio but‐tons, because checkboxes allow multiple selections.
5. Submit a group of selections from a web form using a single field name by usingan array name with square brackets such as choices[], instead of a regular fieldname. Each value is then placed into the array, whose length will be the number ofelements submitted.
6. To submit a form field without the user seeing it, place it in a hidden field using theattribute type="hidden".
7. You can encapsulate a form element and supporting text or graphics, making theentire unit selectable with a mouse-click, by using the <label> and </label> tags.
8. To convert HTML into a format that can be displayed but will not be interpretedas HTML by a browser, use the PHP htmlentities function.
9. You can help users complete fields with data they may have submitted elsewhereusing the autocomplete attribute, which prompts the user with possible values.
10. To ensure that a form is not submitted with missing data, you can apply therequired attribute to essential inputs.
Chapter 12 Answers | 647

Chapter 13 Answers1. Cookies should be transferred before a web page’s HTML, because they are sent as
part of the headers.2. To store a cookie on a web browser, use the set_cookie function.3. To destroy a cookie, reissue it with set_cookie, but set its expiration date in the
past.4. Using HTTP authentication, the username and password are stored in $_SERV
ER['PHP_AUTH_USER'] and $_SERVER['PHP_AUTH_PW'].5. The hash function is a powerful security measure, because it is a one-way function
that converts a string to a 32-character hexadecimal number that cannot be con‐verted back, and is therefore almost uncrackable.
6. When a string is salted, extra characters (known only by the programmer) are addedto it before hash conversion. This makes it nearly impossible for a brute-force dic‐tionary attack to succeed.
7. A PHP session is a group of variables unique to the current user.8. To initiate a PHP session, use the session_start function.9. Session hijacking is where a hacker somehow discovers an existing session ID and
attempts to take it over.10. Session fixation is the attempt to force your own session ID onto a server rather
than letting it create its own.
Chapter 14 Answers1. To enclose JavaScript code, you use <script> and </script> tags.2. By default, JavaScript code will output to the part of the document in which it
resides. If it’s in the head, it will output to the head; if in the body, it outputs to thebody.
3. You can include JavaScript code from other sources in your documents by eithercopying and pasting them or, more commonly, including them as part of a <scriptsrc='filename.js'> tag.
4. The equivalent of the echo and print commands used in PHP is the JavaScriptdocument.write function (or method).
5. To create a comment in JavaScript, preface it with // for a single-line comment orsurround it with /* and */ for a multiline comment.
6. The JavaScript string concatenation operator is the + symbol.
648 | Appendix A: Solutions to the Chapter Questions

7. Within a JavaScript function, you can define a variable that has local scope by pre‐ceding it with the var keyword upon first assignment.
8. To display the URL assigned to the link ID thislink in all main browsers, you canuse the two following commands:
document.write(document.getElementById('thislink').href)document.write(thislink.href)
9. The commands to change to the previous page in the browser’s history array are:history.back()history.go(-1)
10. To replace the current document with the main page at the oreilly.com website, youcould use the following command:
document.location.href = 'http://oreilly.com'
Chapter 15 Answers1. The most noticeable difference between Boolean values in PHP and JavaScript is
that PHP recognizes the keywords TRUE, true, FALSE, and false, whereas only trueand false are supported in JavaScript. Additionally, in PHP TRUE has a value of 1and FALSE is NULL; in JavaScript they are represented by true and false, which canbe returned as string values.
2. Unlike PHP, no character is used (such as $) to define a JavaScript variable name.JavaScript variable names can start with and contain any uppercase and lowercaseletters as well as underscores; names can also include digits, but not as the firstcharacter.
3. The difference between unary, binary, and ternary operators is the number ofoperands each requires (one, two, and three, respectively).
4. The best way to force your own operator precedence is to surround the parts of anexpression to be evaluated first with parentheses.
5. You use the identity operator when you wish to bypass JavaScript’s automaticoperand type changing.
6. The simplest forms of expressions are literals (such as numbers and strings) andvariables, which simply evaluate to themselves.
7. The three conditional statement types are if, switch, and the ?: operator.8. Most conditional expressions in if and while statements are literal or Boolean and
therefore trigger execution when they evaluate to TRUE. Numeric expressions triggerexecution when they evaluate to a nonzero value. String expressions trigger exe‐
Chapter 15 Answers | 649

cution when they evaluate to a nonempty string. A NULL value is evaluated as falseand therefore does not trigger execution.
9. Loops using for statements are more powerful than while loops, because theysupport two additional parameters to control loop handling.
10. The with statement takes an object as its parameter. Using it, you specify an objectonce; then for each statement within the with block, that object is assumed.
Chapter 16 Answers1. JavaScript functions and variable name are case-sensitive. The variables Count,
count, and COUNT are all different.2. To write a function that accepts and processes an unlimited number of parameters,
access parameters through the arguments array, which is a member of all functions.3. One way to return multiple values from a function is to place them all inside an
array and return the array.4. When defining a class, use the this keyword to refer to the current object.5. The methods of a class do not have to be defined within a class definition. If a
method is defined outside the constructor, the method name must be assigned tothe this object within the class definition.
6. New objects are created via the new keyword.7. You can make a property or method available to all objects in a class without rep‐
licating the property or method within the object by using the prototype keywordto create a single instance, which is then passed by reference to all the objects in aclass.
8. To create a multidimensional array, place subarrays inside the main array.9. The syntax you would use to create an associative array is key : value, within curly
braces, as in the following:assocarray ={ "forename" : "Paul", "surname" : "McCartney", "group" : "The Beatles"}
10. A statement to sort an array of numbers into descending numerical order wouldlook like this:
numbers.sort(function(a, b){ return b - a })
650 | Appendix A: Solutions to the Chapter Questions

Chapter 17 Answers1. You can send a form for validation prior to submitting it by adding the JavaScript
onsubmit attribute to the <form> tag. Make sure that your function returns true ifthe form is to be submitted and false otherwise.
2. To match a string against a regular expression in JavaScript, use the test method.3. Regular expressions to match characters not in a word could be any of /[^\w]/, /
[\W]/, /[^a-zA-Z0-9_]/, and so on.4. A regular expression to match either of the words fox or fix could be /f[oi]x/.5. A regular expression to match any single word followed by any nonword character
could be /\w+\W/g.6. A JavaScript function using regular expressions to test whether the word fox exists
in the string "The quick brown fox" could be:document.write(/fox/.test("The quick brown fox"))
7. A PHP function using a regular expression to replace all occurrences of the wordthe in "The cow jumps over the moon" with the word my could be:
$s=preg_replace("/the/i", "my", "The cow jumps over the moon");
8. The HTML attribute used to precomplete form fields with a value is value, whichis placed within an <input> tag and takes the form value="value".
Chapter 18 Answers1. It’s necessary to write a function for creating new XMLHttpRequest objects, because
Microsoft browsers use two different methods of creating them, while all othermajor browsers use a third. By writing a function to test the browser in use, youcan ensure that code will work on all major browsers.
2. The purpose of the try ... catch construct is to set an error trap for the codeinside the try statement. If the code causes an error, the catch section will be ex‐ecuted instead of a general error being issued.
3. An XMLHttpRequest object has six properties and six methods (see Tables 18-1 and18-2).
4. You can tell that an Ajax call has completed when the readyState property of anobject has a value of 4.
5. When an Ajax call successfully completes, the object’s status will have a value of200.
Chapter 17 Answers | 651

6. The responseText property of an XMLHttpRequest object contains the value re‐turned by a successful Ajax call.
7. The responseXML property of an XMLHttpRequest object contains a DOM tree cre‐ated from the XML returned by a successful Ajax call.
8. To specify a callback function to handle Ajax responses, assign the function nameto the XMLHttpRequest object’s onreadystatechange property. You can also use anunnamed, inline function.
9. To initiate an Ajax request, an XMLHTTPRequest object’s send method is called.10. The main differences between an Ajax GET and POST request are that GET requests
append the data to the URL and not as a parameter of the send method, and POSTrequests pass the data as a parameter of the send method and require the correctform headers to be sent first.
Chapter 19 Answers1. To import one style sheet into another, you use the @import directive like this:
@import url('styles.css');
2. To import a style sheet into a document, you can use the HTML <link> tag, likethis:
<link rel='stylesheet' type='text/css' href='styles.css'>
3. To directly embed a style into an element, use the style attribute, like this:<div style='color:blue;'>
4. The difference between a CSS ID and a CSS class is that an ID is applied to only asingle element, whereas a class can be applied to many elements.
5. In a CSS declaration, ID names are prefixed with a # character (e.g., #myid), andclass names with a . character (e.g., .myclass).
6. In CSS, the semicolon is used as a separator between declarations.7. To add a comment to a style sheet, you enclose it between /* and */ opening and
closing comment markers.8. In CSS, you can match any element using the * universal selector.9. To select a group of different elements and/or element types in CSS, you place a
comma between each element, ID, or class.10. Given a pair of CSS declarations with equal precedence, to make one have greater
precedence over the other, you append the !important declaration to it, like this:p { color:#ff0000 !important; }
652 | Appendix A: Solutions to the Chapter Questions

Chapter 20 Answers1. The CSS3 operators ^=, $=, and *= match the start, end, or any portion of a string,
respectively.2. The property you use to specify the size of a background image is background-
size, like this:background-size:800px 600px;
3. You can specify the radius of a border using the border-radius property, like this:border-radius:20px;
4. To flow text over multiple columns, you use the column-count, column-gap, andcolumn-rule properties or their browser-specific variants, like this:
column-count:3;column-gap :1em;column-rule :1px solid black;
5. The four functions with which you can specify CSS colors are hsl, hsla, rgb, andrgba; for example:
color:rgba(0%,60%,40%,0.4);
6. To create a gray text shadow under some text, offset diagonally to the bottom rightby 5 pixels, with a blurring of 3 pixels, you would use this declaration:
text-shadow:5px 5px 3px #888;
7. You can indicate that text is truncated with an ellipsis using this declaration:text-overflow:ellipsis;
8. You include a Google Web Font in a web page by first selecting it from http://google.com/fonts. Then assuming, for example, you chose Lobster, include it in a<link> tag, like this:
<link href='http://fonts.googleapis.com/css?family=Lobster' rel='stylesheet' type='text/css'>
and also refer to the font in a CSS declaration such as this:h1 { font-family:'Lobster', arial, serif; }
9. The CSS declaration you would you use to rotate an object by 90 degrees is:transform:rotate(90deg);
10. To set up a transition on an object so that when any of its properties are changedthe change will transition immediately in a linear fashion over the course of half asecond, you would use this declaration:
transition:all .5s linear;
Chapter 20 Answers | 653

Chapter 21 Answers1. The O function returns an object by its ID, the S function returns the style property
of an object, and the C function returns an array of all objects that access a givenclass.
2. You can modify a CSS attribute of an object using the setAttribute function, likethis:
myobject.setAttribute('font-size', '16pt')
You can also (usually) modify an attribute directly (using slightly modified propertynames where required), like this:
myobject.fontSize = '16pt'
3. The properties that provide the width and height available in a browser window arewindow.innerHeight and window.innerWidth.
4. To make something happen when the mouse passes over and out of an object, attachto the onmouseover and onmouseout events.
5. To create a new element, use code such as:elem = document.createElement('span')
To add the new element to the DOM, use code such as:document.body.appendChild(elem)
6. To make an element invisible, set its visibility property to hidden (or visibleto restore it again). To collapse an element’s dimensions to zero, set its displayproperty to none (the value block is one way to restore it).
7. To set a single event at a future time, call the setTimeout function, passing it thecode or function name to execute and the time delay in milliseconds.
8. To set up repeating events at regular intervals, use the setInterval function, pass‐ing it the code or function name to execute and the time delay between repeats inmilliseconds.
9. To release an element from its location in a web page to enable it to be movedaround, set its position property to relative, absolute, or fixed. To restore it toits original place, set the property to static.
10. To achieve an animation rate of 50 frames per second, you should set a delay betweeninterrupts of 20 milliseconds. To calculate this value, divide 1,000 milliseconds bythe desired frame rate.
654 | Appendix A: Solutions to the Chapter Questions

Chapter 22 Answers1. The new HTML5 element for drawing graphics in a web browser is the canvas
element, created using the <canvas> tag.2. You need to use JavaScript to access many of the new HTML5 technologies such as
the canvas and geolocation.3. To incorporate audio or video in a web page, you use the <audio> or <video> tags.4. In HTML5, local storage offers far greater access to local user space than cookies,
which are limited in the amount of data they can hold.5. In HTML5 you can set up web workers to carry on background tasks for you. These
workers are simply sections of JavaScript code.
Chapter 23 Answers1. To create a canvas element in HTML, use a <canvas> tag and specify an ID that
JavaScript can use to access it, like this:<canvas id='mycanvas'>
2. To give JavaScript access to a canvas element, ensure the element has been given anID such as mycanvas, and then use the document.getElementdById function (orthe O function from the OSC.js file supplied on the companion website) to returnan object to the element. Finally, call getContext on the object to retrieve a 2Dcontext to the canvas, like this:
canvas = document.getElementById('mycanvas')context = canvas.getContext('2d')
3. To start a canvas path, issue the beginPath method on the context. After creatinga path, you close it by issuing closePath on the context, like this:
context.beginPath() // Path creation commands go herecontext.closePath()
4. You can extract the data from a canvas using the toDataURL method, which canthen be assigned to the src property of an image object, like this:
image.src = canvas.toDataURL()
5. To create a gradient fill (either radial or linear) with more than two colors, specifyall the colors required as stop colors assigned to a gradient object you have alreadycreated, and assign them each a starting point as a percent value of the completegradient (between 0 and 1), like this:
Chapter 22 Answers | 655

gradient.addColorStop(0, 'green')gradient.addColorStop(0.3, 'red')gradient.addColorStop(0,79, 'orange')gradient.addColorStop(1, 'brown')
6. To adjust the width of drawn lines, assign a value to the lineWidth property of thecontext, like this:
context.lineWidth = 5
7. To ensure that future drawing takes place only within a certain area, you can createa path and then call the clip method.
8. A complex curve with two imaginary attractors is called a Bézier curve. To createone, call the bezierCurveTo method, supplying two pairs of x and y coordinatesfor the attractors, followed by another pair for the end point of the curve. A curveis then created from the current drawing location to the destination.
9. The getImageData method returns an array containing the specified pixel data,with the elements consecutively containing the red, green, blue, and alpha pixelvalues, so four items of data are returned per pixel.
10. The transform method takes six arguments (or parameters), which are in order:horizontal scale, horizontal skew, vertical skew, vertical scale, horizontal translate,and vertical translate. Therefore, the arguments that apply to scaling are numbers1 and 4 in the list.
Chapter 24 Answers1. To insert audio and video into an HTML5 document, use the <audio> and <video>
tags.2. To guarantee maximum audio playability on all platforms, you should use the OGG
codec plus either the ACC or MP3 codec.3. To play and pause HTML5 media playback, you can call the play and pause meth‐
ods of an audio or video element.4. To support media playback in a non-HTML5 browser, you can embed a Flash audio
or video player inside any audio or video element, which will be activated if HTML5media playing is not supported.
5. To guarantee maximum video playability on all platforms, you should use the MP4/H.264 codec, and the OGG/Theora or VP8 codec to support the Opera browser.
656 | Appendix A: Solutions to the Chapter Questions

Chapter 25 Answers1. To request geolocation data from a web browser, you call the following method,
passing the names of two functions you have written for handling access or denialto the data:
navigator.geolocation.getCurrentPosition(granted, denied)
2. To determine whether or not a browser supports local storage, test the typeofproperty of the localStorage object, like this:
if (typeof localStorage == 'undefined') // Local storage is not available}
3. To erase all local storage data for the current domain, you can call the localStorage.clear method.
4. Web workers communicate with a main program most easily using the postMessage method to send information, and by attaching to the web worker object’sonmessage event to retrieve it.
5. To inform a web browser that the document can be run offline as a local web app,create a file to use as a manifest; in that file, list the files required by the application,then link to the file in the <html> tag, like this:
<html manifest='filename.appcache'>
6. You can prevent the default action of disallowing drag and drop for the events thathandle these operations, by issuing a call to the event object’s preventDefaultmethod in your ondragover and ondrop event handlers.
7. To make cross-document messaging more secure, you should always supply a do‐main identifier when posting messages, and check for that identifier when receivingthem, like this for posting:
postMessage(message, 'http://mydomain.com')
And this for receiving:if (event.origin) != 'http://mydomain.com') // Disallow
You can also encrypt or obscure communications to discourage injection or eaves‐dropping.
8. The purpose of microdata is to make information more easily understandable bycomputer programs, such as search engines.
Chapter 25 Answers | 657


APPENDIX B
Online Resources
This appendix lists useful websites where you can get the material used in this book, orother resources that will enhance your web programs.
PHP Resource Sites• http://codewalkers.com• http://developer.yahoo.com/php/• http://easyphp.org• http://forums.devshed.com• http://free-php.net• http://hotscripts.com/category/php/• http://htmlgoodies.com/beyond/php/• http://php.net• http://php.resourceindex.com• http://php-editors.com• http://phpbuilder.com• http://phpfreaks.com• http://phpunit.de• http://w3schools.com/php/• http://zend.com
659

MySQL Resource Sites• http://launchpad.net/mysql• http://mysql.com• http://php.net/mysql• http://planetmysql.org• http://oracle.com/us/sun• http://w3schools.com/PHP/php_mysql_intro.asp
JavaScript Resource Sites• http://developer.mozilla.org/en/JavaScript• http://dynamicdrive.com• http://javascript.about.com• http://javascript.internet.com• http://javascript.com• http://javascriptkit.com• http://w3schools.com/JS• http://webreference.com/js
CSS Resource Sites• http://freehtmlvalidator.com• http://cssbasics.com• http://dustindiaz.com/css-shorthand• http://quirksmode.org/css/quirksmode.html• http://css-discuss.incutio.com/wiki/Print_Stylesheets
HTML5 Resource Sites• http://htmlvalidator.com• http://caniuse.com
660 | Appendix B: Online Resources

• http://html5test.com• http://html5readiness.com• http://html5demos.com• http://html5-demos.appspot.com• http://modernizr.com• http://html5doctor.com
AJAX Resource Sites• http://ajax.asp.net• http://ajaxian.com• http://ajaxmatters.com• http://developer.mozilla.org/en/AJAX• http://dojotoolkit.org• http://jquery.com• http://mochikit.com• http://mootools.net• http://openjs.com• http://prototypejs.org• http://sourceforge.net/projects/clean-ajax• http://w3schools.com/Ajax
Miscellaneous Resource Sites• http://onlinewebcheck.com• http://apachefriends.org• http://easyphp.org• http://eclipse.org• http://editra.org• http://fireftp.mozdev.org• http://sourceforge.net/projects/glossword• http://mamp.info/en
AJAX Resource Sites | 661

• http://programmingforums.org• http://putty.org
O’Reilly Resource Sites• http://onlamp.com• http://onlamp.com/php• http://onlamp.com/onlamp/general/mysql.csp• http://oreilly.com/ajax• http://oreilly.com/javascript• http://oreilly.com/mysql• http://oreilly.com/php• http://oreillynet.com/javascript
662 | Appendix B: Online Resources

APPENDIX C
MySQL’s FULLTEXT Stopwords
This appendix contains the more than 500 stopwords referred to in the section “Creatinga FULLTEXT index” on page 196 in Chapter 8. Stopwords are words that are consideredso common as to not be worth searching for, or storing, in a FULLTEXT index. Theoret‐ically, ignoring these words makes little difference to the results of most FULLTEXTsearches, but makes MySQL databases considerably smaller and more efficient. Thewords are shown here in lowercase but apply to uppercase and mixed case versions, too:A
a’s, able, about, above, according, accordingly, across, actually, after, afterwards,again, against, ain’t, all, allow, allows, almost, alone, along, already, also, although,always, am, among, amongst, an, and, another, any, anybody, anyhow, anyone,anything, anyway, anyways, anywhere, apart, appear, appreciate, appropriate, are,aren’t, around, as, aside, ask, asking, associated, at, available, away, awfully
Bbe, became, because, become, becomes, becoming, been, before, beforehand, behind,being, believe, below, beside, besides, best, better, between, beyond, both, brief, but,by
Cc’mon, c’s, came, can, can’t, cannot, cant, cause, causes, certain, certainly, changes,clearly, co, com, come, comes, concerning, consequently, consider, considering, con‐tain, containing, contains, corresponding, could, couldn’t, course, currently
Ddefinitely, described, despite, did, didn’t, different, do, does, doesn’t, doing, don’t,done, down, downwards, during
Eeach, edu, eg, eight, either, else, elsewhere, enough, entirely, especially, et, etc, even,ever, every, everybody, everyone, everything, everywhere, ex, exactly, example, except
663

Ffar, few, fifth, first, five, followed, following, follows, for, former, formerly, forth, four,from, further, furthermore
Gget, gets, getting, given, gives, go, goes, going, gone, got, gotten, greetings
Hhad, hadn’t, happens, hardly, has, hasn’t, have, haven’t, having, he, he’s, hello, help,hence, her, here, here’s, hereafter, hereby, herein, hereupon, hers, herself, hi, him,himself, his, hither, hopefully, how, howbeit, however
Ii’d, i’ll, i’m, i’ve, ie, if, ignored, immediate, in, inasmuch, inc, indeed, indicate, indi‐cated, indicates, inner, insofar, instead, into, inward, is, isn’t, it, it’d, it’ll, it’s, its, itself
Jjust
Kkeep, keeps, kept, know, knows, known
Llast, lately, later, latter, latterly, least, less, lest, let, let’s, like, liked, likely, little, look,looking, looks, ltd
Mmainly, many, may, maybe, me, mean, meanwhile, merely, might, more, moreover,most, mostly, much, must, my, myself
Nname, namely, nd, near, nearly, necessary, need, needs, neither, never, nevertheless,new, next, nine, no, nobody, non, none, noone, nor, normally, not, nothing, novel,now, nowhere
Oobviously, of, off, often, oh, ok, okay, old, on, once, one, ones, only, onto, or, other,others, otherwise, ought, our, ours, ourselves, out, outside, over, overall, own
Pparticular, particularly, per, perhaps, placed, please, plus, possible, presumably,probably, provides
Qque, quite, qv
664 | Appendix C: MySQL’s FULLTEXT Stopwords

Rrather, rd, re, really, reasonably, regarding, regardless, regards, relatively, respective‐ly, right
Ssaid, same, saw, say, saying, says, second, secondly, see, seeing, seem, seemed, seem‐ing, seems, seen, self, selves, sensible, sent, serious, seriously, seven, several, shall, she,should, shouldn’t, since, six, so, some, somebody, somehow, someone, something,sometime, sometimes, somewhat, somewhere, soon, sorry, specified, specify, specify‐ing, still, sub, such, sup, sure
Tt’s, take, taken, tell, tends, th, than, thank, thanks, thanx, that, that’s, thats, the, their,theirs, them, themselves, then, thence, there, there’s, thereafter, thereby, therefore,therein, theres, thereupon, these, they, they’d, they’ll, they’re, they’ve, think, third,this, thorough, thoroughly, those, though, three, through, throughout, thru, thus, to,together, too, took, toward, towards, tried, tries, truly, try, trying, twice, two
Uun, under, unfortunately, unless, unlikely, until, unto, up, upon, us, use, used, useful,uses, using, usually
Vvalue, various, very, via, viz, vs
Wwant, wants, was, wasn’t, way, we, we’d, we’ll, we’re, we’ve, welcome, well, went, were,weren’t, what, what’s, whatever, when, whence, whenever, where, where’s, where‐after, whereas, whereby, wherein, whereupon, wherever, whether, which, while,whither, who, who’s, whoever, whole, whom, whose, why, will, willing, wish, with,within, without, won’t, wonder, would, would, wouldn’t
Yyes, yet, you, you’d, you’ll, you’re, you’ve, your, yours, yourself, yourselves
Zzero
MySQL’s FULLTEXT Stopwords | 665


APPENDIX D
MySQL Functions
Having functions built into MySQL substantially reduces the speed of performing com‐plex queries, as well as their complexity. If you wish to learn more about the availablefunctions, you can visit the following URLs:
• String functions• Date and time
But, for easy reference, here are some of the most commonly used MySQL functions.
String FunctionsCONCAT(str1, str2, ...)
Returns the result of concatenating str1, str2, and any other parameters (or NULLif any argument is NULL). If any of the arguments are binary, then the result is abinary string; otherwise, the result is a non-binary string. The code returns thestring "MySQL":
SELECT CONCAT('My', 'S', 'QL');
CONCAT_WS(separator, str1, str2, ...)This works in the same way as CONCAT except it inserts a separator between the itemsbeing concatenated. If the separator is NULL the result will be NULL, but NULL valuescan be used as other arguments, which will then be skipped. This code returns thestring "Truman,Harry,S":
SELECT CONCAT_WS(',', 'Truman', 'Harry', 'S');
LEFT(str, len)Returns the leftmost len characters from the string str (or NULL if any argumentis NULL). The following code returns the string "Chris":
SELECT LEFT('Christopher Columbus', '5');
667

RIGHT(str, len)Returns the rightmost len characters from the string str (or NULL if any argumentis NULL). This code returns the string "Columbus":
SELECT RIGHT('Christopher Columbus', '8');
MID(str, pos, len)Returns up to len characters from the string str starting at position pos. If len isomitted, then all characters up to the end of the string are returned. You may use anegative value for pos, in which case it represents the character pos places from theend of the string. The first position in the string is 1. This code returns the string"stop":
SELECT MID('Christopher Columbus', '5', '4');
LENGTH(str)
Returns the length in bytes of the string str. Note that multibyte characters countas multiple bytes. If you need to know the actual number of characters in a string,use the CHAR_LENGTH function. This code returns the value 15:
SELECT LENGTH('Mark Zuckerberg');
LPAD(str, len, padstr)Returns the string str padded to a length of len characters by prepending the stringwith padstr characters. If str is longer than len, then the string returned will betruncated to len characters. The example code returns the following strings:
JanuaryFebruary March April May
Notice how all the strings have been padded to be eight characters long:SELECT LPAD('January', '8', ' ');SELECT LPAD('February', '8', ' ');SELECT LPAD('March', '8', ' ');SELECT LPAD('April', '8', ' ');SELECT LPAD('May', '8', ' ');
RPAD
This is the same as the LPAD function except that the padding takes place on theright of the returned string. This code returns the string "Hi!!!":
SELECT RPAD('Hi', '5', '!');
668 | Appendix D: MySQL Functions
LOCATE(substr, str, pos)Returns the position of the first occurrence of substr in the string str. If the pa‐rameter pos is passed, the search begins at position pos. If substr is not found instr, a value of 0 is returned. This code returns the values 5 and 11, because the firstfunction call returns the first encounter of the word unit, while the second one onlystarts to search at the seventh character, and so returns the second instance:
SELECT LOCATE('unit', 'Community unit');SELECT LOCATE('unit', 'Community unit' 7);
LOWER(str)
This is the inverse of UPPER. Returns the string str with all the characters changedto lowercase. This code returns the string "queen elizabeth ii":
SELECT LOWER('Queen Elizabeth II');
UPPER(str)
This is the inverse of LOWER. It returns the string str with all the characters changedto uppercase. This code returns the string "I CAN'T HELP SHOUTING":
SELECT UPPER("I can't help shouting");
QUOTE(str)
Returns a quoted string that can be used as a properly escaped value in a SQLstatement. The returned string is enclosed in single quotes with all instances ofsingle quotes, backslashes, the ASCII NUL character, and Control-Z preceded by abackslash. If the argument str is NULL, the return value is the word NULL withoutenclosing quotes. The example code returns the following string:
'I\'m hungry'
Note how the " symbol has been replaced with \'.SELECT QUOTE("I'm hungry");
REPEAT(str, count)Returns a string comprising count copies of the string str. If count is less than 1,an empty string is returned. If either parameter is NULL then NULL is returned. Thiscode returns the strings "Ho Ho Ho" and "Merry Christmas":
SELECT REPEAT('Ho ', 3), 'Merry Christmas';
REPLACE(str, from, to)Returns the string str with all occurrences of the string from replaced with thestring to. The search and replace is case-sensitive when searching for from. Thiscode returns the string "Cheeseburger and Soda":
SELECT REPLACE('Cheeseburger and Fries', 'Fries', 'Soda');
String Functions | 669
TRIM([specifier remove FROM] str)Returns the string str with all prefixes or suffixes removed. The specifier can beone of BOTH, LEADING, or TRAILING. If no specifier is supplied, then BOTH is as‐sumed. The remove string is optional and, if omitted, spaces are removed. This codereturns the strings "No Padding" and "Hello__":
SELECT TRIM(' No Padding ');SELECT TRIM(LEADING '_' FROM '__Hello__');
LTRIM(str) and RTRIM(str)
The function RTRIM returns the string str with any leading spaces removed, whilethe function RTRIM performs the same action on the string’s tail. This code returnsthe strings "No Padding " and " No Padding":
SELECT LTRIM(' No Padding ');SELECT RTRIM(' No Padding ');
Date FunctionsDates are an important part of most databases. Whenever financial transactions takeplace, the date has to be recorded, expiry dates of credit cards need to be noted for repeatbilling purposes, and so on. So, as you might expect, MySQL comes with a wide varietyof functions to make handling dates a breeze.CURDATE()
Returns the current date in YYYY-MM-DD or YYYMMDD format, depending onwhether the function is used in a numeric or string context. On the date May 2,2018, the following code returns the values 2018-05-02 and 20180502:
SELECT CURDATE();SELECT CURDATE() + 0;
DATE(expr)
Extracts the date part of the date or a DATETIME expression expr. This code returnsthe value 1961-05-02:
SELECT DATE('1961-05-02 14:56:23');
DATE_ADD(date, INTERVAL expr unit)Returns the result of adding the expression expr using units unit to the date. Thedate argument is the starting date or DATETIME value, and expr may start with a -symbol for negative intervals. Table D-1 shows the interval types supported and theexpected expr values. Note the examples in this table that show where it is necessaryto surround the expr value with quotes for MySQL to correctly interpret them. Ifyou are ever in doubt, adding the quotes will always work.
670 | Appendix D: MySQL Functions

Table D-1. Expected expr valuesType Expected expr value Example
MICROSECOND MICROSECONDS 111111
SECOND SECONDS 11
MINUTE MINUTES 11
HOUR HOURS 11
DAY DAYS 11
WEEK WEEKS 11
MONTH MONTHS 11
QUARTER QUARTERS 1
YEAR YEARS 11
SECOND_MICROSECOND 'SECONDS.MICROSECONDS' 11.22
MINUTE_MICROSECOND 'MINUTES.MICROSECONDS' 11.22
MINUTE_SECOND 'MINUTES:SECONDS' '11:22'
HOUR_MICROSECOND 'HOURS.MICROSECONDS' 11.22
HOUR_SECOND 'HOURS:MINUTES:SECONDS' '11:22:33'
HOUR_MINUTE 'HOURS:MINUTES' '11:22'
DAY_MICROSECOND 'DAYS.MICROSECONDS' 11.22
DAY_SECOND 'DAYS HOURS:MINUTES:SECONDS' '11 22:33:44'
DAY_MINUTE 'DAYS HOURS:MINUTES' '11 22:33'
DAY_HOUR 'DAYS HOURS' '11 22'
YEAR_MONTH 'YEARS-MONTHS' '11-2'
You can also use the DATE_SUB function to subtract date intervals. However, it’s notactually necessary for you to use the DATE_ADD or DATE_SUB functions, as you canuse date arithmetic directly in MySQL. This code:
SELECT DATE_ADD('1975-01-01', INTERVAL 77 DAY);SELECT DATE_SUB('1982-07-04', INTERVAL '3-11' YEAR_MONTH);SELECT '2018-12-31 23:59:59' + INTERVAL 1 SECOND;SELECT '2000-01-01' - INTERVAL 1 SECOND;
returns the following values:1975-03-191978-08-042019-01-01 00:00:001999-12-31 23:59:59
Notice how the last two commands use date arithmetic directly without recourseto functions.
Date Functions | 671

DATE_FORMAT(date, format)This returns the date value formatted according to the format string. Table D-2shows the specifiers that can be used in the format string. Note that the % characteris required before each specifier, as shown. This code returns the given date andtime as Friday May 4th 2018 03:02 AM:
SELECT DATE_FORMAT('2018-05-04 03:02:01', '%W %M %D %Y %h:%i %p');
Table D-2. DATE_FORMAT specifiersSpecifier Description
%a Abbreviated weekday name (Sun–Sat)
%b Abbreviated month name (Jan–Dec)
%c Month, numeric (0–12)
%D Day of the month with English suffix (0th, 1st, 2nd, 3rd, ...)
%d Day of the month, numeric (00–31)
%e Day of the month, numeric (0–31)
%f Microseconds (000000–999999)
%H Hour (00–23)
%h Hour (01–12)
%I Hour (01–12)
%i Minutes, numeric (00–59)
%j Day of year (001–366)
%k Hour (0–23)
%l Hour (1–12)
%M Month name (January–December)
%m Month, numeric (00–12)
%p AM or PM
%r Time, 12–hour (hh:mm:ss followed by AM or PM)
%S Seconds (00–59)
%s Seconds (00–59)
%T Time, 24-hour (hh:mm:ss)
%U Week (00–53), where Sunday is the first day of the week
%u Week (00–53), where Monday is the first day of the week
%V Week (01–53), where Sunday is the first day of the week; used with %X
%v Week (01–53), where Monday is the first day of the week; used with %x
%W Weekday name (Sunday–Saturday)
%w Day of the week (0=Sunday–6=Saturday)
%X Year for the week where Sunday is the first day of the week, numeric, four digits; used with %V
672 | Appendix D: MySQL Functions

Specifier Description
%x Year for the week, where Monday is the first day of the week, numeric, four digits; used with %v
%Y Year, numeric, four digits
%y Year, numeric, two digits
%% A literal % character
DAY(date)
Returns the day of the month for date, in the range 1 to 31 or 0 for dates that havea zero day part such as 0000-00-00 or 2018-00-00. You can also use the functionDAYOFMONTH to return the same value. This code returns the value 3:
SELECT DAY('2018-02-03');
DAYNAME(date)
Returns the name of the weekday for the date. For example, this code returns thestring "Saturday":
SELECT DAYNAME('2018-02-03');
DAYOFWEEK(date)
Returns the weekday index for date between 1 for Sunday through 7 for Saturday.This code returns the value 7:
SELECT DAYOFWEEK('2018-02-03');
DAYOFYEAR(date)
Returns the day of the year for date in the range 1 to 366. This code returns thevalue 34:
SELECT DAYOFYEAR('2018-02-03');
LAST_DAY(date)
Returns the last day of the month for the given DATETIME value date. If the argumentis invalid, it returns NULL. This code:
SELECT LAST_DAY('2018-02-03');SELECT LAST_DAY('2018-03-11');SELECT LAST_DAY('2018-04-26');
returns the following values:2018-02-282018-03-312018-04-30
As you’d expect, it correctly returns the 28th day of February, the 31st of March,and the 30th of April 2011.
Date Functions | 673

MAKEDATE(year, dayofyear)Returns a date given year and dayofyear values. If dayofyear is 0, the result isNULL. This code returns the date 2016-10-01:
SELECT MAKEDATE(2018,274);
MONTH(date)
Returns the month for date in the range 1 through 12 for January through De‐cember. Dates that have a zero month part, such as 0000-00-00 or 2016-00-00,return 0. This code returns the value 7:
SELECT MONTH('2018-07-11');
MONTHNAME(date)
Returns the full name of the month for date. This code returns the string "July":SELECT MONTHNAME('2018-07-11');
SYSDATE()
Returns the current date and time as a value in either YYY-MM-DD HH:MM:SSor YYYMMDDHHMMSS format, depending on whether the function is used in astring or numeric context. The function NOW works in a similar manner, except thatit returns the time and date only at the start of the current statement, whereasSYSDATE returns the time and date at the exact moment the function itself is called.On December 19, 2018, at 19:11:13, this code returns the values 2018-12-1919:11:13 and 20181219191113.
SELECT SYSDATE();SELECT SYSDATE() + 0;
YEAR(date)
Returns the year for date in the range 1000 to 9999, or 0 for the zero date. This codereturns the year 1999.
SELECT YEAR('1999-08-07');
WEEK(date [, mode])Returns the week number for date. If passed the optional mode parameter, the weeknumber returned will be modified according to Table D-3. You can also use thefunction WEEKOFYEAR, which is equivalent to using the WEEK function with a modeof 3. This code returns the week number 14.
SELECT WEEK('2018-04-04', 1);
674 | Appendix D: MySQL Functions

Table D-3. The modes supported by the WEEK functionMode First day of week Range Where week 1 is the first week...
0 Sunday 0–53 with a Sunday in this year
1 Monday 0–53 with more than three days this year
2 Sunday 1–53 with a Sunday in this year
3 Monday 1–53 with more than three days this year
4 Sunday 0–53 with more than three days this year
5 Monday 0–53 with a Monday in this year
6 Sunday 1–53 with more than three days this year
7 Monday 1–53 with a Monday in this year
WEEKDAY(date)
Returns the weekday index for date where 0=Monday through 6=Sunday. This codereturns the value 2.
SELECT WEEKDAY('2018-04-04');
Time FunctionsSometimes you need to work with the time, rather than the date, and MySQL providesplenty of functions for you to do so.CURTIME()
Returns the current time as a value in the format HH:MM:SS or HHMMSS.uuuuuu,depending on whether the function is used in a string or numeric context. The valueis expressed using the current time zone. When the current time is 11:56:23, thiscode returns the values 11:56:23 and 115623.000000.
SELECT CURTIME();SELECT CURTIME() + 0;
HOUR(time)
Returns the hour for time. This code returns the value 11.SELECT HOUR('11:56:23');
MINUTE(time)
Returns the minute for time. This code returns the value 56.SELECT MINUTE('11:56:23');
SECOND(time)
Returns the second for time. This code returns the value 23.SELECT SECOND('11:56:23');
Time Functions | 675

MAKETIME(hour, minute, second)Returns a time value calculated from the hour, minute, and second arguments. Thiscode returns the time 11:56:23.
SELECT MAKETIME(11, 56, 23);
TIMEDIFF(expr1, expr2)Returns the difference between expr1 and expr2 (expr1 – expr2) as a time value.Both expr1 and expr2 must be TIME or DATETIME expressions of the same type. Thiscode returns the value 01:37:38.
SELECT TIMEDIFF('2000-01-01 01:02:03', '1999-12-31 23:24:25');
UNIX_TIMESTAMP([date])
If called without the optional date argument, this function returns the number ofseconds since 1970-01-01 00:00:00 UTC as an unsigned integer. If the date param‐eter is passed, then the value returned is the number of seconds since the 1970 startdate until the given date. This command will not return the same value for everyonebecause the date given to it is interpreted as a local time (given in the user’s timezone). This code will return the value 946684800 (the number of seconds up to thestart of the new millennium) followed by a TIMESTAMP representing the currentUnix time at the moment you run it.
SELECT UNIX_TIMESTAMP('2000-01-01');SELECT UNIX_TIMESTAMP();
FROM_UNIXTIME(unix_timestamp [, format])Returns the unix_timestamp parameter as either a string in YYY-MM-DDHH:MM:SS or YYYMMDDHHMMSS.uuuuuu format, depending on whether thefunction is used in a string or numeric context. If the optional format parameter isprovided, the result is formatted according to the specifiers in Table 8-17. The pre‐cise value returned will depend on the user’s local time. This code returns the strings"2000-01-01 00:00:00" and "Saturday January 1st 2000 12:00 AM".
SELECT FROM_UNIXTIME(946684800);SELECT FROM_UNIXTIME(946684800, '%W %M %D %Y %h:%i %p');
676 | Appendix D: MySQL Functions

We’d like to hear your suggestions for improving our indexes. Send email to [email protected].
Index
Symbols! (Not) logical operator
in JavaScript, 333, 348in PHP, 57, 82
!= (inequality) comparison operatorin JavaScript, 333in PHP, 56, 81
!== (not identical) comparison operator (Java‐Script), 333
" (quotation marks, double)in JavaScript, 330in MySQL, 173in PHP, 59
# symbol, 263, 425$ (dollar sign)
JavaScript variables, 330, 340PHP variables, 49, 63, 117in regular expressions, 393
$ operator (CSS), 462% (modulus) operator
in JavaScript, 332in PHP, 55
%= (modulus) assignment operatorin JavaScript, 332in PHP, 55
&& (And) logical operatorin JavaScript, 333, 348in PHP, 57, 82
' (quotation marks, single)in JavaScript, 330in PHP, 59
() (parentheses)grouping regular expressions, 389operator precedence and, 77, 346PHP functions and, 104
* (asterisk), 388, 434* (multiplication) operator
in JavaScript, 332in PHP, 55
* (wildcard) operator (CSS), 463*= (multiplication) assignment operator
in JavaScript, 332in PHP, 55
+ (addition) operatorin JavaScript, 332in PHP, 55
+ (plus sign), 388++ (increment) operator
in JavaScript, 332–334, 345in PHP, 55, 58, 76, 78
+= (addition) assignment operatorin JavaScript, 332, 334in PHP, 55, 58
- (hyphen), 390. (dot), 388.= (concatenation) assignment operator (PHP),
55, 59, 62
677

/ (division) operatorin JavaScript, 332in PHP, 55
/* ... */ remark construct, 48, 427// (forward slash, double) remark, 326, 329/= (division) assignment operator
in JavaScript, 332in PHP, 55
:: (double colon) scope operator, 121; (semicolon)
CSS usage, 426JavaScript syntax and, 324, 329MySQL command-line interface and, 177PHP syntax, 49
< (less than) comparison operatorin JavaScript, 333, 348in PHP, 56, 81
<<< (heredoc) operator, 60<= (less than or equal to) comparison operator
in JavaScript, 333, 348in PHP, 56, 81
= assignment operatorin JavaScript, 332in PHP, 55
== (equality) comparison operatorin JavaScript, 333, 347in PHP, 56, 80
=== (identity) comparison operatorin JavaScript, 333, 348in PHP, 81
> (greater than) comparison operatorin JavaScript, 333, 348in PHP, 56, 81
>= (greater than or equal to) comparison opera‐torin JavaScript, 333, 348in PHP, 56, 81
? (conditional) operator, 91, 355[] (square brackets)
accessing array elements, 138, 376checkbox choices and, 286fuzzy matching and, 390
\\ (backslash), 59, 334^ (caret), 390^ operator (CSS), 462__ (underscore, double), 120{} (curly braces)
if statement and, 85, 353JavaScript functions, 364
PHP functions, 106while statements and, 93
|| (Or) logical operatorin JavaScript, 333, 348in PHP, 57, 82
− (subtraction) operatorin JavaScript, 332in PHP, 55
−= (subtraction) assignment operatorin JavaScript, 332in PHP, 55, 58
−− (decrement) operatorin JavaScript, 332–334, 345in PHP, 55, 58, 76, 78
AAAC (audio) codec, 570absolute positioning of elements, 449active pseudo-class (CSS), 452ActiveX technology, 405addColorStop method (canvas), 525–526addition (+) operator
in JavaScript, 332in PHP, 55
Ajaxabout, 405Gmail example, 12–14JavaScript and, 323resource sites, 661sample program, 408–412
alignment of text, 446ALTER command (MySQL)
about, 178adding auto-incrementing column id, 187adding indexes to tables, 193–194changing data types of columns, 190renaming tables, 189
And (&&) logical operatorin JavaScript, 333, 348in PHP, 57, 82
and (low-precedence) logical operator (PHP),57, 82
animation, interrupts and, 506anonymity and databases, 230answers to chapter questions, 639–657Apache Web Server, 11appendChild function (JavaScript), 500arc method (canvas), 543–545
678 | Index

argumentsclasses and, 119functions and, 104
arithmetic operatorsin JavaScript, 332, 345in PHP, 55, 76, 78
(array) cast type, 99Array keyword (JavaScript), 374array keyword (PHP), 134arrays
in JavaScriptabout, 331array methods, 376associative arrays, 374multidimensional arrays, 331, 375numeric arrays, 373as operator type, 345returning values, 367two-dimensional arrays, 331
in PHPabout, 52array functions, 140–144assignment using array keyword, 134associative arrays, 133, 137foreach ... as statement, 135–137multidimensional arrays, 137–140numeric arrays, 131–133, 138as operator type, 76returning values, 108two-dimensional arrays, 53
array_combine function (PHP), 113AS keyword (MySQL), 209as keyword (PHP), 135assignment operators
in JavaScript, 332, 345in PHP
about, 55, 76operator associativity, 79order of precedence, 78variable assignment, 58–60
associative arraysin JavaScript, 374in PHP, 133, 137
associativity of operatorsin JavaScript, 346in PHP, 78–80
asterisk (*), 388, 434Atom feeds, 154attribute selectors (CSS), 434, 461–463
<audio> element (HTML5)about, 513, 571–573attributes supported, 572browser considerations, 573codecs supported, 570
authentication (HTTP)about, 304–307salting passwords, 308–311setting sessions after, 313storing usernames and passwords, 307
autocomplete attribute (HTML5), 295autofocus attribute (HTML5), 295AUTO_INCREMENT data type (MySQL), 186–
188, 223, 260–262
B\b (backspace) escape character, 334background-clip property (CSS3), 464–464background-color property (CSS), 447background-origin property (CSS3), 465background-size property (CSS3), 466backgrounds, multiple (CSS3), 467–468backing up MySQL databases, 235–240backslash (\\), 59, 334backspace (\b) escape character, 334BACKUP command (MySQL), 178BEGIN statement (MySQL), 232Berners-Lee, Tim, 1–2bezierCurveTo method (canvas), 548BIGINT data type (MySQL), 185BINARY data type (MySQL), 184binary operators
in JavaScript, 345in PHP, 76
bitwise operatorsin JavaScript, 345in PHP, 76, 78
BLOB data type (MySQL), 184bookmarklets (JavaScript), 329(bool) cast type, 99Boole, George, 73Boolean function (JavaScript), 360Boolean operators (see logical operators)Boolean values, 73–75border property (CSS), 457border-bottom property (CSS), 457border-color property (CSS3), 469border-left property (CSS), 457border-radius property (CSS3), 469–472
Index | 679

border-right property (CSS), 457border-top property (CSS), 457border-width property (CSS), 457borders
applying with CSS, 457applying with CSS3, 469–472
box model (CSS)about, 454adjusting padding, 458–459applying borders, 457object contents, 459setting margins, 455–457
box-shadow property (CSS3), 472box-sizing property (CSS), 463<br> tag, 11, 74, 343break statement
in JavaScript, 355, 358in PHP, 90, 97
browsersbackground properties and, 466cookies in, 301–304, 319CSS rules, 448, 477debugging JavaScript errors, 327–328DOM and, 340HTTP authentication, 304–311JavaScript scripting and, 325multimedia considerations, 576style sheet support, 436transition support, 483user agent string, 318VBScript support, 326web fonts and, 479XMLHttpRequest object and, 406
<button> tag, 295, 351
C\c (cancel input) command (MySQL), 178canvas (HTML5)
about, 510advanced graphical effects, 558–561creating and accessing, 517–529creating curves, 543–549drawing lines, 533–536editing at pixel level, 554–557filling areas, 537–539manipulating images, 549–554path usage, 536–537transformations, 561–567writing text to, 530–533
caret (^), 390carriage return (\r) escape character, 60, 334Cascading Style Sheets (see CSS)case sensitivity
JavaScript function names, 364PHP class names, 115PHP function names, 106PHP variables, 54
case statementin JavaScript, 355in PHP, 89
castingJavaScript built-in functions and, 360in PHP, 98
centimeters (CSS measurement), 441CHANGE keyword (MySQL), 191chapter questions, answers to, 639–657CHAR data type (MySQL), 183character classes, 390checkboxes in forms, 285–287checkdate function (PHP), 154checked attribute (forms), 285checkuser.php (social networking site), 614child selectors (CSS), 431class attribute (HTML), 425__CLASS__ constant (PHP), 64class selectors (CSS), 433classes
in CSS, 425in JavaScript
declaring classes, 368static methods and properties, 371
in PHPabout, 103declaring classes, 115defining with static properties, 124extending classes, 125inheritance and, 114instances of classes, 114overriding methods, 126passing arguments to, 119
className property (JavaScript), 492clearInterval function (JavaScript), 503clearRect method (canvas), 521clearTimeout function (JavaScript), 503clip method, 539–542cloning objects in PHP, 118Codd, E. F., 219
680 | Index

codecs (encoders/decoders)audio supported, 570video supported, 575
color input type (HTML5), 298color property (CSS), 447colors
adding color stops in gradients, 525–526CSS-supported
about, 447applying gradients, 448–449short color strings, 447
CSS3-supportedapplying to borders, 469colors and opacity, 475–477
cols attribute (forms), 285columns (fields)
about, 171–172adding, 190changing data types of, 190First Normal Form, 220–221multicolumn layout, 473–475removing, 191renaming, 191Second Normal Form, 222–224Third Normal Form, 224–226
command-line interface (MySQL)canceling commands, 178semicolon and, 177starting, 173–177
commandsin MySQL, 178–182, 198–209in PHP, 60–62
commentsCSS rules on, 427HTML tags, 325in JavaScript, 326, 329in PHP, 48
COMMIT command (MySQL), 232compact function (PHP), 143comparison operators
in JavaScript, 333, 345, 348in PHP, 56, 76, 78, 81
CONCAT function (MySQL), 667concat method (JavaScript), 376concatenating strings
in JavaScript, 334, 345in PHP, 58, 76
CONCAT_WS function (MySQL), 667
conditionalsin JavaScript
? operator and, 355about, 353else statement, 353elseif statement and, 353if statement, 353switch statement, 354
in PHP? operator and, 91about, 84else statement, 85–87elseif statement, 87–88if statement, 84–85switch statement, 88–90
constants (PHP)about, 63date constants, 154declaring, 122predefined, 64, 74–75
constructor methods in PHP, 119, 127constructs (PHP)
about, 104nesting, 54
content types (Internet media types), 165continue statement
in JavaScript, 359in PHP, 98
control flowin JavaScript
conditionals in, 353–356error handling in, 327–328, 351–353looping and, 356–359operator precedence, 346
in PHPconditionals and, 84–92looping and, 92–98operator precedence, 77–78
converting valuesconverting number bases, 438explicit casting and, 99implicit casting and, 98string cases, 105, 106strings to numbers, 63
$_COOKIE variable (PHP), 70cookies
about, 301–303accessing, 304DATE_COOKIE constant, 154
Index | 681

destroying, 304forcing cookie-only sessions, 319setting, 303third-party, 301
copy function (PHP), 158count function (PHP), 140CREATE command (MySQL)
about, 178adding indexes to tables, 194creating databases, 179creating tables, 181–182
createElement function (JavaScript), 500createImageData method (canvas), 557createLinearGradient method (canvas), 523–525createPattern method (canvas), 529createRadialGradient method (canvas), 526–528cross document messaging, 595–598cross-site scripting (XSS), 266–268CSS (Cascading Style Sheets)
about, 423accessing properties from JavaScript, 493–
497applying colors, 447–449box model and layout, 454–459box-sizing property, 463cascading properties, 435–440classes in, 425CSS rules, 426–427dynamic web content and, 9enhancing getElementById function, 489–
492fonts and typography, 442–444IDs in, 425importing style sheets, 424inline JavaScript, 497–499managing text styles, 444–446measurement units, 440–442positioning elements, 449pseudo-classes, 452–453pseudo-elements, 452resource sites, 660selectors in, 426, 430–435, 461–463semicolons and, 426shorthand rules, 454, 485social networking site example, 632–636style types, 428–430
CSS3background properties, 463–466borders in, 469–472
box shadows, 472colors and opacity, 475–477element overflow, 473multicolumn layout, 473–475multiple backgrounds, 467–468text effects, 477–479transformations, 481–483transitions, 483–487web fonts, 479–481
CSV format, 239cubic-bezier function (CSS), 485CURDATE function (MySQL), 670curly braces {}
if statement and, 85, 353JavaScript functions, 364PHP functions, 106while statements and, 93
CURTIME function (MySQL), 675curves, working with, 543–549
Ddata array (canvas), 555–557data types
MySQL supported, 183–191, 190PHP cast types, 98
databases (MySQL)about, 171–172adding data to, 7adding data to tables, 188, 257adding indexes to tables, 193–194anonymity and, 230backing up and restoring, 235–240closing connections, 248, 273connecting to, 243–248creating, 179creating tables, 181–182, 255deleting data from tables, 260deleting tables, 191describing tables, 256designing, 217dropping tables, 257joining tables together, 207–209primary keys and, 195, 218–227querying, 198–206, 234, 241–268, 269–277relationships among data, 227–230renaming tables, 189retrieving data from tables, 258selecting, 244updating data in tables, 259
682 | Index

DATE data type (MySQL), 186DATE function (MySQL), 670date function (PHP)
about, 152date constants, 154format specifiers, 152returning values, 66, 67
date input type (HTML5), 298DateTime class (PHP), 152DATETIME data type (MySQL), 186datetime input type (HTML5), 298datetime-local input type (HTML5), 298DATE_ADD function (MySQL), 670DATE_ATOM constant (PHP), 154DATE_COOKIE constant (PHP), 154DATE_FORMAT function (MySQL), 672DATE_RSS constant (PHP), 154DATE_W3C constant (PHP), 154DAY function (MySQL), 673DAYNAME function (MySQL), 673DAYOFWEEK function (MySQL), 673DAYOFYEAR function (MySQL), 673debugging JavaScript errors, 327–328decoration of text, 445decrement (−−) operator
in JavaScript, 332–334, 345in PHP, 55, 58, 76, 78
default styles (CSS), 428default values, in form input, 283define function (PHP), 63, 122DELETE command (MySQL)
about, 178, 200FROM qualifier, 252, 260
denormalization of data, 226derived classes (subclasses)
about, 114calling parent constructors, 127extends operator and, 125parent operator and, 126
descendant selectors (CSS), 430DESCRIBE command (MySQL)
about, 178checking table creation, 181describing tables, 190, 256
destruictor methods in PHP, 120development servers
IDEs and, 41–43installing LAMPs, 38installing MAMPs, 31–37
installing WAMPs, 16–31logging in, 38program editors and, 40setting up, 15transferring files, 39working remotely, 38–39
die function (PHP), 243different_user function (PHP), 317__DIR__ constant (PHP), 64dir system command, 167<div> tag
class attribute, 425id attribute, 425self-closing, 74<span> tag and, 439–440
division (/) operatorin JavaScript, 332in PHP, 55
DNS (Domain Name Service), 3do ... while statement
in JavaScript, 357in PHP, 94
DOCTYPE declaration, 423, 518Document Object Model (DOM)
about, 323, 338–340adding new elements, 500–502browsers and, 340CSS and, 423usage considerations, 341
document object, write method, 338, 350dollar sign ($)
JavaScript variables, 330, 340PHP variables, 49, 63, 117in regular expressions, 393
DOM (Document Object Model)about, 323, 338–340adding new elements, 500–502browsers and, 340CSS and, 423usage considerations, 341
Domain Name Service (DNS), 3dot (.), 388(double) cast type, 99DOUBLE data type (MySQL), 185dragging and dropping objects, 593–595drawImage method (canvas), 549–551DROP command (MySQL)
about, 178deleting tables, 191
Index | 683

DROP keyword (MySQL), 191Duplicate entry error, 195dynamic web content
about, 1Apache Web Server and, 11benefits of, 5combining technologies, 12–14CSS and, 9dynamic linking, 99–101HTML and, 2HTML5 and, 10HTTP and, 2JavaScript and, 8MySQL and, 7open source and, 12PHP and, 6, 45request/response process and, 2–5
Eeach function (PHP), 136echo <<<_END ... _END construct, 280echo command
about, 64print function and, 64, 91
Eclipse PDT IDE, 42Editra program editor, 40else statement
in JavaScript, 353in PHP, 85–87
elseif statementJavaScript and, 353in PHP, 87–88
email addresses, validating on forms, 386ems (CSS measurement), 441encapsulation, 114end function (PHP), 144_END tag, 61endswitch statement (PHP), 90$_ENV variable (PHP), 70equality (==) comparison operator
in JavaScript, 333, 347in PHP, 56, 80
error handling in JavaScriptdebugging errors, 327–328onerror event, 351try ... catch construct, 352, 407
errorHandler function (JavaScript), 351escape characters
in PHP, 59
in JavaScript, 334in regular expressions, 389
escapeshellcmd function (PHP), 169events in JavaScript, 498Exclusive or (xor) logical operator (PHP), 57, 82exec system call, 167execution operators (PHP), 76EXIT command (MySQL), 178EXPLAIN command (MySQL), 234explicit casting
JavaScript and, 360in PHP, 99
explode function (PHP), 141expressions, 344
(see also operators)in JavaScript
about, 343literals in, 344variables in, 344
in PHPabout, 73Boolean values in expressions, 73–75literals in, 75variables in, 75
exs (CSS measurement), 441extends operator (PHP), 125external style sheets, 429extract function (PHP), 142
F\f (form feed) escape character, 334FALSE value
about, 73–75logical operators and, 57, 82–83print function and, 65
fclose function (PHP), 156fgets function (PHP), 156, 157, 159fields (columns)
about, 171–172adding, 190changing data types of, 190First Normal Form, 220–221multicolumn layout, 473–475removing, 191renaming, 191Second Normal Form, 222–224Third Normal Form, 224–226
__FILE__ constant (PHP), 64file handle, 159
684 | Index

file handlingcreating login files, 242development servers, 39in JavaScript, 326in PHP
checking if file exists, 155copying files, 158creating files, 155–157deleting files, 158including files, 111locking files for multiple accesses, 160–
161moving files, 158reading entire files, 162reading from files, 157requiring files, 112updating files, 159–160uploading files, 162–167
file pointer, 159–160File written successfully message, 155$_FILES variable (PHP), 70, 163–165FileZilla, 39file_exists function (PHP), 155, 158file_get_contents function (PHP), 162, 412fillRect method (canvas), 521, 524fillStyle property (canvas), 518, 528–529fillText method (canvas), 532final keyword (PHP), 128FireFTP, 39First Normal Form, 220–221fixed positioning of elements, 450–451(float) cast type, 99FLOAT data type (MySQL), 185flock function (PHP), 160–161focus pseudo-class (CSS), 452font property (canvas), 531@font-face directive (CSS3), 479font-family property (CSS), 442font-size property (CSS), 443font-style property (CSS), 443font-weight property (CSS), 444fonts and typography, 442–444, 479–481fontSize property (JavaScript), 493fopen function (PHP), 156for statement
in JavaScript, 357in PHP, 95–96
foreach ... as statement (PHP), 135–137forEach method (JavaScript), 376
foreign keys, 221form attribute (HTML5), 297form feed (\f) escape character, 334form handling
about, 514building forms, 279–280example program, 292–295features awaiting full implementation, 297–
299HTML5 enhancements, 295–297input types, 284–290displaying forms, 252offering default values, 283redisplaying forms after validation, 397–402retrieving submitted data, 281–292sanitizing input, 291–292uploading files from forms, 162–165validating form data using PHP, 165–167validating form data with JavaScript, 381–
387<form> tag
autocomplete attribute, 295building forms, 279id attribute, 297
formaction attribute (HTML5), 296format function (CSS), 480formenctype attribute (HTML5), 296formmethod attribute (HTML5), 296formnovalidate attribute (HTML5), 296formtarget attribute (HTML5), 296forward slash, double (//) remark, 326, 329fread function (PHP), 156–157Friedl, Jeffrey, 397friends.php (social networking site), 625–628FROM_UNIXTIME function (MySQL), 676fseek function (PHP), 159–160FTP, development servers and, 39FULLTEXT index type (MySQL)
about, 192creating indexes, 196MATCH ... AGAINST construct and, 202stopwords supported, 663–665
__FUNCTION__ constant (PHP), 64function keyword, 106, 363functions
in JavaScript, 336, 360arguments array, 364defining functions, 363returning arrays, 367
Index | 685

returning values, 365–367in MySQL, 209, 667–676one-way, 308in PHP
about, 65–71, 103arguments and, 104array functions, 140–144bundling into objects, 113creating functions, 65date and time functions, 151–154defining functions, 106parentheses in, 104passing by reference, 108–110returning arrays, 108returning values, 106–108variable scope and, 66–71, 111
social networking site example, 605–607functions.php (social networking site), 604function_exists function (PHP), 113fuzzy character matching, 388–390fwrite function (PHP), 97, 156
Ggeolocation, 511–513, 581–586GET method (HTTP)
$_GET variable and, 142, 251usage considerations, 413–415
$_GET variable (PHP)about, 70, 251GET HTTP method and, 142security considerations, 291
getContext method (canvas), 518getCurrentPosition method (JavaScript), 584getElementById function (JavaScript)
Ajax example, 411enhancing, 339, 489–492usage considerations, 433
getElementsByTagName function (JavaScript),491
getImageData method (canvas), 554–555Global Positioning System (GPS), 581global variables
in JavaScript, 336in PHP
about, 68returning values, 110variable scope, 68, 111
globalAlpha property (canvas), 561
globalCompositeOperation property (canvas),558–560
$GLOBALS variable (PHP), 70Gmail, checking availability of usernames, 12–
14Google Maps service, 584Google web fonts, 480GPS (Global Positioning System), 581gradients
applying, 448–449creating, 523–528
GRANT command (MySQL)abiout, 178creating users, 179–180
graphical effects (canvas), 558–561greater than (>) comparison operator
in JavaScript, 333, 348in PHP, 56, 81
greater than or equal to (>=) comparison opera‐torin JavaScript, 333, 348in PHP, 56, 81
GROUP BY clause (MySQL commands), 206groups, selecting by (CSS), 435
HH.264 (video) codec, 576hash function (PHP), 308<head> tag
CSS styling and, 423JavaScript scripts within, 325
header.php (social networking site), 607–608height attribute (HTML5), 297HELP command (MySQL), 178heredoc (<<<) operator, 60hexadecimal RGB colors, 447hidden fields in forms, 288history object (JavaScript), 341HOUR function (MySQL), 675hover pseudo-class (CSS), 452href attribute, 462HSL colors, 475hsl function (CSS), 475HSLA colors, 476hsla function (CSS), 476HTML (Hypertext Markup Language)
about, 1–2accessing JavaScript, 497–499comment tags, 325
686 | Index

form handling, 279–295importing CSS from within, 424JavaScript and, 324–328PHP and, 45–47
HTML injection, preventing, 266–268HTML5, 517
(see also canvas (HTML5))about, 169, 509, 517<audio> element, 513, 570–574cross document messaging, 595–598DOCTYPE declaration, 423dynamic web content and, 10form features awaiting full implementation,
297–299form handling, 514form handling enhancements, 295–297geolocation, 511–513, 581–586local storage, 515, 586–589microdata, 516, 598–601resource sites, 660<video> element, 513, 574–580web applications, 515, 591–593web workers, 515, 589–591
htmlentities function (PHP), 71, 267, 312htmlspecialchars function (PHP), 168HTTP (Hypertext Transfer Protocol)
about, 1–2authentication support, 304–311
Hypertext Markup Language (HTML)about, 1–2accessing JavaScript, 497–499comment tags, 325form handling, 279–295importing CSS from within, 424JavaScript and, 324–328PHP and, 45–47
Hypertext Transfer Protocol (HTTP)about, 1–2authentication support, 304–311
hyphen (-), 390
Iid attribute (HTML5), 297, 425ID selectors (CSS), 432identity (===) comparison operator
in JavaScript, 333, 348in PHP, 81
IDEs (integrated development environments),41–43, 45
if statementin JavaScript, 353in PHP, 84–85
images, manipulating, 549–554<img> tag, 462implicit casting (PHP), 98@import directive (CSS), 424!important declaration, 438importing style sheets, 424inches (CSS measurement), 441include statement (PHP), 111include_once statement (PHP), 112increment (++) operator
in JavaScript, 332–334, 345in PHP, 55, 58, 76, 78
indenting of text, 446INDEX index type (MySQL), 192index.php (social networking site), 610indexes (MySQL)
about, 192, 222adding to tables, 193–194creating, 192–197joining tables together, 207–209querying databases, 198–206
inequality (!=) comparison operatorin JavaScript, 333in PHP, 56, 81
inheritanceabout, 114, 125–126final methods, 128parent operator, 126subclass constructors, 127
ini_set function (PHP), 317, 319inline JavaScript, 497–499inline styles (CSS), 430innerHTML property, 502, 584InnoDB storage engine, 231input (forms) (see form handling)<input> tag
about, 282autocomplete attribute, 295autofocus attribute, 295form attribute, 297formaction attribute, 296formenctype attribute, 296formmethod attribute, 296formnovalidate attribute, 296formtarget attribute, 296height attribute, 297
Index | 687
input types supported, 298list attribute, 297max attribute, 298min attribute, 298placeholder attribute, 296required attribute, 296step attribute, 298width attribute, 297
INSERT command (MySQL)about, 178adding data to databases, 7adding data to tables, 188INTO qualifier, 208
insert IDs, 261instances of classes, 114(int) cast type, 99INT data type (MySQL), 185integrated development environments (IDEs),
41–43, 45interfaces (object), 114internal styles (CSS), 429Internet media types (content types), 165Internet Protocol (IP), 582interrupts, accessing, 503–507intval function (PHP), 99IP (Internet Protocol), 582isPointinPath method (canvas), 542isset function (PHP), 281, 337is_array function (PHP), 140
JJavaScript
about, 323accessing interrupts, 503–507adding new elements, 500–502arrays in, 331, 345, 367, 372–380basic syntax, 363bookmarklets and, 329comments in, 326, 329conditionals in, 353–356debugging errors, 327–328DOM support, 323, 338–341dynamic web content and, 8enhancing getElementById function, 489–
492error handling in, 327–328, 351–353explicit casting and, 360expressions in, 343–345file handling in, 326
functions in, 336, 360, 363–367HTML text and, 324–328implementing Ajax, 405–420inline JavaScript, 497–499literals in, 344looping in, 356–359methods in, 338, 370–372objects in, 338, 368–372operators in, 332–335, 345–349properties in, 338, 493–497regular expressions and, 387, 395resource sites, 660social networking site example, 636validating form data with, 381–387variables in, 330–331, 335–337, 344
javascript.js (social networking site), 636JOIN ... ON construct (MySQL), 208join method (JavaScript), 377jQuery, 420
KKEY index type (MySQL), 192Komodo IDE, 42
L<label> tag, 290LAMPs
about, 16installing on Linux, 38
language attribute (HTML), 324LAST_DAY function (MySQL), 673LEFT function (MySQL), 667LENGTH function (MySQL), 668less than (<) comparison operator
in JavaScript, 333, 348in PHP, 56, 81
less than or equal to (<=) comparison operatorin JavaScript, 333, 348in PHP, 56, 81
letter-spacing property (CSS), 445LIKE qualifier (MySQL commands), 200LIMIT qualifier (MySQL commands), 201__LINE__ constant (PHP), 64line-height property (CSS), 445linear gradients, 448, 523–525lineCap property (canvas), 533–535lineJoin property (canvas), 533–535lineTo method (canvas), 536
688 | Index

lineWidth property (canvas), 533link pseudo-class (CSS), 452<link> tag, 424links object (JavaScript), 341Linux operating system
accessing MySQL, 175installing LAMPs, 38ls system command, 167
list attribute (HTML5), 297list function (PHP), 136literals in expressions
in JavaScript, 344in PHP, 75
local storage, 515, 586–589local variables
in JavaScript, 336in PHP, 66–68, 111
localhost, 29, 242localStorage object, 587–589LOCATE function (MySQL), 669LOCK command (MySQL)
about, 178TABLES qualifier, 235
logical operatorsin JavaScript, 345, 348in MySQL queries, 209in PHP
about, 56, 76, 82–83operator precedence, 78
login.php (social networking site), 615–617logins
creating login files, 242, 269development servers and, 38HTTP authentication prompt, 305social networking site example, 611–614,
615–617logout.php (social networking site), 631LONGBLOB data type (MySQL), 185longdate function (PHP), 66–68LONGTEXT data type (MySQL), 184looping
in JavaScriptabout, 356breaking out of loops, 358continue statement and, 359do ... while statement, 357for statement, 357while statement, 356
in PHPabout, 92breaking out of loops, 97continue statement and, 98do ... while statement, 94for statement, 95–96foreach ... as statement, 135–137while statement, 93–94
LOWER function (MySQL), 669LPAD function (MySQL), 668ls system command, 168LTRIM function (MySQL), 670
MMAC (Media Access Control) address, 582Mac OS X
accessing MySQL, 174debugging JavaScript errors, 327installing MAMPs on, 31–37ls system command, 167
MAKEDATE function (MySQL), 674MAKETIME function (MySQL), 676MAMPs
about, 16configuring MySQL, 35–36installing on Mac OS X, 31–34testing installation, 36–37
many-to-many relationships in data, 229margin property (CSS), 455–457margin-bottom property (CSS), 455margin-left property (CSS), 455margin-right property (CSS), 455margin-top property (CSS), 455margins, setting with CSS, 455–457MATCH ... AGAINST construct (MySQL)
about, 202IN BOOLEAN MODE qualifier, 203
Math Markup Language (MathML), 10MathML (Math Markup Language), 10matrix function (CSS), 482max attribute (HTML5), 298maxlength attribute (forms), 284md5 hashing algorithm, 308measurement units (CSS), 440–442measureText method (canvas), 533Media Access Control (MAC) address, 582MEDIUMBLOB data type (MySQL), 185MEDIUMINT data type (MySQL), 185MEDIUMTEXT data type (MySQL), 184
Index | 689

members.php (social networking site), 622–625messages.php (social networking site), 628–631messaging, cross document, 595–598metacharacters in regular expressions, 388,
393–395__METHOD__ constant (PHP), 64methods
in JavaScriptarray methods, 376DOM and, 338prototype keyword and, 370–372static methods, 371
in PHPabout, 103, 114constructor methods, 119, 127destructor methods, 120final methods, 128method scope, 123overriding methods, 126static methods, 121, 124writing methods, 120
style sheet creation, 436XMLHttpRequest object, 408
microdata, 516, 598–601Microsoft
ActiveX technology, 405VBScript, 326
MID function (MySQL), 668millimeters (CSS measurement), 441MIME types, 165min attribute (HTML5), 298MINUTE function (MySQL), 675miterLimit property (canvas), 535mktime function (PHP), 152MODIFY keyword (MySQL), 190modulus (%) operator
in JavaScript, 332in PHP, 55
MONTH function (MySQL), 674month input type (HTML5), 298MONTHNAME function (MySQL), 674moveTo method (canvas), 536move_uploaded_file function (PHP), 164MP3 (audio) codec, 570MP4 format, 575multicolumn layout (CSS3), 473–475multidimensional arrays
in JavaScript, 331, 375in PHP, 137–140
multiline commentsin JavaScript, 329in PHP, 48
multipart/form-data content type, 163multiple attribute (forms), 288multiple backgrounds (CSS3), 467–468multiple-line commands (PHP), 60–62multiplication (*) operator
in JavaScript, 332in PHP, 55
MySQL, 218(see also databases (MySQL))accessing via phpMyAdmin, 210–214accessing with PHP, 241–268backing up and restoring databases, 235–240command-line interface, 172–178commands supported, 178–182, 198–209configuring, 35–36data types supported, 183–191, 190dynamic web content and, 7FULLTEXT index type, 663–665function support, 209, 667–676HTML forms and, 279index support, 192–209investigating queries, 234mysqli extension, 269–277primary keys, 195–196, 218–227relationships among data, 227–230resource sites, 660terminology associated with, 171–172transaction support, 230–233
mysqldump command, 235–236mysqli extension
practical example, 274–276querying MySQL databases, 269–274using procedurally, 276
mysqli_real_escape_string function (PHP), 292mysql_close function (PHP), 248mysql_connect function (PHP), 243mysql_entities_fix_string function (PHP), 267mysql_error function (PHP), 244mysql_fetch_row function (PHP), 246mysql_fix_string function (PHP), 264, 267mysql_insert_id function (PHP), 260mysql_num_rows function (PHP), 246mysql_query function (PHP), 245mysql_real_escape_string function (PHP), 252,
264mysql_result function (PHP), 245–246
690 | Index

mysql_select_db function (PHP), 244
N\n (newline) escape character, 60, 334name attribute (forms), 281__NAMESPACE__ constant (PHP), 64naming conventions
JavaScript function names, 364JavaScript variables, 330PHP constants, 122PHP constructor methods, 119PHP variables, 54, 69–70
NATURAL_JOIN clause (MySQL commands),208, 263
nestingarrays, 331comments, 49, 329, 428constructs, 54
NetBeans IDE, 42new keyword (PHP), 116newline (\n) escape character, 60, 334normalization
about, 219First Normal Form, 220–221Second Normal Form, 222–224Third Normal Form, 224–226when not to use, 226
<noscript> tag, 324Not (!) logical operator
in JavaScript, 333, 348in PHP, 57, 82
not identical (!==) comparison operator (Java‐Script), 333
NULL value, 74, 82number input type (HTML5), 298numbers
converting number bases, 438numeric data types in MySQL, 185numeric variables in JavaScript, 330, 334numeric variables in PHP, 51, 63
numeric arraysin JavaScript, 373in PHP, 131–133, 138
O(object) cast type, 99object-oriented programming (OOP), 113
objectsdragging and dropping, 593–595in JavaScript
accessing objects, 370attaching events to objects, 498creating objects, 369declaring classes, 368DOM and, 338prototype keyword and, 370–372static methods and properties, 371
in PHPabout, 103, 113accessing objects, 116–118cloning objects, 118constructor methods, 119, 127creating objects, 116declaring classes, 115declaring constants, 122declaring properties, 122destructor methods, 120inheritance and, 114, 125–129, 125–129method scope, 123property scope, 123static methods, 121, 124static properties, 124terminology associated with, 114writing methods, 120
offsetTop property (JavaScript), 501OGG format, 575onabort event, 499onblur event, 499onchange event, 499onclick event, 351, 499ondblclick event, 499ondragover event, 593ondragstart event, 593ondrop event, 593one-to-many relationships in data, 228one-to-one relationships in data, 227one-way functions, 308onerror event, 499onerror event (JavaScript), 351onfocus event, 499onkeydown event, 499onkeypress event, 499onkeyup event, 499onload event, 499onmousedown event, 499onmousemove event, 499
Index | 691

onmouseout event, 499onmouseover event, 499onmouseup event, 499onreset event, 499onresize event, 499onscroll event, 499onselect event, 499onsubmit event, 499onunload event, 499OOP (object-oriented programming), 113opacity, colors and (CSS), 475–477open source software, 12OpenType fonts, 479operators
CSS supported, 462in JavaScript
arithmetic operators, 332, 345arrays as, 345assignment operators, 332, 345binary operators, 345bitwise operators, 345comparison operators, 333, 345logical operators, 345, 348operator associativity, 346operator precedence, 346relational operators, 347–349strings as operators, 345ternary operators, 345, 355unary operators, 345
in MySQL queries, 209in PHP
arithmetic operators, 55, 76, 78arrays as, 76assignment operators, 55, 58–60, 76, 78,
79binary operators, 76bitwise operators, 76, 78comparison operators, 56, 76, 78execution operators, 76extends operator, 125logical operators, 56, 76, 78operator associativity, 78–80operator precedence, 77–78, 82parent operator, 126relational operators, 80–83scope resolution operator, 121strings as operators, 76, 78ternary operators, 76, 78, 91unary operators, 76
or (low-precedence) logical operator (PHP), 57,82
Or (||) logical operatorin JavaScript, 333, 348in PHP, 57, 82
ORDER BY clause (MySQL commands), 205overflow property (CSS3), 473
Ppacket sniffing, 317padding
adjusting with CSS, 458–459strings, 150
padding property (CSS), 458–459padding-bottom property (CSS), 458padding-left property (CSS), 458padding-right property (CSS), 458padding-top property (CSS), 458parent operator (PHP), 126parentheses ()
grouping regular expressions, 389operator precedence and, 77, 346PHP functions and, 104
Parse error message, 49, 65parseFloat function (JavaScript), 360parseInt function (JavaScript), 360passing by reference, 108–110passwords
HTTP authentication and, 304–307salting, 308–311storing, 307validating on forms, 386
PCM (audio) codec, 570percent (CSS measurement), 441Permission denied message, 164perspective function (CSS3), 483PHP
archived examples, 47arrays in, 52–54, 76, 108, 131–145basic syntax, 49, 106comments in, 48conditionals in, 84–92constants in, 63–64, 74–75, 122, 154cookie support, 301–304dynamic linking and, 99–101dynamic web content and, 6, 45explicit casting, 99expressions in, 73–76file handling in, 111–112, 155–167
692 | Index

functions in, 65–66, 103–111, 151–154HTML and, 45–47HTML forms and, 279IDEs supported, 41–43implementing Ajax, 412implicit casting, 98literals in, 75looping in, 92–98methods in, 103, 114, 119–121, 123–129multiple-line commands in, 60–62objects in, 103, 113–129operators in, 55–57, 76–83, 121, 125printf function, 147–151properties in, 114, 121–125querying MySQL databases, 241–268regular expressions and, 387, 396resource sites, 659sending XML requests, 416–419session support, 312–320system calls in, 167–169tags supported, 46, 61, 139variable assignment, 57–60variable scope, 66–71, 111variable typing, 62variables in, 49–54, 75, 110–111, 117version compatibility, 113
phpDesigner IDE, 41PHPEclipse IDE, 42PhpED IDE, 42PHPEdit IDE, 42phpinfo function, 104phpMyAdmin, 210–214phpversion function, 113php_sapi_name function, 306picas (CSS measurement), 441pixels (CSS measurement), 440placeholder attribute (HTML5), 296placeholders feature, 265plus sign (+), 388points (CSS measurement), 441pop method (JavaScript), 378port numbers, 51position property (CSS), 449–451positioning elements (CSS)
about, 449absolute positioning, 449fixed positioning, 450–451relative positioning, 450
POST method (HTTP)$_POST variable and, 142, 251usage considerations, 413–415
$_POST variable (PHP)about, 70, 251POST HTTMP method and, 142security considerations, 291
<pre> tag, 139, 253predefined constants (PHP), 64, 74–75preg_match function (PHP), 396preg_match_all function (PHP), 396preg_replace function (PHP), 396PRIMARY index type (MySQL), 192primary keys
about, 195–196, 218normalization and, 219–227
print function (PHP)about, 64, 104echo command and, 64, 91returning values, 107
printf function (PHP)about, 147conversion specifiers, 147precision setting, 148–150string padding, 150
print_r function (PHP), 116private keyword (PHP 5), 123profile.php (social networking site), 617–622program eidtors, 40program flow
in JavaScriptconditionals in, 353–356error handling in, 327–328, 351–353looping and, 356–359operator precedence, 346
in PHPconditionals and, 84–92looping and, 92–98operator precedence, 77–78
propertiesin CSS
box model and layout, 454–459box-sizing property, 463CSS cascade, 435–440fonts and typography, 442–444managing text styles, 444–446shorthand rules, 454, 485
CSS3-supportedbackground properties, 463–466
Index | 693

border properties, 469–472box shadows, 472colors and opacity, 477element overflow, 473text effects, 477–479transitions, 484–487
in JavaScriptaccessing CSS properties, 493–497DOM and, 338prototype keyword and, 370–372static properties, 371
in PHPabout, 114declaring properties, 122property scope, 123static methods and, 121static properties, 124
window object, 495XMLHttpRequest object, 407
protected keyword (PHP 5), 123prototype keyword (JavaScript), 370–372pseudo-classes (CSS), 452–453pseudo-elements (CSS), 452public keyword (PHP 5), 123push method (JavaScript), 373, 378putImageData method (canvas), 557
QquadraticCurveTo method (canvas), 547Query OK message, 188querying MySQL databases
commands supported, 198–206EXPLAIN command and, 234with mysqli, 269–277with PHP, 241–268
QUIT command (MySQL), 178quotation marks
in JavaScript, 330in MySQL, 173in PHP, 59
QUOTE function (MySQL), 669
R\r (carriage return) escape character, 60, 334radial gradients, 448, 526–528radio buttons in forms, 287range input type (HTML5), 298(real) cast type, 99
REAL data type (MySQL), 185records (rows)
about, 171–172AUTO_INCREMENT and, 186, 223, 260–
262deleting, 252fetching, 247, 272–274First Normal Form, 220–221retrieving data from, 258Second Normal Form, 222–224
rect method (canvas), 537reference, passing by, 108–110register_globals function (PHP), 282regular expressions
about, 387breakdown of typical, 391–393fuzzy character matching, 388–390general modifiers for, 395grouping through parentheses, 389indicating ranges, 390JavaScript and, 387, 395metacharacters in, 388, 393–395negation in, 390PHP and, 387, 396
relational databases (see databases (MySQL))relational operators
in JavaScriptabout, 347comparison operators, 348equality operators, 347logical operators, 348
in PHPabout, 80comparison operators, 81equality operators, 80logical operators, 82–83
relationships in database dataabout, 227many-to-many, 229one-to-many, 228one-to-one, 227
relative positioning of elements, 450remote servers, accessing MySQL on, 176removeChild method (JavaScript), 501RENAME command (MySQL), 178rename function (PHP), 158REPEAT function (MySQL), 669REPLACE function (MySQL), 669replace method (JavaScript), 395
694 | Index

$_REQUEST variable (PHP), 70request/response process, 2–5require statement (PHP), 112, 243required attribute (HTML5), 296require_once statement (PHP), 112, 243, 270reset function (PHP), 144resource sites, 659–662restore method (canvas), 562restoring MySQL databases, 235–240return statement
in JavaScript, 364in PHP, 106
returning valuesabout, 106–108, 365–367arrays and, 108, 367global variables and, 110passing by reference, 108–110
reverse method (JavaScript), 379REVOKE command (MySQL), 181RGB colors, 447, 476rgb function (CSS), 447, 476RGBA colors, 477rgba function (CSS), 477RIGHT function (MySQL), 668ripemd algorithm, 308ROLLBACK command (MySQL), 233rotate function (CSS), 482rotate method (canvas), 562rotate3d function (CSS3), 483rows (records)
about, 171–172AUTO_INCREMENT and, 186, 223, 260–
262deleting, 252fetching, 247, 272–274First Normal Form, 220–221retrieving data from, 258Second Normal Form, 222–224
rows attribute (forms), 285RPAD function (MySQL), 668RSS feeds, 154, 419RTRIM function (MySQL), 670rules (CSS)
about, 426browser-specific prefixes, 448, 477calculating specificity of, 437–438on comments, 427multiple assignments, 426shorthand rules, 454, 485
Ssalting passwords, 308–311save method (canvas), 562Scalable Vector Graphics (SVG), 10scale function (CSS), 482scale method (canvas), 561scale3d function (CSS3), 483scope resolution operator, 121<script> tag
about, 324browser considerations, 325including JavaScript files, 326language attribute, 324placement of, 325reading link URL example, 339type attribute, 324
SECOND function (MySQL), 675Second Normal Form, 222–224Secure Socket Layer (SSL), 317security
$_GET variable, 291PHP superglobals and, 71$_POST variable, 291session considerations, 317–320
SELECT command (MySQL)about, 198AS keyword, 209COUNT qualifier, 198DISTINCT qualifier, 199GROUP BY clause, 206JOIN ... ON construct, 208LIKE qualifier, 200LIMIT qualifier, 201NATURAL_JOIN clause, 208ORDER BY clause, 205WHERE clause, 200
<select> tag, 288selected attribute (forms), 290<selected> tag, 289selectors (CSS)
about, 426, 430, 437attribute selectors, 434, 461–463child selectors, 431class selectors, 433descendant selectors, 430ID selectors, 432selecting by group, 435type selectors, 430universal selectors, 434, 454
Index | 695

self keyword (PHP), 123, 127semicolon (;)
CSS usage, 426JavaScript syntax and, 324, 329MySQL command-line interface and, 177PHP syntax, 49
$_SERVER variable (PHP), 70, 306$_SESSION variable (PHP), 70, 312–315sessions
about, 312cookie-only, 319ending, 315preventing session fixation, 318–319preventing session hijacking, 317security considerations, 317–320setting timeouts, 317shared servers and, 320starting, 312–315
session_destroy function (PHP), 315session_regenerate_id function (PHP), 319session_start function (PHP), 312–315setAttribute function (JavaScript), 493setcookie function (PHP), 303–304setInterval function (JavaScript), 504–506setLineDash method (canvas), 548setTimeout function (JavaScript), 503setTransform method (canvas), 567setup.php (social networking site), 608–610shadowBlur property (canvas), 552shadowColor property (canvas), 552shadowOffsetX property (canvas), 552shadowOffsetY property (canvas), 552shadows
adding in canvas, 552–554box shadows in CSS3, 472
SHOW command (MySQL), 178shuffle function (PHP), 141signup.php (social networking site), 610–614size attribute (forms), 284, 288skew function (CSS), 482SMALLINT data type (MySQL), 185social networking site
checkuser.php, 614designing, 603friends.php, 625–628functions for, 605–607functions.php, 604header.php, 607–608index.php, 610
javascript.js, 636login.php, 615–617logout.php, 631members.php, 622–625messages.php, 628–631profile.php, 617–622setup.php, 608–610signup.php, 610–614styles.css, 632–636
sort function (PHP), 140sort method (JavaScript), 379SOURCE command (MySQL), 178<source> element (HTML5), 572, 576spacing of text, 445<span> tag, <div> tag and, 439–440specificity of CSS rules, calcluating, 437–438split function (JavaScript), 360sprintf function (PHP), 151SQL (Structured Query Language), 7, 171SQL injection, preventing, 263–264square brackets []
accessing array elements, 138, 376checkbox choices and, 286fuzzy matching and, 390
SSL (Secure Socket Layer), 317START TRANSACTION statement (MySQL),
232statements
in JavaScript, 345, 350, 353–356in PHP, 75, 84–92
static methodsin JavaScript, 371in PHP, 121, 124
static propertiesin JavaScript, 371in PHP, 124
static variables (PHP), 69, 111STATUS command (MySQL), 179step attribute (HTML5), 298stopwords, FULLTEXT index type, 663–665(string) cast type, 99String function (JavaScript), 360strings
in JavaScriptconcatenating strings, 334, 345escape characters, 334passing strings, 503string variables, 330strings as operators, 345
696 | Index

MySQL string functions, 667–670in PHP
concatenating strings, 58, 76converting string case, 105converting strings to numbers, 63escape characters, 59multiple-line commands and, 60padding strings, 150string types supported, 59string variables, 50strings as operators, 76, 78
stroke method (canvas), 537strokeRect method (canvas), 522strokeText method (canvas), 530strrev function (PHP), 105strtolower function (PHP), 106strtoupper function (PHP), 105Structured Query Language (SQL), 7, 171str_repeat function (PHP), 105style sheets, 424
(see also CSS)browser support, 436!important declaration, 438importing, 424methods of creation, 436selecting elements for styling, 437
style types (CSS)about, 428default styles, 428external style sheets, 429inline styles, 430internal styles, 429user styles, 428
styles.css (social networking site), 632–636subclasses (derived classes)
about, 114calling parent constructors, 127extends operator and, 125parent operator and, 126
submit button in forms, 290subtraction (−) operator
in JavaScript, 332in PHP, 55
superclassesabout, 114final methods and, 128
superglobal variables (PHP)about, 70security and, 71
SVG (Scalable Vector Graphics), 10switch statement
in JavaScript, 354in PHP, 88–90
SYSDATE function (MySQL), 674system calls in PHP, 167–169
T\t (tab) escape character, 60, 334tab (\t) escape character, 60, 334tables (MySQL)
about, 171–172adding columns to, 190adding data to, 188, 257adding indexes to, 193–194backing up, 238changing data types of columns, 190creating, 181–182, 255creating transaction-ready, 231deleting, 191deleting data from, 260deleting records, 252describing, 256dropping, 257fetching rows, 247, 272–274joining together, 207–209locking for reading, 235, 261normalization and, 219–227practical example using PHP, 248–255removing columns in, 191renaming, 189renaming columns in, 191retrieving data from, 258updating data in, 259
tags (PHP), 139ternary operators
in JavaScript, 345, 355in PHP, 76, 78, 91
test method (JavaScript), 386, 388, 395testing
MAMP installation, 36–37WAMP installation, 28–30
text areas in forms, 284text boxes in forms, 284TEXT data type (MySQL), 184text effect properties (CSS3), 477–479text styles, managing, 444–446text-align property (CSS), 446text-decoration property (CSS), 445
Index | 697

text-indent property (CSS), 446text-overflow property (CSS3), 478text-shadow property (CSS3), 477text-transform property (CSS), 446textAlign property (canvas), 531<textarea> tag
about, 284autofocus attribute, 295
textBaseline property (canvas), 531textDecoration property (JavaScript), 492Theora (video) codec, 576Third Normal Form, 224–226third-party cookies, 301this keyword (JavaScript), 497$this variable (PHP), 120TIME data type (MySQL), 186time function (PHP), 66, 151time input type (HTML5), 298TIMEDIFF function (MySQL), 676timeouts
cancelling, 504repeating, 504setting for sessions, 317
TIMESTAMP data type (MySQL), 186timestamps
creating, 152determining current, 151fetching, 66
TINYBLOB data type (MySQL), 185TINYINT data type (MySQL), 185TINYTEXT data type (MySQL), 184toDataURLmethod (canvas), 519toTimeString function (JavaScript), 505toUpperCase method (JavaScript), 350transactions (MySQL)
about, 230BEGIN statement, 232START TRANSACTION statement, 232transaction storage engines, 231
transform method (canvas), 565–567transform property (CSS3), 481–483transform-origin function (CSS3), 483transformation matrix, 567transformation of text, 446, 481–483, 561–567transition-delay property (CSS3), 484transition-duration property (CSS3), 484transition-property property (CSS3), 484transition-timing property (CSS3), 485transitions, setting up, 483–487
translate function (CSS), 482translate method (canvas), 564translate3d function (CSS3), 483triggers, 227, 499TRIM function (MySQL), 670TRUE value
about, 73–75logical operators and, 57, 82–83print function and, 65
TrueType fonts, 479TRUNCATE command (MySQL), 179try ... catch construct (JavaScript), 352, 407two-dimensional arrays
in JavaScript, 331in PHP, 53
type attribute (HTML), 284, 324type attribute (HTML5), 298type selectors (CSS), 430typeof operator (JavaScript), 336, 337typography and fonts, 442–444
Uucfirst function (PHP), 106unary operators
in JavaScript, 345in PHP, 76
Undefined index error, 135Undefined offset error, 135Undefined variable message, 140underscore, double (__), 120UNISIGNED qualifier (data types), 185universal selectors (CSS), 434, 454Unix operating system
accessing MySQL, 175ls system command, 167
UNIX_TIMESTAMP function (MySQL), 676unlink function (PHP), 158UNLOCK command (MySQL), 179UPDATE ... SET construct (MySQL), 204UPDATE command (MySQL)
about, 179WHERE clause, 195
uploading files using PHP, 162–167UPPER function (MySQL), 669url function (CSS), 480URLs, reading link with JavaScript, 339USE command (MySQL)
about, 179creating tables, 181–182
698 | Index

user agent string, 318user styles (CSS), 428users and usernames
creating users in MySQL, 179Gmail example, 12–14HTTP authentication and, 304–307social networking site example, 611storing, 307validating on forms, 385
Vvalidation
form data using PHP, 165–167form data with JavaScript, 381–387redisplaying forms after, 397–402
value attribute (forms), 283, 290var keyword (JavaScript), 336VARBINARY data type (MySQL), 184VARCHAR data type (MySQL), 183variable substitution, 59variables
in JavaScript$ symbol in variables, 330, 340arrays, 331decrementing variables, 334global variables, 336incrementing variables, 334local variables, 336naming conventions, 330numeric variables, 330, 334string variables, 330variable typing, 335variables in expressions, 344
in PHP$ symbol in variables, 49, 63, 117arrays, 52–54constants and, 63decrementing variables, 58incrementing variables, 58numeric variables, 51, 63returning values in, 110string variables, 50variable assignment, 57–60variable naming rules, 54, 69–70variable scope, 66–71, 111variable typing, 62variables in expressions, 75
VBScript (Microsoft), 326version compatibility (PHP), 113
<video> element (HTML5)about, 513, 574attributes supported, 576browser considerations, 578codecs supported, 575
visibility property (CSS), 502visited pseudo-class (CSS), 452Vorbis (audio) codec, 570VP8 (video) codec, 576VP9 (video) codec, 576
WW3C (World Wide Web Consortium)
DATE_W3C constant, 154HTML5 standard, 10standard colors, 447
WAMPsabout, 16alternative, 31installing on Windows, 16–28testing installation, 28–30
web applications (HTML5), 515, 591–593web browsers (see browsers)web fonts (CSS3), 479–481web workers, 515, 589–591WebM format, 575WEEK function (MySQL), 674week input type (HTML5), 298WEEKDAY function (MySQL), 675WHERE clause (MySQL commands), 195, 200while statement
in JavaScript, 356in PHP, 93–94
width attribute (HTML5), 297window object
closed property, 495defaultStatus property, 495document property, 495frames property, 495history property, 495innerHeight property, 495innerWidth property, 495length property, 495location property, 495name property, 495navigator property, 495opener property, 495outerHeight property, 495outerWidth property, 495
Index | 699

pageXOffset property, 495pageYOffset property, 496parent property, 496screen property, 496screenLeft property, 496screenTop property, 496screenX property, 496screenY property, 496self property, 496status property, 496top property, 496
Windows operating systemsaccessing MySQL, 173calling up command prompt, 173dir system command, 167installing WAMPs on, 16–31
with statement (JavaScript), 350word-spacing property (CSS), 445word-wrap property (CSS3), 479WordPress blogging platform, 100World Wide Web Consortium (W3C)
DATE_W3C constant, 154HTML5 standard, 10standard colors, 447
wrap attribute (forms), 285
XXHTML, 11, 74, 169, 282XML requests, sending, 415–419XMLHttpRequest object
abort method, 408about, 405
creating, 406GET and POST methods, 413–415getAllResponseHeaders method, 408getResponseHeader method, 408onreadystatechange property, 408, 410open method, 408readyState property, 408, 410responseText property, 408, 411responseXML property, 408sample Ajax program, 408–412send method, 408setRequestHeader method, 408status property, 408, 411statusText property, 408, 411XML requests, 415–419
xor (Exclusive or) logical operator (PHP), 57, 82XSS (cross-site scripting), 266–268
YYEAR data type (MySQL), 186YEAR function (MySQL), 674
ZZend Server Free Edition
about, 16accessing MySQL, 173installing on Linux, 38installing on Mac OS X, 31–37installing on Windows, 17–30
Zend Studio IDE, 42ZEROFILL qualifier (data types), 186
700 | Index

About the AuthorRobin Nixon has worked with and written about computers since the early 1980s (hisfirst computer was a Tandy TRS 80 Model 1 with a massive 4KB of RAM!). One of thewebsites he developed presented the world’s first radio station licensed by the musiccopyright holders. In order to enable people to continue to surf while listening, Robinalso developed the first known pop-up windows. He has also worked for one of Britain’smain IT magazine publishers, where he held several roles including editorial, promo‐tions, and cover disc editing, and has now written over 25 books on computing and webdevelopment.
ColophonThe animals on the cover of Learning PHP, MySQL, JavaScript, CSS & HTML5 are sugargliders (Petaurus breviceps). Sugar gliders are small, gray-furred creatures that grow toan adult length of six to seven-and-a-half inches. Their tails, which are distinguishedby a black tip, are usually as long as their bodies. Membranes extend between their wristsand ankles and provide an aerodynamic surface that helps them glide between trees.
Sugar gliders are native to Australia and Tasmania. They prefer to live in the hollowparts of eucalyptus and other types of large trees with several other adult sugar glidersand their own children.
Though sugar gliders reside in groups and defend their territory together, they don’talways live in harmony. One male will assert his dominance by marking the group’sterritory with his saliva and then by marking all group members with a distinctive scentproduced from his forehead and chest glands. This ensures that members of the groupwill know when an outsider approaches; group members will fight off any sugar glidernot bearing their scent. However, a sugar glider group will welcome and mark an out‐sider if one of their adult males dies (the group will typically replace a deceased adultfemale with one of their own female offspring).
Sugar gliders make popular pets because of their inquisitive, playful natures, and becausemany think they are cute. But there are disadvantages to keeping sugar gliders as pets:as they are exotic animals, sugar gliders need specialized, complicated diets consistingof items such as crickets, a variety of fruits and vegetables, and mealworms; healthyhousing requires a cage or space no less than the size of an aviary; their distinctive scentscan be bothersome to humans; as they are nocturnal creatures, they will bark, hiss, run,and glide all night long; it’s not uncommon for them to lose control of their bowels whileplaying or eating; and in some states and countries, it is illegal to own sugar gliders ashousehold pets.
The cover image is from Dover’s Animals. The cover fonts are URW Typewriter andGuardian Sans. The text font is Adobe Minion Pro; the heading font is Adobe MyriadCondensed; and the code font is Dalton Maag’s Ubuntu Mono.